
Tutorial | Prepare recipe#
The Prepare recipe allows you to define a series of steps, or actions, to take on the dataset.
Get started#
Objectives#
In this tutorial, you will:
Create a Prepare recipe.
Add various processor steps in different ways.
Process dates, numbers and text.
Use the Formula language.
Prerequisites#
To complete this tutorial, you’ll need the following:
Dataiku 14.0 or later.
Create the project#
From the Dataiku Design homepage, click + New Project.
Select Learning projects.
Search for and select Prepare Recipe.
If needed, change the folder into which the project will be installed, and click Create.
From the project homepage, click Go to Flow (or type
g+f).
Note
You can also download the starter project from this website and import it as a ZIP file.
You’ll next want to build the Flow.
Click Flow Actions at the bottom right of the Flow.
Click Build all.
Keep the default settings and click Build.
Use case summary#
Let’s say we’re a financial company that uses some credit card data to detect fraudulent transactions.
The project comes with three datasets, described in the table below.
Dataset |
Description |
|---|---|
tx |
Each row is a unique credit card transaction with information such as the card that was used and the merchant where the transaction was made. It also indicates whether the transaction has either been:
|
merchants |
Each row is a unique merchant with information such as the merchant’s location and category. |
cards |
Each row is a unique credit card ID with information such as the card’s activation month or the cardholder’s FICO score (a common measure of creditworthiness in the US). |
Create a Prepare recipe#
Let’s get started preparing the dataset!
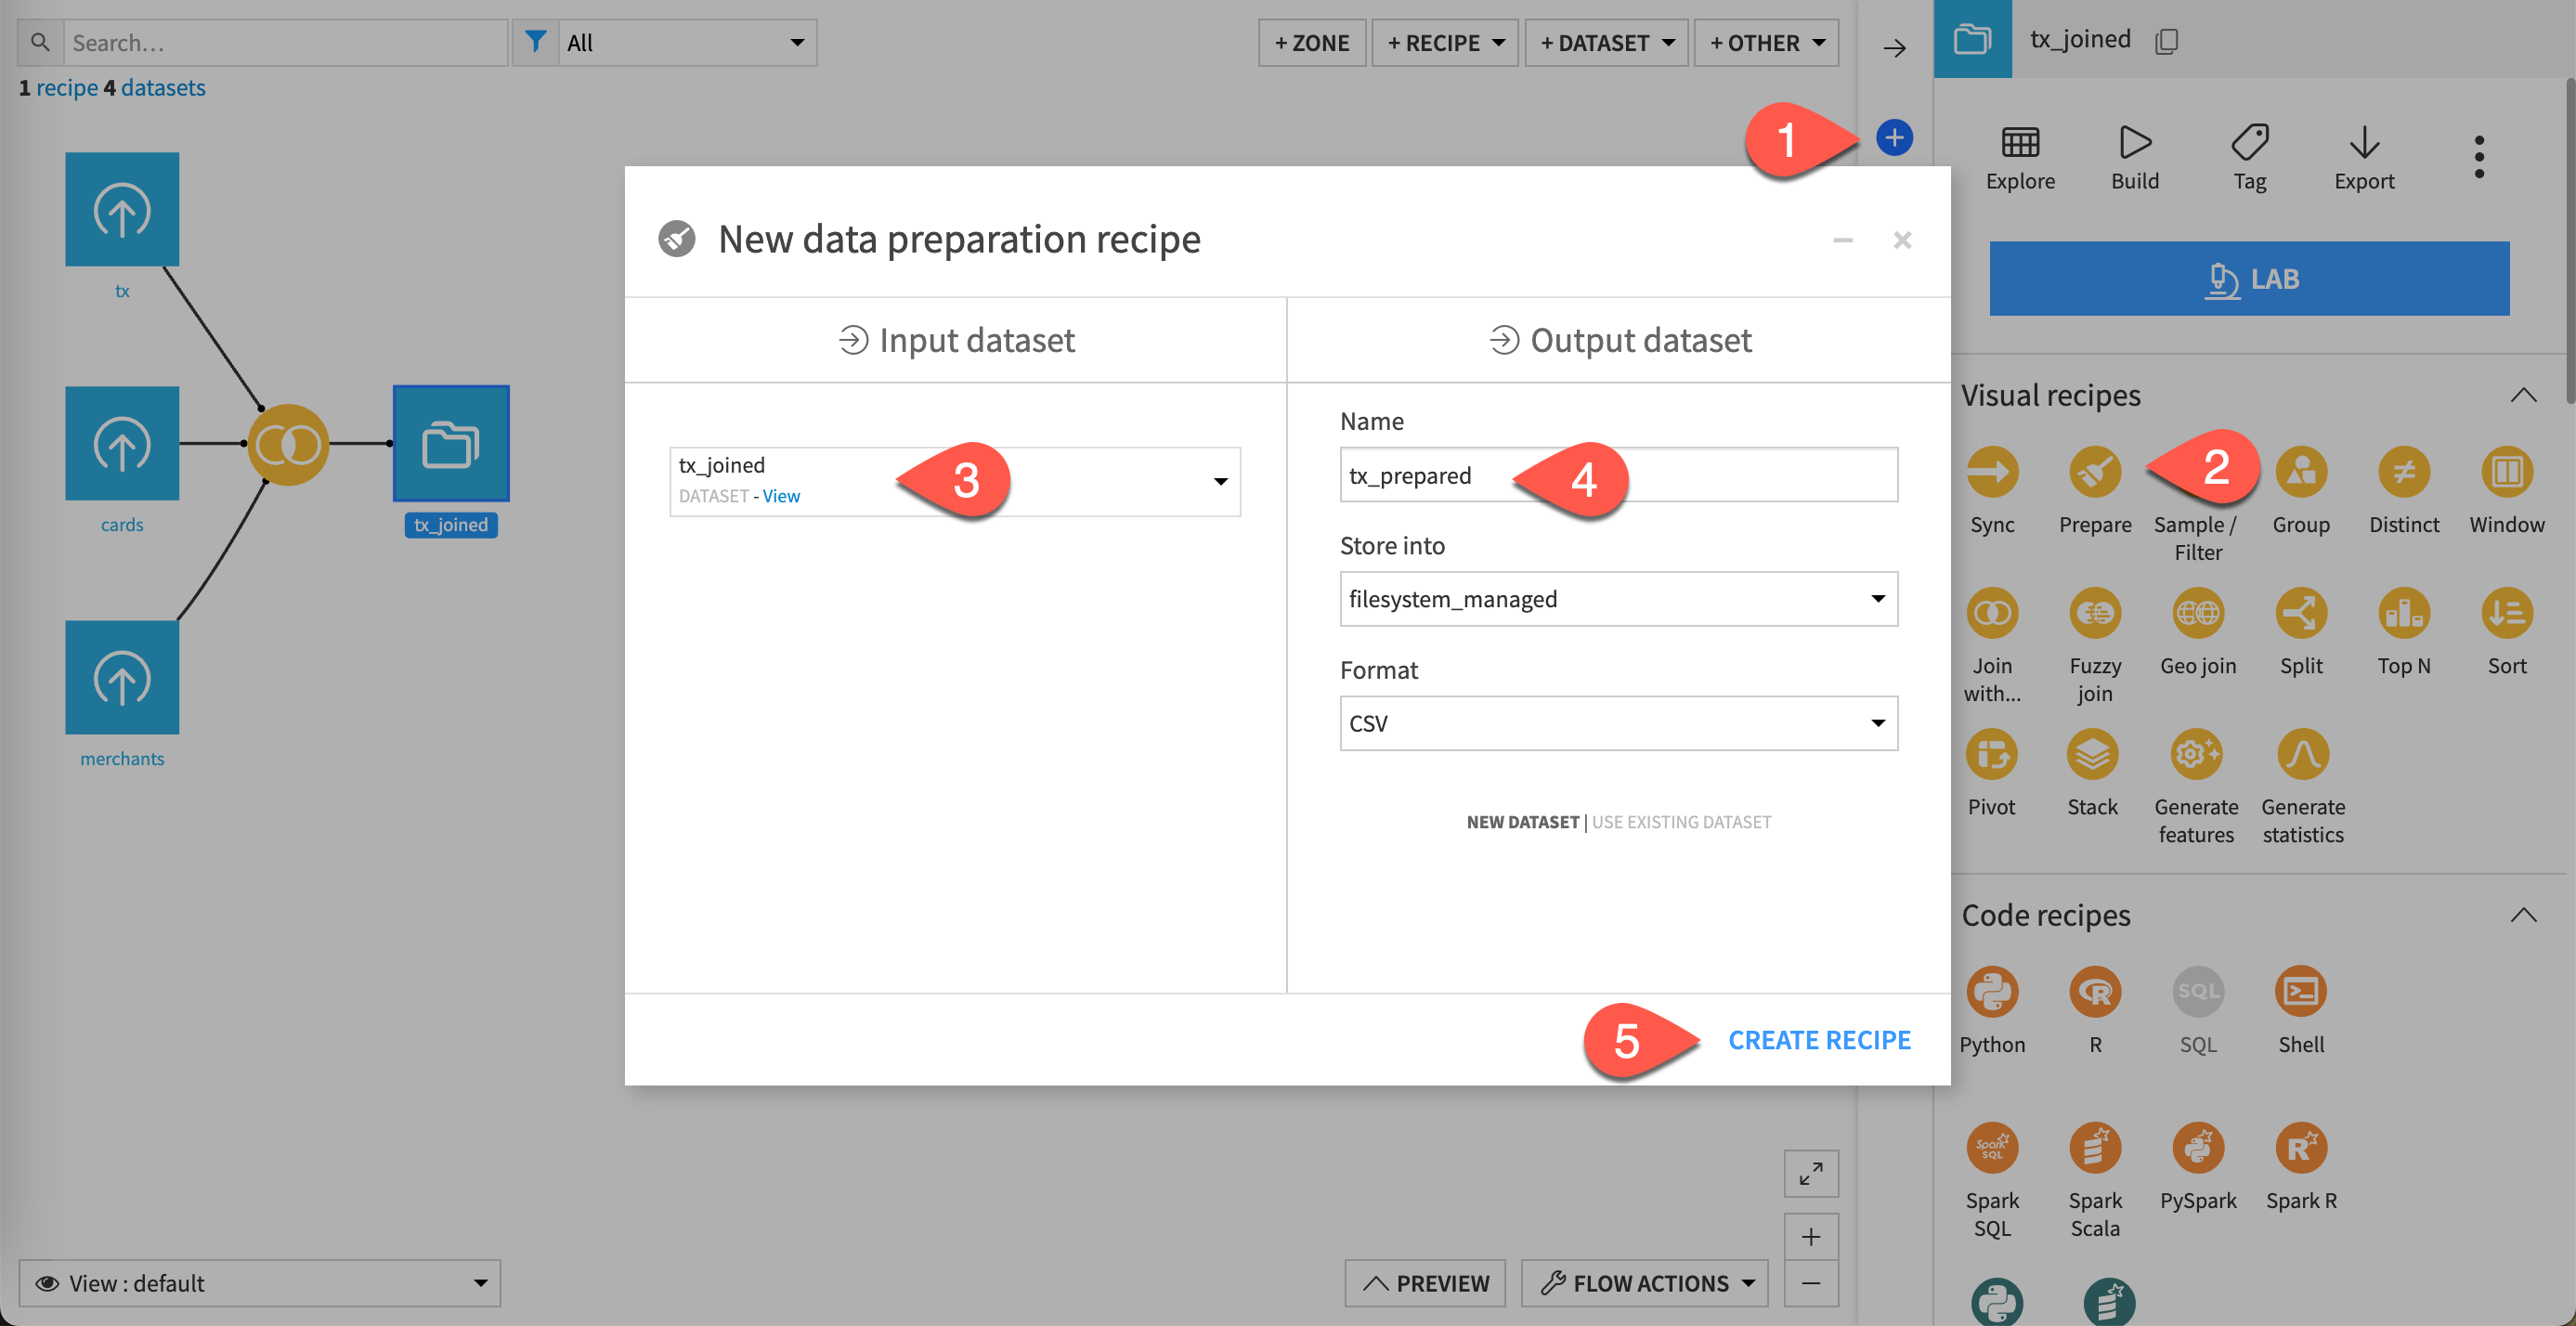
From the Flow, select the tx_joined dataset, and click the Actions (
 ) icon from the right panel.
Under the Visual Recipes section, click on Prepare.
The New data preparation recipe window opens.
Keep tx_joined as the input dataset.
Name the output dataset
tx_prepared.Click Create Recipe.
Add steps to the recipe#
Now that you have a Prepare recipe, it’s time to add some steps to it.
Process dates#
Let’s start with dates.
Only display date columns#
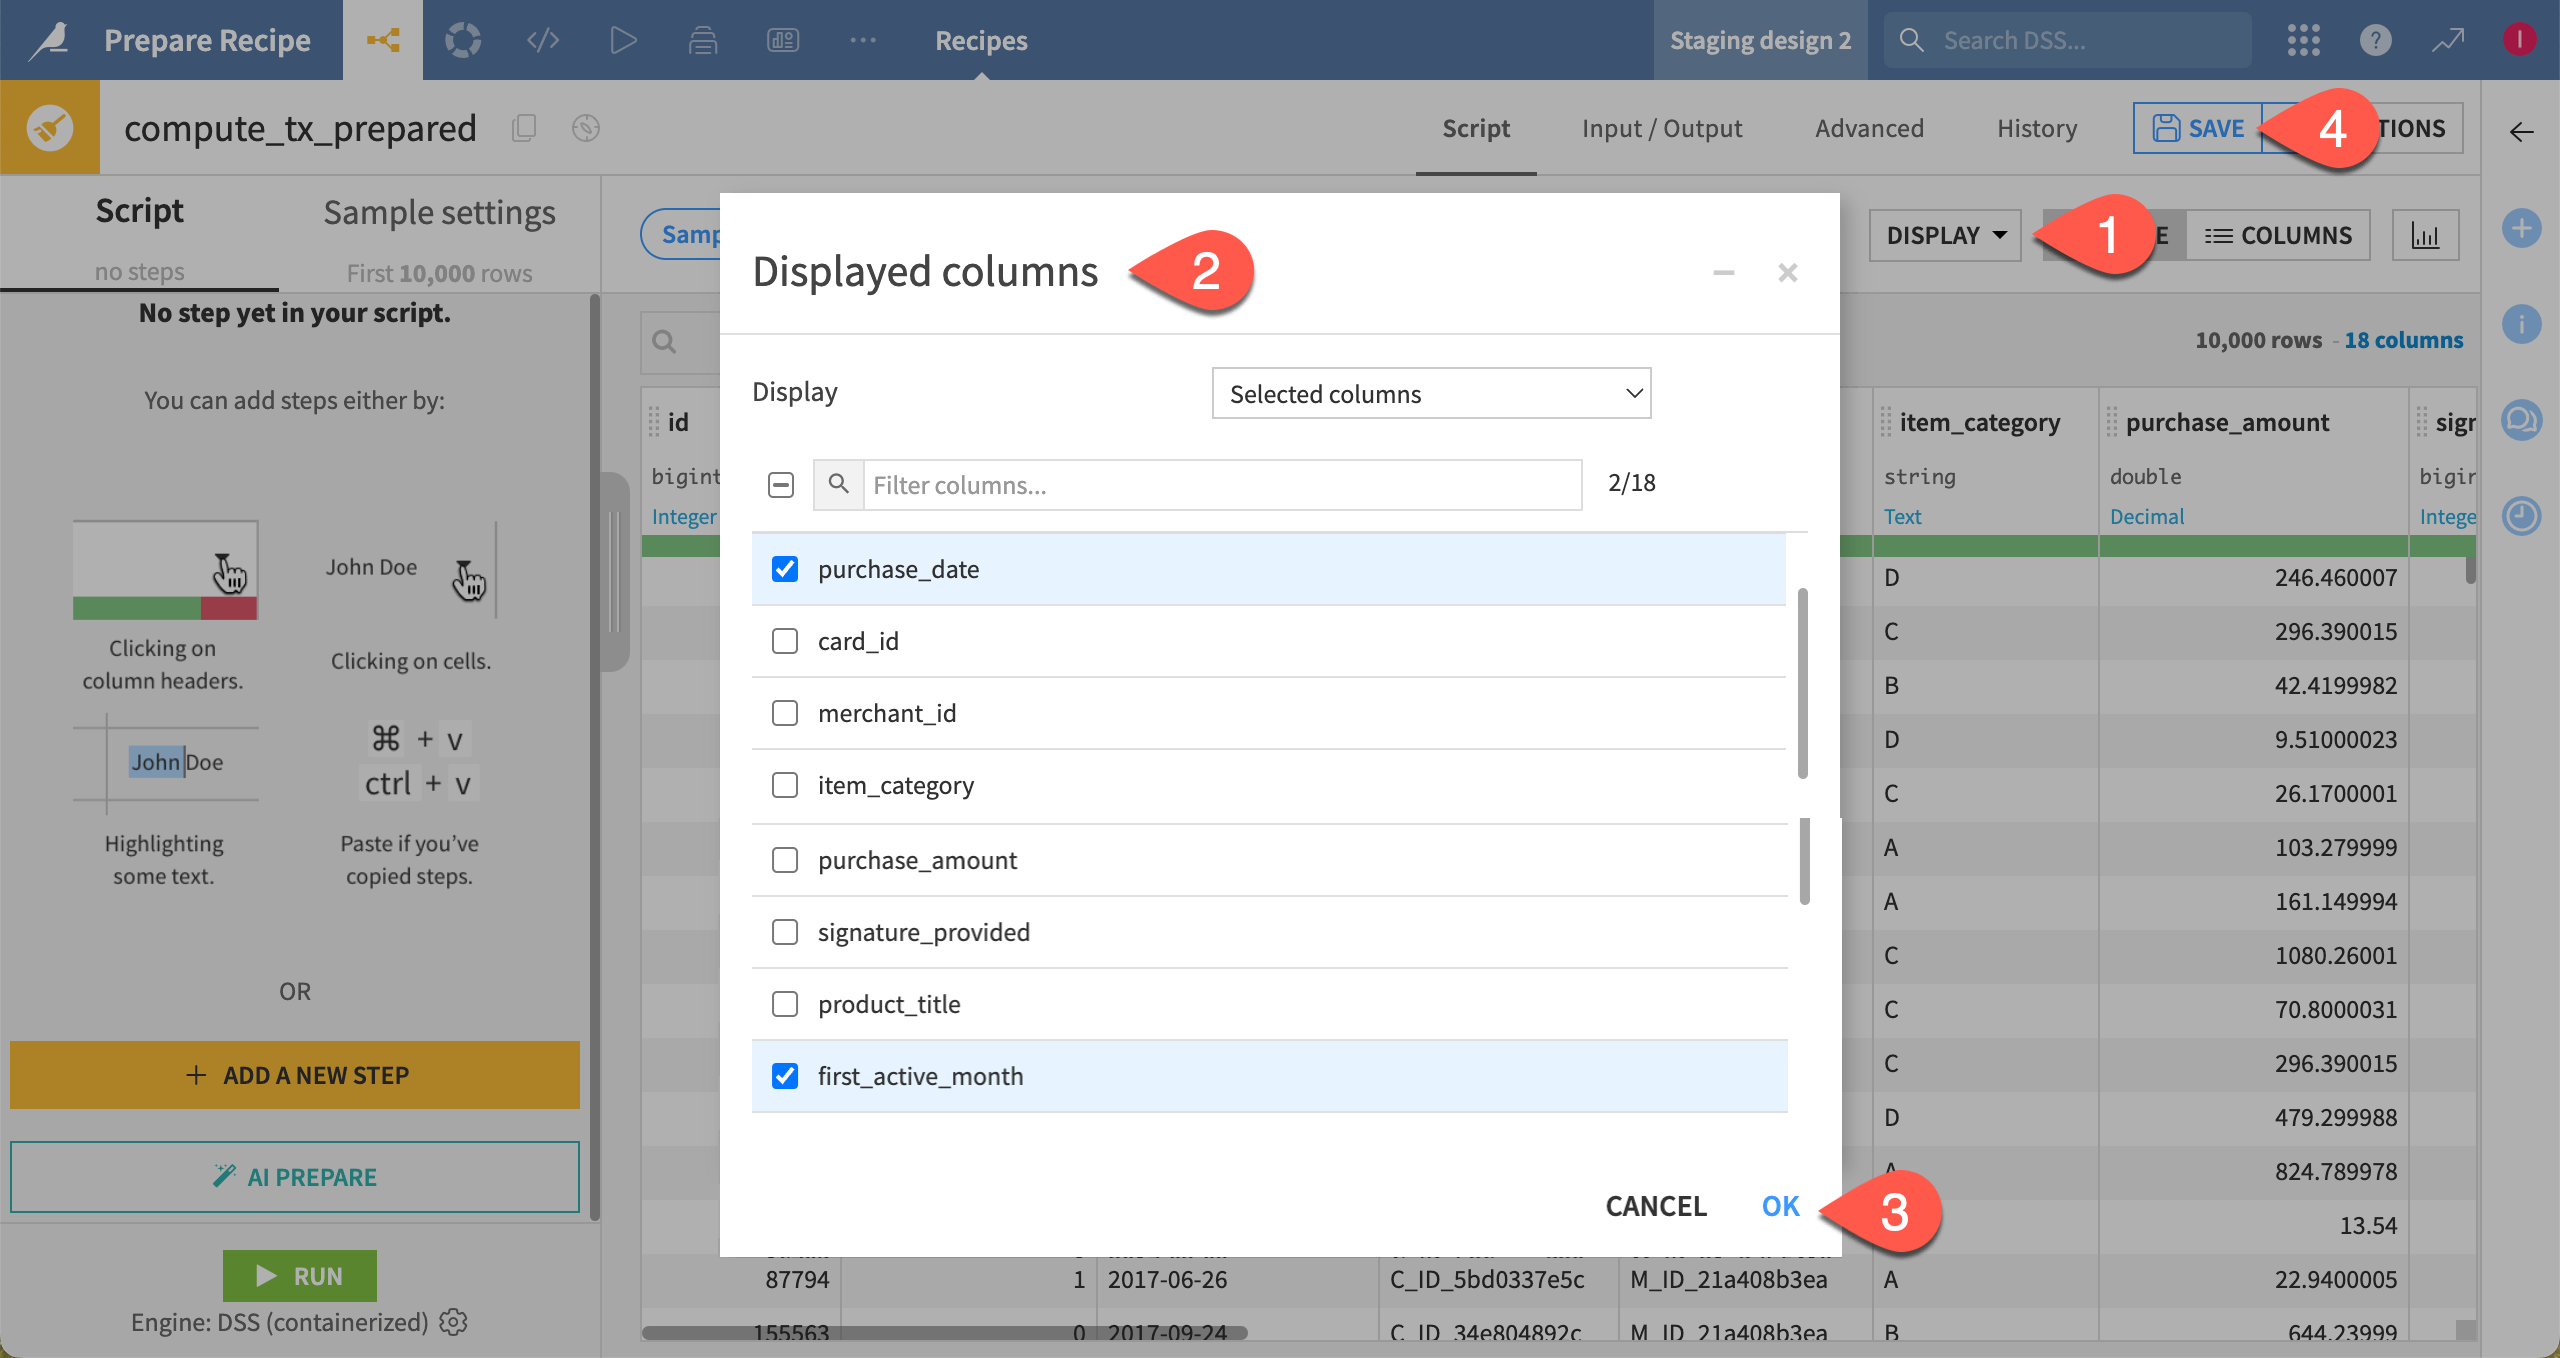
This step is optional, but it shows you how to display only the columns you select.
Here, the aim is to focus your attention on the date columns, which are purchase_date and first_active_month. To do so:
At the top right of the dataset preview, click on Display > Select displayed columns.
In the Displayed columns dialog:
Set the Display option to Selected columns.
Deselect all columns using the checkbox at the top, to the left of the search field.
Select purchase_date and first_active_month.
Click OK. The dataset should now display two columns only.
Note
Recall that the data visible in the recipe is a preview of a sample of your data.
Parse dates#
The dataset includes two columns with date information, but their storage type and meaning show important differences.
Column |
Storage Type |
Meaning |
Value |
|---|---|---|---|
purchase_date |
date only |
Date only |
|
first_active_month |
string |
Date (unparsed) |
|
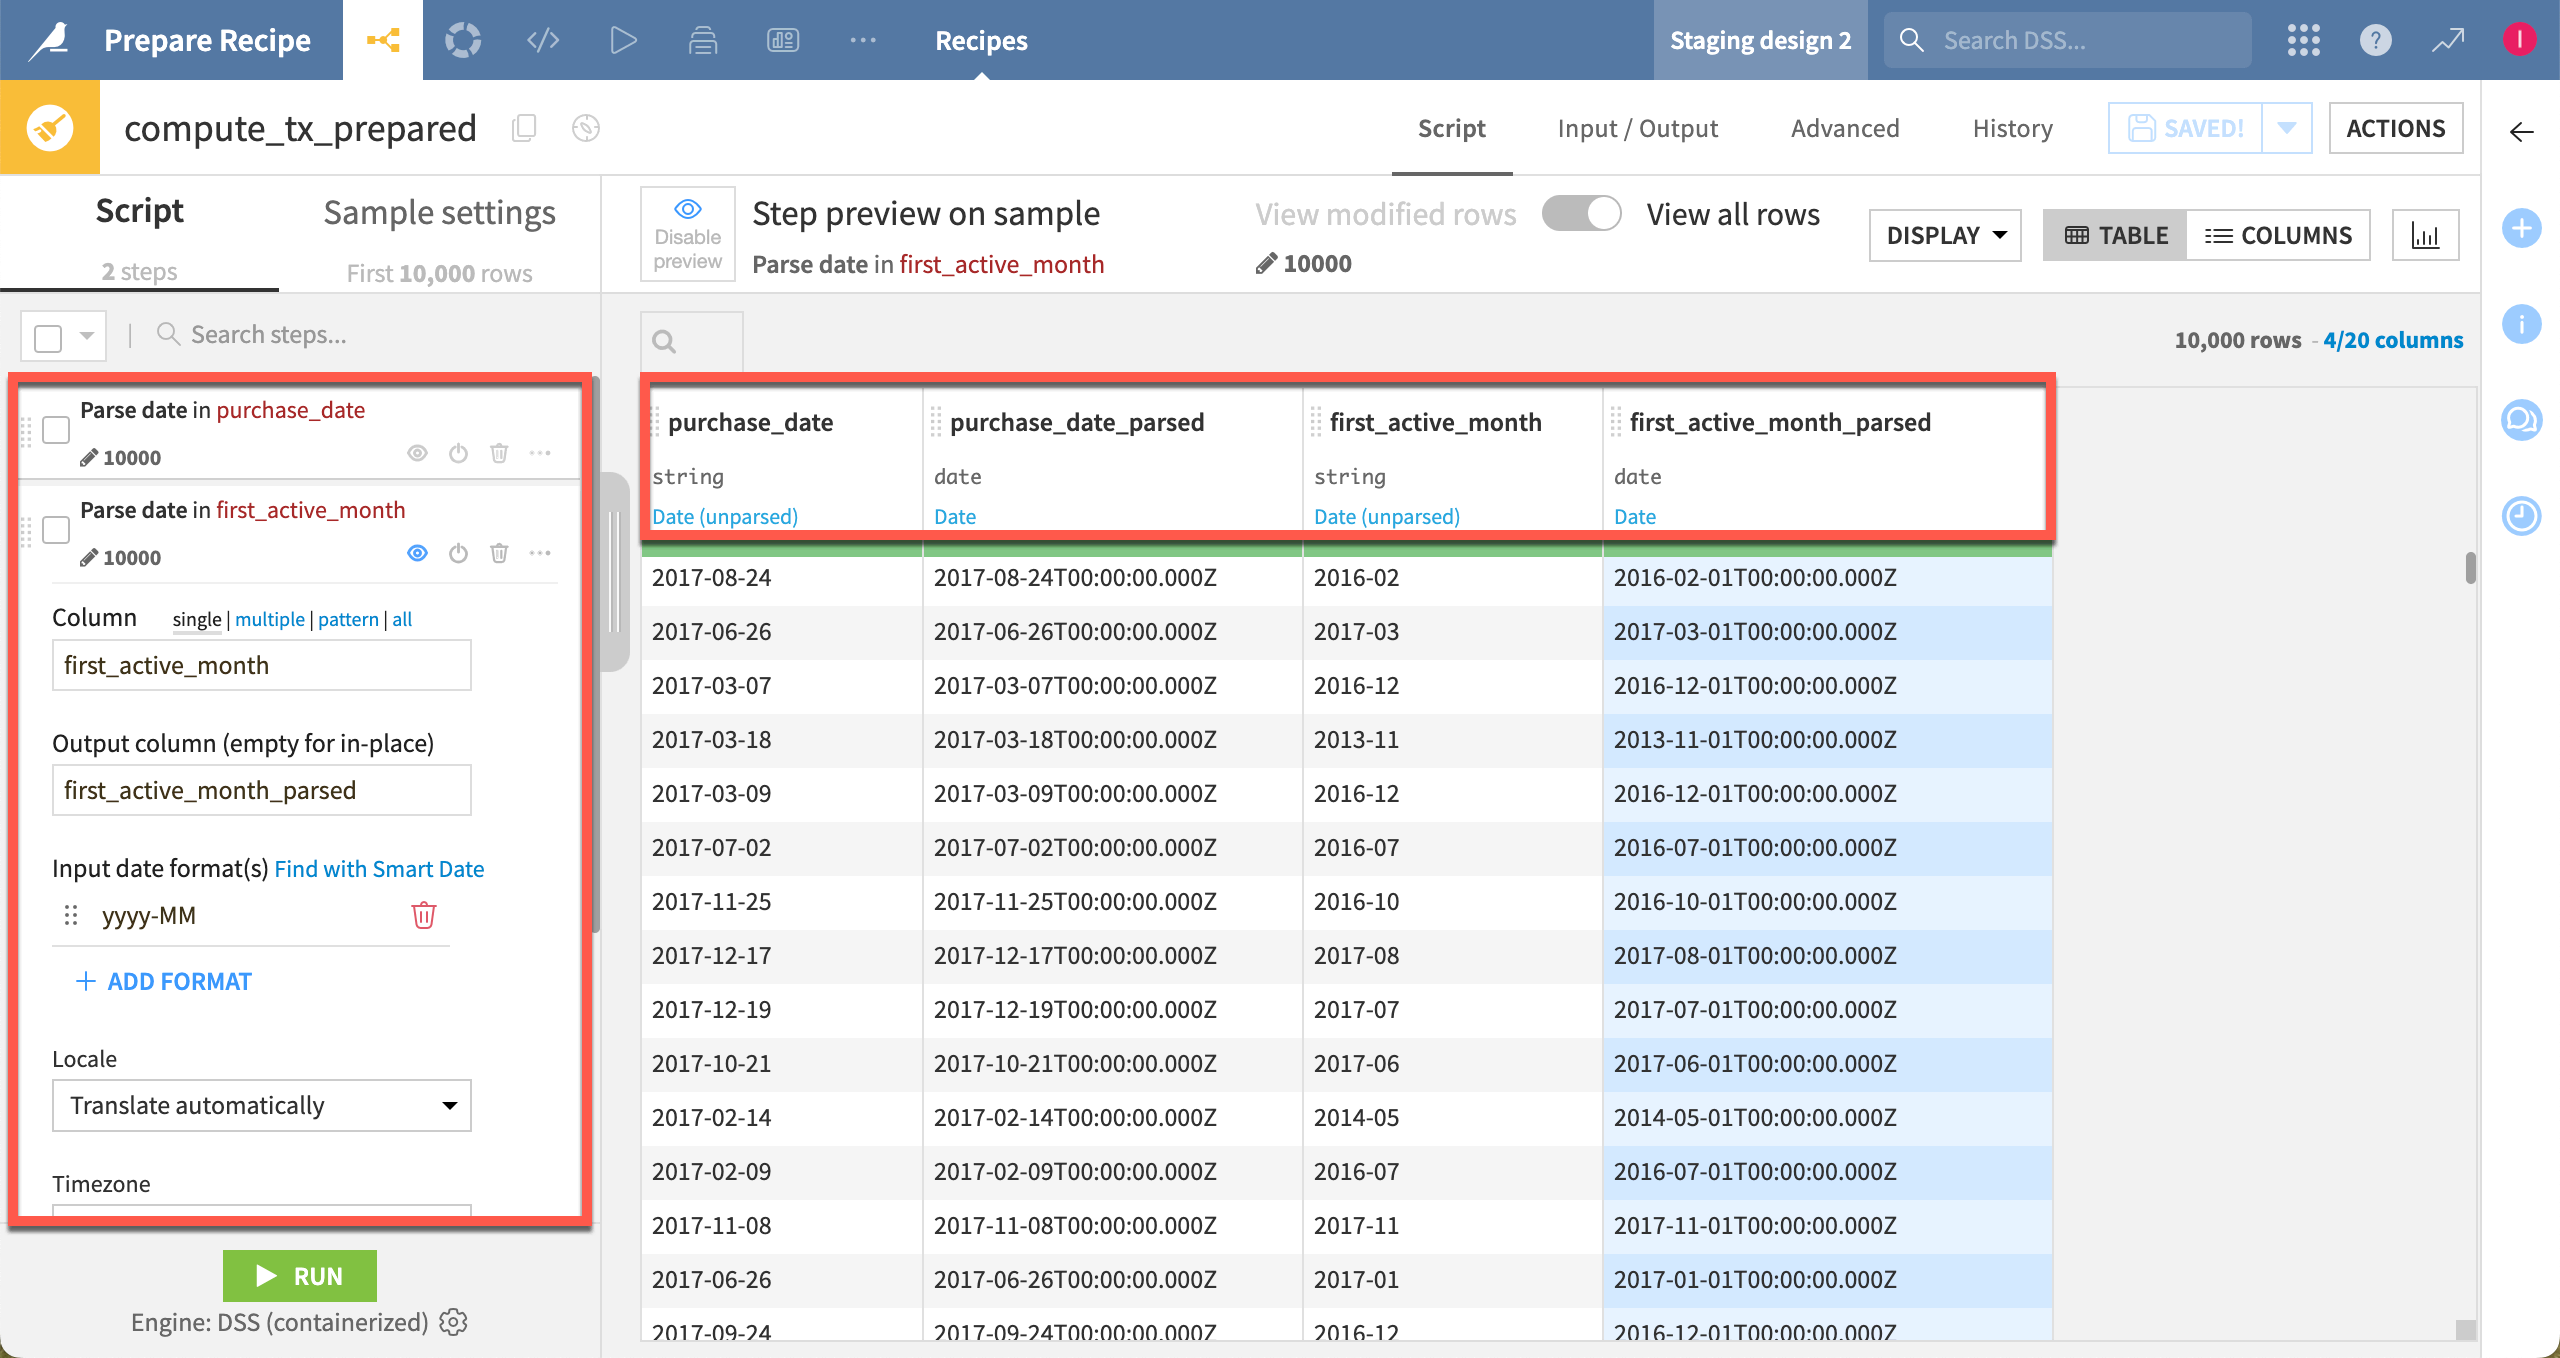
Unlike the purchase_date column, first_active_month might look like it contains dates, but it’s actually holding strings. Therefore, you can’t use it for date operations. You’ll need to turn it from a string into a true date.
Open the first_active_month column header dropdown.
Select Parse date.
With the yyyy-MM format selected, click Use Date Format.
In the preview of the output column first_active_month_parsed, note the change in the column’s storage type, meaning, and values.
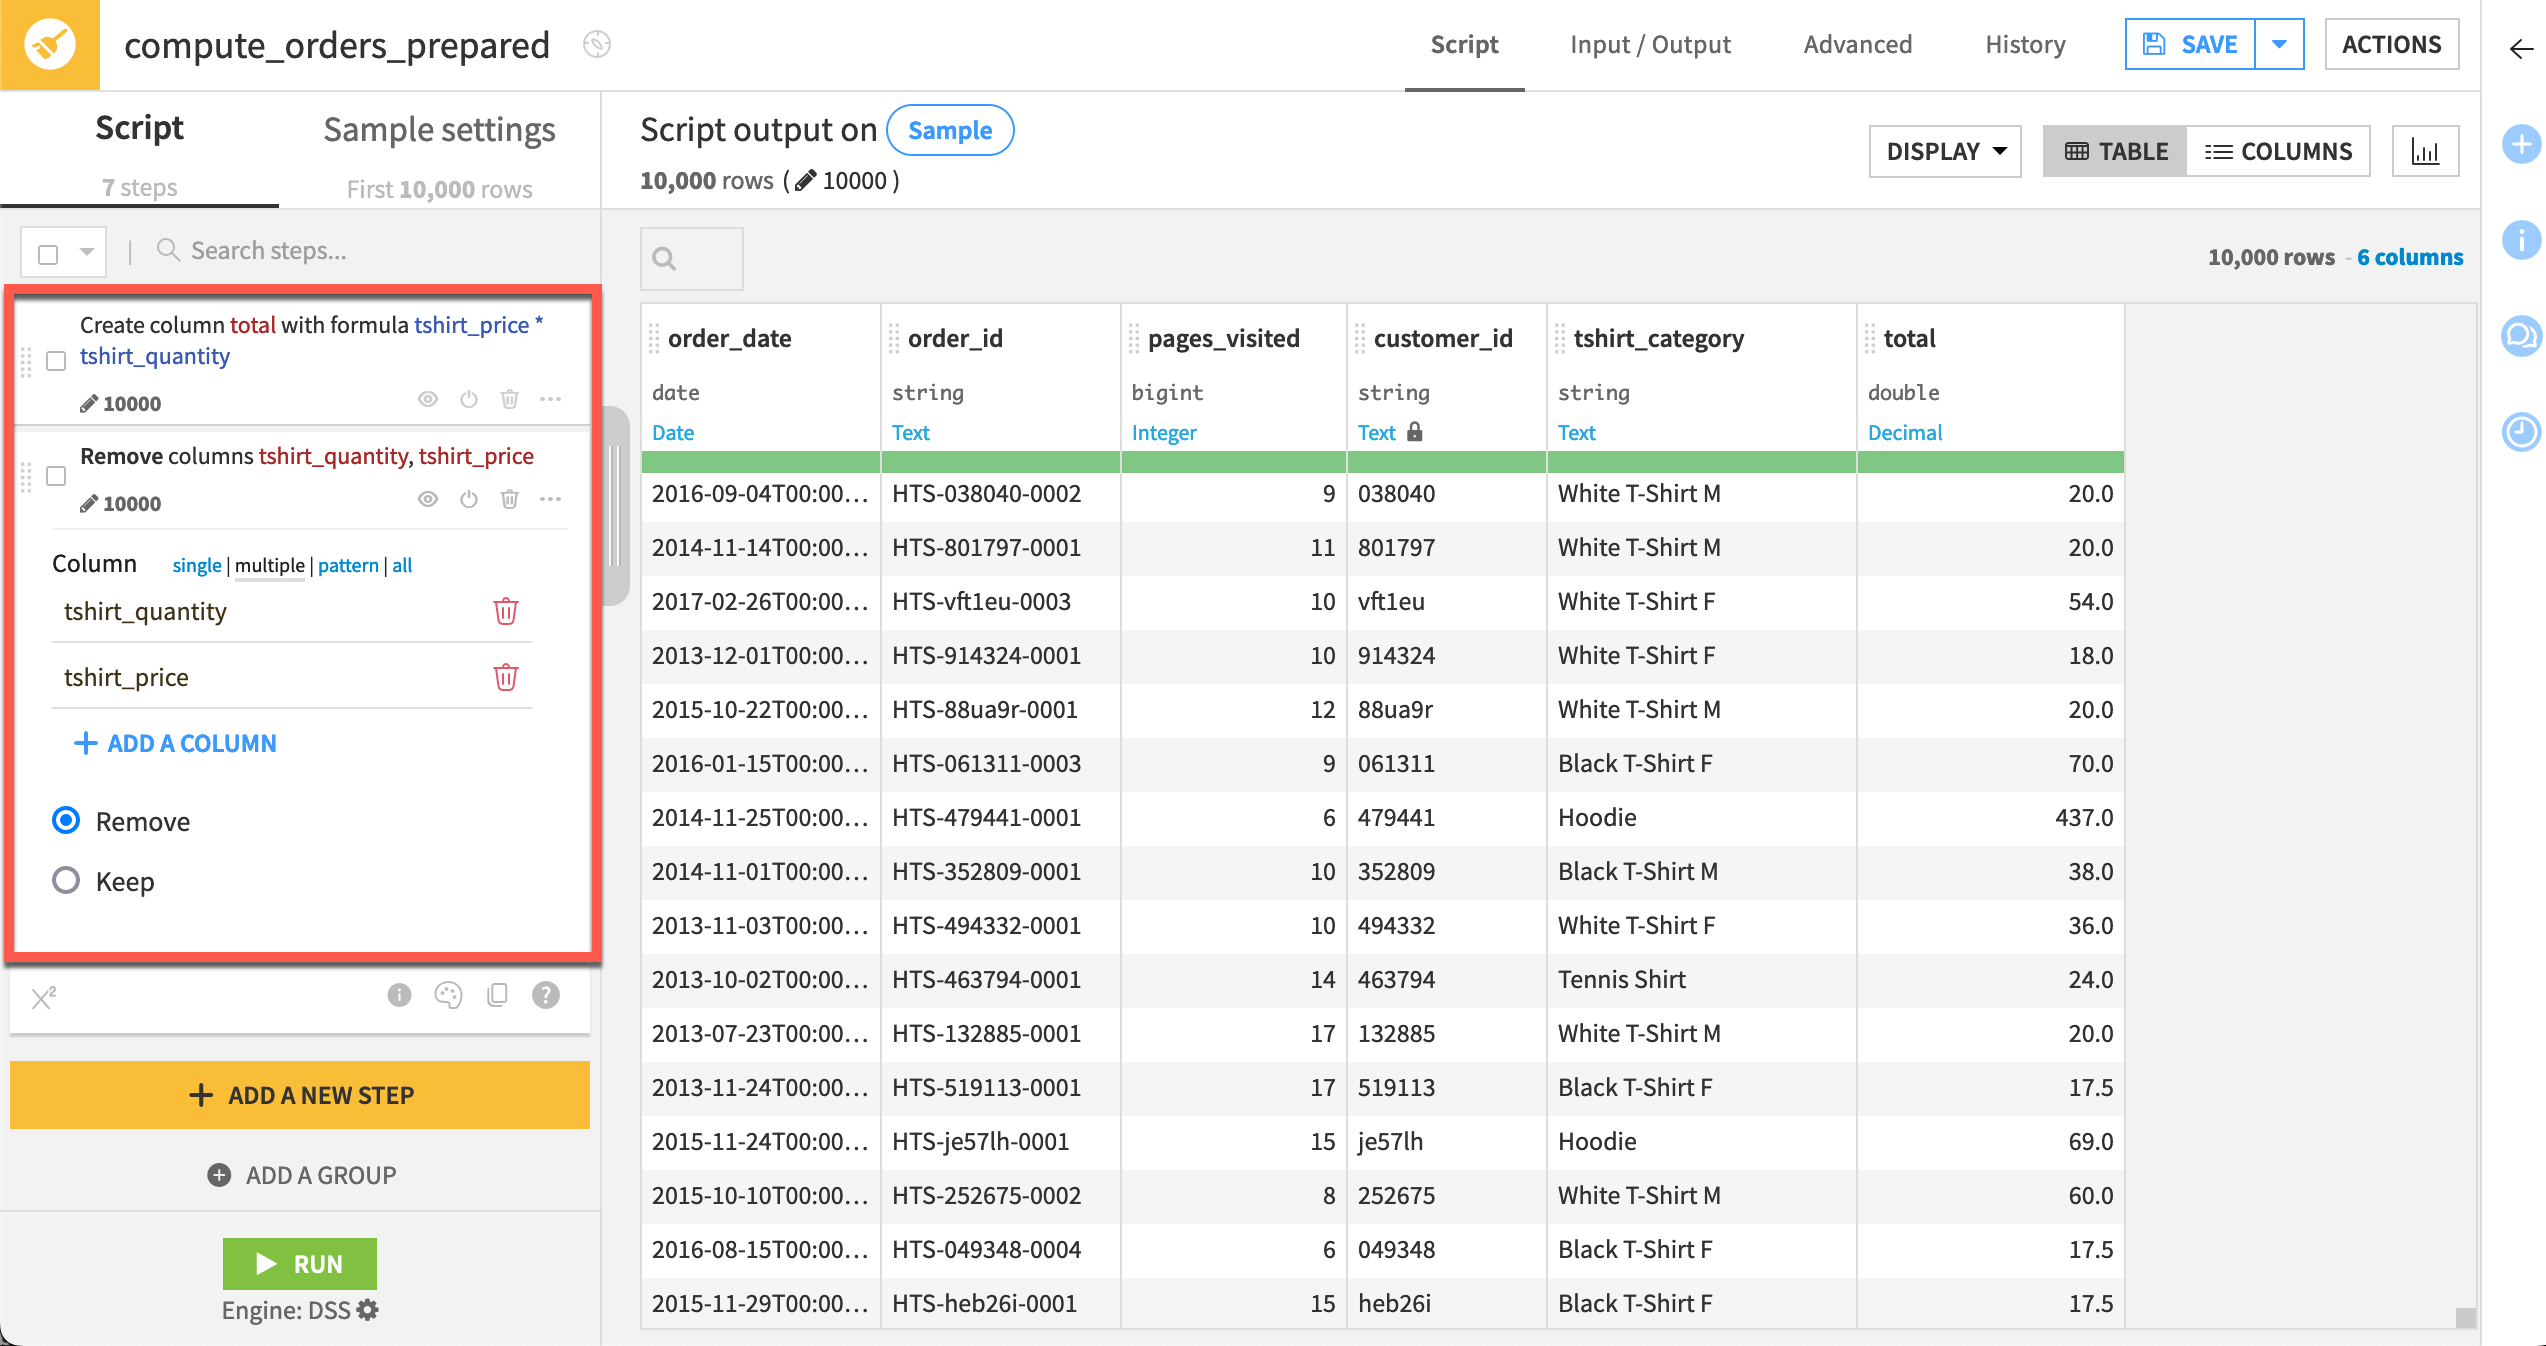
Delete and rename columns#
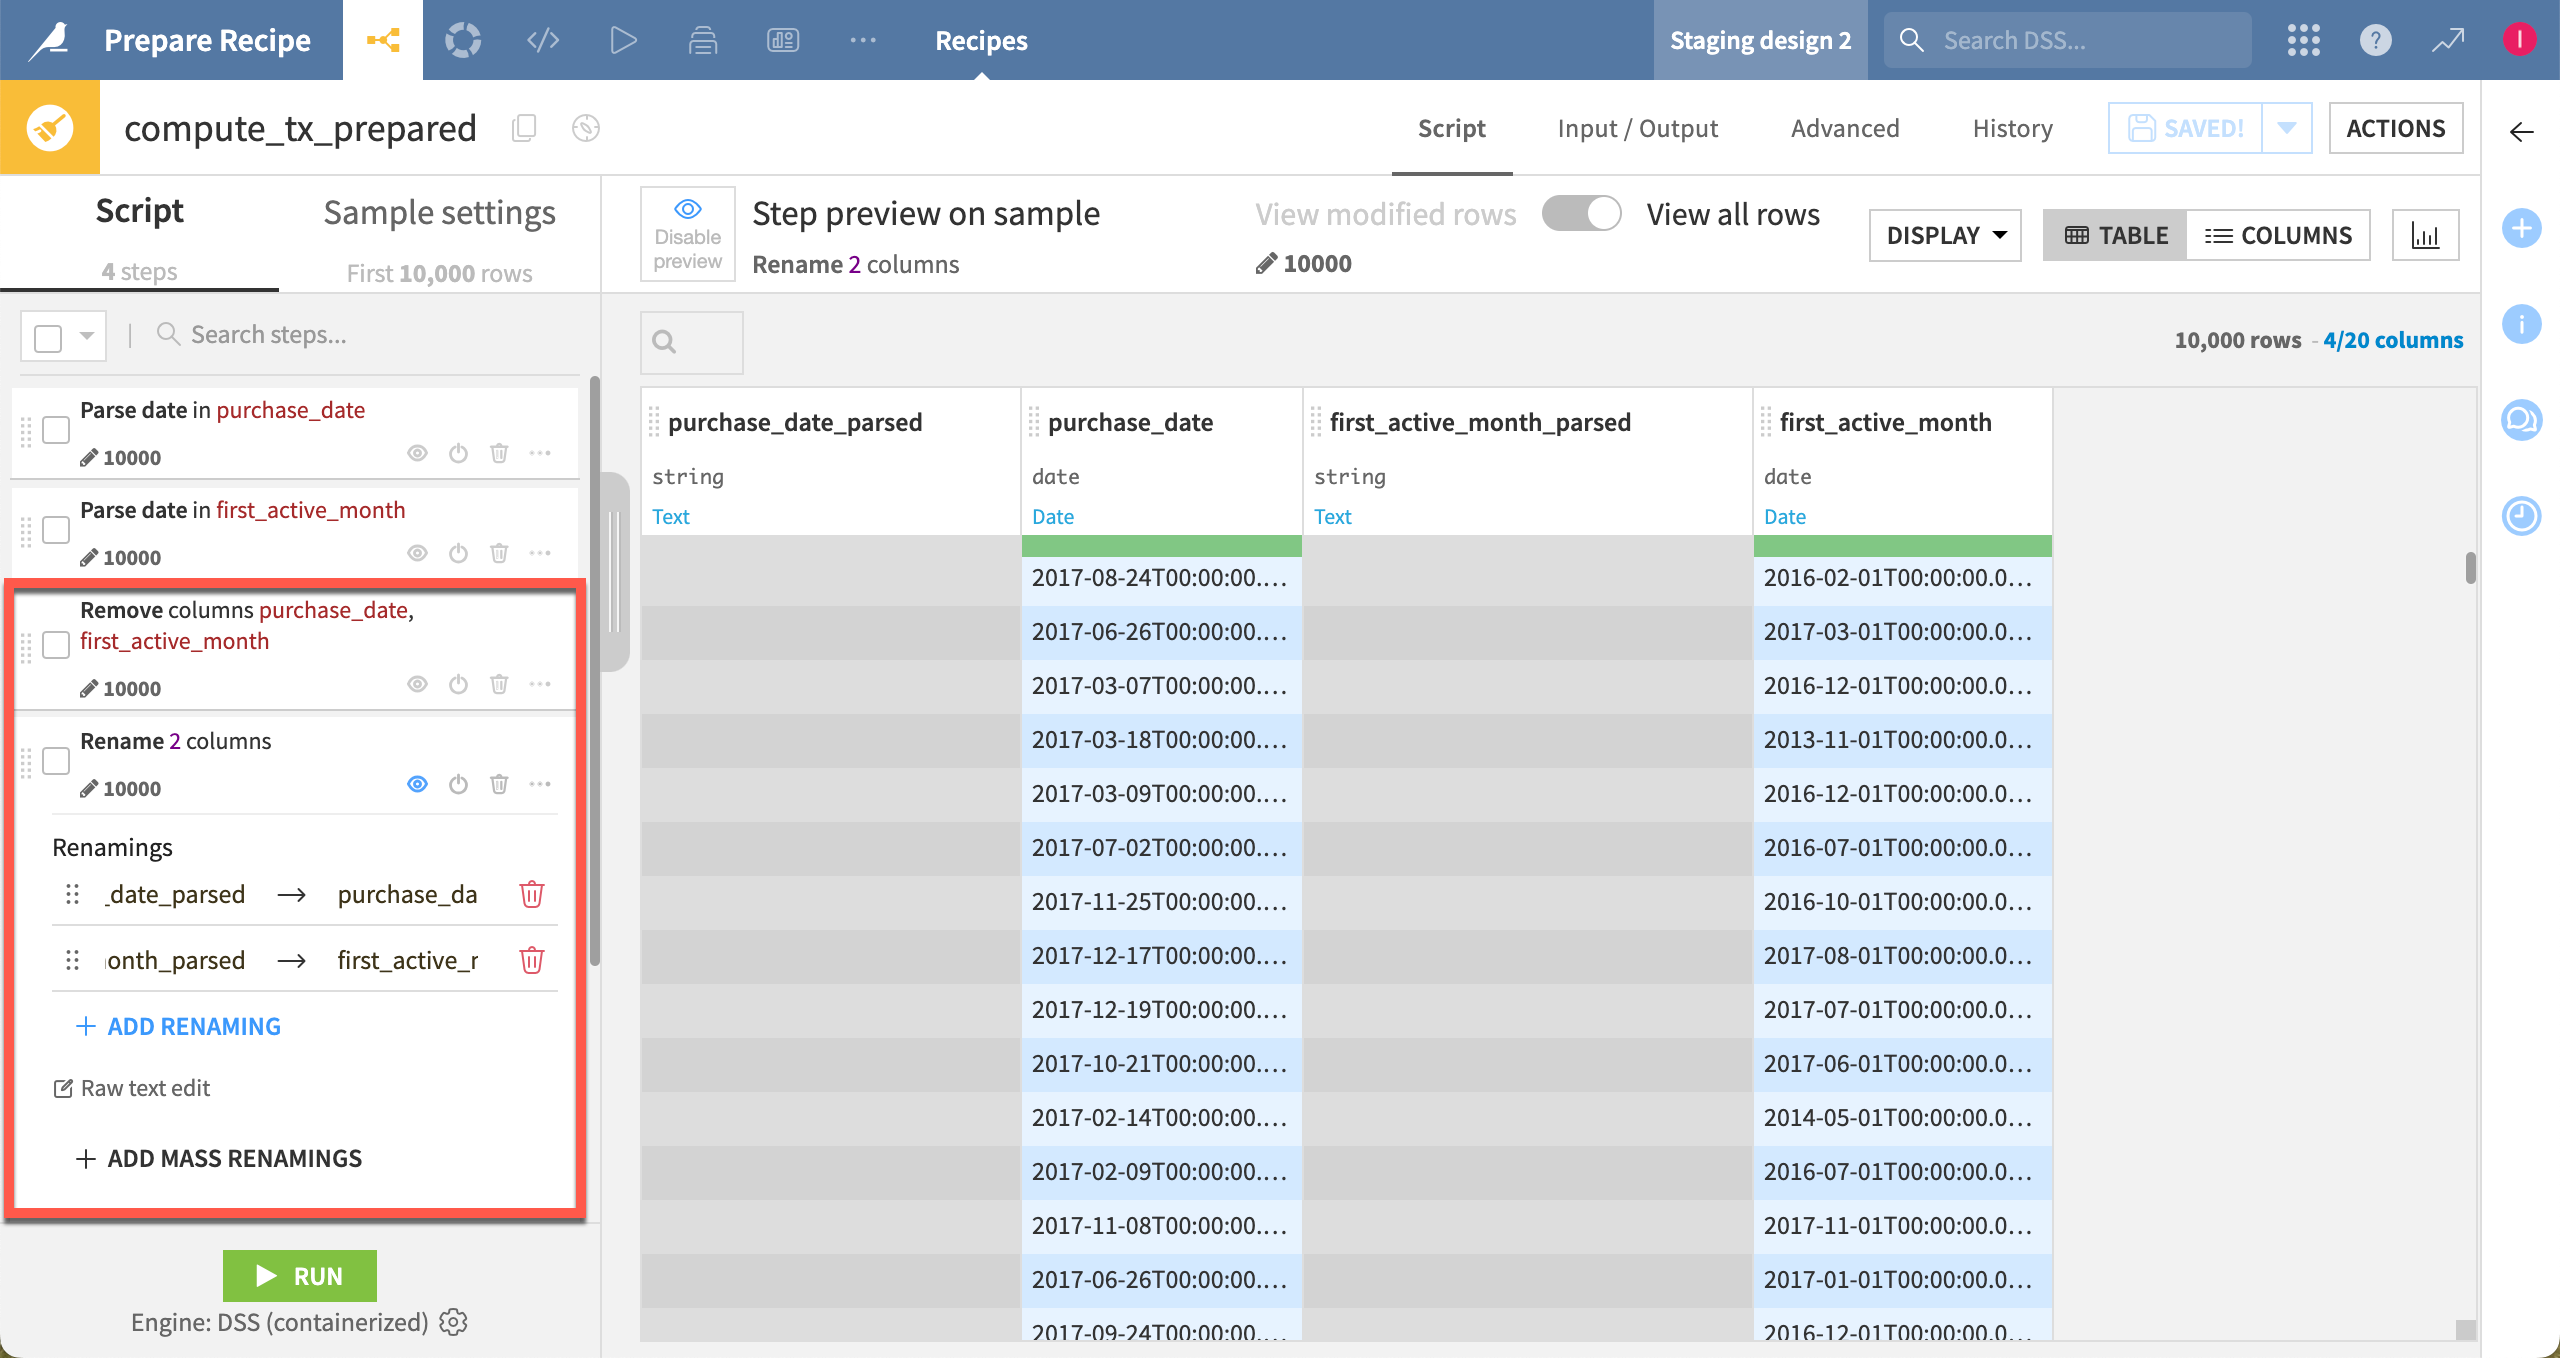
In the script’s Parse date step, you could leave the name of the output column empty to parse the column in place. However, instead of overriding the original date column, delete it, and rename the new column.
Click on the first_active_month column header dropdown, and choose Delete. It adds a Remove columns step to the Script panel.
Click on the first_active_month_parsed column header dropdown, and choose Rename.
Enter the name
first_active_month, and click OK.For the last step in the script, click on the eye (
 ) icon to re-enable the step preview.
Extract date components#
The correct storage of date columns enables usage of several processors built to work on dates.
Open the purchase_date column header dropdown, and choose Extract date components.
In the script, name the output columns as:
In the Year column field, enter
purchase_year.In the Month column field, enter
purchase_month.In the Day column field, enter
purchase_day.In the Day of week column field, enter
purchase_dow.

Important
The values in the purchase_dow (day of the week) column ranges from 1 to 7, where 1 corresponds to Monday.
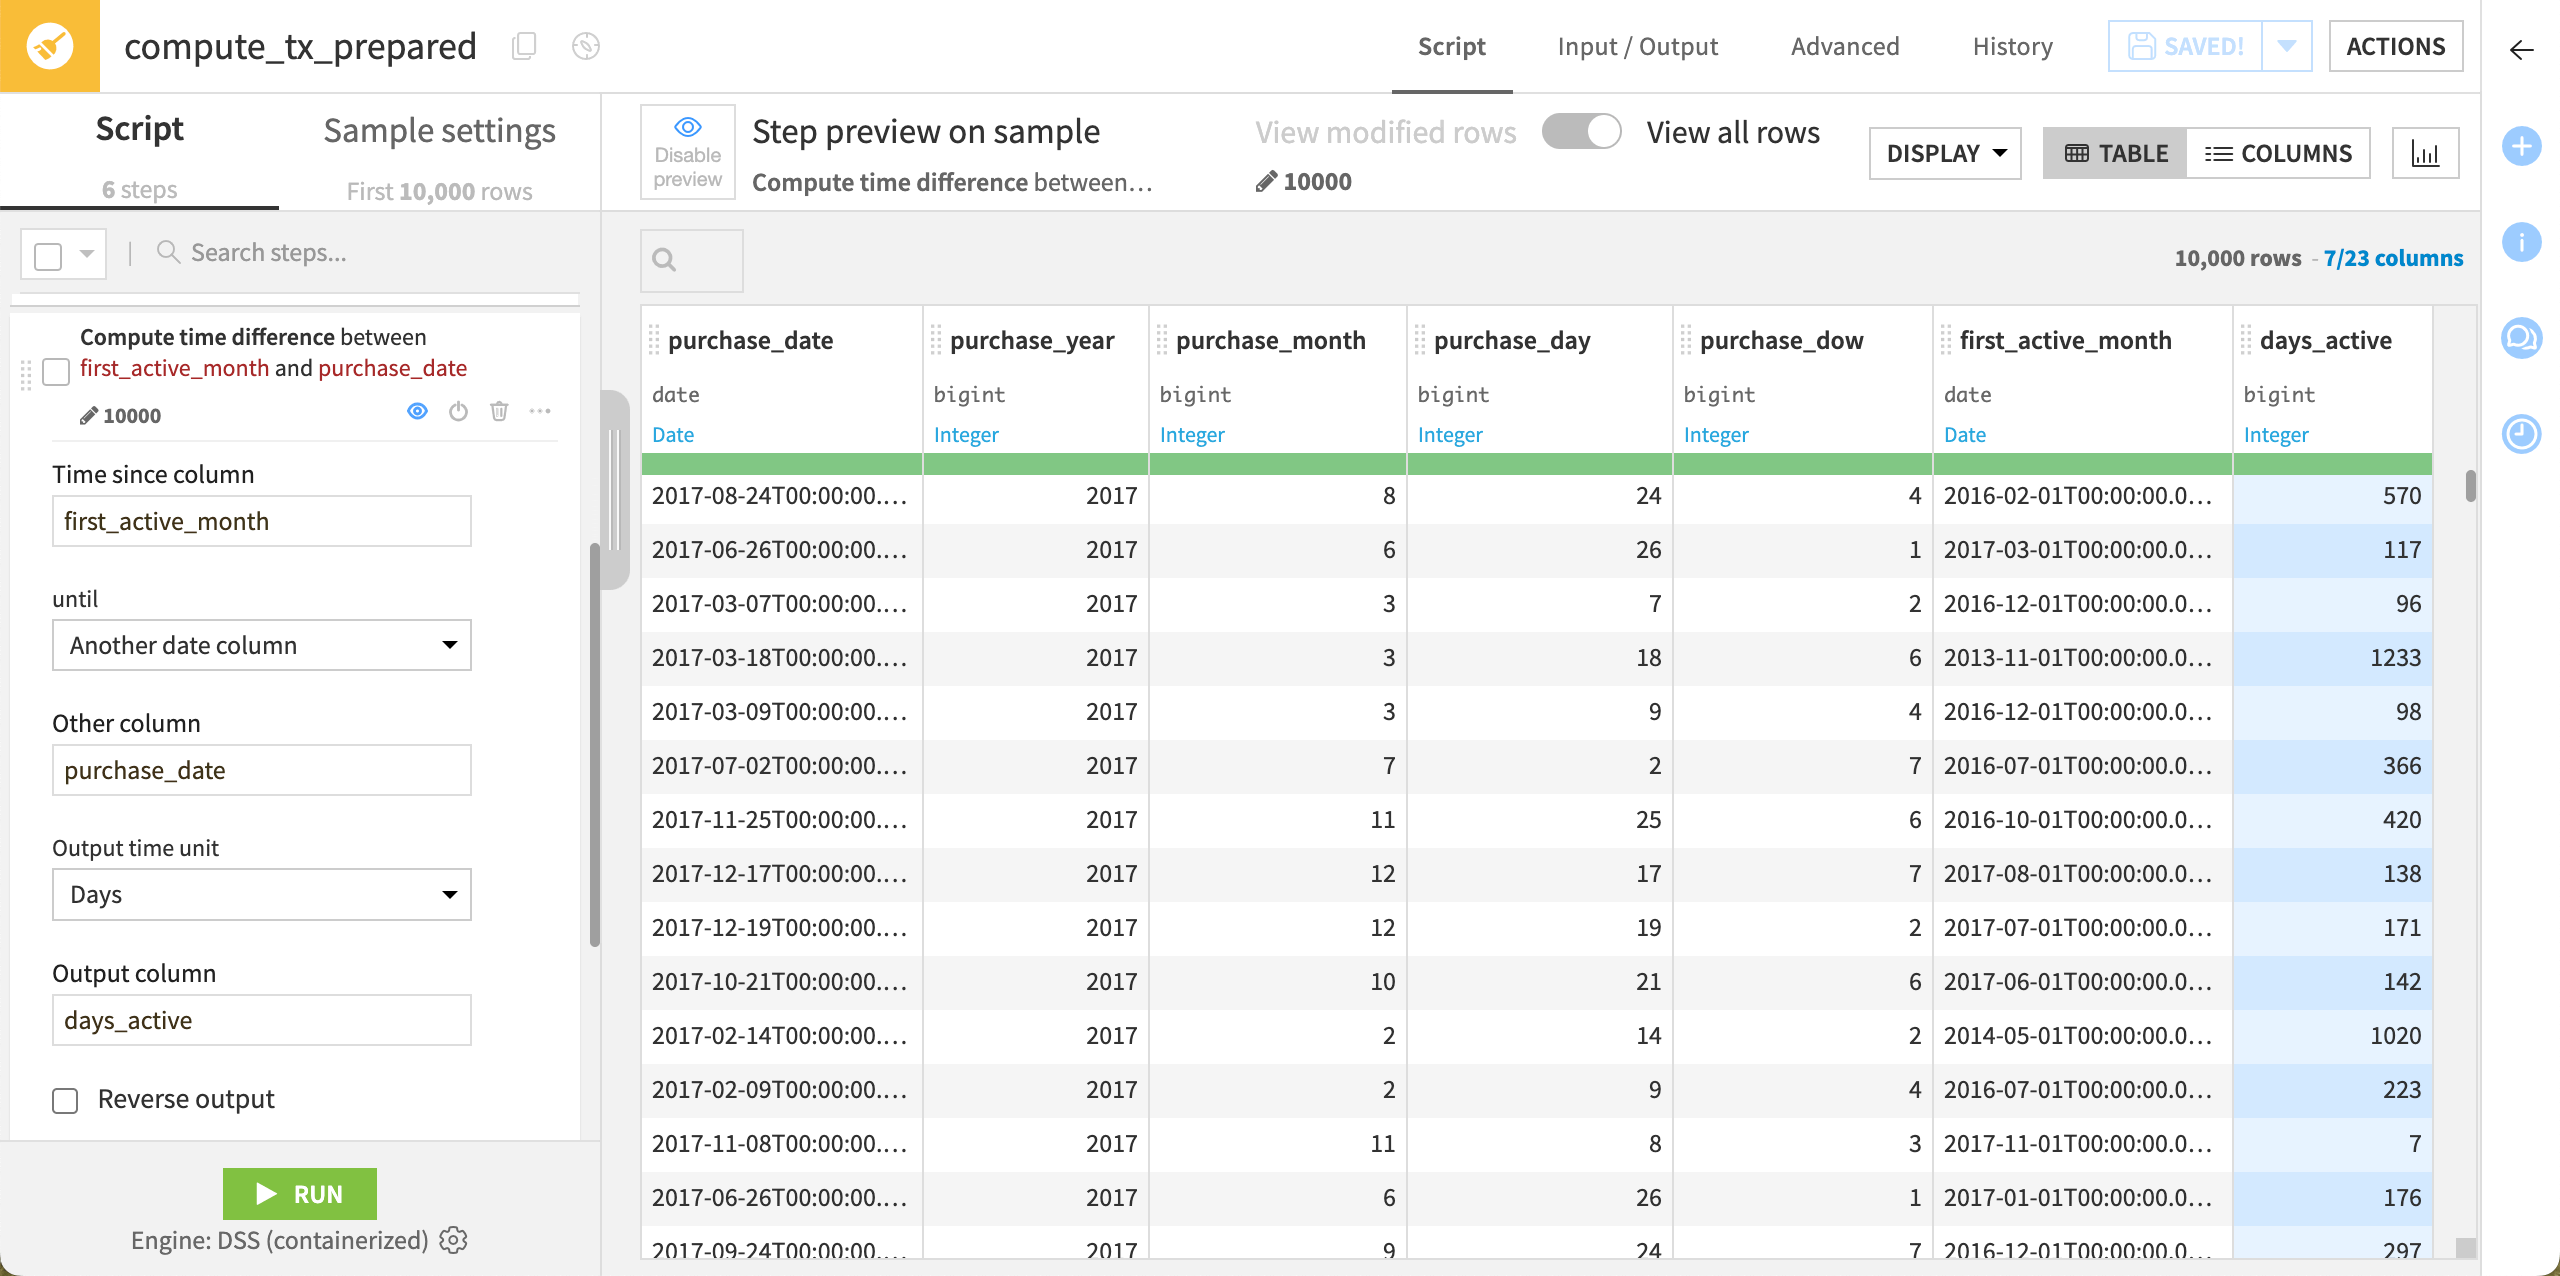
Compute time difference#
Now that first_active_month is a true date, you can use it in date calculations. Compute the time from the card’s activation month to the purchase date.
Click on the first_active_month column header dropdown, and choose Compute time since.
In the script, configure the Compute time difference step as follows:
Leave the Time since column option to
first_active_month.Set the until option to Another date column.
Set the Other column option to
purchase_date.Ensure the Output time unit option is Days.
Enter
days_activeas the name of the Output column.
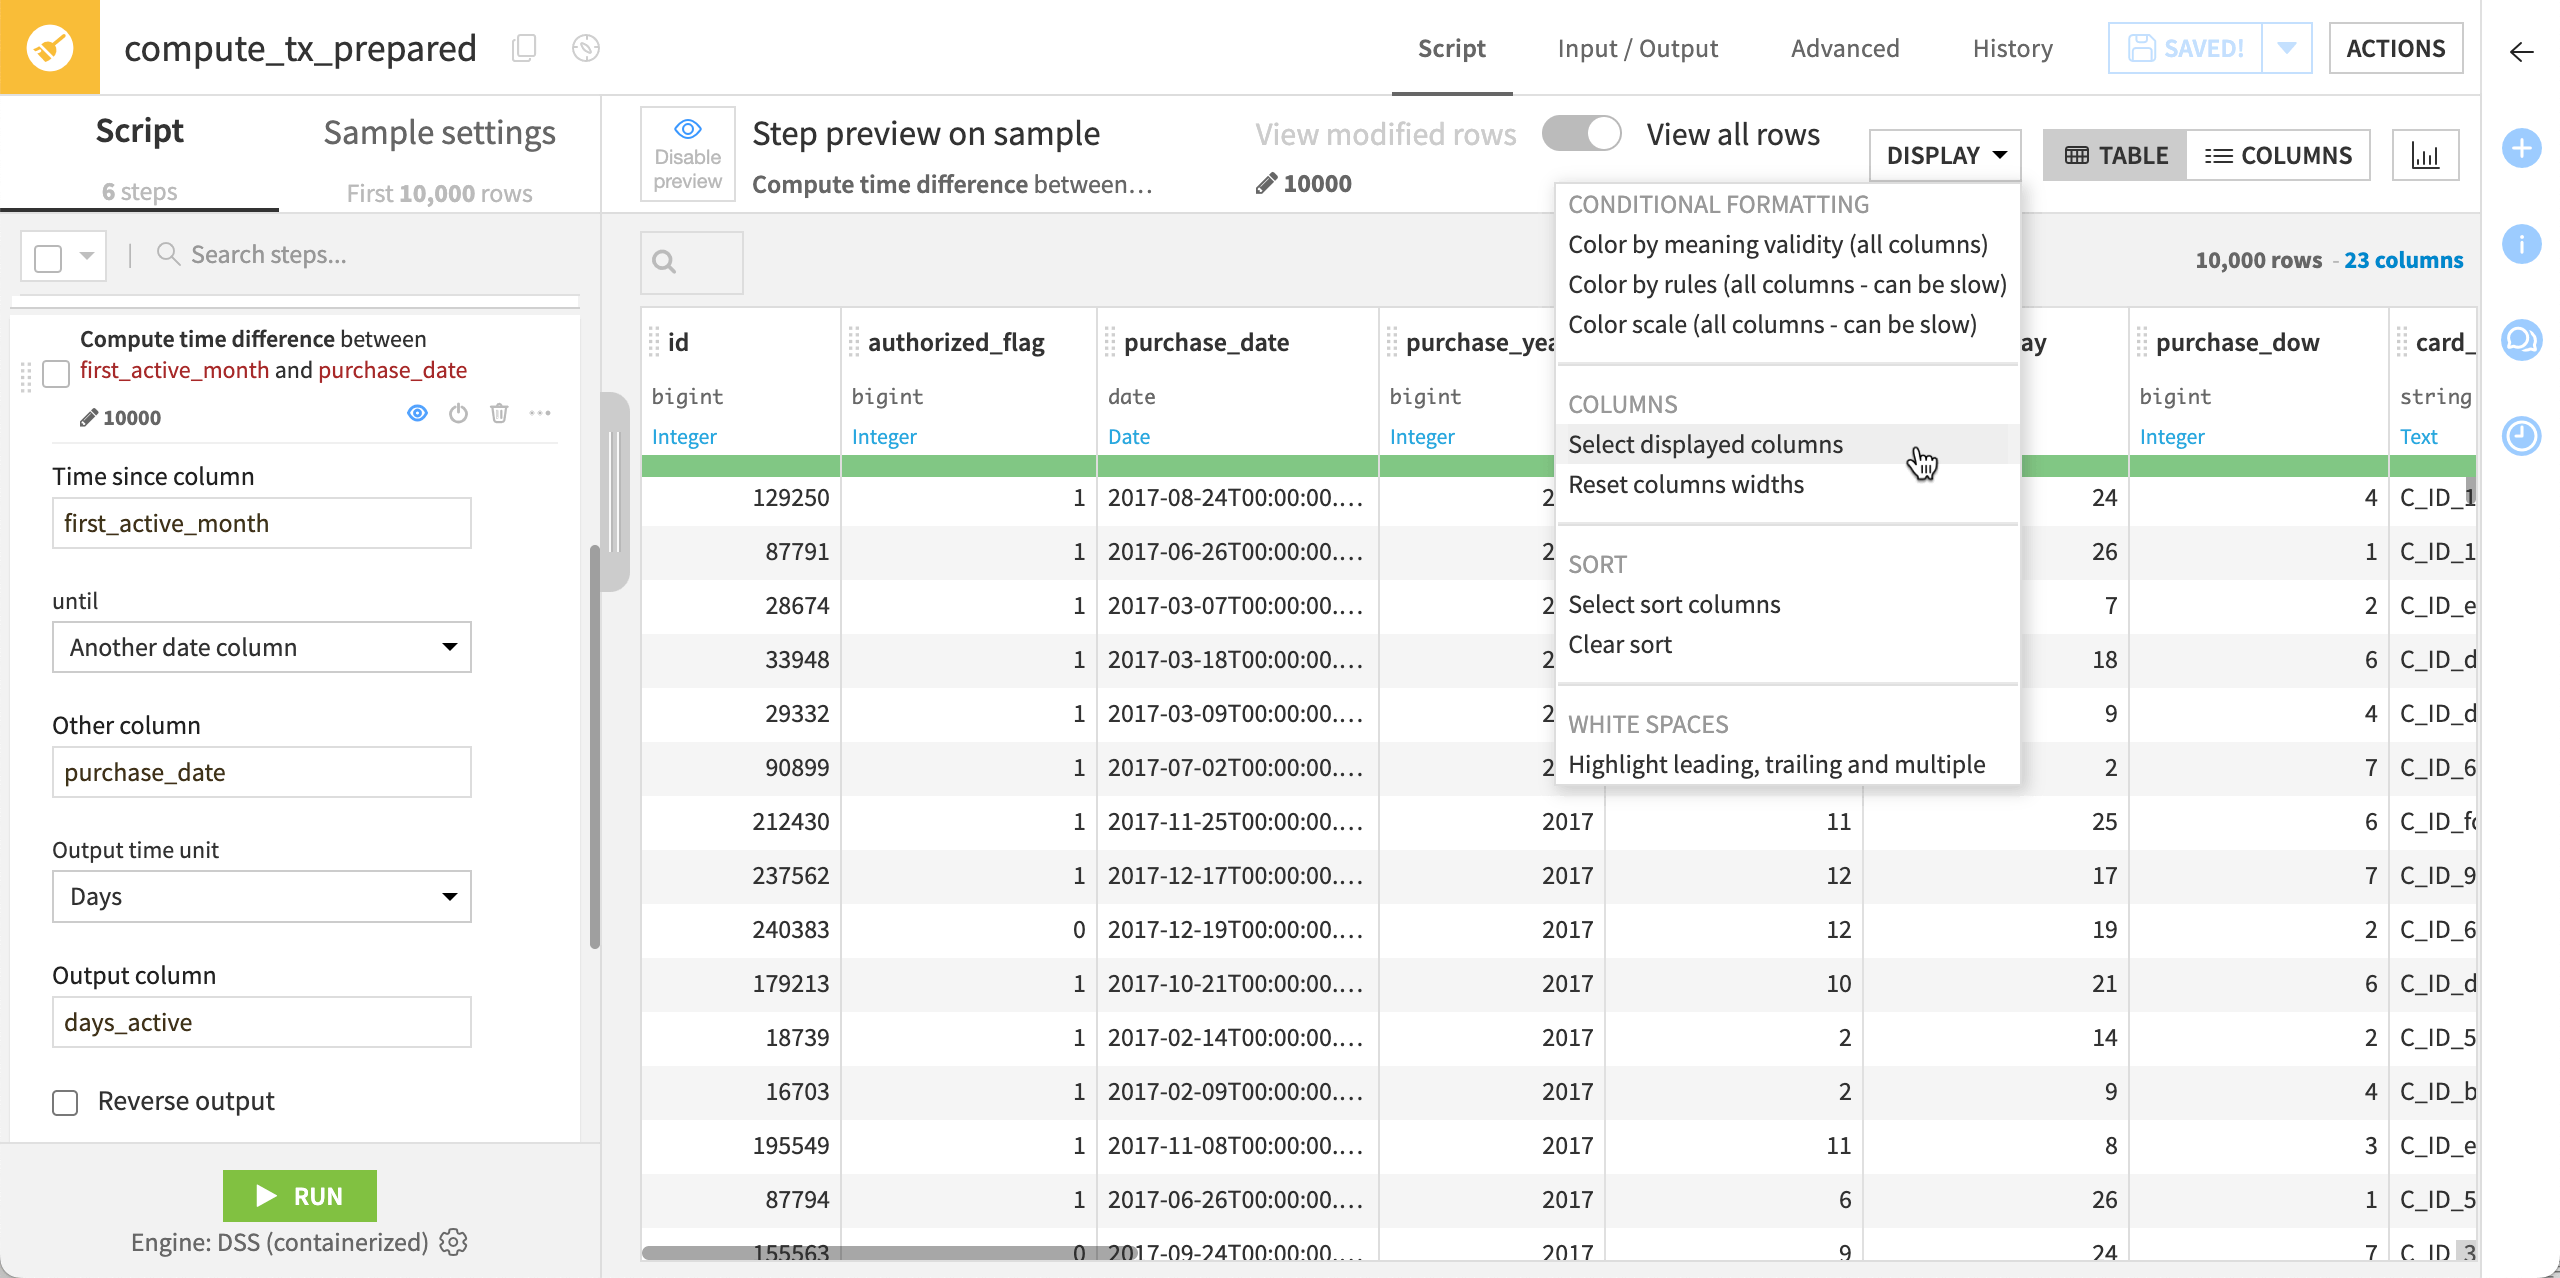
Show all columns from the dataset#
Now that you’ve finished processing the dates, display all the columns in the dataset.
At the top right of the dataset preview, click on Display > Select displayed columns.
In the Displayed columns dialog, set the Display option to All columns.
Click OK. The dataset should now display all columns.
Process numbers#
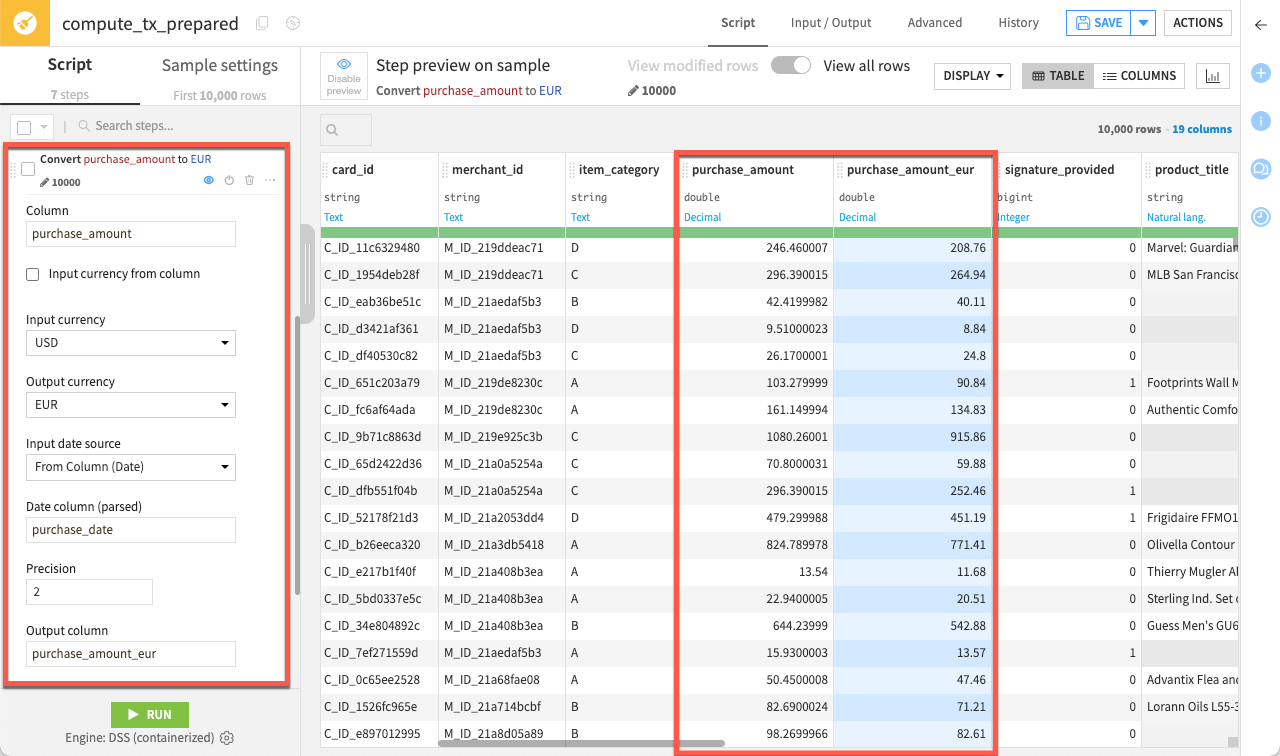
Convert currencies#
One handy processor provides the ability to convert currencies based on a date column.
This time, you won’t add the step by clicking on a column header. Instead, you’ll search the processors library which includes about 100 data preparation processors.
At the bottom of the Script panel, click + Add a New Step.
Search for Convert currencies.
Enter
purchase_amountas the column.Select USD as the input currency.
Select EUR as the output currency.
For input date source, select From Column (Date), and enter
purchase_dateas the date column.Name the output column
purchase_amount_eur.
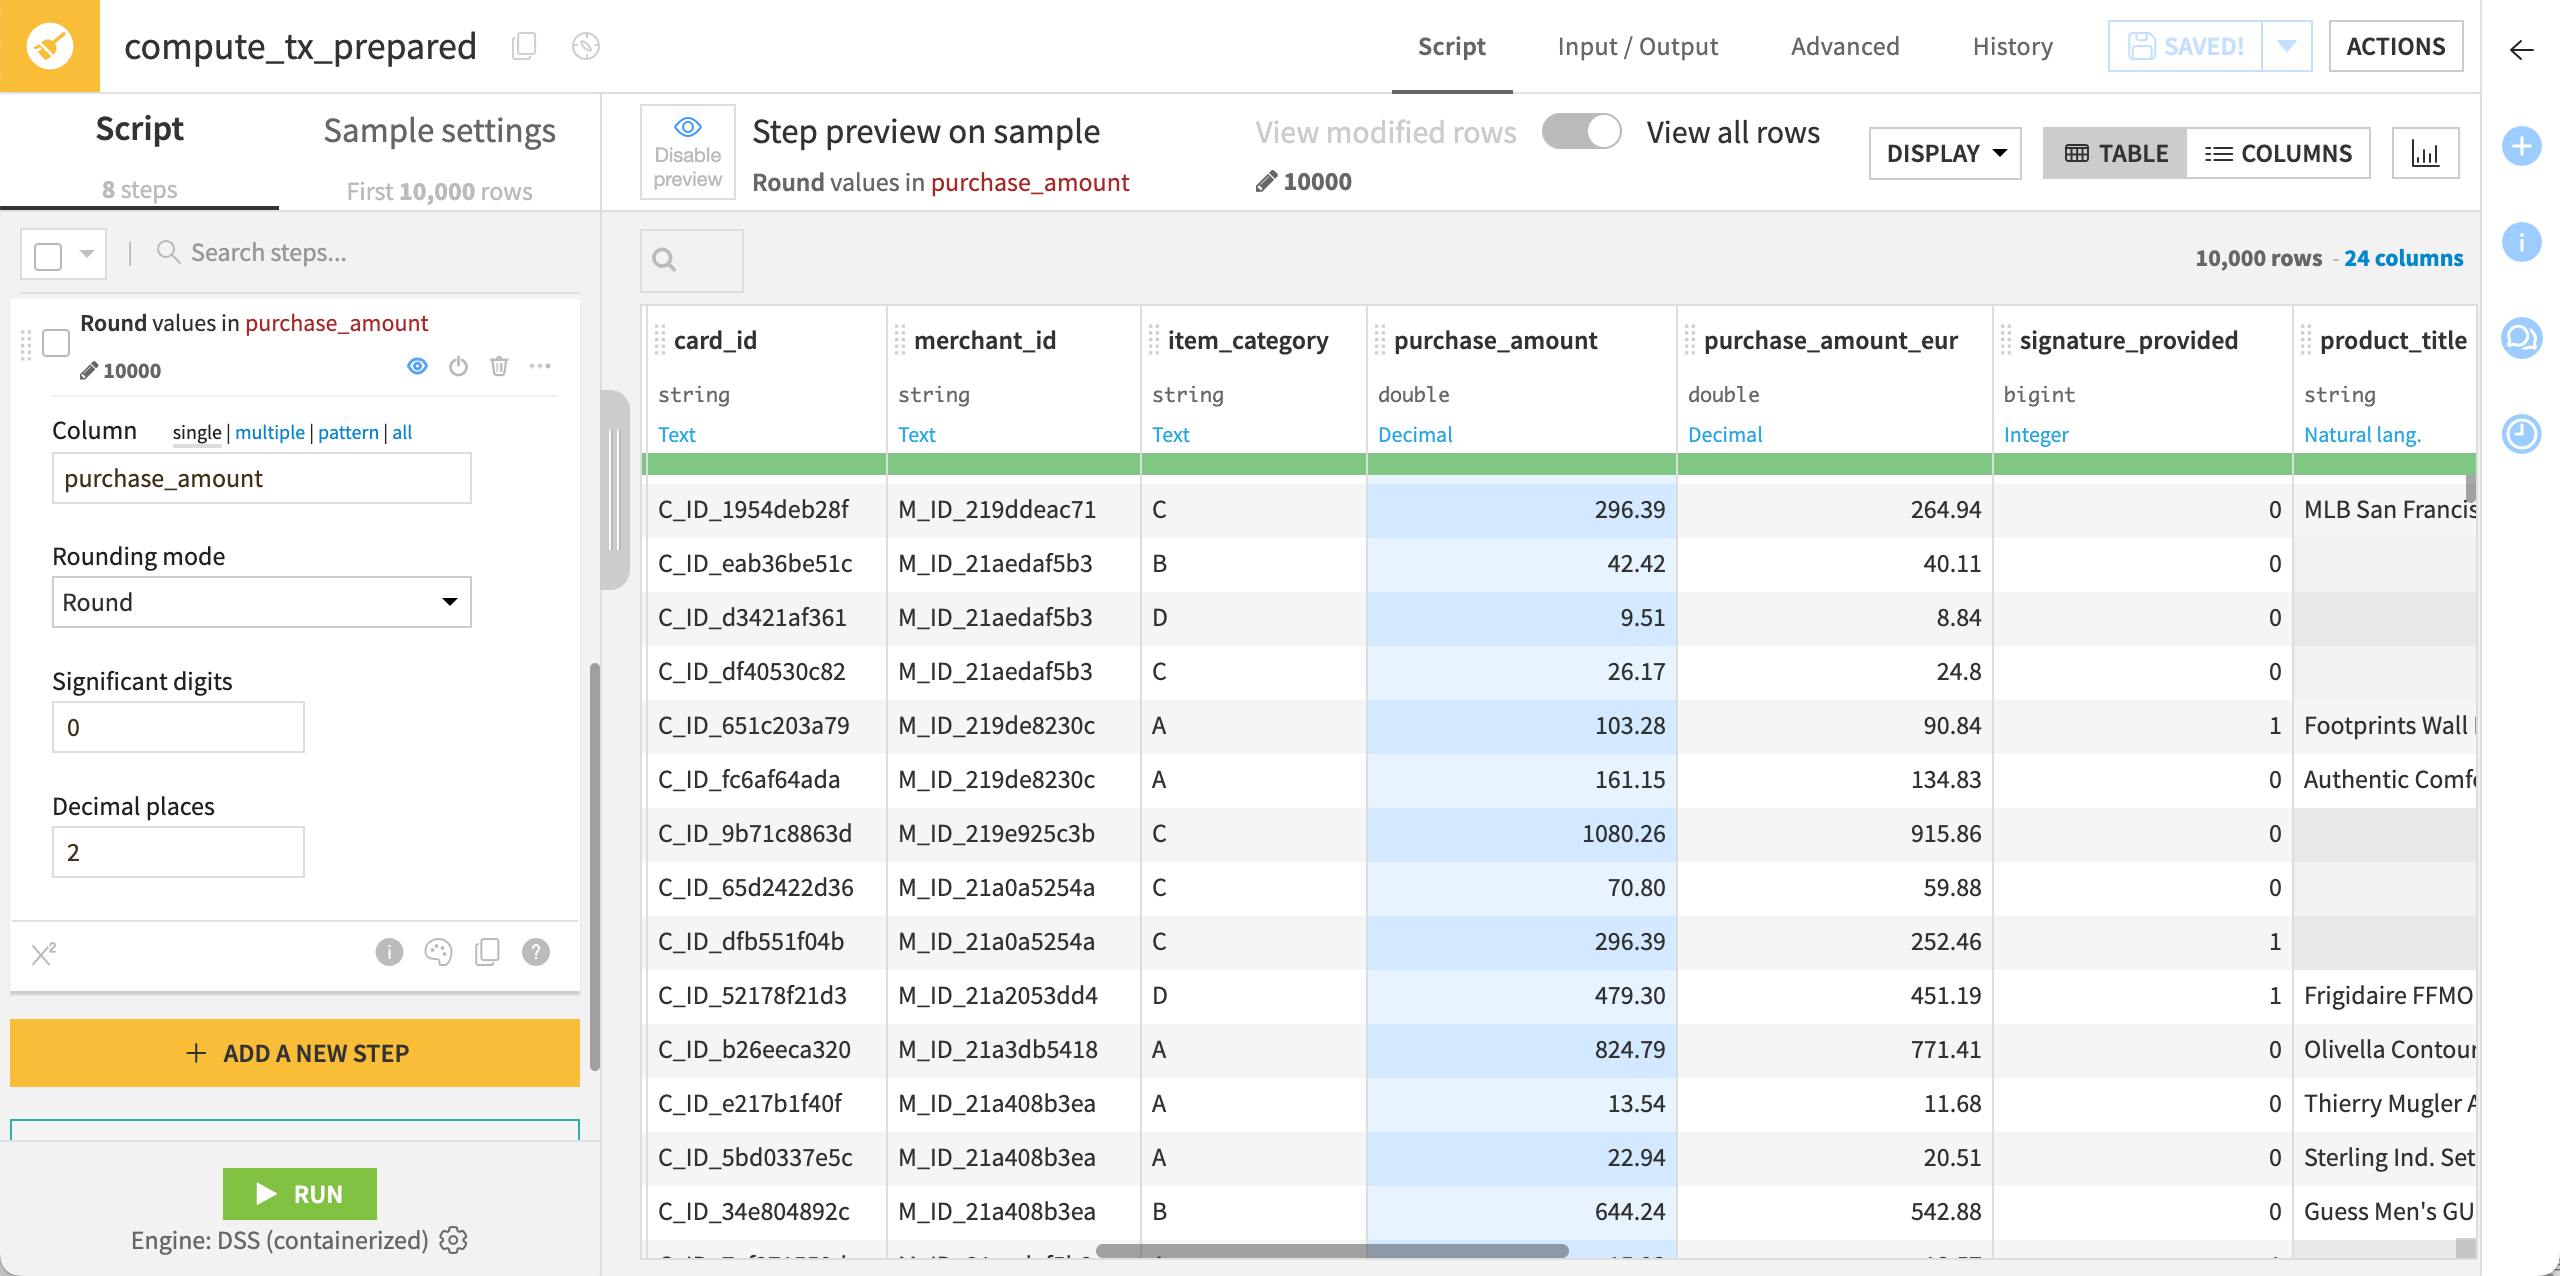
Round numbers#
Let’s also round the original purchase_amount values for simplicity.
Click on the column header for purchase_amount.
Click on Round to integer.
Increase the Decimal places to
2.
Tip
In the Script panel, try to disable/enable this step with the power (![]() ) icon. Dataiku processes the steps sequentially. So, rounding the amounts after the conversion step doesn’t have any impact on the purchase_amount_eur col.
) icon. Dataiku processes the steps sequentially. So, rounding the amounts after the conversion step doesn’t have any impact on the purchase_amount_eur col.
Process text#
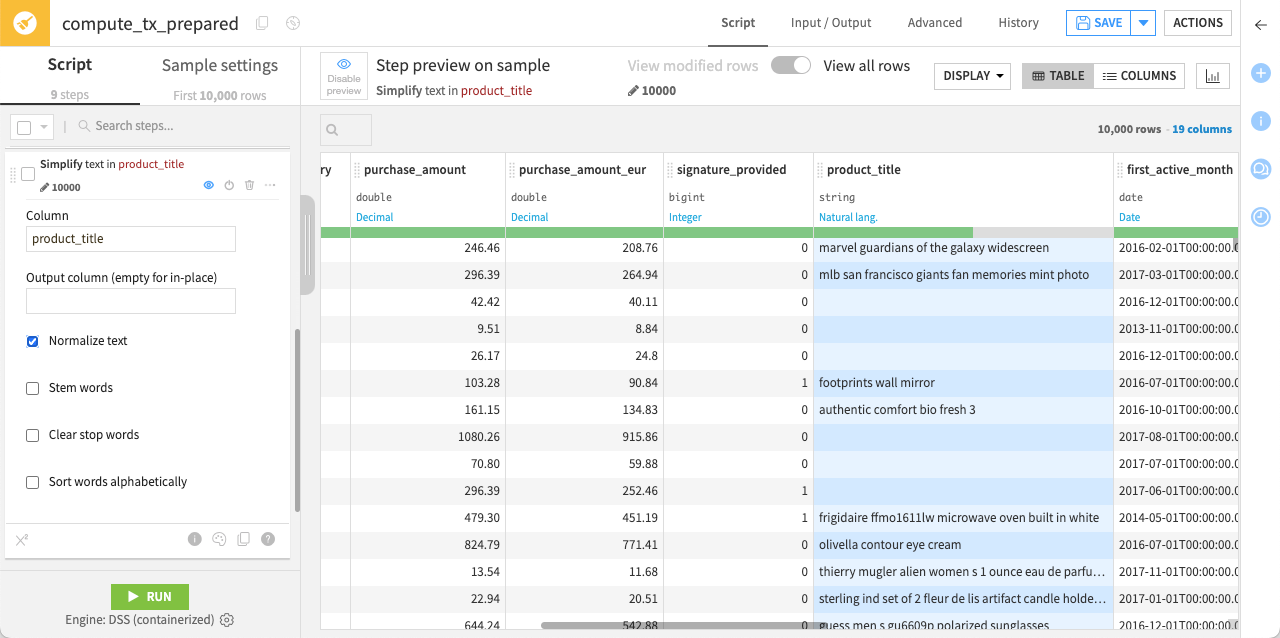
Simplify text#
When working with a text or natural language column, a good starting point is often to normalize the text. When you do so, Dataiku transforms all text to lowercase, removes punctuation and accents, and performs Unicode normalization.
Click on the column header for product_title.
Click Simplify text.
Leave the default option to normalize the text.
Extract text with a regular expression#
You can manipulate string data with regular expressions in many places throughout Dataiku, including in data preparation. As an example, let’s use a regular expression to extract into a new column the name of the first match of common Apple products.
At the bottom of the Script panel, click + Add a New Step, and search for Extract with regular expression.
In the step configuration, enter:
product_titleas the input column.appleas the prefix for the output column.\b(apple|macbook|ipad|iphone|ipod)\bas the regular expression.
As this regular expression doesn’t impact all rows, to see the impact, filter the column:
From the apple1 column header dropdown, select Filter.
In the filter box, check all values except No value to exclude rows that are empty.
Once you’ve reviewed the apple1 column, delete the filter by clicking the bin (
 ) icon next to it.

See also
Here, we’ve provided the regular expression for you, but you can explore how to use the smart pattern builder on your own.
Use a formula#
Finally, let’s use a Formula step to create a binary column named purchase_weekend. Dataiku formulas are a powerful expression language to perform calculations, manipulate strings, and much more.
At the bottom of the Script panel, click + Add a New Step.
Search for Formula.
In the formula editor panel, enter:
purchase_weekendin the Formula for field.if(purchase_dow>5,1,0)in the Formula field. Note that the editor autocompletes column names and shows you a preview of the output.
Click Apply.
Tip
As you can see, purchase_weekend is:
0(false) when the day of the week stored in the purchase_dow column ranges from1to5, as1corresponds to Monday and5to Friday.1(true) when the day of the week is either6or7(Saturday and Sunday, respectively).
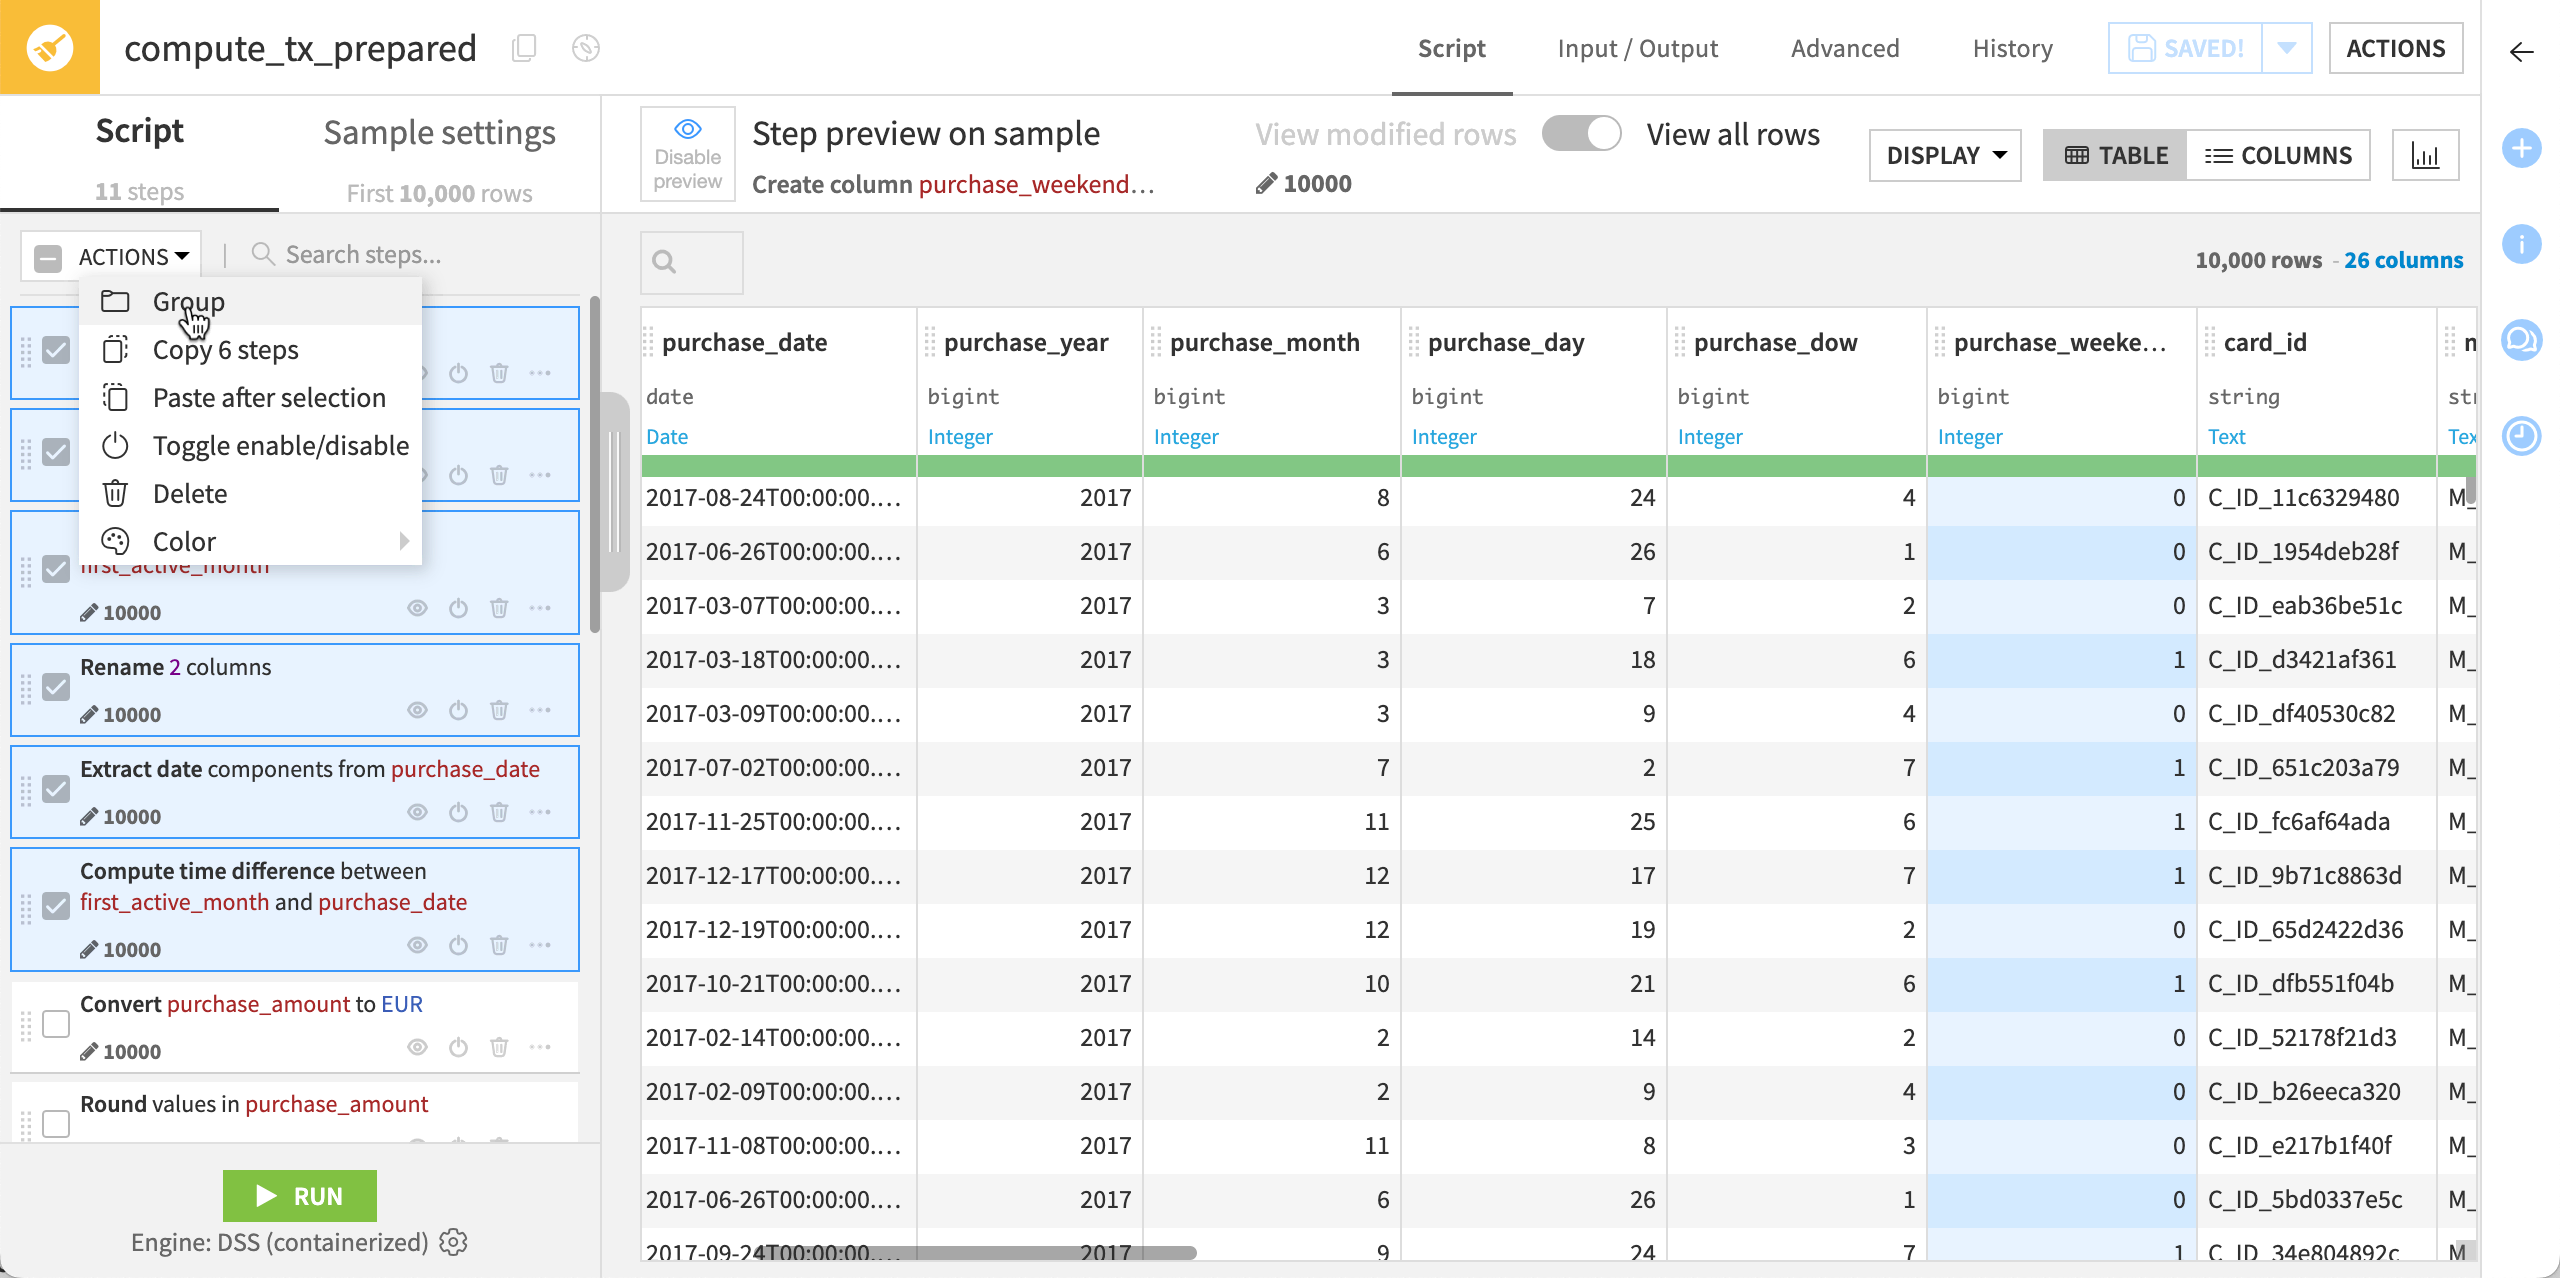
Group steps together#
Dataiku lets you group steps to organize the Script panel. Here, group together the steps used to process the dates.
In the Script panel, select the first five steps working on the date columns.
On top of the step list, click Actions > Group.
Click the pencil (
 ) icon to name the group
 Process dates.
Run the recipe#
Once you’ve defined all the steps in the script, it’s time to apply the script on the whole dataset and explore the output dataset.
Click Run in the lower-left corner of the page (or use the keyboard shortcut
@+r+u+n).When the job completes, click Explore dataset tx_prepared to view the output dataset. You can also return to the Flow and see your progress.
Next steps#
Congratulations on completing your first Prepare recipe! This tutorial only shows a small subset of what you can do in a Prepare recipe.
See also
For more information on data preparation, see also:
The Processors reference in the reference documentation.
The Formula cheat sheet.
The Prepare Data in the Knowledge Base.
Now, you can still do more data exploration and preparation using other visual recipes.
Let’s dive deeper by grouping some data on a dataset.