
Tutorial | Custom preprocessing & modeling within visual ML#
Get started#
Dataiku provides a powerful visual ML tool with built-in feature preprocessing and algorithms. However, you can extend this functionality with Python code, while still retaining many of the benefits of visual models in terms of scoring, monitoring, and, in general, wider usability across diverse teams.
Objectives#
In this tutorial, you will:
Implement custom feature preprocessing compatible with scikit-learn.
Import custom scikit-learn algorithms when training visual models.
Prerequisites#
Dataiku 12.0 or later.
An Advanced Analytics Designer or Full Designer user profile.
Tip
To become familiar with visual ML, visit Machine Learning Basics.
Create the project#
From the Dataiku Design homepage, click + New Project.
Select Learning projects.
Search for and select Custom Preprocessing & Modeling.
If needed, change the folder into which the project will be installed, and click Create.
From the project homepage, click Go to Flow (or type
g+f).
Note
You can also download the starter project from this website and import it as a ZIP file.
Use case summary#
The starting Flow of the project consists of an ecommerce_reviews dataset and a vocabulary folder.
Flow item |
Contents |
|---|---|
ecommerce_reviews dataset |
Contains a dataset of e-commerce customer reviews of women’s clothing found on Kaggle. Rating indicates the final customer rating on a scale of 1 to 5. It’s the target we wish to predict. Review Text contains the free text review and will be used for custom preprocessing. |
vocabulary folder |
Contains a text file, vocabulary.txt, which lists words to be used to perform count vectorization on the Review Text feature. |
The project also contains a visual analysis Quick modeling of Rating on ecommerce_reviews. It’s an AutoML prediction task trained with default settings to predict Rating.
Preprocess features with Python inside visual ML#
Feature preprocessing is a critical step in a machine learning pipeline. In addition to many native feature preprocessing methods, Dataiku also enables you to write custom preprocessing methods, while remaining inside a visual modeling task.
Explore the built-in feature preprocessing#
Let’s first review the built-in feature preprocessing methods.
From the ML (
 ) menu of the top navigation bar, select Visual ML (Analysis) (
g+a).Open Quick modeling of Rating on ecommerce_reviews.
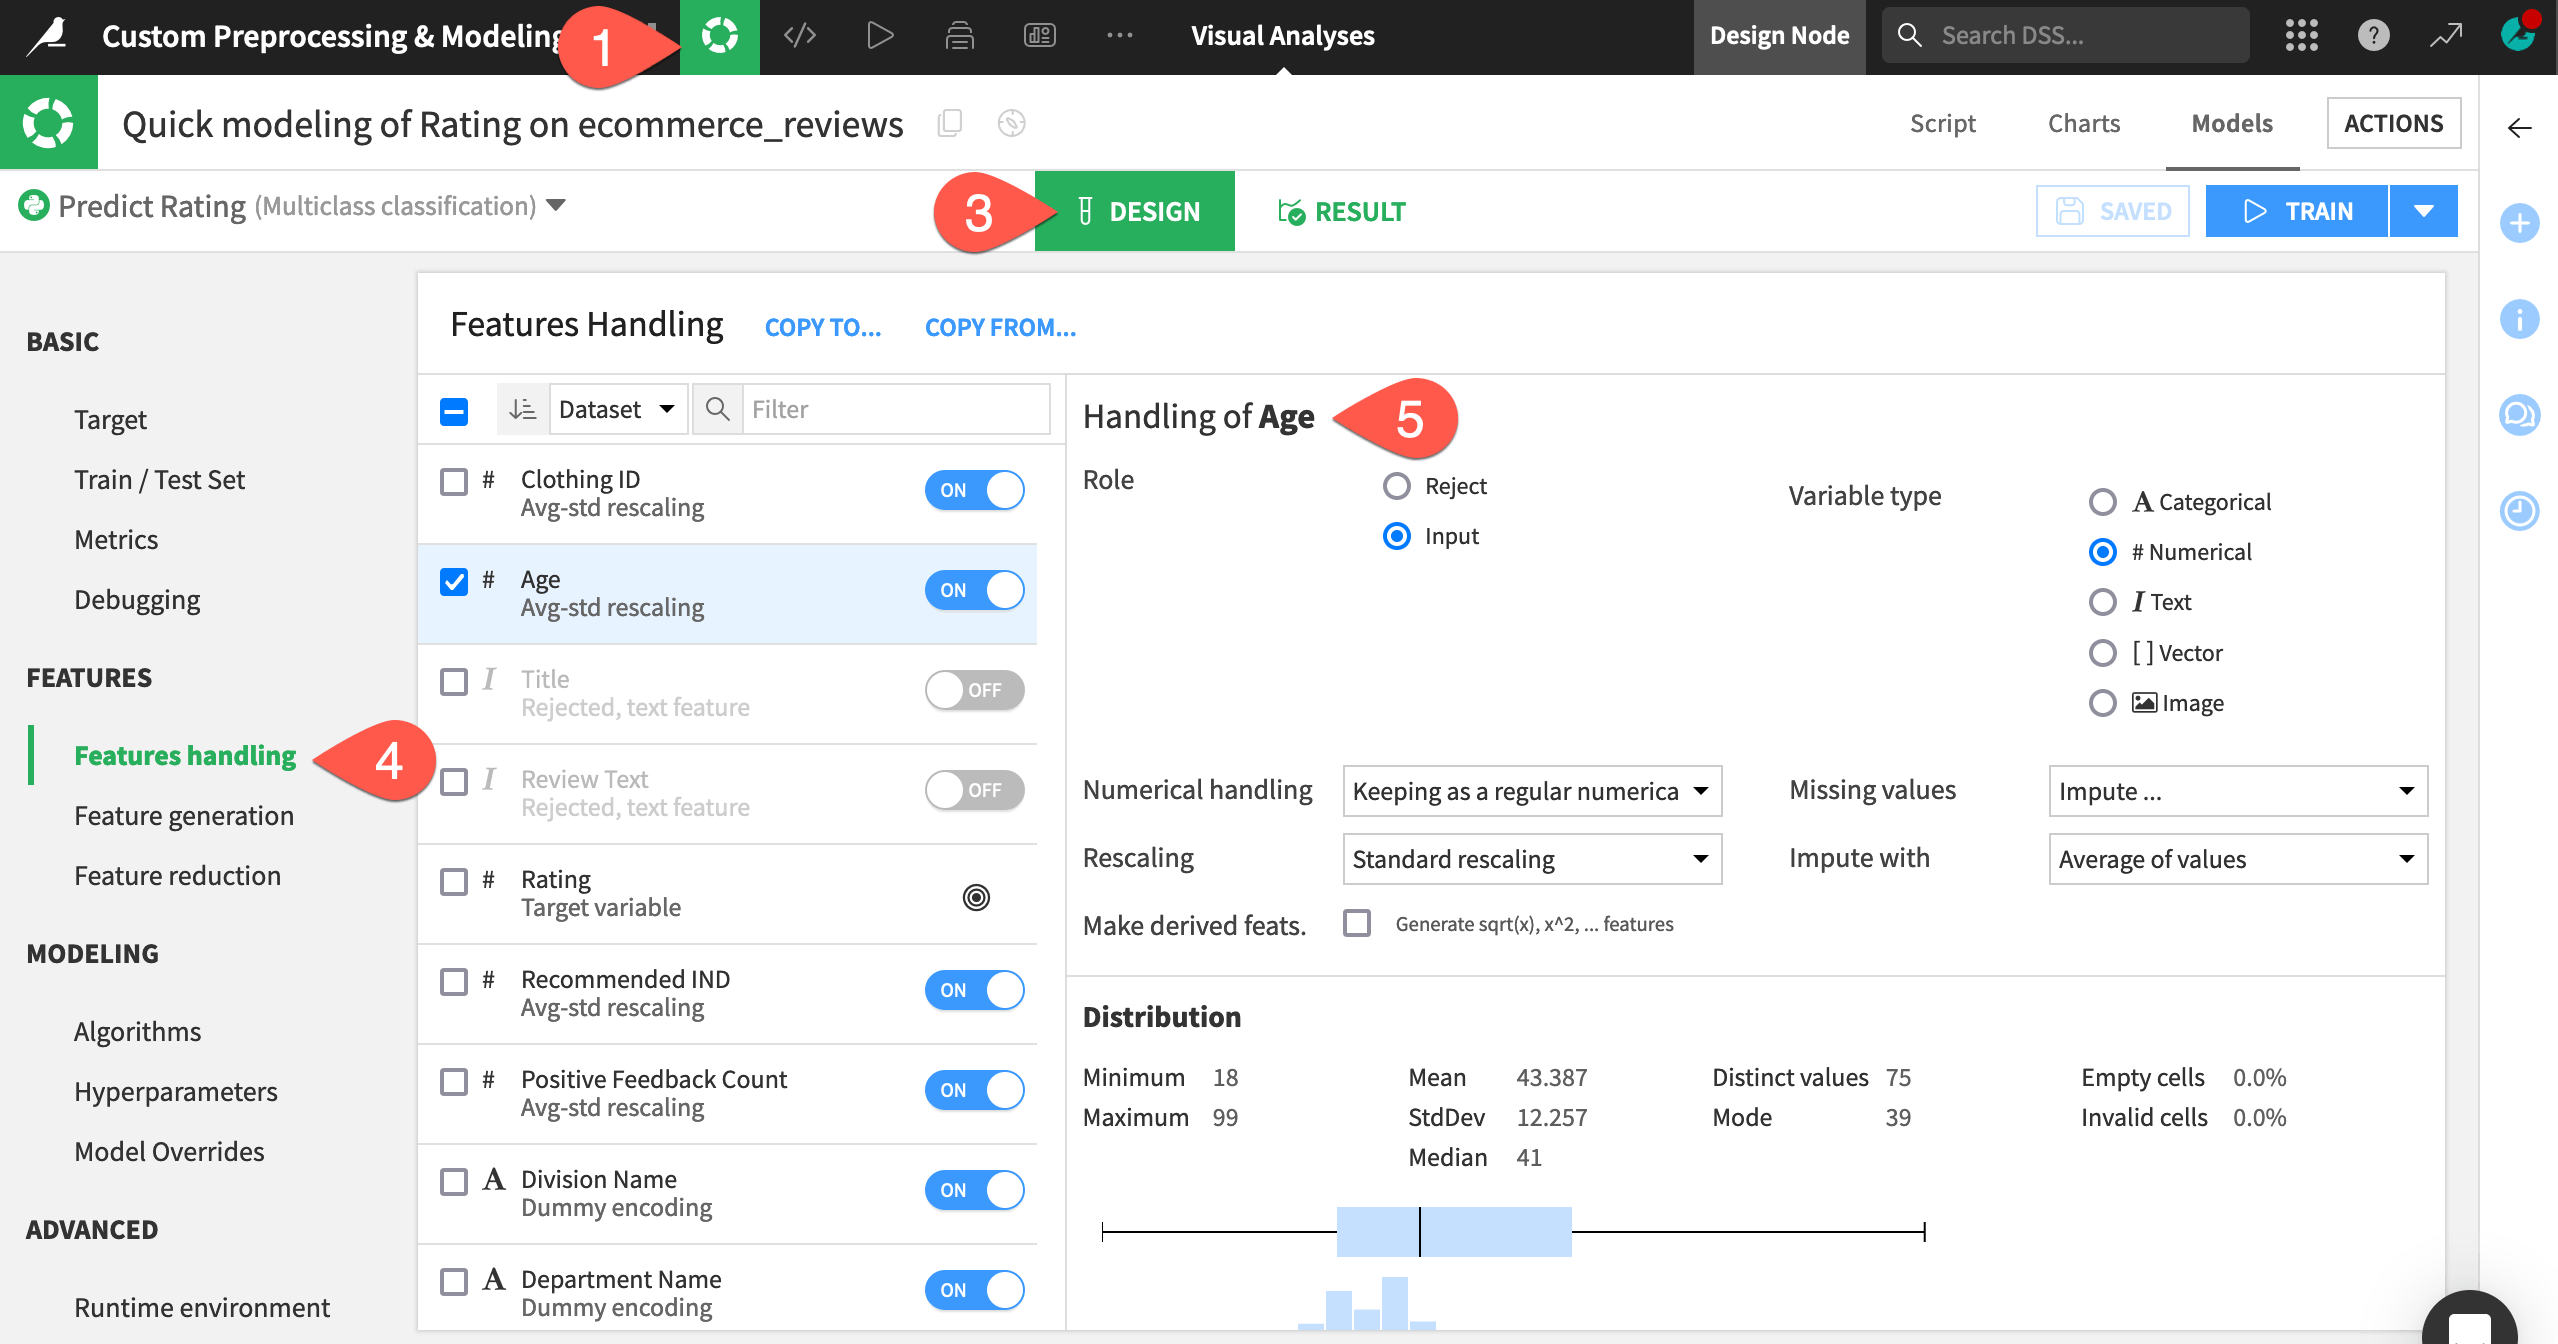
Switch to the Design tab of the modeling task.
Navigate to the Features Handling panel.
Select any feature from the list to see its built-in feature handling methods and some summary statistics.
Important
Because the visual ML tool rejects text features by default, it has rejected the two text features, Title and Review Text.
Apply custom preprocessing to a feature#
Instead of using the default selection for preprocessing the Review Text feature, you can apply a different kind of preprocessing to transform the text into numeric values: count vectorization.
Note
The default text handling method is Tokenize, hash and apply SVD. Learn more in the Academy course NLP - The Visual Way.
This option in Dataiku requires that you specify values for parameters such as stop words, n-grams, etc. However, in this tutorial, you’ll use the coding approach to implementing count vectorization.
When writing custom preprocessing Python code, the processor must be scikit-learn compatible. That is, it needs to have the fit and transform methods.
The
fitmethod must modify the object in place if a fitting is necessary.The
transformmethod must return a pandas DataFrame, a 2-D NumPy array, or a SciPy compressed sparse row matrix (scipy.sparse.csr_matrix) containing the preprocessed result. If thetransformmethod returns a NumPy array or a SciPy compressed sparse row matrix, then the processor should also have anamesattribute containing the list of the output feature names.You must assign the processor to a variable named
processor. Dataiku looks for this variable to apply the processor to the desired feature.
See also
For full details, see the reference documentation on Custom Preprocessing.
Let’s see how to implement the CountVectorizer processor from scikit-learn using the list of words in the vocabulary.txt file as an a priori dictionary of terms for the processor.
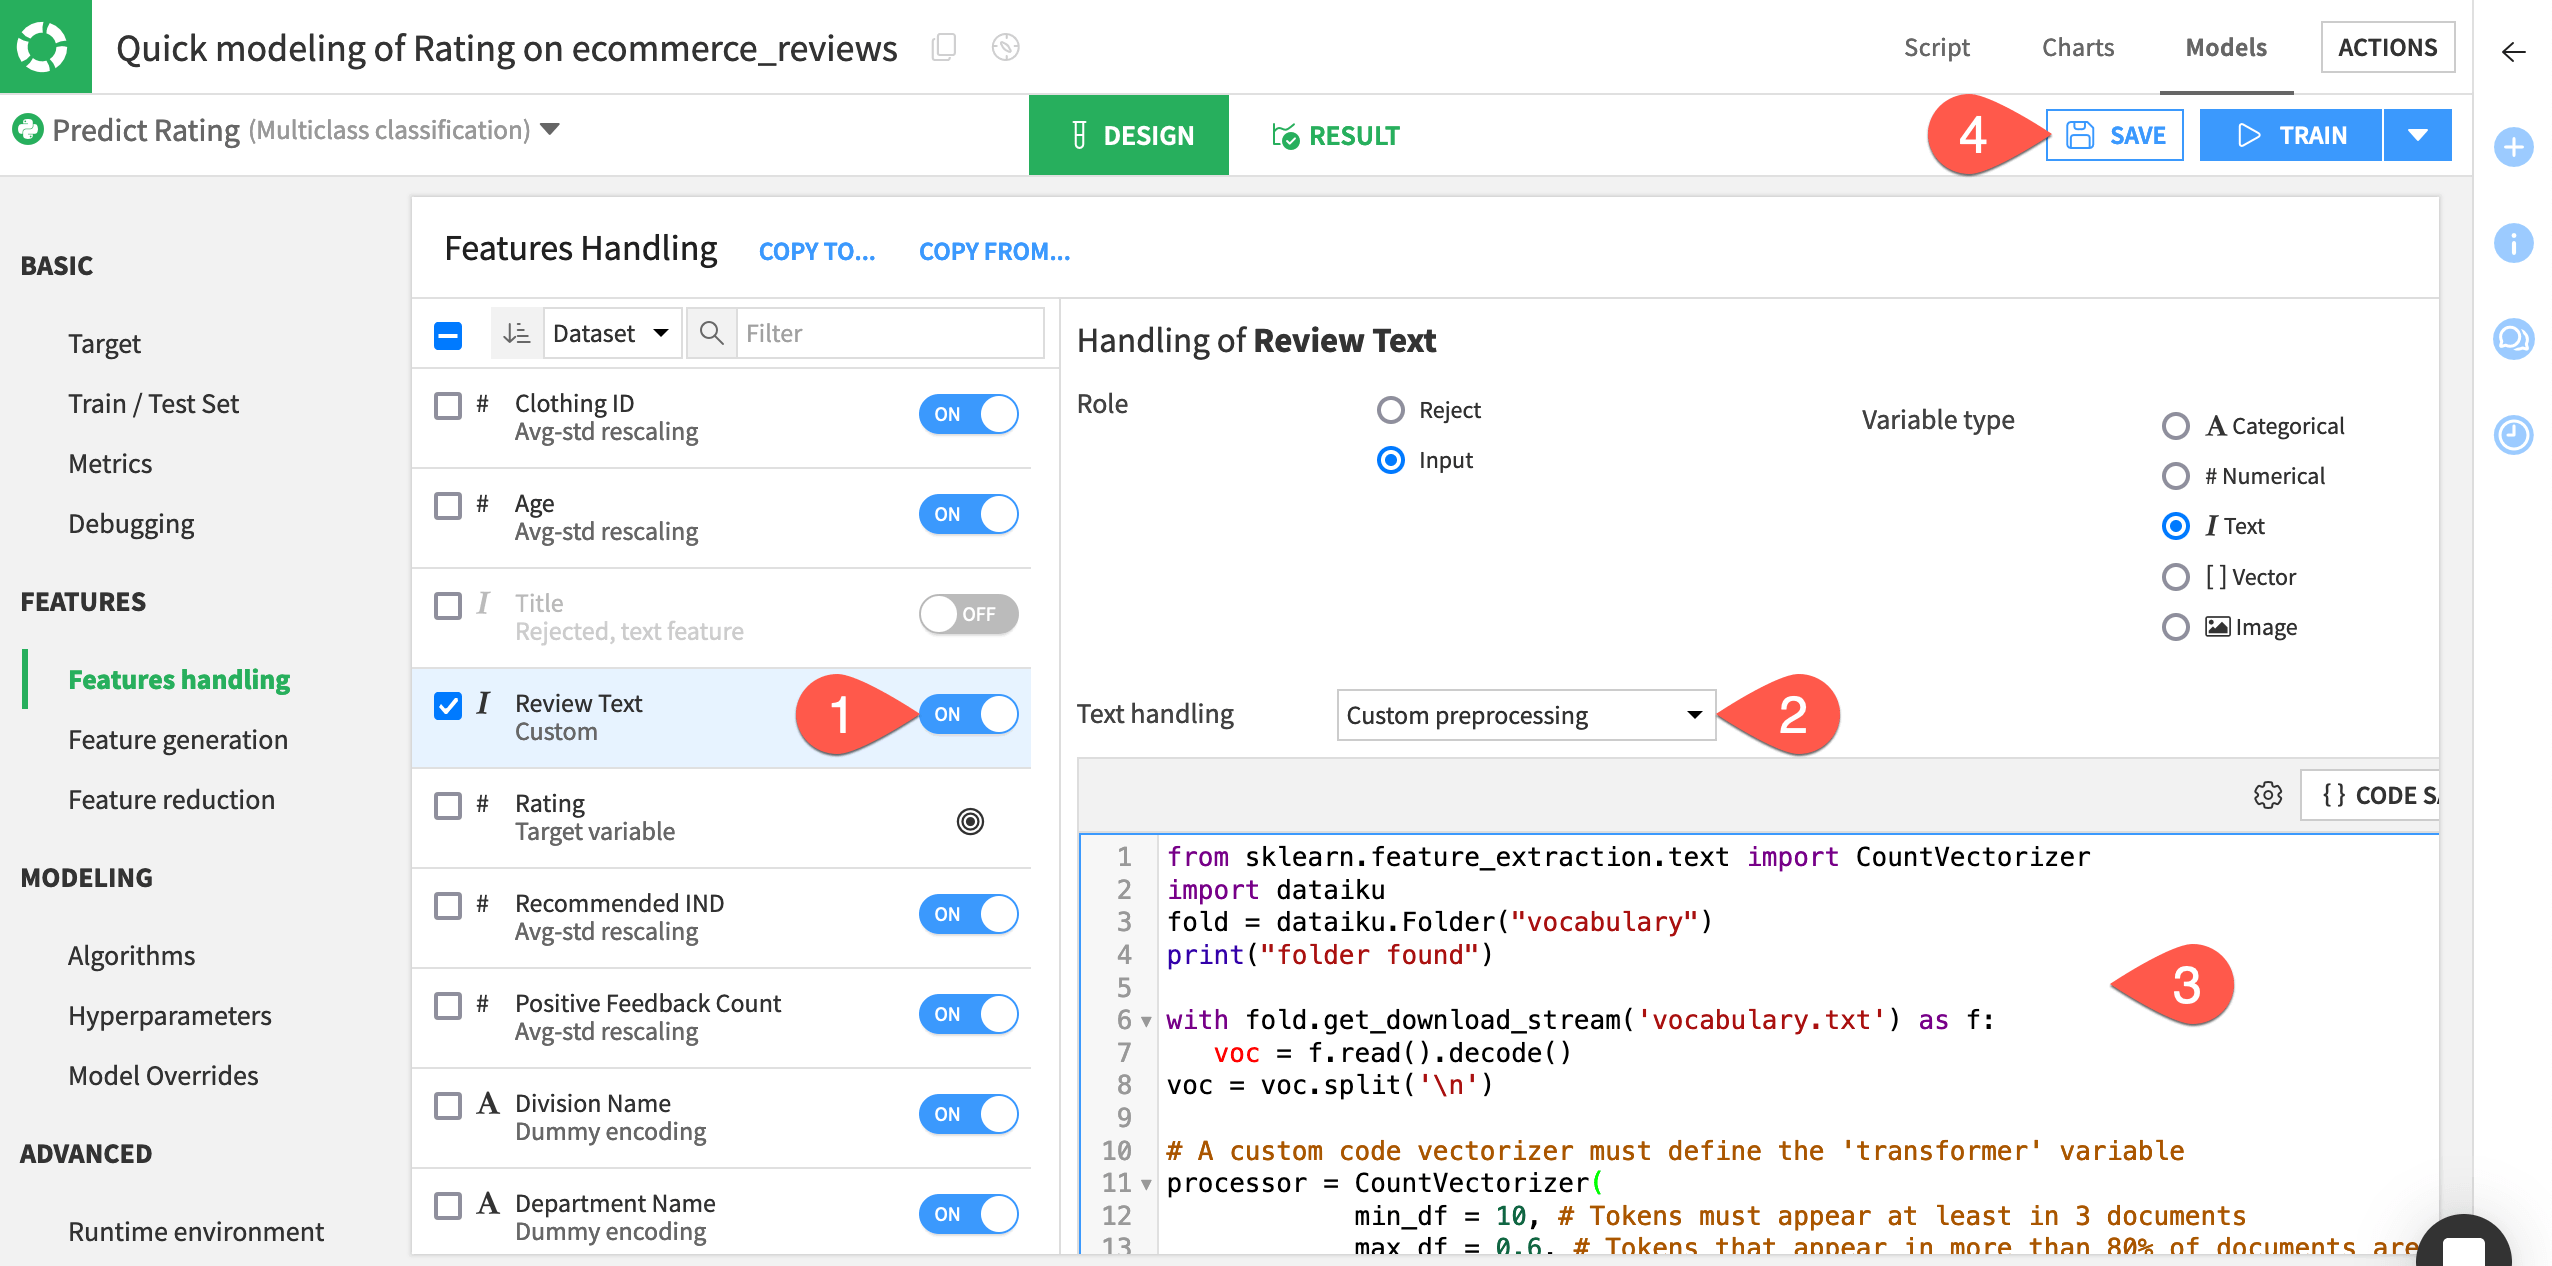
Within the Features handling panel, toggle On the feature Review Text.
For the field Text handling, select Custom preprocessing.
Replace the starter code with the following:
from sklearn.feature_extraction.text import CountVectorizer
import dataiku
fold = dataiku.Folder("vocabulary")
print("folder found")

with fold.get_download_stream('vocabulary.txt') as f:
   voc = f.read().decode()
voc = voc.split('\n')

# A custom code vectorizer must define the 'transformer' variable
processor = CountVectorizer(
            min_df = 10, # Tokens must appear at least in 3 documents
            max_df = 0.6, # Tokens that appear in more than 80% of documents are ignored
            ngram_range = (1,2),
            vocabulary = voc,
            # Here we override the token selection regexp
            token_pattern = u'(?u)\\b\\w\\w\\w\\w\\w+\\b')
Click Save.
Important
In detail, this code:
Imports the
CountVectorizerpreprocessing method from one of the scikit-learn modules.Opens the vocabulary.txt file, and creates a list of words from it.
Instantiates the
CountVectorizer, assigns the list of words to the “vocabulary” parameter, and stores the processor in aprocessorvariable.
Tip
The default Dataiku built-in code environment includes the scikit-learn package. However, if you want to import a package that the default code environment doesn’t contain, you can first create a new code environment that includes this package, and call it from the Runtime environment panel of the visual ML tool.
You can also call classes that exist in the project library.
Train the selected algorithms#
Once you’ve written the code for custom preprocessing, you can proceed to train the selected algorithms in the visual ML tool as you normally would.
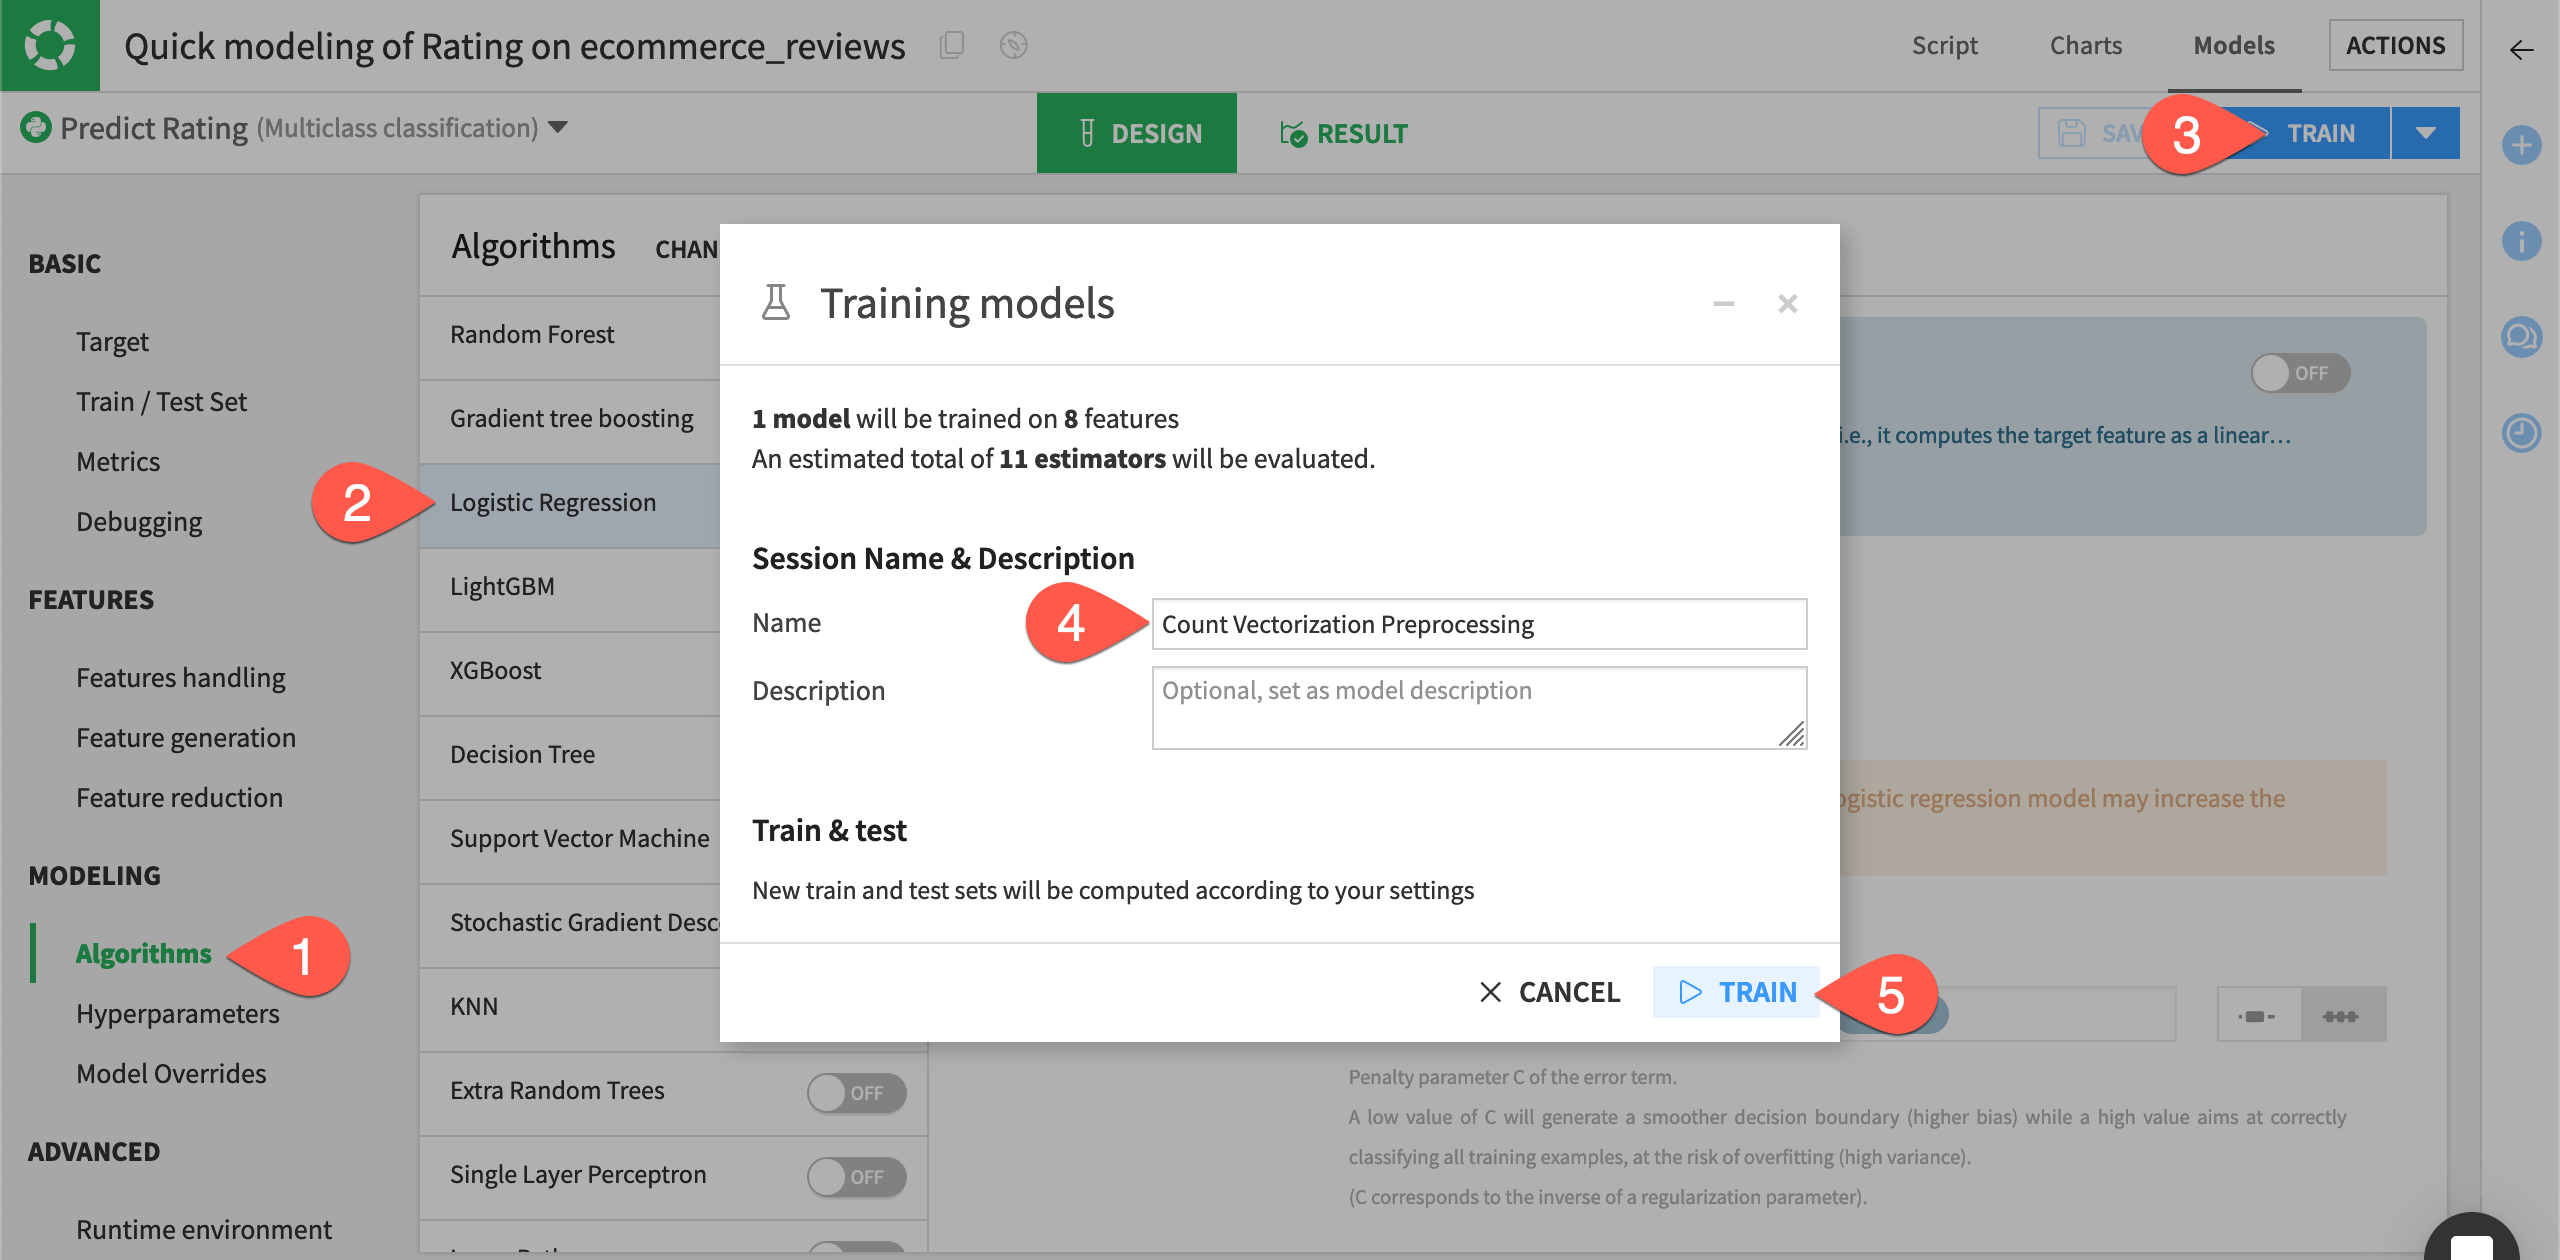
Navigate to the Algorithms panel.
To save training time, toggle Off the Logistic Regression algorithm. One algorithm will be enough for our demonstration.
Click Train.
Name the session
Count Vectorization Preprocessing.Click Train again to start the session.
Interpret the model’s performance#
On the Report page, you can click the panels on the left-hand side to see model interpretations, performance charts, and model information.
Once training completes, click Random forest (Count Vectorization Preprocessing) to open the report.
Navigate to the Feature importance panel.
Switch to the Gini method.
Note how many features include
custom_prep:Review Text:unnamed_<n>in the name. These features correspond to the words from the vocabulary.txt file used to perform count vectorization on the Review Text feature.

Specify custom Python models within visual ML#
In addition to custom preprocessing, you can also import custom Python algorithms within the visual ML tool.
Custom Python model constraints#
The code in the editor must follow some constraints depending on the backend you’ve chosen (in-memory or MLlib). In this example, we’re using the Python in-memory backend, therefore:
The algorithm must be scikit-learn compatible. That is, it needs to have the
fitandpredictmethods.In addition to these methods, classifiers must have a
classes_attribute and can implement apredict_probamethod.
See also
For full details on creating custom models, see the reference documentation on Writing custom models.
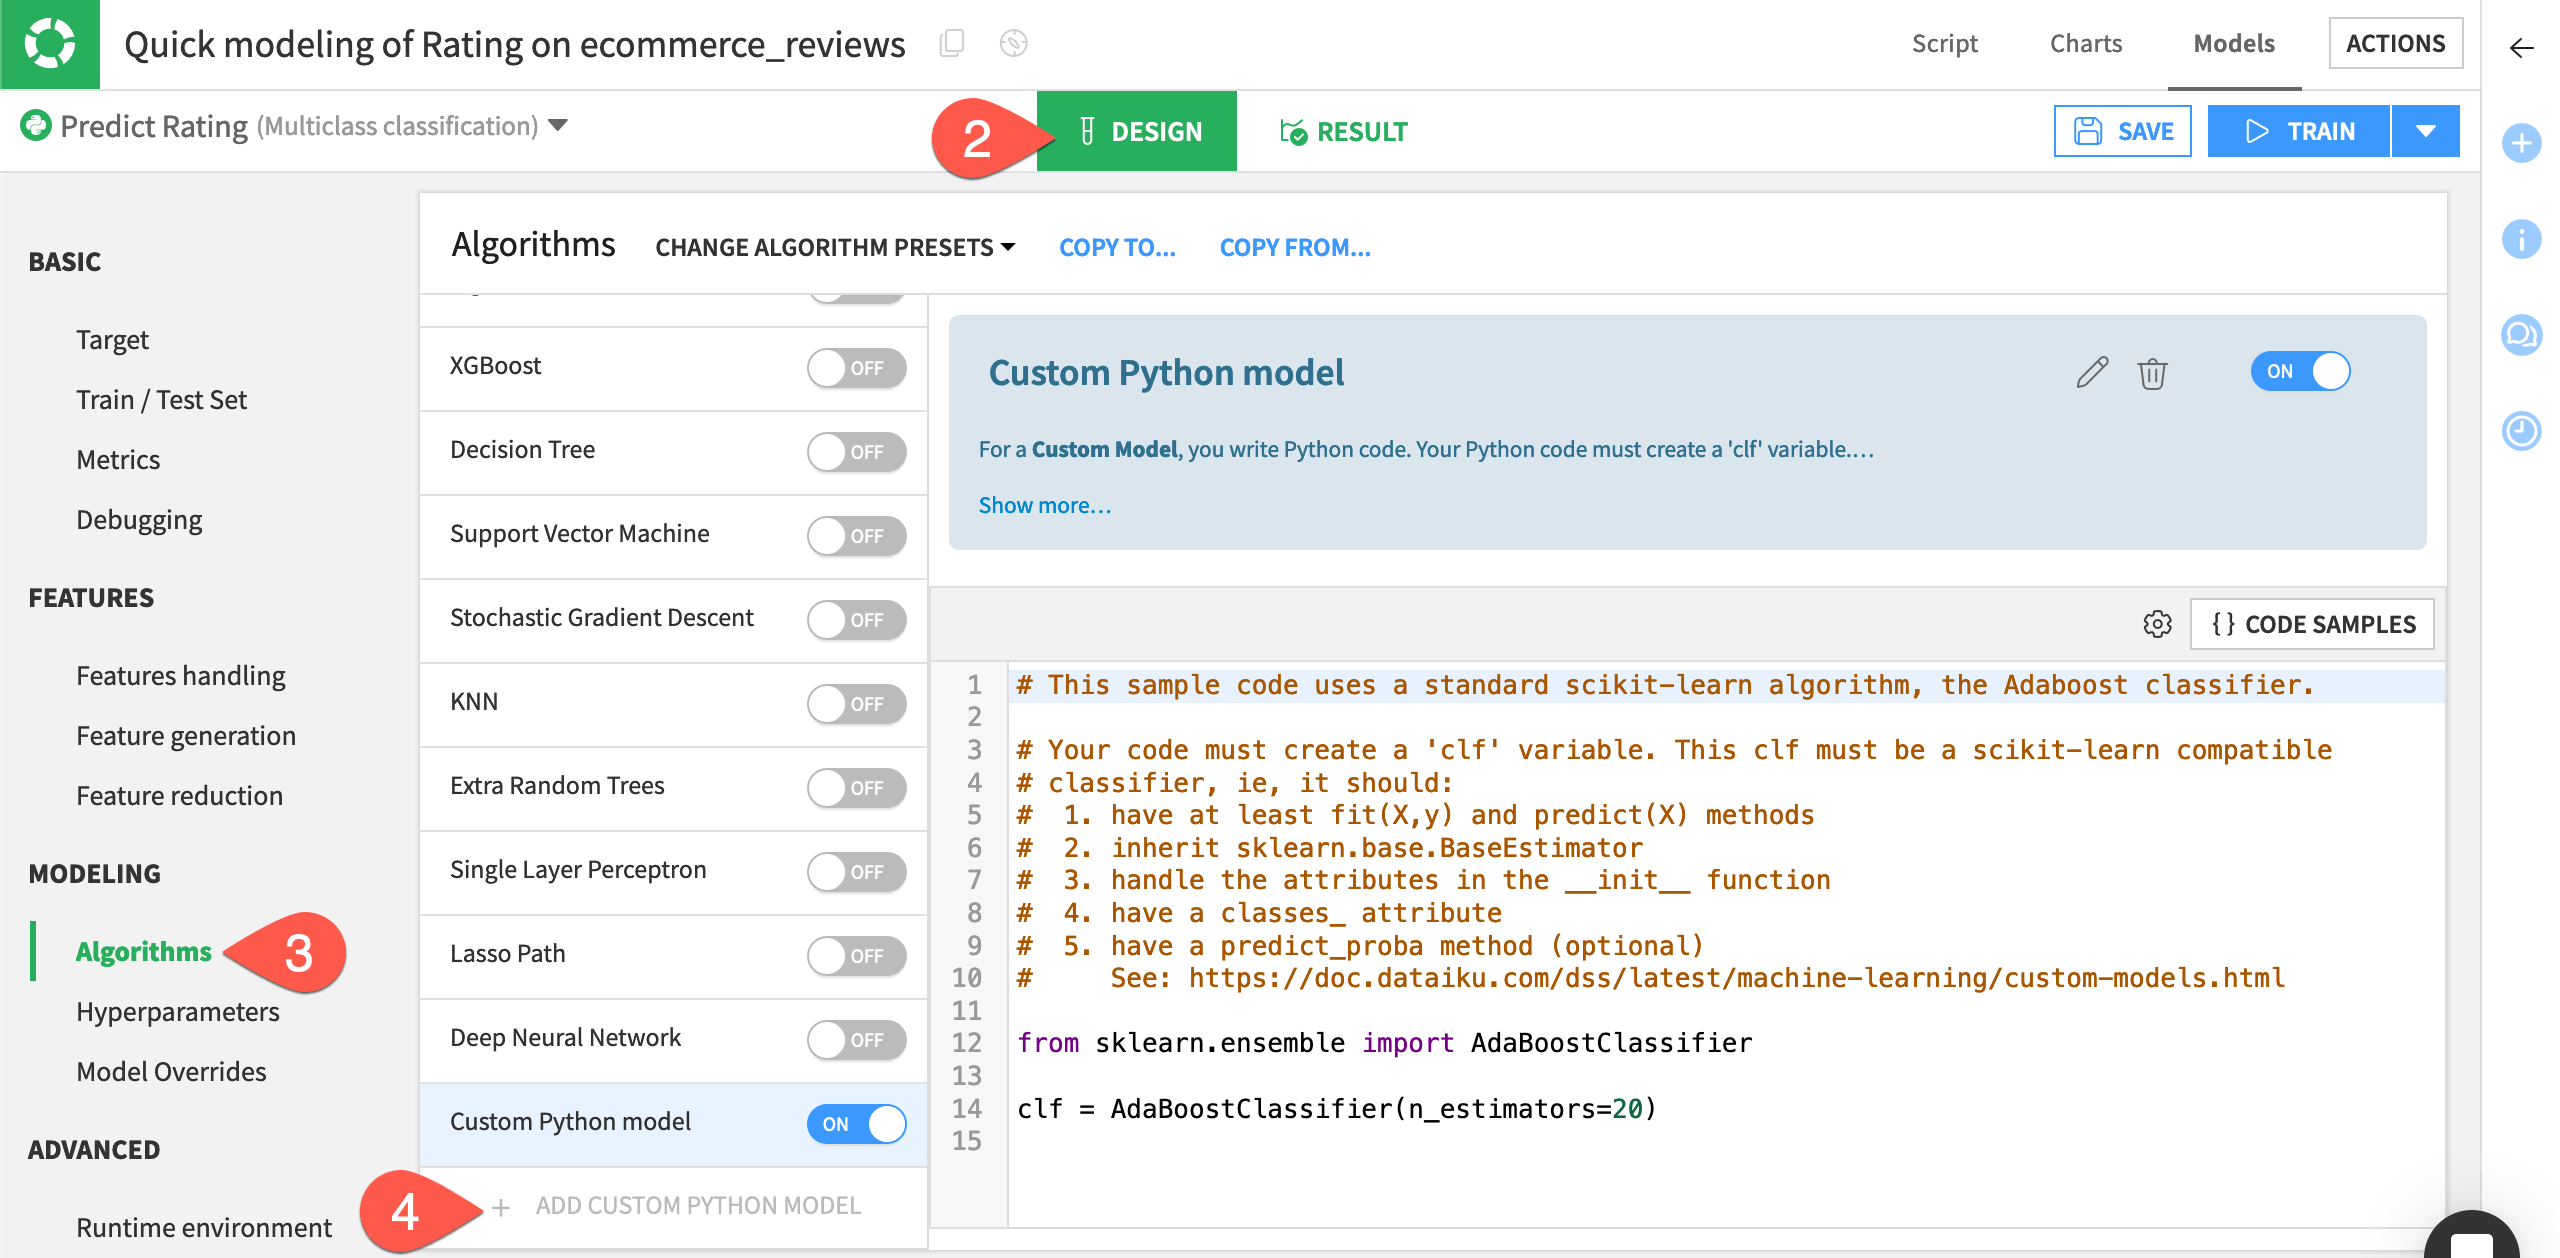
The code template lists some additional constraints when creating the custom model.
From the model report, click Models to return to the Results tab of the modeling task.
Switch to the Design tab of the Quick modeling of Rating on ecommerce_reviews analysis.
Navigate to the Algorithms panel.
At the bottom of the algorithms list, click + Add Custom Python Model.
Import an algorithm from scikit-learn#
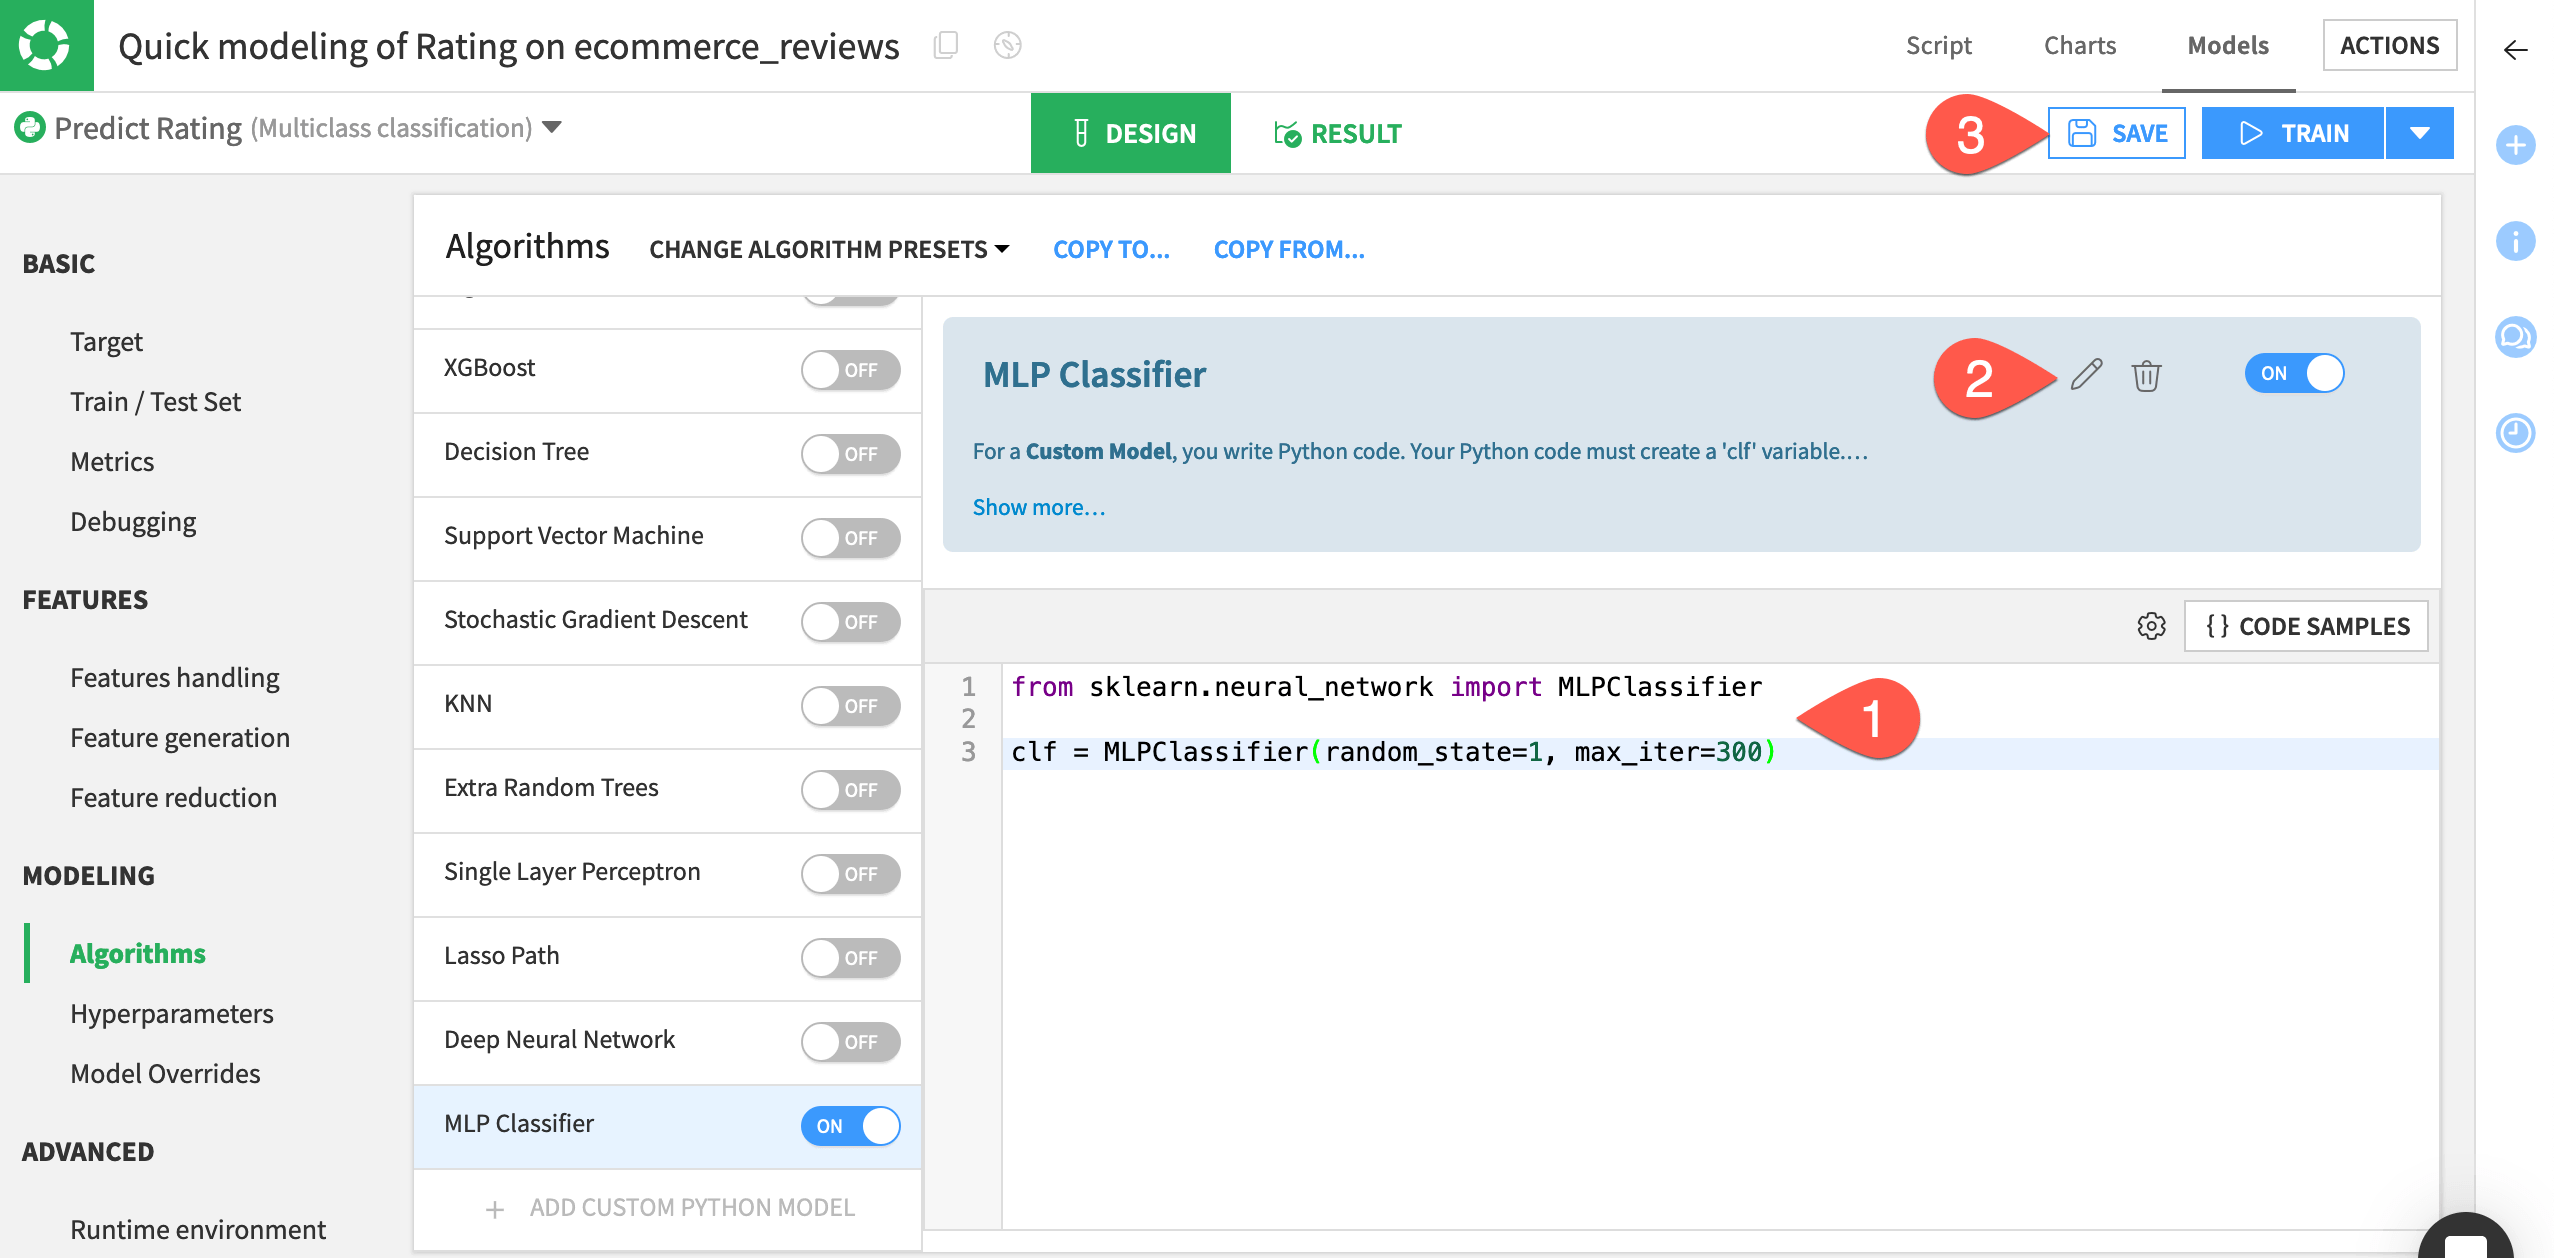
With knowledge of these constraints, let’s import a multi-layer perceptron classifier from one of the scikit-learn modules. The default code environment (DSS built-in environment) used by the visual ML tool includes scikit-learn. Therefore we don’t need to create a new code environment for this.
Important
If you want to import algorithms from different modules, you first need to create a code environment that includes this module, and set the Runtime environment of the visual ML tool to this new code environment.
Replace the template code with the following to instantiate the MLP classifier.
from sklearn.neural_network import MLPClassifier

clf = MLPClassifier(random_state=1, max_iter=300)
Click the pencil icon next to the custom model’s name, and rename it
MLP Classifier.Click Save.
Import an algorithm from the project library#
Here, we’ll import an algorithm already defined in the project library.
From the Code (
 ) menu of the top navigation bar, select Libraries (or
 g+l).Open the file
python/custom_models.pyto review the code for a sample model import.
The file contains the definition for an AdaBoostModel classifier. Notice that this classifier is scikit-learn compatible.
We will import this classifier to create another custom model.
Return to the Algorithms panel of the modeling task’s Design tab. (You can do this quickly by clicking the back arrow in your browser window).
Once again, click + Add Custom Python Model at the bottom of the list.
Click the pencil icon next to the custom model’s name, and rename it
AdaBoost Model.Replace the code in the editor with:
from custom_models import AdaBoostModel

clf = AdaBoostModel()
When ready, click Train.
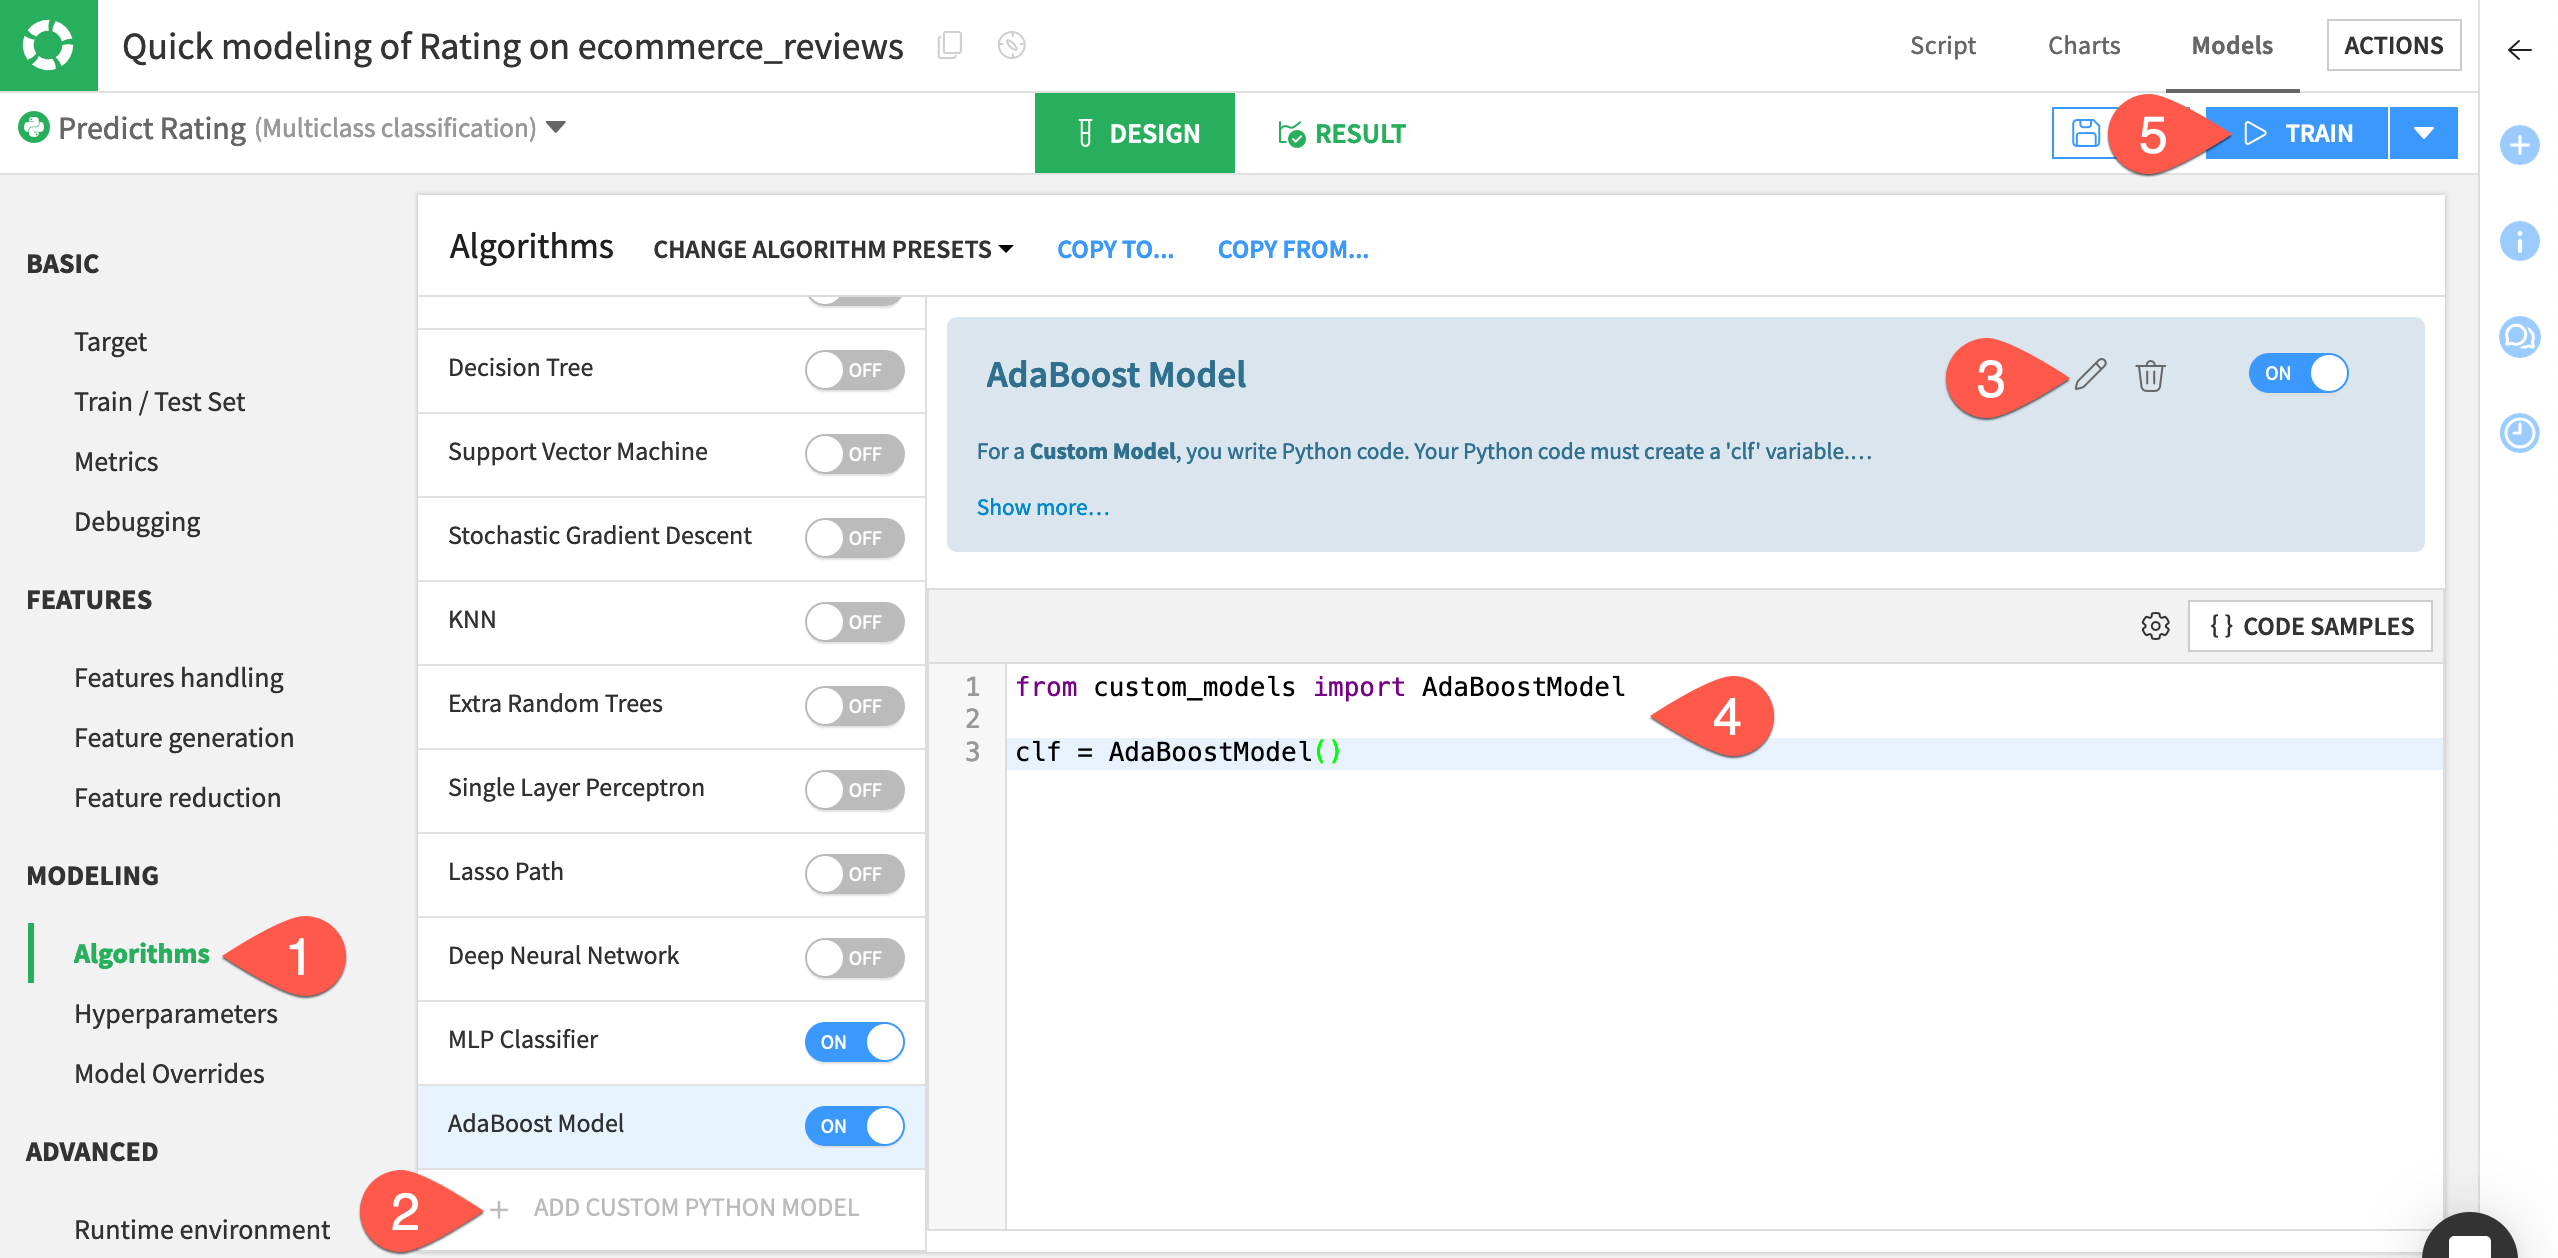
Name the session
Custom Models.Click Train once more to start the session.
Tip
This method is only one way to work with custom models in Dataiku! See the reference documentation on MLflow Models or, more generally, Developer Guide tutorials on Machine Learning.
View session output with custom models#
During training, the Result tab displays a graph of the evolution of the ROC AUC metric during grid search. The grid search option isn’t available to the custom models. However, you can still see the custom models listed along with the other models built during the session.
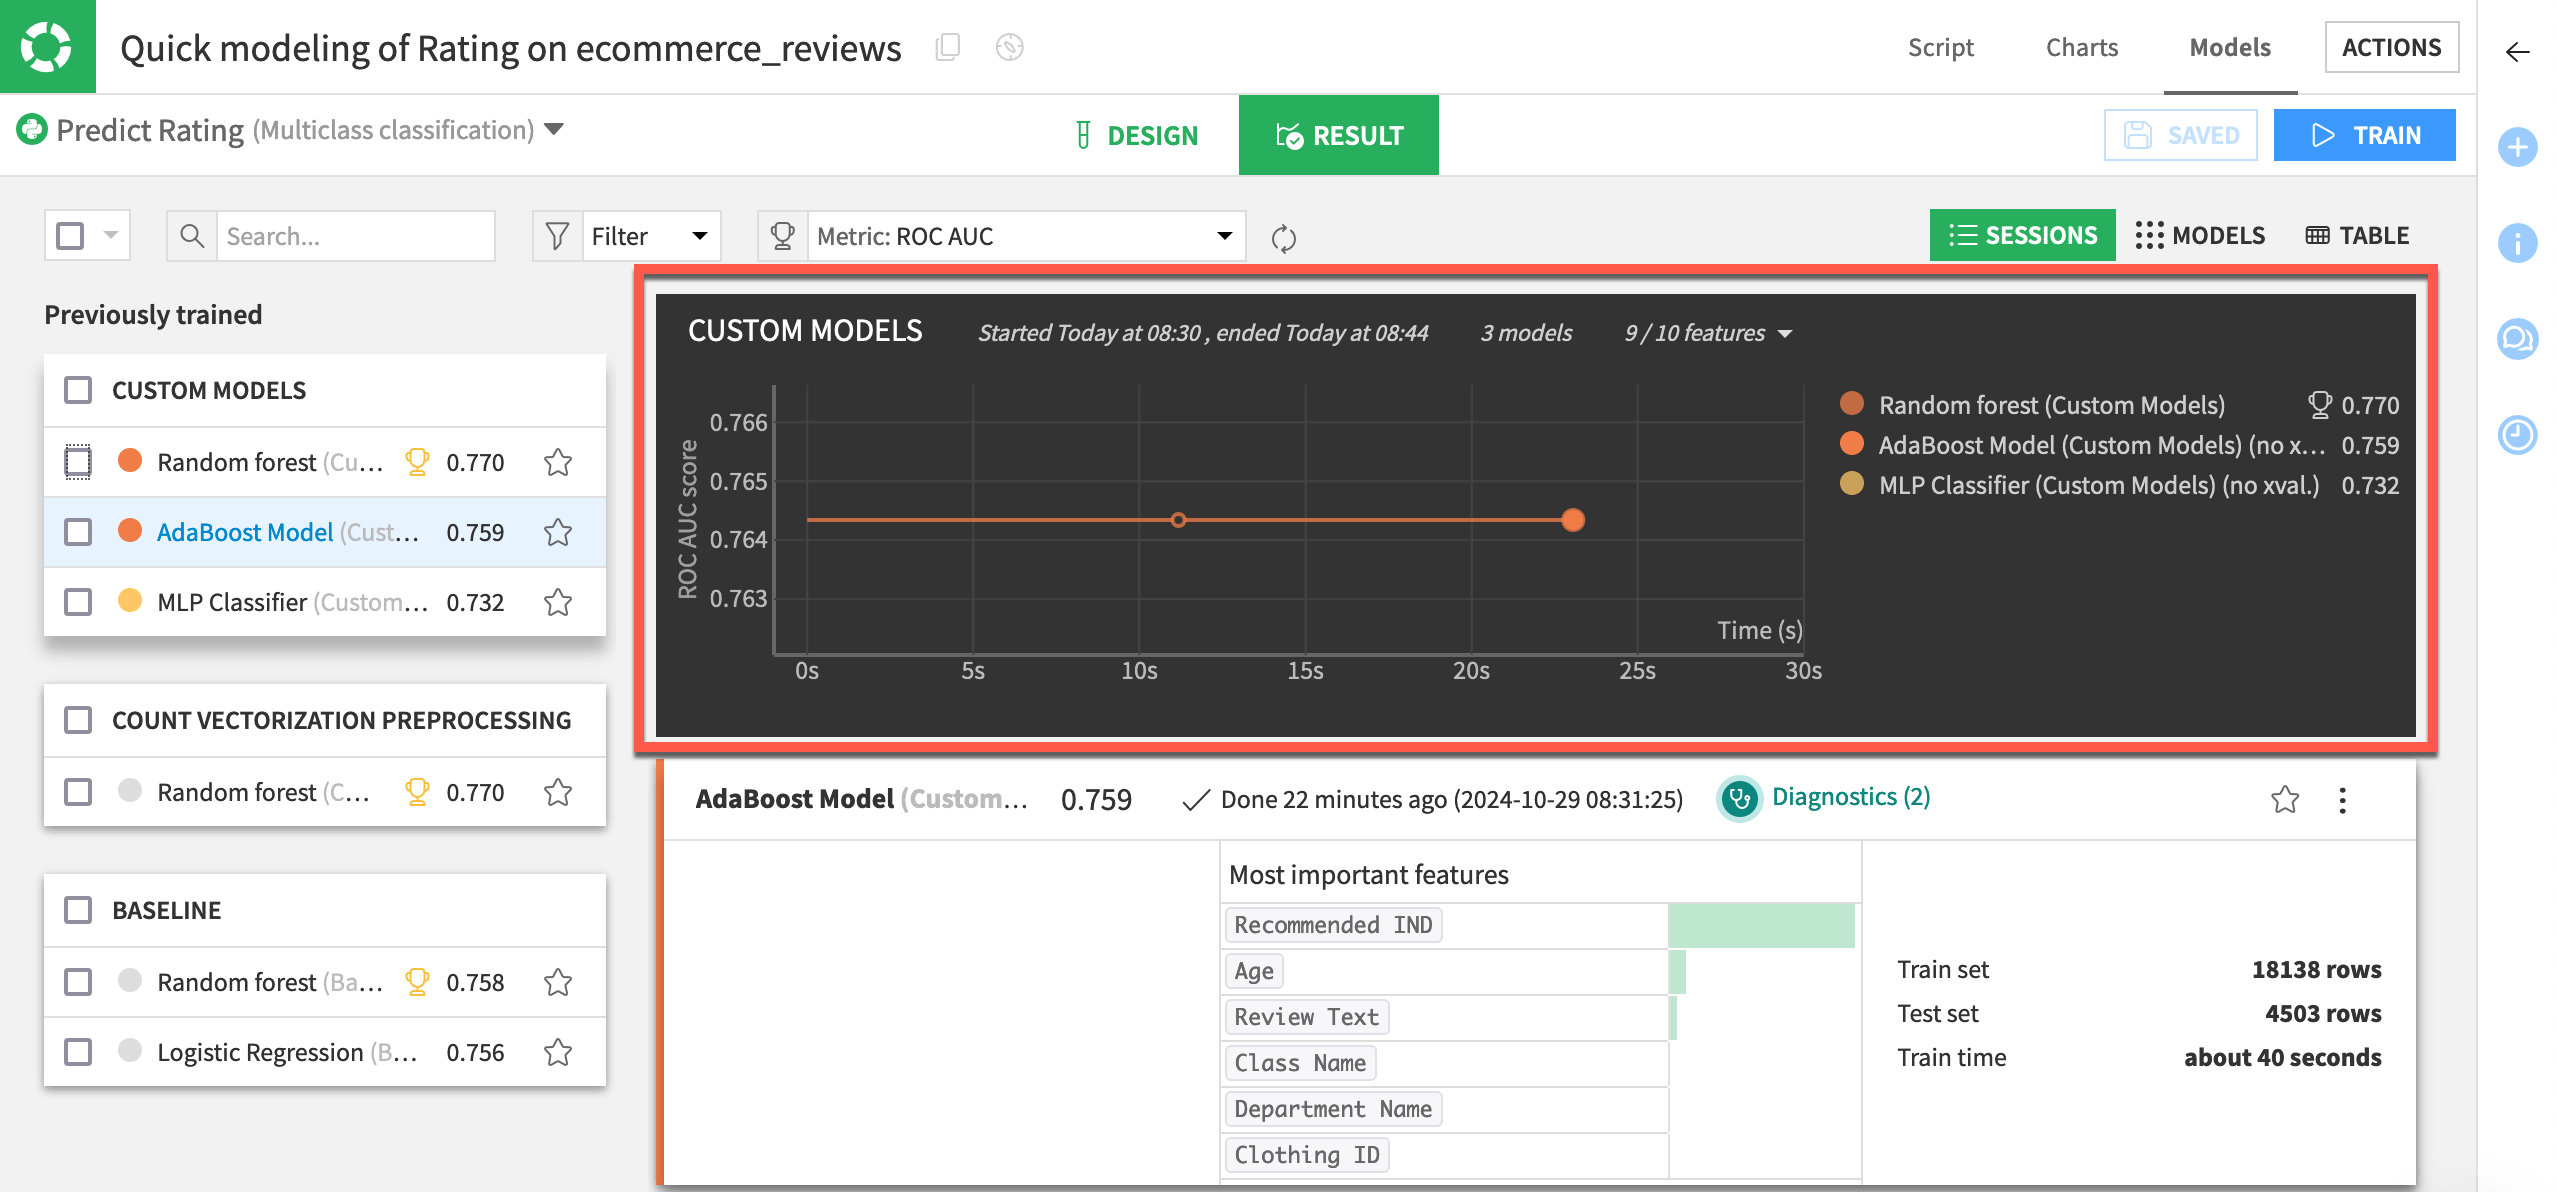
Assess performance of the custom models#
Now we’ll open one of the custom models to visualize its performance and all associated visual insights — just as we would do with a built-in model.
In the Custom Models session, click to open the report of either the AdaBoost Model or MLP Classifier.
Examine the similarity of this report to those of the built-in algorithms.
Navigate to the ROC & PR curves panel for one example.
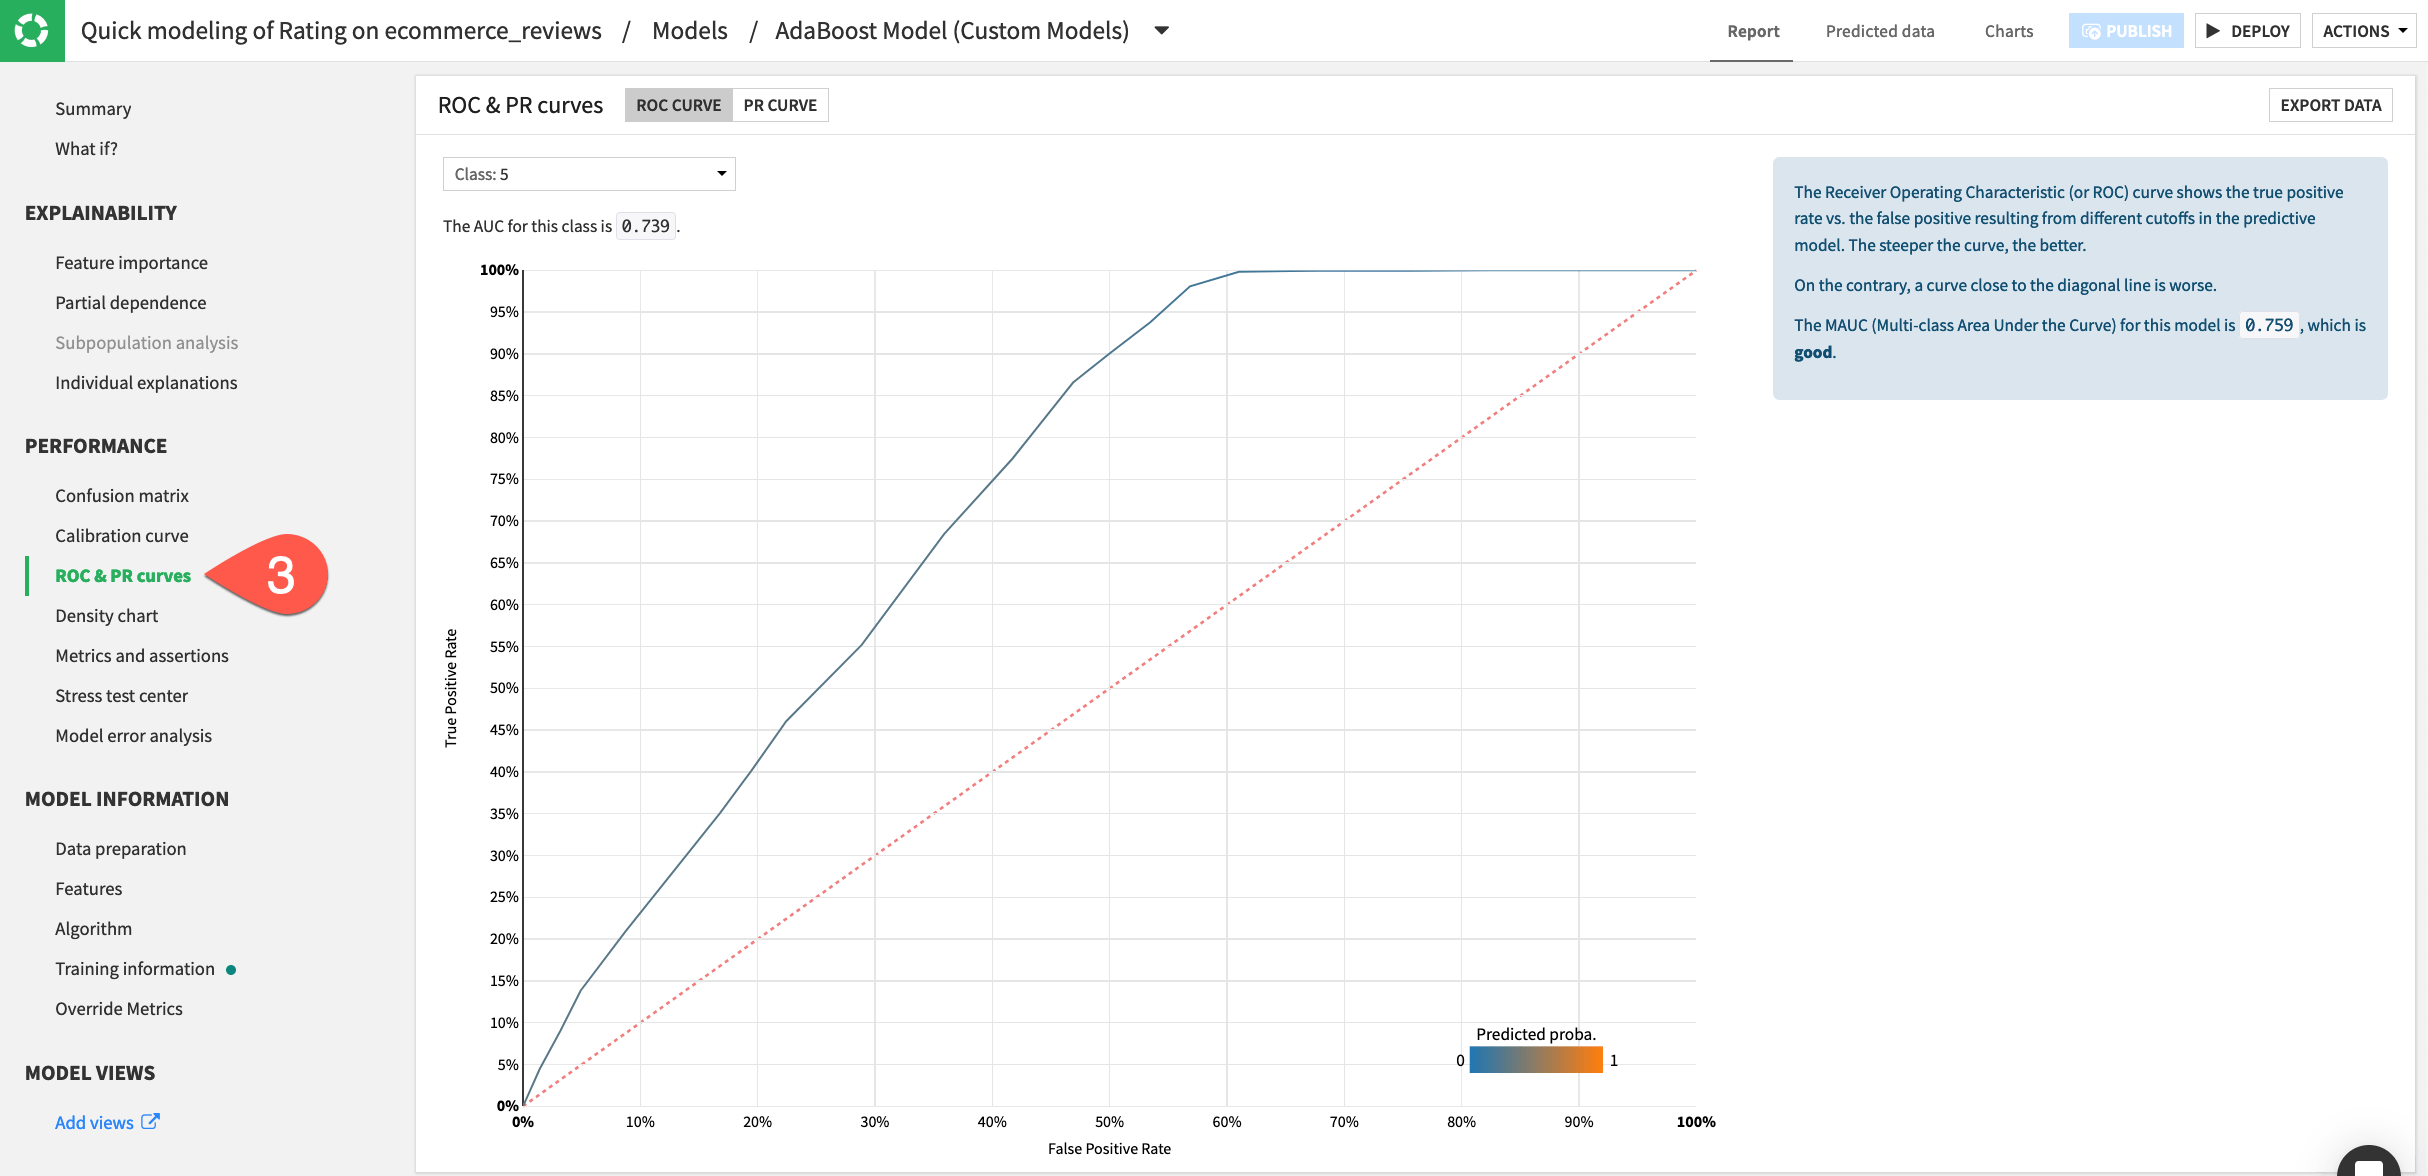
Tip
You can visualize the custom model’s training details such as the individual explanations, confusion matrix, calibration curve, ROC curve, and view metrics such as the F1 score. Dataiku is able to create these metrics and visualizations because the custom model is scikit-learn compatible!
Deploy a custom model to the Flow#
The custom model can now be deployed in the Flow and used like a standard built-in model for scoring, model comparisons, model evaluation stores, etc.
From the report of a custom model, click Deploy.
Click Create.
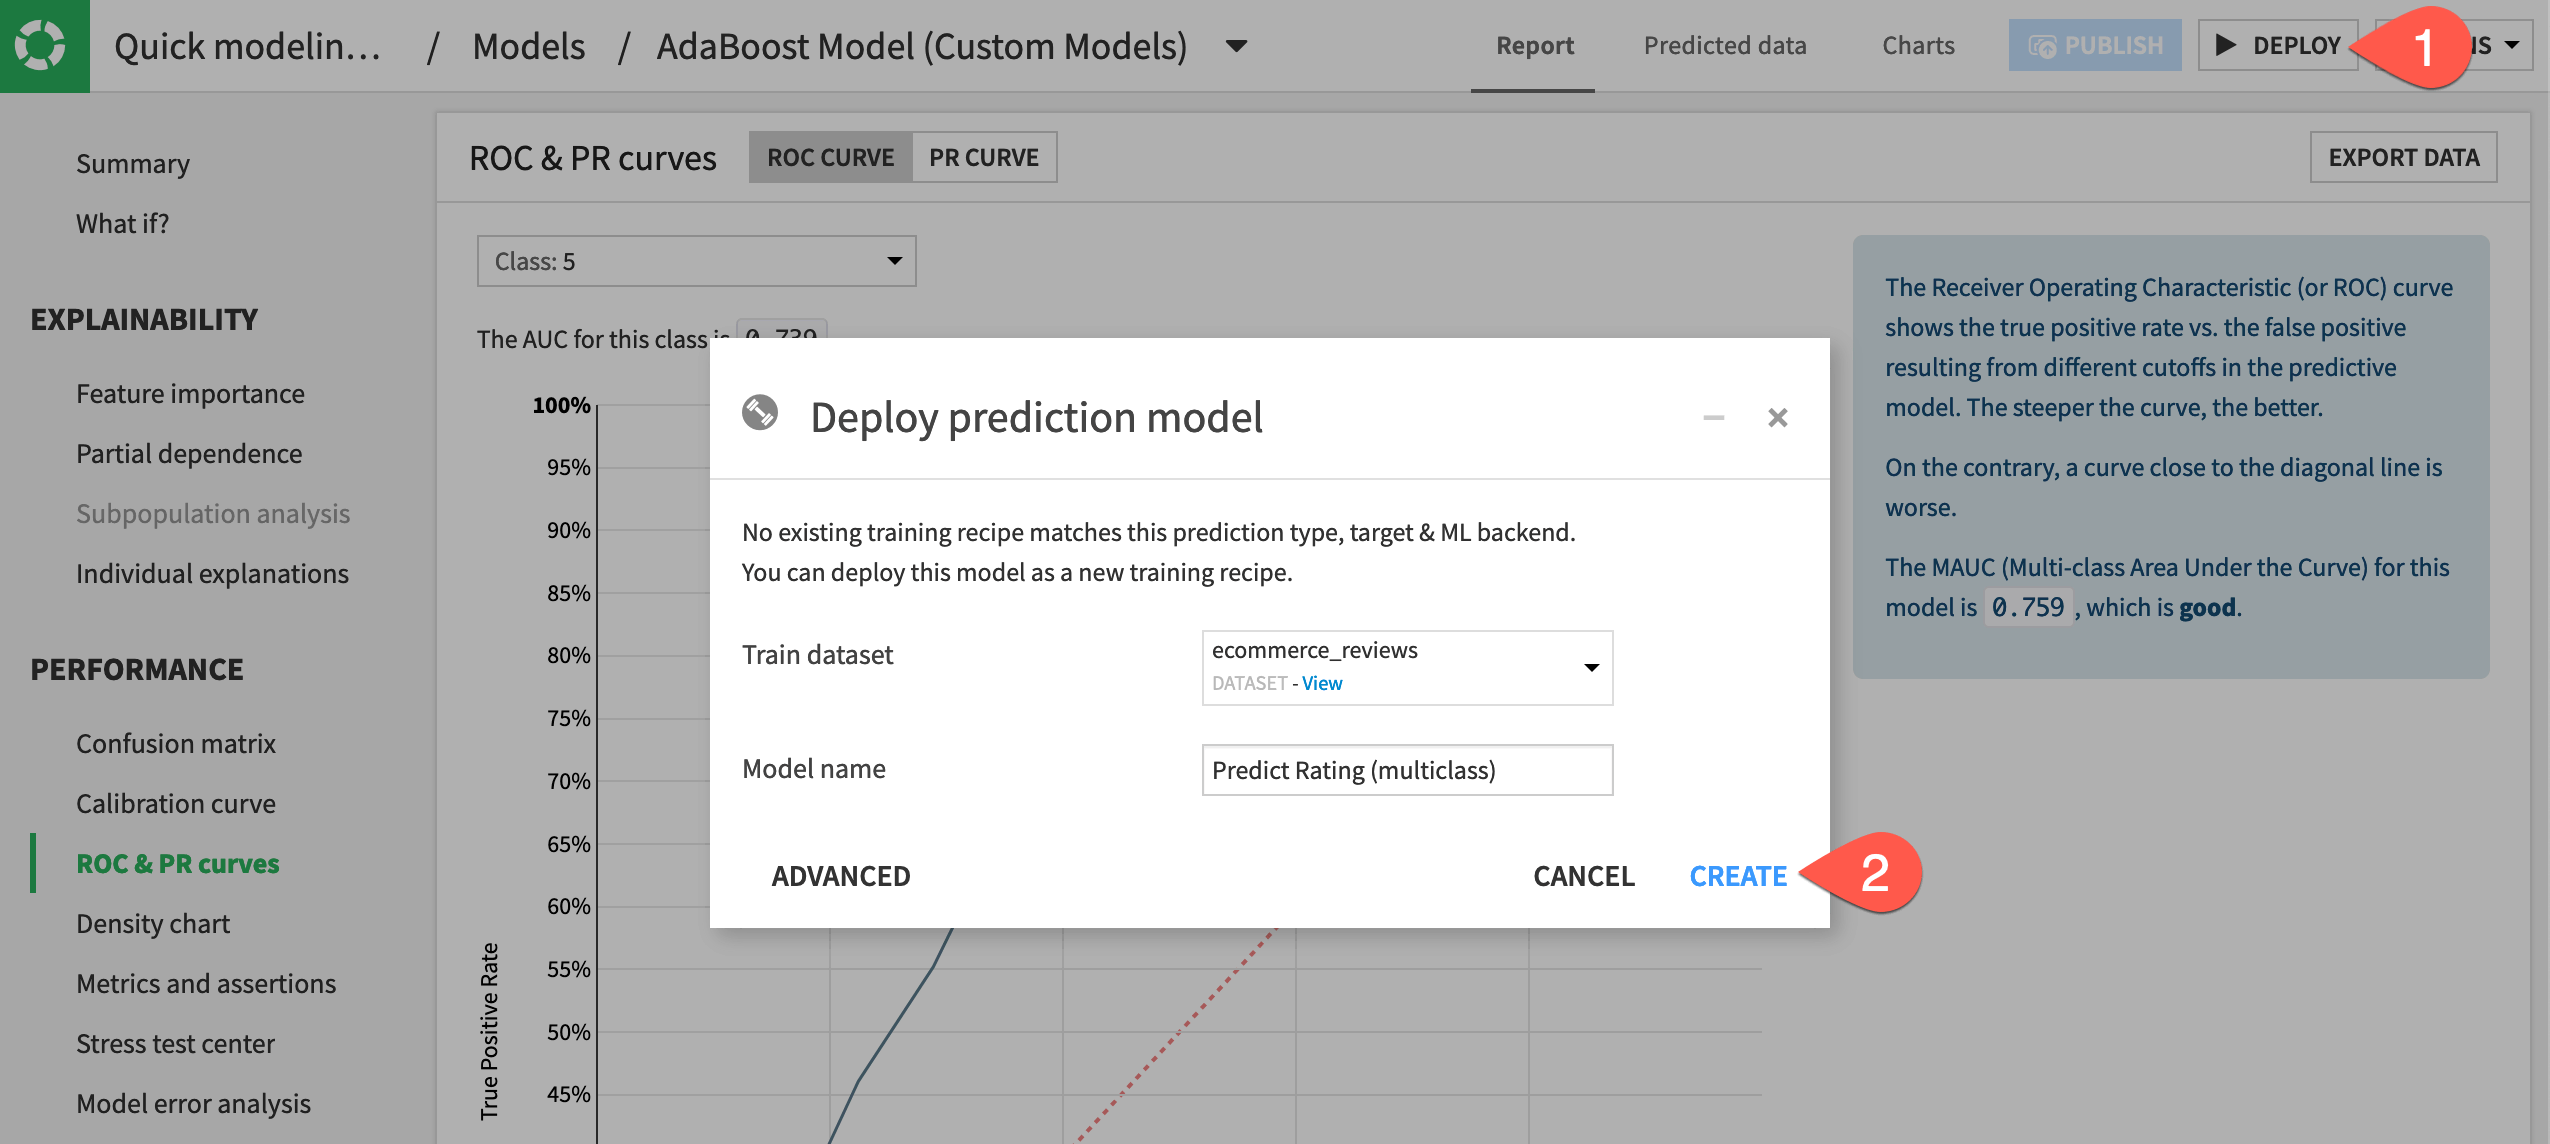
Observe the custom model deployed to the Flow as a saved model.
Next steps#
Congratulations! In this tutorial, you saw how to:
Write custom feature preprocessing methods within a visual ML task.
Import custom models from packages such as scikit-learn and from the project library.
Use custom feature preprocessing and algorithms within the visual ML tool.
See also
To learn more about custom models in Dataiku, see the reference documentation on Writing custom models and Developer Guide tutorials on Machine Learning.