

Tutorial | Agent evaluation#
Get started#
Once you’ve built an agent, you need insight into its behavior. The Evaluate Agent recipe, and its output of a GenAI evaluation store, is key to achieving that goal.
Objectives#
In this tutorial, you will:
Use the Evaluate Agent recipe to assess and monitor the performance of an agent in contexts where ground truth is and isn’t available.
Visualize the trajectory of an agent’s tool calls, and inspect other native and custom evaluation metrics.
Incorporate this recipe’s output (a GenAI evaluation store) into Dataiku’s broader model lifecycle toolbox, including automation scenarios and production environments.
Prerequisites#
Dataiku 14.4 or later.
Advanced LLM Mesh license flag activated.
Full Designer user profile.
LLM connections for computing embeddings and requesting prompts. See the reference documentation for information on LLM connections.
A Python 3.9+ code environment containing the required packages. Use the preset named Agent and LLM Evaluation.
Knowledge of agents in Dataiku; in particular, how Simple Visual Agents call tools.
Create the project#
Download the Agent Evaluation starter project ZIP file for Dataiku 14.4 or later. Make sure the file doesn’t unzip during the download.
On a Dataiku Design node, import the ZIP file.
From the project homepage, click Go to Flow (or type
g+f).
Use case summary#
Tutorial | Simple Visual Agents demonstrates building an industry tracking agent that sends email summaries of AI news articles using a knowledge bank search tool and a send message tool. A more sophisticated agent would have access to a much larger basket of tools.
Accordingly, this tutorial extends this example to an industry tracking agent covering multiple industries. The agent in the Build agent zone of the starter project selects between multiple knowledge banks, each built from articles on different industries.
In the Build agent zone, open the Article summary agent.
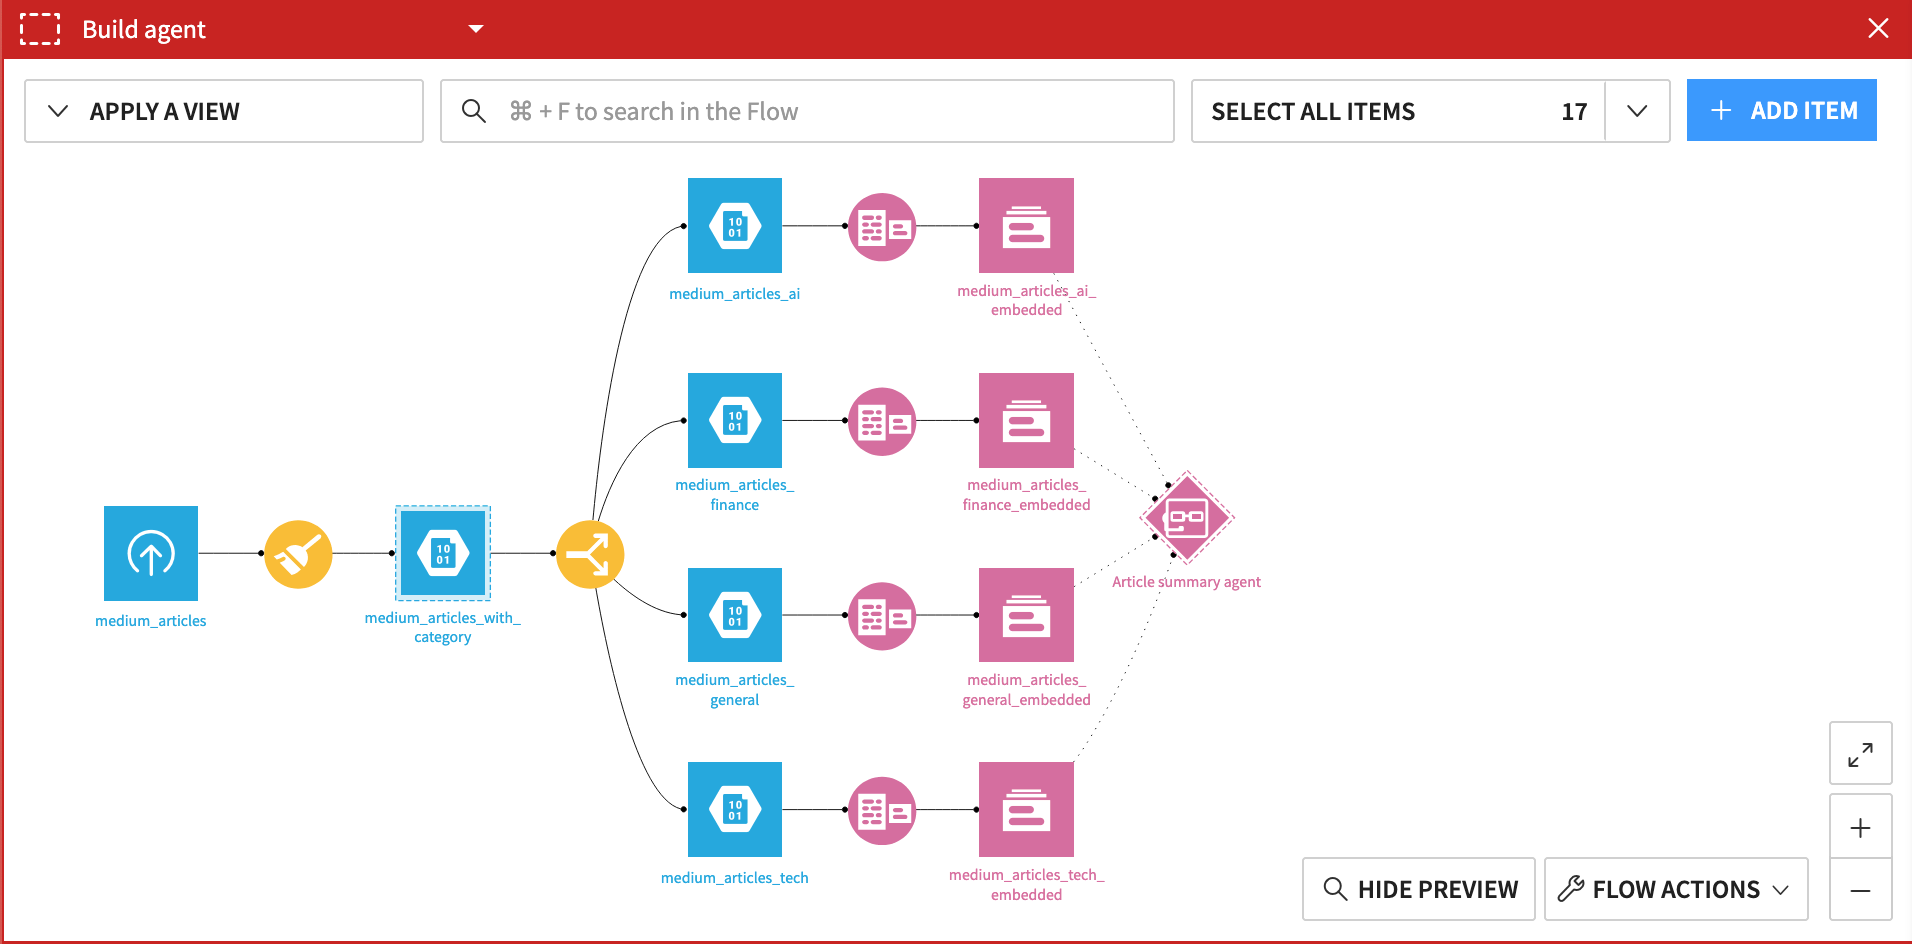
Read its Instructions to understand what it does.
Examine the four knowledge bank search tools to which it has access.
Tip
While not required, feel free to test the agent yourself by assigning an LLM to the agent and entering queries in the chat window.
Important
The use case for this tutorial is a transactional (single-turn) agent. Dataiku 14.5 introduces support for evaluation of conversational (multi-turn) agents. Applied to this case, you can imagine a user chatting with the industry tracking agent. However, what gets evaluated in this tutorial is how the agent responds to the first query.
Understand the agent evaluation challenge#
How would you evaluate the performance of an agent like this?
During the build stage, the agent’s own Design tab and a Prompt Studio are two forums to test its behavior in a preliminary way.
For stronger evidence that the agent under development meets business requirements, the AI builder might start an agent review. Such reviews can expose the agent to rigorous testing using both automated LLM-powered and human SME-led approaches.
However, agentic AI applications can develop surprising behavior in different environments when exposed to previously untested inputs. Therefore, as you move the agent toward pre-deployment and post-deployment phases, you’ll need a more robust evaluation strategy to ensure your agent continues to work as expected.
Agent performance is uniquely evaluated across two dimensions:
The agent’s output
The path to the agent’s output.
Generate ground truth data#
The availability of ground truth data shapes these dimensions. You can always apply LLM evaluation metrics to measure an agent’s answer to a user. However, if possible, it’s also valuable to assess how an agent arrived at its answers. Those questions require knowing the types and order of the tools the agent called to craft its responses.
For the latter, it’s necessary to look beyond the agent’s generated output. You also need to examine if the tool call trajectory matches your expectations. For an agent like this, you’d have questions like:
Did the agent call the correct knowledge bank?
Did the agent find an article to summarize?
What does the agent do when it can’t find an article to summarize?
The ability to answer this class of questions may depend on the agent’s use case or lifecycle stage. The tutorial includes examples demonstrating both of the following:
Stage |
Context |
Evaluation data |
|---|---|---|
Pre-deployment |
The AI builder might simulate their own queries to the agent. Assuming they’re satisfied with the agent’s behavior, these responses could serve as ground truth and reference tool calls. |
The Create reference data zone produces the agent_evaluation_reference_generated dataset via a Prompt recipe. The output includes reference_answer and reference_tools columns. |
Post-deployment |
Having deployed an agent, you can configure Agent Interaction Logging. Logs themselves won’t have ground truth data. |
The Monitor agent zone contains the agent_logs dataset. Ground truth data isn’t available. |
Inspect the input data#
As is true for LLM evaluation, agent evaluation requires an input dataset containing columns representing certain pieces of information. The presence of these columns dictates the kind of metrics you’ll be able to compute.
This tutorial demonstrates how the Evaluate Agent recipe handles both contexts introduced above.
First, walk through an evaluation where ground truth data is available.
Then, compare that to a monitoring use case on agent logs without ground truth.
The Evaluate Agent recipe supports a custom input dataset format where you can assign any column to a particular purpose. However, if the recipe’s input is from a Prompt recipe (like agent_evaluation_reference_generated) or agent interaction logs (like agent_logs), the recipe automatically assigns columns to their function.
Three of these columns are straightforward to understand.
Column |
Contents |
Prompt recipe |
Agent logs |
|---|---|---|---|
Input |
A user prompt or question sent to the agent. |
llm_raw_query |
dku_llm_mesh_raw_query |
Output |
The agent’s response to the user input. |
Inside llm_raw_response |
Inside dku_llm_mesh_raw_response |
Actual tool calls |
An ordered array of agent tool calls in response to user input. |
Inside llm_raw_response |
Inside dku_llm_mesh_raw_response |
Two additional (optional) columns deserve an explanation.
Column |
Contents |
Prompt recipe |
Agent logs |
|---|---|---|---|
Ground truth |
A suitably ‘correct’ (expected) response from an agent to user input. |
reference_answer |
N/A |
Reference tool calls |
The expected ordered array of agent tool calls in response to user input. |
reference_tools |
N/A |
Review both evaluation datasets for this project:
In the Evaluate agent zone, open the agent_response_with_generated_reference dataset (the output of a Prompt recipe).
Explore the data, with particular attention to the five columns mentioned above.
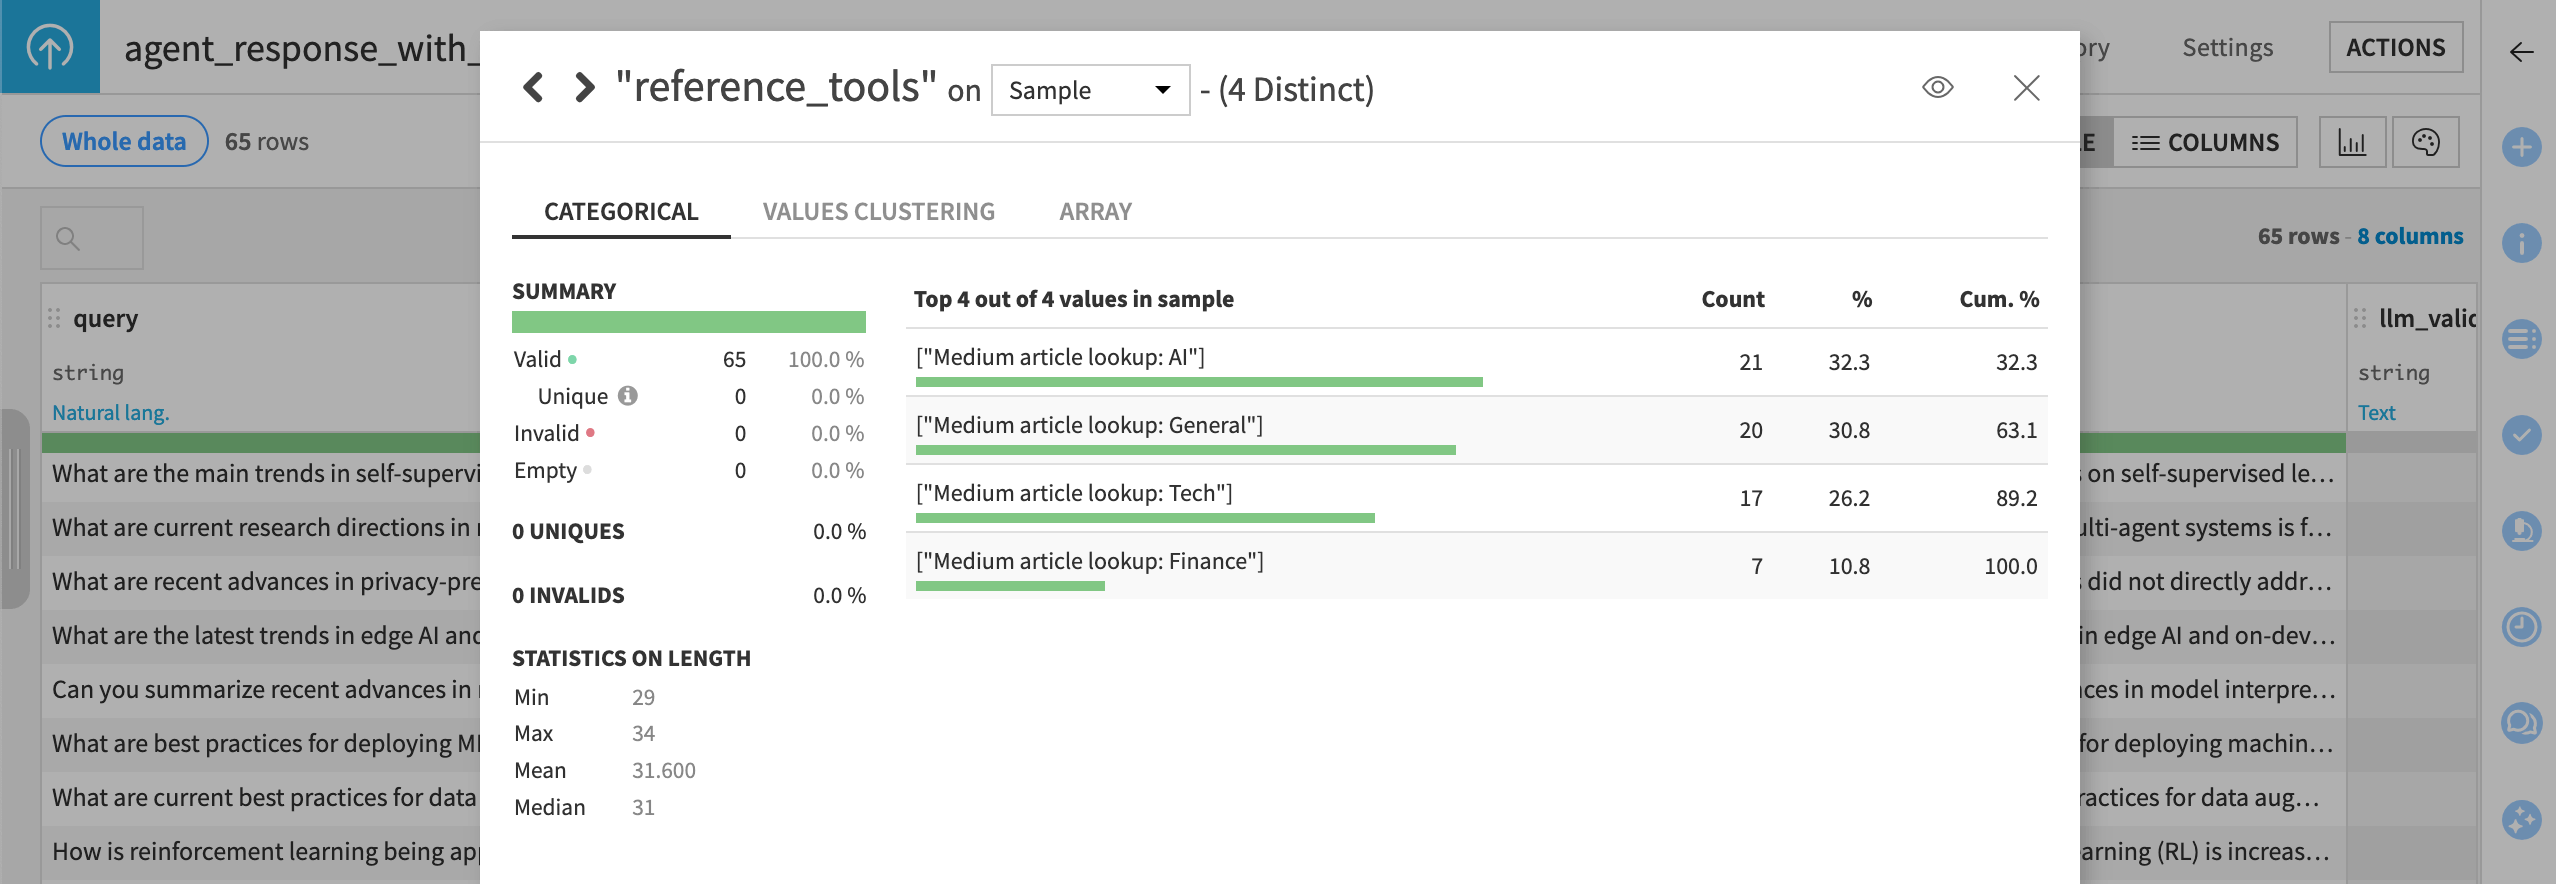
From the reference_tools column header, select Analyze to review the expected tool call arrays.
Important
The reference_tools column codifies a key component of the agent’s definition of success. For each user query, the expectation is the agent will make exactly one tool call — to the most relevant industry knowledge bank.
Compare the Prompt recipe output with the agent_logs dataset, noticing the lack of any column representing ground truth data.
Create an Evaluate Agent recipe#
Once you have the necessary input dataset, configuring the recipe for agent evaluation should feel familiar to users with experience of model or LLM evaluation in Dataiku.
Start with the Prompt recipe output including ground truth:
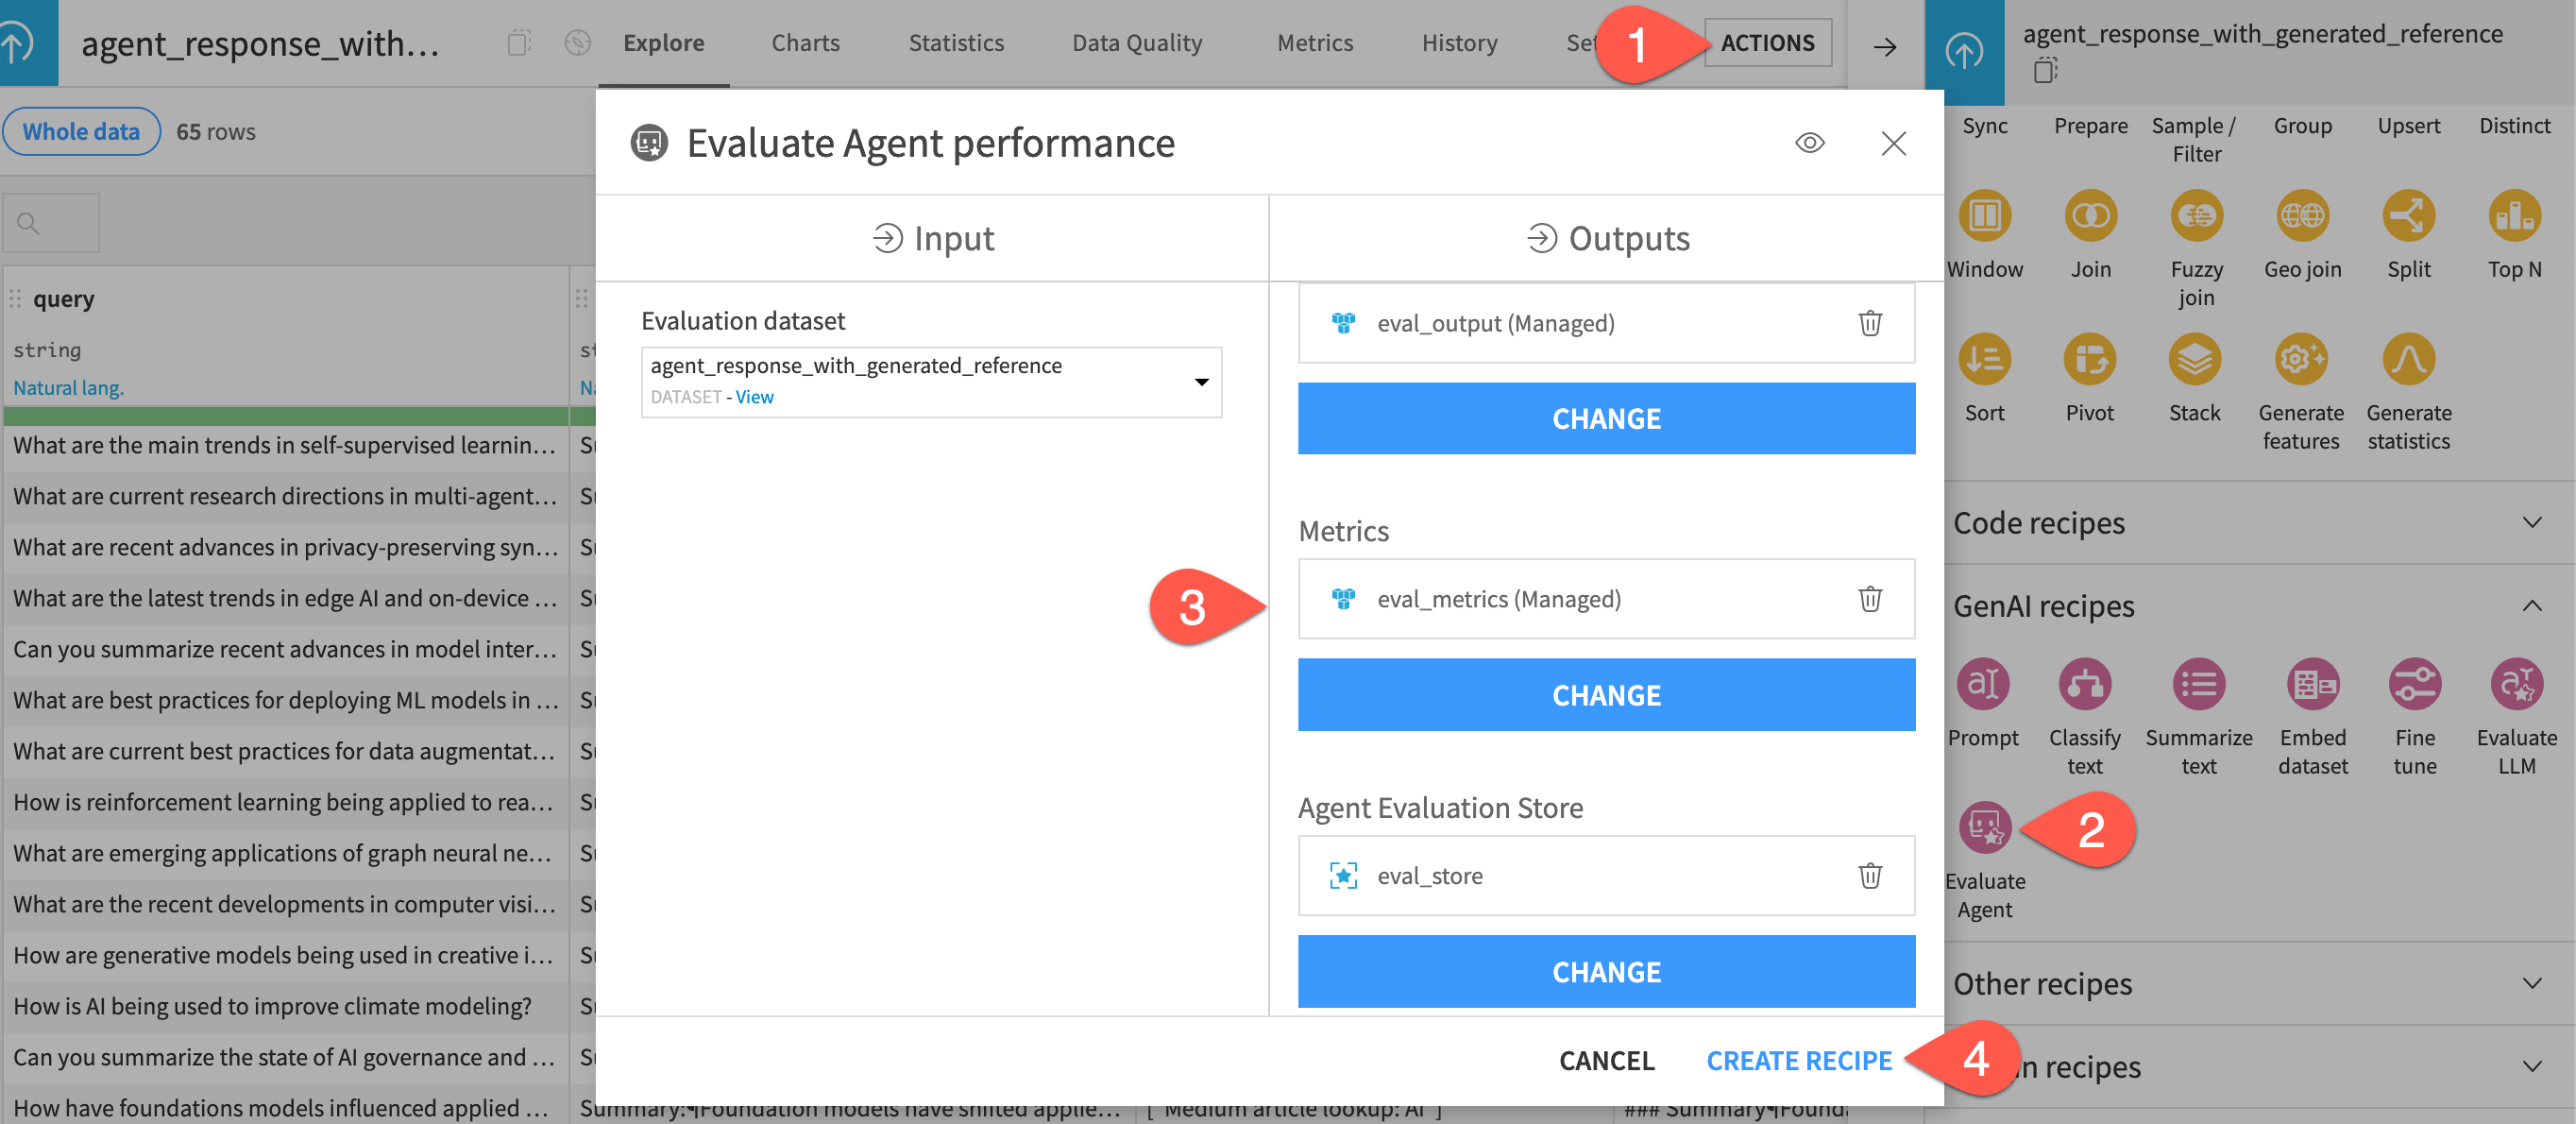
In the Evaluate agent zone, select the agent_response_with_generated_reference dataset.
From the menu of GenAI recipes in the Actions (
 ) tab of the right panel, select Evaluate Agent.
Set the following three outputs:
eval_outputas the output dataseteval_metricsas the metrics dataseteval_storeas the evaluation store
Click Create Recipe.
Configure the Evaluate Agent recipe#
Configuring the Evaluate Agent recipe has two main parts:
Assigning input columns to their function.
Choosing which metrics to compute.
Input dataset mapping#
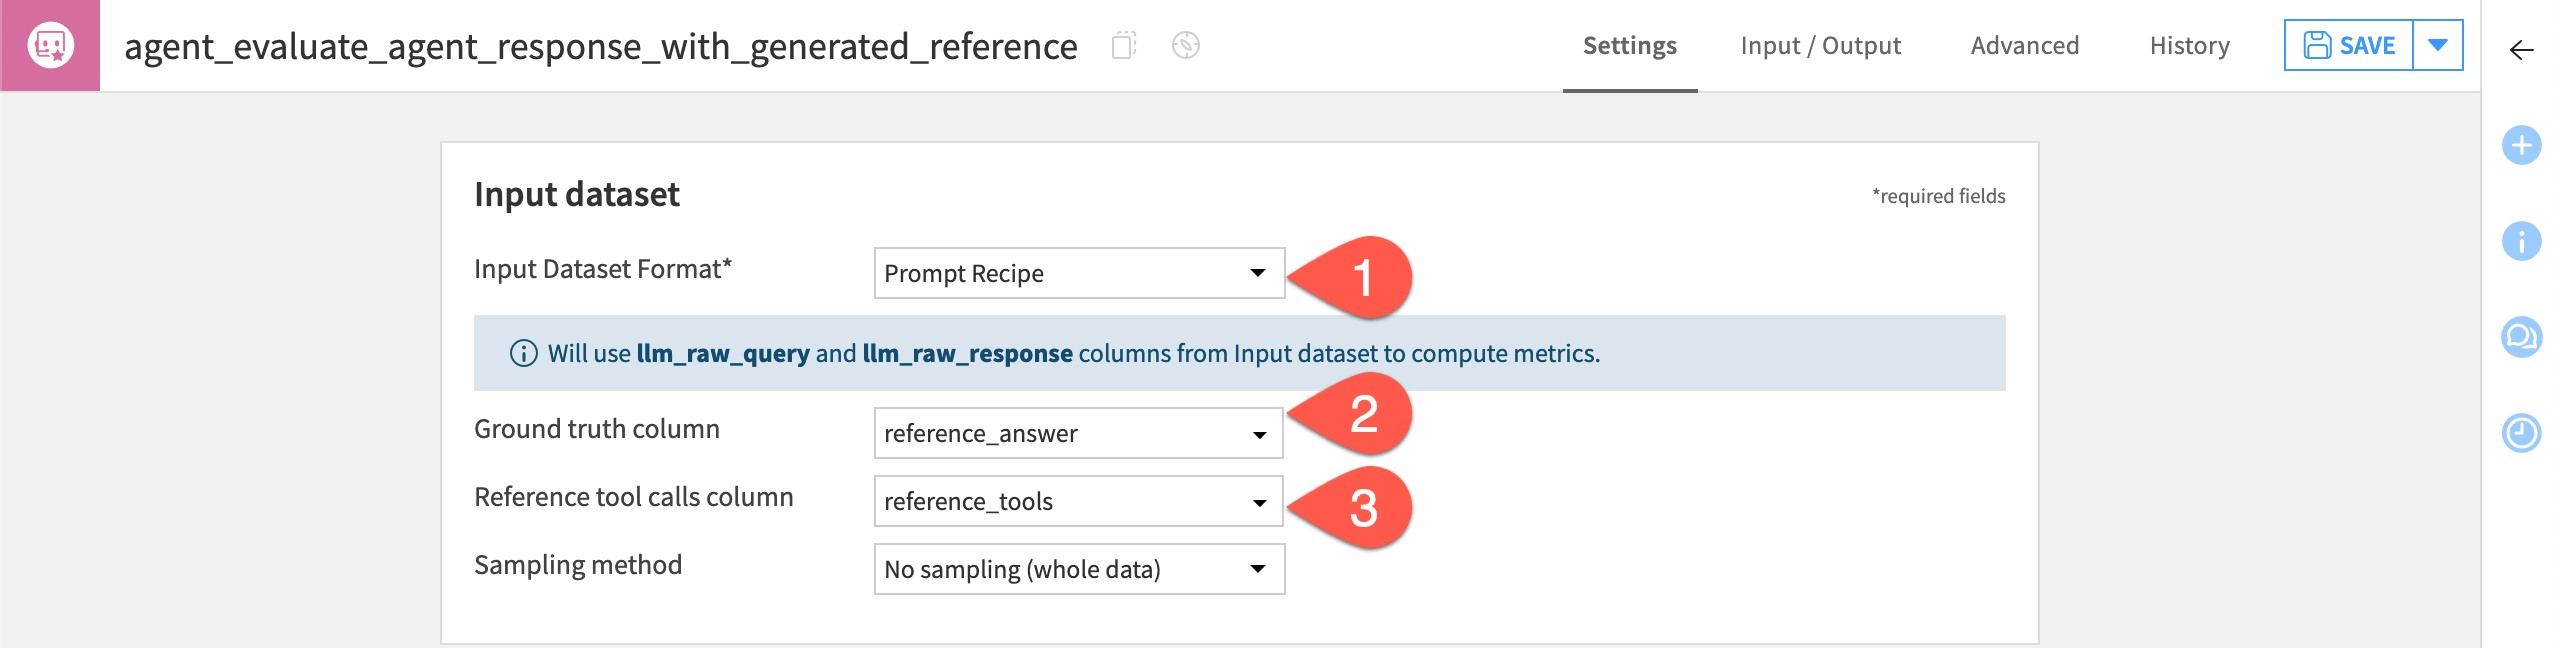
The first input evaluation data for this tutorial is the output of a Prompt recipe. For such cases, the Evaluate Agent recipe can automatically assign certain columns to the correct metric computations.
In the Input dataset tile, for the Input Dataset Format, select Prompt Recipe.
For the Ground truth column, select reference_answer.
For the Reference tool calls column, select reference_tools.
Select metrics to compute#
Once you’ve assigned the correct columns, the next step is selecting the metrics. The shaded box to the right of each metric indicates the required columns.
Tool call metrics#
Tool call metrics require a column of reference tool calls and actual tool calls.
In the present case, when given a query like What are current research directions in multi-agent systems?, the reference tool call (the expected tool call sequence) would be ["Medium article lookup: AI"]. That’s because, for this query, the agent should:
Recognize it’s an AI topic.
Search the knowledge bank specific to the AI industry.
Return a summary of the articles it found in that knowledge bank.
Given this clear definition of success, an exact match is likely the most relevant tool call metric for this particular use case. However, many other cases require a multi-tool workflow. In such cases, the metric of most interest may be the proportion of correct tool calls.
LLM-as-a-judge metrics#
Like with LLM evaluation, you can use an LLM to judge the responses from the agent.
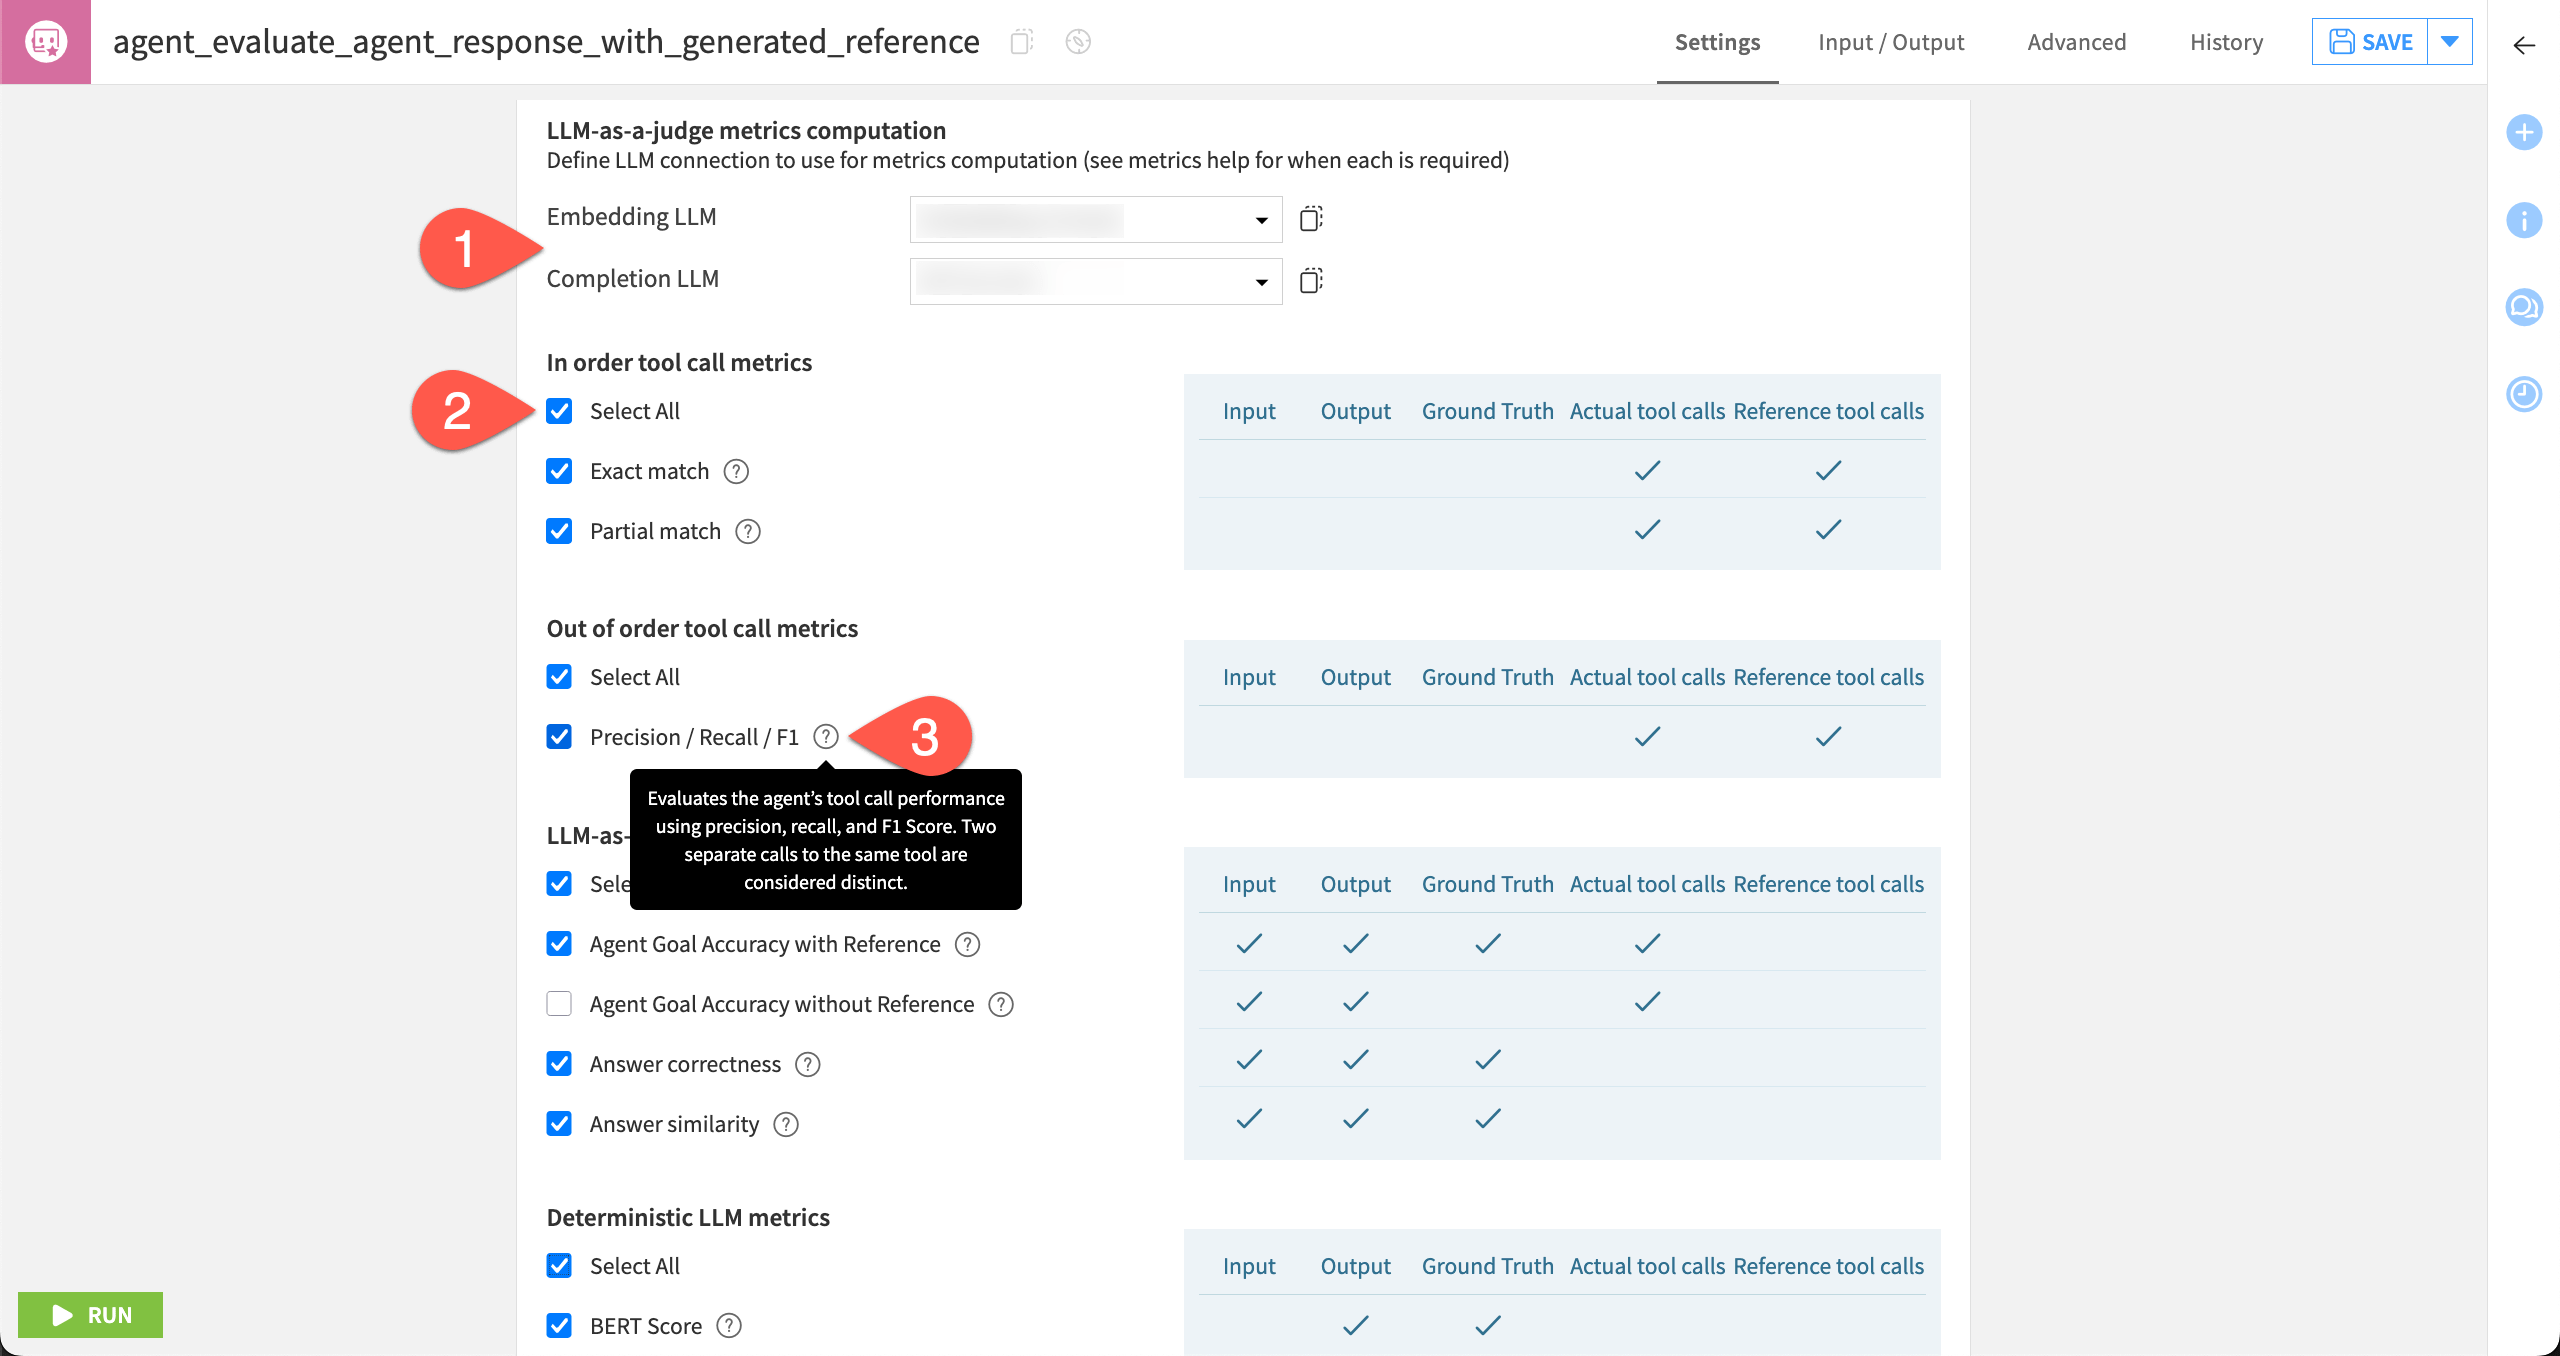
To compute LLM-as-a-judge metrics, select an Embedding LLM and a Completion LLM.
As this project’s evaluation dataset includes all five possible columns, click Select All for all possible sections of metrics.
Hover over the question mark (
 ) icons to review exactly what each metric computes, and see the shaded box to the right to view the required columns.
Custom metrics#
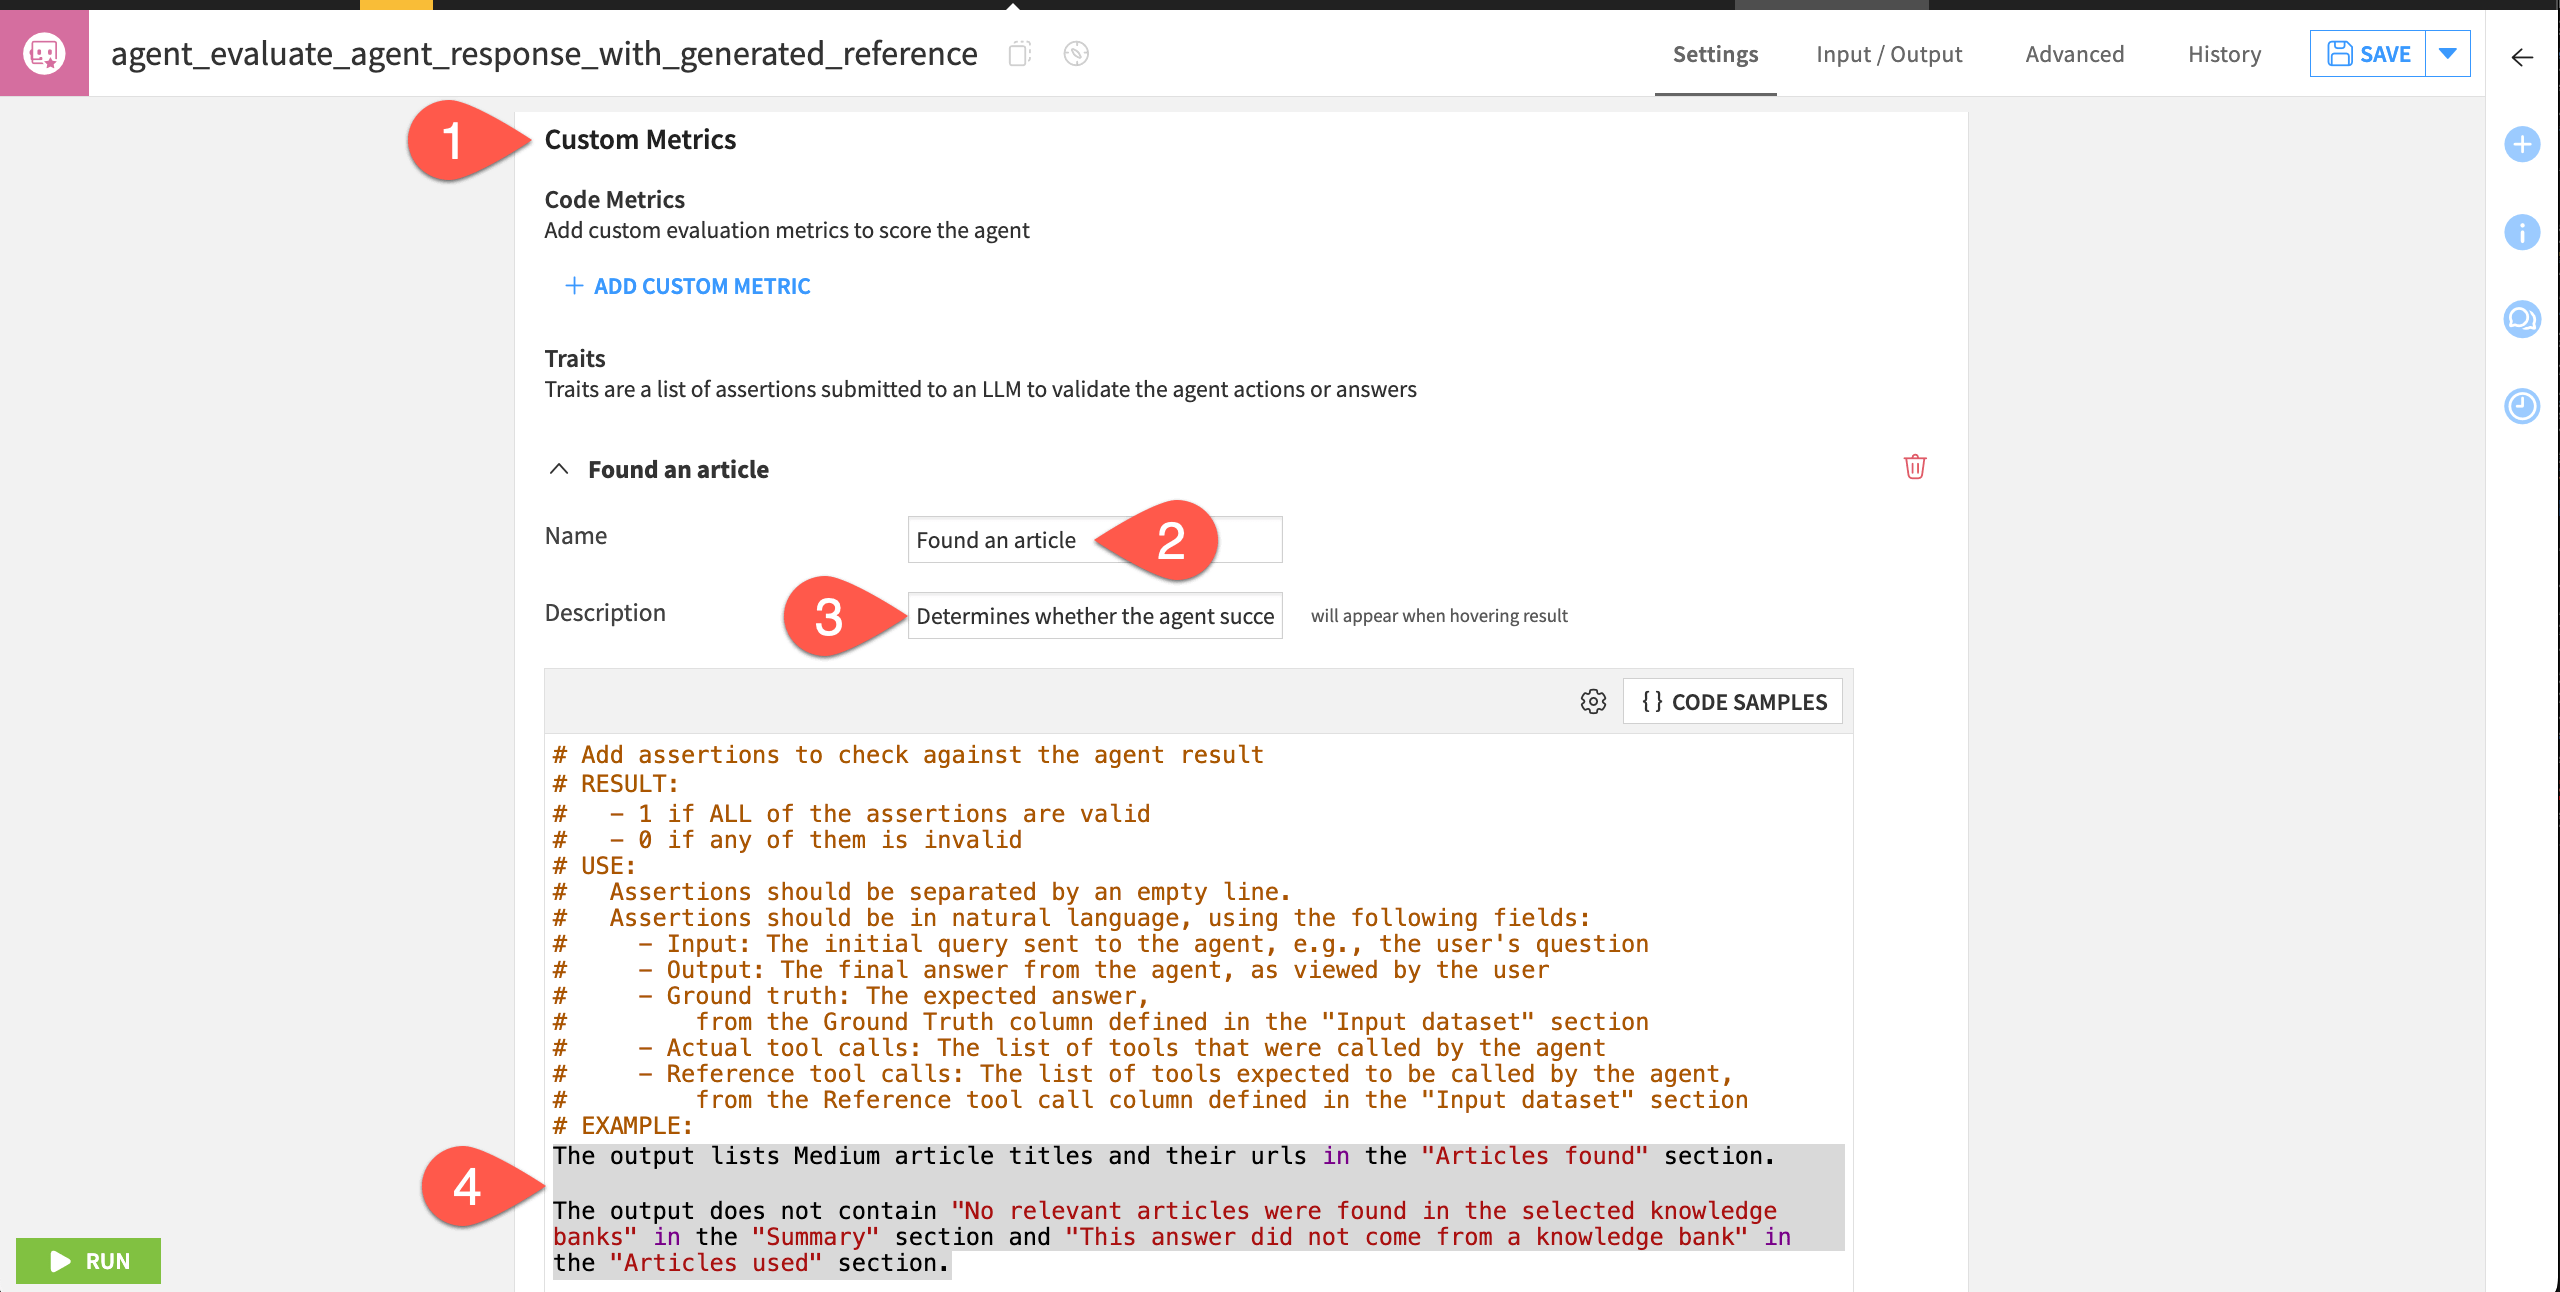
Alongside the built-in metrics, you can also define your own custom metrics. You can do this using Python (similar to custom LLM evaluation metrics). But you can also define assertions in natural language to check against the agent’s results (an LLM-as-a-judge approach).
Click + Add Custom Trait.
Name it
Found an article.For the description, copy-paste:
Determines whether the agent successfully found an article to summarize
Under the commented example, provide the snippet below:
The output lists Medium article titles and their urls in the "Articles found" section.

The output does not contain "No relevant articles were found in the selected knowledge banks" in the "Summary" section and "This answer did not come from a knowledge bank" in the "Articles used" section.
See also
More details on metrics can be found in the reference documentation on Agent Evaluation.
Run the evaluation#
When satisfied with the configuration of metrics, you can execute the recipe.
In the Python environment section, confirm that you have selected a compatible code environment as mentioned in the prerequisites.
Click Run, updating the output schema as needed.
Analyze the results of an agent evaluation#
Once the recipe has finished executing, you can explore the outputs.
Explore the evaluation store#
First, check the GenAI evaluation store, including how to use the trajectory explorer.
Open the eval_store to find the selected evaluation metrics.
For the first evaluation, click Open to view a summary.
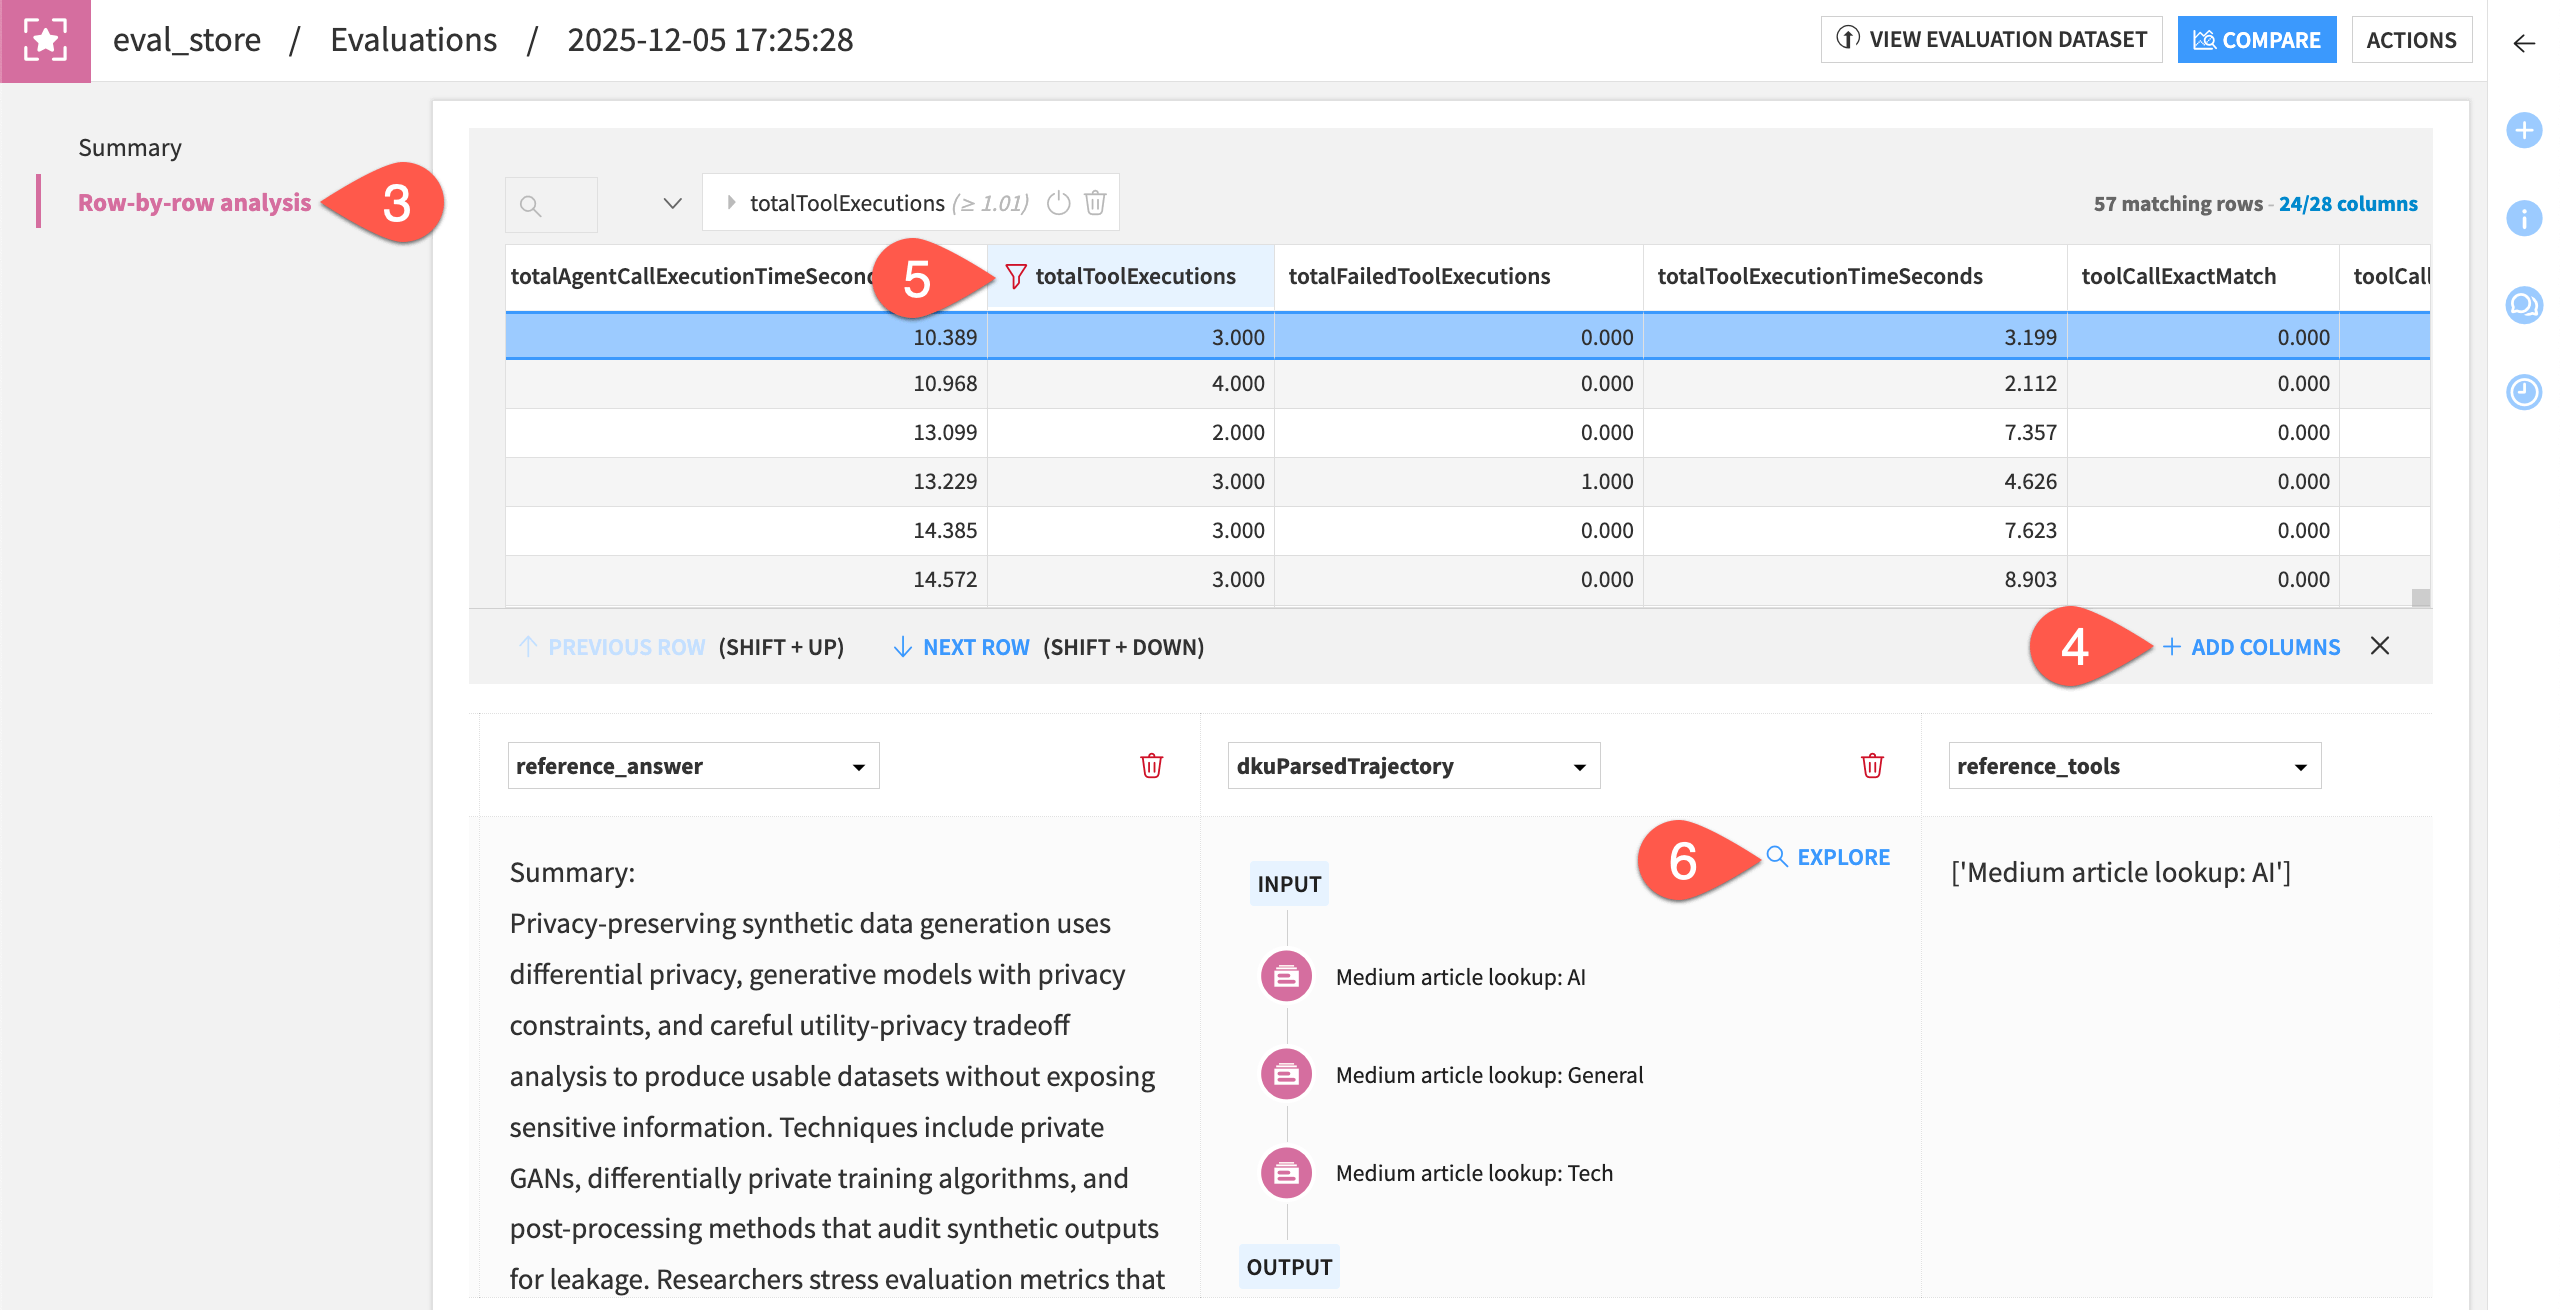
Go to the Row-by-row analysis panel.
Explore the output for a few rows, clicking + Add Columns to inspect columns like totalToolExecutions, toolCallExactMatch, and the custom trait Found an article.
To find the wayward results, filter for rows with totalToolExecutions greater than
1.For the dkuParsedTrajectory column, click Explore to visualize the tool call trajectory.
Tip
While your exact results may differ, in the case above, the agent started with the correct call, but then made two unexpected calls to other knowledge banks. Investigating issues like this is why you do agent evaluation!
If the agent triggered any guardrails, those would also appear in the trajectory explorer.
Explore the output and metrics datasets#
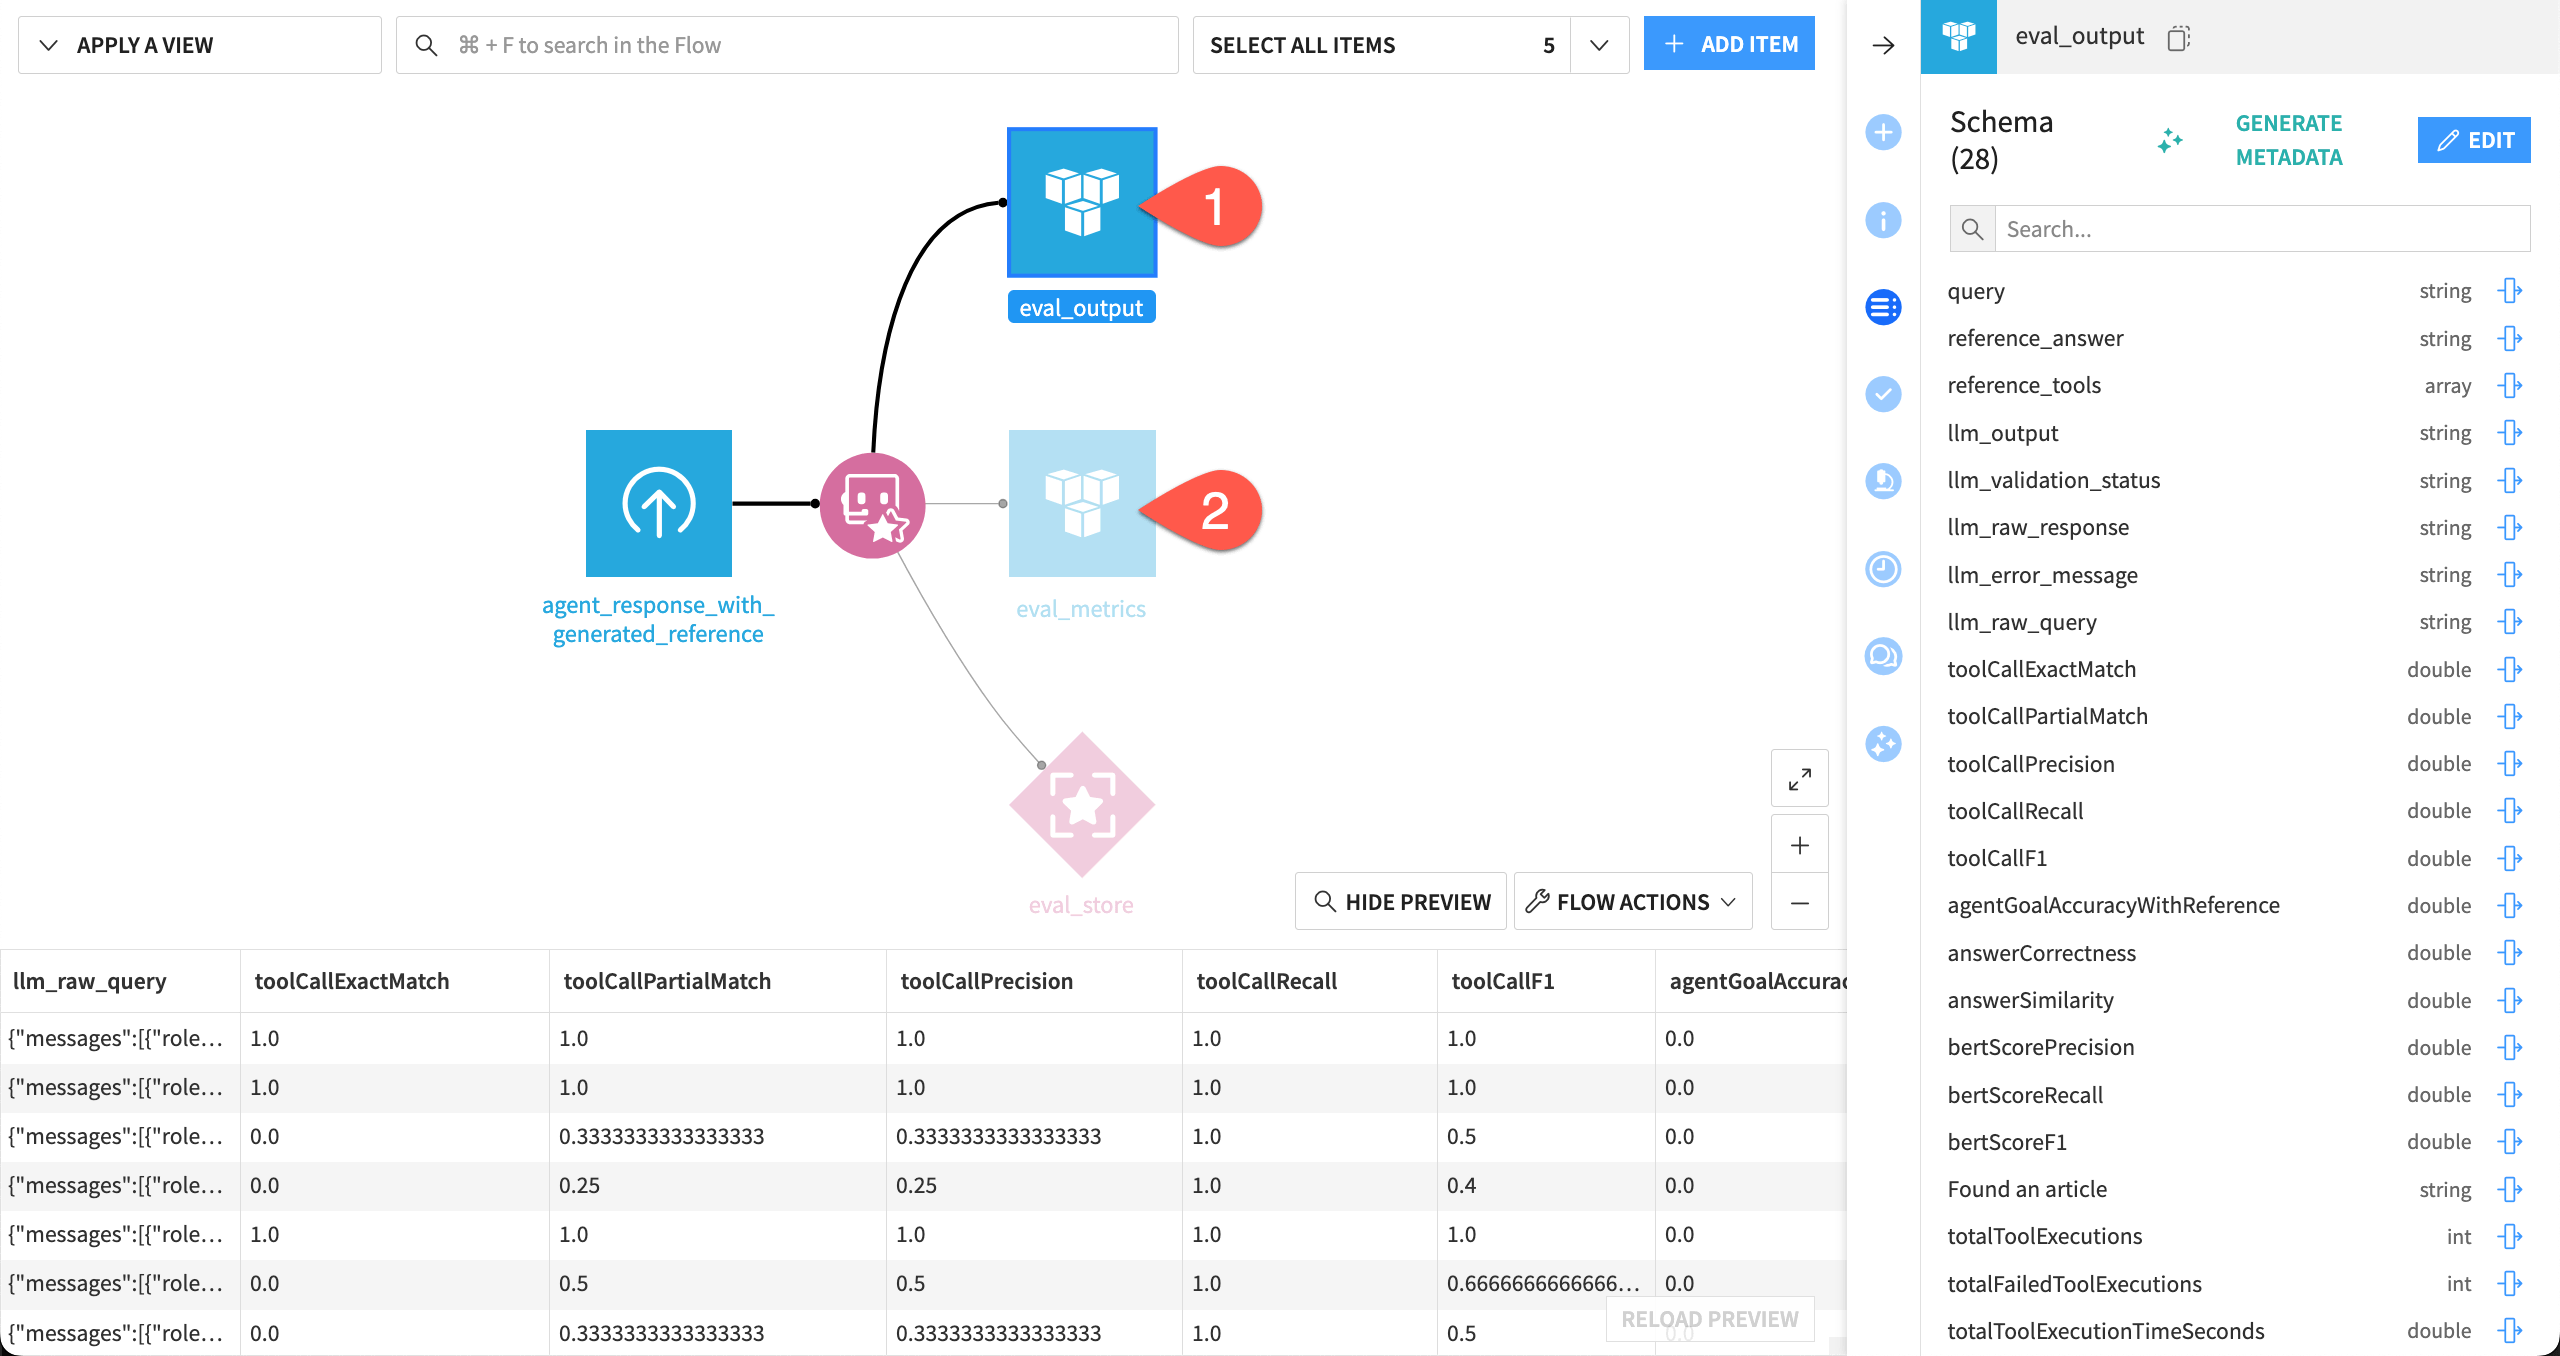
Similar to other evaluation recipes, the Evaluate Agent recipe can also output results in a dataset format:
One dataset containing the input dataset, plus the computed metrics.
One dataset containing only the metrics.
Open the eval_output dataset, and observe the addition of the metrics to the input dataset’s schema, beginning with toolCallExactMatch.
Open the eval_metrics dataset, and find the same metrics without the input data, identified by the timestamp of the evaluation.
Tip
You might find these datasets to be particularly useful as inputs to other processes such as webapps and dashboards.
Compare agent evaluations#
A single evaluation is only the first step. As you ingest new data, or make changes in your upstream GenAI pipeline, you can compare evaluations — much like you do with model comparisons.
You may have noticed the custom trait Found an article did a poor job in accurately identifying cases where the agent found an article. Try refining it before running a second evaluation.
Open the Evaluate Agent recipe.
For the Found an article trait, replace the assertions with the more refined text below:
The output does not contain "No relevant articles were found in the selected knowledge banks."

The output section "Articles used" lists Medium article titles and their urls.

The output section "Summary" does not contain "No relevant articles were found in the selected knowledge banks".
Click Save, and then Run to execute the recipe a second time.
Aside from the Found an article metric, you’d expect the other evaluation results to be stable — accounting for variation in LLM-powered metric outcomes.
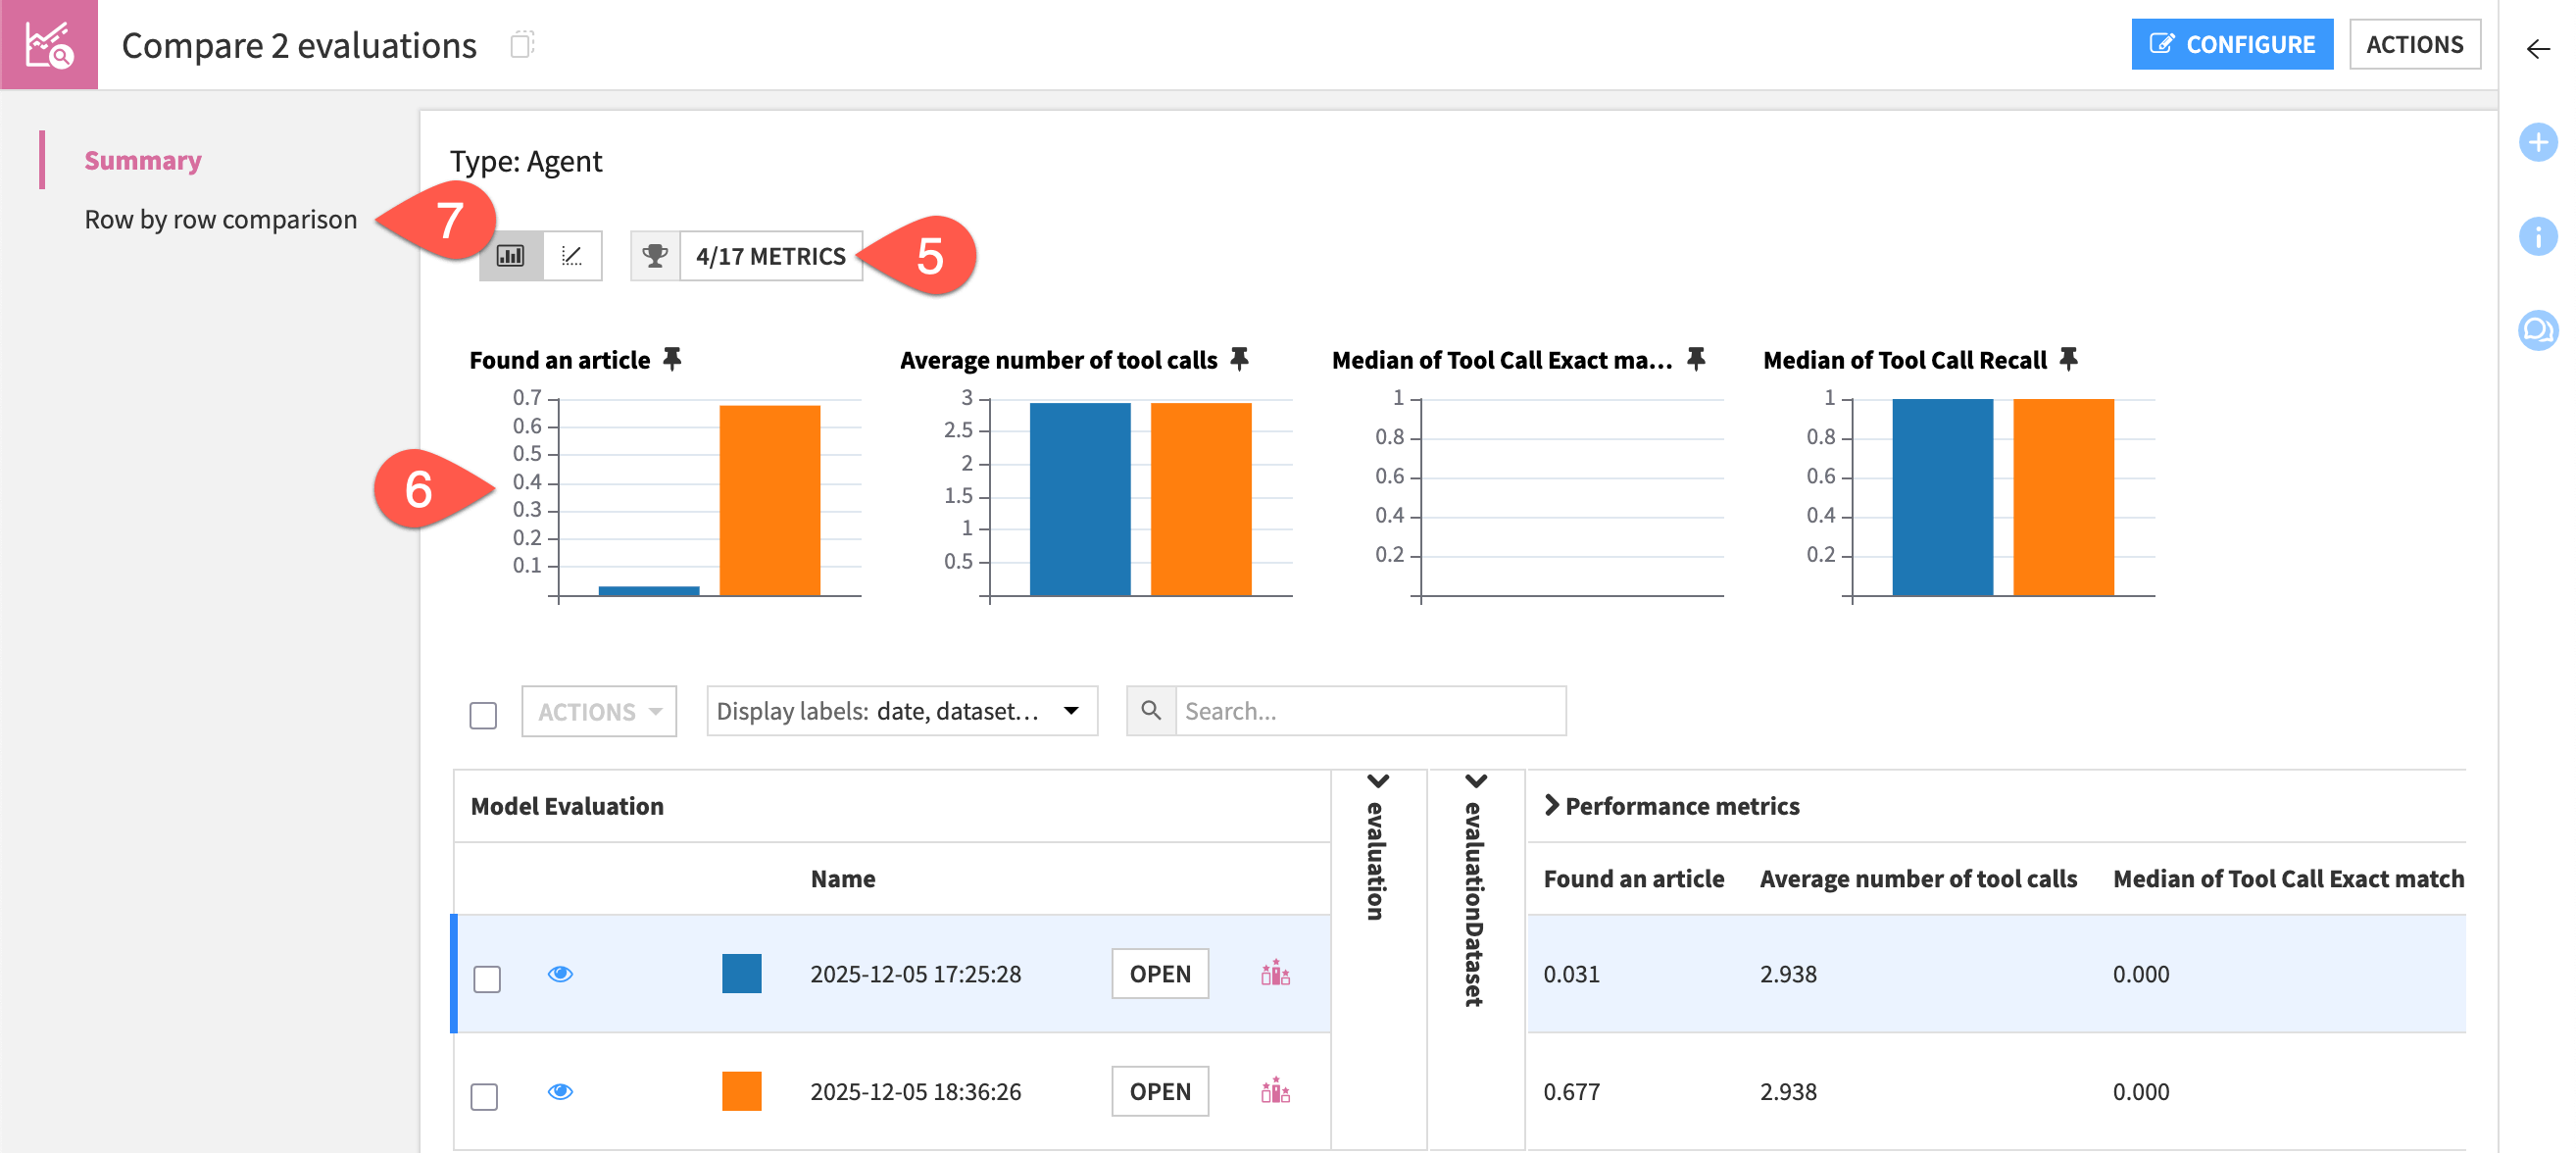
Open the eval_store to observe the results of the second evaluation in relation to the first.
Check the box to the left of the Actions button to select all evaluations.
Click the Actions button, and select Compare.
In the dialog, click Compare to create a new comparison.
Filter the visualization gallery to show Found an article and any other metrics you’d like.
For this LLM-as-a-judge metric, note how changing the assertions sharply impacted this result.
Go to the Row by row comparison to inspect cases that changed from false to true.
Tip
Adding metadata to evaluations can help keep track of what you’re evaluating. It works the same as labeling LLM evaluations.
Monitor the agent logs#
In the previous example, the presence of ground truth and reference tool calls enabled evaluation of a broad range of metrics. These included metrics on tool calls, agent goal accuracy, answer correctness, and answer similarity.
In many other contexts however, ground truth and reference tool calls might not be available, or at least difficult to obtain. If you were monitoring a deployment including an agent, your evaluation might rest on LLM-as-a-judge metrics.
In the Monitor agent zone, select agent_logs, and create an Evaluate Agent recipe.
Set
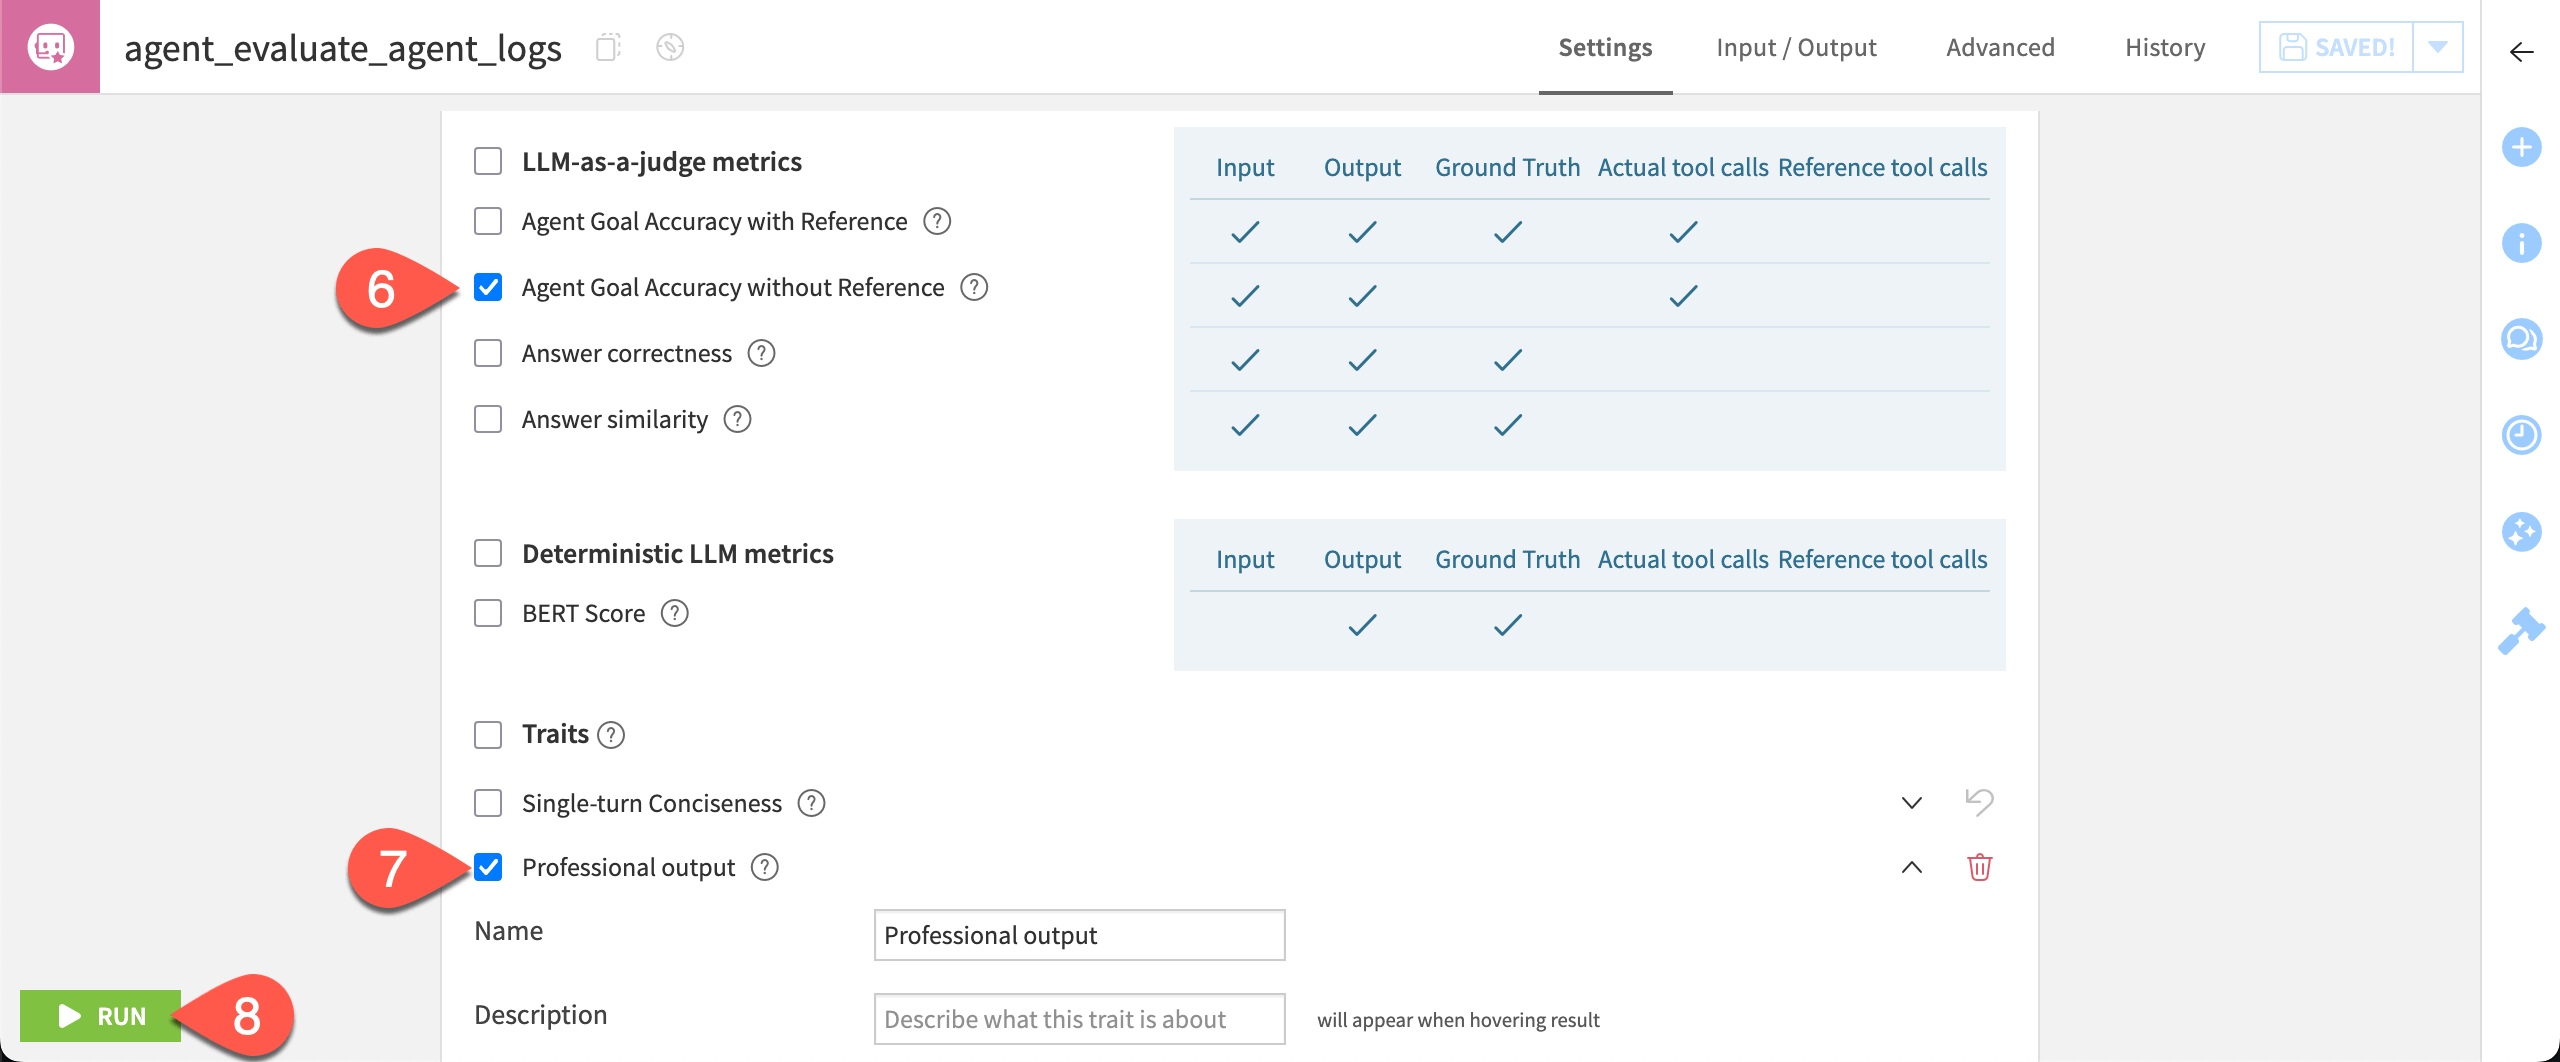
log_output,log_metrics, andlog_storeas the outputs, and create the recipe.In the recipe’s Settings, for the Input Dataset Format, select Agent Interaction Logs.
Leave the Ground truth and Reference tool call columns empty.
Note the inability to compute metrics like In order tool call metrics.
Toggle on Agent Goal Accuracy without Reference.
Add a custom trait named
Professional outputwith the assertion.The output is professional, clear, and concise.
Click Run.
Inspect the available outputs.
Automate the agent lifecycle#
Whether your have ground truth data or not, the Evaluate Agent recipe outputs a GenAI evaluation store. You can incorporate it into Dataiku’s standard automation toolbox of checks and scenarios.
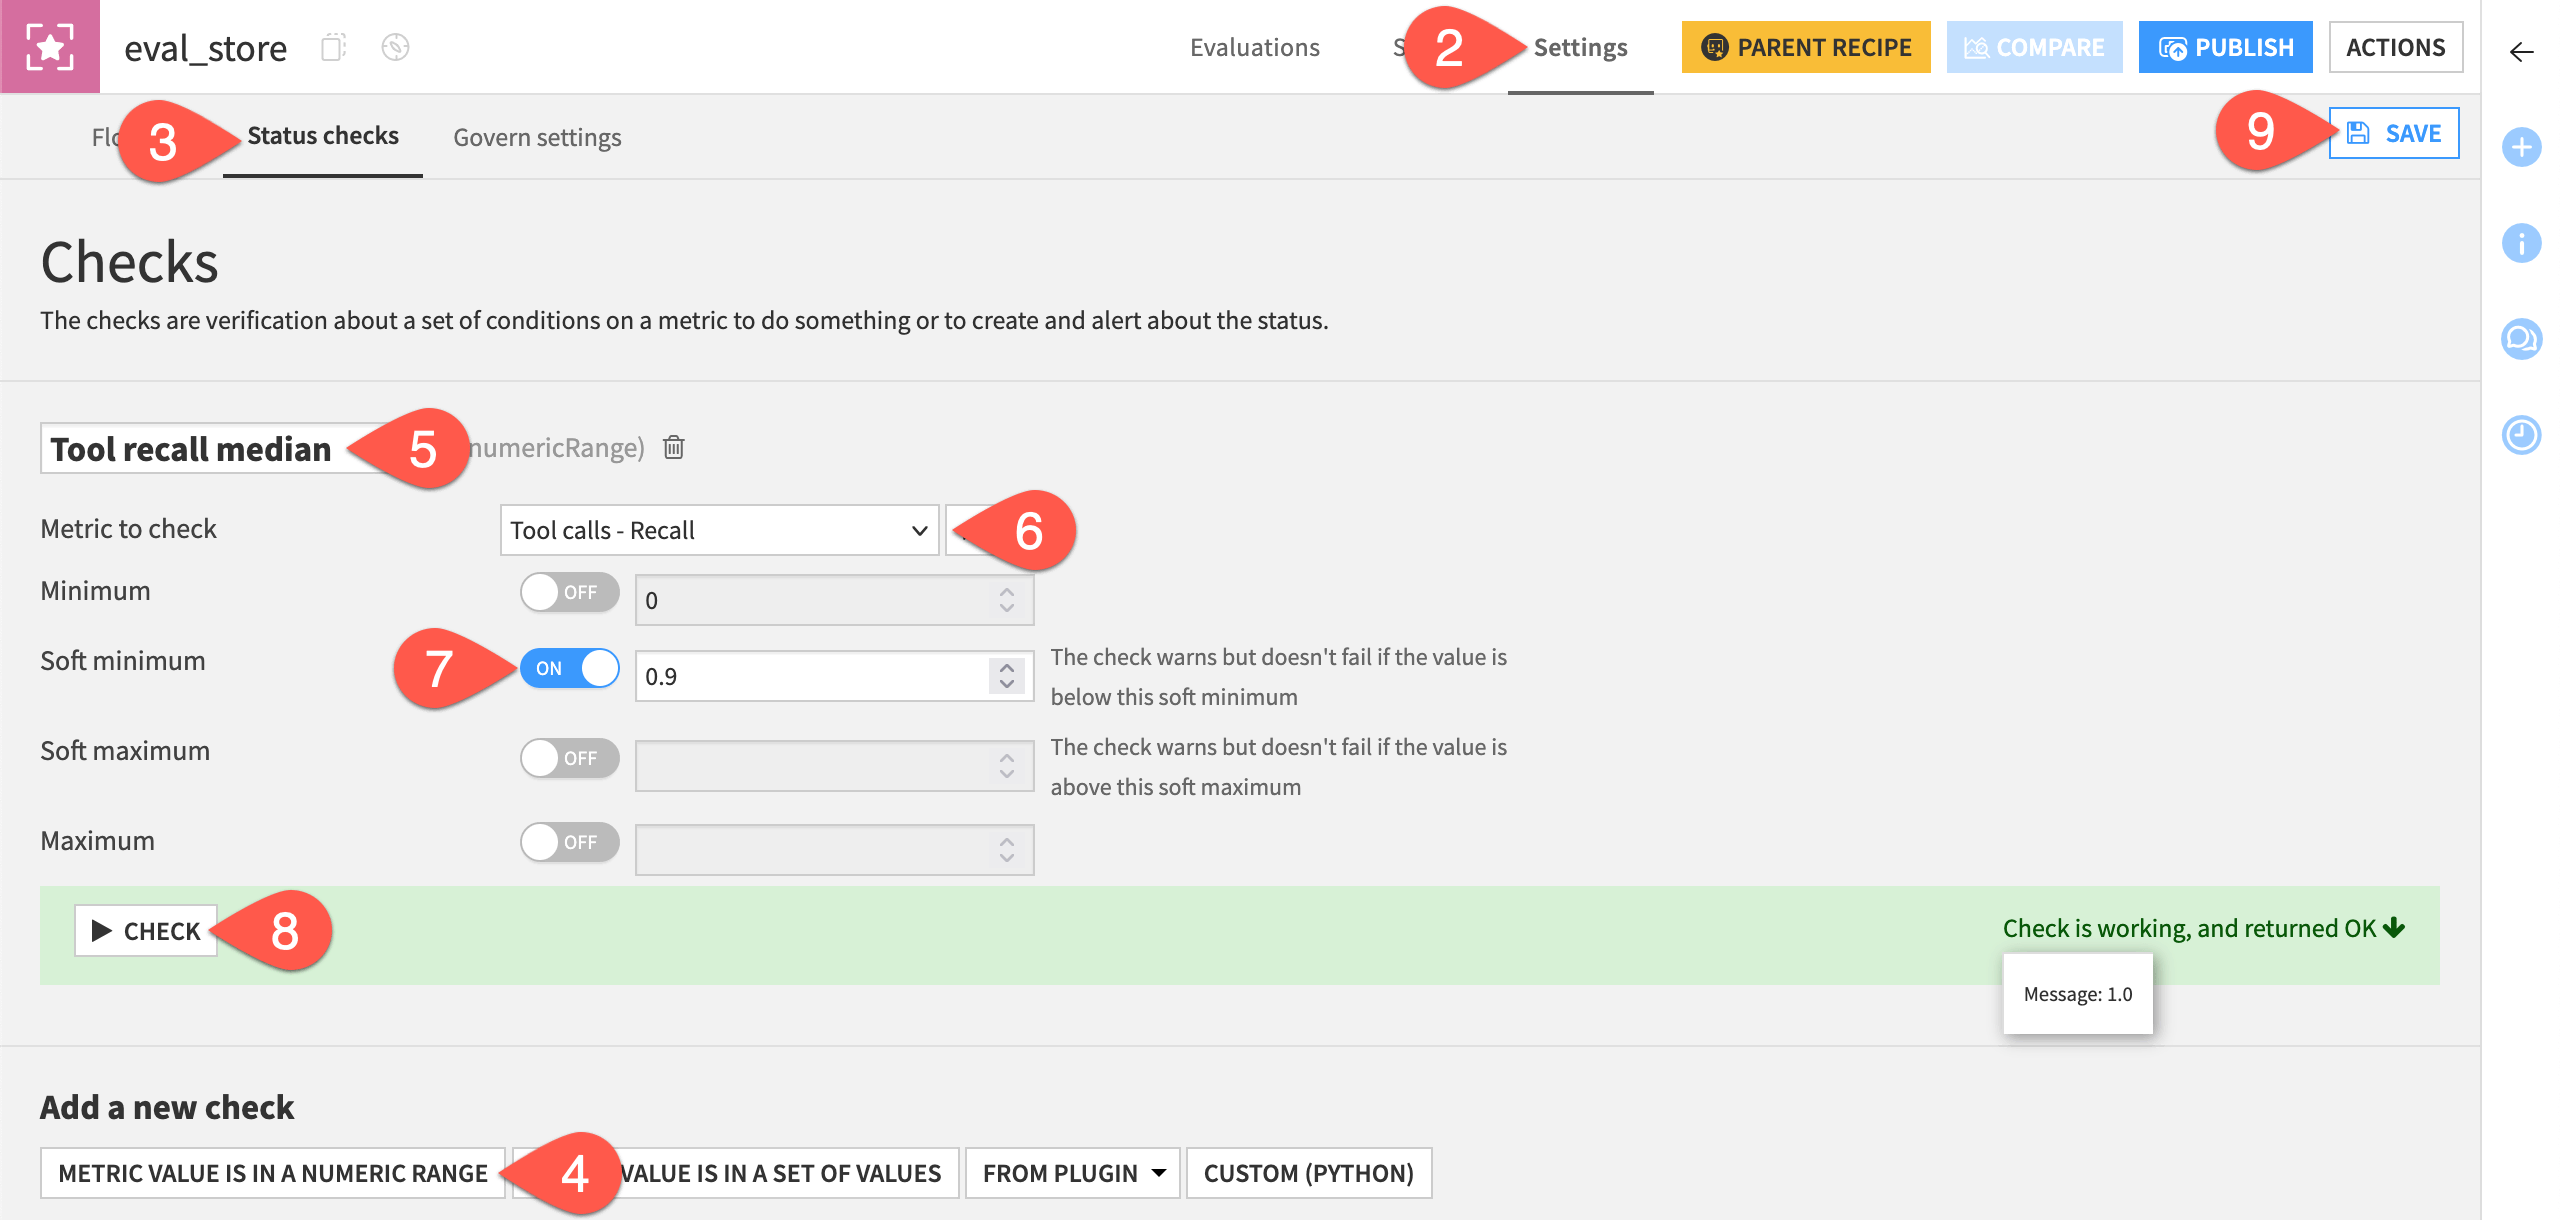
In the first case, the exact tool call match is the metric for complete success, but this agent is rarely perfect. A lower barrier of success is tool recall. In other words, did the agent call the correct tool at any point in its trajectory? (Even if the agent also called incorrect tools).
As with any evaluation store metric, you can create a check on it.
In the Evaluate agent zone, open the eval_store.
Navigate to the Settings tab.
Go to the Status checks subtab.
Click Metric Value is in a Numeric Range.
Name the check
Tool recall median.For the metric to check, select Tool calls - Recall.
For this case, set a Soft minimum of
0.9.Click Check to test it.
Click Save.
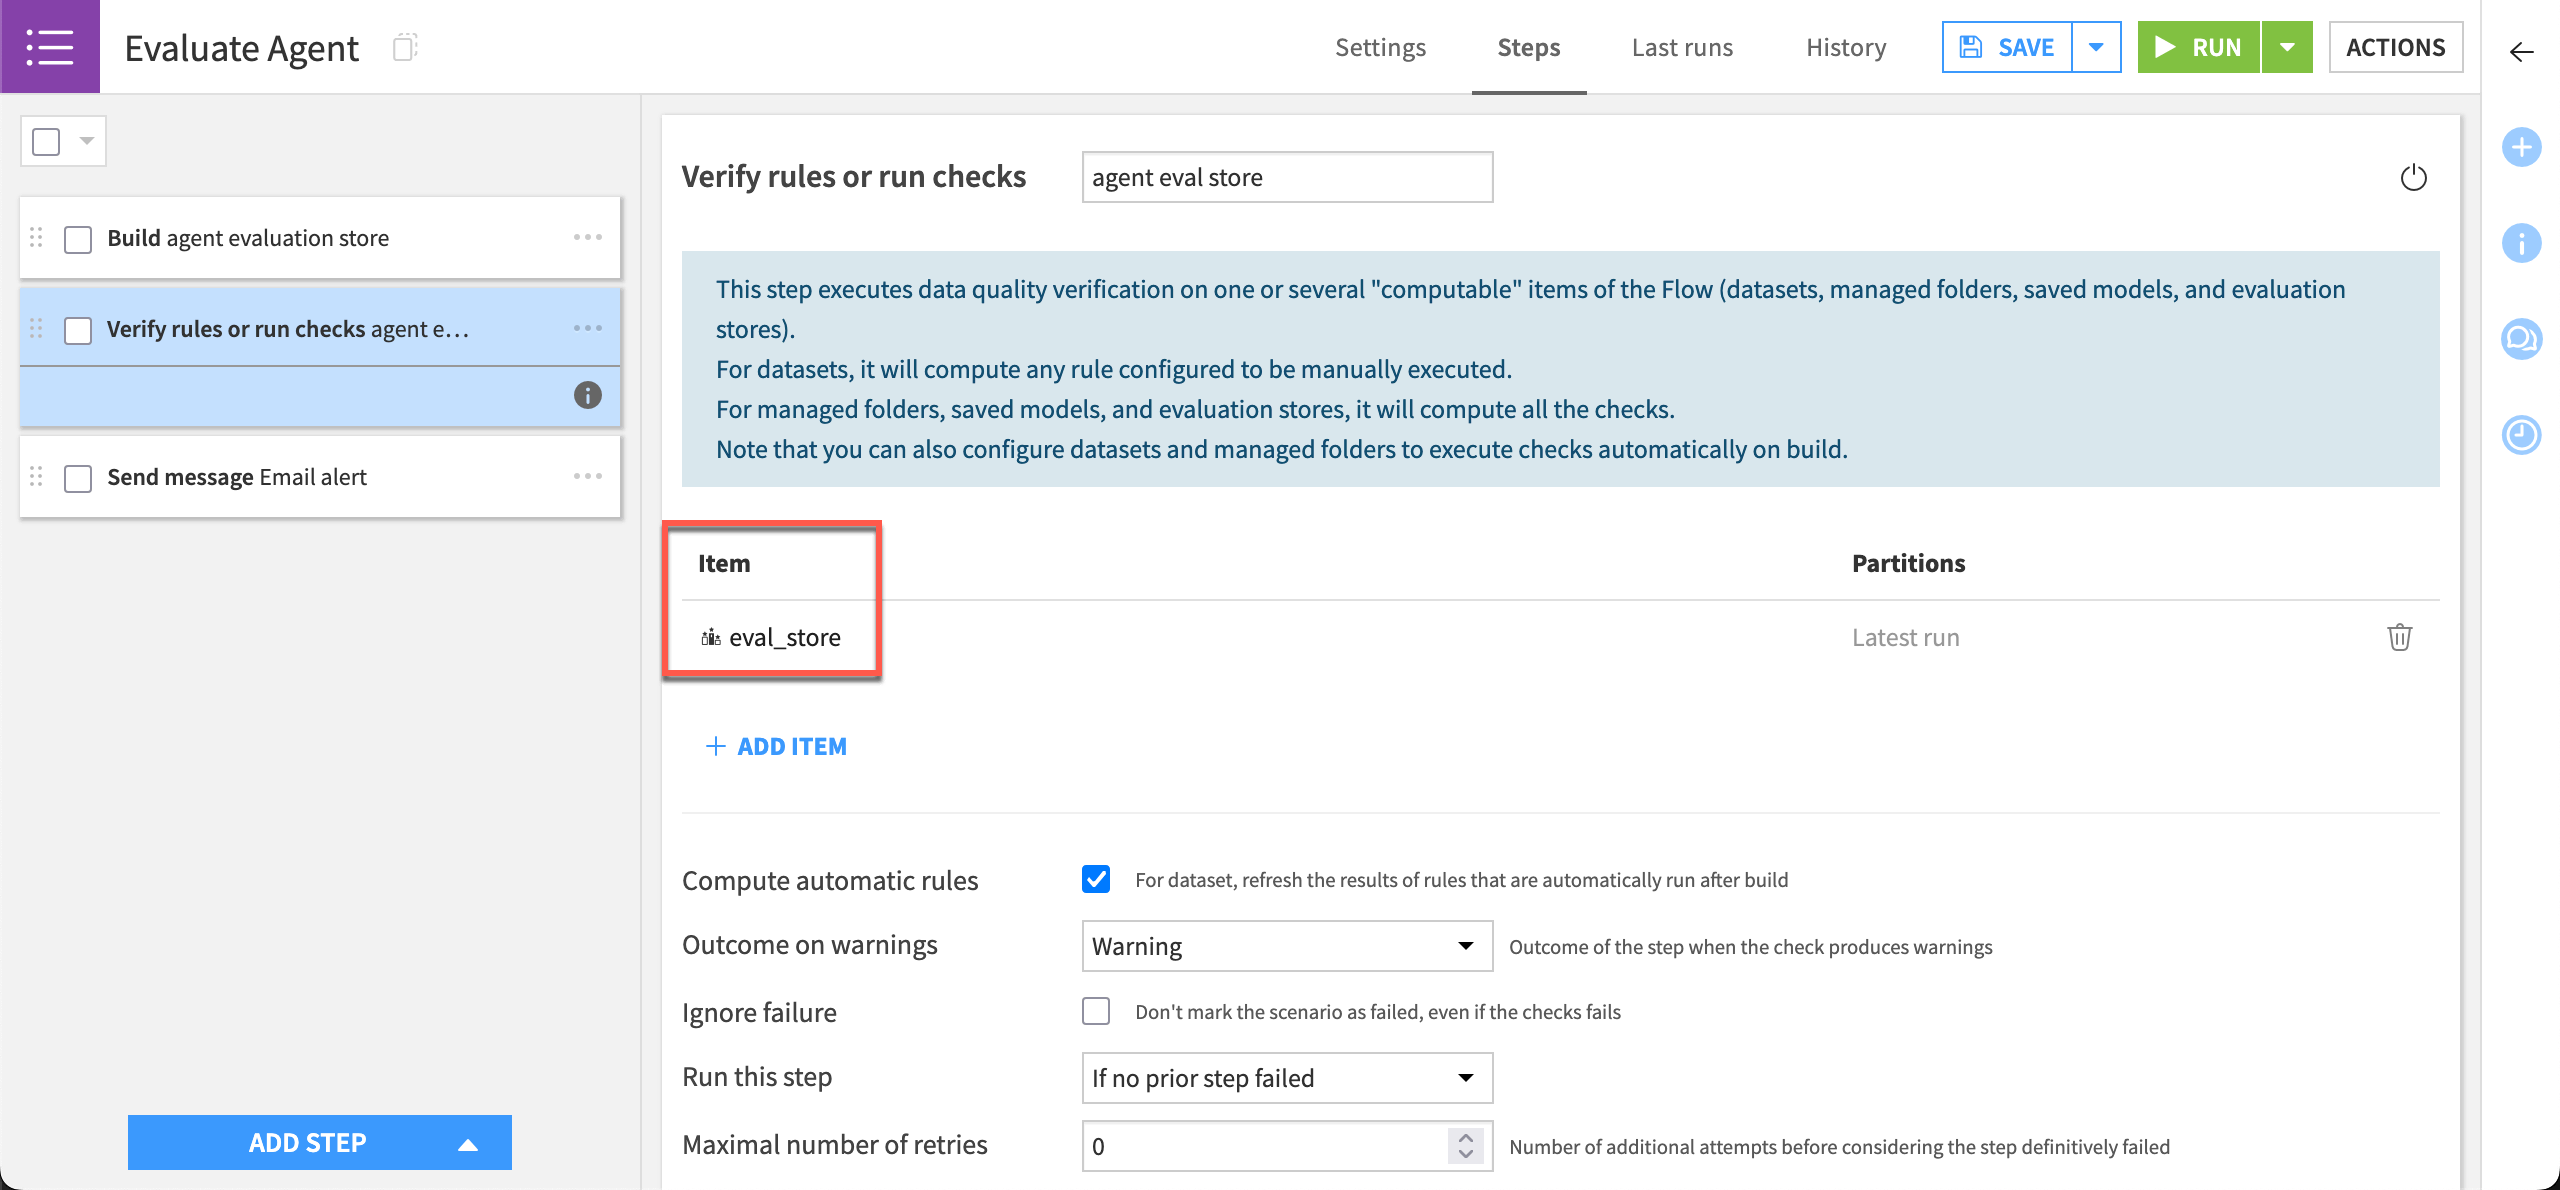
Once you have a check on a valuable metric, you can create a scenario like the one below to send a notification if it deviates from the expected range.
See also
If incorrect tool calls were a major problem, you might shift from the Simple Visual Agent shown here to a Structured Visual Agent. With the latter, you can exert greater control over the agent’s execution flow.
Next steps#
Congratulations! You’ve seen how the Evaluate Agent recipe can assess the performance of a GenAI application including an agent. You’ve also seen how it fits into Dataiku’s broader operationalization ecosystem.
See also
If you haven’t already done so, explore Tutorial | Agent Review to see how it can complement agent evaluation.
Otherwise, consult the reference documentation for more information on AI Agents and Agent Evaluation.