

Tutorial | Governance lifecycle#
Get started#
Once you understand the basics of the Govern node, you’re ready to walk governing an AI initiative from the beginning to the end of its lifecycle. You’ll start from the initial ideation phase and work to a deployment in a production environment.
Objectives#
In this tutorial, you will:
Explore and qualify an AI initiative in the Govern node before building any Dataiku assets.
Walk through a sign-off process within a governance workflow, requesting and submitting feedback on a governed child item.
Inject human oversight into a deployment process for more secure MLOps.
Prerequisites#
To reproduce the steps outlined in this tutorial, you will need:
Dataiku 14.5 or later.
A Dataiku Govern node connected to a Design node.
You should be confident with all concepts covered in Tutorial | Governance basics.
To complete the last section, you’ll also need all prerequisites in Tutorial | Deploy a project bundle to a production environment, including an Automation node connected to your Design node.
Caution
By its nature, effective AI governance requires close collaboration between many individuals of diverse responsibilities. Completing governance tutorials may require you to perform actions outside your own day-to-day activities. If you find yourself lacking the permissions to complete certain actions, reach out to your instance administrator. Otherwise, read along to simulate the suggested steps.
Create a Govern project#
The Govern node raises the visibility of existing Dataiku items. However, your governance efforts, especially those that are high risk, often might begin before any activity in a Design node. Rather than governing existing Dataiku items, the governance lifecycle can begin in the Govern node itself.
For a high risk use case like fraud prediction, this is definitely the case. Before building such a project, it’s important to qualify the project’s scope, sponsors, and expected outputs.
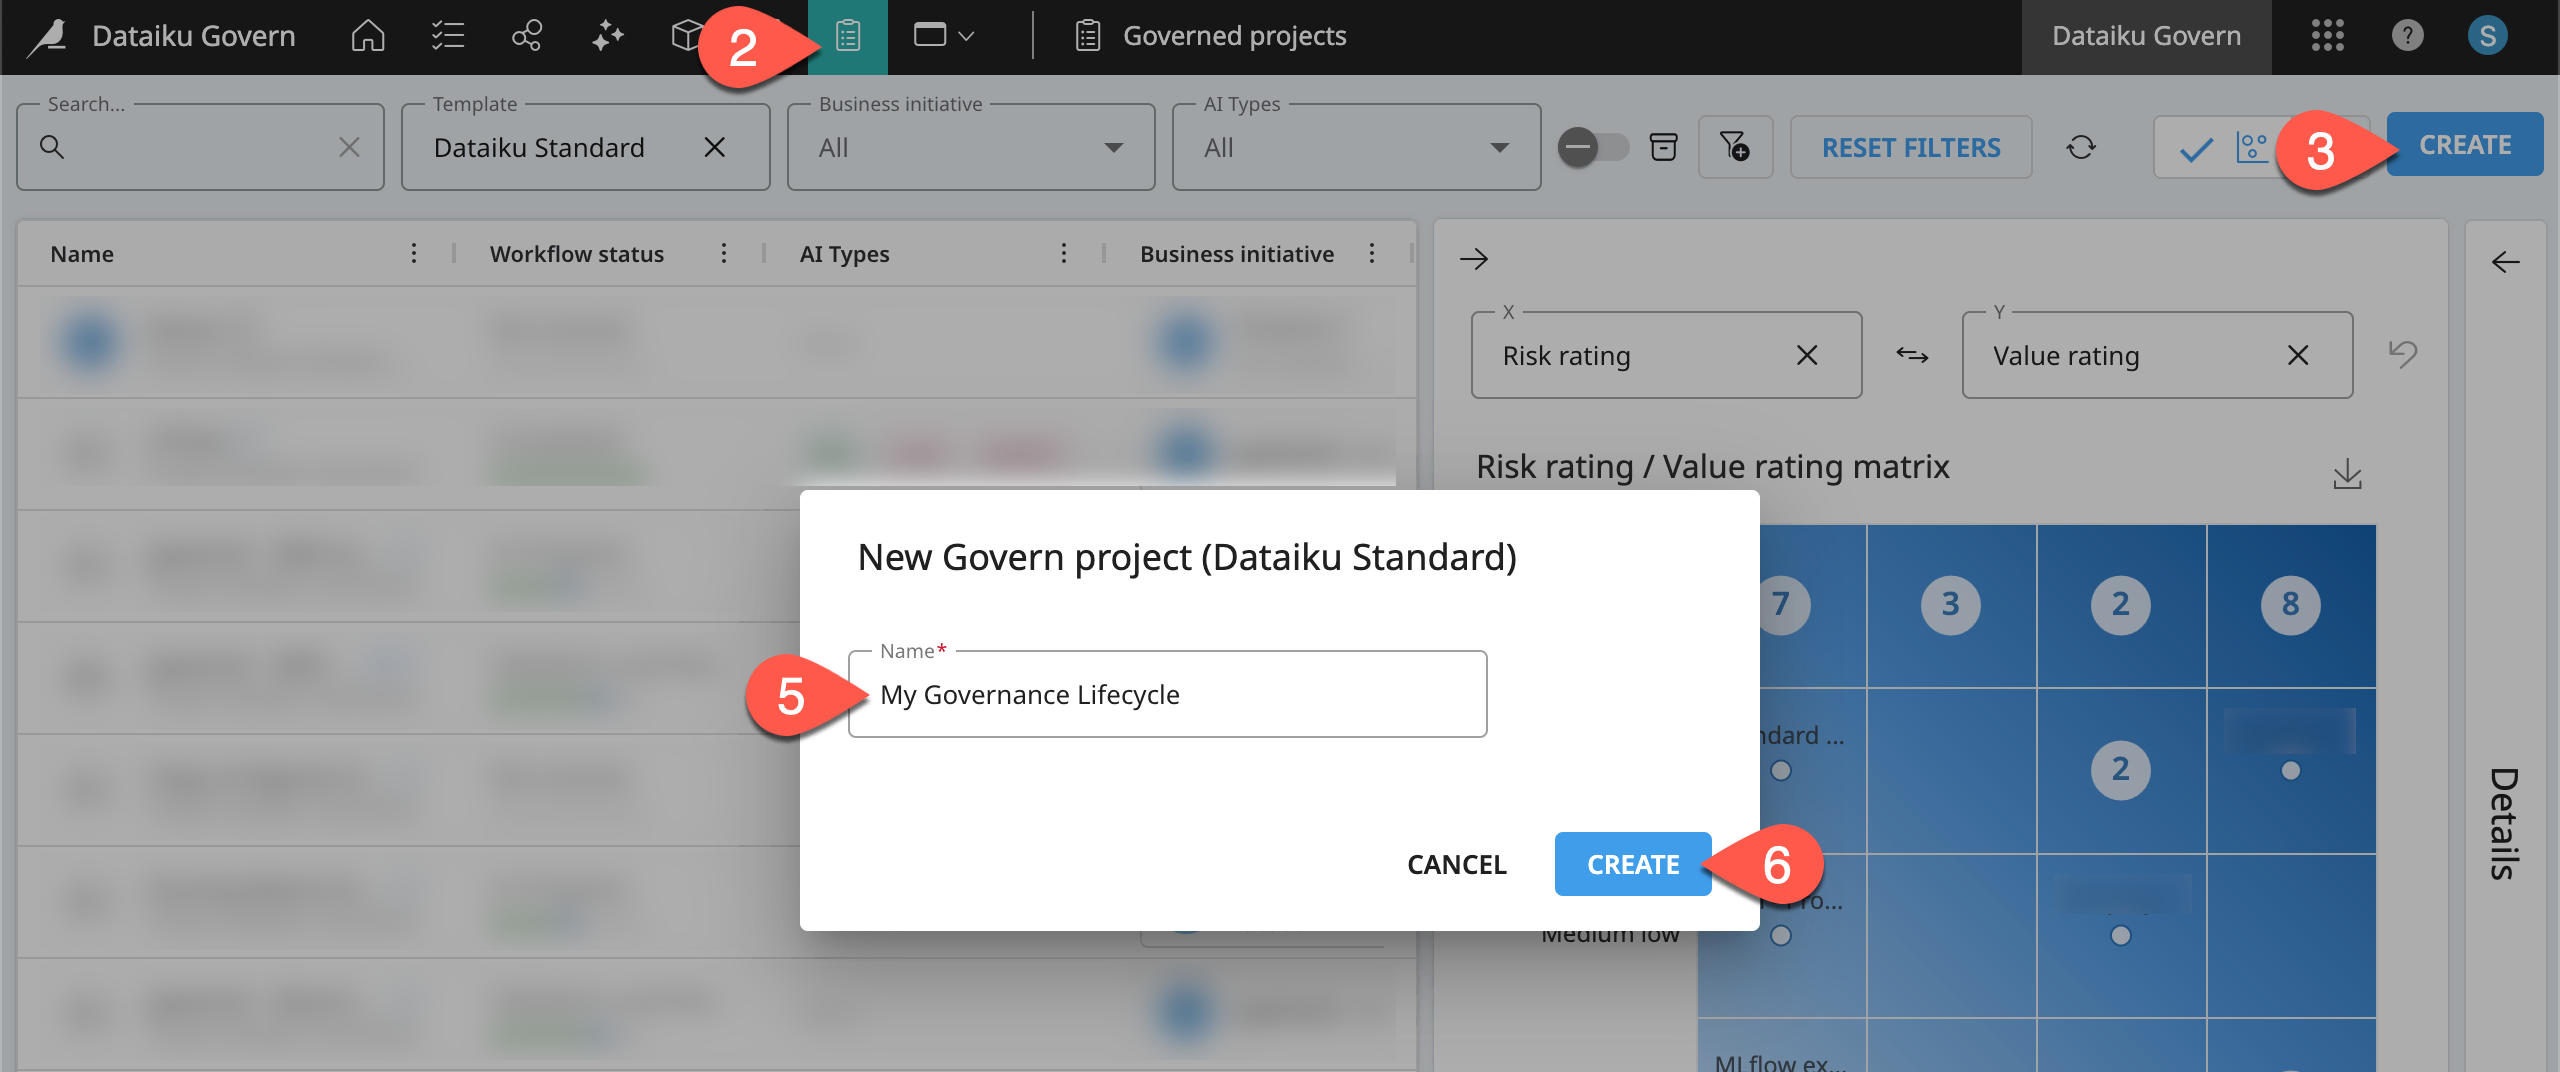
Open the Govern node. You can navigate there from the Overview panel of the Cloud Launchpad or, from a Design node, go to the waffle (
 ) menu > Dataiku Govern.
Go to the Governed projects (
 ) page.
Click Create.
If necessary, select the Dataiku Standard template.
Name the governed project as
<YOUR INITIALS> Fraud Prediction.Click Create.
In the governed project, navigate to the Source objects panel to confirm that it has no Dataiku source item.
Tip
Only after pre-qualifying the fraud prediction project in the Govern node will you proceed with the build phase in the Design node!
Use case summary#
Governance is a team sport! Many different parties share responsibilities for an AI initiative over the course of its lifecycle. For example:
One group may originally sponsor an initiative.
A second group may build the actual assets, such as a bundle, model, or agent.
Multiple groups may have a role in approving or rejecting those assets.
Another group may deploy approved assets to production environments.
For the purpose of this tutorial however, you’ll switch between all these hats. Given your own organizational structures, you’ll need to imagine how to adapt the workflow demonstrated here, while keeping in mind the objectives of effective AI governance.
Important
Here you’ll move a fraud prediction project through the standard workflow. From this demonstration, you’ll see how the components in the standard workflow can meet the governance needs of a project like this. At the same time, remember that organizations with advanced licenses, can design their own items, including their own workflows. Therefore, their own governance lifecycle may take a different shape from the actions shown here.
Explore and qualify initiatives before building#
The governance journey demonstrated in Tutorial | Governance basics started by raising the visibility of existing Dataiku items from a connected Design node.
However, it’s possible that you may institute a governance framework before building any Dataiku assets. For example, your organization may use the Govern node to guide exploration and qualification stages to ensure that your team is working on fully validated initiatives.
For a high risk project like credit card fraud prediction, that’s the approach you’ll adopt here!
Add reviewers to a governed project#
A key step in this qualification process is identifying the necessary stakeholders upfront. For example, the request for a fraud prediction project may have come from a business department. However, you’ll also need support from units in risk and compliance, as well as IT and operations.
Therefore, before starting any work, designating which individuals or groups must formally green-light a project clarifies responsibilities, ownership, and expectations. To achieve this, you can designate which groups or individuals can provide feedback on an item and approve it through a formal review process.
While a true fraud prediction project would require approval from a number of parties, for simplicity, designate yourself as both one category of reviewer and the final approver.
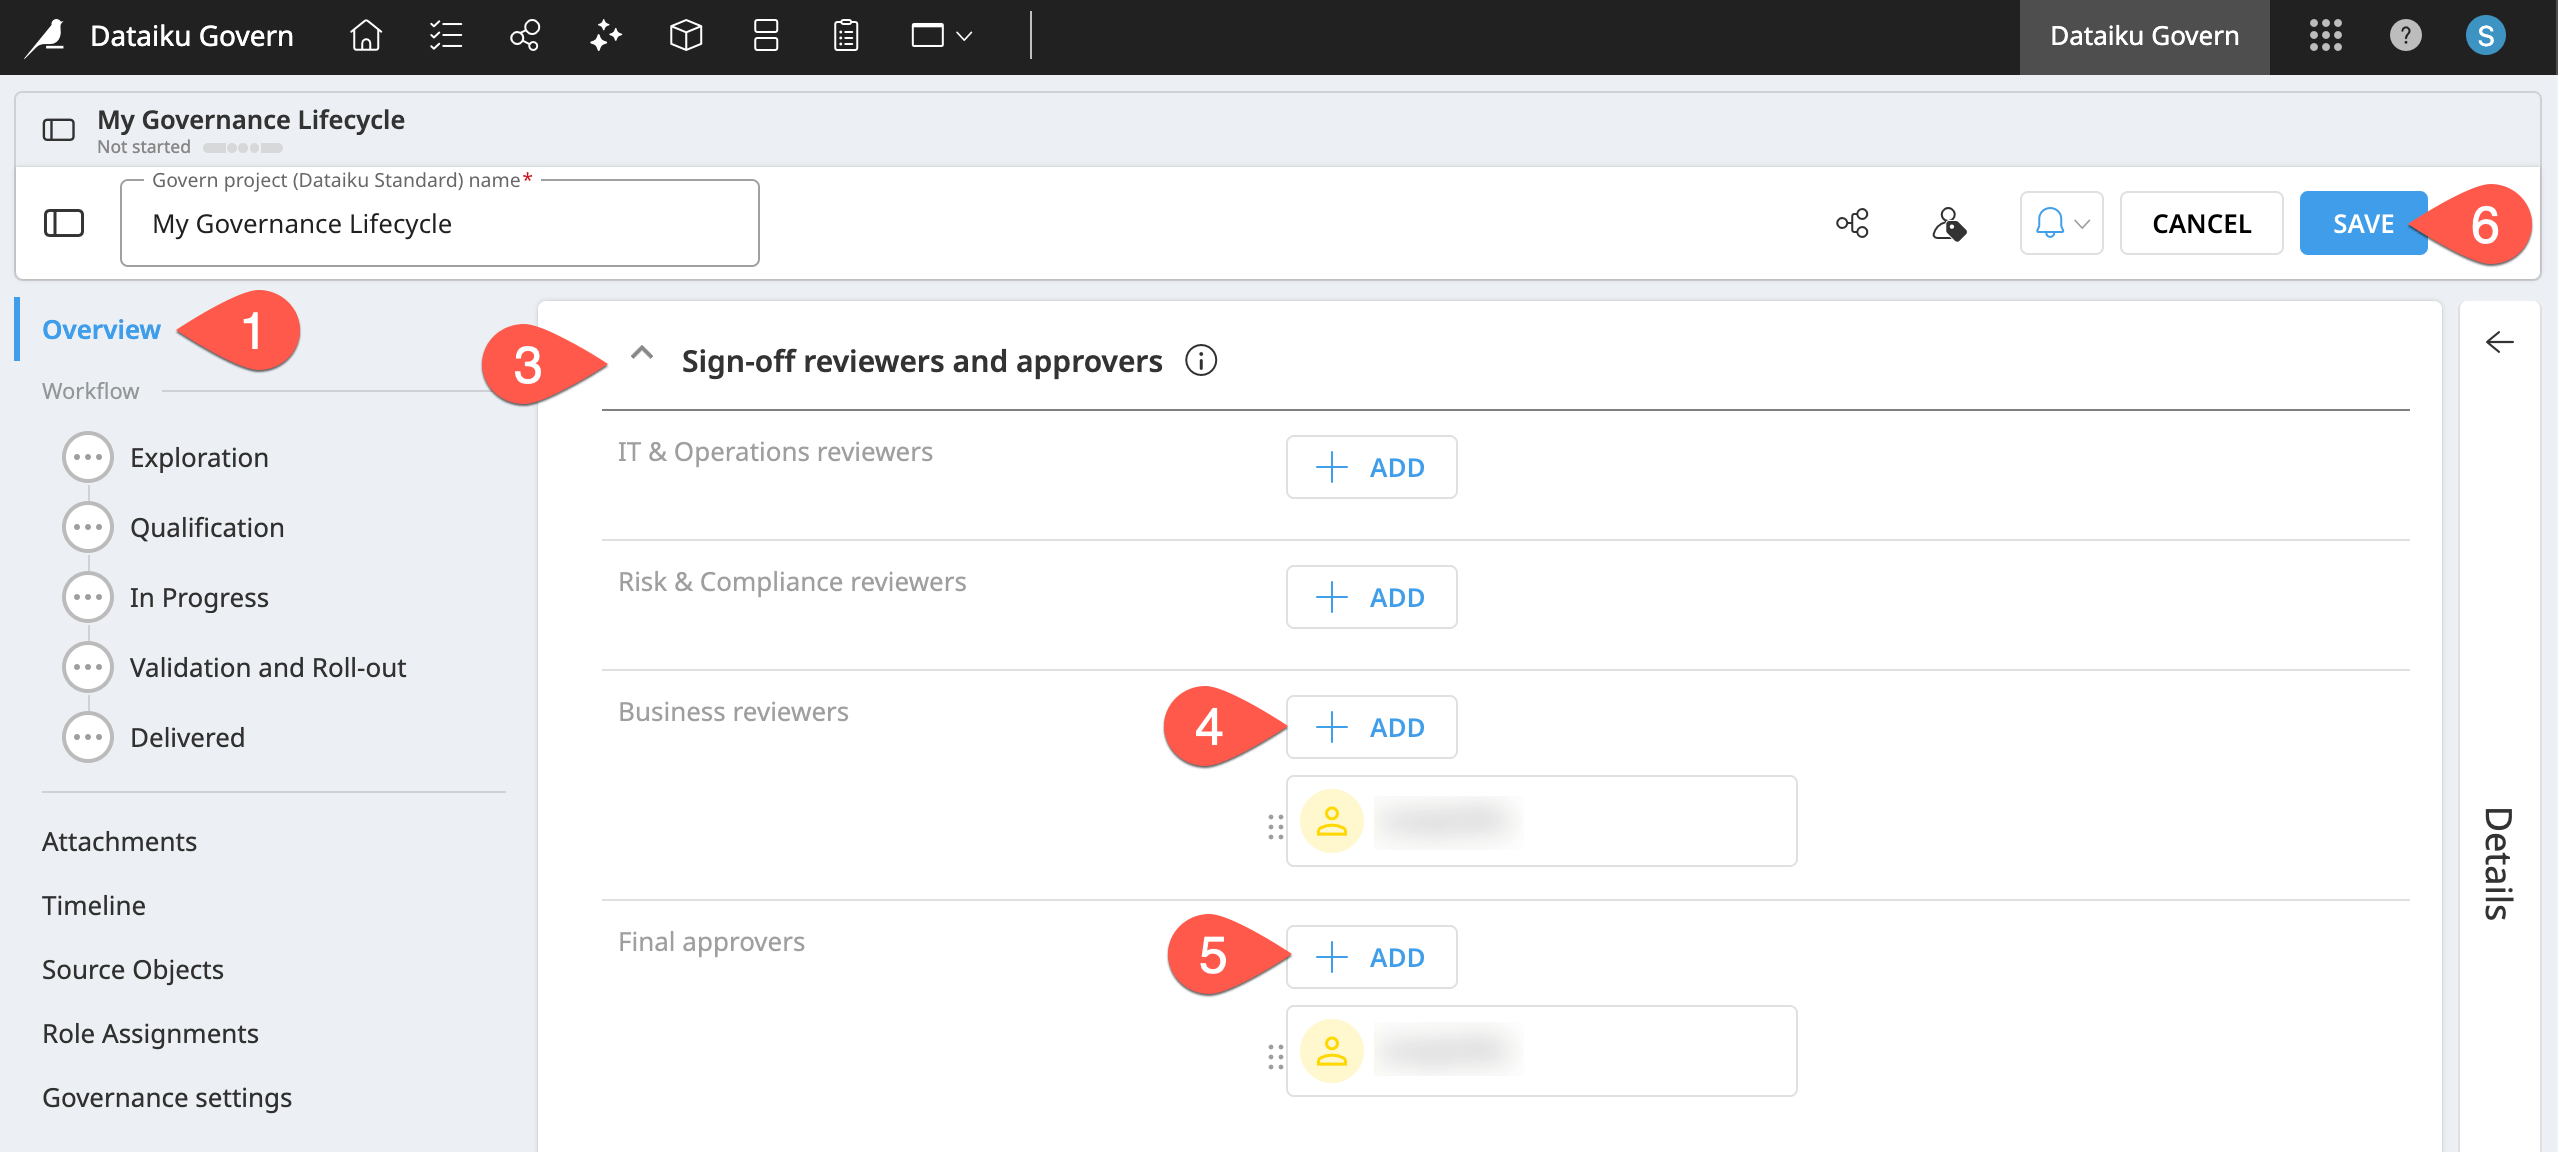
From your governed project, navigate to the Overview panel.
Click Edit in the item header.
Scroll down to the Sign-off reviewers and approvers section.
Next to Business reviewers, click + Add, and select yourself.
Also, next to Final approvers, click + Add, and select yourself.
Click Save in the item header.
Validate project plans#
While it pays dividends in the long run, approving work to begin on a fraud prediction project, or any high risk initiative, could be a lengthy process. This could involve detailed requests for documentation, investigations of compliance requirements, and analysis of regulatory frameworks.
For the purposes of this tutorial, you’ll assume these key steps resulted in a decision to move ahead with the project.
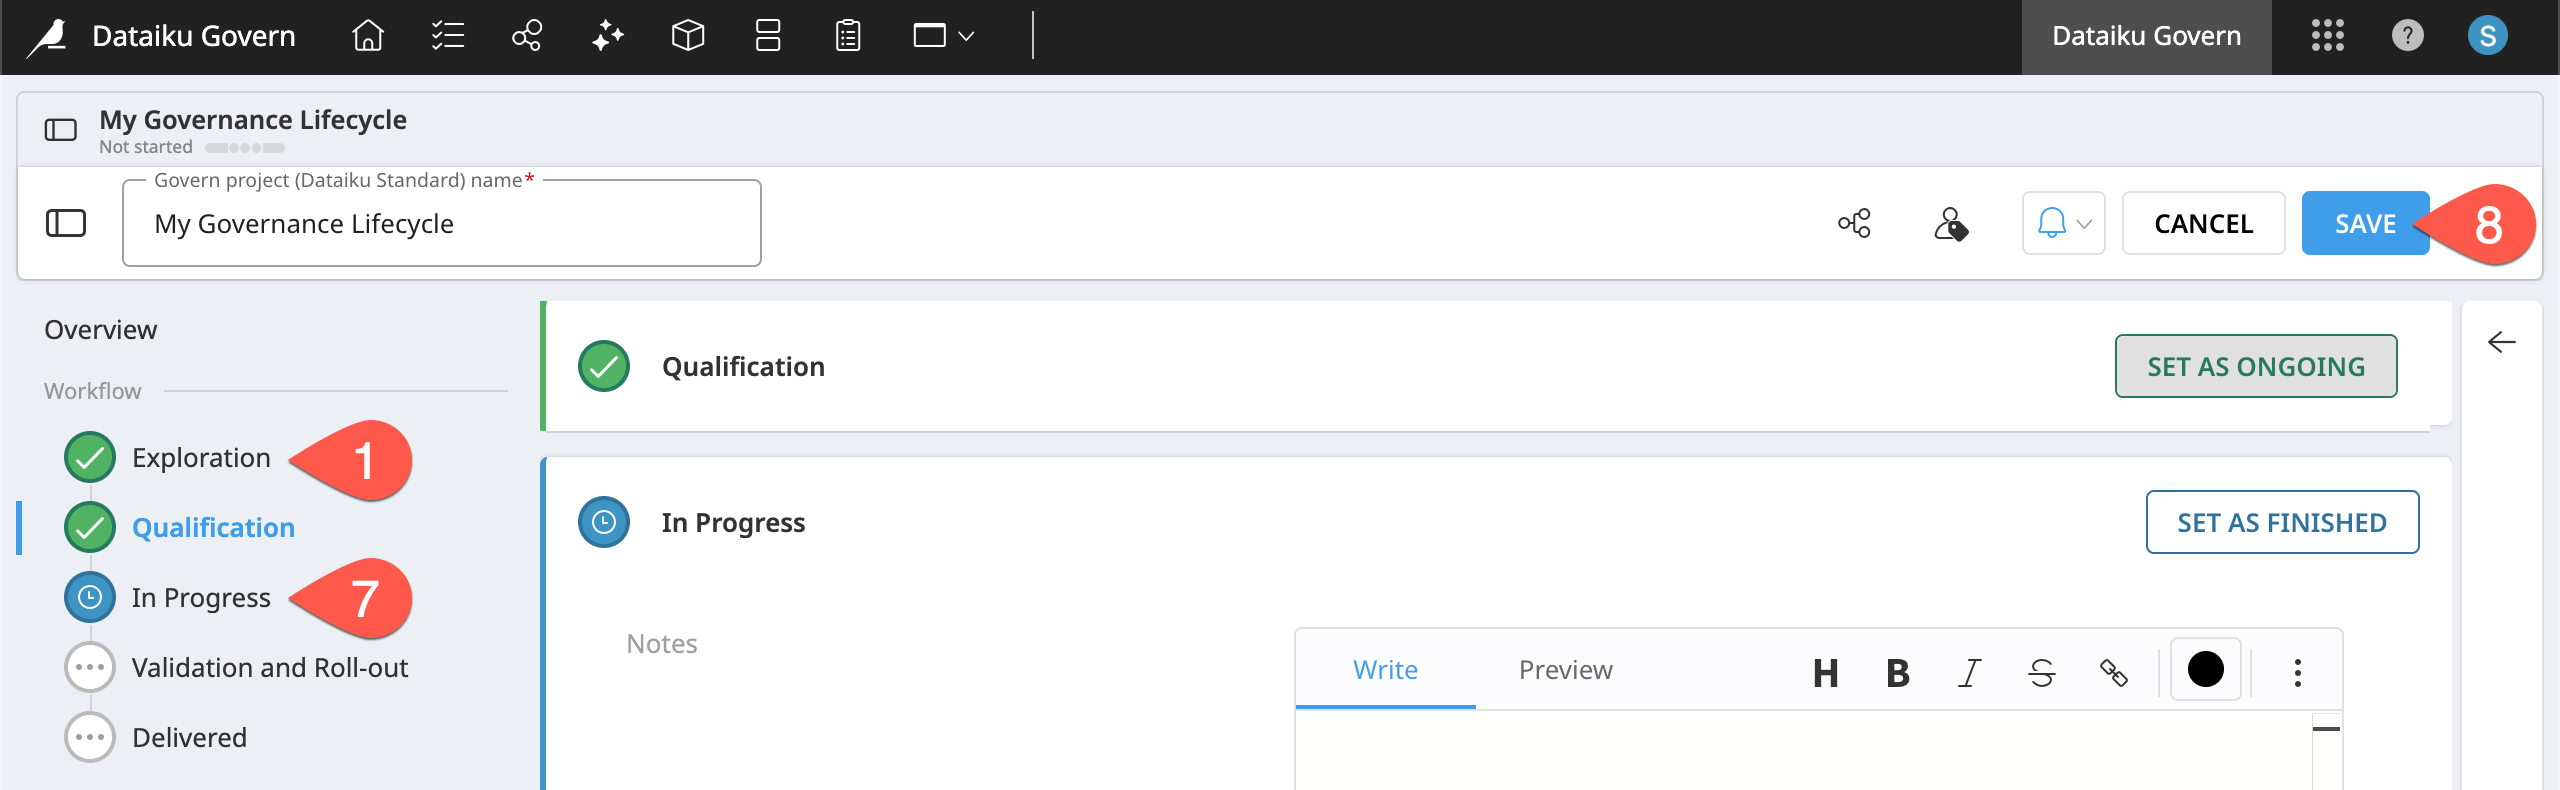
Navigate to the Exploration step of the workflow.
Click Edit in the item header.
Click Set as Ongoing to begin the Exploration step.
In the Notes field, copy-paste the sample below.
The business unit has requested a fraud prediction model for both batch and real-time scoring.
It will require deployment to both Automation and API nodes.
Start researching the risk, value, cost, and feasibility of this project.
Assuming this research is complete, click Set as Finished, thereby advancing to the Qualification step.
In the Qualification step, set the Risk rating to High, the Value rating to High, the Cost rating as Medium low, the Feasibility rating as Medium high.
Finally, set the Resulting decision field to Go.
Click Set as Finished to move to the In Progress step.
Click Save in the item header.
Tip
Imagine how you’d use fields like these to perform true exploration and qualification of a new initiative!
Build Dataiku items in tandem with a governance workflow#
Having completed the exploration and qualification steps, you’ve green-lit the start of a new project using the Govern node. The next step would be to create a Dataiku project in the Design node linked to the validated Govern project. Then, as development progresses in the Design node, you’ll manage the corresponding governance workflow steps in the Govern node.
Link a Dataiku project to a validated Govern project#
In this situation, a validated Govern project authorizes the creation of a blank Dataiku project. The build stage, like the previous exploration and qualification stages, brings its own timeline and challenges.
However, for the purpose of this tutorial, assume the initial build stage of the fraud prediction project was successful. Instead of building it yourself, import a completed fraud prediction project into the Design node.
Open the homepage of a Design node connected to your Govern node.
Click + New Project > Learning projects.
Search for and select Governance Lifecycle.
Click Create, and OK.
On the project homepage, click the pencil (
 ) next to the title.
Rename it
<YOUR INITIALS> Fraud Prediction.
Note
You can also download the starter project from this website and import it as a ZIP file.
Tip
For convenience, it’s helpful if the name of your Dataiku project matches the name of your Govern project. If they don’t, you’ll see an information ( ) icon on the title hinting at the Dataiku source project. You can edit the titles at any time as shown in Tutorial | Governance basics.
Once you have a Dataiku fraud prediction project, you can link it as the source object of the fully validated Govern project.
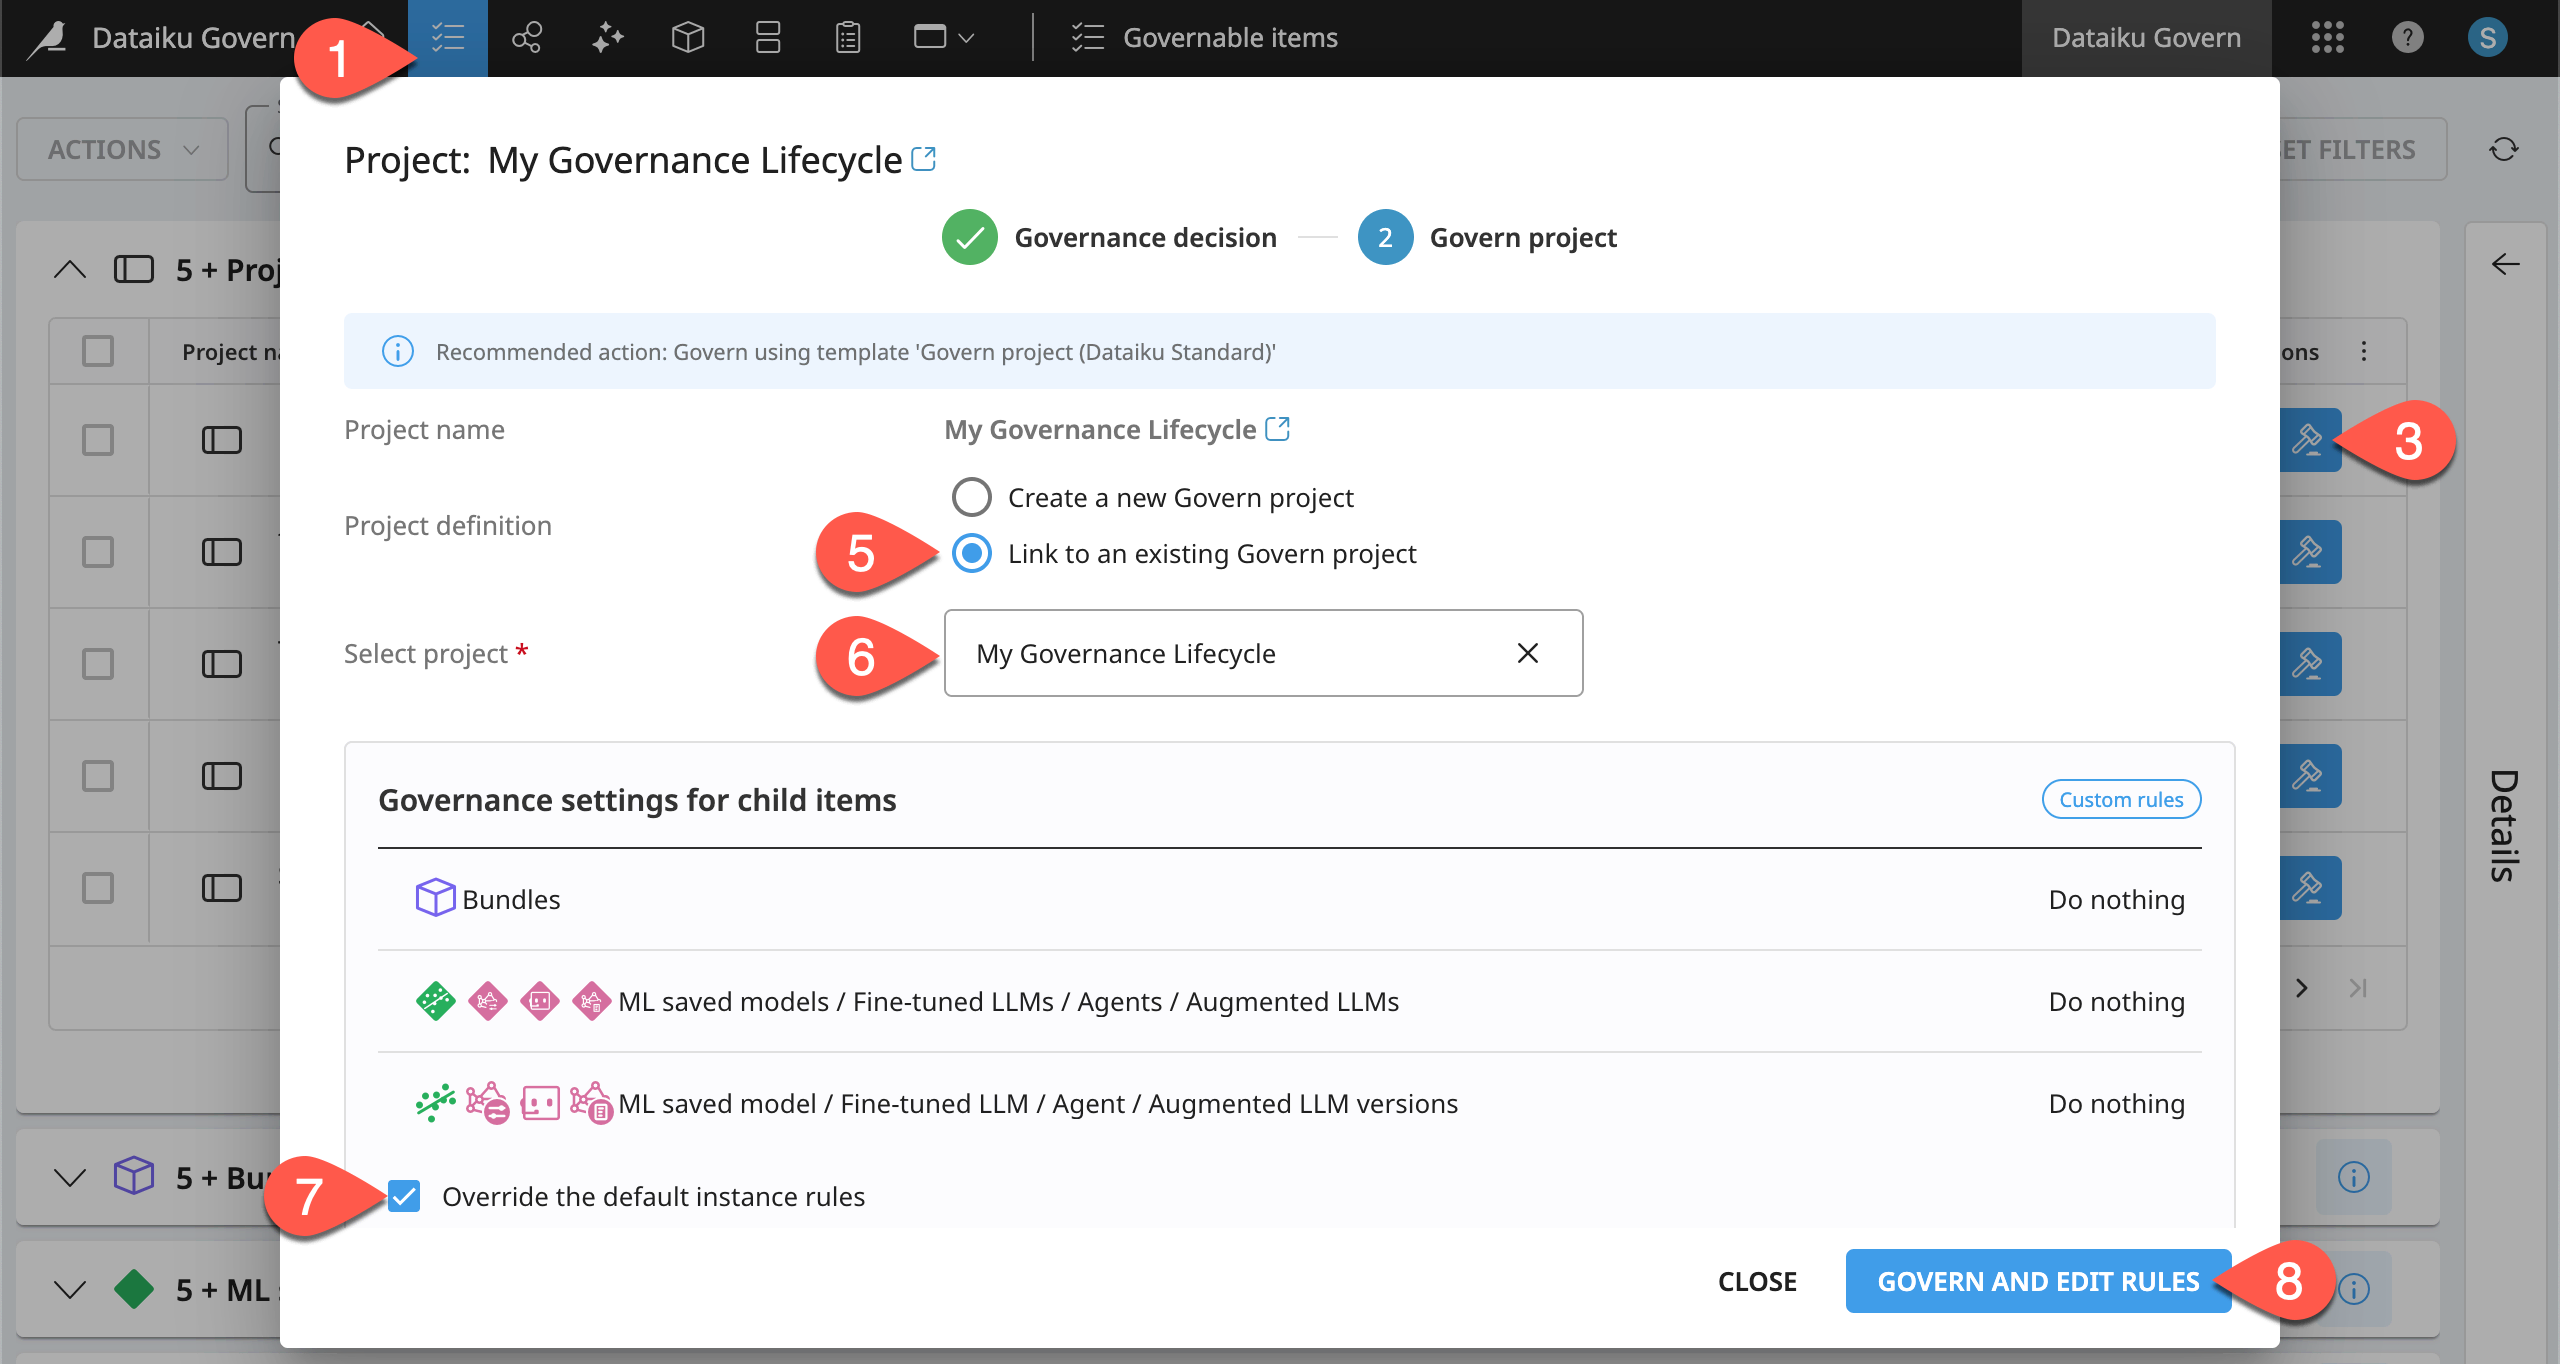
Navigate to the Governable items (
 ) page of your Govern node.
In the Projects accordion menu, find your Fraud Prediction project.
At the end of its row, click the gavel (
 ) to govern it.
Select Govern this item, and click Start.
For the project definition, choose Link to an existing Govern project.
Select your governed project. Its name should be
<YOUR INITIALS> Fraud Prediction.To ensure parity with the tutorial, click Override the default instance rules.
Click Govern and Edit Rules.
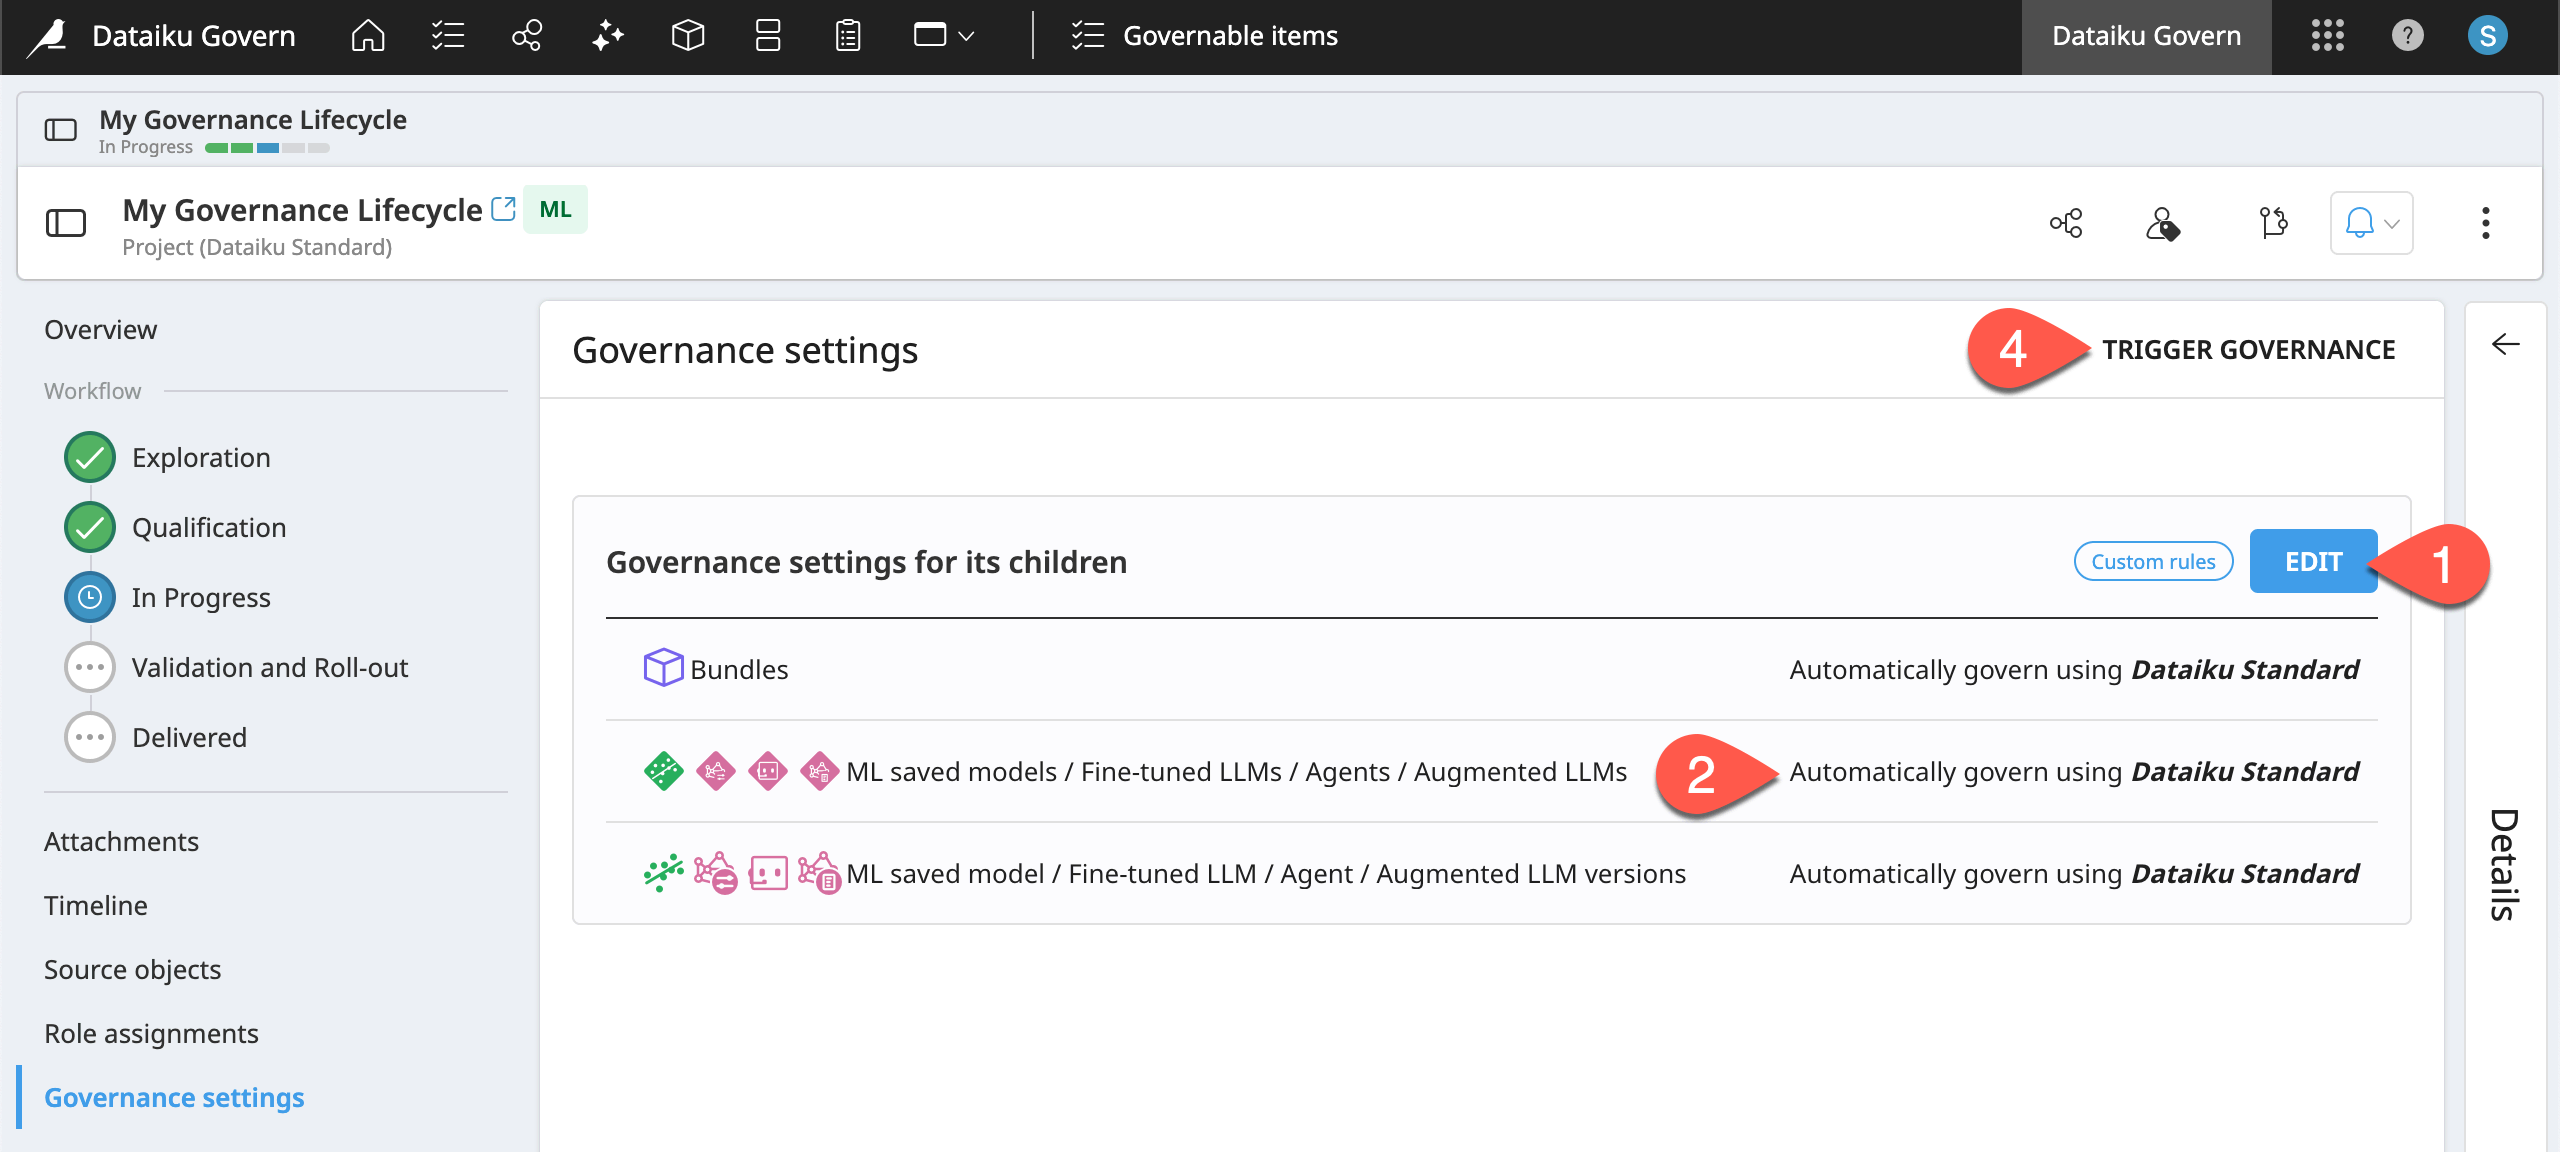
Automatically govern child items#
At this point, you’ve established a link between the Dataiku and Govern projects, but haven’t yet defined rules for governing the child items. As the tutorial plans to put bundles and models into production, do that now.
In the Governance settings panel of the Govern project, click Edit to define custom rules.
Set all types of child items to be automatically governed according to the Dataiku Standard template.
Click Save.
Click Trigger Governance, and then Trigger Auto-Governance to ensure existing child items come under the new settings.
Confirm the governance of source objects#
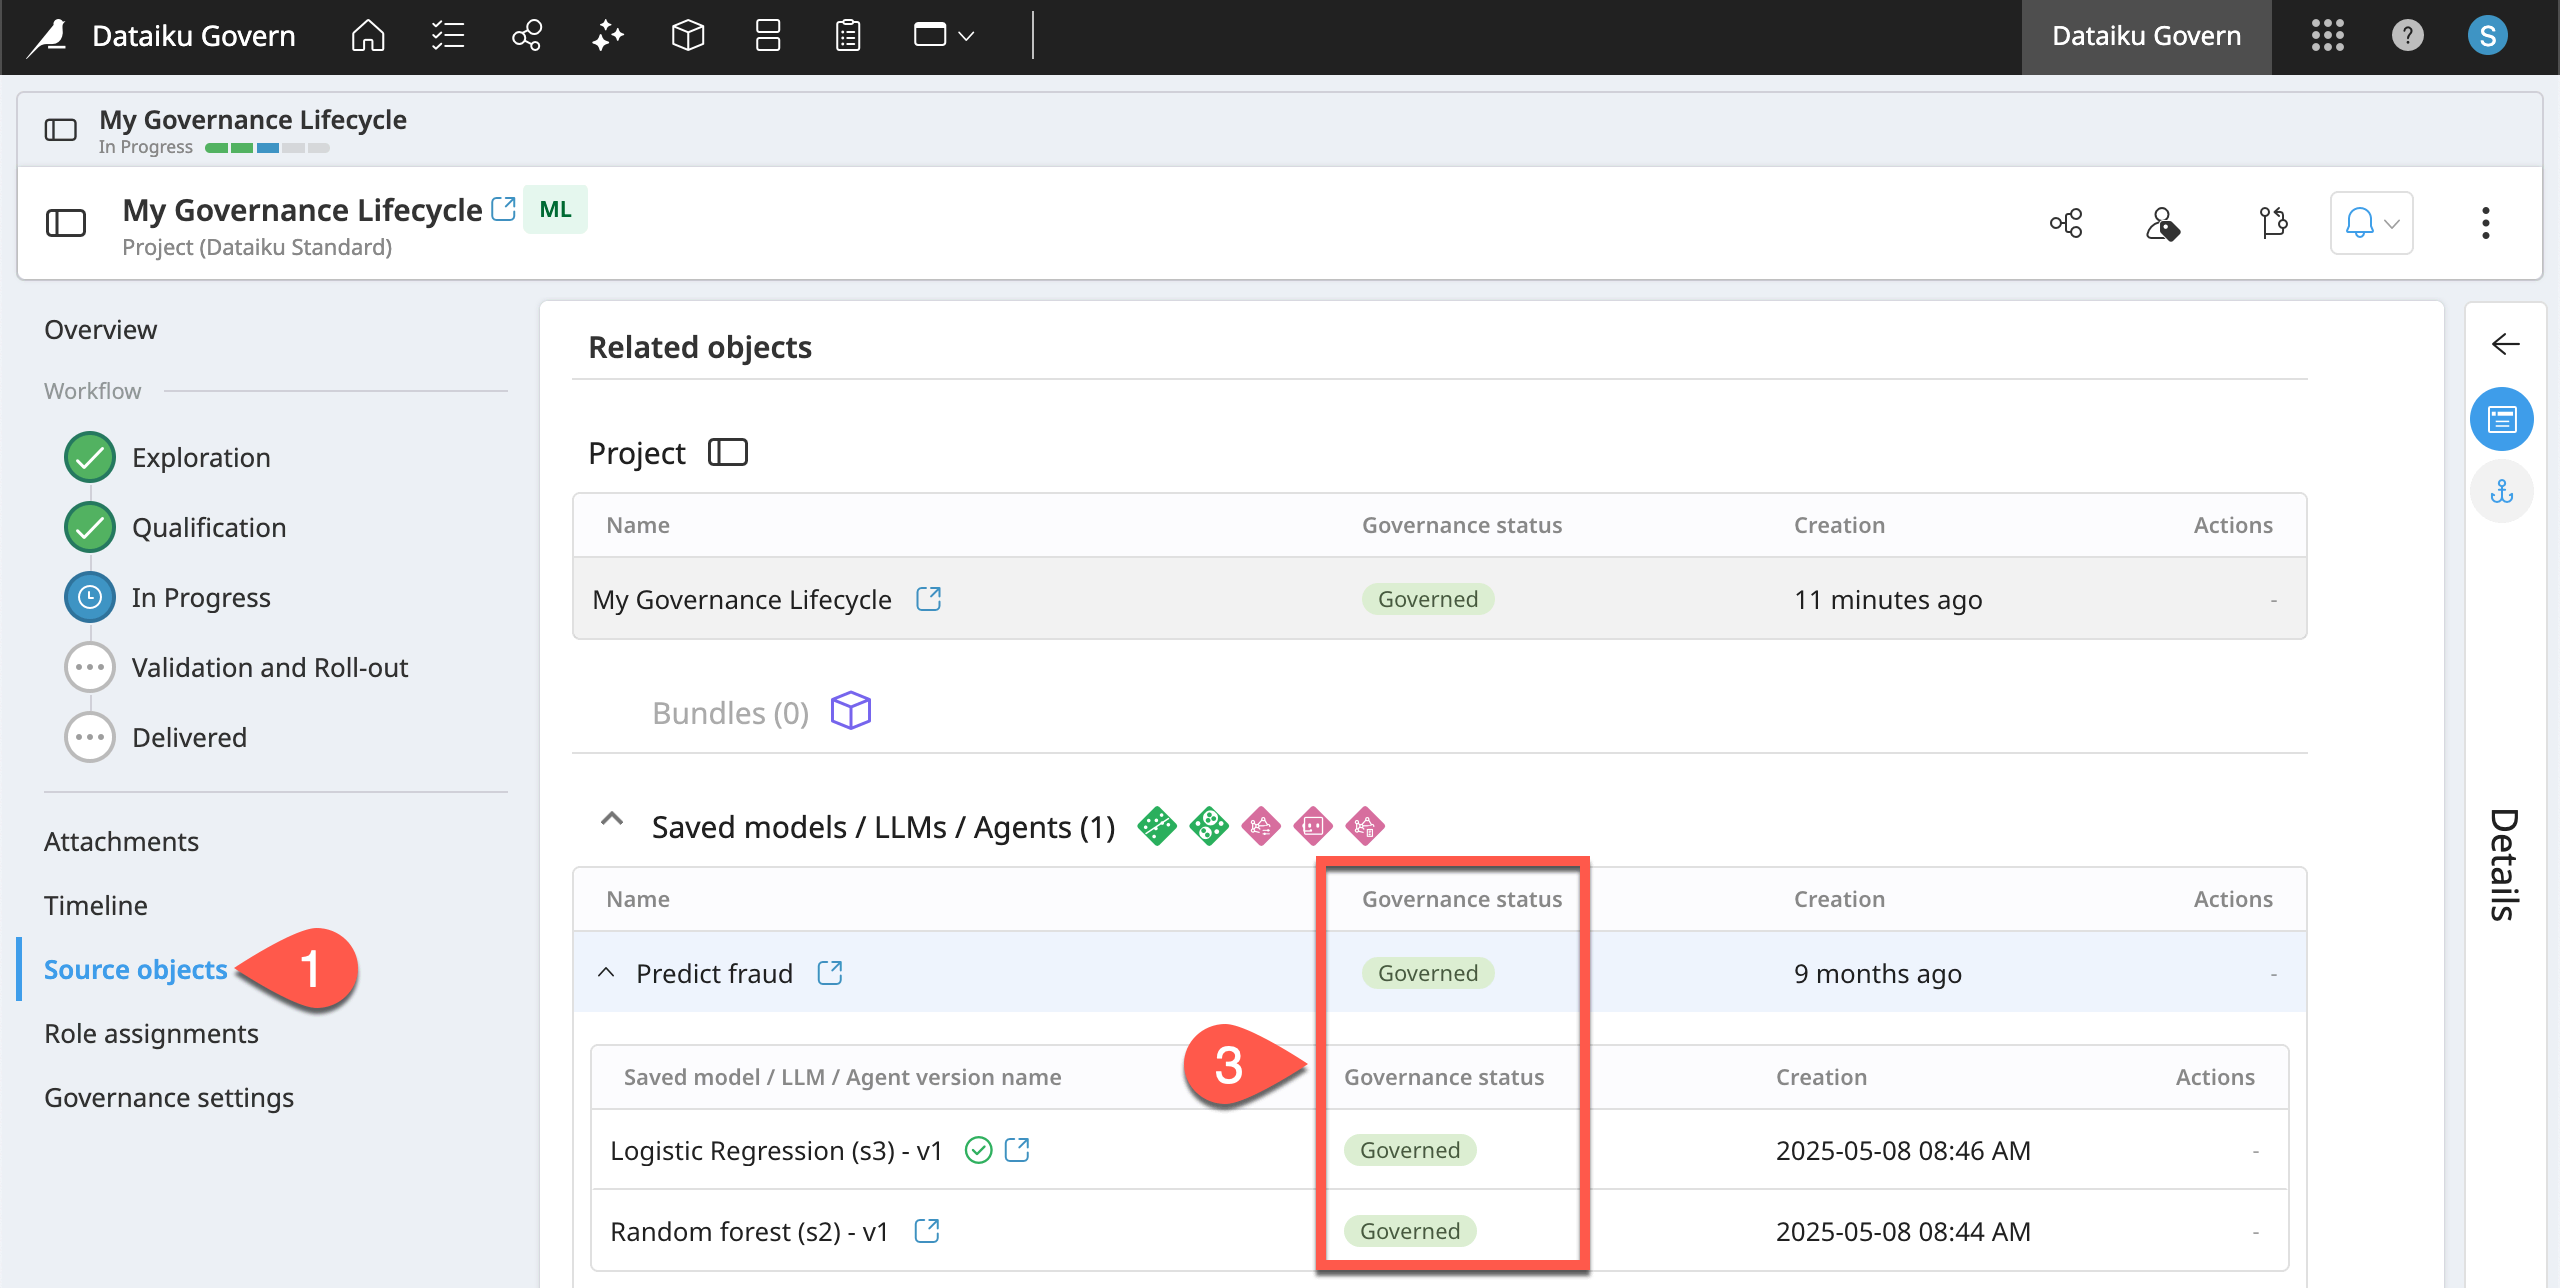
You already had a Govern project in progress. To this Govern project, you linked a Dataiku source project. Now you’re automatically governing its child items. Confirm these facts first.
Navigate to the Source objects panel of the Govern project.
Confirm the presence of your Dataiku project as the source object.
Under Related objects, recognize that the model and its model versions are now governed.
Tip
Keep your Dataiku and Govern projects open in separate tabs to make it easier to switch back and forth throughout this tutorial!
Add new Dataiku child items#
Having confirmed a successful link between the Govern node and your Design node project, the project builder now wants to move their project into production. To generate monthly fraud reports, they’ll need to package their project as a bundle. This is the actual artifact that teams will review and eventually approve for deployment.
Return to your Fraud Prediction project on the Design node.
From the top navigation bar, select More Options (
 ) > Bundles.
Click + New Bundle.
Name it
v1.Click Create.
After creating the bundle, select it to open it.
Review its Governance status.
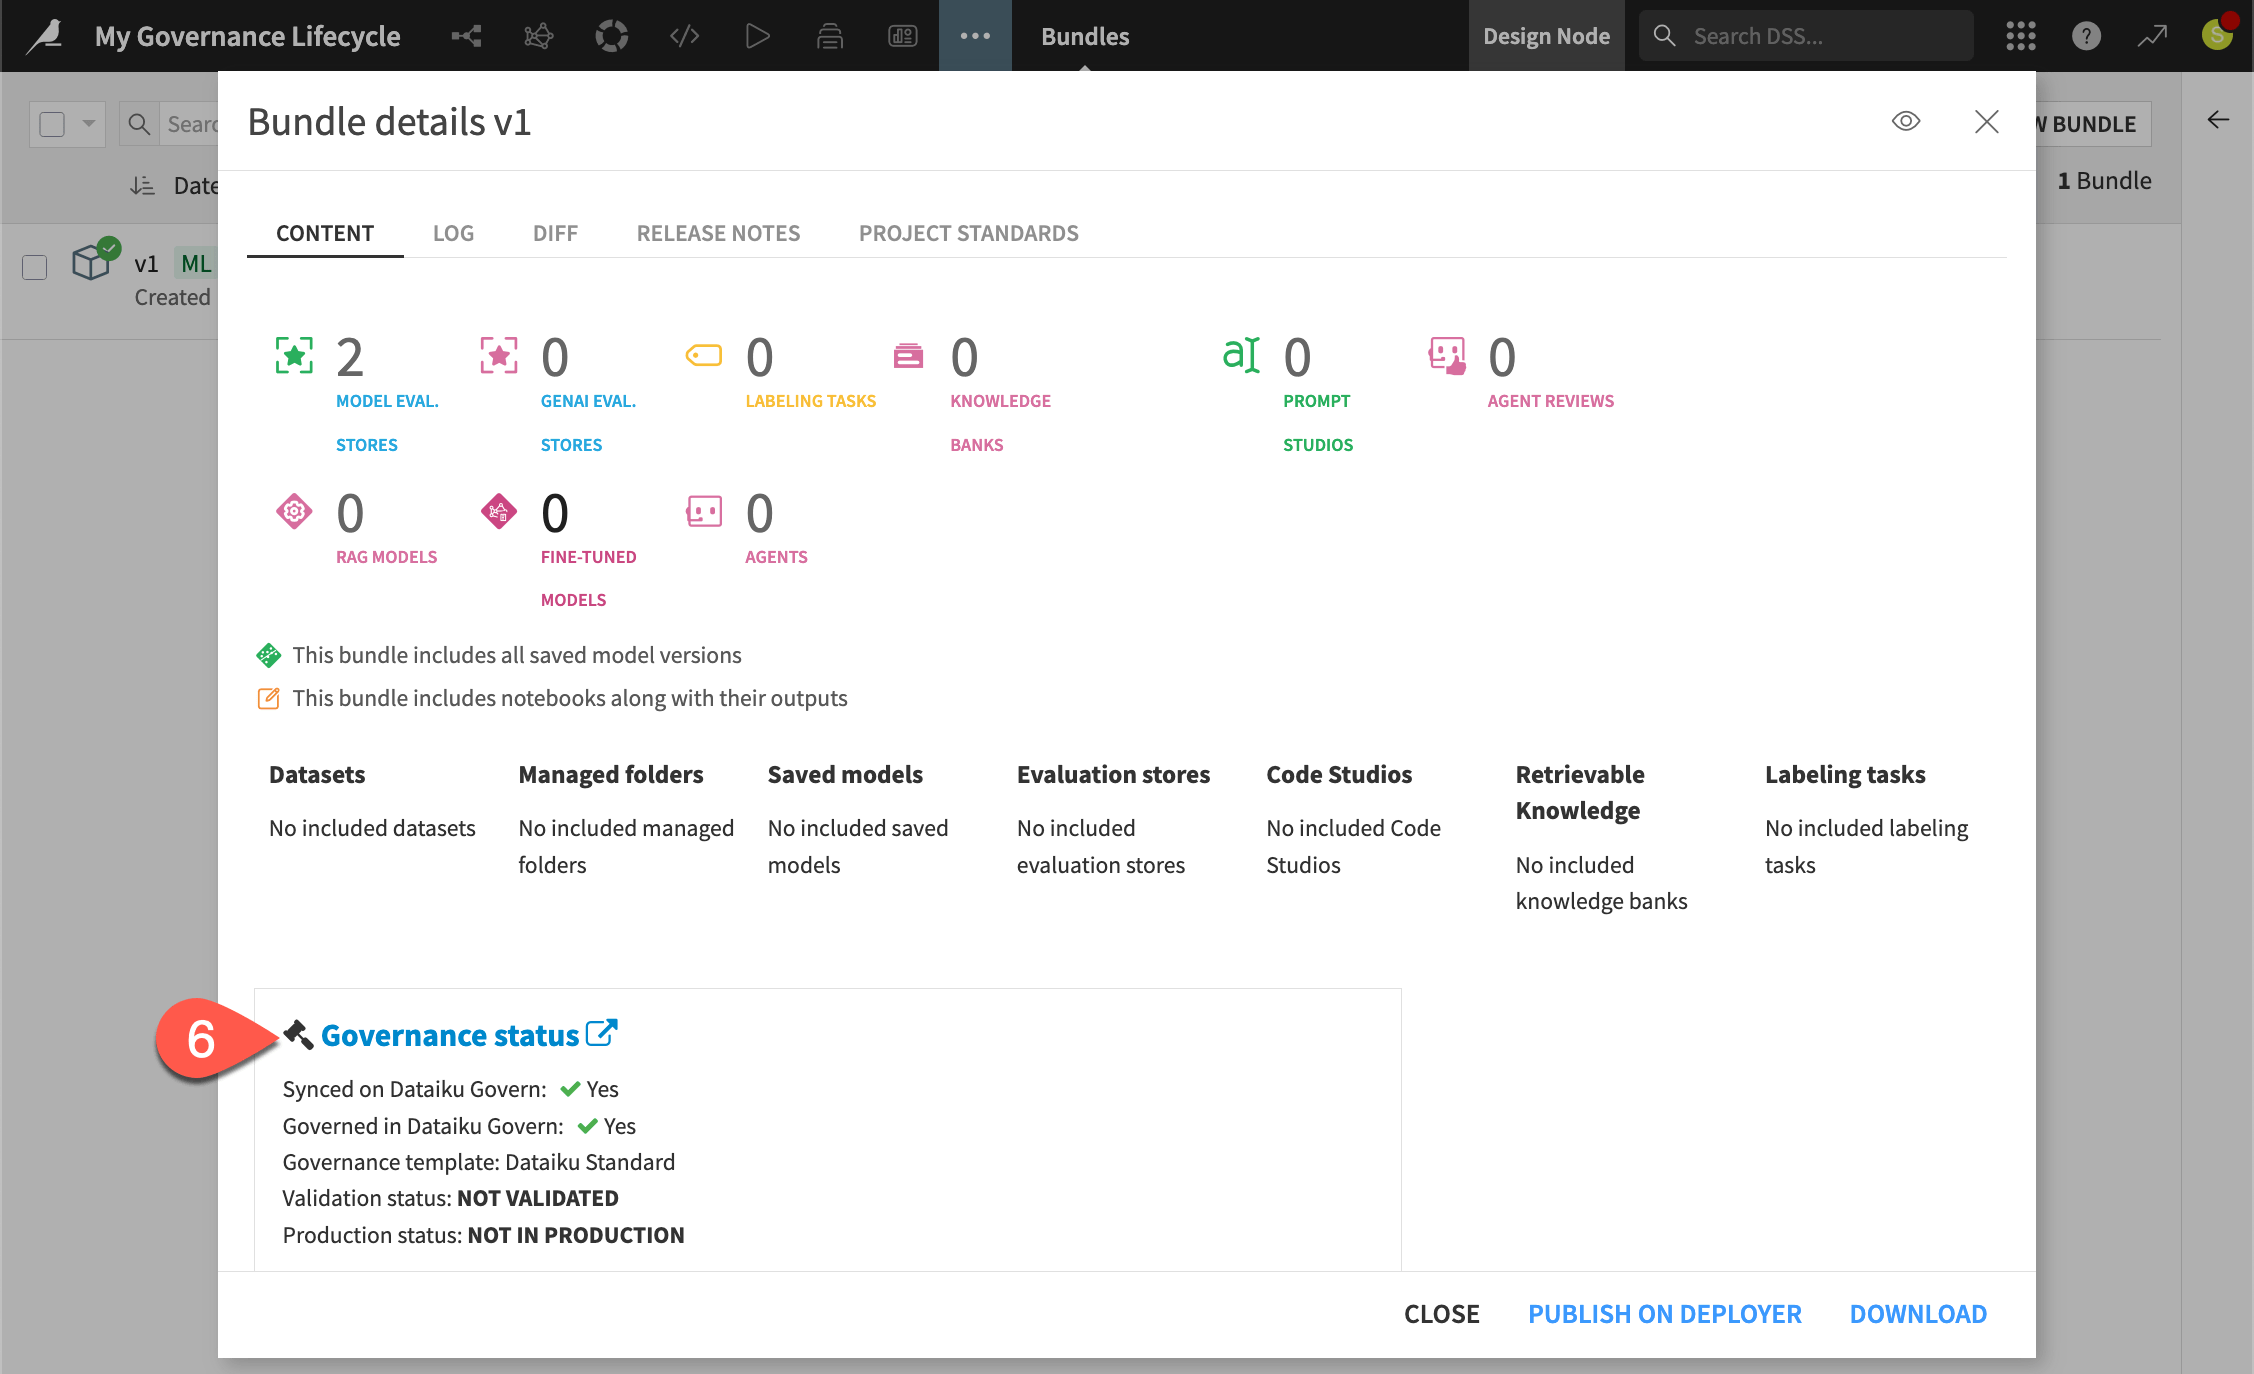
Your bundle should be synced and governed according to the standard template. However, it’s not yet validated or in production.
Tip
Refresh the Source objects panel of the Govern project to confirm the new bundle is in fact automatically governed.
Sign-off on Dataiku items#
You now have a qualified Govern project automatically governing new child items (bundles and model versions) from a Dataiku project. In this section, you’ll play the roles of both builder and reviewer, switching between the Design and Govern nodes as you advance a project through a governance workflow.
Start the workflow of a governed child item#
Your Govern project is in progress, but recall that governed child items (namely Govern bundles and model versions) have their own workflow steps. According to the standard template, the workflow of these items includes a step with an attached sign-off.
Next, walk through the workflow for a project bundle.
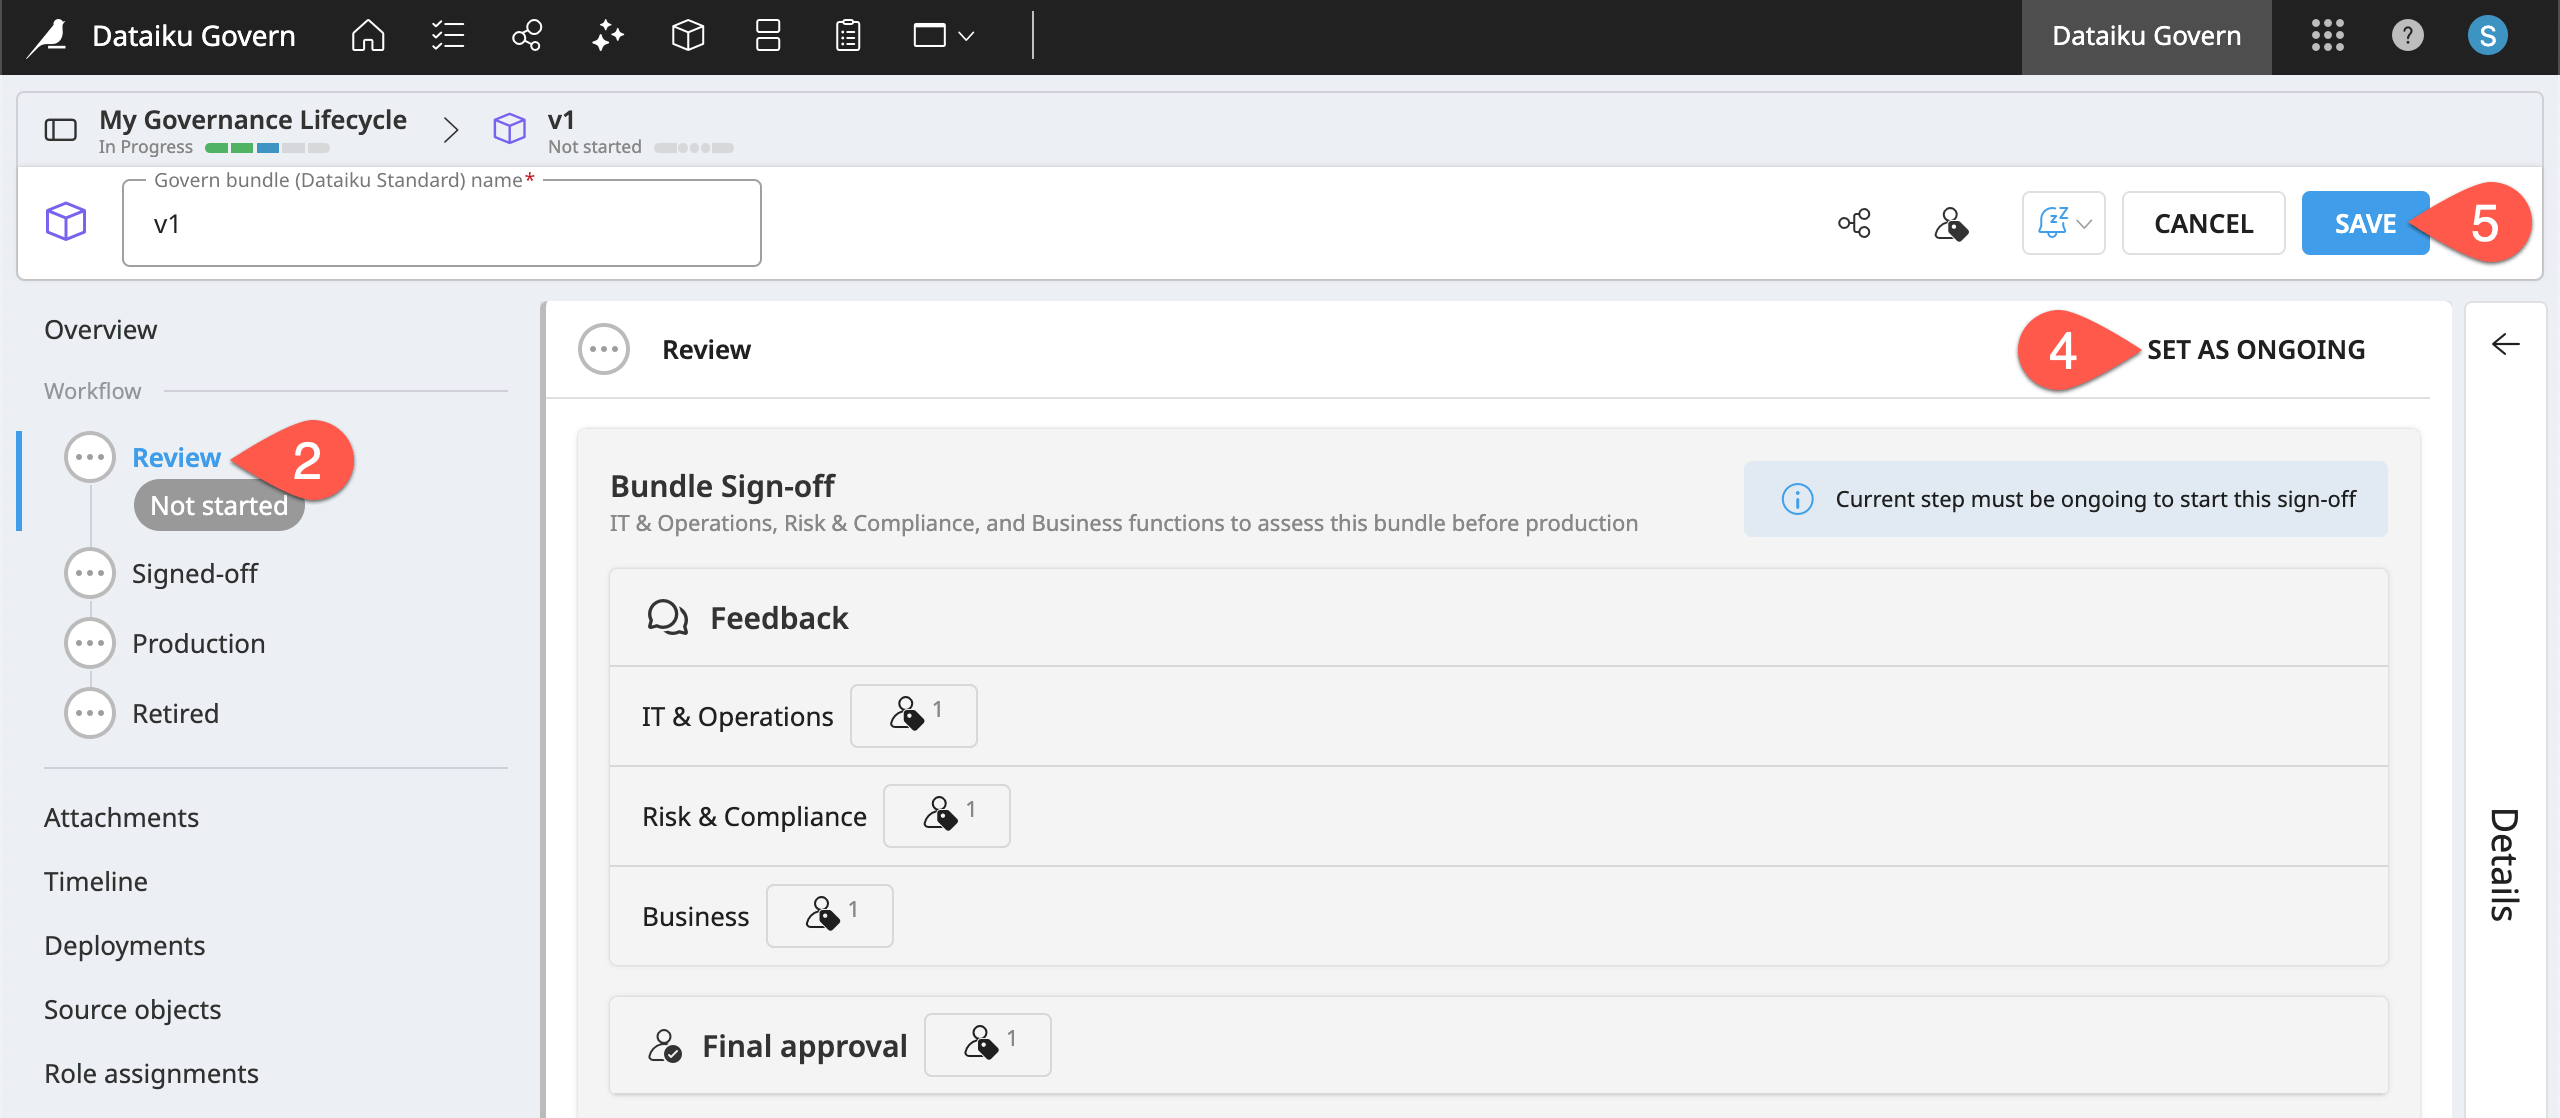
From the Source objects panel of the Govern project, select the v1 bundle, and click Open in the right panel.
From the governed bundle, select the Review workflow step.
Click Edit in the item header.
Click Set as Ongoing to initiate this step.
Click Save in the item header.
Request feedback#
Recall that after creating the governed project, you added reviewers in different areas. These areas provide a space to surface concerns from different stakeholders. IT, for example, may investigate the project’s technical architecture and expected infrastructure needs. Risk and compliance teams meanwhile have an entirely different set of concerns around laws and regulations.
You can use review steps to insert humans in the loop of your governance processes. Once on the Review step, notice that you can’t set it as finished. It’s impossible to advance the workflow step without a final approval. Work toward that approval!
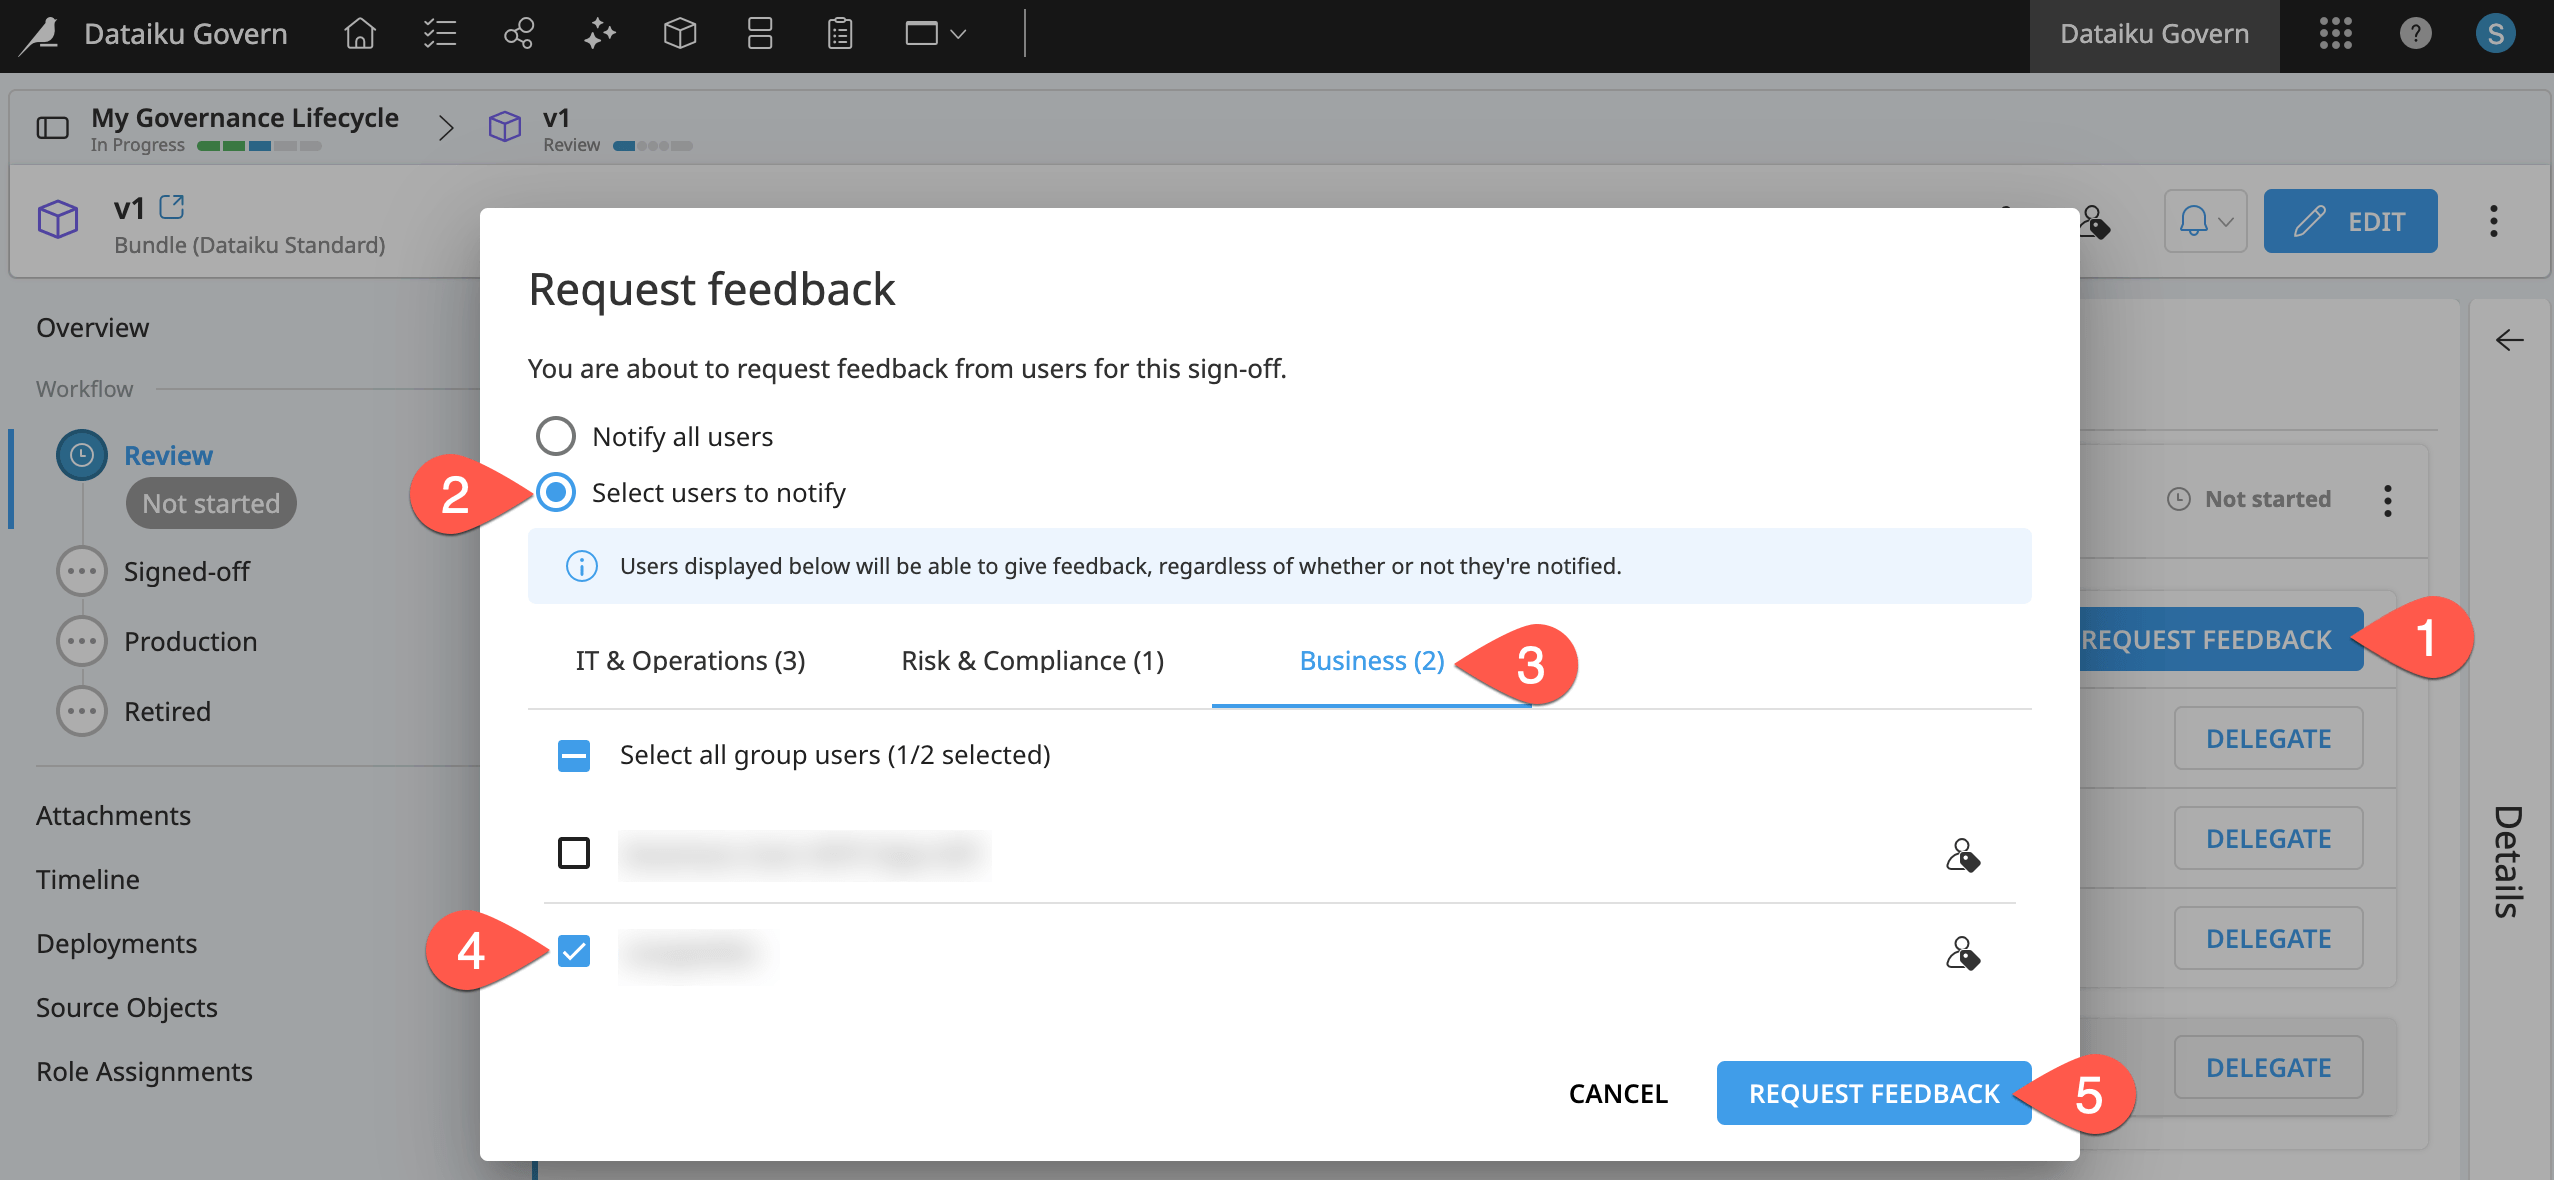
From within the Review step of the governed bundle, click Request Feedback.
Choose Select users to notify.
Display the Business reviewers.
Select yourself.
Click Request Feedback to complete the dialog.
Submit feedback#
Remember that you’re playing all roles in this situation. Having requested feedback, now it’s your turn to submit feedback!
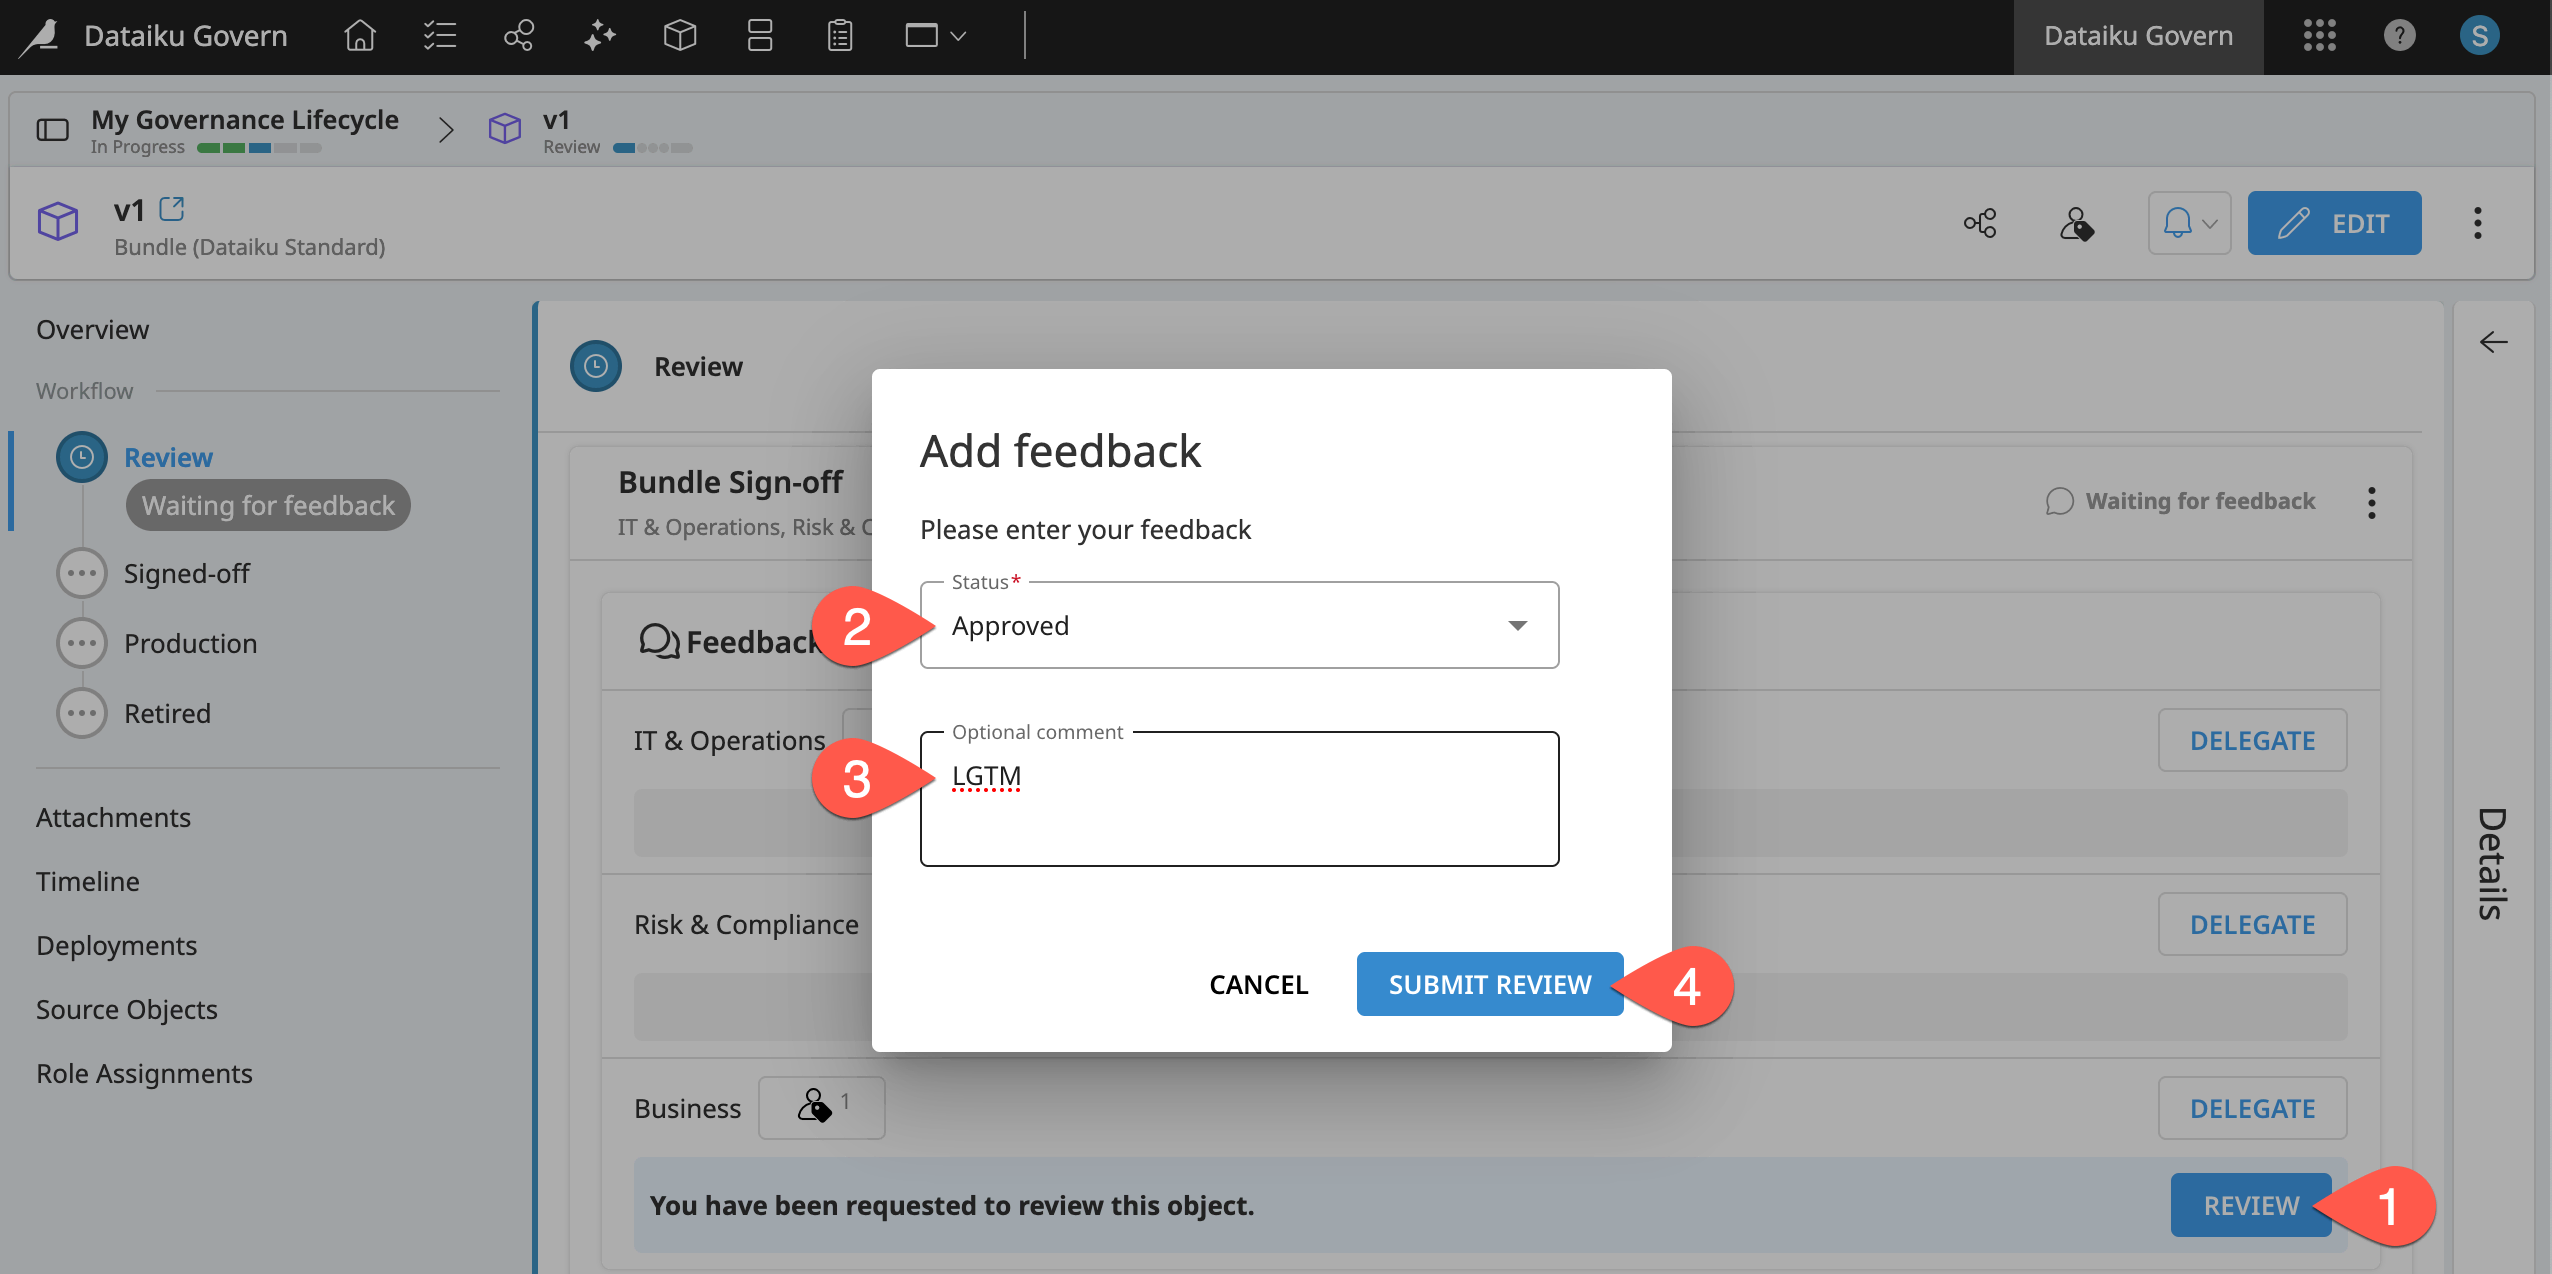
From within the Review step of the governed bundle, click Review for the business division.
Set the status to Approved.
Add the comment
LGTM. This fraud prediction model will achieve key business objectives.Click Submit Review.
Reject an item under review#
Various teams can provide feedback during the review process, but one party is responsible for a final approval, according to the standard template.
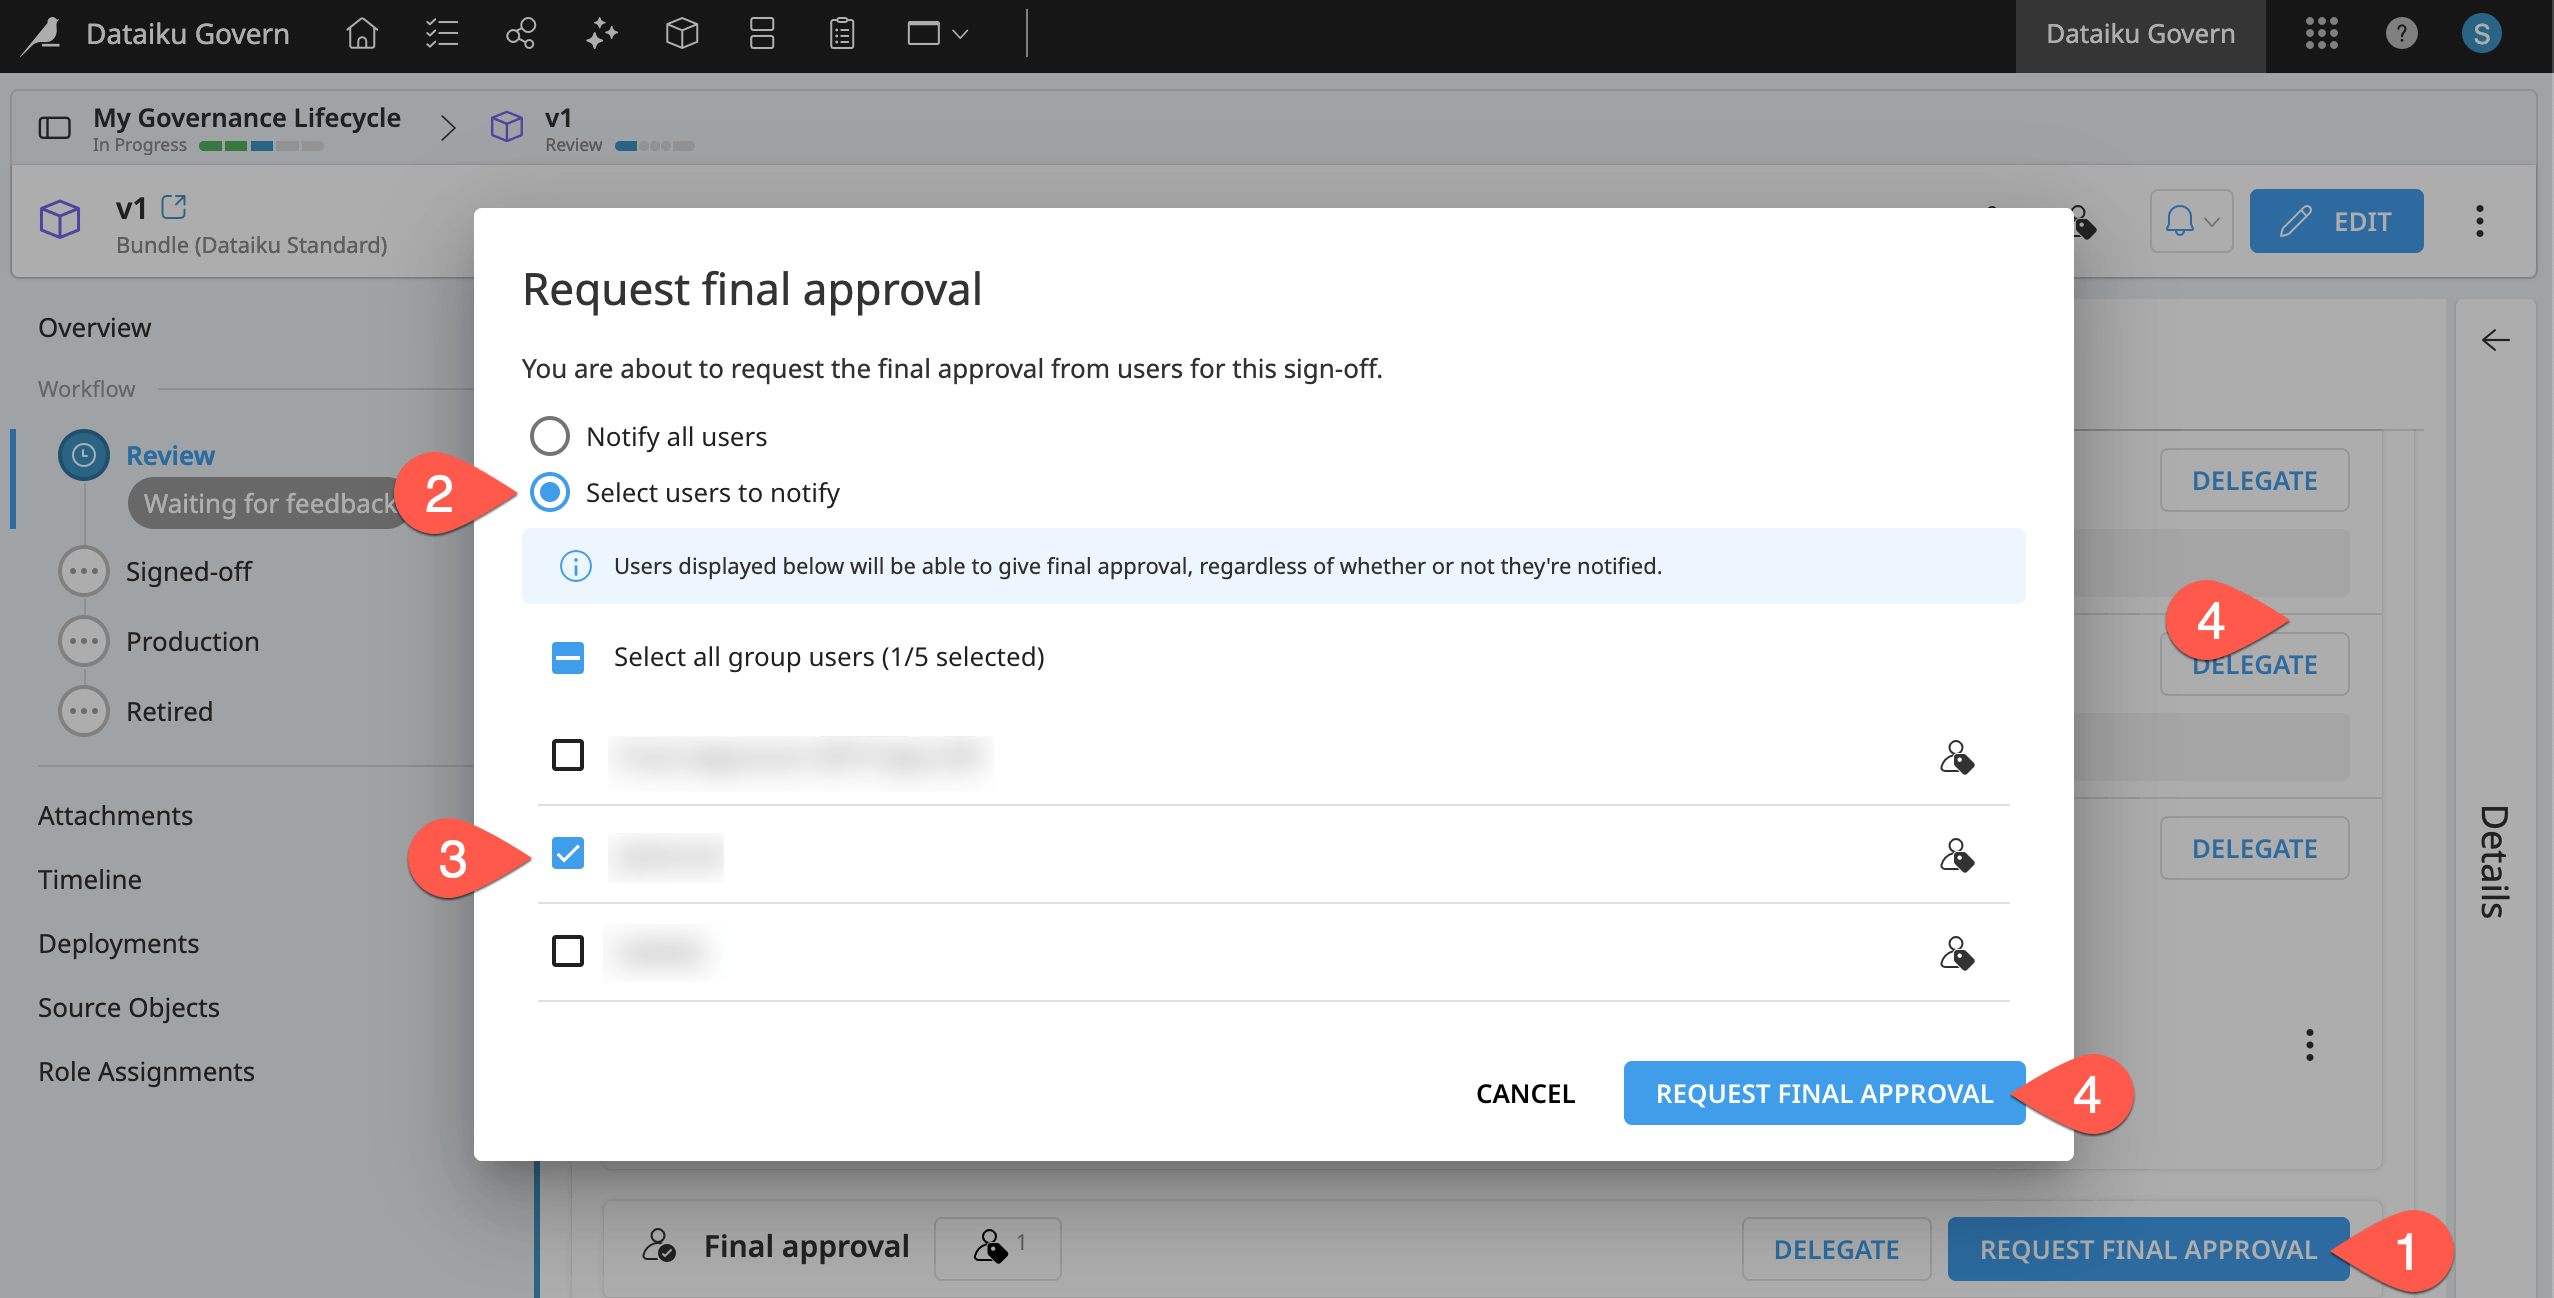
From within the Review step of the governed bundle, click Request Final Approval.
Choose Select users to notify.
Select yourself.
Click Request Final Approval once more to complete the dialog.
Now put on the hat of the final reviewer, but reject it. A bundle like this could fail to meet requirements for any number of reasons.
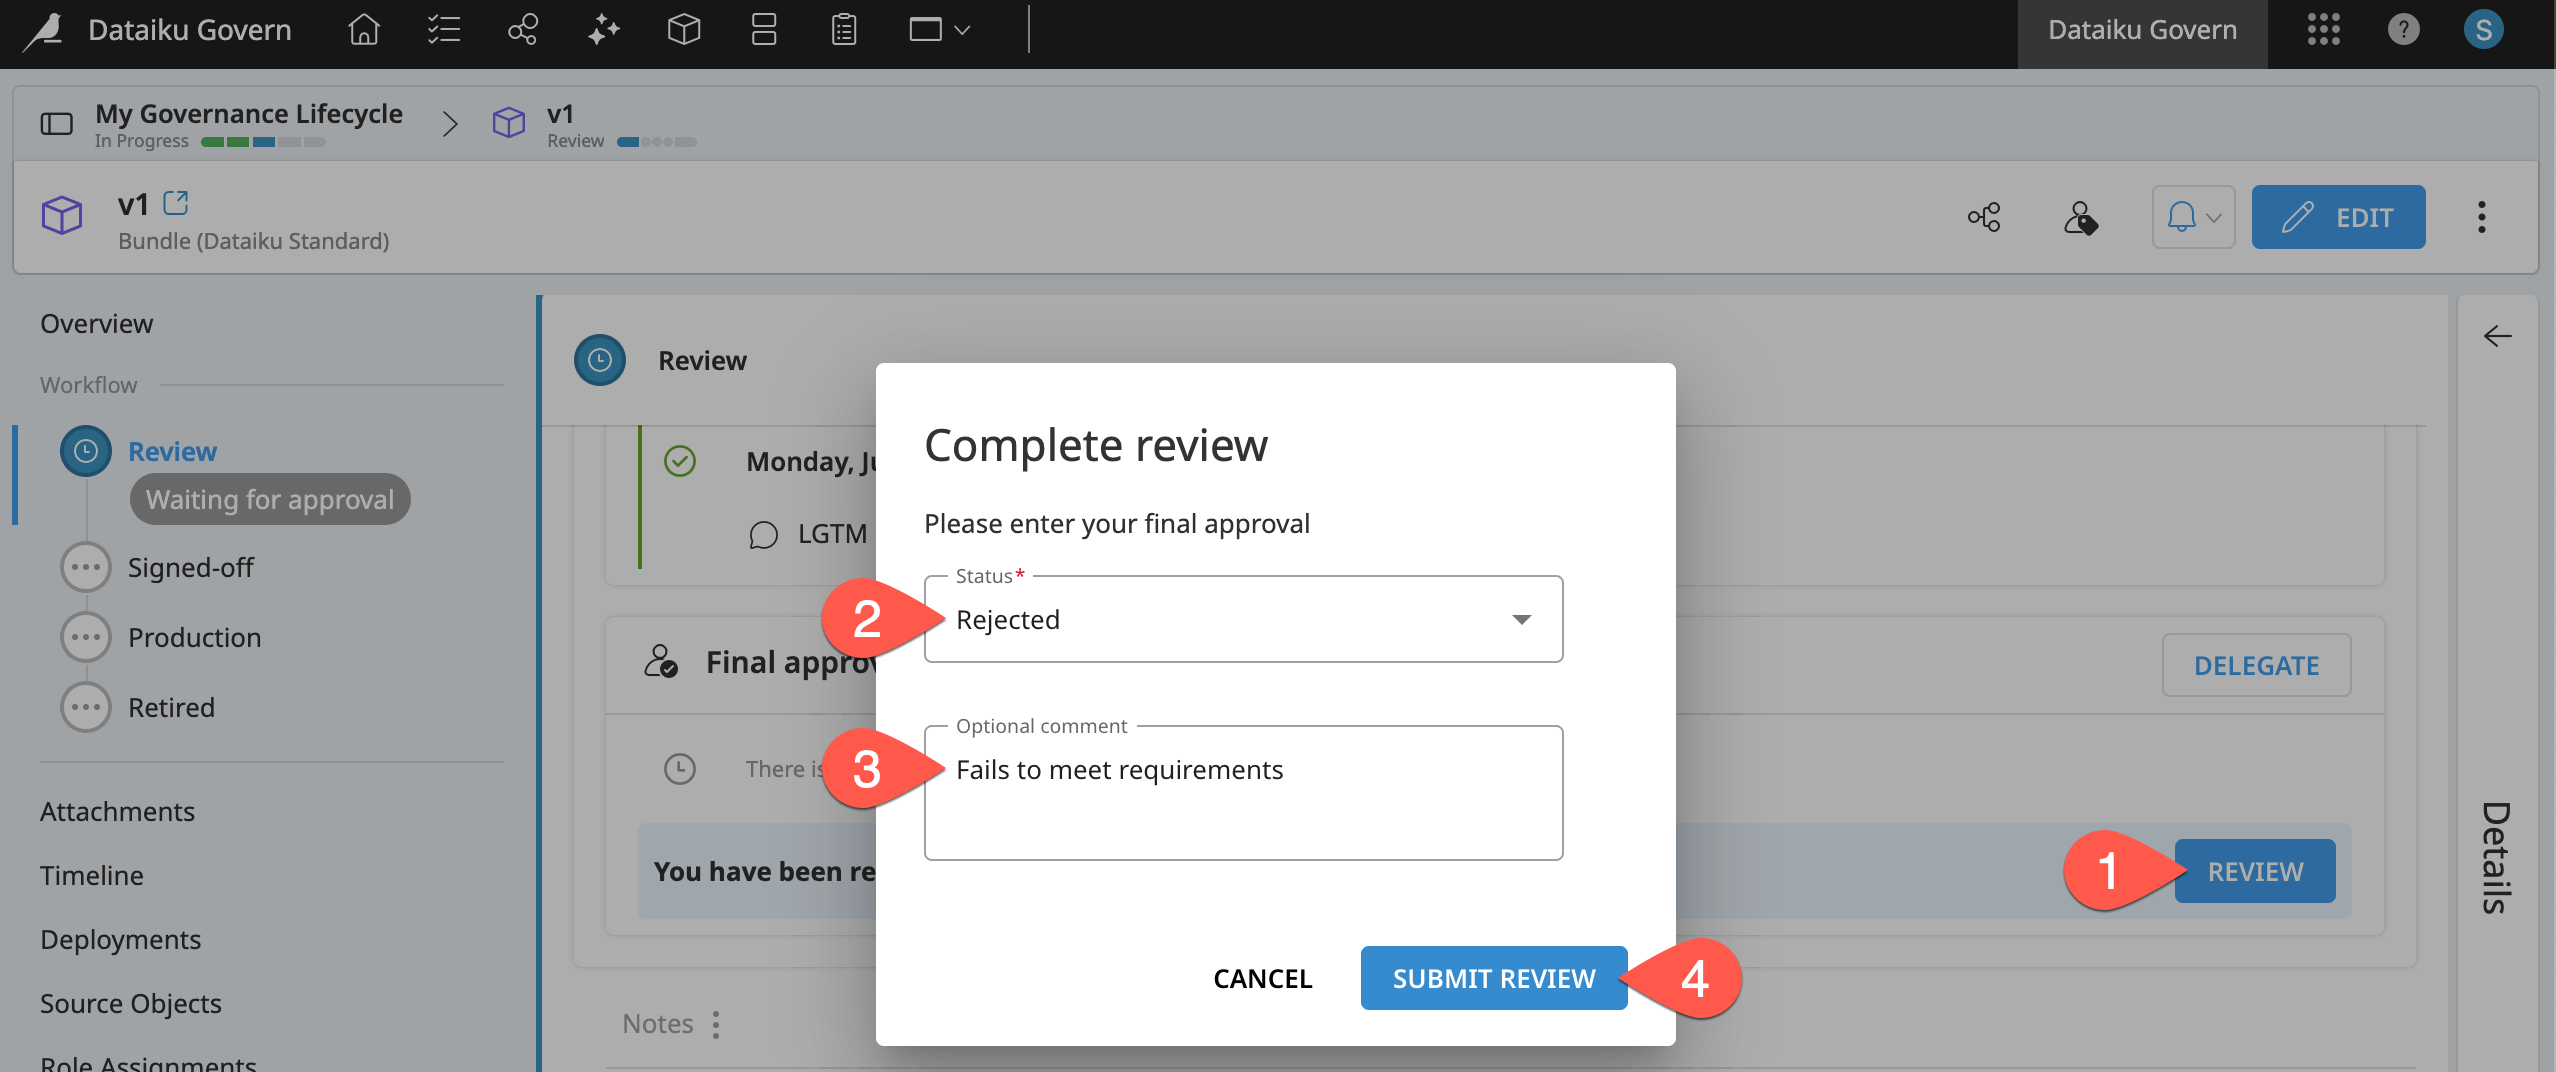
From within the Review step of the governed bundle, click Review to partake in the final approval process.
Set the status to Rejected.
Add a comment like
The DS team failed to include required technical documentation in a wiki.Click Submit Review.
Tip
Confirm for yourself that you’re unable to advance the bundle to the next workflow step with a rejected approval status!
Grant final approval#
A reviewer might reject a bundle or model version for many possible reasons. Faced with this rejection, the builders must take any feedback they’ve received and work on a new version. First, create a new bundle.
If you’d like, add a wiki to the Design node project.
Return to the Bundles page.
Click + New Bundle, name it
v2, and click Create.Return to the Govern node, and open the new governed v2 bundle.
Now request another review.
Repeat the same process as before, beginning the Review step for the v2 bundle.
In the Review step, once again click Request Feedback.
Select yourself among the Business reviewers.
Skip the actual business review this time. Instead, go ahead to click Request Final Approval.
In the dialog, choose Select users to notify, and select yourself.
Click Request Final Approval.
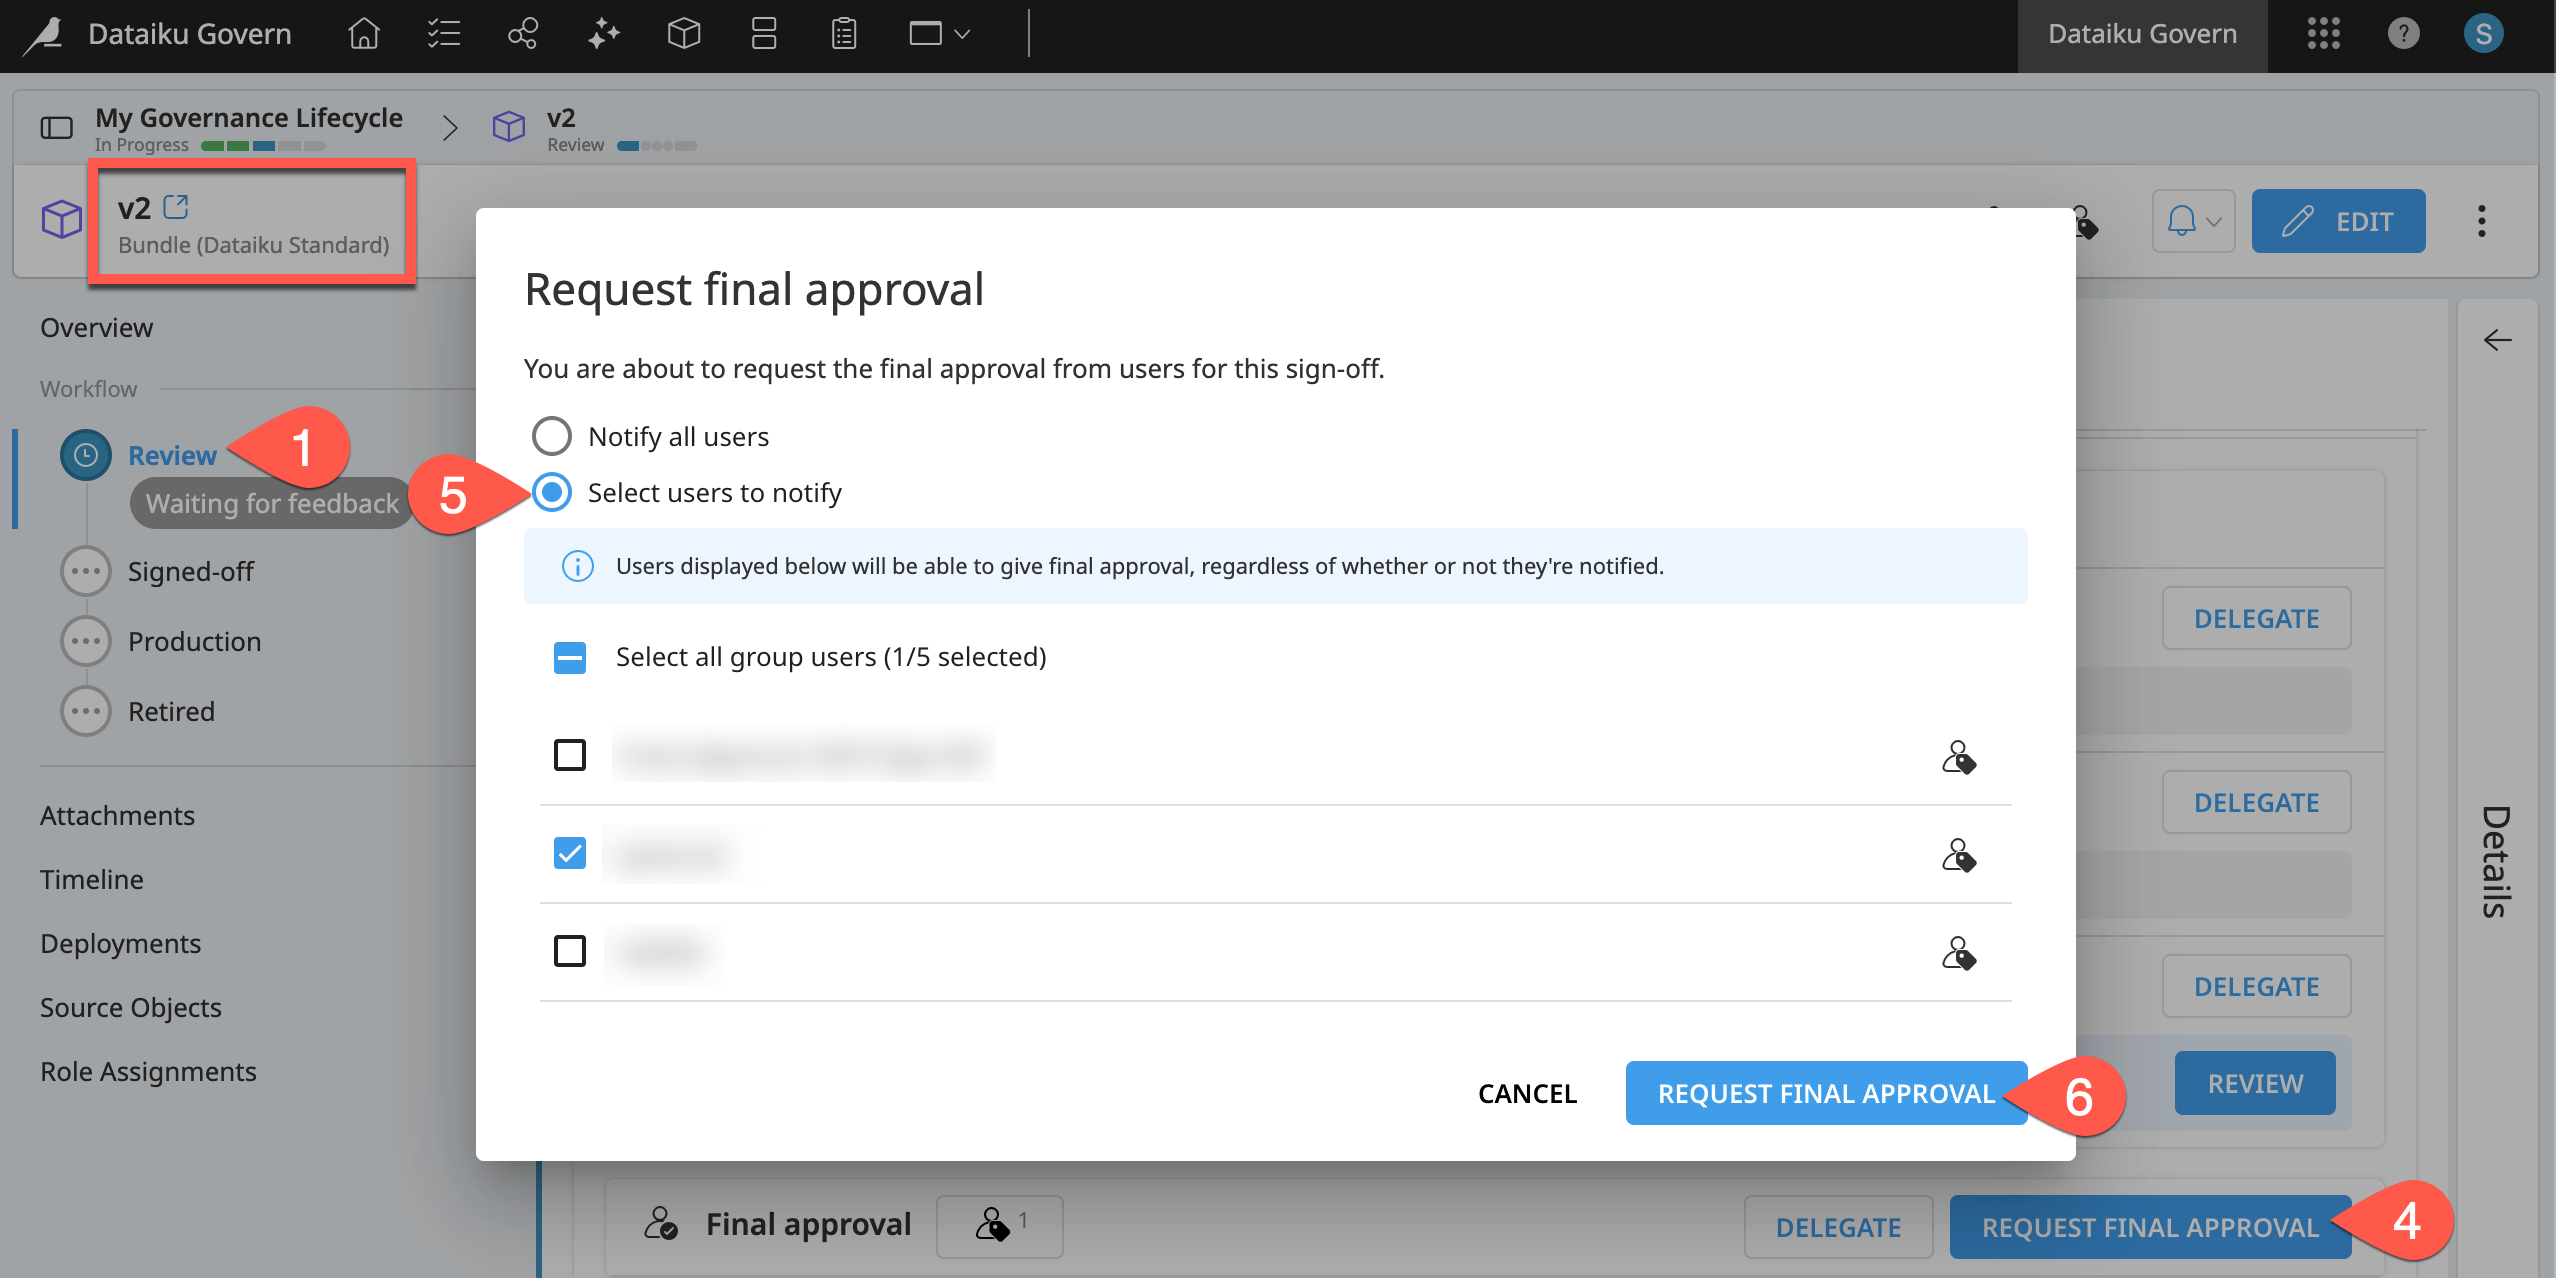
Assuming the wiki requirement is now met, this time approve it.
In the Final approval tile of the governed v2 bundle, click Review.
Set the status to Approved.
Add the comment
All requirements met.Click Submit Review.
Click Edit on the item header of the governed bundle.
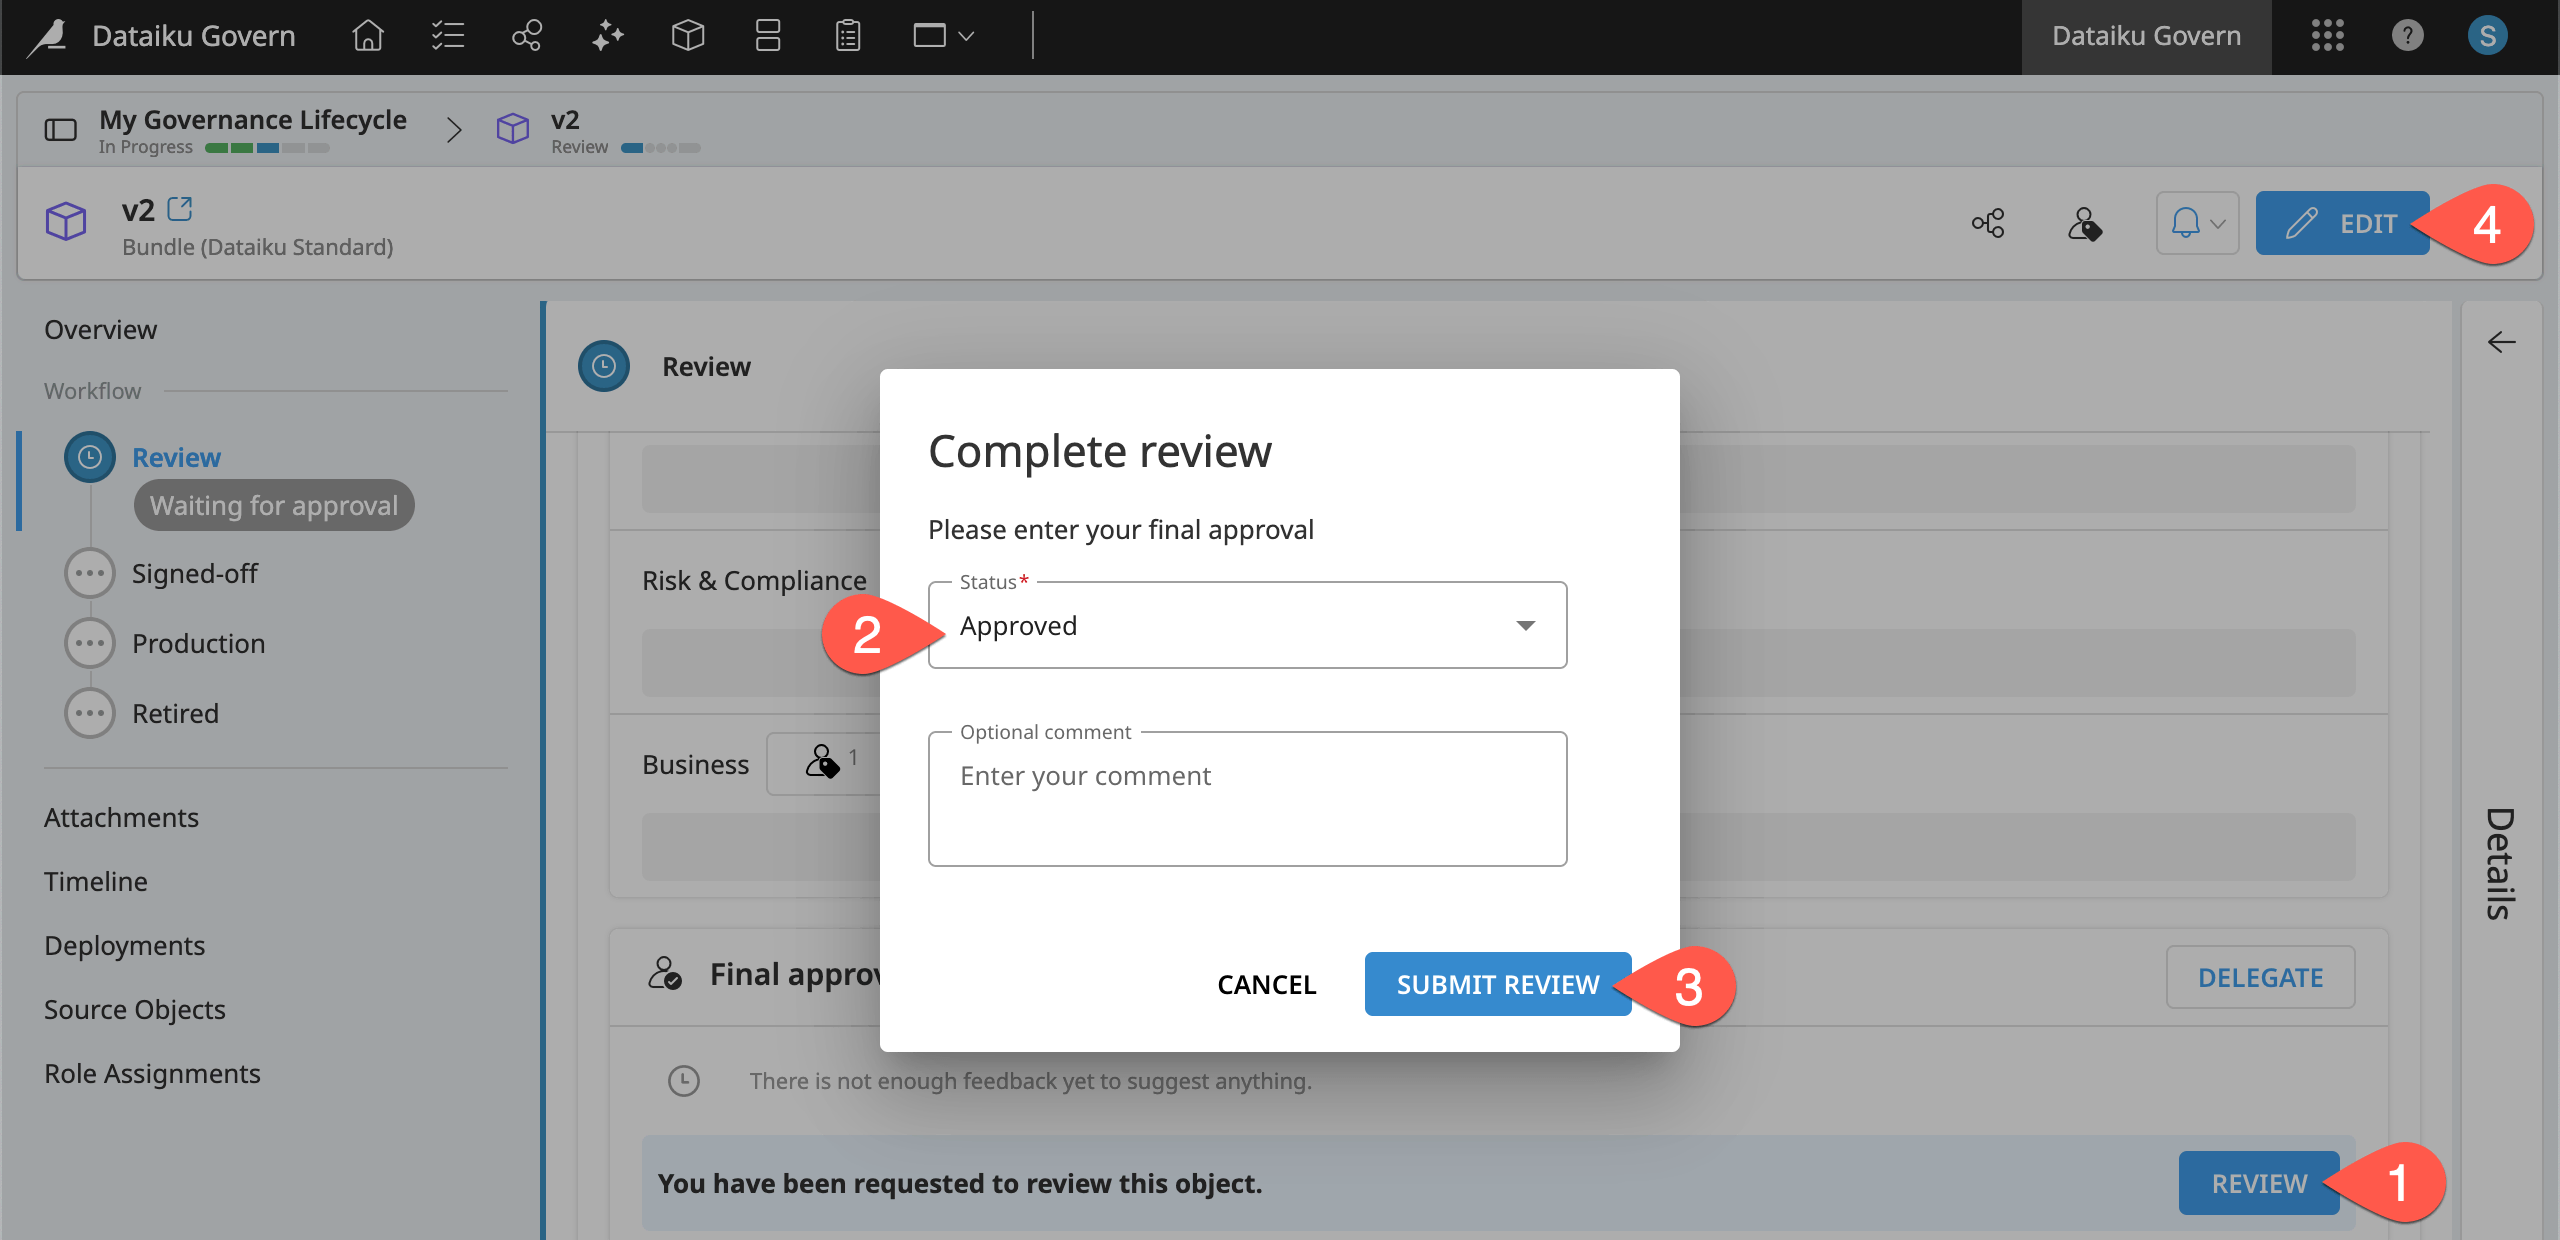
Click Set as Finished on the Review step, advancing the bundle to the Signed-off step.
Click Save on the item header to confirm.
Deploy Dataiku items in tandem with a governance workflow#
You now have a bundle in a Design node project that has earned an explicit approval in the Govern node. It’s time to deploy the fraud prediction project to a production environment!
Review governance details in the source project#
Before deploying, note that the sync between the Govern node and the Design node works both ways. This sharing of information between Govern, Design (and Deployer) nodes ensures all teams remain aligned for effective collaboration.
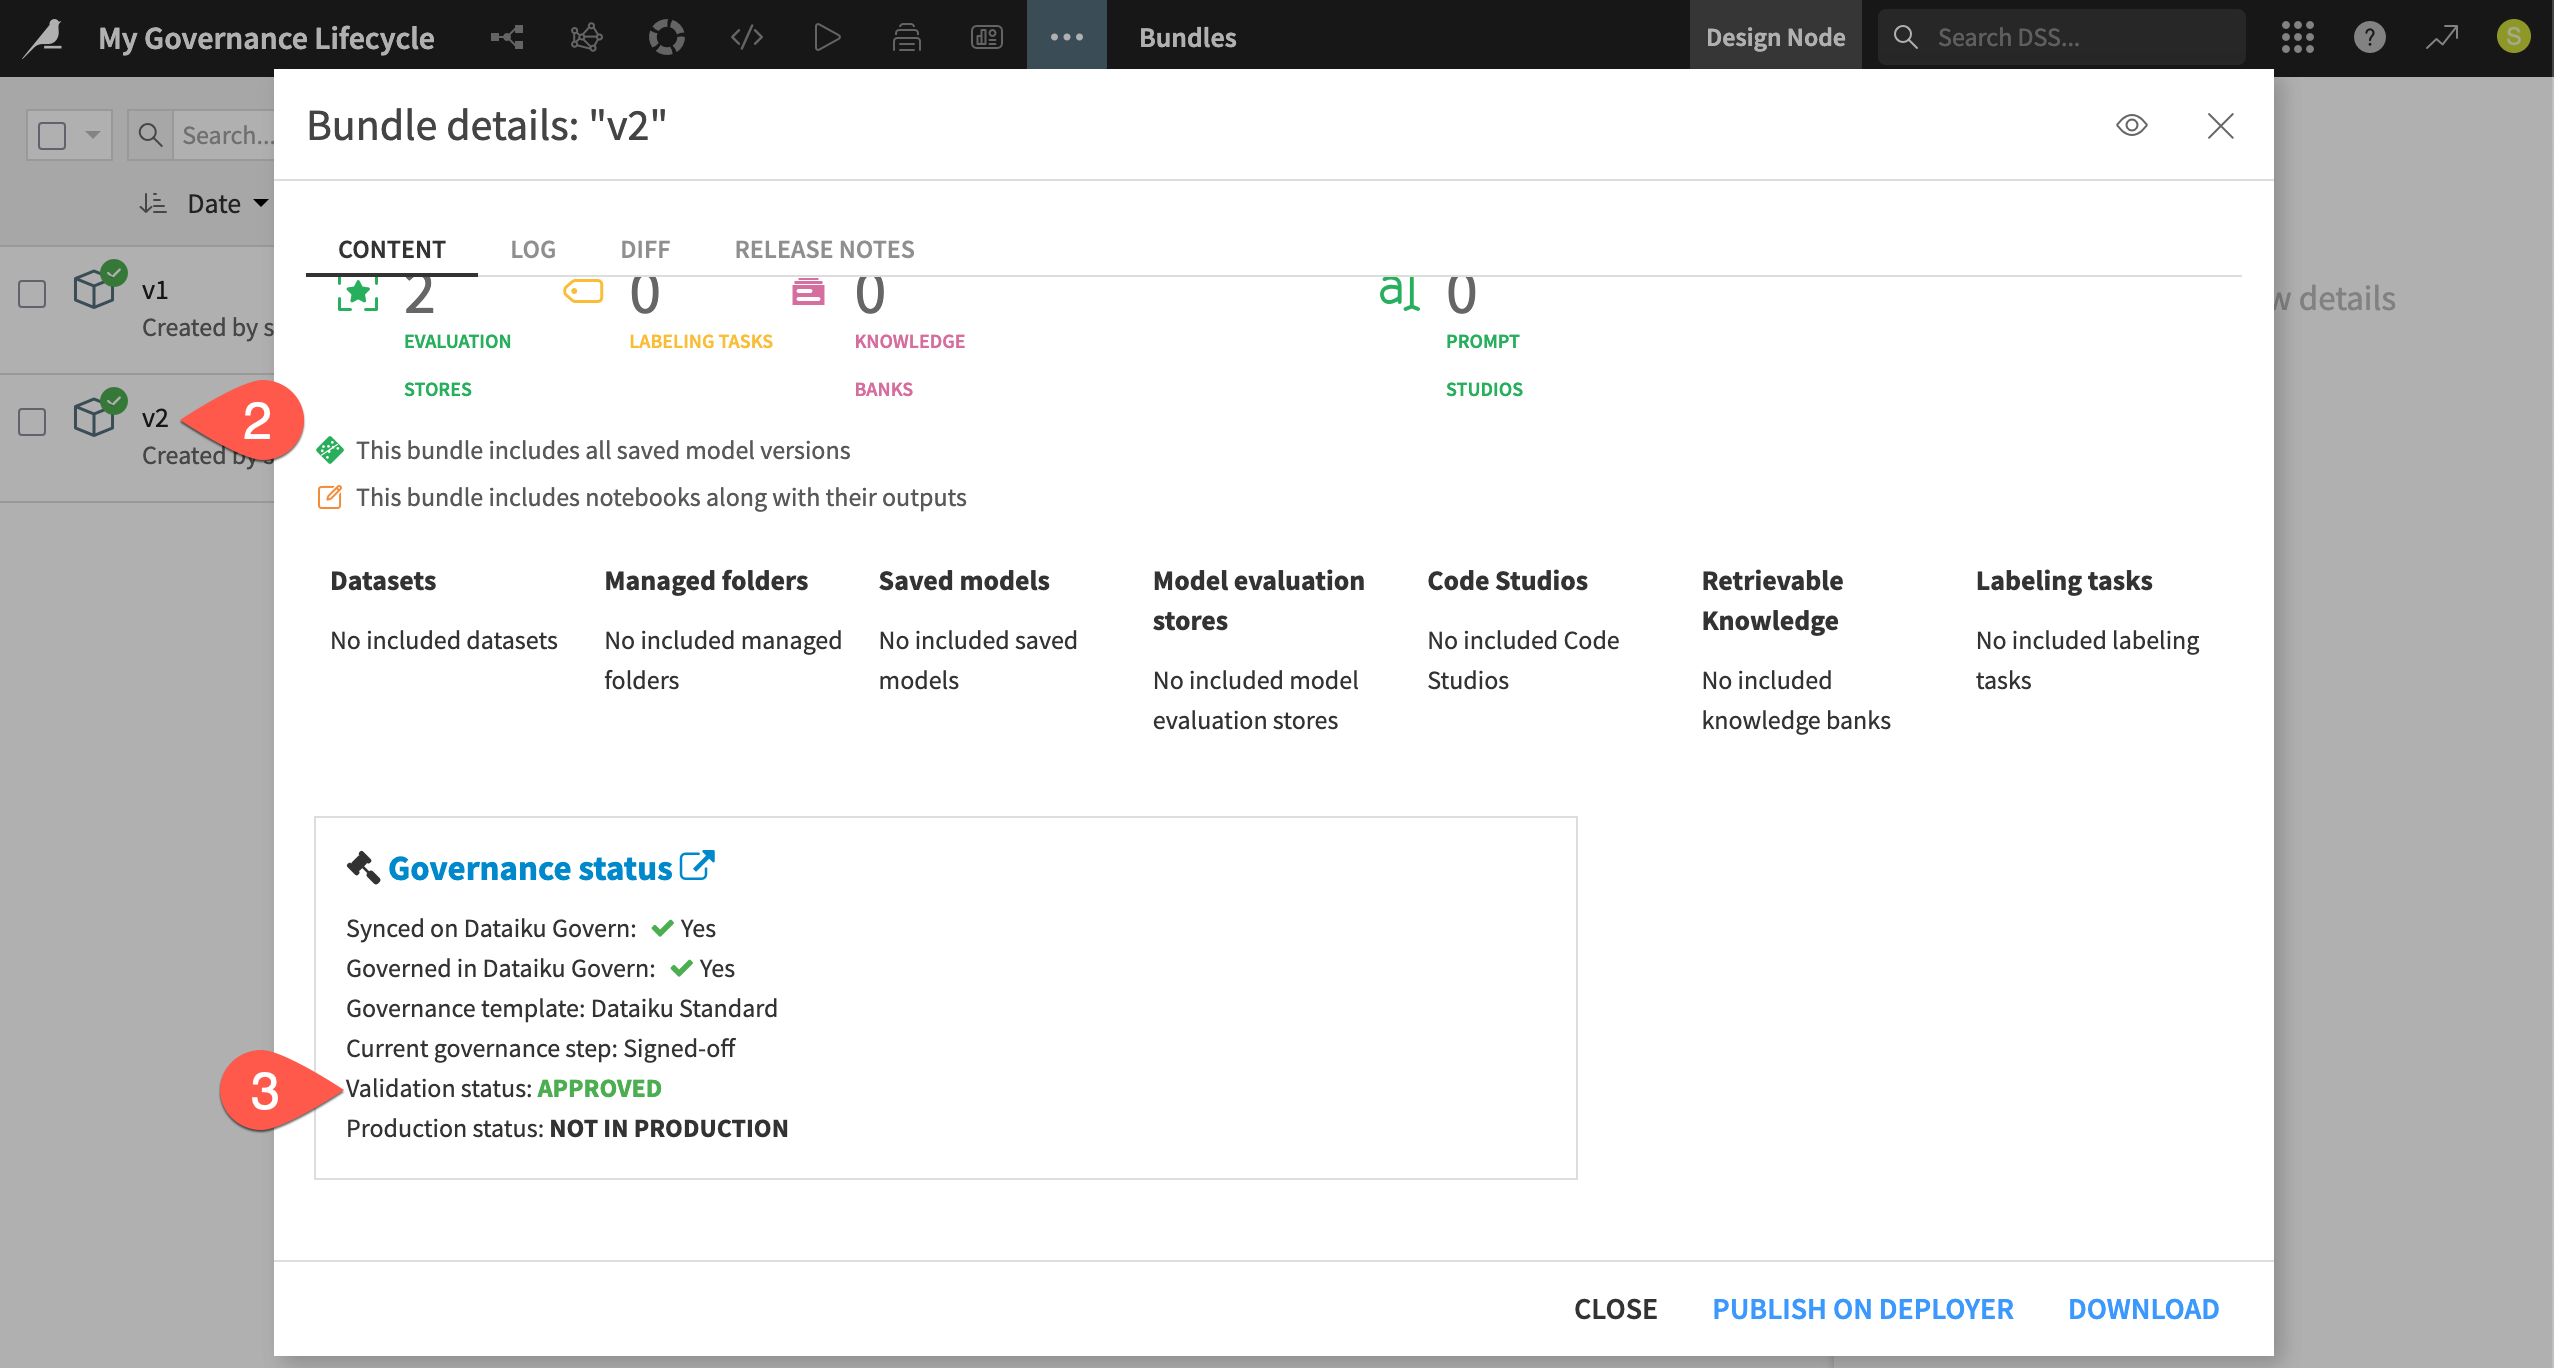
For example, you can find the governance status of child items like bundles and saved model versions in the Dataiku source project.
Return to the Bundles page of the Design node project.
Open the v2 bundle.
In the Governance status, confirm it now reports an approved validation status.
Tip
You’ll find the same governance status details for a saved model version in its Summary panel.
Publish a bundle to the Deployer#
Other resources provide detailed accounts for deploying project bundles and API services, respectively. For that reason, this tutorial won’t cover those processes again here, and instead assume you’re comfortable deploying either kind of package to a production environment.
Caution
Remember that governance is a team sport! It’s possible that deployment isn’t your responsibility, and so you won’t have the required permissions to complete the remainder of this tutorial yourself.
If you don’t have deployment rights, you may need to request permissions from your instance administrator. See Tutorial | Deploy a project bundle to a production environment for a discussion of prerequisites. Otherwise, read along to follow how you’d govern an actual deployment.
In the Design node project, select the v2 bundle.
Click Publish on Deployer, and Publish on Deployer again to confirm.
Don’t actually deploy it to an infrastructure yet!
Review your infrastructure’s Govern policy#
The Govern node’s tight integration with the Deployer allows organizations to secure their MLOps workflow according to their needs.
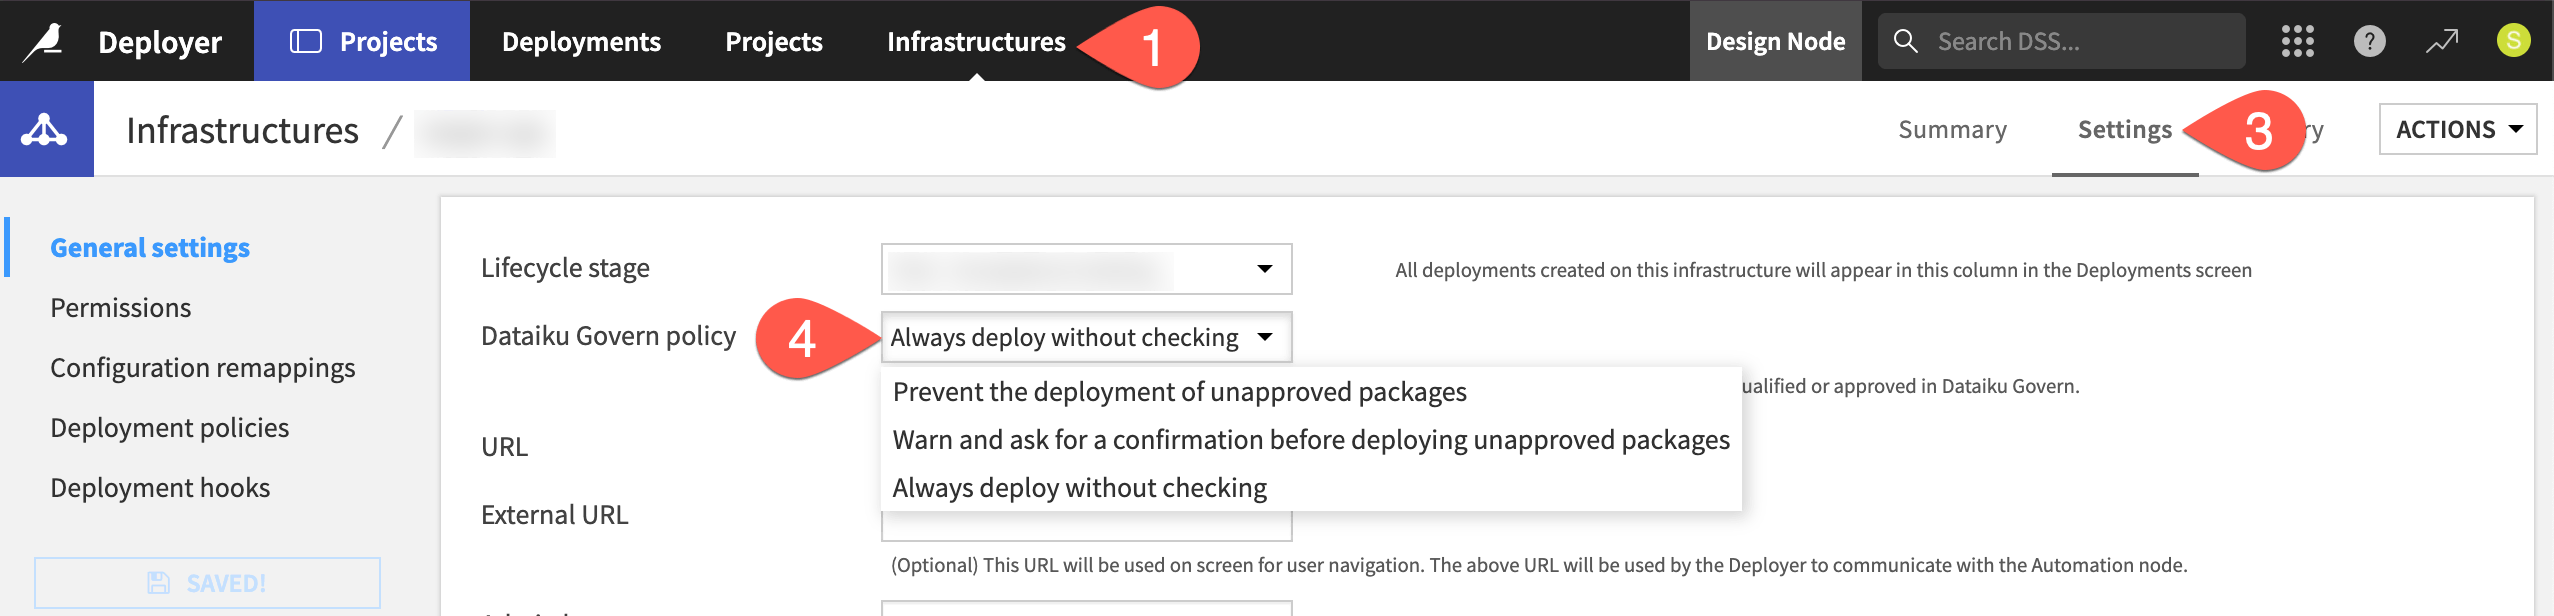
As defined in the reference documentation on Deployment Governance policies, organizations have three options to define how the Deployer should behave when a user tries to deploy a bundle or an API service to an infrastructure:
Always deploy without checking.
Warn and ask for confirmation before deploying unapproved packages.
Prevent the deployment of unapproved packages.
Instance administrators define this policy with respect to each infrastructure.
If you have permission, on the (Project or API) Deployer, navigate to the Infrastructures tab in the top navigation bar.
Select an infrastructure.
Go to the Settings tab.
In the General settings panel, view the selection and options for Dataiku Govern policy, but don’t make any changes.
Tip
Regardless of the Govern policy in place, users with the necessary permissions can still publish bundles or API services to the Deployer. A bundle or an API service published on the Deployer, but not pushed to an infrastructure, isn’t a deployment. The potential restriction comes when trying to deploy the package to a specific infrastructure.
It’s up to your organization (and possibly external pressures like the regulatory environment) to determine what role the Govern node should play in deployment processes. To give one possible example, many organizations designate their infrastructures according to lifecycle stage. For example, they may have one infrastructure for development, another for testing, and a final one for production.
Accordingly, an organization might use all three policies:
Always deploy without checking on the development infrastructure.
Warn before deploying unapproved packages on the test infrastructure.
Prevent the deployment of unapproved packages on the production infrastructure.
See also
The Govern policy isn’t the only way to inject oversight into deployment processes. See the reference documentation on Deployment infrastructures to learn more about topics such as deployment policies and hooks.
Deploy an approved bundle#
Your bundle already has received an approval in the Govern node. Therefore, no matter what Govern policy your organization has chosen, there should be no blocker to deploying it.
Return to your v2 bundle on the Project Deployer.
Complete the usual deployment routine (clicking Deploy, selecting an infrastructure, clicking Create, and finally Deploy and Activate).
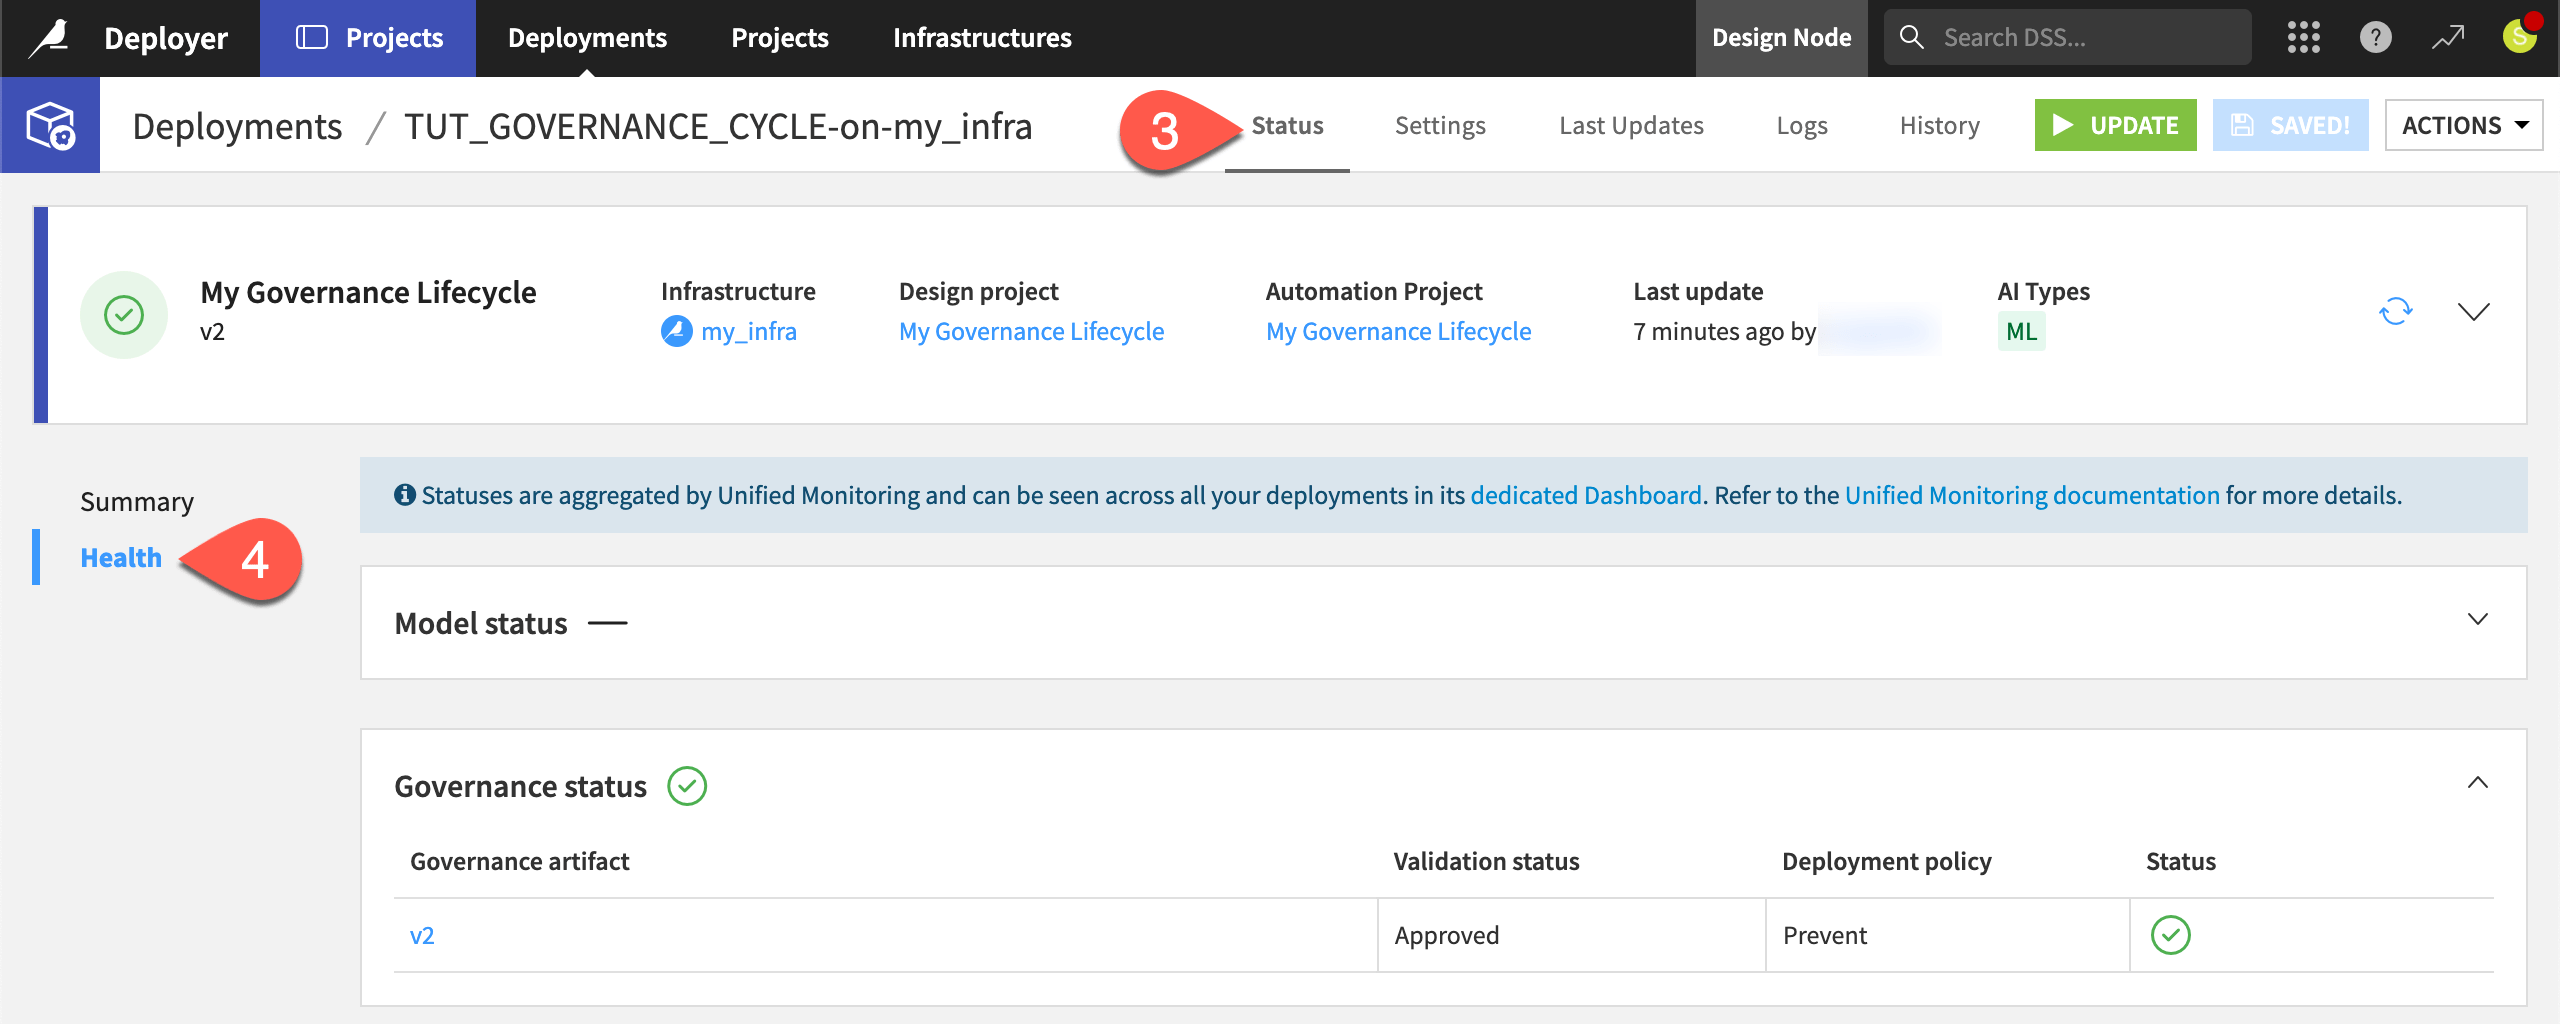
When it succeeds, navigate to the Status tab of the deployment.
Go to the Health panel to review the governance status. You may need to refresh the page after a few minutes for it to register.
Govern a bundle in production#
You now have an approved fraud prediction project in production! That’s a big step, but it’s not the end of the governance story.
Complete the following three tasks in the Govern node on your own.
In the Bundle registry (
 ), filter for deployments (
 ), and confirm your bundle remains.
Advance the governed v2 bundle from the Signed-off stage to Production.
Advance the governed parent project from the In Progress stage to Validation and Roll-out.
See also
Here you have to manually move the governed bundle from the Signed-off stage to Production. However, it’s possible you could automate this with a deployment hook. Learn more in the reference documentation on Deployment infrastructures.
Govern a model version#
This tutorial demonstrated a governance workflow for deploying the fraud prediction project as a bundle to an Automation node. For use cases that require real-time scoring, you’ll want to deploy the model inside an API service to an API node. From a governance perspective, the workflow is the same!
On your own, follow the same procedures shown here using the saved model version found inside the Dataiku project instead of the bundle. The governance principles work exactly the same regardless of your chosen type of deployment artifact.
Next steps#
Congratulations! You’ve now seen one complete lifecycle of an AI initiative, from its initial exploration to an approved deployment in a production environment.
Before you finish, take a moment to delete work that you no longer need as a courtesy to those sharing your Govern node.
From the Governed projects (
) page, open your project. From the vertical dots ( ) menu, click Delete Govern Project.
From the Design node, open your project. From the project homepage, click Actions > Delete this project.
From the waffle (
) menu of your Design node, go to Local/Remote Deployer > Deploying Projects. Select your deployment.From the deployment page, open the Automation Project in a new tab. From the Automation project’s homepage, click Actions > Delete this project.
From the deployment page, click Actions > Delete this deployment.
This was only one possible workflow: the standard workflow. Advanced license holders have the ability to create their own workflows, including review stages as needed. You’ll learn more about customization in the Academy course on Custom Governance Templates.
See also
For more information, see the reference documentation on AI Governance.