

Tutorial | Governance basics#
Get started#
Dataiku’s Govern node enables project managers, lines of business, and compliance managers to track the progress of AI initiatives at the scale of an enterprise. Take your first steps as a Govern node end user!
Objectives#
In this tutorial, you will:
Raise awareness of your organization’s existing AI assets.
Add a governance layer to chosen items.
Move items through governance workflows.
Organize governed projects under Business initiatives.
Continue governing as your Dataiku items evolve.
Prerequisites#
To reproduce the steps outlined in this tutorial, you will need:
Dataiku 14.5 or later.
A Dataiku Govern node connected to a Design node.
Caution
By its nature, effective AI governance requires close collaboration between many individuals of diverse responsibilities. Completing governance tutorials may require you to perform actions outside your own day-to-day activities. If you find yourself lacking the permissions to complete certain actions, reach out to your instance administrator. Otherwise, read along to simulate the suggested steps.
Create the project#
From the Dataiku Design homepage, click + New Project.
Select Learning projects.
Search for and select Governance Basics.
If needed, change the folder into which the project will be installed, and click Create.
From the project homepage, click Go to Flow (or type
g+f).
Note
You can also download the starter project from this website and import it as a ZIP file.
Use case summary#
You’ve created a project in the Design node, Dataiku’s development environment for building analytics, models, and agents.
This particular project concerns fraud prediction. It starts from a dataset of credit card transactions. For each transaction, the dataset records details like the purchase amount, the timestamp, the location, the merchant sector, the card holder’s credit score, etc. From this information, the project builder trained a machine learning model to predict which transactions could be fraudulent.
The initial build stage is complete, but is it ready for deployment into a production environment? While your own use cases may differ, this project, as well as many others, could follow two typical paths:
Deploy the project as a bundle to an Automation node for batch scoring. Think of generating a monthly report.
Deploy the model as an API service to an API node for real-time scoring. Think of generating a prediction for each new request.
Deploying a project like this however carries a number of risks:
Does the project meet all internal requirements? For example, has the model passed tests for bias?
Have all relevant stakeholders approved the project? Think of parties like IT, risk and compliance, or business units that may not have participated in the build phase.
Does the project need to satisfy external regulations or policies based on industry or geography? For example, does it need to adhere to the EU AI Act?
For many possible reasons, a project like this requires governance! While your own projects may differ considerably from fraud prediction, the tenets are the same. In this tutorial, your goal is to apply a governance framework to this project using the Govern node.
Using this basic project as an example, you’ll be able to understand how the Govern node can fit into your organization’s AI governance strategy.
On the Design node, navigate to the Governance Basics project you created.
On the project homepage, next to the title, click the pencil (
 ) icon to rename the project
 <YOUR INITIALS> Governance Basicsto make it easier to identify as your own.From the waffle (
 ) menu in the top navigation bar of the Design node, select Dataiku Govern.
Tip
Throughout this tutorial, you’ll often move between the Govern and Design nodes. Keep separate browser tabs open to ease switching back and forth!
Raise awareness of AI assets#
Before taking any actions, it’s important to recognize how the Govern node surfaces the metadata of items from connected Dataiku nodes.
Start at the Govern homepage#
Begin at the homepage of the Govern node.
If not already there, click the home (
 ) icon in the top navigation bar of the Govern node.
Recognize the presence of the following pages along the top navigation bar:
Governable items (
 )
)Registries for models (
 ), bundles (
 ), and possibly GenAI (
 )
)Business initiatives (
 )
)Governed projects (
 )
)
When you finish this tutorial, you’ll understand the purpose of each of these pages.
Important
Your experience with the Govern node may differ depending on whether your organization has a standard or advanced license. An advanced license allows for greater customization, as well as greater capabilities with respect to GenAI. Nevertheless, the foundations covered in this tutorial apply equally to all users.
Review an inbox of governable items#
An email service has a spam filter controlling which mails enter the inbox. Similarly, your Govern node administrator may define controls over what items appear in your governance “inbox.” The Governable items page serves as that inbox. It surfaces items eligible for governance from all connected Dataiku nodes. For example:
The administrator might automatically hide certain items so they never crowd your inbox. Think of trial experiments that will never go into production.
Alternatively, the administrator might automatically govern certain items, bypassing the inbox entirely. Think of projects falling into certain legal jurisdictions or having sensitive information.
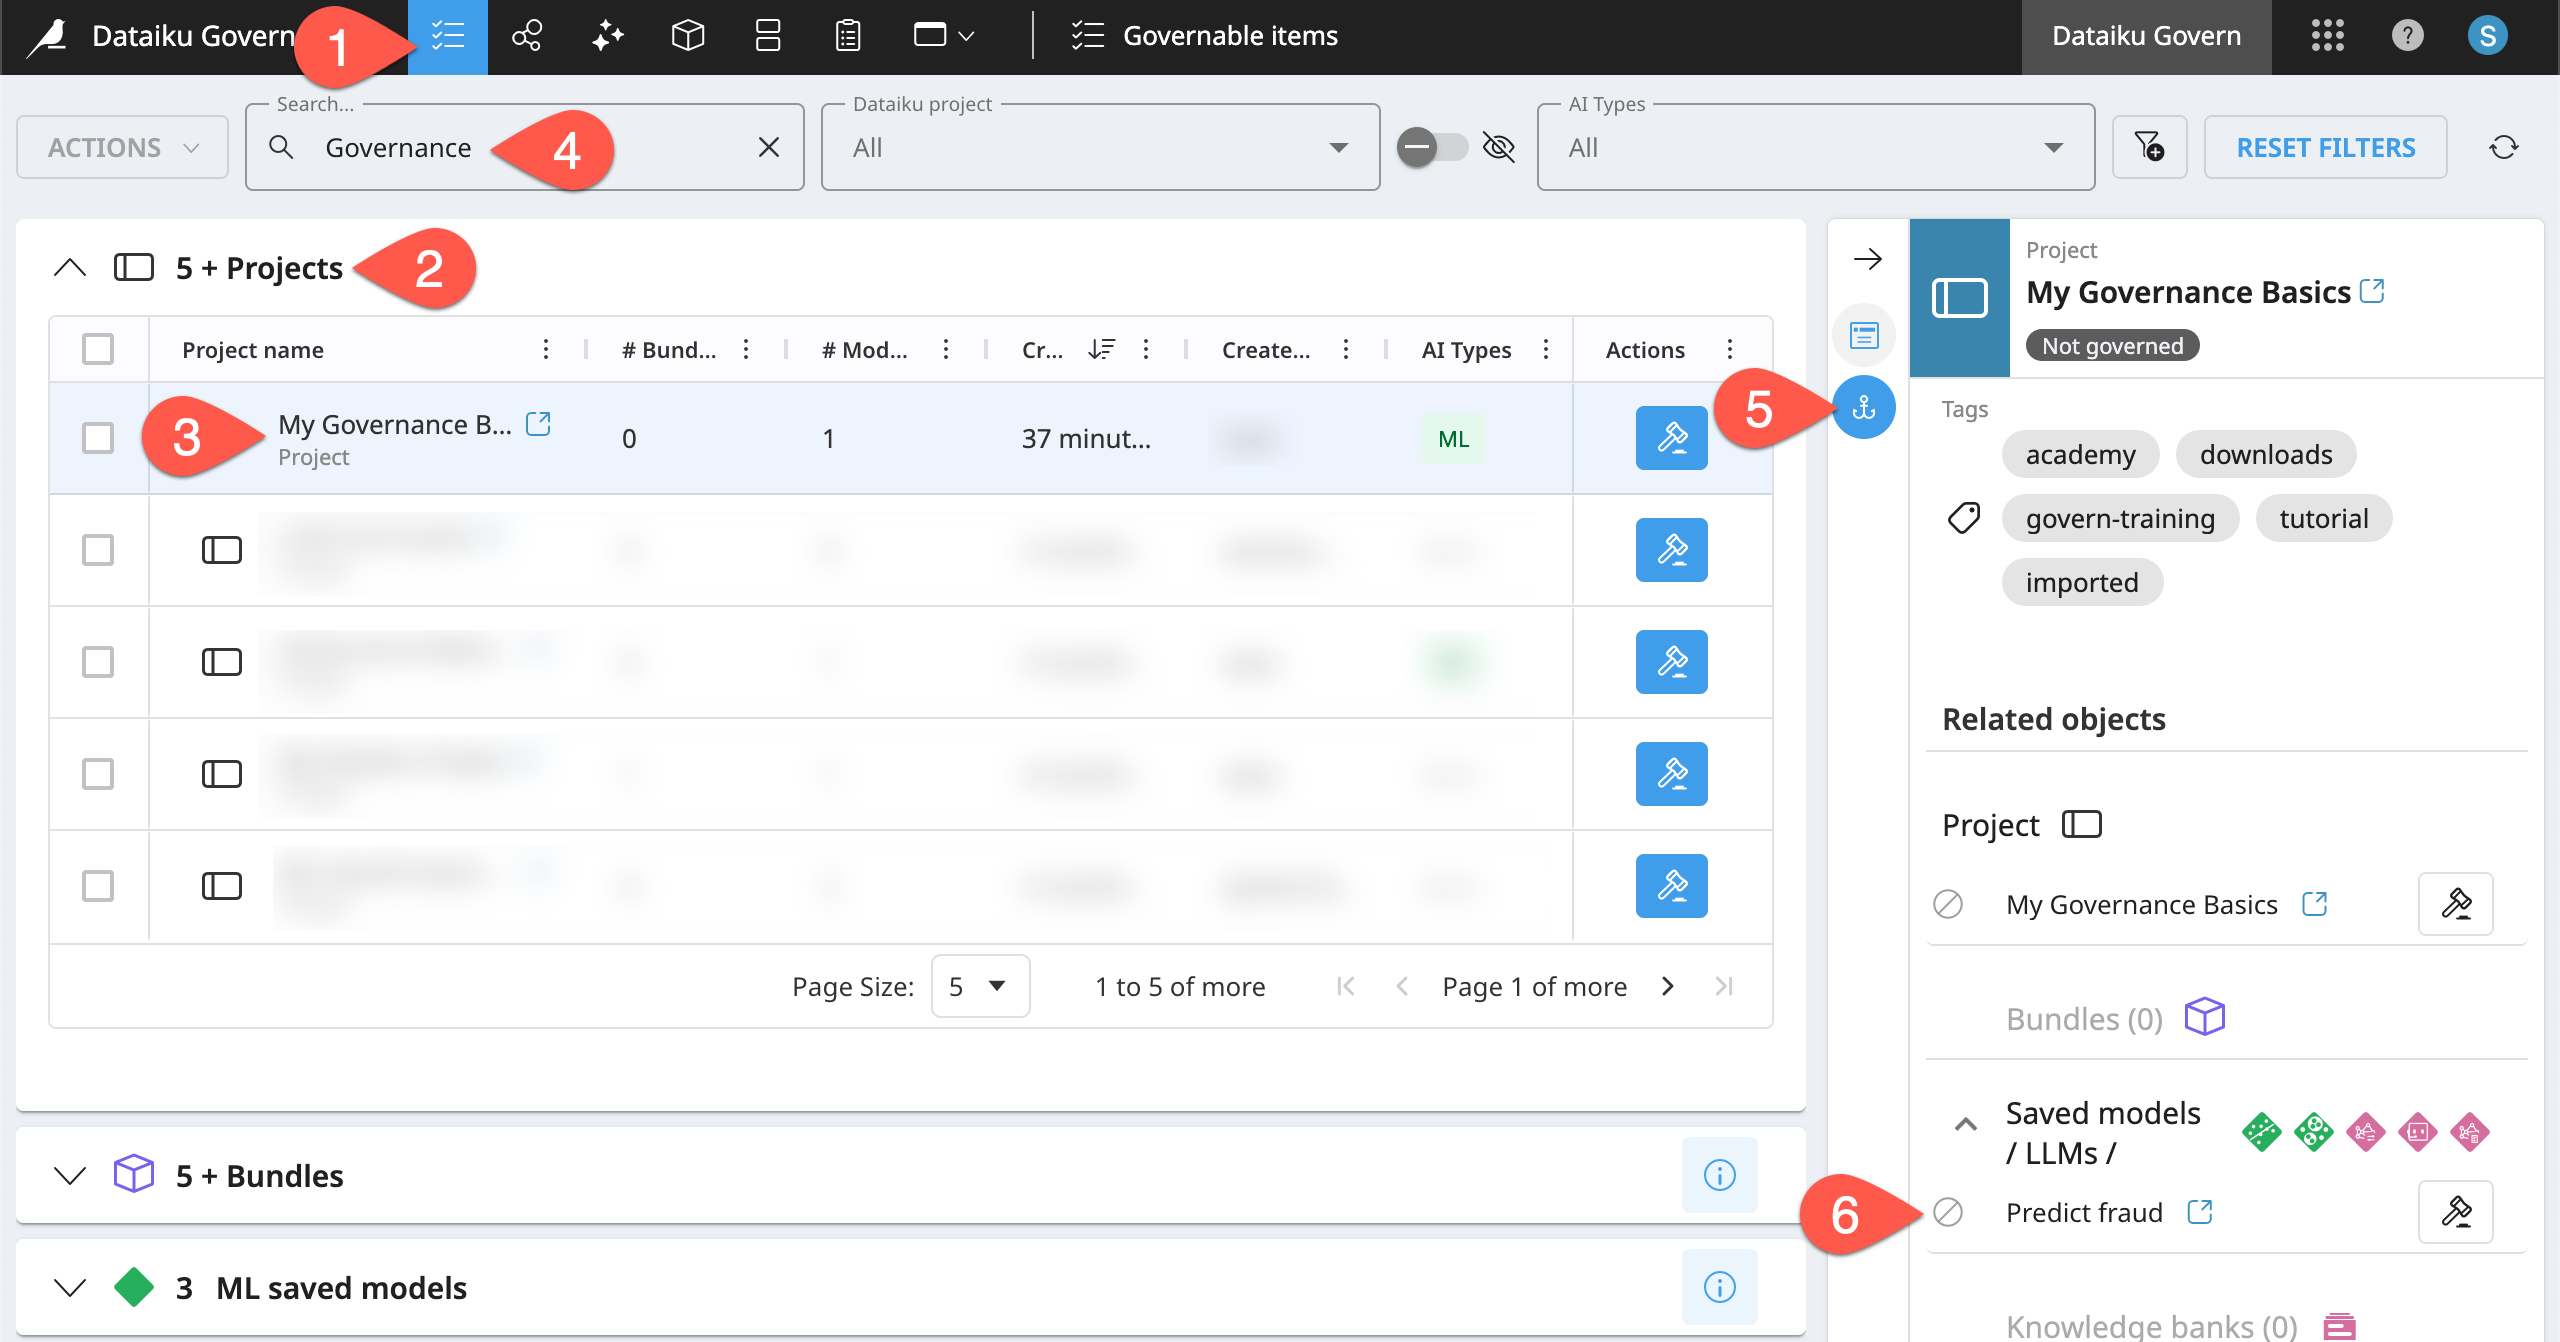
A project like credit card fraud prediction needs governance! It requires internal qualification, documentation of controls and sign-offs, and adherence to external regulations. Unless your administrator has defined a rule saying otherwise, this project should appear on the Governable items page because it’s an ungoverned Dataiku item from a synced Design node.
Either from the homepage or directly from the top navigation bar, navigate to the Governable items (
) page.Recognize the accordion menus of surfaced Dataiku items, including projects, bundles, saved models, etc.
In the Projects section, find your Governance Basics project.
If needed, use the search box to find it.
Review the project’s metadata in the Source objects (
 ) tab of the right Details panel.
Confirm in the Related objects section that this project contains one saved model, but no bundles.
Test the sync between the Govern and Dataiku nodes#
The Govern node actively tracks certain types of items from connected Dataiku nodes. Bundles are one such item. If the goal was a monthly fraud report, this is the artifact you’d deploy into production.
Add a bundle to the project, and confirm the Govern node tracks this update.
Return to the Design node, and open your version of the Governance Basics project.
From the More Options (
 ) menu of the top navigation bar, select Bundles.
Click + New Bundle.
Name it
v1.Click Create.
Return to the Governable items (
) page of the Govern node.Select your Governance Basics project.
Confirm the presence of the v1 bundle in the related objects section of the Source objects (
) tab. (Refresh the page if needed).
Tip
You’ll notice the presence of a  icon, indicating that the project, bundle, and model aren’t governed. You’ll understand this soon!
Filter governable items#
At the scale of an enterprise, you might have thousands of items you could govern. Accordingly, it’s worth getting familiar with the search, hiding, and filtering controls at the top of Govern node pages.
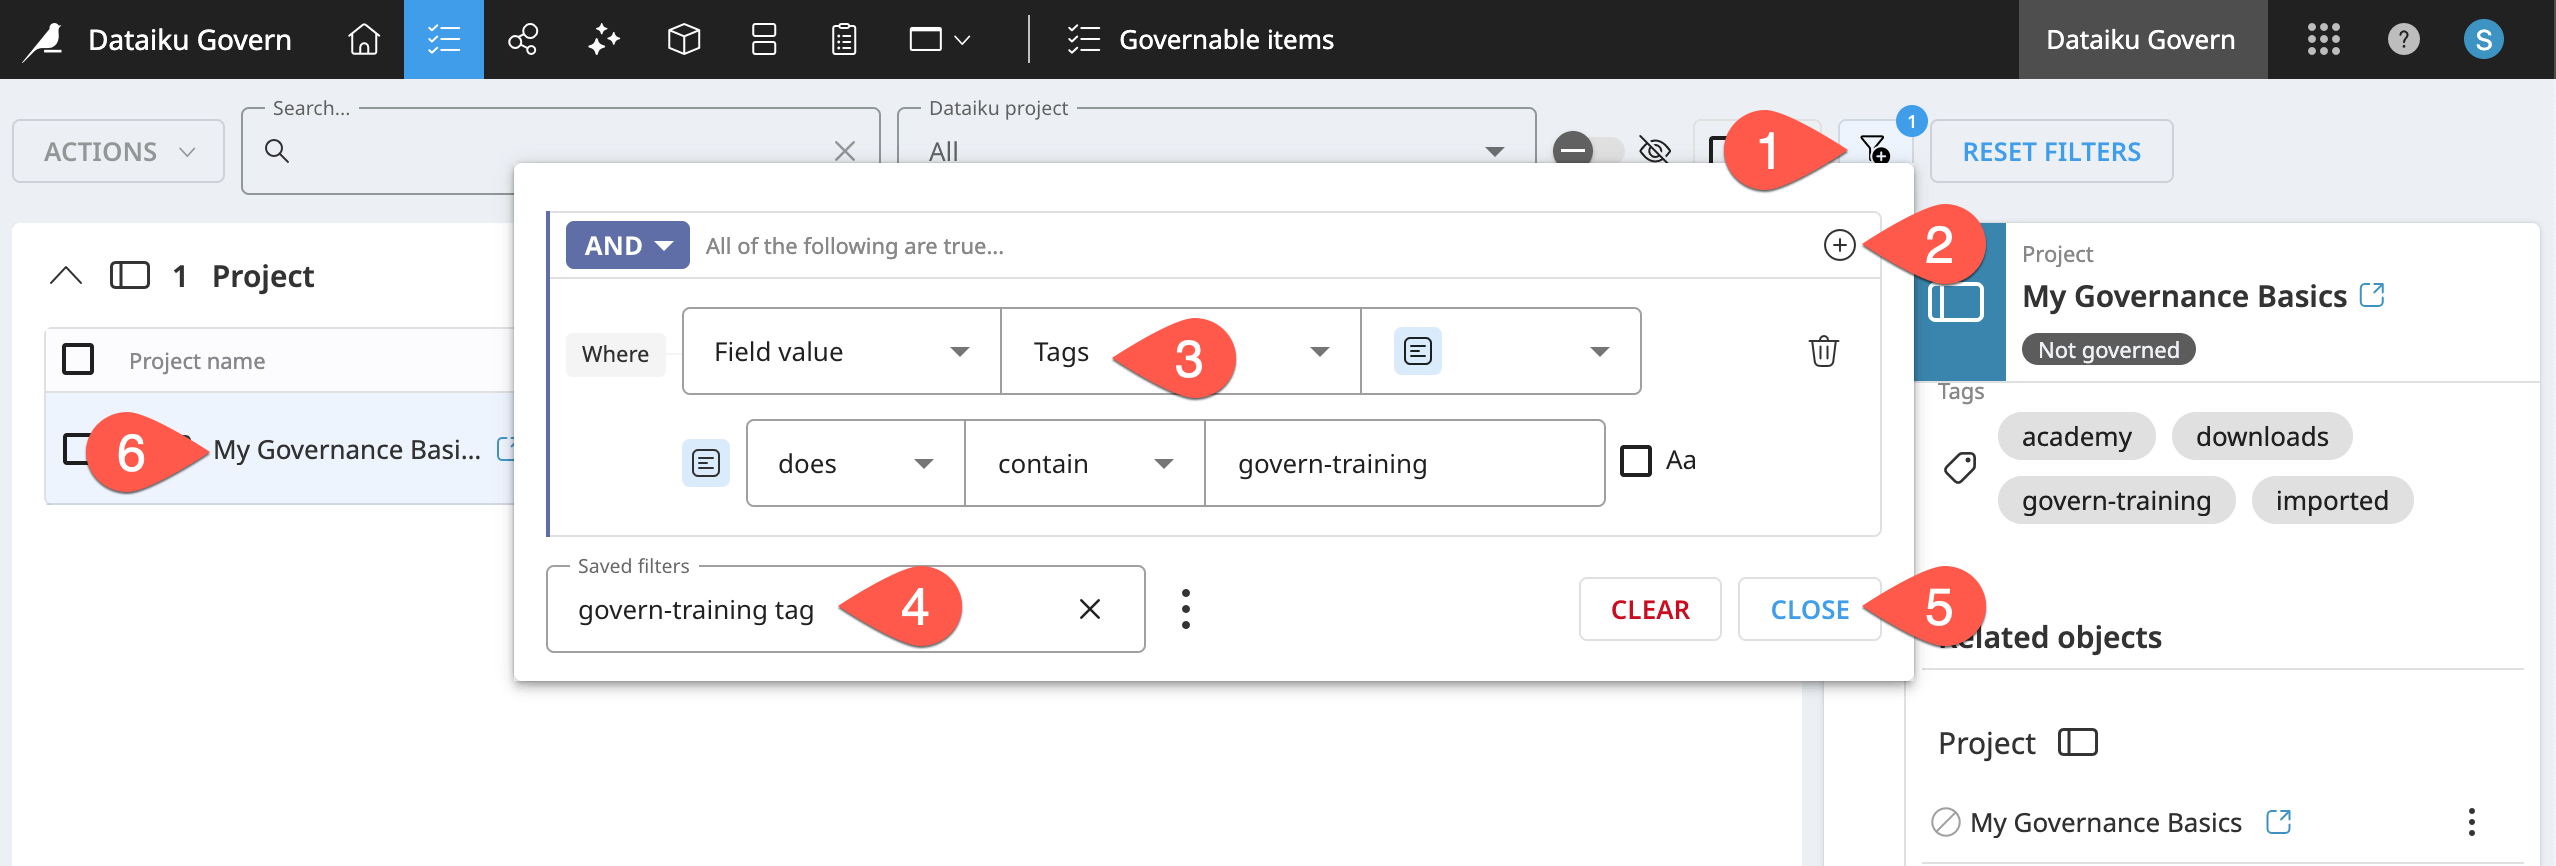
For example, the project you created on the Design node includes a specific tag: govern-training. Filter for ungoverned projects with this specific tag.
From the Governable items (
) page, click the Add Filter ( ) icon.
Click the plus (
 ) icon > Condition to add a condition.
If it doesn’t already exist, create a filter where the field value Tags does contain the value
govern-training.Click Save. Name it
govern-training tag, and click Save again.Click Close on the filter dialog.
Observe how only items with this project tag remain.
Explore registries of Dataiku items#
For now, resist the temptation to govern the project. Complete the tour of the other key pages in the Govern node first.
The registry pages centralize all Dataiku items of a respective type into one location. From one particular registry, an organization can see all its models, bundles, or GenAI items. The ability to filter these lists in various ways makes these registries watchtowers for your data and AI initiatives.
From the top navigation bar of the Govern node, navigate to the Model registry (
).Recognize that you can filter the registry in many ways, including to show only deployed models (
 ).
).Find your version of the Governance Basics project, and expand the accordion menus to drill down into the model and model versions inside it.
Select the active model version (
 ) by clicking on its name.
Explore the right Details panel options, including the Model metrics (
 ) tab to review metrics of the model version.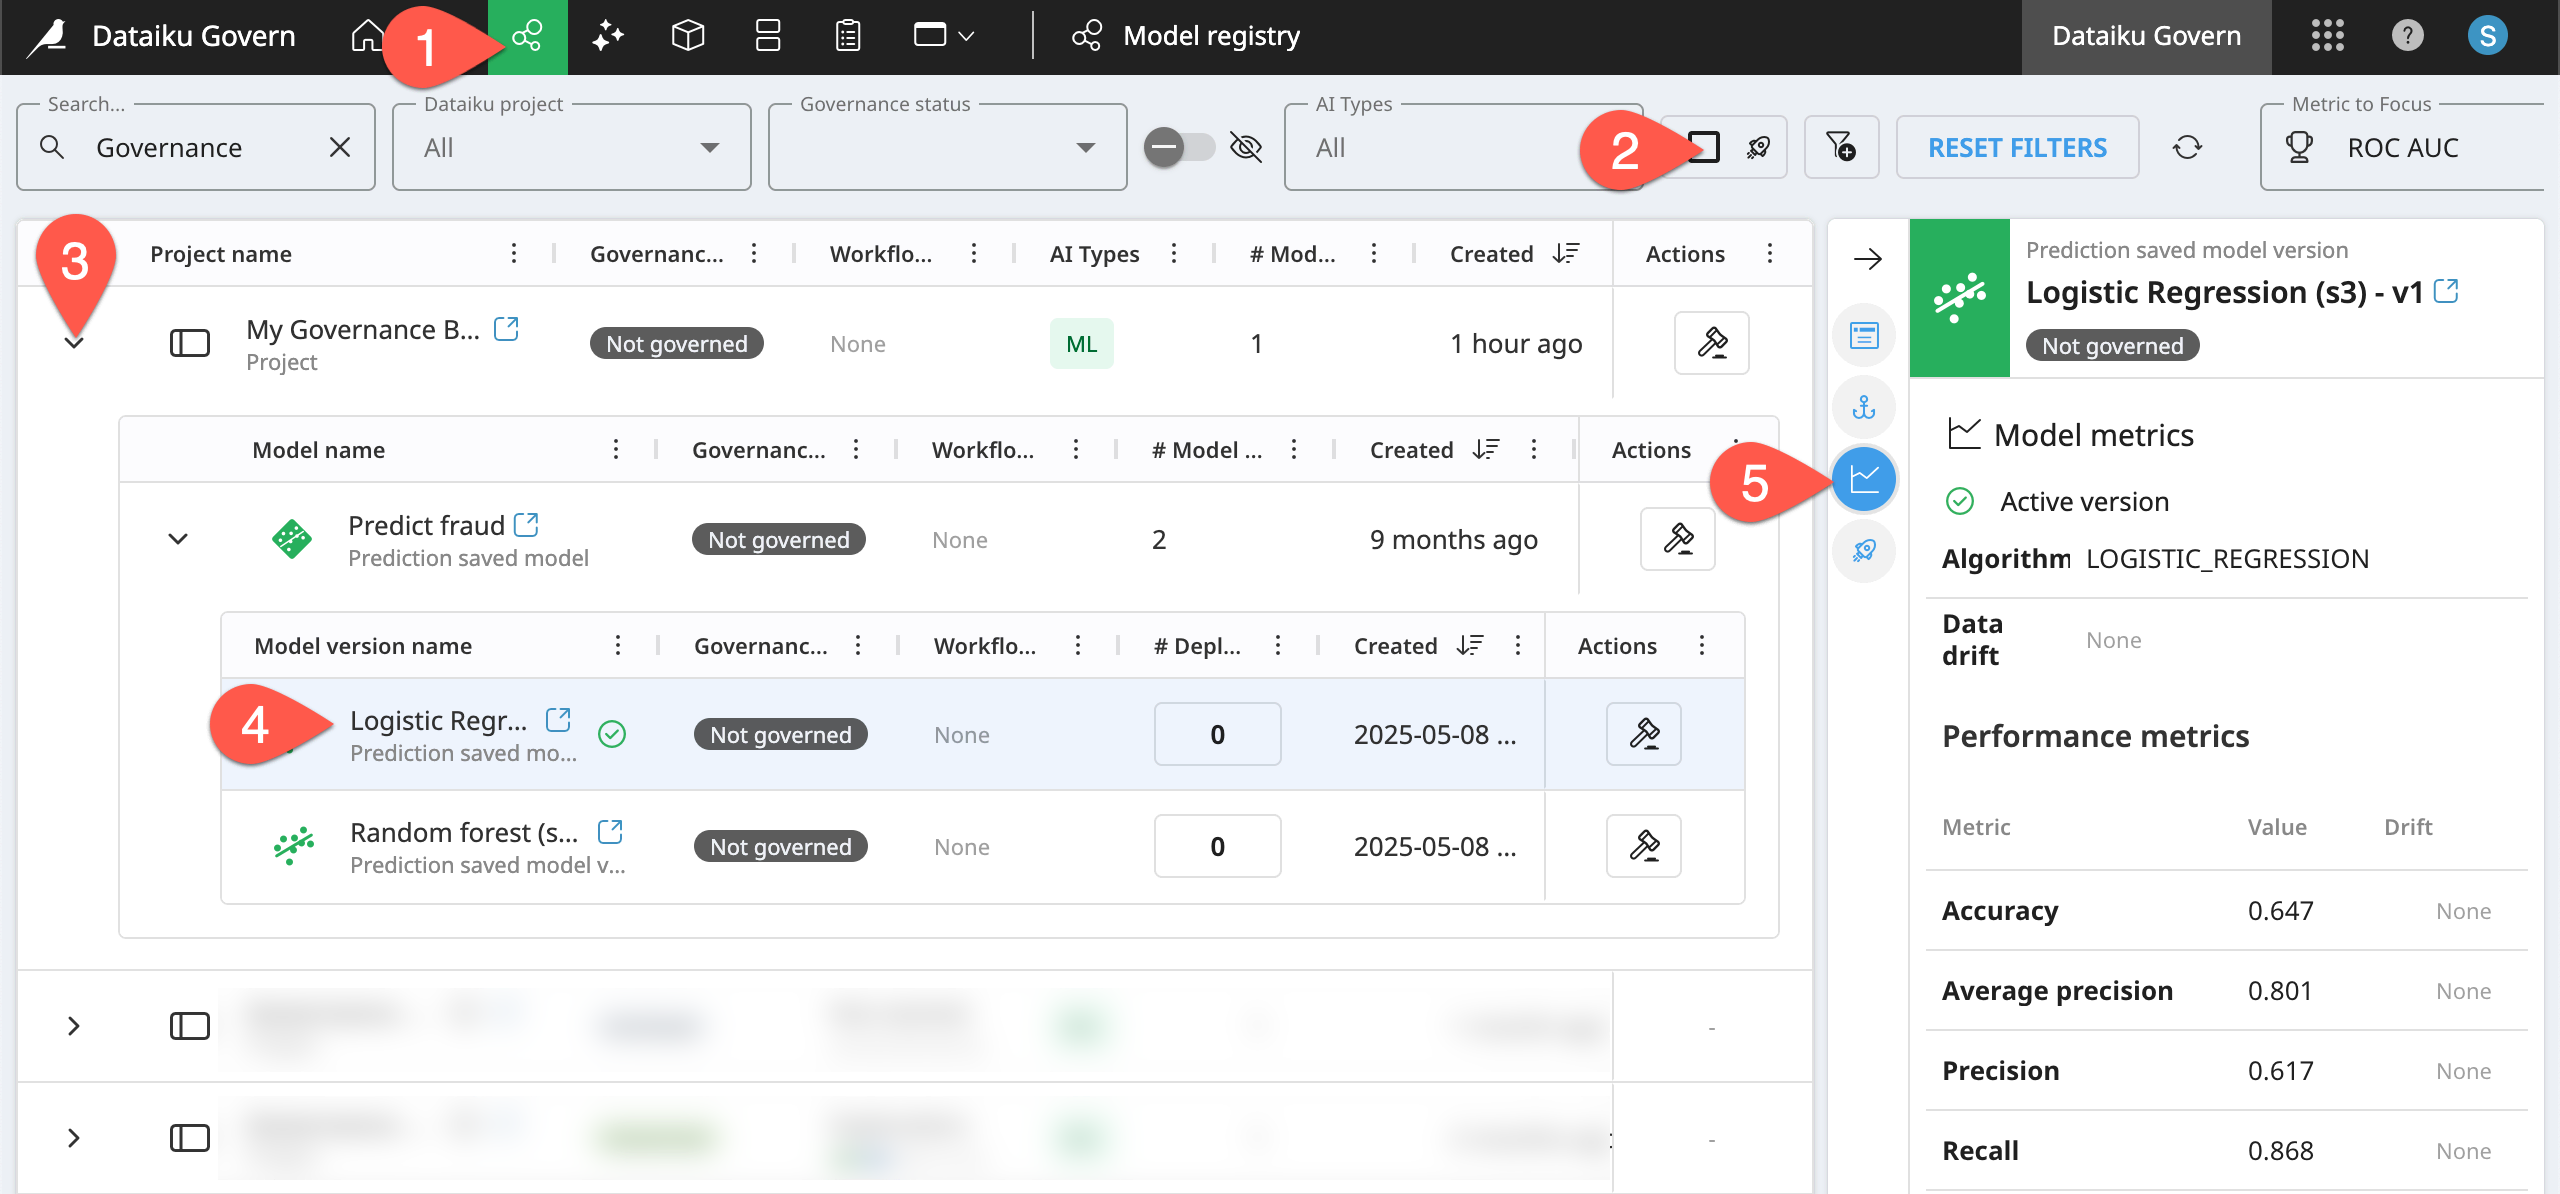
Repeat the same process for the Bundle registry (
), or, if available to you, the GenAI registry (). You’ll find these pages function like the Model registry.
Tip
Remember that the Govern node surfaces items from all connected nodes. The Instance (node ID) column reports which node the item comes from.
Add a governance layer to Dataiku items#
In the registry pages, you likely noticed a governance status for all items. Beyond surfacing metadata of synced items from Dataiku nodes, the first action you’ll often take in the Govern node is adding a governance layer to such items. In other words, you’ll choose which Dataiku items you want to govern.
Important
Recall that Instance Governance settings mediate the end user experience. This tutorial shows an instance where the Govern node administrator has recommended all item types to be governed according to the Dataiku Standard template. While this is one possible configuration, your own administrator may have a different set of rules in place to meet your own governance objectives.
Focus on governed projects#
First, check if your Govern node already has projects with an active governed status.
From the top navigation bar of the Govern node, navigate to the Governed projects (
) page.Your page might be empty. It could also have projects that other users sharing the space have chosen to govern.
If you have projects here, feel free to explore this page further, recognizing new terminology like template, workflow, and Business initiative.
Tip
Once you govern your first project, it will appear on this page!
Govern your first Dataiku project#
Add a governance layer to the Design node project you initially created.
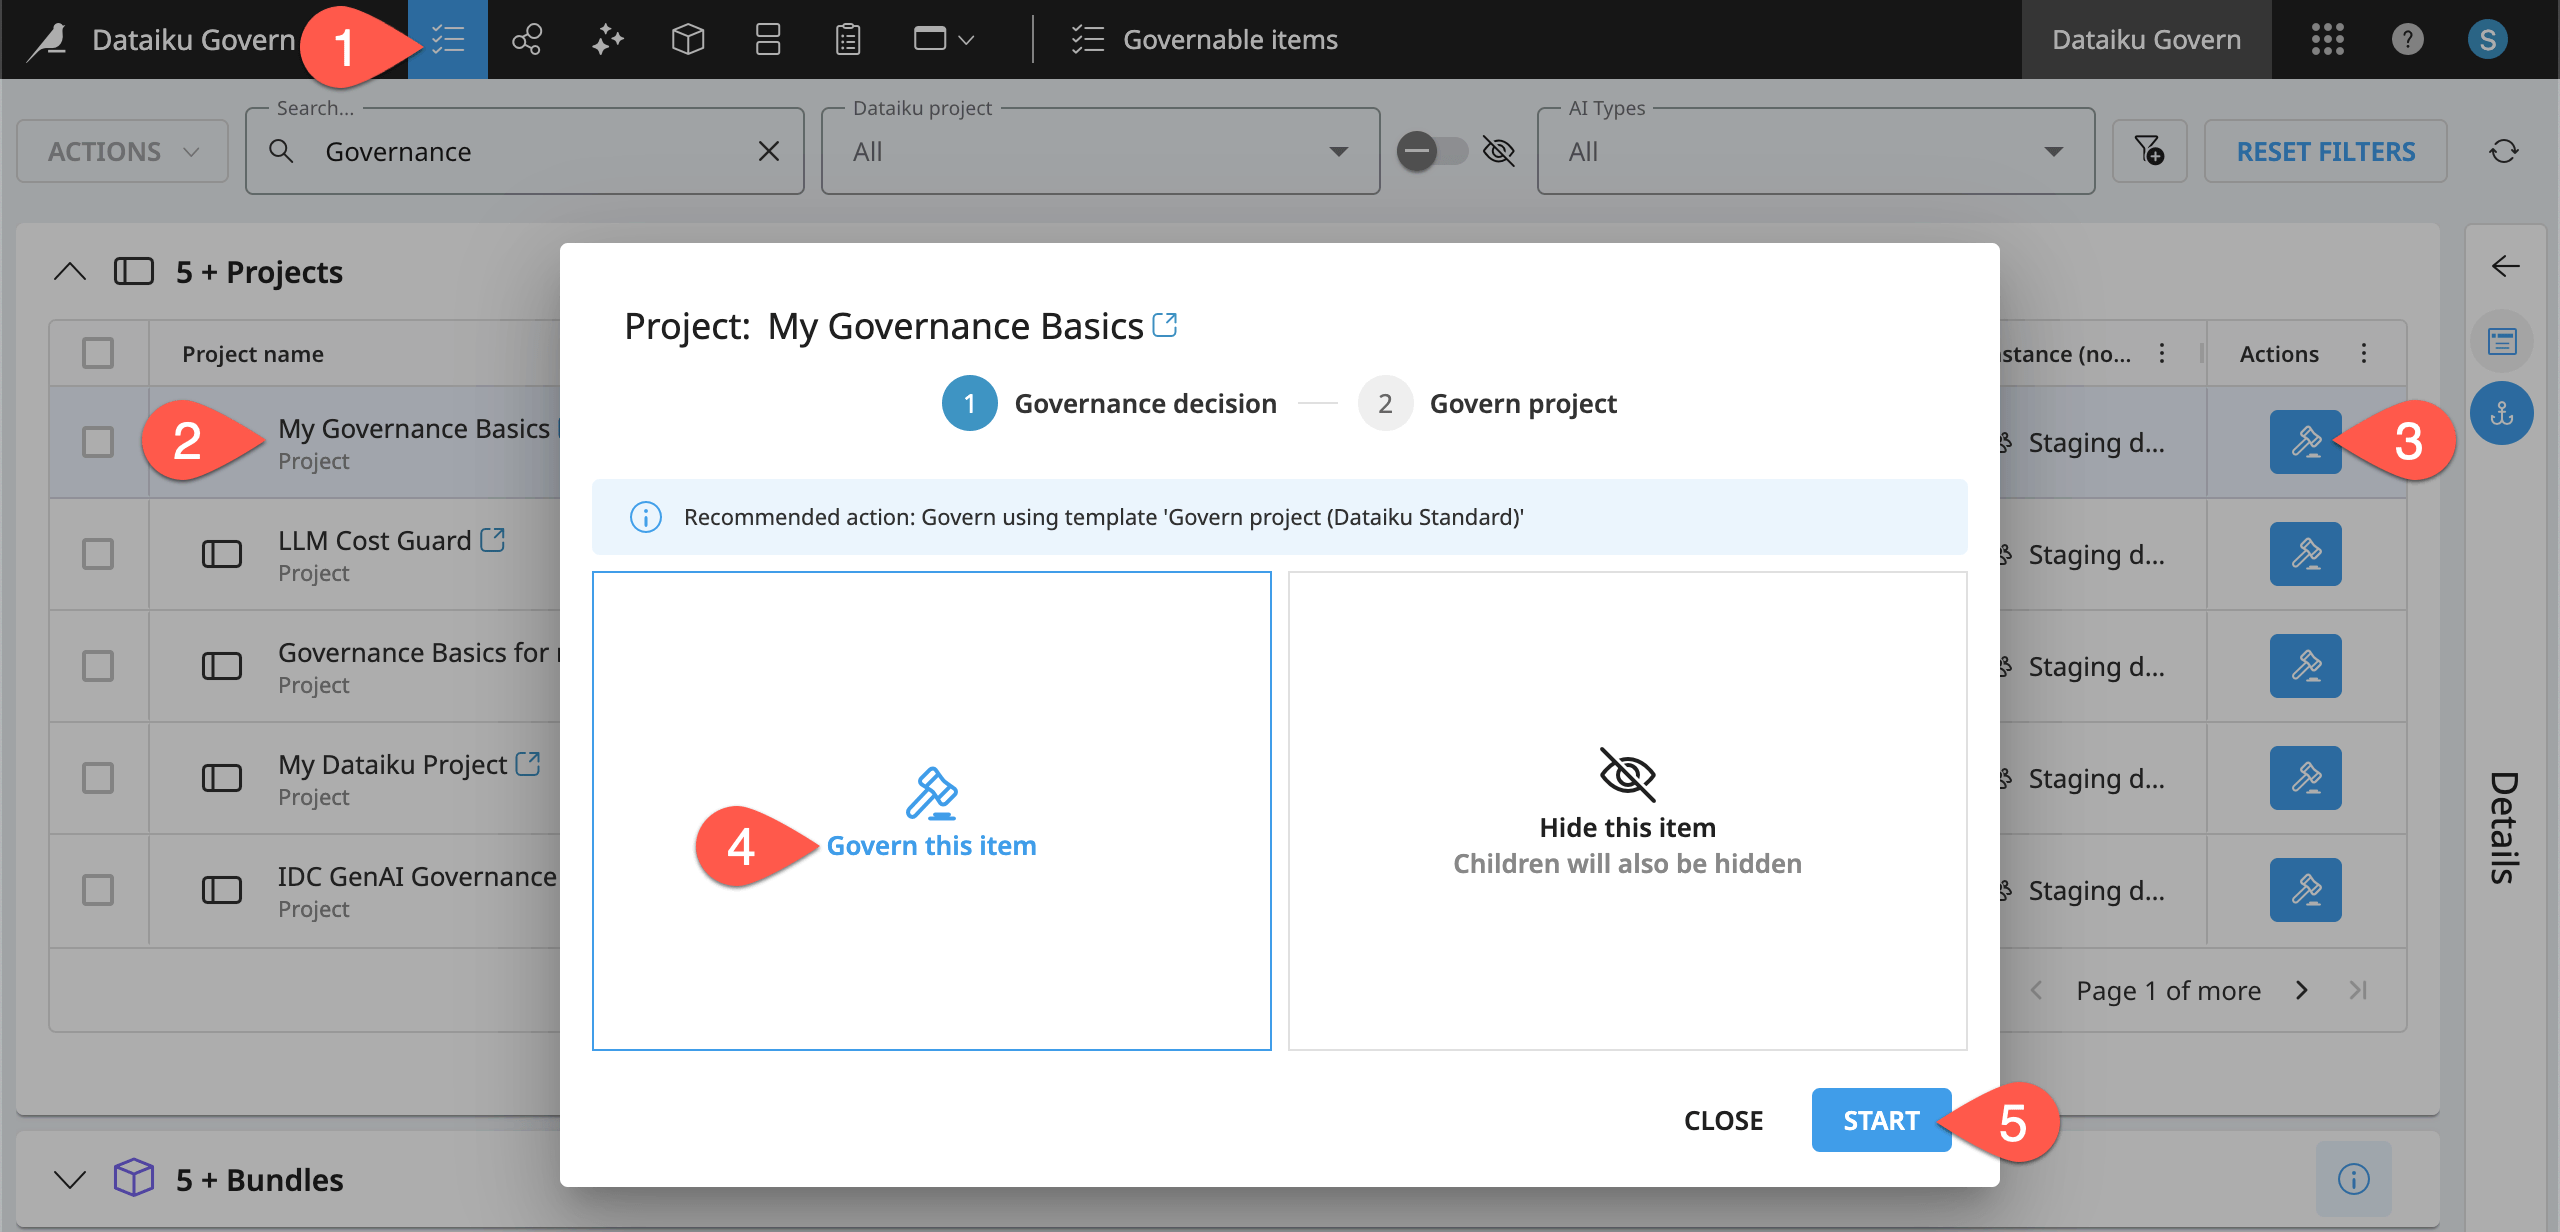
Using the top navigation bar of the Govern node, navigate to the Governable items (
) page.In the Projects menu, find your version of the Governance Basics project.
At the end of its row, click the gavel (
 ) to govern it.
If not already chosen, select Govern this item.
Click Start.
Now you have some choices to make about how to govern the item, in this case, a project.
For the project definition, confirm Create a new Govern project is selected.
For the project template, select the Dataiku Standard template.
The project’s child items may follow Instance rules like the screenshot below, but it depends on your instance’s settings.
In any case, click Override the default instance rules to maintain consistency with the tutorial.
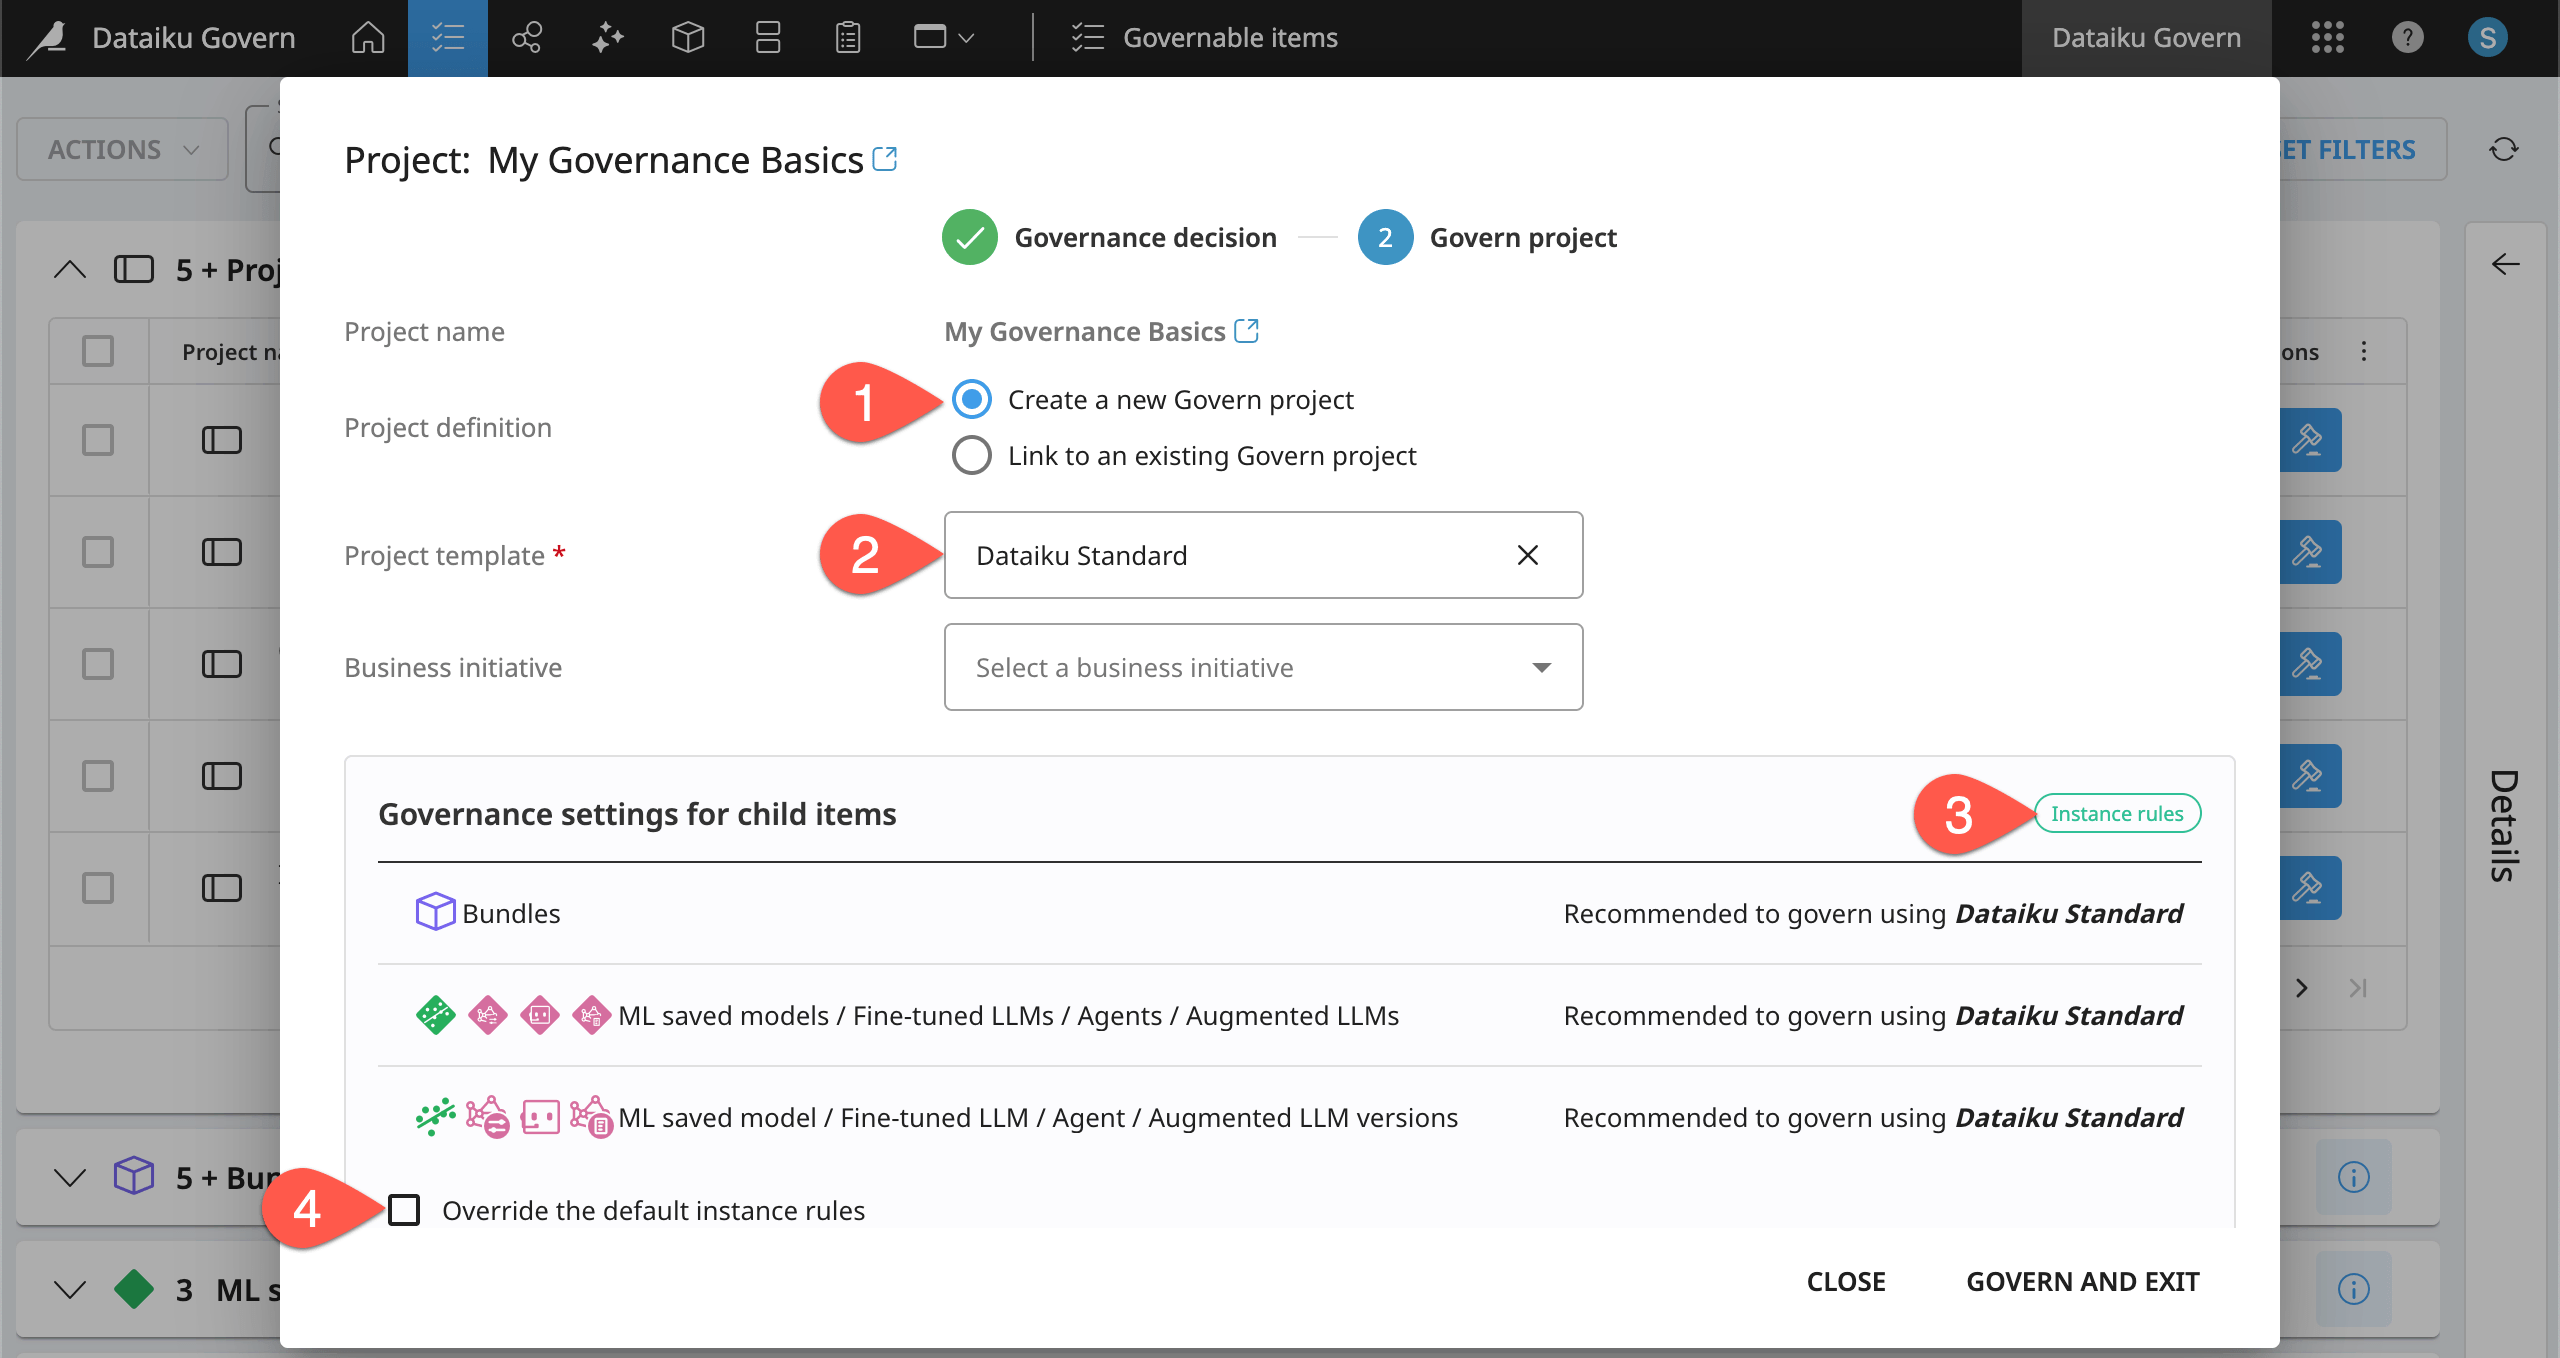
Noting the change in the modal, click Govern and Edit Rules.
Tip
The tutorial returns later to explaining terms like templates, child items, and Business initiatives!
Find the source objects of Govern items#
You should now be looking at the governance settings for child items of the Govern project, which you’ve just created. Before making changes, step back for a moment. It’s important to distinguish between synced Dataiku source items and capital “G” Govern items.
The Govern node syncs the metadata of Dataiku items (such as projects, models, bundles, and GenAI items) from connected nodes. These items are the actual assets built by teams of data scientists, engineers, and analysts. In this tutorial, the fraud prediction model is one example of a Dataiku item.
The Govern node presents the choice to govern these Dataiku source items, thereby creating Govern items. Although a Govern item includes the metadata of its Dataiku source item, these objects exist as separate entities. In this tutorial, the fraud prediction model’s collected metadata is a Govern item.
Important
From the perspective of the Govern node, the Dataiku source item is a read-only object. As a Govern user, you won’t interact with the model itself. Instead you’ll document, qualify, and review the Govern node’s representation of the underlying model.
To better illustrate the distinction between these two separate entities, consider what happens to the Dataiku project when you delete the corresponding Govern project.
Return to the Governable items (
) page, and confirm the absence of your Governance Basics project (since it’s now governed, it’s no longer in your inbox).Then navigate to the Governed projects (
) page.Find your version of the Governance Basics project, and click on its name to open your first capital “G” Govern item, in this case, a Govern project.
Navigate to the Source objects panel.
Recognize that the source of this governed item is your Design node project.
In the item header, click the vertical dots (
 ) > Delete Govern project.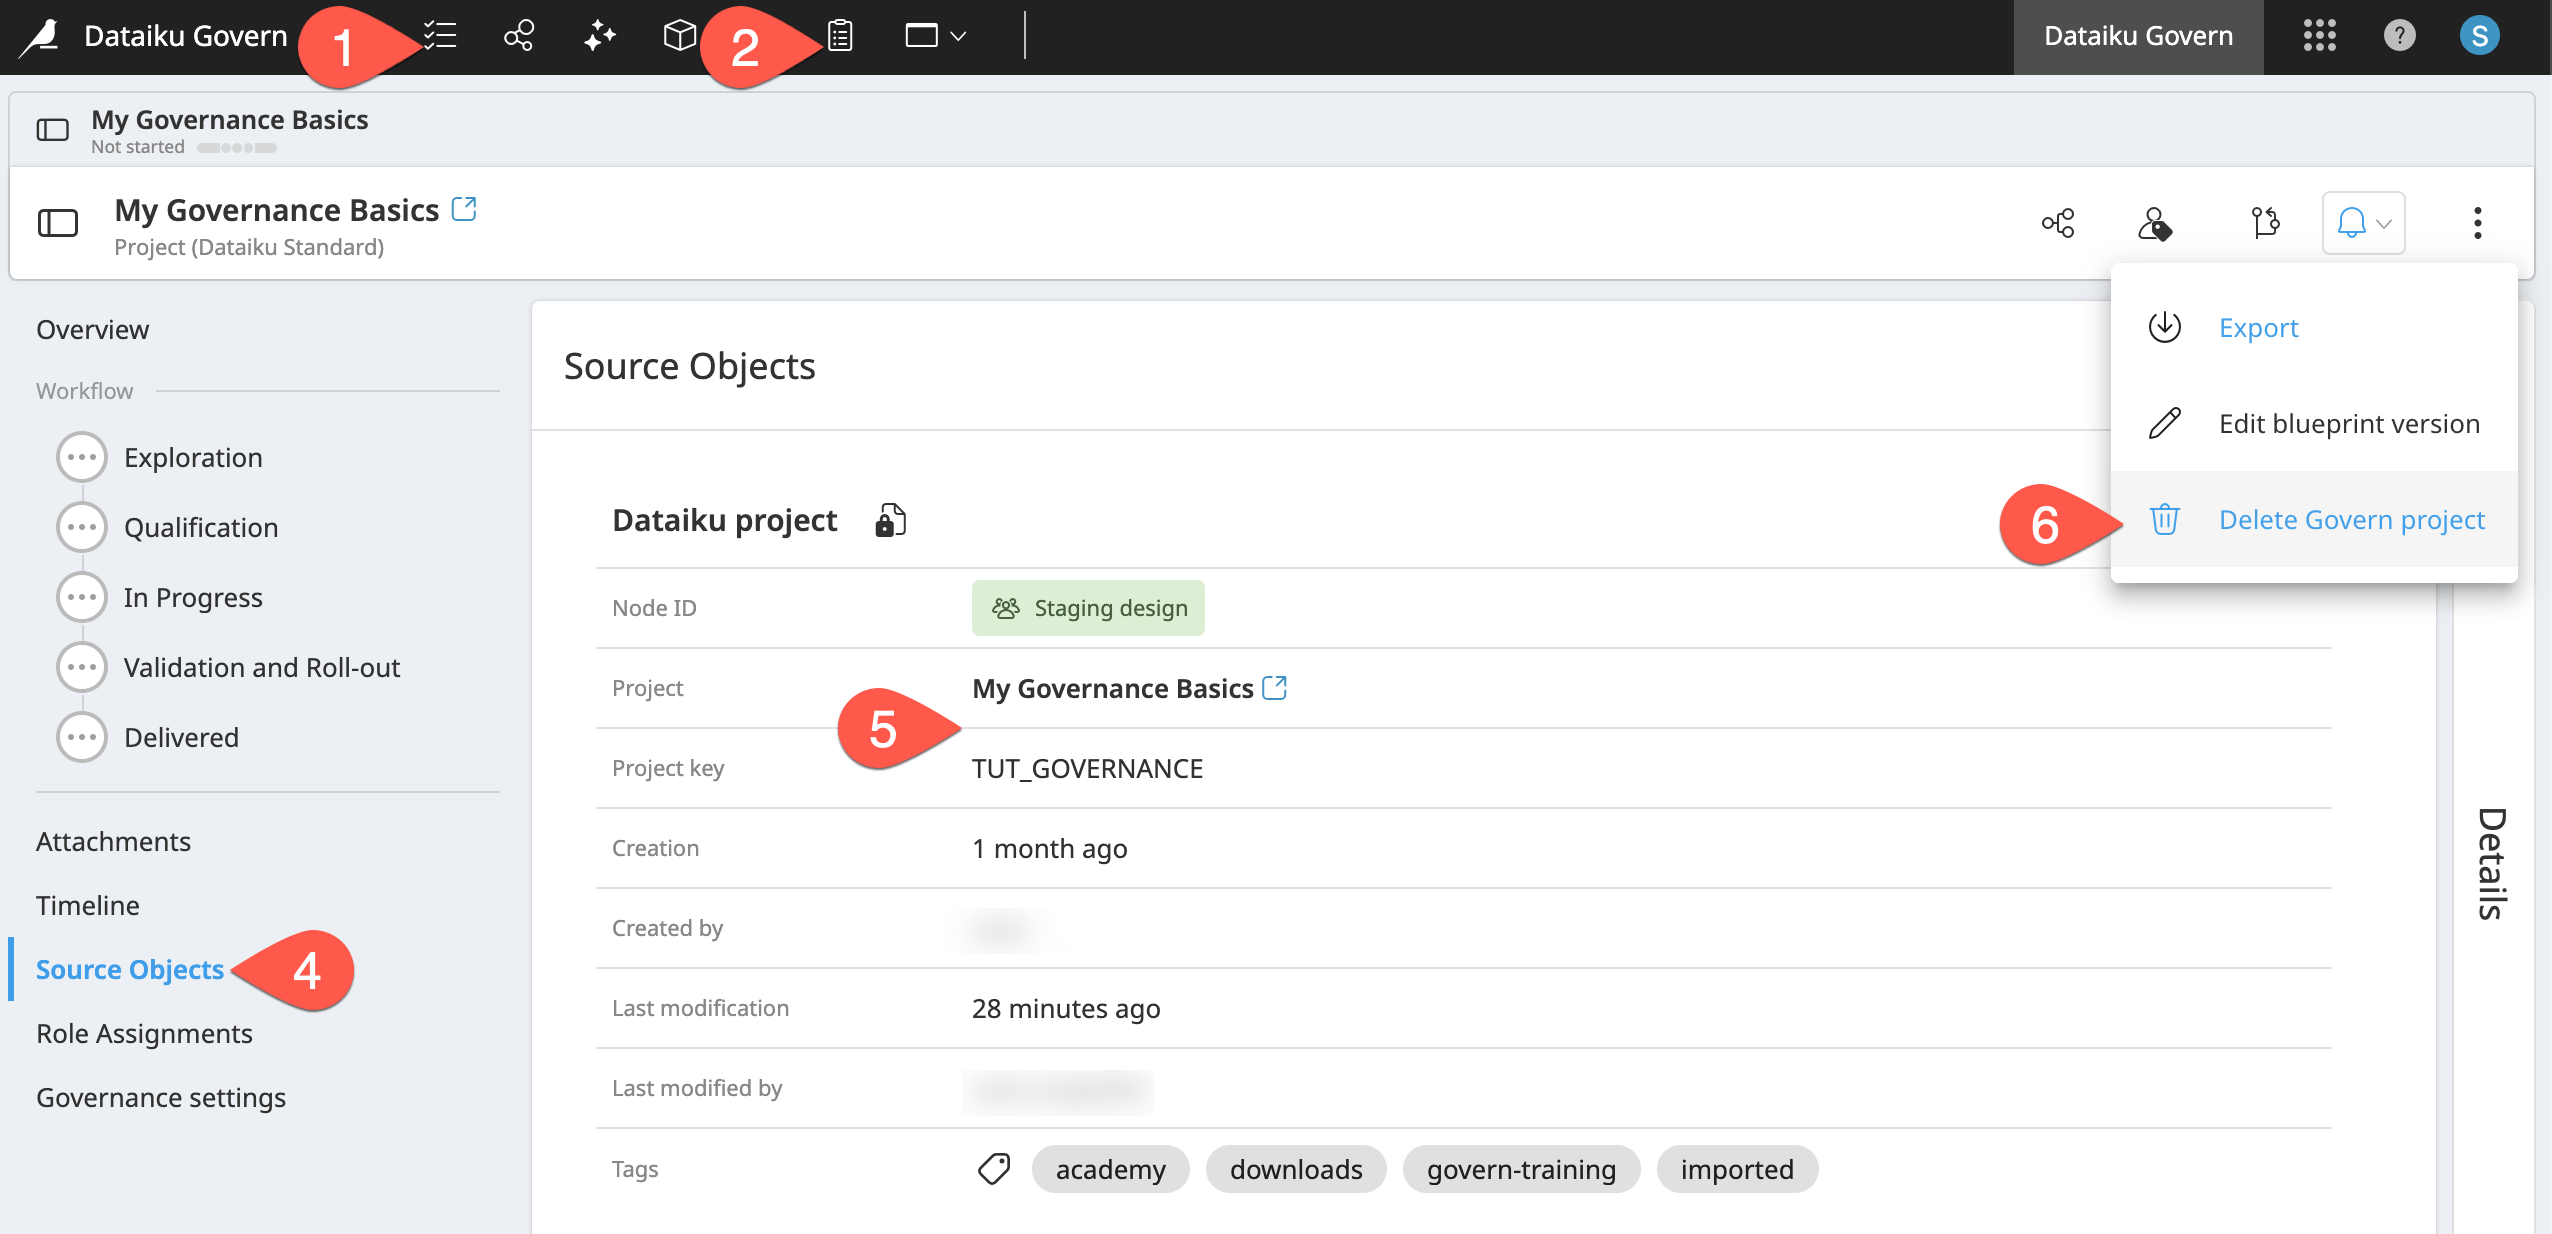
Read the confirmation that this action doesn’t delete the original Dataiku project found in the Design node, and then click Delete Govern Project.
Return to the Governable items (
) page to confirm your Dataiku project is once again available to be governed.
Tip
Not every Govern item necessarily has a Dataiku source item. Later, you’ll learn about pure Govern node items, such as Business initiatives, that exist only in the Govern node.
Understand custom governance rules#
Although your governance settings may have differed, the first walkthrough of governing the project specified that the child items would be governed according to the instance rules. Compare that experience to governing the same project a second time, having previously overridden the default instance rules on this project.
From the Governable items (
) page, find your Governance Basics project, and click the gavel () to govern it again.Once more, select Govern this item, and click Start.
Apply the same Dataiku Standard template to the new Govern project.
Recognize that the project’s child items now follow Custom rules.
Click Govern and Exit to add the governance layer again.
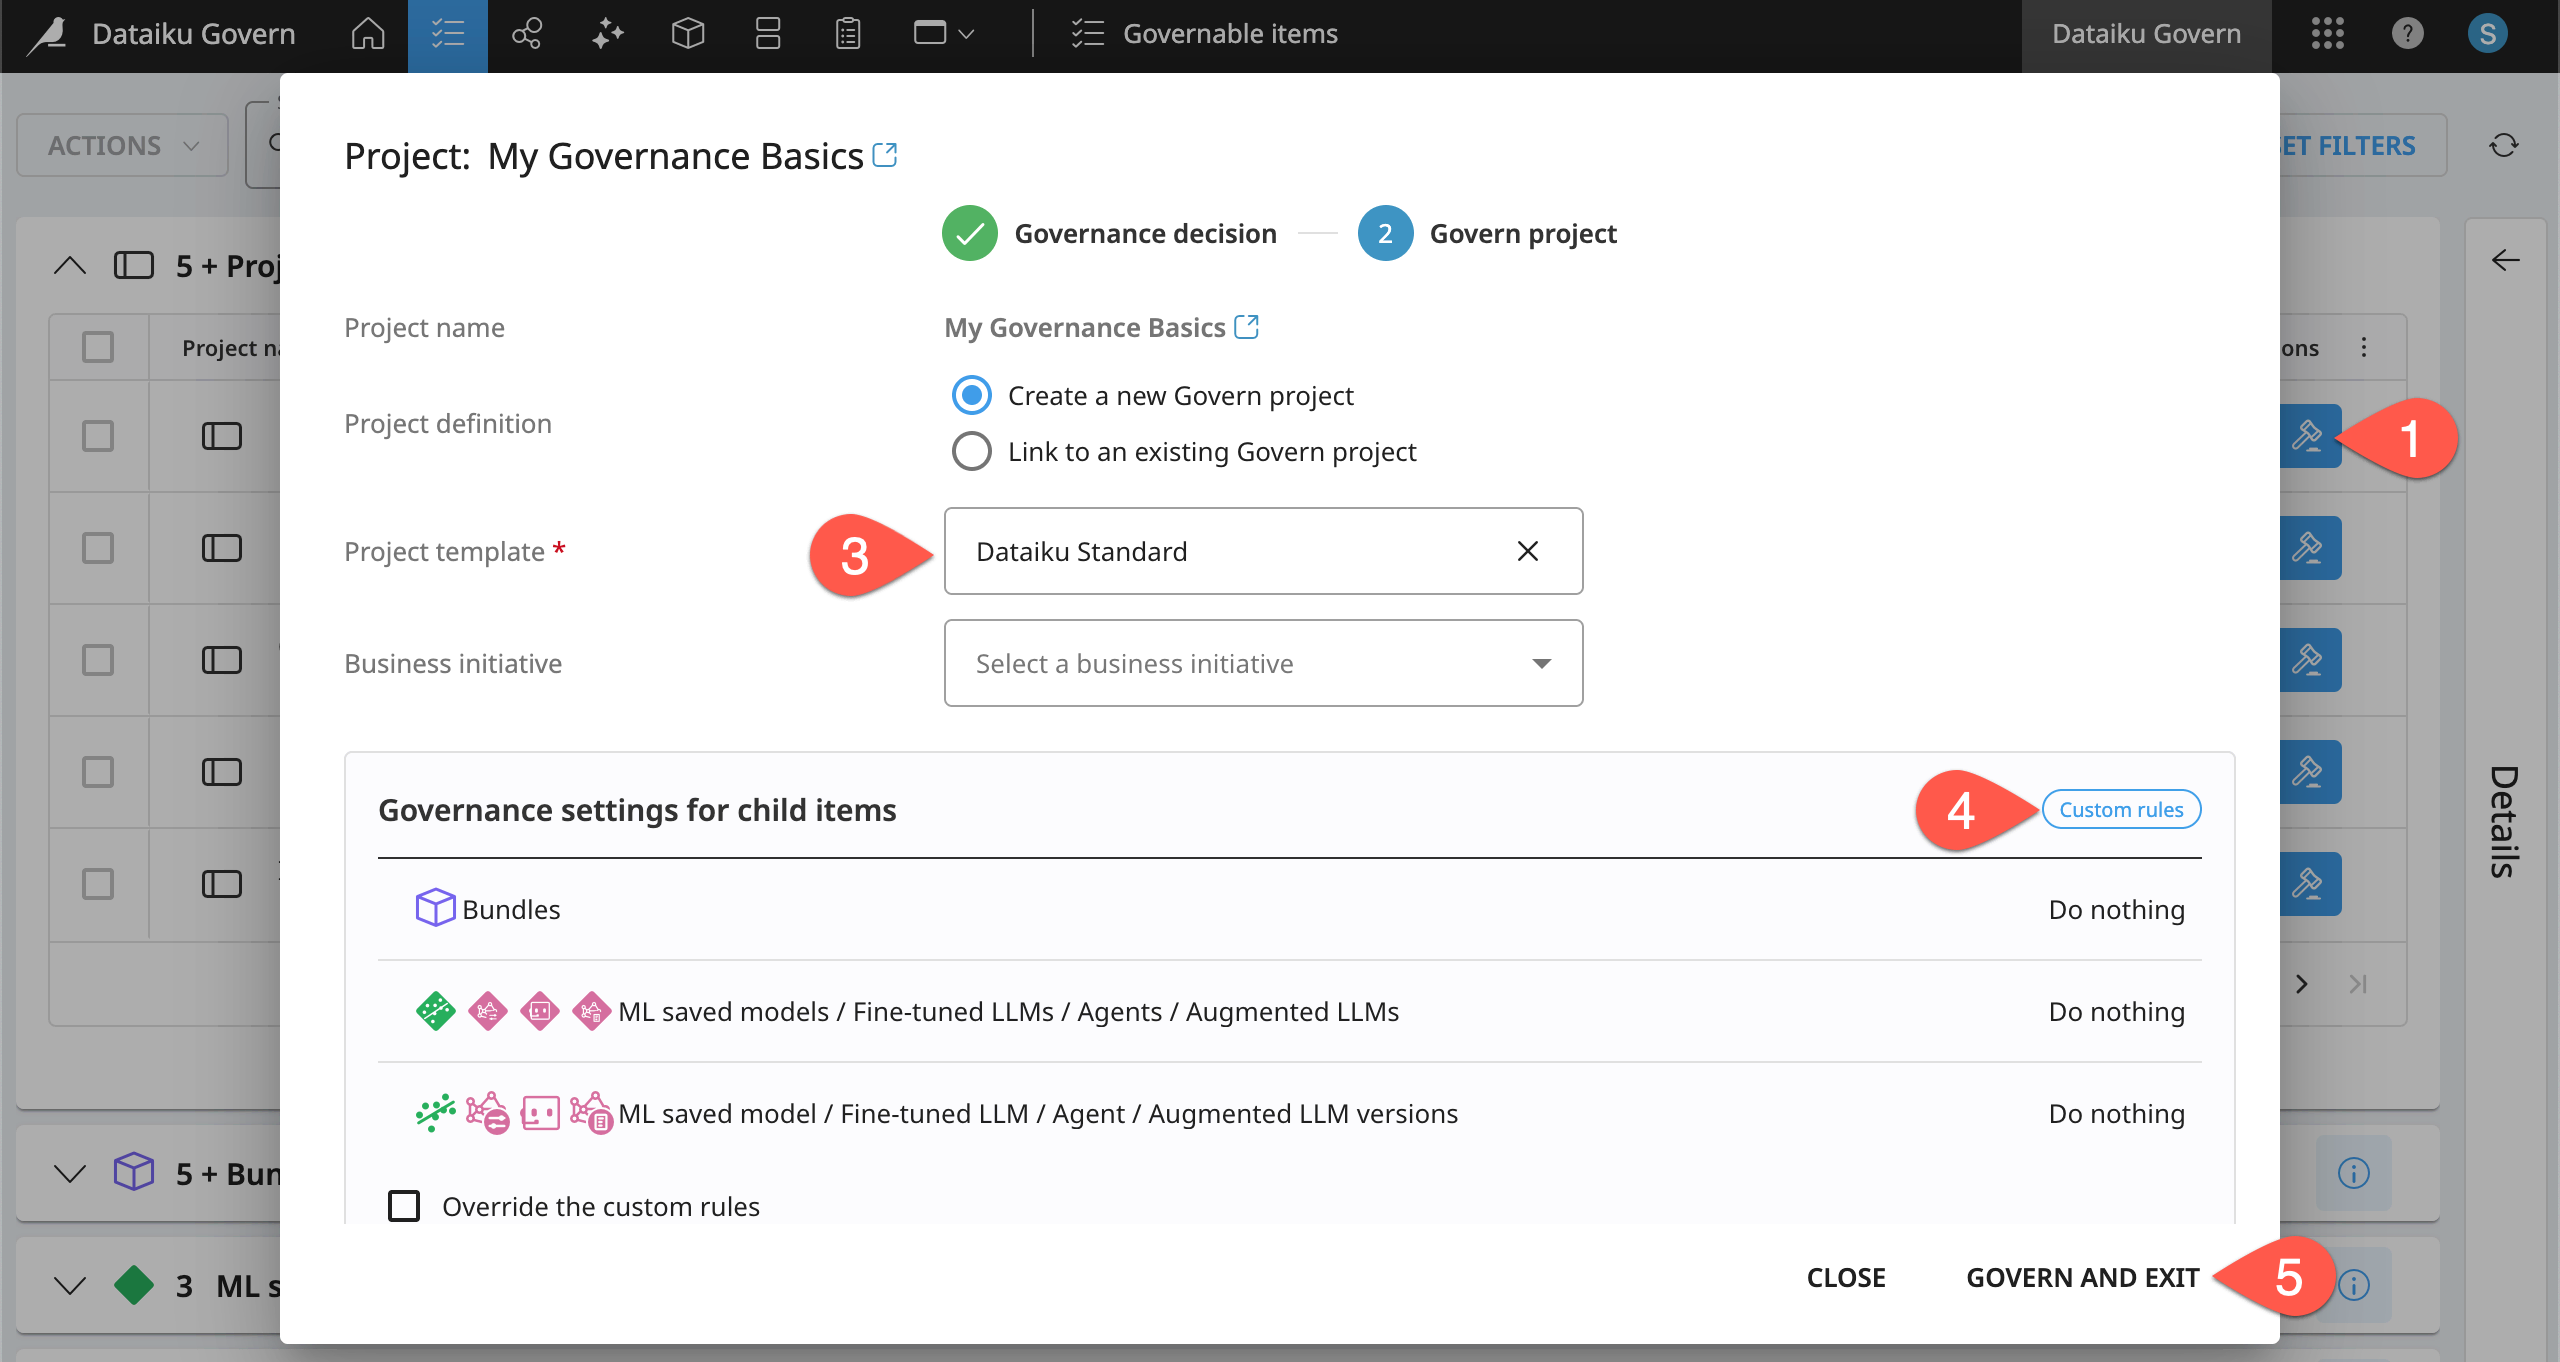
Confirm your project’s return to the Governed projects (
) page.Navigate to the Model registry (
) or Bundle registry () pages.In either case, find your governed Governance Basics project, and expand its accordion menu to see that the project’s child items (bundle, model, model versions) aren’t governed.
Govern with respect to the item hierarchy#
At this point, you’ve governed only the project—using custom rules defined at the project level. However, the actual artifacts moving into production are the project’s child items (either the bundle or the saved model version).
Try governing the project’s active saved model version.
Navigate to the Model registry (
) page.Find your version of the Governance Basics project.
Expand the accordion menus until reaching the project’s active saved model version (
).At the end of its row, click the gavel (
) to govern it.Following the item hierarchy, recognize that you’ll first need to govern the parent saved model before governing the child saved model version.
Select Govern this item.
Click Start.
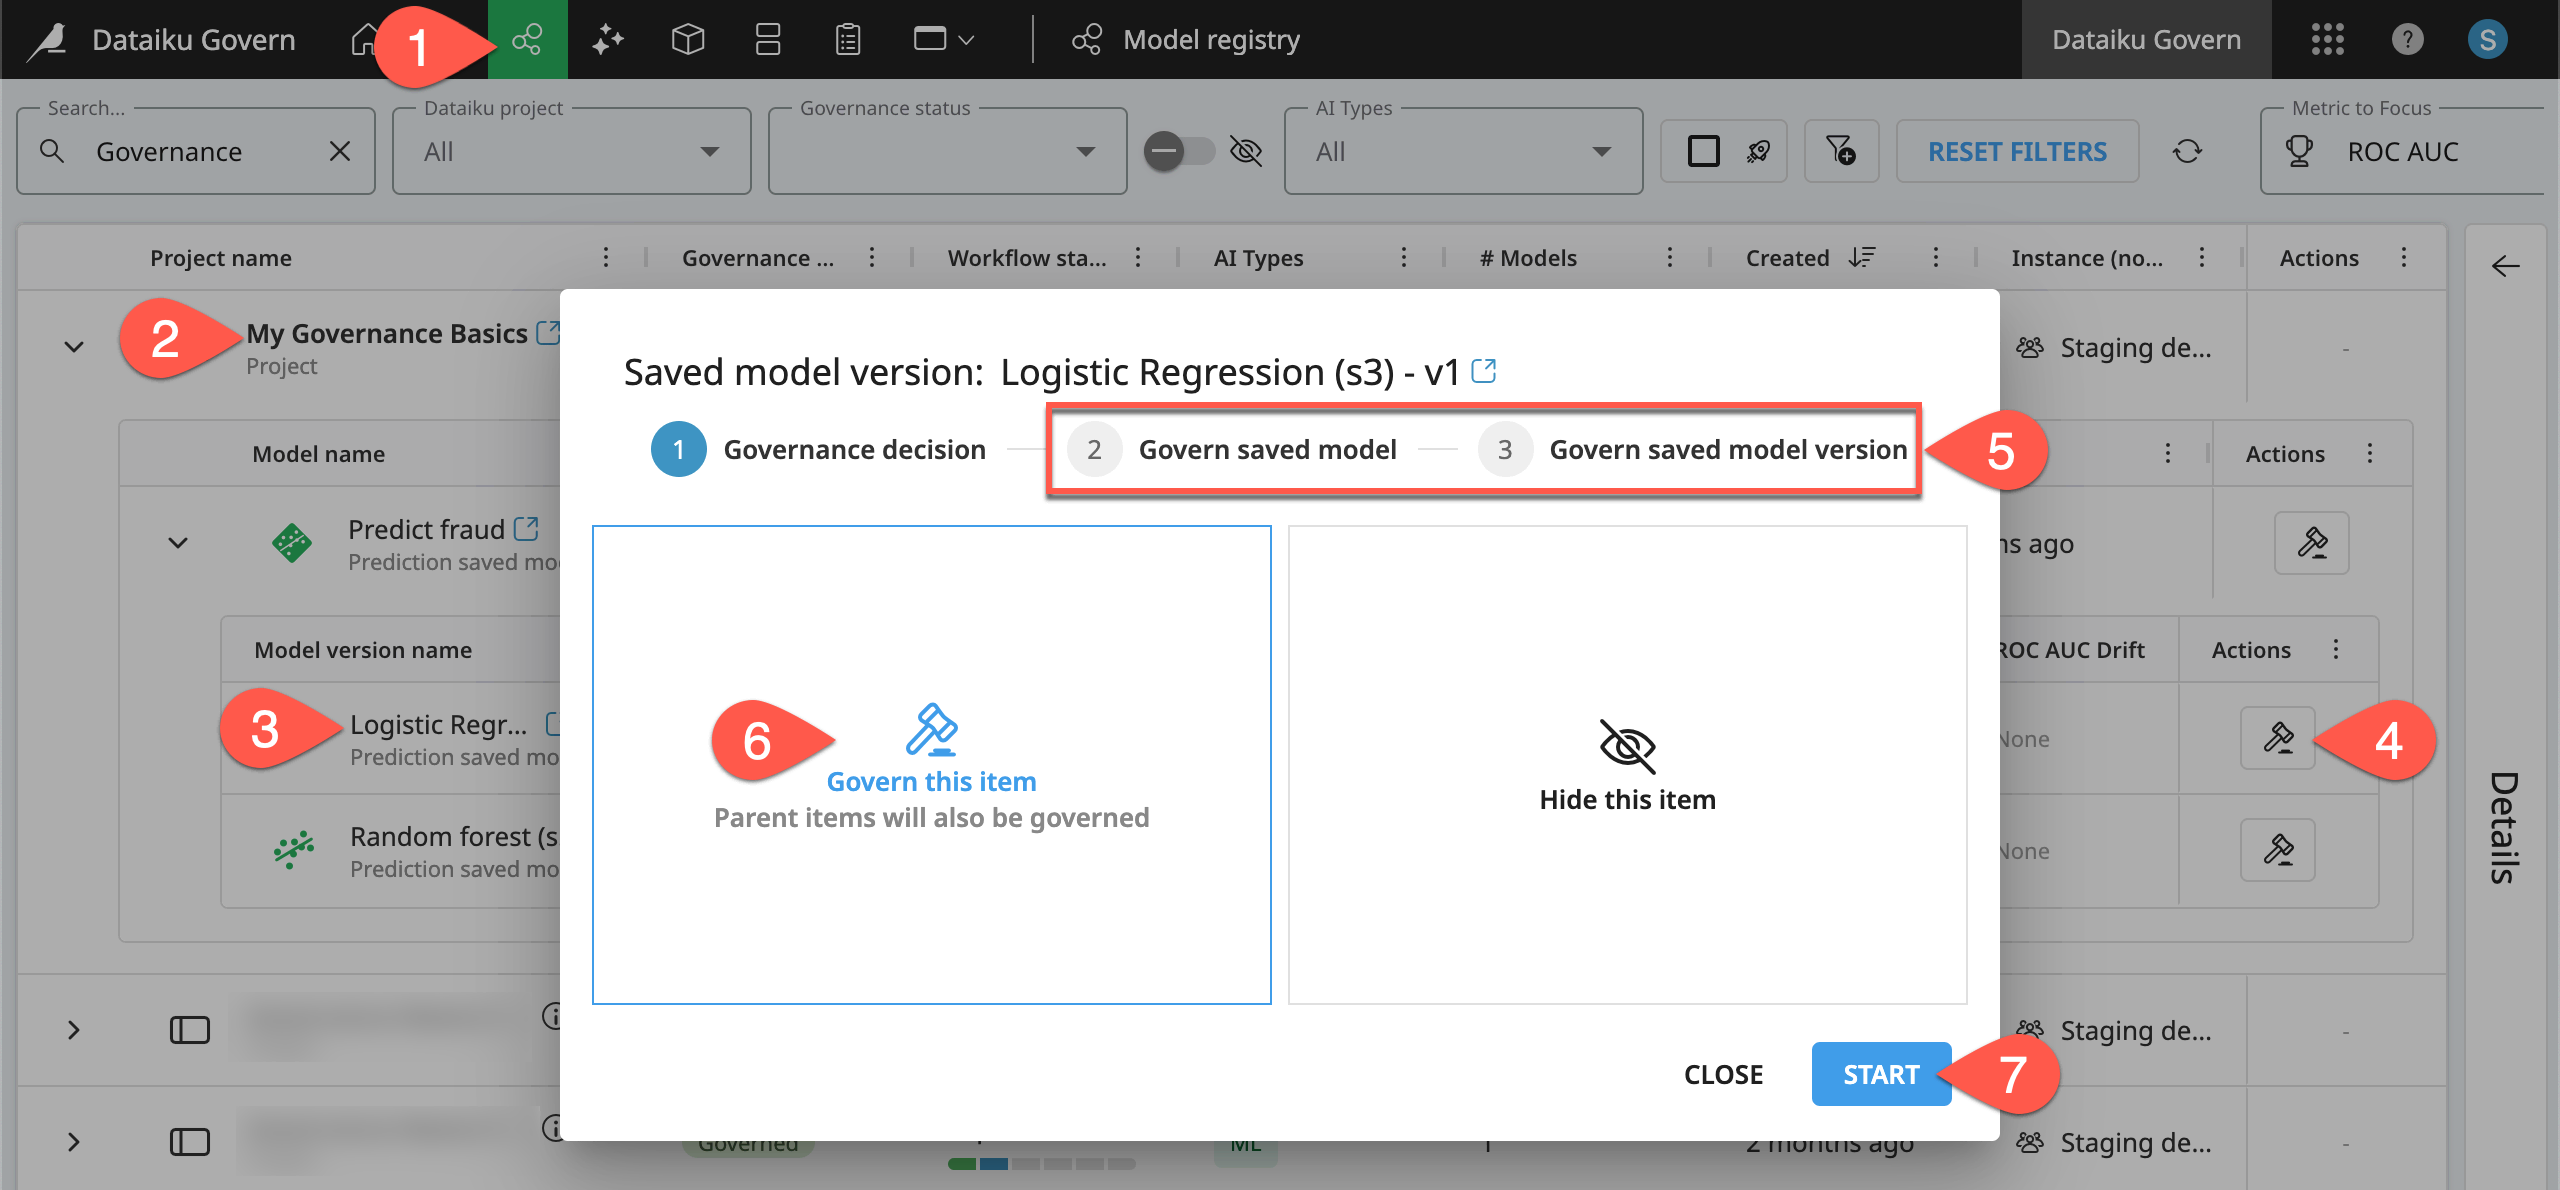
Governing the child items introduces a new category of rules: project rules.
Recall that the tutorial first overrode the instance rules at the project level.
Therefore, the project follows its own custom rules.
As a consequence, the governance settings of the parent project now define the rules for the child items. In other words, the child items follow project rules.
In this case, the custom rules defined at the project level currently define a rule of “do nothing” for child items, leaving you free to make your own choices.
Govern the parent model according to the Dataiku Standard template.
Recognize the child model version will follow a project rule of “do nothing.”
Click Govern and Next.
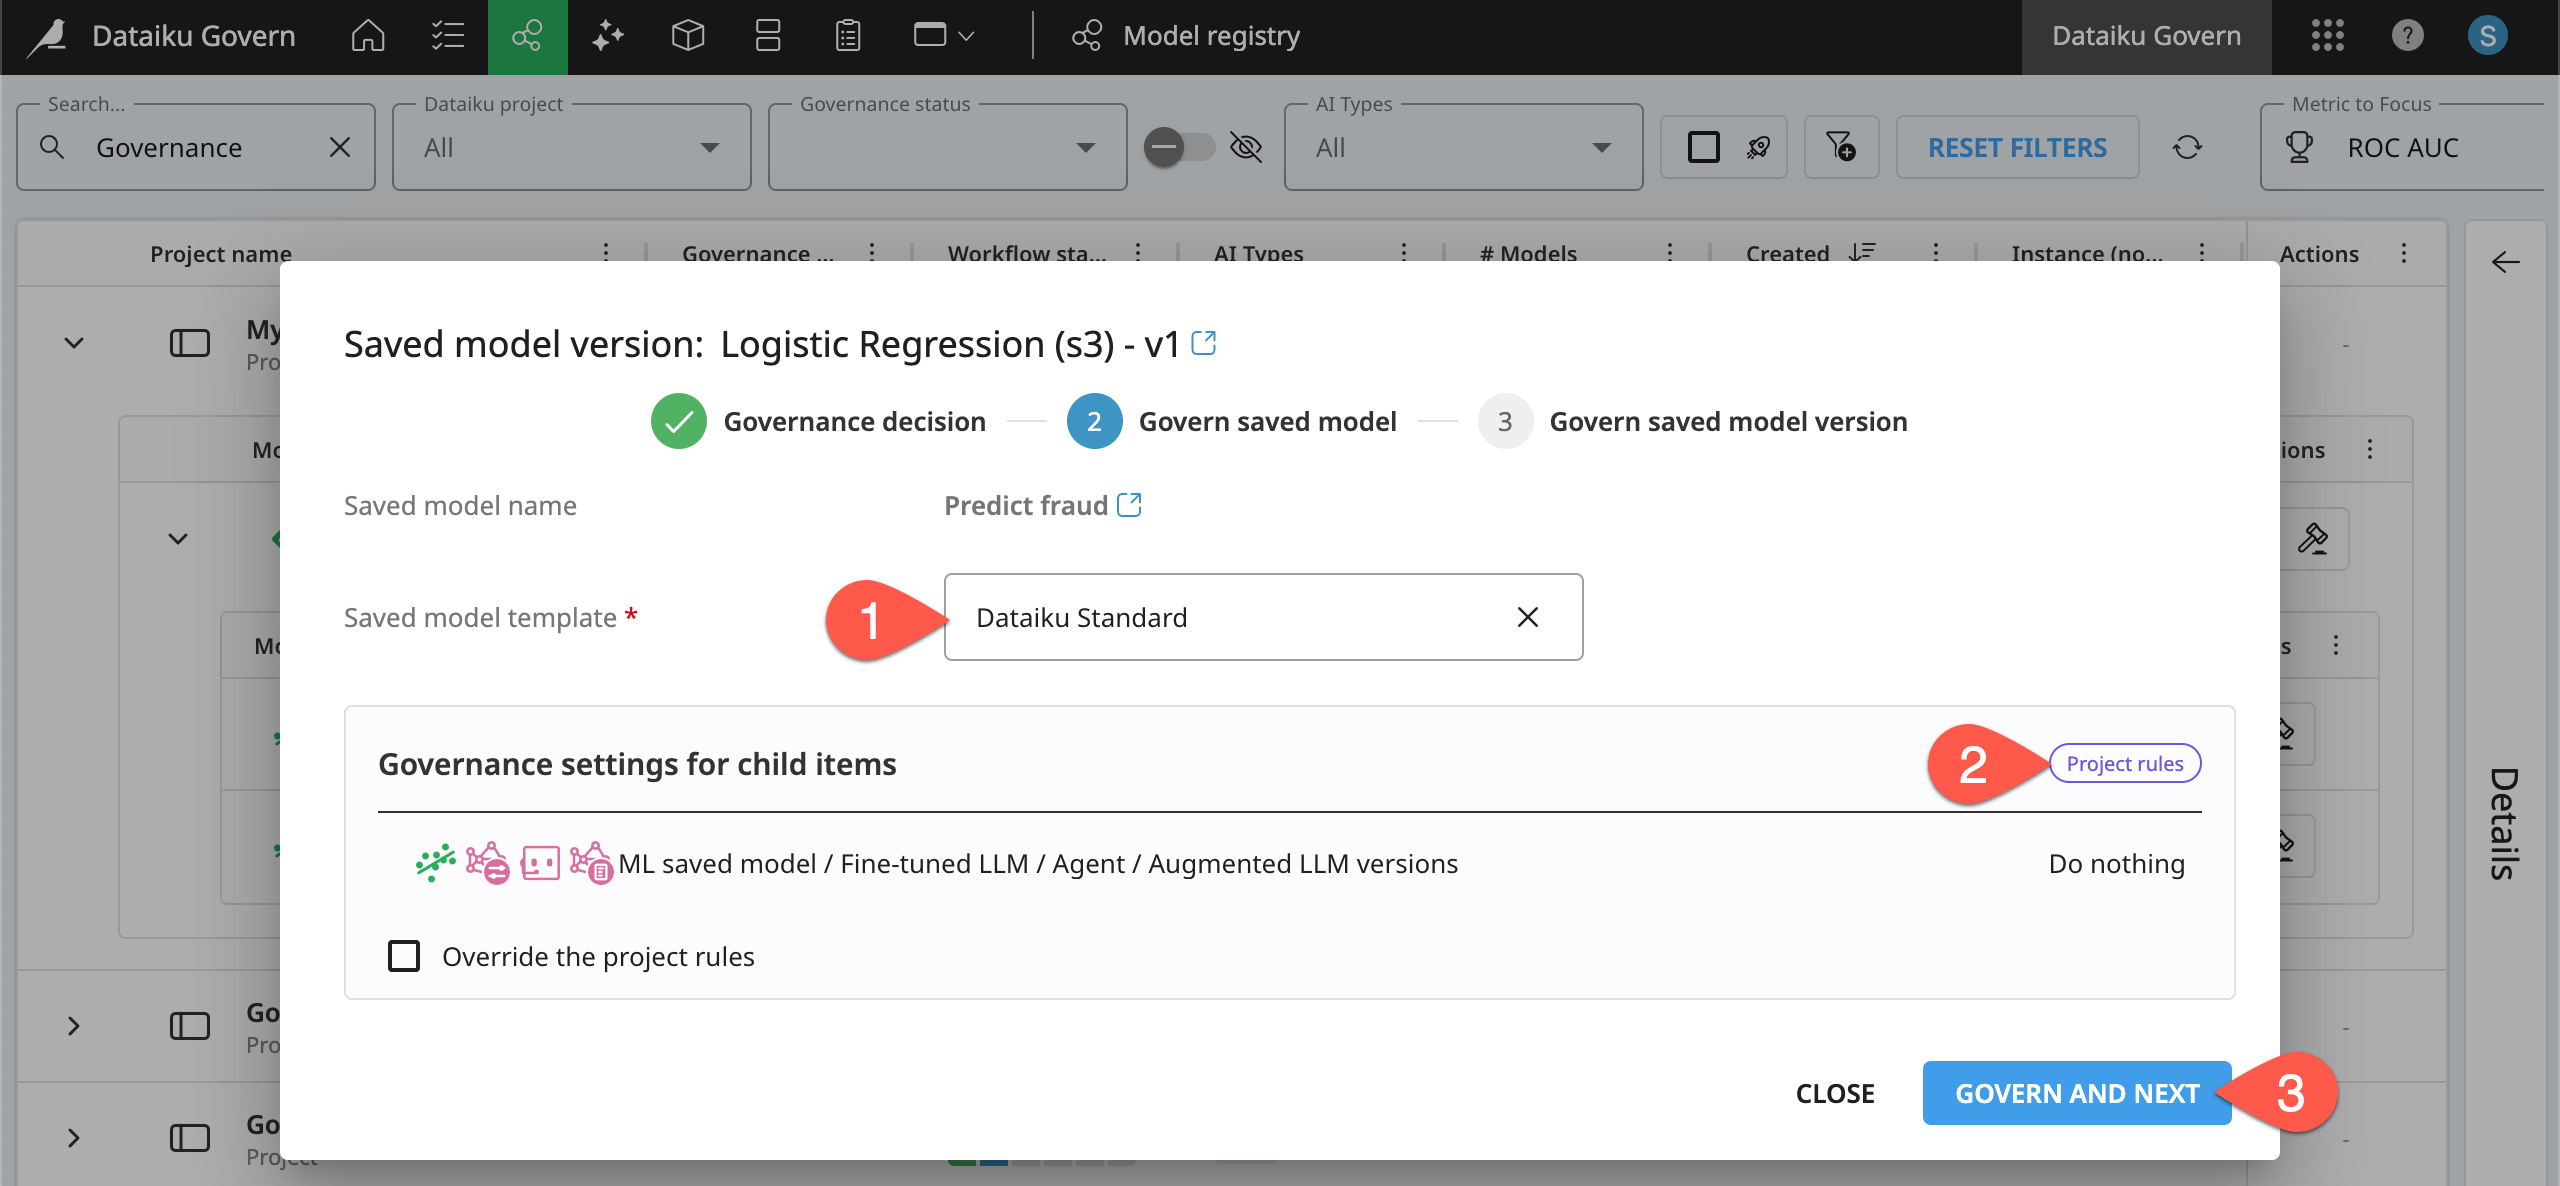
On the last step, govern the selected saved model version according to the Dataiku Standard template.
Click Govern and Exit.
Use governance workflows#
You’ve now added a governance layer to a Dataiku project, its child model, and model version. When doing so, you applied a specific governance template, in this case, the Dataiku Standard template. Having done so, start exploring the contents of a capital “G” Govern item.
Add metadata to a governed item#
One benefit a governance layer enables is the ability to attach various kinds of metadata to a Dataiku source item.
For example, you can enrich a Govern project with descriptions, scope definitions, reviewer assignments, and a schedule. You can document whether the project has sensitive information and which countries it impacts. In the context of an audit, this may be essential information to include.
Navigate to the Governed projects (
) page.Find your Governance Basics project, and click on its name to open it.
While in the Overview panel, click Edit in the item header.
Next to Sponsor, click + Add, and select yourself.
Copy-paste the text below into the Description field.
A high-risk fraud prediction project for Govern training.
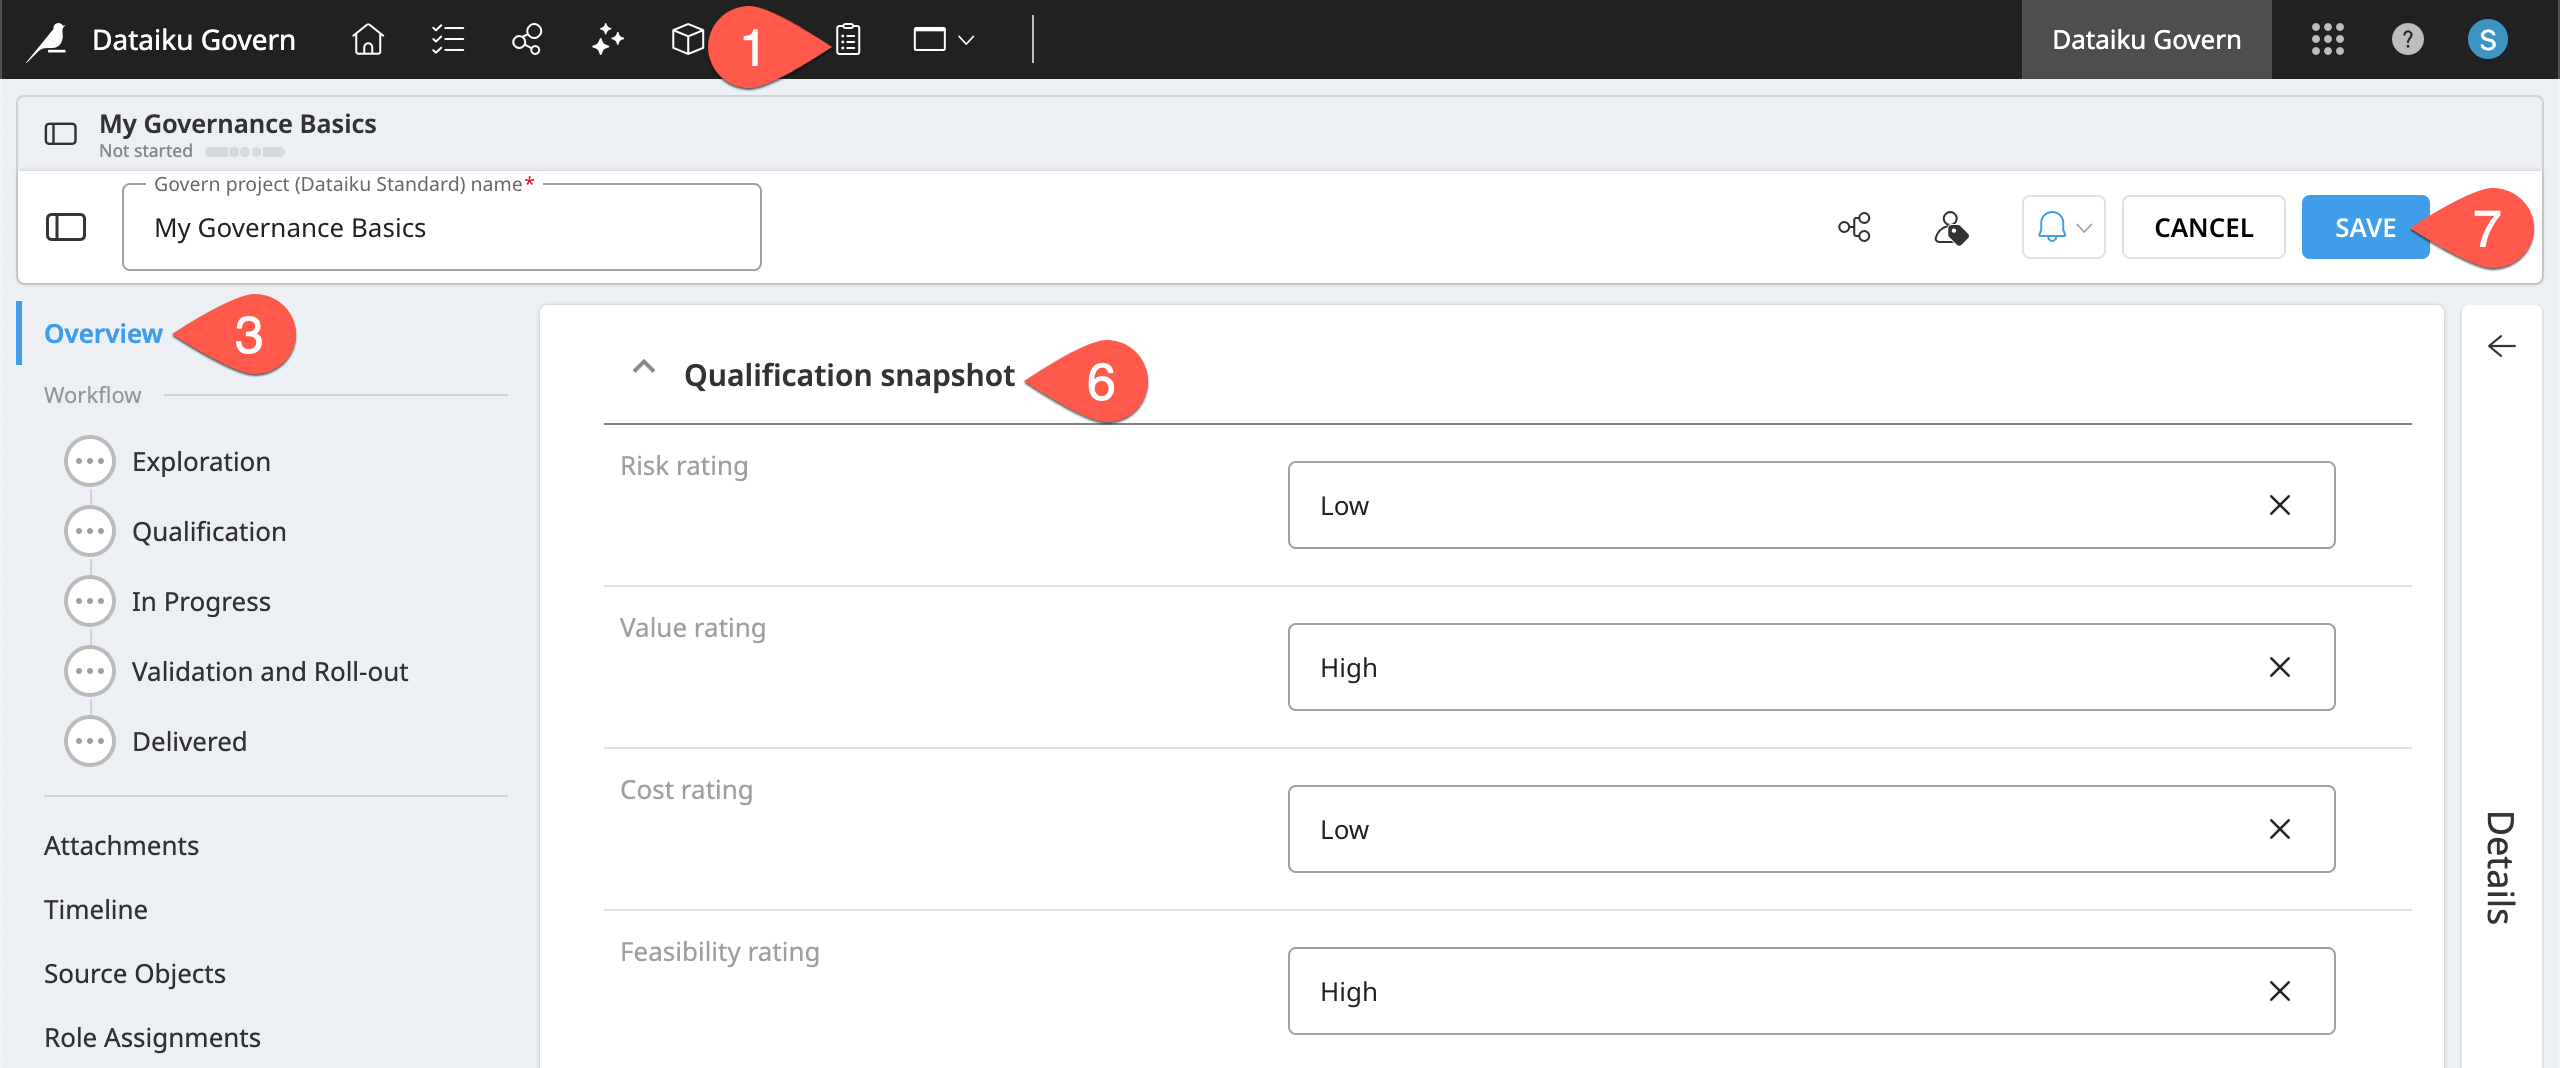
Still within the Overview panel, scroll down to the Qualification snapshot. Try selecting different values for the risk, value, cost, and feasibility ratings. A project like fraud prediction would likely be high risk.
Feel free to edit any further fields, and click Save in the item header when finished.
Tip
It’s up to your organization to determine how to make the best usage of a governed item’s fields. You’ll want to focus on collecting the necessary information to make informed governance decisions.
Advance a project through a governance workflow#
In the left panel, beneath the overview, you’ll see a workflow of five steps. This is the standard workflow that you selected when governing the project.
For now, advance through these steps quickly. In Tutorial | Governance lifecycle, you’ll learn how to make them a meaningful part of your governance lifecycle.
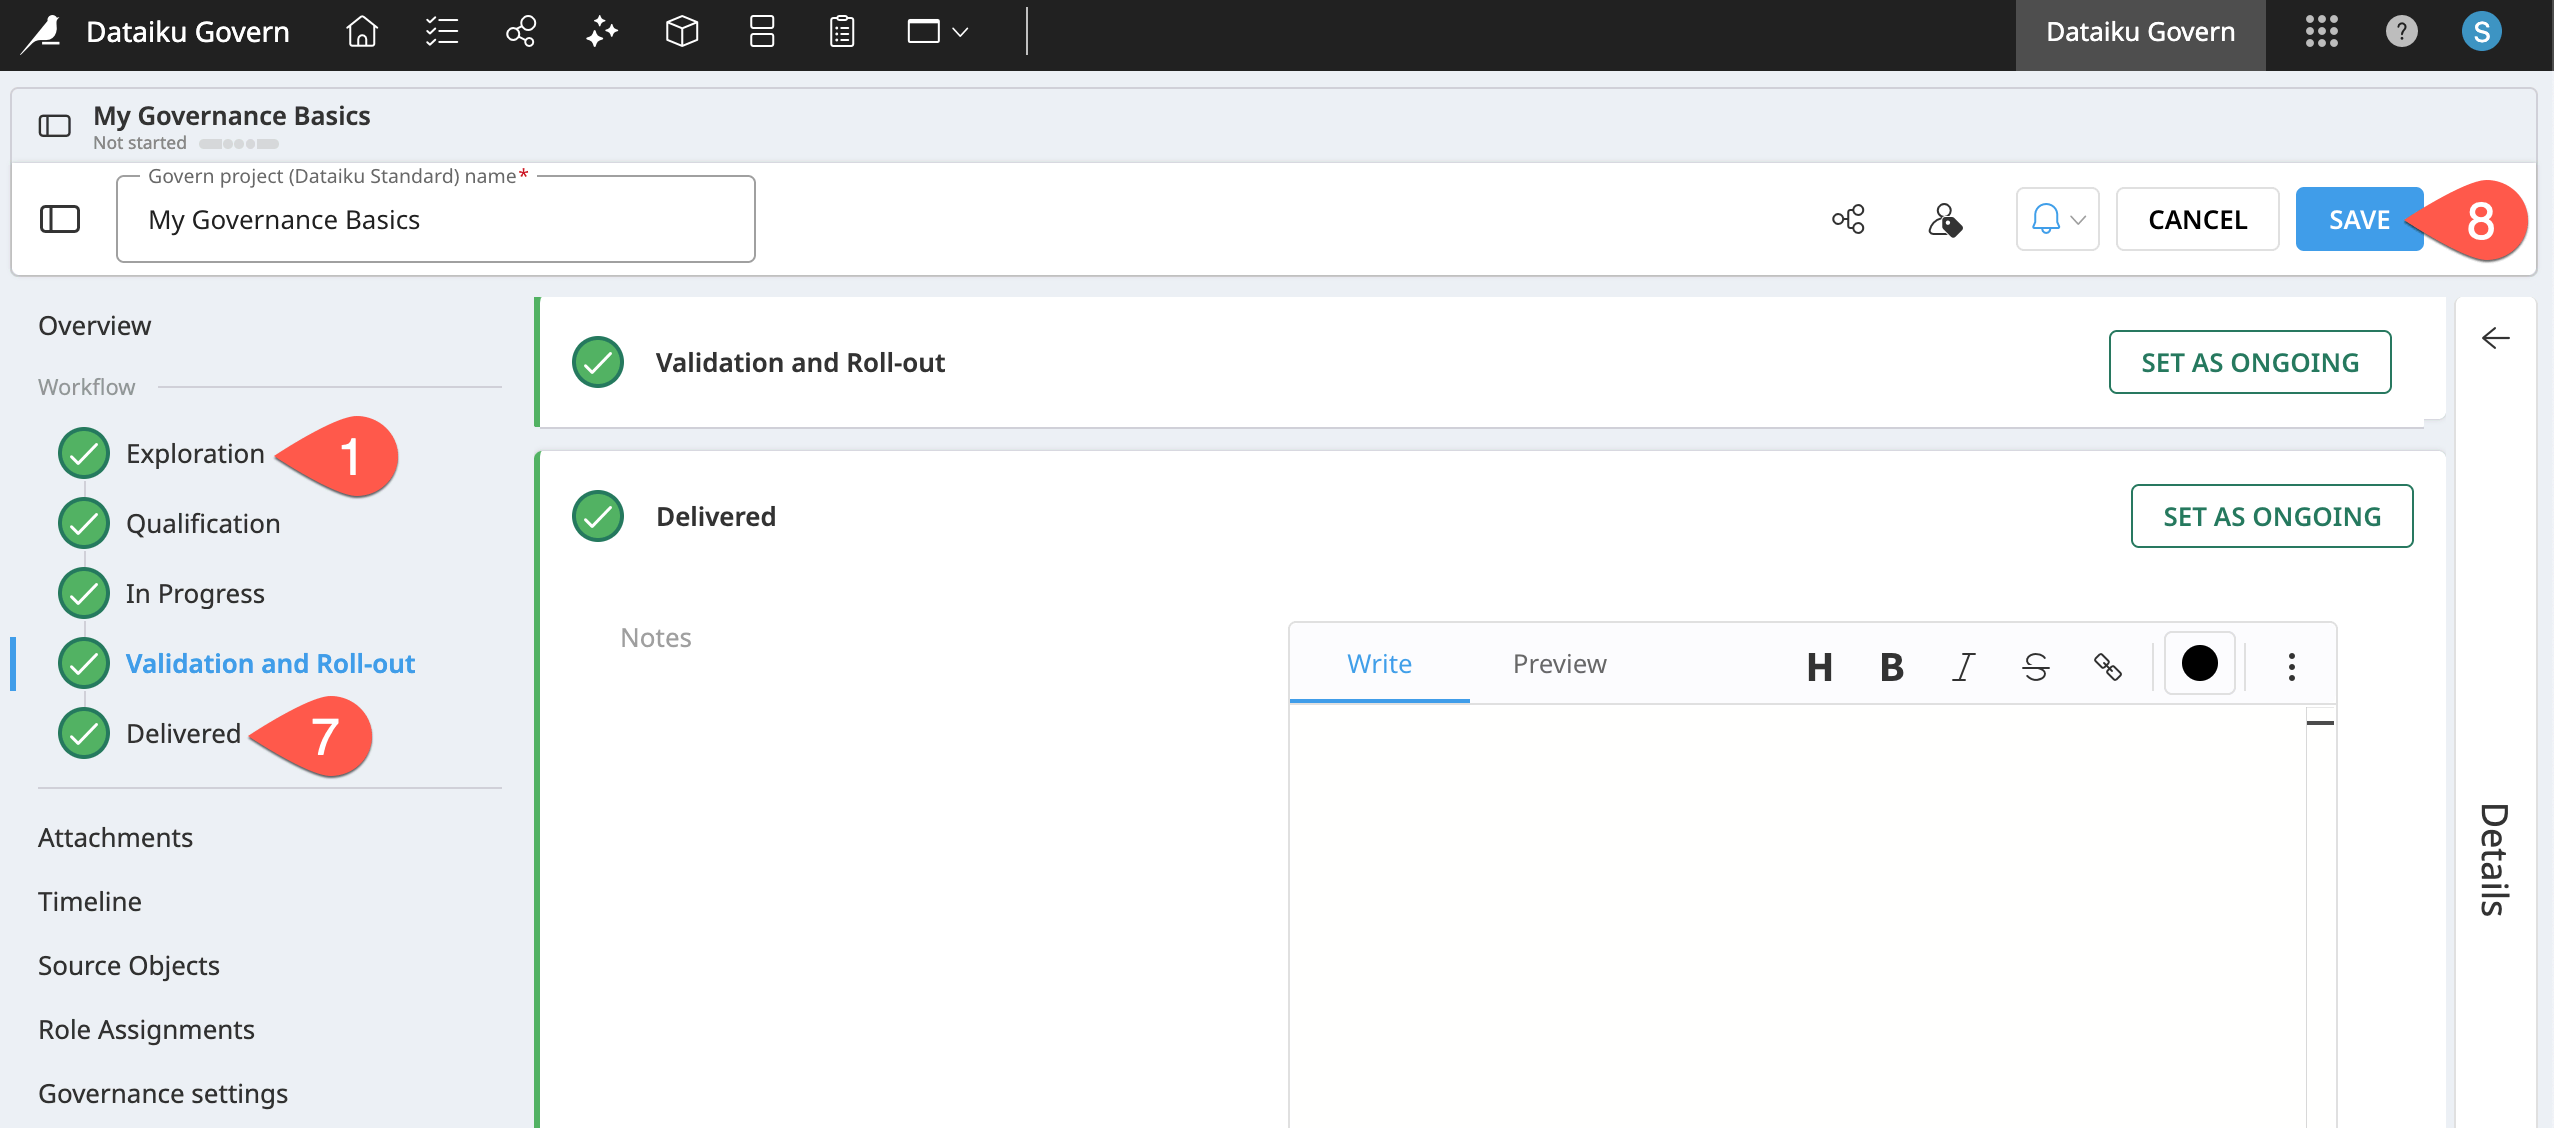
From the left panel of your governed project, click Exploration to view that step of the project’s workflow.
Click Edit in the item header.
Click Set As Ongoing to indicate this step is in progress.
For the Notes field, copy-paste the following example:
During the Exploration phase, we need to determine the key risks, responsibilities, and projected value of the project.
Click Set As Finished to advance to the next step in the workflow.
Scroll down to the Qualification step and explore the available fields.
Click Set As Finished, and repeat this process until your project has finished the Delivered step.
Feel free to move back and forth between steps to test how it works. Click Save in the item header when ready to move on.
Advance child items through a governance workflow#
Govern projects aren’t the only Govern item that have a workflow. According to the standard template, Govern bundles and Govern model versions have their own governance workflows.
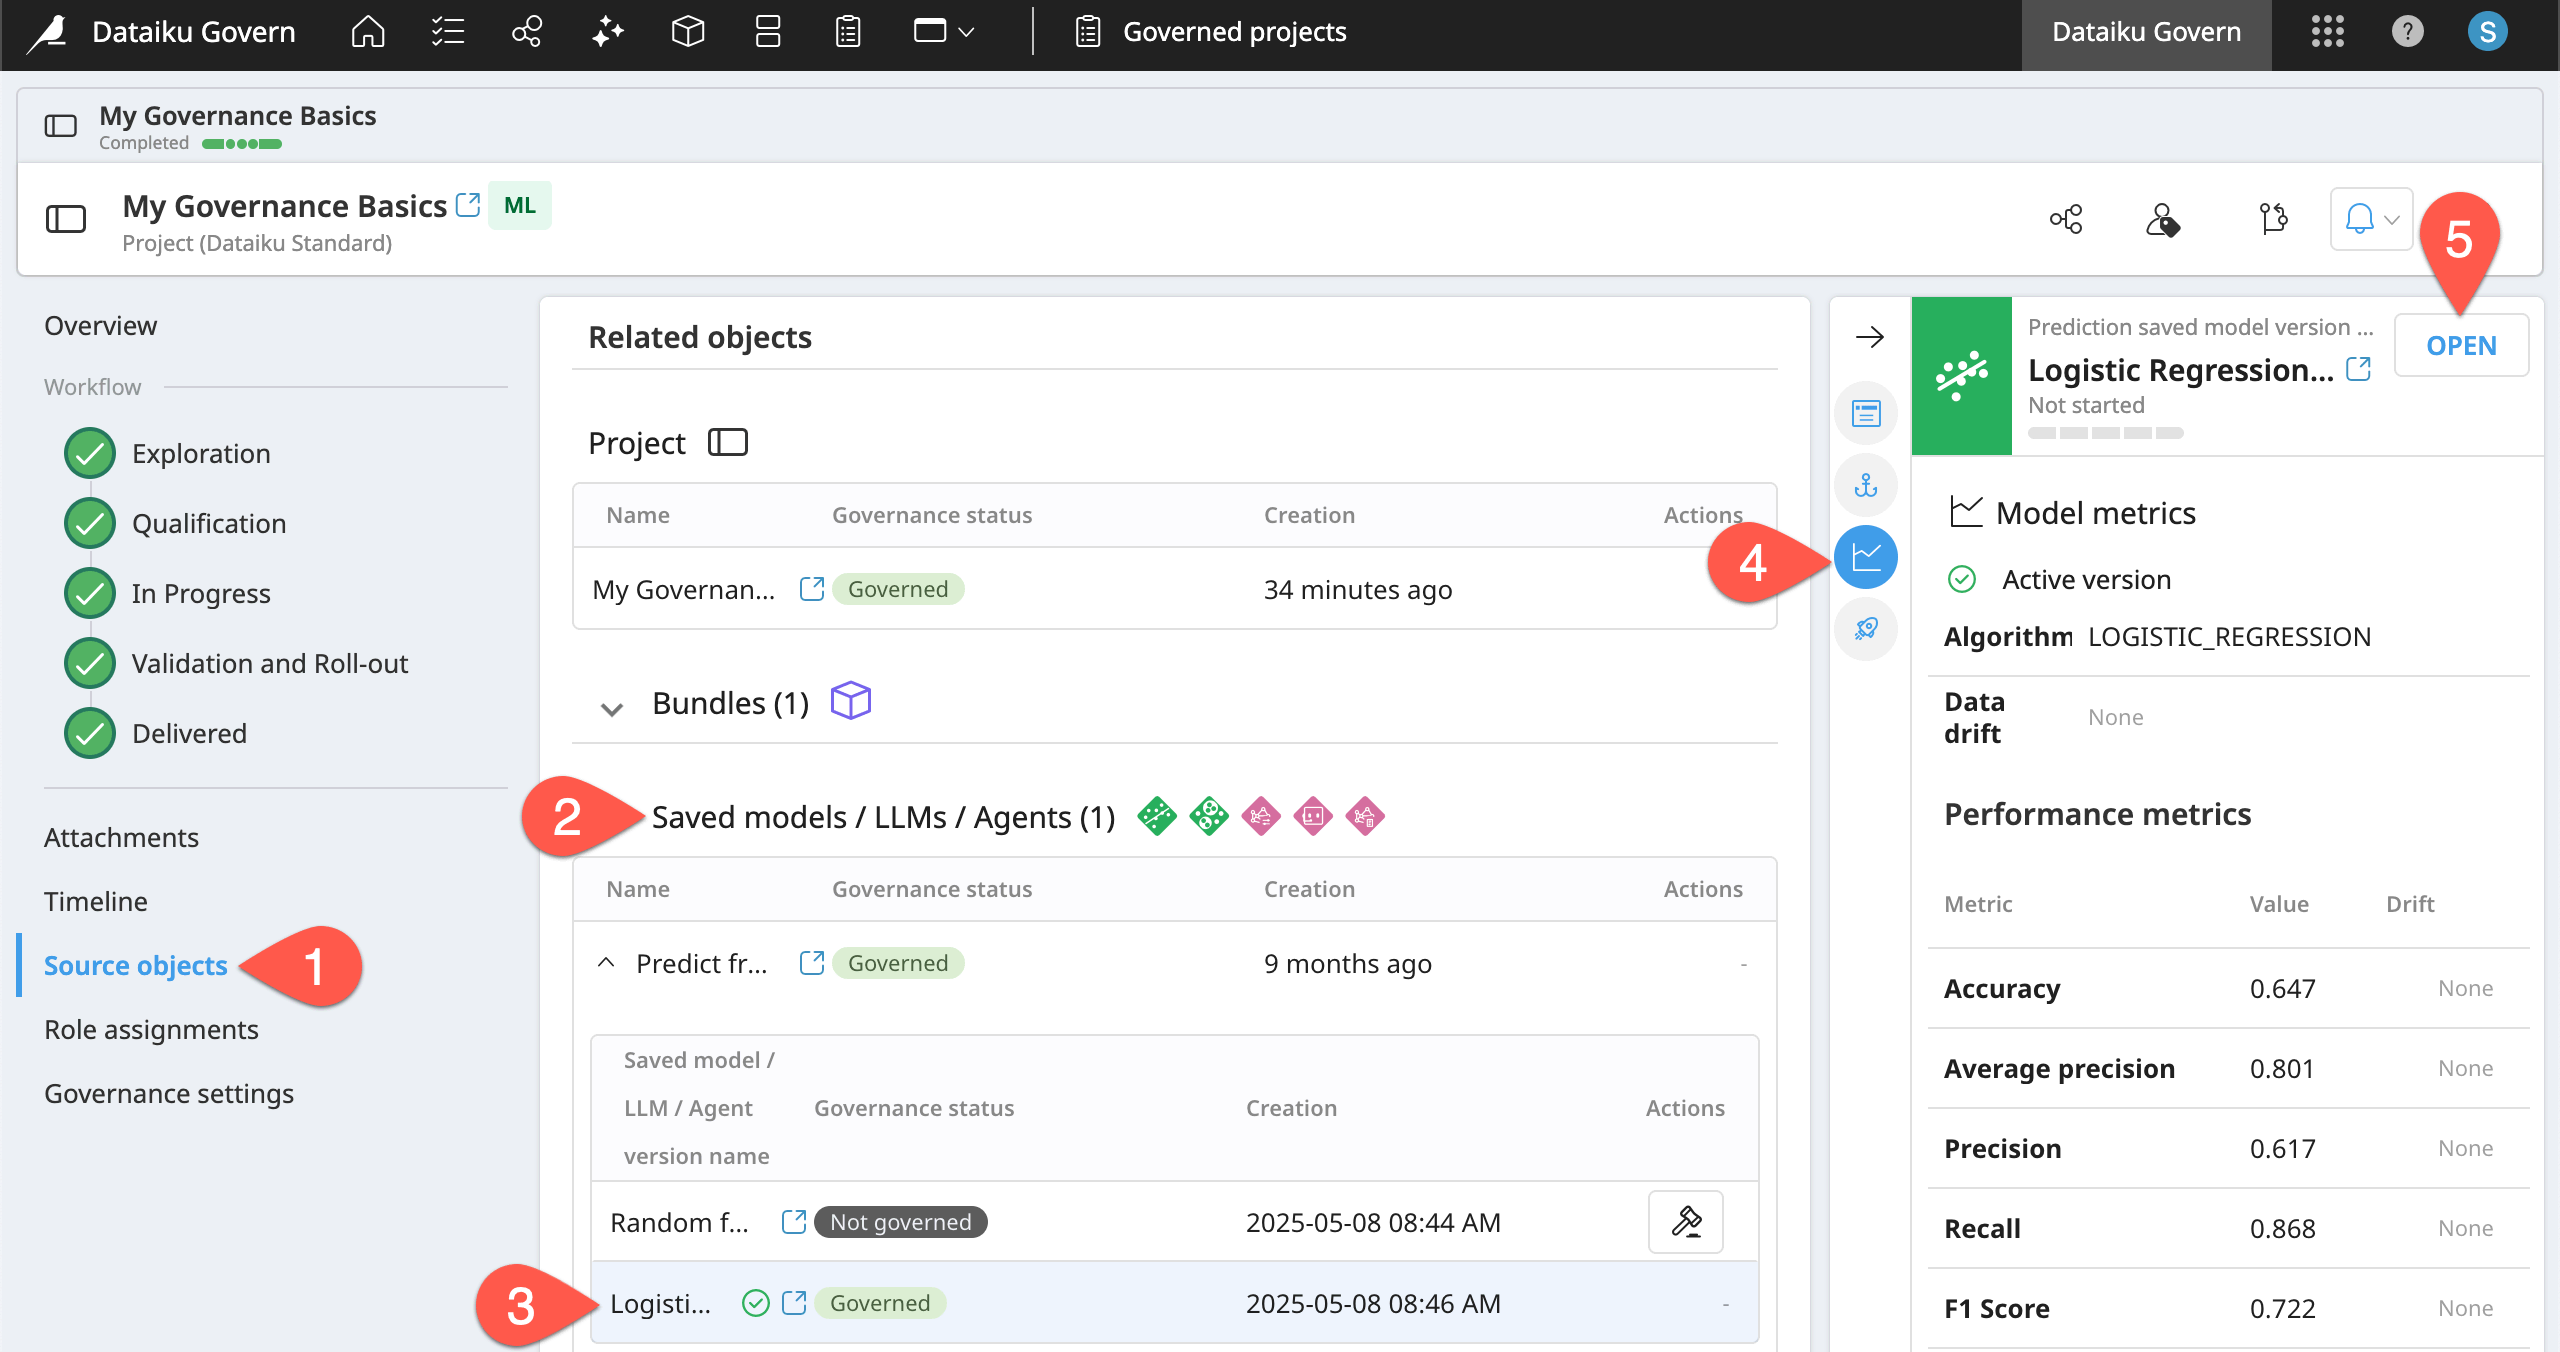
You can navigate to the child items in several ways, including from the Source objects panel of the parent project.
From your governed project page, navigate to the Source objects panel.
Under Related objects, expand the Saved models accordion menu.
Expand the project’s saved model, and select the active version (
).Explore the active model version’s metadata in the right panel, including the Model metrics (
) tab.In the right panel, click Open to view the governed model version.
Recognize how the model version has its own independent overview and workflow steps, which you can progress through in a similar manner as the governed parent project.
Tip
At the top of the page representing the governed model version, recognize the nested hierarchy: project, saved model, and model version.
Review the matrix and Kanban views of governed projects#
Now that your governed project includes metadata and workflow progress, explore how it’s visualized in matrix and Kanban views.
From the top navigation bar, return to the Governed projects (
) page.Find your Governance Basics project, noting its Completed workflow status (having finished the Delivered step).
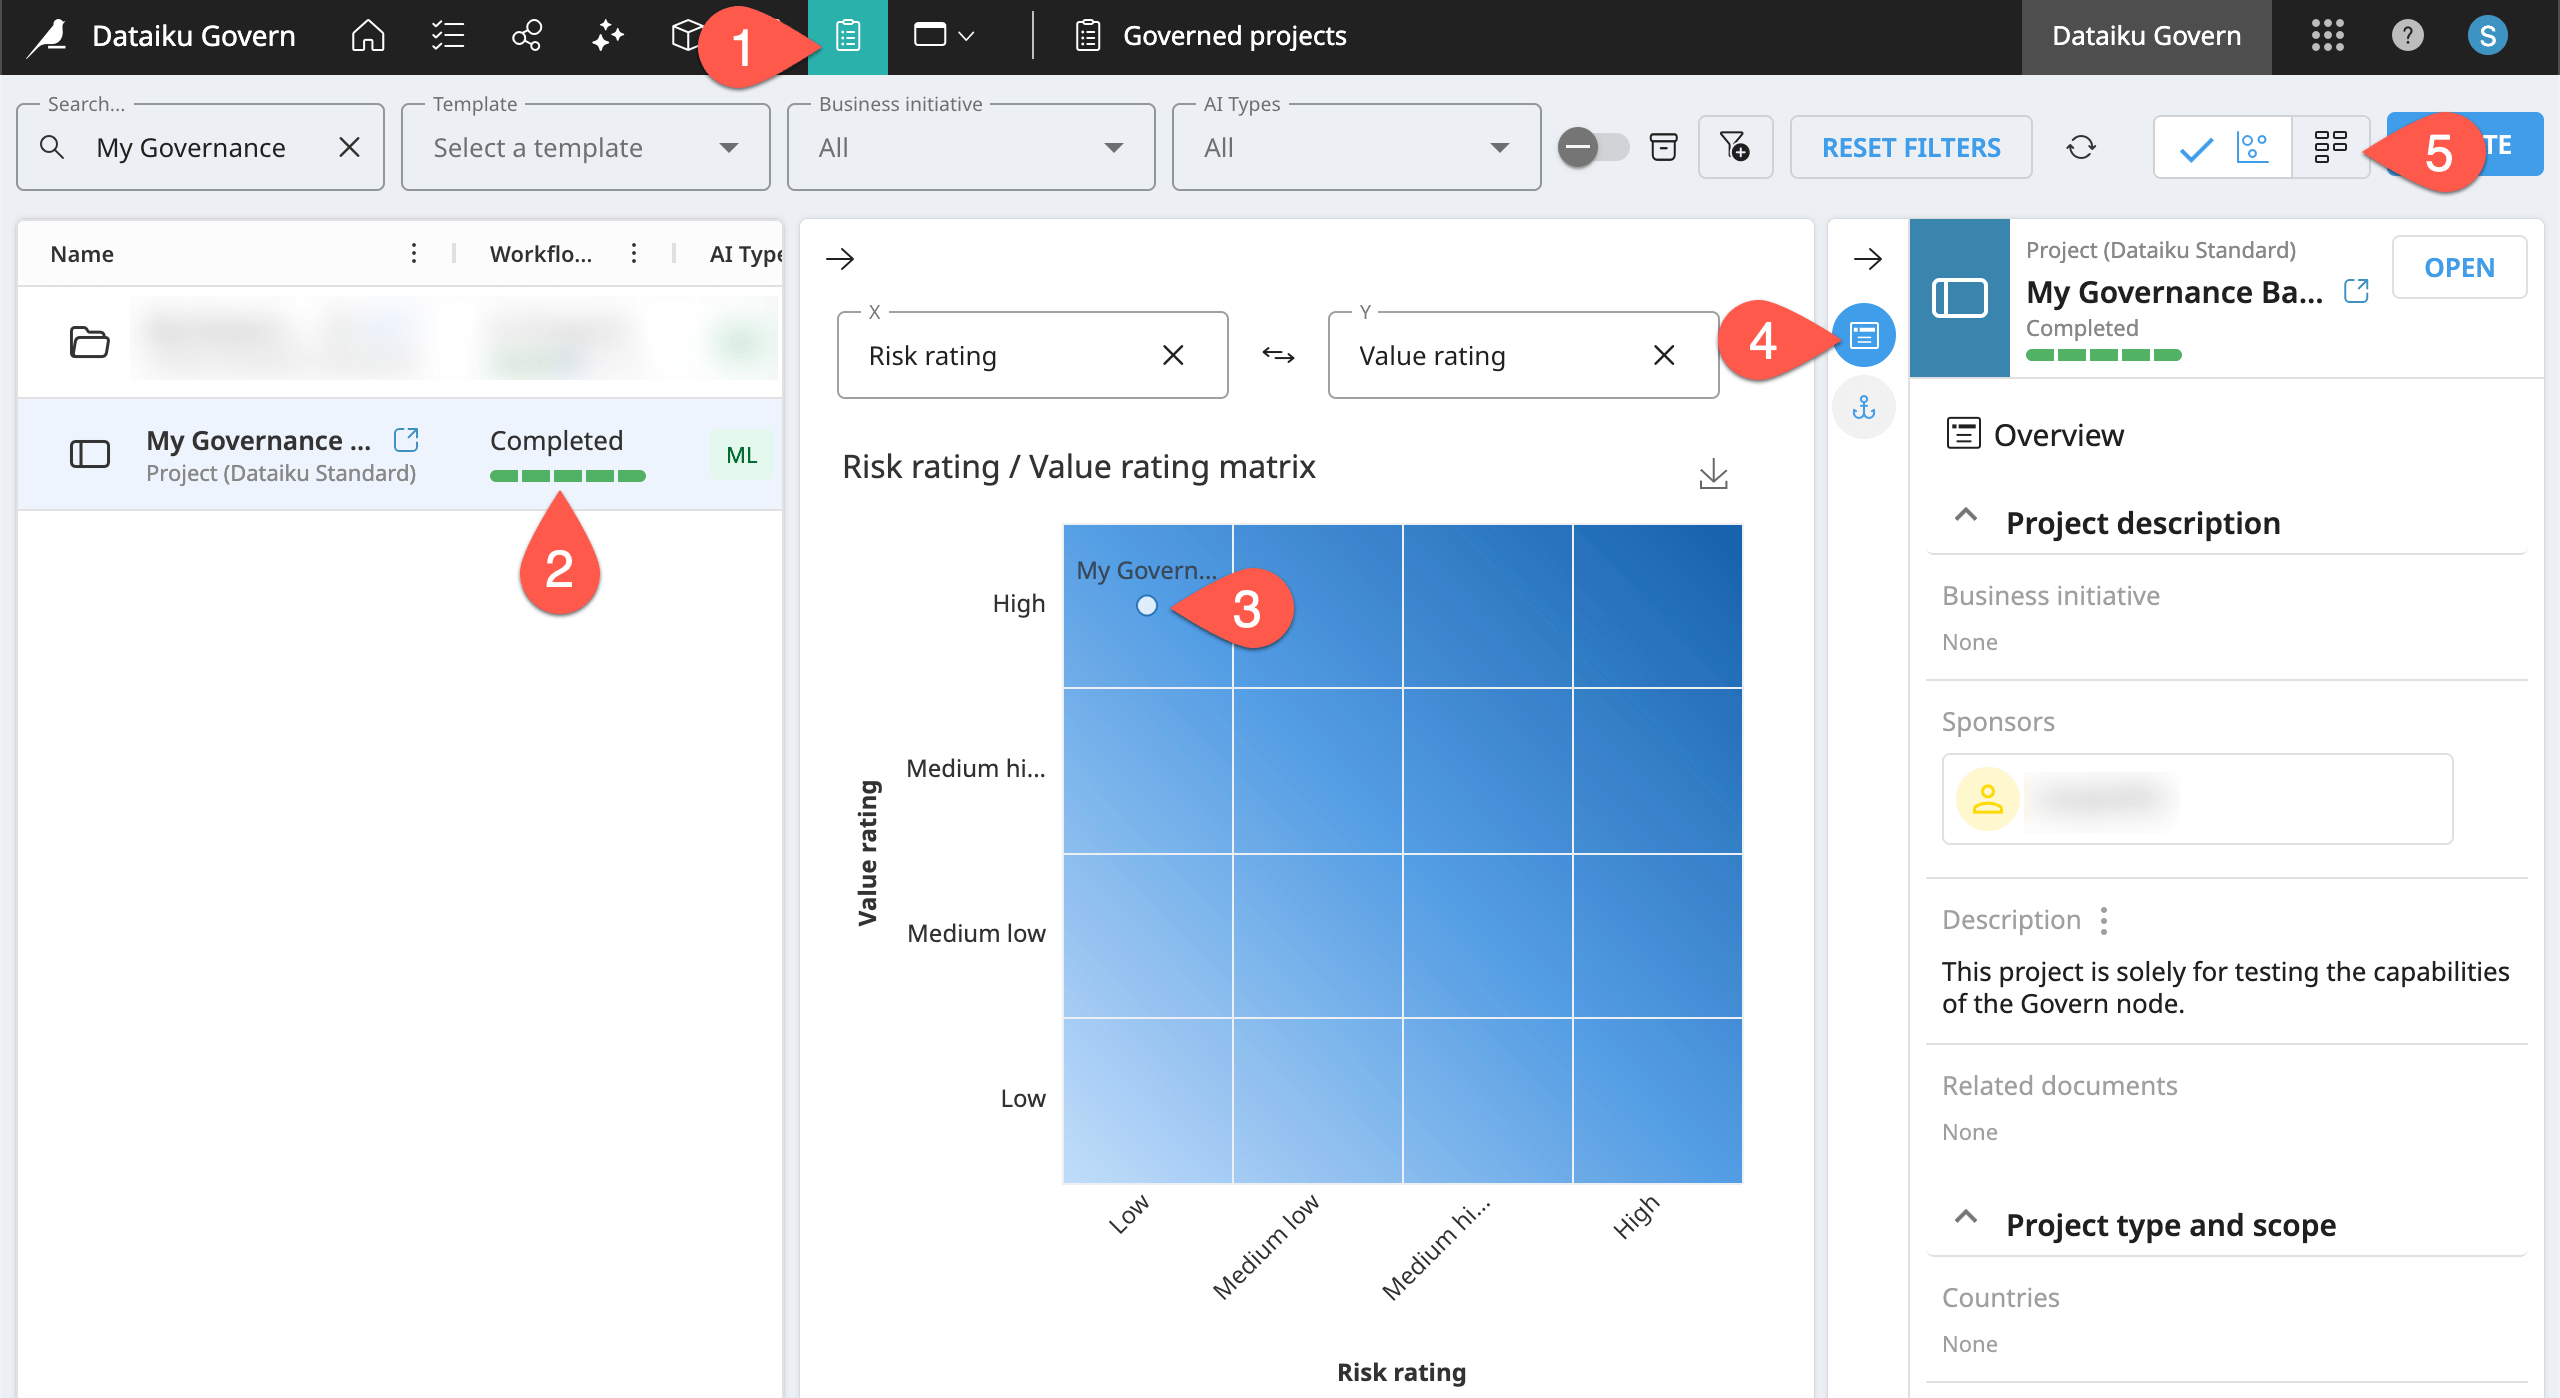
Locate your project in the qualification matrix, and click its plot point to filter for projects matching the same criteria.
Review the metadata you added in the Overview (
 ) tab of the Details panel.
To see the overall status of all governed projects, switch to the Kanban (
 ) view.
Tip
In the screenshot, the project is high value and low risk—a clear sign to move forward. If the reverse were true, there might be a strong case to abandon the project—a decision brought to light via the Govern node.
Manage governed projects with Business initiatives#
As your organization scales its governance activities, you may quickly accumulate hundreds if not thousands of governed projects.
A Business initiative functions as an extra level of organization to manage governance activities. It enables grouping Govern projects together on some shared theme, characteristic, or business goal. On top of this grouping, it provides its own workflow and space for documentation.
Create a Business initiative#
From the Governed projects page, you may have noticed that your governed project isn’t assigned yet to a Business initiative. Create one now!
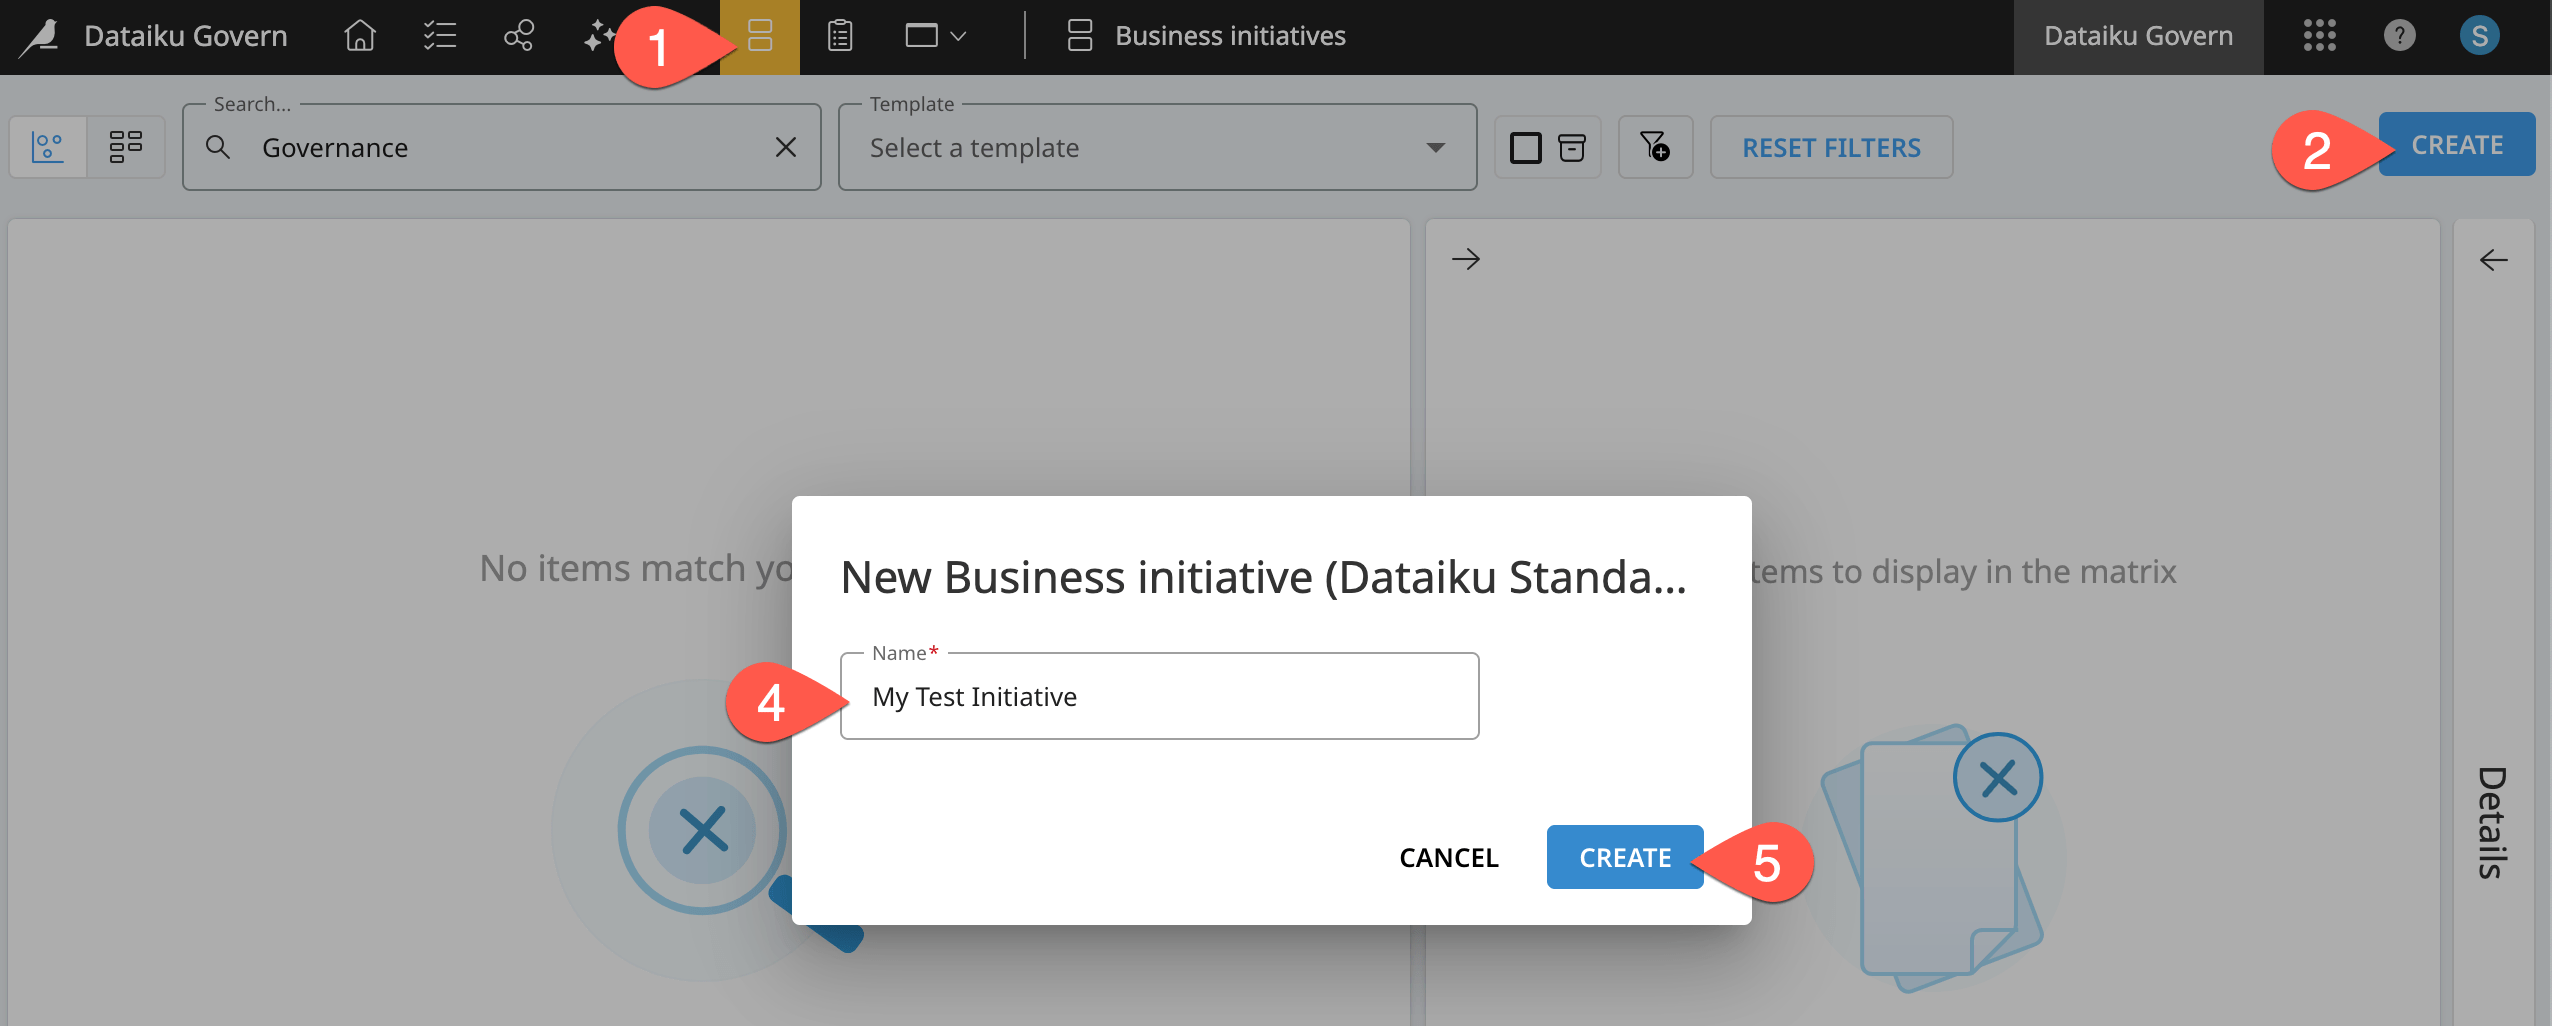
From the top navigation bar of the Govern node, go to the Business initiatives (
) page.Click Create.
If necessary, select Dataiku Standard as the template.
Name it
<YOUR INITIALS> Fraud Department.Click Create to make a new Business initiative.
Add a governed project to a Business initiative#
Once you have a Business initiative, you can add Govern projects to it.
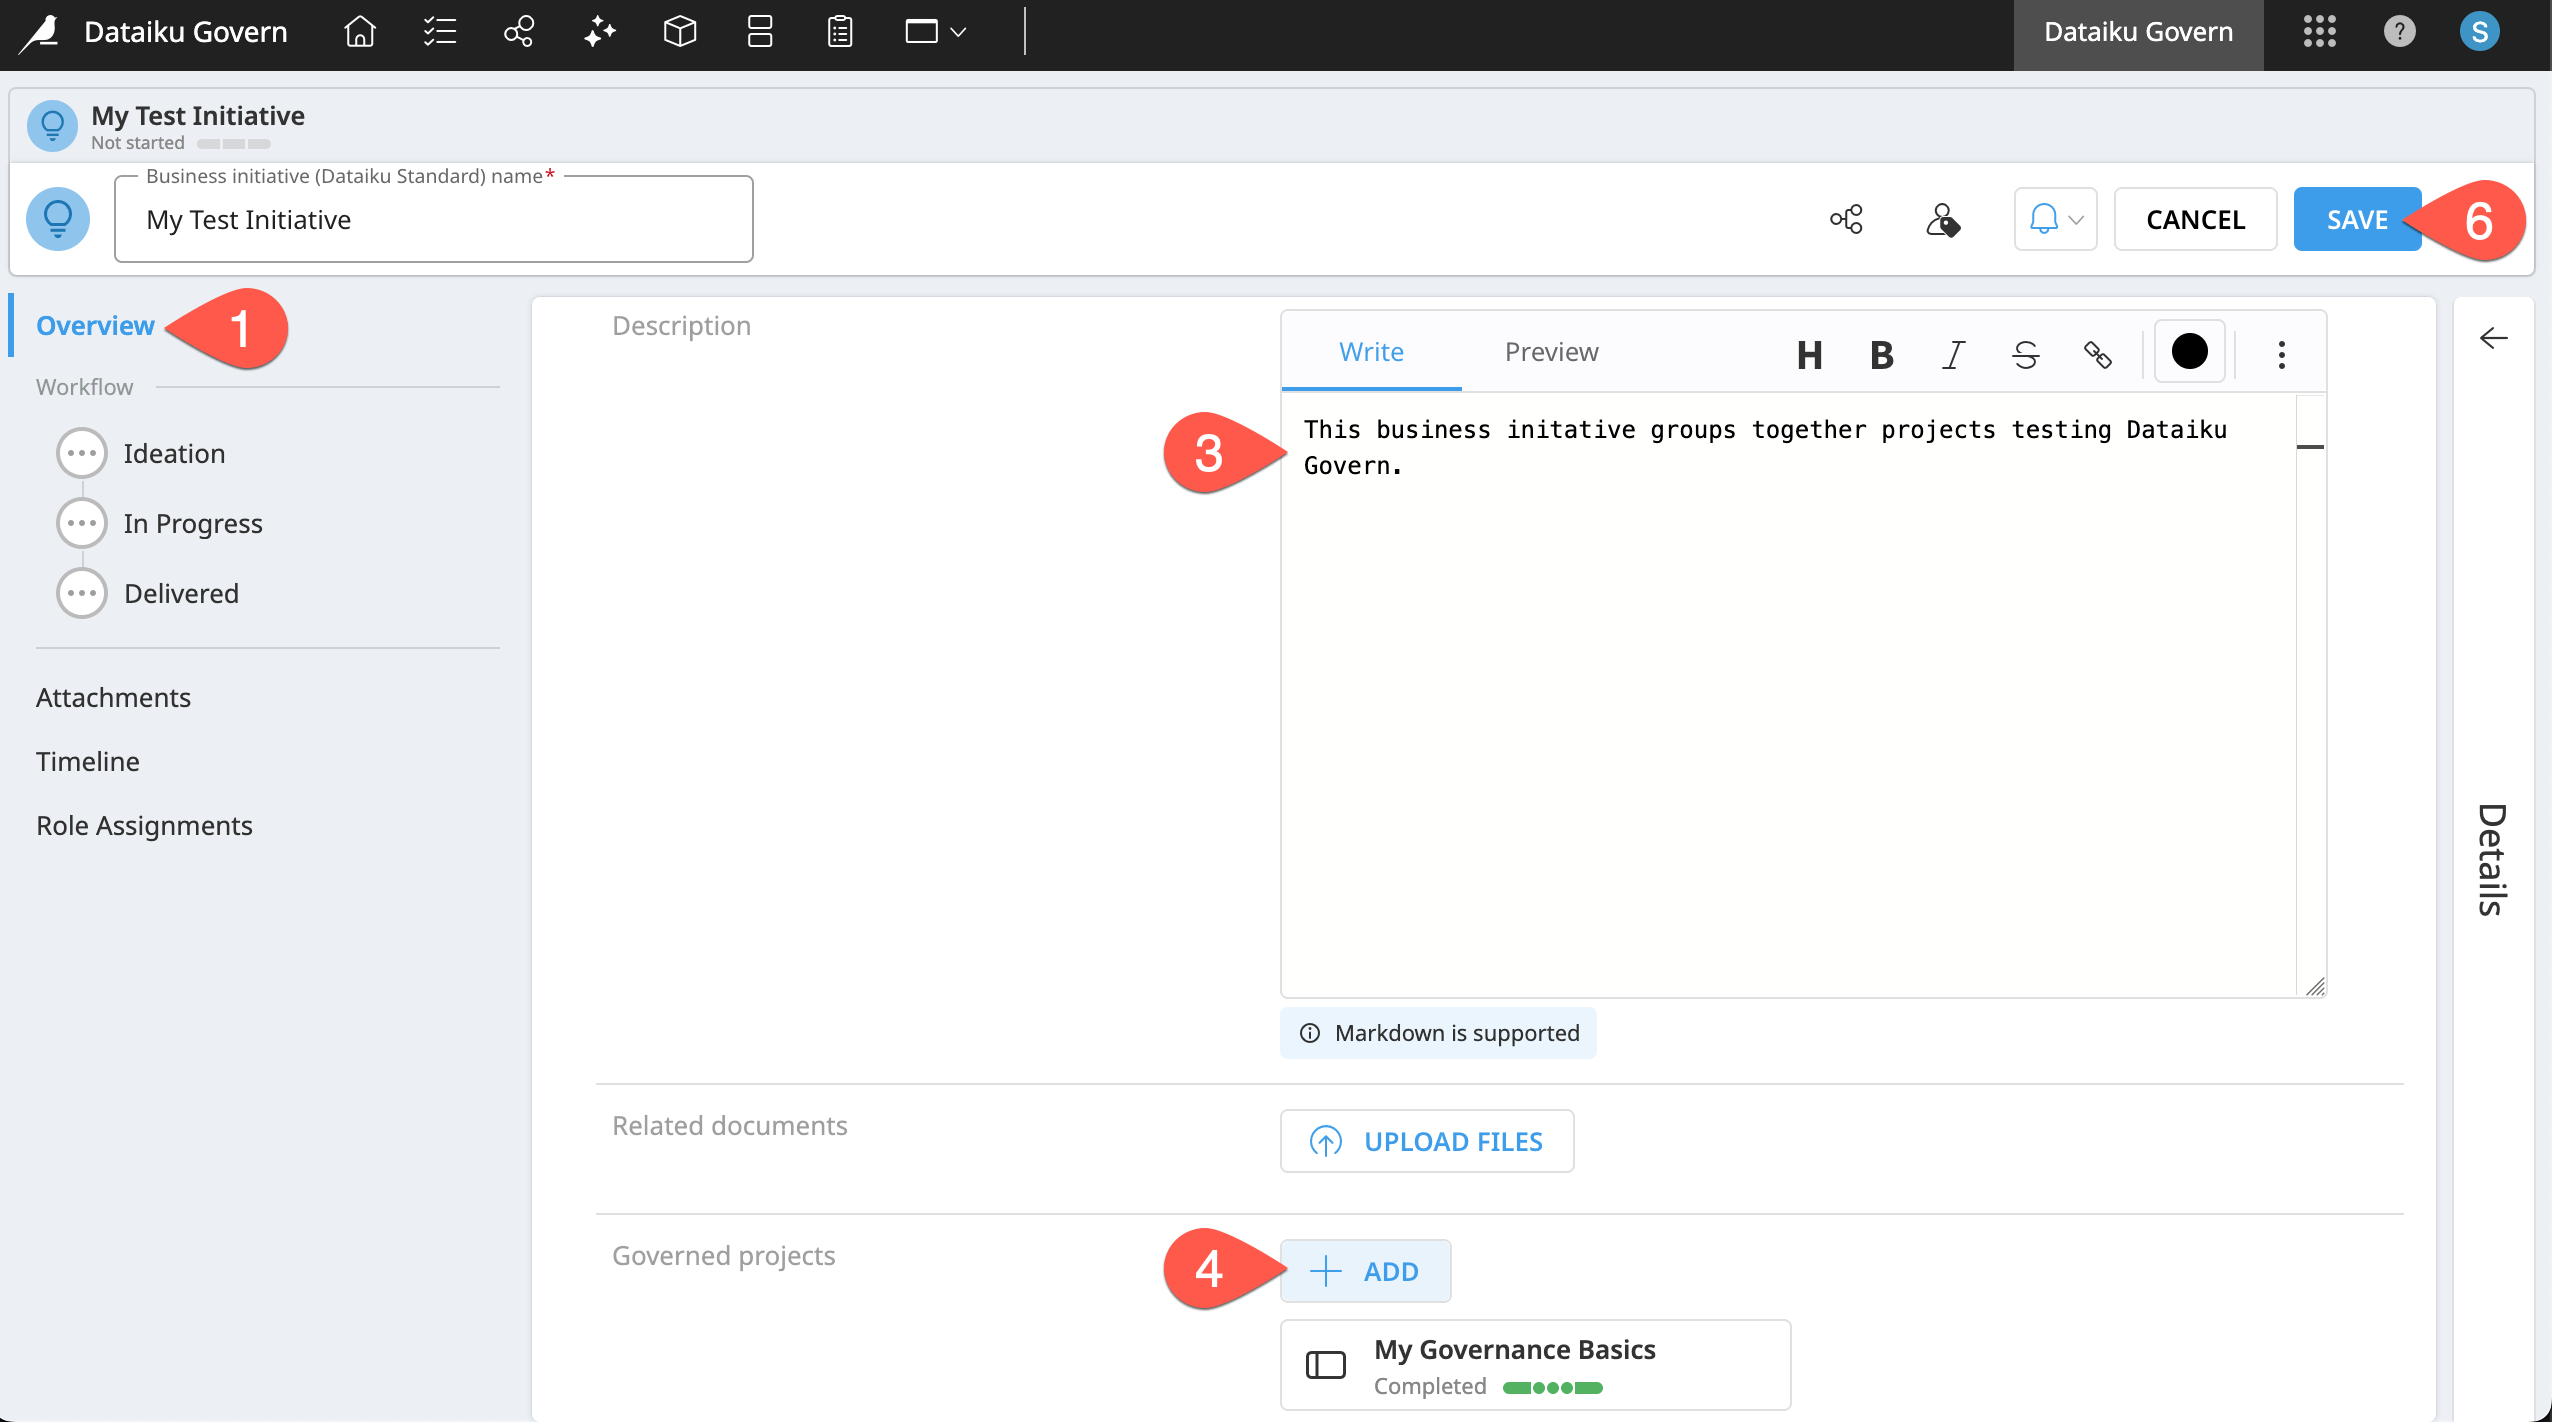
Within the Overview panel of the new Business initiative, click Edit in the item header.
For Sponsors, click + Add, and select yourself.
Copy-paste a description such as:
This Business initiative groups projects in the Fraud Department.
Next to Governed projects, click + Add.
Find your Governance Basics project, and click Select.
Back in the header of the Business initiative page, click Save.
Return to the Governed projects (
) page, and confirm your Governance Basics project is now part of the new initiative.
Tip
Here you started with a Business initiative and added a governed project to it. You can also open a governed project, and add it to an existing Business initiative.
Move a Business initiative through a governance workflow#
Business initiatives follow their own workflow, letting you keep tabs on progress with matrix and Kanban views. In this case, the Business initiative adheres to the standard workflow.
From the Govern node’s top navigation bar, go to the Business initiatives (
) page.Find your Business initiative, and click on its name Fraud Department to open it.
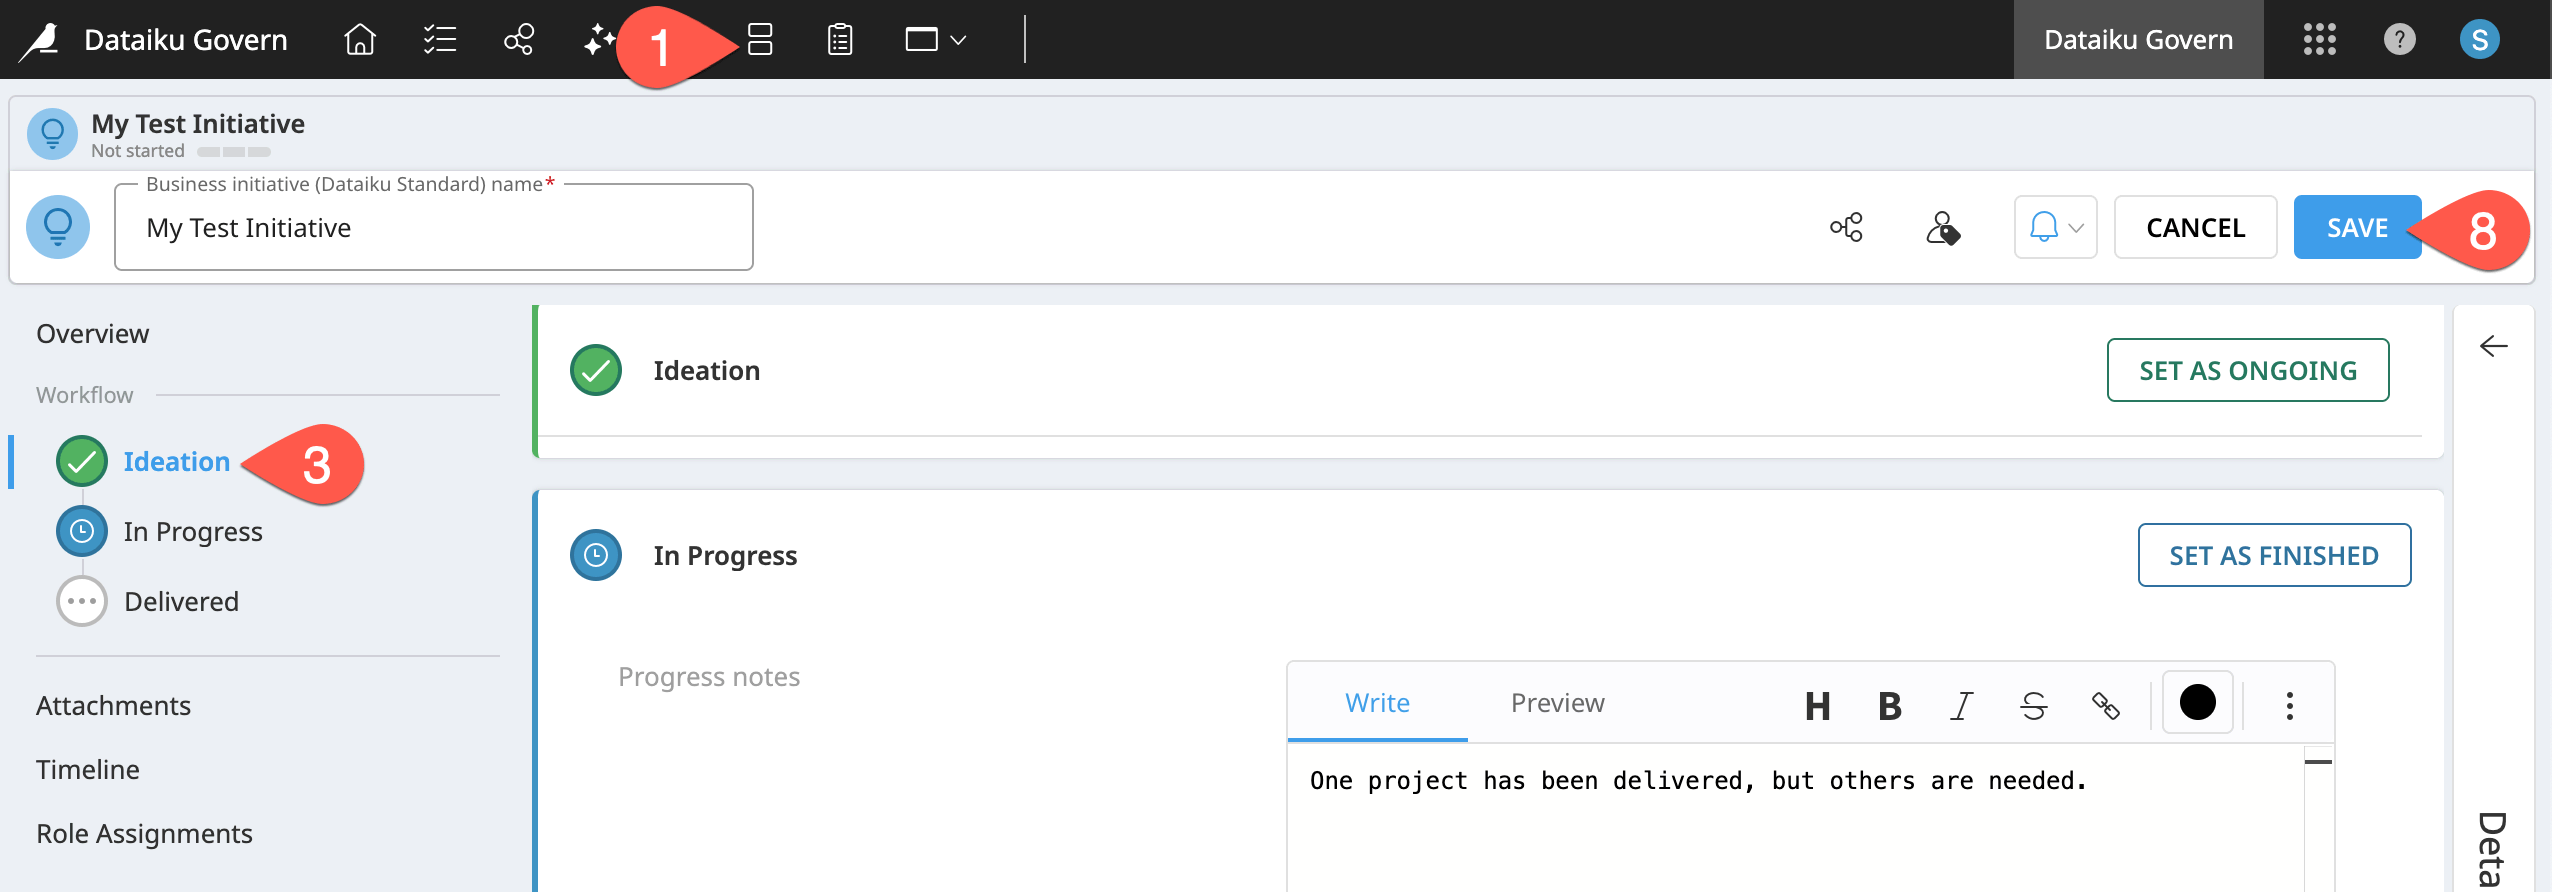
From your Business initiative page, select the Ideation workflow step.
Click Edit in the item header.
In the Ideation step, click Set As Ongoing.
Make any adjustments to the fields and ratings as desired. A case like fraud prediction might be inherently a high risk activity.
Click Set As Finished to advance to the In Progress step.
When finished exploring, click Save in the item header.
Return to the Business initiatives (
) page, and find your in-progress initiative in the matrix ( ) and Kanban () views.
Having grouped a project under a Business initiative, your tour of the standard Govern node pages is complete! Next, see how to manage governance as your Dataiku items evolve.
Tip
This tutorial demonstrates organizing governed projects in terms of a department. A Business initiative like this may never reach the Delivered step of its workflow. It might permanently remain In Progress.
Alternatively, other Business initiatives may be time-bound, like those tied to a business quarter or a special project, with clear start and end dates.
Govern an evolving project#
Governance isn’t a one-time snapshot. It’s an ongoing commitment! The remainder of this tutorial focuses on how the Govern node handles changes in the synced Dataiku items which it governs. By doing so, you’ll further clarify your understanding of Dataiku items and Govern items.
Review the governance settings of child items#
Any active Dataiku project will continue to evolve. In the case of fraud prediction, as new transaction data arrives, the project builder might create a new version of the model. Whether they package it as an API service or inside the project bundle, this means new deployment requests to review. How does a Govern project respond to the evolution of its source objects?
Initially, the answer depends on the instance-level governance settings defined by the Govern node administrator. However, recall that your Govern project is no longer following the instance rules. Instead, you’ve switched to custom rules, which at the moment say to “do nothing.”
Change that now. As this is a high risk project, you want to automatically govern new bundles.
From the Governed projects (
) page, open your Governance Basics Govern project.Navigate to the Governance settings panel.
Recognize the project’s child items follow Custom rules, and click Edit.
Adjust the settings to automatically govern bundles in the project according to the Dataiku Standard template.
Click Save.
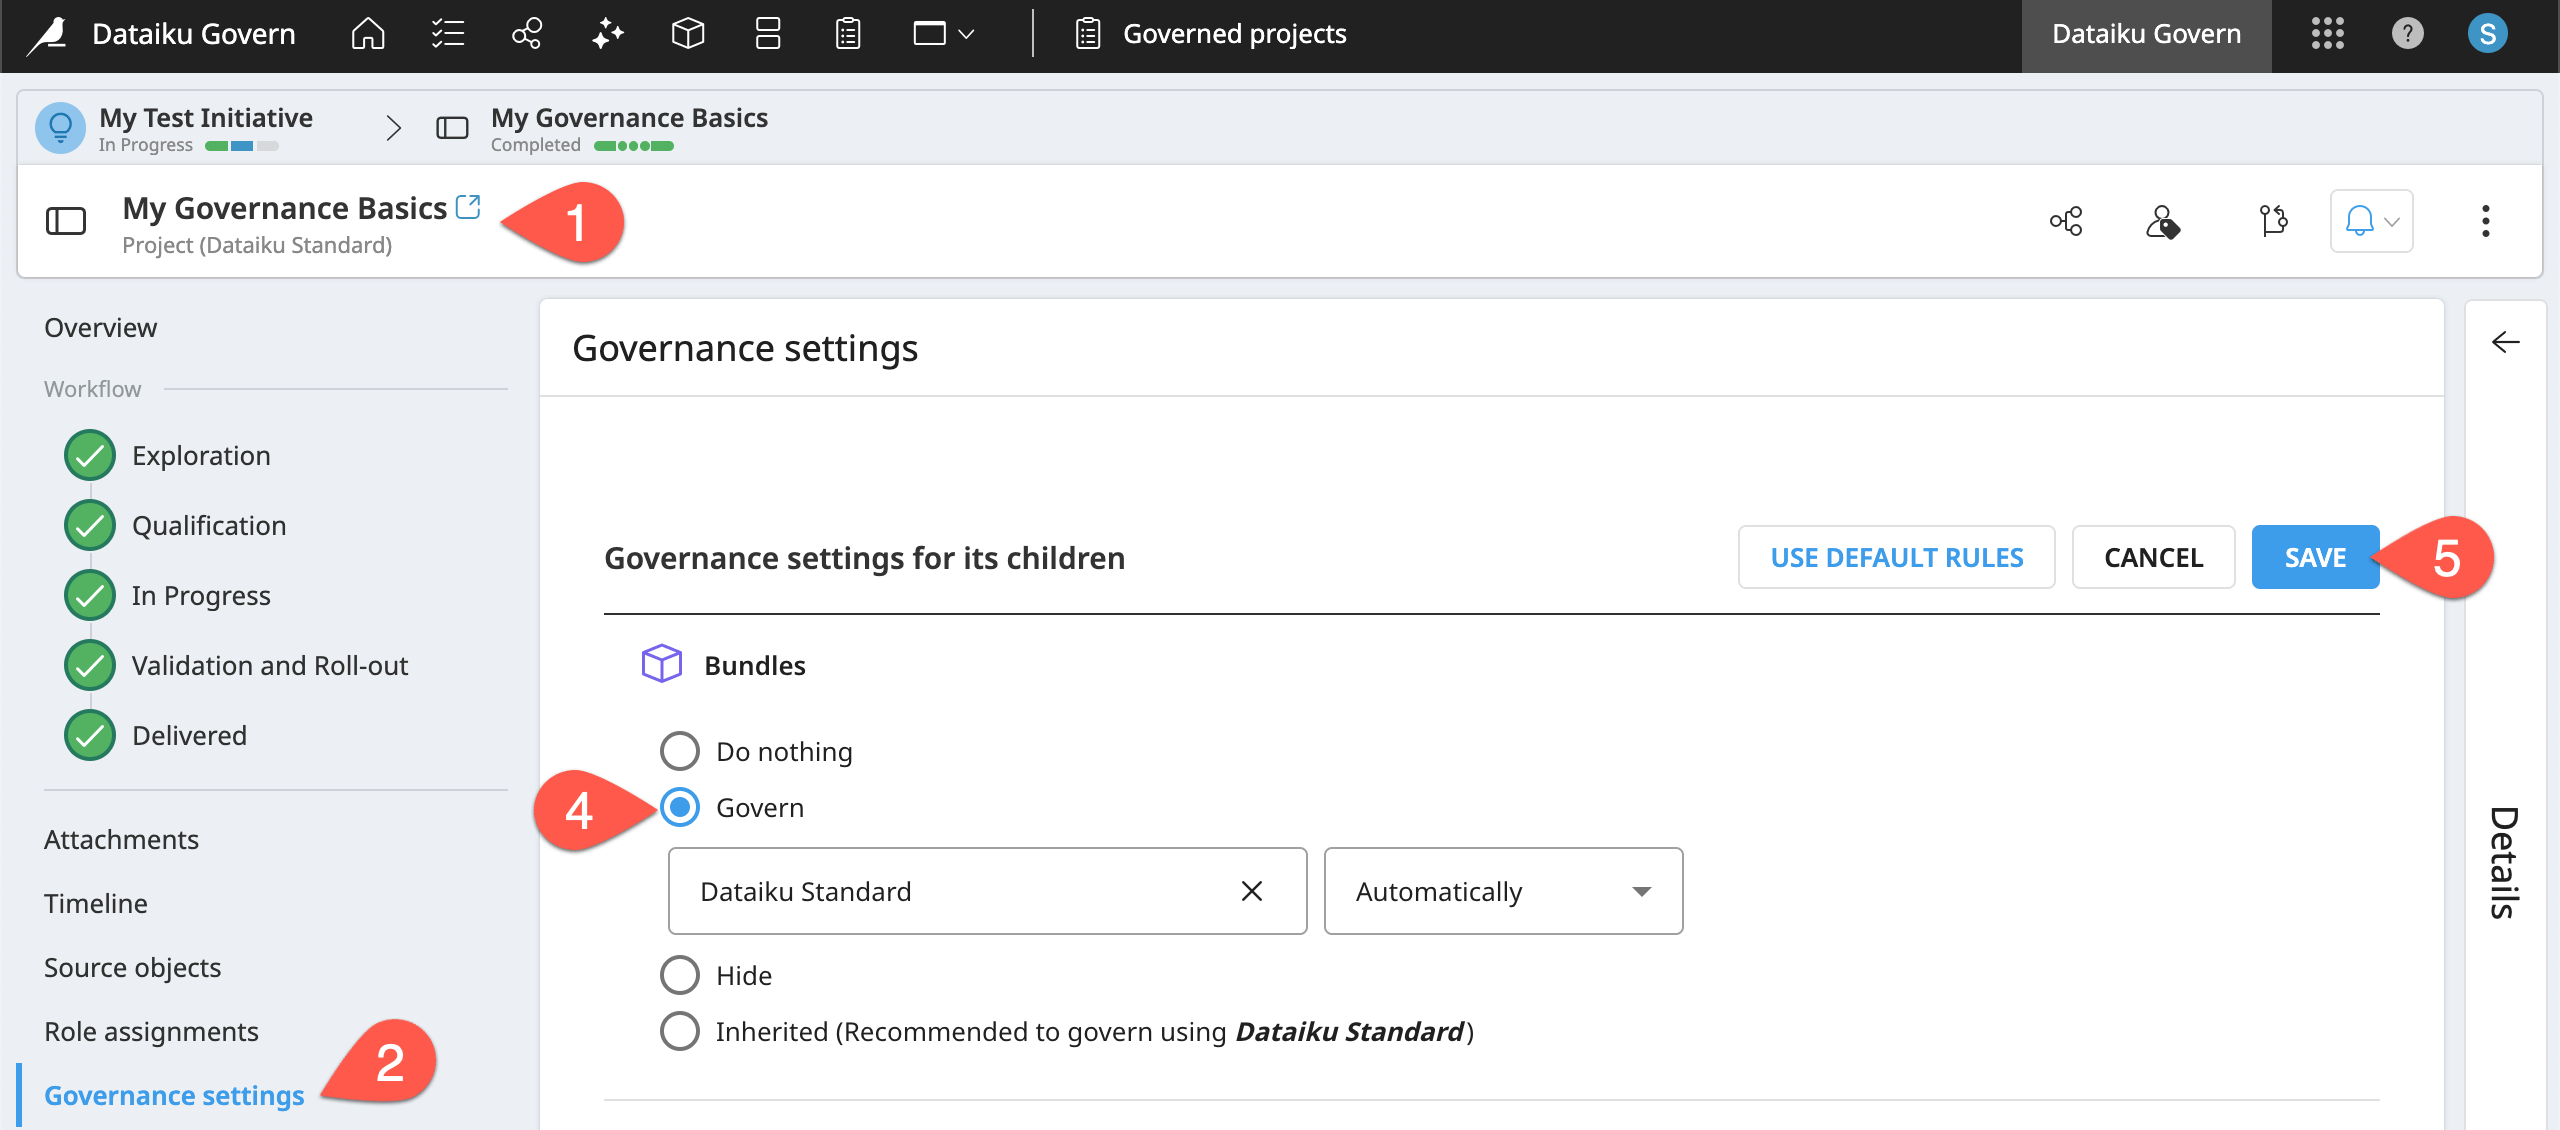
Still in the Governance settings panel, confirm the change in the project’s Custom rules.
Add a child item to a governed project#
The project could have a new bundle for a wide variety of reasons. Perhaps a stakeholder rejected an earlier bundle. The project builder might also create a new model to address data drift or incorporate new feature engineering.
Put the rules you updated above to the test by creating a new bundle in the Dataiku source object of the governed project.
Return to the Design node, and open your version of the Governance Basics project.
From the More Options (
) menu of the top navigation bar, select Bundles.Click + New Bundle.
Name it
v2.Click Create to finish adding a second bundle to the Dataiku project.
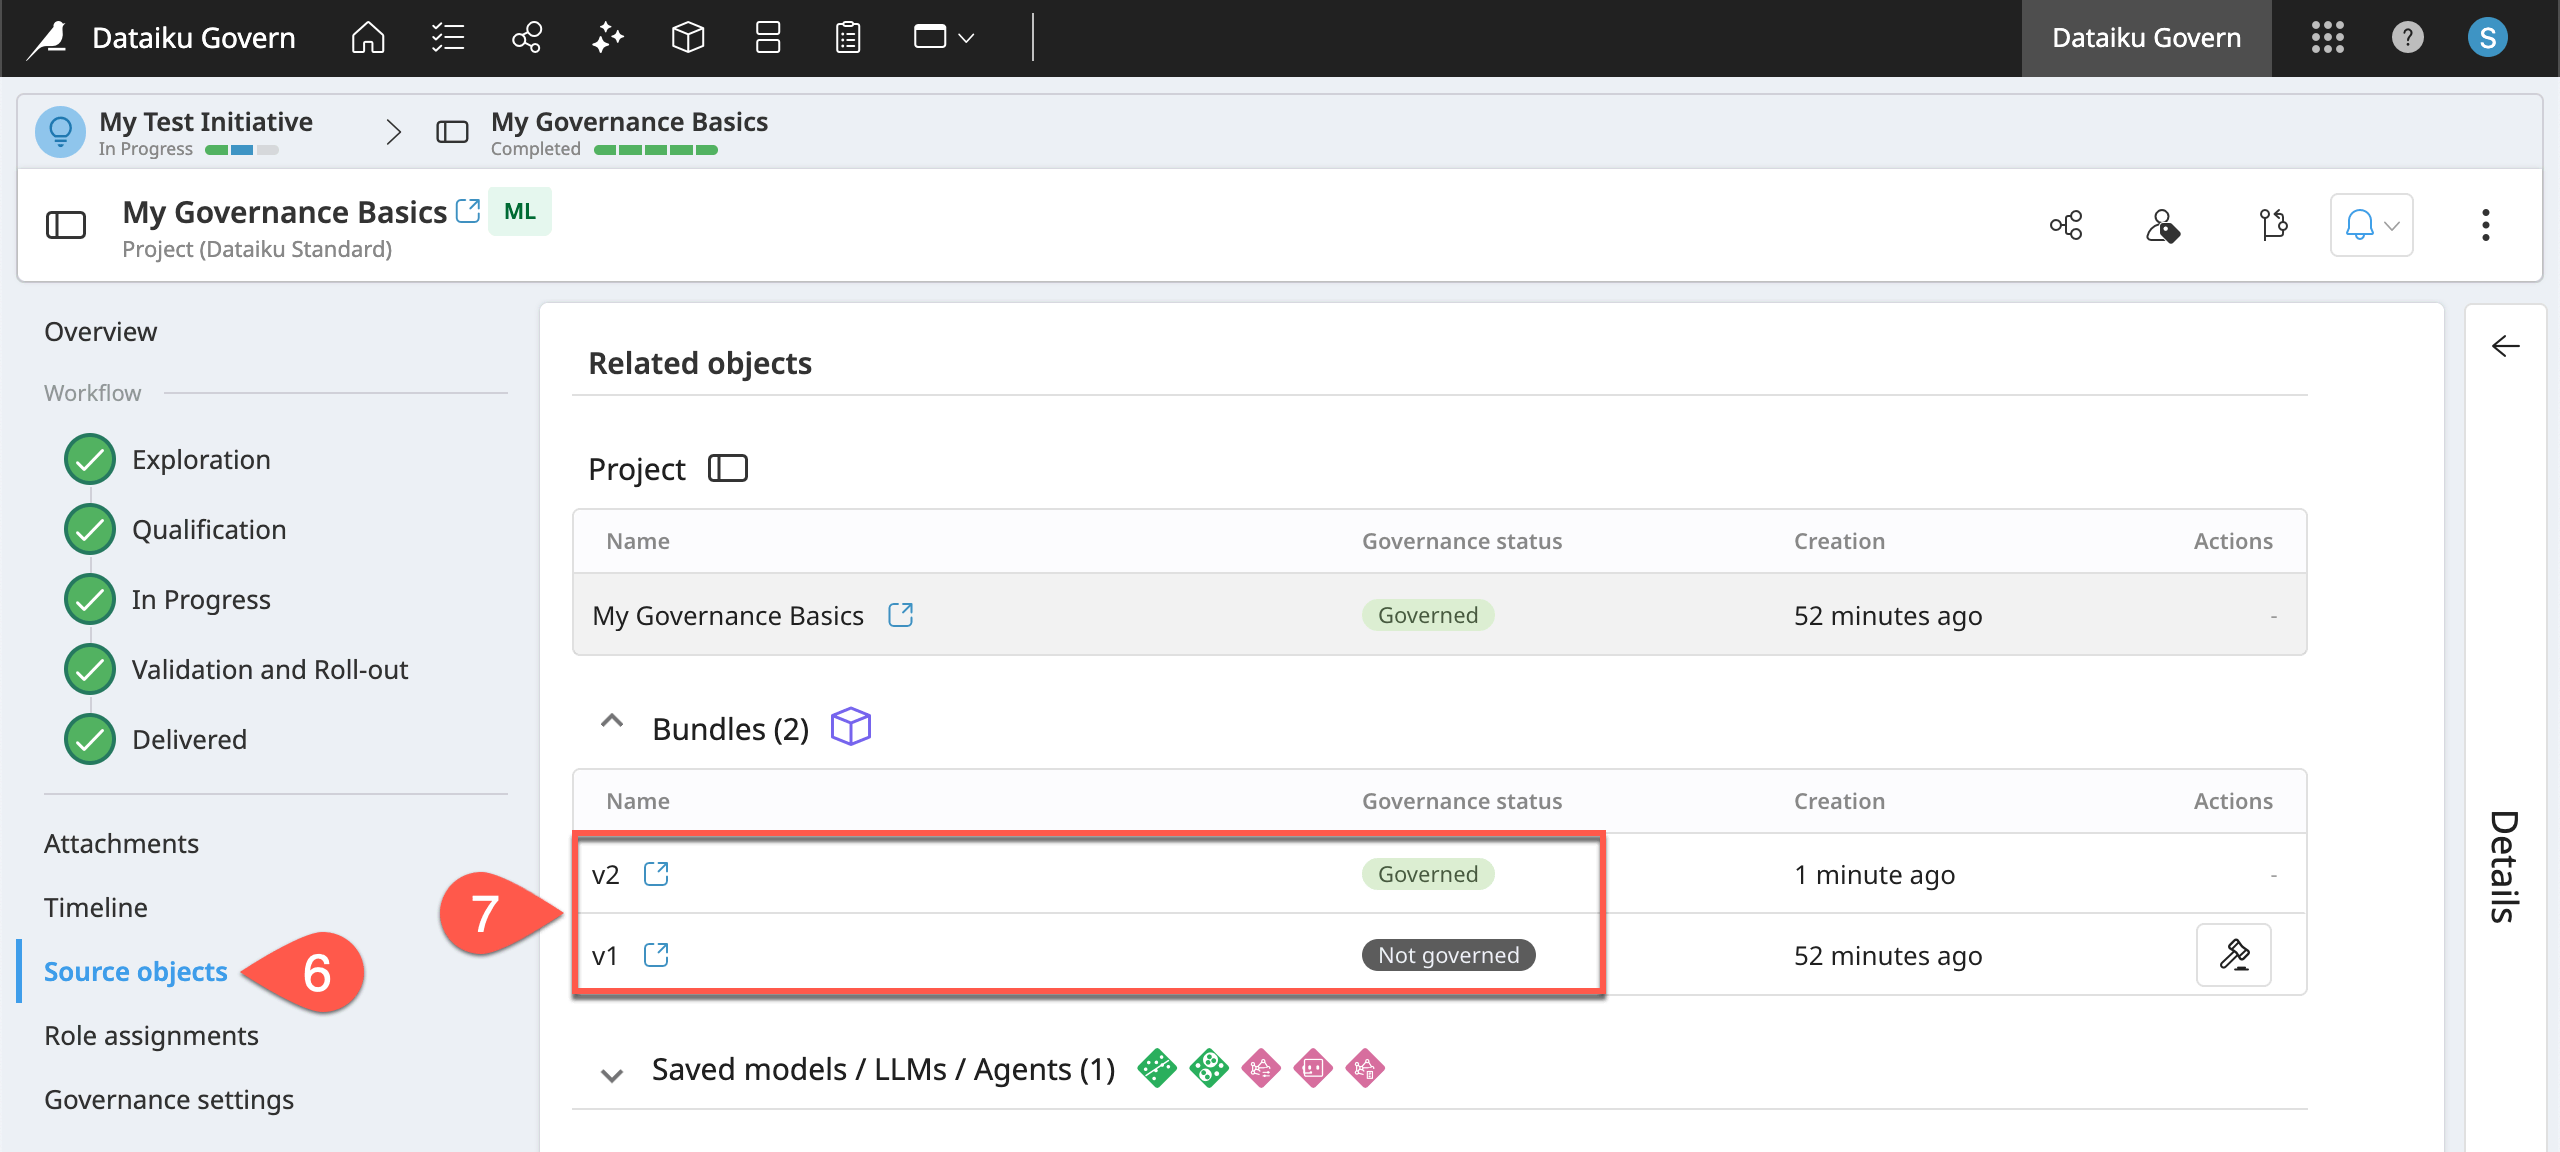
Return to the Govern node, and refresh the Source objects panel of the governed project.
In the Related objects section, confirm that the v1 bundle remains ungoverned, while the new v2 bundle, added after changing the rule, is automatically governed.
Trigger a governance run on child items#
Although you defined a project rule to automatically govern bundles in the project, the original bundle remains ungoverned. This is a temporary dilemma. Changes in a project’s governance settings don’t instantaneously apply to existing child items. However, changes in the Dataiku source items (such as a name change) will trigger a sync between the Dataiku and Govern items, resolving this discrepancy.
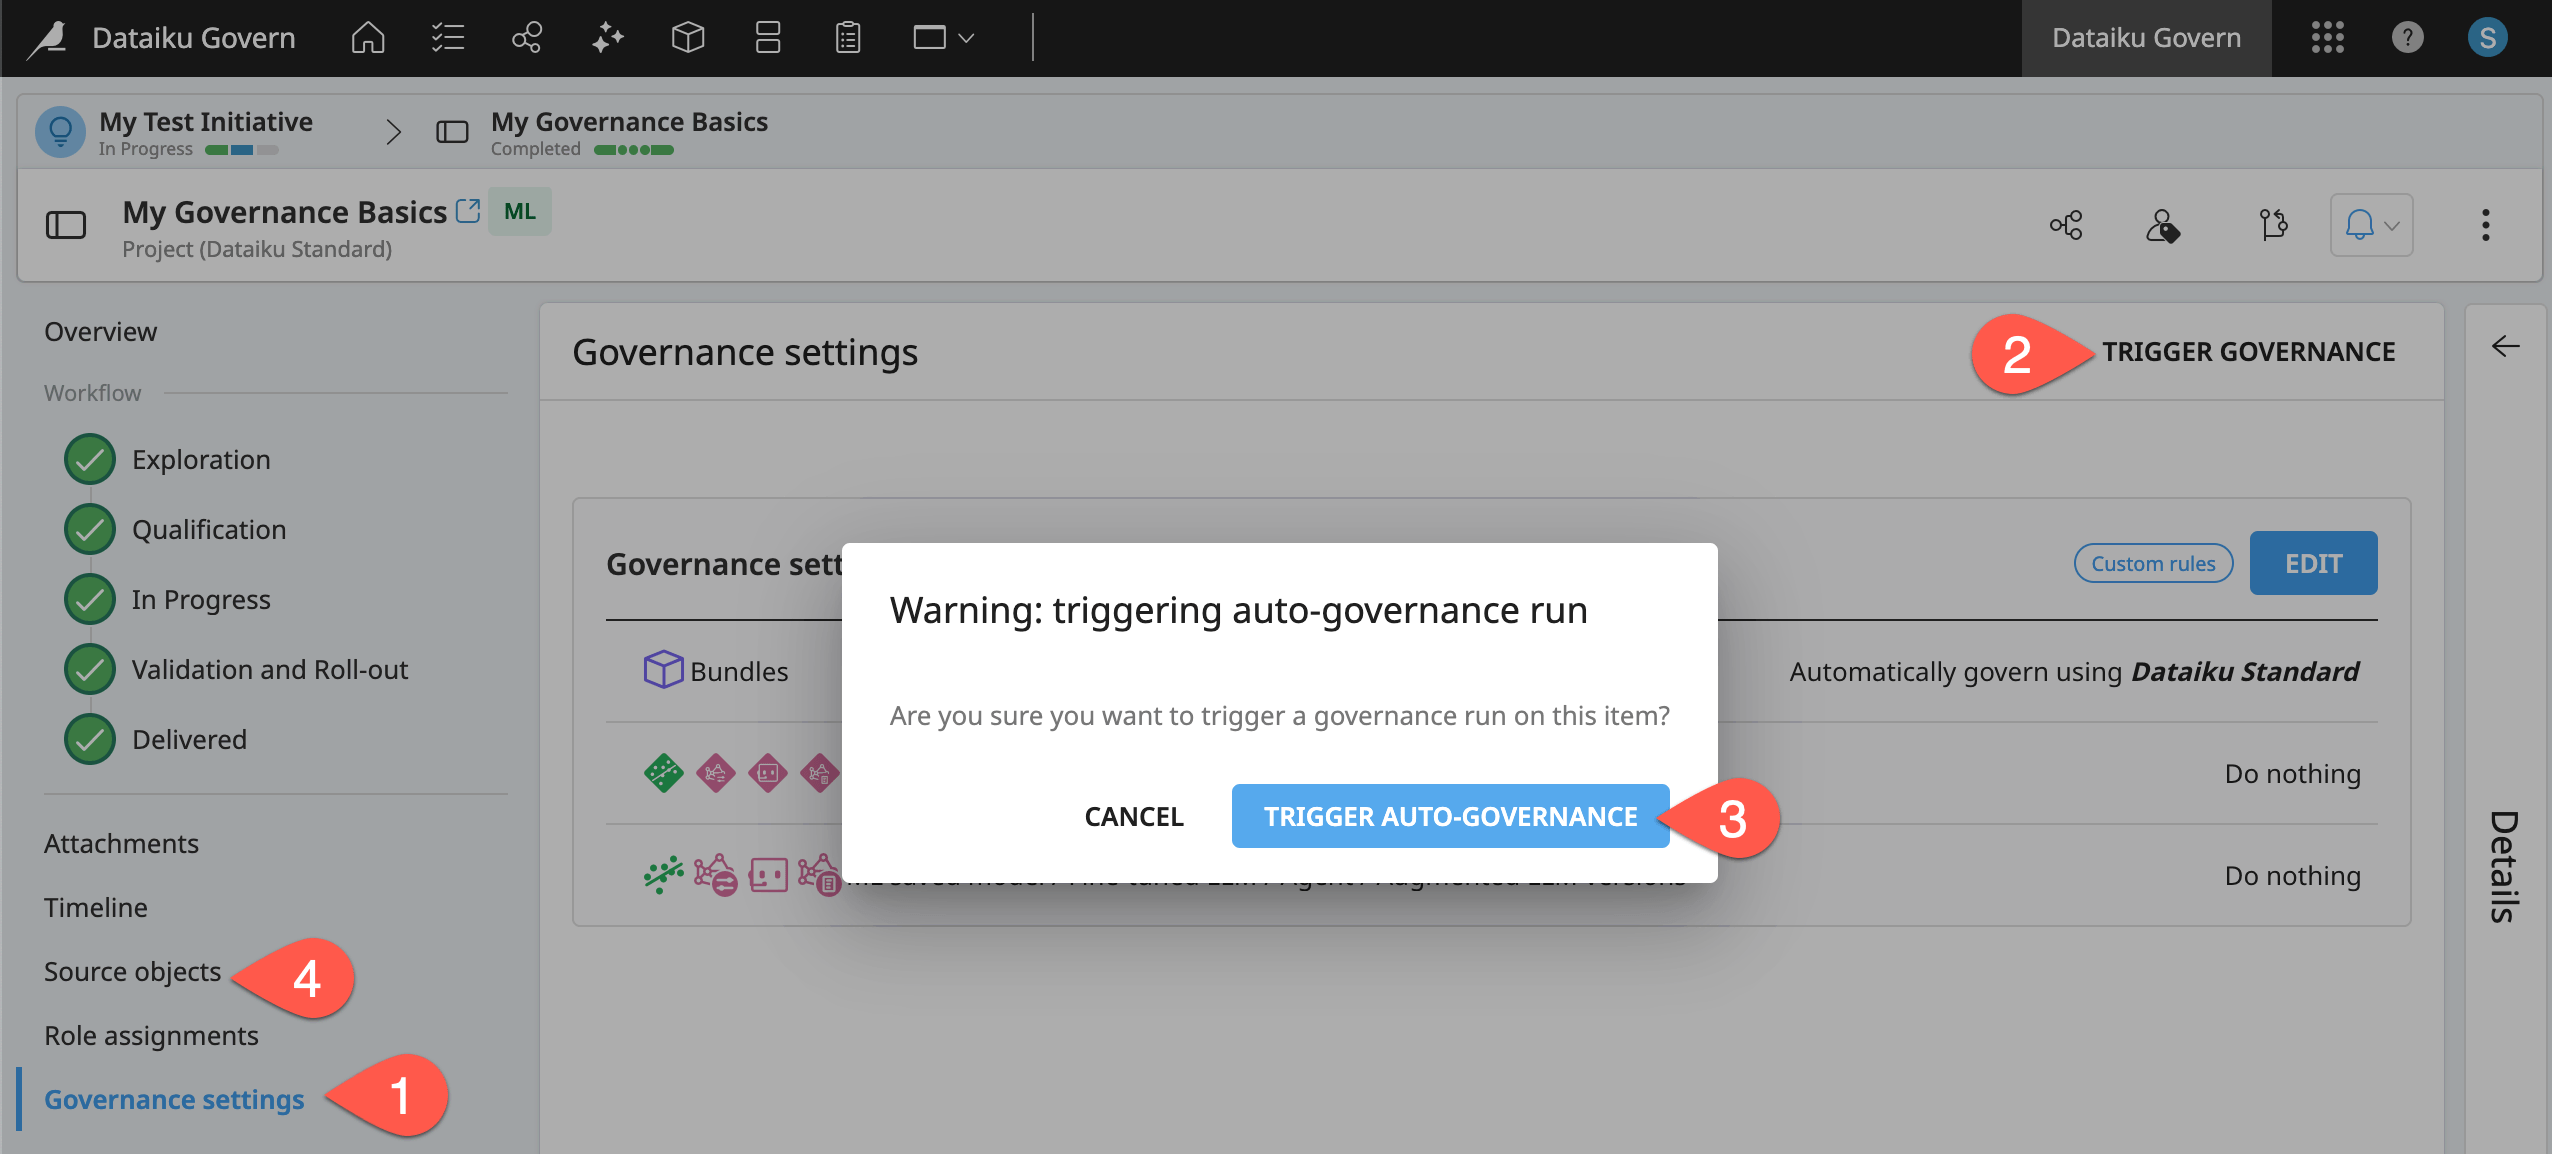
You can also manually trigger a governance run to ensure existing items follow their new rules:
Navigate to the Governance settings panel of the Govern project.
Click Trigger Governance.
Click Trigger Auto-Governance to confirm.
Return to the Source objects panel, and confirm that the original v1 bundle is now governed, refreshing the page if needed.
Edit the source object of a governed project#
That example addresses the governance of new and existing source items. But how does the Govern node respond to changes in the source objects themselves?
To explore this question, change the name of the Dataiku source project belonging to your Govern project.
Return to the Design node, and open your version of the Governance Basics project.
From the project homepage, click the pencil (
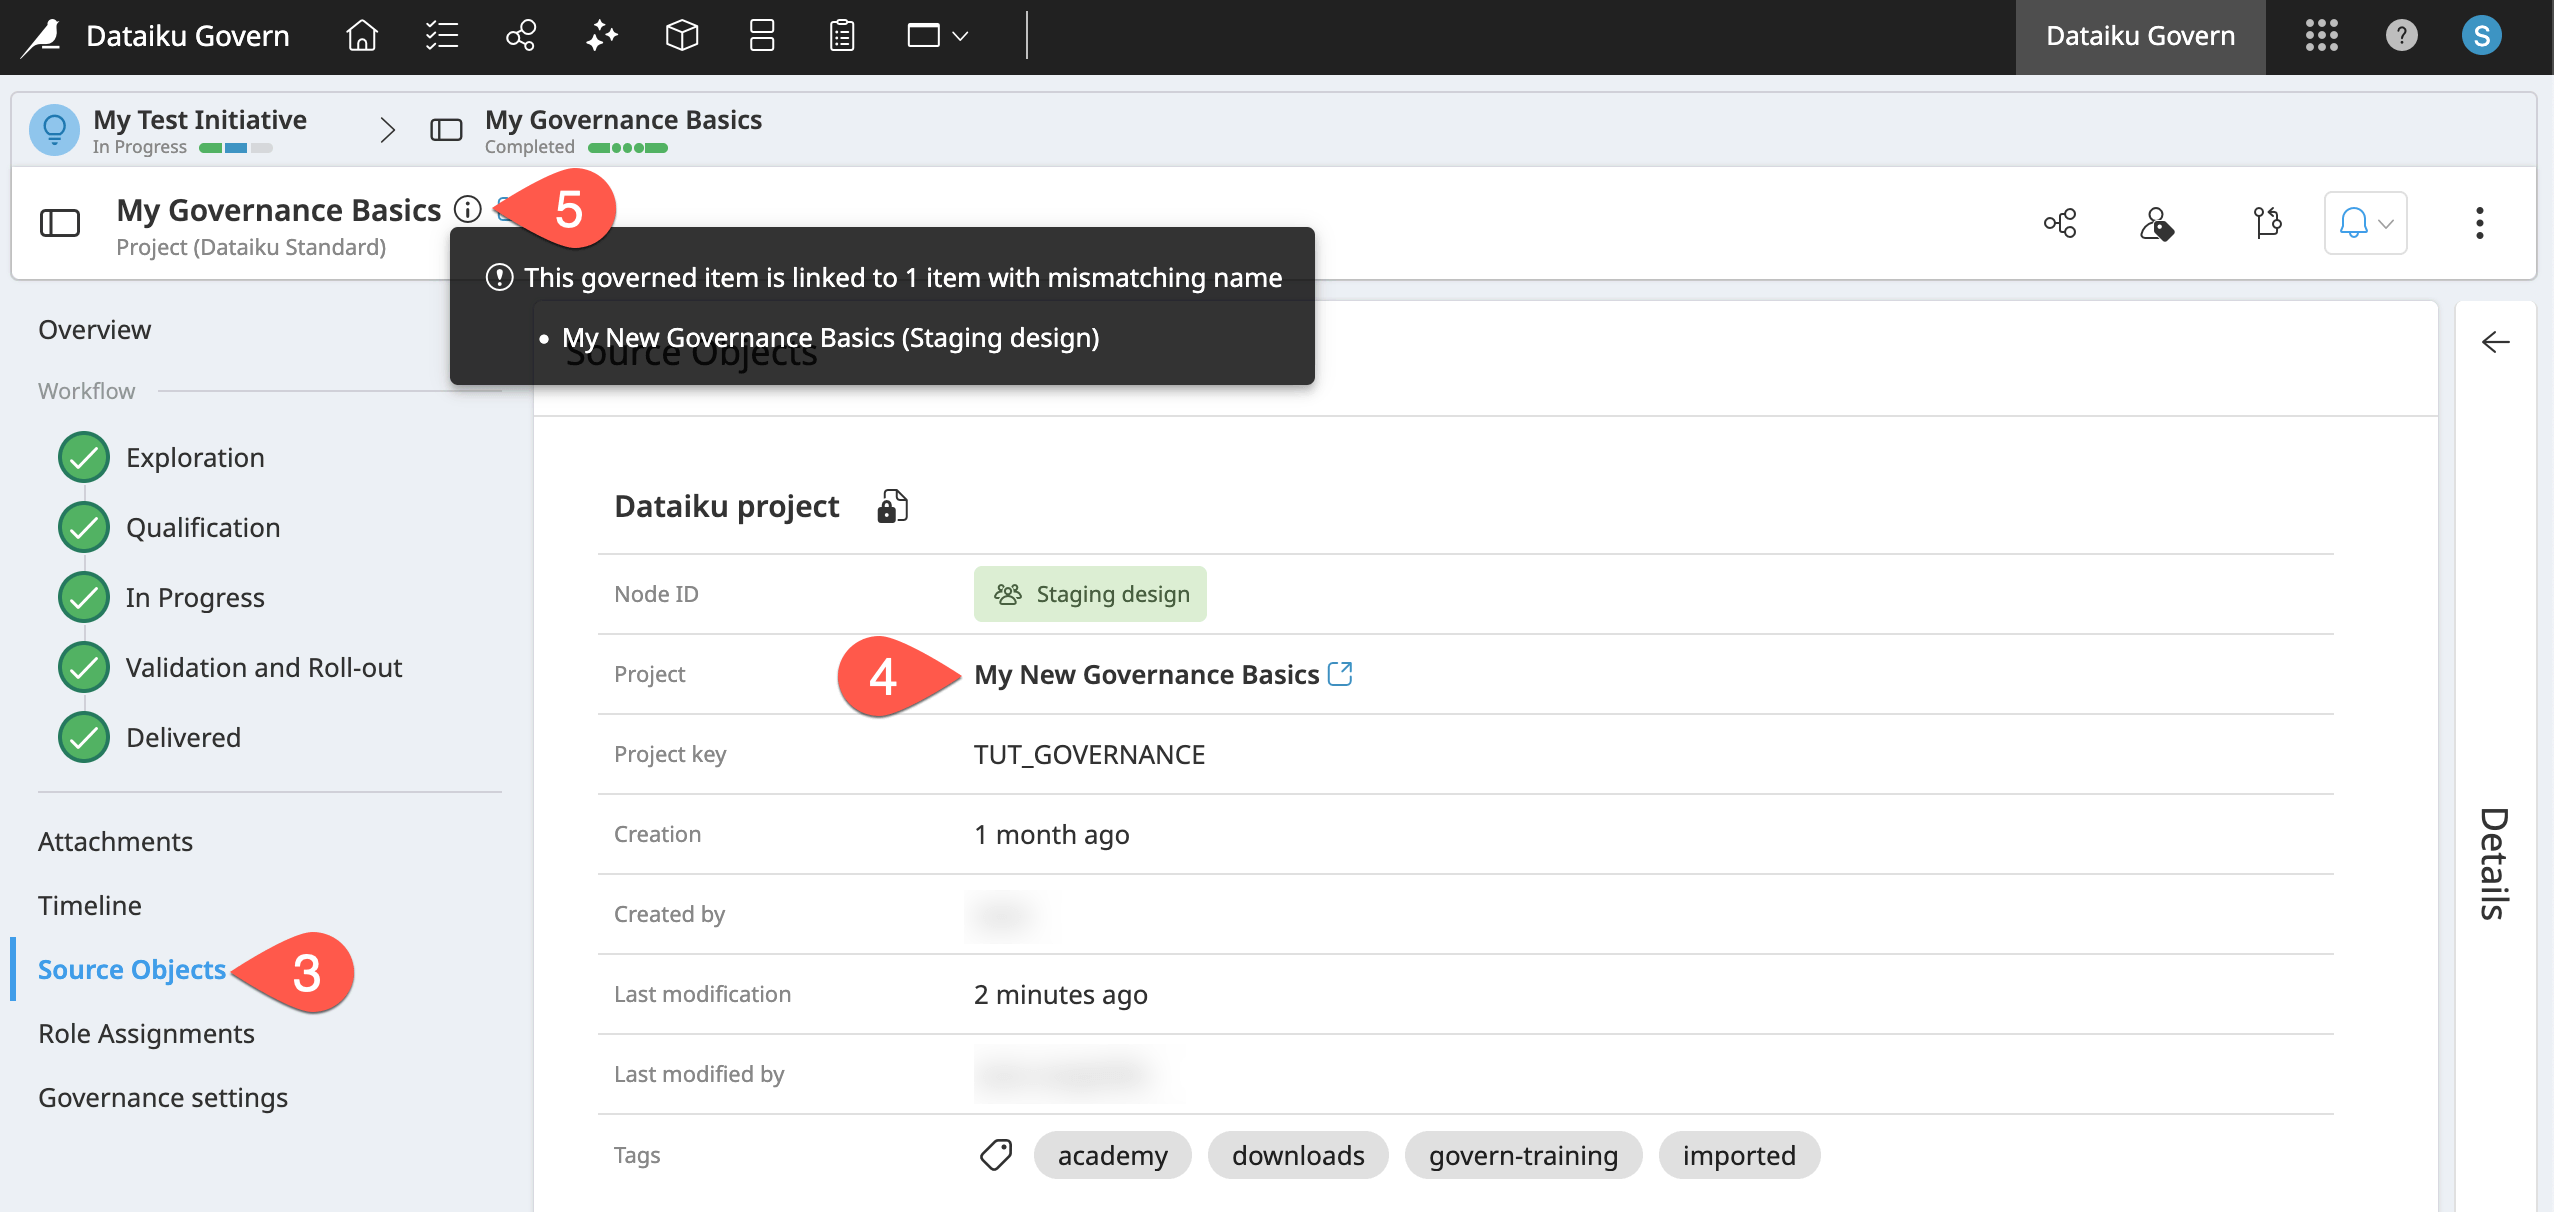
) icon to edit the title. Name it <YOUR INITIALS> Fraud Prediction, and click Save.Refresh the Source objects panel of the governed project.
In the Dataiku project section, confirm the governed project points to the updated Fraud Prediction title.
Confirm the presence of an information (
 ) icon in the item header of the governed project (the name of which hasn’t changed). Hover over it to find the name of the Dataiku source project.
Tip
Recall the distinction between Dataiku items and Govern items first discussed when deleting the original governed project. These mismatched names highlight the separation between the synced Dataiku source project and the capital “G” Govern project connected to it.
If desired, navigate to the Overview of the governed project page. Click Edit in the item header, and match the name of the governed project to its Dataiku source project. The information () icon disappears!
Next steps#
Congratulations! Faced with a high risk project, you’ve taken your first steps using the Govern node to:
Raise visibility into Dataiku items from connected nodes.
Apply a governance layer to those items so they can be qualified and documented.
Advance those items through workflow steps as defined by a governance template.
Organize governance activities under Business initiatives.
Continue governing items as their Dataiku source objects evolve.
Before you finish, take a moment to delete work that you no longer need as a courtesy to those sharing your Govern node.
From the Business initiatives (
) page, open your test initiative. From the vertical dots () menu, click Delete Business Initiative.From the Governed projects (
) page, open your project. From the vertical dots () menu, click Delete Govern Project.From the Design node, open your project. From the project homepage, click Actions > Delete this project.
In this tutorial, you added a governance layer to Dataiku items, and moved them through workflow steps in an arbitrary manner to understand the basic functionality of the Govern node.
Next, look at these how tools can play a instrumental role during all stages of the AI lifecycle. Start with pre-qualification in the ideation phase and execute an AI project all the way through to monitoring a deployed project.
You’ll see how to do that in Tutorial | Governance lifecycle!