Hands-On Tutorial: Plugin Development
Plugins allow developers to extend the native features of Dataiku DSS by coding functionalities and packaging them into reusable components that can be shared with other team members.
Let’s Get Started!
In this lesson, you will learn how to create your own plugins by developing a credit card fraud plugin, Fraud monitoring, consisting of two components:
a visual recipe that outputs a 3D scatter plot into a managed folder; and
a preparation processor (or Prepare recipe step) that hides certain words in a dataset’s column.
You’ll also learn ways to distribute the plugin.
Prerequisites
This lesson assumes that you have a basic understanding of coding in Dataiku DSS. If you do not have this prerequisite, we recommend completing the Code in Dataiku DSS Academy course. You should also be familiar with the basics of Git.
Additionally, you’ll need the following:
Dataiku DSS version 8.0 or above (the free edition is compatible).
A Python code environment that includes the matplotlib package.
Note
You can follow the instructions in this article to create a code environment that is compatible with the hands-on lessons in the Developer learning path.
Also, while this tutorial was tested using a Python 3.6 code environment, other Python versions may be compatible.
(Optional) Access to a remote Git repository where you can push changes. Your Dataiku DSS instance must have permission to work with this repository, and ideally, it should be empty.
Note
If you do not already have a GitHub account, you can visit GitHub Docs to find out how to sign up. To find out how to add a public SSH key to your account, visit Connecting to GitHub with SSH.
Create the Project
The first step is to create the project.
From the Dataiku homepage, click +New Project > DSS Tutorials > Developer > Plugin Dev (Tutorial).
Note
You can also download the starter project from this website and import it as a zip file.
Before building the Flow, you need to specify a code environment that contains the necessary Python packages for the project. We will use the py36-developer-v9 code environment that was created in this article.
Go to the More Actions (…) button from the top navigation bar and click Settings.
Click Code env selection from the left panel.
Specify the “Default Python code env” as py36-developer-v9.
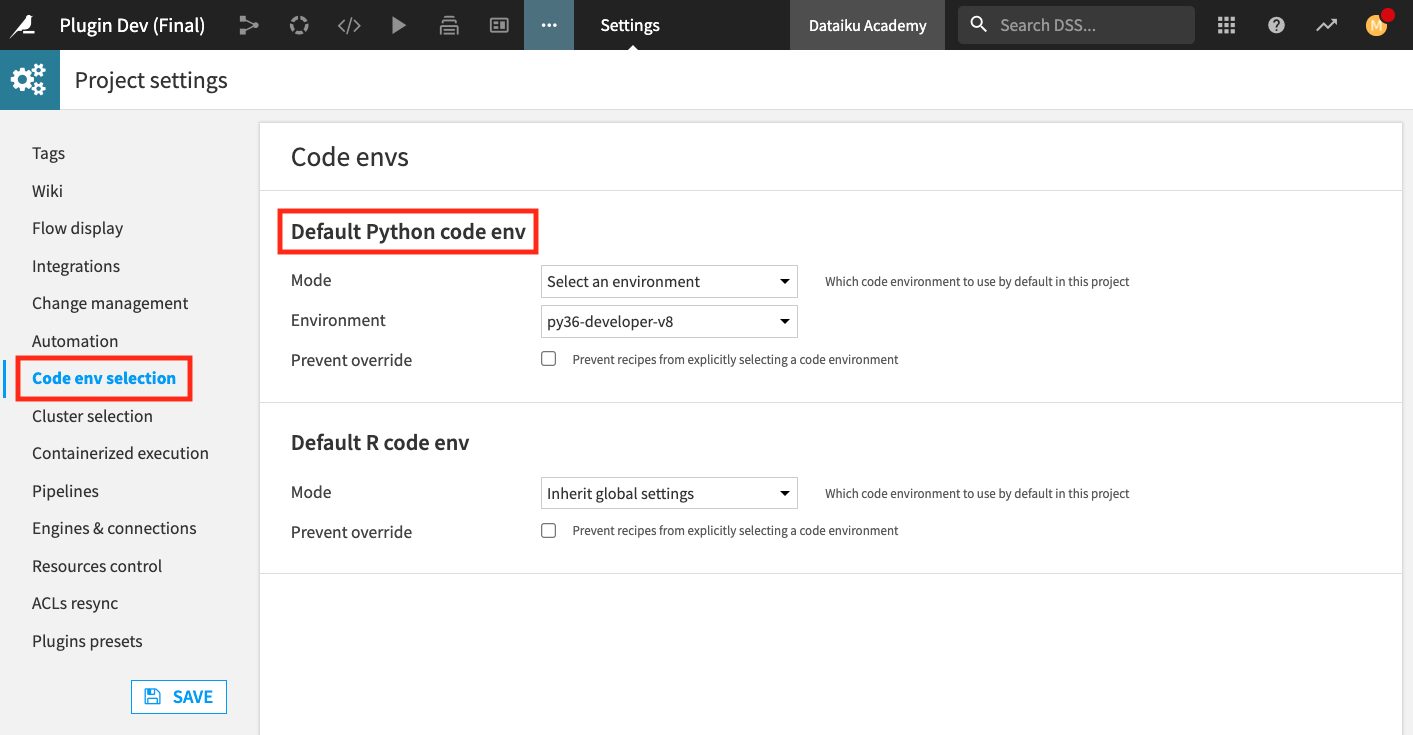
Click Save and return to the project’s Flow.
Click the Flow Actions button in the bottom right corner of the Flow and select Build all.
Keep the default dependencies selection and click Build.
Refresh the page when the job completes.
Tip
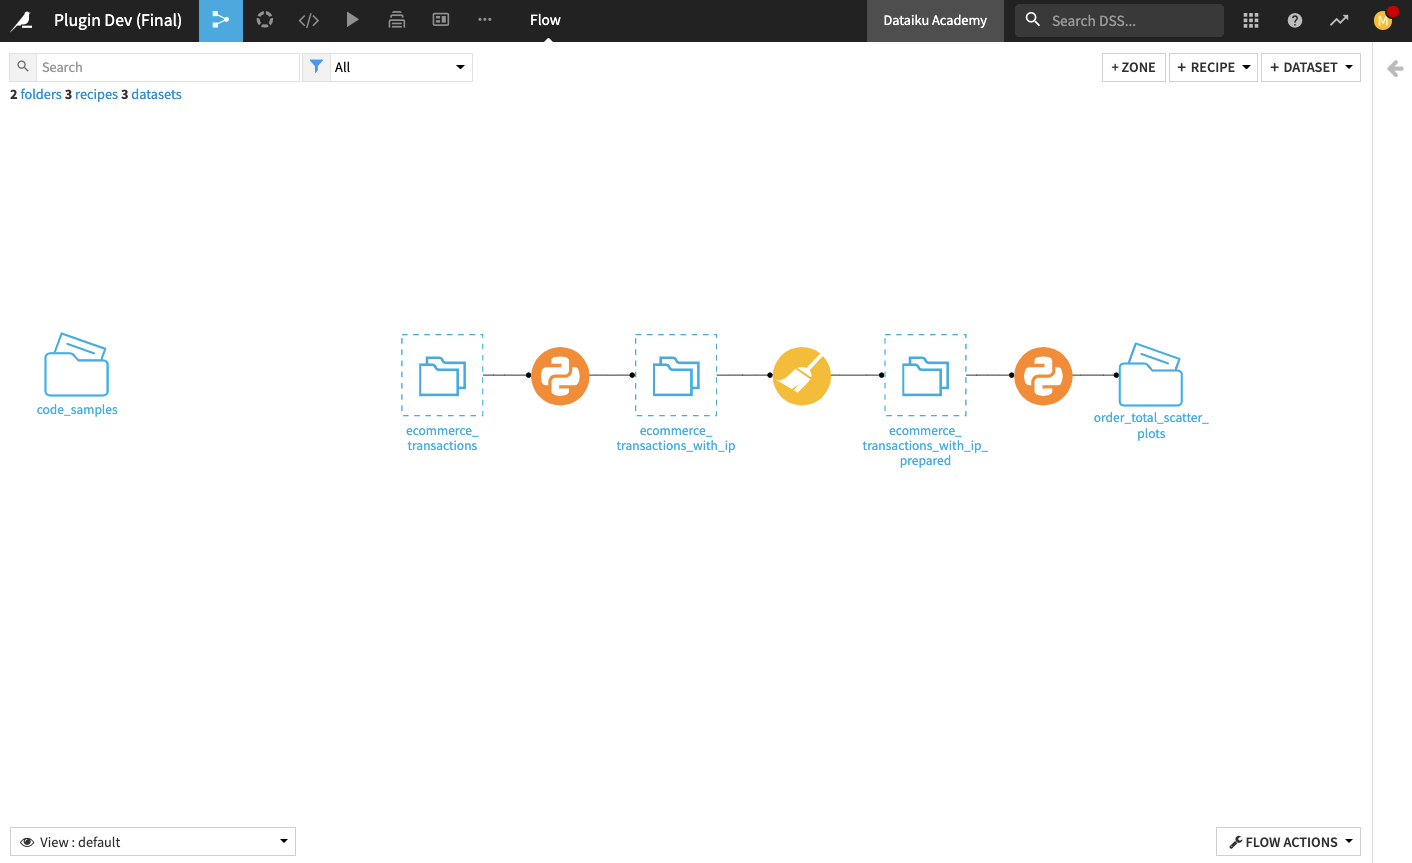
To reduce the likelihood of making errors when editing the lines of code in the plugin’s files, we’ve included a code_samples folder in the Flow. This folder includes files that contain the code we will use to customize the plugin so that you can easily copy and paste as needed.
We suggest that you open up a duplicate tab of your web browser to display your Flow throughout the tutorial so that you can easily access these files when editing the plugin.
Create a Plugin Recipe
We begin by creating a visual plugin recipe component.
Tip
If a Dataiku DSS instance has many projects or many collaborators, it is best practice to set up another instance specifically for plugin development. This way, edits to the plugin will not immediately affect existing projects, and you can implement any CI/CD processes.
The plugin recipe will output a 3D scatter plot into a managed folder. By creating this recipe, we want its functionality to be reusable via a simple interface to end-users. The recipe will also have a customized icon in the Flow.
The plugin recipe component must be created from an existing code recipe in the Flow. We’ll use the downstream Python recipe (the one that outputs the order_total_scatter_plots folder).
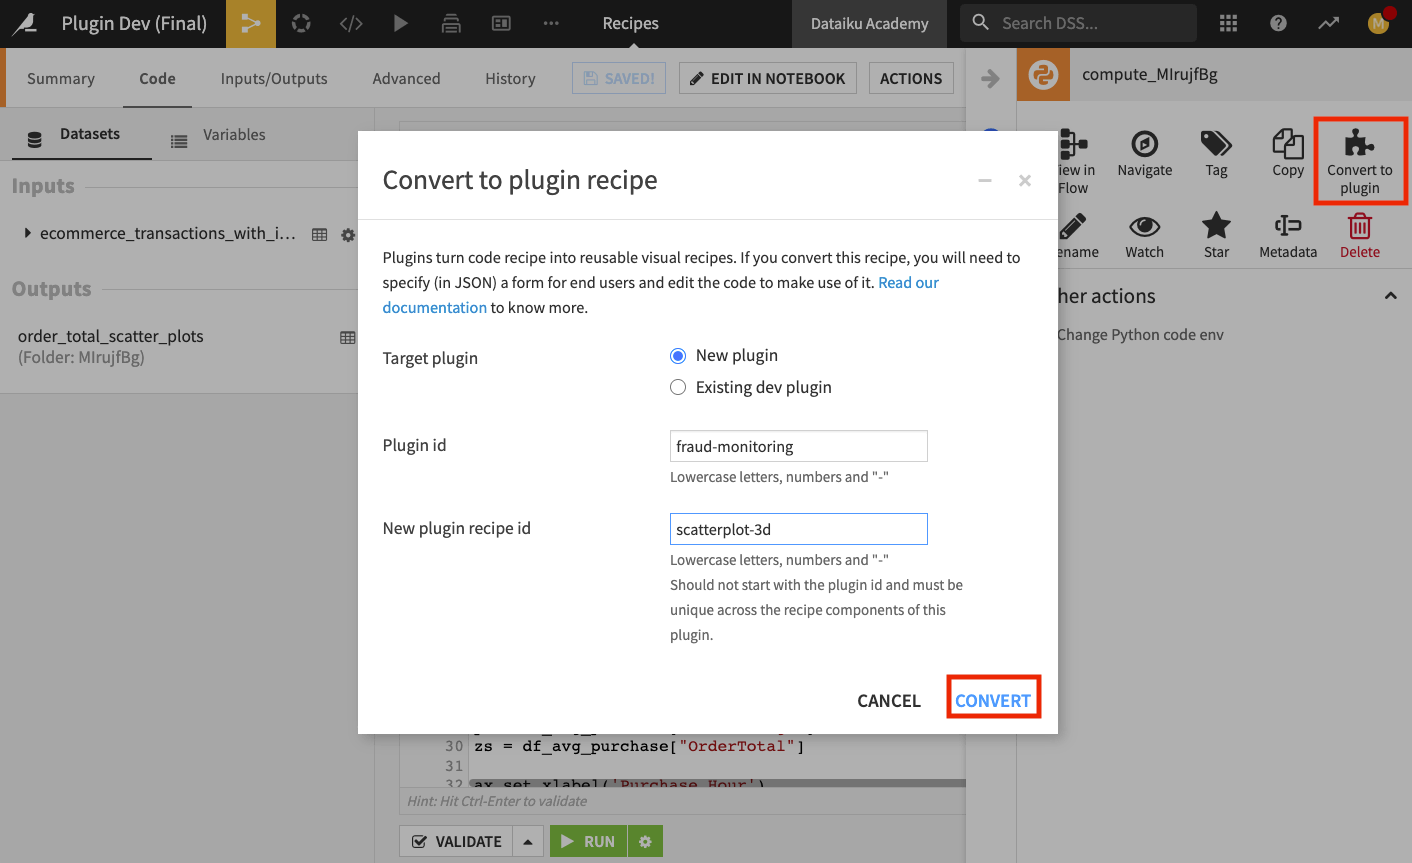
Open the downstream Python recipe, and select Convert to Plugin from the sidebar.
In the “Convert to plugin recipe” window, select New plugin, and fill in the “Plugin ID” as
fraud-monitoringand the “Recipe ID” asscatterplot-3d.Click Convert.
Edit the JSON Descriptor and Python Code
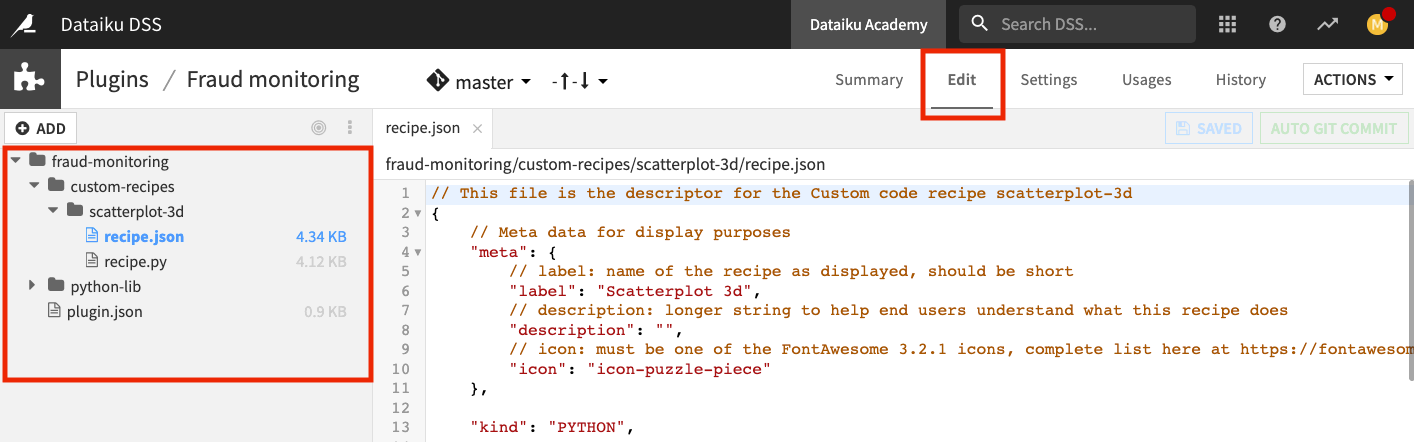
Once you convert the recipe to a plugin, you’ll land on the plugin’s Edit page. Here you can see a folder structure on the left-hand side and an open recipe.json file with some template code in the editor window. There is also a recipe.py file with some template code for the recipe.
Note
A plugin is defined by configuring three main parts:
A JSON descriptor that defines recipe inputs, outputs, and parameters
A Python or R file that contains custom code
Optionally, a dedicated code environment for the plugin
Many plugin components (such as recipes) can be configured through a JSON file. This file must contain a JSON array of the allowable parameters for the particular plugin component. Dataiku DSS can then use the JSON array to generate the plugin component’s user interface.
Tip
For a full list of the types of parameters and for details on how to describe them, see the product documentation.
We’re going to edit the JSON descriptor and the Python code of the plugin so that they follow good coding practices. This will provide a good user experience when the plugin is used in practice.
Let’s replace the JSON descriptor with the code from the tutorial_recipe.json file. Recall that this file is in the code_samples folder in the Flow, and you can switch to the duplicate tab of your project (if you have one open) to copy the file’s content.
Replace the default content in the recipe.json file with the content of the tutorial_recipe.json file.
Also, replace all the content of the recipe.py file (comments and Python code) with the content of the tutorial_recipe.py file.
Click Save All to save the plugin.
Tip
To get to the plugin’s Editor tab from the Flow, click the Applications menu (grid icon in the top navigation bar) > select Plugins > click Development tab > click Fraud monitoring plugin > and click Edit tab.
Explore Contents of the JSON Descriptor and Python File
When converting an ad-hoc code recipe into a plugin, you should follow good coding practices (such as cleaning up the template code and improving its robustness) to ensure you have a good experience using the plugin.
Using the plugin recipe as an example, notice the following:
In the recipe.py file, the “Read Plugin Inputs” section (starting at line 14) uses the
get_recipe_config().get('parameter_name')syntax to retrieve user-defined input parameters instead of usingget_recipe_config()['parameter_name'](the syntax used in the original template). This way, if a user fails to provide a required input value in the user interface, Dataiku DSS will return “None”, rather than have the recipe fail with aKeyError.Additionally, the “Error Checking of User Inputs” section of the recipe.py file (starting at line 36) includes checks for any unexpected input values so that Dataiku DSS can raise clear and understandable error messages to help with debugging.
The plugin also uses good naming conventions. The recipe’s name (scatterplot-3d) is self-explanatory, without including unnecessary terms like “recipe”, “custom”, or “plugin”.
Finally, the plugin provides clear labels and descriptions in the recipe.json file for the recipe and its parameters. These can help people that are unfamiliar with the plugin to know what its parameters are and to understand the plugin’s function.
Other things you can do to make your plugin more robust include:
Writing documentation (in addition to the descriptions) to go with the plugin. You can do this using a Dataiku DSS wiki or other formats.
Tagging plugins in an informative way, e.g., by using tags like “fraud detection”, “NLP”, etc.
Splitting your Python code using libraries so that you do not end up with large amounts of code that are difficult to manage.
For more information on the customizations in the JSON file, see Component: Recipes in the product documentation.
Create the Plugin’s Code Environment
From the Summary page of the plugin, we can create the plugin’s dedicated code environment.
Note
By default, Python and R-based plugin components will run using the default built-in code environment. This is not ideal, as the plugin developer has no control over the interpreter version or library list.
Following best practices, we will create a dedicated code environment for the plugin.
Click the Summary tab to go to the plugin’s Summary page.
Click + Create a Code Environment.
Leave the “Force Conda” box unchecked and click Create.
Dataiku DSS opens the plugin’s Edit page again. Notice that by creating the code environment, Dataiku DSS makes the appropriate additions to the plugin directory’s structure, along with some starter code that we will modify.
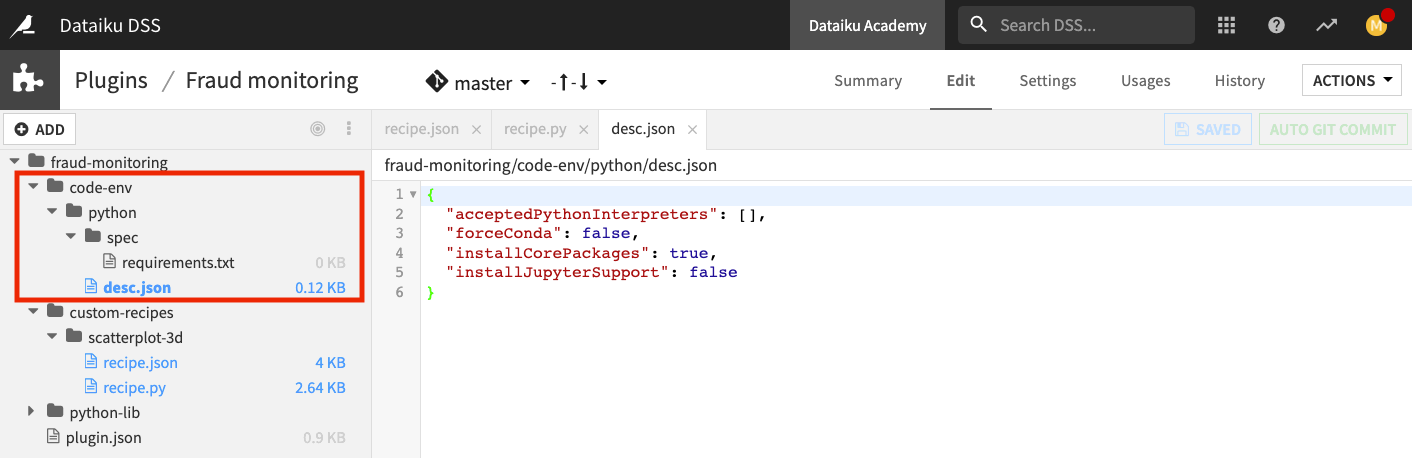
The desc.json file contains the environment characteristics, while the tutorial_requirements.txt file will contain the list of desired packages.
Click the desc.json file and replace the contents with the contents of the tutorial_desc.json file, making sure to indent the lines correctly. Alternatively, you can edit the content to specify the parameters:
acceptedPythonInterpretersandbasePackagesInstallMethodas follows:
{
"acceptedPythonInterpreters": ["PYTHON36"],
"forceConda": false,
"installCorePackages": true,
"installJupyterSupport": false,
"basePackagesInstallMethod": "PRE_BUILT"
}
Tip
We strongly recommend that you fill in the value of the acceptedPythonInterpreters parameter with the Python version of a default code environment when possible.
Click the dropdown arrow next to the spec folder.
Open the requirements.txt file and type in the library
matplotlib.Click Save All.
Return to the Summary page of the plugin and click Build New Environment.
Wait while Dataiku DSS creates the environment, then click Ok.
Test the Plugin Recipe
We’ll test the plugin recipe from the project’s Flow.
Return to the Flow of the “Plugin Dev (Tutorial)” project.
Tip
You can switch to the duplicate tab of your project if you have one open.
Click the ecommerce_transactions_with_ip_prepared dataset. (Note that you may need to refresh your browser page).
From the side panel under “Plugin Recipes”, select Fraud monitoring.
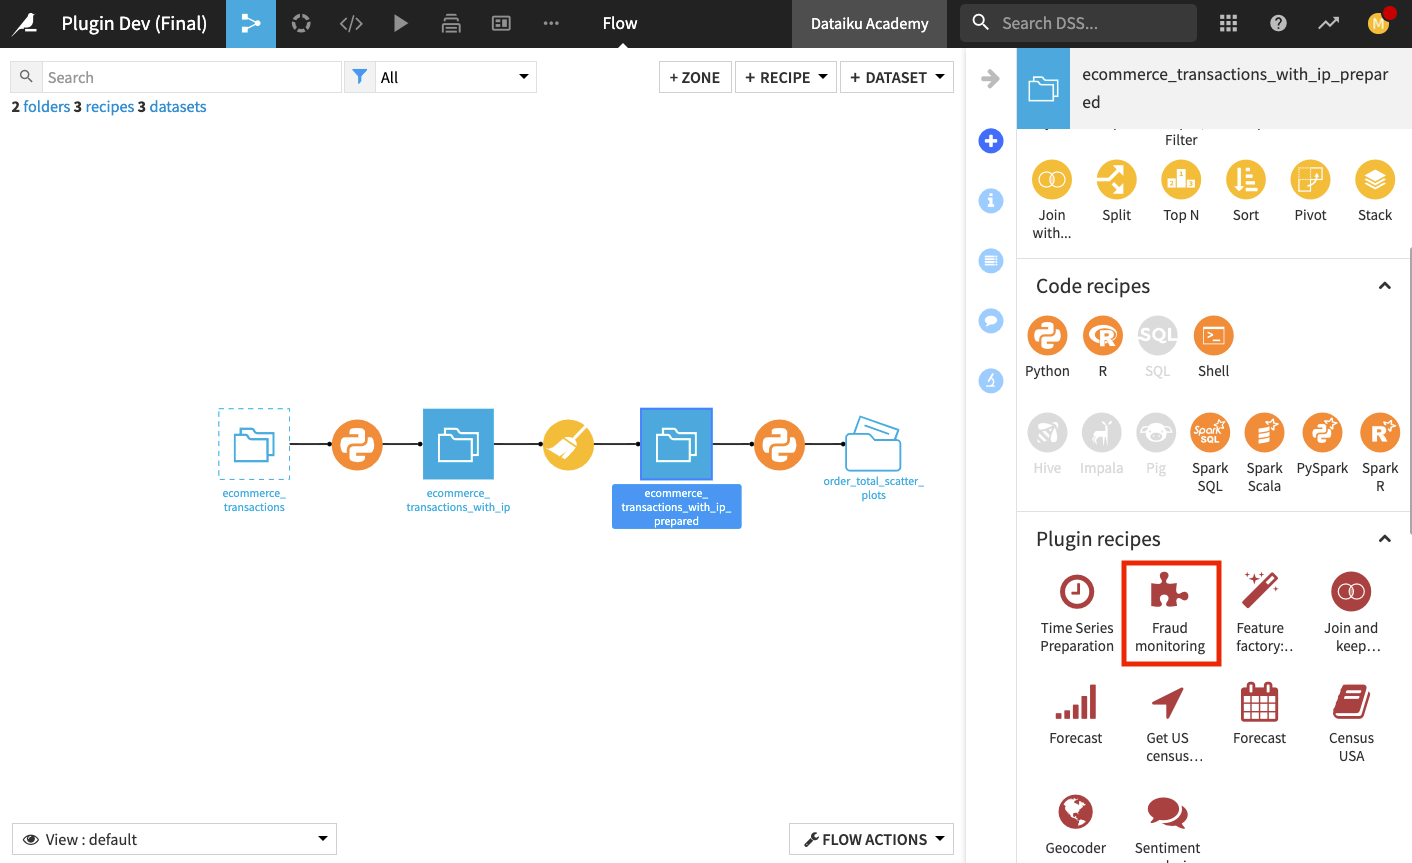
Select CC Fraud, the 3D scatter plot recipe, from the pop-up window.
In the “Outputs” section, create a managed folder called
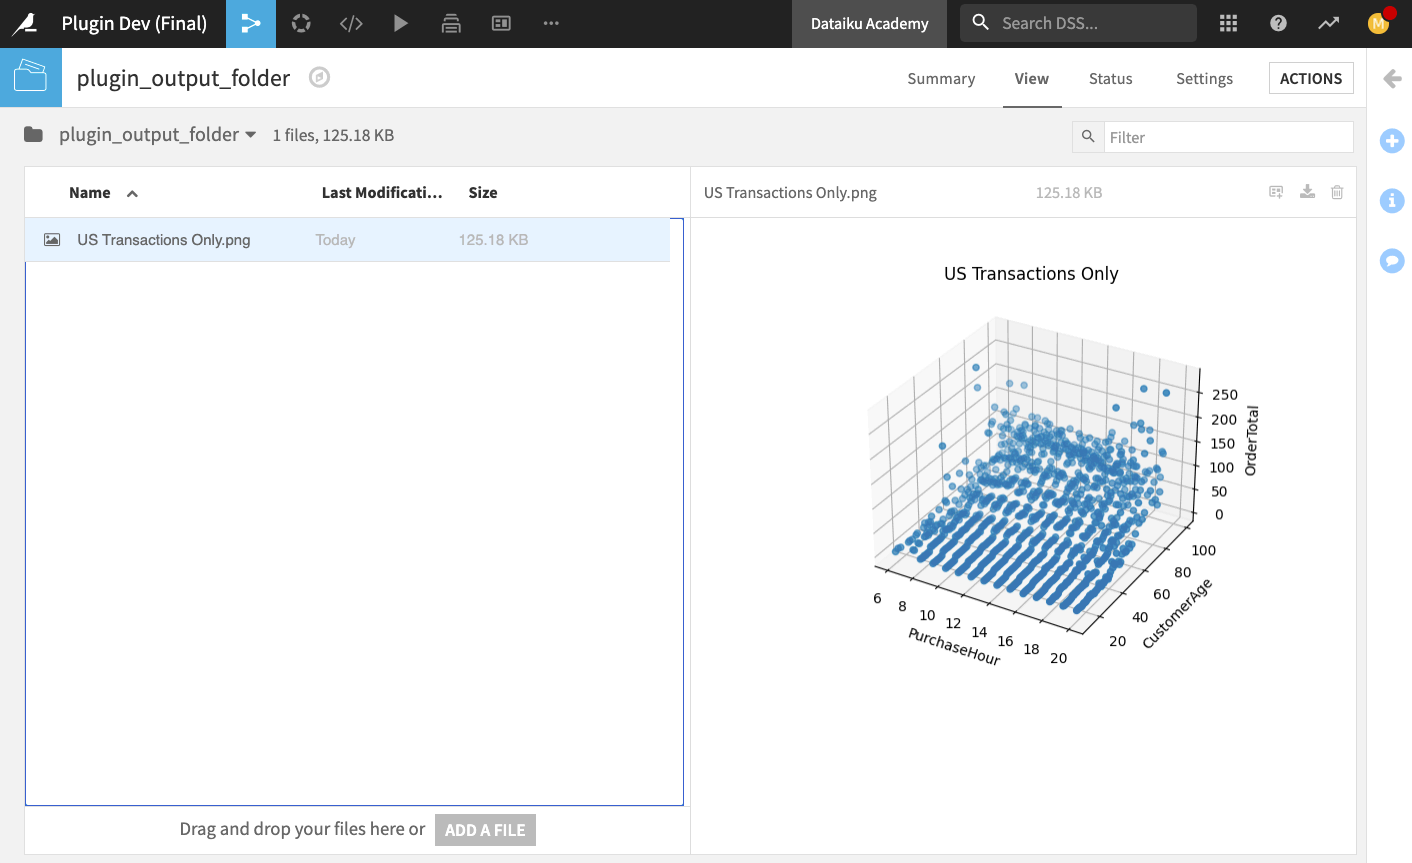
plugin_output_folderto be stored in the “filesystem_folders”.Finally, specify the recipe parameters as follows:
Scatter Plot Title:
US Transactions OnlyX Axis:
PurchaseHourY Axis:
CustomerAgeZ Axis:
OrderTotalFilter Column (Optional):
MerchantIP_countryFilter Value:
United States
Click Run.
Once the recipe finishes running, open the output folder to see that the scatter plot has been created successfully.
Return to the Flow.
Create a Plugin Preparation Processor
Next, we’ll add a custom processor component to the plugin. A preparation processor provides a visual user interface for implementing a Python function as a Prepare recipe step. Our preparation processor will perform the function of hiding certain words that appear in a dataset’s column.
Tip
Preparation processors work on rows independently; therefore, only Python functions that perform row implementations are valid. If your Python function performs column aggregates, for example, then it won’t be a proper preparation processor.
Also, preparation in Dataiku DSS should be interactive. Thus, the code that is executed should not be arbitrarily slow.
The plugin’s preparation processor component must be created from the Summary page of the Fraud Monitoring plugin.
Go to the duplicate tab of your project where the Plugin’s Summary page is open.
Click the +New Component button and select the Preparation Processor.
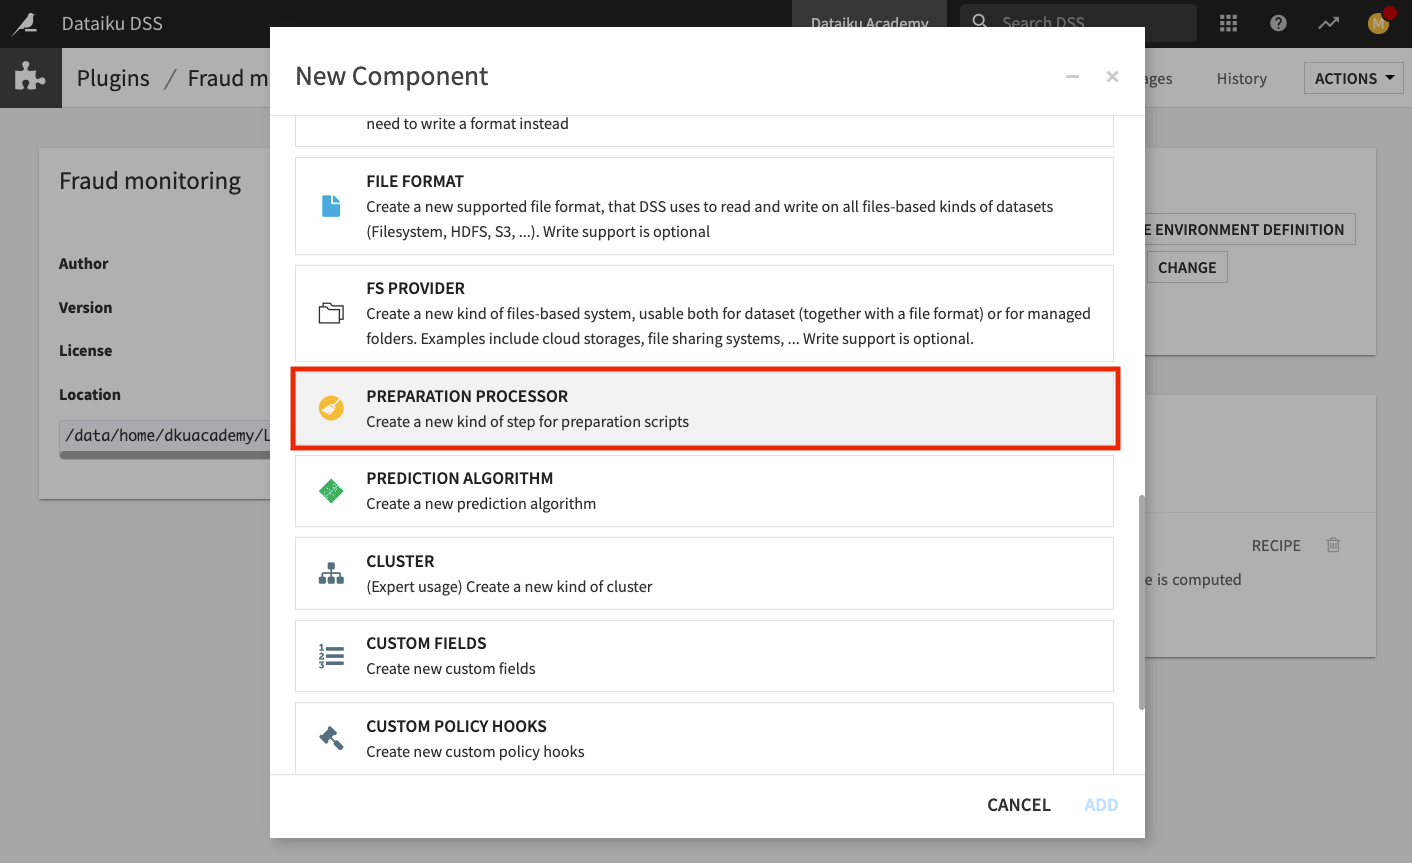
In the “Identifier” box, name the processor
hide-colorsand click Add.
Again, notice that Dataiku DSS has added the appropriate folders and files for the processor component into the plugin directory’s structure. The files processor.py and processor.json contain some starter code that we will modify.
Edit the JSON Descriptor and Python Code
We want the processor to hide certain colors that appear in our dataset in a case-insensitive manner. To do this, we will begin by modifying the processor’s Python code.
Replace the content of the processor.py file with the code from the tutorial_processor.py file.
We will also modify the contents of the processor’s JSON descriptor that Dataiku DSS will use to generate the user interface.
Click the processor.json file and replace its content with the code from the tutorial_processor.json file.
Click Save All to save your changes.
For more information on the customizations in the JSON file, see Component: Preparation Processor in the product documentation.
Test the Preparation Processor
We’ll test the processor component from the Prepare recipe in the project’s Flow.
Refresh the Flow of the “Plugin Dev (Tutorial)” project.
Tip
You can switch to the duplicate tab of your project if you have one open.
Open the Prepare recipe and click +Add a New Step.
Begin to search for “Hide colors” and select Hide colors.
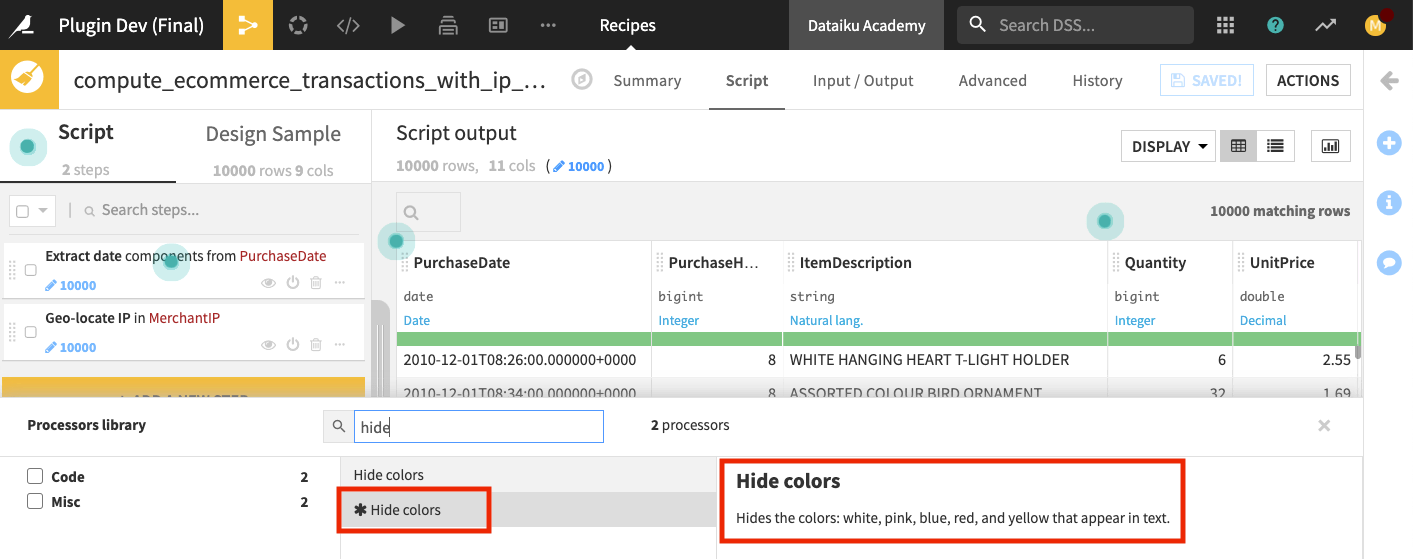
Configure the processor as follows:
“Output column”:
ColorlessItemDescription“Input column”:
ItemDescription
Scroll across the Preview page to view the output column ColorlessItemDescription with colors hidden (that is, replaced with “****”).
Run the Prepare recipe and Update Schema.
When the run completes, navigate to the output dataset to ensure that the processor worked as expected.
Return to the Flow.
Distribute The Plugin
Finally, after developing our plugin, we can share it with other coders and manage the plugin’s development lifecycle.
You can distribute plugins in various ways. For example, you can download plugins from a Dataiku DSS Design instance so that they can be uploaded and installed on other DSS instances. These downloads and installations can be made through the DSS user interface or through corresponding API calls.
Also, you can install plugins directly from Github through the Dataiku DSS user interface or through API calls.
Note
Many parts of Dataiku DSS, such as plugins, integrate well with Git. In fact, every plugin that you create in the plugin editor is associated with a Git repository. The Git integration for plugins is separate from the Git integration for projects, and the two should not be confused.
To share our Fraud Monitoring plugin via GitHub, we need to connect to a remote Git repo.
Tip
We recommend using a separate repository for each plugin.
In the duplicate tab of your project, go to the plugin’s Summary page.
Click on the change tracking indicator and select Add remote.
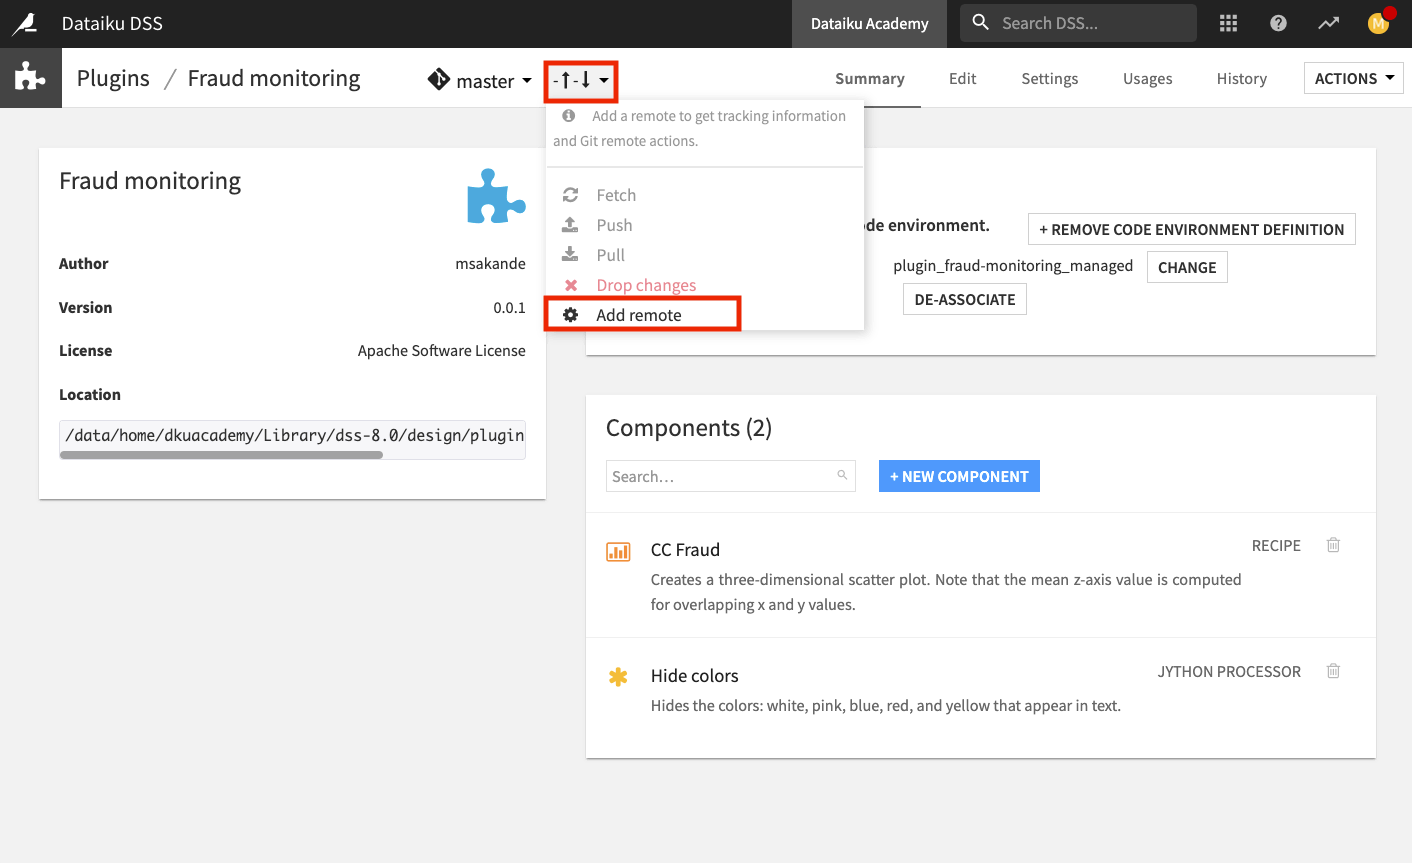
Enter the URL of the remote repo and click Ok.
If the remote repo is not empty, and its master branch has commits that are ahead of the local master branch, first pull those changes, using the Pull button in the change tracking indicator.
From the change tracking indicator, select Push.
When the Git push is done, click Ok.
Go to your remote Git repo to see that the master branch has been successfully pushed.
What’s Next?
Congratulations! You’ve completed the hands-on lesson for Plugin Development 101!
In this lesson, you learned how to create a development plugin, customize it, and test its components. You also saw how to share your plugin with others by pushing it to a remote Git repo. To learn more, check out the following resources:
The Examples of Plugin Component Development article for more examples on how to create other kinds of plugin components.
The Managing Plugin Versions with Git article for more details about Git versioning.
The product documentation on plugins for more information on all the available components you can include in a plugin.
Finally, a repository containing the code of publicly available Dataiku plugins. In particular, look at the samples folder, which lists which feature each dataset and recipe in the public repository use.