Managing Dataiku Instances in Fleet Manager
Overview
Cloud Stacks allows you to easily manage the lifecycle of your Dataiku DSS (DSS) instances from Fleet Manager without having to type a command.
Once you have configured the virtual network and instance template for your DSS instances, you can go to the Instances panel in Fleet Manager to manage your instances.
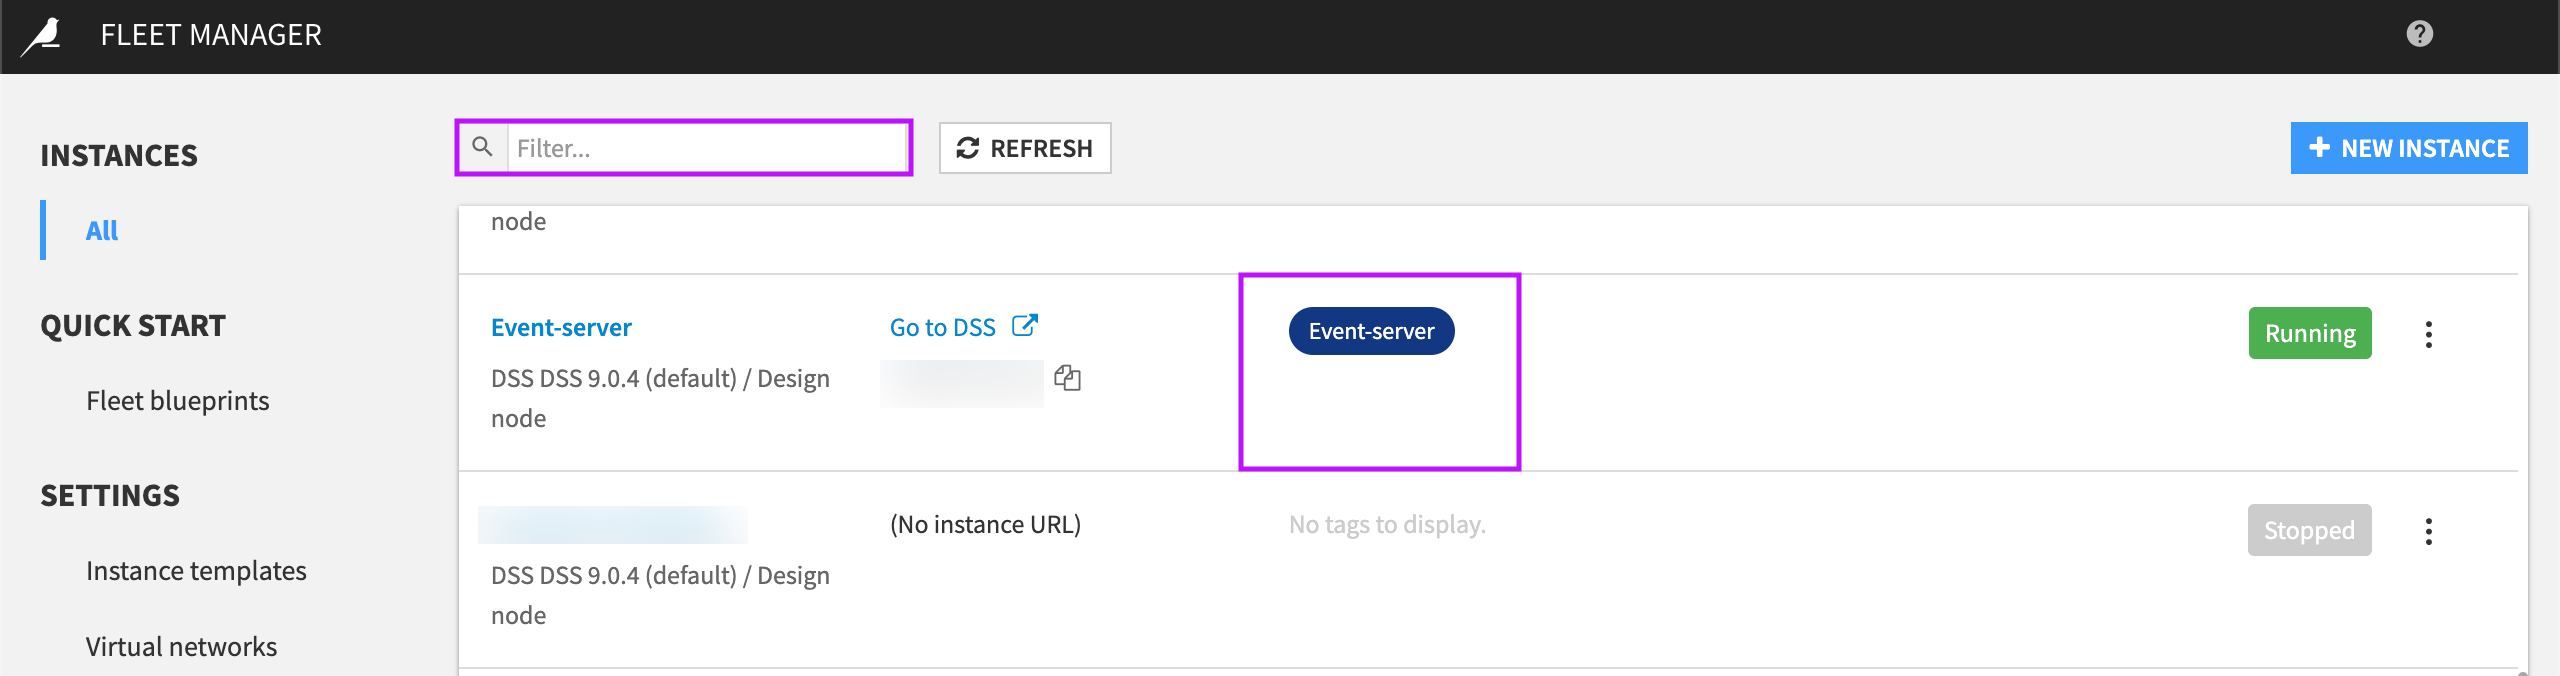
In the Instances panel, select All.
Fleet Manager displays all instances whether they are provisioned or not. You can create new instances by selecting + New Instance.

Note
The list of instances may be extensive, particularly if you have multiple instances for different environments.
To organize your instances, you can use Fleet Manager’s in-built tags. You can assign tags anytime, including when you provision the instance. Tags display next to the instance name for quick identification. Tags are also used for searching.
When you search for an instance, Fleet Manager searches the instance characteristics, including the instance name, tags, type of node, and status.
Defining Settings at the Instance Level
When you provision an instance, the instance takes on the settings and parameters defined in the instance template. However, there are some settings that you can define at the instance level. You can define the following settings and more:
Type of DSS node (only at the time of provisioning)
Machine type (memory and CPU)
Data disk (type, size, encryption)
IP addresses assignment
SSL properties
Snapshots policy
Fleet Manager tags and AWS tags
After you provision the instance, some settings cannot be changed. For example, you cannot modify the type of node (i.e., the design, automation, or deployer node) or the data disk encryption (along with its encryption key and the type of disk used).
Note
Fleet Manager provides a single user interface for managing your DSS instances and modifying instance settings. While this allows for flexibility, your modifications can significantly impact your Dataiku users or cause unwanted results.
A provisioned instance of DSS on AWS is an Amazon Elastic Compute Cloud (EC2) instance provisioned from an Amazon Machine Image (AMI). Ths AMI is created and made available by Dataiku. A data disk is attached for storing DSS data. The data disk contains everything relevant for DSS to run.
Setting the Disk Sizes
DSS instances are based on a data disk and an Operating System (OS) disk. The data disk contains everything stateful relevant for DSS to run. This is why Fleet Manager only snapshots the data disk. The data disk is the only thing that matters when provisioning or reprovisioning an instance because the OS disk is always replaced at provisioning time.
Caution
You should avoid storing anything outside the data disk because when you upgrade or reprovision an instance, everything stored outside the data disk is lost.
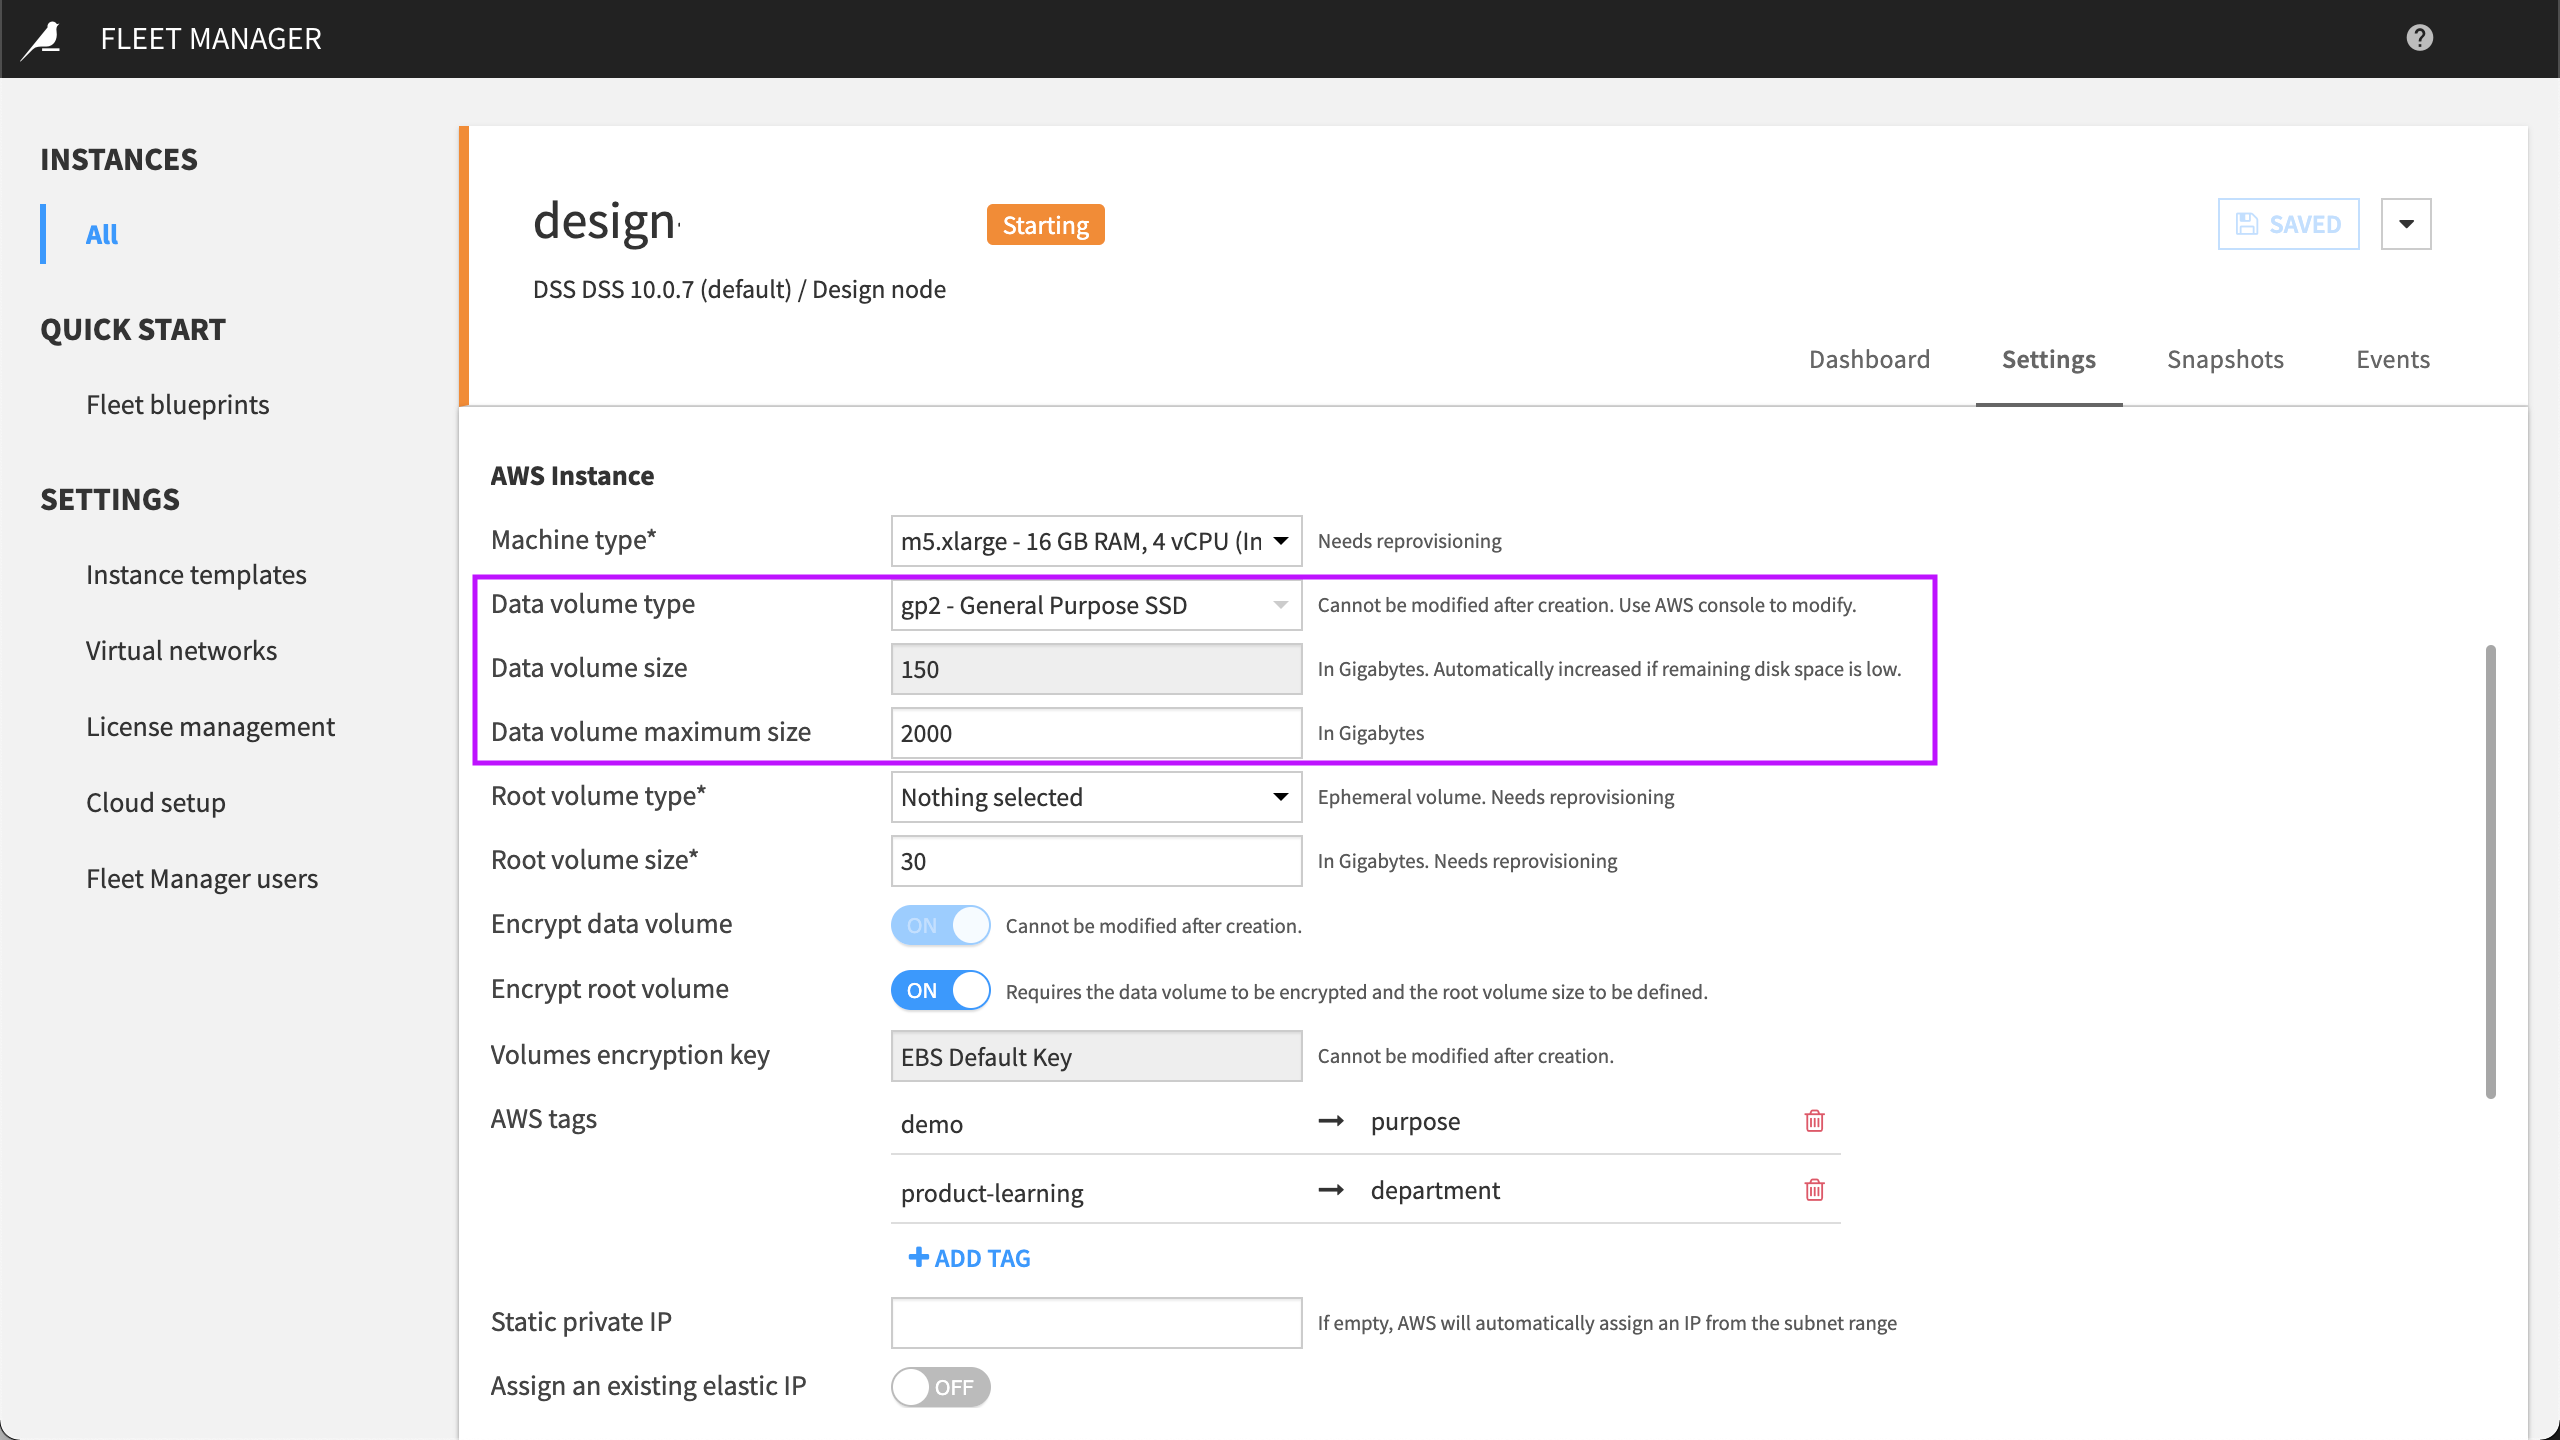
Data Disk
The data disk contains all the DSS configuration and its data files. Fleet Manager uses Elastic Block Storage (EBS) volumes as the storage layer for the data disk.
It’s possible to set a starting size for the data disk and the maximum size the disk is allowed to reach. The Fleet Manager agent in the DSS instance will automatically grow the disk whenever the space occupied reaches 80% until it reaches the maximum allowed size.
Even though it’s not best practice to store data in local filesystem connections, sometimes it’s convenient for small datasets or lookups. Furthermore, DSS will need a reasonably sized data disk to store logs, code environments, and anything else that cannot be offloaded to cloud storage.
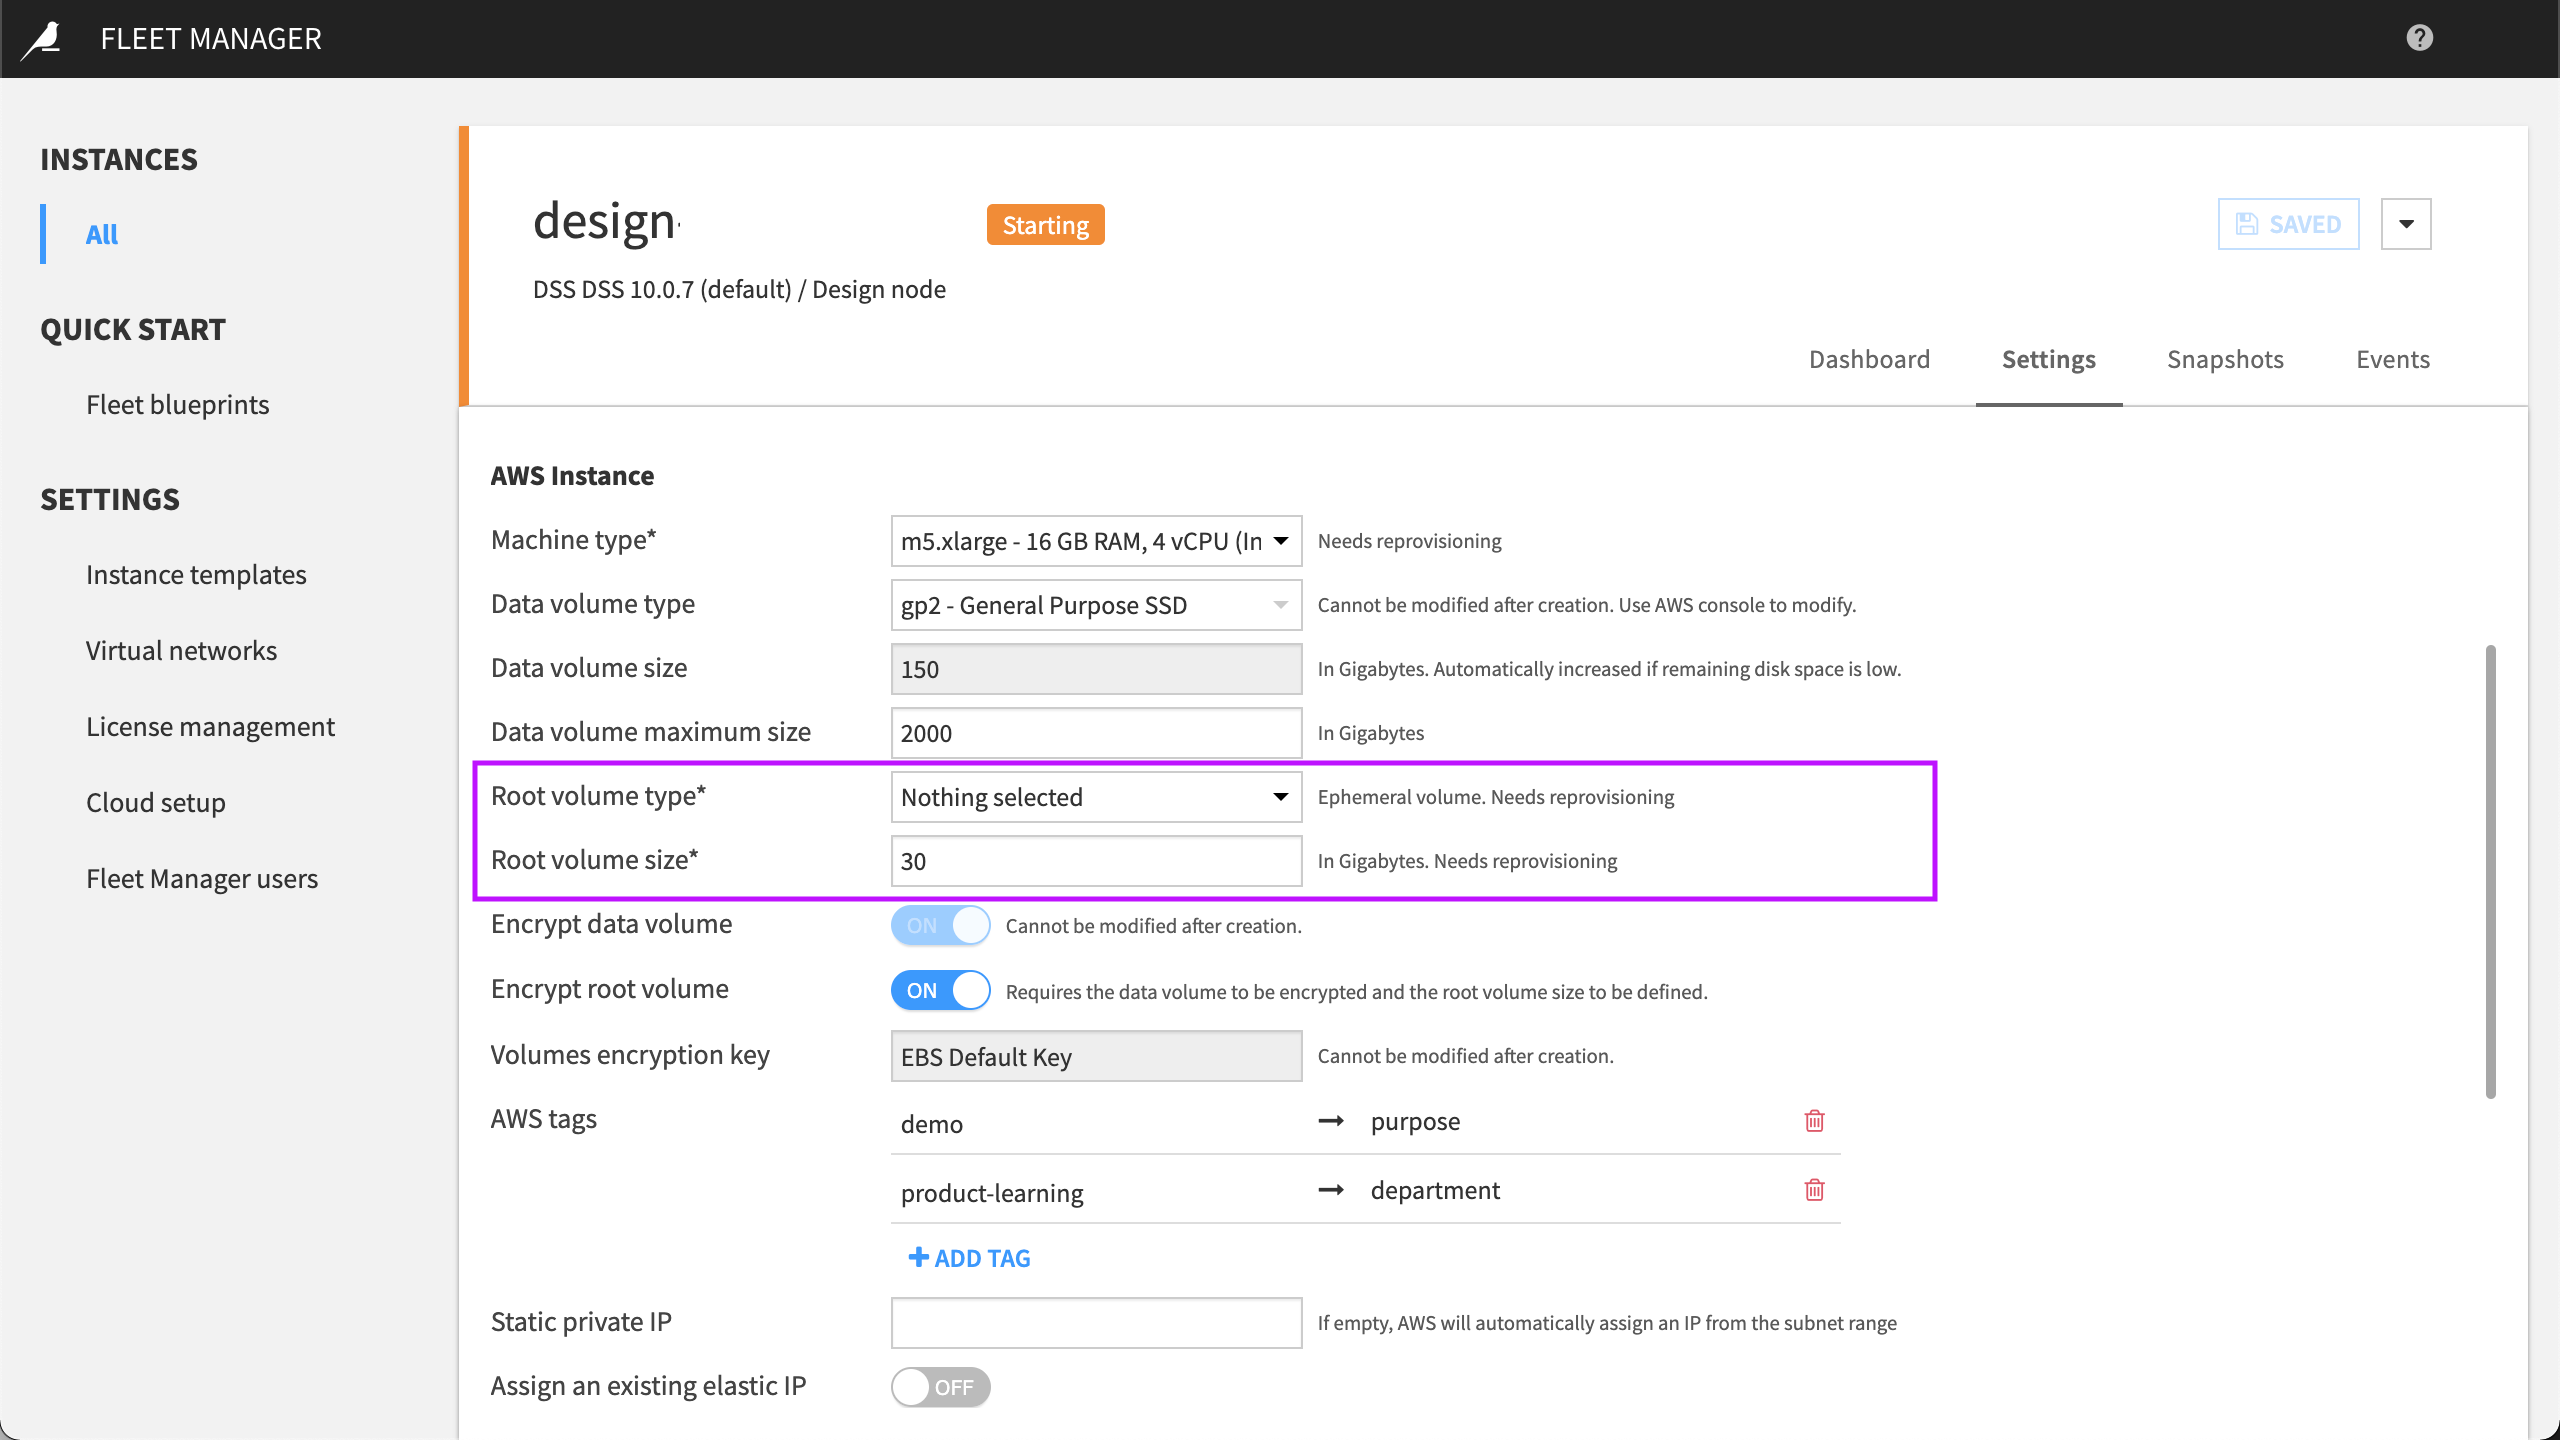
OS Disk
The OS disk is where the OS and other binaries are installed. The OS disk can be considered as temporary because it is replaced every time the instance is reprovisioned. However, a good reason to have a reasonably sized OS disk (20GB to 50GB) is because Python and R packages, along with ML models, might use the OS’ default temp folder location to store temporary files. There are ways to alter this behavior, but unfortunately, not all packages/tools abide by the same conventions.
Reprovisioning an Instance
When you spin up a new instance for the first time, the data disk is created according to the settings defined in the instance template, and DSS is installed as part of the Amazon Machine Image (AMI).
If you deprovision the DSS instance, the EC2 instance is deleted from AWS, and the data disk is kept so that it can be reused when you provision the instance again. However, you will still see the instance in Fleet Manager with all its settings and snapshots.
Deleting an Instance
If you want to delete an instance from Fleet Manager and AWS permanently, you will need to delete it from Fleet Manager.
Stopping an Instance
If you stop an instance, Fleet Manager keeps the instance and stops it at the AWS level.
Upgrading an Instance
Fleet Manager follows the same release cycle as DSS. Dataiku updates the AMI with every release. The AMI is configured with the best settings for DSS and the latest security patches available at the creation time.
Fleet Manager automatically checks DSS servers to see if a new version of DSS is available. If the Fleet Manager version you currently have installed can deploy a new version of DSS, you will see the available version in the instance settings.
To upgrade an instance:
From Instances, choose All and select the instance you want to upgrade.
Navigate to the Settings tab.
Select the DSS Version menu arrow and choose a version from the list.
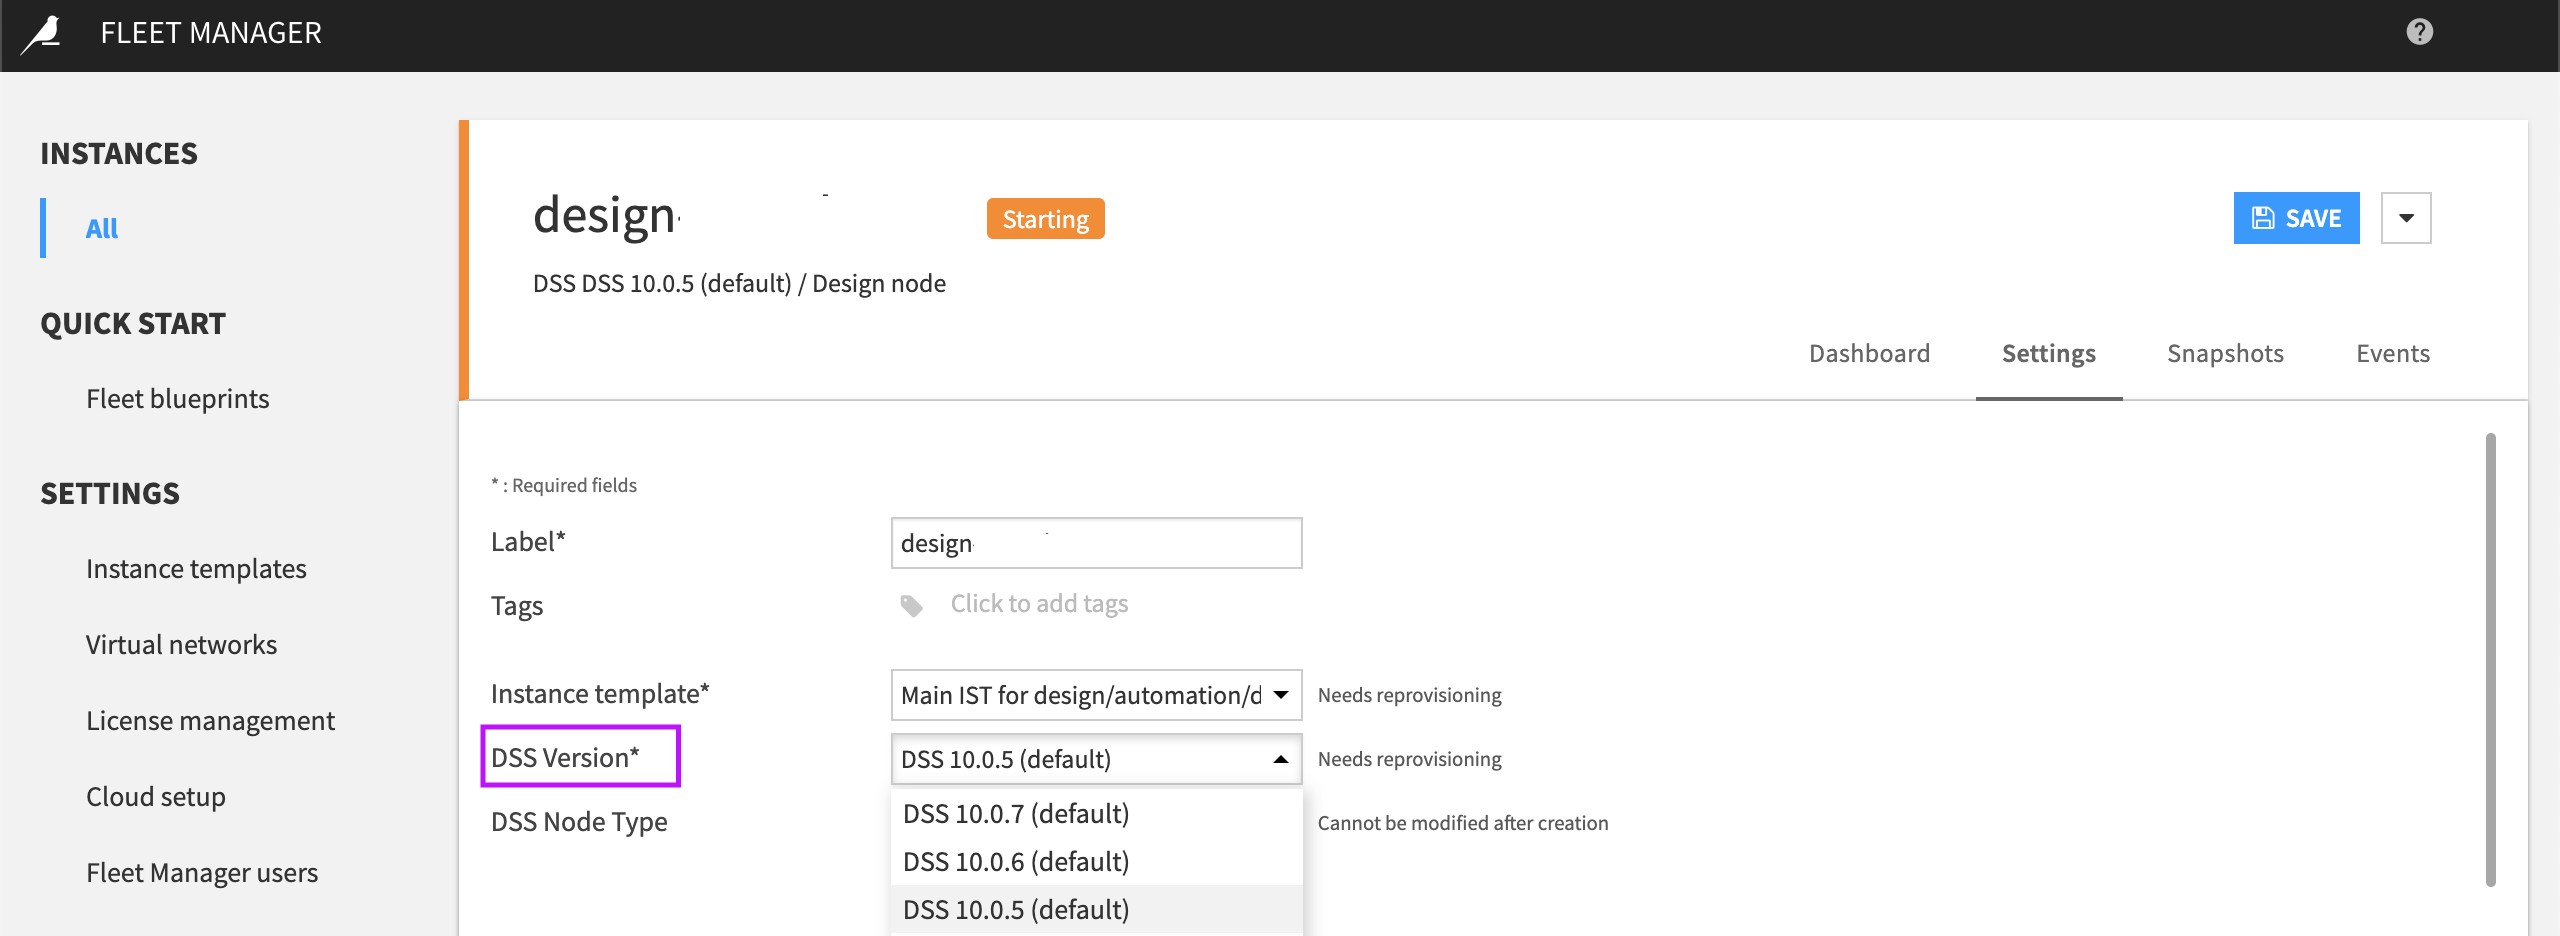
Save your changes.
Fleet Manager alerts you that the instance needs to be reprovisioned.
Reprovision the Instance to Apply the Upgrade
To reprovision an instance after changing the instance settings:
Select Reprovision then select Confirm.
The operation running in the background is a complete reprovision. A new EC2 instance is created based on the right AMI, the same data disk is attached to the instance, and the upgrade procedure is launched. After this, all the configurations defined in the instance template are replayed.
When reprovisioning, Fleet Manager automatically takes a snapshot of the data disk. If something fails during an upgrade, you can change the version back in the settings and revert to the previous state by selecting Reprovision From in the snapshot tab.
Prepare the Upgraded Instance for Users
When upgrading to a new major version, Dataiku recommends rebuilding code environments and retraining ML models. These operations are not performed automatically by the upgrade procedure. You’ll need to perform these actions manually from DSS or its API.
To prepare the upgraded instance for users:
Rebuild any code environments.
Retrain any ML models.
Defining Static IP Addresses
If not explicitly set, the private IP address will change if you deprovision an instance and reprovision it. You can specify the IP associated with this instance to avoid connectivity issues or to update your DNS entry pointing to this IP address. This IP address must be part of the subnet where your instance is provisioned. In addition, you’ll need to ensure it is available, so the provisioning doesn’t fail.
For Elastic IPs you will need to specify the ID of an EIP you have previously created.
Defining an SSL Strategy
The SSL Strategy you choose depends on the settings in the virtual network template. You can always add additional domain names at the instance level. If the virtual network specifies a per-instance certificate strategy, you must add the SSL certificate and key.
Note
To enter the *SSL key (PEM data) field, you need to have defined a CMK key in the Cloud Setup panel so that Fleet Manager can encrypt it.
Policy for Defining Snapshots
When deprovisioning or reprovisioning an instance, Fleet Manager creates a snapshot of the data disk to retain it.
You can also configure Fleet Manager to automatically take snapshots of the data disk, including the time interval and the number of snapshots to retain. To do this:
From the instance dashboard, navigate to the Settings tab, then scroll to the Snapshots section.
Toggle Automated snapshots to On.
Set the Frequency in hours.
Set the Number of snapshots to retain.
These snapshots will appear in the Snapshots tab, and you can revert to them just by clicking on one of the snapshots and confirming
If you do not want Fleet Manager to retain any snapshots, switch off the Automated snapshots toggle.
Using the Dashboard and Agent Logs
The dashboard is your command center. The Fleet Manager agent (running on the DSS instance) performs tasks on the instance and updates Fleet Manager every 30 seconds. You can view all Fleet Manager agent tasks as they occur through the Agent logs. The Agent logs represent actions outside your cloud platform, such as replaying setup actions, restarting instances, and resetting passwords. These logs are handy for debugging issues that might happen with actions performed by the agent (such as Ansible tasks errors or JDBC driver installation errors).
Note
Agent logs only display for instances that are running or starting.