Deploying a Dataiku Instance to Cloud Stacks on Azure
In this article, we’ll walk through a step-by-step process to set up and deploy an instance of Dataiku using Dataiku Cloud Stacks for Azure.
Deploying a Dataiku instance is a three-step process:
Gather information
Deploy Fleet Manager
Deploy a first instance
We’ll use a Microsoft Azure Resource Manager (ARM) template for deploying Dataiku Fleet Manager. Then, we’ll use Fleet Manager to deploy our first Dataiku instance.
Fleet Manager handles the entire lifecycle of Dataiku instances, freeing you from most administration tasks. A fleet is the collection of Dataiku resources such as nodes deployed together. A blueprint is a set of pre-configured instances or complete fleets.
At the end of this user guide, you’ll have set up a Dataiku Cloud Stack for Azure with Dataiku Fleet Manager and a single Dataiku Design node without elastic AI capabilities.
Completing these steps will help you understand the basics of Fleet Manager so that you’ll be able to deploy more complex instances, including complete fleets.
Step 1. Gather Information
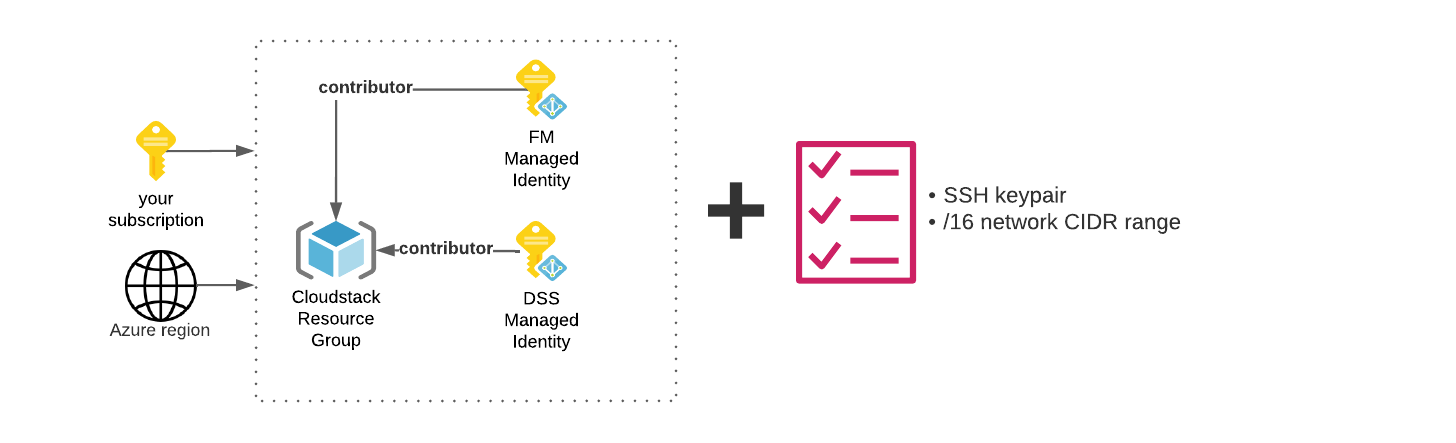
Gathering the necessary information up front will make the process run smoother. You can find the following information in your Microsoft Azure environment or by contacting your cloud administrator. You’ll need this information to complete the ARM template:
Landing zone information for Dataiku DSS (Dataiku), including the subscription and region
An Azure resource group for which you are an owner
A user-assigned managed identity dedicated to managing the Dataiku nodes through Fleet Manager.
A user-assigned managed identity dedicated to Dataiku resources to manage and interact with Azure Kubernetes Services (AKS) or Azure Container Registry (ACR).
For help creating the required managed identities, visit the user guide.
A virtual network range with a CIDR /16 size
A SSH key pair
Determine if you want a public or private IP address to access Fleet Manager
Step 2. Set Up and Deploy Fleet Manager
In this section, we’ll use an ARM template to deploy a cloud stack that contains the following infrastructure:
A Dataiku Fleet Manager VM including its storage and NIC
A CIDR /16 virtual network
The resources shown in the diagram are needed to set up and deploy Fleet Manager:
Complete the Custom ARM Template
To set up and deploy Fleet Manager, we’ll use a custom ARM template.
To open the template:
Visit the Dataiku documentation to find the link.
Select Deploy to Azure.
The Azure portal displays the template.
Complete the template using the guidelines.
Template Guidelines
Project Details
Choose the Azure Subscription.
Choose an existing Resource group dedicated to the cloud stack or create a new one.
Instance Details
Select the Azure Region where you want to deploy the cloud stack.
Set the Virtual Machine Size for Fleet Manager.
A size of 2 vCPUs and 8 GB of RAM is recommended. You can always increase the machine size later.
In Instance identity, enter the “fm-id-name”.
This user-assigned managed identity is dedicated to Fleet Manager and manages the Dataiku nodes.
Enter the name of the managed identity. Use the short format of the name. Do not enter the full ID that displays under the managed identity properties. For example, do not include “/subscription/…./resource”.
This information is found in the Managed Identity properties in the Azure console.
In Username, choose a username for signing in to Fleet Manager.
This is the Fleet Manager administrator username.
In Password, enter a strong password for signing in to Fleet Manager.
This is the Fleet Manager administrator password.
In SSH Username, enter the username for the SSH user that is permitted to connect to the Fleet Manager VM.
This sudo Linux user will connect to Fleet Manager VM via SSH.
In SSH public key source, choose a source for the key.
For example, you can choose to use your existing public key.
In SSH Public Key, enter an RSA public key for signing into the Fleet Manager VM.
Network Parameters
In Virtual Network CIDR, enter the address of the CIDR /16 virtual network that is allocated to the cloud stack, for example, 10.0.0.0/16.
Enter the Subnet CIDR you want to create. Use the “X.X.X.X/X” format.
Enter the Private Ip Address for Fleet Manager.
In Associate Public Ip Address, select true if you want a public IP address for connecting to Fleet Manager; otherwise, select false.
If using a public IP address, you may need to consider how to secure it.
In Allow CIDR, enter the IP addresses permitted to connect to Fleet Manager.
Leave Snapshot empty. This is the default setting for a new installation.
To migrate or upgrade from a snapshot, you’ll first need to create a snapshot of the data disk for the Fleet Manager instance you want to migrate or upgrade.
You’ll then reference the Resource ID in the Snapshot field.
For example: /subscriptions/xxxxxxxx-xxxx-xxxx-xxxx-xxxxxxxxxxxx/resourceGroups/xxxx/providers/Microsoft.Compute/snapshots/my-snapshot.
You are now ready to review and deploy the template.
Select Review + create.
Verify the creation information, and then select Create.
Azure deploys the resources, including the new virtual network resulting in a new Fleet Manager VM on your cloud stack.
Note
To visualize the deployed resources, choose Visualize in the Azure console.
Azure displays an error message if it is not able to validate the information provided in the template or if rights to create the resources are insufficient.
You are now ready to deploy your first instance of Dataiku.
Step 3. Deploy Your First Dataiku Instance
Log in to Fleet Manager
To connect to Fleet Manager, you’ll need to determine the Fleet Manager IP Address. To do this:
In the Azure console, select Go to resource group.
Choose the VM instance to view its details.
Copy the “Public IP address”.
Note
If you selected private IP, you’ll need to expose the application.
Type the address in your browser to launch Fleet Manager.
Wait while Fleet Manager starts.
Enter the administrator username and password you specified in the template.
The Dataiku Fleet Manager home page displays.
Configure Your Dataiku License
To deploy a Dataiku instance, you’ll first need to configure your Dataiku license. One way to do this is by using the settings under Cloud setup.
Under Settings, choose Cloud setup.
Select Edit.
In License mode, choose Manually entered.
In License file, enter your license file. Be sure to copy the entire contents of the JSON file including the final ‘}’.
Save your changes.
The license file now displays the license expiration date.
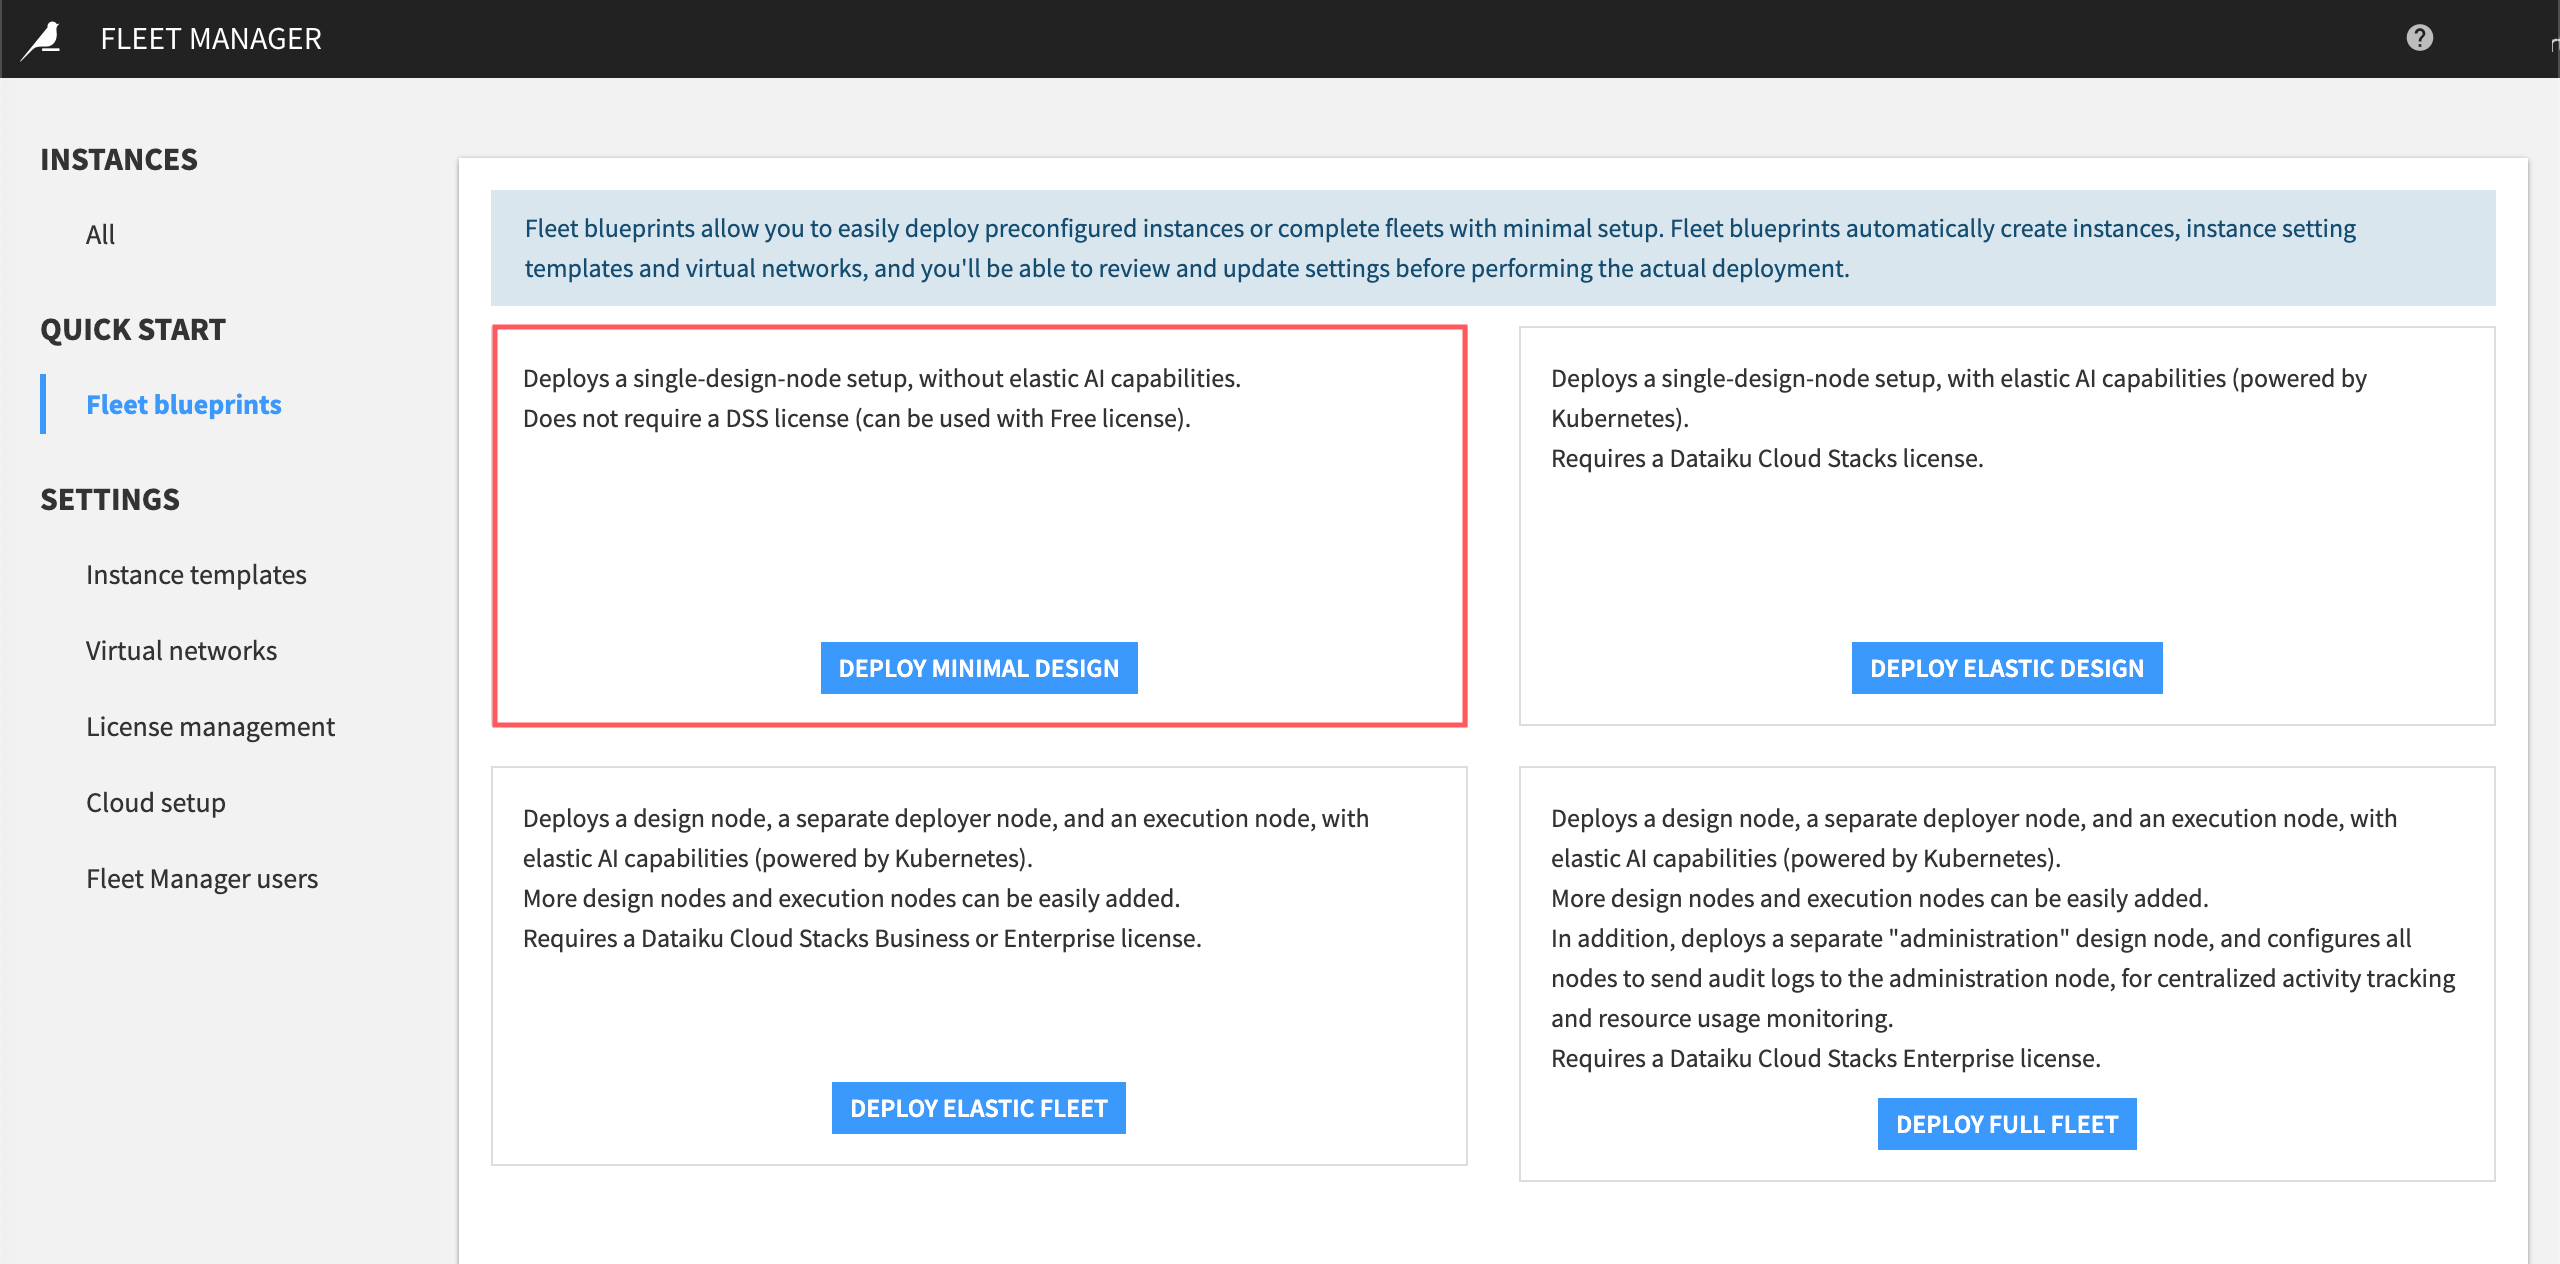
Deploy a Fleet Blueprint
Fleet blueprints allow you to deploy pre-configured instances or complete fleets with minimal setup. Fleet blueprints automatically create instances, instance setting templates, and virtual networks. Using Fleet blueprints you can deploy everything from a minimal design with a single design node to a full fleet with elastic AI capabilities.
In this section, we’ll deploy a single design node without Kubernetes (Elastic AI) capabilities.
Under Quick Start, choose Fleet blueprints.
Choose Deploy Minimal Design.
Fleet Manager displays the fleet configuration page.
Enter a descriptive name for the fleet.
Follow your organization’s naming convention for network resources.
For example, “design-admin-learning-dss-01”.
This name is added to all deployed instances, instance templates and virtual networks.
Optional: Add tags to tag your Azure resources.
Optional: Enter the name of the Azure resource group in which all resources will be created.
By default, all resources will be created under the Azure Virtual Machine resource group (this is the resource group where Fleet Manager is deployed).
Enter an authorized SSH key. This allows Azure to sign in to the Dataiku instances.
Optional: In Design node data volume name, assign a unique name to the storage volume.
This cannot be renamed later.
Review and update your settings before performing the actual deployment.
Select Deploy.
Fleet Manager creates the fleet and lets you know that the fleet is ready for provisioning.
Select OK.
Return to the Fleet Manager home page to view All instances. You are now ready to provision the instance.
Provision the Instance
The Dataiku instance(s) you deployed using the blueprint are not yet available to Dataiku users. In this section, we’ll provision the instance.
Before provisioning any instance(s), you can specify configuration options, including the VM type and the name of the Azure objects, and add tags.
From Instances, choose All and then locate the new instance.
Select the name of the instance to view its settings.
The status of the instance is Not provisioned.
Navigate to the Settings tab.
You can configure the settings, including the VM type and the name of the Azure objects. You can also add tags. Each field is labeled to let you know if the change requires reprovisioning.
If you made any changes, select Save.
You can now provision the instance to make it available to Dataiku users.
Select the Save menu arrow to display the list.
Choose Provision.
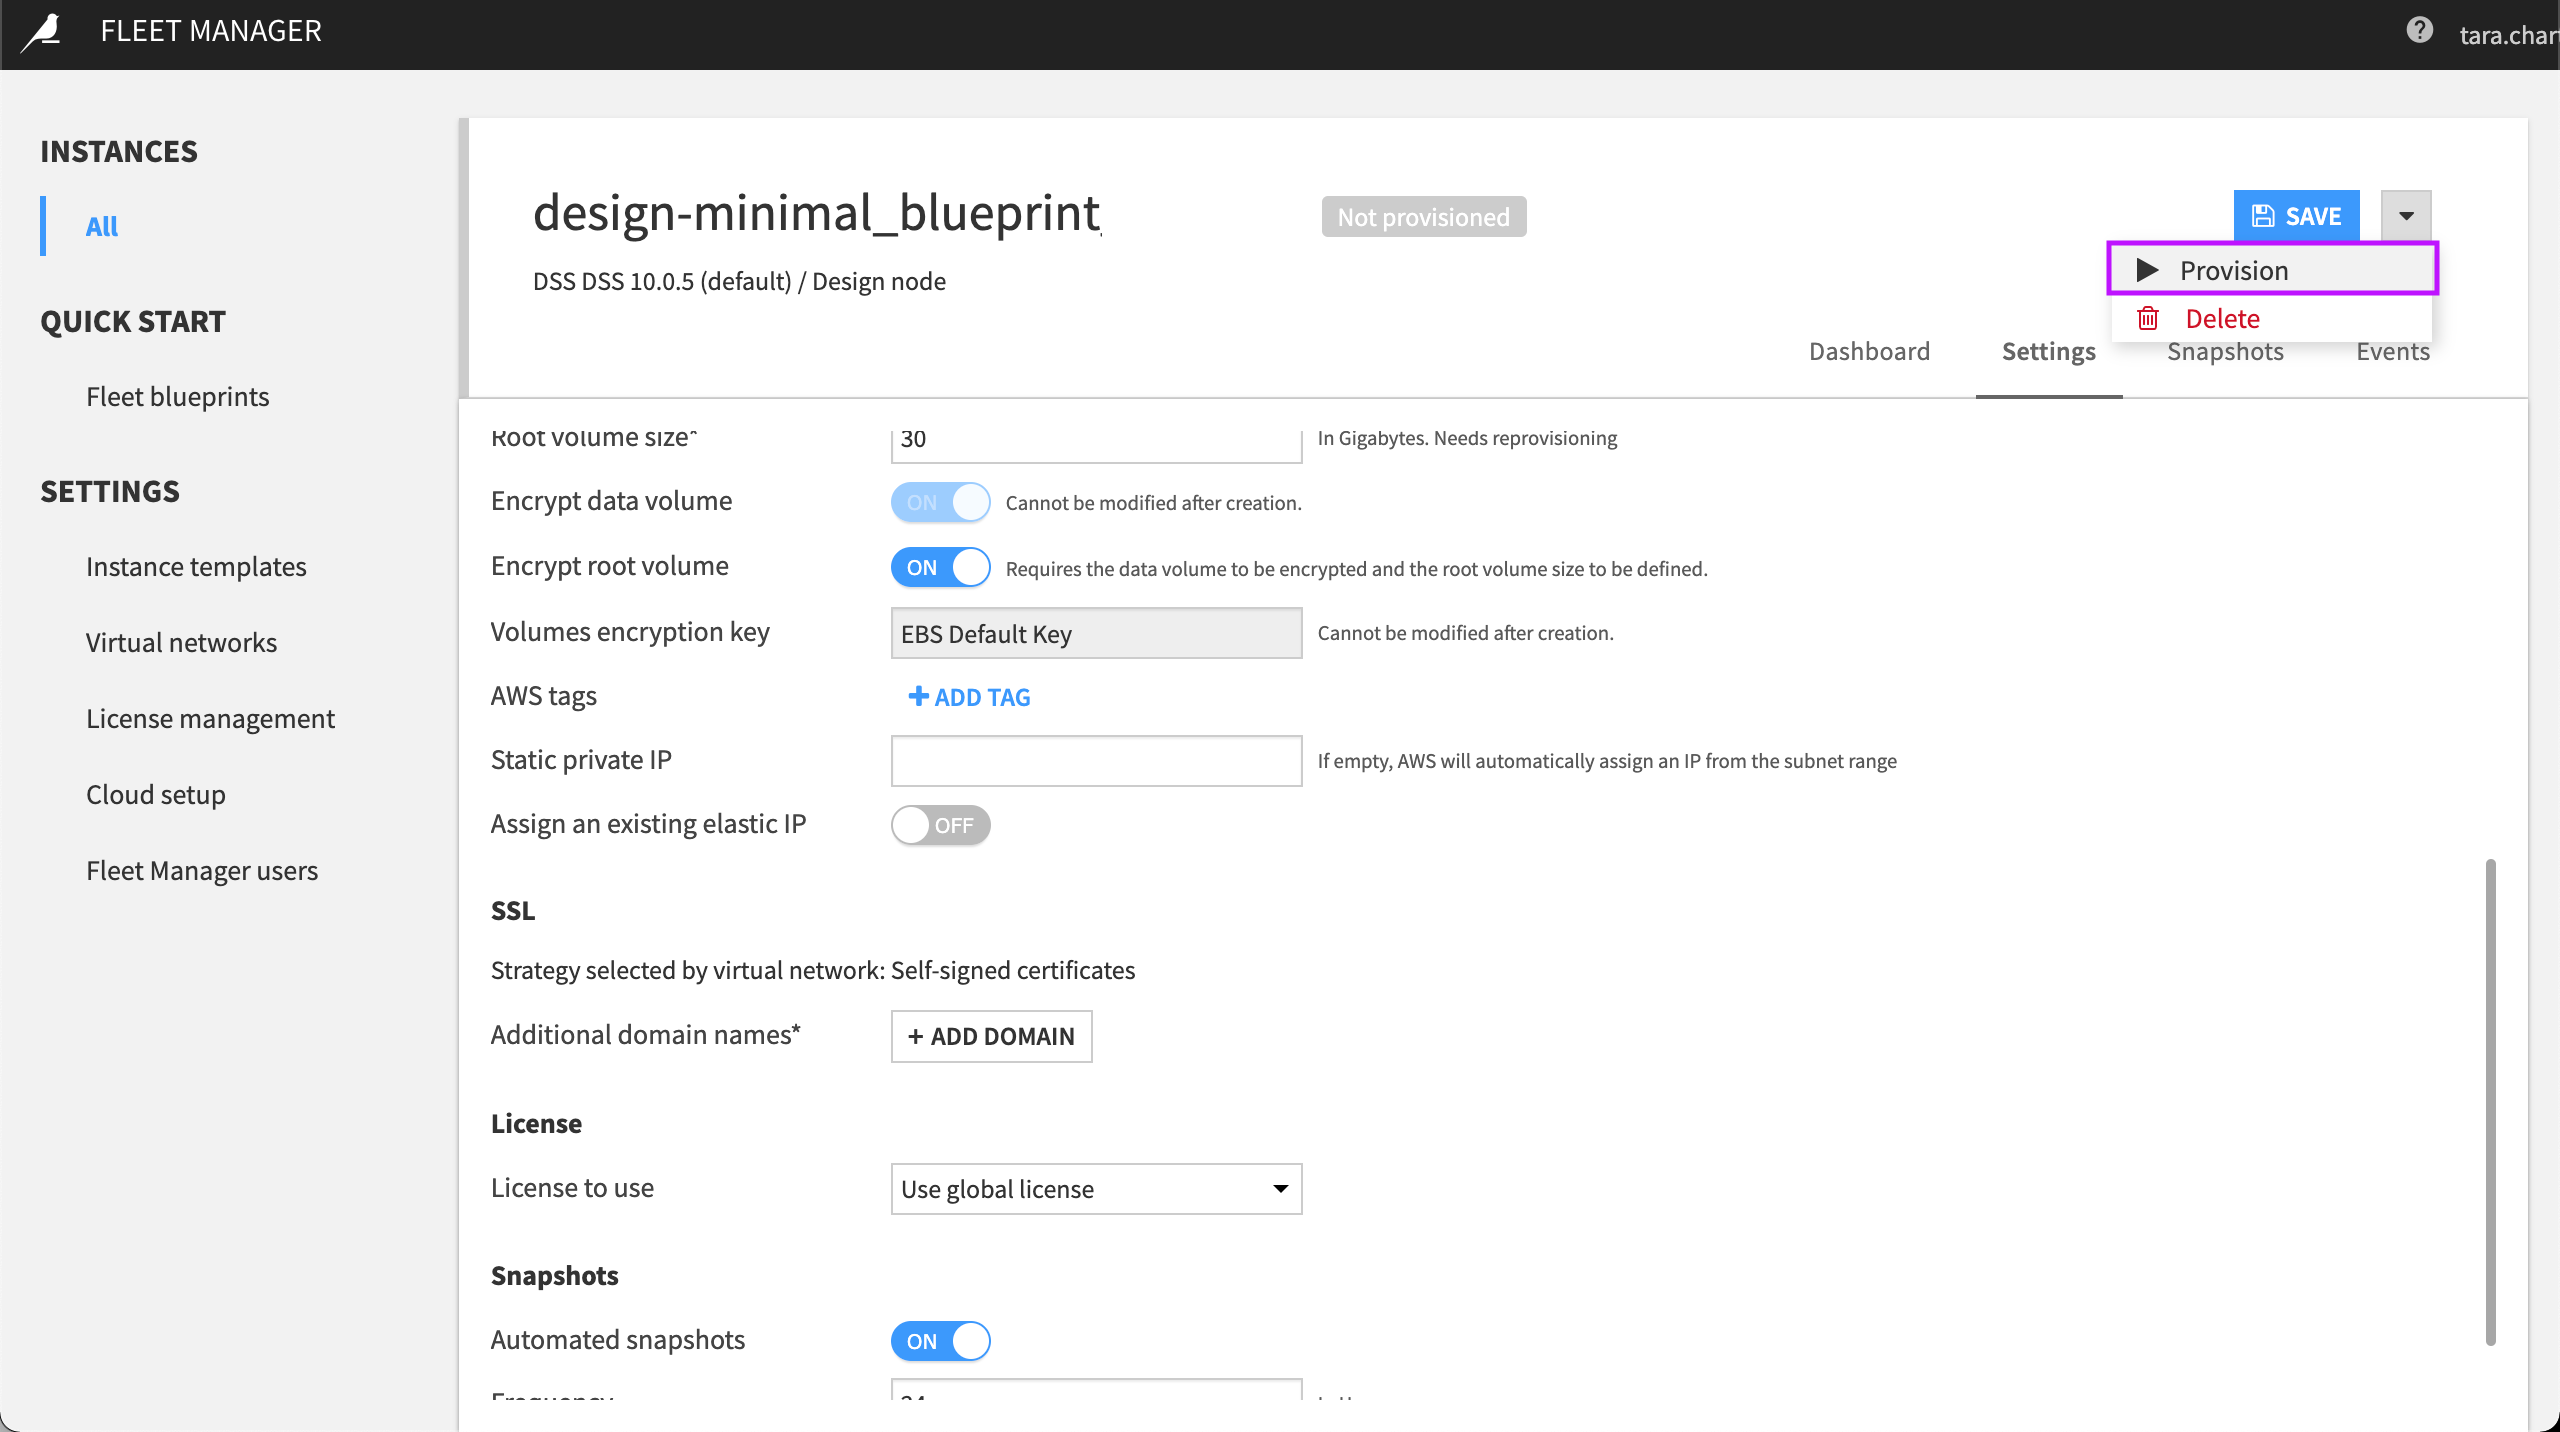
Wait while Fleet Manager provisions the instance.
In the Fleet Manager home page, you can see that the status of the instance has changed from Not provisioned to Running.
The resources deployed in the Azure resource group now look like this:
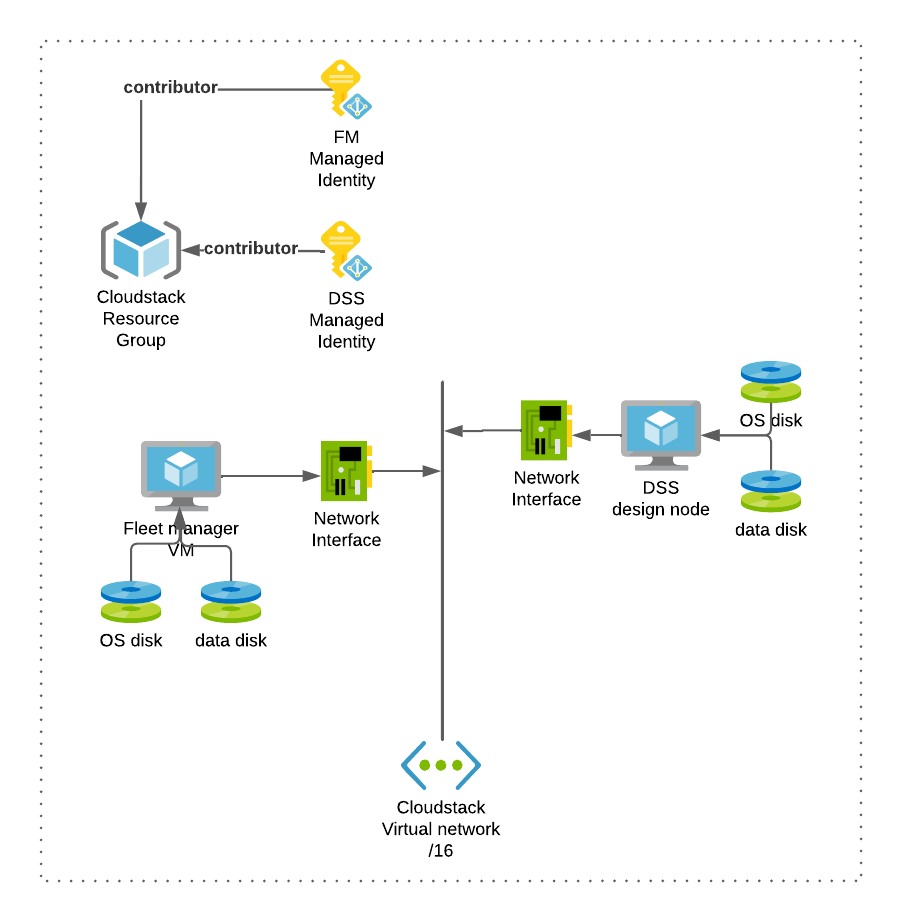
You are now ready to launch the Dataiku instance.
Launch Dataiku
In this section, we’ll launch the Dataiku instance.
From Instances, choose All and locate the newly provisioned instance.
Select the name of the instance to view its settings.
The dashboard displays the following information:
The instance details, including the storage capacity
Settings templates
The VM’s Virtual network connection
Basic VM information
Agent logs
To launch Dataiku:
Select Retrieve to retrieve the initial admin password.
Copy the password. It will display only once.
Select Go to DSS.
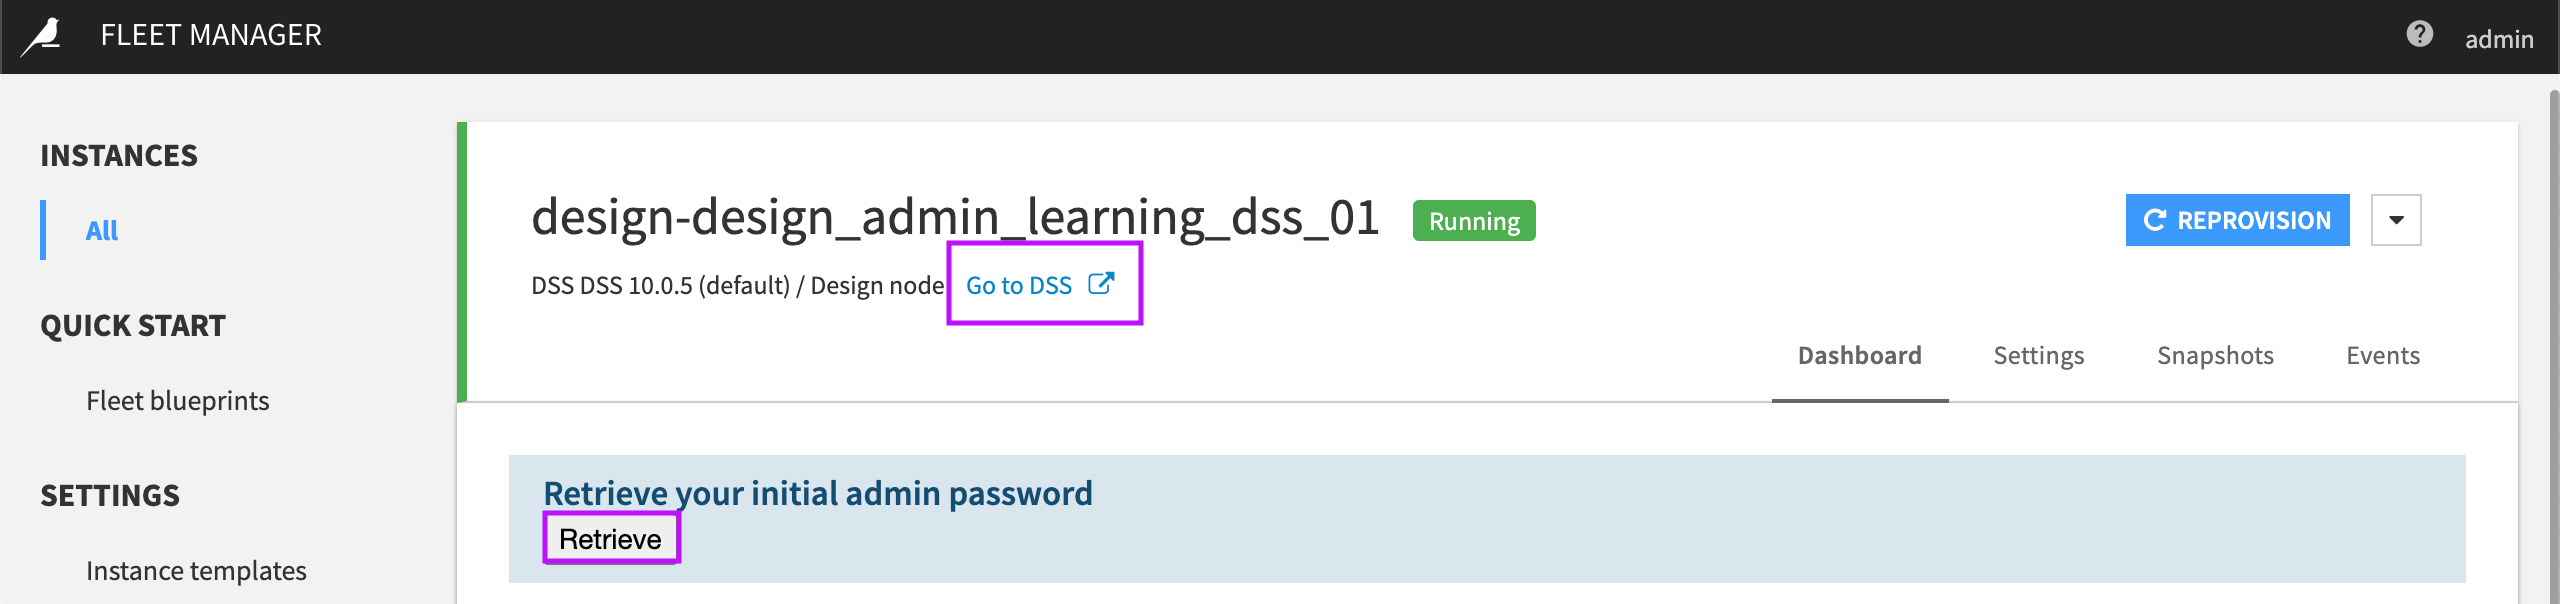
Sign in with your admin username and password.
Change the initial password.
Note
You can manage the admin password by visiting the Administration menu in your Dataiku instance. Visit the Security tab and then select the admin user. In Change password, enter a new password.