Repartitioning a non-partitioned dataset
Partitioning is one of the most powerful features of DSS.
Partitioning refers to the splitting of a dataset along meaningful dimensions. Each partition contains a subset of the dataset. With partitioning, you can process different portions of a dataset independently and have some incrementality for operations based on a dataset.
We recommend that you have a good understanding of the two partitioning models of DSS before reading this article:
File-based partitioning
Column-based partitioning for non-file datasets
There is one case which is not covered by these two models: when you have a files-based dataset (i.e: a filesystem, HDFS, S3 or uploaded dataset), where the files don’t map directly to partitions.
For example, if you have a collection of files containing unordered timestamped data, and want to partition on the date. In the regular files-based partitioning model, each file must belong to a single partition, which is not the case here.
To solve this, you have to use the redispatch feature of DSS. This feature allows you to go from a non-partitioned dataset to a partitioned dataset. Each row is assigned to a partition dynamically based on columns.
Unlike regular builds, when you build a redispatched dataset, you build all partitions at once (normally in DSS, each activity builds a single dataset partition).
Starting the tutorial
This tutorial will guide you through redispatching a dataset to a partitioned dataset. We’ll be using an extract from the “Blue book for Bulldozers” Kaggle competition data. It is a dataset where each row represents the sale of a used bulldozer.
We have a single file as input, and we want to create a dataset partitioned by the year of build of the bulldozer - because we want to process each year independently, for example.
To follow the tutorial, open it from the DSS home page > Tutorials > Partitioning.
The dataset is already available in the project, so you can go on and Explore it. You’ll see that there is a SalesID, a SalePrice … and a YearMade column.
Redispatching by YearMade (Sync recipe)
The source dataset is non partitioned. To redispatch it, we are actually going to use a Sync recipe, enabling a specific repartitioning mode.
Create the recipe
From the Flow, click on the bulldozer_small_extract dataset, and click on Sync. We are going to store the output in a Filesystem dataset, so you will probably not have to change anything in the Sync recipe creation options.
Note that, at this point, we’re leaving the output dataset unpartitioned. That’s because, since there is no partitioning yet in the project, DSS cannot suggest an existing partitioning scheme.
Let’s name the output dataset bulldozer_partitioned (that might sound weird, but we’ll fix that very shortly).
Make the output dataset partitioned
From the recipe screen, click on the output dataset name (bulldozer_partitioned) to go to this dataset, and then click on the Settings tab, and on the Partitioning sub-tab.
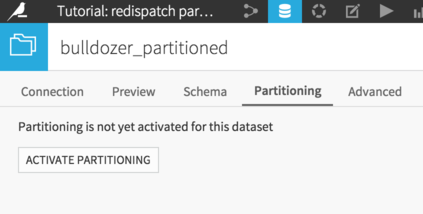
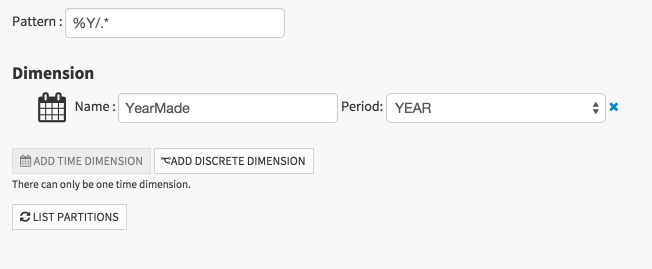
Let’s activate partitioning, and add a time-based (year) dimension.
Important point: the name of our partitioning dimension MUST match the name of the column in the source dataset. In the source dataset, the column is called YearMade, so that’s how we’ll name our dimension. Click on the “Click to insert in pattern” link to automatically prepare the file paths pattern. (For more information, see the Reference documentation about files-based partitioning)
Save the dataset settings and go back to the recipe.
Hint: you have at least three ways of going back to the recipe:
Click on Flow, then double-click on the recipe
Hit twice the Back button of your browser
Click on the Actions menu > Details, and the recipe that created this dataset is reachable from here.
Activate redispatch mode
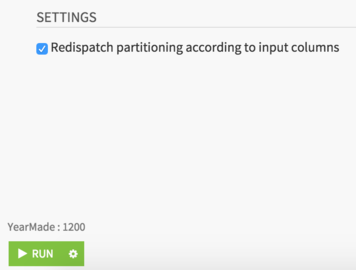
Now that our output dataset is partitioned, a new option has appeared in the Sync recipe: Redispatch partitioning according to input columns. This is the option that we want: it will tell DSS to dispatch each row of the input dataset to its own partition, and that a build must actually build ALL partitions.
Check this option.
You’ll notice that the Run button is still grayed out. That’s a small issue with DSS (as of DSS 2.2): even if the recipe will build ALL partitions, you must still select one because that’s the “normal” way of building. Click on the “Click to select partitions” link, enter anything for YearMade (for example: 1200, even though there is no Bulldozer with YearMade=1200).
You can now Run your recipe.
Once the job is complete, we can Explore the output dataset. We don’t see anything very impressive, but if you go to the Status tab, and click on the Partitions subtab, we can now list the partitions of the output dataset.
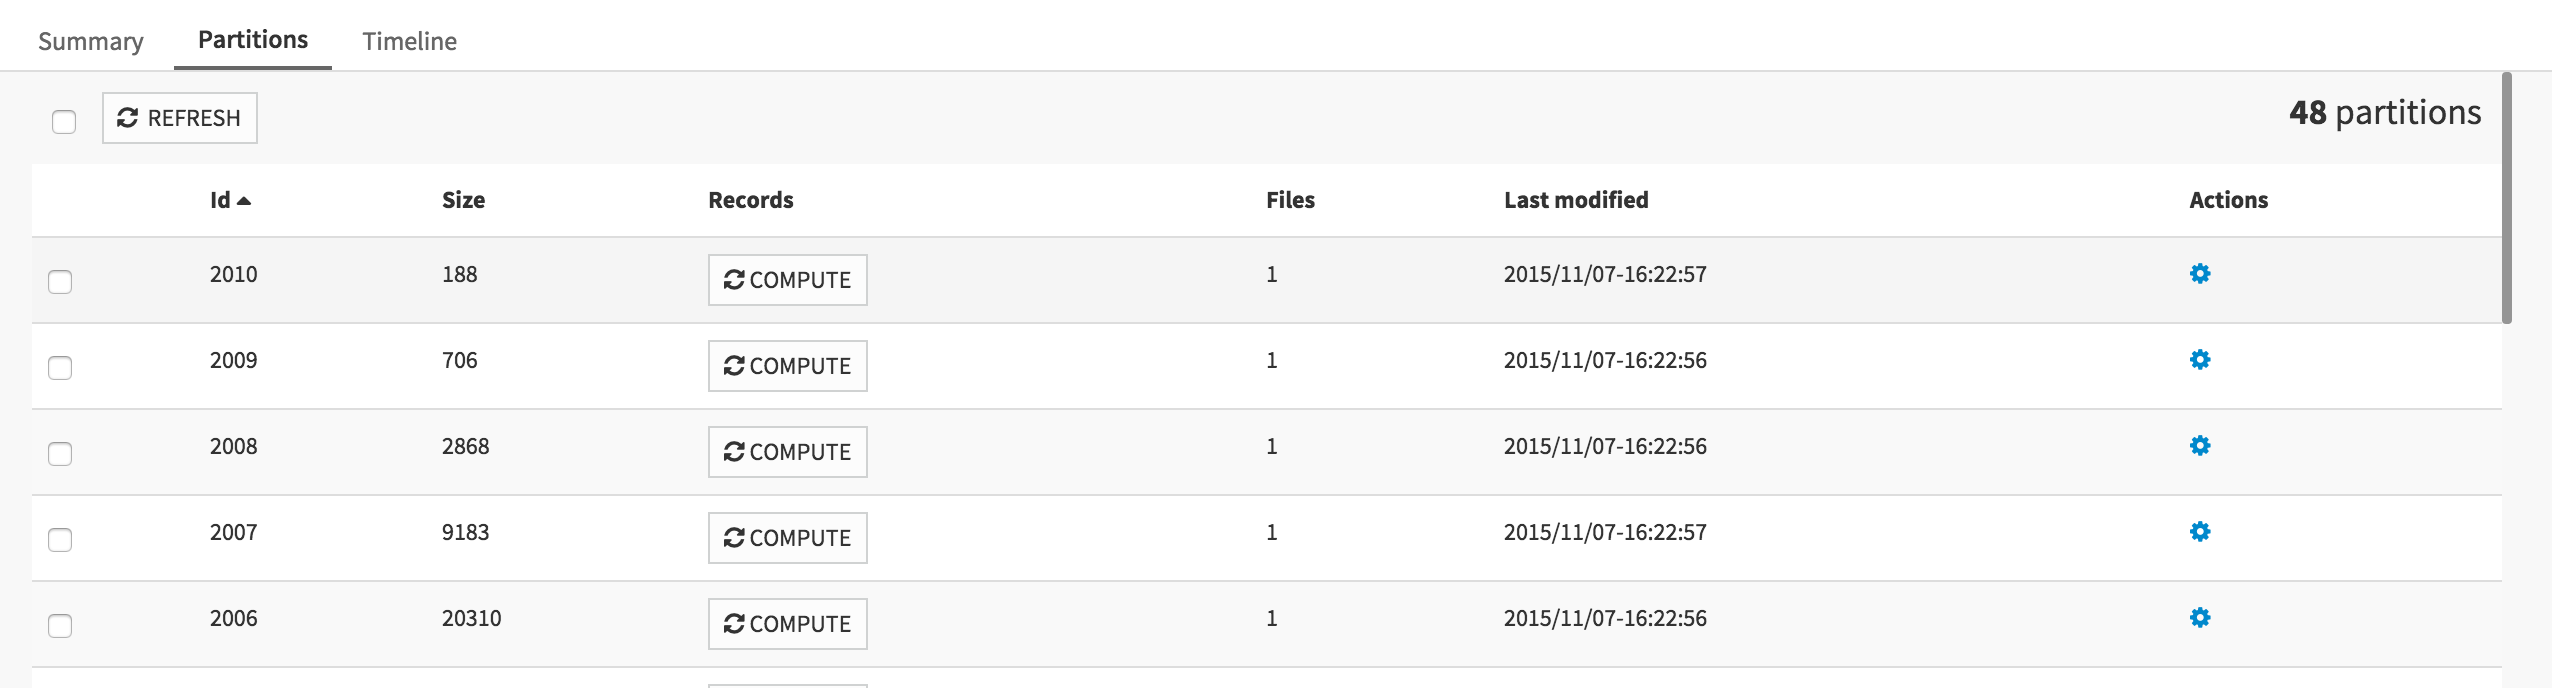
As expected, we have created 48 partitions at once. Each partition now only has the bulldozers of a given year.
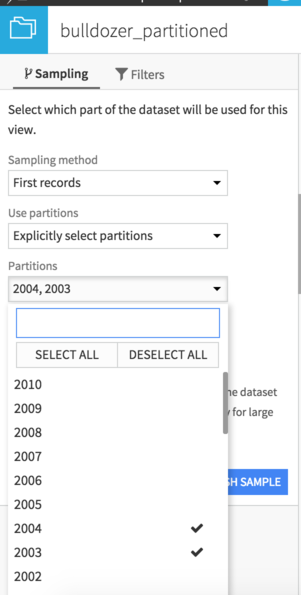
You can for example go to the Explore tab, open the left pane, in Sampling, select “Explicitely select partitions”, click on the List partitions button, and select 2003 and 2004. We now have only 1669 rows left.
We can now build a partitioned Flow as usual.
Redispatching by day of sale (Prepare recipe)
We have successfully redispatched our unpartitioned and unsegregated dataset, based on the values in one column. We could also have used multiple partitioning dimensions.
What if we want to redispatch, but not based directly on the values in a column. What if we want some preprocessing ? The good news is, you can! Just like the Sync recipe, the Prepare recipe allows you to redispatch. We are going to redispatch our dataset by the day on which the sale was made.
Prepare the column
Create a new Prepare recipe based on the
bulldozer_small_extractdatasetThe saledate column contains the date of sale, but not in a proper format. Use the Parse date tool to reformat it (in the same saledate column)
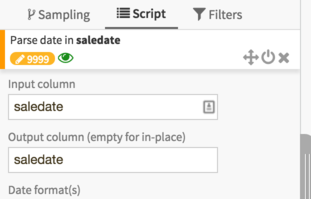
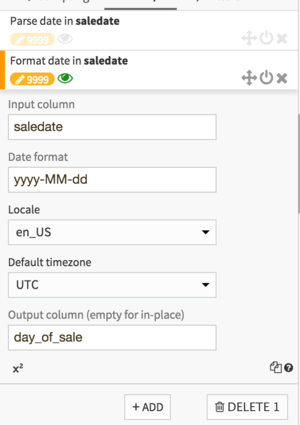
We obtain a full DSS Date + Time. For partitioning, we want a proper partition identifier, which means something in the form yyyy-MM-dd. We’ll use the “Format date” processor for that. Click on the header of the saledate column and select More > Reformat date.
Another advantage of using a Prepare recipe for redispatch is that we can name our partitioning column as we want. Let’s call it “day_of_sale”. Our reformat processor should look like that:
We now have our proper output column. Let’s save our recipe, accept the new schema, and go to the output dataset, where we’ll declare it as partitioned by day.
Partition the dataset, activate and run
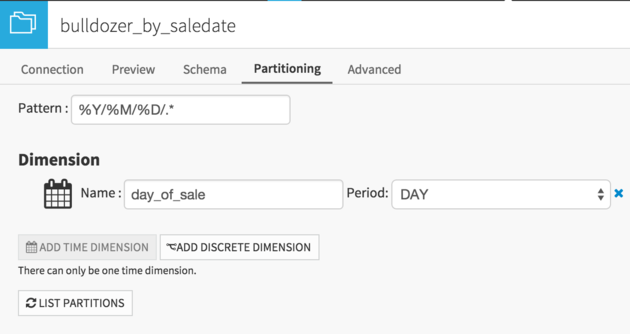
Activate partitioning and add a Time dimension by day. Don’t forget: the partitioning dimension must be called day_of_sale. Click on the three pattern elements to automatically add them to the pattern.
Go back to the recipe, and in the Advanced tab, enable the redispatch option. Go back to Script tab and Run (Once again, the actual value that appears for “day_of_sale” does not matter for a redispatching recipe).
Explore the output dataset, go to the Status, and you’ll see that you now have 588 partitions!
Conclusion
By using a Prepare recipe rather than a simple Sync recipe, we’ve been able to actually create our partitioning dimension column, rather than being restricted to the columns that we already in the dataset.
Redispatch-partitioning is a powerful feature that allows you to deal with datasets that have not been designed in a way that makes them easily partitionable, and tranform them in partitioned datasets.
Redispatch partitioning is also available on non-file sources and targets.
The redispatch recipe is automatically rerun each time you use a Recursive “smart” build, if the input data has changed (provided that the input data is files-based).