Hands-On Tutorial: My First Code Studio
When coding and building solutions in Dataiku, it can be helpful to access your own Integrated Development Environment (IDE), such as JupyterLab or Visual Studio Code (VS Code). Dataiku Code Studios allows you to do just that.
Let’s Begin!
Follow along as we create our first Code Studio template, edit a Dataiku code recipe and a project library in a Code Studio, and sync the changes back to your Dataiku project. At the end of this tutorial, you’ll know how to perform the following tasks:
Create a Code Studio template with a VS Code editor
Edit a Python recipe in a VS Code Studio
Edit a Project Library in a VS Code Studio
Prerequisites
A Dataiku 11 instance with:
Administrator privileges for your user profile.
A Kubernetes cluster is configured. For details, visit Elastic AI Computation.
A base image is built. Typically, this is built using a command such as
./bin/dssadmin build-base-image --type container-exec. For details, visit Build the Base Image.
Use Case Summary
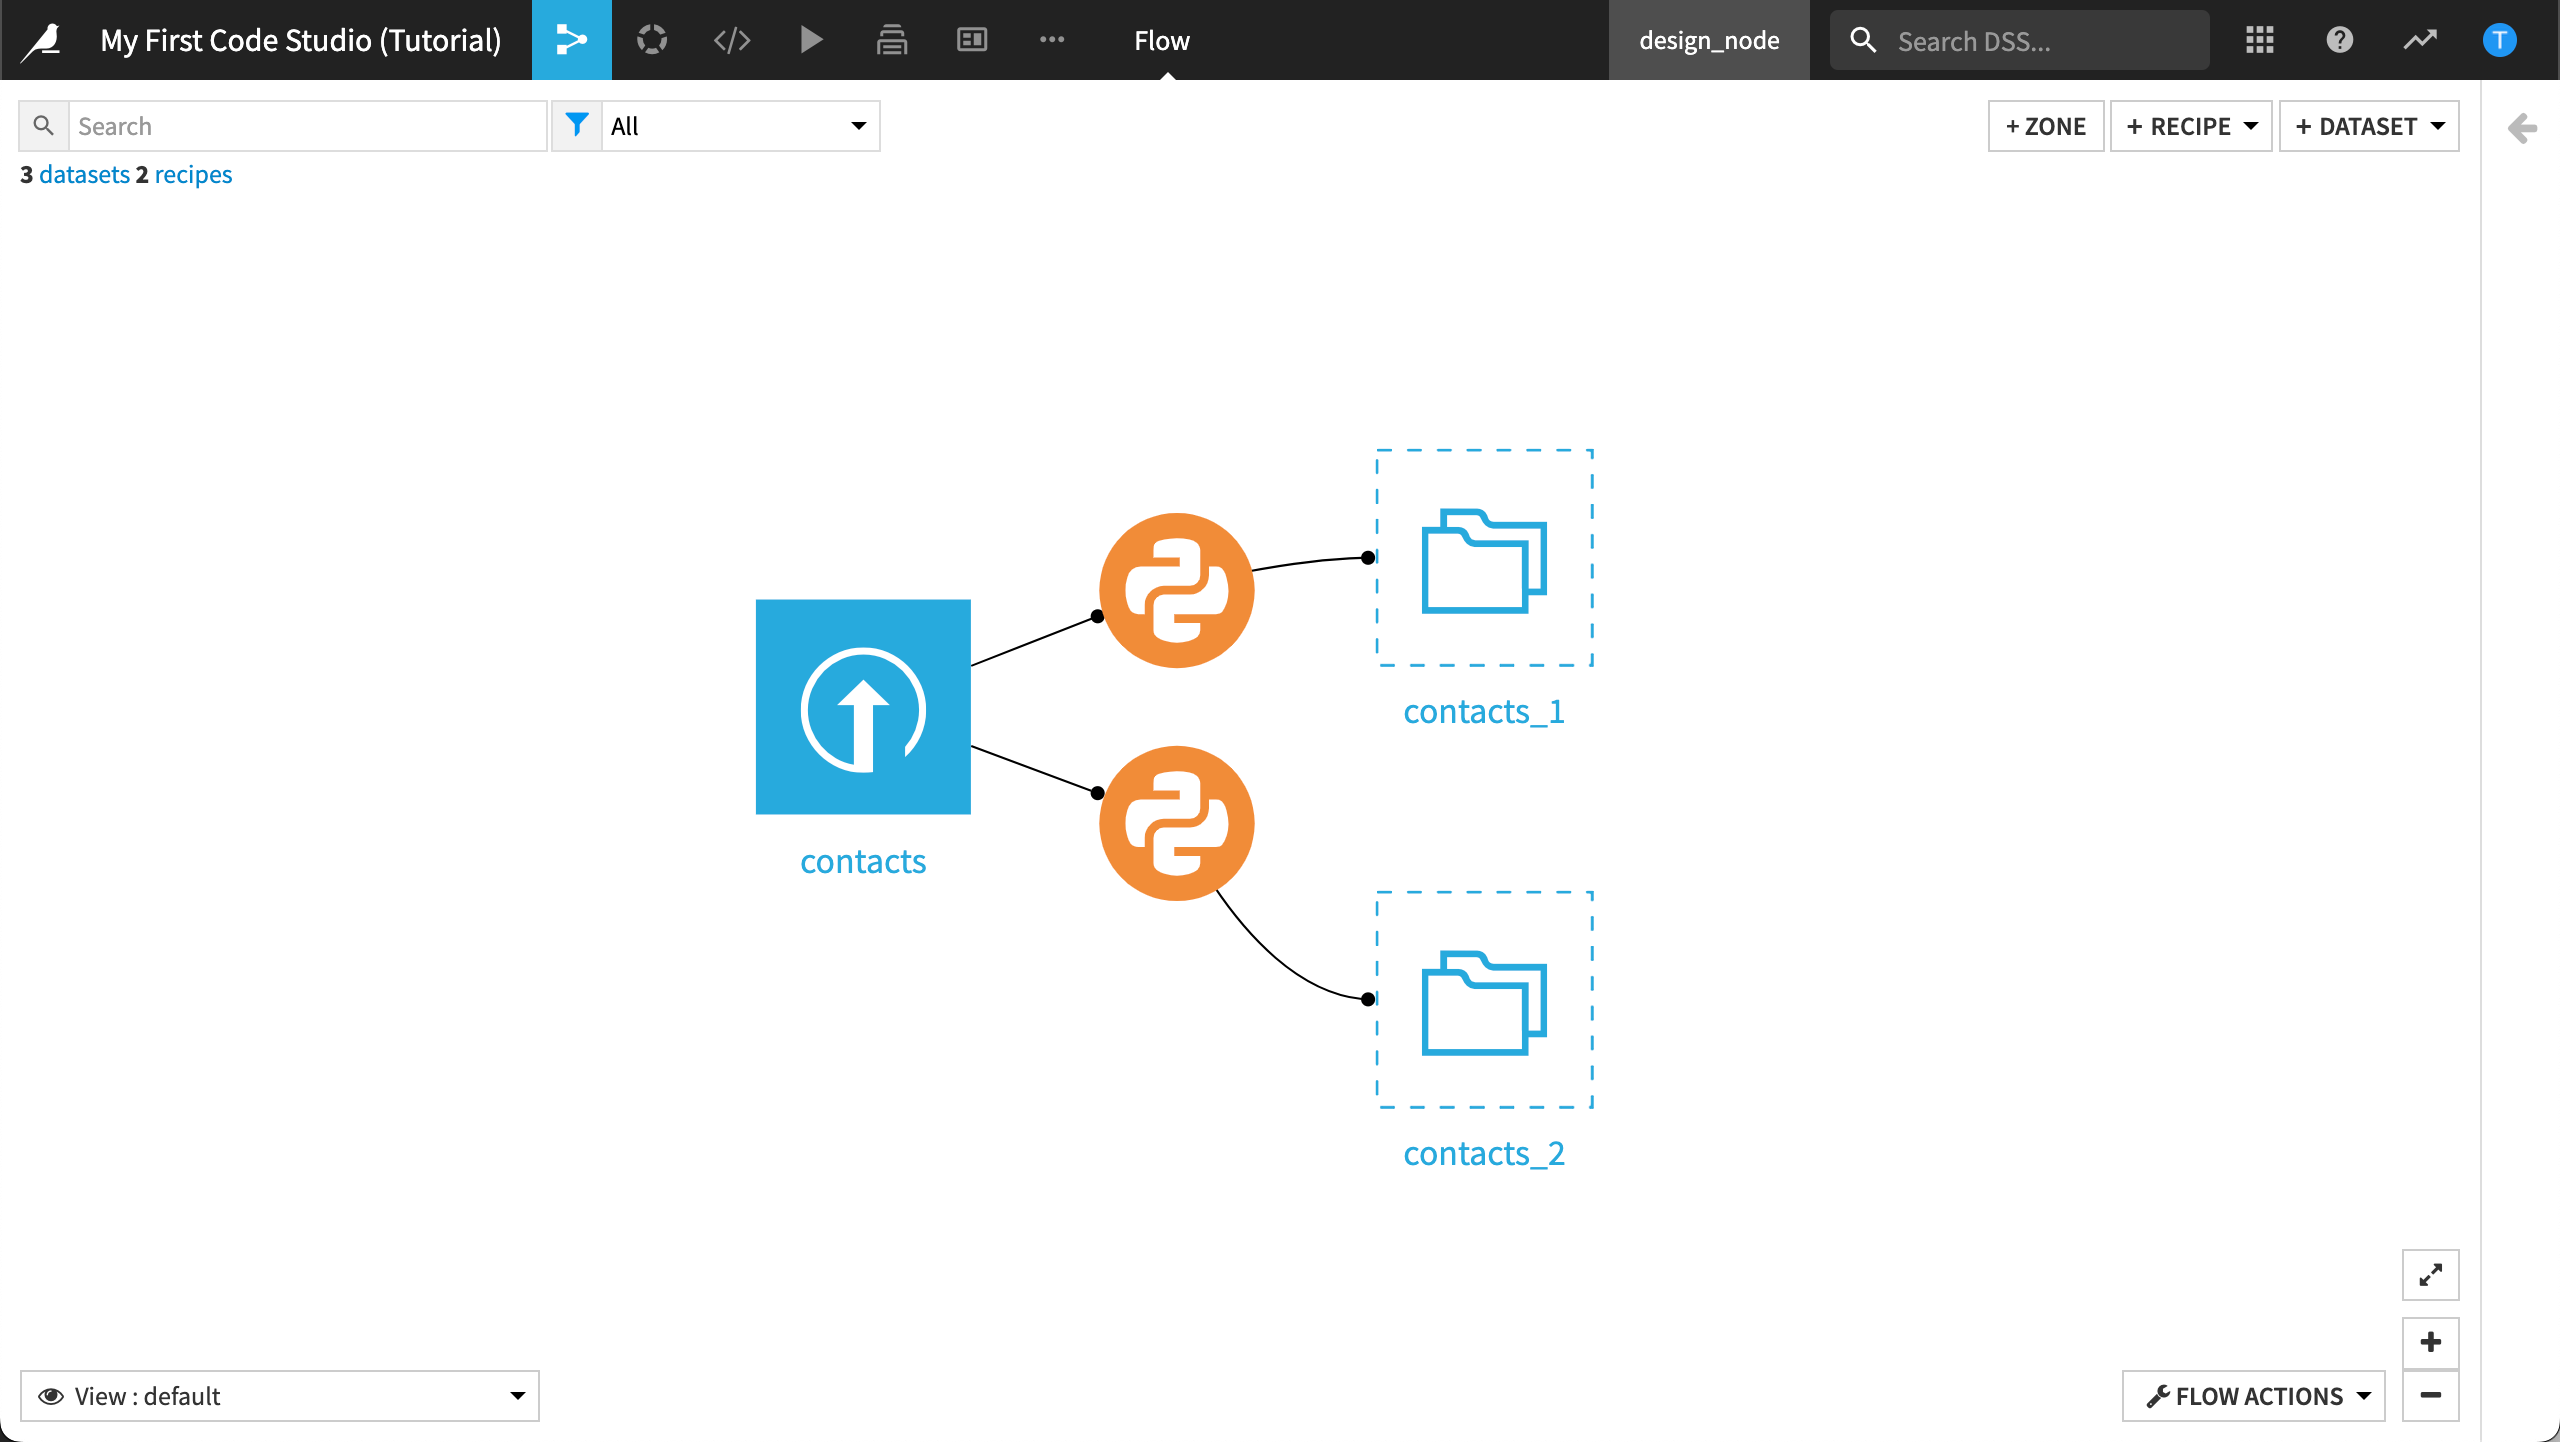
We’ll work with a project that contains a simple pipeline: one input dataset, two Python recipes, and two output datasets. Both recipes generate errors when run. Our goal is to debug these recipes in our own IDE. We’ll accomplish this within Dataiku using Code Studios.
The first thing we’ll need is a Code Studio template. Once we have the template created, we can start our own VS Code Studio.
Create the Project
From the Dataiku homepage, click +New Project > DSS Tutorials > Code > My First Code Studio (Tutorial).
Note
You can also download the starter project from this website and import it as a zip file.
Create a Code Studio Template
To use Code Studios, you’ll need to set up a Code Studio template.
Note
You’ll need Administrator privileges on your instance to create a Code Studio template.
To do this:
In your Dataiku instance, choose Administration from the Applications menu.
Navigate to the Code Studios tab.
Select +Create Code Studio Template.

Type a name for your template, like
my-vsc-templateand then select Create.
Let’s configure our template.
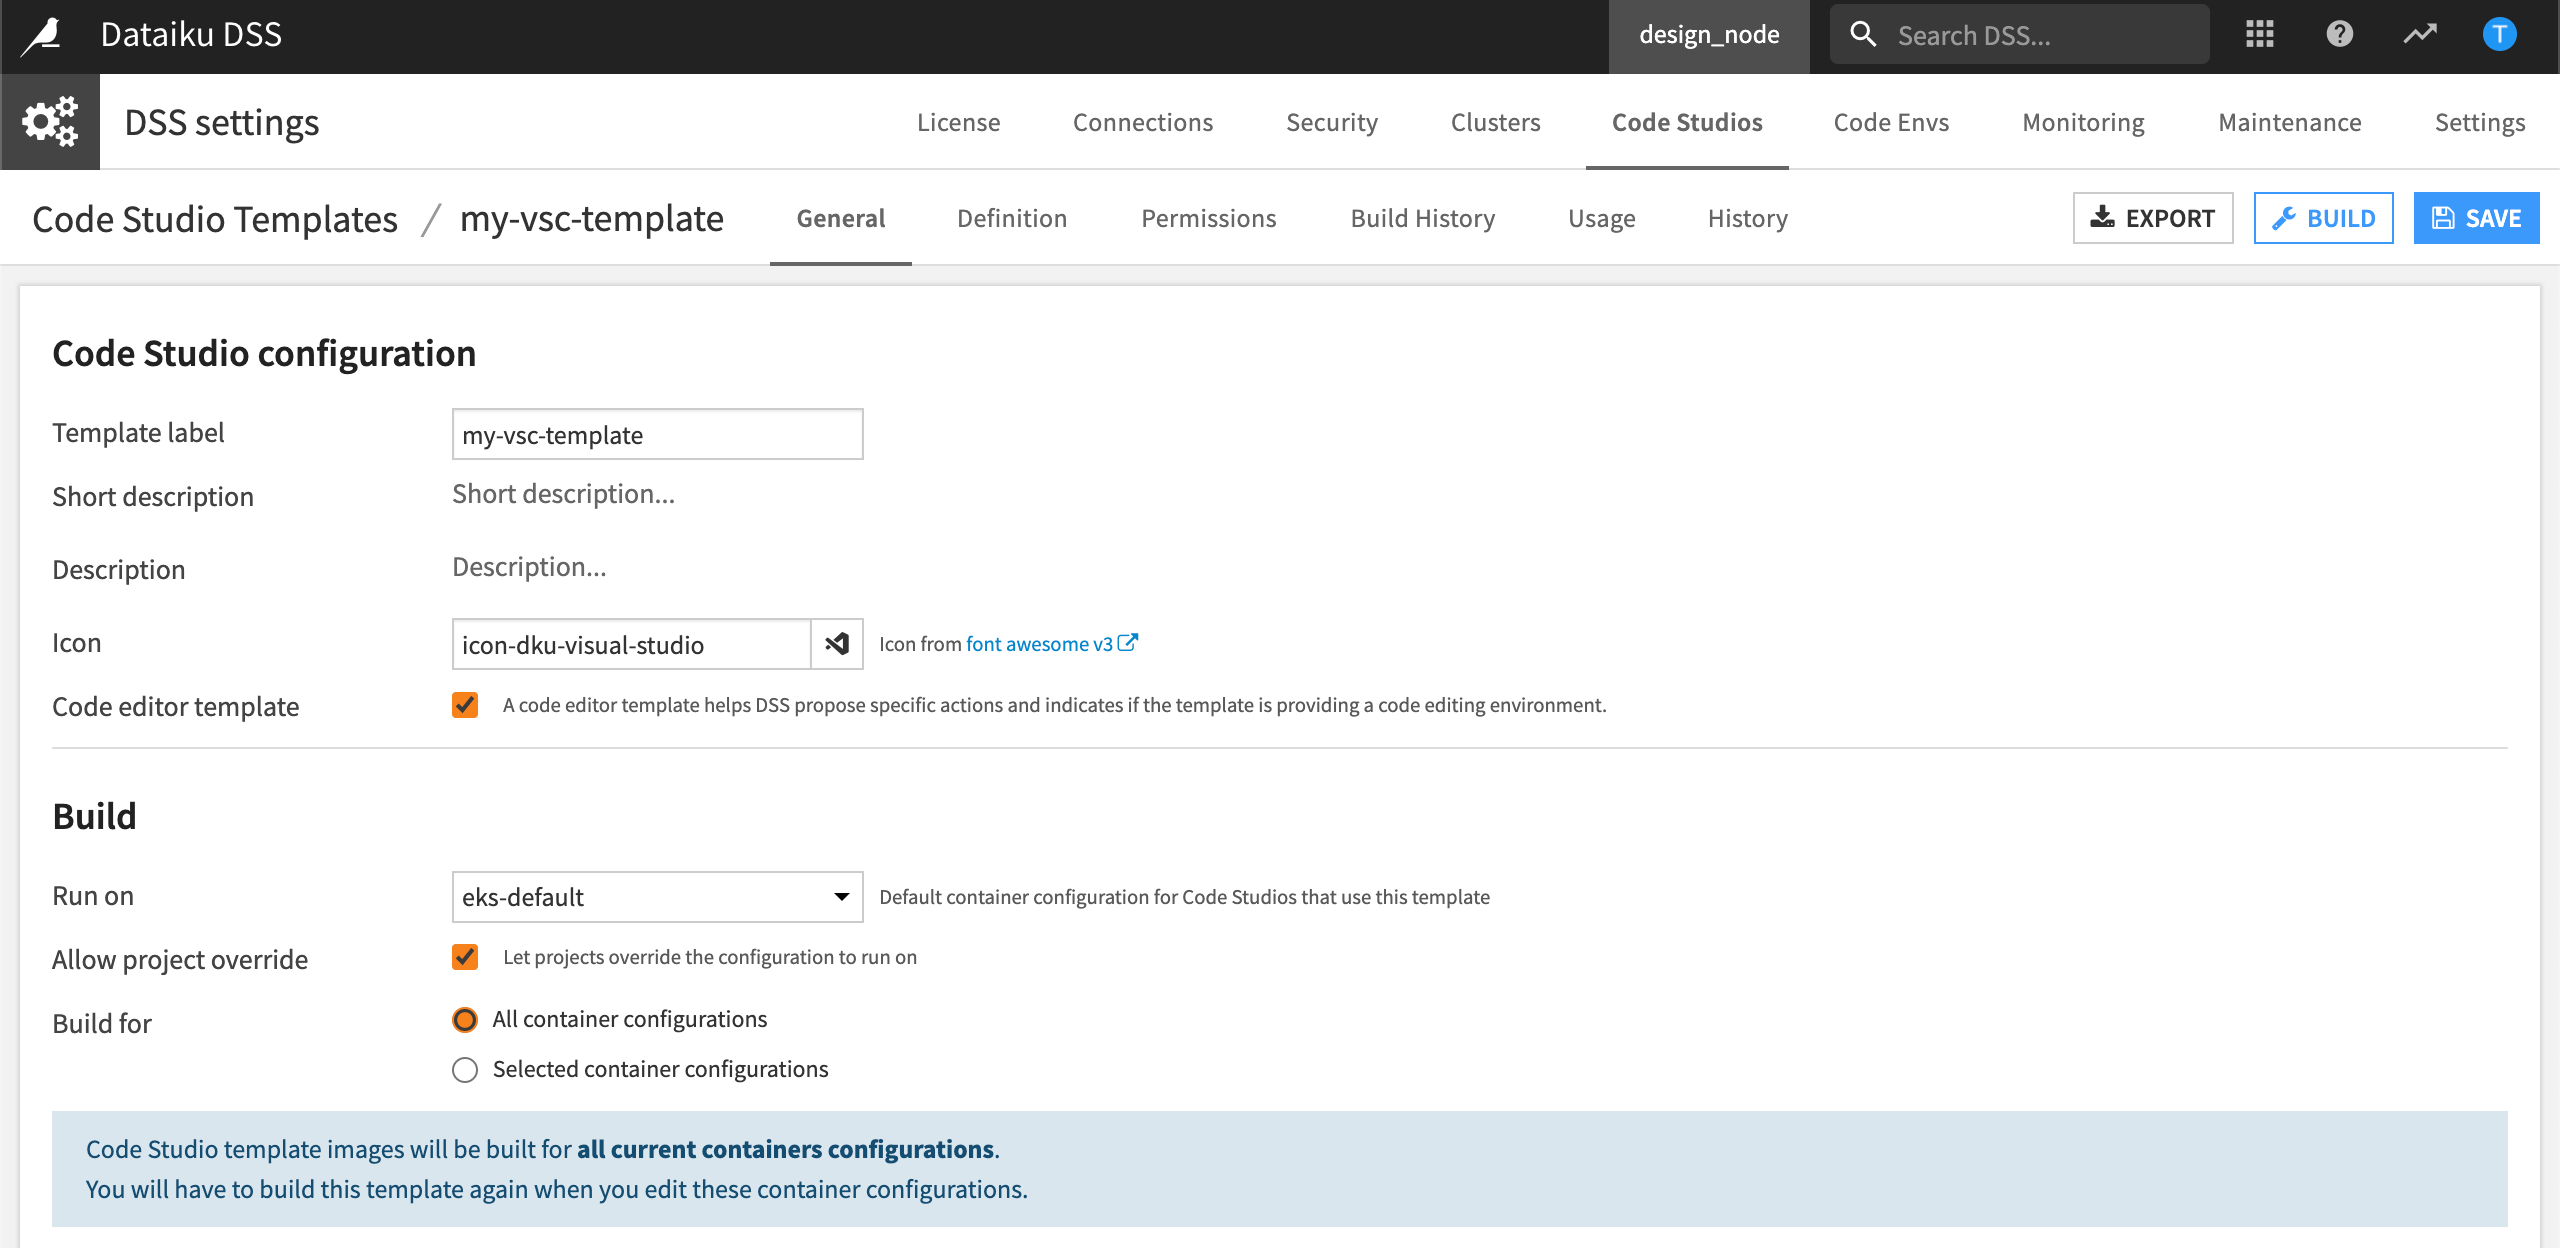
Configure General Settings
Use the General tab to give a meaningful name and description to your template. You can even add an icon. In the Build section, the container is set to the default container configuration for your instance. This is configurable.
In the General tab, make any changes you want to your template including adding a description. Or, leave the default settings.
Select Save.
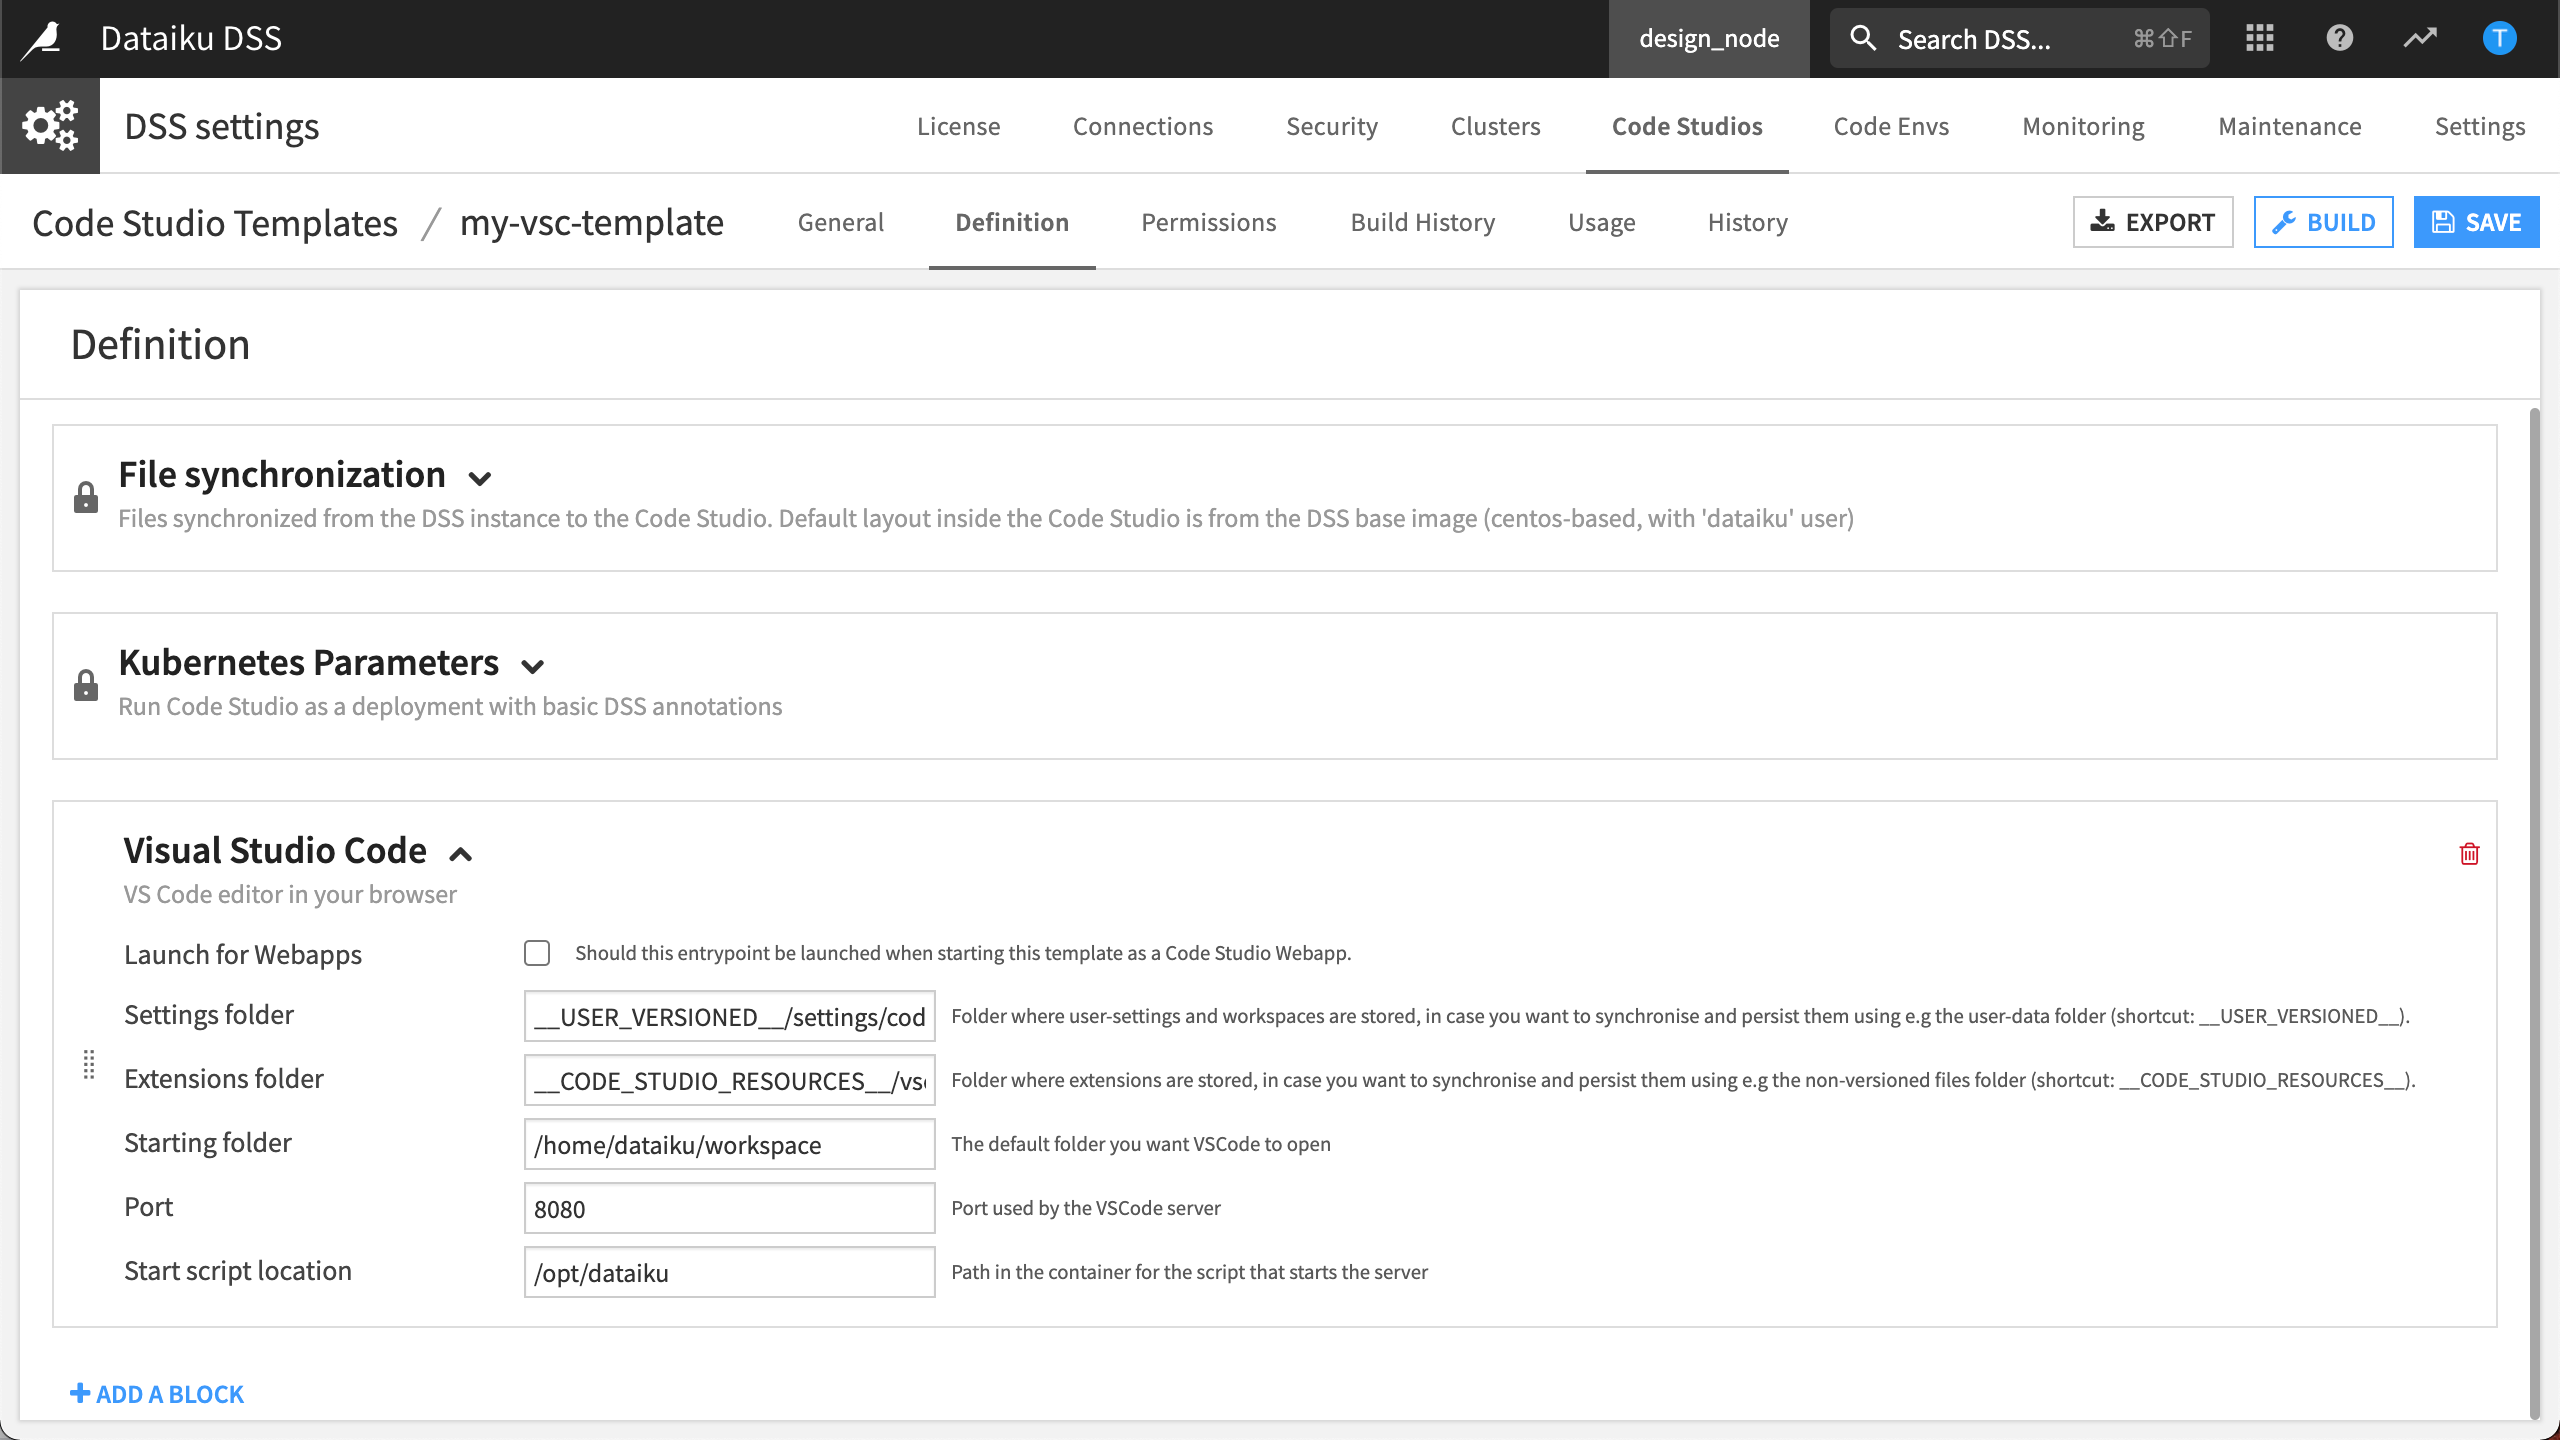
Configure Definition Settings
The Definition settings define the services provided by your template. To enrich the template definition, you add blocks. Let’s add a VS Code block so that we can use a VS Code editor in our browser.
Navigate to the Definition tab.
Select Add a Block.
In Select a block type, click Visual Studio Code.
Leave the other settings as default and select Save.
Note
The VS Code block contains a basic Python 3.6 code-environment and Dataiku APIs by default. To add a specific code environment, select Add Block. In Select a block type, select Add Code Environment.
Build the Template
Let’s build and publish the docker image so that our template becomes available. To do this:
Select Build.
Wait while Dataiku begins building the docker image. When the build is complete, you can select Build History to view the details of the build.
We are now ready to use VS Code in our project!
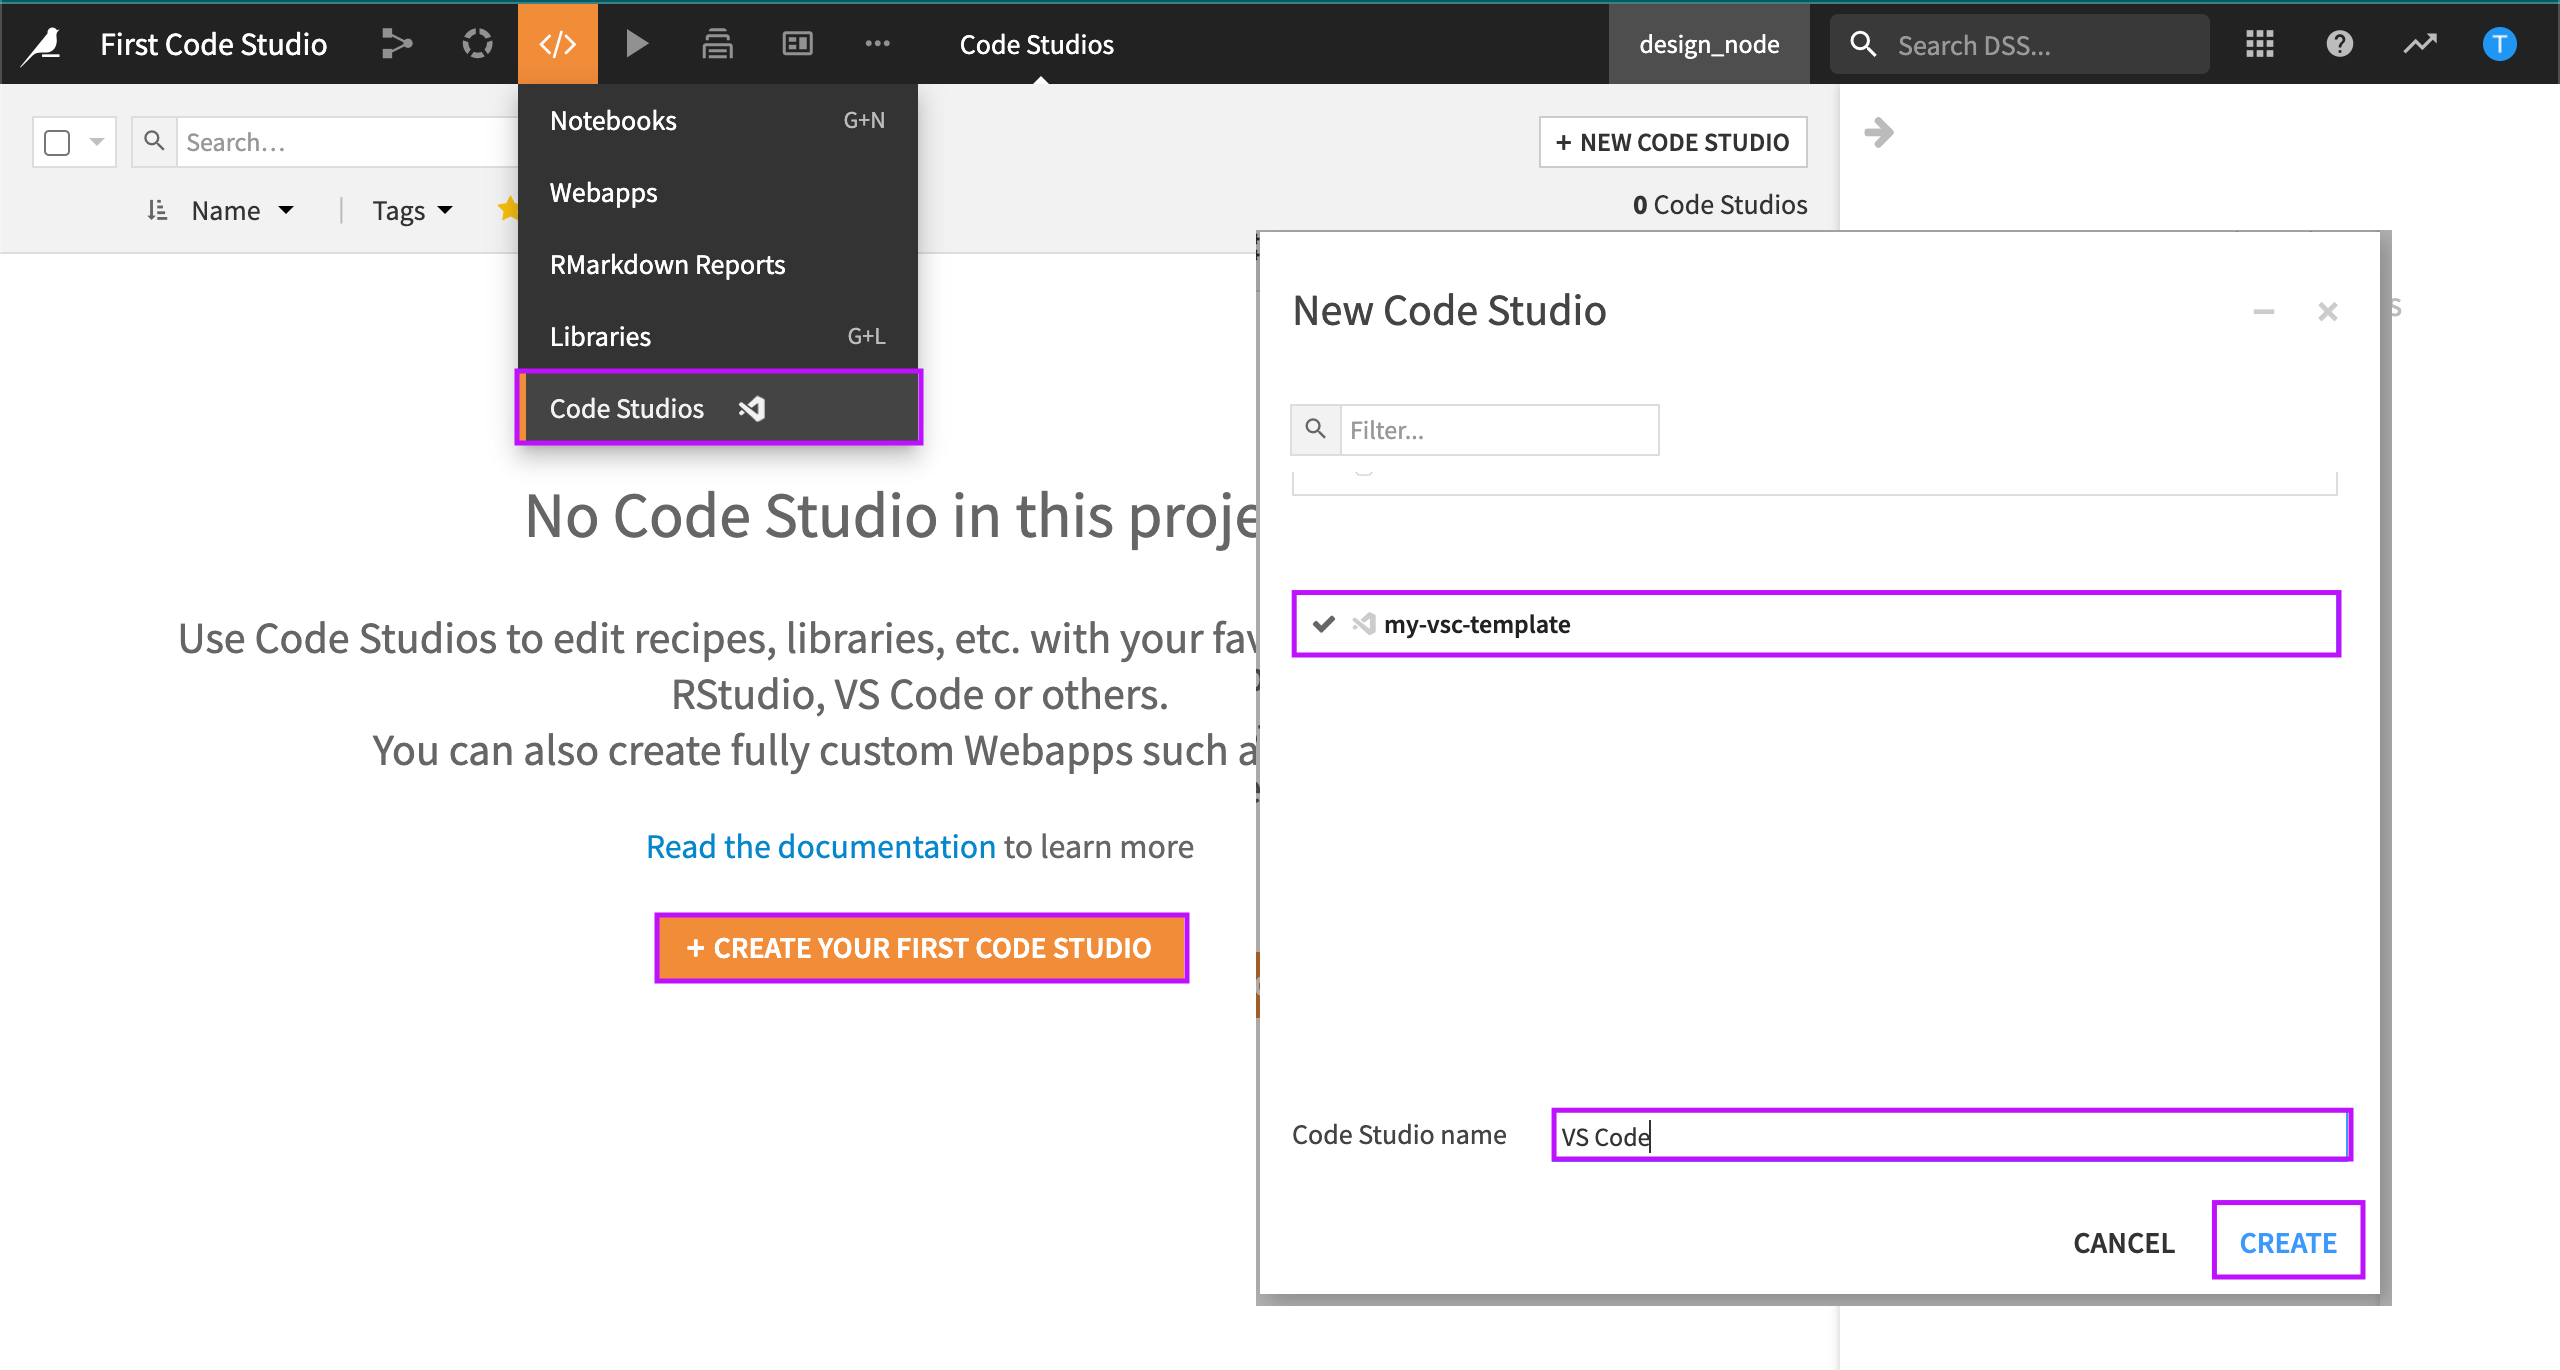
Launch Your First Code Studio
Back in our project, we’ll launch Code Studios and select our new VS Code template.
From the Code menu, select Code Studios.
Select Create Your First Code Studio.
In New Code Studio, select the VS Code template you just created.
Name the Code Studio
VS Codeand select Create.
Dataiku lets you know the Code Studio status is stopped. Now that your Code Studio is created, let’s start it and get a first look!
Select Start Code Studio.
Wait while Dataiku starts the Code Studio and launches it in a browser window. In the next few sections, we’ll use our Code Studio to debug a code recipe and the project library.
Note
If you exit the tutorial and come back later, you may have to restart your Code Studio.
Debug a Recipe in a VS Code Studio
In this section, we’ll use our Code Studio to edit and debug a code recipe.
If you have not already started your Code Studio, you can start it now to ensure it is ready.
From the Code menu, select Code Studios.
Click Start to start the Code Studio.
Wait while Dataiku starts the Code Studio and launches the VS Code Workspace Explorer.
Return to the Flow.
Open and Run the Python recipe that generates contacts_1.
Dataiku displays “Job succeeded with warnings”.
While we could inspect the errors and edit our code within the recipe itself, we want to demonstrate using the tools in our IDE so we’ll debug this recipe in our Code Studio.
Debug with VS Code
Let’s inspect and debug this recipe in our Code Studio.
From the recipe, select Edit in Code Studio.
In Code Studios, select VS Code.
Dataiku displays the VS Code Workspace Explorer ready to debug the recipe.
Tip
To go back and forth between the Flow and your Code Studio, you can keep the VS Code Workspace Explorer open in its own browser tab.
We are interested in working with the Python recipe, compute_contacts_1. To find it:
Open the Recipes folder.
Select compute_contacts_1.py.
Let’s run the code to generate the errors we saw in the recipe.
Run the code.
Running the recipe in VS Code displays the same error we saw in the Flow. This lets us know our Code Studio is configured correctly.
We see that we can work with our code recipe within our own IDE, all from Dataiku. However, we are now working in VS Code and not in the Dataiku Python recipe editor. If we make any changes to our code from our IDE, we’ll need to sync the changes back to Dataiku. Since we suspect the error is occuring when the output dataframe is written, let’s set a breakpoint and use the VS Code debugger.
Click in the far left margin next to the last line of code to set a breakpoint.
Select Debug Python File from the dropdown at the top right.
![[type alt]](../../../_images/vs-code-debug-python-file.png)
VS Code executes the code and pauses at the breakpoint. To debug our code, we can take advantage of navigation commands and shortcuts in our IDE. More specifically, we can inspect the variables.
Expand special variables in the debugger explorer.
Upon inspection, we can see that the project variable, my_var is fetched and added to the column, new_feat. To see the definition of this project variable, select … > Variables from the top navigation bar.
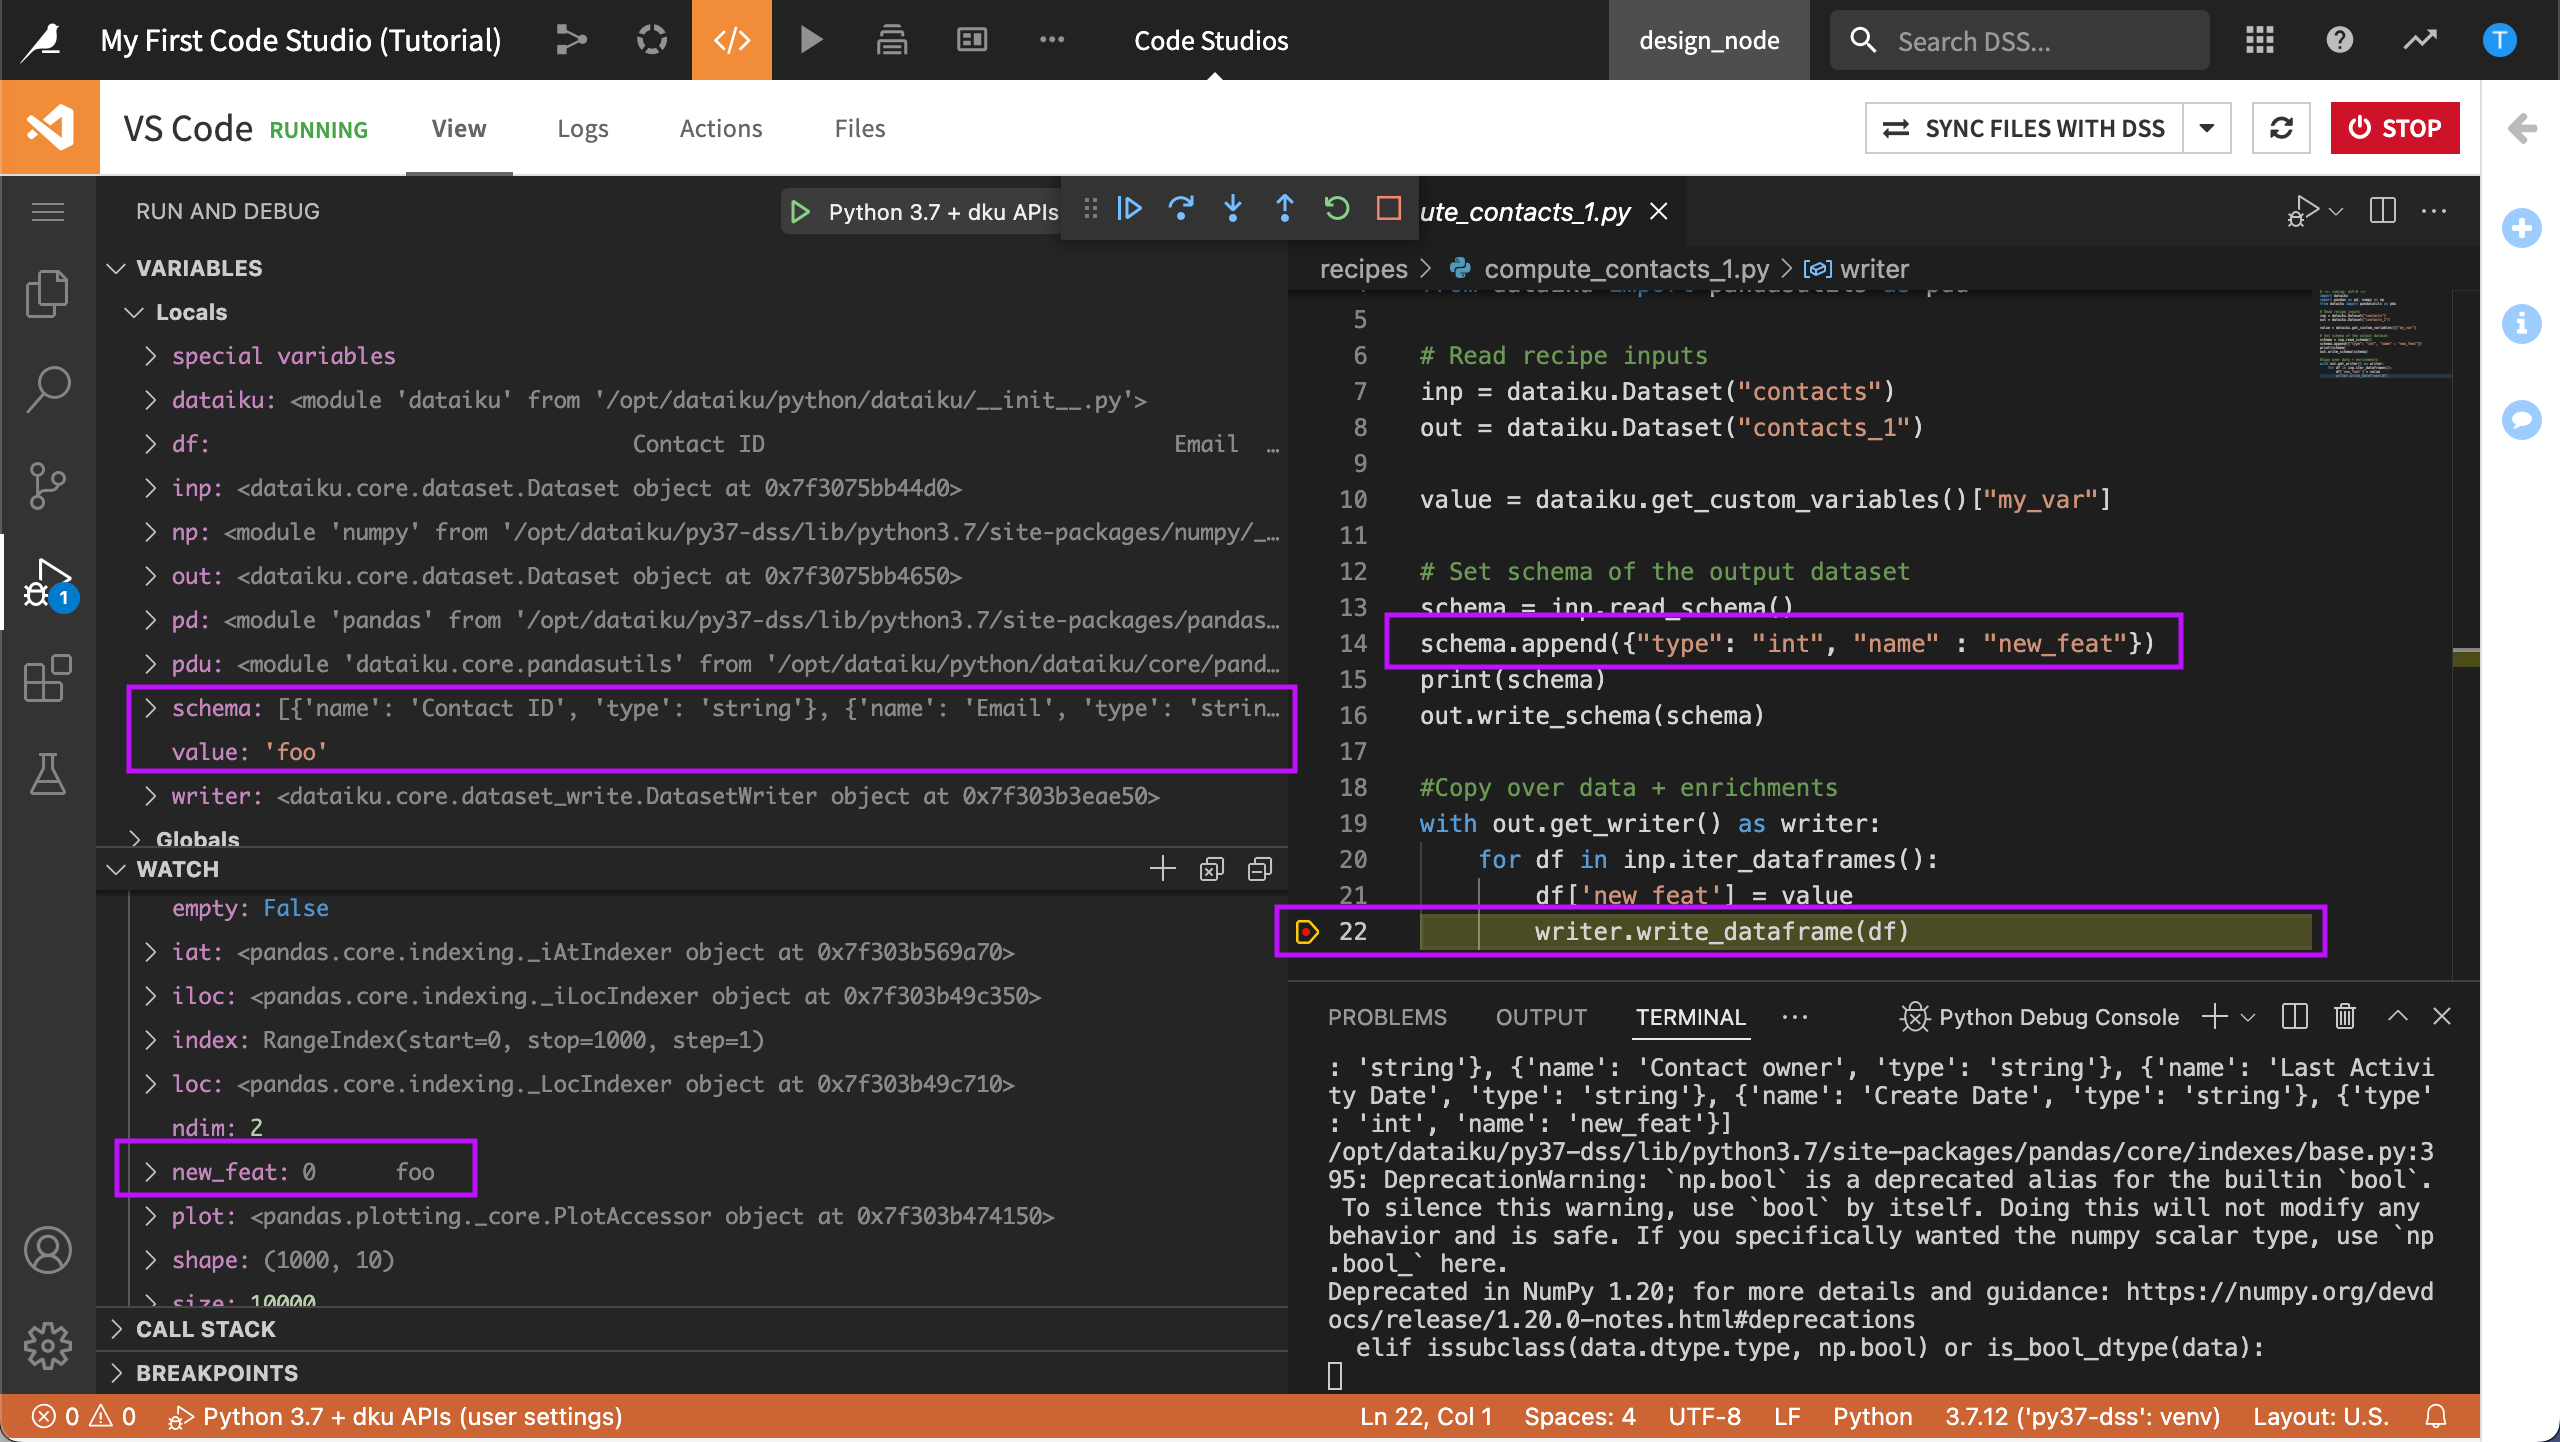
However, this column contains a string - foo. This is causing a type mismatch because the new column should be an integer.
To resolve this issue, we’ll replace my_var with the variable, my_var2.
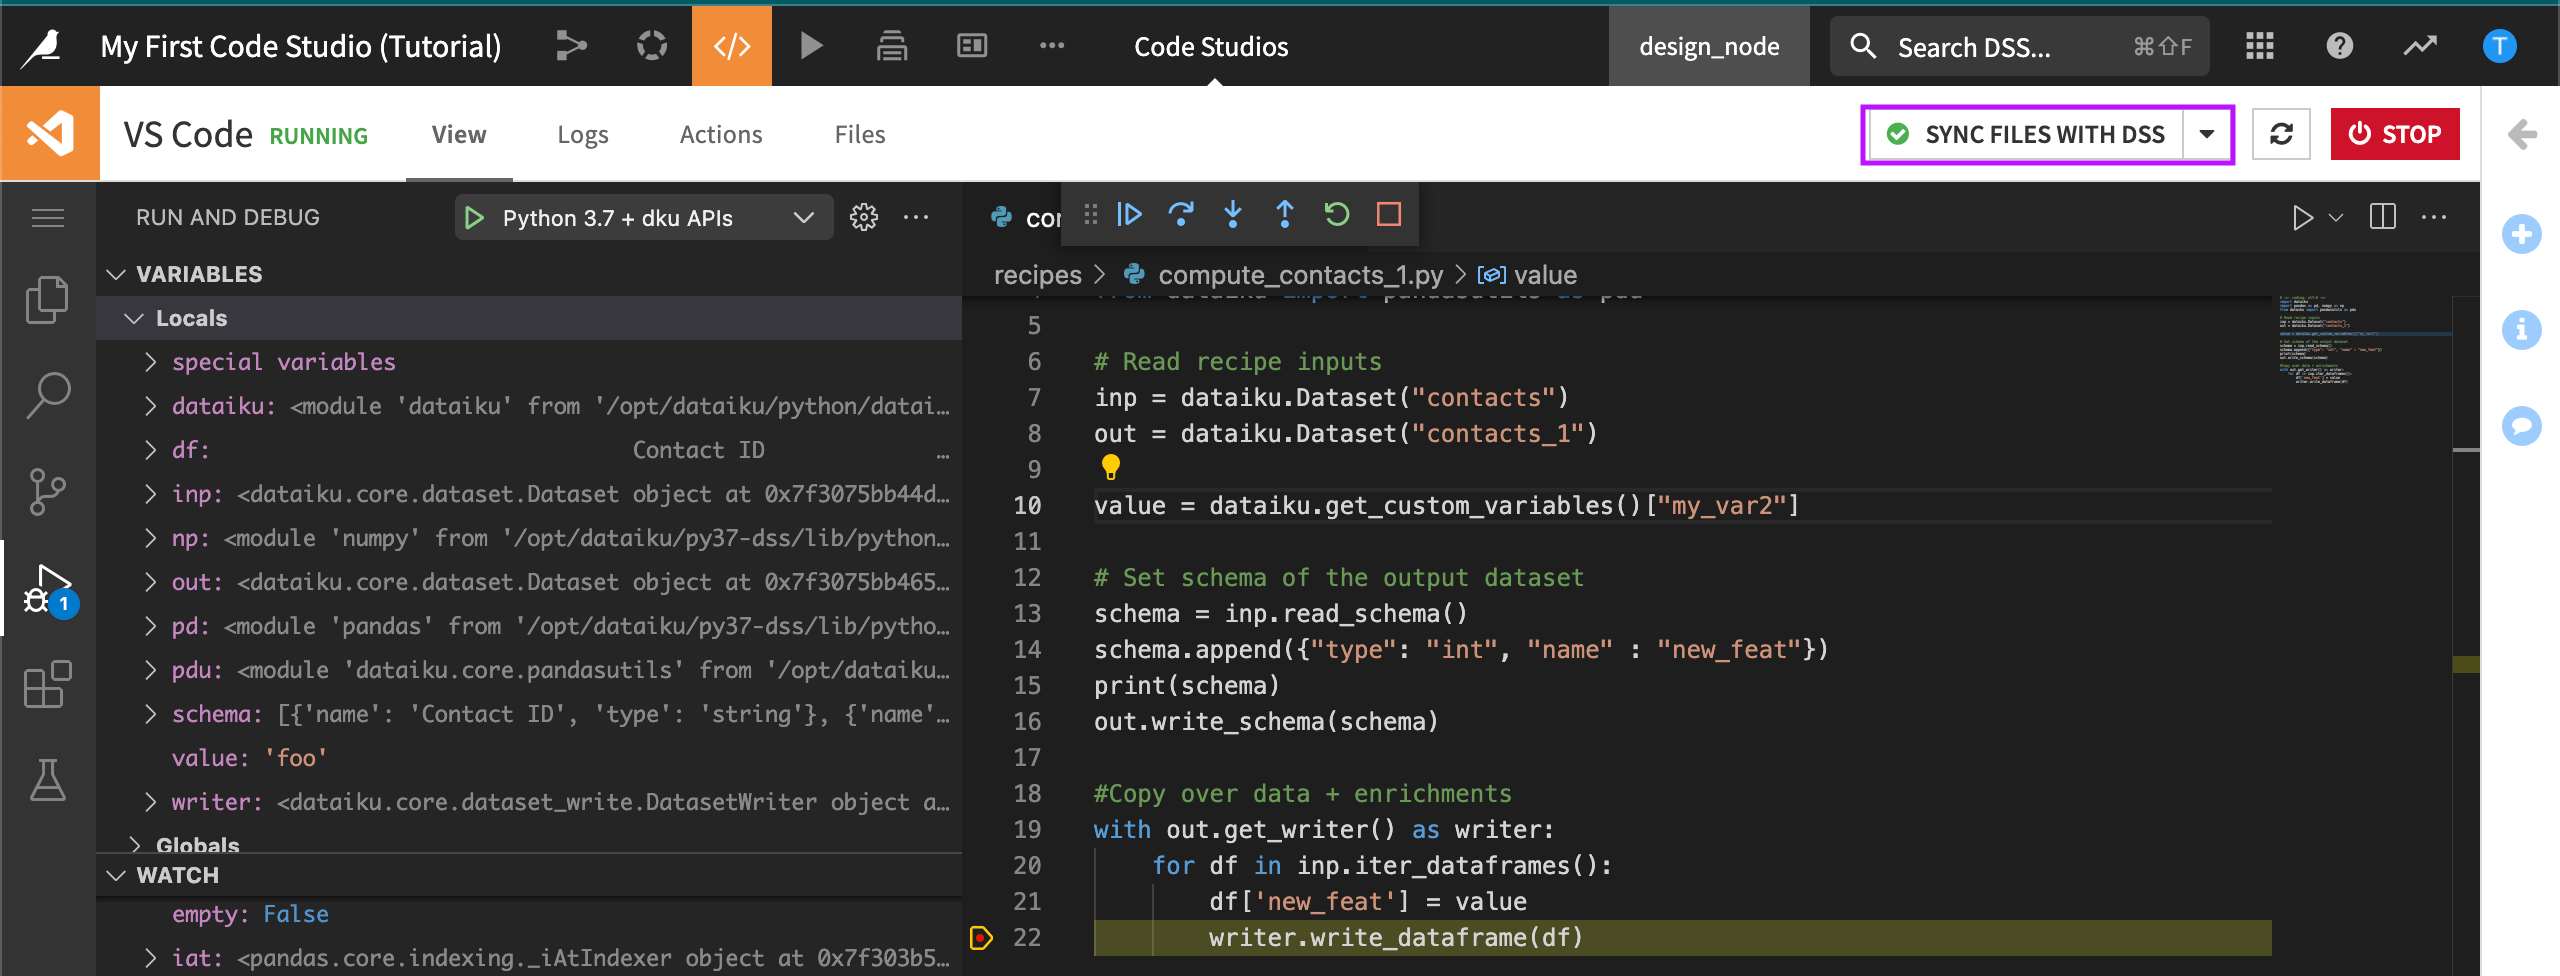
Edit the code, replacing my_var with my_var2.
Run the code again.
Now that our code executes without error, we can sync our changes back to our recipe in the Flow.
Sync the Changes back to Dataiku
When we are developing in Code Studios, we are working with a local copy of the code. If we return to the Flow now, we’ll still be using the broken code. In order to push the new version to the recipe, we’ll need to sync our changes back to Dataiku.
In VS Code, select Sync Files With DSS in the upper right.
Once the sync is complete, VS Code displays a green checkbox.
Return to the Flow.
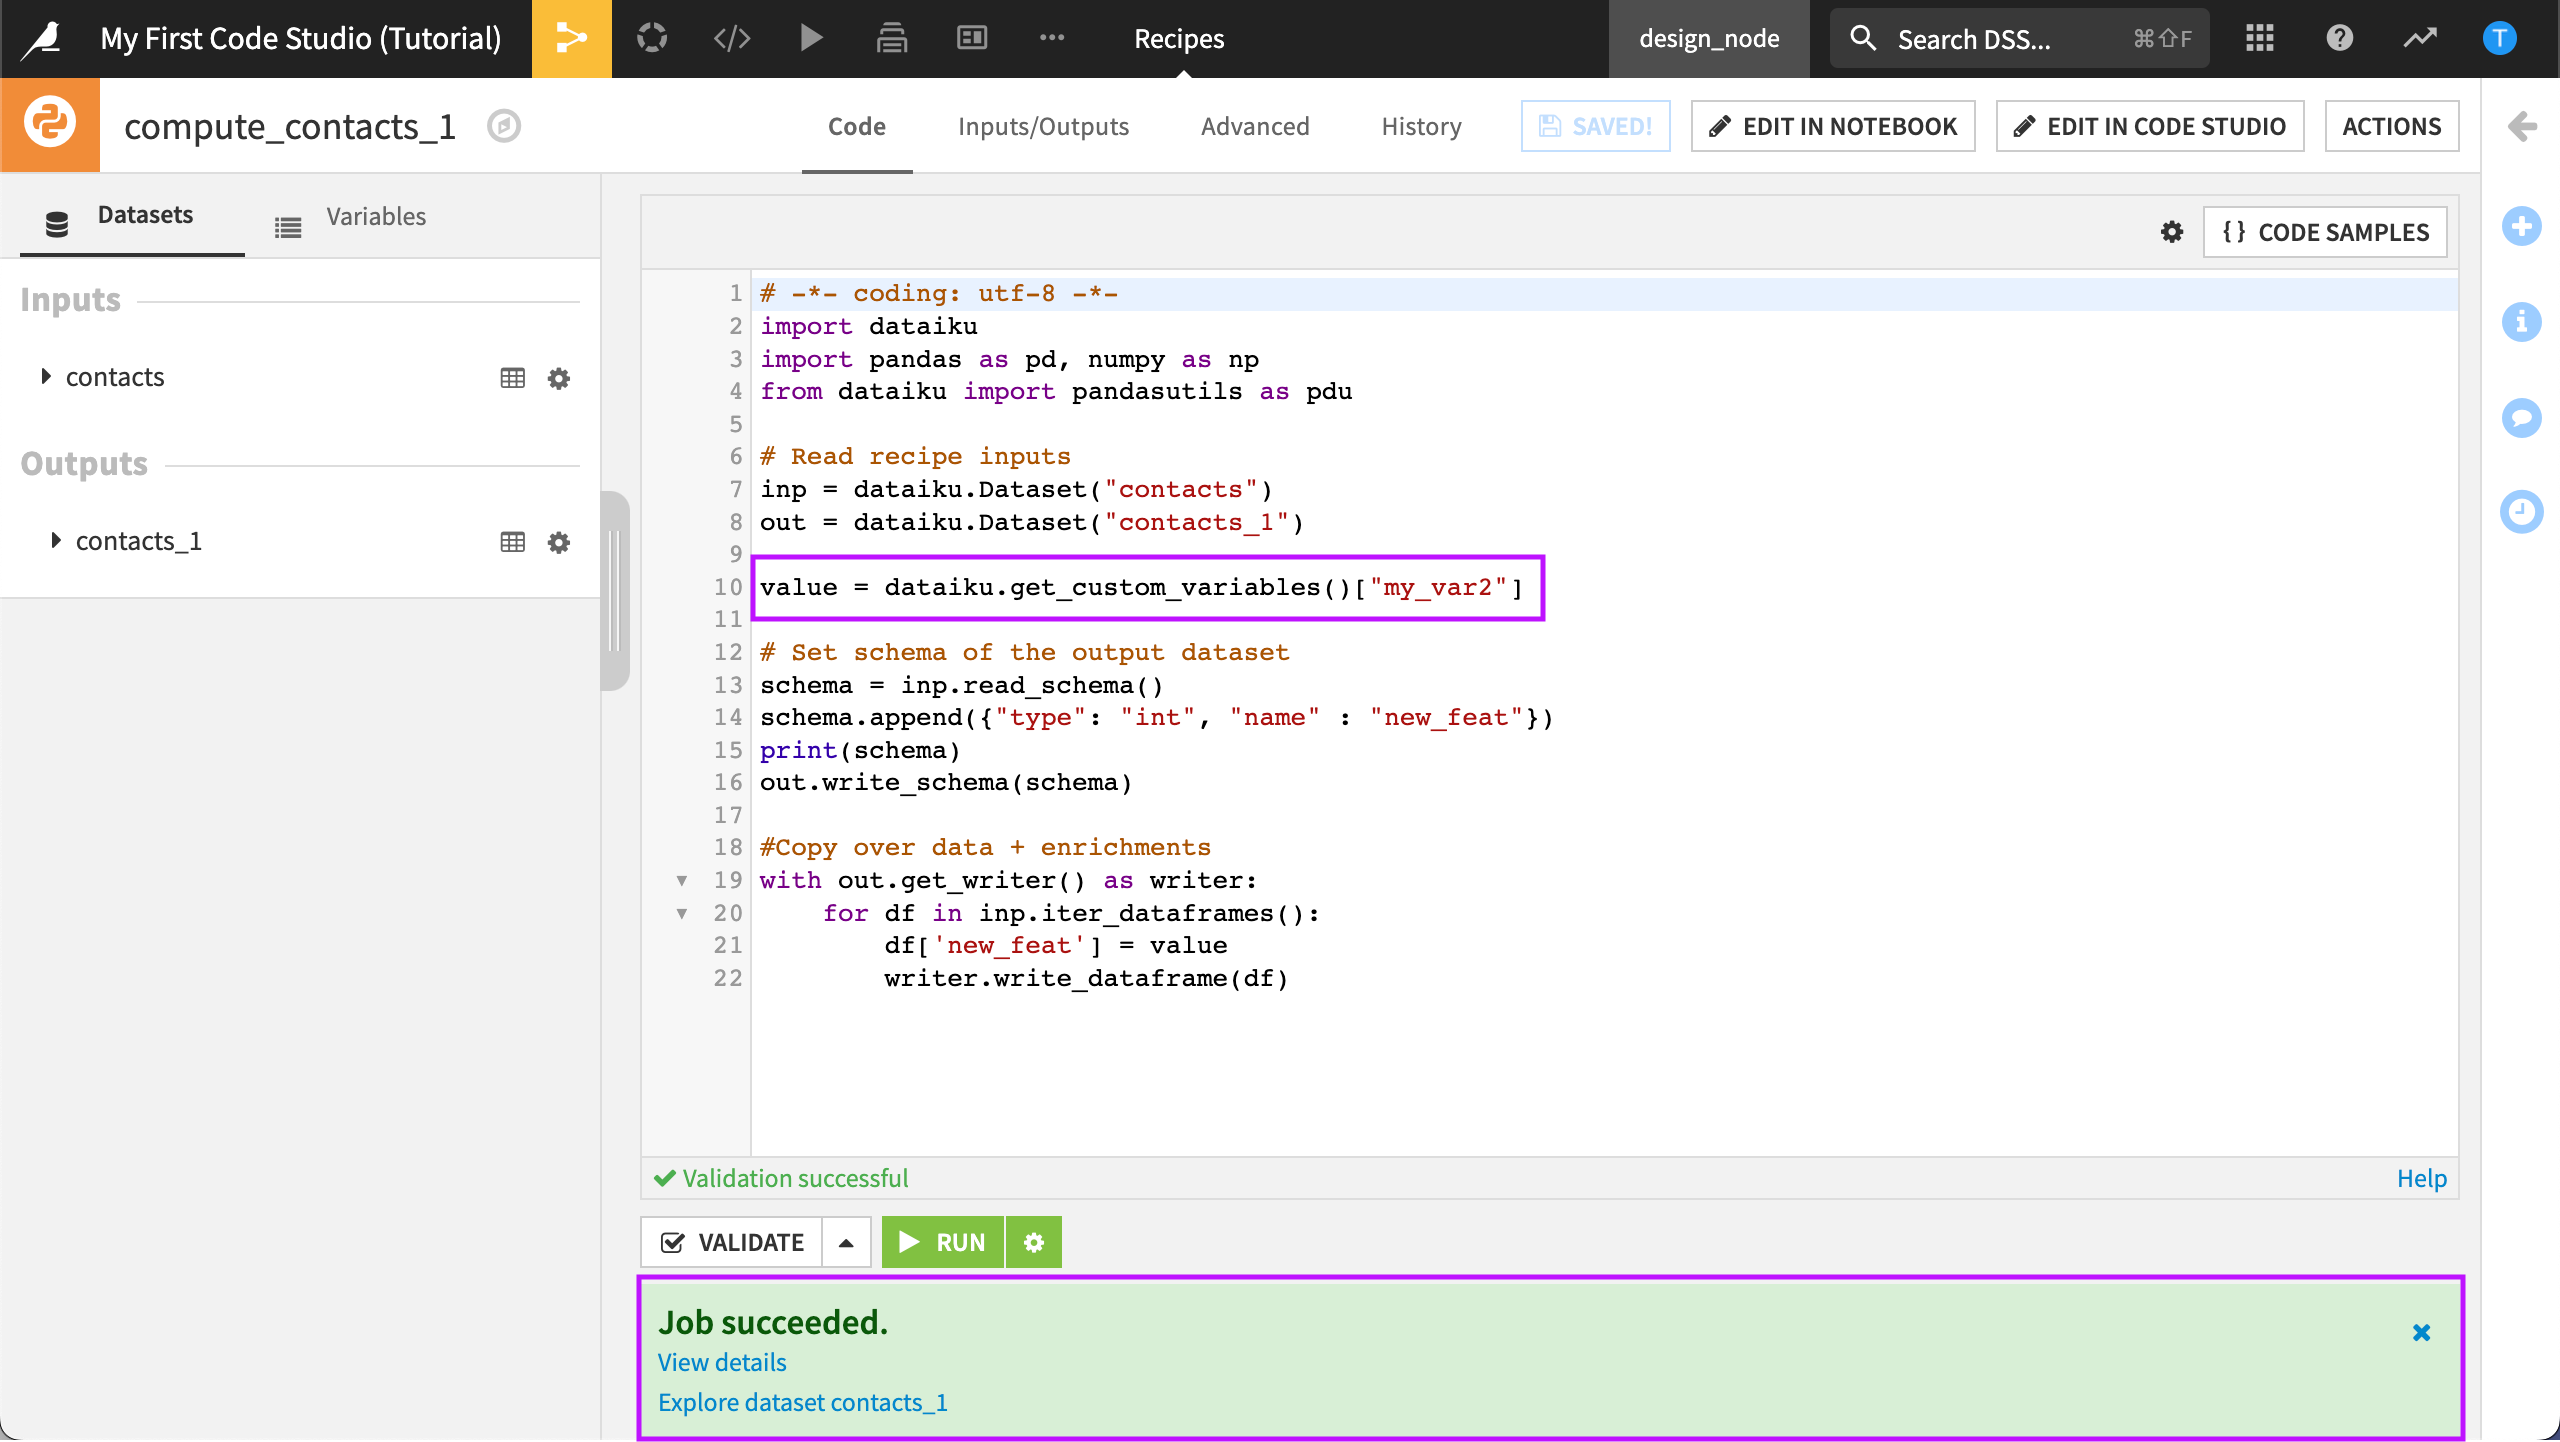
Open the compute_contacts_1 Python recipe.
We can see that our recipe is updated and that “my_var” is now “my_var2”.
Run the recipe.
The recipe runs without warnings.
Edit a Project Library
Project libraries are a great way to organize your code in a centralized location that can be reused in any project on the instance. From Dataiku, you can also connect to a remote Git repository to manage your code. For more details, visit Reusing Python Code.
In this section, we’ll practice editing a project library in our Code Studio. We’ll be working with the second Python recipe in our project.
Start the Code Studio
If you have not already started your Code Studio, you can start it now to ensure it is ready.
From the Code menu, select Code Studios.
Click Start to start the Code Studio.
Wait while Dataiku starts the Code Studio and launches the VS Code Workspace Explorer.
Run the Python Recipe
Return to the Flow and run the Python recipe that generates contacts_2.
This recipe is performing a simple transformation using a custom Python package, my_package.
The error, “list index out of range”, is raised at line 21 of our code.
We want to inspect this error to find out more. One way to do this is to use the logs, but we can also inspect and debug this error in our Code Studio.
Debug with VS Code
Let’s see if we can find out more by using the VS Code debugger.
From the recipe that generates contacts_2, select Edit in Code Studio.
In Code Studios, select VS Code.
Dataiku displays the VS Code Workspace Explorer ready to debug the recipe. The project-lib-versioned folder contains our Python package, my_package. In addition, the recipes folder contains our recipes.
Let’s run our recipe in the debugger.
Open the Recipes folder.
Select compute_contacts_2.py.
Select Debug Python File.
We can work with our recipe within our own IDE even when it is using a project library. However, we are now working in VS Code and not in the Dataiku Python recipe editor. If we make any changes to our code from our IDE, we’ll need to sync the changes back to Dataiku. Running the recipe in VS Code displays the same error we saw in the Flow.
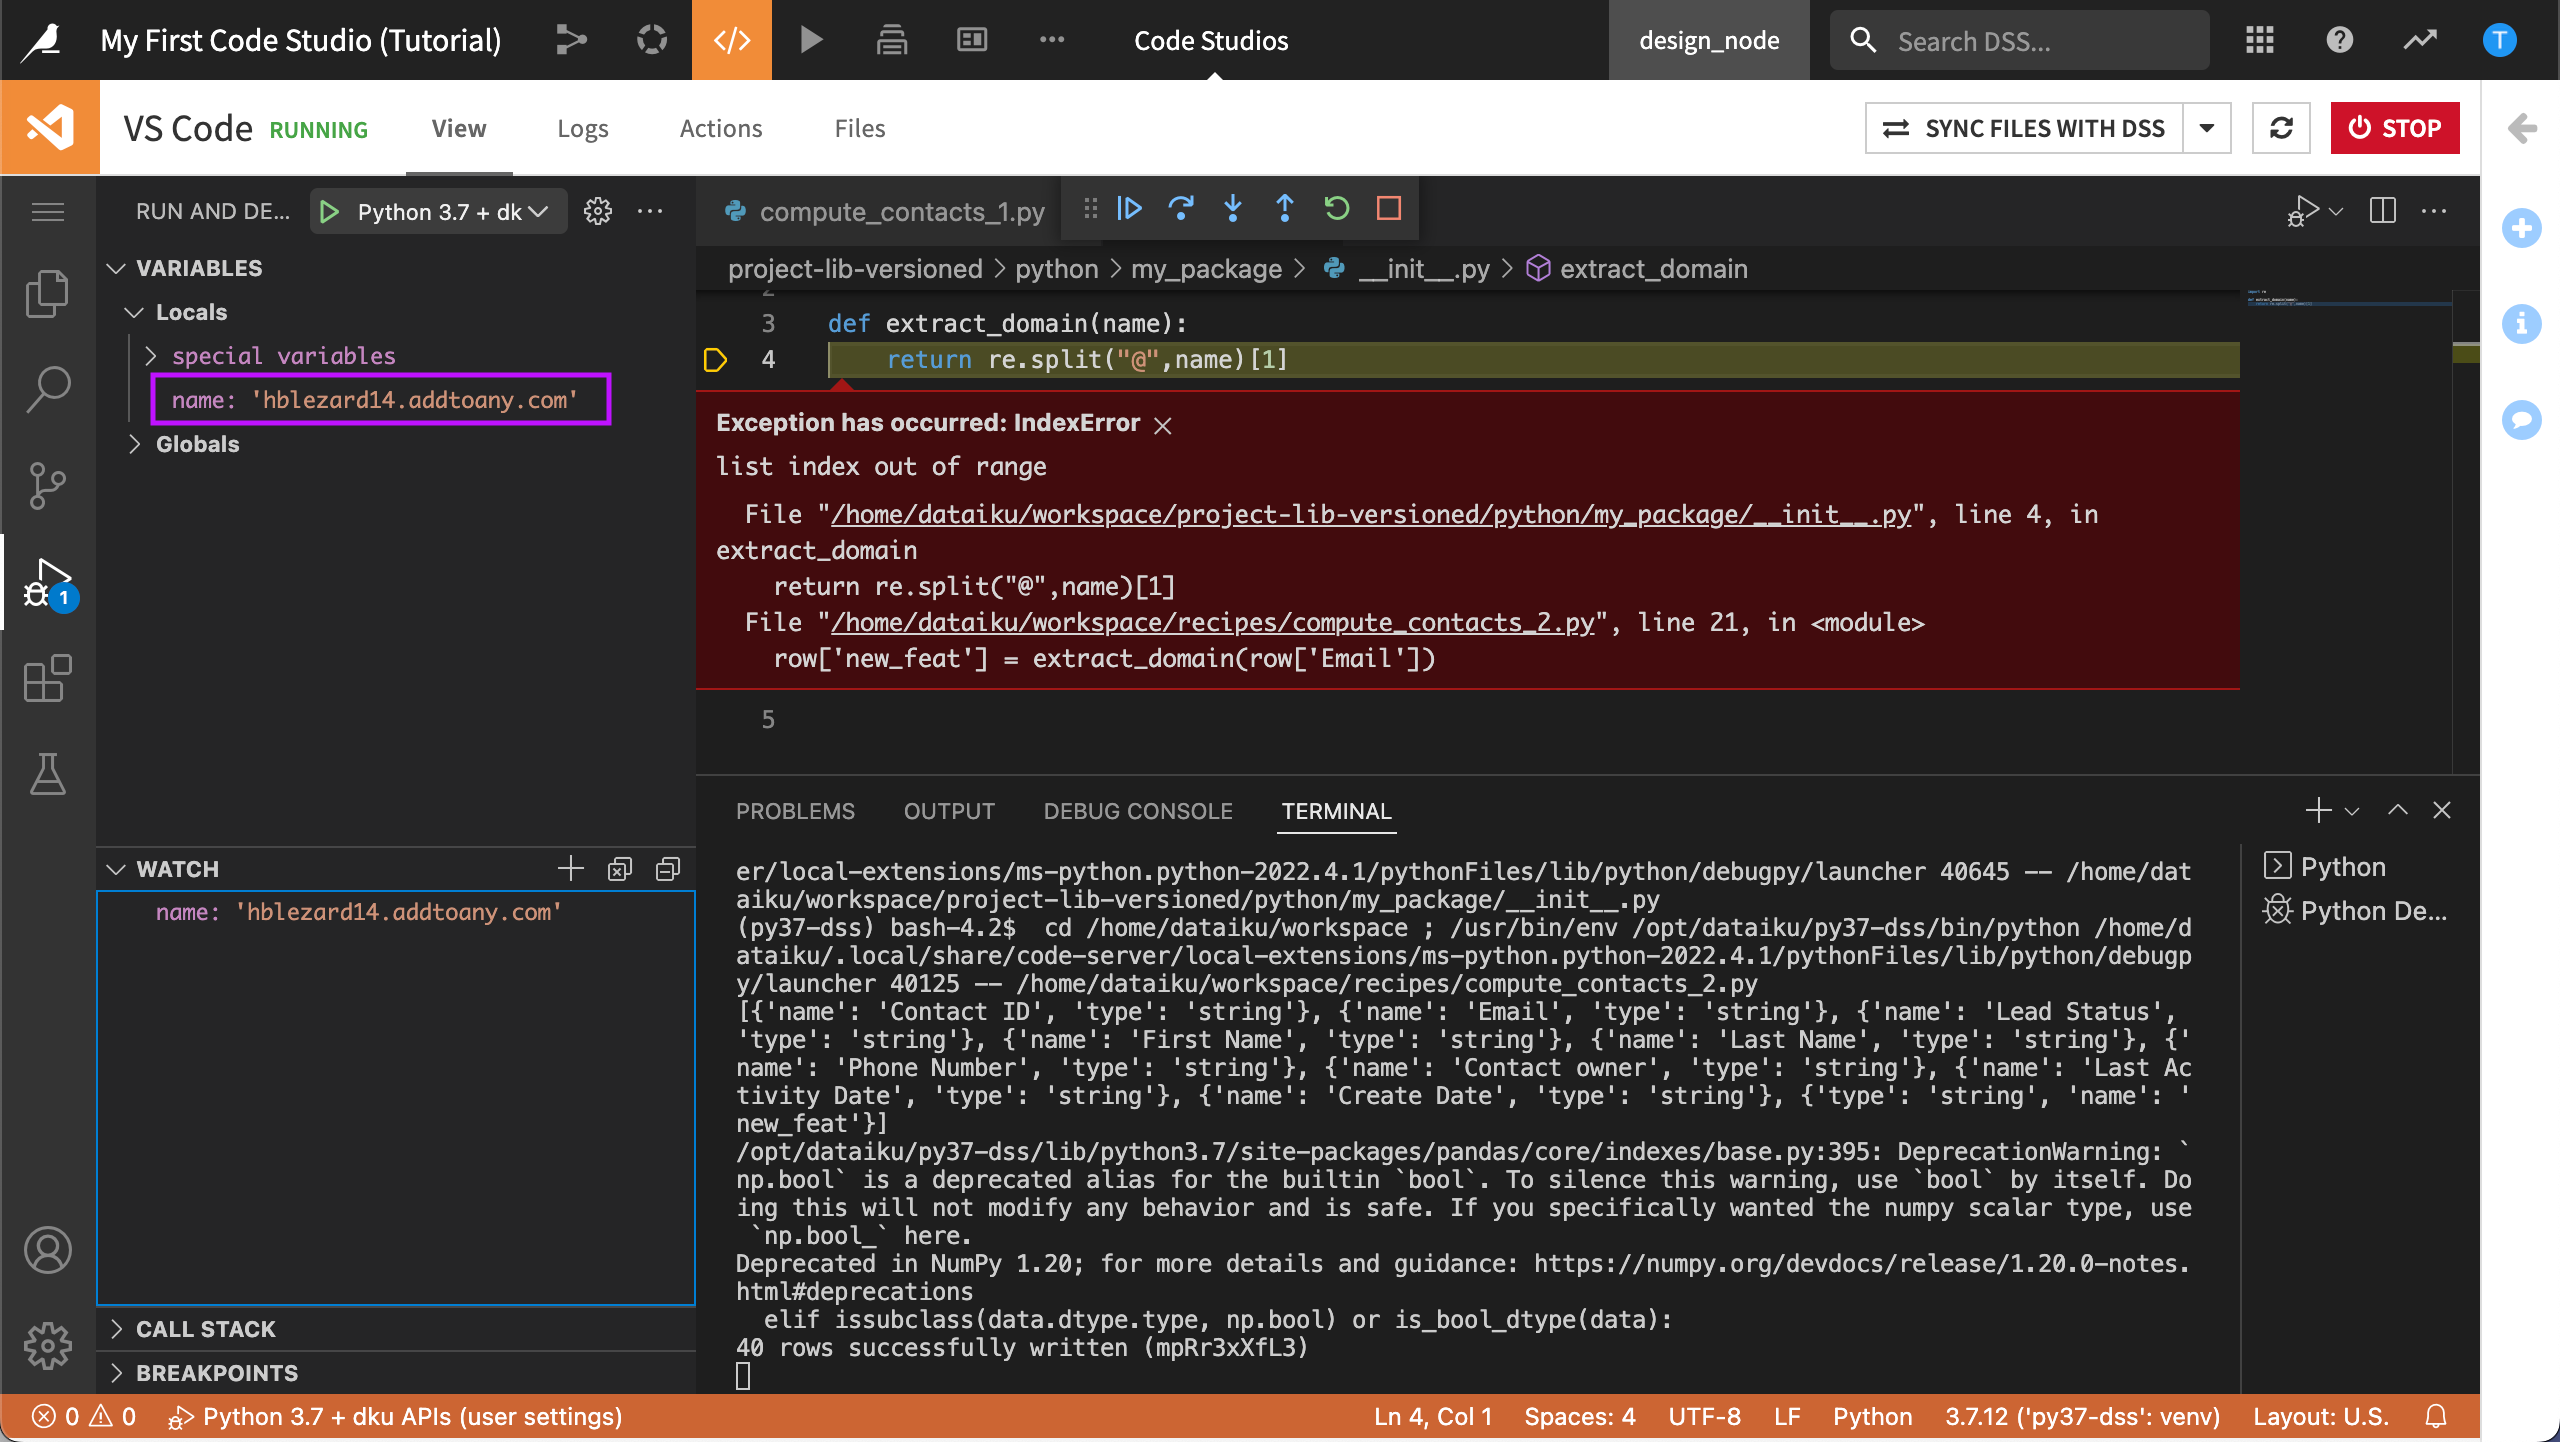
We can see that the record “hblezard14.addtoany.com” does not fit our regex split pattern because it is missing the “@” symbol.
Add a Basic Control
Let’s add a very basic control to solve this issue.
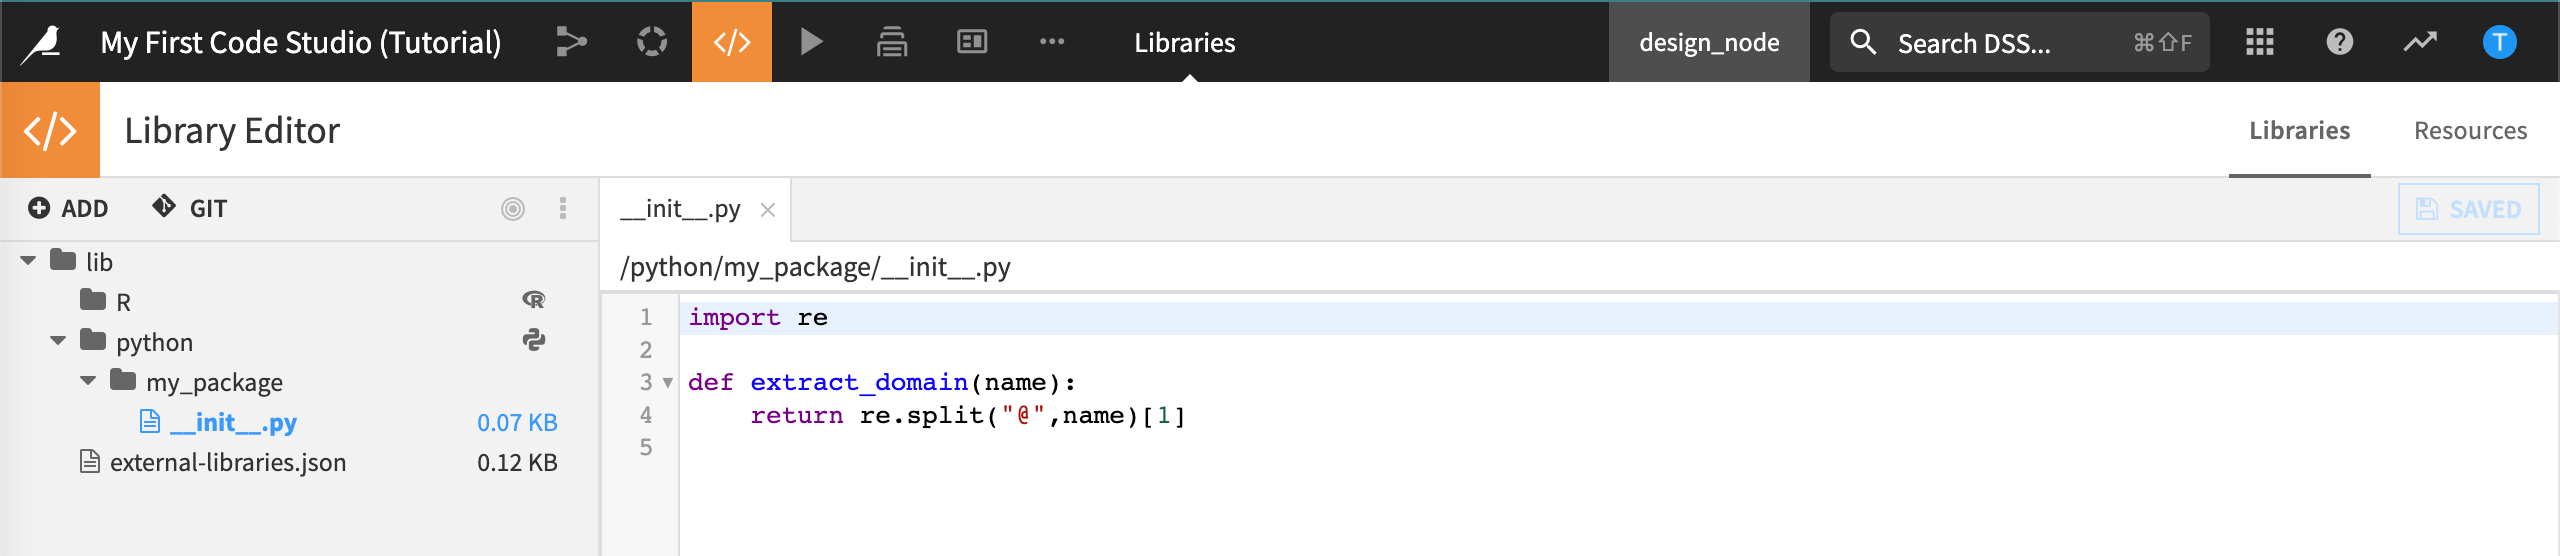
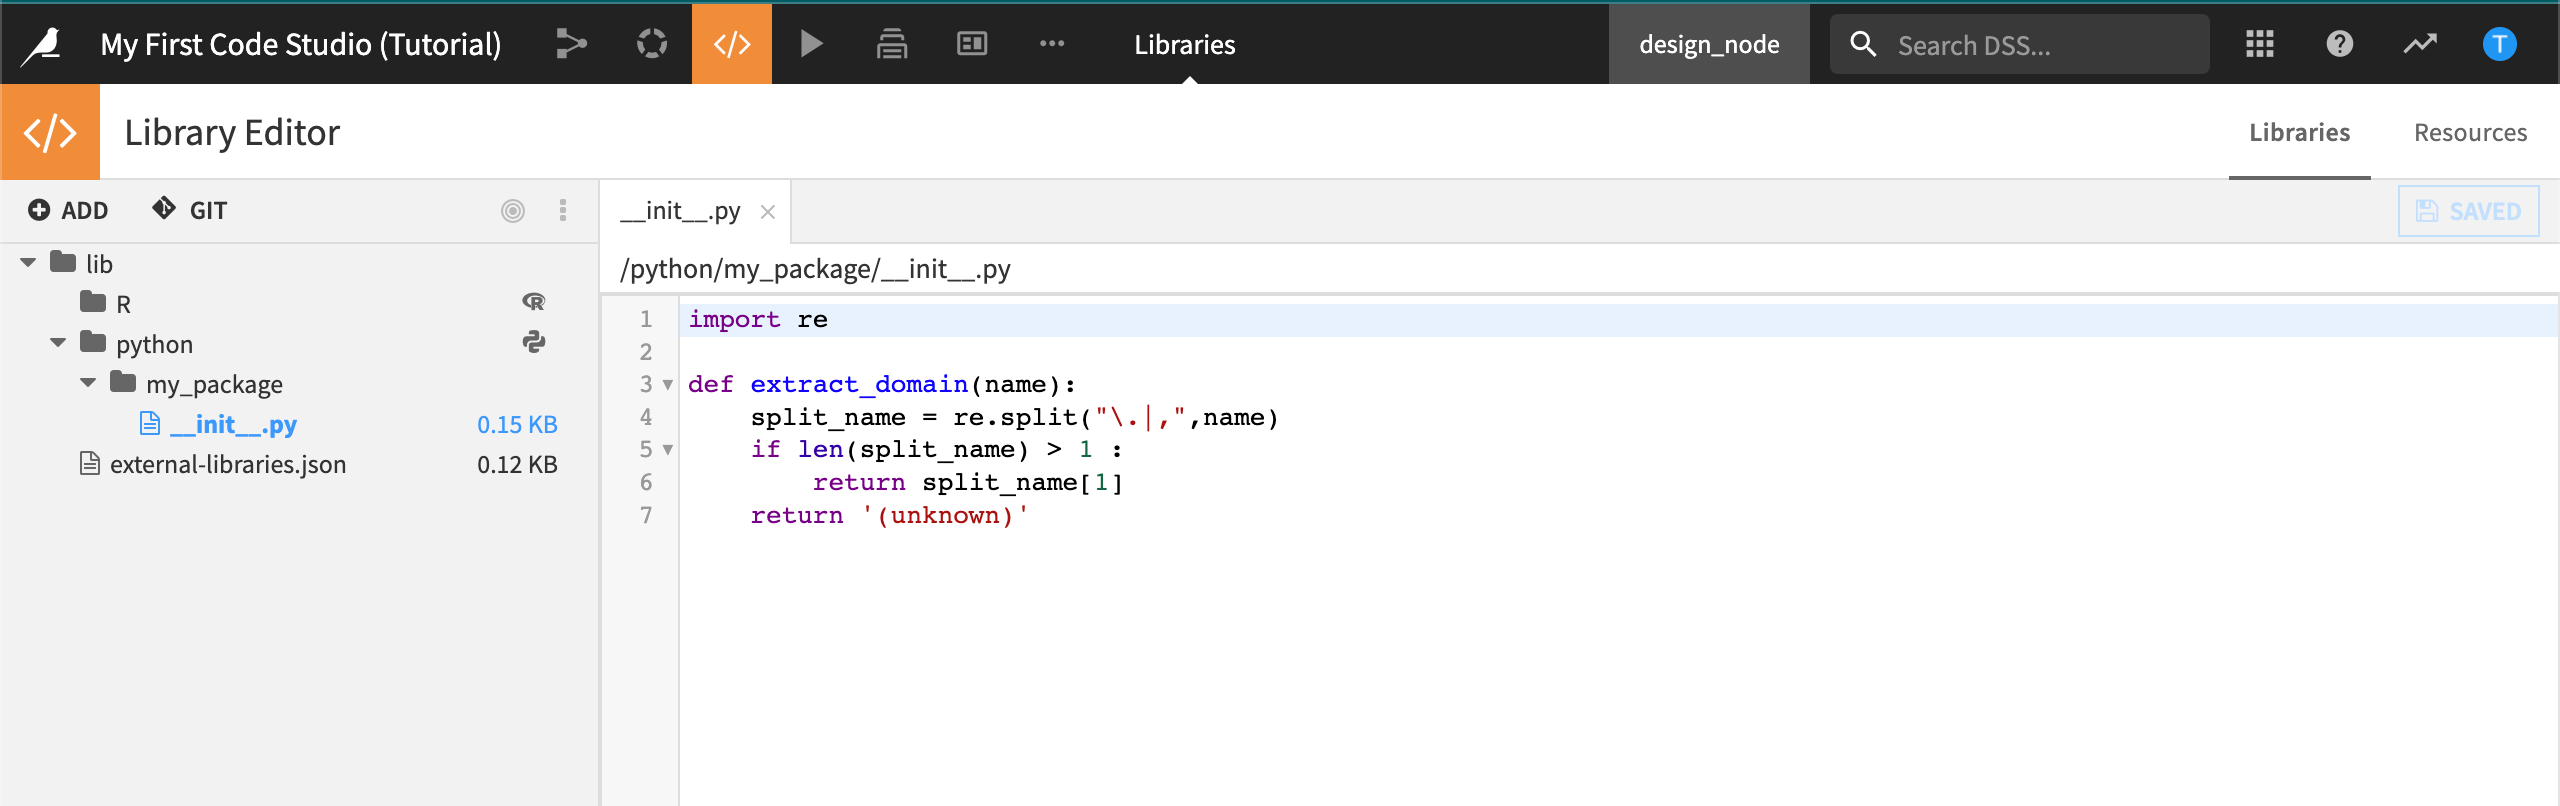
Open _init_.py from the proj-lib-versioned folder.
Edit the code as follows:
Run the code again.
Our code executes without error.
Sync the Changes back to Dataiku
Let’s sync our changes back to our recipe in the Flow.
In VS Code, select Sync Files With DSS in the upper right.
Dataiku synchronizes both the recipe and the project library file back to the project. Once the sync is complete, VS Code displays a green checkbox. Let’s check that the project library file is now updated.
From the Code menu, select Libraries.
We can validate the synchronization back to our project library file was successful.
Run the recipe that generates contacts_2 to see that the output dataset is built without exceptions.
What’s Next?
In this tutorial, you took your first steps with Code Studios and learned the basics including how to create a Code Studio template, start a Code Studio, edit a recipe, and edit a project library. You saw how you can take advantage of the tools such as the debugger in your IDE and synchronize any changes back to your project.
Now you are ready to explore Code Studios on your own! You can use Code Studios to create more advanced templates, code more efficiently, and even write entirely custom web applications using Streamlit! To find out more, visit Preparing Code Studio templates > Streamlit.