Documenting Your Project Workflow
Introduction
Your project workflow must be documented before deploying it to production. A well-documented workflow aids reproducibility, is easier to maintain, and allows better collaboration between team members.
This article demonstrates the concept of workflow documentation using a Wiki. Throughout, you’ll notice we’ve used a sample project–Detect Credit Card Fraud. Using this sample project, we’ll walk through typical sections of a project Wiki:
Project Goals
Code Environment and Plugins
Data Sources
Data Processing
ML Modeling
Dashboards
Scenarios, Metrics, and Checks
Deployment
Project Goals
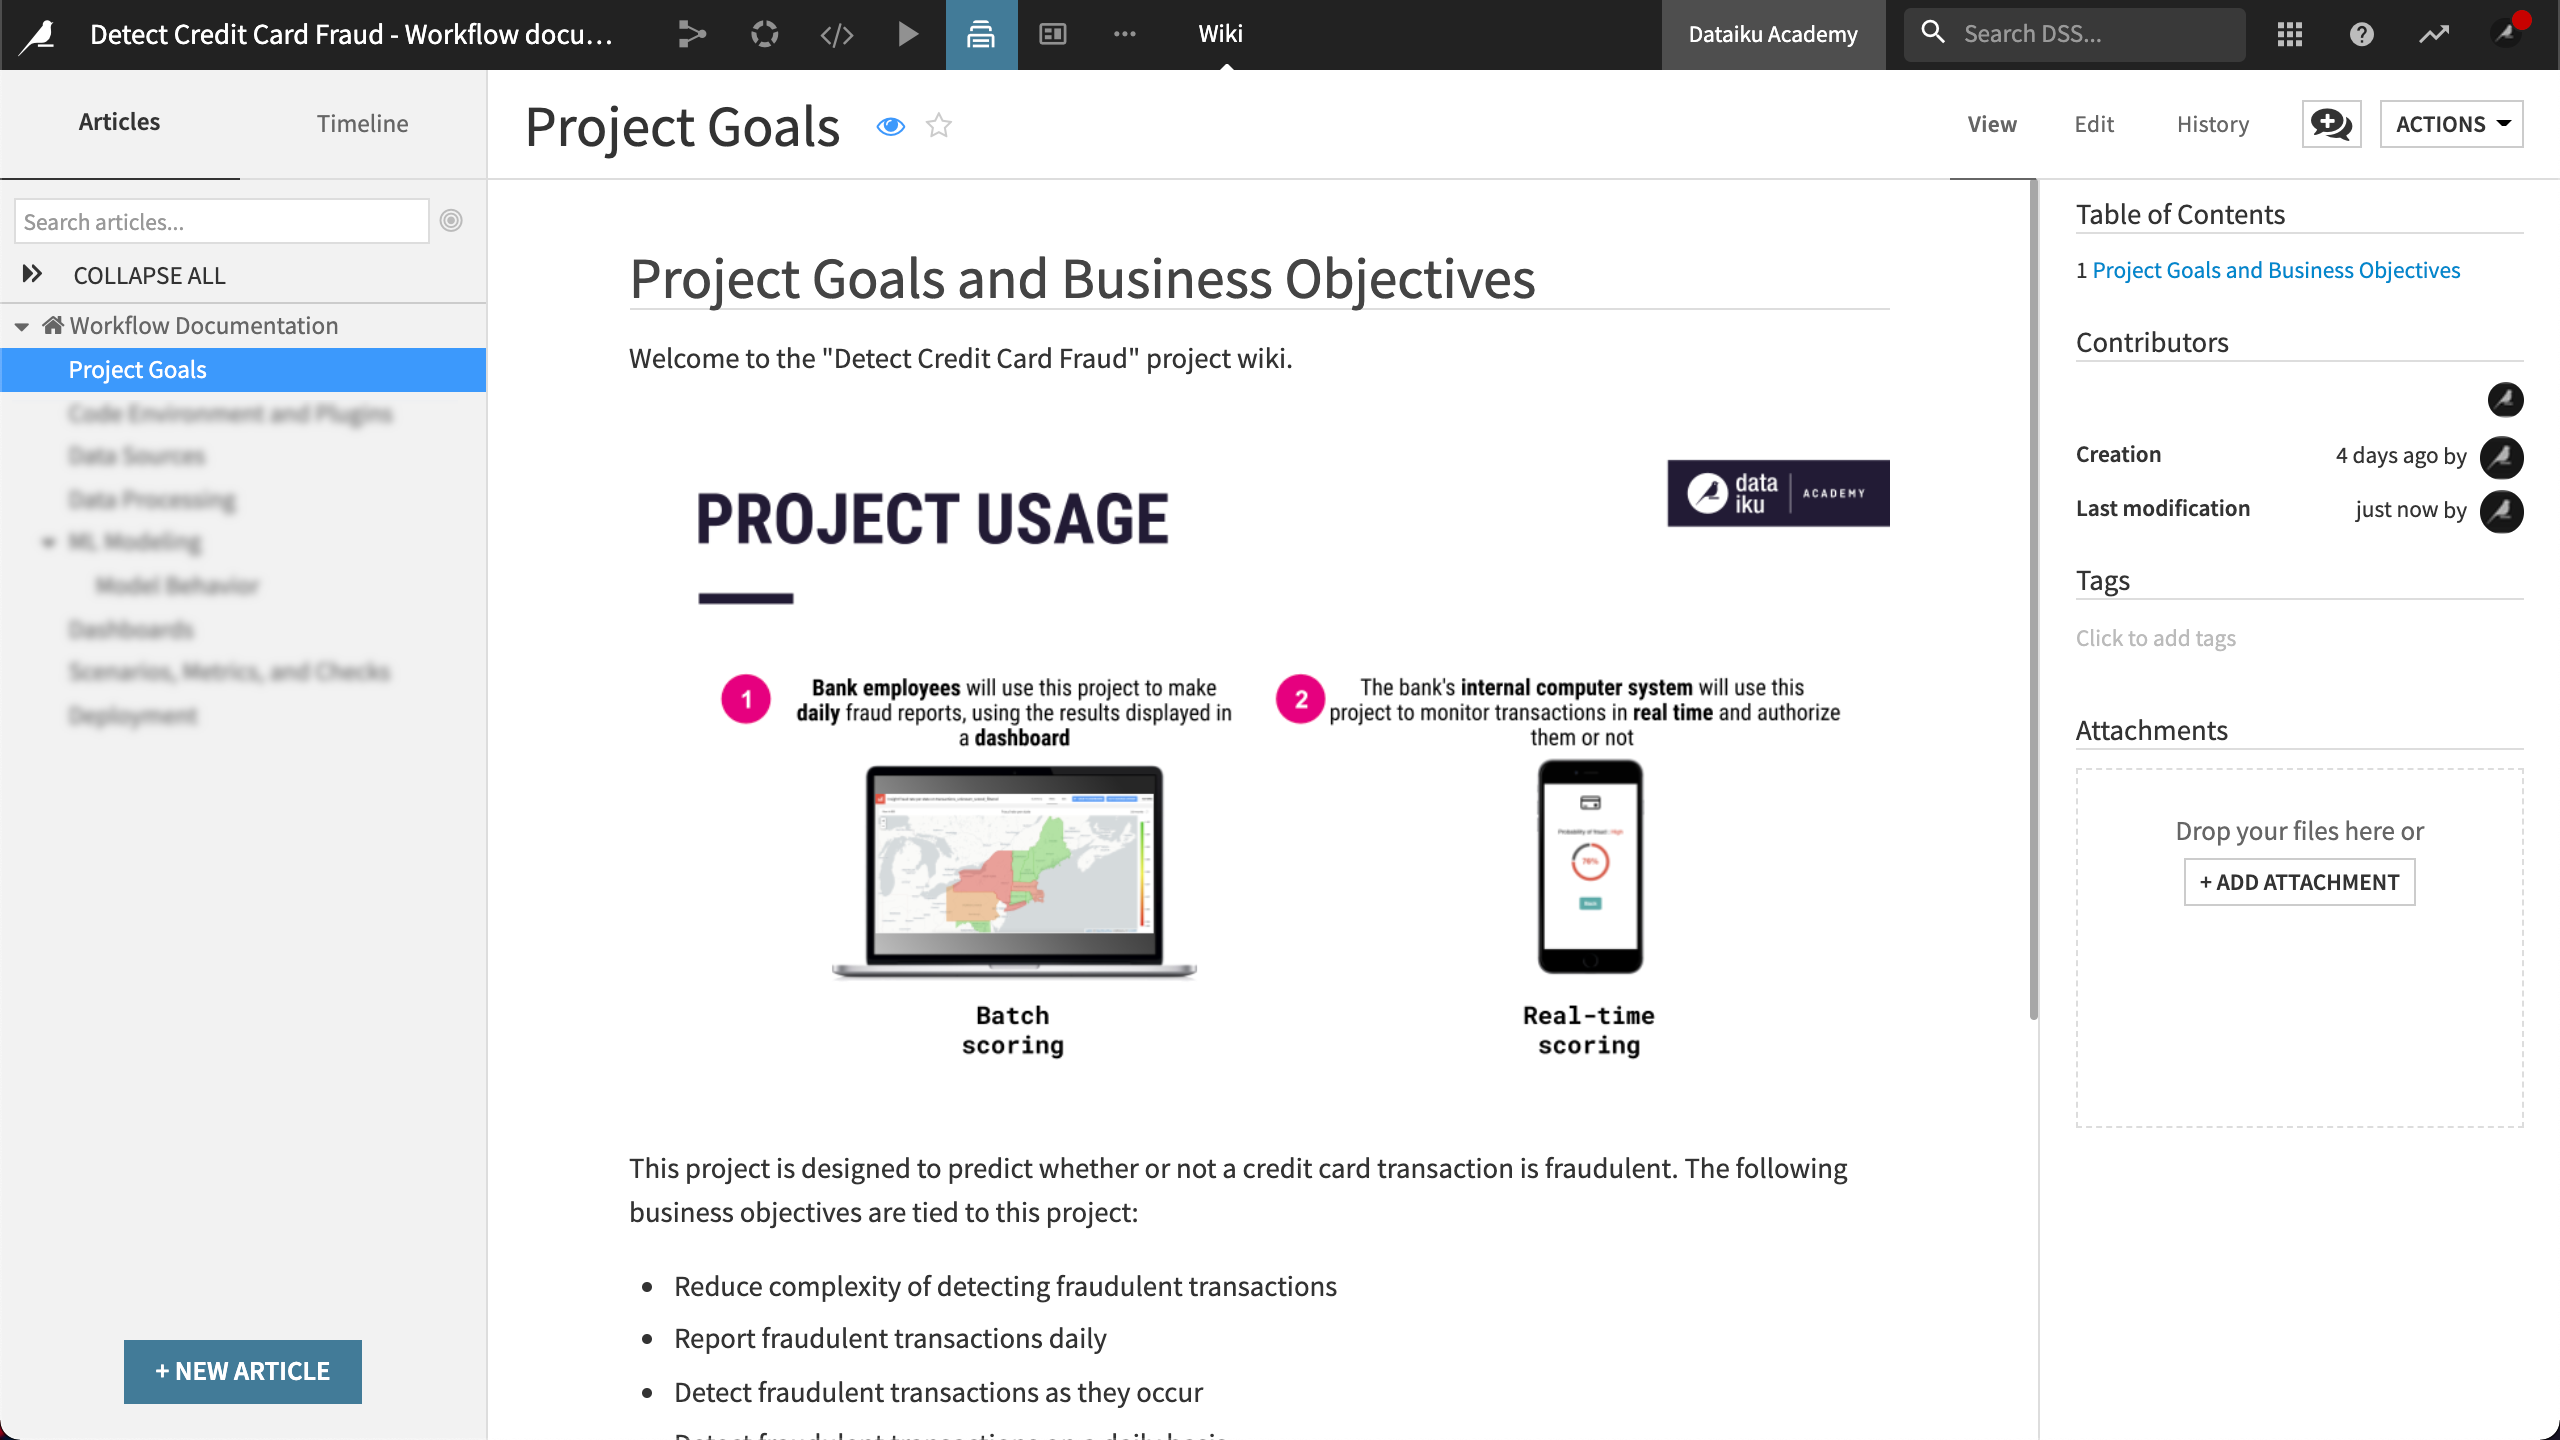
The first section of our Wiki documents the project goals. The documentation helps stakeholders understand the purpose of the project.
As an example, our Wiki contains information that answers the following:
What is the purpose of the project, including project goals?
Who will be using the project in production?
What problem does the project solve?
Code Environment and Plugins
Next, we’ll document our project’s code environment and plugins to ensure that the development and production environments are identical.
Code Environment
Our code environment on our Automation node comes from the project bundle we created on our Design node. As described in the product documentation on Automation nodes, the code environment on our Automation node can be versioned, and each project bundle can be linked to a specific version of a code environment. For these reasons, we’ll want to document our code environment.
Note
Code environments can be created directly on a Dataiku instance.
Our sample project has a single Python code environment. Our Wiki includes the following information.
Environment name
Python version
Required packages
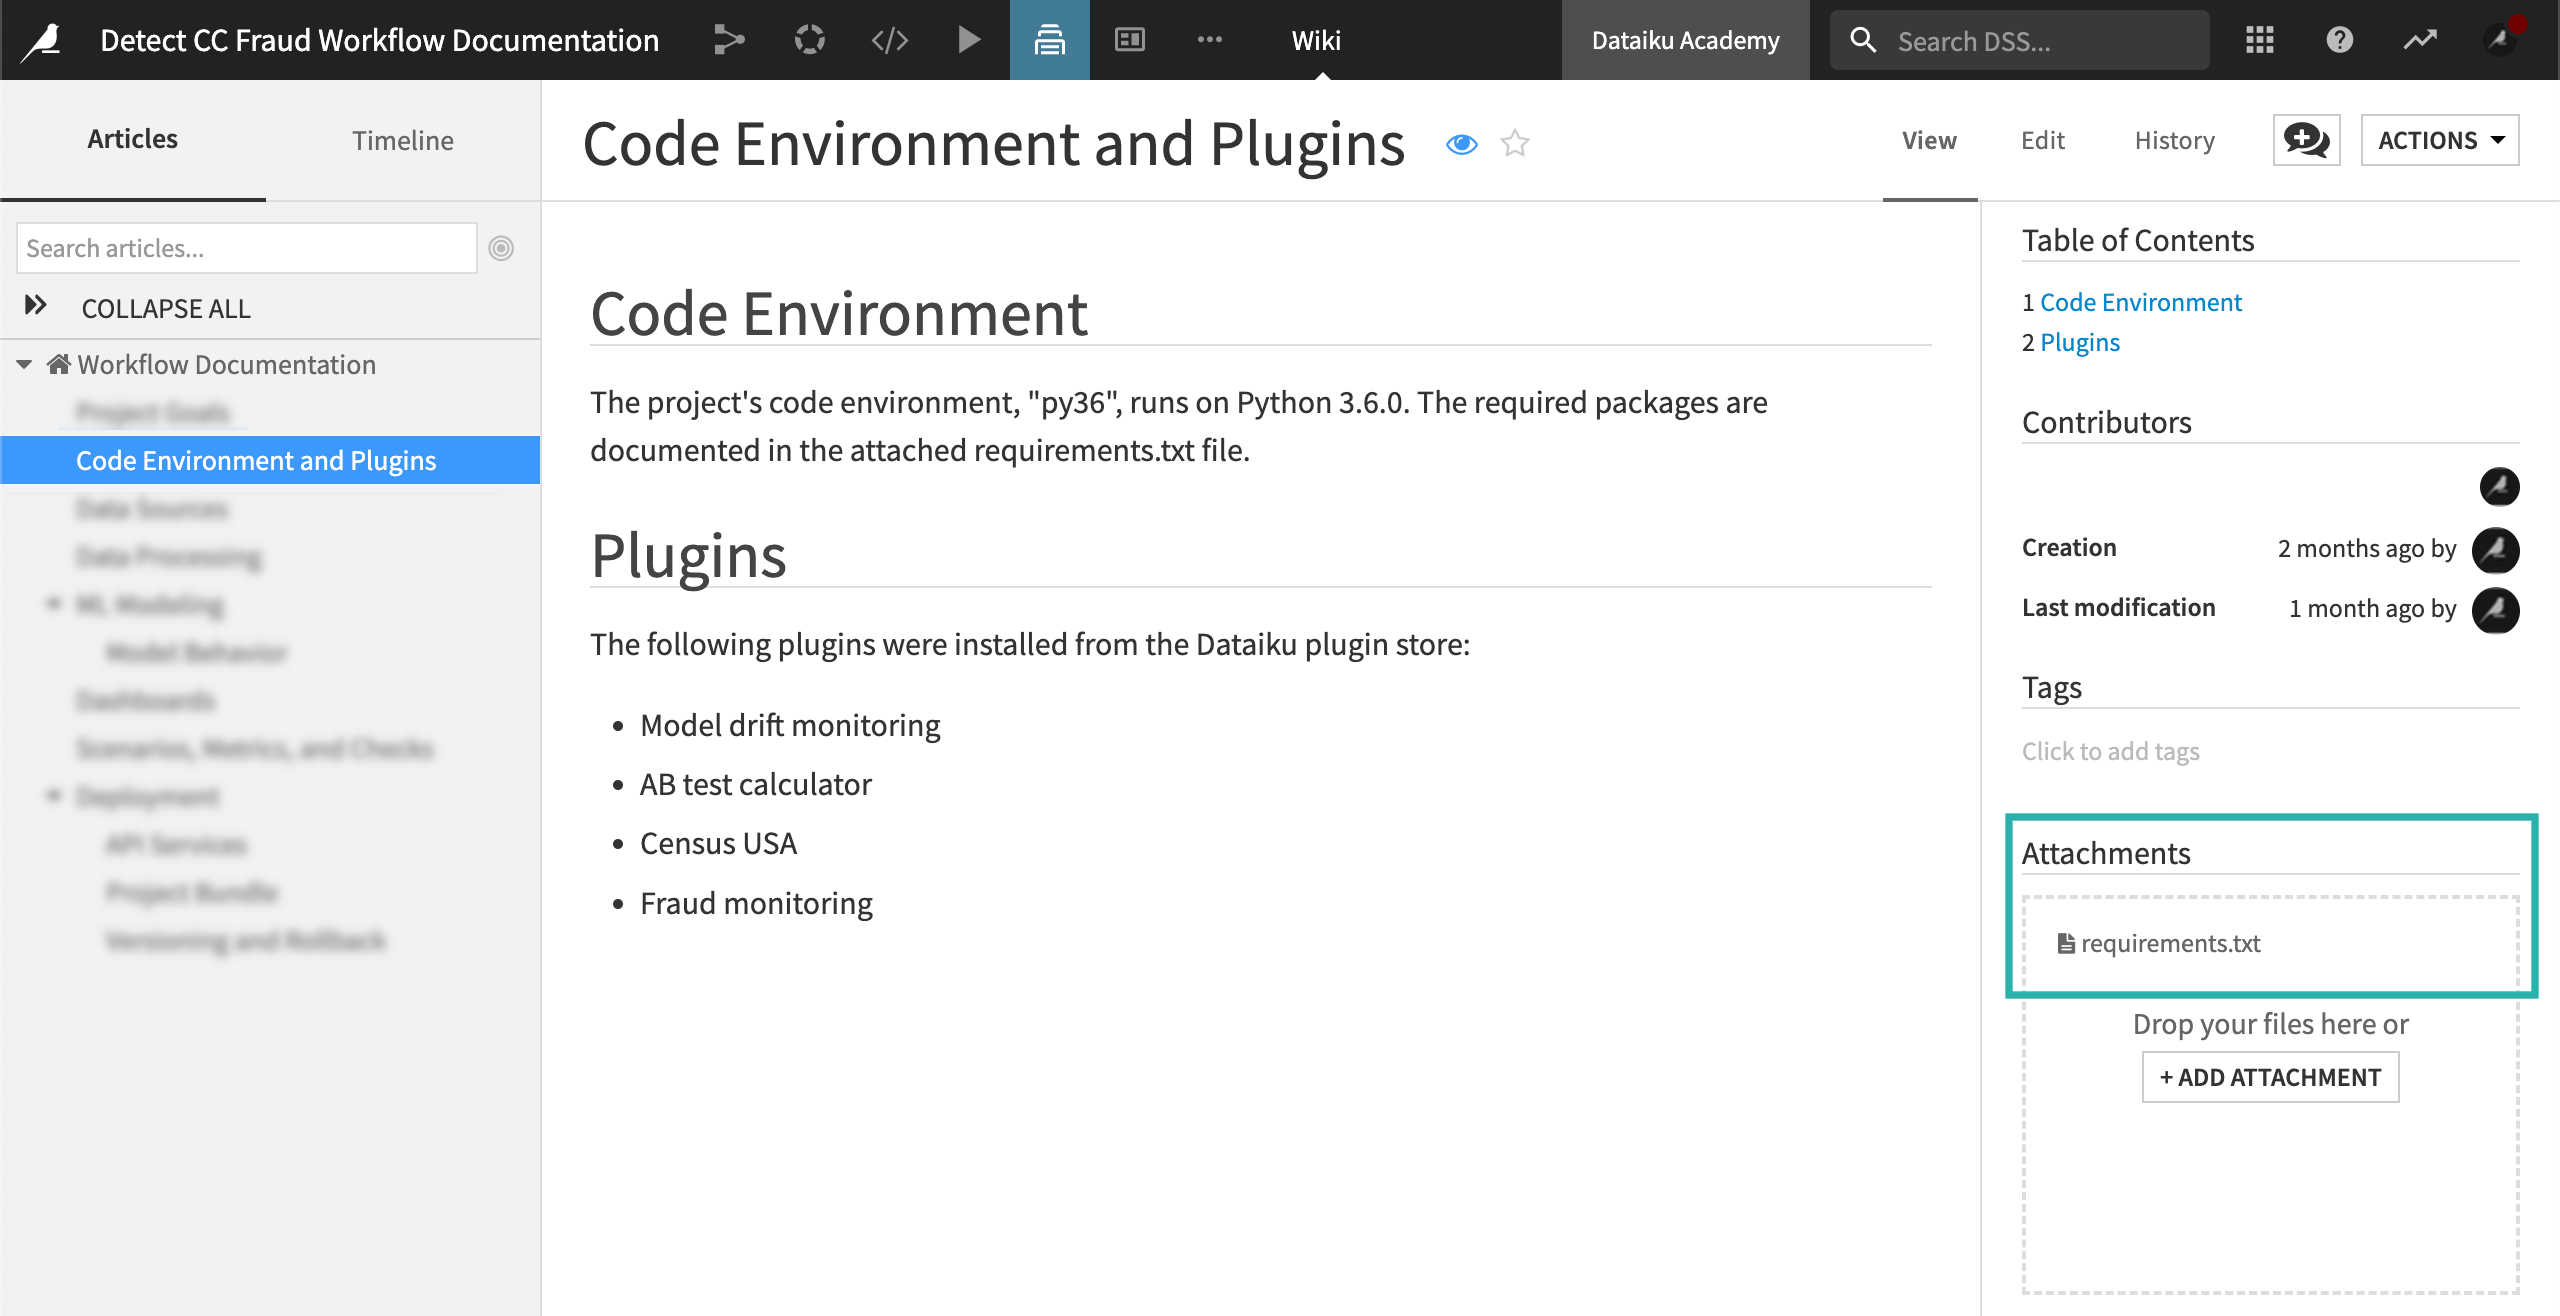
In the Code Environment and Plugins section of our Wiki, we’ll document the project’s code environment.
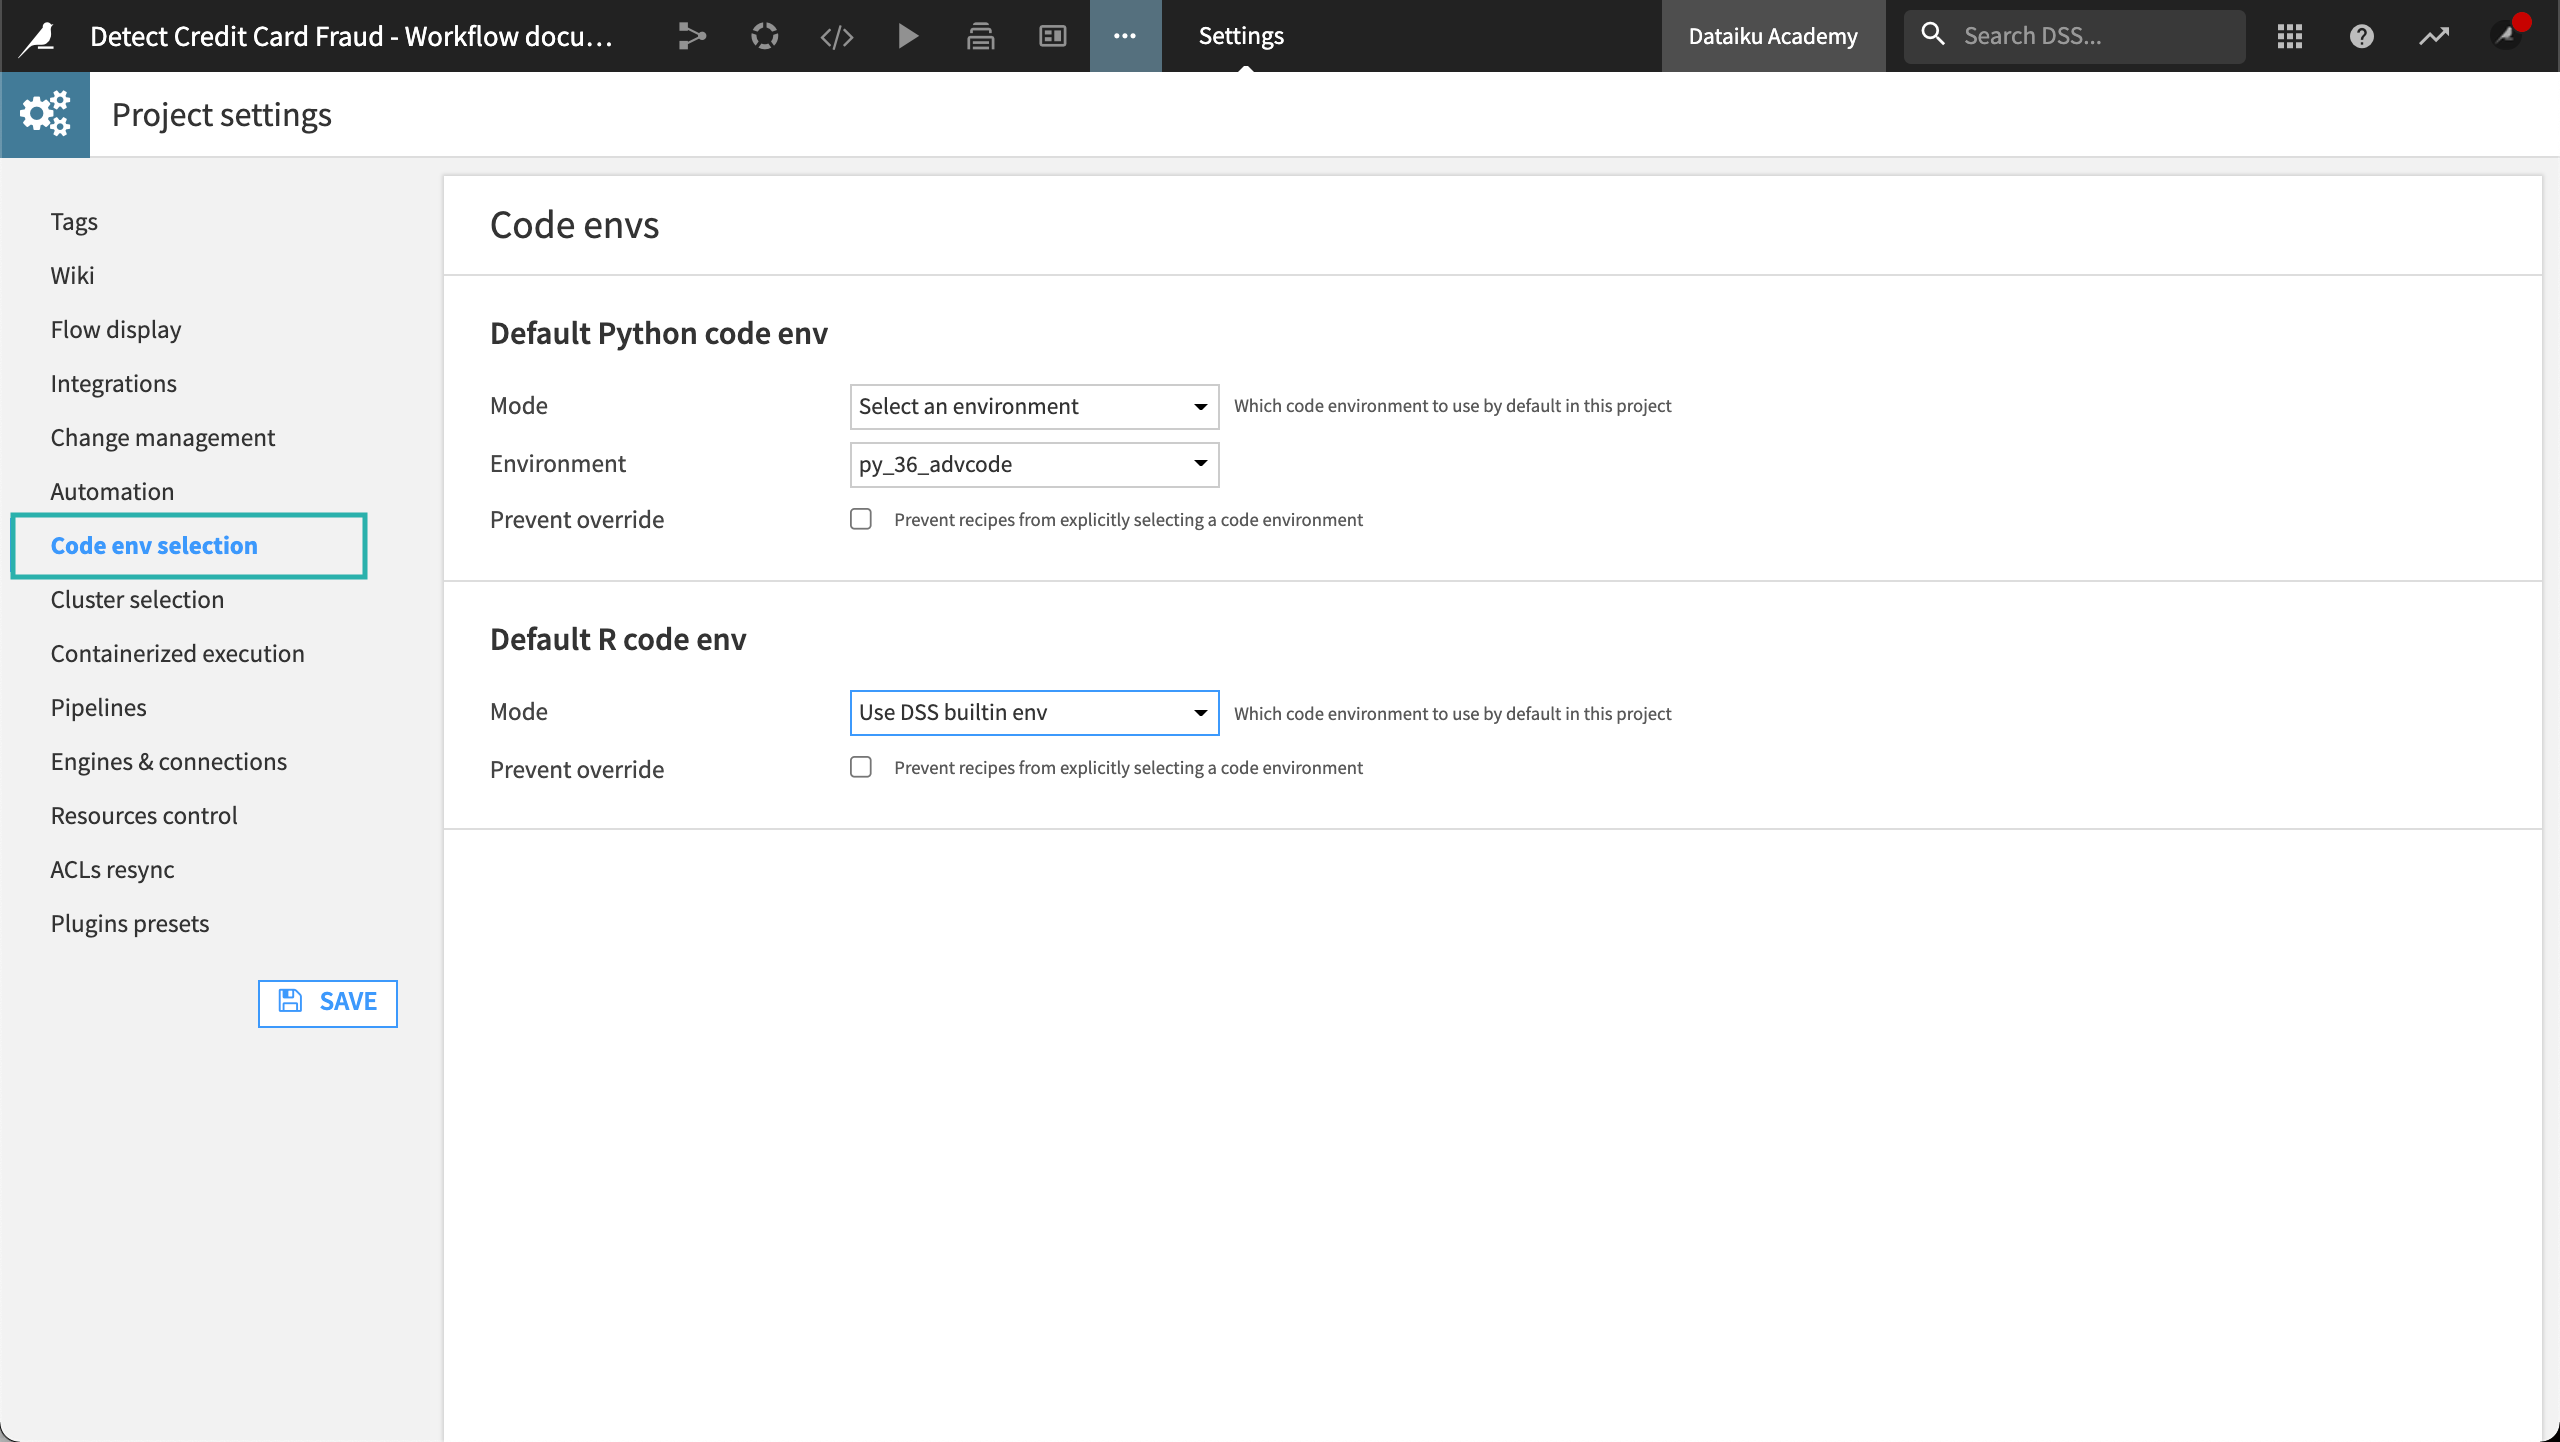
To document your code environment:
Visit the Code env selection panel in Project settings to find out which code environment the project uses.
Visit the Code Envs tab of the Administration panel, and then download the zip file.
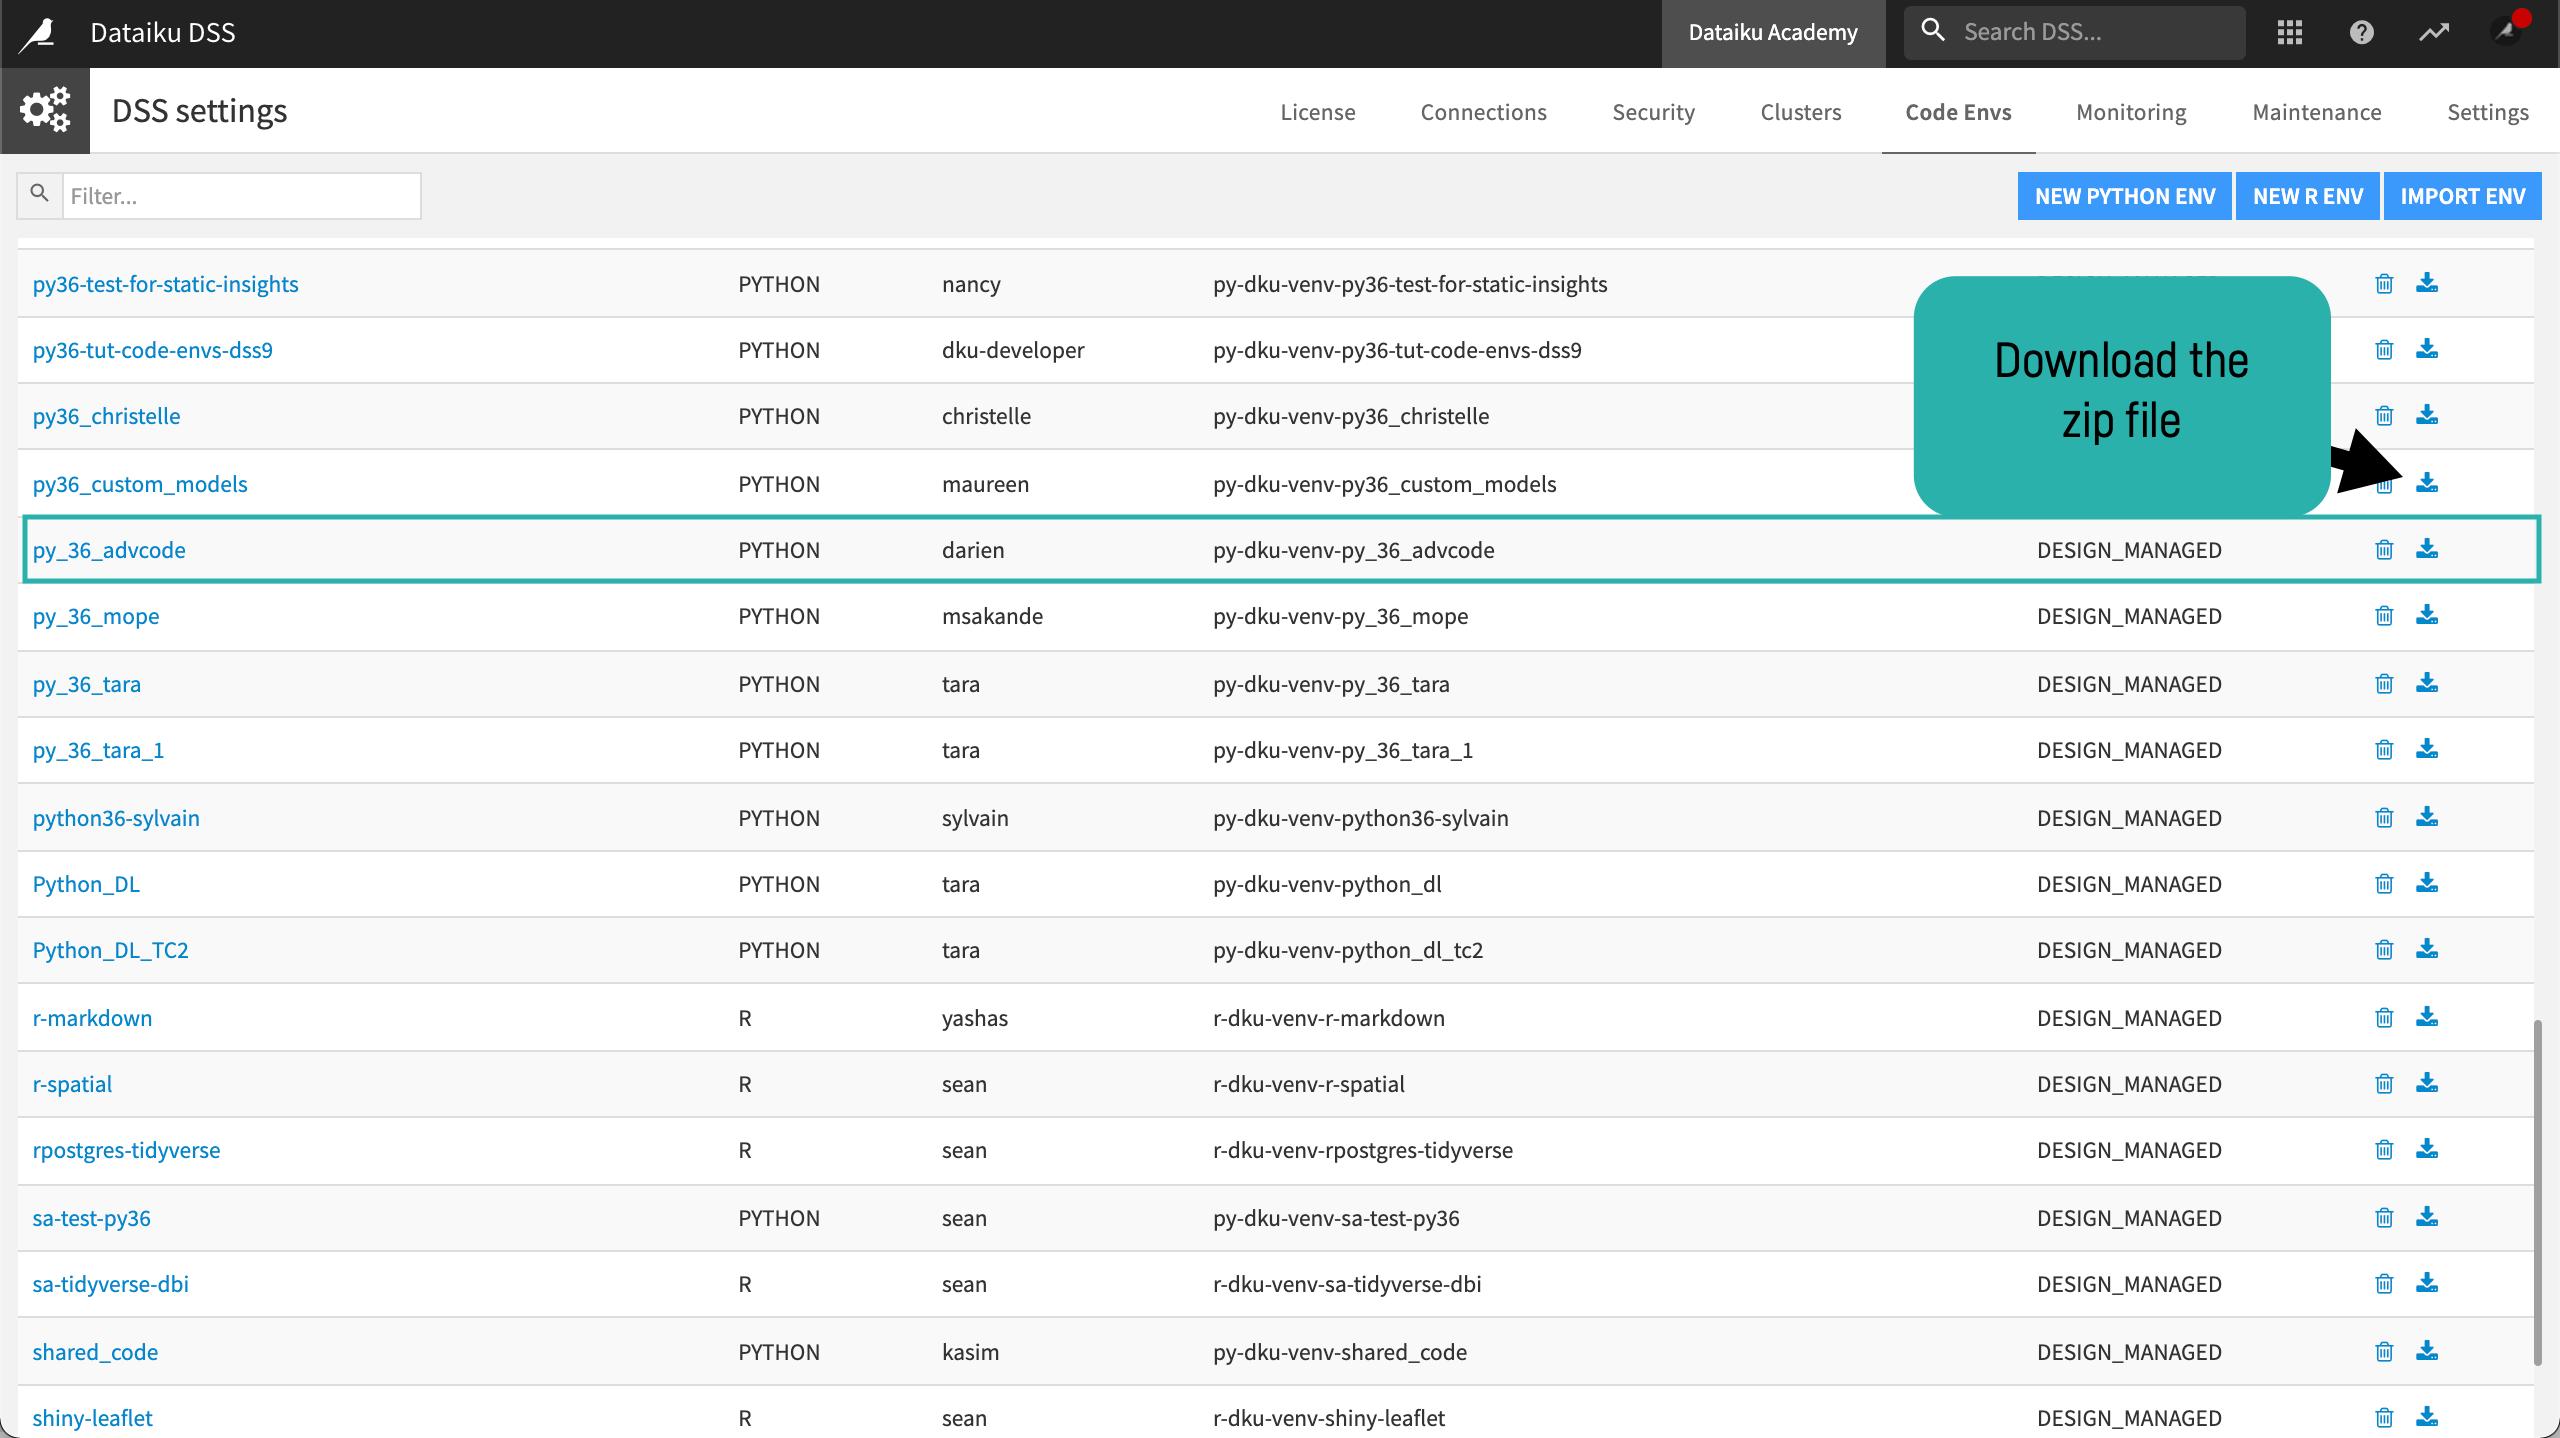
Once you’ve downloaded the zip file, you can retrieve the requirements.txt file. The requirements.txt file lists the packages required for the code environment.
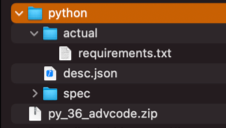
In our example, we’ve attached the requirements.txt file to our project Wiki under our Code Environment section. Even team members without access to the Administration panel can access the file.
Note
Project Bundles and Code Environments: Like projects, code environments on an automation node come from bundles created on a Design node and imported in the Automation node. There are specific instructions for activating a bundle of a project that uses non-built-in code environments.
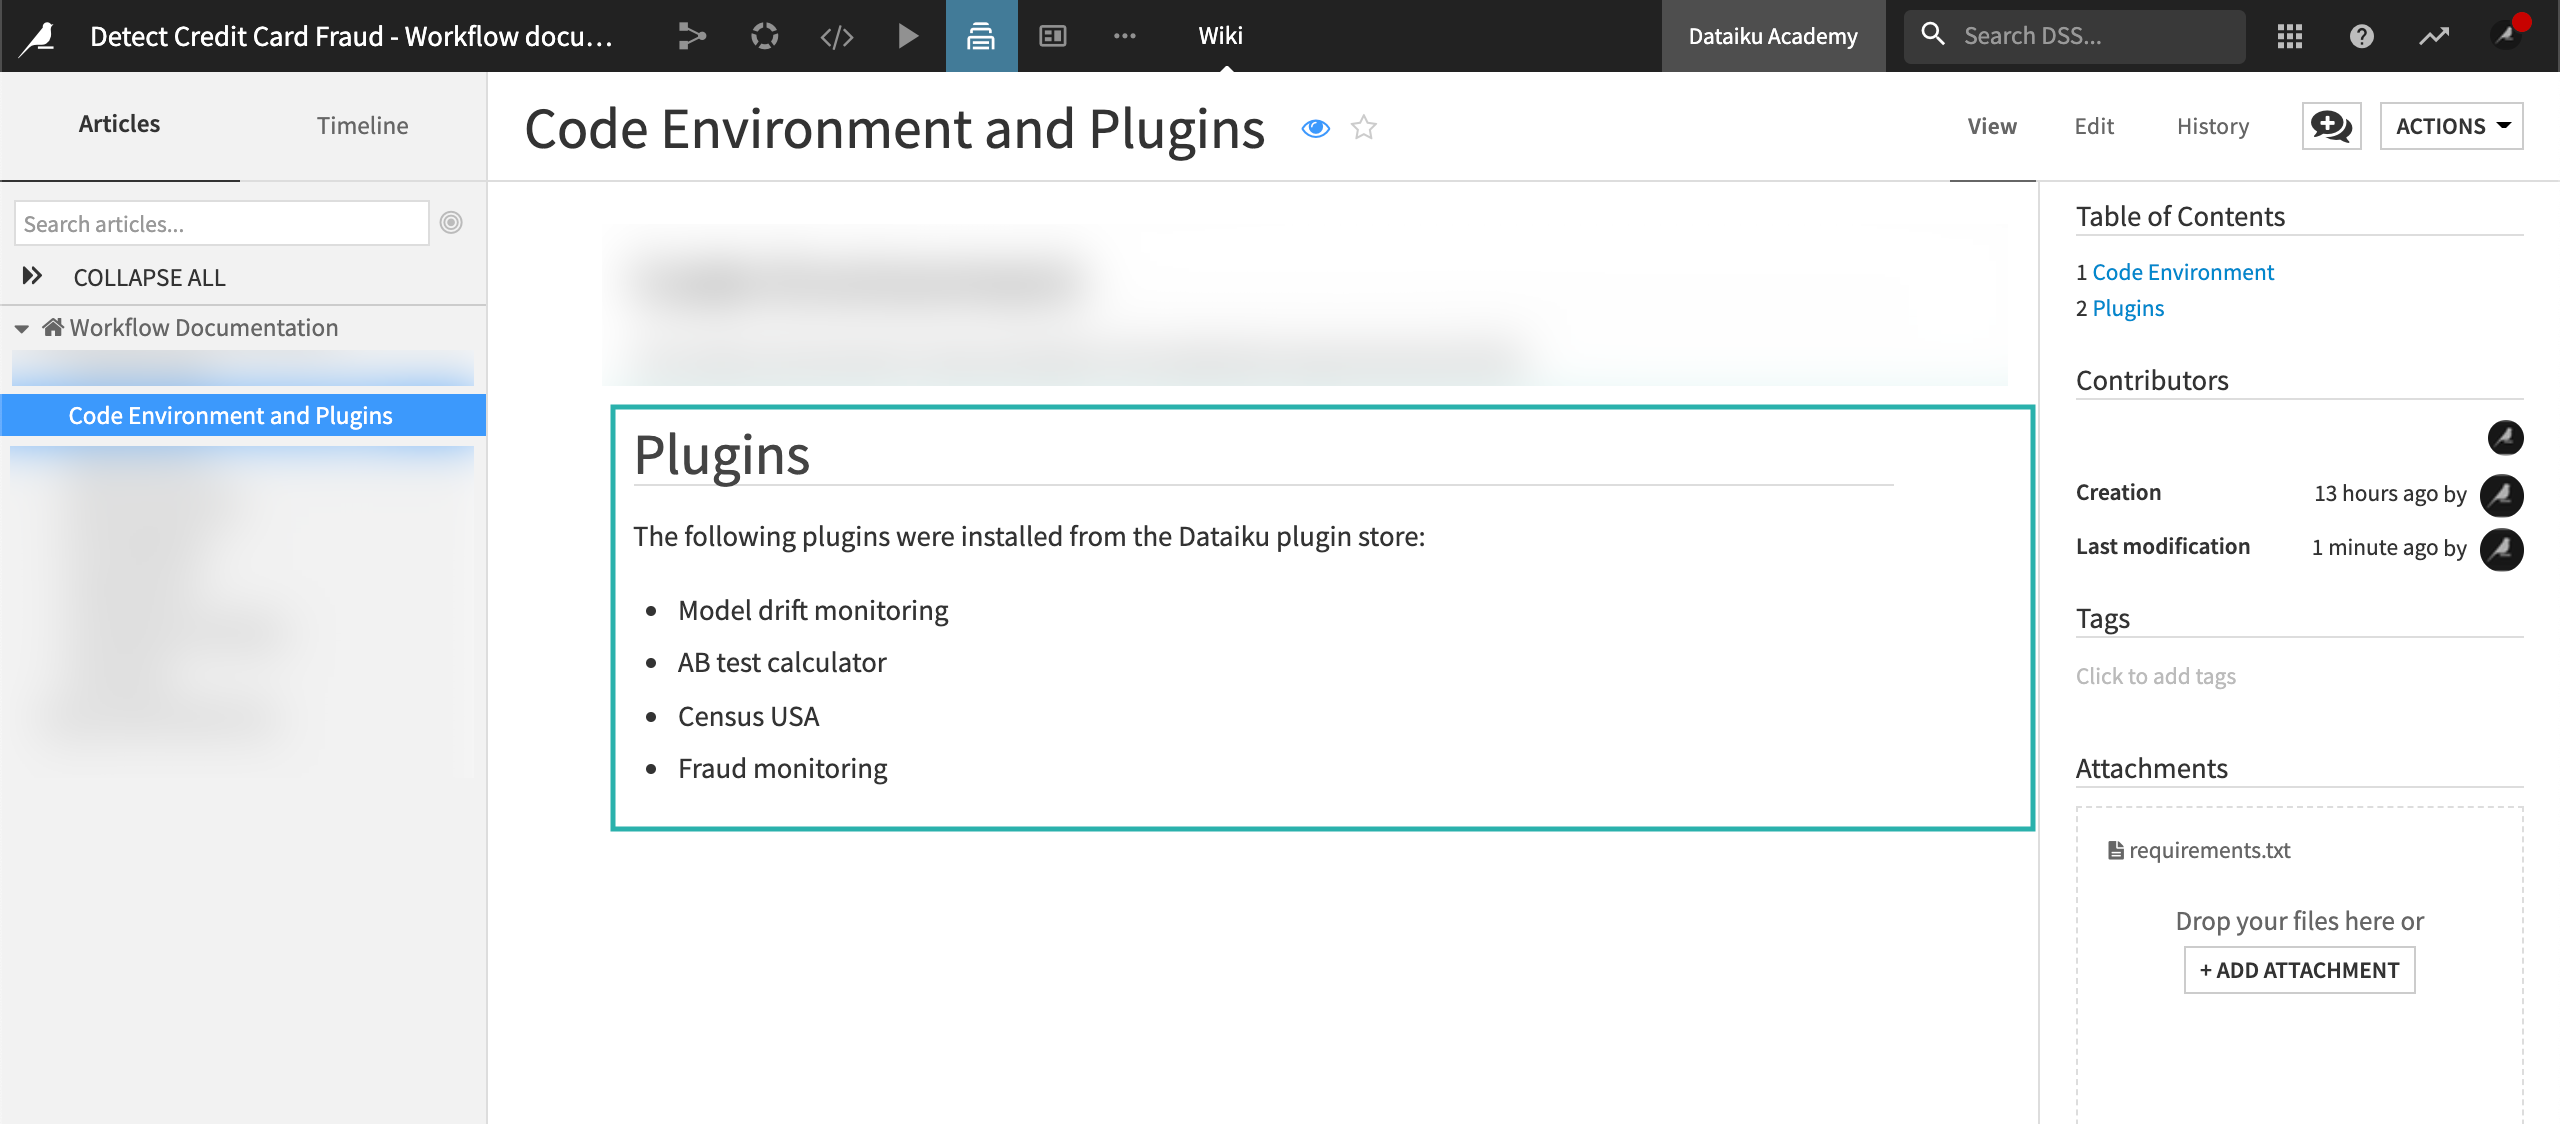
Plugins
When we use a plugin anywhere in our project, we’ll need to document it to ensure the plugin is added to the production environment.
In our Wiki, we’ve manually listed the plugins that we used to design our workflow. Our plugins were installed from the Dataiku plugin store. Datasets, recipes, processors, custom formula functions, and more can be added through plugins. This makes the use of plugins not always obvious and therefore essential to document.
Data Sources
Our Design node is our experimental sandbox for developing the project. Therefore, in our example, our workflow on the Design node is connected to the “development version” of the databases. By contrast, our production nodes need to be “ready” for production. Our production environments are connected to the “production version” of the databases.
Documentation of these independent versions of our databases is required to help avoid unexpected behavior. Unexpected behavior can happen when the databases in our development and production environments have different schemas.
Data source documentation should include the following:
Data source
Data availability
Data ownership
Schema
Column description
Data connection configuration between Dataiku and the database
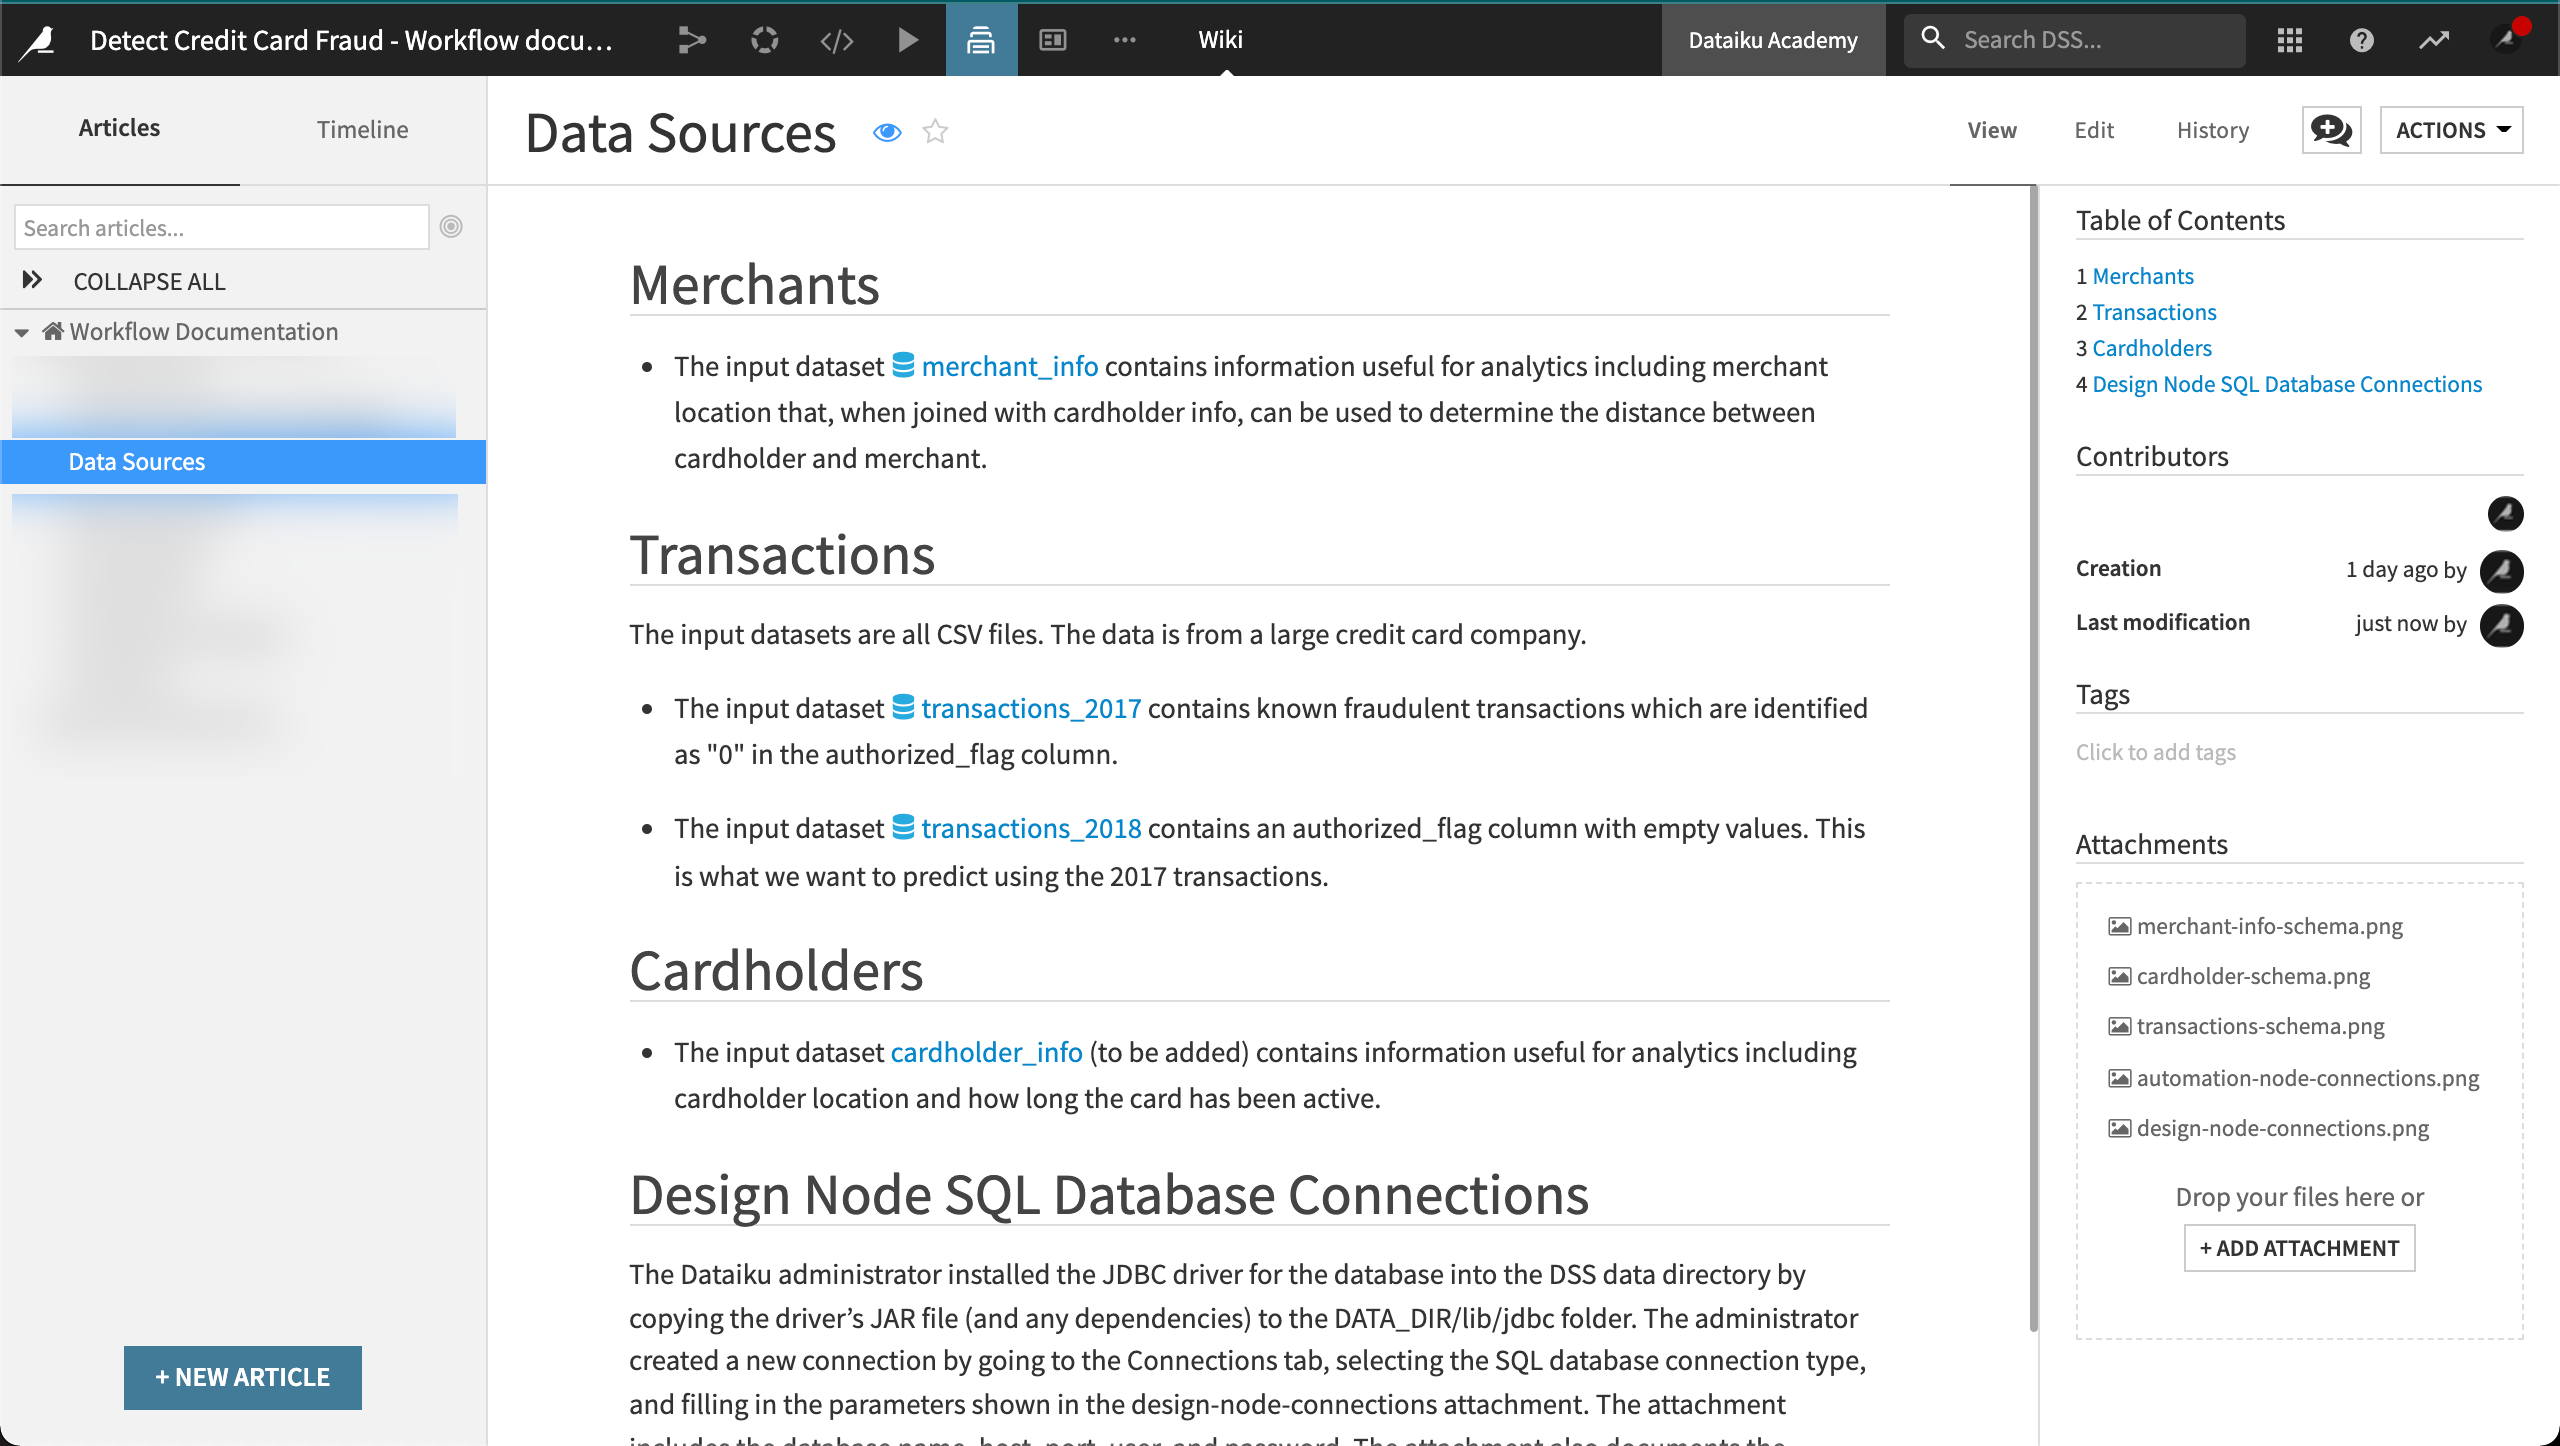
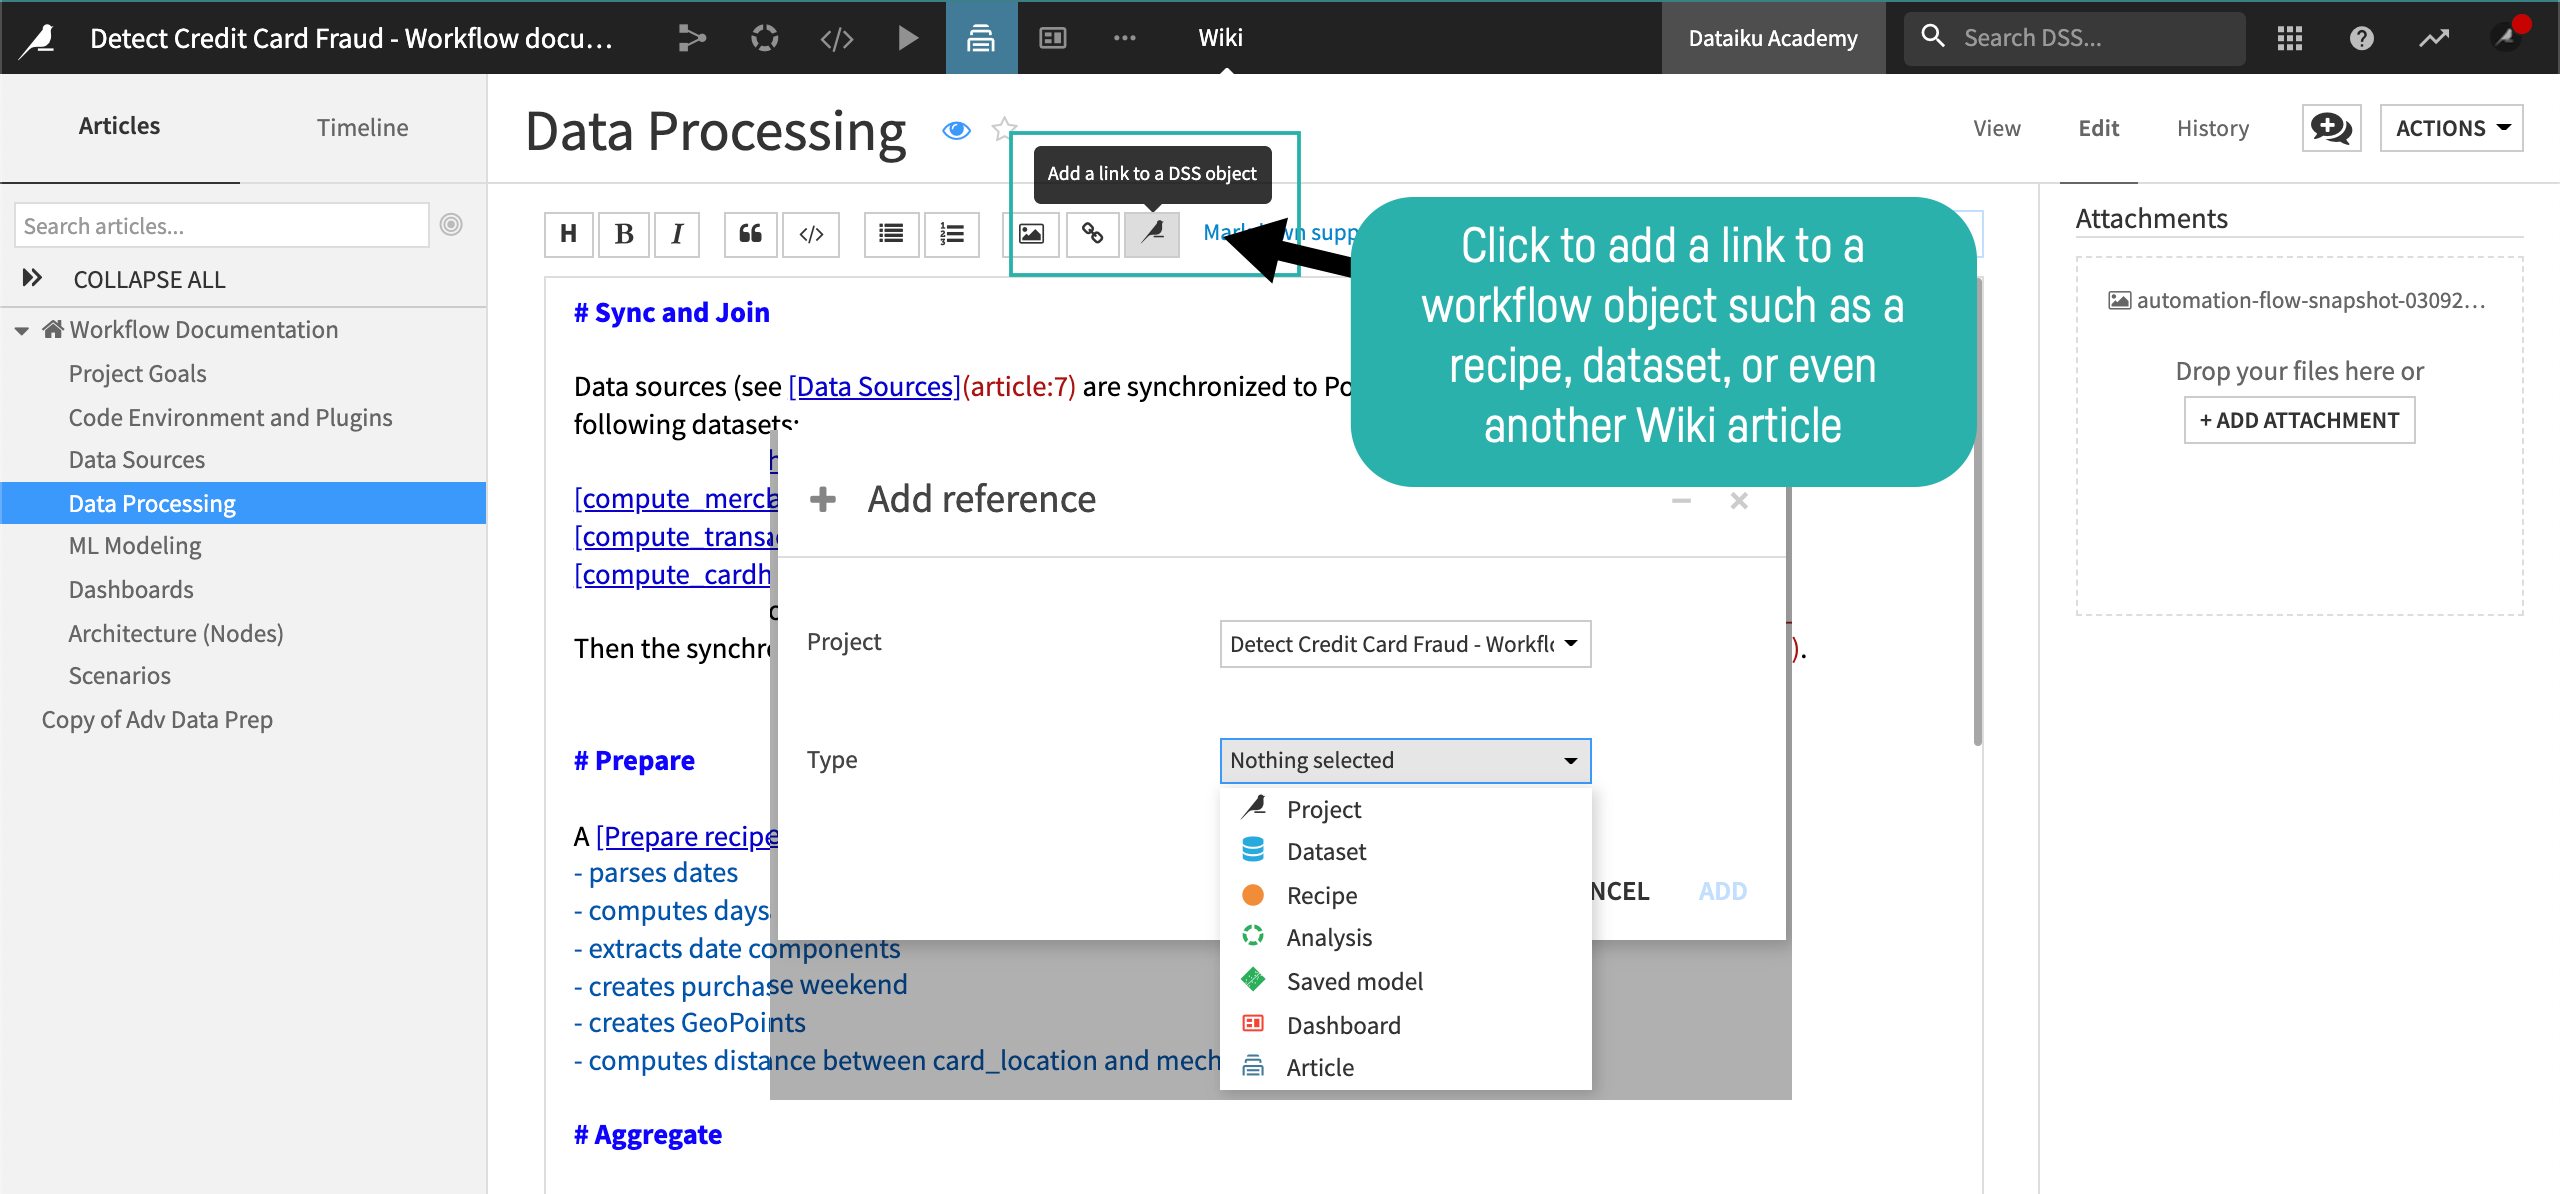
In our data sources section, we’ve created clickable links to objects in the Flow.
Note
Descriptions can be handy. You can add descriptions throughout your project, including in the project’s homepage, the summary tab of a dataset, column details, and in the code of your custom recipes. Visit Best Practices for Collaborating in Dataiku DSS for more information.
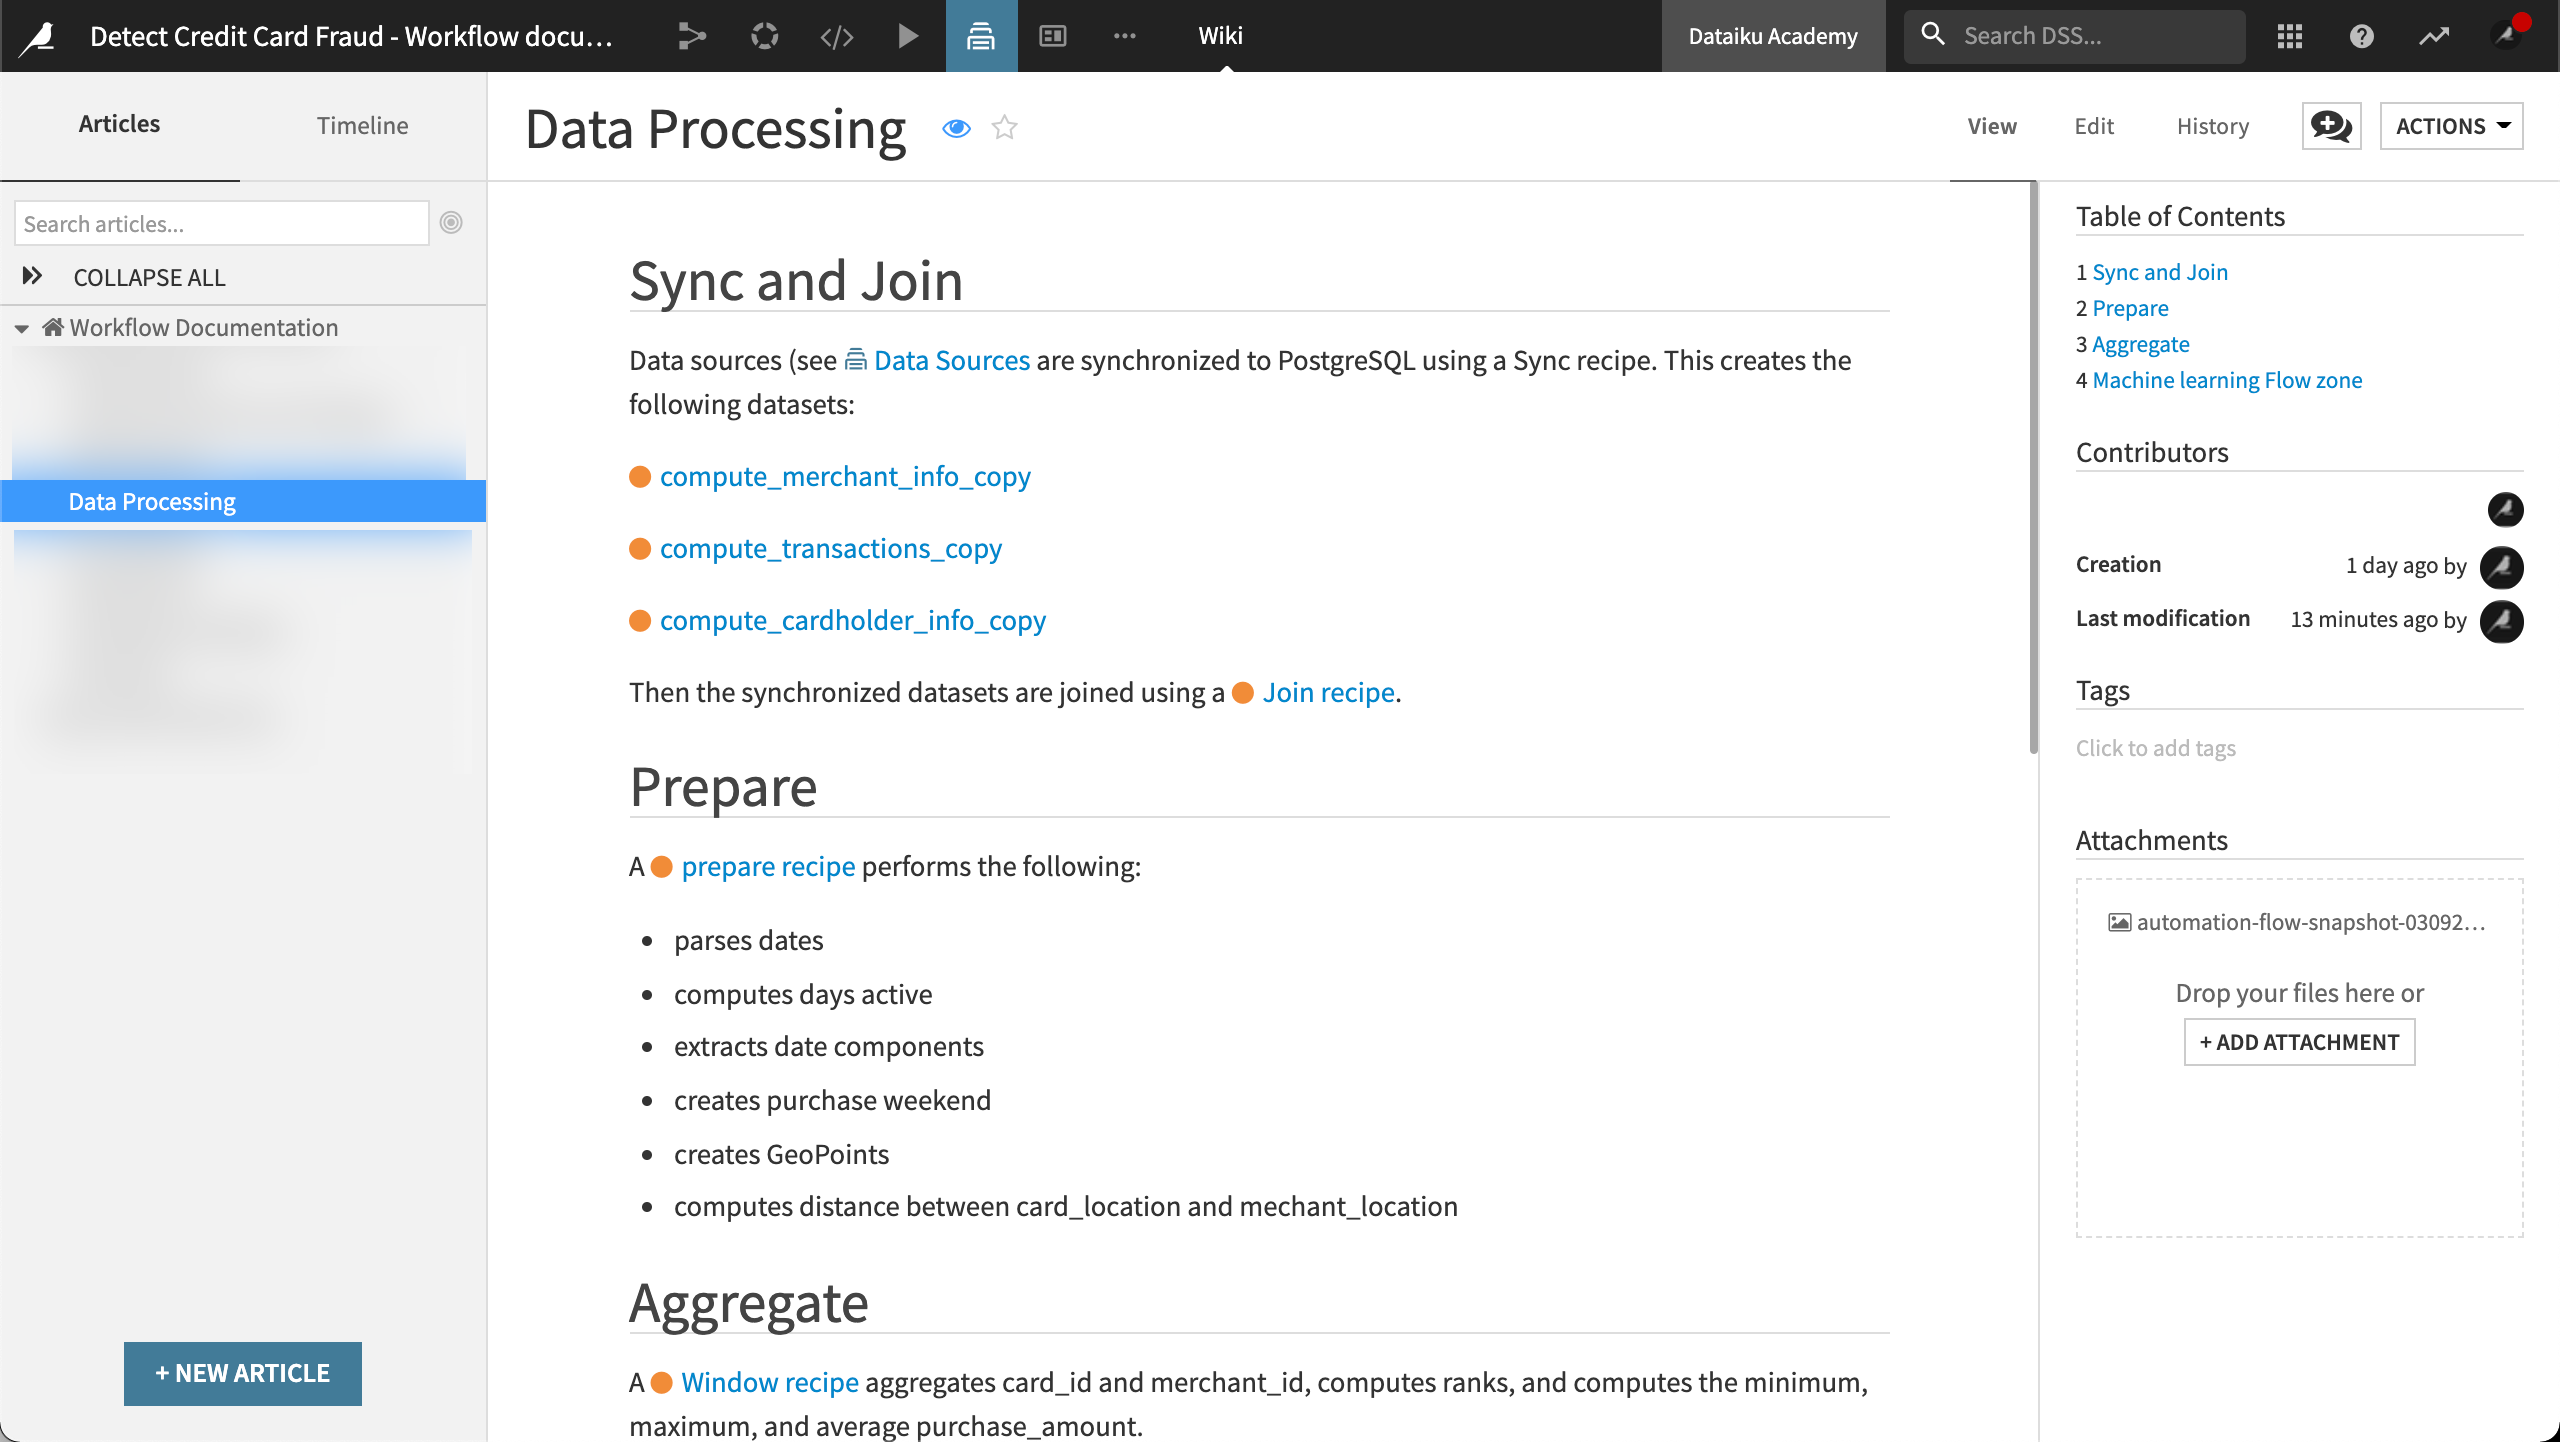
Data Processing
The time-consuming nature of workflow design involves making decisions–decisions that can become lost or forgotten if they are not documented. Documentation of dataset preparation and computation provides the necessary transparency for maintenance and improvement of the workflow. The documentation could also be used to help reproduce or restore the workflow.
Our data processing section documents the following:
How each input dataset was prepared
How each output dataset was computed
Once again, we’ve created clickable links to the objects in the Flow.
ML Modeling
We make many decisions during the development of a machine learning model. We might iterate on a model’s design many times and make multiple design choices with each new iteration. We quickly forget the decisions behind each iteration and why each model version exists.
Documentation of machine learning model design provides transparency for caretakers of the MLOps process. We can take advantage of model documentation features in Dataiku to generate machine learning model documentation. Team members can use this documentation to help with tasks such as model behavior monitoring. It allows you to prove that you followed industry best practices to build your model.
Our ML Modeling Wiki documents the model summary and the monitoring of the model’s behavior including model drift.
Model Summary
Our goal for our model summary documentation is to help stakeholders identify the following model information:
The dataset the model was trained on
What the model does
How the model was built, tuned, and validated, including which features were selected

To document our model, we used the Model Document Generator to generate a Microsoft Word™ .docx file. We then attached the file to the Wiki.
To generate a Model Document for the Active model:
Click on the model name from the Result tab.
Under Actions, click Export model documentation.
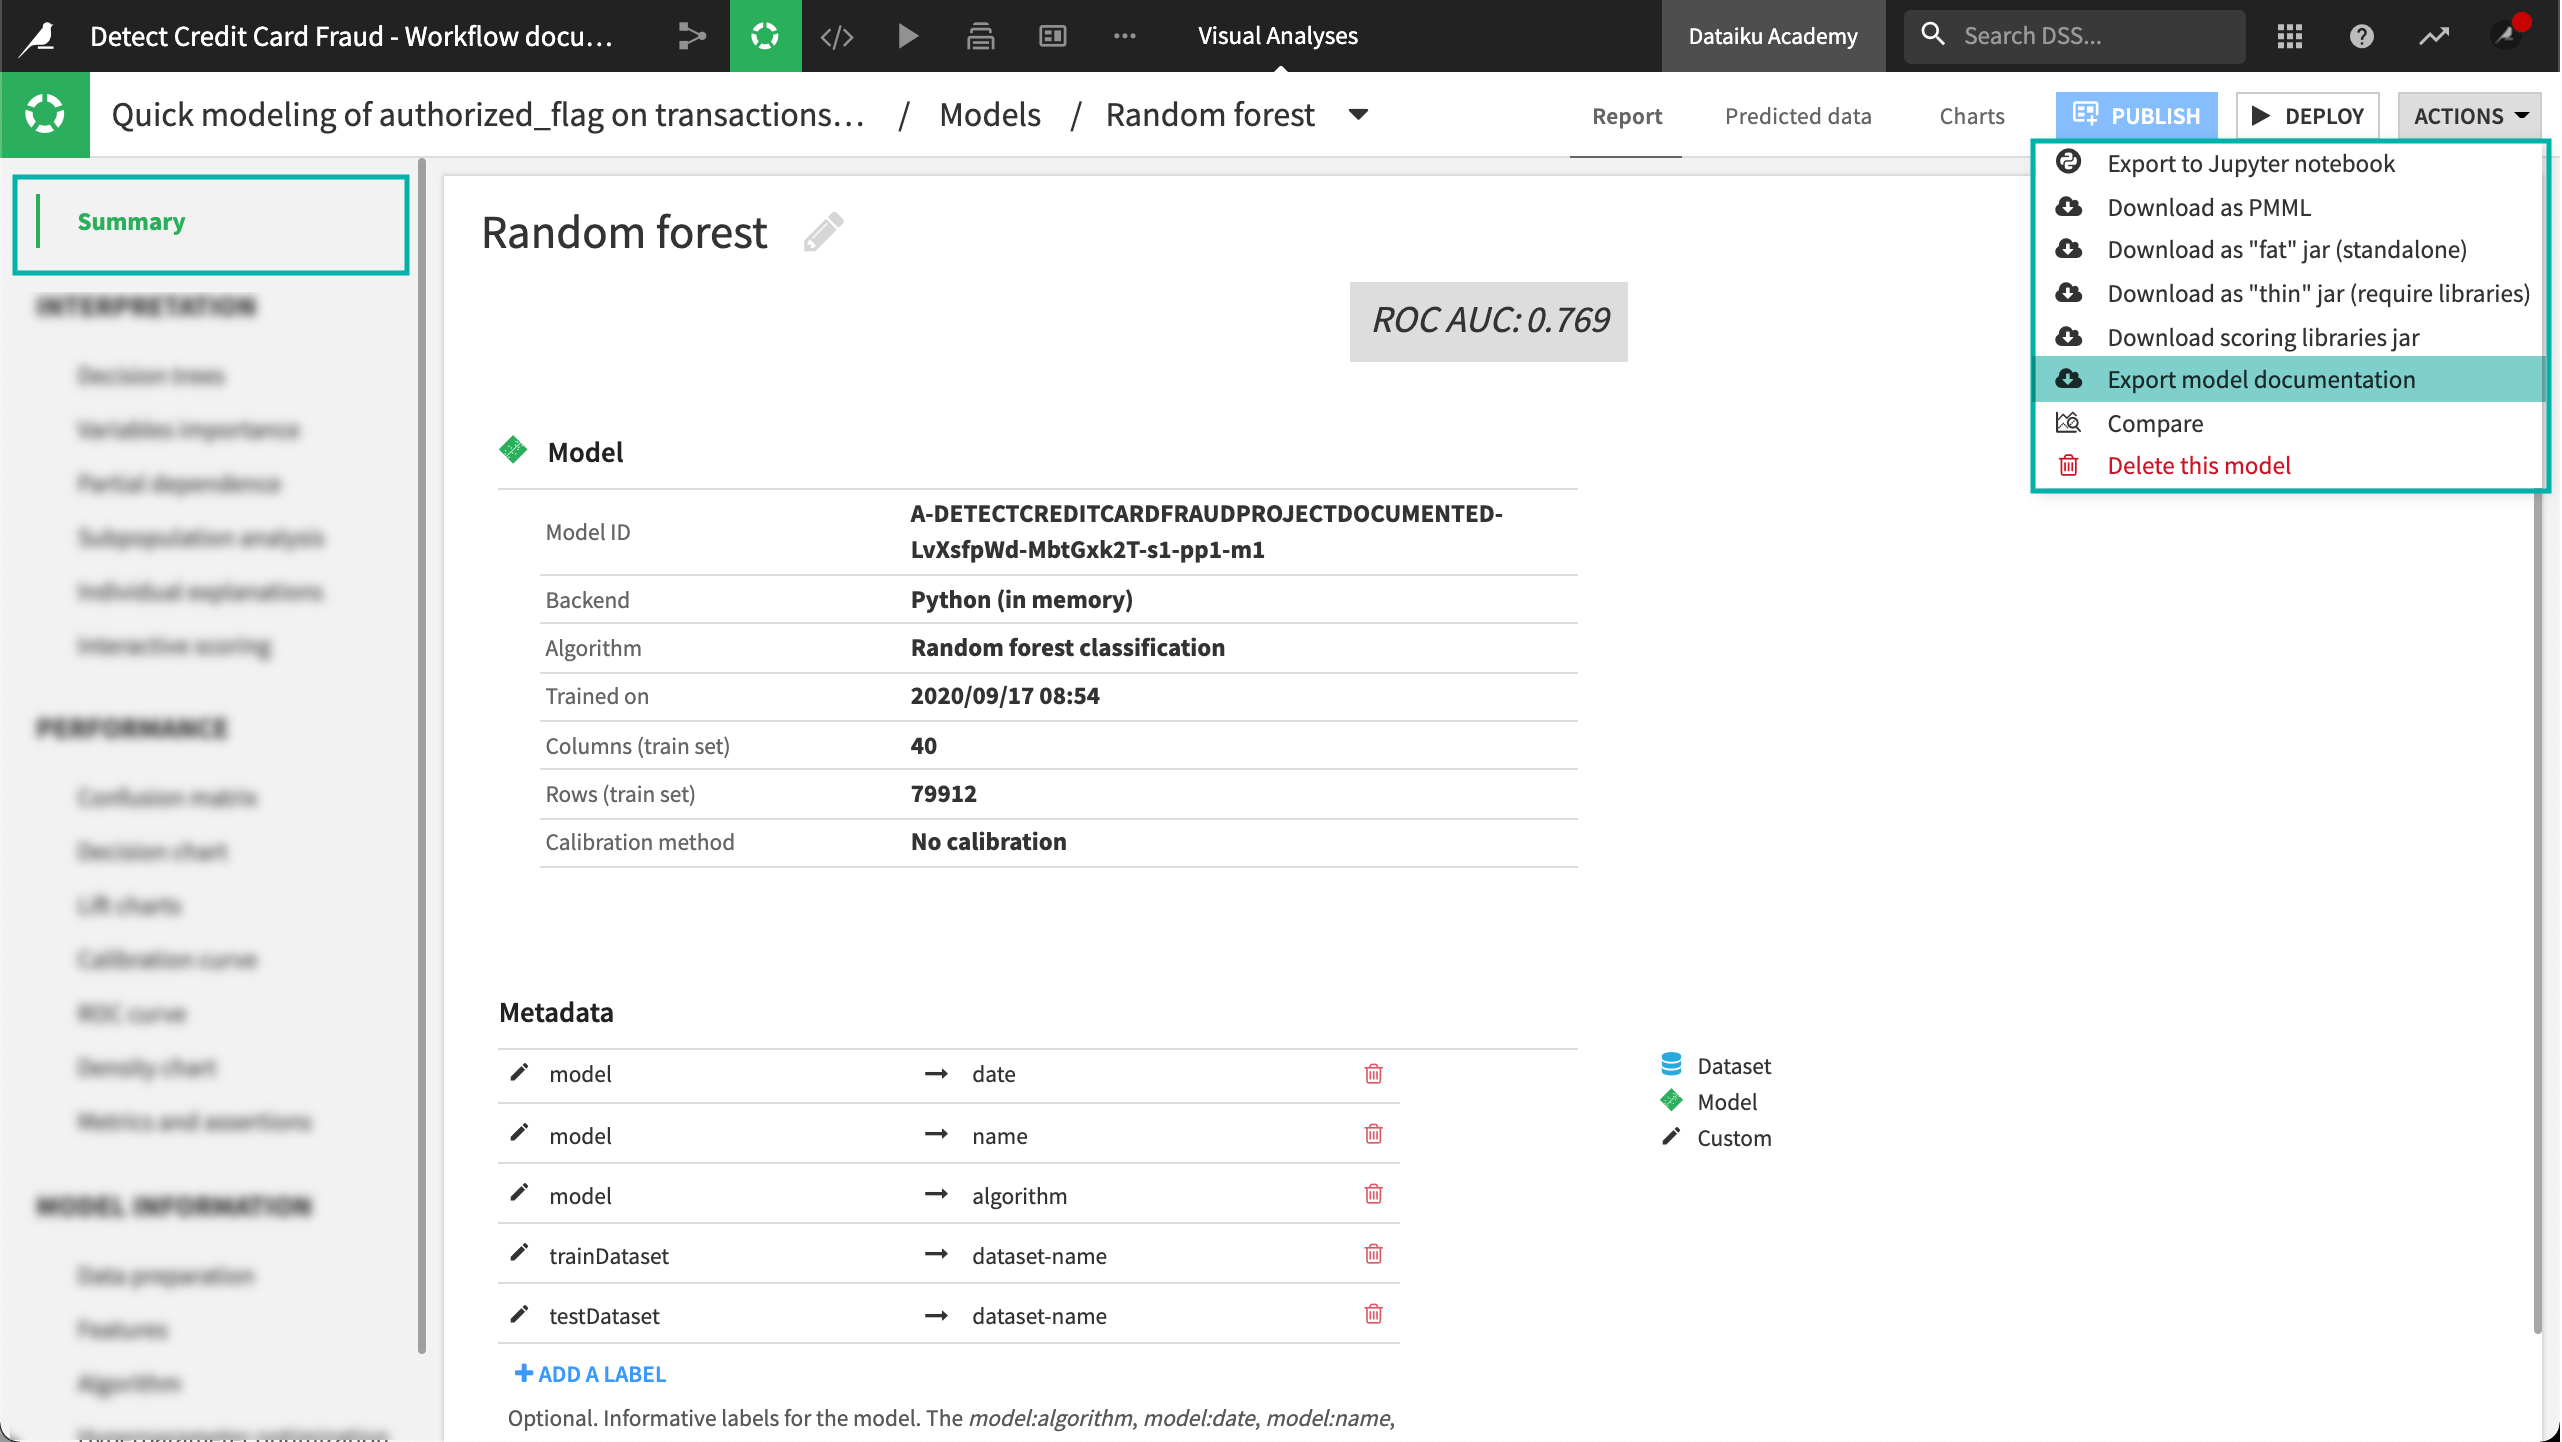
Click Export to export using the default template.
Click Download to download the file.
Note
You can also create your own template or download sample templates.
Dataiku generates the model document. The file includes the following sections:
Executive Summary * Methodology * Results
Methodology * Problem Definition * Data Ingestion * Model and Feature Training
The Model and Feature Training section includes pre-processings, tested algorithms, selected model, alternative models, hyperparameter search, and weighting strategy.
Evaluation and Selection
Experiment Results * Selected Model * Alternative Models
Selected Model Results * Selected Model Metrics * Selected Model Performance
Note
To use the Model Document Generator, Dataiku must be set up to export images. For more information, visit Setting Up DSS Item Exports to PDF or Images.
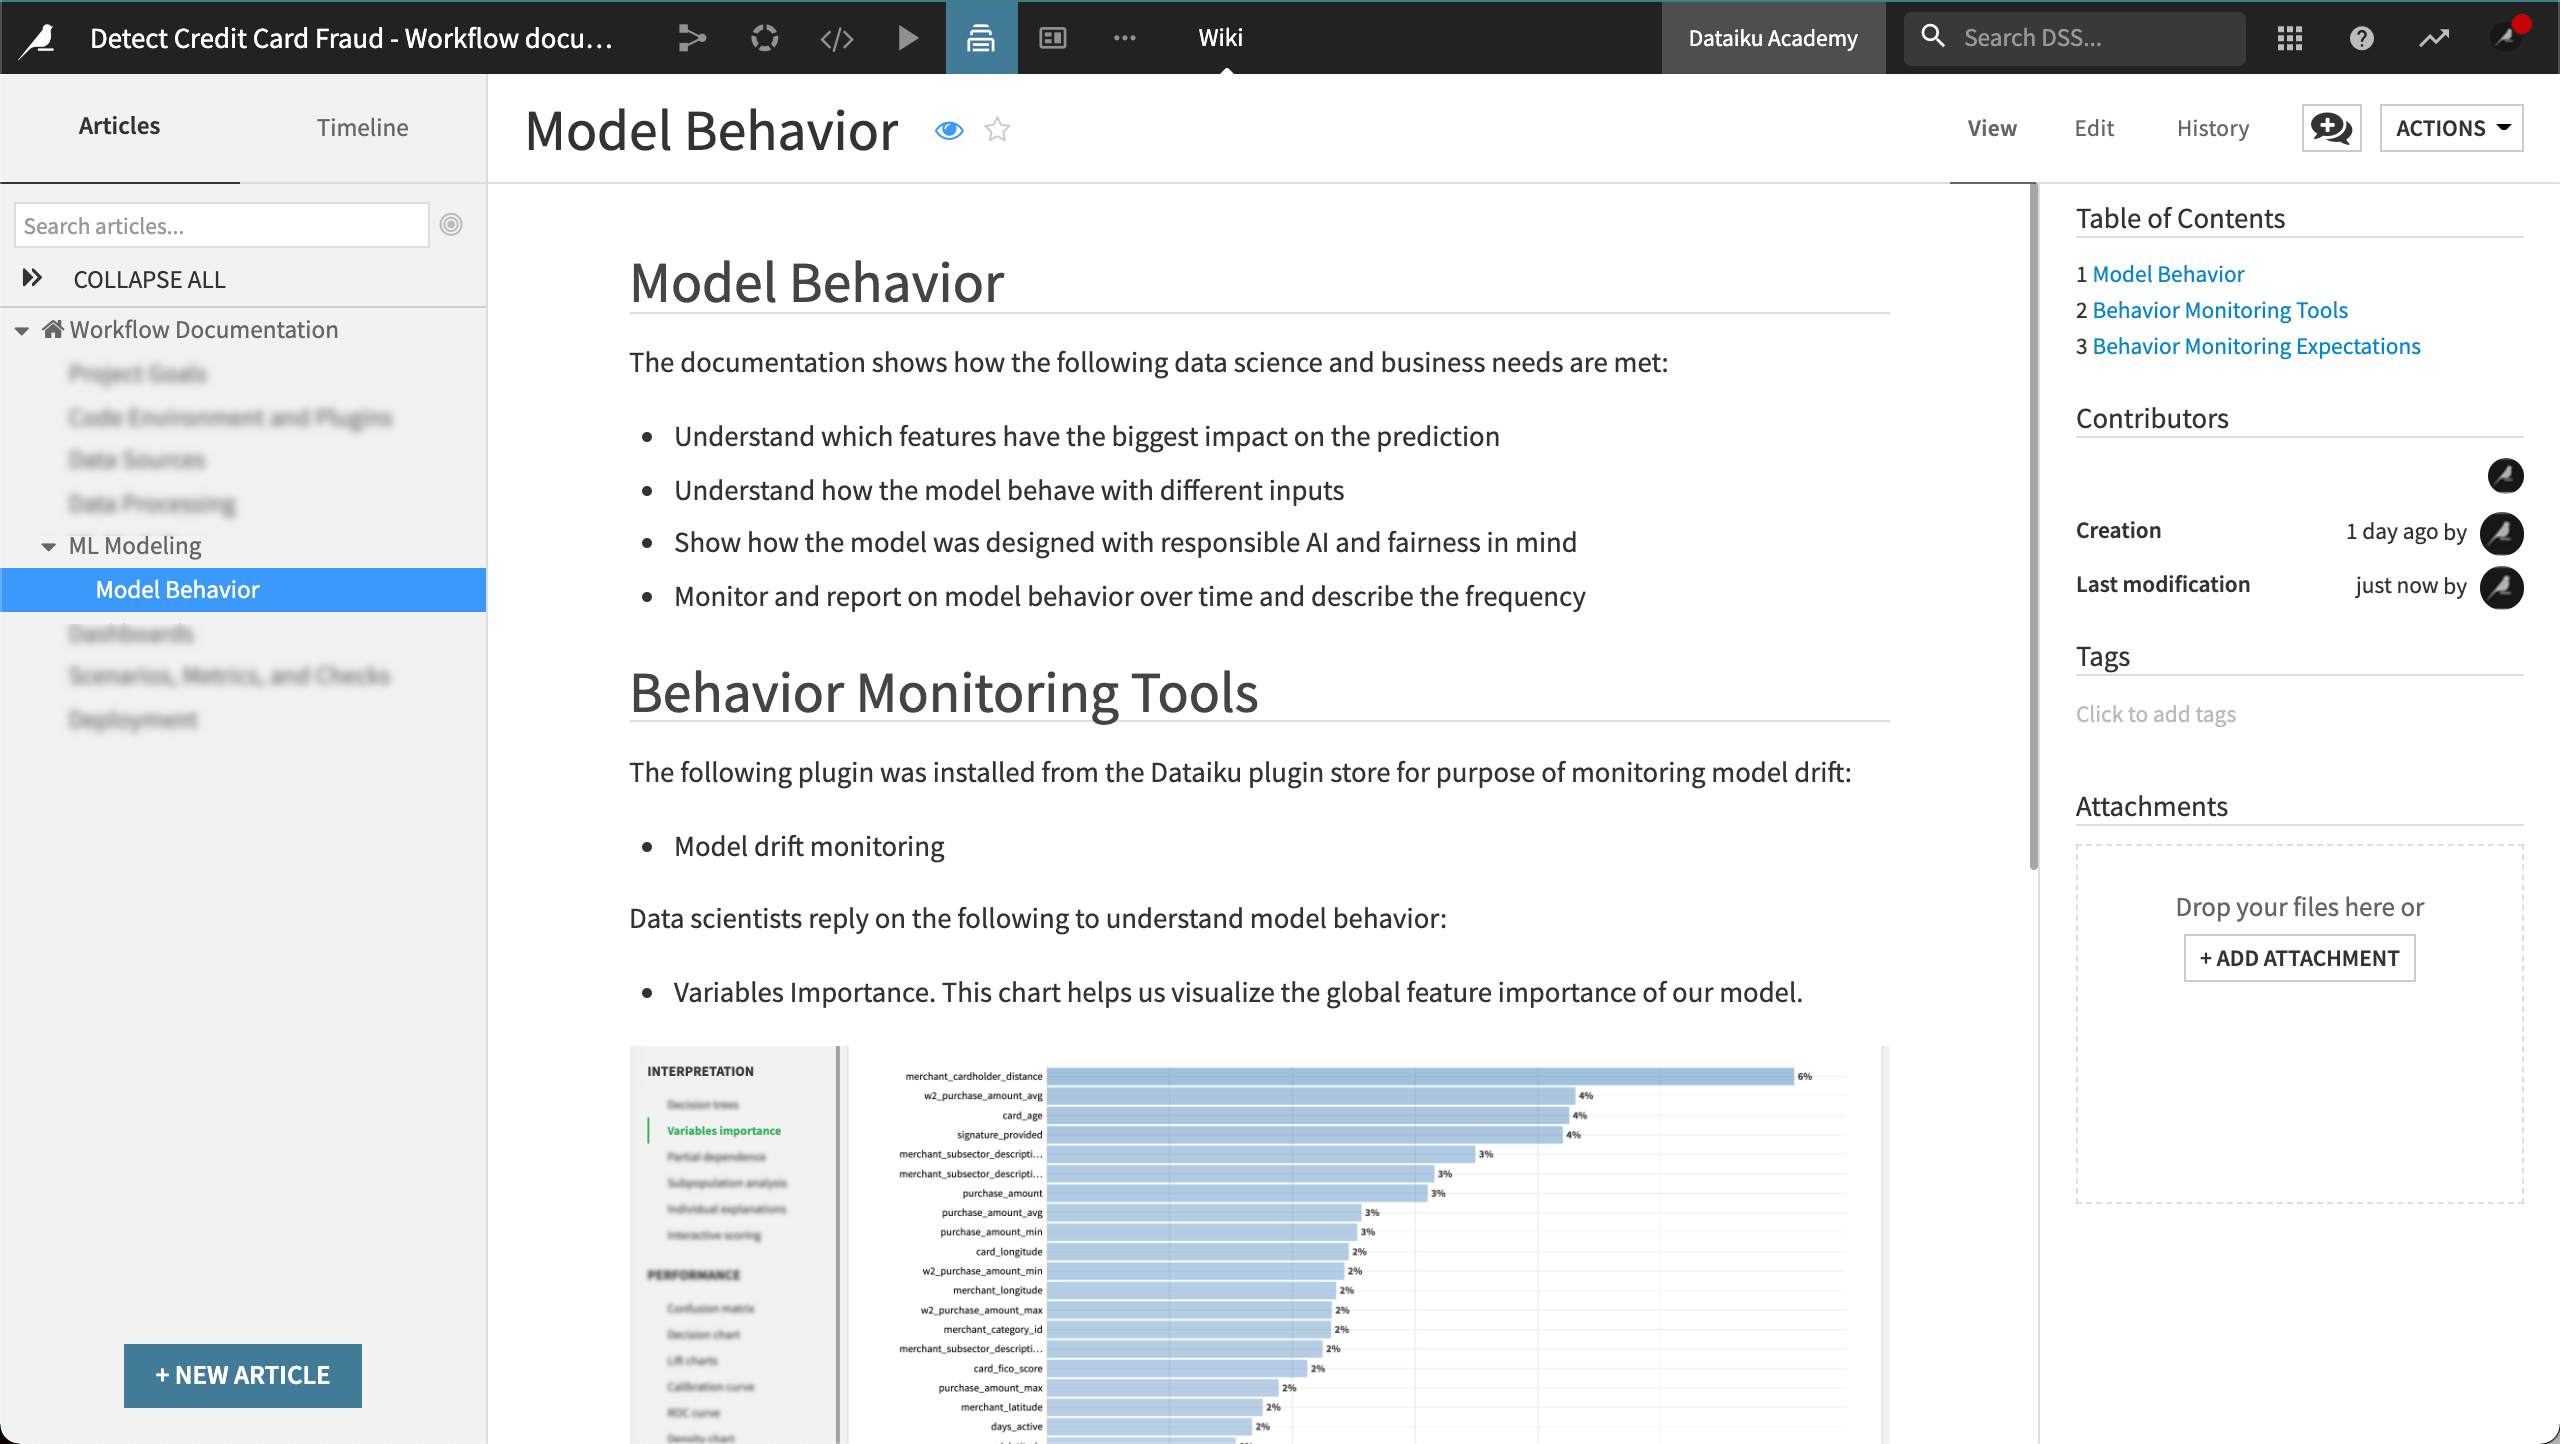
Model Behavior and Monitoring
Our goal for our model behavior documentation is to help stakeholders identify the following model information:
Which features have the most significant impact on the prediction?
How does the model behave with different inputs?
Was the model designed with responsible AI and fairness in mind?
If new data is significantly different from the data used to train the model, the model will likely no longer perform well. Therefore, stakeholders will also want to know how we plan to monitor model behavior, including model drift.
In addition, our documentation describes the reason for monitoring model behavior. This includes the following:
Model monitoring frequency
Expected performance drift (in metrics)
Expected prediction drift
We’ve also documented that our project uses a specific plugin to examine if new data waiting to be scored has diverged from the training data.
Dashboards
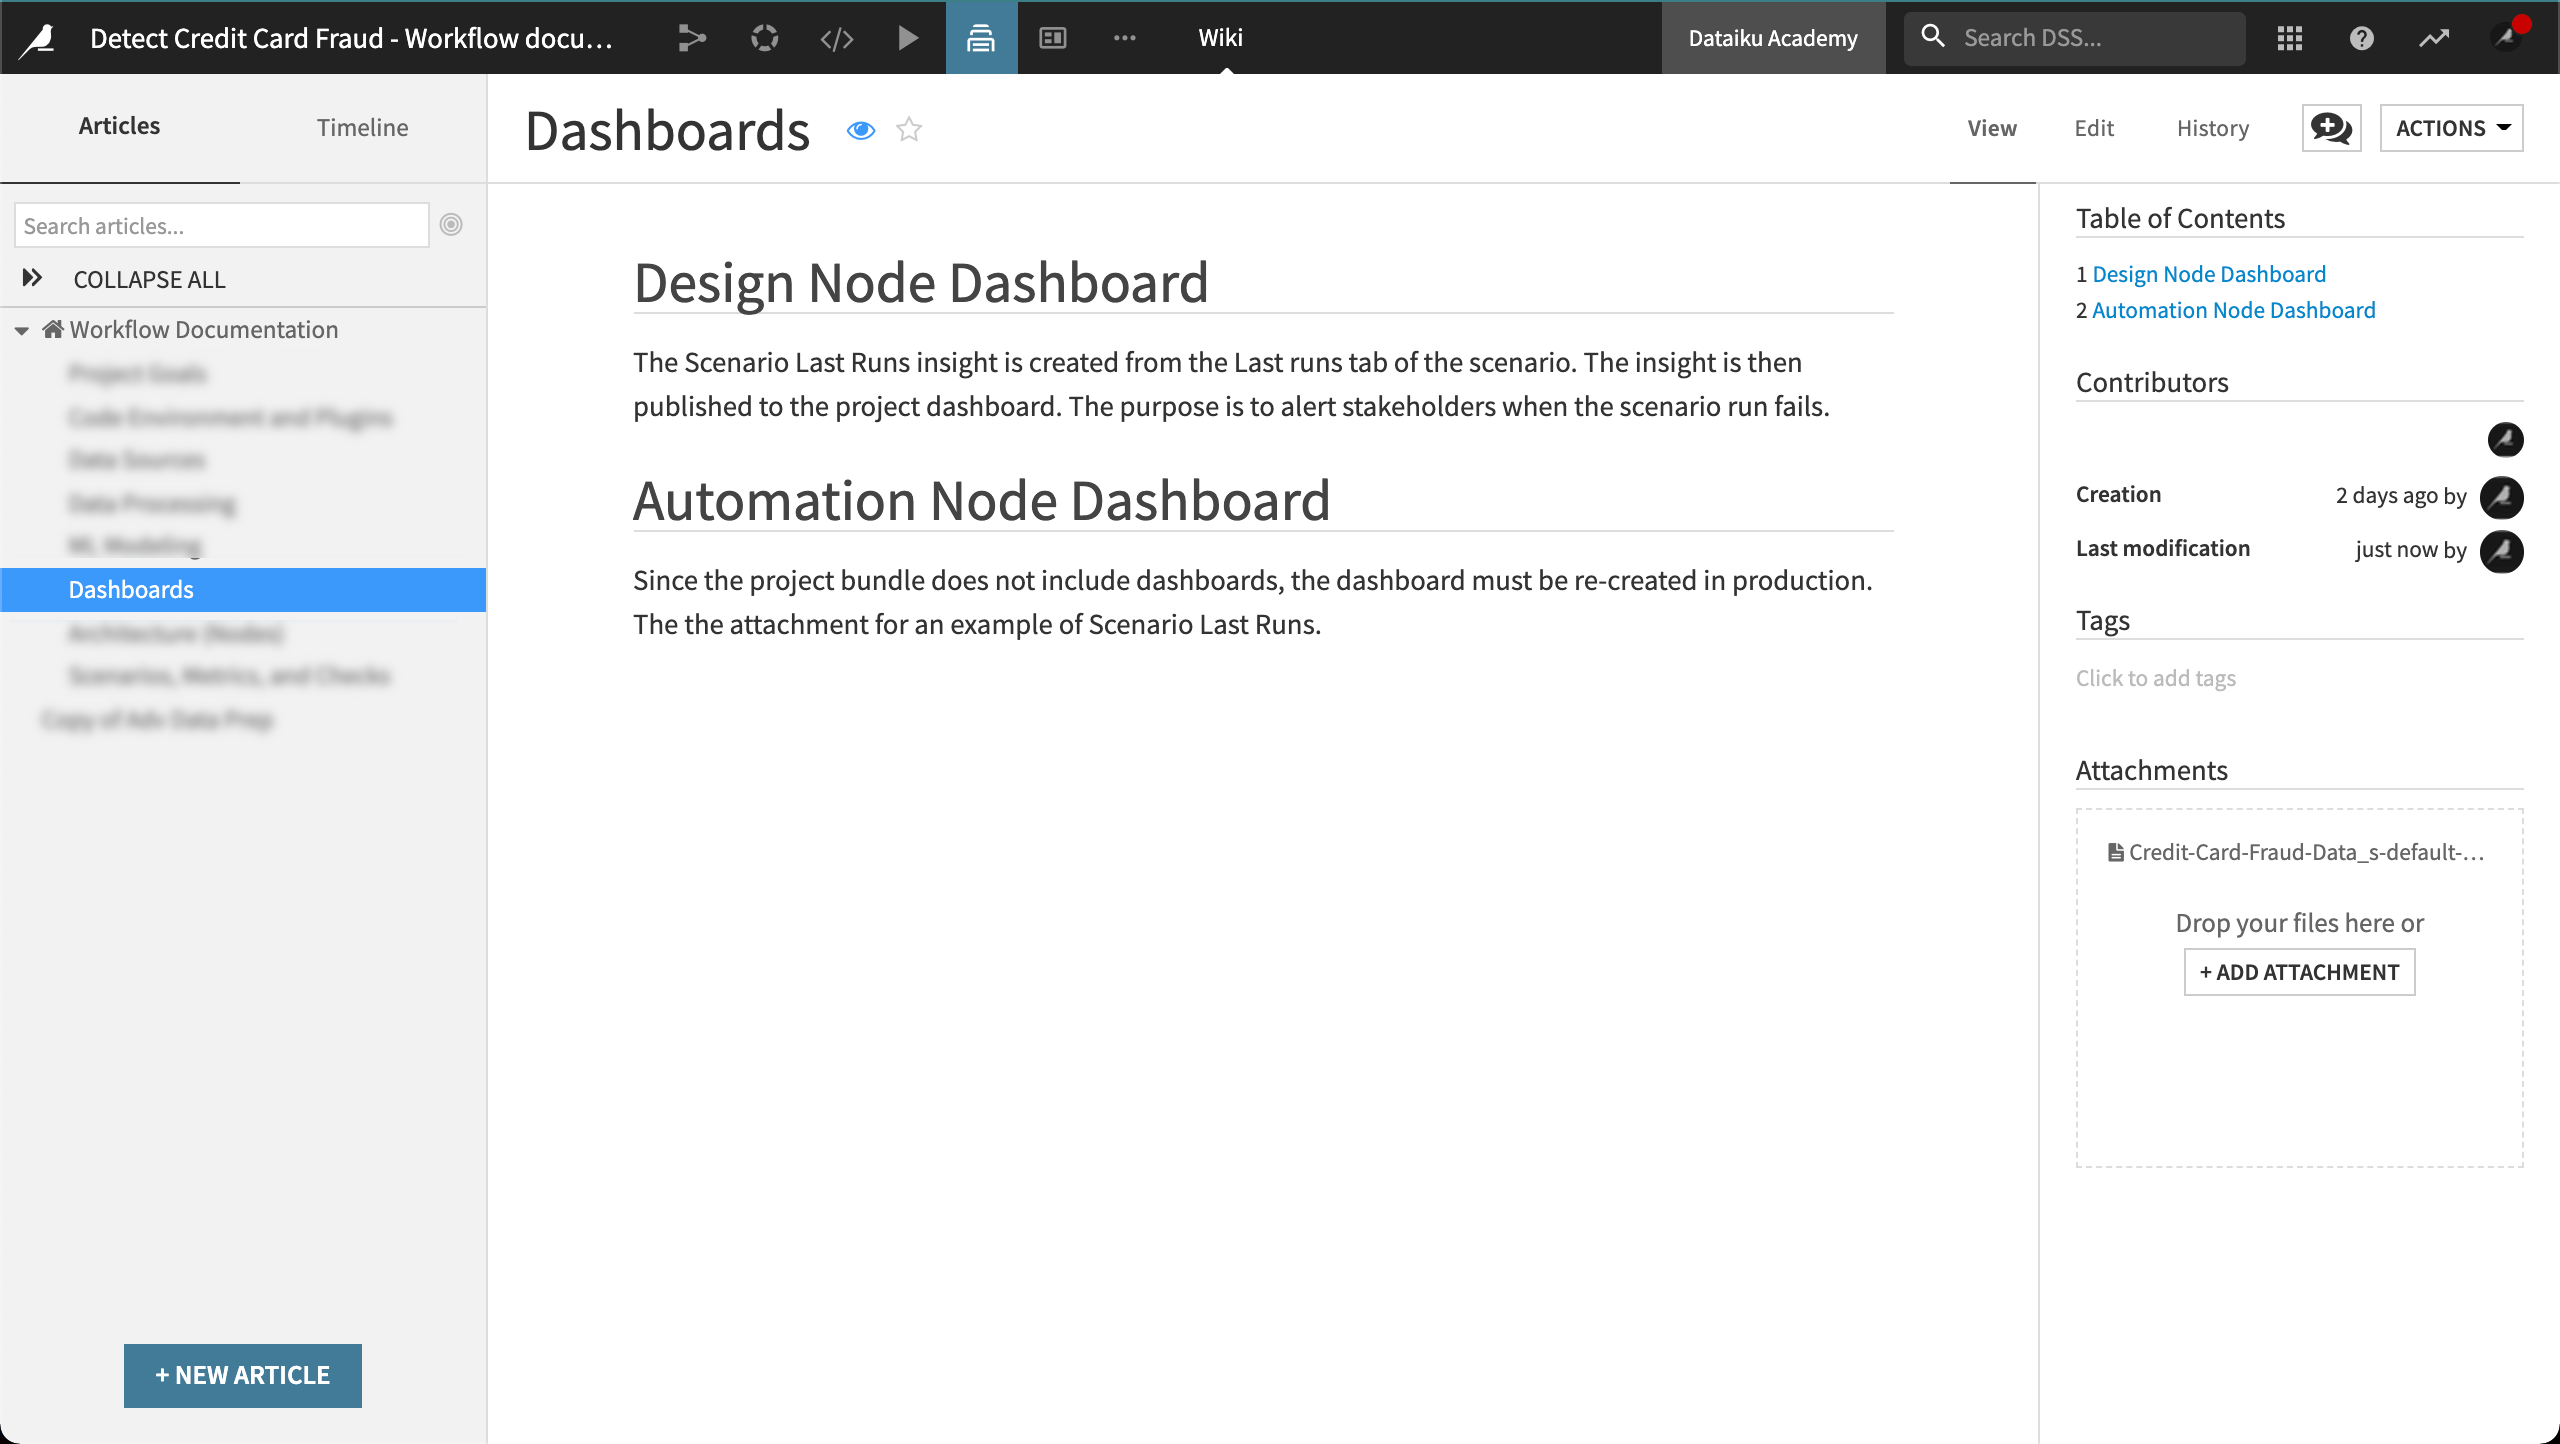
You can document your dashboards.
In our example, we created an insight from the Last runs tab of our scenario and added it to the project dashboard. We repeated this process for the production project on the Automation node.
The dashboard displays a report of the scenario that runs daily, letting stakeholders know if the scenario run was successful.
Our Dashboards section includes the following information:
Dashboard title and purpose
Steps to create the insights published to the dashboard
Whether or not dashboards are re-created in production
Scenarios, Metrics, and Checks
Scenarios are the basis for production automation. In our example project, one of our goals is to automatically compute metrics, run checks, and score new credit card transactions on a daily basis. To help stakeholders maintain this automation throughout the MLOps process, we’ll document each component of our scenario, and the decisions and rationale behind each component.
In our example, we documented the metrics and checks required for the scenario to run. This includes computing metrics and checks to verify the data quality of our datasets and includes documentation of custom SQL query probes.
We’ve added the following information to this section of our Wiki:
A diagram of the Flow
Metrics and checks
Scenario settings and steps
Scenario trigger
Scenario Reporter including the email template
In our use case, we included the reason for the daily scenario trigger.
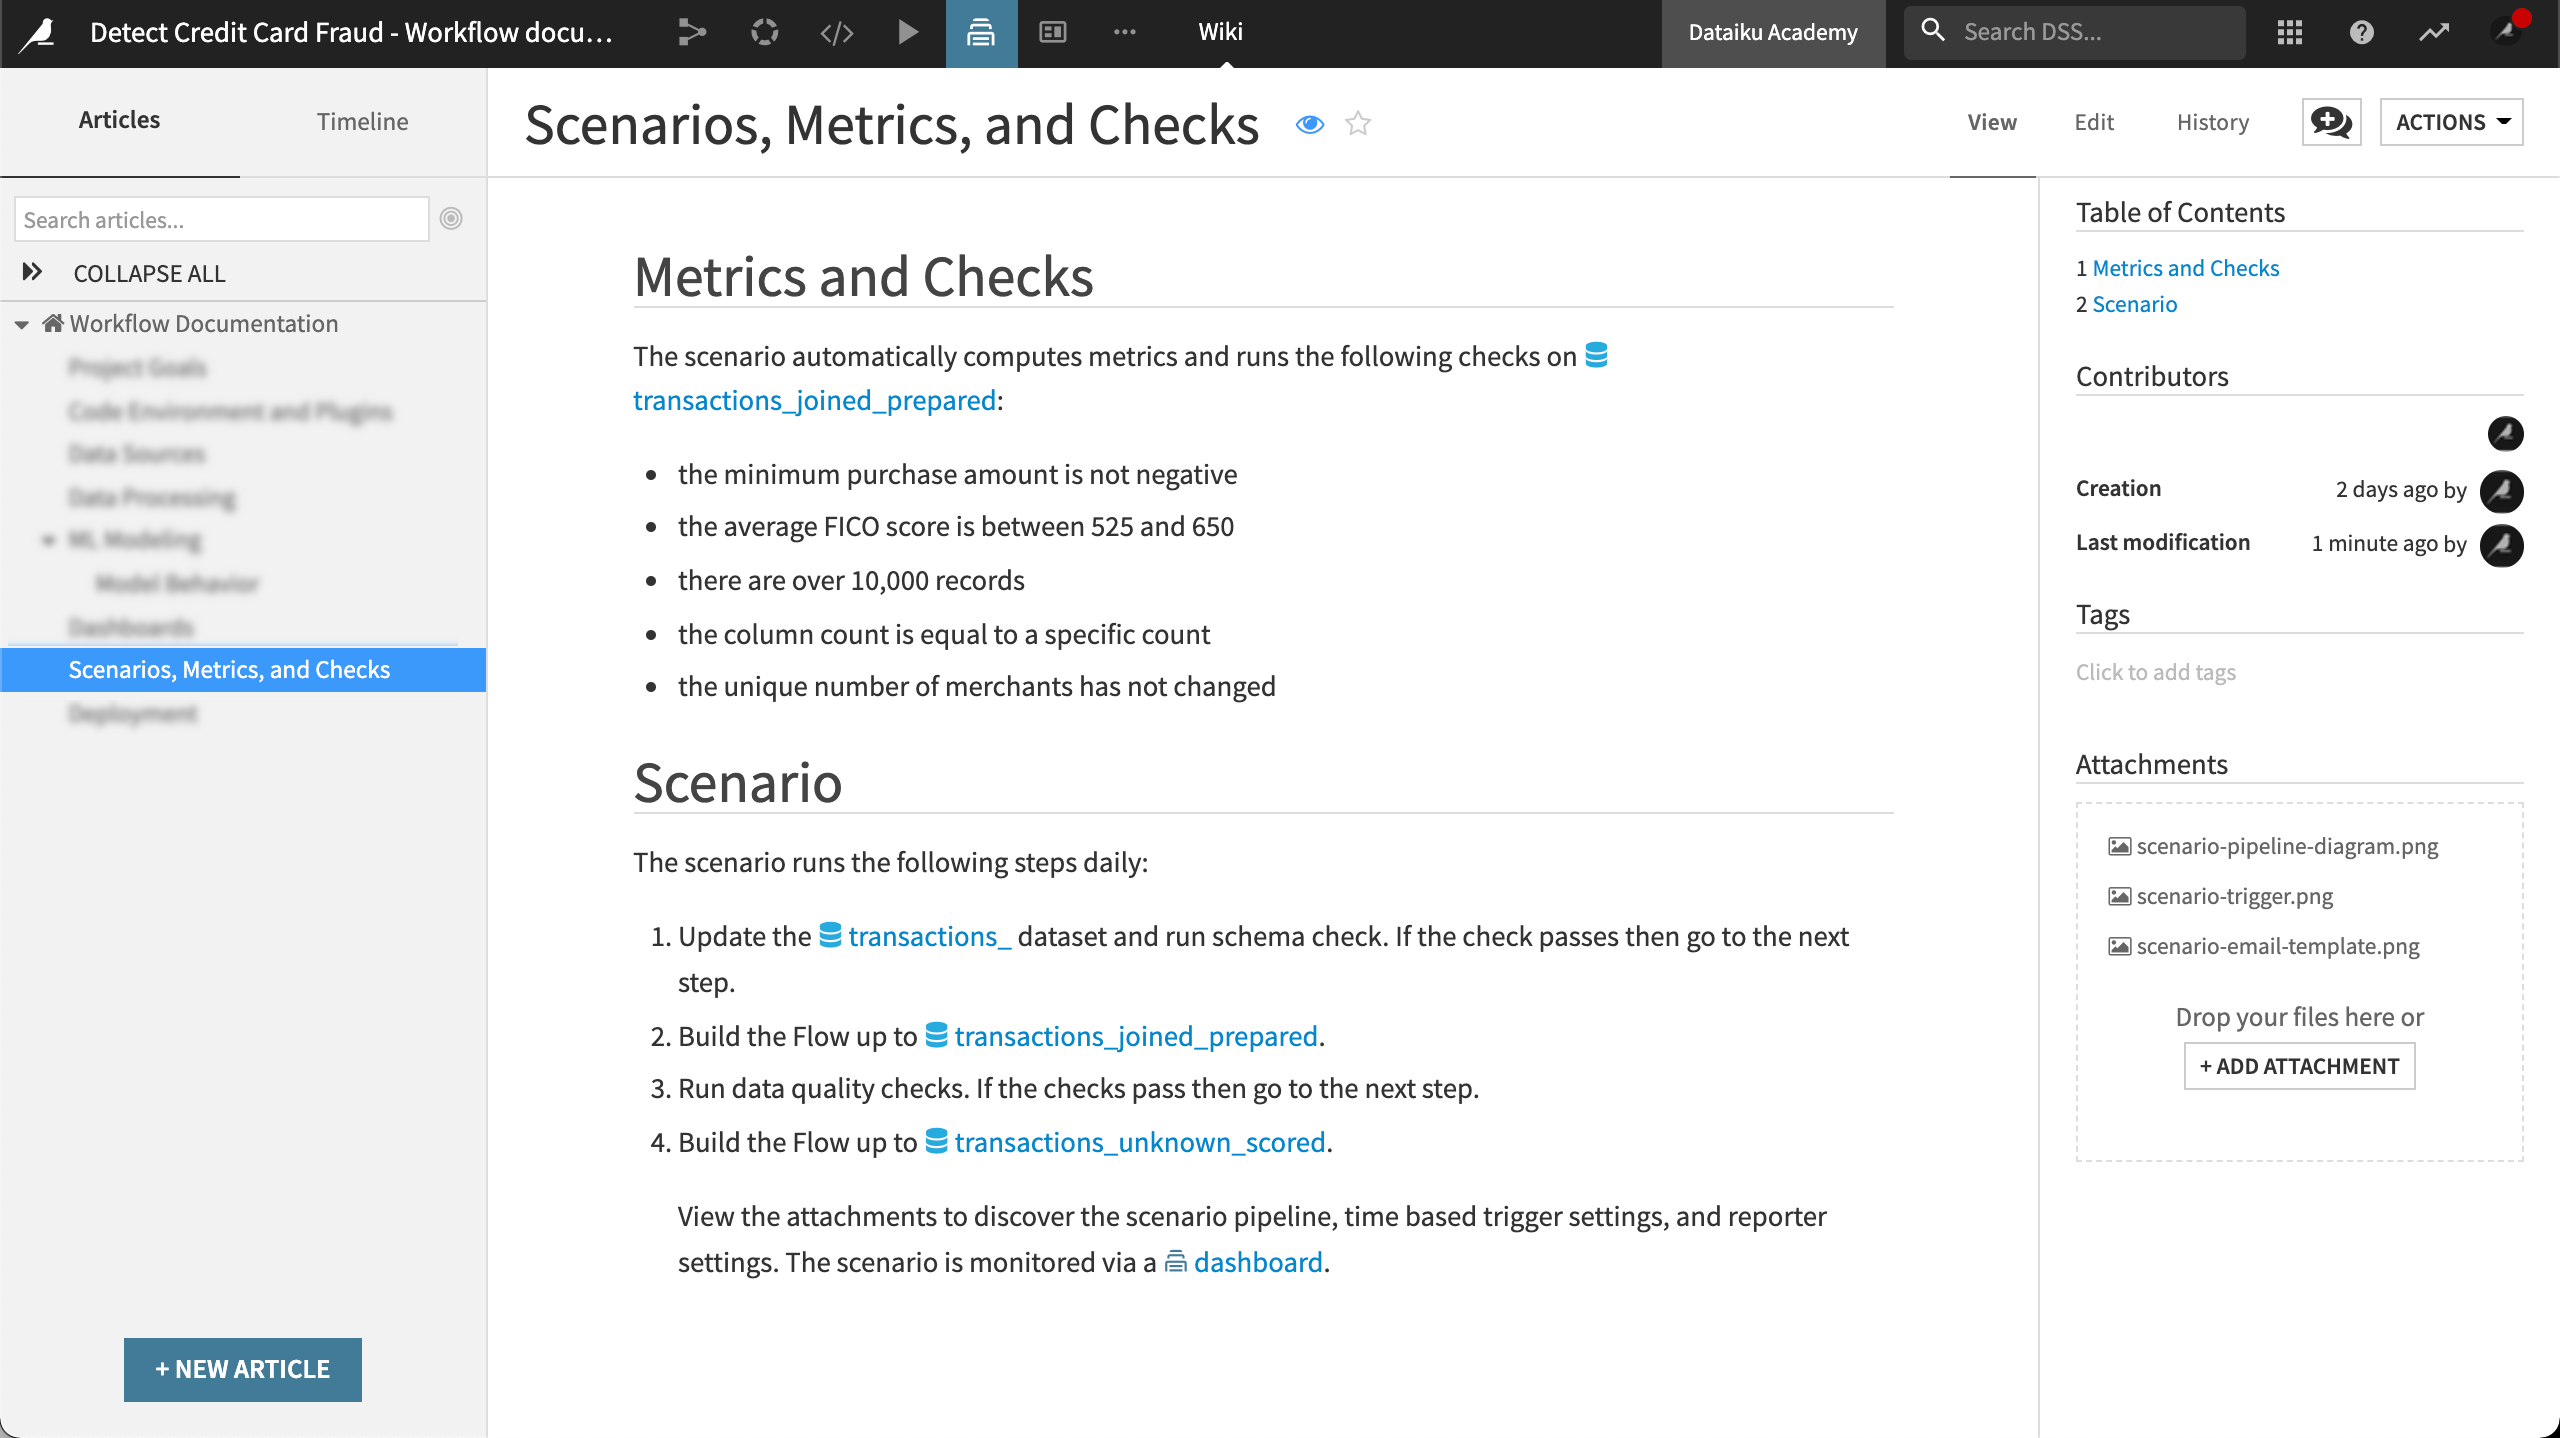
We can also document if the scenario’s triggers are enabled, disabled, or left alone when activating a bundle on the Automation node.
Other information we might want to include in this section is documentation of our project variables and how they are used.
Deployment
Moving into production is an iterative process. There are many reasons for documenting deployment. One reason is being able to roll back to a prior version. For example, stakeholders will want to understand how the project bundle is deployed to the Automation node and how it is versioned.
For our sample use case, we’ve included the following deployment documentation:
Deployer infrastructure description
API Deployer
API services
Naming conventions
Versioning
Project Deployer
Project bundles
Naming conventions
Versioning
Project Version Control
Metadata, including information about the last change
Deployer Infrastructure Description
In this section of our Wiki, we’ll document the configuration of the nodes, including the connections, and the deployment of our project via the project architecture. This includes our API service, deploying the service to the API node, our project bundle, and deploying the bundle to the Automation node.
The parent article describes the infrastructure, while the child articles describe the API Services and Project Bundles.
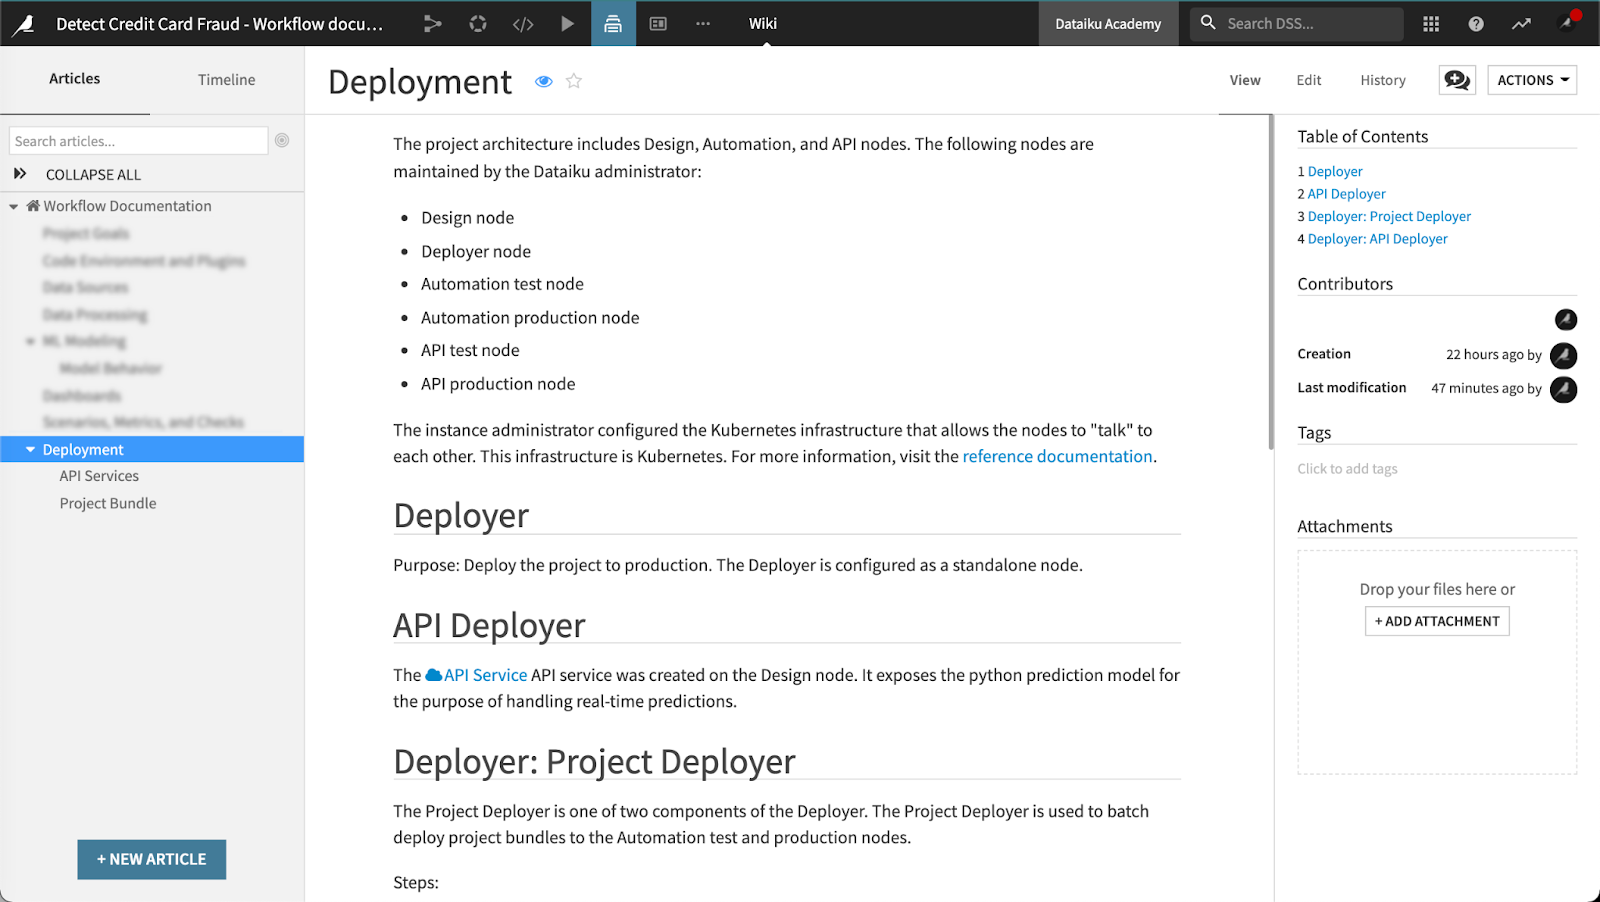
API Deployer
Our fraud prediction model is deployed as a prediction endpoint on the API node. The bank uses this endpoint to monitor transactions in real-time and decide whether to authorize them or not. It is a good practice to document (a) the API deployment infrastructure and (b) how the API service is created and deployed.
Since models degrade over time, we will eventually replace the deployed model with a new version. In some cases, we may even want to roll back to a previous version, such as when we determine the current model is not performing as well as a previous model.
This section of our Wiki includes the following information:
A link to documentation about the API infrastructure
API services
How the services are deployed and versioned
We have also included a link to the model monitoring section of the Wiki as a cross-reference.

API services documentation can also include the following details:
Endpoints and their URLs
Naming conventions
Test queries
Deployment process
Versioning information and history
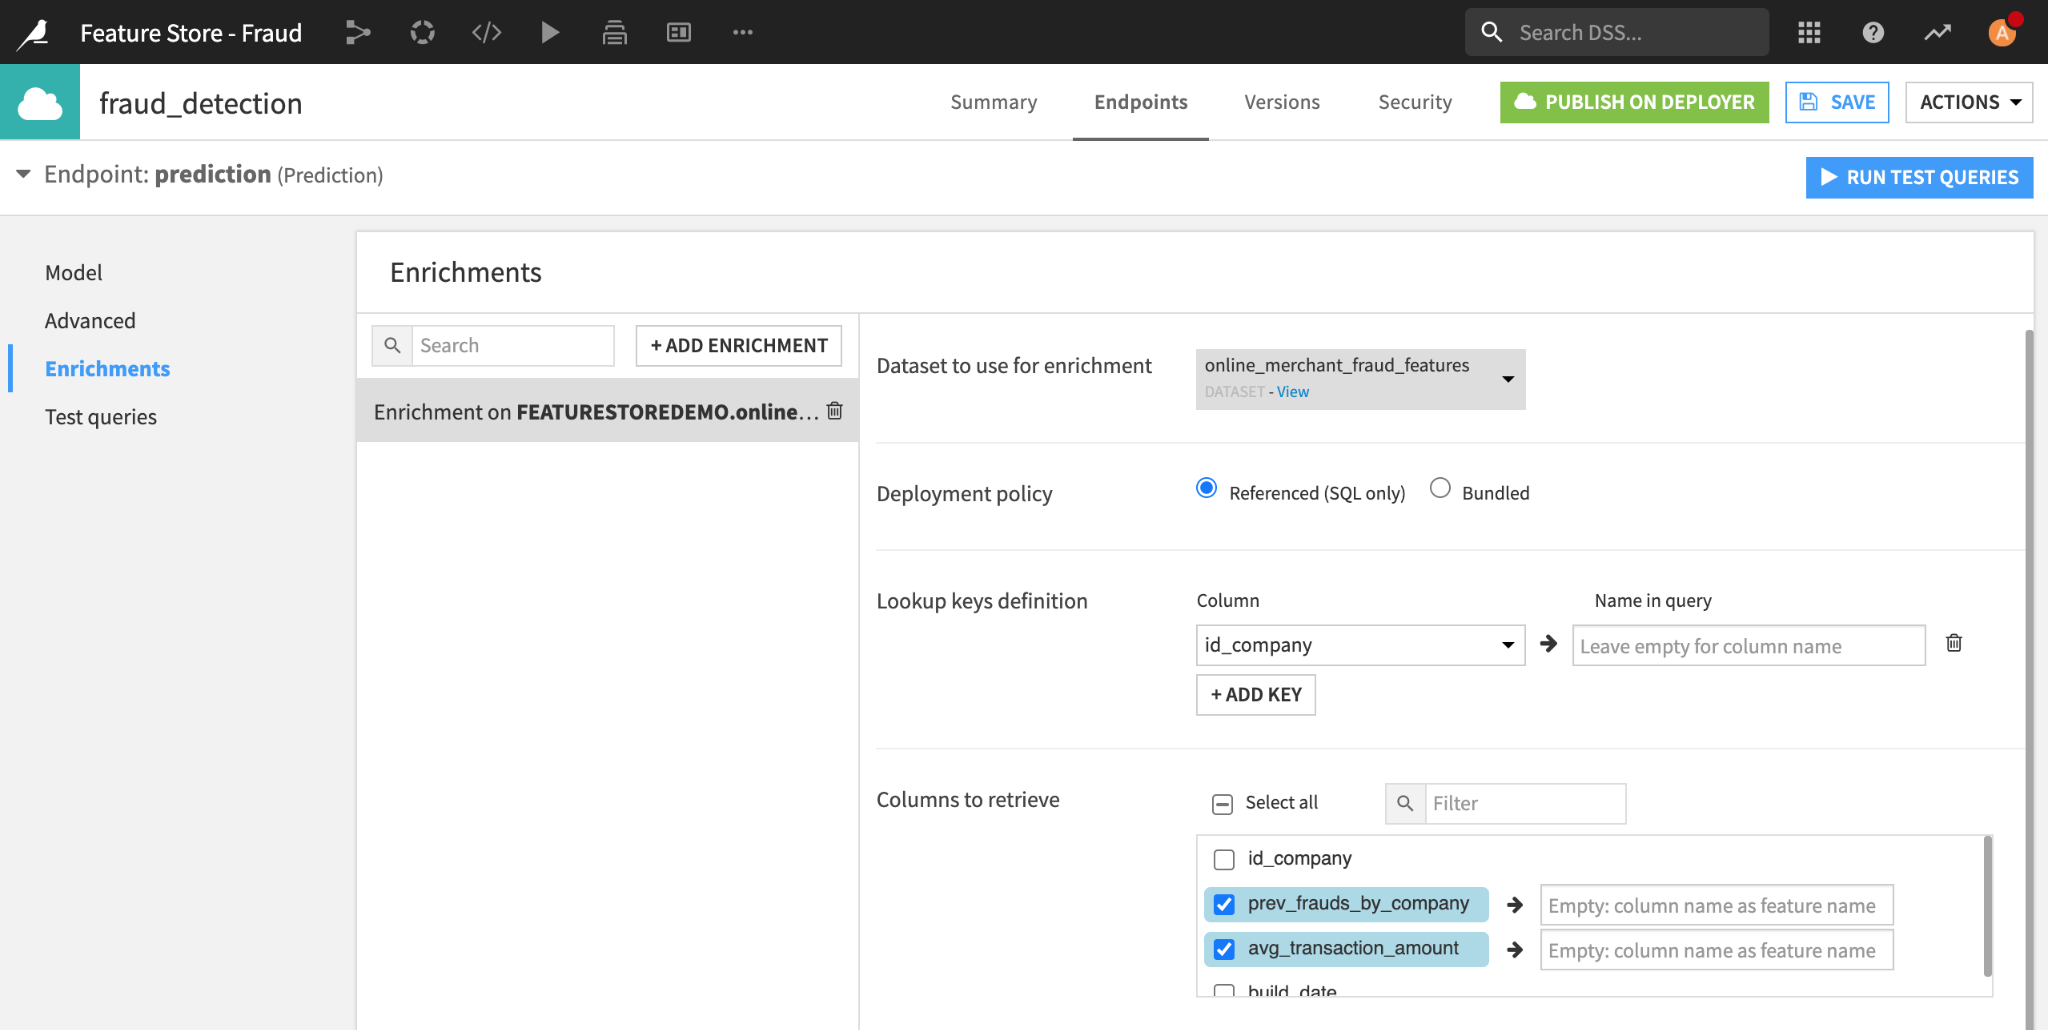
In addition, if your API service includes feature store lookups, you’ll want to document the query enrichment.
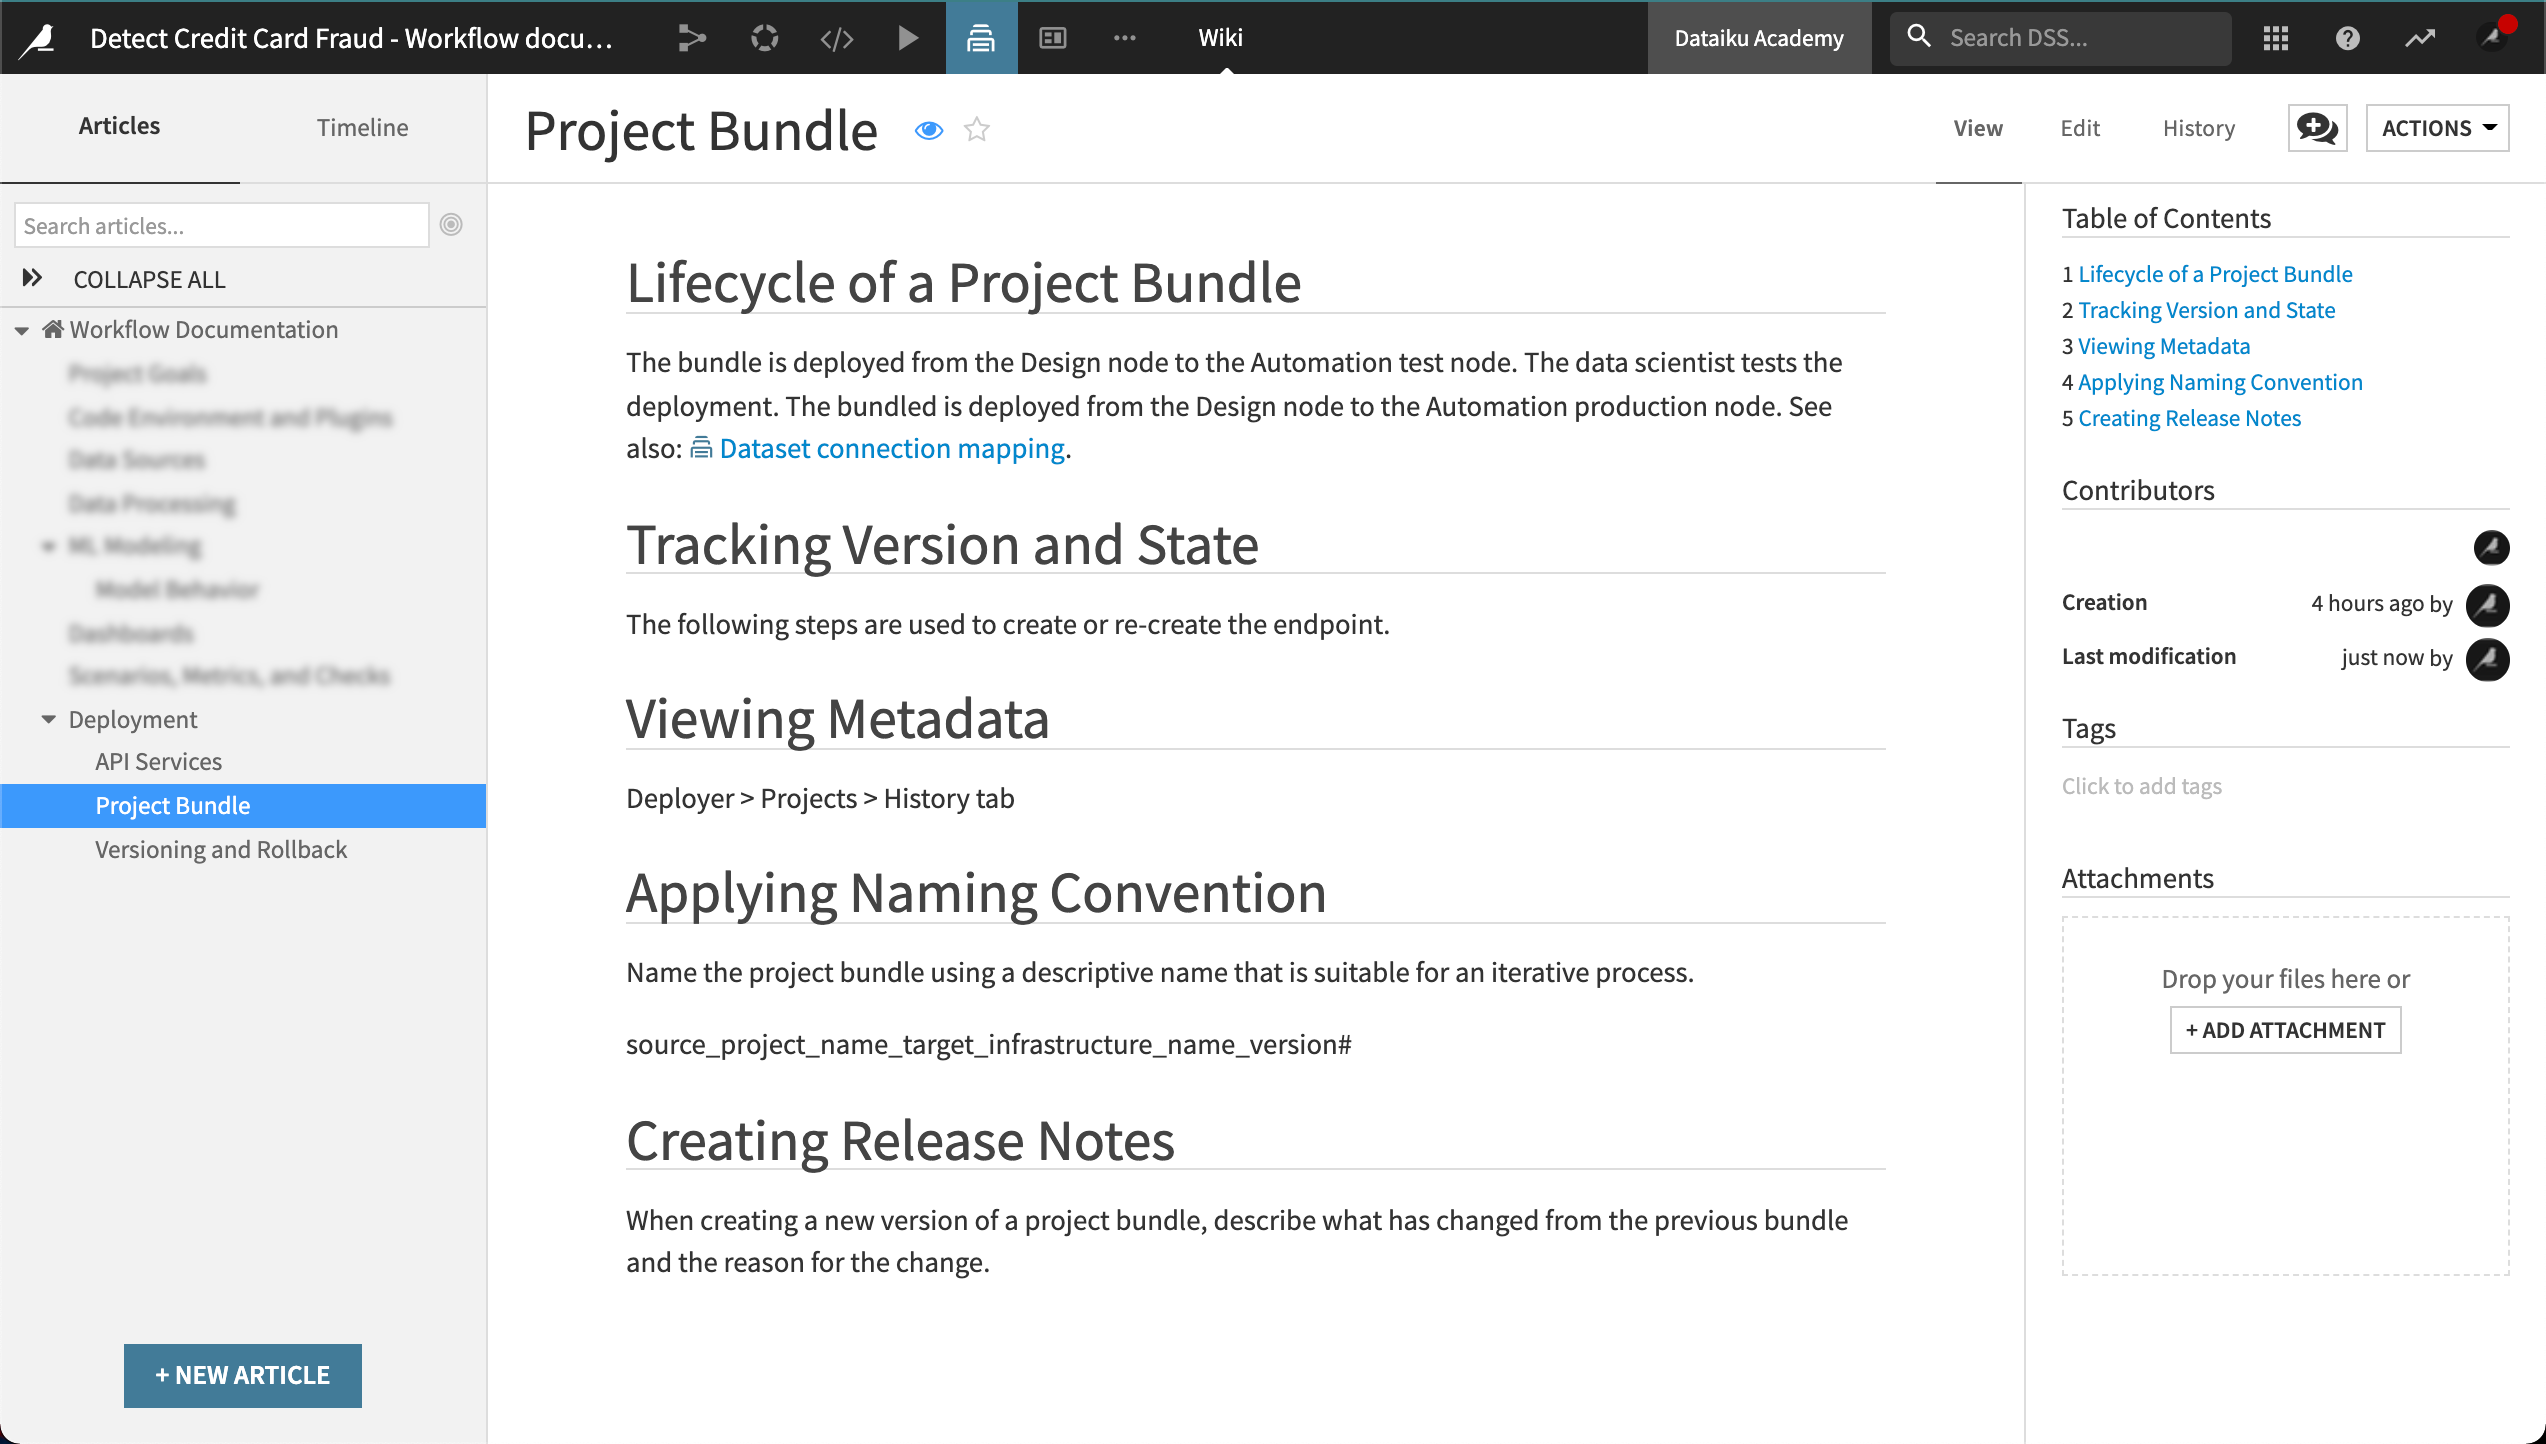
Project Deployer
Our credit card fraud project runs each day on the Automation node. Bank employees use this project to make daily fraud reports. The model scores batches of transactions daily.
We’ll want to document the version tracking of the state of the bundles and the difference between versions. This includes fundamental changes in code environments, models, and metadata (i.e., version date, the user who committed the changes).
In our example, we’ll let stakeholders know the naming convention for bundles, that the name should be both descriptive and concise, and also suitable for an iterative process. We’ll also describe how to leave release notes–detailed notes about what has changed from the previous bundle.
In summary, our Project Deployer documentation provides the following crucial information:
Project bundles including naming conventions
Metadata (including the user who committed the changes)
Naming conventions
Release notes (describing the difference between versions)
Summary
To help ensure our project components are reproducible in production, we can maintain our Wiki throughout the MLOps process. Documentation can help stakeholders overcome some of the challenges they are likely to face including training data that can’t be reproduced, scenario failures, and model training failures.
Resources for Further Exploration
Dataiku Academy: Using Wikis to Share Knowledge
Dataiku Reference Documentation: Wikis
Dataiku Knowledge Base: Best Practices for Collaborating in Dataiku DSS
Dataiku Product Documentation: MLOps and Model Document Generator