Create a Dataiku Application
At this point, our project is mostly done, and we may want to share it with others so that they can reuse it with any well (not limited to Shrimplin). However, if we were to give users access to the whole project, they would certainly make many changes that might not be ideal. One way to solve this problem while allowing others to use the project is to package it as a reusable Dataiku application.
Before we create the Dataiku application, we will need to make a few modifications to the project. These include: automating the retraining of the model when the input train dataset changes and creating a variable that can take on the value of any desired Well name.
Automate Model Retraining
Let’s start by creating a scenario to automate model retraining. Every time that a different “Well Name” is selected in the Split recipe, we will need to rebuild the FLow, re-train the machine learning model, and rerun the Evaluate recipe. We would also want to update the dashboard to view our results.
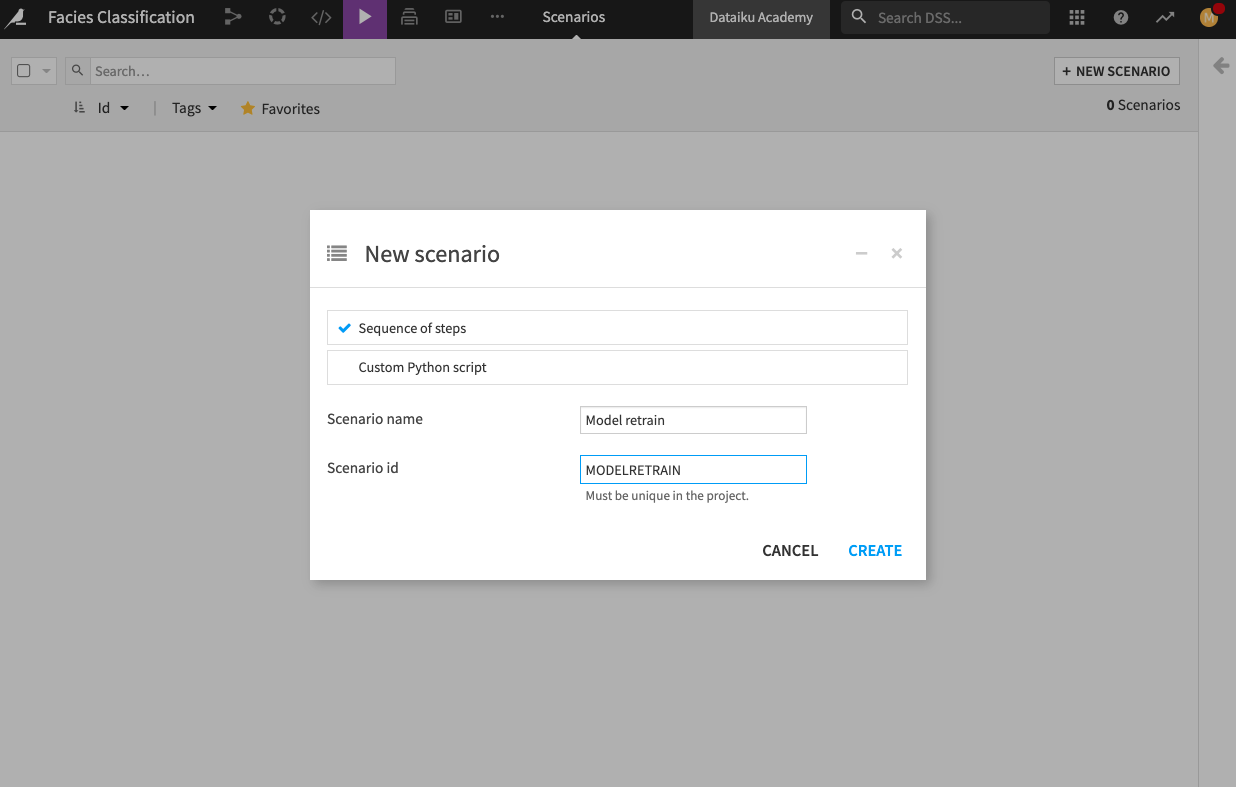
Let’s create the Scenario.
From the project’s top navigation bar, go to Scenarios.
Click Create Your First Scenario and name it
Model retrain.Click Create.
Go to the Steps tab.
Add a Build/Train step.
Click Add a Model to Build and select the deployed model (there should be only one).
Click Add.
Change the build mode to Force-rebuild dataset and dependencies.
Add a second Build/Train step.
Add two datasets to build: custom_predictions and custom_metrics.
Keep the default settings.
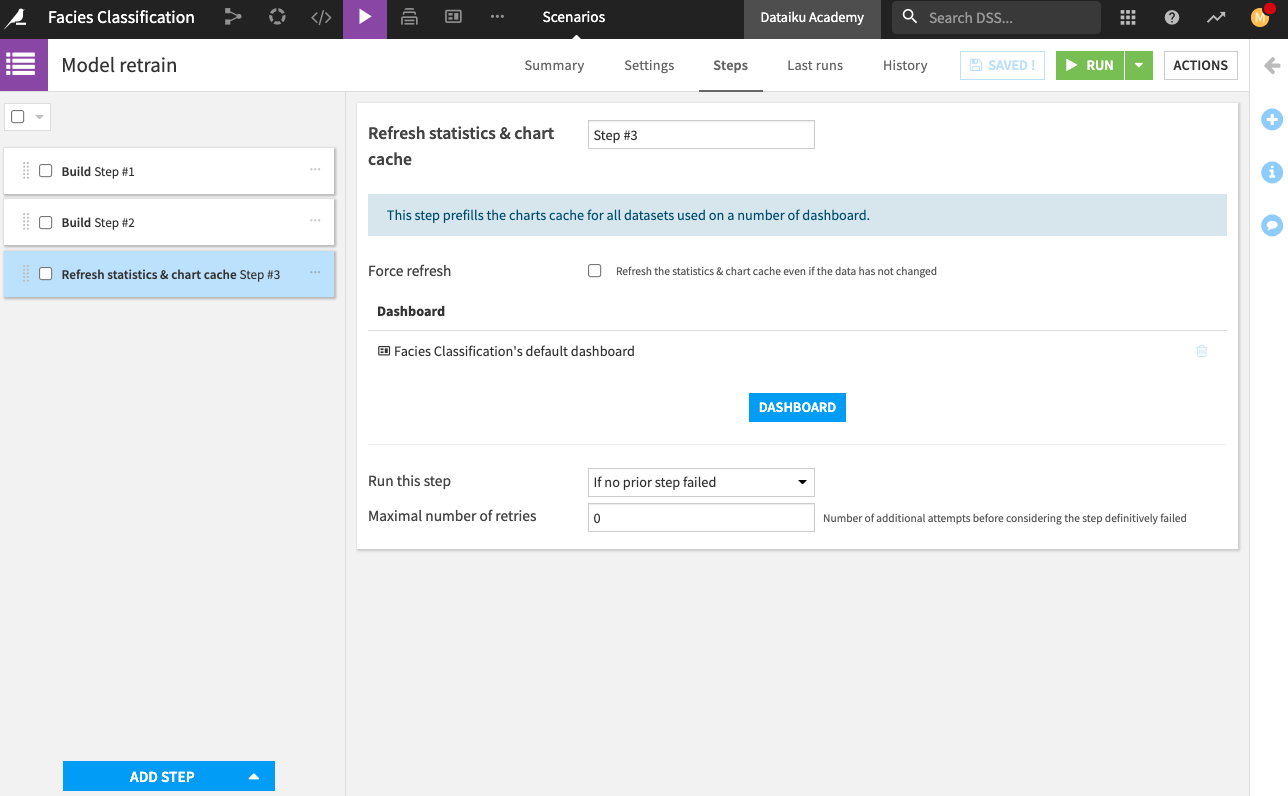
Add a last step to Refresh statistics and chart cache, and add your dashboard to that step. This last step will refresh the dashboard with the new computations.
Save the scenario.
Now we have a scenario to retrain our machine learning model, rebuild our Flow, and refresh the dashboard. However, we are still missing an important step — We need to assign the Well Name to a variable so that its value can be changed as needed.
Define a Project Variable
Let’s use a project variable to change the Well Name used in the Split recipe.
From the project’s top navigation bar, go to the More Options (…) menu and select Variables.
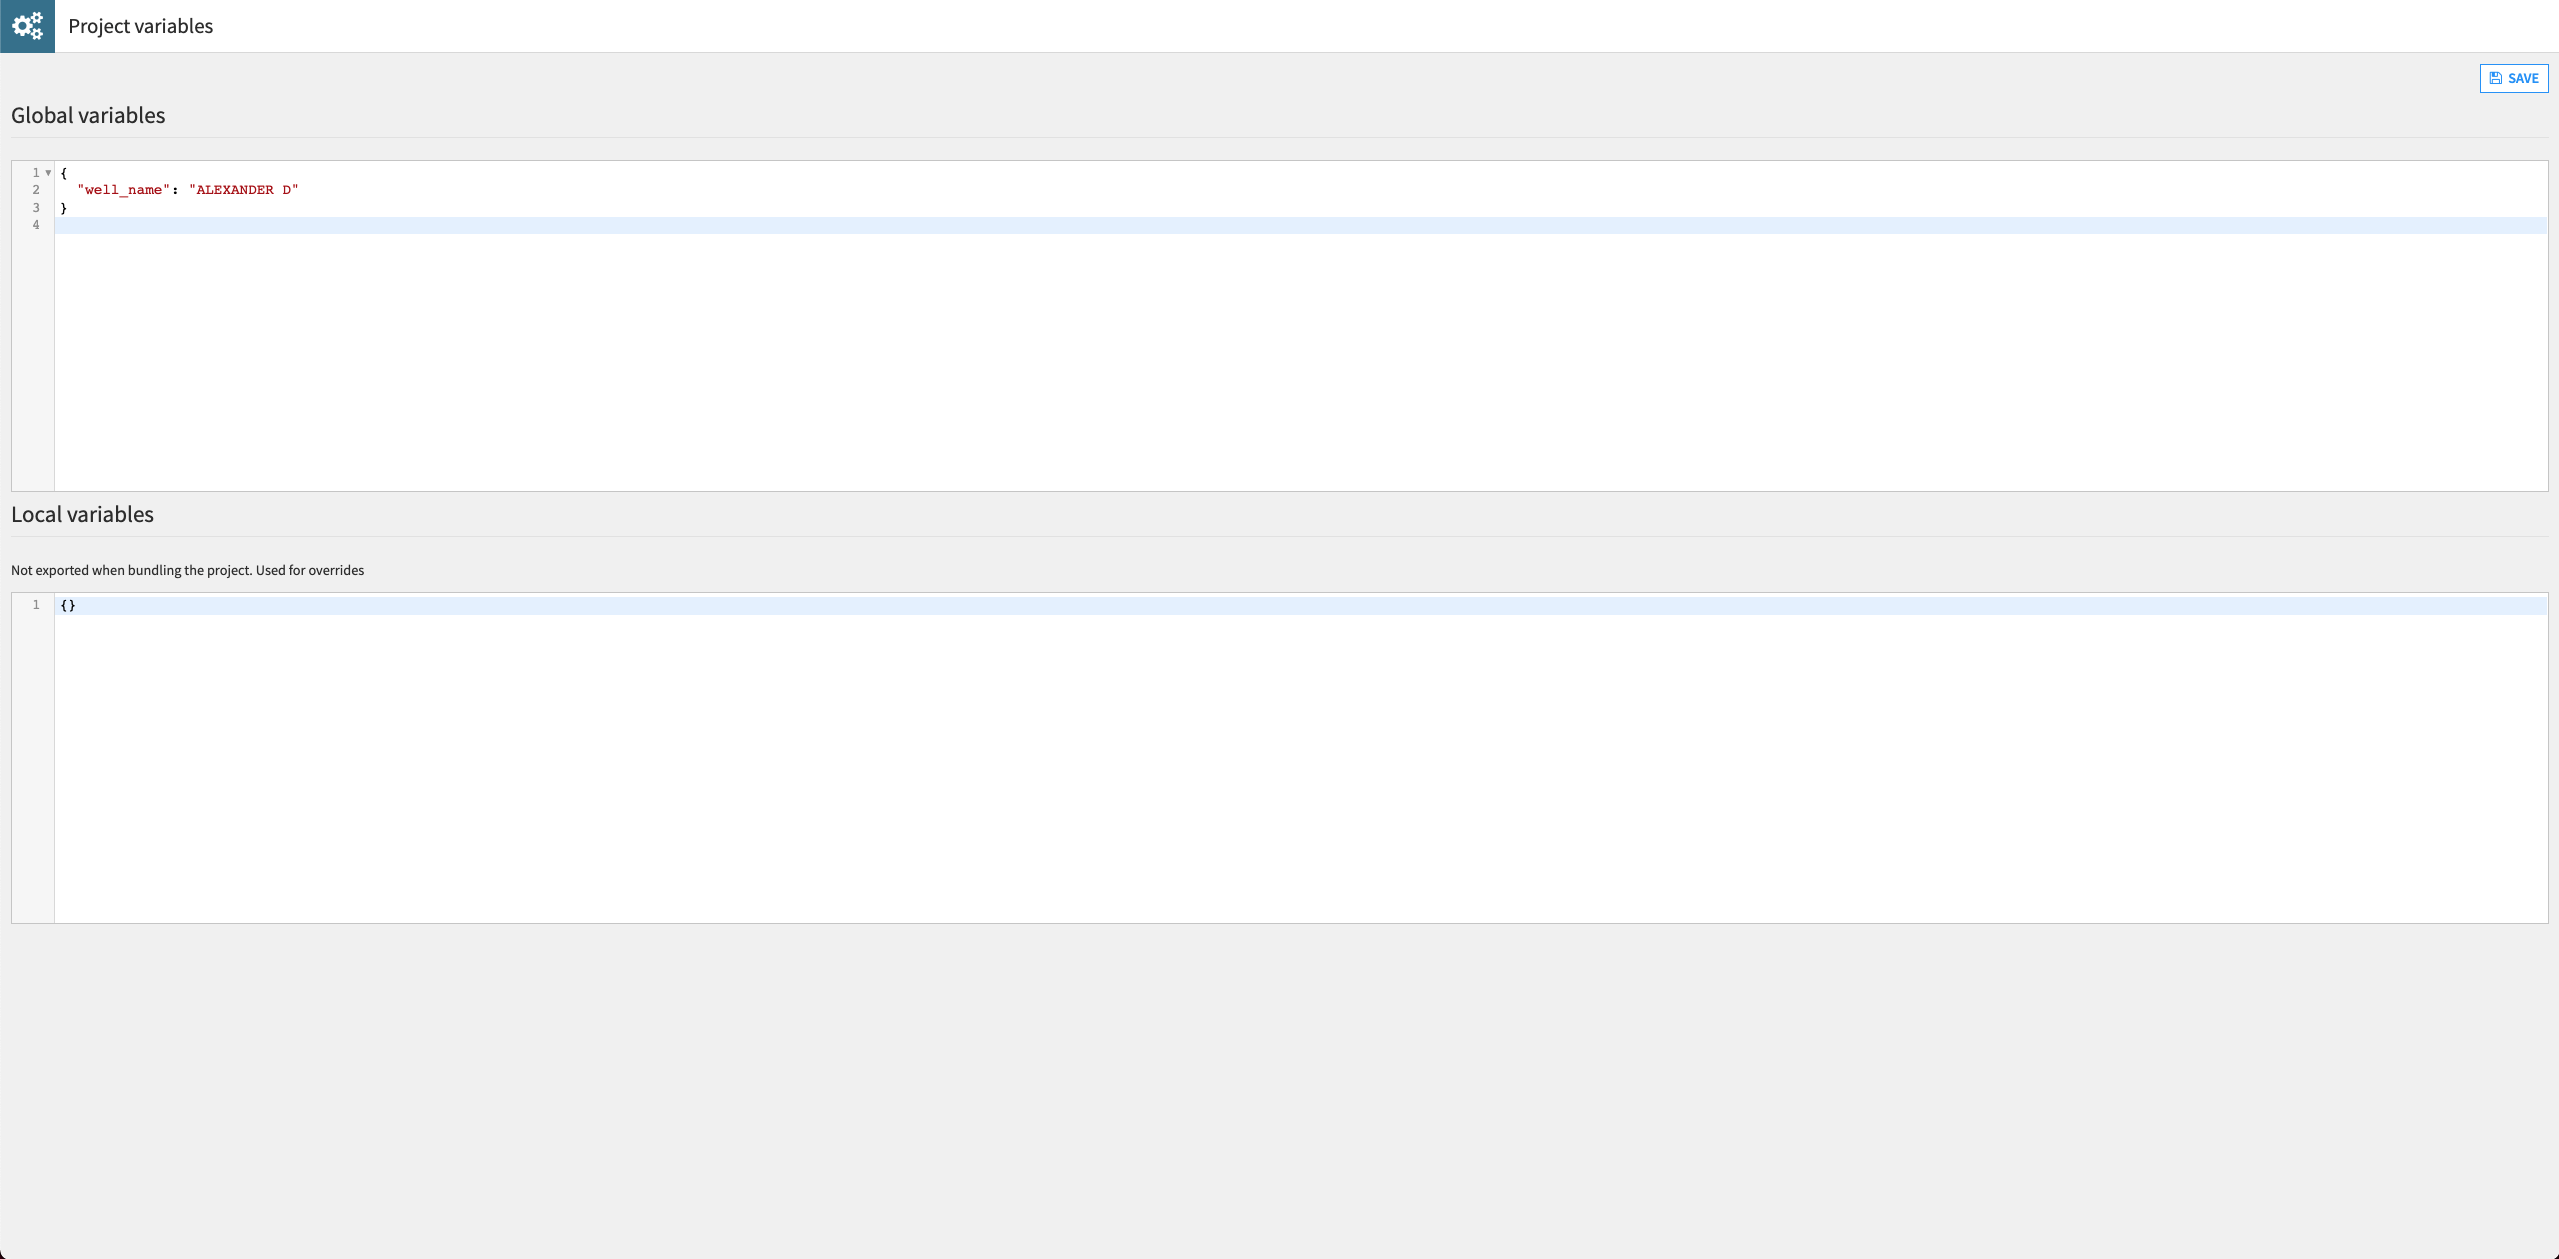
Define a project variable as follows:
{
"well_name": "ALEXANDER D"
}
Click Save.
Return to the Flow and open the Split recipe.
Update the formula in the “Splitting” step to replace “SHRIMPLIN” with the reference to the project variable as shown:
val('Well Name') == "${well_name}".Click Save.
Return to the “Model retrain” scenario and run it. Wait for the run to complete (it might take a few minutes).
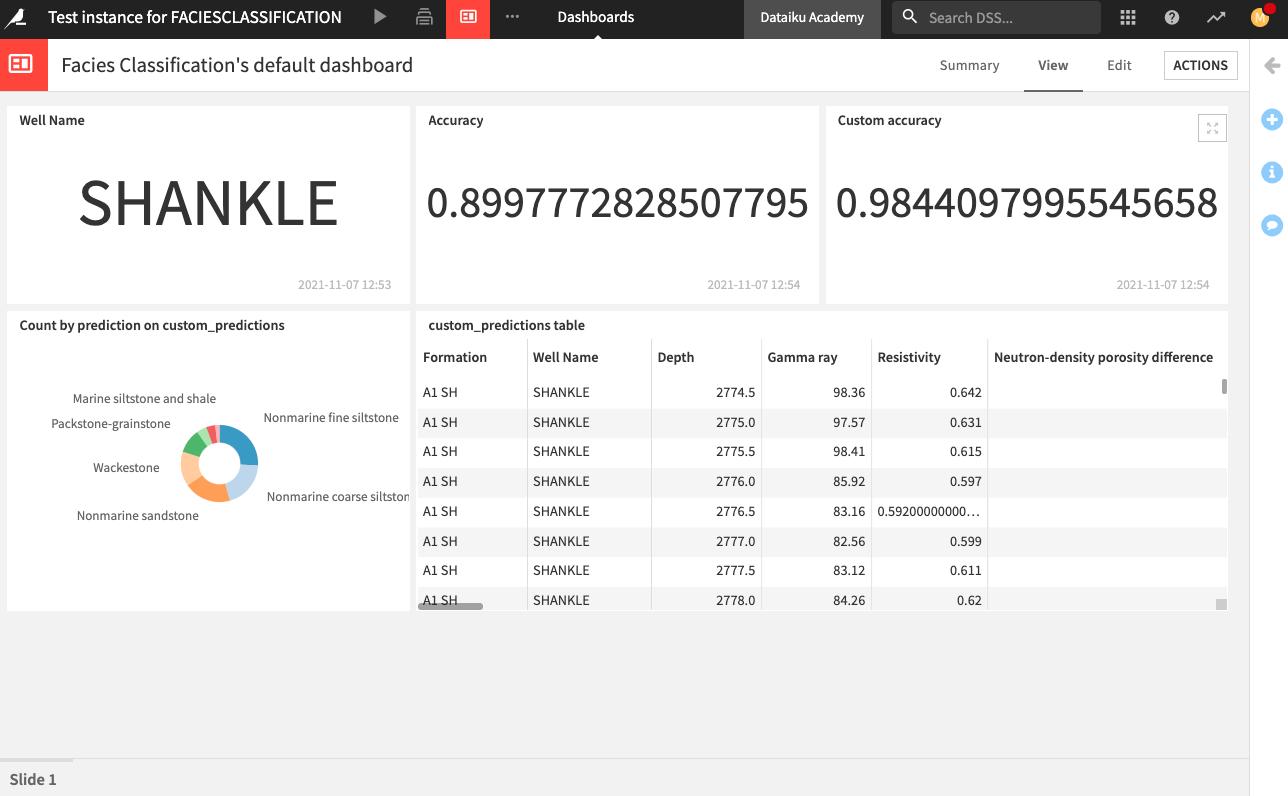
Open the dashboard to see that the tiles have been updated with information for the well “Alexander D”.

Create a Dataiku Application
Finally, we can package our project as a Dataiku application.
From the project’s top navigation bar, go to the More Options (…) menu and select Application Designer.
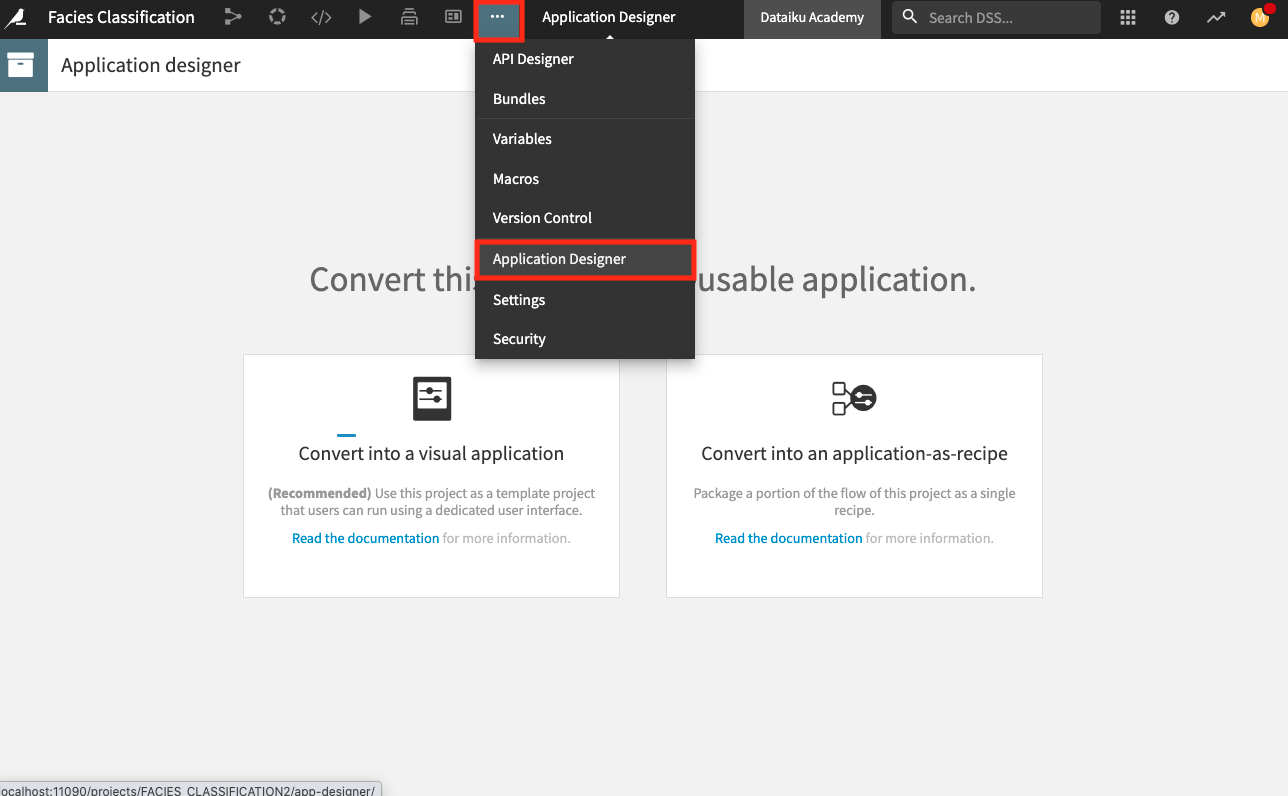
Select the option to Convert into a visual application.
In the “Content” tab, tick the option to “Export all ‘uploaded’ datasets”.
Keep the other default settings.

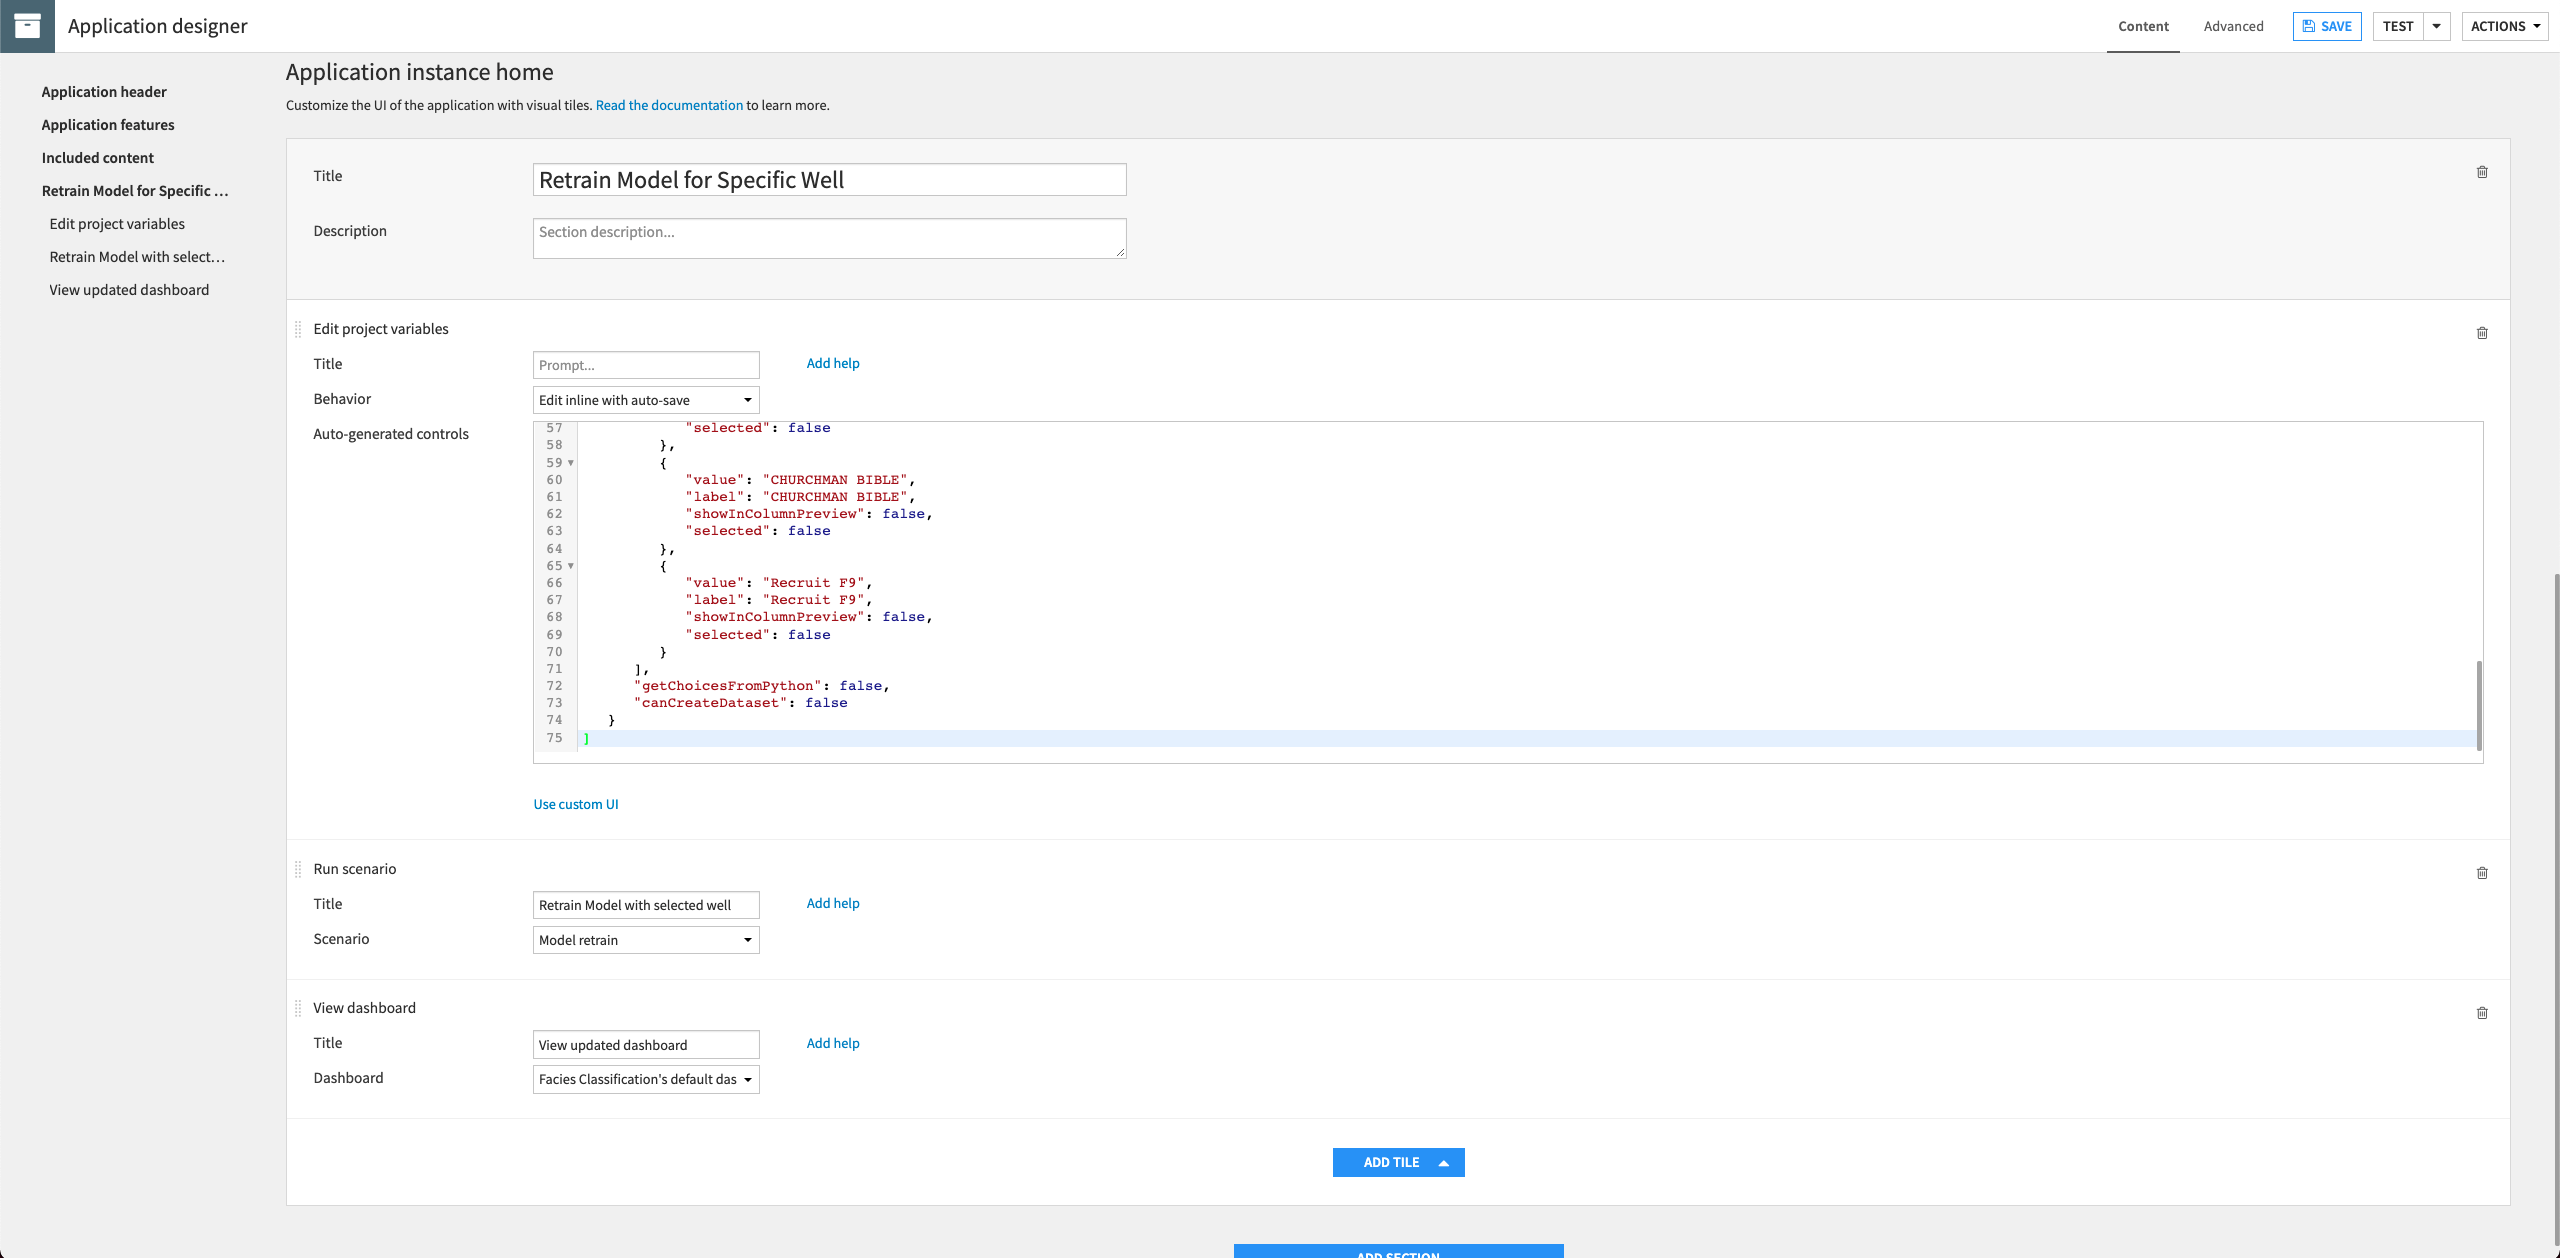
Click Add Section to a new section to the application.
Provide the Title:
Retrain Model for Specific Well.In this section, click Add Tile to add a new tile and select Edit project variables.
Provide the “Title”:
Select Well Name.Select the “Behavior”: Edit inline with auto-save.
In the “Auto-generated controls” code editor, provide the following JSON:
[
   {
      "name": "well_name",
      "type": "SELECT",
      "label": "Well Name",
      "mandatory": true,
      "canSelectForeign": false,
      "markCreatedAsBuilt": false,
      "allowDuplicates": true,
      "selectChoices": [
         {
            "value": "CROSS H CATTLE",
            "label": "CROSS H CATTLE",
            "showInColumnPreview": false,
            "selected": false
         },
         {
            "value": "SHRIMPLIN",
            "label": "SHRIMPLIN",
            "showInColumnPreview": false,
            "selected": false
         },
         {
            "value": "ALEXANDER D",
            "label": "ALEXANDER D",
            "showInColumnPreview": false,
            "selected": false
         },
         {
            "value": "NEWBY",
            "label": "NEWBY",
            "showInColumnPreview": false,
            "selected": false
         },
         {
            "value": "LUKE G U",
            "label": "LUKE G U",
            "showInColumnPreview": false,
            "selected": false
         },
         {
            "value": "SHANKLE",
            "label": "SHANKLE",
            "showInColumnPreview": false,
            "selected": false
         },
         {
            "value": "KIMZEY A",
            "label": "KIMZEY A",
            "showInColumnPreview": false,
            "selected": false
         },
         {
            "value": "NOLAN",
            "label": "NOLAN",
            "showInColumnPreview": false,
            "selected": false
         },
         {
            "value": "CHURCHMAN BIBLE",
            "label": "CHURCHMAN BIBLE",
            "showInColumnPreview": false,
            "selected": false
         },
         {
            "value": "Recruit F9",
            "label": "Recruit F9",
            "showInColumnPreview": false,
            "selected": false
         }
      ],
      "getChoicesFromPython": false,
      "canCreateDataset": false
   }
]
In the same section, click Add Tile to add a new tile and select Run scenario.
Provide the “Title”:
Retrain Model with selected well.Select the “Scenario”: Model retrain.
Add a last tile to the section, selecting the type View dashboard.
Provide the “Title”:
View updated dashboard.Select the default dashboard for the project.
Save the application and then Test it. Creating a test instance might take a few minutes.
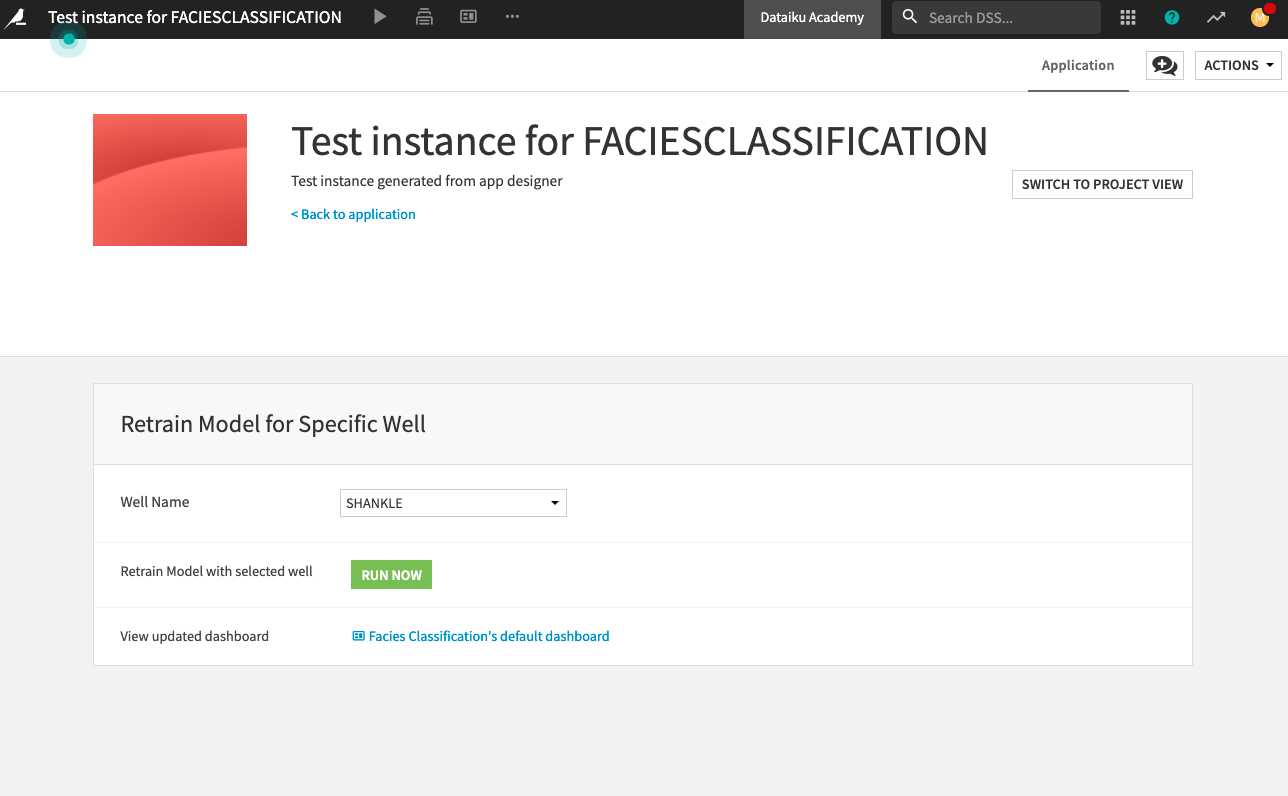
Once the test instance is ready, you can test the application with different well names (e.g., “Shankle”) by selecting a name from the dropdown menu of the “Well Name” section.
You can then retrain the model for the chosen well by clicking the Run Now button to run the project’s scenario.
After running the scenario, you can explore the dashboard that has been updated to reflect information for the selected well.