Sessionization in SQL, Hive, Python, and Pig
Why sessionization?
Sessionization is the act of turning event-based data into sessions, the ordered list of a user’s actions in completing a task. It is widely used in several domains, such as:
Web analytics
This is the most common use, where a session is composed of a user’s actions during one particular visit to the website. You can think of this as a buying session on an e-commerce website for example. Using sessions enables you to answer the following questions: what are the most frequent paths to purchase on my website? How do my users get to a specific page? When / why do they leave? Are some acquisition funnels more efficient than others?
Trip analytics
Given the GPS coordinates history of a vehicle, you can compute sessions in order to extract the different trips. Each trip can then be labelled distinctly (user going to work, on holidays, etc.).
Predictive maintenance
Here a session can be all information relative to a machine’s behavior (machine working, on idle, etc.) until a change in its assignation.
So given a “user id” or a “machine id”, the question is: how can we recreate sessions? Or more precisely, how do we choose the boundaries of a session?
In the above examples, the third one is easy to deal with: a new session is defined when there is a change of assignation. If we look at the two first examples however, we see that we can define a new session if the user has been inactive for a certain amount of time T.
So in this case, a session is defined by two things: a user id and a threshold time such as if the next action is in a range of time greater than T, it defines the start of a new session. This threshold can depend on the web site constraints themselves. For instance, banks and e-commerce websites close their users’ navigation sessions after around 15 minutes of inactivity.
Note
The first two examples can be seen as a generalization of the third one where we do not have clear boundaries, and so we will focus on this type of session creation.
Prerequisites
This tutorial includes examples of coding in SQL, Python, Hive, and Pig. To complete the tutorial for your languages of interest, you will need access to a Dataiku DSS instance with the appropriate data connections. For example, this might be:
an SQL database that supports window functions, such as PostgreSQL.
an HDFS connection for Hive and Pig
Getting Started
Let’s first create a project with some sample data.
From the Dataiku DSS homepage, click +New Project > DSS Tutorials > Code > Sessionization (Tutorial).
From the project homepage, click Go to Flow.
Note
Alternatively, you can download and import this CSV file into a new project. Just be aware that the code snippets below may differ from yours depending on your project key, database schema, and dataset name.
Prepare the Data
Coming from a CSV, the mytimestamp column of the toy_data dataset is currently stored as string. In order to tackle sessionization, we want it stored as a date.
Create a Prepare recipe with toy_data as the input.
Store the output into your SQL database and create the recipe.
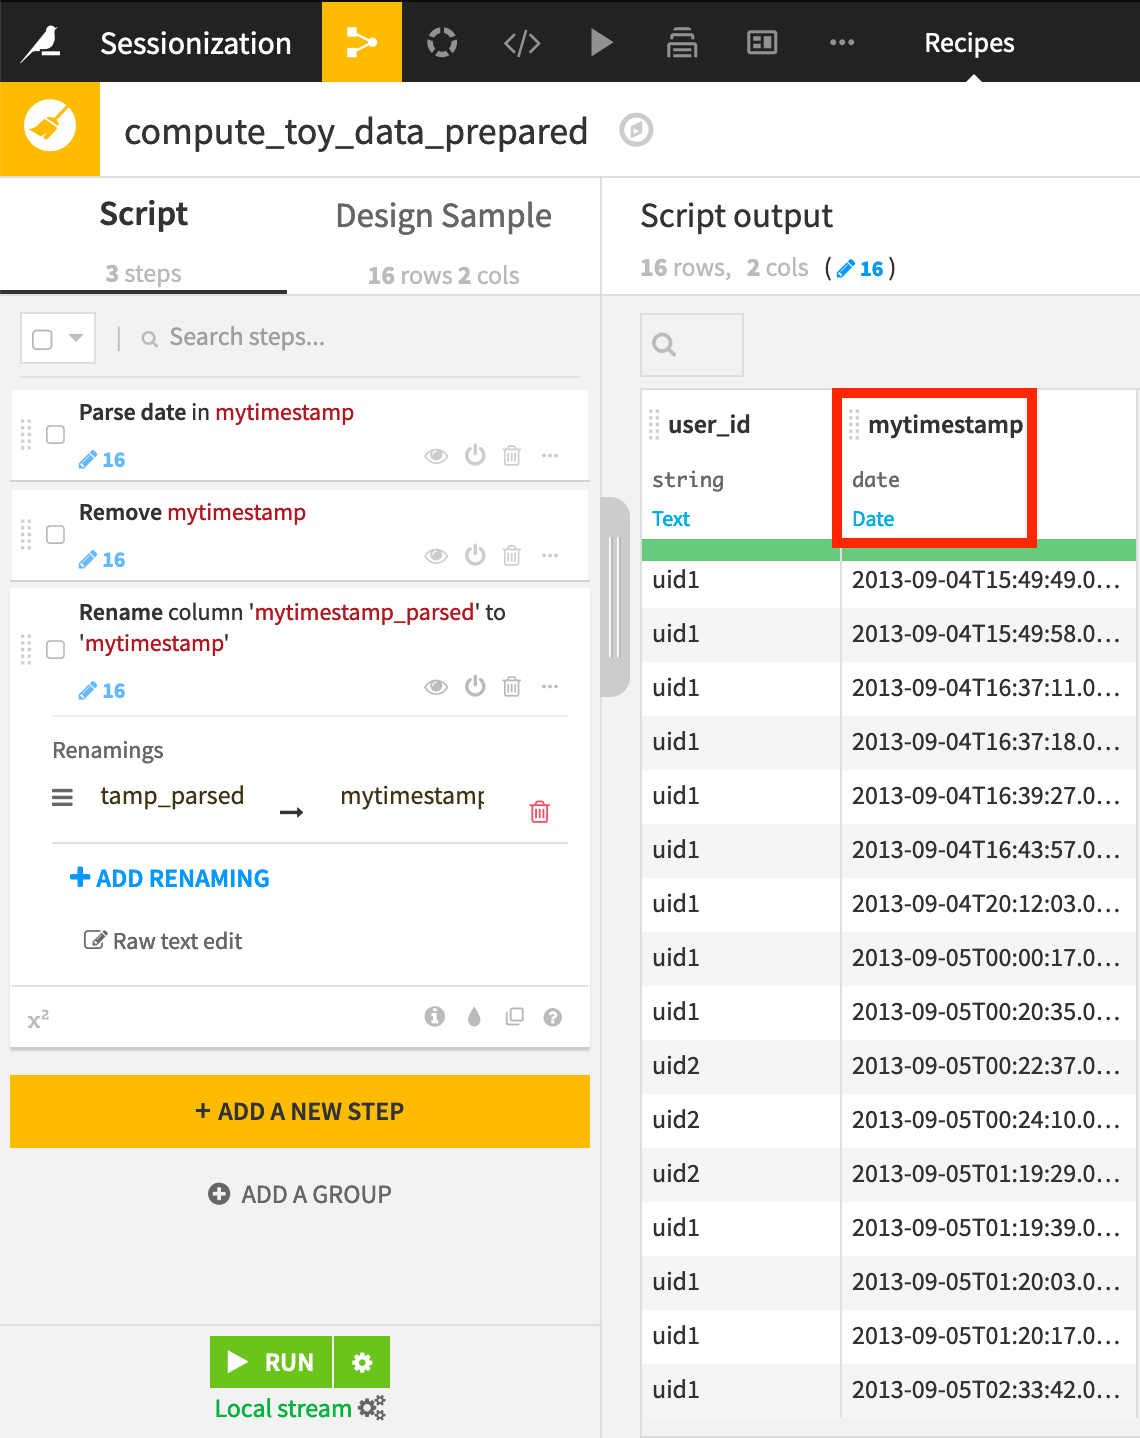
Parse the mytimestamp column as a date into a new column.
Delete the original and rename the parsed date column as
mytimestamp.Run the recipe and update the schema.

On opening the synced output dataset, recognize that:
It is sorted by time.
There are two different users.
mytimestamp is stored as a date.
Note
For more information on syncing datasets to SQL databases, please see this course on Dataiku DSS & SQL
Sessionization in SQL
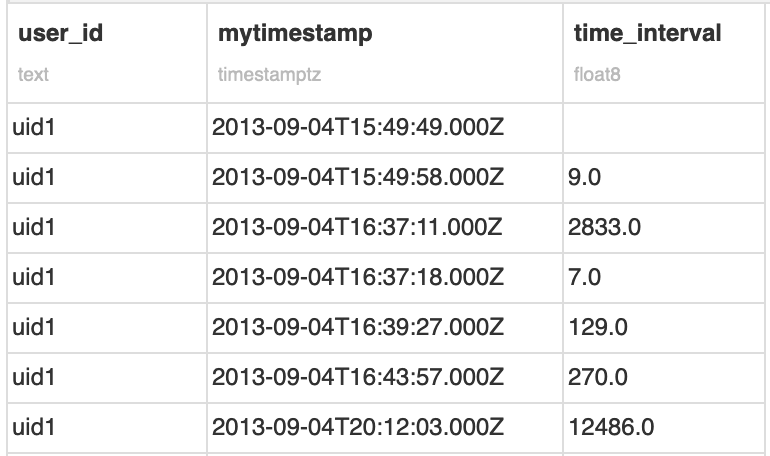
The objective is to detect on which row there is a new session in the ordered dataset. To do that, we need to calculate the interval between two rows of the same user. The SQL window function LAG() does it for us:
Create a new SQL notebook on the toy_data_prepared dataset.
Create a new query.
Use the tables tab on the left to confirm the name of your table.
If using the starter project, you can directly copy the snippet below to calculate a time_interval column.
Click Run to confirm the result.
SELECT *
    ,  EXTRACT(EPOCH FROM mytimestamp)
       - LAG(EXTRACT(EPOCH FROM mytimestamp))
       OVER (PARTITION BY user_id ORDER BY mytimestamp) AS time_interval
FROM "DKU_SESSIONIZATION_toy_data_prepared";
This SQL query outputs a new column which is the difference between the timestamp of the current row and the previous one, by user_id. Notice that the row of the first appearance of a user contains an empty time interval since the value cannot be calculated.

Based on this interval, we are now going to flag each session of a given user. Assuming a new session is defined after 30 minutes of inactivity, we can slightly transform the previous expression into this one:
SELECT *
  , CASE
      WHEN EXTRACT(EPOCH FROM mytimestamp)
           - LAG(EXTRACT(EPOCH FROM mytimestamp))
           OVER (PARTITION BY user_id ORDER BY mytimestamp) >= 30 * 60
      THEN 1
      ELSE 0
    END as new_session
FROM
  "DKU_SESSIONIZATION_toy_data_prepared";
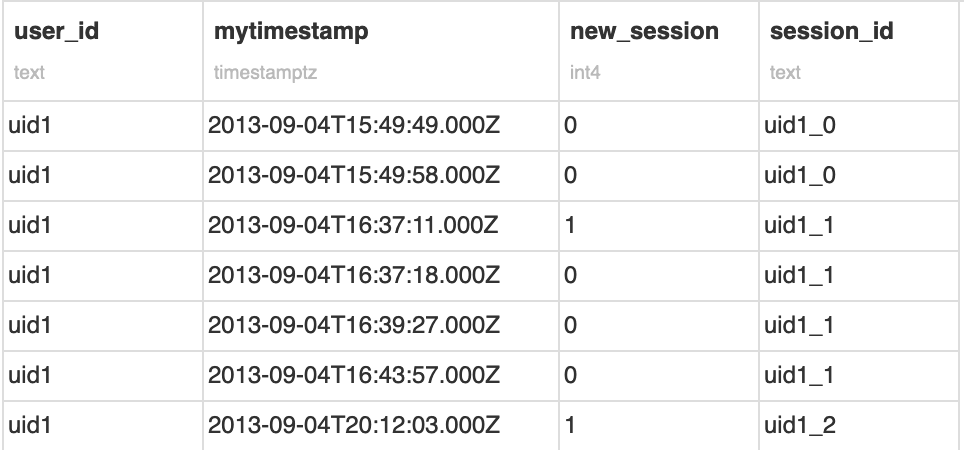
This query creates a boolean column, a value of 1 indicating a new session, 0 otherwise.
Finally, we can just create a cumulative sum over this boolean column to create a session_id. To make it easier to visualize, we can concatenate it with the user_id, and then build our final session_id column:
SELECT *
  , user_id || '_' || SUM(new_session)
  OVER (PARTITION BY user_id ORDER BY mytimestamp) AS session_id
FROM (
  SELECT *
    , CASE
       WHEN EXTRACT(EPOCH FROM mytimestamp)
          - LAG(EXTRACT(EPOCH FROM mytimestamp))
            OVER (PARTITION BY user_id ORDER BY mytimestamp) >= 30 * 60
       THEN 1
       ELSE 0
      END as new_session
    FROM
      "DKU_SESSIONIZATION_toy_data_prepared"
) s1
We finally have our sessionized data! We would be able to move now towards more advanced analytics and deriving new KPIs.

Note that this code is enough for this simple example. However, if we had a large partitioned Hive table, a simple increment may not be enough (because we would have collision for each partitions). In this case, it is possible to concatenate the user id with the epoch of the first row of the session. This can be done by calculating the first timestamp of each session and join it on the session_id previously calculated.
Sessionization in Hive
If your data is stored in Hadoop (HDFS), and you can use Hive (and a version >= 0.11, where window partitioning functions were introduced), creating sessions will be very similar to the previous example in PostgreSQL. To make it work properly, just make sure that your timestamp column has been serialized as “Hive” in your DSS dataset, (in Dataset > Settings > Preview).
Copy the existing Prepare recipe.
Name the output
toy_data_hdfs.Store it into an HDFS connection.
Make sure the format is “CSV (Hive compatible)”.
Create and run the recipe.
In a Hive notebook on the output dataset, run the following query, adjusting the connection name as needed.
SELECT *
    , CONCAT(user_id,
       CONCAT('_',
        SUM(new_session) OVER (PARTITION BY user_id ORDER BY mytimestamp)
       )
      ) AS session_id
FROM (
    SELECT *
        , CASE
            WHEN UNIX_TIMESTAMP(mytimestamp)
                 - LAG (UNIX_TIMESTAMP(mytimestamp))
                 OVER (PARTITION BY user_id ORDER BY mytimestamp) >= 30 * 60
            THEN 1
            ELSE 0
          END AS new_session
    FROM `connection_name`.`toy_data_hdfs`
) s1
Sessionization in Python
You can also build sessions using Python. There are several ways to do it, from a pure Python implementation to reproducing the logic above using the Pandas library, which is what we are going to show here.
In a Python notebook, use the following snippet.
import dataiku
import pandas as pd
from datetime import timedelta

# define threshold value
T = timedelta(seconds=30*60)

# load dataset
toy_data = dataiku.Dataset("toy_data_prepared").get_dataframe()

# add a column containing previous timestamp
toy_data =  pd.concat([toy_data,
                       toy_data.groupby('user_id').transform(lambda x:x.shift(1))]
                      ,axis=1)
toy_data.columns = ['user_id','mytimestamp','prev_mytimestamp']

# create the new session column
toy_data['new_session'] = ((toy_data['mytimestamp'] - toy_data['prev_mytimestamp'])>=T).astype(int)

# create the session_id
toy_data['increment'] = toy_data.groupby("user_id")['new_session'].cumsum()
toy_data['session_id'] = toy_data['user_id'].astype(str) + '_' + toy_data['increment'].astype(str)

# to get the same result as with hive/postgresql
toy_data = toy_data.sort_values['user_id','mytimestamp'])
The output of this code should give you the sessionized dataset similar to the previous example. We can see that the shift() function is equivalent to LAG() in PostgreSQL, and transform() to a window function.
Sessionization in Pig
Still in the Hadoop ecosystem, one can create sessions using Pig. Even if base Pig has plenty of functions, we can recommend using the very nice Datafu collection of user-defined functions (UDF).
In Dataiku DSS, do not forget to set your dataset’s quoting style to “No escaping nor quoting”. To get rid of the date parsing issues in Pig, make sure to set the Date Serialization Format (in Dataset, Settings, Preview) to “ISO”.
The Pig script below reproduces the previous examples, including setting the limit for new sessions to 30 minutes:
-- register datafu jar and create functions.
REGISTER '/path/to/datafu-1.2.0.jar';

DEFINE Sessionize datafu.pig.sessions.Sessionize('30m');

DEFINE Enumerate datafu.pig.bags.Enumerate('1');

-- Read input DSS dataset
a = DKULOAD 'toy_data_hdfs';

-- format for datafu
b = FOREACH a GENERATE mytimestamp, user_id ;

-- sessionize
c = FOREACH (GROUP b BY user_id) {
     ordered = ORDER b BY mytimestamp ;
     GENERATE FLATTEN(Sessionize(ordered)) AS (mytimestamp, user_id, session_id);
};

-- order dataset per size to be comparable with other methods
d = ORDER c BY user_id, mytimestamp;

-- Store output as DSS dataset
DKUSTORE d INTO 'toy_data_sessionized';
The final result is different here. We have no increment but a session_id built with a hash. Like previously, it is possible to use this id to create a new one as the concatenation between the user_id and the first unix timestamp in the session.
By now, you should be able to sessionize your data in your favorite language and derive the KPI’s needed wether you have weblogs, telematics or other kinds of data.