Building a Jenkins pipeline for Dataiku DSS with Project Deployer
In this article, we will show how to set up a sample CI/CD pipeline built on Jenkins for our Dataiku DSS project. This is part of a series of articles regarding CI/CD with DSS.
For an overview of the CI/CD topic, the use case description, the architecture and other examples, please refer to the introductory article.
The use case here is to deploy a analytics flow using Project Deployer as the centerpiece. If you are using a DSS version older than version 9 or are not using Project Deployer, you need to to use this other article.
Note
You can find all the files used in this project attached to this article dss_pipeline_pdpl-master.zip.
Introduction
Based on the generic setup described in the introductory article, let’s review this case. We will be using a DSS feature called Project Deployer as the centerpiece for deployment.
Project Deployer is a feature released in version 9 of DSS allowing you to centrally manage the deployment of bundles to Automation nodes.
Our CI/CD environment will be made of:
- One Jenkins server (we will be using local executors) with the following Jenkins plugins:
One DSS Design node where data scientists will build their flows
Two DSS Automation nodes, one for Pre-Production and the other Production
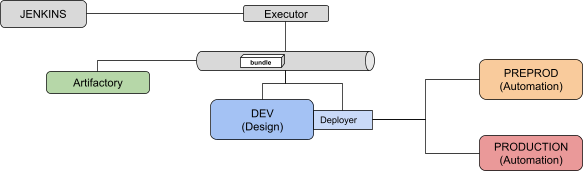
Note that we need direct connection to the Automation nodes to execute the various tests.
As explained in the introductory article, we will use the DSS Prediction churn sample project that you need to have deployed and working on your Design node.
Pipeline Configuration
The first step is to create a project in Jenkins of the “Pipeline” type. Let’s call it dss-pipeline-cicd.
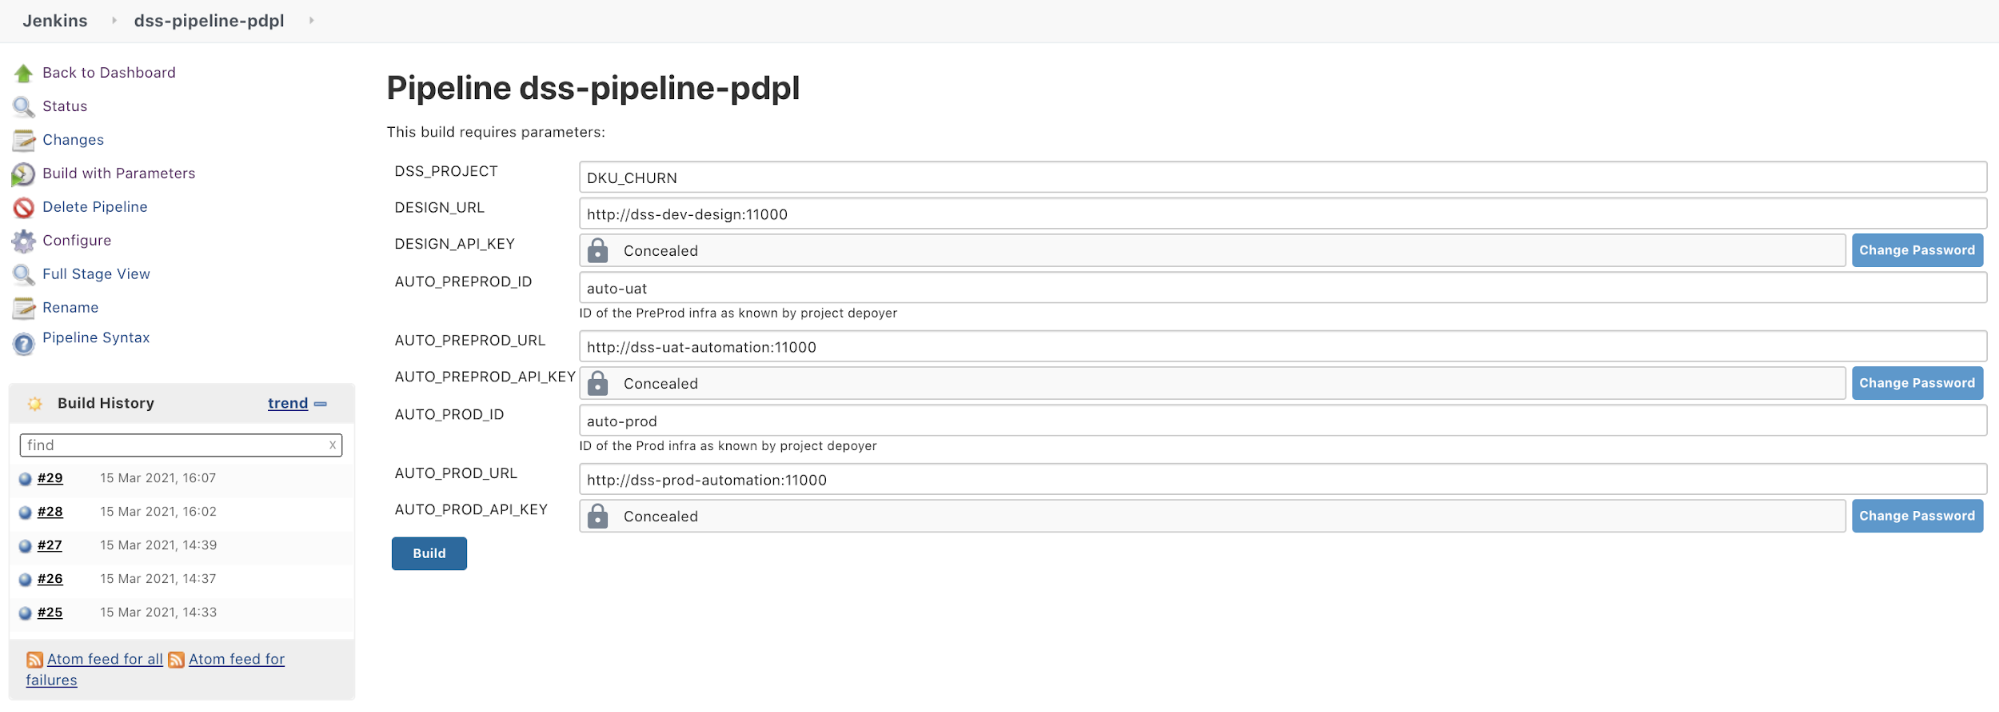
We will use the following parameters for this project:
DSS_PROJECT (String): key of the project we want to deploy (e.g. DKU_CHURN)
DESIGN_URL (String): URL of the design node (e.g. http://dss-dev-design:1000)
DESIGN_API_KEY (Password): Personal API key to connect to this node (this needs to be a personal API key; global API keys will not work)
AUTO_PREPROD_ID (String): ID of the pre-production node as known by Project Deployer (e.g. auto-uat)
AUTO_PREPROD_URL (String): URL of the PREPROD node (e.g. http://dss-preprod-auto:1000)
AUTO_PREPROD_API_KEY (Password): the API key to connect to this node
AUTO_PROD_ID (String): ID of the production node as known by Project Deployer (e.g. auto-prod)
AUTO_PROD_URL (String): URL of the PROD node (e.g. http://dss-prod-auto:1000)
AUTO_PROD_API_KEY (Password):the API key to connect to this node
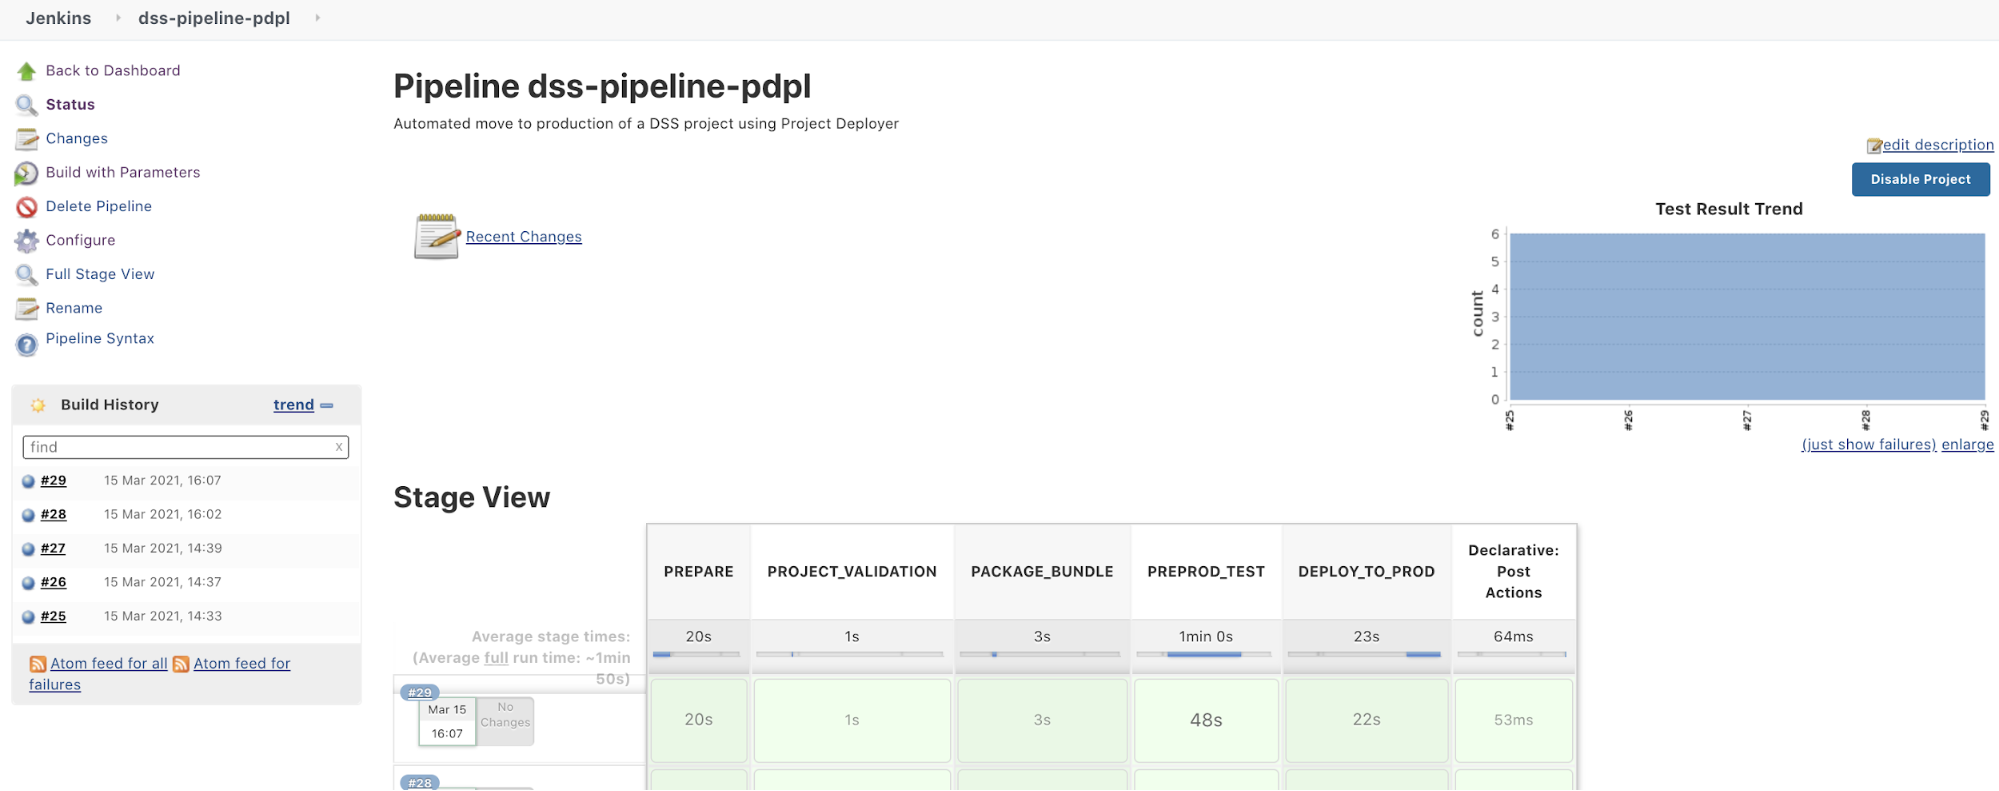
The pipeline contains 5 stages and 1 post action:
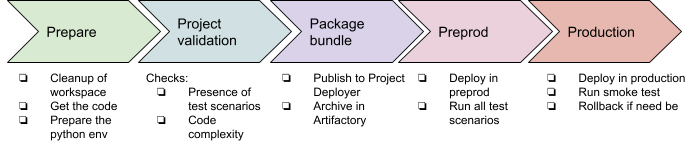
The post action will be used to clean up the bundle zip file from the local Jenkins workspace to save space and will also retrieve all the xUnit test reports.
As an additional global note, we are using a global variable bundle_name so that we can pass this information from one stage to another. This variable is computed using a shell script with the date and time of the run (the script is explained after it is displayed).
You can find the groovy file of the pipeline in the zip: pipeline.groovy. In this file, you have the definition of the different stages and for each stage the details of the steps.
Let’s review those steps one by one.
‘PREPARE’ stage
This stage is used to build a proper workspace. The main tasks are to get all the CI/CD files we need from your GitHub project and build the correct Python3 environment using the requirements.txt file.
‘PROJECT_VALIDATION’ stage
This stage contains mostly Python scripts used to validate that the project respects internal rules for being production-ready. Any check can be performed at this stage, be it on the project structure, setup, or the coding parts, such as the code recipes or the project libraries.
Note that we are using pytest capability to use command-line arguments by adding a conftest.py.
This is very specific to each installation, but here are the main takeaways:
In this project, we will be using the pytest framework to run the tests and report the results to Jenkins. The conftest.py is used to load our command line options. The run_test.py file contains the actual tests, all being Python functions starting with ‘TEST_’
The checks we have:
If this state is OK, we know we have a properly written project, and we can package it.
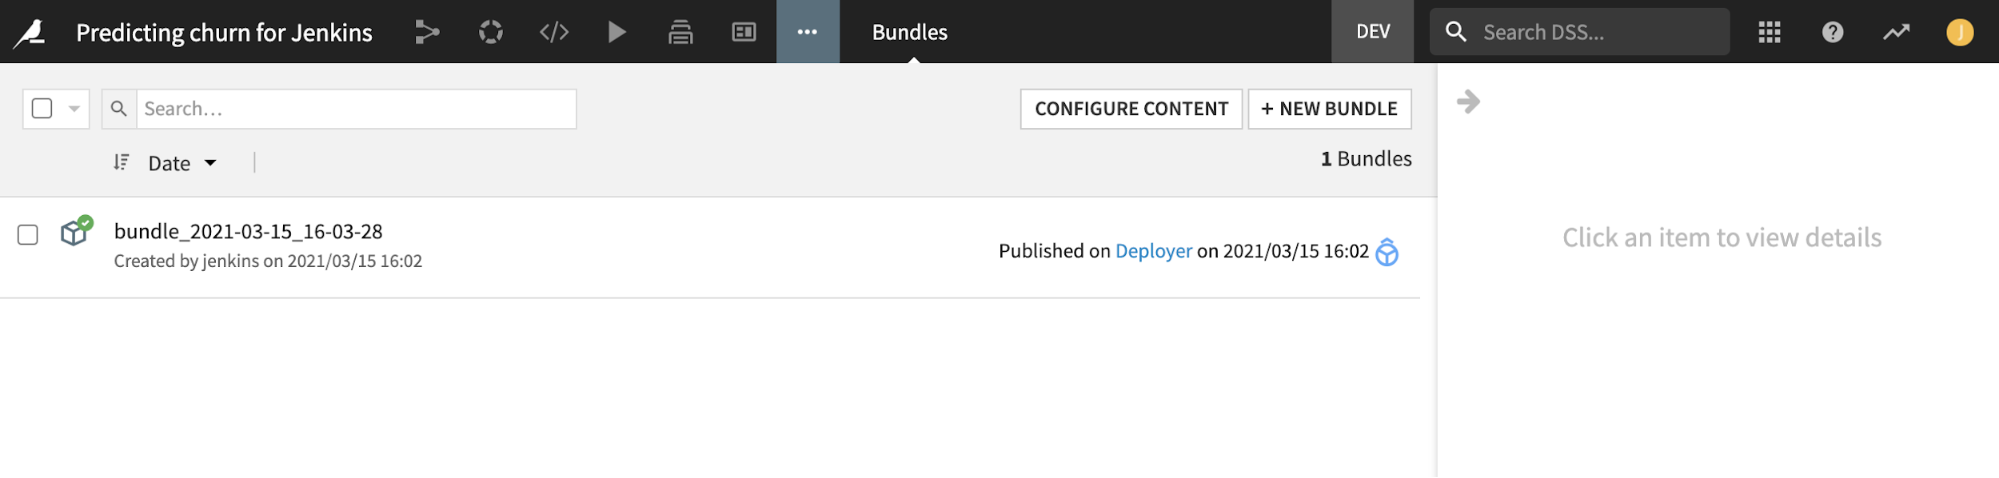
‘PACKAGE_BUNDLE’ stage
The first part of this stage is using a Python script to create a bundle of the project using DSSProject.export_bundle, and then publish it to Project Deployer using DSSProject.publish_bundle.
For archiving purposes, we are also downloading a zip file of the bundle and publishing to our Artifactory repository “generic-local/dss_bundle/”. Note the stage will fail if no file is published (the “failNoOp: true” option) so there is no need for an extra check.
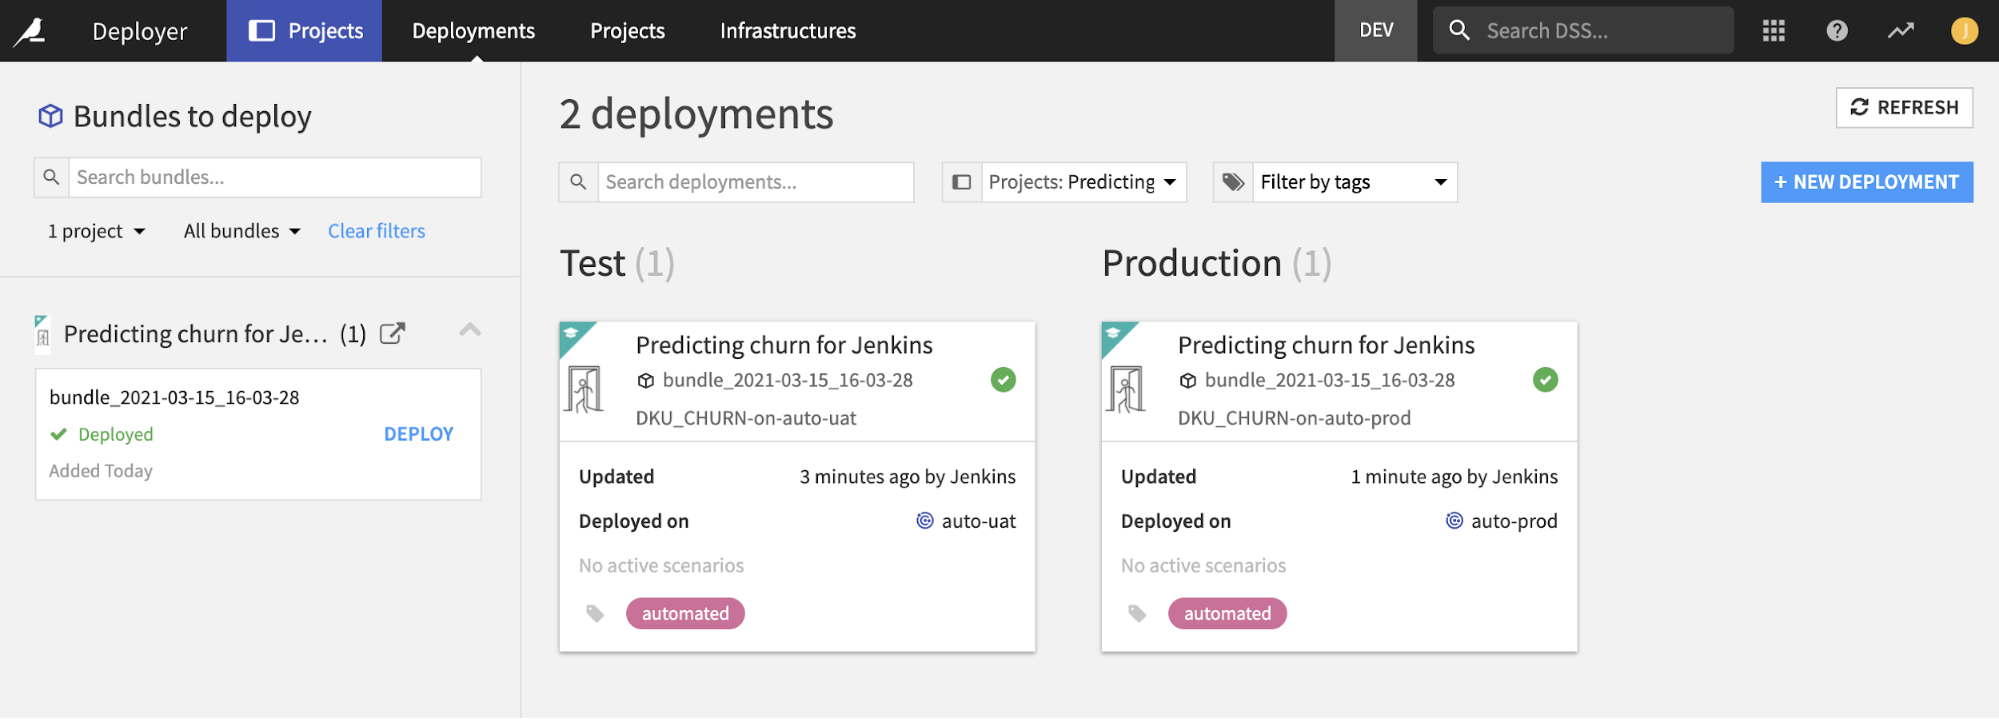
‘PREPROD_TEST’ stage
In this stage, we are deploying the bundle produced at the previous stage on our DSS PREPROD instance, and then running tests.
The bundle deployment is done in import_bundle.py:
We search if the project is already deployed or not. If it is deployed, we just update the bundle to use, and if it is not, we create a brand new deployment.
We request Project Deployer to deploy this new bundle using DSSProjectDeployerDeployment.start_update
In this example, we consider connection mappings to be already valid as Project Deployer allows a default remapping to be defined at Infrastructure level, and this should cover most needs.
The following script run_test.py executes all the scenarios named TEST_XXX and fails if a result is not a success.
This pytest configuration has an additional twist. If you have only one test running all the TEST_XXX scenarios, they will be reported to Jenkins as a single test–successful or failed.
Here, we make this nicer by dynamically creating one unit test per scenario. In the final report, we will have one report per scenario executed, making the report more meaningful. This requires some understanding of pytest parameterization. Note that you can perfectly keep one test that will run all your scenarios if you are not feeling at ease with this.
‘DEPLOY_TO_PROD’ stage
The previous stage verified we have a valid package. It’s time to move it to production!
We have one Python script that is going to deploy the bundle on the production Automation node, and then execute the TEST_SMOKE scenario. In case of failure, a rollback to the previous bundle is executed. In detail:
Same as for the pre-production deployment, we find or create a deployment on the production node (saving the currently running bundle id in case of update, for the rollback).
We ask Project Deployer to deploy the bundle.
In order to ensure the new bundle is working, we execute the TEST_SMOKE scenario.
If the deployment or TEST_SMOKE fails, we perform the rollback by re-deploying the previous bundle.
Post Actions
The Post Actions phase allows us to clean locally downloaded zip files and publish all test xUnit reports in Jenkins to have a nice test report. Those reports were produced all along the pipeline by pytest and are here aggregated into a single view to have something like:
How to use this sample?
Now we have seen step-by-step how to build a solid CI/CD pipeline with Jenkins. If you want to use this and adapt it to your setup, here is a checklist of what you need to do:
Have your Jenkins, Artifactory, and DSS nodes installed and running.
Make sure to have Python 3 installed on your Jenkins executor.
Get all the Python scripts for the project and put it in your own source code repository.
Create a new pipeline project in your Jenkins:
Add the variables as project parameters and set them as default values according to your setup.
Copy/paste the pipeline.groovy as Pipeline script.
In the pipeline, set up your source code repository in the PREPARE stage.
And then hit ‘Build with parameters’:
How to improve it?
You can of course improve this startup kit and here are some ideas:
Define a trigger for your pipeline:
A time trigger, to run the pipeline every day for example
A Jenkins GUI manual trigger where users connect to Jenkins and trigger the job
An API trigger, by calling Jenkins from a DSS webapp, scenario, or a macro (using Generic Webhook Trigger | Jenkins plugin or Remote Access API)
You can also add a manual sign-off in this process if you are not confident. The easiest way is to use the Jenkins manual input step.
And of course, add as many test scenarios as possible that will ensure a reliable continuous deployment.