Active Learning for classification problems
Prerequisites
You should be familiar with the basics of machine learning in Dataiku DSS.
Technical Requirements
Access to a DSS instance where the ML-assisted Labeling plugin is installed.
Access to a DSS code environment with Python3 support, including the package set for Dataiku DSS Visual Machine Learning. The code environment used to build the model that assists with the labeling needs to be compatible with the code environment of the ML-assisted Labeling plugin.
Setting Up
Suppose you are the editor of a browser extension that allows users to block clickbait news articles. As a first step, you have crawled the web to gather a set of news titles.
Supporting Data
We will use the following two files:
clickbait_reported_by_users.csv. This contains 50 titles that you have already manually labeled.
clickbait_to_classify.csv. This contains unlabeled titles.
These datasets are reformatted versions of the data provided in this repository (see [CPKG16]).
Create the Project and Set the Code Environment
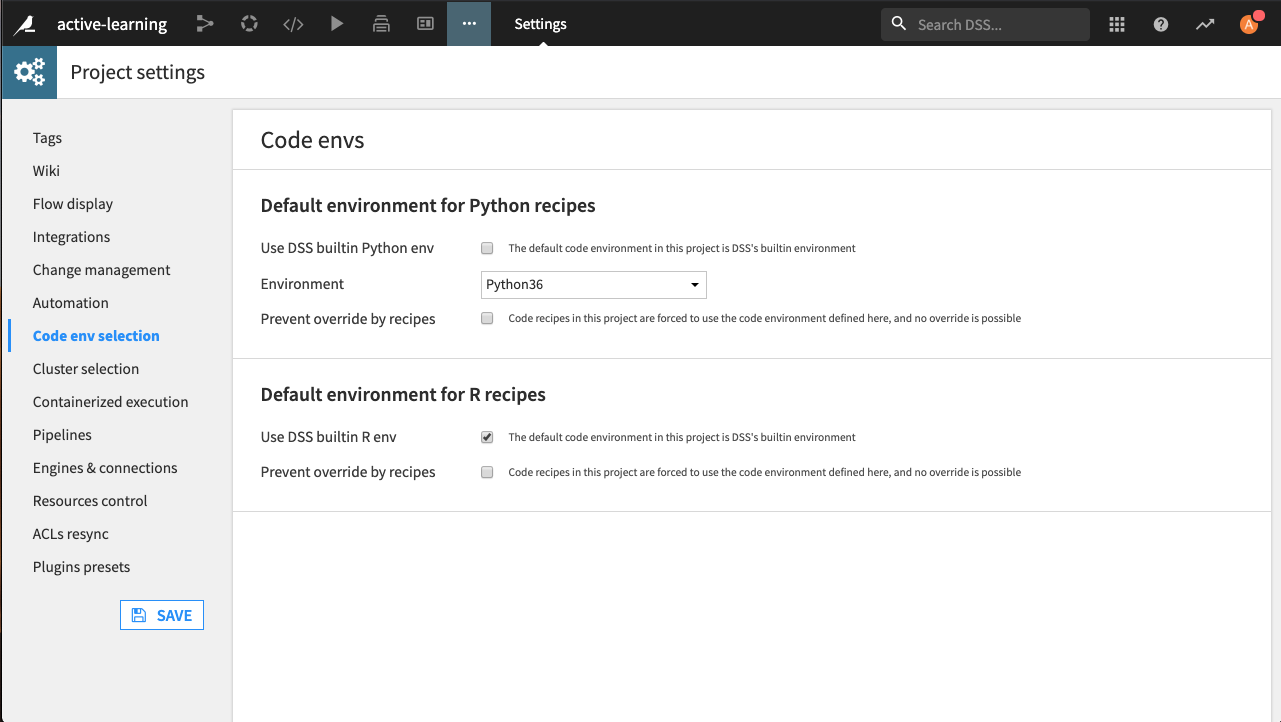
Create a new project and within the new project go to … > Settings > Code env selection.
Deselect Use DSS builtin Python env and select an environment that has Python3 support.
Click Save.
Prepare the Data
Upload the CSV files as new Uploaded files datasets with the the following settings on the Format/Preview tab:
Select Quoting style Escaping only
Enter a Separator value of
_Enter a Skip first lines value of
0Check Parse next line as column headers
Note
The data to classify has only one column, because it is not classified yet.
Later on, we’ll merge newly manually labeled data with the already labeled data. In order to prepare for this eventuality, an additional step is necessary.
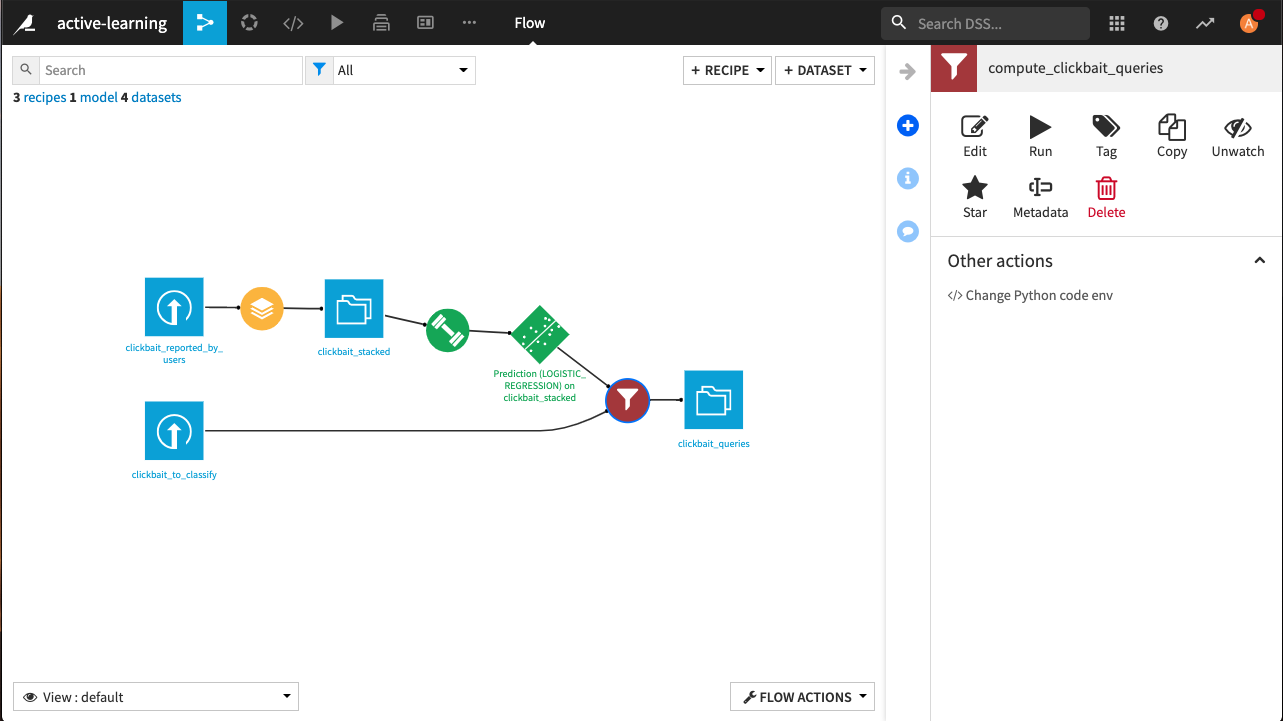
Select the clickbait_reported_by_users dataset and create a Stack recipe.
Create as output a dataset named clickbait_stacked and change no other parameters.
Run the recipe.
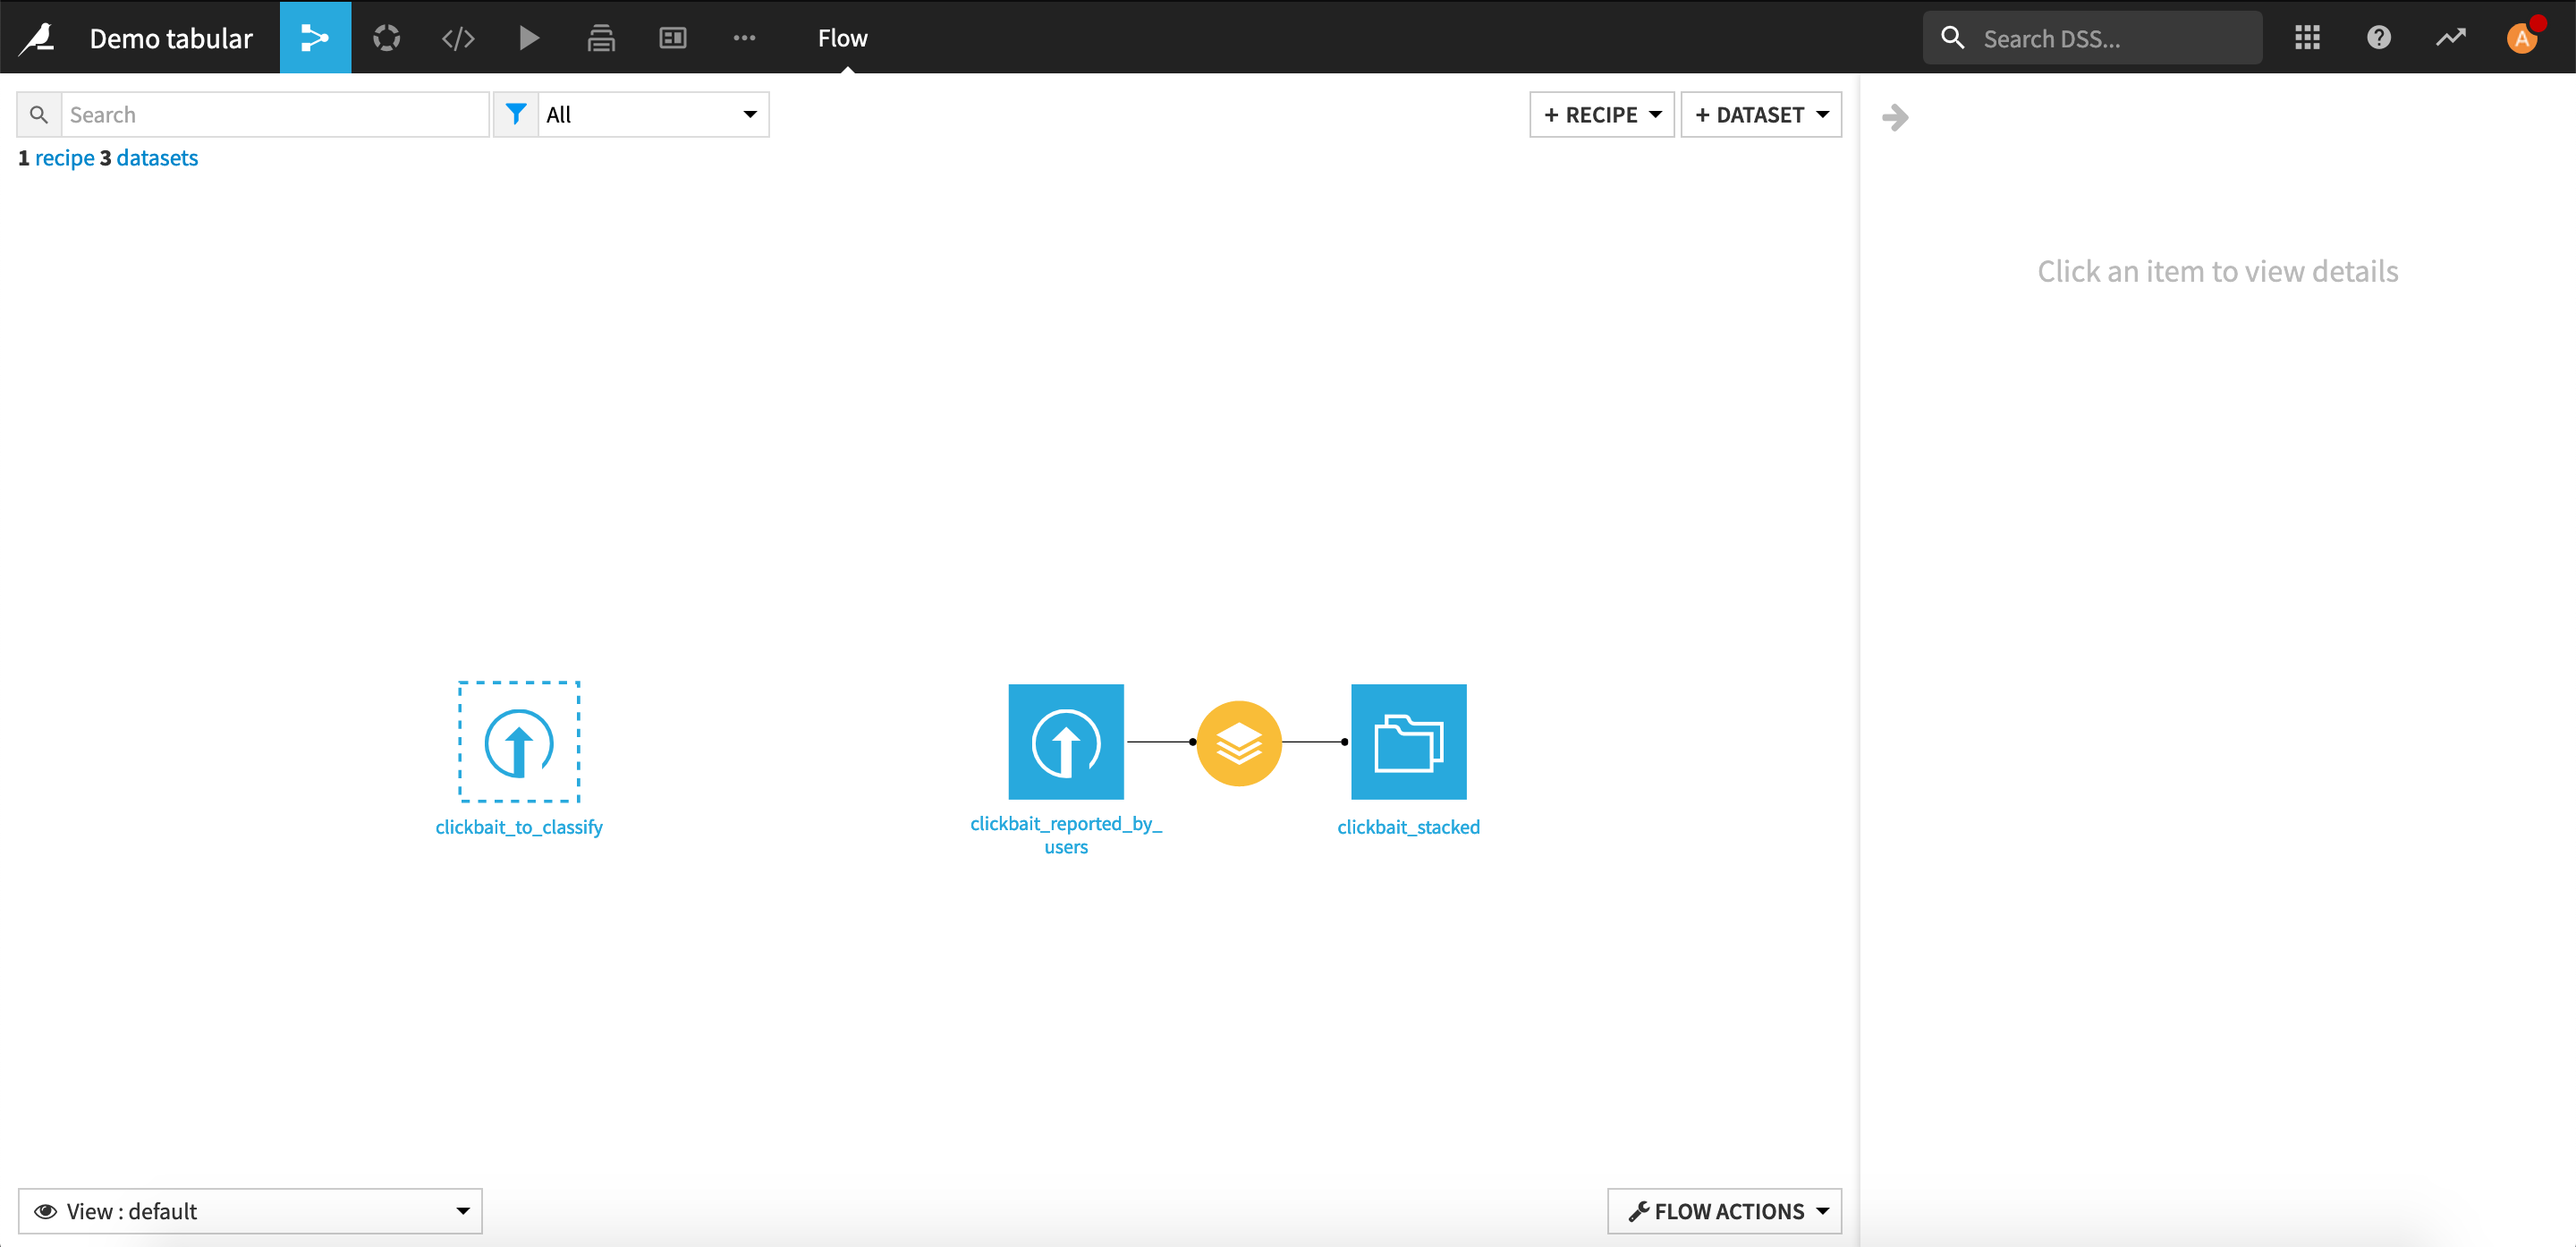
Later on, the dataset of labeled samples will be set as another input of the recipe.
The flow should now look like this:
Building a First Model
Before even considering doing active learning, one needs to fit a model on the already labeled data. If the performance is good enough, active learning may not even be needed.
Select the clickbait_stacked dataset, and then click Lab.
Click Quick model > Prediction
Select clickbait as the target column and then click Automated Machine Learning > Quick prototypes > Create.
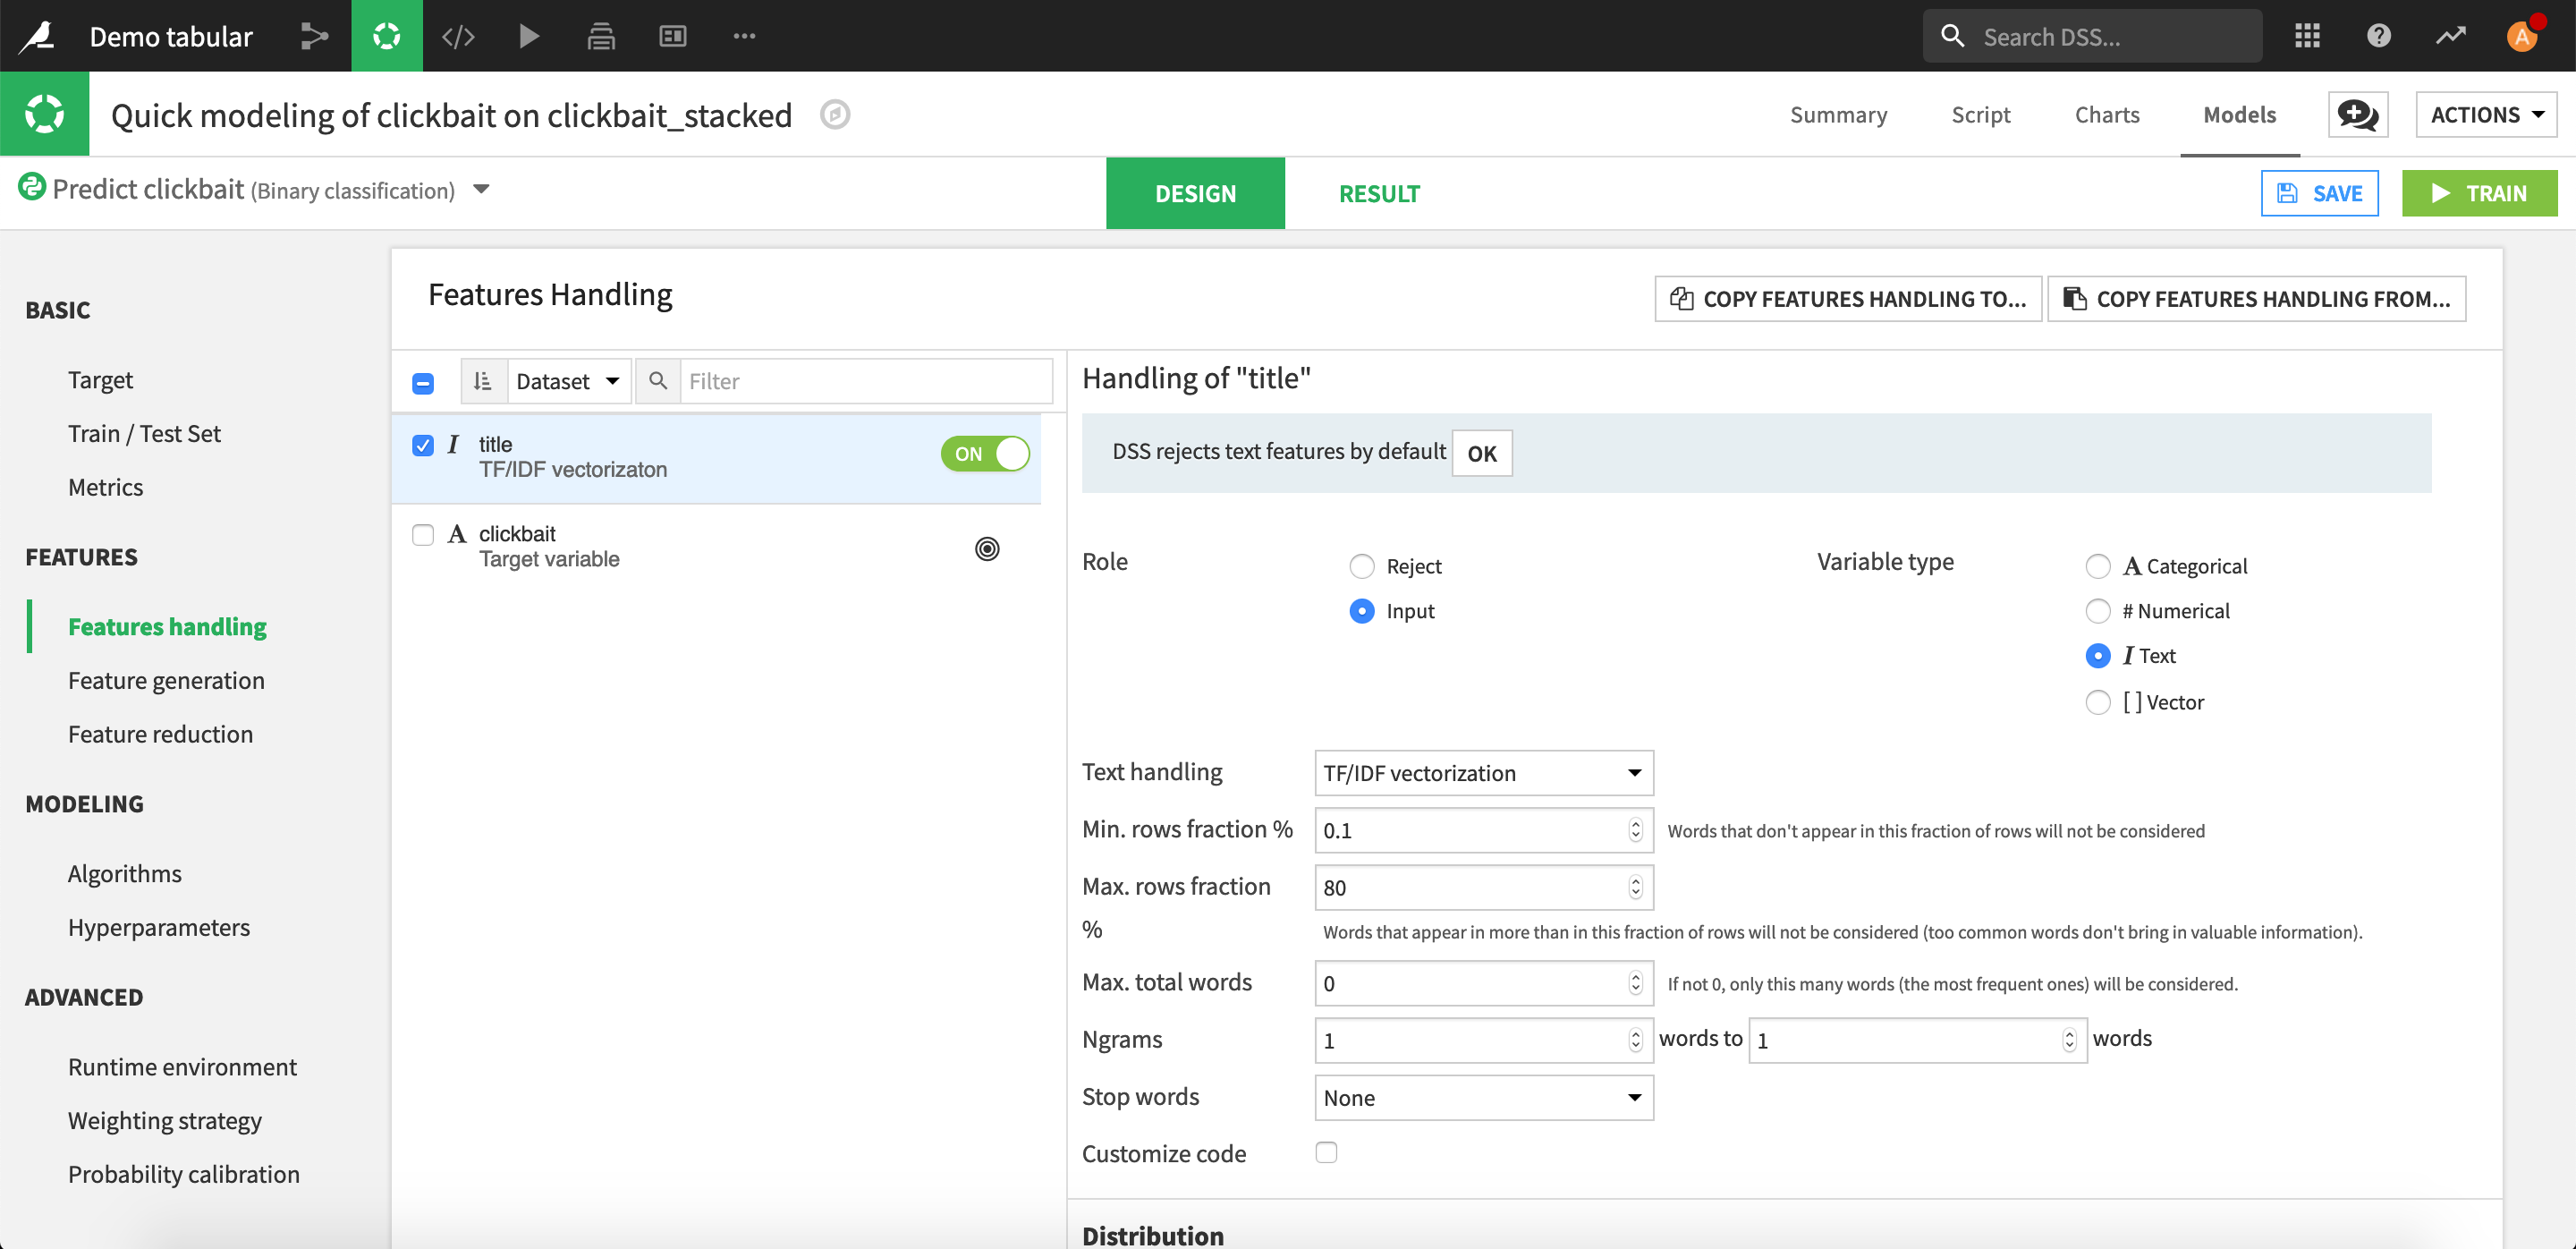
DSS tries to guess the best parameters for the current task and set an analysis. However, since our input is not really standard, it is by default rejected by DSS.
Go to the Design tab and then Features handling.
Click on title and set its Role as an input.
Choose TF/IDF vectorization and add English stop words.
In the Algorithms settings, disable Random Forest, leaving Logistic Regression the only algorithm.
In the Runtime environment settings, choose Inherit project default as the selection behavior for the code environment.
Click Train and see your model learn! The performance of the model should be around 0.5.
Click on the model and deploy it.
Note
Troubleshooting. Did your training fail because of a missing module? This is because your code environment doesn’t have the set of packages needed for Visual Machine Learning. Choose another code environment or talk to your DSS administrator.
Putting Active Learning in Place
We would like to improve the model performance by labeling more rows and adding them to the training set. This is where active learning comes into play. We will:
Set up the recipe that uses the logistic regression model to determine the order in which rows should be manually labeled.
Set up a web app that makes it easier to manually label rows.
Set up a scenario that automates the the rebuild of the ML model and then updates the the order in which rows should be manually labeled.
Set up a dashboard to monitor how well our active learning project is progressing.
Set Up the Query Sampler Recipe
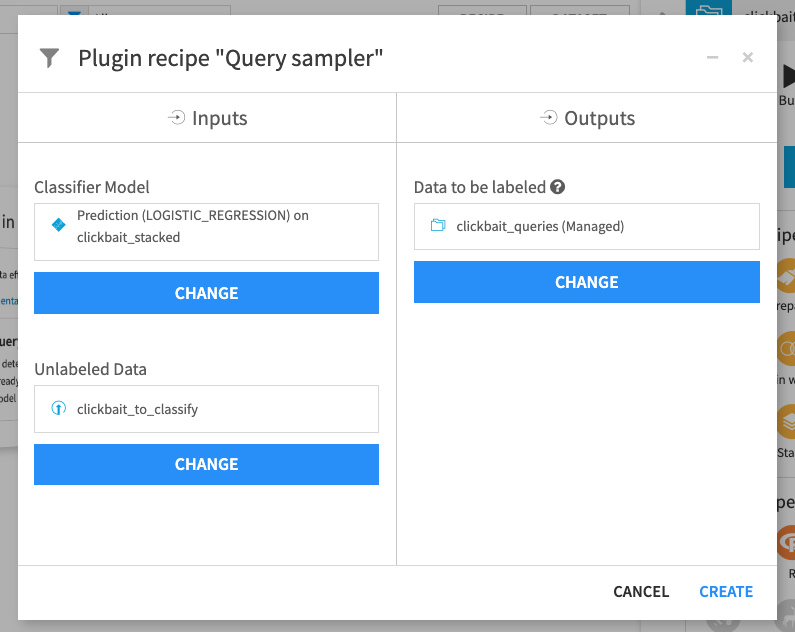
Click + Recipe > ML-assisted Labeling > Query sampler.
For the Classifier Model, select Prediction (LOGISTIC_REGRESSION) on clickbait_stacked.
For the Unlabeled Data, select clickbait_to_classify.
For the output Data to be labeled, create a new dataset called
clickbait_queries.Click Create.
Ensure that Smallest confidence sampling is selected as the Query strategy. On binary classification tasks, all the strategies give the same results, but the smallest confidence sampling strategy is the least computationally expensive. Run the recipe.
Note
Troubleshooting. Did the recipe fail because of a code environment mismatch between the deployed model and the plugin? Rebuild and redeploy your model with a Python3 code environment or talk to your DSS administrator.
Set Up the Labeling Application
Start by creating a web application to label images:
Go to </> > Webapps
Click + New Webapp > Visual Webapp > Tabular data labeling.
Name the webapp
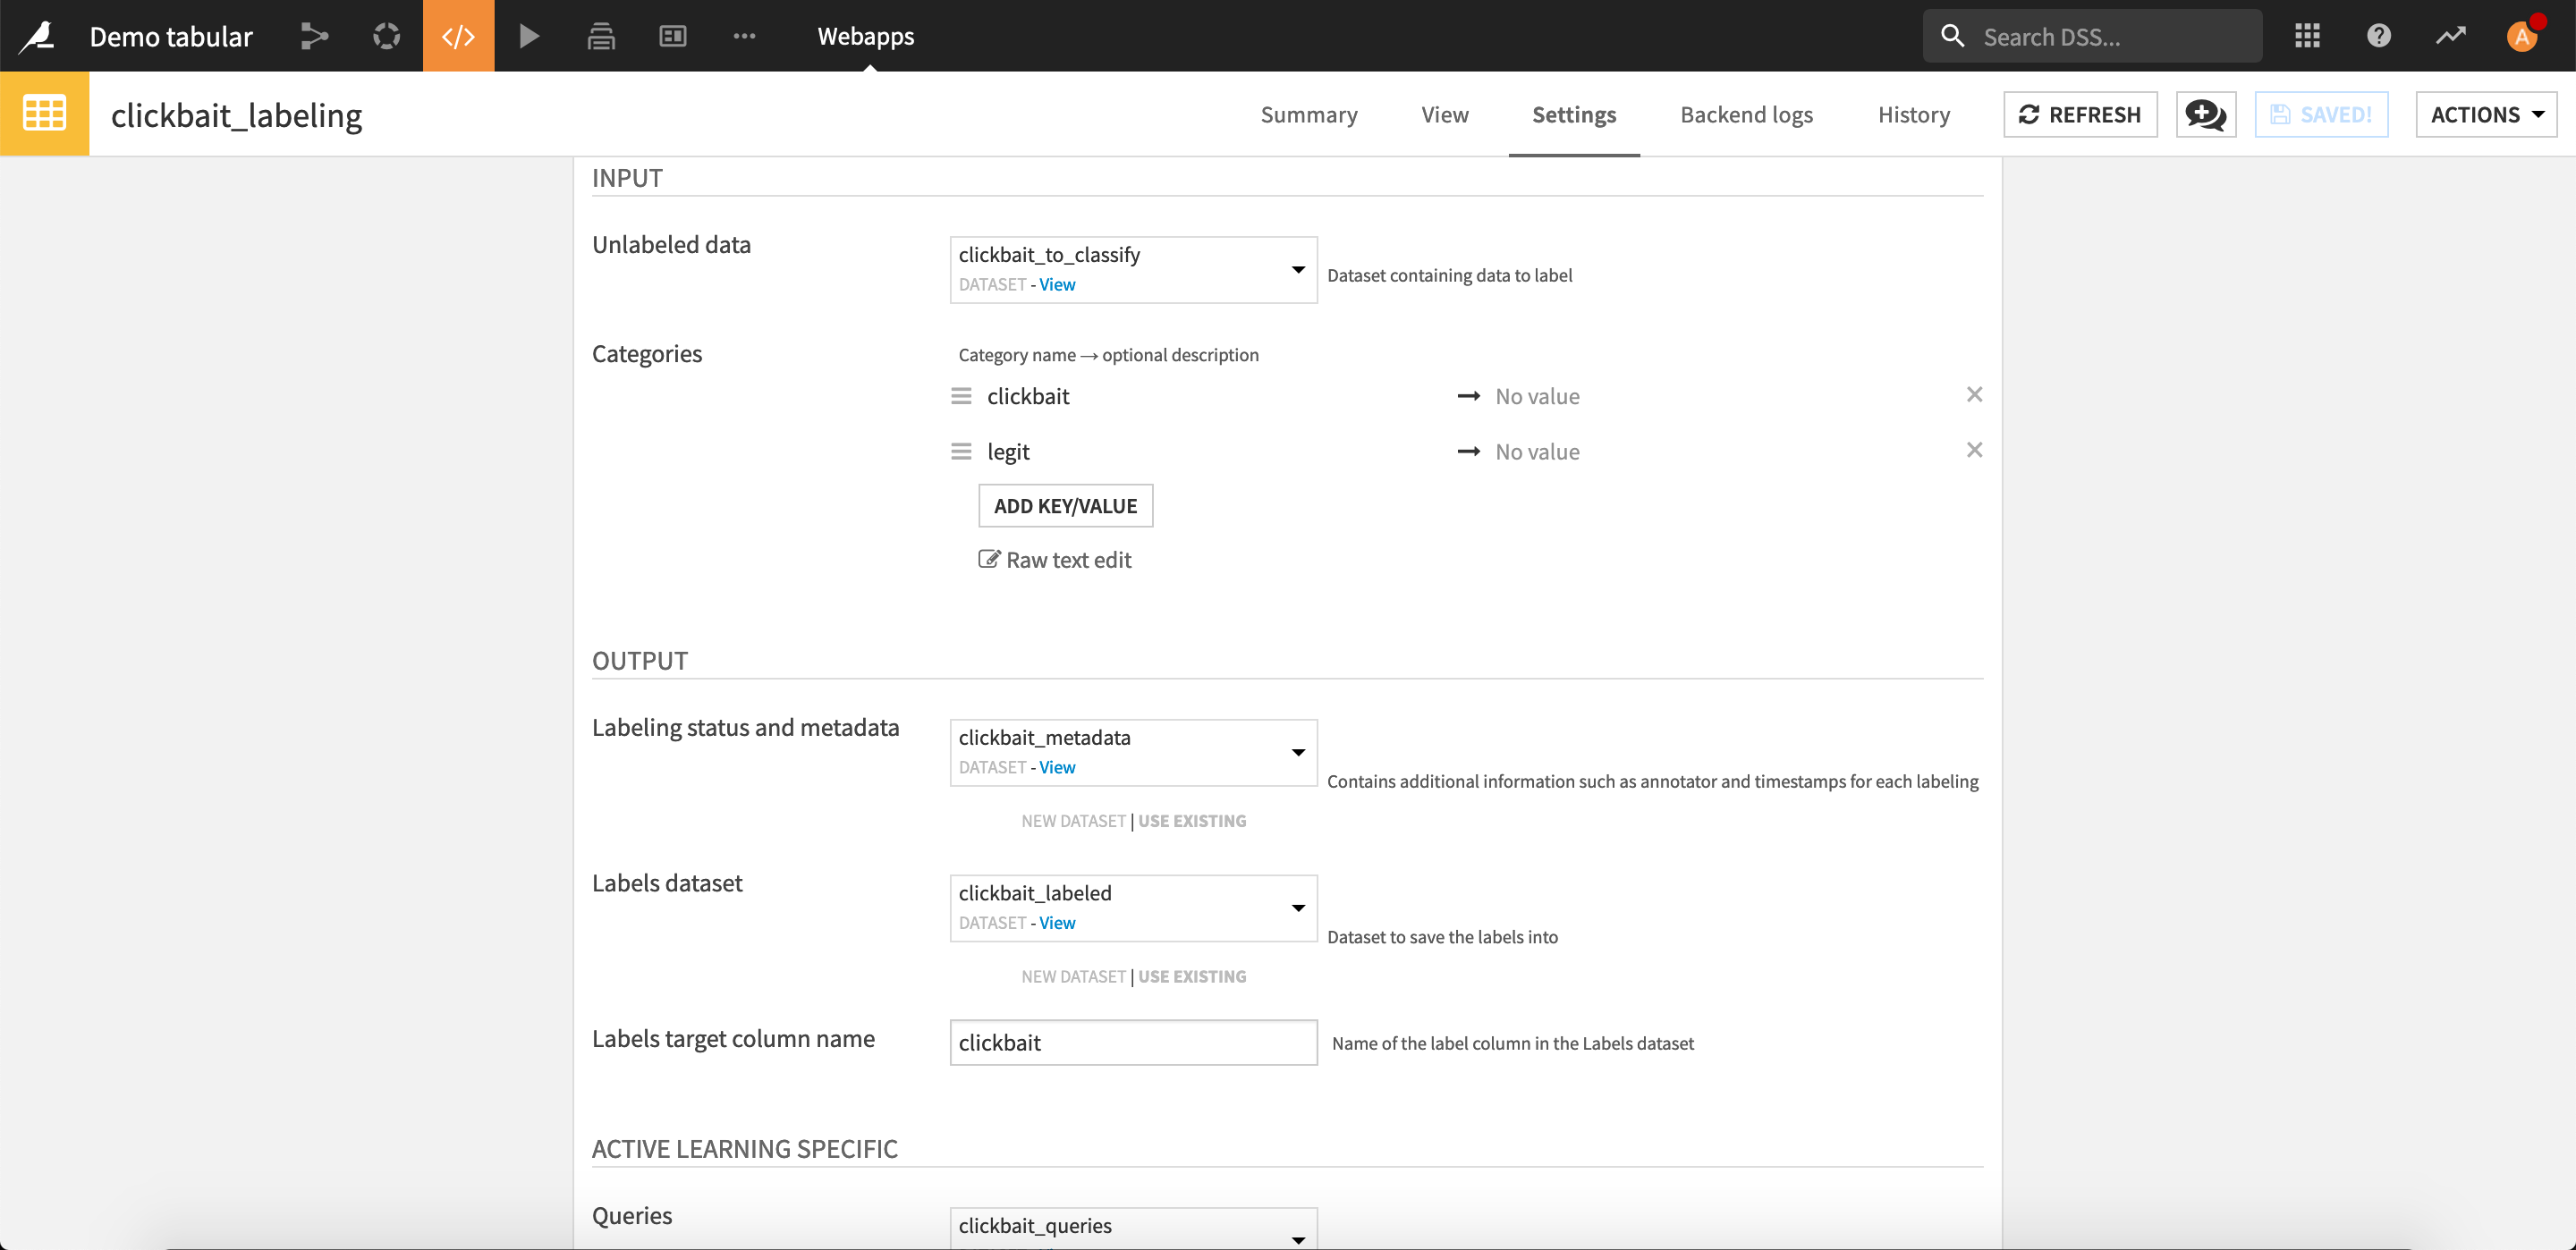
Clickbait labelingand click Create.Choose the following web app settings:
Input
For Unlabeled data, select clickbait_to_classify.
For Categories, add
clickbaitandlegitas categories. Optionally give them more detailed descriptions.
Output
For Labels dataset, create a new dataset named
clickbait_labeled.For Labeling metadata dataset, create a new dataset named
clickbait_metadata.Enter the Labels target column name as
clickbait.
Active Learning specific
For Queries, select clickbait_queries, which is the dataset created by the Query Sampler recipe.
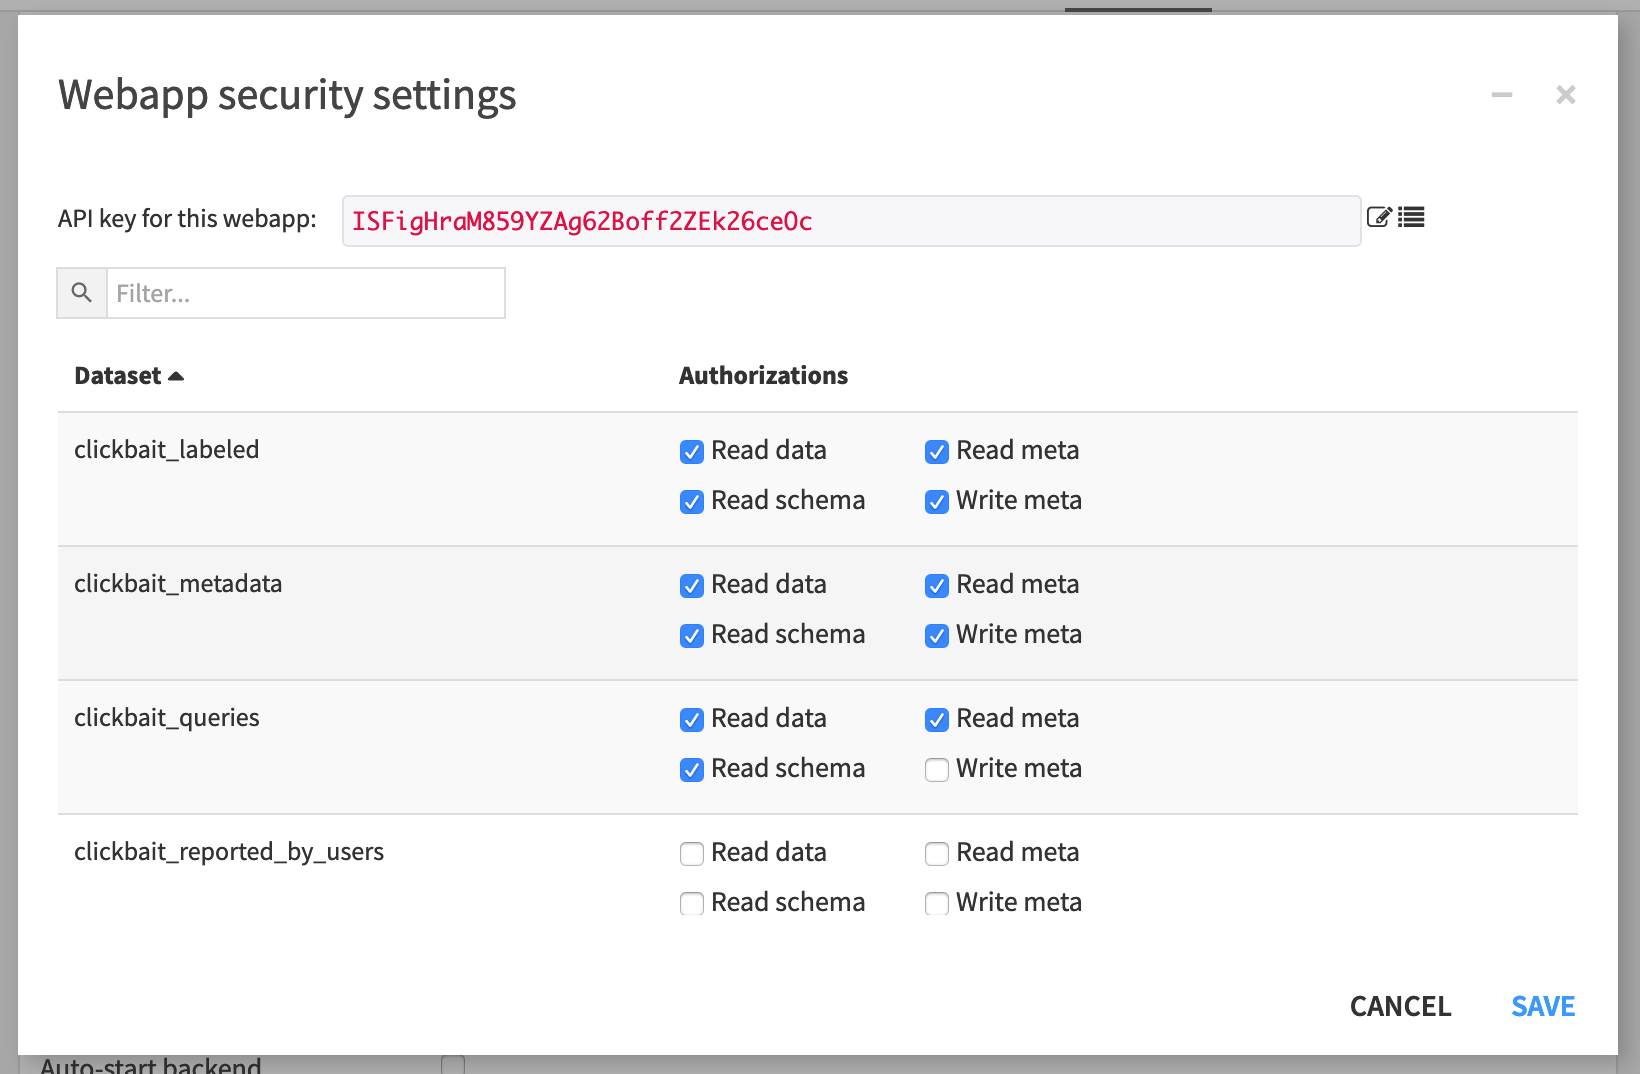
Under Javascript security click Configure
Give all authorizations for the output datasets clickbait_labeled and clickbait_metadata.
Give all “Read” authorizations for the input datasets clickbait_queries and clickbait_to_classify.
Click Save.
From the webapp’s Actions menu, click Start.
It begins by initializing the output datasets. You could start labeling right away but we can make this experience even better for the labeler by first setting up the whole data processing pipeline.
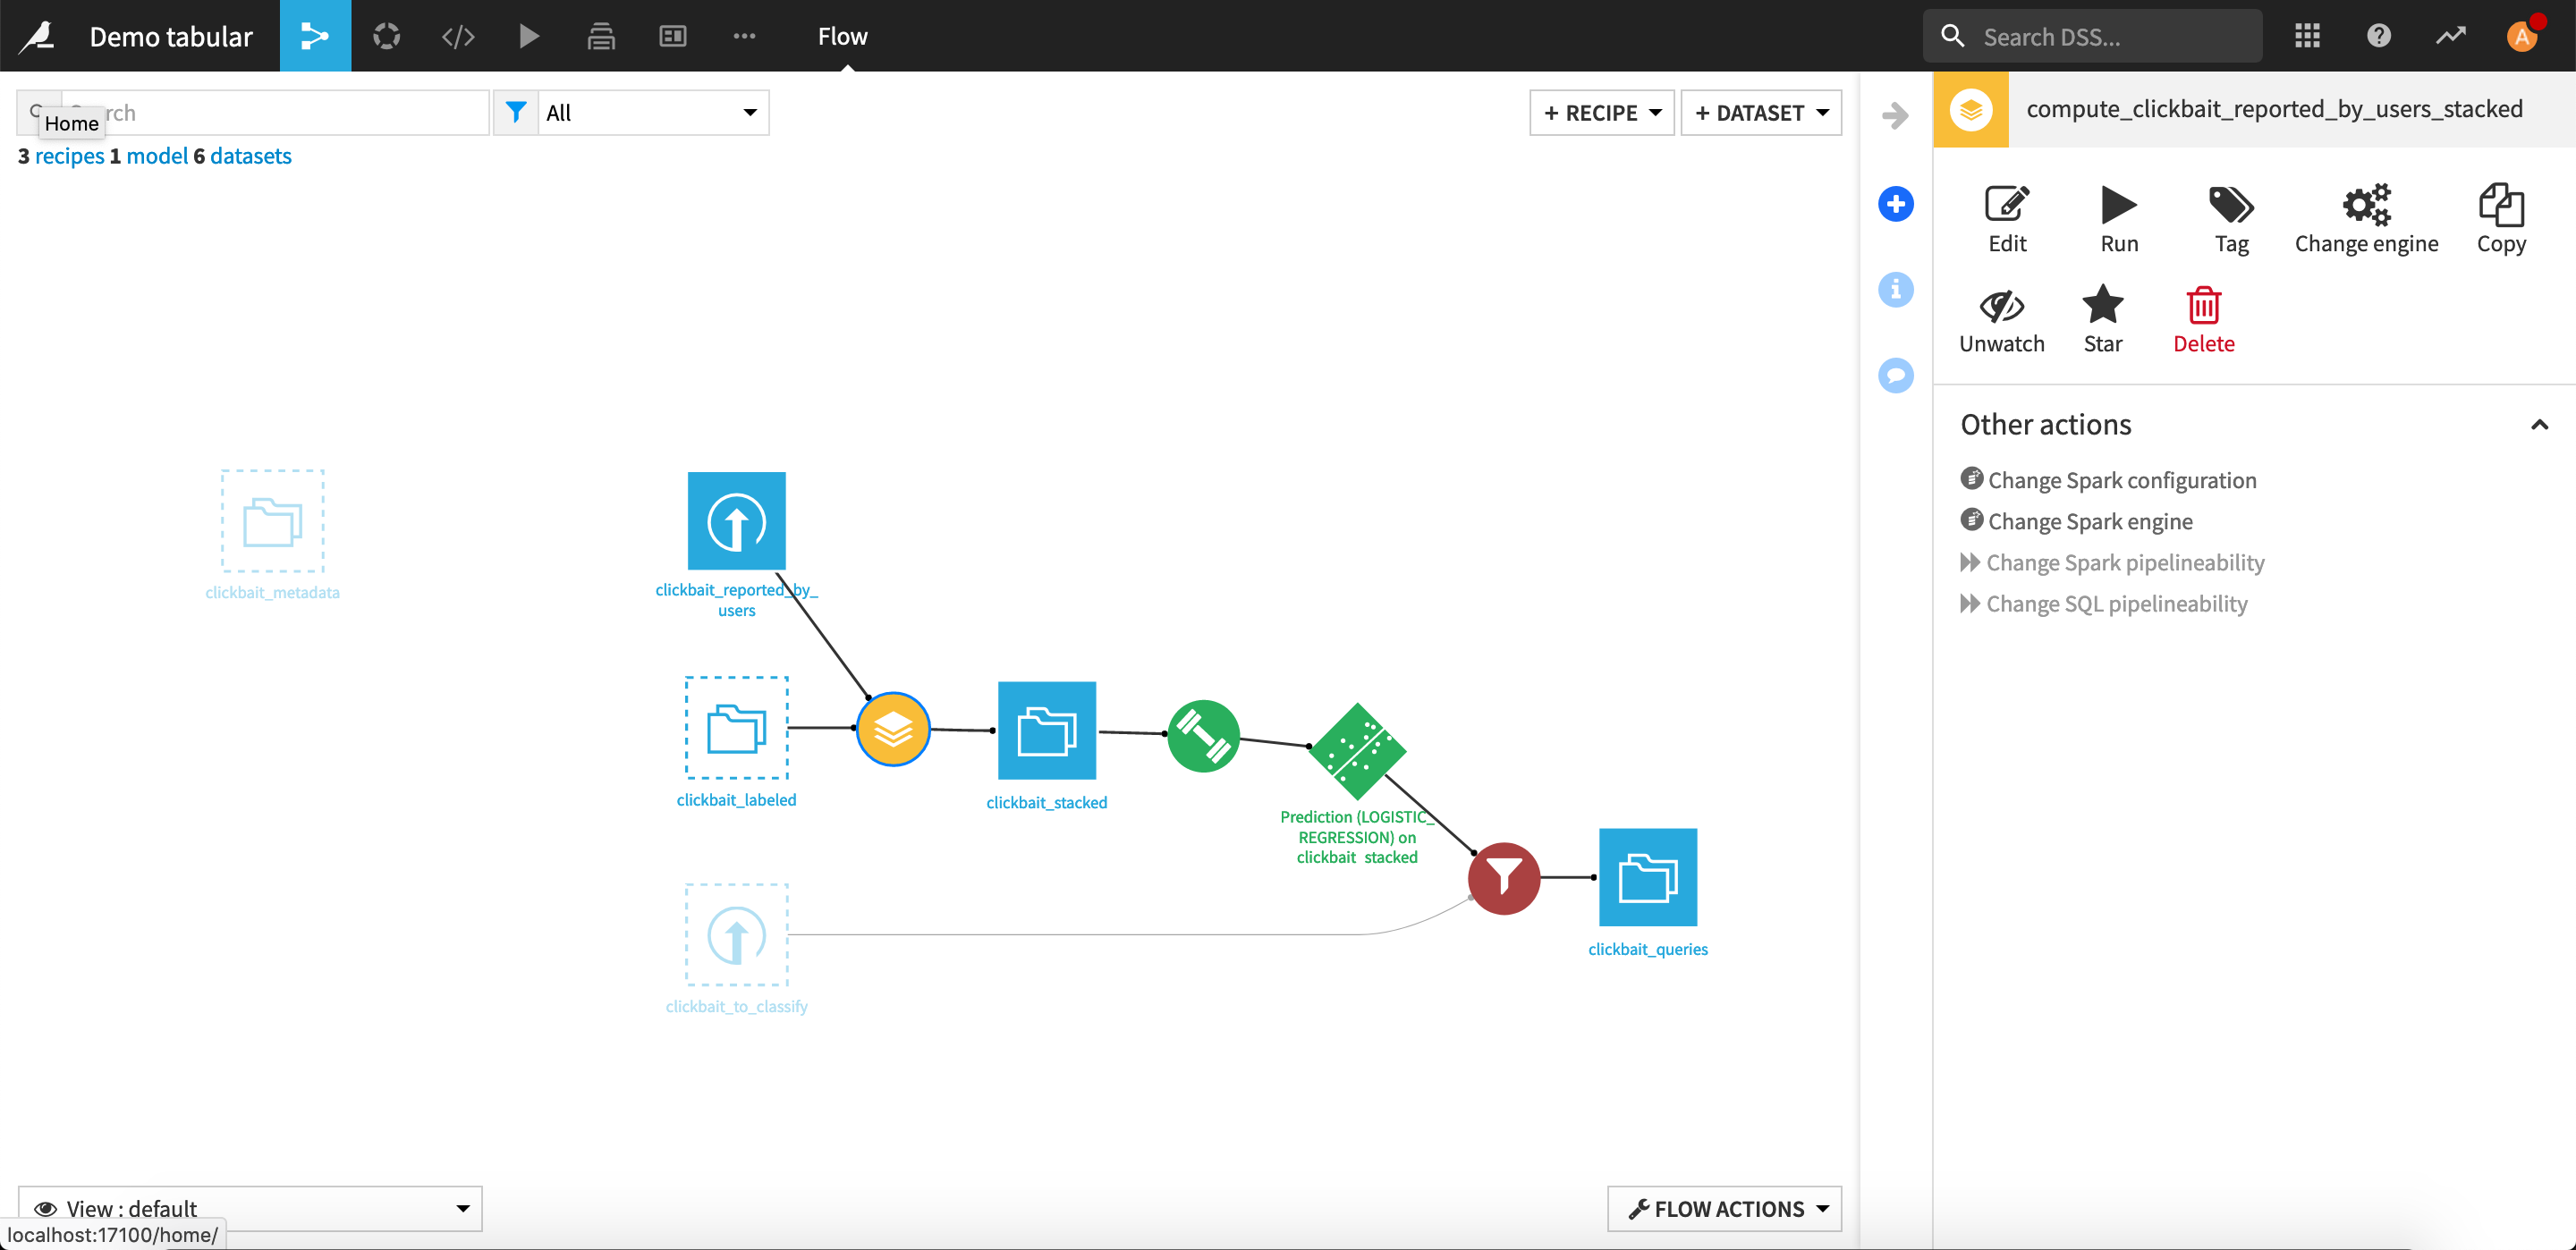
The first task is to integrate newly manually labeled data into the training set of the model. Go back to the Flow, where you should see that a dataset clickbait_labeled has been created.
Open the Stack recipe we created earlier and click Add input.
Select clickbait_labeled.
Run the recipe and update the schema.

All the labeled rows that will be added by the webapp into the dataset will now be fed into the model.
Note
For identification purposes, the labeling webapp creates a unique hash proper to each sample. This is where the additional clickbait_id column comes from. It is not used anywhere else so you should not include this column in any processing.
Set Up the Training Scenario
The Flow is now complete; however, the model must be manually retrained in order to generate new queries. The active learning plugin provides a scenario trigger to do it automatically. Let’s set it up.
From the Jobs dropdown in the top navigation bar, select Scenarios.
Click + New Scenario
Name it
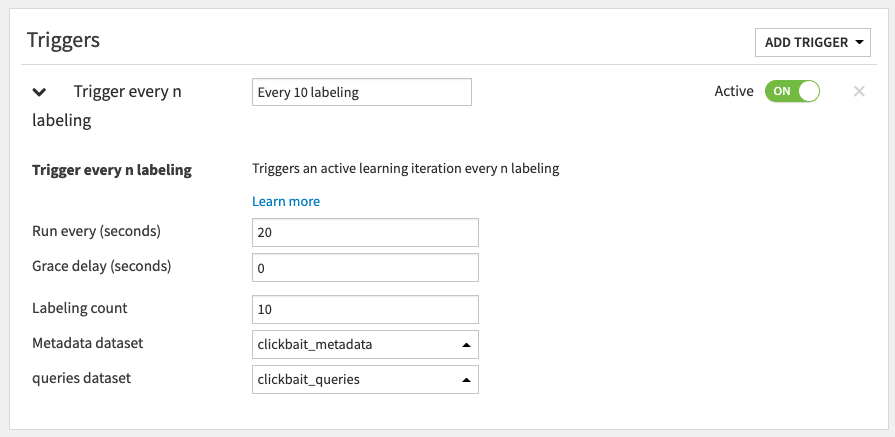
Retrain clickbaitand click Create.Click Add Trigger > ML-assisted Labeling > Trigger every n labeling.
Name the trigger
Every 10 labeling.Set Run every (seconds) to
20.Set Labeling count to
10.Set the Metadata dataset to clickbait_metadata.
Set the Queries dataset to clickbait_queries.
In the Steps tab:
Click Add Step > Build/Train.
Name it
Stack data.Click Add Dataset to Build and add clickbait_stacked.
For the Build mode, select Build only this dataset.

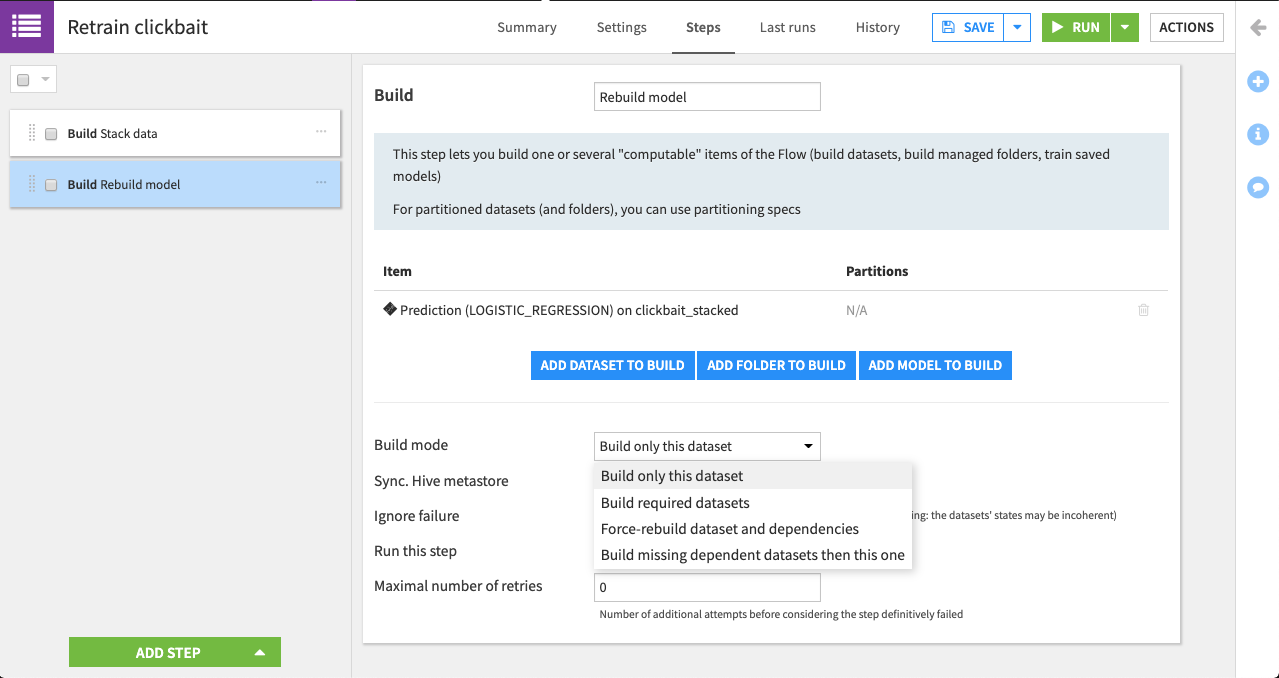
Click Add Step > Build/Train.
Name it
Rebuild model.Click Add Model to Build and add Prediction (LOGISTIC_REGRESSION) on clickbait_stacked
For the Build mode, select Build only this dataset.
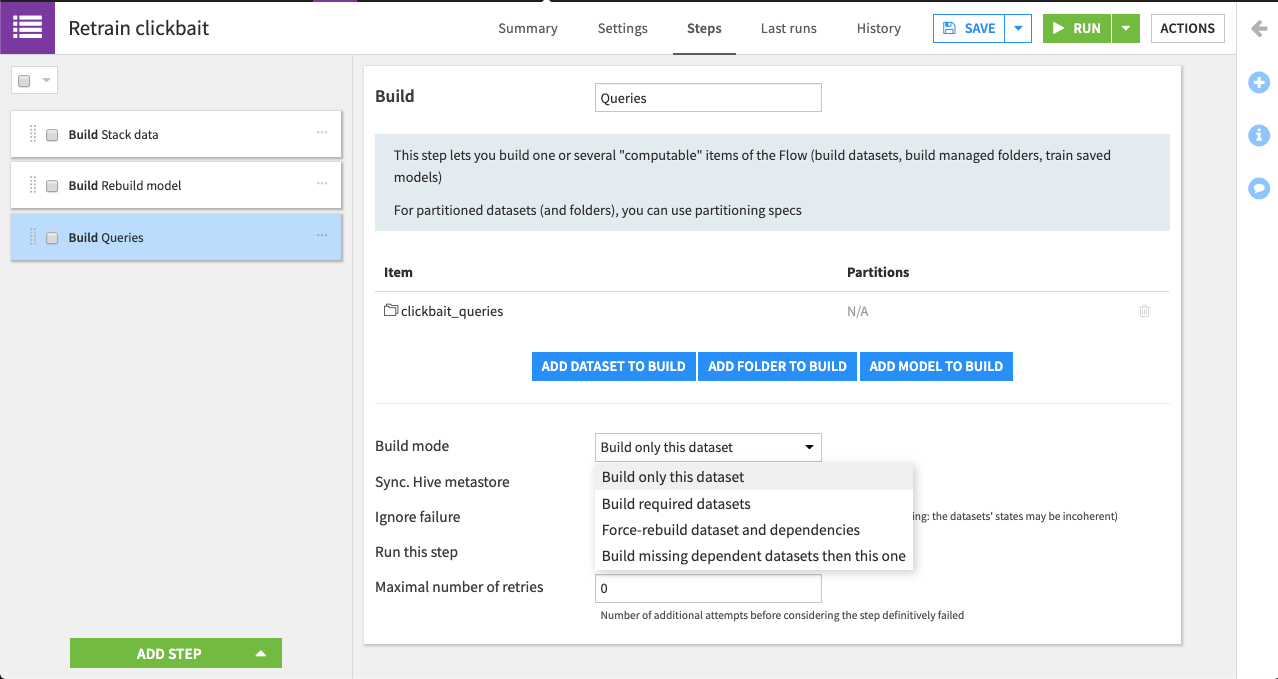
Click Add Step > Build/Train.
Name it
Queries.Click Add Dataset to Build and add clickbait_queries.
For the Build mode, select Build only this dataset.
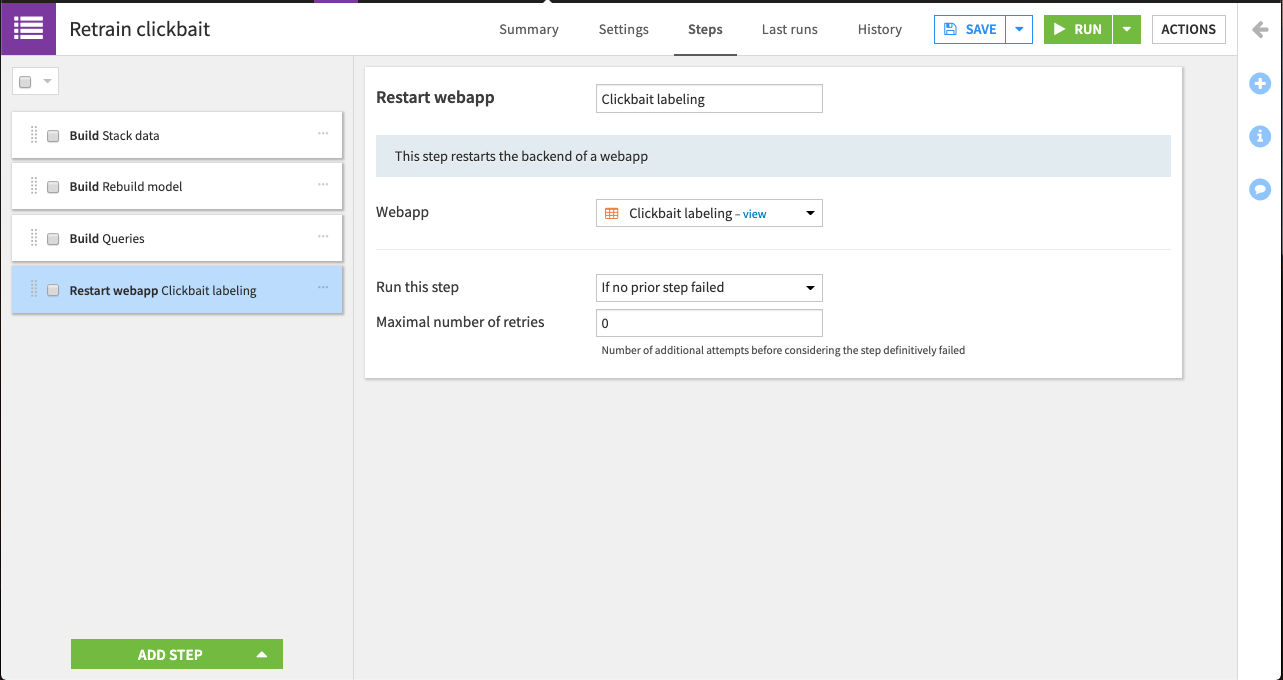
Click Add Step > Restart webapp.
Name it
Clickbait labeling.Select Clickbait labeling as the web app to restart.
In the scenario Settings tab, set the auto-trigger of the scenario on. What happens now is that the scenario will trigger the generation of new queries every time 10 samples are labeled.
Prepare a Monitoring Dashboard
In order to track model improvements over time, let’s create a dashboard. Go to Dashboards.
Rename the default dashboard
AL monitoring.Add a tile to the first slide of type Metrics insight with the following settings:
Set Type to Saved model.
Set Source to Prediction (LOGISTIC_REGRESSION) on clickbait_stacked.
Set Metric to AUC.
Click Add.
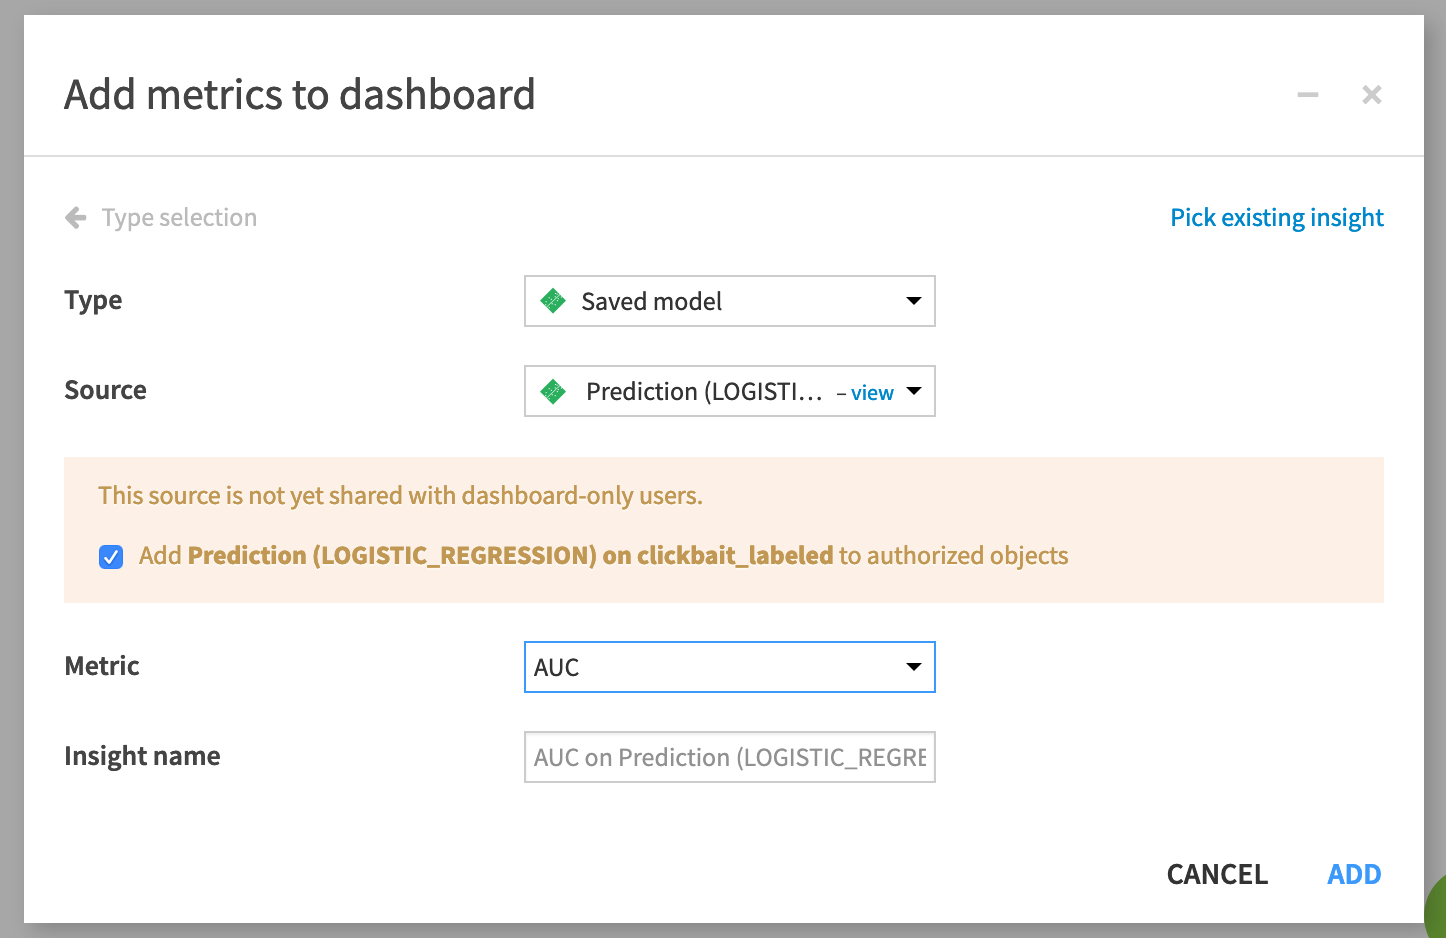
Set the Metrics options to History.
Label data
This is it! You can use the webapp by going to its View tab. Start labeling articles as clickbait or legitimate based upon the article title. Notice that you can use keystrokes to label images faster. Simply hit c or l, on your keyboard to select the class of the current tweet.
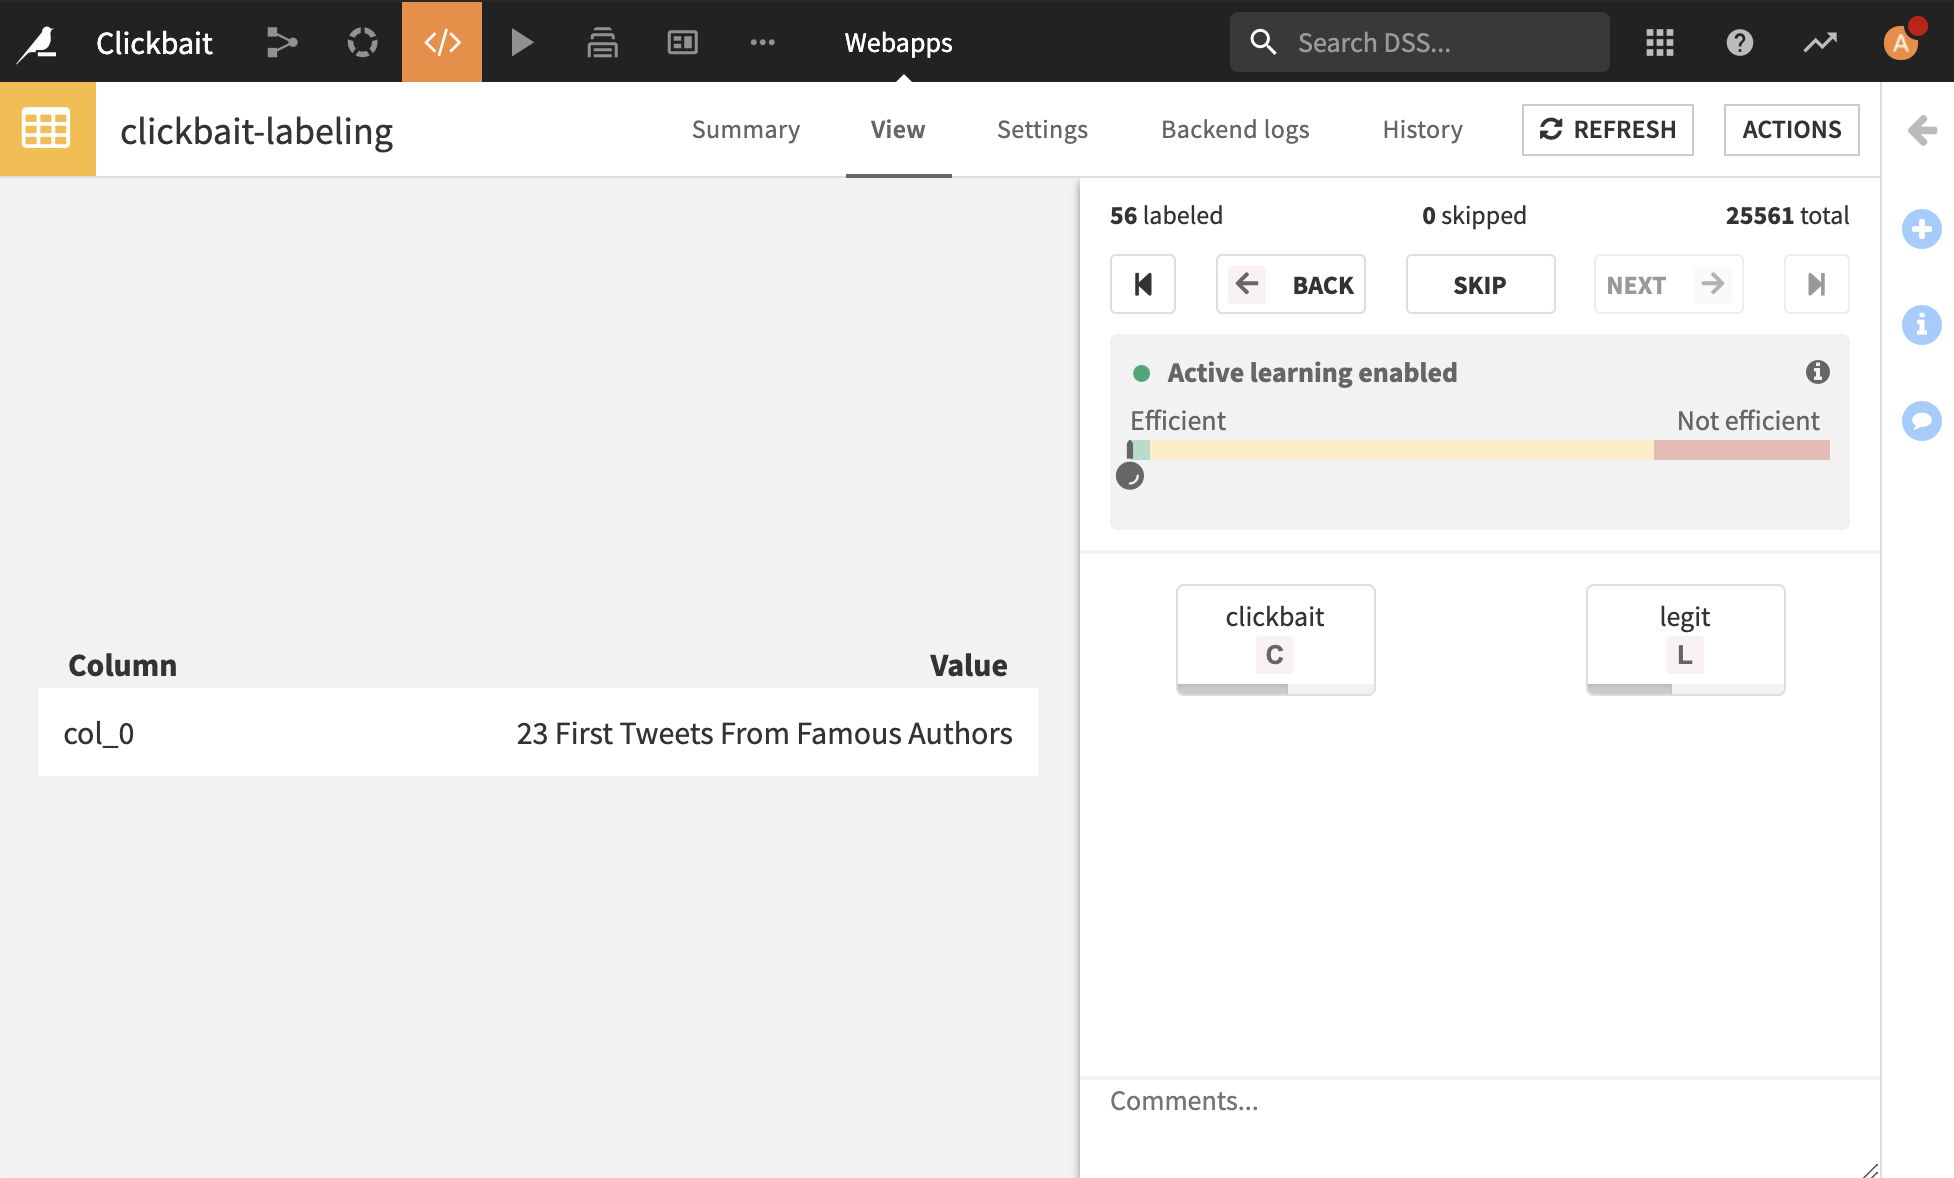
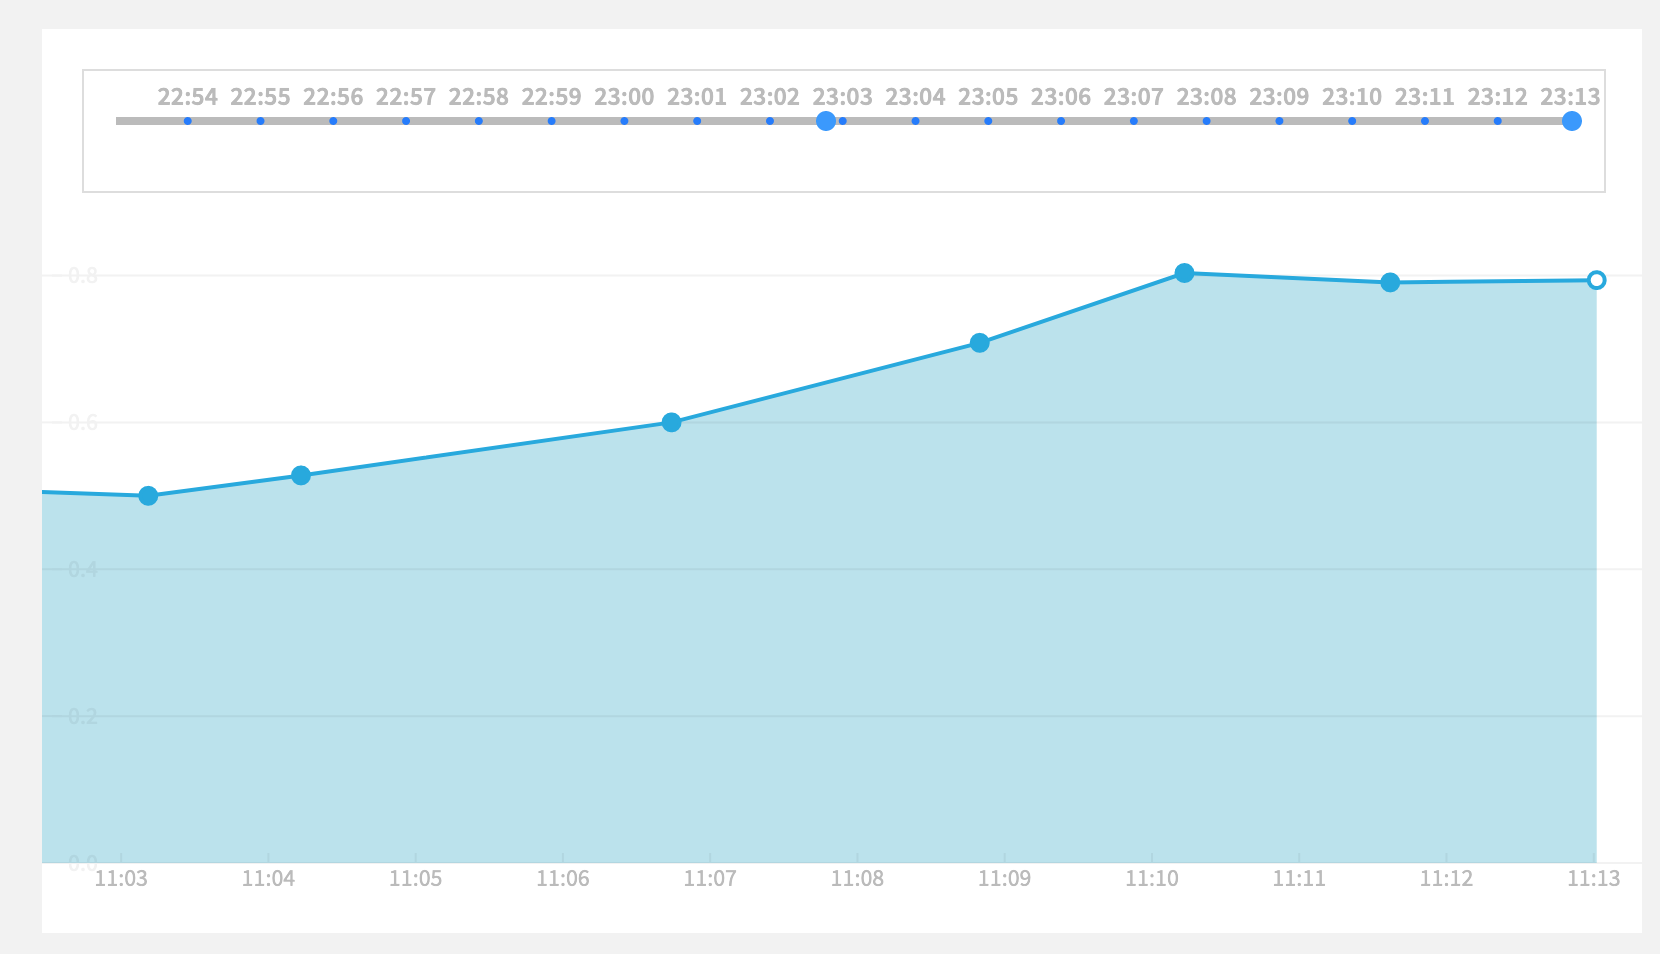
As you label, you will see notifications pop every 10 labels. You can keep labeling and watch the dashboard from time to time. See the AUC rising!
What’s Next
For more on active learning, see the following posts on Data From the Trenches:
References
- CPKG16
Abhijnan Chakraborty, Bhargavi Paranjape, Sourya Kakarla, and Niloy Ganguly. Stop clickbait: detecting and preventing clickbaits in online news media. In Advances in Social Networks Analysis and Mining (ASONAM), 2016 IEEE/ACM International Conference on, 9–16. IEEE, 2016.