Image Classification with Code
Deep learning models are powerful tools for image classification. In Dataiku you can build a convolutional neural network model for image classification.
However, such models can be difficult and expensive to create from scratch, especially if you don’t have a large number of images for training the model. Dataiku provides a plugin that supplies a number of pre-trained deep learning models that you can use to classify images. You can also retrain a model to specialize it on a particular set of images, a process known as transfer learning.
Objectives
This how-to walks through how to build a convolutional network for image classification, using Keras code in Dataiku’s Visual Machine Learning.
We’ll then walk through how to perform transfer learning retrain a model on a particular set of images.
Prerequisites
You should have some experience with Deep Learning with Code in Dataiku.
You should have some familiarity with Keras.
You will need access to a code environment with the necessary libraries. When creating a code environment, you can add sets of packages on the Packages to Install tab. Choose the Visual Deep Learning package set that corresponds to the hardware you’re running on.
In the Transfer Learning example, you will need the Deep Learning for images plugin. Install this plugin from the store.
Recognizing Handwritten Digits
To demonstrate how to build a model from scratch, we’ll use the MNIST database. The goal is for the model to be able to identify a handwritten number.
Preparing the Data
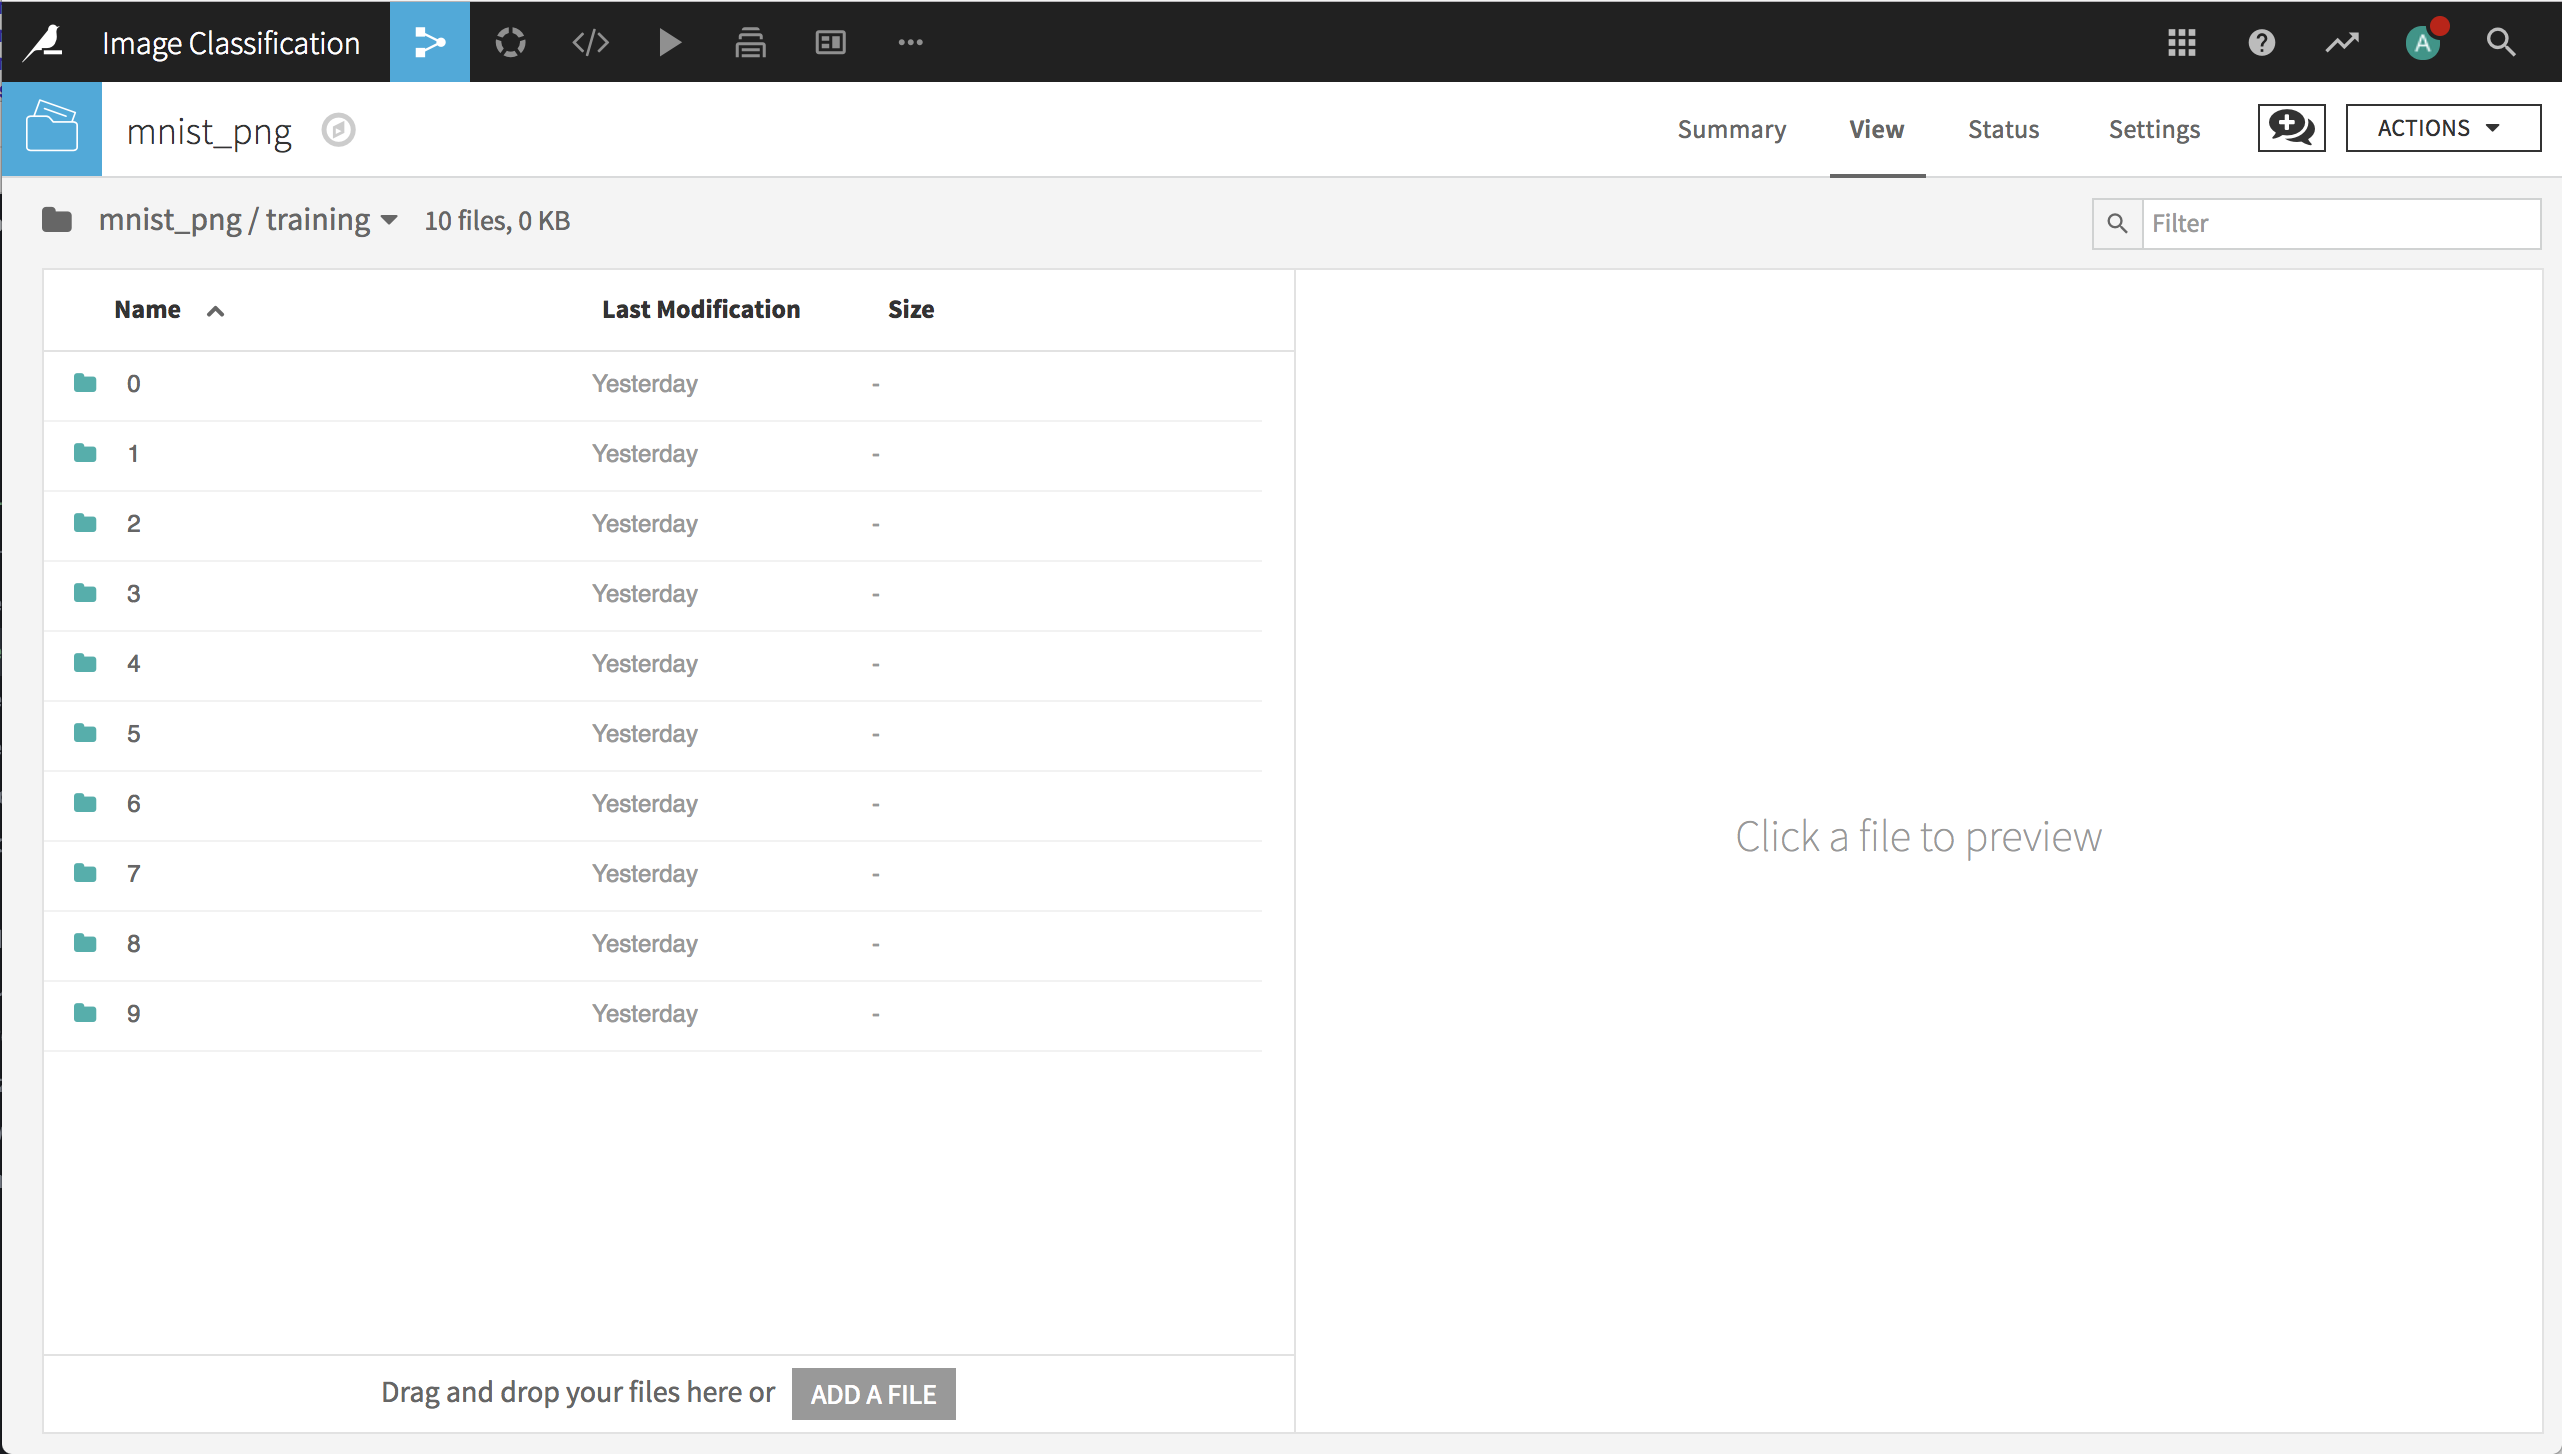
Download the PNG version of the database and uncompress the archive. Create a new project. Create a new folder mnist_png in the flow and populate it with the contents of the mnist_png archive.
In order to train and test a deep learning model for these images, we need to create train and test datasets that contain the path to each image (so that the model can find it) and the label that identifies the digit each image represents.
As a first step, we’ll create a Python recipe that uses the mnist_png folder as an input and a new dataset mnist as the output. The code of the recipe uses the Dataiku Python API to retrieve the list of paths of all images in the folder (and its subfolders) and writes the paths as a column in the output dataset.
Note
In order to use this code in your project, you’ll need to change “9672PoPB” to the identifier for the folder in your project.
# -*- coding: utf-8 -*-
import dataiku
import pandas as pd, numpy as np
from dataiku import pandasutils as pdu

# Read recipe inputs
folder = dataiku.Folder("9672PoPB")

# Initialize data frame
df = pd.DataFrame(columns=['path'])

# Populate dataframe with paths
df['path'] = folder.list_paths_in_partition()

# Write recipe outputs
mnist = dataiku.Dataset("mnist")
mnist.write_with_schema(df)
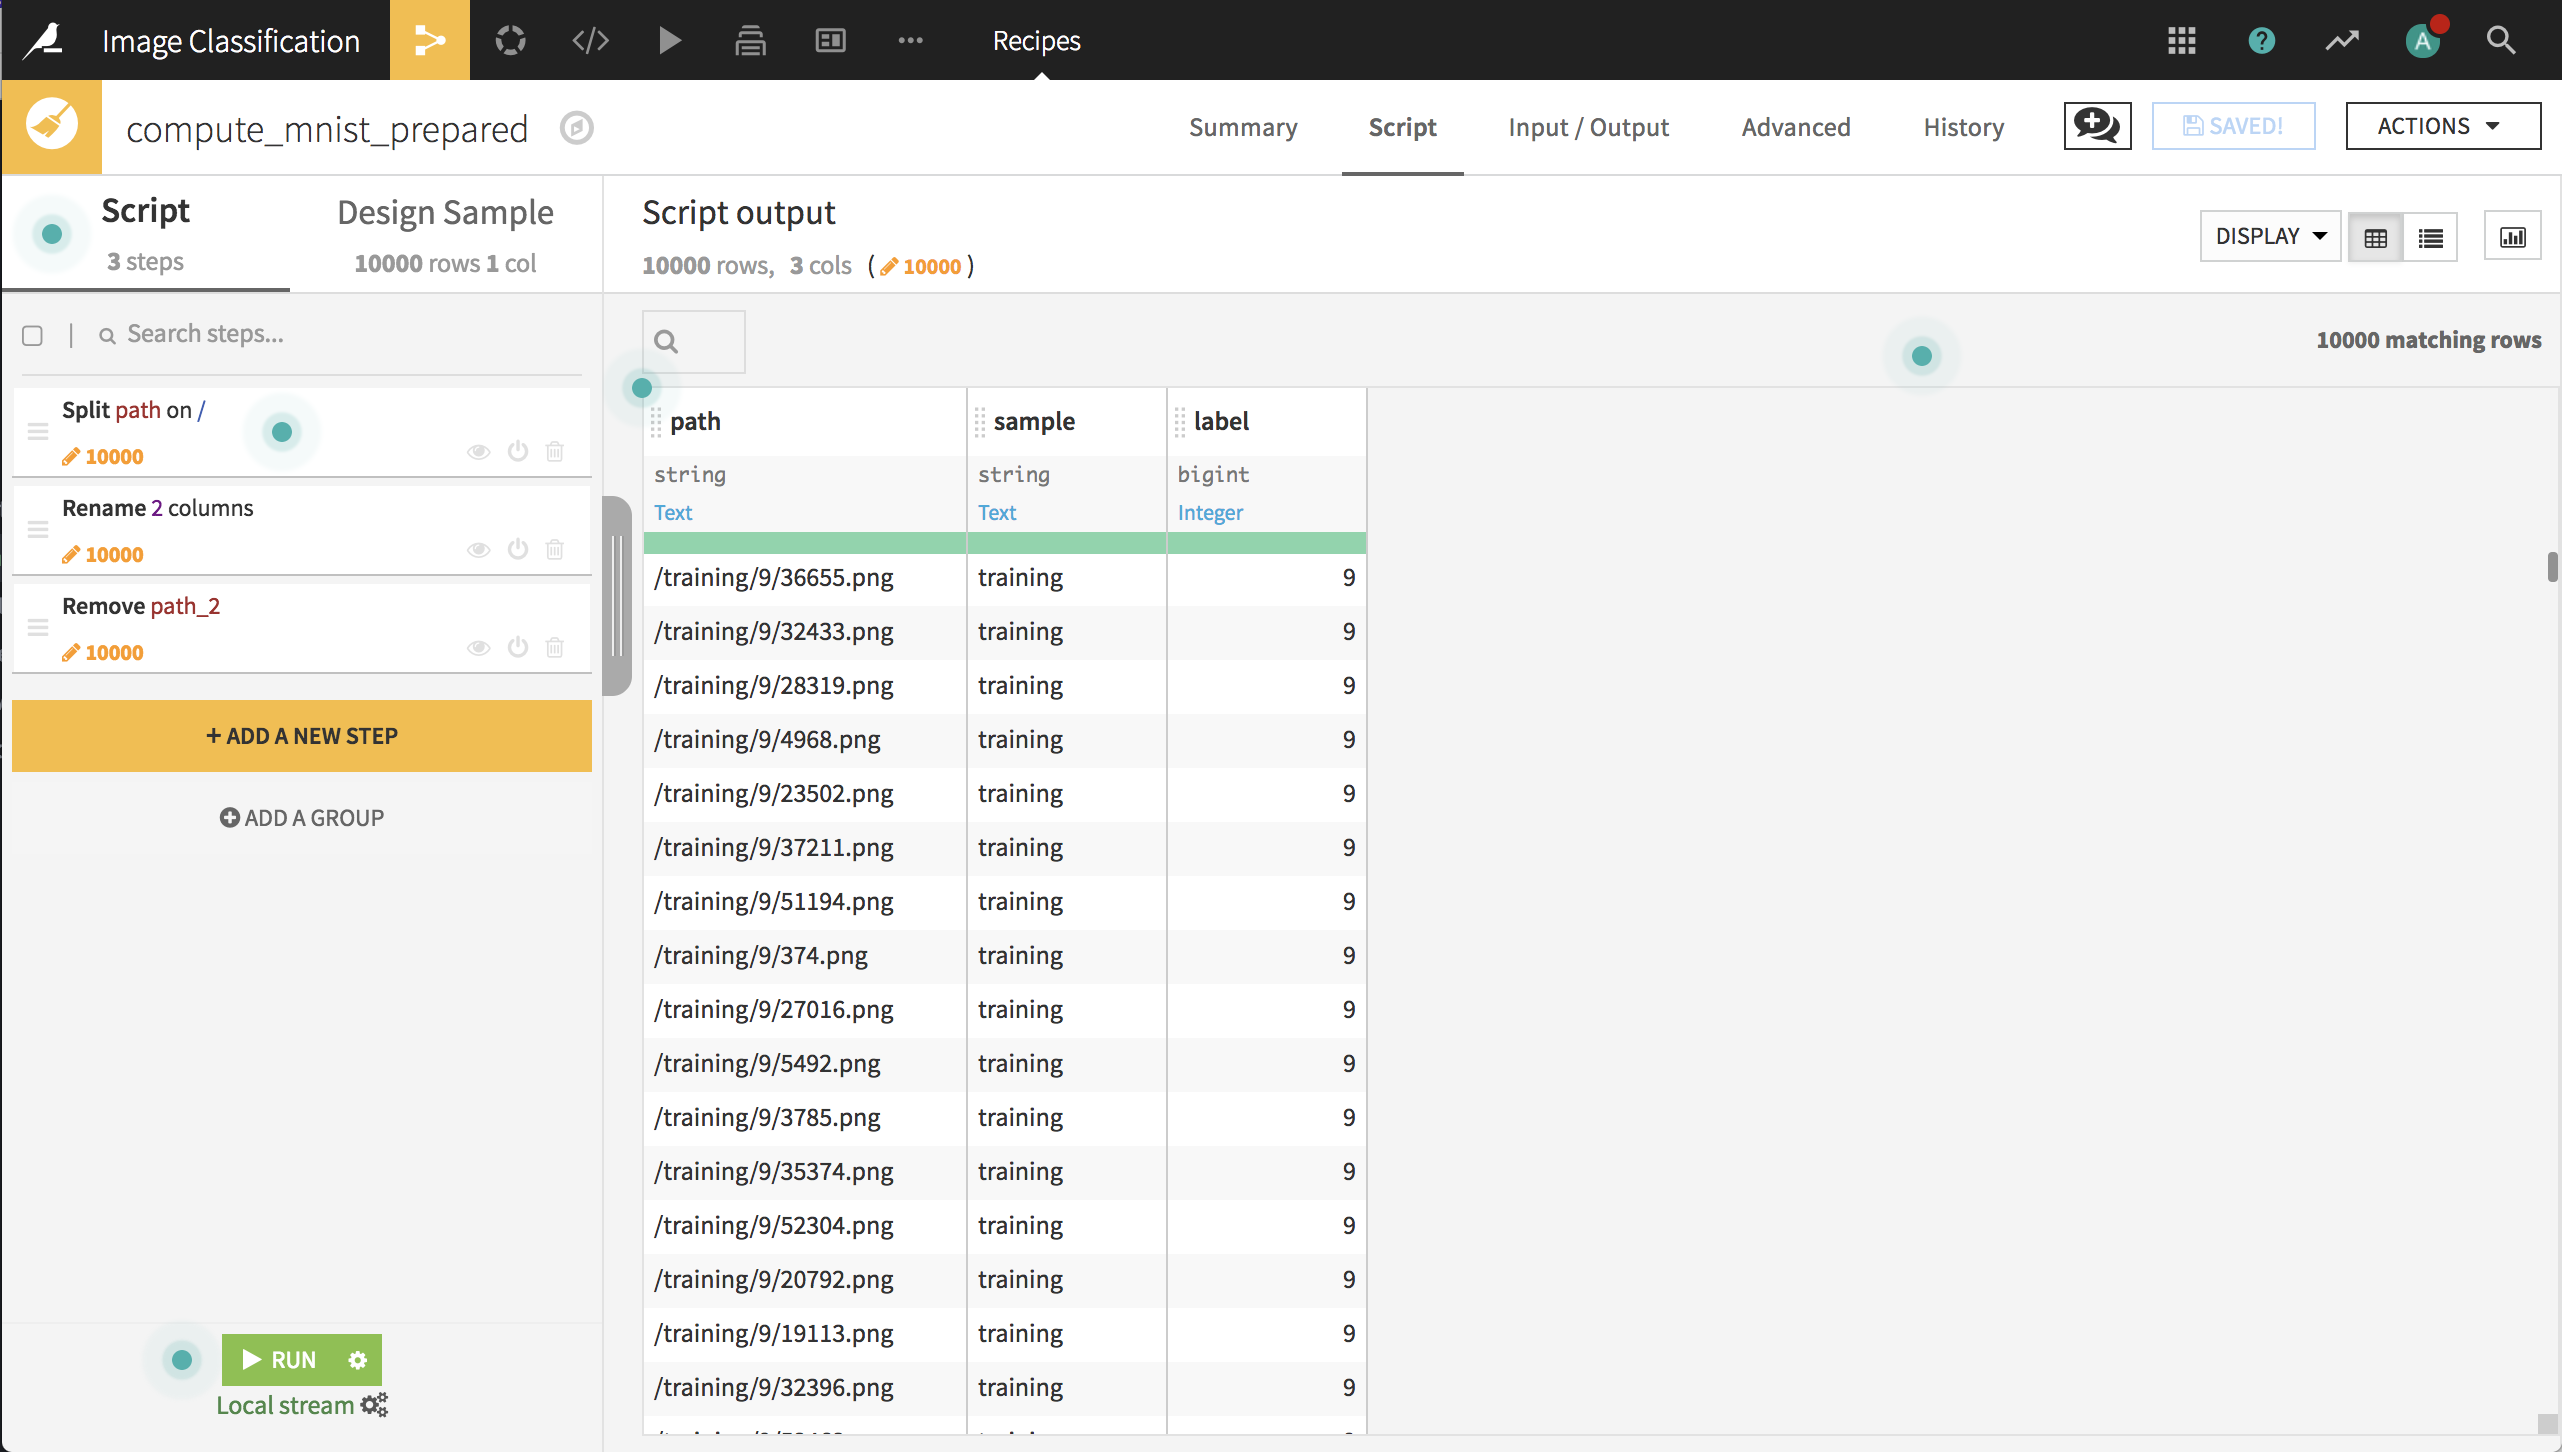
Our next step is to use a Prepare recipe to extract the label from the image path and whether the image belongs to the train or test sample.
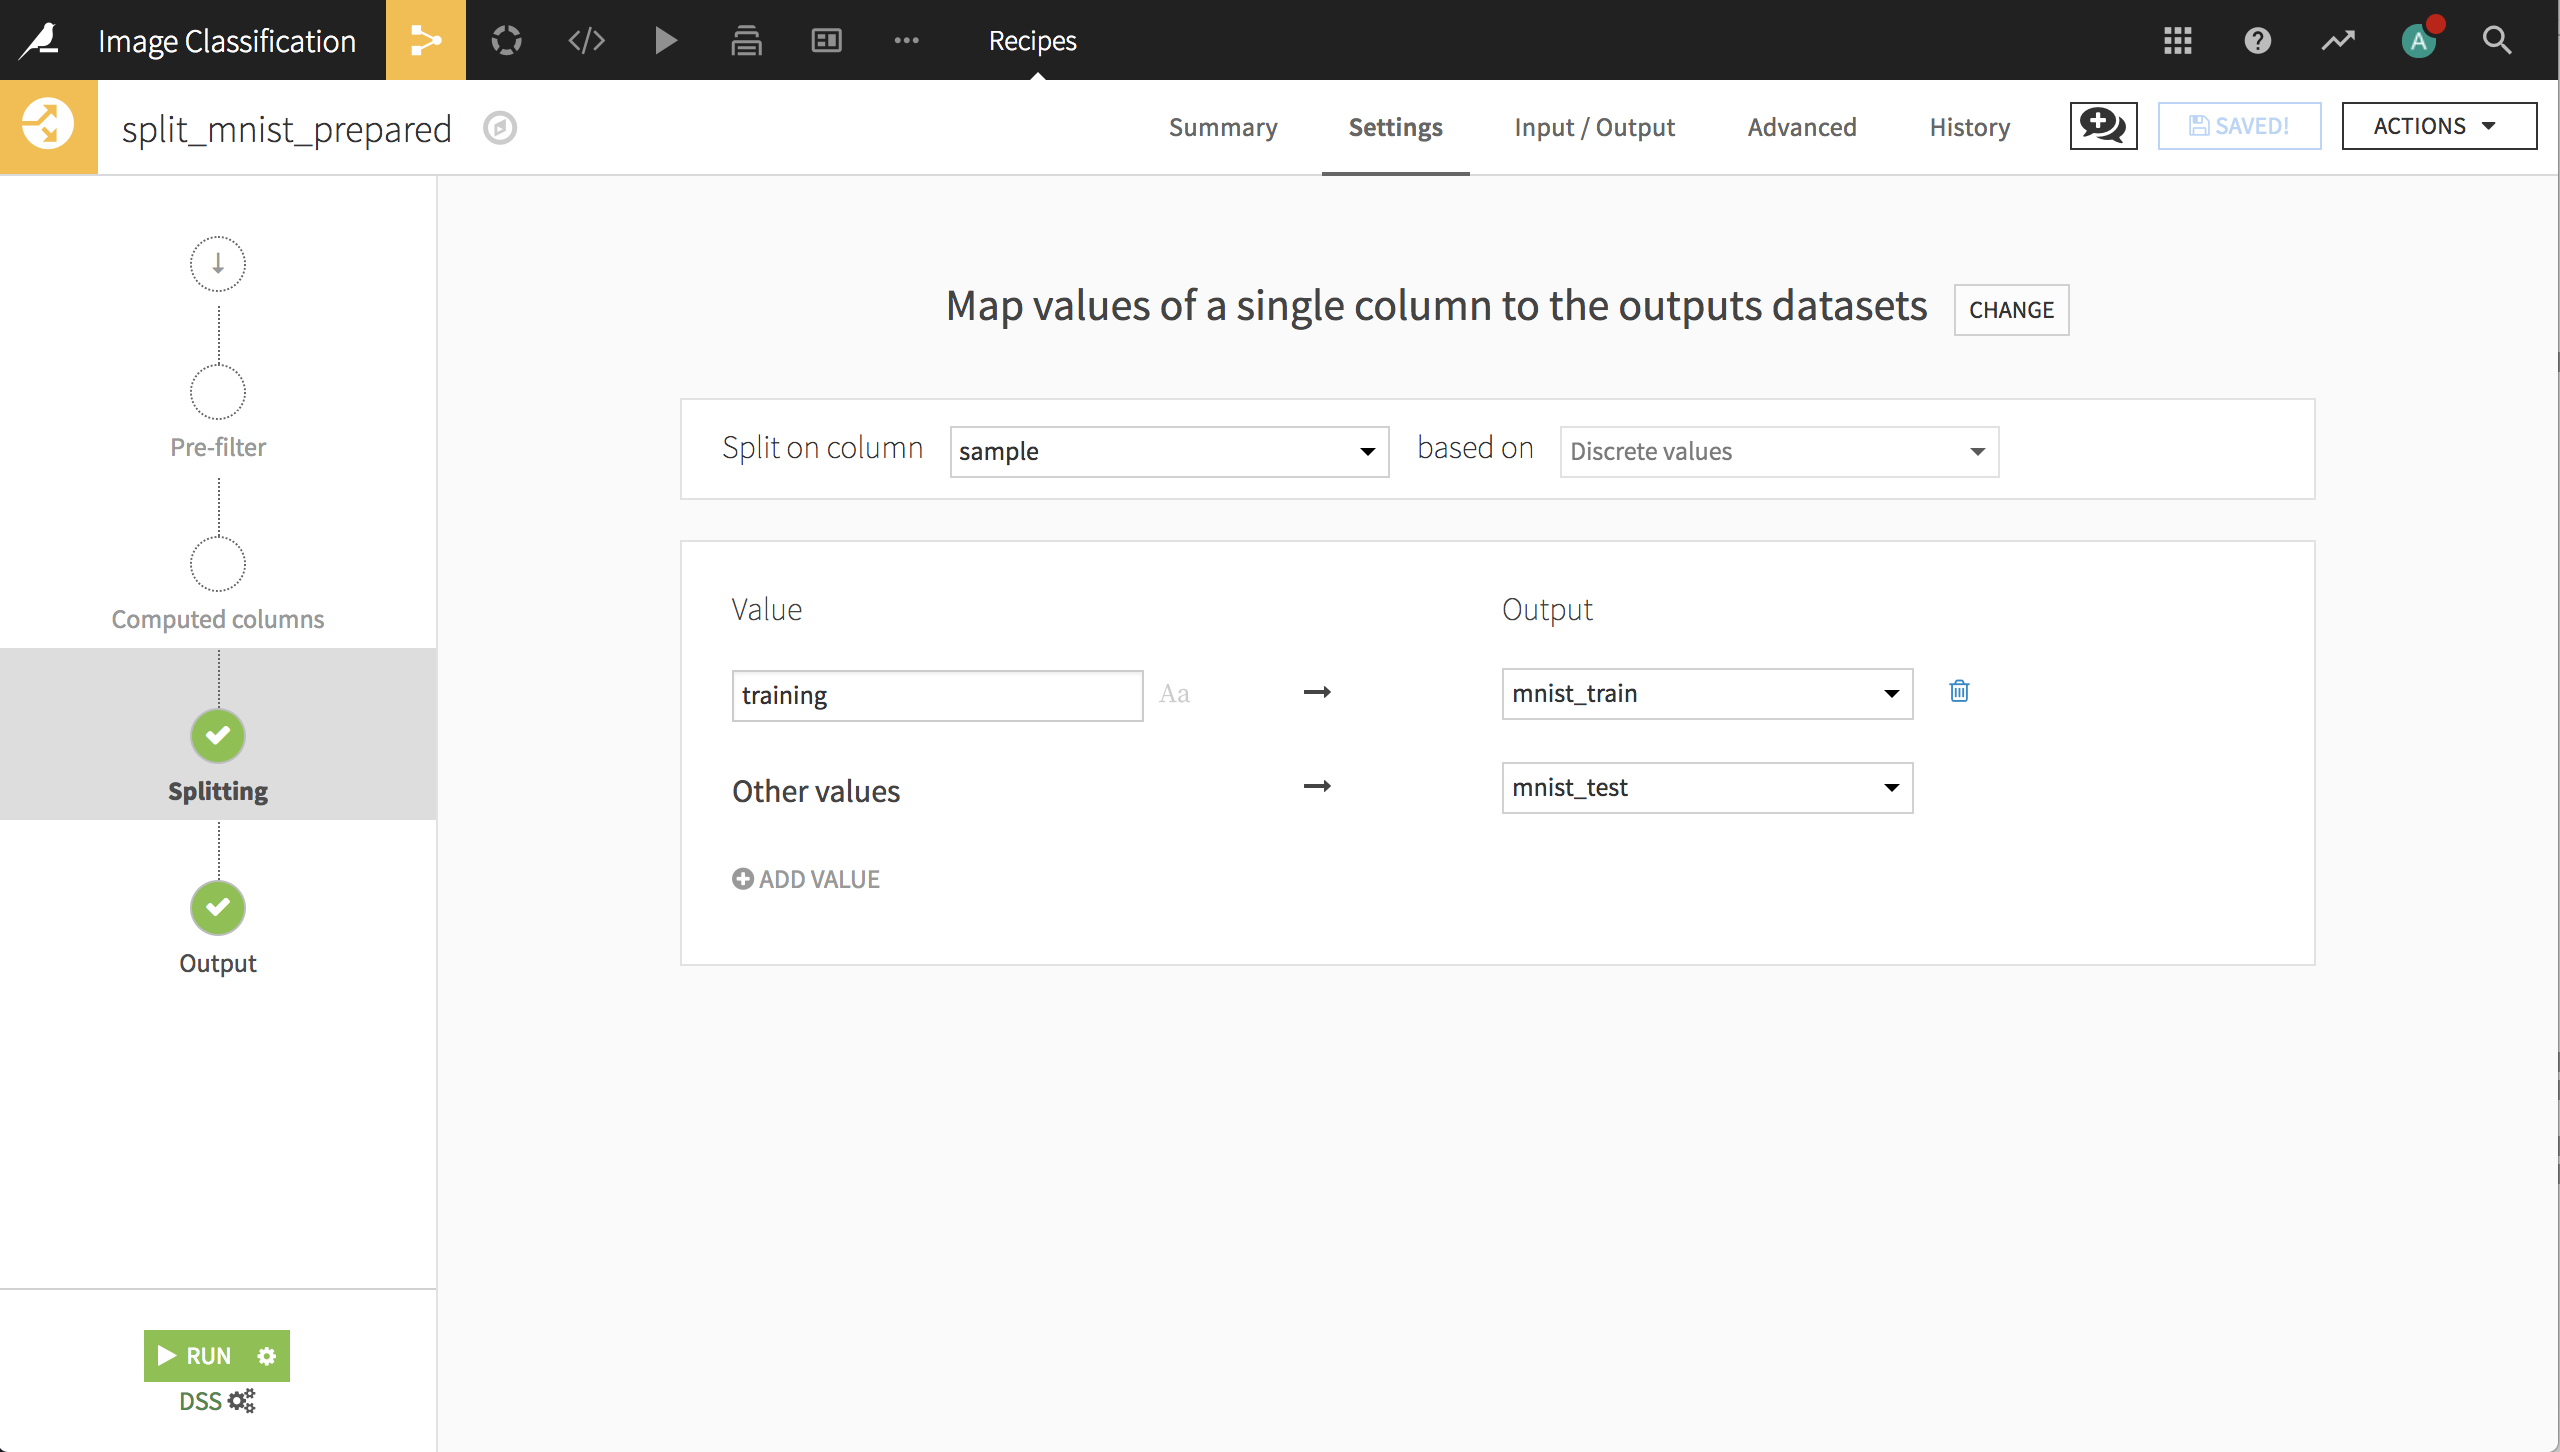
Next, we’ll use a Split recipe to split the records into the train and test datasets. Now the data is ready to build a deep learning model for image classification.
The Deep Learning Model
Create a Visual Analysis for the training dataset (from the dataset’s Actions menu, Lab > Visual Analysis). In the Script tab of the Visual Analysis, change the Design Sample to ensure that all 10 digits are represented in the sample. Since the training sample is only 60,000 records, you can simply choose the first 60,000 records. Save and refresh the Design Sample.
Next, create a new model with:
Prediction as the task,
label as the target variable
Expert mode as the prediction style
Deep learning as the Expert mode, then click Create
This creates a new machine learning task and opens the Design tab for the task. On the Target panel, Dataiku DSS may identify this as a Regression type of ML task because label is a numeric column with many unique values. Change the prediction type to Multiclass classification.
Features Handling
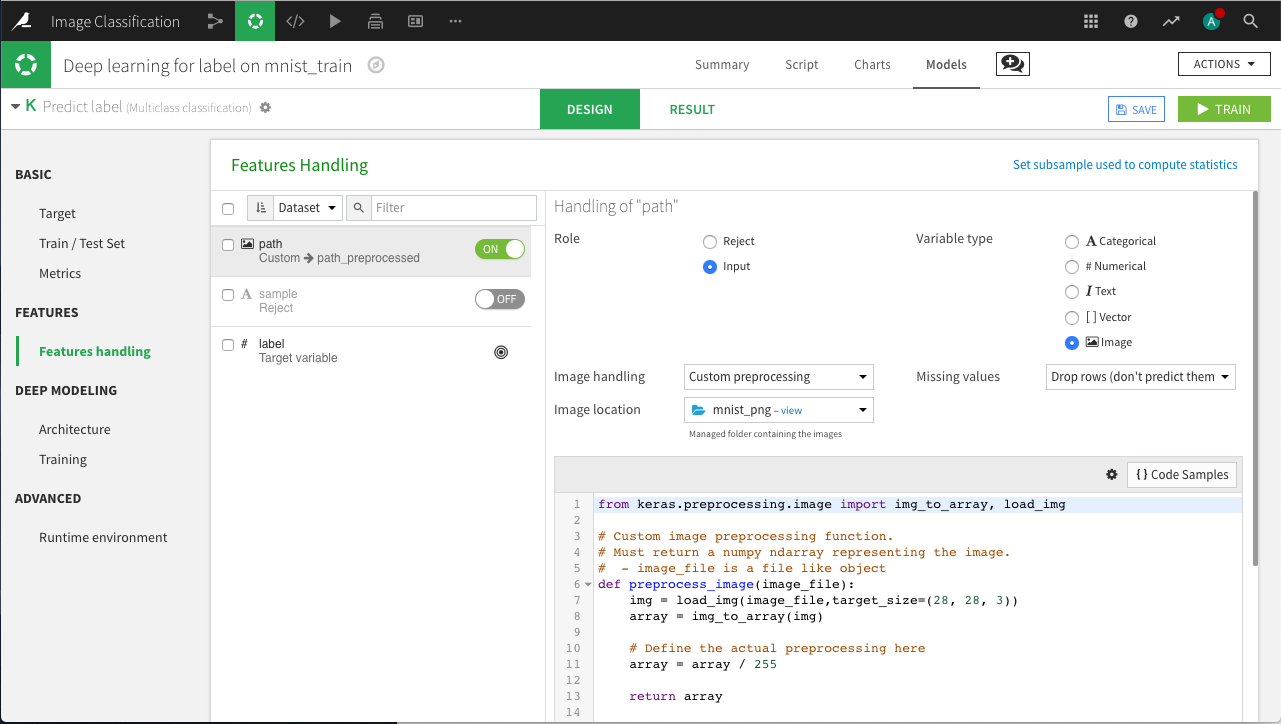
On the Features Handling panel, turn on path as an input, and select Image as its variable type.
Select the folder that contains the image archive. IMPORTANT: the trained model will look for images in this directory. If we want to score new handwritten digits, they will need to be placed in this folder.
We need to add our own preprocessing code, which works in the following steps:
Load the image with the desired dimensions (28x28x3).
Convert the image to a Numpy array.
Rescale the values between 0 and 1.
Deep Learning Architecture
We now have to create our network architecture in the build_model() function. We won’t use the default architecture, so just remove all the code. Then, click on {} Code Samples on the top right and search for “images”. Select the CNN architecture for image classification.
Insert the CNN code then click on Display inputs on the top left. You should see that the “main” feature is empty because we are only using the image data, which is in the input path_preprocessed.
In order to build the model, we need to make a few changes to the code.
In the line that defines
image_shapechange197, 197, 3to28, 28, 3In the line that defines
image_input_name, changename_of_your_image_input_preprocessedtopath_preprocessed.The code sample defines a fairly complex CNN with several hidden layers and a large number of nodes within each layer. Unless you have access to a GPU, erase all of the code in the
build_model()function between the commentDEFINING THE ARCHITECTUREand thereturn modelline, and replace it with the following:
x = Conv2D(32, kernel_size=3, padding='same', activation='relu')(image_input)
x = Conv2D(32, kernel_size=3, padding='same', activation='relu')(x)
x = MaxPooling2D(pool_size=(2, 2))(x)
x = Flatten()(x)
x = Dense(128, activation='relu')(x)
x = Dropout(0.2)(x)
predictions = Dense(n_classes, activation='softmax')(x)

model = Model(inputs=image_input, outputs=predictions)
This should be sufficient to create a good model for the images that won’t take all night to build on a laptop.
Model Results
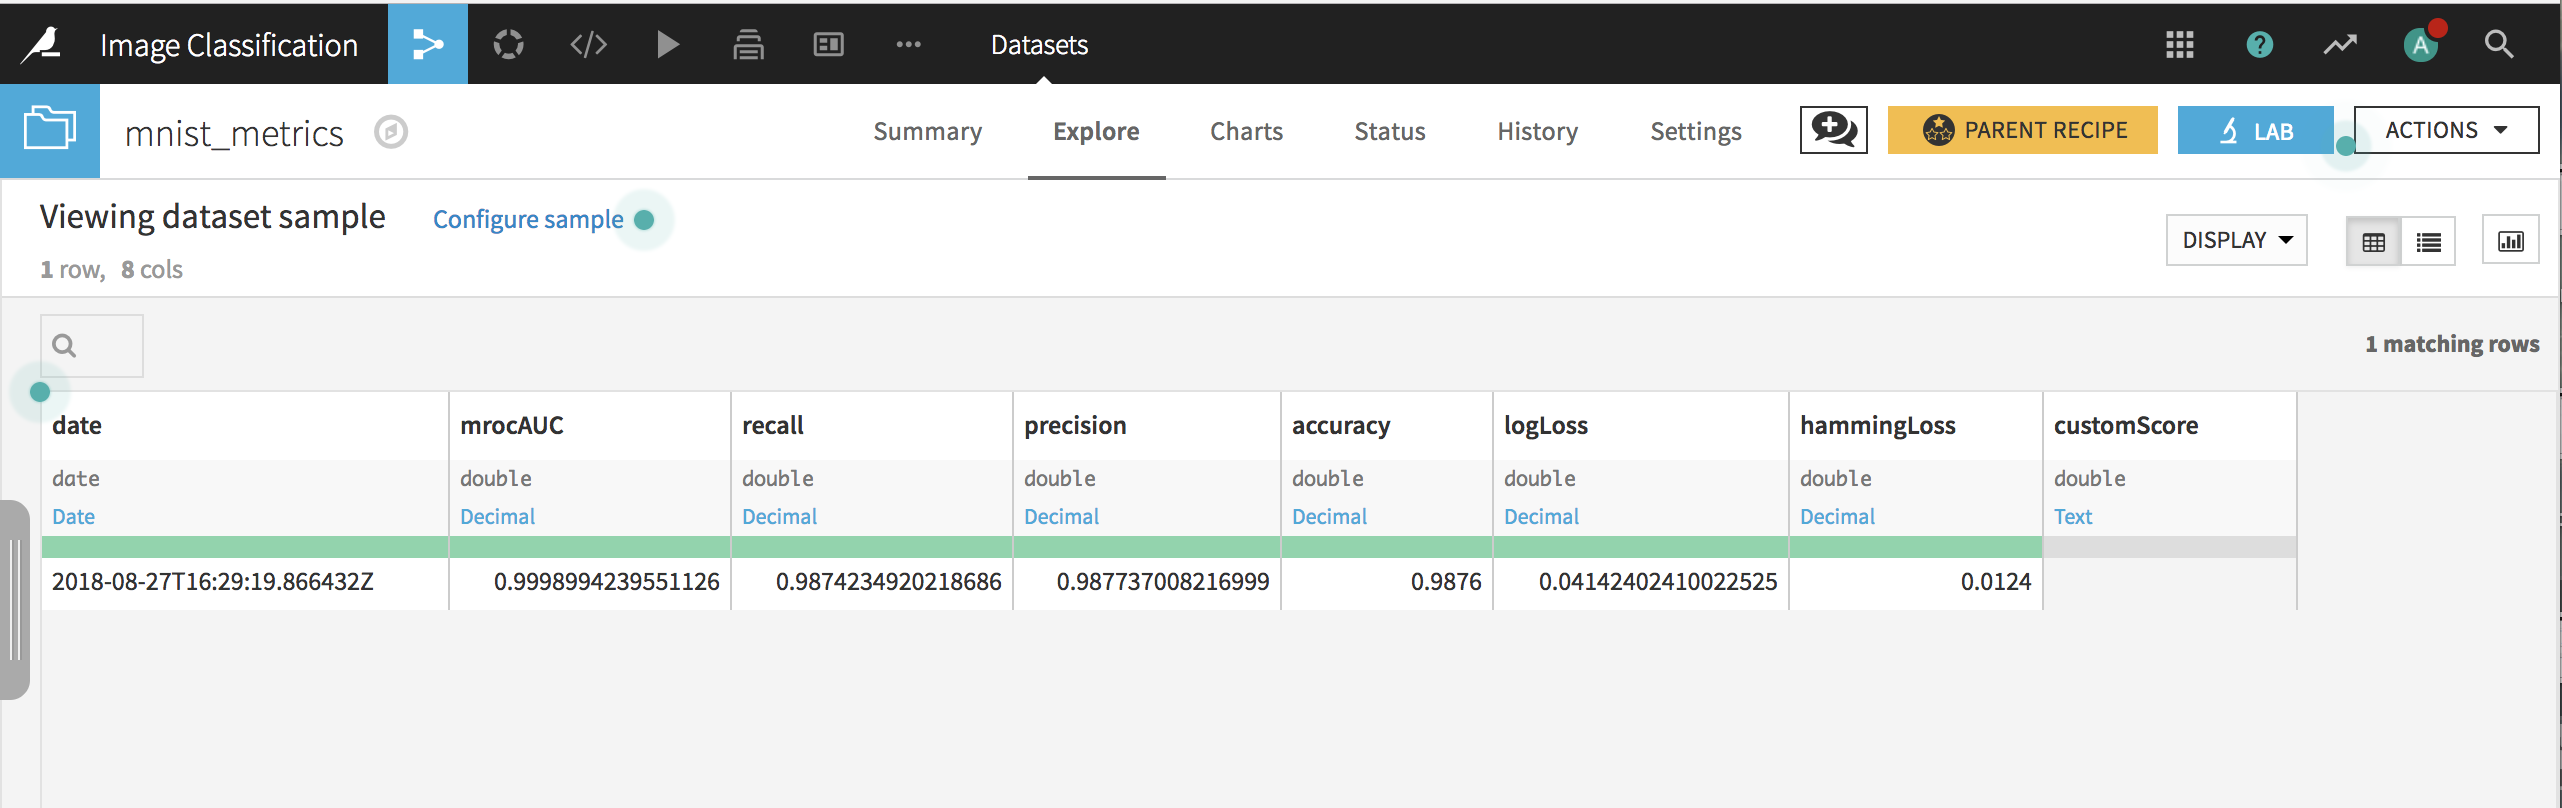
Click Train and, when complete, deploy the model to the flow, create an evaluation recipe from the model, and evaluate on the test data. In the resulting dataset, you can see that the model has an accuracy of about 98.7%.
Transfer Learning
The MNIST dataset is useful for learning how to train a convolutional network from scratch. However, for most image-related tasks, training a model from scratch takes a very long time, and will have weak performance unless you have a sufficiently large image archive.
We will now start with a pre-trained model that has learned another dataset such as ImageNet, and use a relatively small archive of 4000 images to perform transfer learning so that the retrained model can classify cats and dogs.
Preparing the Data
Use the same project we used with the MNIST data or create a new one. Create a new folder cats_dogs in the flow and populate it with the uncompressed contents of the cats_dogs archive.

In order to perform transfer learning for these images, we need to
Create train and test datasets that contain the path to each image (so that the model can find it) and the label that identifies the digit each image represents.
Download the specifications of a pre-trained model that will be retrained using these images.
As a first step, we’ll create a Python recipe that uses the cats_dogs folder as an input and a new dataset cats_dogs_labels as the output. The code of the recipe uses the Dataiku Python API to retrieve the list of paths of all images in the folder (and its subfolders), extracts the paths, randomizes the order of records, and writes the paths as a column in the output dataset.
Randomizing the order of records ensures that each iterative training batch contains a mix of cats and dogs, and better performance than if all the cats and then all the dogs are used.
Note
In order to use this code in your project, you’ll need to change “EQysY5vS” to the identifier for the folder in your project.
# -*- coding: utf-8 -*-
import dataiku
import pandas as pd, numpy as np
from dataiku import pandasutils as pdu

# Read recipe inputs
folder = dataiku.Folder("EQysY5vS")

# Initialize dataframe
df = pd.DataFrame(columns=['path'])

# Populate dataframe with paths and labels
df['path'] = folder.list_paths_in_partition()

# Randomize order of records
df = df.sample(frac=1).reset_index(drop=True)

# Write recipe outputs
cats_dogs_labels = dataiku.Dataset("cats_dogs_labels")
cats_dogs_labels.write_with_schema(df)
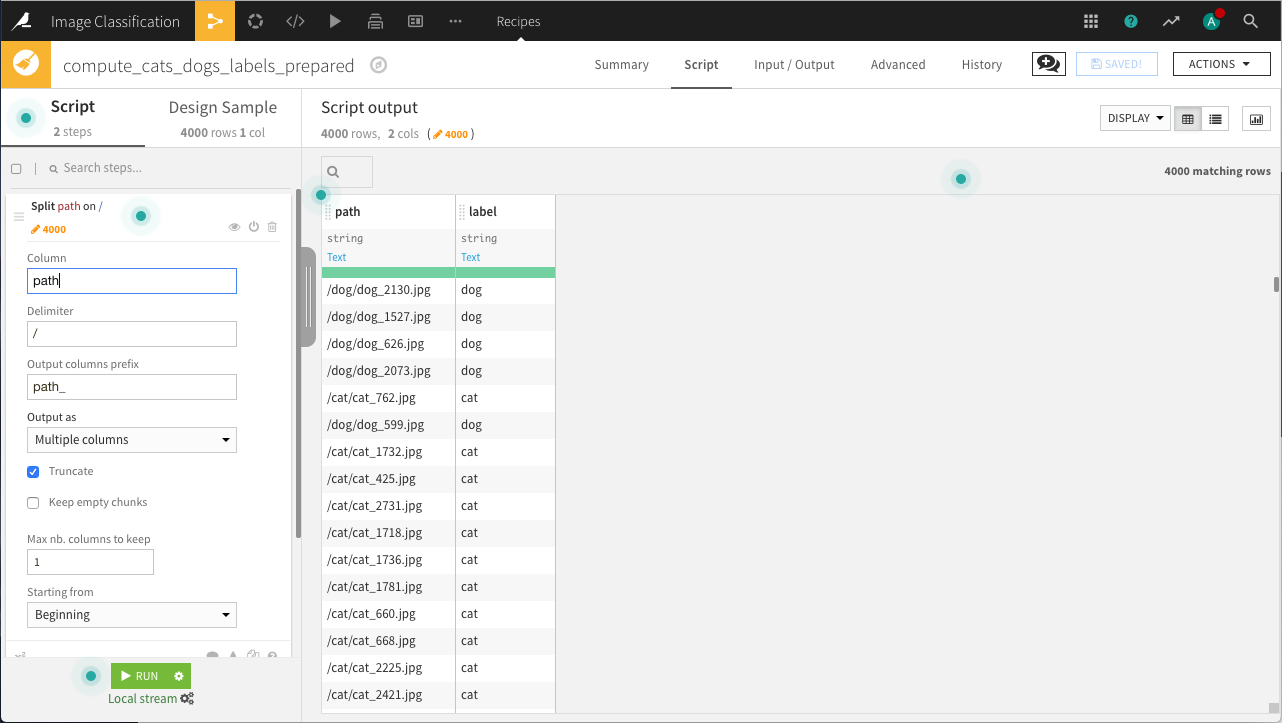
Our next step is to use a Prepare recipe to extract the label from the image path.
Next, we’ll use a Split recipe to assign records into the train and test datasets.
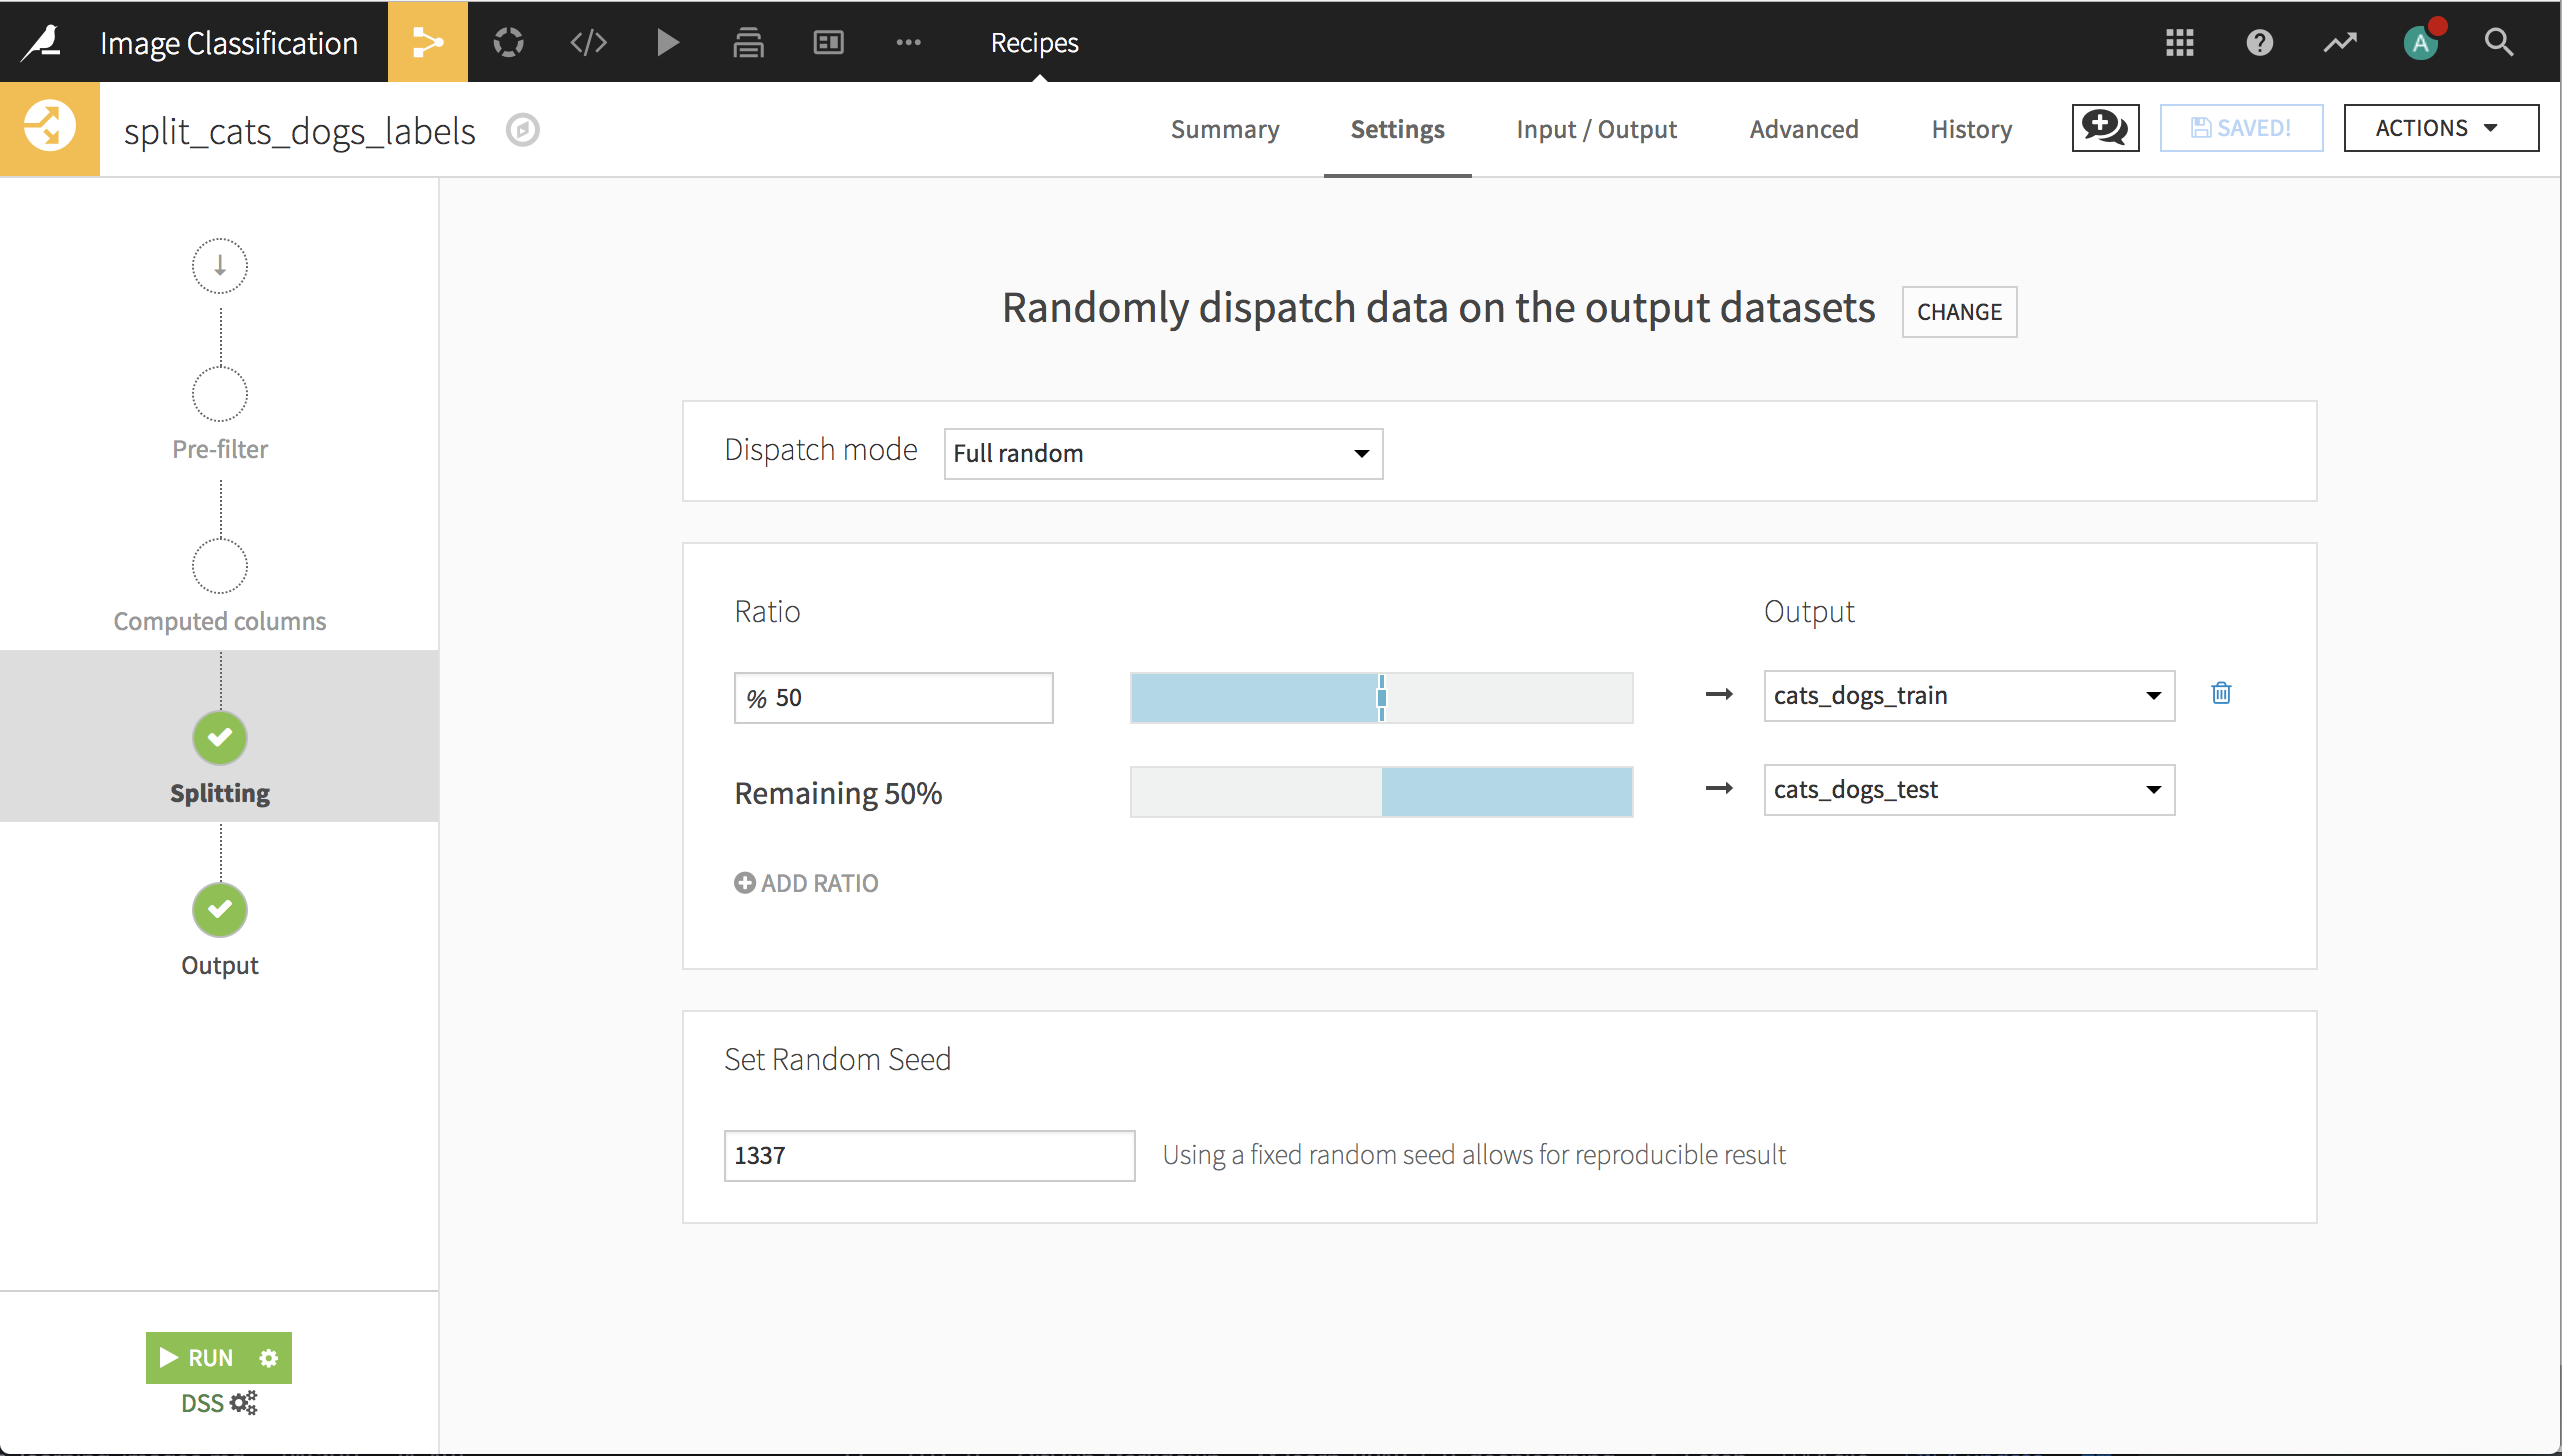
Important note: the quality of transfer learning for image classification is dependent upon the training & testing sets. In particular, different random splits of this set of 4000 images can give excellent or poor results. This underscores the importance of having a testing set, and may also show that 4000 images is not very many to train on for this application.
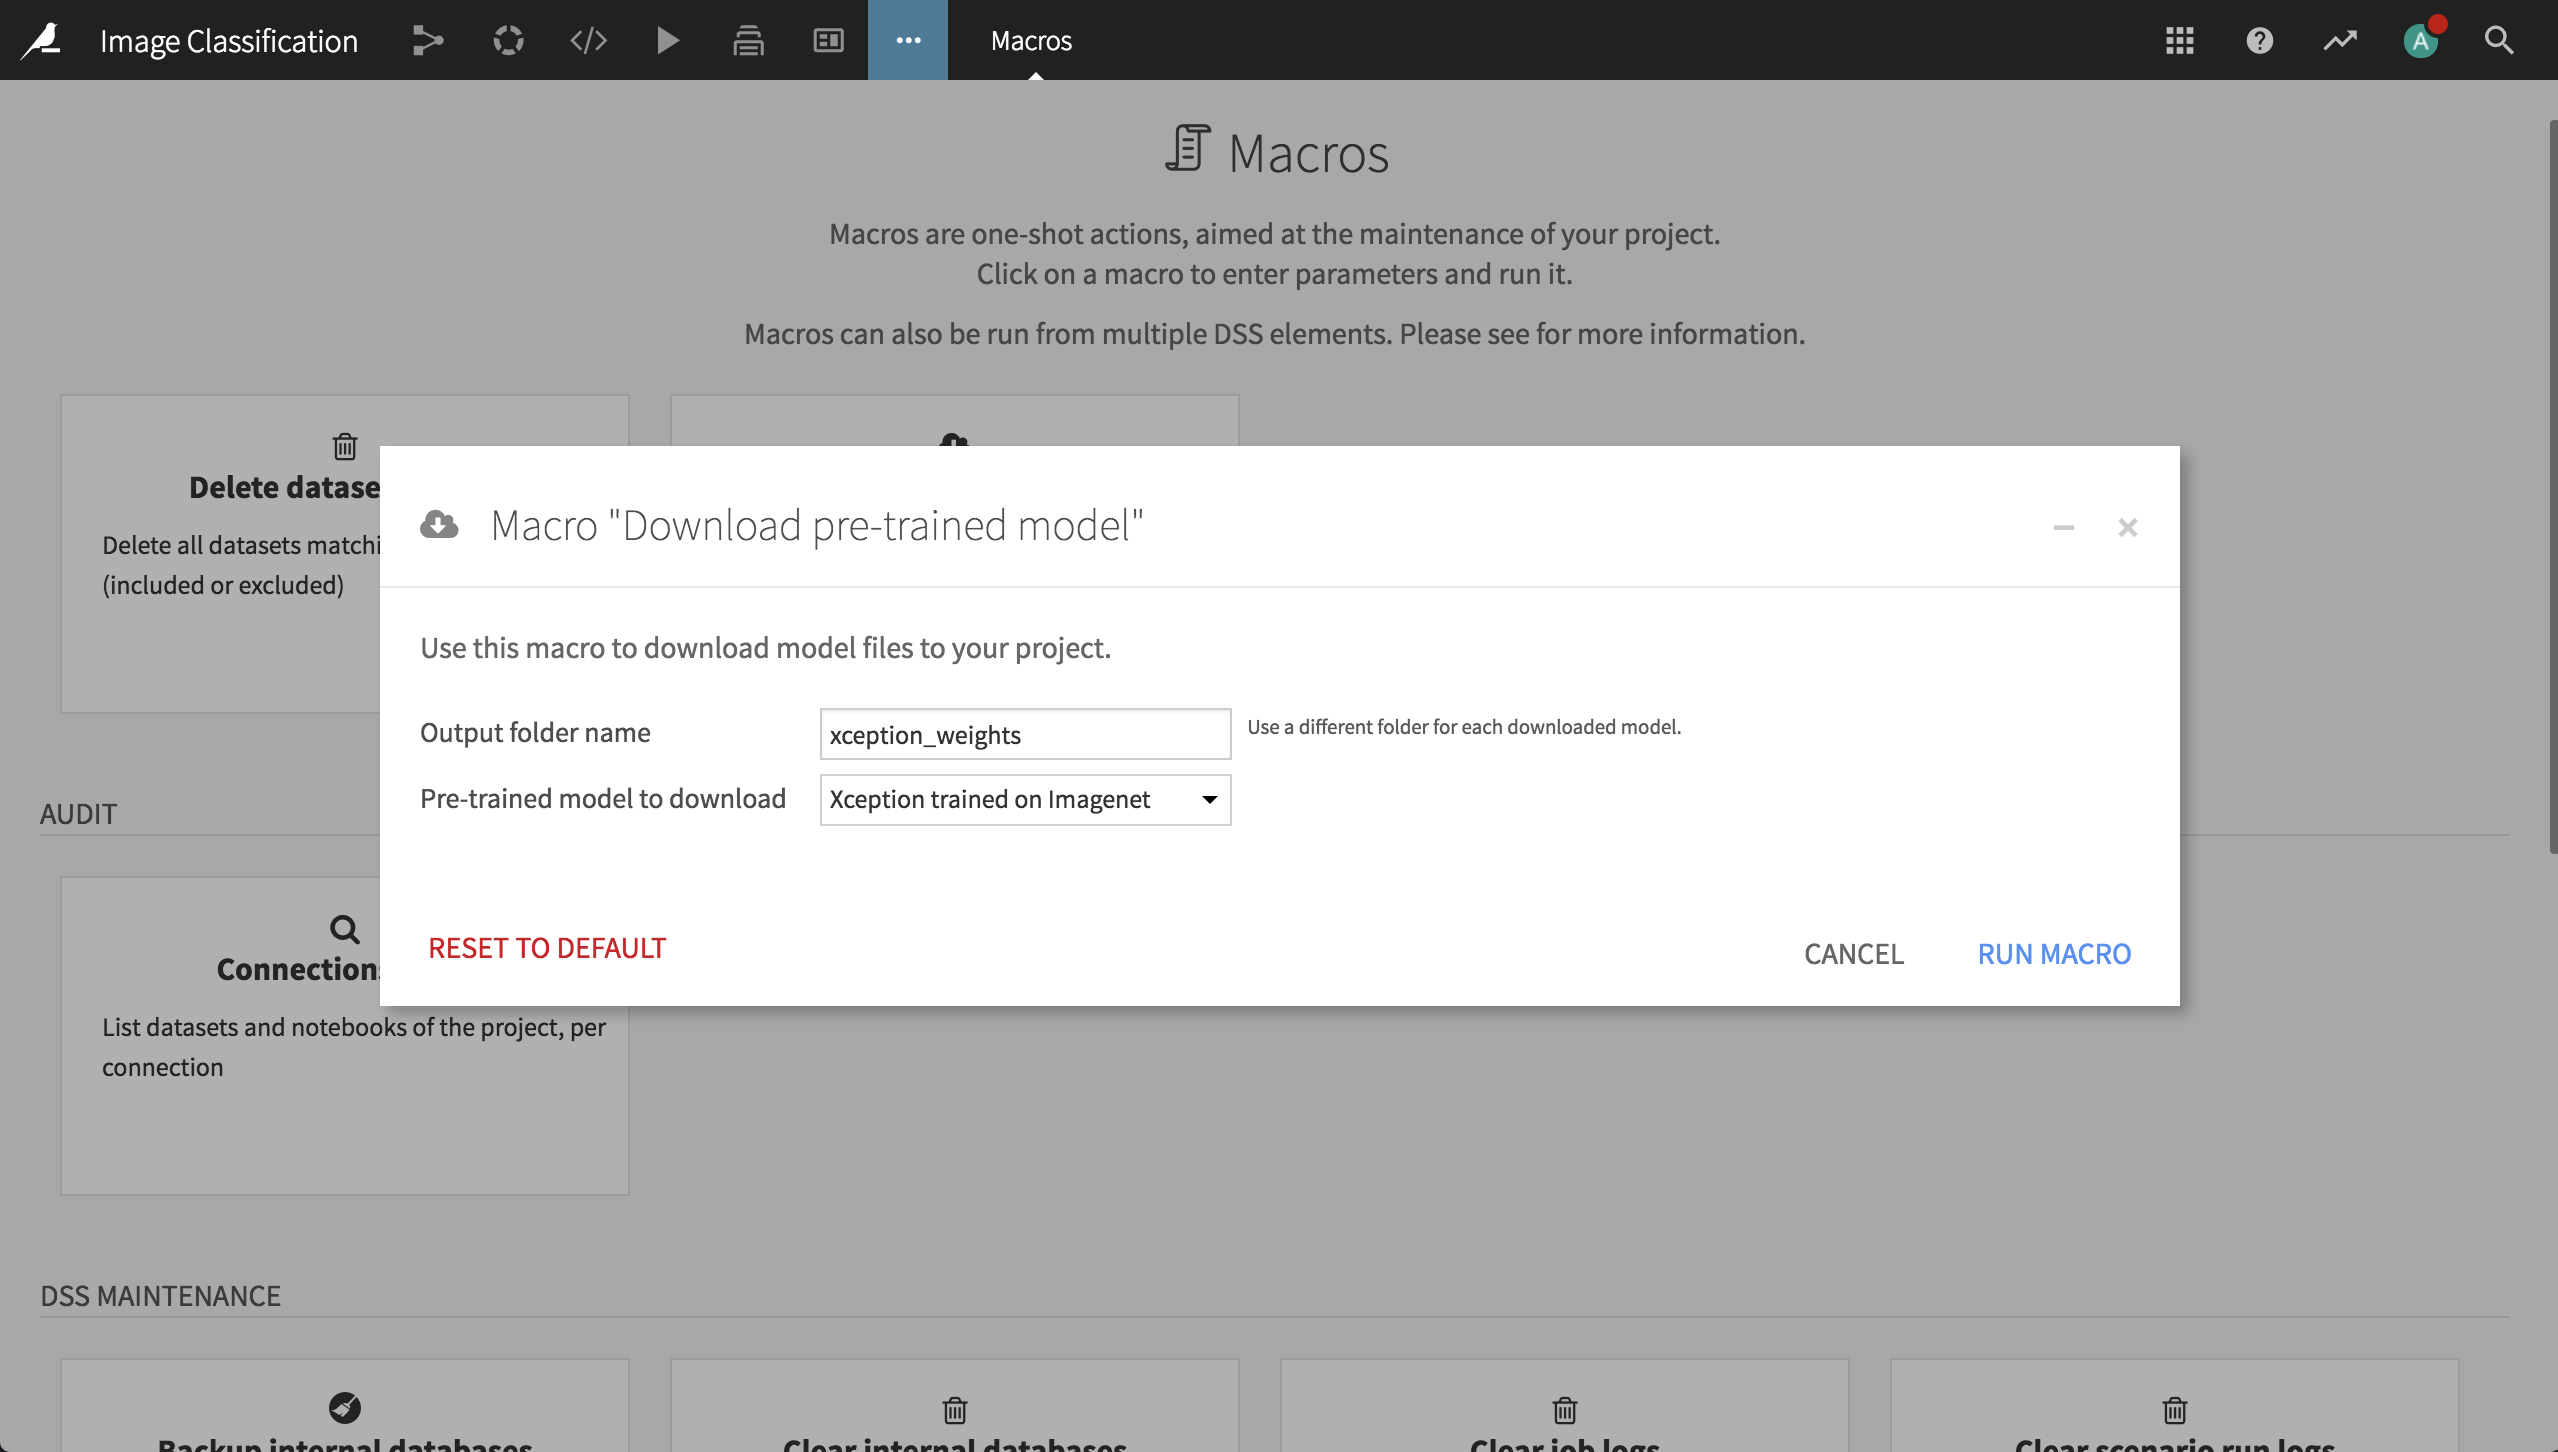
Finally, before going to the Lab, we need to download and place the pre-trained weights in a folder. Assuming you installed the Deep Learning for images plugin as noted in the Prerequisites, go the macro page of your project, click on the box Download pre-trained model, type xception_weights as the output folder, and select the Xception architecture.
The Deep Learning Model
In a Visual Analysis for the training dataset (from the dataset’s Actions menu, Lab > Visual Analysis), create a new model with:
Prediction as the task,
label as the target variable
Expert mode as the prediction style
Deep learning as the Expert mode, then click Create
This creates a new machine learning task and opens the Design tab for the task. On the Target panel, verify that Dataiku DSS correctly identifies this as a Two-class classification type of ML task.
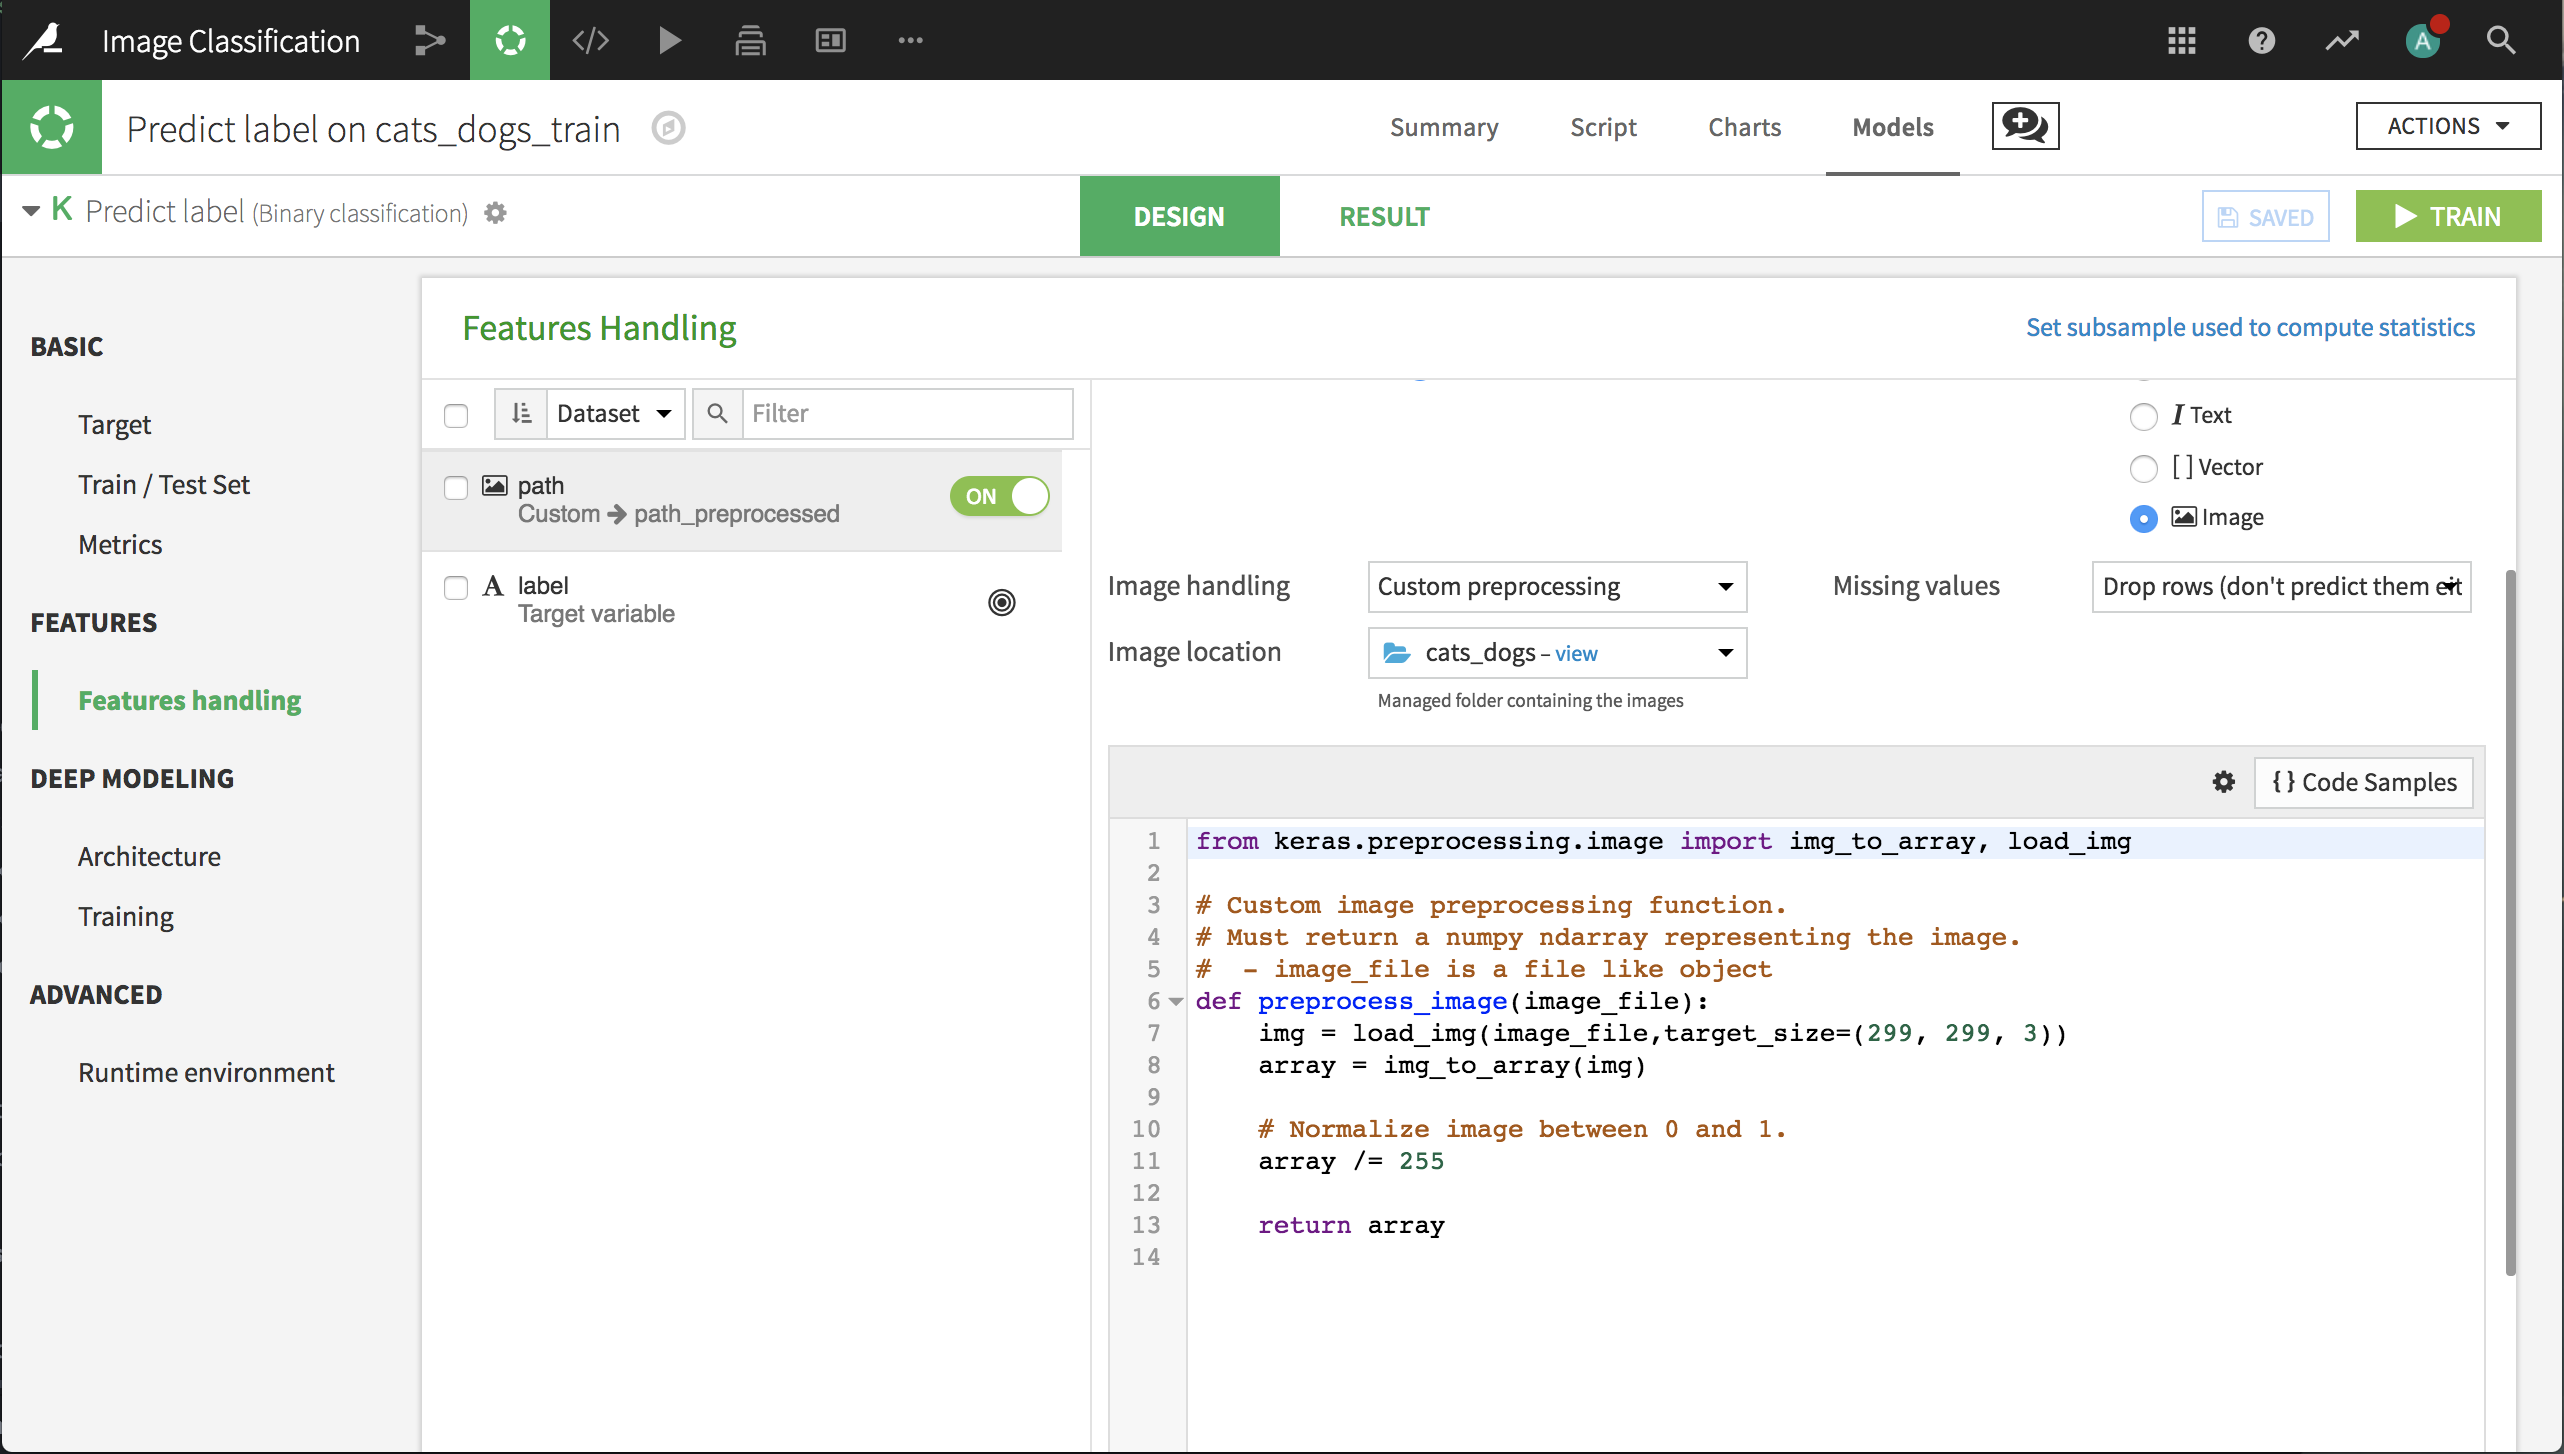
Features Handling
On the Features Handling panel, turn on path as an input, and select Image as its variable type.
Select the folder that contains the image archive. IMPORTANT: the trained model will look for images in this directory. If we want to score new images of cats and dogs, they will need to be placed in this folder.
We need to add our own preprocessing code, which works in the following steps:
Load the image with the desired dimensions (299x299x3).
Convert the image to a Numpy array.
Rescale the values between 0 and 1.
Deep Learning Architecture
We now have to create our network architecture in the build_model() function. We won’t use the default architecture, so just remove all the code. Then, click on {} Code Samples on the top right and search for “images”. Select the Pre-trained architecture to classify images (Xception).
Insert the code; in order to retrain the model, we need to make a few changes to the code.
In the line that defines
image_shapechange197, 197, 3to299, 299, 3In the line that defines
image_input_name, changename_of_your_image_input_preprocessedtopath_preprocessed.In the line that defines
folder, changename_of_folder_containing_xception_weightstoxception_weights.Add the following lines after the call to
base_model.load_weights(). This preserves the Xception layers because they are already modified to distinguish visual features. Sometimes we will want to retrain these layers, but not now.
for layer in base_model.layers:
    layer.trainable = False
Deep Learning Training Settings
Now that our architecture is set up, go the Training panel, then click on Advanced mode in the upper-right corner. In this code editor we will add image augmentation and a callback.
First, add the following import statements to the top of the code.
from dataiku.doctor.deep_learning.sequences import DataAugmentationSequence
from keras.preprocessing.image import ImageDataGenerator
from keras import callbacks
In the build_sequences() function, change the batch size from 32 to 16, then add the following lines, which define how the images will be augmented.
ImageDataGenerator defines how some images fed to the neural network will be randomly altered. Those alterations are subtle enough so we can distinguish its content, and their goal is to help the model generalize to unseen pictures.
augmentator = ImageDataGenerator(
    zoom_range=0.2,
    shear_range=0.2,
    rotation_range=20,
    width_shift_range=0.2,
    height_shift_range=0.2,
    horizontal_flip=True
)
DataAugmentationSequence defines the augmented training sequence, and takes as inputs the existing training sequence, the input containing the images (in this case, path_preprocessed), the augmentations to be performed that we just defined, and the number of augmentations to perform. The number of augmentations corresponds to the number of times an image is augmented in the same batch. When in doubt, leave this parameter set to 1.
augmented_sequence = DataAugmentationSequence(
    train_sequence,
    'path_preprocessed',
    augmentator,
    1
)
The final line of the function should be altered to return augmented_sequence instead of train_sequence.
In the function fit_model(), we’ll create a new callback, a small class that can apply an operation on the model at each batch or at each epoch. You can choose one from the Keras API or code your own. This callback will reduce the learning rate as model performance on the validation set stops improving.
We simply need to add the newly created callback to the list base_callbacks that is passed to the fit_generator() method.
callback = callbacks.ReduceLROnPlateau(
    monitor='val_loss',
    factor=0.2,
    patience=5
)

base_callbacks.append(callback)
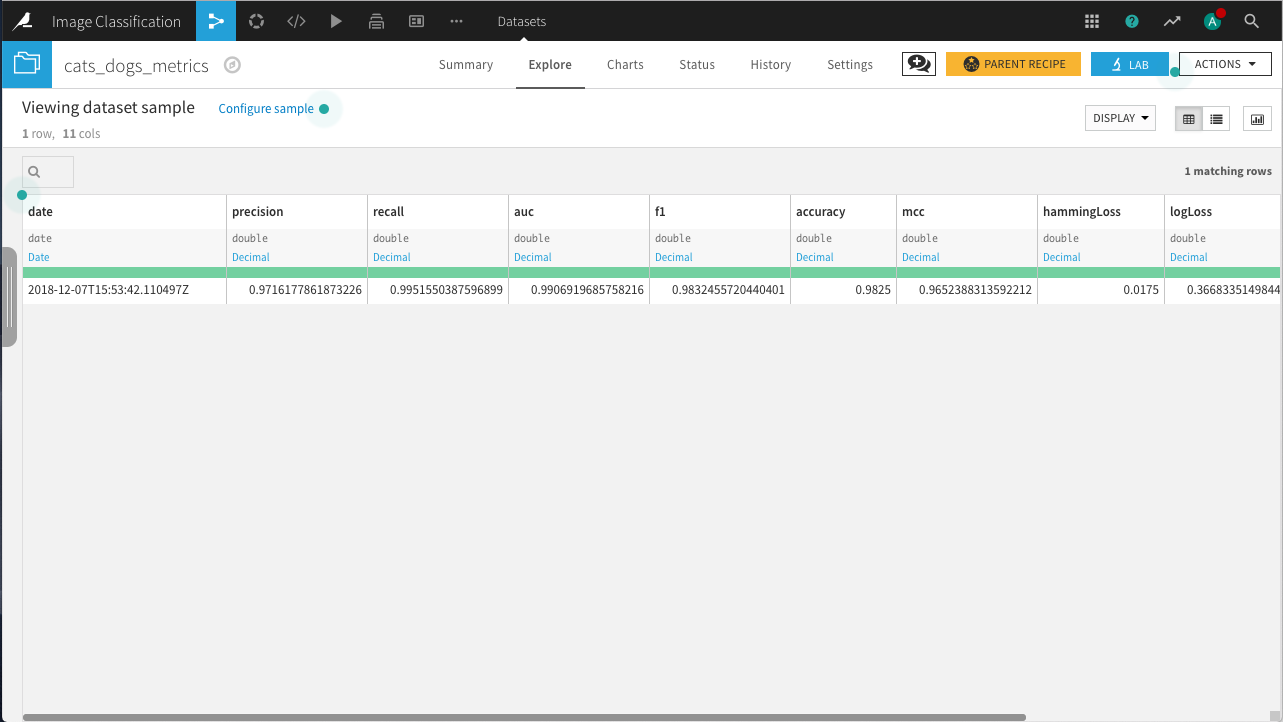
Model Results
Click Train. If you’re running on CPU, it will take some time to complete. When the training finishes, deploy the model to the flow, create an evaluation recipe from the model, and evaluate on the test data. In the resulting dataset, you can see that the model has an accuracy of about 98.25%.
Wrap Up
See a completed version of this project on the Dataiku gallery.
See the Dataiku DSS reference documentation on deep learning.