Automation Quick Start
Welcome
The lifecycle of a data project doesn’t end once a Flow is complete. It’s not possible to Dev/Test a model until it’s perfect because data is ever changing. At the same time, ensuring that your data and models are up-to-date is something that you don’t want to have to do manually. Dataiku has automation features to help with this.
In this tutorial, you will learn the basics of:
scheduling jobs using scenarios,
monitoring jobs, and
monitoring the status and quality of your dataset.
The video below walks through all of the steps covered in this tutorial.
Prerequisites
This lesson assumes that you have basic knowledge of working with Dataiku datasets and recipes.
Note
If not already on the Advanced Designer learning path, completing the Core Designer Certificate is recommended.
You’ll need access to an instance of Dataiku DSS (version 9.0 or above).
The free edition and Dataiku Online can be used for some, but not all portions of this tutorial.
Create Your Project
We will work with data from the fictional retailer, Haiku T-Shirt.
From the Dataiku homepage, click +New Project > DSS Tutorials > Automation > Automation (Tutorial) to initiate the project.
Need Help Creating the Project?
Note
You can also download the starter project from this website and import it as a zip file.
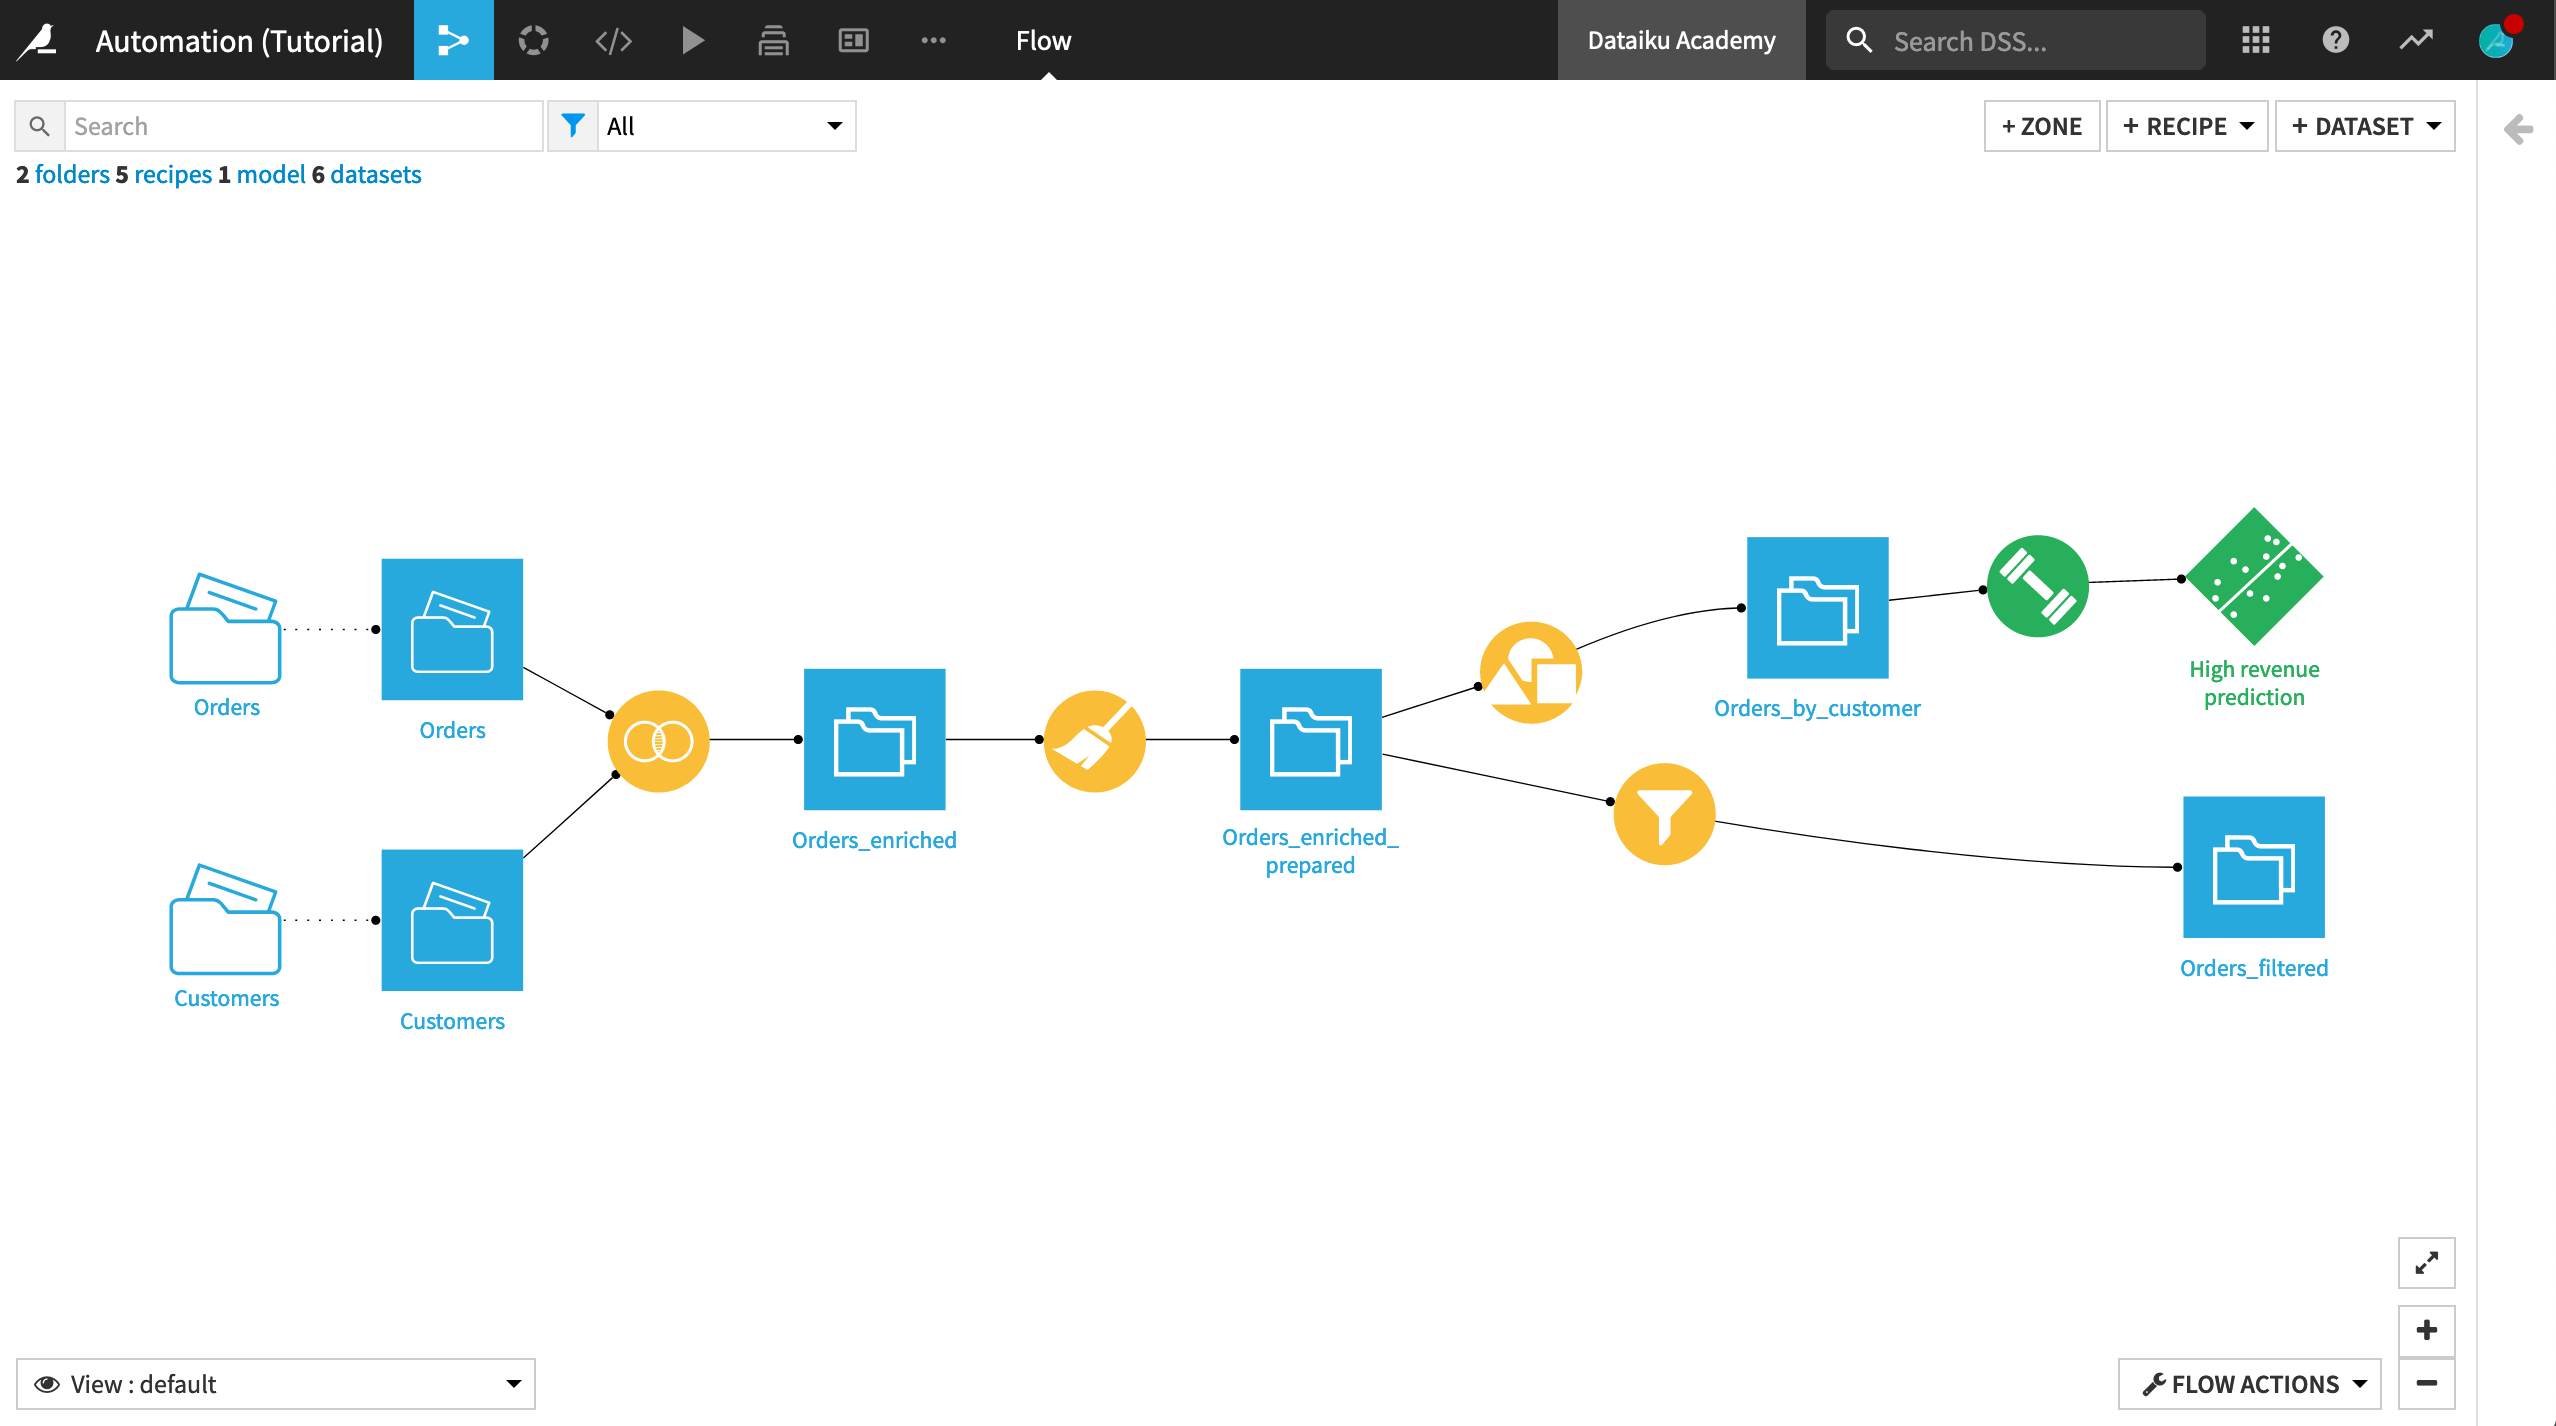
There are a few things to note in the existing Flow:
The initial datasets, Customers and Orders, are joined so that the order data is enriched with the customer data.
The joined dataset is then prepared, at which point the Flow forks in two branches:
One branch builds a random forest model to predict whether a customer will generate high revenue. This step is similar to the predictive model built in Machine Learning Basics.
The other branch filters rows to identify customers who have made their first order, so that we can monitor whether the company continues to attract new customers.
Note
The initial data is stored in managed folders. The datasets, Customers and Orders, are created from these folders. For this tutorial, we’ll assume that these folders are updated regularly. In such a situation, automating this workflow becomes important and even necessary.
Automating Tasks with a Scenario
The Flow is now complete for the purposes of this tutorial. Our goal is to create that simple scenario to automate and monitor retraining of the model and identification of first-time customers.
From the Jobs dropdown in the top navigation bar, select Scenarios.
Click + New Scenario.
Name the scenario
Rebuild data and retrain model, and click Create.
Note
In Dataiku, the scenario is the way to automate tasks. Some common tasks that can be automated are rebuilding datasets, retraining models, and so on. These tasks can be achieved with pre-defined steps or Python code, as covered in the product documentation.
A scenario has two required components:
triggers that activate a scenario and cause it to run, and
steps, or actions, that a scenario takes when it runs.
There are many predefined triggers and steps, making the process of automating Flow updates flexible and easy to do. For greater customization, you can create your own Python triggers and steps.
While optional, it is often useful to set up a reporting mechanism to notify you of scenario results (for example: send a mail if the scenario fails).
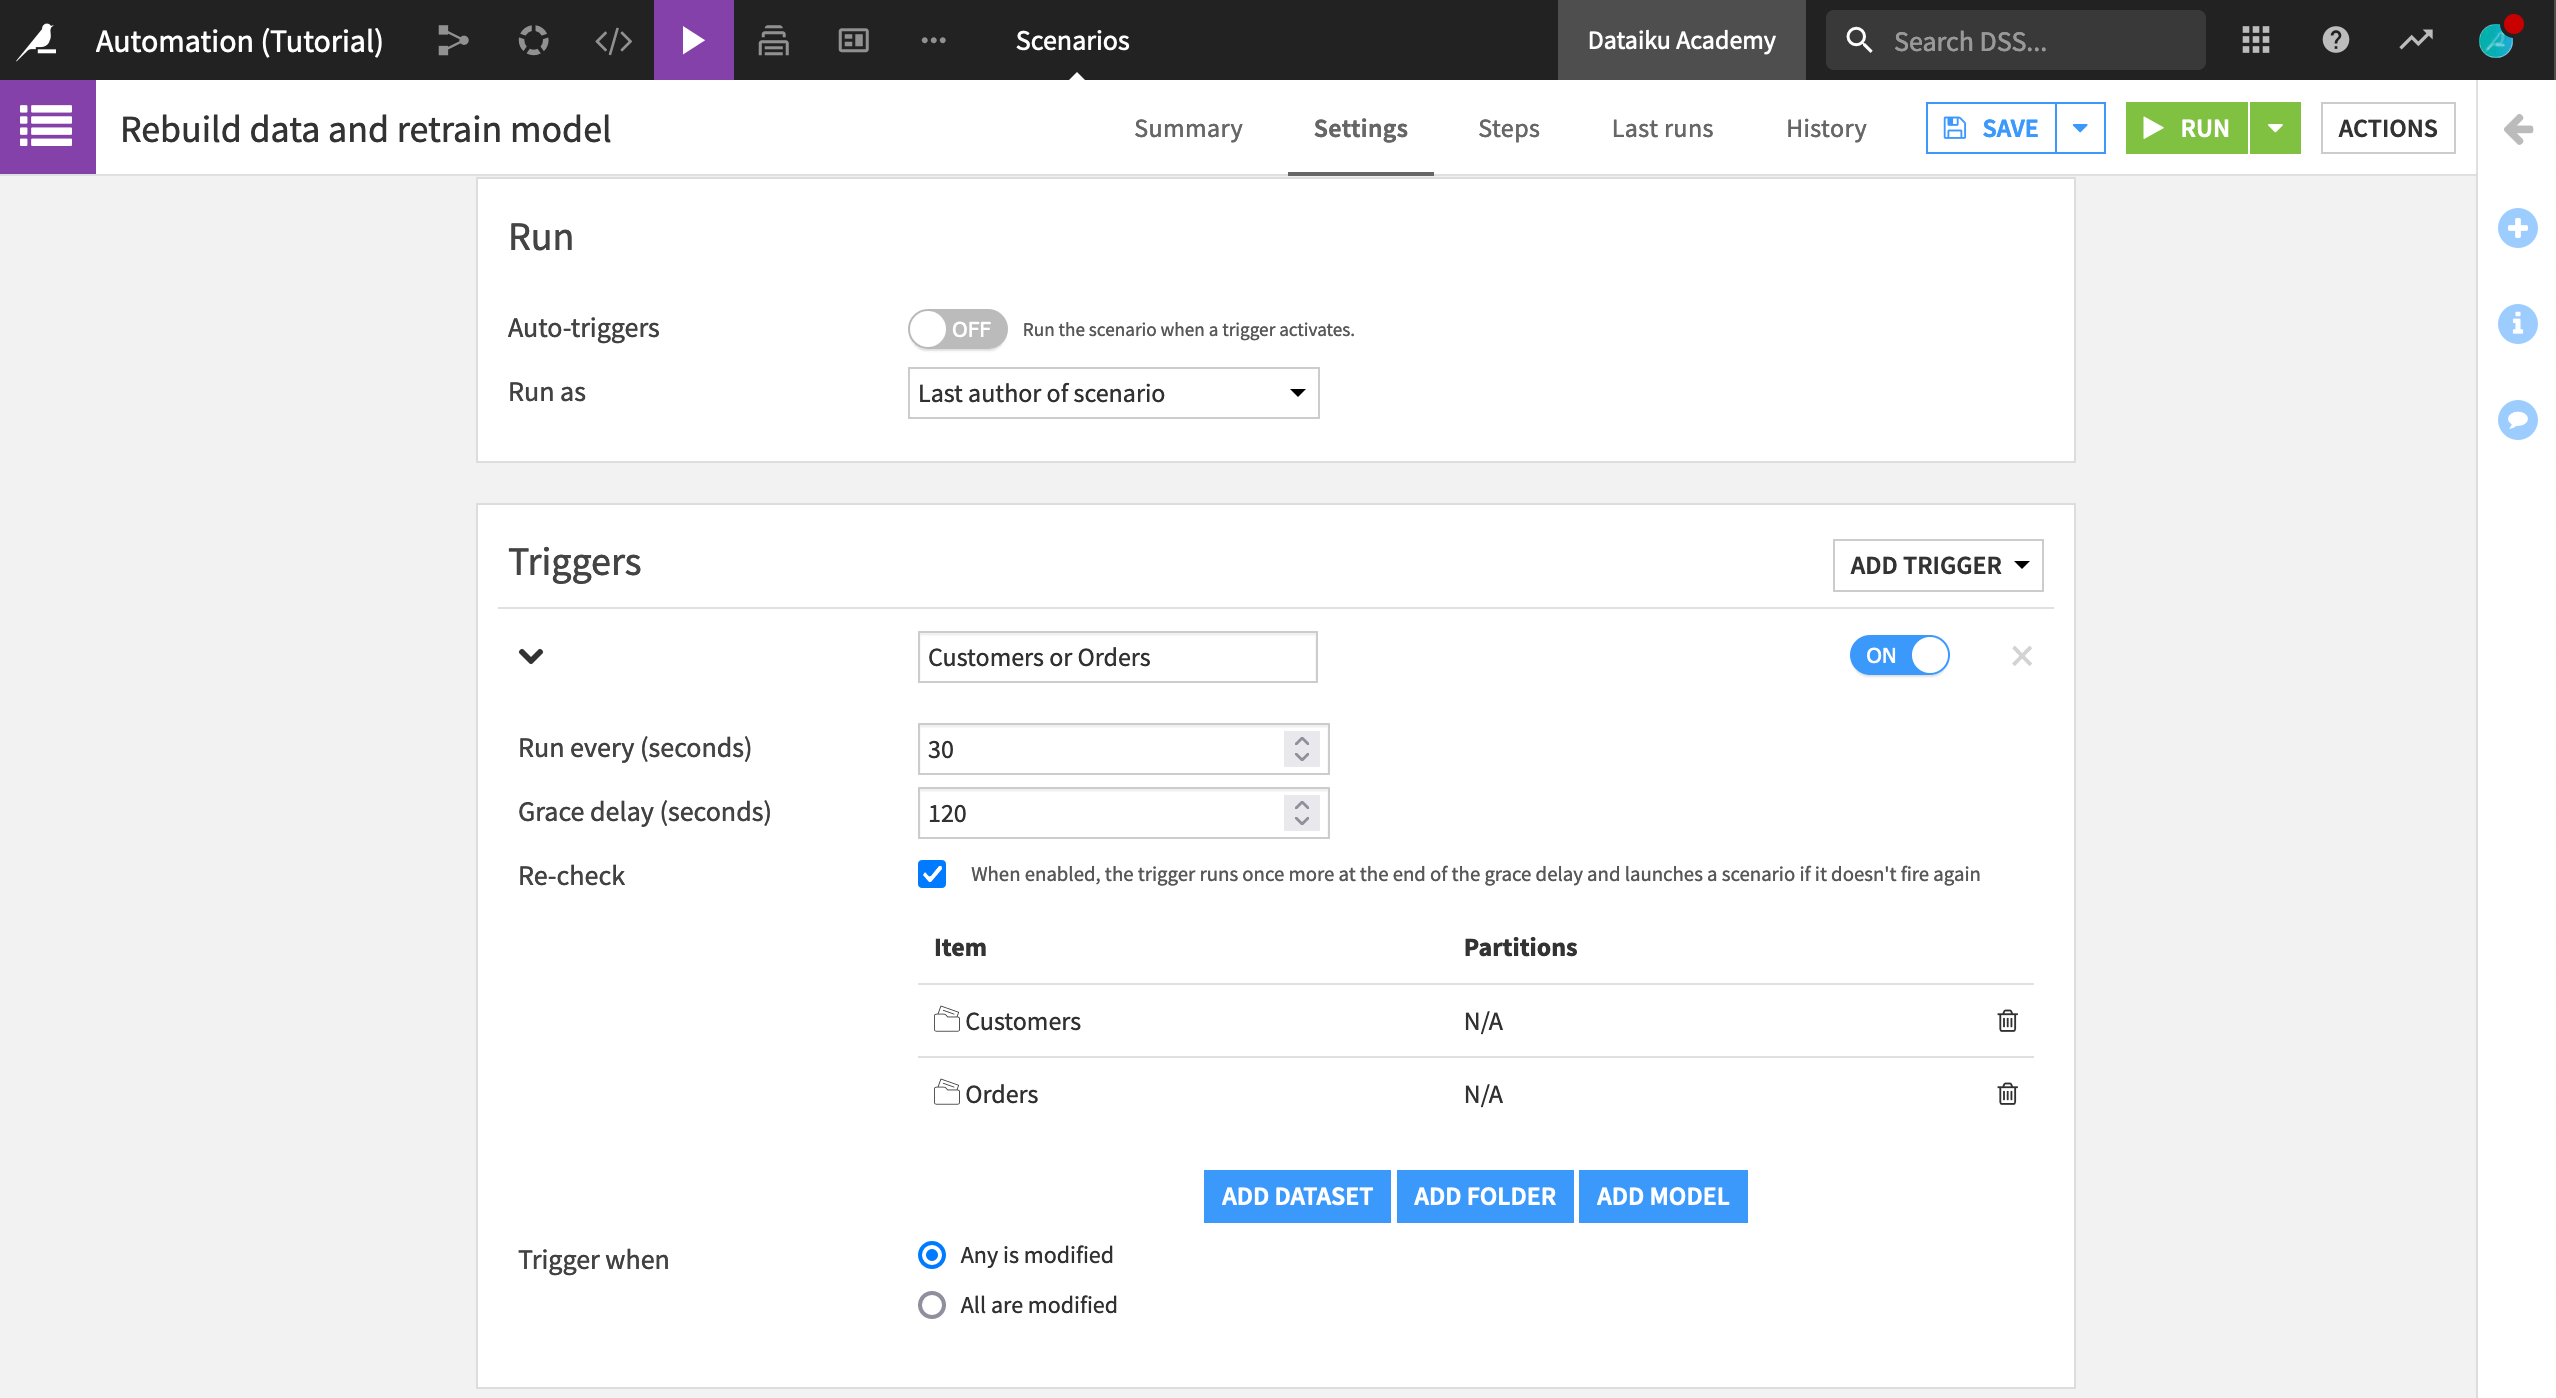
Define Triggers
Say we want to track our customer acquisition and retrain the model as new data arrives, and the underlying data source has changed. We want a trigger that will “watch” the input datasets, and run the scenario as soon as the data in the inputs has changed.
On the Settings tab of the new scenario, click Add Trigger > Trigger on dataset change.
Replace the default trigger name with
Customers or Orders.Choose to check the trigger condition every 30 seconds.
With the grace delay of 120 seconds, after Dataiku determines that the trigger has been activated, it will wait two minutes to ensure that no other triggers are activated before running the scenario.
Add both Customers and Orders as the datasets to monitor for changes.
Define Steps
Now let’s define the actions the scenario will take when triggered.
Navigate to the Steps tab.
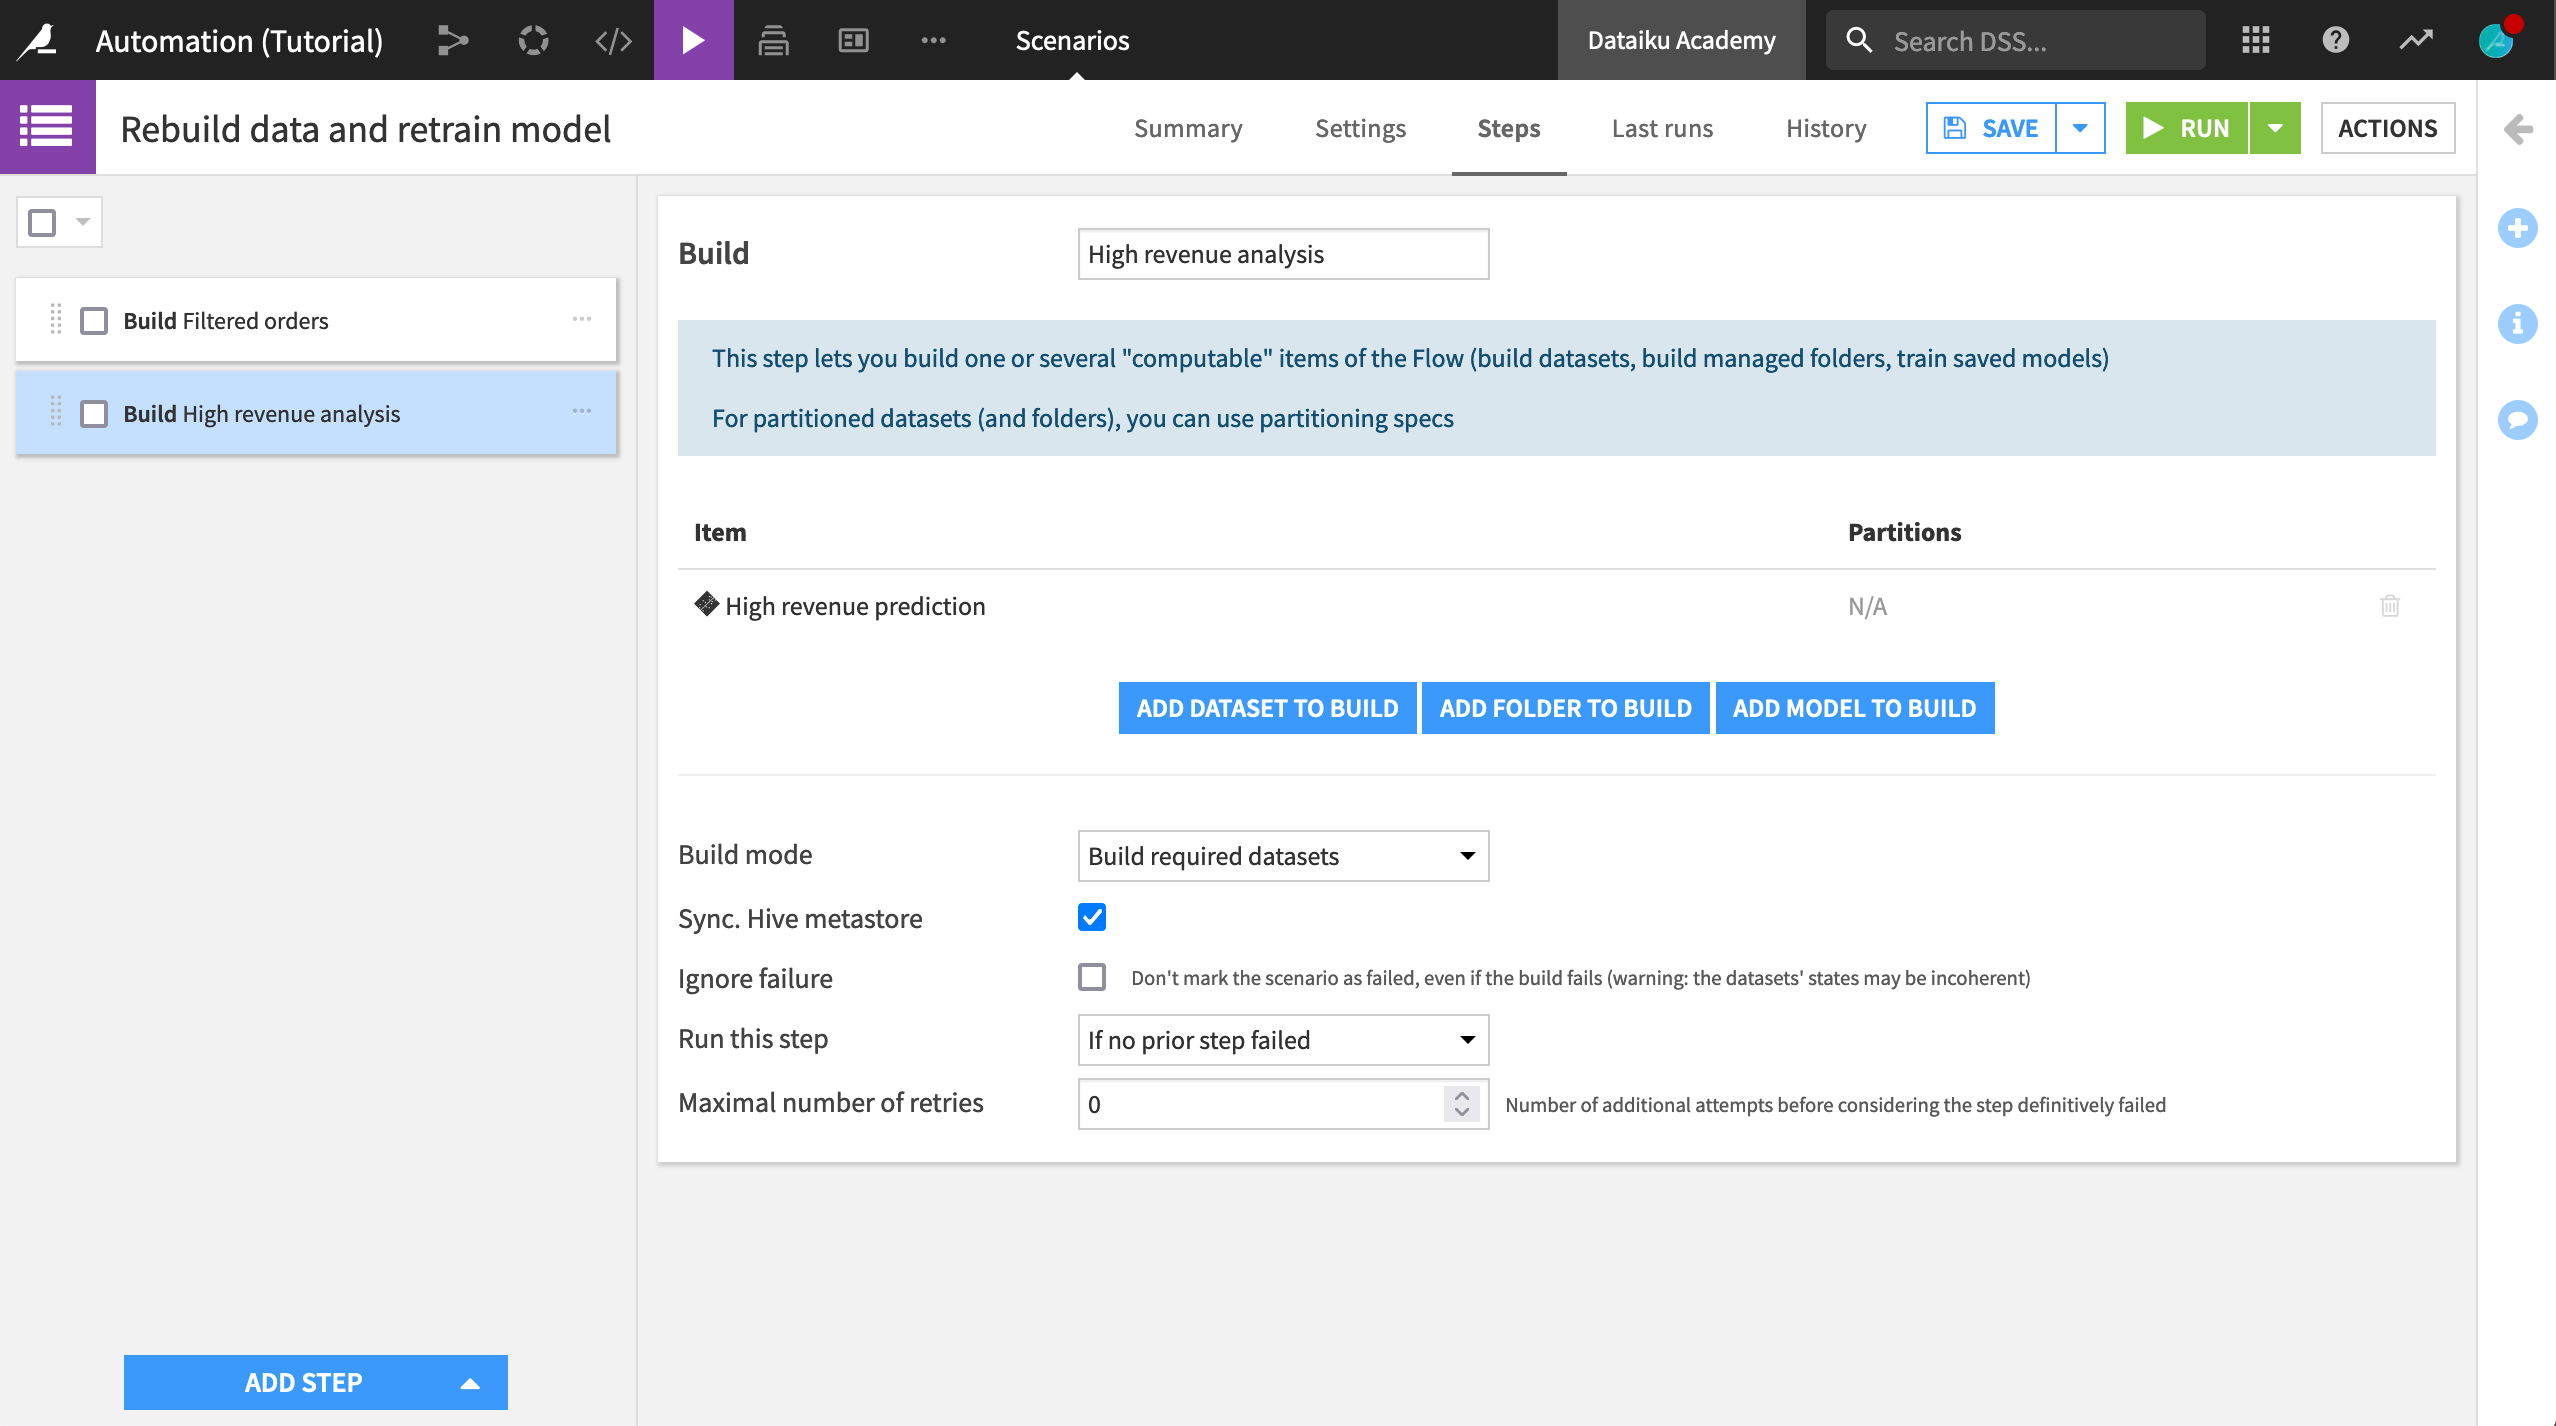
Click Add Step > Build / Train.
Name the step
Filtered orders.Click Add Dataset to Build, and select Orders_filtered as the dataset to rebuild. (Recall that this dataset is the last in its branch).
Ensure that Build required datasets is the build mode.
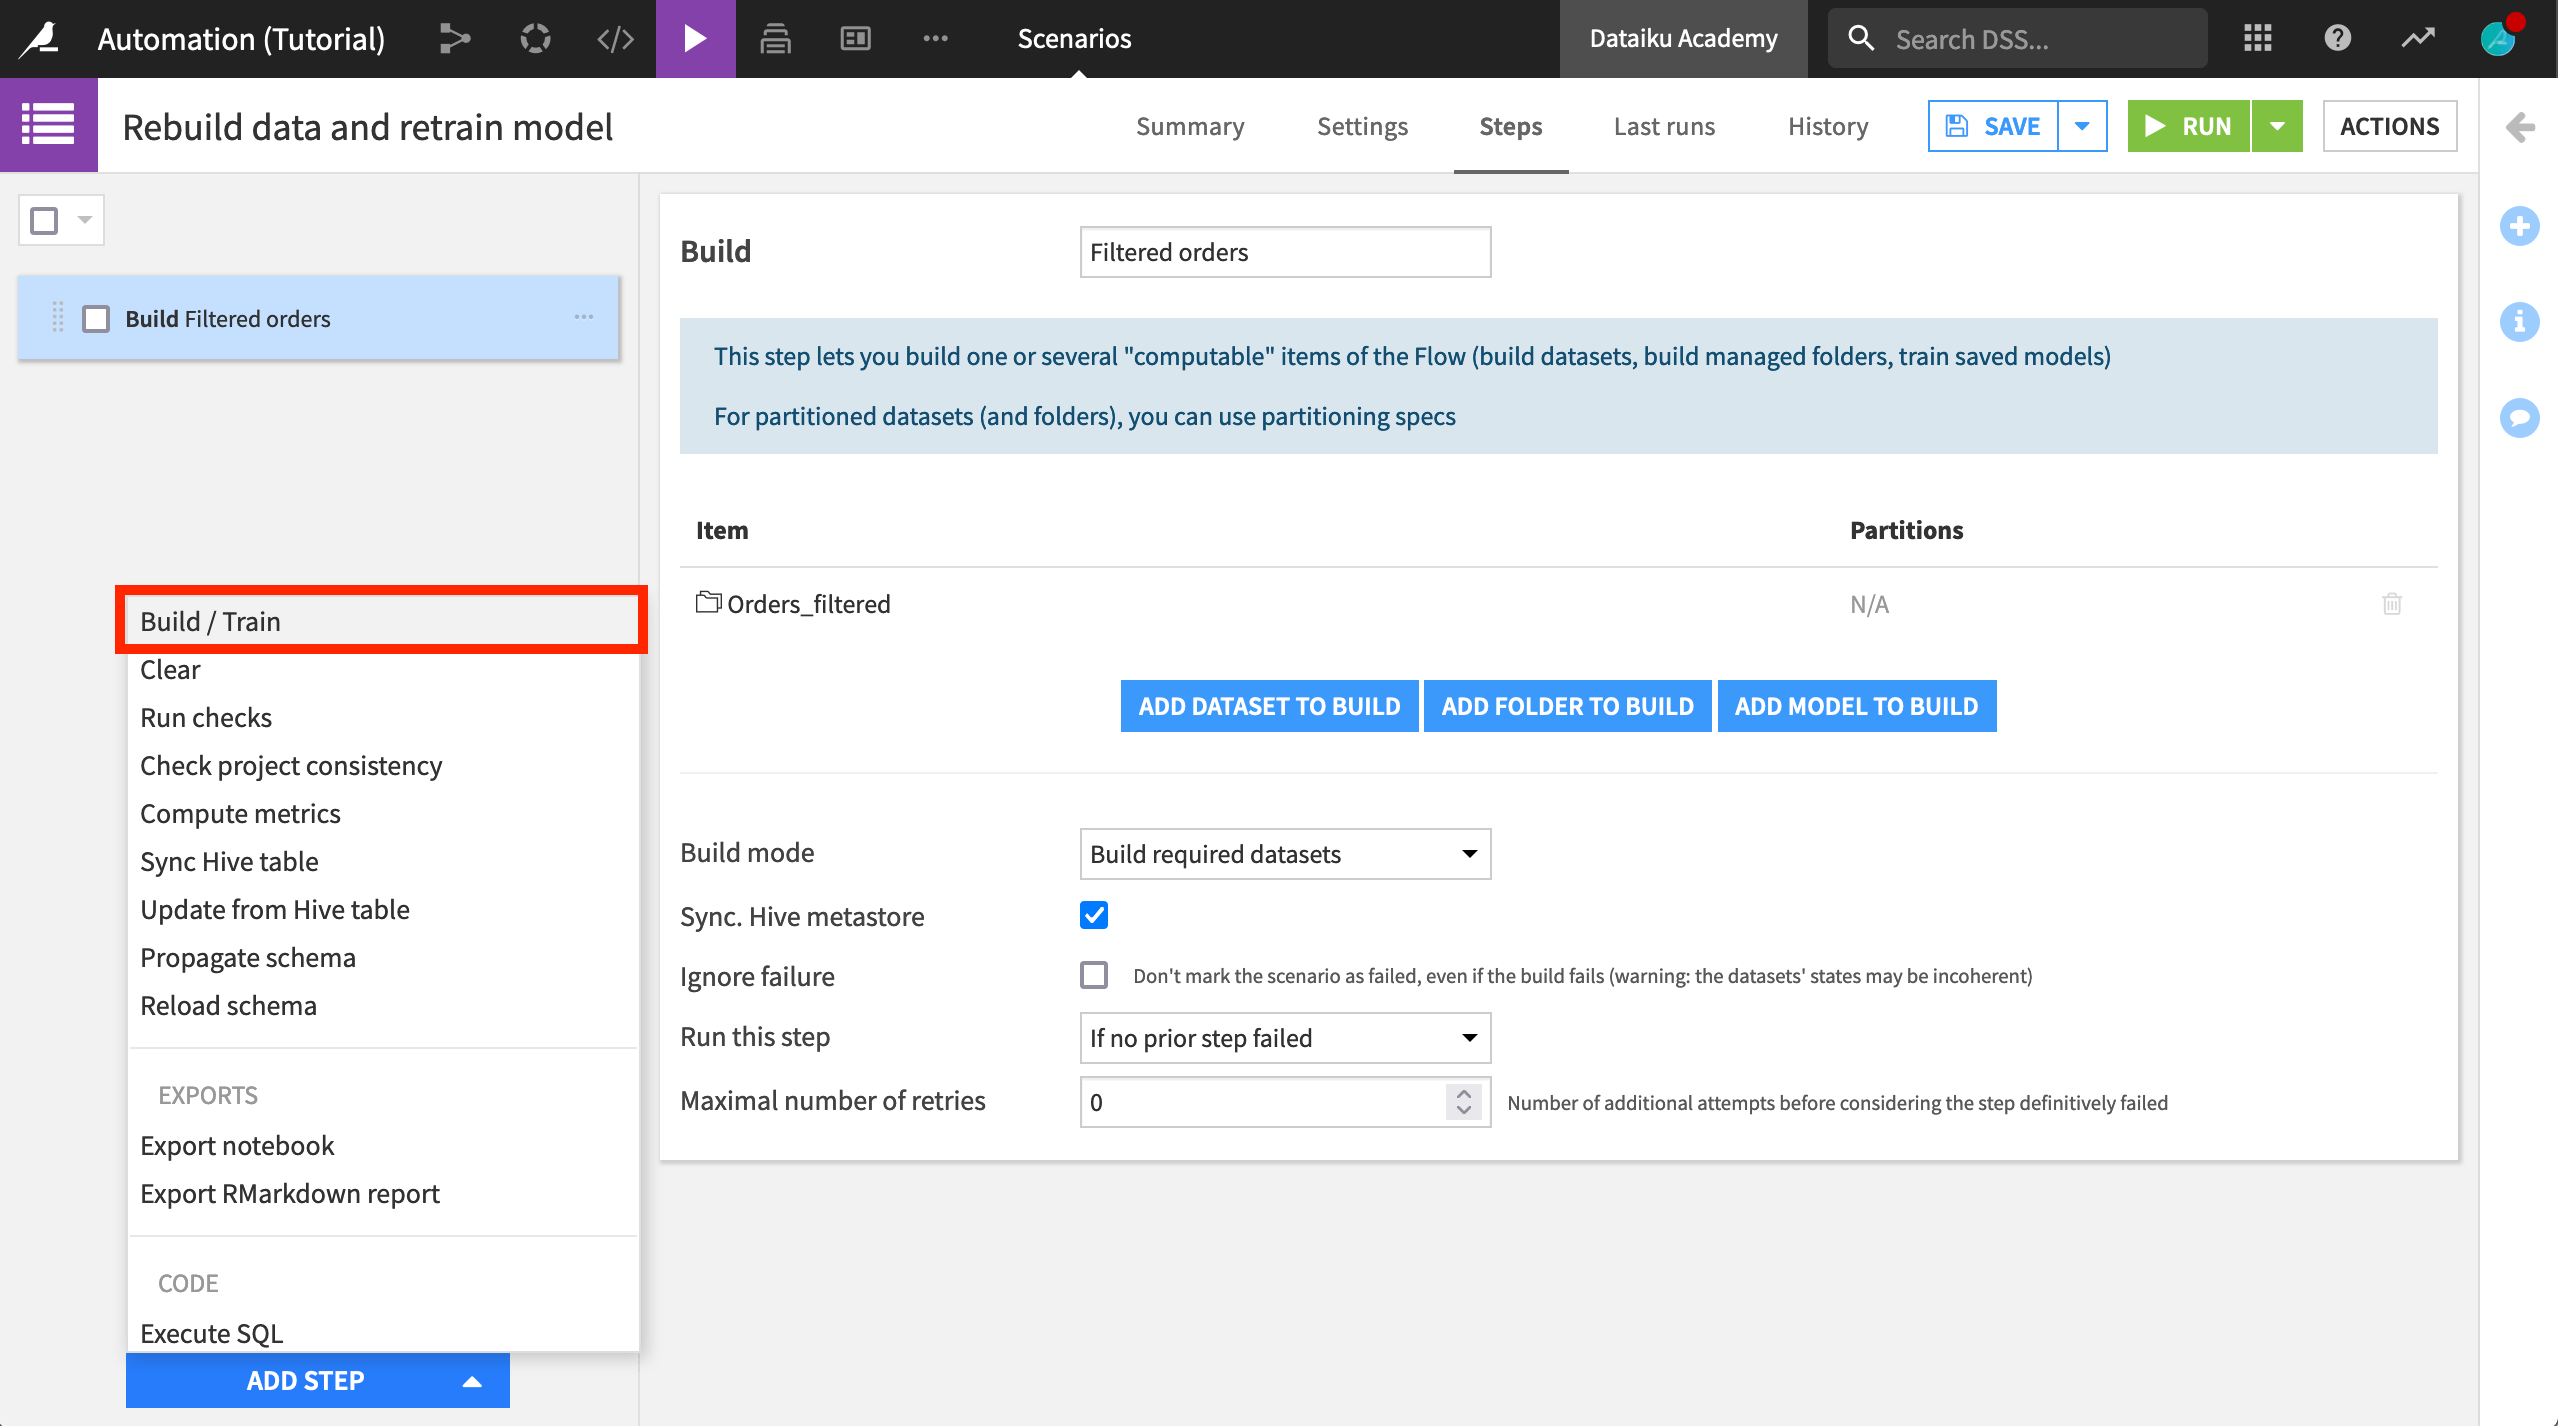
This scenario will now rebuild the Orders_filtered dataset whenever the Orders or Customers datasets change. Since the Build mode is set to build all required datasets, Dataiku will check to see if the source datasets have changed, and update each dataset in the Flow as appropriate.
Now let’s add the step to retrain the model.
Click Add Step, and select Build / Train.
Name the step
High revenue analysis.Click Add Model to Build, and select High revenue prediction.
Run the Scenario
The scenario is now ready to use.
To test it, click the green Run button.
Click Last runs to follow the progress of this manually-triggered scenario. (Like any other job, you can also see the activity in the Jobs page).
You can examine details of the run, what jobs are triggered by each step in the scenario, and the outputs produced by each scenario.
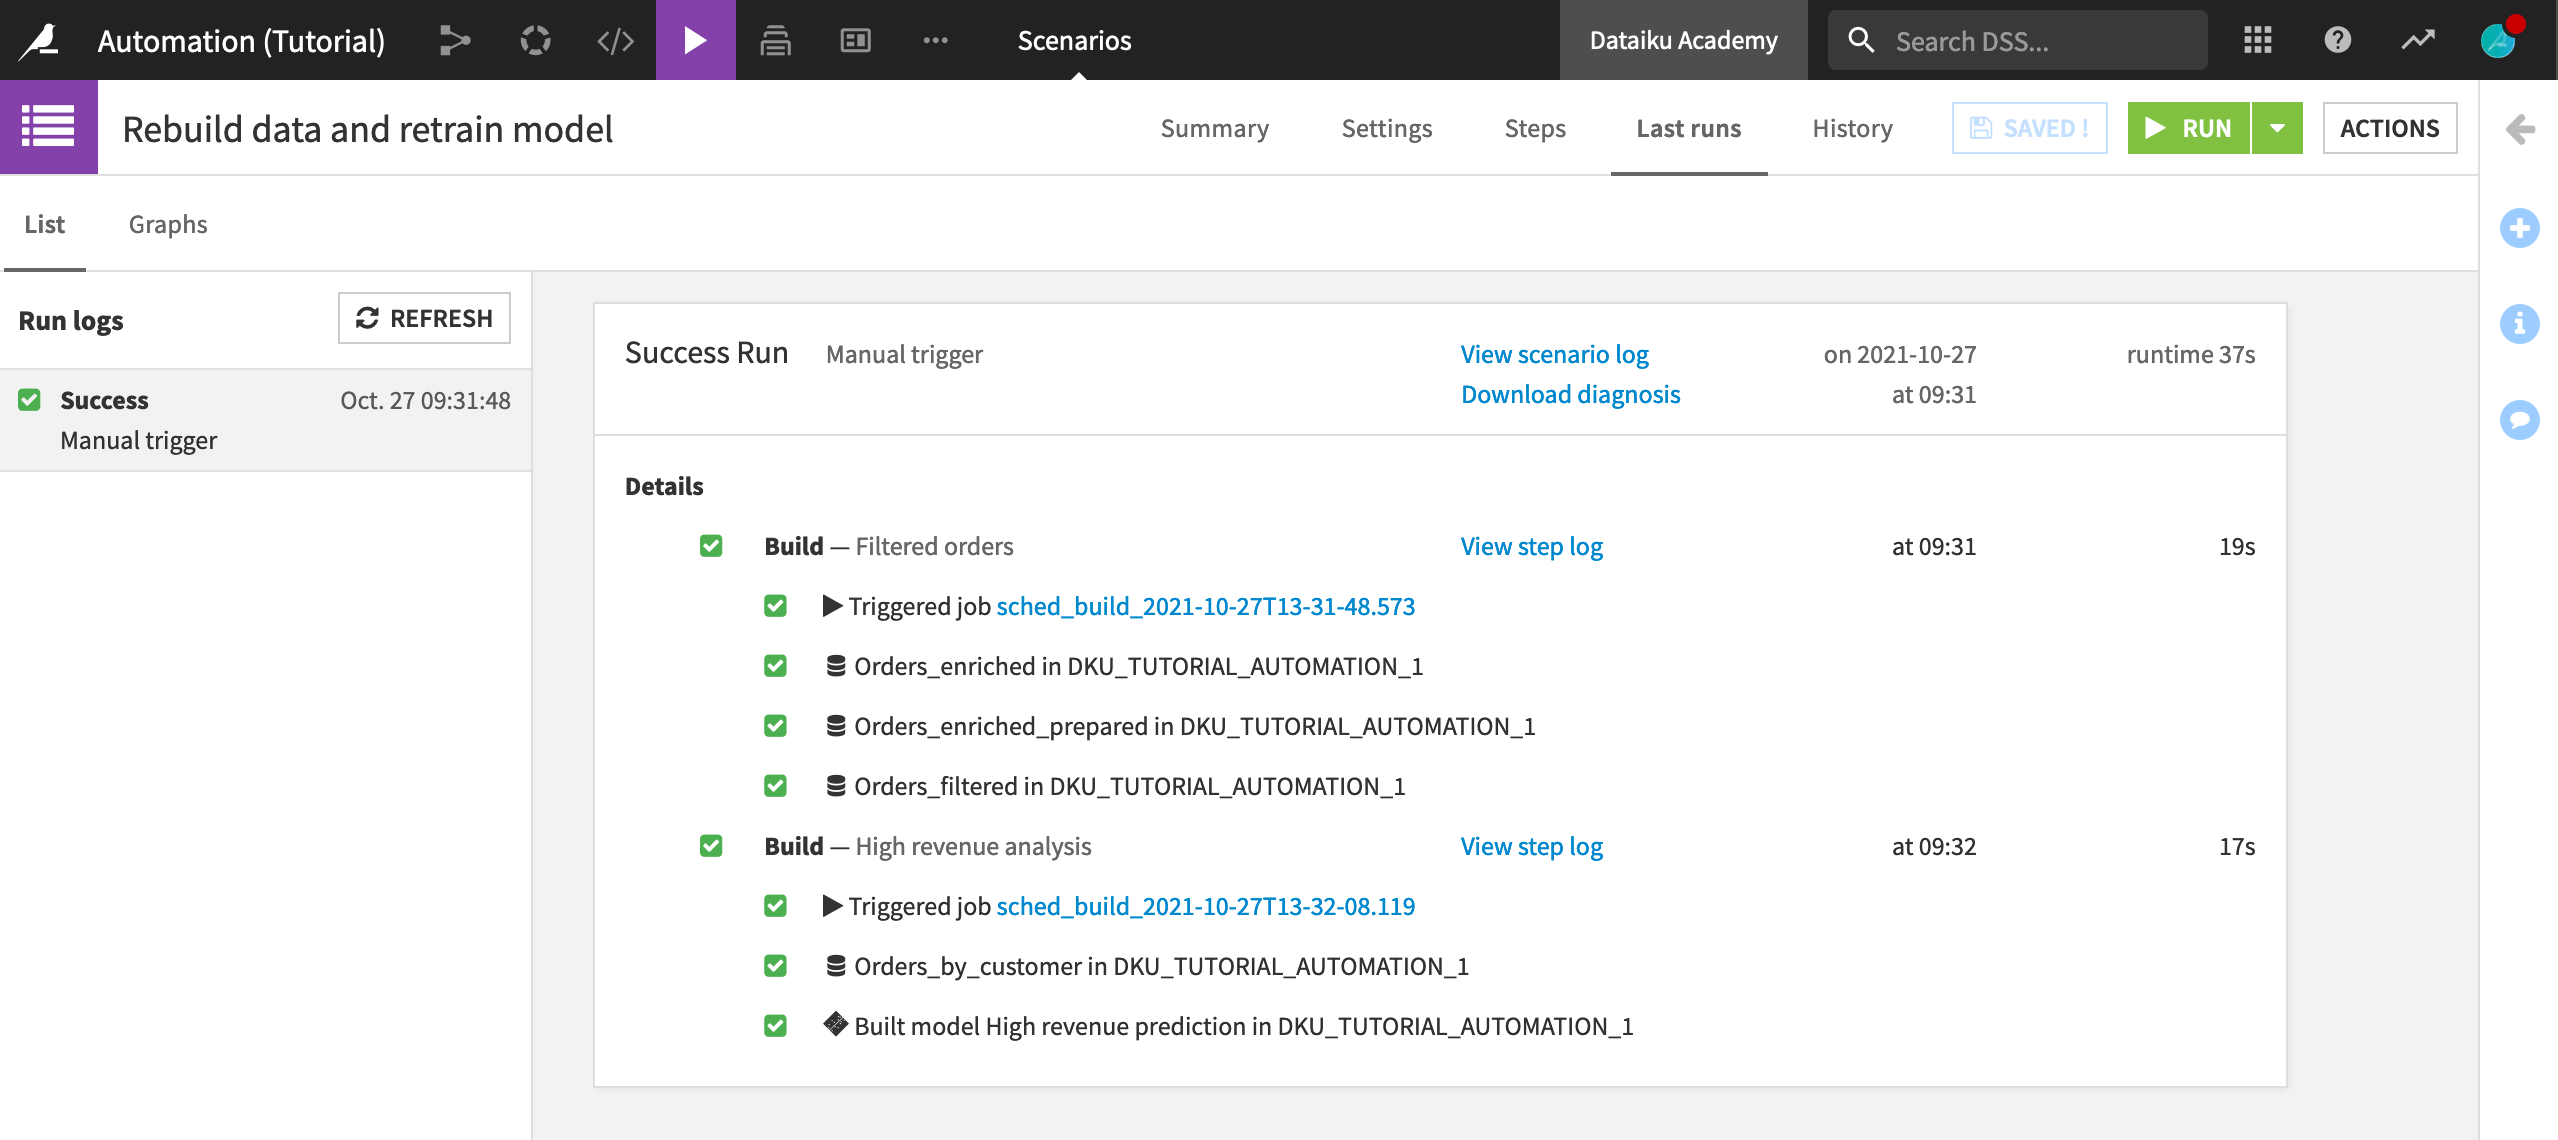
This scenario will now run whenever the Orders or Customers datasets changes, and rebuild the Orders_filtered dataset and the high revenue prediction model.
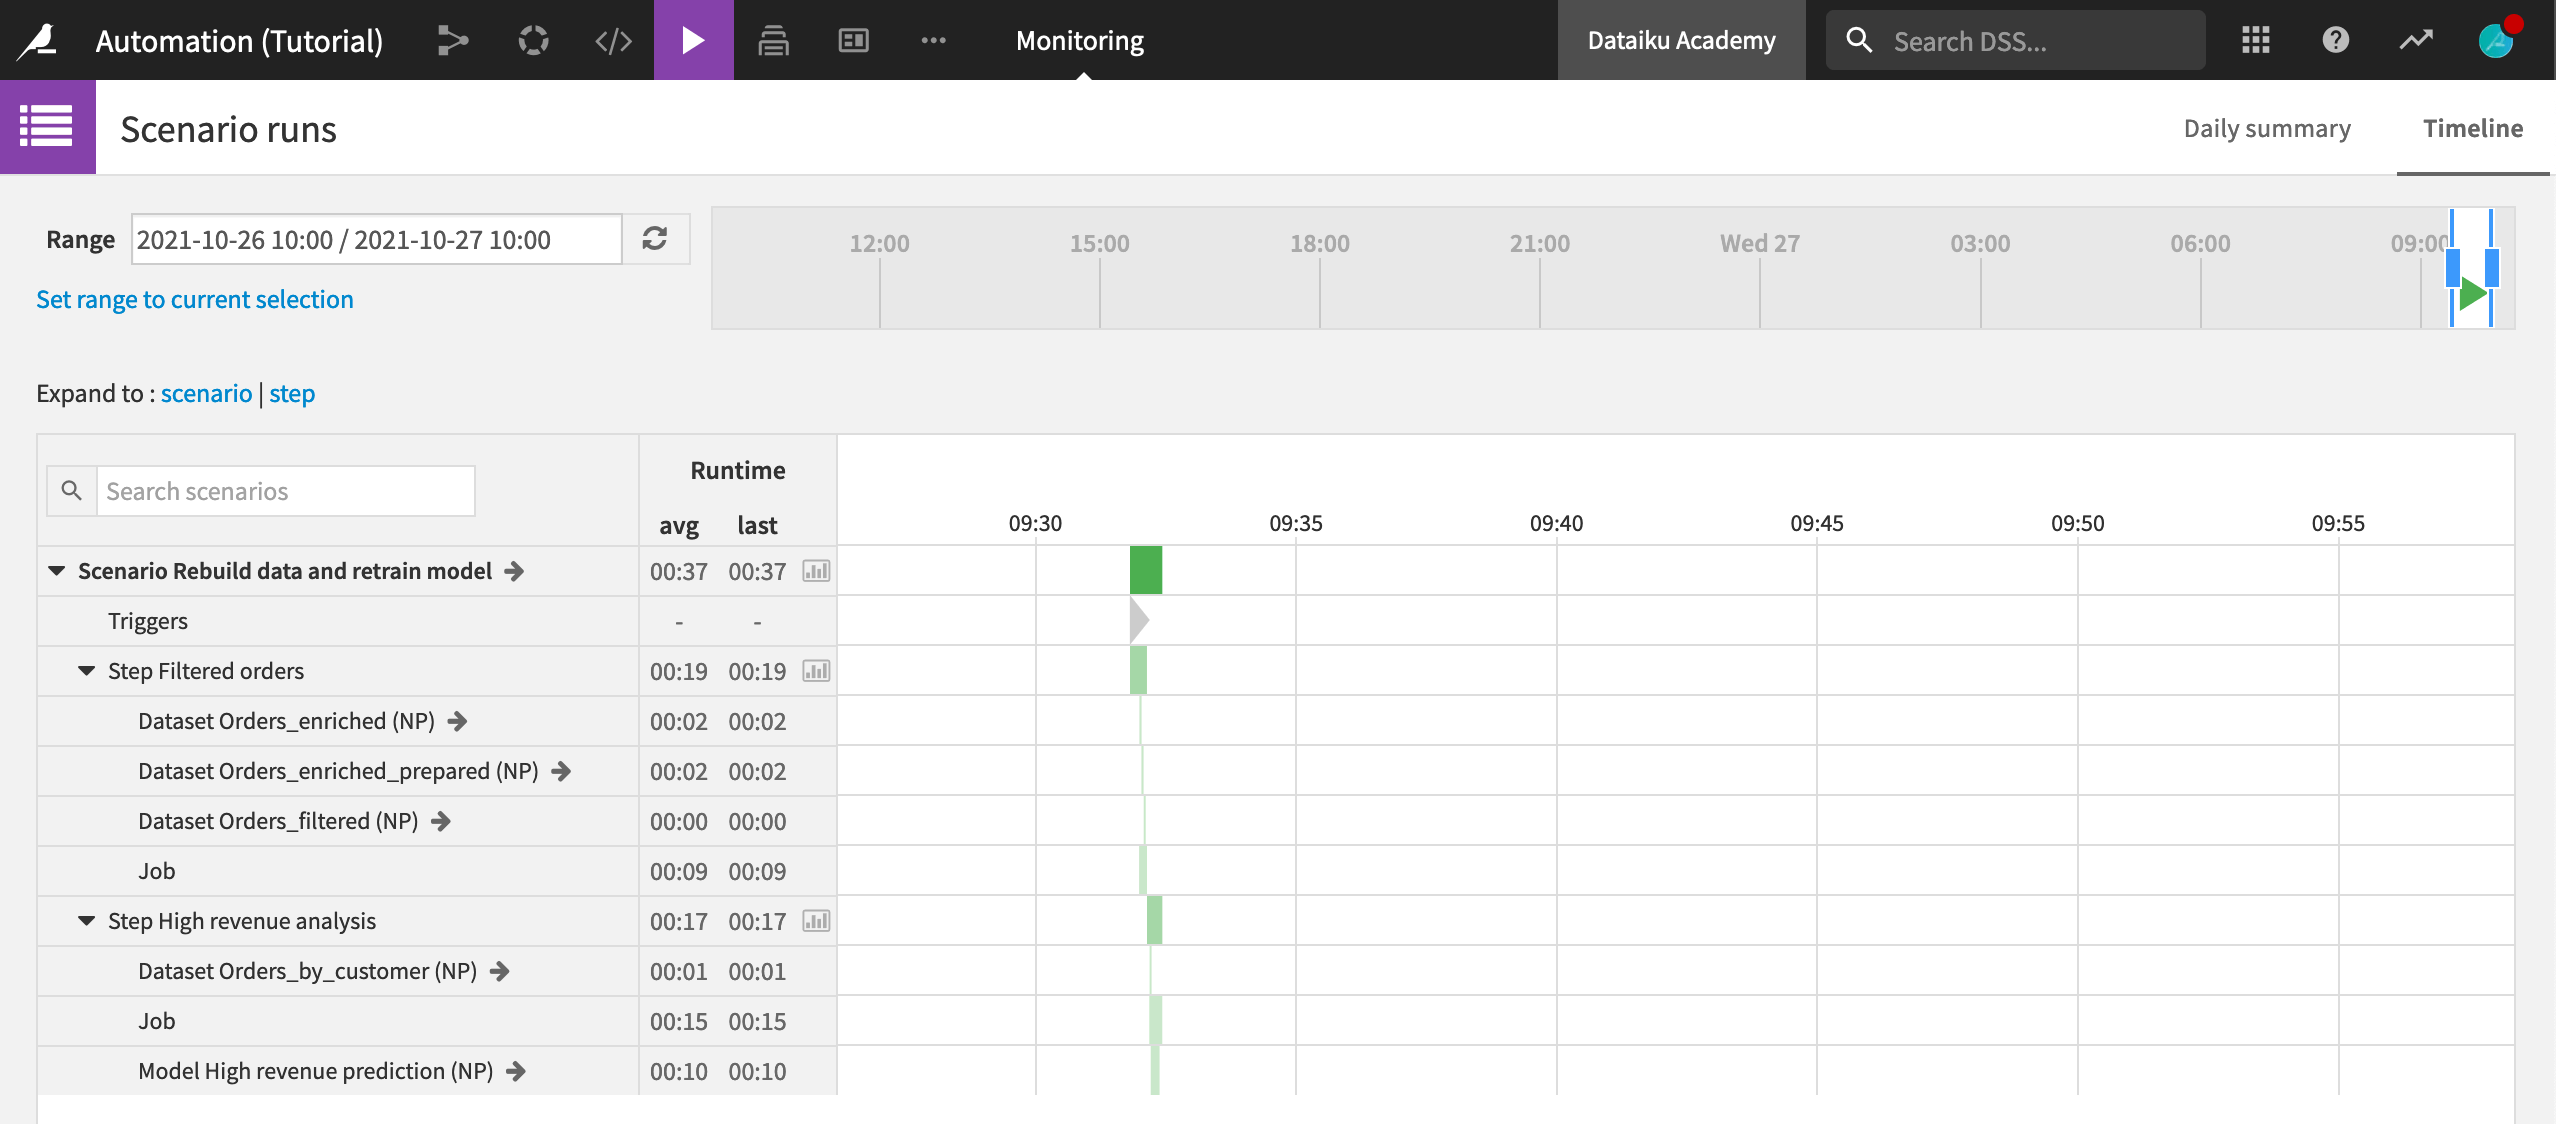
Over time, we can track scenarios to view patterns of successes and failures. From the Jobs menu in the top navigation bar, select Monitoring.
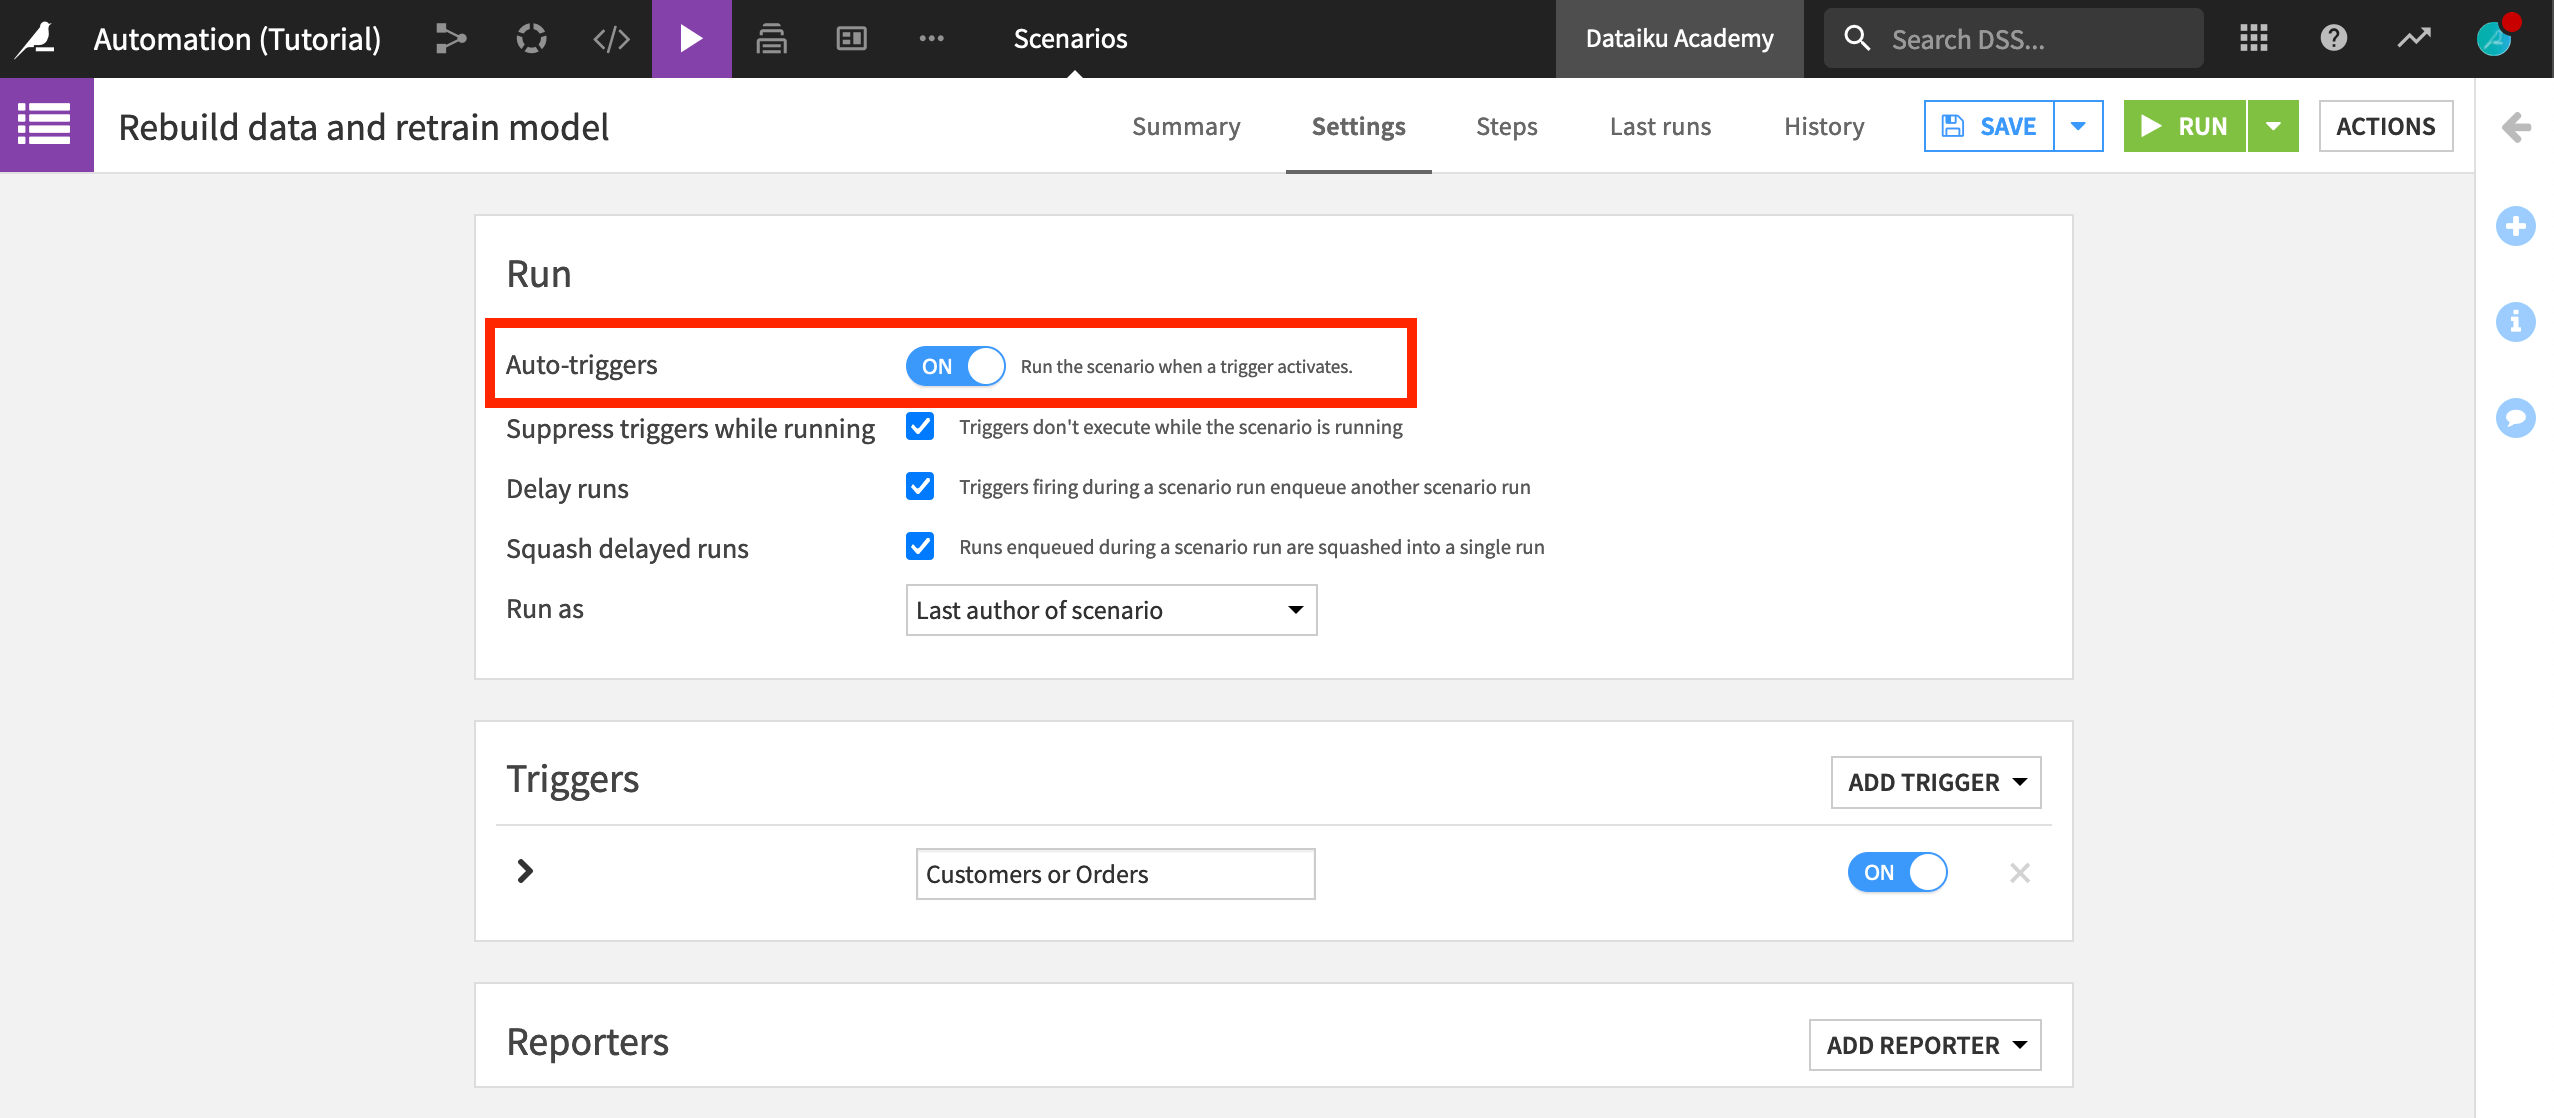
Before we move on, make sure to enable the “Auto-trigger” of the scenario. When you create a scenario, by default, its triggers are inactive.
Return to the Settings tab of the scenario.
Set Auto-triggers to On.
Save the scenario.
Monitoring with Metrics and Checks
In addition to the Automation Monitoring dashboard, we can use metrics and checks to monitor questions like:
whether the company continues to attract new customers at the expected rate, and
whether the model degrades over time.
Note
The metrics system provides a way to compute various measurements on objects in the Flow, such as the number of records in a dataset or the time to train a model.
The checks system allows you to set up conditions for monitoring metrics. For example, you can define a check that verifies that the number of records in a dataset never falls to zero. If the check condition is not valid anymore, the check will fail, and the scenario will fail too, triggering alerts.
You can also define advanced checks like “verify that the average basket size does not deviate by more than 10% compared to last week”.
By combining scenarios, metrics, and checks, you can automate the updating, monitoring, and quality control of your Flow.
Define Metrics and Checks on a Dataset
First, let’s set up metrics and checks for the dataset.
Navigate to the Status tab of the Orders_filtered dataset.
Ensure that the Record Count metric is displayed. If it’s empty, compute it.
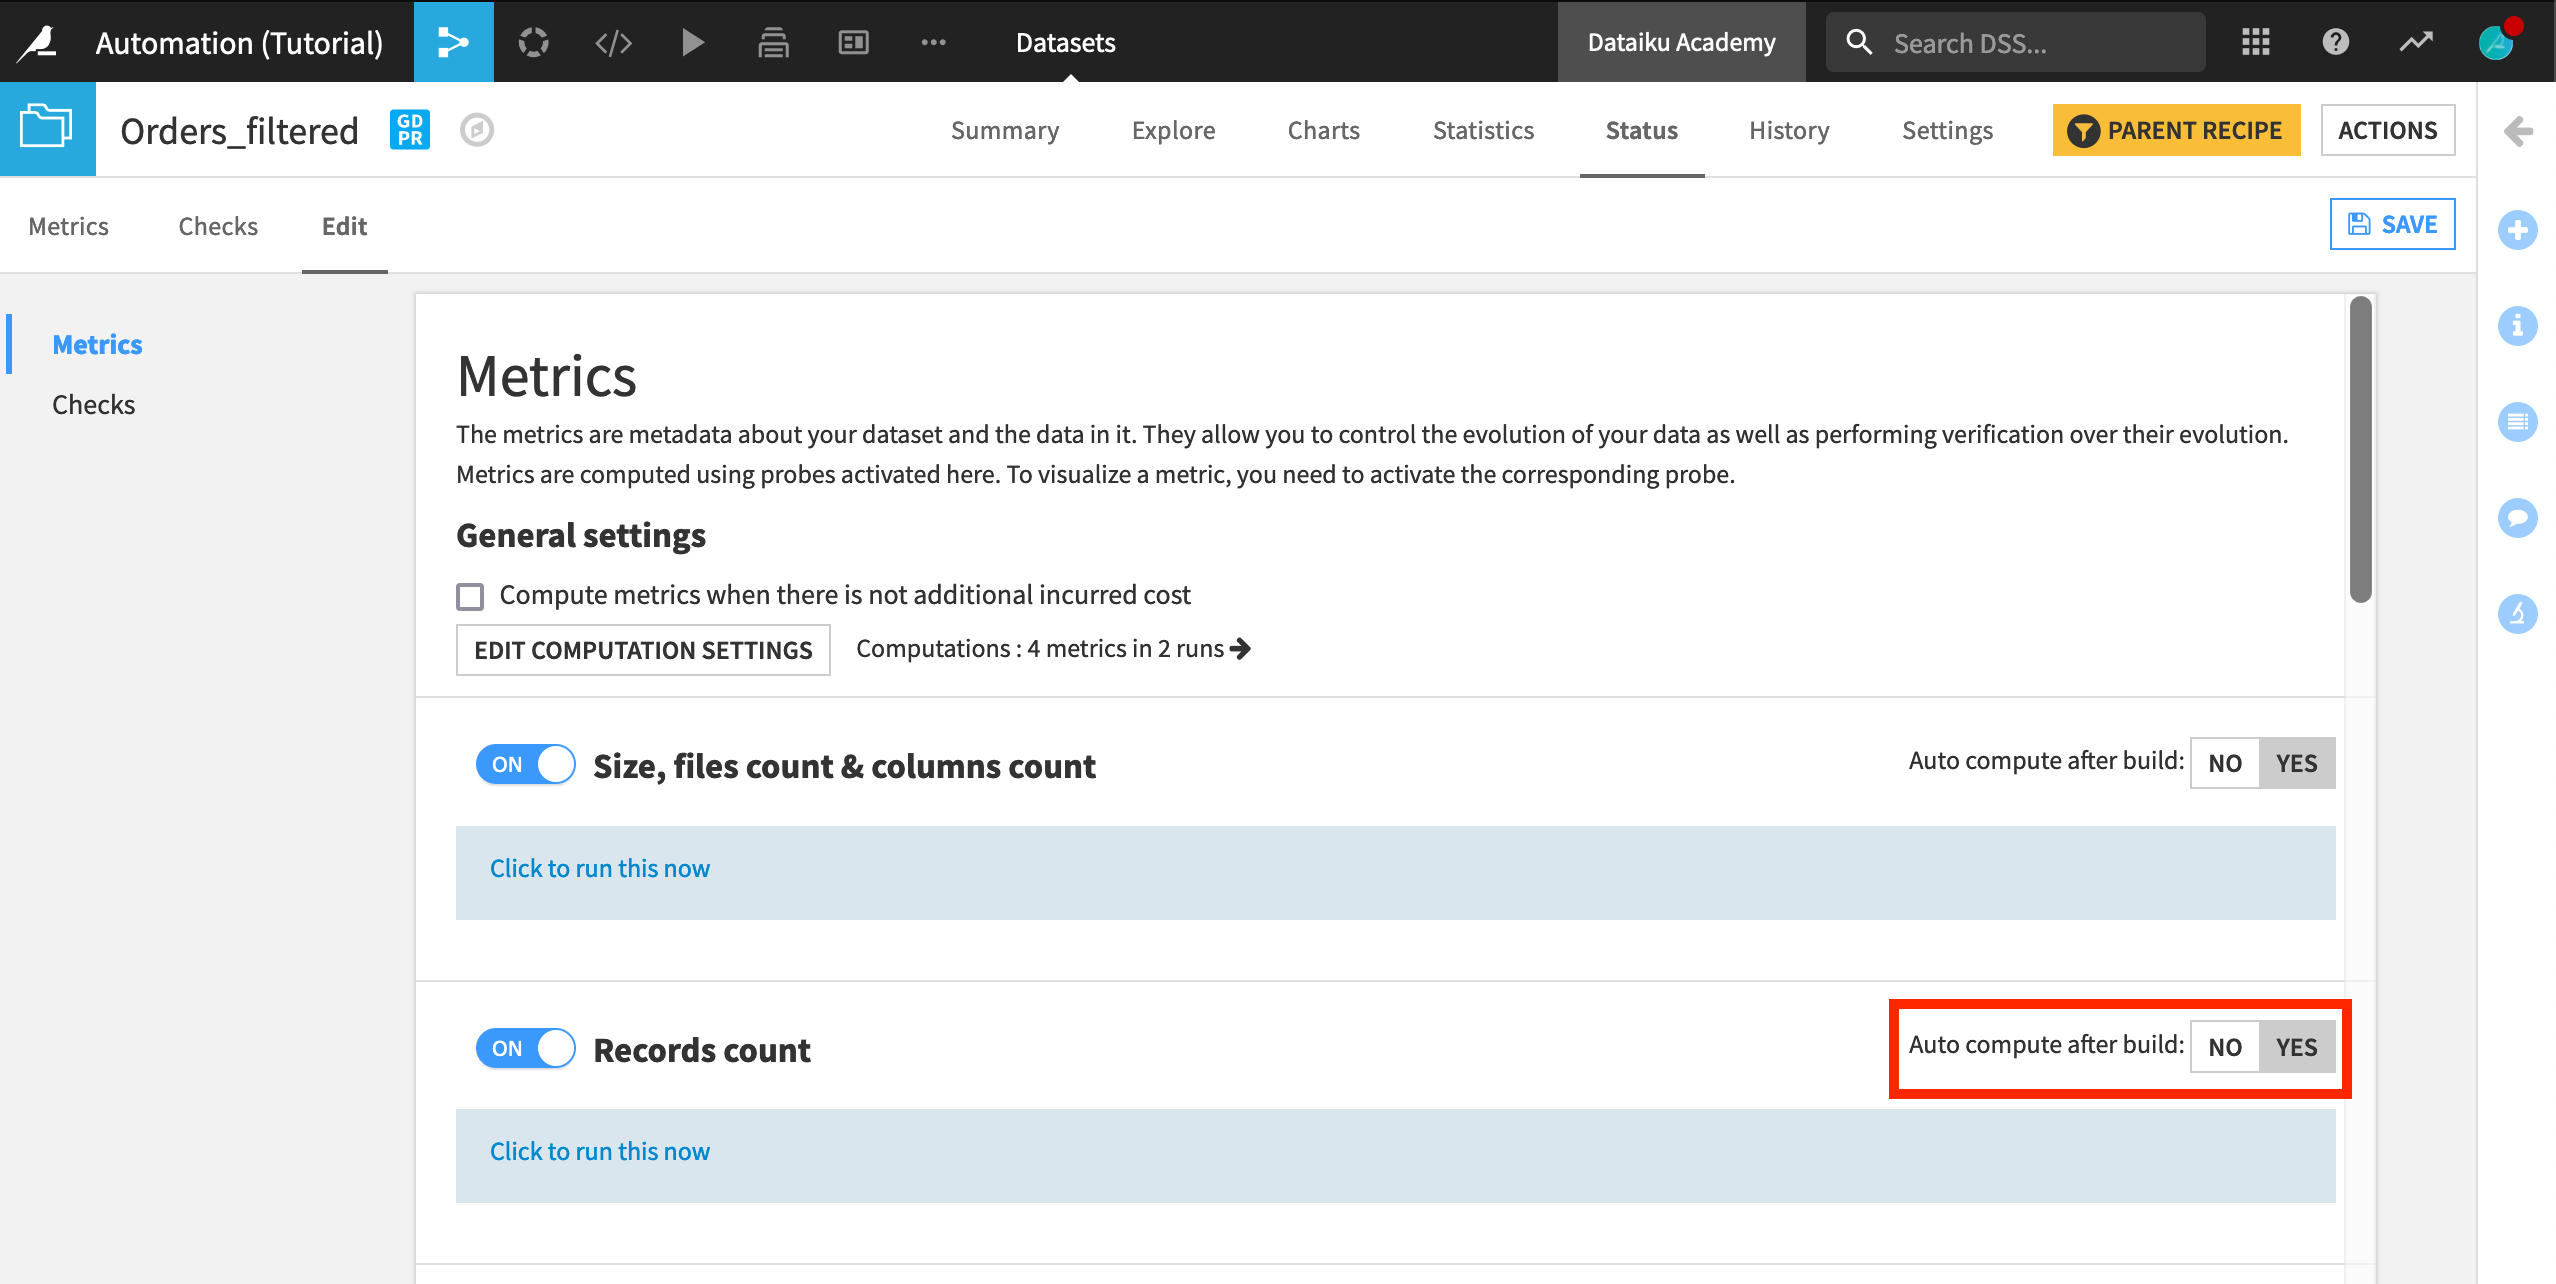
Navigate to the Edit subtab.
On the Metrics panel, ensure that the Records count is automatically computed after a rebuild (click “Yes” in “Auto compute after build”).
Now we’ll create a new check to ensure that the number of new customers is above a minimum value.
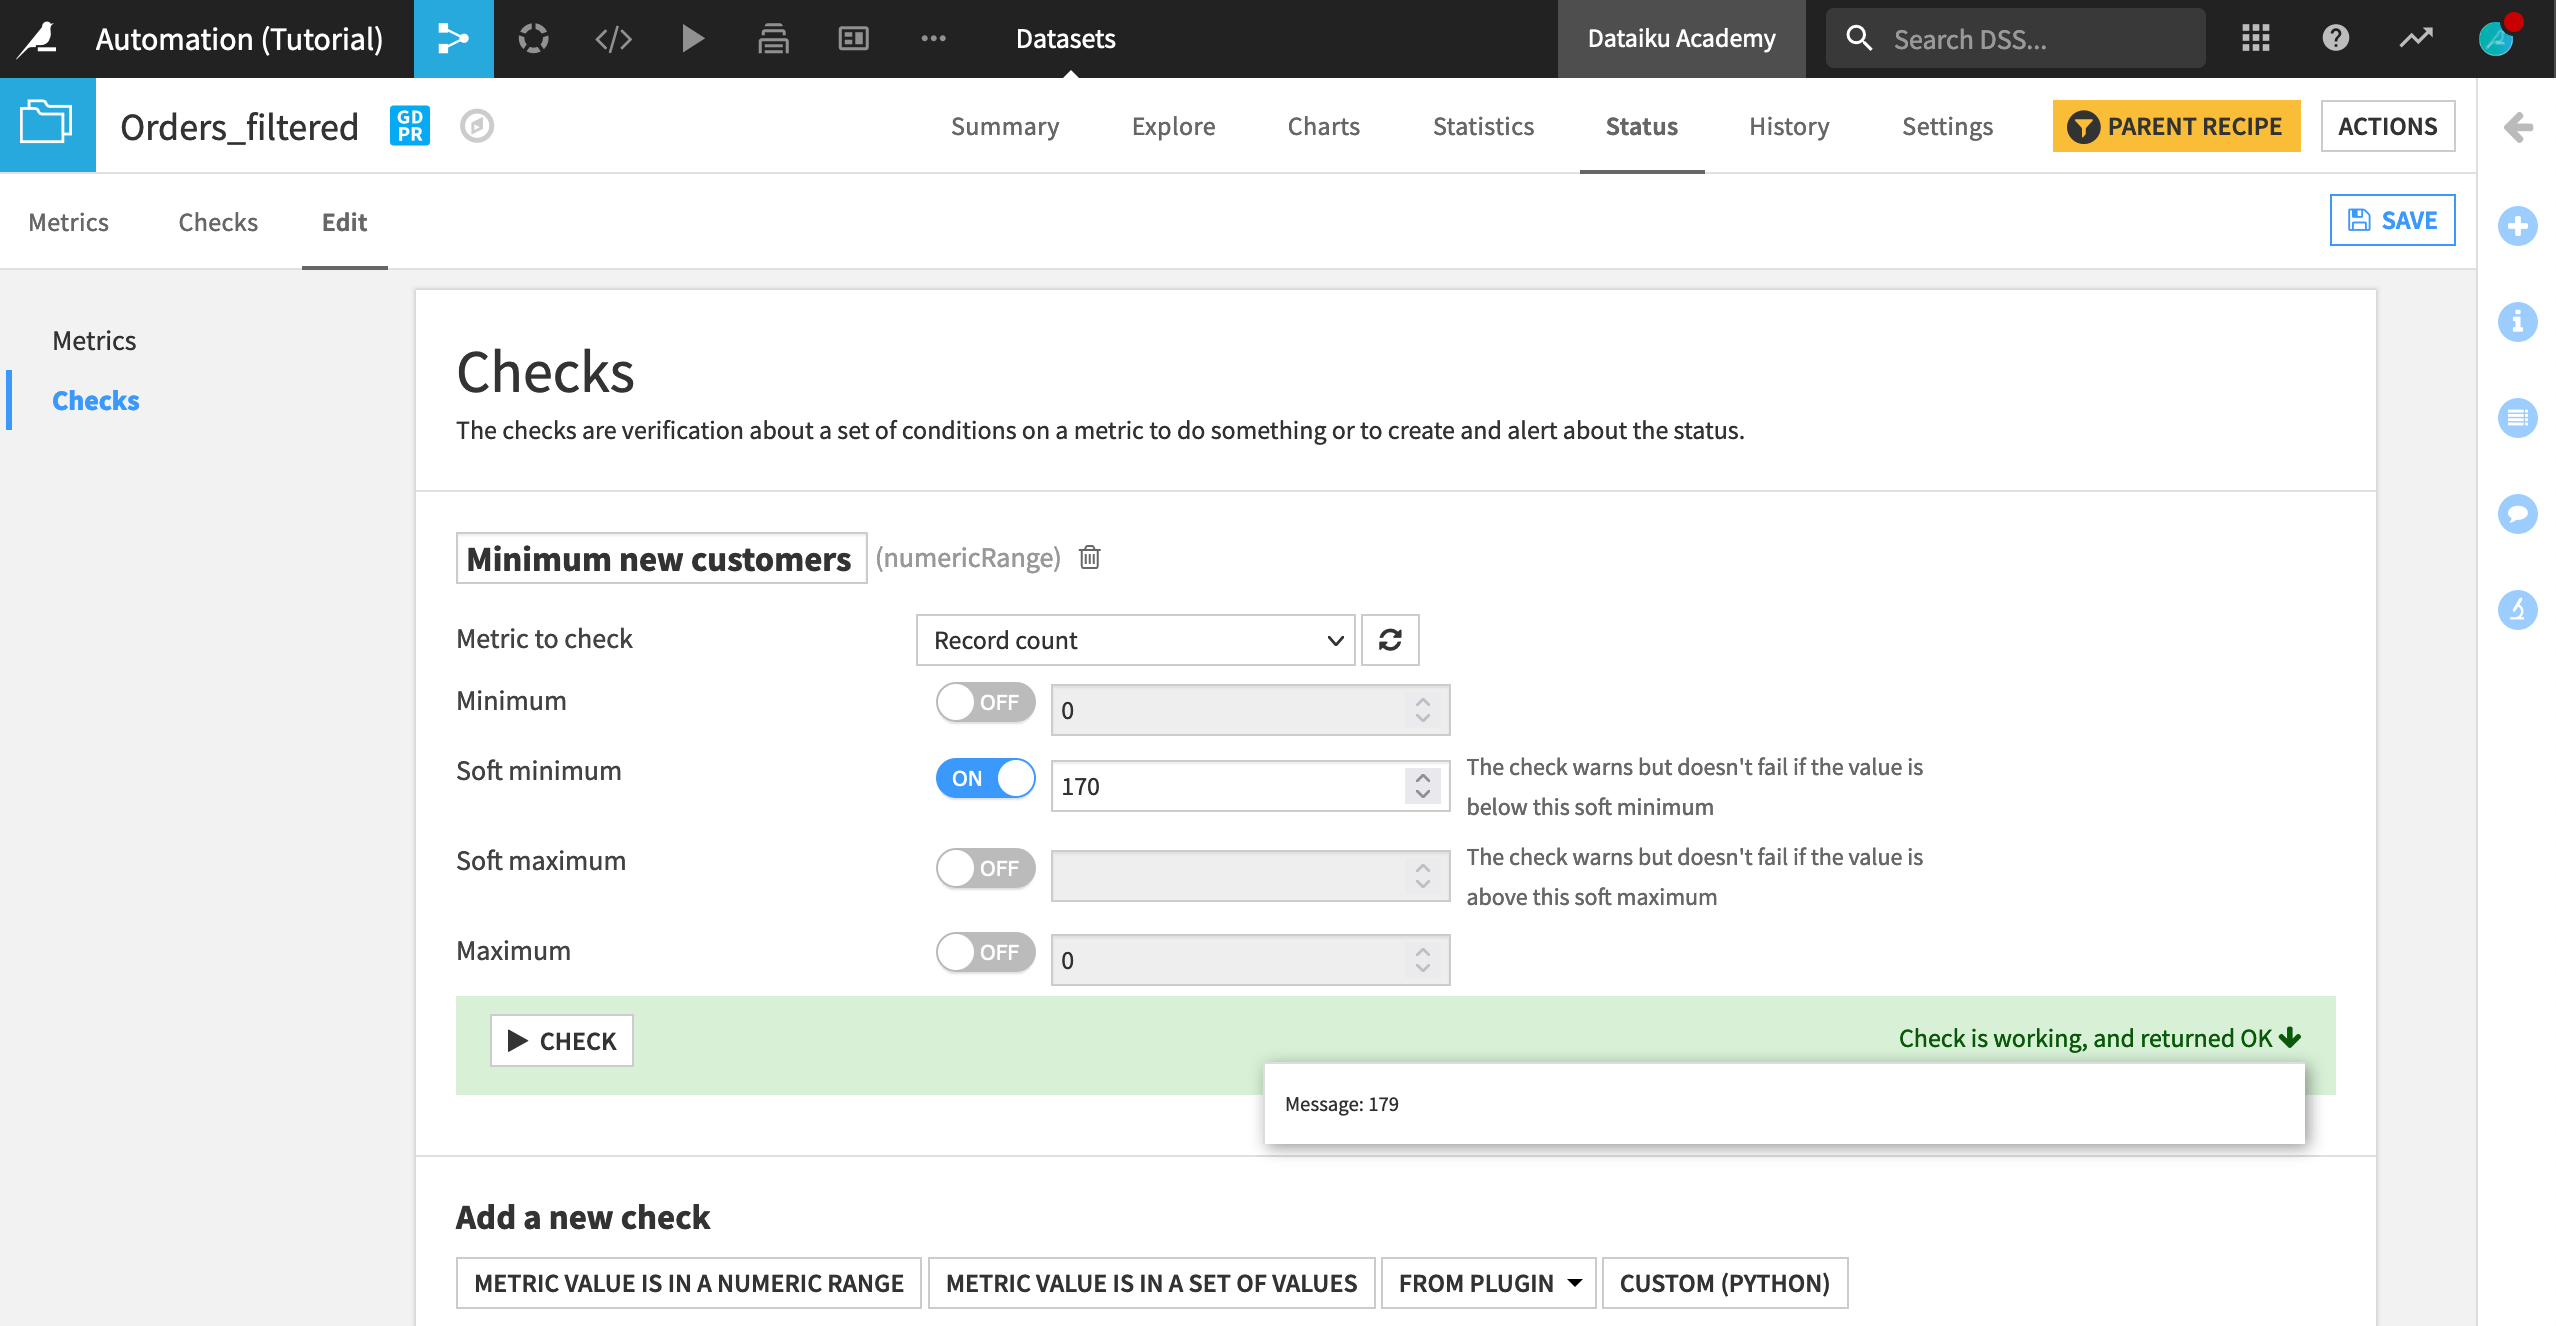
Still within the Edit subtab, navigate to the Checks panel.
Under “Add a new check”, click Metric value is in a numeric range.
Name the new check
Minimum new customers.Select Record count as the metric to check, and set
170as the soft minimum for the number of new customers to acquire in a month.Click Check to test if the check is working.
Note
Setting a soft minimum ensures that the dataset is built, while warning us if there is a problem. On the other hand, setting a (hard) minimum would throw an error.
Finally, we need to make sure the check is displayed.
Navigate to the Checks tab, and select to display the Minimum new customers check if necessary.
Define Metrics and Checks on a Model
Now let’s set up metrics and checks for the model.
Go back to the Flow, and open (double-click) the prediction model.
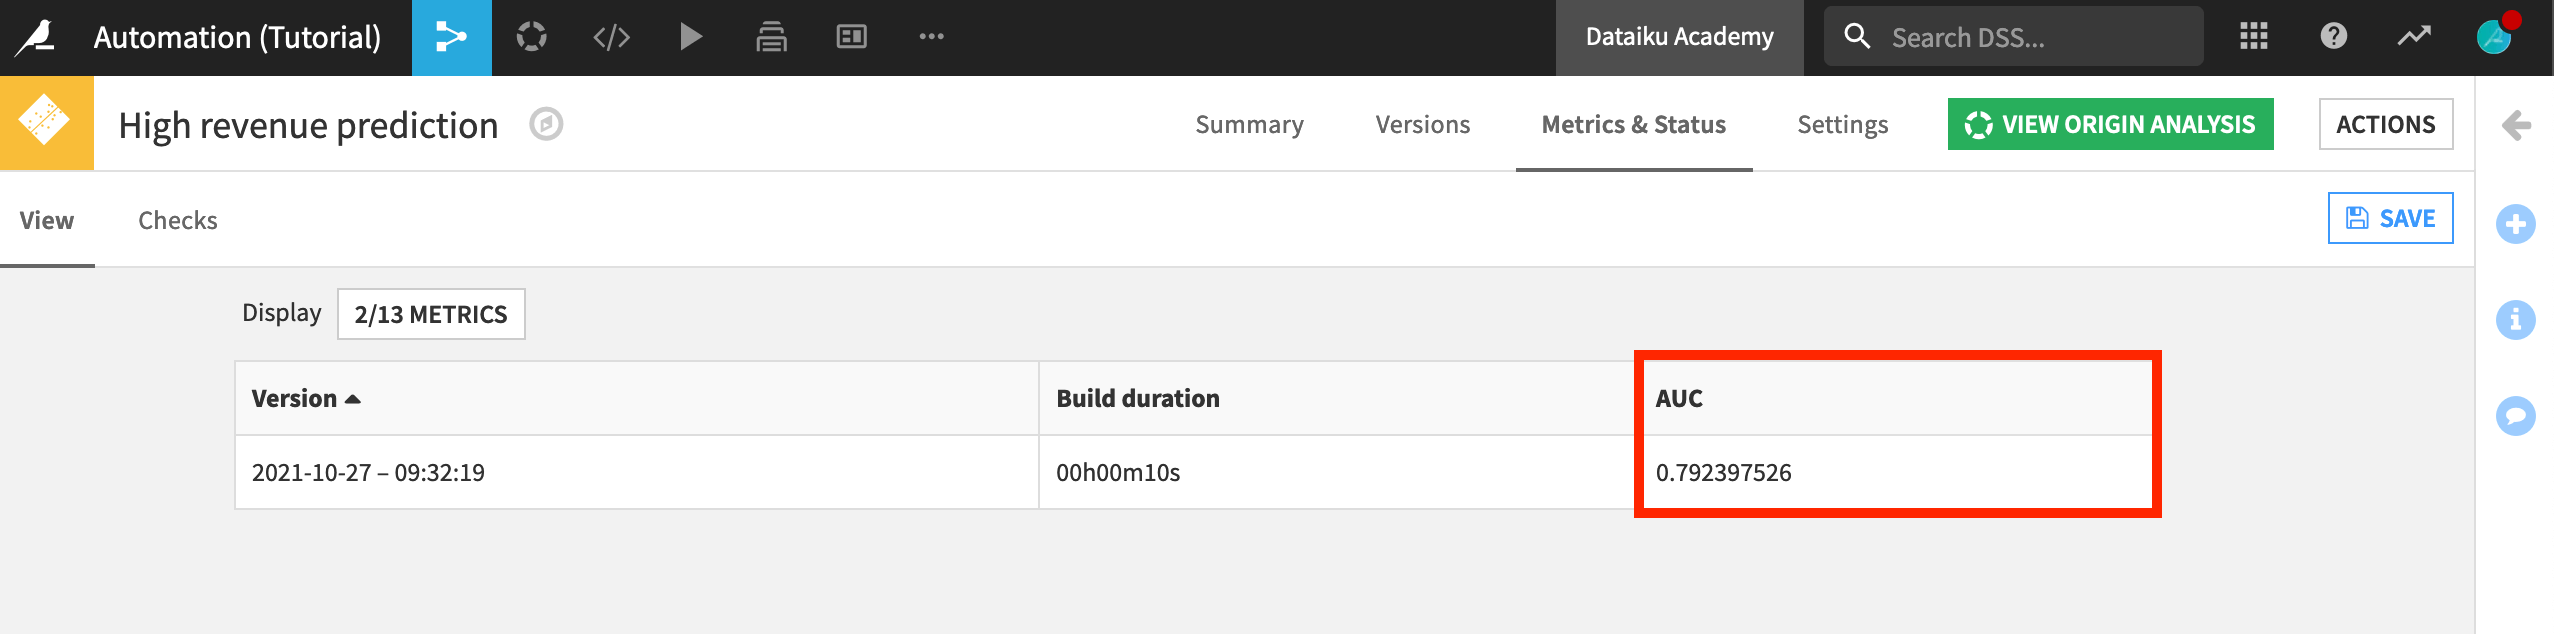
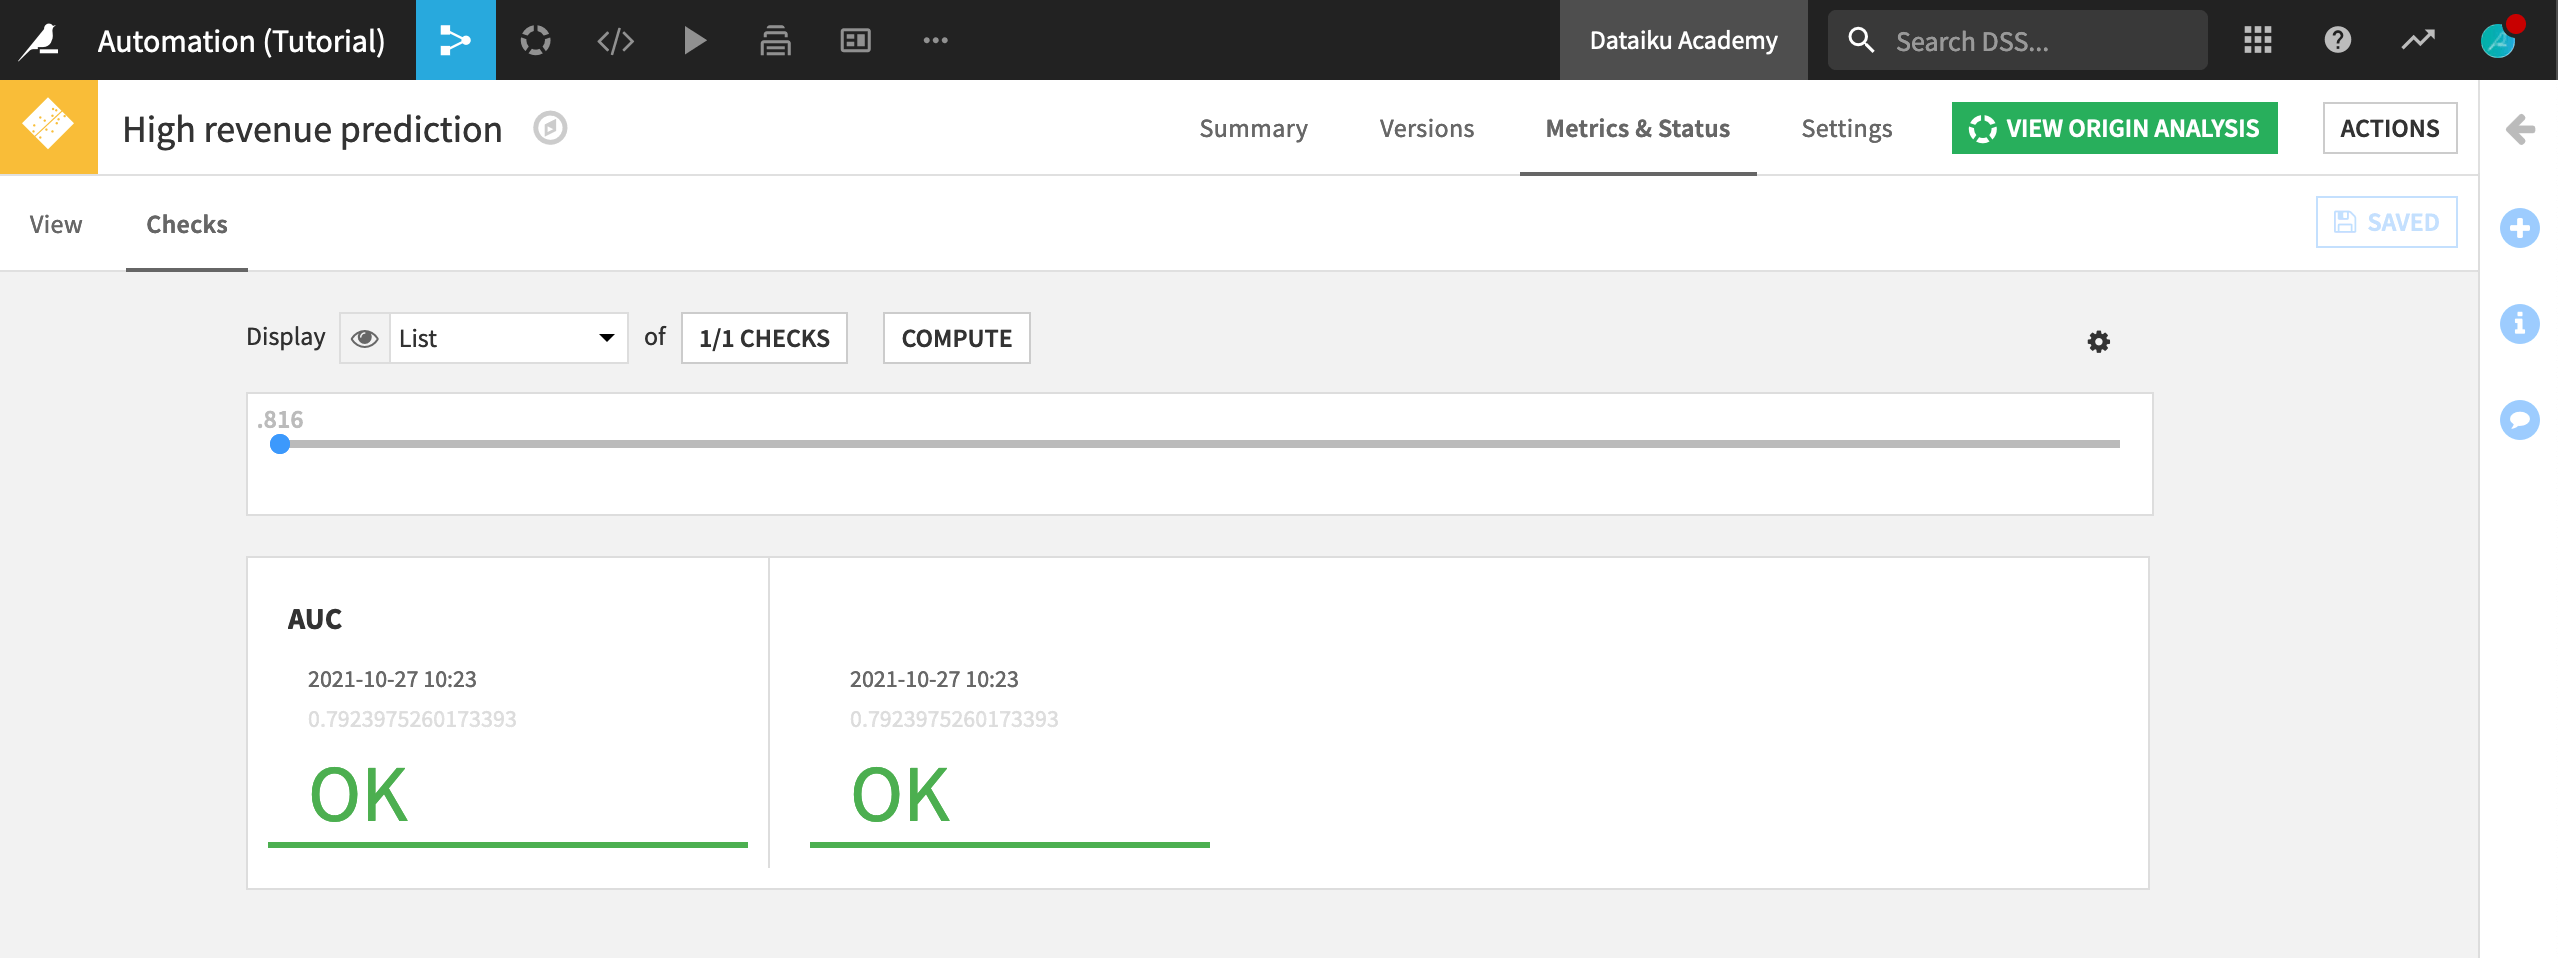
Navigate to the Metrics & Status tab.
On the View subtab, click the Metrics button to open the Metrics Display Settings.
Ensure that AUC (the area under the ROC curve) is displayed, and then Save.
Here we’ll create a new check to monitor the performance of the model over time.
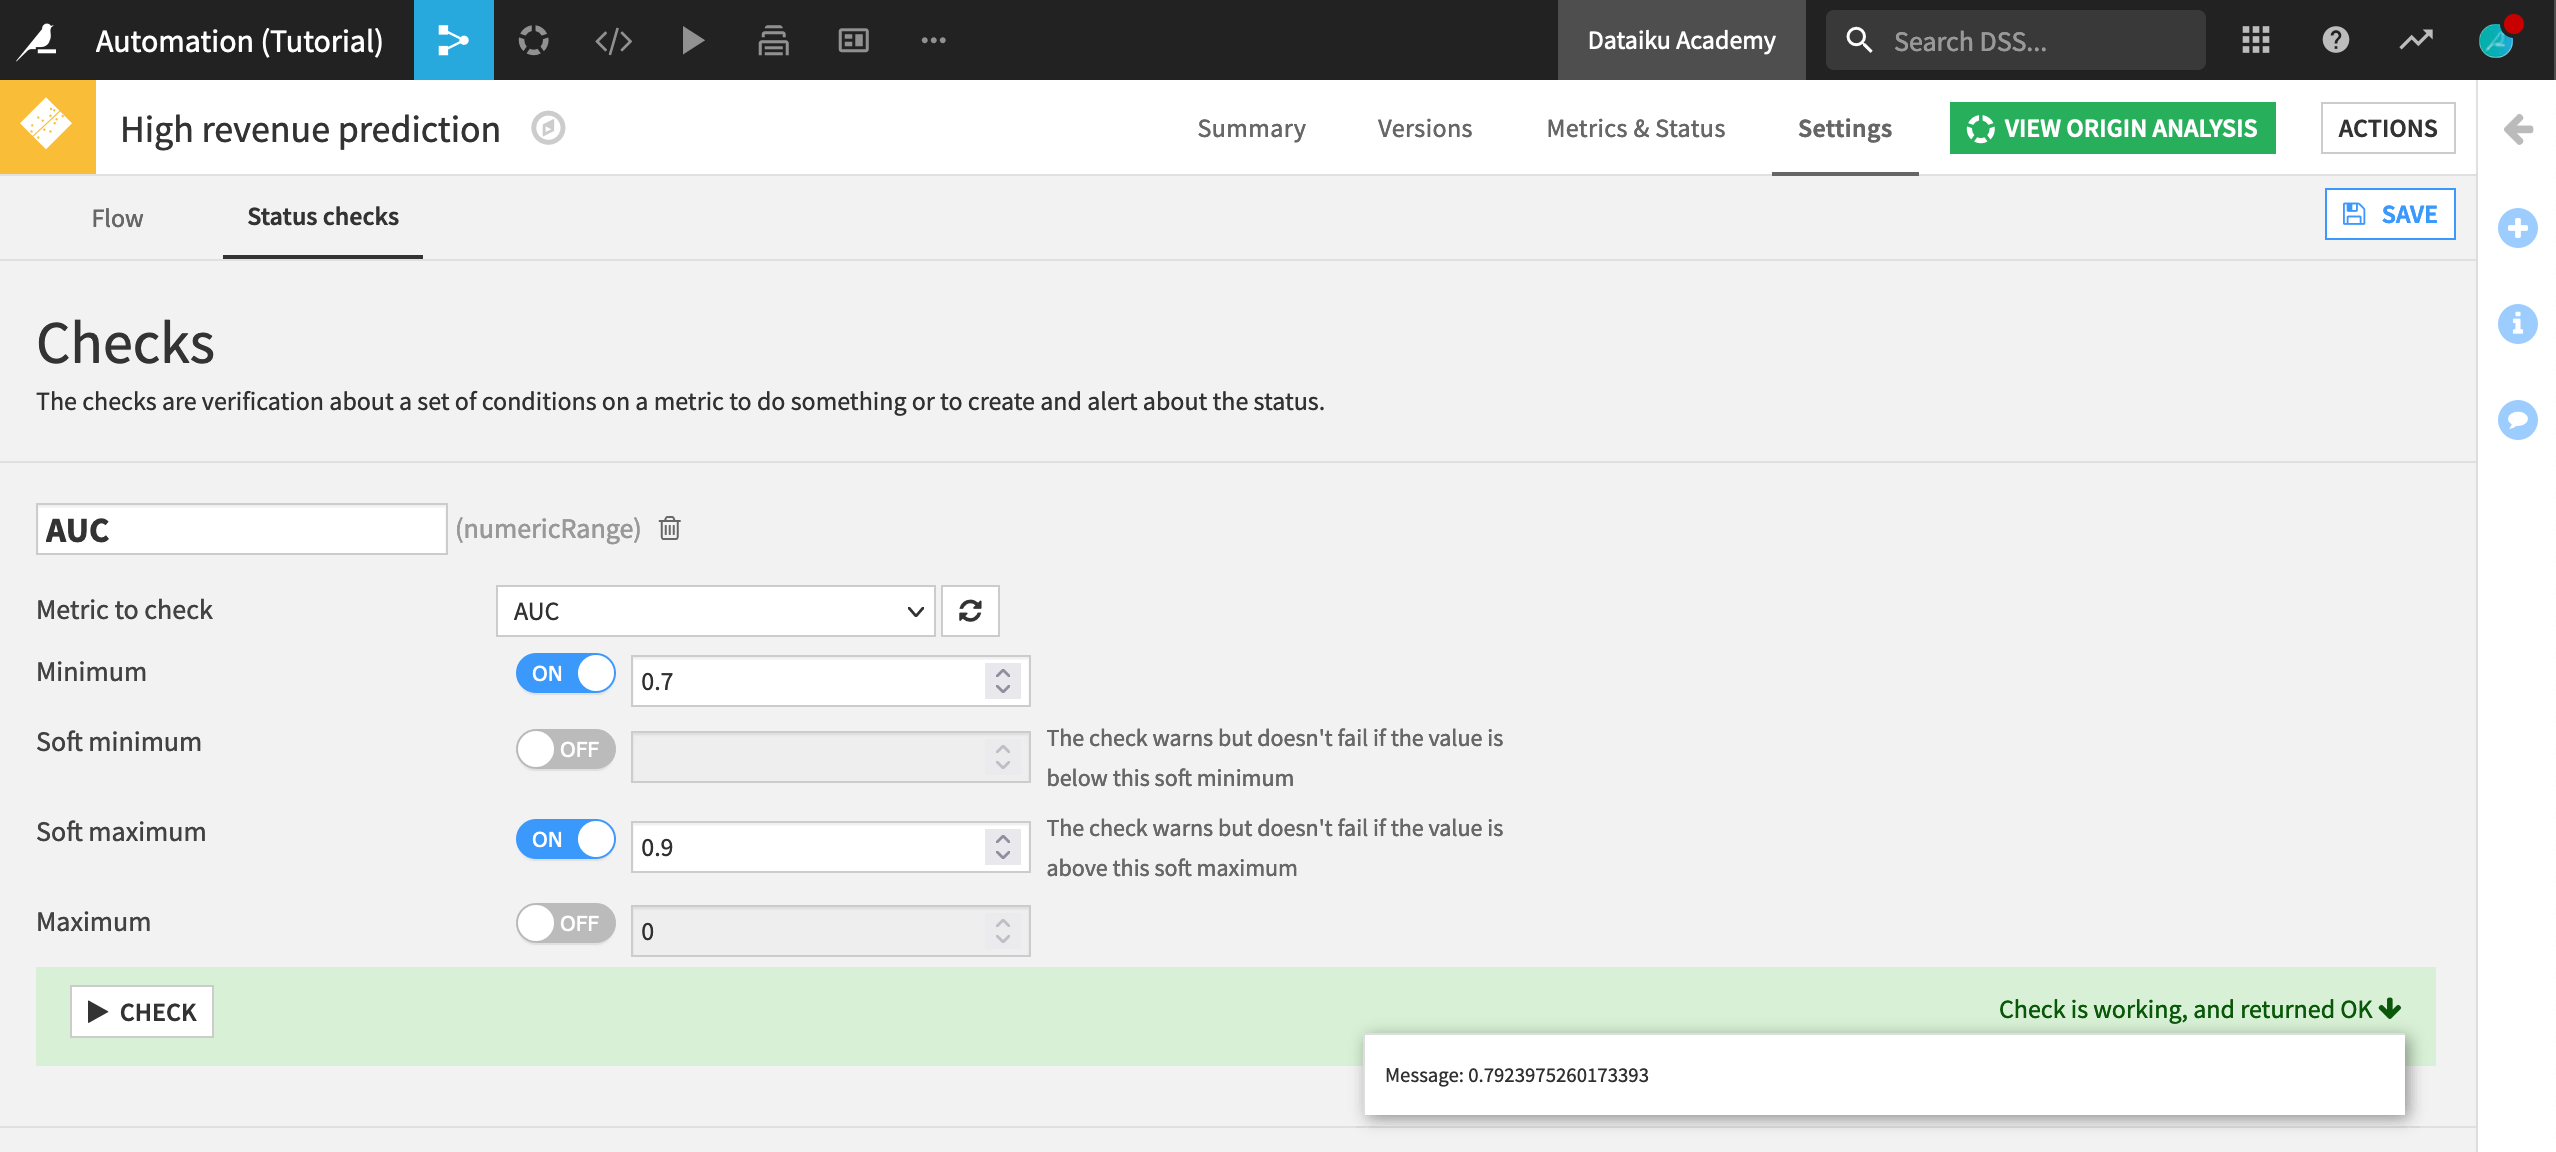
Navigate to the Settings tab, and within that, the Status checks subtab.
Under “Add a new check”, click Metric value is in a numeric range; then name the new check
AUC.Select AUC as the metric to check, and set 0.7 as the minimum and 0.9 as the soft maximum for the area under the ROC curve.
Click Check to test the check; then click Save.
Note
Setting a (hard) minimum ensures that if the model performance degrades too much, the model retraining fails, and the new model is not put into production.
The soft maximum allows the model to be put into production, while warning us that the model performance may be suspiciously high and should be investigated.
Finally, we need to activate the check.
Navigate to the Metrics & Status tab and the Checks subtab within that.
Ensure that AUC is displayed.
Test It All
Let’s see how well we’ve done in setting up the scenario and monitoring. To do this, we’re going to make some slight modifications to the Flow in order to simulate a change to the underlying data.
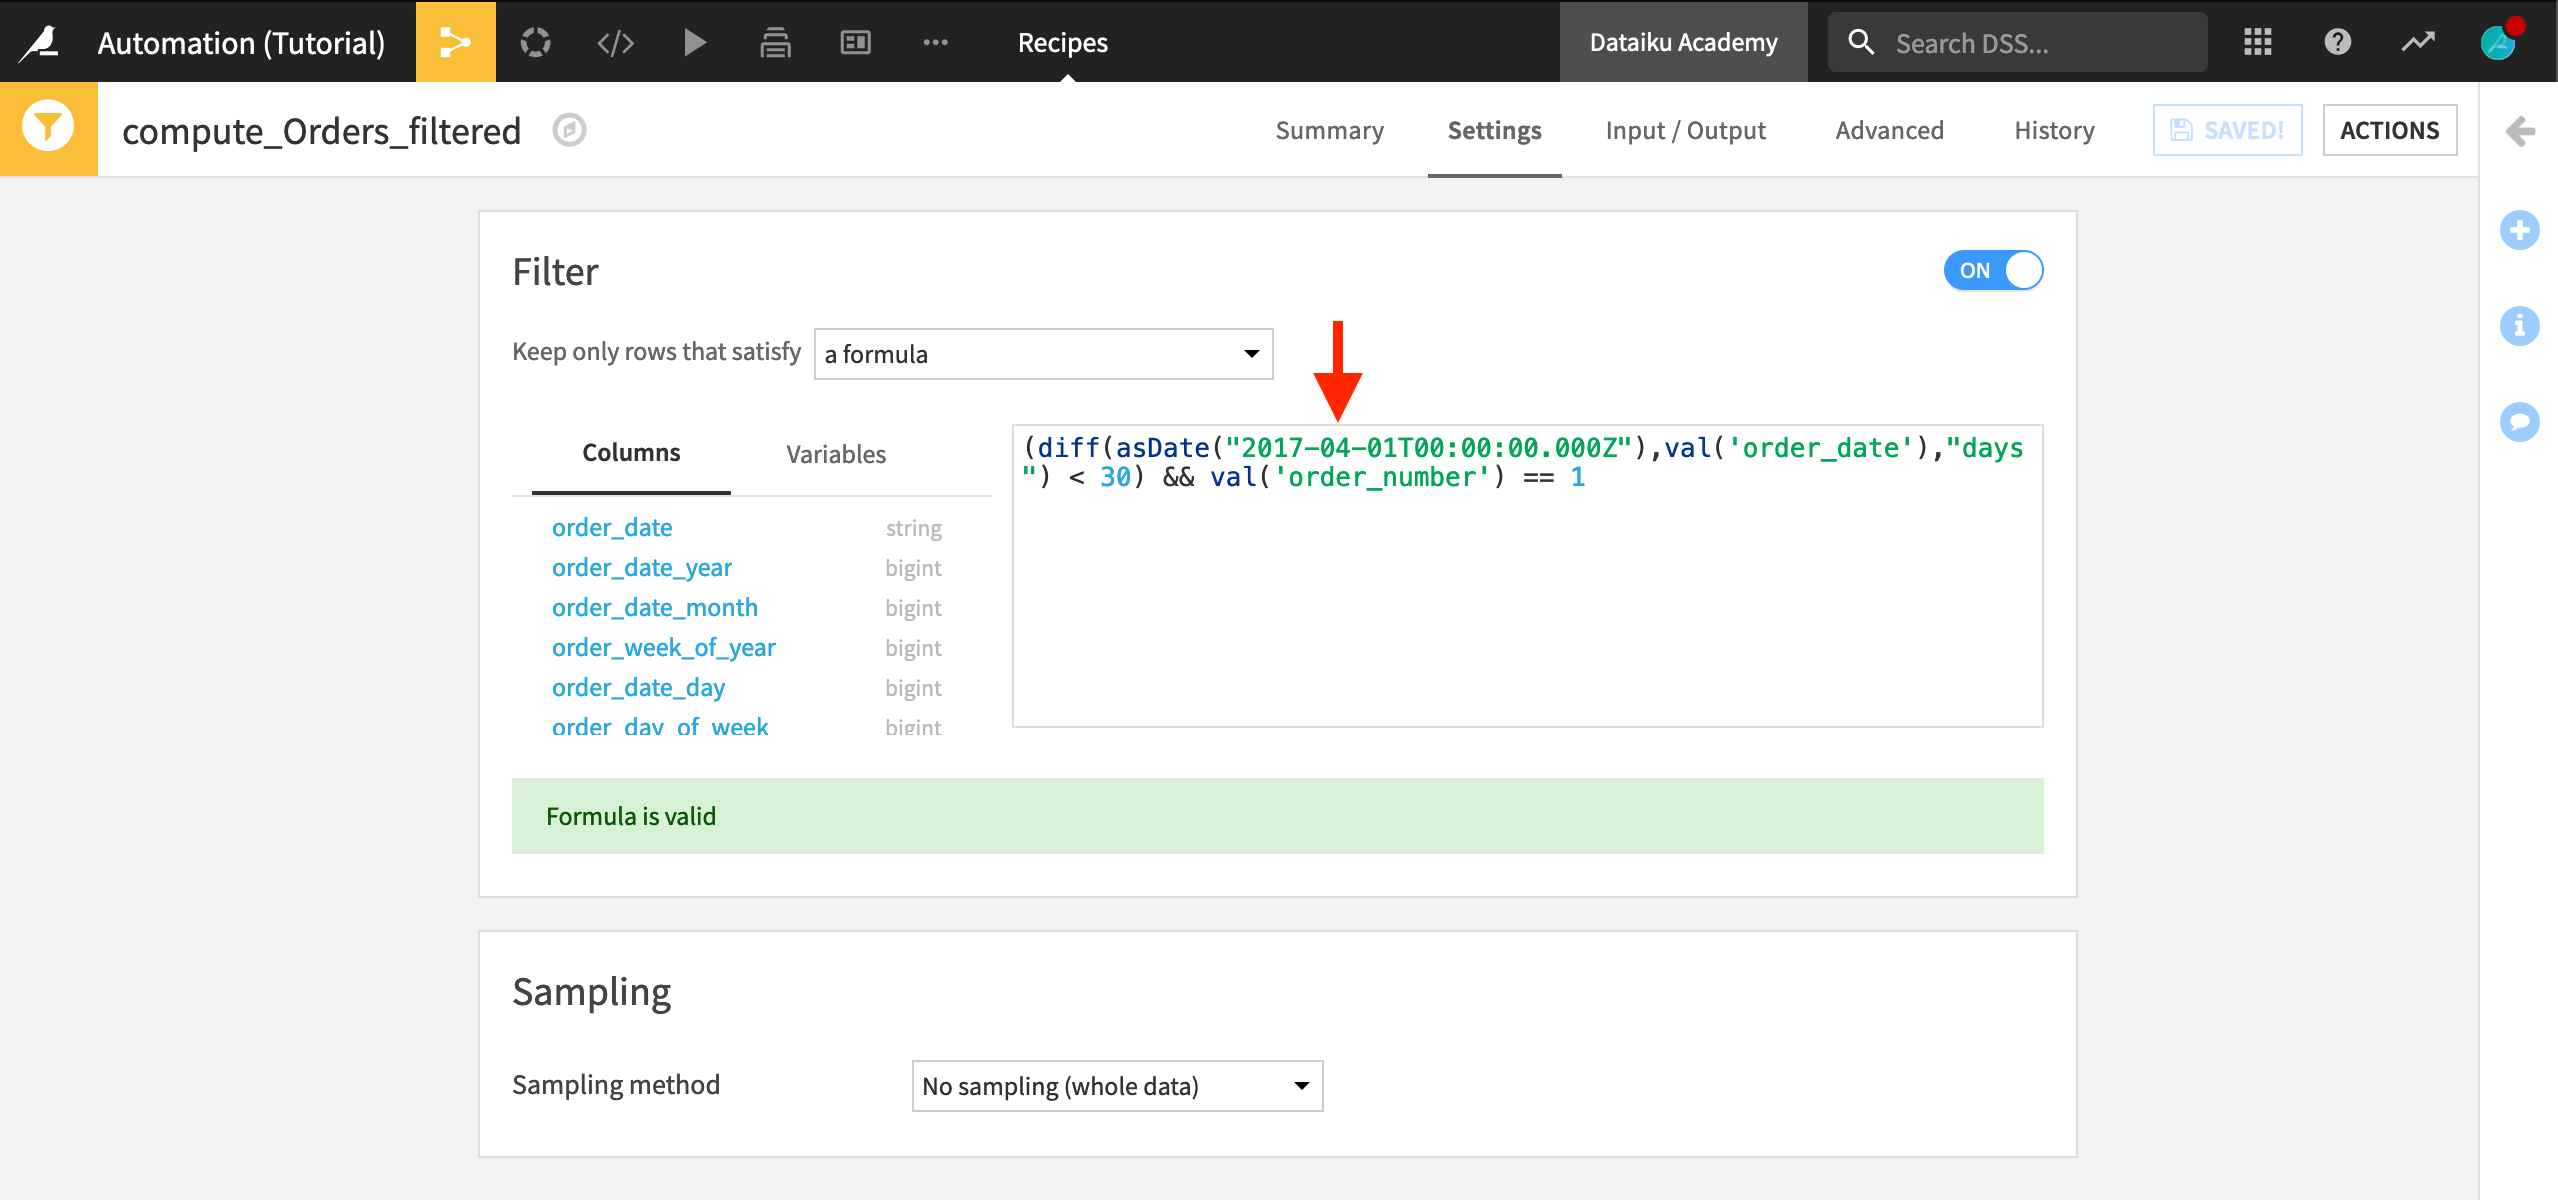
Navigate back to the Flow, and open the Filter recipe.
This recipe uses the Dataiku Formula language to identify people who newly became customers in the 30 days prior to 2017-03-01. Specifically:
The diff() function call computes the difference in days between each order date and 2017-03-01, and then checks whether this difference is less than 30.
It also checks whether this is the first order the customer has made (
val('order_number') == 1).Only if both of these statements are true do we identify this as a new customer.
To simulate a change in data, we just need to adjust the date.
Change the formula to look back 30 days from 2017-04-01 by altering the
asDate()function call toasDate("2017-04-01T00:00:00.000Z").Save your changes.
Note
In a real-life Flow, we would look back from today(), but the CSV files we have available only have data through March 2017.
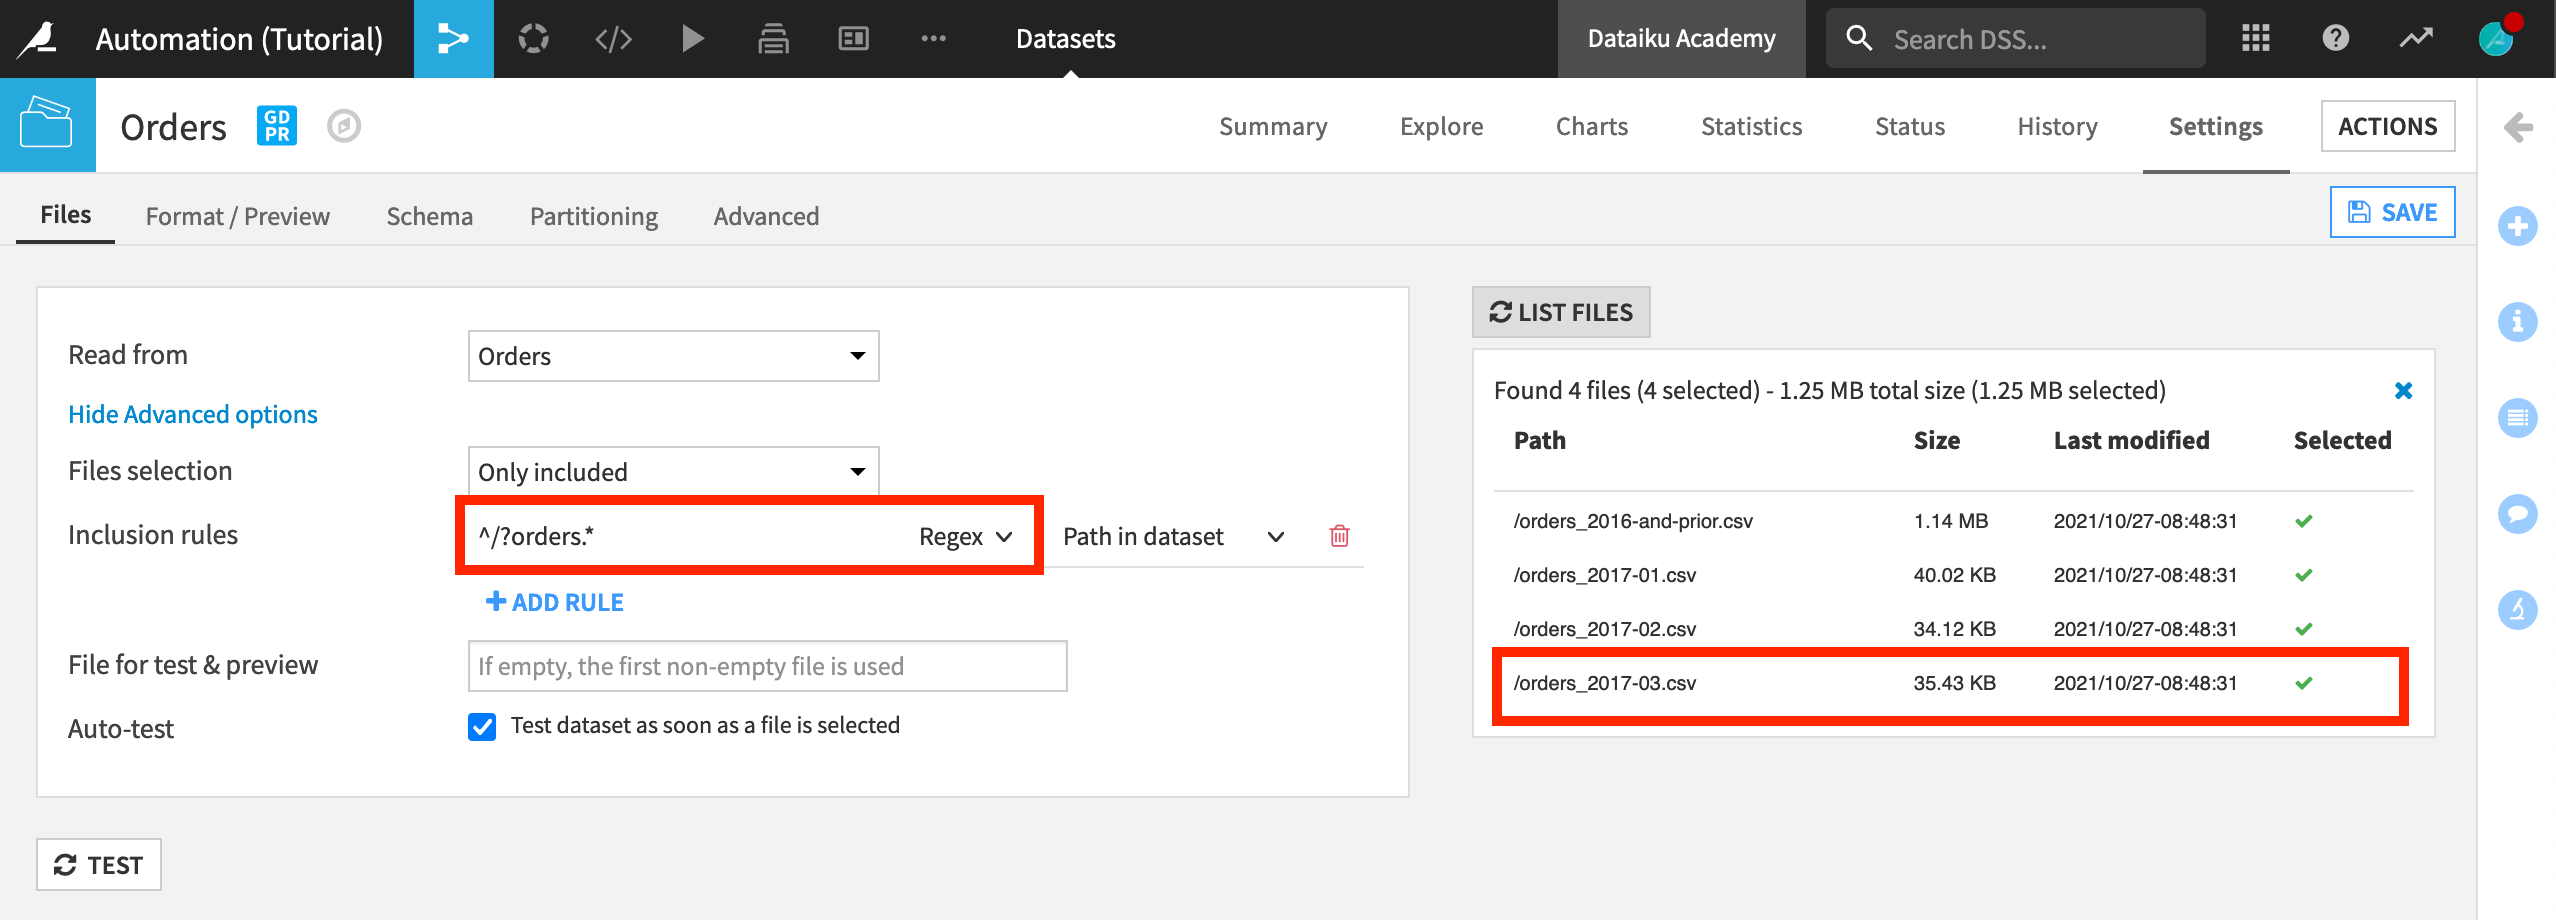
Now, navigate to the Orders dataset.
Click the Settings tab, and then click Show Advanced options from within the Files tab.
Click List Files to confirm that the March 2017 CSV is not yet included in the Orders dataset.
The dataset specification uses a regular expression to select which files to use as source data from the managed folder. The expression ^/?orders_201.*[^(03)].csv$ excludes the data from March 2017.
Replace the file specification with the regular expression
^/?orders.*, and save your changes.The “List Files” section should now confirm that the Orders dataset will use all of the CSV files in the Orders folder.
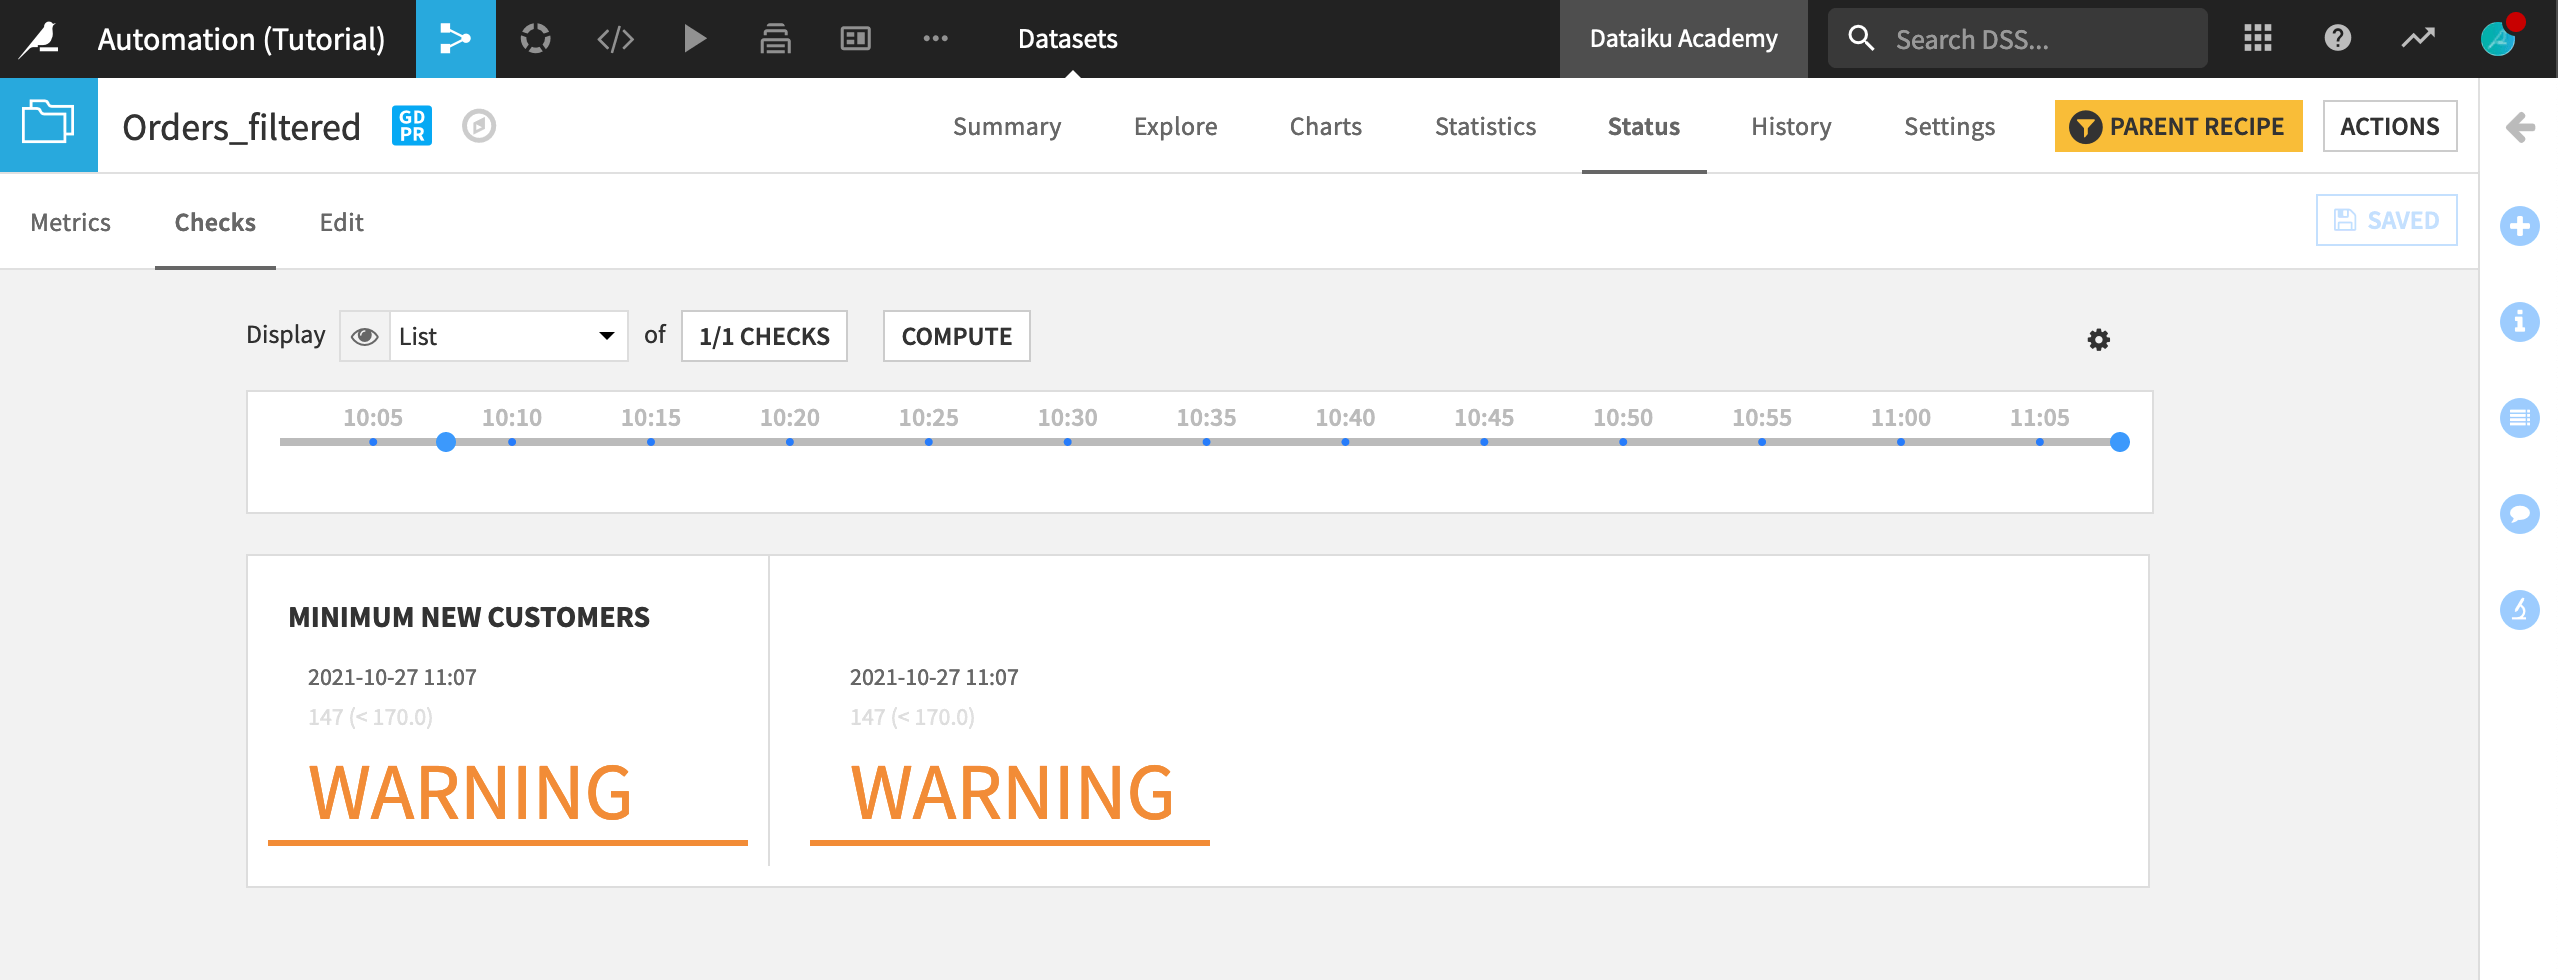
After a short period (around 2 minutes), Dataiku recognizes that the underlying data has changed, and the scenario automatically runs, rebuilding the Flow, and leaving only 147 records in the Orders_filtered dataset.
In order to verify that this is the case, go back to the Flow, and open the Orders_filtered dataset.
Click on Status, and then navigate to the Checks tab. After the run, the Checks tab for the Orders_filtered dataset shows that fewer than 170 new customers were added in the last 30 days.
Next Steps
Congratulations! You have created your first automation scenario and monitoring check.
See the course on deploying a Flow to production to learn how to put your automation scenarios and monitoring checks into a production environment.