Hands-On Tutorial: Flow Zones, Tags, & More Flow Views
Flow views (accessed at the bottom left menu) provide various options for displaying the Flow with different levels of detail. These views can help with organizing large Flows so that they are easier to navigate. They can also guide the optimization of a Flow.
Let’s Get Started!
In this hands-on lesson, you will learn to:
create and manage tags for better data governance;
create and manage Flow Zones to create a higher-level view of the Flow;
use Flow Zones to isolate experimental branches of the Flow; and
leverage available view options to highlight details about your Flow.
Advanced Designer Prerequisites
This lesson assumes that you have basic knowledge of working with Dataiku DSS datasets and recipes.
Note
If not already on the Advanced Designer learning path, completing the Core Designer Certificate is recommended.
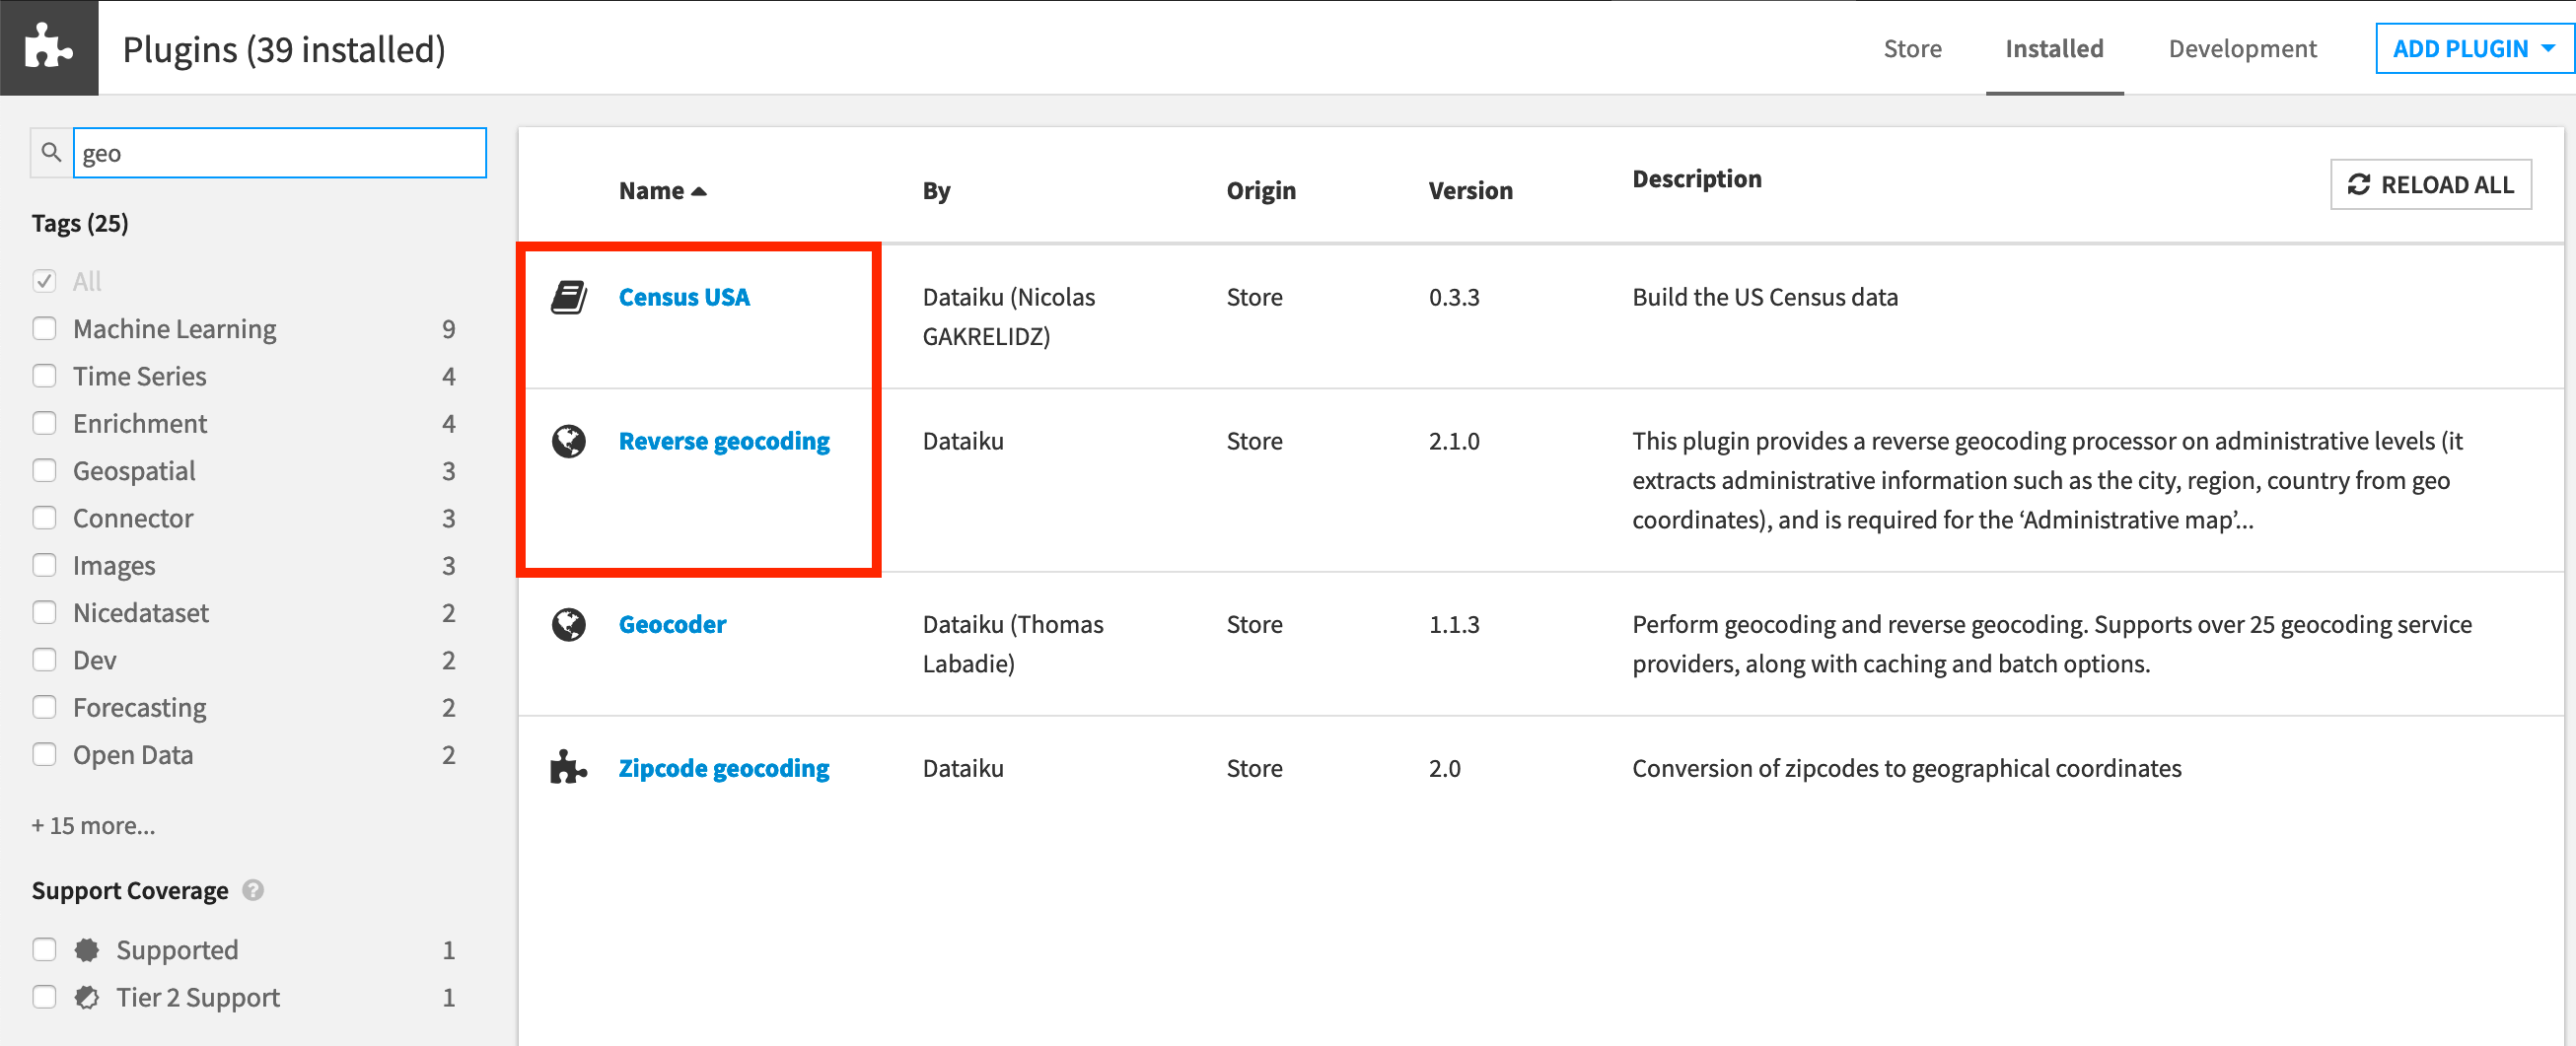
You’ll need access to an instance of Dataiku DSS (version 9.0 or above) with the following plugins installed:
Census USA (minimum version 0.3)
These plugins are available through the Dataiku Plugin store, and you can find the instructions for installing plugins in the reference documentation. To check whether the plugins are already installed on your instance, go to the Installed tab in the Plugin Store to see a list of all installed plugins.
We also recommend that you complete the Flow Views: Zones, Tags, & More lesson beforehand.
Plugin Installation for Dataiku Online Users
Tip
Users of Dataiku Online should note that while plugin installation is not directly available, you can still explore available plugins from your launchpad:
From your instance launchpad, open the Features panel on the left hand side.
Click Add a Feature and choose “US Census” from the Extensions menu. (“Reverse geocoding” is already available by default).
You can see what plugins are already installed by searching for “installed plugins” in the DSS search bar.
Create the Project
You can use a project from the previous Plugin Store hands-on tutorial. If you skipped it, create this project instead:
Click +New Project > DSS Tutorials > Advanced Designer > Flow Views & Automation (Tutorial).
Need Help Creating the Project?
Note
You can also download the starter project from this website and import it as a zip file.
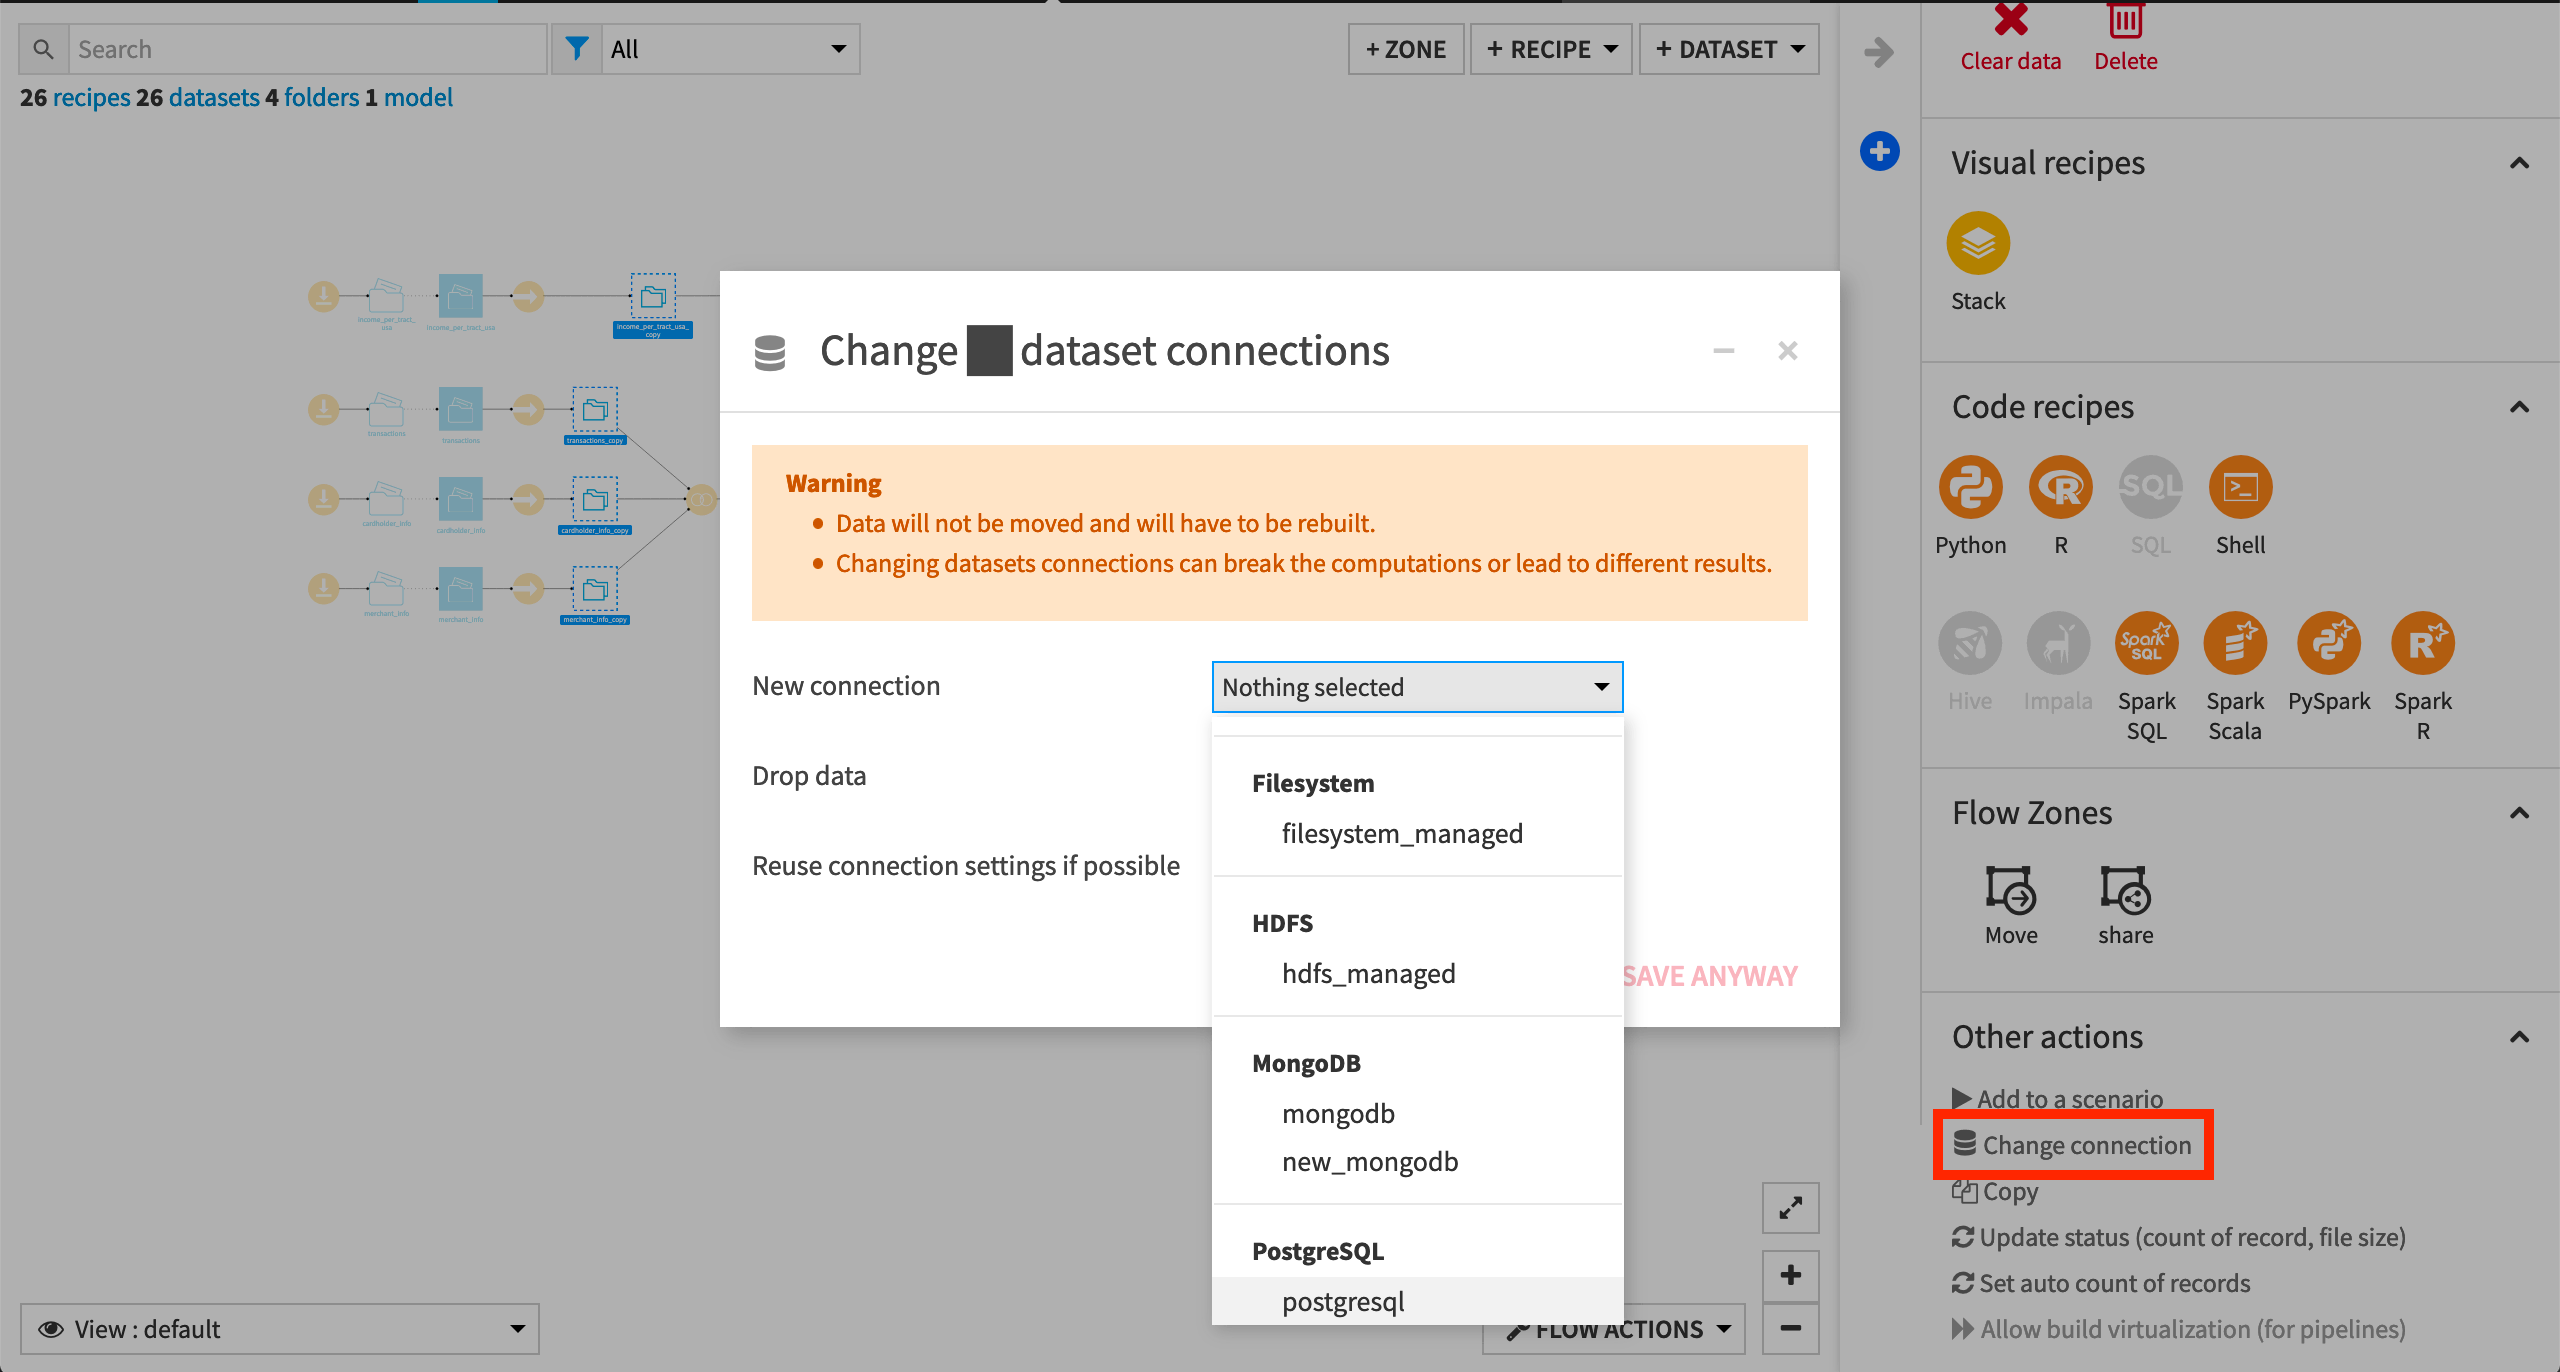
Change Dataset Connections (Optional)
Aside from the input datasets, all of the others are empty managed filesystem datasets.
You are welcome to leave the storage connection of these datasets in place, but you can also use another storage system depending on the infrastructure available to you.
To use another connection, such as a SQL database, follow these steps:
Select the empty datasets from the Flow. (On a Mac, hold Shift to select multiple datasets).
Click Change connection in the “Other actions” section of the Actions sidebar.
Use the dropdown menu to select the new connection.
Click Save.
Note
For a dataset that is already built, changing to a new connection clears the dataset so that it would need to be rebuilt.
Note
Another way to select datasets is from the Datasets page (G+D). There are also programmatic ways of doing operations like this that you’ll learn about in the Developer learning path.
The screenshots below demonstrate using a PostgreSQL database.
Whether starting from an existing or fresh project, ensure that the entire Flow is built.
See Build Details Here if Necessary
To build the entire Flow, click Flow Actions at the bottom right corner of the Flow.
Select Build all.
Build with the default “Build required dependencies” option for handling dependencies.
Note
See the article on Dataset Building Strategies and the product documentation on Rebuilding Datasets to learn more about strategies for building datasets.
Tags
Tags are a universal property of all DSS objects. They can help organize work within projects, and make it more discoverable across the Dataiku instance.
Creating and Assigning Tags
One of the easiest ways to create and assign tags is from the summary of a DSS object. To create your first tag:
Go to the project homepage.
Click + Add tags to open the tag editor.
From here, you can add or remove tags currently assigned to the project or create entirely new tags.
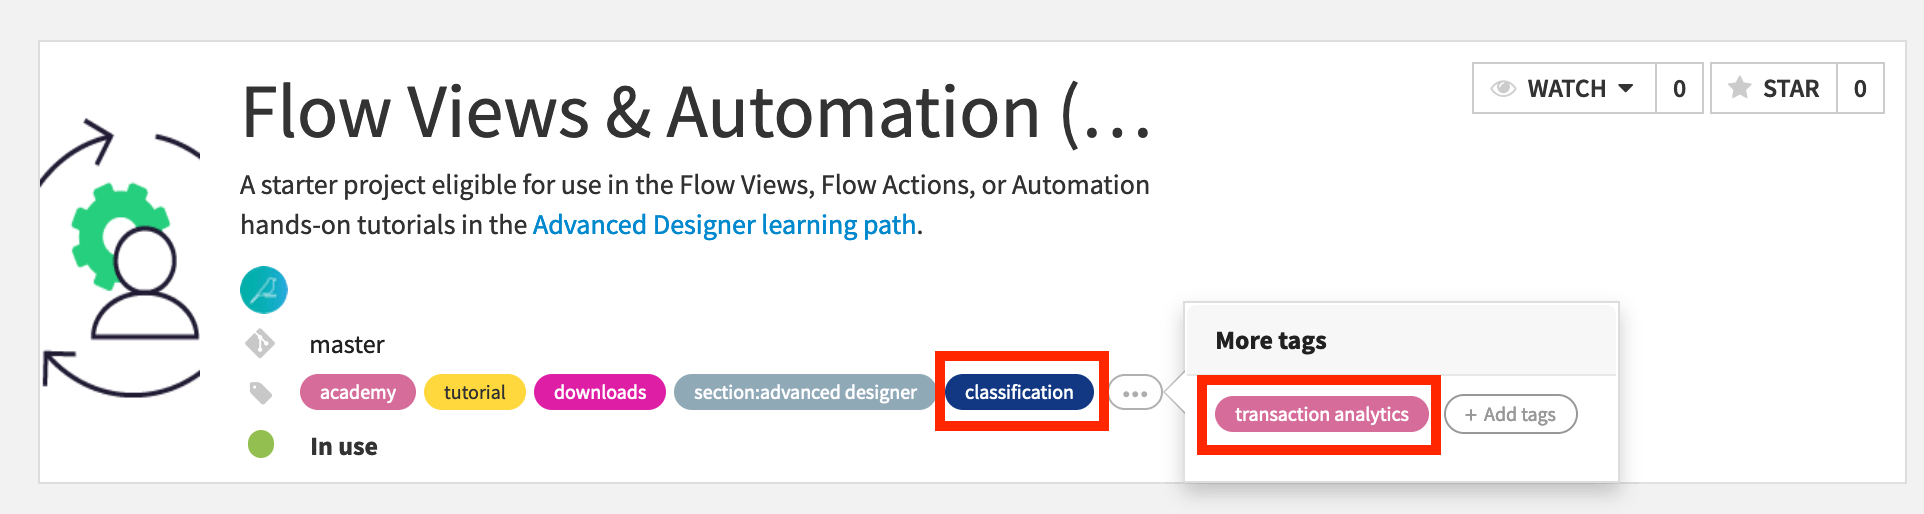
Since this project includes a classification task on customer transaction data, add
classificationandtransaction analyticsas tags, creating them if necessary.
Note
The list of existing tags depends upon the Dataiku instance you’re working on, so what you see may differ from the images below.
You can also apply tags to multiple objects at once.
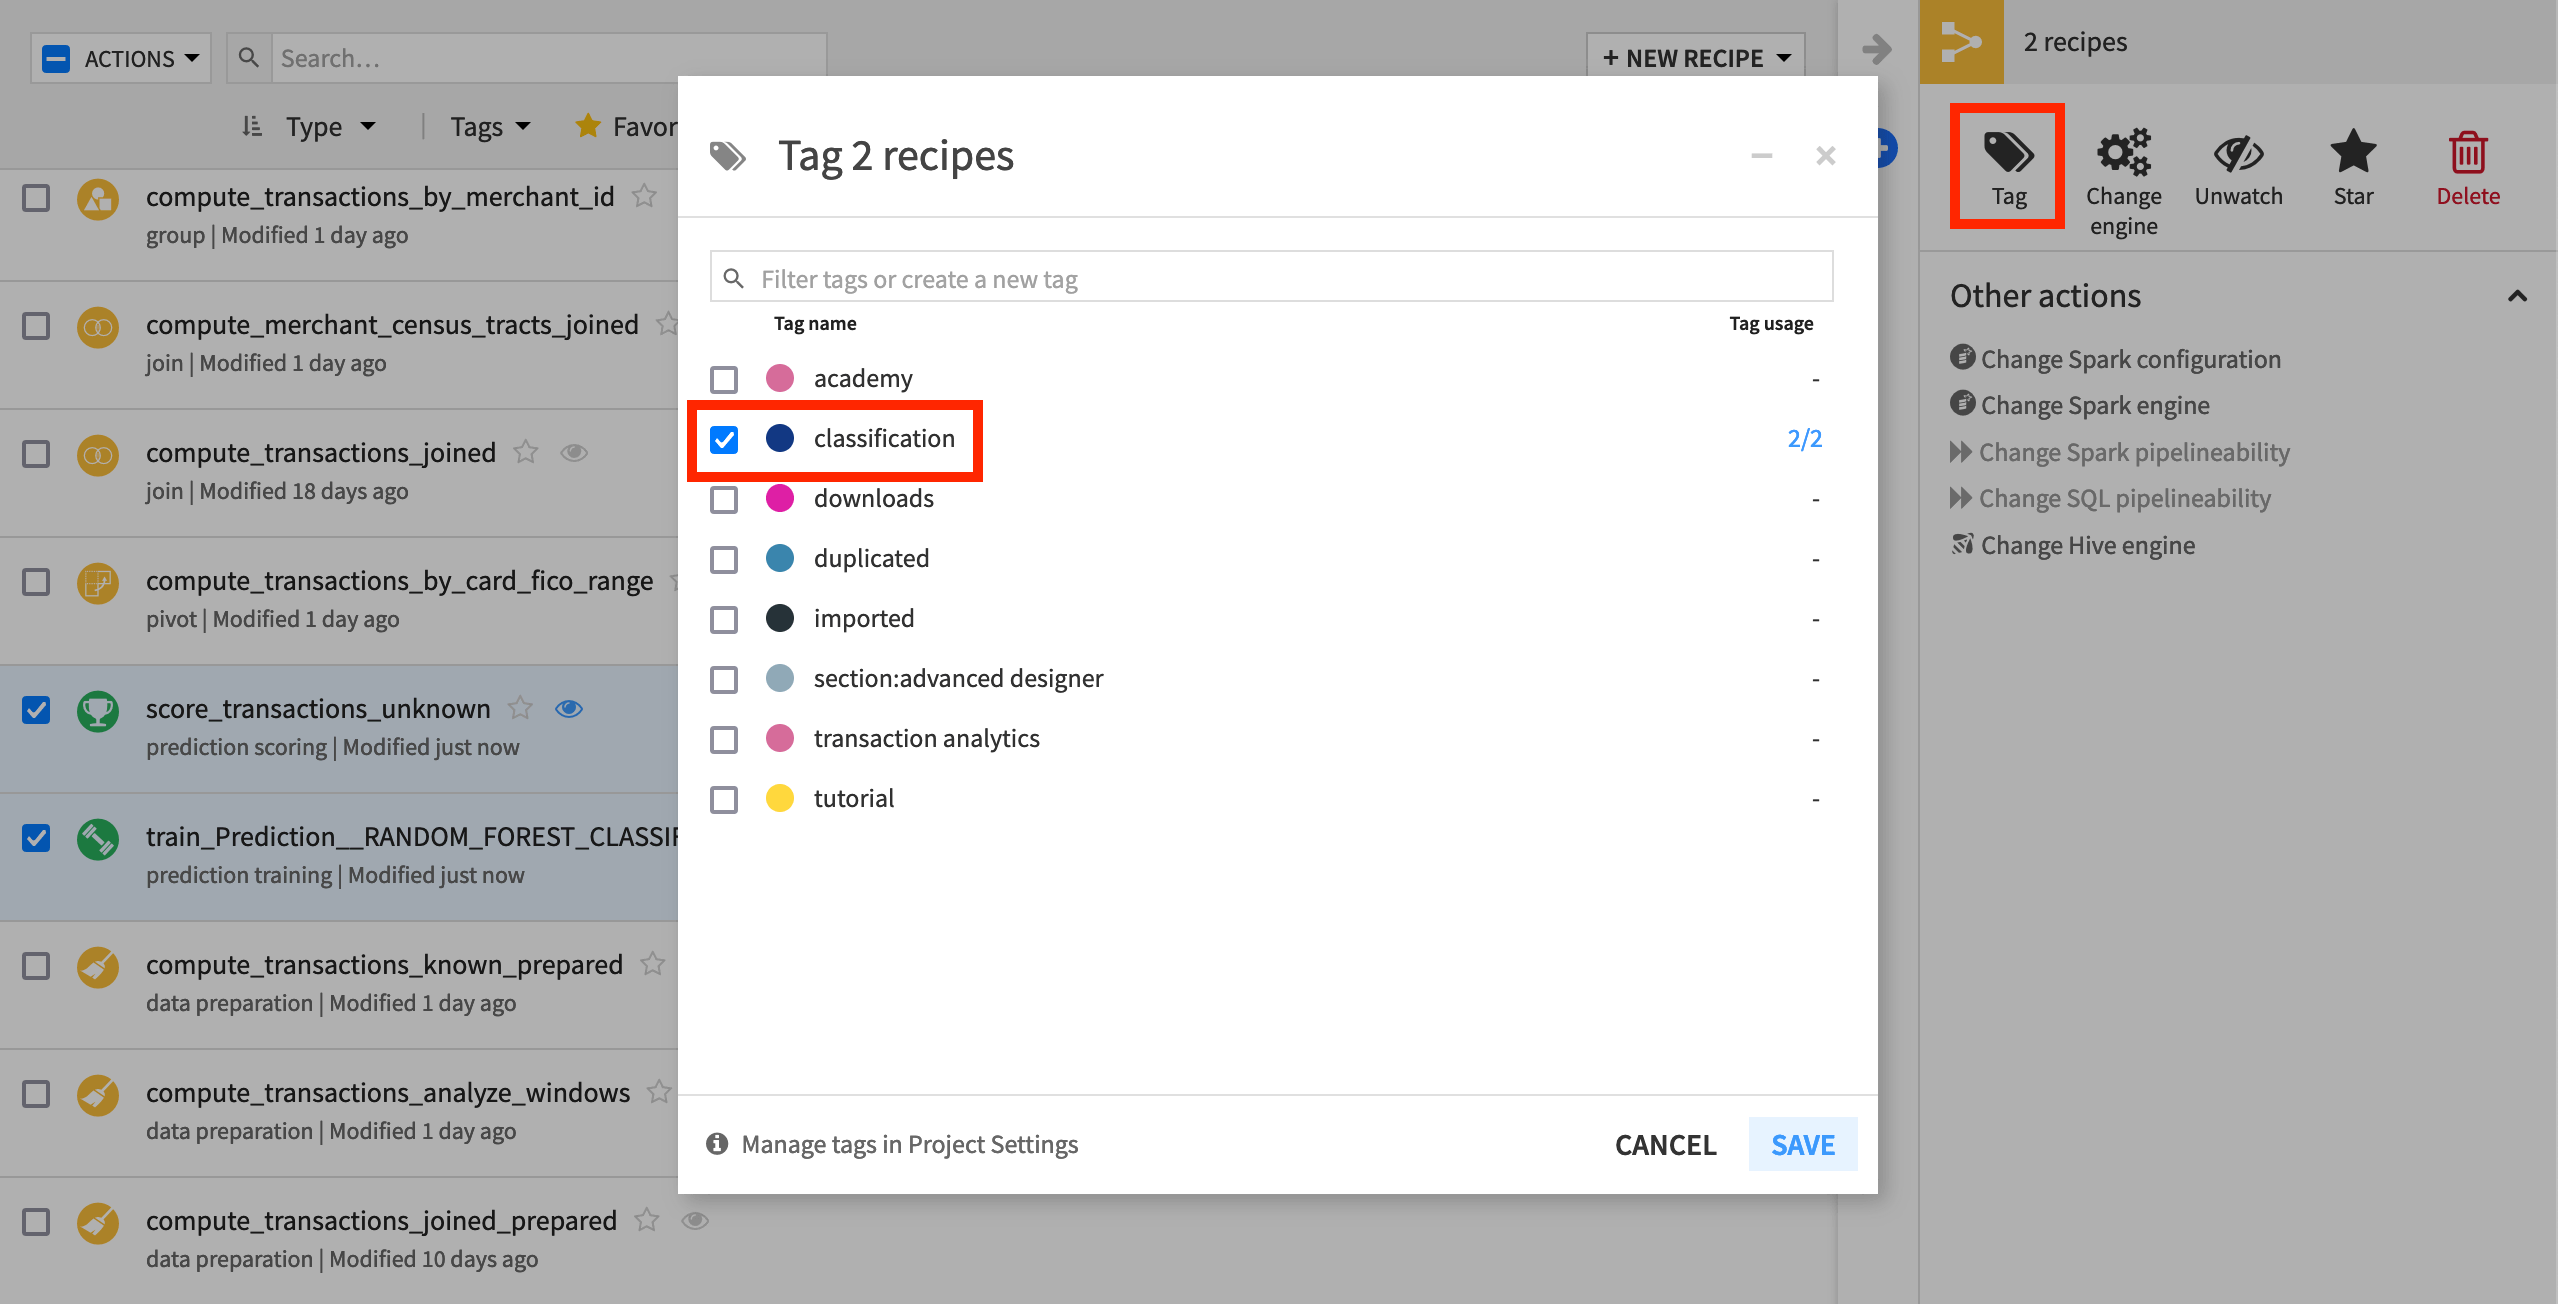
From the top navigation bar, click Recipes (or use the keyboard shortcut G+R).
Select the checkbox for score_transactions_unknown and train_Prediction__RANDOM_FOREST_CLASSIFICATION__on_transactions_known.
From the Actions panel on the right, select Tag.
For these two recipes, add the tag classification (or create it if it does not already exist).
Click Save.
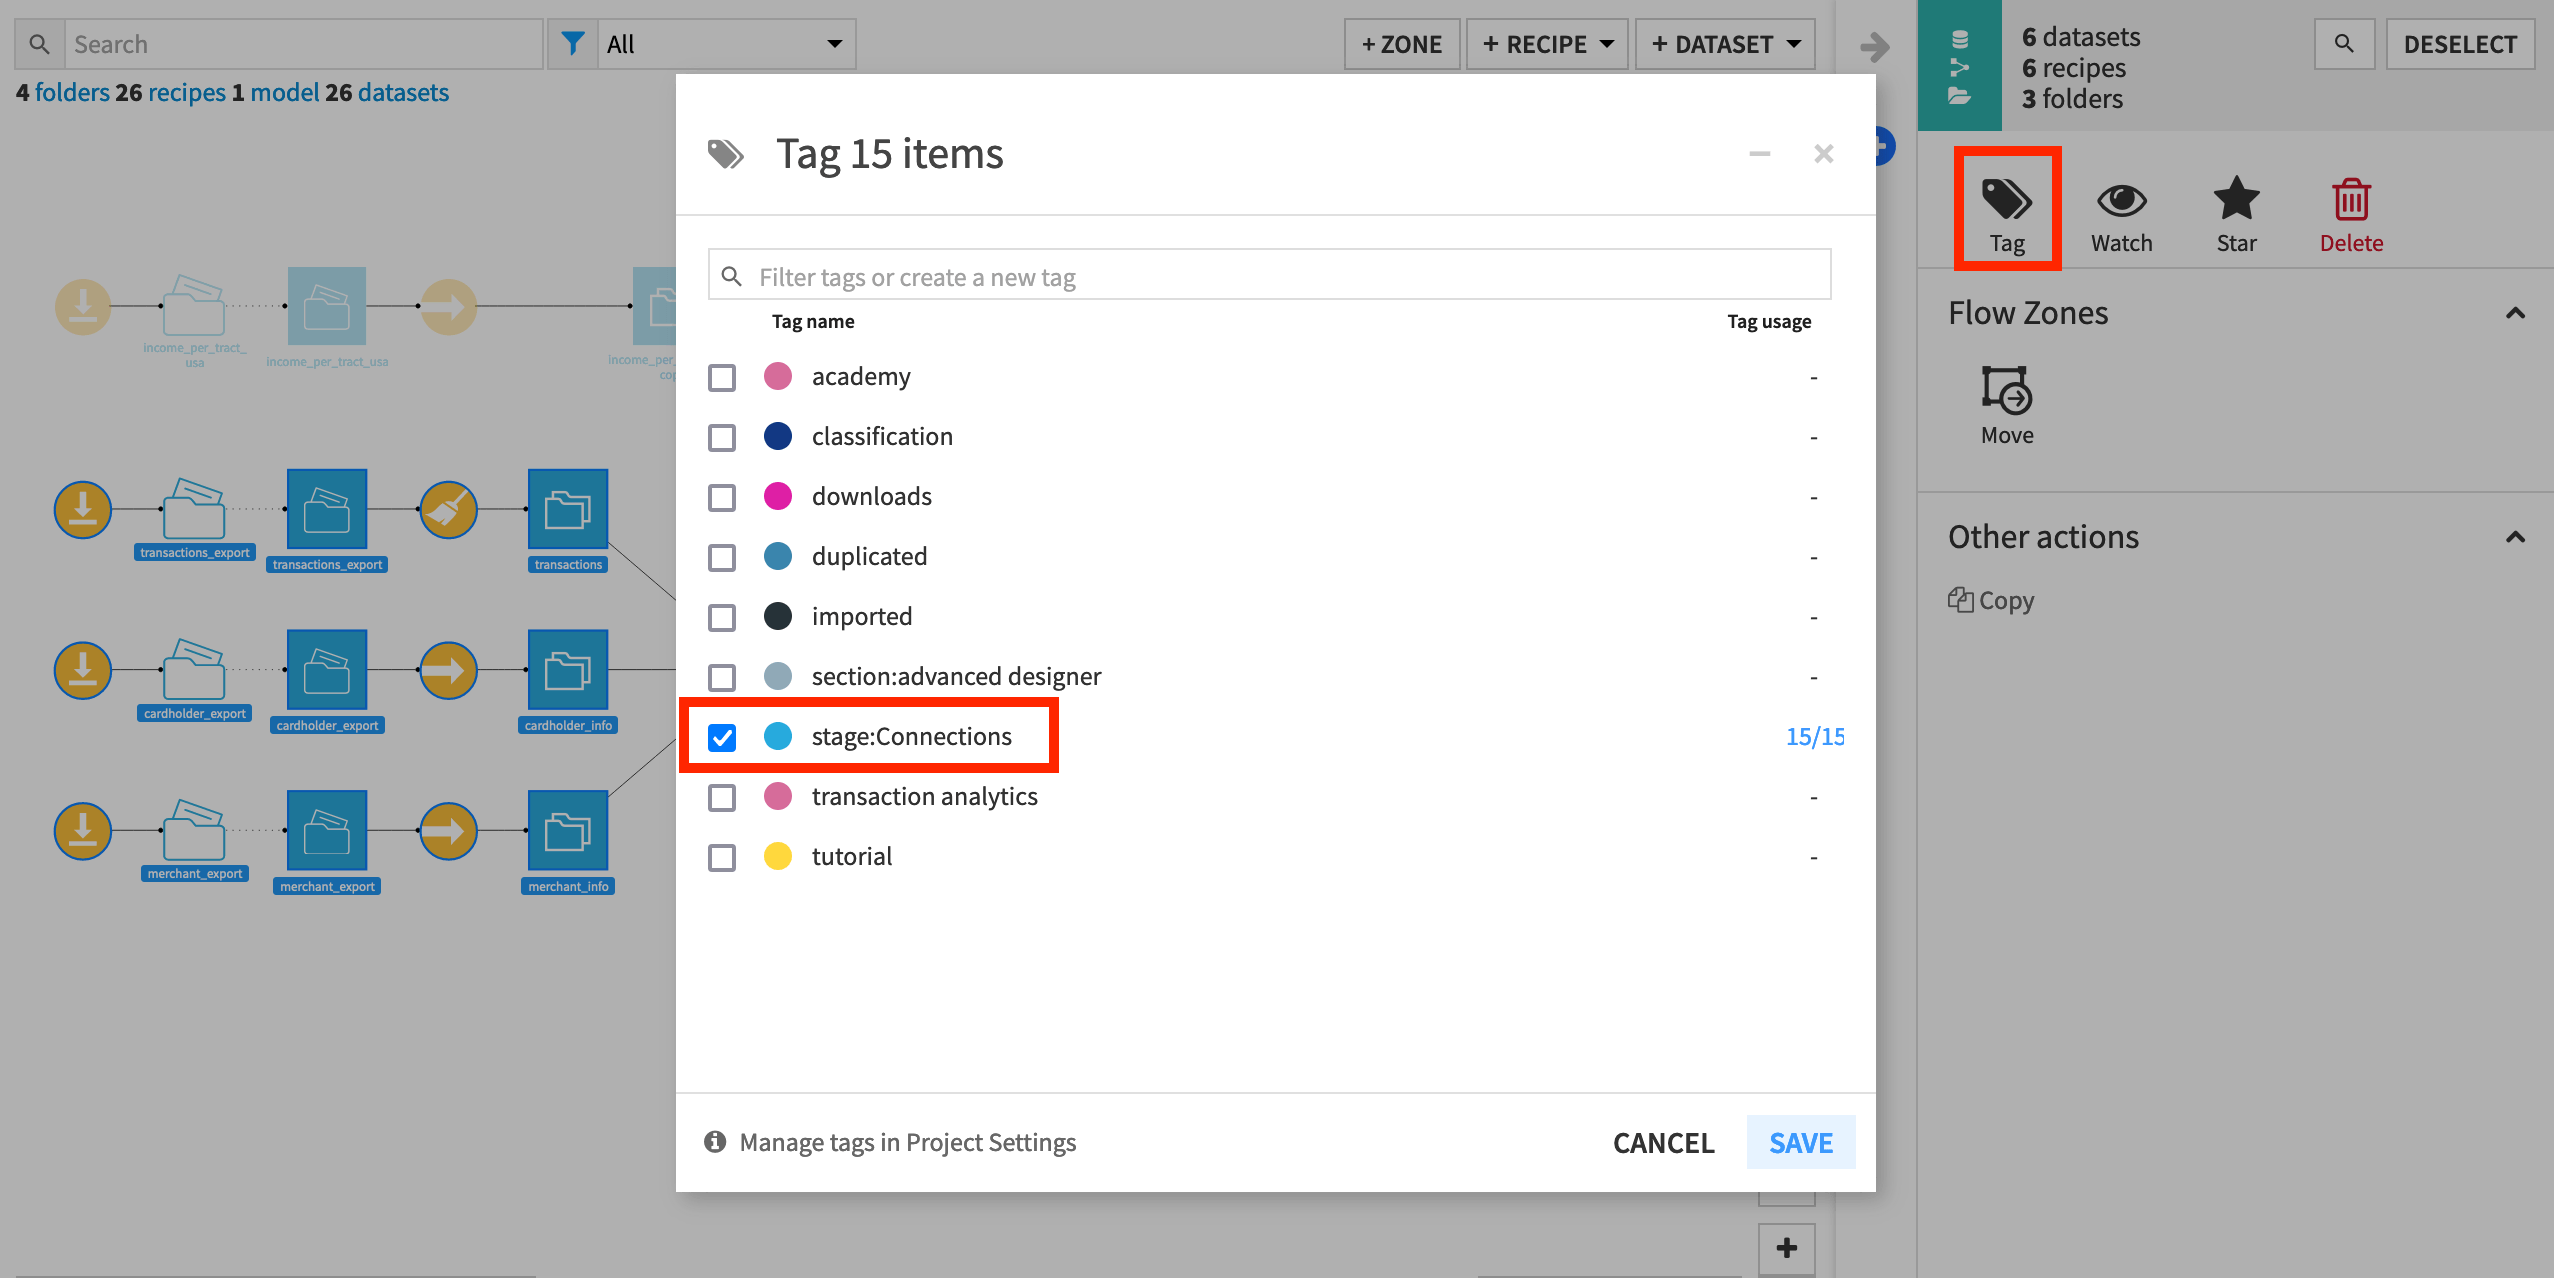
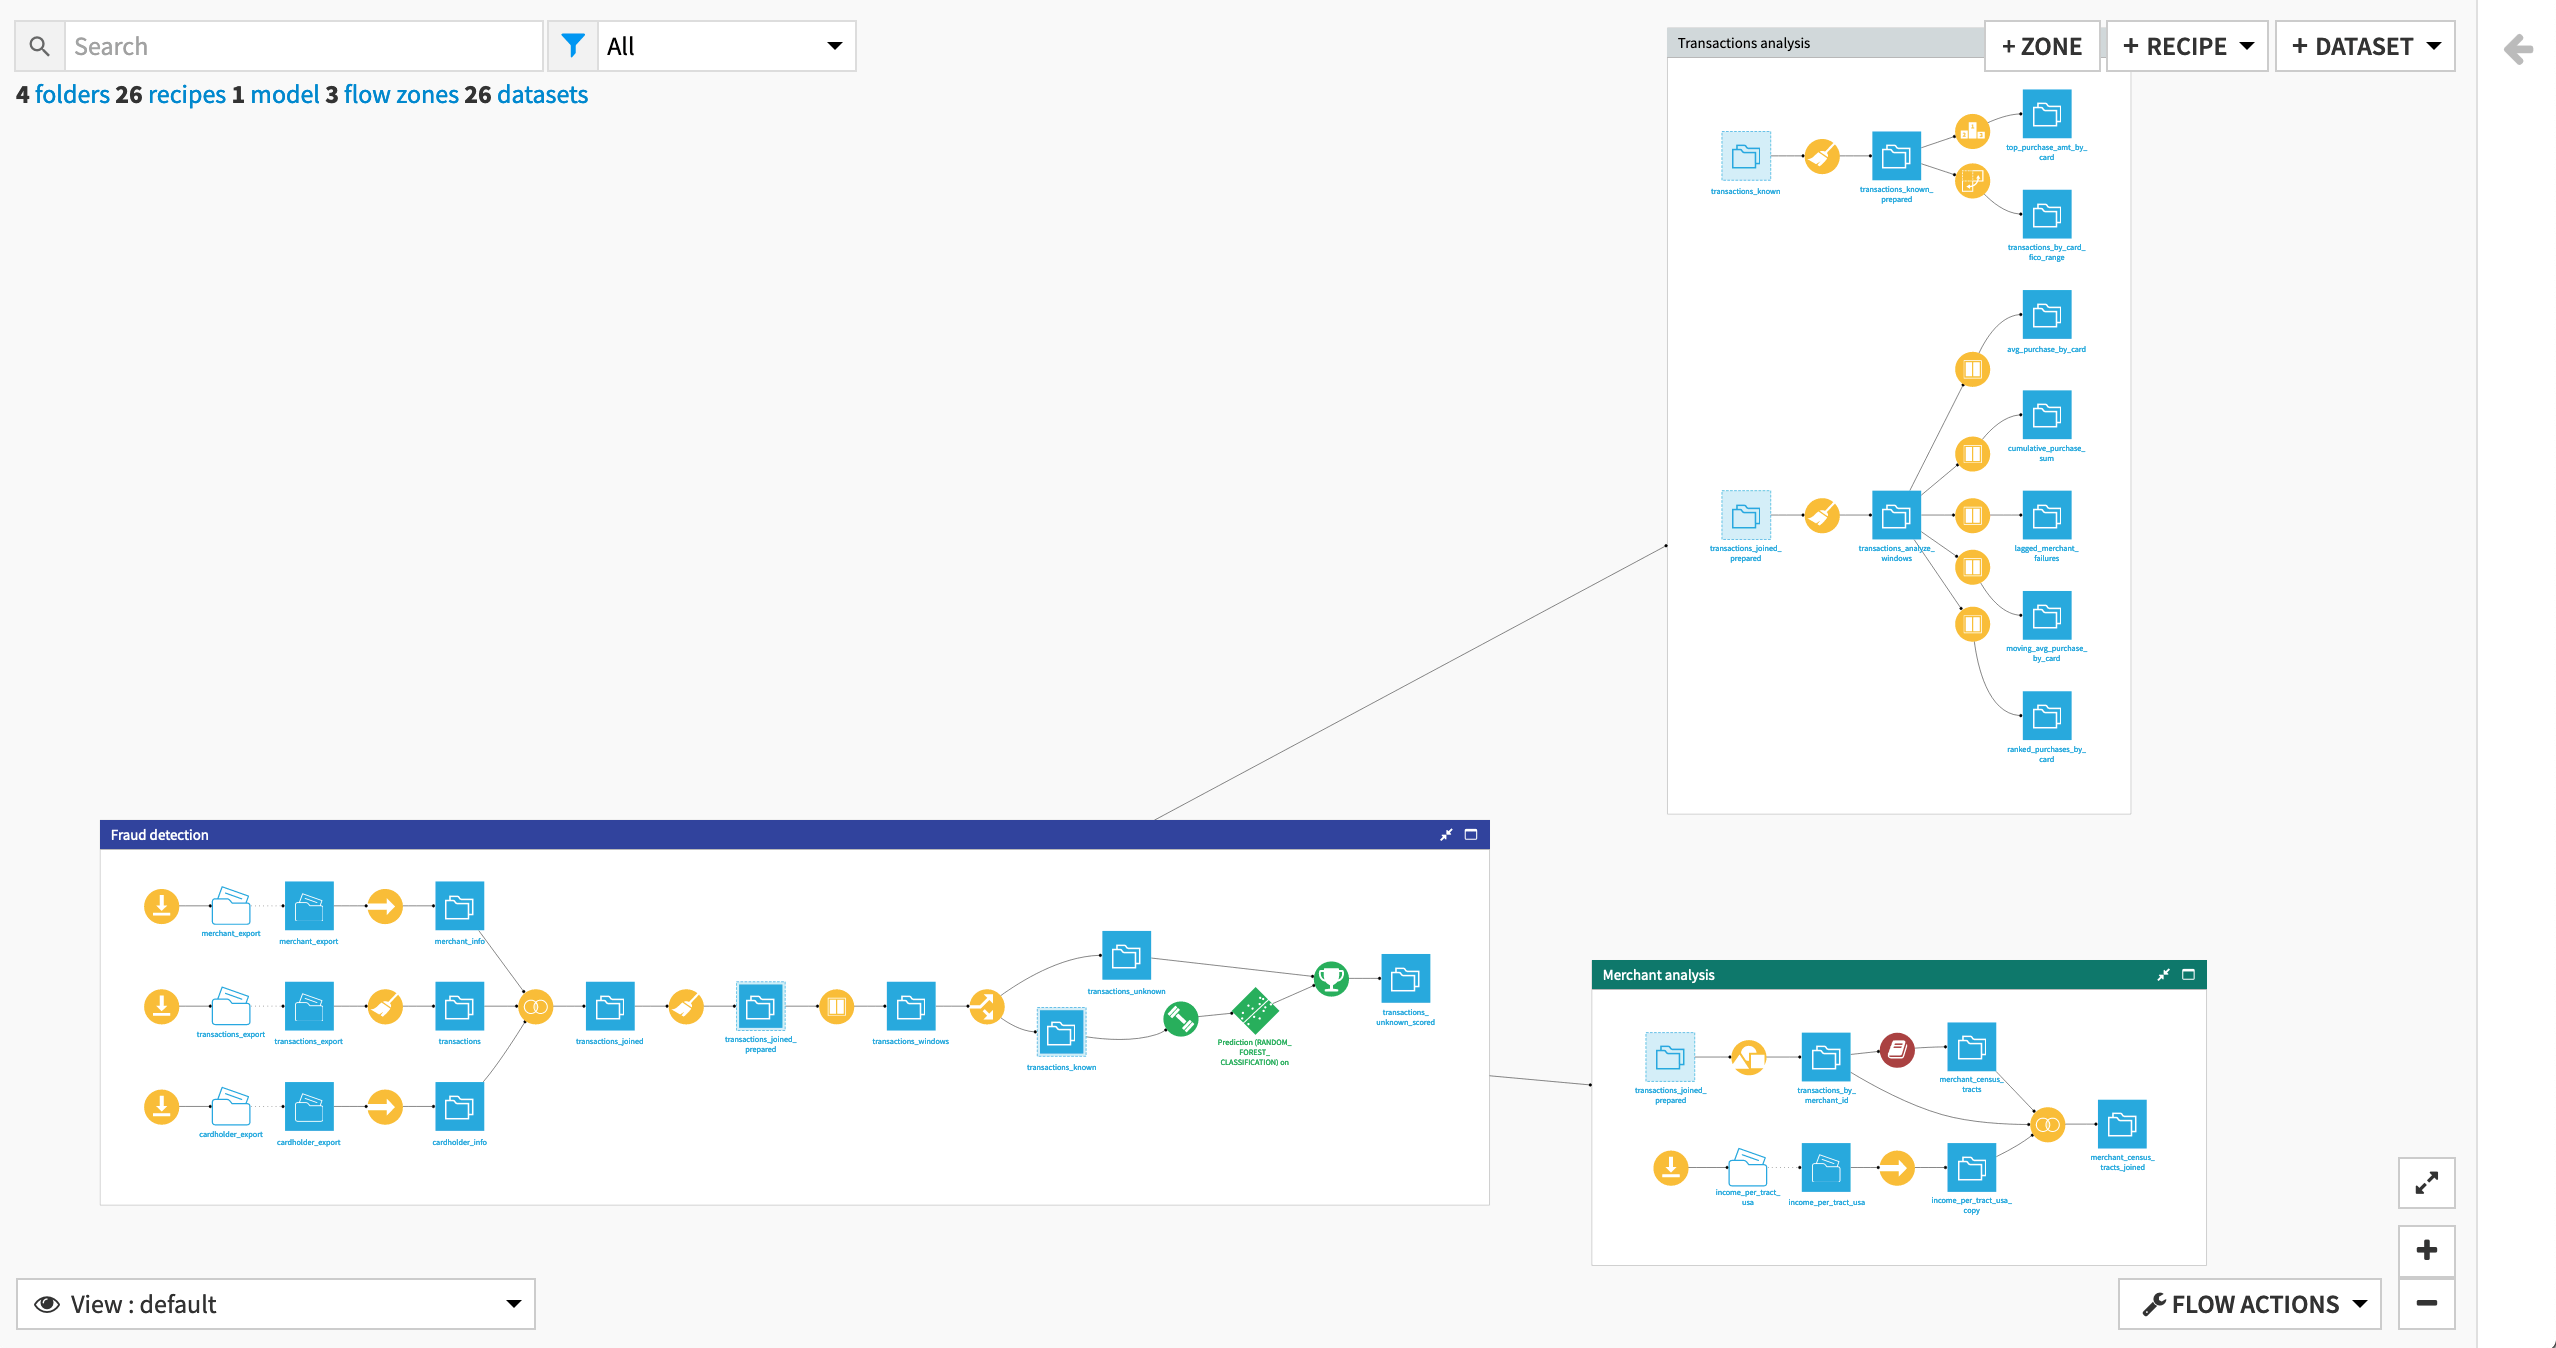
You can also apply tags directly to objects in the Flow. Let’s set a goal to tag objects within the Flow to indicate different stages of activities for the ML branch.
Return to the Flow of this project.
Select the 15 objects leading to the compute_transactions_joined recipe. This includes:
three Download recipes,
three managed folders,
three input datasets (transactions_export, cardholder_export, merchant_export),
two Sync and one Prepare recipe, and
the corresponding copies (transactions, cardholder_info, merchant_info).
Hint
An easy way to select multiple objects in the Flow is by holding the ‘Shift’ or ‘Command’ key while dragging a box that contains the objects.
In the Actions right panel, click Tag.
In the modal dialog, type
stage:Connections(or select it, if already existing).Click Save.
Now we’ll repeat the process for the meat of the data processing pipeline.
Select the six objects from the Join recipe up to and including the transactions_windows dataset.
In the Actions right panel, click Tag.
In the modal dialog, create the tag
stage:Data processing(or select it if it already exists), and click Save.Repeat this process once more to assign the tag
stage:ML/Scoringfor the seven objects from the Split recipe up to and including the transactions_unknown_scored dataset.
In the default view of the Flow, the tags are invisible. We can only see them by hovering over an object or from the Details panel. However, we can use the Tags view to enrich our overall understanding of the Flow.
Tags View
Rather than the default Flow view, we can view the Flow color-coded by tag.
From the View menu in the lower left corner of the Flow, select Tags.
Select to display all three stage tags.
You can thus get a view of the Flow with the objects colored by tag, rather than by type of object. A small dot at the lower right of each icon indicates a tag even when it is not selected in the view so you can still see that the object is tagged.
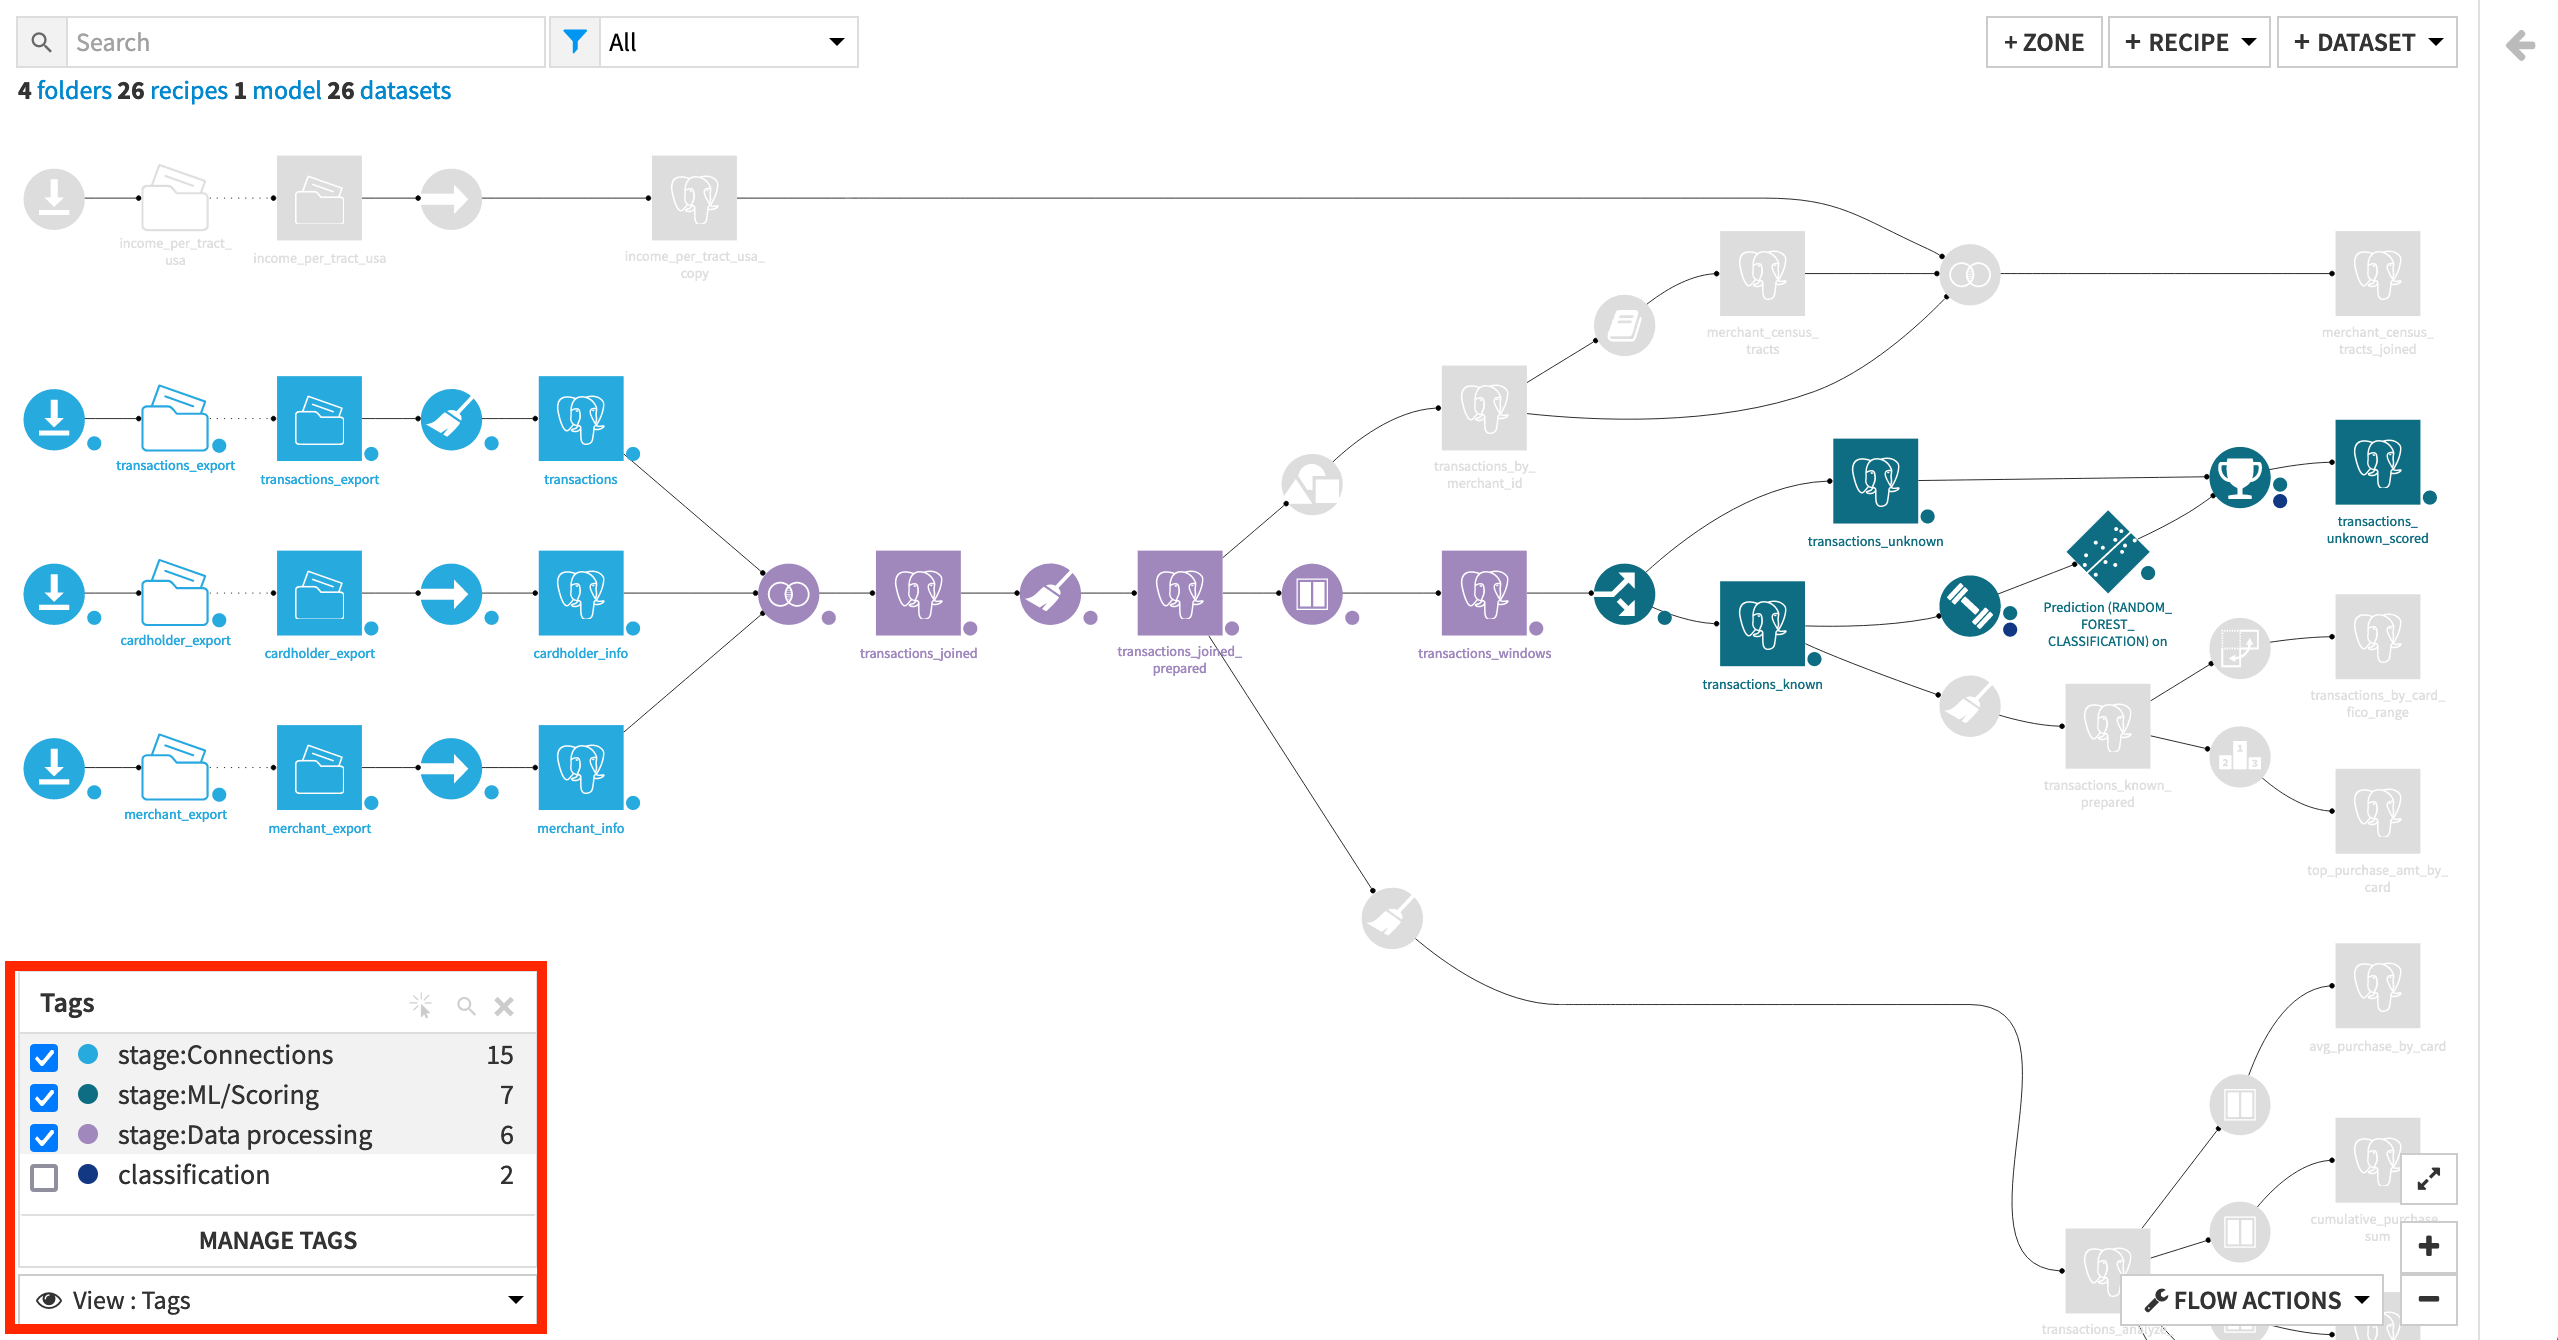
We can immediately see that some of the objects in the Flow are not tagged. Now that you’ve seen how to create tags, feel free to tag other Flow objects with an appropriate category (eg. transactions analytics for the lower branch).
Note
Objects can have multiple tags. For example, the training and scoring recipes are tagged as part of the machine learning stage and for classification.
So far, we have been creating tags on an ad hoc basis. What happens if another colleague creates their own tags like stage:Inputs, stage:Processing data, or stage:Machine Learning on the same instance?
The intent behind these tags is the same as the ones we’ve created, but because the exact names of the tags are different, it will make discoverability more difficult. Fortunately, we can use tag categories to create common tags across projects on an instance.
Tag Categories
Tip
See this video for an introduction to tag categories.
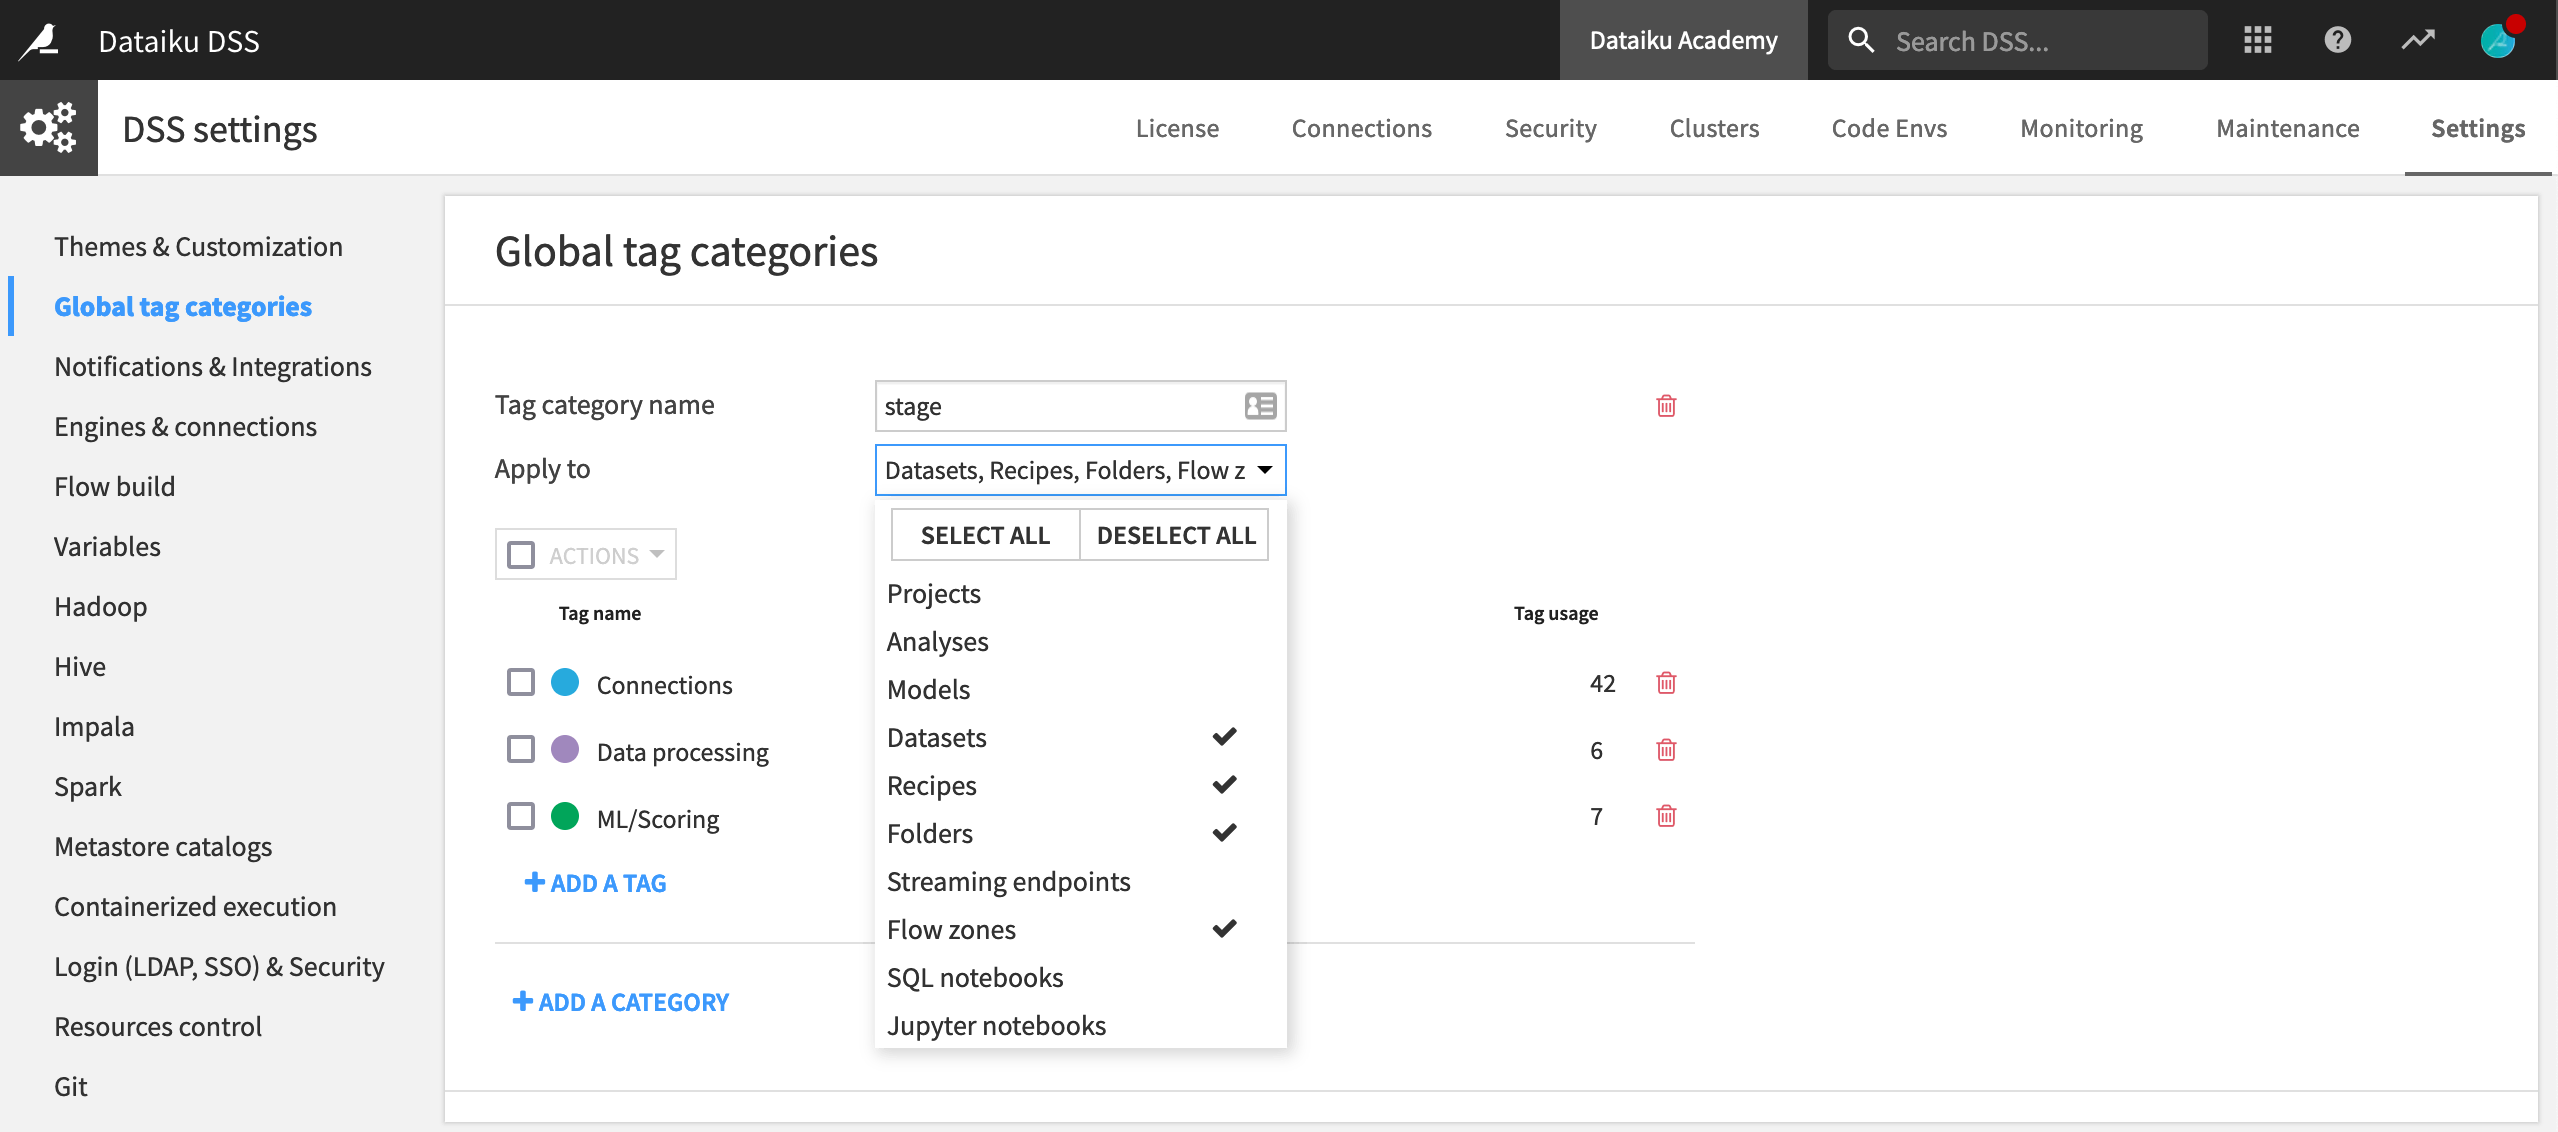
Tag categories are an administrative tool to improve governance and consistency. They are set at a global level and apply across the entire instance.
Note
You must have the Administrator general permission on your Dataiku instance in order to manage tag categories.
Within the admin settings, you can create tag categories and define the tags within a category.
From the Application menu, choose Administration.
Navigate to Settings > Global tag categories.
Click + Add a New Category, and name it
stage.Click + Add a Tag, and type
Connectionsas the name of the tag within this category.Repeat to create tags
Data processingandML/Scoringwithin the stage category.Tag categories can be applied to all kinds Dataiku DSS objects or only a subset of them. Choose to apply these categories just to Flow objects like datasets, recipes, folders, and Flow zones.
Click Save.
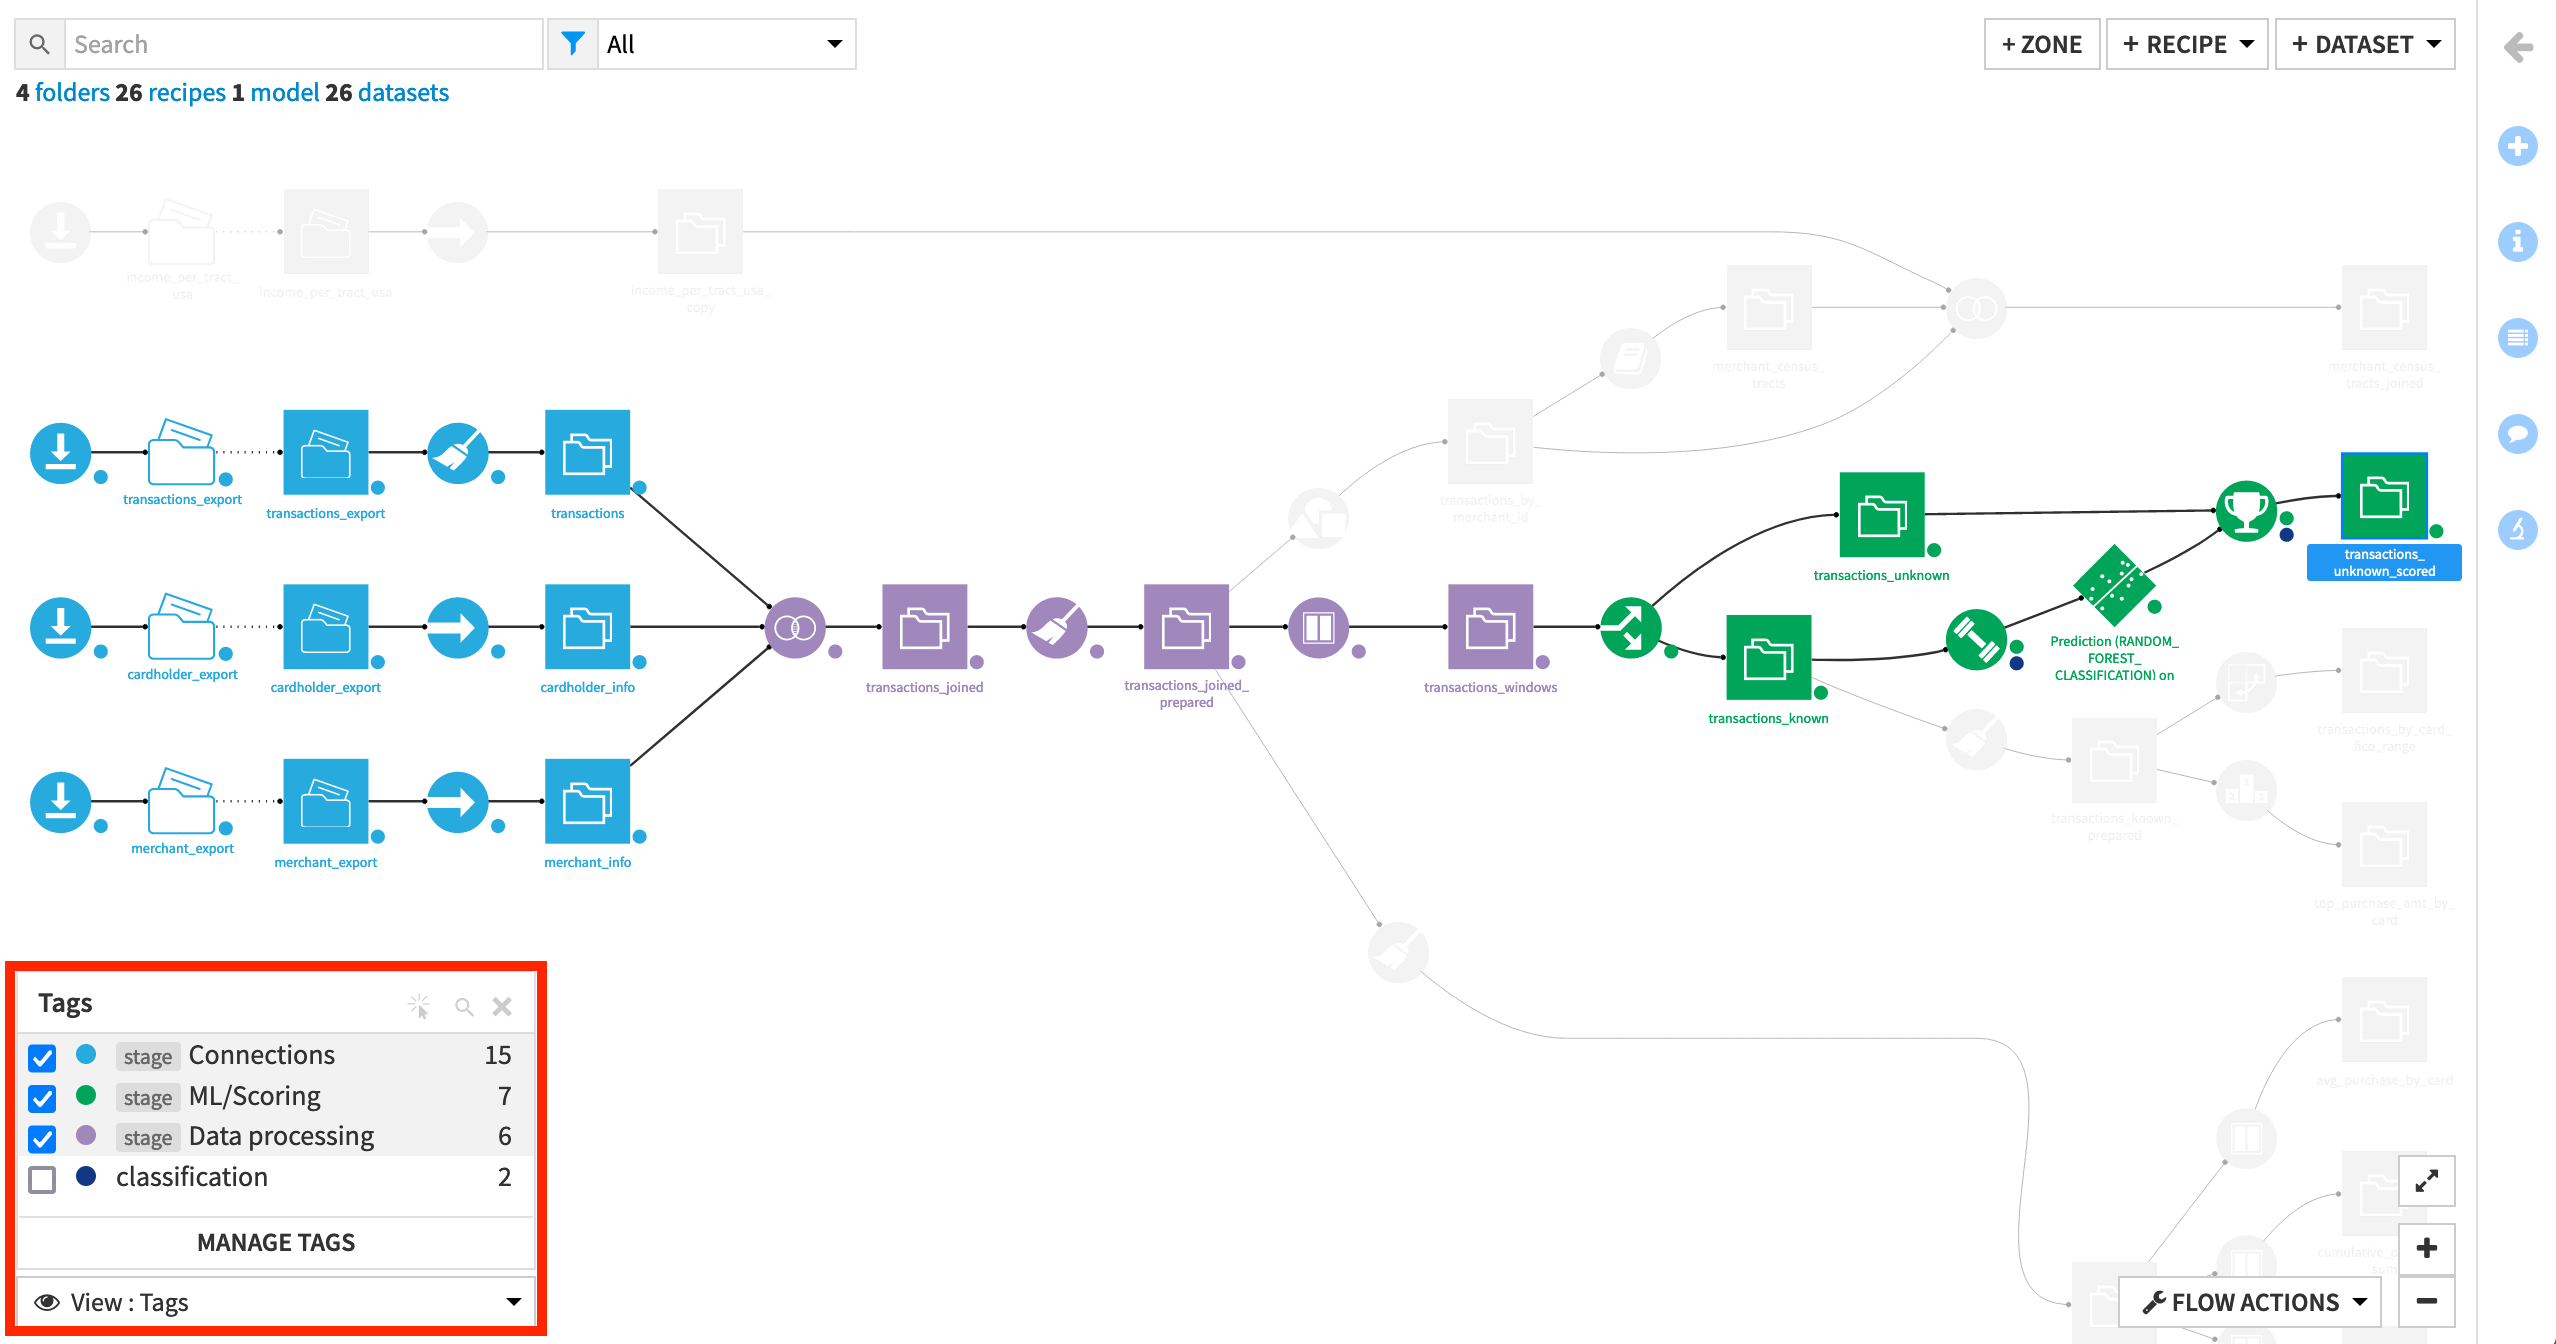
Once saved, tags from global tag categories act like any other tag. Return to the Flow to see that the new tag categories have superseded our old tags. This is because of the special format we used to create the tags (<category>:<tag>) so that when we created category stage with tag Connections, it immediately took the place of stage:Connections.
We have created tags to understand our work within the project. Let’s do some more organization by dividing the Flow into smaller Flow zones.
Flow Zones
Flow zones help to organize large Flows so that they are easier to navigate at a higher level of abstraction. This can help to quickly onboard new team members to projects, as they will be able to grasp the overall purpose of the Flow before getting into the details.
We’ll begin by showing how to:
create Flow zones and move objects into zones to create a higher-level view of the Flow;
manage the contents and properties of existing Flow zones; and
use Flow zones to isolate experimental branches of the Flow.
Creating Flow Zones
To create your first zone:
From the top right corner of the Flow, click + Zone.
Type
Fraud detectionas the name of the zone.Click Confirm.
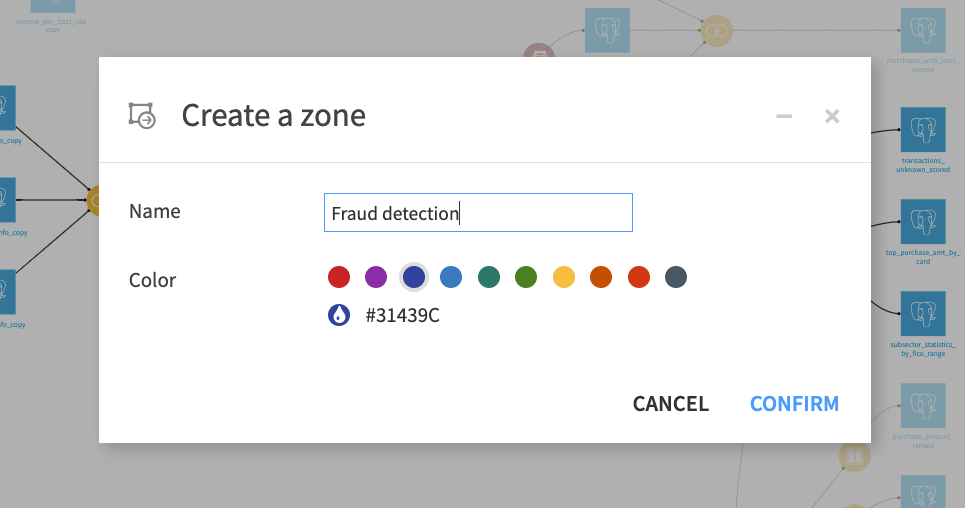
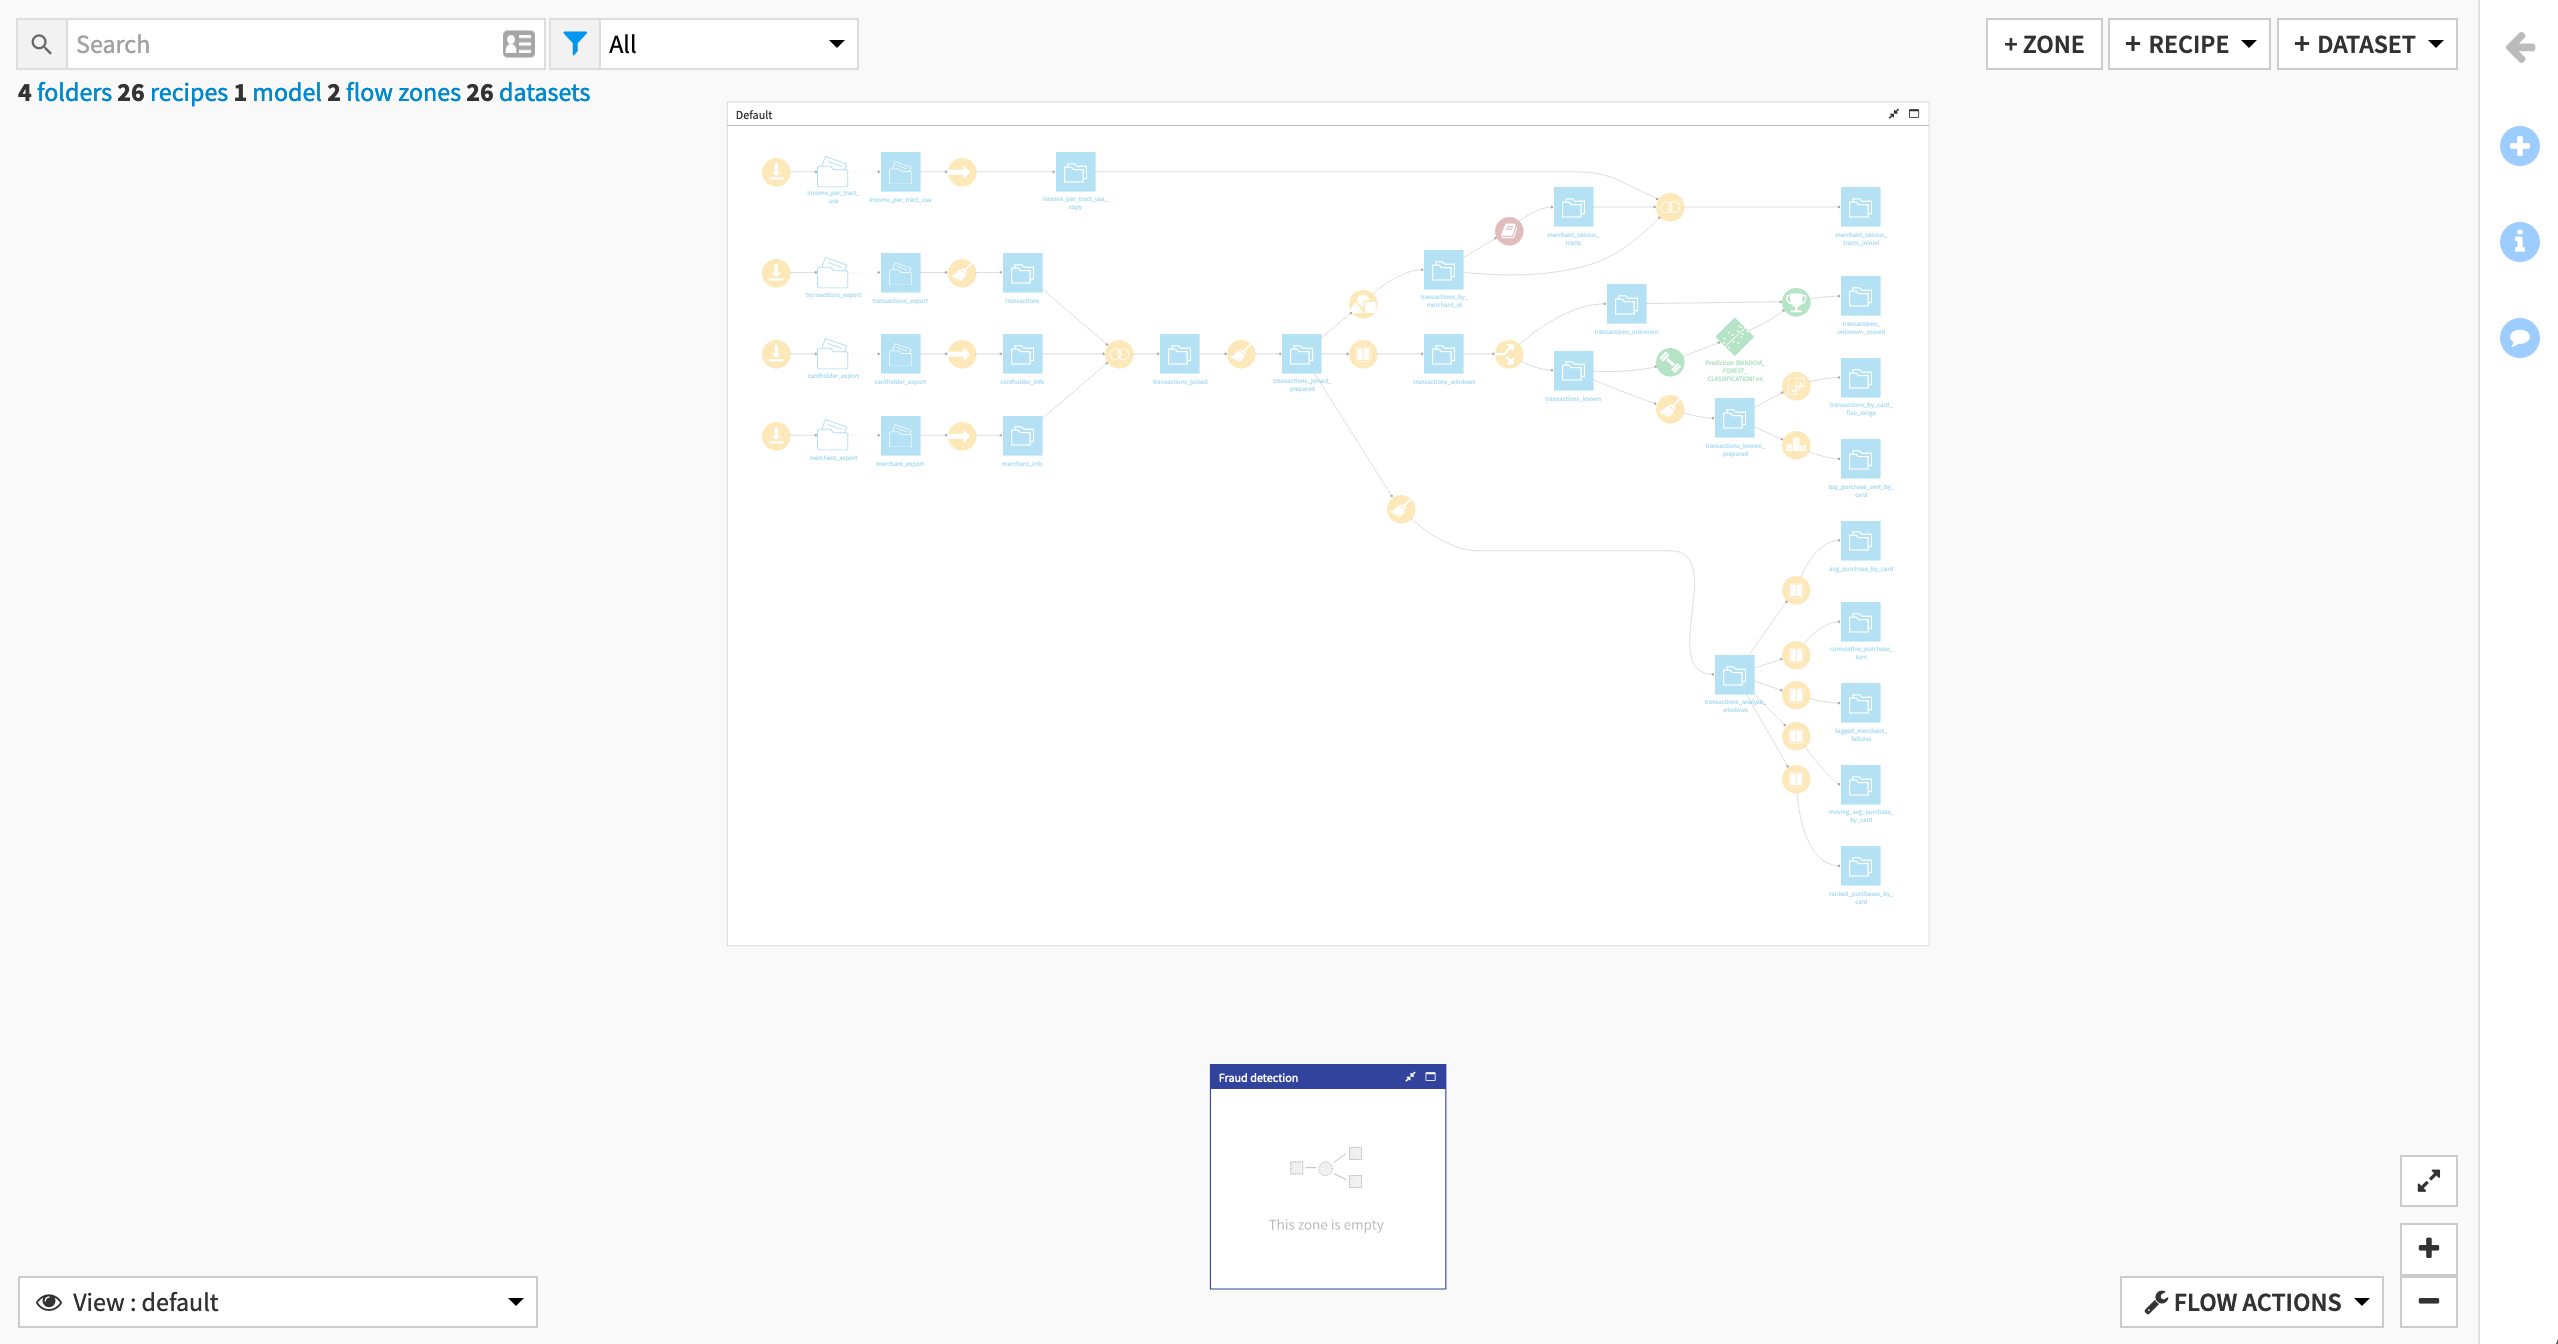
This creates an empty zone named Fraud detection, and reveals the Default zone, which presently contains all of the Flow objects.
Moving Objects to Flow Zones
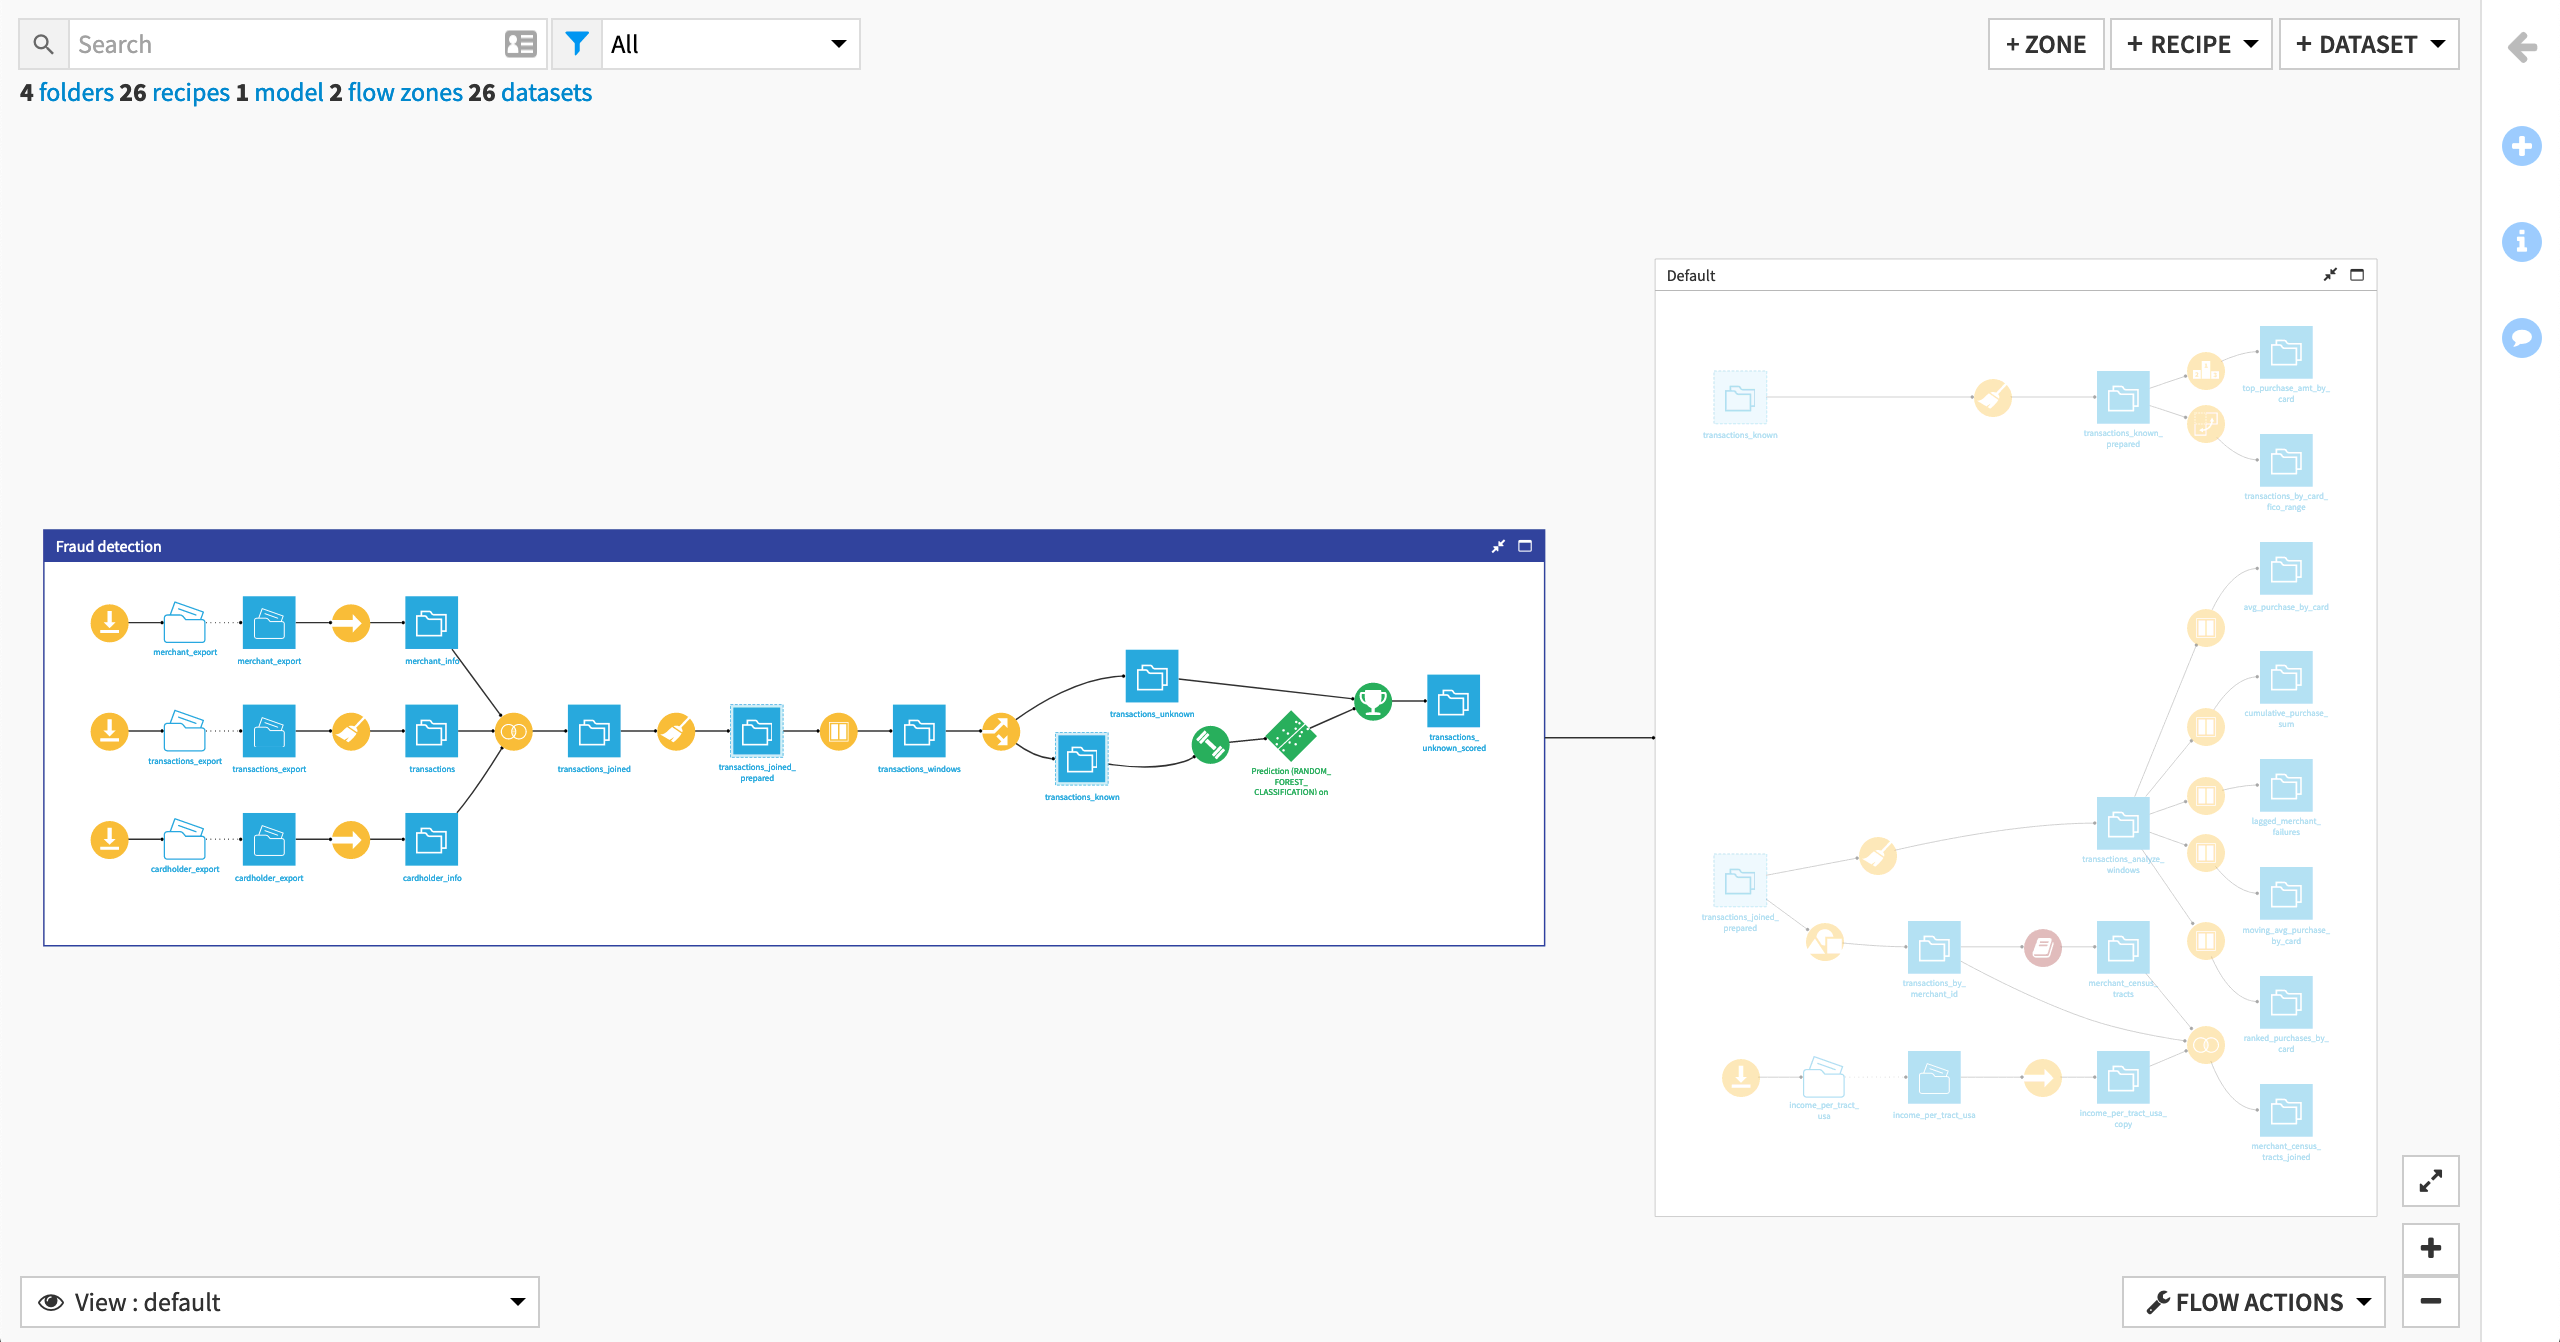
To move objects into the Fraud detection Flow zone:
In the default zone, select the branch of the Flow starting with the three Download recipes datasets and ending with the dataset transactions_unknown_scored.
Tip
Hold down ‘Shift’ or ‘Command’ while dragging a box to select several Flow items at once, and then click again on unwanted objects while holding shift.
In the right panel, or by right-clicking to open the context menu, select Move to a flow zone.
Confirm in the modal dialog that Fraud detection is selected as the destination zone, and then click Move.
Note
Another tool for managing large flows is Flow folding. You can learn more in the product documentation.
Moving a Dataset Moves its Parent Recipe
When you move a dataset to a new Flow zone, its parent recipe comes with it.
Let’s create a new Flow zone directly from selected objects in the Flow. For example:
Click to enter the Default zone for a better view.
Select the six objects used primarily in the Plugin Store tutorial:
the managed folder and two datasets about income per census tract: income_per_tract_usa (folder and dataset) and income_per_tract_usa_copy.
the three datasets about merchant information: transactions_by_merchant_id, merchant_census_tracts, and merchant_census_tracts_joined.
From the right panel, select Move to a Flow Zone.
Within the modal dialog, click New Zone, and name it
Merchant analysis.Click Confirm.
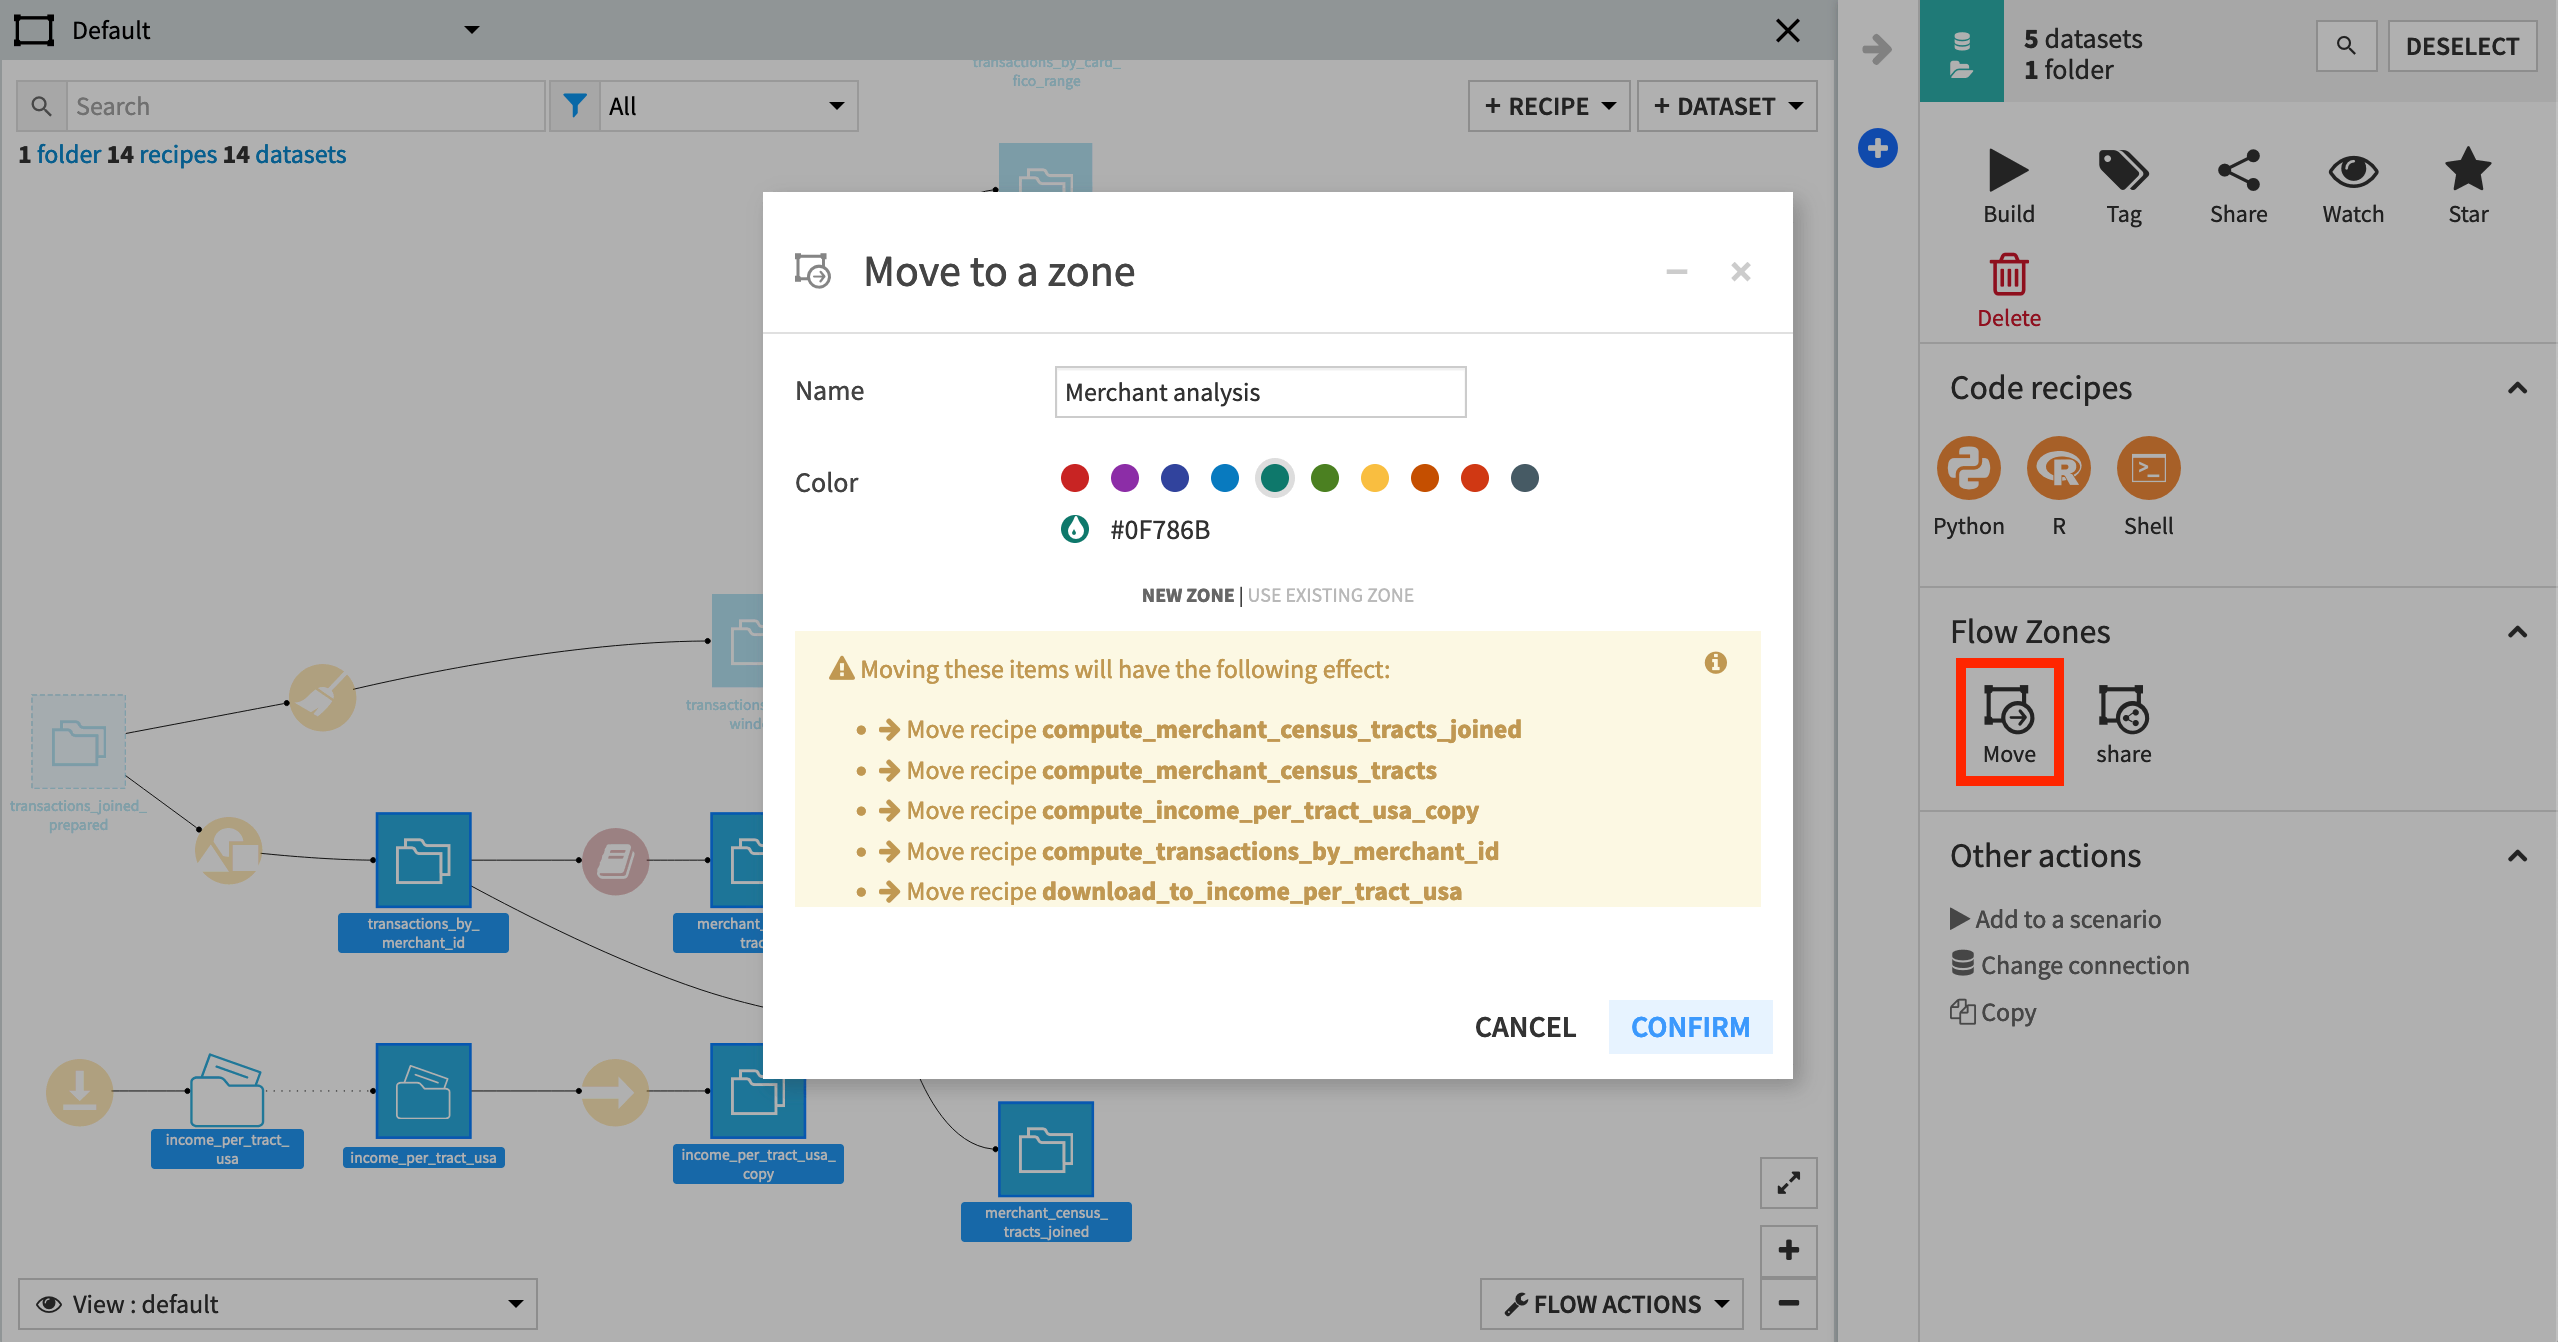
Note
Even though you did not explicitly select them, the dialog warns that moving these datasets will have the additional effect of moving several recipes into the new zone. These are the parent recipes of the selected datasets. A recipe and its outputs always live in the same zone, and so it can be helpful to think in terms of moving recipes as opposed to moving datasets.
The Default Zone
Finally, we can rename the Default zone to something more descriptive.
Right-click on the Default zone, and select Edit from the context menu.
Type
Transactions analysisas the new name.
Note
Although we have renamed the default zone to something else, Transactions analysis is still the “Default” zone. You can see this fact when viewing this object in the right panel. You can also note that it cannot be deleted unlike the other zones.
This can be helpful to remember in some situations. For example, when deleting a Flow zone, its objects return to the default zone. If you were to delete the Fraud detection zone, objects there would be transferred to the Transactions analysis zone.
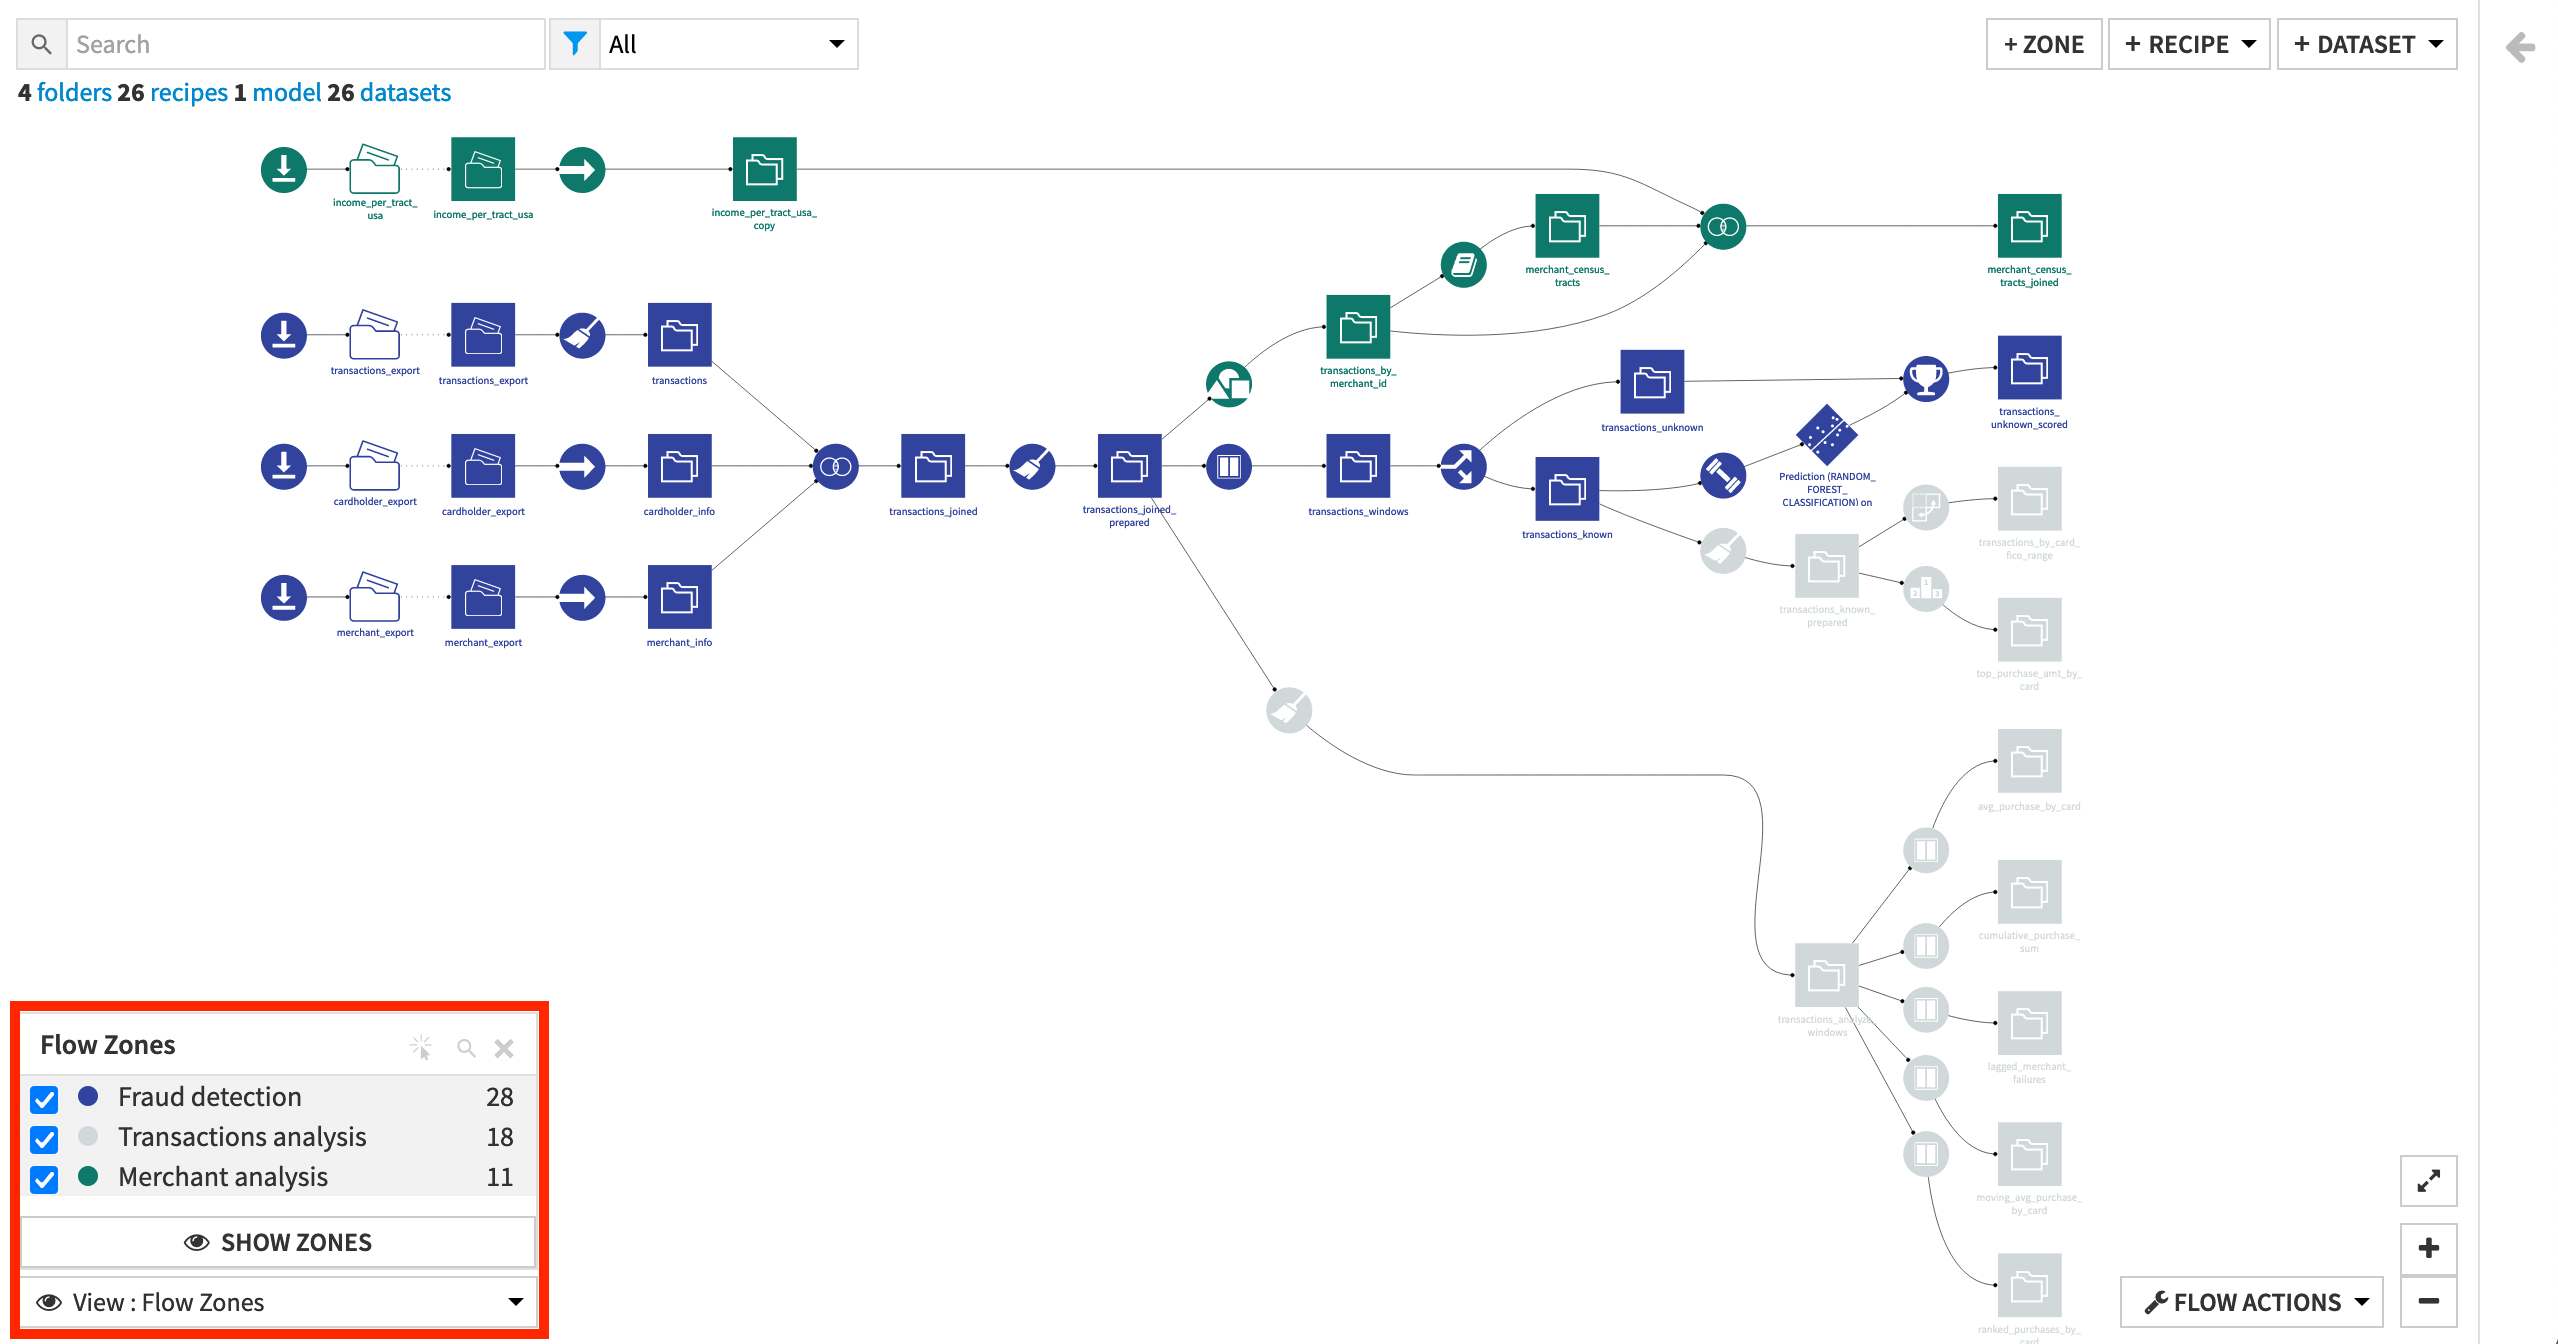
Flow Zone Views
To see the zones in a project at any given time, there is a special Flow Zones view:
From the View menu in the lower left corner of the Flow, select Flow Zones.
Click Hide Zones.
This view shows the entire Flow as one, but with the Flow objects colored according to their assigned zone.
Note
Since Flow zones are DSS objects, you can give them descriptions and tags, or hold discussions on them. You can access this functionality in the right panel, as you can with other Flow objects.
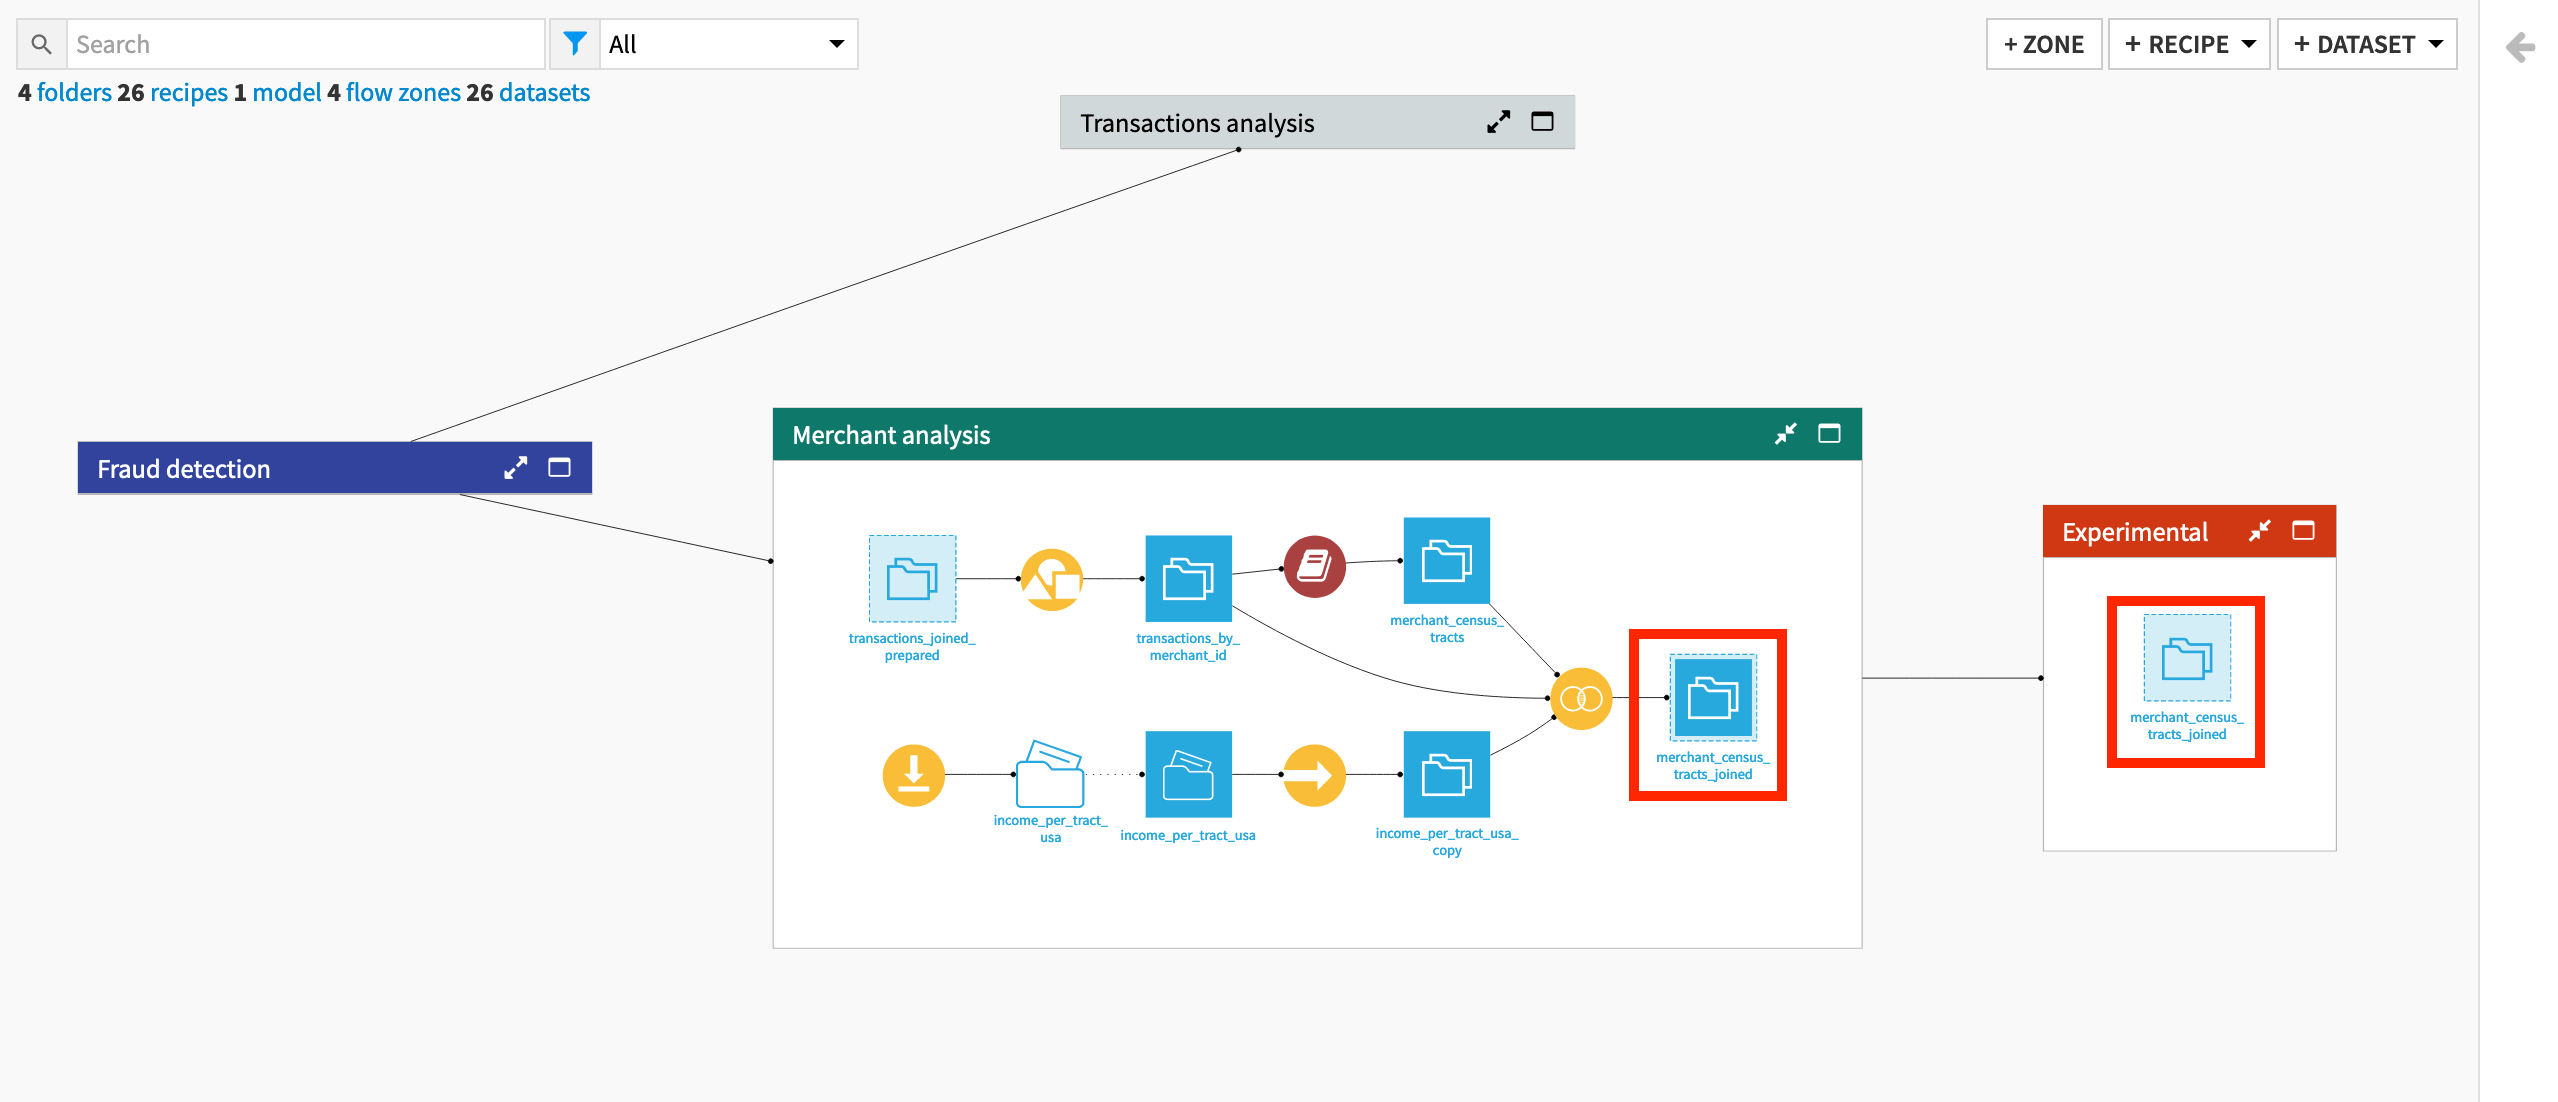
Isolating Experimental Work
Lastly, you can use Flow Zones to mark off “experimental” work within a Flow. For this goal, it is helpful to understand the difference between “moving” and “sharing” objects to a Flow zone.
Note
When moving objects to a Flow zone, as done above, the parent recipes also move to the destination zone. Moving objects helps with the high-level organization of the project.
Another option is to share a dataset to a new Flow zone. A dataset shared to a Flow zone is available to be worked upon in a fresh space. However, it has not been “moved” from its original Flow zone.
When sharing a dataset (instead of moving), the parent recipe is not shared, and so you can create a new zone with any dataset of interest without disturbing the main Flow of a project.
Let’s see how this works.
Close the Fraud detection zone to return to the main view of the Flow, where all zones are visible.
Expand the Merchant analysis zone, and right-click on the last output dataset merchant_census_tracts_joined.
Right-click to open the context menu, and select Share to a flow zone.
In the modal dialog, click New Zone, and name it
Experimental.Click Confirm.
Note
Recognize how the dataset shared in the Experimental zone is light blue in color. If it had been moved, instead of shared, it would be the normal shade of blue and bring with it its parent recipe.
Try this out for yourself by deleting the Experimental zone and moving, instead of sharing, the dataset merchant_census_tracts_joined.
Other Flow Views
We have seen Views such as tags and Flow zones, but Dataiku offers many other informative views, such as connections, recipe engines, and code environments.
Tip
Dataiku Online users will see different specific results than the images below, but the intention is the same.
Connections View
Let’s have a look at the connections used in this project.
From the “View” menu in the lower left corner of the Flow, select Connections.
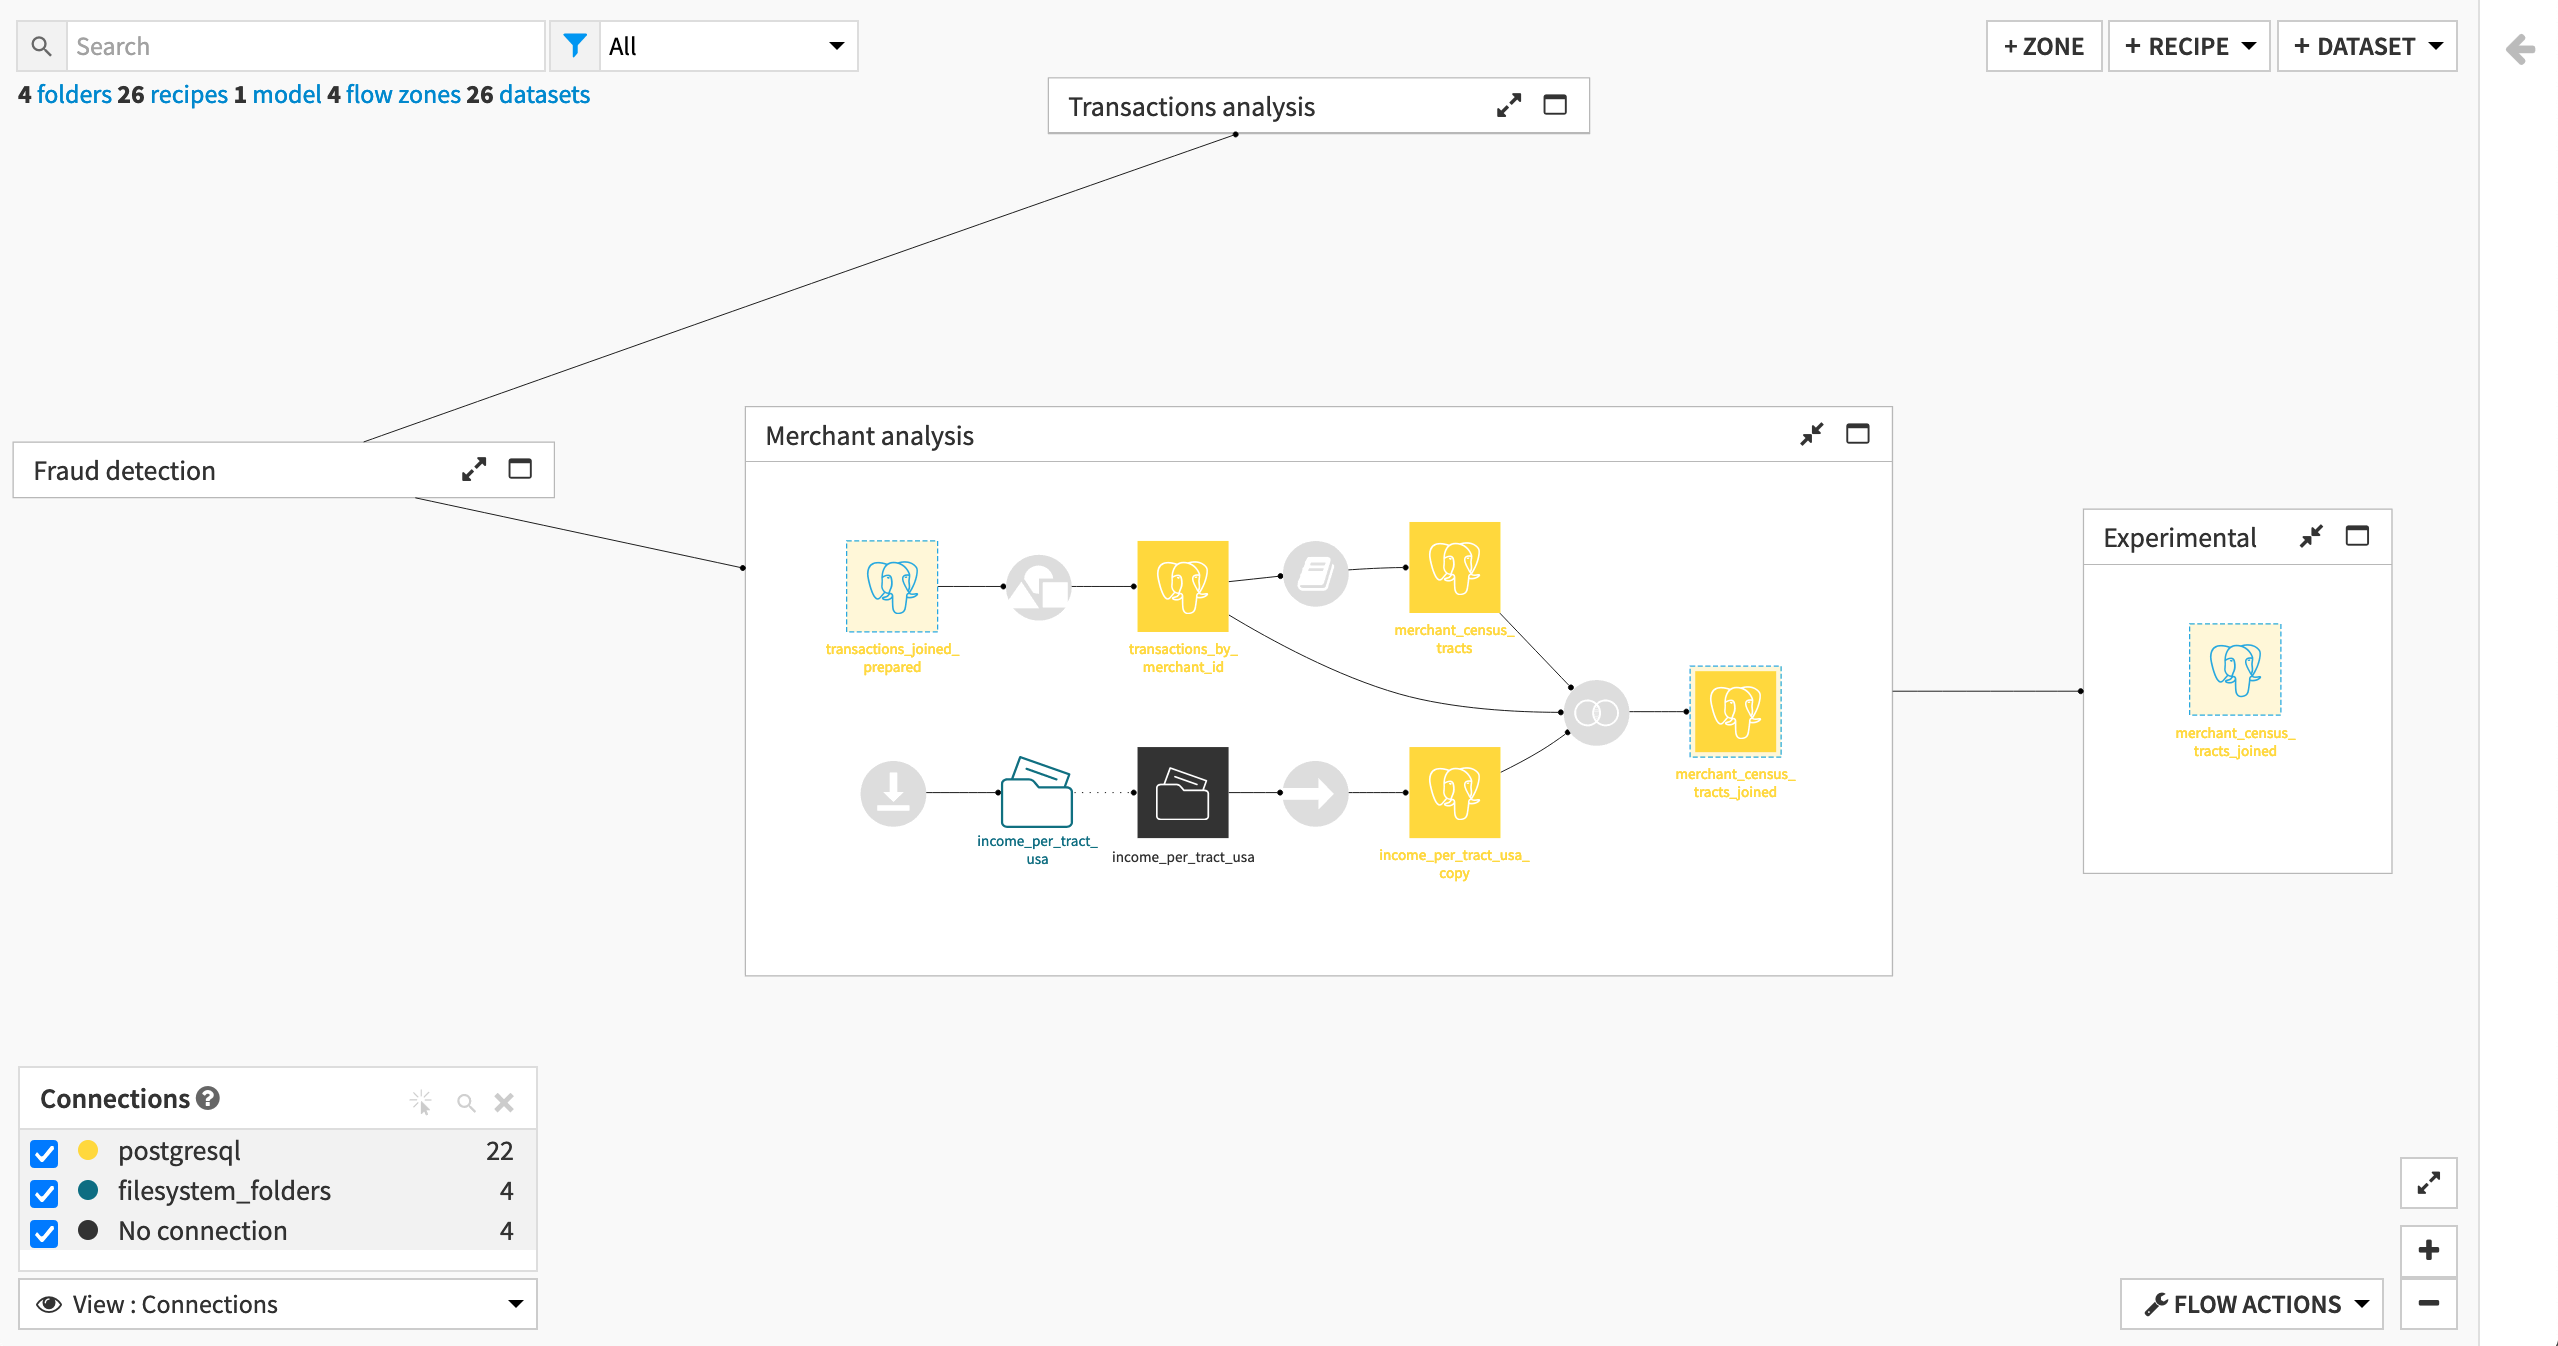
Since this Flow leverages only a single connection (in this case, a PostgreSQL database, but in yours possibly the managed filesystem), this view does not bring a lot of information. In production though, we can imagine a situation where different datasets are stored in different connections. In such a situation, the Connections view would provide an overview of where the datasets are stored.
Recipe Engines View
Another informative view is the Recipe engines view. Since we changed the connection to an SQL database, we expect the recipes to leverage the SQL engine. Let’s check if that is the case.
First expand all Flow Zones by right-clicking the header of any zone, and selecting Expand all.
Then from the View menu, click Recipe engines, and select only the checkbox for the “Sql” engine.
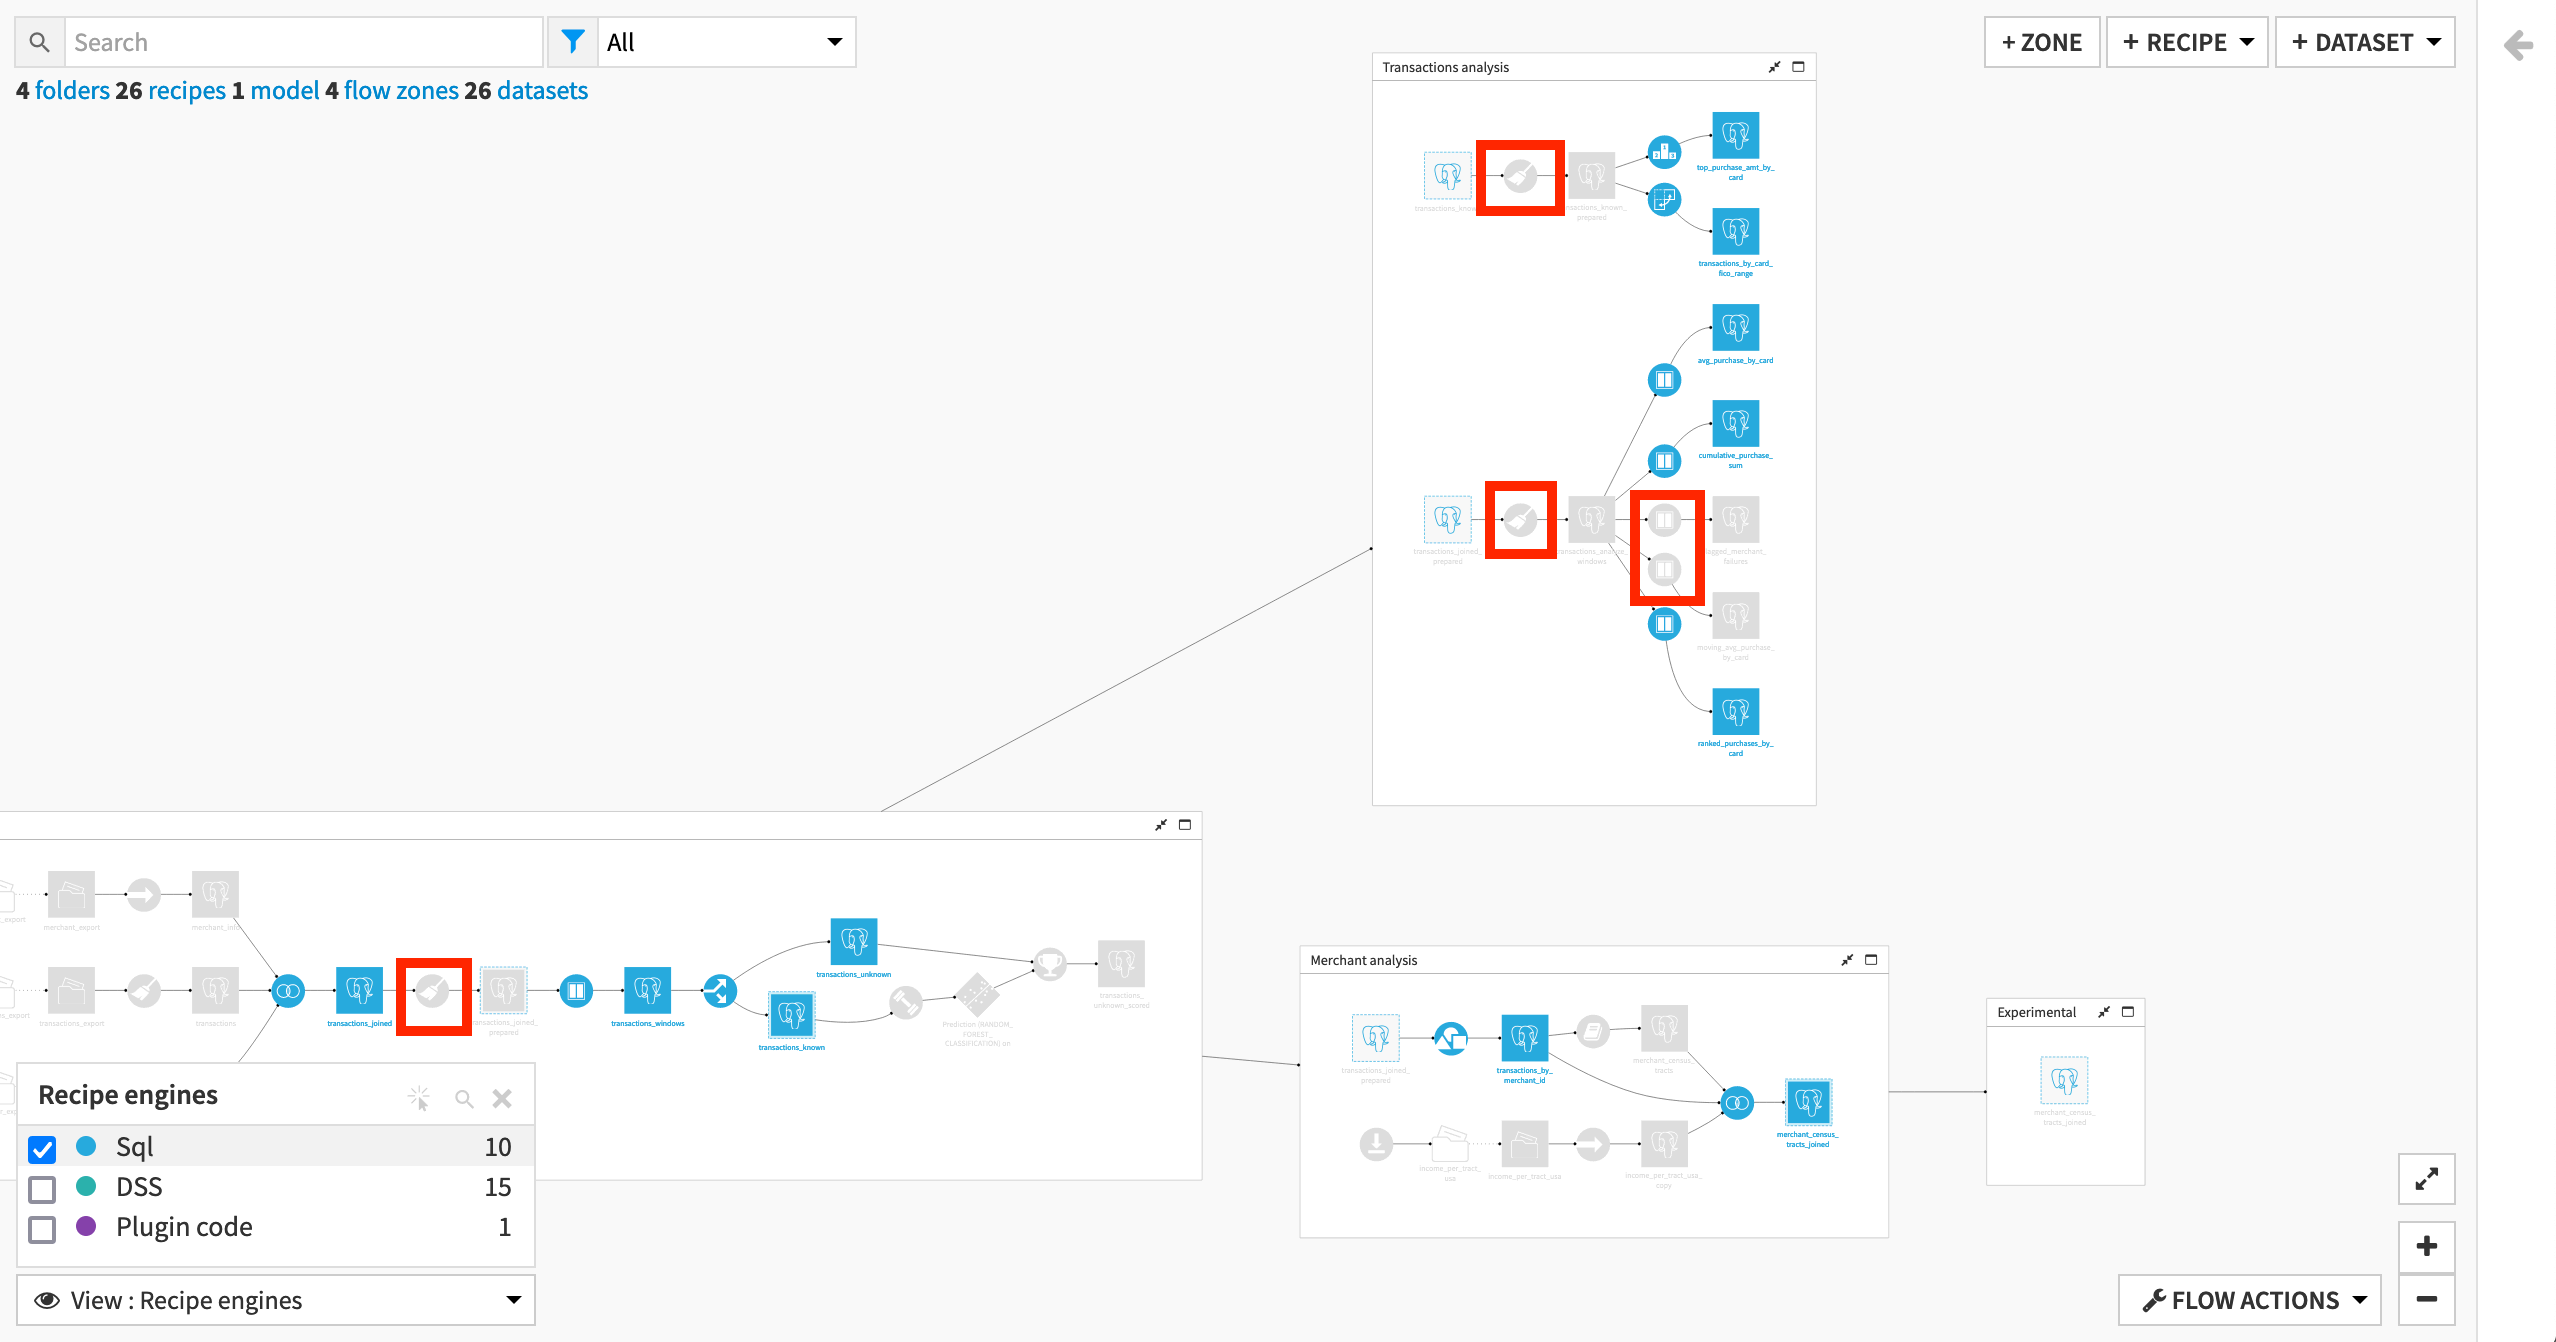
We can see that most recipes that have SQL datasets as input and output leverage the SQL engine.
The reason this is not true for some Prepare and Window recipes varies:
Some Prepare recipes use a non-SQL compatible processor. (See Details on the in-database (SQL) engine to learn more).
One Prepare recipe looks to have issues with possible storage type-casting that could be investigated.
These Window recipes limit the window frame on a time interval, and so prevent use of the SQL engine unlike the other Window recipes.
Tip
On your own, try out some of the other available views to see what value they can bring to managing complicated Flows.
Learn More
Great job! Now you have some hands-on experience working with Tags, Flow Zones, and some of the other available Views.
If you have not already done so, register for the Academy course on Flow Views & Actions to validate your knowledge of this material.
You can also explore additional articles in the Flow Views & Actions page of the Knowledge Base to learn more about this topic.