Hands-On Tutorial: Plugin Store
Plugins allow users to extend the native features of Dataiku. A plugin can contain one or more components, such as recipes, datasets, webapps, processors, and more.
Tip
The hands-on tutorial below on how to use a plugin is also found in the Dataiku Academy’s Plugin Store course, which is part of the Advanced Designer learning path. Register for the course if you’d like to track and validate your knowledge alongside concept videos, summaries, and quizzes.
Let’s Get Started!
Using the same credit card transactions project from other Advanced Designer tutorials, you will use the Census USA plugin to enrich a dataset with socio-demographic variables from the US Census Bureau.
Advanced Designer Prerequisites
This lesson assumes that you have basic knowledge of working with Dataiku DSS datasets and recipes.
Note
If not already on the Advanced Designer learning path, completing the Core Designer Certificate is recommended.
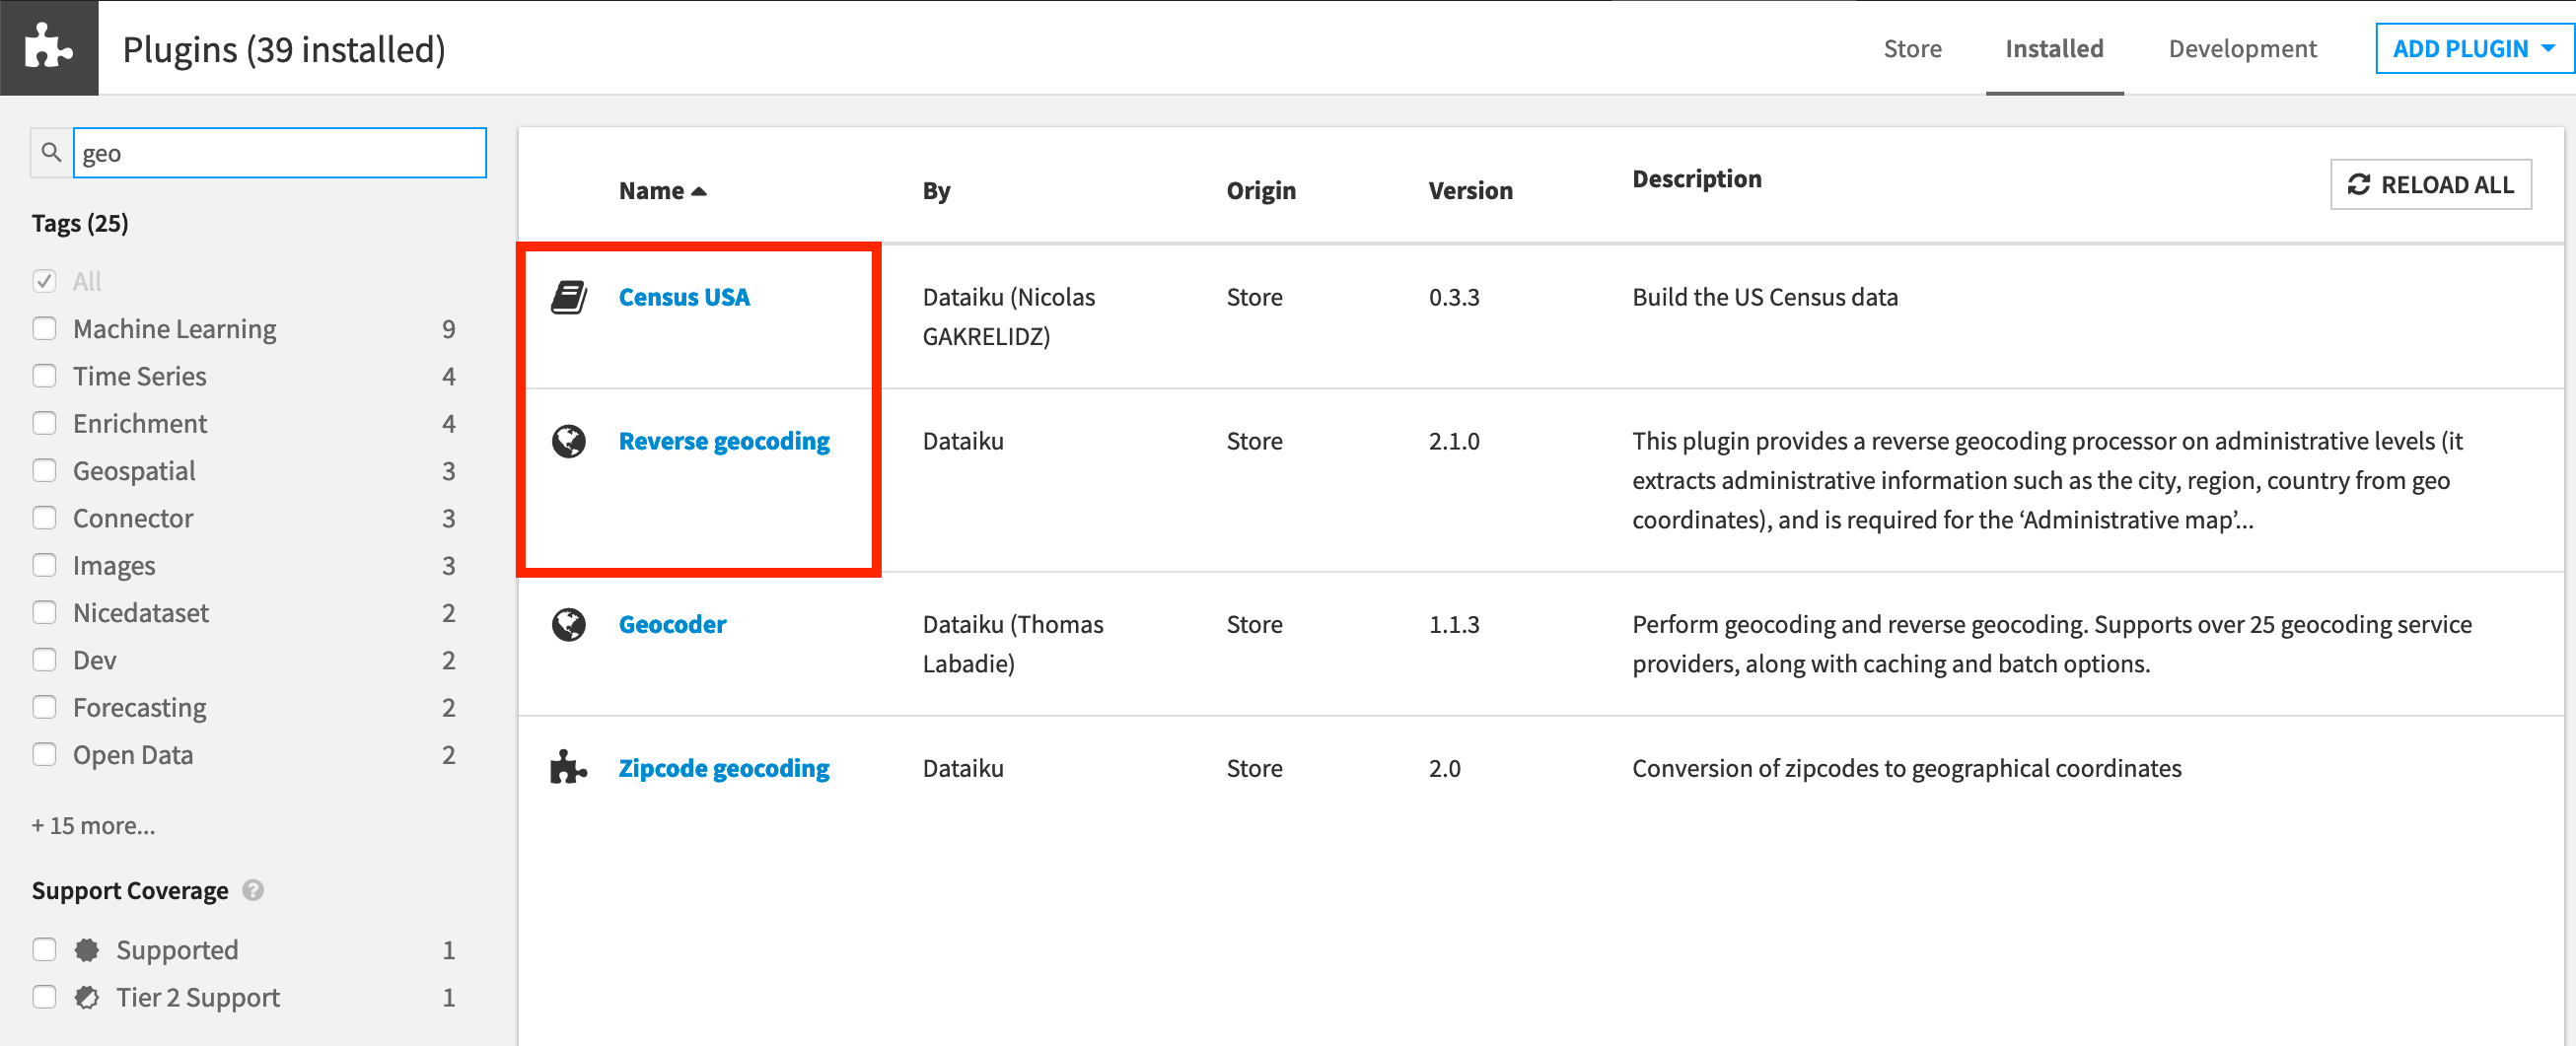
You’ll need access to an instance of Dataiku DSS (version 9.0 or above) with the following plugins installed:
Census USA (minimum version 0.3)
These plugins are available through the Dataiku Plugin store, and you can find the instructions for installing plugins in the reference documentation. To check whether the plugins are already installed on your instance, go to the Installed tab in the Plugin Store to see a list of all installed plugins.
Note
If not already registered in the Academy Plugin Store course, we also recommend that you complete the following lessons beforehand:
Plugin Installation for Dataiku Online Users
Tip
Users of Dataiku Online should note that while plugin installation is not directly available, you can still explore available plugins from your launchpad:
From your instance launchpad, open the Features panel on the left hand side.
Click Add a Feature and choose “US Census” from the Extensions menu. (“Reverse geocoding” is already available by default).
You can see what plugins are already installed by searching for “installed plugins” in the DSS search bar.
Workflow Overview
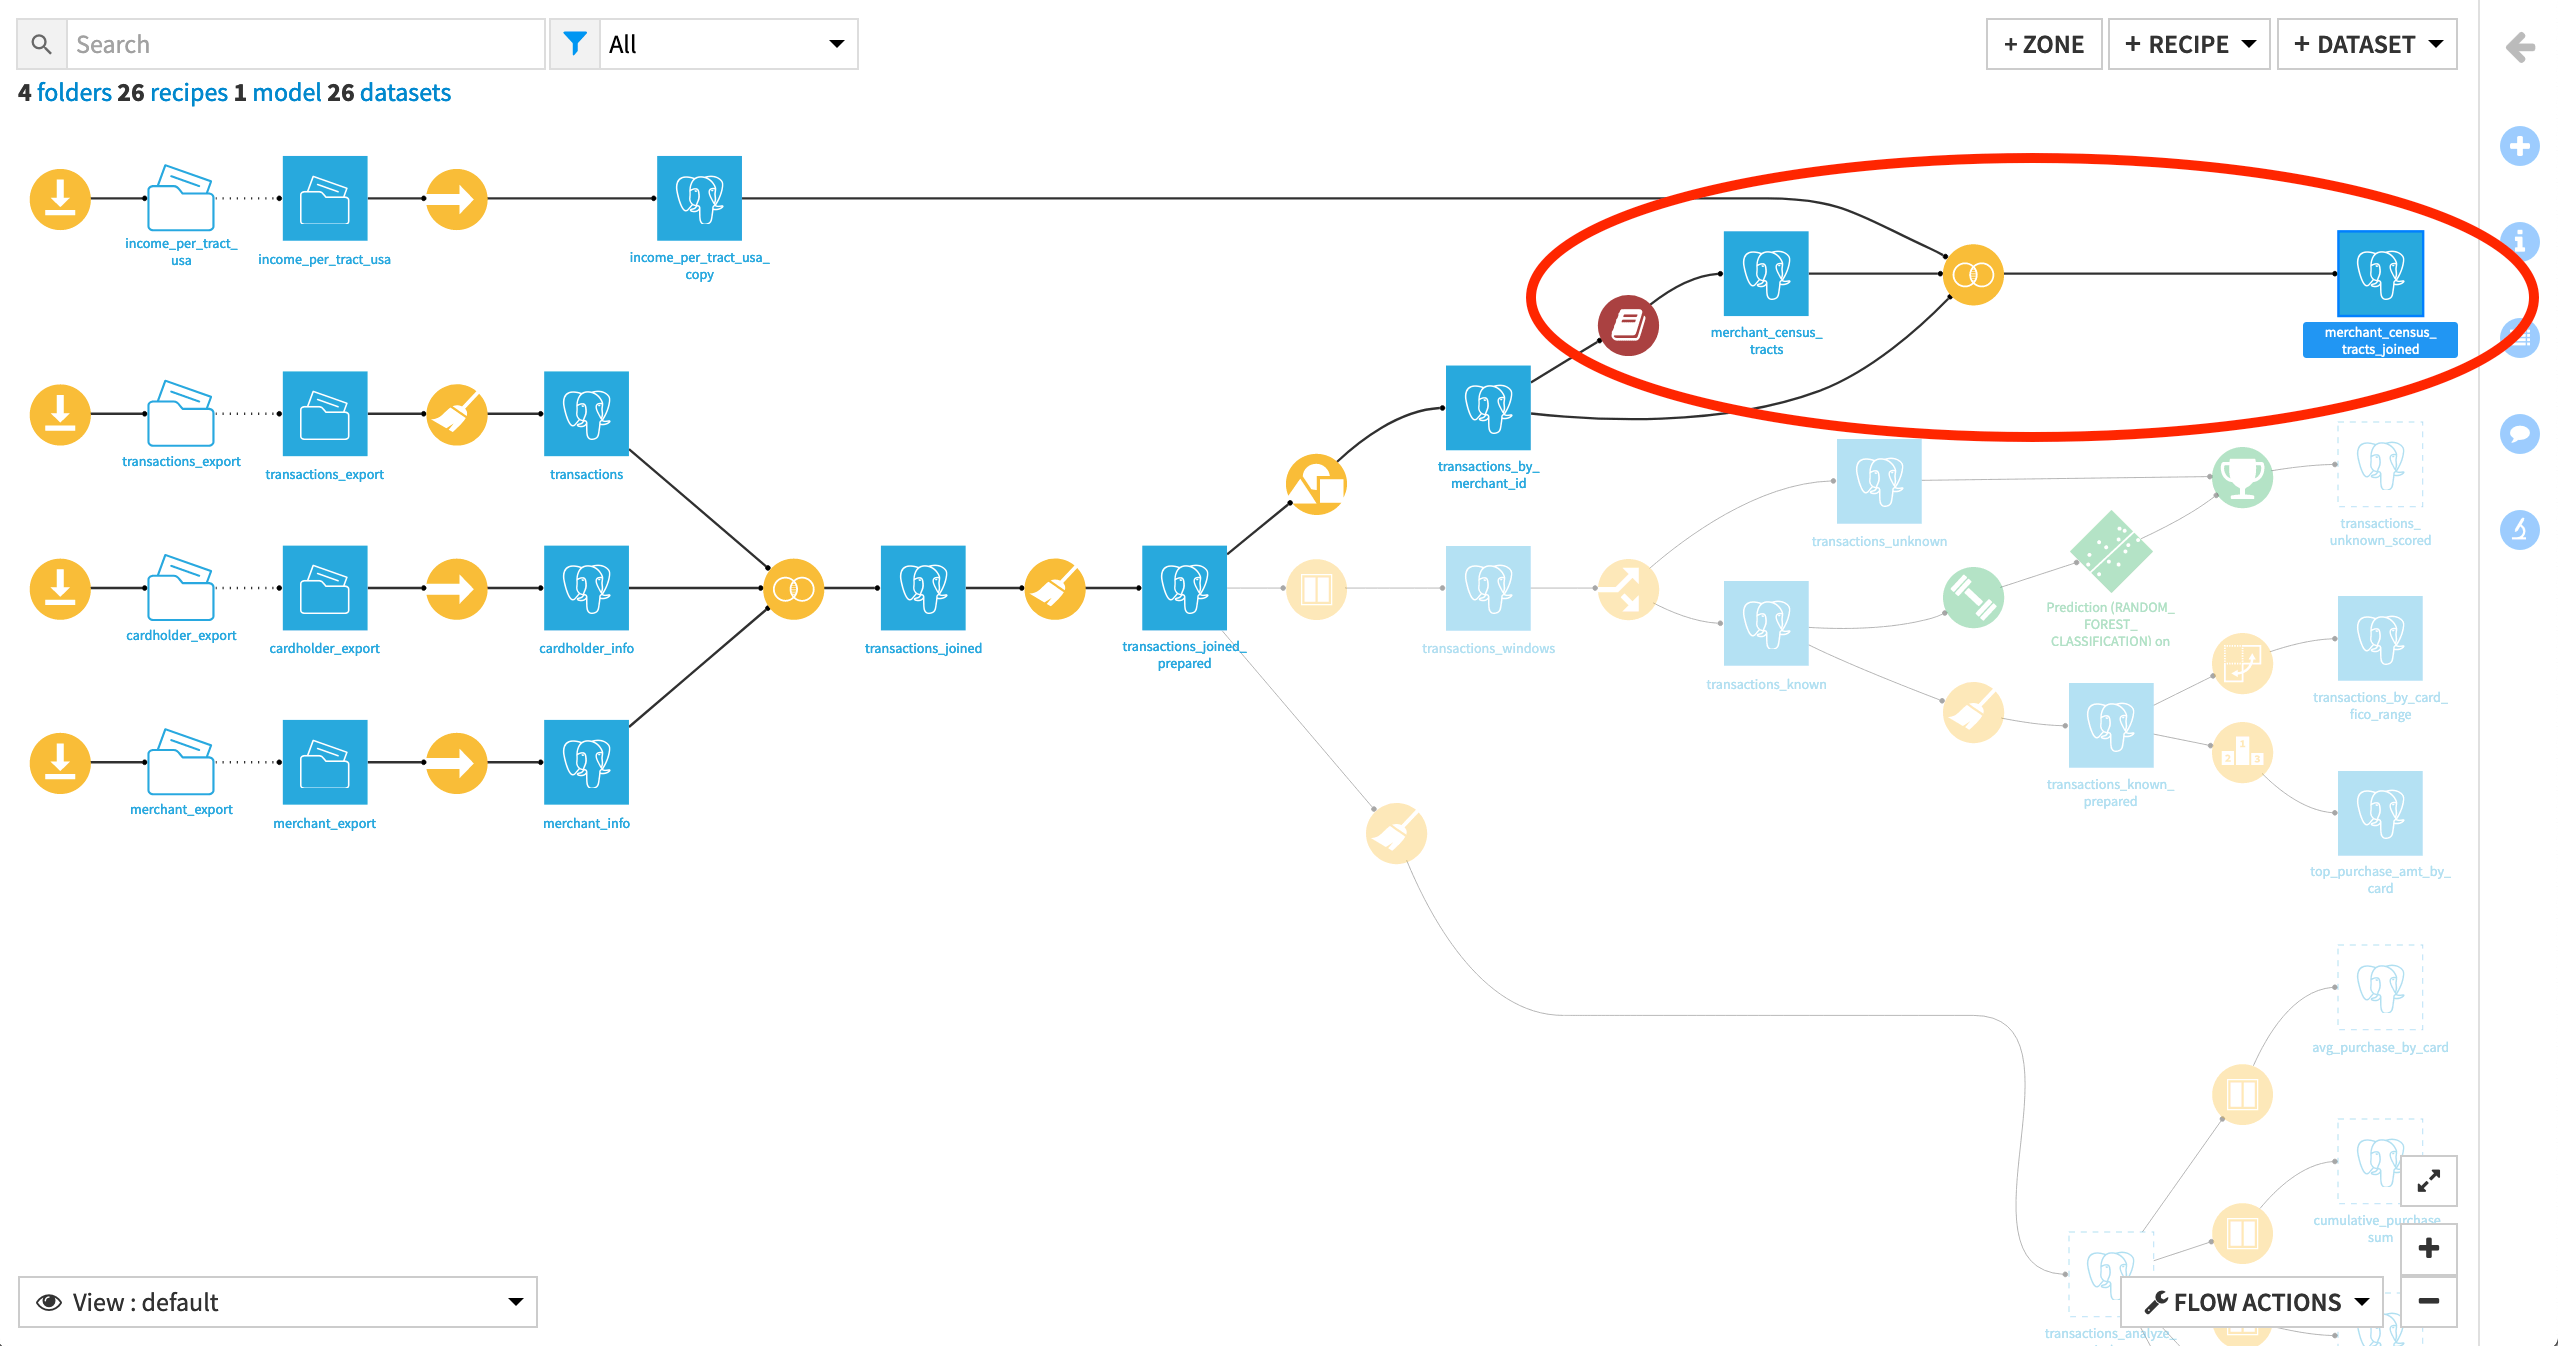
The following figure shows the final Flow in Dataiku DSS, having added a plugin recipe and a Join recipe.
Create Your Project
You can use a project from the previous Visual Recipes 102 hands-on tutorials. If you skipped them, create this project instead:
Click +New Project > DSS Tutorials > Advanced Designer > Visual Recipes & Plugins (Tutorial).
Need Help Creating the Project?
Note
You can also download the starter project from this website and import it as a zip file.
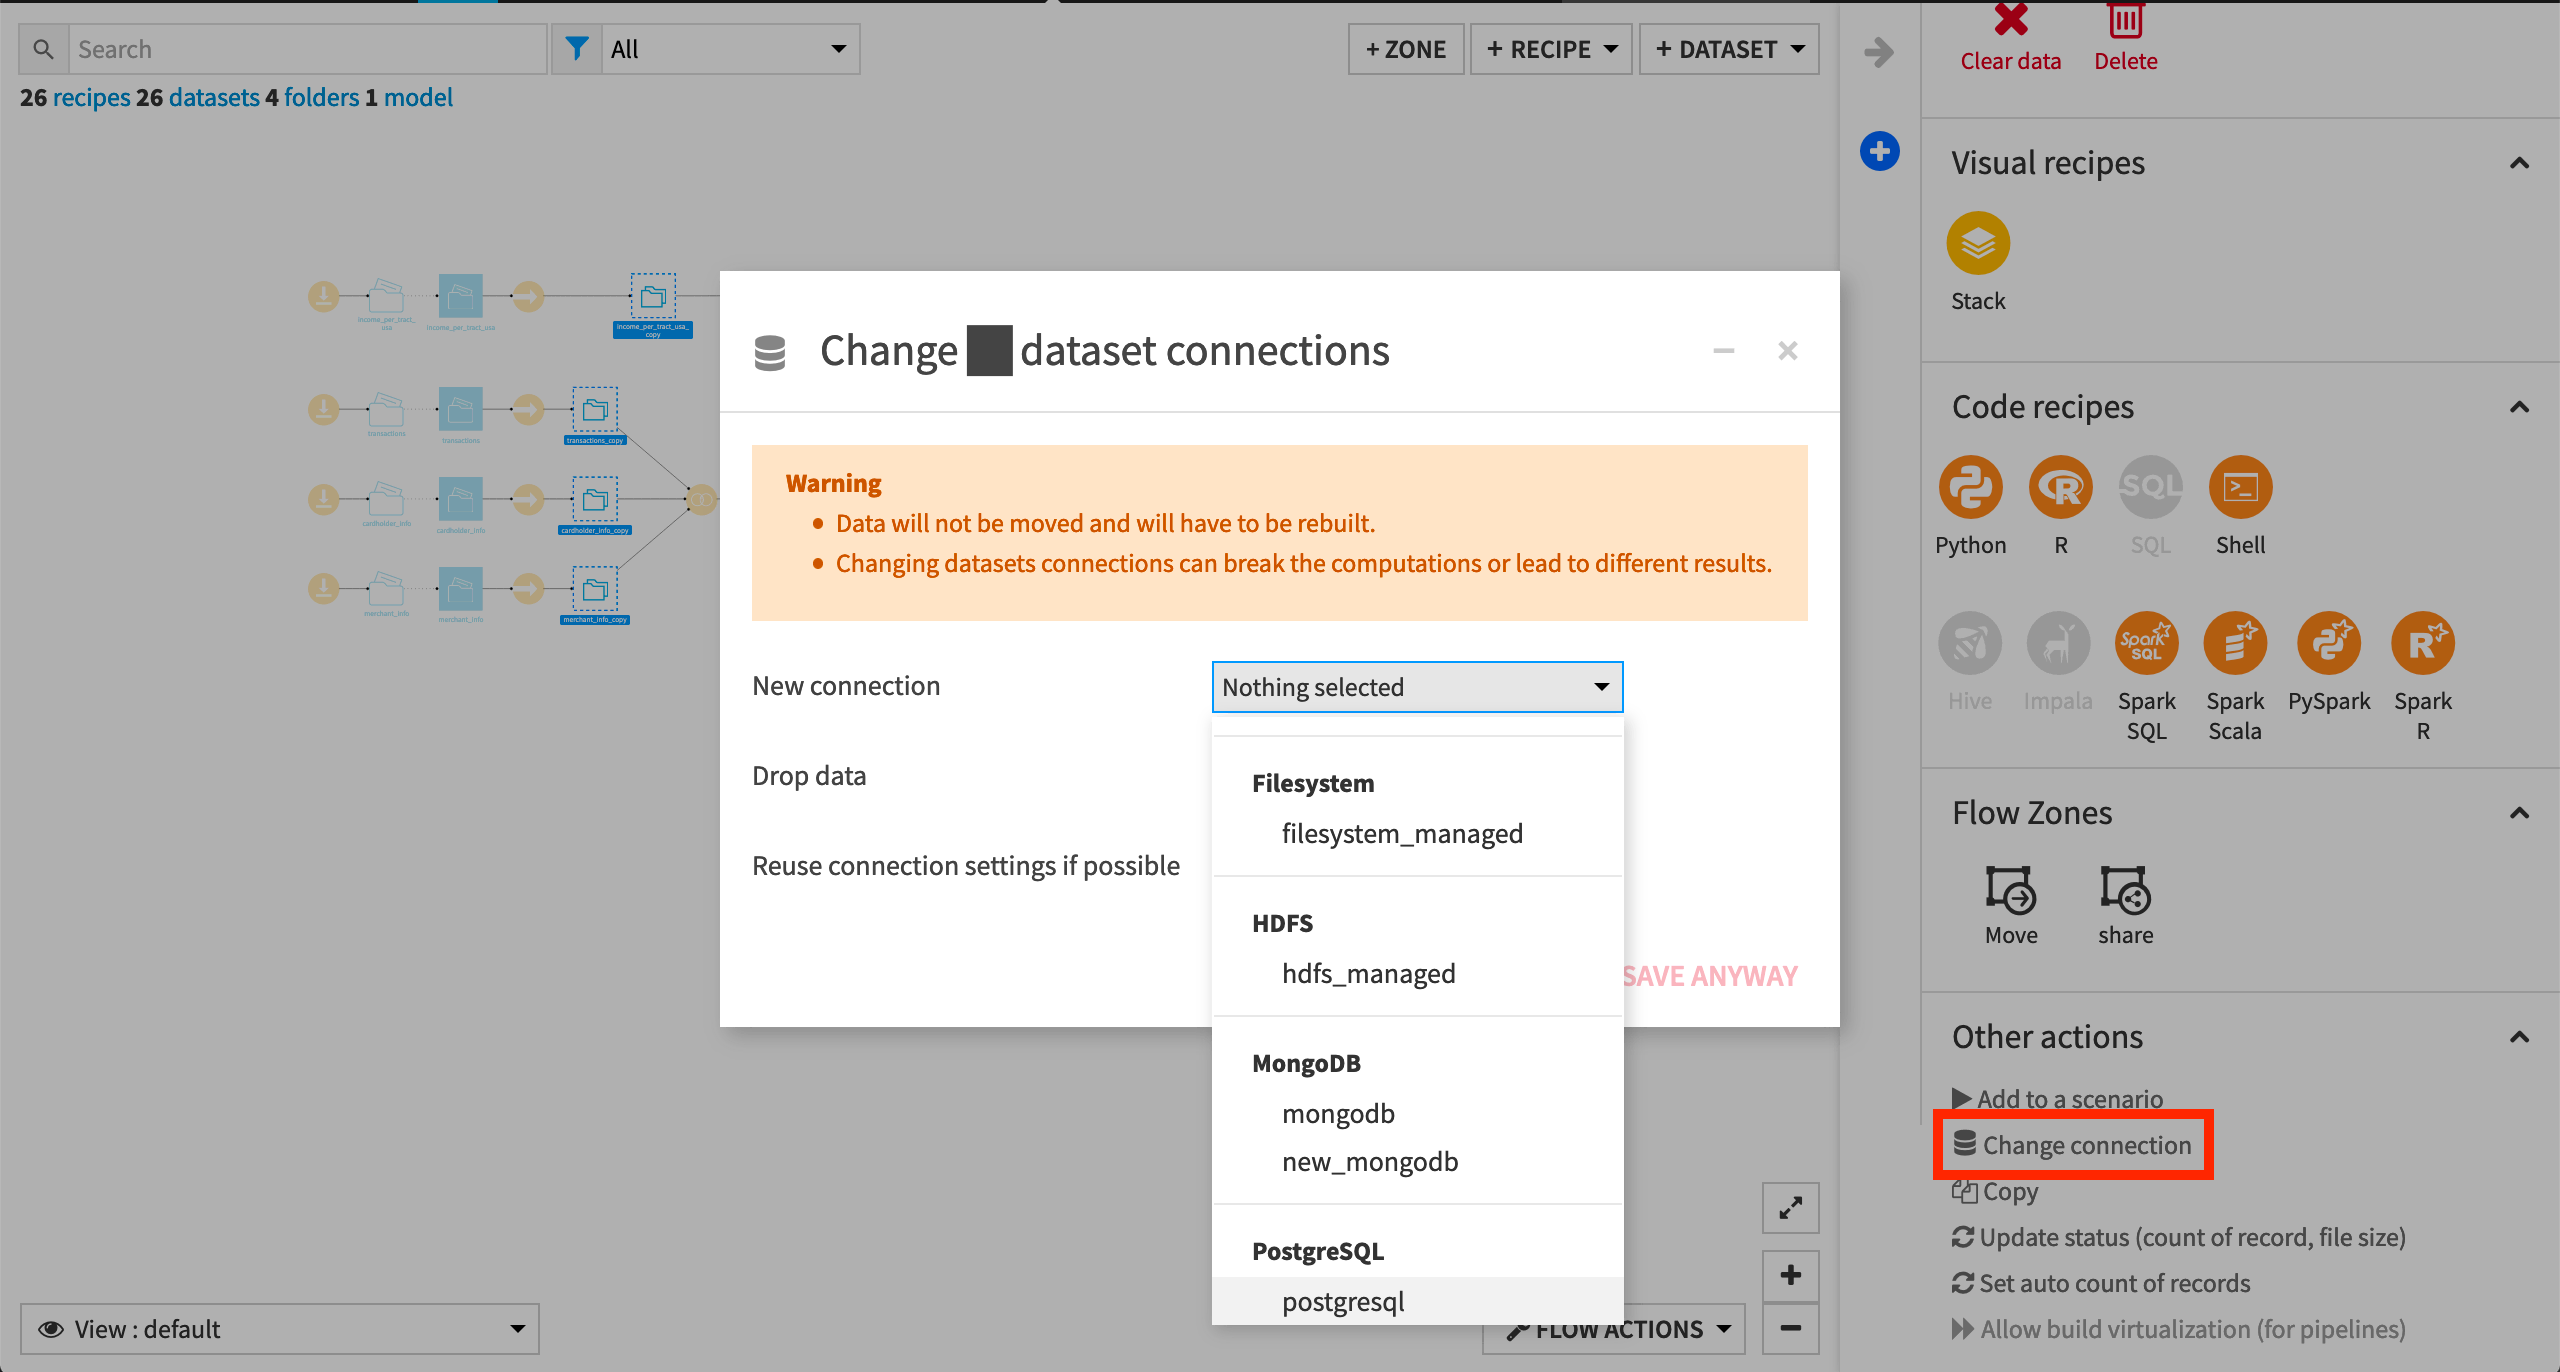
Change Dataset Connections (Optional)
Aside from the input datasets, all of the others are empty managed filesystem datasets.
You are welcome to leave the storage connection of these datasets in place, but you can also use another storage system depending on the infrastructure available to you.
To use another connection, such as a SQL database, follow these steps:
Select the empty datasets from the Flow. (On a Mac, hold Shift to select multiple datasets).
Click Change connection in the “Other actions” section of the Actions sidebar.
Use the dropdown menu to select the new connection.
Click Save.
Note
For a dataset that is already built, changing to a new connection clears the dataset so that it would need to be rebuilt.
Note
Another way to select datasets is from the Datasets page (G+D). There are also programmatic ways of doing operations like this that you’ll learn about in the Developer learning path.
The screenshots below demonstrate using a PostgreSQL database.
Whether starting from an existing or fresh project, ensure that the datasets income_per_tract_usa_copy and transactions_by_merchant_id are built.
See Build Details Here if Necessary
From the Flow, select the end datasets required for this tutorial: income_per_tract_usa_copy and transactions_by_merchant_id
Choose Build from the Actions sidebar.
Leave the setting “Build required dependencies” in place.
Click Build to start the job, or click Preview to view the suggested job.
In the Jobs tab, you can see all the activities that Dataiku will perform.
Click Run, and observe how Dataiku progresses through the list of activities.
Inspect the Data
Imagine we’d like to investigate the possible association between known fraud and the income level near a merchant’s location.
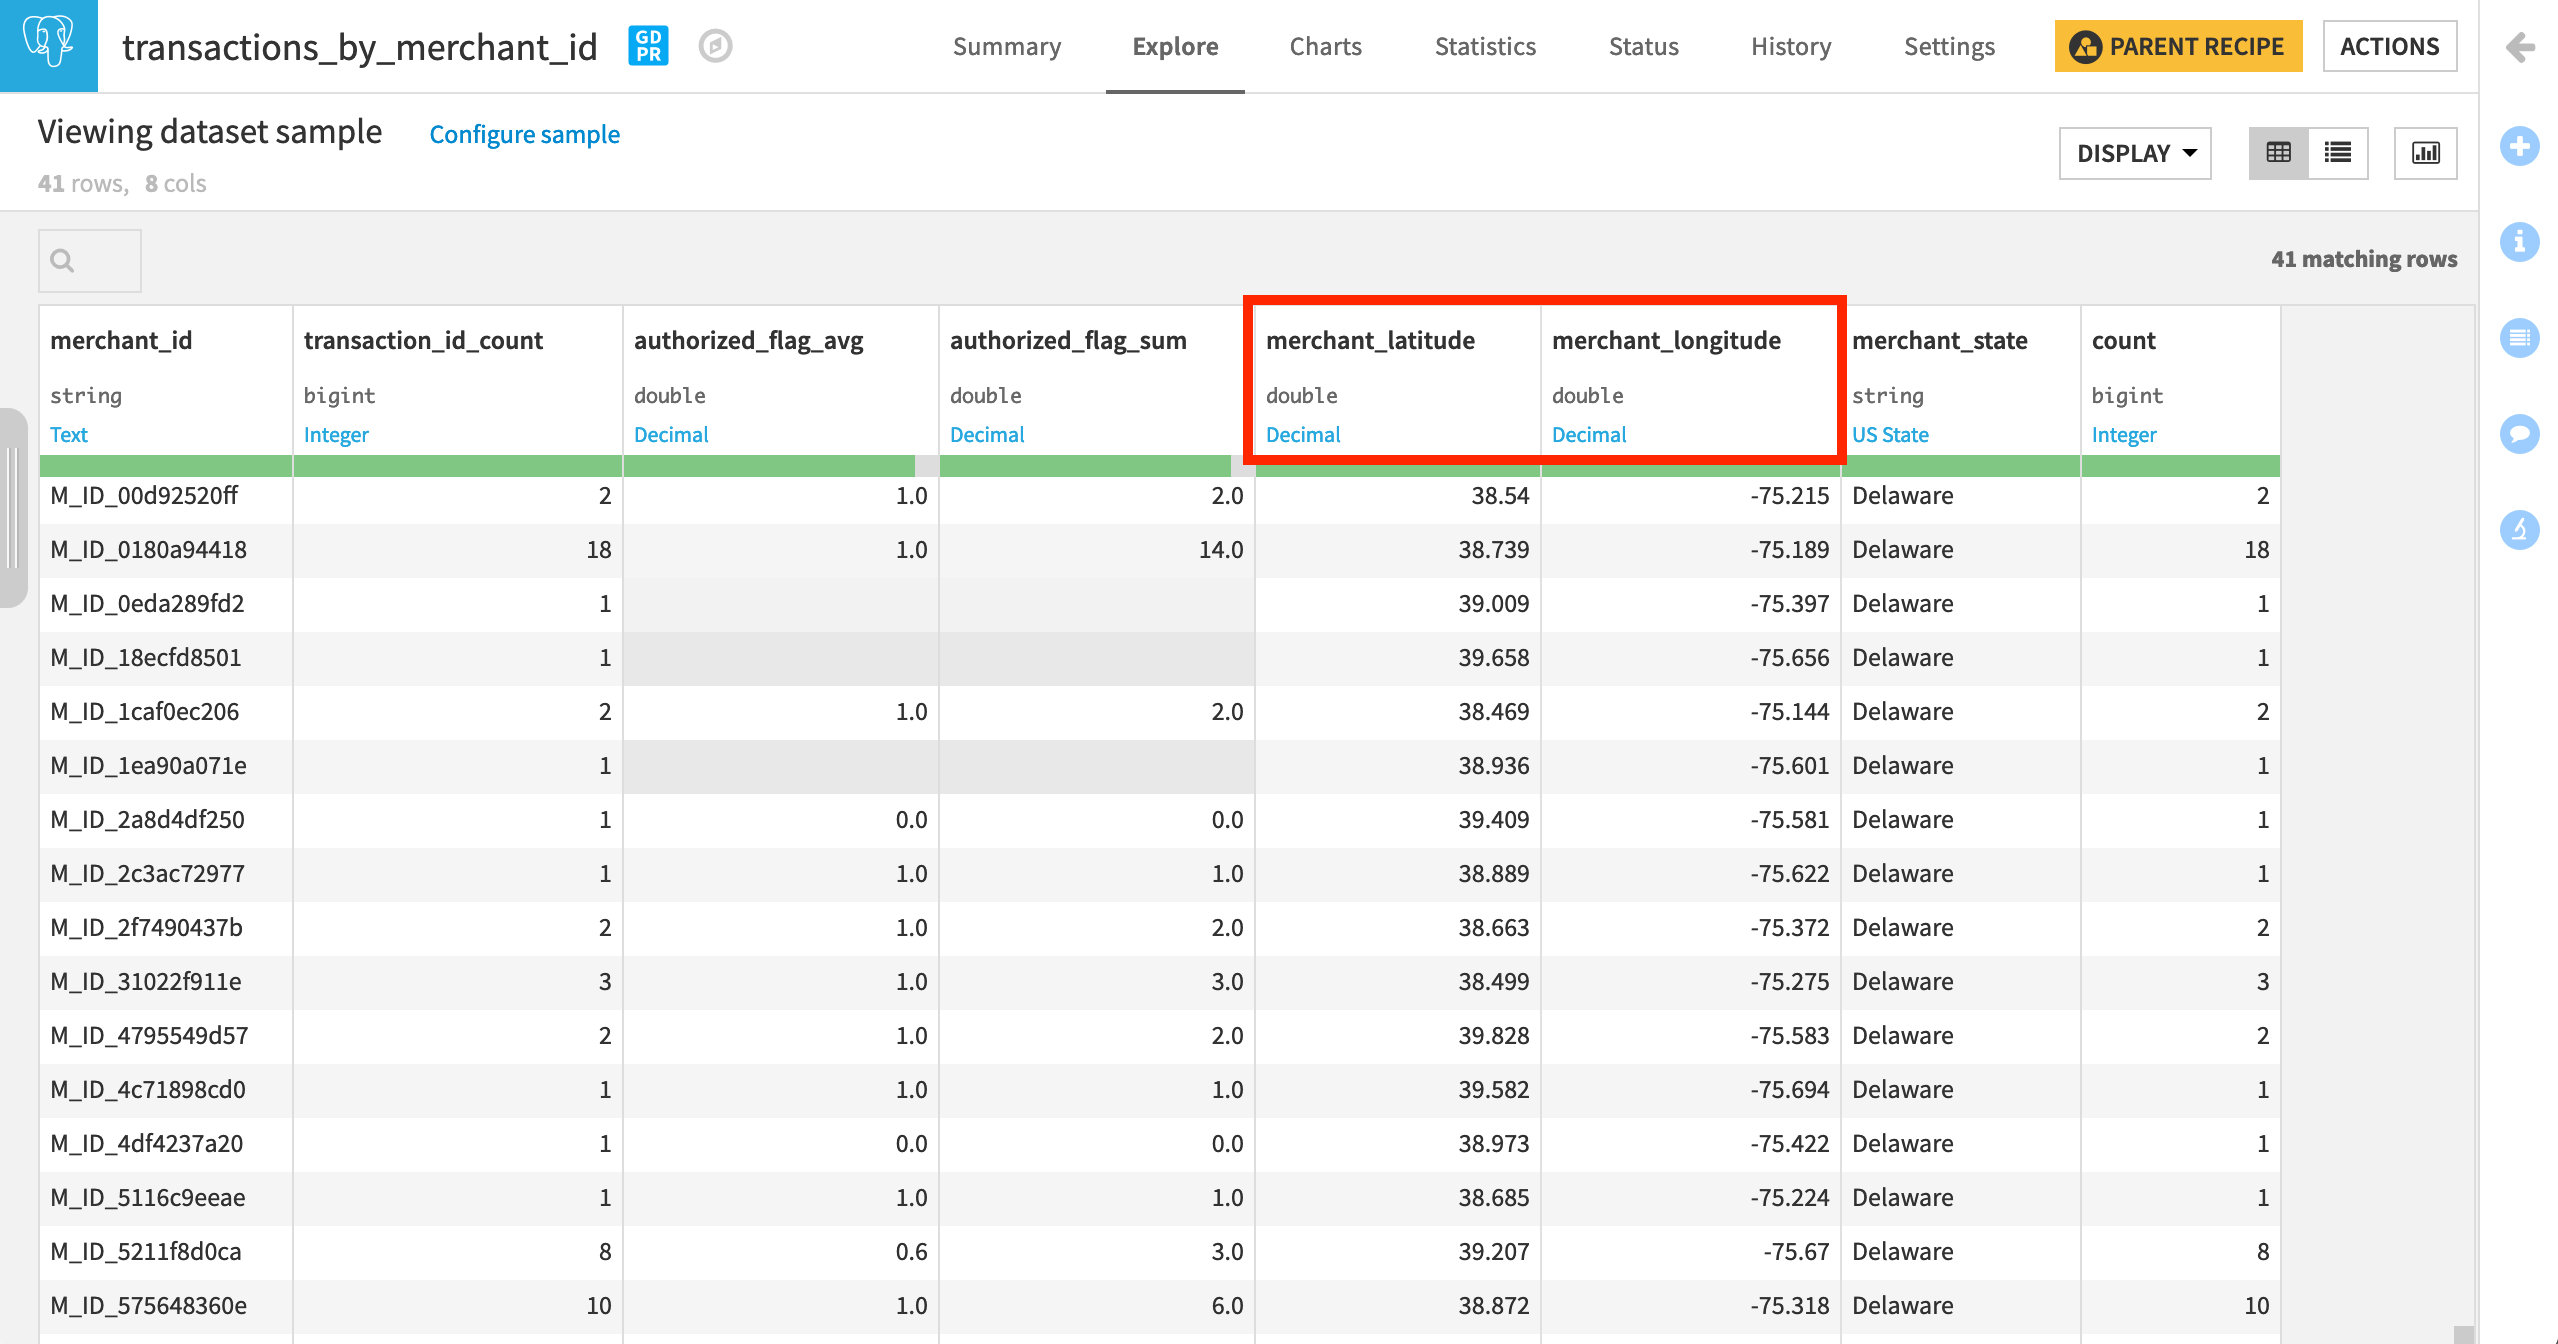
In addition to the count and percentage of transactions failing authorization at every merchant, the transactions_by_merchant_id dataset tells us the location of every merchant. However, we don’t yet know the income level near those merchant locations.
The income_per_tract_usa_copy dataset, however, includes the average_tract_income for a large number of census tracts.

Note
In decreasing levels of specificity, the US Census Bureau defines states, counties, census tracts, block groups, and finally census blocks.
If we can find out which census tract a merchant belongs to, we can also know the average income near every merchant. The Census USA plugin can provide this missing connection.
Access the US Census Plugin
Normally, to query the US Census Bureau we would have to write code that uses their API to request data. The Census USA plugin, however, includes recipes that have a graphical user interface (GUI) wrapper around the code to do this.
How you access the Census USA plugin will depend on which of its components that you choose to use. This plugin consists of six components — three dataset connectors and three visual recipes.
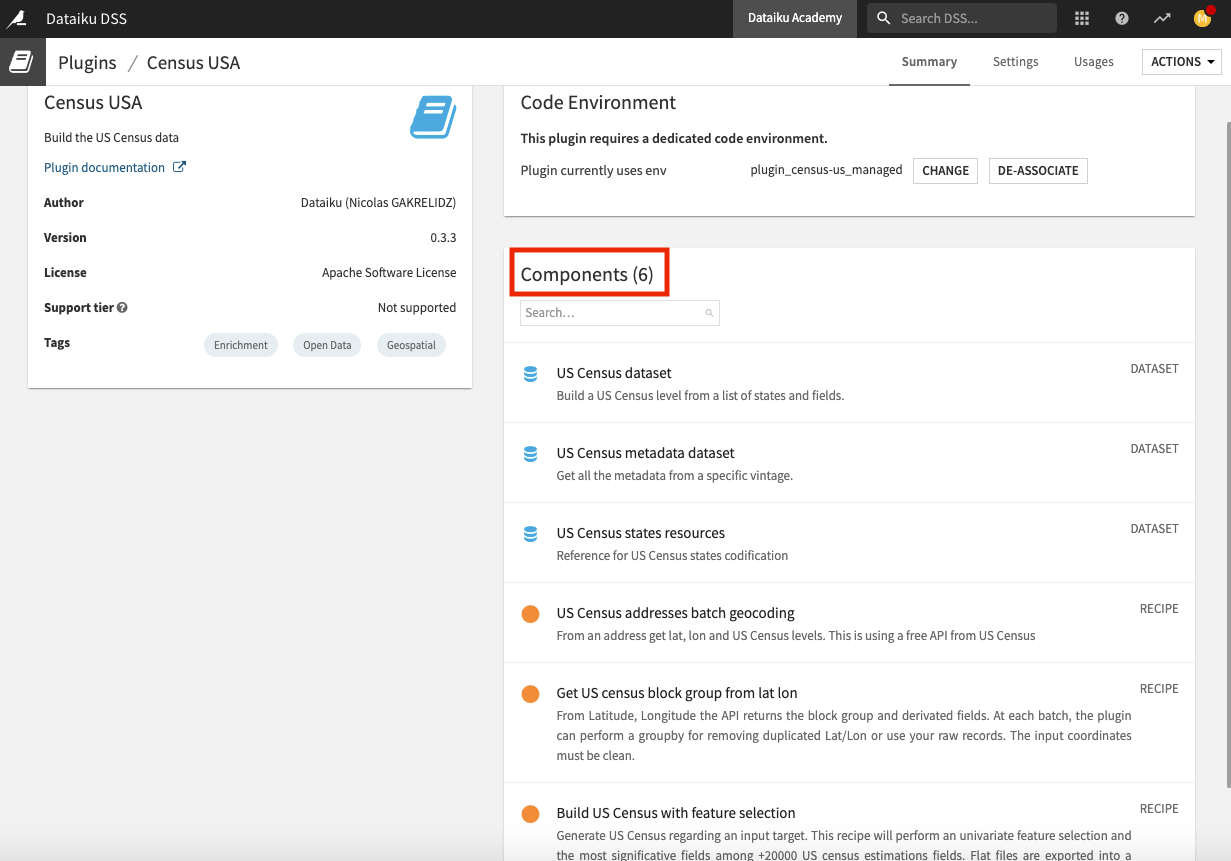
We’ll use the Get US census block group from lat lon recipe to find the census tract to which each merchant belongs.
Select the transactions_by_merchant_id dataset.
In the Actions panel, click Census USA from the “Plugin recipes” section to bring up a window containing the three recipes in the plugin.
Select the Get US census block group from lat lon recipe.
Configure the Plugin Recipe
The dialog for creating this plugin recipe is no different than for a native visual recipe.
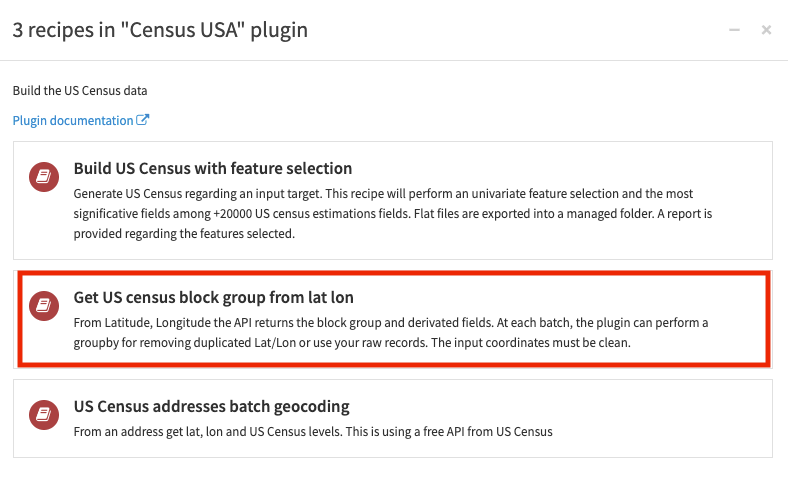
In the recipe creation dialog, name the output dataset
merchant_census_tracts.Click Create Dataset, and Create.
Once on the recipe’s settings page:
Specify the value of “Column LATITUDE” as merchant_latitude and “Column LONGITUDE” as merchant_longitude.
Leave a few default settings in place:
Public_AR_Current as the “Benchmark” to use the most recent snapshot of the US Census database;
Current_Current as the “Vintage” to use the current address ranges as of the selected benchmark;
1 as the “API call throttle” to define the pause in seconds between each API call. For a larger dataset, you may need to increase this.
Select Use an id column as the value for “param_strategy.”
Specify the “Input Column ID” to correspond to the unique IDs in the
merchant_idcolumn of the dataset.Then Run the recipe.
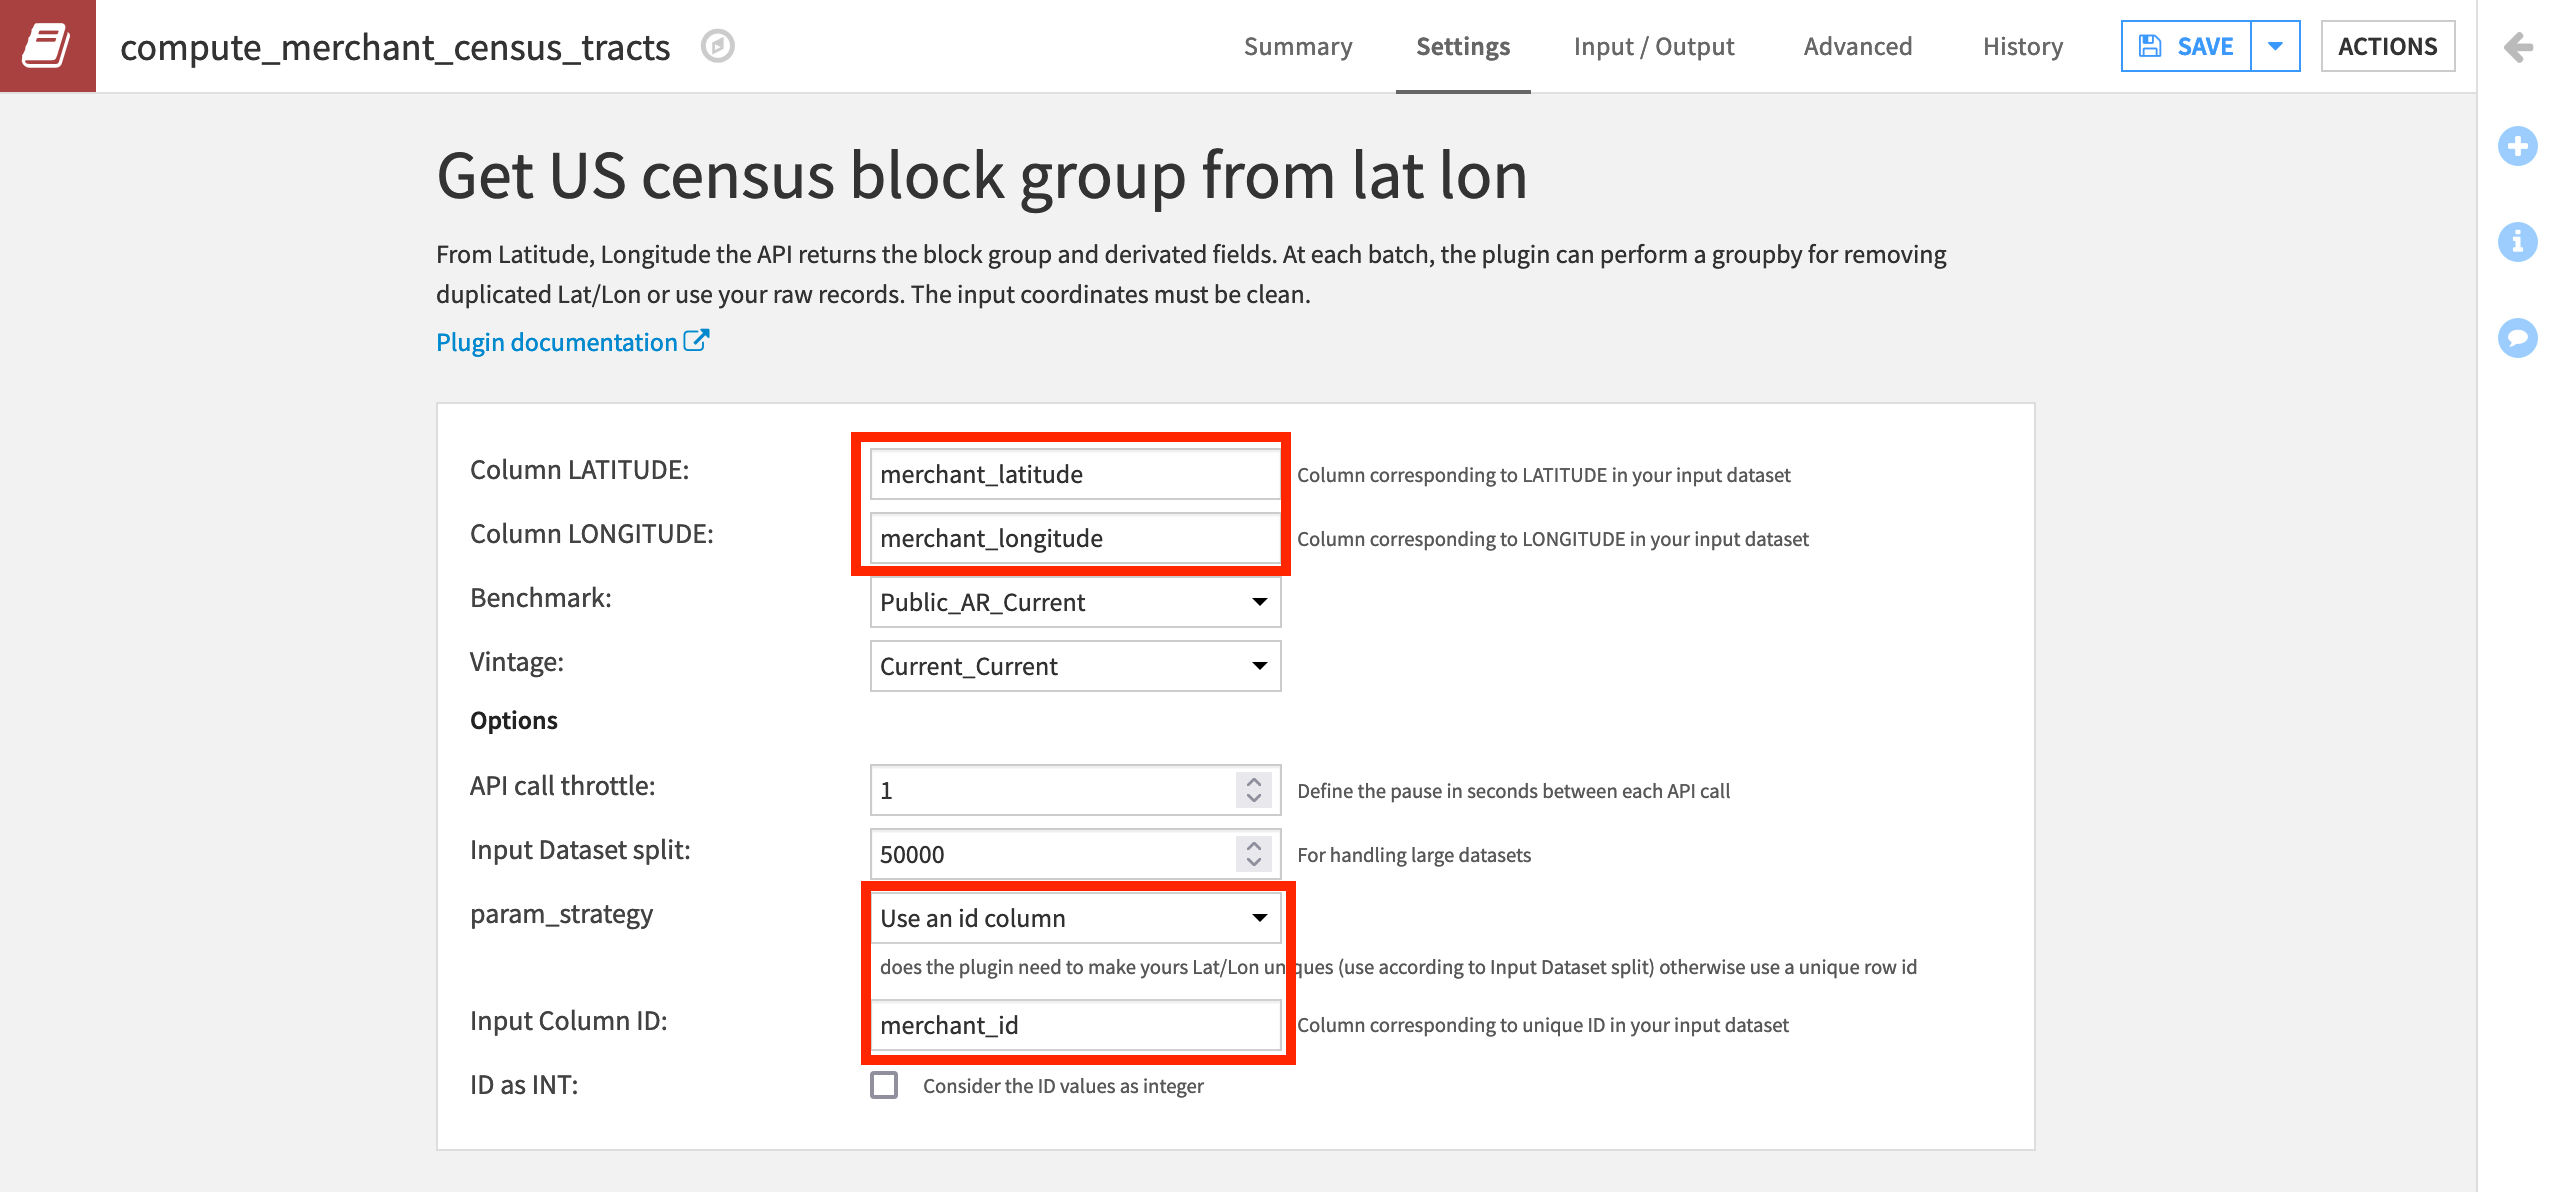
You can see that the output dataset contains geographical information about the census tract ID and the state, county, and block codes.
In the output dataset, we now have the Census-defined categories (most importantly tract_id) for every merchant_id.
Join the Datasets
All that’s left is to join in the income data so we have the average_tract_income for every merchant_id in one dataset!
From the merchant_census_tracts dataset, initiate a Join recipe.
Select the additional input dataset transactions_by_merchant_id.
Click Create Recipe.
Now we just have to define the Join conditions.
On the Join step, click +Add Input.
Select income_per_tract_usa_copy as the “New input dataset” to be joined with the “Existing input dataset” merchant_census_tracts.
Click Add Dataset.
All of the join keys and selected columns should be correct so go ahead, and Run the recipe.
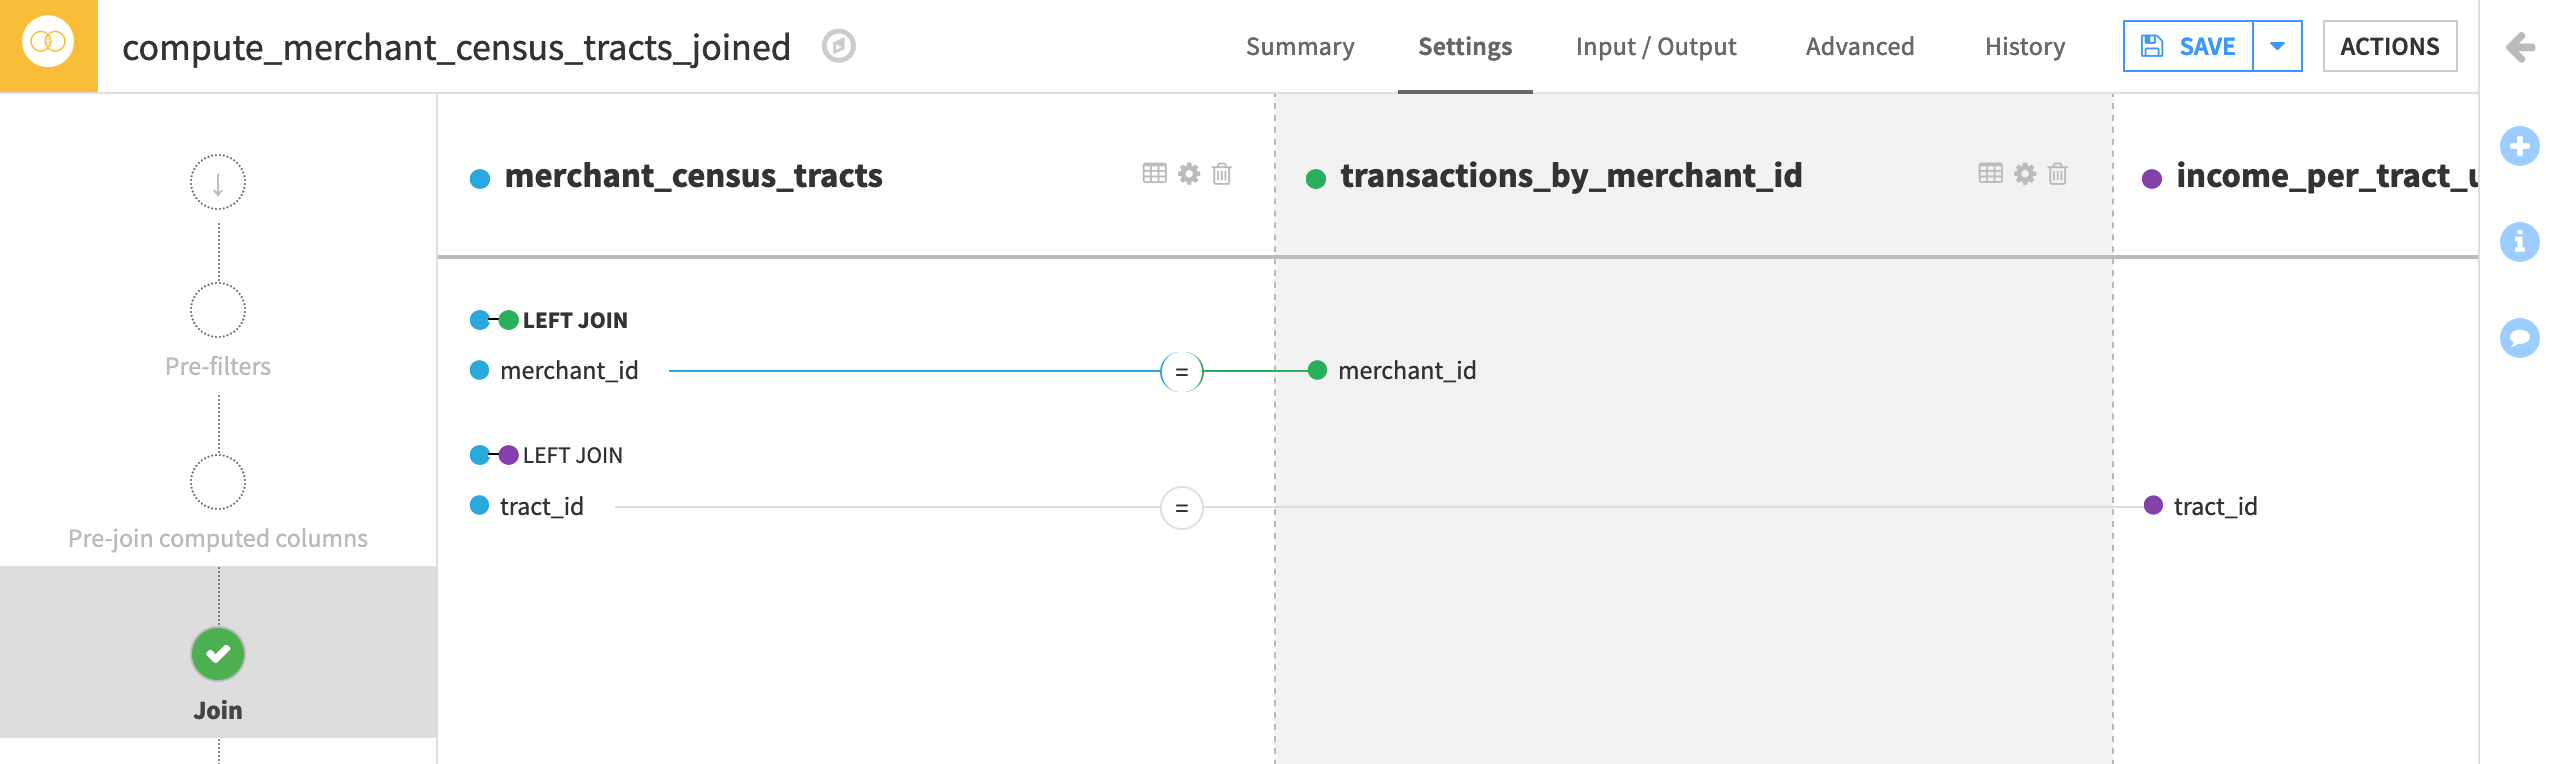
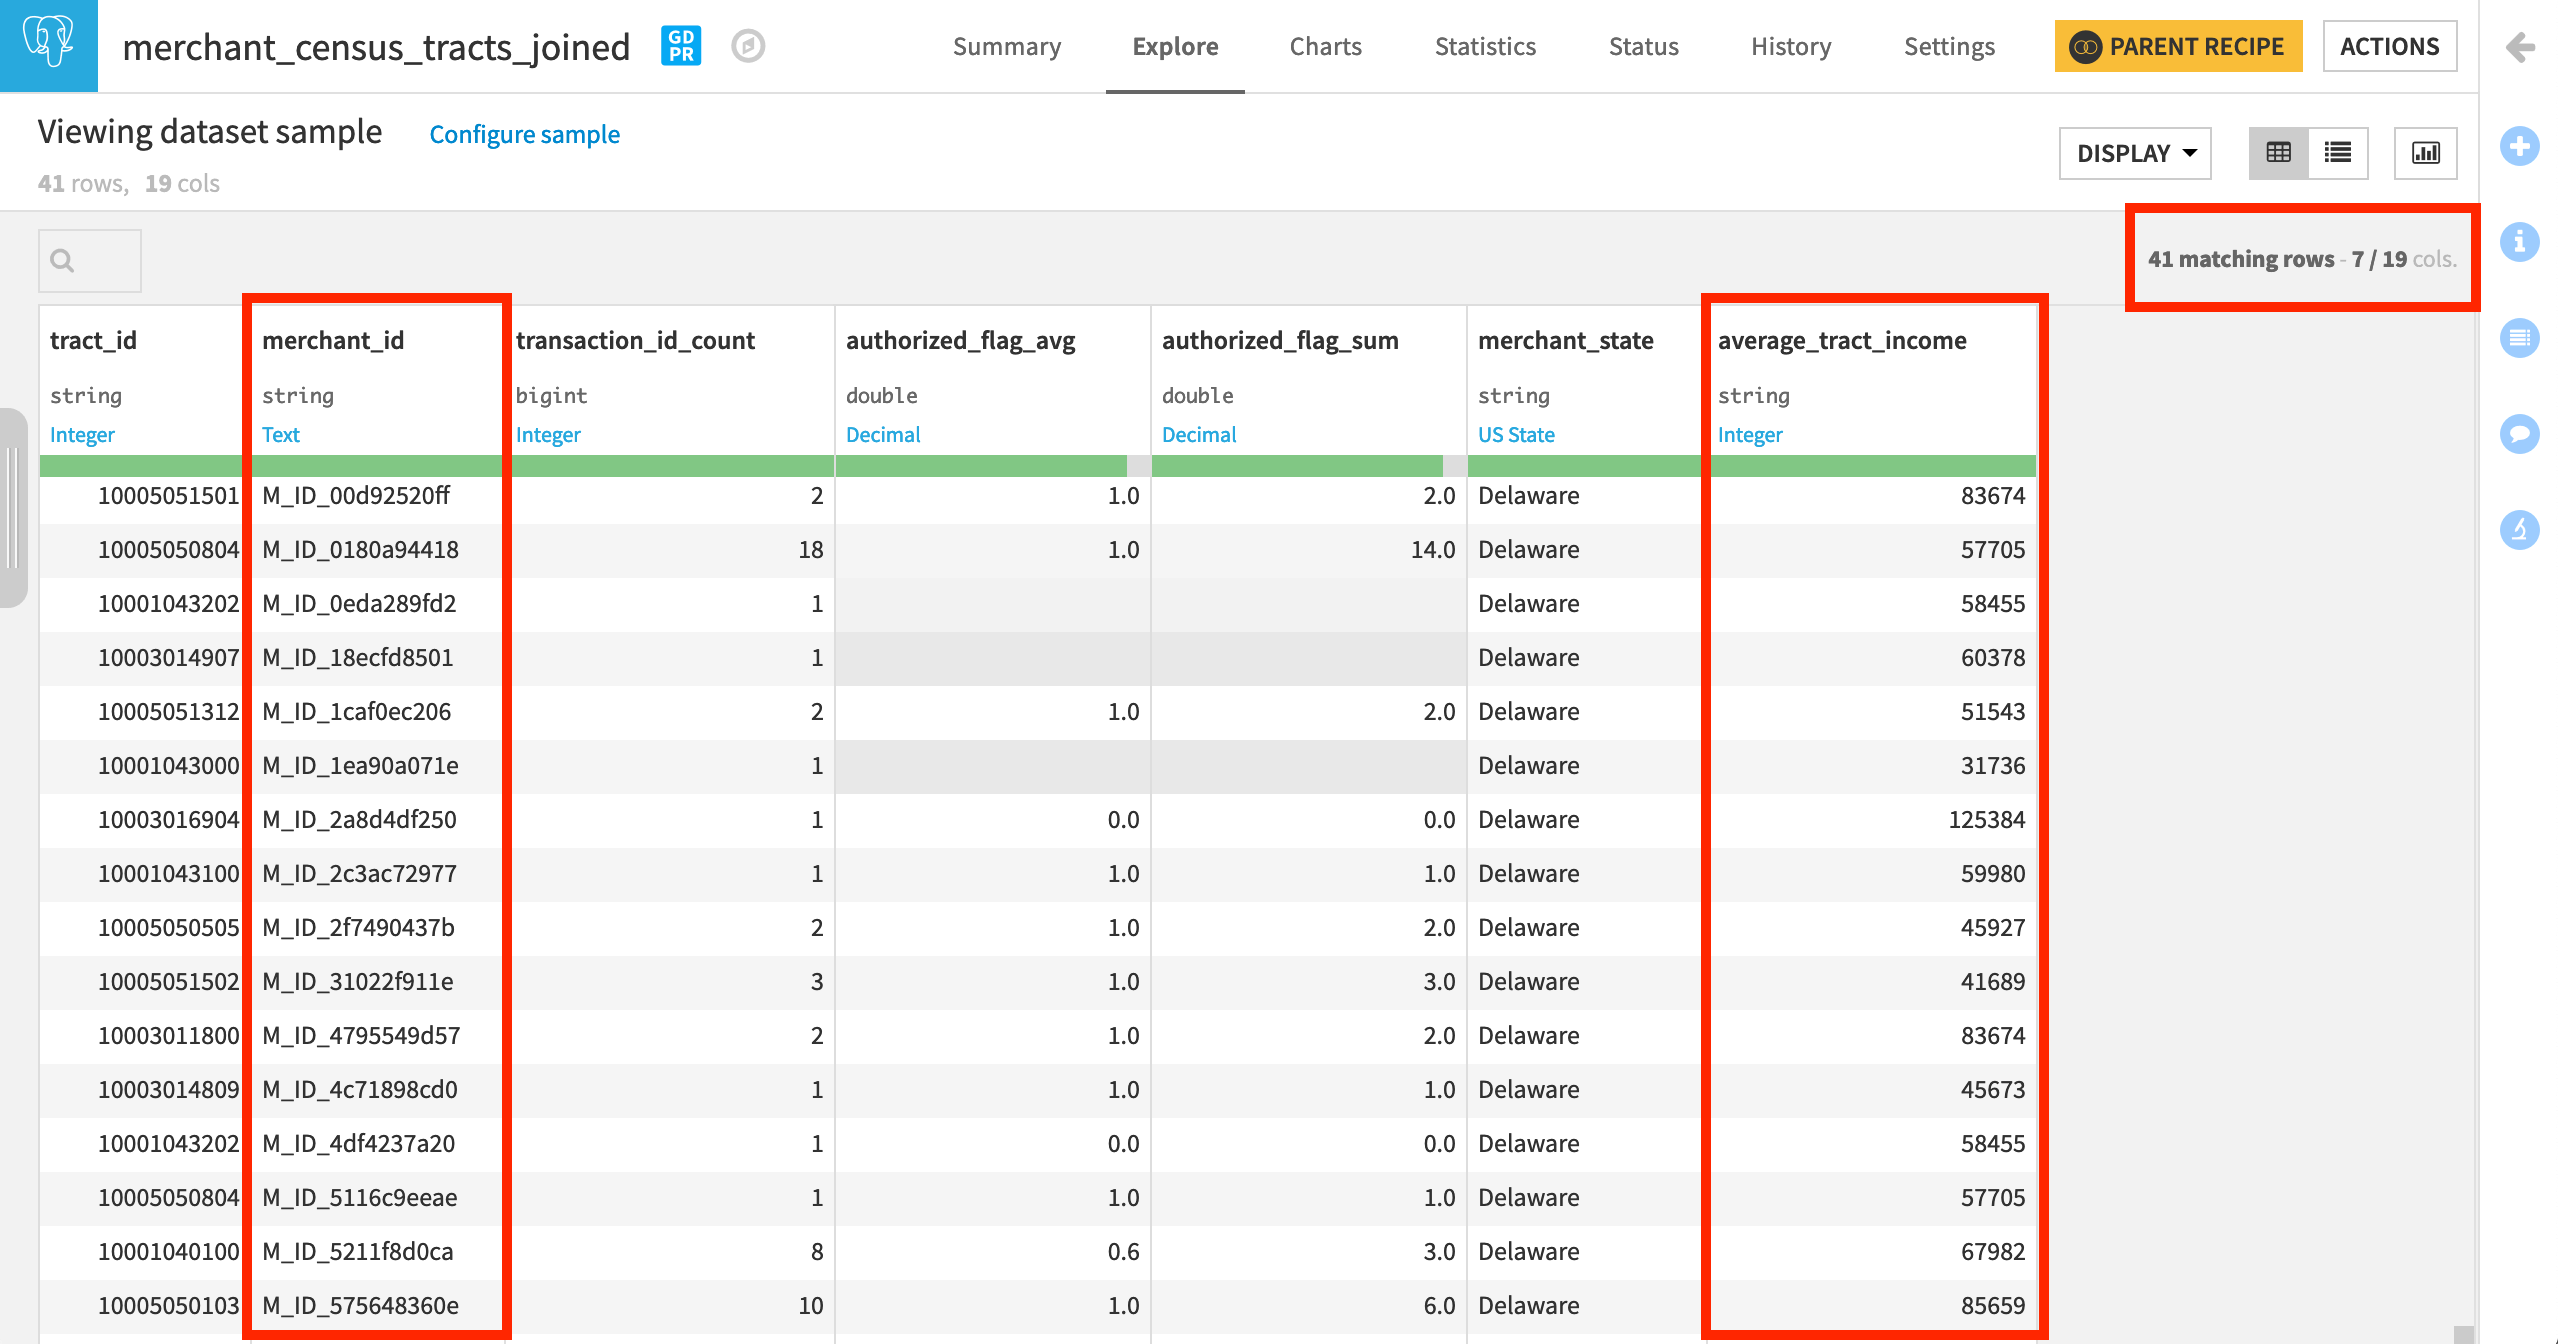
In the output dataset, we now know the average_tract_income for every merchant_id.
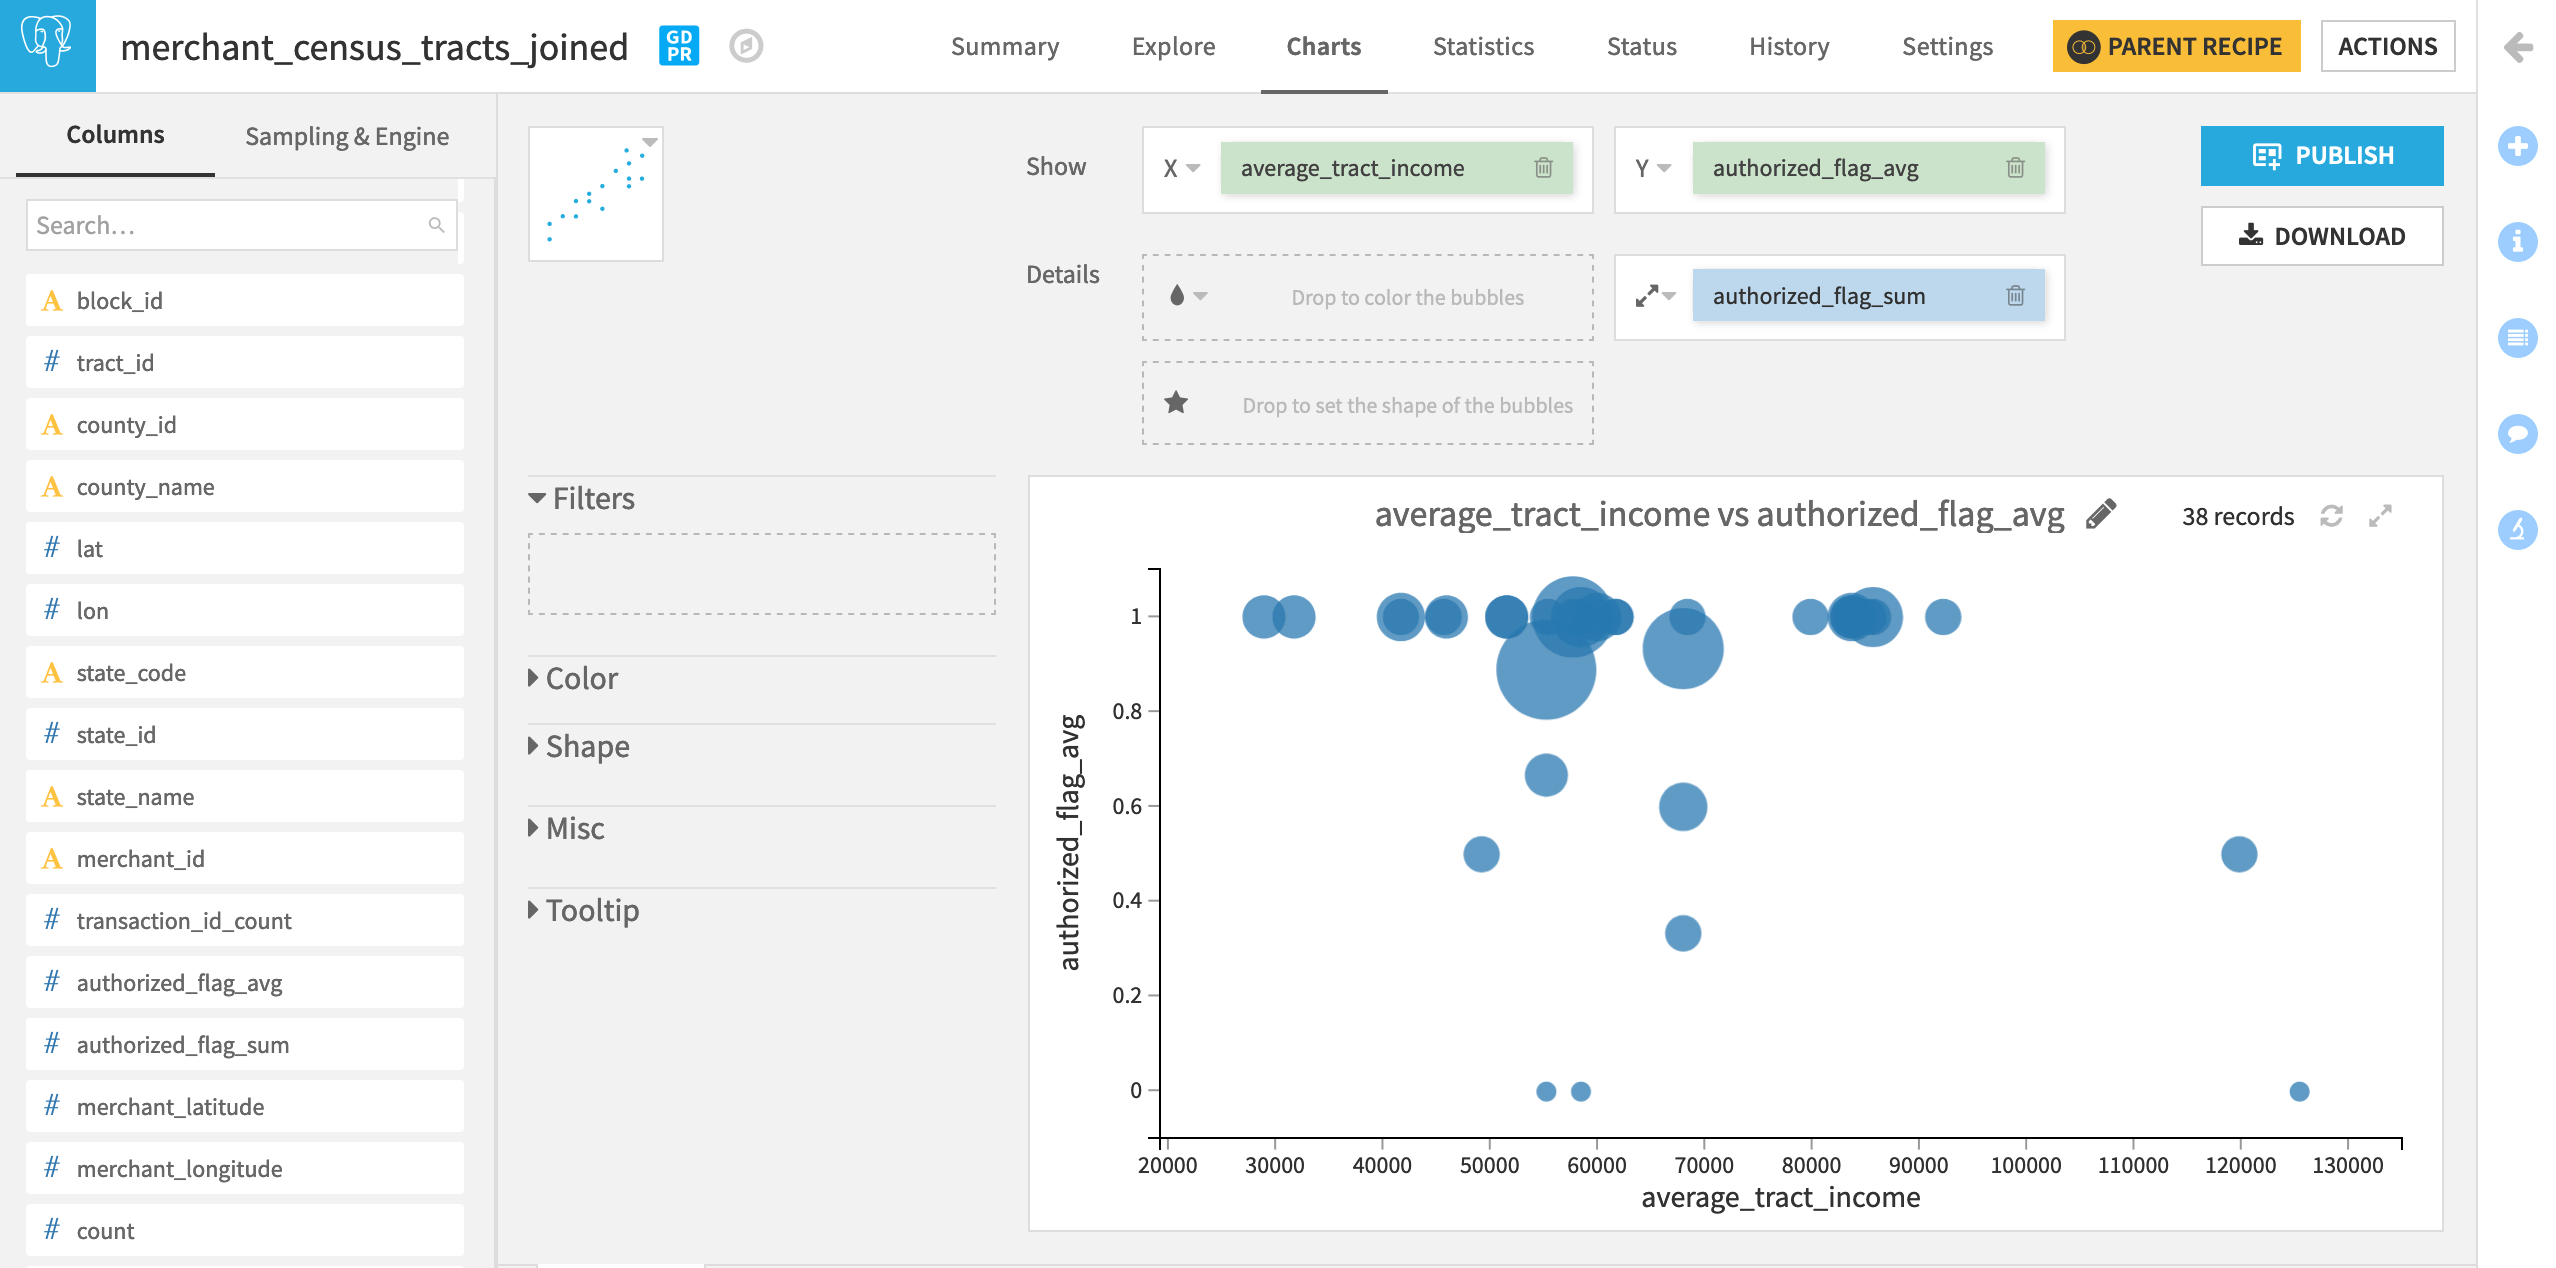
This enables us to explore the association (or lack thereof) between income and fraud. The chart below though doesn’t suggest much of a relationship–at least for the state of Delaware–where we find transactions that fail authorization in poor, middle income, and rich census tracts.
Learn More
Great job! Now you have some hands-on experience working with a plugin recipe. This is just a first step in working with plugins. You can try using other components in the Census USA plugin, such as the dataset connectors. You can also install plugins that include other kinds of components and try using them in your workflow.
Be sure to register for the Academy Plugin Store course to validate the knowledge gained from this tutorial.