Hands-On Tutorial: Scenarios (Part 2)
In the section above, we saw how to use built-in metrics and checks to monitor the status of datasets and models in Dataiku DSS.
Now let’s see how to use these metrics and checks inside of a scenario to automate workflows.
Create a Scenario
Let’s create our first scenario.
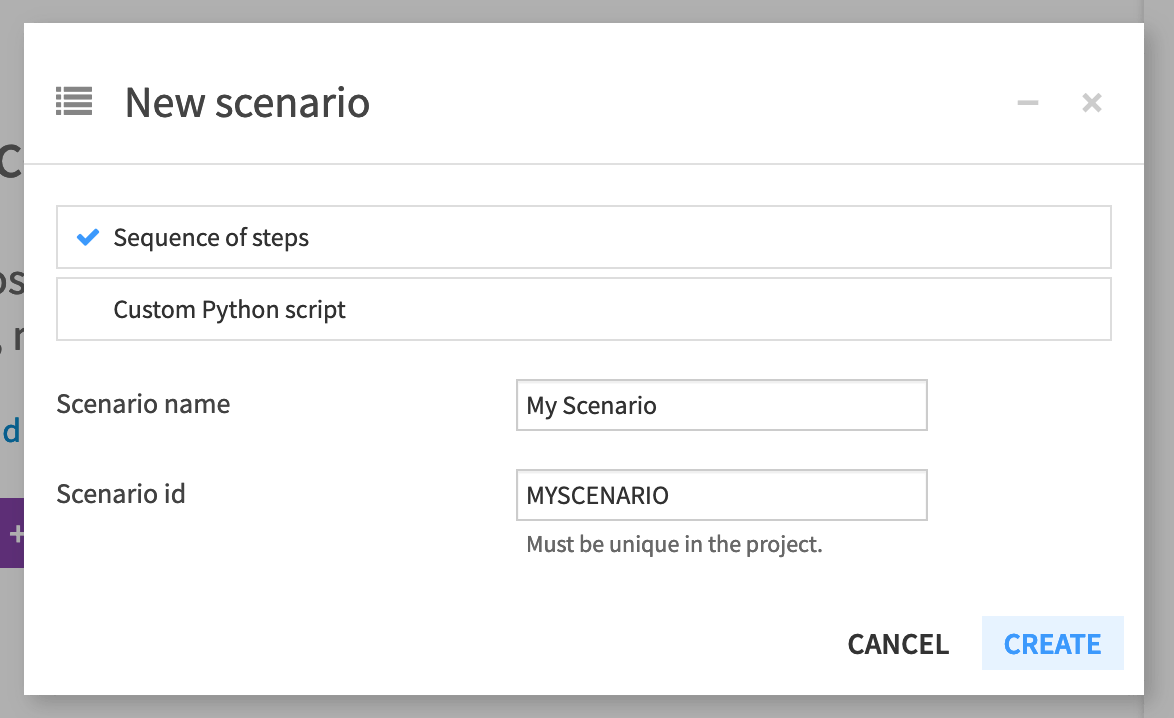
From the Jobs menu, navigate to the Scenarios panel, and create a new scenario.
Ensure “Sequence of steps” is selected, and name it
My Scenario.
Note
We’ll see the Custom Python scenario in the next part of the tutorial.
A scenario has two required components:
triggers that activate a scenario and cause it to run, and
steps, or actions, that a scenario takes when it runs.
An optional third component of a scenario is a reporter. Please see the product documentation for more information on reporters.
Add a Trigger
Dataiku DSS allows us to create many kinds of triggers to activate a scenario. These triggers can be based on:
a change in time,
a change in a dataset,
a change in the result of a SQL query,
or custom code.
Scenario Notes for Dataiku Online Users
Tip
Orbit subscribers of Dataiku Online should note that only time-based triggers are available.
Free trial users of Dataiku Online will not be able to automatically run scenarios with a trigger. When asked to do so below, they will need to manually run the scenario.
Let’s start with the simplest kind of trigger.
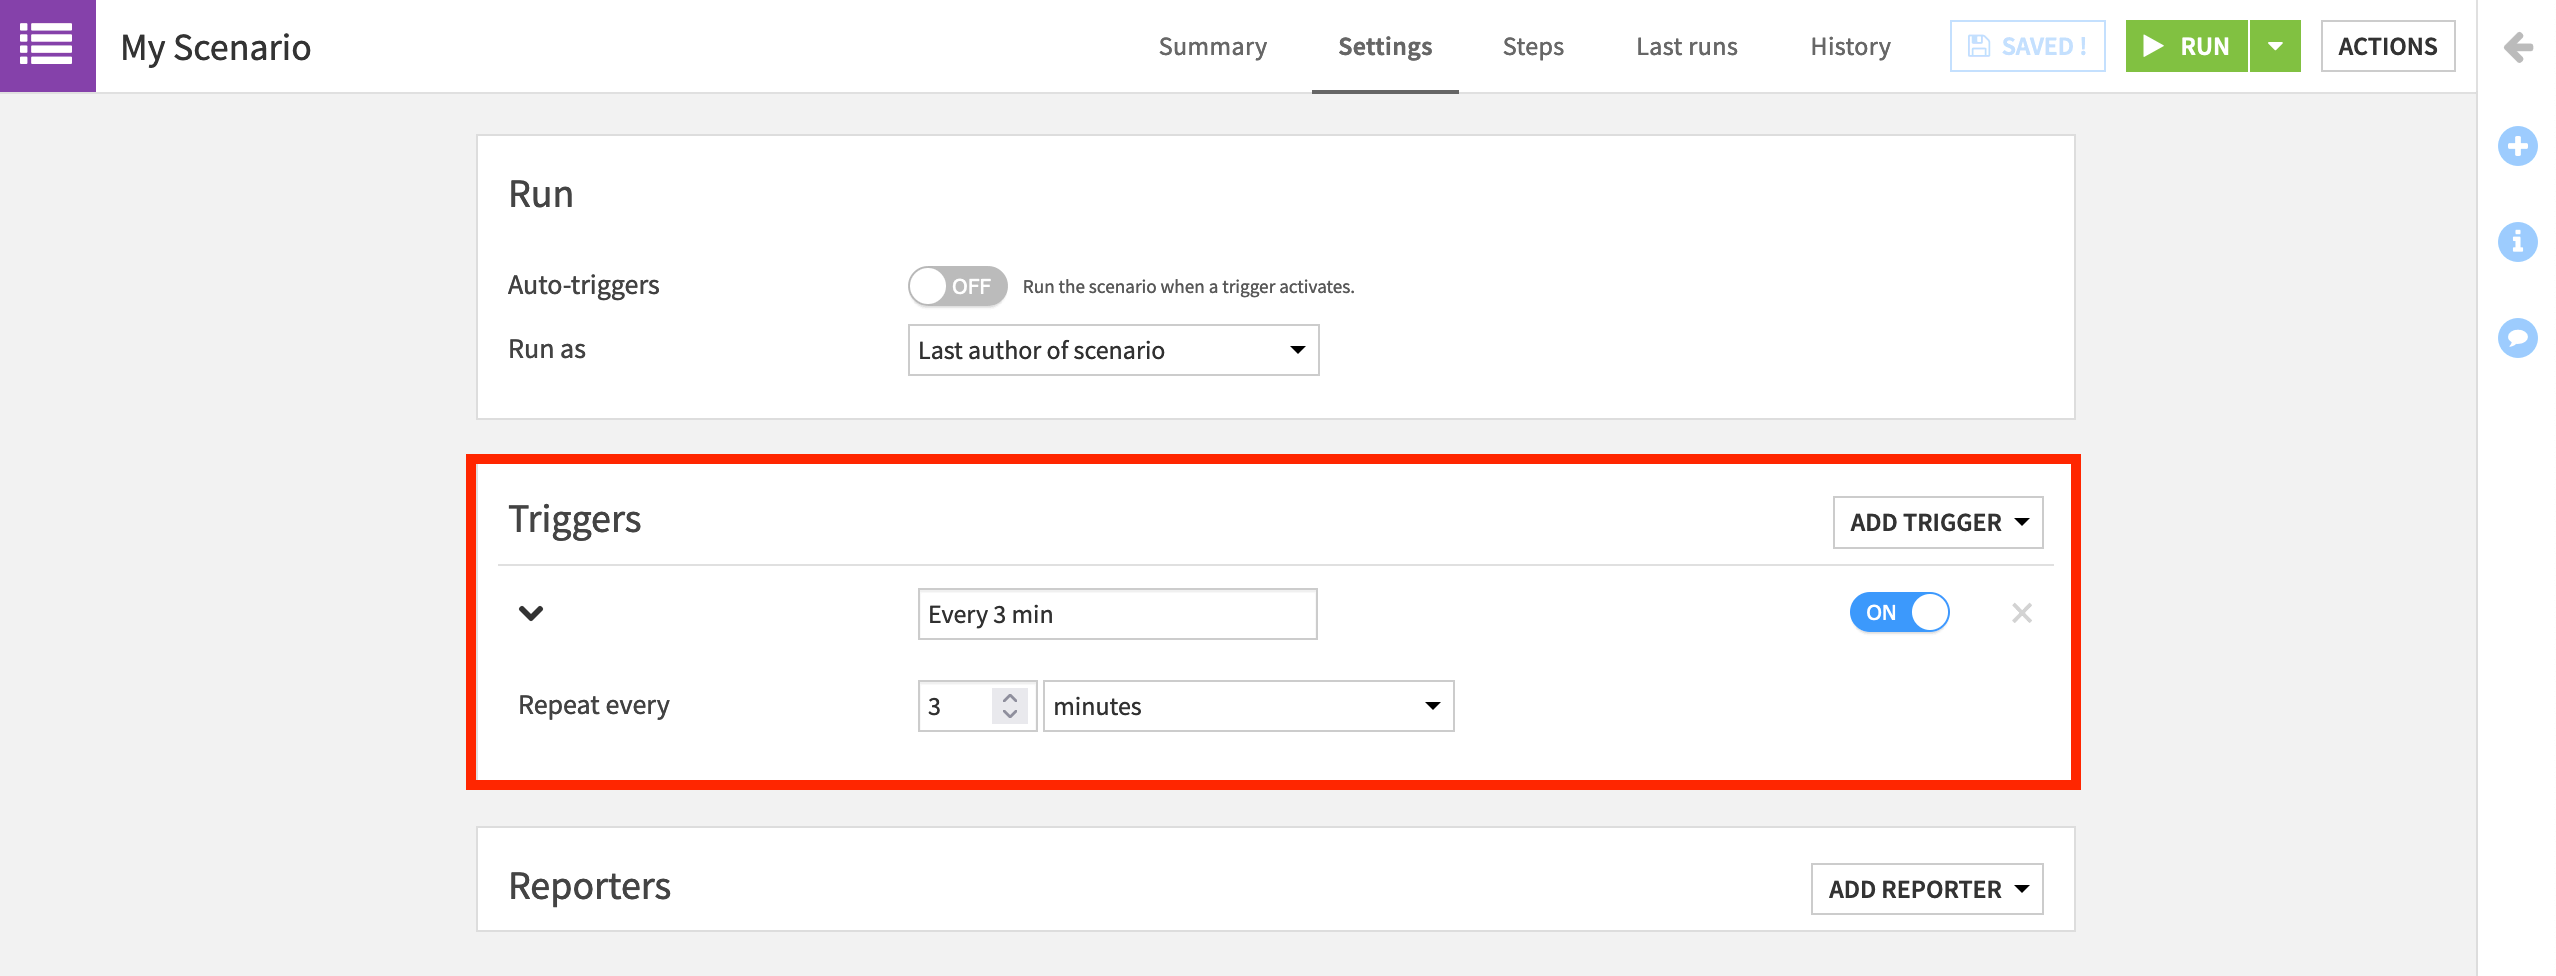
Within the Triggers panel of the Settings tab, click the Add Trigger dropdown button.
Add a Time-based trigger.
Instead of the default “Time-based”, name it
Every 3 min.Change “Repeat every” to 3 minutes.
Make sure its activity status is marked as ON.
Note
For many use cases, it would be unusual to have a scenario run this frequently. This short duration is only to let us see the scenario running in a short amount of time.
Add Steps
Now that we have a trigger in place, we need to provide the steps that the scenario will take when a trigger is activated. In a somewhat contrived example, let’s demonstrate how to rebuild datasets, compute metrics, and set project variables in a scenario.
Navigate to the Steps tab.
From the Add Step dropdown, first add a Build / Train step. Add transactions_joined_prepared as the dataset to build.
Note that this step has Build required datasets as the Build mode. Accordingly, because we won’t have “new” data in this tutorial, datasets upstream to transactions_joined_prepared will never be out of date, and this step will only build transactions_joined_prepared.
Note
To learn more about building strategies in Dataiku DSS, see the course Flow Views & Actions.
Add the step Compute metrics. Choose transactions_joined_prepared as the dataset to compute.
Earlier we manually computed metrics like the minimum and maximum of card_fico_score. Now the scenario will execute this computation whenever triggered.
Add the step Run checks. Choose transactions_joined_prepared as the dataset to check.
Checks we created, such as whether the minimum of card_fico_score is greater than or equal to 300, will be recomputed.
Add the step Check project consistency.
As our data has not changed, we know that the schema consistency check is going to run smoothly, but in a production use case, it can help detect when the schema of an input dataset has changed.
Add the step Set project variables. The current state_name variable is “Delaware”. Reset it to another state as shown below. You can imagine changing the value of the variable if some condition is met.
{
    "state_name": "Rhode Island"
}
Add a Clear step. Choose transactions_by_merchant_id as the dataset to clear.
This is the output dataset to the Group recipe which uses the state_name variable.
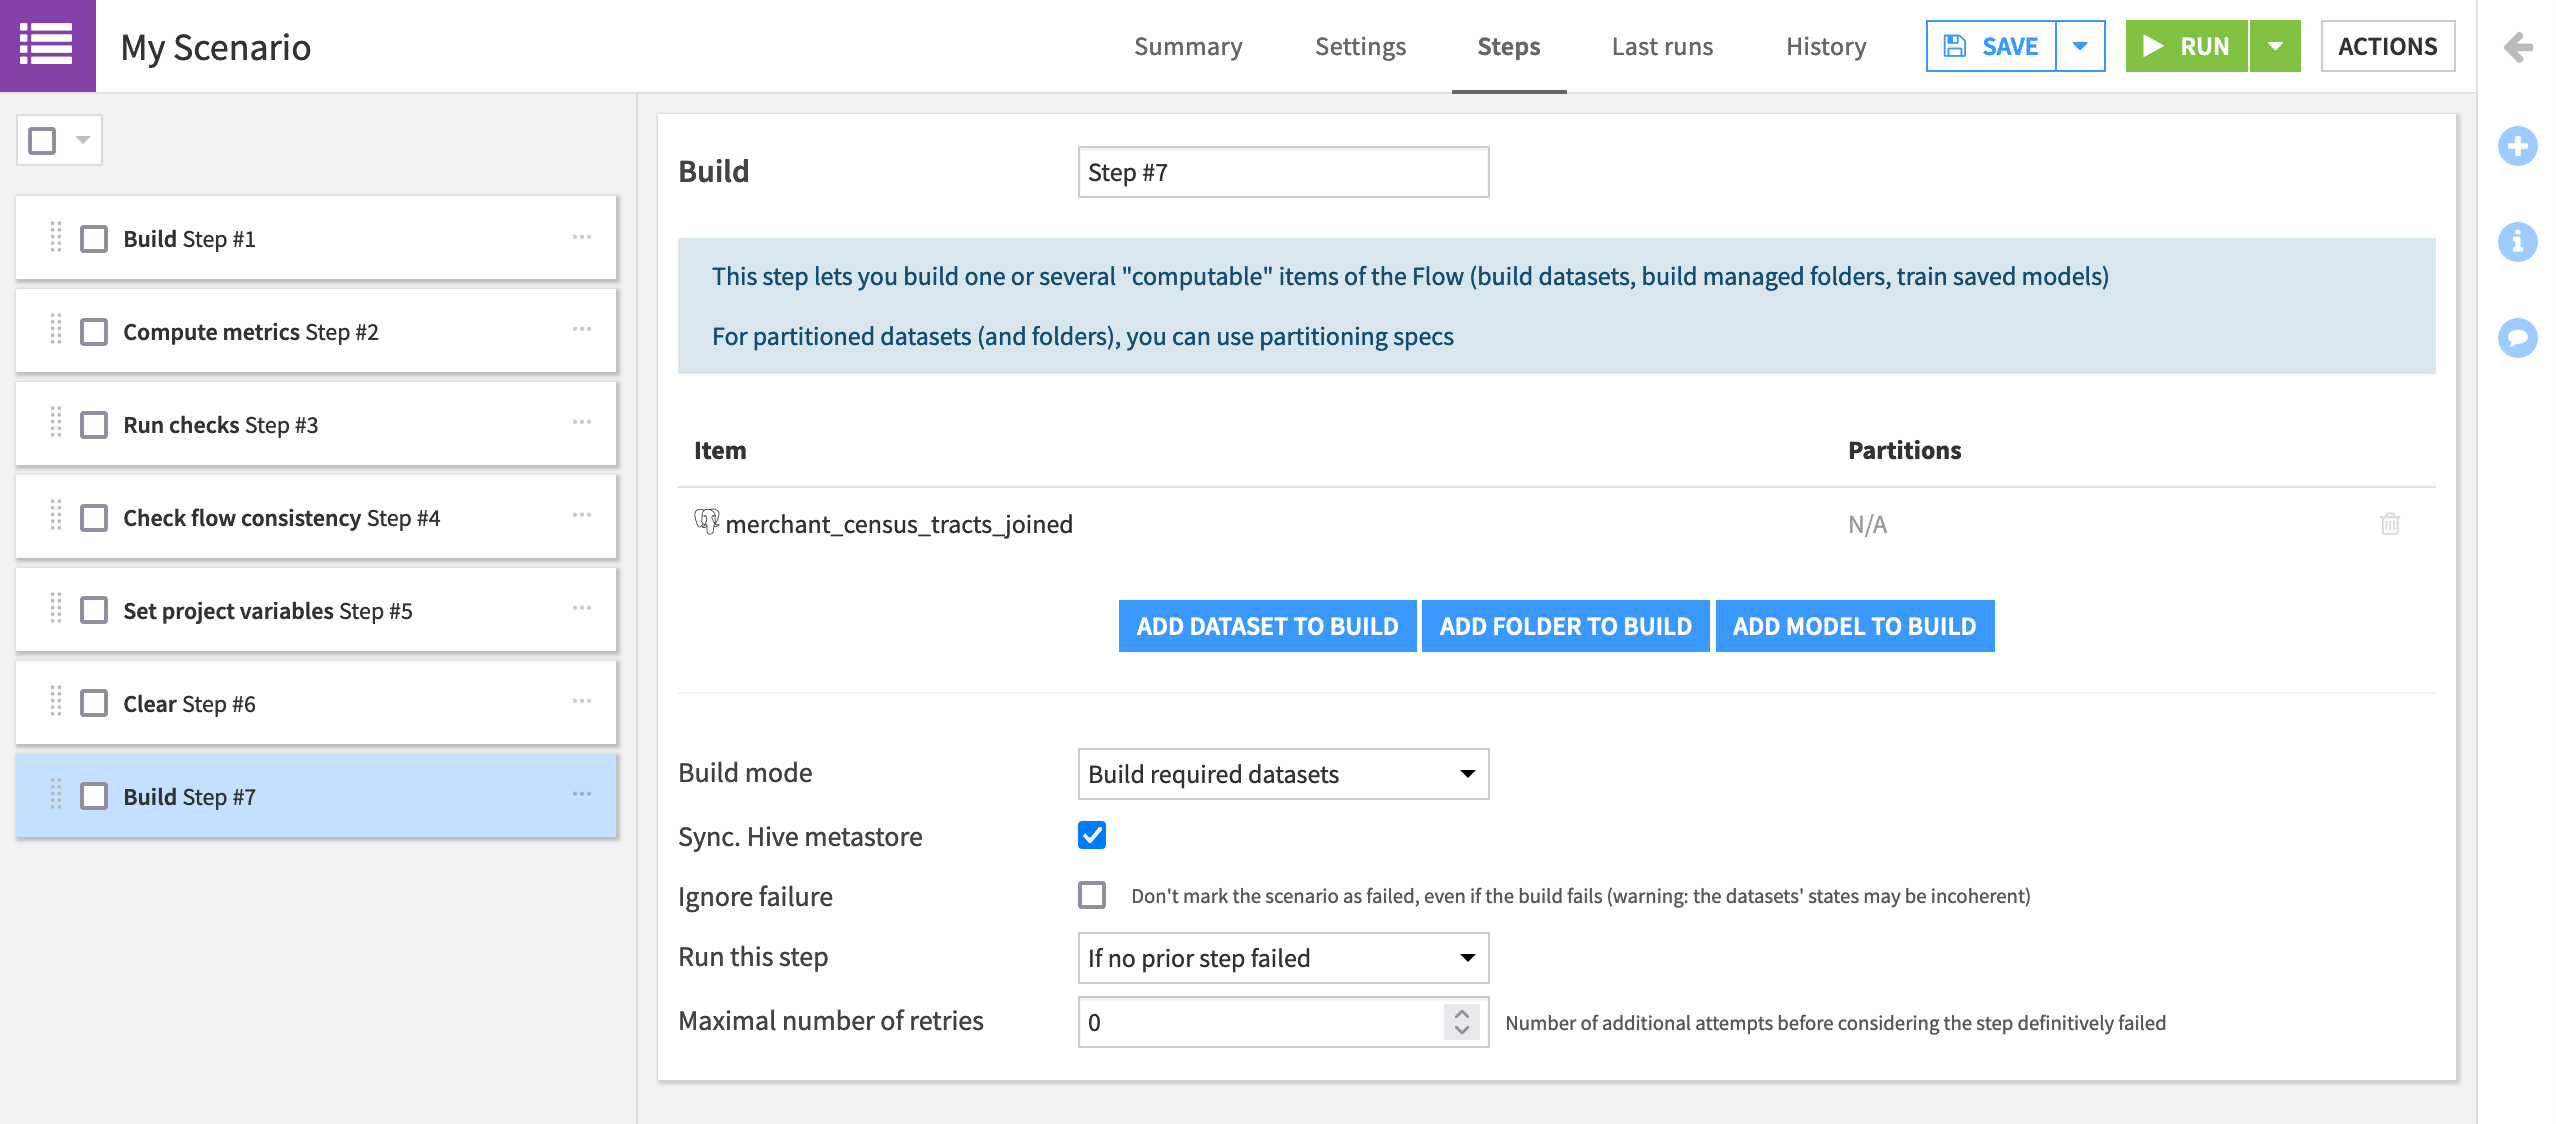
Add one more Build / Train step. Choose merchants_census_tracts_joined as the dataset to build.
With a new state_name variable and an empty transactions_by_merchant_id dataset, this section of the Flow will get rebuilt from the Group recipe.
After saving, we could click the green Run button to manually trigger the scenario. This is important to test out scenario runs, but let’s see the triggers in action!
Navigate to the Scenario panel in the Jobs menu where all scenarios for the project are listed.
Turn the “Auto-triggers” switch to “ON” to have Dataiku DSS start monitoring the triggers of the scenario.

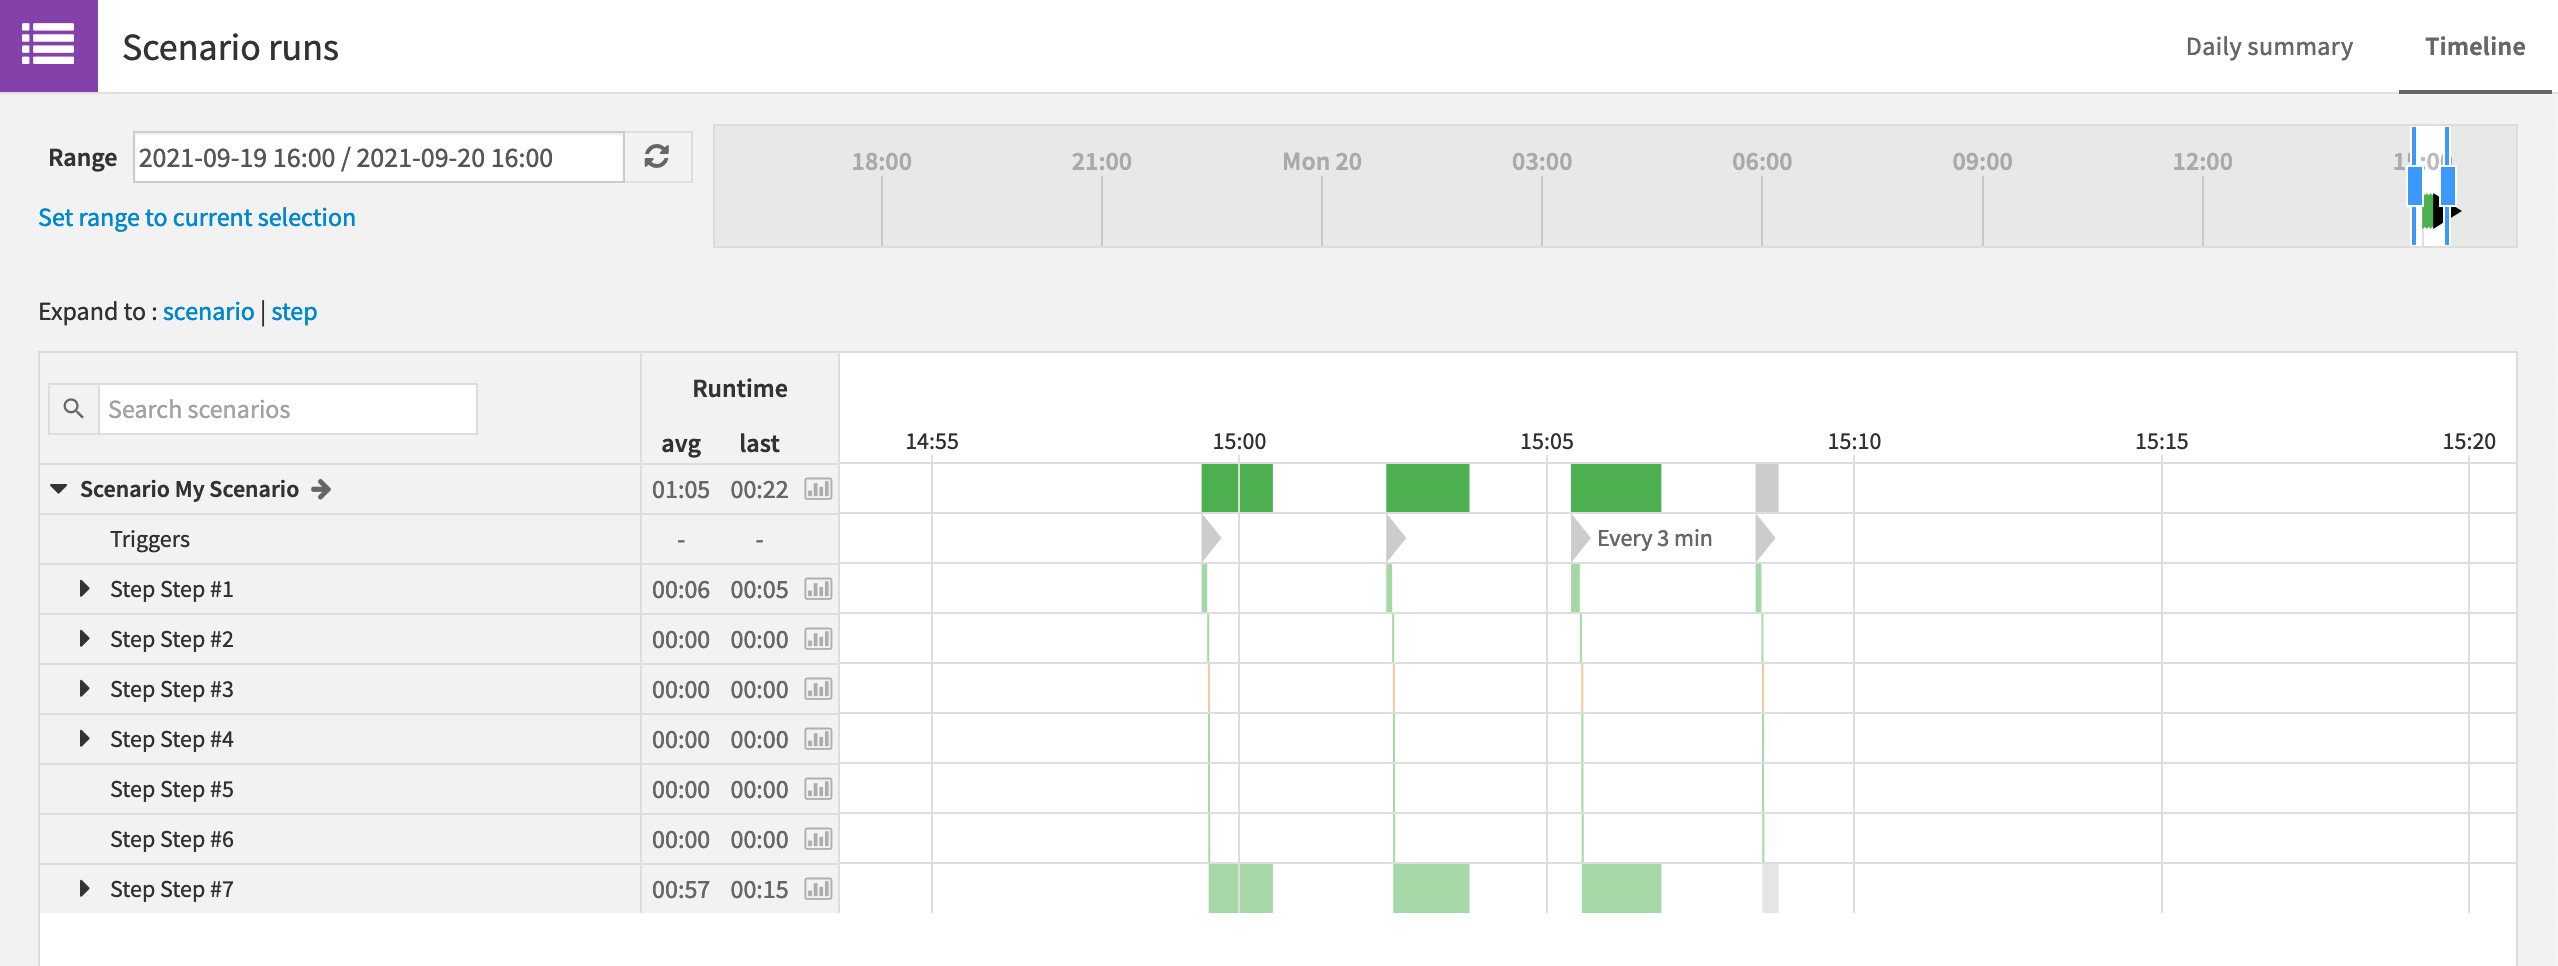
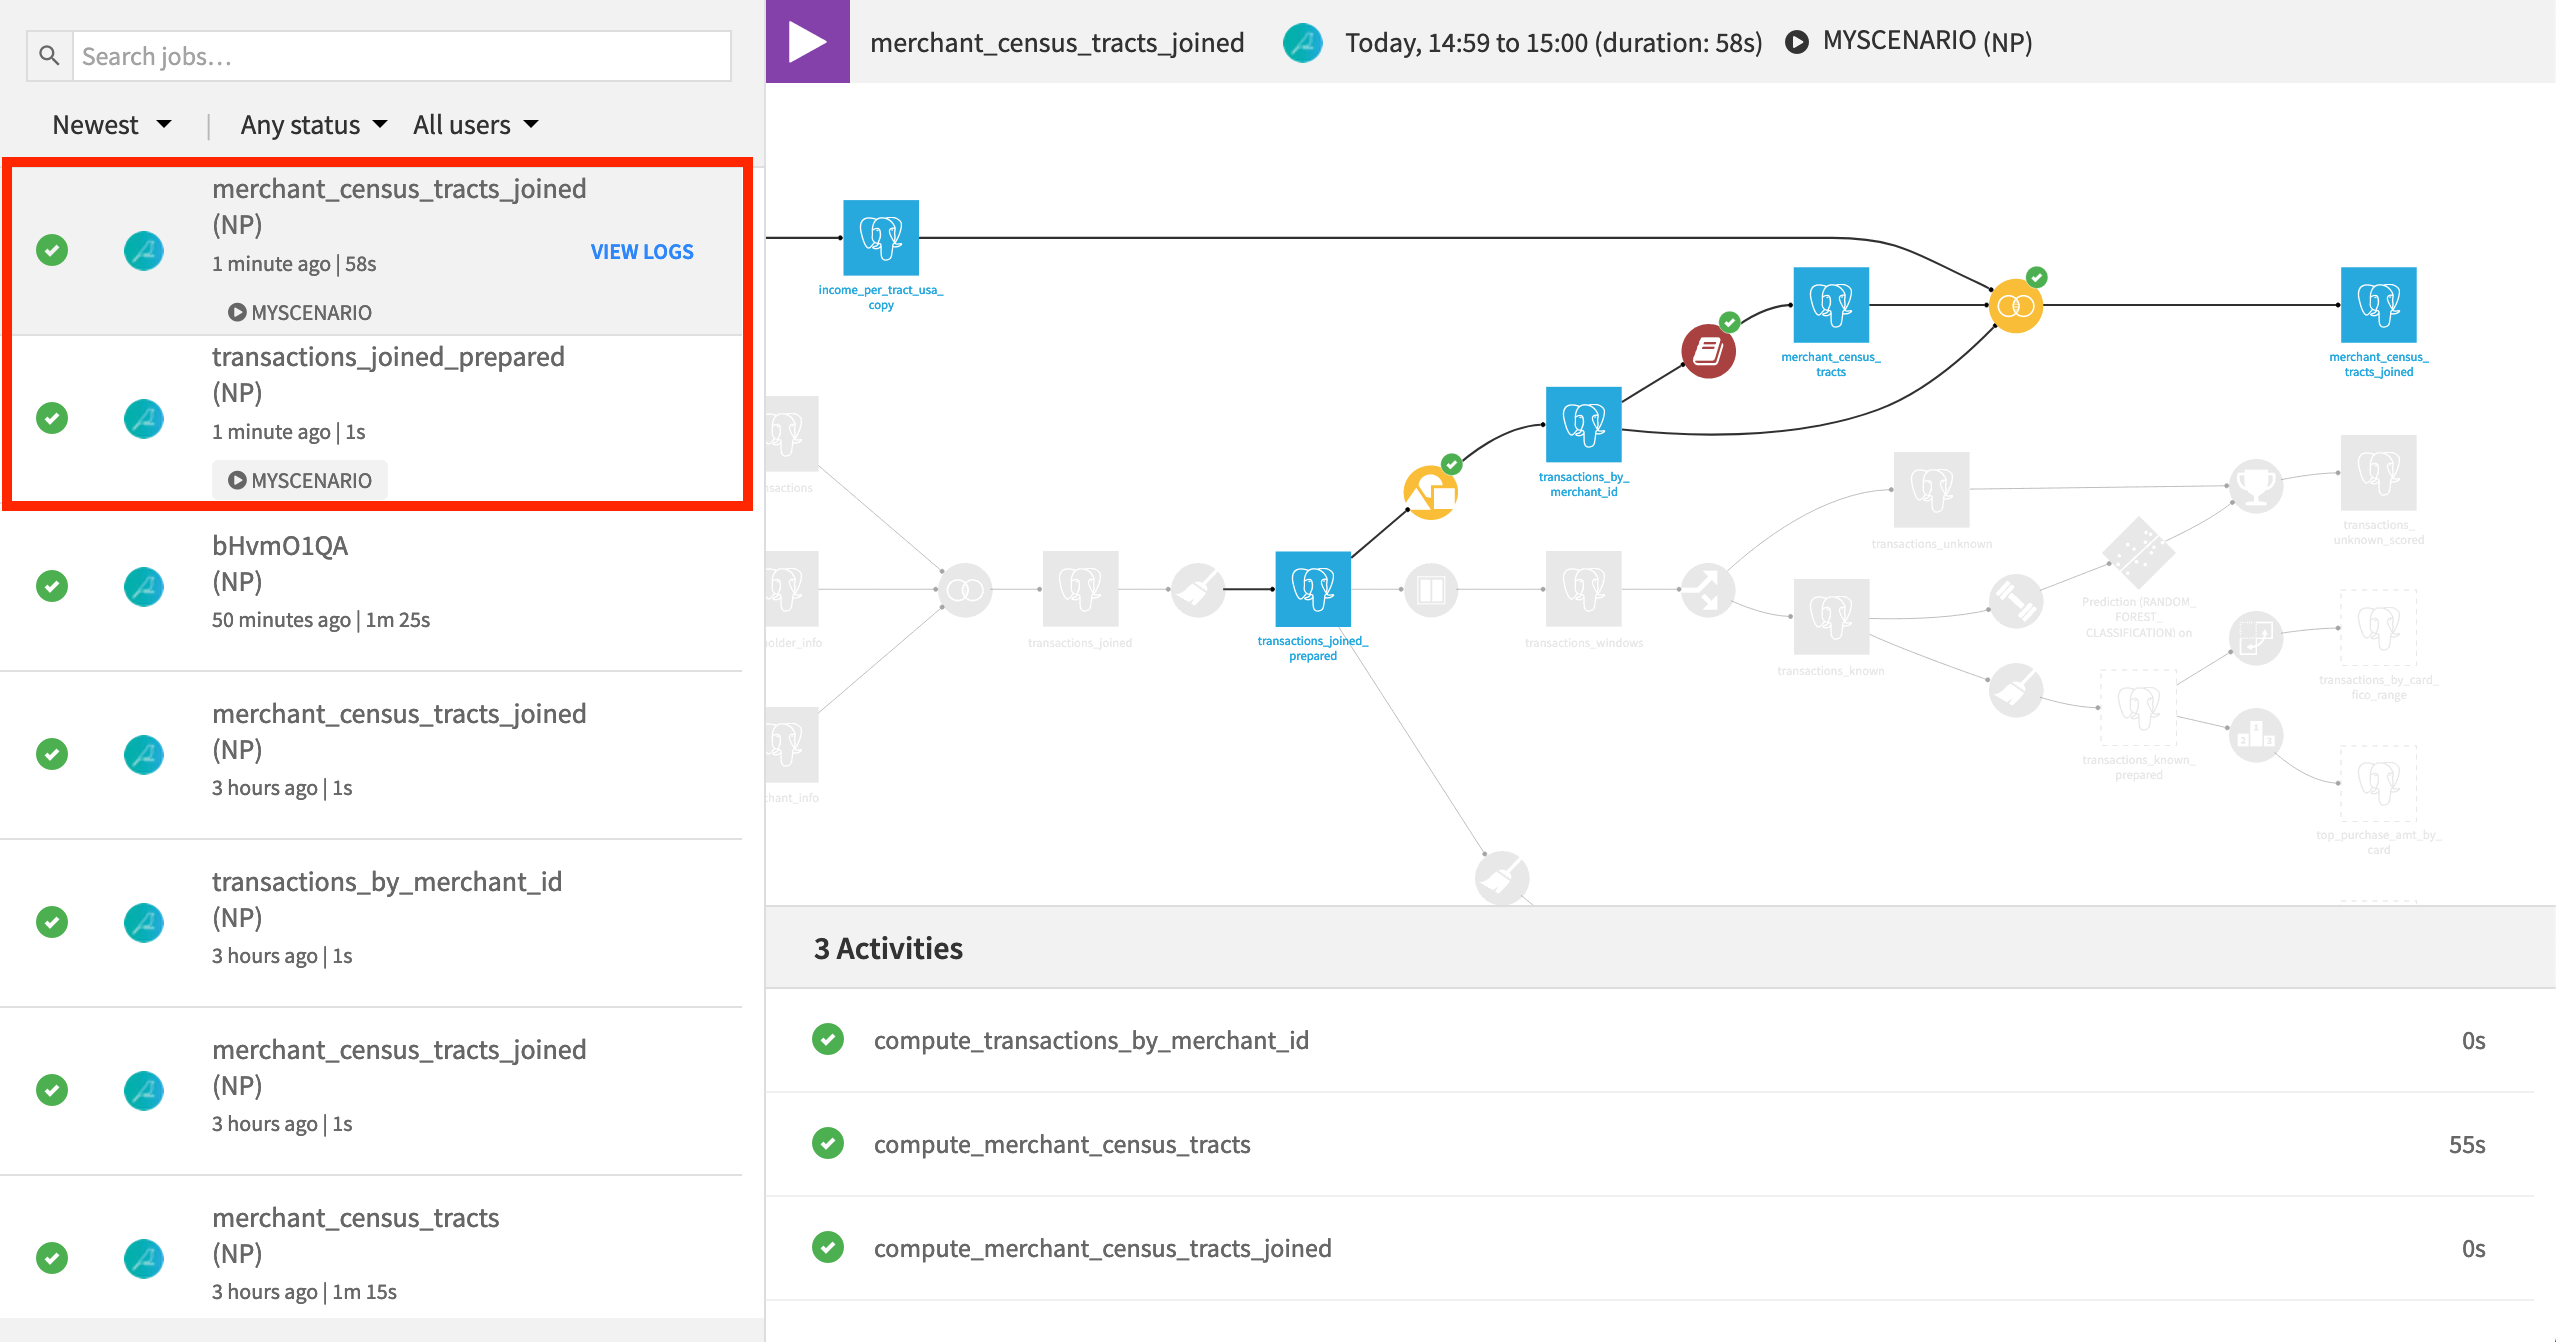
Once the scenario starts running, check its progress in the Jobs page. Jobs attached to a scenario have a label including the name of the scenario. We can see that this scenario creates two jobs.
Recall that we chose “Build required datasets” for the build mode instead of an option like “Build only this dataset” or “Force rebuild”. Accordingly, there is “nothing to do” for building transactions_joined_prepared as there is no new data.
Rebuilding merchants_census_tracts_joined, however, does require activity because one of the datasets it depends on has been cleared.
Hint
Check the merchants_census_tracts_joined dataset again. Has the merchant_state column updated from “Delaware” to the new variable?
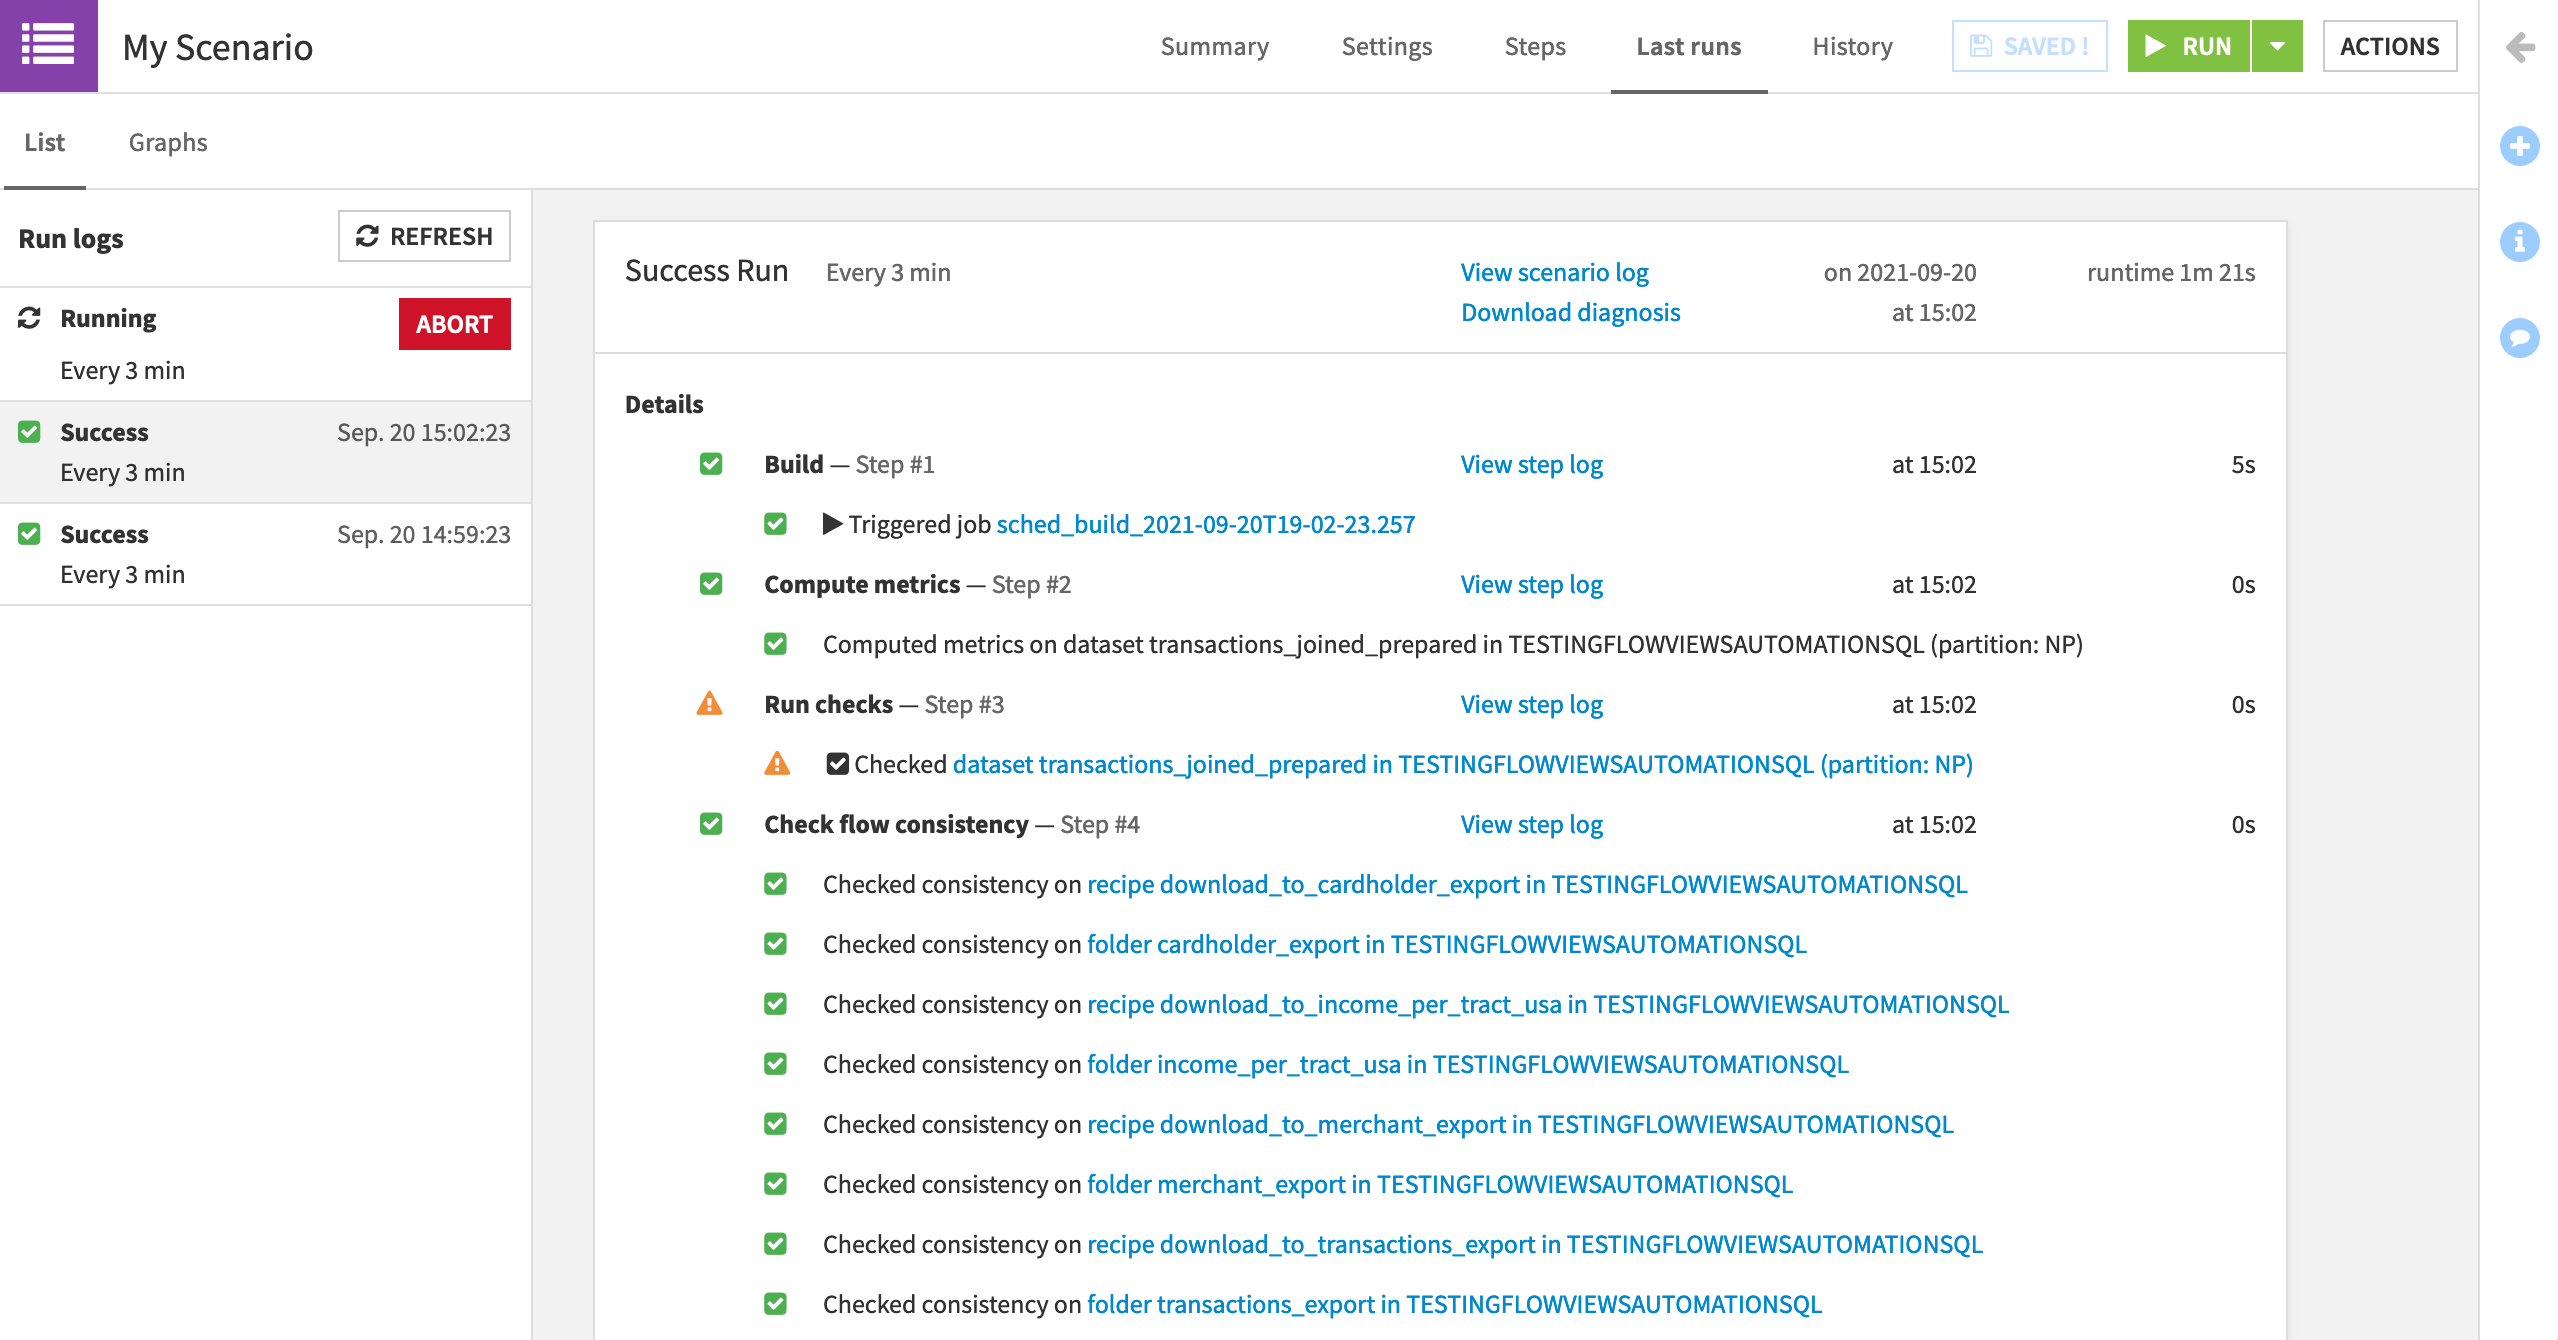
We can keep tabs on the progress through the Last runs tab of the scenario.
Click to open the scenario.
Navigate to the Last runs tab.
Once you have seen a few runs, turn off the scenario from the main Scenarios page.
Note
If we have multiple scenarios, the Automation Monitoring panel in the Jobs menu provides similar information for all scenario activities coming from the project. This feature is not available to free edition users.