Hands-On: Interval Extraction
In the previous hands-on exercise, we used the Resampling recipe from the Time Series Preparation plugin in order to equally space and interpolate the t-shirt time series data.
Now that we have successfully resampled the data, where a value of 0 represents a day without any sales for a particular t-shirt category, let’s work at extracting some intervals of interest by using the Interval Extraction recipe.
Basic Interval Extraction
In many cases, we may be interested in extracting periods when time series values are within a given range. For example, here we will identify intervals of above-average sales figures.
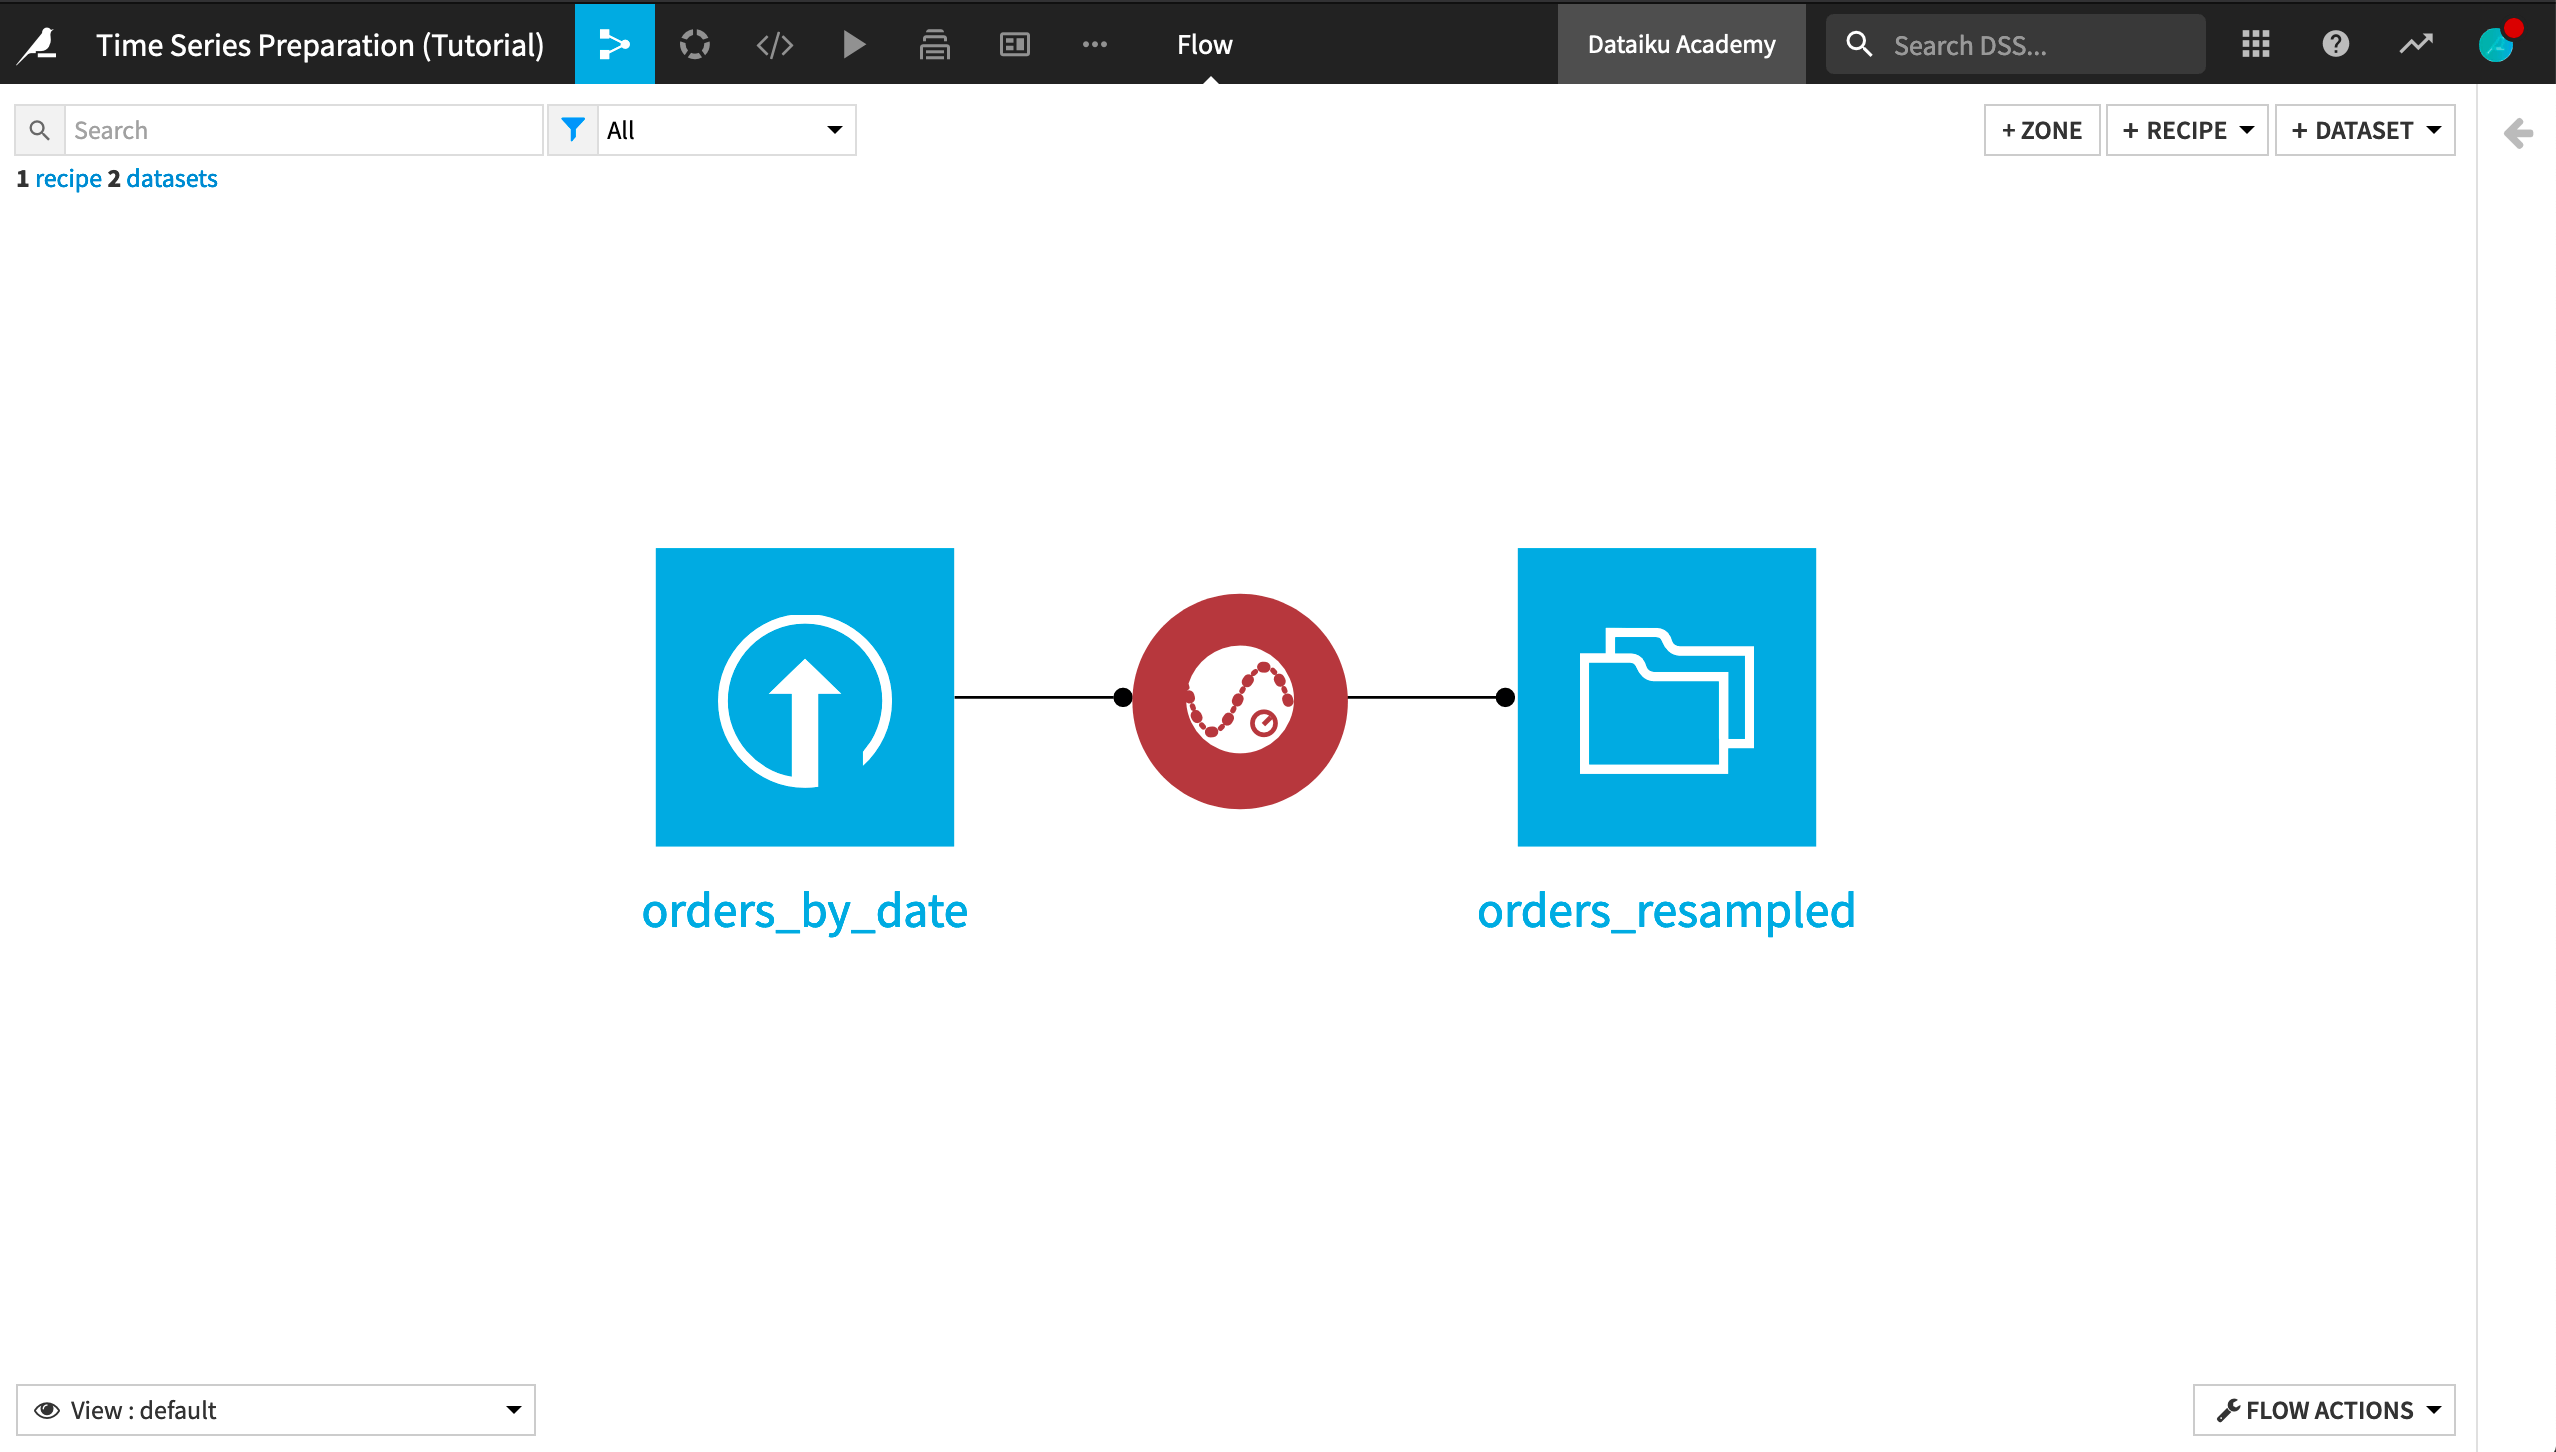
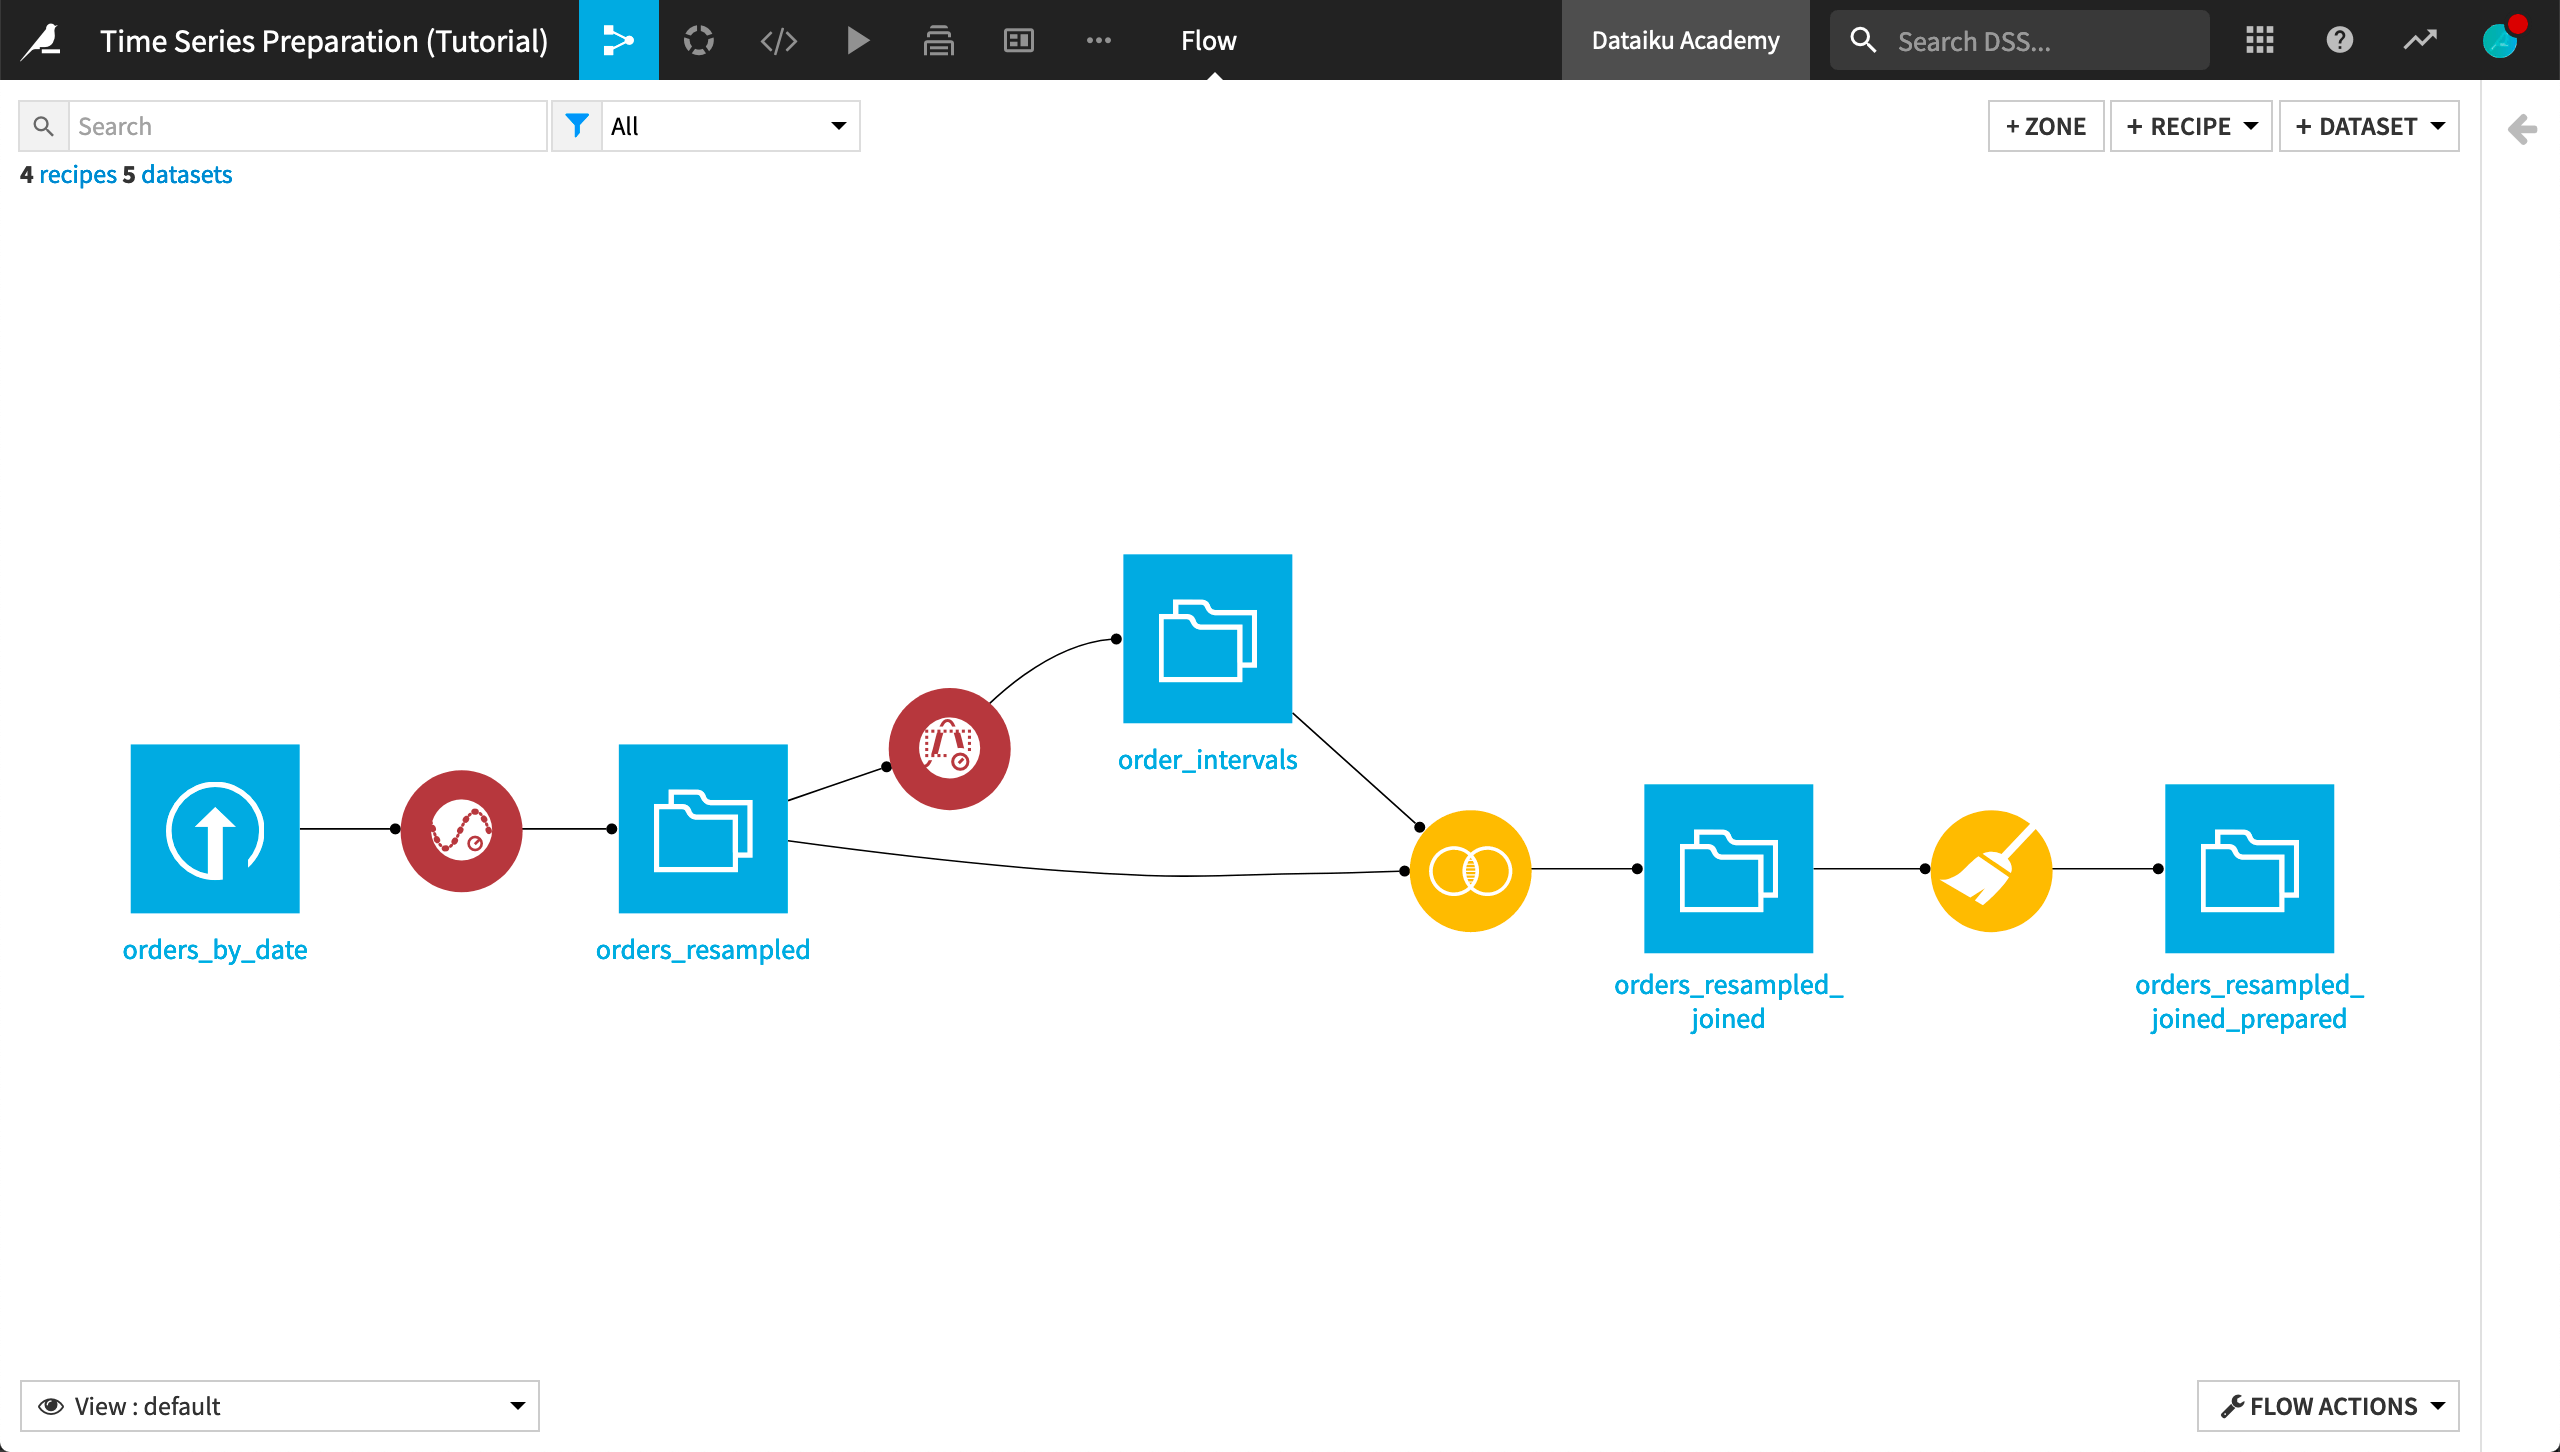
The Interval Extraction recipe can help us achieve this goal. Here is our starting Flow.
From the previous lessons, we know that the two segment parameters (acceptable deviation and minimal segment duration) are key to understanding the Interval Extraction recipe.
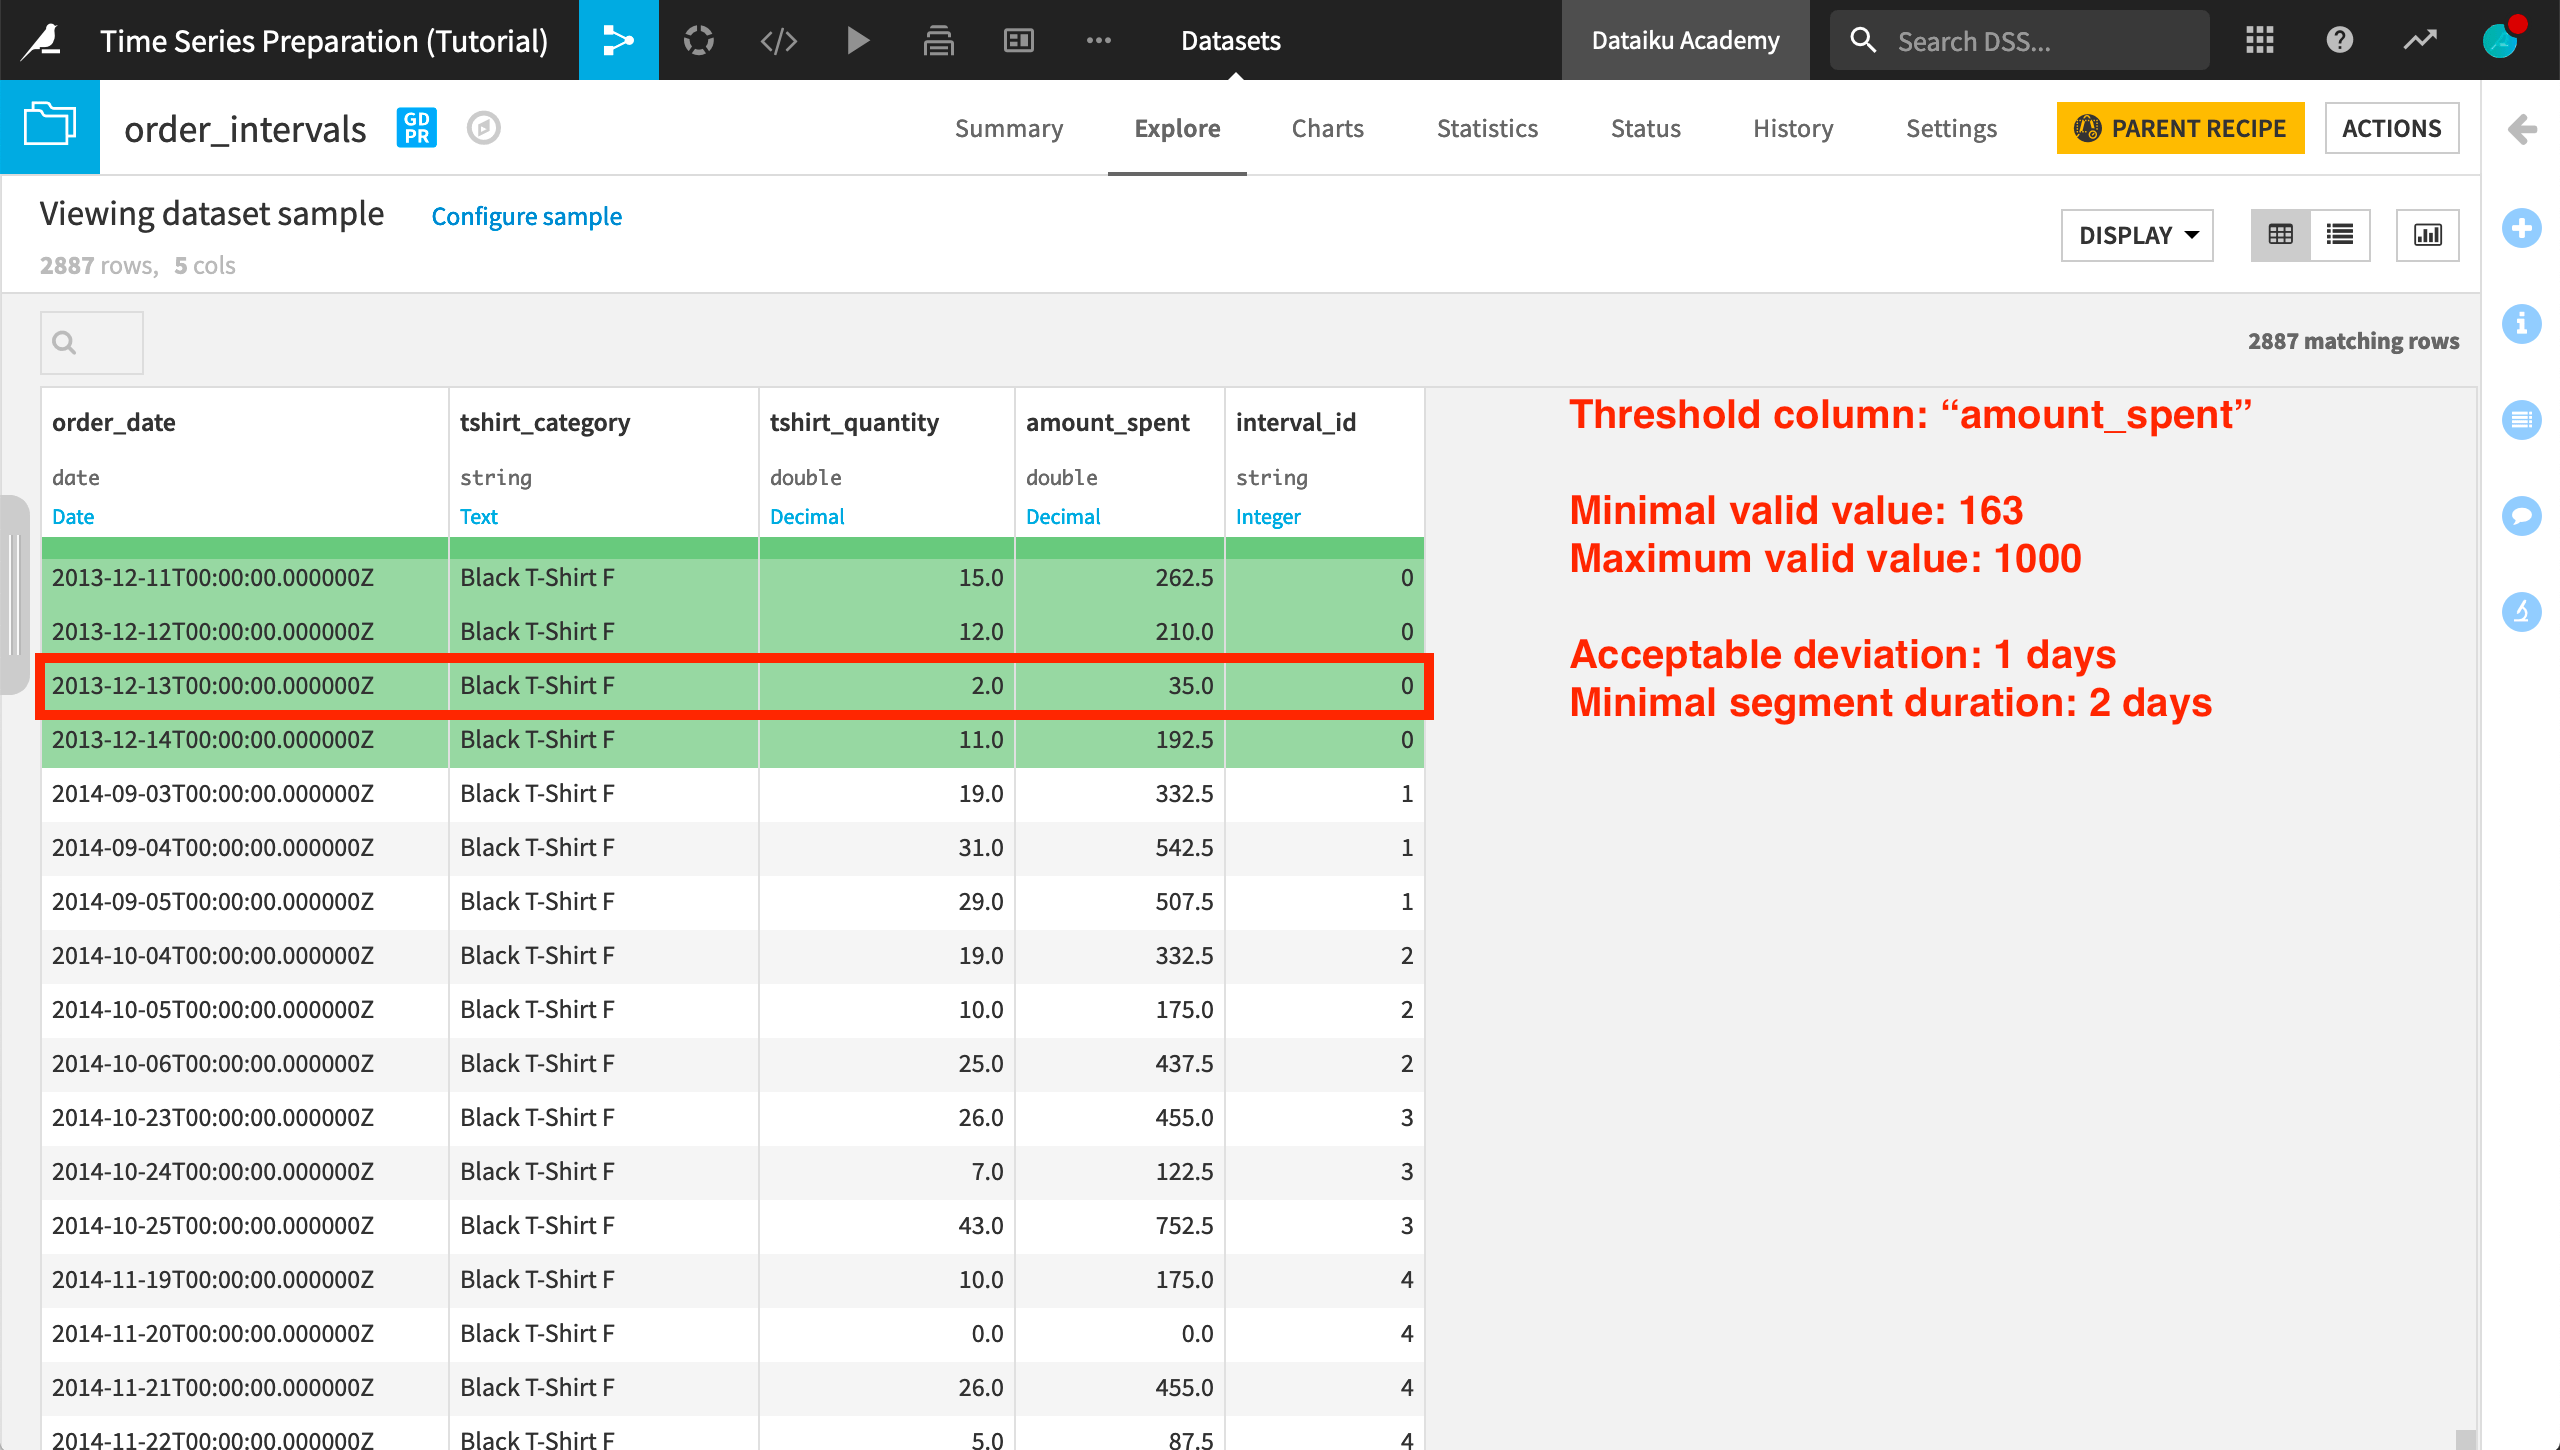
For our first attempt with the Interval Extraction recipe, let’s keep both of these parameters set to 0 days.
Select the orders_resampled dataset.
From the Actions sidebar, select the Time Series Preparation plugin recipe.
Choose the Time series interval extraction recipe.
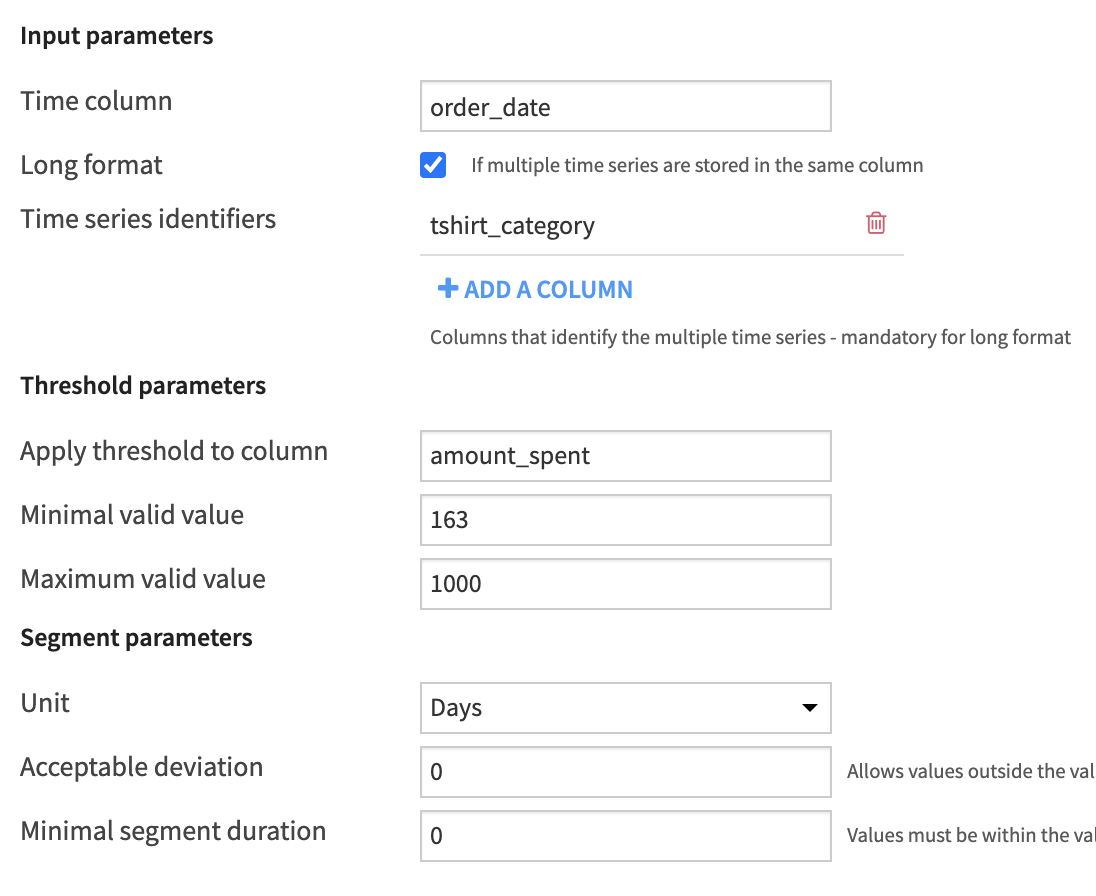
Name the output dataset
order_intervals.Specify order_date as the “Time column”. (A parsed date is required).
Apply the threshold to the amount_spent column. (A numeric column is required).
For the “Threshold parameters”,
set the minimal valid value to the mean value,
163,and the maximum valid value to
1000.
For the “Segment parameters”,
change the “Unit” to Days,
set the “Acceptable deviation” to
0days,and the “Minimal segment duration” to
0days.
Check the box to indicate the data is in Long format and provide tshirt_category as the identifier column.
In the output, we can see the same original four input columns, plus one new column, interval_id. For each independent time series in the dataset, interval IDs start at 0 and increase from there.
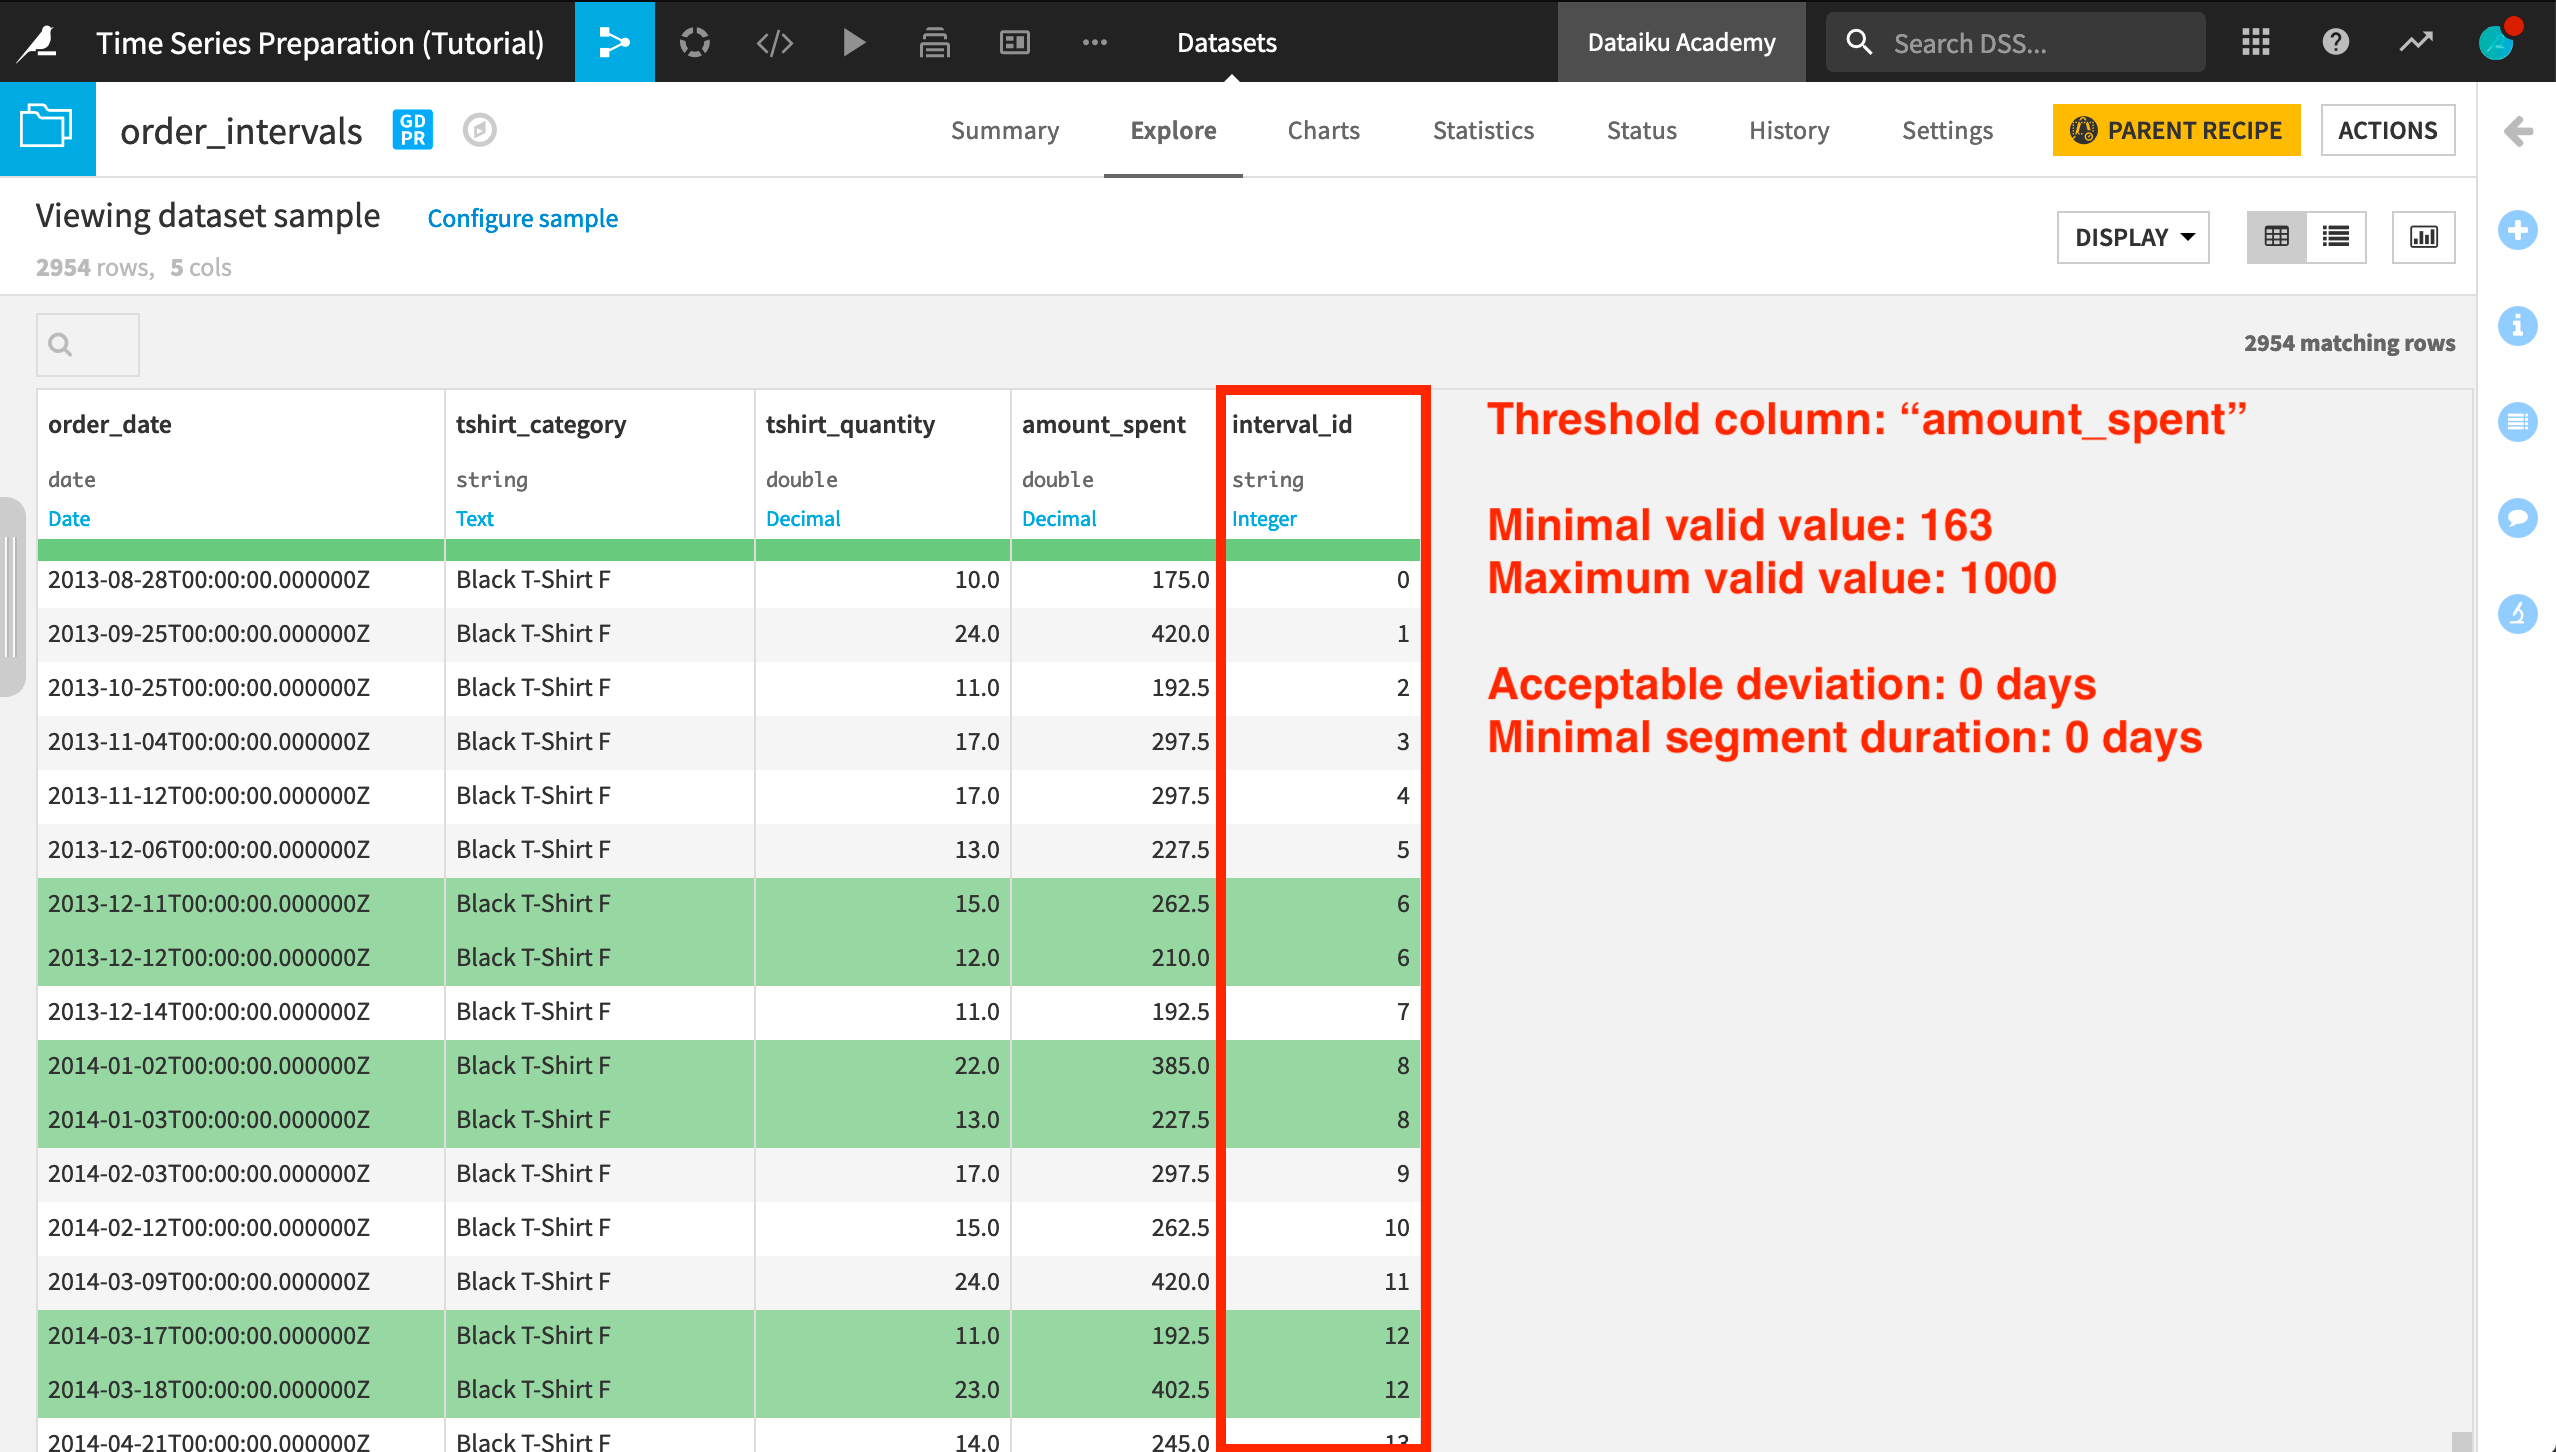
Because there is no acceptable deviation, we can see that timestamps sharing the same interval ID (such as 6, 8, or 12) must be consecutive days during which the amount_spent is within the threshold range.
Each independent time series in the dataset has its own set of interval IDs, with each set starting from zero. If we filter the data for a different product category, for example, “White T-Shirt M”, we can see that the interval ID column returns a set of IDs starting from 0.

Minimal Segment Duration
Many of the interval IDs in the output above only consist of one or two timestamps. The Interval Extraction recipe allows us to specify a Minimal segment duration. This parameter allows us to enforce a stricter requirement for the length of an interval, by filtering out intervals that shorter than a specified value.
Let’s return to the parent recipe that produces the order_intervals dataset:
Increase the “Minimal segment duration” from 0 to
2days.Keep all of the other recipe parameters the same.
With a higher standard to qualify for an interval ID, the output dataset has fewer rows.
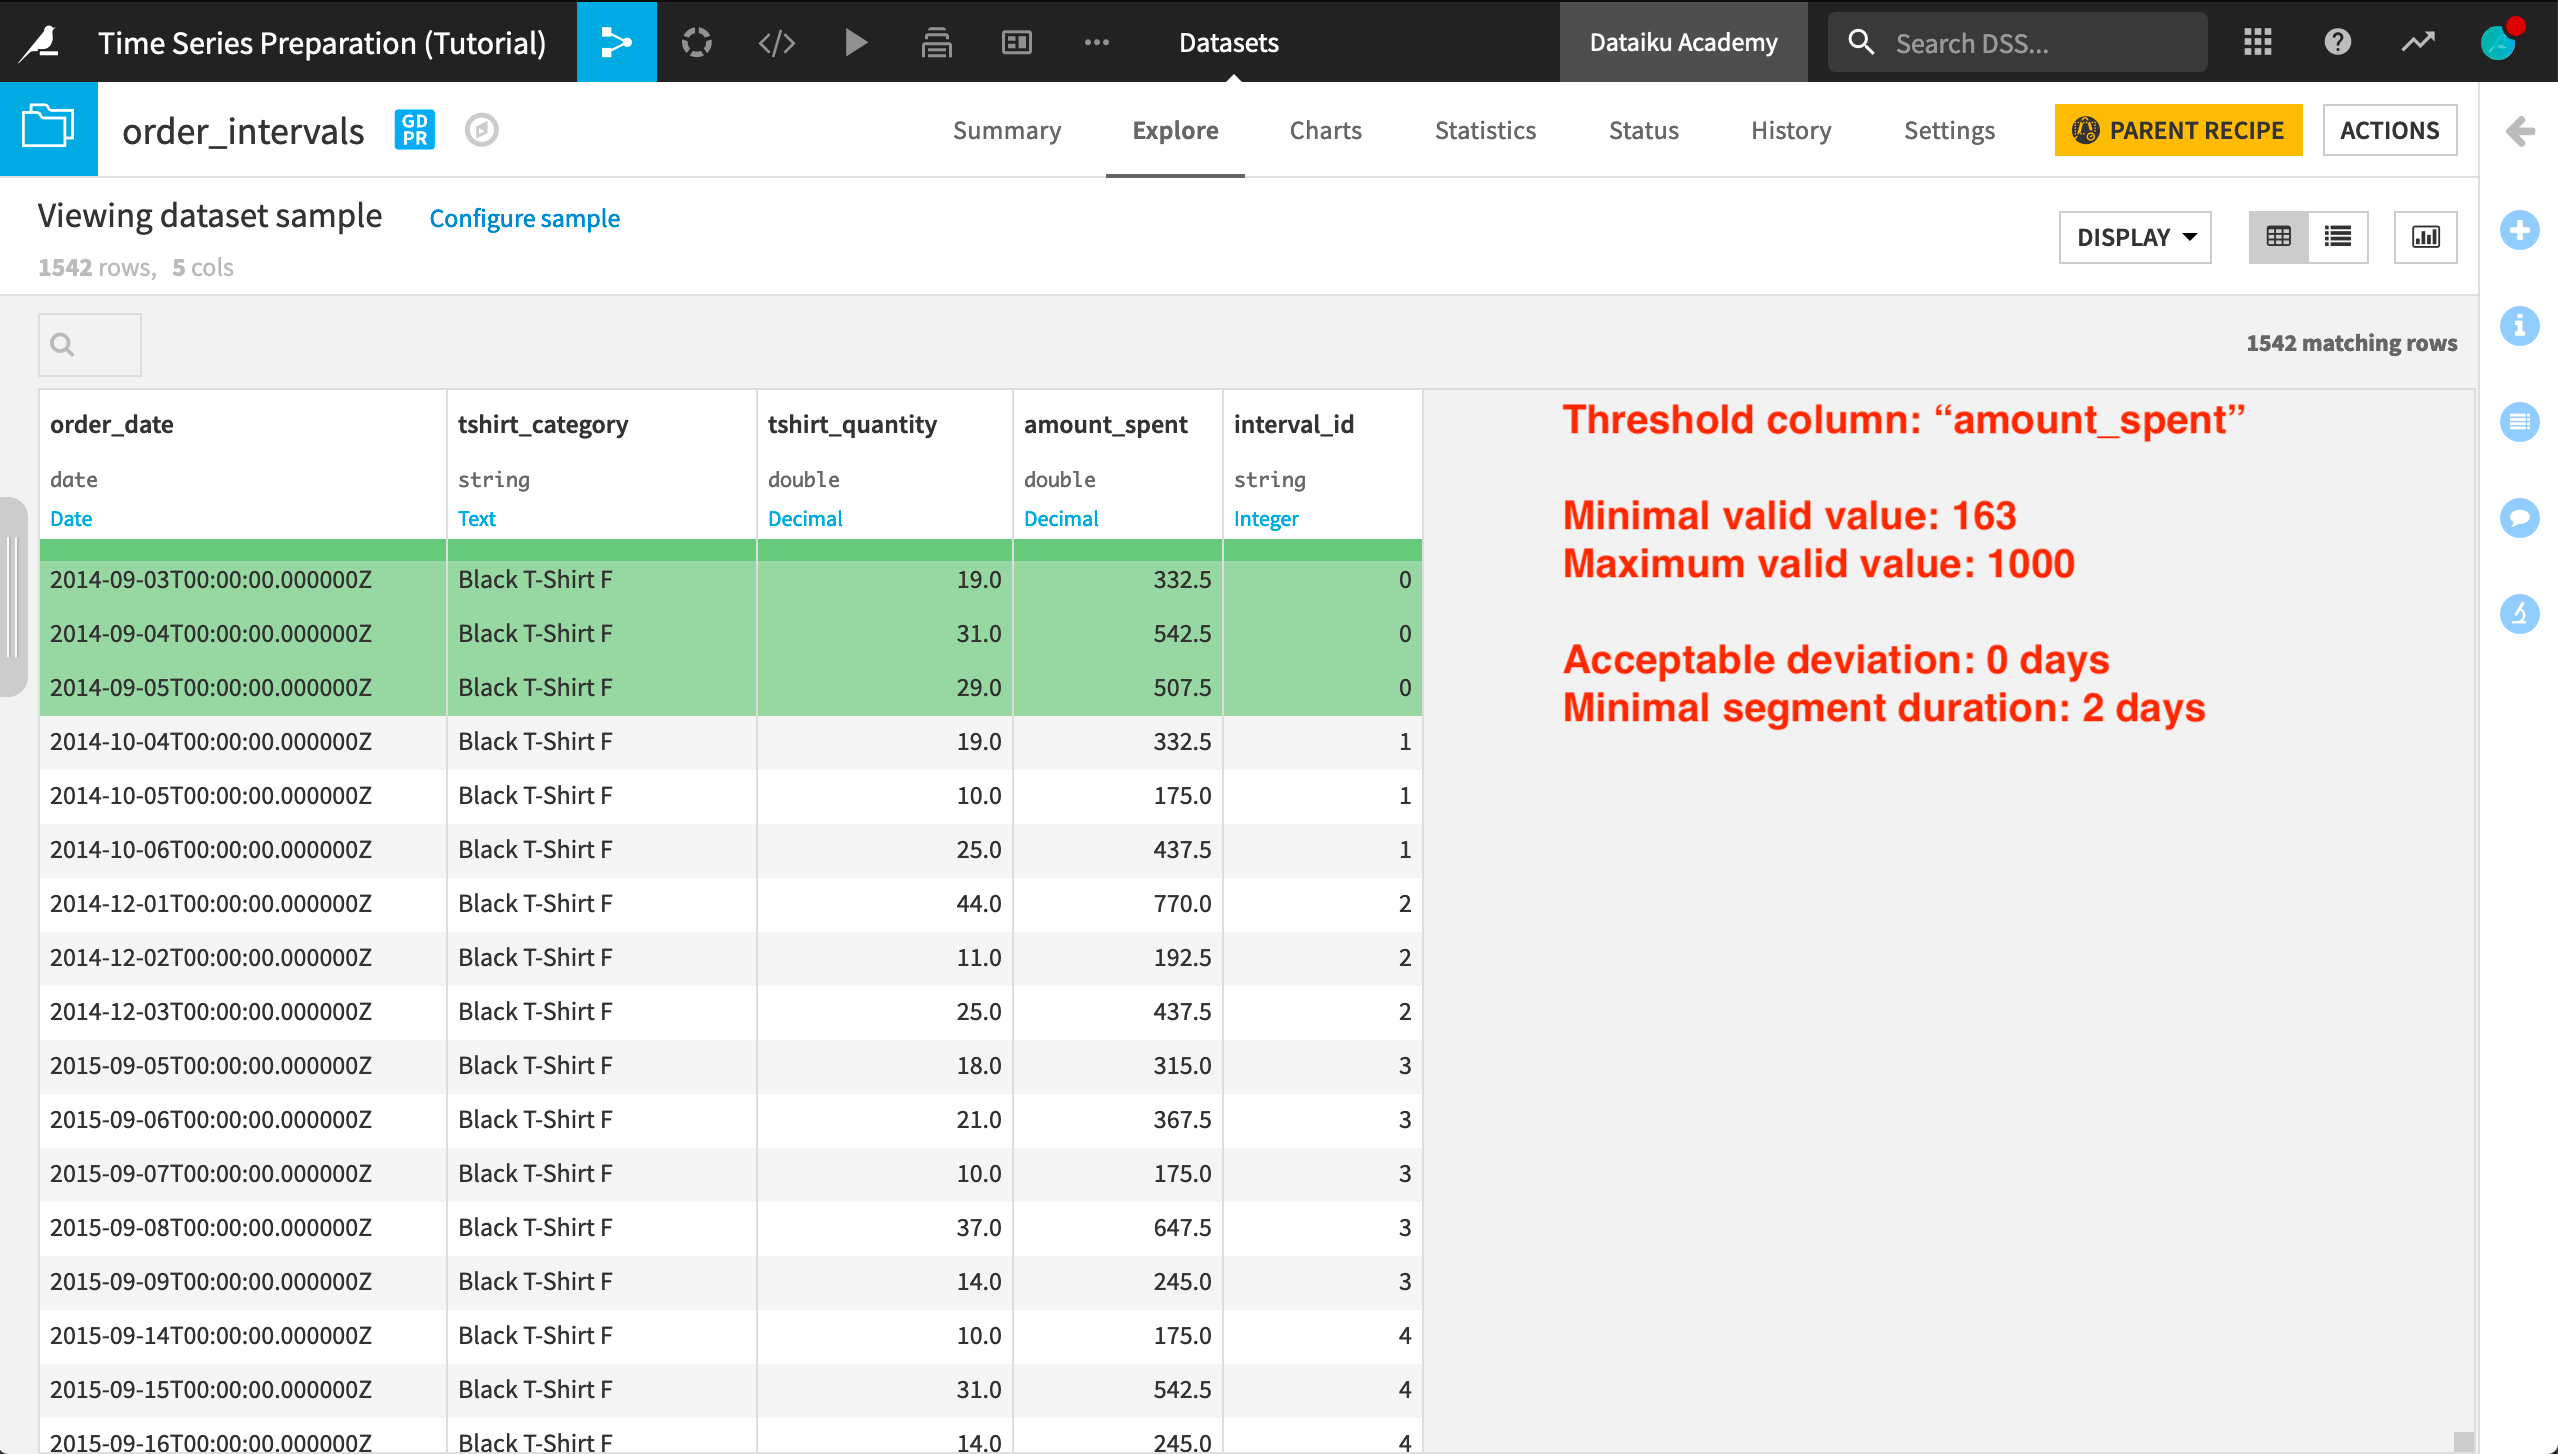
We can also see the effect of a minimal segment duration of 2 days in the very first interval ID of the “Black T-Shirt F” category:
Three consecutive timestamps are assigned to the interval ID “0”.
All three of these values are within the threshold range. There are no deviations.
The difference between the final valid timestamp (“2014-09-05”) and the first valid timestamp (“2014-09-03”) is 2 days, which satisfies the “Minimal segment duration” requirement.
Acceptable Deviation
Increasing the value of the “Minimal segment duration” parameter imposed a higher standard for assigning interval IDs, thereby reducing the number of rows in the output dataset.
Now, let’s increase the value of the “Acceptable deviation” parameter. Doing this should produce the opposite effect from what we just saw with the minimal deviation, as we will be relaxing the requirement that all values of a valid interval lie within the threshold range. With this more flexible standard for assigning an interval ID, we should see more rows returned in the output dataset.
Return to the parent recipe that produces the order_intervals dataset:
Increase the “Acceptable deviation” from 0 to
1day.Keep all of the other recipe parameters the same.
With a more flexible standard to qualify for an interval ID, the output dataset has more rows.
We can also see the effect of an acceptable deviation of 1 day in the very first interval ID of the “Black T-Shirt F” category:
The value of amount_spent for “2013-12-12” is within the threshold range. The value for the next day “2013-12-13” is out of range. But then the value for the following day, “2012-12-14”, returns to the threshold range. This is a deviation of only 1 day, which satisfies our condition.
Also, note that the difference between the final valid timestamp (“2013-12-14”) and the first valid timestamp (“2014-12-11”) is 3 days, which satisfies the “Minimal segment duration” requirement.
Retrieving Rows outside an Interval ID
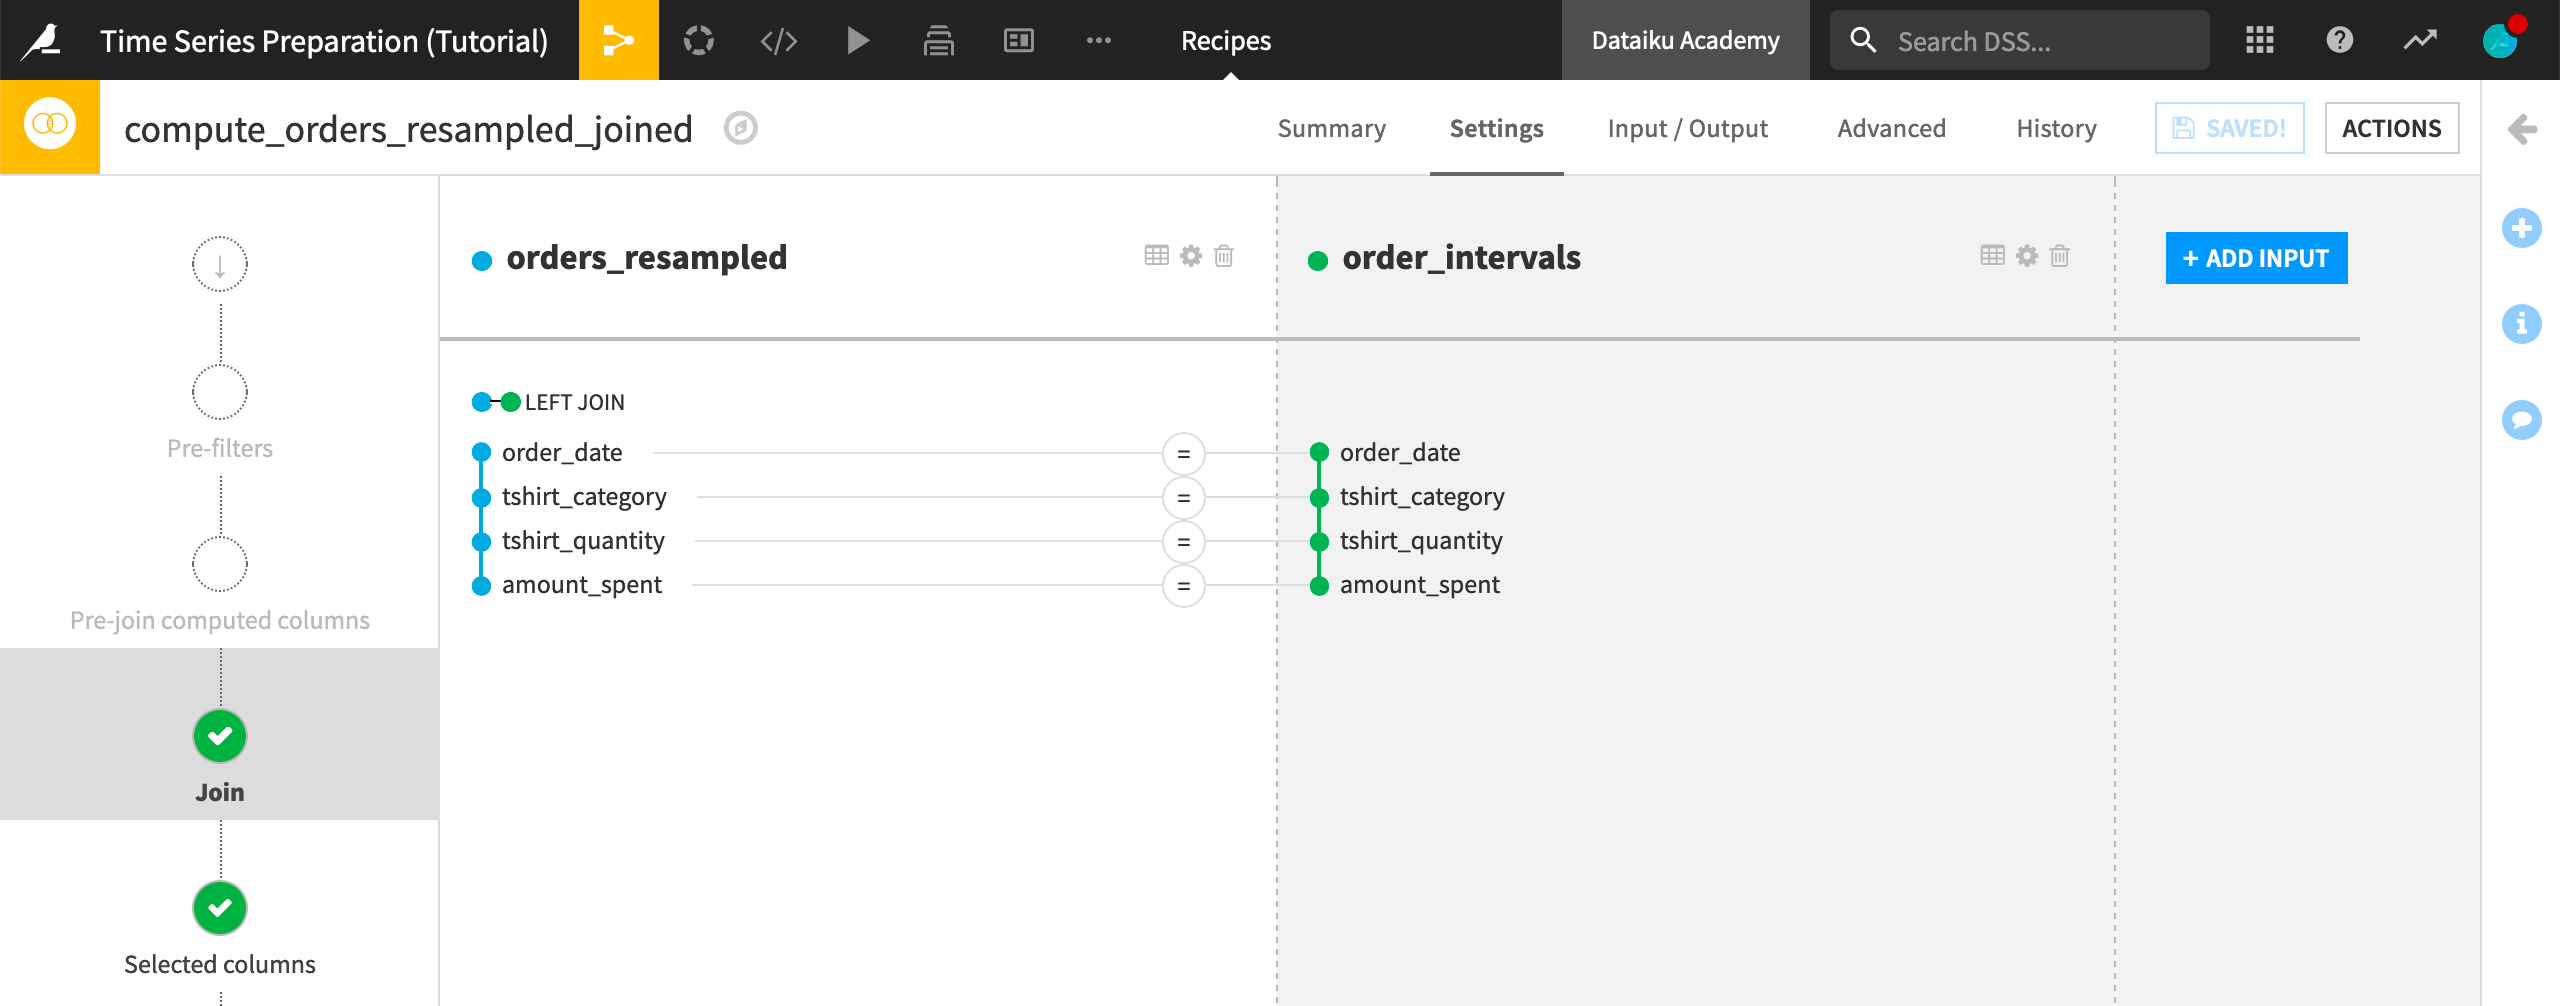
The Interval Extraction recipe returns only rows of the input dataset that are assigned an interval ID. In some cases though, we may want a dataset that retains all rows of the input dataset, only with the new interval_id column appended.
We can achieve this with a Join recipe.
Select the orders_resampled dataset.
Initiate a Join recipe.
Add order_intervals as the second dataset.
Accept the default output and create the recipe.
The default left join with the original four columns as the key should already be chosen.
Run the recipe.
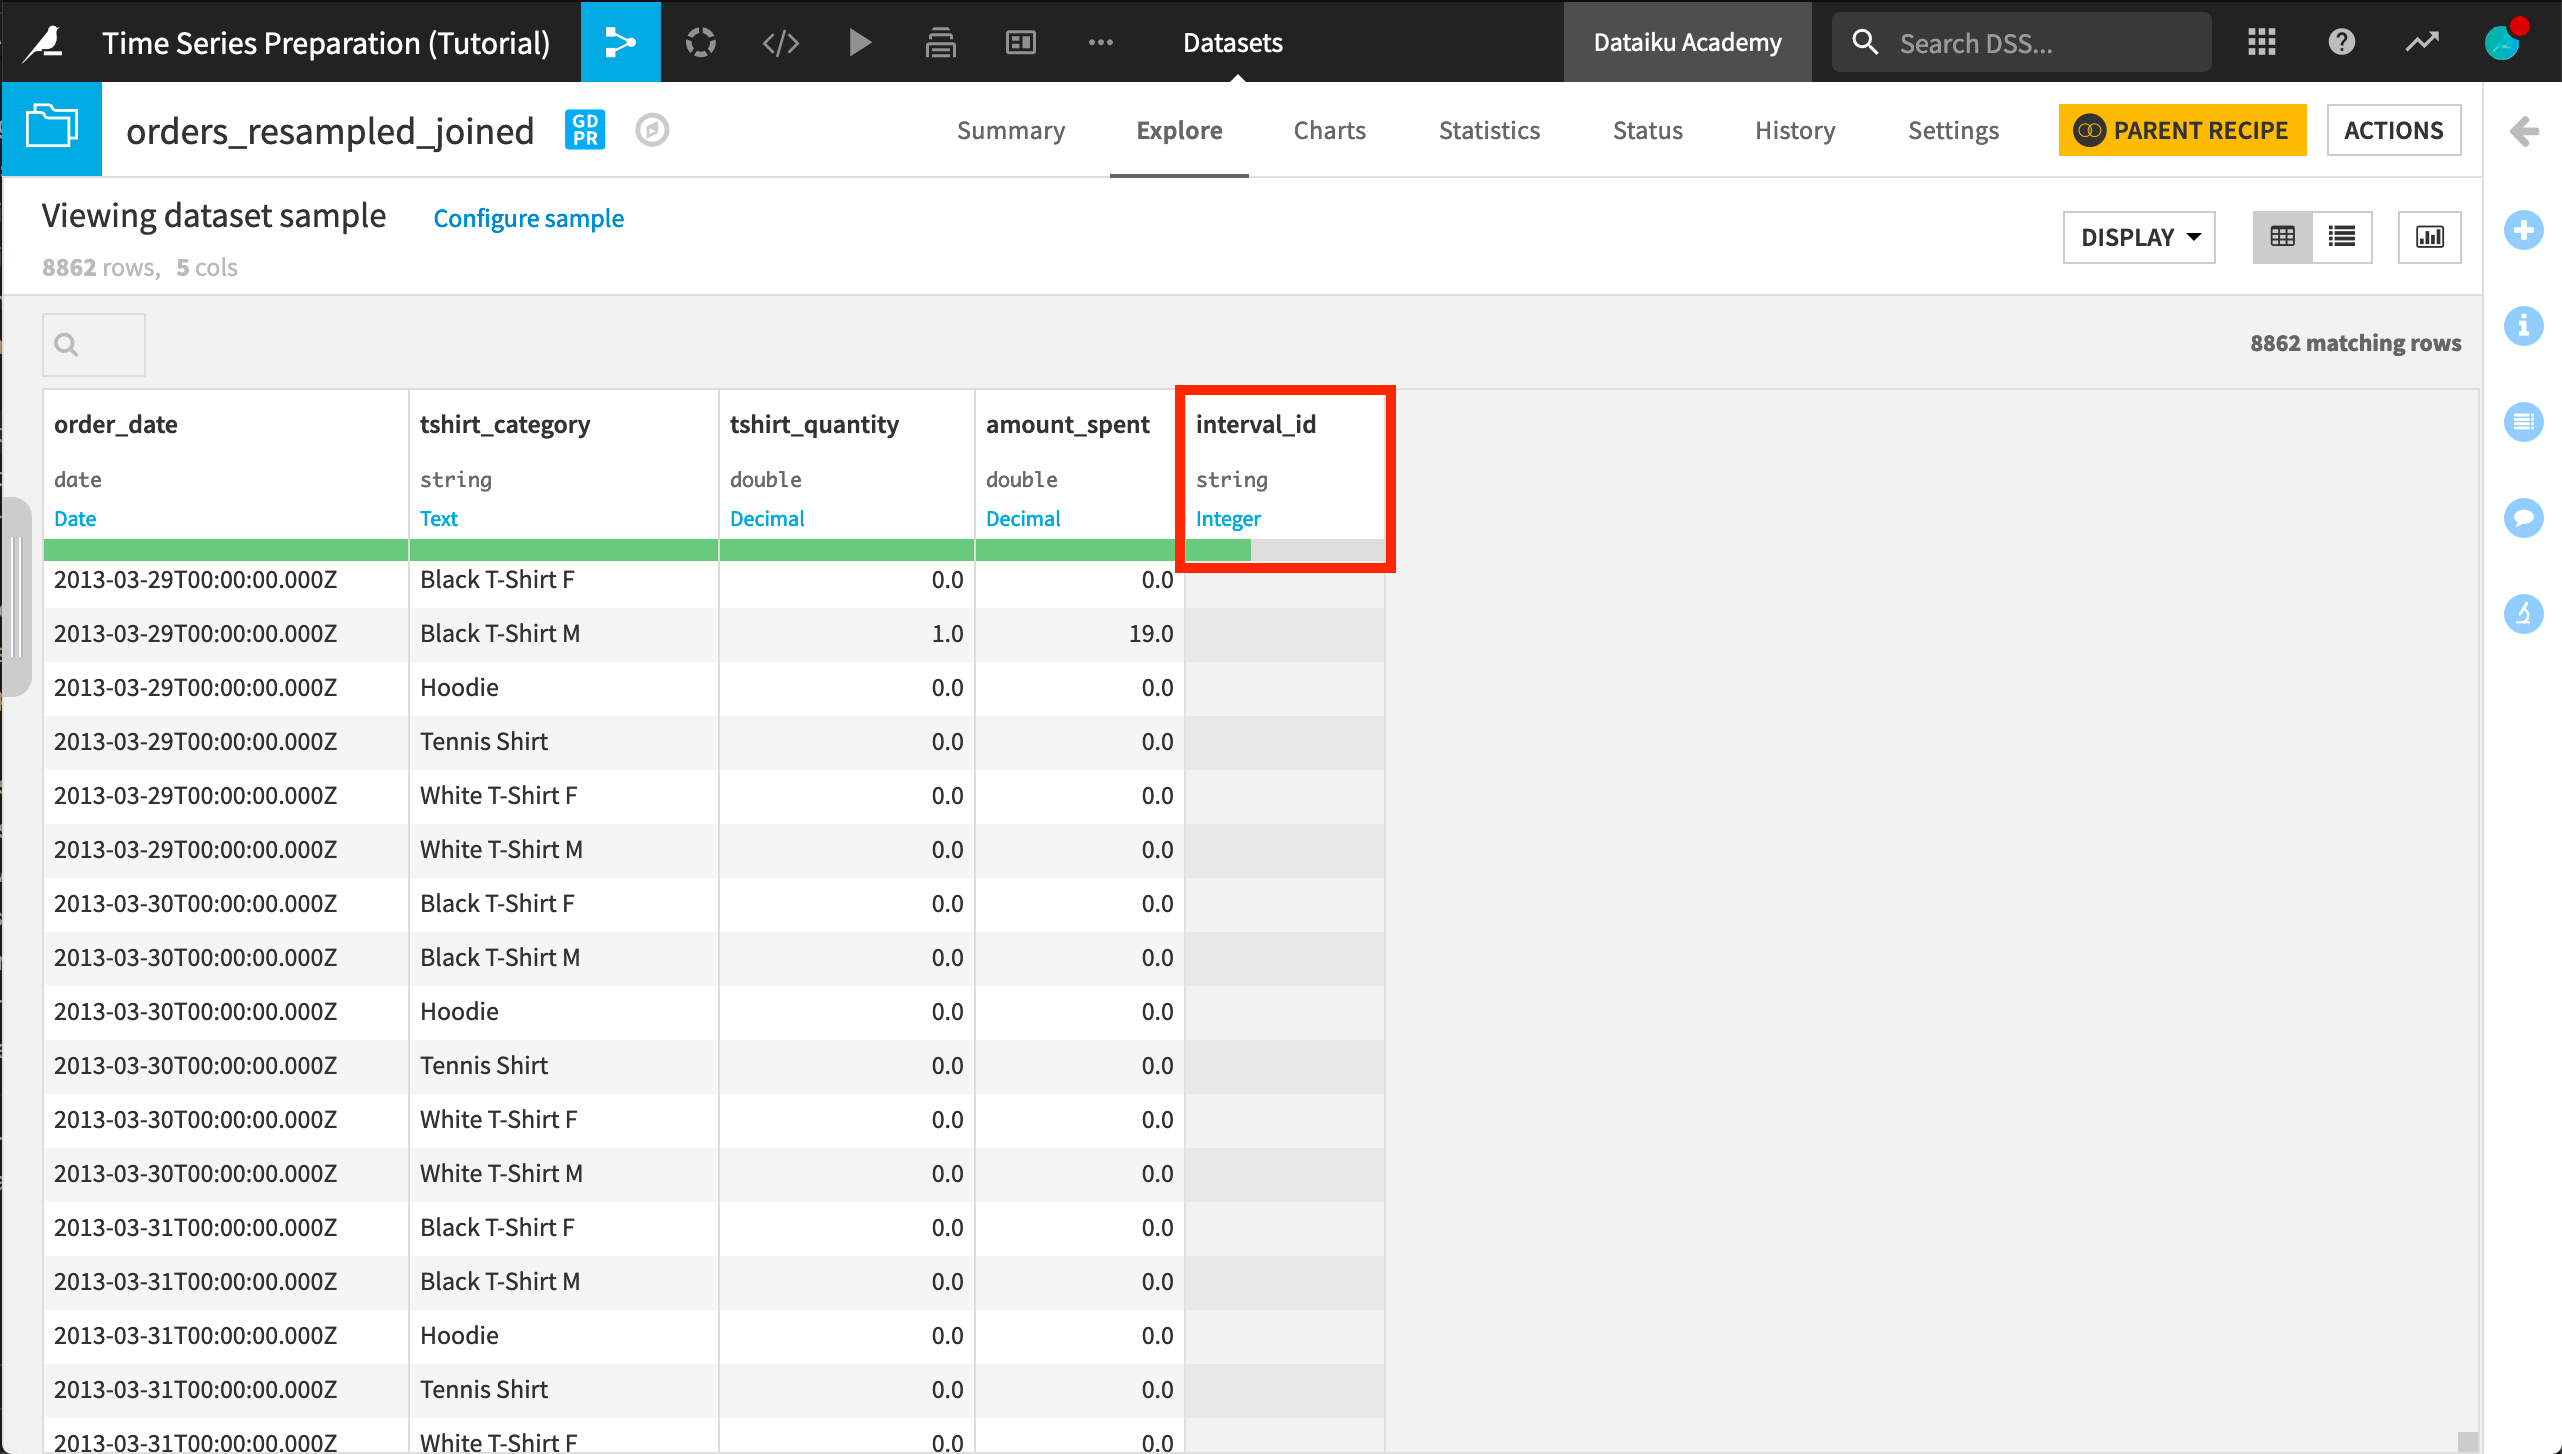
In the output, we can see that all of the rows of the original input dataset are found. The data quality bar in the interval_id column header shows us that many values are empty. These are rows that did not qualify for an interval ID.
Feature Creation with Interval IDs
In many cases, we many want to use the interval_id column as the basis for feature creation to be used in a modeling task.
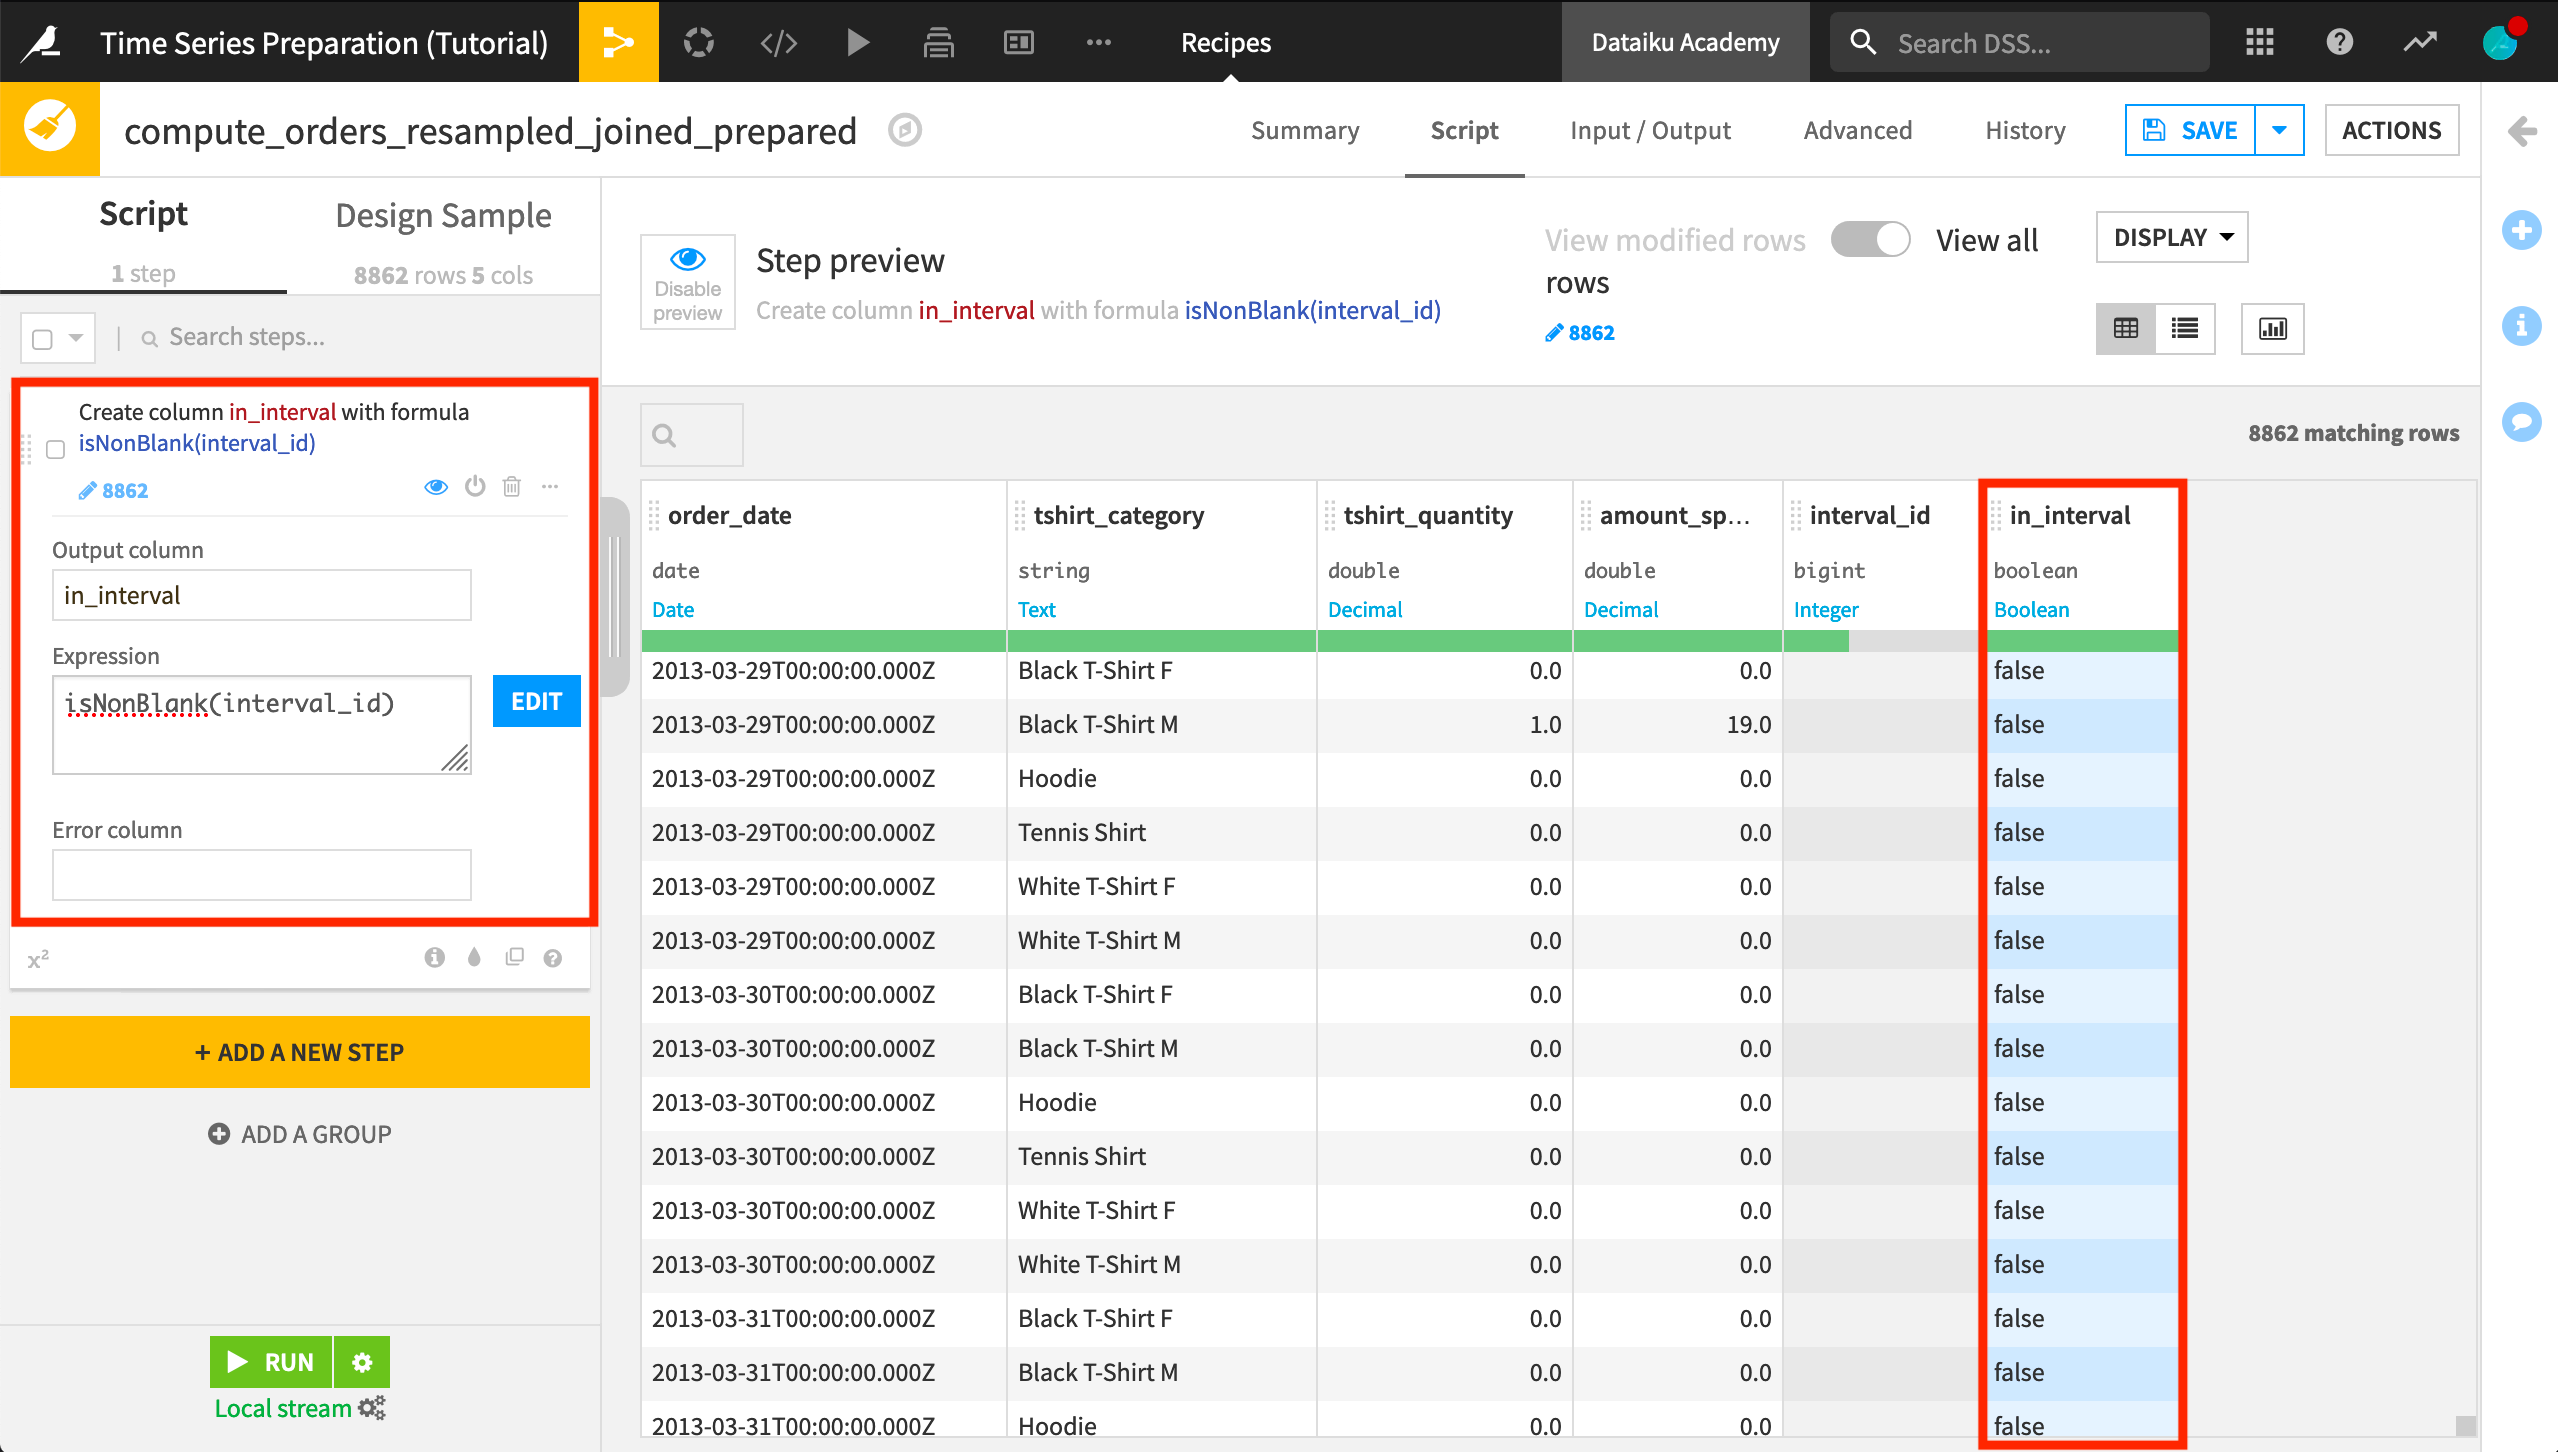
For example, one of the simplest features we could build is one determining if a row belongs to an interval or not. Let’s add that:
Select the orders_resampled_joined dataset.
Create a Prepare recipe.
Accept the default output name.
Add a Formula step.
Name the output column
in_interval.Provide the expression
isNonBlank(interval_id).Run the recipe.
What’s next?
Congratulations! Your Flow should resemble the one below.
Now that you have learned how to extract intervals from a resampled time series dataset, you are ready to test out other recipes in the Time Series Preparation plugin.
The time series Windowing recipe is an excellent option to build more features on a dataset like the one above, and so that’s where we’ll look next.
See also