
Tutorial | Simple Visual Agents#
Get started#
AI agents can be useful across many industries to automate repetitive tasks, increase efficiency, and help non-technical users to access information from data.
Keeping up with AI market and research news is itself a challenge! Let’s build a Simple Visual Agent to help an industry analyst with some of those repetitive tasks, such as searching the latest news and research, generating reports, and emailing reports to stakeholders.
Objectives#
In this tutorial, you will:
Build multiple agent tools to perform different tasks.
Test tools to gauge performance.
Create a Simple Visual Agent and add tools to the agent.
Interact with the agent via chat.
Prerequisites#
To complete this tutorial, you will need:
Dataiku 14.4 or later.
An Advanced Analytics Designer or Full Designer user profile.
A connection to at least one Generative AI model that supports tool calling and one that supports embedding. See supported models for tool calling and embedding (note that some models support both). Your administrator must configure the connection(s) in the Administration panel > Connections > New connection > LLM Mesh.
An internal code environment for retrieval augmented generation and agents. Your administrator must set this up in the Administration panel > Code Envs > Internal envs setup > Retrieval augmented generation code environment.
If you want the agent to send you a message, you’ll also need an administrator to grant access to an active messaging channel. This tutorial uses an email reporter, but other kinds of channels work similarly.
To use the Agent Chat conversational interface, you’ll need the Agent Hub plugin version 1.3 or later.
Tip
You don’t need previous experience with large language models (LLMs), though it would be useful to read these articles before completing this tutorial:
Create the project#
From the Dataiku Design homepage, click + New Project.
Select Learning projects.
Search for and select Simple Visual Agents.
If needed, change the folder into which the project will be installed, and click Create.
From the project homepage, click Go to Flow (or type
g+f).
Note
You can also download the starter project from this website and import it as a ZIP file.
Embed the dataset#
The project includes a dataset of articles about the AI industry and technology published on the Medium website. We’ll work with a small sample to reduce computation cost.
The first step is to embed the articles in a knowledge bank. This will help the agent to understand the articles semantically and return better results than if we used the dataset alone.
See also
To learn more about embedding, see Tutorial | Retrieval Augmented Generation (RAG) with the Embed dataset recipe.
Create the Embed dataset recipe#
First, create the Embed dataset recipe.
With the medium_articles dataset selected in the Flow, go to the Actions panel > GenAI recipes > Embed dataset.
Choose the Embedding model your administrator has set up.
Choose the Vector store type. ChromaDB is the default, though your administrator might have set up other options.
Click Create Recipe.

Configure the Embed dataset recipe#
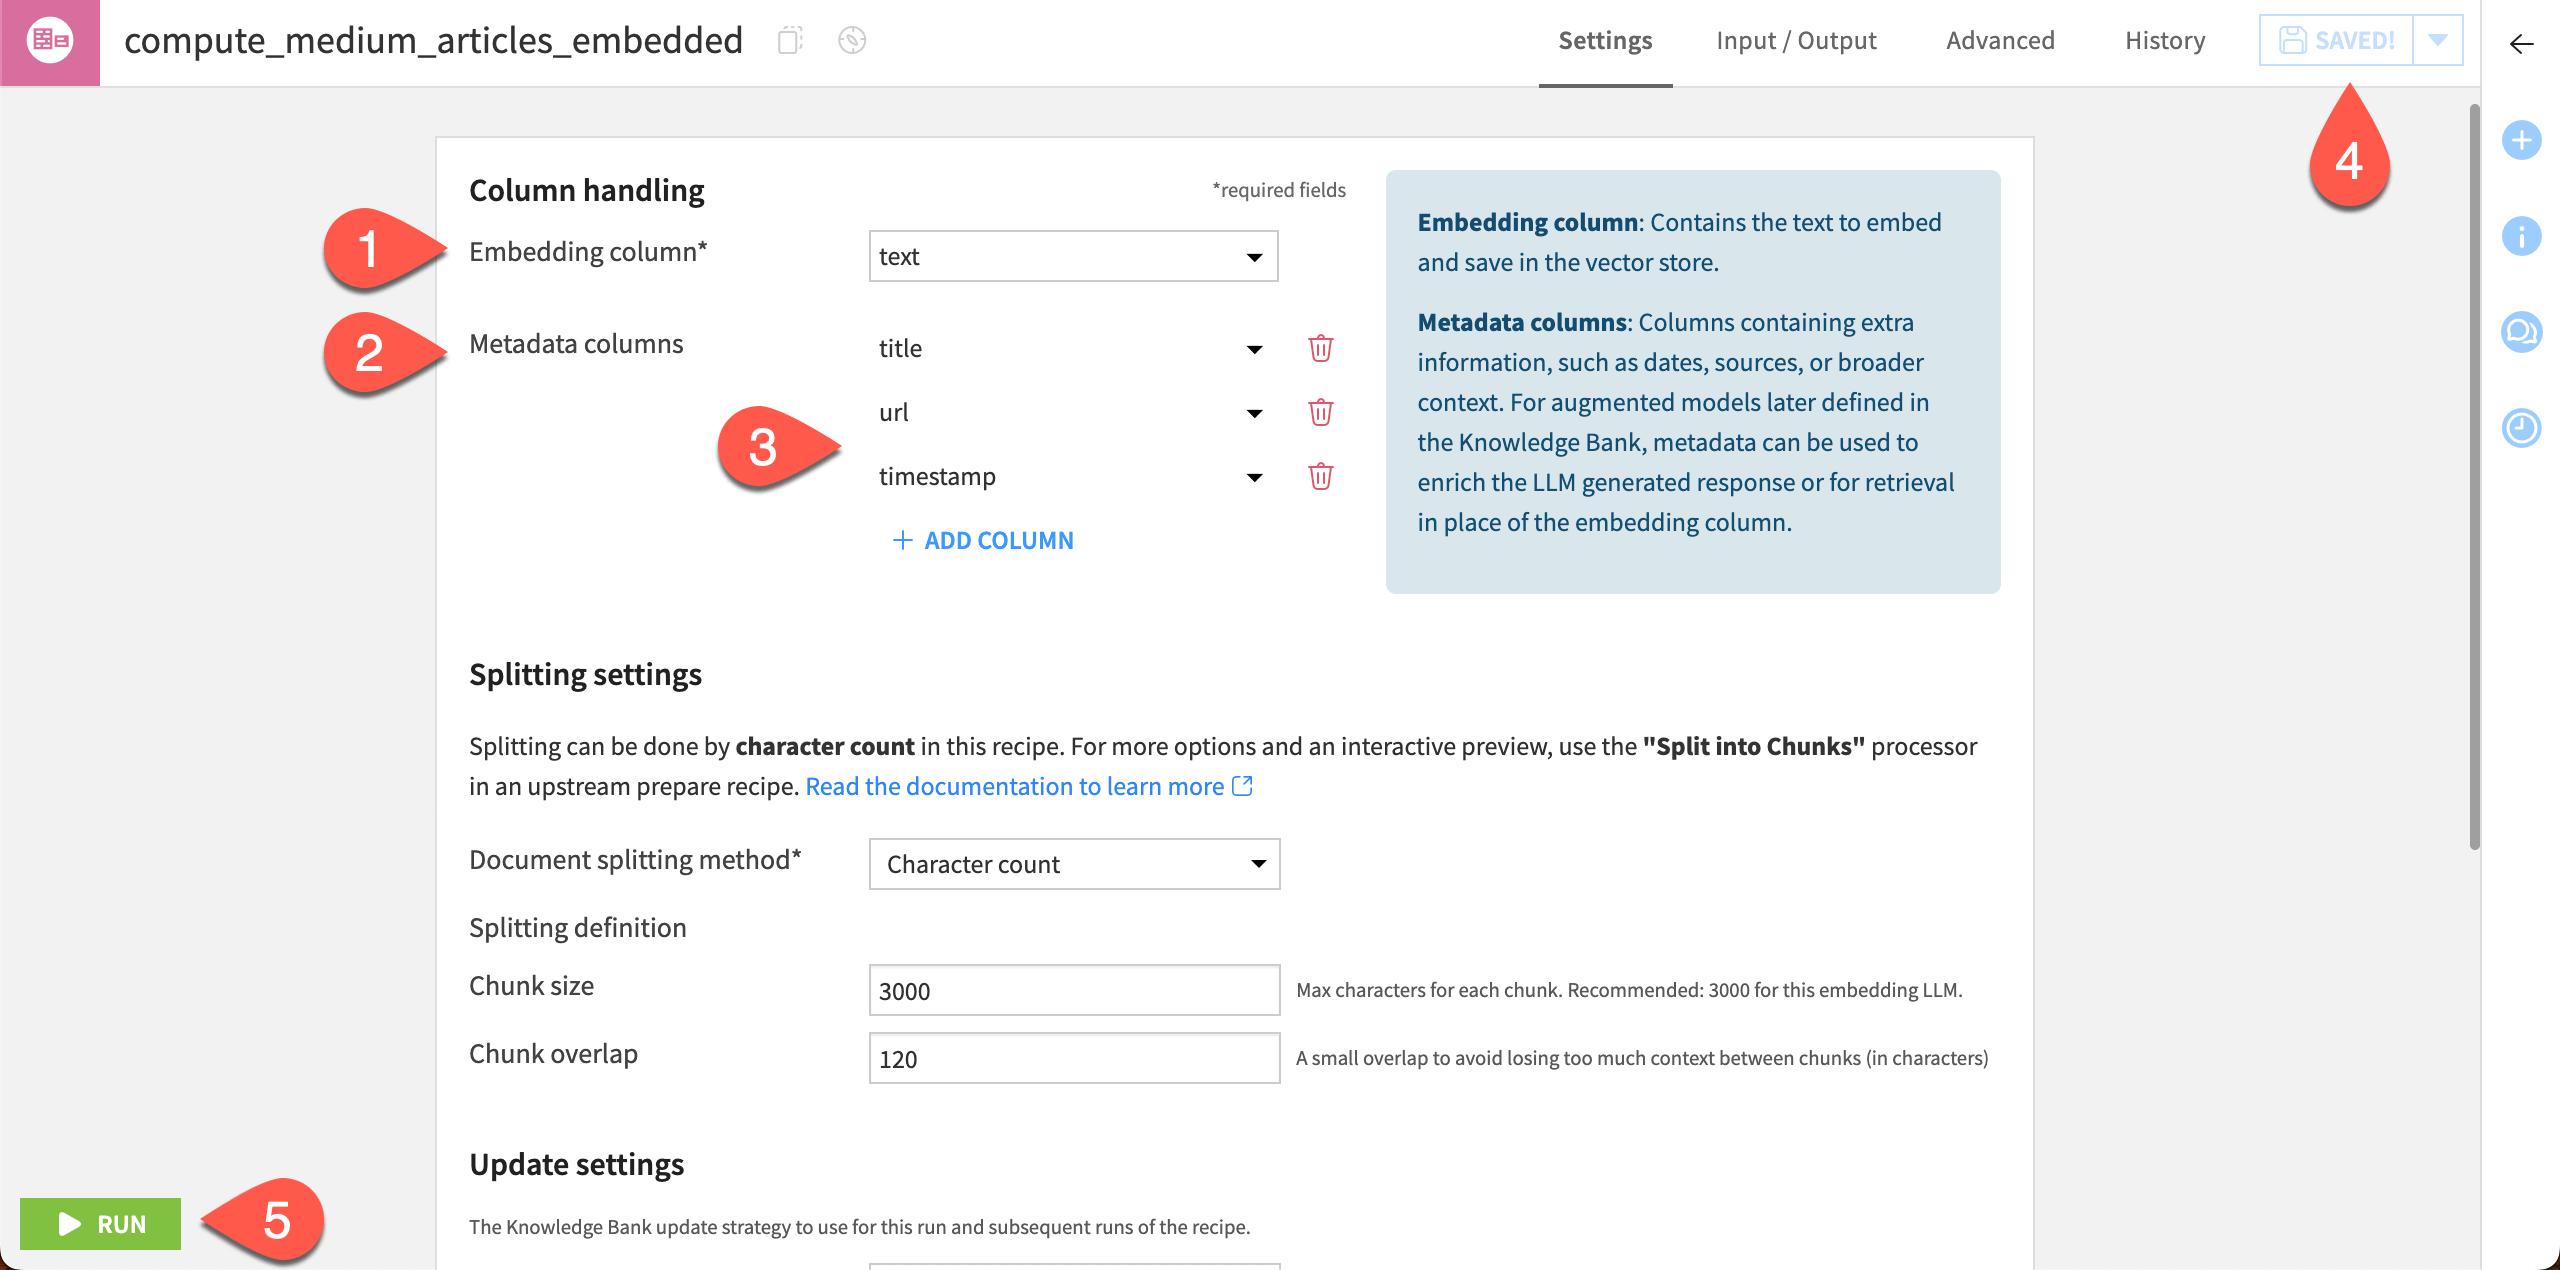
Next, in the recipe settings, choose which columns to embed.
For the Embedding column, choose text.
For the Metadata columns, click + Add Column and choose title.
Do the same for url and timestamp.
Click Save in the top right.
Click Run to execute the recipe.
When the recipe has finished running, the new knowledge bank medium_articles_embedded will appear in the Flow. You’ll use it to build the first agent tool.
Build agent tools#
You’ll create two managed tools — individual components that complete different tasks — that you’ll add later to an agent. Dataiku offers multiple built-in tools that you can configure in just a few clicks.
Add a knowledge bank search tool#
The first tool specializes in searching knowledge banks like the one we just built.
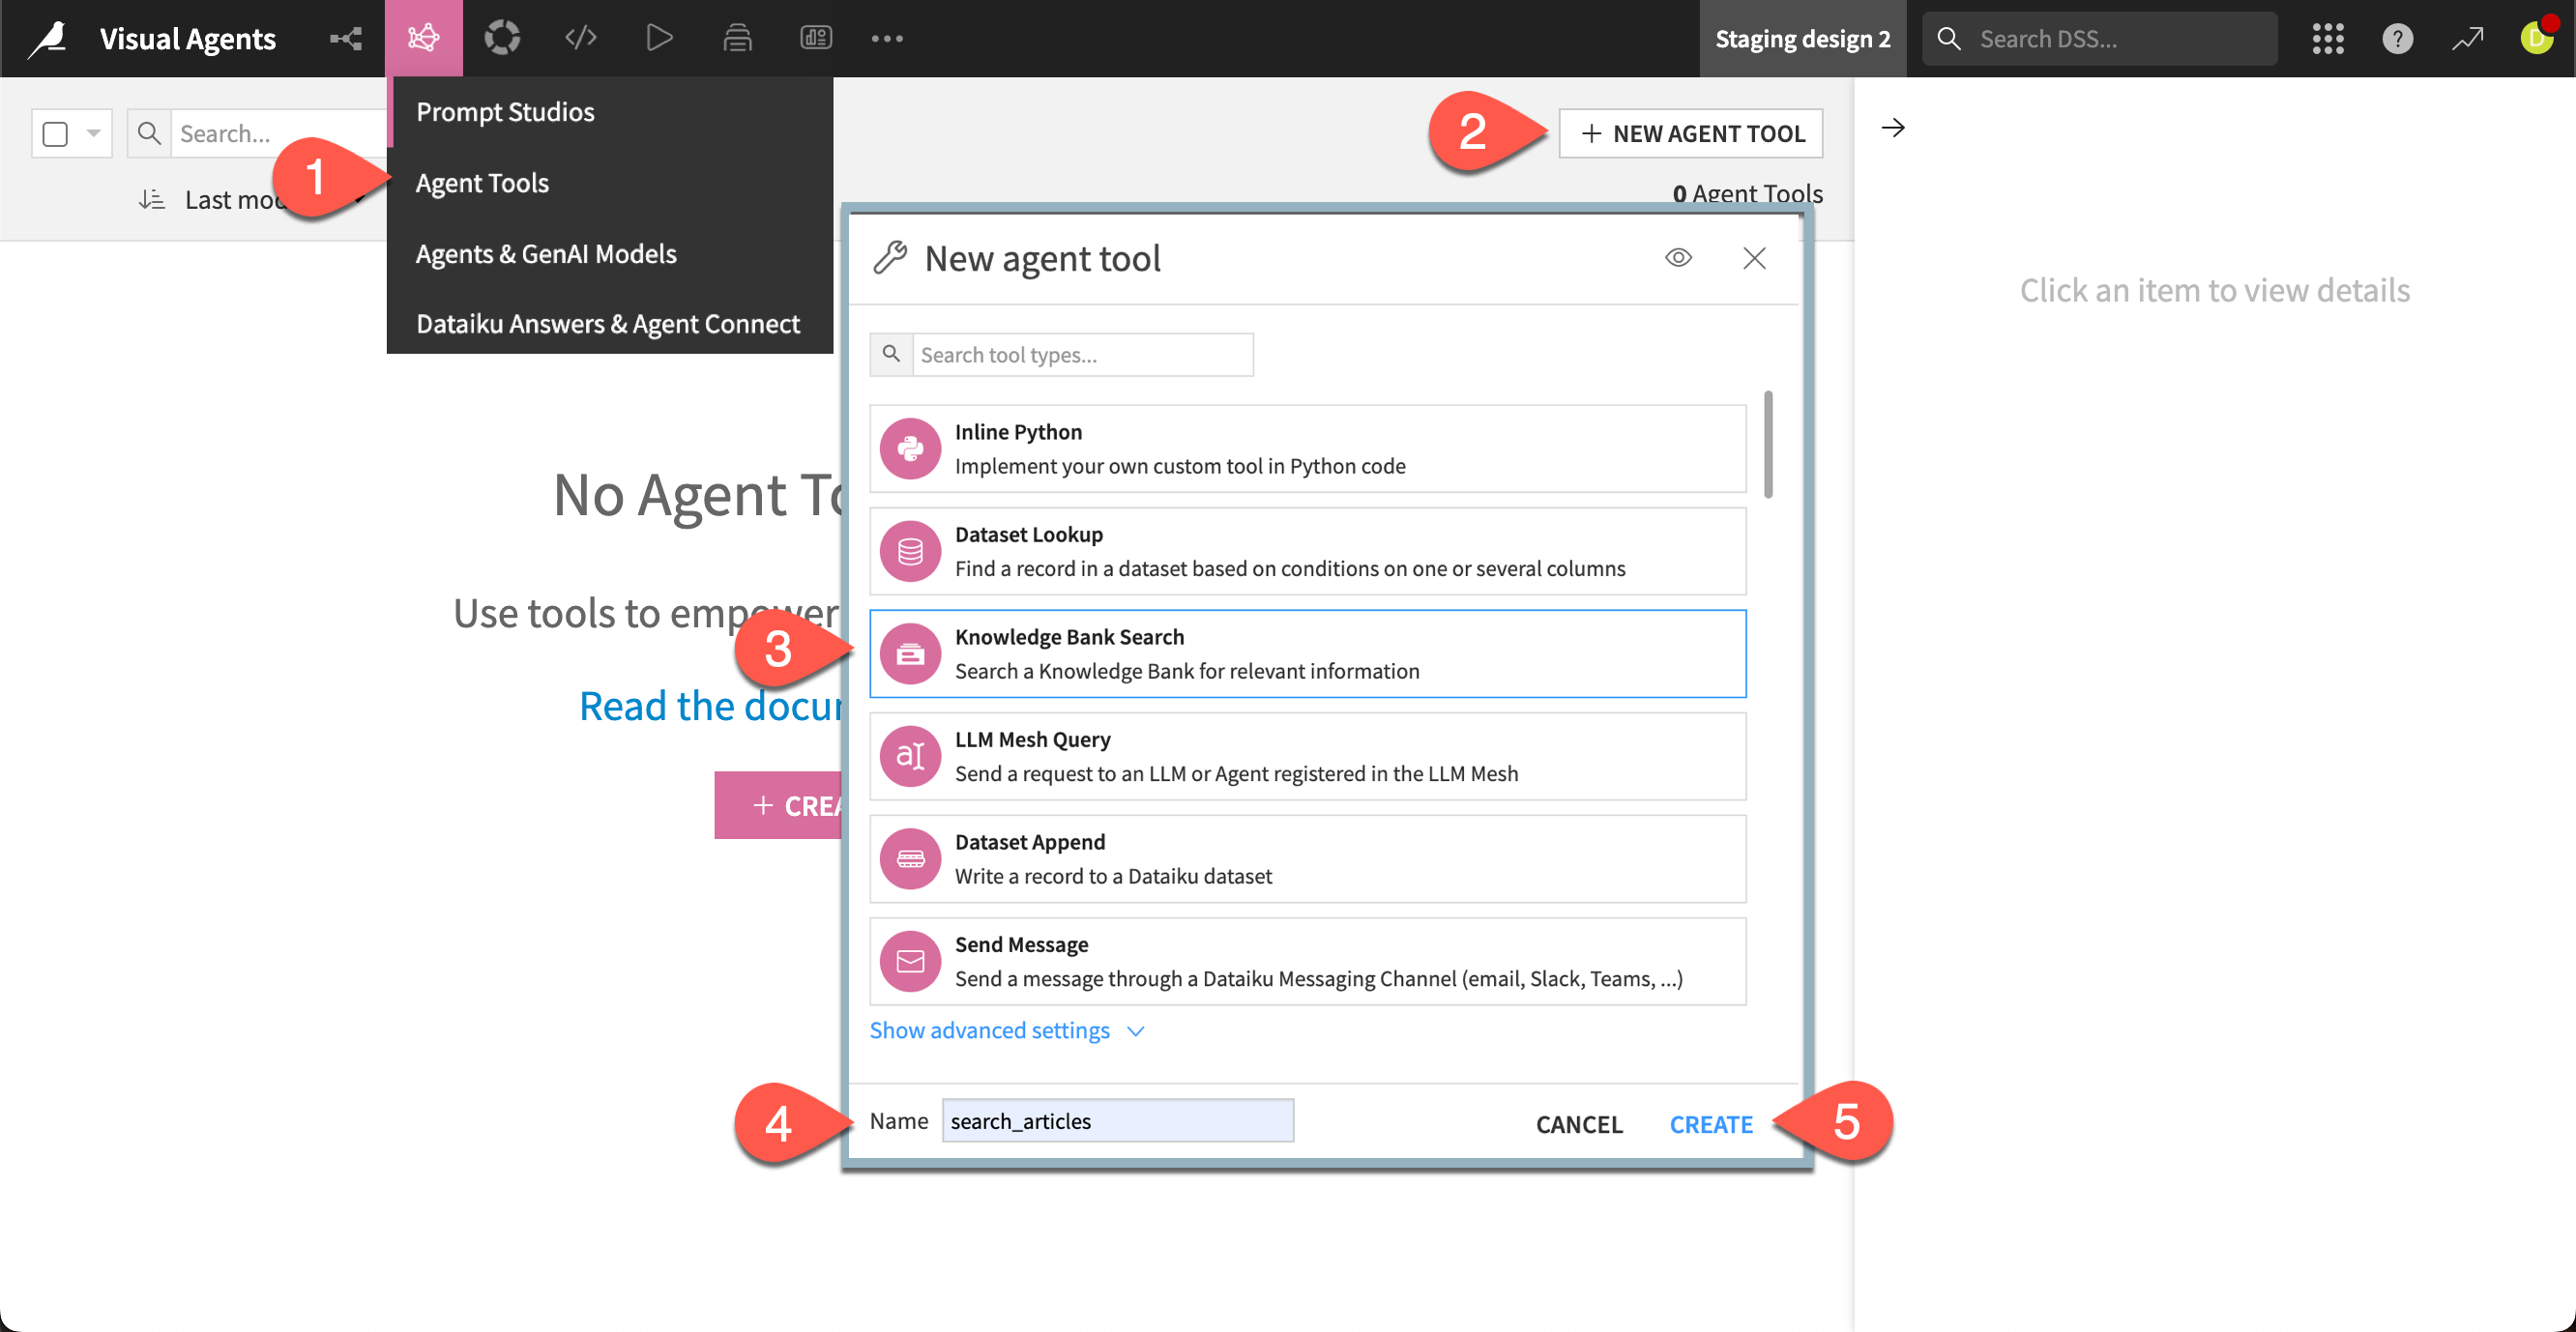
Go to GenAI (
 ) > Agent Tools in the top navigation bar.
Click + New Agent Tool.
Choose Knowledge Bank Search from the available tools.
Give the tool the Name
search_articles.Click Create.
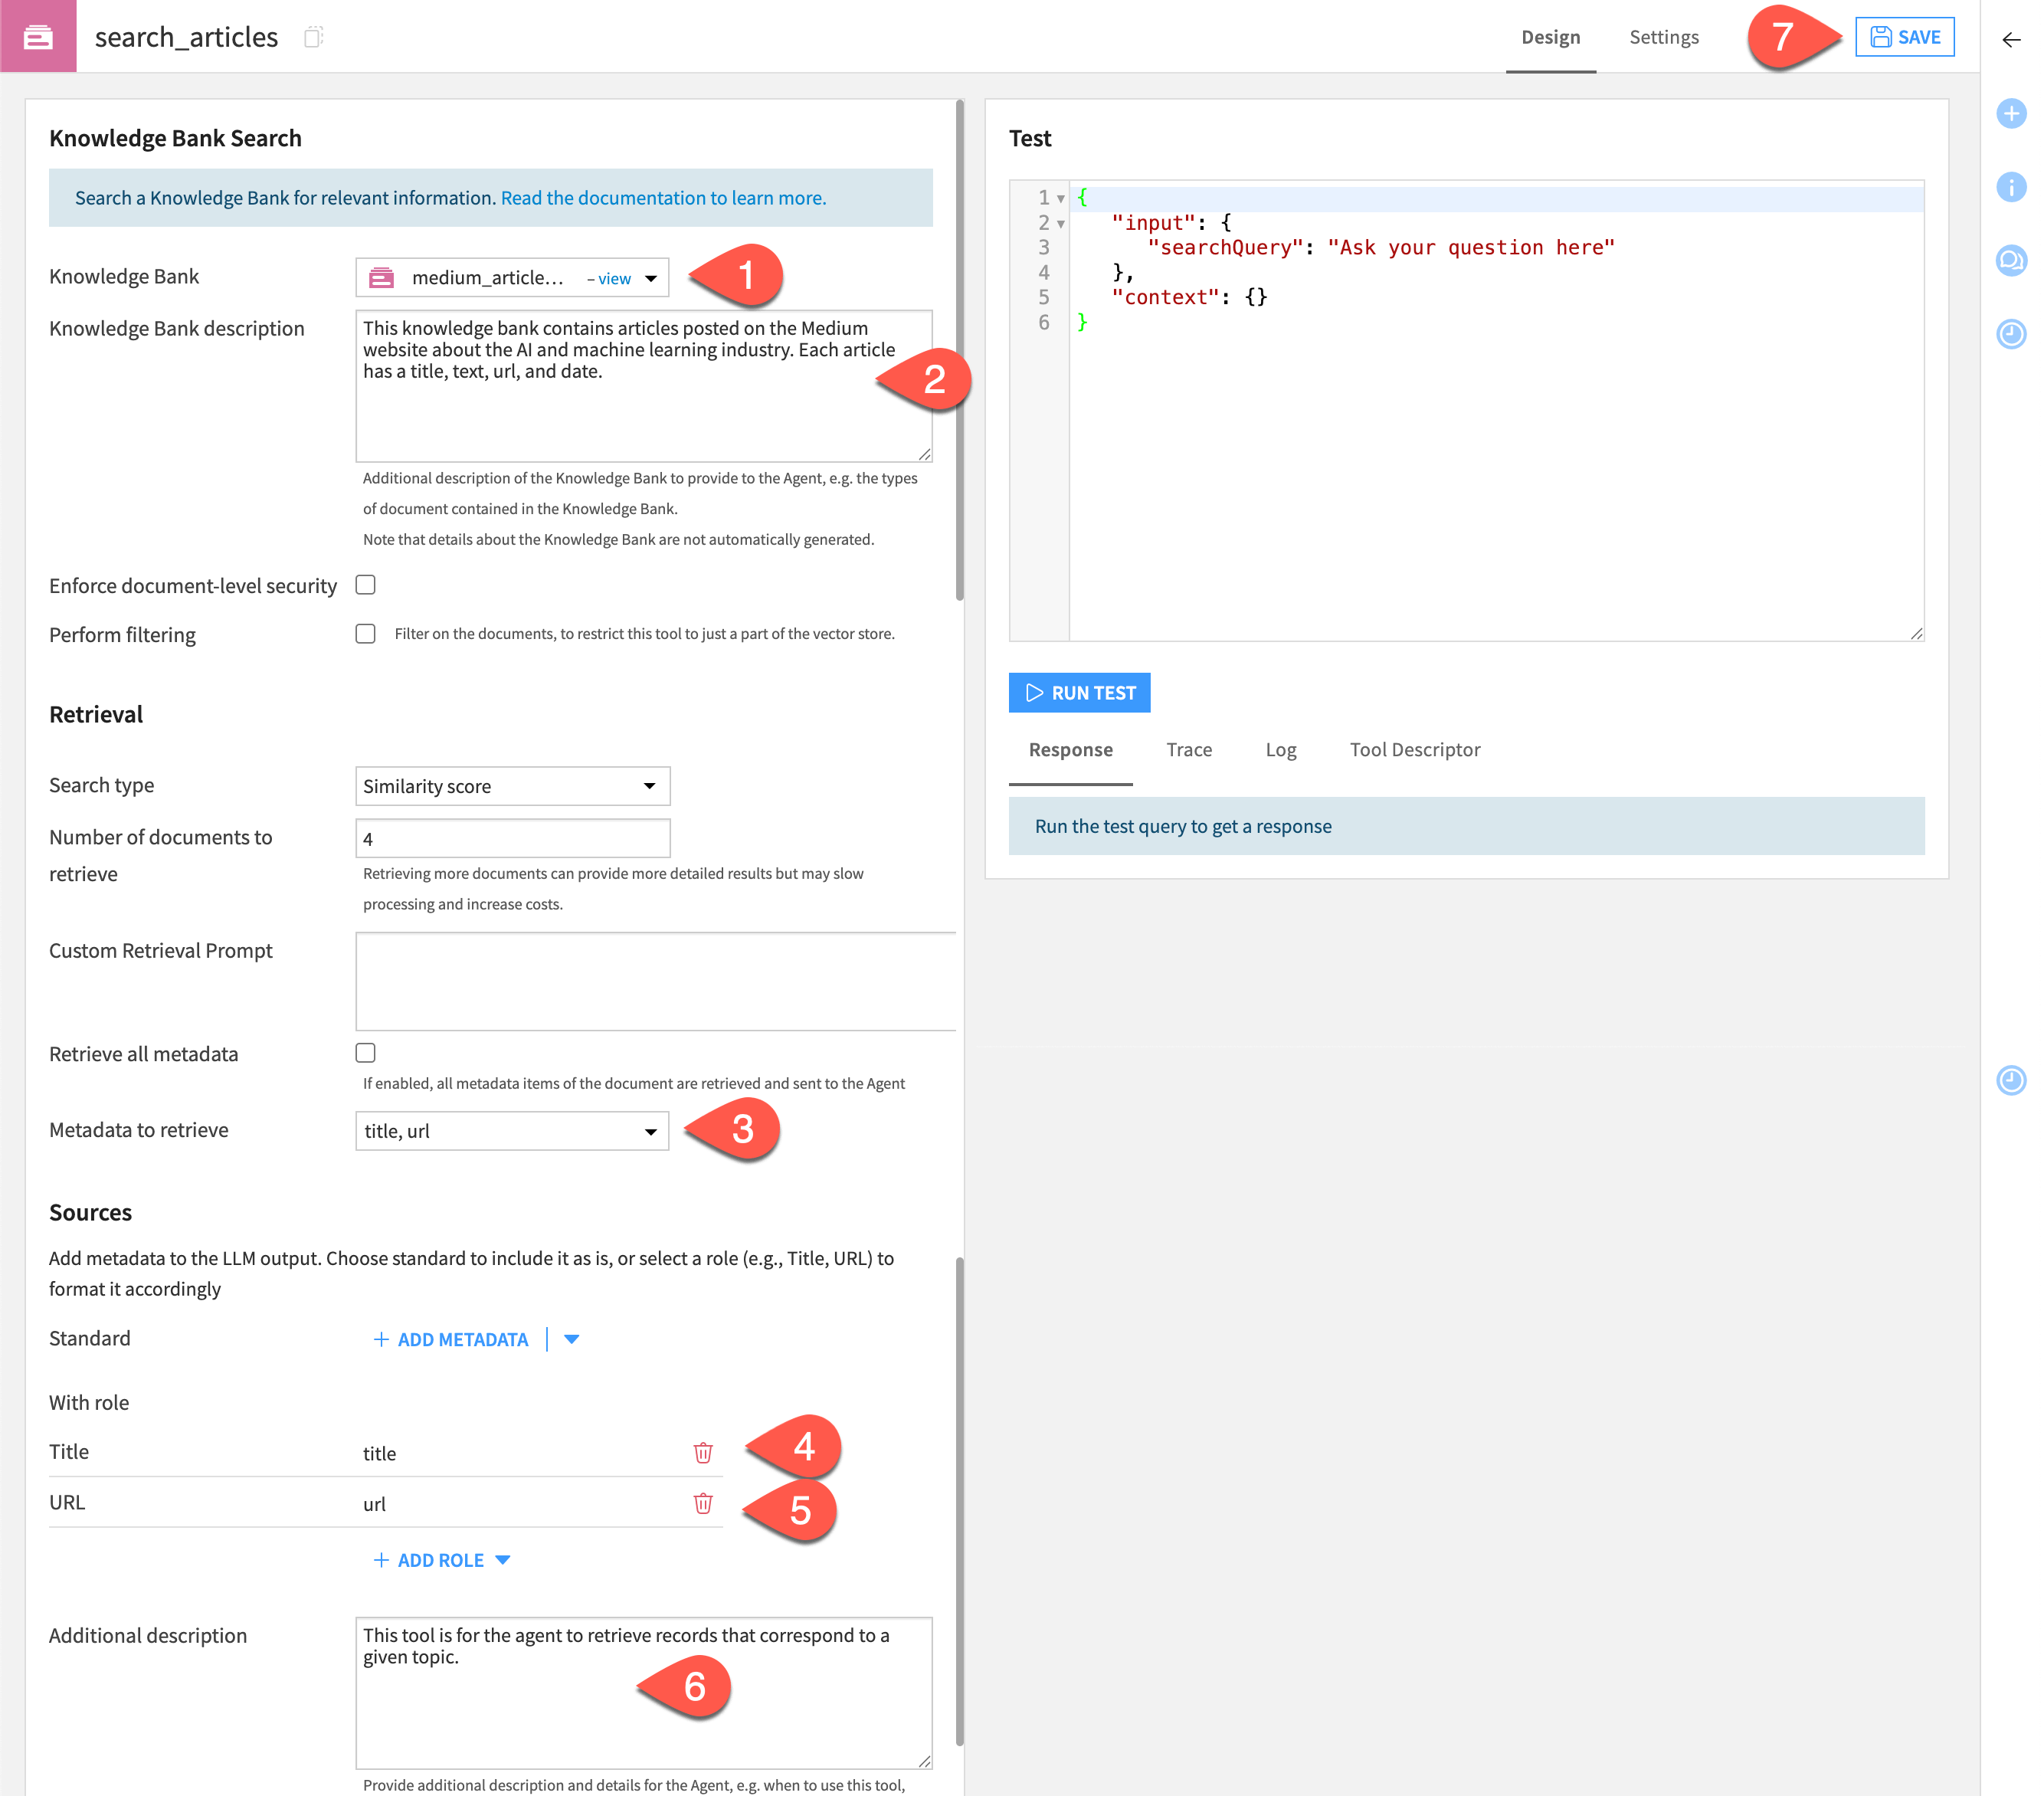
Next, configure the tool to use the knowledge bank. We can choose from among the data columns we embedded for the agent to include as metadata and sources in its responses. We’ll also add some descriptions that give the agent some context about the knowledge bank and how the tool should be used.
In the Design tab of search_articles, choose medium_articles_embedded as the Knowledge Bank.
In the Retrieval section, next to Columns to retrieve, select title and url.
In the Tool description > Description for LLM window, copy and paste the following text:
This knowledge bank contains articles posted on the Medium website about the AI and machine learning industry. Each article has a title, text, url, and date.

This tool is for the agent to retrieve records that correspond to a given topic.
Click Save.
Test the search tool#
We can run a quick test of the tool to see how it performs. This gives a behind-the-scenes look at how the tool will run a query. Later, we’ll interact with the agent using a chat interface.
Let’s look for any articles that deal with deep learning.
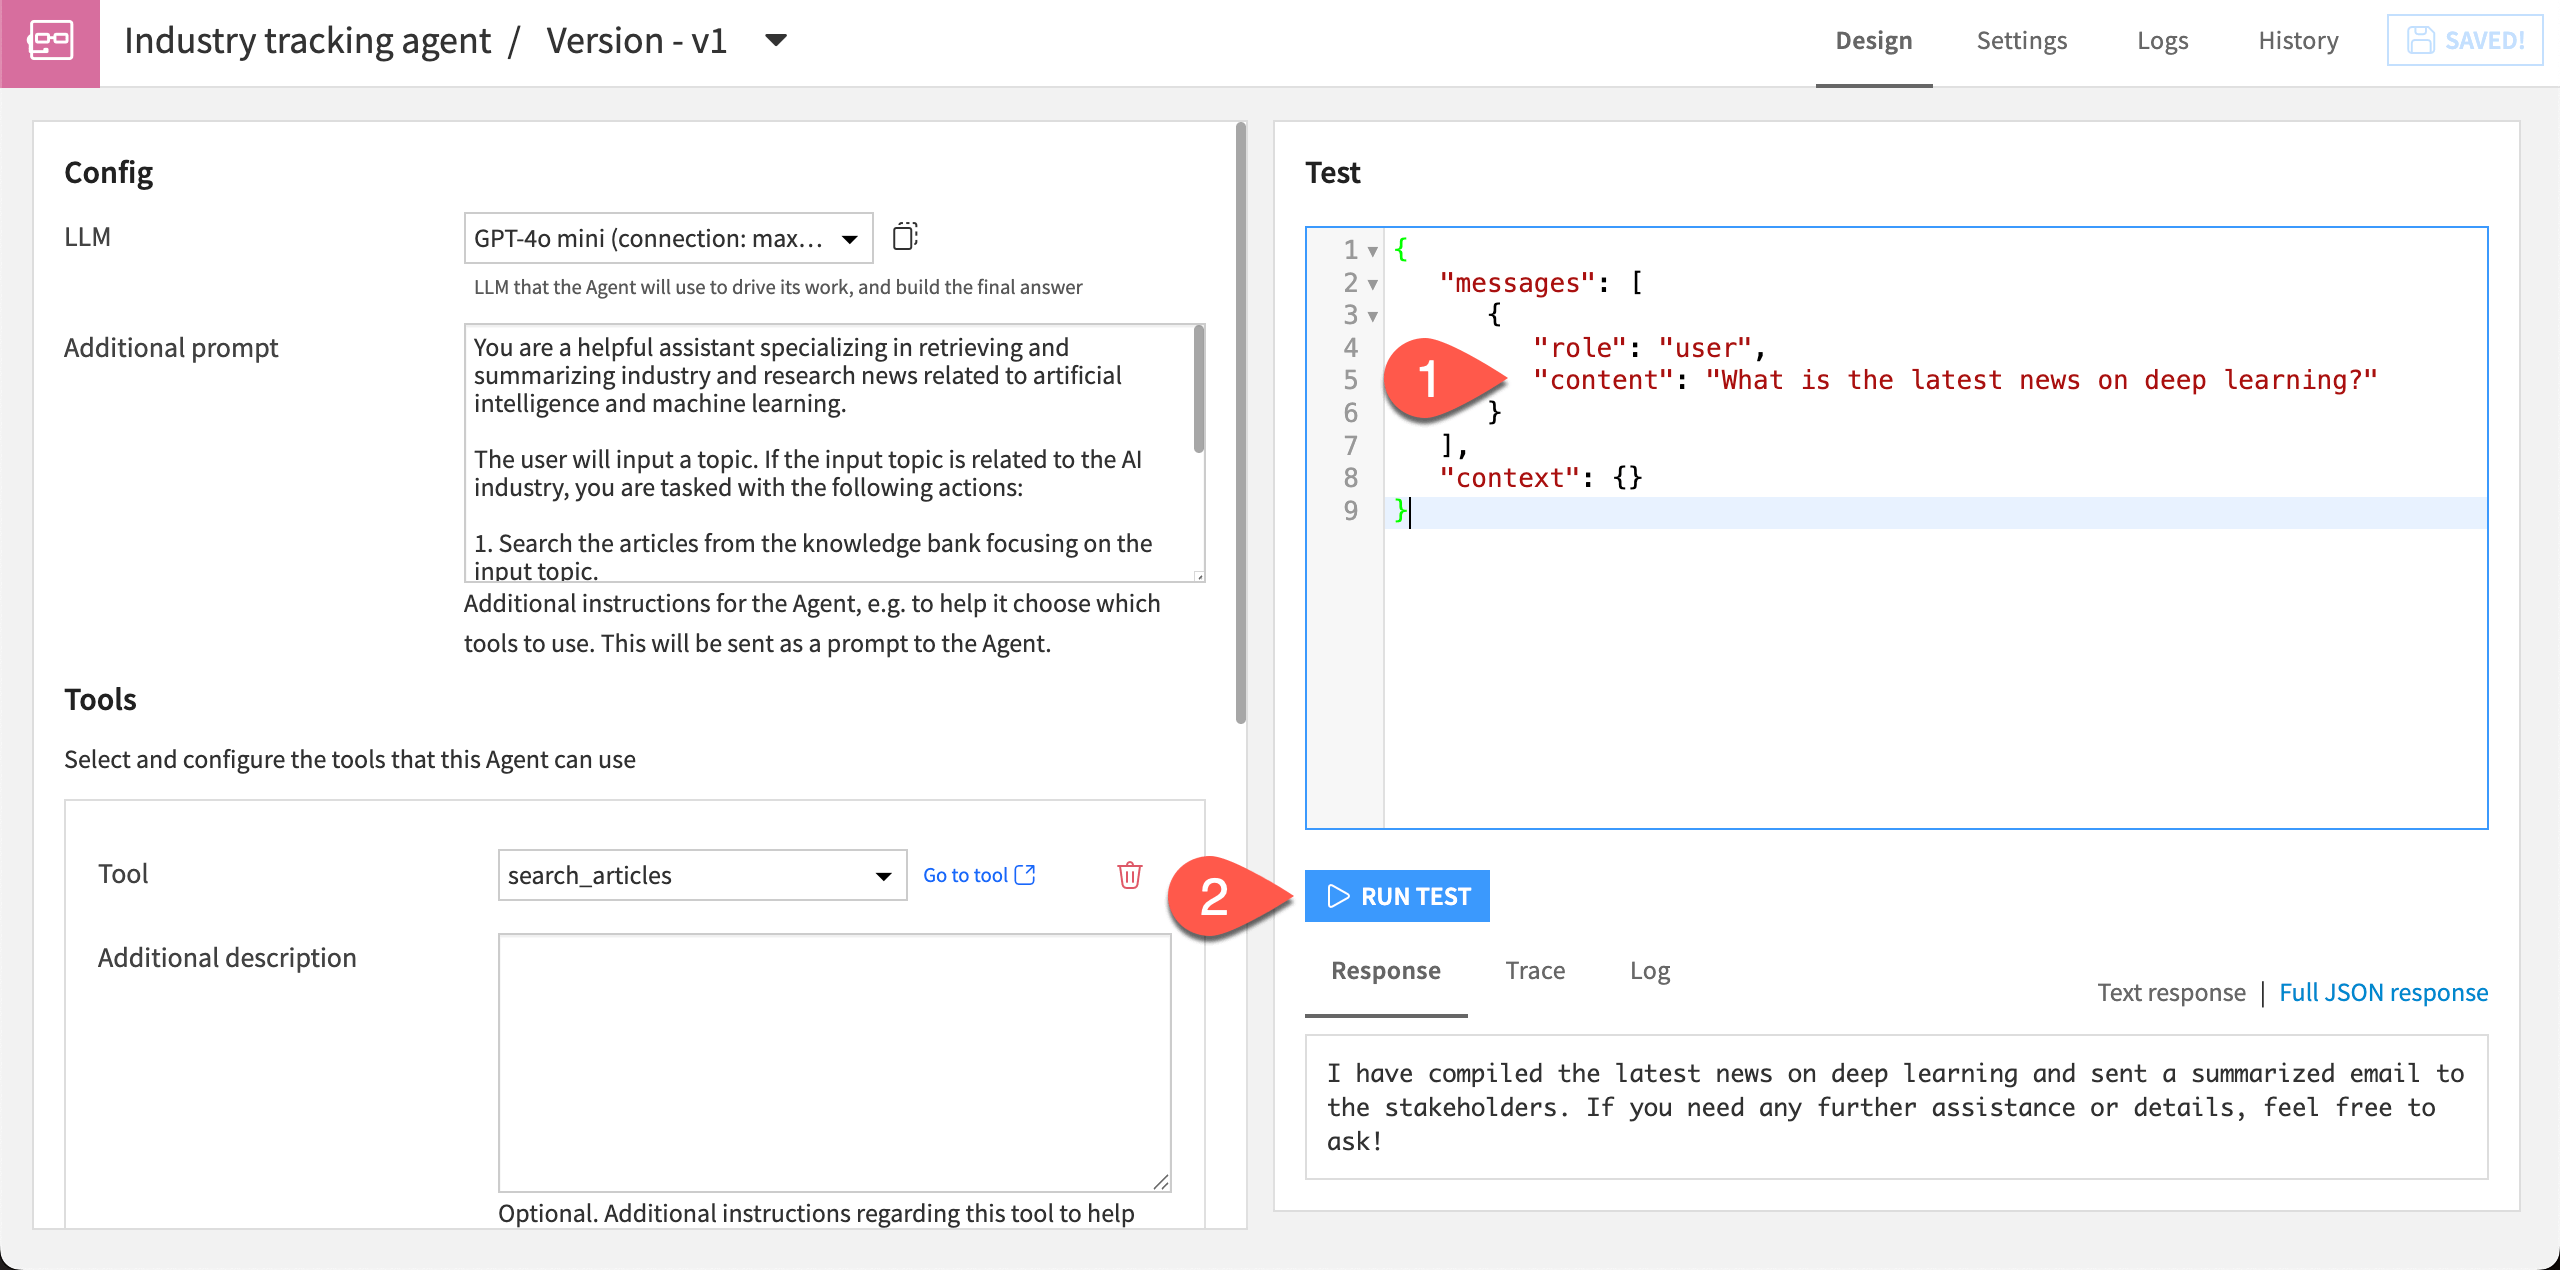
Still in the Design tab, move to the Test window.
Replace the text Enter search query here with the following text:
What is the latest news on deep learning?
Click Run Test.
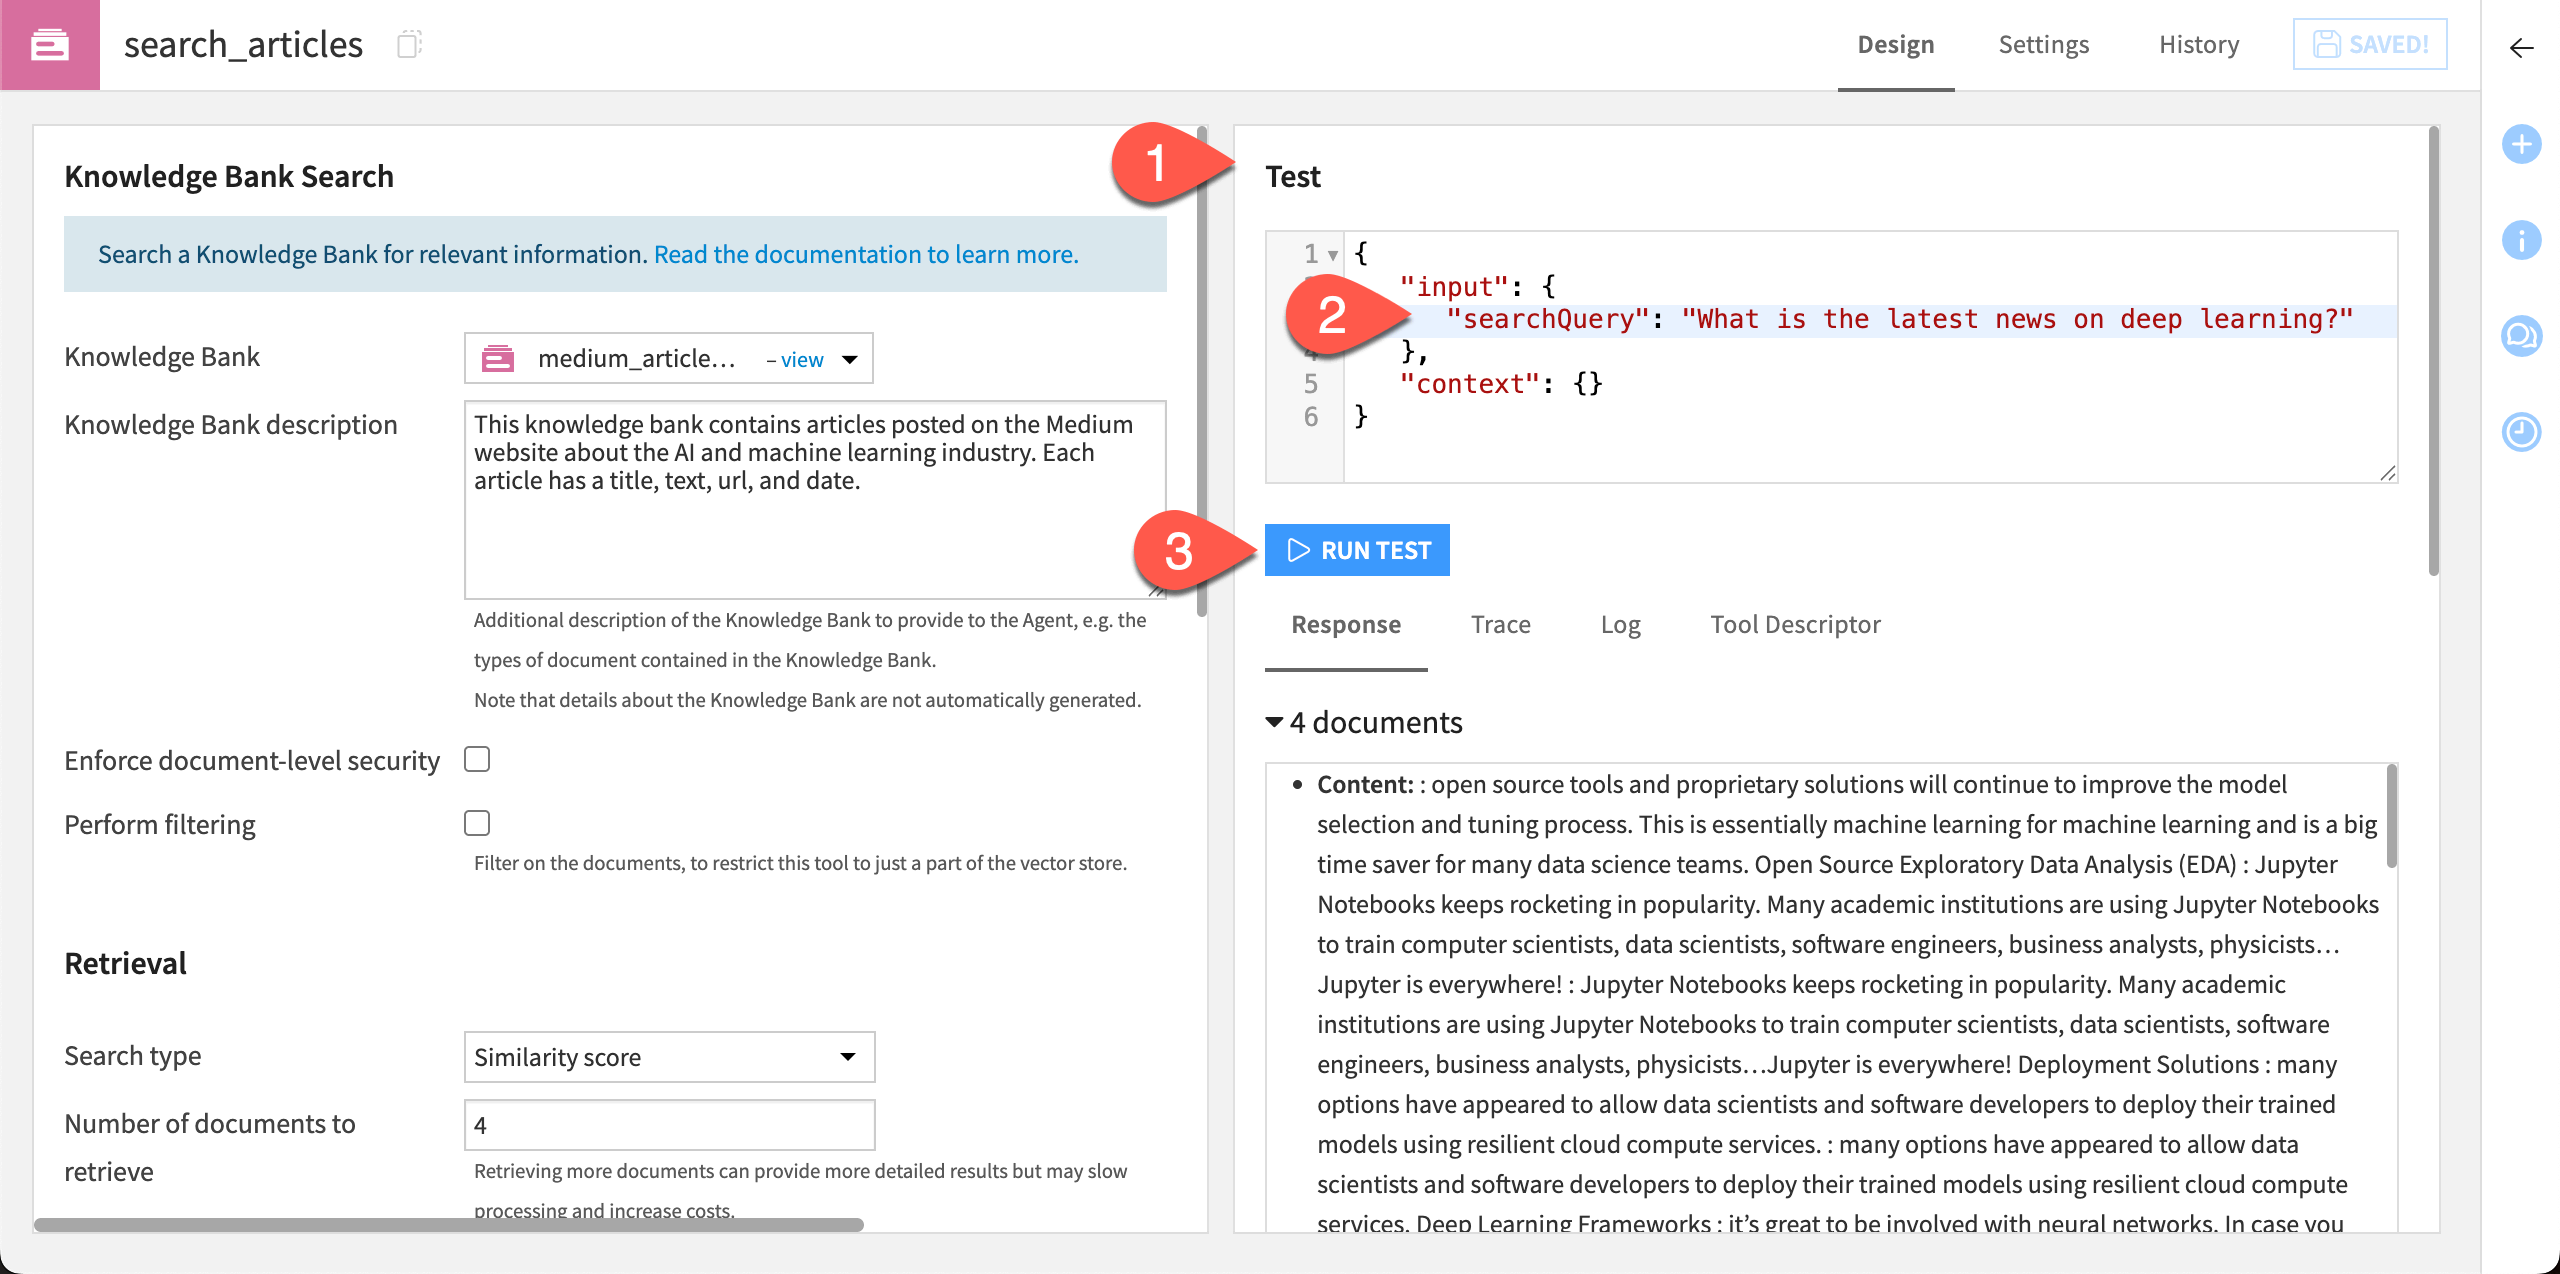
The tool returns several pieces of useful information under the test window, including:
Response |
Includes the content and metadata of relevant articles, along with sources. You can change the number of documents, metadata, and sources retrieved in the Design tab. |
Trace and Log |
Can help audit and debug an agent’s actions. |
Tool Descriptor |
Provides information about the tool for agent use. |
Add a messaging tool#
The next tool to build sends a message summarizing the articles returned using the knowledge bank search tool.
Note
You can send a message via Slack, Microsoft Teams, or email. An administrator must configure these settings. This tutorial uses email, though feel free to experiment with the message type of your choice and adapt the steps below accordingly.
Return to the Agent Tools page and click + New Agent Tool.
Choose the Send Message tool.
Add the Name
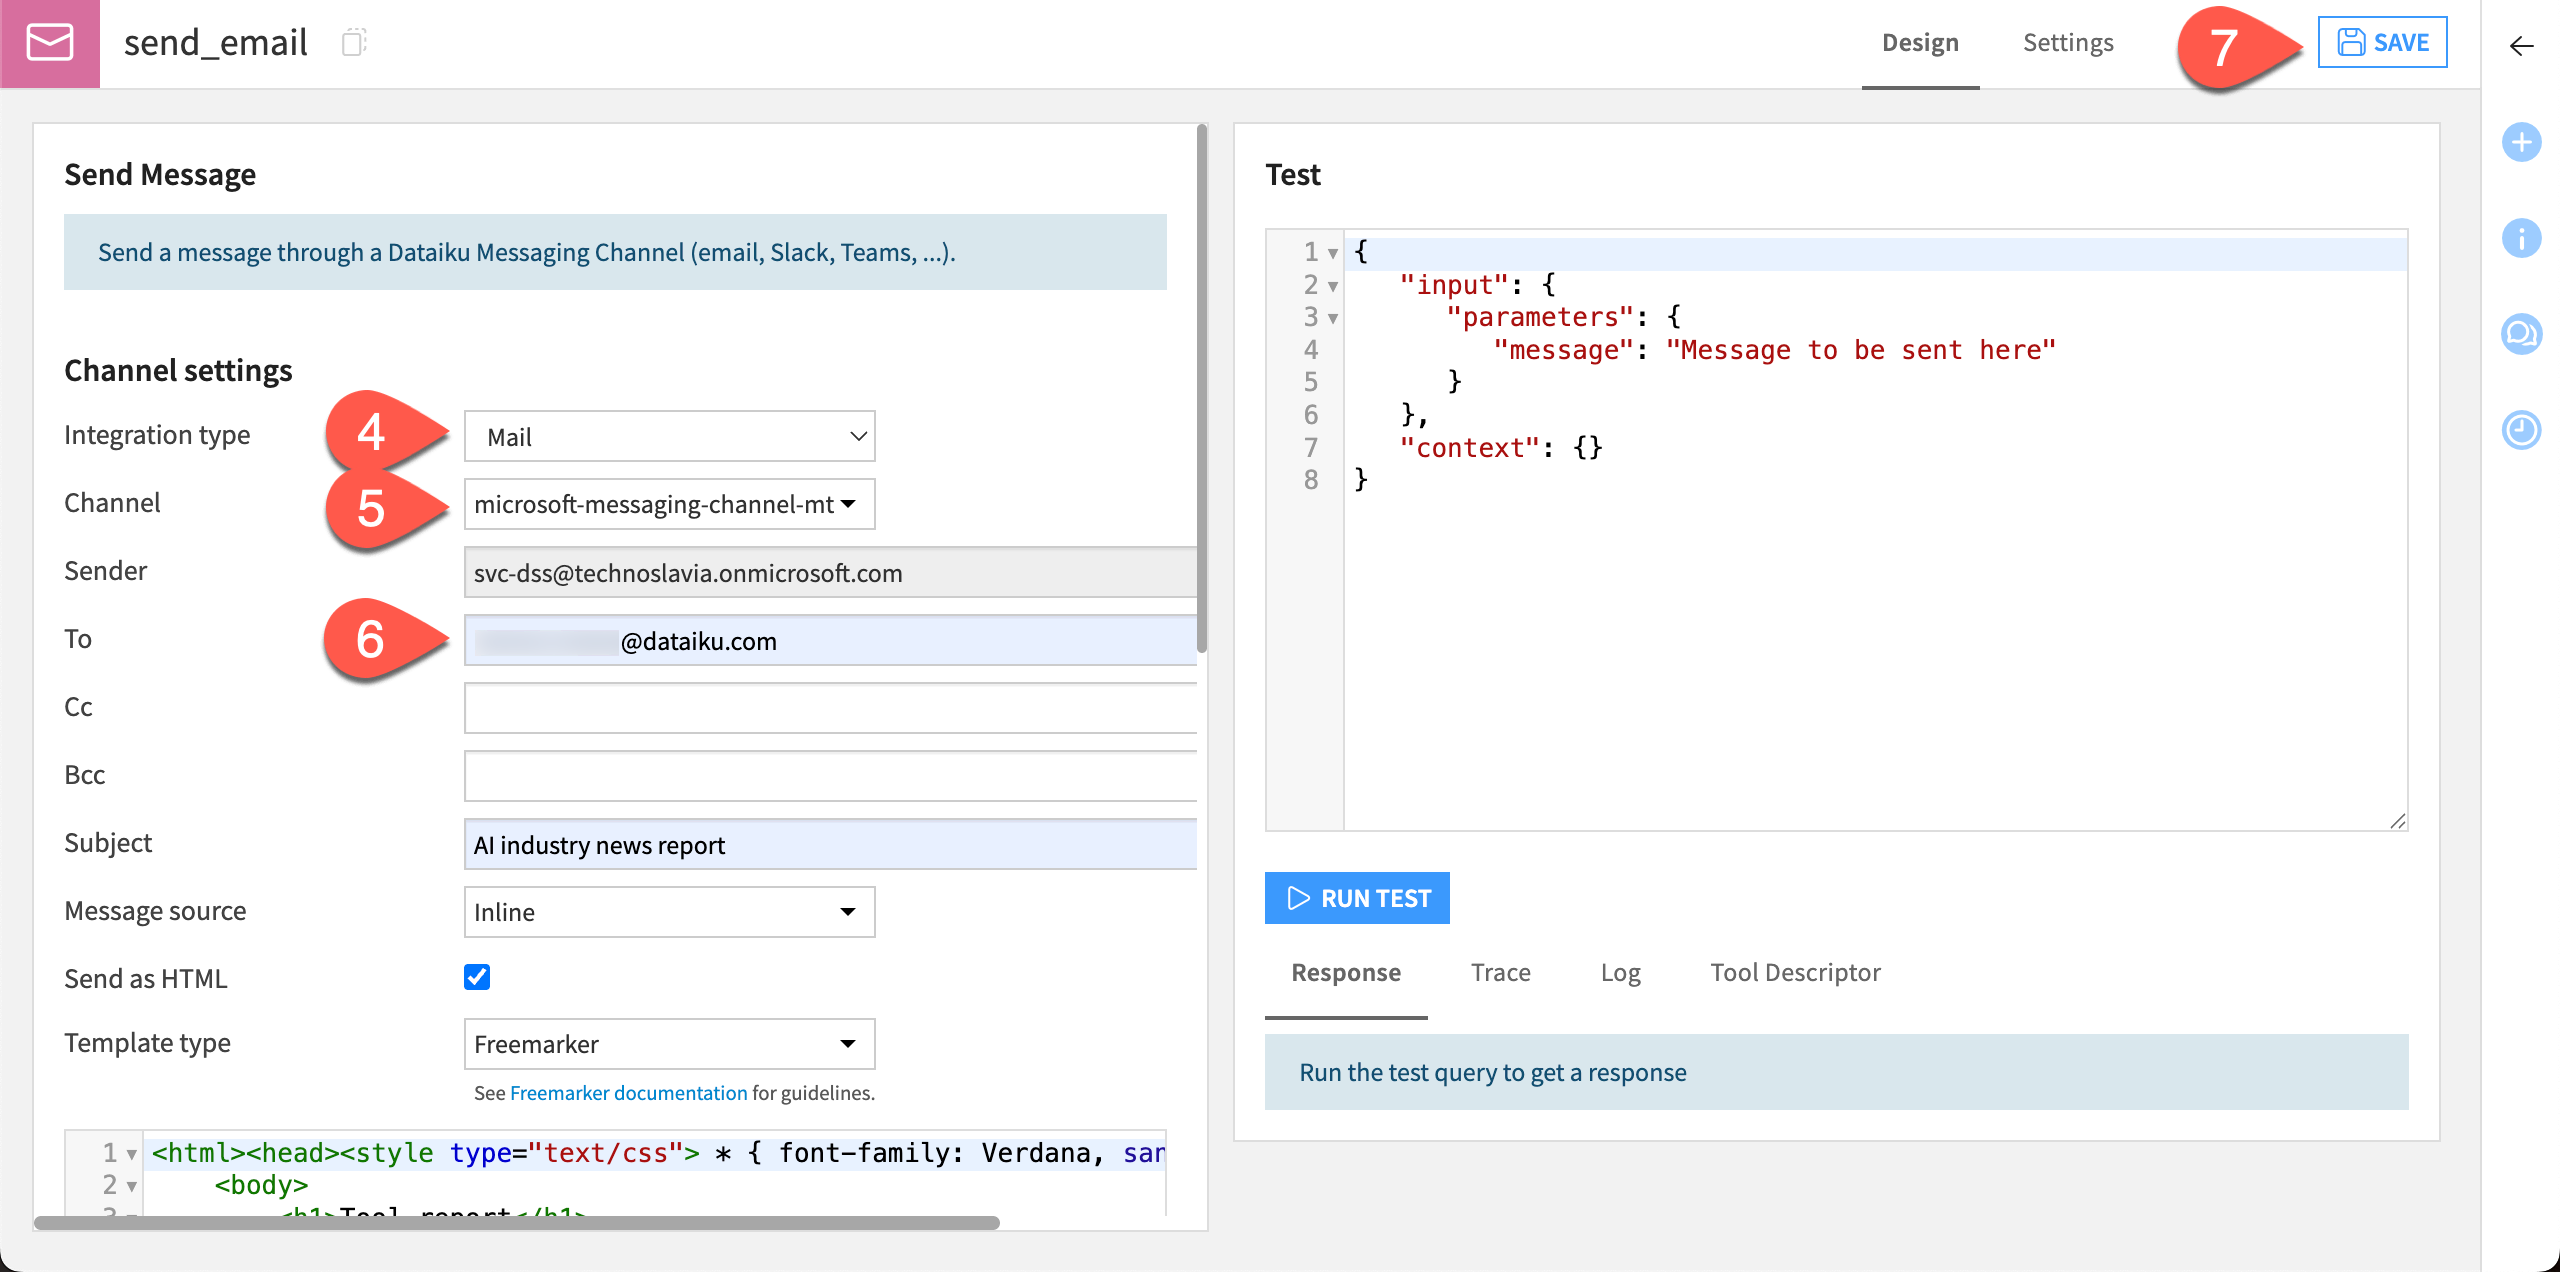
send_emailand click Create.In the tool Design page, choose the Integration type of Mail.
For the Channel, choose the channel configured by your administrator.
Add the following text to the corresponding boxes:
To: Your email address
Subject:
AI industry news reportTool description > Description for LLM:
This tool should be used to send a summary of the most relevant articles found by the search_articles tool, via email.
Click Save.
Test the messaging tool#
Let’s run a quick test to make sure this tool is working correctly.
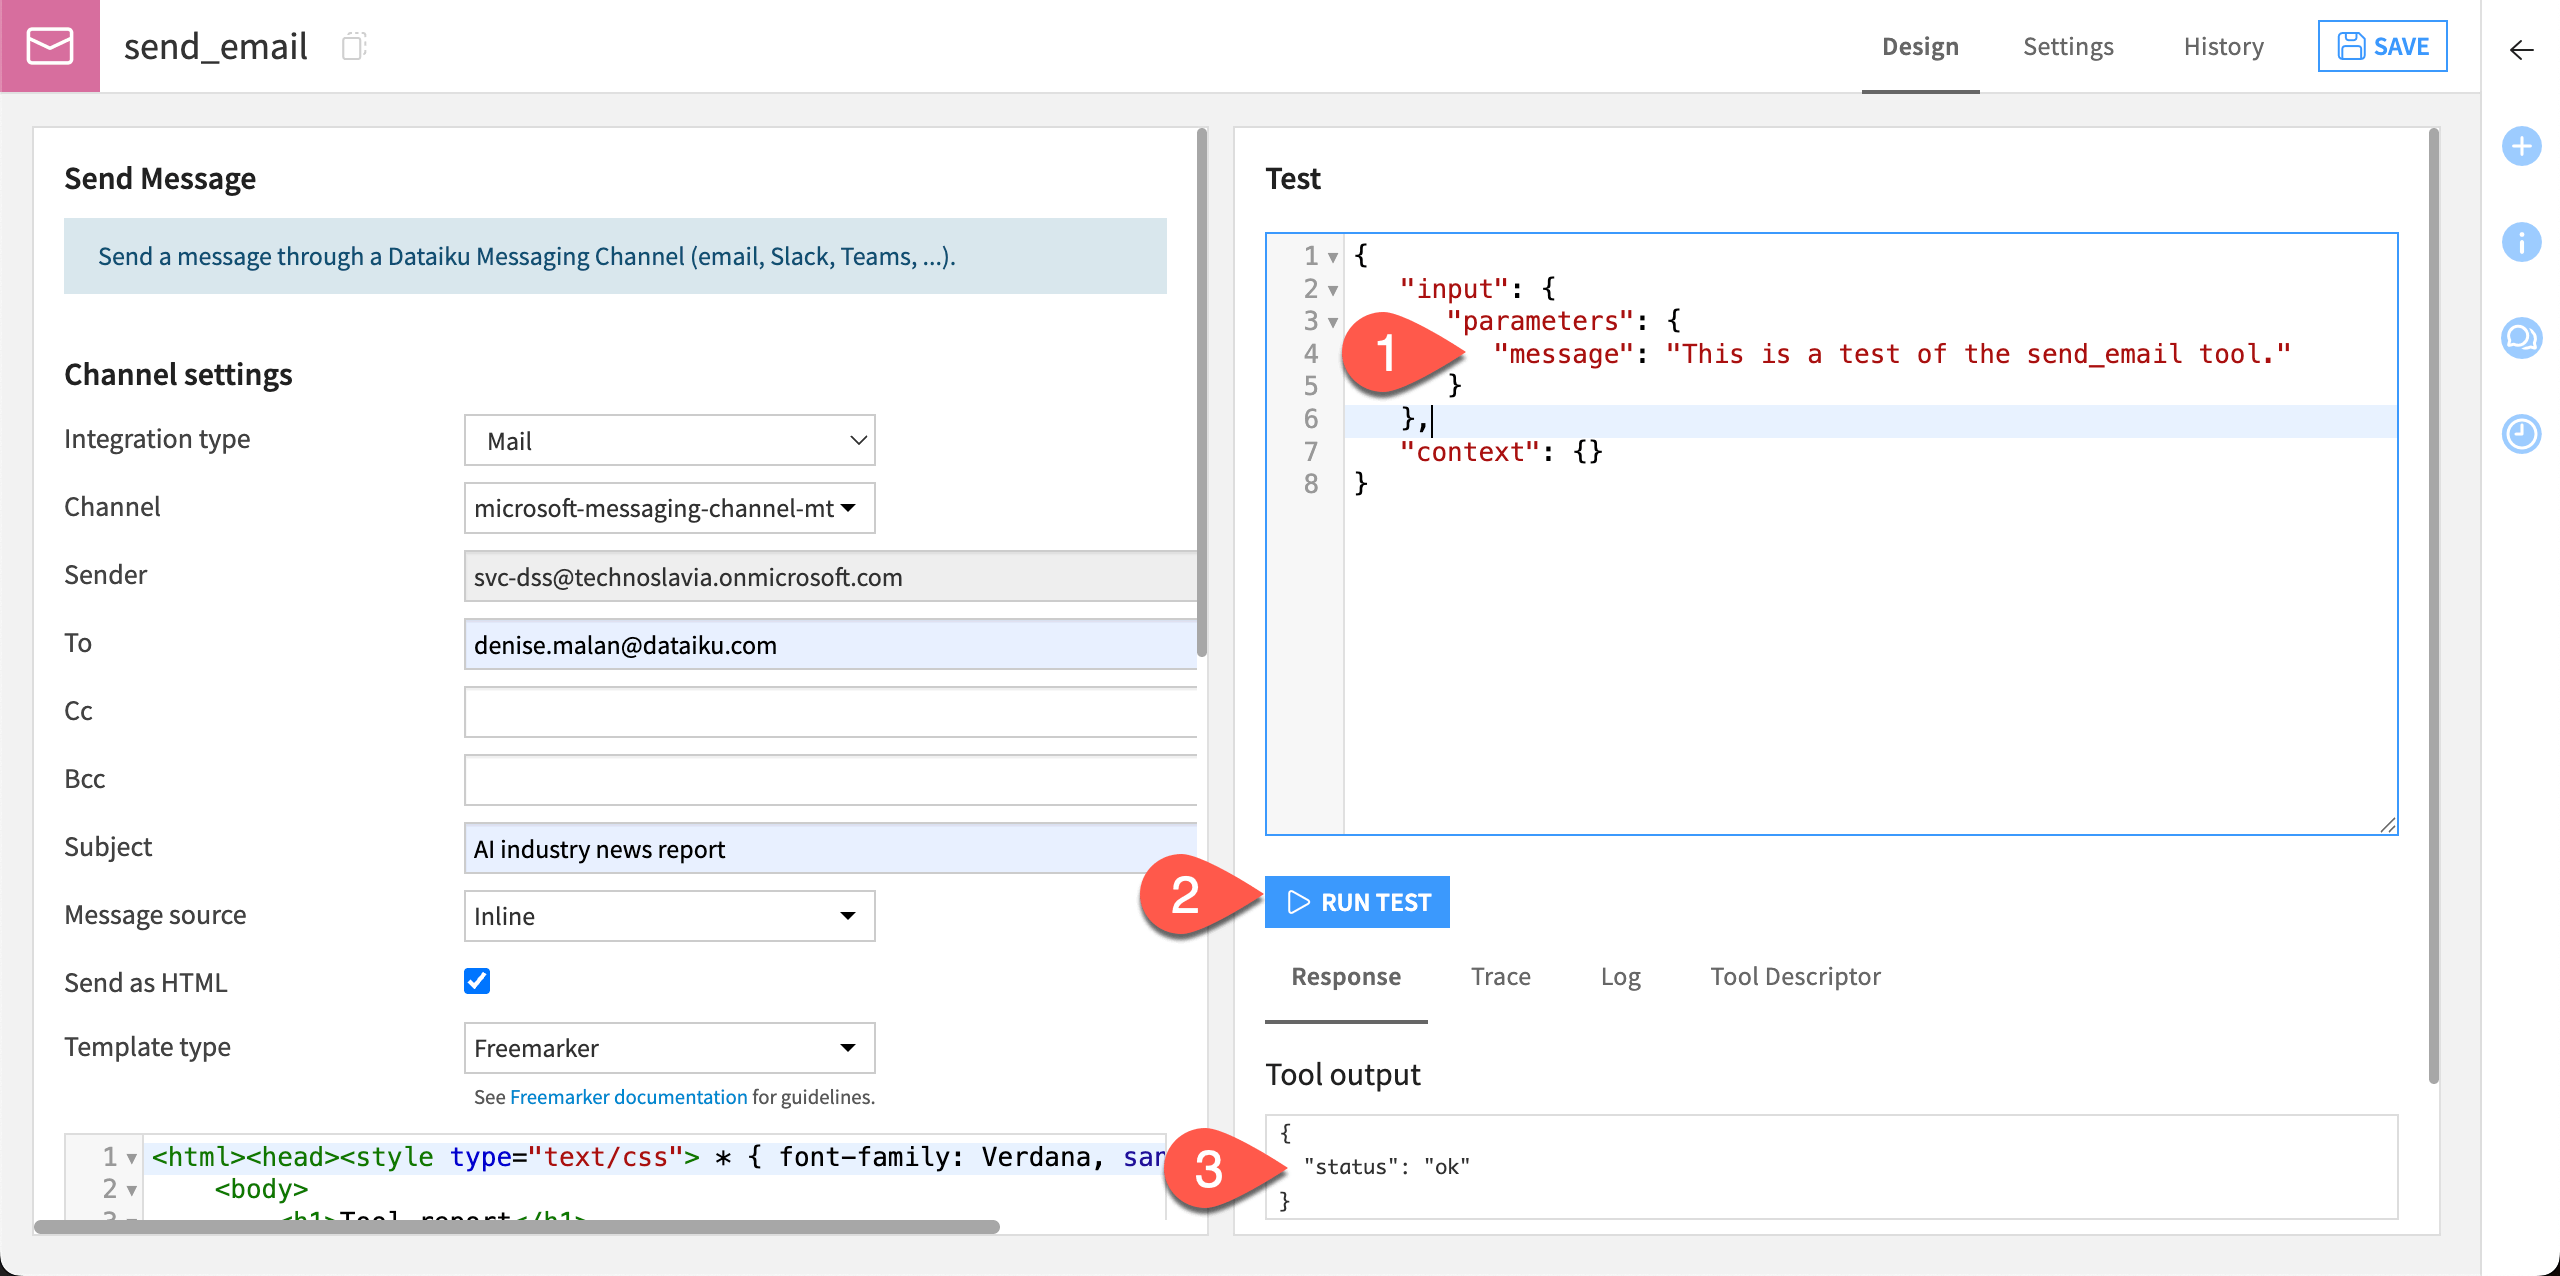
In the Test window, optionally add your own message in the Test query box, replacing the text
The message to send.Click Run Test.
Check that the Tool output window returns
ok. You can also check your email or other messaging tool to find the test message.
Now that you have two tools that are working separately, let’s put them together to build an agent!
Create a new agent#
We’ll first create the agent, then add the tools.
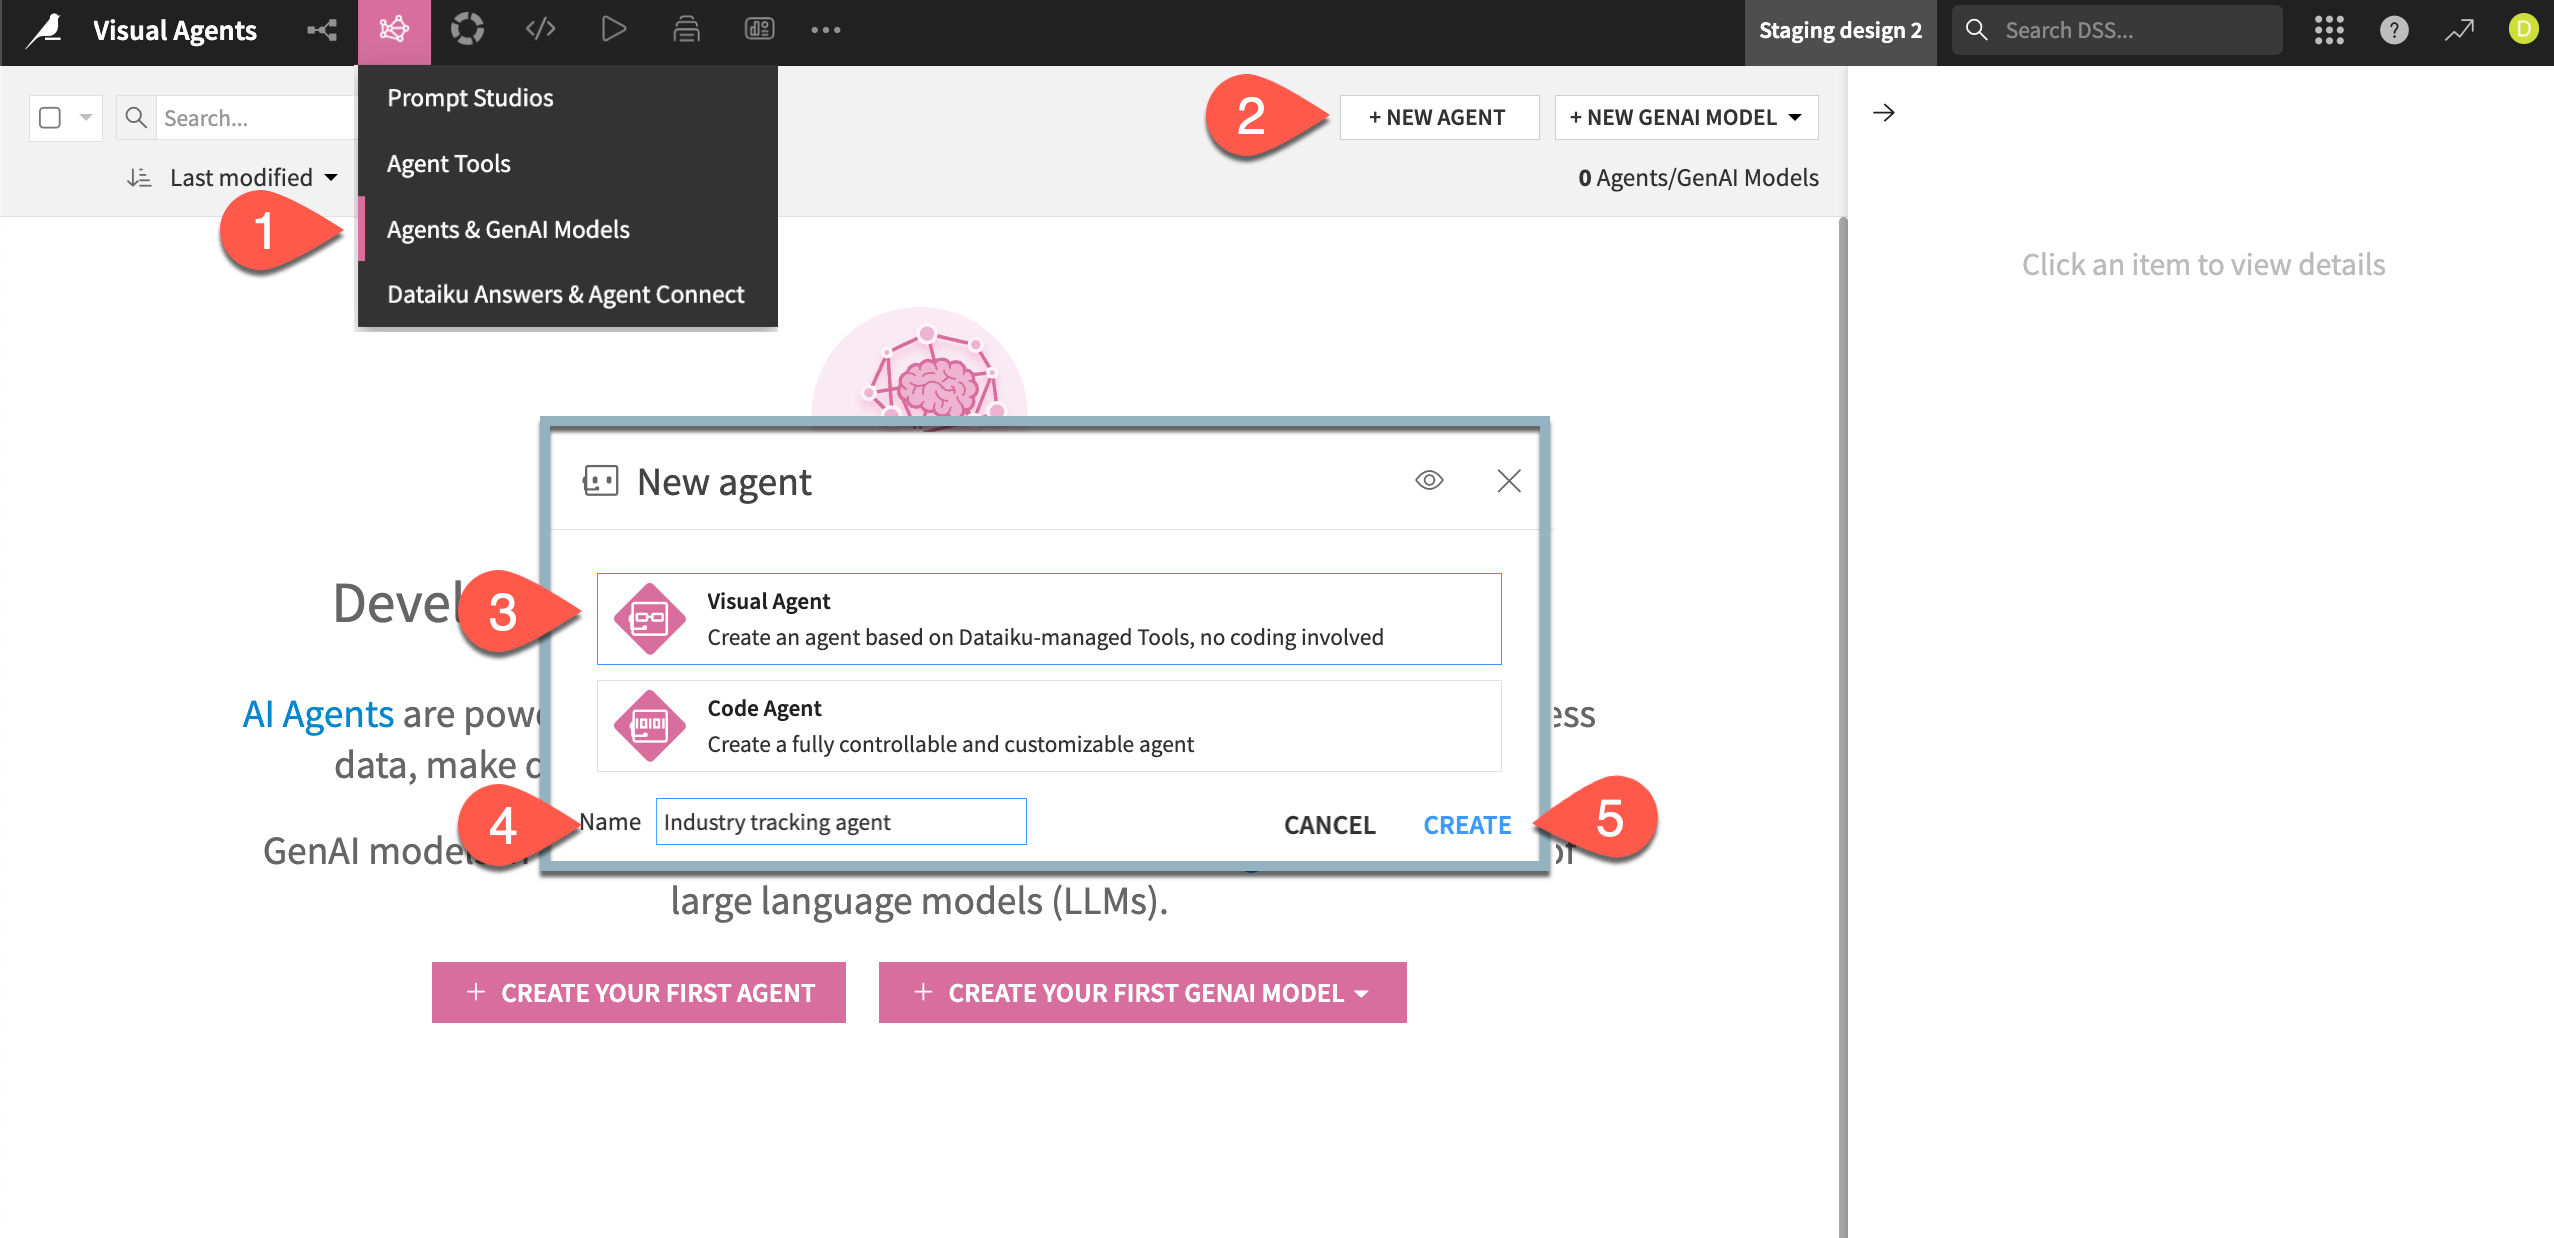
Go to GenAI (
) > Agents & GenAI Models.Click + New Agent.
Choose Simple Visual Agent.
Give it the name
Industry tracking agent.Click Create.
Configure the agent#
Next, configure the agent.
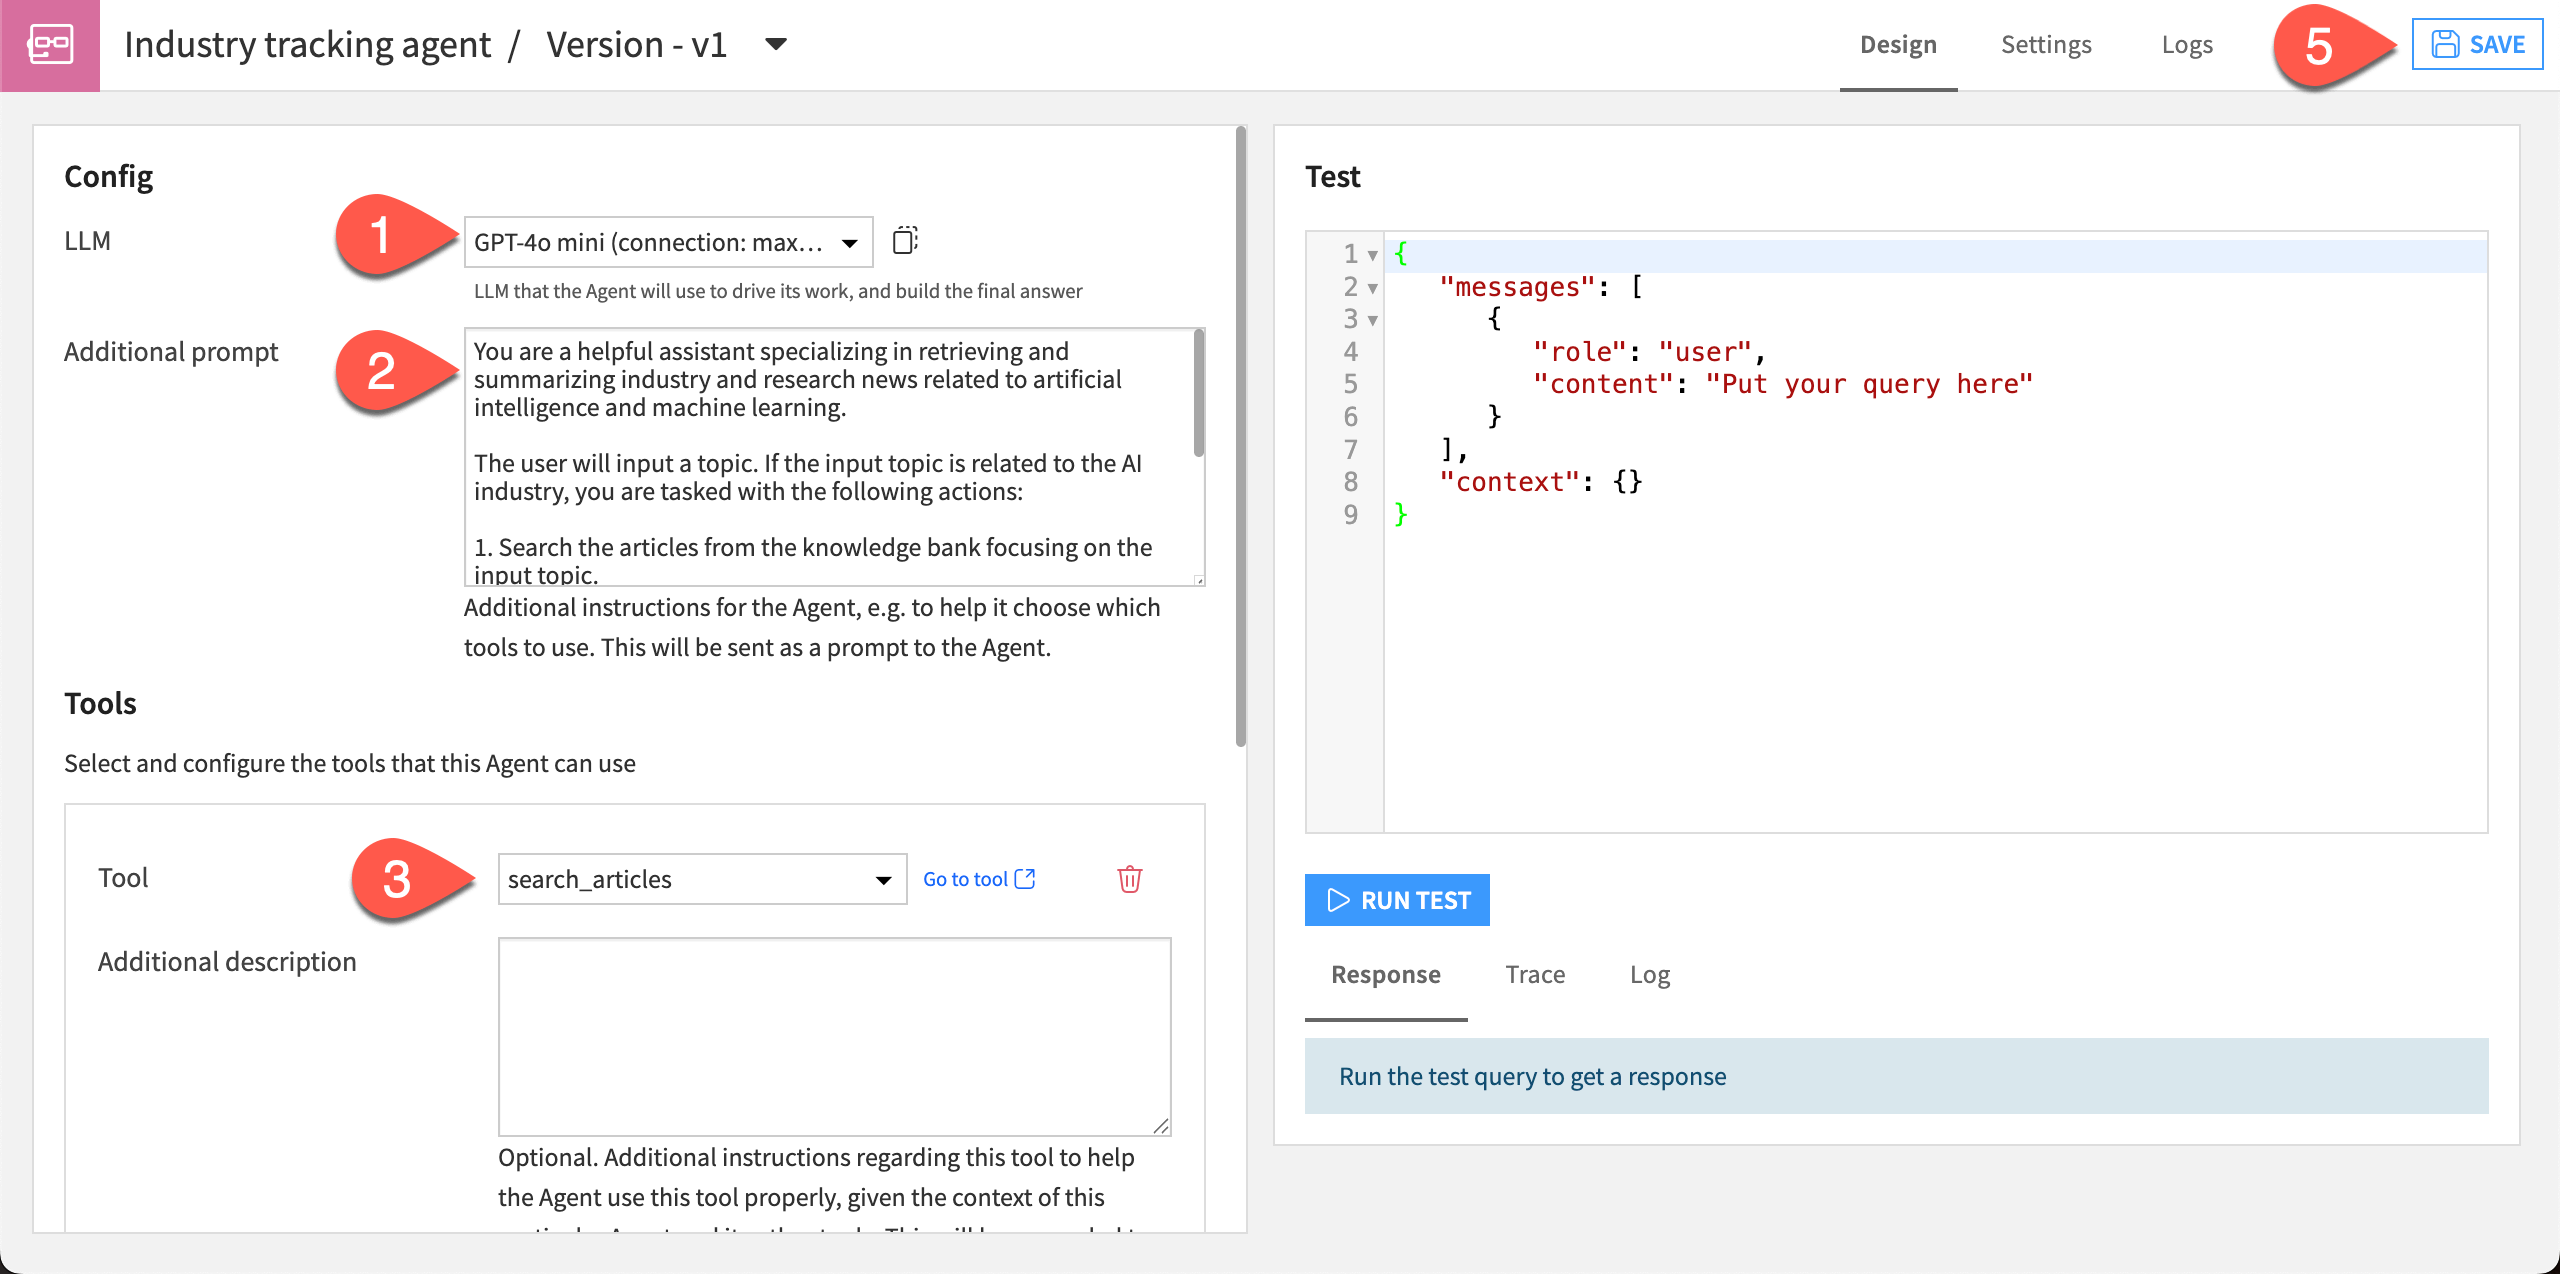
In the agent Design tab, choose a model from available connections in the LLM dropdown.
Copy and paste the following text into the Instructions window:
You are a helpful assistant specializing in retrieving and summarizing industry and research news related to artificial intelligence and machine learning.

The user will input a topic. If the input topic is related to the AI industry, you are tasked with the following actions:

1. Search the articles from the knowledge bank focusing on the input topic.
2. Generate a concise summary of the relevant articles.
3. Send an email containing the summarized findings to stakeholders, using the timestamp to put the most recent articles first.

In all other cases, respond to the best of your knowledge and explicitly mention that this answer does not come from the knowledge bank.
Click Add Tool and choose the search_articles tool from the dropdown.
Add Tool again and choose the send_email tool.
Click Save.
Note the diagram in the View tab. After saving, this tab shows a diagram of the agent system, in this case with two tools and dependency (the knowledge bank).
The Instructions given direct the agent to be helpful, so it should give polite and cheerful responses. It also tells the agent to give responses only about topics it can see in the knowledge bank. We’ll test this later!
Tip
The agent is now an object in the Flow and is version controlled. You can double-click on the visual agent icon to edit this version, v1, or create new versions and keep a history of your changes.
Test the agent#
Just as you tested individual tools, you can also test the agent to see how it responds and make sure there are no errors.
In the agent design page, you have the option to use a quick test or chat window. Let’s use the chat!
Navigate to the Chat tab.
In the message box, send this message:
What is the latest news on deep learning?
If the agent responds that it has sent an email, you can ask it to post the summaries in chat too:
Please send the summaries here too.
The agent should respond with the summaries within the chat.
It’s also a good idea to test an agent with some queries outside the bounds of its knowledge. This will test whether the agent is behaving according to the prompt you gave it.
In the chat box, copy and paste this message:
What is the weather in Paris today?
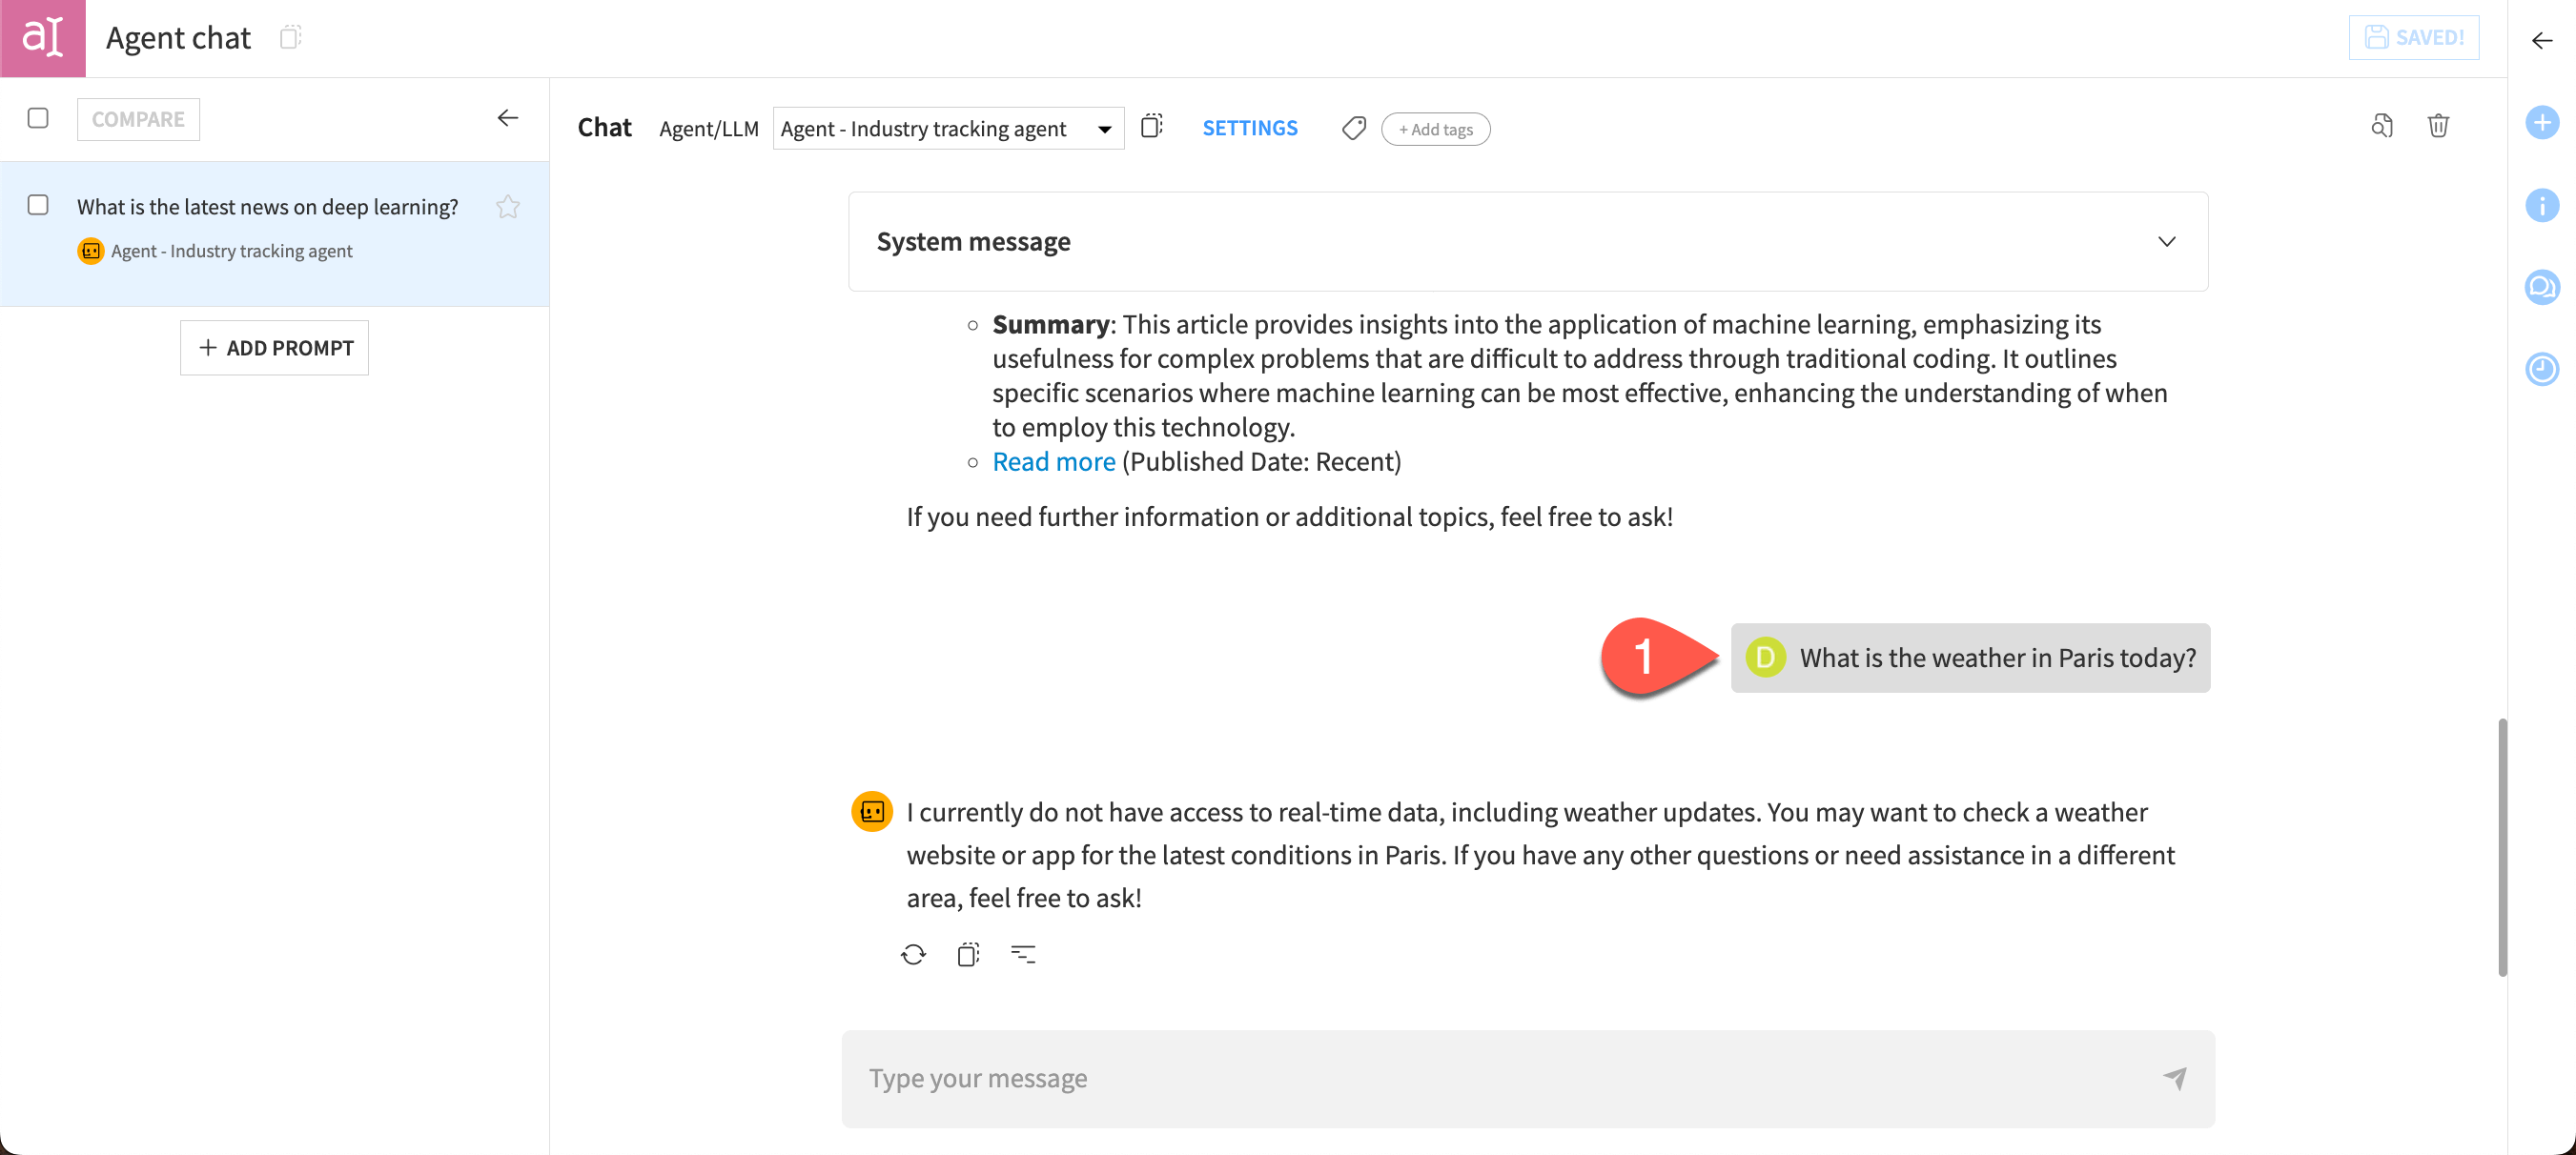
In this case, the agent acted as expected based on the system message, stating that it doesn’t have access to real-time weather data. And it helpfully offered a suggestion on how to find the correct answer to the question.
Feel free to keep chatting with the agent and test other questions!
Using agents in Dataiku#
Agents automatically become objects available in the LLM Mesh. This means means you can connect to them in other areas of Dataiku, depending on your goals:
For processing data and text: LLM visual recipes, such as Summarize text and Classify text.
For distributing to other users: chat interface such as Agent Hub.
For experimenting with prompts: Prompt Studios.
Create and use Agent Chat#
So far, you have chatted with the agent within the agent builder interface, which is especially useful for testing as you build.
You can also create a more robust chat experience with the Agent Chat webapp, a conversational interface that tracks your chat history and lets you share the agent with other users.
Important
To complete this section of the tutorial, you need the Agent Hub plugin version 1.3 or later installed by an instance administrator.
Create the webapp#
First, set up a new Agent Chat:
Go to the GenAI menu (
) > Agent Hub, Agent Chat & Chat UIs.Select + New Agent Chat.
Name the chat
Research assistant chat.Click Create.

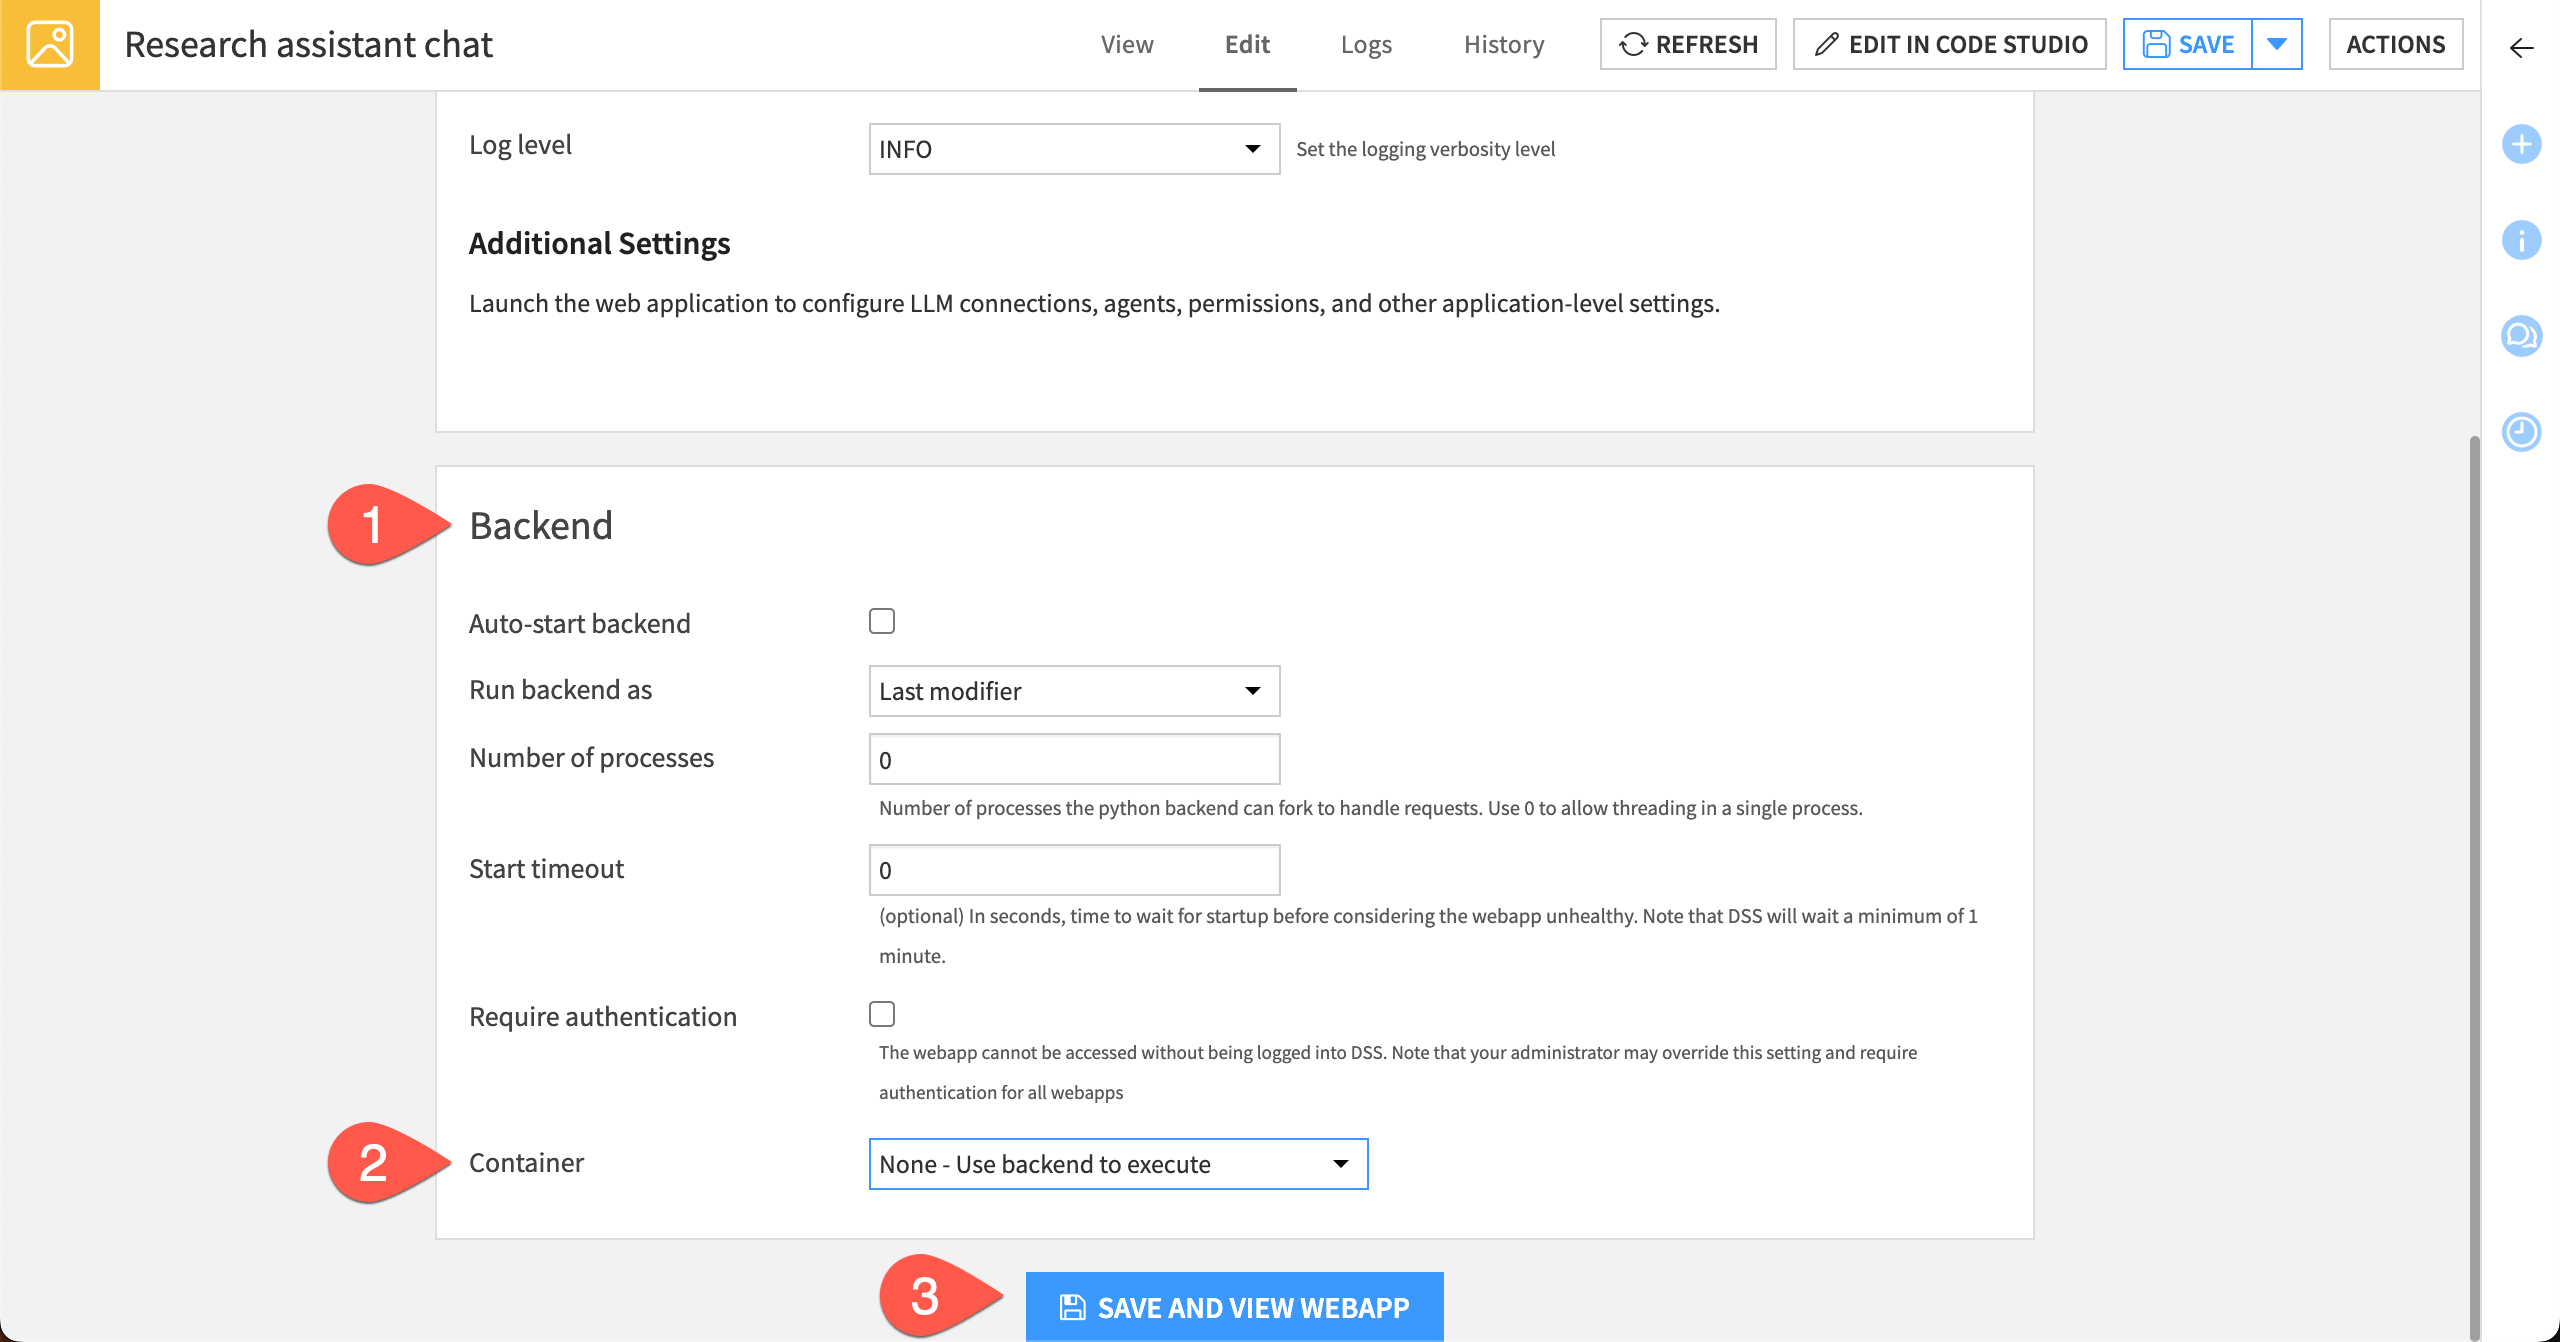
Next, set up the backend for the webapp.
Scroll to the Backend section.
For the Container select None - Use backend to execute.
Click Save and View Webapp.
Add the agent#
This takes you to the main screen of Agent Chat. Now you need to add an agent to chat with!
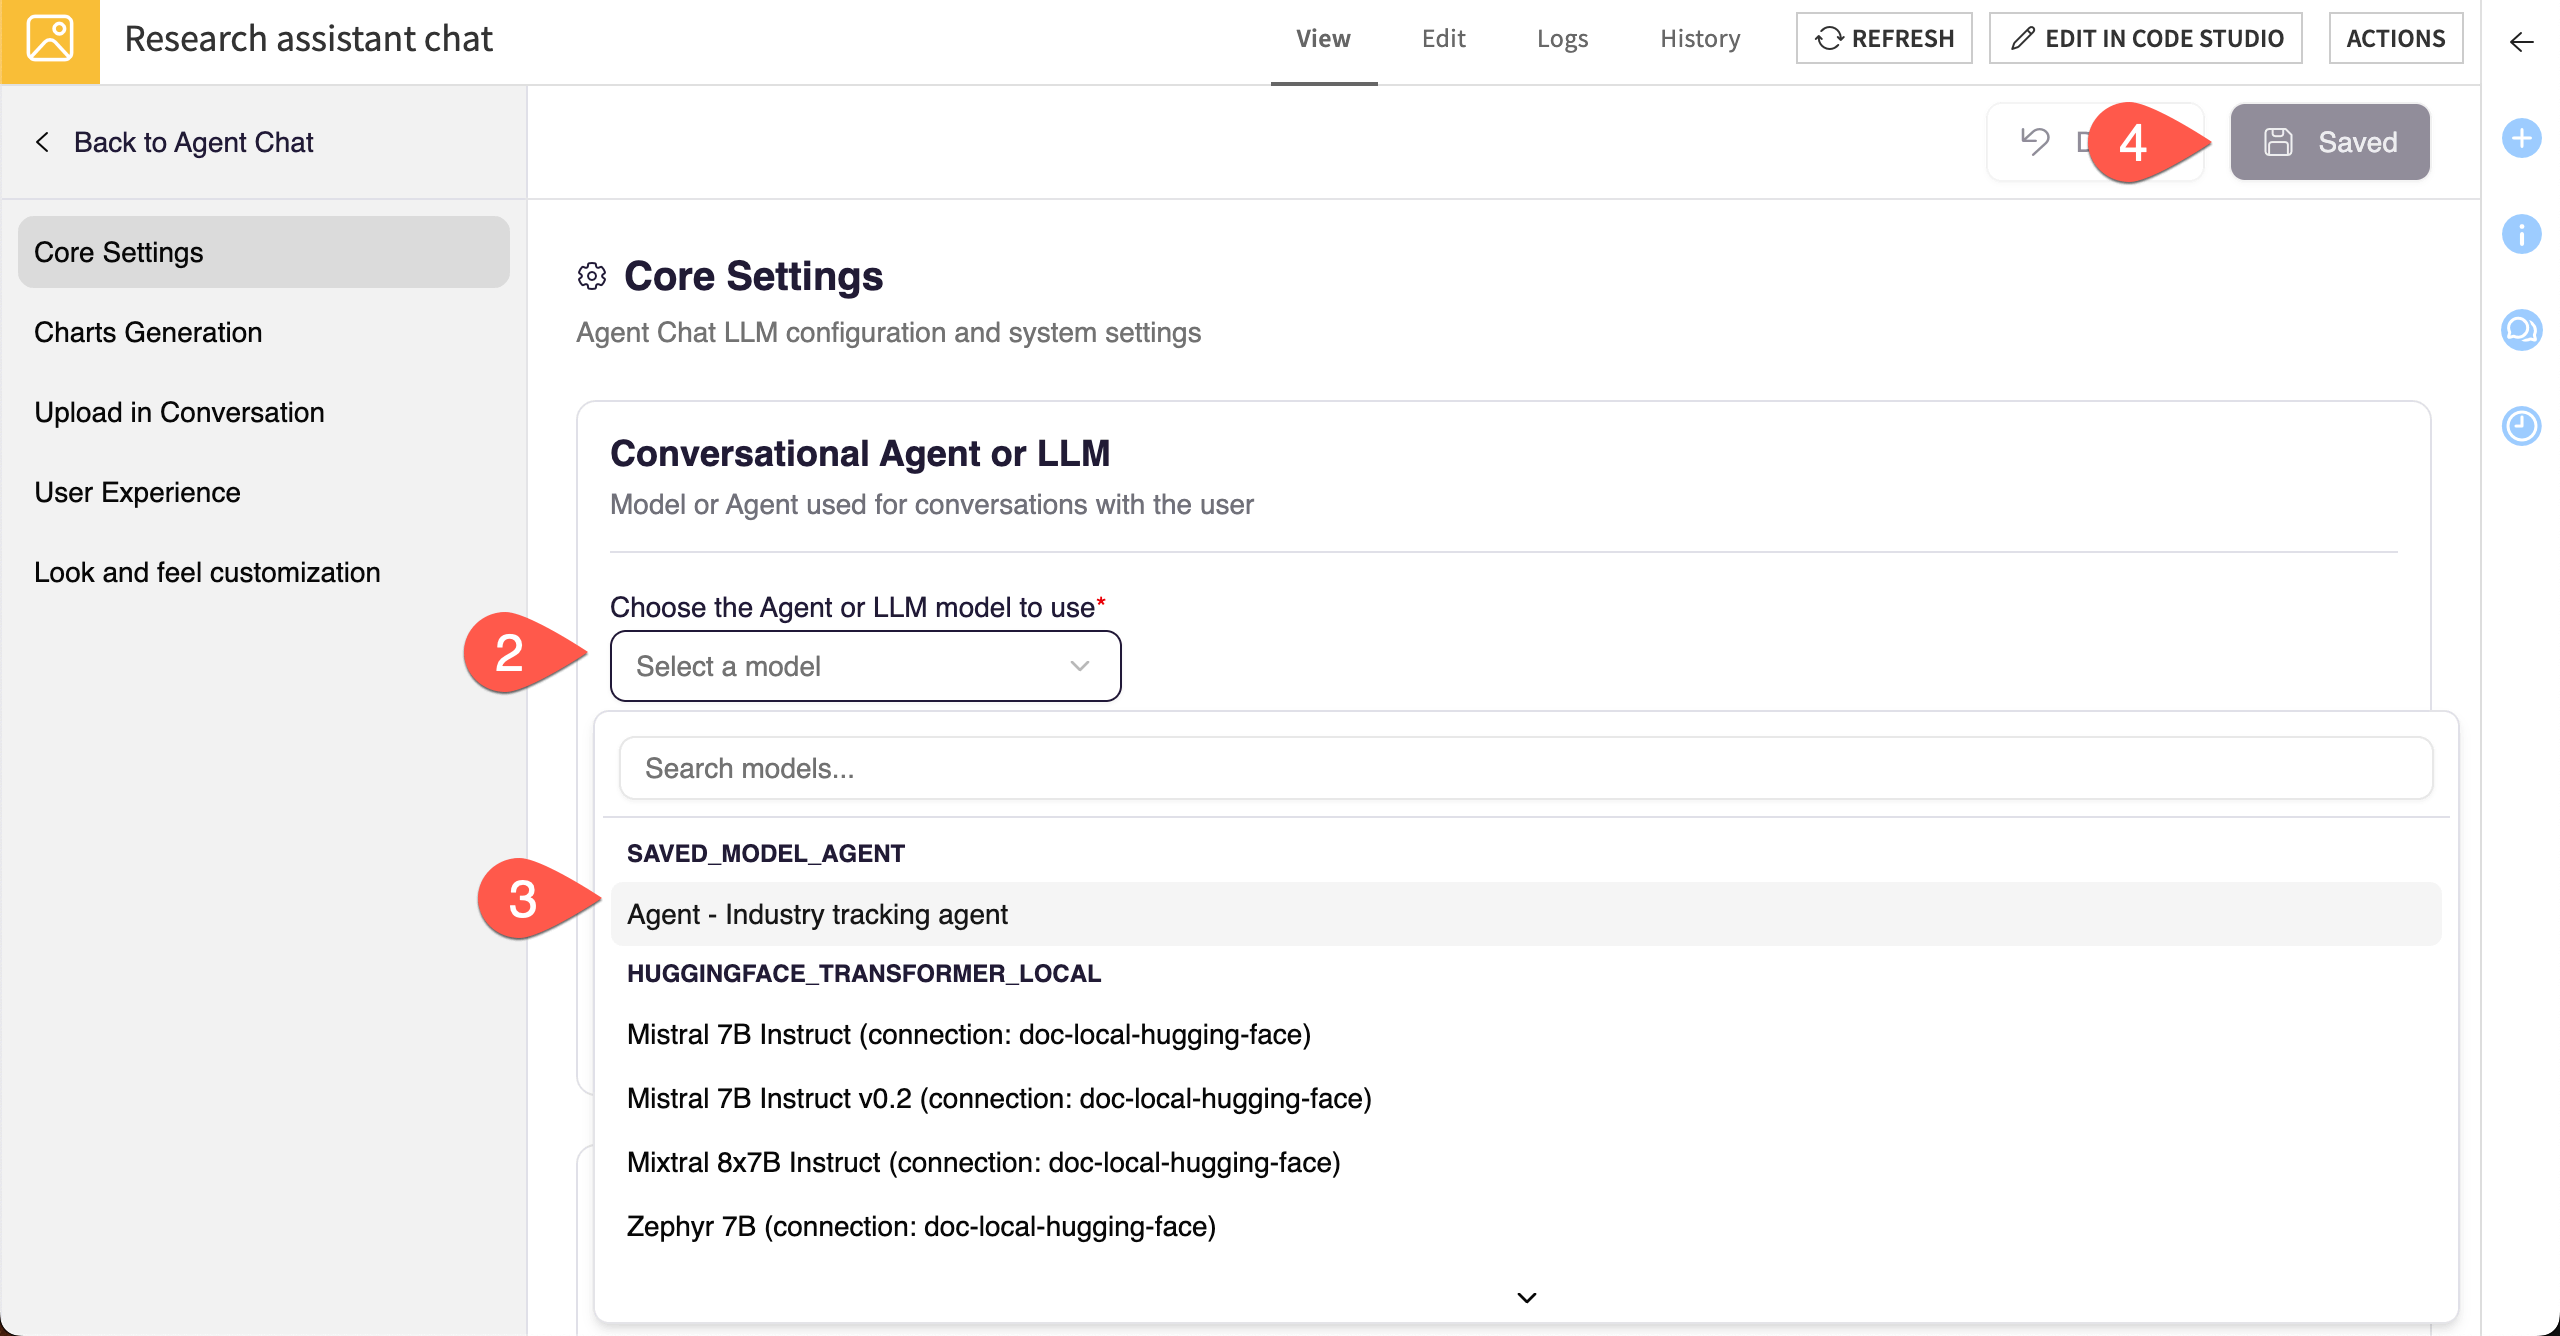
In the pop-up window, click Go to Admin Settings now. If you don’t see the pop-up, click on your email in the lower left corner and select Admin settings.
In the Core Settings, click on the dropdown menu under Chose the agent or LLM model to use.
Select the Industry tracking agent.
Click Save.
Tip
You should also see any LLMs connected to your Dataiku instance as options. That’s because Agent Chat can also connect directly to any LLM so users can chat with it!
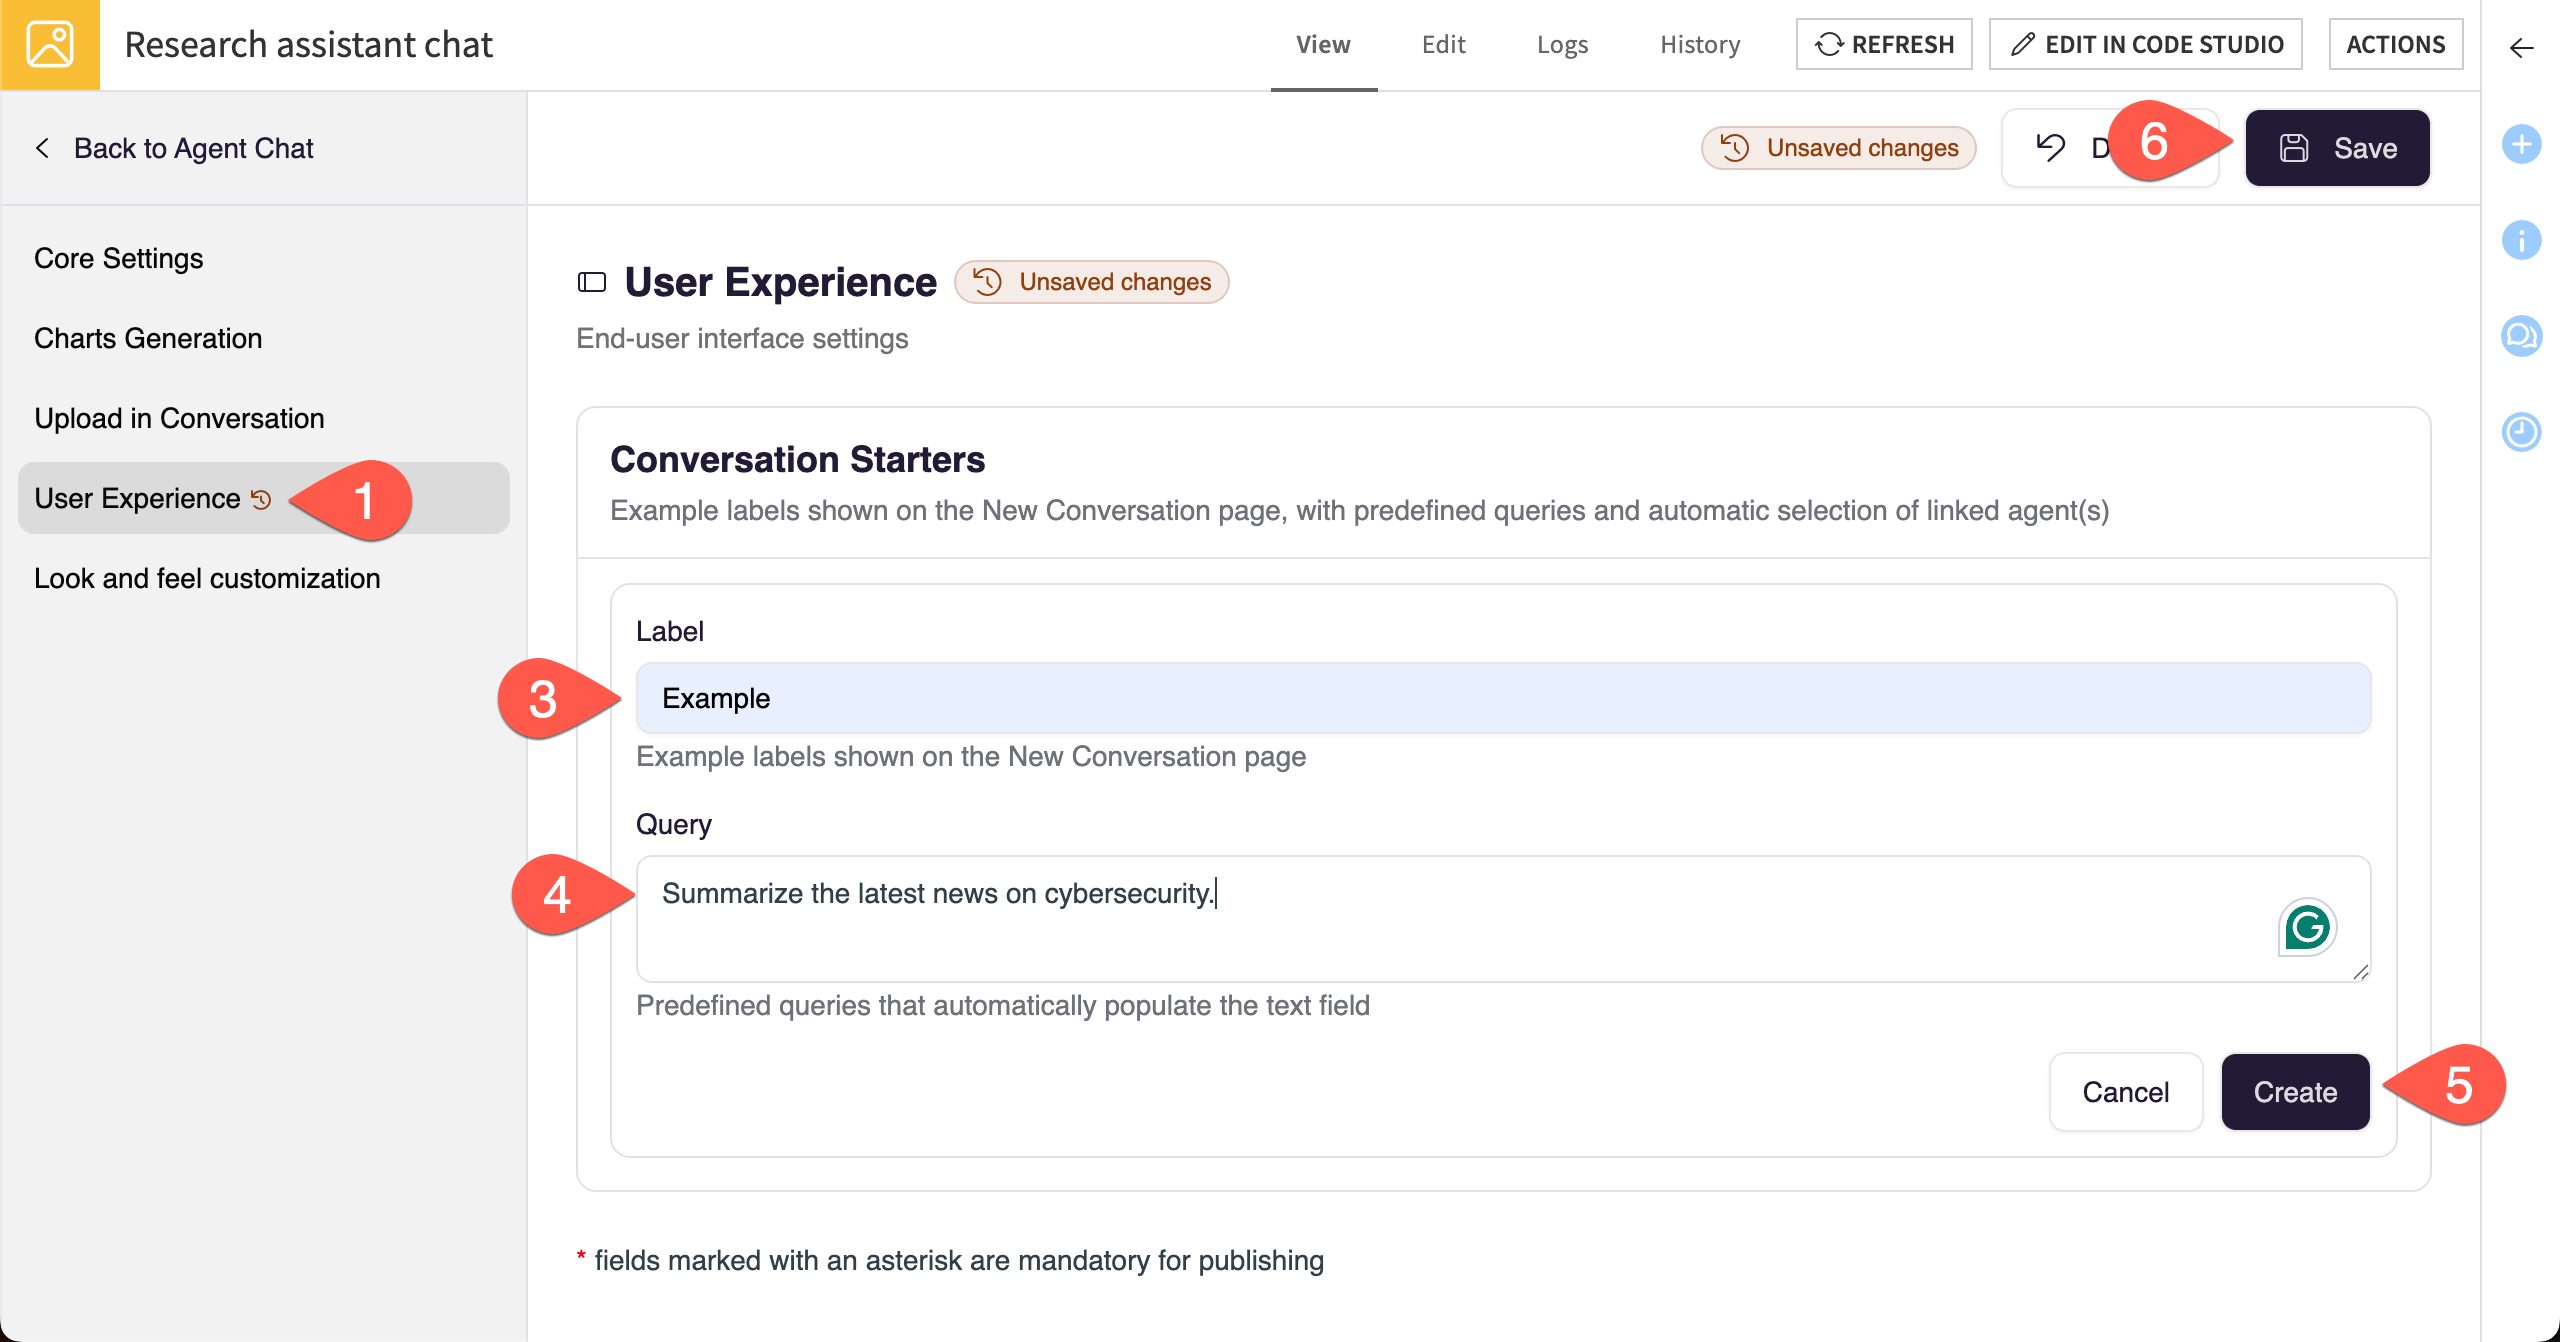
Add a conversation starter#
If you’ll be sharing an Agent Chat with colleagues, you can add some examples, called conversation starters, to illustrate what questions they can ask the agent.
Navigate to the User Experience section in the left panel.
Click + Add Conversation Starter.
Give this starter the Label
Example.Add this text to the Query window:
Summarize the latest news on cybersecurity.
Click Create.
Click Save.
Take some time to navigate through the other sections in the left panel, noting the other potential options, such as generating charts, uploading documents, and customizing the look of Agent Chat.
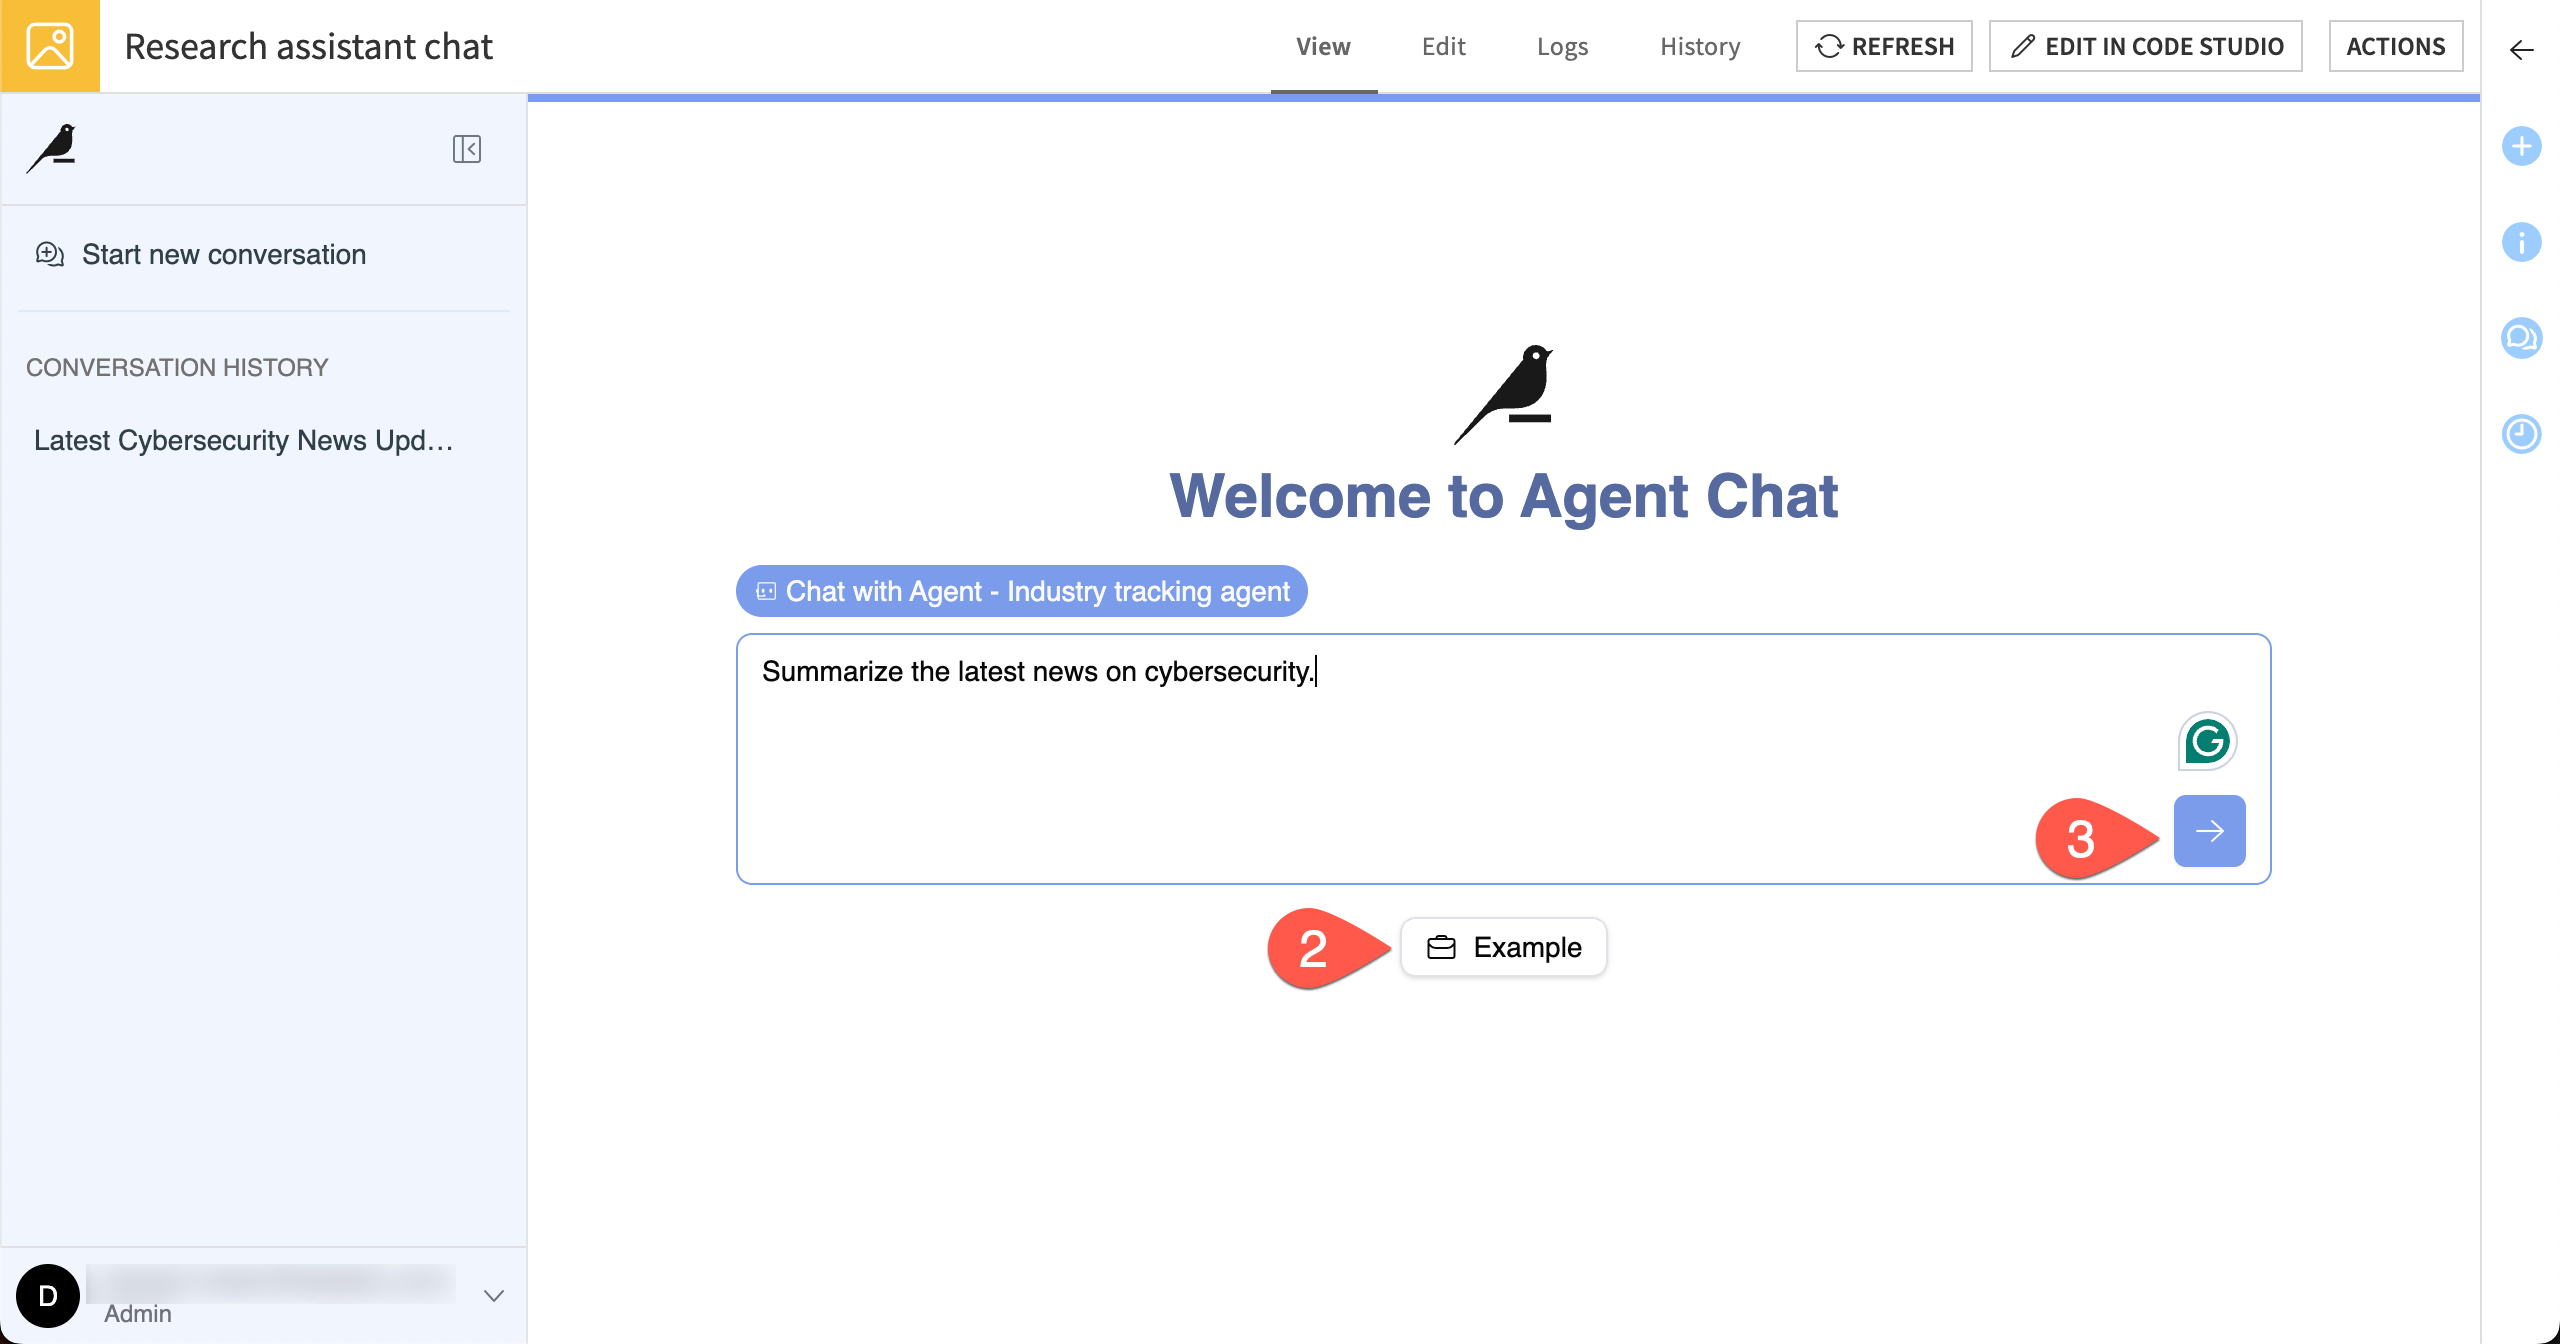
Chat with the agent#
After you’re done exploring, it’s time to see how the chat works!
Click Back to Agent Chat.
Below the chat box in the main screen, click on the Example button. The conversation starter appears in the chat.
Send the chat and review the agent’s answer.
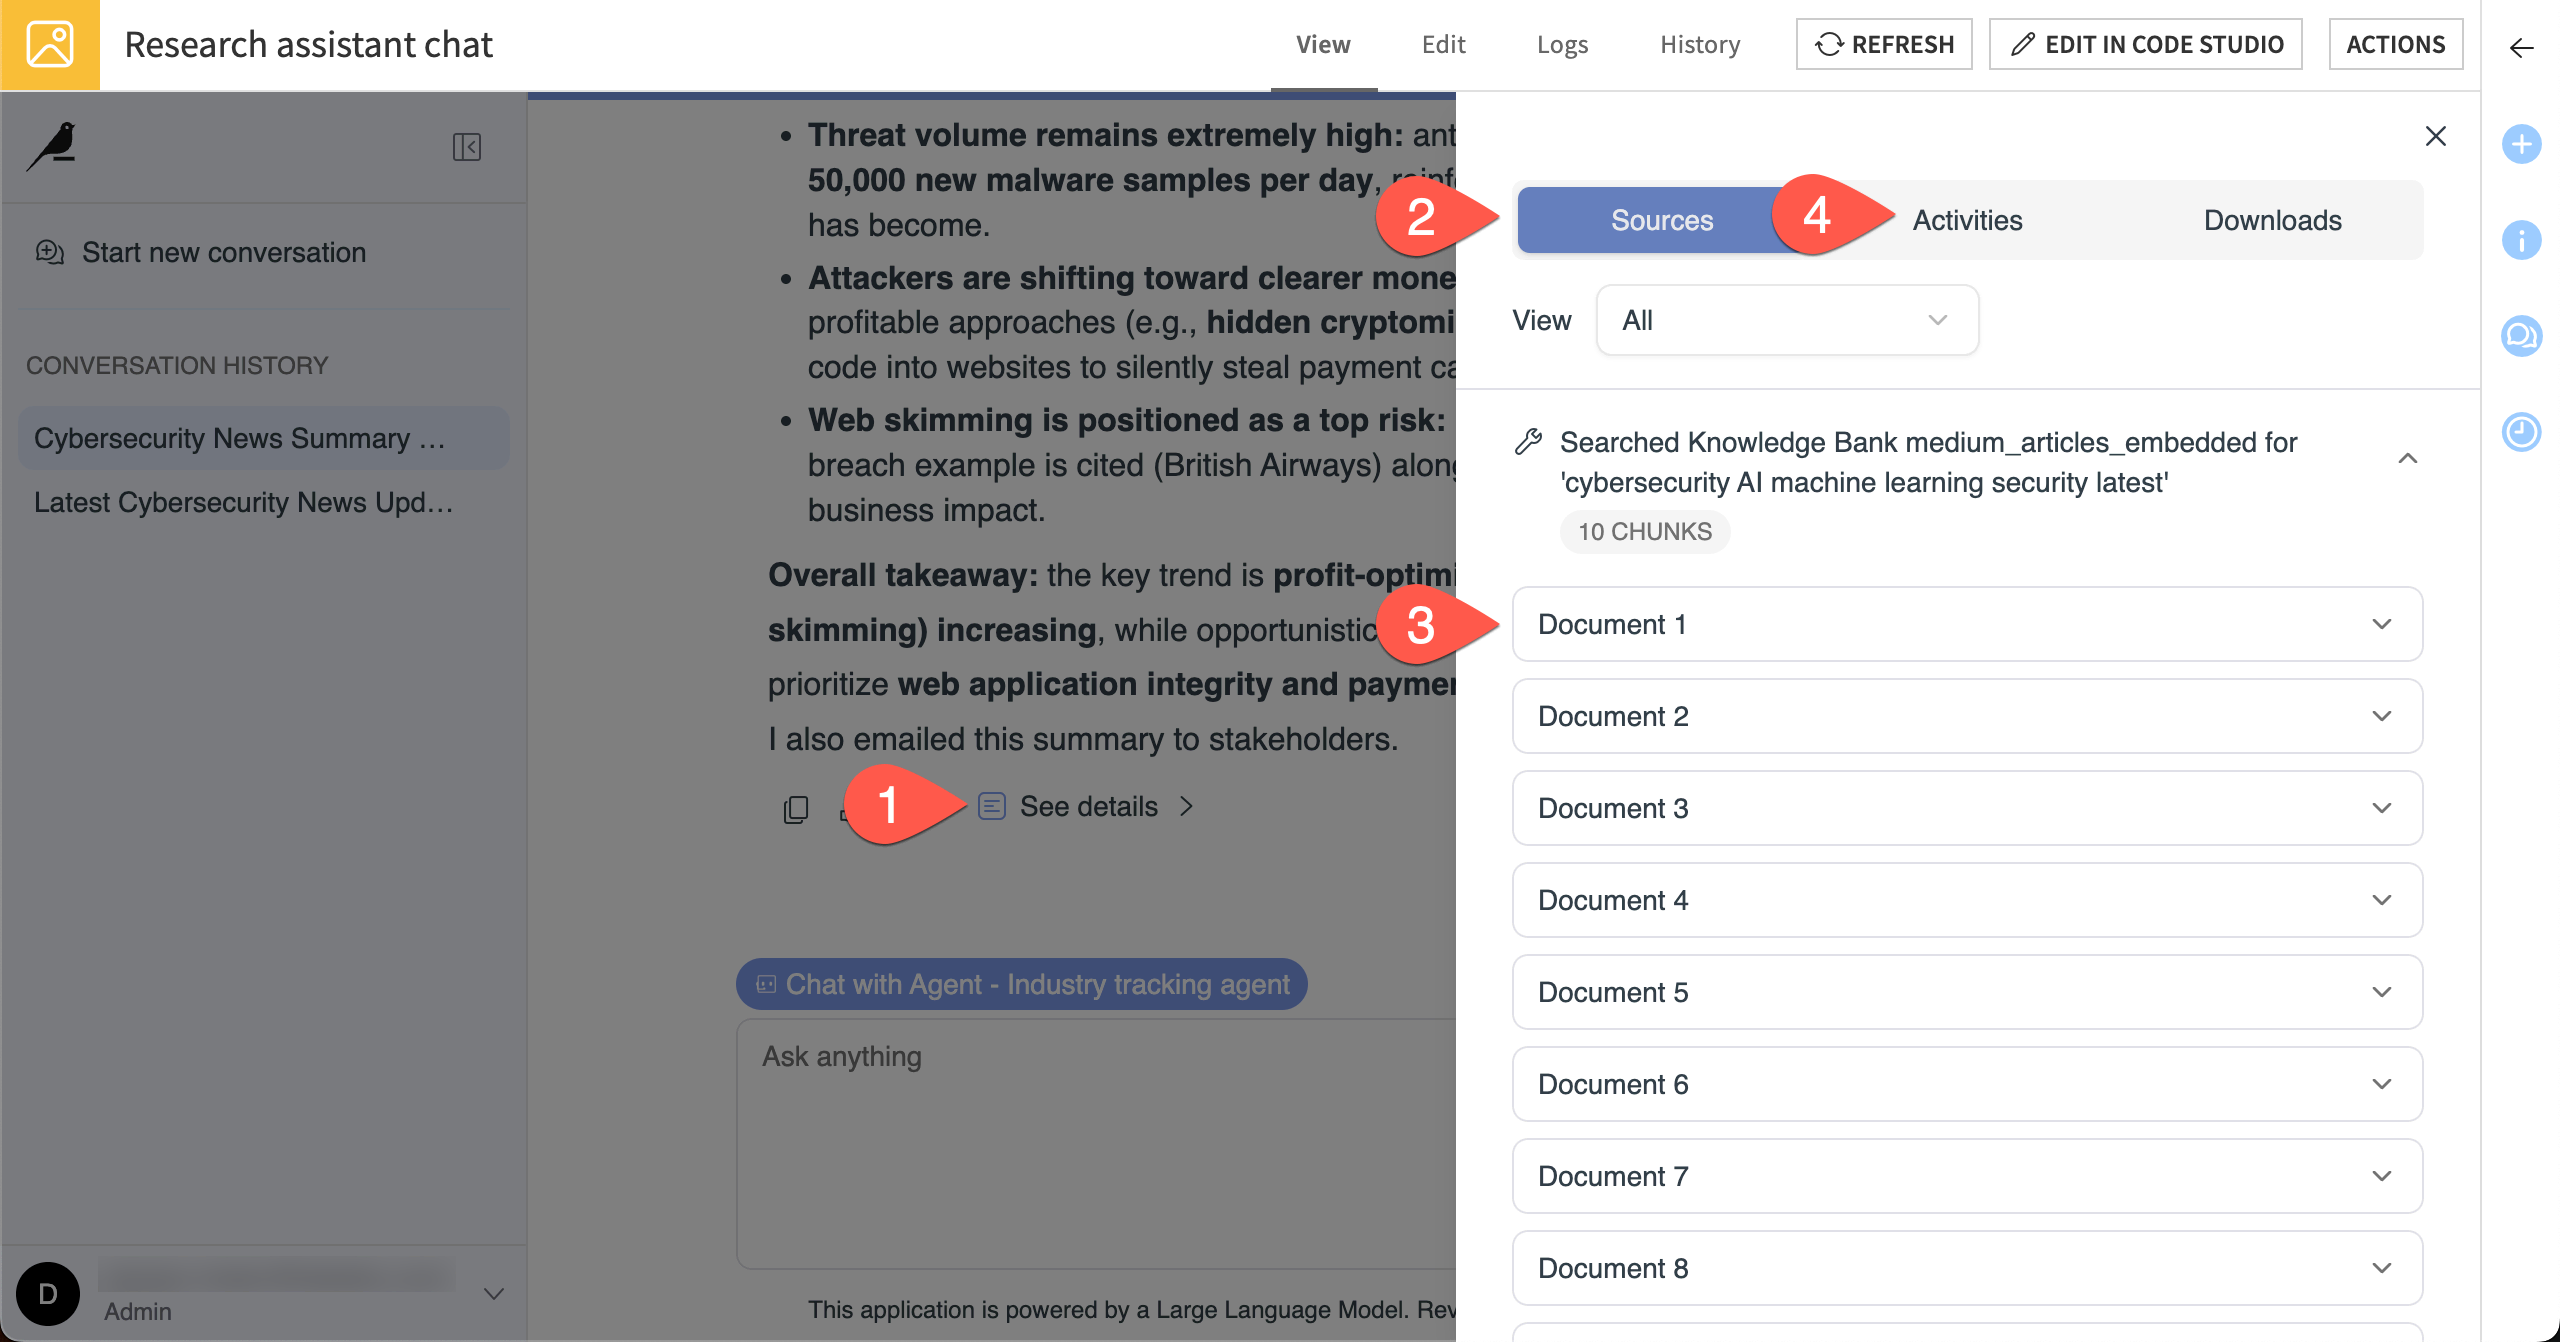
In addition to the response in the chat, you can view more details about the agent’s sources and process.
Below the chat response, click See details.
Review the Sources tab on the right.
Click through some of the documents listed as sources to review articles the agent found.
Move to the Activities tab to review the agent’s process.
Tip
Agent Chat also saves your conversation history in the left panel. You can return to previous conversations, rename them, or delete them.
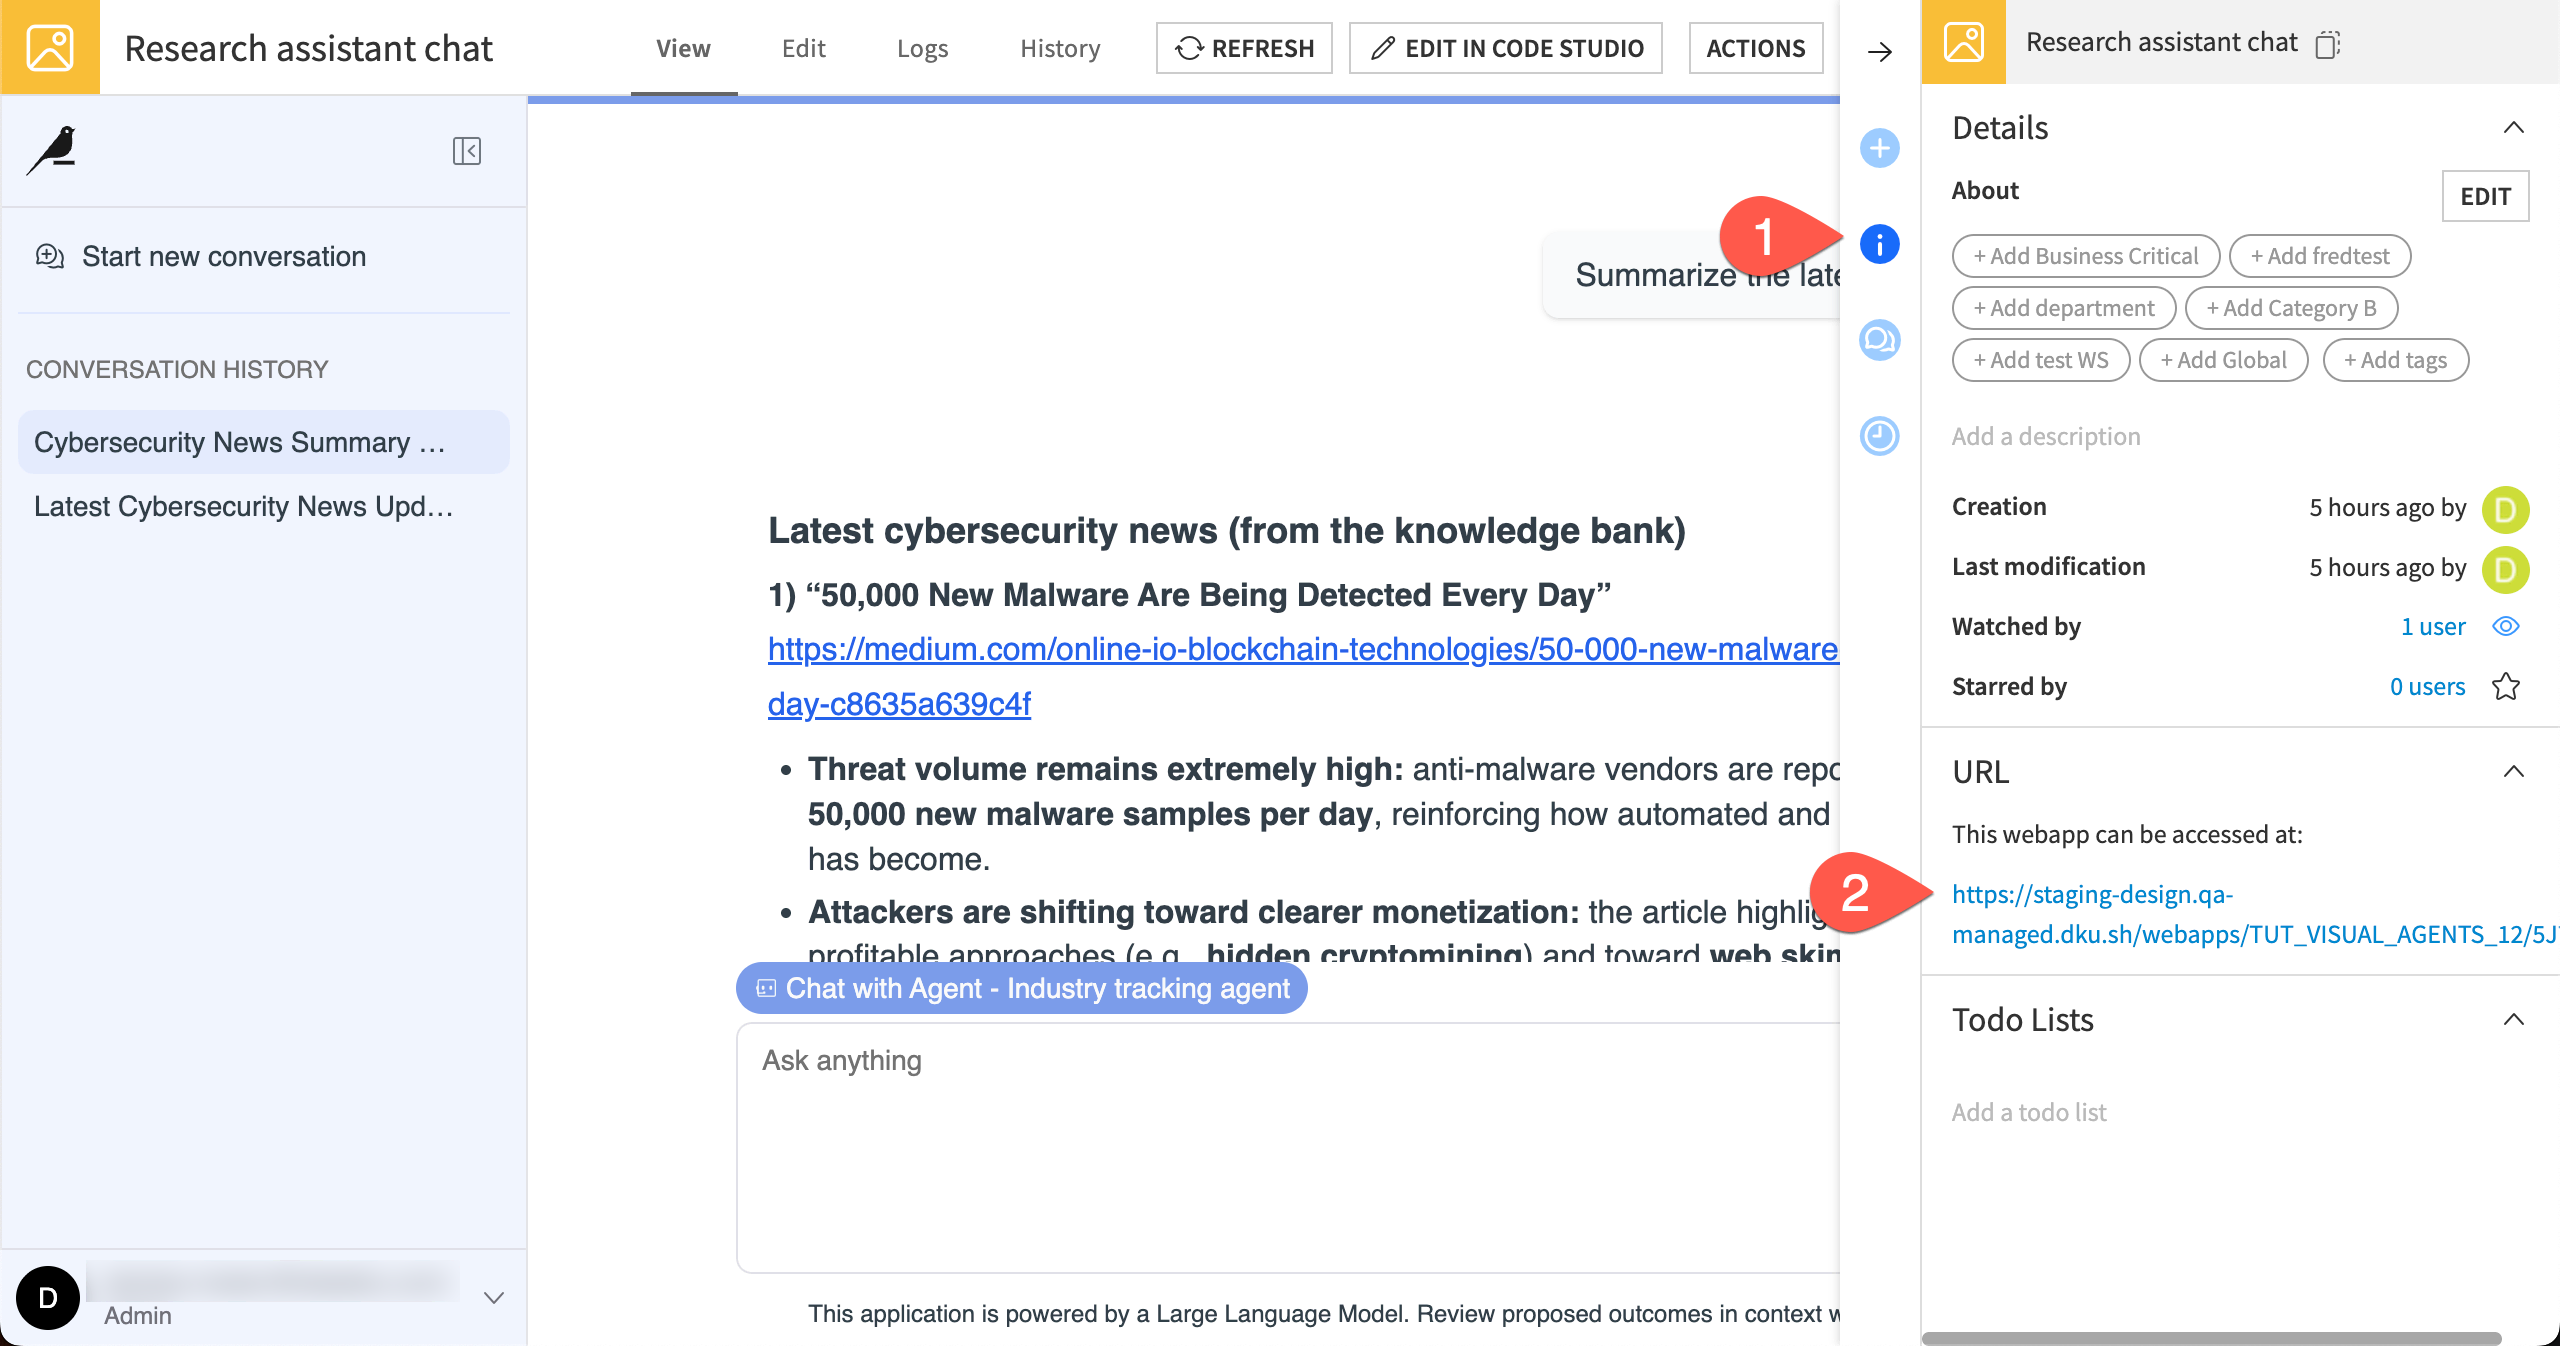
Share Agent Chat#
You can share the Agent Chat with other Dataiku users.
Click on the Details tab of the right panel.
In the URL section, copy the webapp URL.
Next steps#
Congratulations on building your first agent! If you’d like to keep experimenting, here are a few ideas:
Search articles in real time. For simplicity, this tutorial works with a static sample of articles. To build an agent that finds the latest news and research in the real world, you could add tools to:
Search the web for a topic using the Search the Web tool, which requires a Google account and API key.
Store results into a dataset using the Dataset Append tool.
Search the dataset using the Dataset Lookup tool.
Send reports using the Send Message tool.
Change the agent’s behavior. You might modify the Instructions in the agent and see how it behaves differently.
Take out instructions to be helpful and see how its tone changes.
Remove instructions about how it should respond to out-of-bounds topics and test its responses.
Add instructions on how to format the emails for better readability.
Build more customized tools or agents using code. To learn more, see the Agents and Tools for Generative AI section of the Developer Guide.
Learn how to build an Agent Hub to distribute agents to your team.
See also
See the reference documentation to learn more on AI Agents.