
Tutorial | Semantic models for agents#
Get started#
Semantic models build a foundation of context between structured datasets and the LLM that queries them.
They can help make responses from LLMs and agents more accurate.
Objectives#
In this tutorial, you will:
Build a semantic model with business context.
Learn the components of a semantic model, including entities and glossary.
Test the semantic model.
Use the model in an agent via a tool.
Prerequisites#
To complete this tutorial, you will need:
Dataiku 14.4 or later.
Data Designer, Advanced Analytics Designer, or Full Designer profile.
Connections and a plugin installed by your administrator:
An SQL connection.
A connection to one or more Generative AI models. At least one must support embedding.
Knowledge of Simple Visual Agents in Dataiku.
Create the project#
From the Dataiku Design homepage, click + New Project.
Select Learning projects.
Search for and select Semantic Models Lab.
If needed, change the folder into which the project will be installed, and click Create.
From the project homepage, click Go to Flow (or type
g+f).
Note
You can also download the starter project from this website and import it as a ZIP file.
Use case summary#
Imagine that you work with sales data for an electronics retailer. You are tasked with creating an AI agent that helps your less technical colleagues answer questions from a sales database.
While testing the agent, you’ve noticed that it sometimes needs additional context to accurately answer queries. For example, users might frequently request specific aggregations or data by fiscal year, which aren’t defined in the dataset.
To help solve these issues, you can create a semantic model.
The project contains three datasets that make up the company’s sales data. The transactions dataset is the main dataset that contains details about sales transactions. It joins with the products and customers datasets.
Note
This use case includes a small, simplified example of sales data to reduce the processing costs and time associated with LLM usage.
Prepare the data#
Before building a semantic model, you need to store the datasets in your SQL connection.
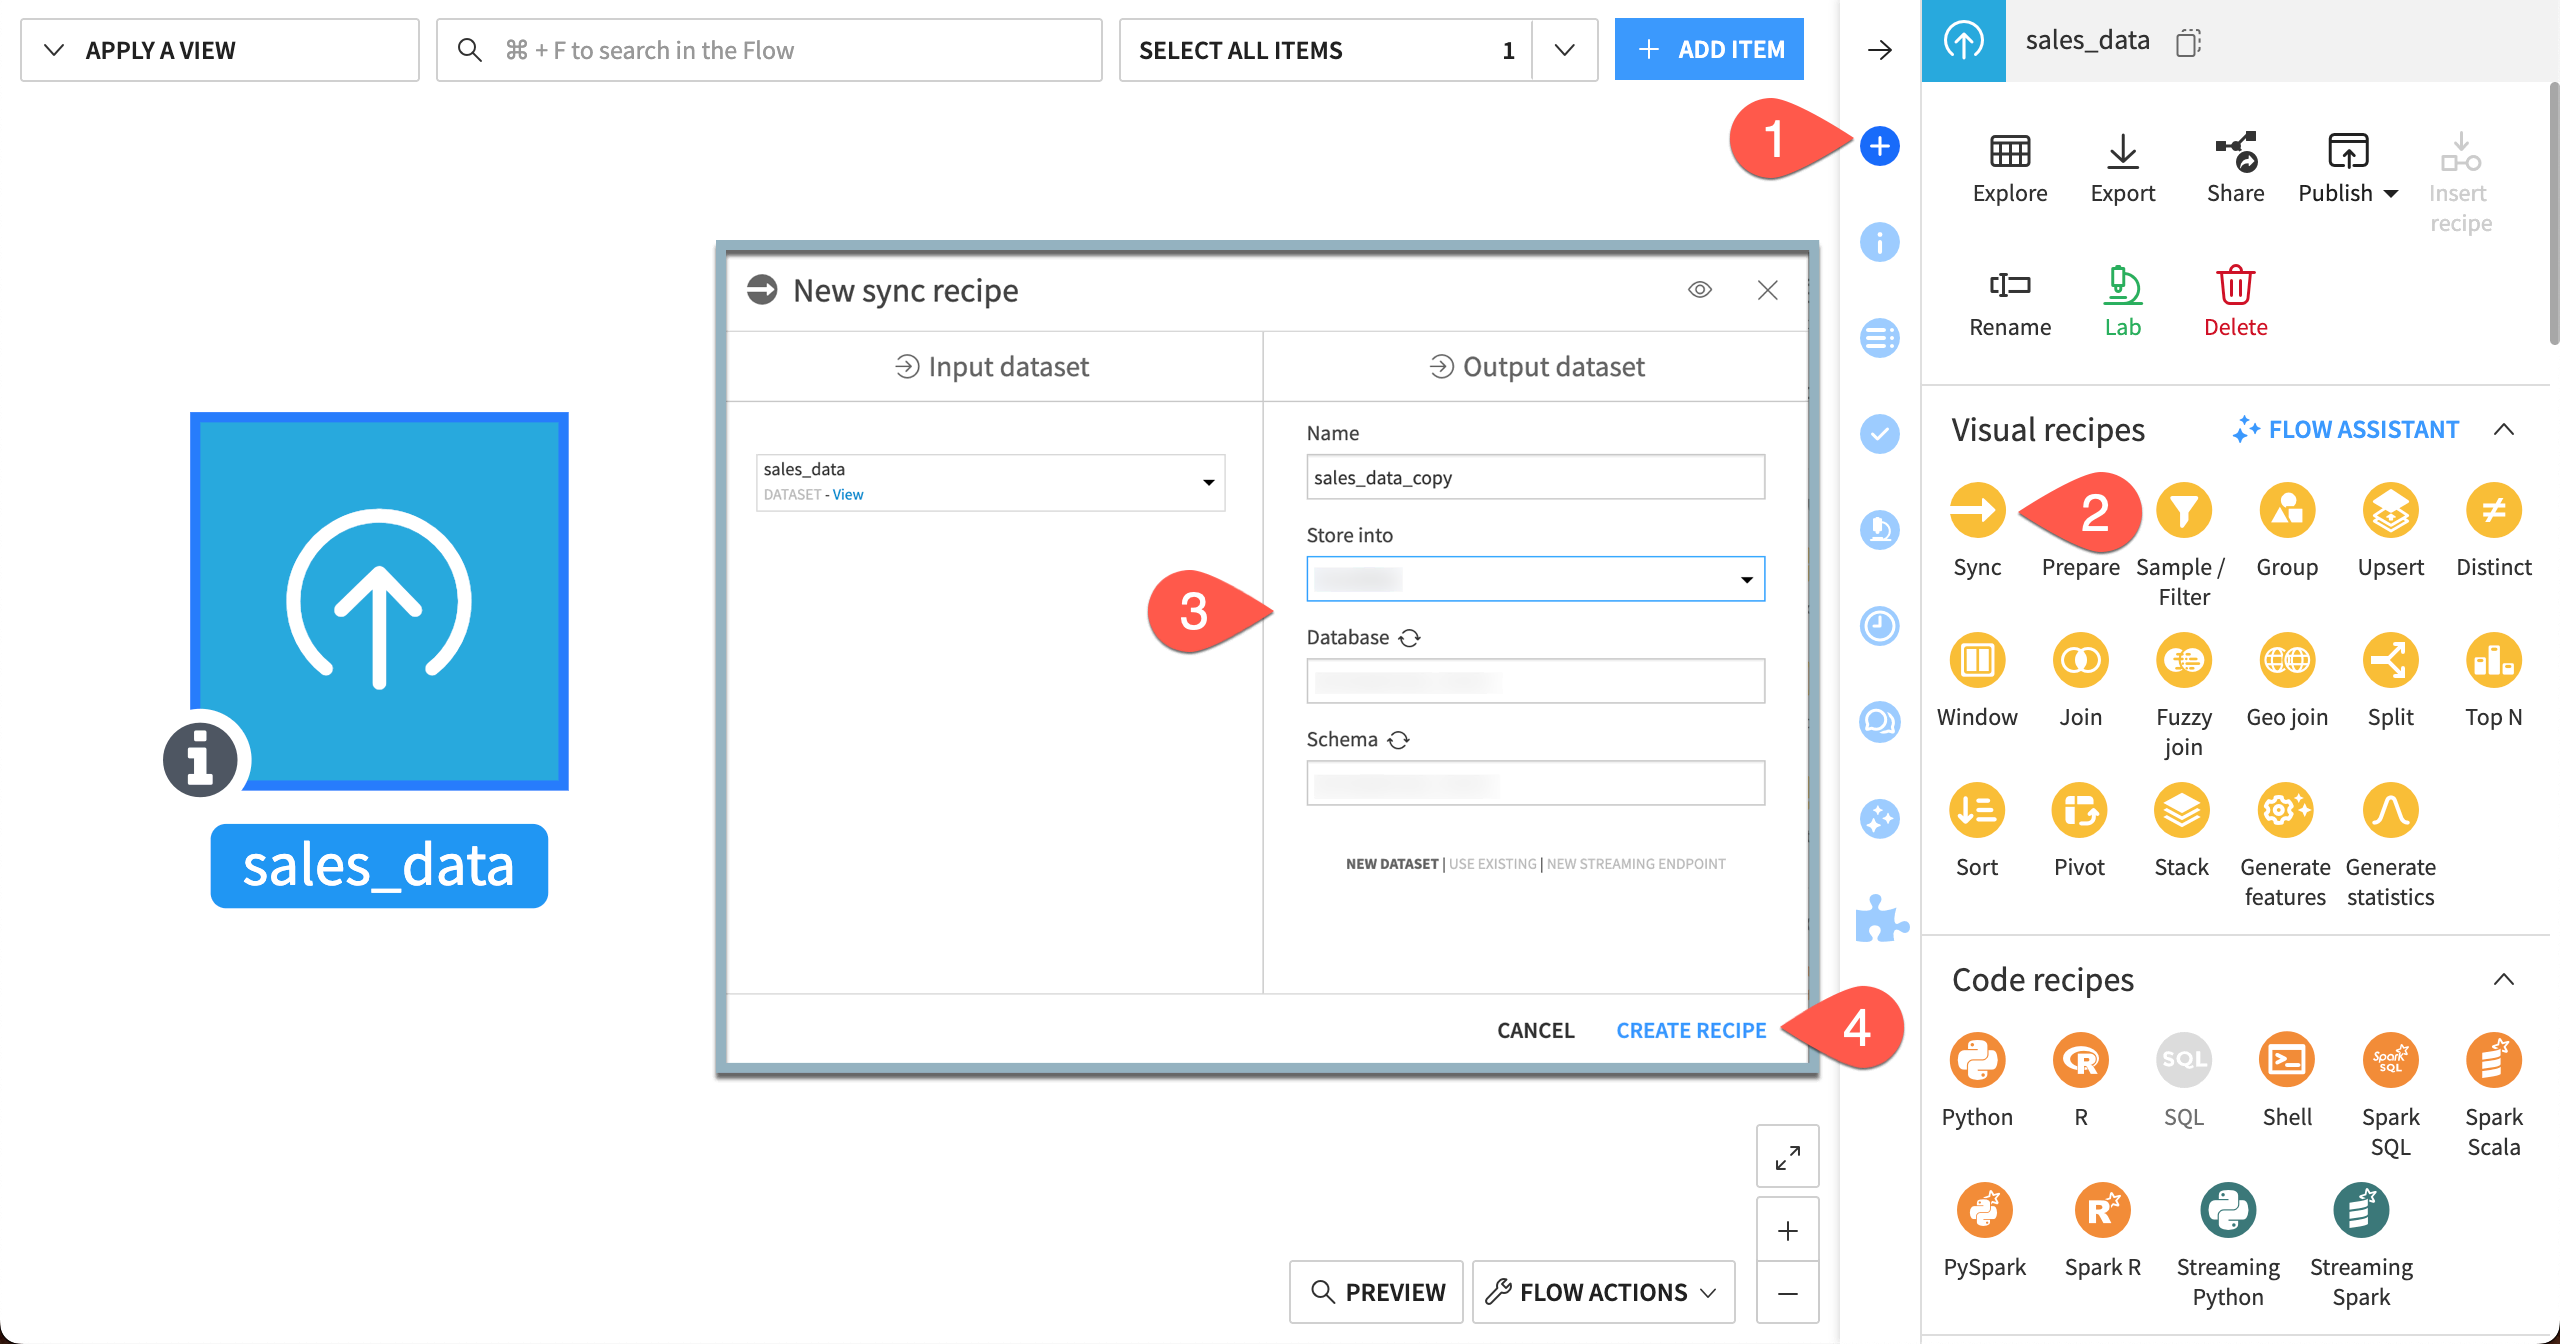
With transactions selected in the Flow, open the right Actions panel.
Create a Sync recipe.
Select your SQL connection information to store the data into.
Click Create Recipe.
In the recipe Configuration page, click Run.
Repeat this process for the customers and products datasets.
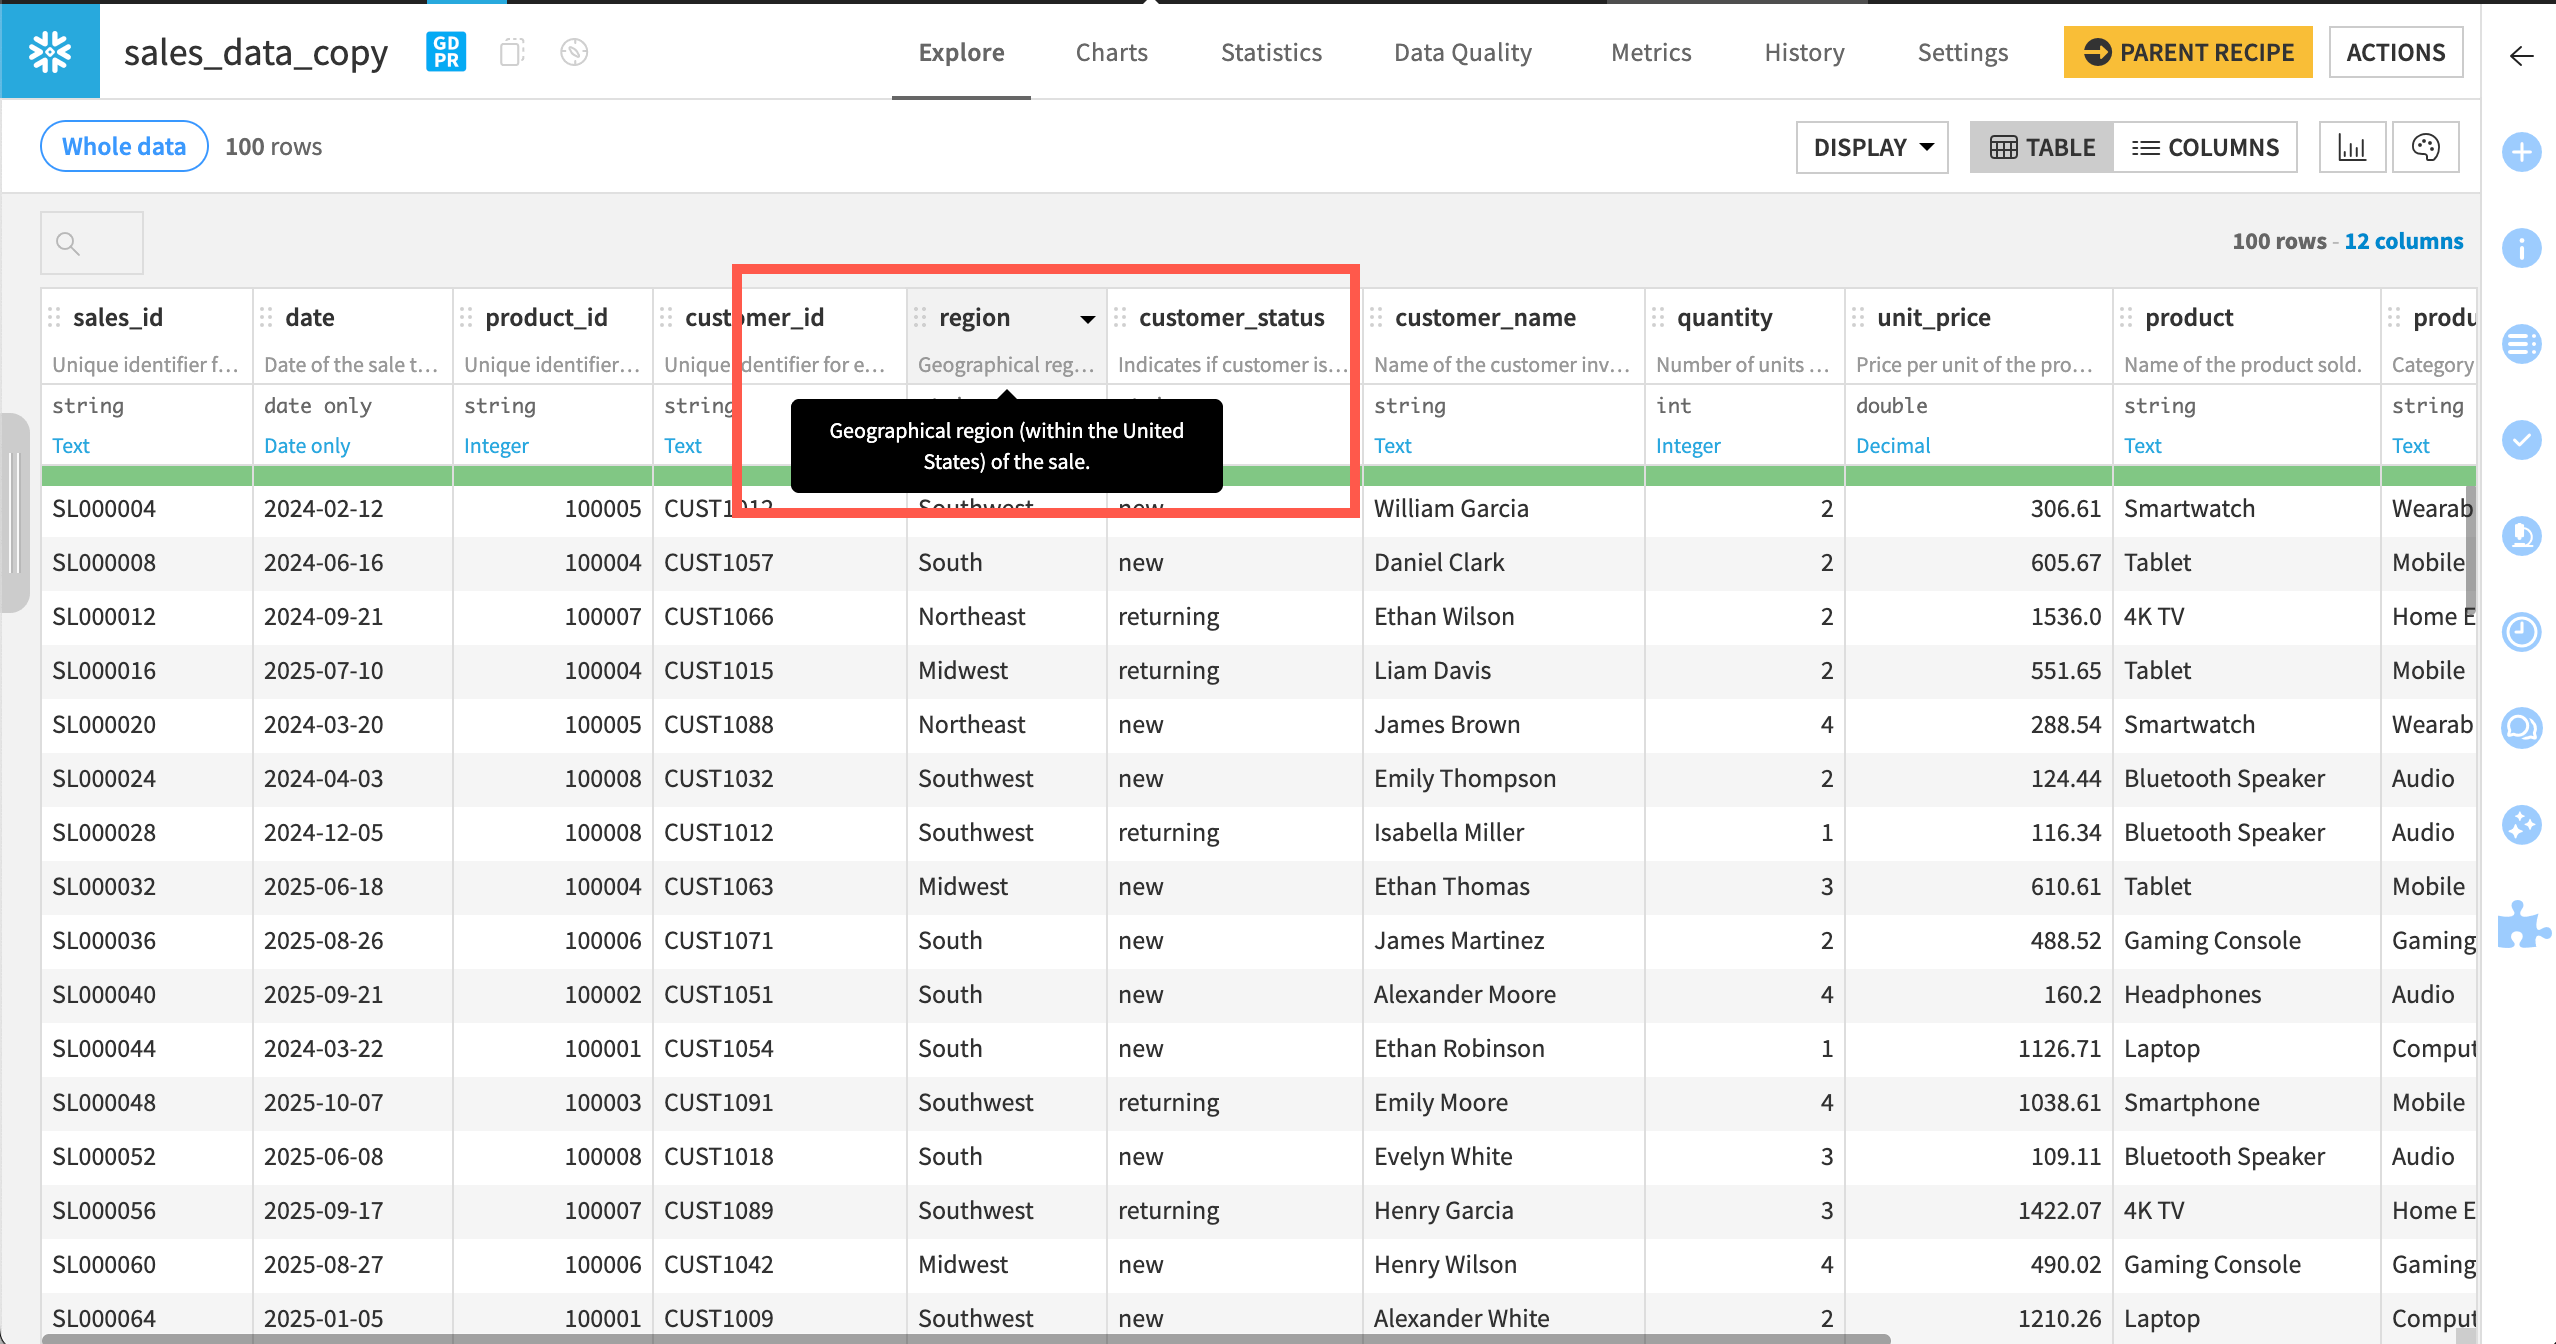
It’s also a good practice to create column descriptions before putting data into the Semantic Models Lab.
All three datasets already include metadata for the datasets and each column. Take a moment to read through the descriptions by hovering over each column header.
Tip
In your own projects, if AI assistants are enabled on your instance, you can generate metadata using an LLM. Otherwise, you can add descriptions manually in the Schema panel or by clicking on each column header and selecting Edit column schema.
Create a semantic model#
First, create a new semantic model.
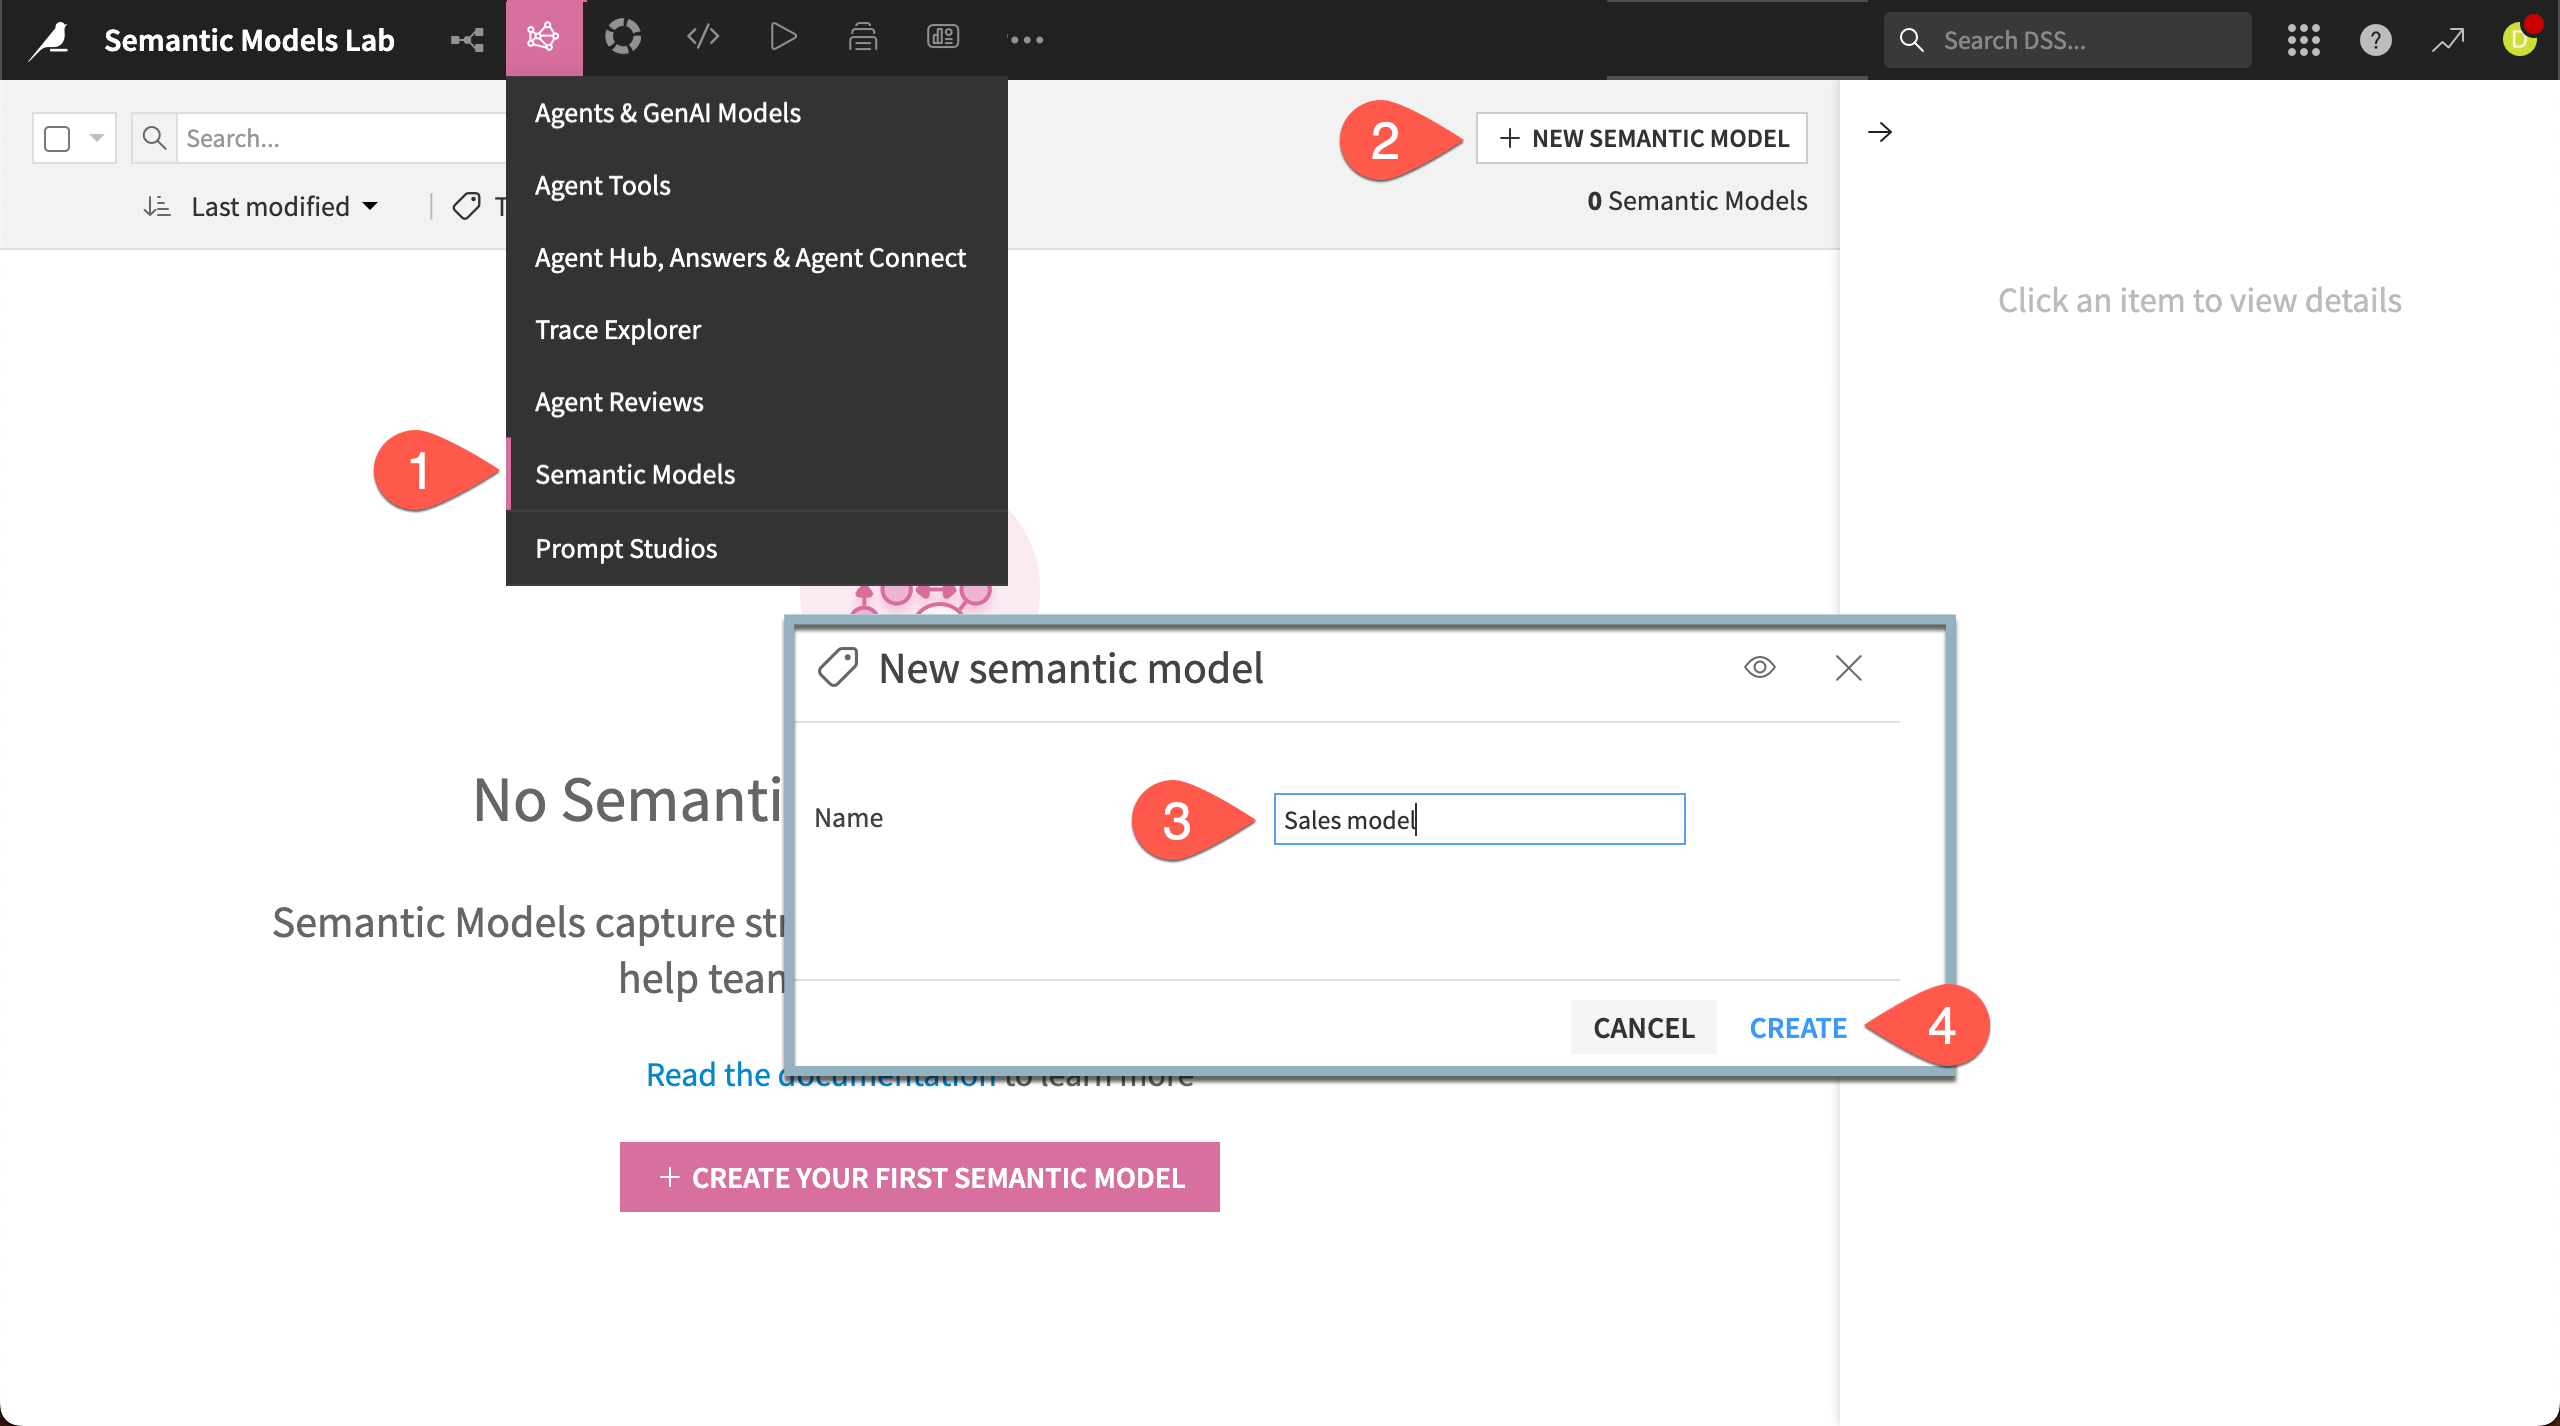
Go to the GenAI menu (
 ) > Semantic Models.
Click + New Semantic Model.
Choose Create.
Name the model
Sales semantic model.Click Create.
Generate entities#
The first step to building a semantic model is creating entities, or the tables that will be linked with specific context.
You can do this manually or by using an LLM to create entities according to your instructions. This tutorial will use the automatic mode with an LLM.
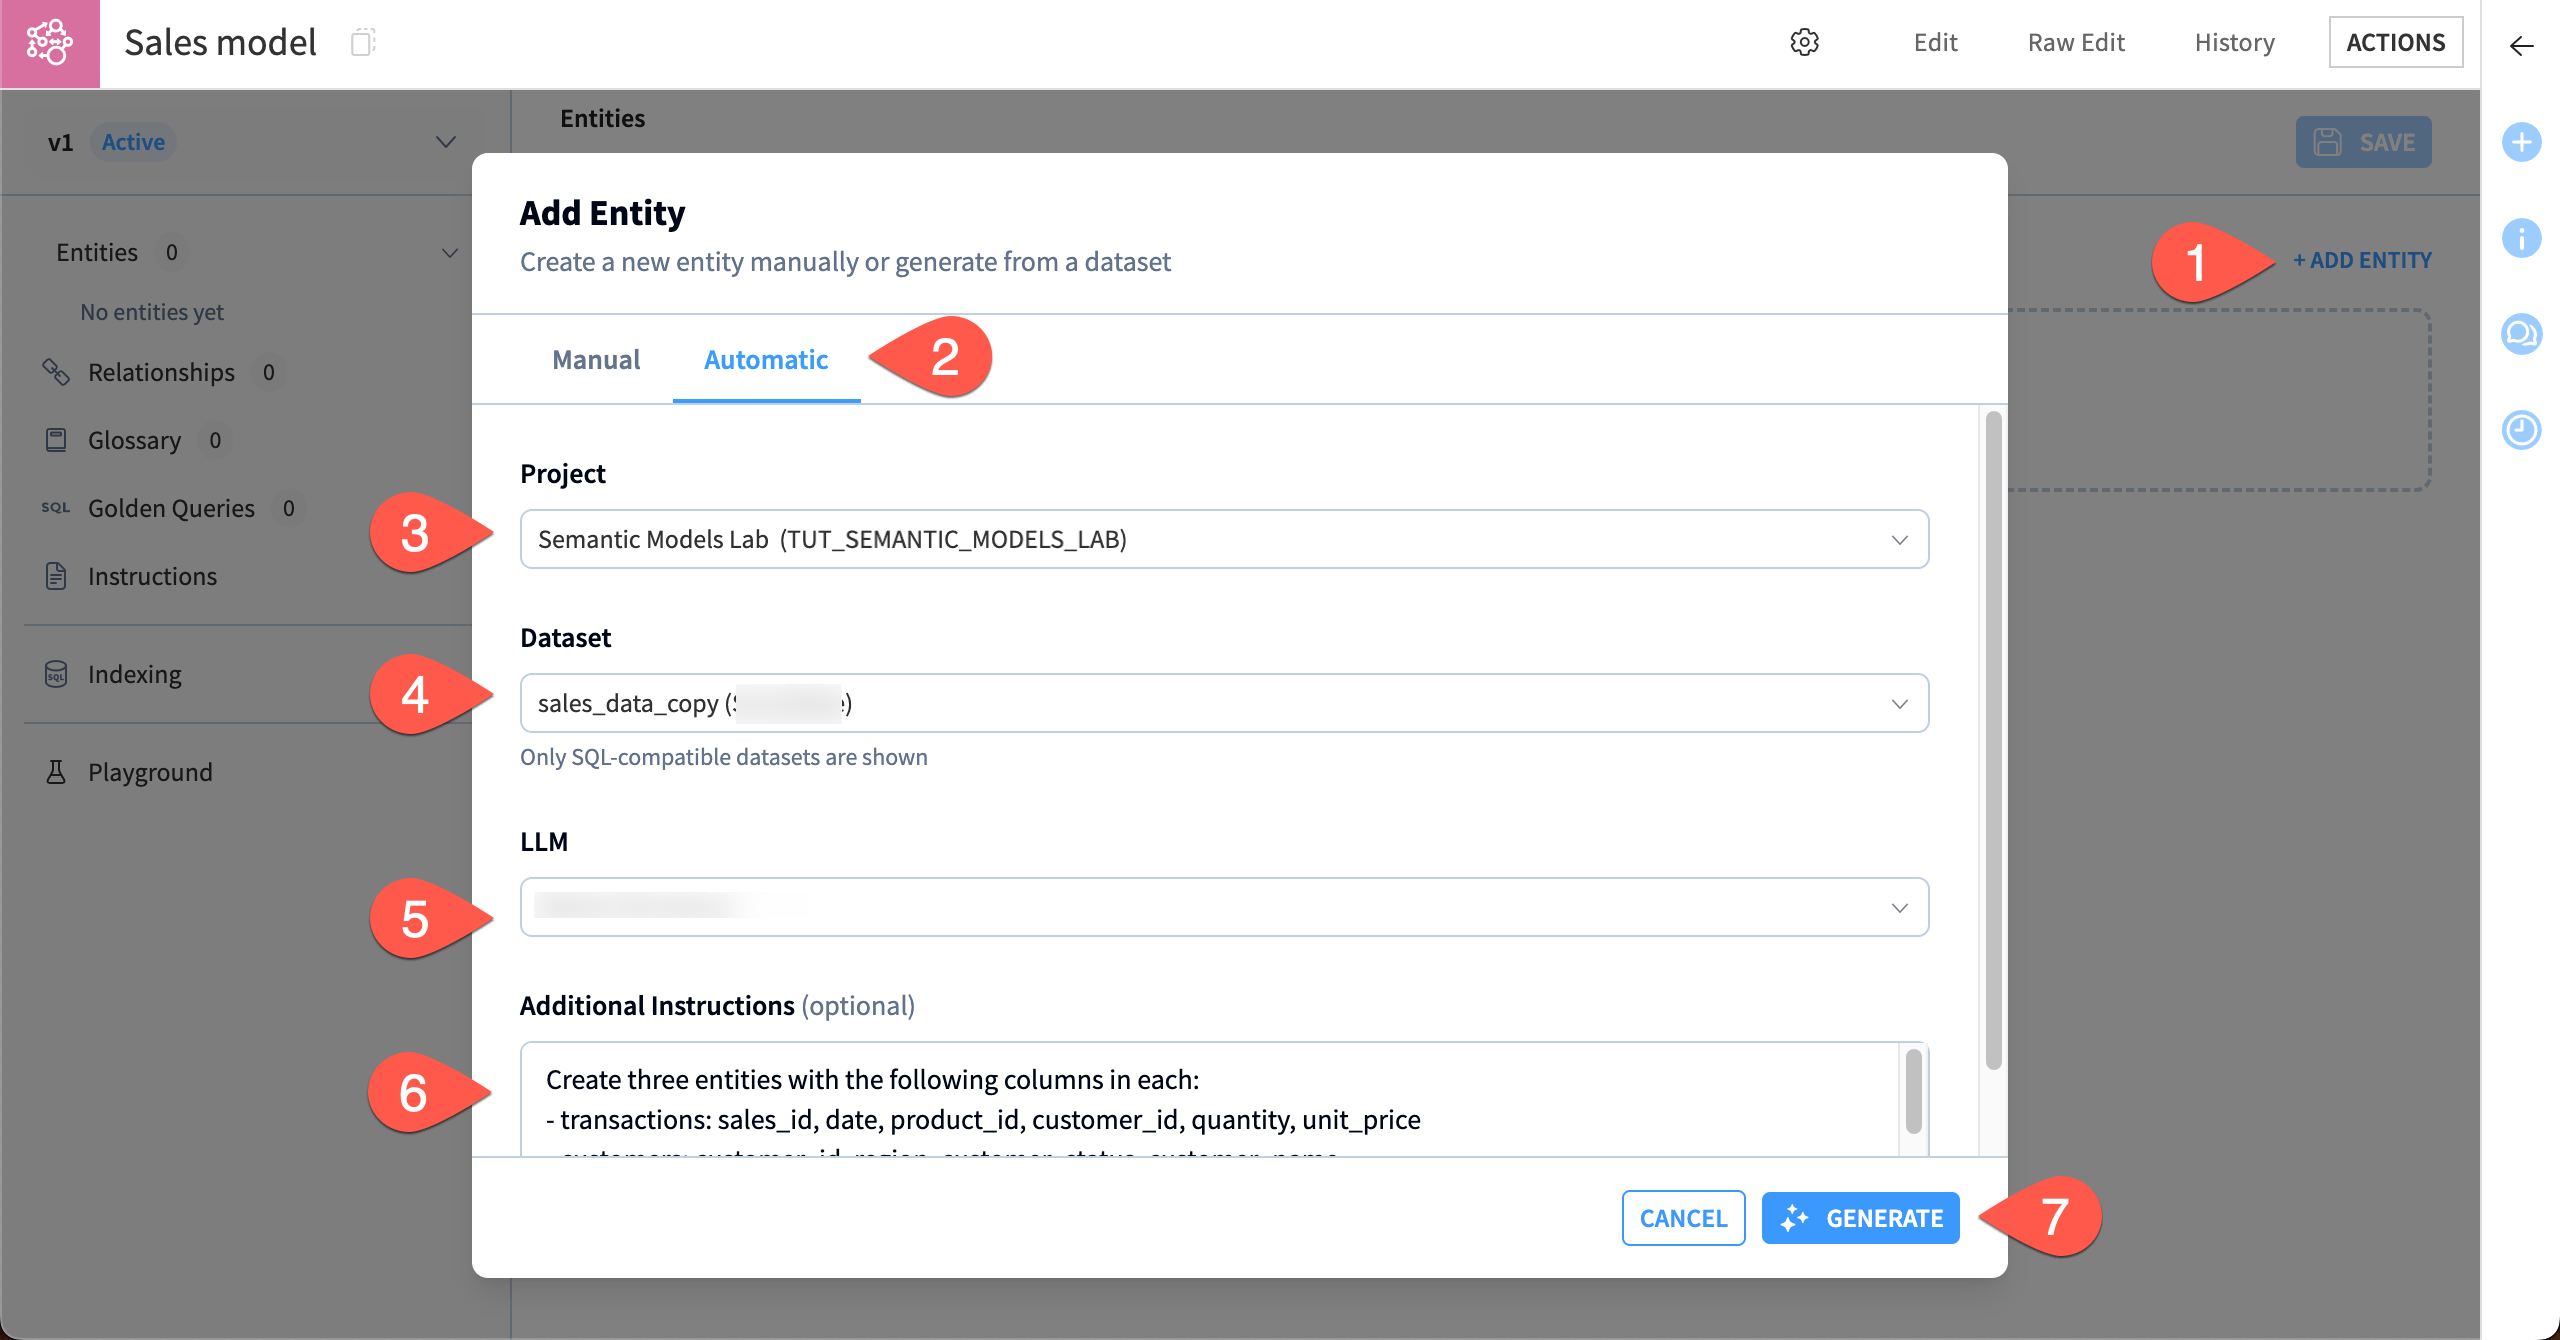
Click + Add Entity.
On the Select path screen, choose Generate automatically, then Next.
On the Select datasets screen, the Project should load automatically. If it doesn’t, choose the current project (the key should start with
TUT_SEMANTIC_MODELS_LAB).For the datasets, check the Select All box to select the three SQL datasets, and click Next.
On the Attributes screen, choose the Embedding model from your available LLM connections, and click Next.
On the Provide context screen, choose the LLM model used for generation.
Click Generate.
Check the entities#
After the model finishes, you can inspect the draft entities it created and save them to the model.
You likely have three entities that align with the original datasets customers, products, and transactions, and have similar names. In this section, you’ll verify that each entity has a proper description, primary key, and attributes (columns). You can edit any of these as needed.
You might also notice that the model has created some metrics or filters in the entities. You’ll look at these later.
Important
LLMs can produce different output. To replicate the rest of this tutorial, you’ll need to ensure that the entity names and attributes match these instructions.
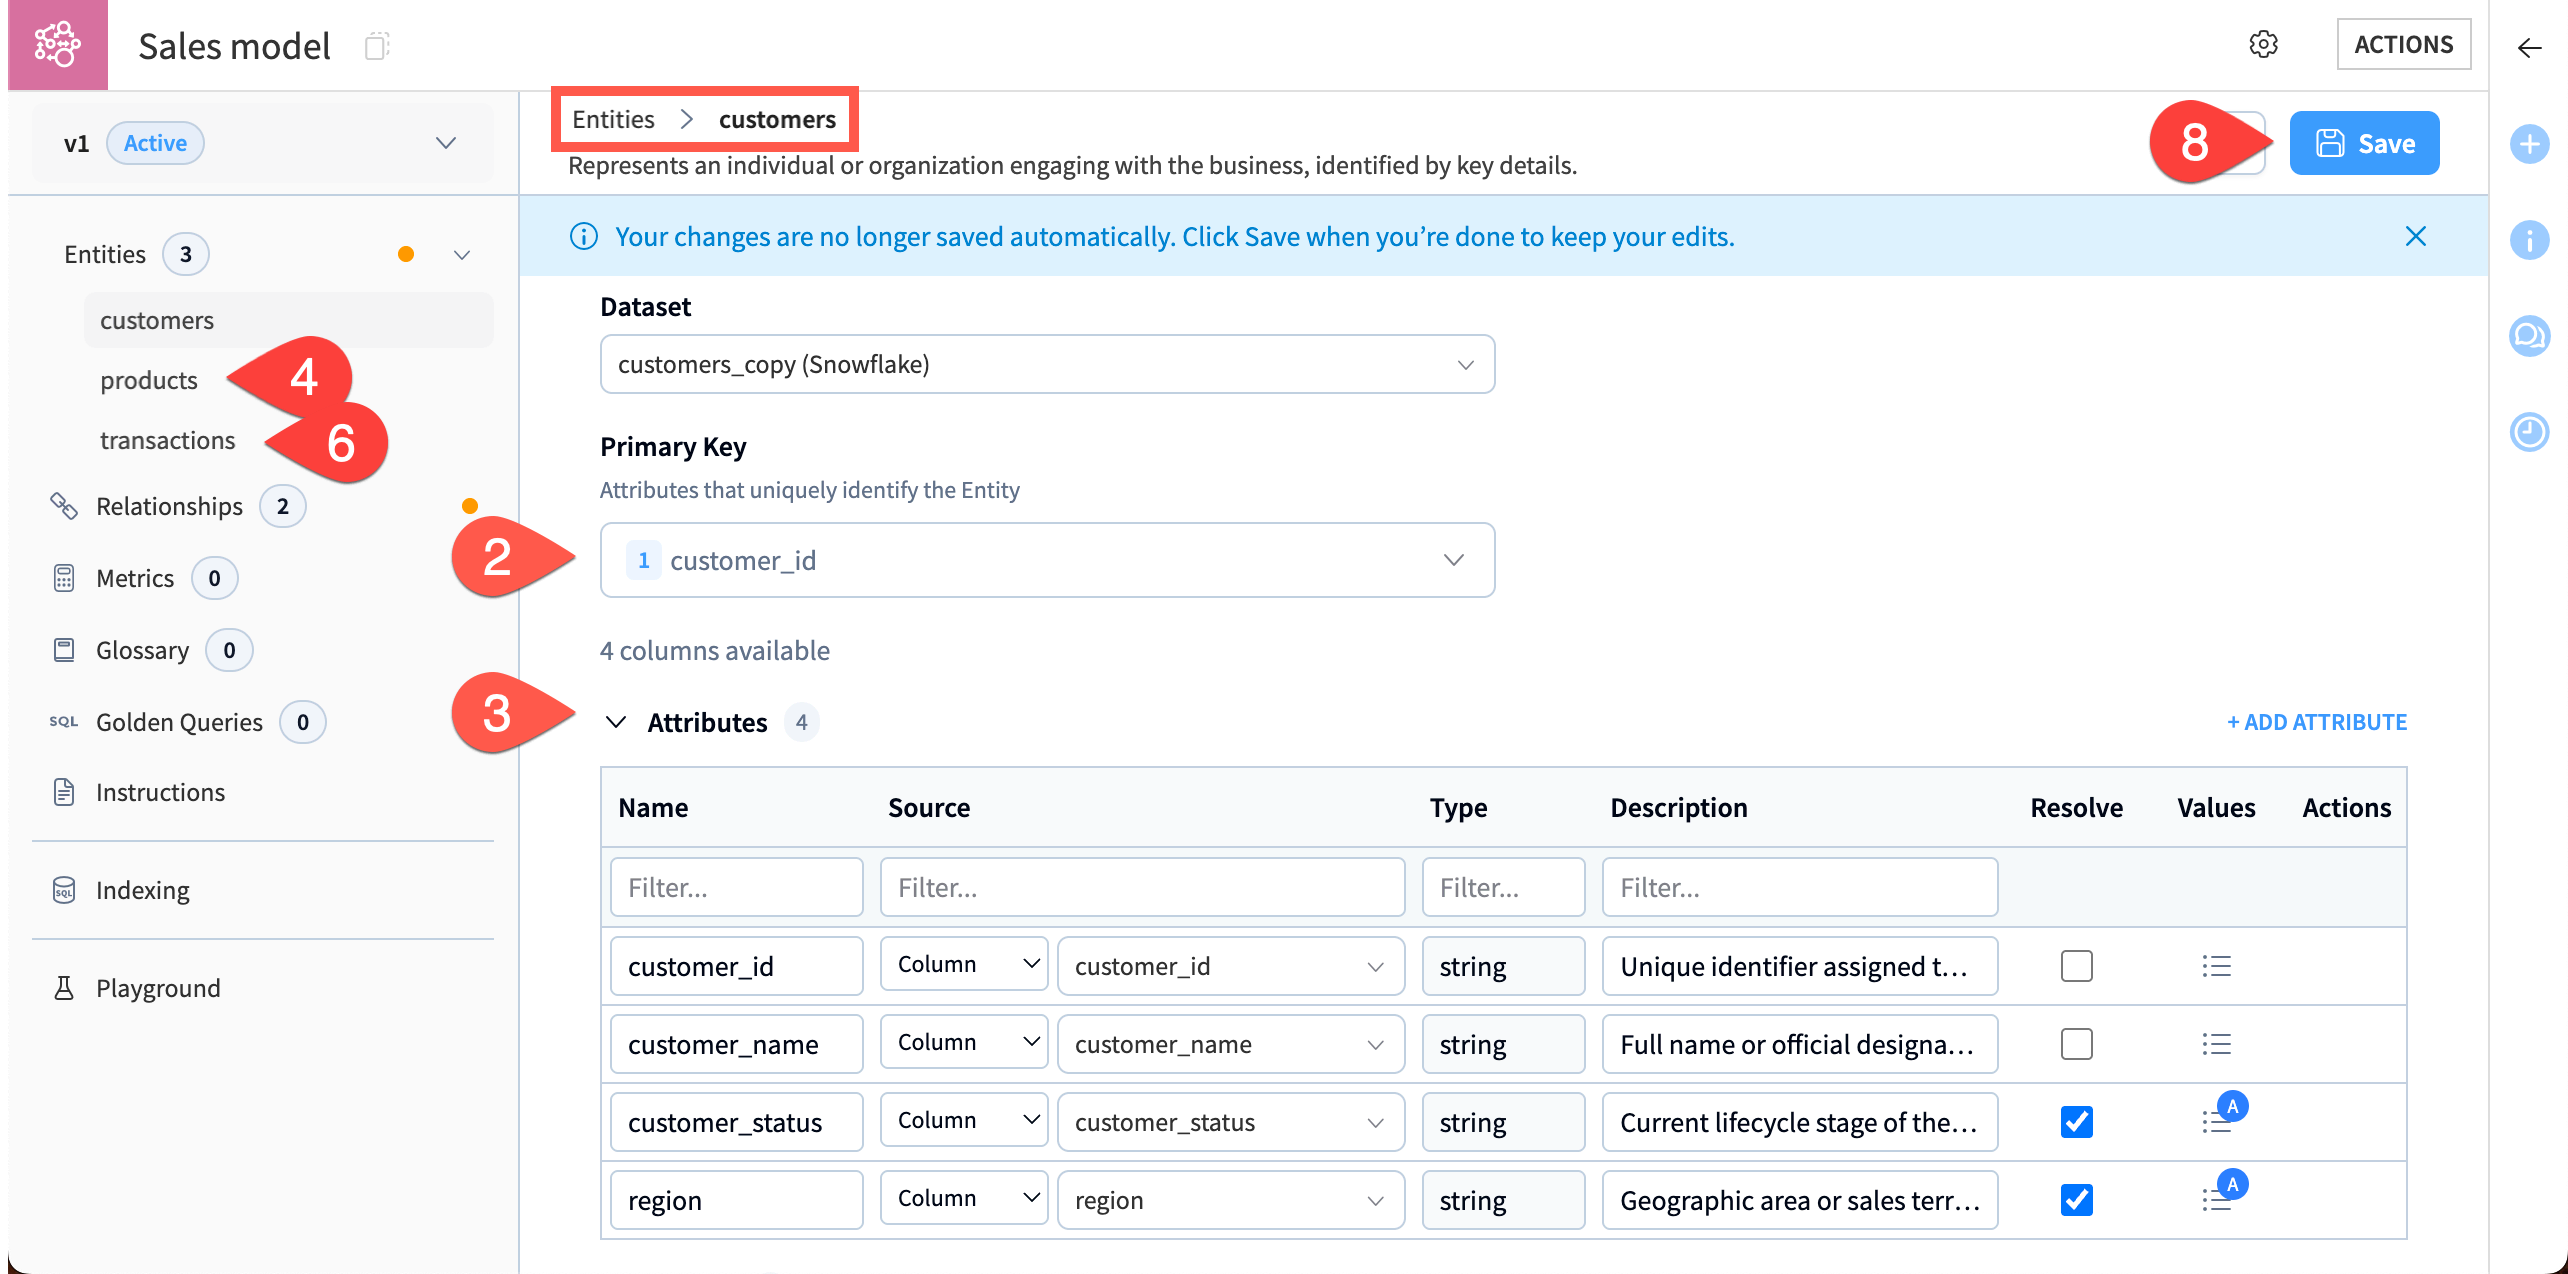
Open the customers entity.
Read the Description and verify that the Primary Key is customer_id.
Verify that the Attributes are:
customer_id
customer_name
customer_status
region
Open the products entity, read the Description and verify that the Primary Key is product_id.
Verify that the Attributes are:
product
product_id
product_desc
product_type
Open the transactions entity, read the Description and verify that the Primary Key is sales_id.
Verify that the Attributes are:
sales_id
unit_price
date
product_id
customer_id
quantity
Click Save to save all the entities to the semantic model.
Index the values#
The next step is to index the distinct values for each entity’s attributes. Indexing is necessary for the model’s term resolution, which is when a user’s query terms are fuzzy-matched to values from these attributes.
Navigate to Indexing in the left panel.
The Embedding LLM should be preselected with the model you chose when creating entities. Make any changes if you’d like.
Click Start Indexing.
Wait for the page to display Indexing finished successfully.

Add metrics#
Within each entity, you can use SQL expressions to define metrics, which are aggregations of the attributes. For this sales data, it would be useful to add metrics for total sales across the entire table and revenue per transaction (among others).
Important
Your model might have added some metrics automatically. If so, it might have already created one or more of these and you can just change the name to match these instructions.
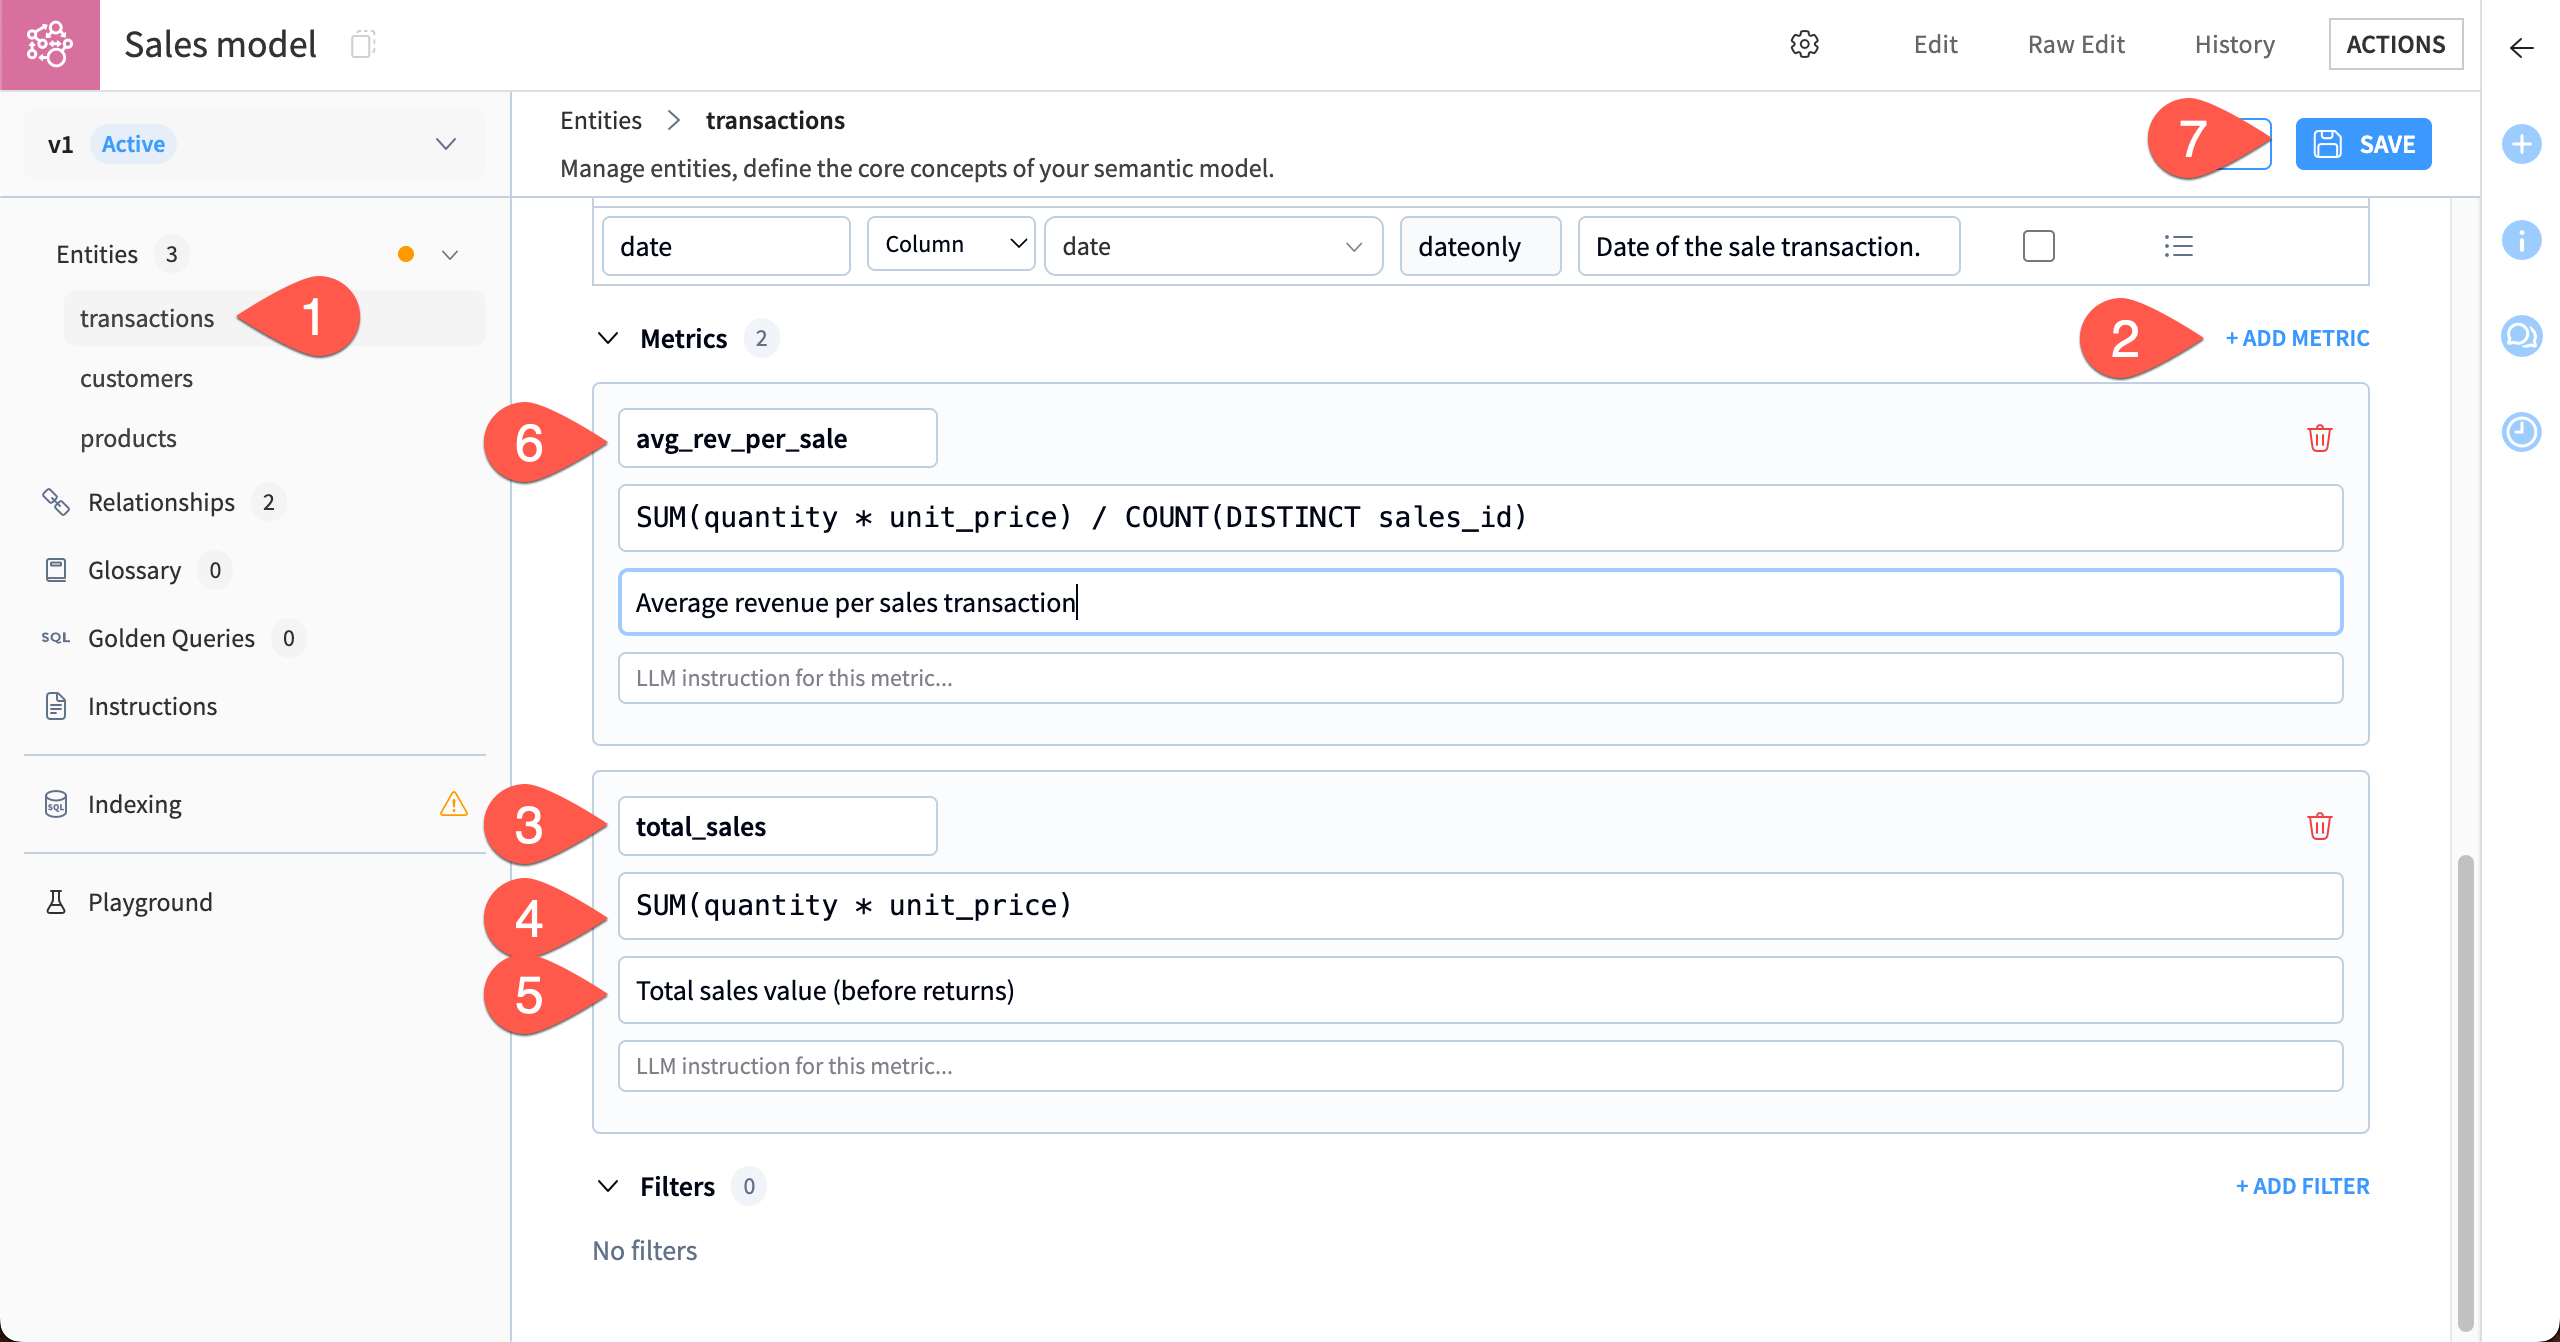
Navigate to the transactions entity.
Under Metrics, click + Add Metric.
Name this metric
total_sales.In the SQL expression window, type
SUM(quantity * unit_price).In the description window, type
Total sales value (before returns).Add another metric with these attributes:
Name:
avg_rev_per_saleSQL expression:
SUM(quantity * unit_price) / COUNT(DISTINCT sales_id)Description:
Average revenue per sales transaction
Click Save.
Add relationships#
To ensure that queries will work correctly, you can define the relationships between tables.
In this case, the LLM should have automatically created relationships when it set up the entities.
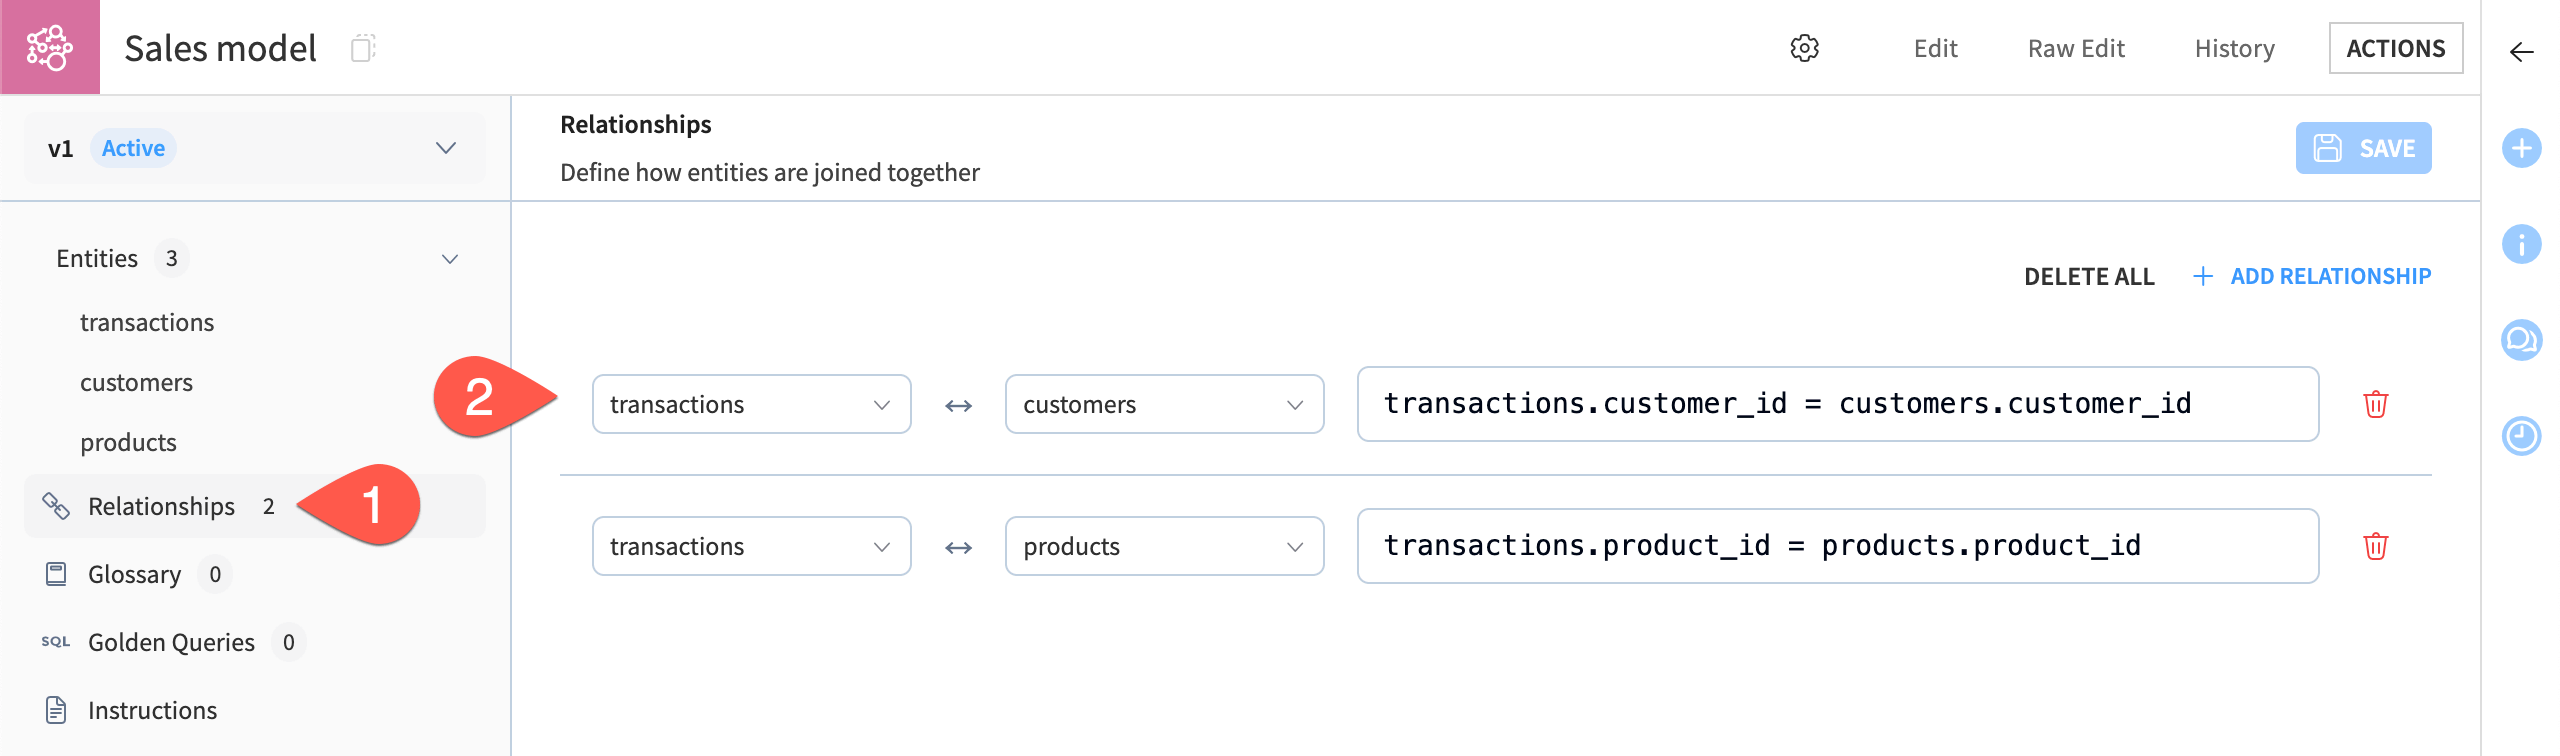
Navigate to Relationships in the left panel.
If relationships are set, check that they match the ones below. If not, add these two relationships manually and Save:
transactionsrelates tocustomersontransactions.customer_id = customers.customer_idtransactionsrelates toproductsontransactions.product_id = products.product_id
Add a Glossary#
The Glossary is a collection of terms, along with their definitions and synonyms, that build business context around the data. You can add terms automatically from business documents or manually, as you will do in this tutorial.
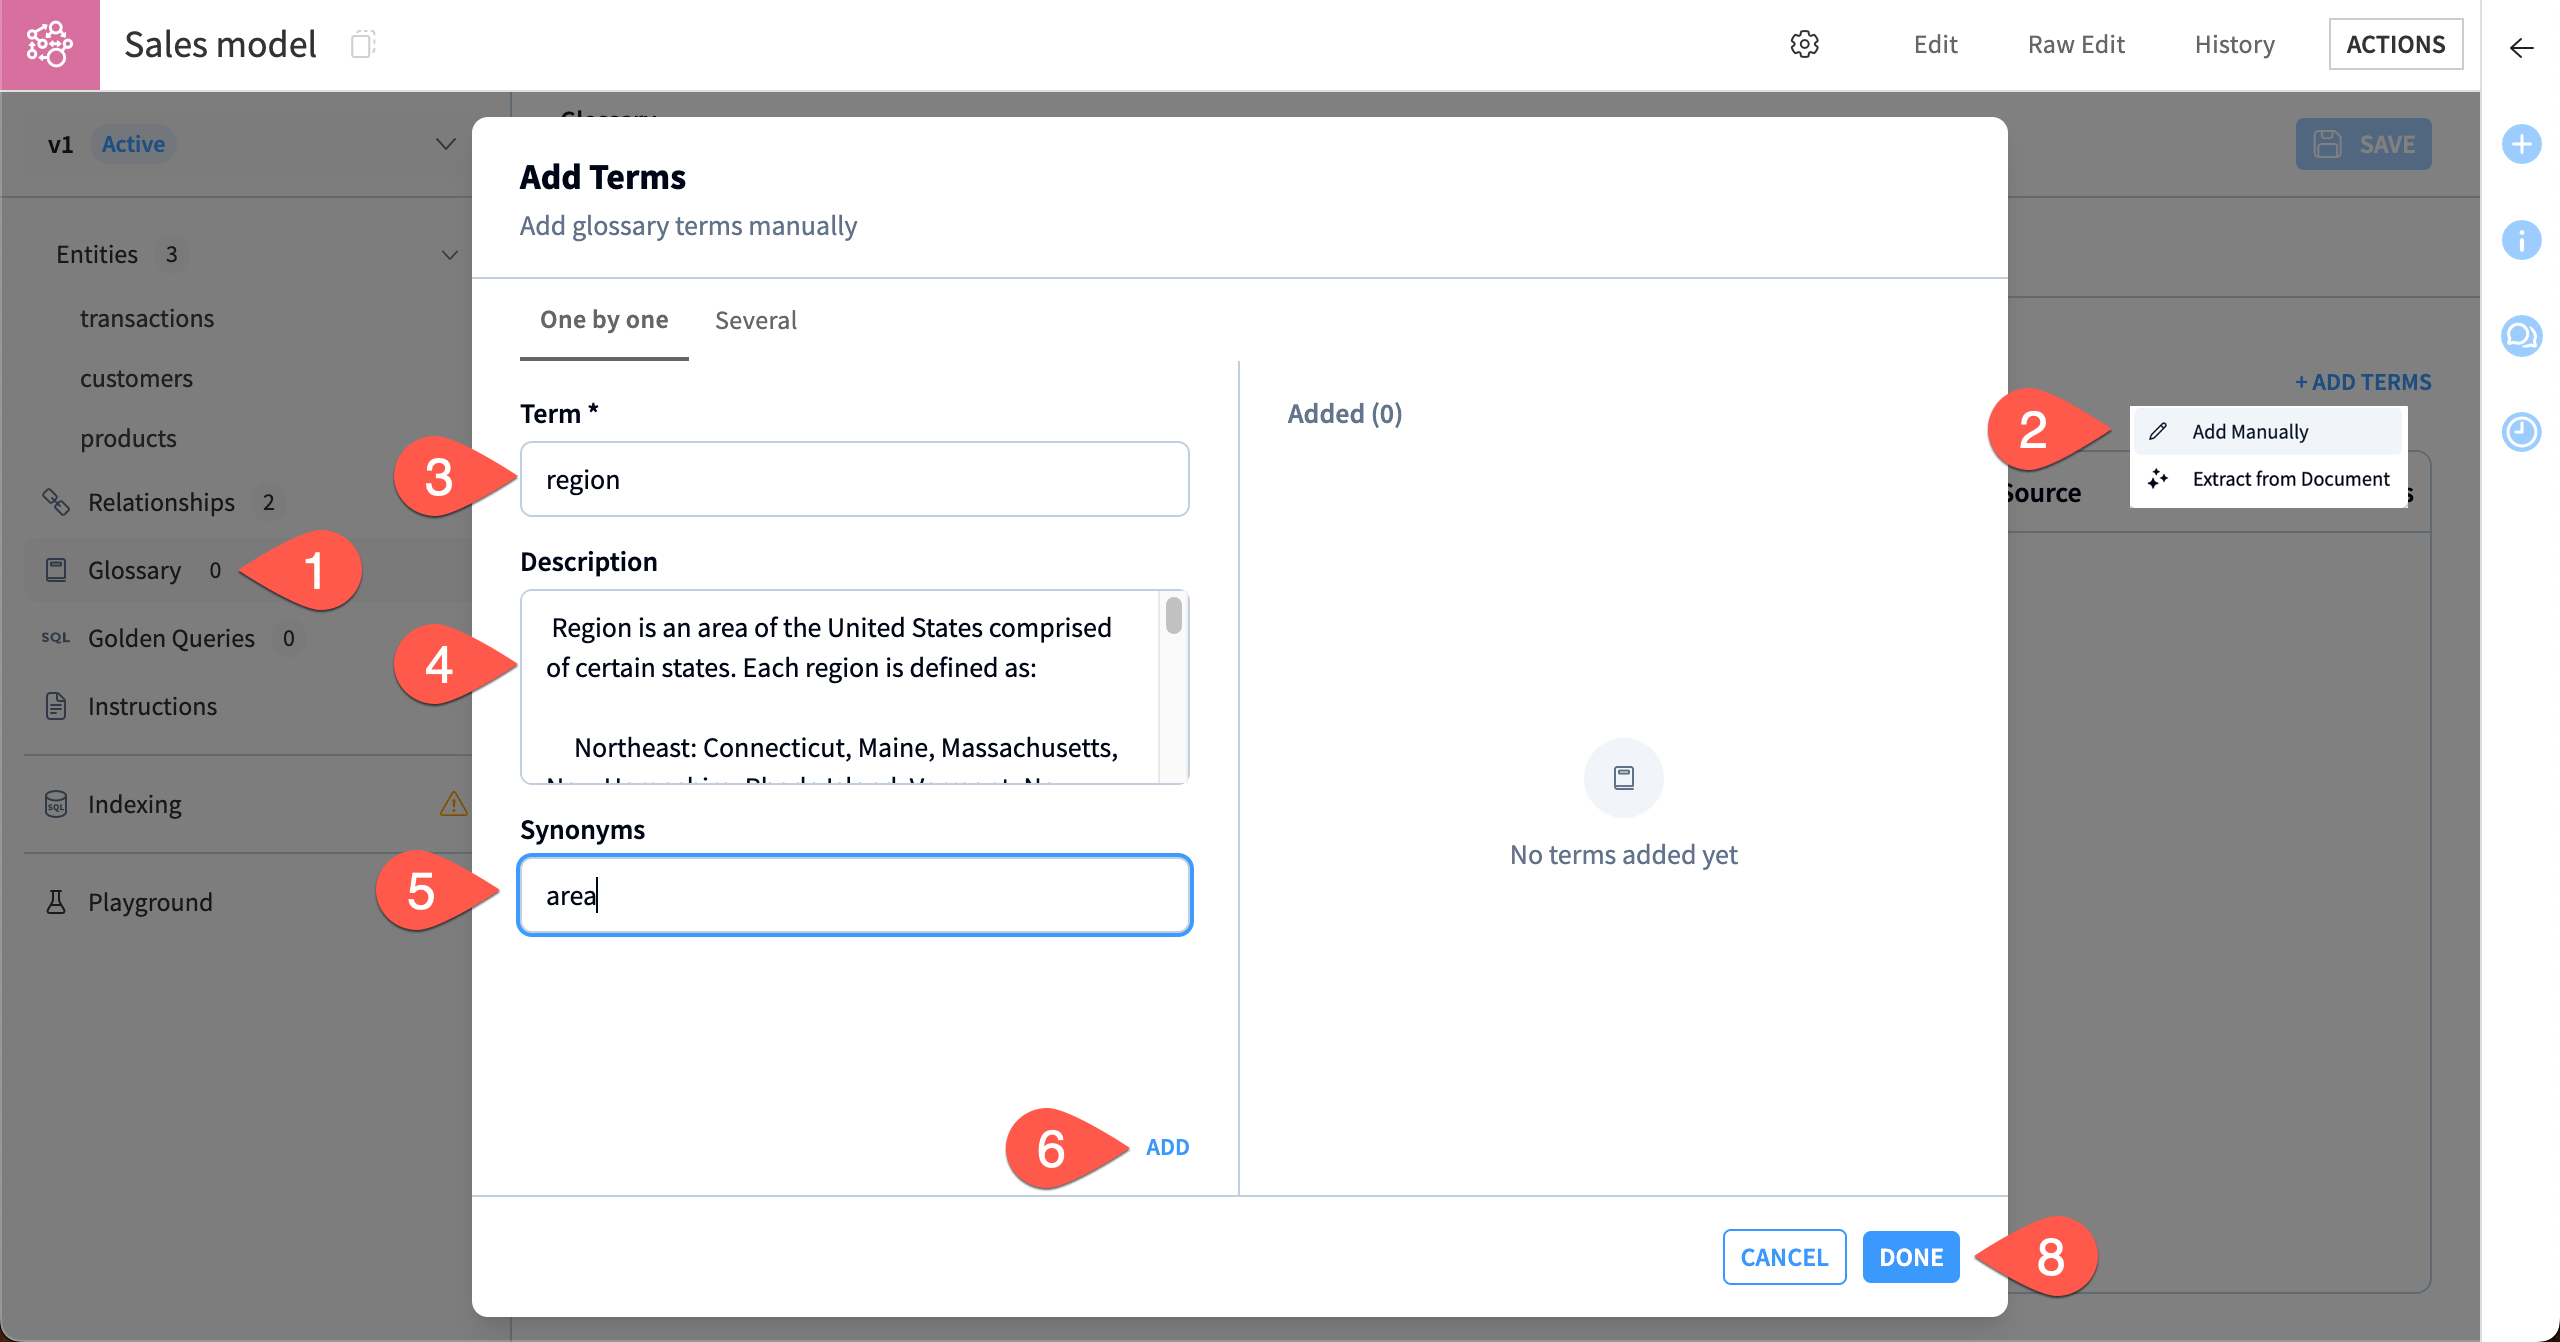
Go to the Glossary in the left panel.
Click + Add Terms and choose Add Manually.
Add the Term
region.For the Description, copy and paste this text:
Region is an area of the United States comprised of certain states. Each region is defined as:

Northeast: Connecticut, Maine, Massachusetts, New Hampshire, Rhode Island, Vermont, New Jersey, New York, Pennsylvania, Delaware, Maryland
Midwest: Illinois, Indiana, Michigan, Ohio, Wisconsin, Iowa, Kansas, Minnesota, Missouri, Nebraska, North Dakota, South Dakota
South: Florida, Georgia, North Carolina, South Carolina, Virginia, West Virginia, Alabama, Kentucky, Mississippi, Tennessee, Arkansas, Louisiana, Oklahoma, Texas
Southwest: Arizona, Colorado, Idaho, Nevada, New Mexico, Utah
West: Montana, Wyoming, California, Oregon, Washington, Alaska, Hawaii
In Synonyms, write
area.Click Add.
Add another term:
Term:
fiscal yearDescription:
The fiscal year is from July 1 to June 30.Synonyms:
business year, financial year, accounting year
Click Add and Done.
In this case, the region term should be linked to an attribute so the model understands that it defines the regions listed in the data. The fiscal year term should remain unlinked so the model uses it as general context when it answers queries.
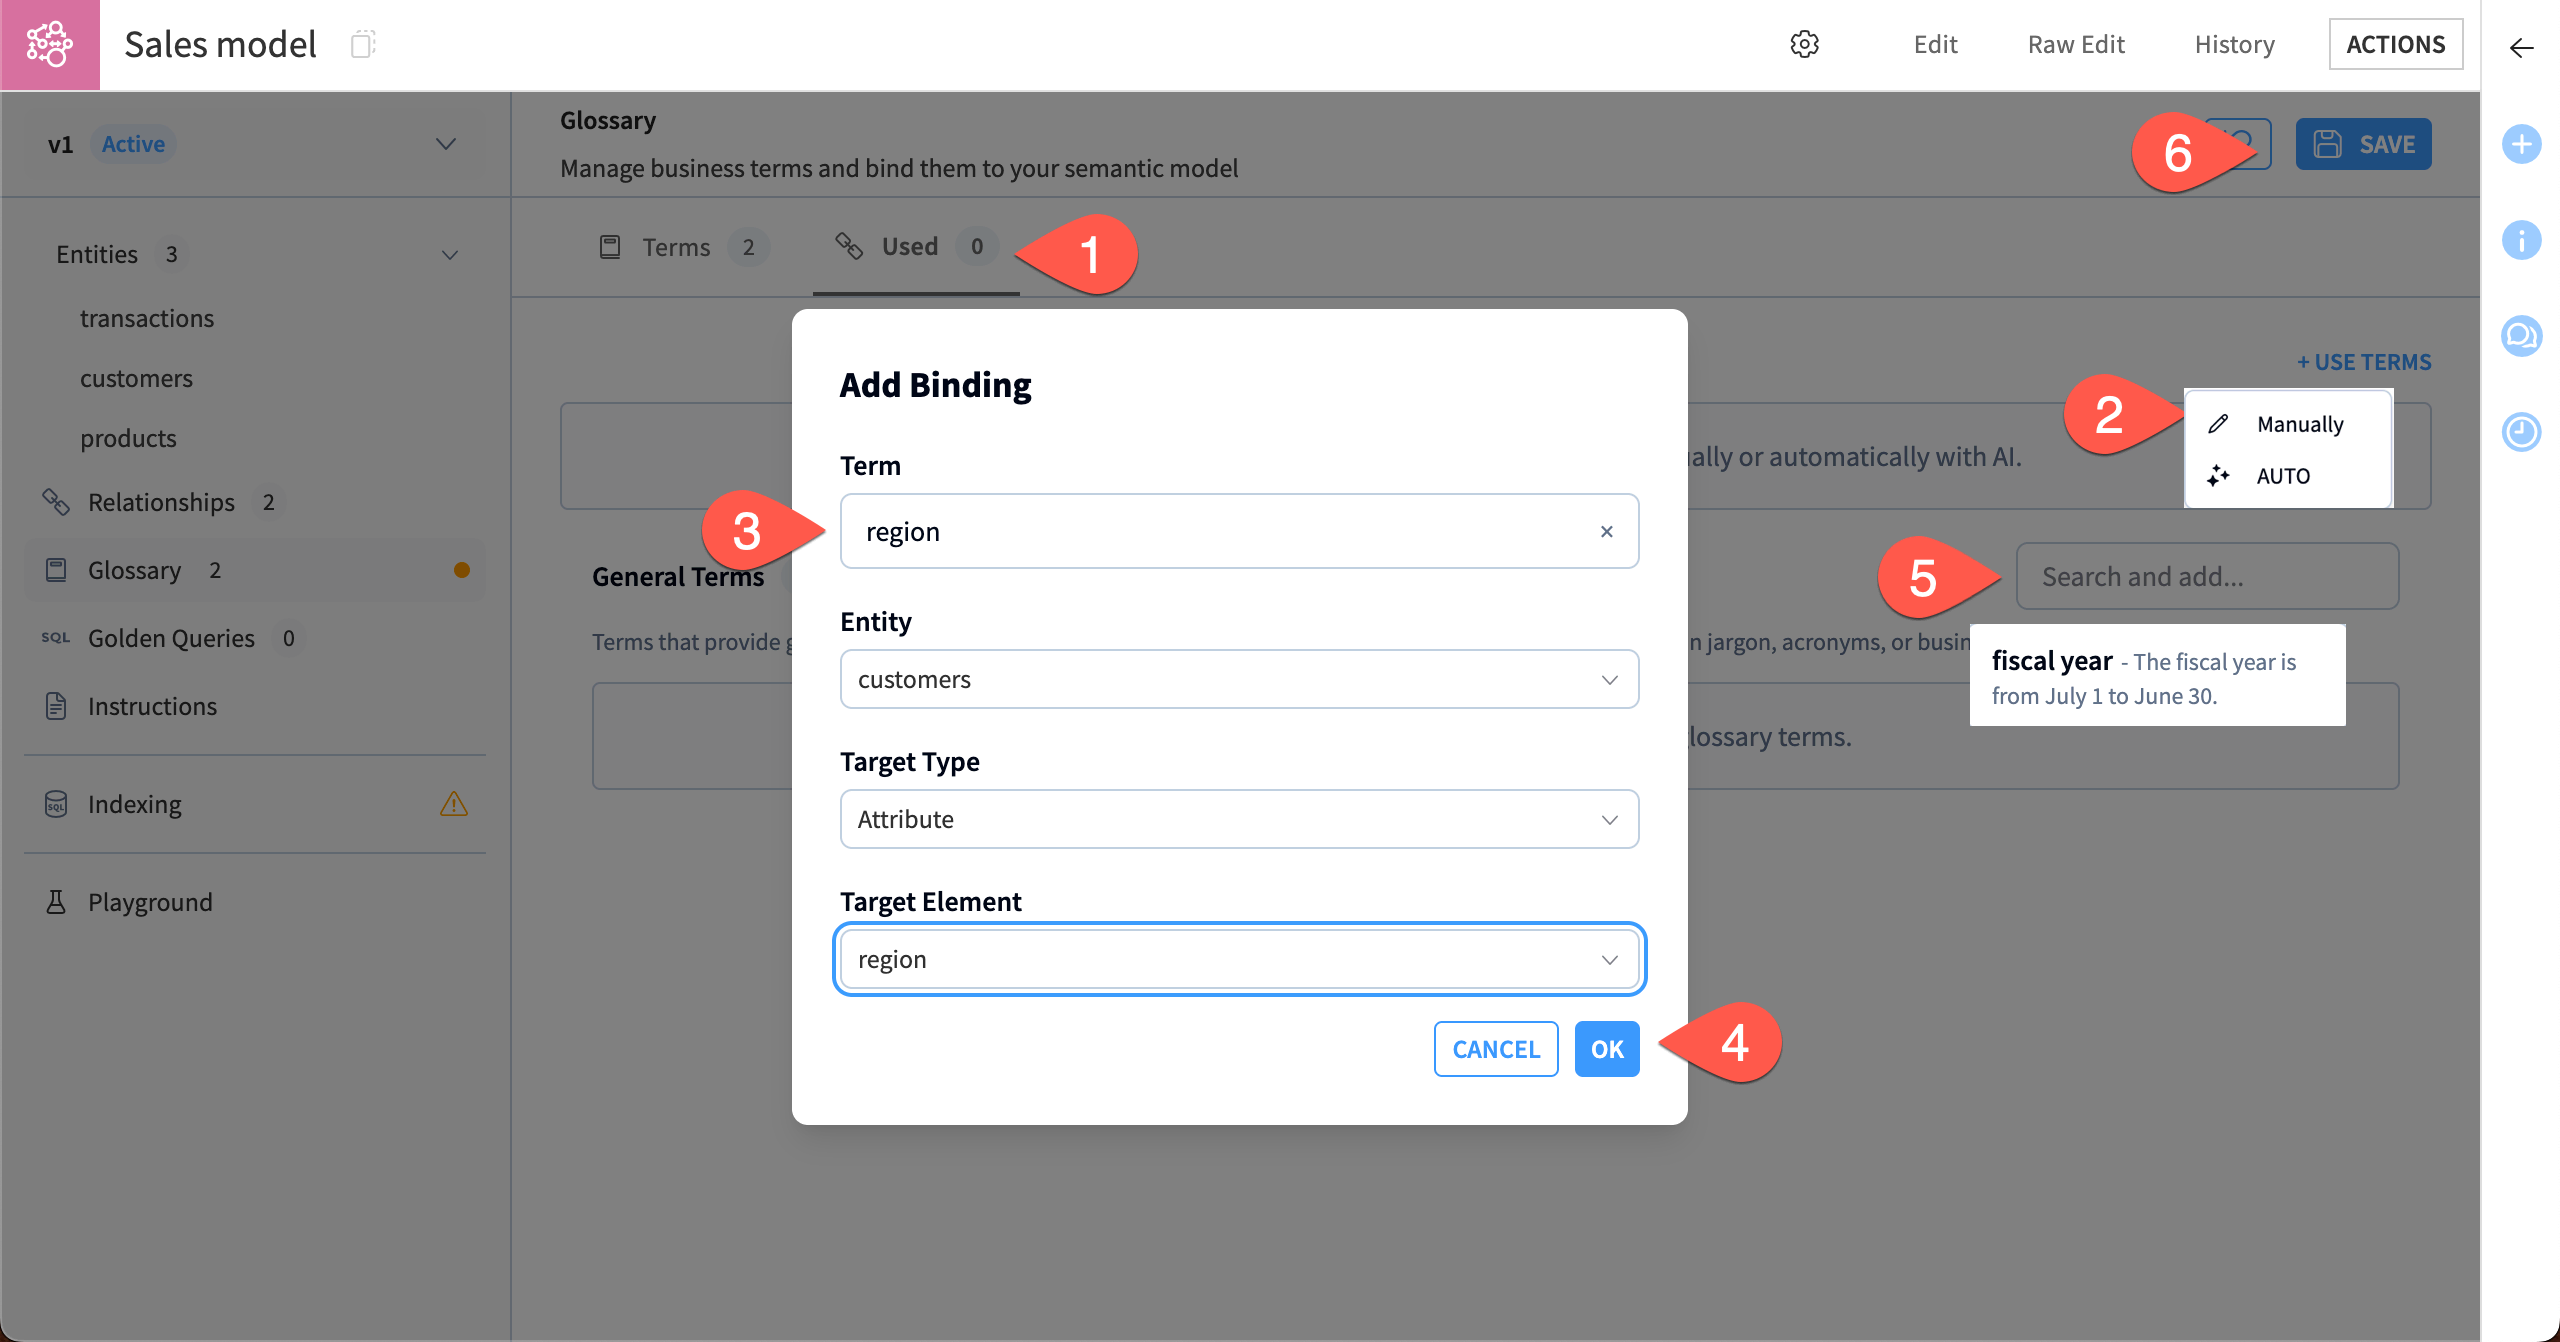
In the Glossary, click on the Used tab.
Click + Use Terms and choose Manually.
Make the following selections:
Term:
regionEntity:
customersTarget Type:
AttributeTarget Element:
region
Click OK.
Under General Terms, click in the Search and add box, then add fiscal year.
Click Save.
The model now has access to both terms from the Glossary.
Add instructions#
You can add instructions that will help guide the LLM in every query. In this example, the instructions will be simple, though in the real world they can be much more complex.
Navigate to Instructions in the left panel.
Copy and paste the following instructions:
Use the sales data to answer questions about sales by product, region, customer, etc.

If a user asks about sales for a state, use the region associated with that state and specify that data is available only by region, not by state.
Click Save.

Test the model#
The model is now ready to test in the Playground! You can test a number of example user queries to see how the model responds.
In this case, you can use some queries designed to test the metrics, glossary definitions, and instructions you set up.
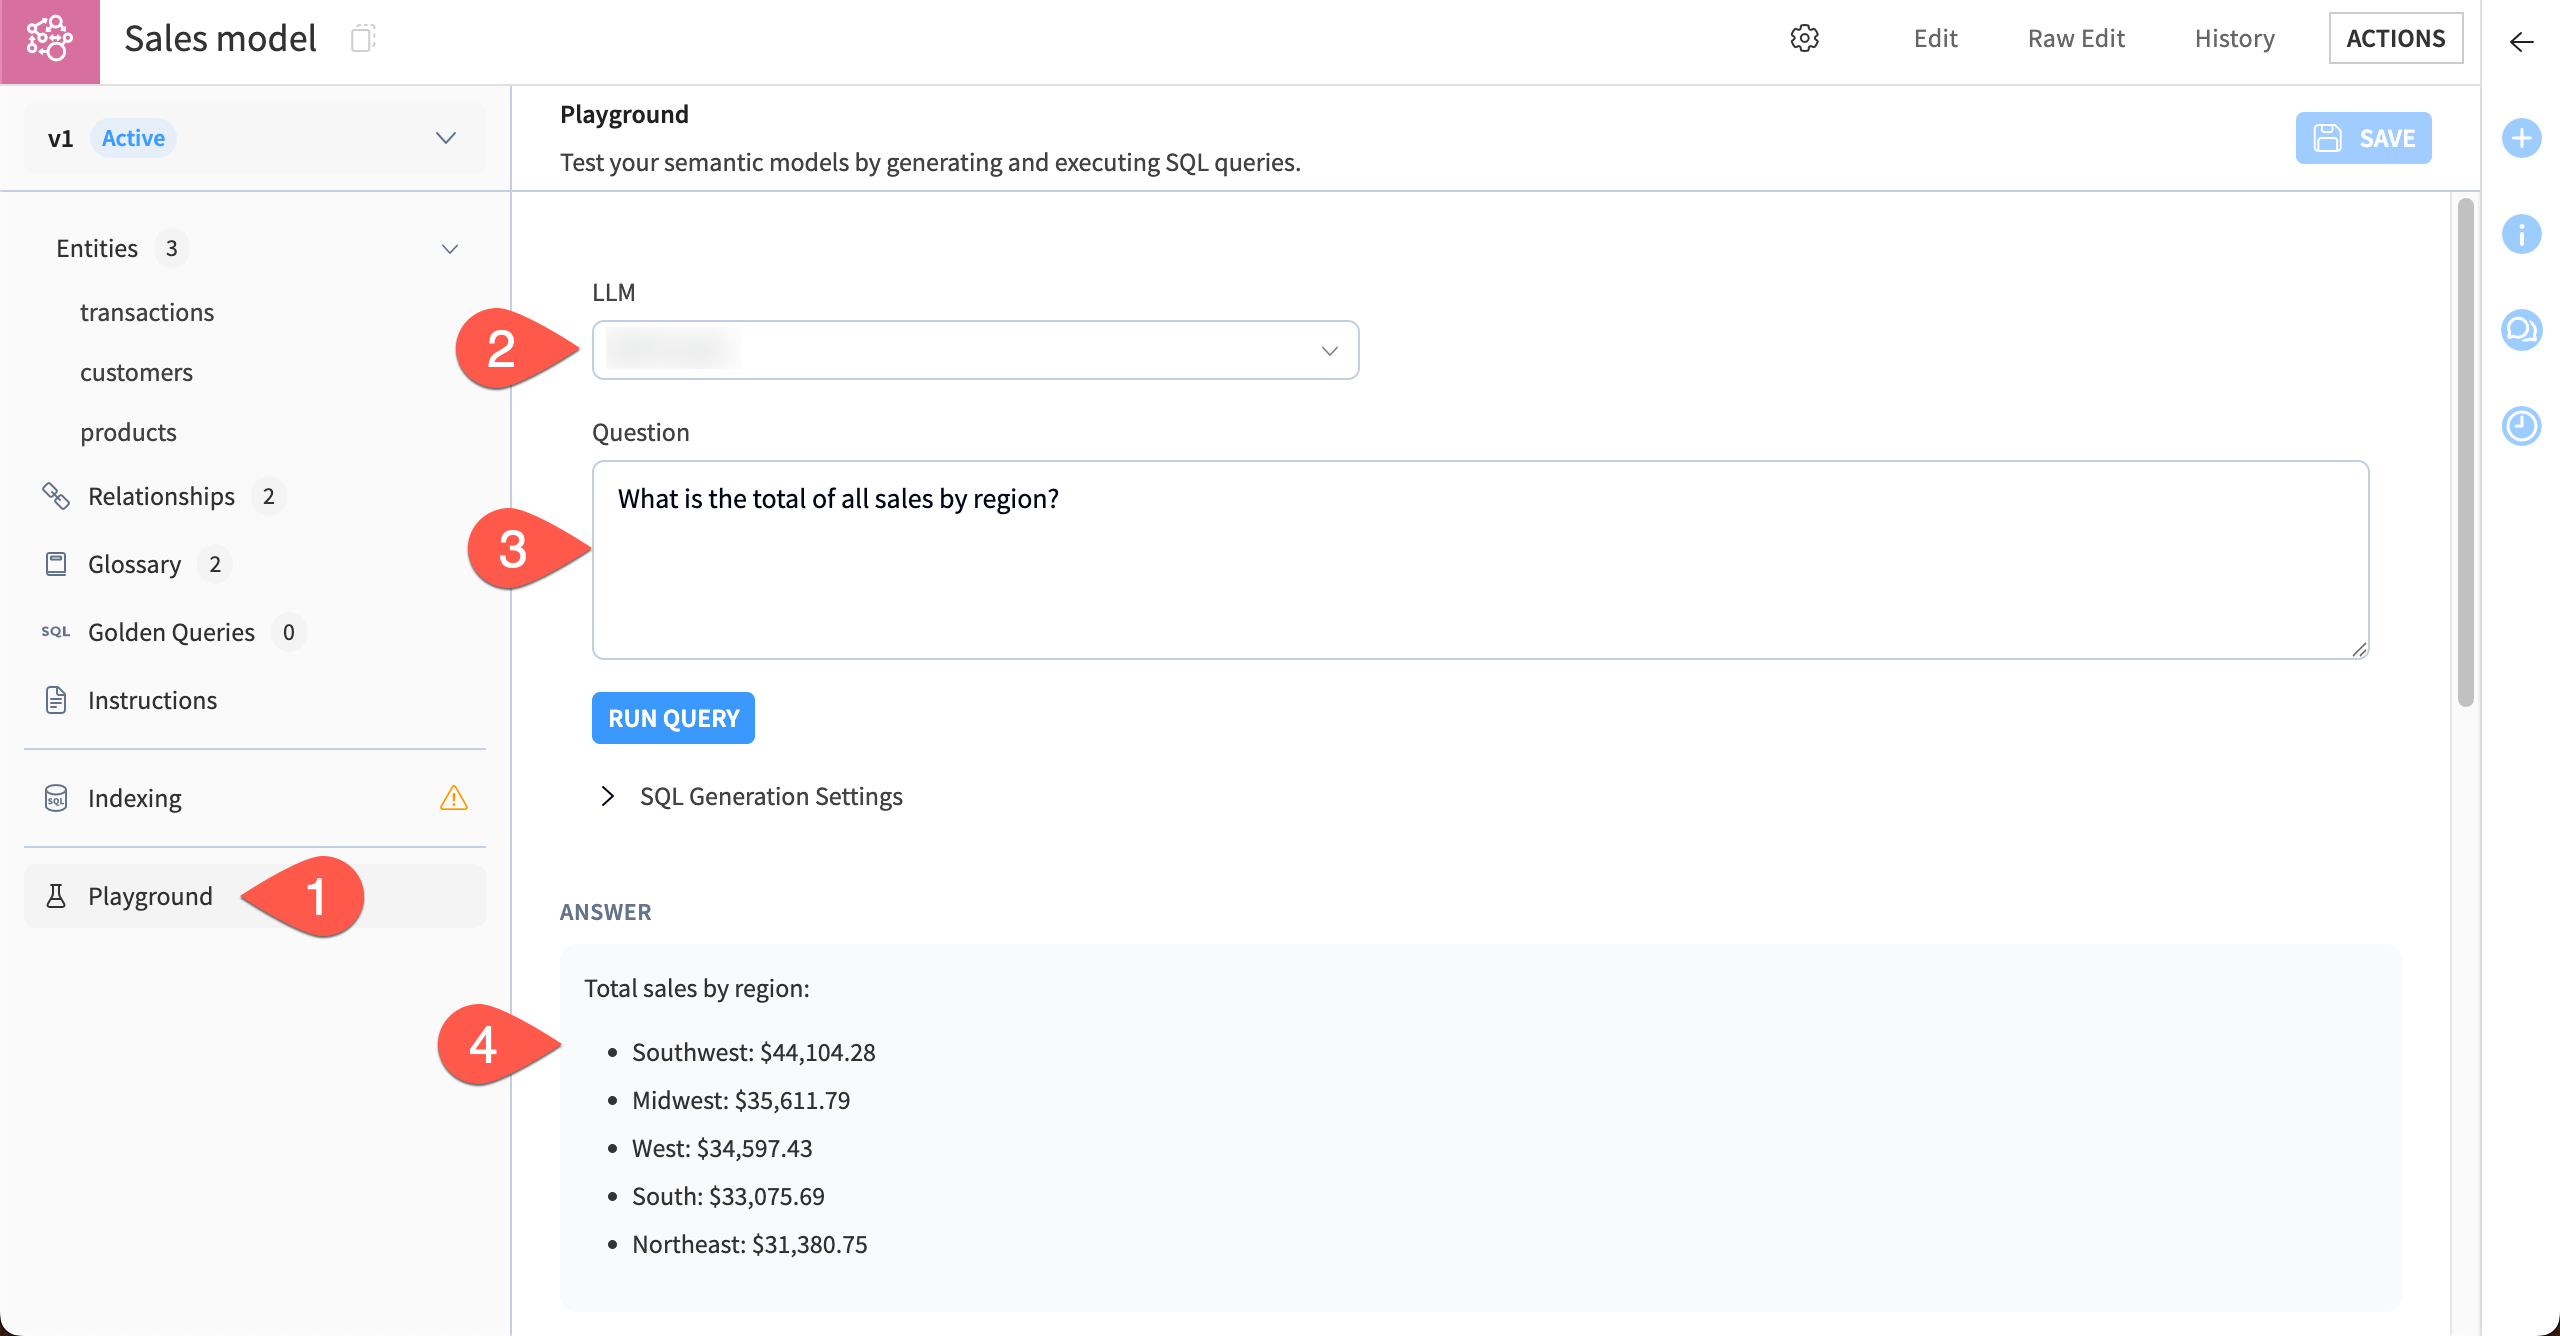
Navigate to Playground in the left panel.
Choose an LLM from your available connections.
Copy and paste this Question to test the metric for total sales, and Run Query:
What is the total of all sales by region?
When the query finishes, review the results. Scrolling down the page, you can see how the model uses glossary terms and the generated SQL query behind the results it returned.
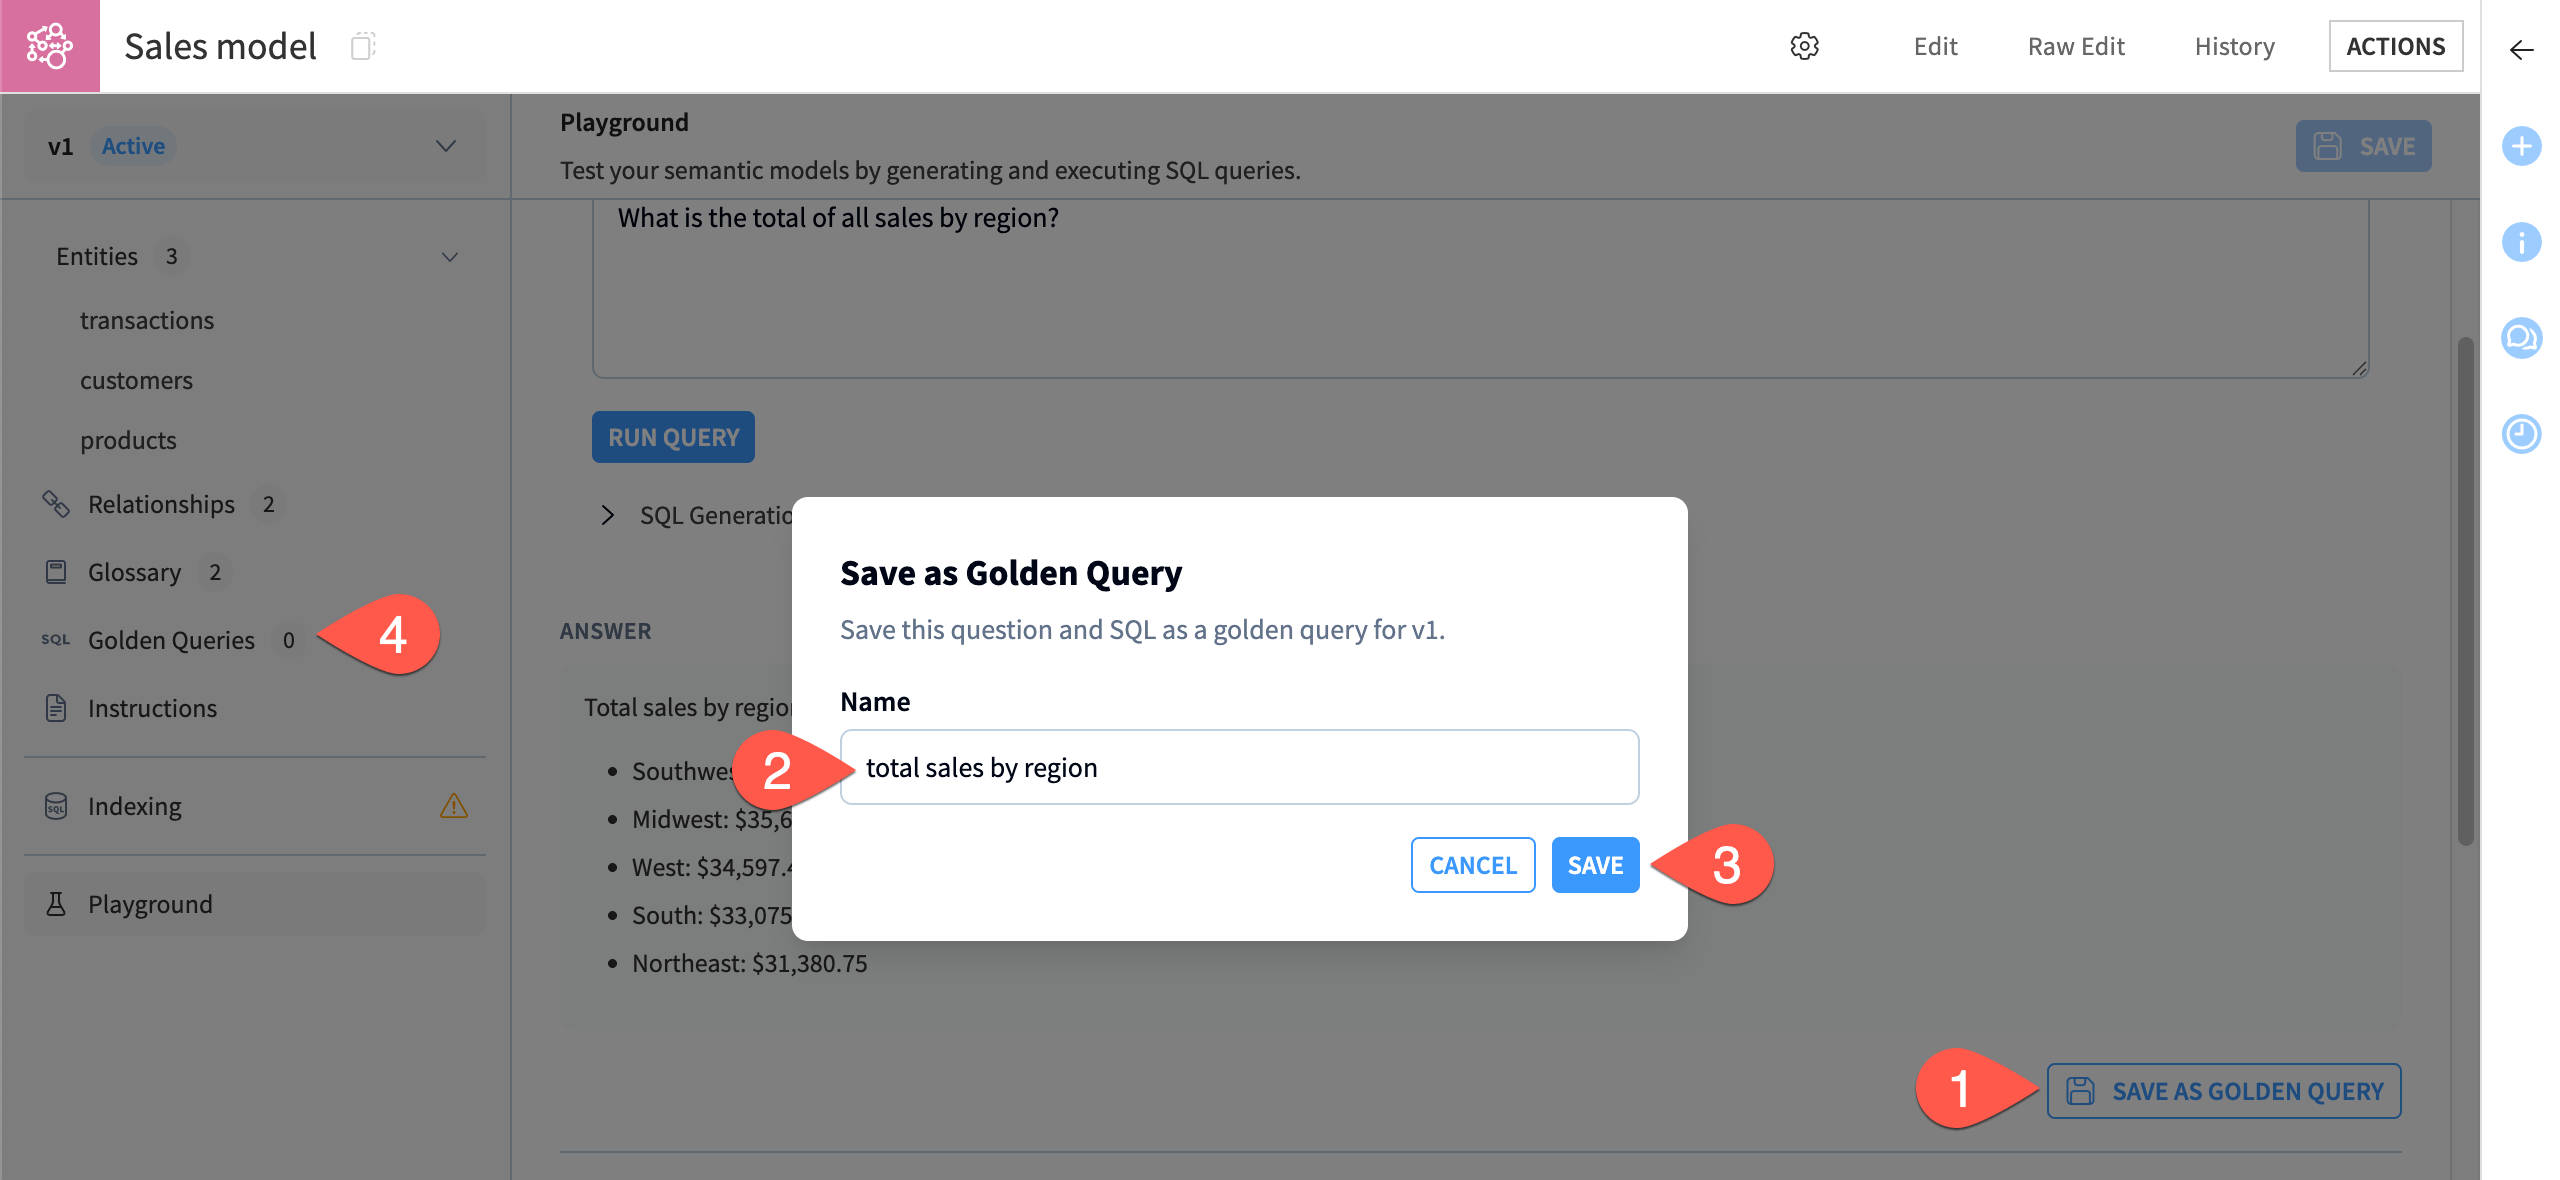
If you like the results, you can save this as a golden query, which can be used to save the expected output of frequent or complex queries.
Click Save as Golden Query.
Give the query a name, such as
total sales by region.Click Save.
Navigate to Golden Queries in the left panel and check that the query has been saved.
Note
You might need to refresh your browser page to see the Golden Query saved.
You can continue testing the model with a few other queries. Here are some to copy, or try your own!
Test the metric for average revenue per sale:
What was the average revenue per sale in 2024?
Test the definition of region, and the instructions to use region instead of state:
What products are sold the most in Massachusetts?
Test the definition of fiscal year:
What is the total sales value for fiscal year 2024-25?
Important
Responses to the queries will vary depending on the LLM. In addition to testing multiple queries, you can use the Playground to test responses from various LLMs if you have multiple connections.
Use the model in an agent#
After you’re happy with the semantic model, you can use it in an agent with the Semantic Model Query tool. The tool queries structured data with SQL, using the semantic model as a context layer.
Create a new agent#
First, create the agent.
Go to the GenAI menu (
) > Agents.Click + New Agent.
Select Simple Visual Agent, give it a name, such as
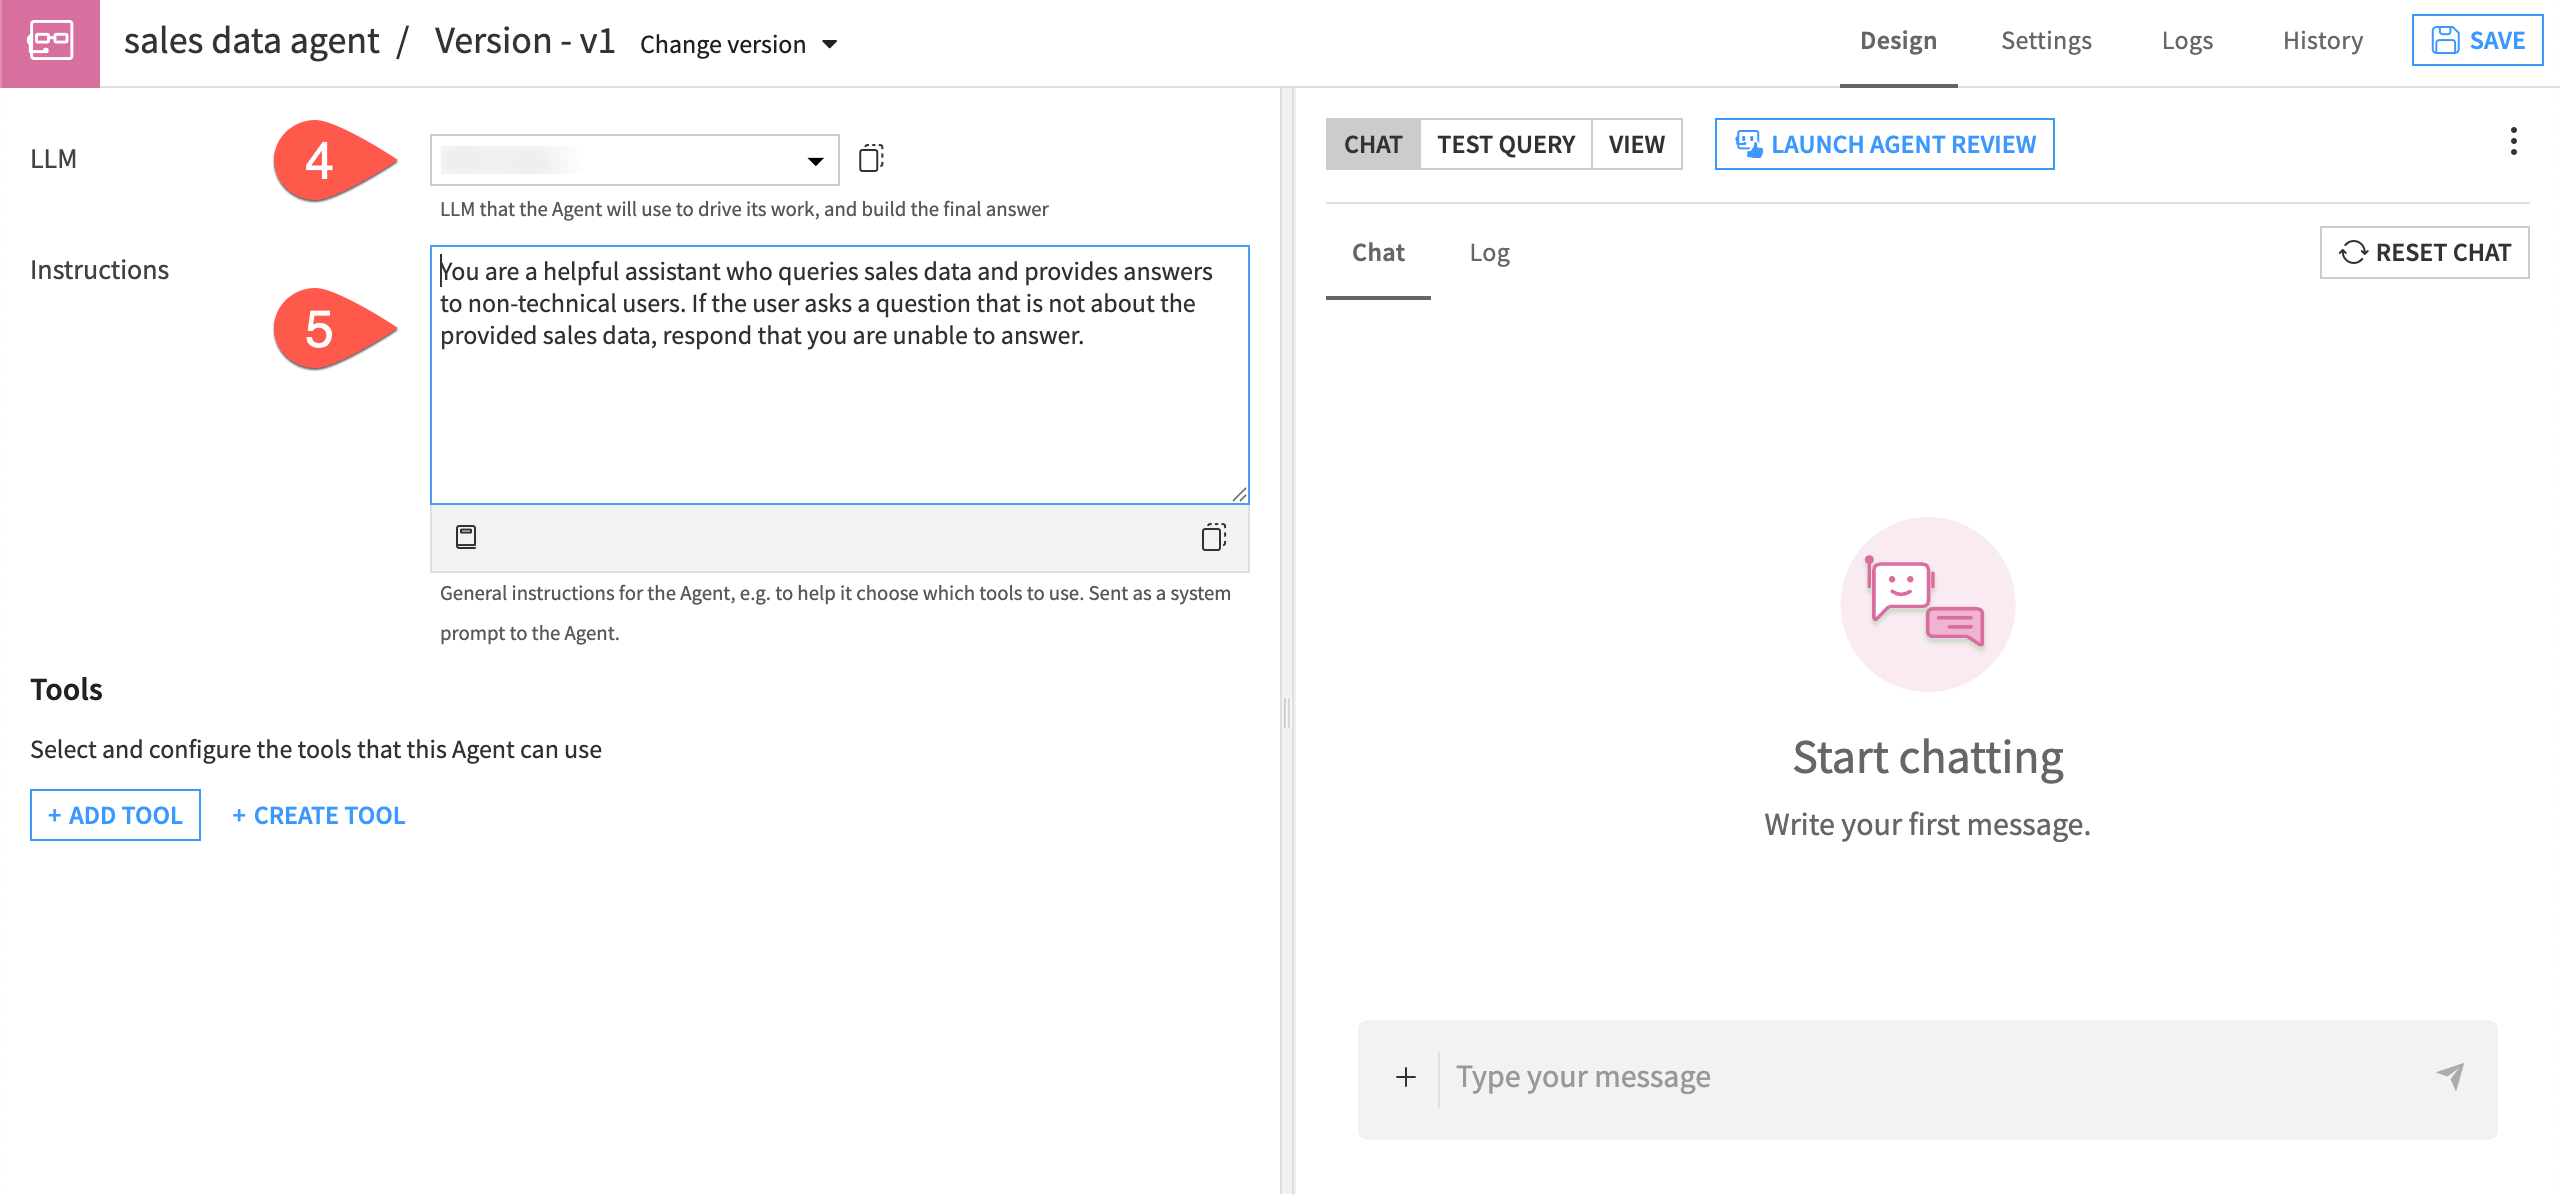
sales data agentand click Create.In the agent Design page, choose an LLM connection.
In the Instructions window, copy and paste this text:
You are a helpful assistant who queries sales data and provides answers to non-technical users. If the user asks a question that is not about the provided sales data, respond that you are unable to answer.
Create the query tool#
Now, you can create a tool that queries the data using the semantic model.
Click + Create Tool.
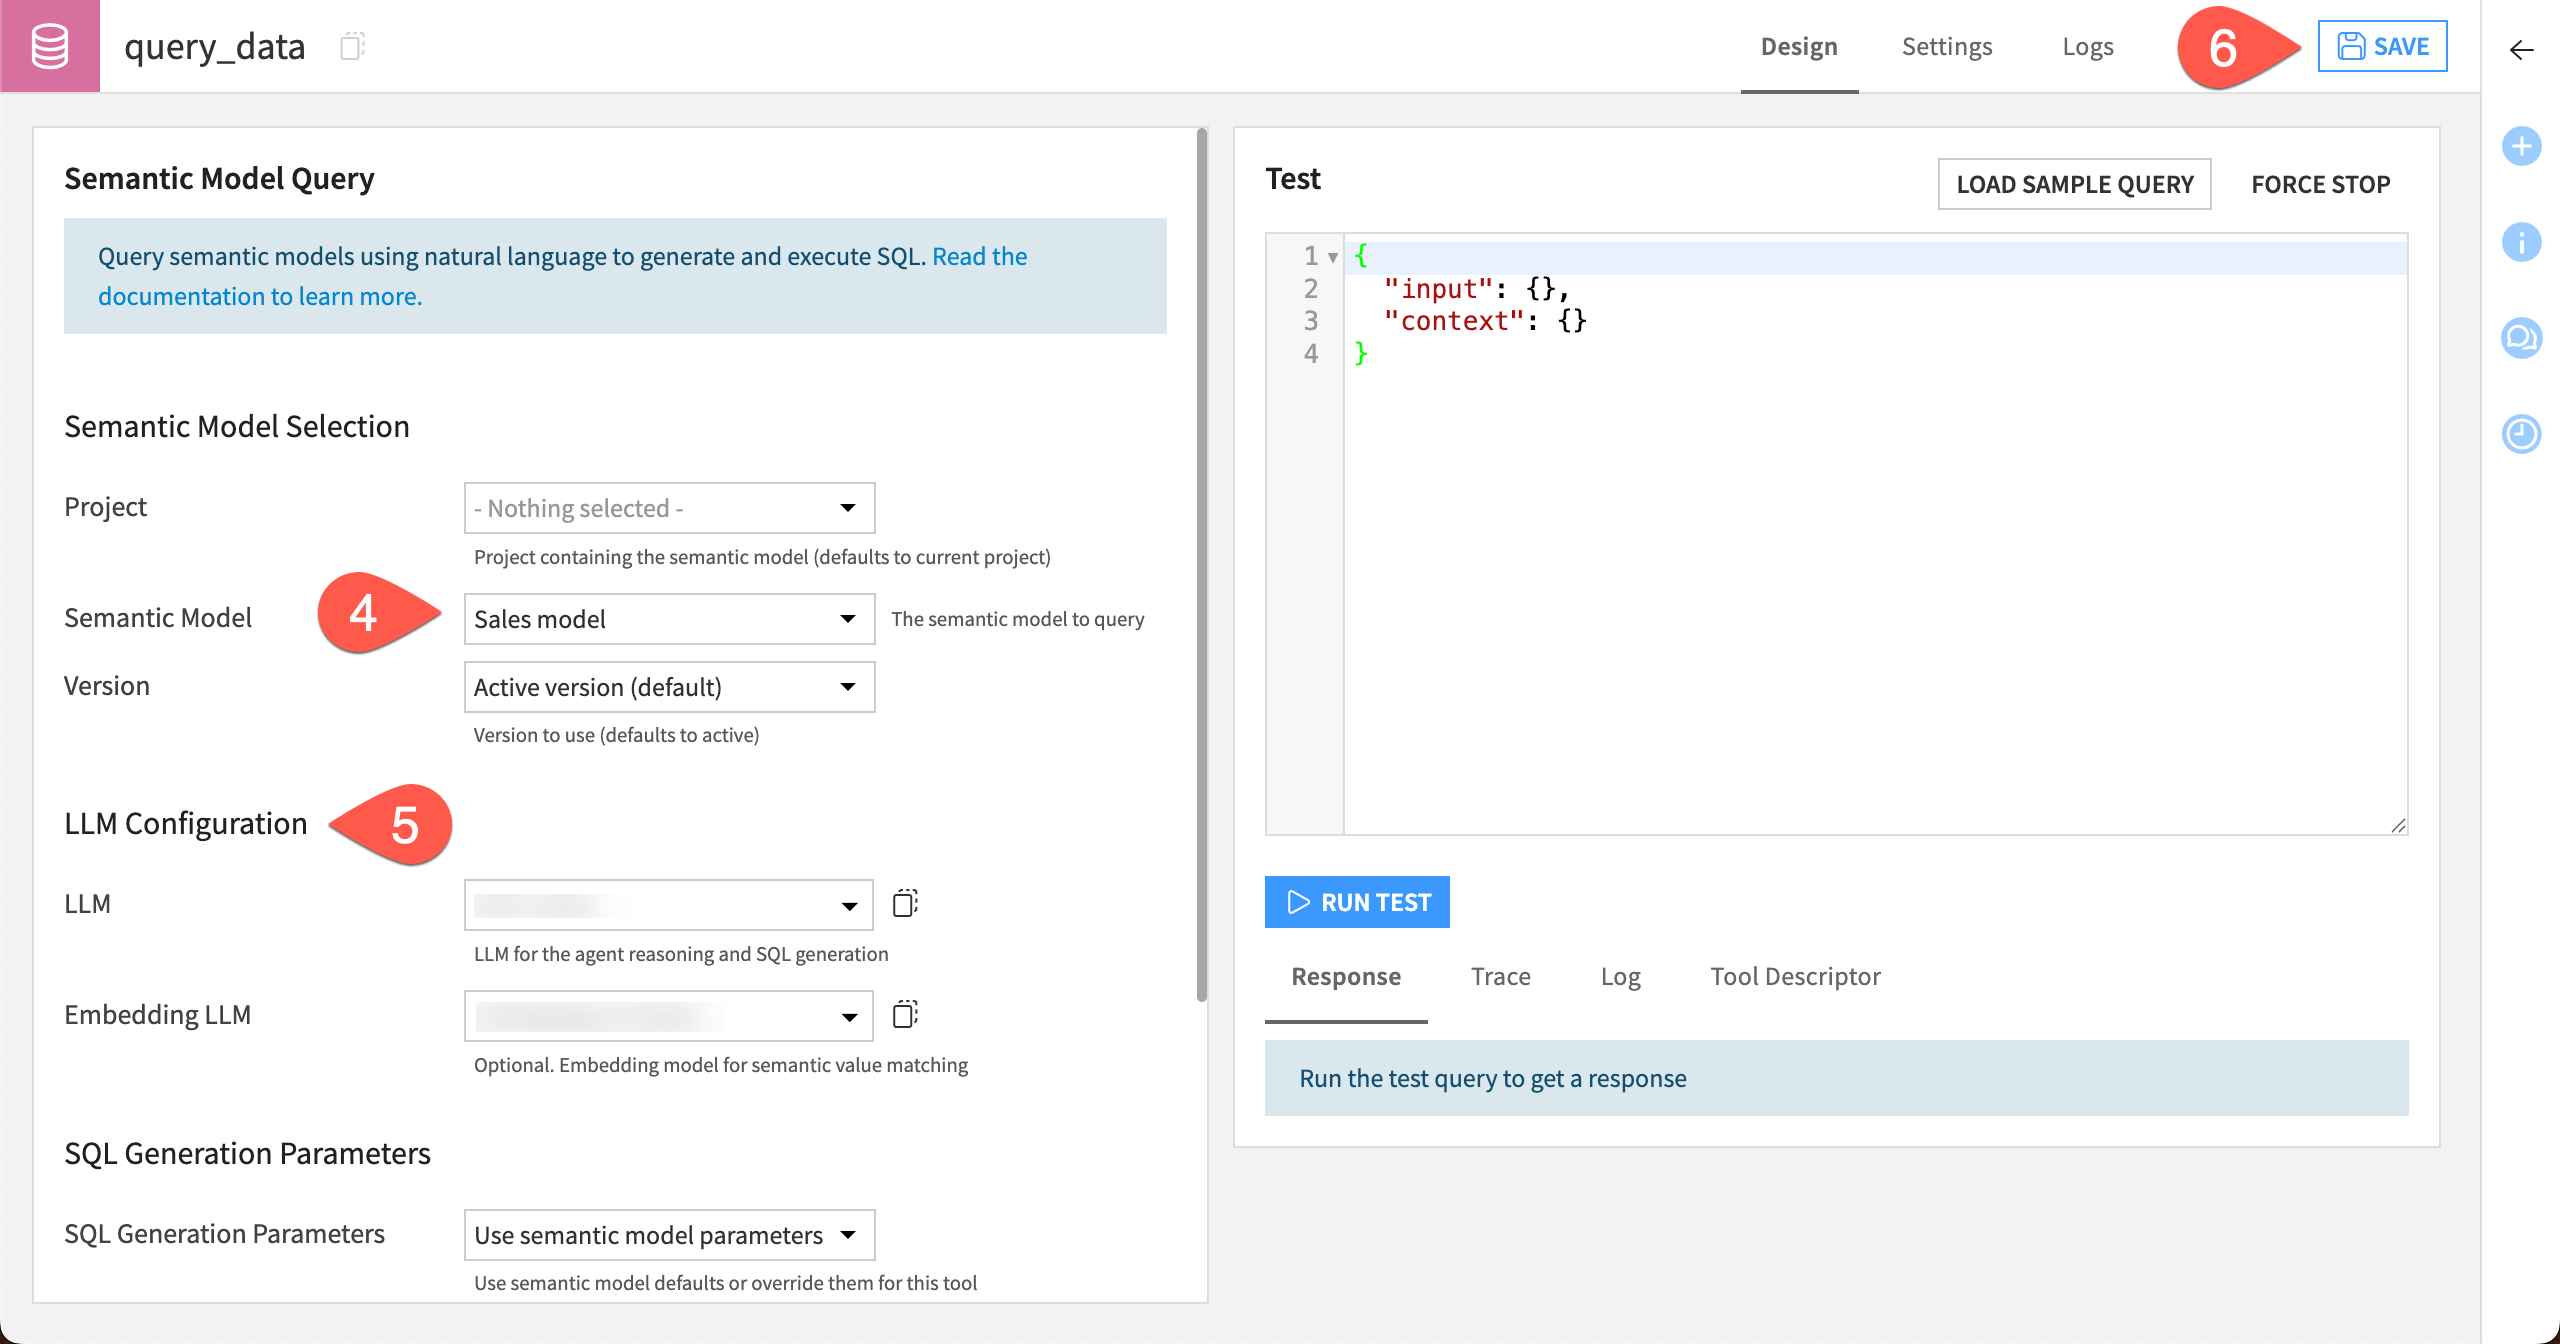
Choose a Semantic Model Query tool.
Give it the name
query_dataand click Create.In the tool Design page, select the Semantic Model name.
Under LLM Configuration, select from your available LLM and Embedding LLM connections.
Click Save.
Next, add the tool to the data analysis agent.
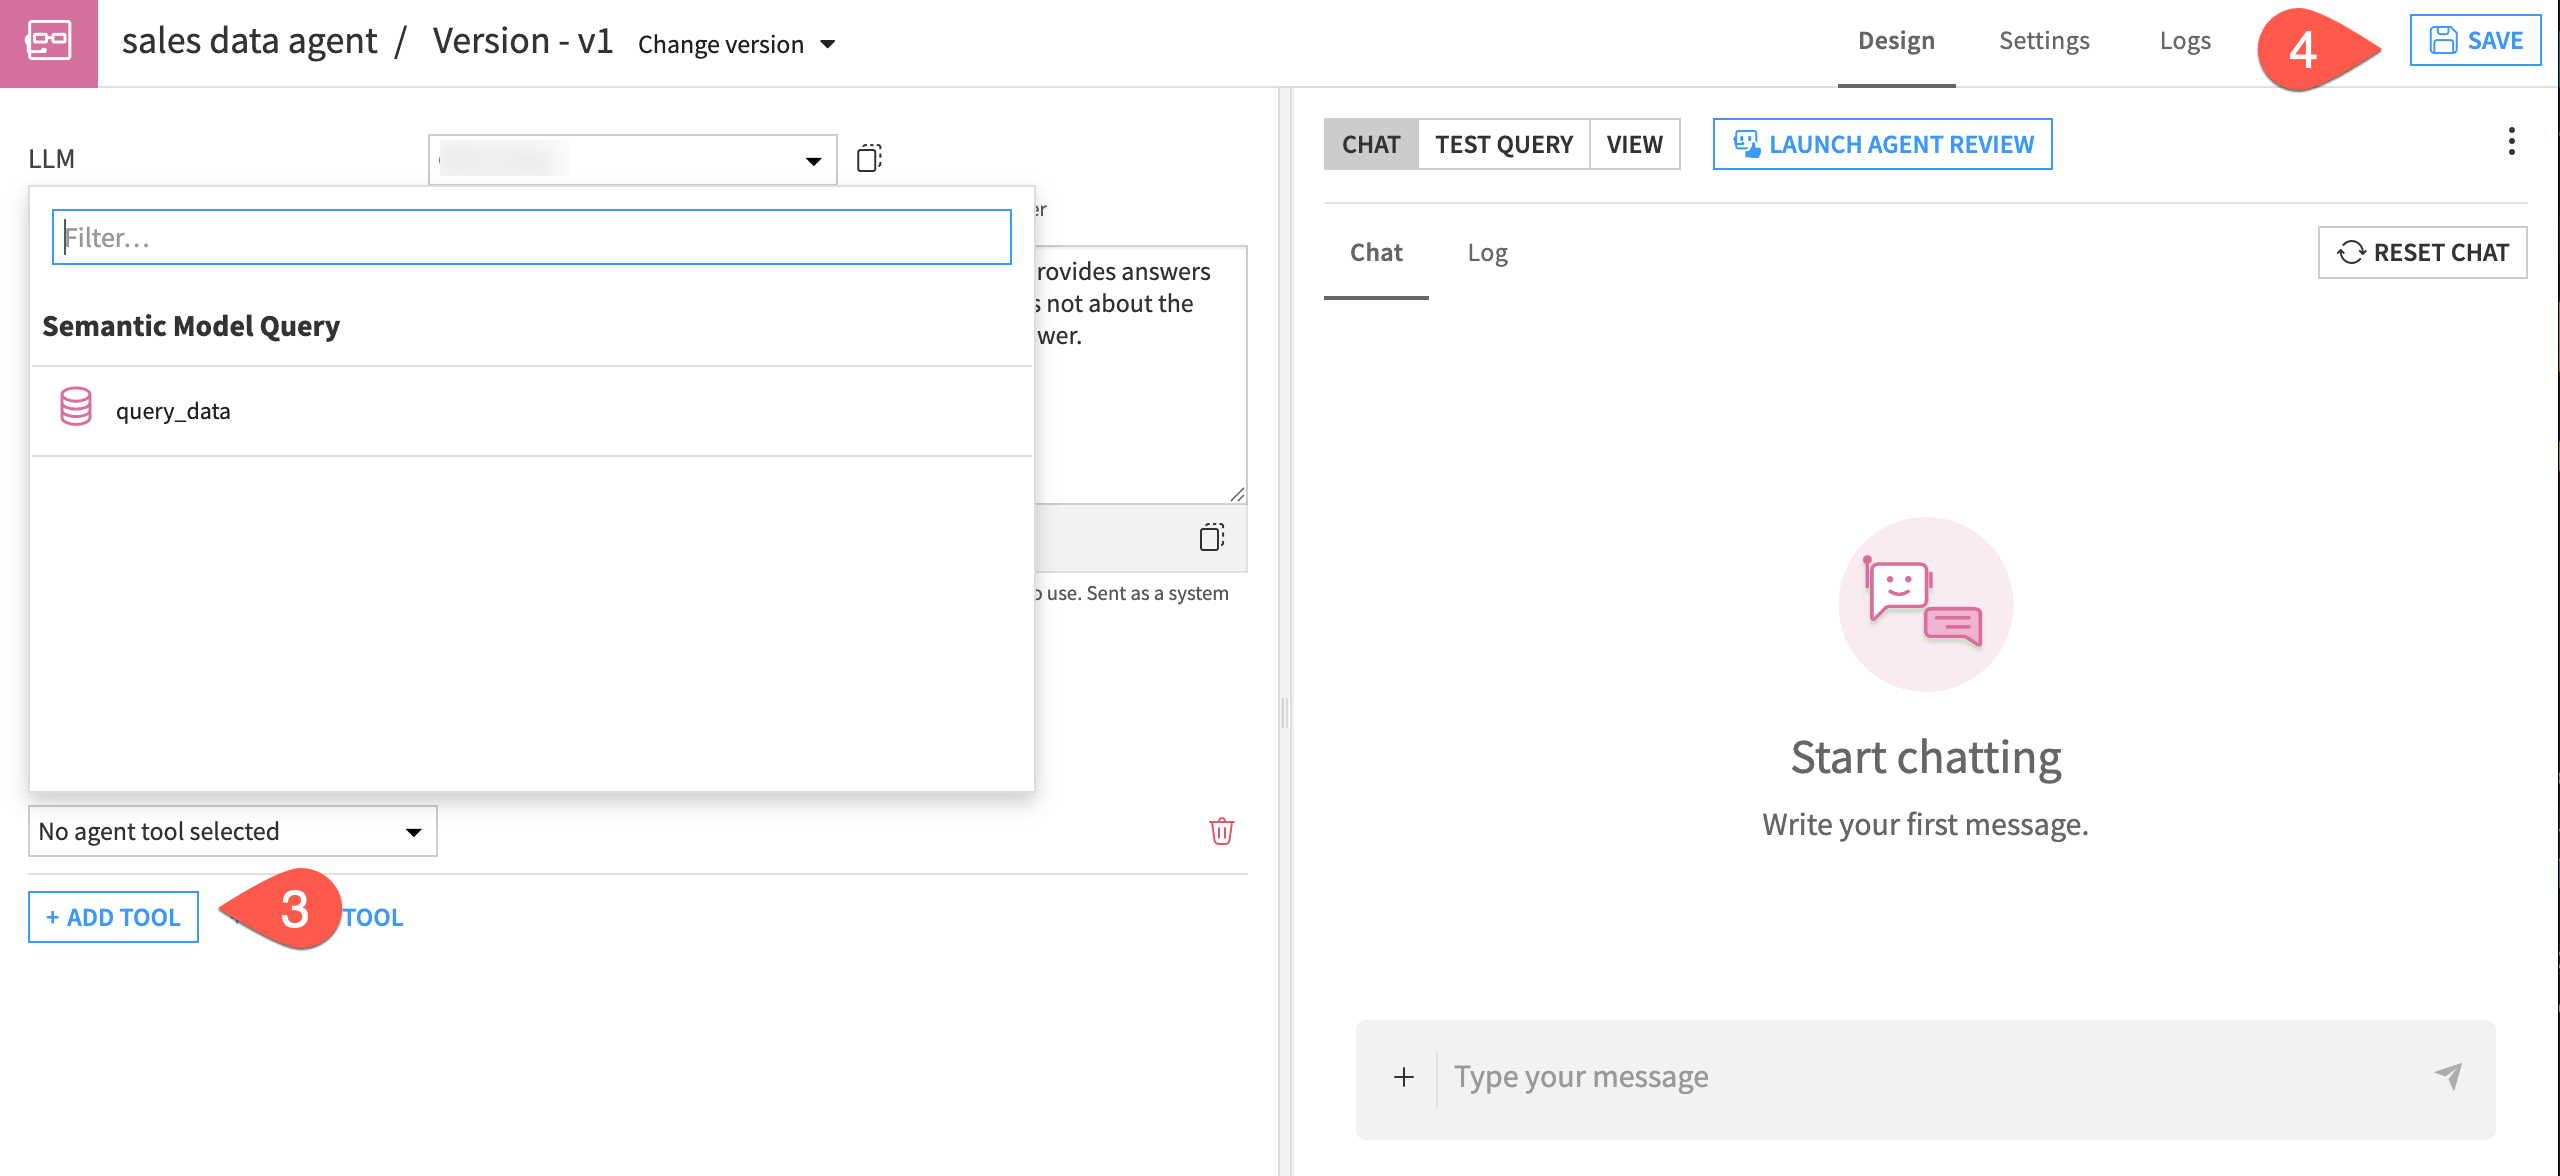
Return to the Agents page in the GenAI menu.
Click on the sales data agent name to open the agent.
Click + Add Tool and select the query_data tool.
Click Save in the top right corner.
Test the agent#
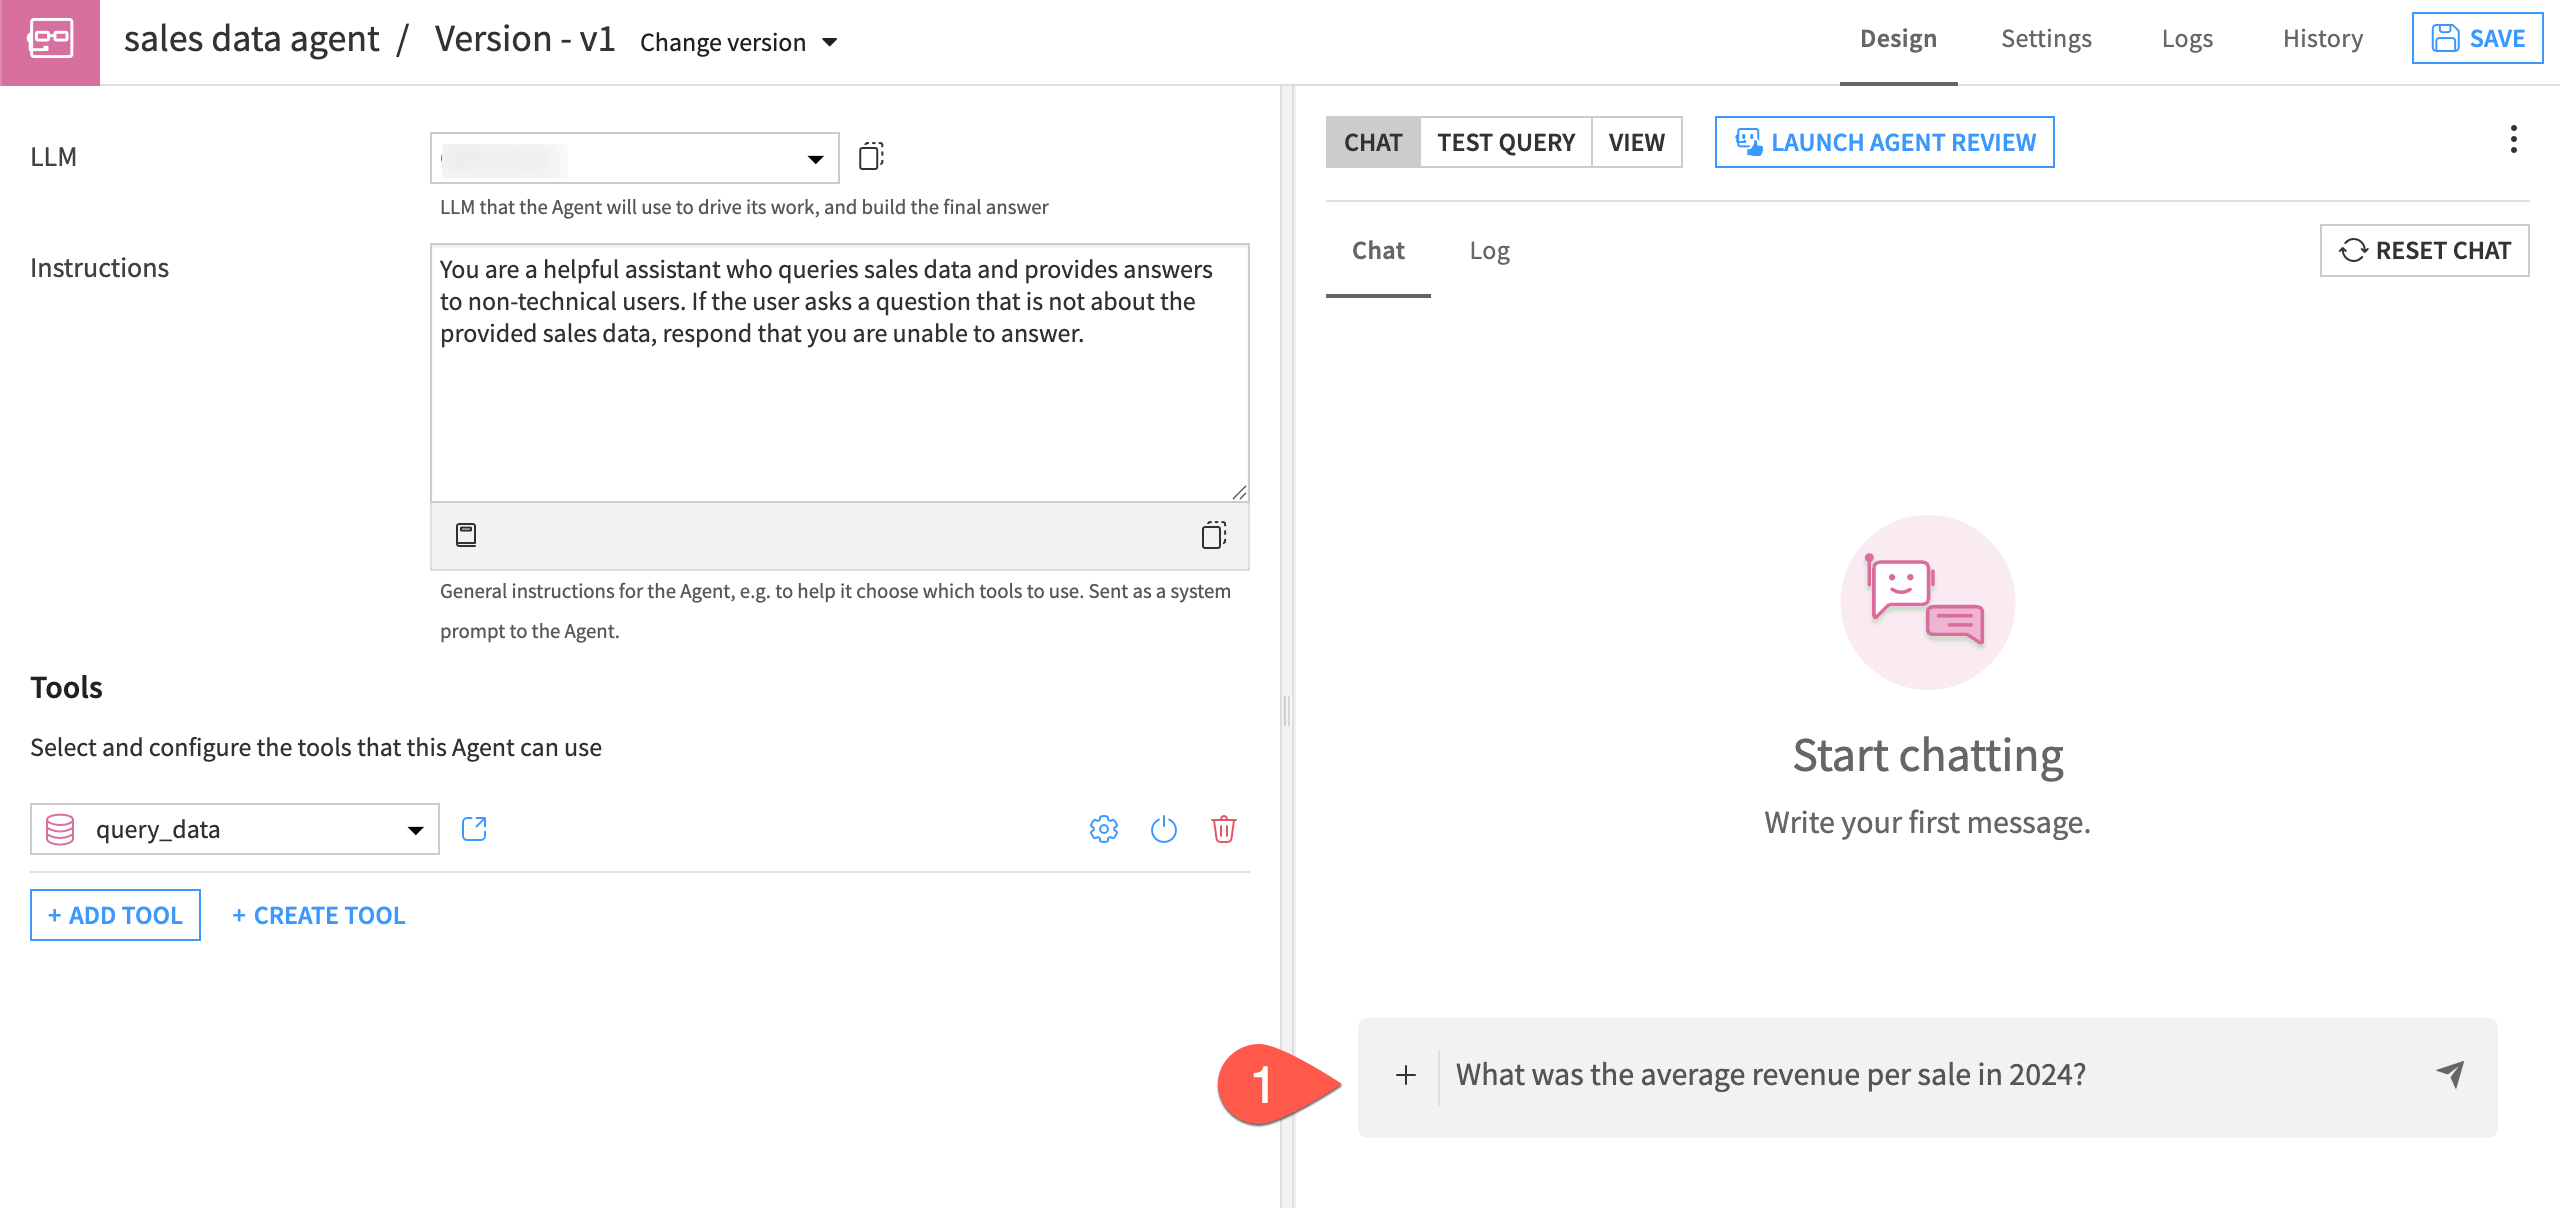
Chat with the agent to test it within the agent Design page. You might want to start with some of the same test queries from the semantic model.
Copy and paste this question into the Chat window.
What was the average revenue per sale in 2024?
Continue to test the agent with some of these queries, or try your own:
Which product generated the most total sales value in the Northeast region?
List the average revenue per sale for each region in 2025.
What is the total quantity sold for each product type?
Next steps#
Congratulations! You have successfully built a semantic model via the Semantic Model Lab and used it in an agent!
Your next steps might be to learn about using agents in Agent Hub.