
Tutorial | Structured Visual Agents#
Get started#
Imagine you are tasked with helping an insurance company automate the complex process of evaluating property damage claims.
Typically, insurance adjusters review claim documents, such as police reports, images, and policy terms, to decide how to handle a claim.
You can automate this process in Dataiku using a Structured Visual Agent, a type of AI agent built in a visual interface and composed of a series of blocks with a predefined routing logic.
In this tutorial, you’ll build an agent to assist insurance adjusters. The agent will review claim information and decide for each claim whether to approve it, request further information, or escalate it for human review.
Objectives#
In this tutorial, you will:
Build a Structured Visual Agent.
Learn how to build a logical execution flow using multiple types of blocks.
Use temporary memory features to save information in the agent.
Test the agent’s ability to process user requests.
Prerequisites#
To complete this tutorial, you will need:
Dataiku 14.4 or later.
Knowledge of AI agents in Dataiku, and ideally hands-on experience with Simple Visual Agents.
An Advanced Analytics Designer or Full Designer user profile.
A connection to at least one Generative AI model that supports tool calling. Your administrator must configure the connection(s) in the Administration panel > Connections > New connection > LLM Mesh.
An internal code environment for retrieval augmented generation and agents. Your administrator must set this up in the Administration panel > Code Envs > Internal envs setup > Retrieval augmented generation code environment.
Create the project#
From the Dataiku Design homepage, click + New Project.
Select Learning projects.
Search for and select Structured Visual Agents.
If needed, change the folder into which the project will be installed, and click Create.
From the project homepage, click Go to Flow (or type
g+f).
Note
You can also download the starter project from this website and import it as a ZIP file.
Create a new agent#
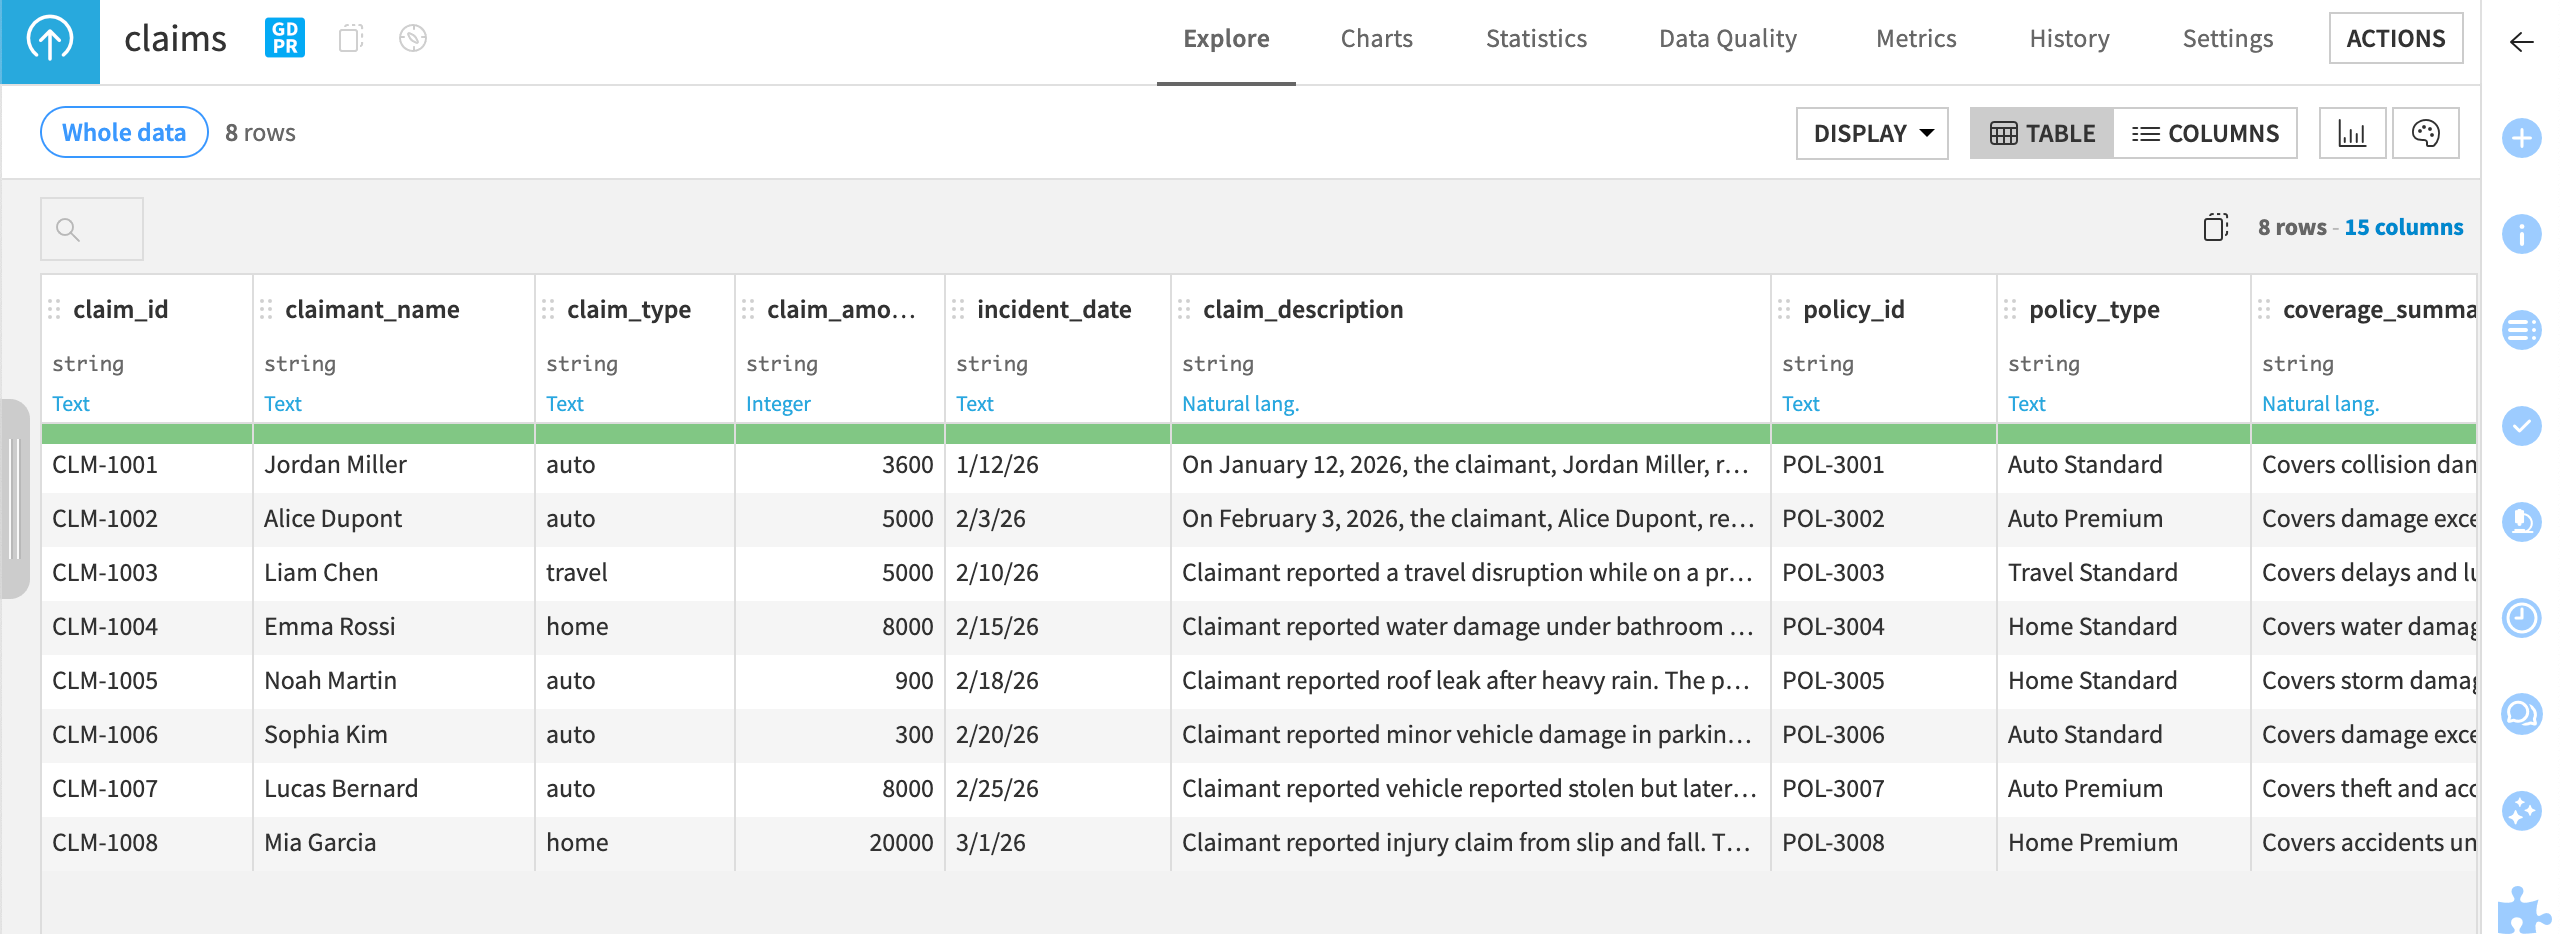
The project contains a dataset of insurance claims, with information such as damage description, policy type, and coverage limits. The documents_json column contains two supporting documents about each claim, structured in JSON format. The expected_decision column contains the agent’s expected outcome, which you can use to test it once it’s complete.
Note
The claims dataset is small and simplified for this tutorial. In the real world, an insurance claims agent would likely have many more data fields and input types, such as documents in multiple formats, images, and knowledge banks of internal company documents.
The project also includes one agent tool called claim_lookup that retrieves data from the claims dataset. You can view the tool in the GenAI menu (![]() ) > Agent Tools.
) > Agent Tools.
You’ll use this dataset and this tool to build an agent that:
Takes a claim number as input from the insurance adjuster.
Retrieves claim and policy data for that claim ID.
Reviews supporting documents.
Assesses the claim against policy coverage.
Decides whether to:
Approve the claim.
Request additional information.
Escalate for manual review.
And finally generates the appropriate output document.
To create the agent:
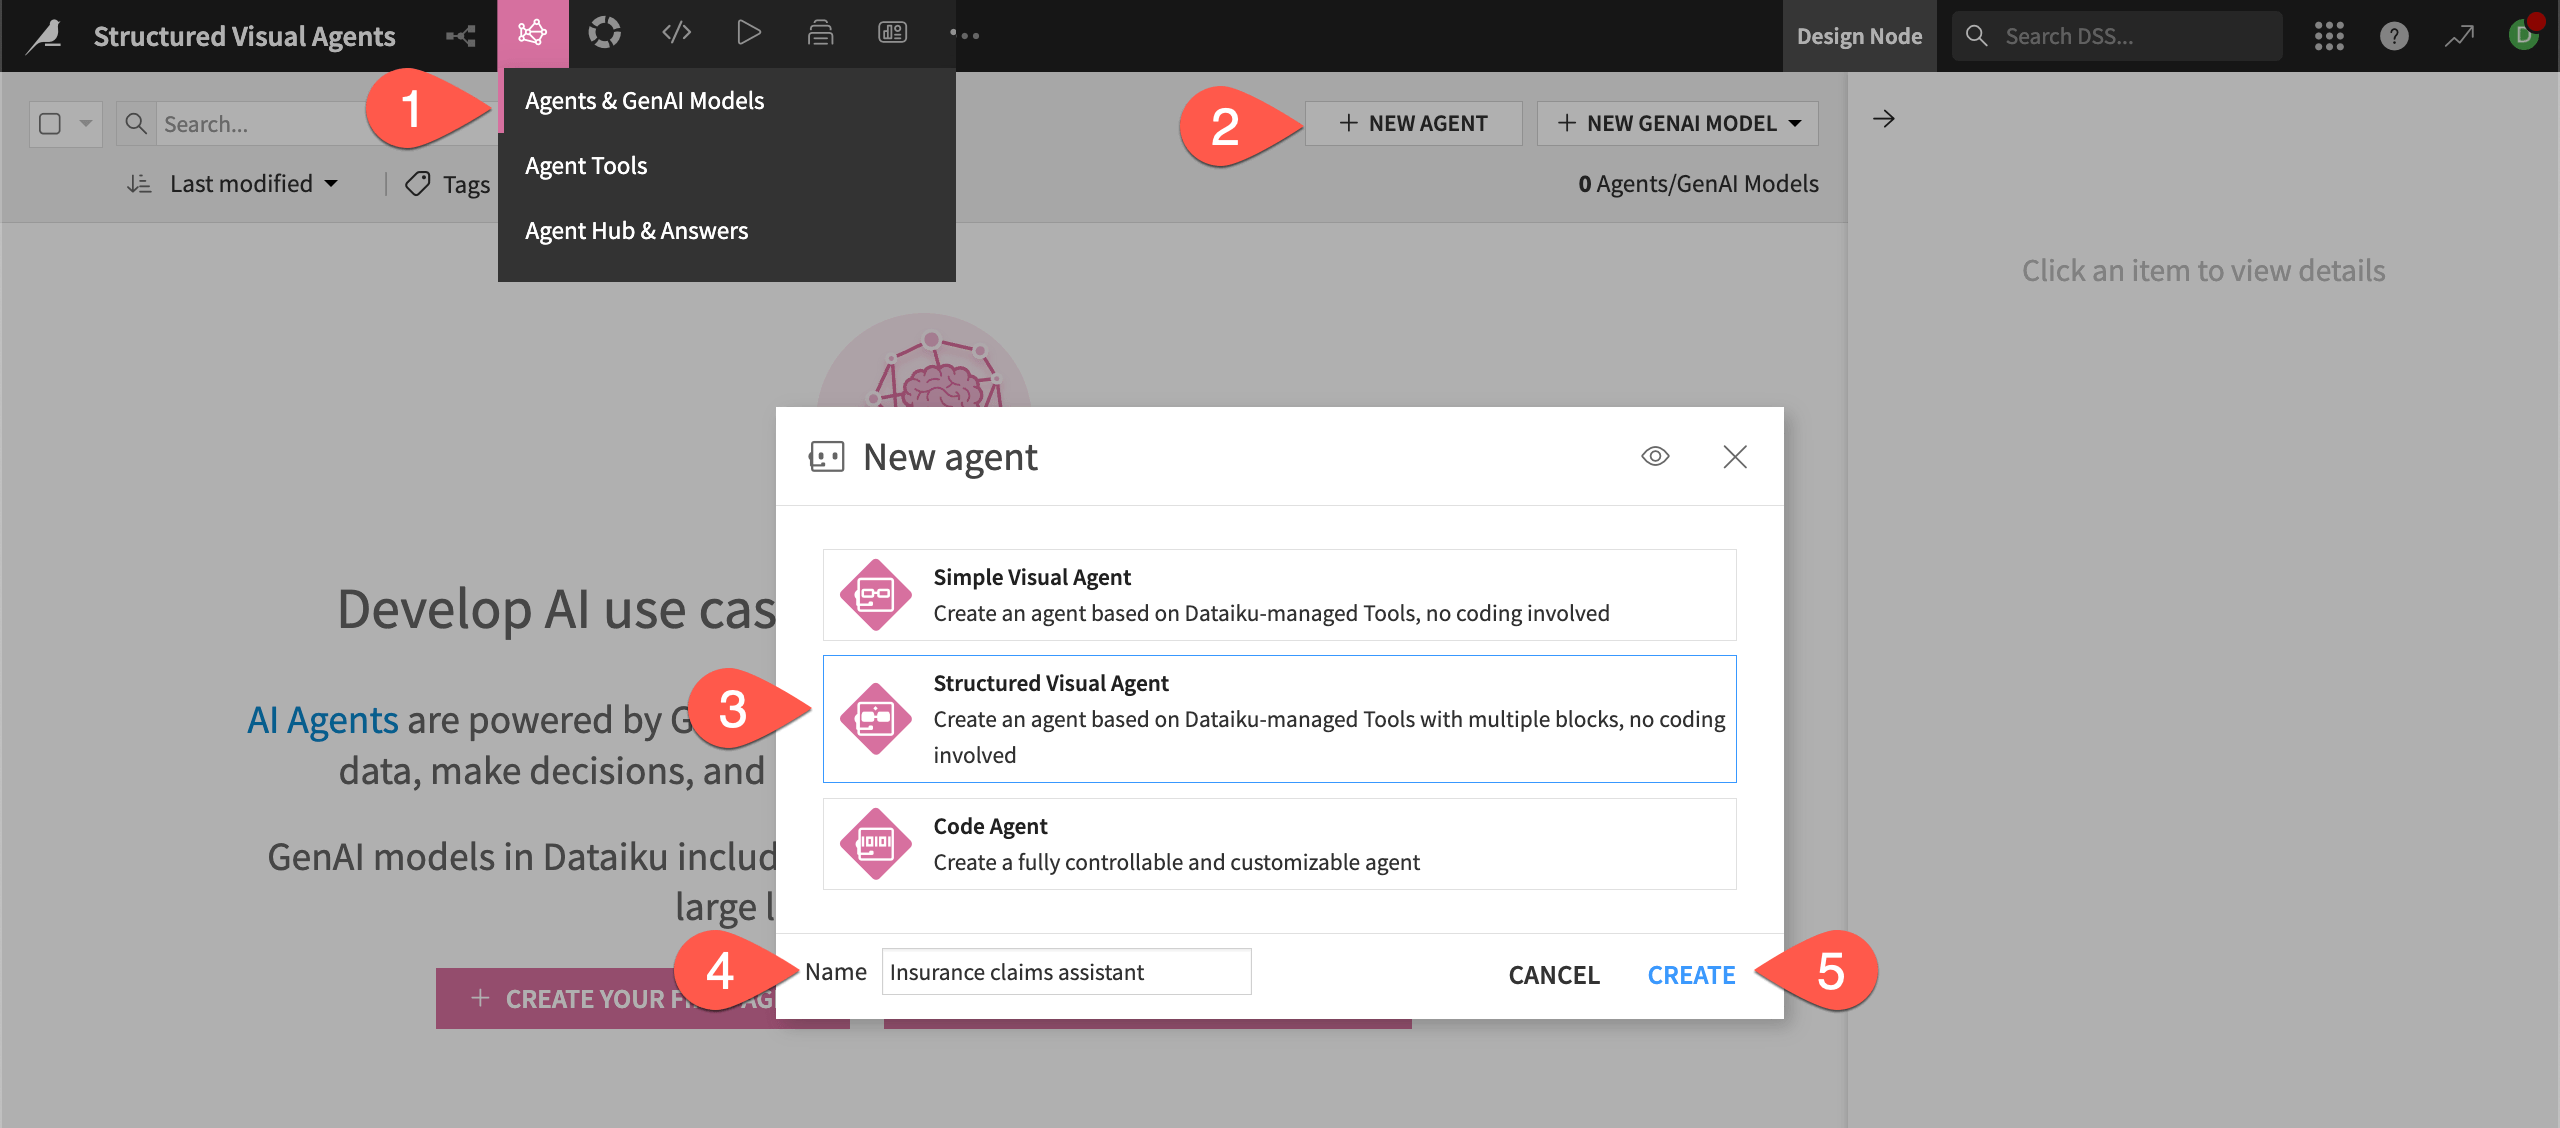
Go to the GenAI menu (
 ) > Agents & GenAI models.
Click + New Agent.
Choose Structured Visual Agent.
Name it
Insurance claims assistant.Click Create.
This takes you to the Structured Visual Agent design page, where you will add blocks to construct the agent.
Tip
As you build, you will follow a couple of best practices:
Test each block as you create it to make sure the agent works to that point. This makes it much easier to catch and debug errors, and to understand what the agent is doing in each step.
Track the agent’s structure in the View tab to understand its logical flow.
Take input from the user#
The goal of the first block is to:
Take a claim_id as input from the user (or ask for it if the conversation is off topic).
Save that claim_id in a temporary storage area called state that persists throughout the user’s conversation with the agent. This will be saved in a key called state.claim_id for use in other blocks.
Build an Agentic Loop block#
For these tasks, you will create a block known as an Agentic Loop, which uses tools, instructions, and an LLM similarly to Simple Visual Agents.
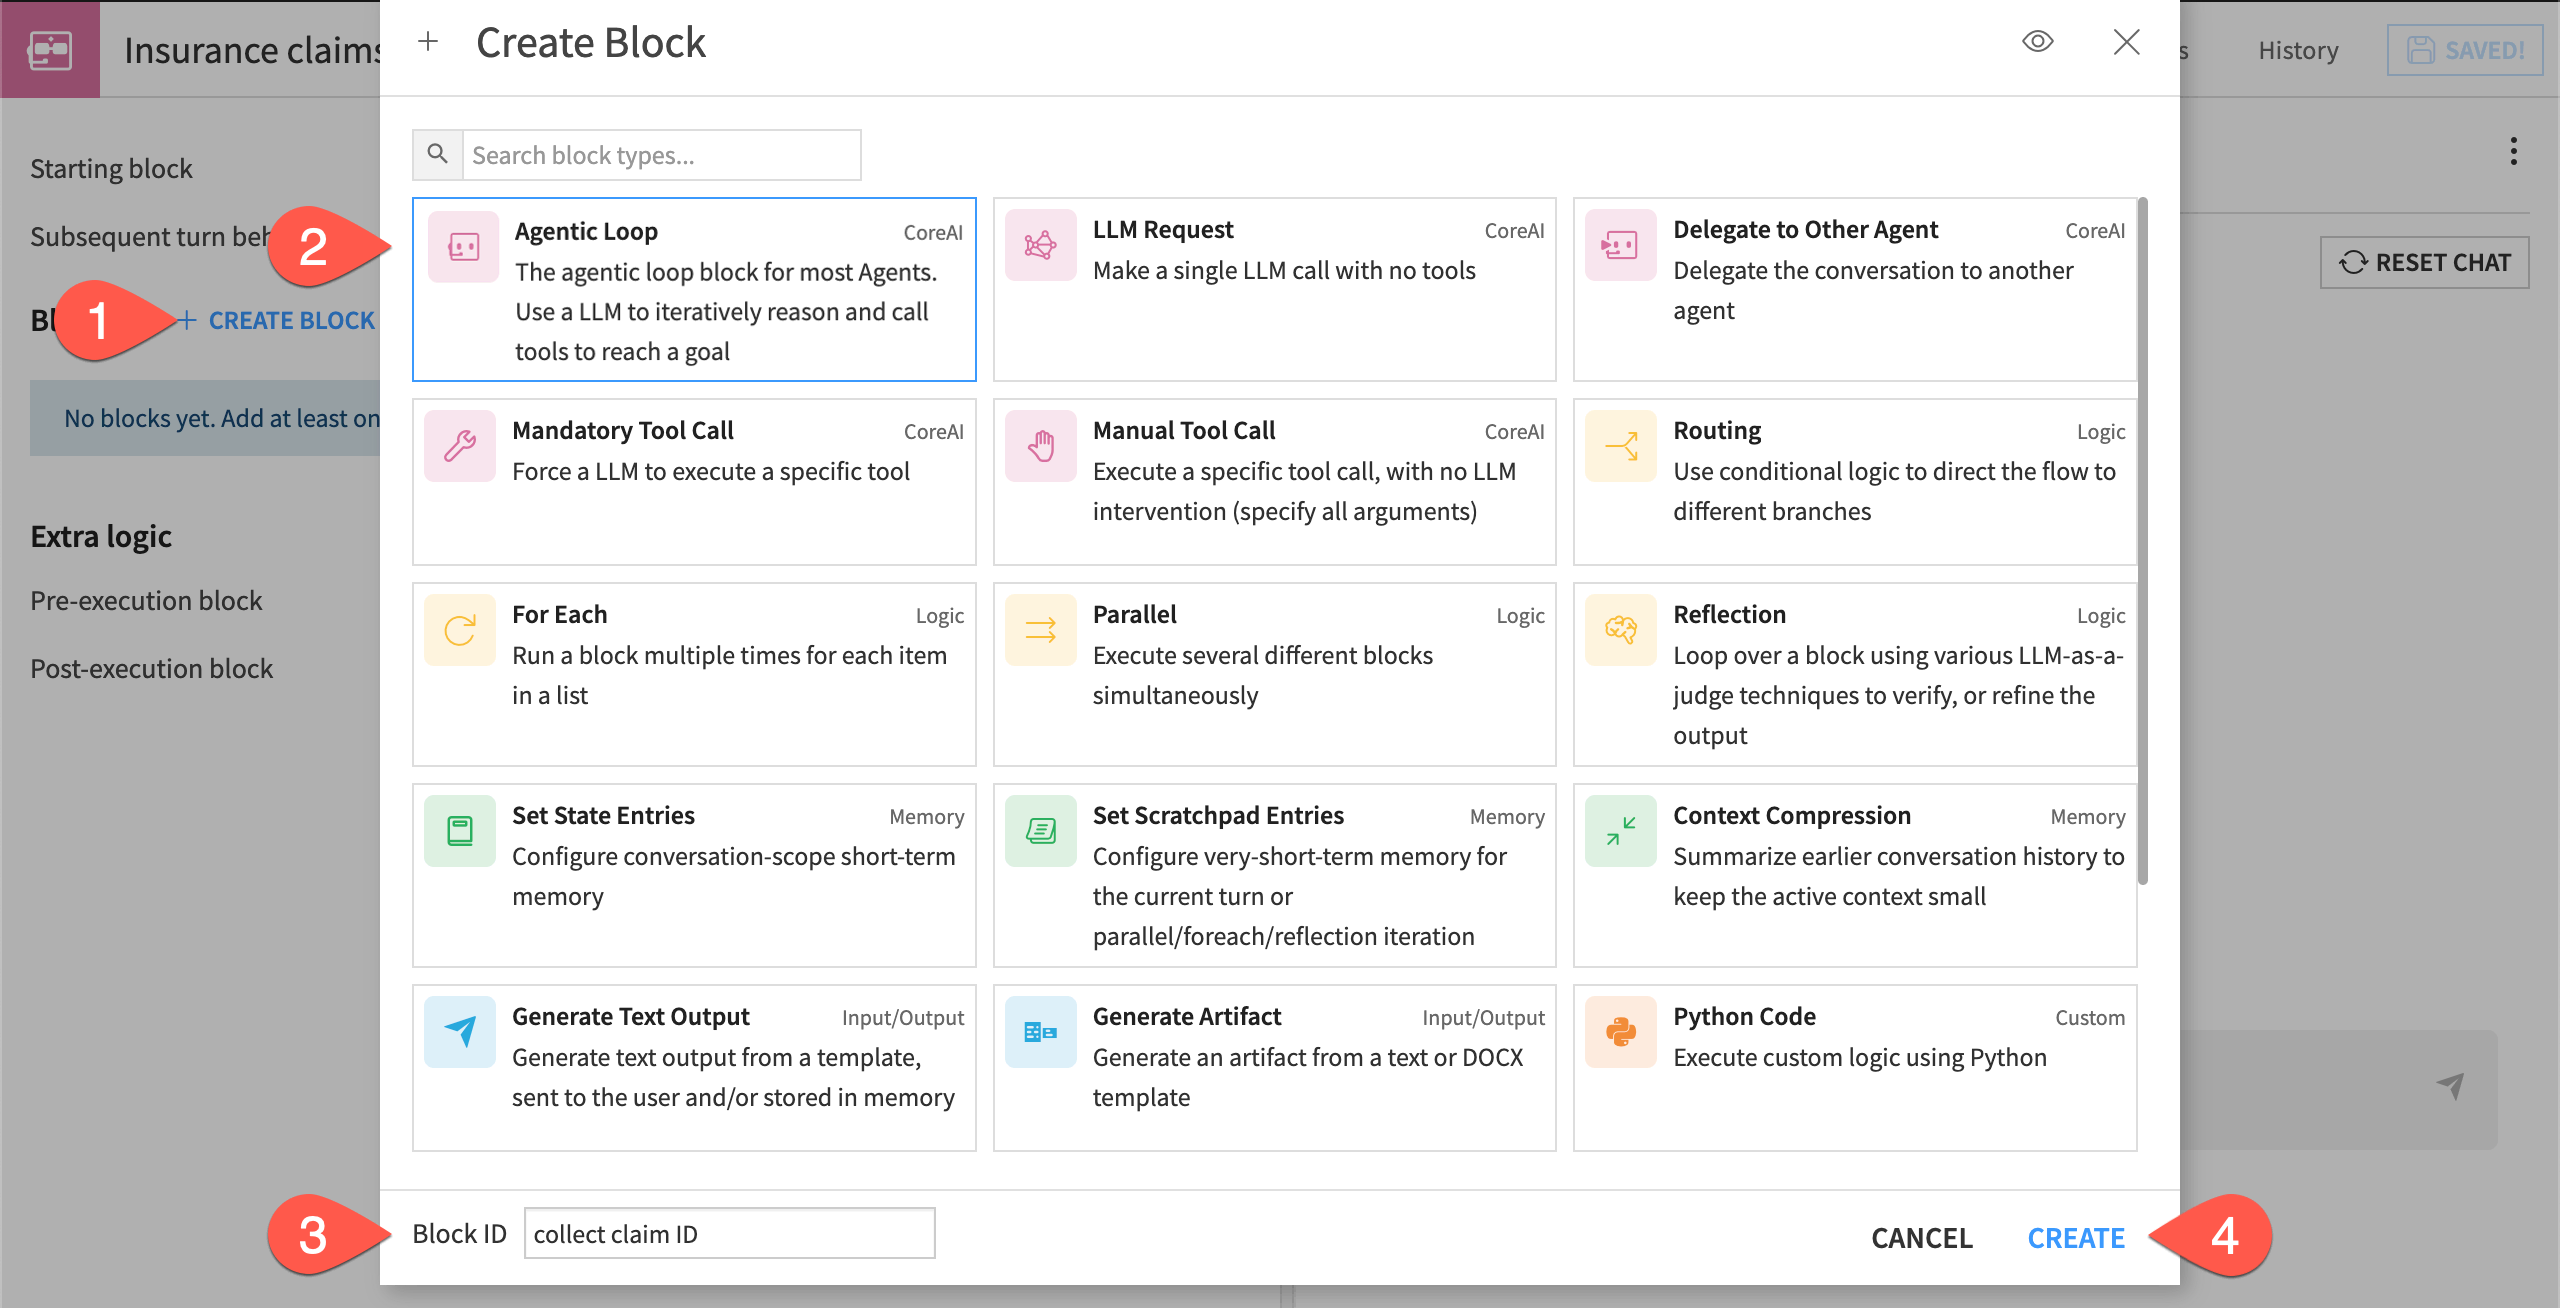
From the Design tab of the agent, click + Create Block.
Choose Agentic Loop.
Give it the Block ID
collect claim ID.Click Create.
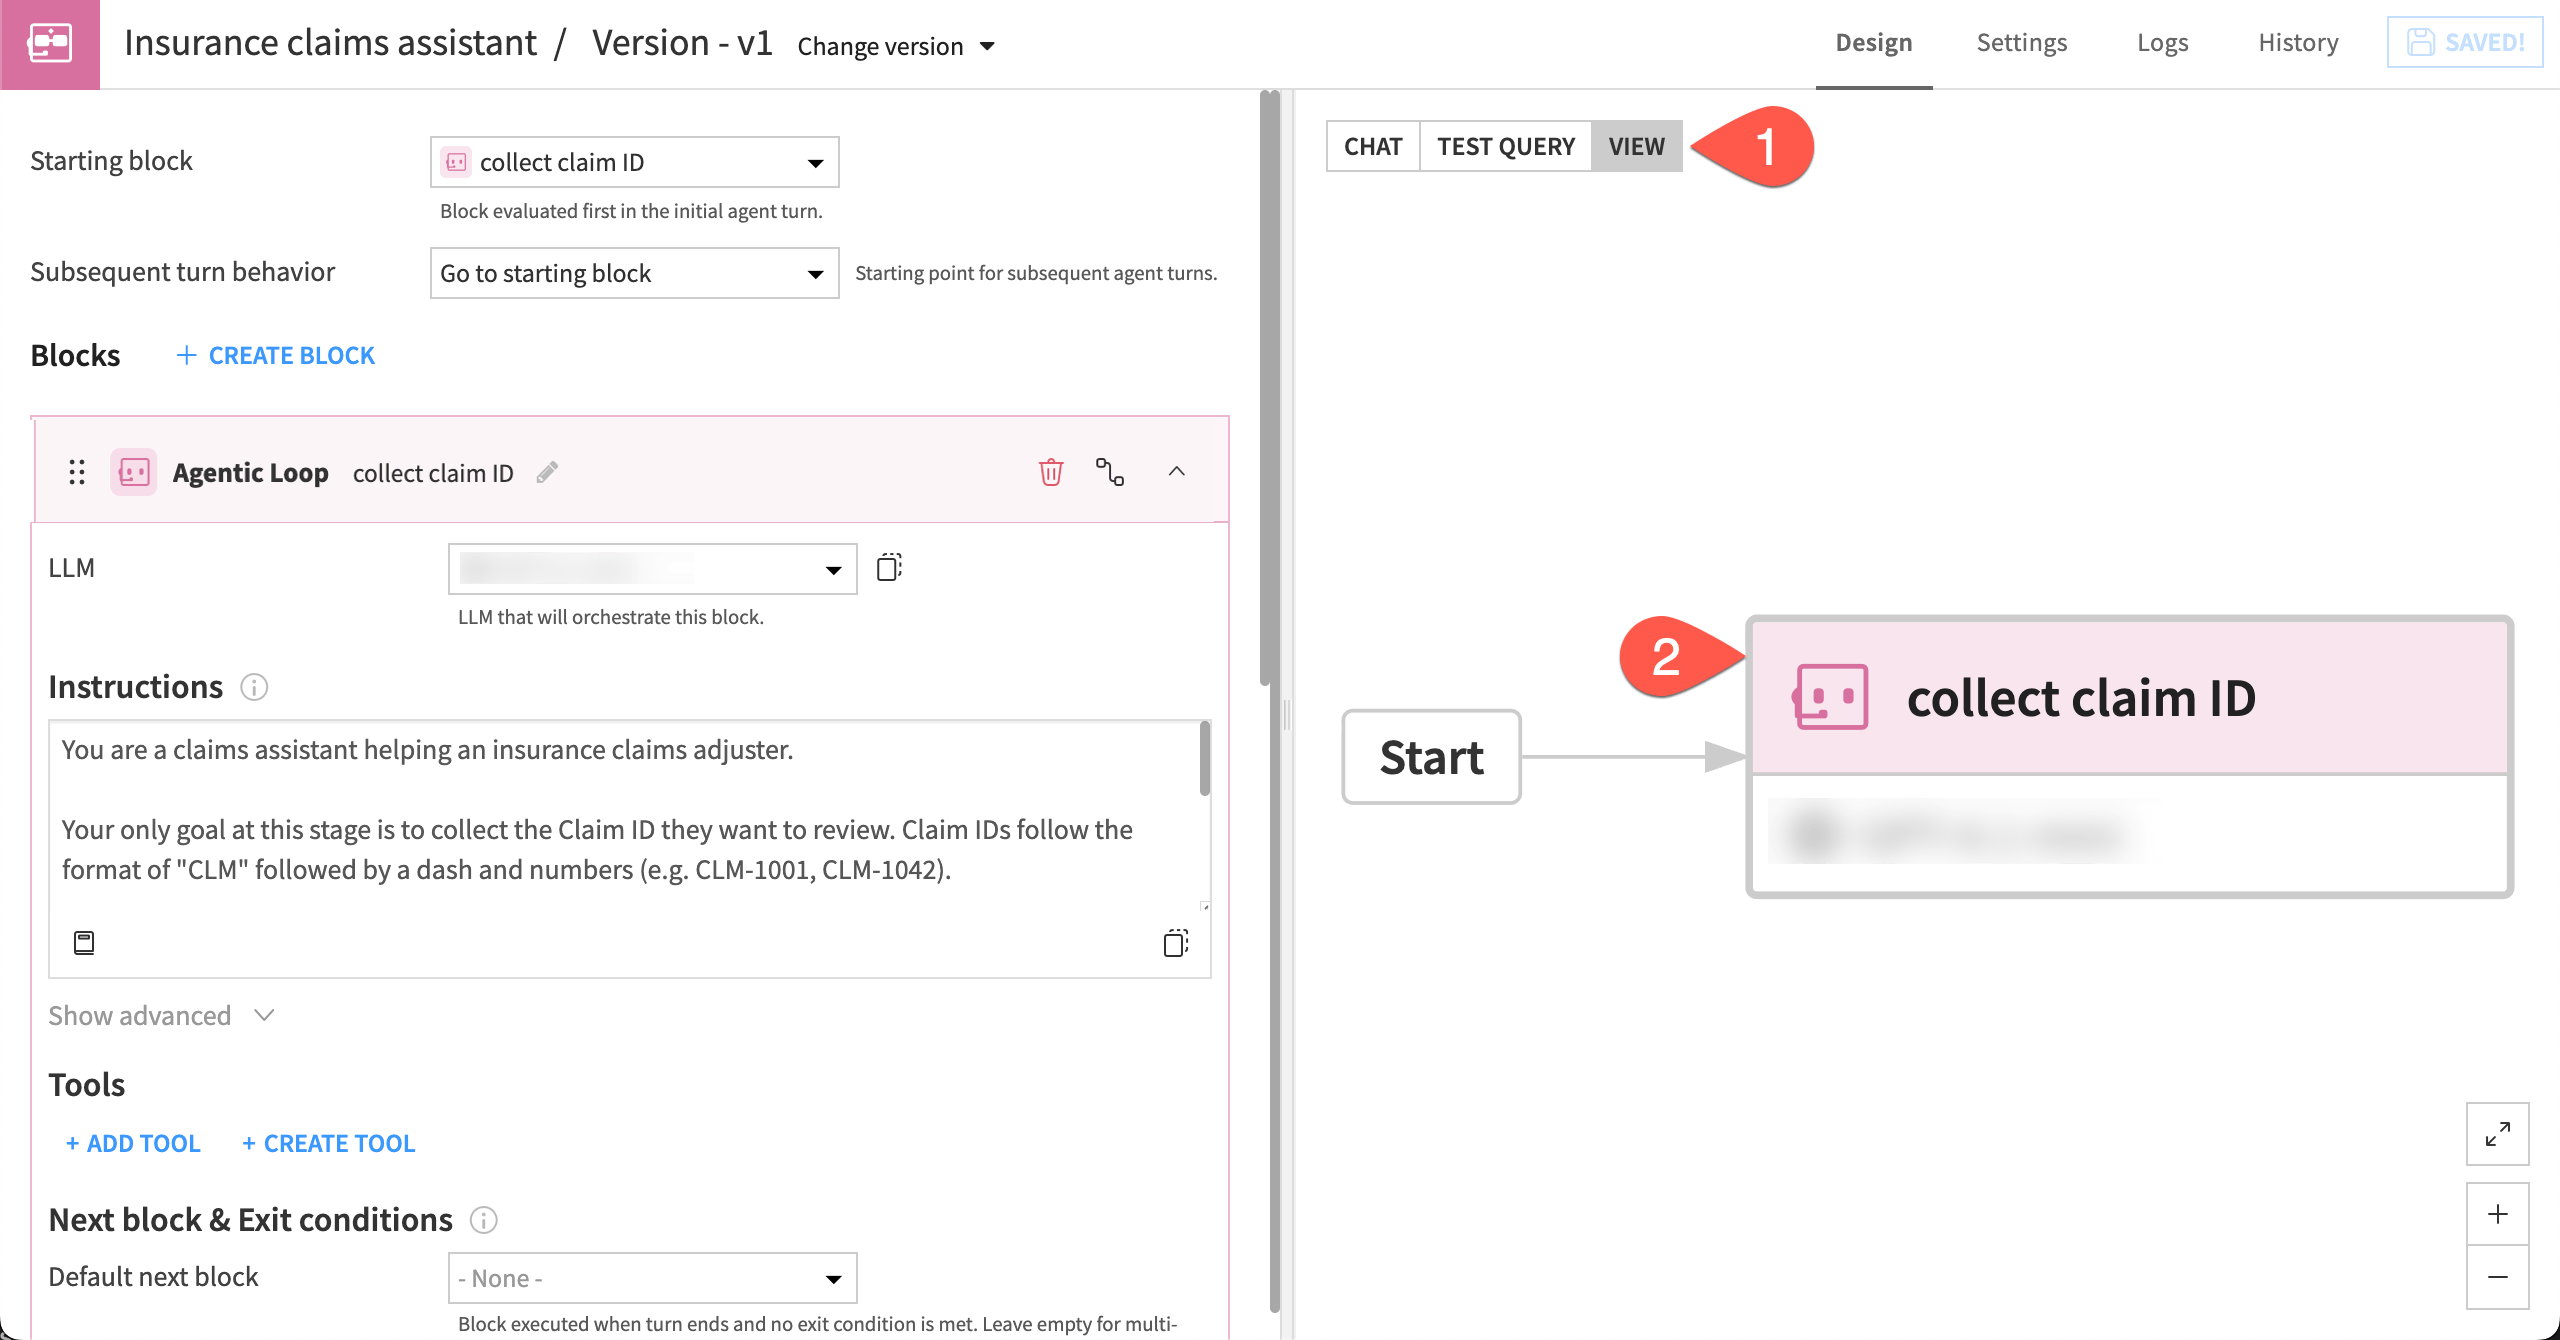
In the block design, you can define the tasks you want the block to perform in the freeform instructions to the LLM. You can also use the visual interface to define when the agent should exit to the next block.
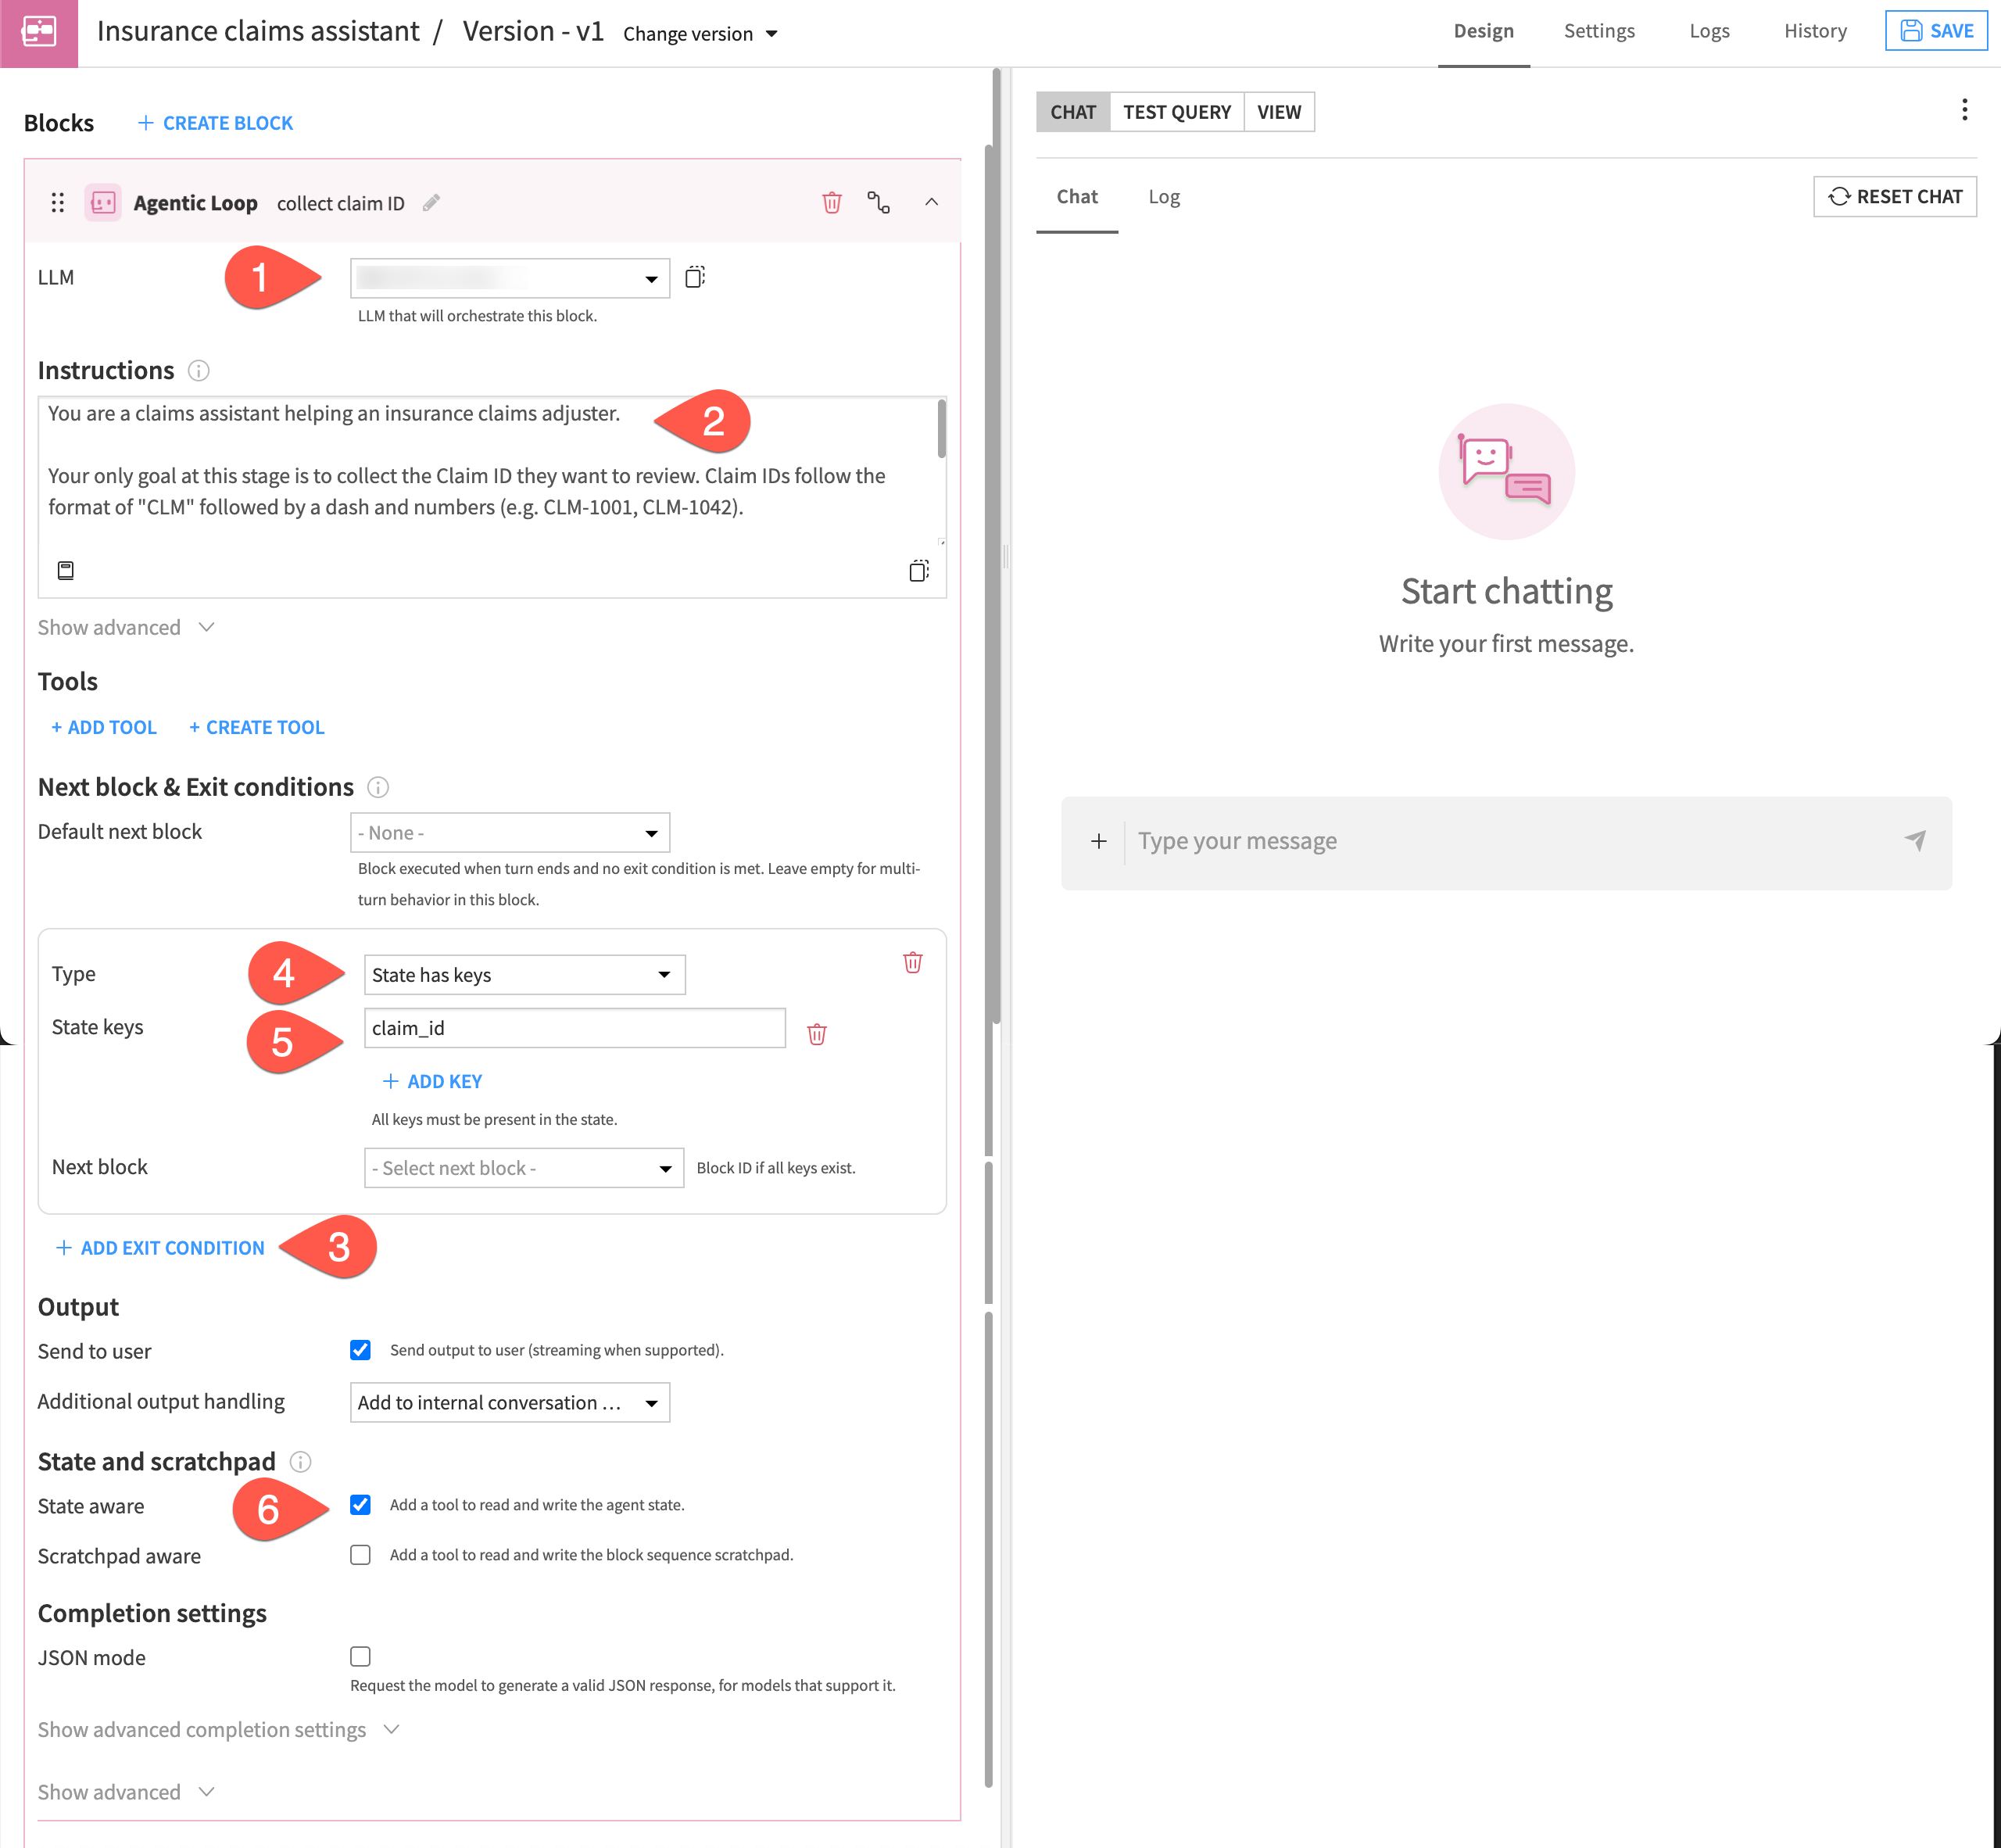
Select the LLM to orchestrate this block from your available connections.
Copy and paste this text into the Instructions window:
You are a claims assistant helping an insurance claims adjuster.

Your only goal at this stage is to collect the Claim ID they want to review. Claim IDs follow the format of "CLM" followed by a dash and numbers (e.g. CLM-1001, CLM-1042).

- If the adjuster has not yet provided the claim ID, please ask for it politely. If you already have it in the state, DO NOT ask for it again.
- Once they provide a valid Claim ID, call the "set state" tool with: key="claim_id", value="CLM-XXXX".
- Do not ask for any other information.
- Keep responses brief and professional.
Tip
Be sure to read all instructions provided to the agent in this tutorial. These will help you understand the agent’s actions.
Under Next block & Exit conditions, click + Add Exit Condition to define when the block should end its task.
For Type, leave the default State has keys.
Click Add Key, and type
claim_id. This ensures the agent won’t move to the next block until the claim ID information has been collected and stored in the state.Under State and scratchpad, select the State aware checkbox. This adds a tool that reads and writes the state memory.
Tip
If you are using a reasoning LLM, you can speed up the agent’s response by disabling the reasoning capabilities under Completion settings > Reasoning effort > Disable. This is especially useful while building and testing an agent. You can enable the reasoning capabilities at any time in the same location.
View the agent graph#
Although the agent has only one block so far, you can get into the habit of checking the graph view as you construct the agent. This view shows all the blocks and their relationships.
Click on View in the agent Design page.
Note the collect claim ID block downstream of the Start step.
Test the Agentic Loop block#
For now, don’t define a next block for the agent to move onto. You’ll want to test this block first.
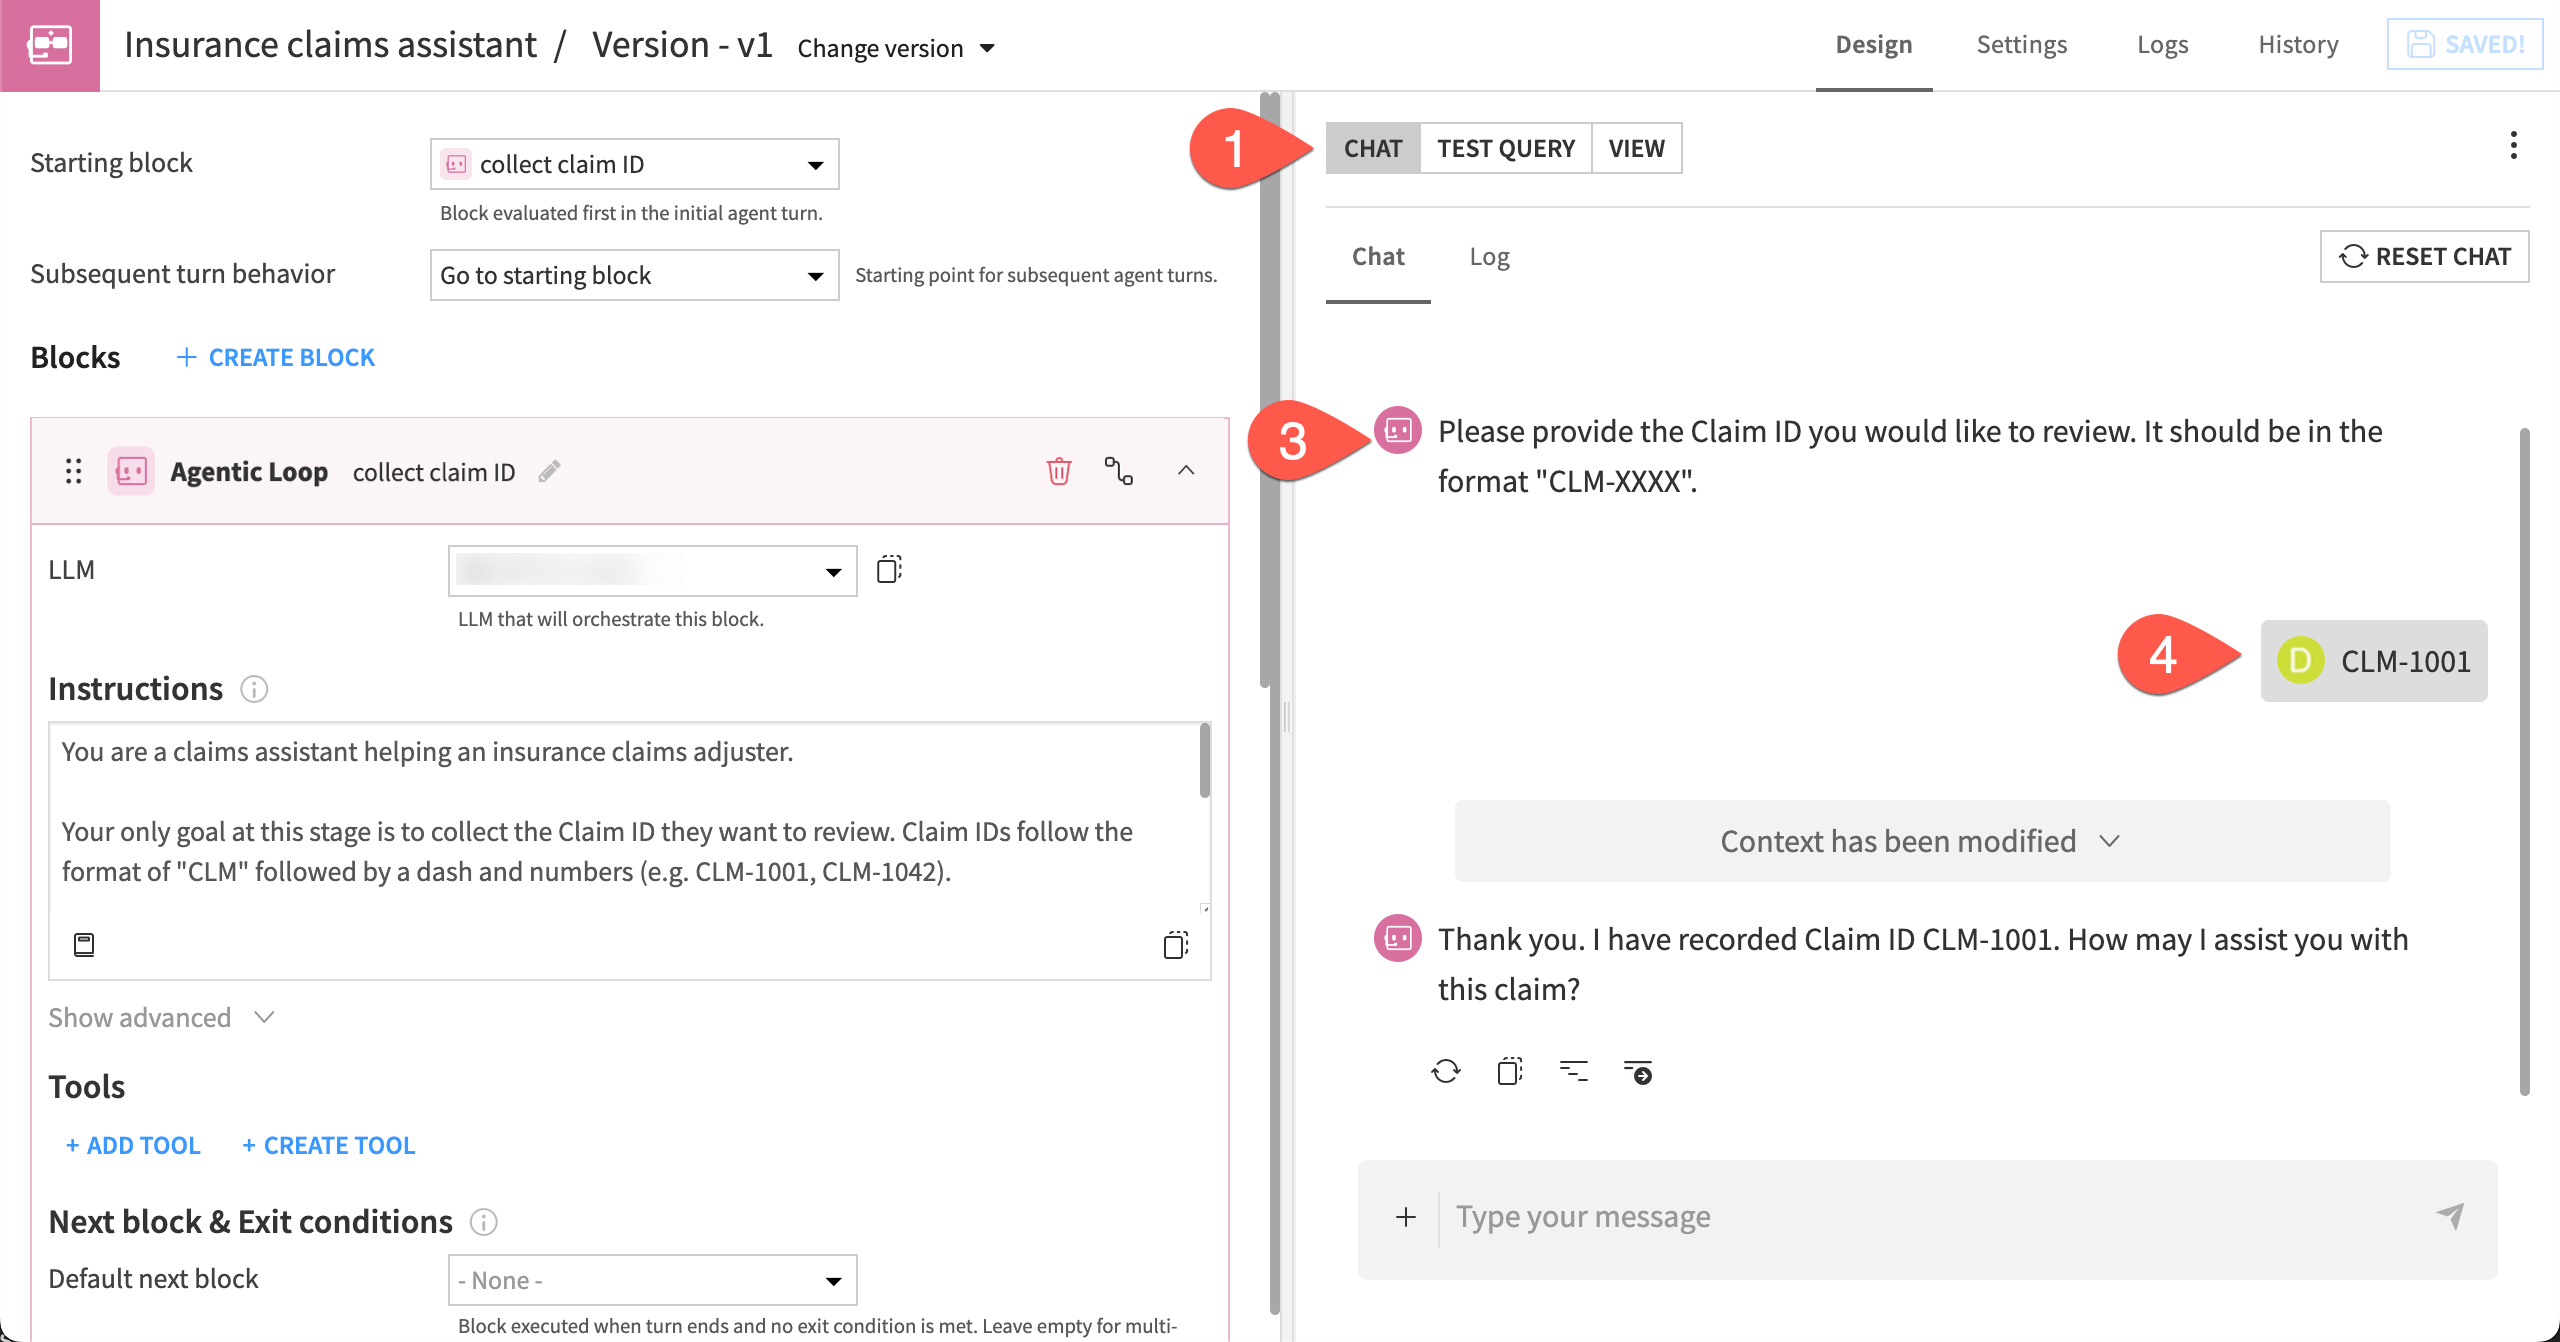
Move to the Chat on the right side of the agent Design page.
Type
Hello, and send it to the agent.Observe the response. The agent should ask you for a claim ID, according to the instructions.
Provide the claim ID
CLM-1001, which is the first claim in the dataset.
Note
Your results will vary depending on the model used and can also differ in every run.
The agent should respond that it has stored the claim ID. In this case, it has asked how it might assist you with this claim. So far, it has no other tasks.
Now, you can add another block.
Lookup and save data#
The next tasks for the agent are to look up available data corresponding to the user-provided claim ID and save it for use in other blocks.
Create the Manual Tool Call block#
You will use a block known as the Manual Tool Call block. This block is a way to enforce the use of a specific tool, without leaving the decision to an LLM. Here, you want to make sure that the claim_lookup tool is called, with the correct arguments.
You will set up this block to:
Given a claim_id, extract the associated data from the claims_dataset using the claim_lookup tool.
Save the information to state memory in a variable called claim_data.
You can create this block directly from the first block so it will automatically come next.
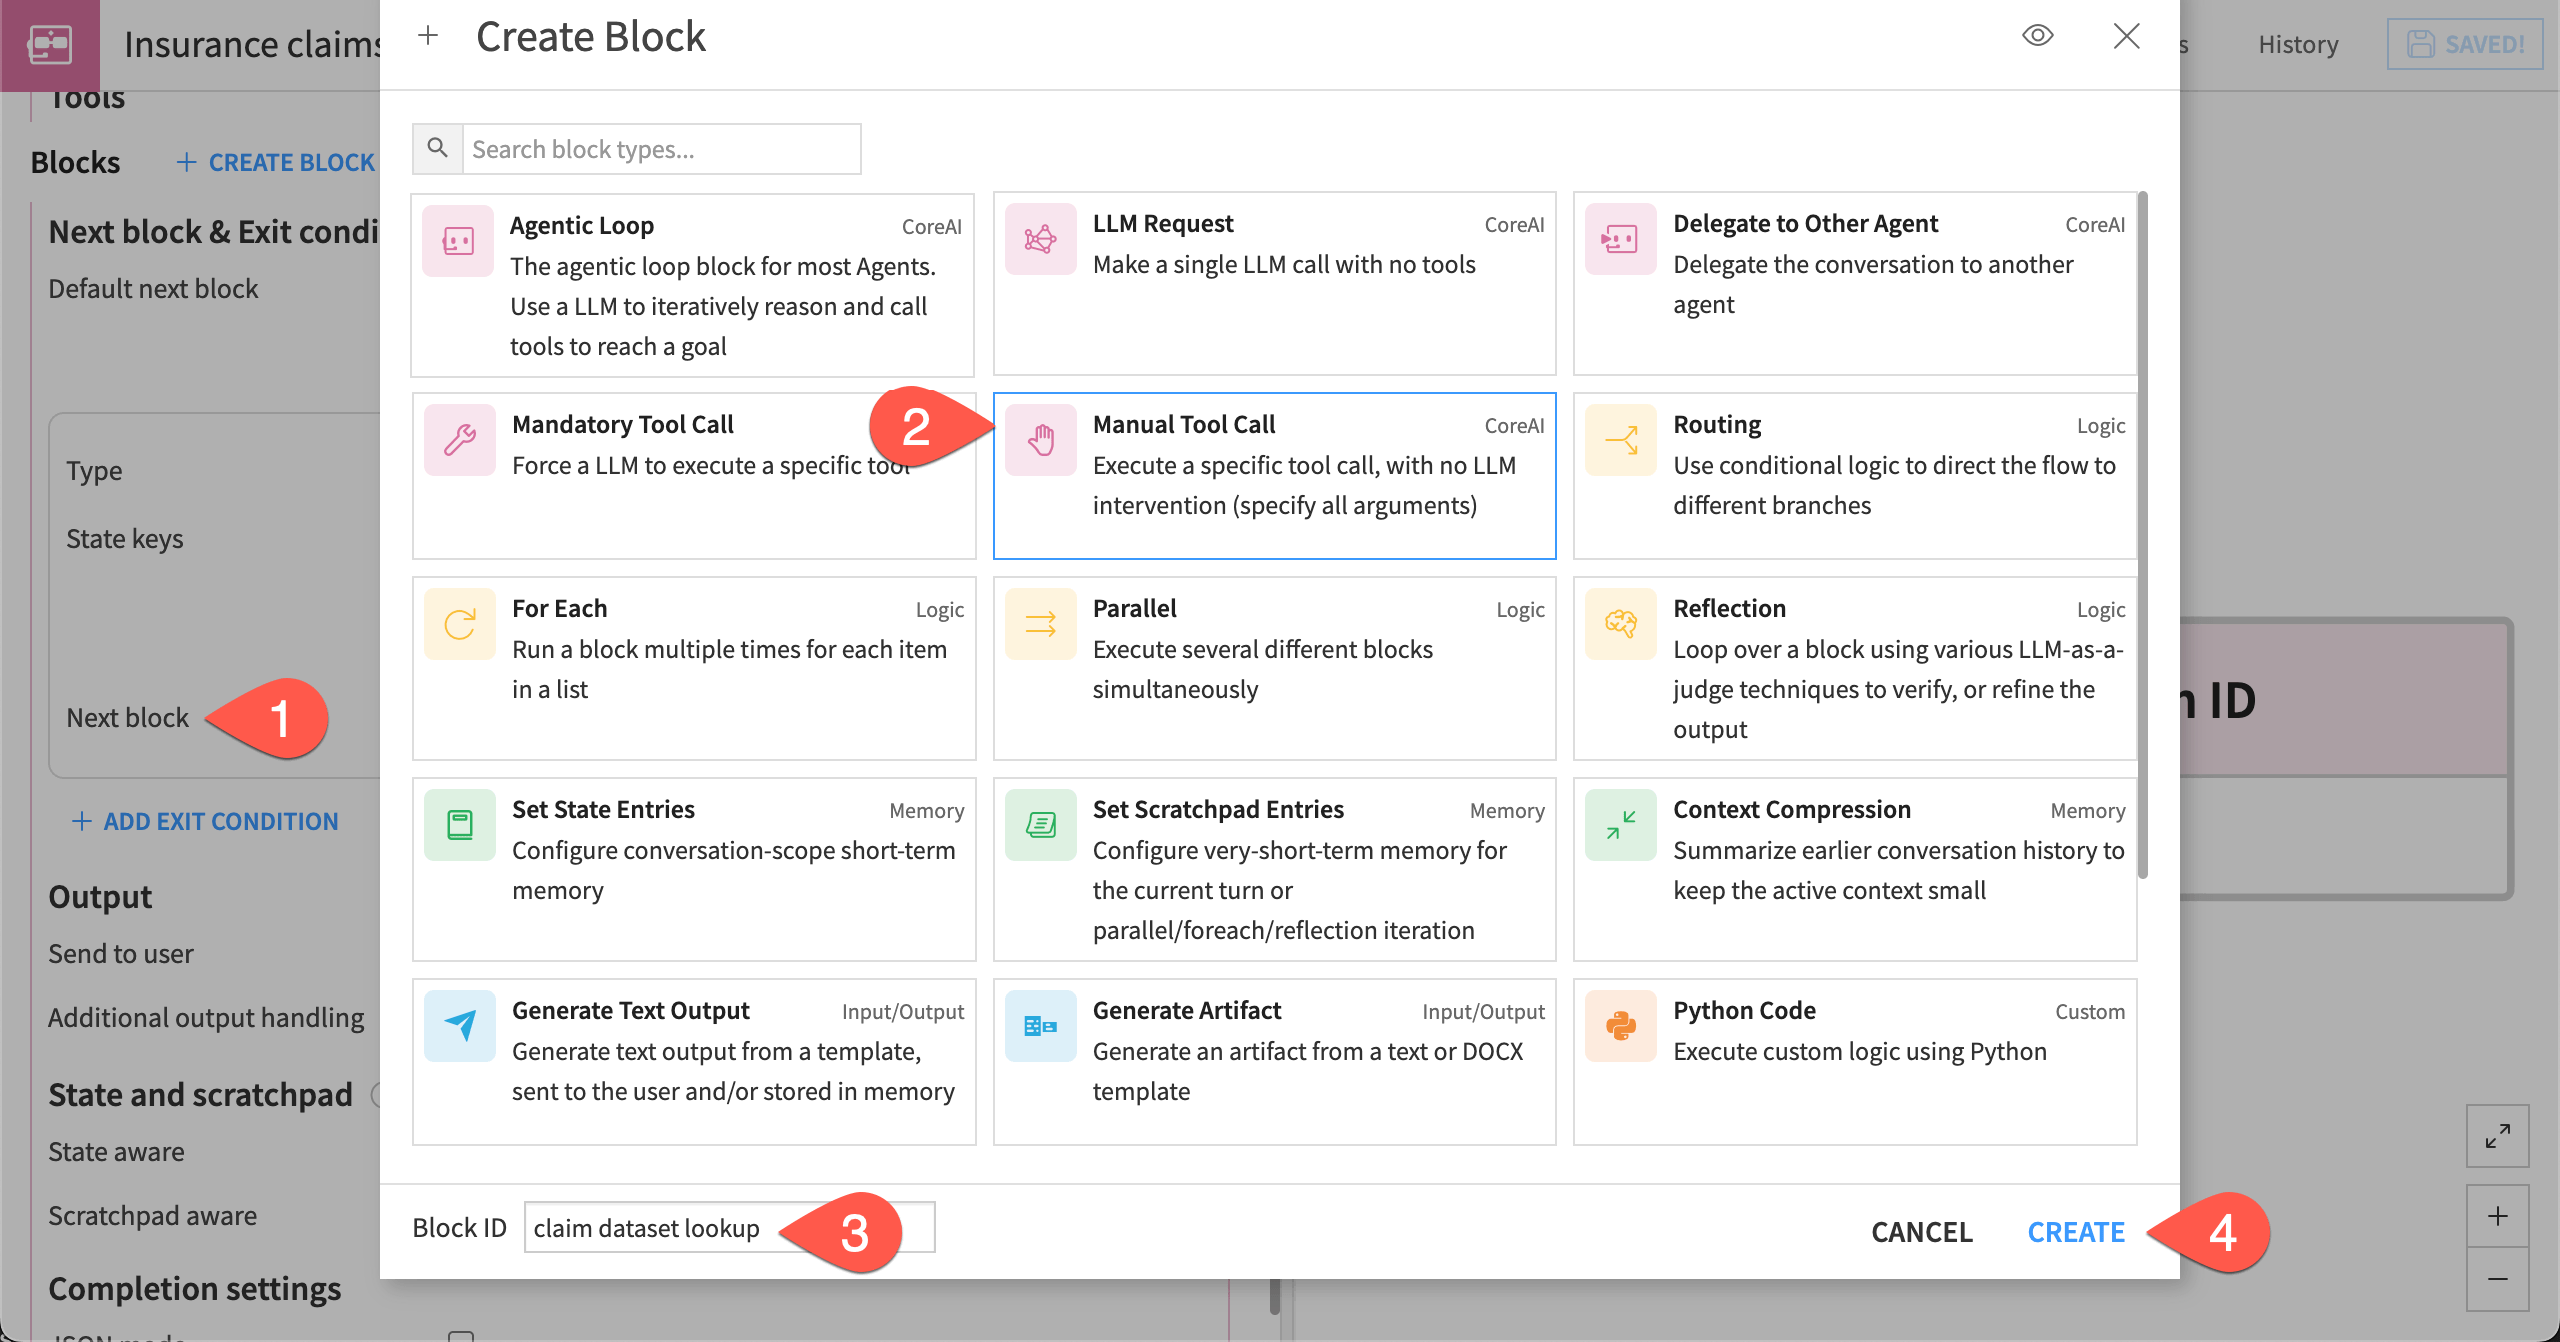
In the collect claim ID block, go to Next block & Exit conditions > Next block and select + Create new block.
Choose Manual Tool Call.
Name the block
claim dataset lookup.Click Create.
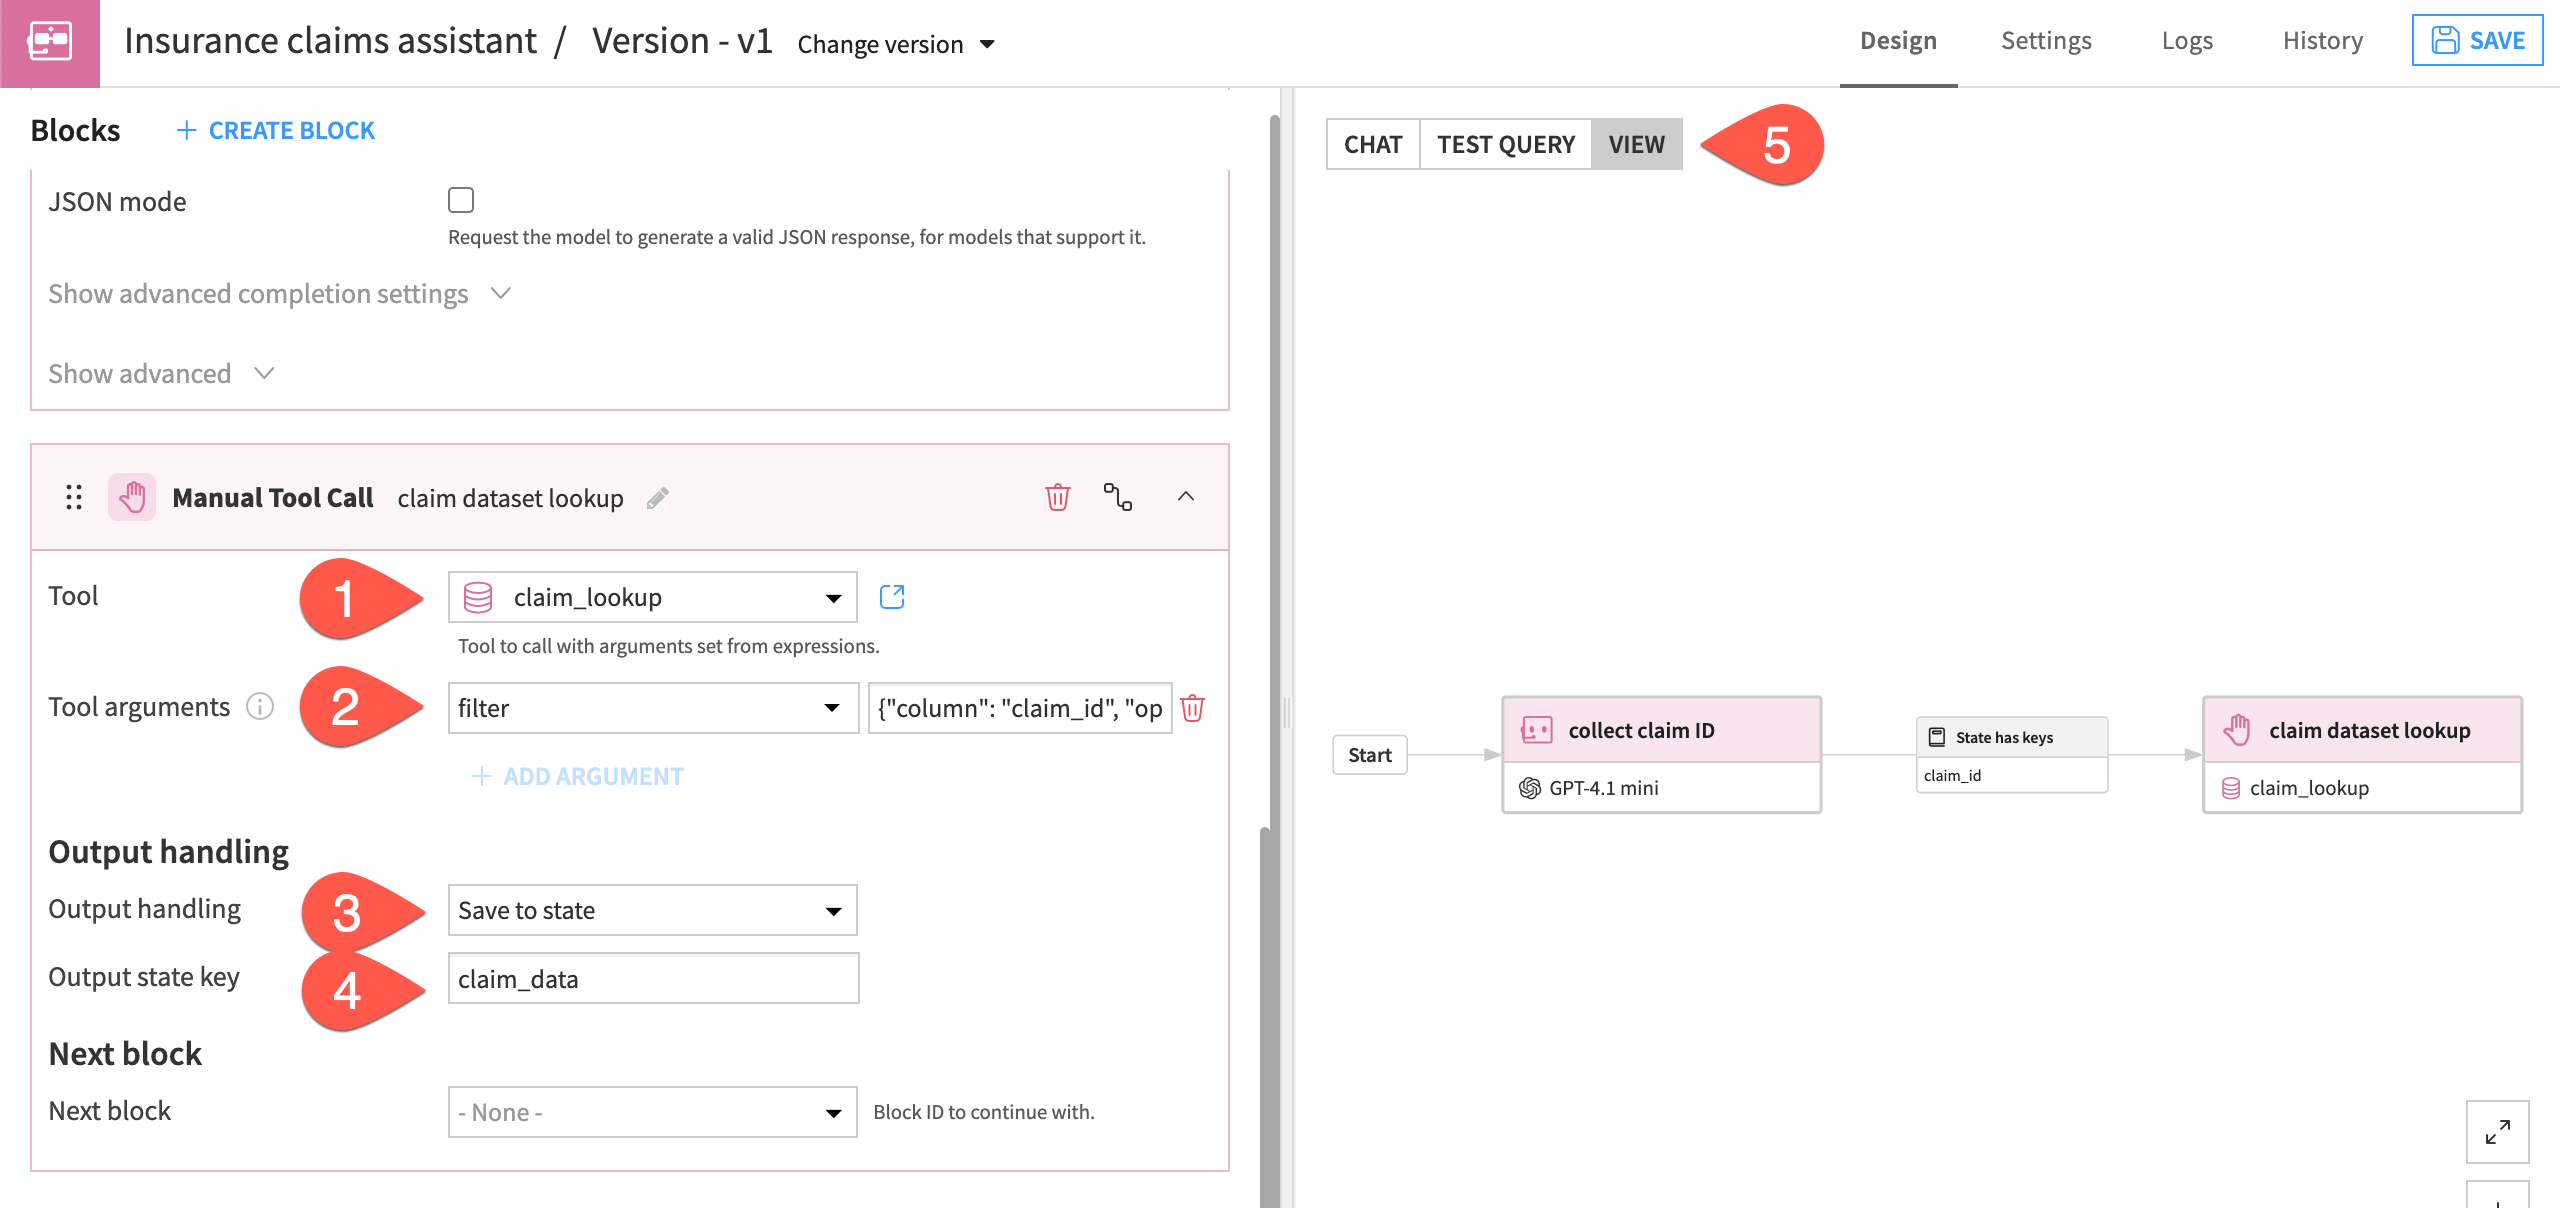
Now add settings for this block.
For Tool, select the claim_lookup tool.
Under Tool arguments, click + Add Argument, and add this filter expression, which means the tool will find data where the claim_id equals the value stored in state memory from the previous block:
{"column": "claim_id", "operator": "EQUALS", "value": state.claim_id}Tip
The filter expression is written in Common Expression Language (CEL). See Expressions and templates for more.
Under Output handling, choose Save to state.
Add the Output state key
claim_data.Navigate to the View tab, and observe the new block in the graph.
Tip
If you are unsure about what arguments a given tool takes, you can go to the tool configuration page and look at the test query or the tool descriptor. For the Dataset Lookup tool, you can see it takes one “filter” argument, which always looks like:
{
  "column": "<COLUMN_NAME>",
  "operator": "EQUALS",
  "value": "<VALUE>"
}
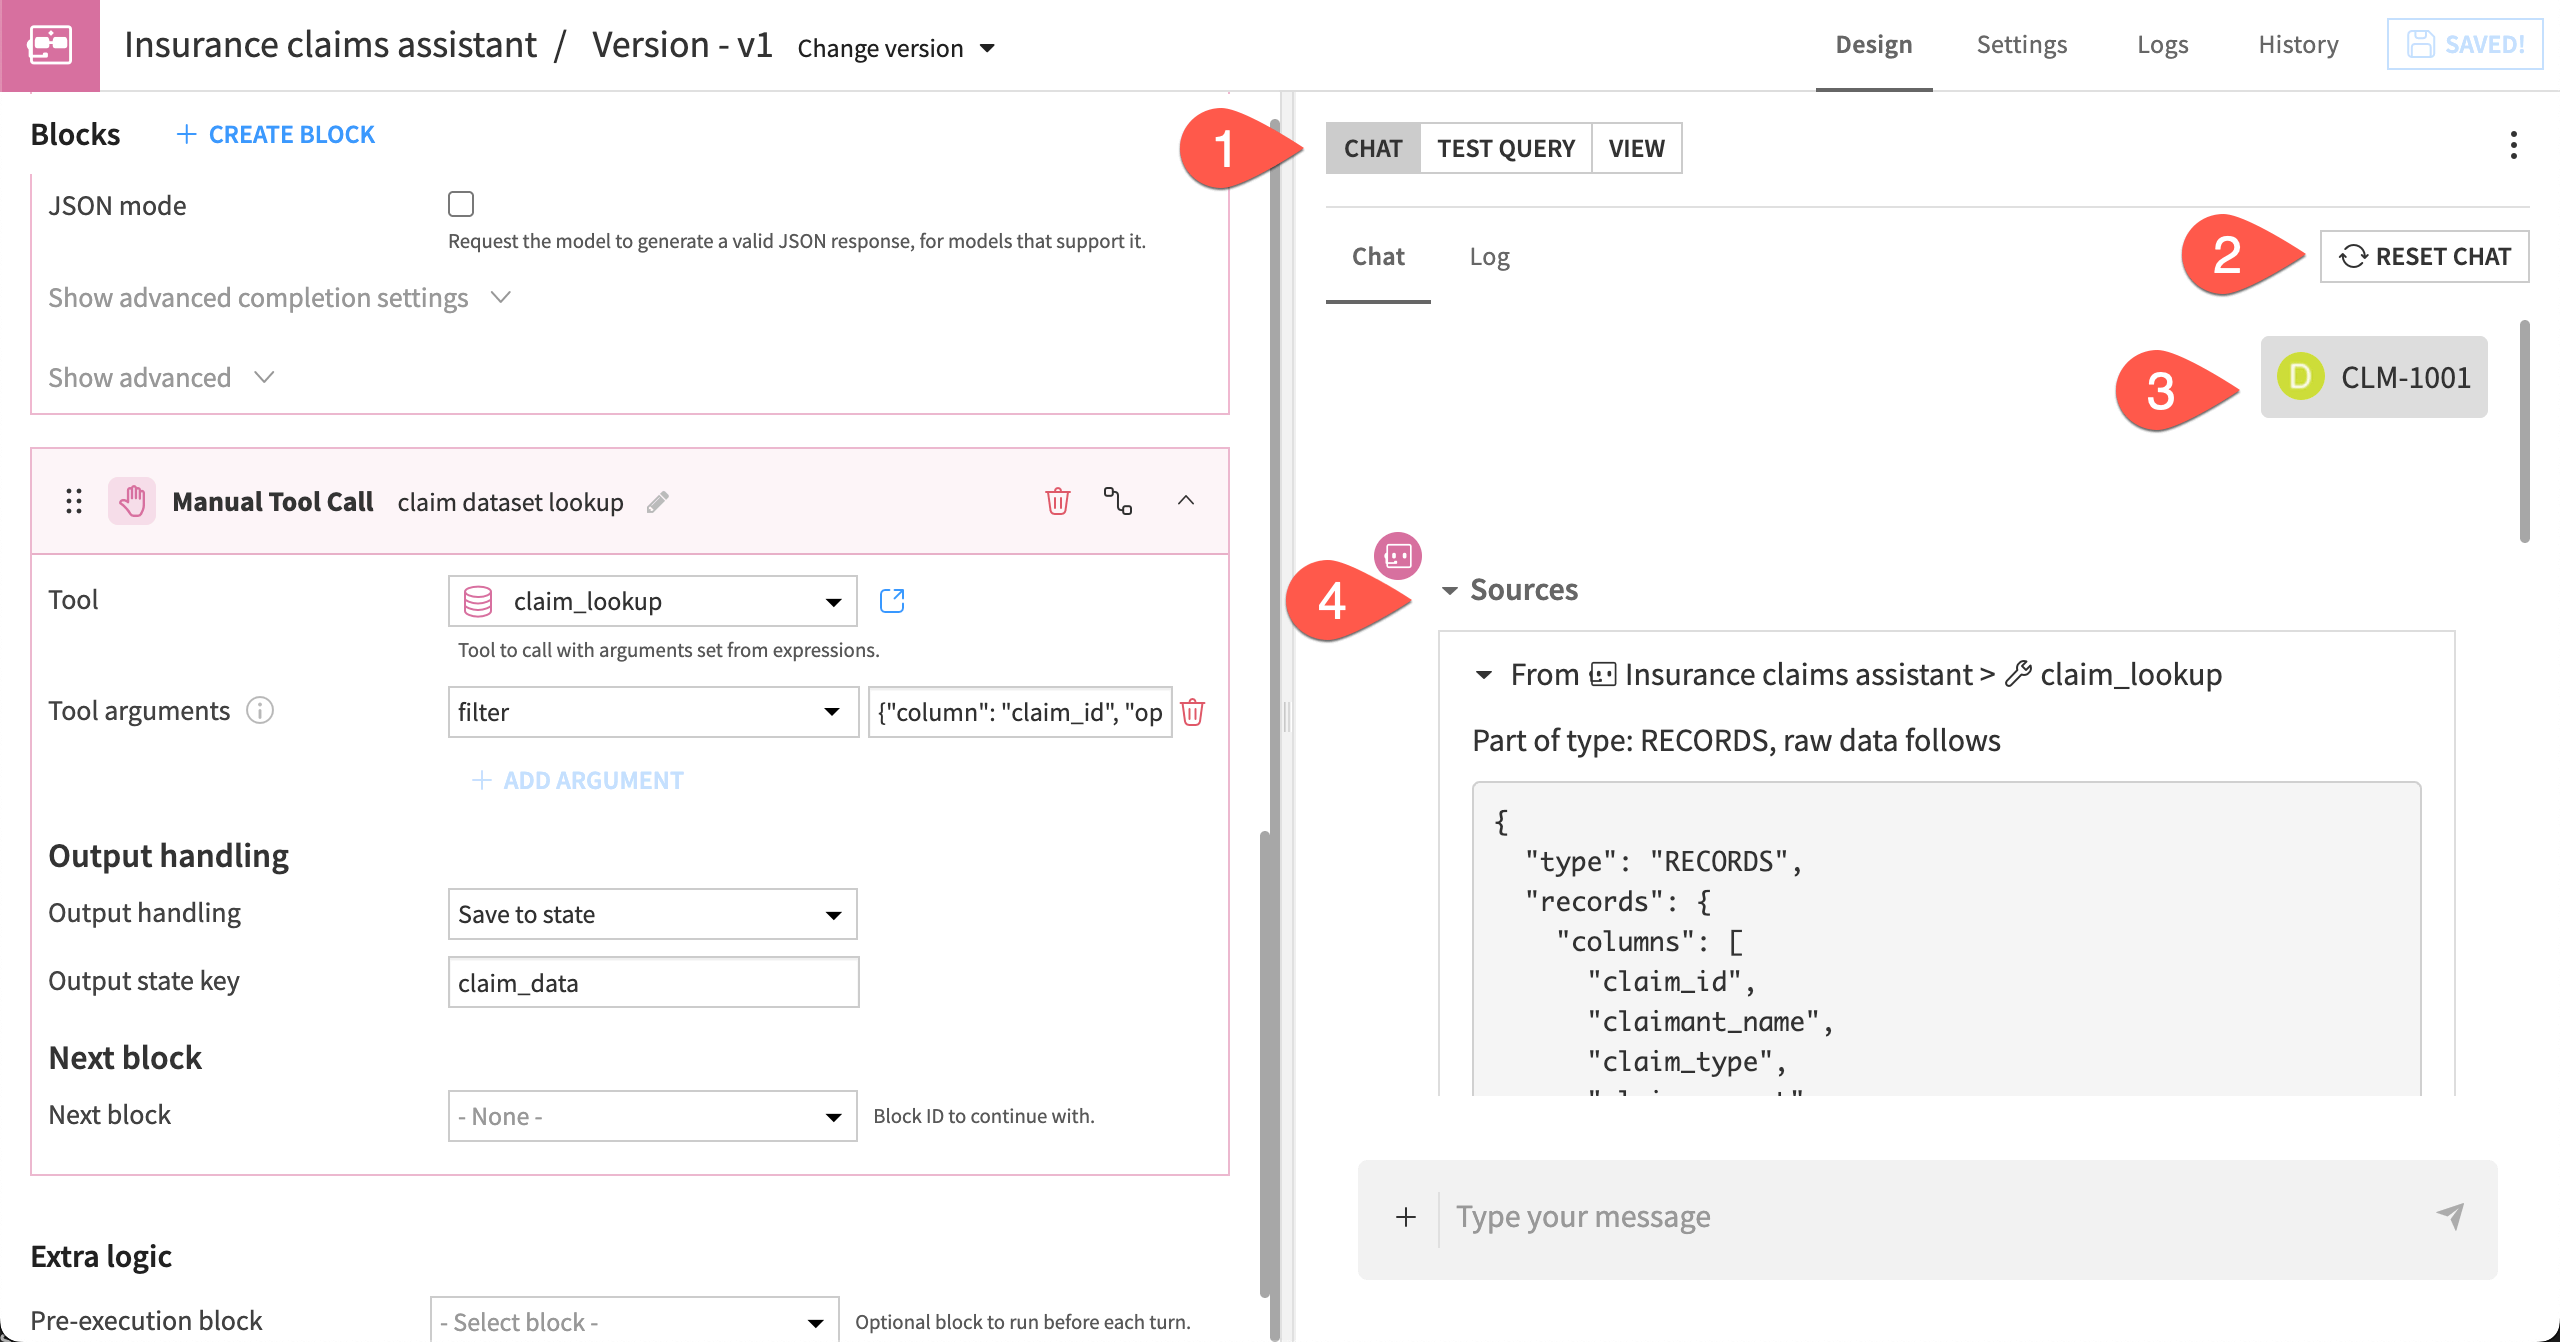
Test the Manual Tool Call block#
Now you can test the new Manual Tool Call block. Because the block instructs the agent to save data behind the scenes, it won’t have a conversational response. It should, however, show you the raw data sources.
Navigate to the Chat tab.
Click Reset Chat.
Type and send the message
Please help me with the claim CLM-1001.
Tip
Depending on your agent’s response, you might need to reword the message or send follow-up messages as necessary.
Click Sources to view the raw data saved from the lookup tool. It should correspond to the first row in the dataset. If the claim ID is incorrect and doesn’t appear in the dataset, then the tool will return empty data.
Create and test Set State Entries block#
The next block is a Set State Entries block, which:
Saves values from the claim_data (created in the previous block) into individual variables, making it easier to refer to them in later blocks.
In the block settings, you will define each state variable using CEL of the format state.claim_data.{column_name}. You’ll save most of the columns from the dataset.
In the Manual Tool Call block, go to Next block, and choose + Create new block.
Choose a Set State Entries block type with the Block ID
structure the data.Click Create.
In the block settings, under Entries, add the following pairs of State key and CEL expression:
State key
CEL expression
claimant_namestate.claim_data.claimant_nameclaim_typestate.claim_data.claim_typeclaim_amountstate.claim_data.claim_amountincident_datestate.claim_data.incident_dateclaim_descriptionstate.claim_data.claim_descriptionpolicy_idstate.claim_data.policy_idpolicy_typestate.claim_data.policy_typecoverage_summarystate.claim_data.coverage_summarycoverage_limitstate.claim_data.coverage_limitdeductiblestate.claim_data.deductibleexclusionsstate.claim_data.exclusionsdocuments_jsonstate.claim_data.documents_jsonNavigate to the View tab to check the structure the data block in the agent graph.
Go to the Chat tab, reset the chat, and test the block with the input
CLM-1001. The response should again be raw data under Sources.

The agent has retrieved data about the claim and saved it into internal memory. You can now give the agent instructions on what to do with it.
Tip
If you type a claim ID that’s not in the dataset, the claim_lookup tool won’t find it, and the state key claim_data will exist but won’t contain anything. In that case, when you try to access the variable state.claim_data.claimant_name in the Set State Entries block, the agent won’t find it and will raise an error.
This tutorial assumes that the claim ID is always valid. You could address the possibility of invalid IDs by adding a Routing block after the Manual Tool Call block, testing for the presence of the key state.claim_data.claimant_name. Then route the query to a LLM Request block, so that the user gets a nice response from an LLM, like “This claim ID doesn’t exist, please try again.”
Analyze the information#
The next two blocks work in tandem to analyze the claim information contained in the state.documents variable, which is pulled from the documents_json column in the original dataset. Each claim contains two documents formatted in JSON.
The main block for this task is the For Each block. This block will:
Iterate over each document in state.documents, which in this case is two documents for a claim.
For each of the documents, execute a separate block that you specify. This will be an LLM Request block that calls an LLM. You’ll give it specific instructions on how to analyze the documents.
Save the LLM’s analysis to the scratchpad, which is a temporary memory similar to state but more short-lived. The agent stores information in the scratchpad across a certain sequence of blocks, but the memory doesn’t persist across turns through the agent tasks as state does. Using the scratchpad here also ensures that analysis from each of the documents remains separate and doesn’t corrupt each other.
Create a For Each block#
First, create the For Each block that will execute repetitions of the LLM Request block.
From the Set State Entries block, go to Next block, and click + Create a new block.
Choose For Each, name the block
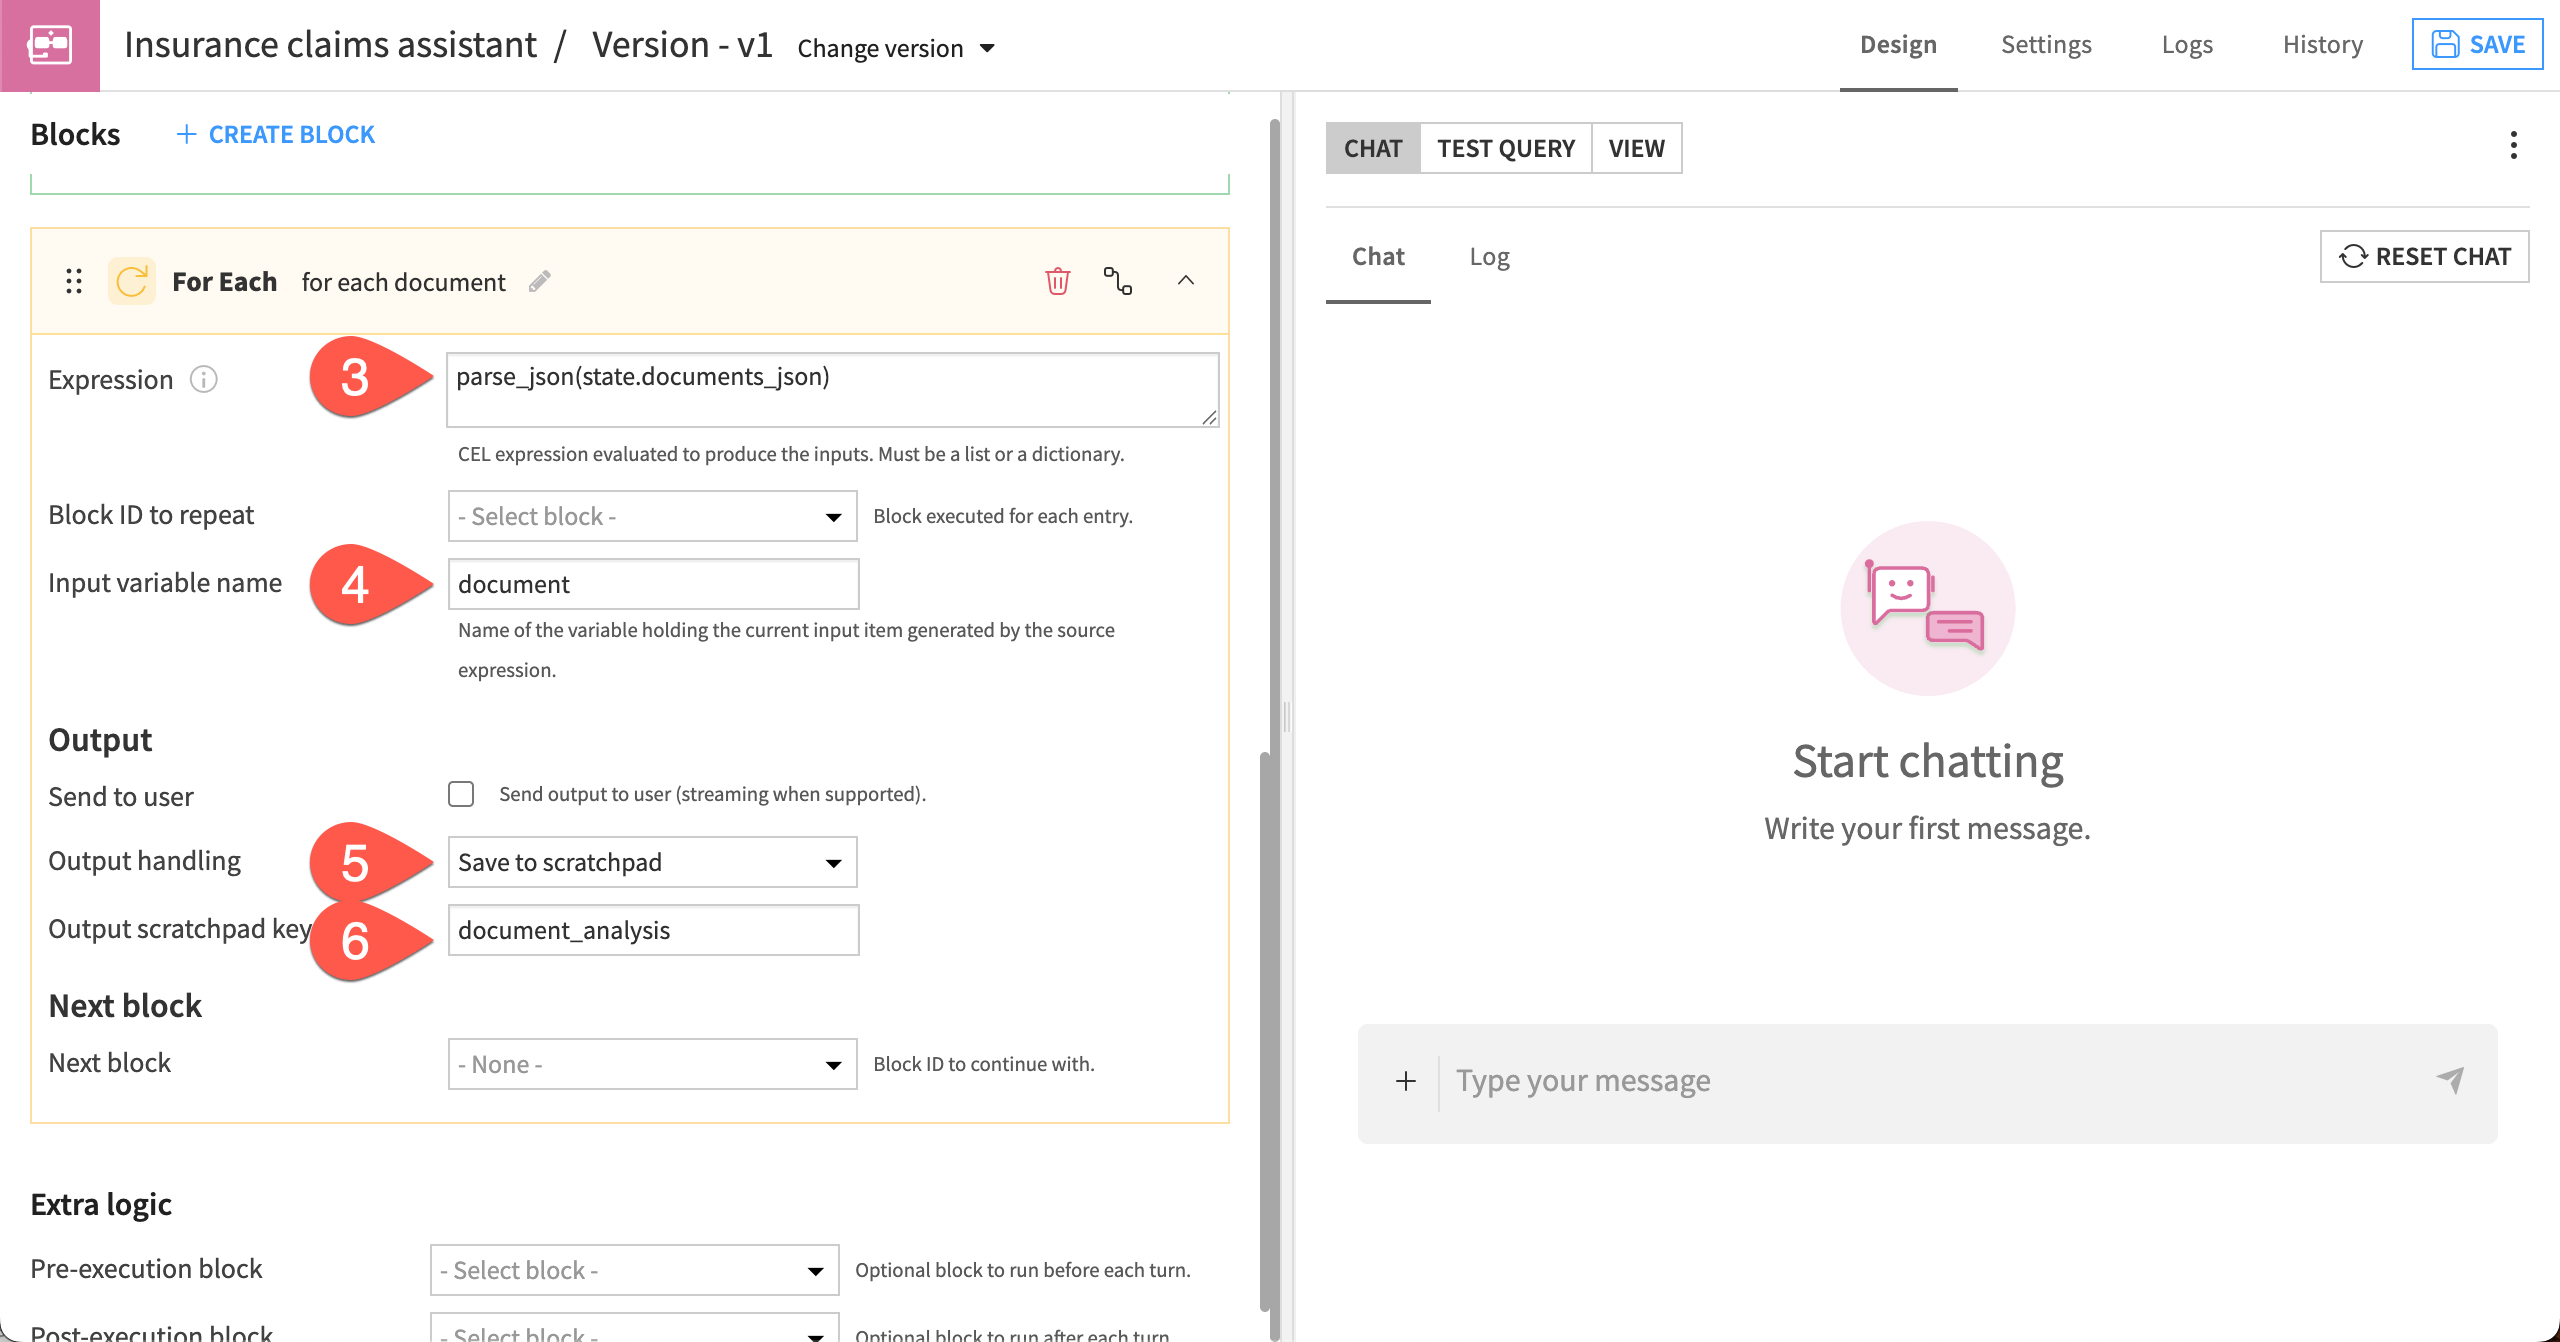
for each document, and click Create.In the Expression box, add this text:
parse_json(state.documents_json). This will parse the documents that are in JSON format. It’s an important step because the For Each block can only take a list or dictionary as input.For the Input variable name, write
document. This will save each document as input for the repeating block.Under Output handling, choose Save to scratchpad.
Add the Output scratchpad key of
document_analysis. This will save the LLM’s analysis to short-term memory for use later.
Create a nested LLM Request block#
Next, create the LLM Request block that will be inside the For Each block and be repeated for each document.
Within the For Each block, next to Block ID to repeat, select + Create new block.
Choose LLM Request and give it the name
analyze documents.Choose an LLM from your available options.
Add the following text to the Instructions window:
You are an expert insurance claim analyzer. You are tasked with analyzing the input document and:

- Summarize key information
- Identify inconsistencies or missing elements
- Flag potential risks (e.g., fraud, unclear evidence)

Keep it short and comprehensive.

The document is as follows: {{document}}.
Check the latest agent graph in the View tab, and observe the for each document block with the analyze documents block nested inside it.

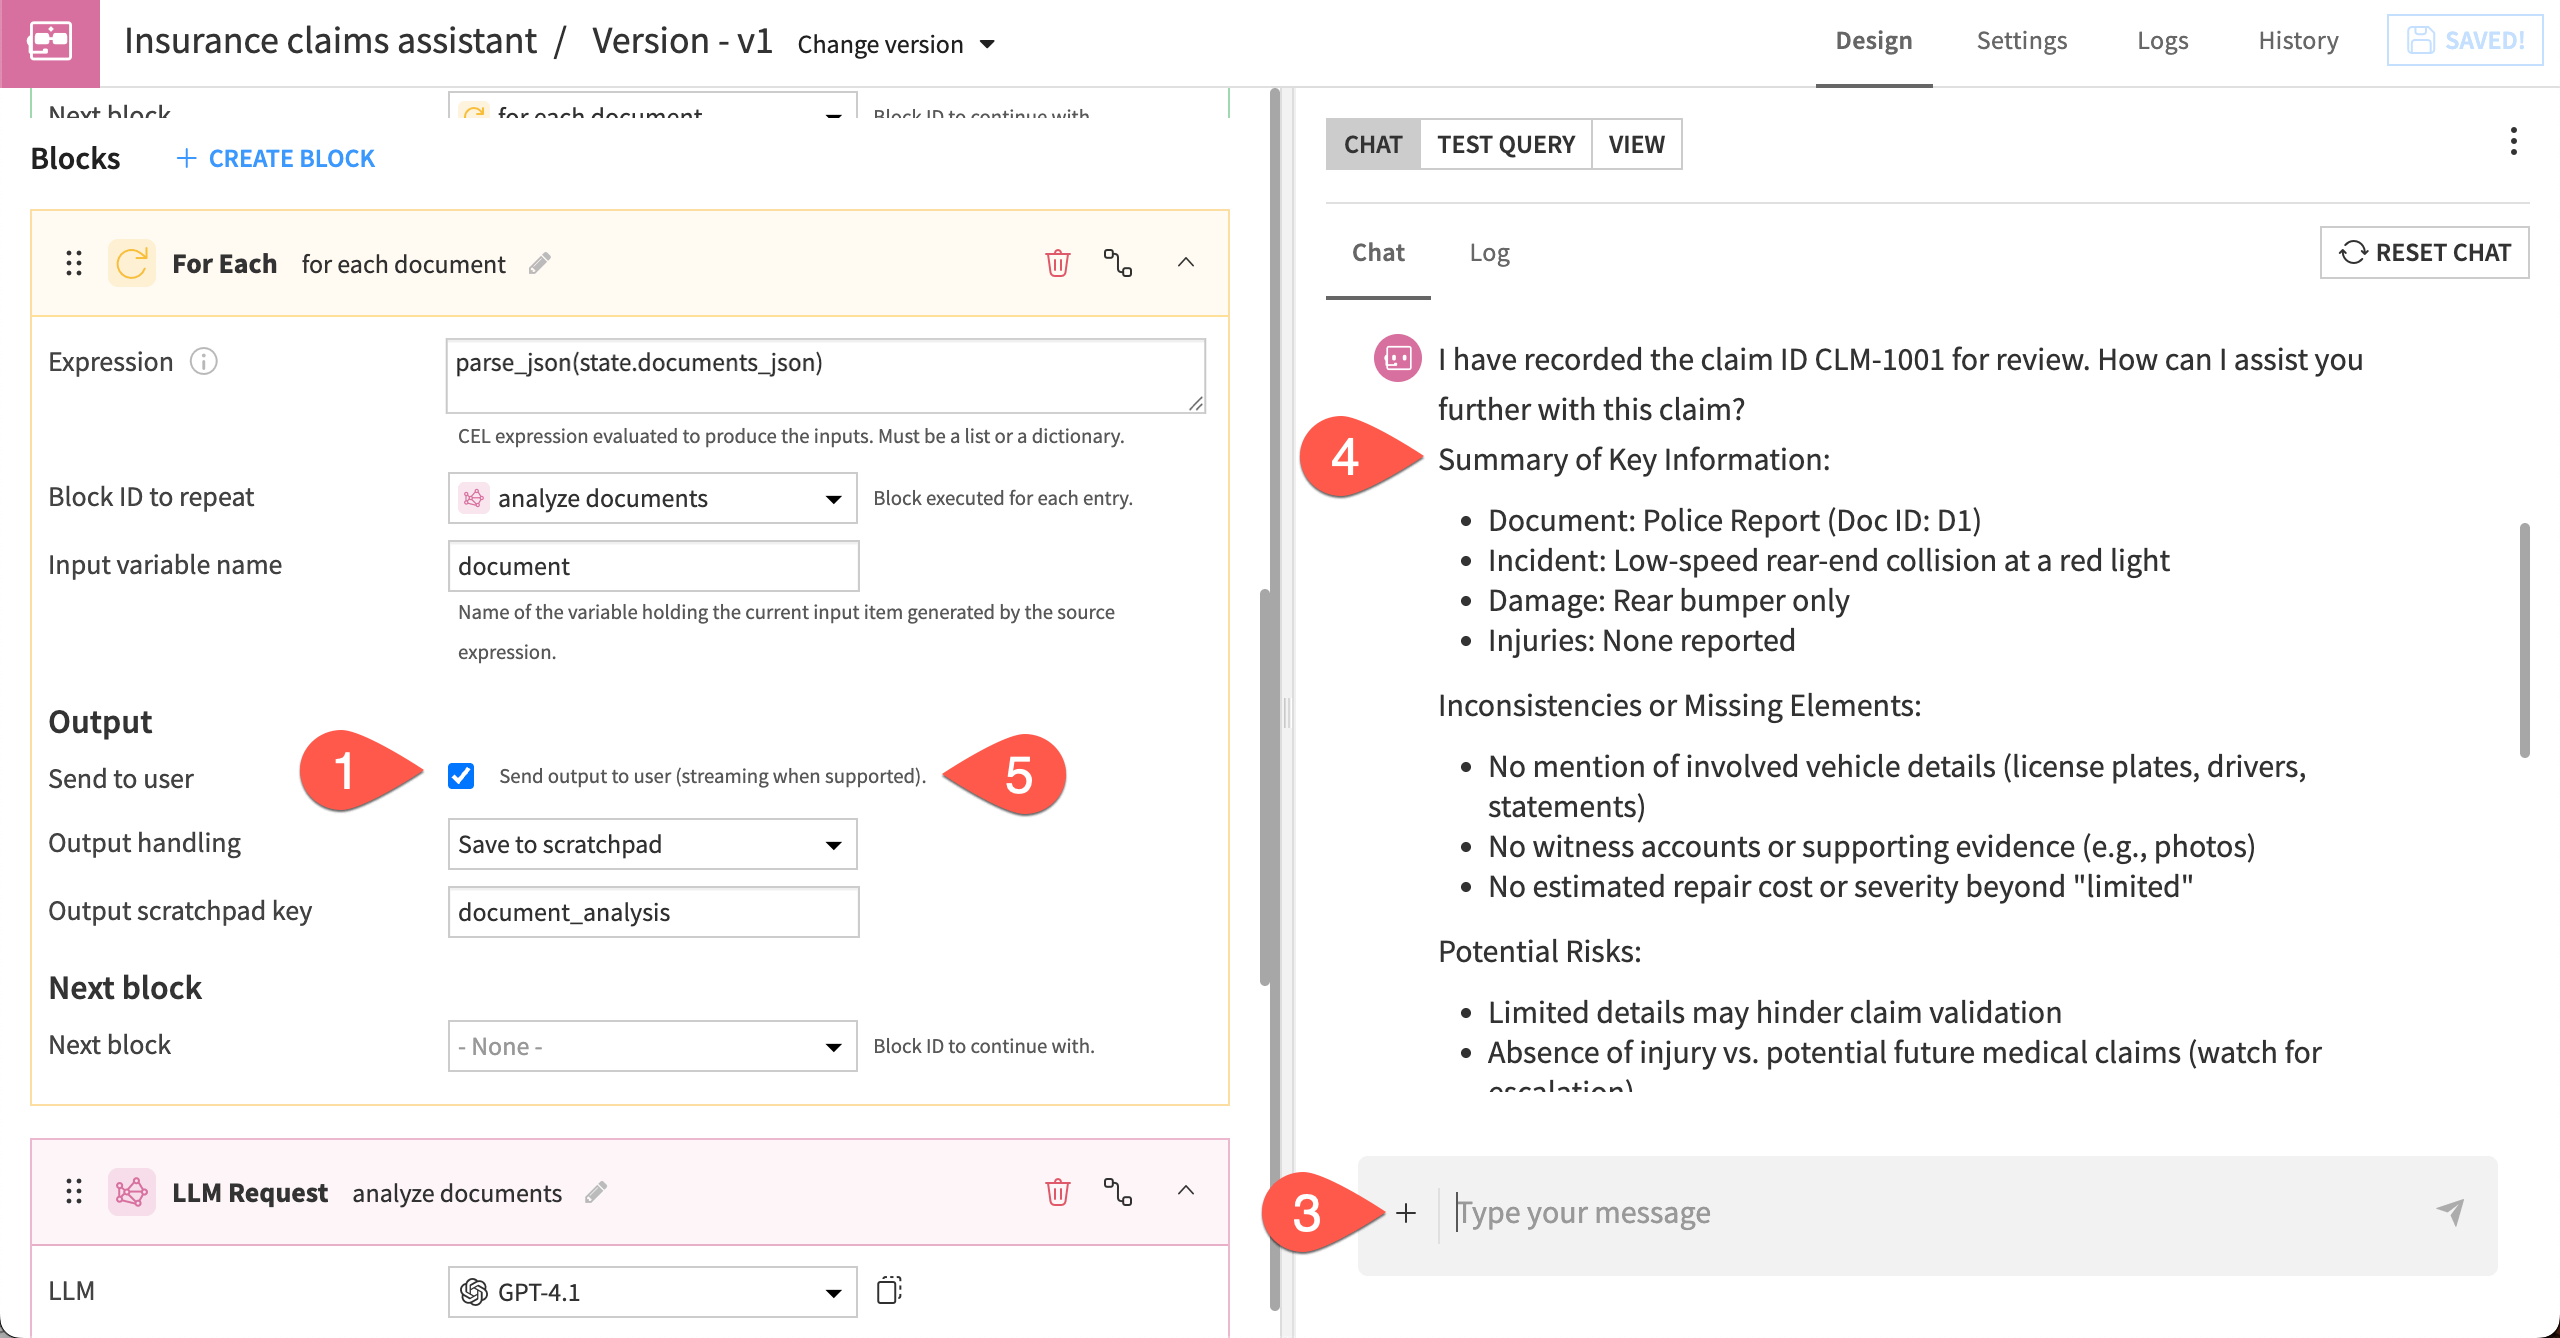
Test the blocks#
Now test the two blocks you just created to make sure the document analysis is working. To test, you can send the output to the chat.
In the For Each block, go to Output, and make sure the Send to user box is checked.
Check the same box in the LLM Request block.
In the Chat window, send the claim ID
CLM-1001.The agent should return an analysis of the two documents for this claim ID.
Return to both the LLM Request and For Each blocks, and uncheck the Send to user boxes so the output won’t be shown as you continue to build the agent.
Use an LLM to make a decision#
The next block will be another Agentic Loop block that will:
Take input from:
Claim and policy data saved into state in the Set State Entries block. Each variable will be denoted by the expression
{{state.variable_name}}.The document_analysis saved to the scratchpad in the previous For Each block. This will be written as
{{scratchpad.document_analysis}}.
Synthesize all the inputs to make a decision, either to:
Approve the claim.
Request more information about the claim.
Escalate the claim for a human review.
Provide a rationale for the decision.
Create another Agentic Loop block#
This Agentic Loop block will run after the For Each block.
From the For Each block, create a Next block.
Choose the Agentic Loop block, give it the ID
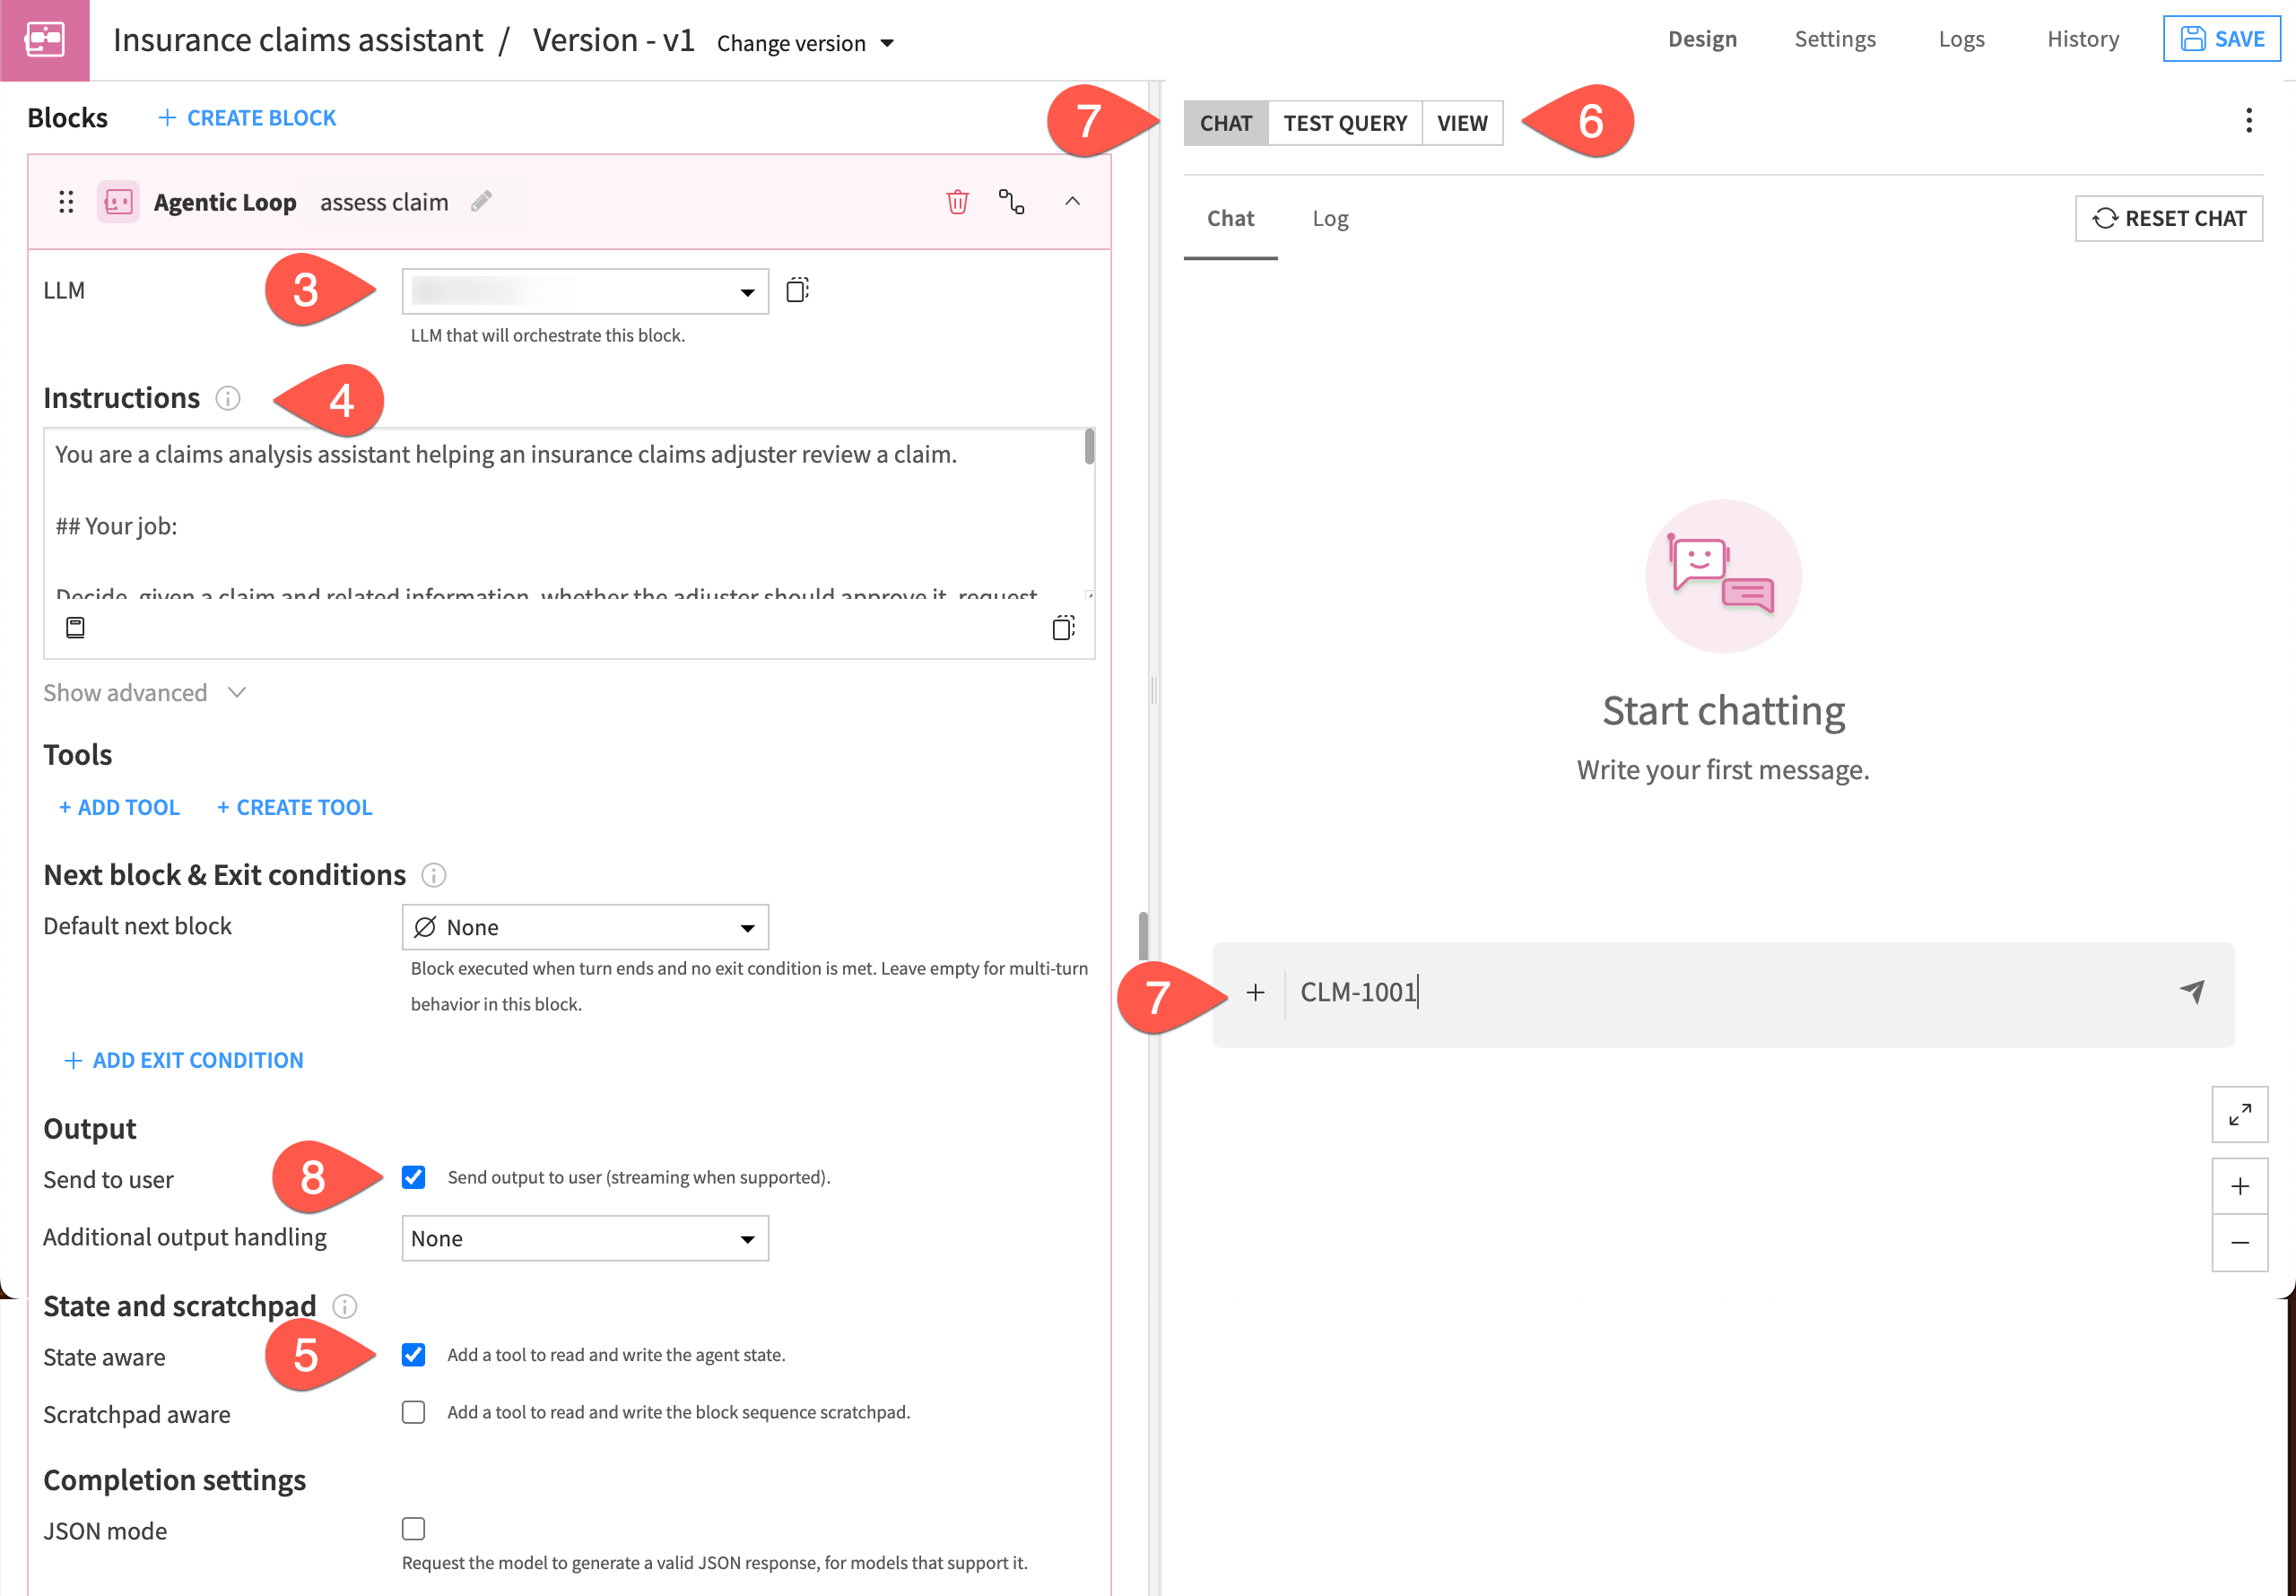
assess claim, and Create.In the block settings, choose an LLM for the block to use.
Copy these into the Instructions window:
 You are a claims analysis assistant helping an insurance claims adjuster review a claim.

 ## Your job:

 Decide, given a claim and related information, whether the adjuster should approve it, request more info, or escalate to human review.

 ## Claim details:
- Claim ID:   {{state.claim_id}}
- Claimant:   {{state.claimant_name}}
- Claim type: {{state.claim_type}}
- Incident date:   {{state.incident_date}}
- Description:   {{state.claim_description}}
- Amount claimed:   {{state.claim_amount}}
- Policy type:   {{state.policy_type}}
- Coverage summary: {{state.coverage_summary}}
- Coverage limit:   {{state.coverage_limit}}
- Deductible:   {{state.deductible}}
- Exclusions: {{state.exclusions}}

You also have an analysis of the documents provided for the claim. Here is the analysis: {{scratchpad.document_analysis}}.


## Decision Guidelines

### APPROVE
Choose "APPROVE" if:
- The cause of loss is clear and consistent
- The loss is covered under the policy
- Supporting documents confirm the claim (this could include police reports, repair estimates, etc.)
- There are no major inconsistencies

---

### REQUEST_INFO
Choose "REQUEST_INFO" if:
- Key details are missing (e.g., cause, timeline, cost)
- Documentation is incomplete, vague, or low quality
- Coverage applicability is unclear but not contradictory

---

### ESCALATE
Choose "ESCALATE" if:
- There are inconsistencies between documents and the claim
- Evidence suggests possible fraud or misrepresentation
- The situation is complex and cannot be resolved with available information alone

---

## Further instructions

- Do NOT default to "request_info" if enough information is present. If there are sufficient details to understand the claim, and there are no conflicts or signs of fraud, approve it.
- Do NOT require photographic evidence or witness statements to approve a claim. Written descriptions of photographs are sufficient.
- Do NOT approve if there are contradictions.
- Prefer "escalate" over "request_info" when there are contradictions.


## Example Reasoning Style

- "The police report and repair estimate both confirm the incident and costs, and there are no inconsistencies."
- "The documents do not clarify whether the damage was sudden or gradual, which affects coverage."
- "The timeline in the report conflicts with GPS data, indicating a potential inconsistency."


##Output:

Output one of "APPROVE", "REQUEST_INFO" or "ESCALATE" and store it in the state, in a key called "decision".

Also output a short explanation of why you took this decision, and store in the state, in a key called "decision_rationale".
Click the checkbox for State and scratchpad > State aware so the block will create the state keys decision and decision_rationale (according to the instructions above).
Check the agent graph in the View tab.
In the Chat window, test the agent by submitting the claim
CLM-1001again. Though your results may vary, the expected output is approval.Uncheck the Send to user box in the block to disable the responses in the chat.
Generate reports#
The final step for this agent is to output one of three documents depending on the claim outcome.
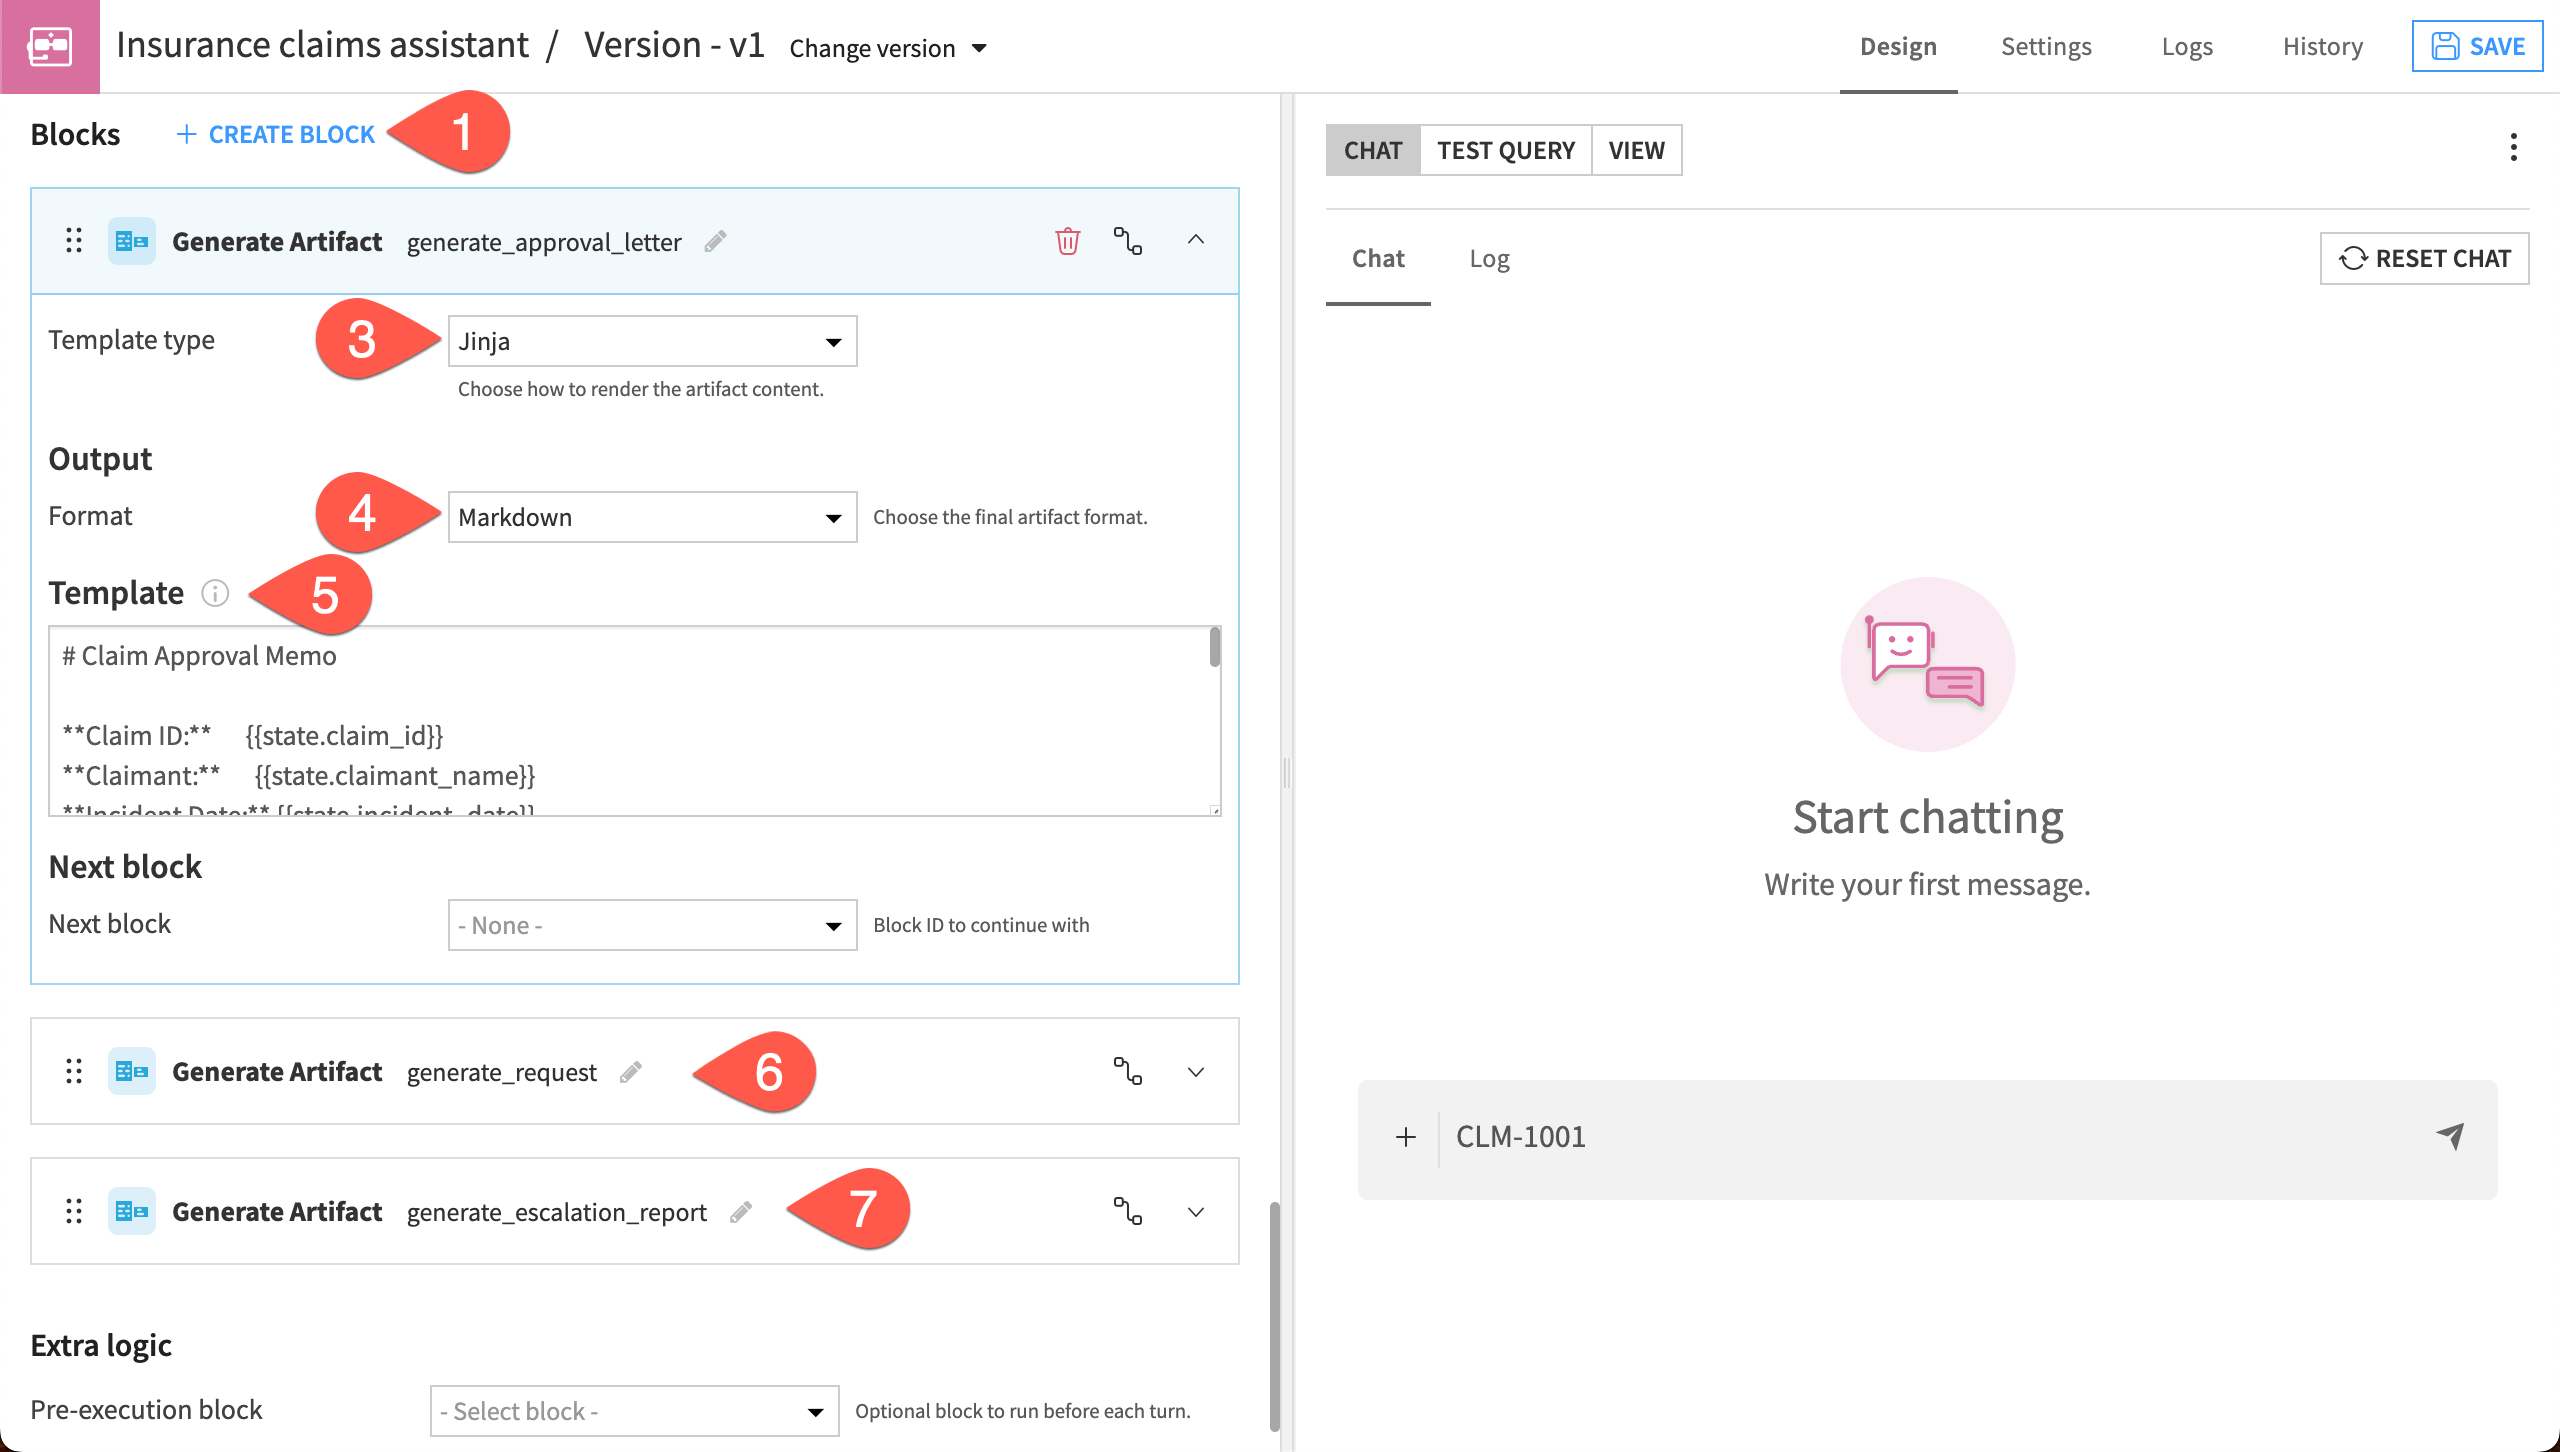
Create the Generate Artifact blocks#
The Generate Artifact block outputs documents that follow a template. You will set up three of these blocks to:
Generate an approval letter.
Generate a request for more information.
Generate an escalation report.
First, you’ll create the three artifact blocks. Then you’ll create a separate block that routes the agent to one of the three.
At the top of the agent, click + Create Block.
Choose the Generate Artifact block, give it the ID
generate approval letter, and click Create.Choose the Template type > Jinja. Jinja is a templating engine for Python.
Under Output > Format choose Markdown.
In the Template window, copy and paste this text:
# Claim Approval Memo

**Claim ID:**      {{state.claim_id}}
**Claimant:**      {{state.claimant_name}}
**Incident Date:** {{state.incident_date}}
**Amount:**        ${{state.claim_amount}}
**Policy:**        {{state.policy_type}}

---

## Decision: ✅ APPROVED

## Claim Summary
{{state.claim_description}}

## Adjuster Notes
{{state.decision_rationale}}

---
*Reviewed and approved via Claims Adjuster Assistant.*
*Please proceed with payment processing.*
Create a second Generate Artifact block with the ID
generate info request, the same Jinja template type and Markdown output, and the following template:
ID:
generate info request
Template:
# Additional Information Request

**Claim ID:**      {{state.claim_id}}
**Claimant:**      {{state.claimant_name}}
**Incident Date:** {{state.incident_date}}
**Amount:**        ${{state.claim_amount}}

---

## Decision: ℹ️ ADDITIONAL INFORMATION REQUIRED

## Claim Summary
{{state.claim_description}}

## Adjuster Notes
{{state.decision_rationale}}

---
*Please follow up with the claimant to obtain the above.*
*Claim will be re-reviewed upon receipt of documentation.*
Create the third Generate Artifact block with the following fields:
ID:
generate escalation report
Template:
# Escalation report

**Claim ID:**      {{state.claim_id}}
**Claimant:**      {{state.claimant_name}}
**Incident Date:** {{state.incident_date}}
**Amount:**        ${{state.claim_amount}}

---

## Decision: ⬆️ADJUSTER REVIEW NEEDED

## Claim Summary
{{state.claim_description}}

## Adjuster Notes
{{state.decision_rationale}}

---
*Please review the claim information to make a final decision.*
Create a Routing block#
Finally, you’ll use a Routing block to:
Direct the agent to the proper Generate Artifact block to produce an appropriate response, depending on the output stored in state.decision (
APPROVE,REQUEST_INFO, orESCALATE).
From the assess claim block, create a default next block.
Choose Routing, name it
decision-based branching, and click Create.For the Routing mode, leave the default If-Then/Else-If Clauses.
In the first clause, click +Add Decision (If-Then), and provide this Expression.
state.decision == "APPROVE"
Tip
In a clause, the expression must evaluate to True or False. Here, you are testing whether the decision from the previous block is equal to “APPROVE” or not. If this evaluates to True, then the agent will move to the corresponding next block.
For Next block, choose generate approval letter.
Create two more clauses by clicking + Add Decision (If-Then) and adding these expressions and next blocks:
Expression
Next block
state.decision == "REQUEST_INFO"generate info requeststate.decision == "ESCALATE"generate escalation report
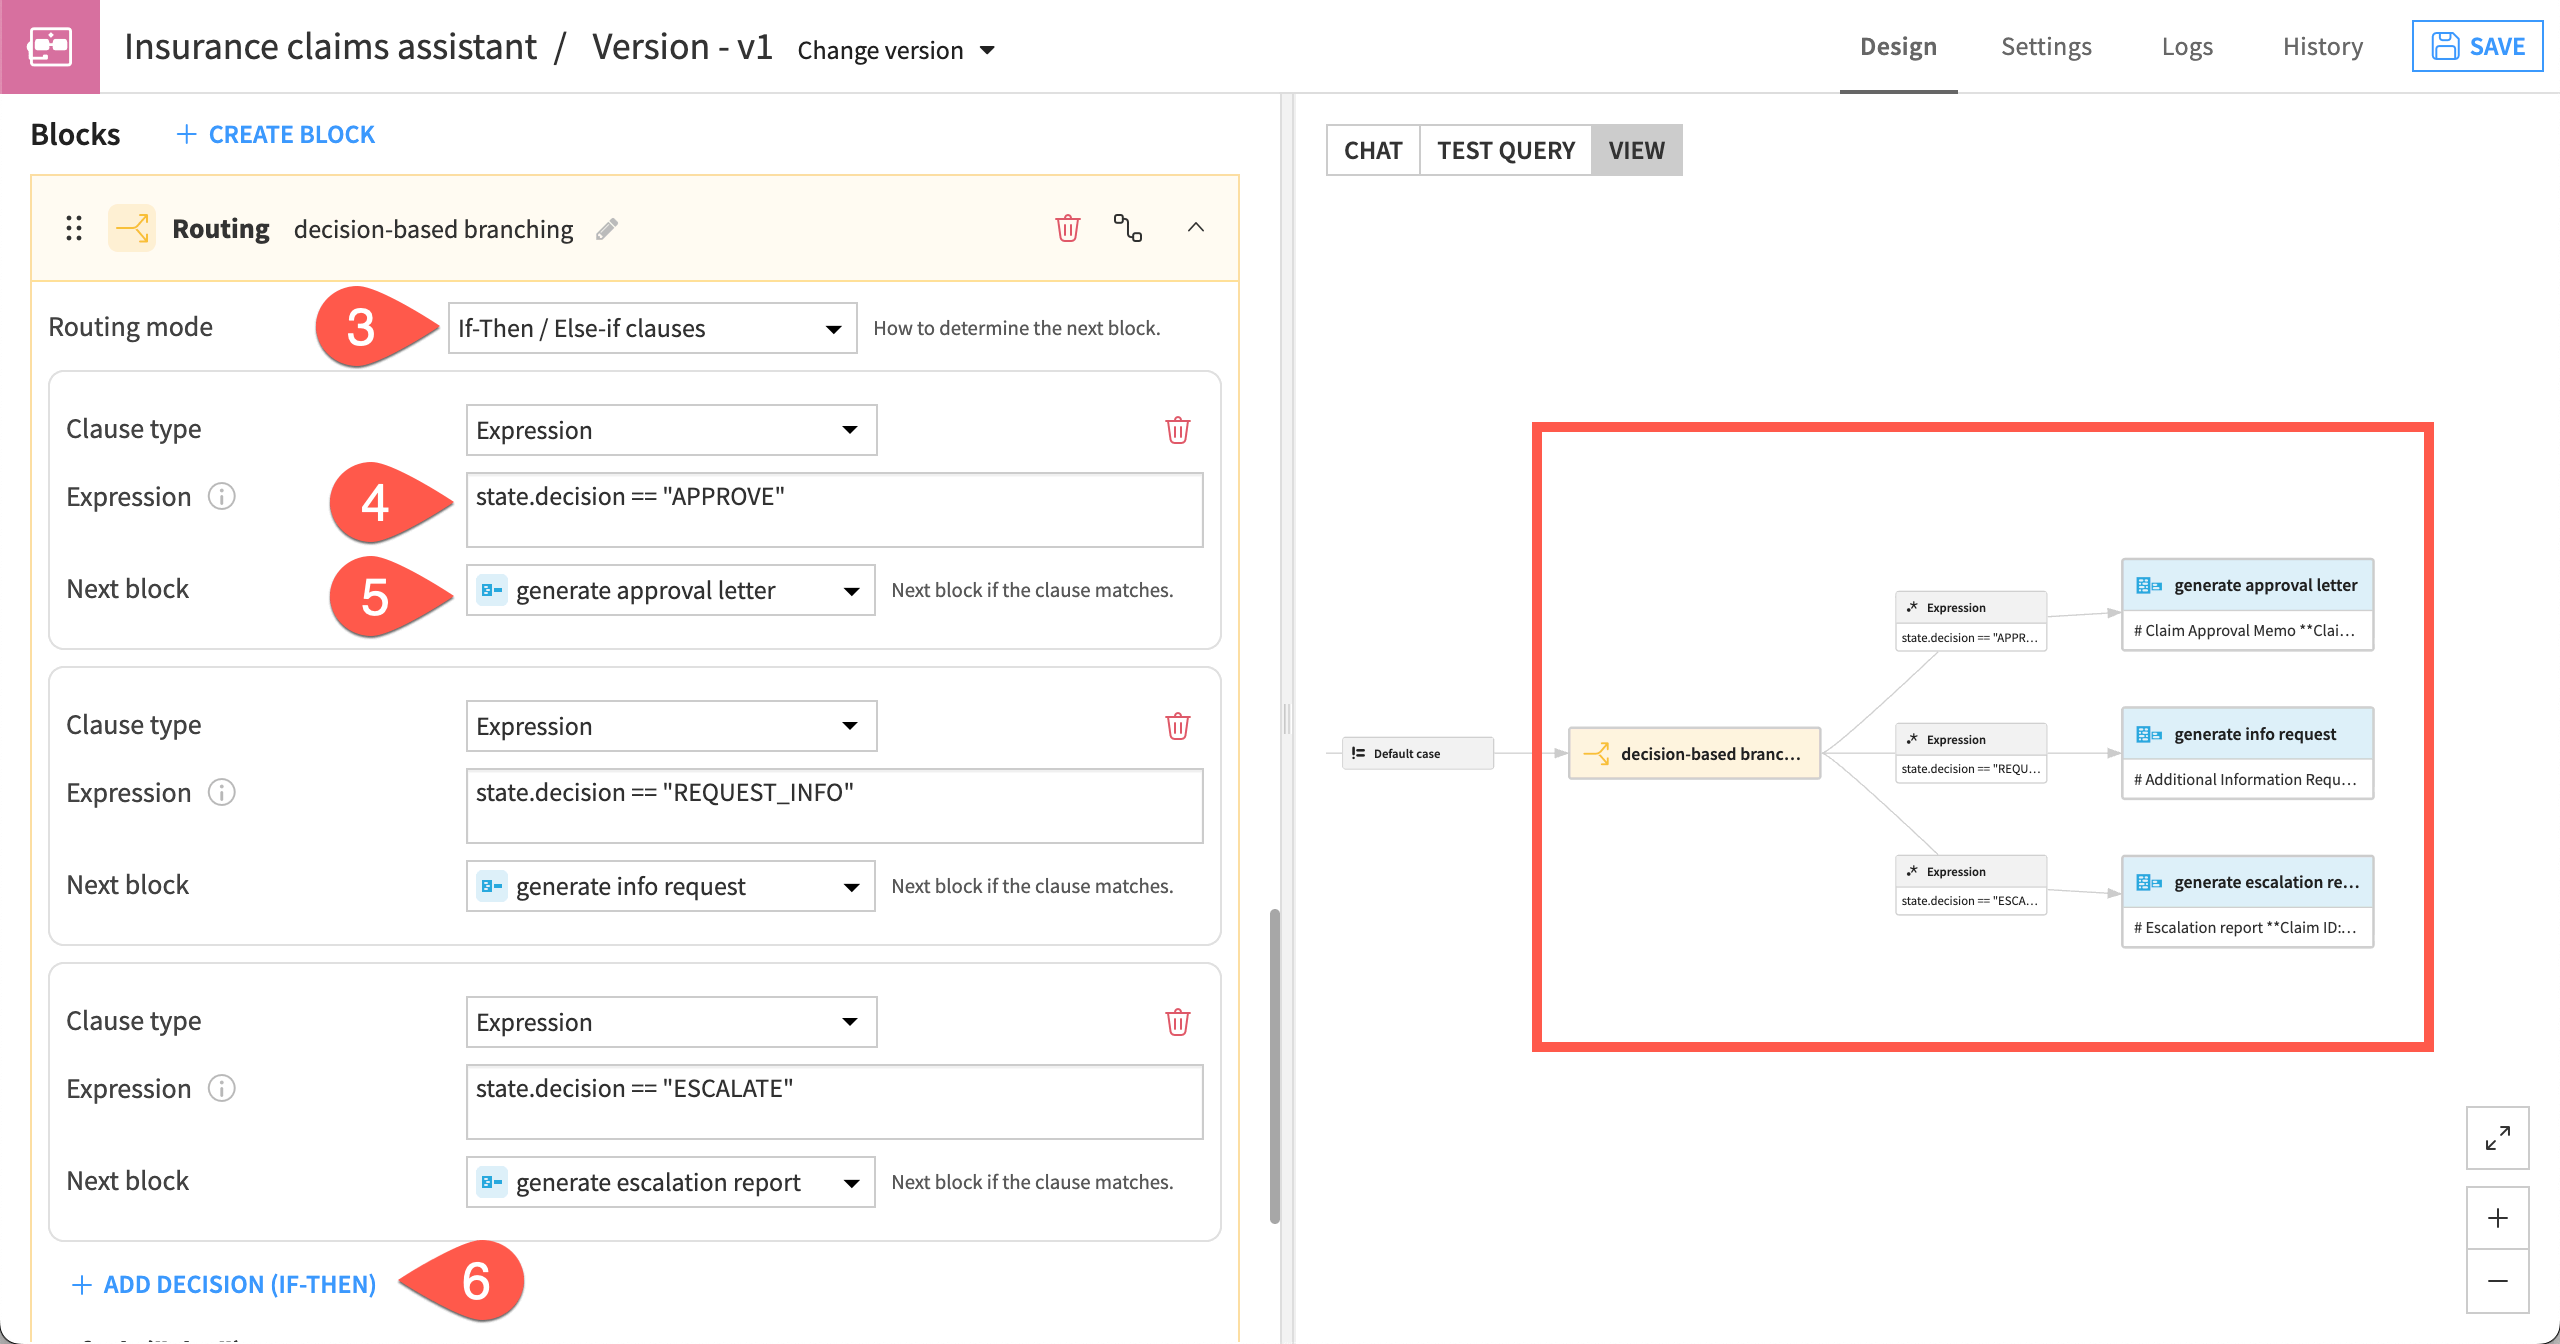
In the View panel, you should see that the graph now leaves takes three potential paths after leaving the decision-based branching block. There is one Generate Artifacts block for each expression.
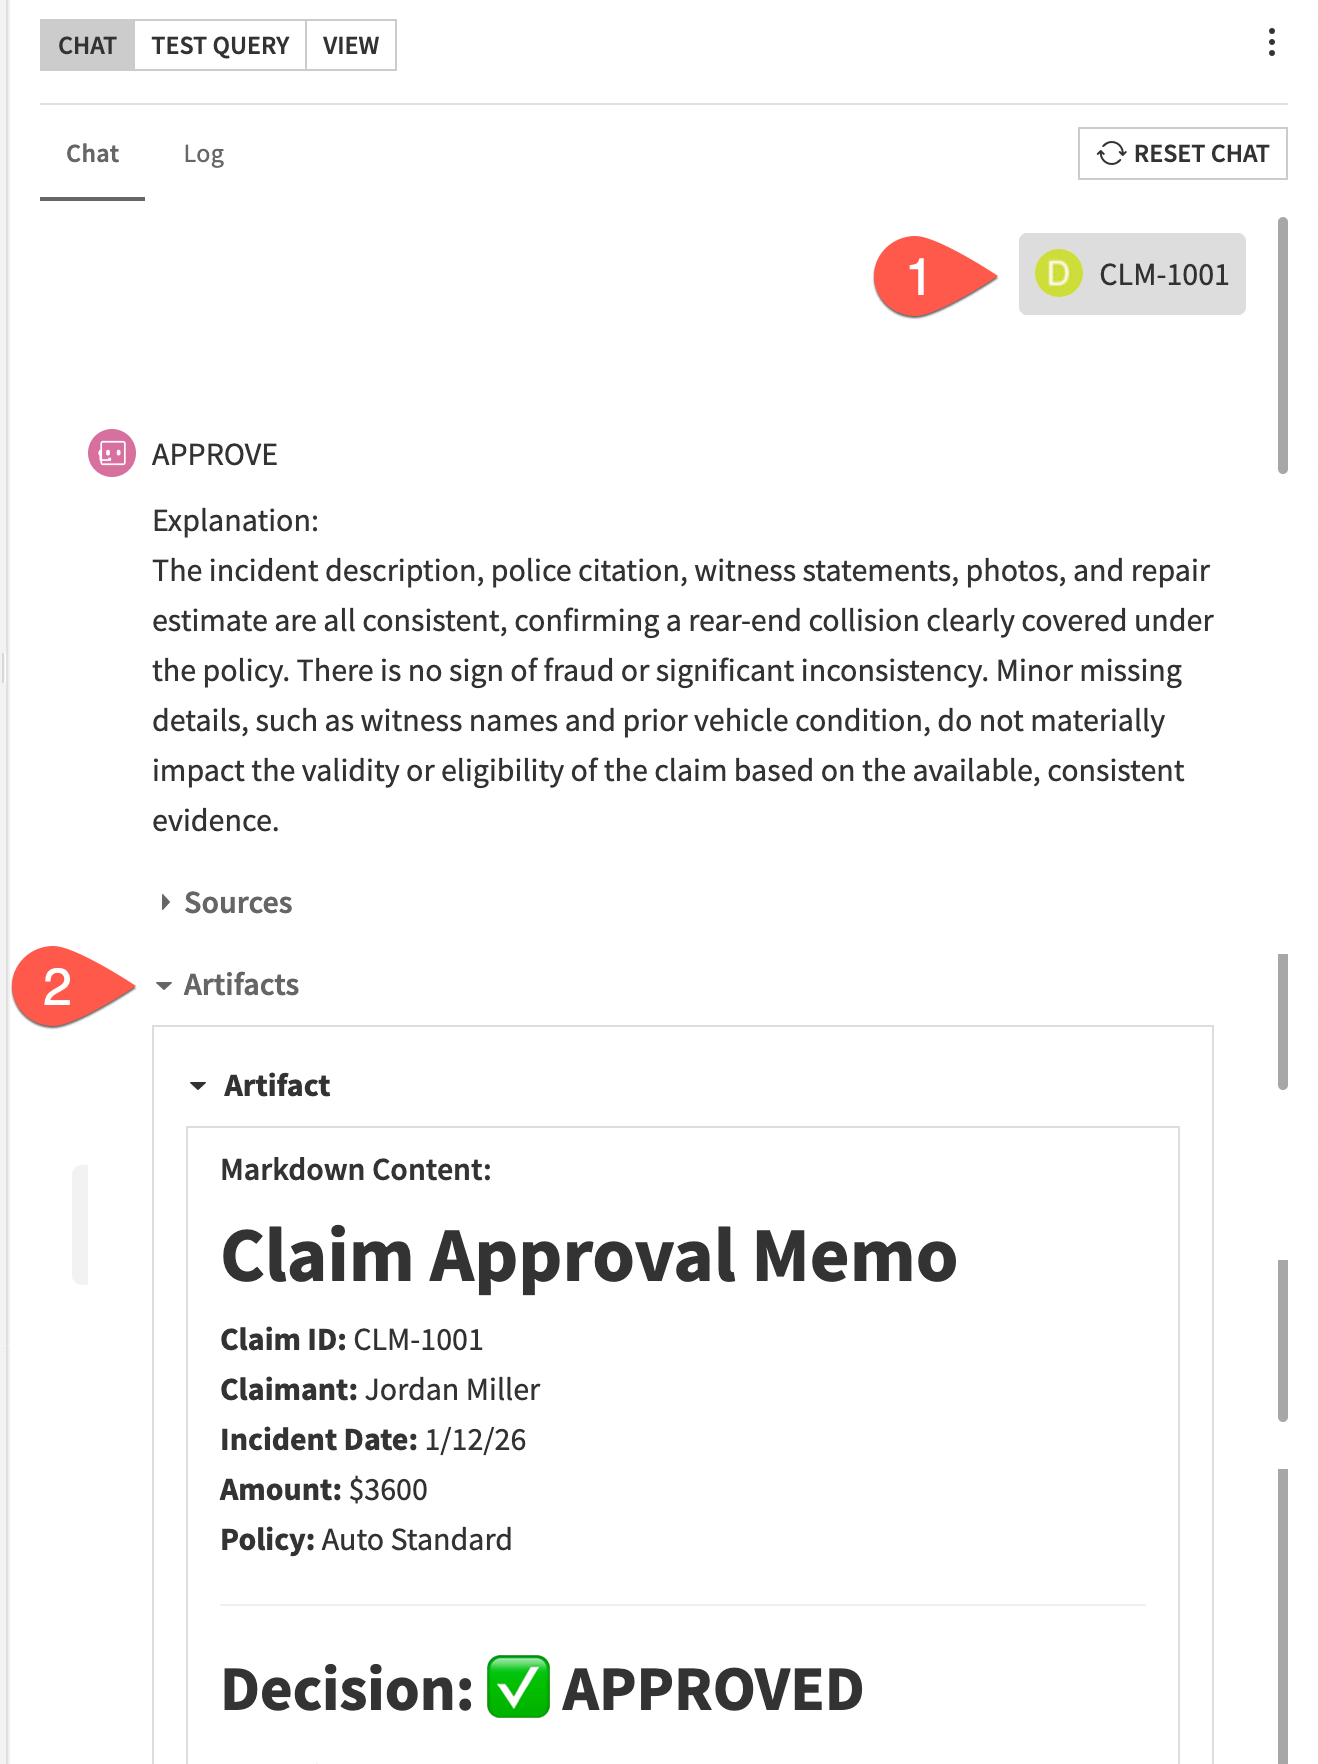
Test the completed agent#
With all the blocks completed, its time to test how the agent works!
In the Chat tab, reset the chat if necessary. Submit the claim ID
CLM-1001and wait for an artifact.In the response, click on Artifact to view the agent’s final output, which should be a completed template with the decision about the claim.
Tip
The claim CLM-1001 has an expected decision of approval. Remember that different models have different outputs, so your results might vary. You can even compare the results of different models if your instance has multiple LLM connections.
The main goal with this testing is to make sure the agent is indeed creating an artifact following the template.
Continue testing other claim numbers if you’d like. Try
CLM-1004for an expected request for more information orCLM-1008for an expected escalation.
Next steps#
Congratulations on creating your first Structured Visual Agent and all its components!
To continue learning about Generative AI and agents in Dataiku, you might want to check out the GenAI Practitioner learning path in the Dataiku Academy or take the test to earn your GenAI Practitioner Certificate.