
Tutorial | Flow management and views#
Get started#
As projects grow in complexity, the ability to efficiently organize, customize, and search within them becomes of greater value.
Objectives#
In this tutorial, you will:
Organize a project with Flow zones.
Customize the display of the Flow.
Search inside the Flow for items, and apply mass actions.
Learn how to undo changes in the Flow.
Prerequisites#
To reproduce the steps in this tutorial, you’ll need:
Dataiku 13.4 or later.
Basic knowledge of Dataiku (Core Designer level or equivalent).
Create the project#
From the Dataiku Design homepage, click + New Project.
Select Learning projects.
Search for and select Flow Management.
If needed, change the folder into which the project will be installed, and click Create.
From the project homepage, click Go to Flow (or type
g+f).
Note
You can also download the starter project from this website and import it as a ZIP file.
You’ll next want to build the Flow.
Click Flow Actions at the bottom right of the Flow.
Click Build all.
Keep the default settings and click Build.
Use case summary#
The project has three data sources:
Dataset |
Description |
|---|---|
tx |
Each row is a unique credit card transaction with information such as the card that was used and the merchant where the transaction was made. It also indicates whether the transaction has either been:
|
merchants |
Each row is a unique merchant with information such as the merchant’s location and category. |
cards |
Each row is a unique credit card ID with information such as the card’s activation month or the cardholder’s FICO score (a common measure of creditworthiness in the US). |
Organize a Flow into zones#
While this Flow has only ten datasets, true projects can be much larger — perhaps more than 100 datasets and recipes.
Flow zones are one key organizational tool to divide a complex Flow into more manageable sections. They make it easier to understand the overall purpose of a Flow.
Looking at the Flow of this project, you can abstract its purpose to two stages: data ingestion and data preparation. These stages are natural buckets for separate Flow zones.
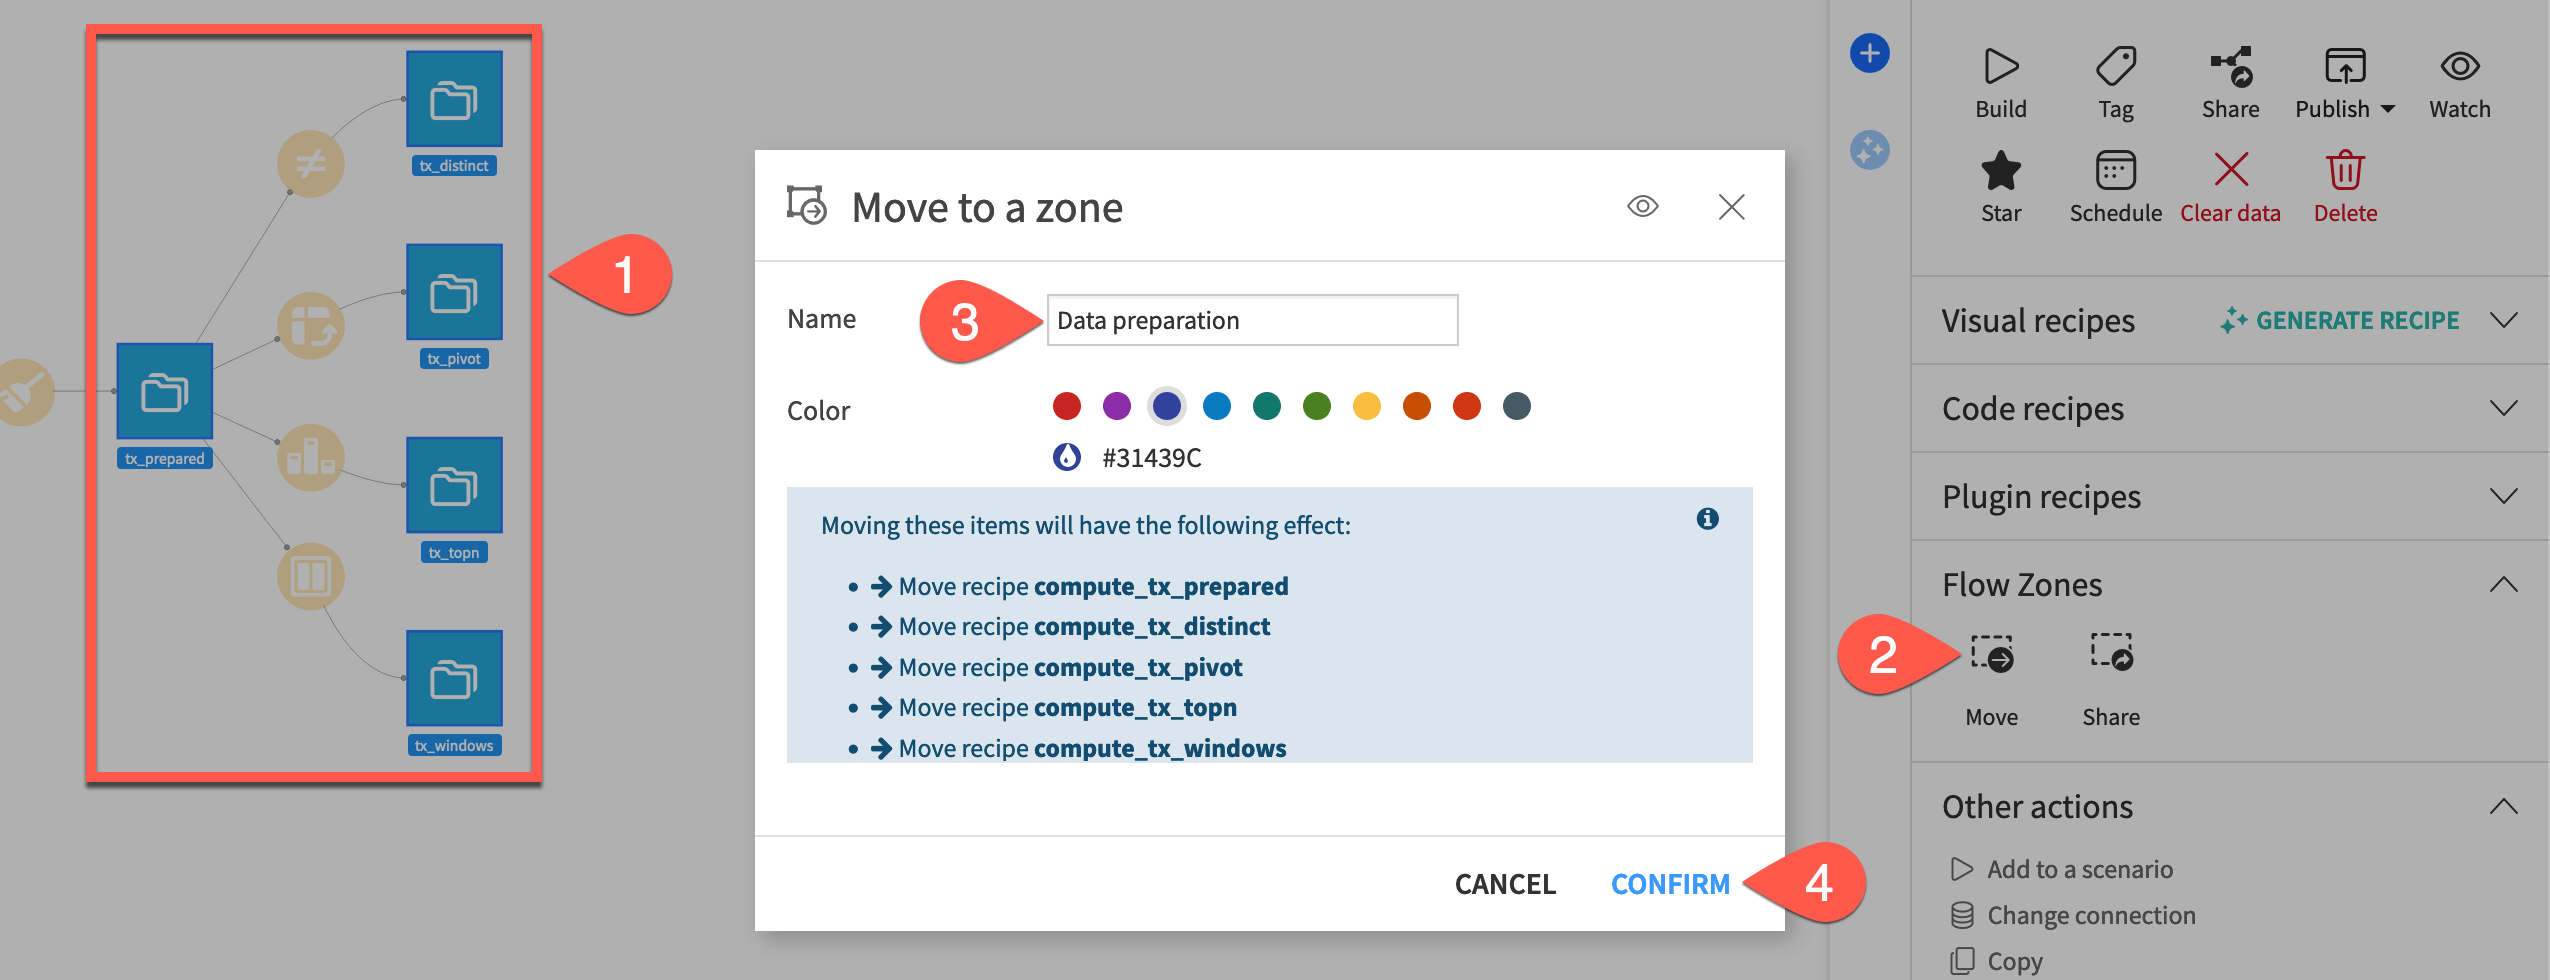
Move items to a new zone#
Start by moving items to a new Flow zone.
Hold the
Cmd/Ctrlkey, and select the five datasets furthest downstream:tx_prepared
tx_distinct
tx_pivot
tx_topn
tx_windows
In the Actions (
 ) tab of the right panel, under Flow Zones, select Move (or right-click on the selection, and select Move to a flow zone).
Name the zone
Data preparation, and review which recipes will move as well.Click Confirm.
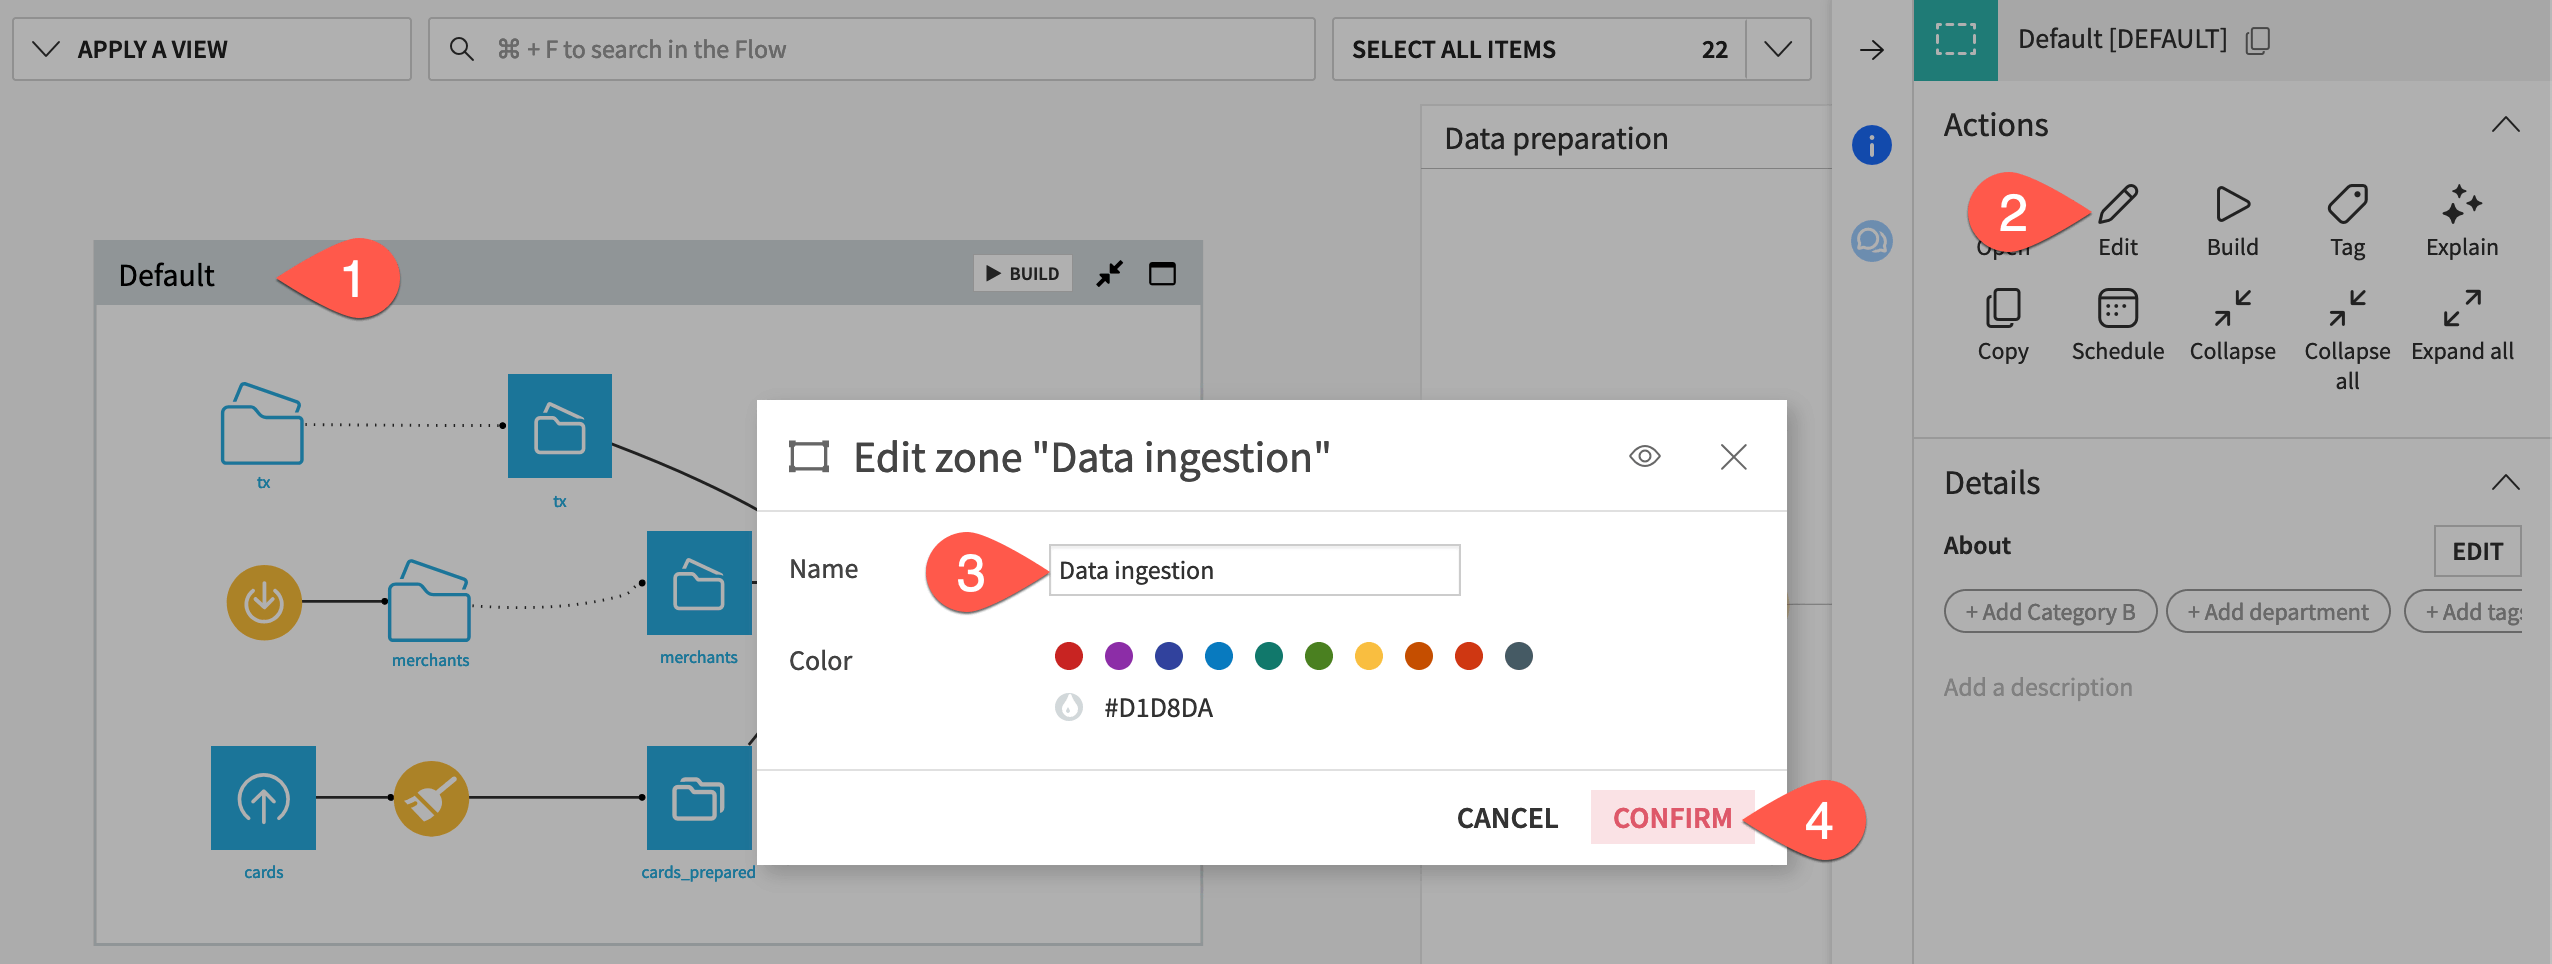
Rename the default zone#
You’ll find the remaining items automatically grouped into a default Flow zone.
Select the Default Flow zone.
In the Actions (
) tab, click Edit.Rename the Flow zone
Data ingestion.Click Confirm.
Customize the display of the Flow#
Once you have the Flow organized into more manageable zones, you might also look into options to configure the Flow’s display. One quick temporary option is right clicking on an item, and selecting the option to Hide all upstream or Hide all downstream.
There are also a number of more persistent Flow display options.
From the More Options (
 ) menu of the top navigation bar, select Settings.
From the right panel, select Flow display.
Although it will have only a small impact for this particular Flow, uncheck the option to Anchor Flow graph.
Check the box to Manually position zones.
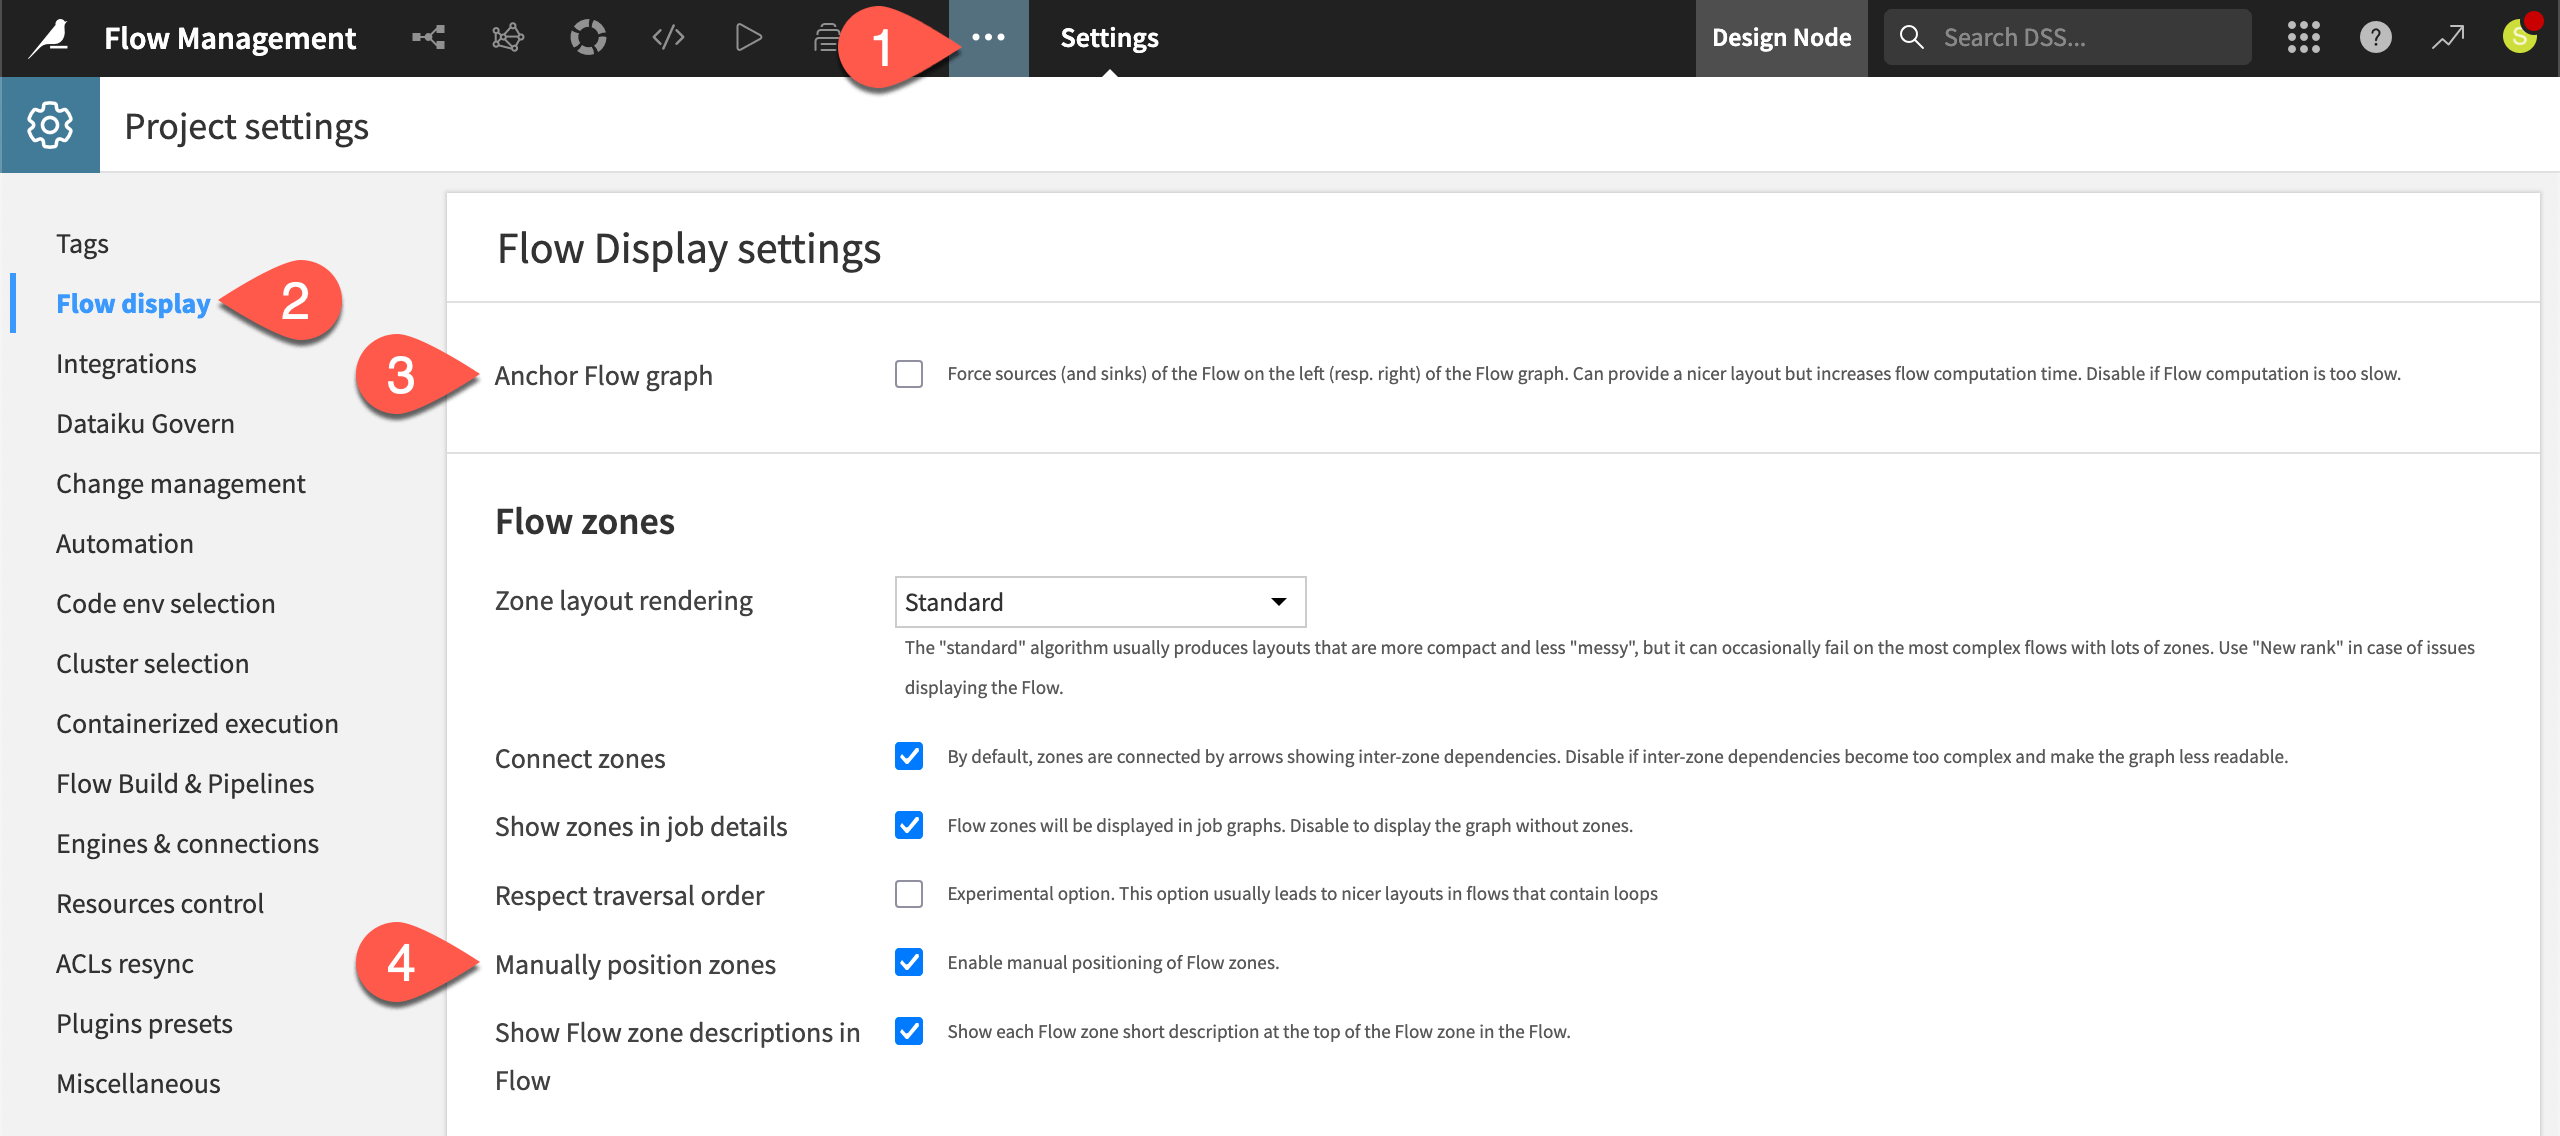
Click Save.
Return to the Flow (
g+f), and examine the differences, including the ability to drag zones to your preferred locations.
Search within a Flow#
Knowing how to efficiently search for information within a large Flow can be a huge time saver.
Directly beneath the top navigation bar, the Flow has three boxes to help you identify patterns, search for items, and make selections (based on which you can apply mass actions).
Apply a view#
Starting on the left, a menu of Flow views provides color-coded representations according to a variety of properties. For example, you can use these views to:
Analyze selections of connections and recipe engines.
Review which items have the most recent changes.
Track the size of data at each step in the Flow.
To give another use case, perhaps you want to change a column in one recipe. However, you’re unsure of what unintended impact your changes could have. First, it would be a good idea to trace the column lineage (![]() ) from the Schema (
) from the Schema (![]() ) tab of the right panel.
) tab of the right panel.
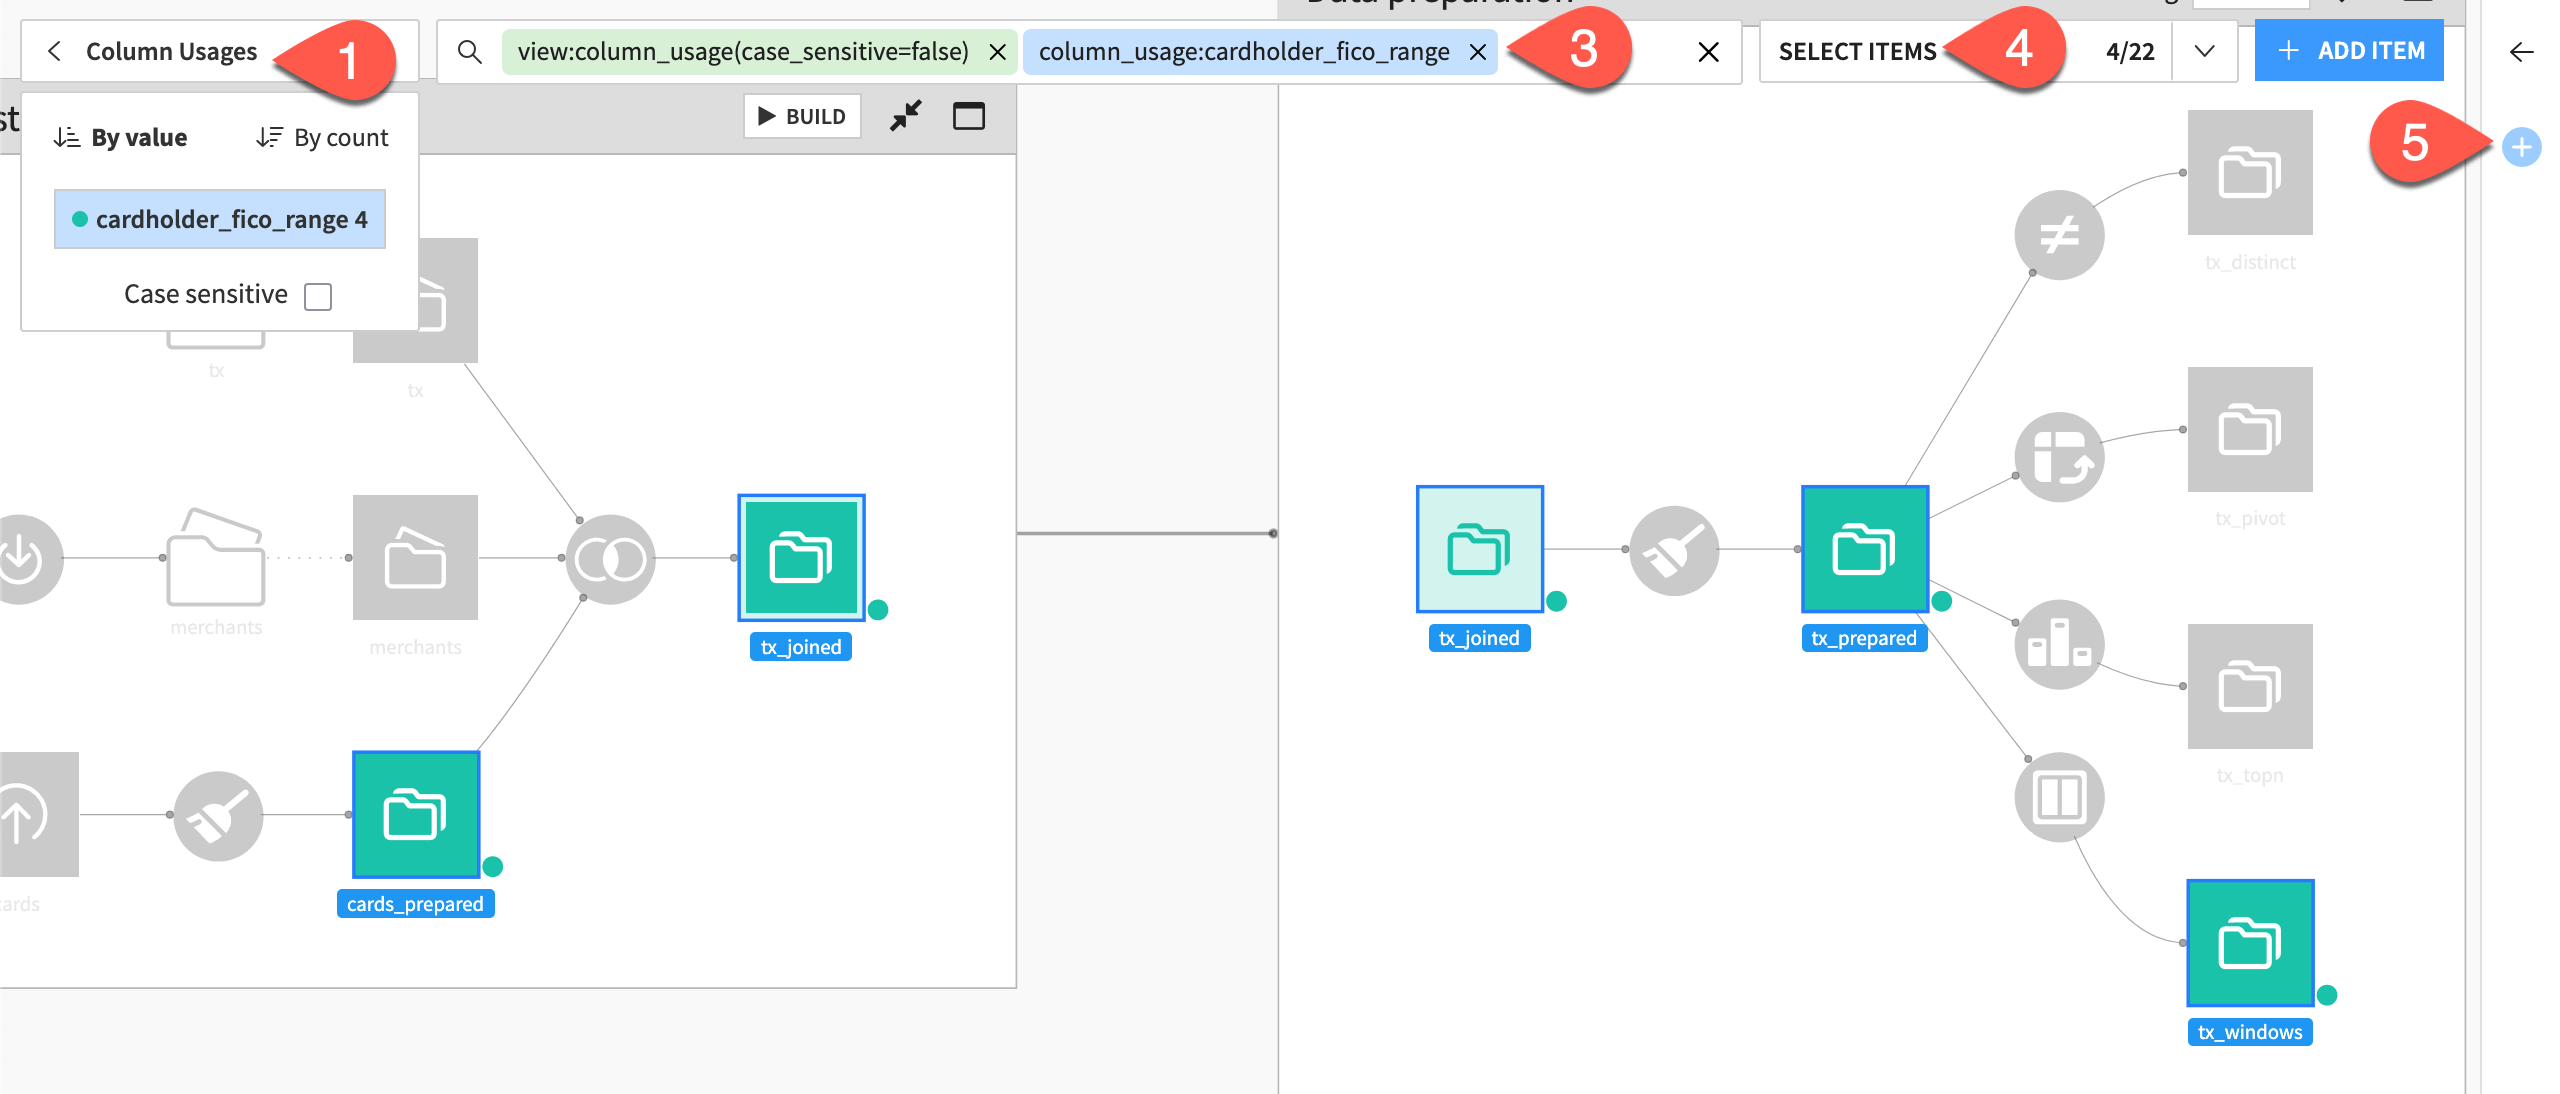
You can also use a Flow view to examine the usage of a particular column.
At the top left, click Apply a View, and select Column Usages.
Notice two chips immediately added to the search box, with the column_usage chip ending in a
:.Underneath the search bar, select cardholder_fico_range so that the second chip reads
column_usage:cardholder_fico_range.Click Select Items to confirm the selection of all datasets in the Flow matching the present search criteria.
As an example, with these four datasets selected, open the Actions (
) tab, and click Watch.
Tip
In this case, it wouldn’t have been difficult to manually select these four datasets. However, this tool provides a way to apply mass actions (such as tagging) on much larger item selections.
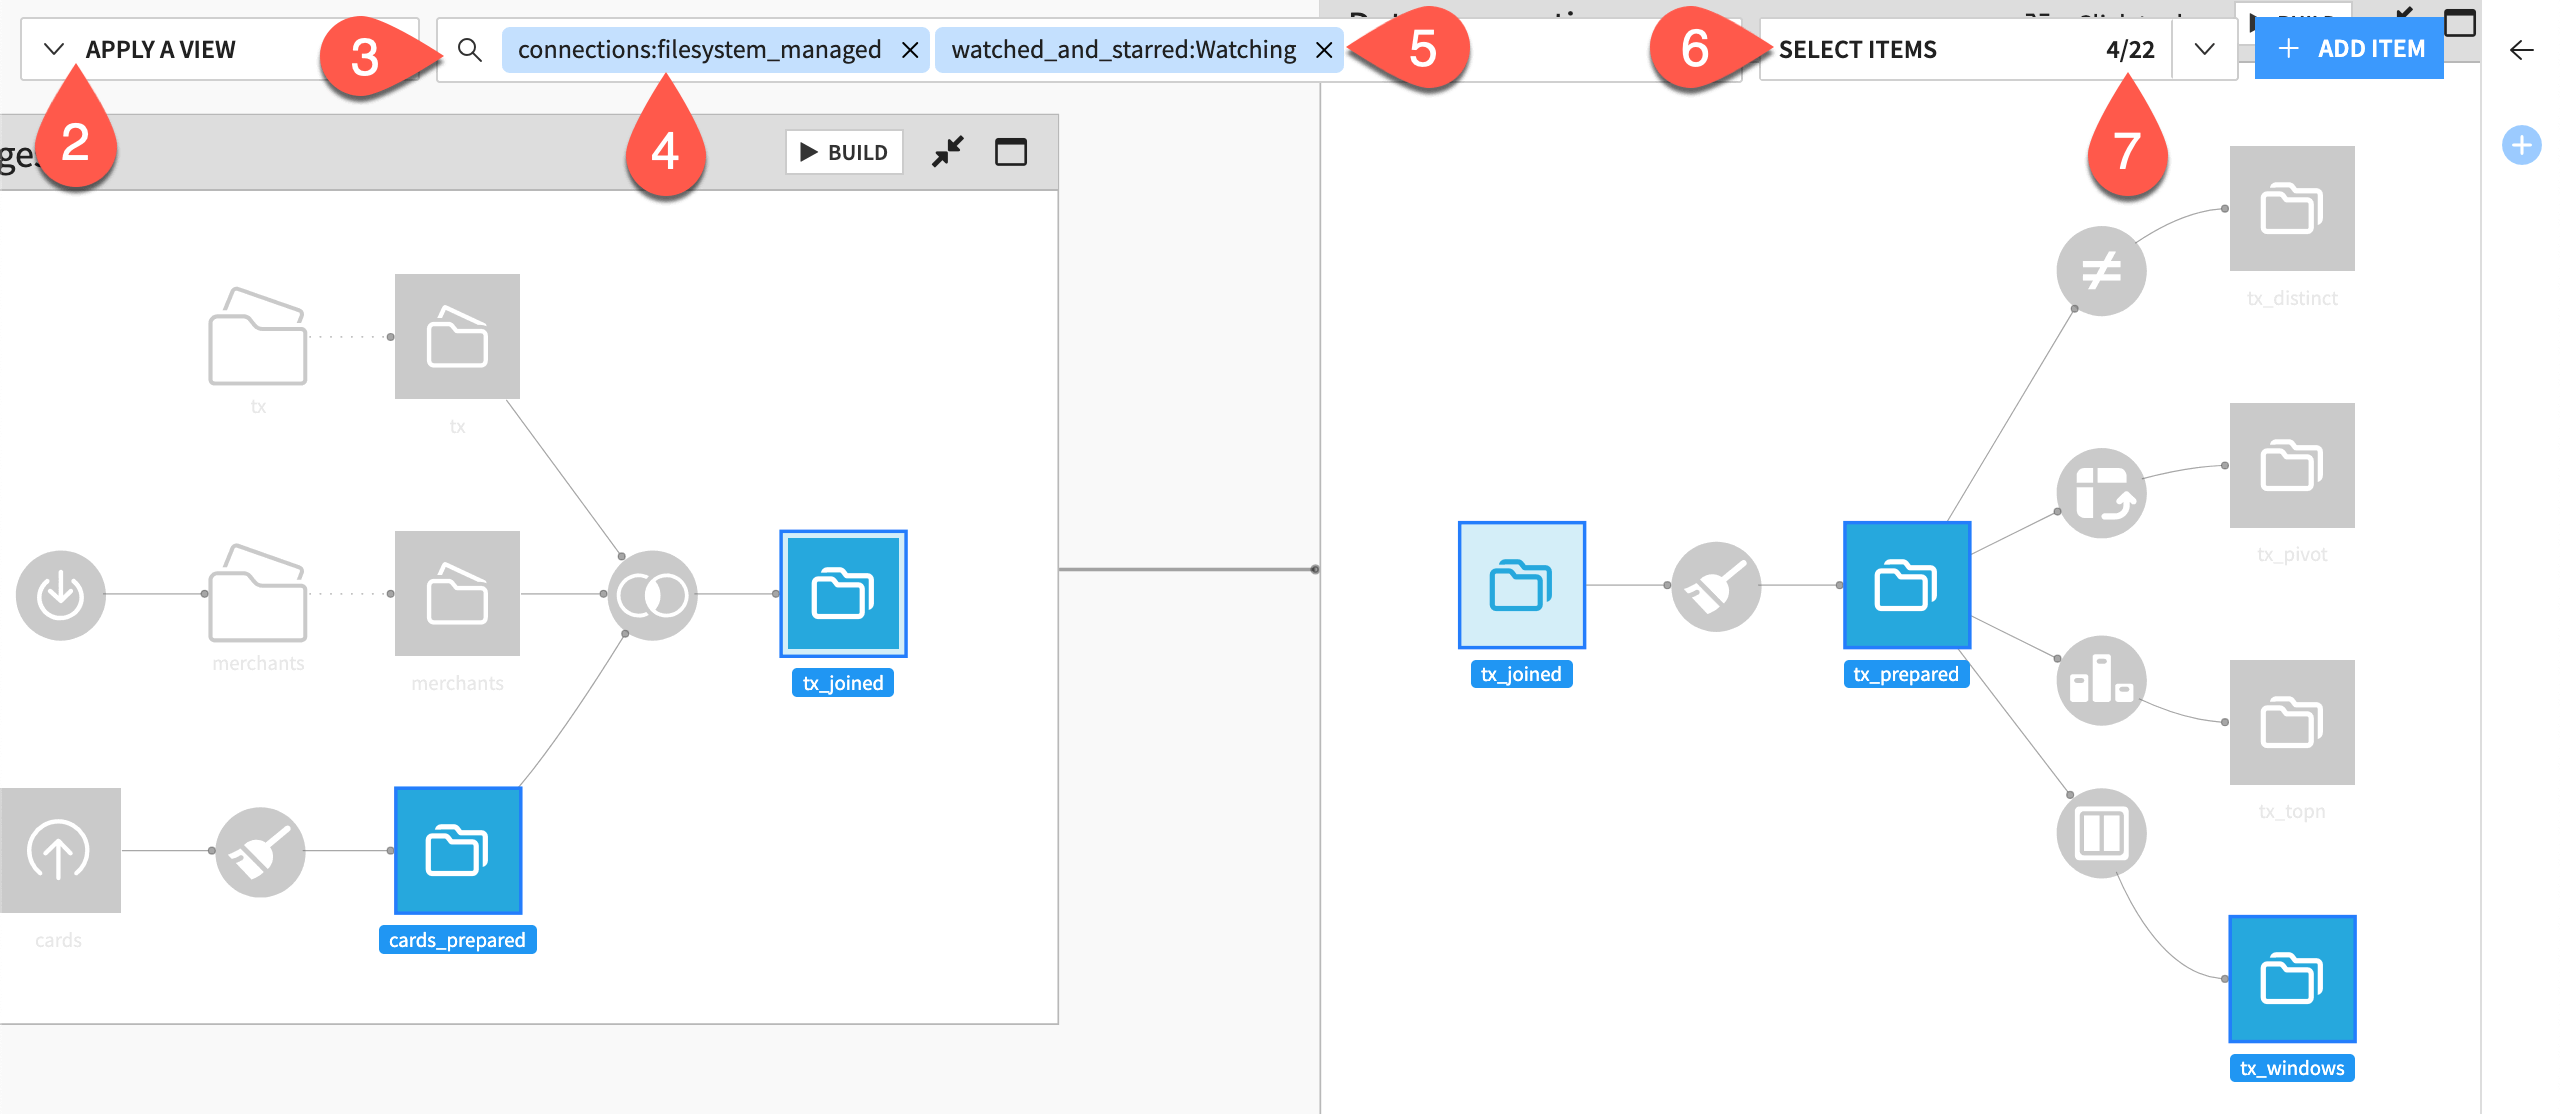
Search by keyword#
When applying the column usage Flow view, you may have noticed that Flow views are a shortcut to one possible type of search criteria (view:name). You can also add a much broader range of criteria directly to the search bar following a keyword:value format.
Be aware that, when adding multiple search conditions, the underlying operator logic is AND. Test this for yourself.
Clear all criteria from the search bar.
To confirm you’re watching the four datasets including the column of interest, click Apply a View > Watched and Starred. Then clear the search bar again.
Click in the search bar (or use the shortcut
Cmd/Ctrl+f) to initiate a new search.Select or type the keyword
connections. Selectfilesystem_managedso that the full chip readsconnections:fileystem_managed. Recognize the selection of seven datasets.In the search bar, add a second condition by typing or selecting
watched_and_starred:Watching.Click Select Items.
Notice that, instead of selecting all seven datasets that satisfy either condition (
ORlogic), the search returns only the four datasets matching both conditions (ANDlogic).
Navigate the Flow#
Rather than searching, sometimes you need the fastest way to reach a known item of interest. While you can visually mouse to it in the Flow, you can also find it through the search bar. Once you’ve found the right item, you can navigate to its upstream and downstream items using the keyboard.
Clear all criteria from the search bar.
Click in the search bar (or type
Cmd/Ctrl+f).Start typing
tx_prepared, recognizing how the search bar surfaces any item type of this name (here, both the dataset and its parent recipe).Select or finish typing
compute_tx_prepared.To navigate to upstream and downstream items, click the compass (
 ) (or use the shortcut
 Shift+a).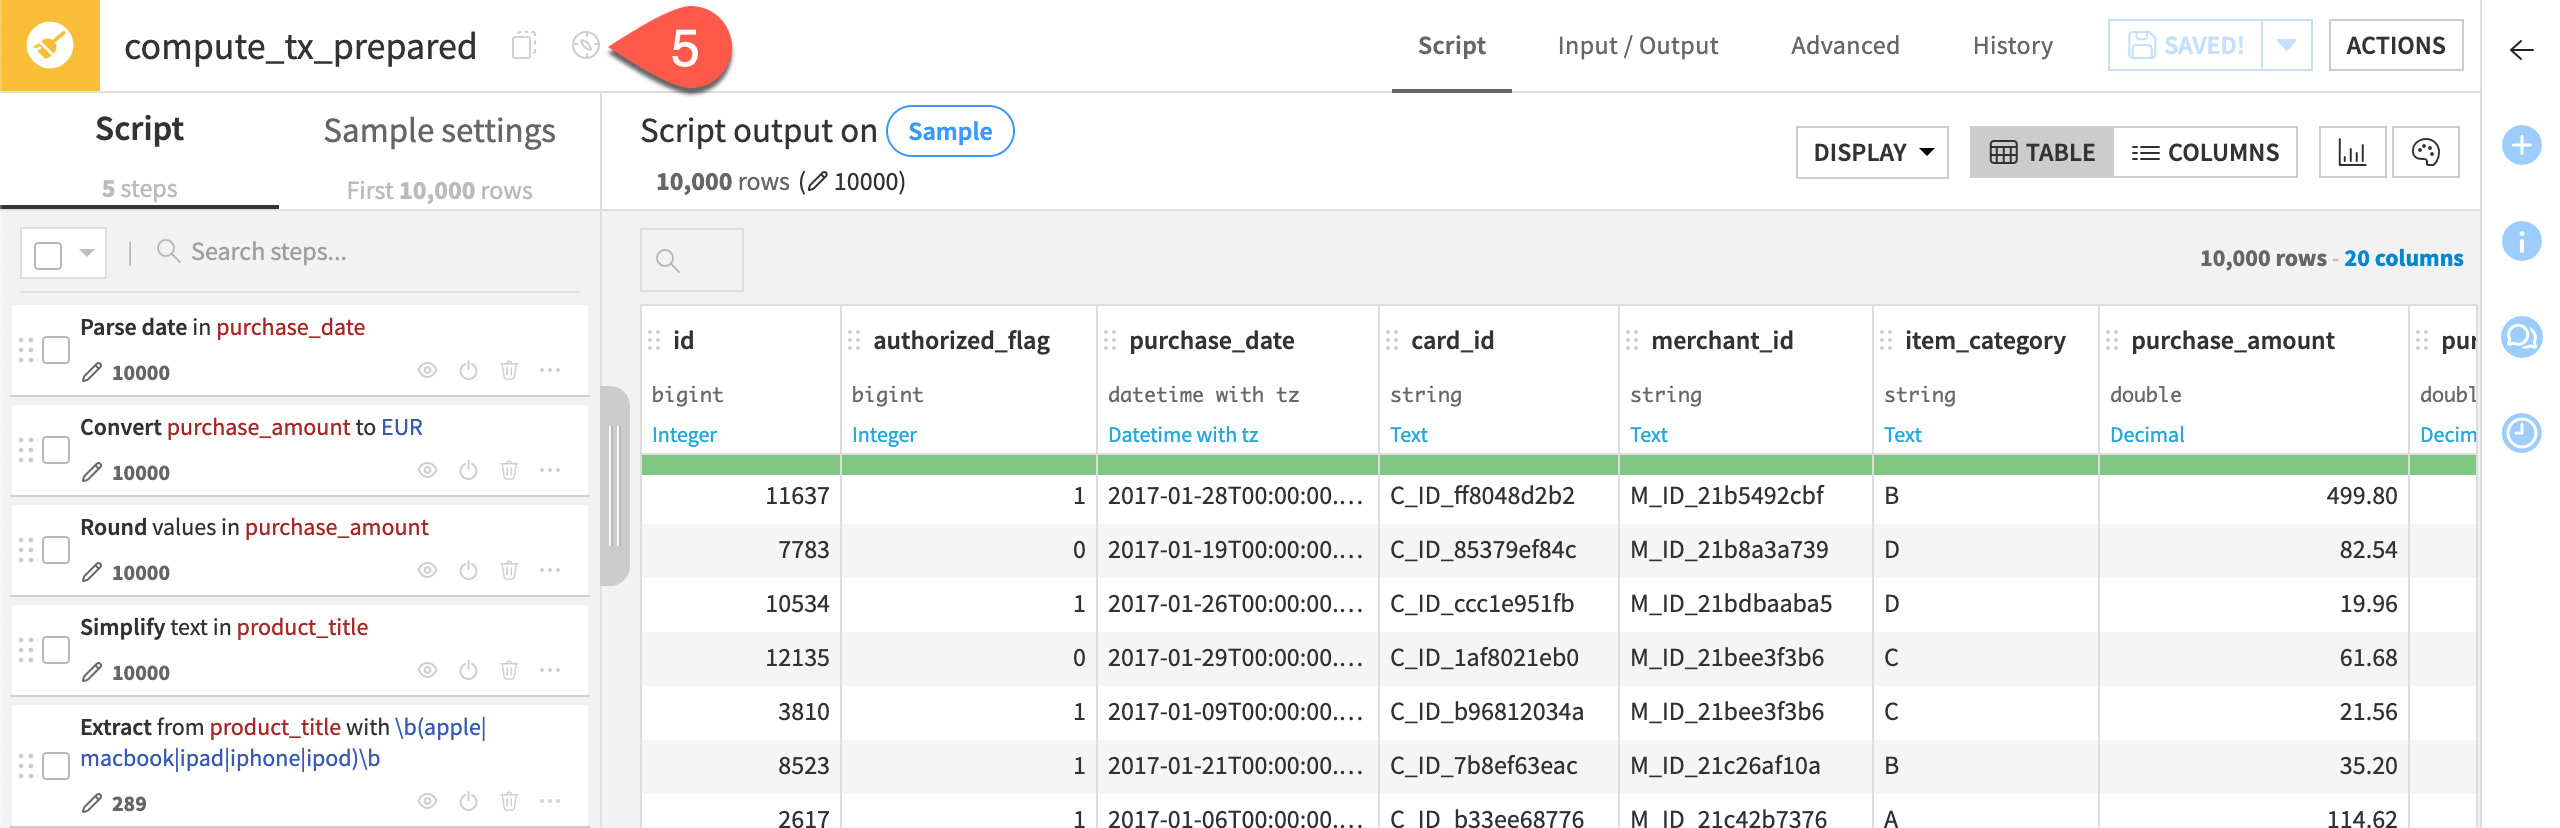
Use the keyboard arrows to navigate in any direction.
When finished, return to the Flow (
g+f).
Undo a change in the Flow#
Mistakes happen. When they do, it’s a great comfort to have an “undo” button. A Git repository tracks changes to Dataiku projects. This makes it possible to revert a project to an earlier state.
Delete a Flow zone#
To trial this idea, delete a Flow zone.
Select the Data preparation Flow zone.
In the Actions (
) tab, click Delete.Click Confirm.
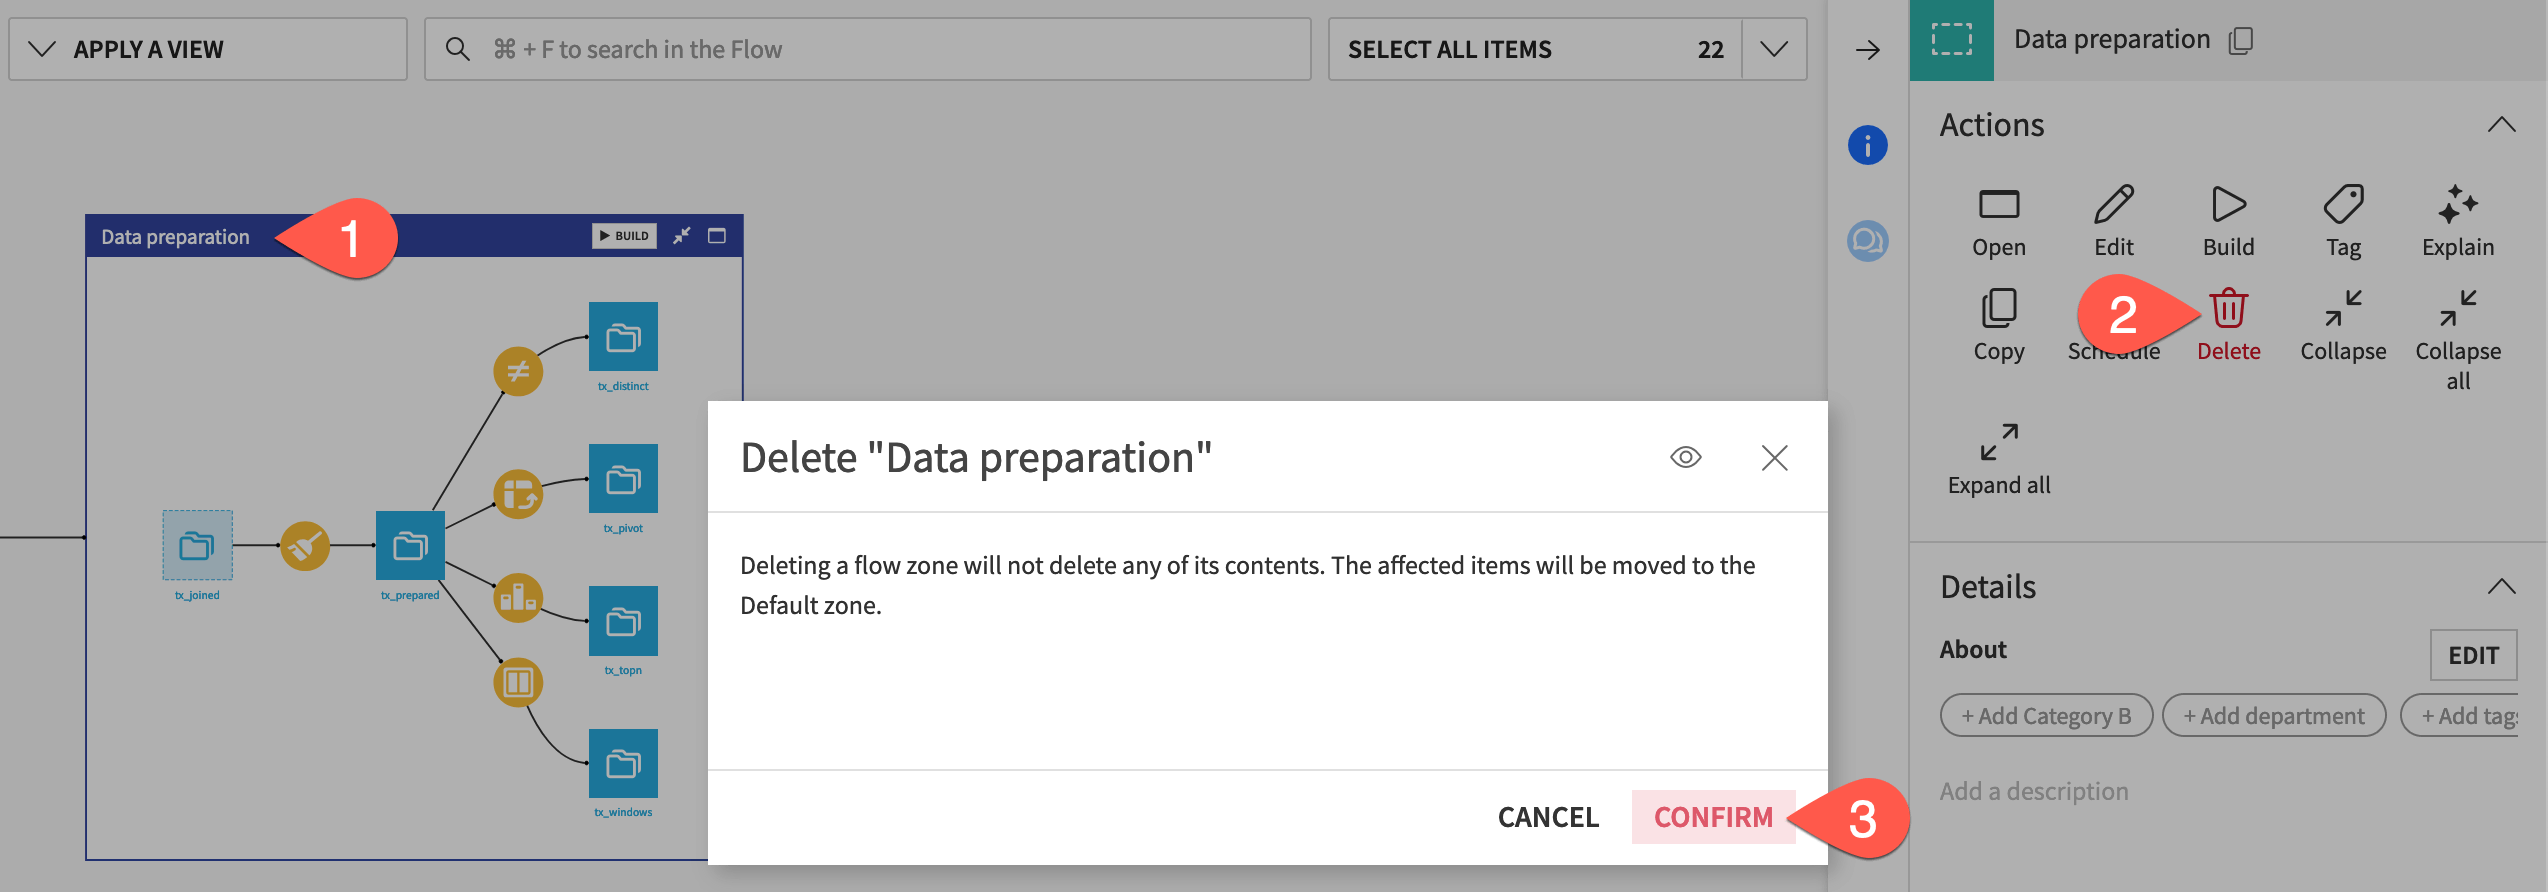
You’ll see that both Flow zones disappear. This is because items in the deleted Flow zone move to the Default Flow zone (renamed as Data ingestion). However, when there’s only one zone, you’re left with the single Flow itself.
Tip
If you had tried to delete the Data ingestion Flow zone, it wouldn’t have been possible. You can’t delete the default Flow zone.
Revert a change#
Imagine you had deleted the Flow zone by accident. Roll back this change.
From the More Options (
) menu in the top navigation bar, select Version Control.Click on the change you made before deleting the Flow zone. (Assuming you made no other changes, this will be the second item in the list from the top.)
Select Revert To This Revision and Confirm to undo any changes you made after this commit.

Return to the Flow (
g+f) to see the restored zone.
See also
To learn more about version control in Dataiku, see Project Version Control.
Next steps#
Having learned the basics of Flow organization, customization, and searching, you’re ready to tackle larger projects!
To learn about how to use Flow zones to your advantage when building datasets, check out Tutorial | Build modes!
See also
For more information, see Working with Flow zones in the Developer Guide.