
Quick Start | Dataiku for agents#
Get started#
Are you interested in using Dataiku to build AI agents to perform tasks? You’re in the right place!
Create an account#
To follow along with the steps in this tutorial, you need access to a 14.3+ Dataiku instance. If you don’t already have an account, you can get started in one of two ways:
Follow the link above to start a 14 day free trial. See How-to | Begin a free trial from Dataiku for help if needed.
Install the free edition locally for your operating system.
Open Dataiku#
The first step is getting to the homepage of your Dataiku Design node.
Go to the Launchpad.
Within the Overview panel, click Open Instance in the Design node tile once your instance has powered up.
Important
If using a self-managed version of Dataiku, including the locally downloaded free edition on Mac or Windows, open the Dataiku Design node directly in your browser.
Once you are on the Design node homepage, you can create the tutorial project.
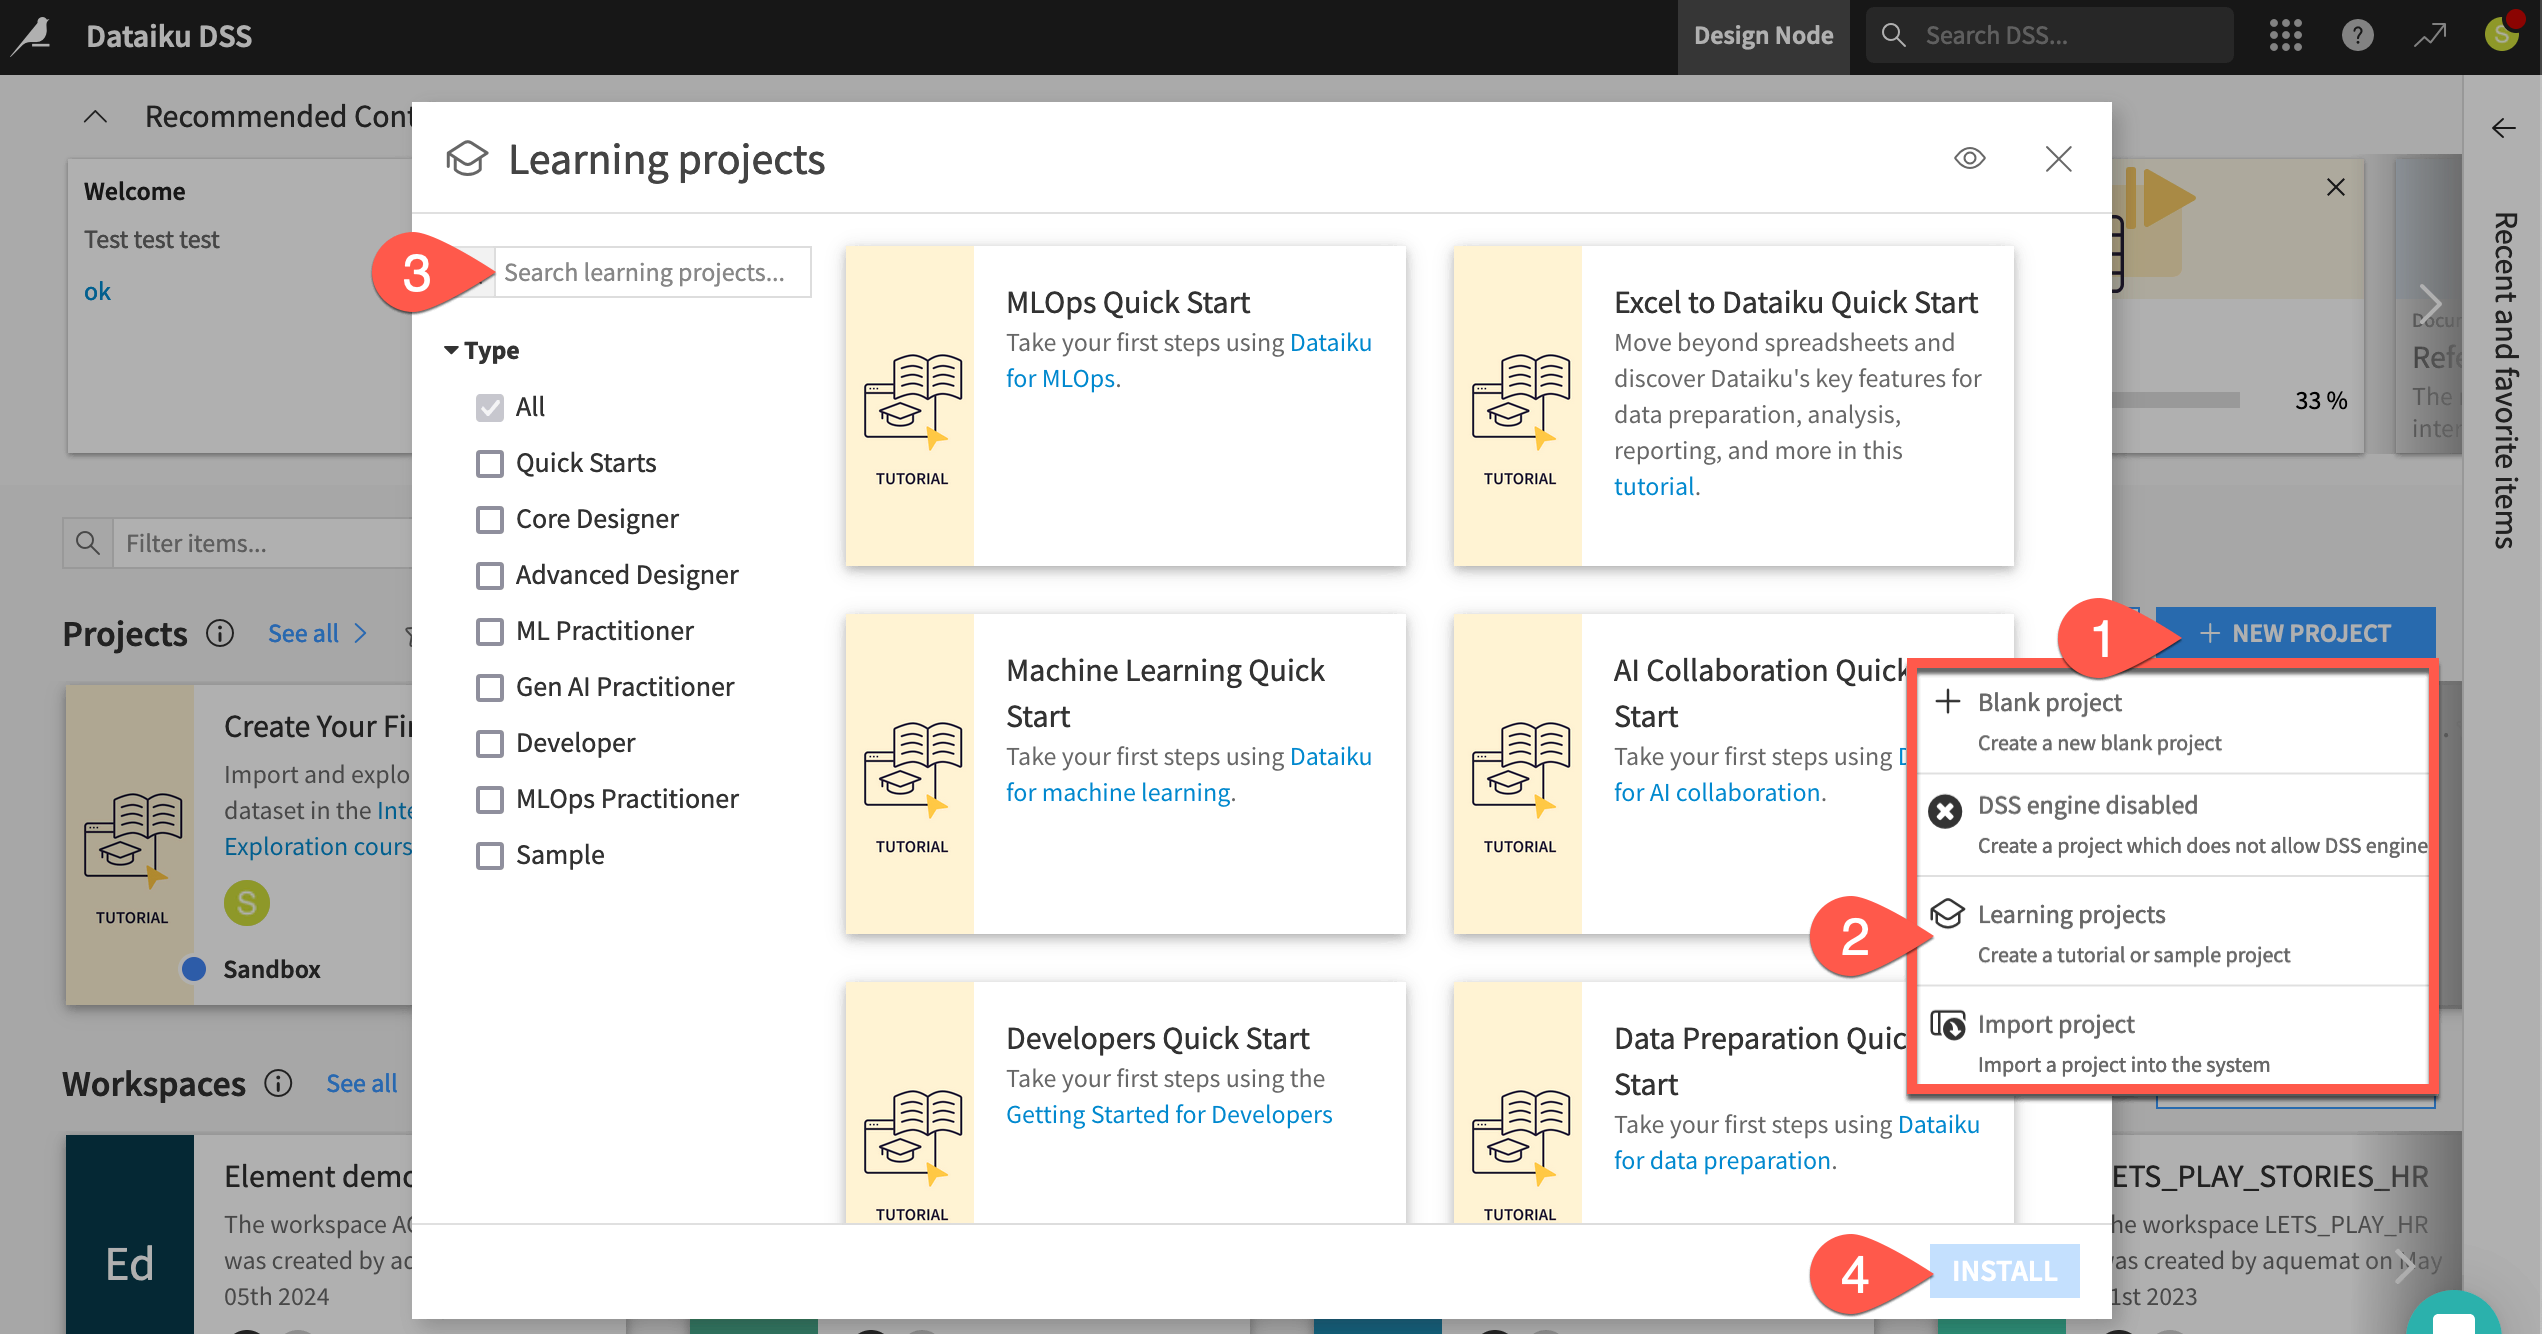
Create the project#
From the Dataiku Design homepage, click + New Project.
Select Learning projects.
Search for and select Agents Quick Start.
If needed, change the folder into which the project will be installed, and click Create.
From the project homepage, click Go to Flow (or type
g+f).
Note
You can also download the starter project from this website and import it as a ZIP file.
Understand the project#
Before building your first agent and tools, take a moment to understand the goals for this quick start and the data at hand.
Objectives#
In this quick start, you’ll:
Build tools that perform actions.
Combine these tools with instructions to create a Simple Visual Agent.
Chat with the agent and use it as an assistant.
See also
This quick start focuses on Dataiku’s visual tools for AI agents. If your primary interest is using code and Dataiku to build agents, start with the Agents and Tools for Generative AI section in the Developer Guide.
Tip
To check your work, you can review a completed version of this entire project from data preparation through MLOps on the Dataiku gallery.
Review the Flow#
You should now be on the Flow of your Agents Quick Start project. In Dataiku, the Flow is the visual representation of how datasets, recipes, models, and agents move data through an analytics pipeline.
Shape |
Item |
Color & Icon |
|---|---|---|
|
Squares represent datasets and knowledge banks. |
|
|
Circles represent recipes, which are instructions for data processing. |
|
|
Diamonds represent models and agents. |
|


About this project#
Imagine you’re a job seeker. Instead of checking individual job boards, you’ve built your own Flow to process potential job opportunities.
Like most data projects, this one began with some basic data preparation. At the left of the Data Preparation Flow zone, the project starts from a dataset of job postings labeled as real or fake. A pipeline of recipes processes this initial data for the next stage.
In the Machine Learning Flow zone, the project creators used this cleaned data to train a classification model. The Flow applies this model to predict whether a new job posting is real or fake.
The Generative AI Flow zone contains a sampled jobs dataset ready for processing by GenAI recipes.
See also
To build these three zones yourself, explore the quick starts for Data Preparation, Machine Learing, and Generative AI respectively.
Take a closer look at the Flow for yourself.
At the far left of the Data Preparation Flow zone, click once on the job_postings dataset.
Click Preview (or use the keyboard shortcut
Shift+P) to pull up the first few rows.Confirm for yourself how each record is a different job posting, complete with information like job titles, locations, descriptions, and requirements.
Open the Details (
 ) tab of the right panel to review its metadata.
Moving right, select other items downstream in the Flow until you reach the Generative AI Flow zone.

Explore the starting data#
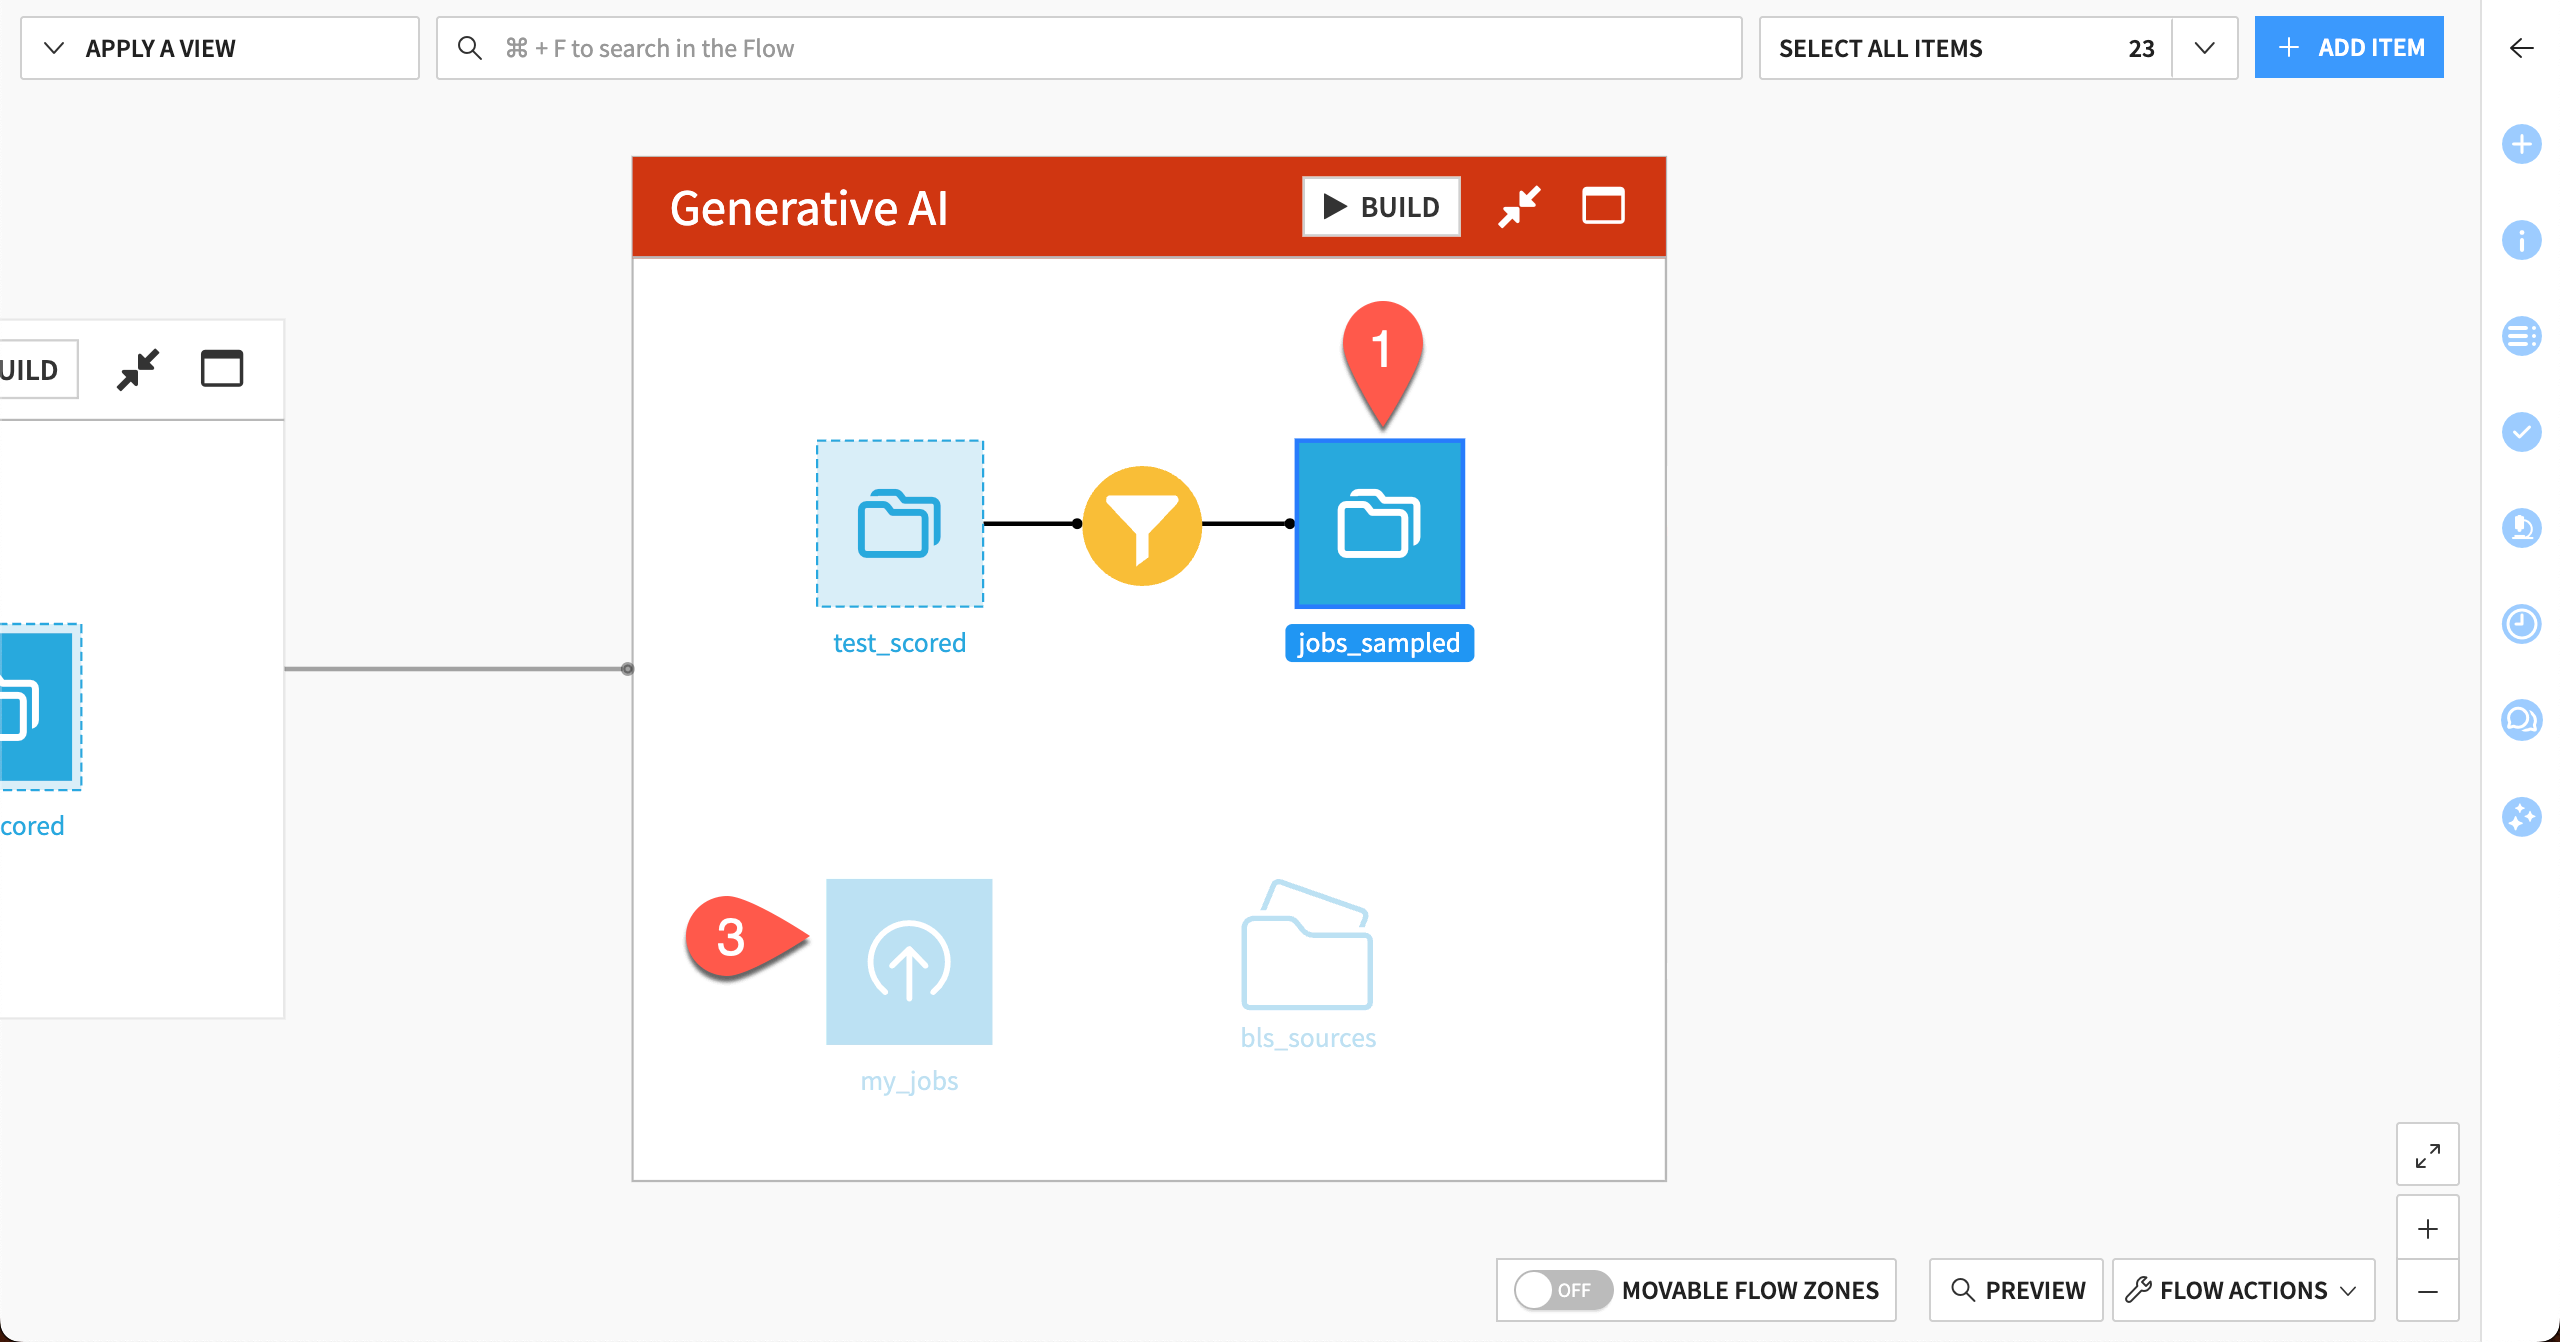
The starting point for this quick start is the dataset called jobs_sampled, found in the Generative AI Flow zone. This is a subset of job listings that were scored by a traditional machine learning model that predicted whether each job was a real or fake posting.
In the Generative AI Flow zone, double click on the jobs_sampled dataset.
Confirm for yourself that each record in this dataset is a job posting.
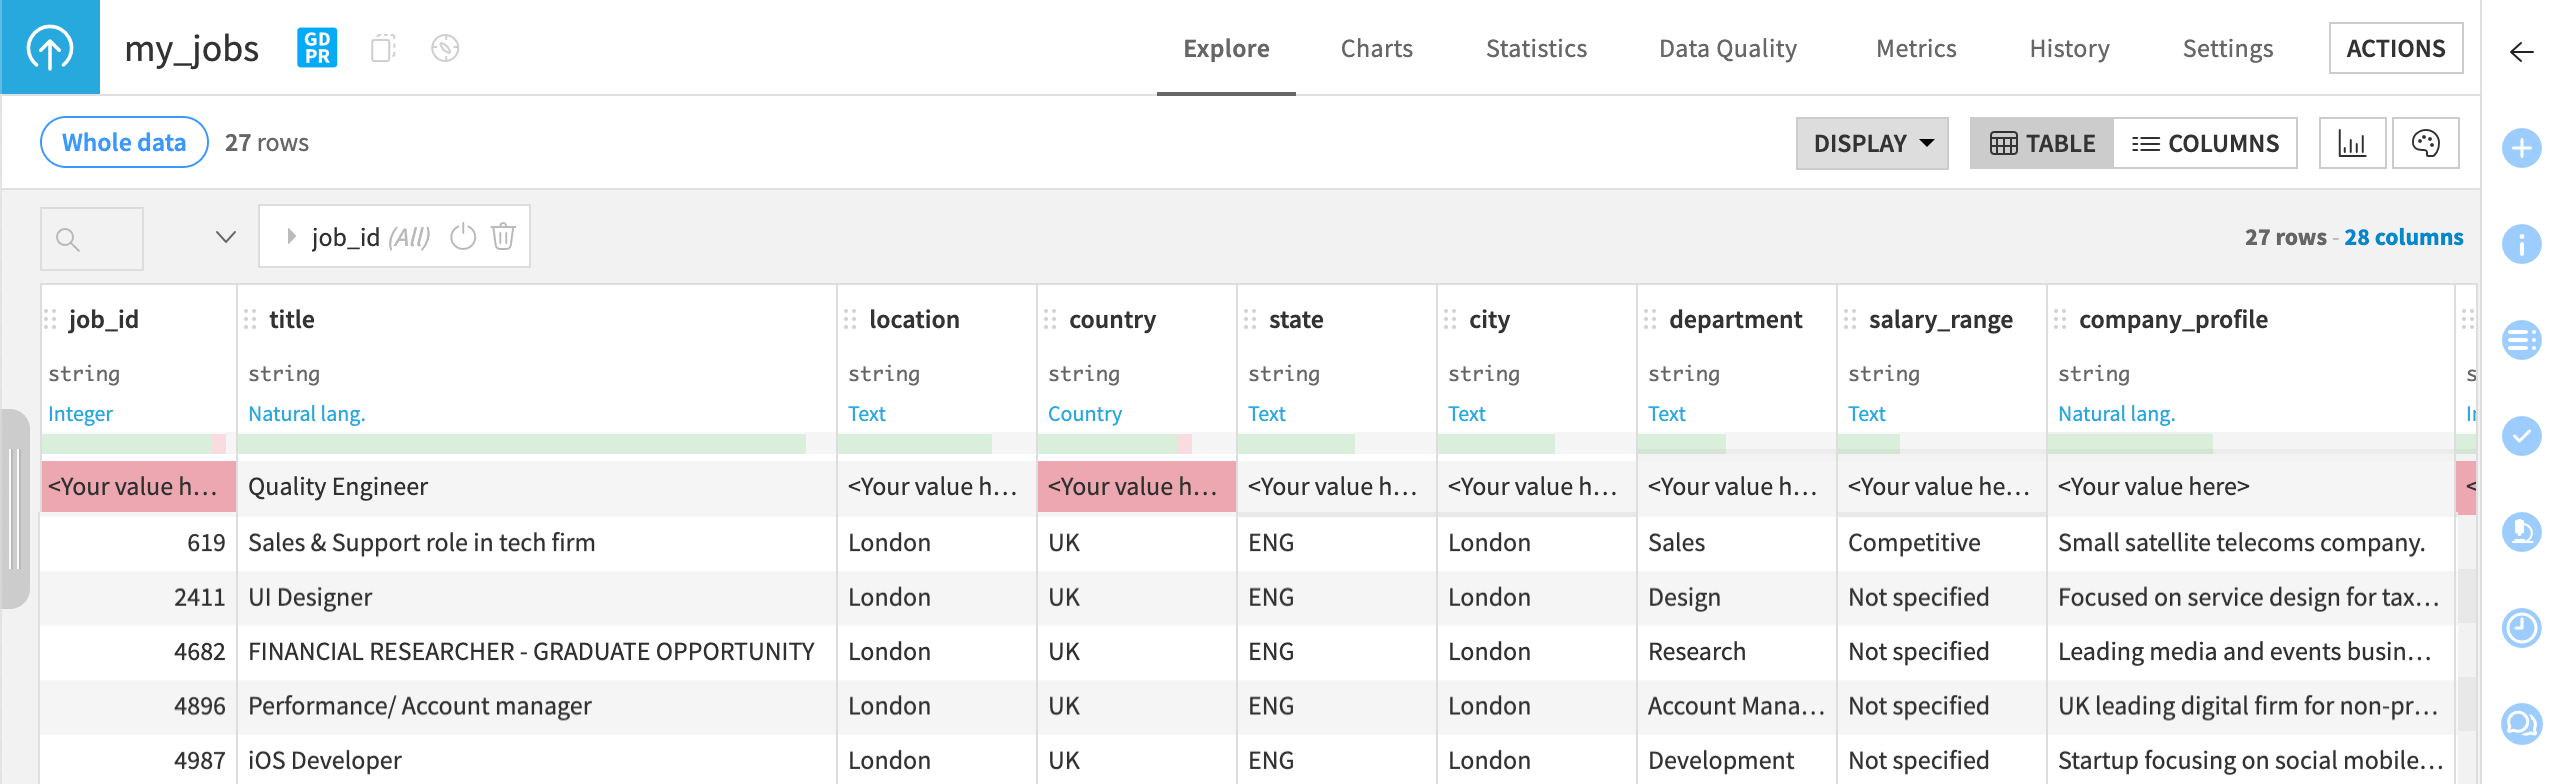
Double click to open the my_jobs dataset and confirm it is an empty dataset that contains the same columns as jobs_sampled. You’ll see later how an agent can save job postings into this empty dataset!
How agents can help#
For a job seeker, searching the data and saving relevant jobs would be a useful task. However, it could be time consuming to create filters that find the desired jobs by searching through multiple columns of the dataset.
This is where agents can help!
Agents go beyond processing text. Powered by large language models (LLMs), they can use tools to perform actions on datasets, predictive models, documents, and other kinds of objects.
In this case, an agent can:
Take search input from a user.
Search the entire dataset for jobs relevant to the search.
Save those jobs to a new dataset for the user to explore.
Let’s build an agent to automate these tasks!
Connect to the LLM Mesh#
LLMs specialize in processing input and generating responses to prompts. LLMs can also power agents that perform tasks and workflows.
Dataiku’s LLM Mesh provides a unified secure gateway to your organization’s choice of LLMs. It solves the problems of oversight, governance, and centralization — all factors which hinder the deployment of LLM-based applications and agents.
See also
For an introduction to the LLM Mesh, you might start with the original blog post introducing the concept, The LLM Mesh: A Common Backbone for Generative AI Applications. Newcomers to the field may also wish to consult Concept | Large language models and the LLM Mesh.
Obtain an API key from an LLM provider#
An LLM connection isn’t the same as a free account with ChatGPT or another LLM provider. Your instance administrator needs to follow the terms of an LLM provider to get started with its API.
Identify your instance administrator. If you’ve started a Dataiku trial, you are the instance administrator in this respect!
Next, choose a supported LLM connection.
If a suitable LLM connection already exists on your instance, request the administrator to grant you access to it. Alternatively, create it yourself with the instructions below.
To create the connection yourself, you’ll first need to follow your LLM provider’s documentation to obtain an API key.
Tip
If your chosen LLM provider has a chat interface (for example, ChatGPT for OpenAI), ask it how to get started with its API.
Create an LLM connection in Dataiku#
If you are administrator of your instance, return to Dataiku’s Design node to create the connection once you have an API key from an LLM provider.
From the waffle (
 ) menu of the top navigation bar, select Administration.
Go to the Connections tab.
Click + New Connection.
Scroll down to the LLM Mesh section, and choose your LLM provider.
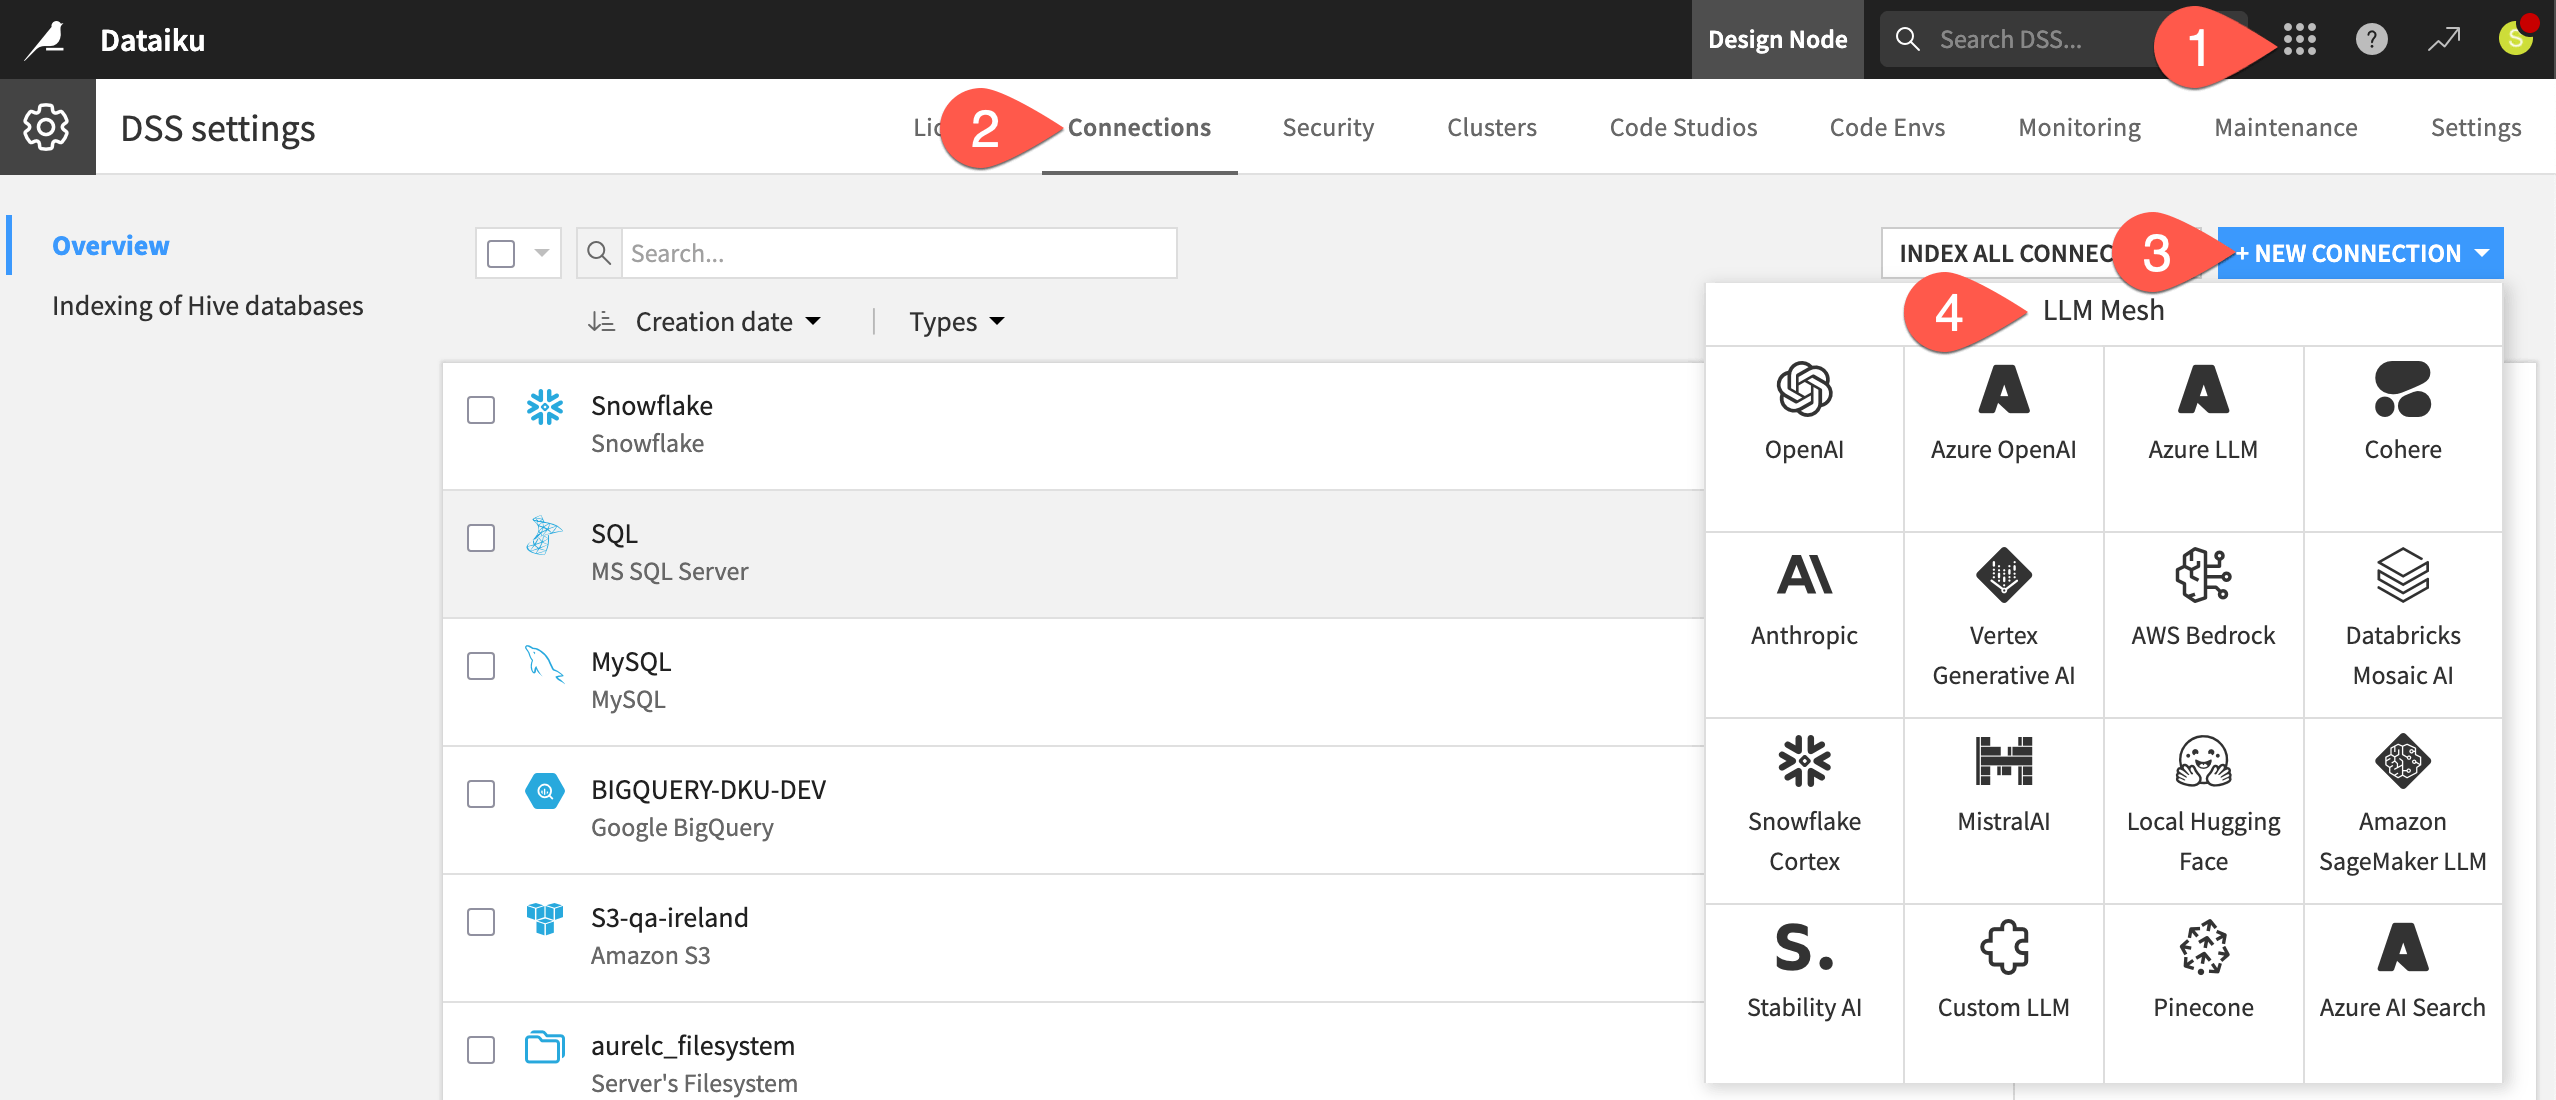
The exact details can differ depending on the type of connection, but typically you’ll need to:
Provide a name for the connection (such as
<your-name>-<llm-provider-name>).Provide your API key.
Click Test to confirm your API key is working.
See also
Always consult the reference documentation for details on establishing a specific LLM connection.
Once you’ve confirmed your API key is working, finish creating the connection.
Select at least one text completion model your connection should be able to access, including:
Adjust security settings as needed, such as limiting which groups can use the connection. If you go to your profile in the top right corner, you’ll see the groups to which you belong.
When ready, click Create.
Install internal code environment#
The agent requires a code environment for embedding unstructured data. Accordingly, your instance administrator needs to follow the reference documentation to install and enable the following internal code environment:
Tip
If you’re not able to meet all these prerequisites, you can still read along to understand Dataiku’s approach to building agents!
Build the tools#
An agent is made up of one or more tools, each of which includes a particular task for the agent to perform.
Dataiku provides a number of managed tools that you can configure through a visual interface.
See also
You can also create your own custom tools via code. See these tutorials in the Developer Guide to learn how:
The job search agent will include two tools built from Dataiku’s managed tools:
Search a dataset based on input from the user.
Copy results from that search into a different dataset.
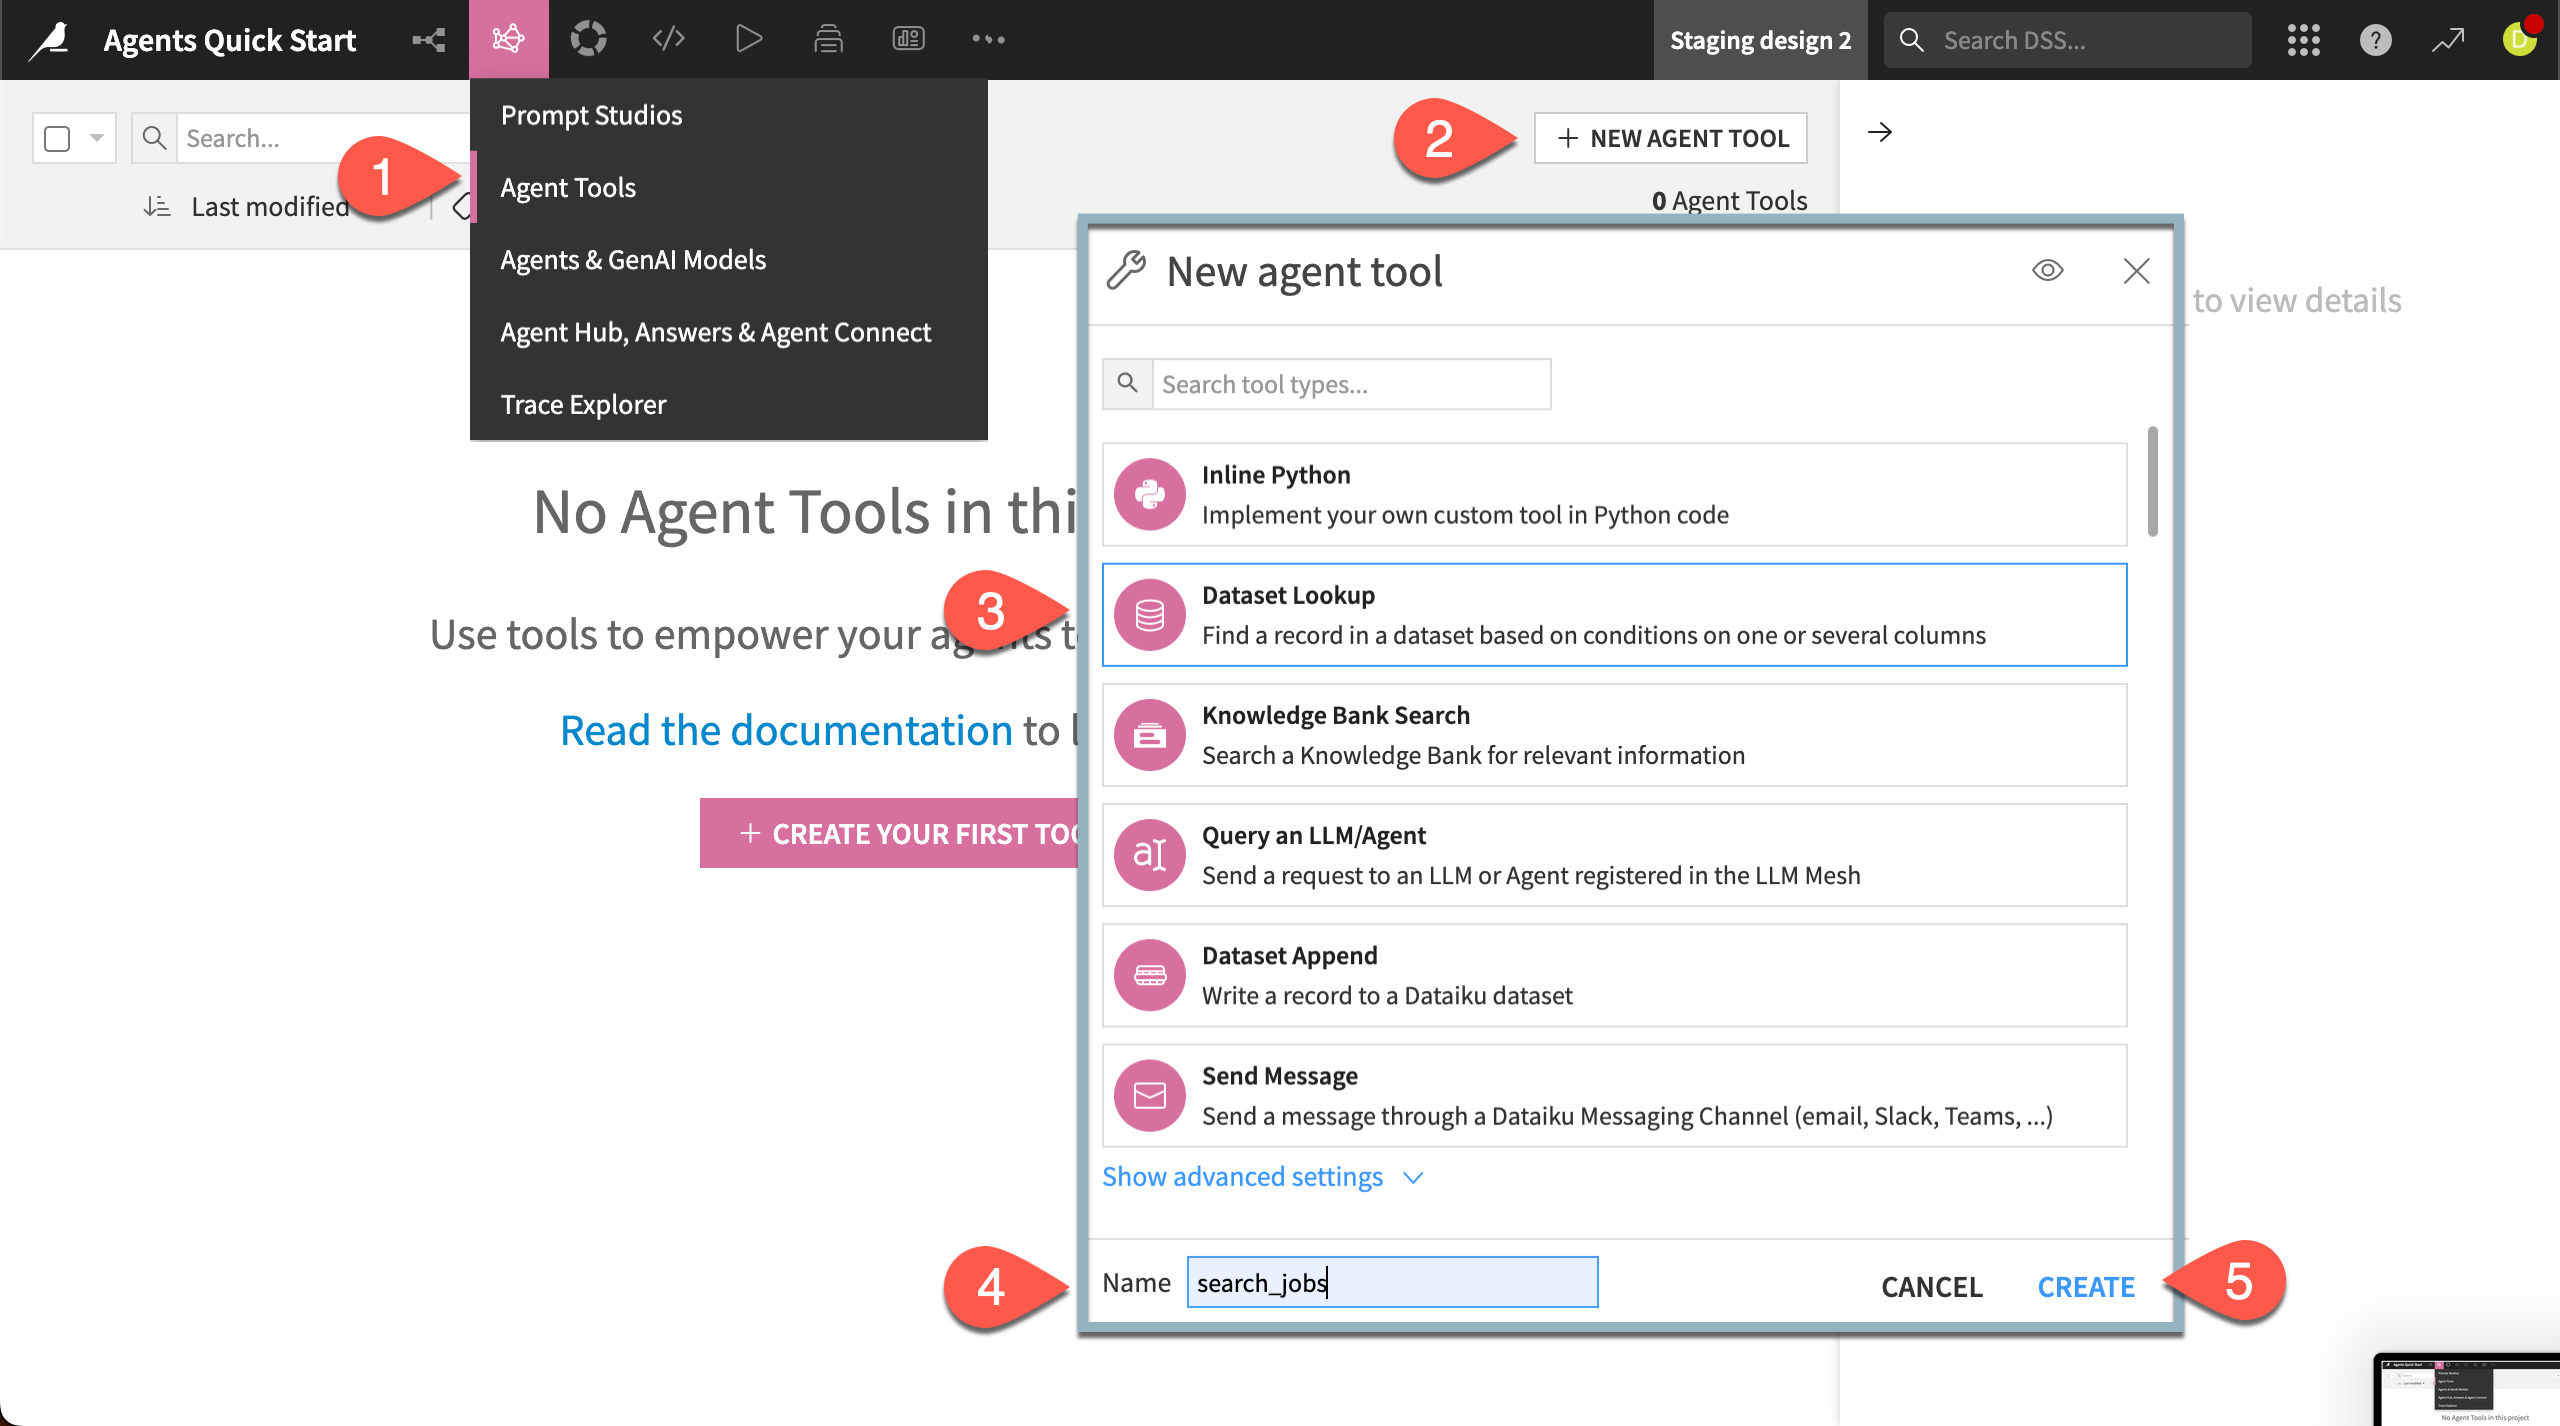
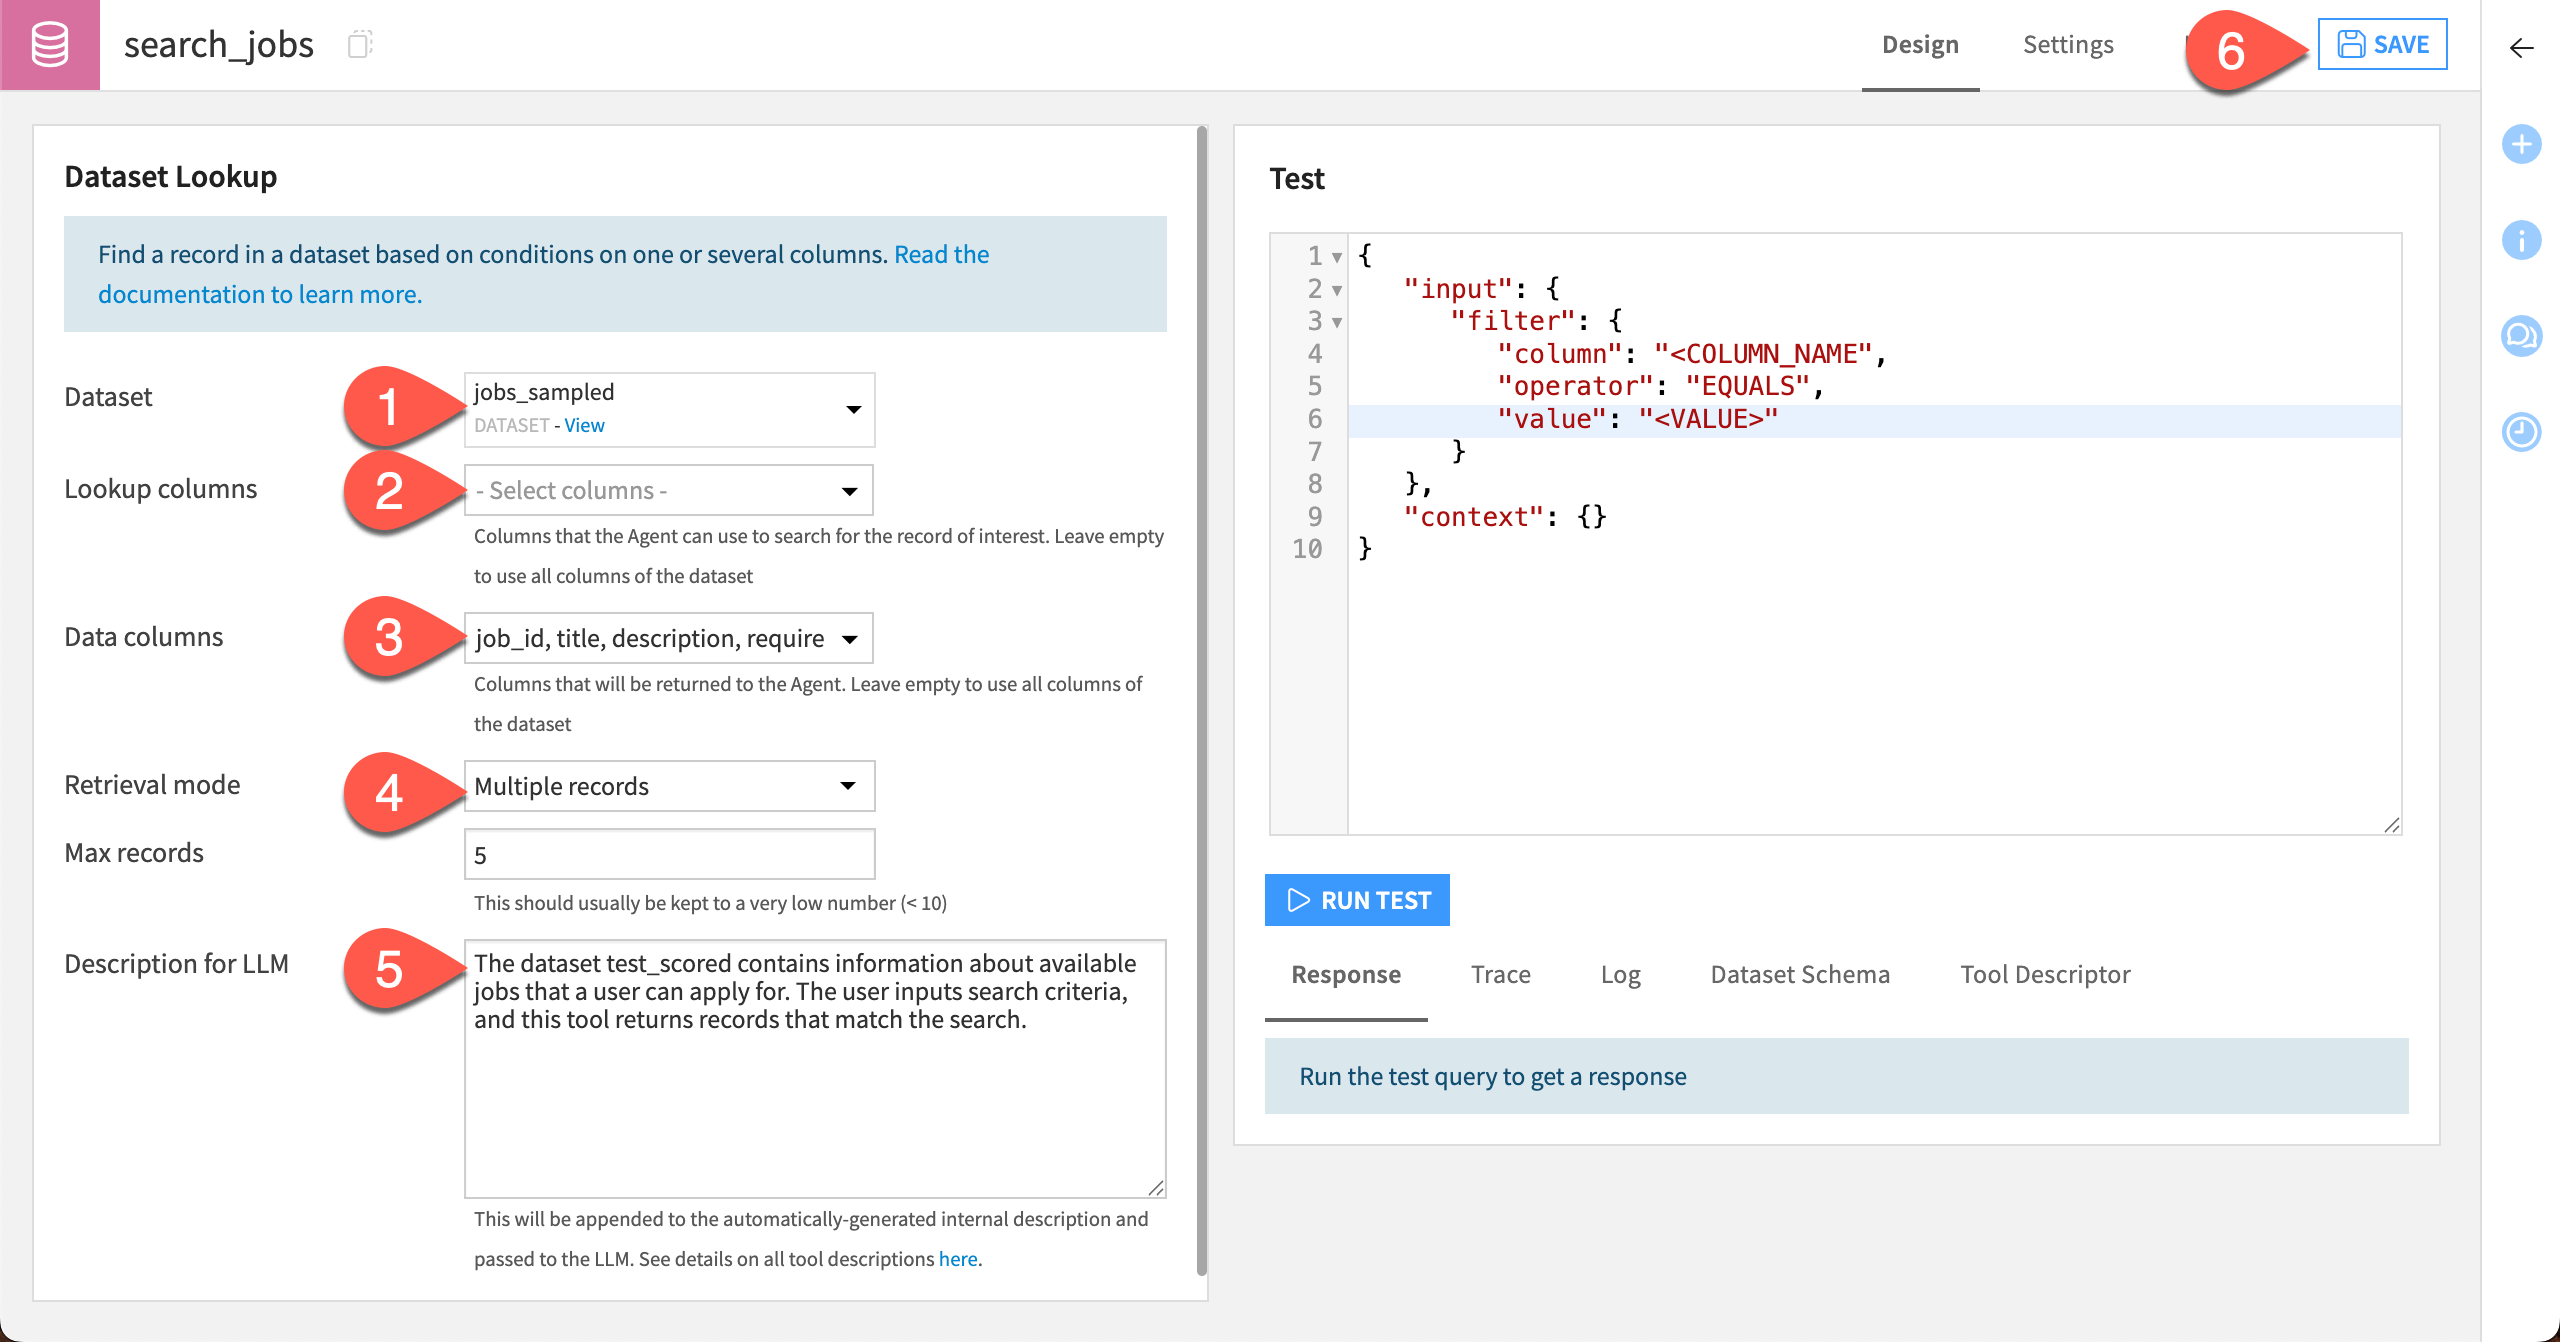
Create the lookup tool#
The first tool will search the jobs_sampled dataset, which includes a subset of the job listings. This small dataset will keep the LLM costs low for the purposes of this tutorial. In a real situation, you could use the larger dataset.
In the top navigation bar, go to the GenAI (
 ) menu > Agent Tools.
Click + New Agent Tool.
Choose Dataset Lookup from the available tools.
Give the tool the Name
search_jobs.Click Create.
Next, configure the settings that tell the tool what to do.
In the dropdown next to Dataset, select jobs_sampled.
For Lookup columns, leave the menu empty so the tool will search all available columns of the dataset.
For Data columns, select the following columns: job_id, title, description, requirements.
For Retrieval mode, choose Multiple records and leave the Max records at
5. This will keep LLM responses short.In the Description for LLM box, copy and paste the text below. It will help the agent know what the tool does and when to use it.
The dataset jobs_sampled contains information about available jobs that a user can apply for. The user inputs search criteria, and this tool returns records that match the search.
Click Save.
Test the lookup tool#
You can test each tool you build to gauge its responses before adding it to an agent.
Test the search_jobs tool by searching for certain jobs.
- In the Test window, replace the following text:
<COLUMN NAME>withtitle<VALUE>withQuality Engineer
Click Run Test.
Review results under the Tool output section.
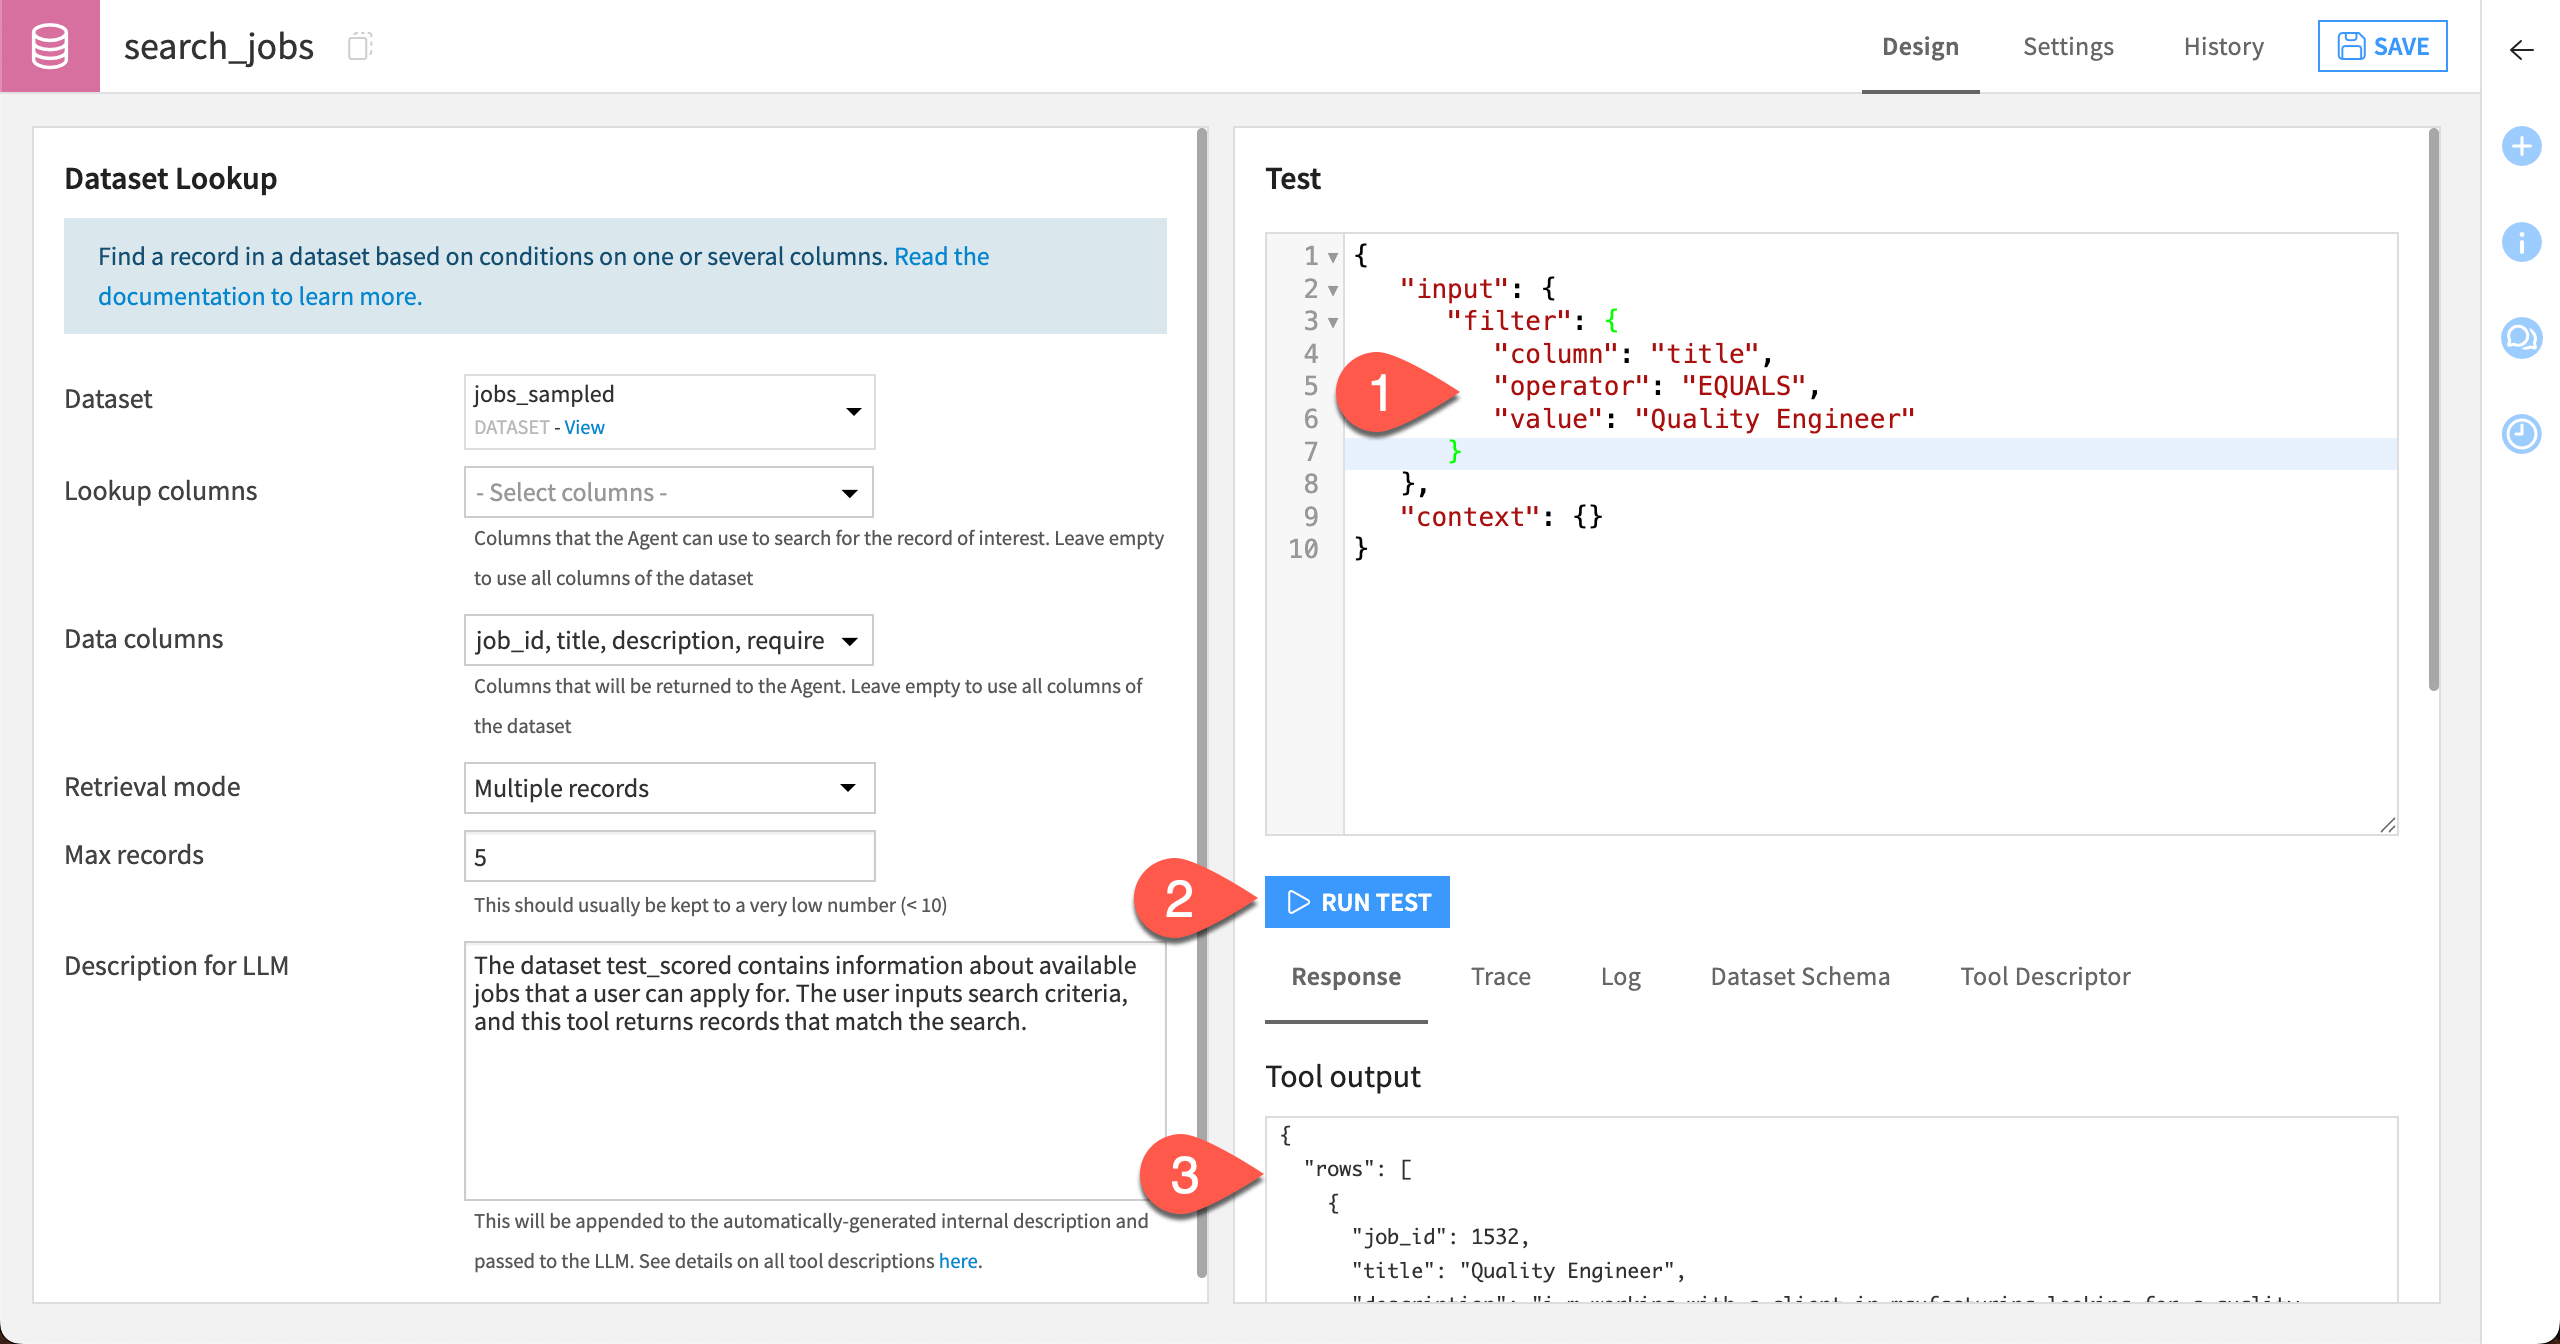
The tool should return (up to) five jobs matching the job title, with only the four data columns specified in the settings.
Note
The responses from your tools and agent throughout this quick start might look different depending on the models used. Your results might even vary each time you run a test or query!
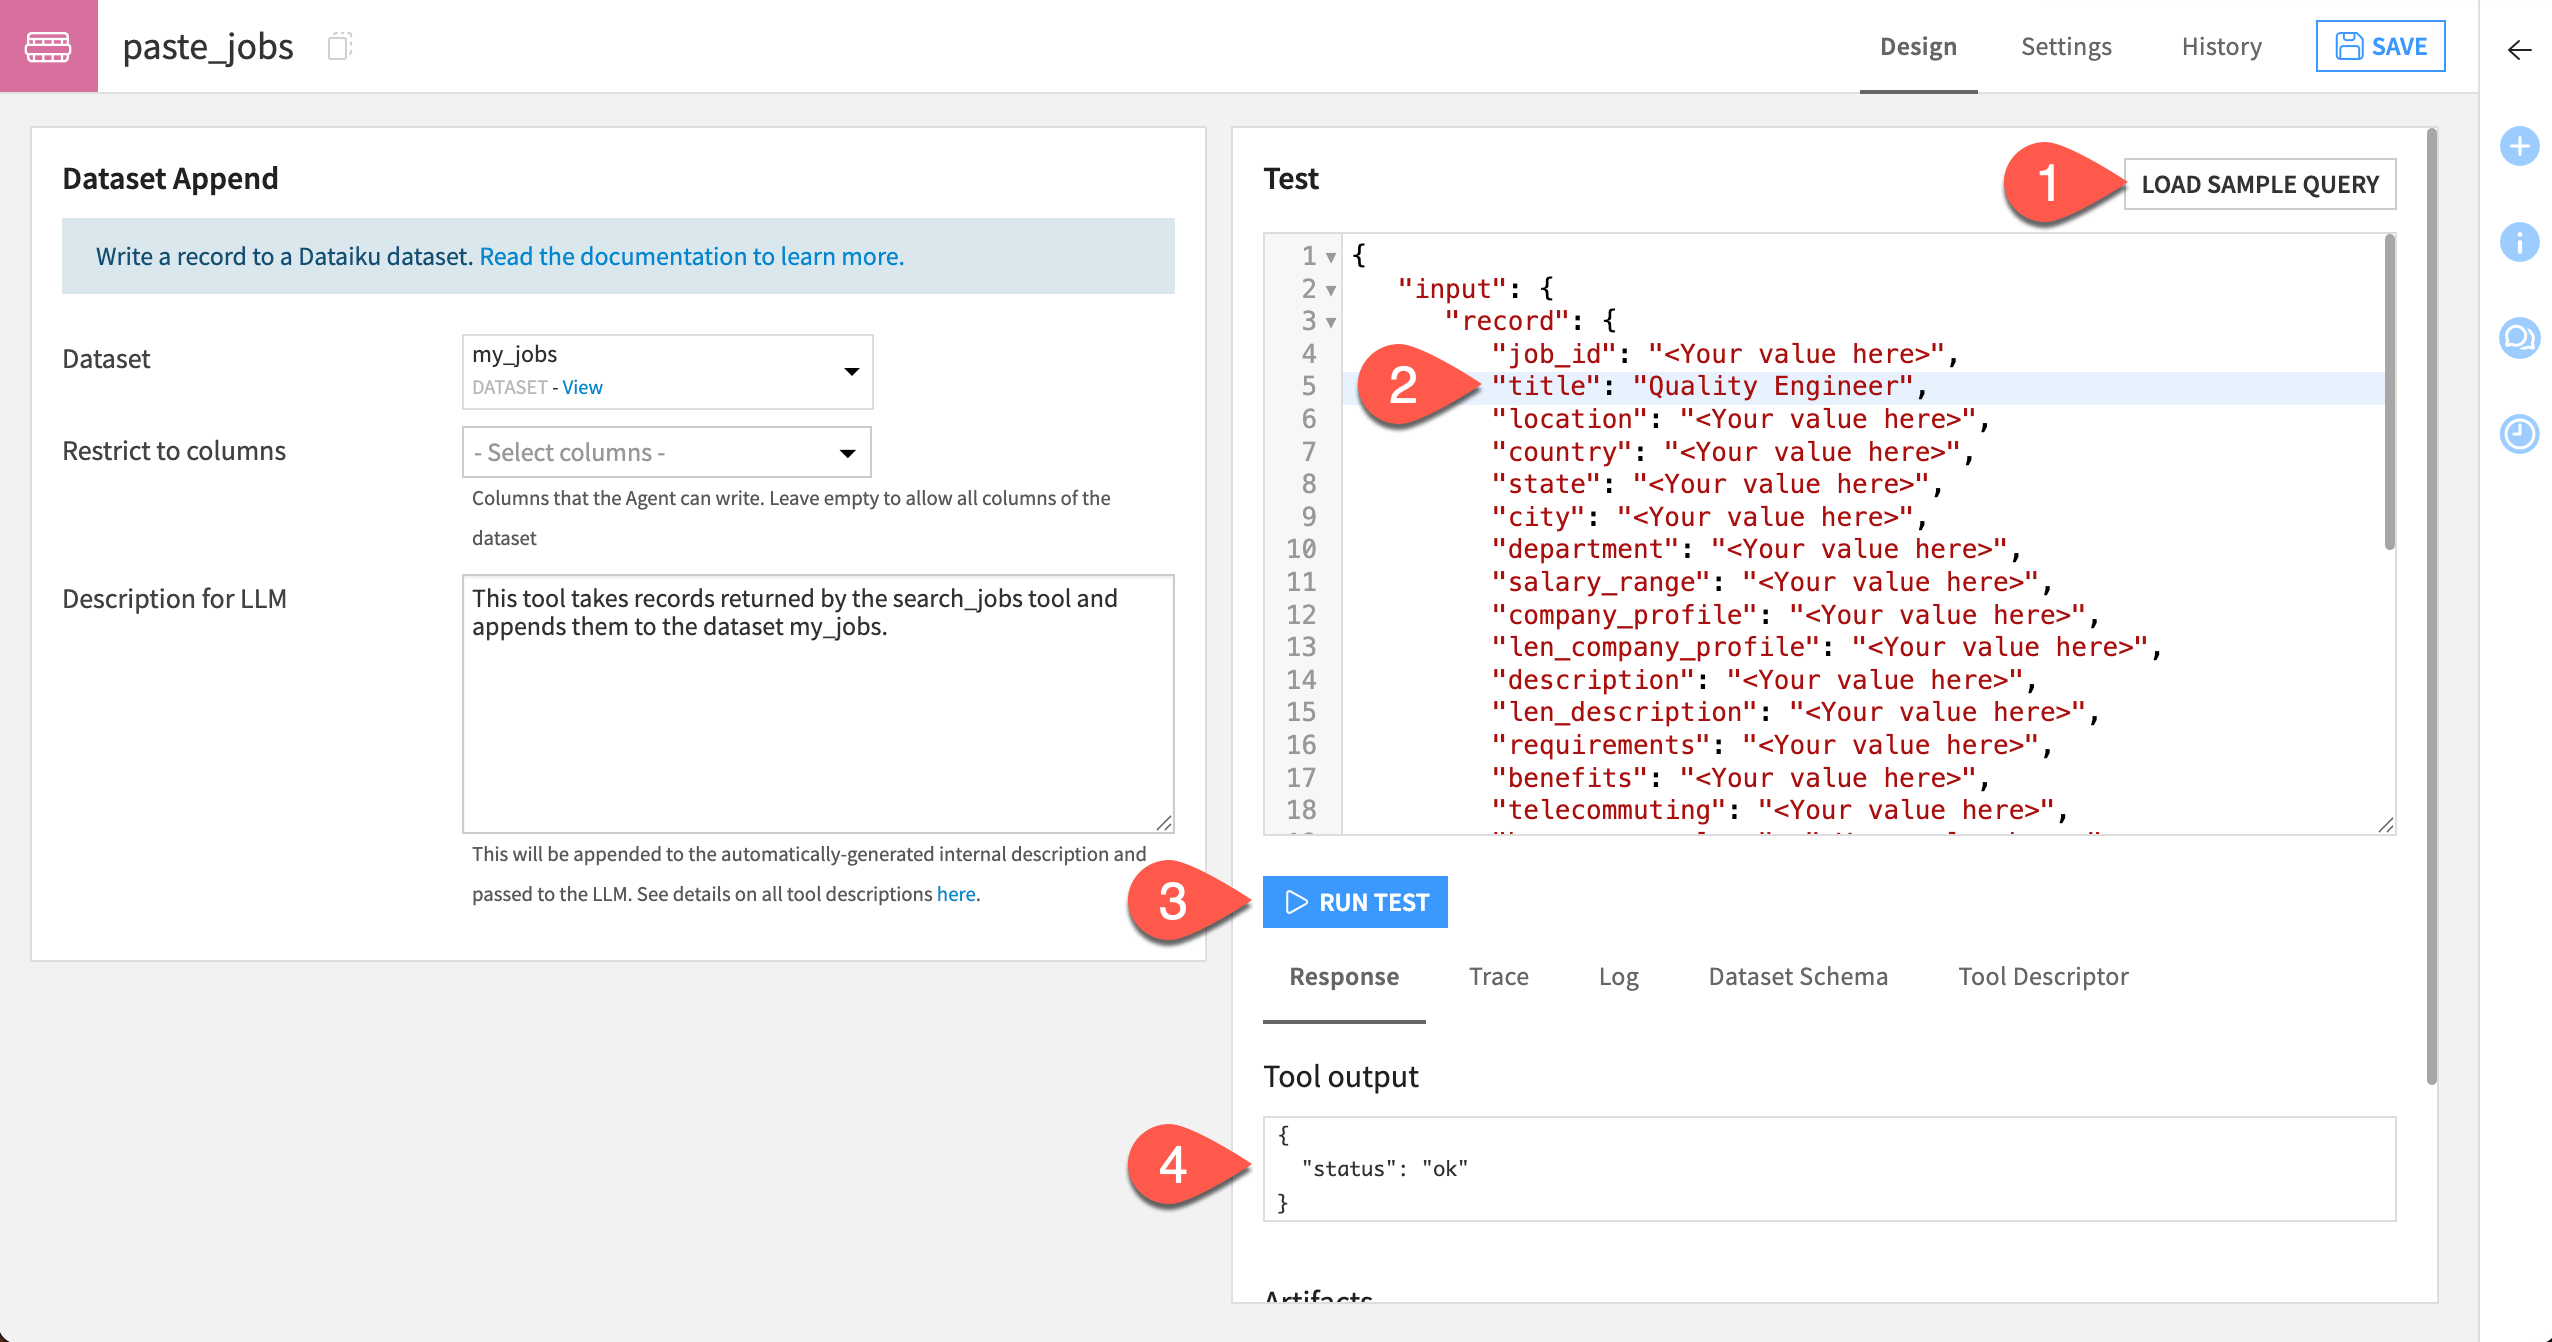
Create the append tool#
The next tool, called the Dataset Append tool, will take results from the search and put them into a new dataset for easy access.
Return to the GenAI (
) menu > Agent Tools page.Click + New Agent Tool.
Choose Dataset Append from the available tools.
Give the tool the Name
save_jobs_to_dataset.Click Create.

Next, add the settings with the tool instructions.
In the dropdown next to Dataset, select my_jobs.
In the Description for LLM box, copy and paste this text:
This tool takes records returned by the search_jobs tool and appends them to the dataset my_jobs.
Click Save.

Test the append tool#
To test the save_jobs_to_dataset tool, you can run a sample query that adds a row to the dataset.
To the right of the Test window, click Load Sample Query. This loads the column names expected by the tool and saves you some typing.
Next to “title” in the test query, replace
<Your value here>withQuality Engineer.Click Run Test.
Verify that the Tool output says the status is ok.
To further verify that the tool works, navigate to the my_jobs dataset and see that a row has been added with the Quality Engineer title. All other columns show “<Your value here>” because they appear that way in the test, but the agent will fill them all when using the tool!
Put tools together in an agent#
Now that you have two tools that complete distinct tasks, it’s time to put them together in an agent!
Create an agent#
Navigate to the GenAI menu (
) > Agents & GenAI Models.Click + New Agent.
Choose Simple Visual Agent.
Give it the name
Job search agent.Click Create.

This brings you to the Design page for the agent, where you can configure the LLM to power it, give it specific instructions, and add the tools.
In the LLM menu, choose a model from your available connections.
In the Instructions window, copy and paste this text:
You are an agent that helps users with their job searches. The user will ask  to find jobs in the dataset that match certain criteria. You should return jobs that match the search, with the results ranked by best match first.

If there are no matches for the specific criteria a user lists, you can find matches that might be similar. If you do this, state that the match is an "Inexact match".

For each response, list the records found in a chat and also add them to the dataset as instructed in the "save_jobs_to_dataset" tool.
Under Tools, click + Add Tool.
Choose the search_jobs tool.
Add another tool and choose the save_jobs_to_dataset tool.
Click Save in the top right corner.

The agent is now ready to test!
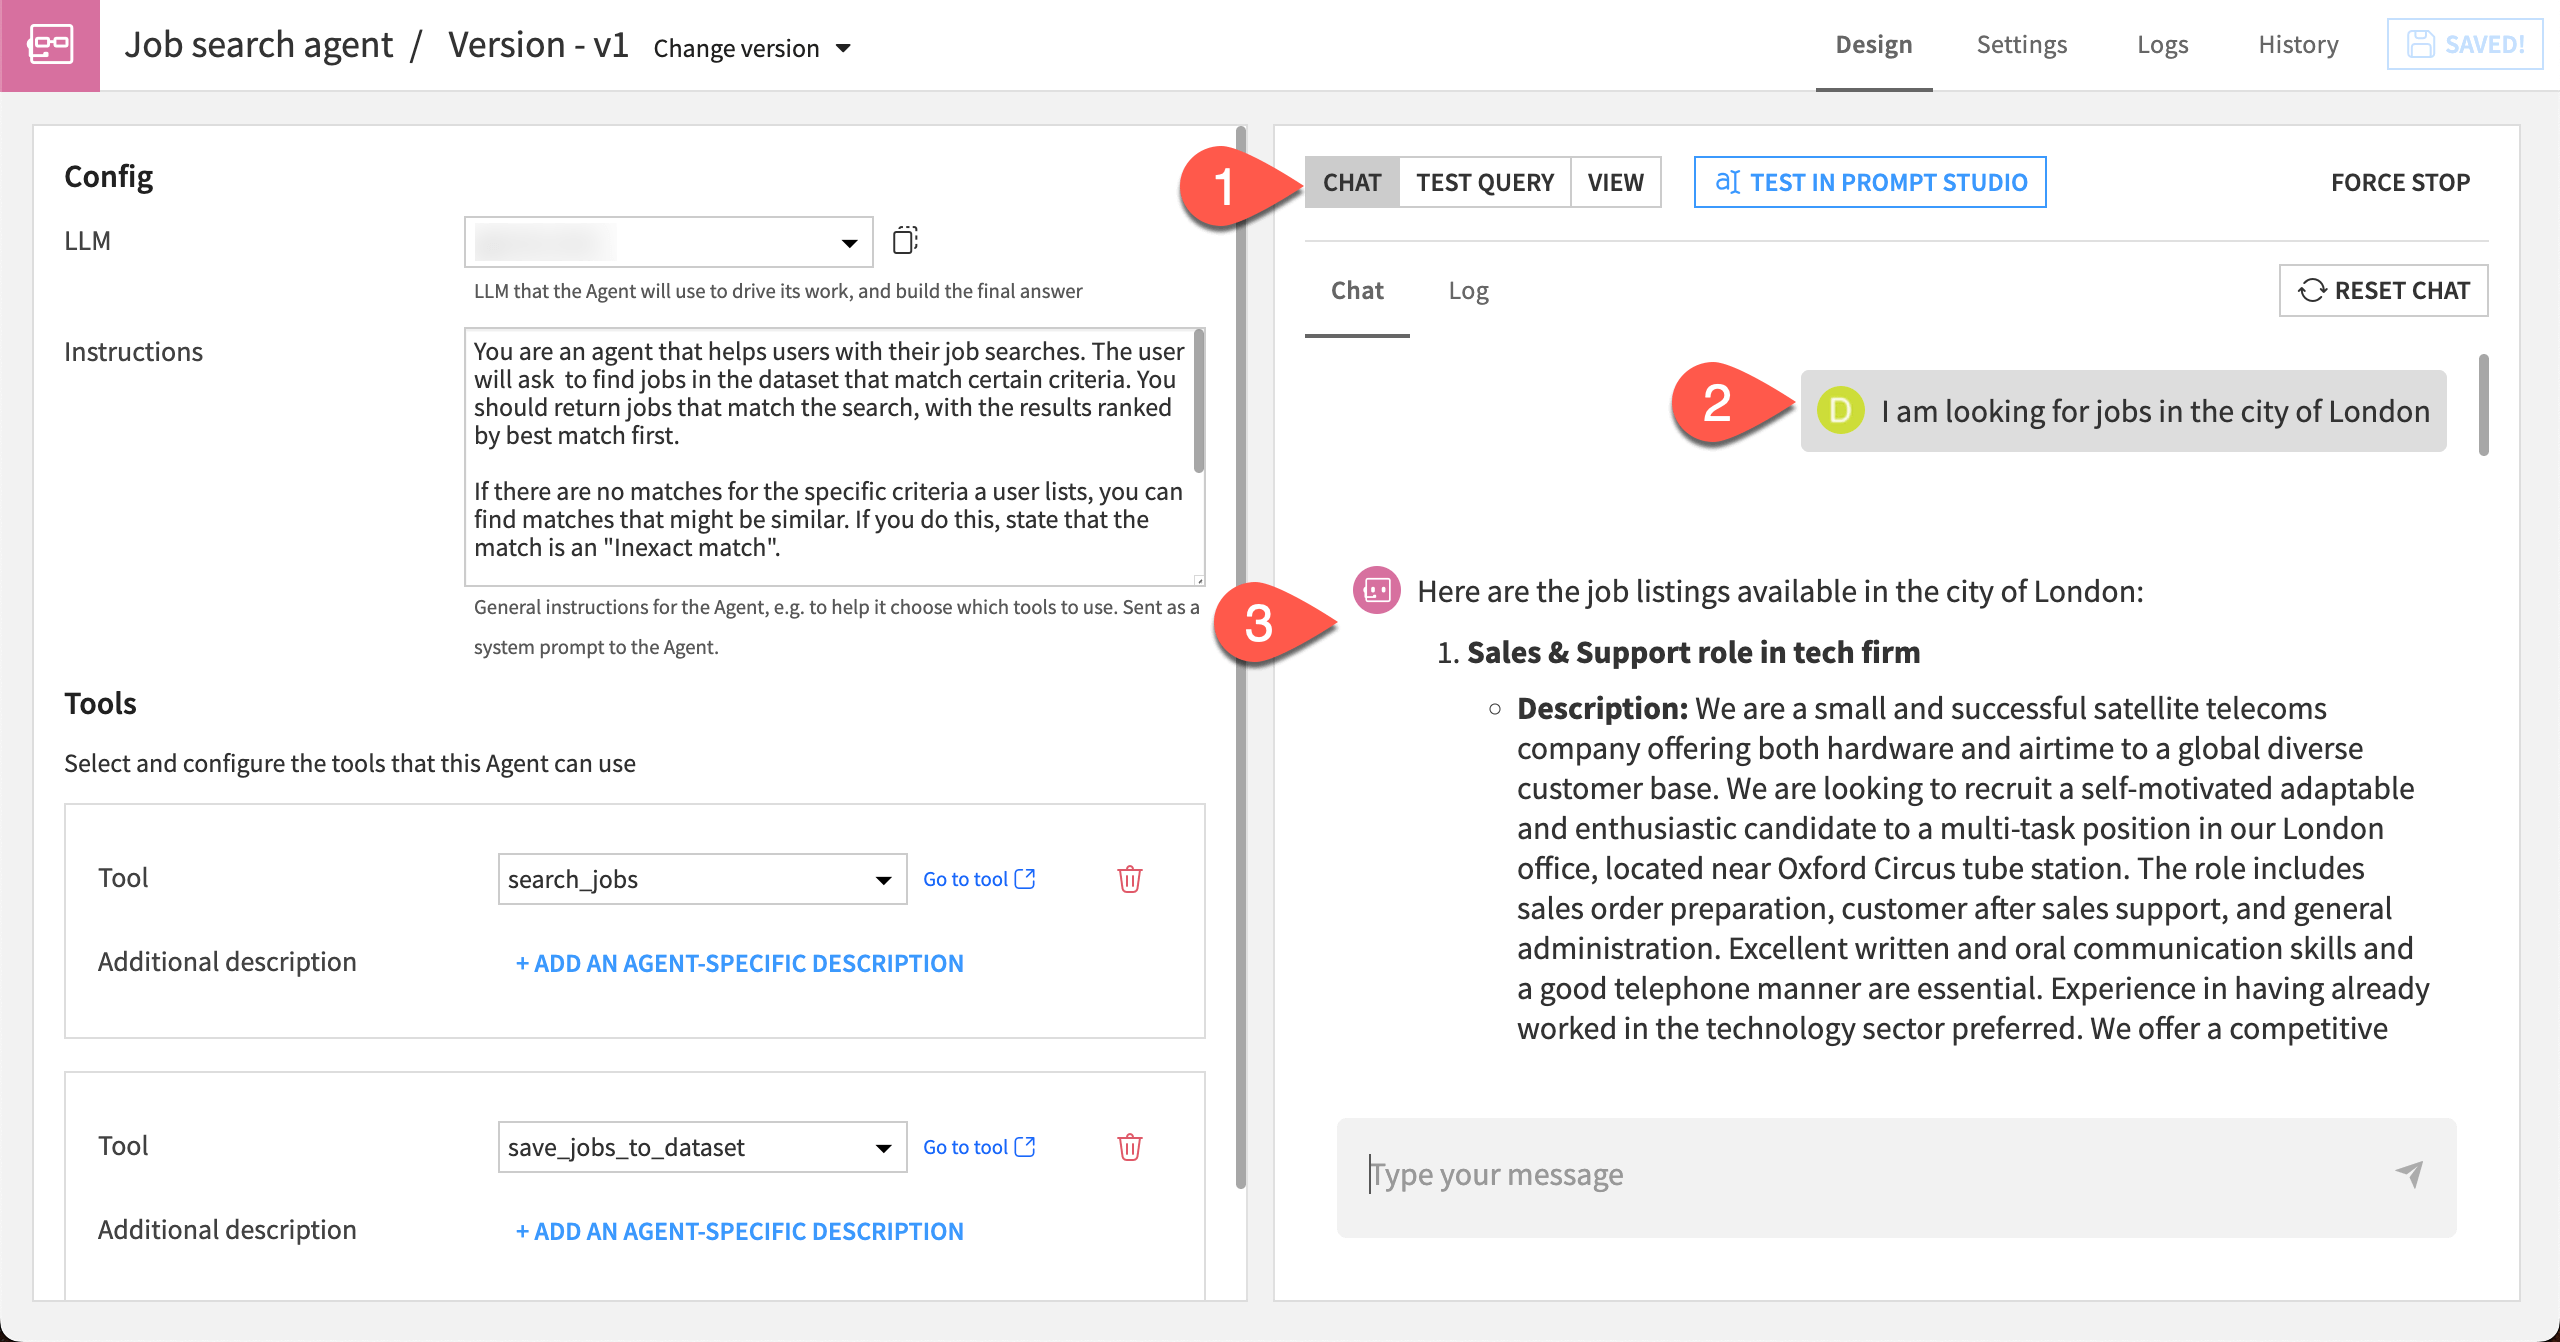
Test the agent#
In the agent configuration page, you can run test queries to get a feel for how the agent responds. You can update the agent instructions, tools, and tool descriptions as needed to improve the agent’s performance.
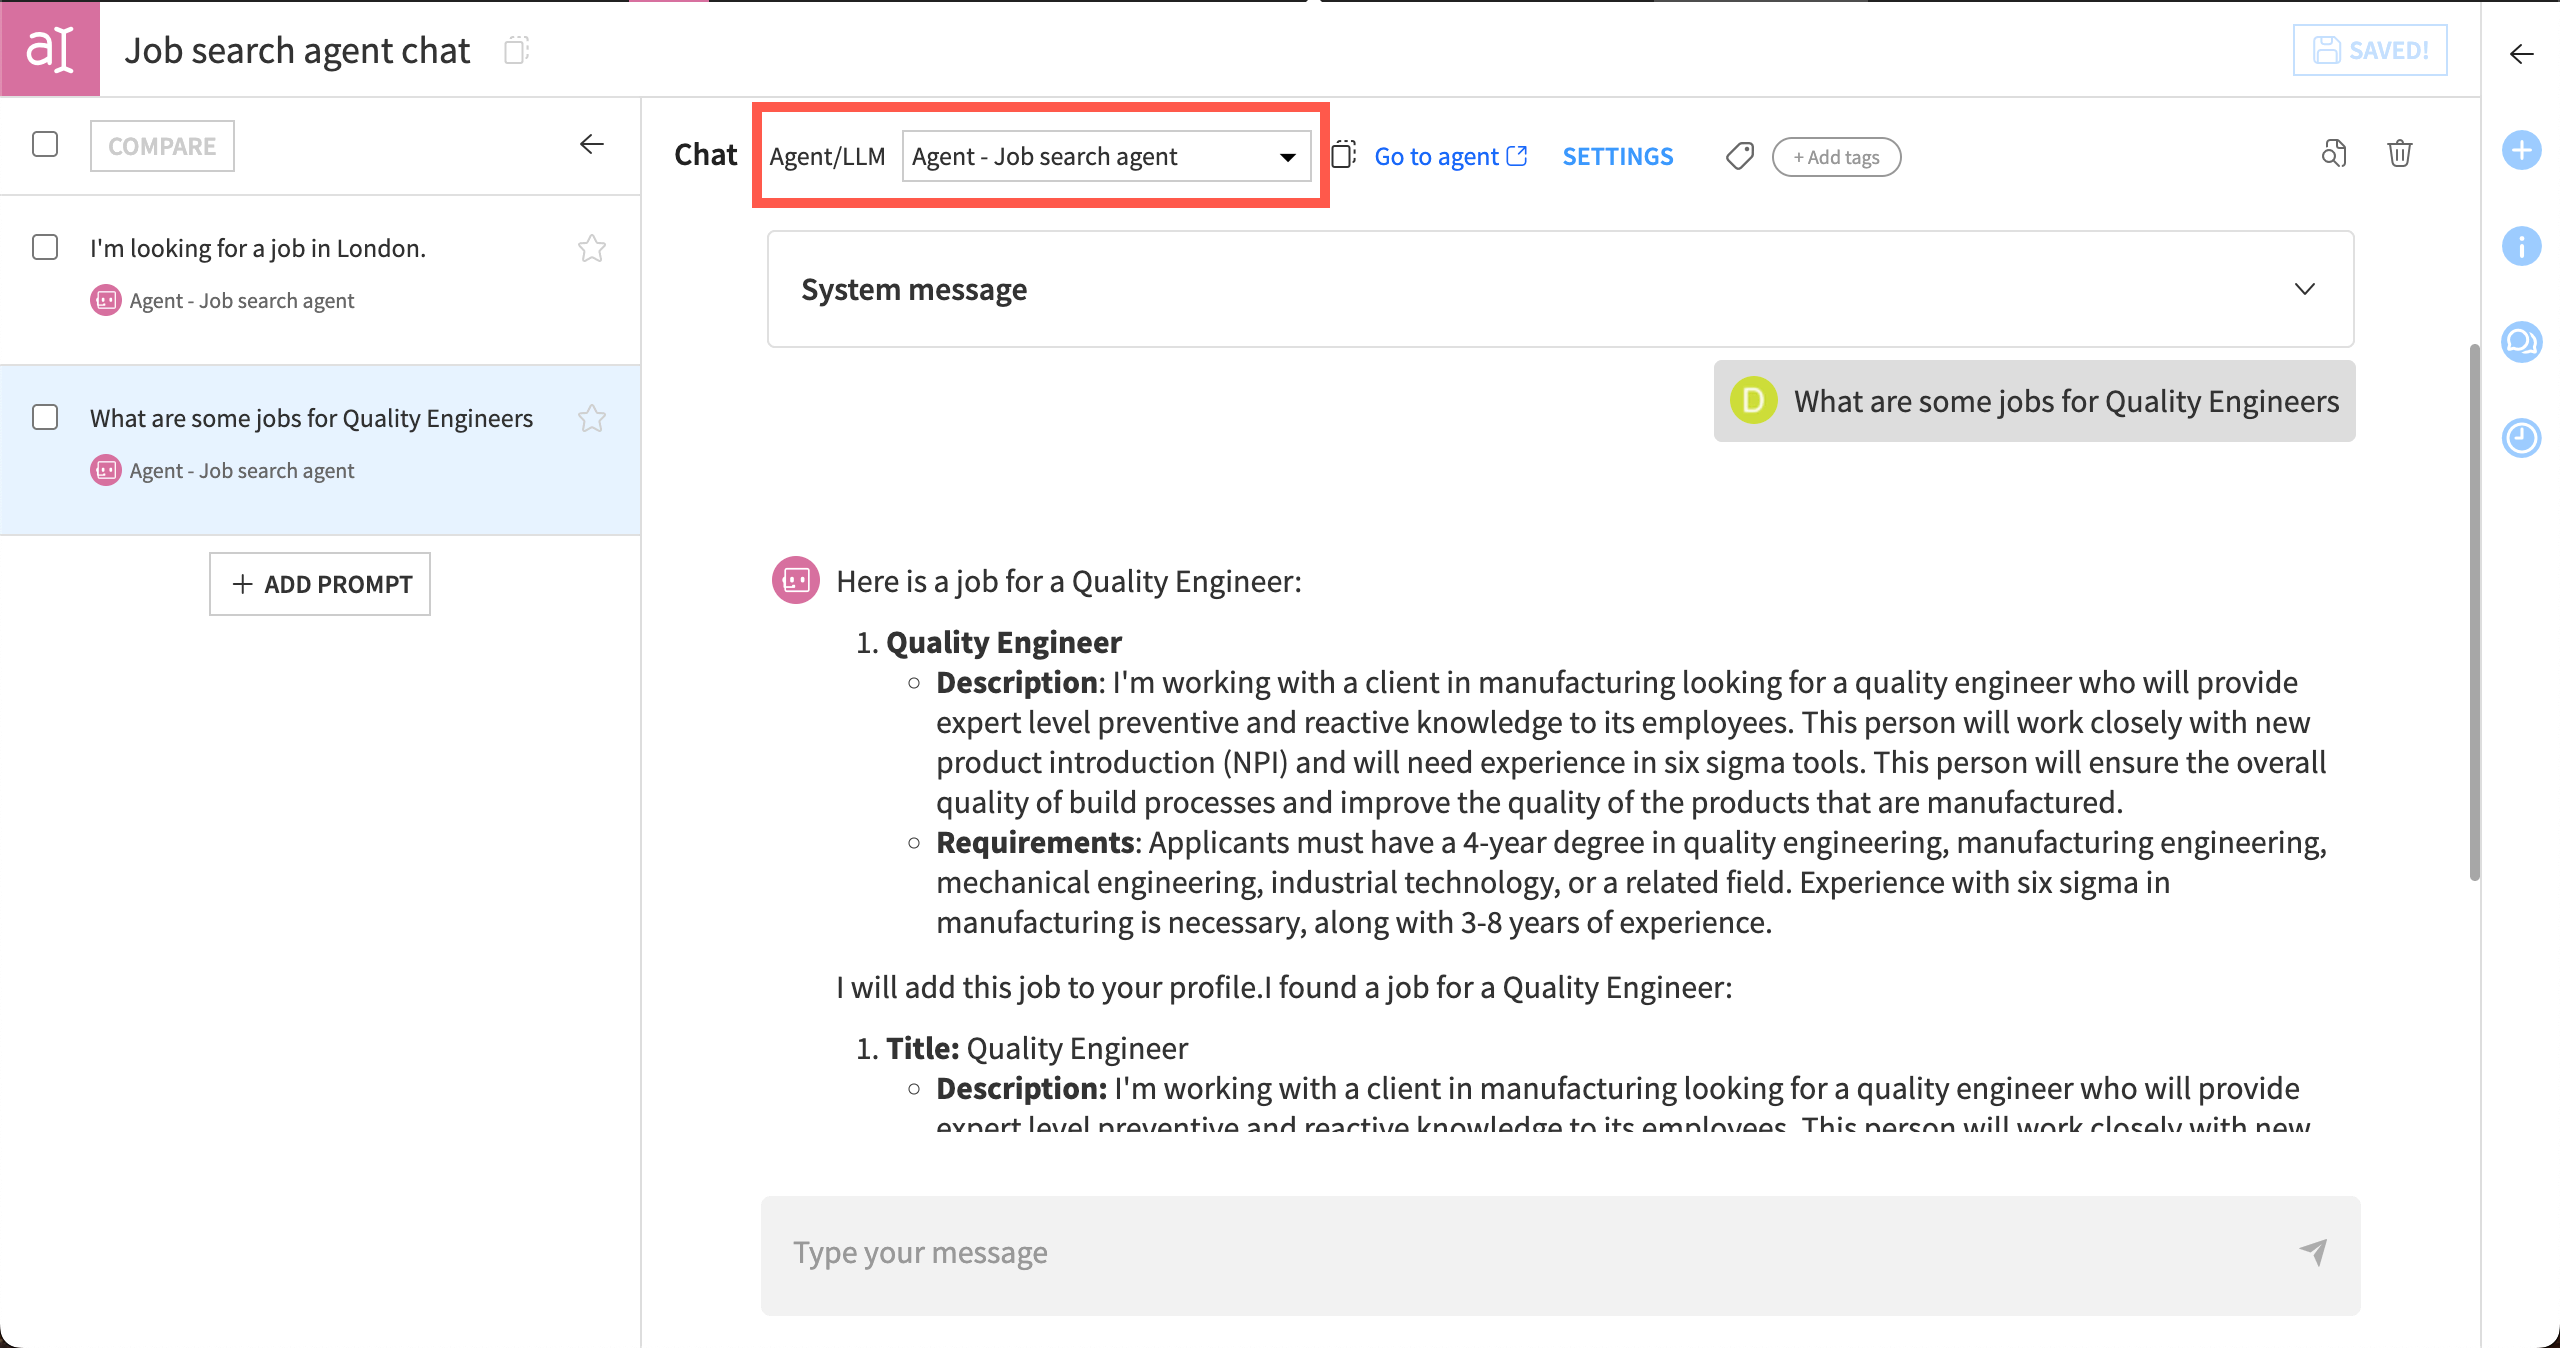
Navigate to the Chat tab to the right.
Copy this message into the chat and send it:
I am looking for jobs in the city of London.
Review the results the agent returns.
Tip
Your results will vary depending on the LLM used. If you have access to multiple LLM connections, this is a great time to experiment and compare the responses given to the same query by different LLMs!
You can also experiment with changing the agent’s instructions, such as telling it to always include the job_id in responses.
Though you can see the agent’s response in the chat, you can also check to make sure the agent is copying the jobs into the my_jobs dataset.
Return to the Flow.
Double-click on the my_jobs dataset to open it.
View the results, which should include rows from testing the agent tool and the agent.
Interact with the agent#
Now that the agent is ready, you can interact with it in several places within Dataiku.
Agents in the Flow#
Agents become objects in the Flow, which shows you how the agent fits into your overall project and workflow. The agent is visually connected to the datasets, folders, models, or other objects it reads from or writes to.
Save the agent.
Return to the Flow by going to the Flow menu (
 ) > Flow (or use the keyboard shortcut
 g+f).Zoom in to the Generative AI Flow zone.
Double click on the Job search agent.

This returns you to the agent configuration page, where you can make any edits. You can also create multiple versions of an agent and access them through the versions list, which is useful for iterating on the agent instructions or other settings.
Tip
You can also access agents from the GenAI menu (|genai|) > Agents & GenAI Models in the top navigation bar.
Agents in the LLM Mesh#
Agents also become objects in the LLM Mesh, allowing you to connect to them as you would any LLM.
You can interact with the agent from various places within Dataiku.
Agent Hub#
Agent Hub allows you to connect to multiple agents, distribute them to your team, and monitor their performance.

Prompt Studio and Prompt recipe#
Prompt Studio includes a chat interface where you can chat with the agent and keep your chat history.
You can also test how it interacts with datasets before using it in the Prompt recipe.
Once you are satisfied with a prompt, you can use a Prompt recipe to apply the agent over many records in a dataset. This is useful for handling many tasks or cases at once.
LLM Mesh API#
The LLM Mesh API allows you to query the agent with code and connect to other applications.
Next steps#
Congratulations! You’ve taken your first steps toward working with AI agents inside Dataiku.
Your next step might be to take the courses on Simple Visual Agents and Agent Hub, a webapp to orchestrate and provide access to multiple agents in Dataiku.
To dive deeper into other Generative AI topics not covered here, check out the Generative AI Practitioner learning path. There you’ll learn about text processing with LLMs and the RAG technique.
See also
You can also find more resources on agents in the following spaces: