
Tutorial | Increase project quality through Project Standards#
Get started#
Designing a high quality project isn’t a simple task as it may contain many components. These components, whether they may be visual or code, interact with many other systems in your ecosystem, each with its own set of rules.
Part of the reason building a high quality project can be so difficult is a lack of shared understanding as to what quality means.
A Flow designer might think that their project is well designed, but then realize it violates many best practices.
On the other hand, an expert who knows all organizational rules may be overwhelmed with the complexity of reviewing and helping all designers.
For organizations on the Dataiku for Enterprise AI package, Project Standards is a way to address the challenge of building high quality projects.
Objectives#
Utilizing Project Standards incorporates different roles across an organization. In this tutorial, you’ll switch hats between:
Instance administrators who define the quality assurance checks (the actual Project Standards) and the scopes which determine where they should be applied.
Flow designers who run the report, which includes these QA checks, and then act on its findings to improve the quality of their projects.
See also
This feature is also important for Ops managers, who can set policies to gate deployments with respect to the results of the Project Standards report. See Tutorial | Gate deployments with Project Standards to learn more.
Prerequisites#
Dataiku 14.1 or later.
The Dataiku for Enterprise AI package.
Membership in a group with the Administrator permission.
Tip
If you’re a Flow designer rather than an administrator, the most important section for you to follow starts from Run checks before deploying.
Create the project#
From the Dataiku Design homepage, click + New Project.
Select Learning projects.
Search for and select Project Standards.
If needed, change the folder into which the project will be installed, and click Create.
From the project homepage, click Go to Flow (or type
g+f).
Note
You can also download the starter project from this website and import it as a ZIP file.
Create instance-wide project standards checks#
Your organization may already have its own unwritten project guidelines. Project Standards provides a way to codify such conventions. To get started, an instance administrator needs to design and enable QA checks relevant to their organization.
Add a QA check#
Start with the most basic kind of check, the default checks available to all instances.
From the waffle (
 ) menu of the top navigation bar, select Administration.
Go to the Project Standards tab.
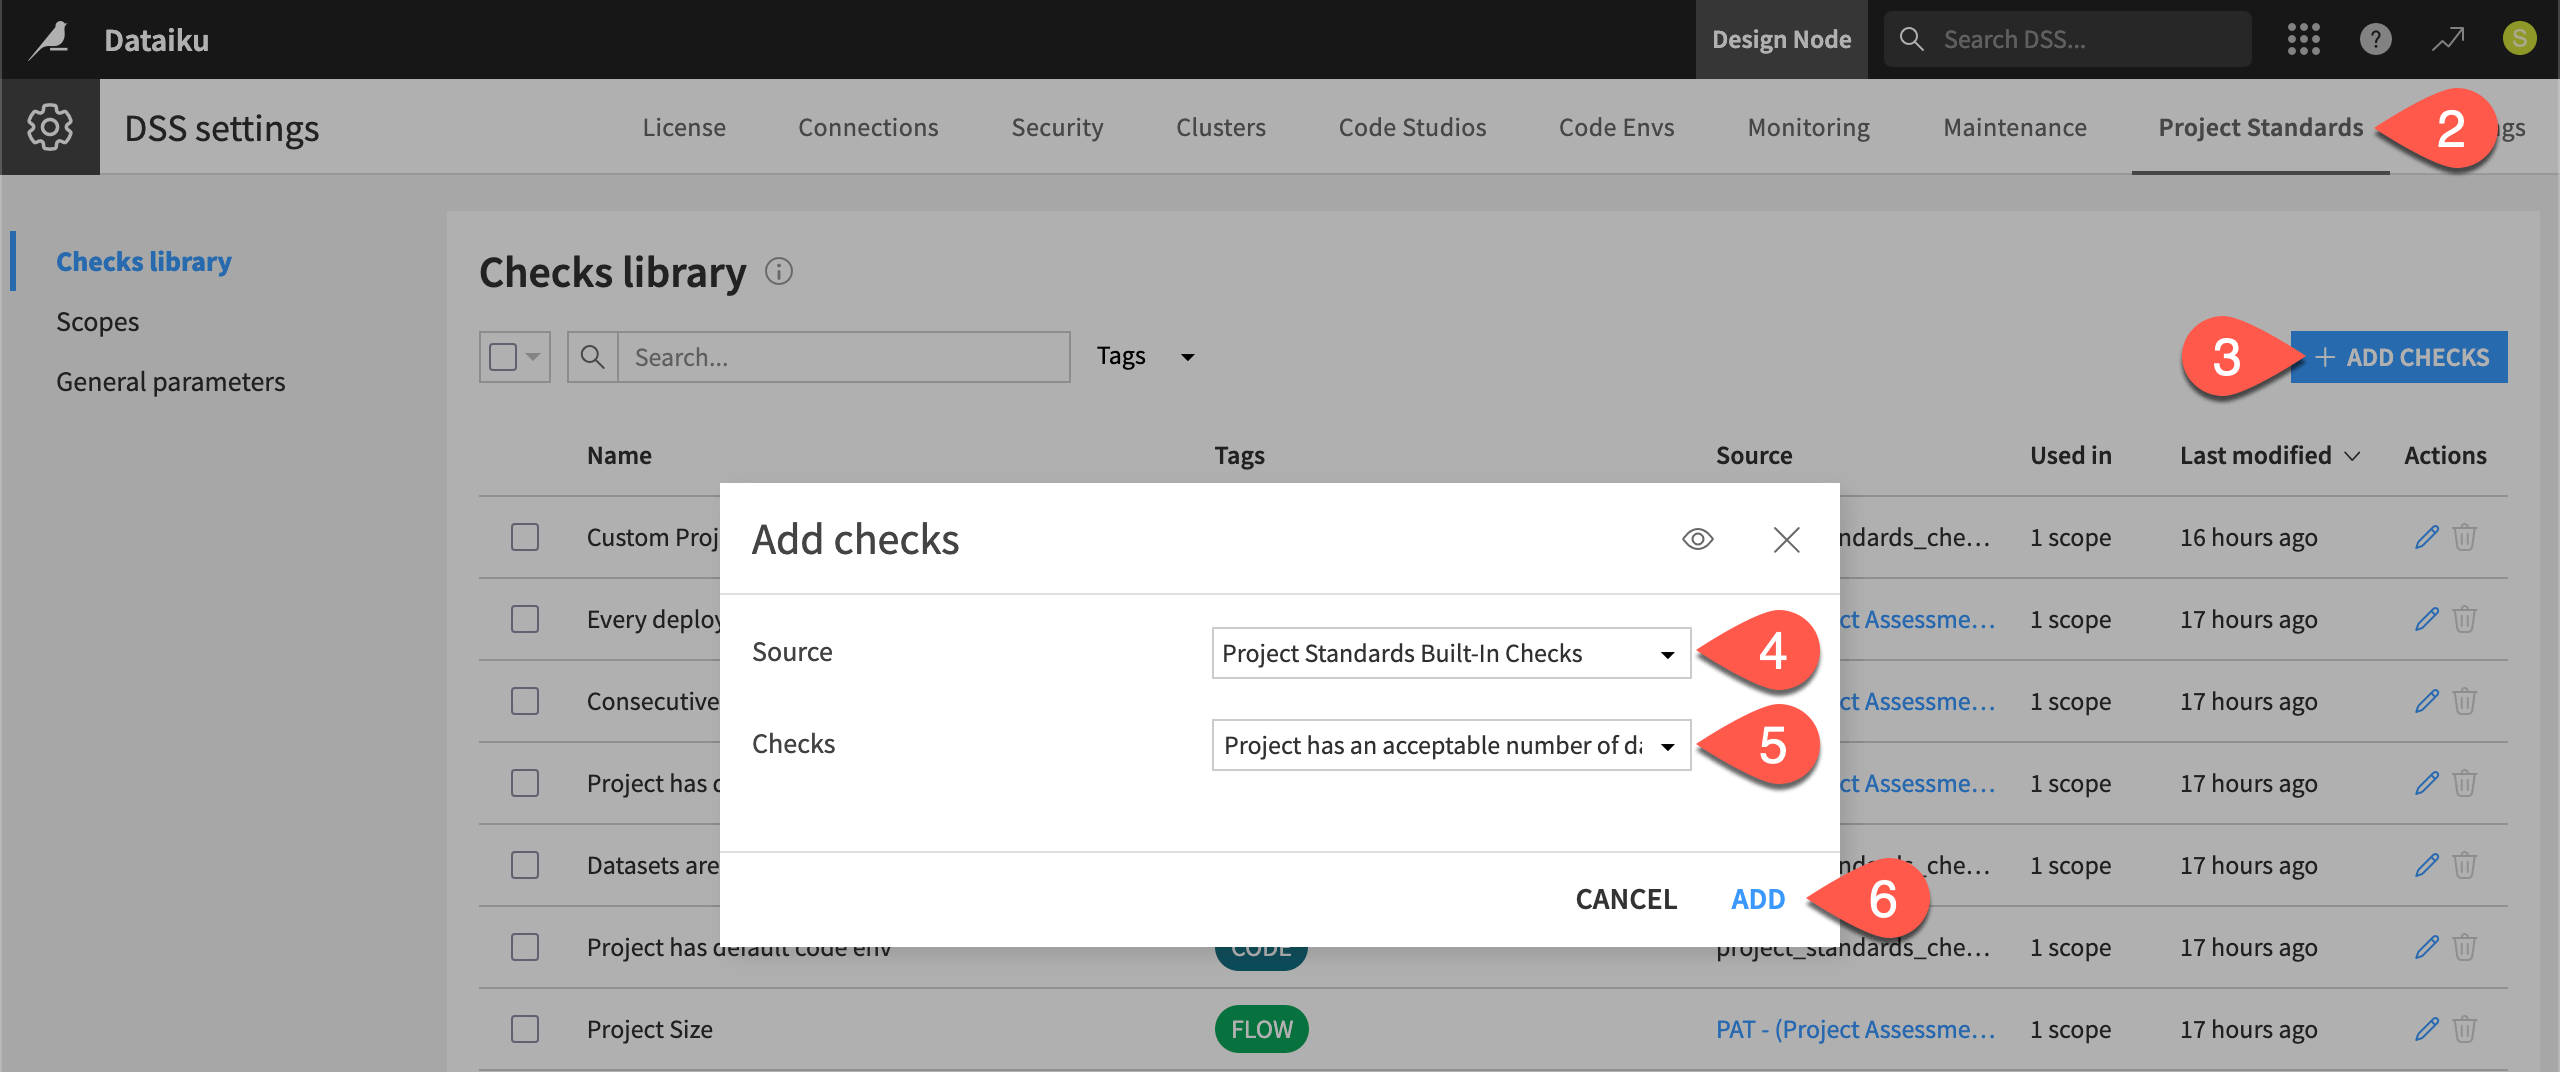
Within the Checks library panel, click + Add Checks.
For the source plugin, select Project Standards Built-in Checks.
For checks, click Select All to add all available built-in checks.
Click Add to confirm.
Tip
These default checks are generic demonstrations. For Project Standards to play a meaningful role in your organization’s processes, you’ll want to design your own. To get started, see Project Standards Check component in the Developer Guide. Alternatively, work with Dataiku’s data science teams to import commonly used checks.
Edit checks#
After adding the built-in checks, you can customize them further. Certain checks may have parameters you can configure based on your needs.
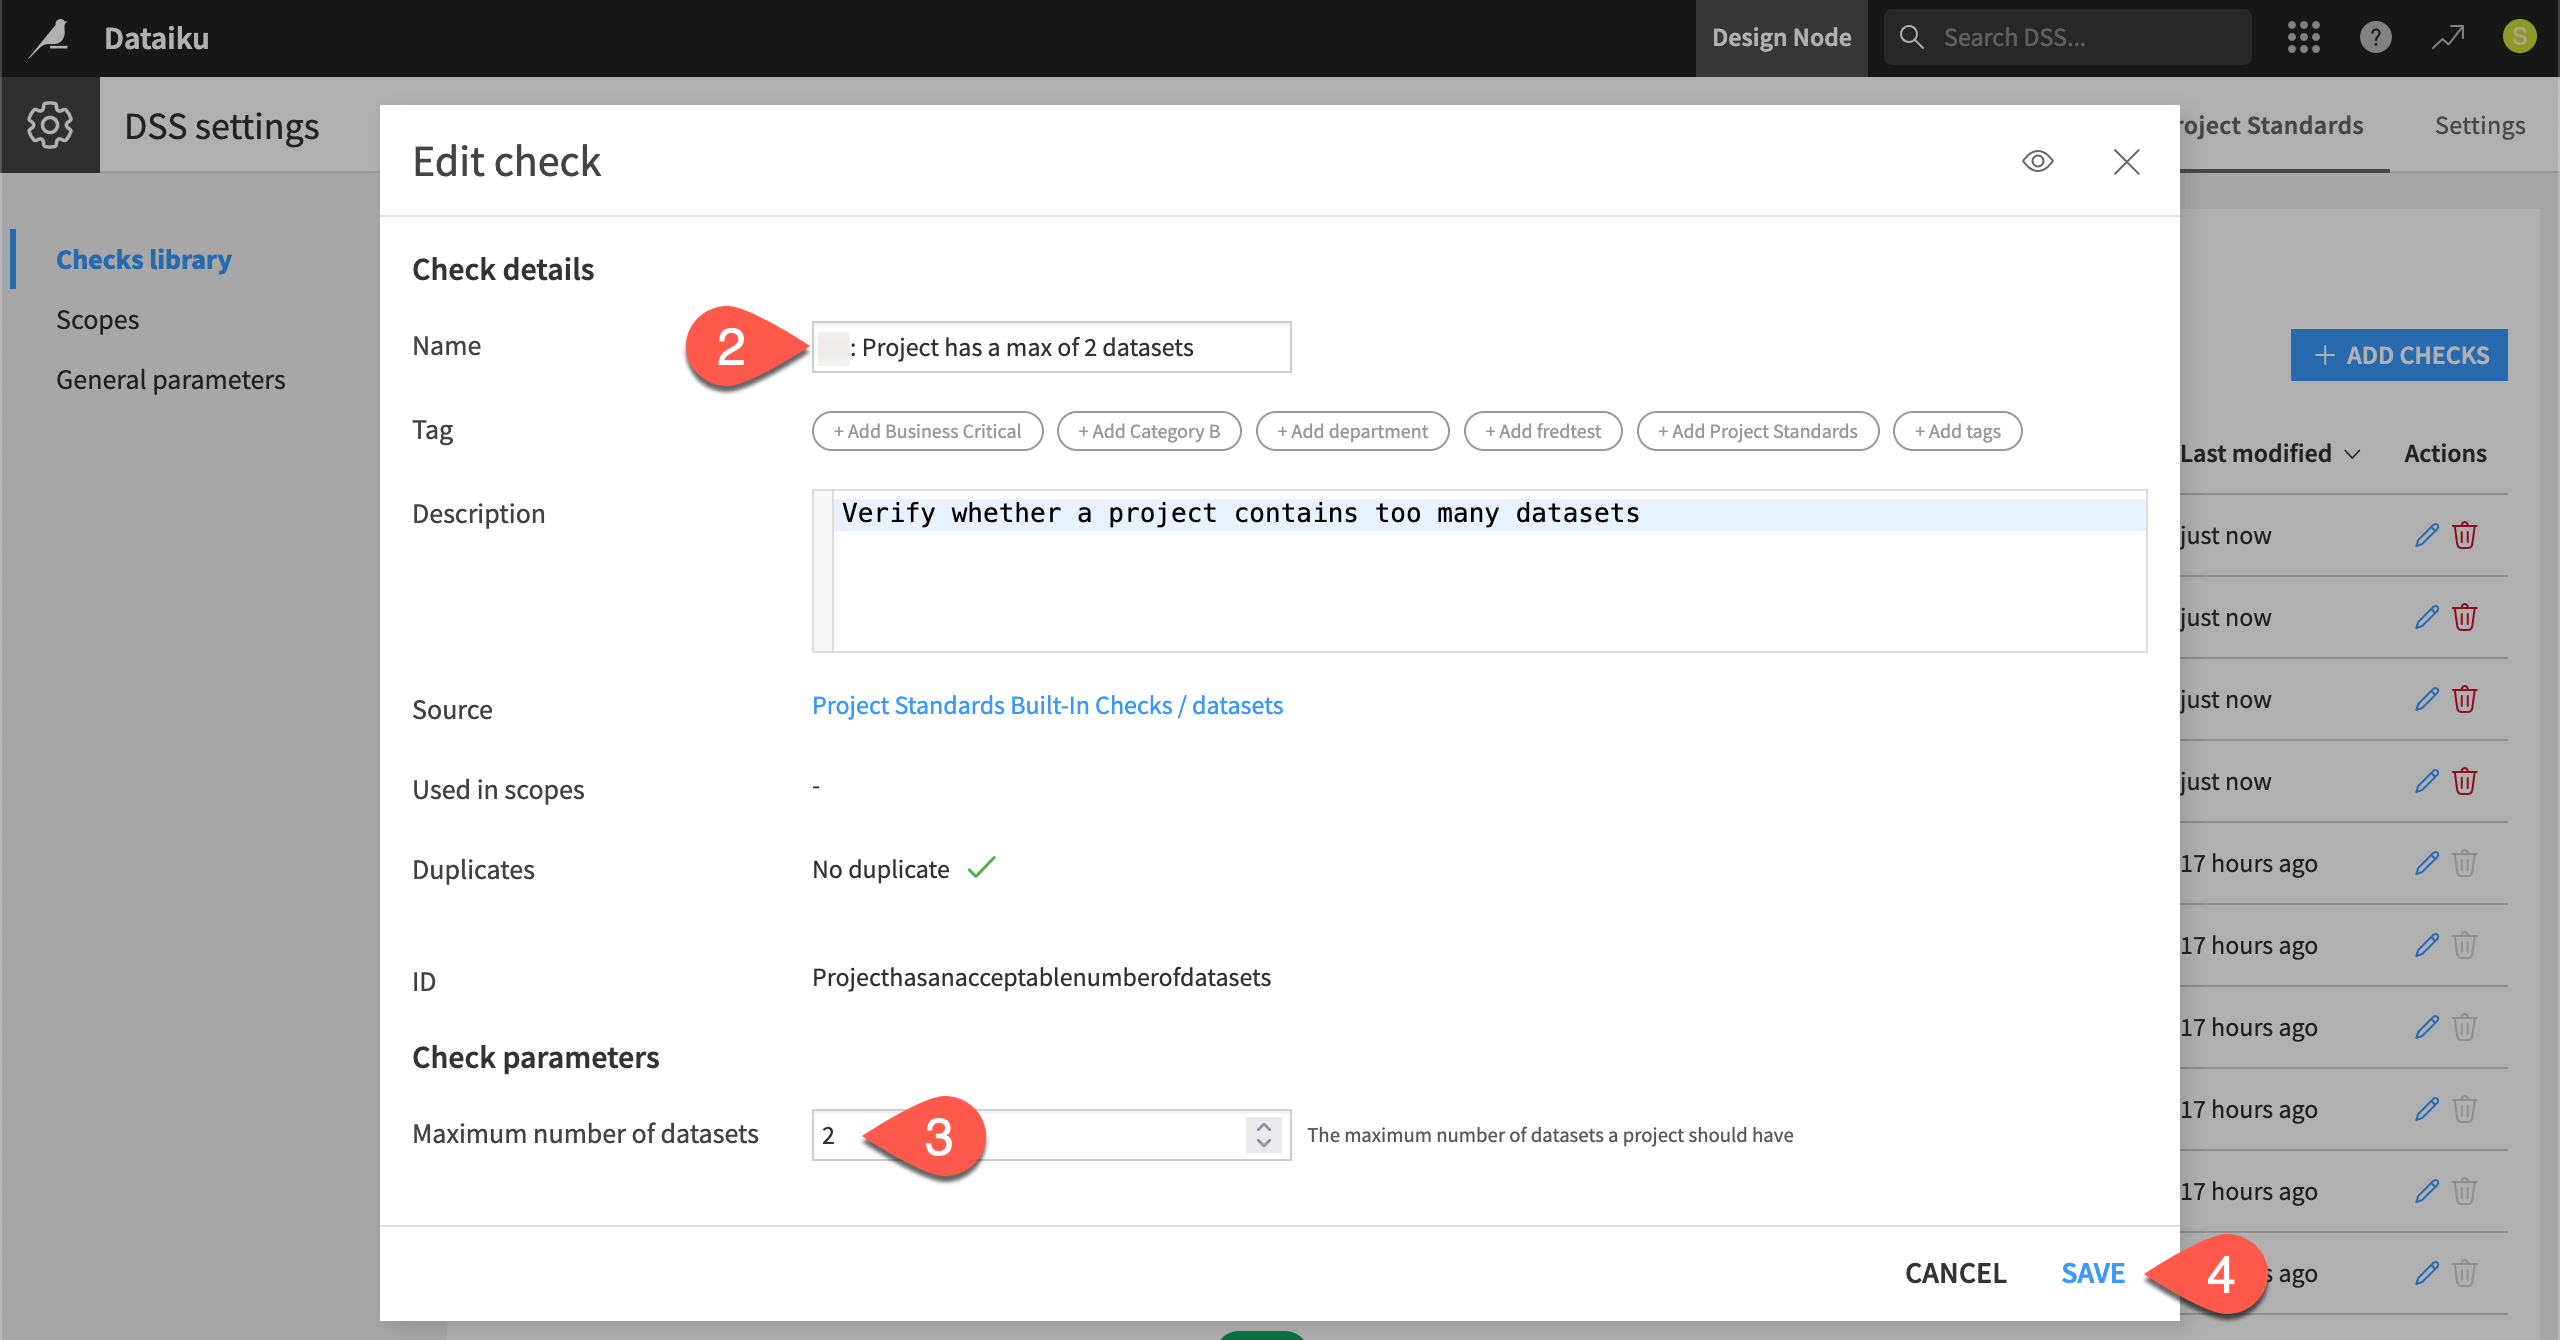
In the Checks library panel, select the check
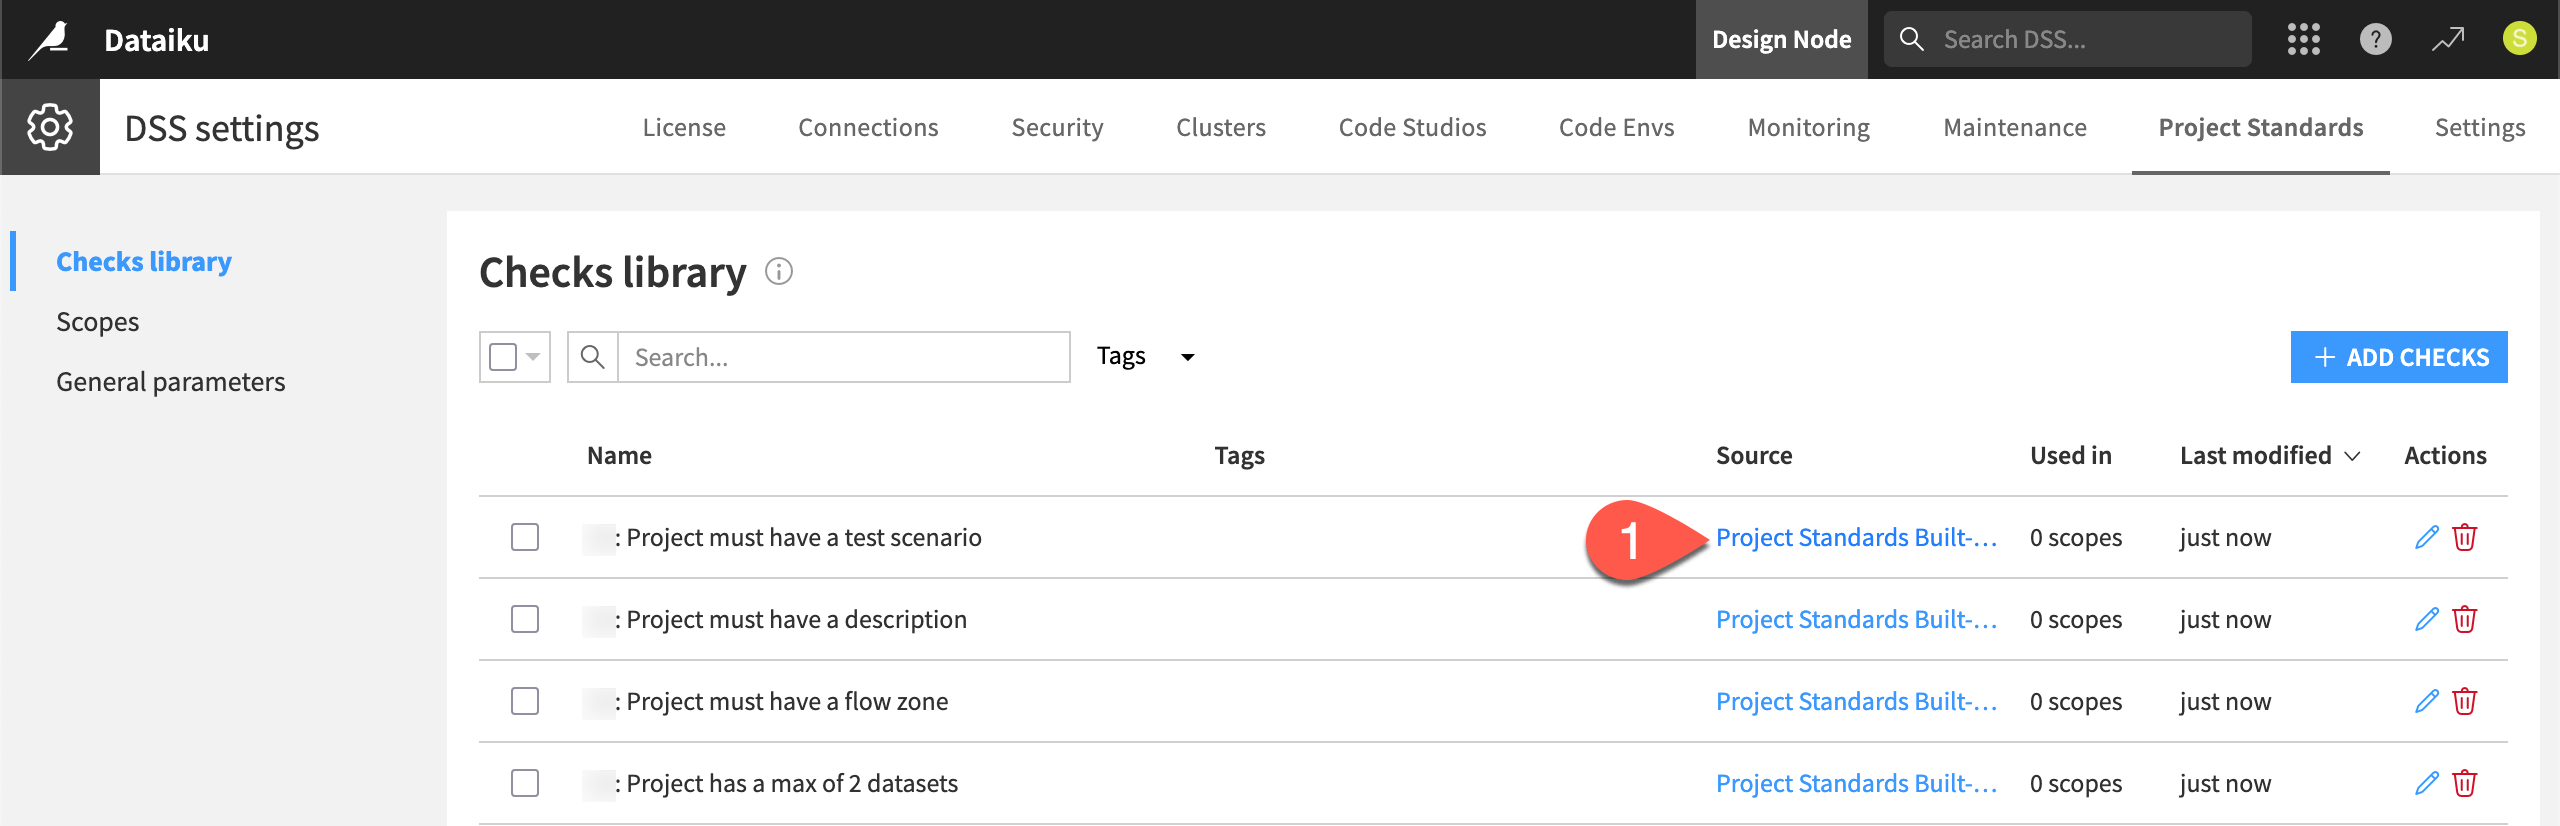
Project must not have too many datasets. It should have 0 scopes.To more easily identify it as your own, as well as to force an error, select it, and rename it
<YOUR INITIALS>: Project has a max of 2 datasets.Under Check parameters, set the maximum number of datasets to
2.Click Save.
Repeat this kind of process for the other checks you’ve added. Recognize which have parameters, and insert your initials into the name of each check.
Explore the source of a check#
All checks come from plugins. This could be the built-in checks plugin found on all instances, those built by Dataiku, or ones specific to your organization.
From the Checks library panel, for any of the checks you’ve added, click Project Standards Built-in Checks in the Source column.
Explore how each check is a plugin component.
Define a scope#
The checks you created aren’t yet applied to any projects. The checks library should report that your checks are used in 0 scopes.
The scope defines which checks apply to which projects. You can select projects by key, folder, or tag. For example, you may have Dataiku projects with an academy tag. You could create a scope to apply specific checks to only Dataiku projects with this specific tag.
In this first example, make the scope even more narrow. Apply it to one specific project name.
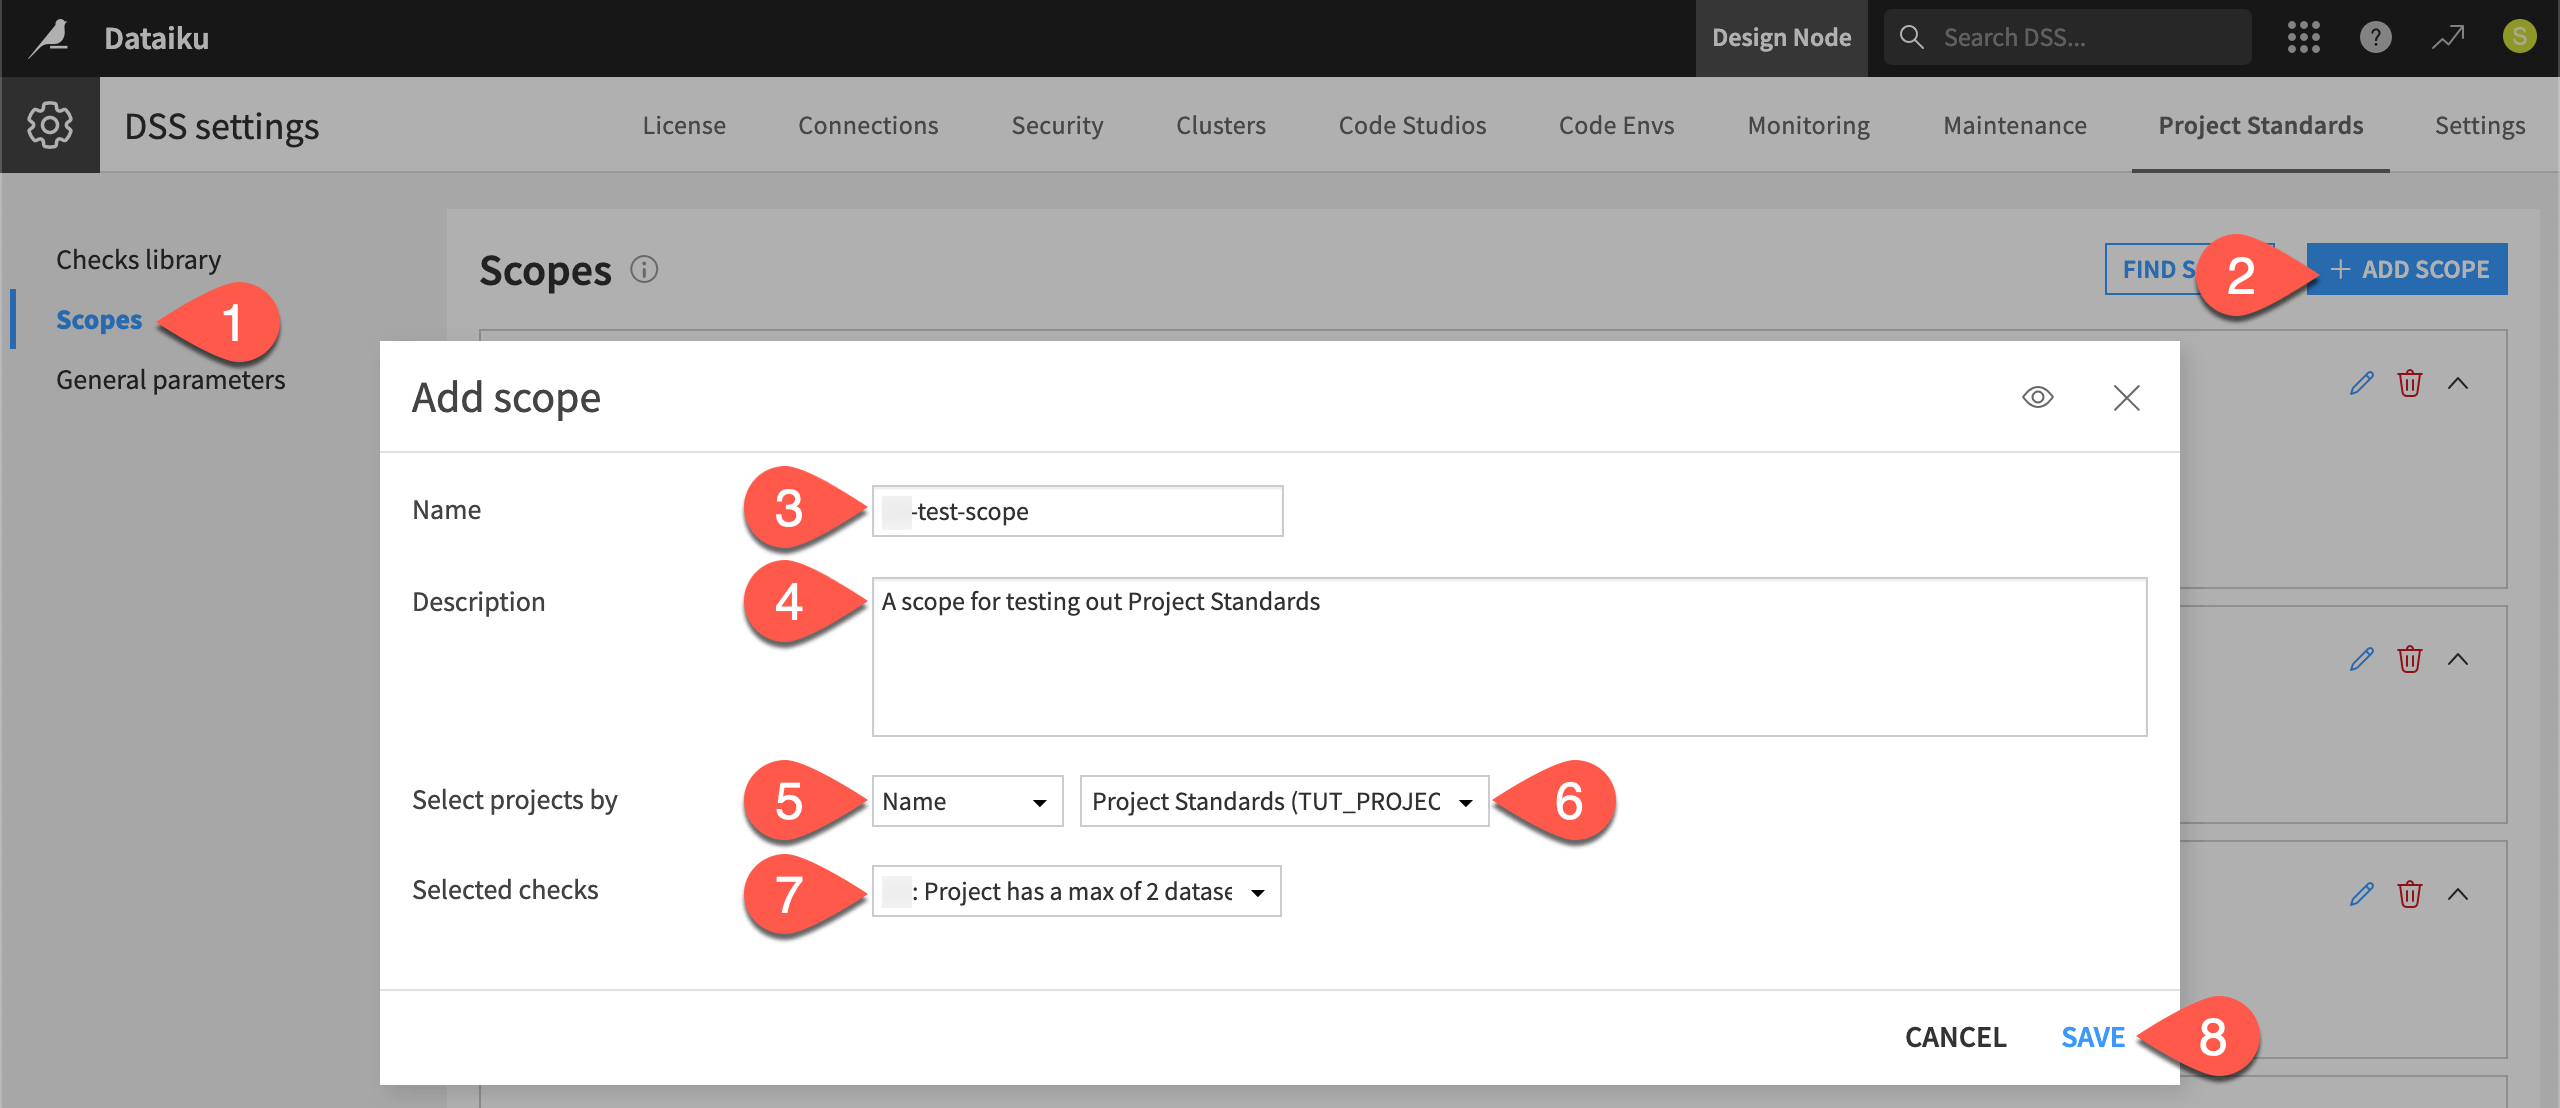
From the Project Standards tab of the Administration page, go to the Scopes panel.
Click + Add Scope.
Name it
<YOUR-INITIALS>-test-scope.Give any description such as
A scope for testing Project Standards.Select projects by Name.
Select your version of the Project Standards Dataiku project.
Select all checks belonging to you.
Click Save.
Tip
If you return to the Checks library panel, you should see your checks now included in 1 scope.
Run checks before deploying#
Now you’ve set up some basic checks for your organization. Take a moment to see how they work from the perspective of project designers who will use such checks.
Create a Project Standards report#
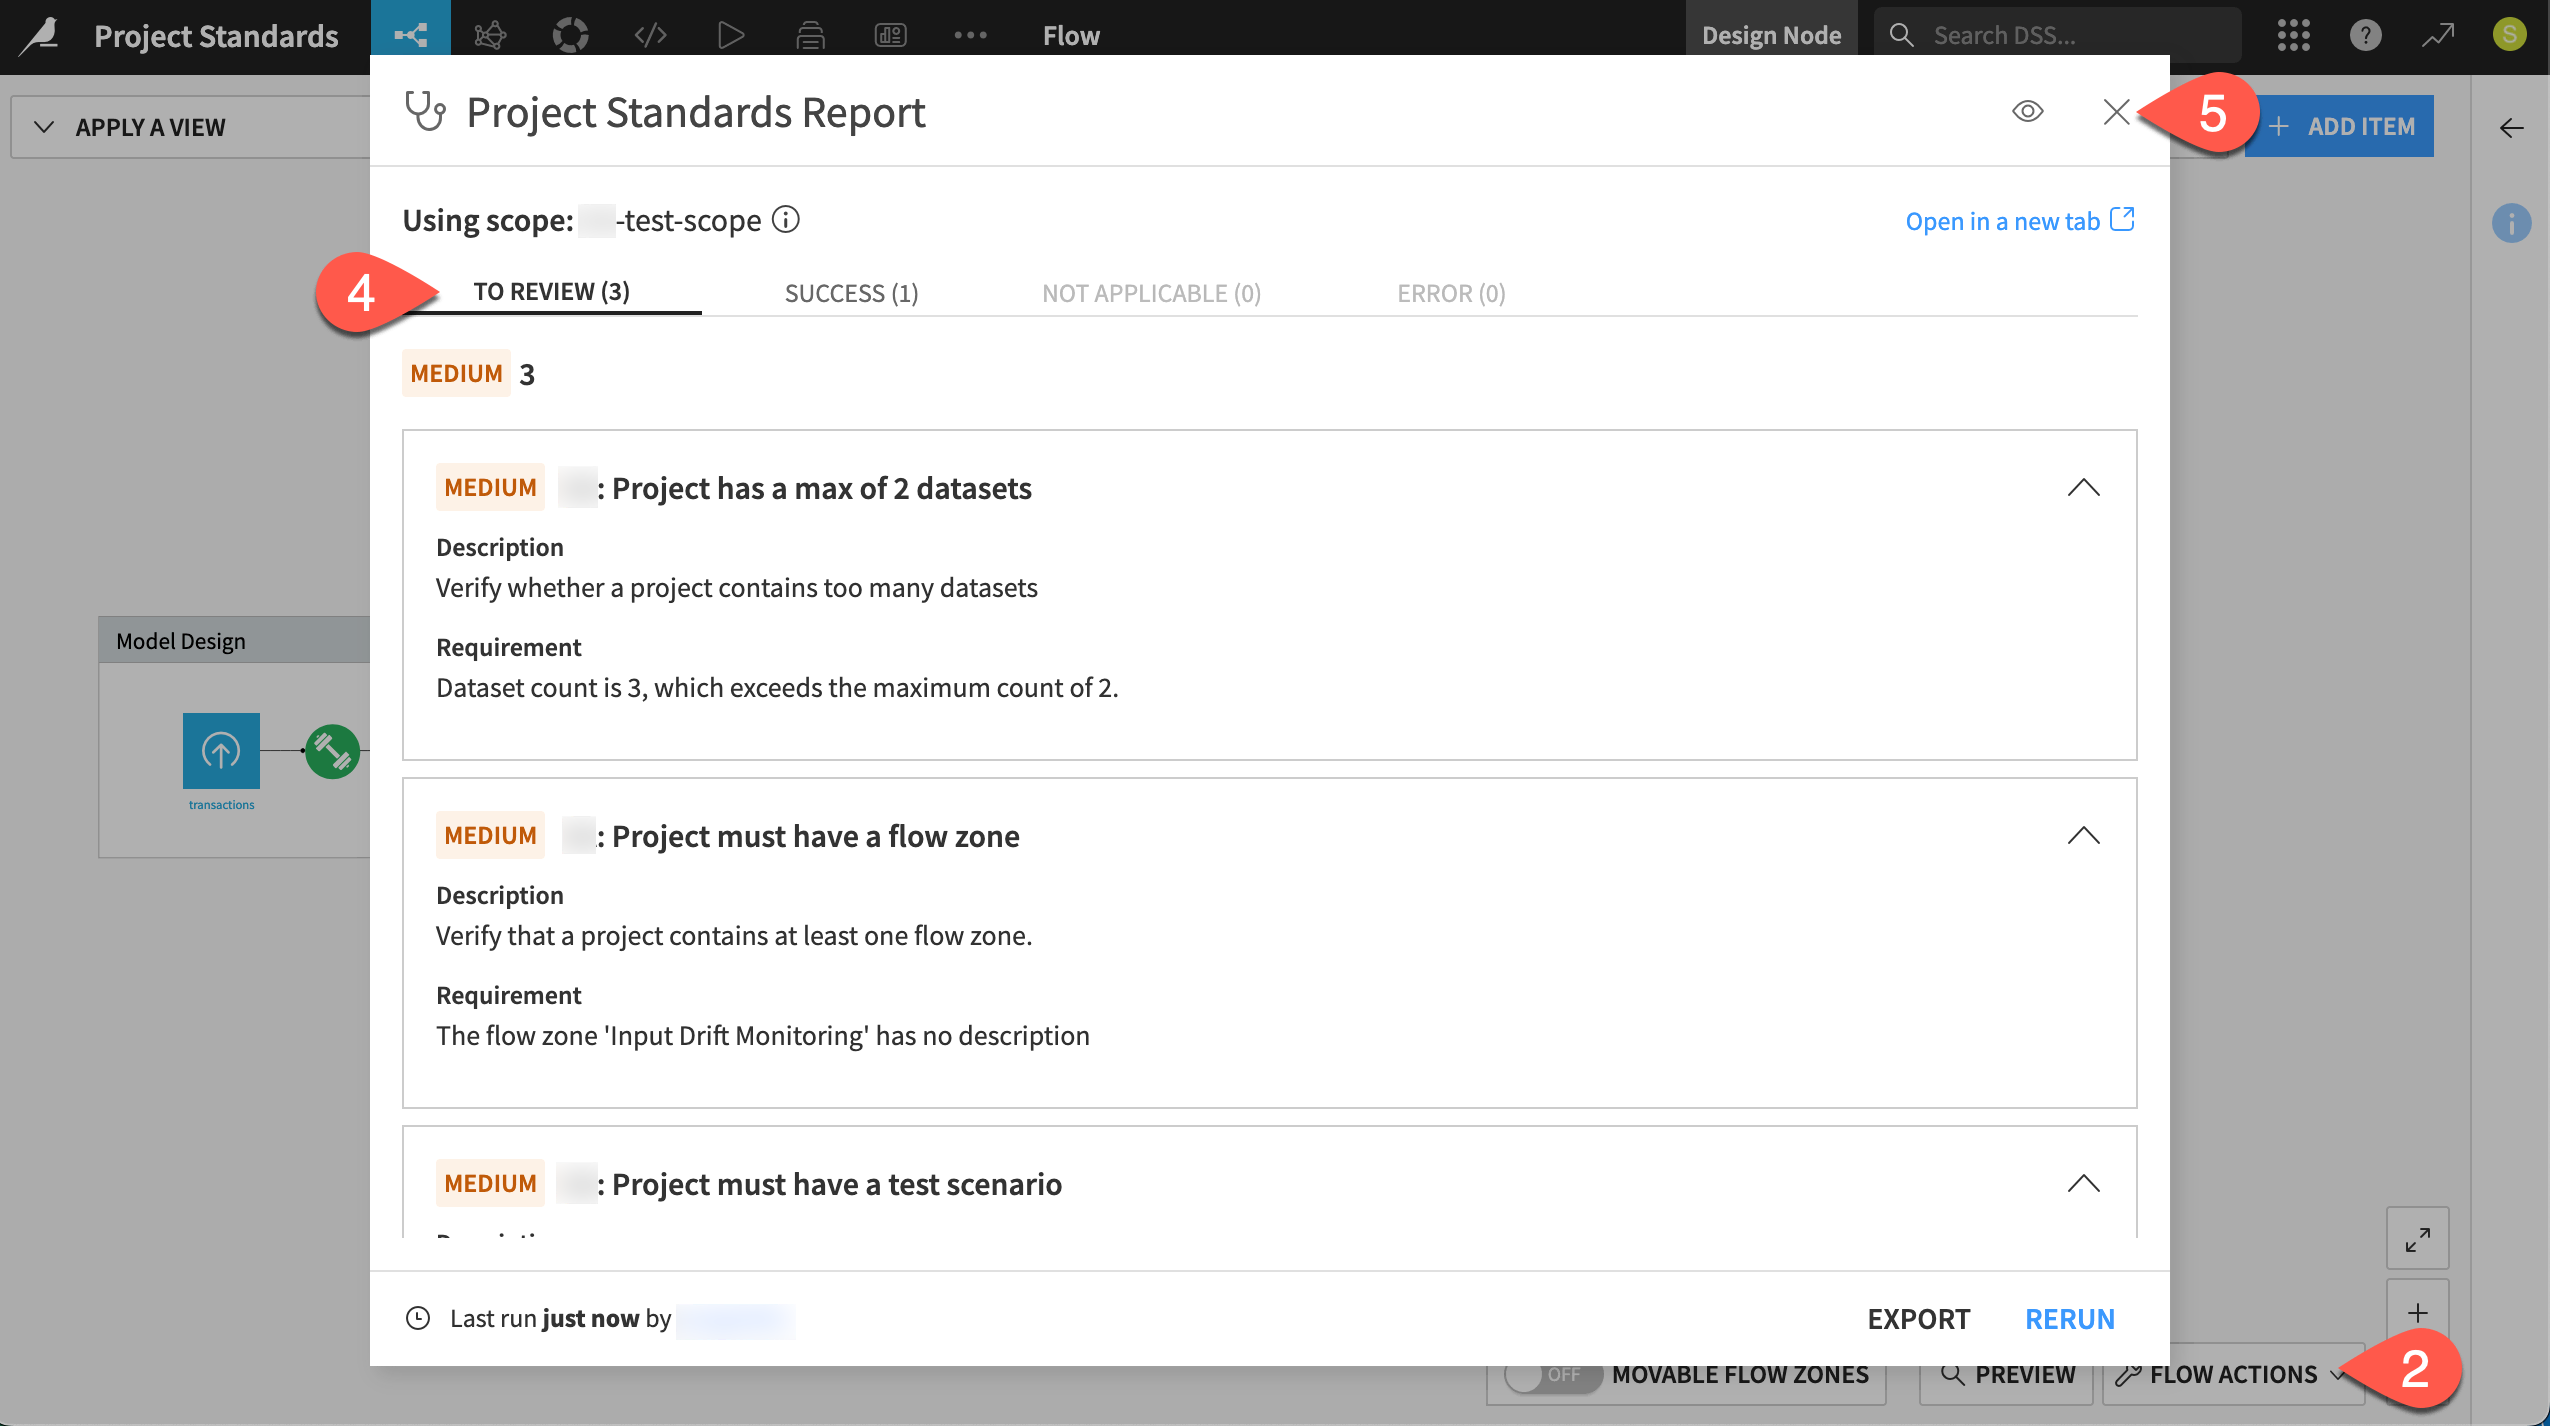
To test if the current project meets the deployment standards defined by their organization, users can build the Project Standards report at any time from the Flow.
From your version of the Project Standards project, go to the Flow (
g+f).Click Flow Actions > Check Project Standards.
Click Run Project Standards.
Explore the checks you need to review, those that succeeded, and those not applicable.
Close the window when finished reviewing.
Tip
These basic built-in checks are only of medium severity. For your own checks, you’ll be able to define statuses ranging from lowest to critical, should a condition violate the checks.
Act on a check#
Users can follow the results of the Project Standards report to determine if their works meets the organization’s guidelines. According to the report in this case, one check to review was the presence of a test scenario.
Add an empty test scenario to demonstrate how to move a check into the success state.
From the Jobs (
 ) menu of the top navigation bar, select Scenarios.
Click + New Scenario.
Name it
Test Scenario.Click Create.
Within the Settings tab of the scenario, check the box to Mark as a test scenario.
Click Save.
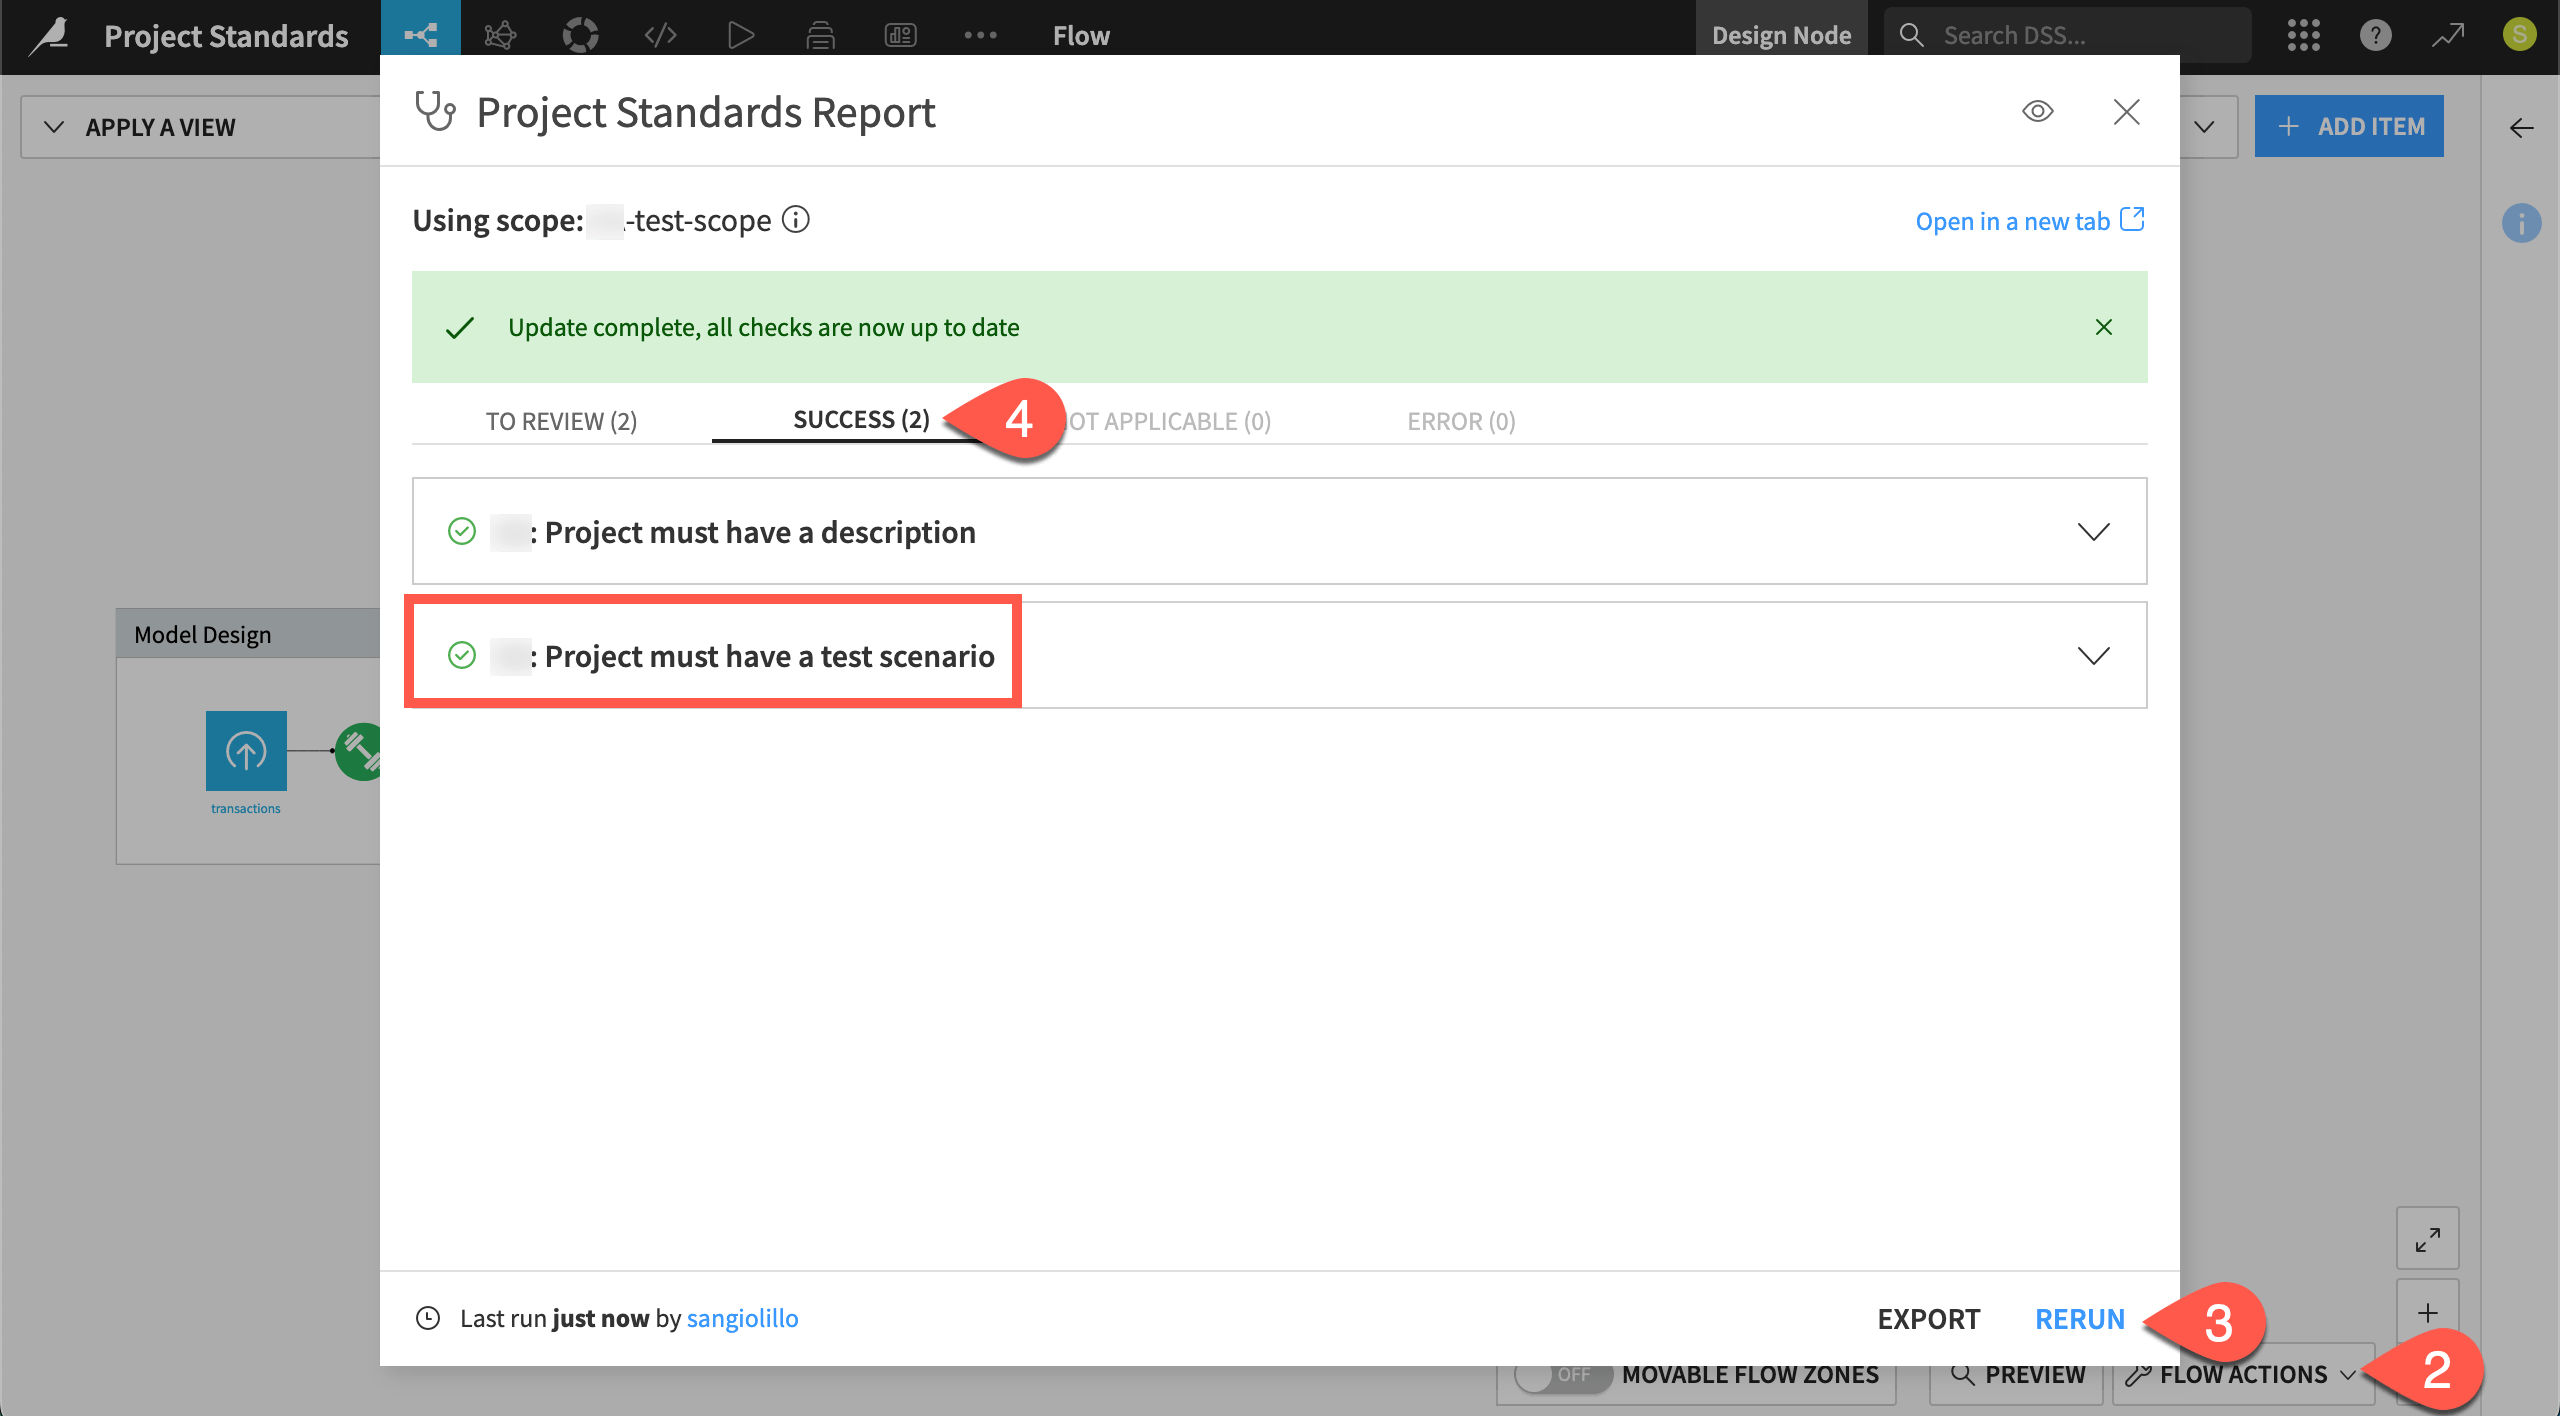
The Project Standards report is in fact a report. It doesn’t recompute automatically.
Return to the Flow.
Go to Flow Actions > Check Project Standards, and confirm that the test scenario check still needs review.
Click Rerun to generate a new report.
Confirm the test scenario check moves into the Success tab.
Next steps#
Congratulations! You should now have an understanding of how your organization can implement quality assurance checks, giving users a clearer path to escaping the sandbox.
If the next step for your project is to create a bundle, you’ll want to review Tutorial | Gate deployments with Project Standards. From there, you’ll learn how to use the results of the Project Standards report to gate production deployments.
Once you no longer need them, take a moment to delete the test checks as a courtesy to those sharing your instance.
Within the Project Standards tab of the Administration page, return to the Scopes panel.
Click the bin (
 ) next to your scope to delete it.
Navigate to the Checks library panel.
Search for your checks, and delete them as well.
Tip
To start using Project Standards in real projects, you’ll need to go beyond the basic checks shown here. To design your own, consult Project Standards Check component in the Developer Guide. You can also reach out to Dataiku’s data science account teams to learn how to import existing checks.
See also
See Project Standards in the reference documentation for more information.