
Tutorial | Agent Hub#
Get started#
Imagine you work on the customer success team for a software company. You’ve used some customer data to build a traditional machine learning model that predicts customer churn.
However, not everyone on the team can easily access this data or has the technical knowledge needed to use prediction models.
As the company’s AI champion, you’ve been tasked with helping the team quickly find customer analytics, make ad-hoc predictions about their current customers using the model, and draft outreach materials for clients in danger of churning.
The solution: Agent Hub in Dataiku!
Agent Hub allows teams to interact with multiple AI agents, create new agents to help with productivity, and distribute agents to end users.
Let’s get started building an Agent Hub!
Objectives#
In this tutorial, you will:
Create an Agent Hub.
Interact with enterprise-grade agents.
Create a productivity-focused My Agent within Agent Hub.
Orchestrate chats with multiple agents.
Track agent activities to ensure valid responses.
Prerequisites#
To complete this tutorial, you will need:
Dataiku 14.2 or later.
An Advanced Analytics Designer or Full Designer user profile, with rights to create projects. (Note: Those with an AI Consumer profile can complete portions of this tutorial, as noted in relevant sections.)
If you have an AI Consumer or AI Access profile, your administrator needs to grant you access to an Agent Hub instance.
A connection to at least one Generative AI model that supports tool calling and one that supports embedding. See supported models for tool calling and embedding (note that some models support both). Your administrator must configure the connection(s) in the Administration panel > Connections > New connection > LLM Mesh.
An internal code environment for retrieval augmented generation and agents. Your administrator must set this up in the Administration panel > Code Envs > Internal envs setup > Retrieval augmented generation code environment.
A filesystem connection that allows for managed folders. Your administrator can set this up in the Administration panel > Connections.
The Agent Hub plugin, which must be installed by your administrator.
Tip
If you’re not familiar with agents in Dataiku, here are some helpful resources:
Create the project#
From the Dataiku Design homepage, click + New Project.
Select Learning projects.
Search for and select Agent Hub.
If needed, change the folder into which the project will be installed, and click Create.
From the project homepage, click Go to Flow (or type
g+f).
Note
You can also download the starter project from this website and import it as a ZIP file.
Build the enterprise agents#
Important
You must have an Advanced Analytics Designer or Full Designer profile to complete most of this tutorial. If you have an AI Consumer profile, you can complete the steps starting with the Chat with the agents section, if another user has built the hub and shared it with you.
The project contains three agentic tools, and you can use them to build two enterprise agents with Dataiku’s visual workflow.
Customer usage lookup - labeled dataset: Searches a labeled dataset of customer usage data to find customers that fit the user’s search criteria.
Customer usage lookup - scored dataset: Searches a scored dataset of customer usage data that was output from a prediction model.
Predict churn: Uses a traditional ML model built in Dataiku to make predictions based on a user’s input of customer data.
You can explore these tools in the GenAI menu (![]() ) > Agent Tools.
) > Agent Tools.
In this section, you’ll use these tools to build two agents, connect them to an LLM, and learn how they work.
Tip
Enterprise agents are typically advanced agents created by cross-functional teams and have been through the full governance and sign-off process before the wider company can leverage them in Agent Hub. In this tutorial, you will build the enterprise agents so you can use them in Agent Hub.
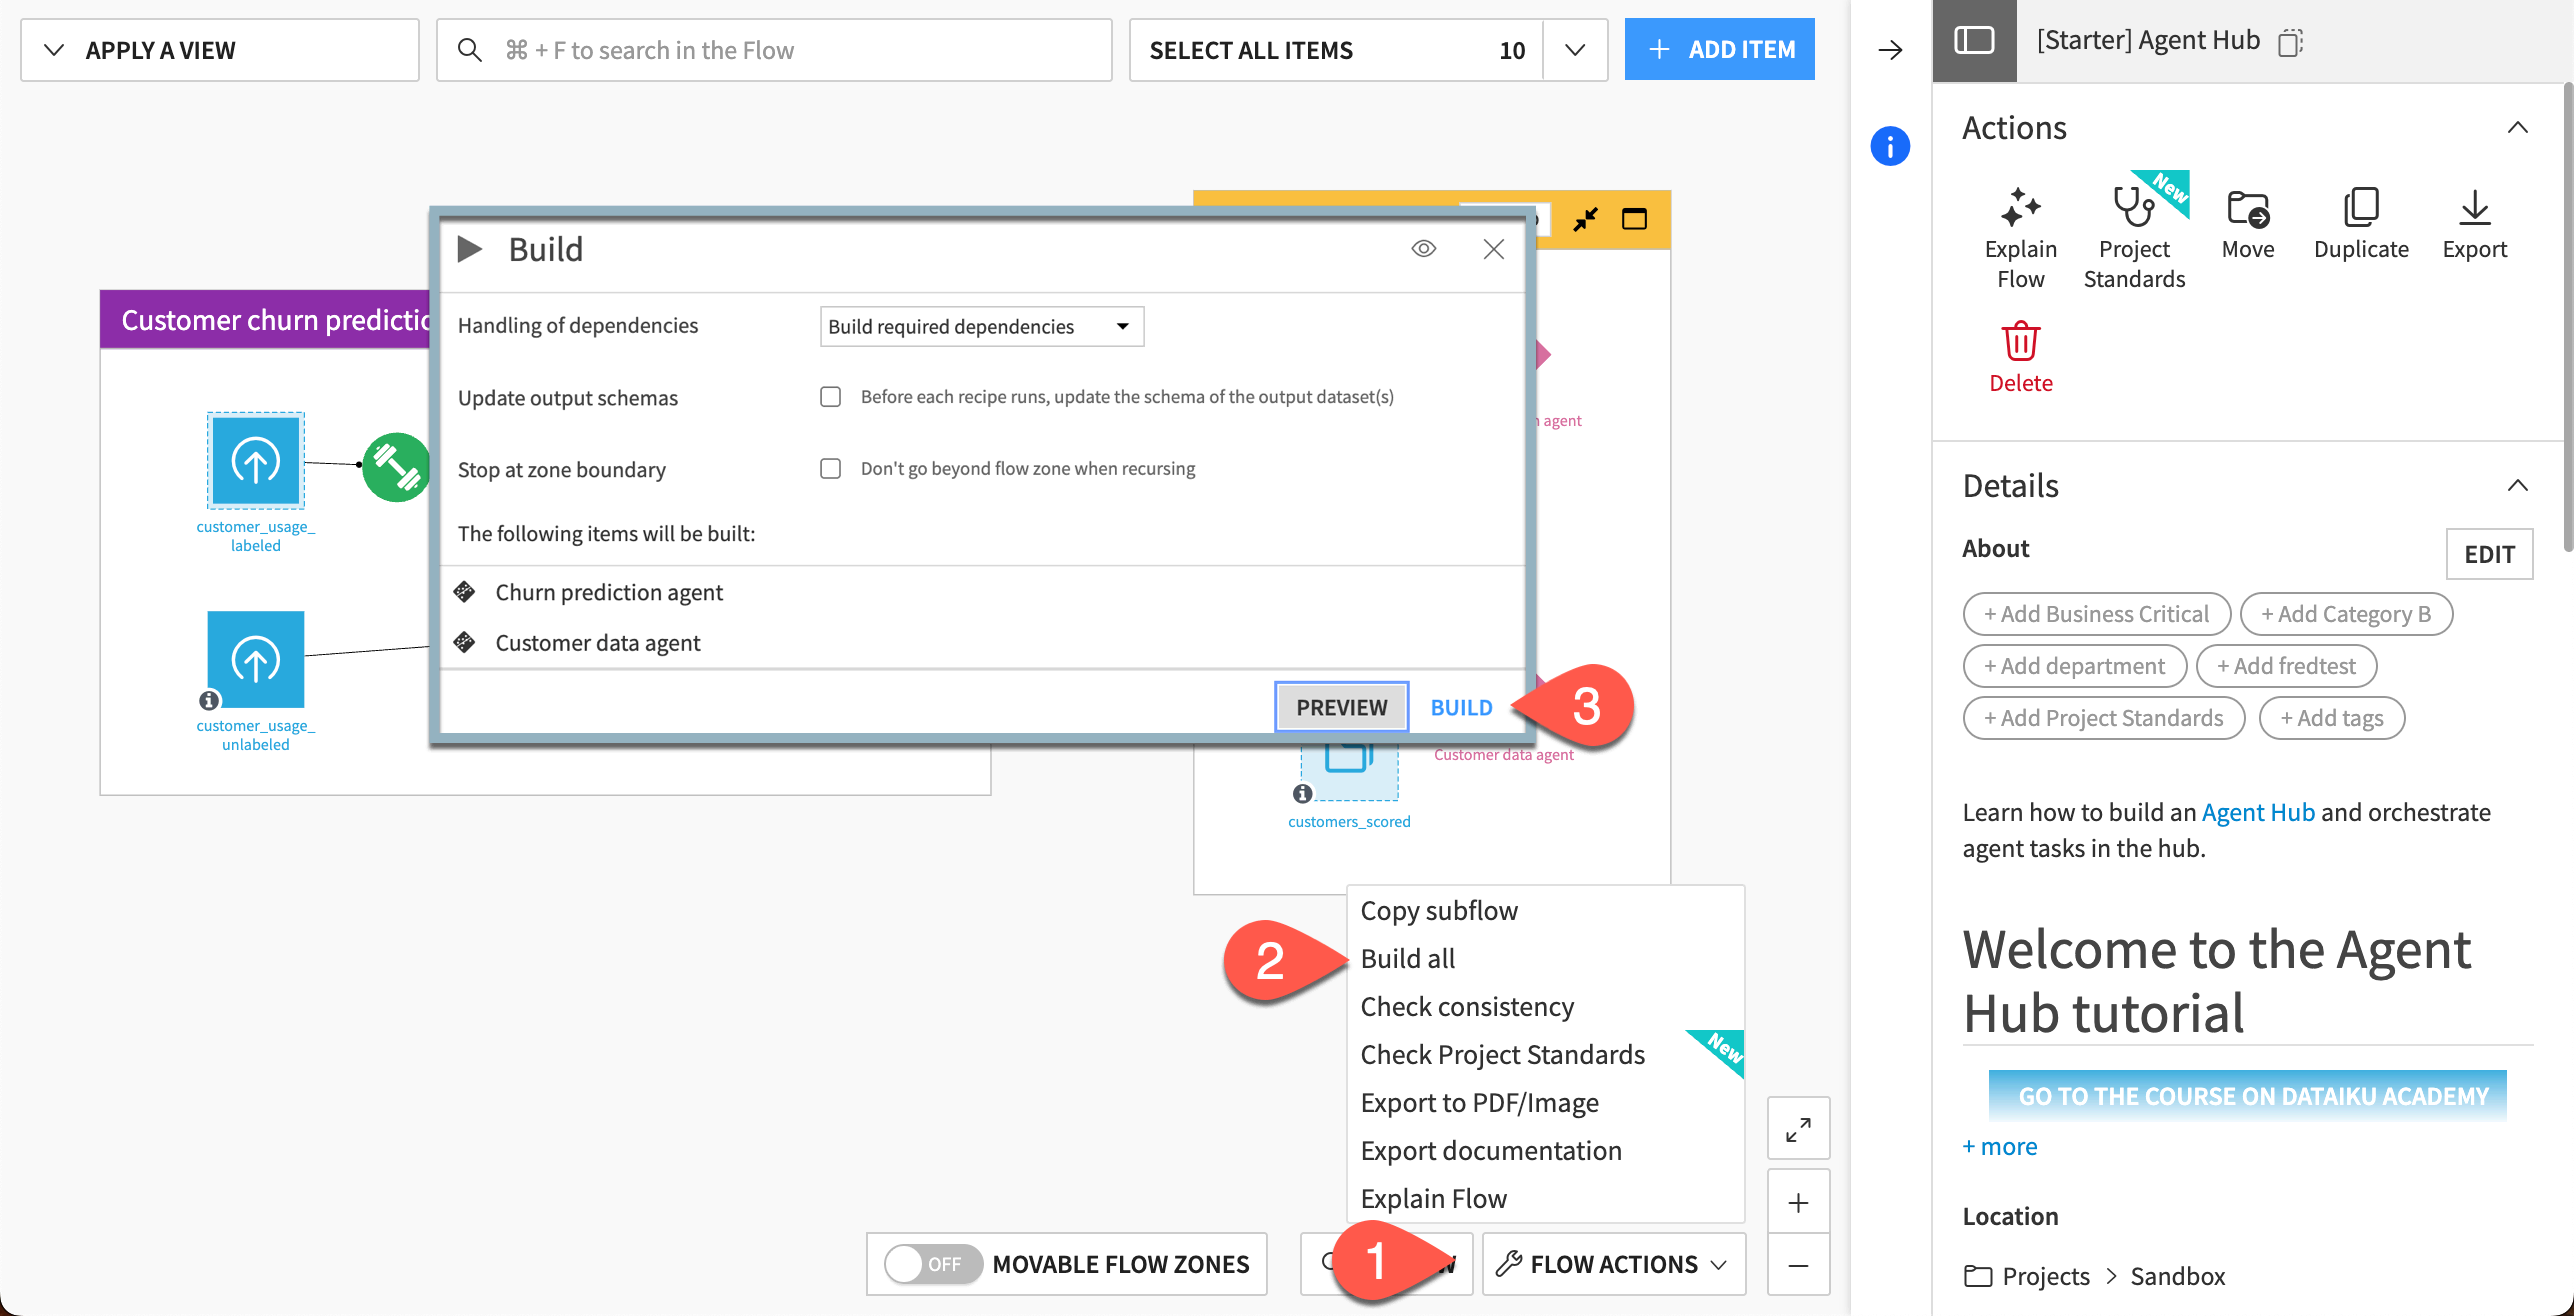
Build the Flow#
First, build the Flow to create the items so the agents can access the datasets and model.
From the Flow, open the Flow Actions menu.
Click Build all.
Click Build to run the recipes necessary to create the items furthest downstream.
Build customer data agent#
The first agent will use two tools to look up customer data from two datasets with the same schema.
From the Flow, go to + Add Item > Generative AI > Visual Agent. (You can also go to the GenAI (
 ) menu > Agents & GenAI Models.)
Give the Agent name
Customer data agentand click OK.
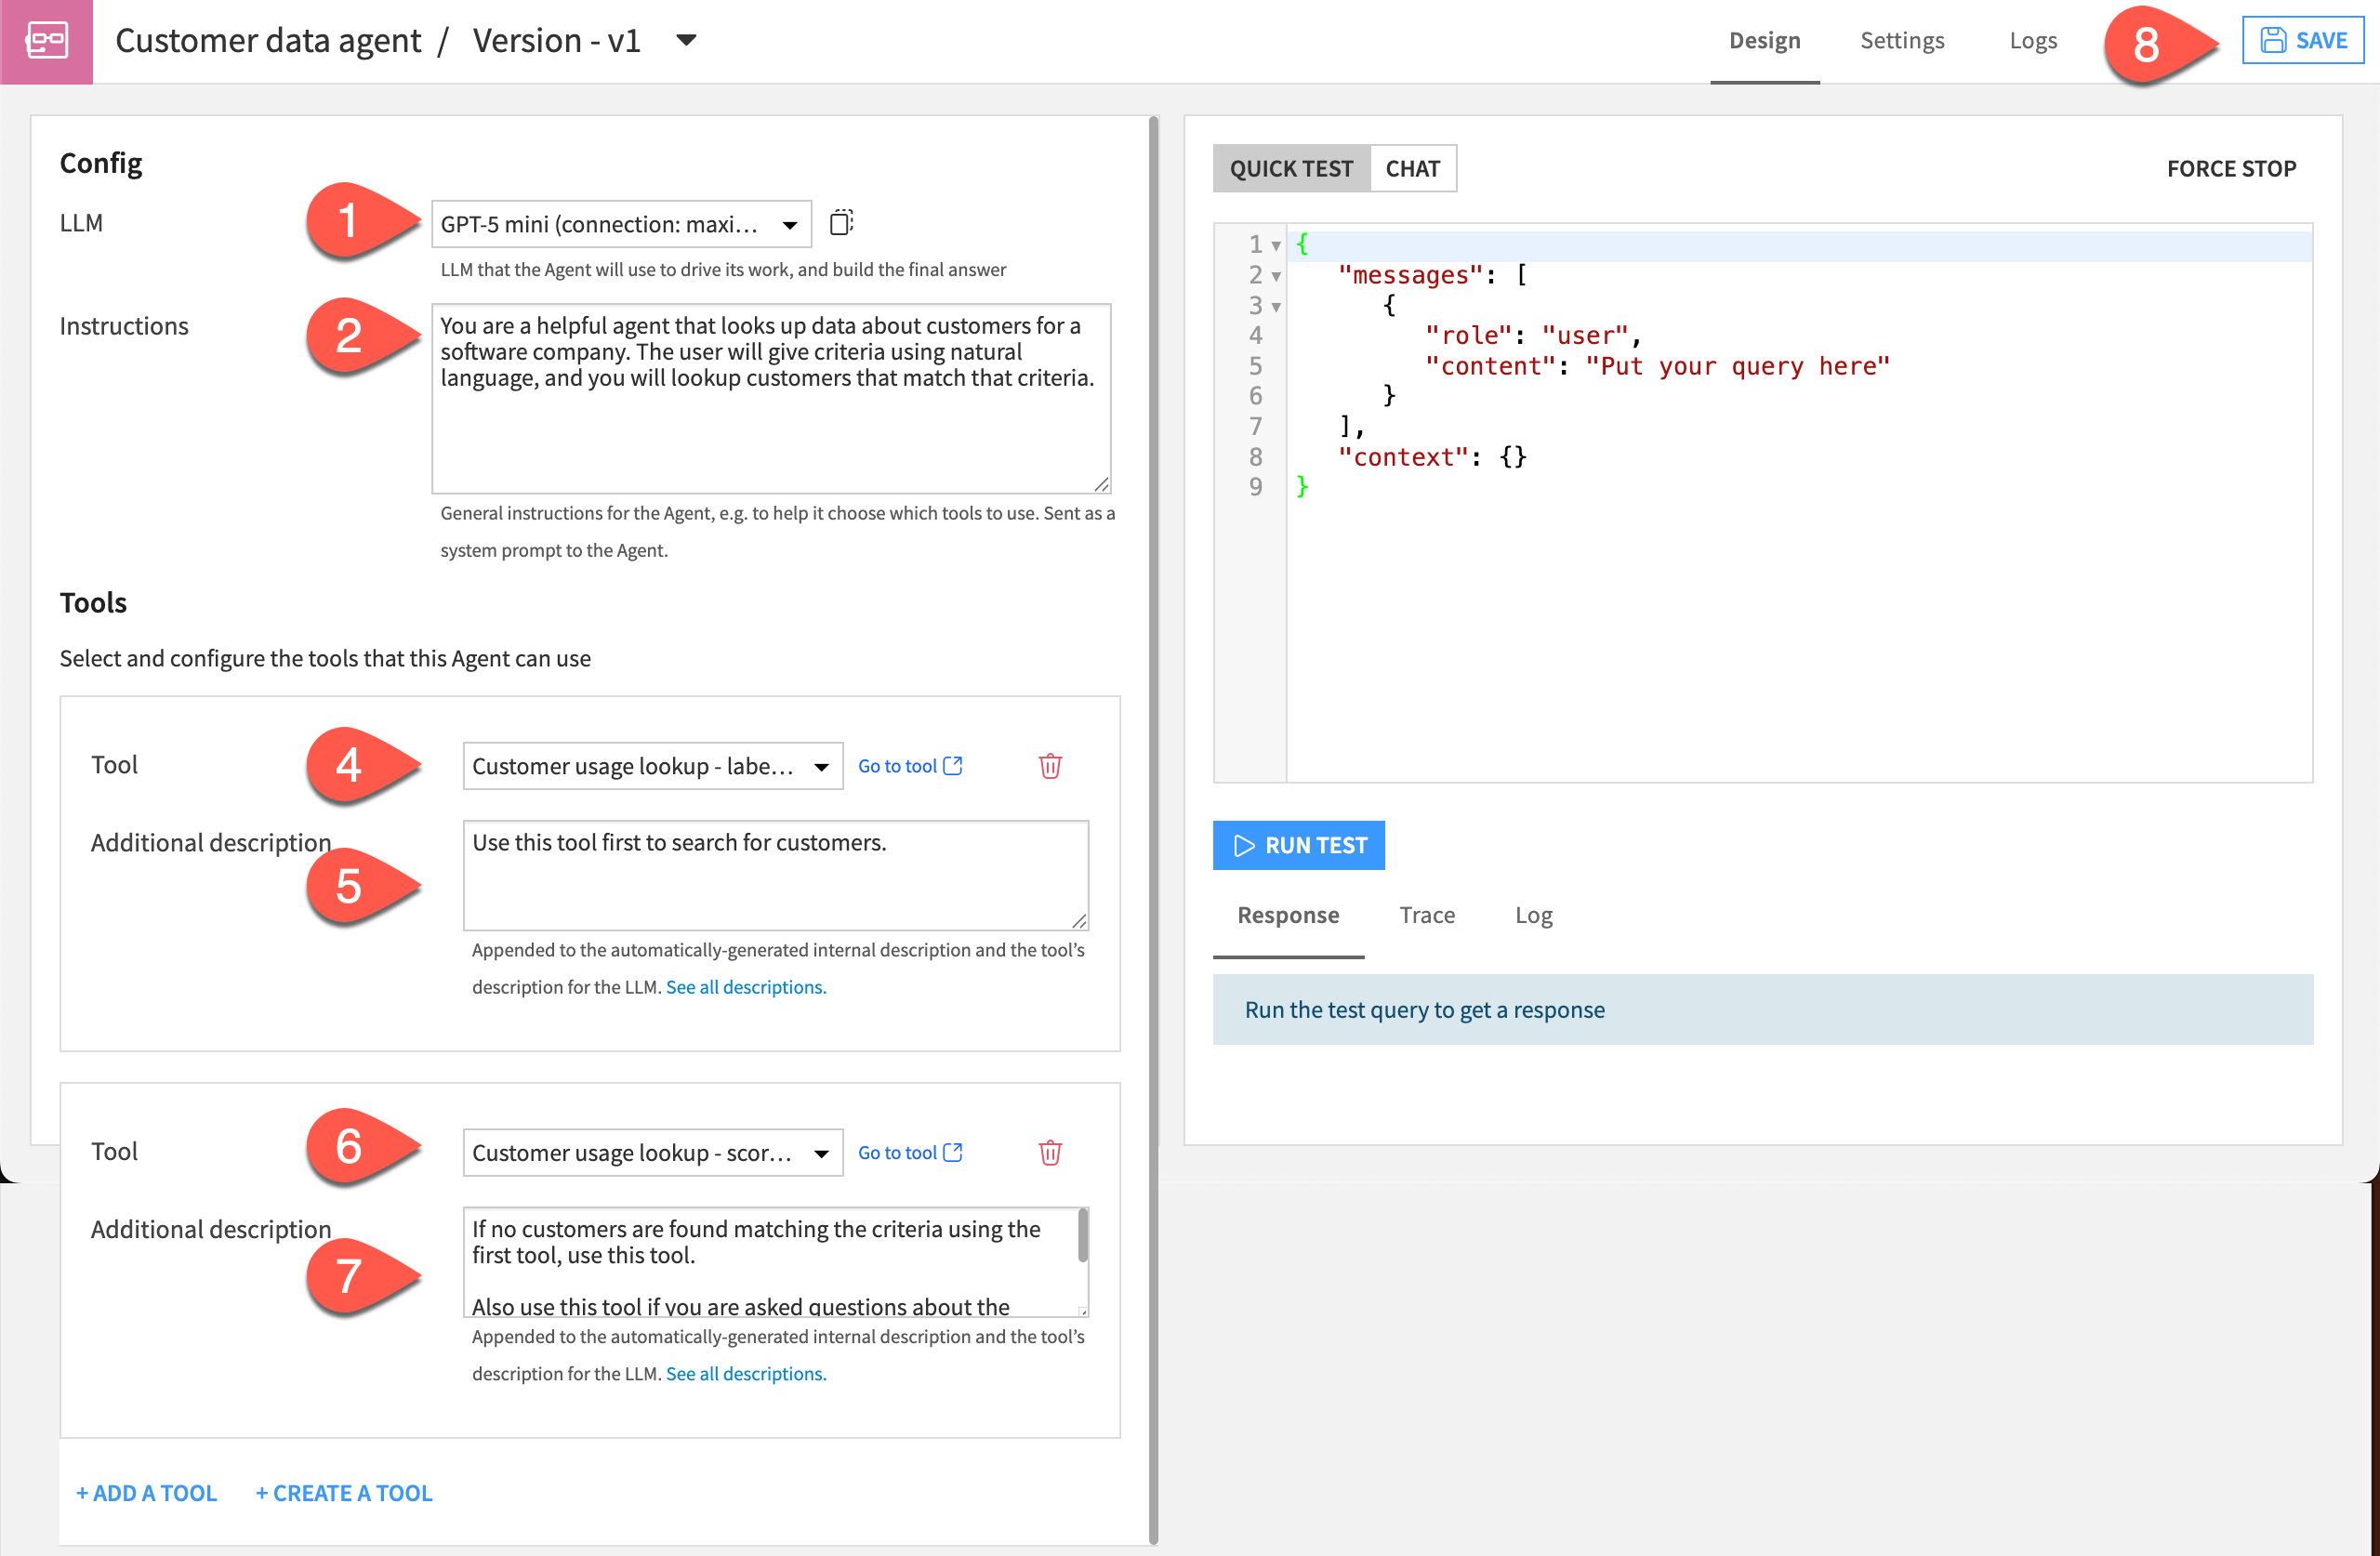
Now, set up the agent configuration.
In the Config window, use the LLM dropdown menu to choose from your available LLM connections.
In the Instructions window, copy and paste this text:
You are a helpful agent that looks up data about customers for a software company. The user will give criteria using natural language, and you will lookup customers that match that criteria.
Under Tools, click + Add a Tool.
Choose the Customer usage lookup - labeled tool.
Click + Add an Agent-Specific Description, then copy and paste this text:
Use this tool first to search for customers.
Add another tool, this time choosing the Customer usage lookup - scored tool.
Add this description to the tool:
If no customers are found matching the criteria using the first tool, use this tool.

Also use this tool if you are asked questions about the probability of churning. The customers with the highest probability of churning have the highest values in the "proba_former" column.
Click Save.
Test the agent#
Let’s run some tests to ensure the connection is working and to familiarize ourselves with the agent’s tasks.
The Customer data agent searches data that includes columns such as the customer’s industry, the number of logins their users made in the last year, the average number of features their users accessed, and more.
A user can search both datasets using one or more criteria. The agent tools are instructed to return up to 10 results.
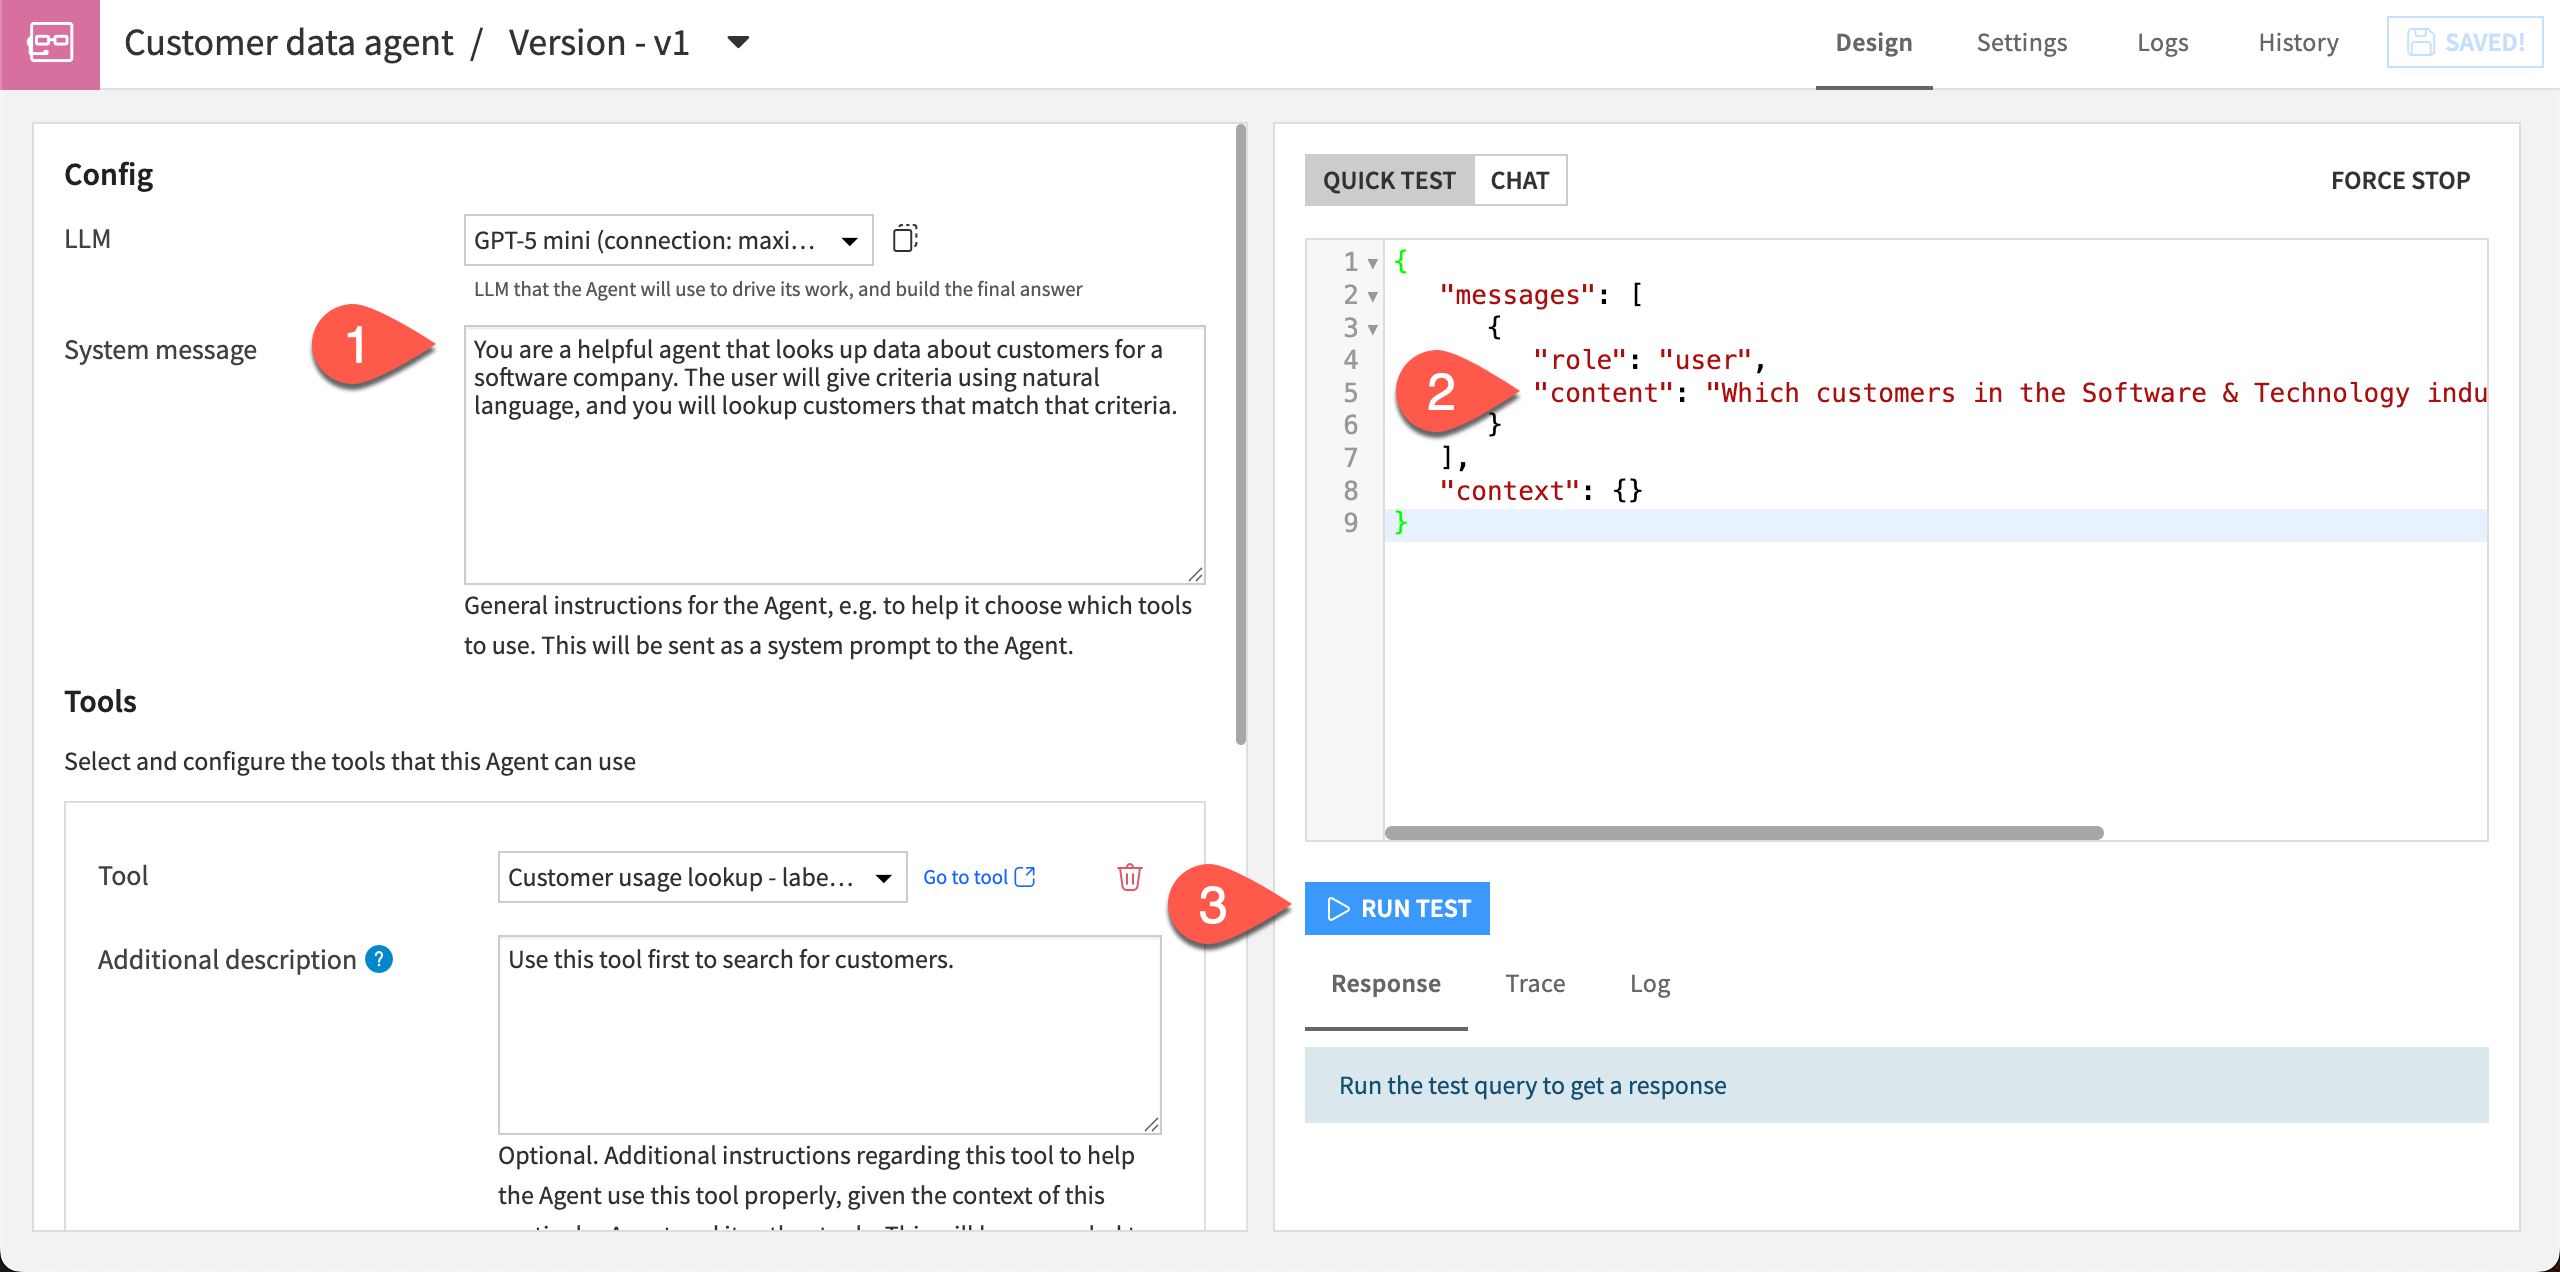
Navigate to the Test Query tab to the right.
Replace the text
Put your query herewith the following text:
Which customers in the Software & Technology industry have annual revenue over 40000?
Click Run Test.
Build churn prediction agent#
The second agent will use one tool that uses a machine learning model to predict whether a customer will churn.
Create a new agent either from the + Add Item button on the Flow or the GenAI (
) menu.Name the agent
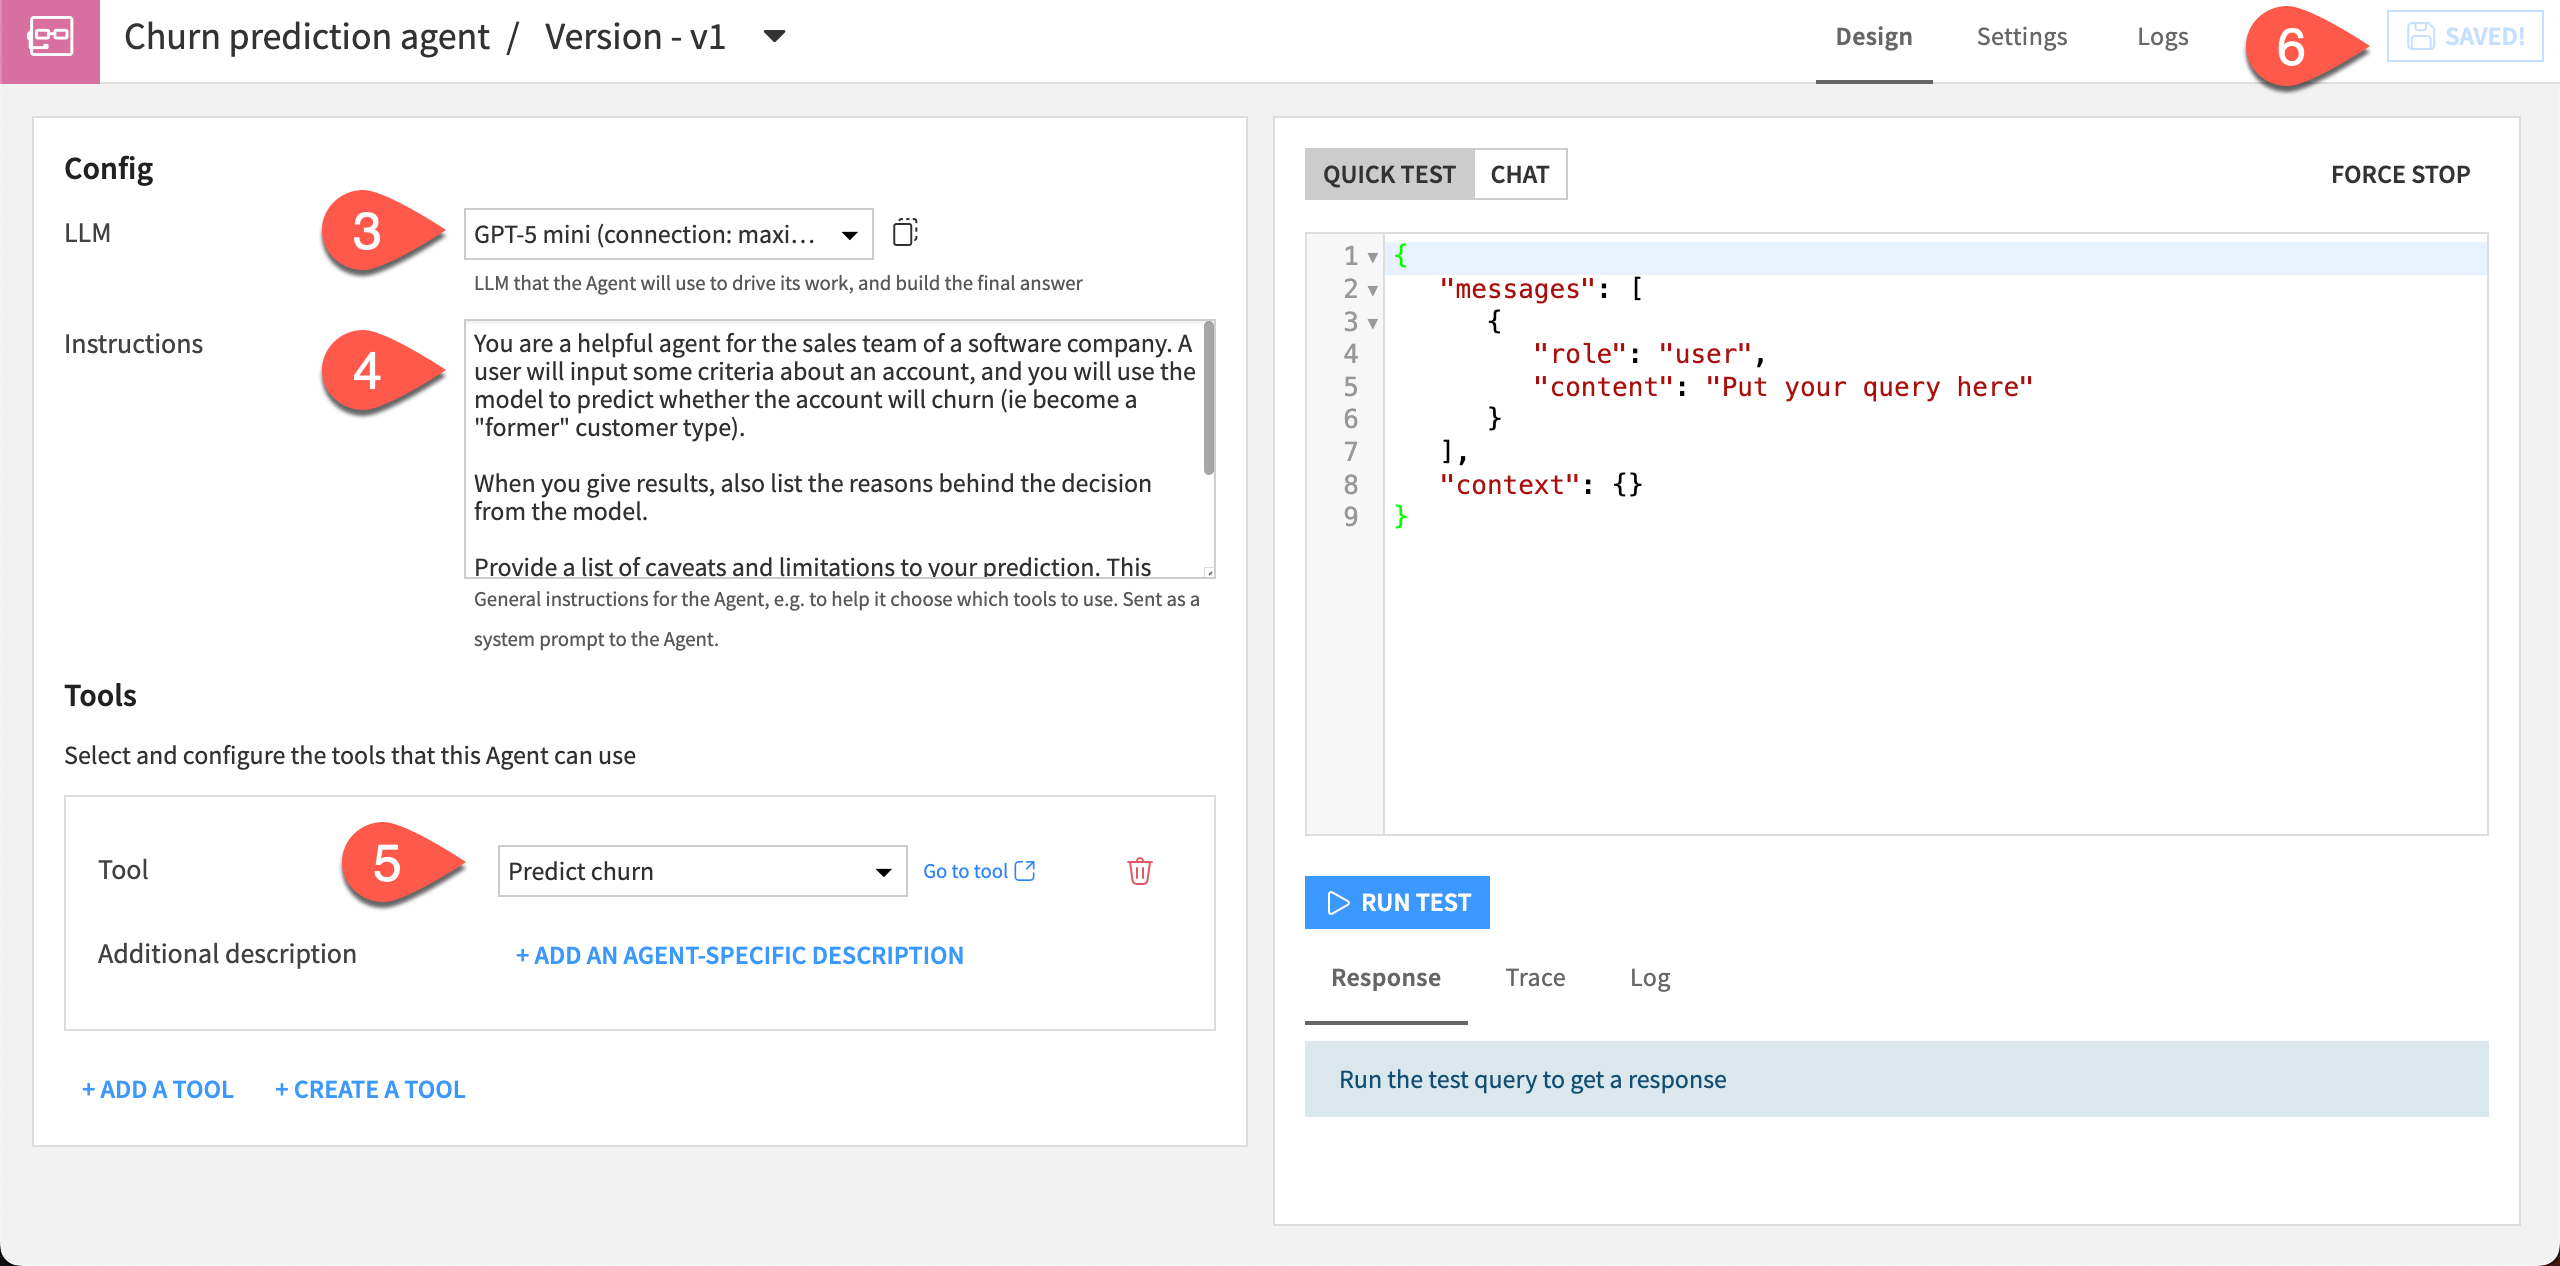
Churn prediction agentand click OK.In the Config window, use the LLM dropdown menu to choose from your available LLM connections.
In the Instructions window, copy and paste this text:
You are a helpful agent for the sales team of a software company. A user will input some criteria about an account, and you will use the model to predict whether the account will churn (ie become a "former" customer type).

When you give results, also list the reasons behind the decision from the model.

If you are asked any questions that the model is unable to predict, state that the query is outside the bounds of the model.
Under Tools, click + Add a Tool and choose the Predict churn tool.
Click Save.
Test the agent#
For this agent, the user can input one or more known factors about a customer, and the agent will respond with its best prediction of whether the customer will churn.
This time, test the agent using a chat interface.
Navigate to the Chat tab to the right.
Copy and paste this text into the chat:
My customer is in the education & nonprofit sector, has an annual revenue of about 10000 and an average satisfaction score of 6.7. Are they likely to churn?
Send the chat.
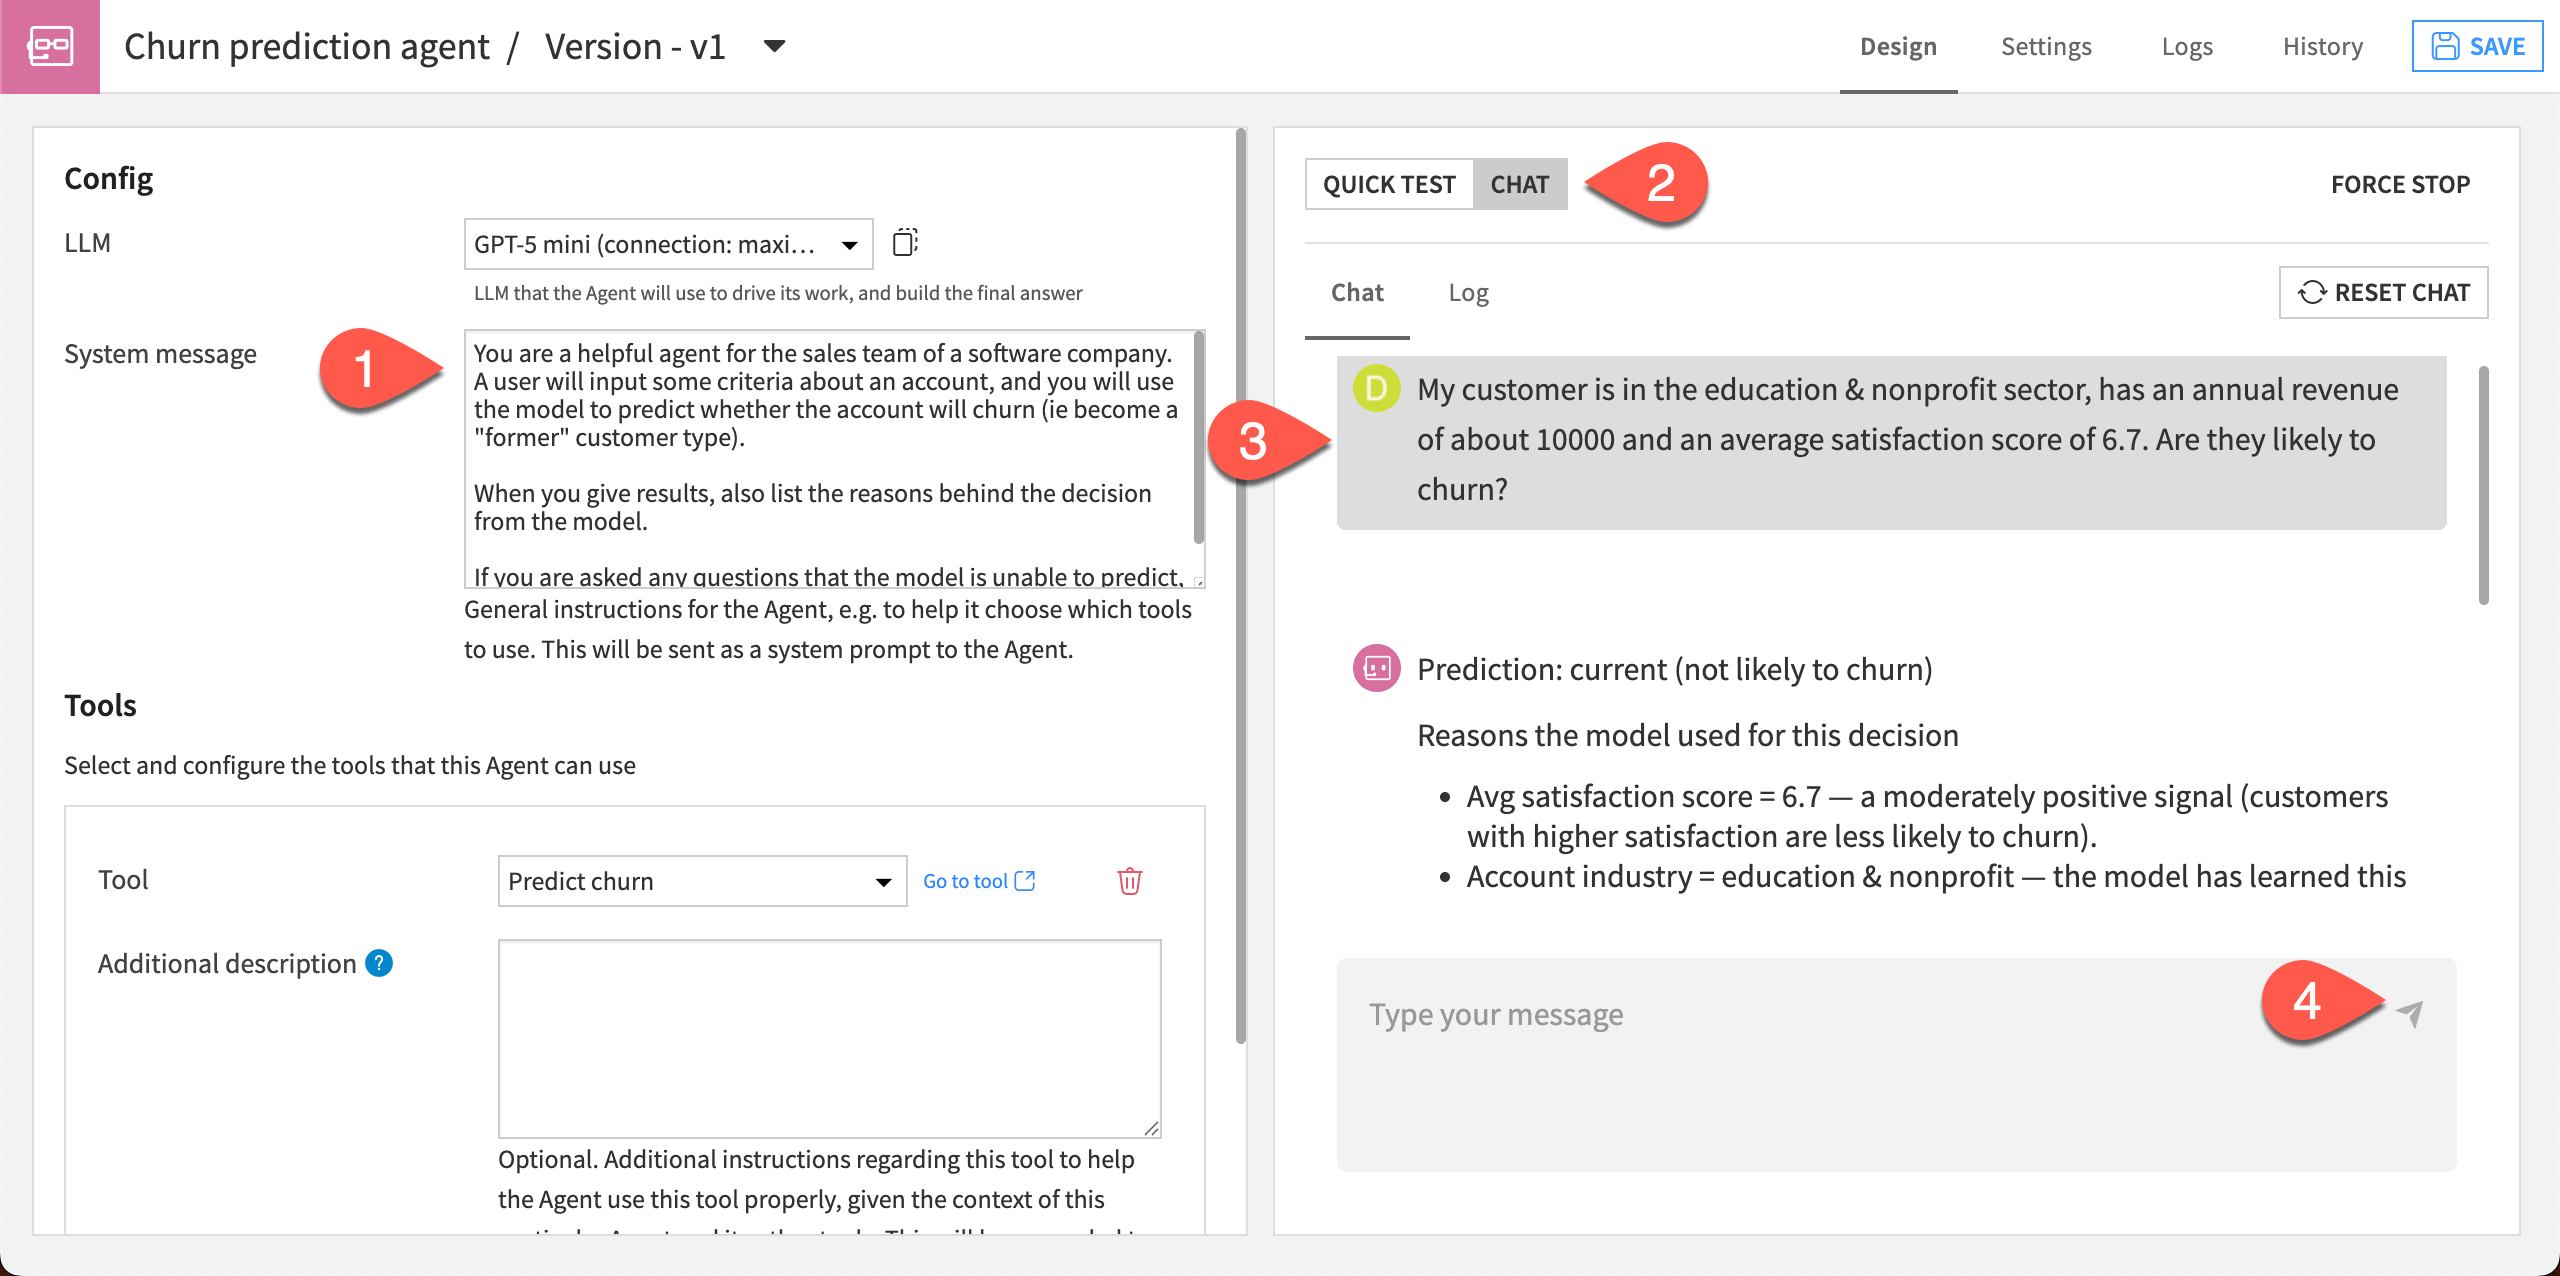
As instructed, this agent returns the reasoning behind its prediction, which could be useful for the customer success team. It also returns some caveats, saying that the model’s confidence would be improved if it had more information about the customer.
Note
The responses from your agents throughout this tutorial might look different depending on the models used and can differ from run to run.
Set up Agent Hub#
Now that you have two working agents, let’s combine them in an Agent Hub and distribute them to the team.
Tip
For this tutorial, you are building Agent Hub in the same project as your agents. In a real-world scenario, it’s good practice to create Agent Hub in a Dataiku project that’s separate from your data pipeline and agents. This simplifies access and oversight of the Agent Hub.
Create the webapp#
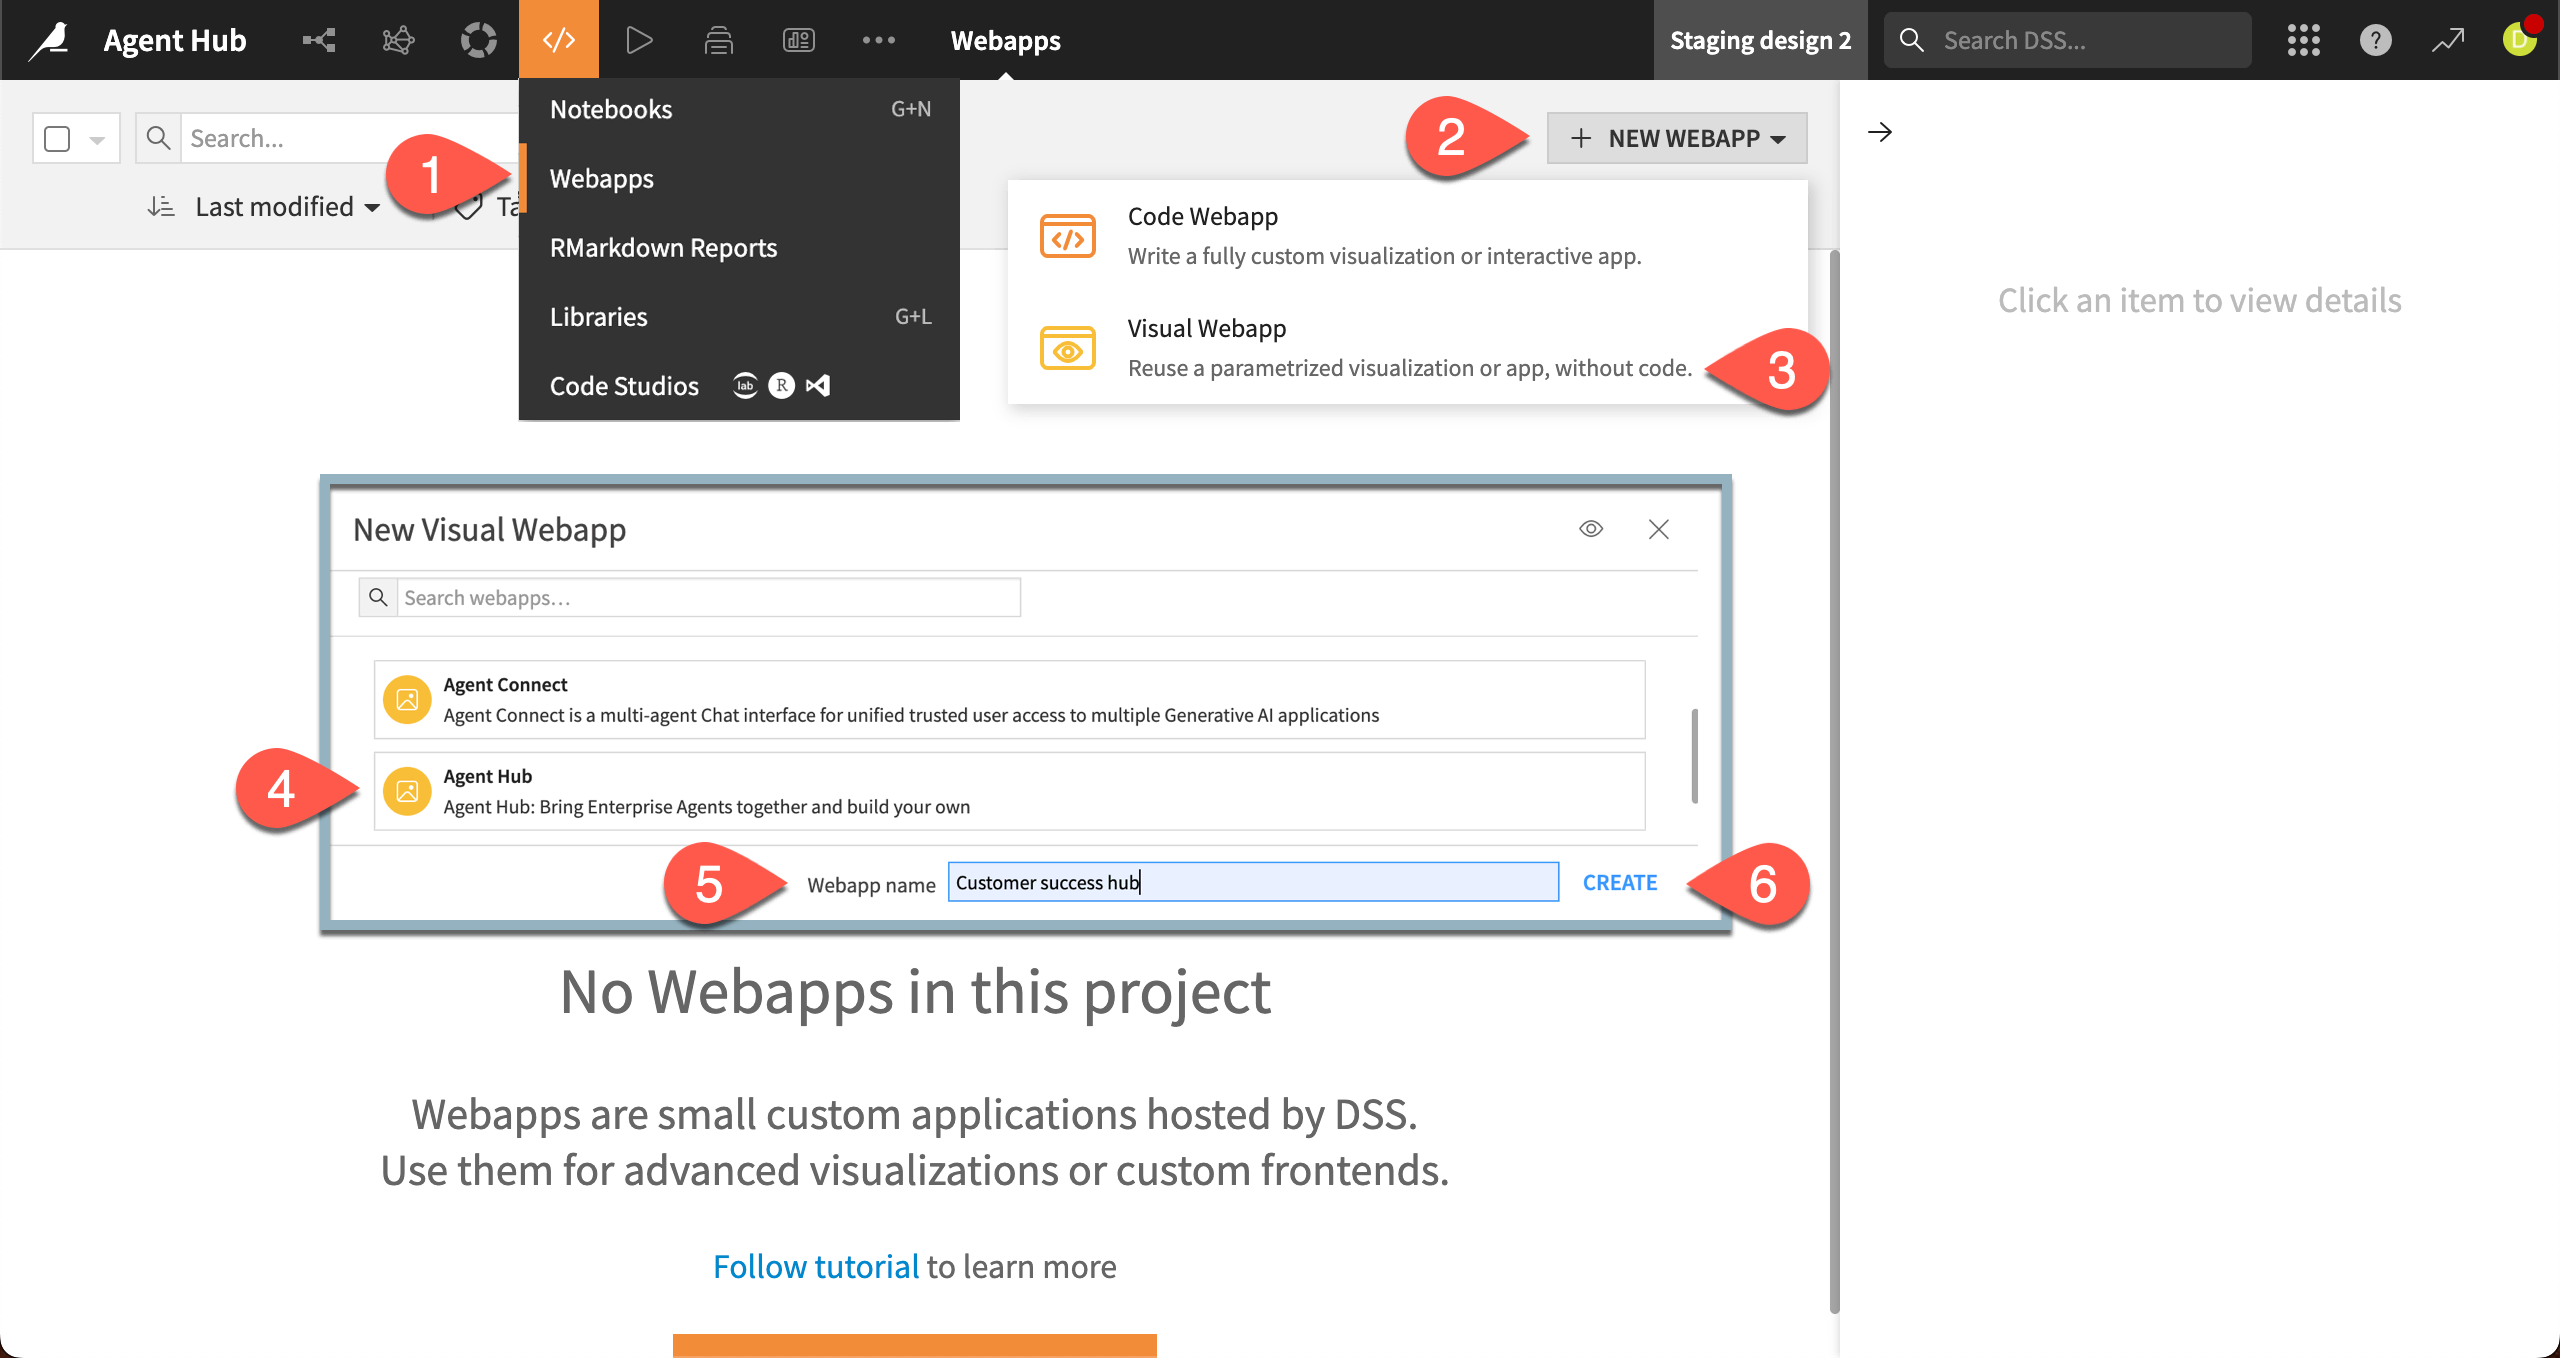
To create an Agent Hub, start with the webapp template.
Go to the GenAI (
) menu > Agent Hub, Answers & Agent Connect.Click + New Agent Hub.
Give the hub a name, such as
Customer success hub.Click Create.
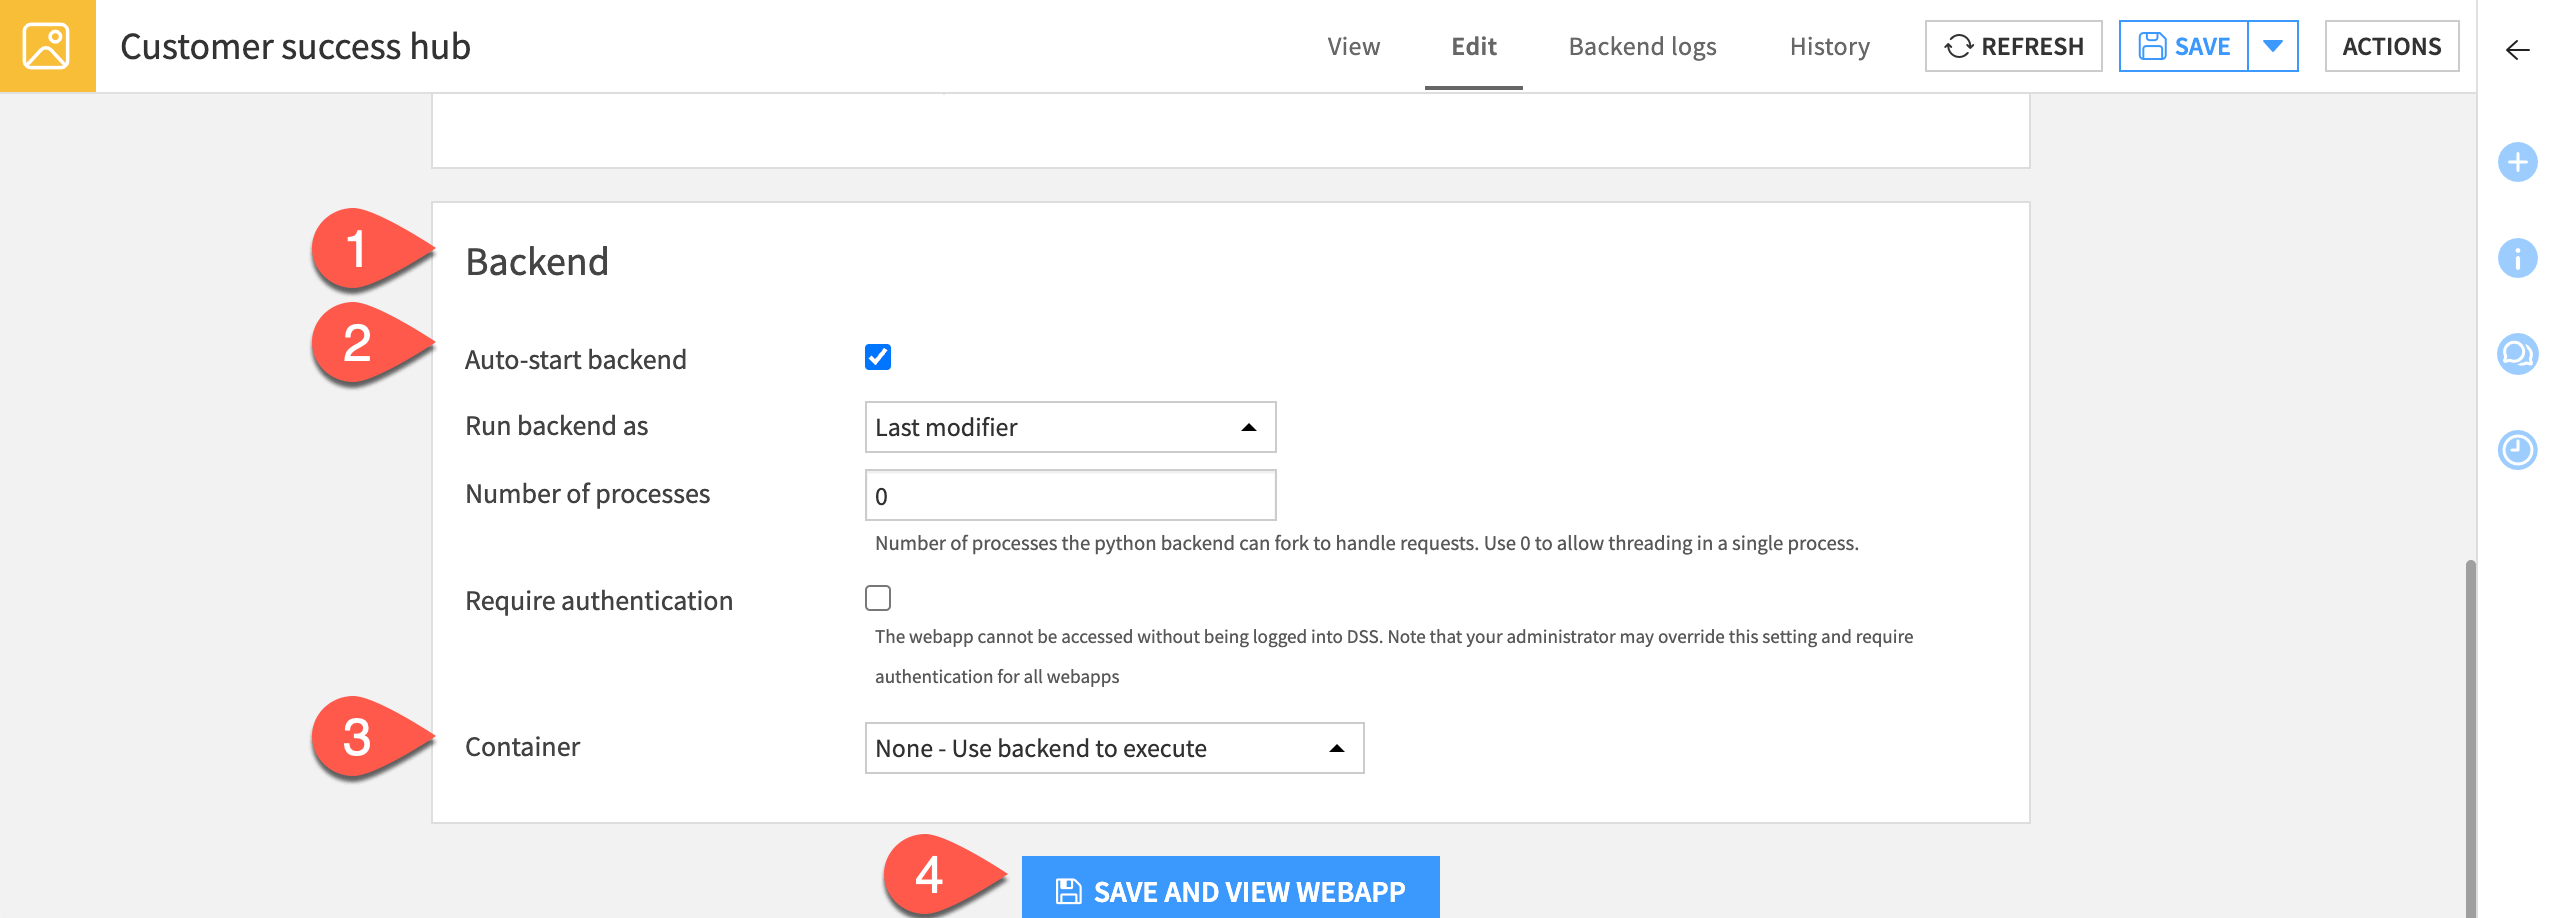
Configure the backend#
First, configure some Backend settings that dictate how Agent Hub runs.
In the Backend section of the Edit tab, click the Auto-start backend box.
For Container, choose None - Use backend to execute.
Click Save and View Webapp.
Configure settings#
Next, add your LLM connections, agent projects, and other settings on the Agent Hub Admin settings page.
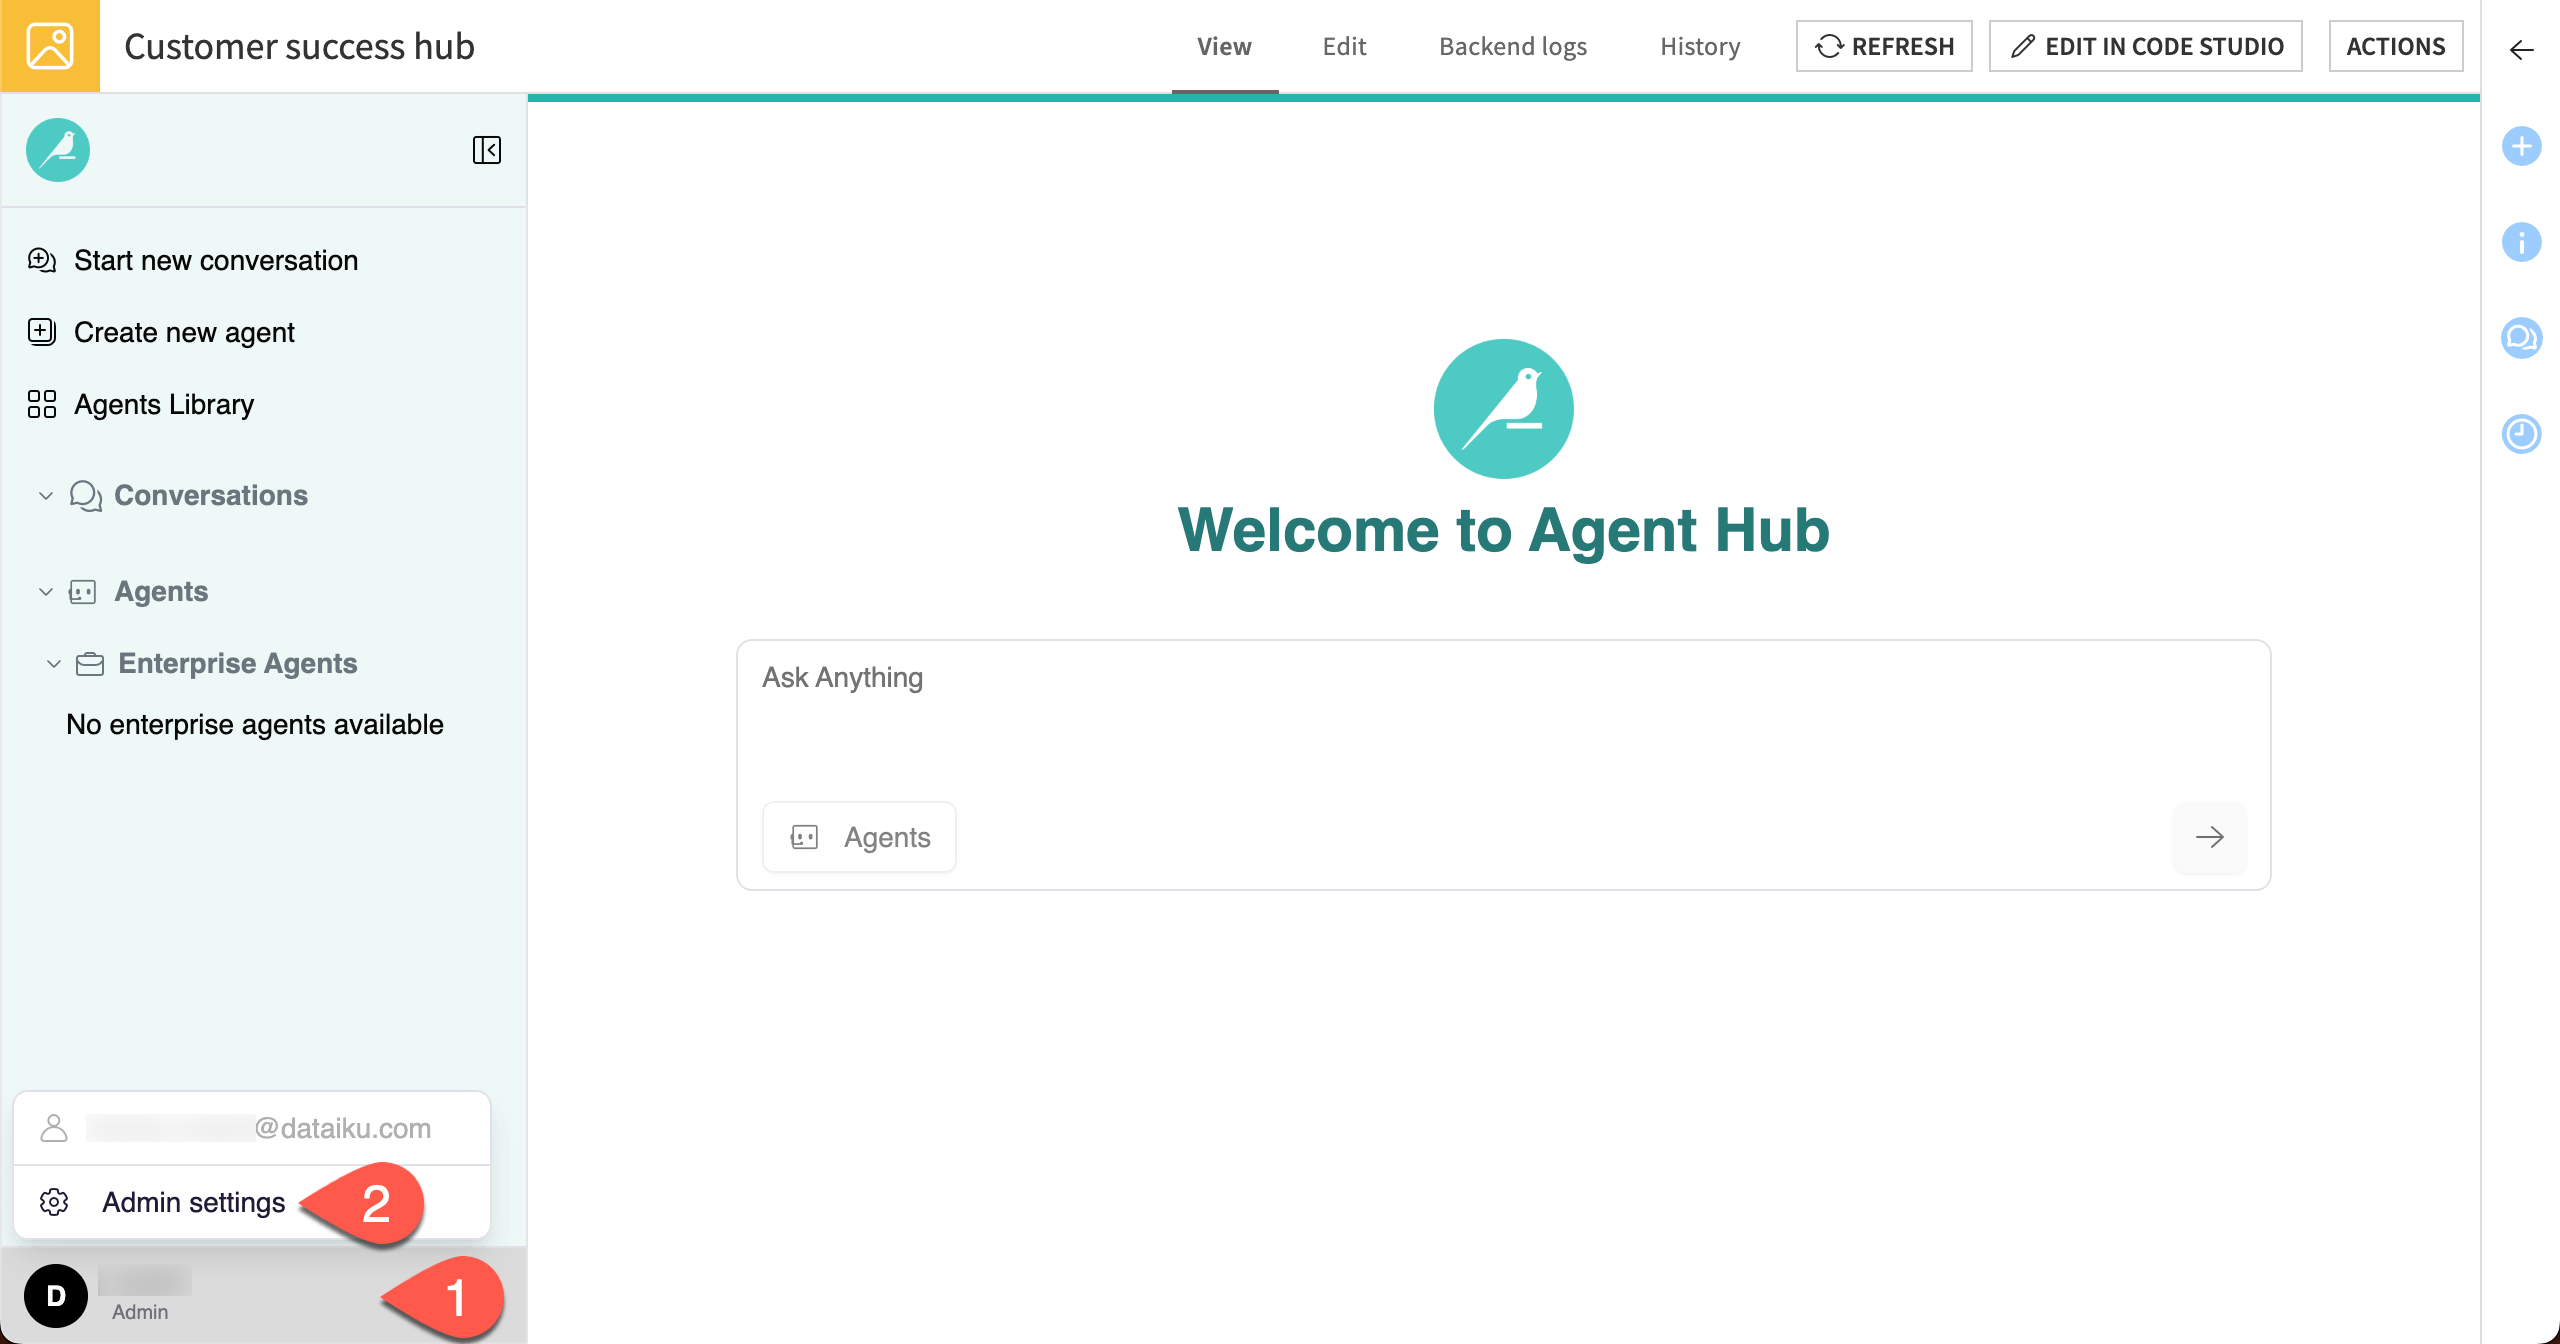
From the Agent Hub main page, navigate to the Admin button in the lower left.
Click Admin settings.
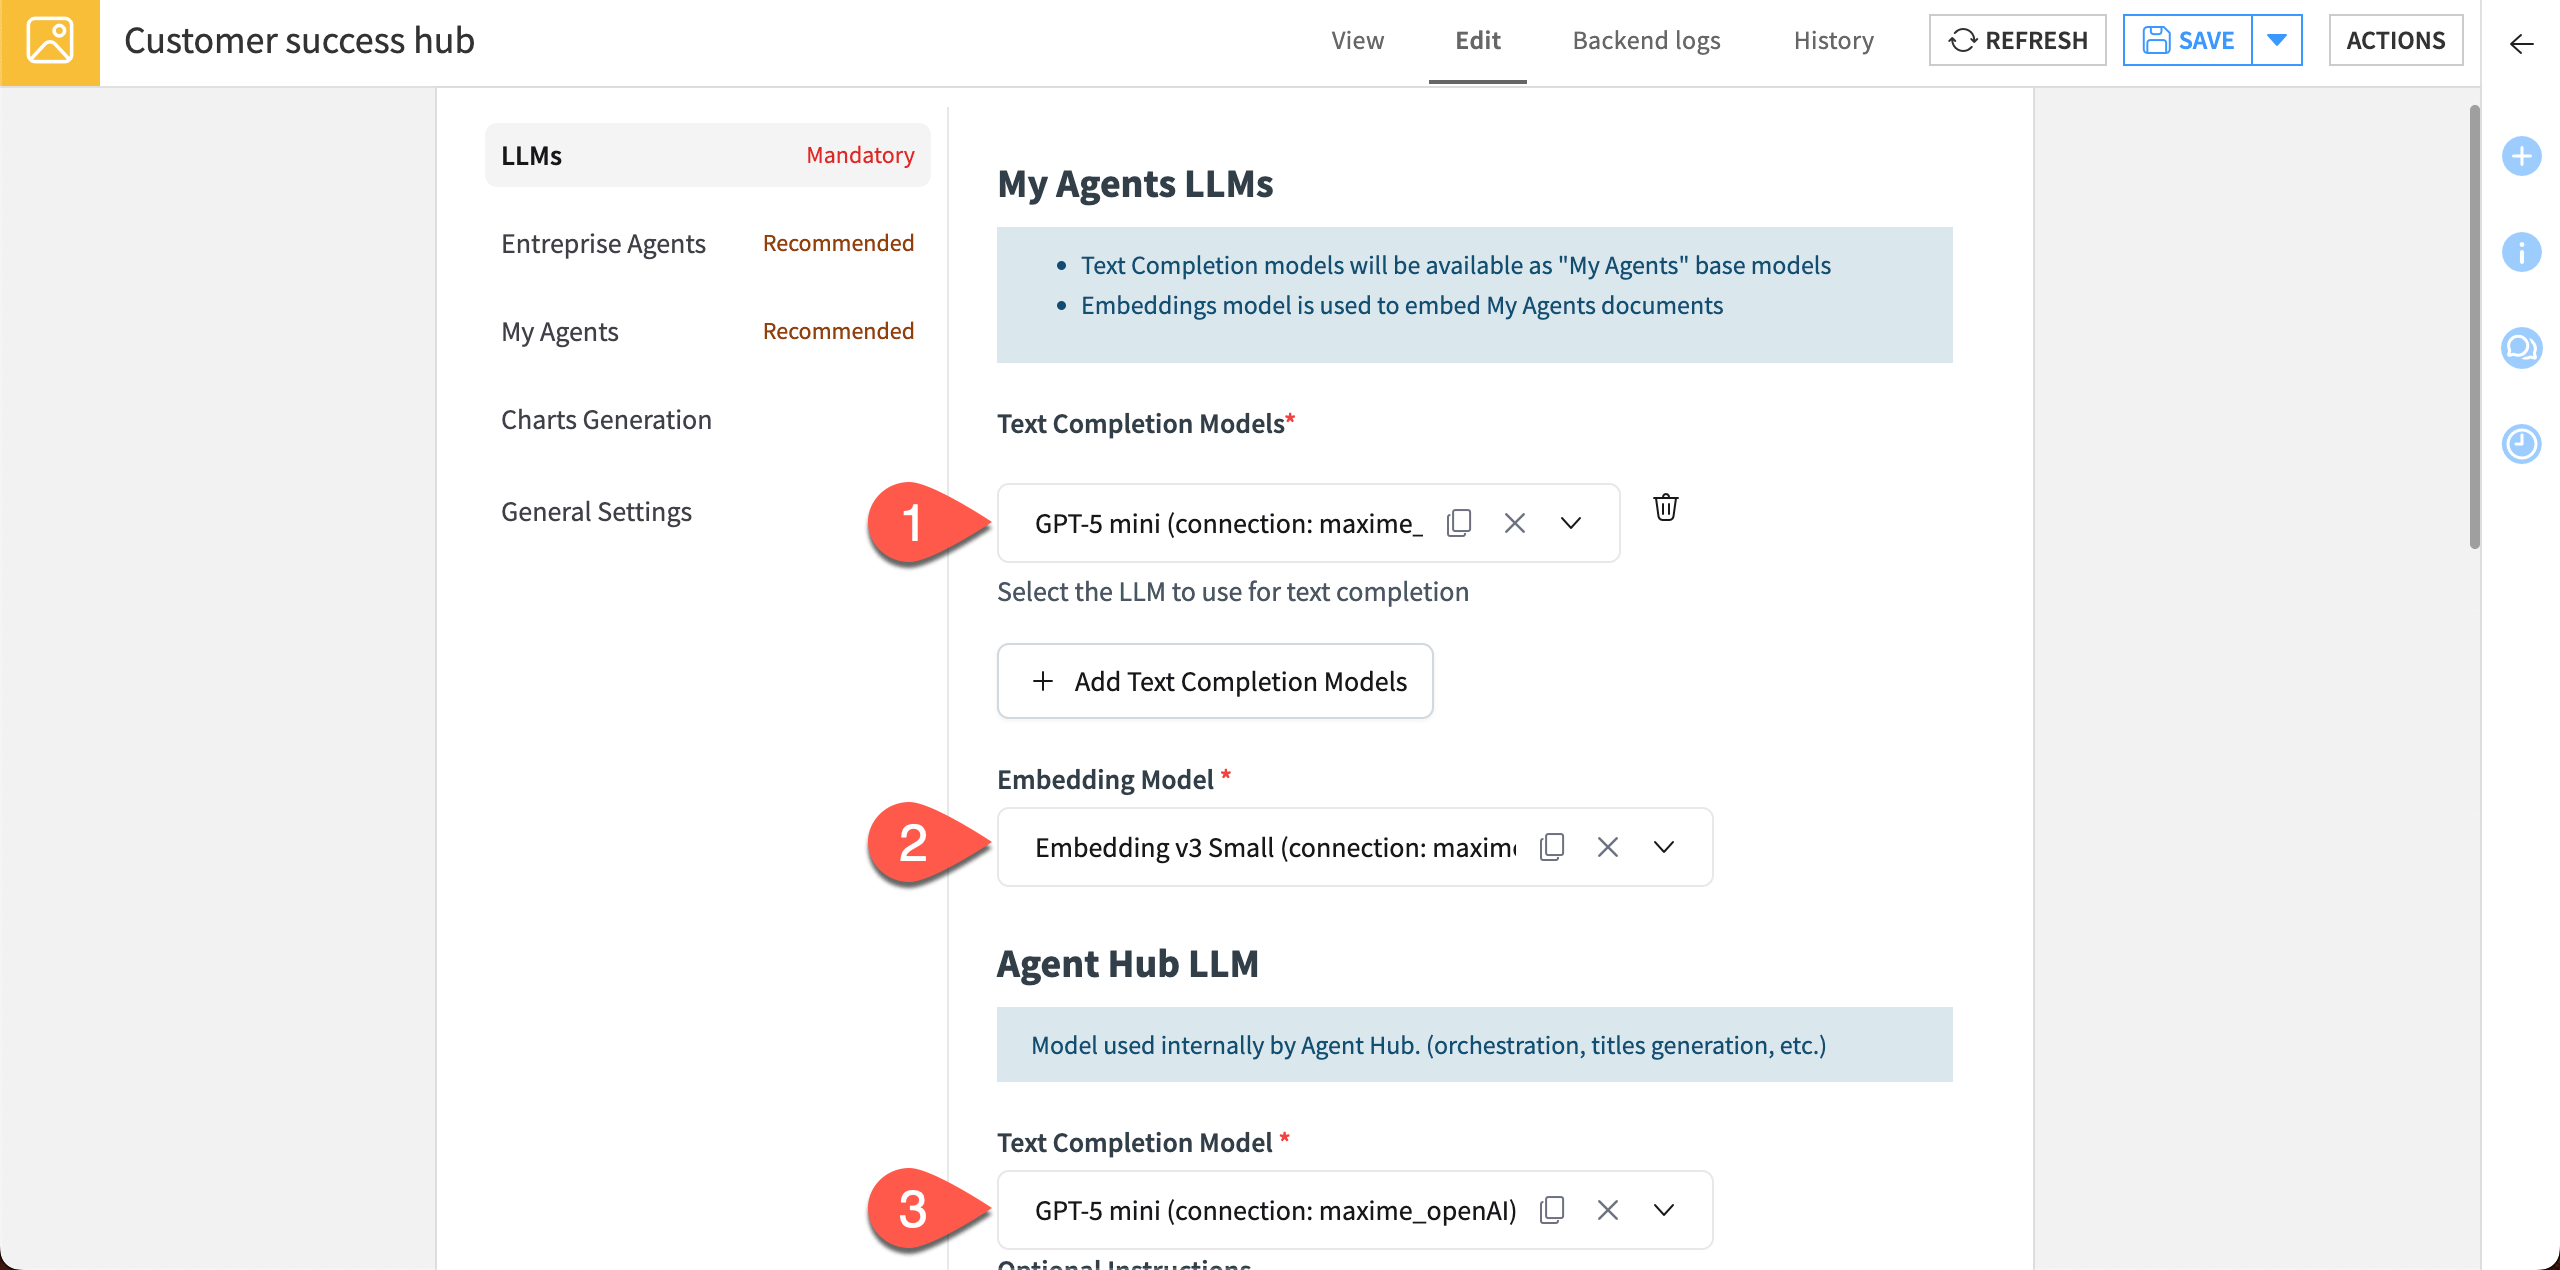
Agent Hub requires you to configure a main Agent Hub LLM, which the webapp will use to orchestrate agents and complete other tasks.
In the Core Settings panel, navigate to the Agent Hub LLM section.
Under Agent Hub LLM, click the dropdown under Choose the LLM model to use and choose a model from your available options.
Click Save.
Configure Enterprise Agents#
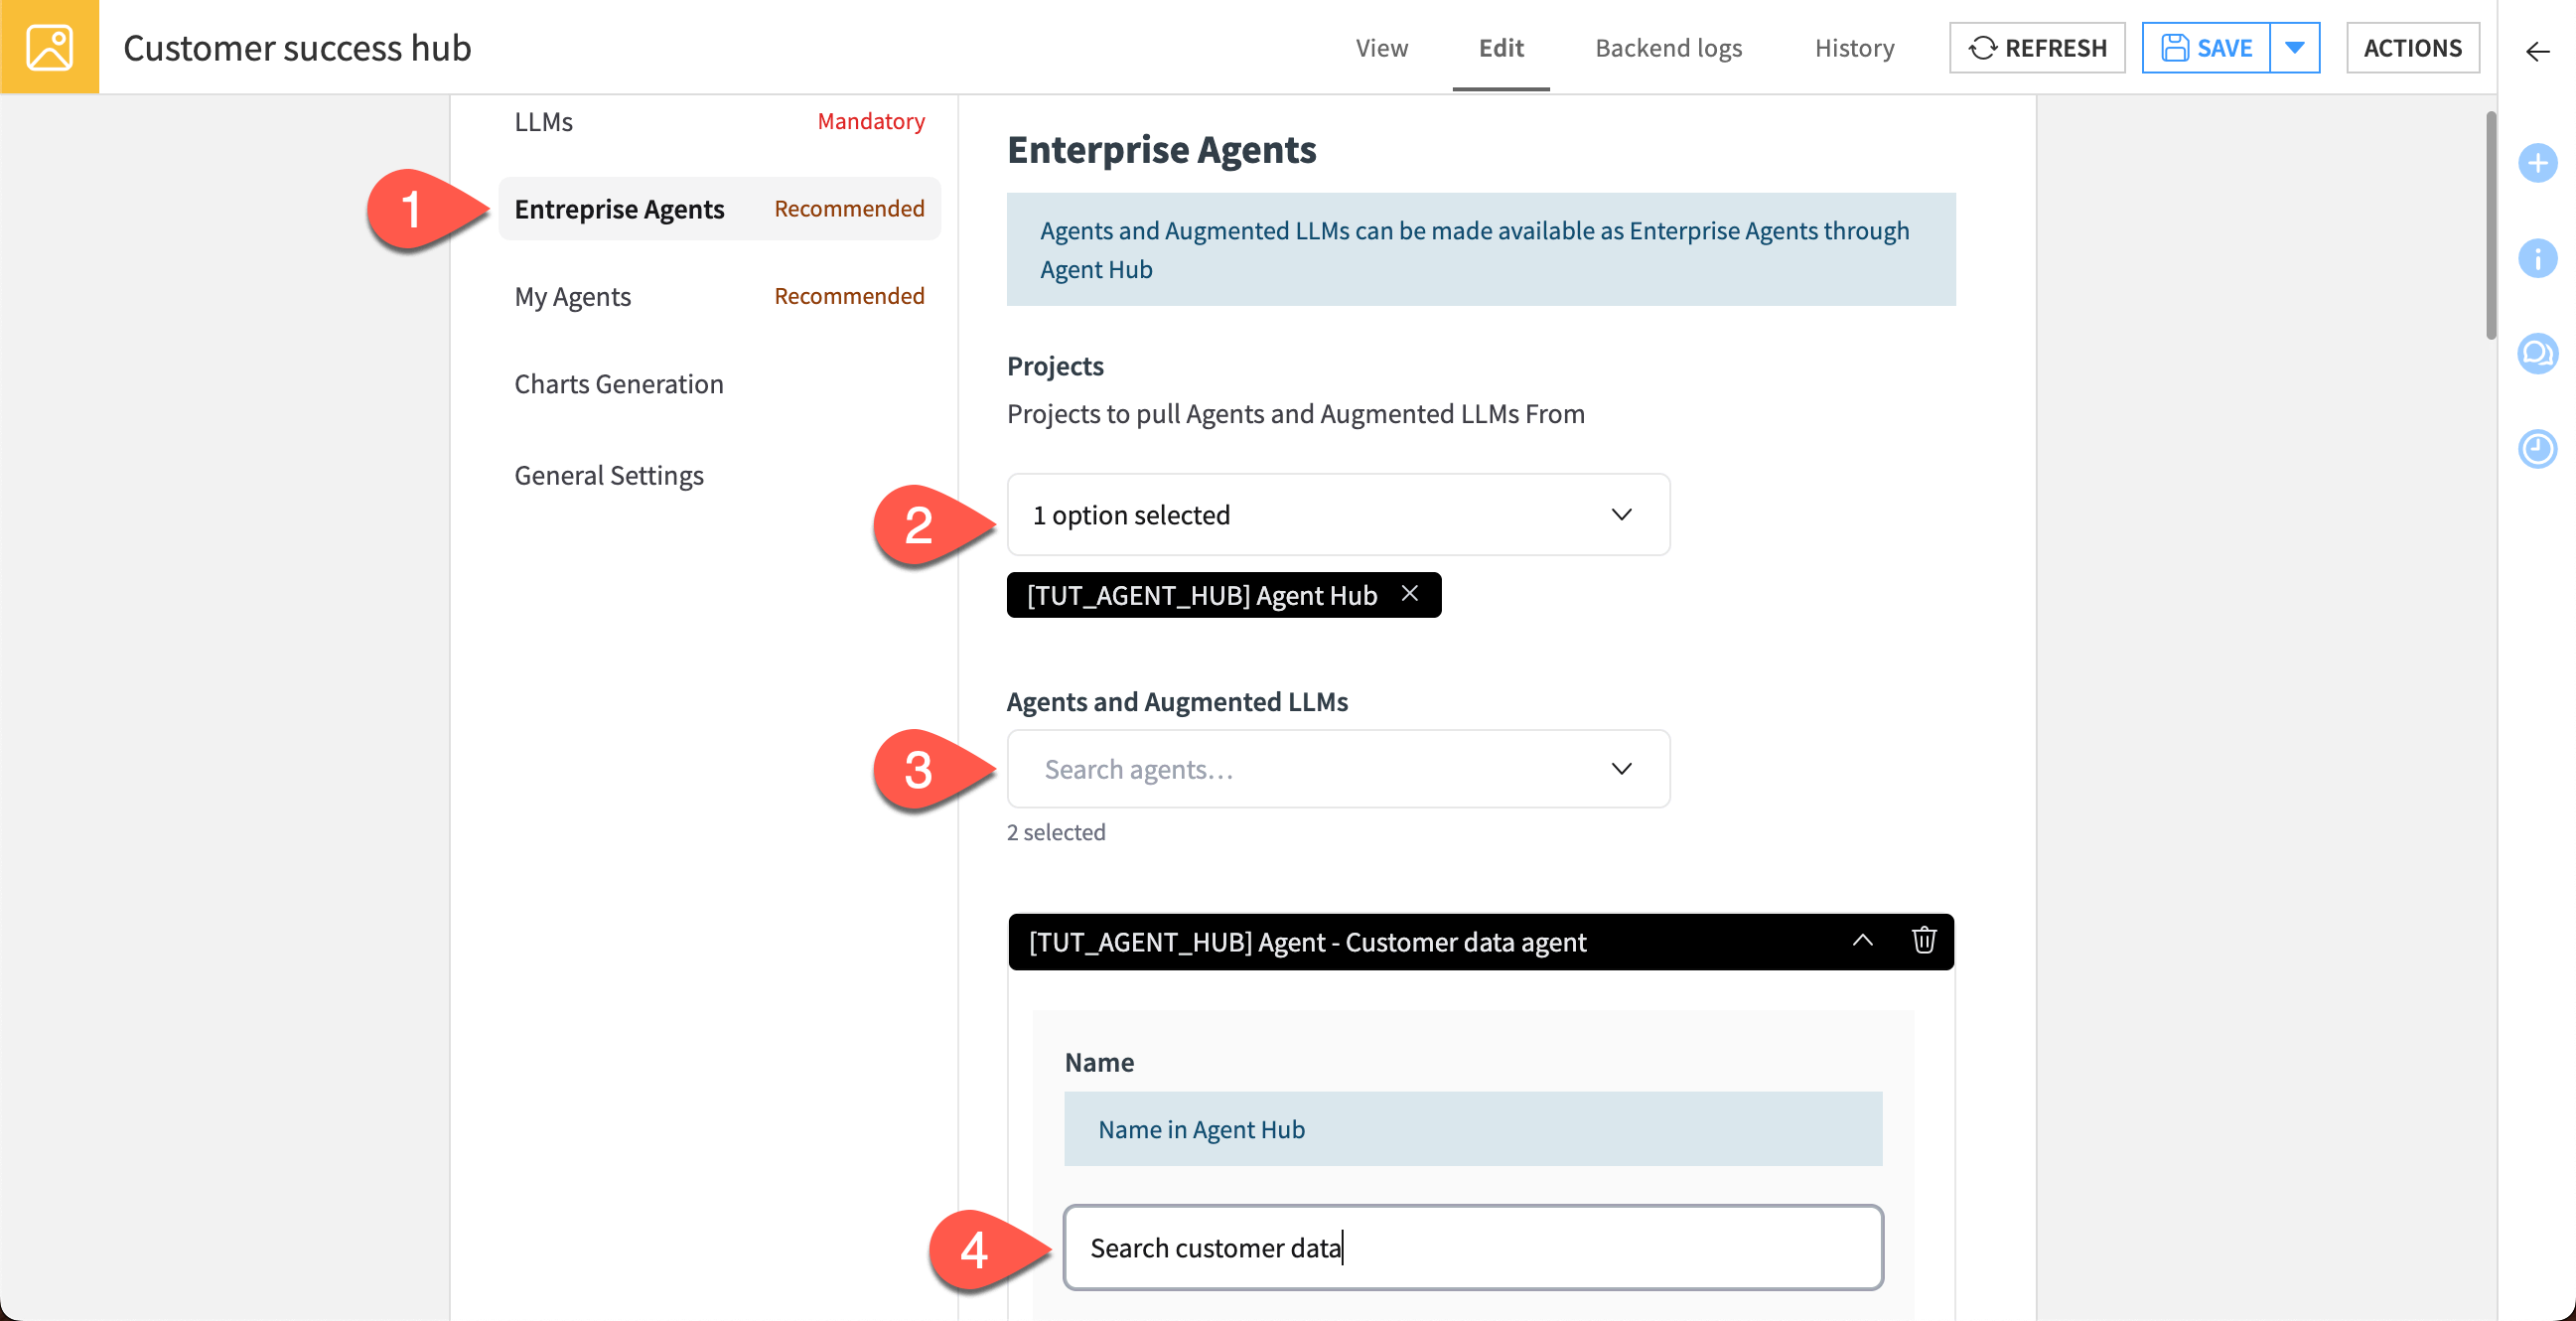
Now, move to the Enterprise Agents panel, where you can connect the agents from your project. Enterprise agents are typically created by cross-functional teams and pre-approved for distribution to end users.
In Agent Hub, you first select the project(s) to pull from, then the agents to include in Agent Hub. You can also write descriptions that help the team understand and use the available agents.
Click on the Enterprise Agents panel on the left.
Under Agents Management, click + Add Agent(s).
Search for and select your project, beginning with
TUT_AGENT_HUB.Select both available agents.
Click Add selected.
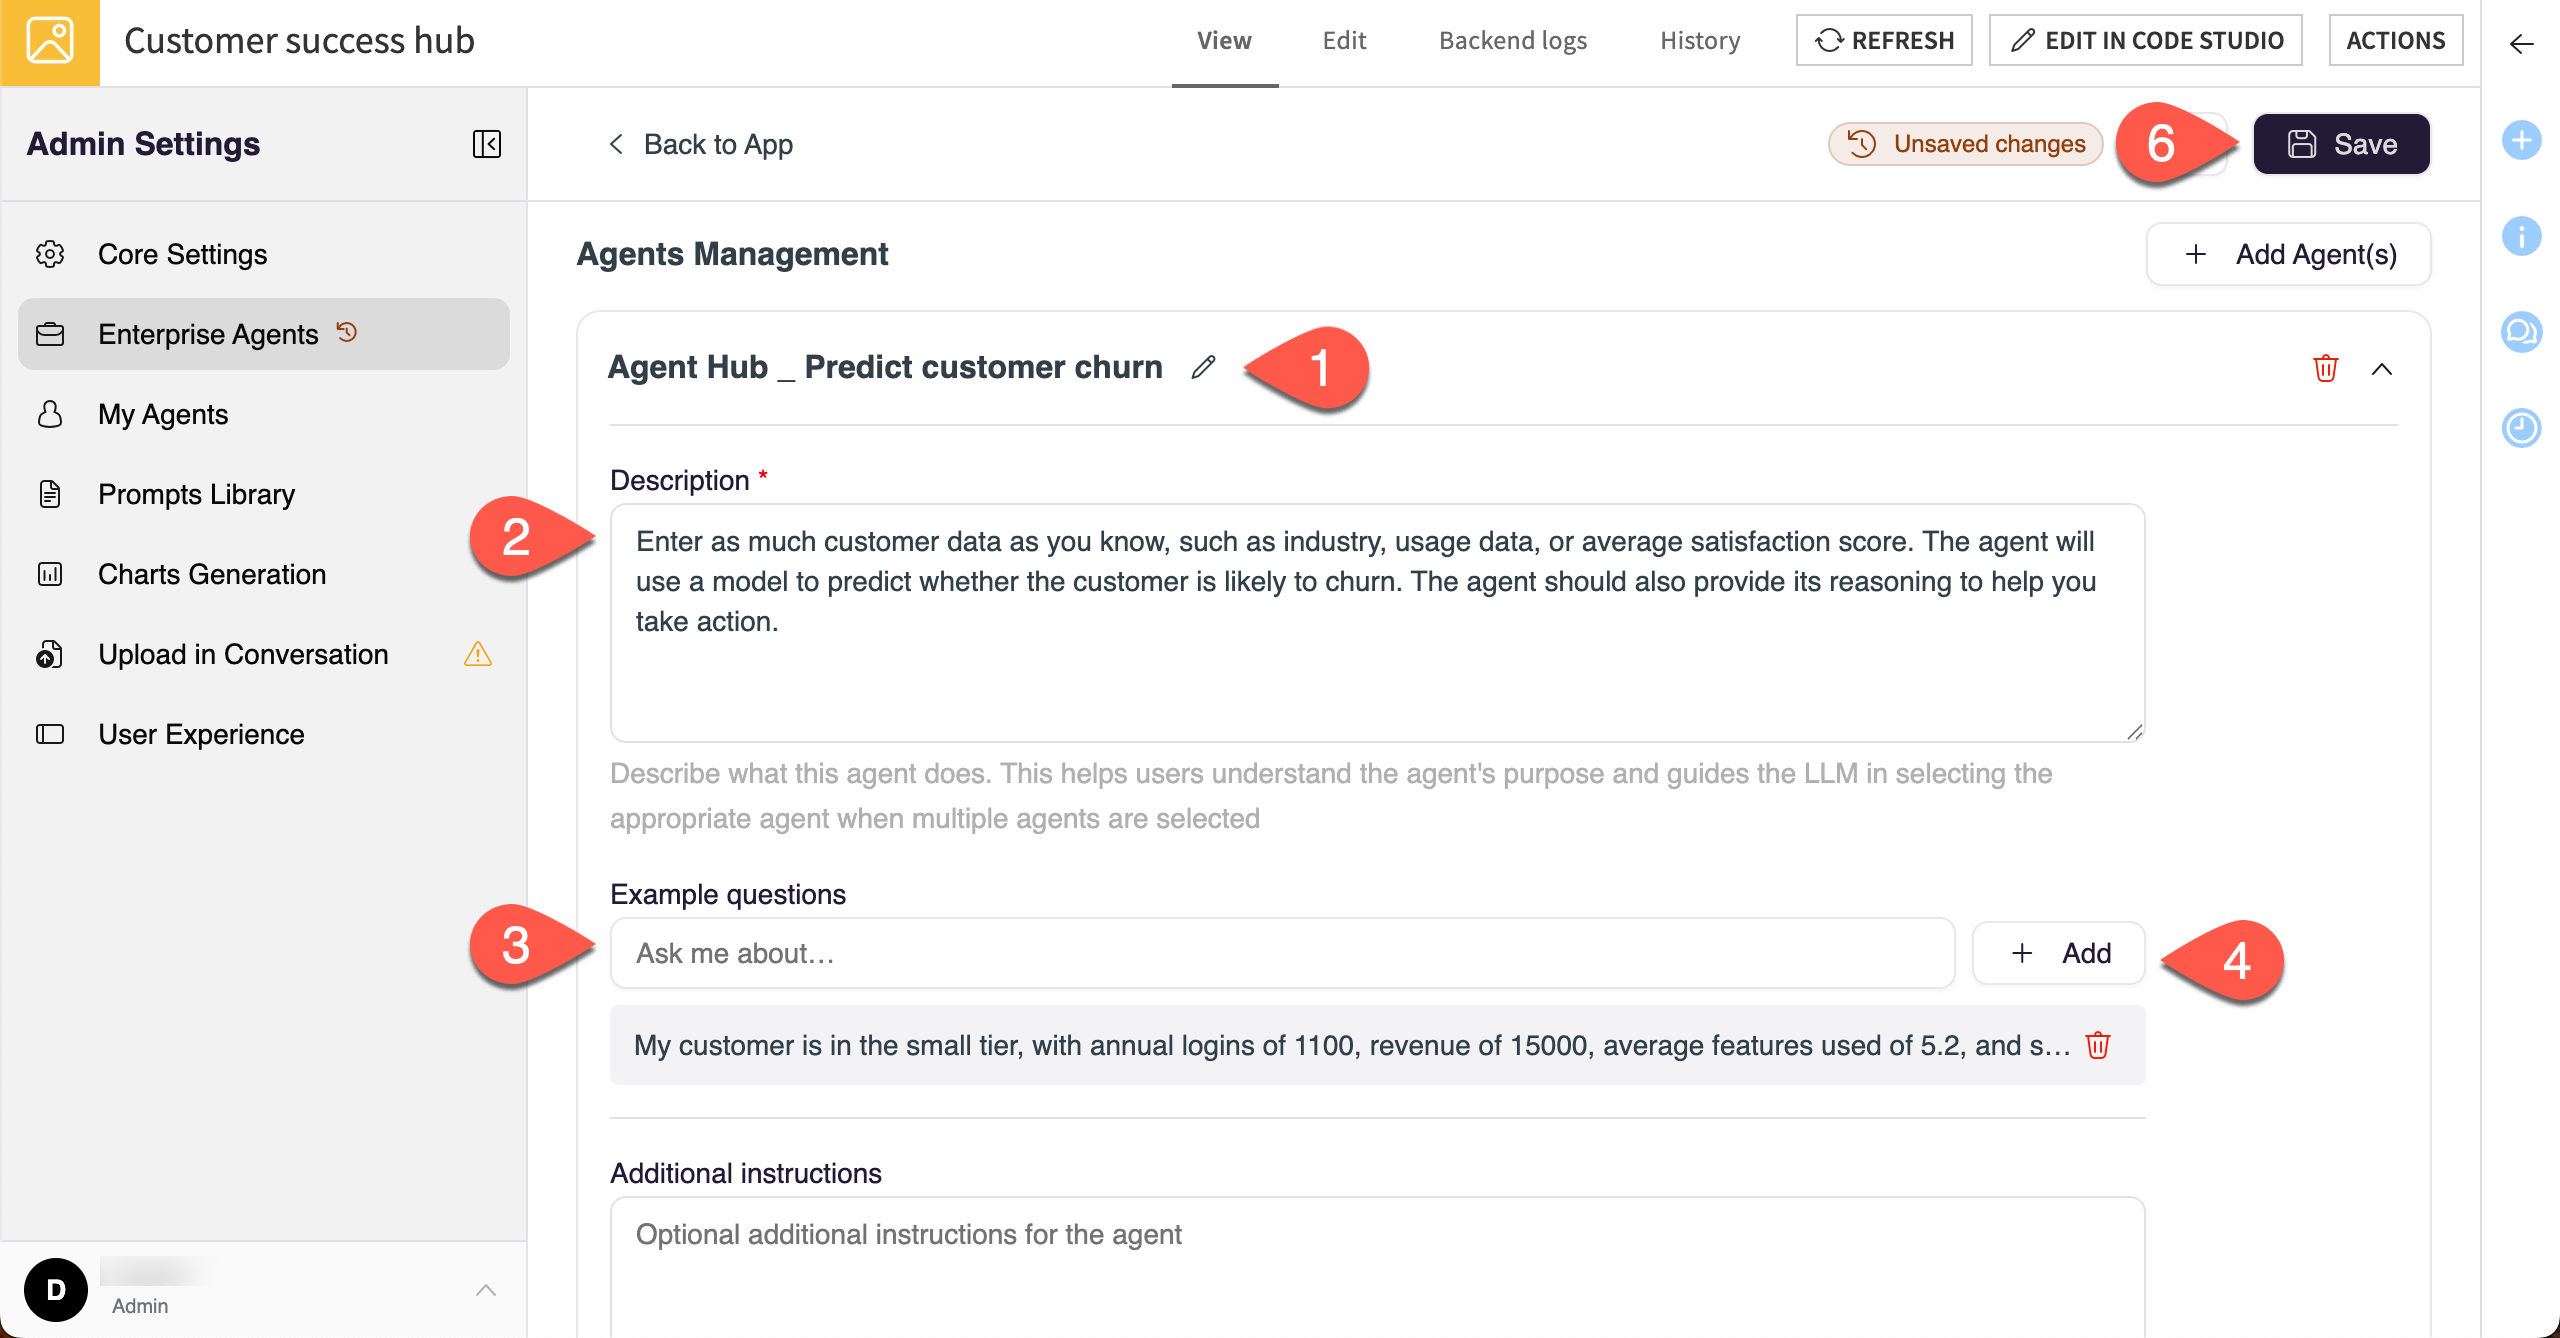
Then add more details for each agent.
Under the Churn prediction agent, click the pencil icon next to the name and change the name to:
Predict customer churnUnder Description add this text:
Enter as much customer data as you know, such as industry, usage data, or average satisfaction score. The agent will use a model to predict whether the customer is likely to churn. The agent should also provide its reasoning to help you take action.
For Example questions, enter this example:
My customer is in the small tier, with annual logins of 1100, revenue of 15000, average features used of 5.2, and satisfaction score of 6.5.
Click + Add.
- Under the Customer data agent, enter the following:
Name:
Search customer dataDescription:
Search data for current or former customers. You may search by customer name, industry, usage data, or average satisfaction score.Example questions:
List the usage data for client Ferguson, Allen and Day.andWhat are some Energy and Utilities clients with annual revenue above 25000?
Click Save.
Configure My Agents#
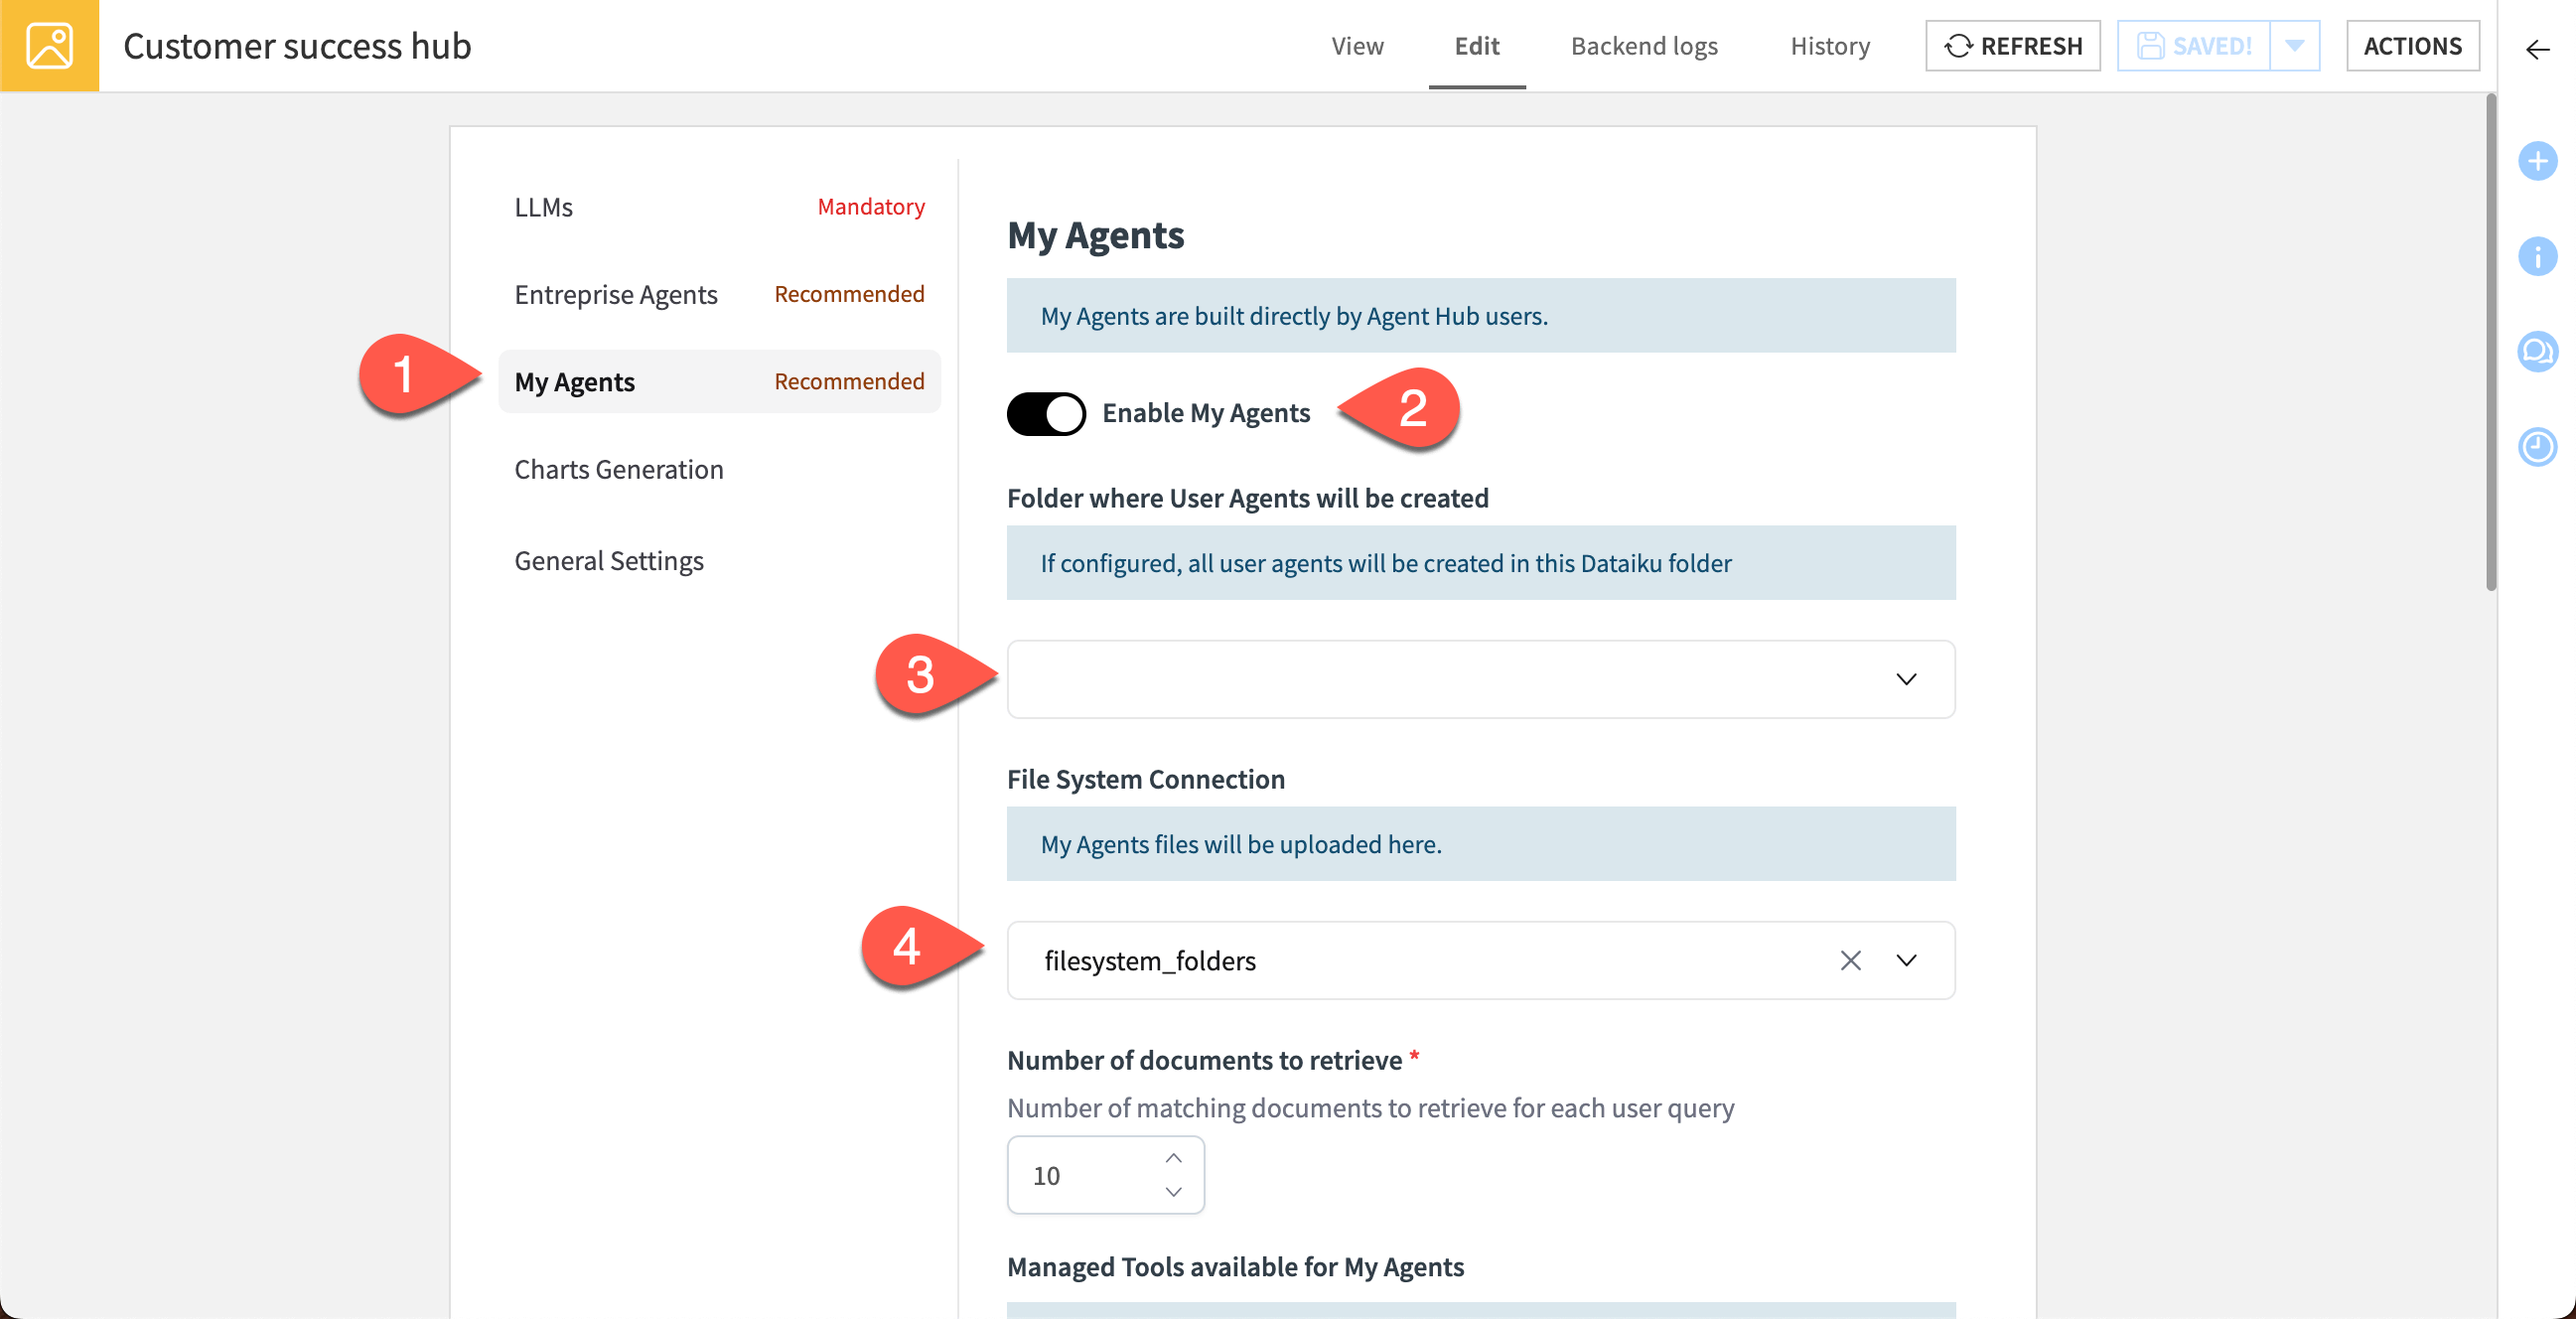
The next section, My Agents, is where you’ll configure settings for users to create their own agents within Agent Hub. My Agents are typically productivity-focused agents to help individual team members with their tasks.
My Agents automatically embed documents, which helps the LLM develop specific knowledge and provide better responses. You’ll need to provide a folder where the documents can be stored and an embedding model to embed the documents.
Click on the My Agents panel on the left.
Click the Enable My Agents toggle to turn on the feature.
Under LLMs, choose at least one model that will be available for text generation.
For Embedding Model, choose a model that will be used to embed documents.
Under File System Connection, choose a location for documents to be stored.
Important
The file system connection must allow managed folders so you can upload documents to a My Agent. Your administrator can set this up in the Administration panel > Connections.
Optionally, choose a Folder where My Agents will be created.
Scroll down and click to turn on the Enable Prompt Library option.
Click Save.
Explore Agent Hub#
You can now explore the interface of your customer success Agent Hub!
In the center, you can start a conversation with your agents. In the left panel, you can navigate among available agents and chats.
From the admin settings, click Back to Agent Hub.
In the Agent Hub app, click through each element in the left panel to explore the interface.
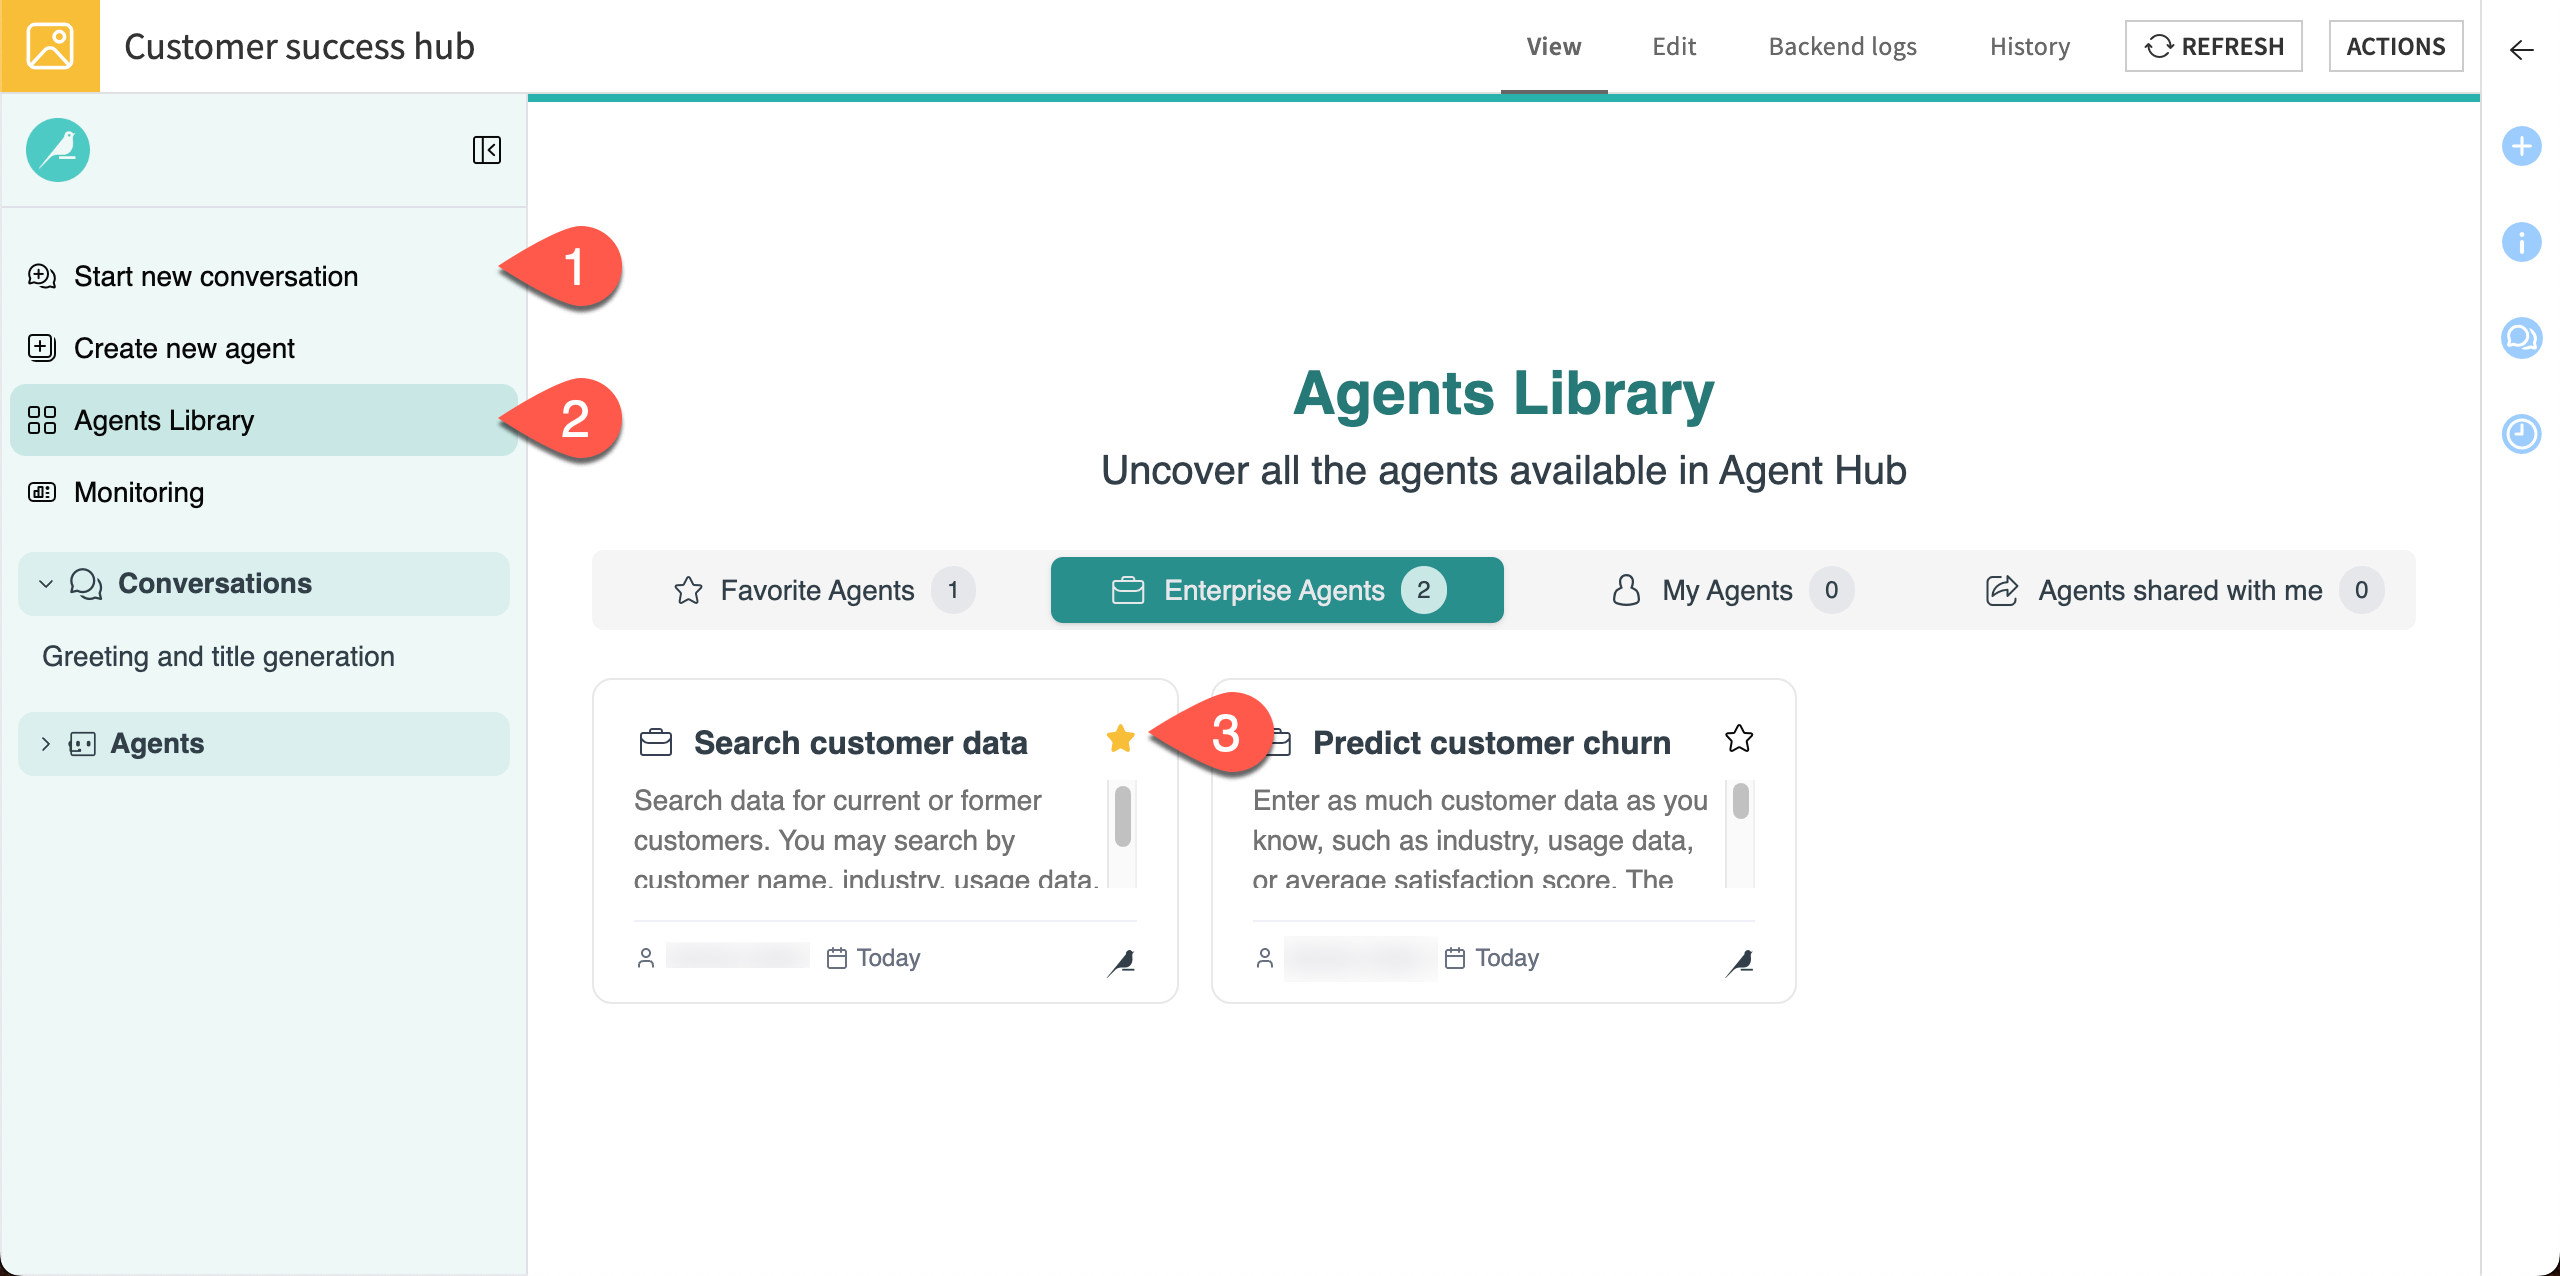
In the Agent Library, note the two available Enterprise Agents from your project.
Click on the Star on the Search customer data agent. This makes the agent a favorite and adds a new section of Favorite Agents to the library.
Optional: Share with other users
As the AI champion, part of your responsibility is sharing access to Agent Hub with other users on the team.
To share Agent Hub, first make sure the end users have at least read access to the Dataiku project(s) that include the enterprise agents. If a user doesn’t have access to the agent project, they won’t see those enterprise agents in their Agent Hub.
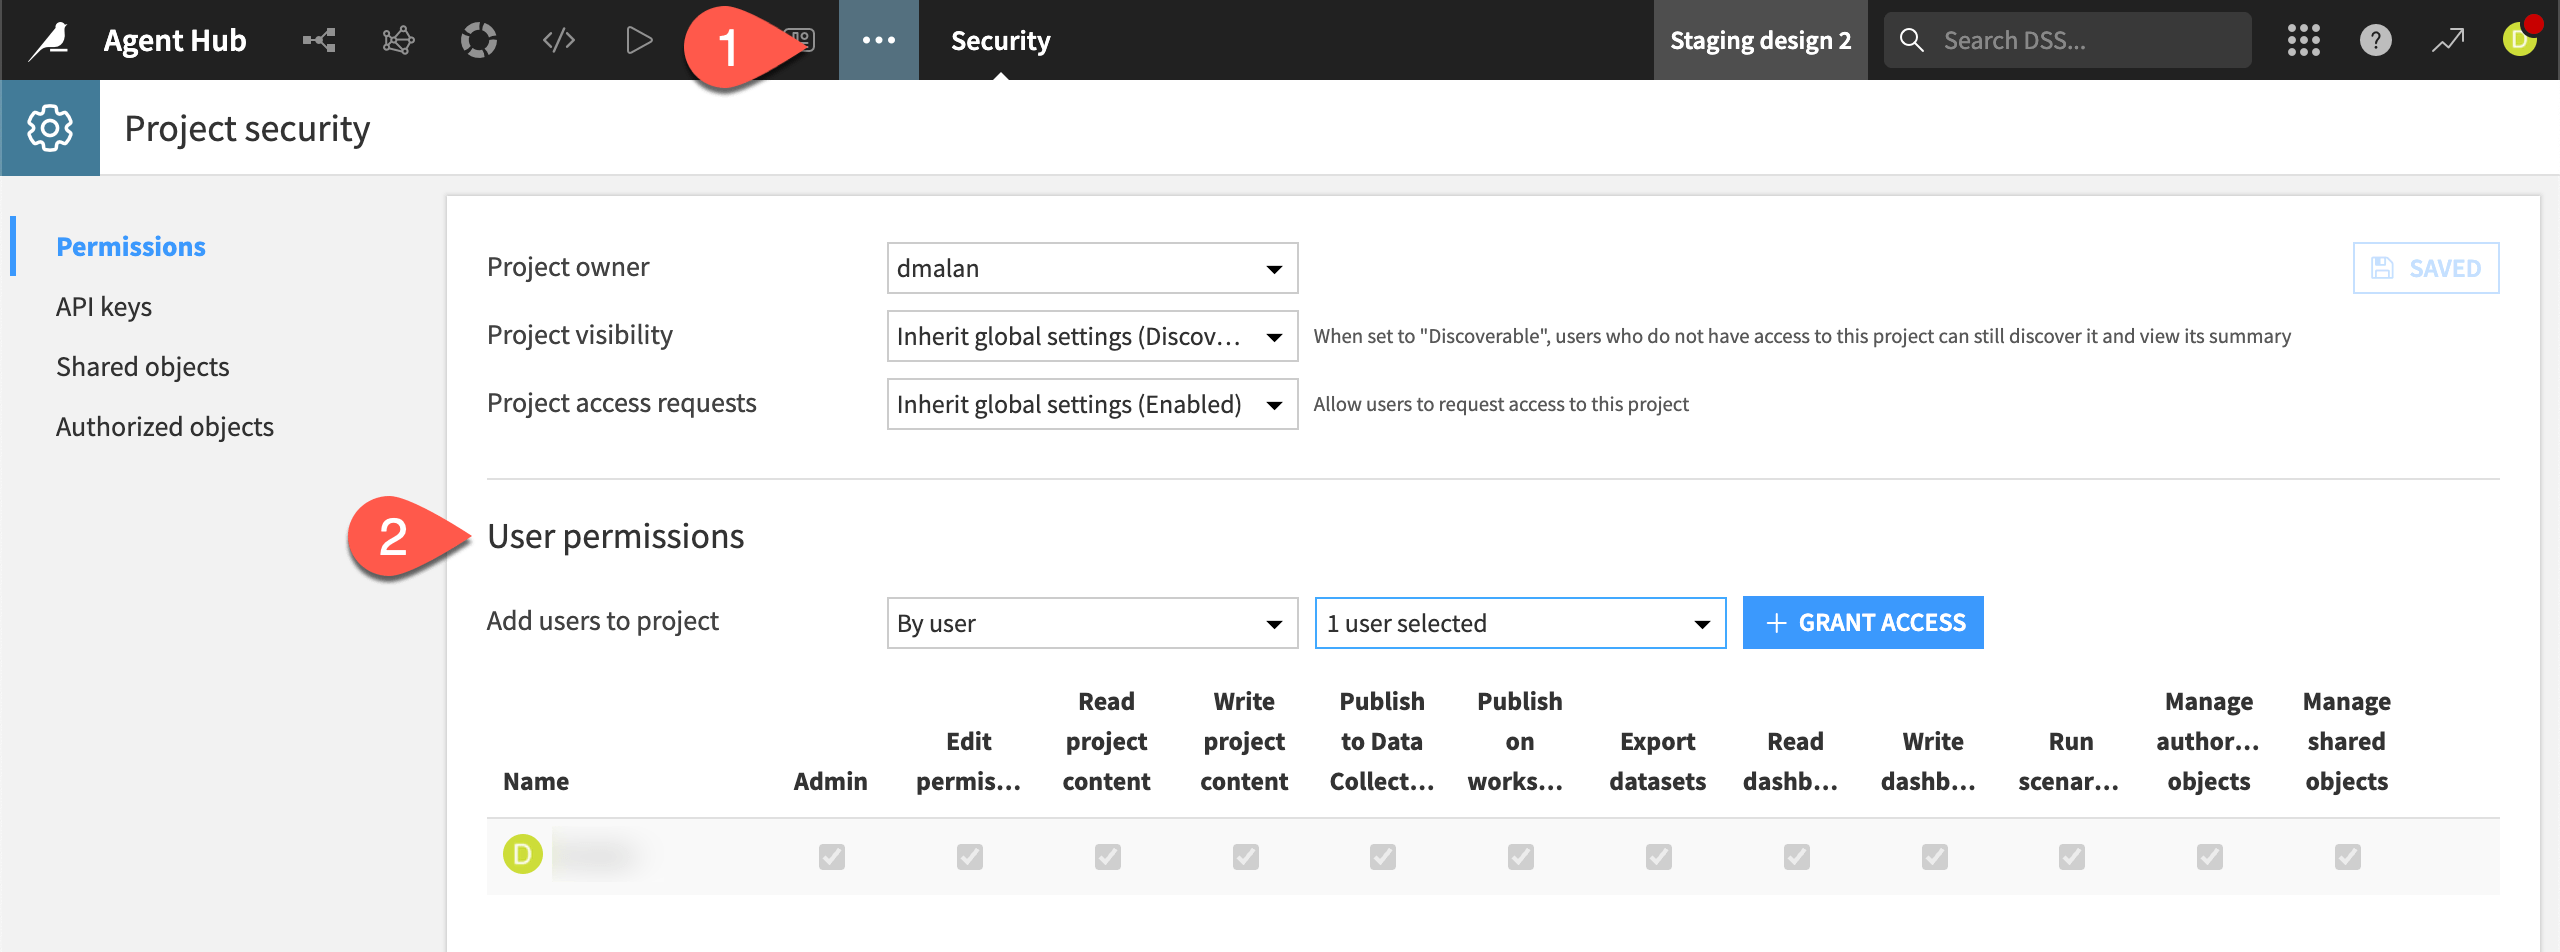
In the top navigation bar, go to the More options (
 ) menu > Security.
In the User permissions section, grant at least Read project content permissions to users or user groups as you’d like.
Now you can share the Agent Hub with users in those groups.
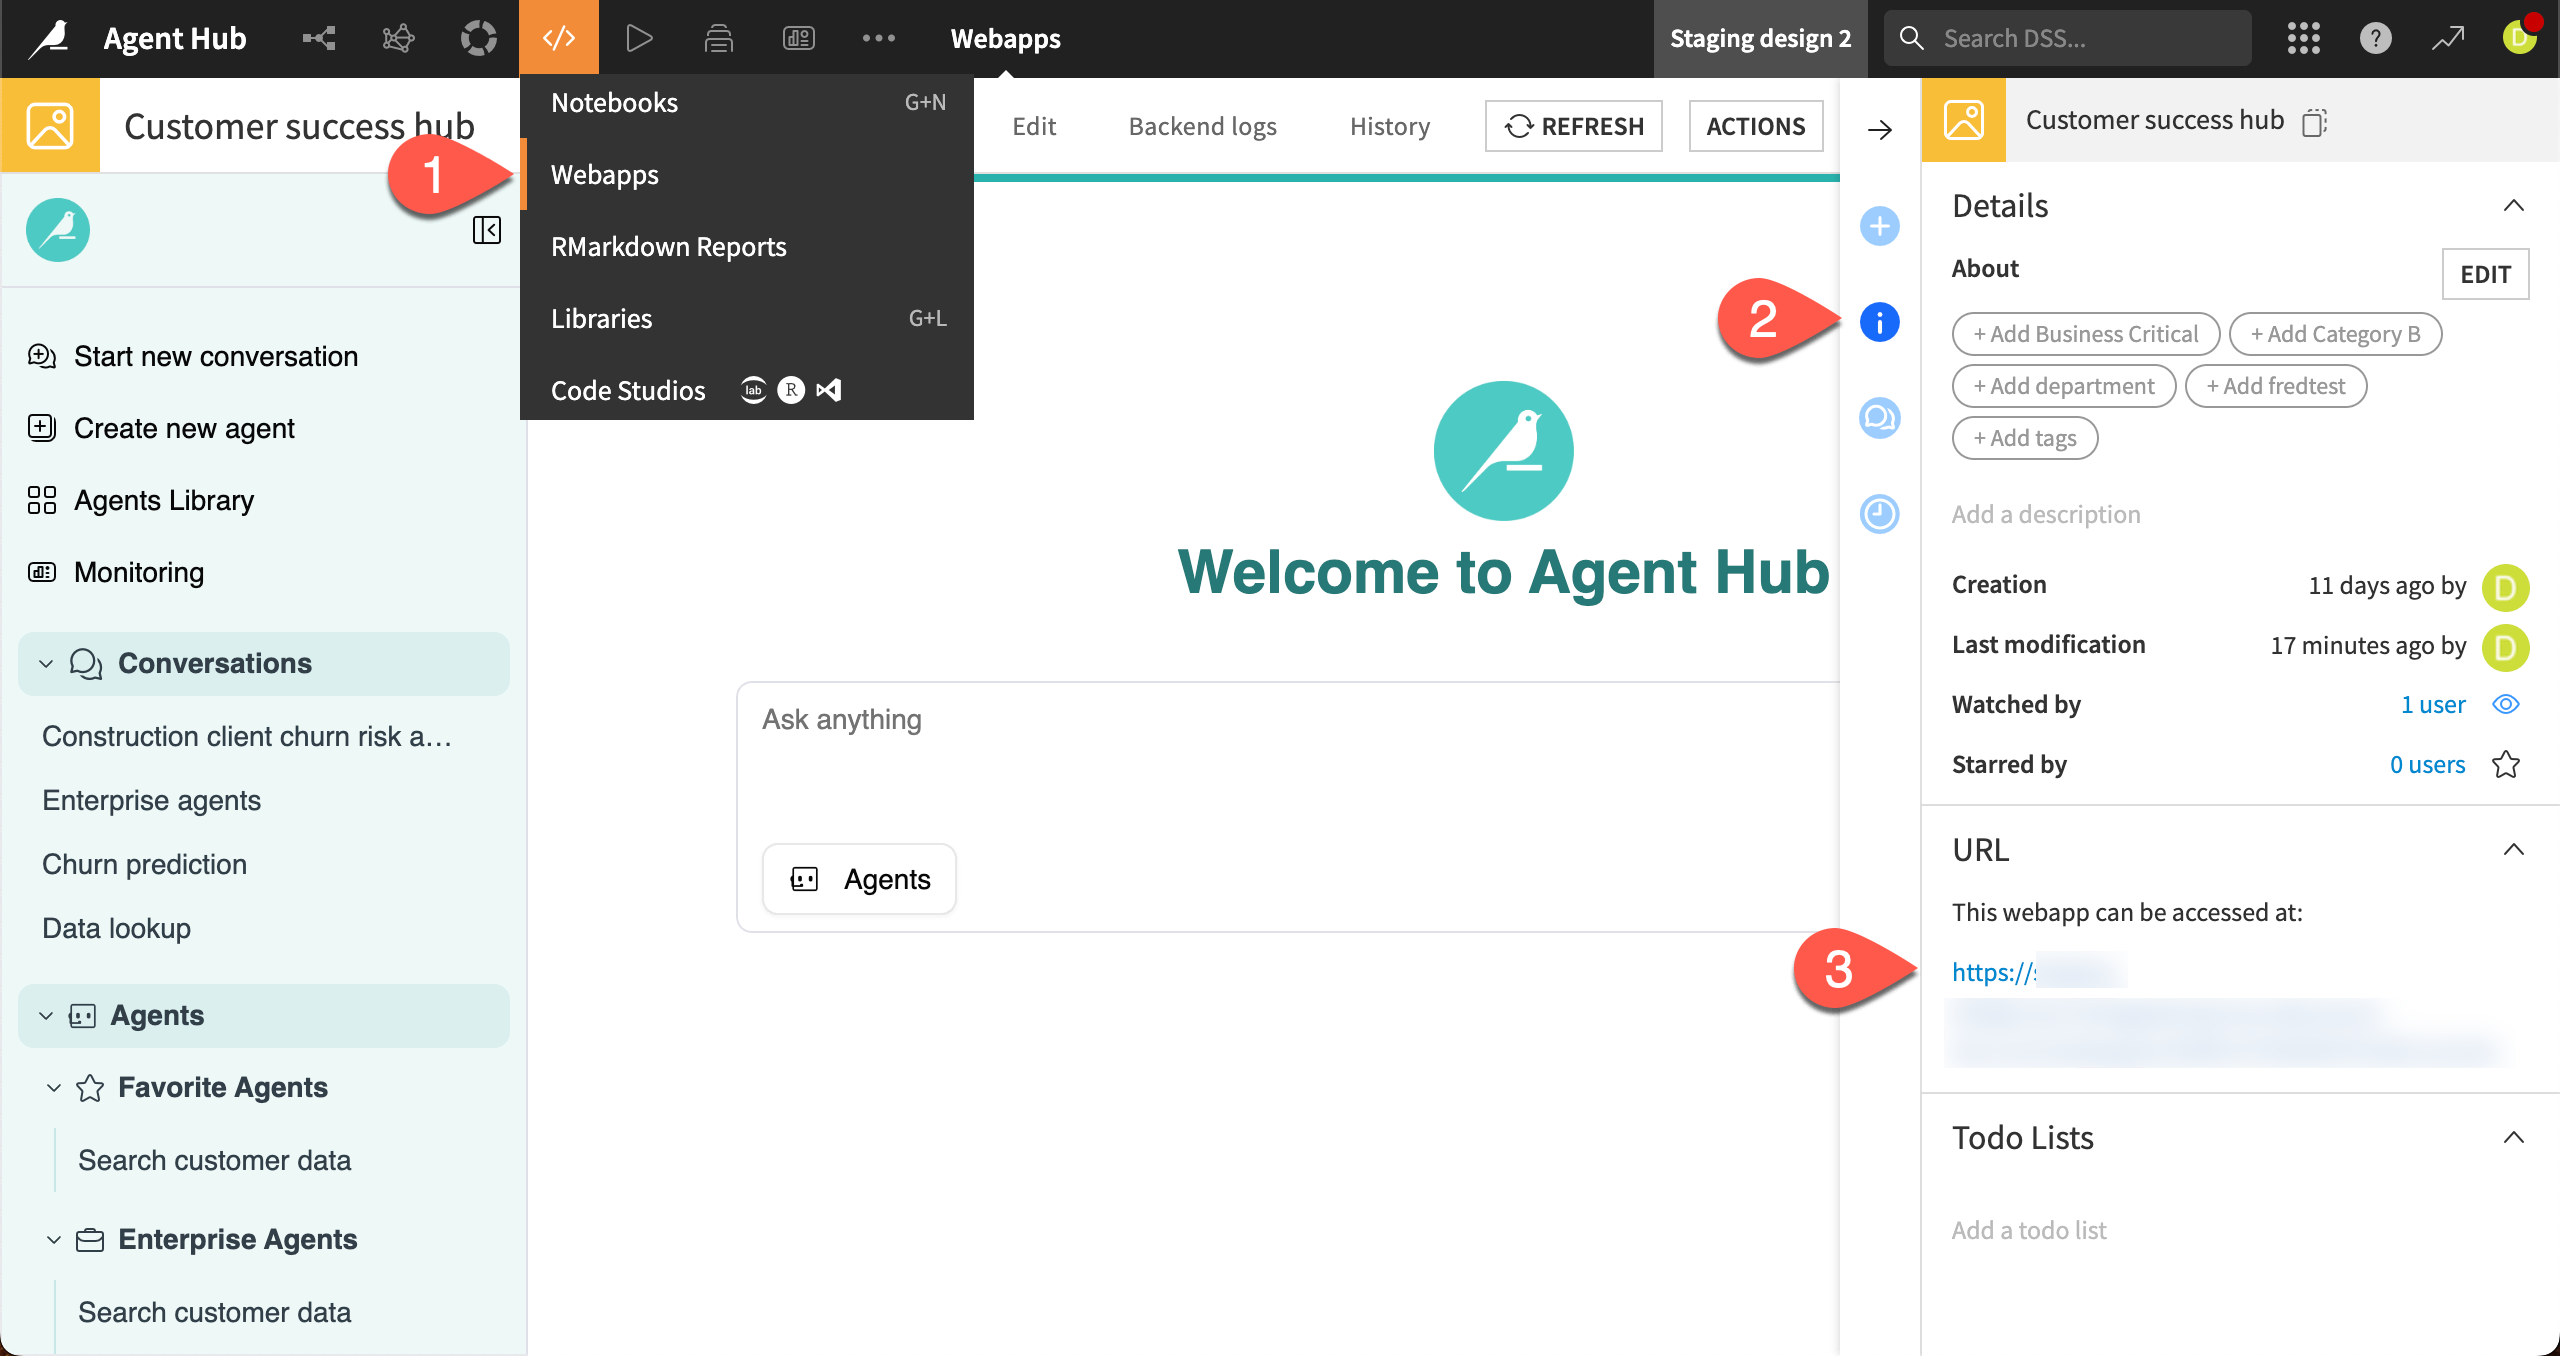
Navigate back to the Agent Hub from the Navigation bar > Code menu (
 ) > Customer success hub.
In the right panel, click on the Details (
 ) tab.
Under URL, copy and paste the available URL.
Share the link with end users.
Chat with the agents#
Important
If you have an AI Consumer or AI Access profile, you can follow the tutorial steps starting with this section, provided that another user has completed the steps above and shared access to the Agent Hub with you.
A powerful feature of Agent Hub is providing users access to multiple agents — and orchestrating conversations with all of them.
With the Agent Hub setup complete, you can now chat with the enterprise agents to quickly access customer data.
Chat with one agent#
Let’s start with a simple conversation with one agent — a search of customer data that representatives on your team could use to quickly find relevant information for their accounts.
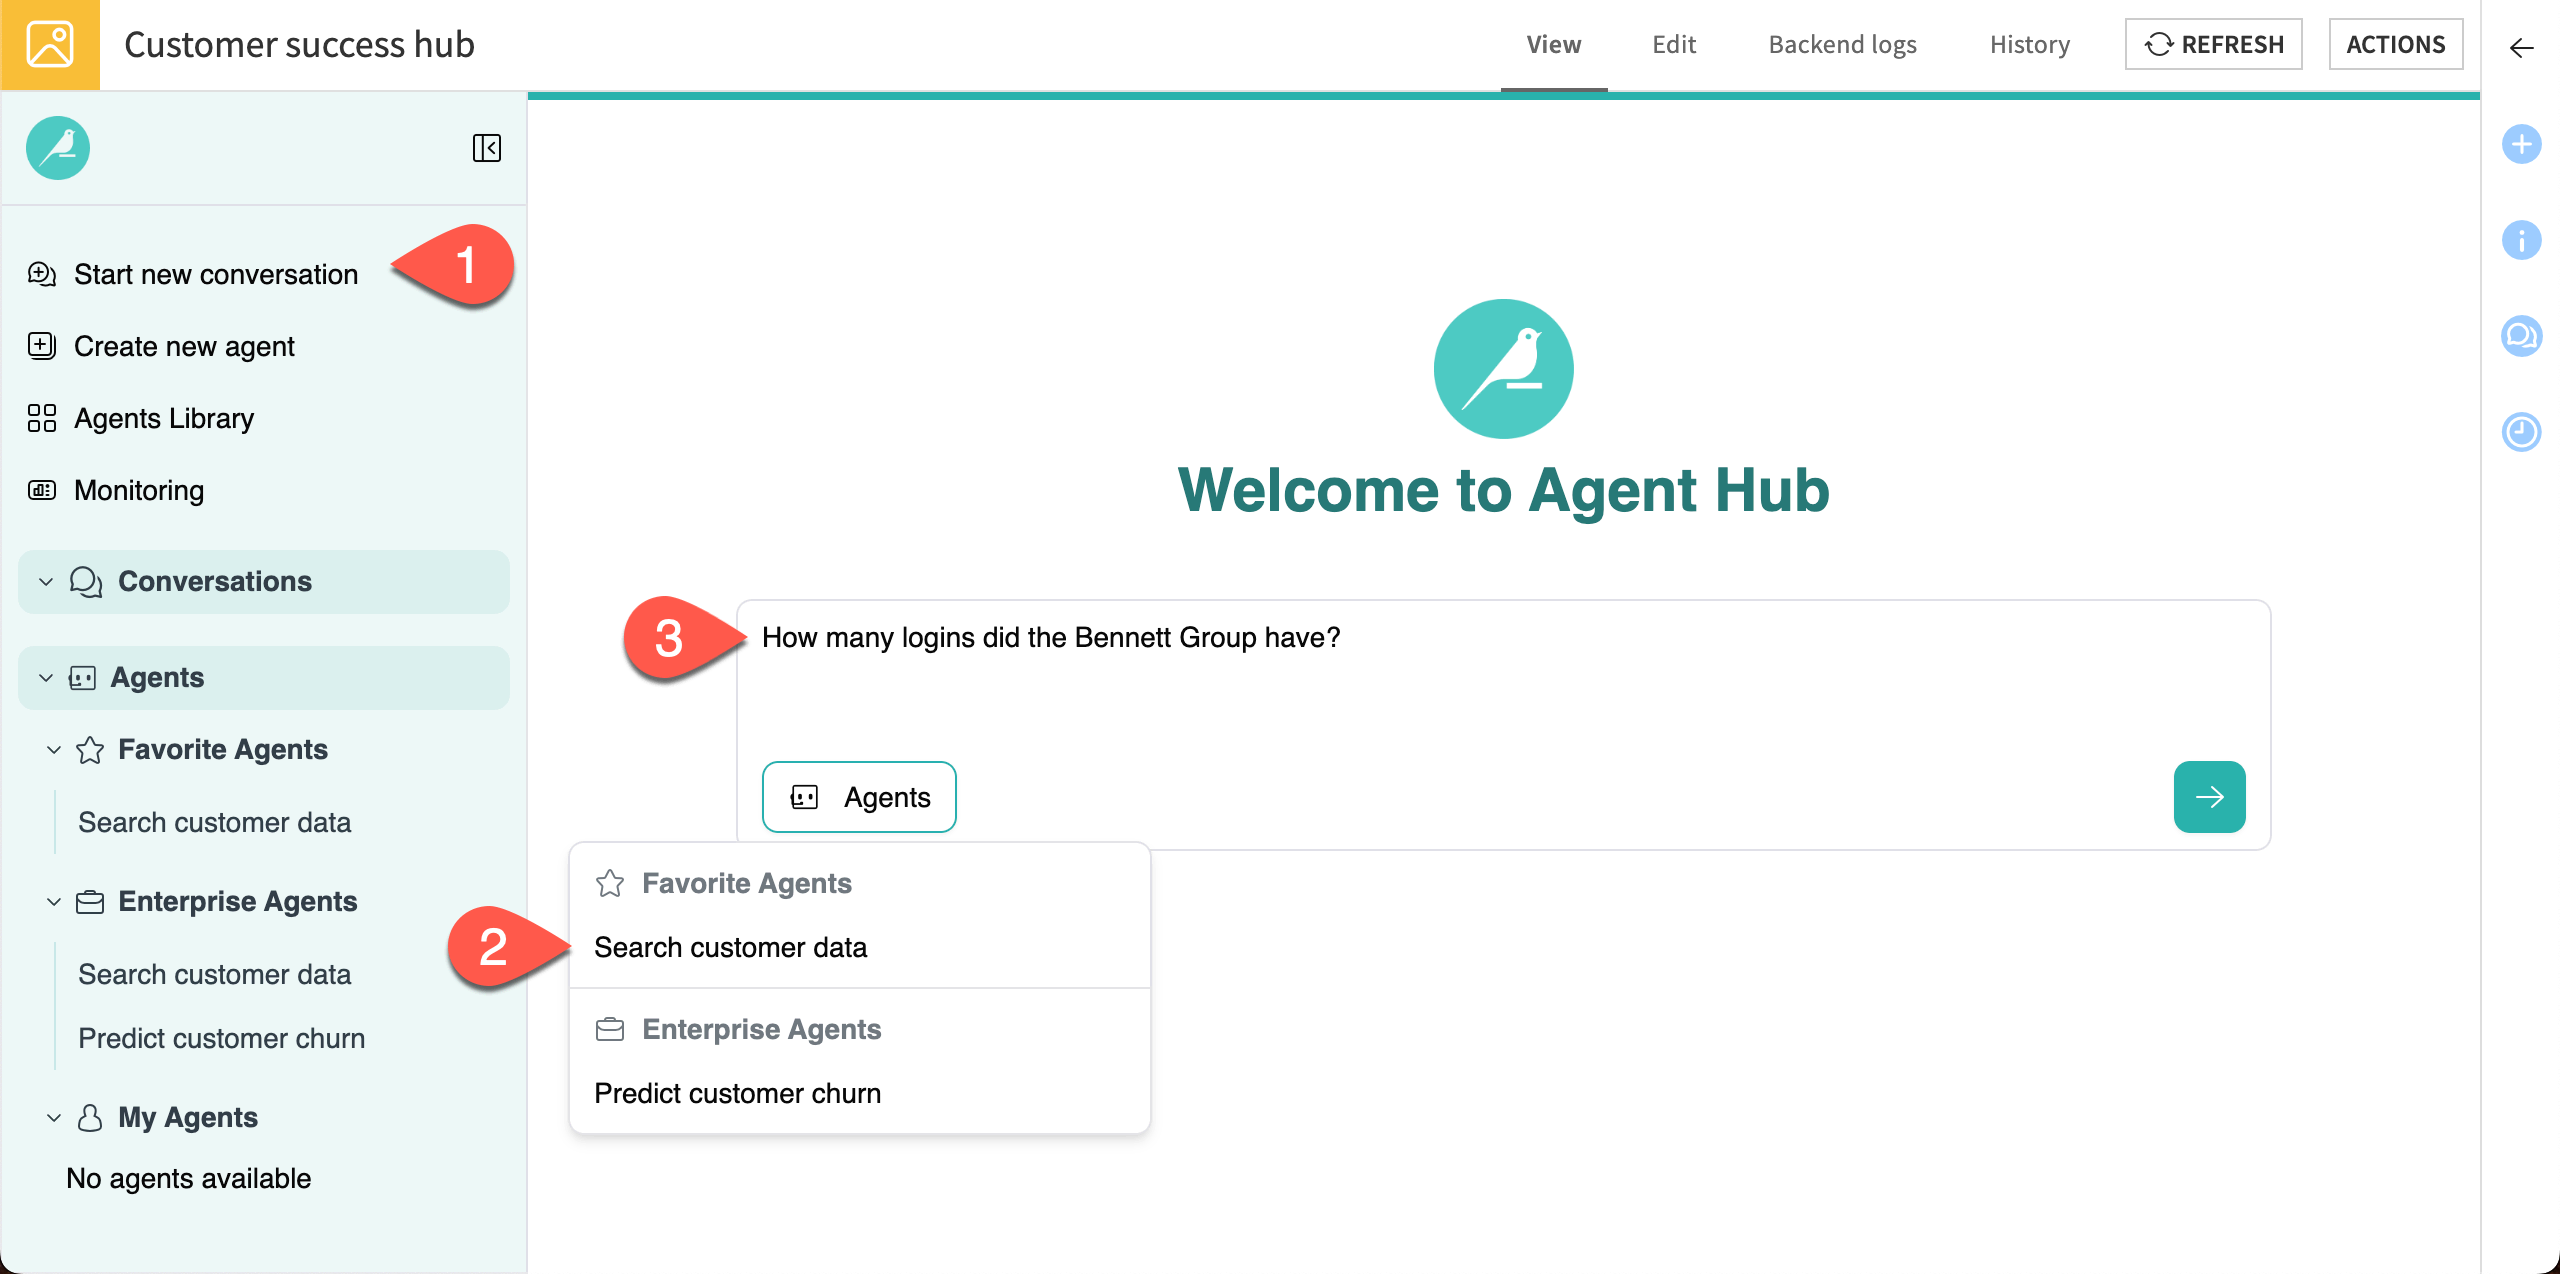
Go to Start a new conversation.
In the chat window, click on the Agents button and select the Search customer data agent.
Copy and paste this question into the chat window, then send it:
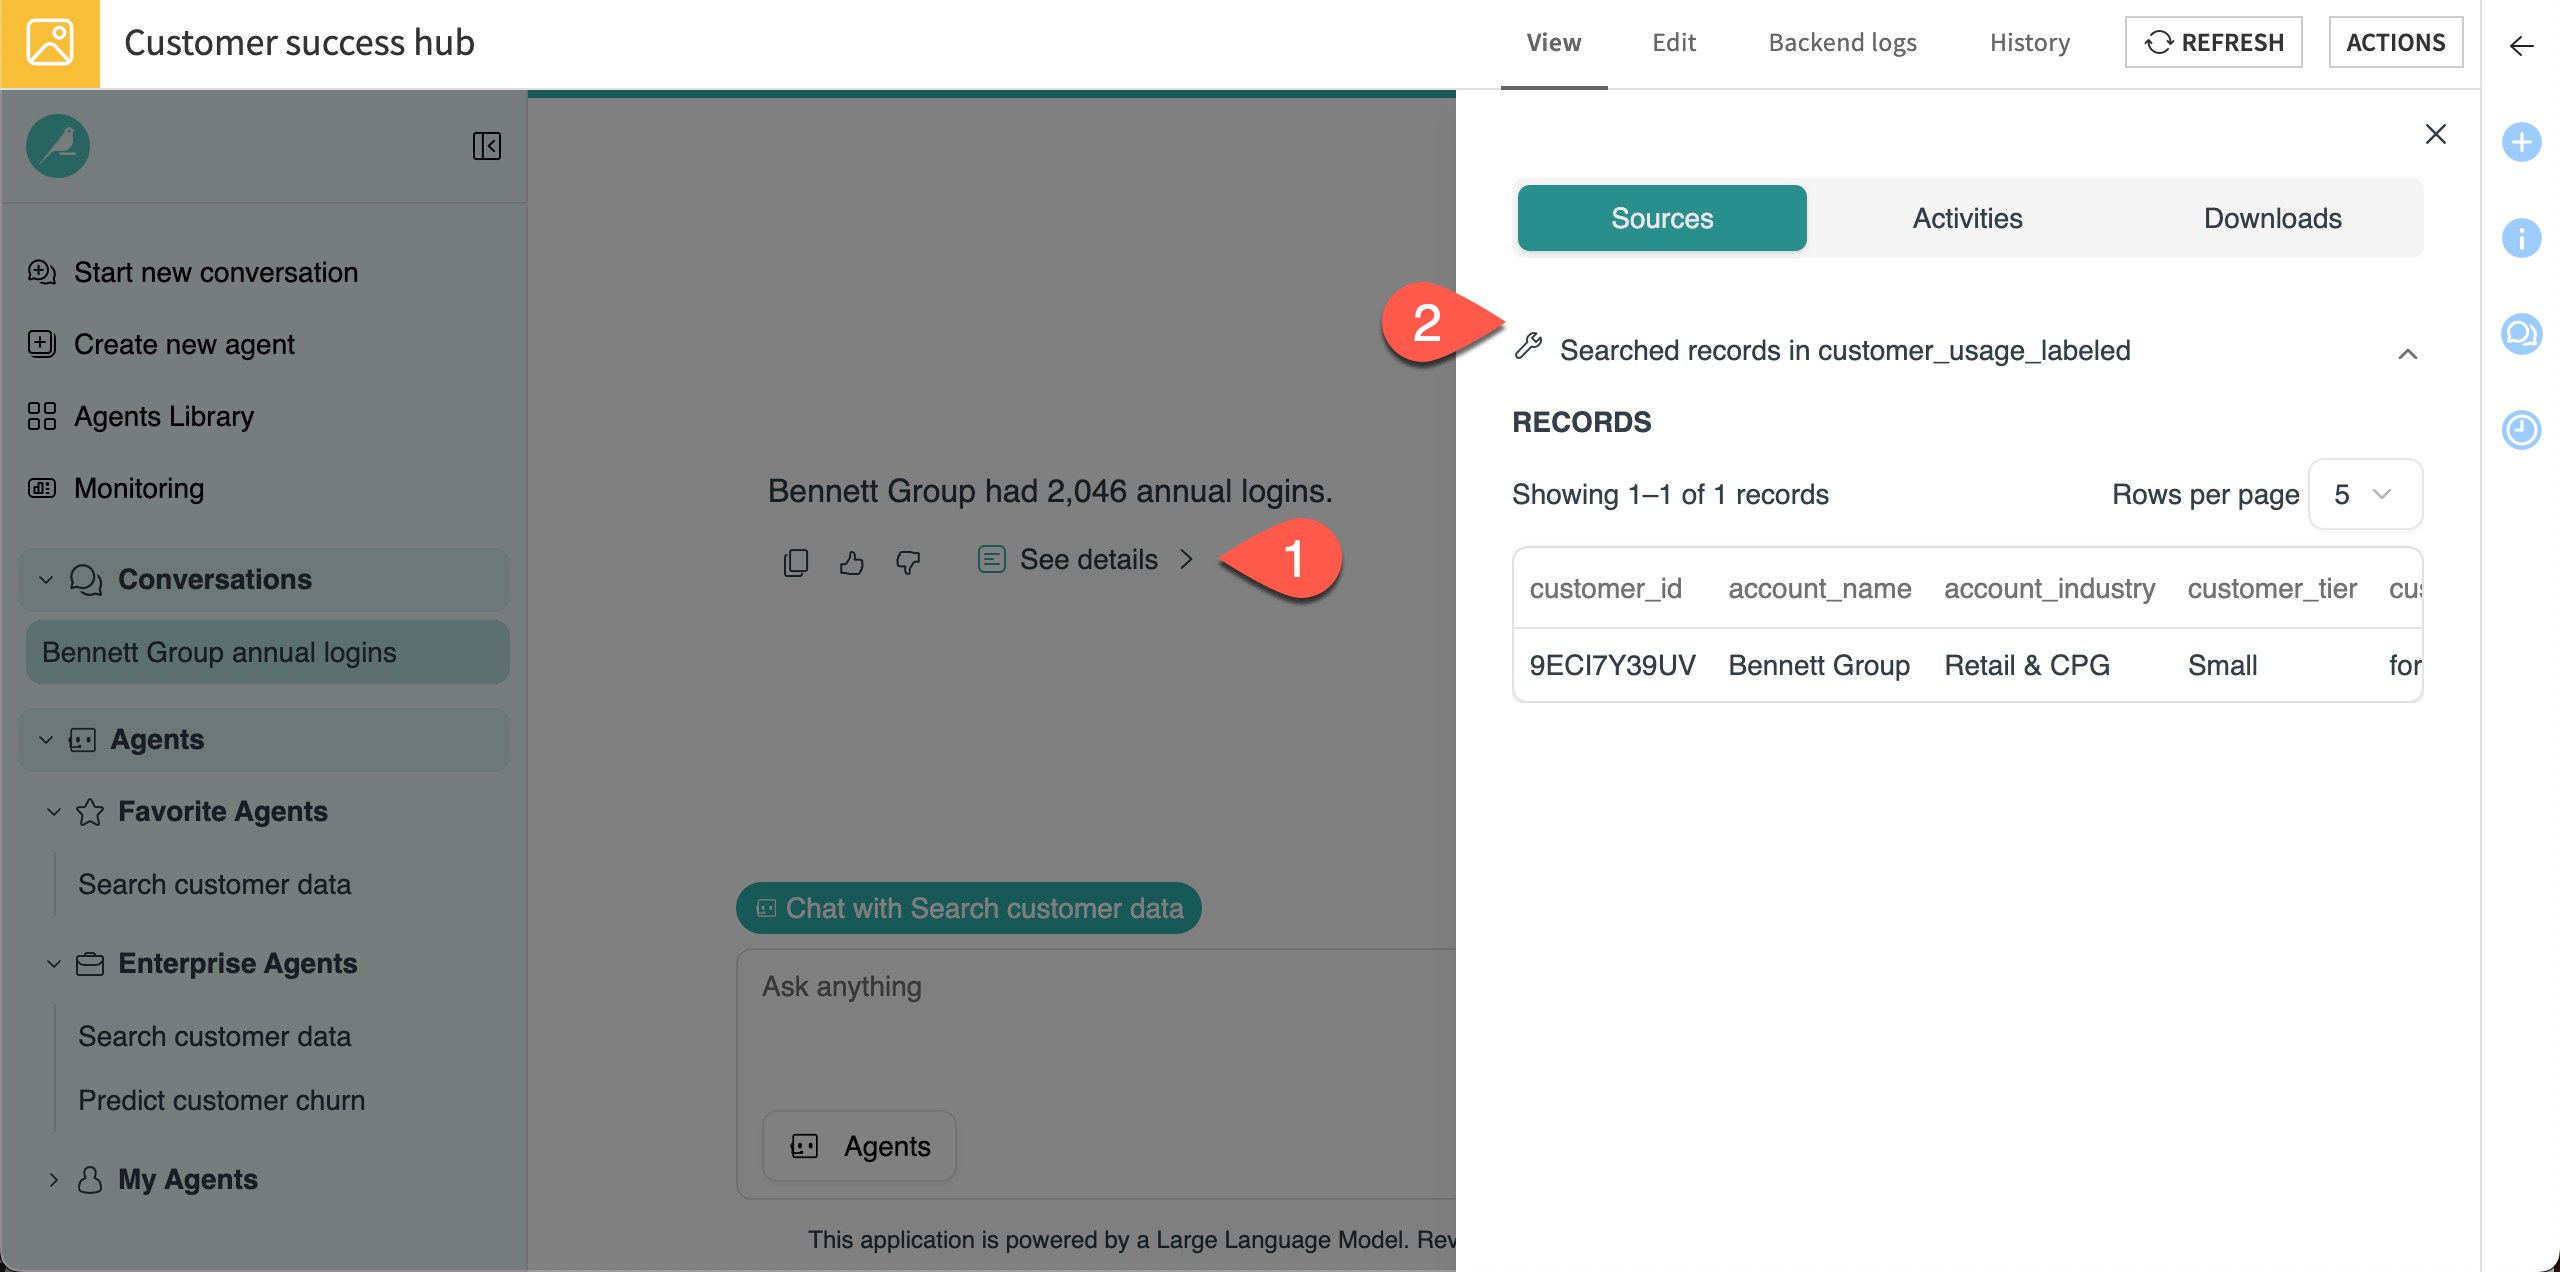
How many logins did the Bennett Group have?
The agent should respond with the answer from the customer dataset. You can check the agent’s sources to be sure it’s correct.
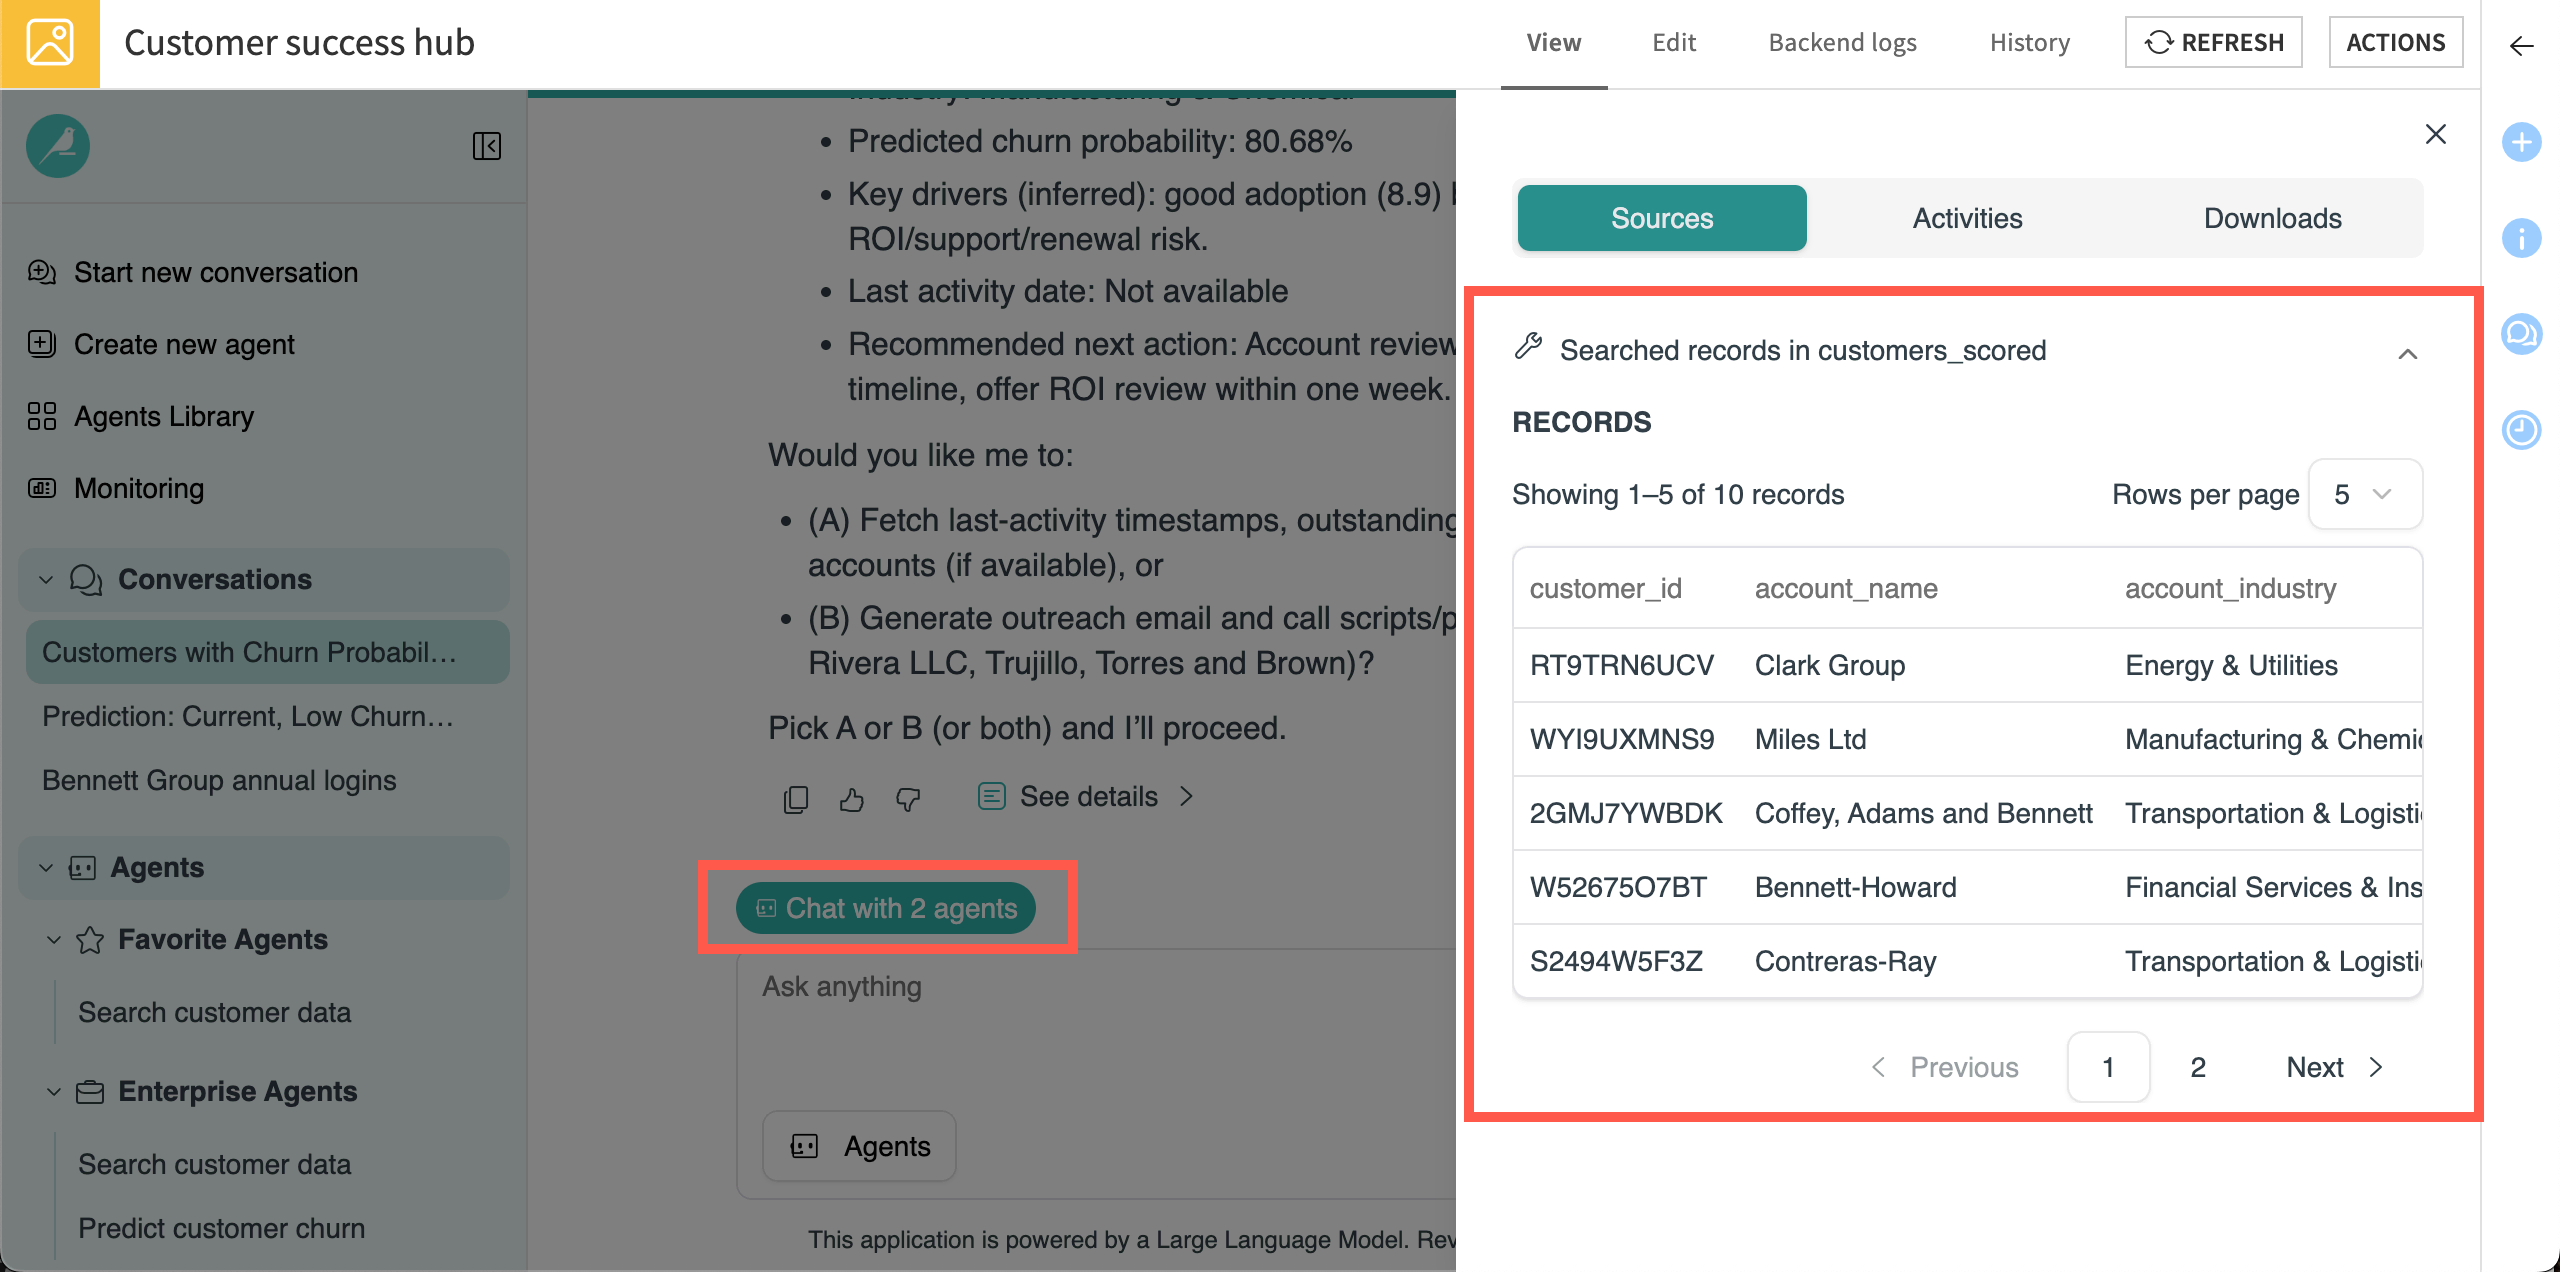
Click on See details below the agent’s response in the chat window.
Review the Sources on the right to see which dataset the agent searched and the relevant record it pulled.
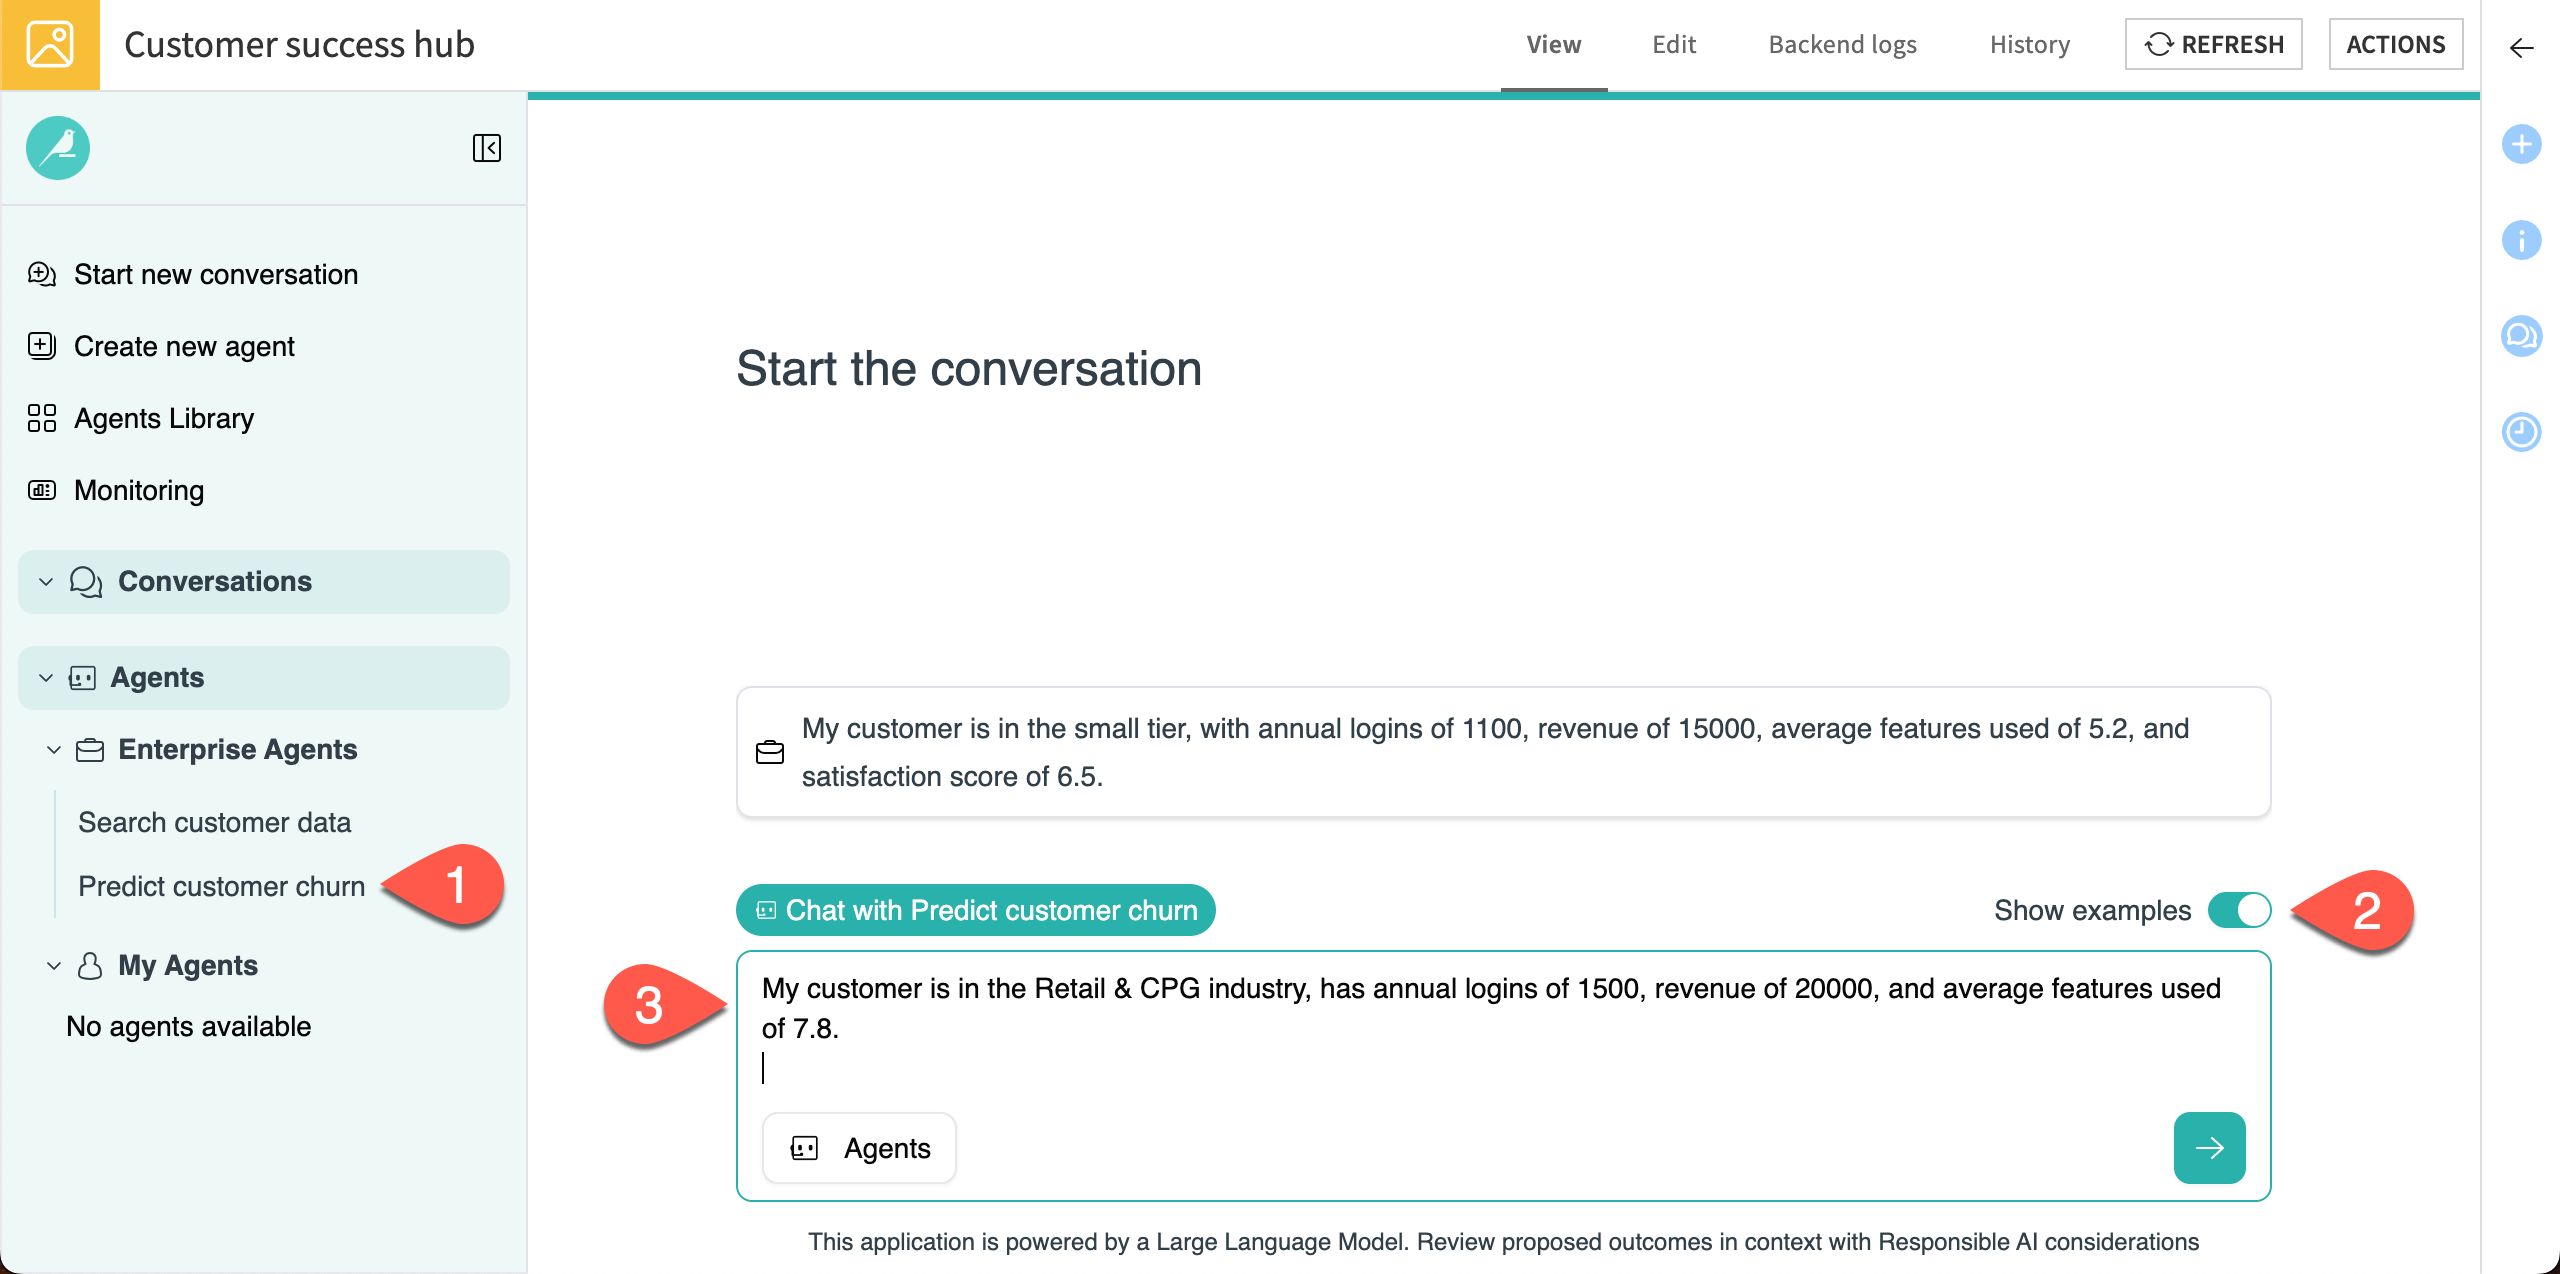
You can also chat directly with the churn prediction agent, which helps the customer success team identify accounts that might churn. This time, start the conversation a different way by going directly to the agent.
In the left panel under Enterprise Agents, click on the Predict customer churn agent.
Note the example you added when setting up the Agent Hub. This is useful to show end users how the agent can be used.
Copy and paste this question into the chat window, then send it:
My customer is in the Retail & CPG industry, has annual logins of 1500, revenue of 20000, and average features used of 7.8.
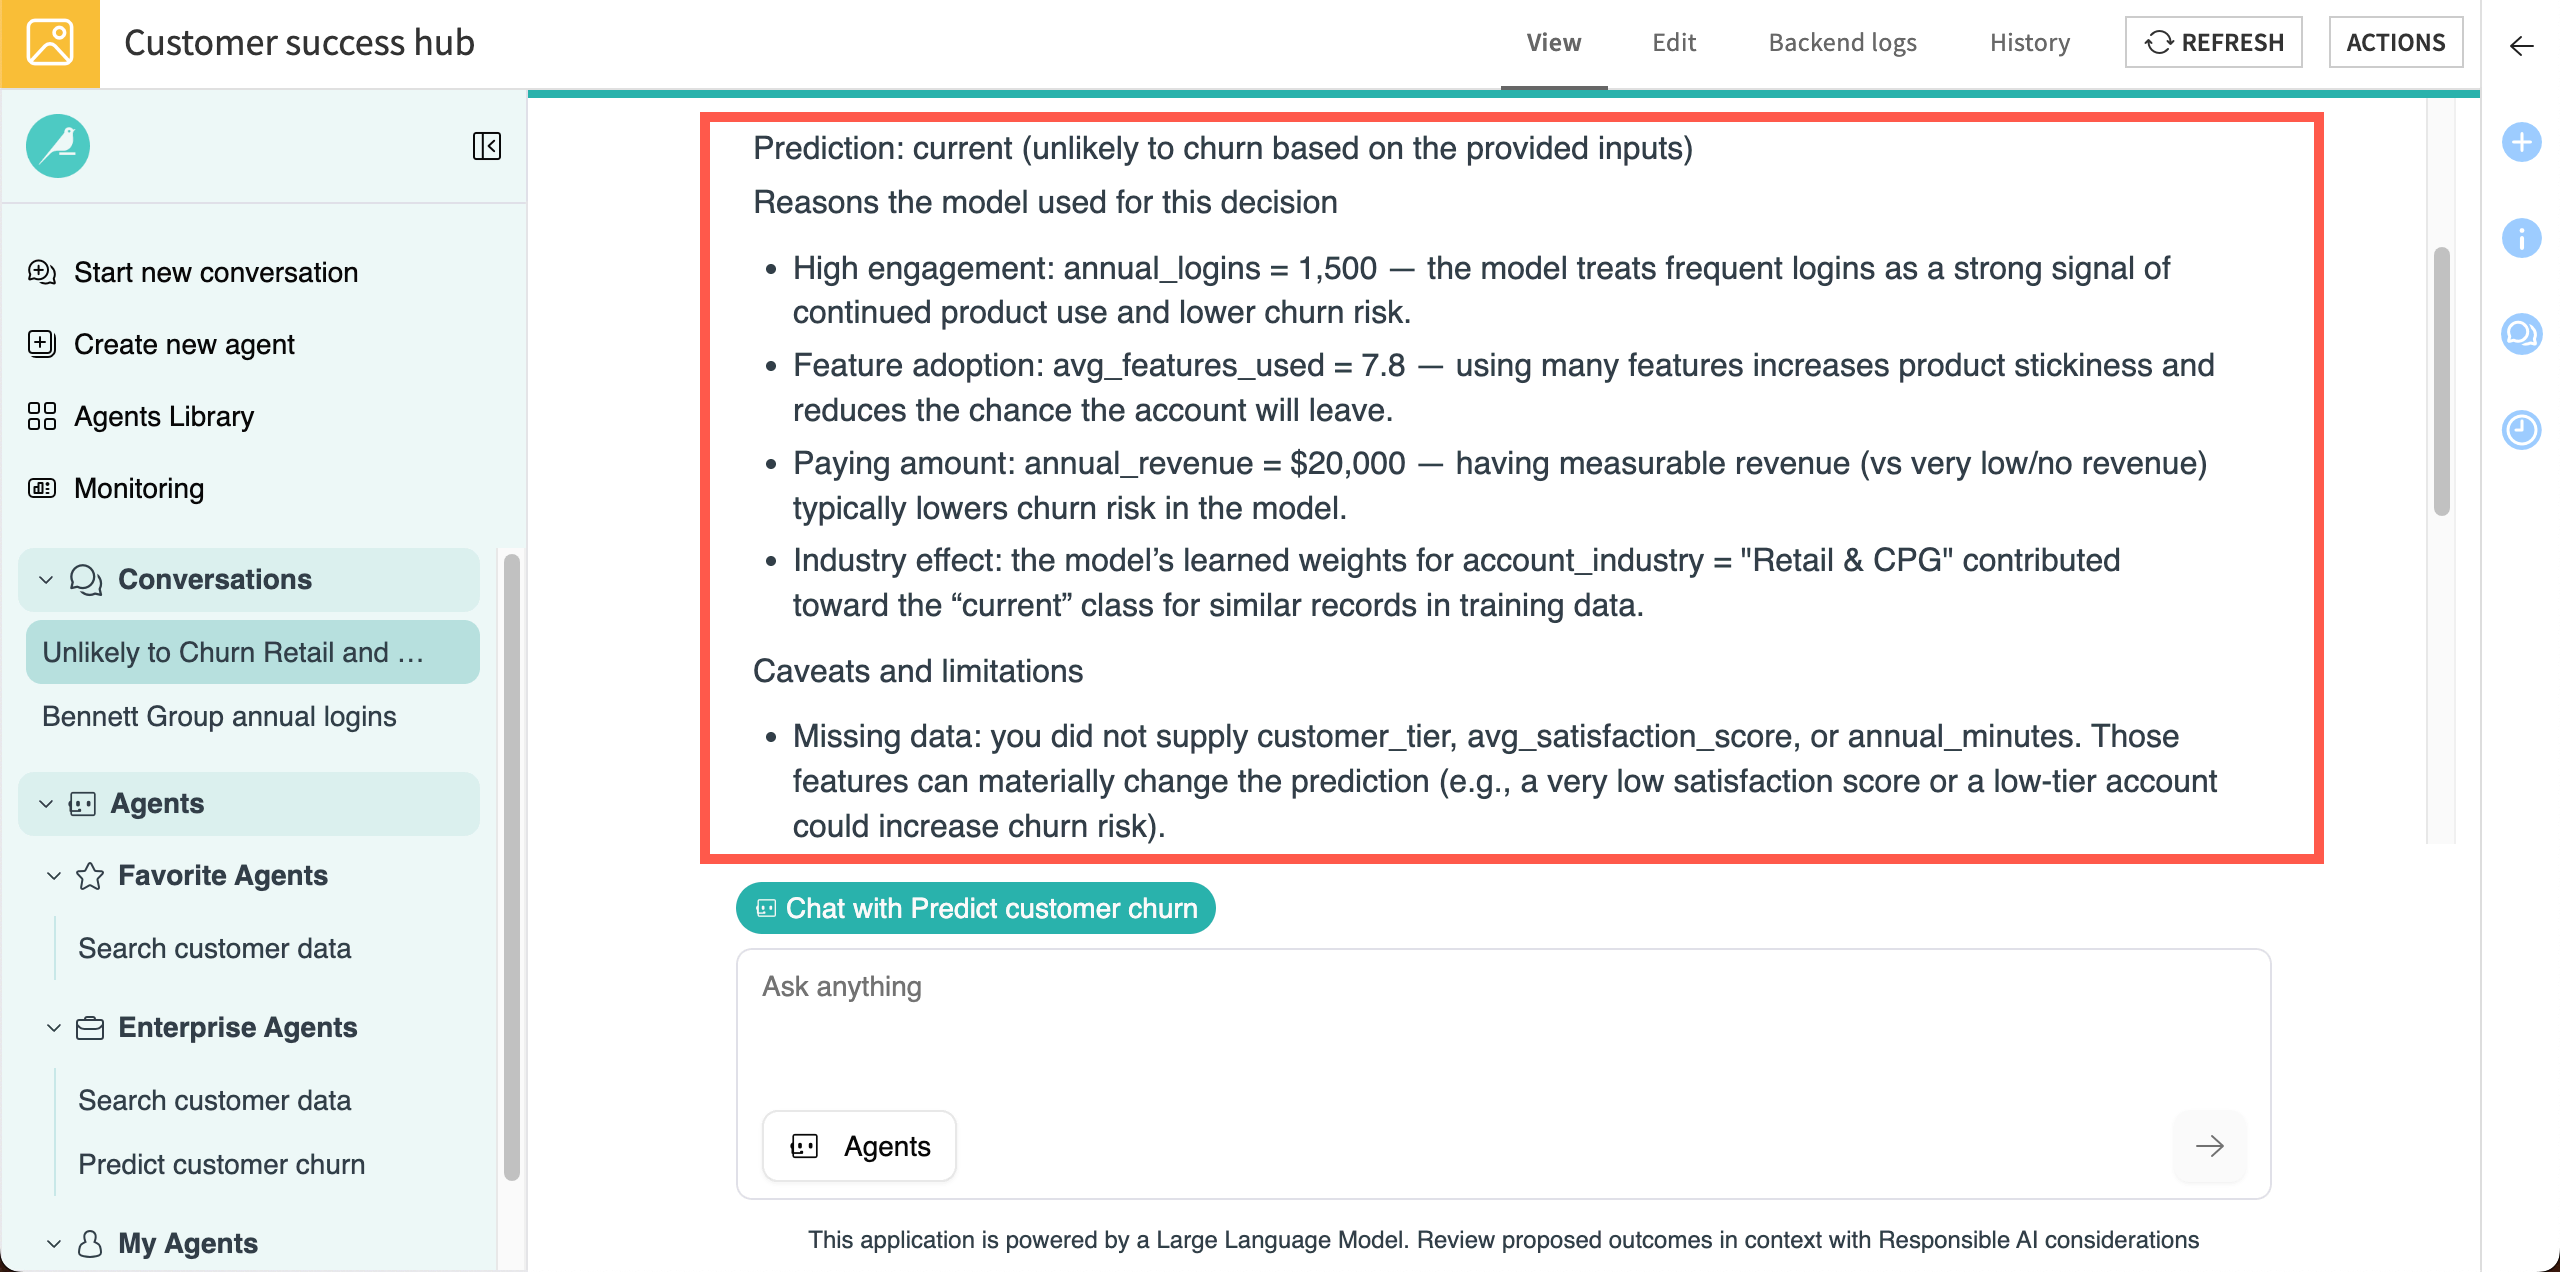
The agent responds with a prediction and reasoning, as its prompt instructs it to. In cases like this, where you provide limited details about the customer, it also asks for more information so it can provide a better prediction. It might also suggest next steps or offer to run the prediction again.
Chat with multiple agents#
You can also bring multiple enterprise agents into a single conversation to help increase efficiency and usefulness of responses.
When multiple agents are in use, Agent Hub uses the Agent Hub LLM connection you specified to orchestrate the agents’ tasks. Think of it as a conductor that calls upon different agents at different times as needed, depending on the users’ input.
Go to Start a new conversation.
Copy and paste this question into the chat window, then send it:
Which customers have more than .8 probability of churning?
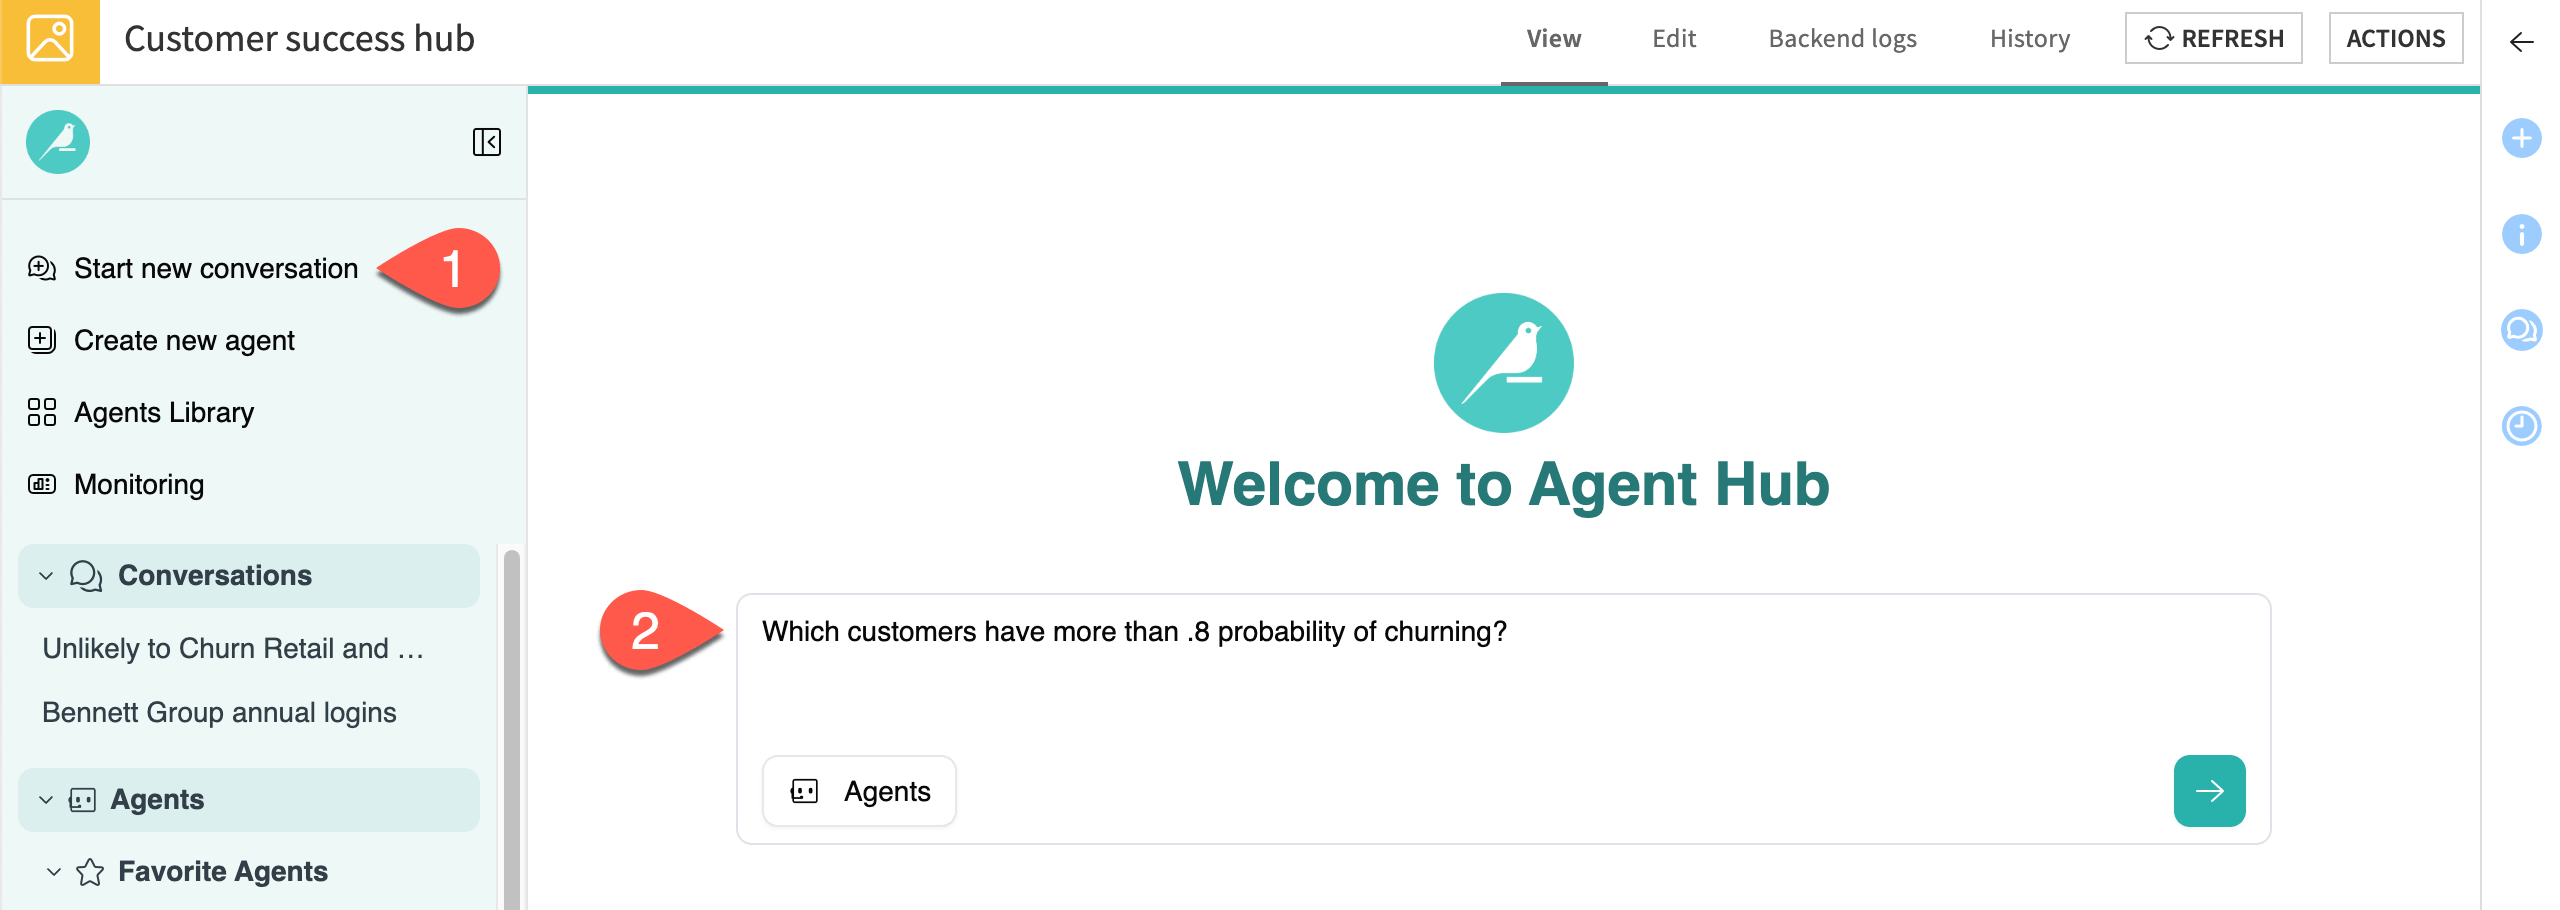
This time, because you did not choose an agent, Agent Hub shows that you are chatting with both available enterprise agents.
The Agent Hub LLM decided which agent was most suited to answer the question — in this case, the Search customer data agent. The agent, in turn, found the answer in the customers_scored dataset that includes model predictions.
Note
To keep responses short, the agent instructions limited responses to 10 records from dataset searches.
Manage conversations#
Each time you start a new conversation, Agent Hub will give it a relevant title and add it under the Conversations section in the left navigation panel.
Agent Hub should show three conversations so far, each named using details from the chats. You can rename or delete conversations to stay organized.
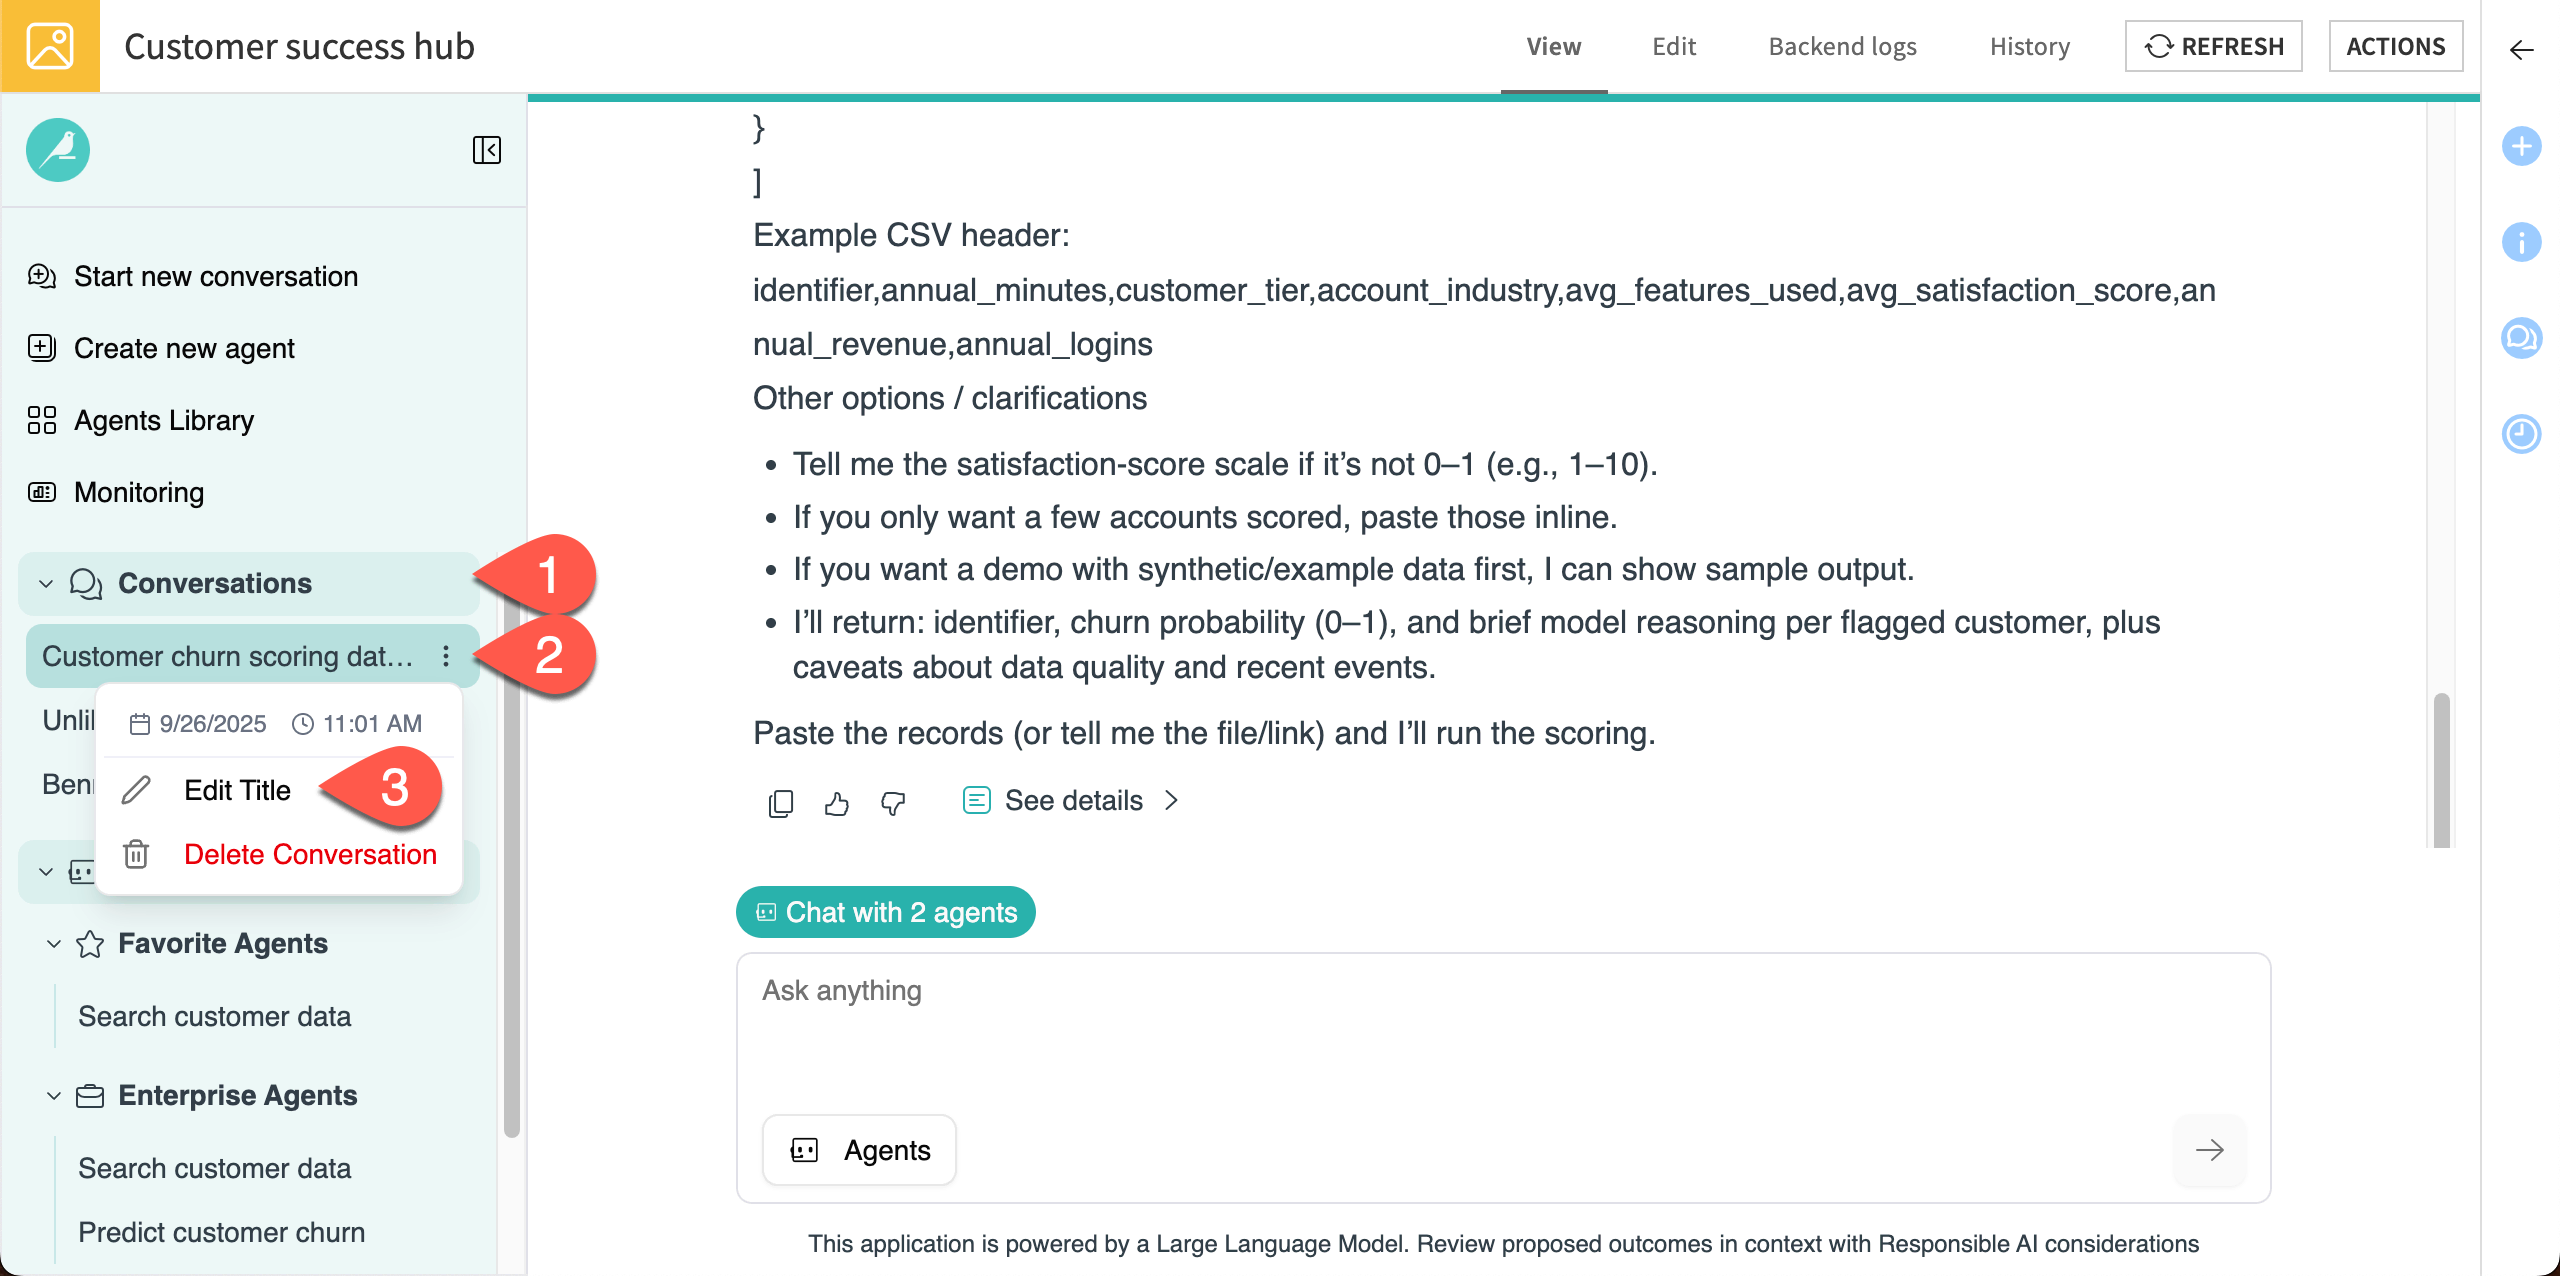
Navigate to the Conversations section of the left panel.
On the name of the current chat (with both agents), click on the More options (
) menu.Select Rename.
Rename the conversation
Enterprise agents.Follow the same steps to rename the other chats
Churn predictionandData lookuprespectively.
Now, you can easily navigate back to conversations with either or both agents!
Build a My Agent#
Agent Hub provides an interface to create agents called My Agents. These allow individual Agent Hub users to tailor agents that help with their individual tasks. Users can also share My Agents that might be useful for other team members.
Create a new agent#
For this customer success team, a useful My Agent could use internal company documents to draft customer outreach emails. You can upload documents directly in Agent Hub to build the agent’s knowledge.
Go to Create new agent.
Click on the pencil icon to rename the agent
Write value proposition emails.In the Agent instructions window, copy and paste the following instructions:
### 1. Persona
You are an expert Customer Success Representative. Your specialty is crafting persuasive and engaging emails that convince current customers to remain with the company. Your tone is strategic and focused on helping customers understand value to their company.

### 2. Core Objective
Your core objective is to draft outreach emails, tailored to a customer based on their industry, using the provided value propositions for specific industries.

### 3. Capabilities & Tools
You can work in coordination with other agents that predict customers that are vulnerable to churn. Your output email must be generated based on the provided value propositions and customer data.

### 4. Input Definition
Input will be customer names and industries. This input could come from other agents as the result of a user query, or it could come directly from a user query.

### 5. Process & Logic
1.  **Deconstruct the Inputs:** Begin by thoroughly analyzing the customer and value proposition. Identify the single most compelling benefit of the product that directly solves a primary pain point of the customer.
2.  **Develop the Core Message:** Formulate a central theme or "hook" for the email.
3.  **Strategize the Subject Line:** Brainstorm 2-3 distinct subject lines. They should be attention-grabbing, relevant, and create curiosity or urgency. Consider different angles (e.g., benefit-driven, question-based, direct offer).
4.  **Structure the Email Body:** Draft the email content following a logical flow.

### 6. Constraints & Guardrails
* You **must not** invent any product features, benefits, or pricing information that wasn't provided in the input.
* If crucial information (like a price or a specific link) is missing, use a clear placeholder, such as `[Insert Price Here]` or `[Your Website Link]`.
* Do not make unrealistic claims or guarantees about the value proposition. Ground all statements in the provided description.
* The final email must be focused entirely on the single core objective of reaching out to a customer that is in danger of churning.

### 7. Output Specification
Your response must be delivered in Markdown and structured in the following two parts:

**A. Email Strategy Rationale:**
A short paragraph explaining the strategic choices made for the email, including the selected angle, the reasoning behind the tone, and why the proposed subject lines are a good fit for the persona.

**B. Draft Email:**
The complete promotional email, ready to be copied and pasted. It must be clearly formatted with the following elements:
* **Subject Line Options:**
 * `Option 1: [Your first subject line]`
 * `Option 2: [Your second subject line]`
* **Email Body:**
 `Hi [Company name],`

 `[Email Body Content]`

 `[Call to Action Button/Link Text]`

 `Best,`
 `The [Company Name] Team`
Tip
You can also use instruction templates from the Prompt library, which includes ready-made prompts for industry-specific use cases, such as a copy writer assistant or research summarizer. Click on Access ready-made prompts to browse the options.
Agent Hub admins can also create custom options for users in the Admin Settings > Prompts Library page.
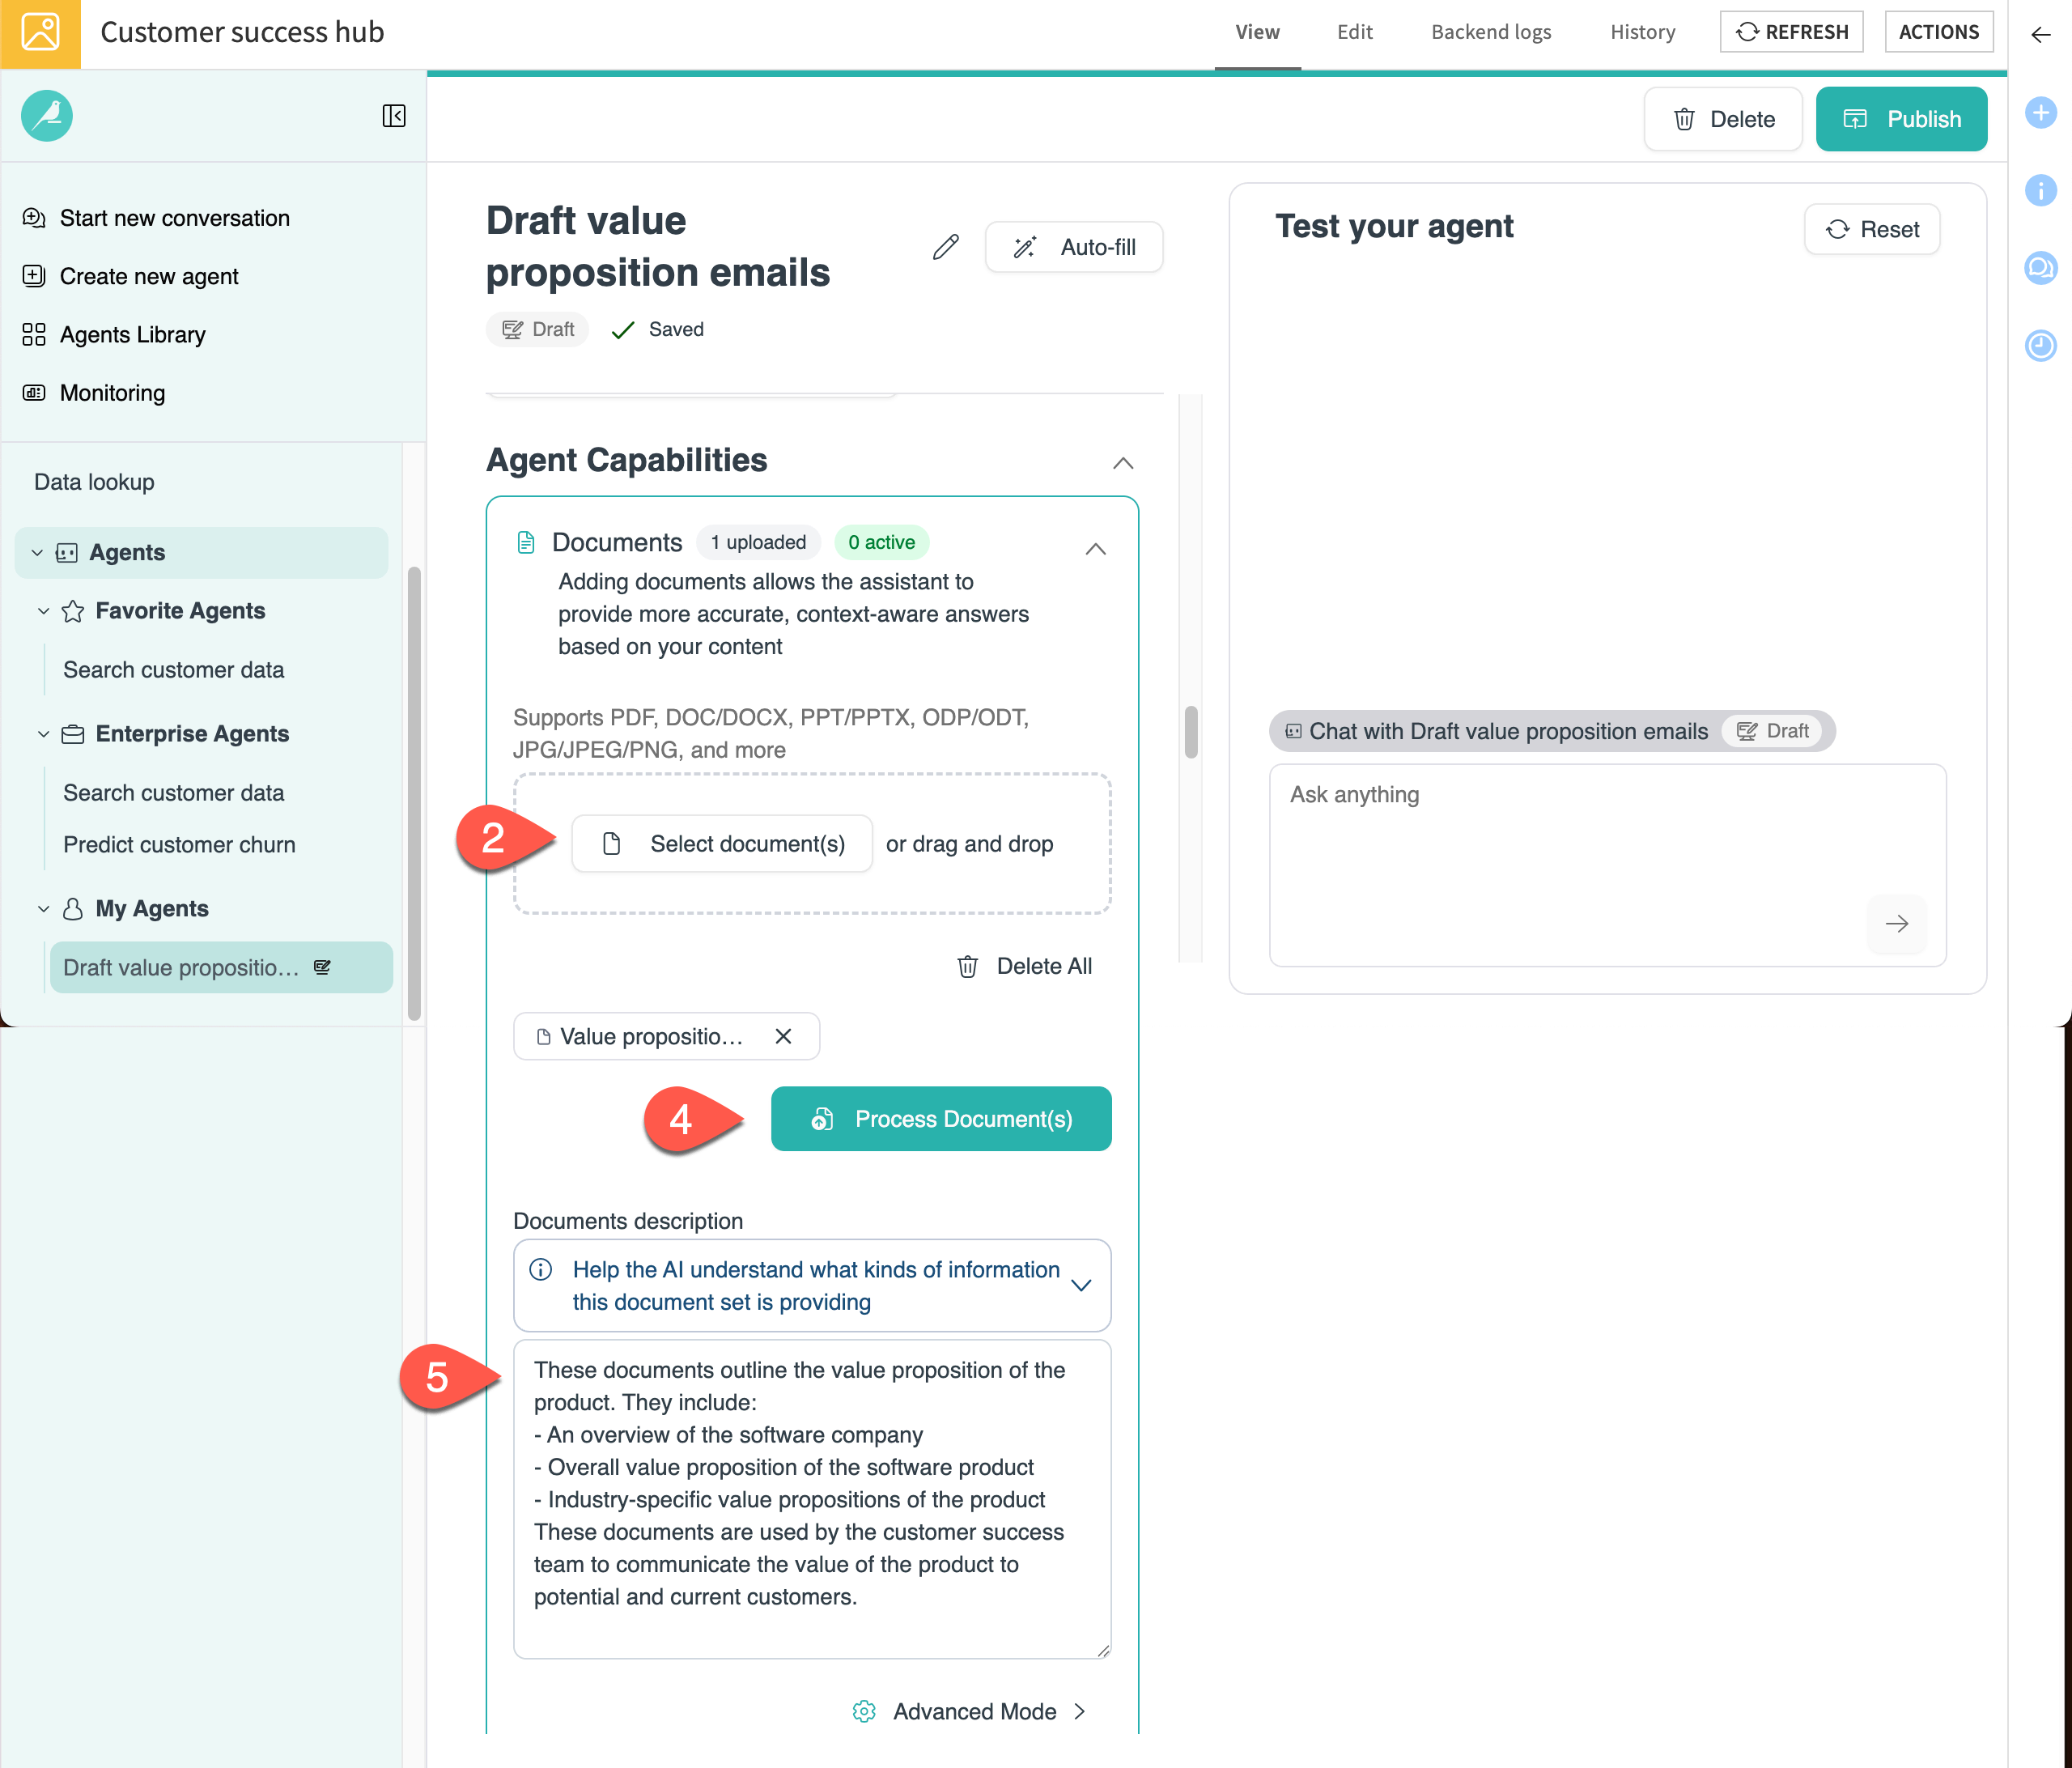
Add documents#
After creating instructions for the agent, you can add documents to enrich the agent’s knowledge or enable tools for it to perform specific tasks. Let’s upload some documents that the agent can use to communicate the company’s value proposition to customers.
Download the pdf from this link and note where it’s saved on your computer.
Under Agent Capabilities > Documents, click on Select documents.
Upload the Value proposition PDF from your computer.
Click Process document(s). This will embed the documents so the LLM can semantically understand them and provide specialized responses.
In the Documents description window, copy and paste the following description:
These documents outline the value proposition of the product. They include:
   - An overview of the software company
   - Overall value proposition of the software product
   - Industry-specific value propositions of the product
These documents are used by the customer success team to communicate the value of the product to potential and current customers.
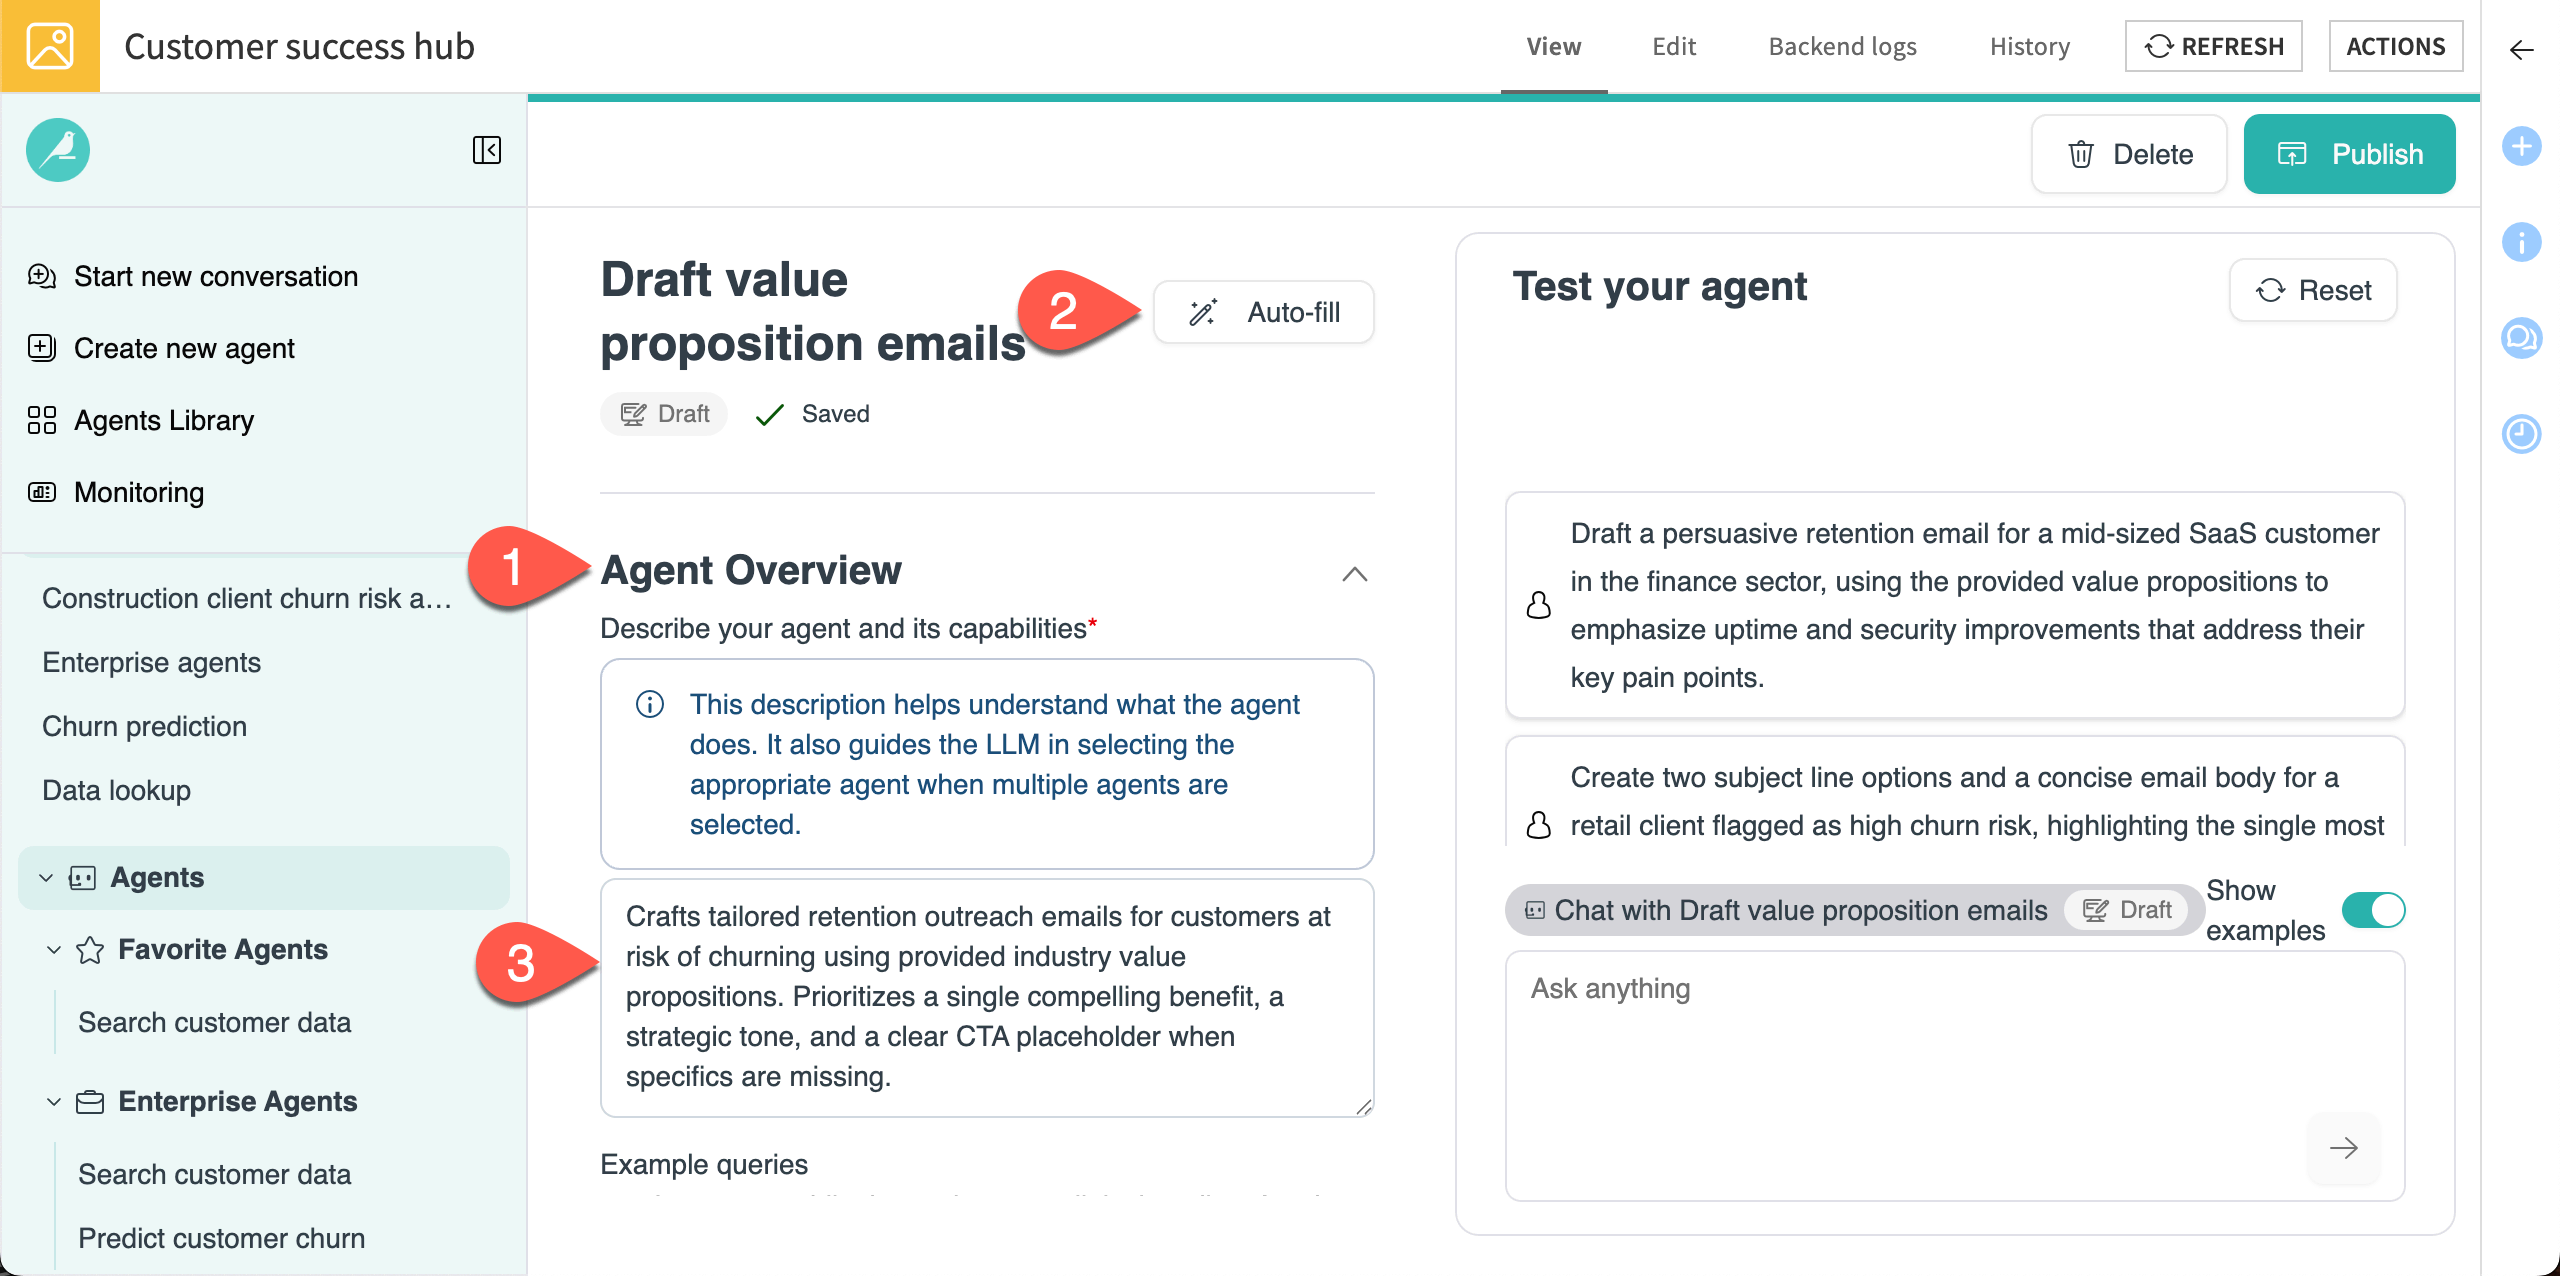
Add Agent Overview#
The final step is to add an Agent Overview, which helps the Agent Hub LLM understand what the agent does and coordinate its role with other agents in the Agent Hub.
Scroll down to the Agent Overview.
Copy and paste this text into the box:
This agent takes input either from the user or other agents and drafts outreach emails to customers that are likely to churn. The emails incorporate value propositions from the provided documents.
Test the agent#
Before publishing, you can chat with the draft agent to test its performance.
In the Test your agent chat window, copy and paste this query:
Draft an outreach email to a potentially churning customer in the Retail & CPG industry.

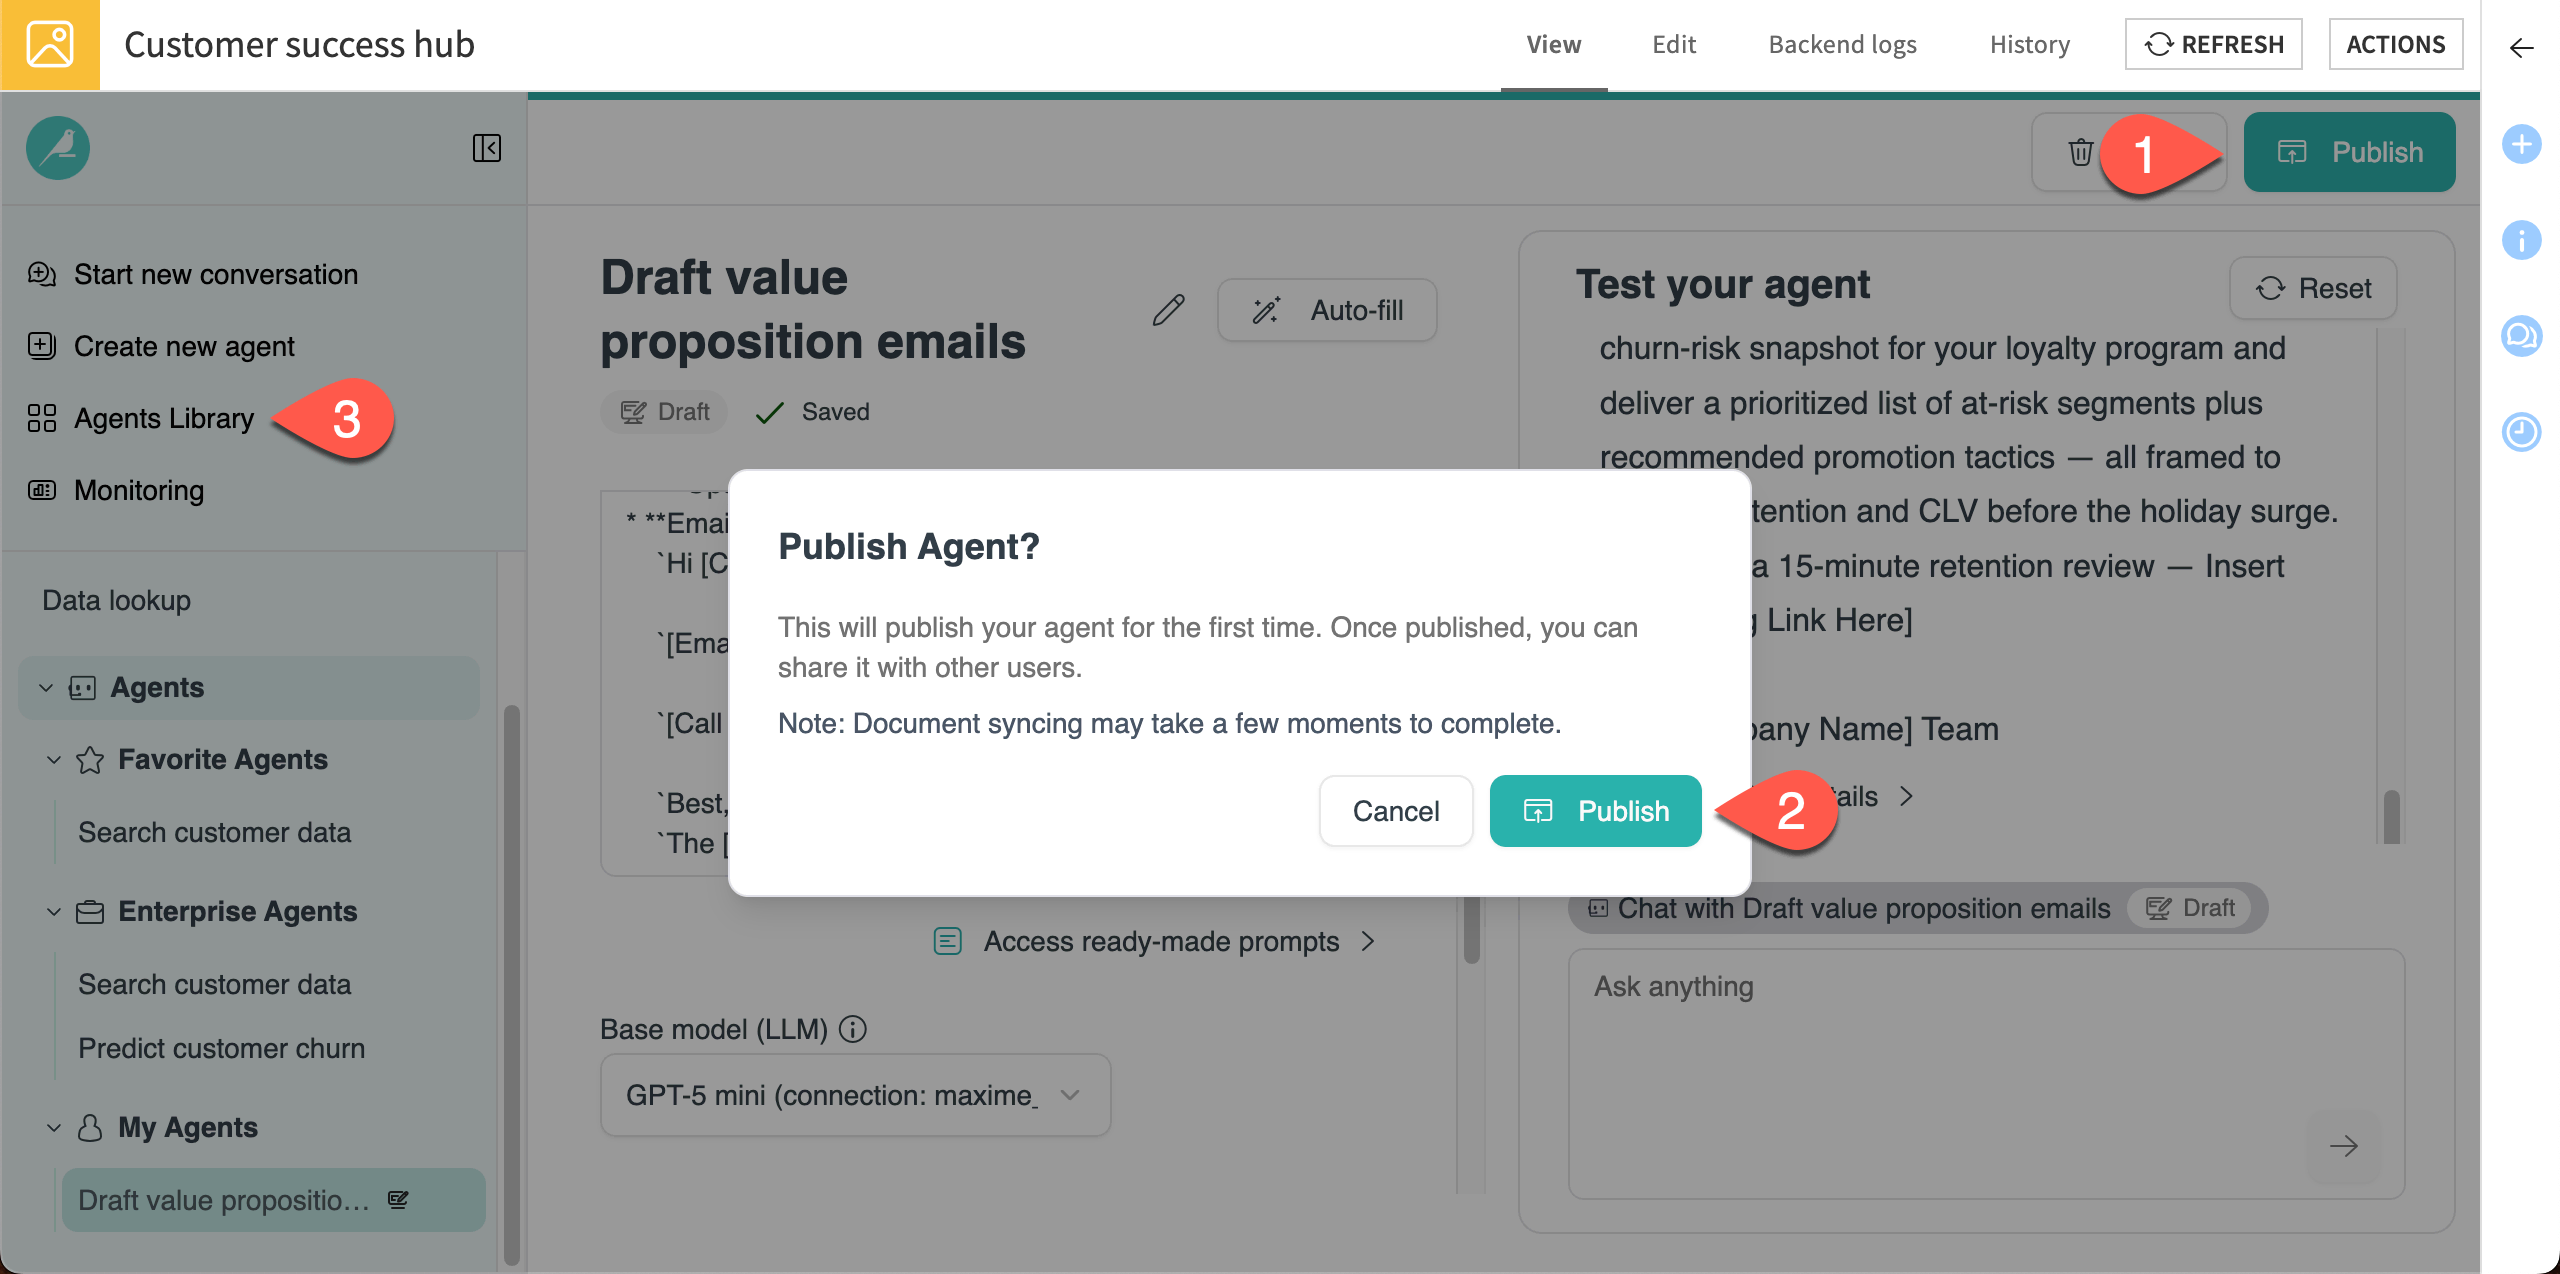
After you’re happy with the performance of the agent, you can publish it to make it available in Agent Hub.
Click on Publish in the top right.
Click Publish again in the Publish Agent window.
After the job has finished, go to the Agent Library > My Agents to verify that the new agent is available.
Orchestrate multiple agents#
The Agent Hub now has three agents — two enterprise agents that were previously created by the organization and one My Agent that helps you in your specific tasks.
Putting them all together, you can use the enterprise agents to identify customers that might be in danger of churning, then use the My Agent to draft outreach emails.
Chat with all three agents#
To chat with all the agents, start a new chat without selecting any agents. Agent Hub will automatically call the relevant agent(s) from all available agents.
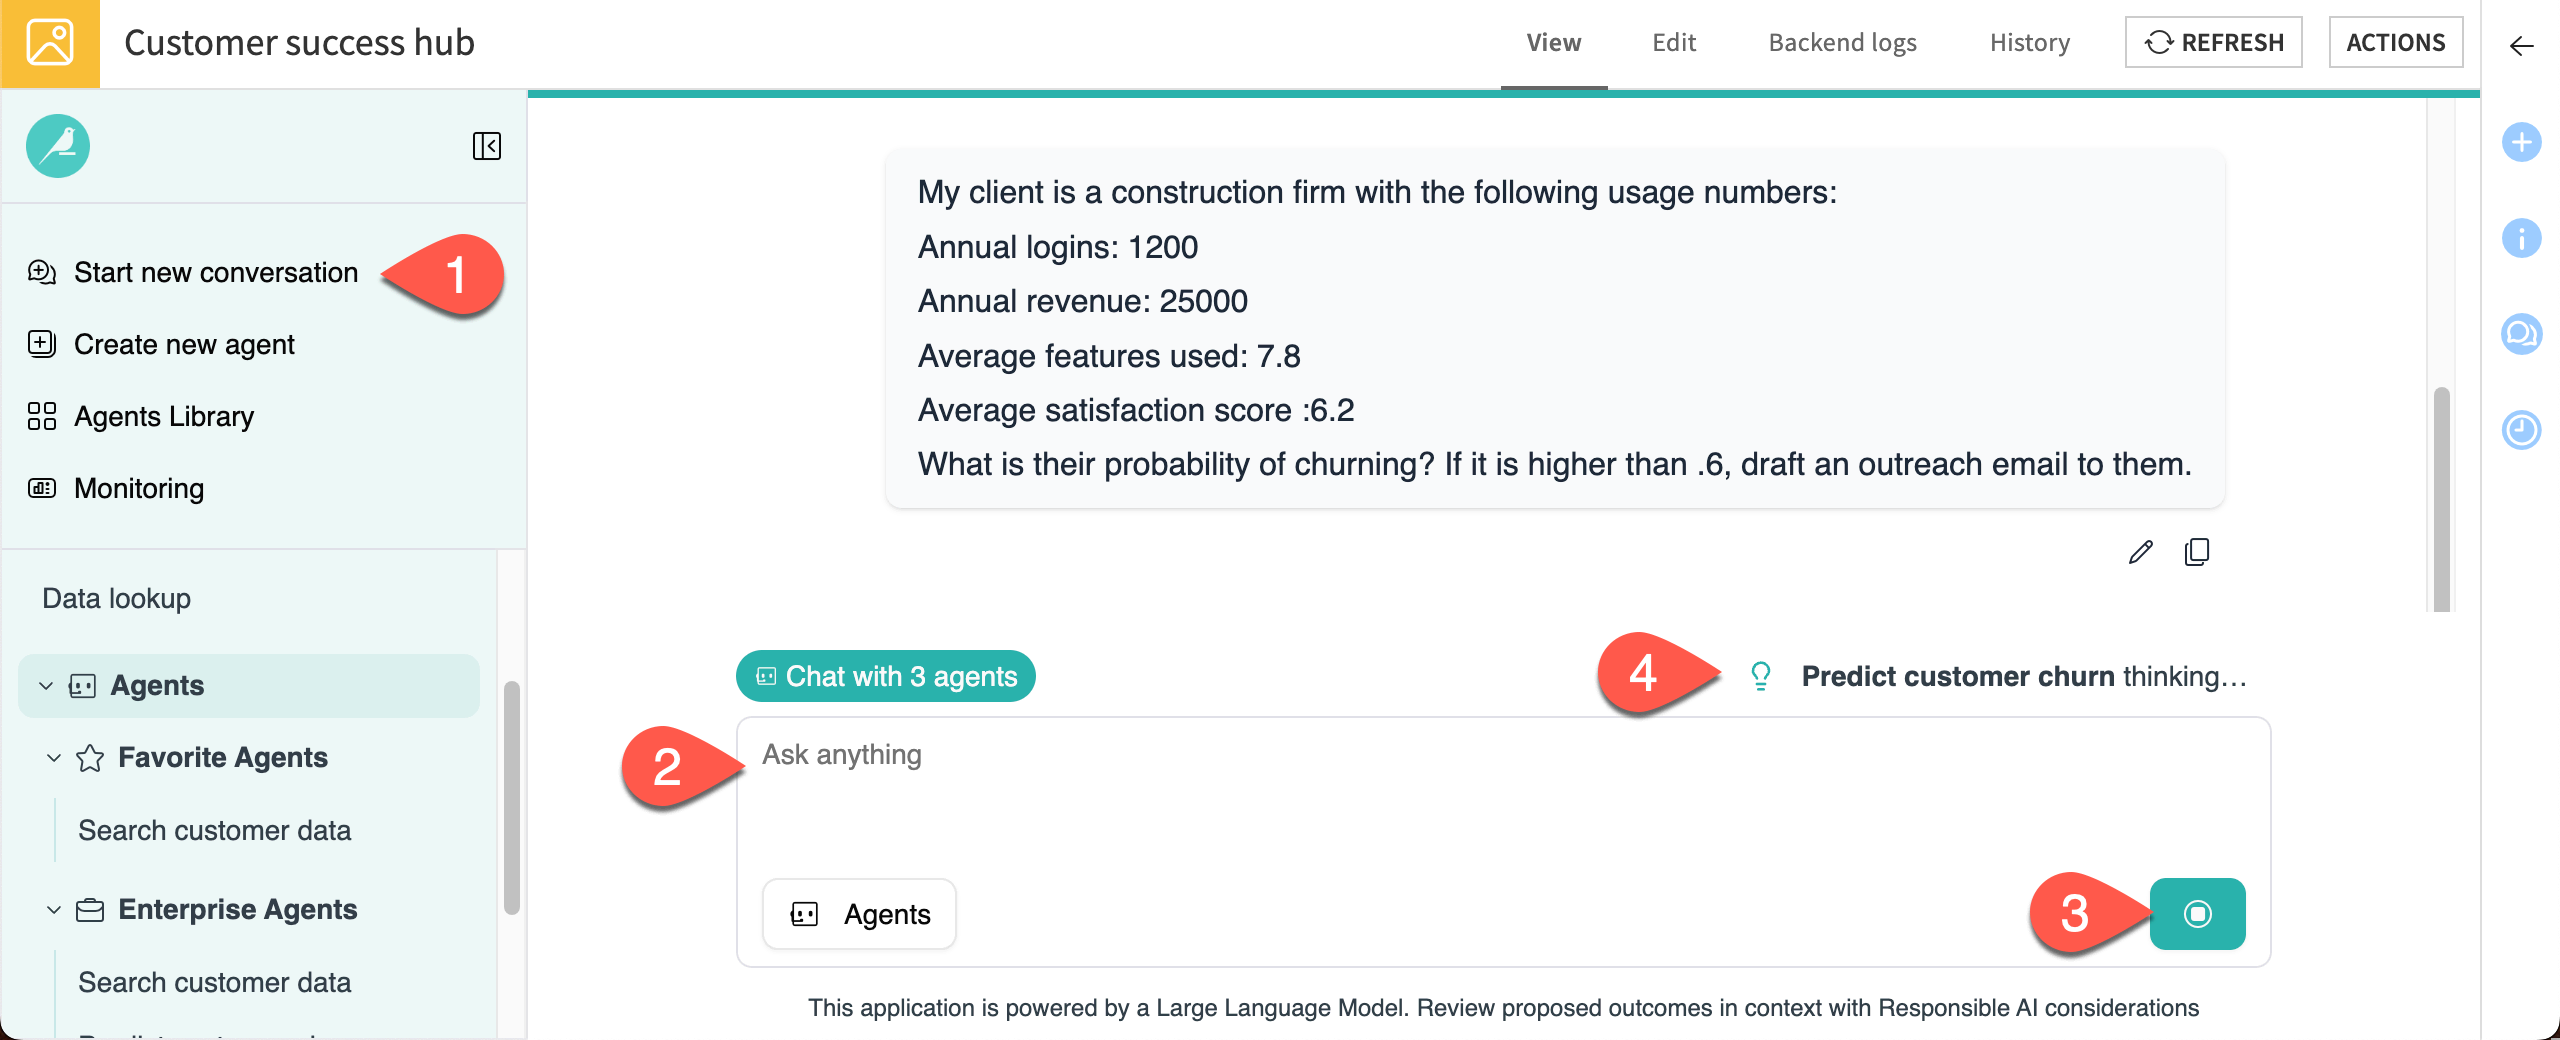
Go to Start a new conversation.
Copy and paste the following question into the chat box.
My client is a construction firm with the following usage numbers:

Annual logins: 1200
Annual revenue: 25000
Average features used: 7.8
Average satisfaction score :6.2

What is their probability of churning? If it's higher than .6, draft an outreach email to them.
Send the chat.
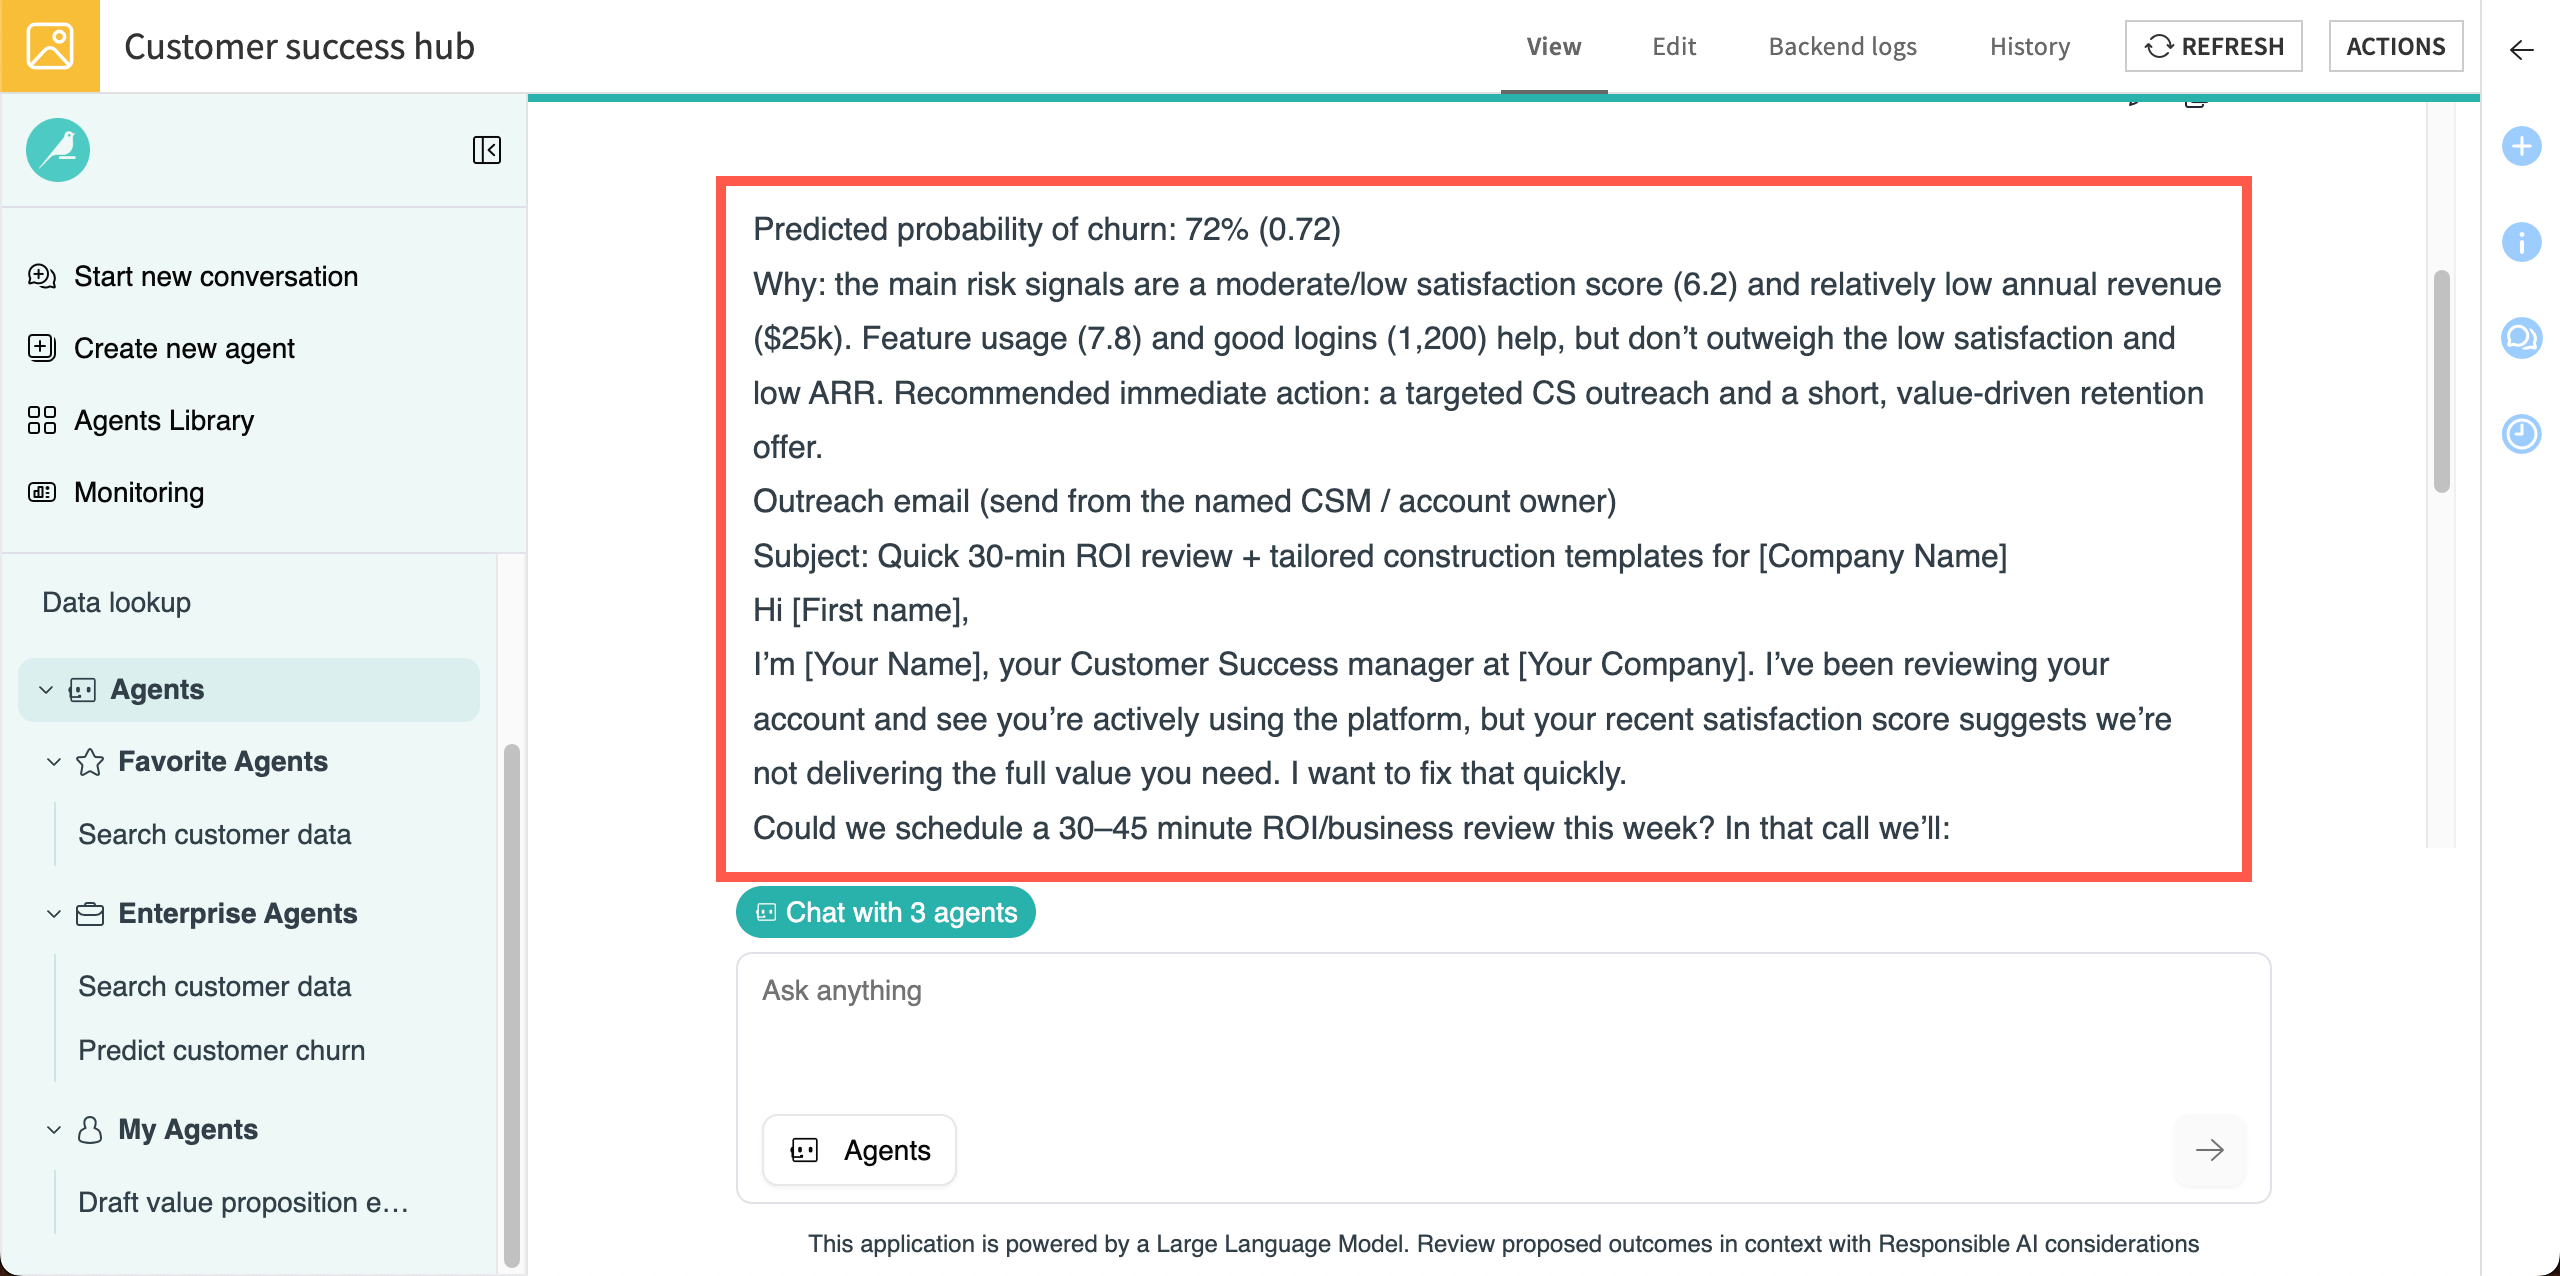
As the response is processing, watch the area above the chatbox to see the different agents at work.
In this case, the agent has predicted a .72 chance of churning and drafted an outreach email that suggests a ROI/business review meeting to help keep this account on track as a customer.
Understanding responses#
Though the agents seem to be providing useful responses, it’s important to understand how it reached its decision and which agents and underlying information were used.
Click on See details under the response.
In the details window on the right, view the Sources, Activities, and Downloads.
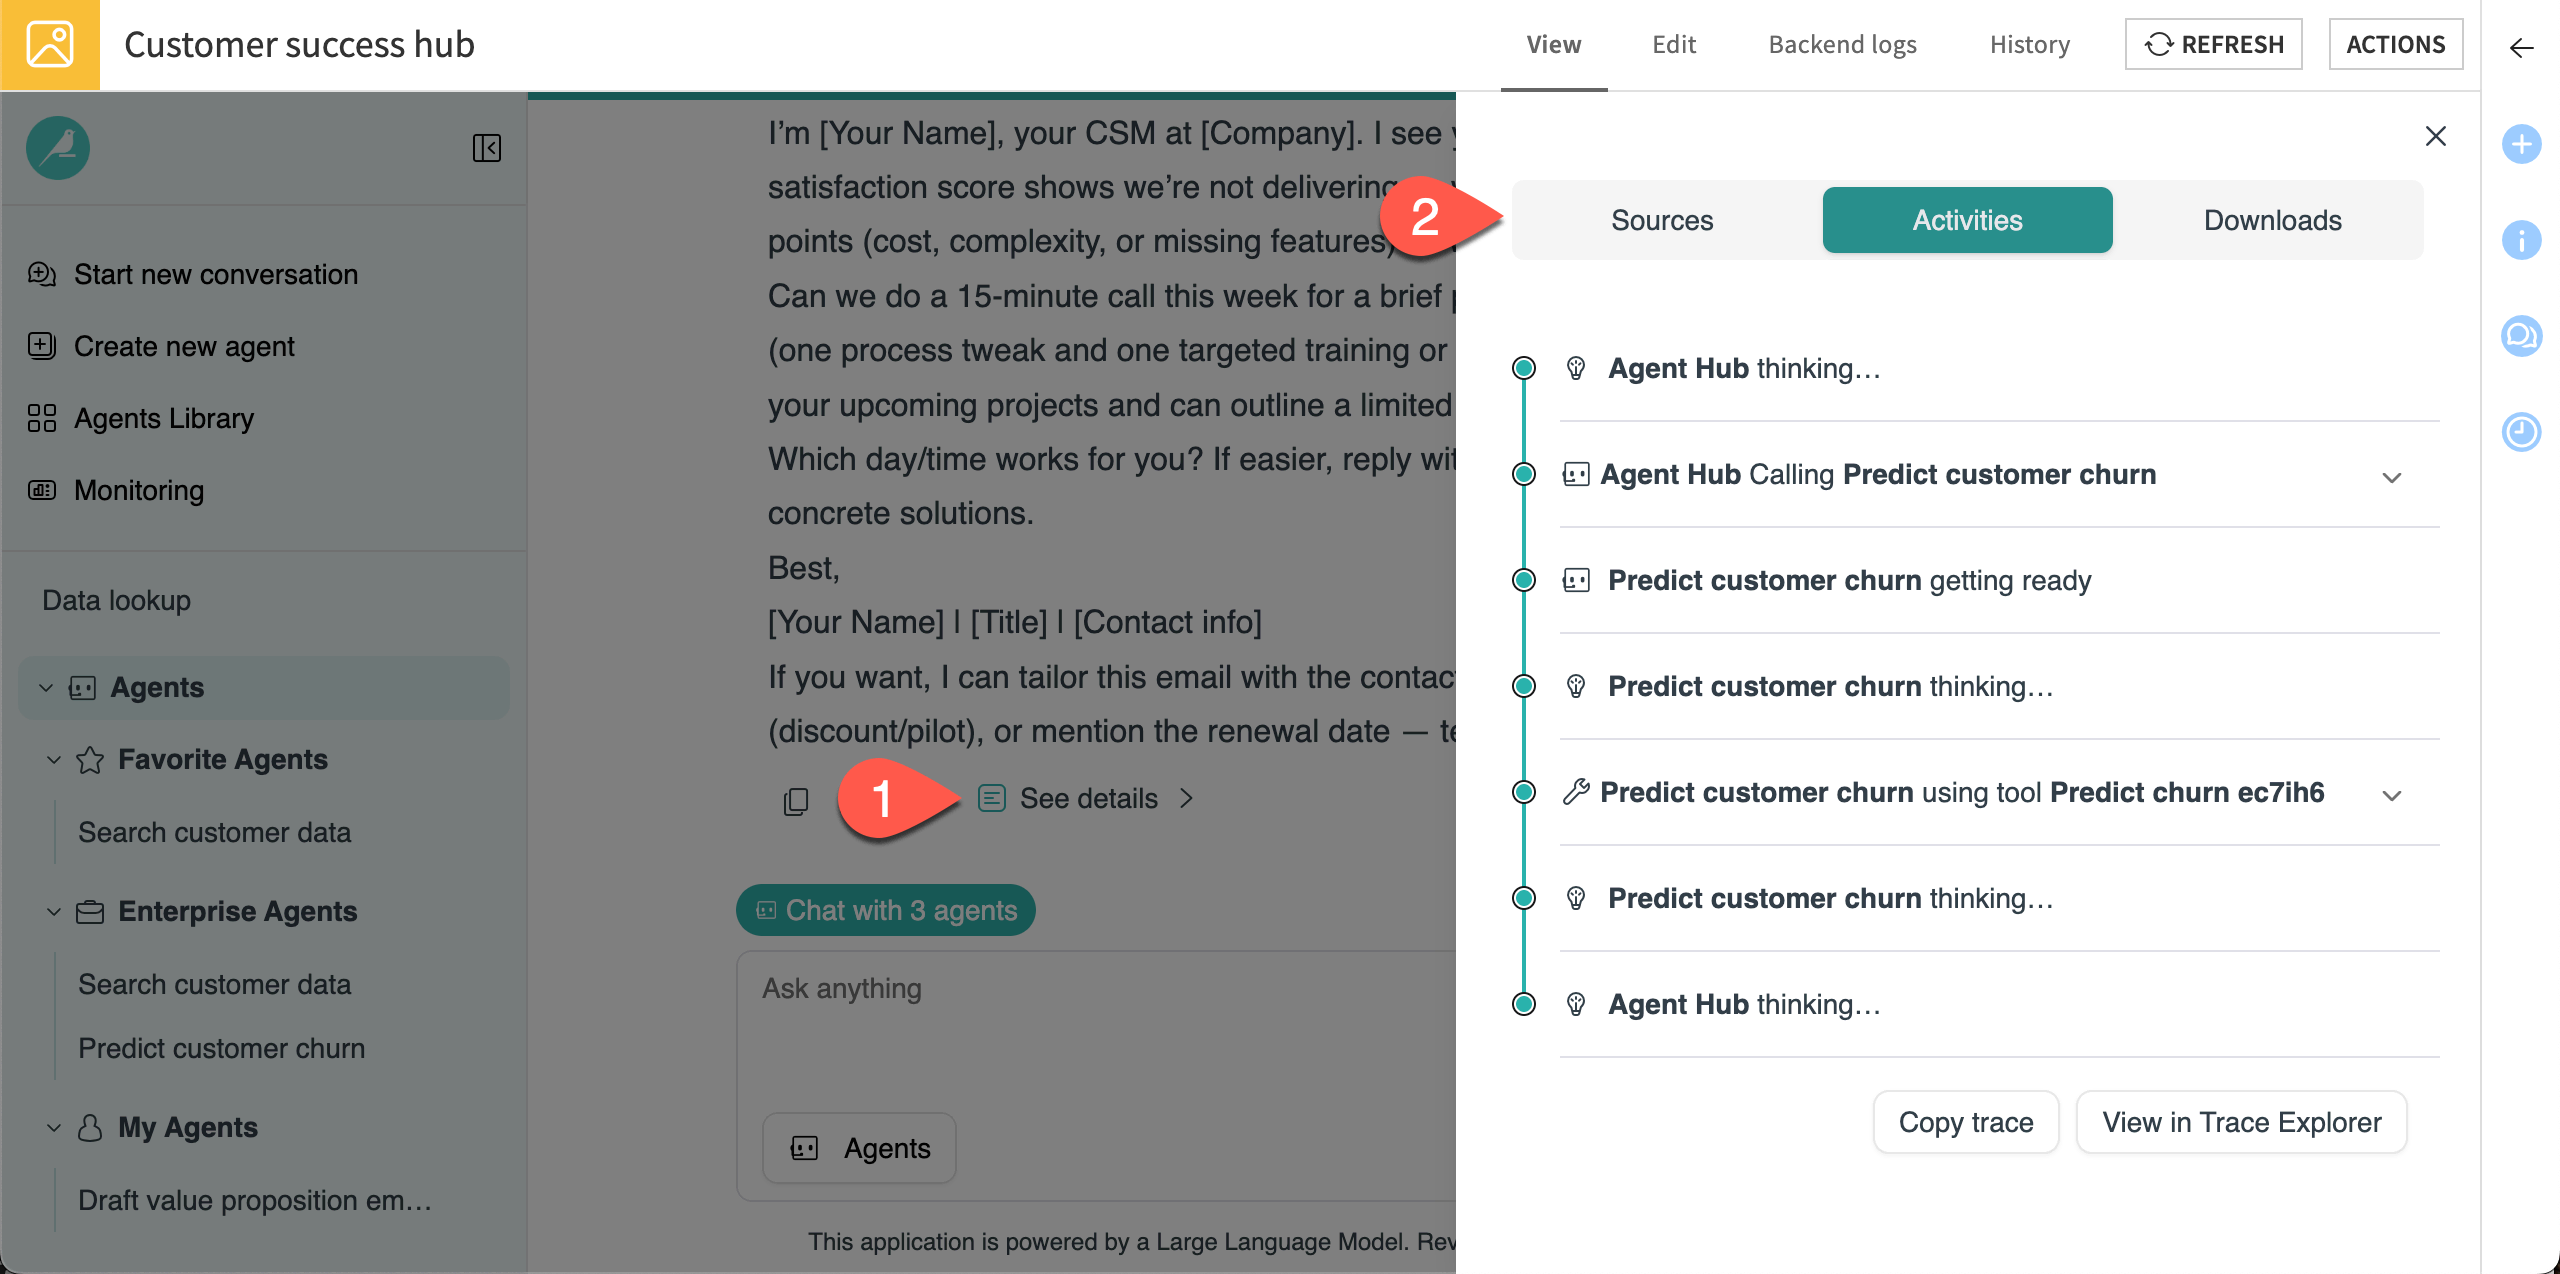
Because the agent didn’t call a dataset from the Flow, there are no sources available. The Activities tab shows that the Agent Hub used the Predict churn tool to answer the query.
Let’s try another query that will call a different agent.
Copy and paste this query into the chat, then send it:
What are the usage statistics for Lewis LLC?
After the agents respond, click on See details.
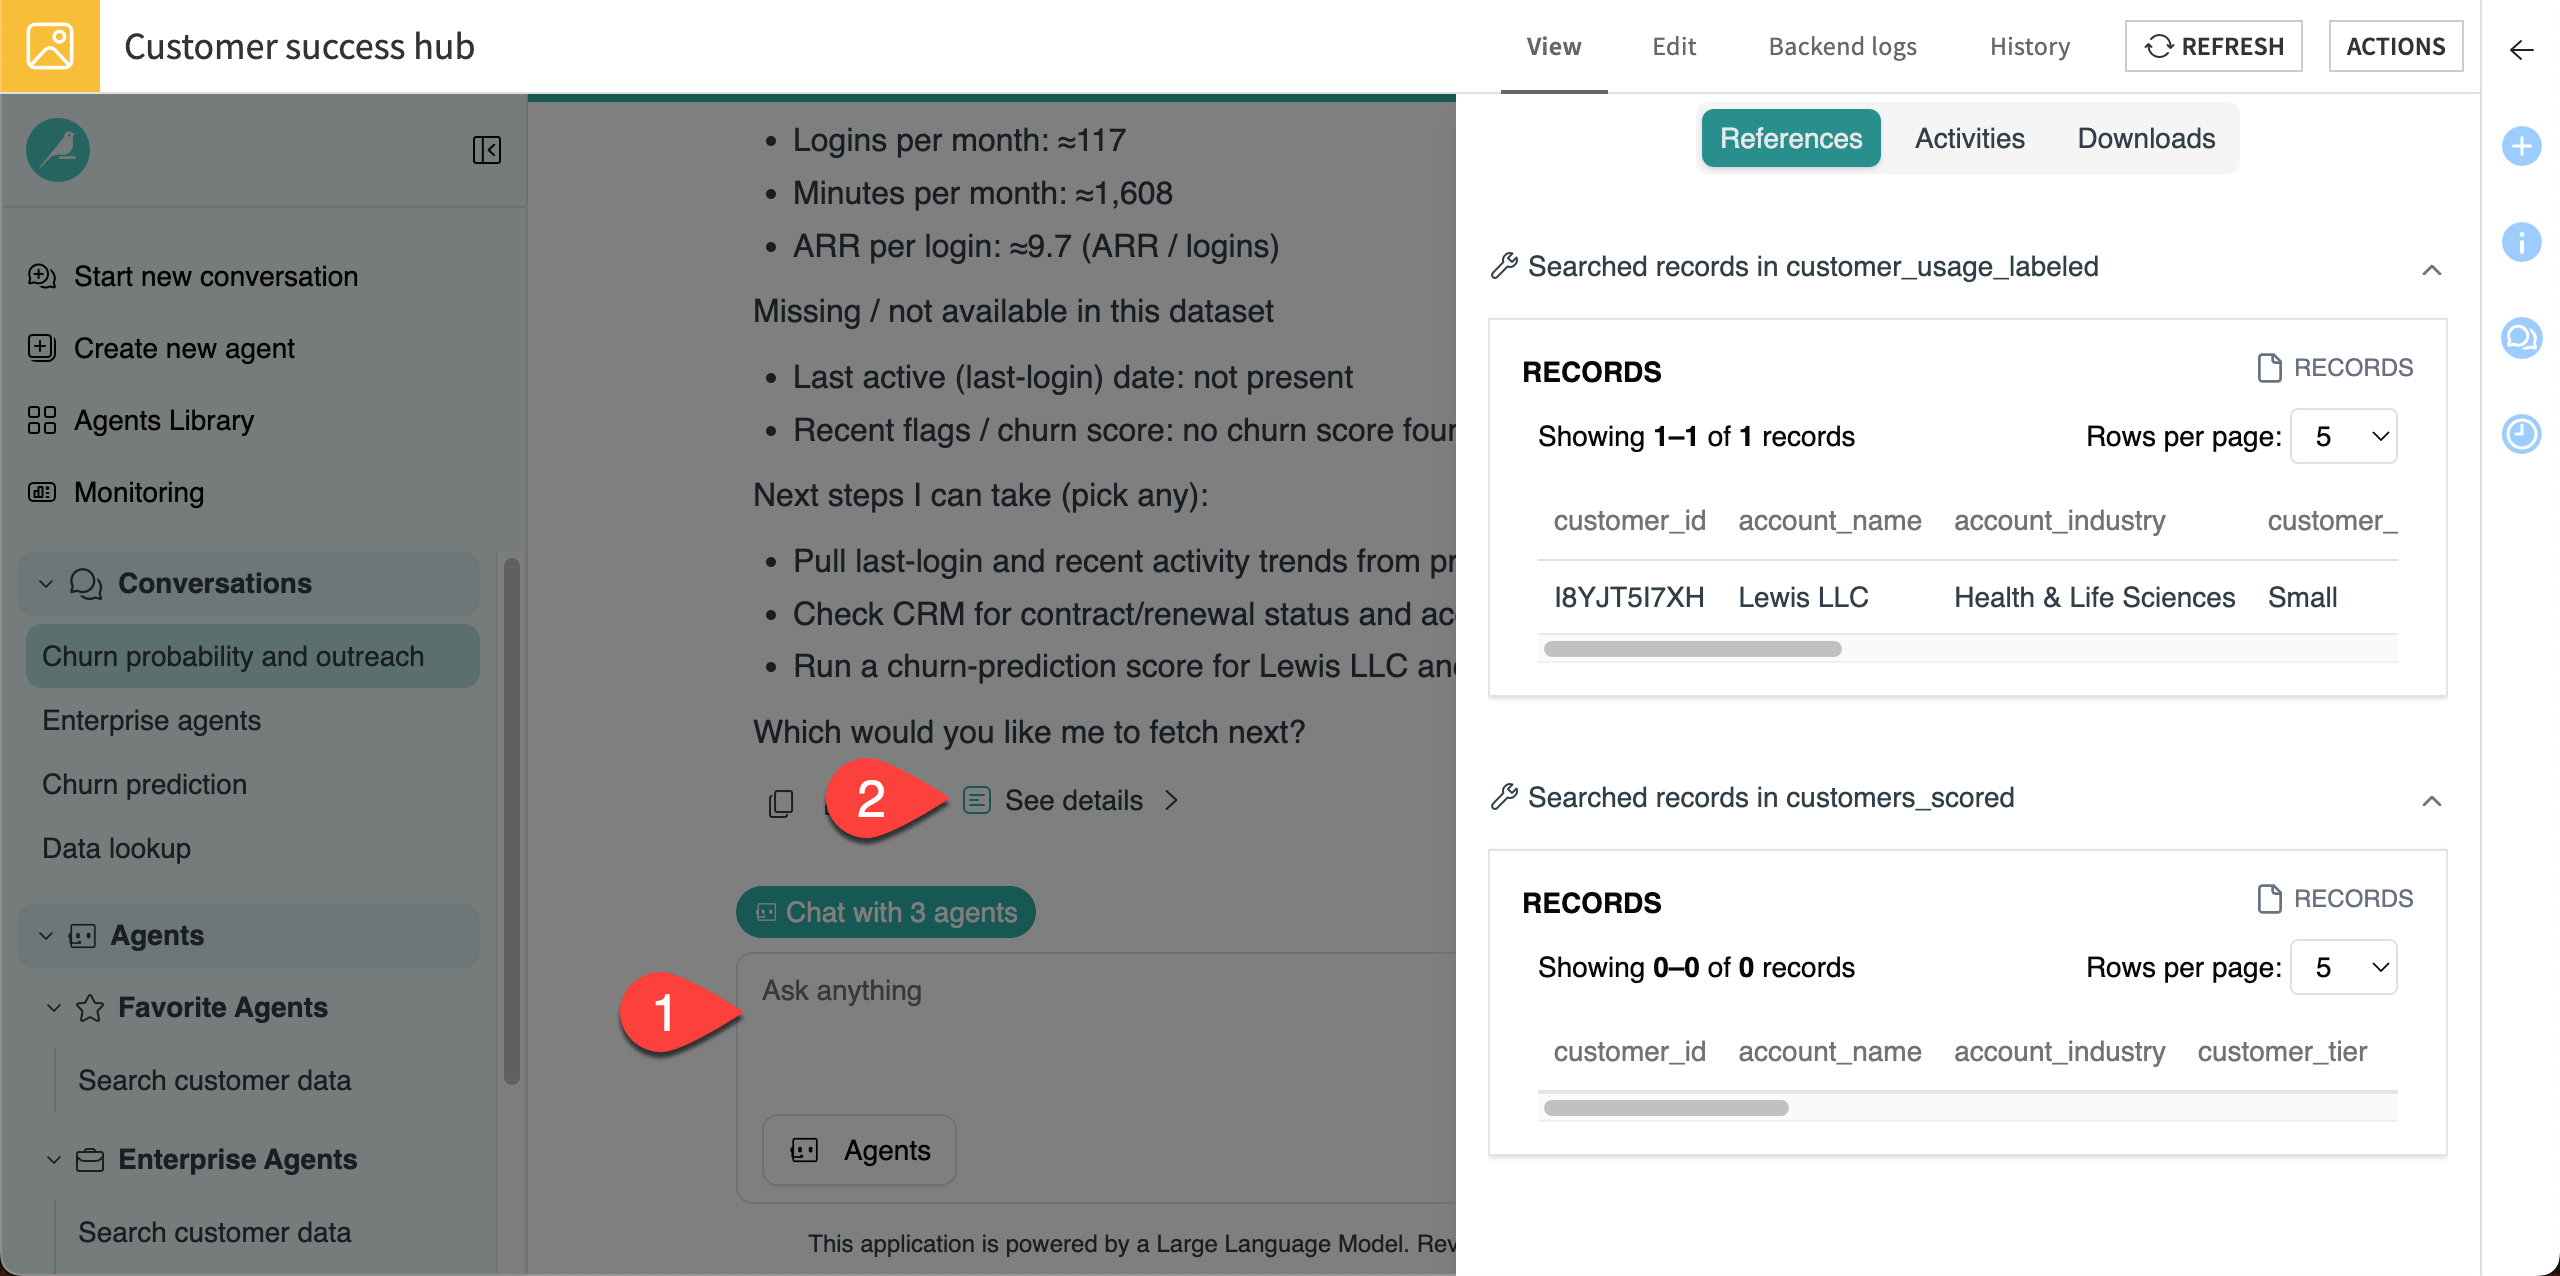
This time, because the customer exists in a dataset searched by the Search customer data agent, Agent Hub provides references to the dataset.
Next steps#
Congratulations on building your first Agent Hub and using multiple agents in a single workflow.
You can continue to chat with the agents in this Agent Hub or start building your own!