
Tutorial | Manage document-level permissions for RAG#
Get started#
When you use RAG enterprise-wide, you might need to provide access to specific documents for certain groups of people and restrict it for others. In that case, if a user tries to run a query without the required permissions, the LLM will ignore restricted data and return a general response instead.
When using a SharePoint folder as the data source, Dataiku makes this possible with the List Access recipe, which retrieves permissions from Azure user groups and assigns the appropriate access rights to users in Dataiku.
In this tutorial, you’ll see exactly how to prepare and set up the recipe to enable secure RAG access.
Objectives#
In this tutorial, you will:
Create a List Access recipe from your SharePoint folder.
Populate a knowledge bank with embedded access.
Leverage a RA model or an agent with a search tool in a chatbot interface.
Prerequisites#
To complete this tutorial, you’ll need:
Dataiku 14.2 or later.
An Advanced Analytics Designer or Full Designer user profile.
A compatible code environment for RAG.
A connection to a supported embedding model for text embedding in the Embed documents recipe.
A connection to a supported Generative AI model, which is the model that will be augmented. See LLM connections for details.
The Agent Connect plugin.
A SharePoint access.
Dataiku groups mapped to Azure AD groups and readable by everyone.
Important
The Dataiku group must be of an Azure AD type.
Create the project#
From the Dataiku Design homepage, click + New Project.
Select Learning projects.
Search for and select Manage Document-Level Permissions for RAG.
If needed, change the folder into which the project will be installed, and click Create.
From the project homepage, click Go to Flow (or type
g+f).
Note
You can also download the starter project from this website and import it as a ZIP file.
Create the list of permissions#
With an empty Flow, the first step is to create a folder with the files from your SharePoint folder.
Create the folder#
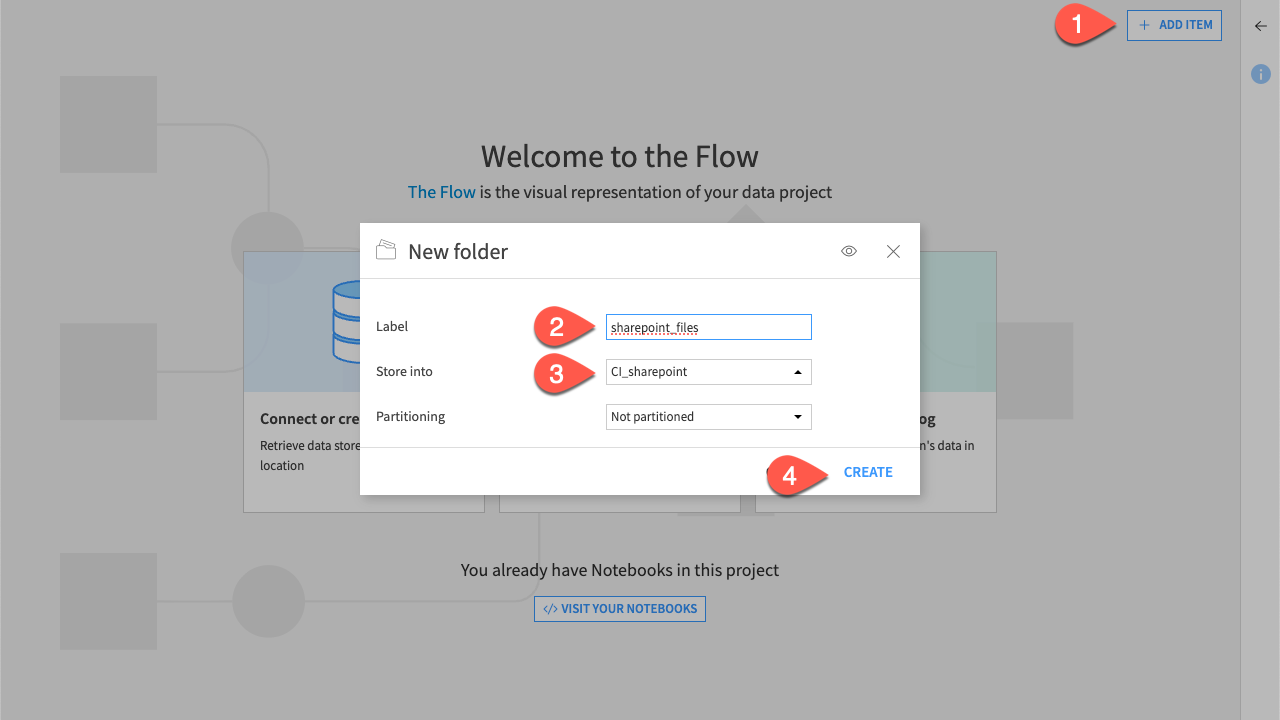
From the Flow, click + Add Item > Connect or create > Folder.
Name it
sharepoint_files.Select a SharePoint Online connection as the Store into.
Click Create.
Navigate to the Settings tab.
Input the different settings of your SharePoint folder containing your files.
Click Save.
List access#
The List access recipe allows you to list the files inside a folder and the respective groups that have the access. More precisely, it lists the Entra groups from SharePoint and maps them to the Dataiku user groups. This enables you to add a layer of document-level security with security tokens.
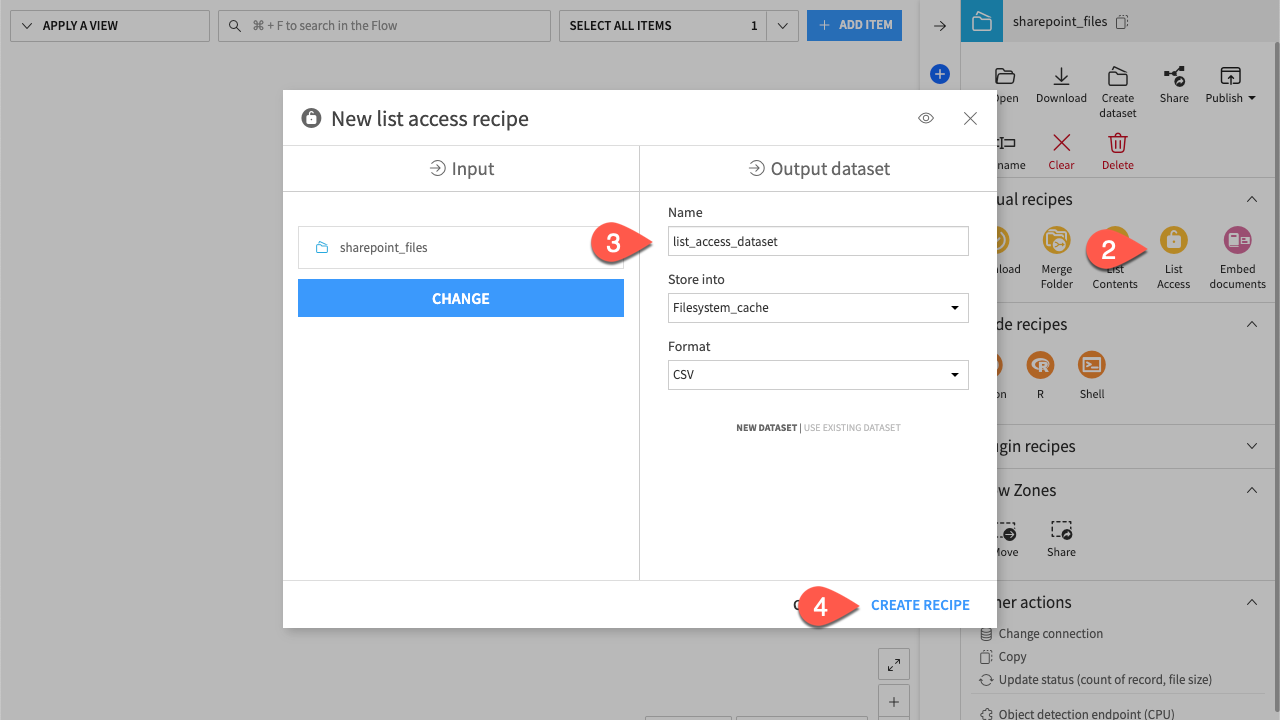
Select the created sharepoint_files folder.
In the Actions (
 ) panel, under Visual Recipe, click List Access.
Name the output dataset
list_access_dataset.Click Create Recipe.
Click Run.
Alternatively, if your instance doesn’t have a mapping with Azure AD groups, you can still provide a manual mapping dataset as an input. You need a dataset with two columns: DSS groups (string) and Entra groups (JSON array). For example:
DSS groups |
Entra groups |
|---|---|
Dss_group_1 |
[“Entra_group-1”, “Other_entra_group”] |
Dss_group_2 |
[“Entra_group-2”] |
The List Access recipe retrieves which group has access to which file based on the manual mapping that you have provided.
Embed your documents with security permissions#
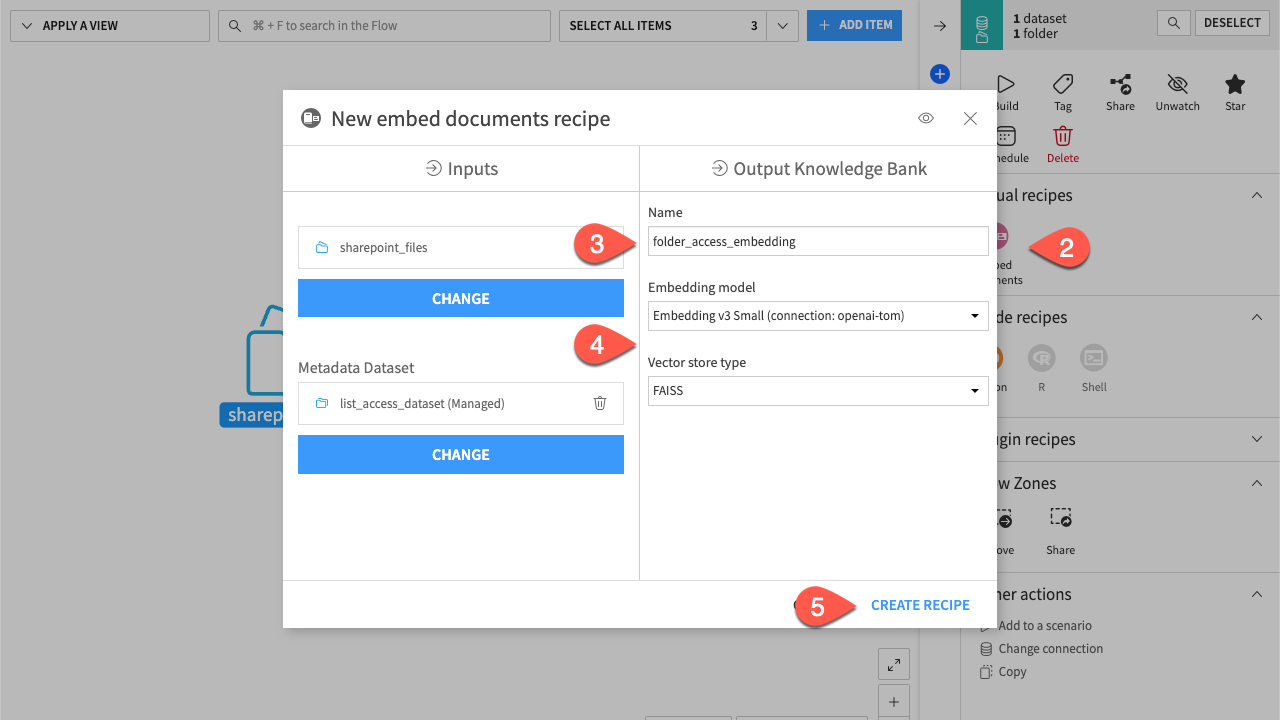
Select both the list_access_dataset and sharepoint_files folder.
In the Actions (
) panel, click Embed documents.Enter
folder_access_embeddingas the output name.Select the model and the vector store of your choice.
Click Create Recipe.
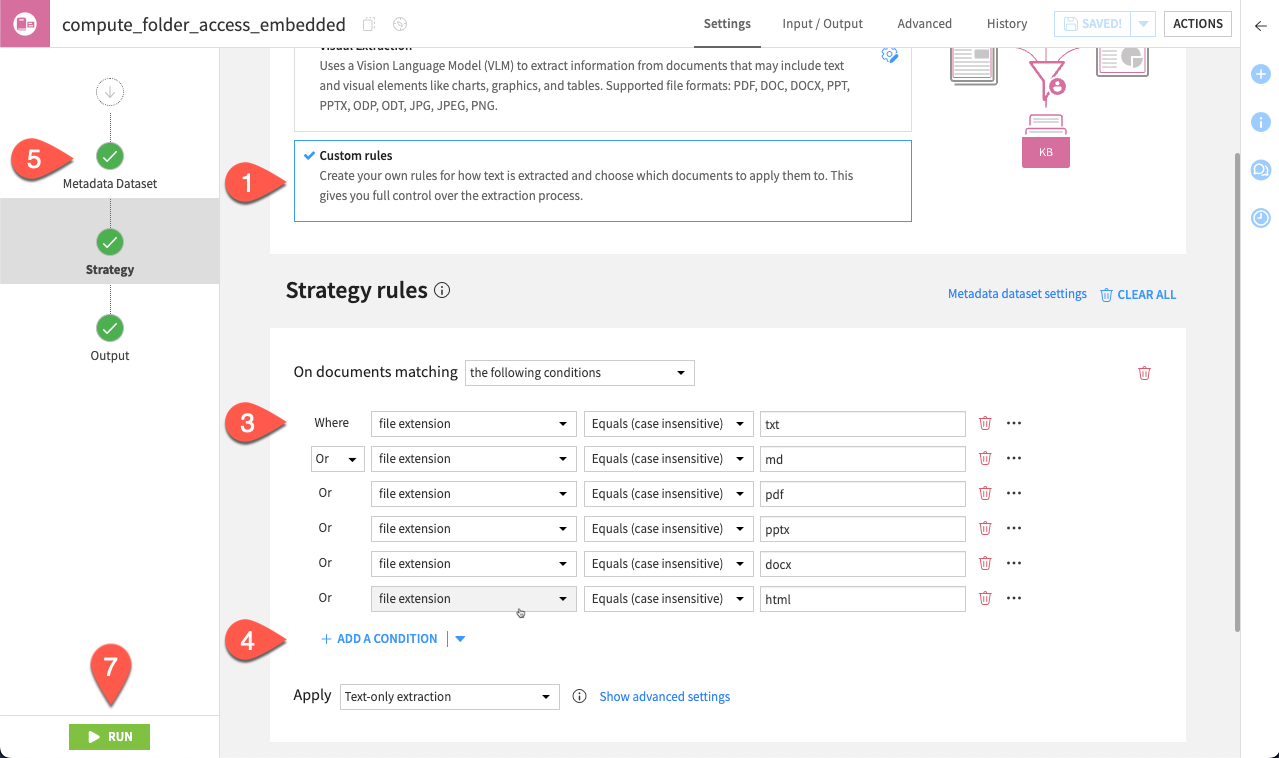
Here, the goal is to embed the documents while integrating permissions as metadata. You can choose from pre-built extraction options, such as text or visual, which support specific file types. However, in this case, you’ll want something custom to cover everything.
Select Custom Rules.
Click Add New Rule.
Leave the file extension and Equals (case sensitive) and enter
txtas the wanted file extension.Click + Add A Condition and add the following file extensions to be retained:
md
pdf
pptx
docx
html
Navigate to Metadata Dataset.
Select your Security tokens column among the columns.
Click Run.
Note
If you start from a dataset containing document chunks and security tokens rather than a folder, use the Embed dataset recipe. The security token option is available under the recipe’s Advanced settings.
You now have created your knowledge bank populated with your security tokens. The next step is to provide a way to retrieve them.
Retrieve your security tokens#
In Dataiku, there are two possibilities to retrieve stored security tokens and utilize them into a webapp or an application:
RA model
Agent
Use agents if your goal is to build a more comprehensive system that integrates multiple tools. For simple retrieval-augmented generation (RAG) tasks, the RA model is more suitable.
For your chosen solution:
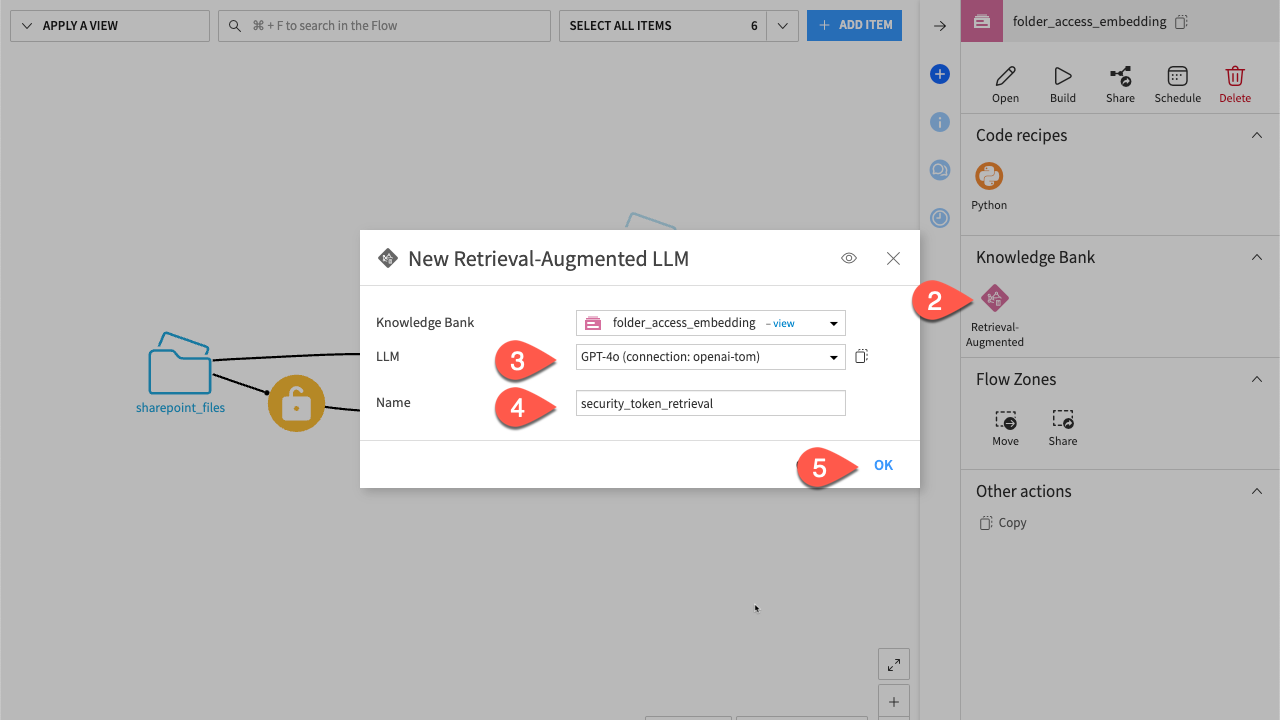
From the Flow, click on the knowledge-bank folder_access_embedding.
In the Actions (
) panel, under Knowledge Bank, click Retrieval Augmented.Select your LLM (GPT-4o in the example).
Name it
security_token_retrieval.Click OK to confirm.
The RA model is created and linked to your knowledge bank. You must set it up with the proper LLM and security settings.
From the RAG menu, select the LLM of your choice.
Check Enforce document-level security.
Enable Smart mode. The RA model will search in the KB only if it’s needed, allowing more fluidity for the chatbot.
Click Save.
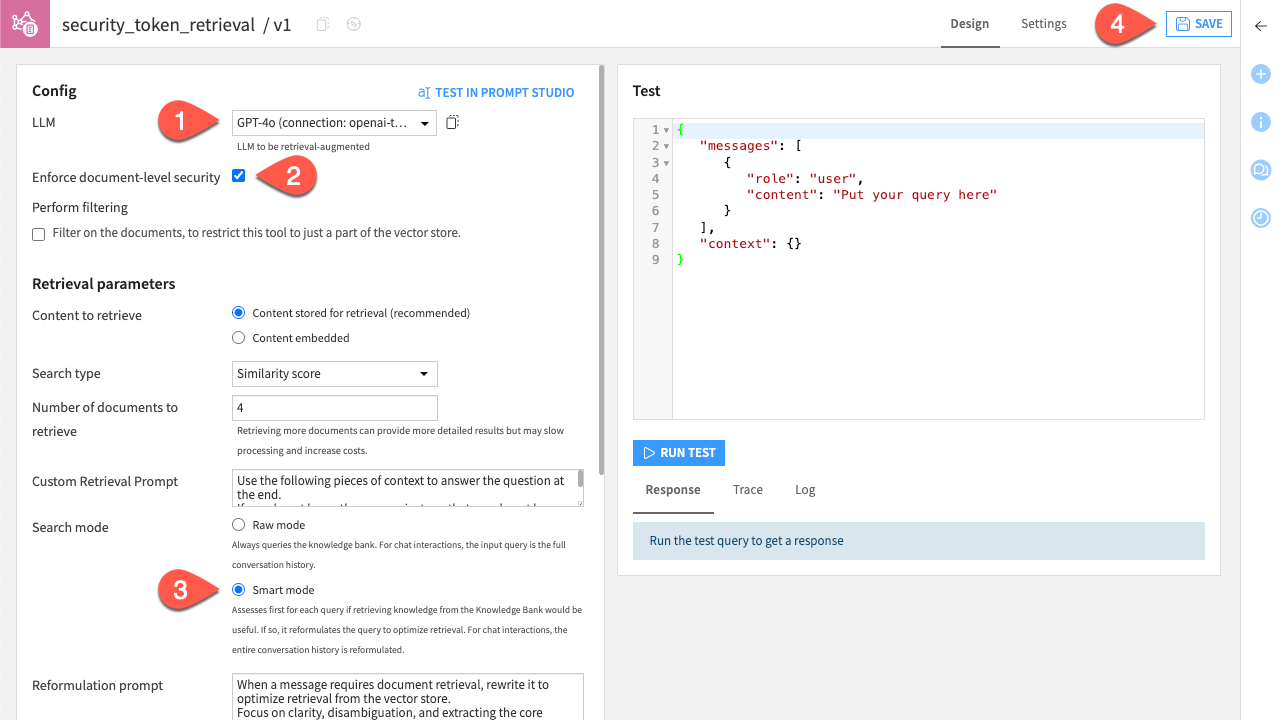
You can explore the other proposed settings for your RA model so it fits your needs.
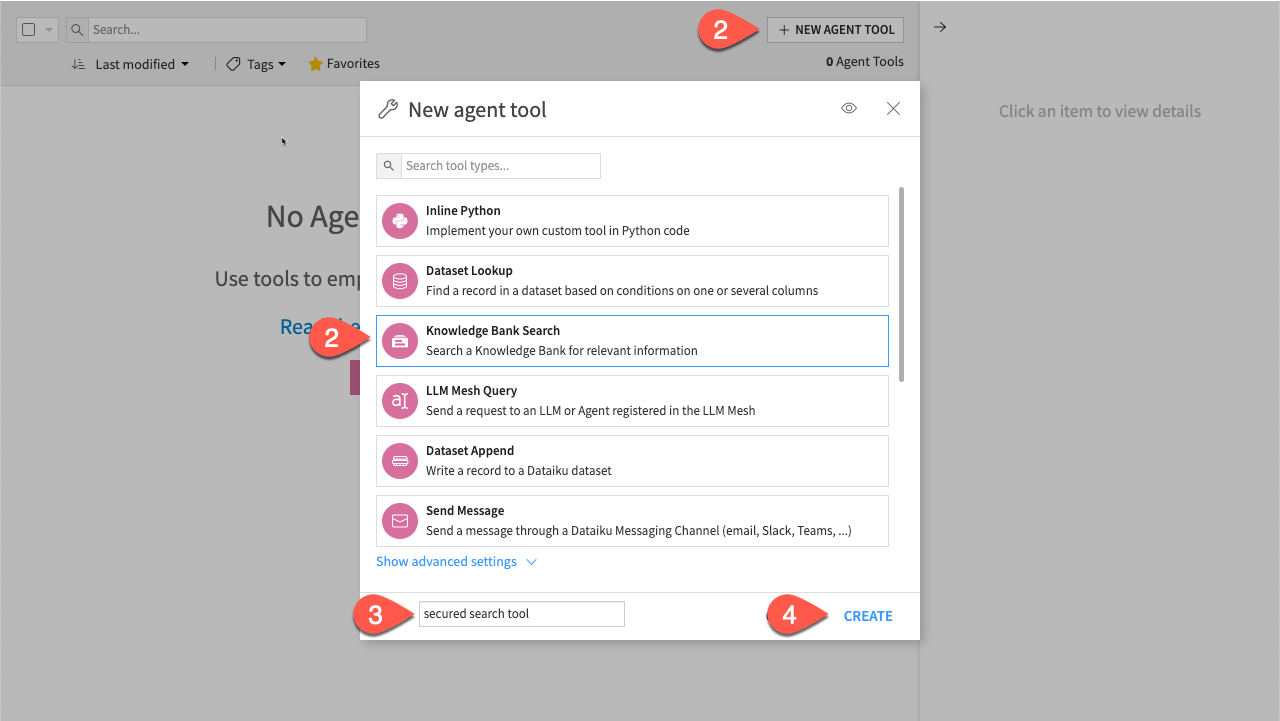
From the Gen AI (
 ) menu in the top navigation bar, select Agent Tools.
Click + New Agent Tool and select Knowledge Bank Search.
Enter
secured search toolas the Name.Click Create to confirm.
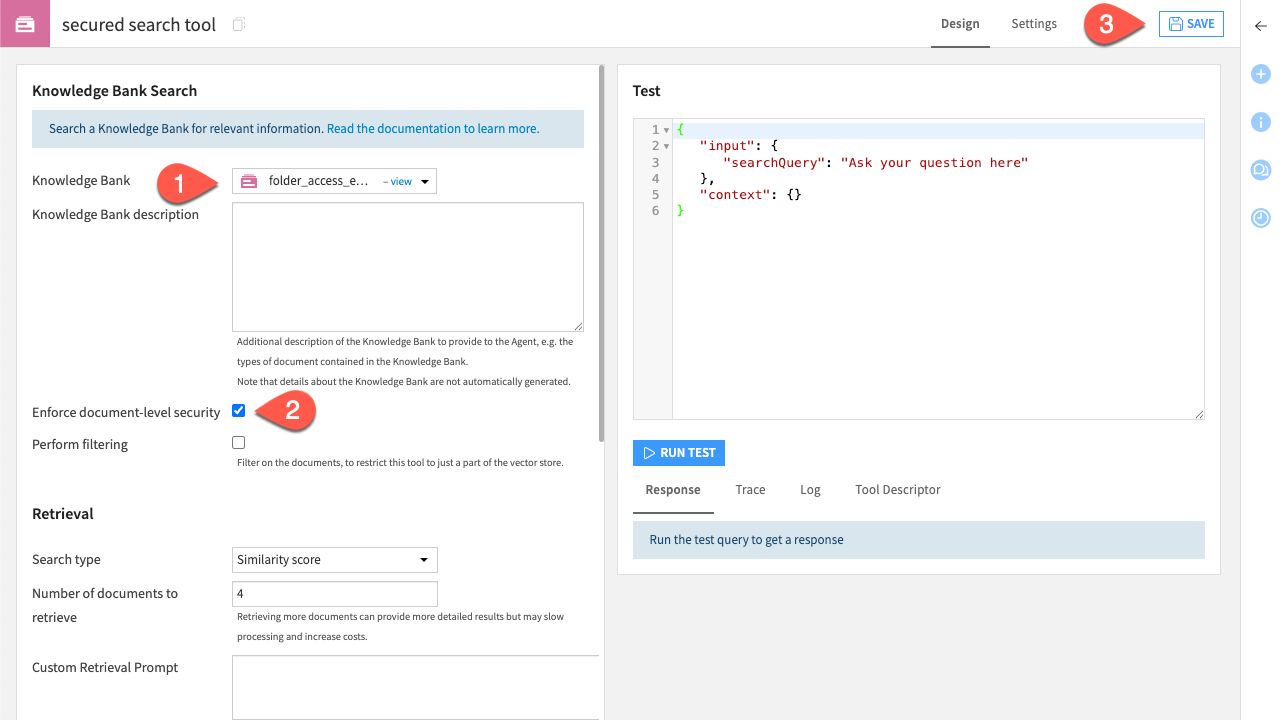
Next, configure your agent by linking it to the knowledge bank and enabling the security setting.
From the Agent menu, select the folder_access_embedding knowledge bank.
Check Enforce document-level security.
Click Save.
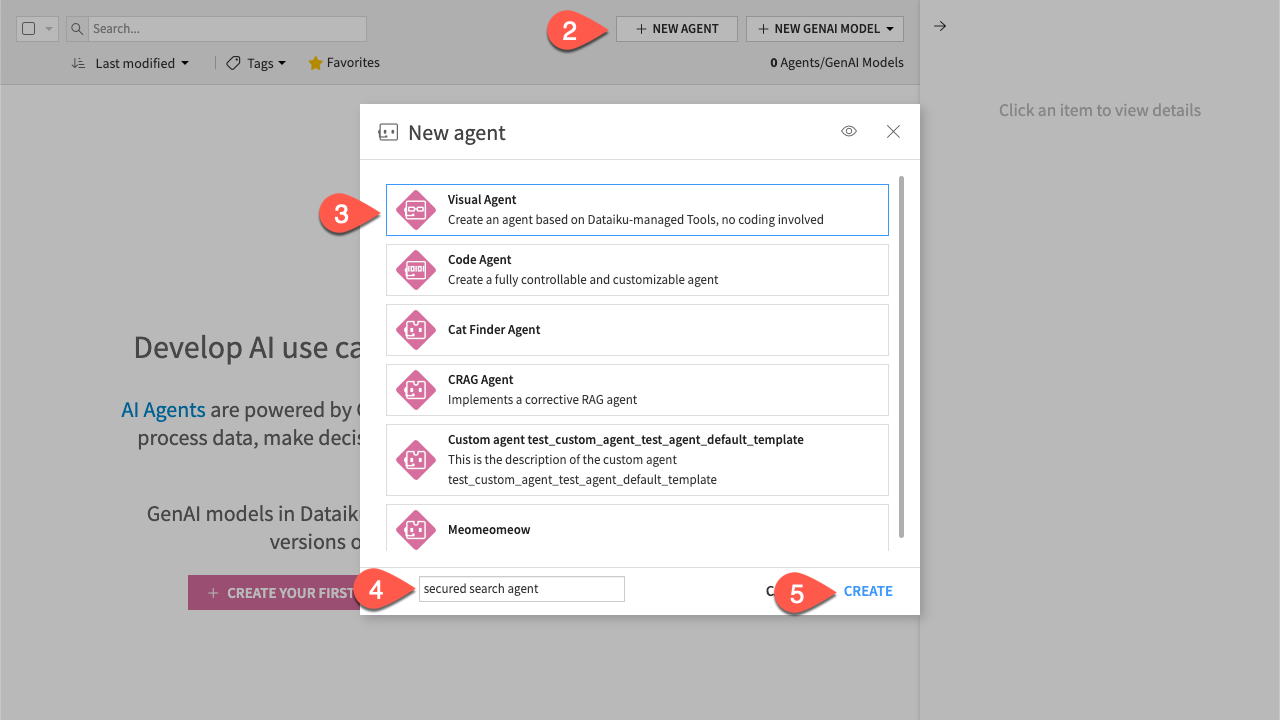
Now you can create an agent that will use the tool.
From the Gen AI (
) menu in the top navigation bar, select Agents & GenAI Models.Click + New Agent.
Select Visual Agent.
Enter
secured search agentas the Name.Click Create to confirm.
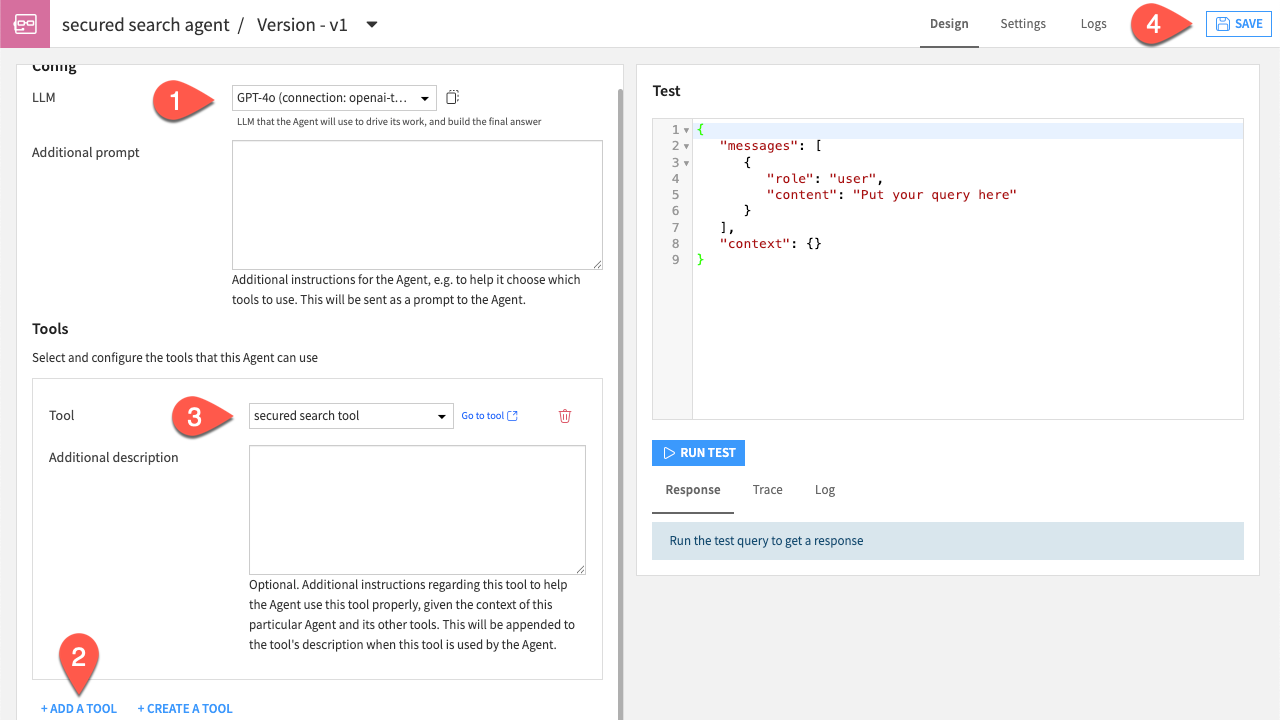
Next, link the tool you created to this new agent.
From the agent menu, select the LLM.
Click + Add A Tool.
In Tool, select the secured search tool.
Click Save.
Use your secured knowledge bank with a webapp#
Now that your pipeline is set up, you can securely use a webapp with a chatbot to interact with the data, provided you belong to the group of users who have the correct permissions. If you don’t, the chatbot will still respond, but the answer won’t include the restricted information.
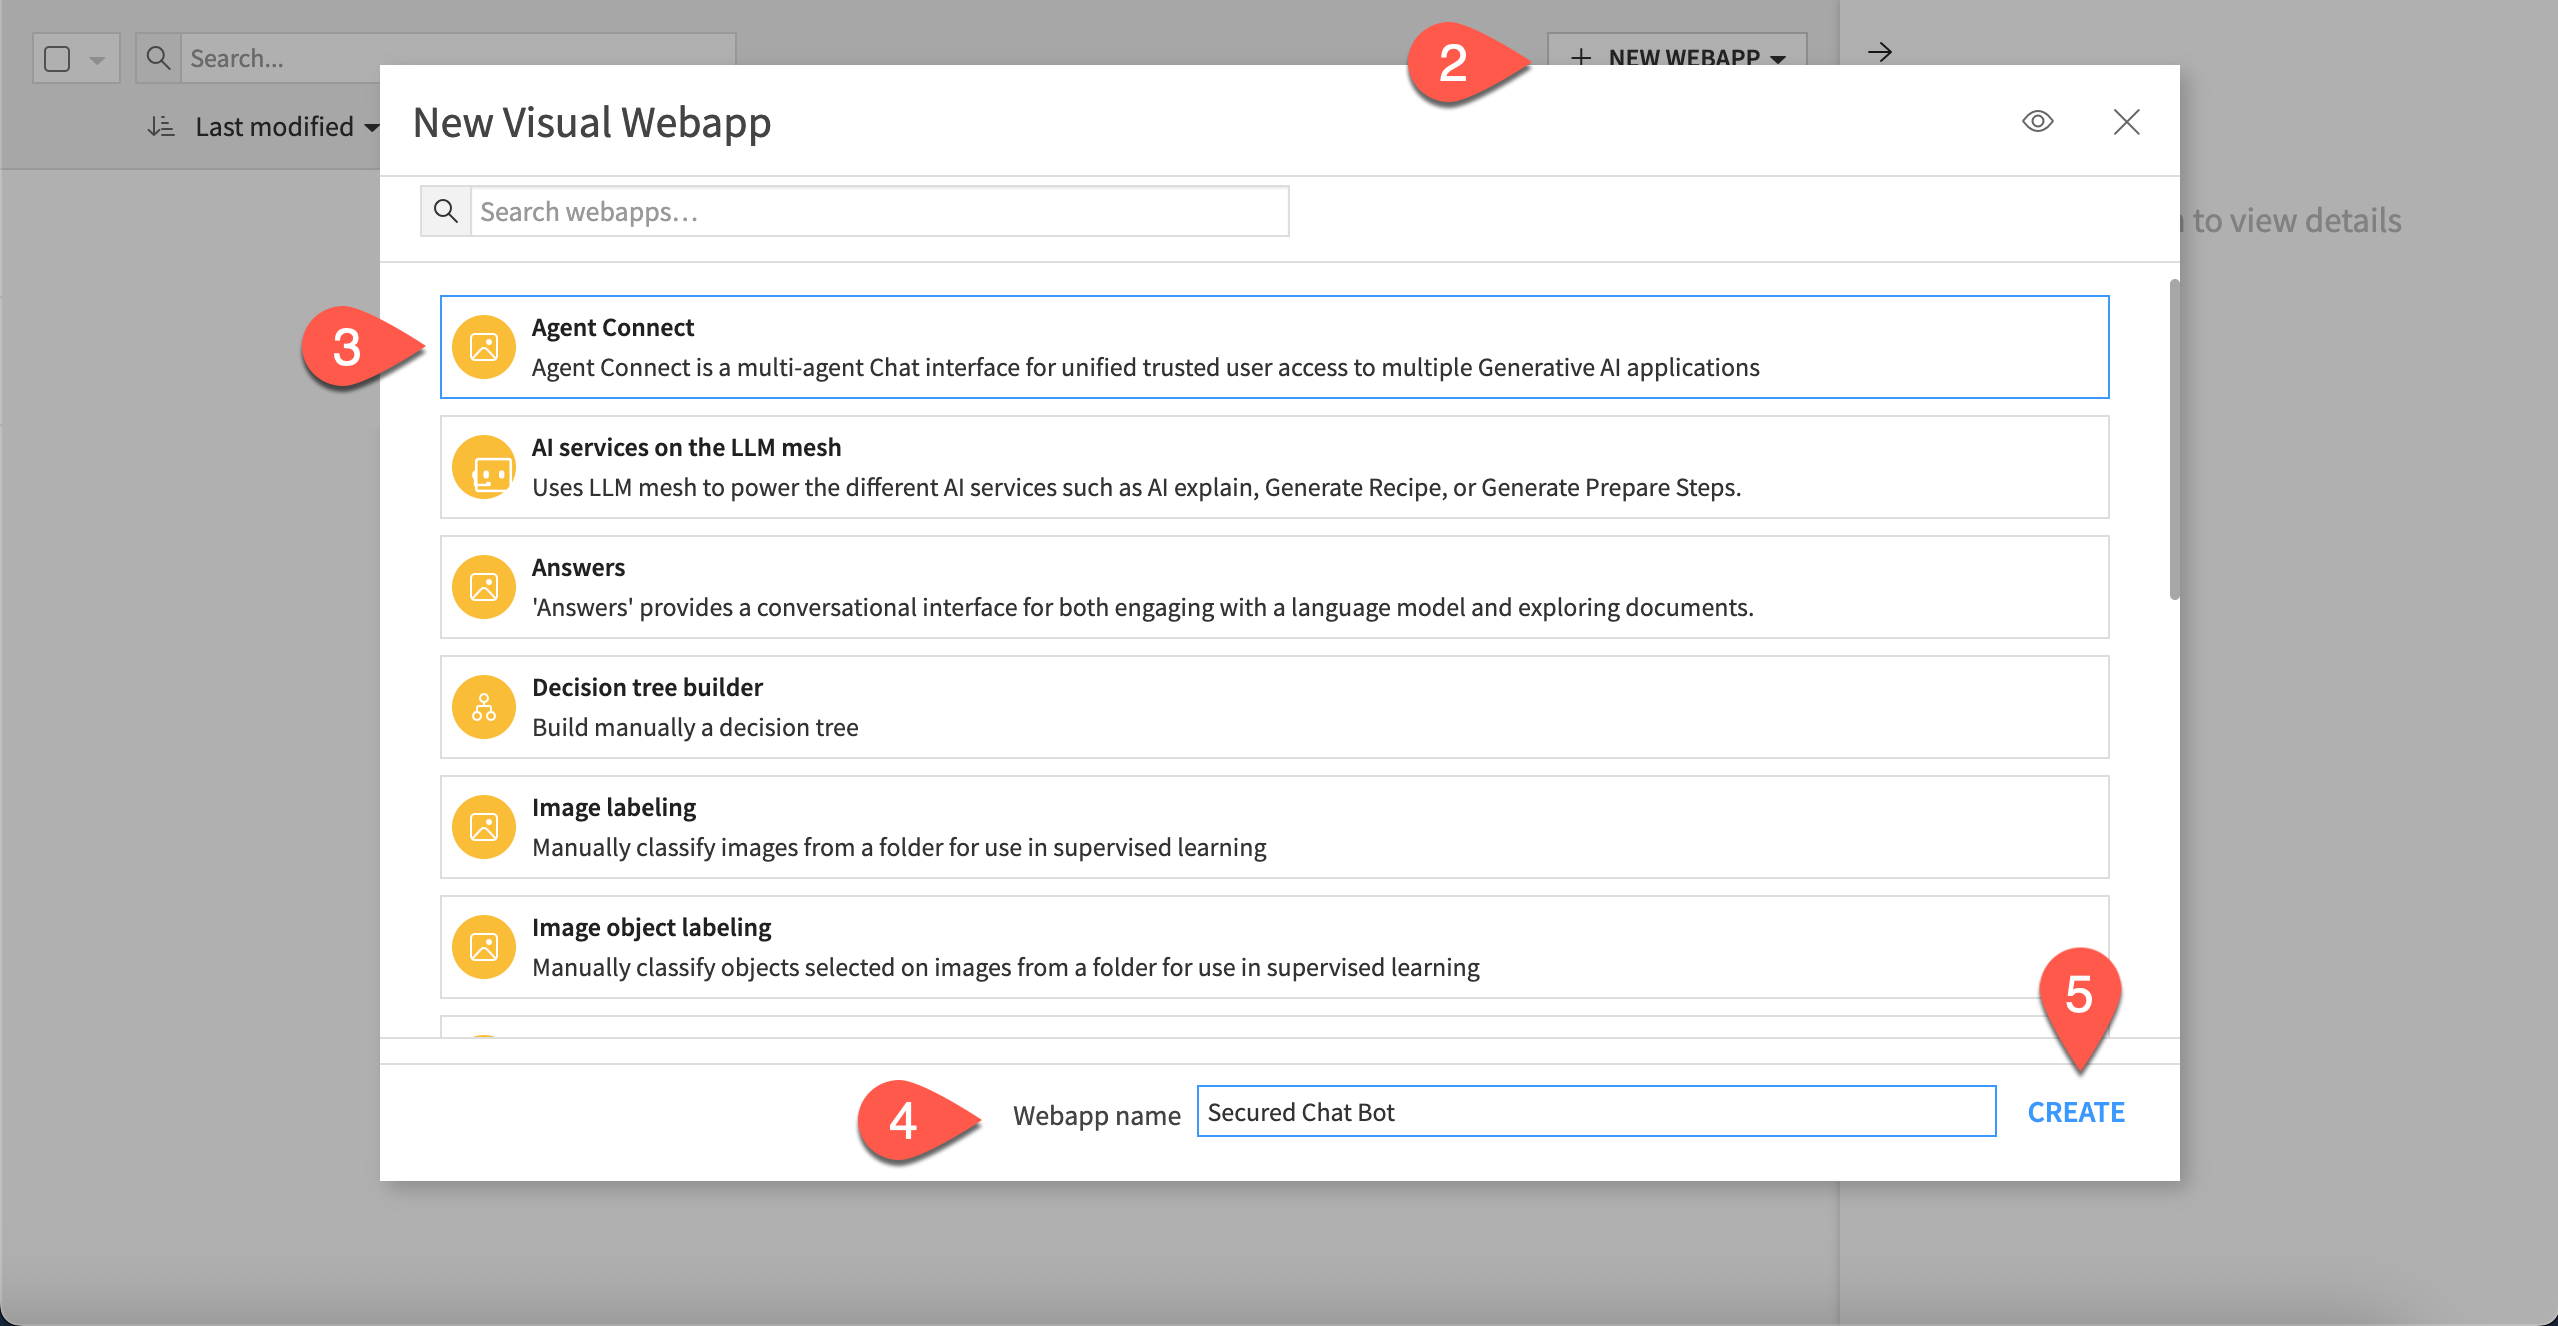
You can do this using Agent Connect, a webapp that makes it easy to chat with and manage all your agents in one place.
Create the webapp#
From the Code (
 ) menu in the top navigation bar, select Webapp.
Click + New Webapp and select Visual Webapp.
Select the Agent Connect one.
Enter
Secured Chat Botas the Webapp name.Click Create.
Configure Agent Connect#
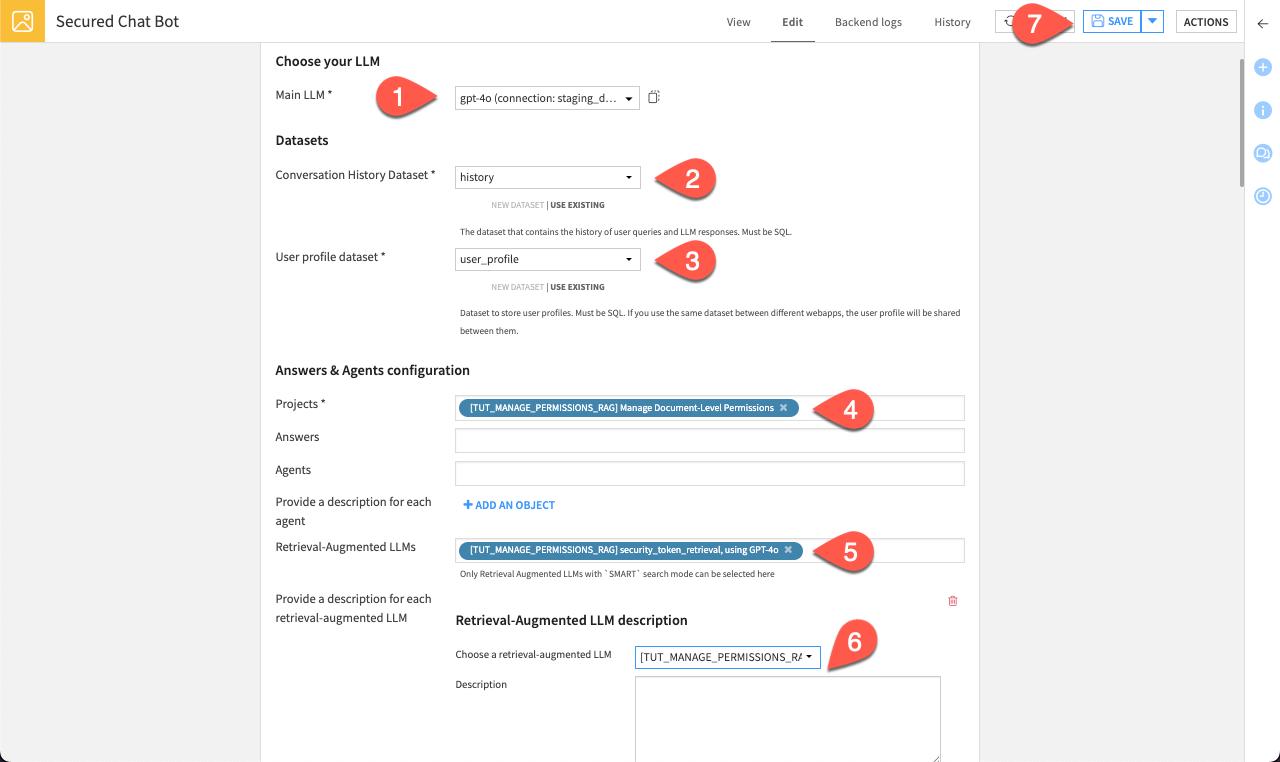
Next, configure the webapp by specifying settings such as the LLM and the chat history storage location.
In Main LLM, select the LLM of your choice.
As Conversation History Dataset, select New Dataset. Name it
historyand click Create Dataset.Important
Both the history and user profile must be stored in an SQL-compatible database.
Do the same for the User profile dataset and name it
user_profile.In Projects, add your project.
In Retrieval-Augmented LLMs, add the
security_token_retrievalmodel you created.Note
RA models must be in smart mode to be used in Agent Connect.
Click + Add an object for the RAG descriptions. Select your
security_token_retrievalmodel and provide the appropriate description.Click Save and navigate to the View tab.
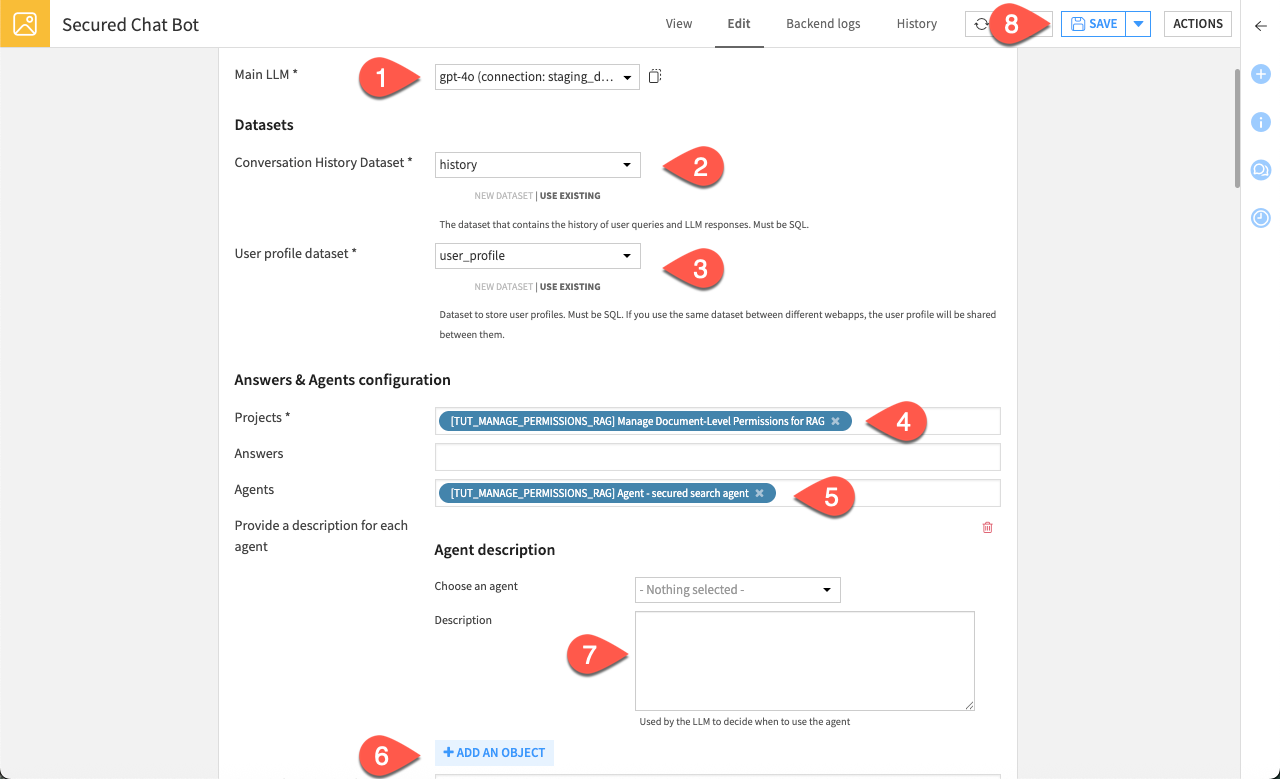
In Main LLM, select the LLM of your choice.
As Conversation History Dataset, select New Dataset. Name it
historyand click Create Dataset.Important
Both the history and user profile must be stored in an SQL-compatible database.
Repeat the same for the User profile dataset and name it
user_profile.In Projects, add your project in which agents you want to use are stored.
In Agents, add your agent
secured search agent.Click + Add an object to provide a description to the agent.
Select your agent and enter a description about its purpose.
Note
In Agent Connect, when you work with multiple agents, descriptions help the system choose the most relevant one based on your request. Clear descriptions improve agent selection. Descriptions are important to properly use Agent Connect.
Click Save and navigate to the View tab.
Agent Connect is now fully configured and connected to the agent responsible for securely retrieving restricted documents based on the SharePoint user group permissions.
Next steps#
You’ve now enabled document-level security on your RAG-powered chatbot. Explore more Generative AI topics in Dataiku, such as Tutorial | Build a RAG system and turn it into a conversational agent.