
Tutorial | Agent Review#
Get started#
In the process of developing an agent, it’s important to ensure that the agent’s design satisfies business requirements before it reaches real users.
Agent Review brings together AI builders and subject matter experts (SMEs) to validate the design of an agent through both automated LLM-powered and manual SME-led techniques. The end result should be confidence from the whole team, based on clear evidence, that the agent meets requirements and is ready for production.
Objectives#
In this tutorial, you will:
Design a suite of tests to validate an agent’s performance against business requirements.
Review the results of these tests using both automated LLM-powered and manual SME-led approaches.
Use the results of such tests to iterate on the design of an agent.
Prerequisites#
Dataiku 14.4 or later.
Advanced LLM Mesh license flag activated.
Full Designer user profile.
An LLM connection that supports embedding LLMs.
The internal RAG code environment. Importing the project below will fail without this.
Knowledge of Simple Visual Agents in Dataiku.
Create the project#
Download the starter project ZIP file for Dataiku 14.4 or later. Make sure the file doesn’t unzip during the download.
On a Dataiku Design node, import the ZIP file.
From the project homepage, click Go to Flow (or type
g+f).
Use case summary#
In the Flow of the starter project, you’ll find the first version of an agent. This agent has access to four different knowledge bank search tools. Each of these tools has the ability to search for documents in a specific knowledge bank organized by topic (AI, finance, technology, and general).
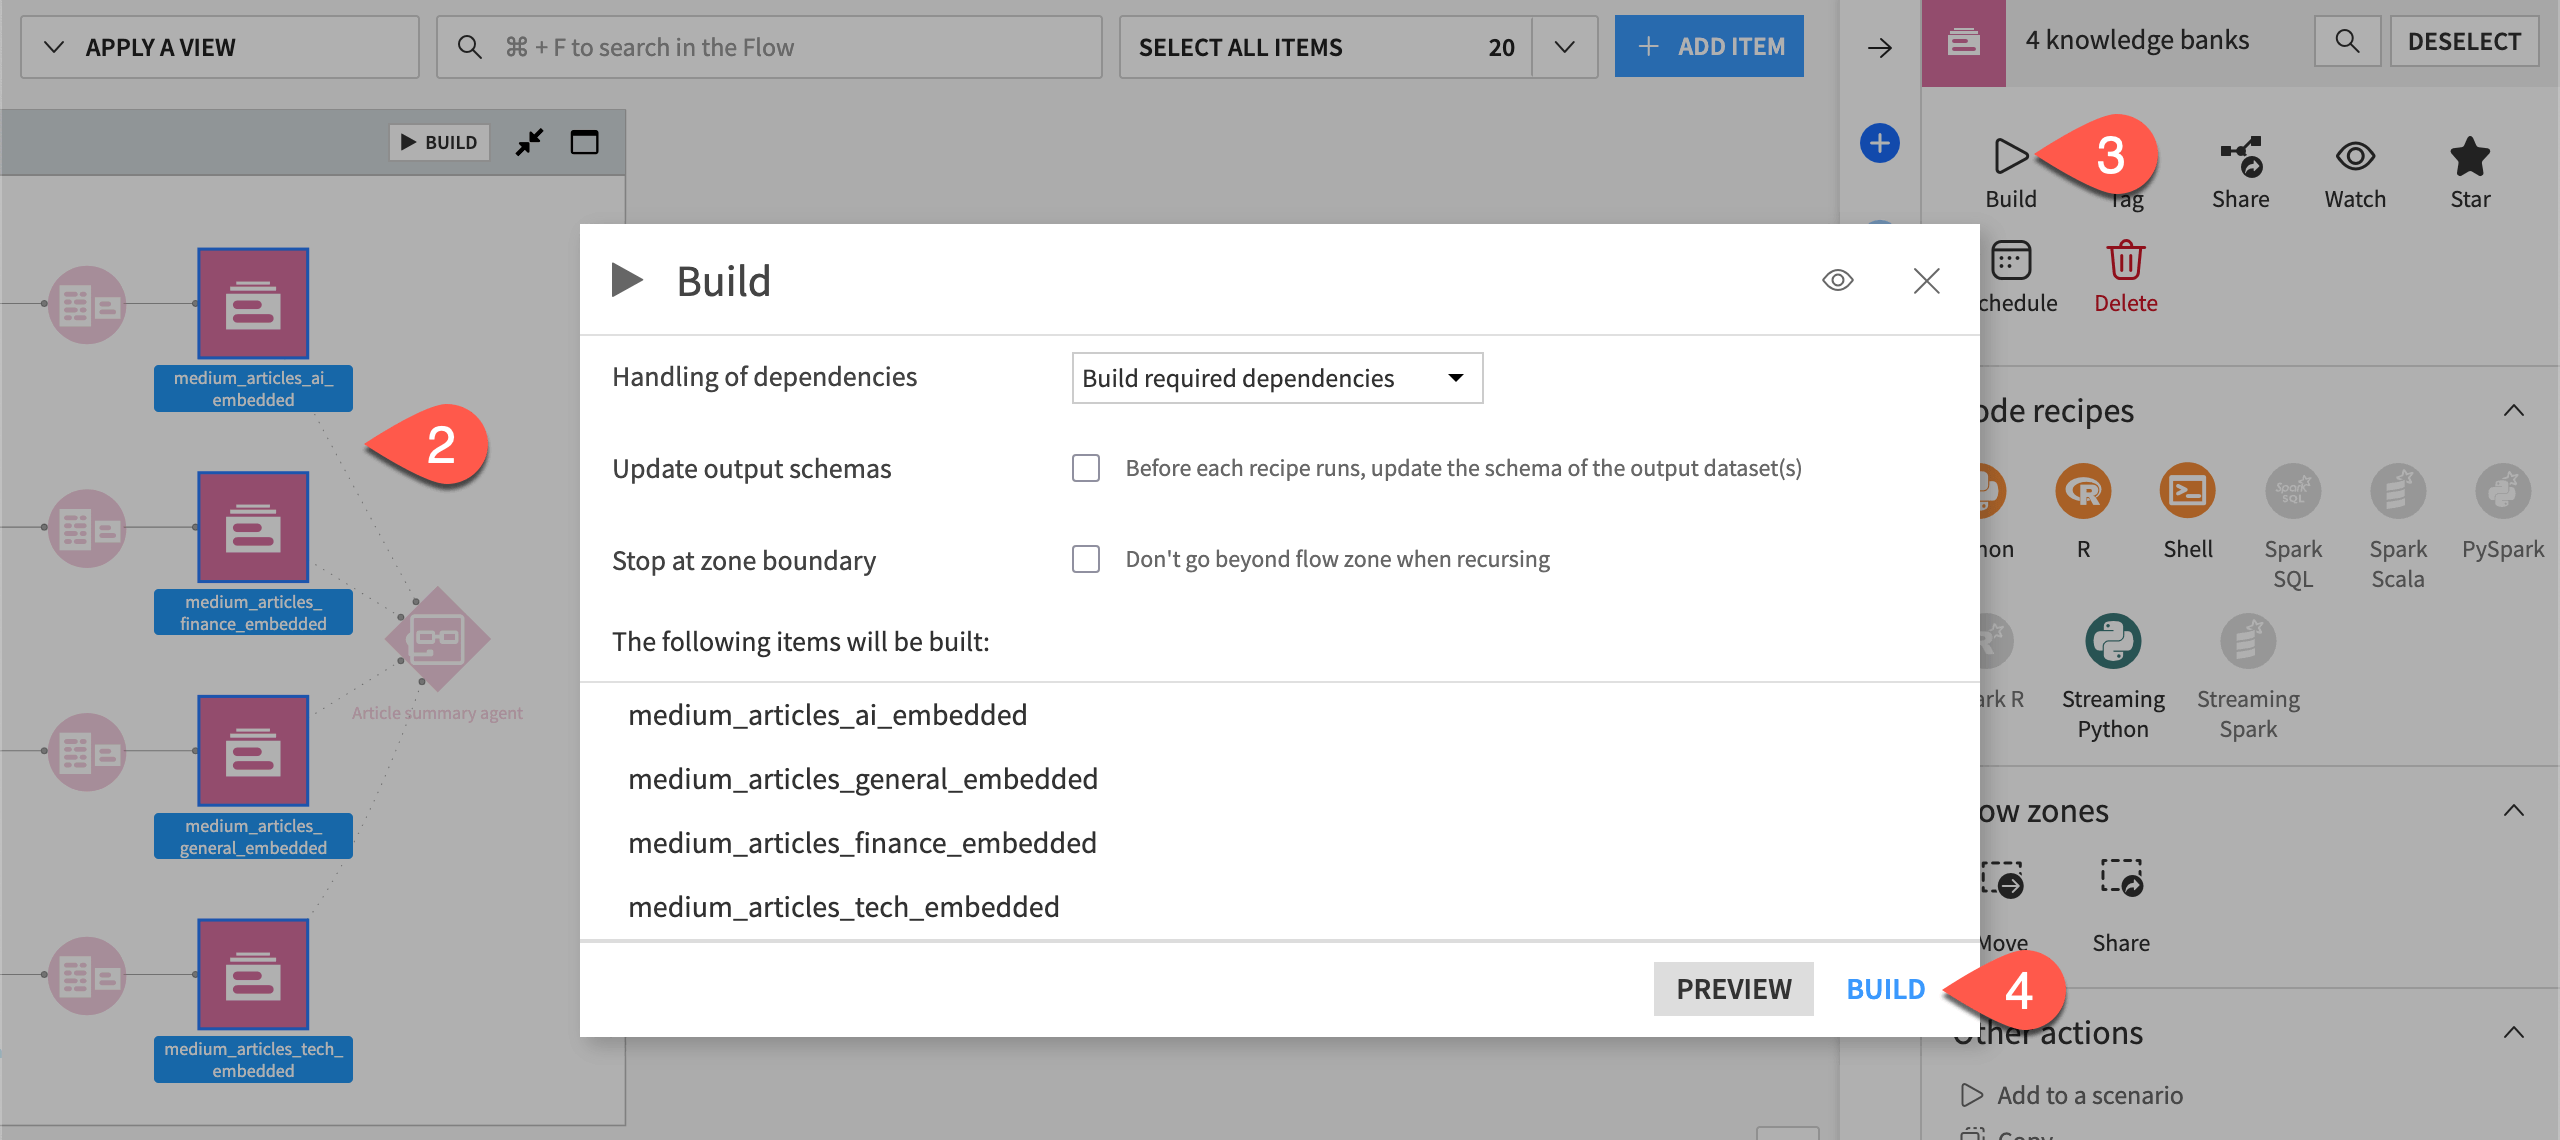
Before going further, you’ll need to build the Flow to populate the knowledge banks.
For each of the four knowledge banks in the Flow, go to the Settings tab, and select an Embedding model.
From the Flow, select the four knowledge banks.
In the Actions tab of the right panel, select Build.
Click Build to recursively build each knowledge bank from the upstream datasets of Medium articles.
The agent in the Flow has a clear task. After identifying the most relevant knowledge bank based on a user’s query, produce a summary of the most relevant articles and include a list of sources.
For this project, the AI builder has finished the initial agent design. However, is this agent ready for real users? Can you trust the agent for actual work? It’s impossible to know without further testing in a rigorous and structured manner.
Build a test suite#
This form of rigorous testing begins with designing a suite of tests, most often in collaboration with SMEs.
Get initial agent feedback#
During the design phase of the agent lifecycle, the AI builder can obtain immediate feedback for preliminary testing directly in the agent’s Design tab. For more structure, they can also use a Prompt Studio. Try the former option now:
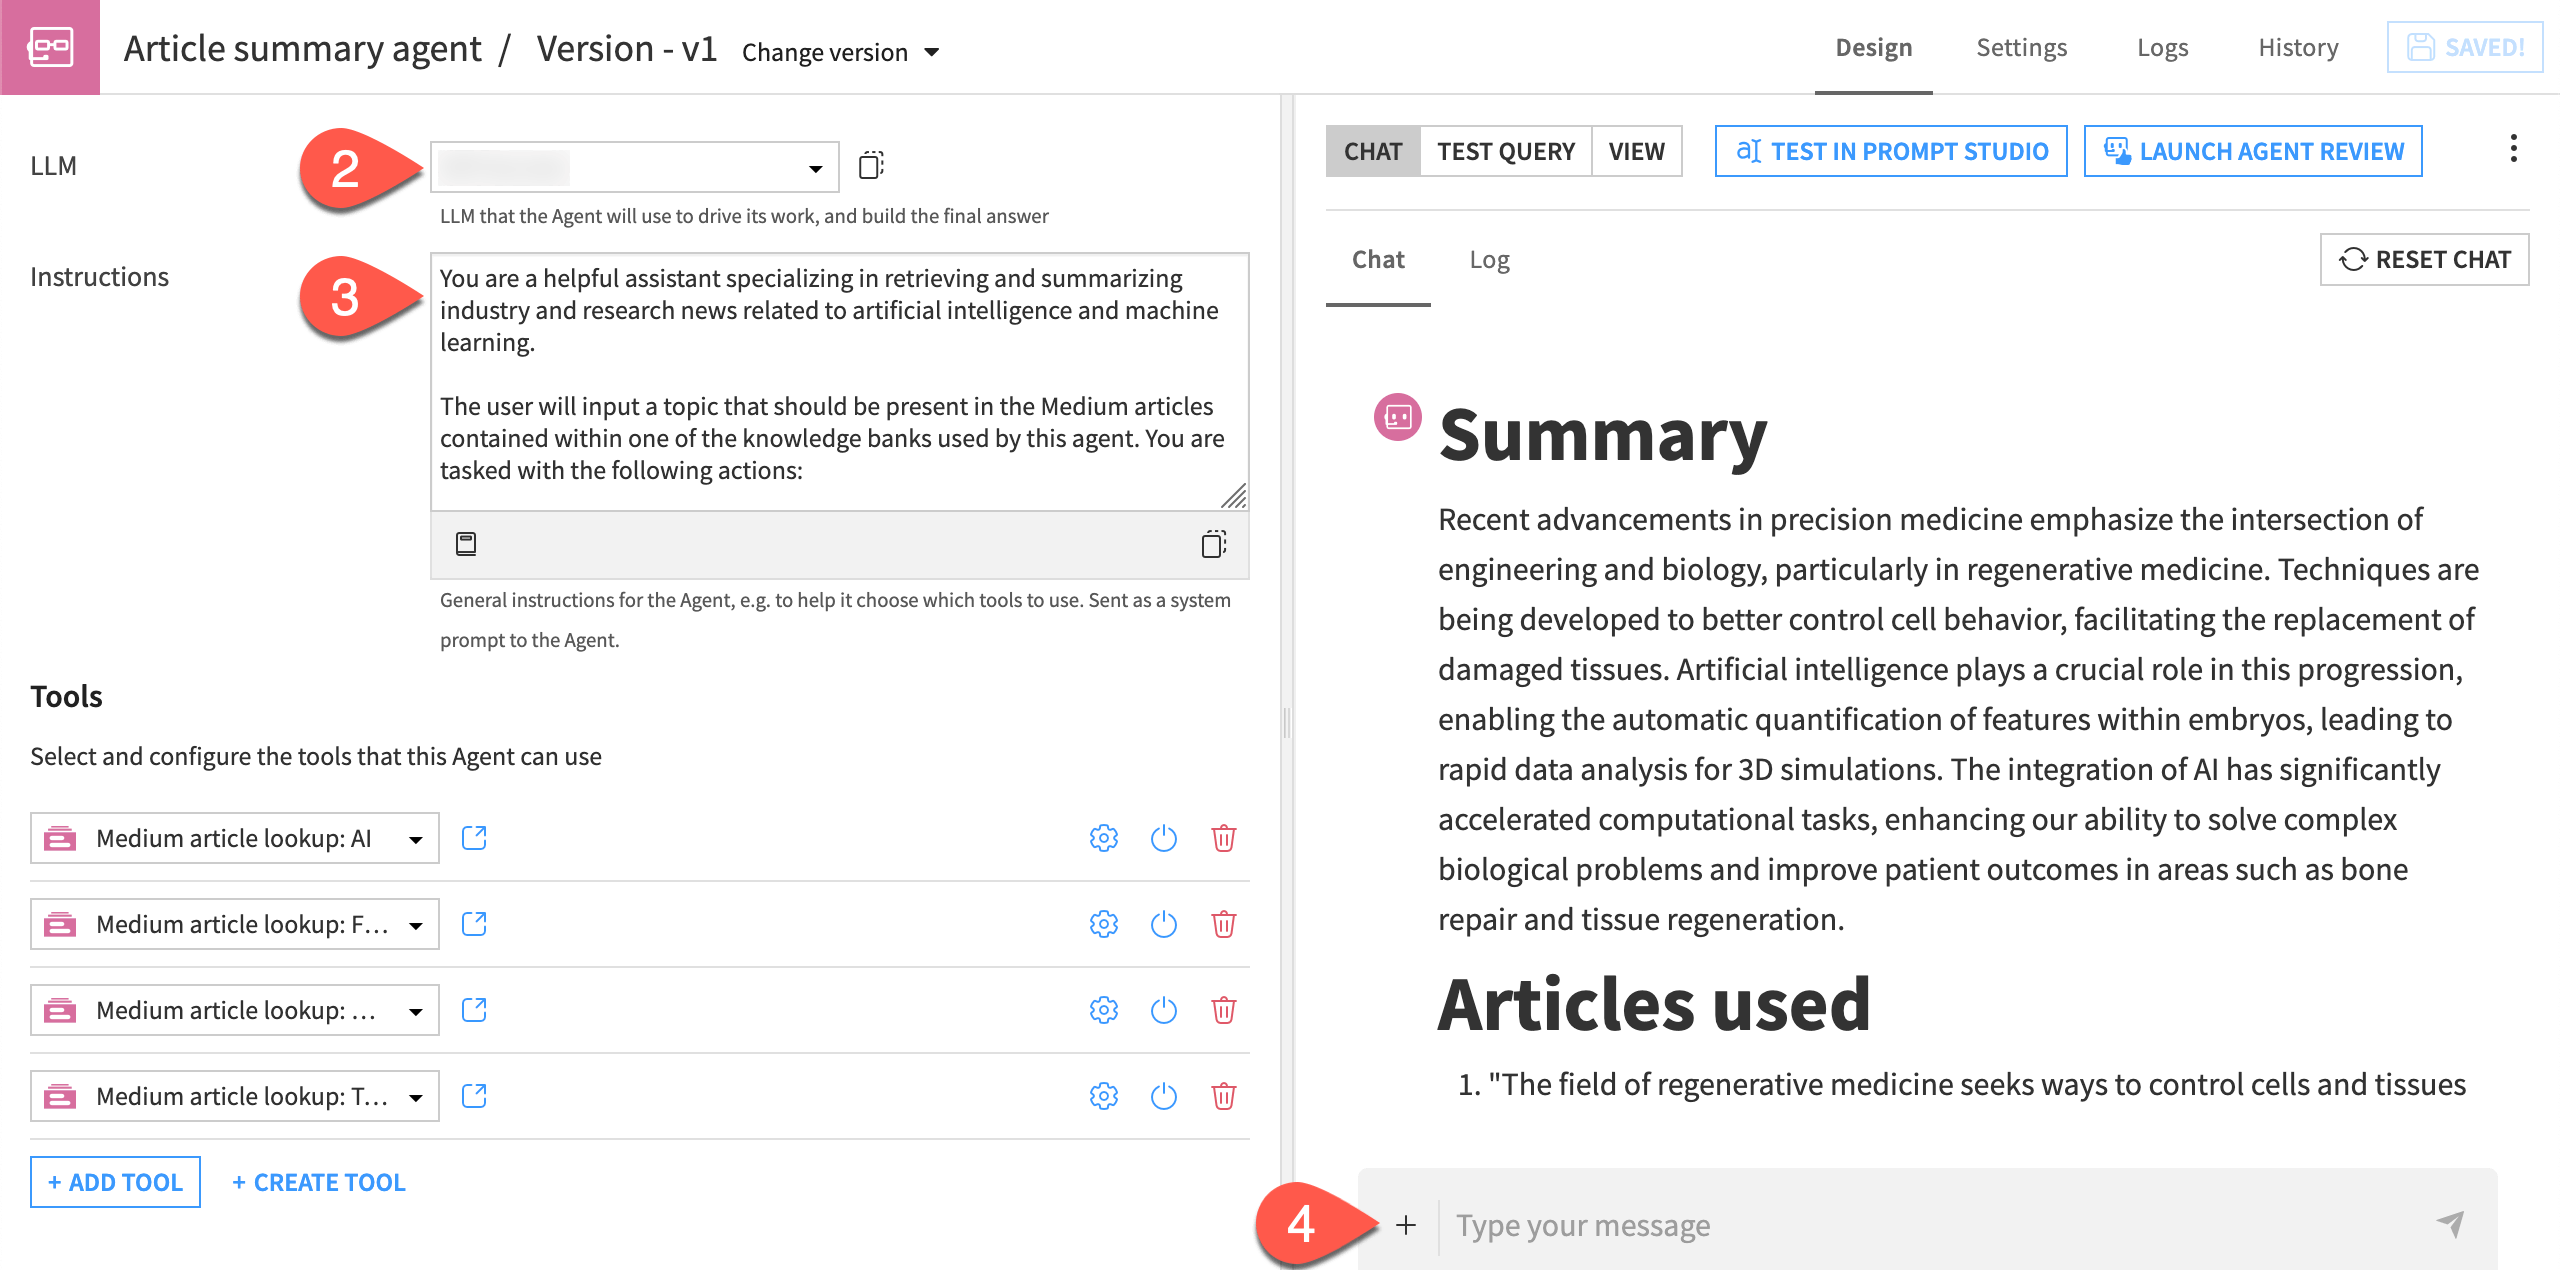
From the Flow, double-click to open the Article summary agent.
Choose an LLM to drive the agent’s work.
While in the agent’s Design tab, read its instructions, and observe the tools it can use.
Test the agent in the Chat window with a query like:
What are the most recent advancements in precision medicine?
Tip
While responses from LLMs always involve some degree of variability, the agent’s response hopefully produced a response faithful to its instructions. Section headers “Summary” and “Articles used” should be present. Given what’s known to be in the knowledge banks at its disposal, you can expect the agent to include a link to an article.
Create an agent review#
While an AI builder has options to examine the results of their agent, storing and running multiple test cases can be a challenge. Moreover, it can be difficult to obtain feedback from SMEs or external stakeholders in a structured way. These groups may have their own definitions of an acceptable agent response. That’s why input from these groups is essential for rigorous agent validation.
With this goal in mind, start your first agent review.
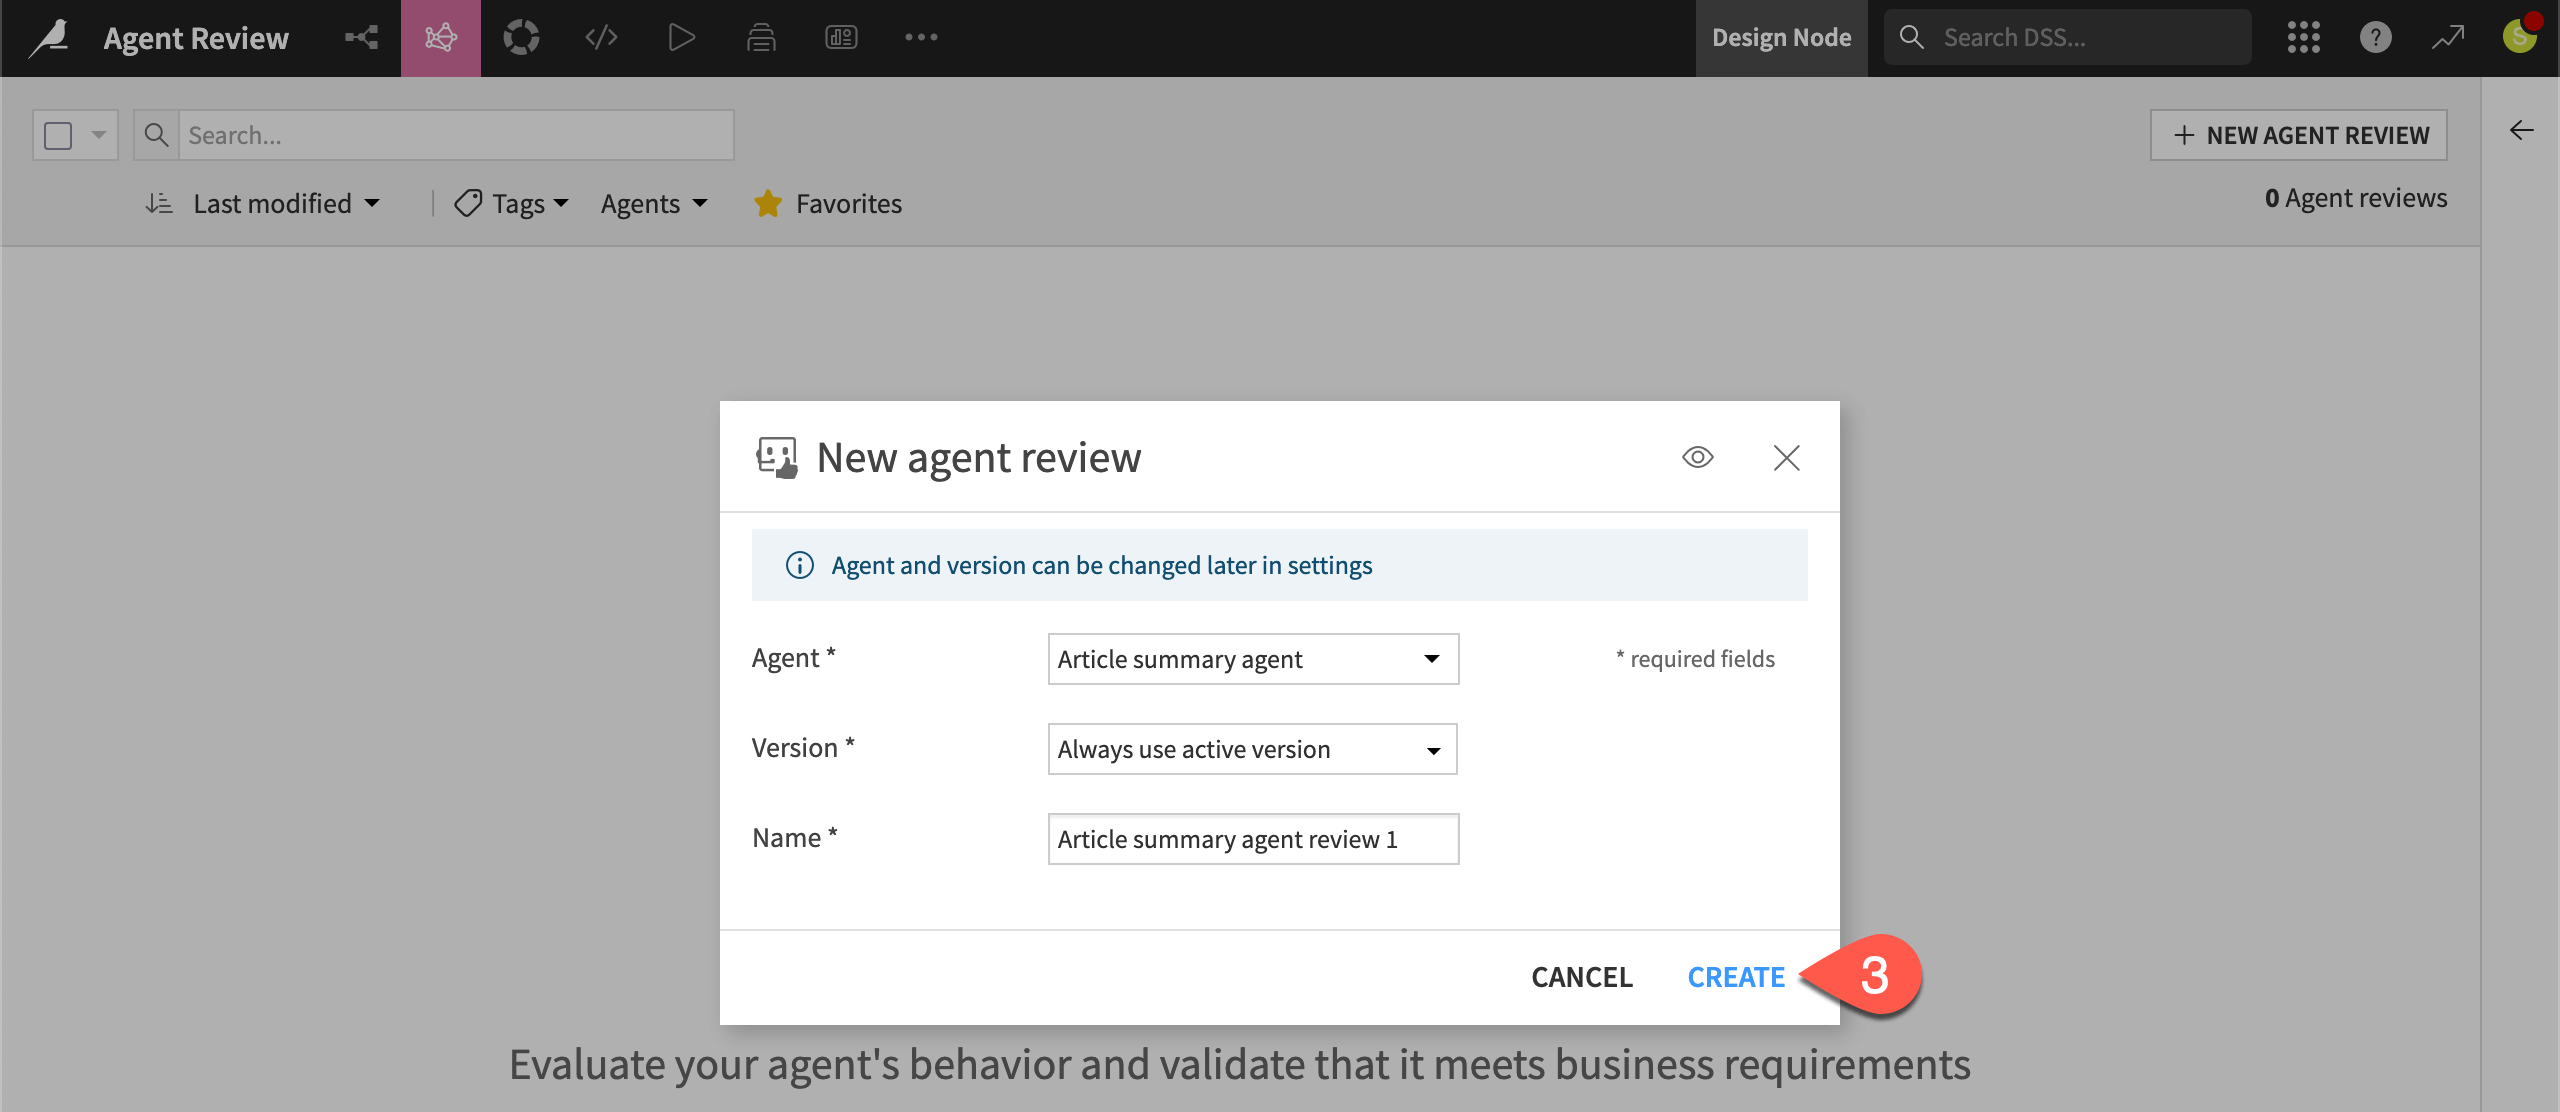
From the Design tab of the agent, click Launch Agent Review.
Leave the default settings.
Click Create.
Start with a manual test#
One way to get started with an agent review is by creating a test from a single query. In addition to this query (a user prompt), you also have the option to define:
A reference answer (an ideal or golden agent response)
Expectations (ideal or golden agent behaviors)
As you’ll see, you can use an LLM to get started with the latter two.
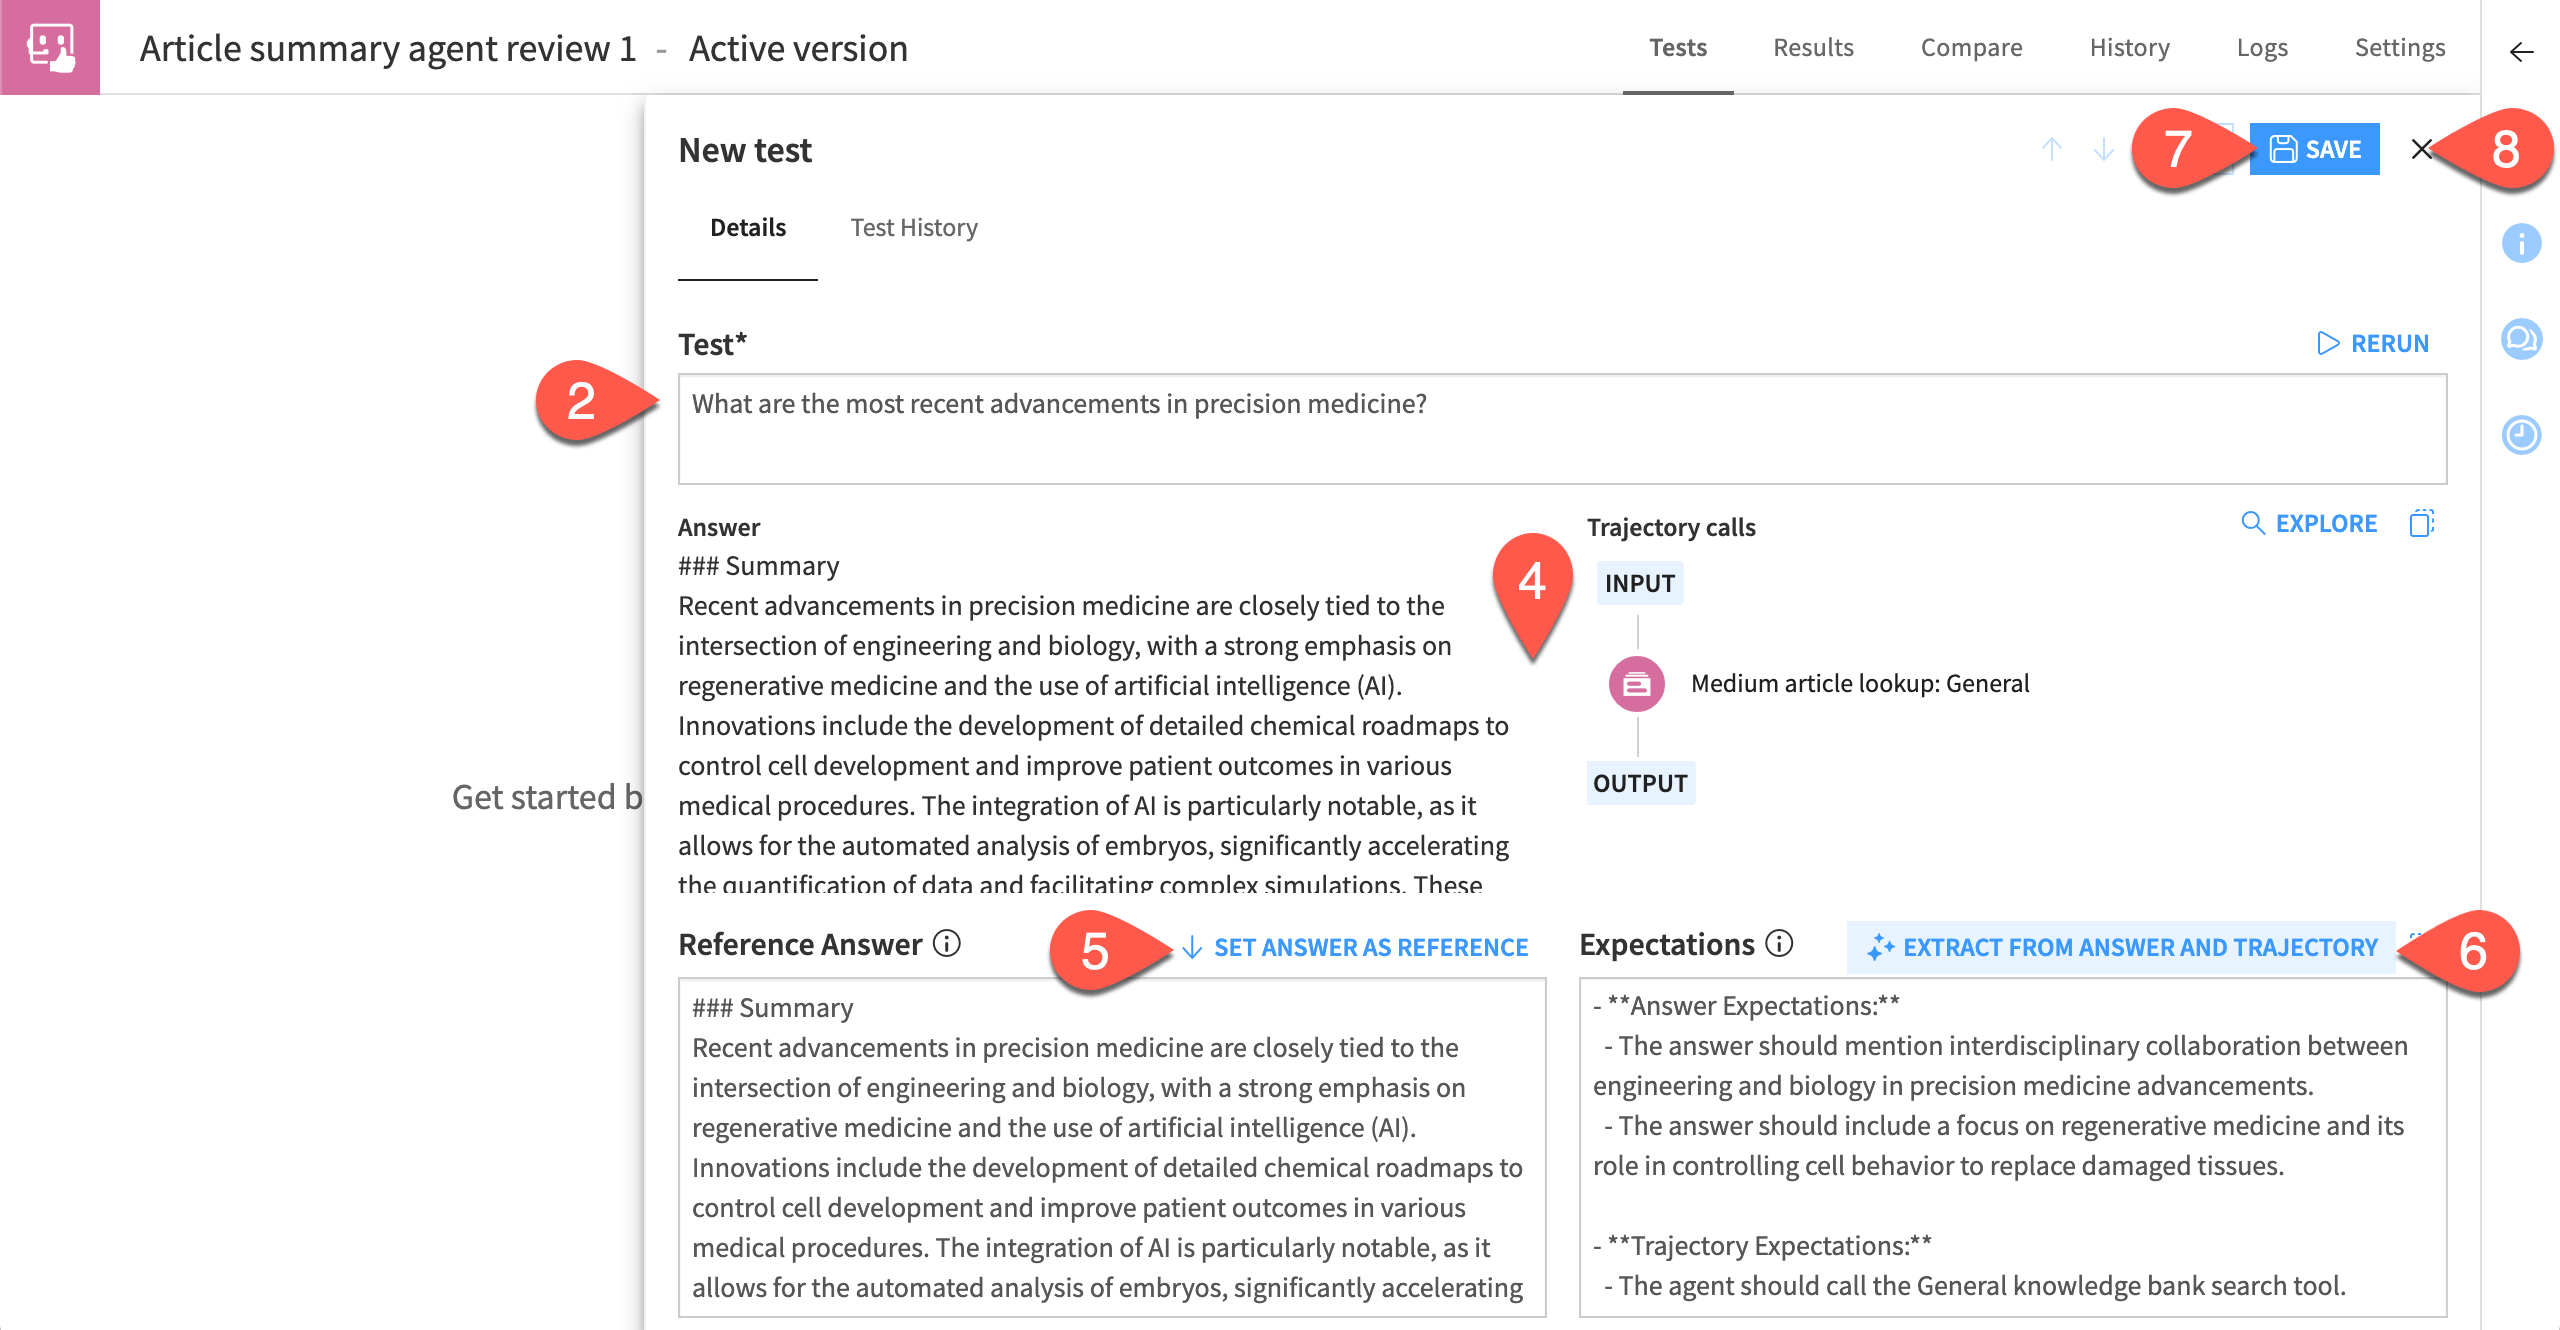
From the Tests tab of the agent review, click Manual.
In the Test field, provide the same query entered in the agent’s chat window.
Click Quick Test.
Examine the agent’s answer and tool call trajectory.
Assuming the agent did well, for the reference answer, click Set Answer as Reference.
Similarly, for the expectations, click Extract from Answer and Trajectory, adjusting as needed.
Click Save.
Click the (
 ) to return to the Tests tab.
Tip
Consider the LLM-generated reference and expectations as a starting point. In real cases, you’ll tailor these fields to validate specific business requirements.
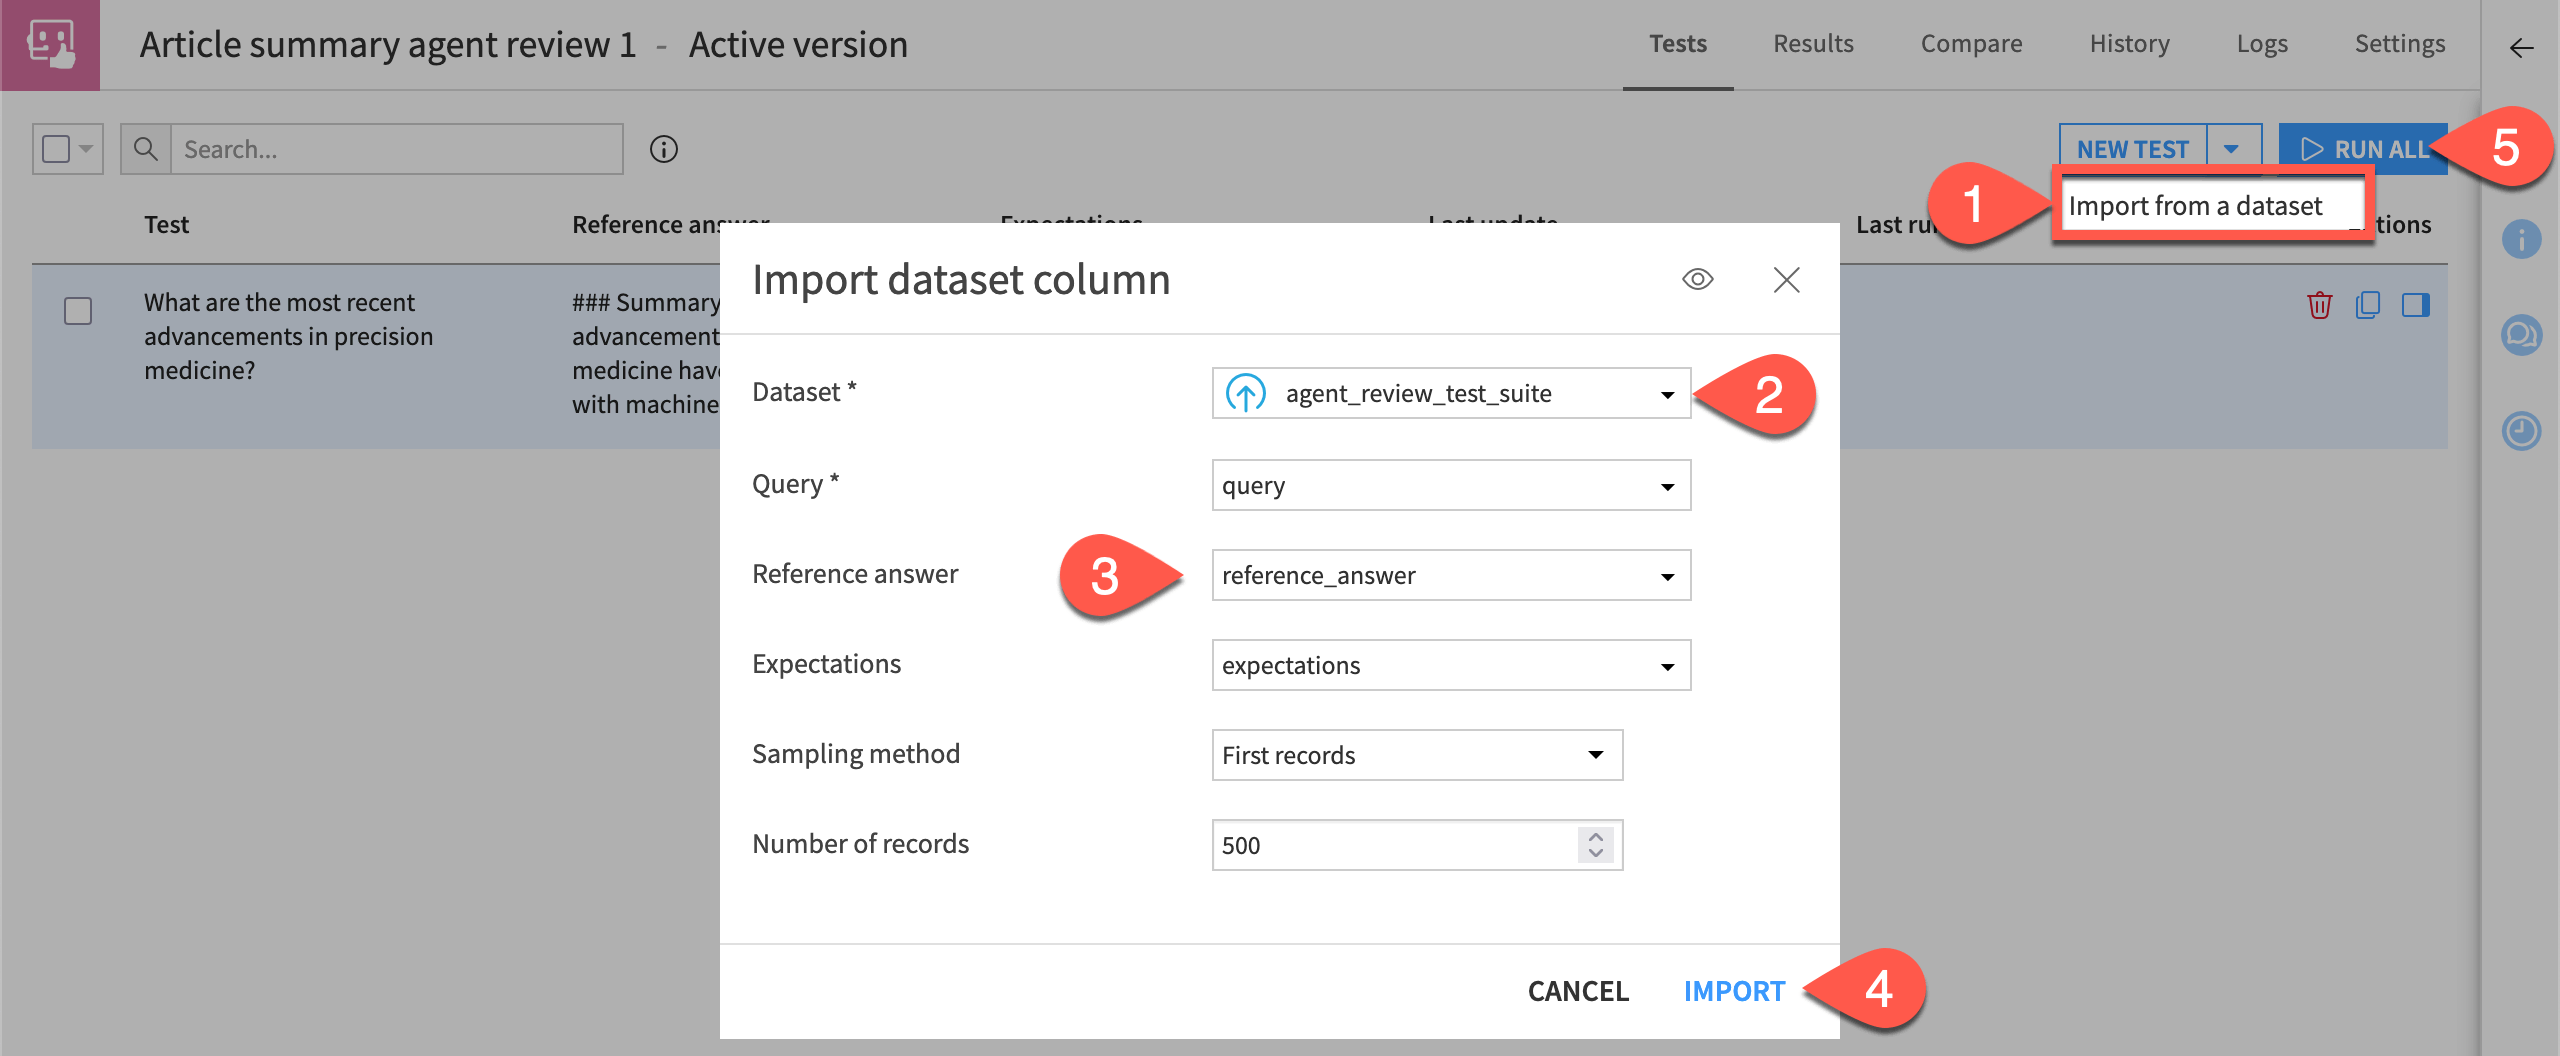
Import tests#
In addition to creating manual tests, you can also import tests from a dataset. This is particularly useful when SMEs design their own requirements.
From the Tests tab of the agent review, next to New Test, click the dropdown arrow (
 ) > Import from a dataset.
For the Dataset field, select agent_review_test_suite.
For the next three fields, match the field with its corresponding column name in the dataset.
Click Import.
After you’ve imported the tests, click Run All.
Tip
Designing effective tests is highly dependent on the use case. You’ll need to work with SMEs to translate business requirements into validated queries.
Review test results#
Once you have a test suite that can represent business requirements, you, and potentially your entire team, can focus on analyzing the results. The AI builder can bring more personas into the agent development process. Greater collaboration has the potential to speed development, produce better agents, and decrease the risk of project delivery.
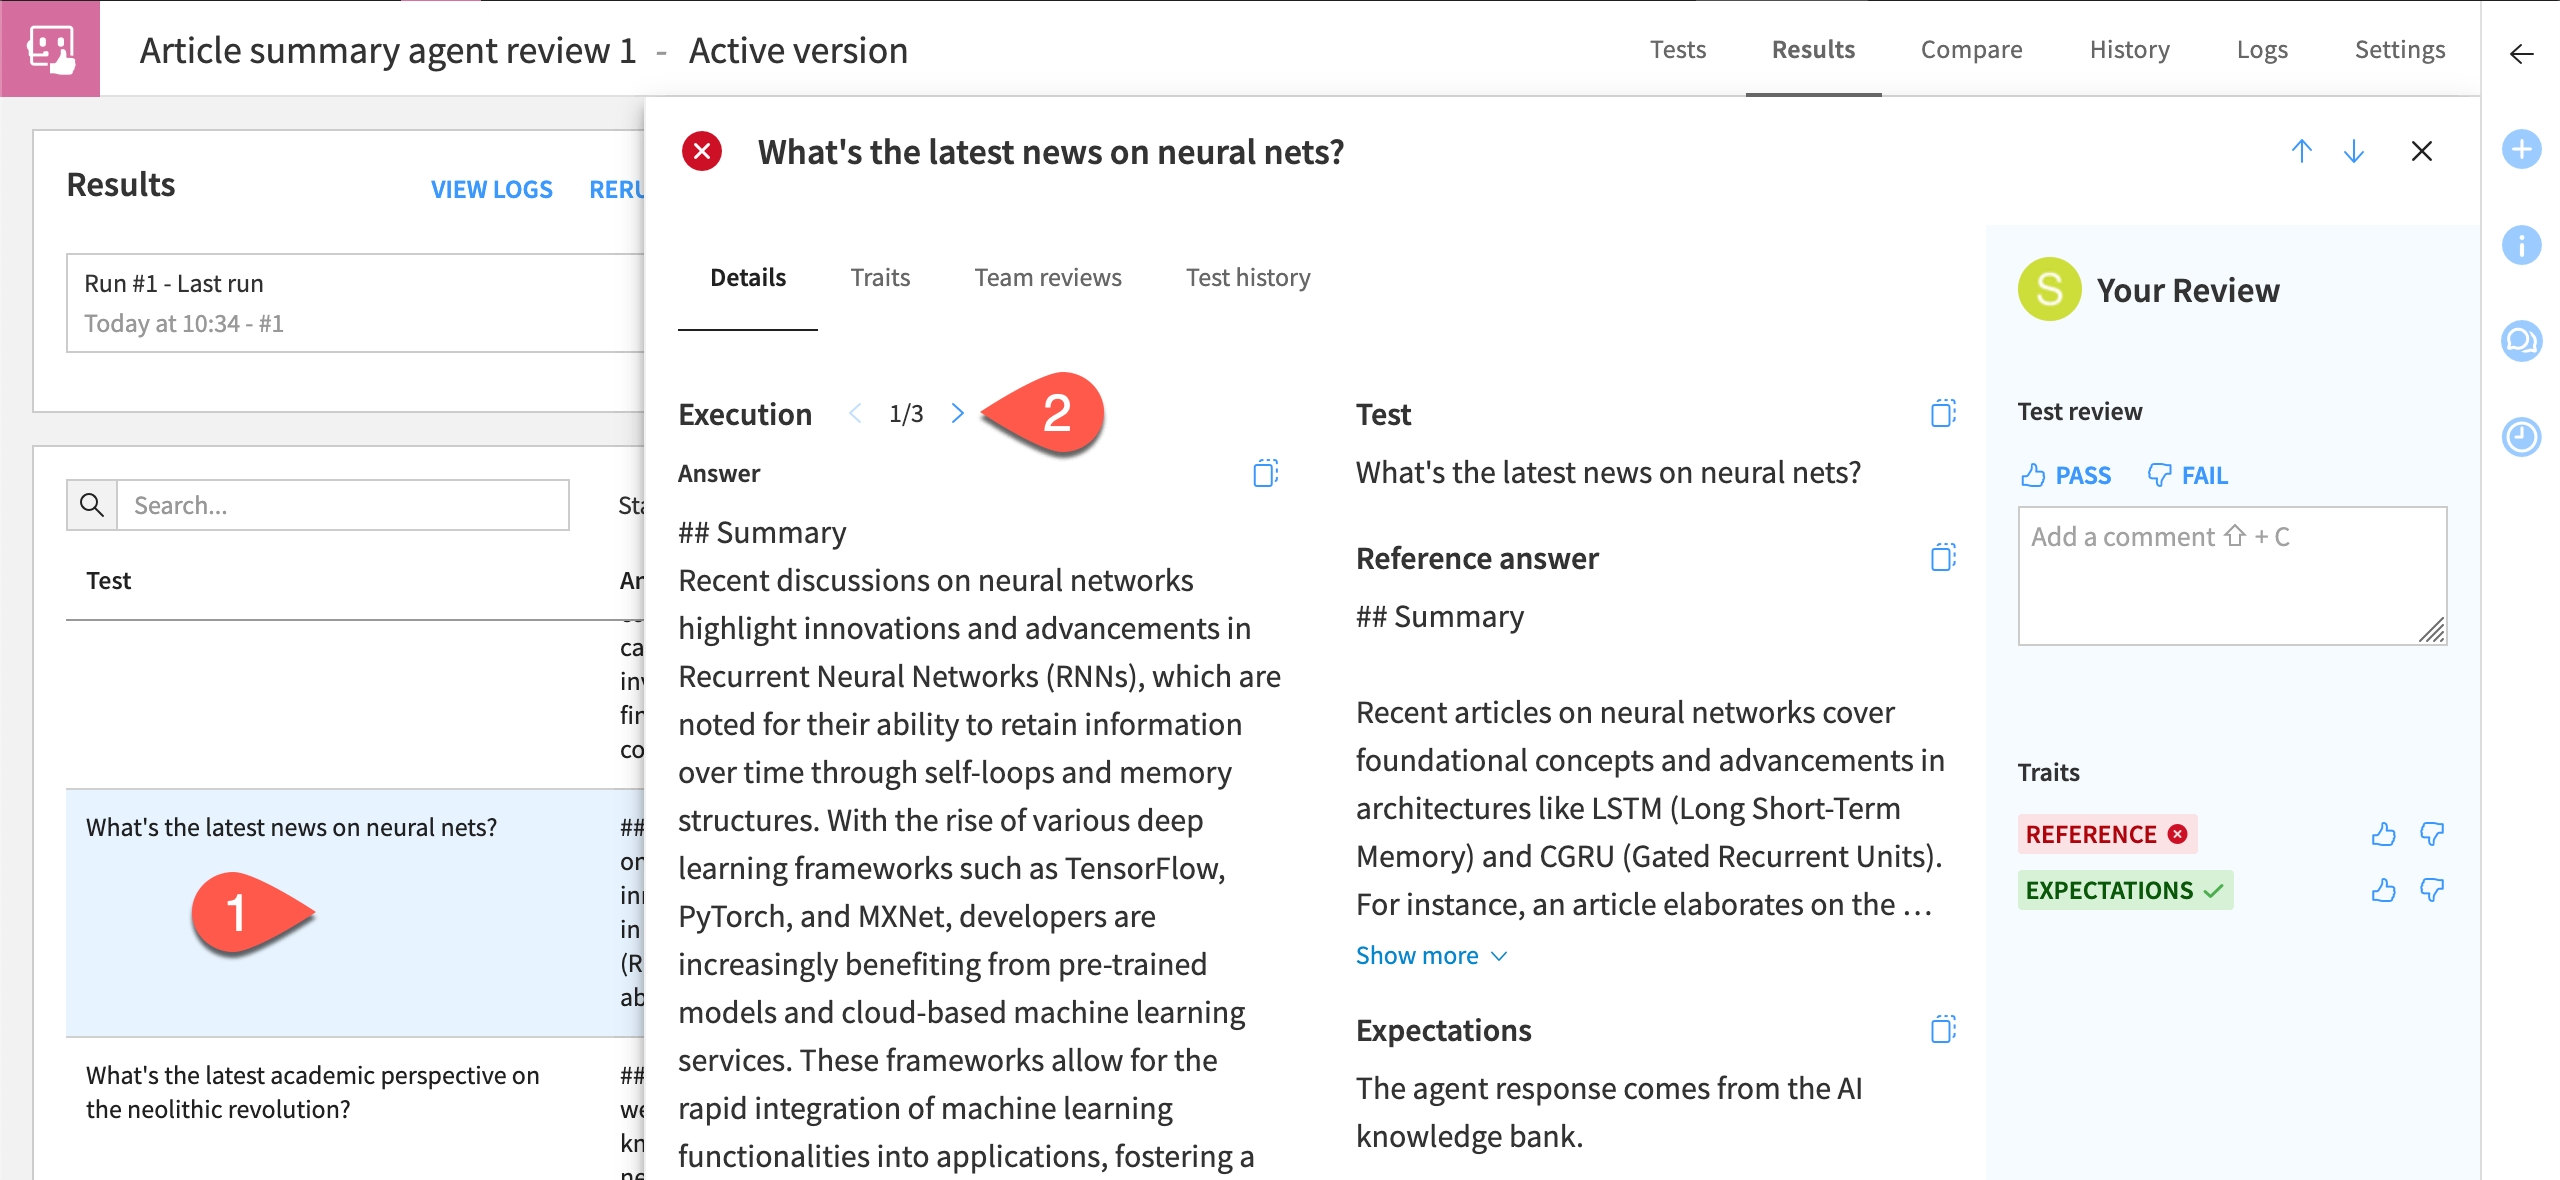
Account for LLM variability#
LLM responses bring inherent variability, making it possible for users to receive different answers to the same query. Executing the same tests multiple times and presenting responses together for review can lead to one of two outcomes. Either you’re confident in the agent’s responses, or you’ve highlighted reliability issues.
Within the Results panel, select a test, and open the side panel (
 ) to see more information.
Within the Details subtab, use the arrows to browse the agent’s response and tool call trajectory across three executions of the same query.
Tip
To adjust this parameter, go to the Settings tab of the agent review, and find Number of Executions per Test.
Leverage LLMs for automated analysis#
Agent reviews can leverage the wisdom of both LLMs and SMEs. Starting with the former, LLMs can analyze agent responses through traits. By default, every review comes configured with two traits: reference and expectations. For these traits, an LLM determines if the agent’s actual response matches the previously defined golden answer and behavior.
Review the criteria for these traits, and then add your own.
For any test, go to the Traits subtab, and check whether the LLM judged each test execution to pass or fail with respect to the default traits.
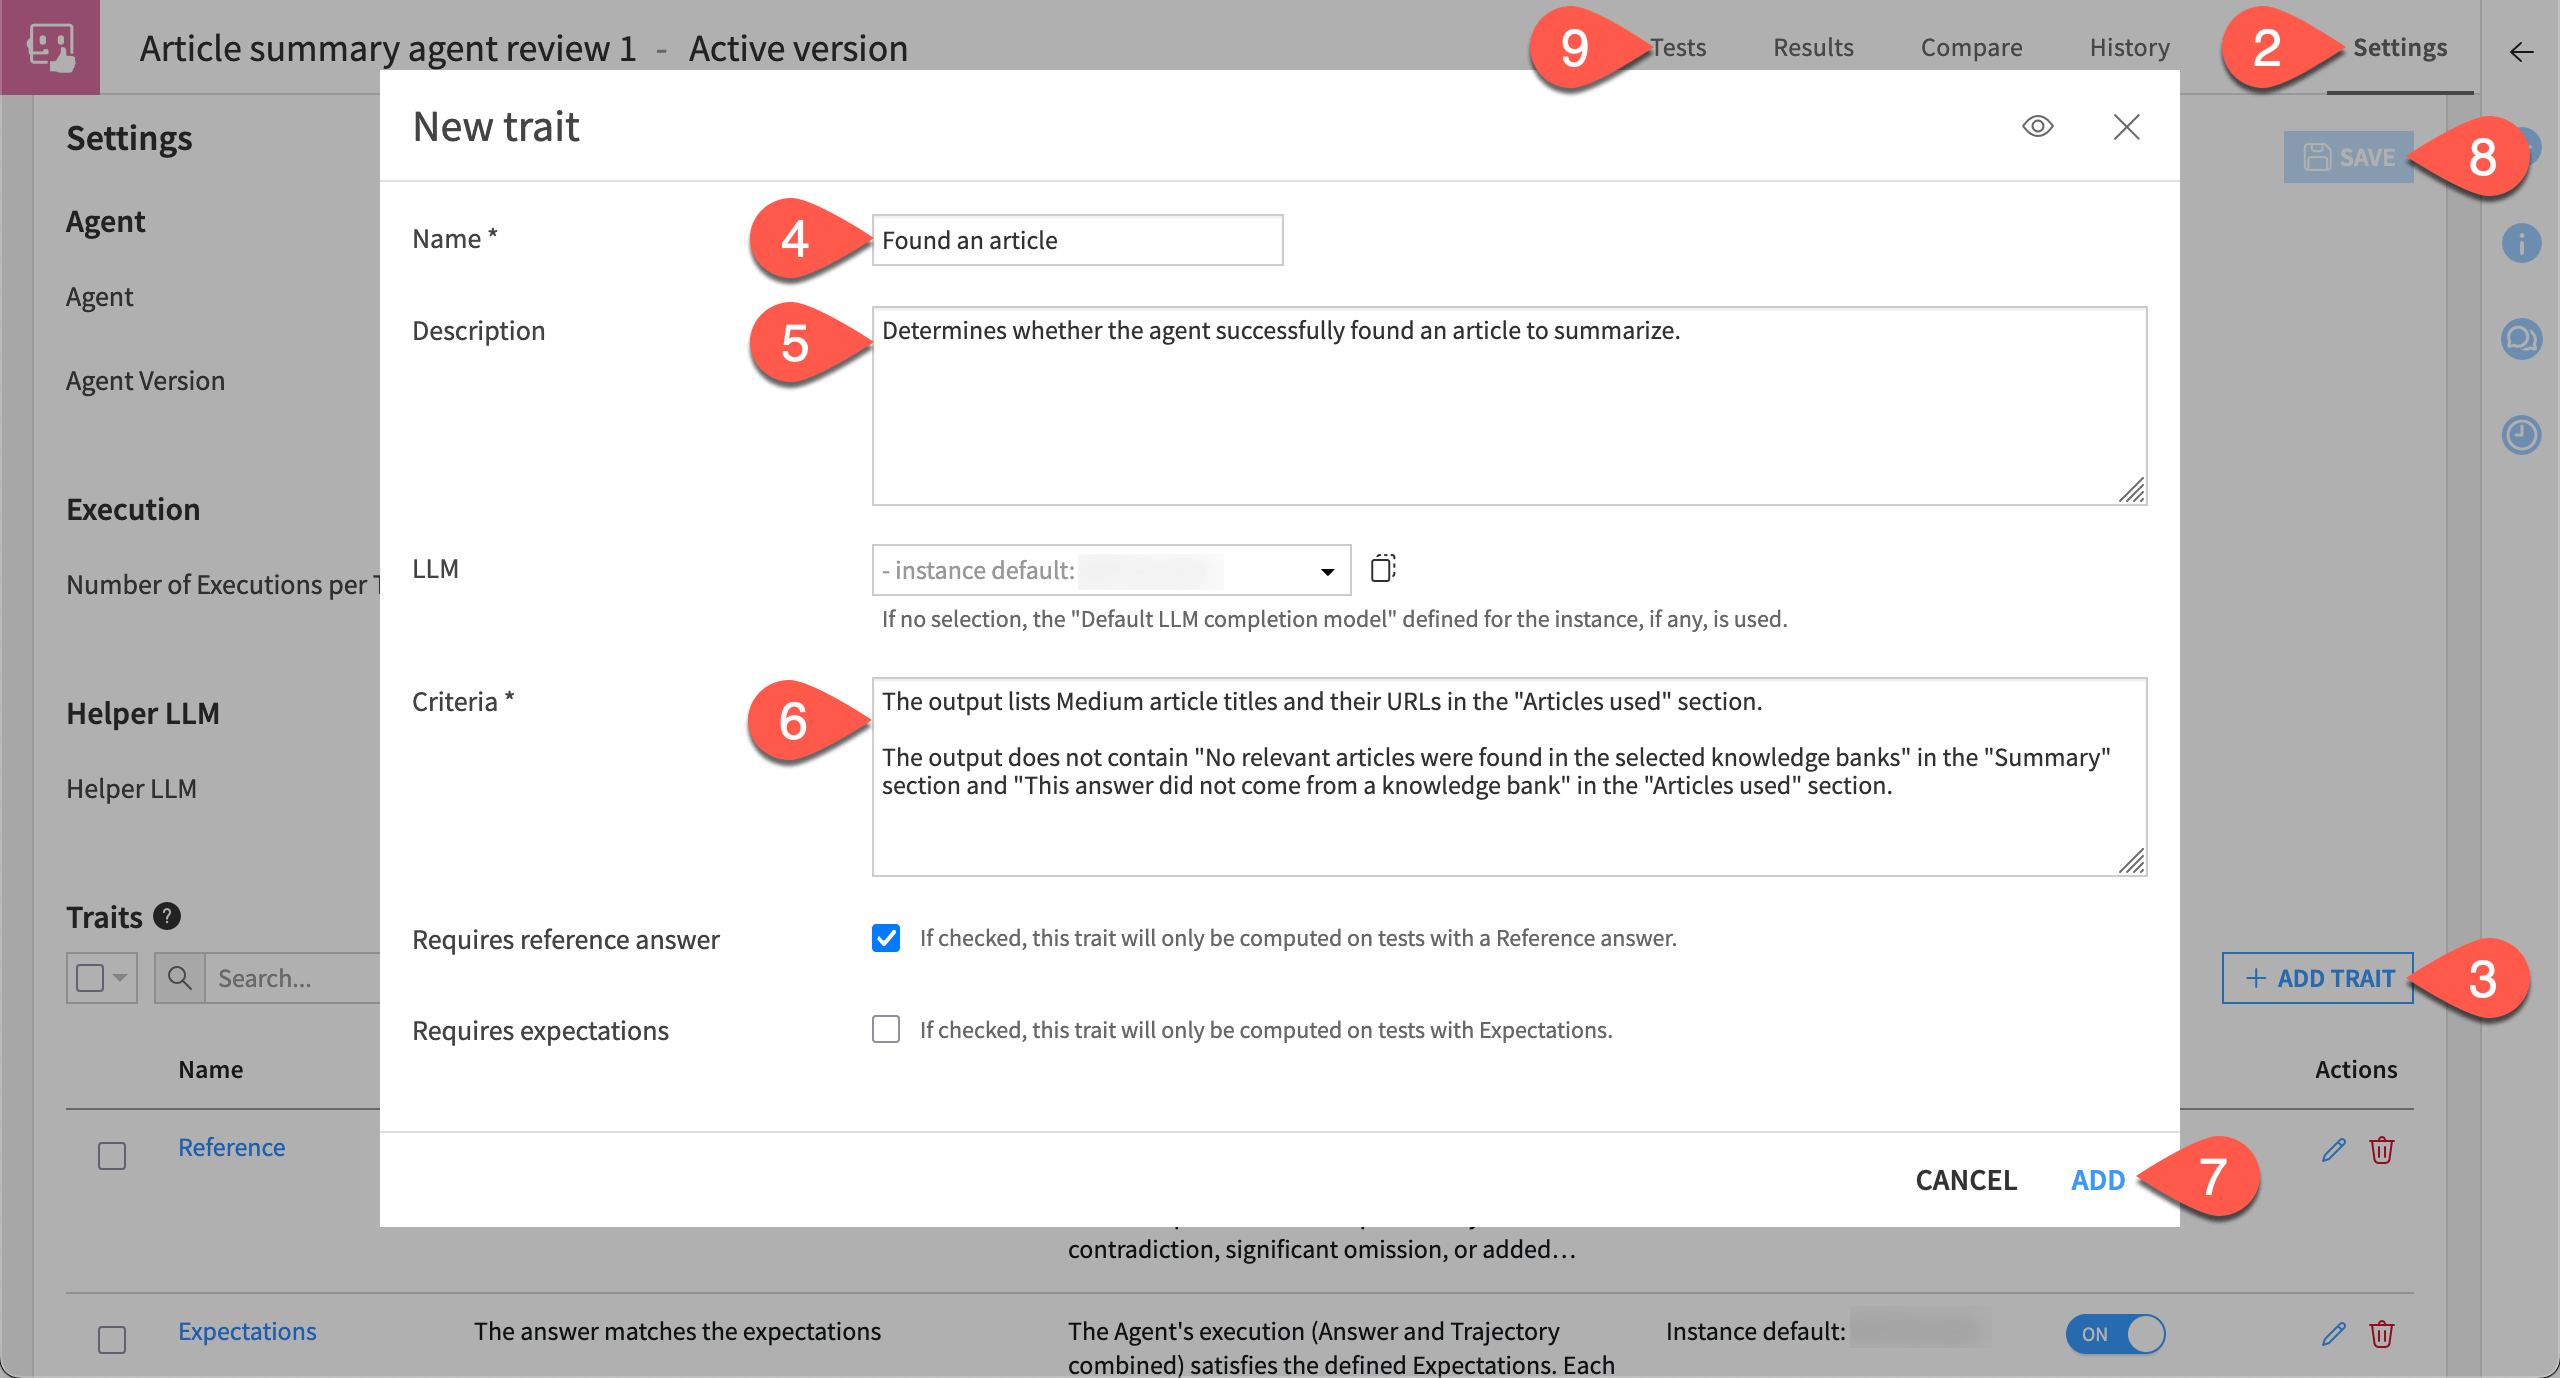
Go to the Settings tab of the agent review, and find the Traits section to review the definition of these traits.
Then click + Add Trait to add a new one.
Name it
Found article.Provide the description
Determines whether the agent successfully found an article to summarize.For the criteria, copy-paste the following:
The output lists Medium article titles and their URLs in the "Articles used" section.

The output does not contain "No relevant articles were found in the selected knowledge banks" in the "Summary" section and "This answer did not come from a knowledge bank" in the "Articles used" section.
Click Add.
When finished, click Save.
Return to the Tests tab, and click Run All to execute the test suite once more, this time including the new trait.
Collect expert feedback#
SMEs might disagree with the conclusions of an LLM. For example, a human reviewing the agent’s response might decide the agent produced an acceptable response. Moreover, certain kinds of tests may mandate human intervention. When LLMs and SMEs disagree, human reviews take precedence over LLM judgements.
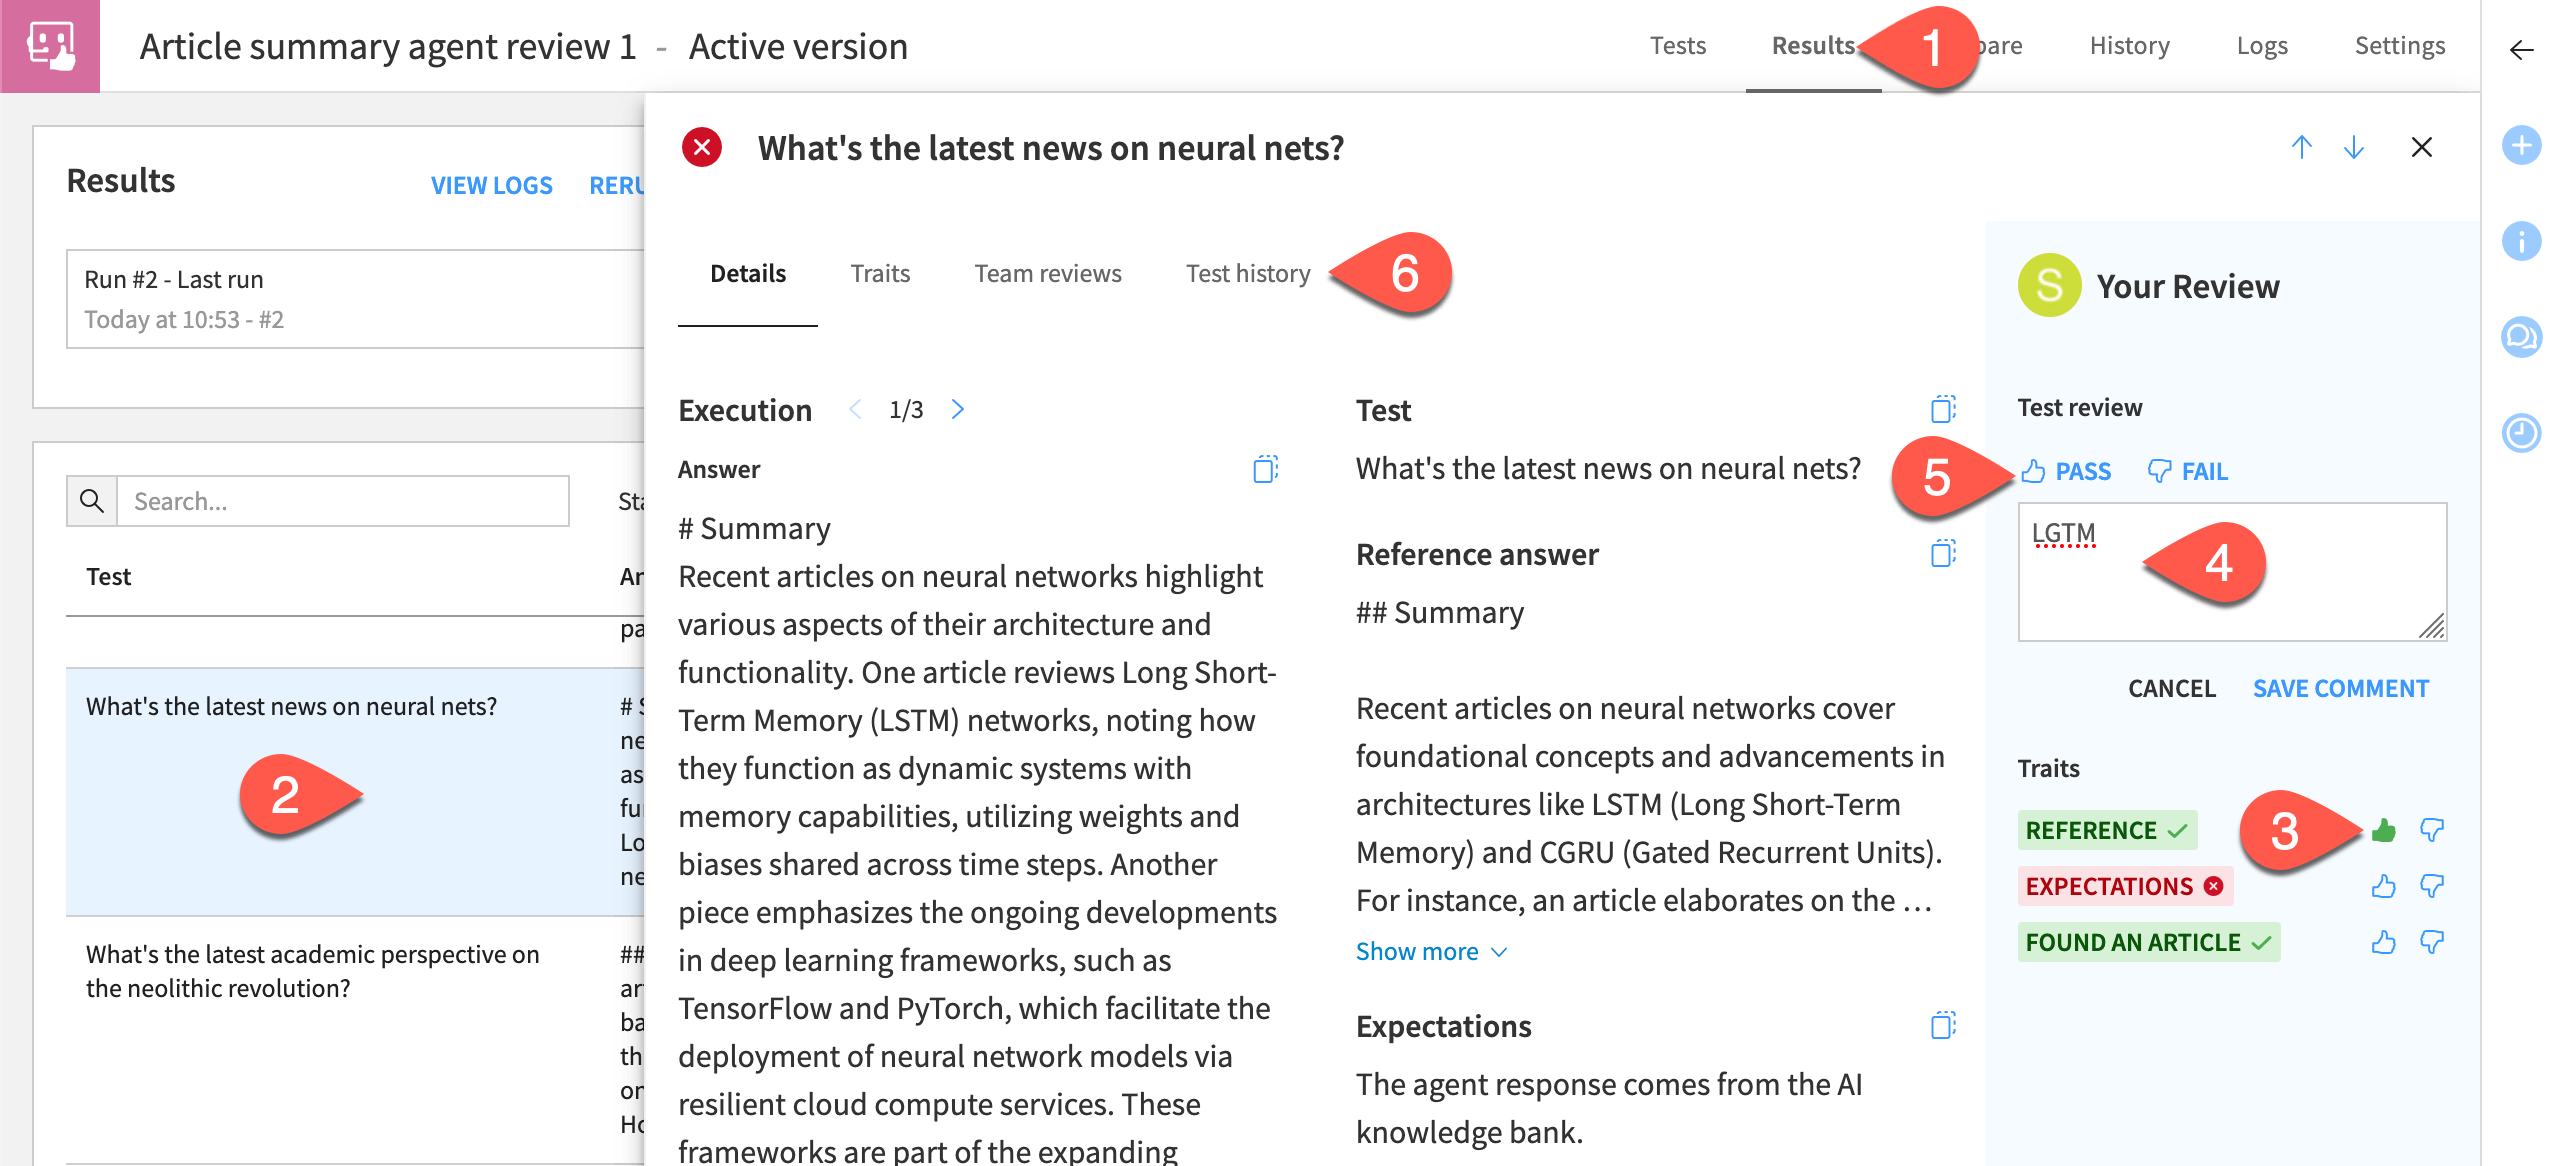
Assume the role of an SME assigned to review the test results.
Return to the Results tab of the agent review.
For a test with failing traits, open the side panel (
) to see more information.Override a failing trait by clicking the thumbs up (
 ).
).Annotate your review by adding a comment like
LGTM.Click Pass to change the overall status of the test.
Within the detailed test view, explore subtabs like Test history to see a log of trait performance and team reviews.
Tip
Human reviews aren’t only for cases of disagreement. SMEs can also confirm LLM judgements, adding weight to an LLM’s assessment.
Iterate on an agent’s design#
The test results from an agent review should surface the agent’s strengths and weaknesses. Based on these clear benchmarks, the AI builder can improve the agent’s design. For example, it might need more detailed instructions, better tools, or a different underlying LLM.
Create a new agent version#
Equipped with insights from the agent review, you’re ready to design a better agent. In this case, create a new version from a copy of the current agent.
From the Flow, open the Article summary agent.
From the Design tab of the v1 agent, navigate up a level to the agent homepage by clicking Article summary agent.
Click + New Version.
Select the option From existing version > v1 (Active version).
Click Create.
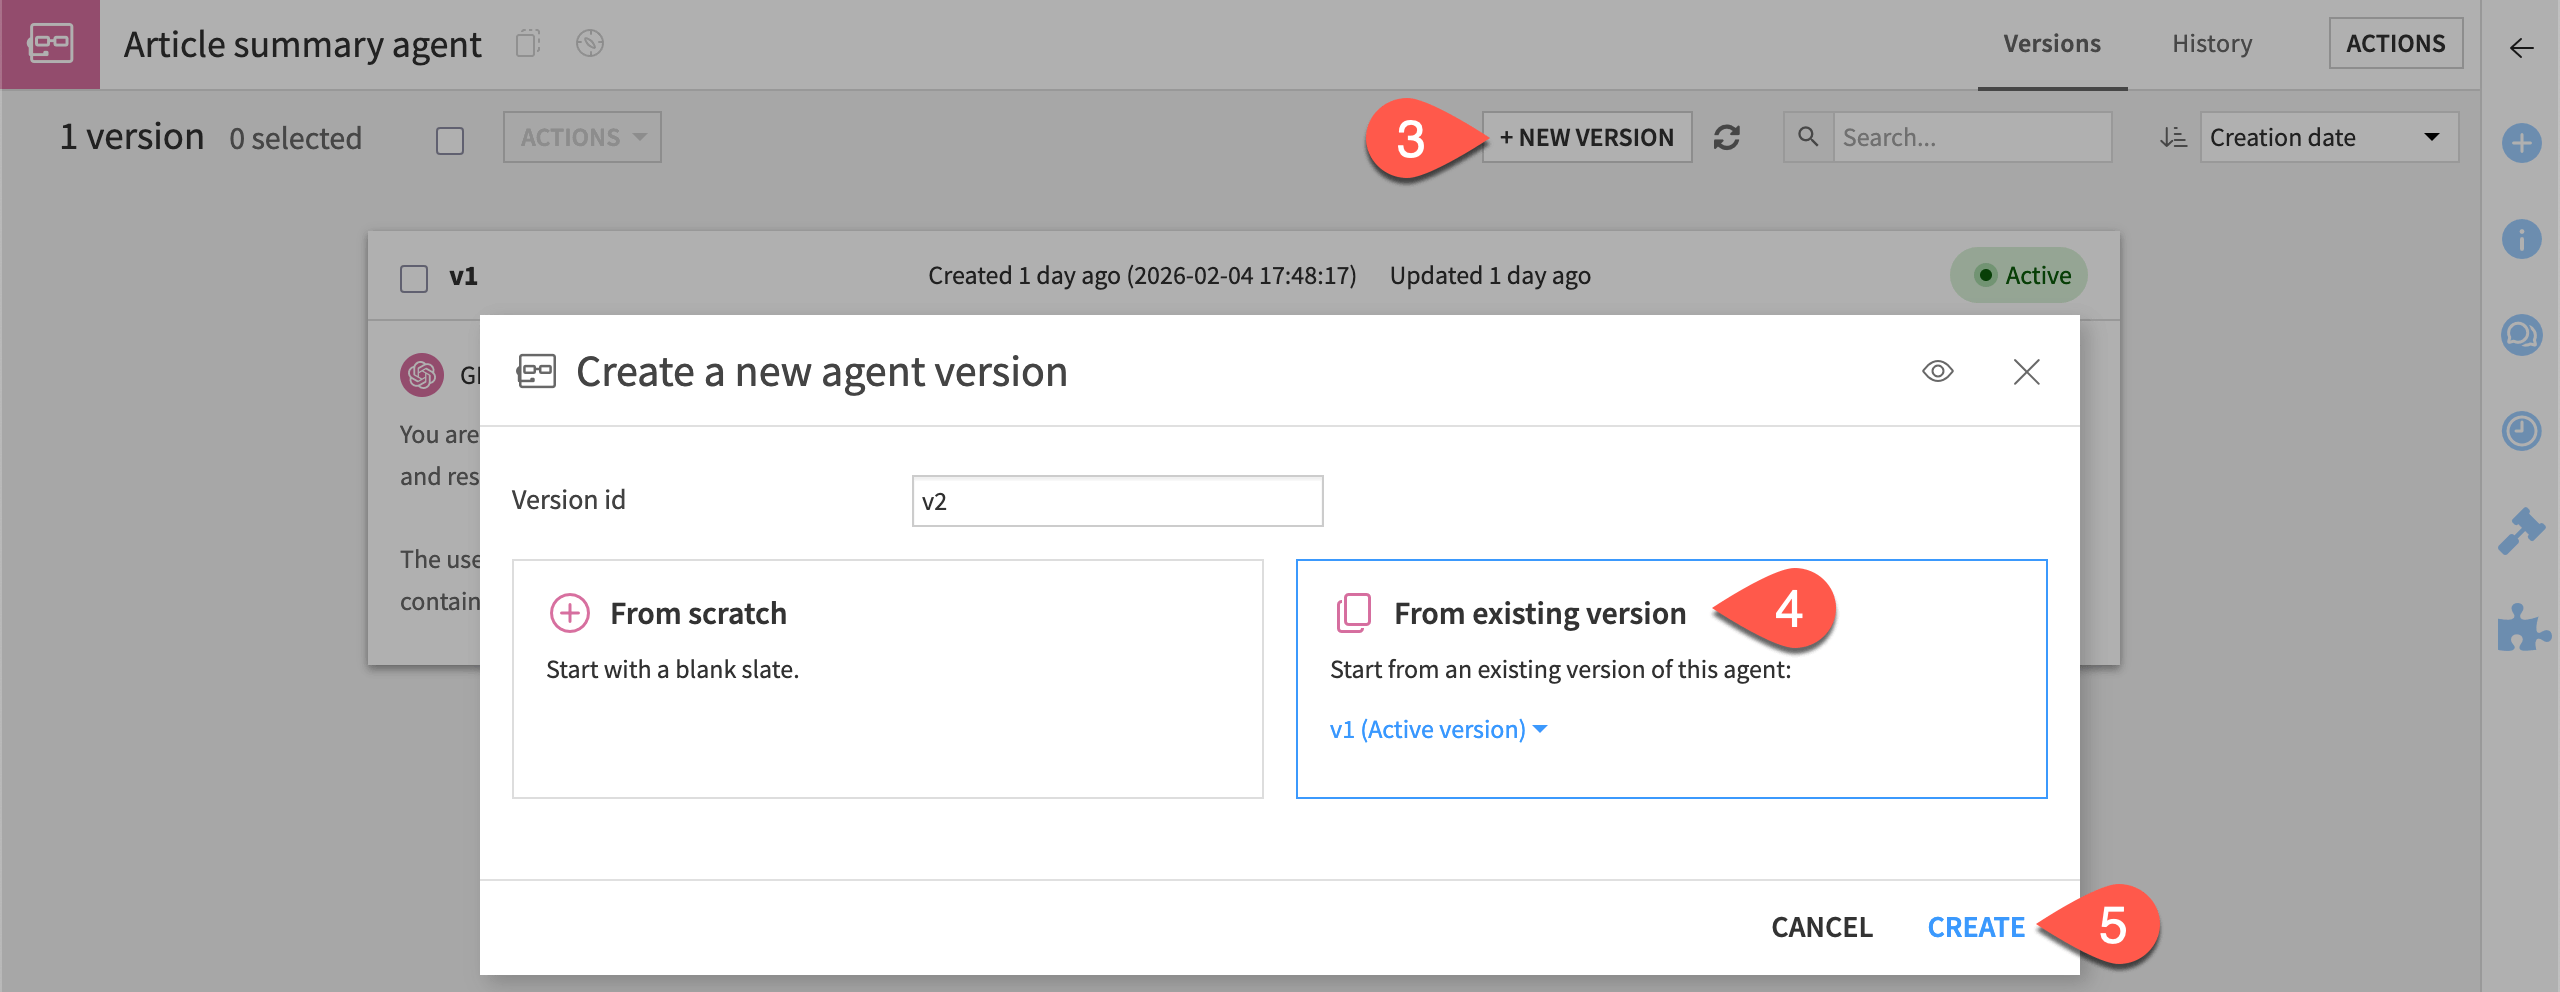
Perhaps the length of the summaries is making it difficult for LLMs (and SMEs) to assess accuracy. In steps 3 and 4 of the v2 agent’s instructions, reduce the expected summary length from 4-5 sentences to
1-2sentences.Click Save.
Tip
It can be a good practice to create feedback loops based on your iteration! For example, here you might add a trait Summary too long to test if the agent meets its new requirement.
Run tests on a new version#
Now you can apply the same test suite in the existing agent review to the new version of the agent.
From the GenAI (
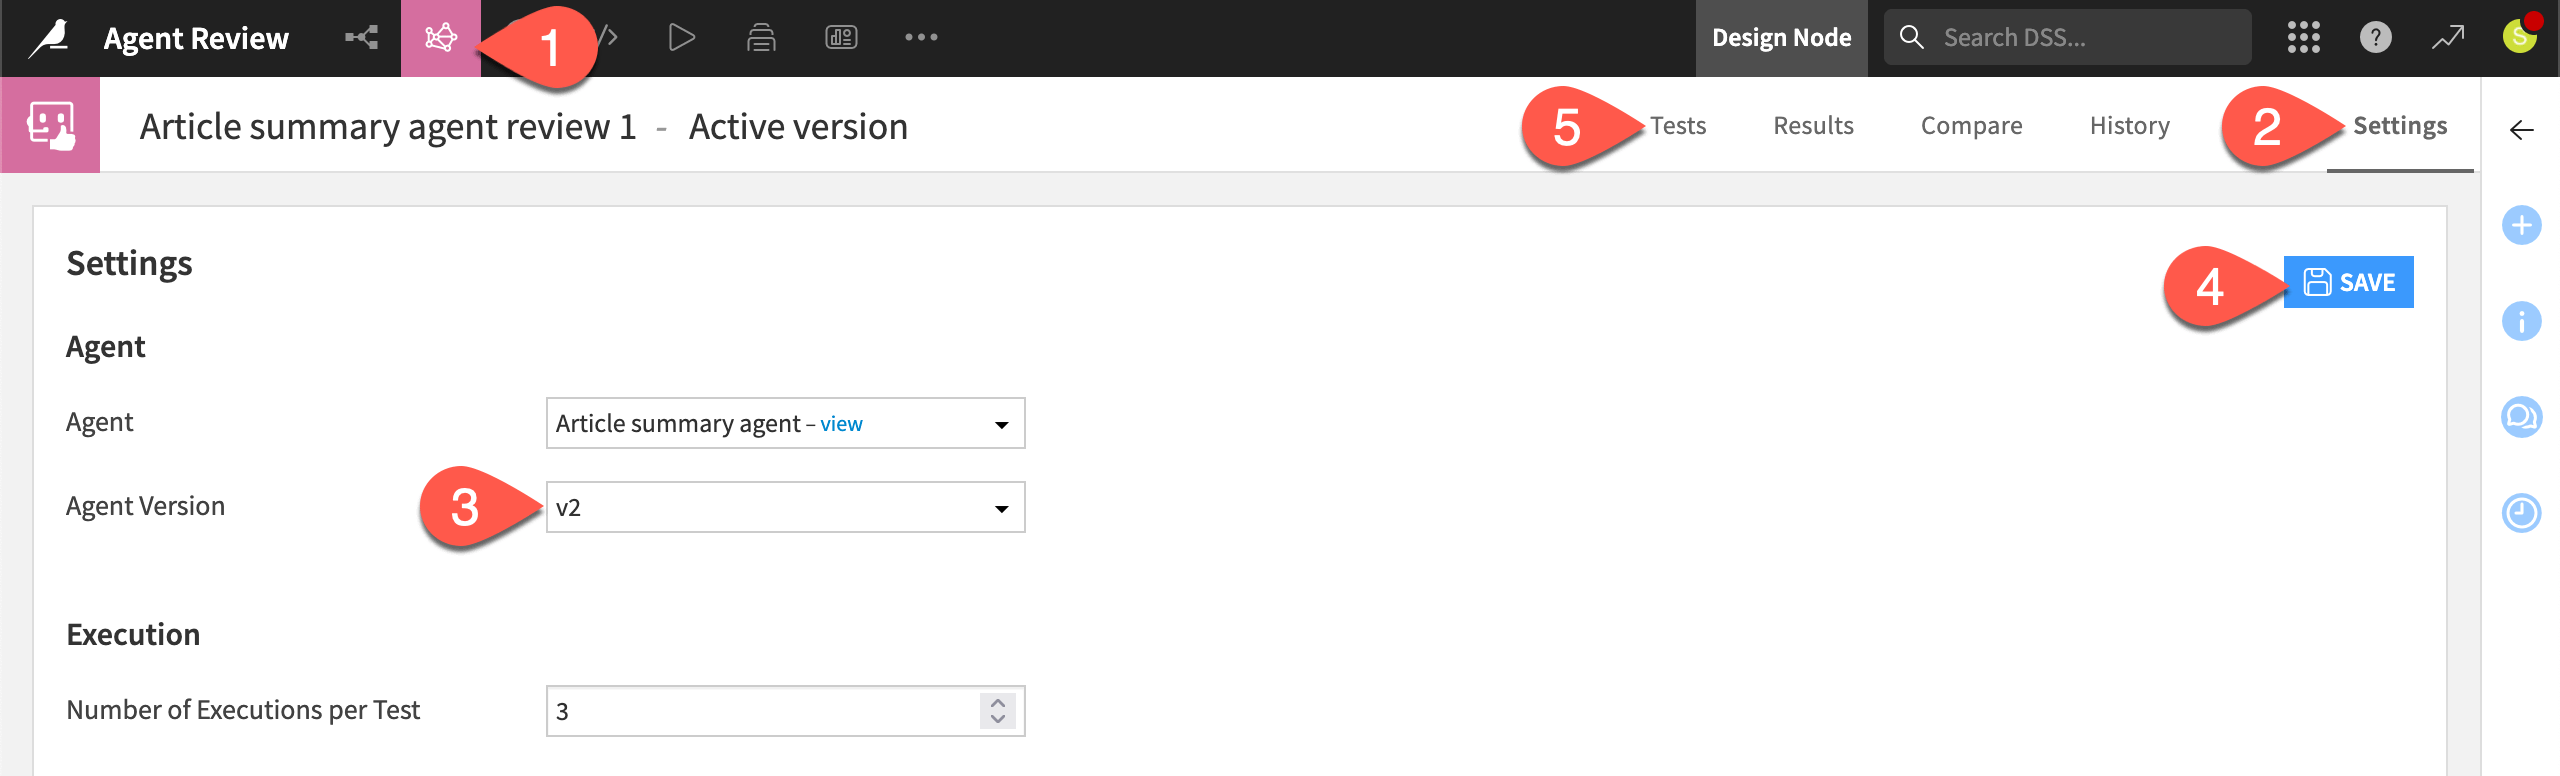
 ) > Agent Reviews menu in the top navigation bar, open Article summary agent review 1.
Go to the Settings tab.
For the Agent Version field, switch to v2.
Click Save.
Return to the Tests tab, and click Run All again, this time running the test suite against the new version of the agent.
Tip
Being able to reuse a test suite can speed the agent development cycle instead of starting from scratch with each new version.
Continue iterating#
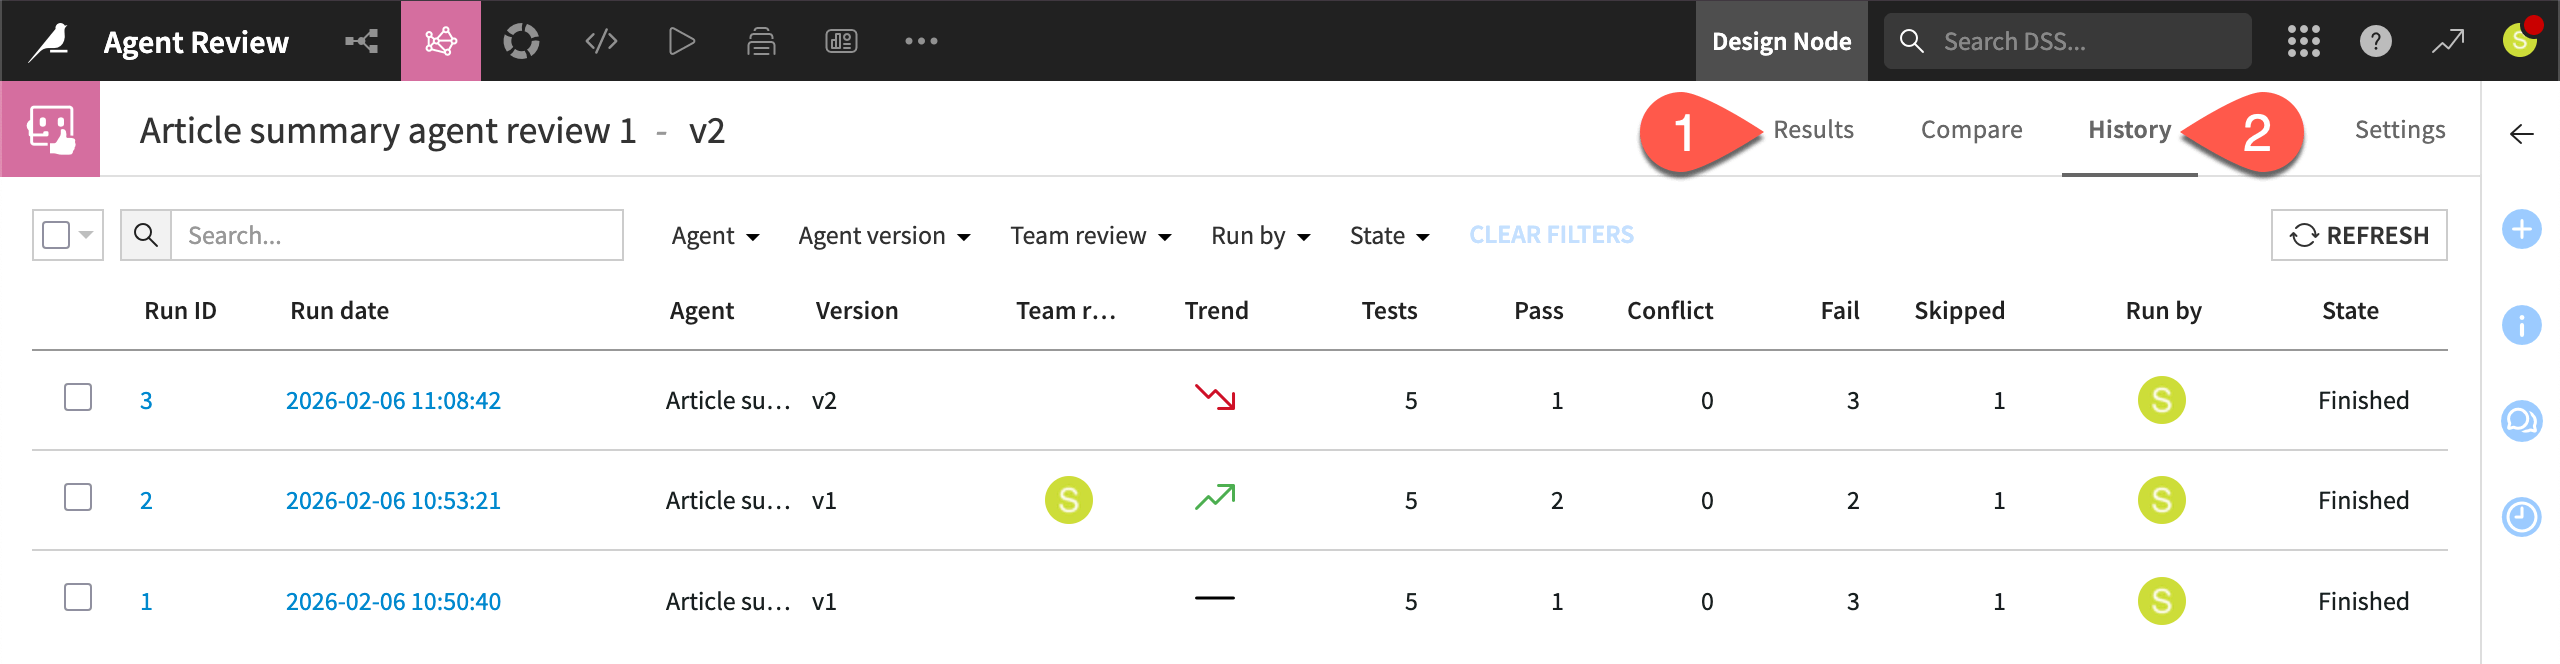
As you run more tests, you can analyze the results over time. You can track not only the accuracy of agent responses, but also the stability of results.
From the Results tab of the agent review, note the Trend metric reporting the ratio of passing tests compared to the previous test run.
Explore trends further in the Compare and History tabs.
Engage with the test results as a reviewer to better understand how human reviews can complement, and when needed, override LLM judgements.
Tip
As your agent matures, you may want to automate test execution, particularly for non-regression testing. To do so, use the Run Agent Review step in a scenario and Dataiku’s toolkit of triggers and reporters.
Next steps#
After careful iteration driven by test results, you’ve reached a point where your agent returns consistent, satisfactory results that meet business requirements.
See also
For more details, see the reference documentation on Agent Review.
When you’ve validated that an agent meets business requirements, you’ll want to think about production readiness and monitoring. For systematically measuring agent output at scale, see Tutorial | Agent evaluation.
For practical steps to deploy an agent, see How-to | Deploy an agentic project.