

Tutorial | Configure containerized execution#
Get started#
An administrator sets up containerized execution so teams can run their Python and R code, visual recipes, notebooks, and webapps on a Kubernetes cluster instead of on the Dataiku node.
This tutorial starts from an instance that already has a cluster attached, and configures the containerized execution that runs on it.
Note
This tutorial works on both Dataiku Cloud and self-managed instances, but the settings differ between them. Where the steps split, follow the tab that matches your setup.
Objectives#
In this tutorial, you will:
Create the container configurations your teams will use.
Set the instance defaults so projects pick them up automatically.
Enable a code environment to run on the cluster.
Run a recipe in a container and confirm it in monitoring.
Grant a group access to the cluster.
Recognize and fix the two most common containerized-execution errors.
Prerequisites#
An instance with an attached, managed Elastic AI cluster.
A reachable image registry, for example Amazon ECR or Azure ACR.
Knowledge of code environments.
A code environment you can build for the cluster.
Membership in a group that can manage clusters and code environments.
Use case summary#
Your teams need to scale their work beyond a single node. You’ll create two container configurations, one for everyday work and one for web apps, tell the instance which to use by default, connect a code environment so recipes can run on the cluster, and grant a group access.
By the end, a recipe runs on the cluster and you know how to read the two errors administrators hit most often.
Set up a container configuration#
A container configuration describes how a workload runs on the cluster: which image, which namespace, and how many resources. In this section, you’ll create one and set it as the instance default.
First, open the Containerized execution settings:
From the waffle (
 ) menu of your Design node’s top navigation bar, select Administration.
Go to the Settings tab.
In the left panel, under Compute & Scaling, click Containerized execution.
Create the image build config#
Start with defining the image build config. It defines where container images are built and pushed.
On Dataiku Cloud, image build configs are handled for you and may not be visible here. Continue to the next step.
Tip
Contact Dataiku support to have one set up so you can manage image building.
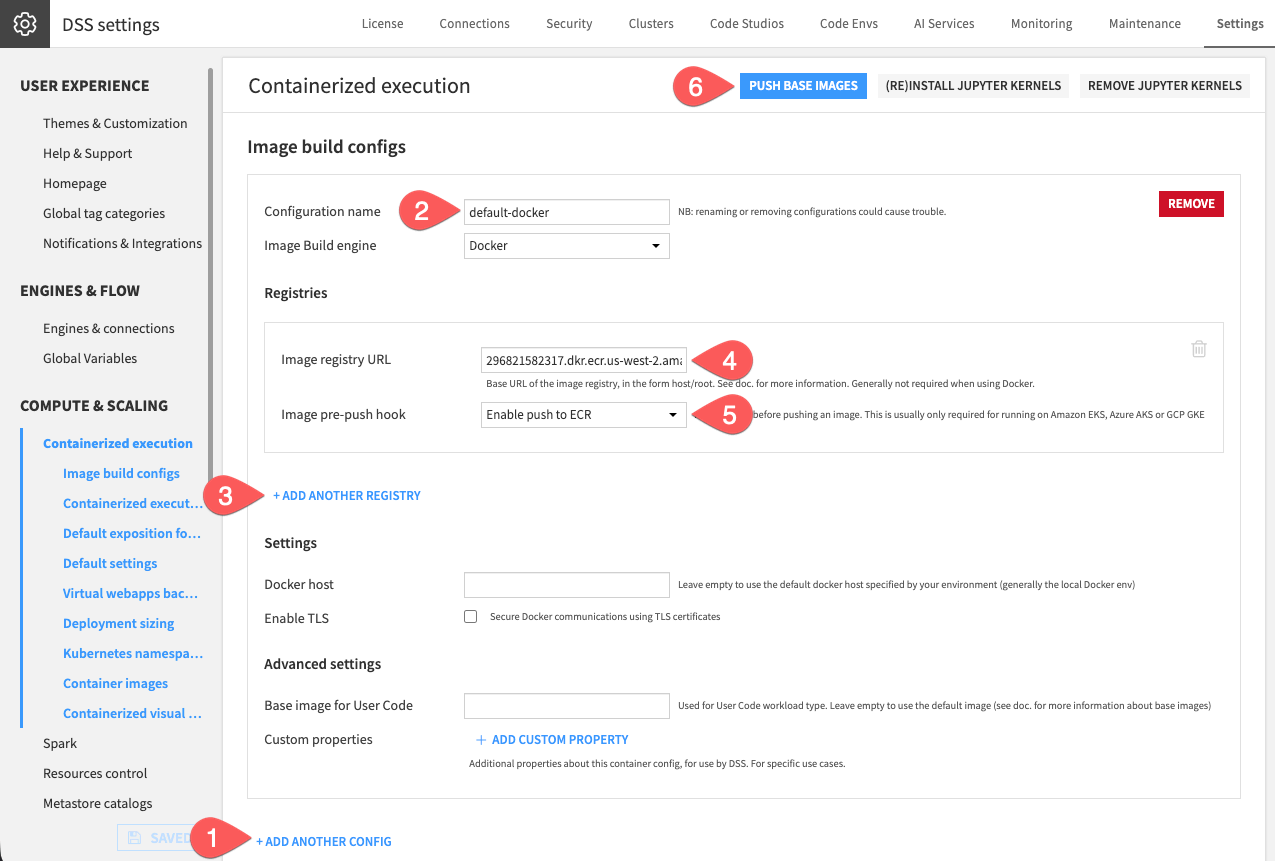
Under Image build configs, click + Add Another Config.
Name it
default-docker.Click + Add another registry.
Enter your registry in the Image registry URL field.
As Image pre-push hook, select Enable push to ECR (or the option matching your registry).
Click Push Base Images.
Create the container configurations#
With the image build config in place, create the container configuration that points to it and runs your work.
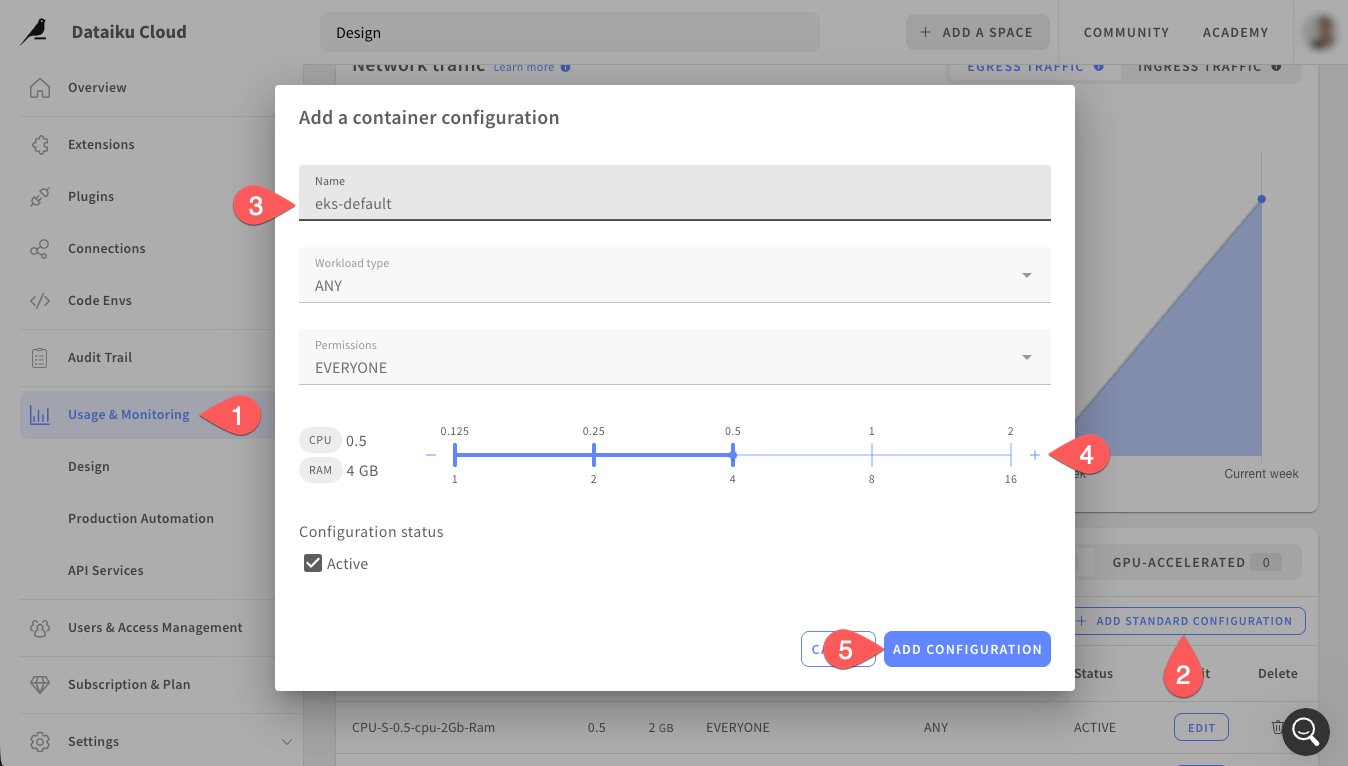
From the Cloud Launchpad, navigate to the Usage & Monitoring tab.
Under Containerized execution configurations, click + Add A Container Configuration.
Name it
eks-default.Use the slider to set the necessary CPU and RAM performances.
Click Add Configuration.
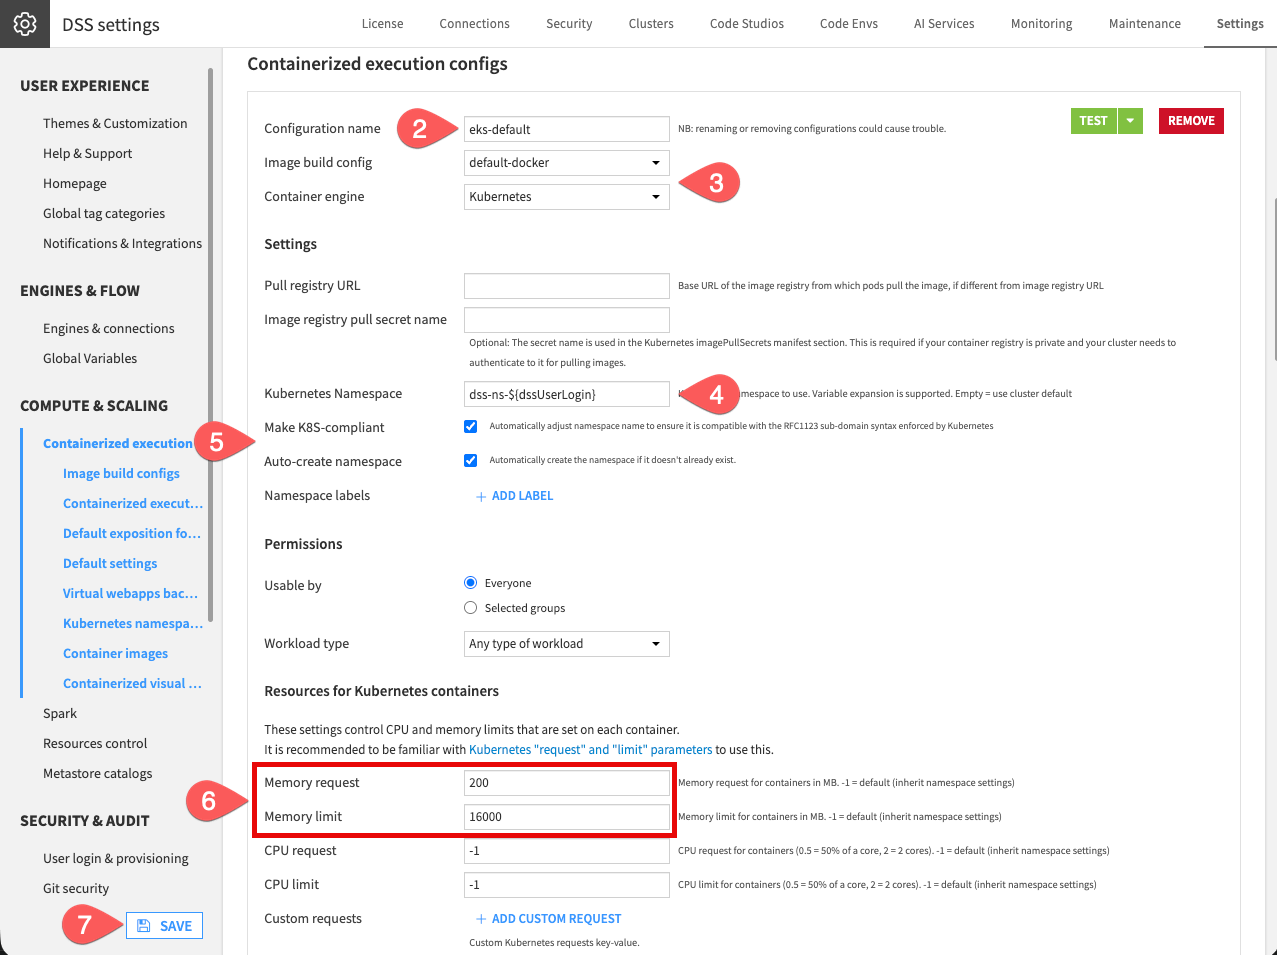
Under Containerized execution configs, click + Add another config.
Name it
eks-default.Set its Image build config to
default-dockerand its Container engine toKubernetes.Under Settings, set the Kubernetes namespace to
dss-ns-${dssUserLogin}.Enable Auto-create namespace and Make K8S-compliant.
Under Resources for Kubernetes containers, set the Memory request to
200, and Memory limit to16000.Click Save.
You can test your configuration by clicking the Test button. Confirm your configuration works well.
Important
Under Permissions, a configuration is usable by everyone by default. You can change this setting to reserve a configuration for specific teams, for example a heavy configuration for advanced coders.
Tip
To run GPU workloads:
On self-managed instances: create a configuration with a Custom Limit
nvidia.com/gpu = 1and a toleration matching your GPU nodes, paired with a code environment built with a GPU runtime.On Dataiku Cloud: under the Gpu-Accelerated tab, click + Add Gpu Accelerated Configuration.
Set the default configuration#
You now have a configuration, but no project uses it yet. Defaults tell the instance which configuration to apply when a project doesn’t choose its own.
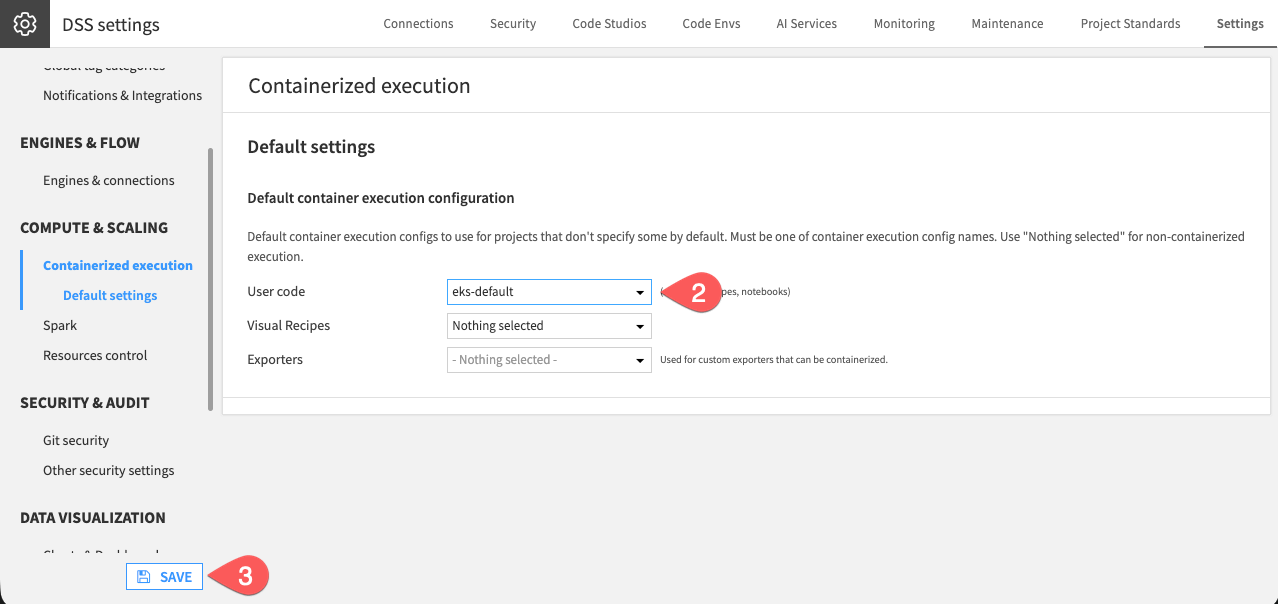
From your Design node, navigate to waffle (
) > Administration > Settings > Containerized execution.Under Default container execution configuration, set User code to
eks-default.Click Save.
Go to the section Default settings.
Set your cluster as the Default cluster. This is needed, otherwise any activity that runs on Kubernetes fails because it has nowhere to run.
Under Default container execution configuration, set User code to
eks-default.Click Save.
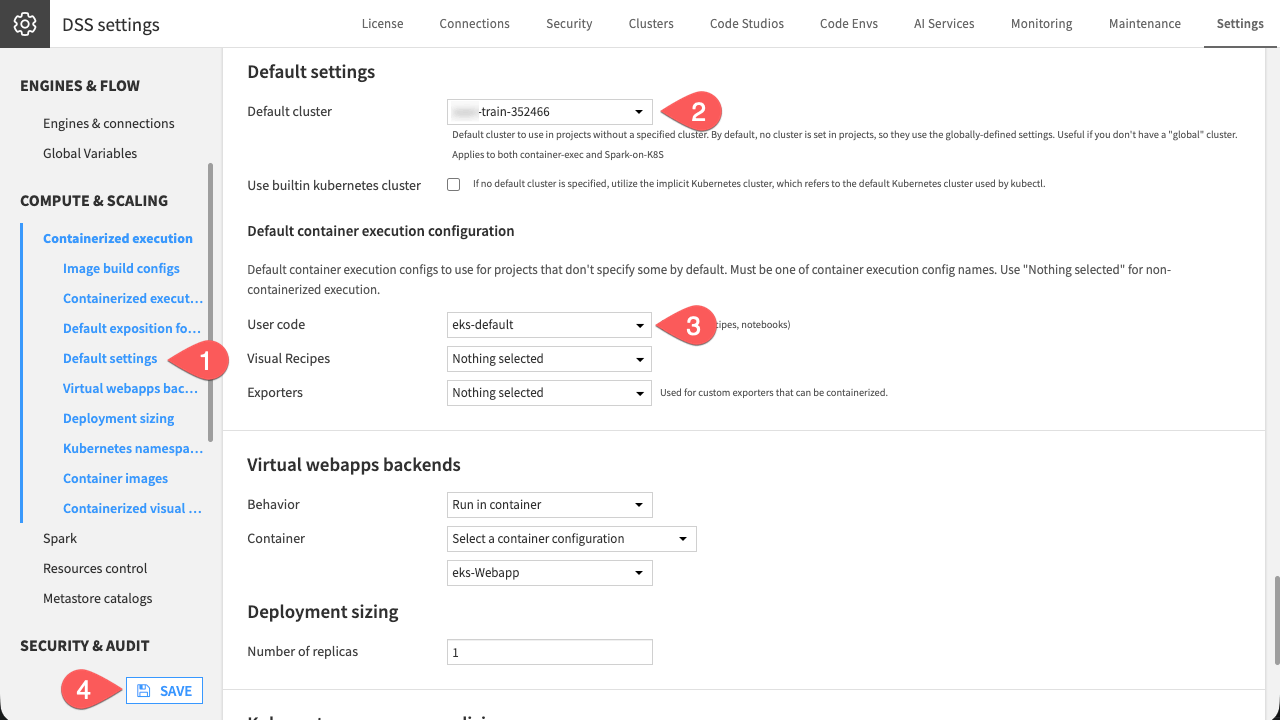
You can leave Visual Recipes and Exporters unset: visual recipes usually run in-database or on Spark rather than in a container, so most instances don’t set a container default for them.
Note
For self-managed instances, you can also assign a configuration to run web apps under Virtual webapps backends settings.
With a configuration created, tested, and set as the default, your instance is ready to run work in containers.
Enable a code environment#
A container configuration says how work runs; a code environment says which packages it runs with. Before a recipe can use an environment on the cluster, enable that environment for the configurations that need it. Enabling it builds the environment and pushes it to the registry as a container image.
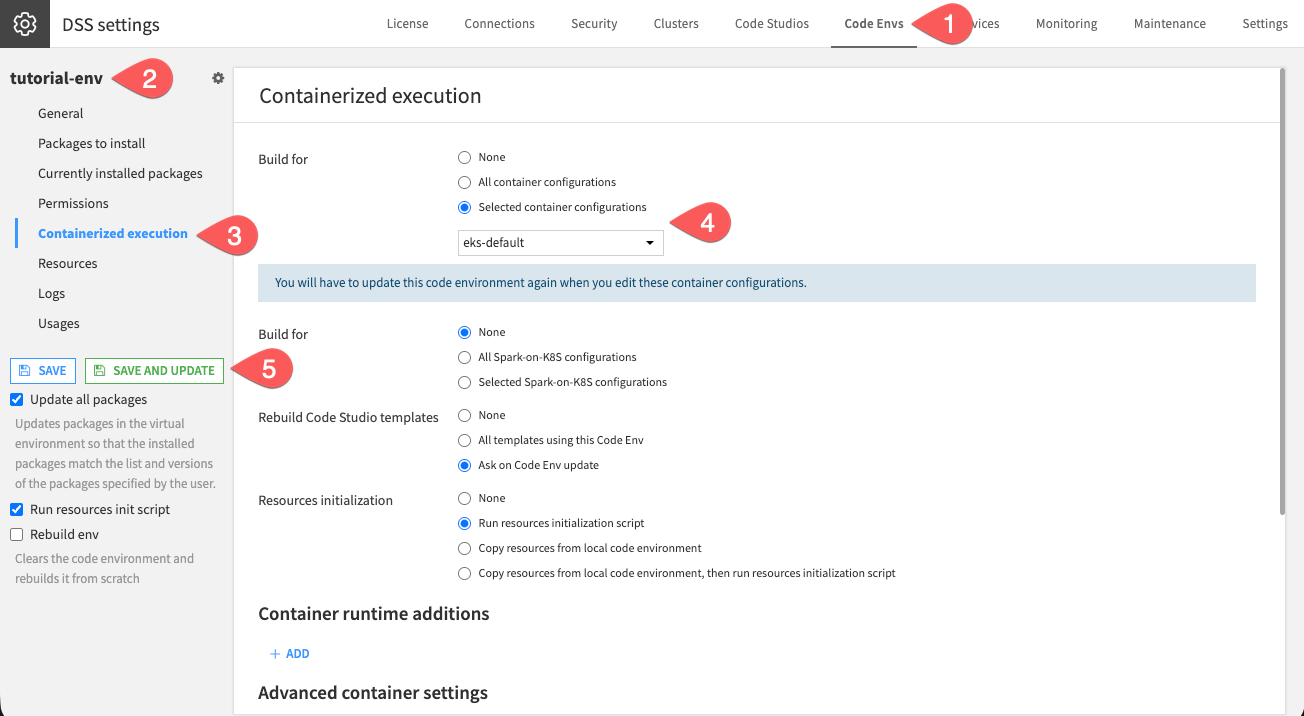
Navigate to the Code Envs tab.
Open the code environment you want to run on the cluster.
Click its Containerized execution panel.
Under Build for, choose Selected container configurations and pick
eks-default.Click Save And Update to build the environment and push it to the registry.
Note
The panel has a second Build for, for Spark-on-Kubernetes configurations. Leave it for now; Spark is covered in its own articles.
Tip
Build an environment only for the configurations that need it. Every configuration you select produces another image in the registry, so building for all of them wastes storage.
Run containerized work#
With a configuration, a default, and a code environment in place, you can send a job to the cluster and watch it run. Import the tutorial project to work from a ready-made dataset.
If needed, from the Dataiku Design homepage, use the (
 ) icon to switch to the Designer view.
Click + New Project > Learning projects.
Search for and select Containerized Execution.
If needed, change the folder into which the project will be installed, and click Create.
From the project homepage, click Go to Flow (or type
g+f).
Note
You can also download the starter project from this website and import it as a ZIP file.
Run a code recipe#
Start with a code recipe, the workload containerized execution is used for most often.
In the tutorial project, open the provided Python recipe.
On its Advanced tab, set the Python environment to the one you enabled, and check the Container configuration settings.
Run the recipe. In its job log, look for a line like
Executing recipe on Kubernetes with config=eks-default, which confirms it ran in the container rather than locally.
Tip
Leaving Container configuration on Inherit project default makes the recipe follow the default you set earlier, which is what you want for most recipes. Override it only when a recipe needs a specific configuration, for example one with more memory.
Note
Visual recipes can also run in a container. To make it run, choose the DSS (containerized) engine on the recipe engine settings.
Monitor the job#
As the recipe runs, confirm it actually reached the cluster.
From the Cloud Launchpad, go to Usage & Monitoring > Design
Find your job under Running Tasks. You can see the task’s CPU, RAM, and status here. Pod-level details aren’t exposed on Dataiku Cloud.
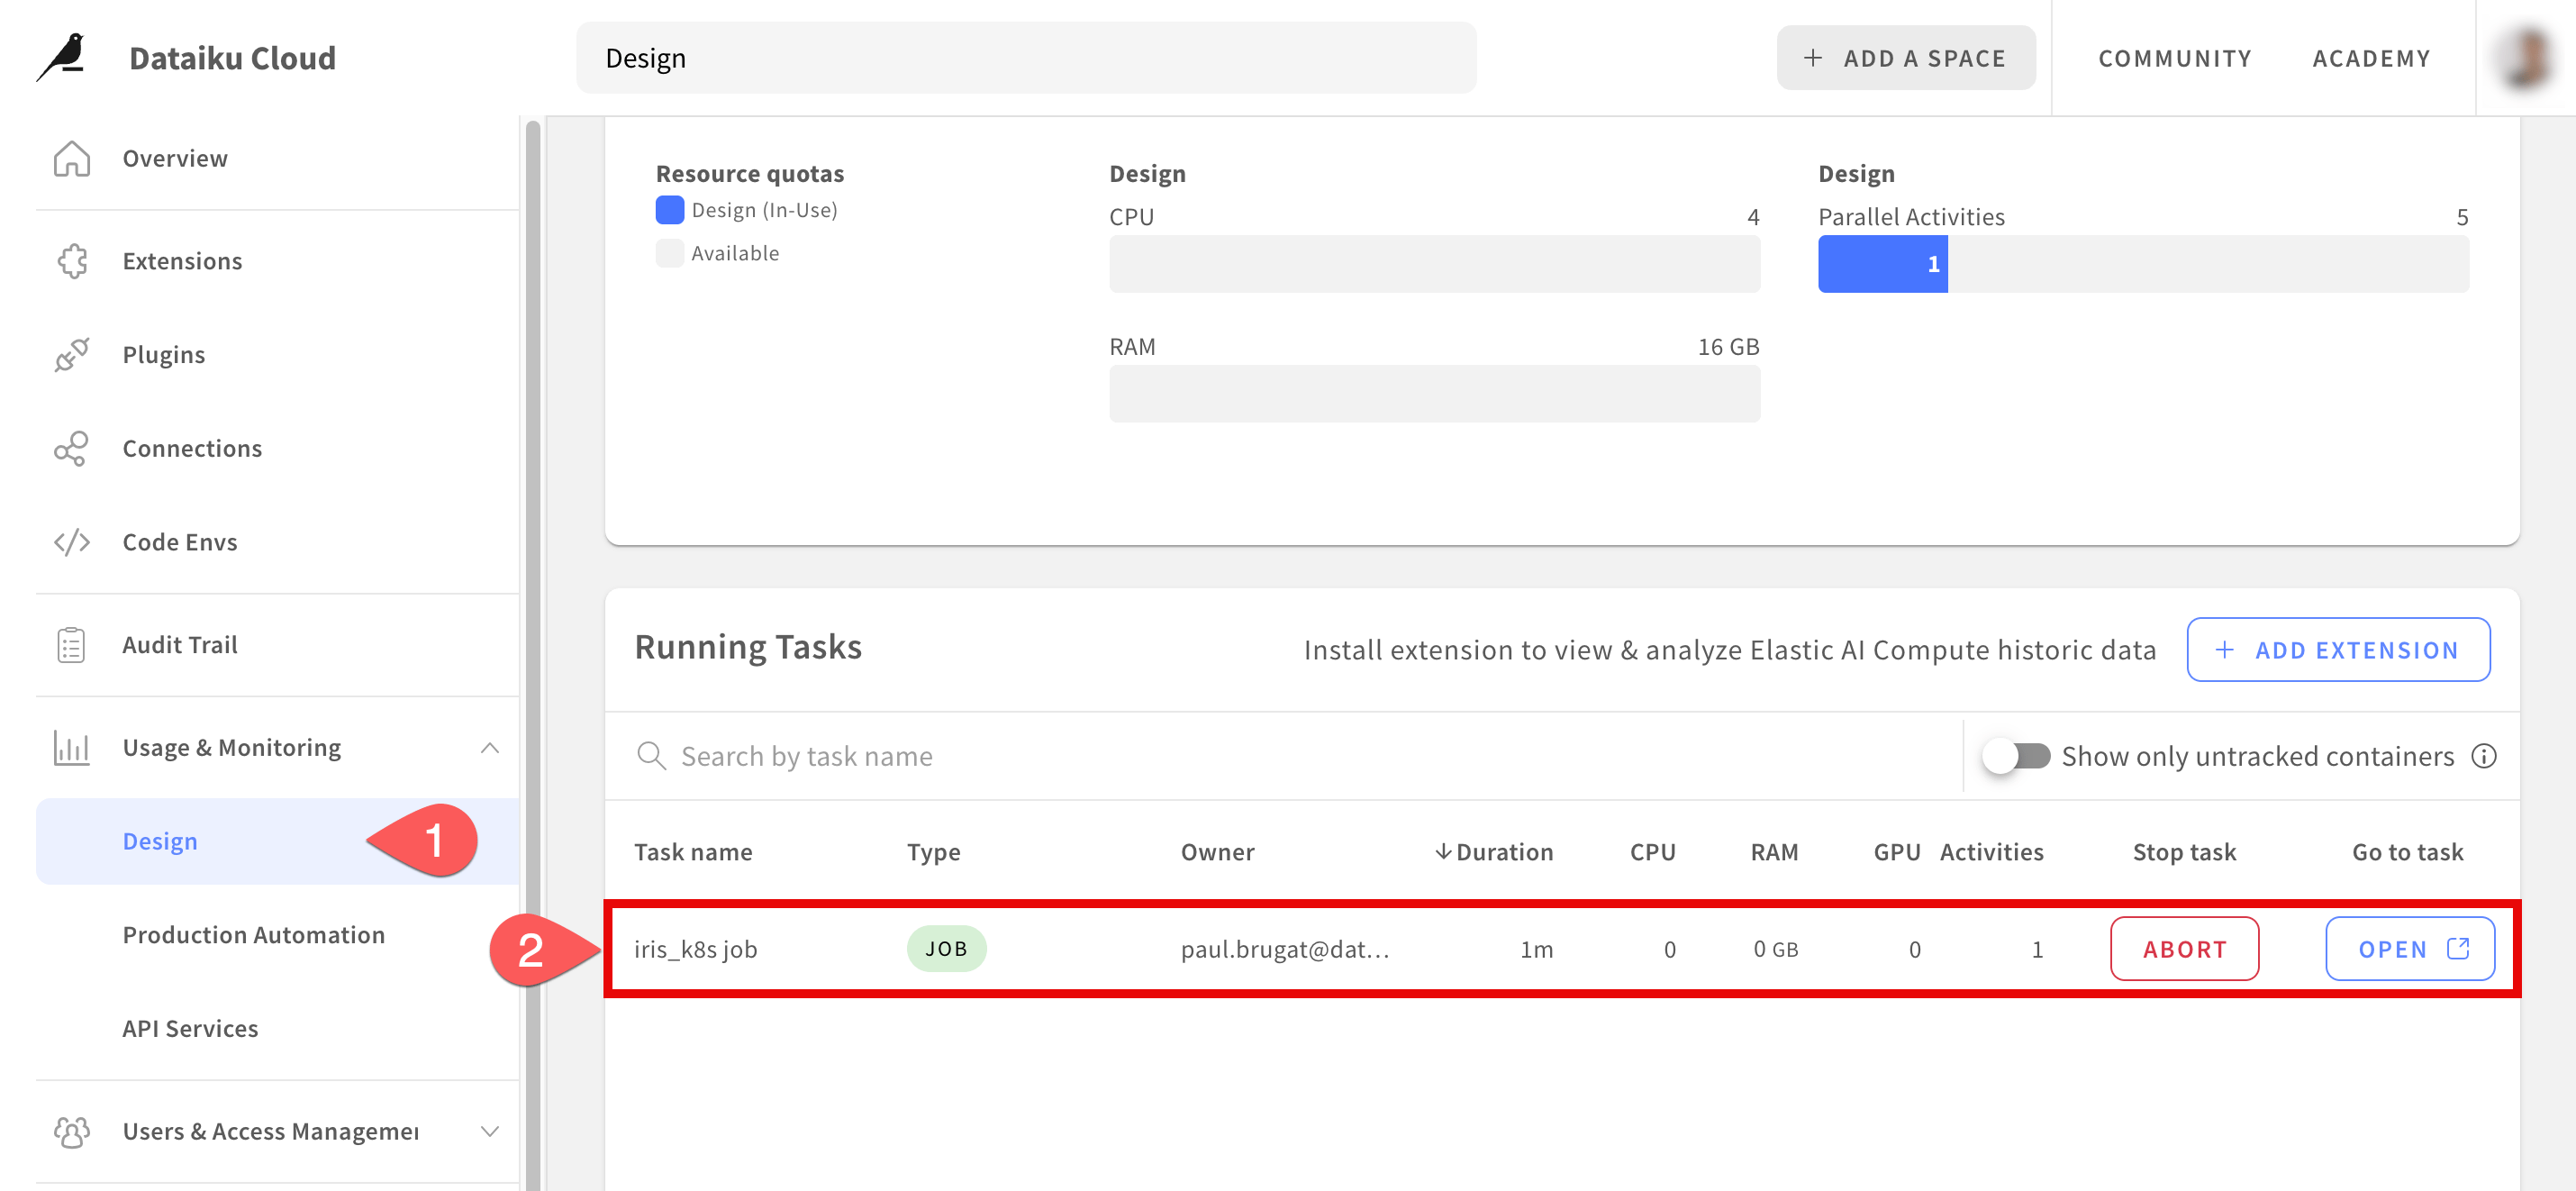
While the job runs, go to
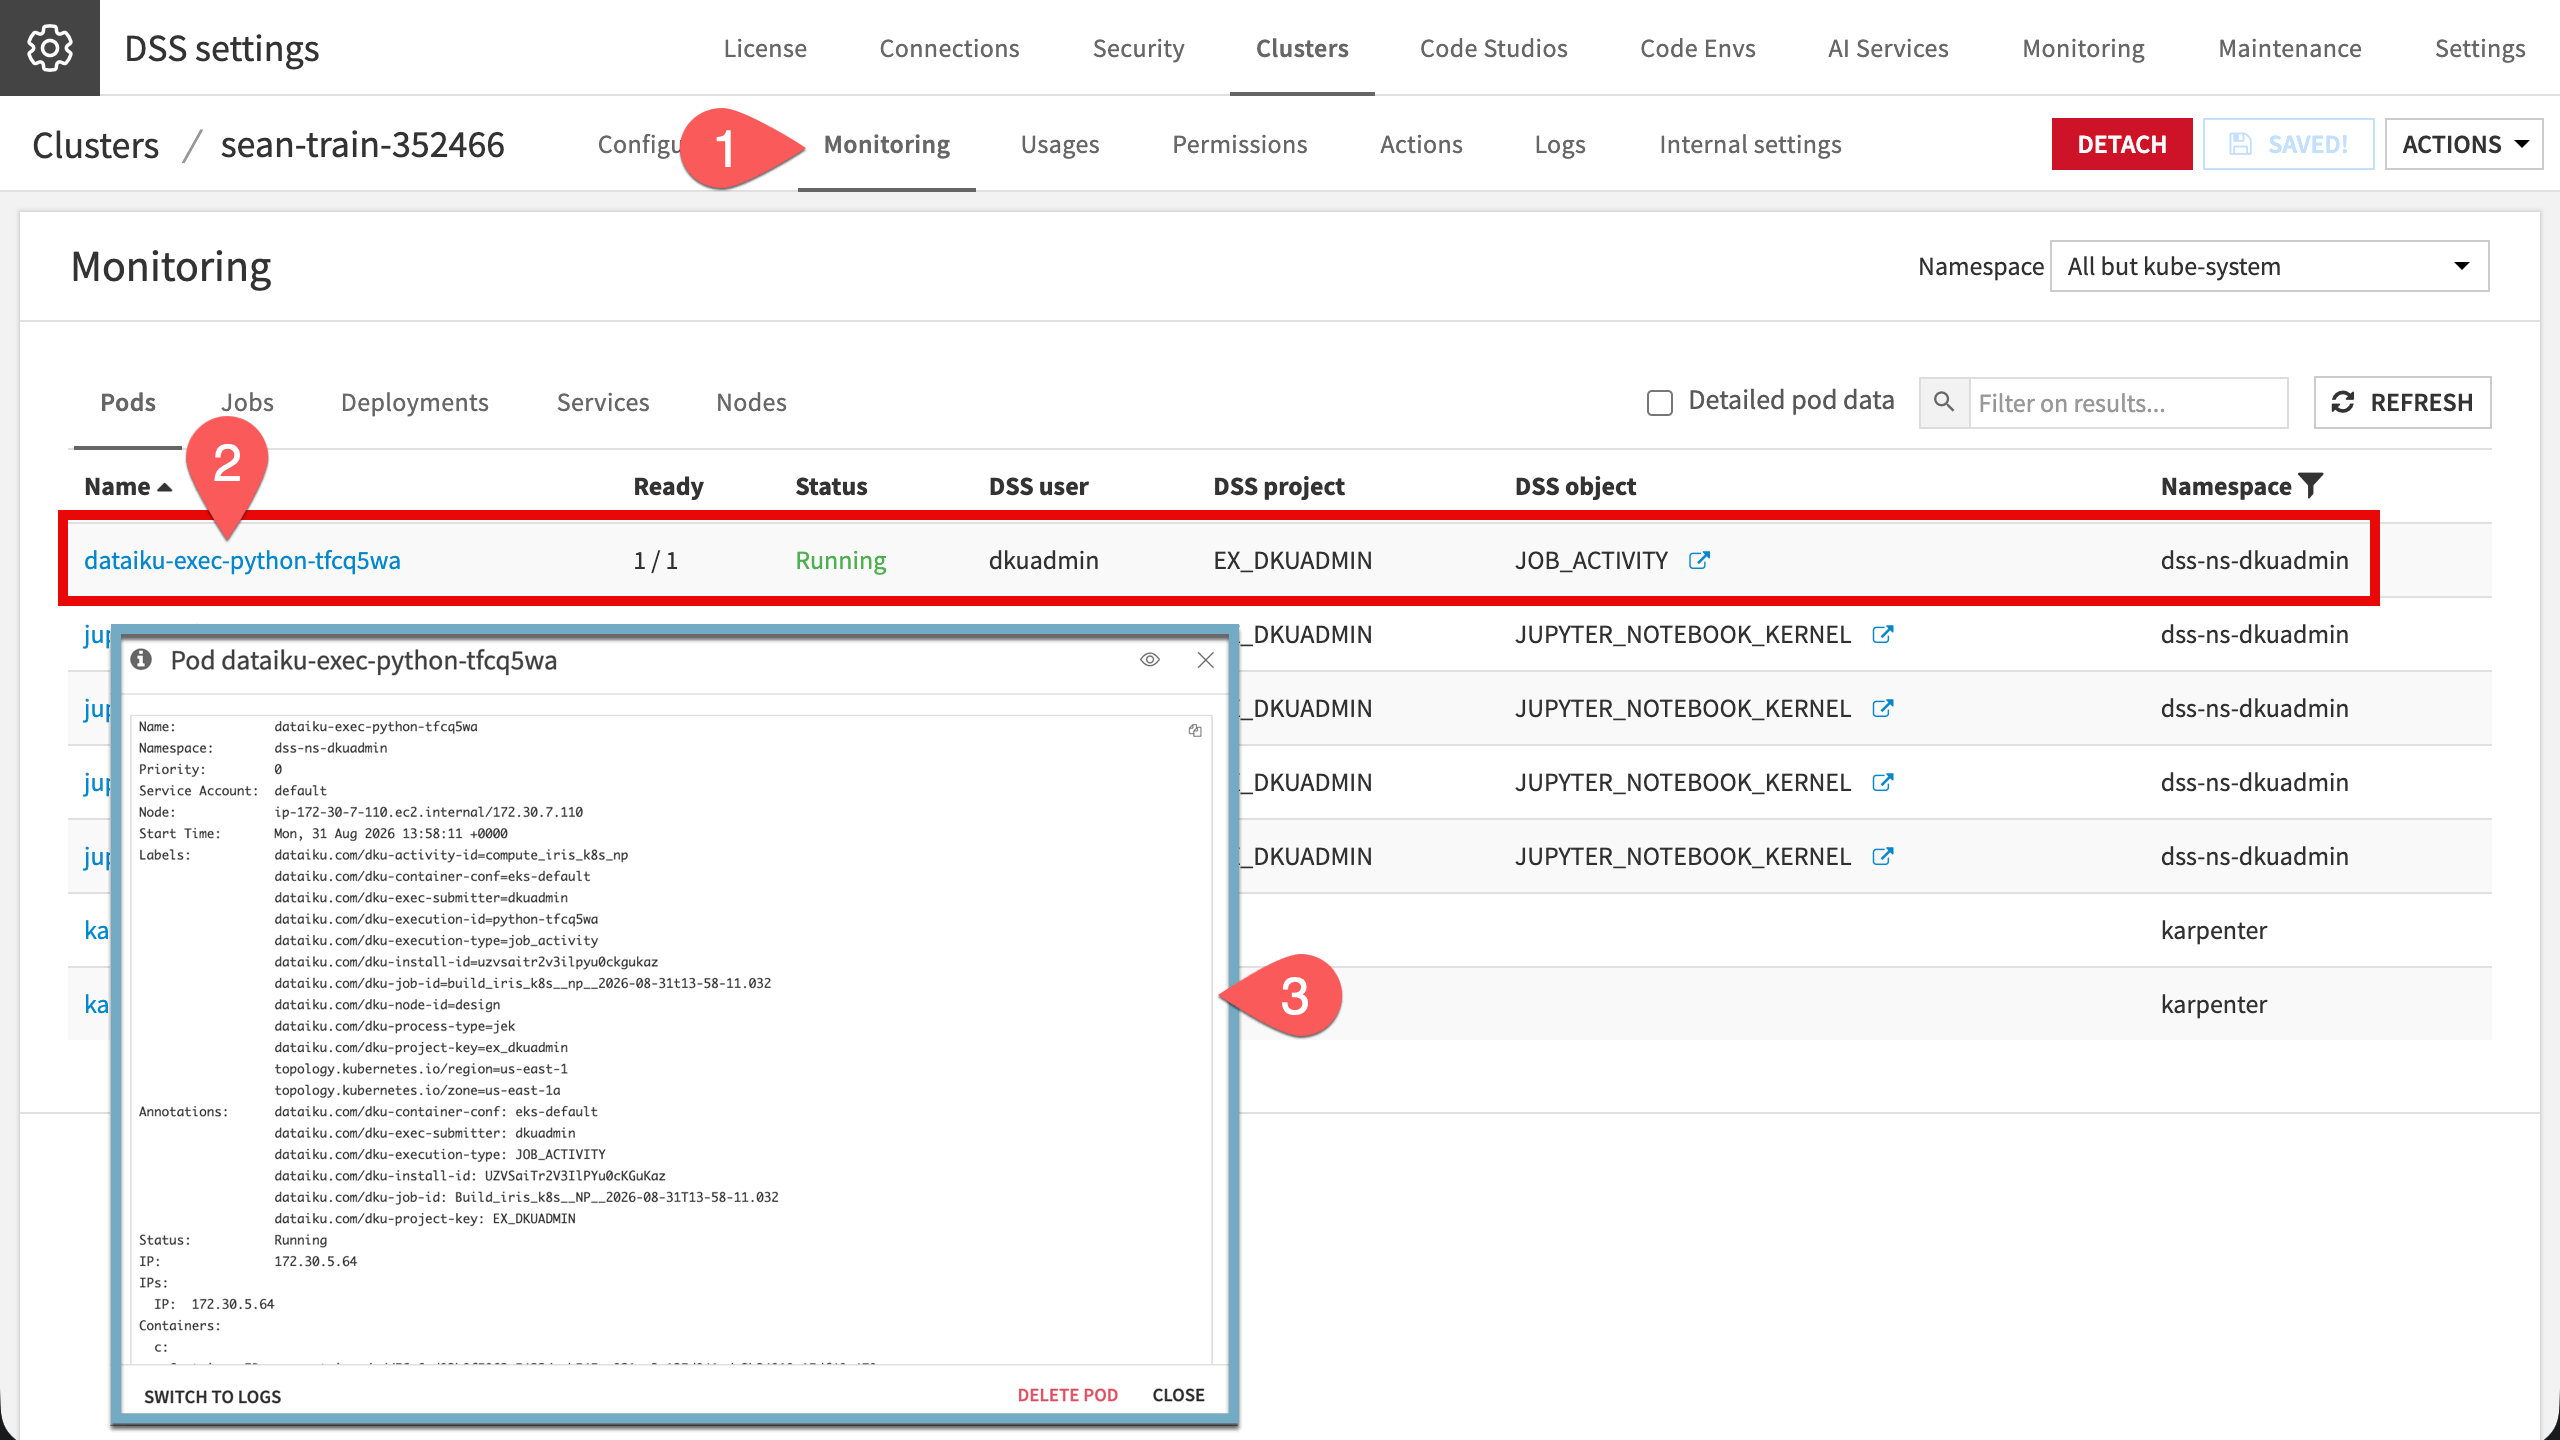
> Administration > Clusters, select your cluster, and open Monitoring > Pods.Confirm that a pod is created for the job, and click the pod to open its details.
Inspect its status and events. This is where you can troubleshoot a failed or stuck job.
Note
Pods are short-lived. Look while the job is still running: a completed pod is removed from the list shortly after it finishes.
Grant and troubleshoot cluster access#
Running work is one half of administration. Deciding who else can, and fixing what goes wrong, is the other.
Grant a group access to the cluster#
So far you’ve worked as an administrator. To let a team send its own work to the cluster, grant their group access.
On Dataiku Cloud, clusters are managed for you, so you control access on the container configuration instead of on the cluster.
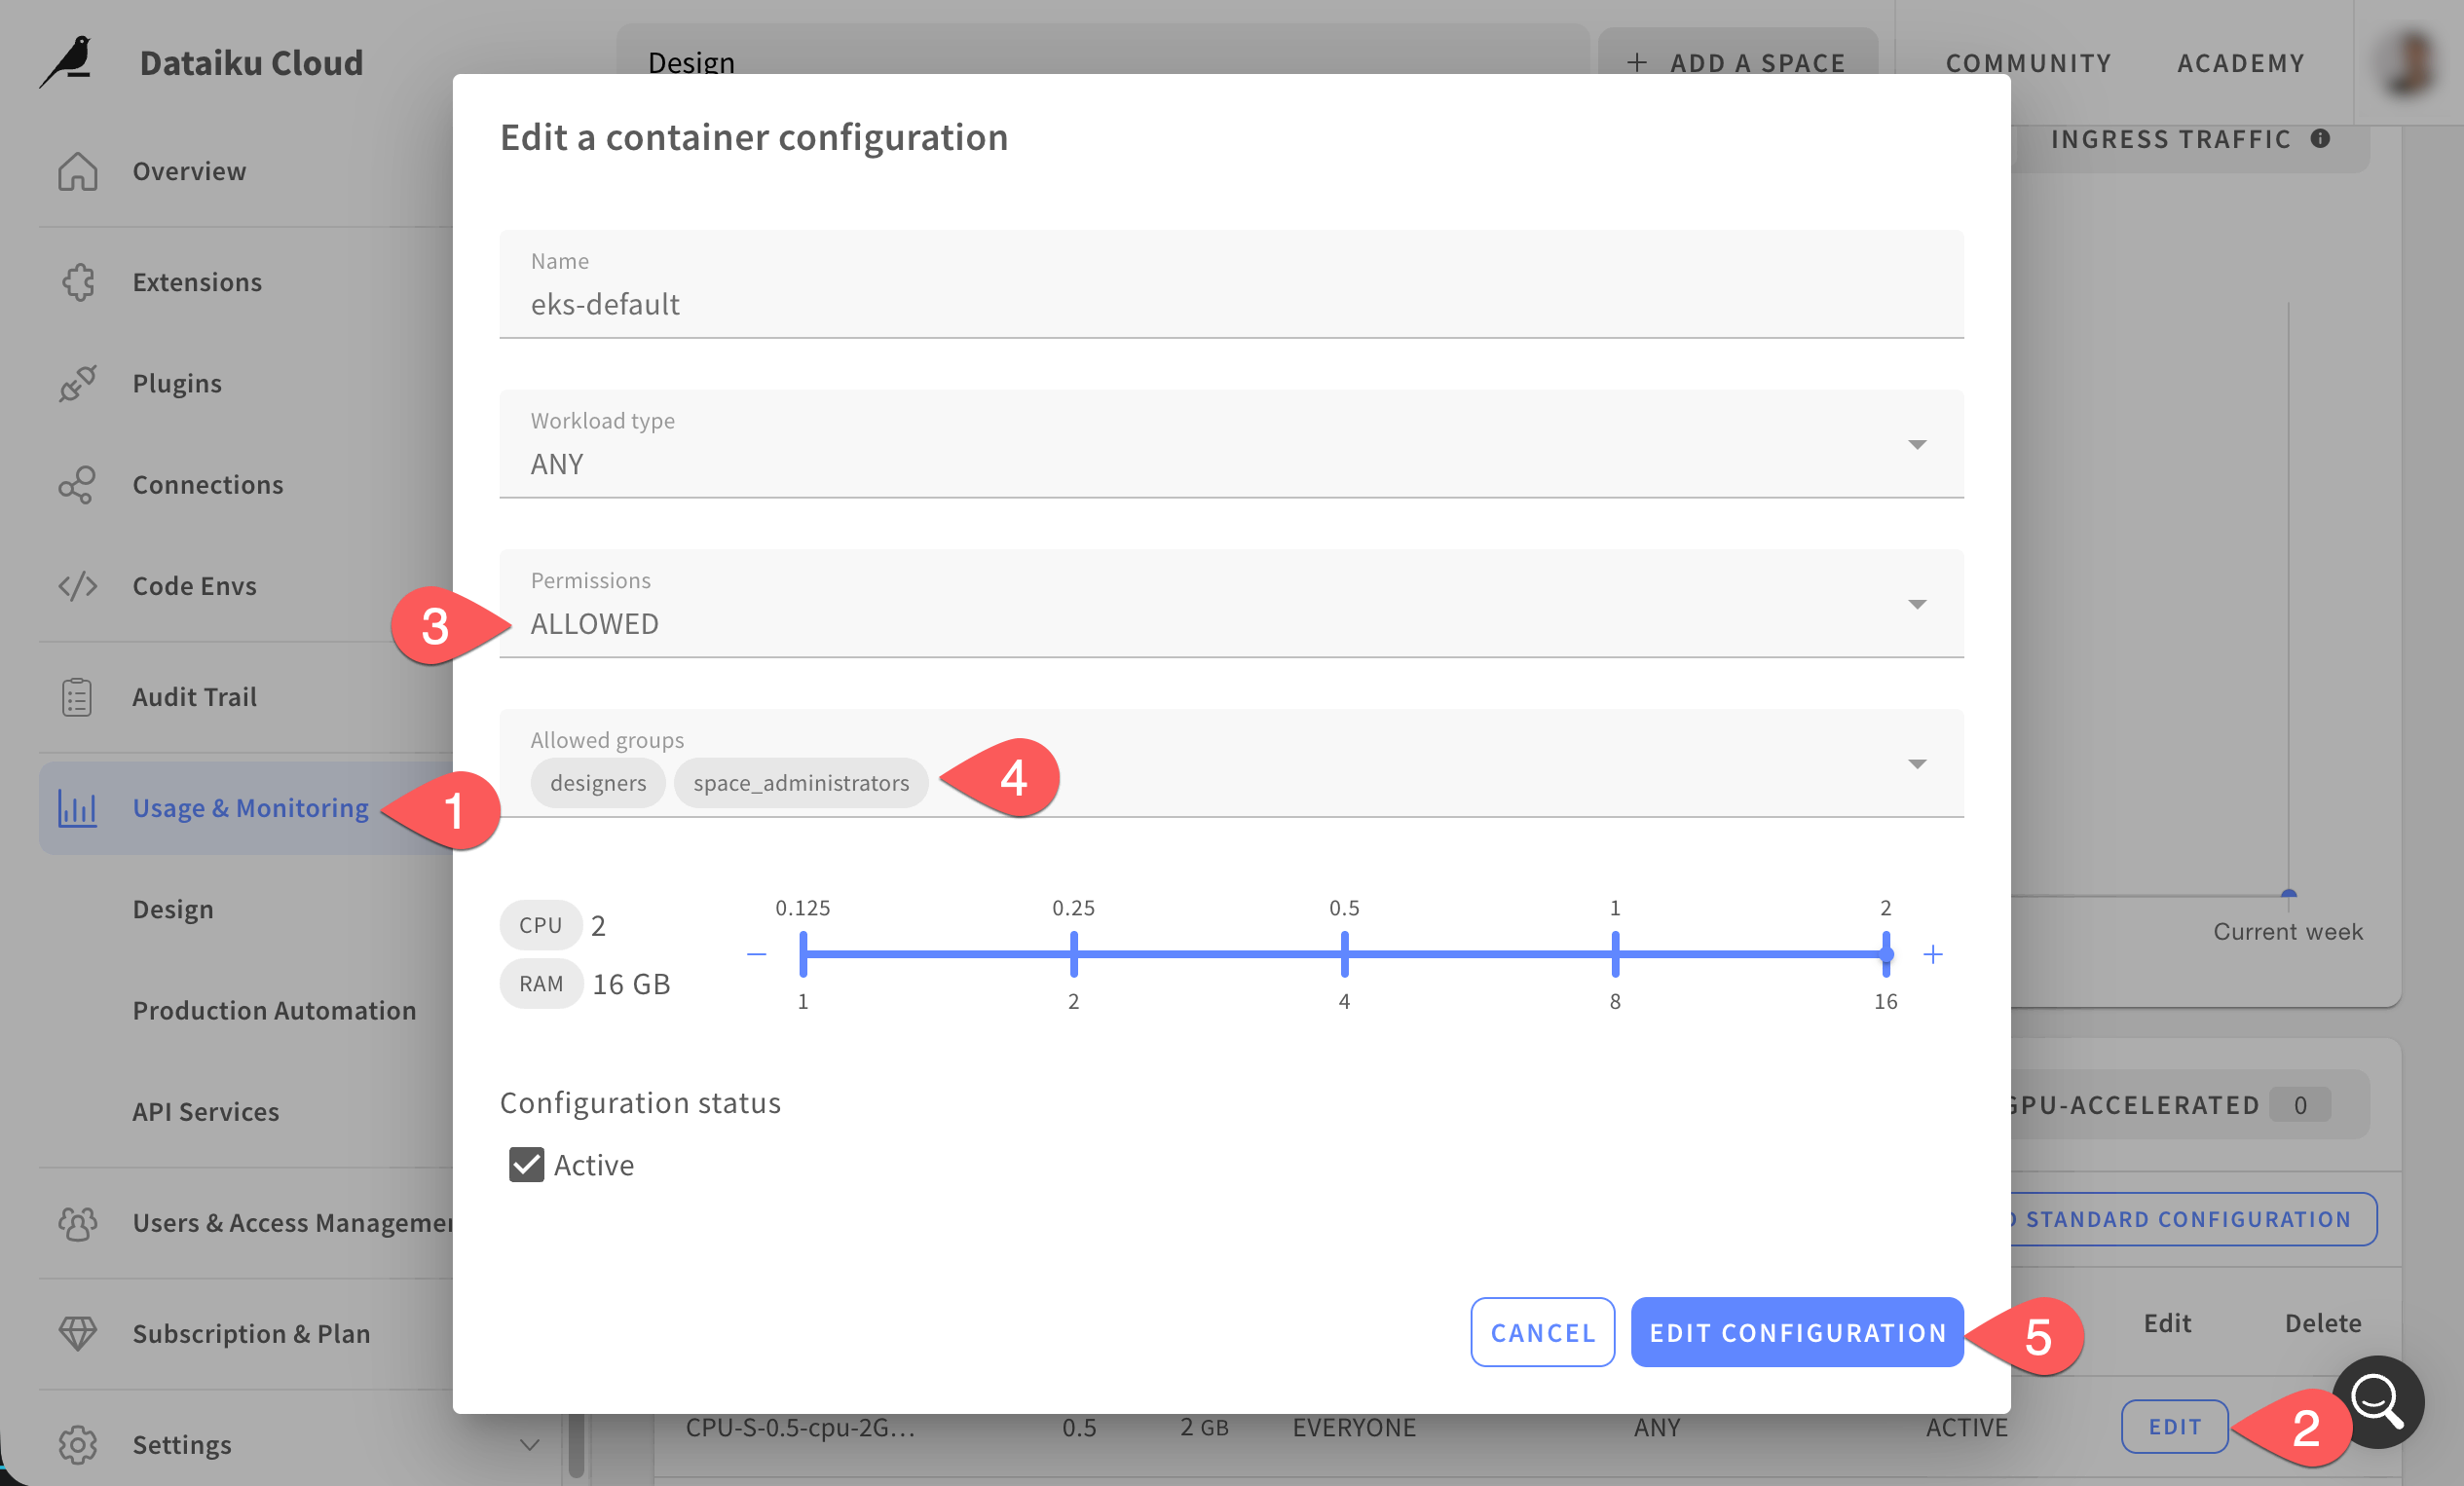
Click the Usage & Monitoring tab.
Locate your container configuration eks-default, and click Edit.
Set Permissions to ALLOWED.
Under Allowed groups, select the groups that may use it.
Click Edit Configuration to confirm.
Still under
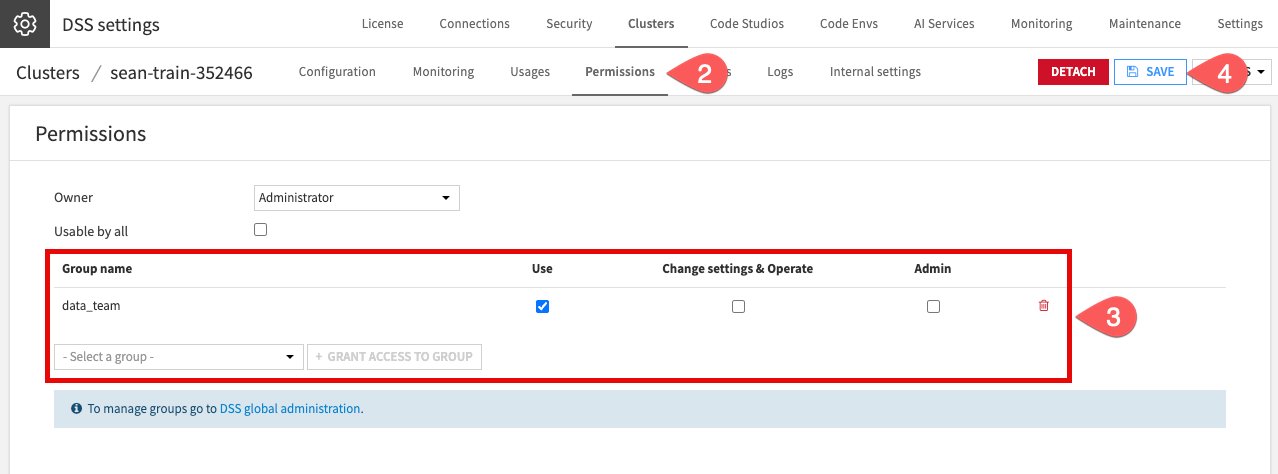
> Administration, go to the Clusters tab and select your cluster.Enter the Permissions tab.
Add a group and grant it Use.
Click Save.
Tip
Most teams need only Use: it lets them send work to the cluster without being able to change or stop it. Add Change settings & Operate or Admin only for the administrators who maintain the cluster.
Troubleshoot common errors#
Two errors come up so often when work first moves into containers that they’re worth recognizing, even though you won’t reproduce them here:
Symptom |
Cause |
Fix |
|---|---|---|
A recipe fails with an error about the code environment. |
The code environment isn’t built for the chosen container configuration. |
Enable and build that environment for the configuration (see the previous section). |
A Kubernetes activity fails, saying no cluster is available. |
No default cluster is set, or the project points to a cluster the user can’t reach. |
Set a default cluster under Default settings, and check the user’s access on the cluster’s Permissions tab. See Elastic AI clusters concept for details. |
Next steps#
In this tutorial, you created a container configuration, set it as the instance default so projects use it automatically, enabled a code environment on the cluster, ran a recipe in a container, monitored its pod, and granted a group access to the cluster.
Next, learn how to run distributed Spark workloads on the same cluster in Concept | Spark on Kubernetes.
See also
For more information, see the reference documentation on Containerized DSS engine and Using code envs with containerized execution.