

Tutorial | Configure Spark on Kubernetes#
Get started#
Spark spreads a single job across the whole cluster, which is what makes it suited to large, distributed data processing. In this tutorial, you’ll set up a Spark configuration, run a Spark job and learn where to read its logs, speed several recipes up with a pipeline, and see for yourself what keeps data on the fast path.
Objectives#
In this tutorial, you will:
Create and apply a Spark configuration.
Run a Spark recipe and retrieve its logs and the Spark History Server.
Merge recipes into a Spark pipeline and virtualize an intermediate dataset.
Run a PySpark notebook correctly.
Compare fast-path and slow-path data transfer.
Prerequisites#
Spark enabled on your instance. On Dataiku Cloud and Cloud Stacks this is already done; on a custom installation, it’s set up with the Spark standalone integration.
An attached Elastic AI cluster and a reachable image registry, for example Amazon ECR.
A PySpark code environment you can build for Spark.
A native connection with Spark native integration enabled, for example Amazon S3 or Snowflake, to test the fast data-transfer path.
Use case summary#
Your teams have work that a single node can’t handle: joins over large datasets, heavy aggregations, or feature engineering at scale. Spark lets that work run in parallel across an attached cluster.
In this tutorial, you’ll prepare the Spark configuration an administrator maintains, then import a ready-made project and use it to run and inspect Spark workloads. You’ll inspect its logs, see how Spark pipelines work, run a PySpark notebook correctly, and compare the fast and slow paths for data transfer.
Create a Spark configuration#
A Spark configuration tells the cluster how to run a Spark application. Setting one up has two parts: an image build config that specifies where the Spark image is built and stored, and a runtime configuration that specifies how the application runs on Kubernetes.
Note
On Dataiku Cloud and Dataiku Cloud Stacks, Spark on Elastic AI is already set up, so you can skip this section. The steps below are for a custom installation.
Enable Spark#
First, make sure Spark is enabled for your instance.
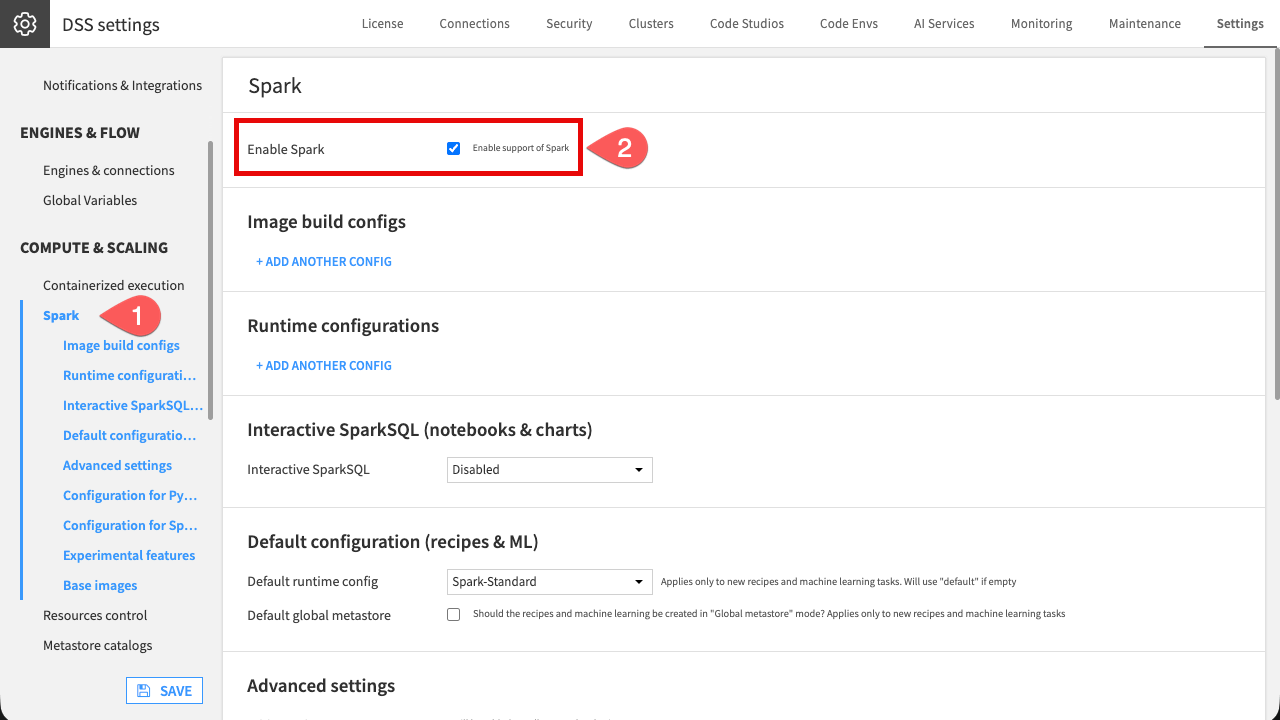
On your Design node, go to
 > Administration > Settings > Spark.
Confirm that Enable support of Spark is checked. If not, enable it.
Create the Spark image build config#
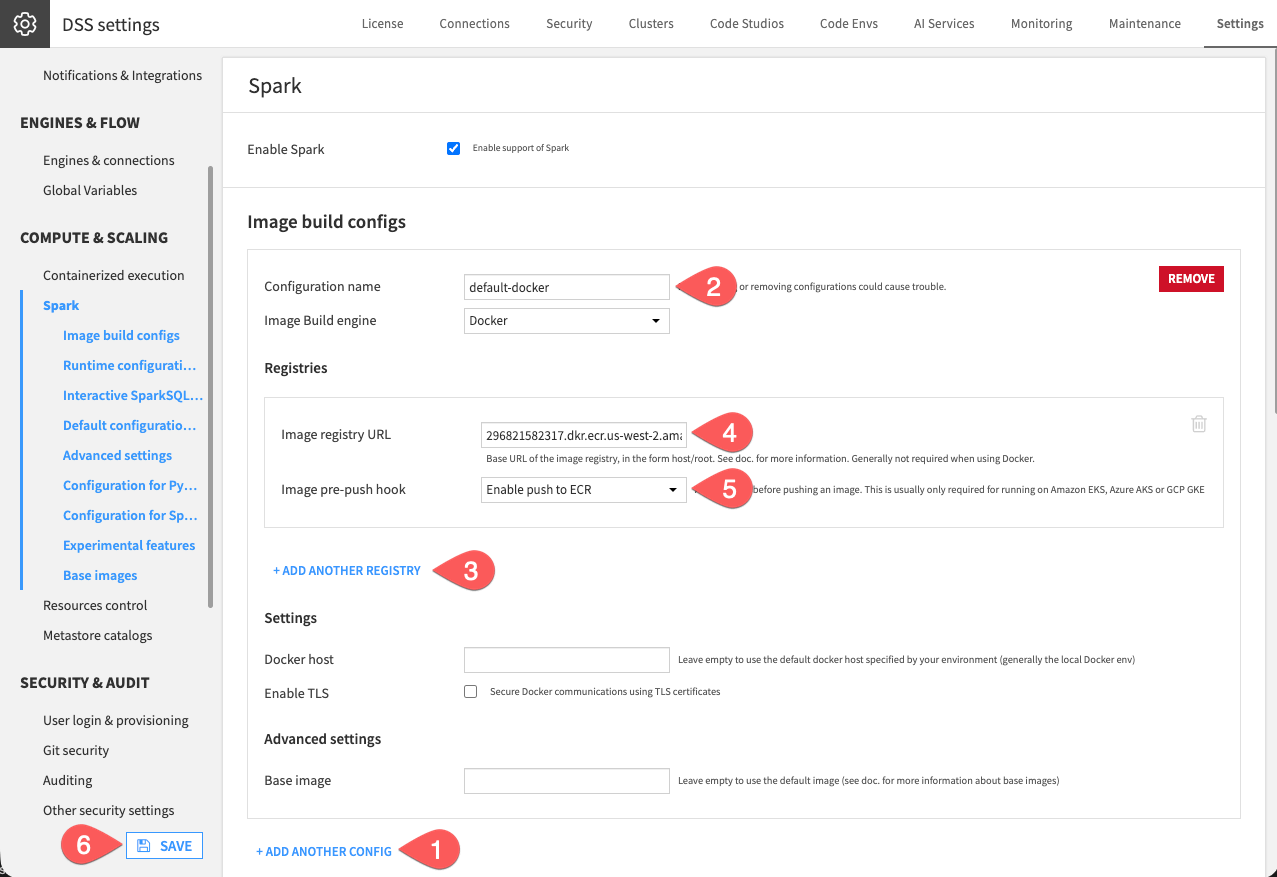
Still on the Spark settings page, set up the image build config, which points Spark at the registry where its container image is published.
Under Image build configs, click + Add another config
Name it
default-docker.Click + Add another registry.
Enter your registry in the Image registry URL field.
As Image pre-push hook, select Enable push to ECR (or the option matching your registry).
Click Save.
Create the Spark runtime configuration#
The runtime configuration holds the Spark properties and connects Spark to Kubernetes.
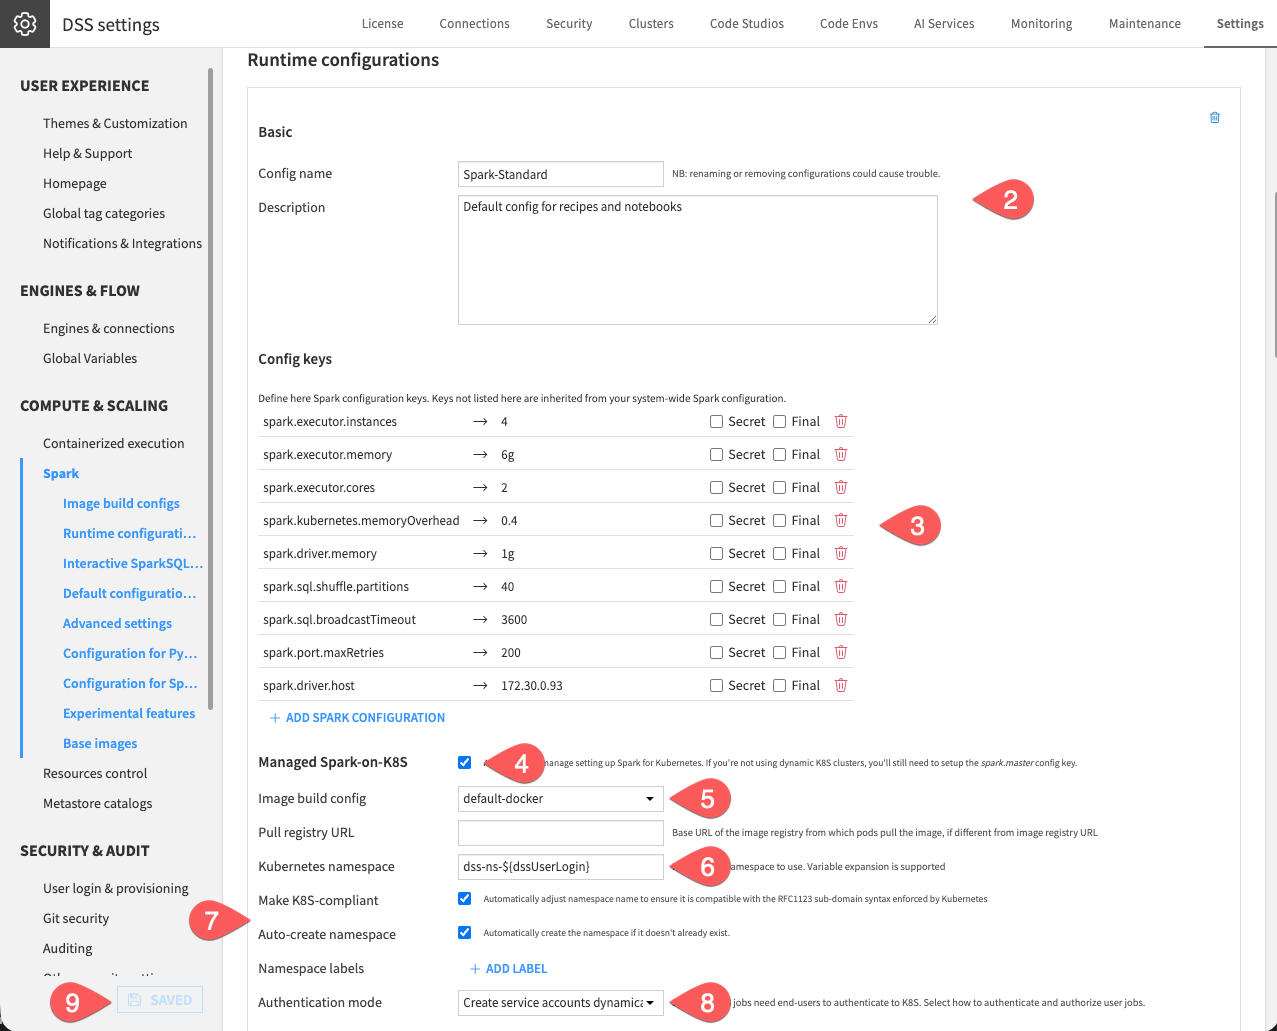
Under Runtime configurations, click + Add another config.
Name it
Spark-Standardand give it a description such asDefault config for recipes and notebooks.Under Config keys, add the Spark properties from the standard configuration described in Spark configurations.
Check Managed Spark-on-K8S.
Set the Image build config to
default-docker.Set the Kubernetes namespace to
dss-ns-${dssUserLogin}.Enable Make K8S-compliant and Auto-create namespace.
Set Authentication mode to Create service accounts dynamically.
Click Save.
See also
To get more help about Spark configurations, see Spark configurations in the reference documentation.
Set the default Spark configuration#
Now tell the instance to use this configuration by default.
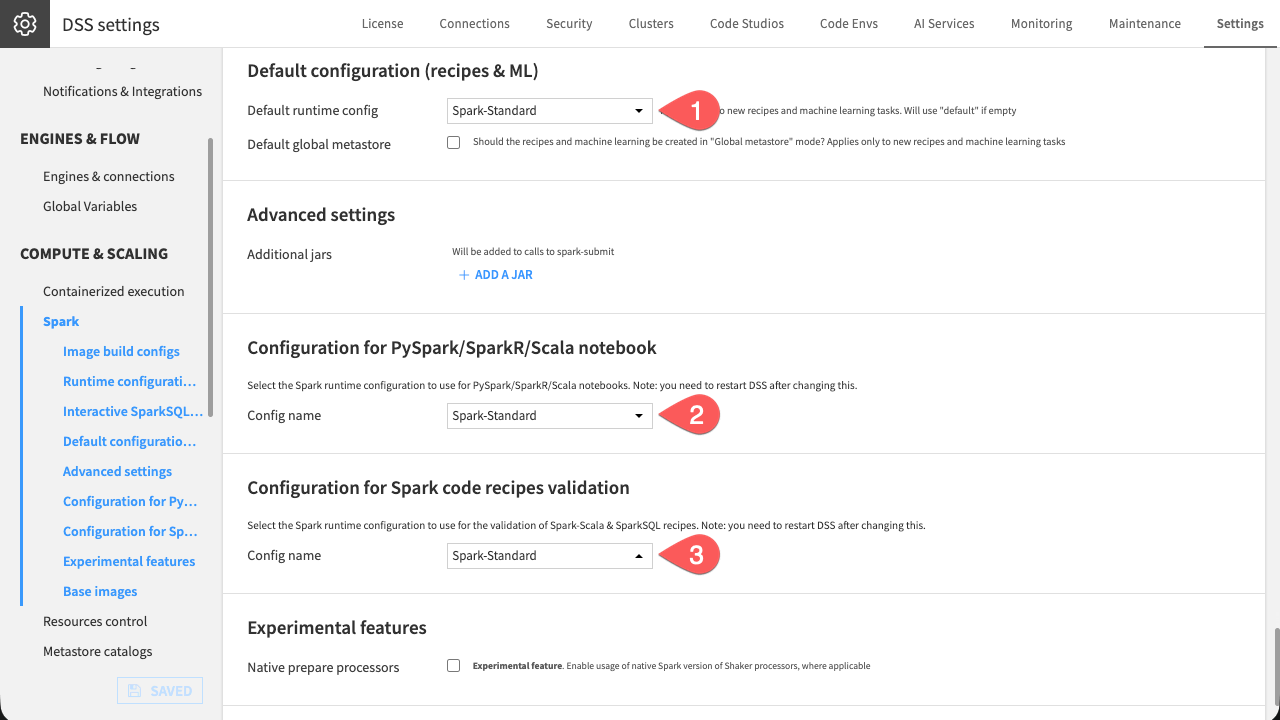
Under Default configuration (recipes & ML), set Default runtime config to
Spark-Standard.Under Configuration for PySpark/SparkR/Scala notebook, set Config name to
Spark-Standard.Under Configuration for Spark code recipes validation, set Config name to
Spark-Standard.
Tip
Some of these take effect only after a DSS restart. If a configuration you just created doesn’t appear in a dropdown, save, restart DSS, and try again.
Push the base images#
Now you’re ready to publish the Spark base image.
Go to the Base images section at the bottom of the page.
Click Push Base Images to build and publish the Spark base image.
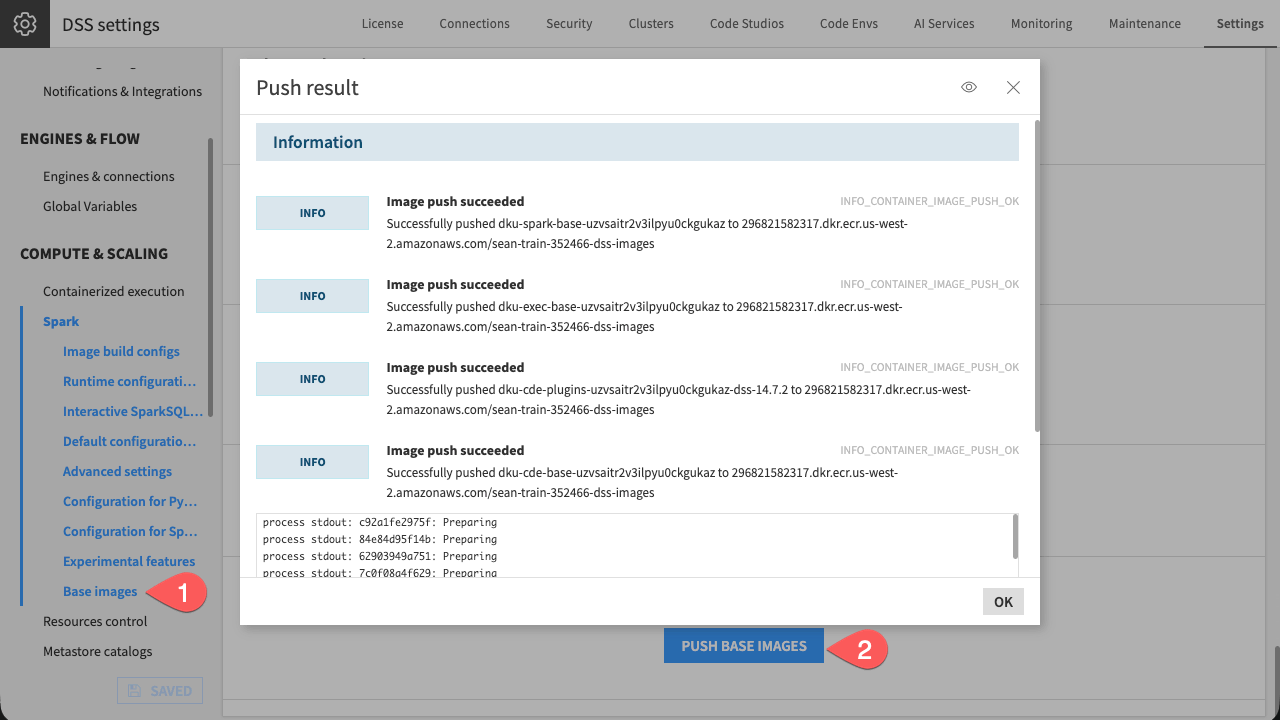
With Spark set up, you can now run a job on the cluster.
Run a Spark recipe#
Now that Spark is configured, import the tutorial project and run a job on it. It comes with a small Flow containing a chain of Spark recipes, so you can focus on running and inspecting jobs.
If needed, from the Dataiku Design homepage, use the (
 ) icon to switch to the Designer view.
Click + New Project > Learning projects.
Search for and select Spark on Kubernetes.
If needed, change the folder into which the project will be installed, and click Create.
From the project homepage, click Go to Flow (or type
g+f).
Note
You can also download the starter project from this website and import it as a ZIP file.
The project’s Flow has two branches: a chain of recipes you’ll set to run on Spark (used here and in the pipeline section), and two Sync recipes used at the end to compare the fast and slow data-transfer paths.
Configure a recipe#
First, tell the recipe to use the Spark configuration you created.
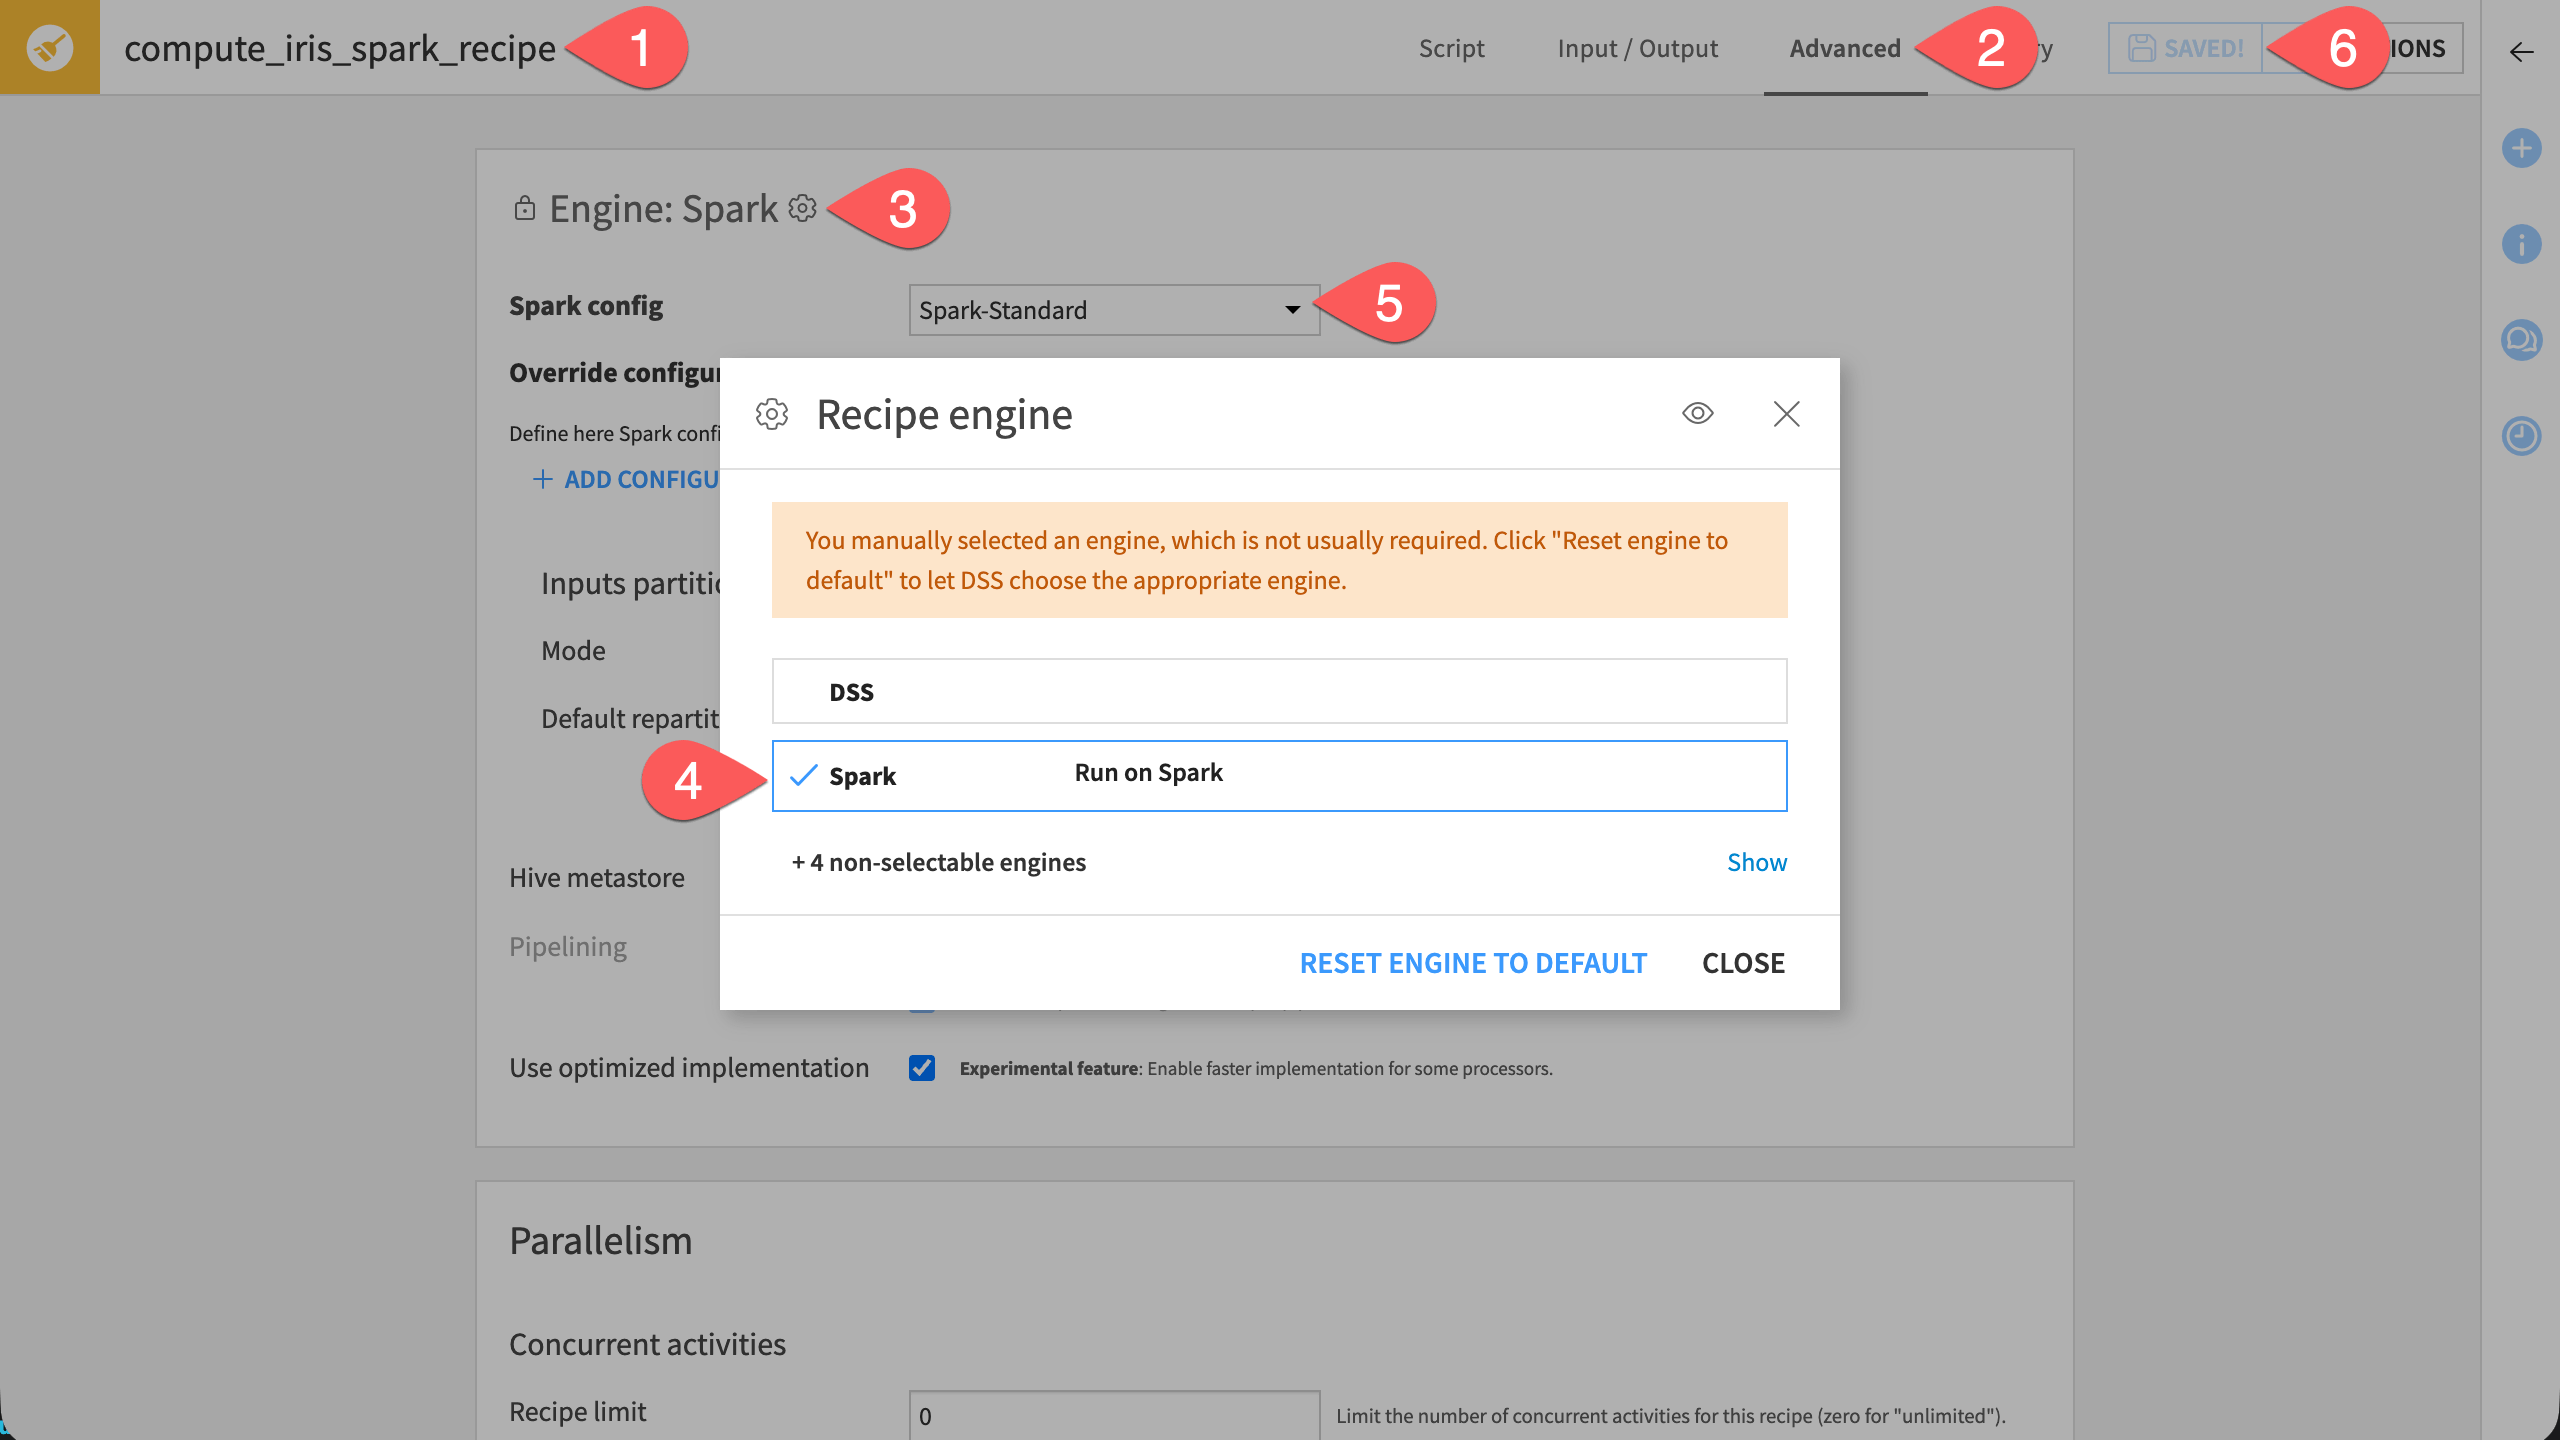
Open the Prepare recipe compute_iris_prepared.
Navigate to the Advanced tab.
Click the gear icon (
 ) next to change the Engine.
Select Spark.
Under Spark config, select your configuration Spark-Standard.
Click Save.
Run a recipe#
Now that your recipe is configured to use Spark, run it.
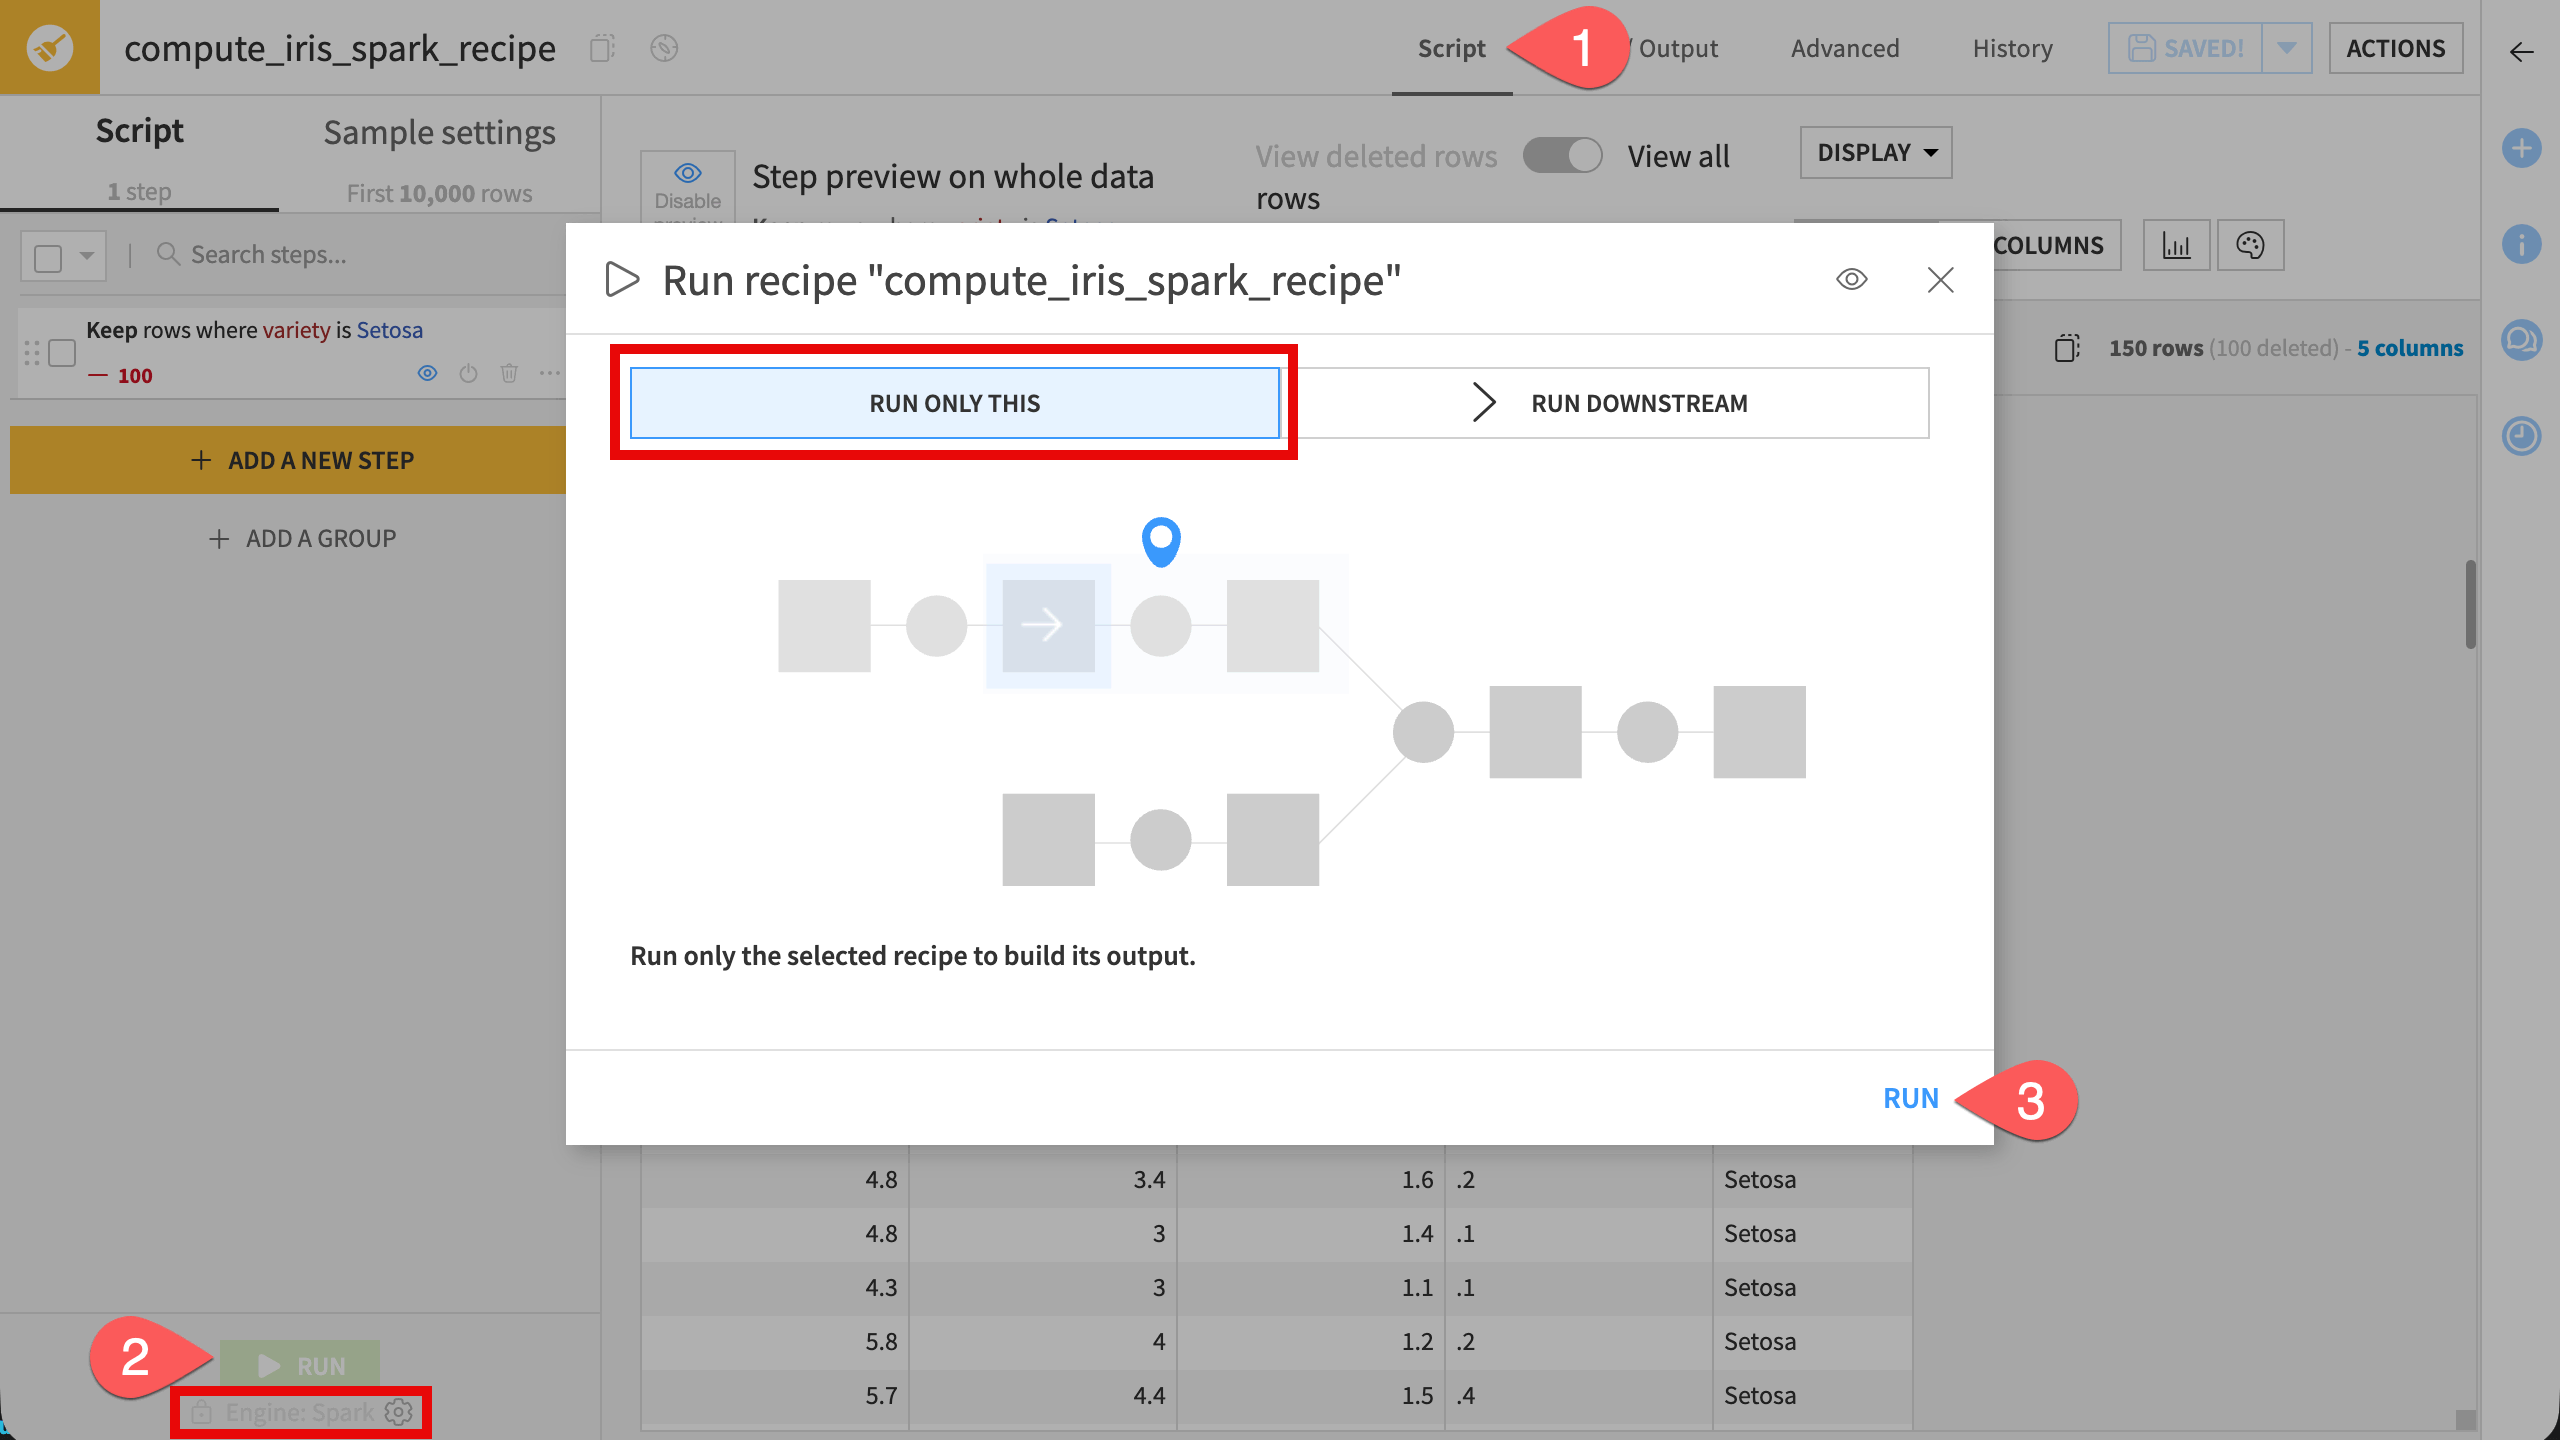
Go back to the Script tab.
Confirm the selected engine is Spark, and click Run.
Select Run Only This, then click Run. Wait for the job to finish.
Retrieve the logs#
When a Spark job misbehaves, everything you need is on the job’s page.
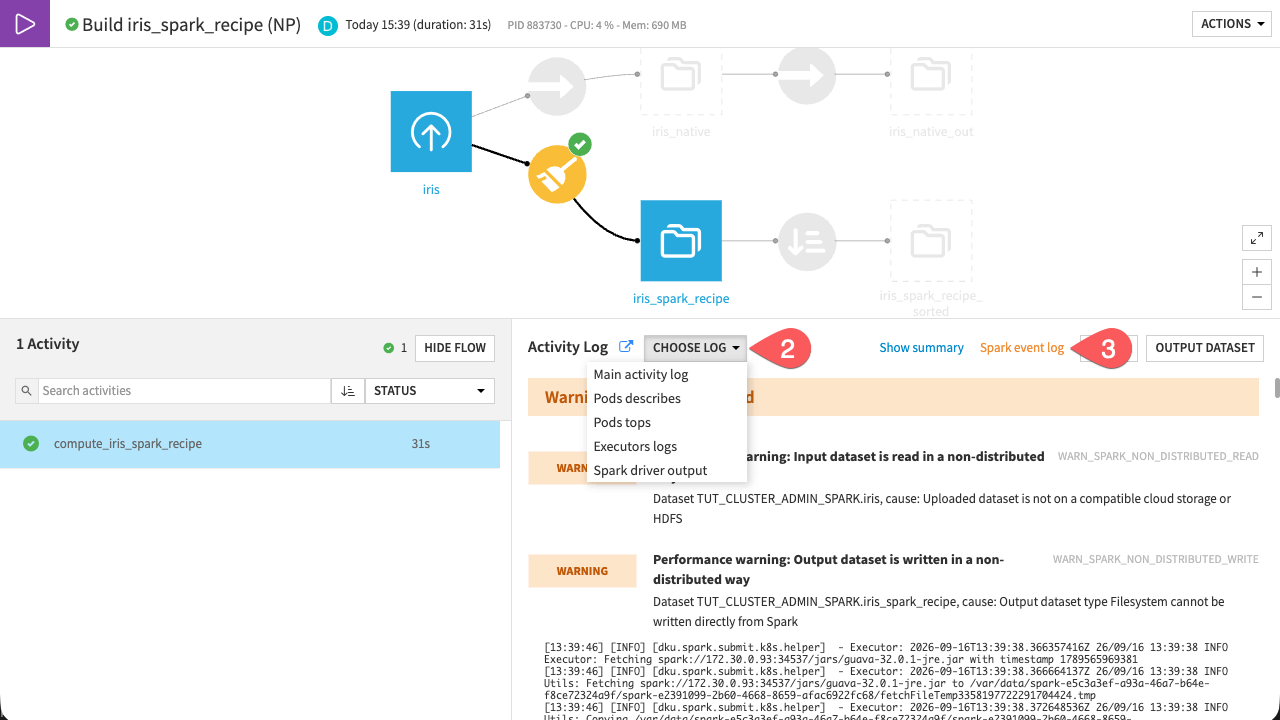
From the top navigation bar, click
 > Jobs, and select the job you just ran.
Click Choose Log to inspect the different logs: the driver log, the executors logs, and the pods.
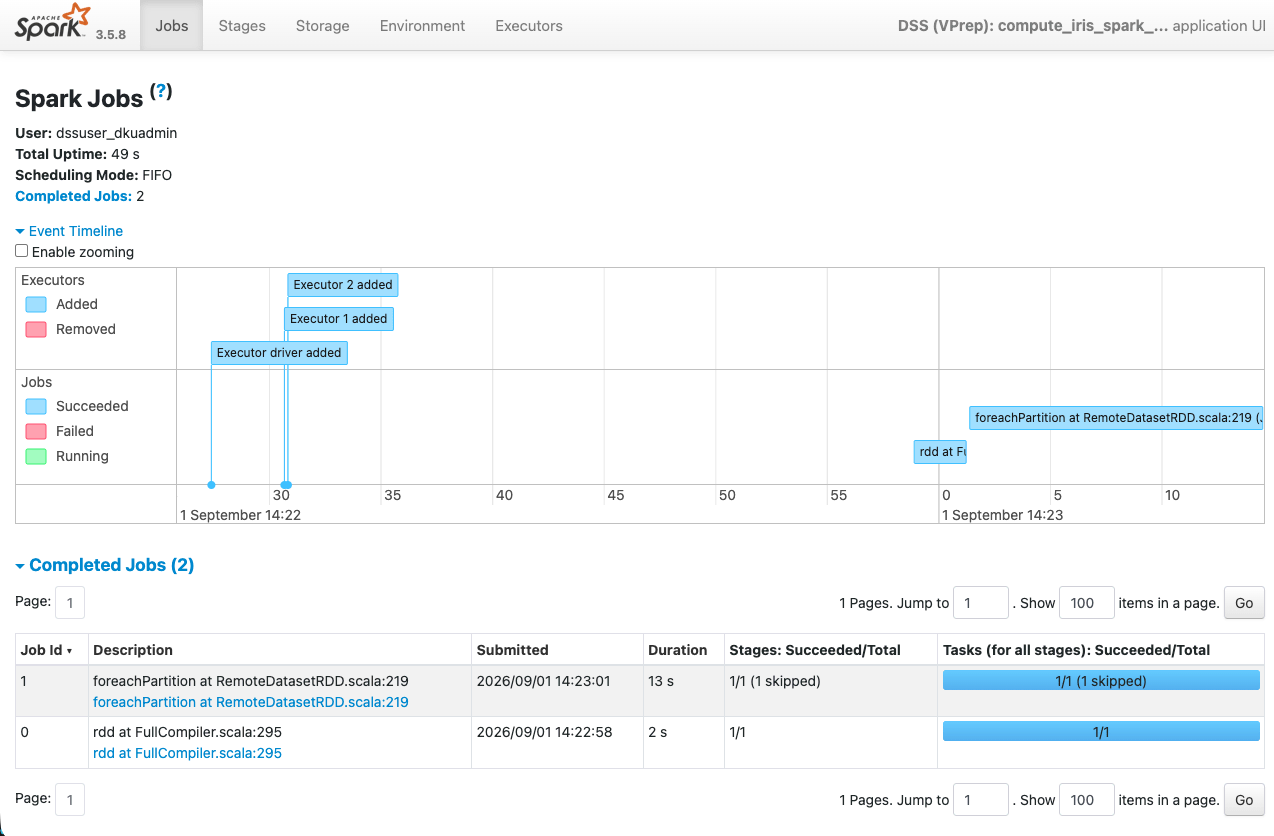
Click Spark event log to open the Spark History Server, the standard Apache Spark user interface.
Tip
The driver log shows how the job was coordinated, the executor logs show the work itself, and the pod descriptions help when a job fails to schedule (for example, not enough resources). Use the Spark History Server to dig into per-stage performance. From there you can also download the event log to share it.
Note
The Performance warning messages are expected here. The tutorial datasets are stored on Filesystem storage, which Spark can’t access natively, so the job takes the slow path. The last section of the tutorial, on fast and slow paths, explains why.
The Spark History Server lists the application. Click its App ID to open the Spark Jobs view, where you can drill into the executors, stages, and per-job timings.
Use Spark pipelines#
When several Spark recipes run one after another, a pipeline lets them run as part of a single Spark job, reducing the need to write intermediate results to storage and read them back. To enable this behavior, set up Spark pipelines.
Enable Spark pipelines#
First, enable Spark pipelines for the project.
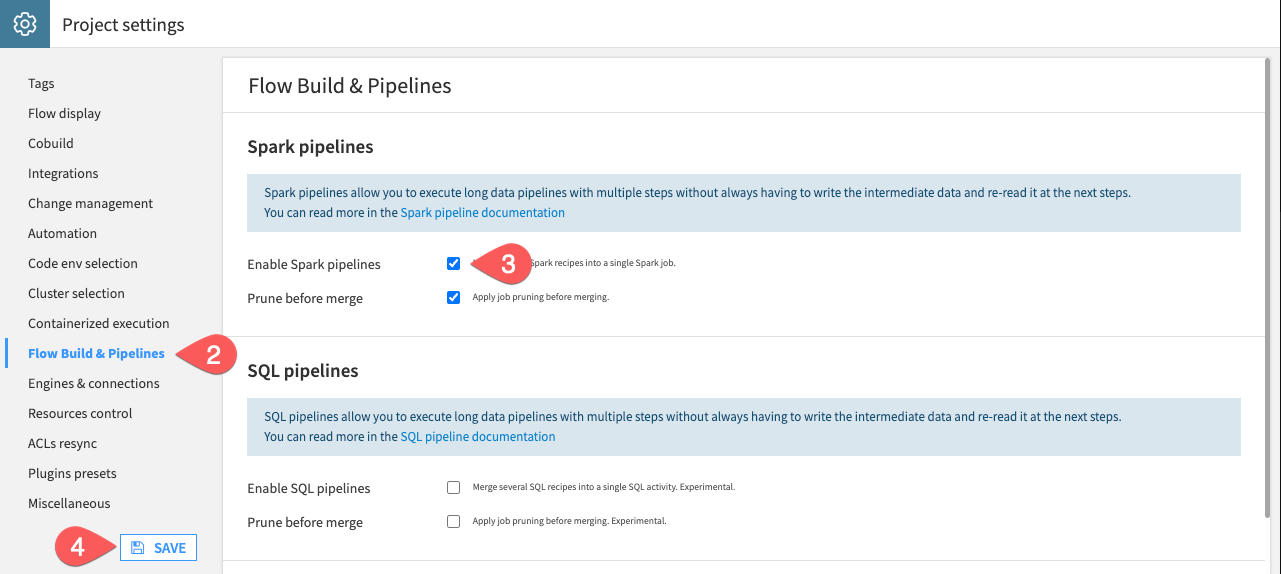
In your project, from the top navigation bar, go to
 > Settings.
Open the Flow Build & Pipelines tab.
Under Spark pipelines, check Enable Spark pipelines.
Click Save.
Run a pipeline#
Now, build a chain of Spark recipes and run them as a single Spark pipeline.
Go back to the Flow and open the compute_iris_spark_recipe_sorted Sort recipe. Make sure it’s configured to run on Spark with your Spark-Standard configuration, as you did for the first recipe.
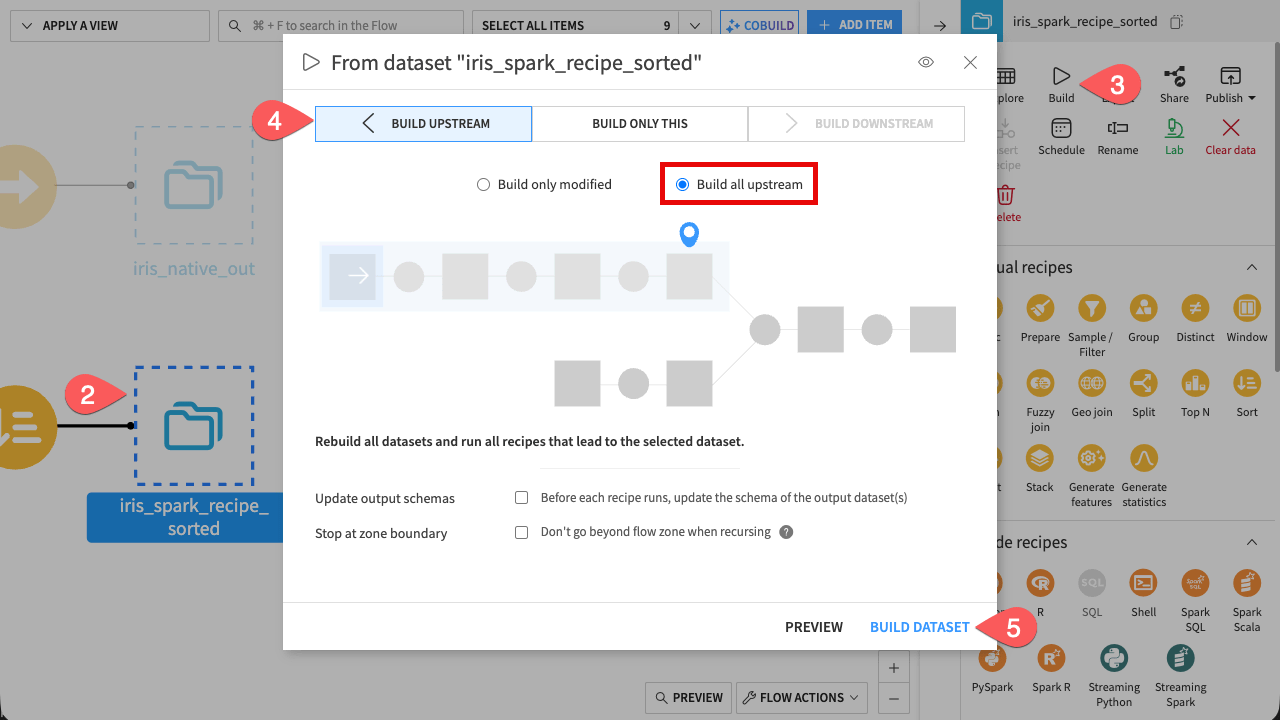
In the Flow, select the dataset iris_spark_recipe_sorted.
Open the Actions (
 ) tab and click Build.
Select Build Upstream and then Build all upstream.
Click Build Dataset to run the entire Spark pipeline. Wait for the job to finish.
Now, inspect the logs.
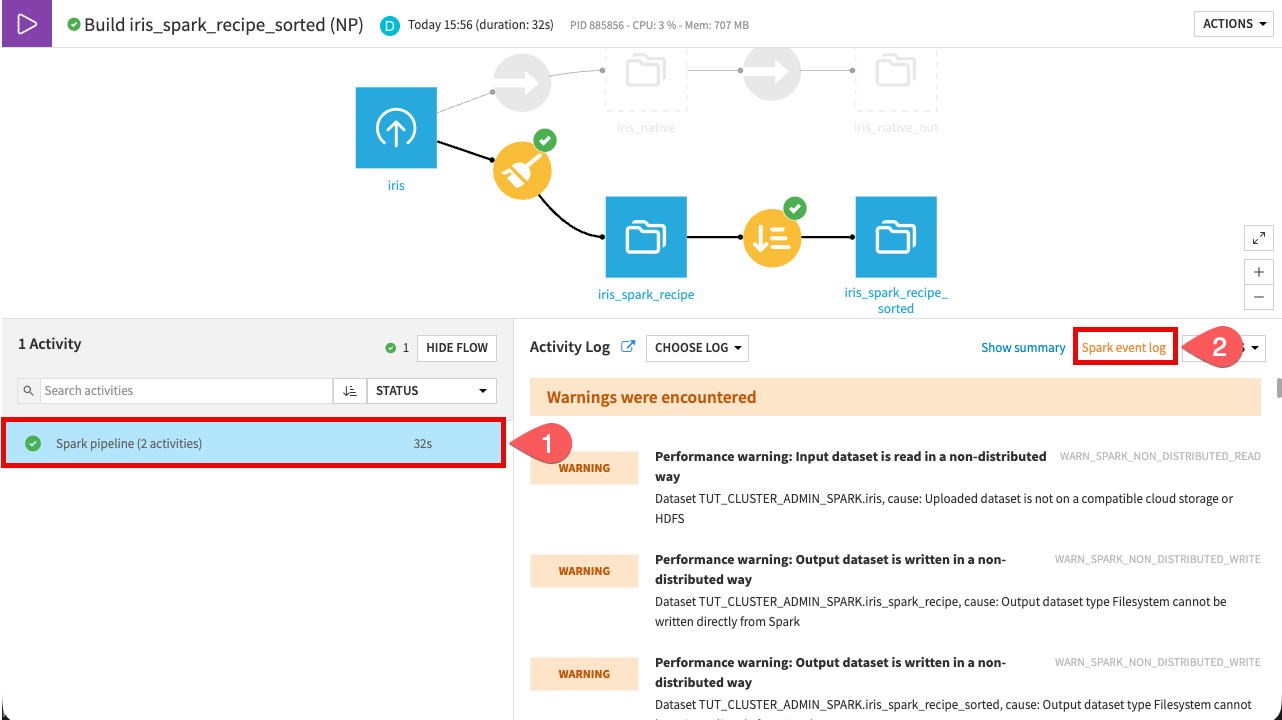
On the Jobs page, open the job and confirm that the chain runs as a single Spark pipeline, rather than as one job per recipe.
Click Spark event log to open the Spark History Server and inspect the pipeline’s stages.
Virtualize an intermediate dataset#
An intermediate dataset that only feeds the next recipe can be kept in memory instead of being written to storage. In this example, virtualize the intermediate dataset.
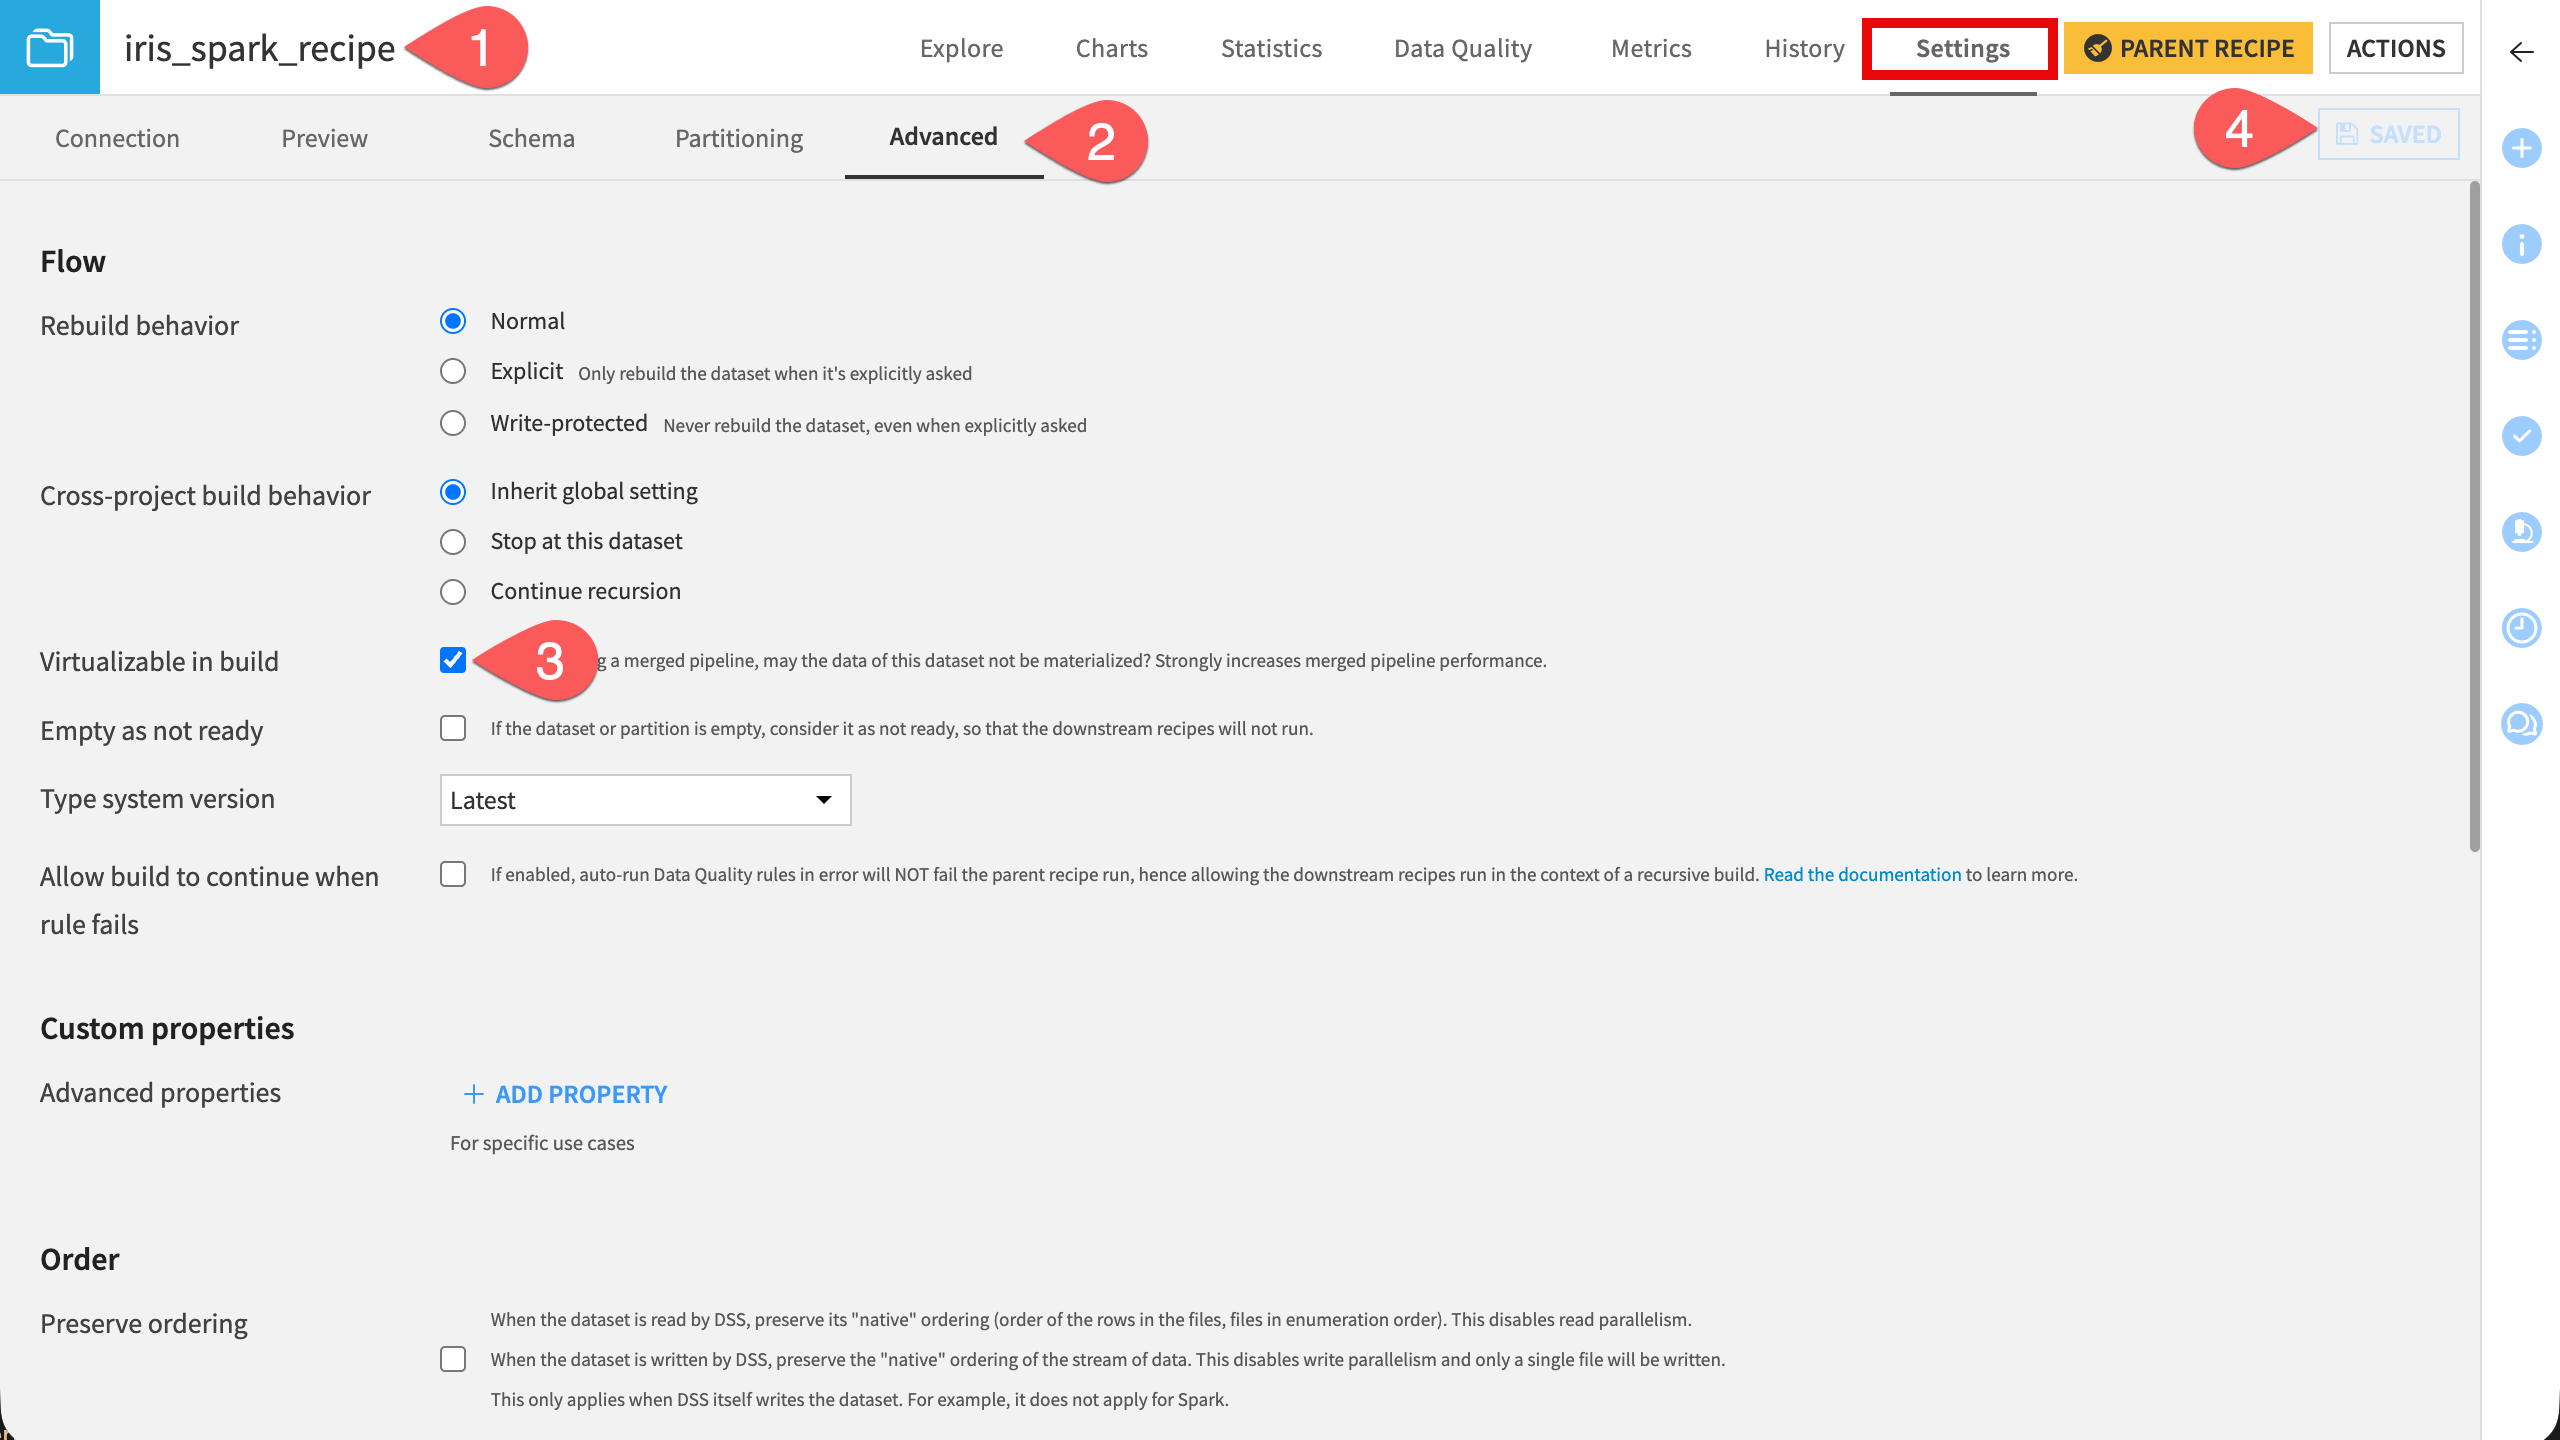
Go back to the Flow and open the intermediate dataset iris_spark_recipe.
Navigate to its Settings > Advanced tab.
Enable Virtualizable in build.
Click Save.
Now, rebuild the Spark pipeline.
From the Flow, clear the data of the datasets iris_spark_recipe and iris_spark_recipe_sorted (
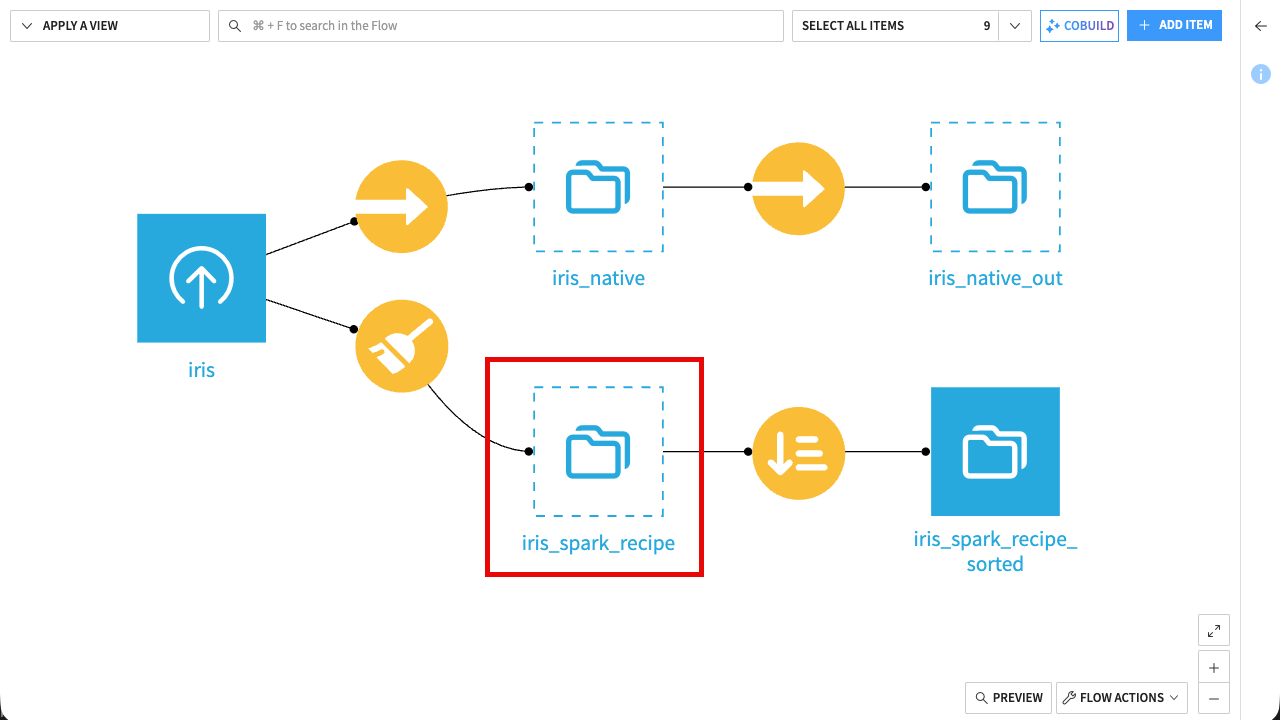
> Clear data).Rebuild iris_spark_recipe_sorted the same way (Build all upstream). The dataset is now computed in memory as part of the pipeline instead of being written to storage. In the Flow, it’s no longer shown as built because it hasn’t been materialized.
Tip
Virtualization only applies when the dataset is built as part of a pipeline: a virtualized dataset isn’t written to storage, so it can’t be read independently. Keep a dataset materialized if other jobs or dashboards need to read it directly.
Notebooks and data transfer#
Two aspects of Spark on Kubernetes can be unexpected for administrators: where a PySpark notebook runs and how data is transferred between the Dataiku node and the cluster. This section explains both behaviors and their impact on data transfer.
Run a PySpark notebook#
Spark runs in client mode, which means that the driver for a PySpark notebook runs on the Dataiku node. The notebook itself therefore runs locally, while the Spark executors run on the Kubernetes cluster.
From the top navigation bar, click
 > Notebooks.
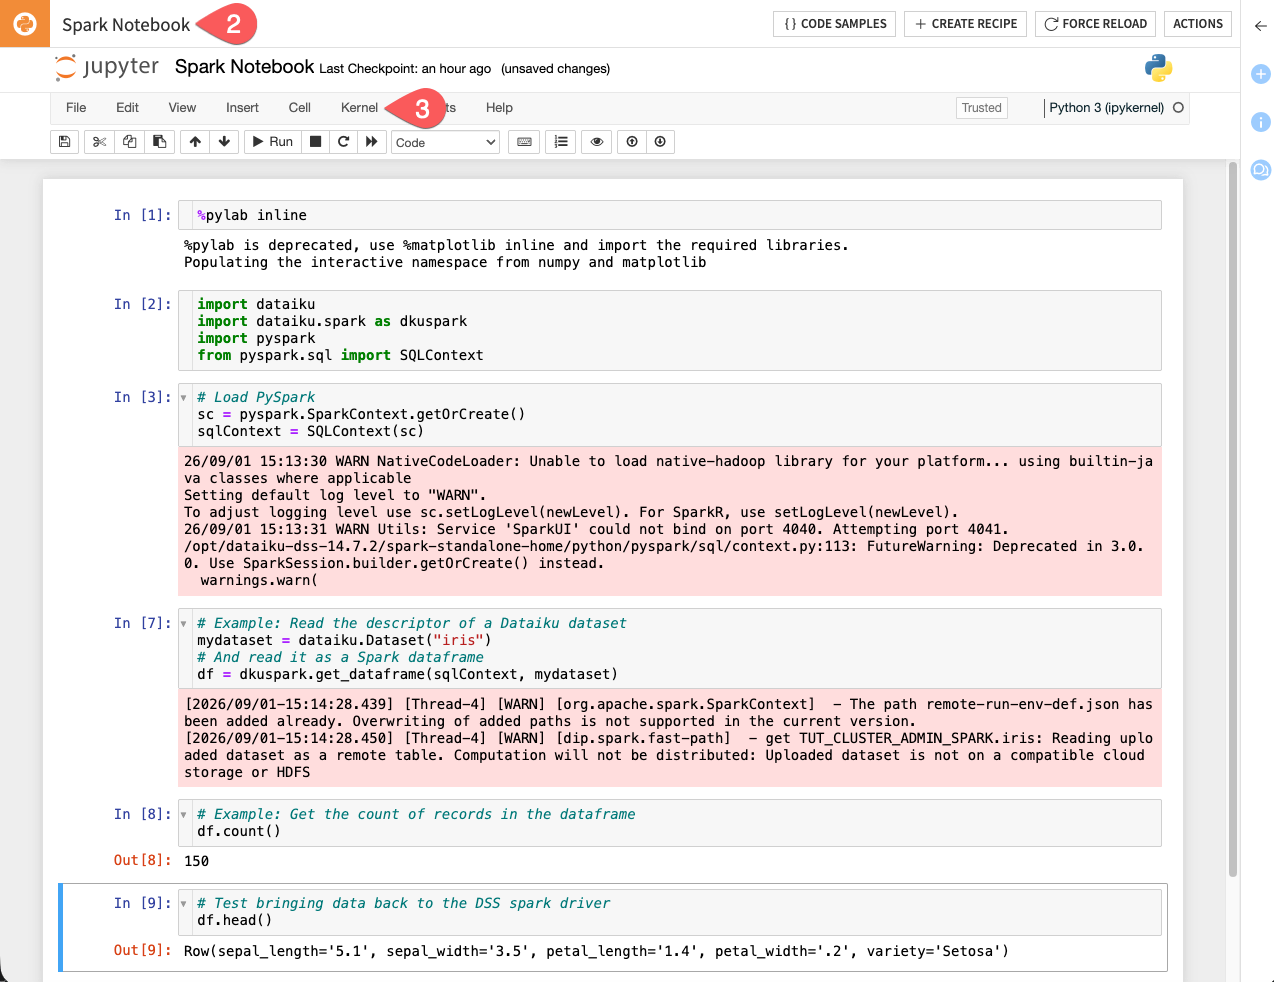
Open the Python notebook Spark Notebook.
Select a Kernel that uses a PySpark code environment.
Run all the cells.
Confirm that the session starts and the cells run without error. The notebook runs locally, while its executors run on the cluster.
Note
Some warnings in the output are expected. For example, you may see warnings about the native Hadoop library, a deprecated Spark API, or an already-added Spark context path. The one reading Computation won’t be distributed means that the dataset, here an uploaded iris dataset, isn’t stored on a native connection. Spark therefore uses the slow path described in the next section.
Tip
If you select a container configuration for the notebook’s kernel and start a Spark session, the notebook fails because the Spark driver must run on the Dataiku node, not in a Kubernetes pod.
Compare the fast and slow paths#
You’ve already seen the slow path: the tutorial datasets are uploaded or stored on the filesystem, so Spark can’t read from or write to them natively.
To use the fast path, both the input and output datasets must use storage that Spark can access natively. The project includes two Sync recipes that copy the data from iris to iris_native, and then from iris_native to iris_native_out.
Select the iris_native dataset, open the Actions (
) tab, and click Change connection.Select a connection with Spark integration, such as Amazon S3 or Snowflake.
Repeat steps 1 and 2 for the iris_native_out dataset.
Make sure both Sync recipes use the Spark engine with the Spark-Standard configuration.
Run the first Sync recipe. Its input is an uploaded dataset, so this copy stays on the slow path. That’s expected: it just lands the data on native storage once.
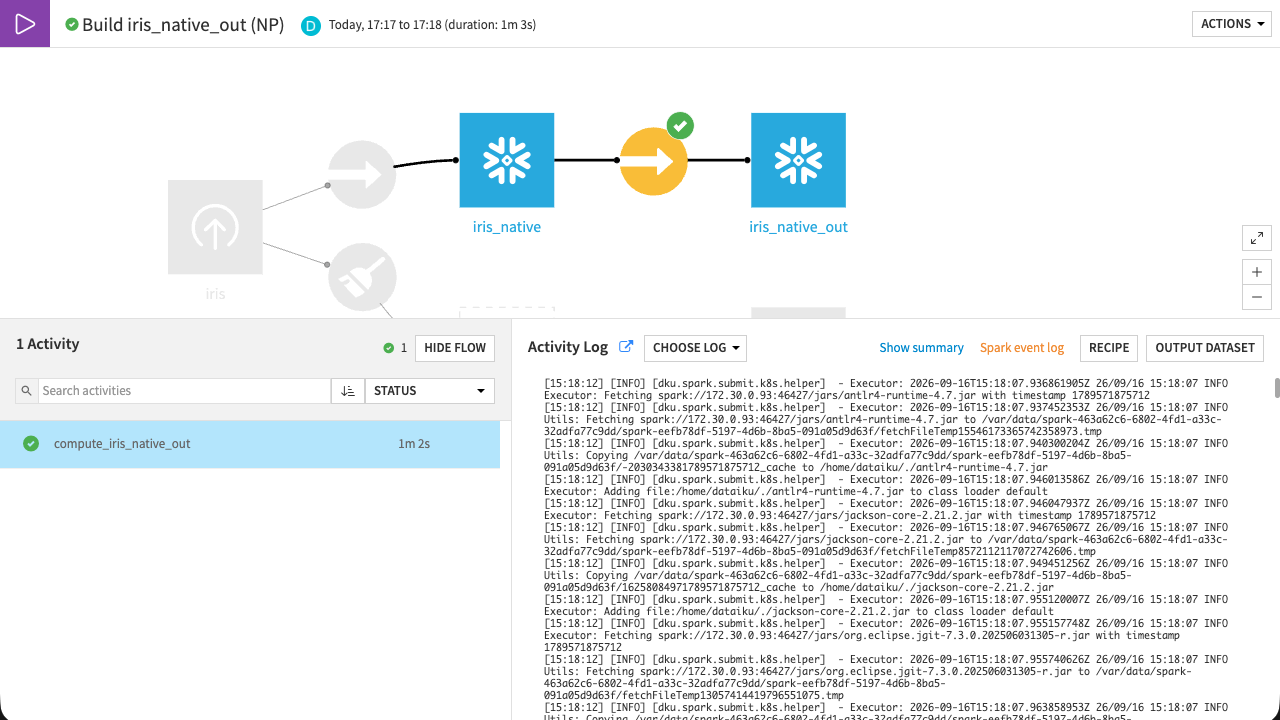
Run the second Sync recipe. Both ends are now native, so the job runs on the fast path.
Open the second job from the Jobs page and check its logs: there’s no Computation will not be distributed warning, unlike the slow-path job you saw earlier.
Note
For Spark to use the fast path, the user also needs the Details readable by permission on the connection. See the Spark on Kubernetes concept.
See also
For a list of connections that Spark can read natively, see DSS and Spark in the reference documentation.
Next steps#
In this tutorial, you set up a Spark configuration, ran a Spark recipe and inspected its logs, merged recipes into a single Spark pipeline and virtualized an intermediate dataset, ran a PySpark notebook correctly, and compared the fast and slow paths for data transfer.
You now have the configuration and concepts needed to run Spark workloads on an Elastic AI cluster.
When you’re ready, continue on the Administrator learning path.
See also
For more information, see the reference documentation on DSS and Spark.