
Quick Start | Dataiku for Generative AI#
Get started#
Are you interested in using Dataiku to leverage the power of large language models (LLMs)? Perhaps build your own chatbot? You’re in the right place!
Create an account#
To follow along with the steps in this tutorial, you need access to a 14.1+ Dataiku instance. If you don’t already have an account, you can get started in one of two ways:
Follow the link above to start a 14 day free trial. See How-to | Begin a free trial from Dataiku for help if needed.
Install the free edition locally for your operating system.
Open Dataiku#
The first step is getting to the homepage of your Dataiku Design node.
Go to the Launchpad.
Within the Overview panel, click Open Instance in the Design node tile once your instance has powered up.
Important
If using a self-managed version of Dataiku, including the locally downloaded free edition on Mac or Windows, open the Dataiku Design node directly in your browser.
Once you are on the Design node homepage, you can create the tutorial project.
Create the project#
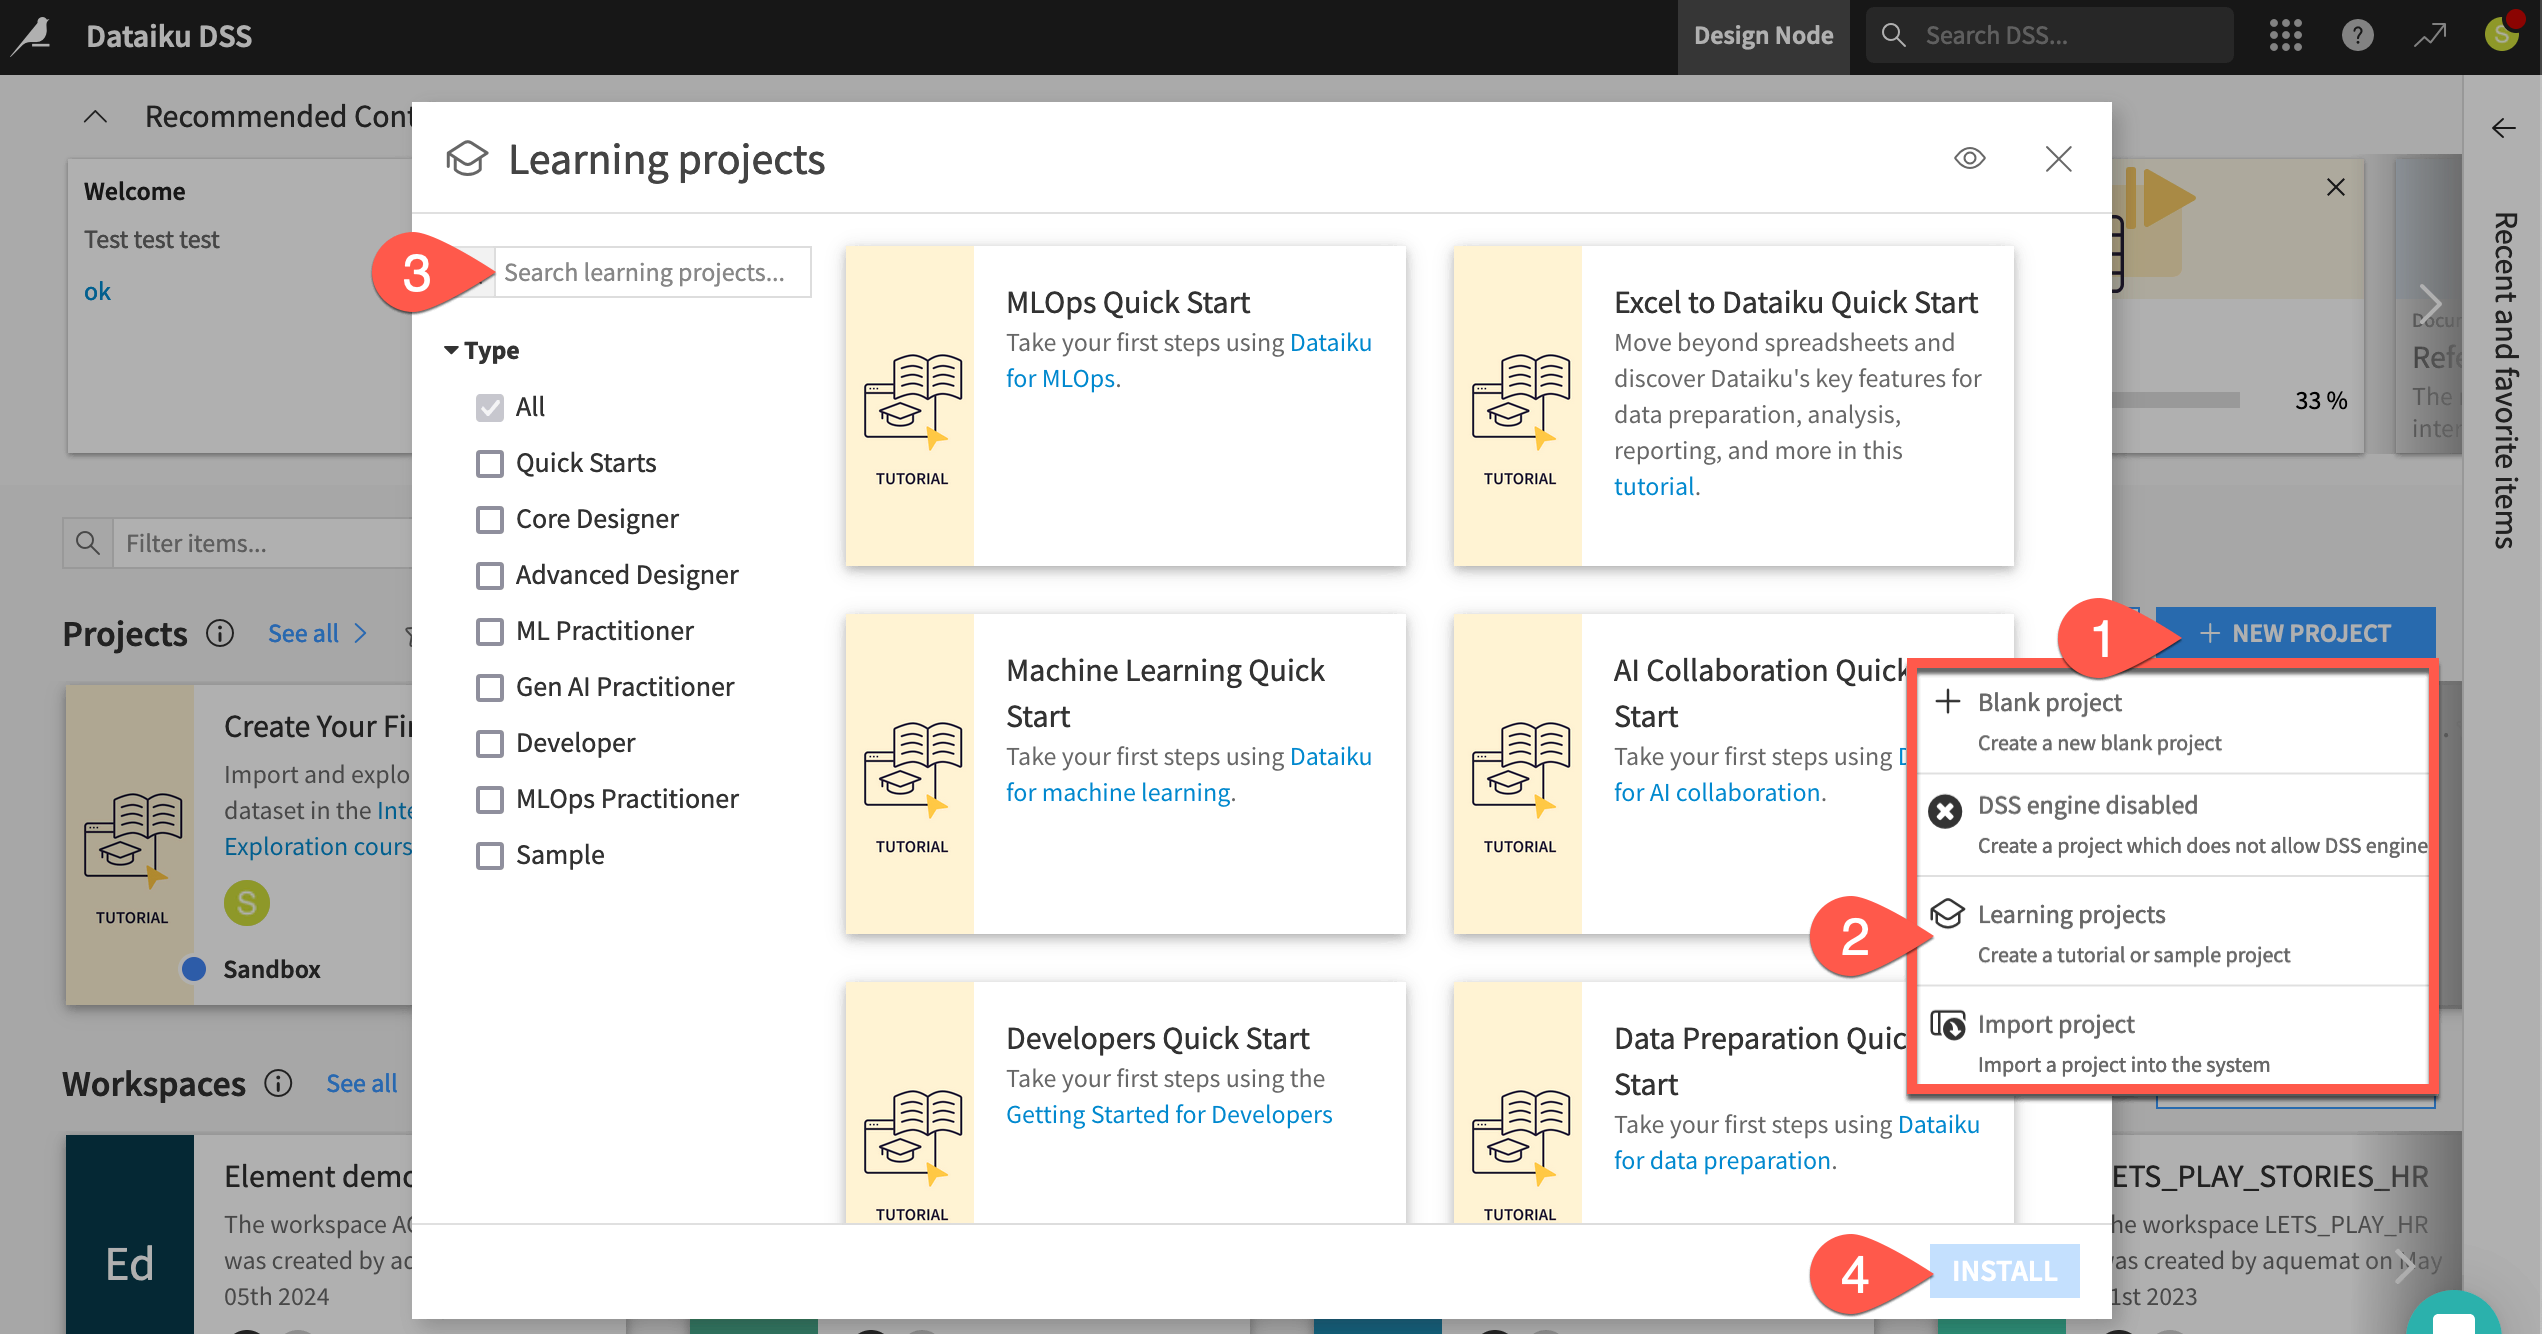
From the Dataiku Design homepage, click + New Project.
Select Learning projects.
Search for and select Generative AI Quick Start.
If needed, change the folder into which the project will be installed, and click Create.
From the project homepage, click Go to Flow (or type
g+f).
Note
You can also download the starter project from this website and import it as a ZIP file.
Understand the project#
Before diving into Generative AI tools, take a moment to understand the goals for this quick start and the data at hand.
Objectives#
In this quick start, you’ll:
Test and refine natural language prompts to an LLM before using the best one in a data pipeline.
Demonstrate the power of LLMs in tandem with traditional data preparation and machine learning tools.
Augment a foundational LLM with your own documents using the retrieval augmented generation (RAG) technique.
Take the first step toward building a chatbot powered by Generative AI.
See also
This quick start focuses on Dataiku’s visual tools for Generative AI. If your primary interest is using code and Dataiku with Generative AI, start with the LLM Mesh section in the Developer Guide.
Tip
To check your work, you can review a completed version of this entire project from data preparation through MLOps on the Dataiku gallery.
Review the Flow#
You should now be on the Flow of your Generative AI Quick Start project. In Dataiku, the Flow is the visual representation of how datasets, recipes, models, and agents move data through an analytics pipeline.
Shape |
Item |
Color & Icon |
|---|---|---|
|
Squares represent datasets and knowledge banks. |
|
|
Circles represent recipes, which are instructions for data processing. |
|
|
Diamonds represent models and agents. |
|


About this project#
Imagine you’re a job seeker. Instead of checking individual job boards, you’ve built your own Flow to process potential job opportunities.
Like most data projects, this one began with some basic data preparation. At the left of the Data Preparation Flow zone, the project starts from a dataset of job postings labeled as real or fake. A pipeline of recipes processes this initial data for the next stage.
In the Machine Learning Flow zone, the project creators used this cleaned data to train a classification model. The Flow applies this model to predict whether a new job posting is real or fake.
See also
To build these two zones yourself, explore the quick starts for Data Preparation and Machine Learing, respectively.
Take a closer look at the Flow for yourself.
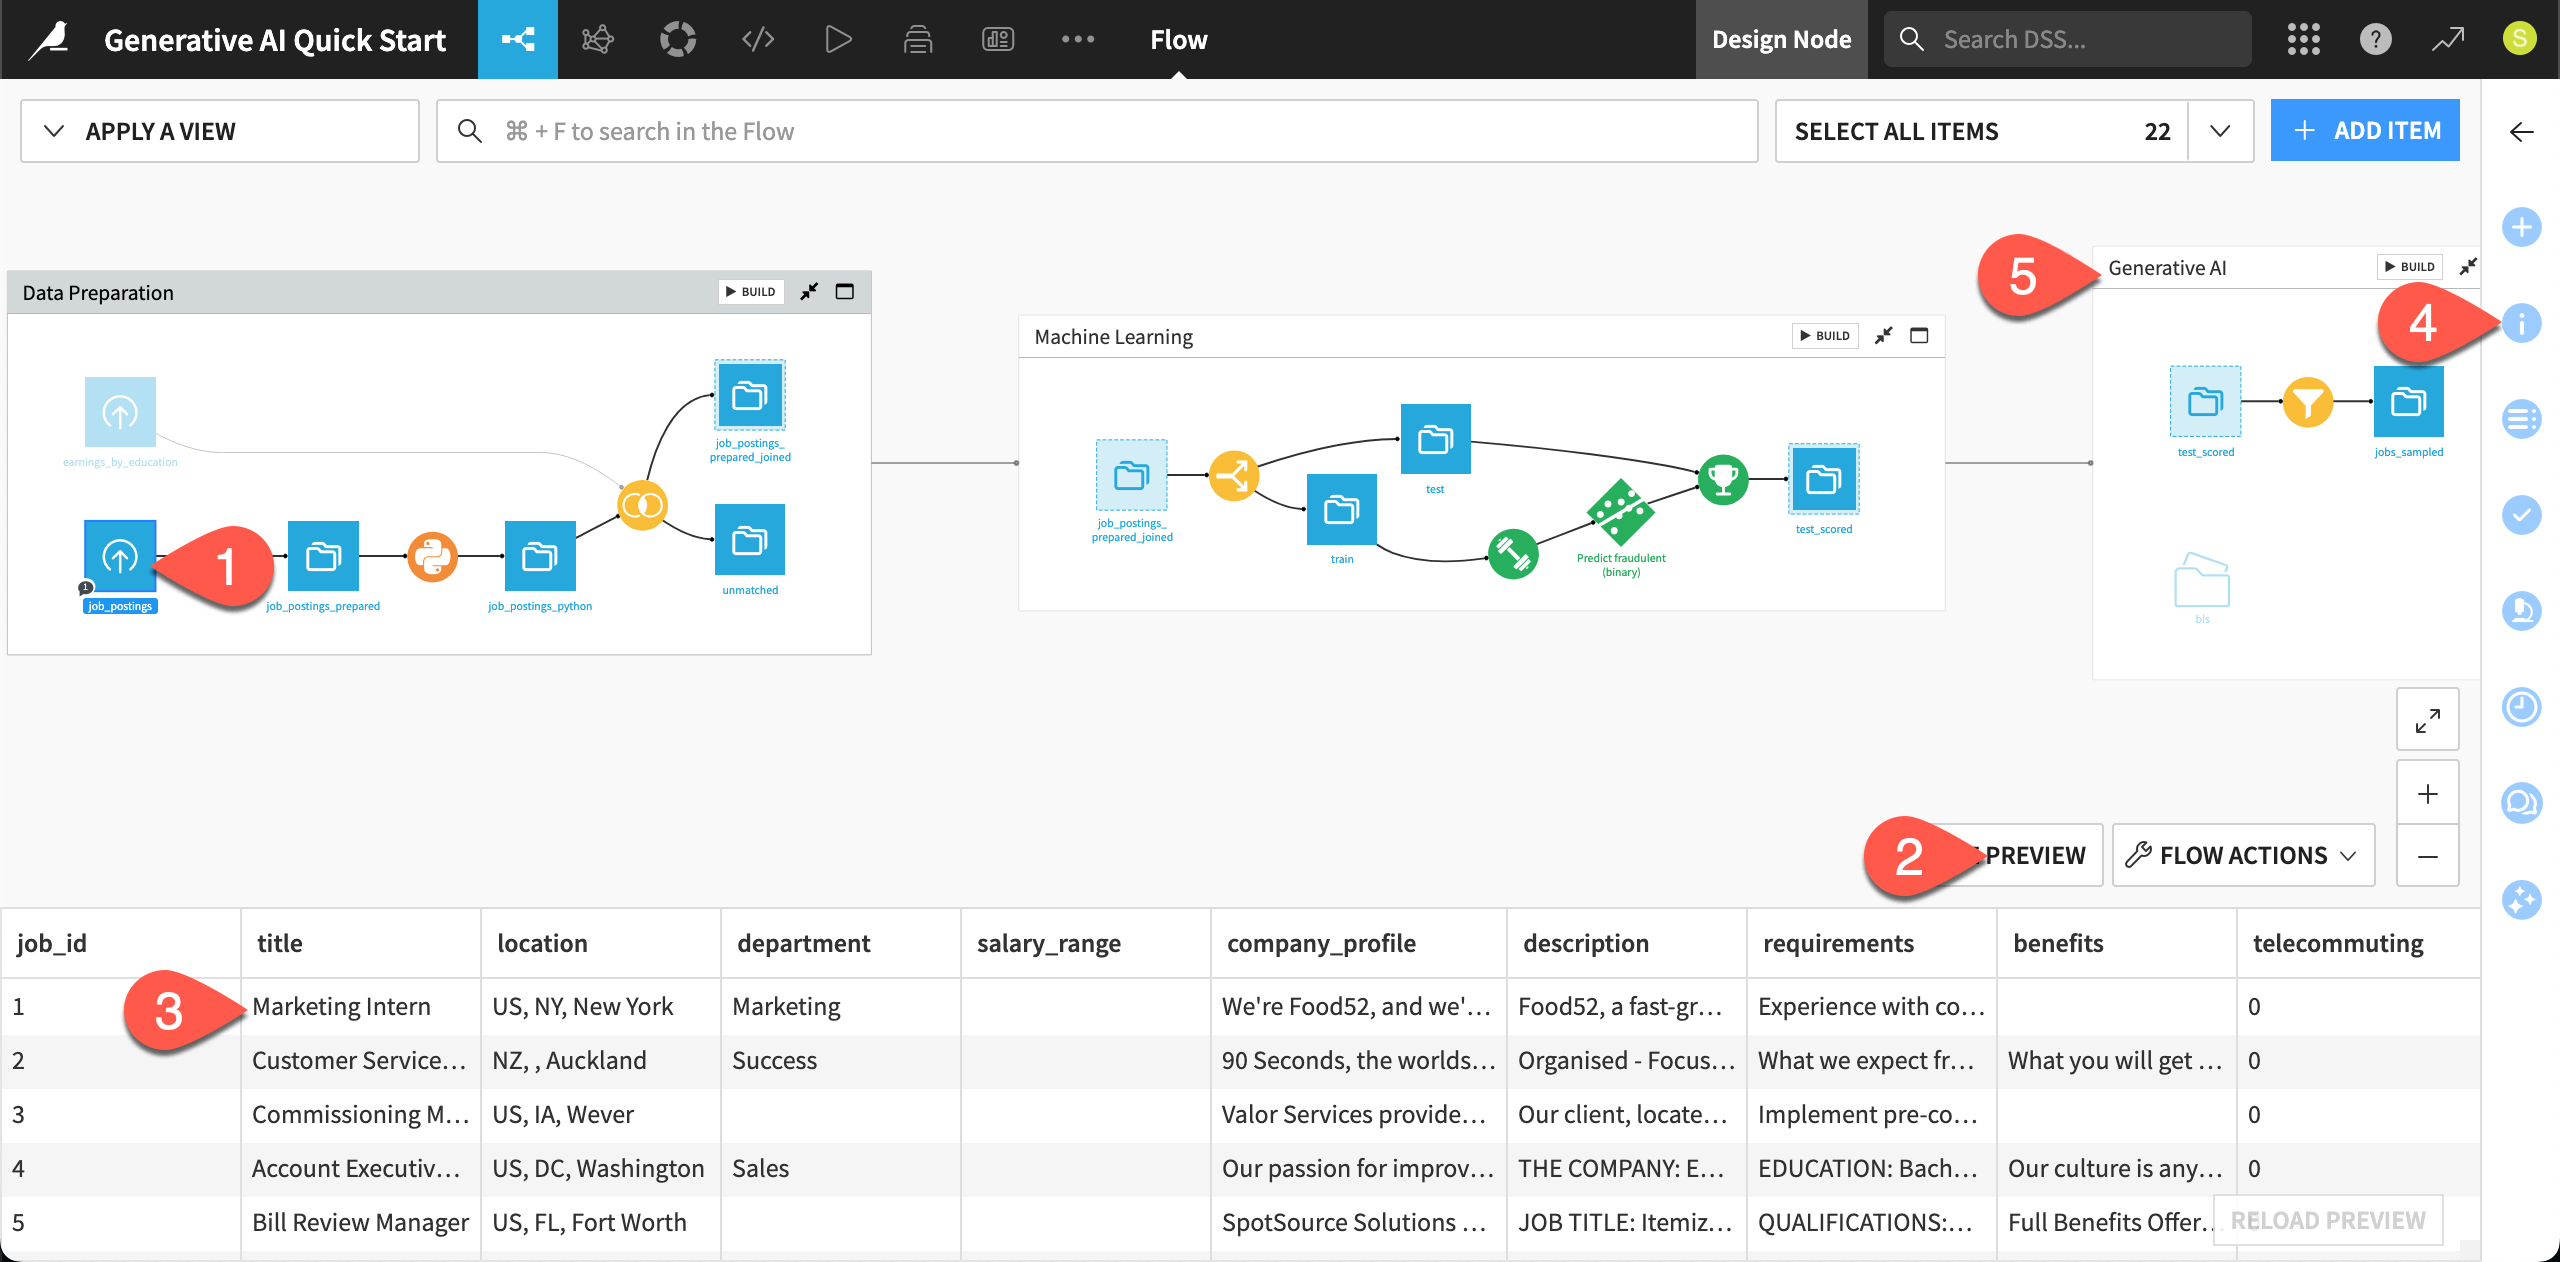
At the far left of the Data Preparation Flow zone, click once on the job_postings dataset.
Click Preview (or use the keyboard shortcut
Shift+P) to pull up the first few rows.Confirm for yourself how each record is a different job posting, complete with information like job titles, locations, descriptions, and requirements.
Open the Details (
 ) tab of the right panel to review its metadata.
Moving right, select other items downstream in the Flow until you reach the GenAI & Agents Flow zone.
Explore the starting data#
The starting point for this quick start is a small sample of prepared job postings — found in the GenAI & Agents Flow zone.
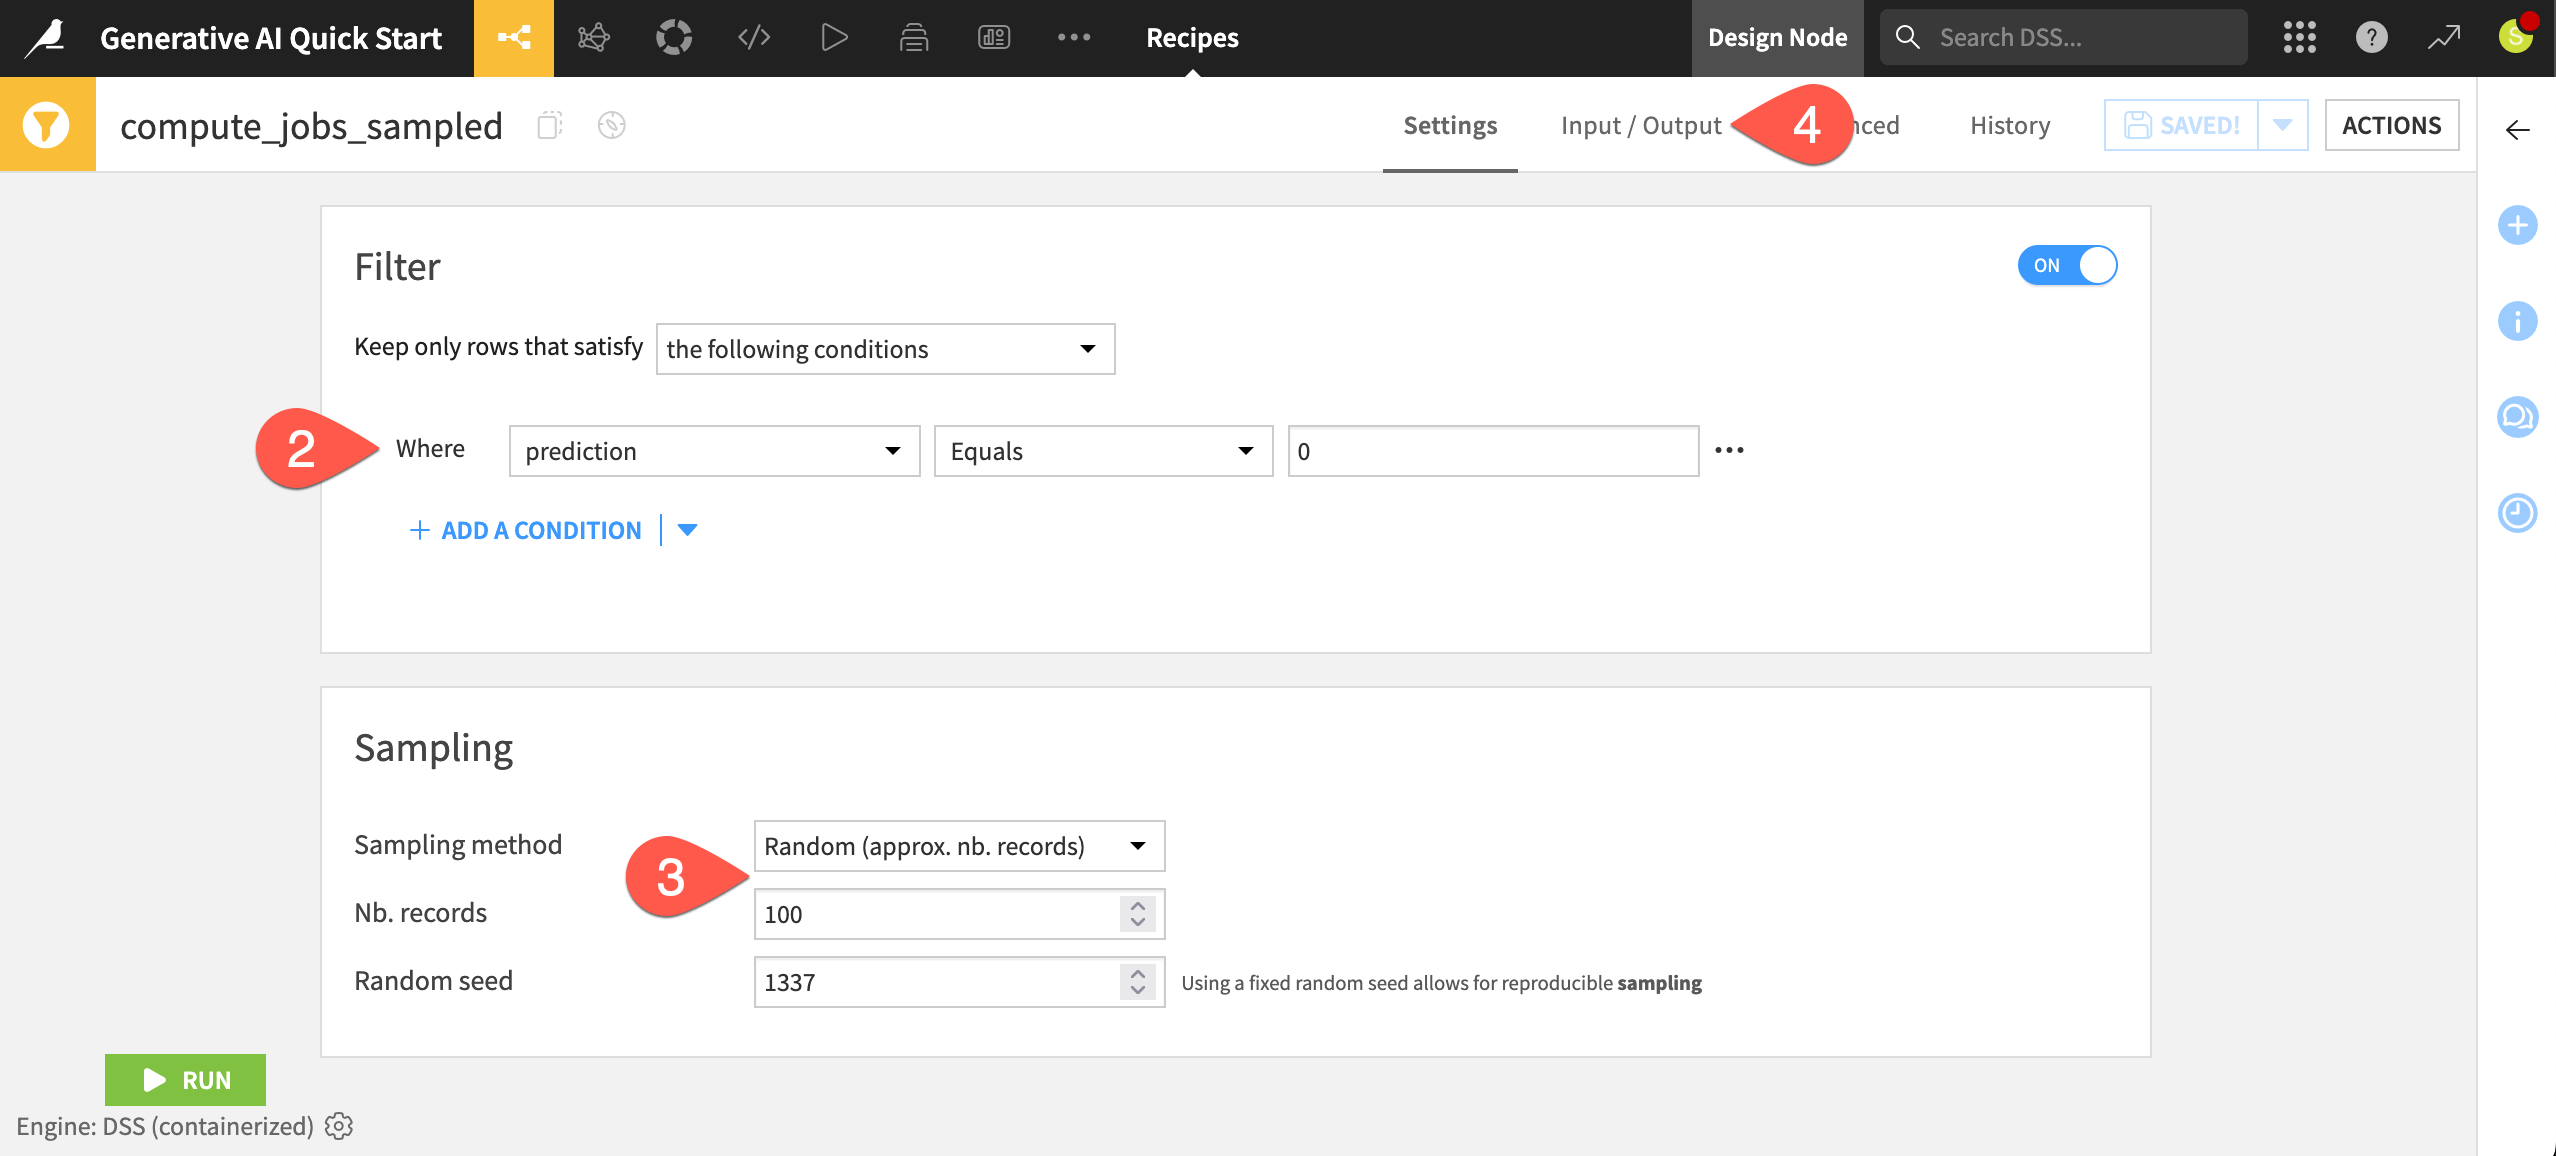
In the GenAI & Agents Flow zone, double click on the Sample/Filter (
 ) recipe that outputs the jobs_sampled dataset.
Confirm for yourself that this visual recipe filters for real job postings. (A value of 0 in the prediction column means that the model in the Flow didn’t predict that a job posting is fraudulent).
After filtering for real jobs, it samples approximately 100 records from the input dataset. As you’re only testing, having fewer records ensures downstream recipes run faster, and, since you’ll be using LLMs, minimizes costs.
Navigate to the Input/Output tab, and click on jobs_sampled in the Output section to explore the data you’ll be working with.
The need for LLMs#
For any job seeker, beginning from real job opportunities is the most basic requirement. However, if you wanted to use this data for a job search, it would have many limitations. For example:
The job descriptions in the description column vary widely in length and quality.
The data in the required_experience column is missing or ambiguous. The actual required years of experience is often buried in the requirements column.
Knowing which job opportunities have the most potential for career growth could be valuable.
These are only three possible examples, but they all demonstrate an opportunity for LLMs where traditional data preparation or machine learning approaches have limited answers.
Start tackling these challenges with Generative AI!
Connect to the LLM Mesh#
Many pieces of software (including Dataiku) incorporate various forms of AI assistants. While these kinds of assistants can aid productivity, the LLM powering them is most often hidden from the user.
For many use cases however, including this one, you’ll need to:
Choose the LLM best suited to the task at hand.
Iterate over data. In other words, query the LLM repeatedly in a standardized way.
Monitor and govern the usage of LLMs.
Enter the LLM Mesh! The LLM Mesh provides a unified secure gateway to your organization’s choice of LLMs. It solves the problems of oversight, governance, and centralization — all factors which hinder the deployment of LLM-based applications.
See also
For an introduction to the LLM Mesh, you might start with the original blog post introducing the concept, The LLM Mesh: A Common Backbone for Generative AI Applications. Newcomers to the field may also wish to consult Concept | Large language models and the LLM Mesh.
Obtain an API key from an LLM provider#
An LLM connection isn’t the same as a free account with ChatGPT or another LLM provider. Your instance administrator needs to follow the terms of an LLM provider to get started with its API.
Identify your instance administrator. If you’ve started a Dataiku trial, you are the instance administrator in this respect!
Next, choose a supported LLM connection.
From this broad list, ideally choose a connection that includes a model supporting image input. If not, you won’t be able to complete the section on retrieval augmented generation (RAG).
If a suitable LLM connection already exists on your instance, request the administrator to grant you access to it. Alternatively, create it yourself with the instructions below.
To create the connection yourself, you’ll first need to follow your LLM provider’s documentation to obtain an API key.
Tip
If your chosen LLM provider has a chat interface (for example, ChatGPT for OpenAI), ask it how to get started with its API.
Create an LLM connection in Dataiku#
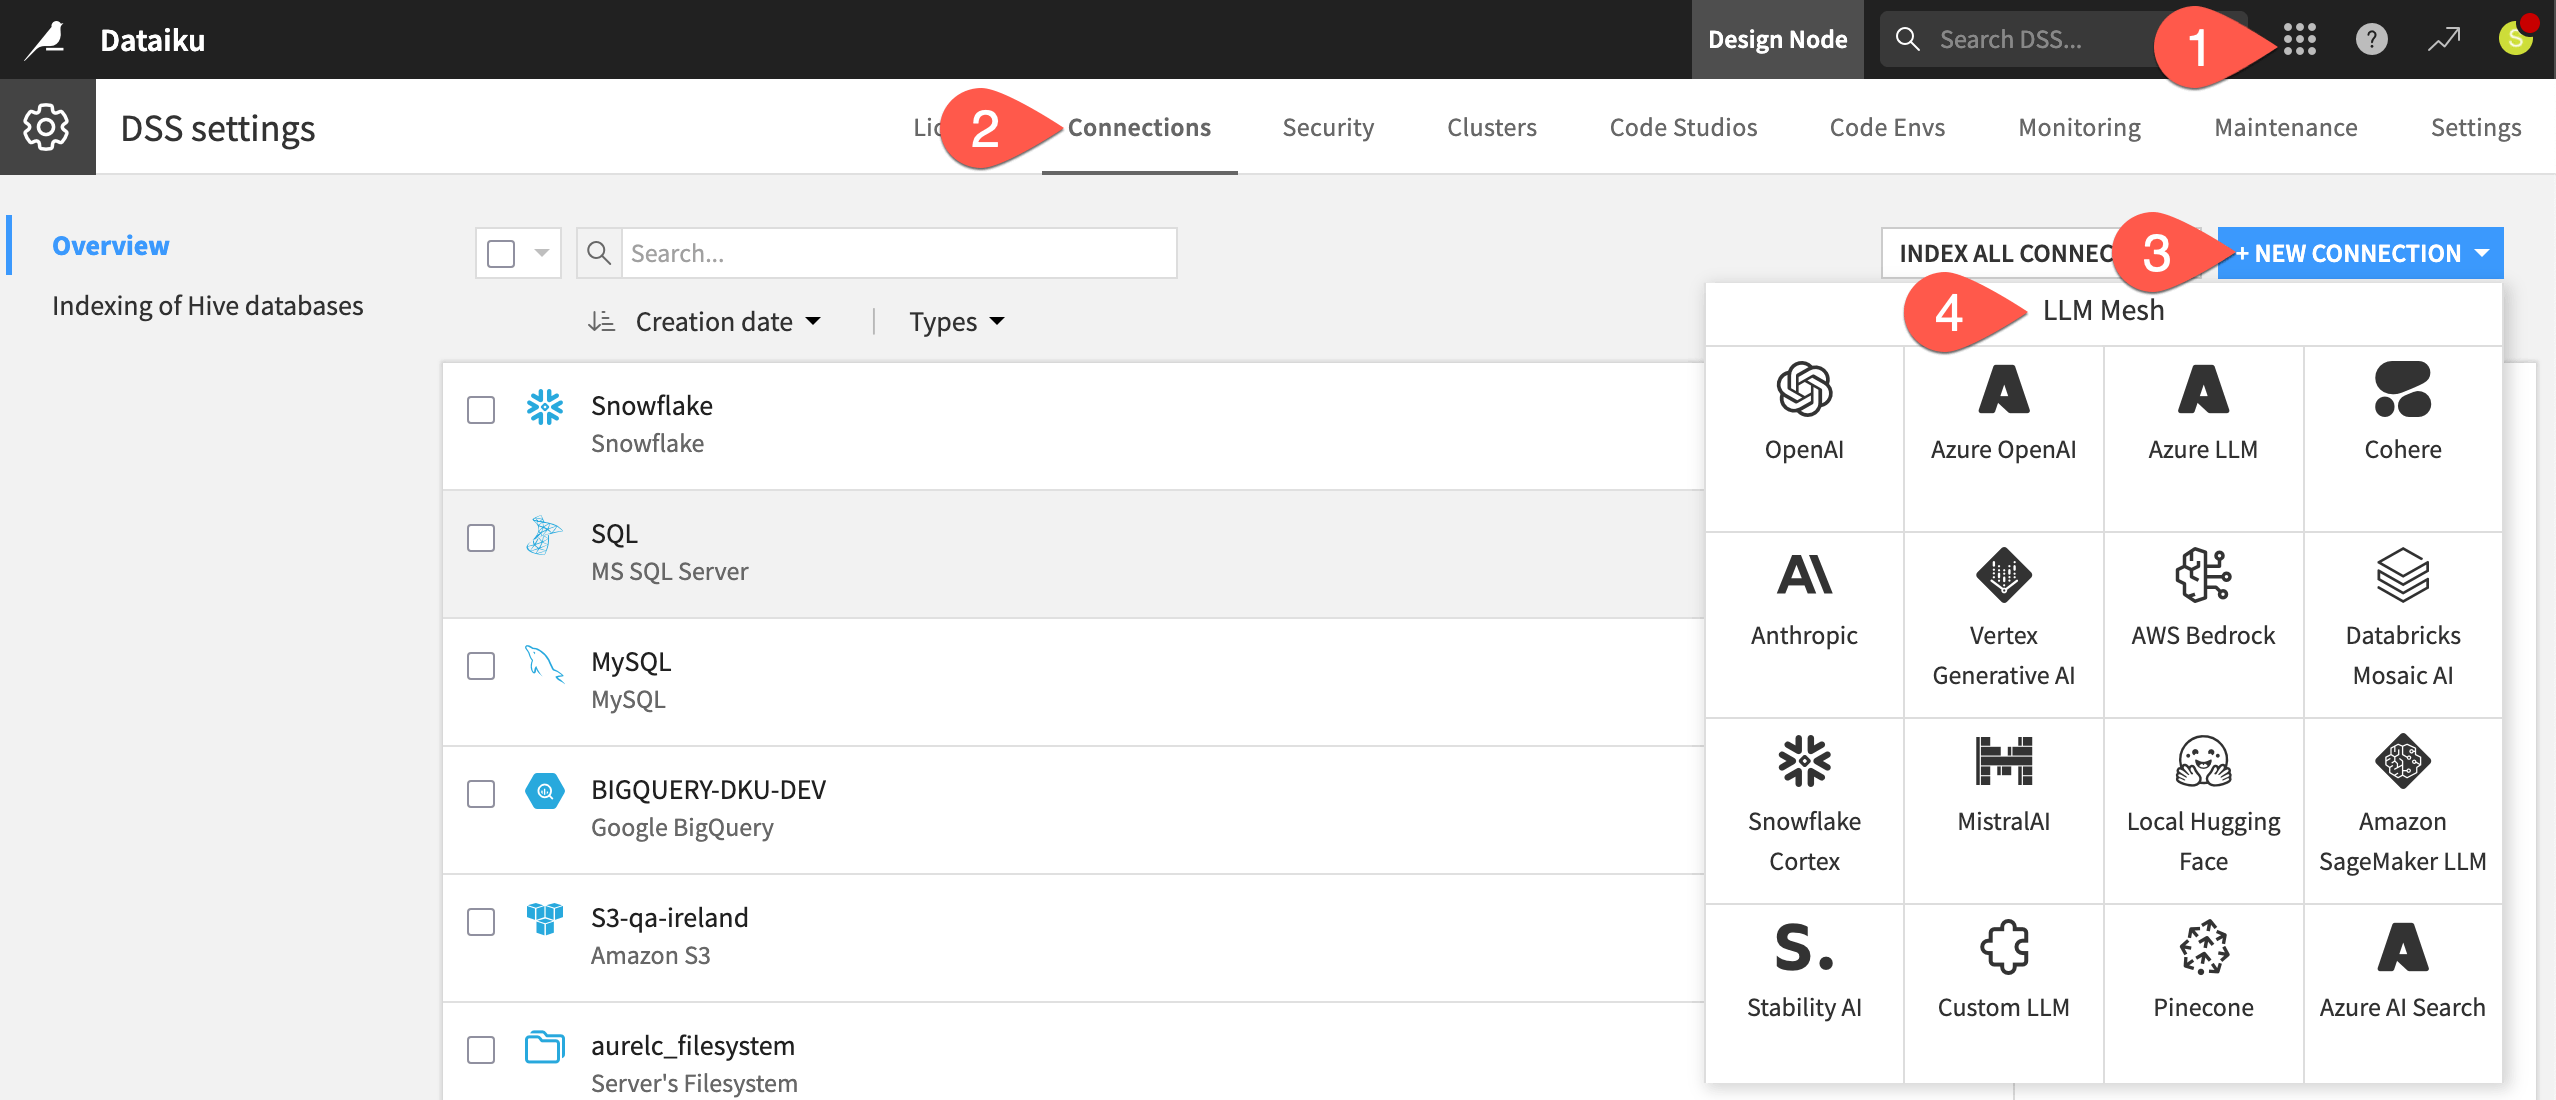
Once you have an API key from an LLM provider, return to Dataiku’s Design node to create the connection.
From the waffle (
 ) menu of the top navigation bar, select Administration.
Go to the Connections tab.
Click + New Connection.
Scroll down to the LLM Mesh section, and choose your LLM provider.
The exact details can differ depending on the type of connection, but typically you’ll need to:
Provide a name for the connection (such as
<your-name>-<llm-provider-name>).Provide your API key.
Click Test to confirm your API key is working.
See also
Always consult the reference documentation for details on establishing a specific LLM connection.
Once you’ve confirmed your API key is working, finish creating the connection.
Select which specific models from the LLM provider your connection should be able to access, including:
At least one text completion model (Feel free to choose a less expensive model given that performance isn’t the objective).
For the RAG section: first, one text completion model that supports image input, and second, one embedding model.
Adjust security settings as needed, such as limiting which groups can use the connection. If you go to your profile in the top right corner, you’ll see the groups to which you belong.
When ready, click Create.
Tip
If you’re not able to meet this prerequisite, you can still read along to understand Dataiku’s approach to Generative AI!
Install internal code environments#
There’s only one more prerequisite to complete all sections of this quick start.
The example presented for RAG requires embedding unstructured data. Accordingly, your instance administrator needs to follow the reference documentation to install and enable the following two internal code environments:
One for text extraction.
Another for retrieval augmented generation.
Query LLMs from a visual interface#
Now that you have an LLM connection, begin with the most basic usage before building up to increasingly powerful techniques.
Use LLMs for classification and summarization#
Dataiku supports traditional ML methods for natural language processing (NLP) tasks. However, LLMs have moved into this territory for common use cases such as summarization, classification, and sentiment analysis.
In this case, the original job descriptions vary widely in length and quality. An LLM may be able to summarize the job description for each posting.
Return to the Flow (
g+f) of your Generative AI Quick Start project.In the GenAI & Agents Flow zone, click once to select the jobs_sampled dataset.
Open the Actions (
 ) tab of the right panel.
From the menu of GenAI recipes, select Summarize text.
Name the output dataset
jobs_summarized.Click Create Recipe, accepting the default storage location and format for your instance.
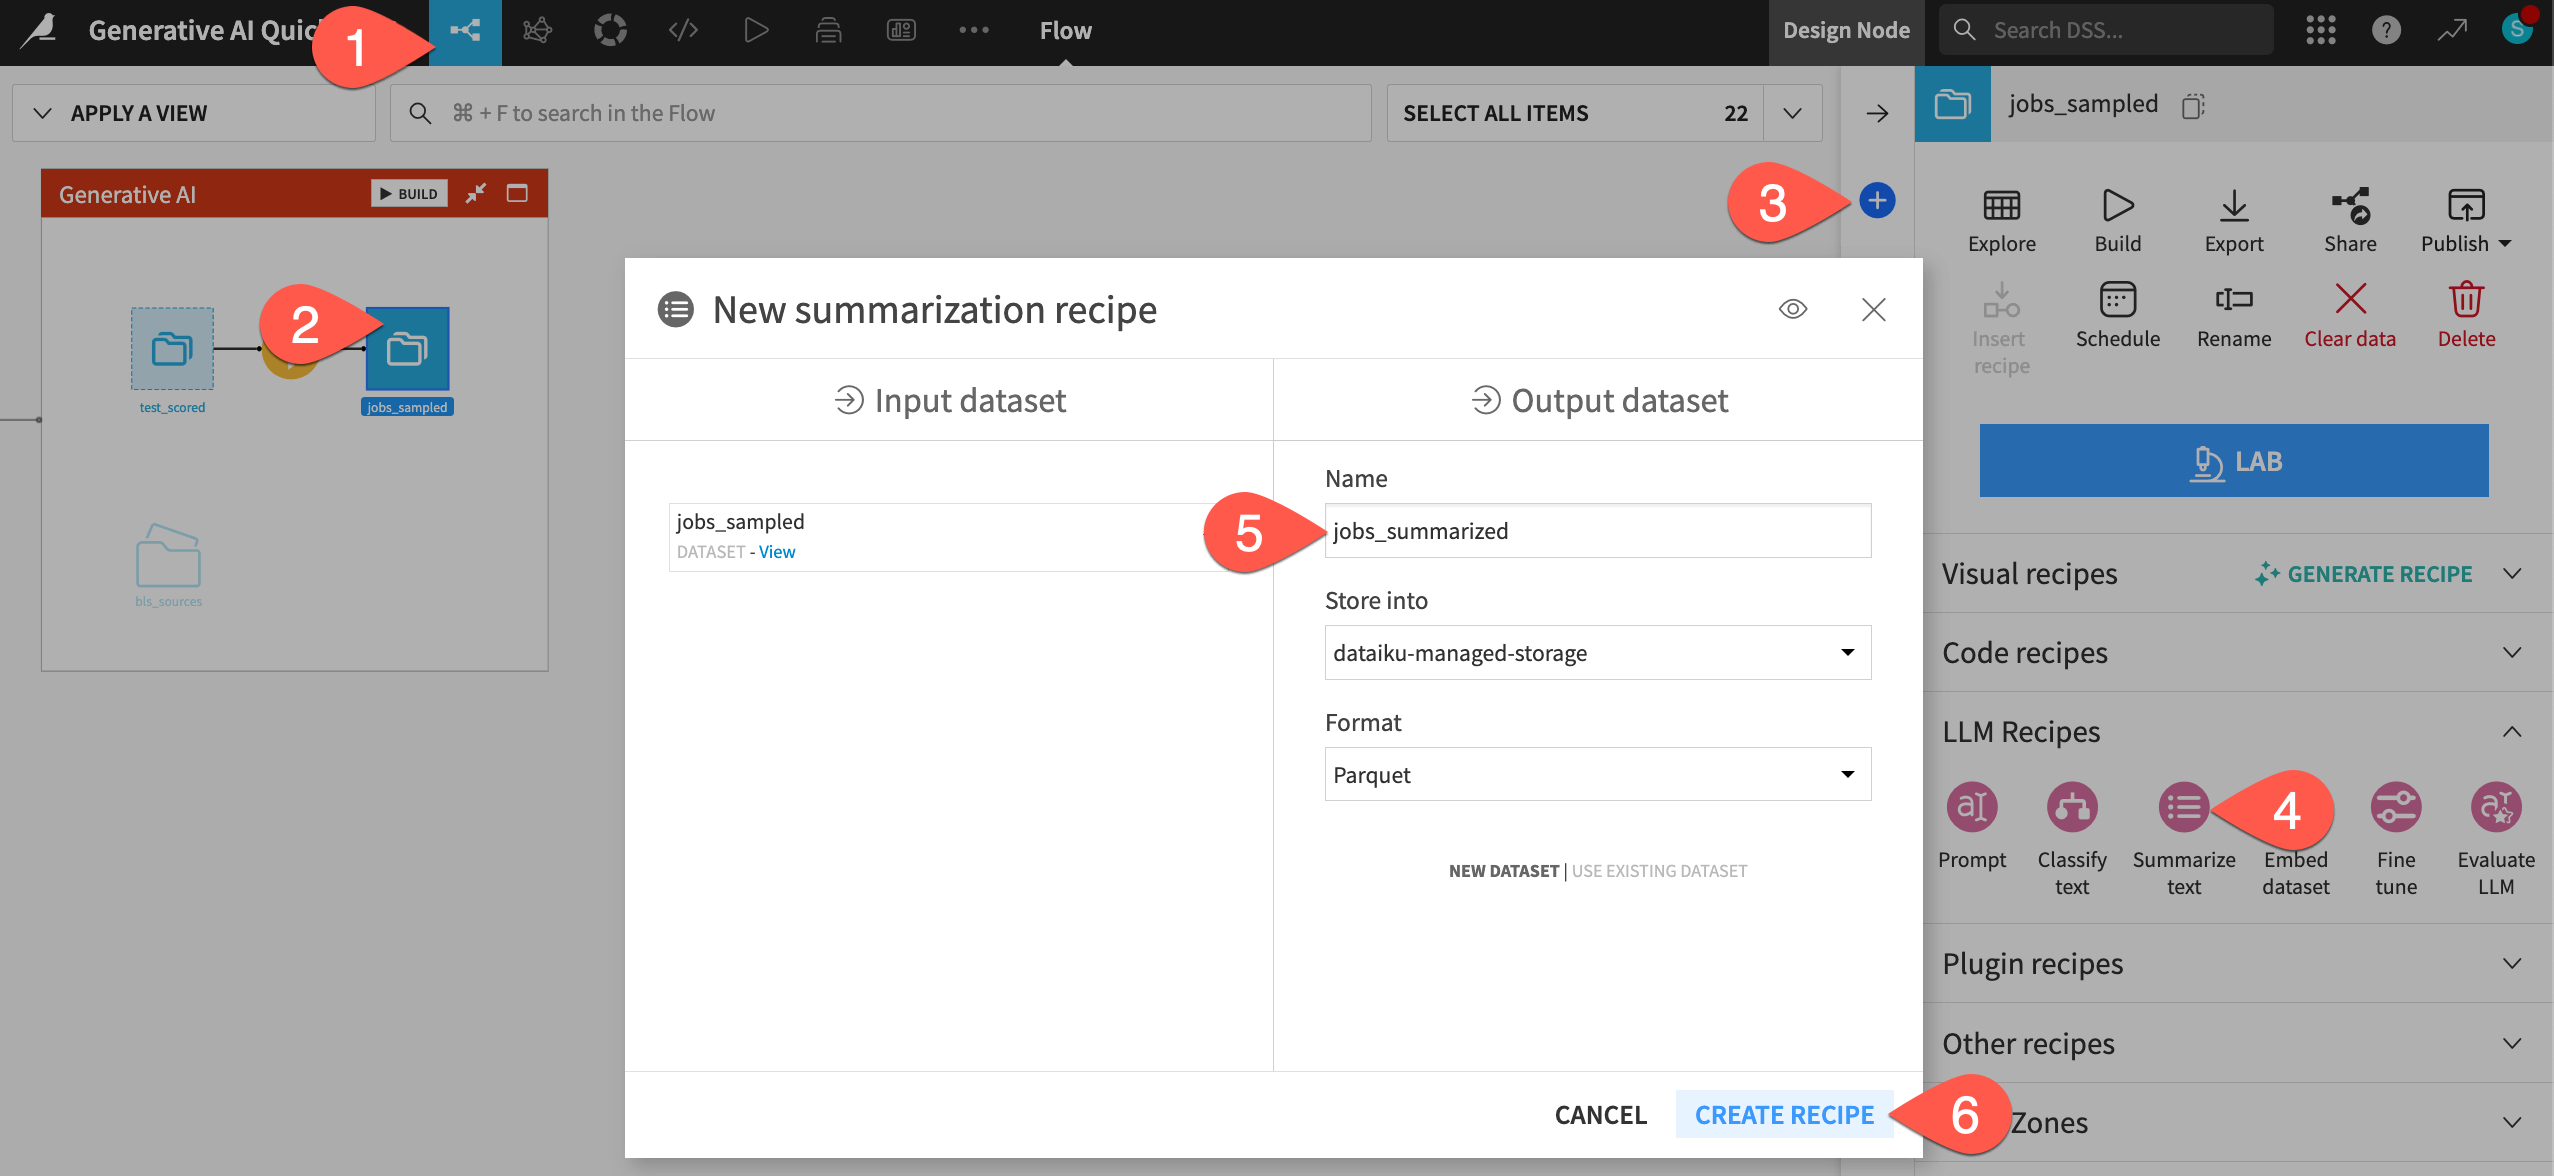
Run a GenAI recipe#
Although it’s a GenAI recipe, the interface looks similar to that of other visual recipes, such as the Sample/Filter recipe you saw earlier. However, with a GenAI recipe, you specify the LLM to use for the job.
In the Settings tab of the recipe, for the LLM field, select a model from your LLM connection.
For the input column, select description, which contains text summaries of the job descriptions.
Set the Summary language to
English.Check the box to Set desired max output length.
Set the desired max output length to
1sentence.Before running the recipe, click Show Prompt to see what the recipe will send to the LLM.
Read the prompt. Note how you are unable to edit it (yet!). Click Cancel when ready.
Click Run (or type
@+r+u+n) to apply the recipe to the input dataset.When finished, click Explore dataset jobs_summarized to view the LLM’s response in the summary column at the far right. You should now have much more concise job descriptions!
Caution
Running GenAI recipes has a cost! For learning or exploratory use cases, use small samples and the least expensive LLM available to you.
Engineer natural language prompts#
GenAI recipes like Classify text and Summarize text are perfect when your task aligns with traditional NLP objectives.
However, many other use cases require control over not only the choice of LLM, but also the prompt. You need to be able to engineer prompts — quickly, cost-effectively, and within a governed environment.
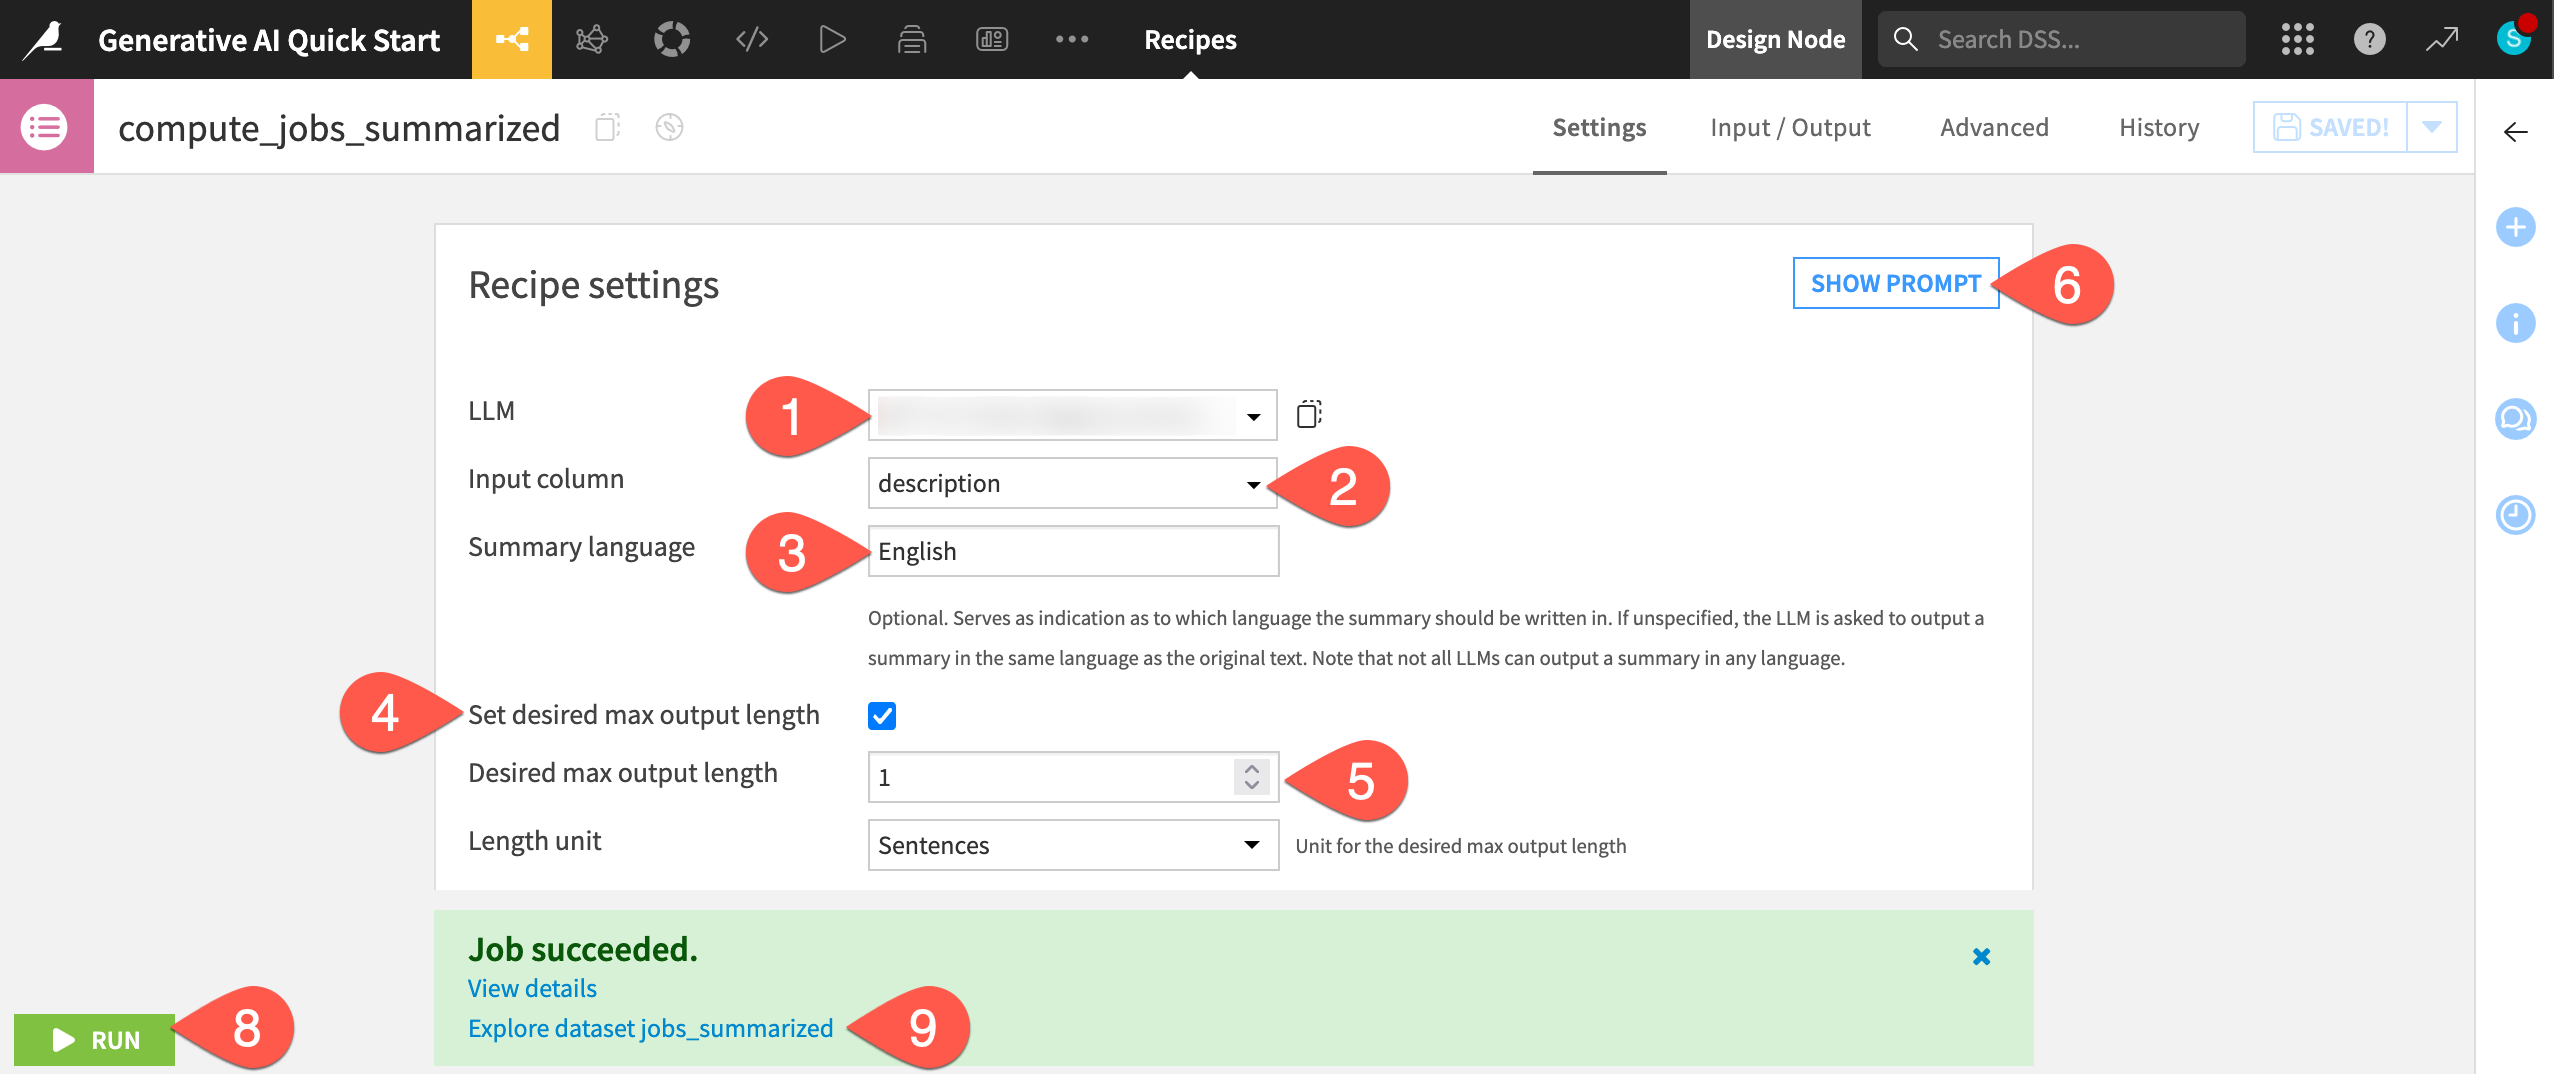
Create a Prompt Studio#
These kinds of cases call for a Prompt Studio, a development environment for prompt engineering.
From the GenAI (
 ) menu of the top navigation bar, select Prompt Studios.
Click + New Prompt Studio.
Name it
Extract required experience.Click Create to initiate a Prompt Studio.
Select Managed mode (Blank template).
Click Create to start your first prompt.
Design a prompt#
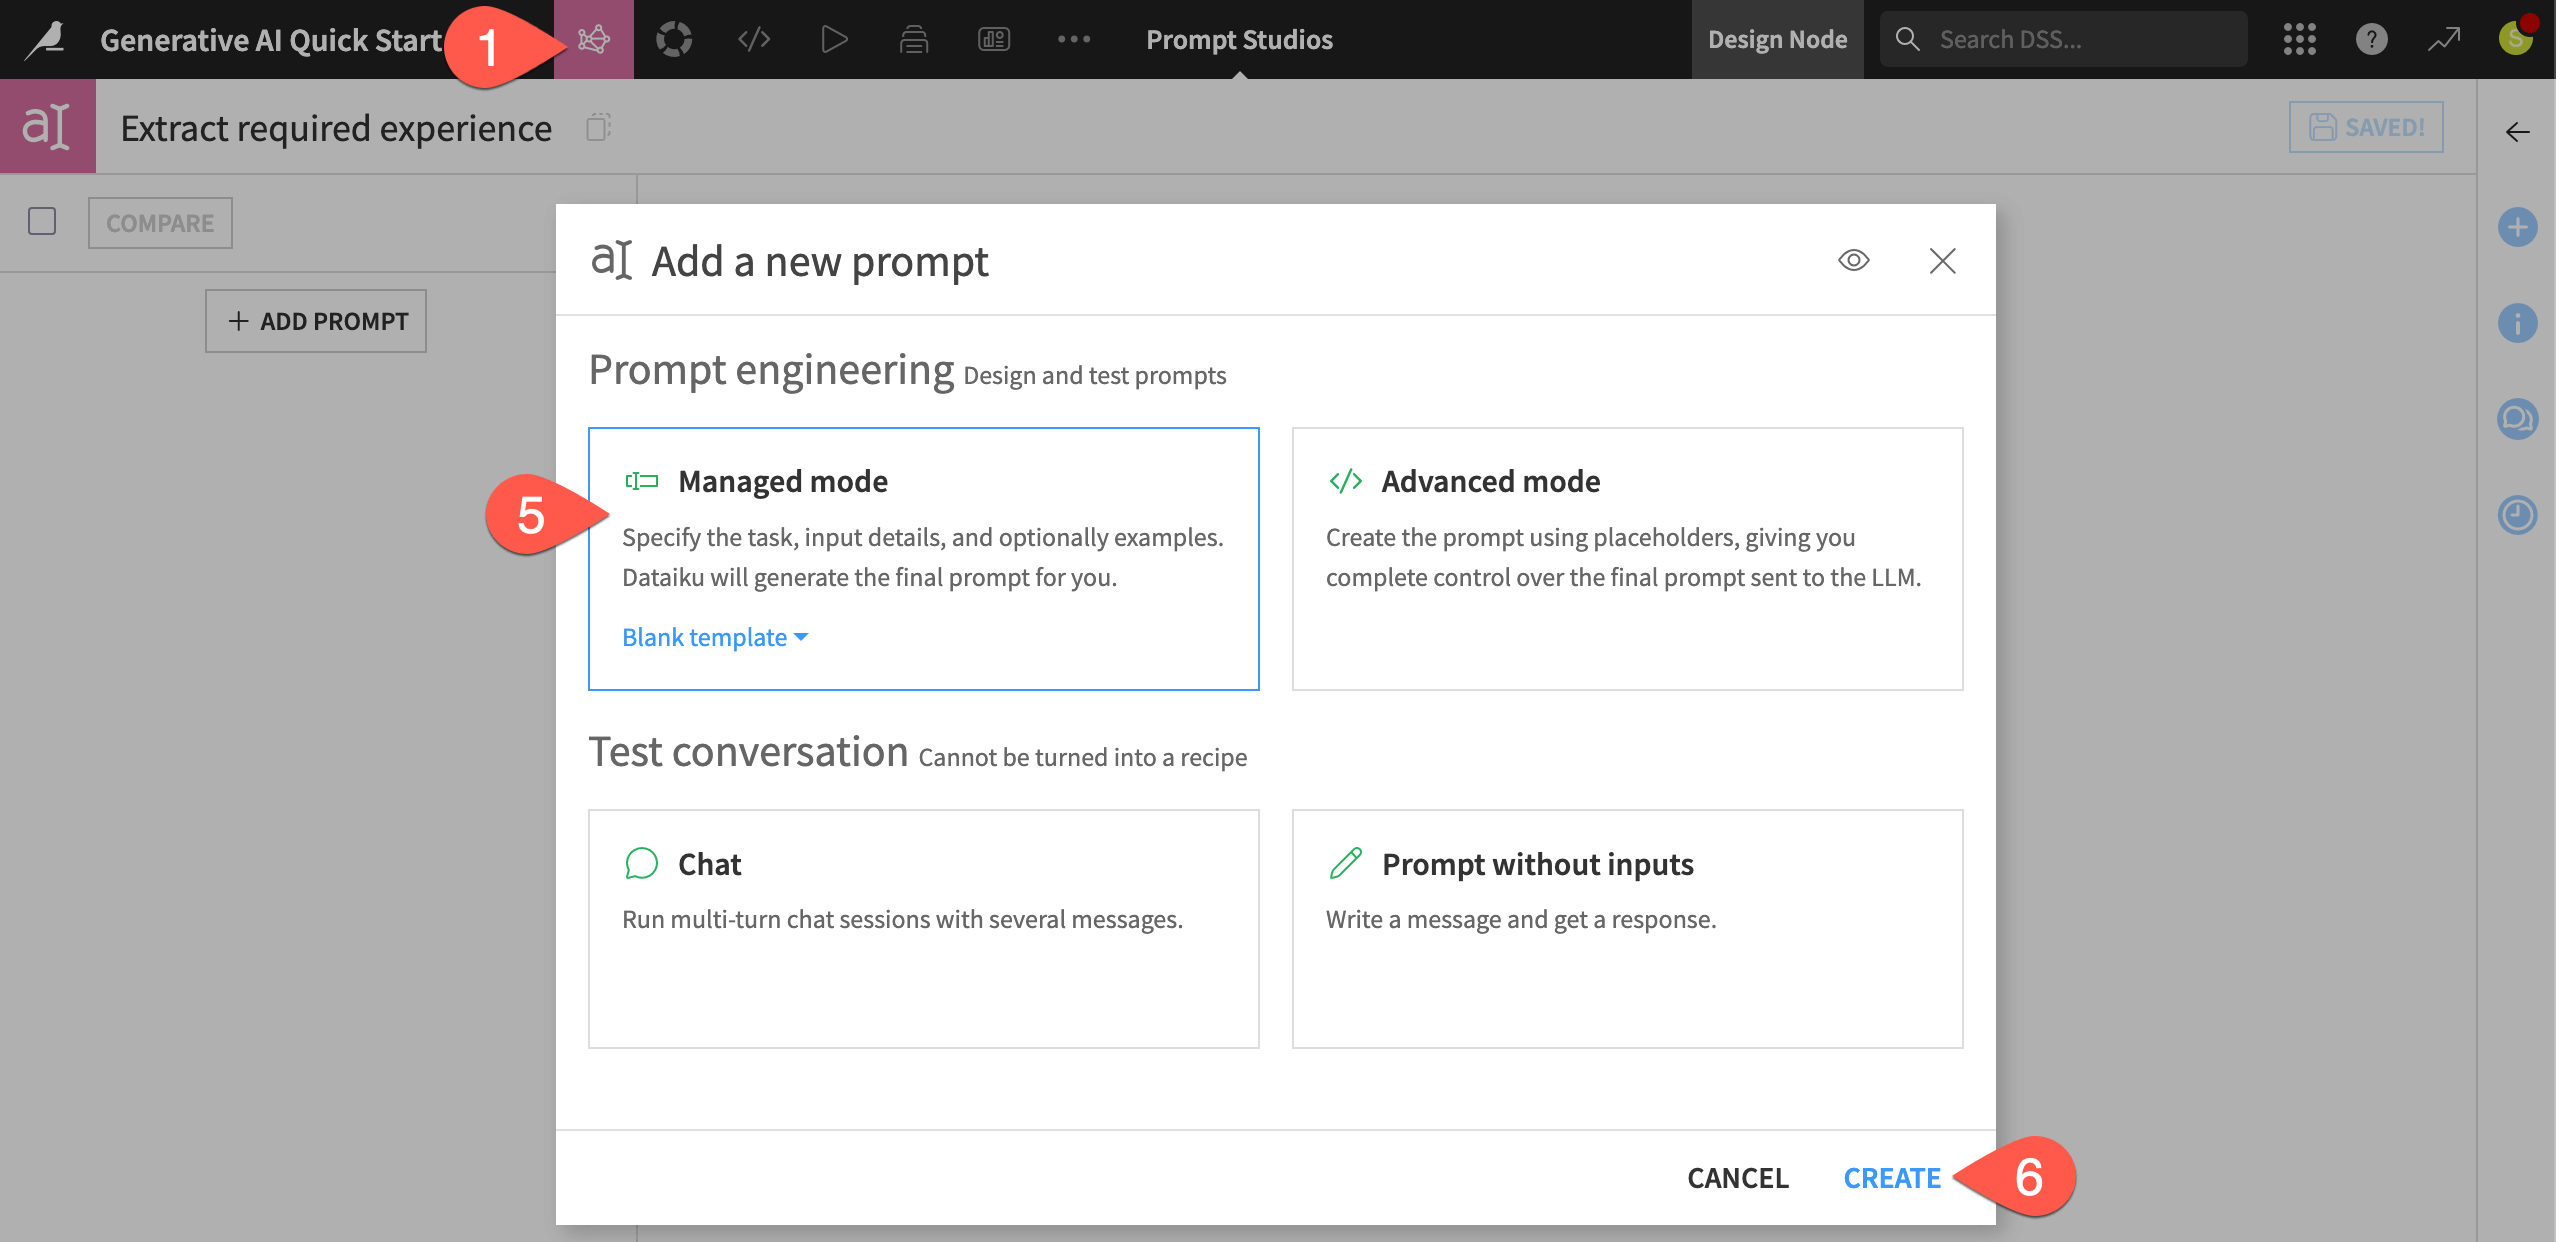
The jobs_summarized dataset includes a column required_experience. However, much of the data in this column is missing, and its categorical values like Mid-Senior Level are ambiguous.
What would be more helpful is the actual required years of experience. The lack of structure to this data rules out any kind of regular expression approach. An LLM, on the other hand, may be able to extract the required years of experience from the requirements column as a numerical value.
In the Agent/LLM field of the prompt design, select a model from your LLM connection.
Under Inputs from, select the jobs_summarized dataset to send data from its rows to the LLM.
For the input underneath, select requirements as the column.
In the description field, enter
job requirementsto help the LLM understand the context.Copy-paste the basic prompt below into the Prompt field:
Extract years of experience.
Click Run Prompt to execute the prompt on a few test cases from the input dataset.
Observe the test results, as well as a cost estimate to run this prompt, with this LLM, on 1,000 records.
Tip
LLMs, by their nature, don’t return reproducible results. Even if you were using the same LLM, your exact results will differ from those shown here.
Iterate on a prompt#
Rapid iteration is key to successful prompt engineering. You could refine the same prompt and access its history from the clock (![]() ) icon. Instead, create a new prompt to allow for a clearer comparison.
) icon. Instead, create a new prompt to allow for a clearer comparison.
In the first prompt, click the Duplicate (
 ) icon to replicate it as a new prompt in the same studio.
In the new prompt, replace the original query with one having more detailed context and expectation:
Extract the minimum years of required experience from the job requirements.
If you cannot determine the required years of experience, return an empty string.
Otherwise, return an integer greater than or equal to 0.
Guide the LLM with examples of the desired output by clicking + Add Example as needed:
Input: job requirements
Output
no experience required
0
+2 years of experience
2
min 4 yrs experience
4
8-10 years exp
8
Click Run Prompt, and view the results among the test cases.
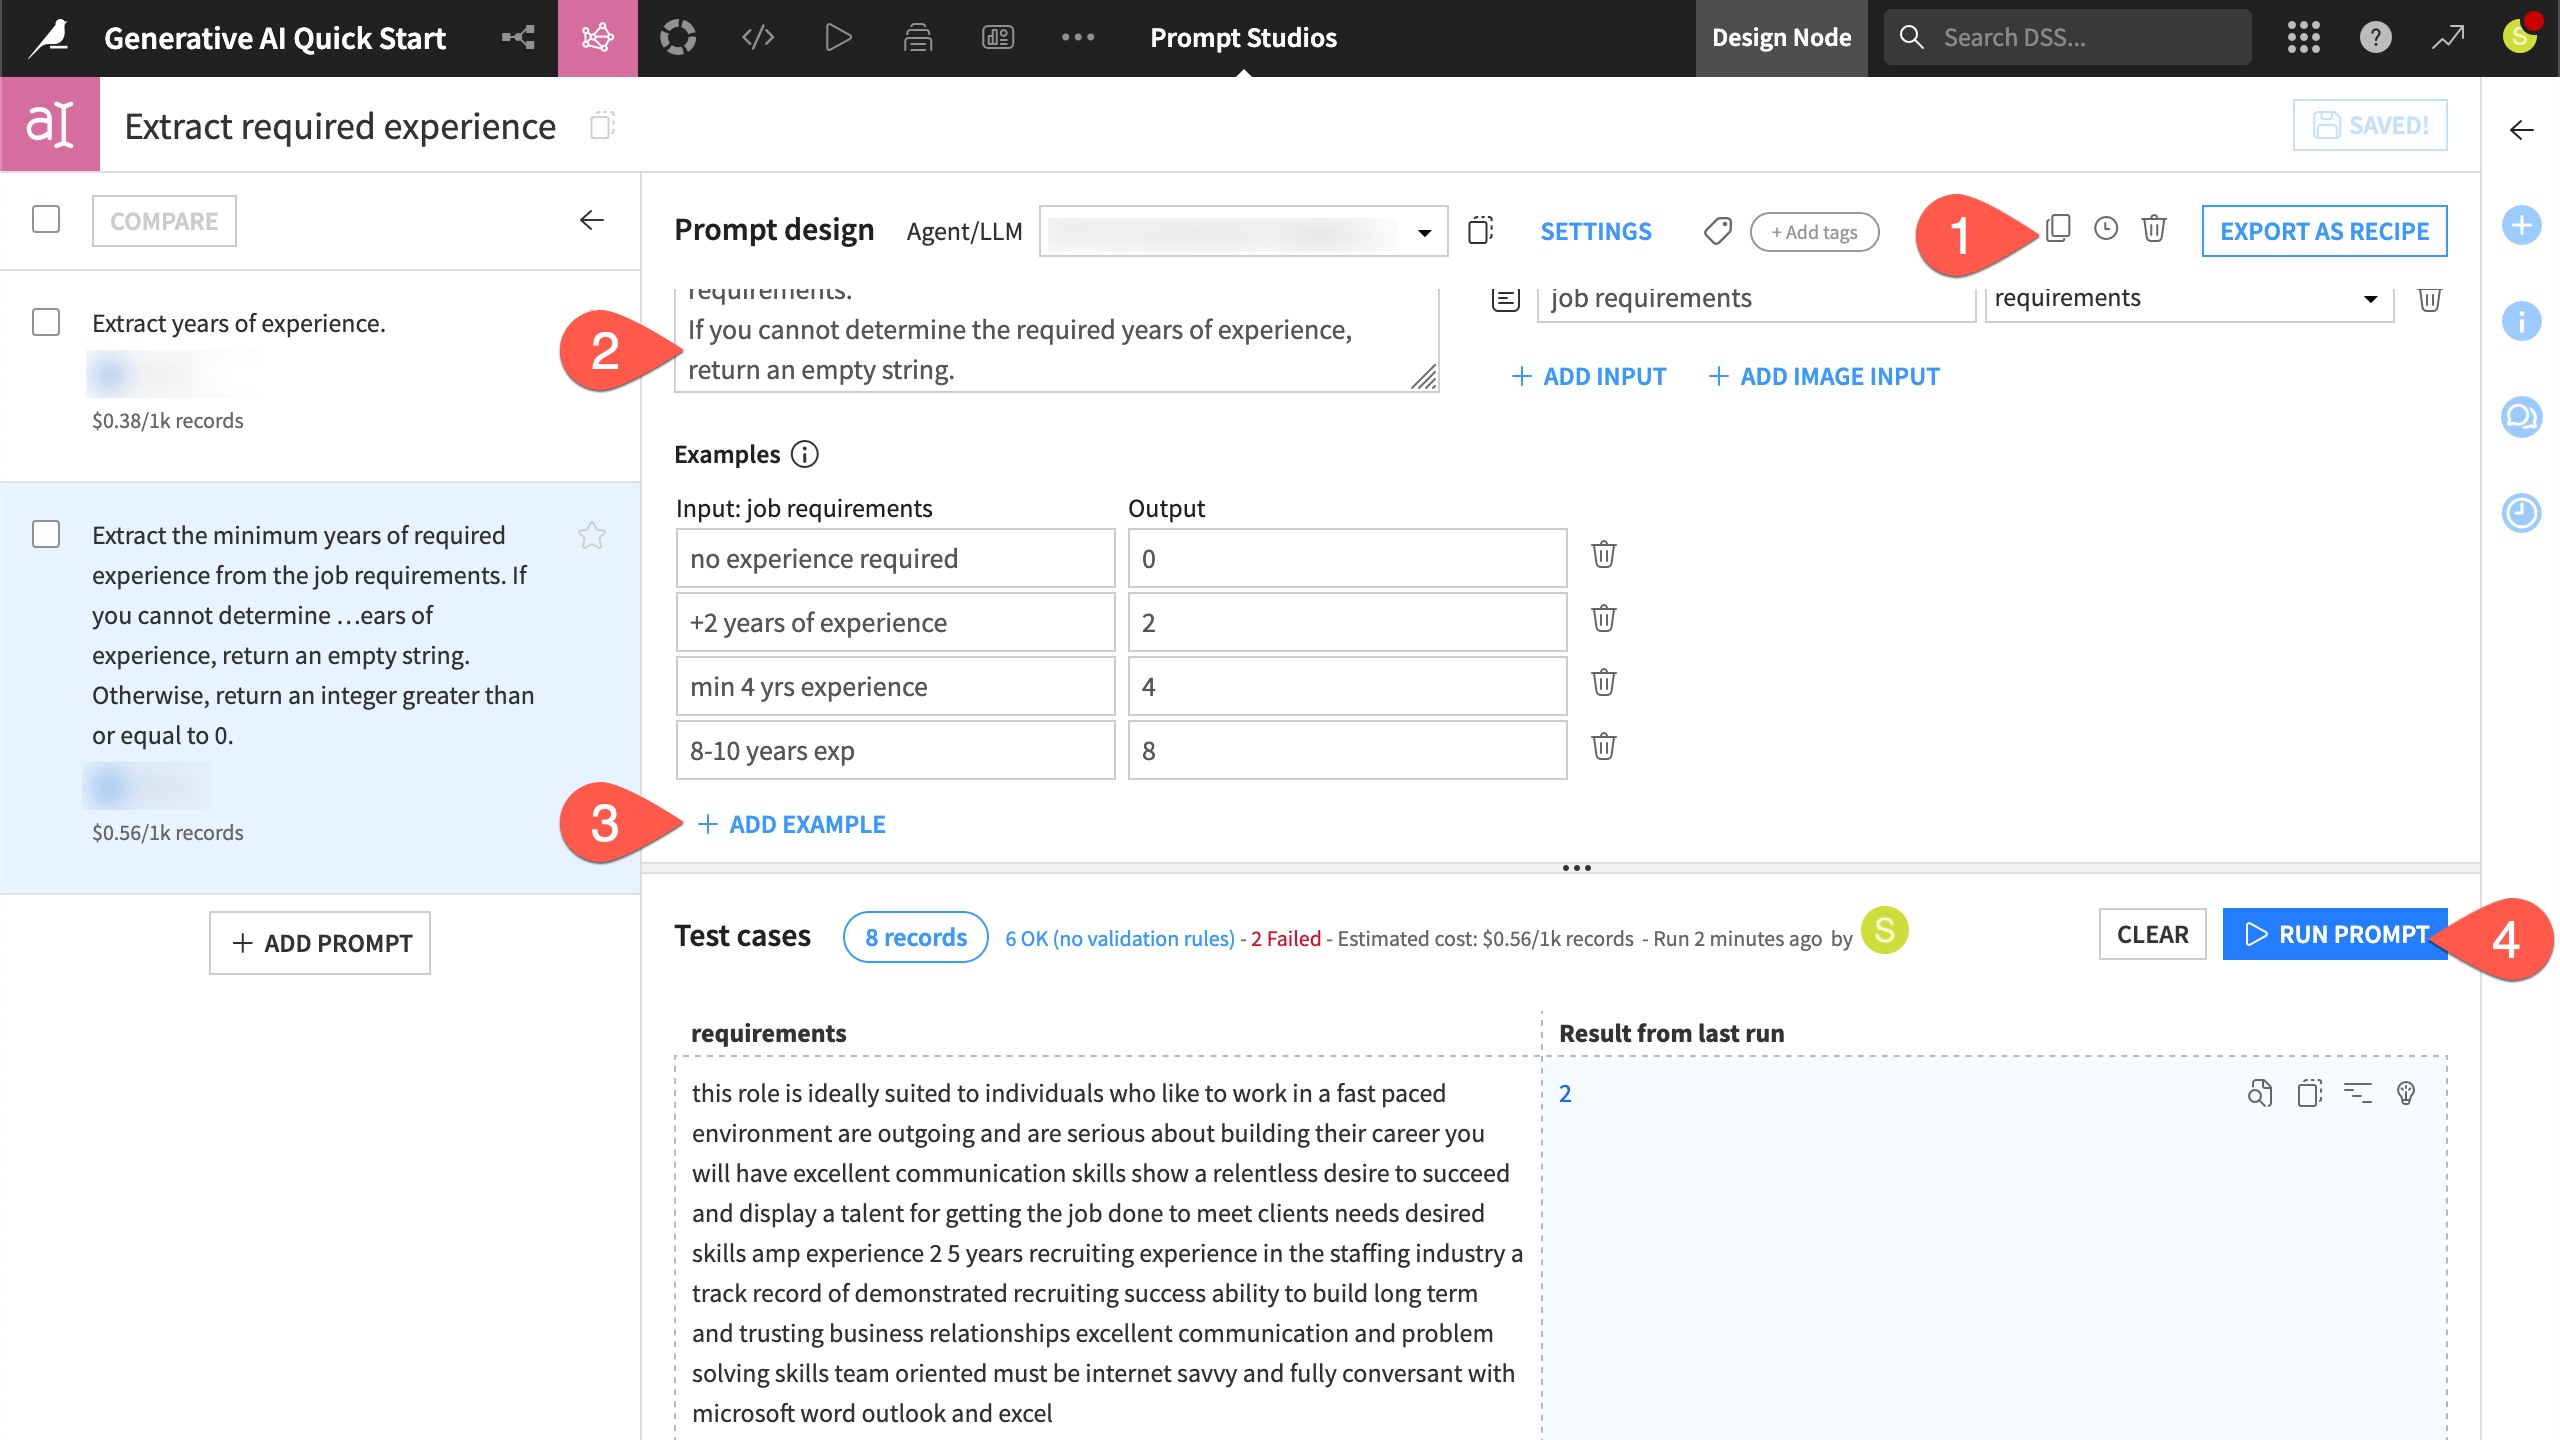
Tip
Testing prompts on a few cases in the Prompt Studio before running them on large datasets in the Flow is an important tool for controlling the cost of LLM inference!
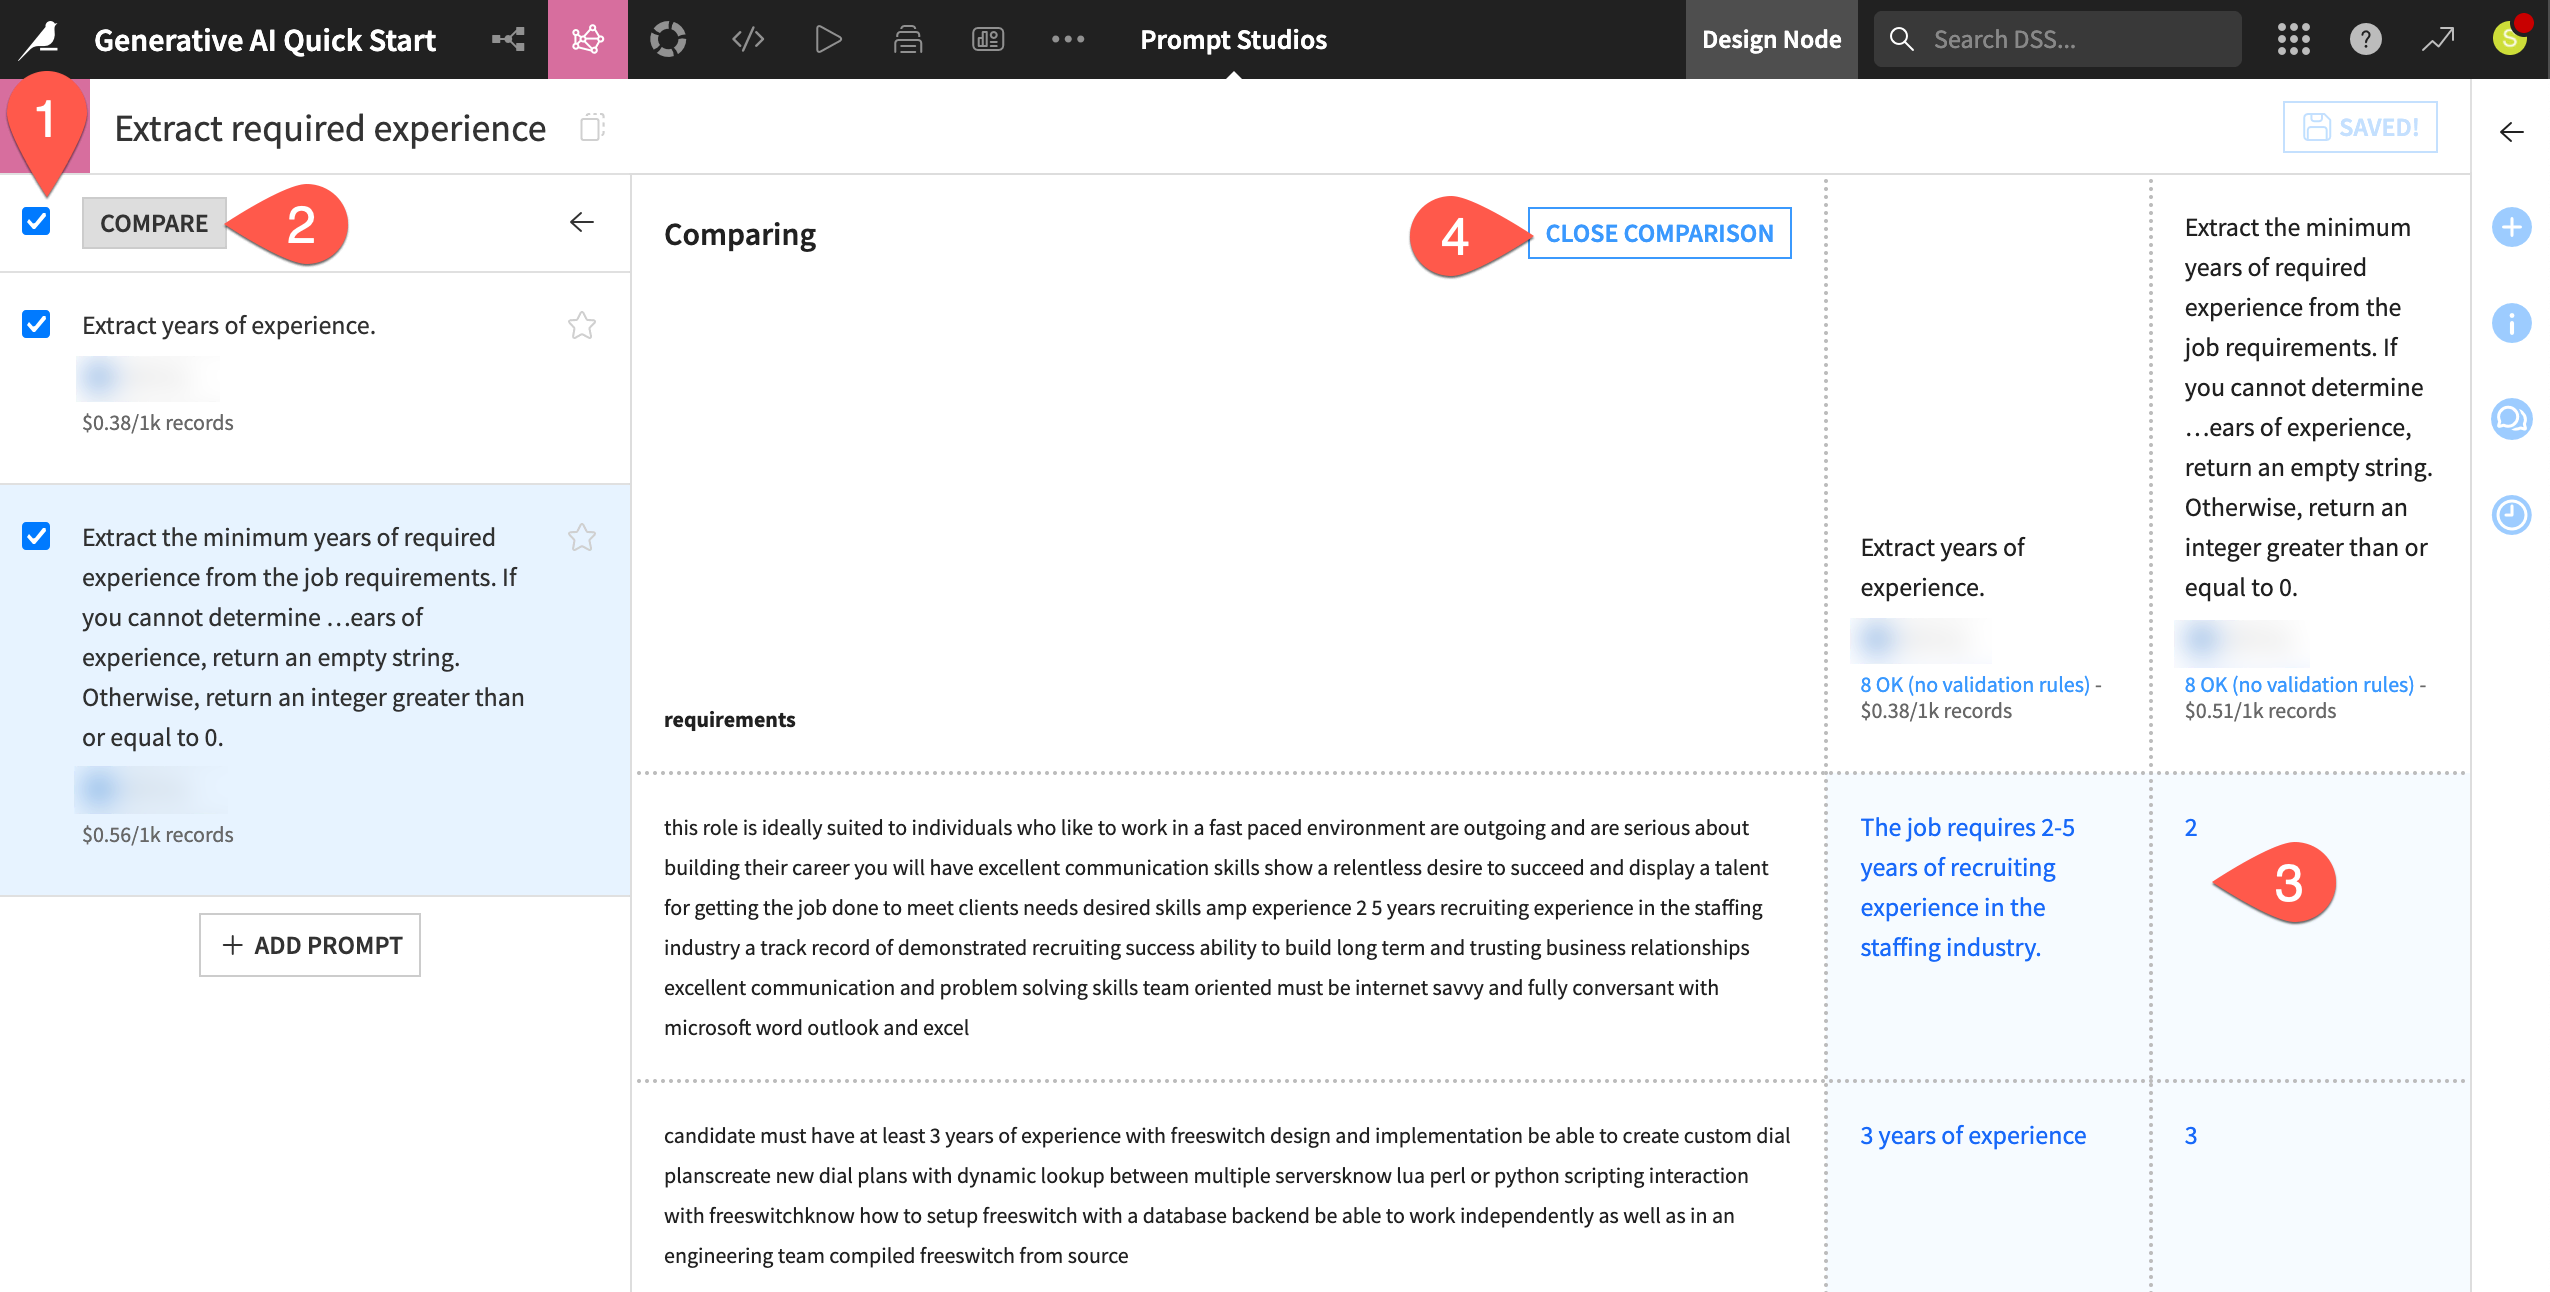
Compare prompt results#
In real use cases, you’ll need to evaluate not only which prompt is better, but also which LLM, at which price point, best meets your needs. With new models frequently releasing, being able to swap between LLMs is a necessity.
Accordingly, you’ll want to compare prompt results side-by-side.
In the left panel of the Prompt Studio, select both prompts.
Click Compare.
Observe how the more detailed context, expectation, and example cases better constrained the LLM output.
When finished comparing the results on the test cases, click Close Comparison.
See also
The Prompt Studio provides a wide degree of flexibility for working with LLMs through a visual interface. For even more freedom, you can interact with the LLM Mesh programmatically. Get started in the LLM Mesh section of the Developer Guide.
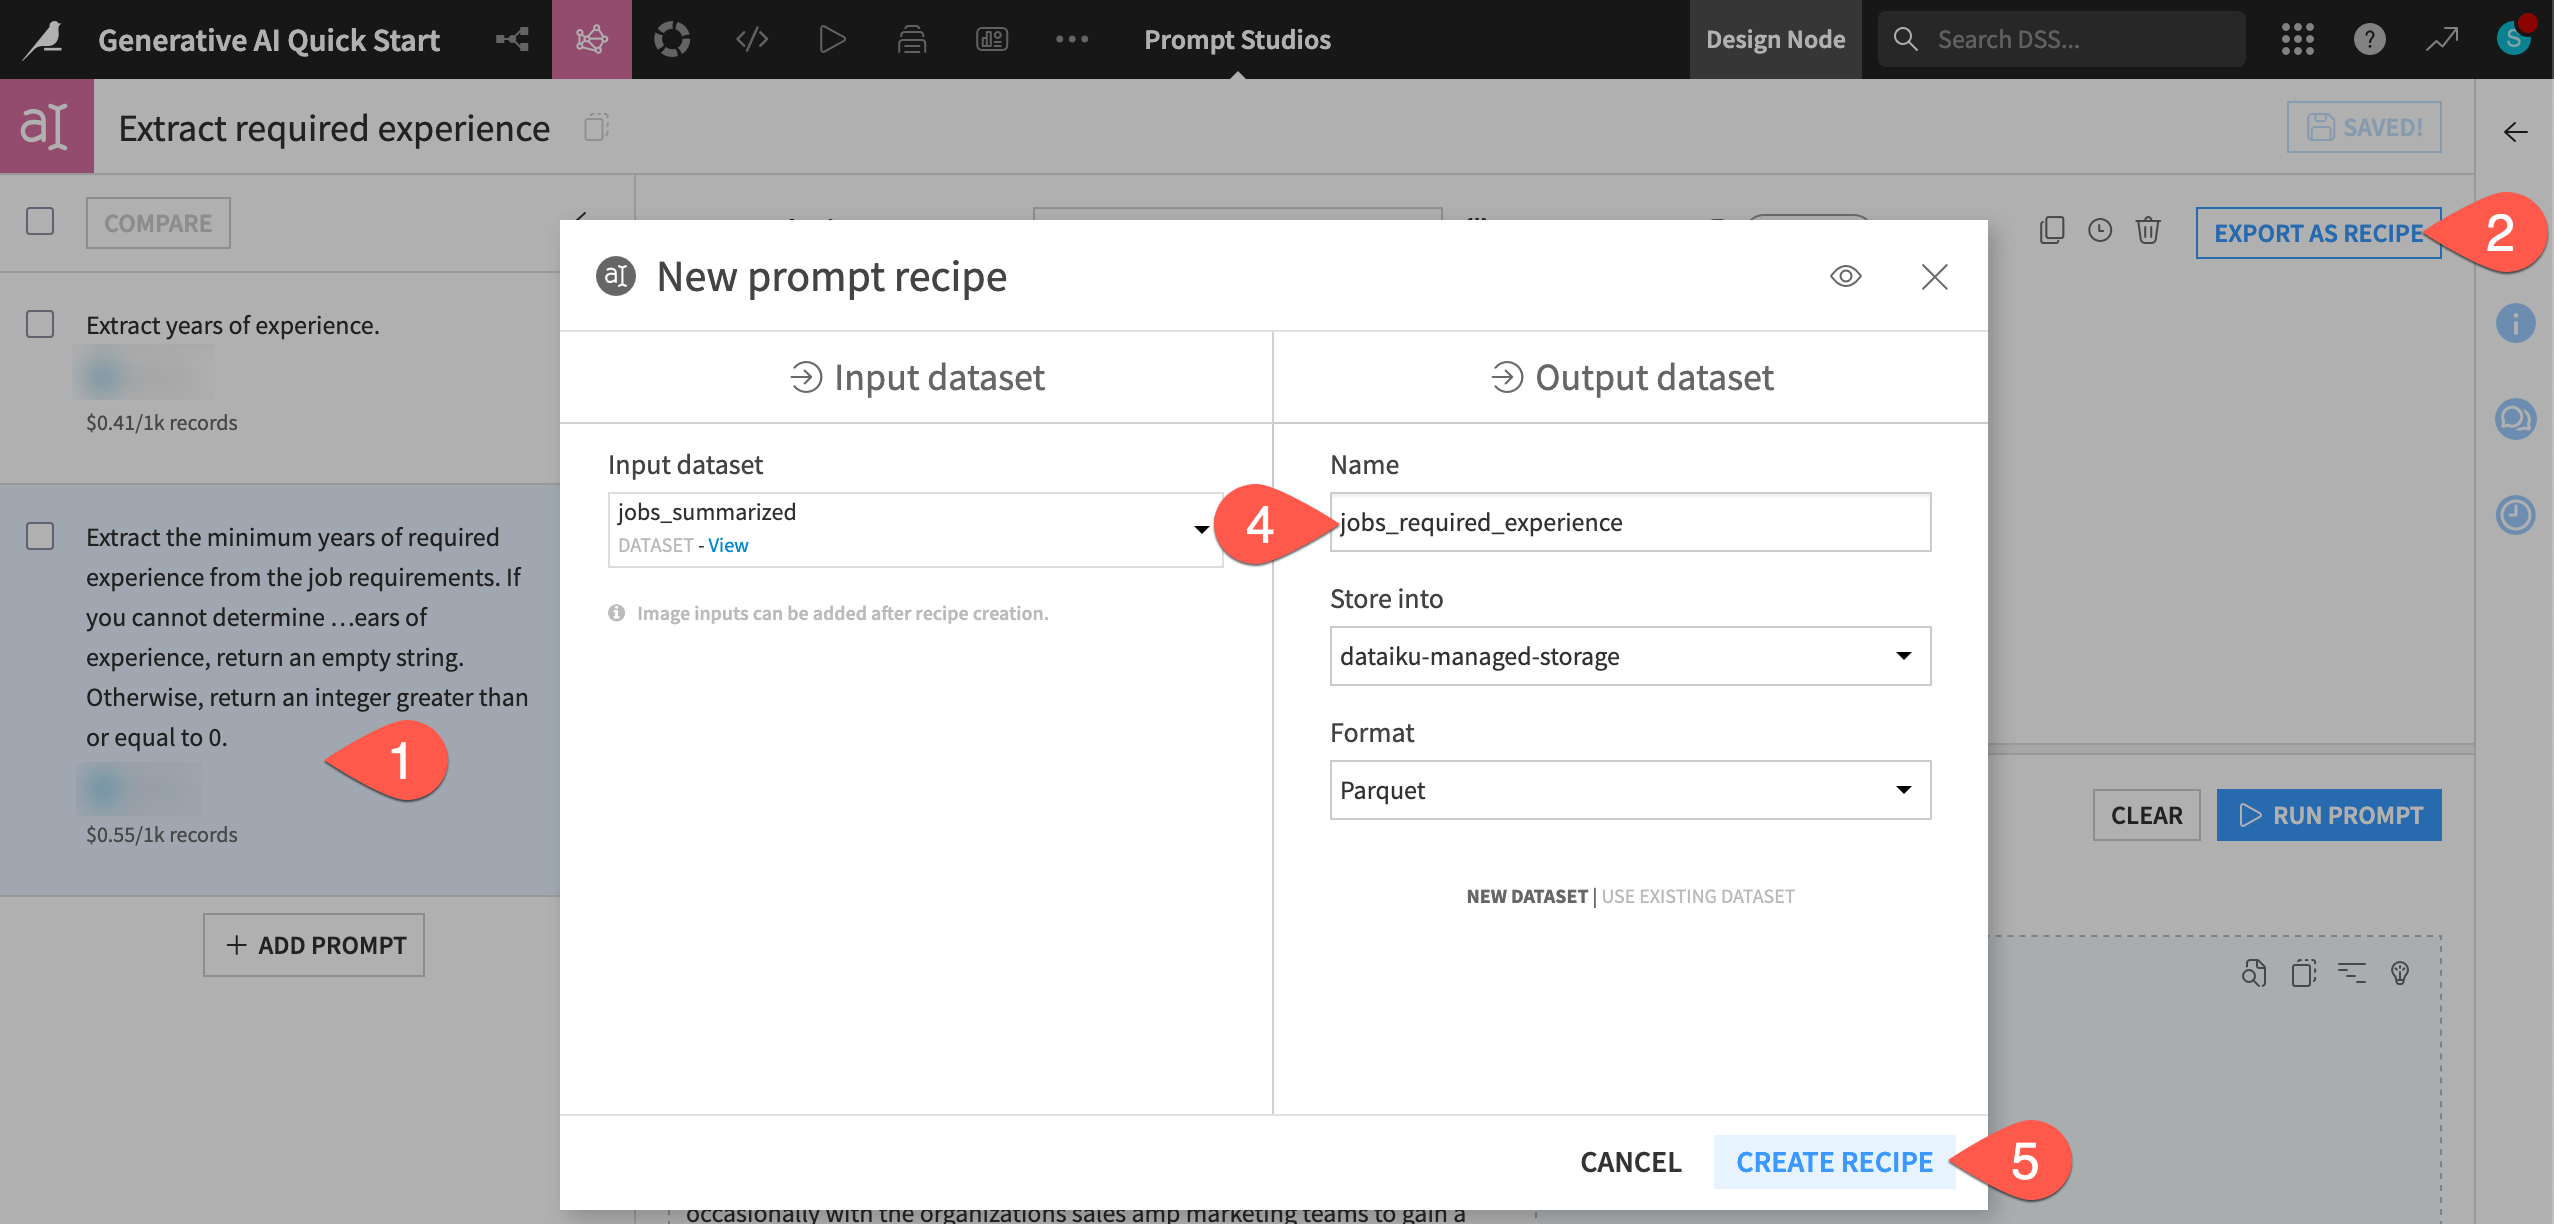
Export natural language prompts to the Flow#
When satisfied with your prompt engineering results, you can use the prompt in a Prompt recipe, which you can execute like any other recipe in a data pipeline.
In the Prompt Studio, select the prompt with the best results.
Click Export as Recipe.
Accepting the option to create a new recipe, click Create.
Name the output dataset
jobs_required_experience.Click Create Recipe.
Tip
A Prompt Studio and a Prompt recipe illustrate a dynamic found in many areas of Dataiku: a testing ground for experimentation and an output-oriented Flow for production.
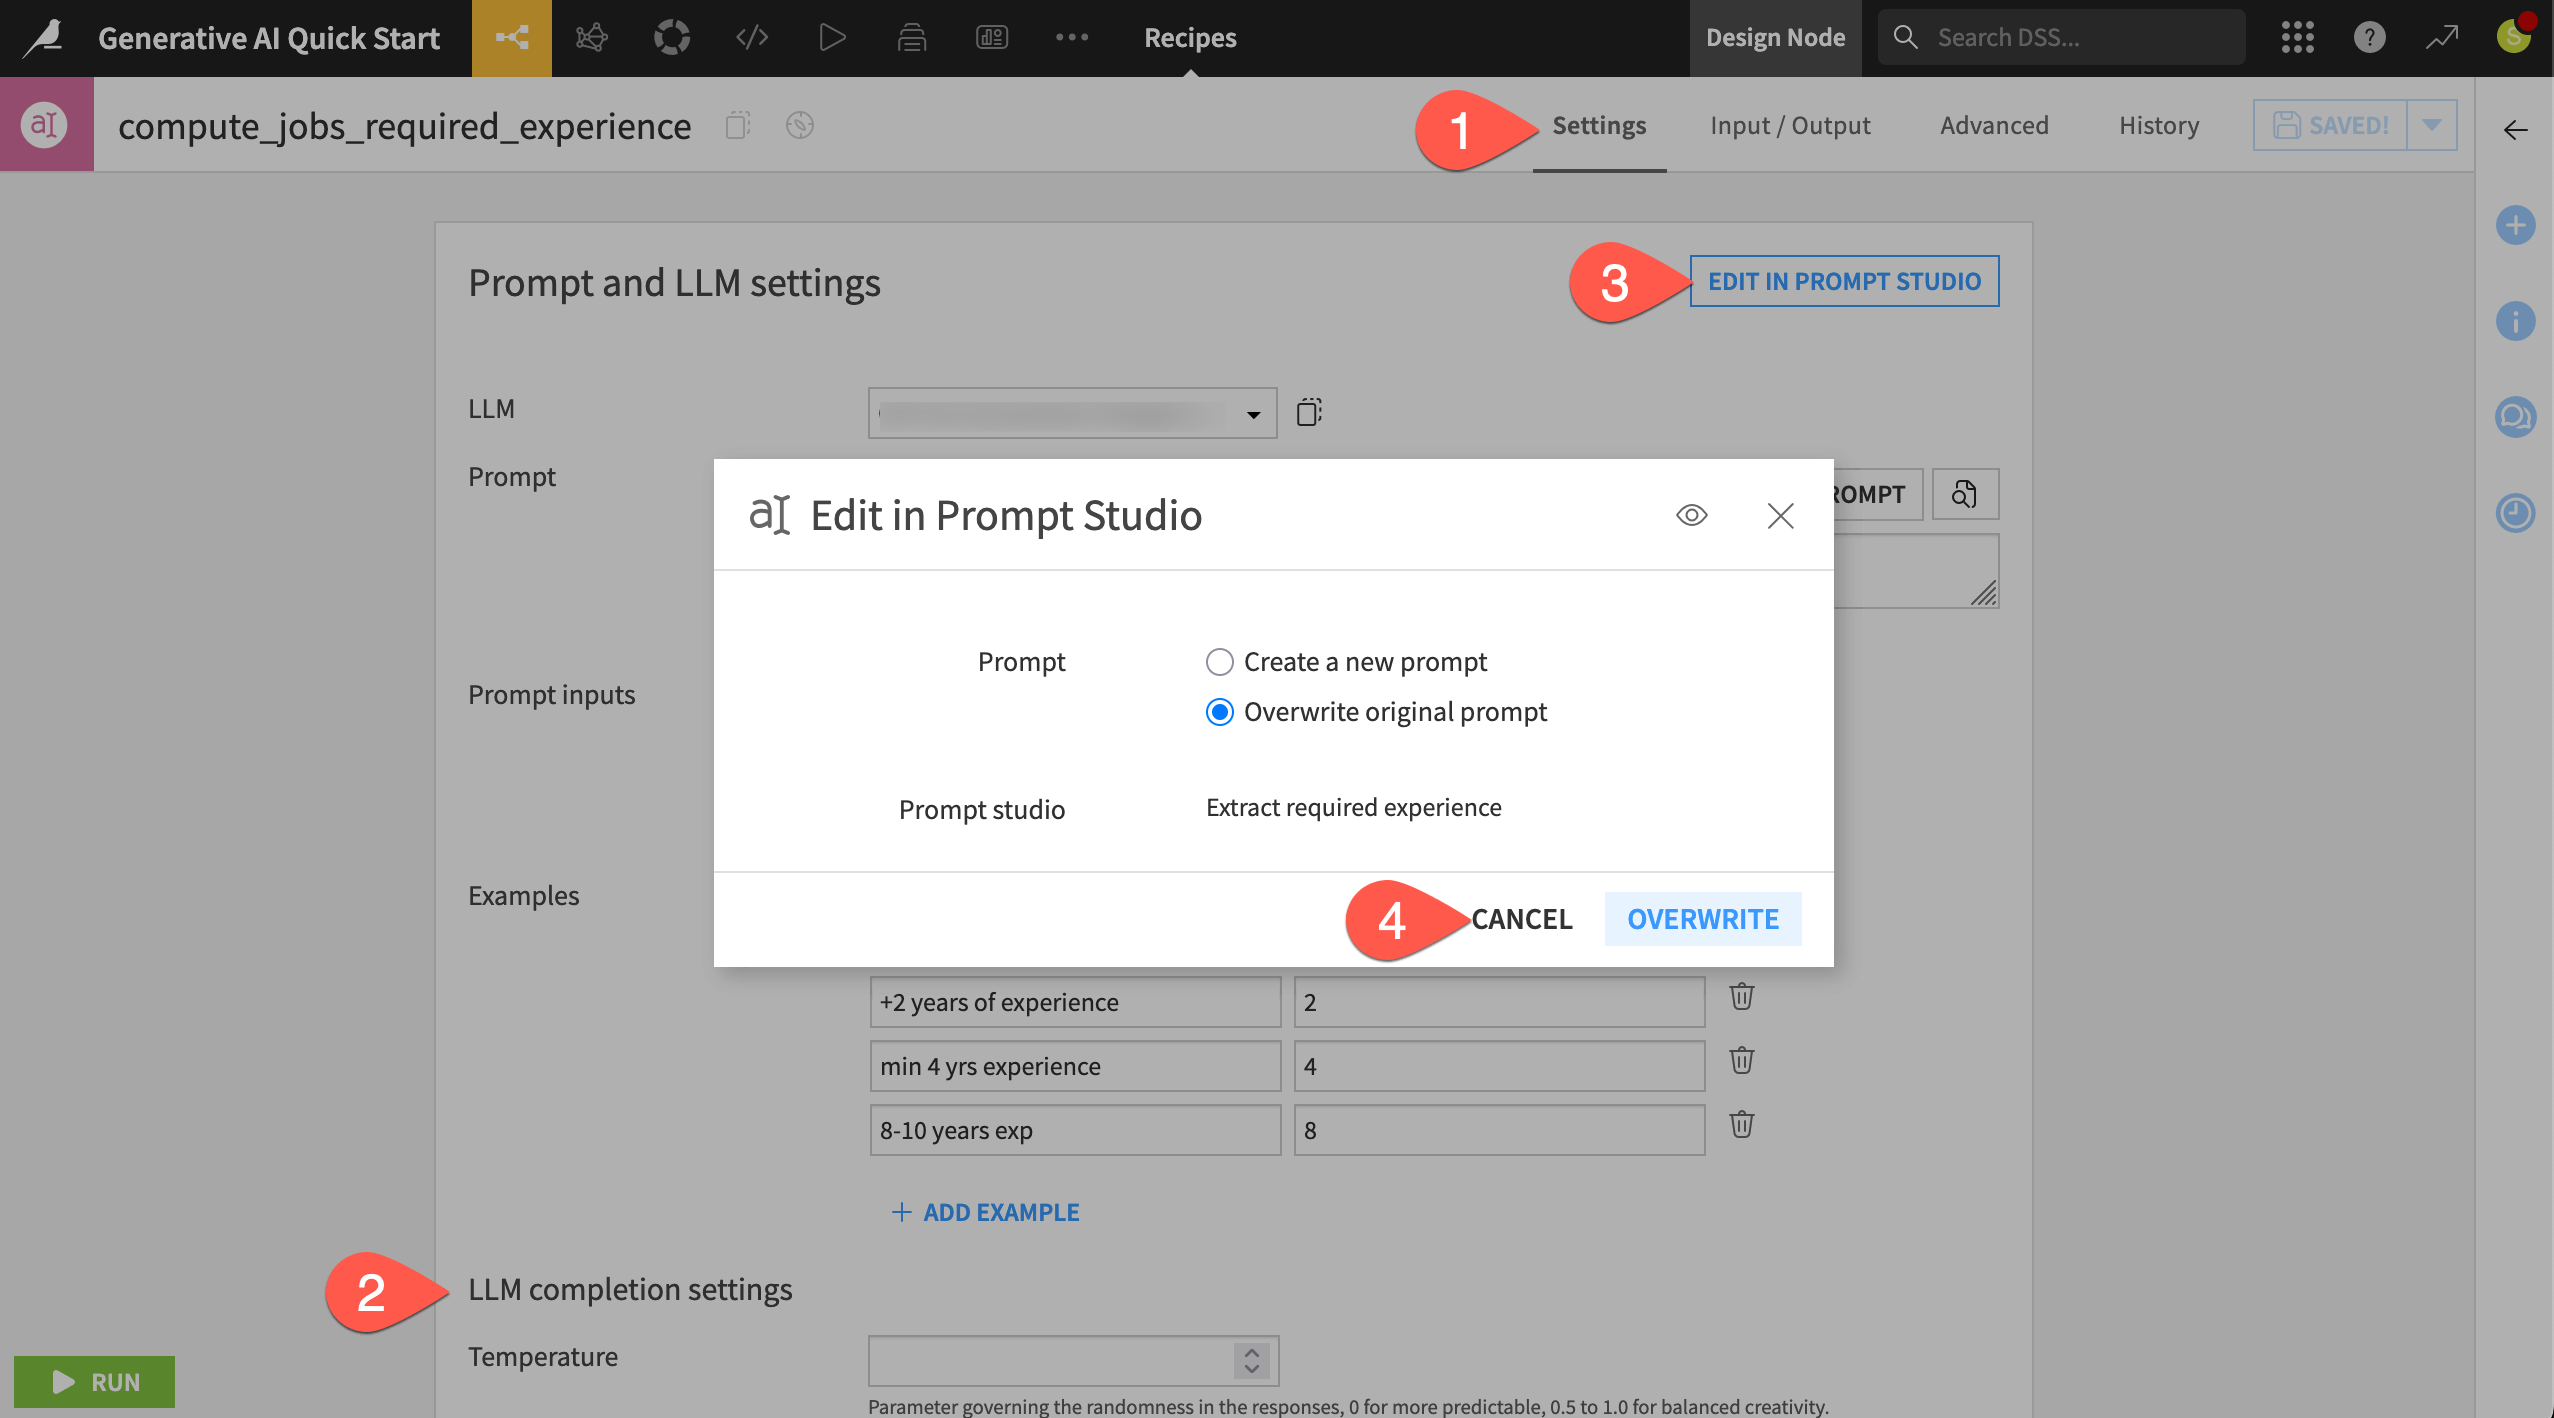
View a Prompt recipe#
In the Prompt recipe, you’ll find the same settings inherited from the Prompt Studio. Now however, you can execute these instructions on an entire input dataset in the Flow.
In the Settings tab of the Prompt recipe, confirm for yourself it includes the same parameters in the Prompt Studio, such as the LLM, the prompt, the input dataset, and examples.
Observe many other settings (also found in the Prompt Studio) that allow for additional control.
Click Edit in Prompt Studio to recognize how you could iterate back and forth between a Prompt Studio and a Prompt recipe.
Click Cancel to return to the recipe, but don’t run it yet.
See also
One important setting in this recipe not discussed is guardrails. See Concept | LLM guardrails to learn how Dataiku can reduce potential risks from LLMs with guardrails like toxicity detection, PII detection, and forbidden terms.
Combine GenAI with traditional data tools#
The last two GenAI recipes demonstrate use cases that would not be achievable with traditional data preparation or machine learning approaches.
At the same time, these models aren’t perfect. Although LLMs open the door to a whole new array of use cases, you still need a complete data toolkit. Accordingly, before moving on to additional Generative AI features, let’s demonstrate how both sets of tools complement each other in Dataiku.
Build a data pipeline including GenAI recipes#
The last two recipes use an LLM, but they’re fully integrated with the existing data pipeline in the Flow. The same pipeline that processed data with visual and code recipes now processes data with GenAI recipes.
From the Prompt recipe, navigate back to the Flow (
g+f).Observe the pink Summarize (
 ) and Prompt (
 ) recipes in the Flow (compared to the yellow visual recipes, orange code recipe, and green ML recipes).
Click to select the unbuilt jobs_required_experience dataset.
Open the Actions (
) tab of the right panel.Click Build.
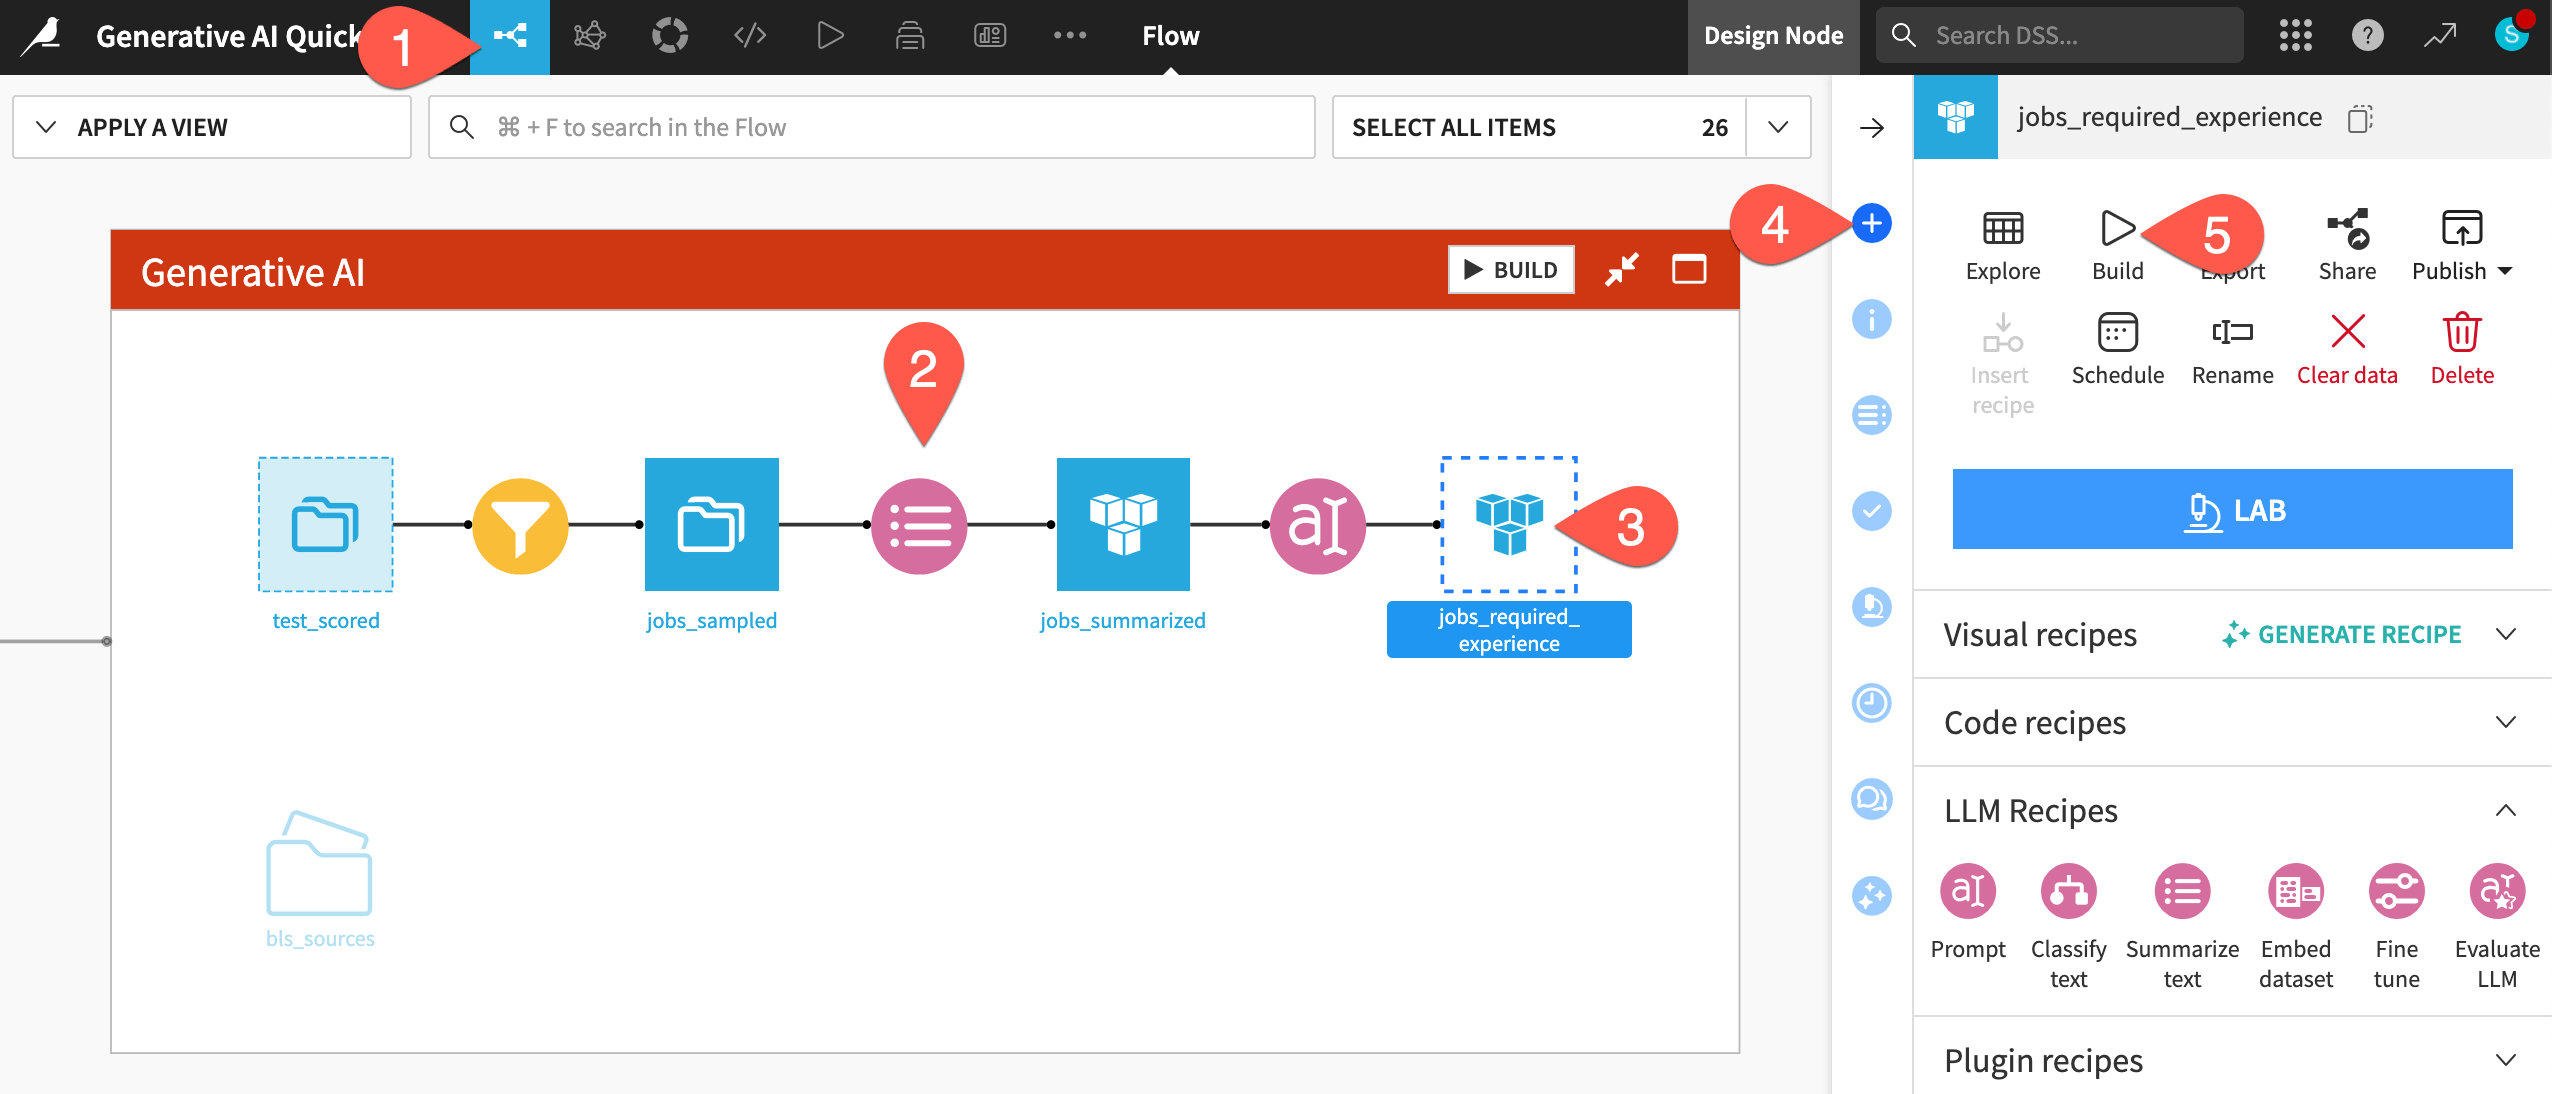
Click Build Dataset to execute the Prompt recipe on not only the test cases, but the entire input dataset.
See also
Here the default option of Build Only This does exactly what you need. You’ll learn more about various build modes in the Data Pipelines course and how to automate those builds in the Data Quality & Automation course!
Inspect the output of a GenAI recipe#
The output of a GenAI recipe exists as an ordinary Dataiku dataset. It’s ready for further data preparation, model building, data visualization, etc. You can apply any of Dataiku’s tools for automation or MLOps.
When the previous job finishes, double click to open the jobs_required_experience dataset.
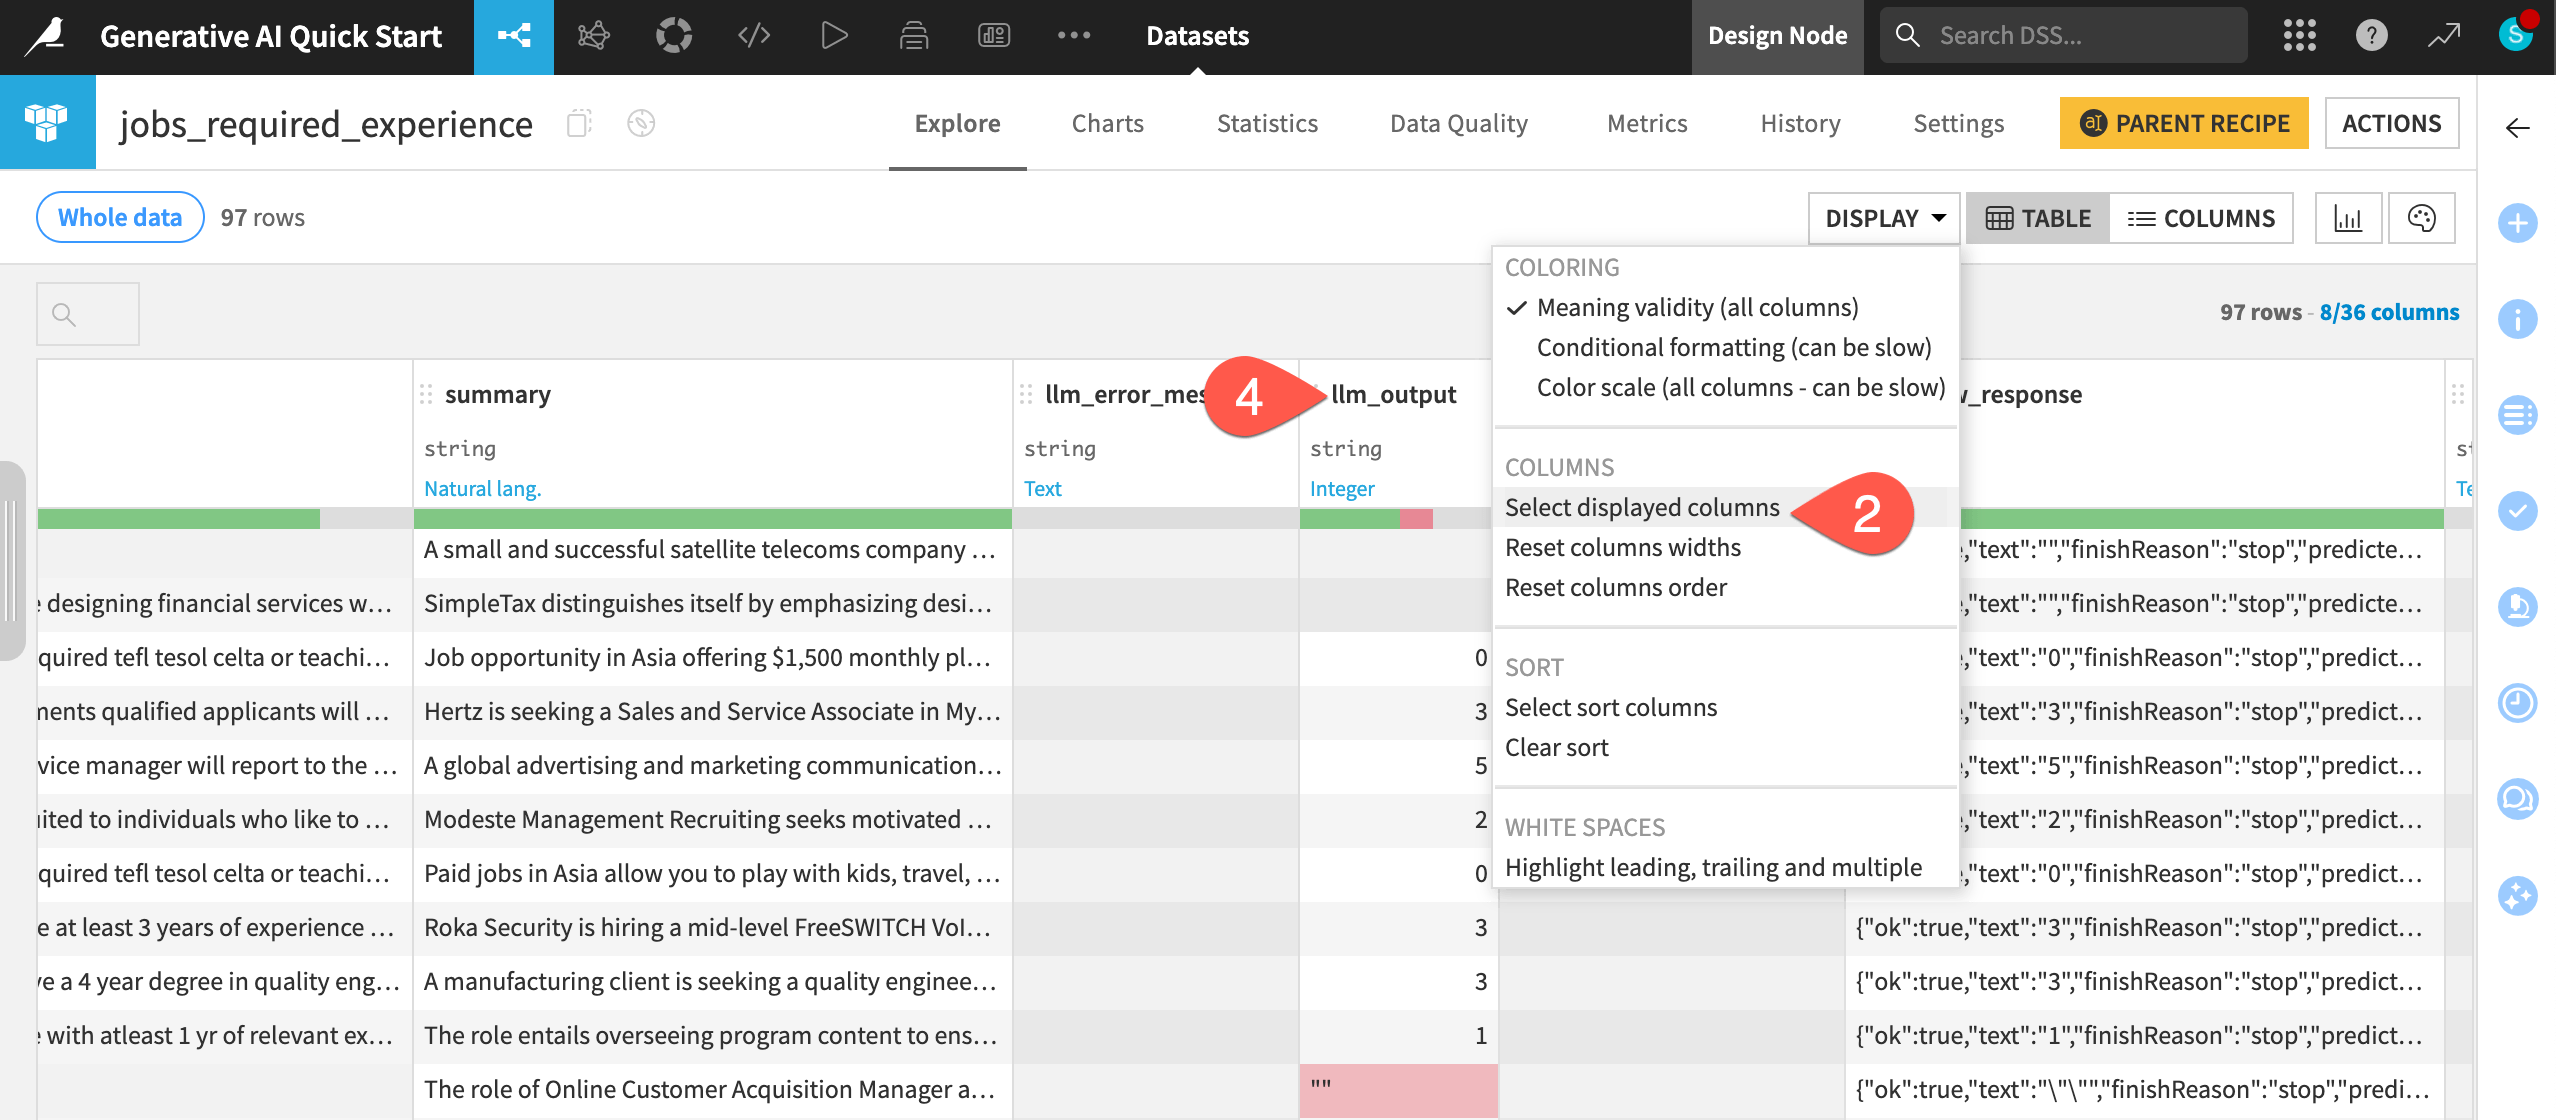
Click Display > Select displayed columns to view a subset of columns.
Choose Selected columns, and display only the following columns:
summary, the summarized job description from the first GenAI recipe
requirements, the original job requirements
any columns beginning with
llm_
Review the llm_output column to inspect how well the LLM extracted the required years of experience from the original requirements column.
Do more data preparation#
Your output from the LLM likely needs additional data preparation.
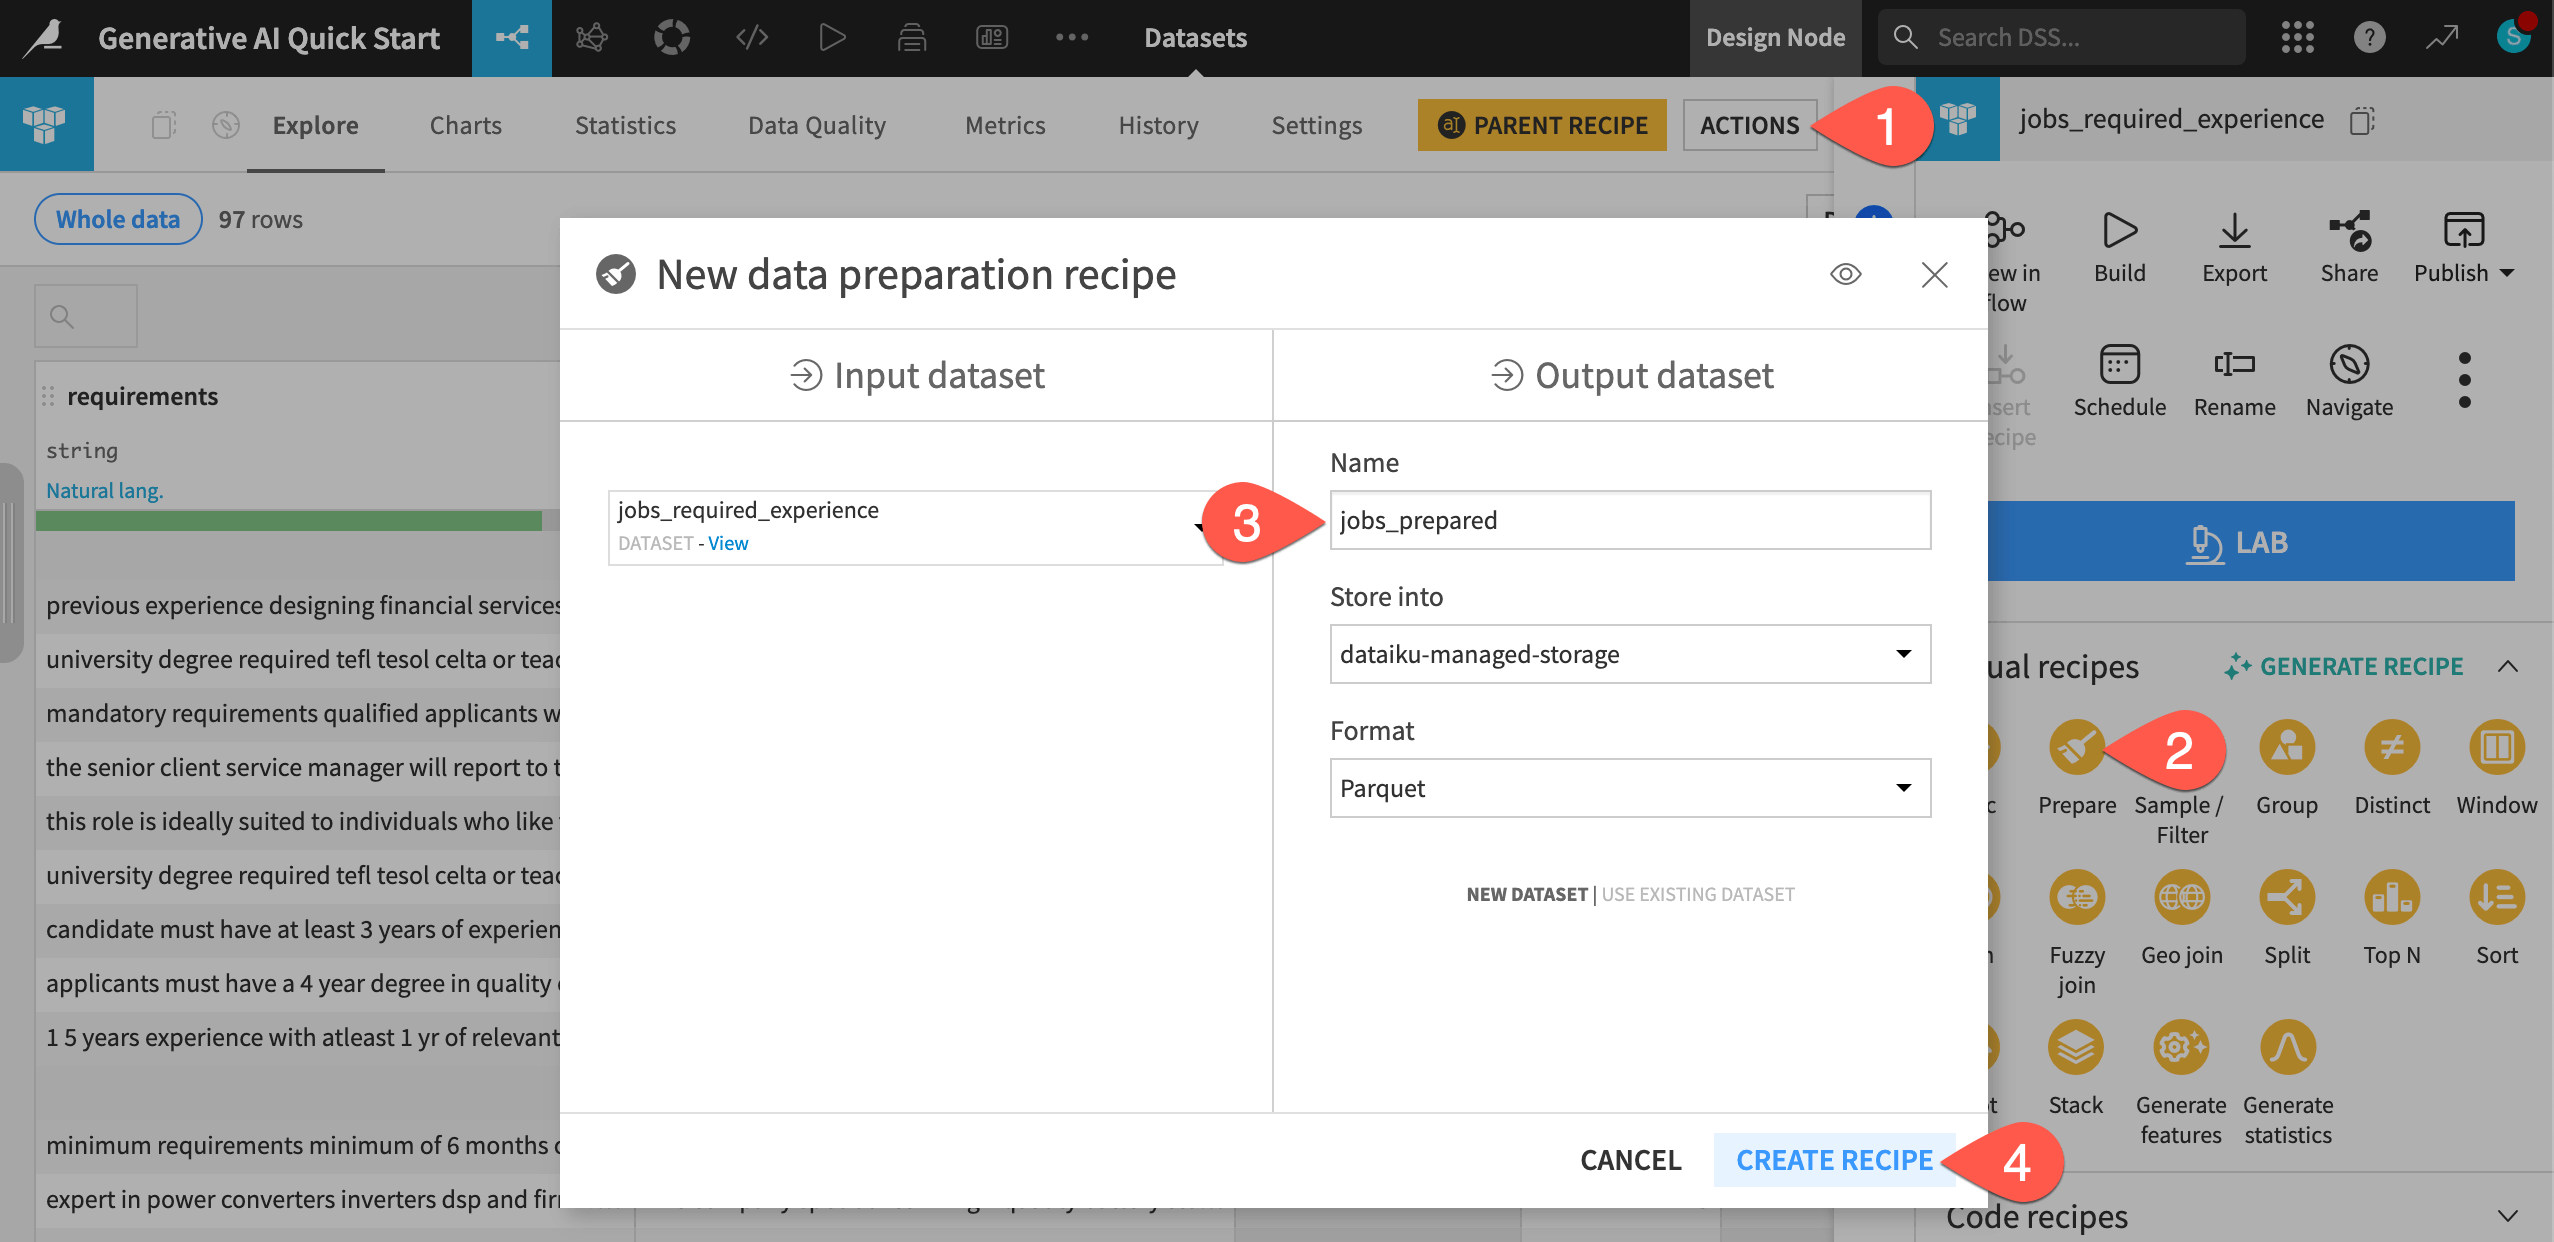
From the jobs_required_experience dataset, open the Actions (
) tab of the right panel.From the menu of Visual recipes, select a Prepare recipe.
Name the output dataset
jobs_prepared.Click Create Recipe.
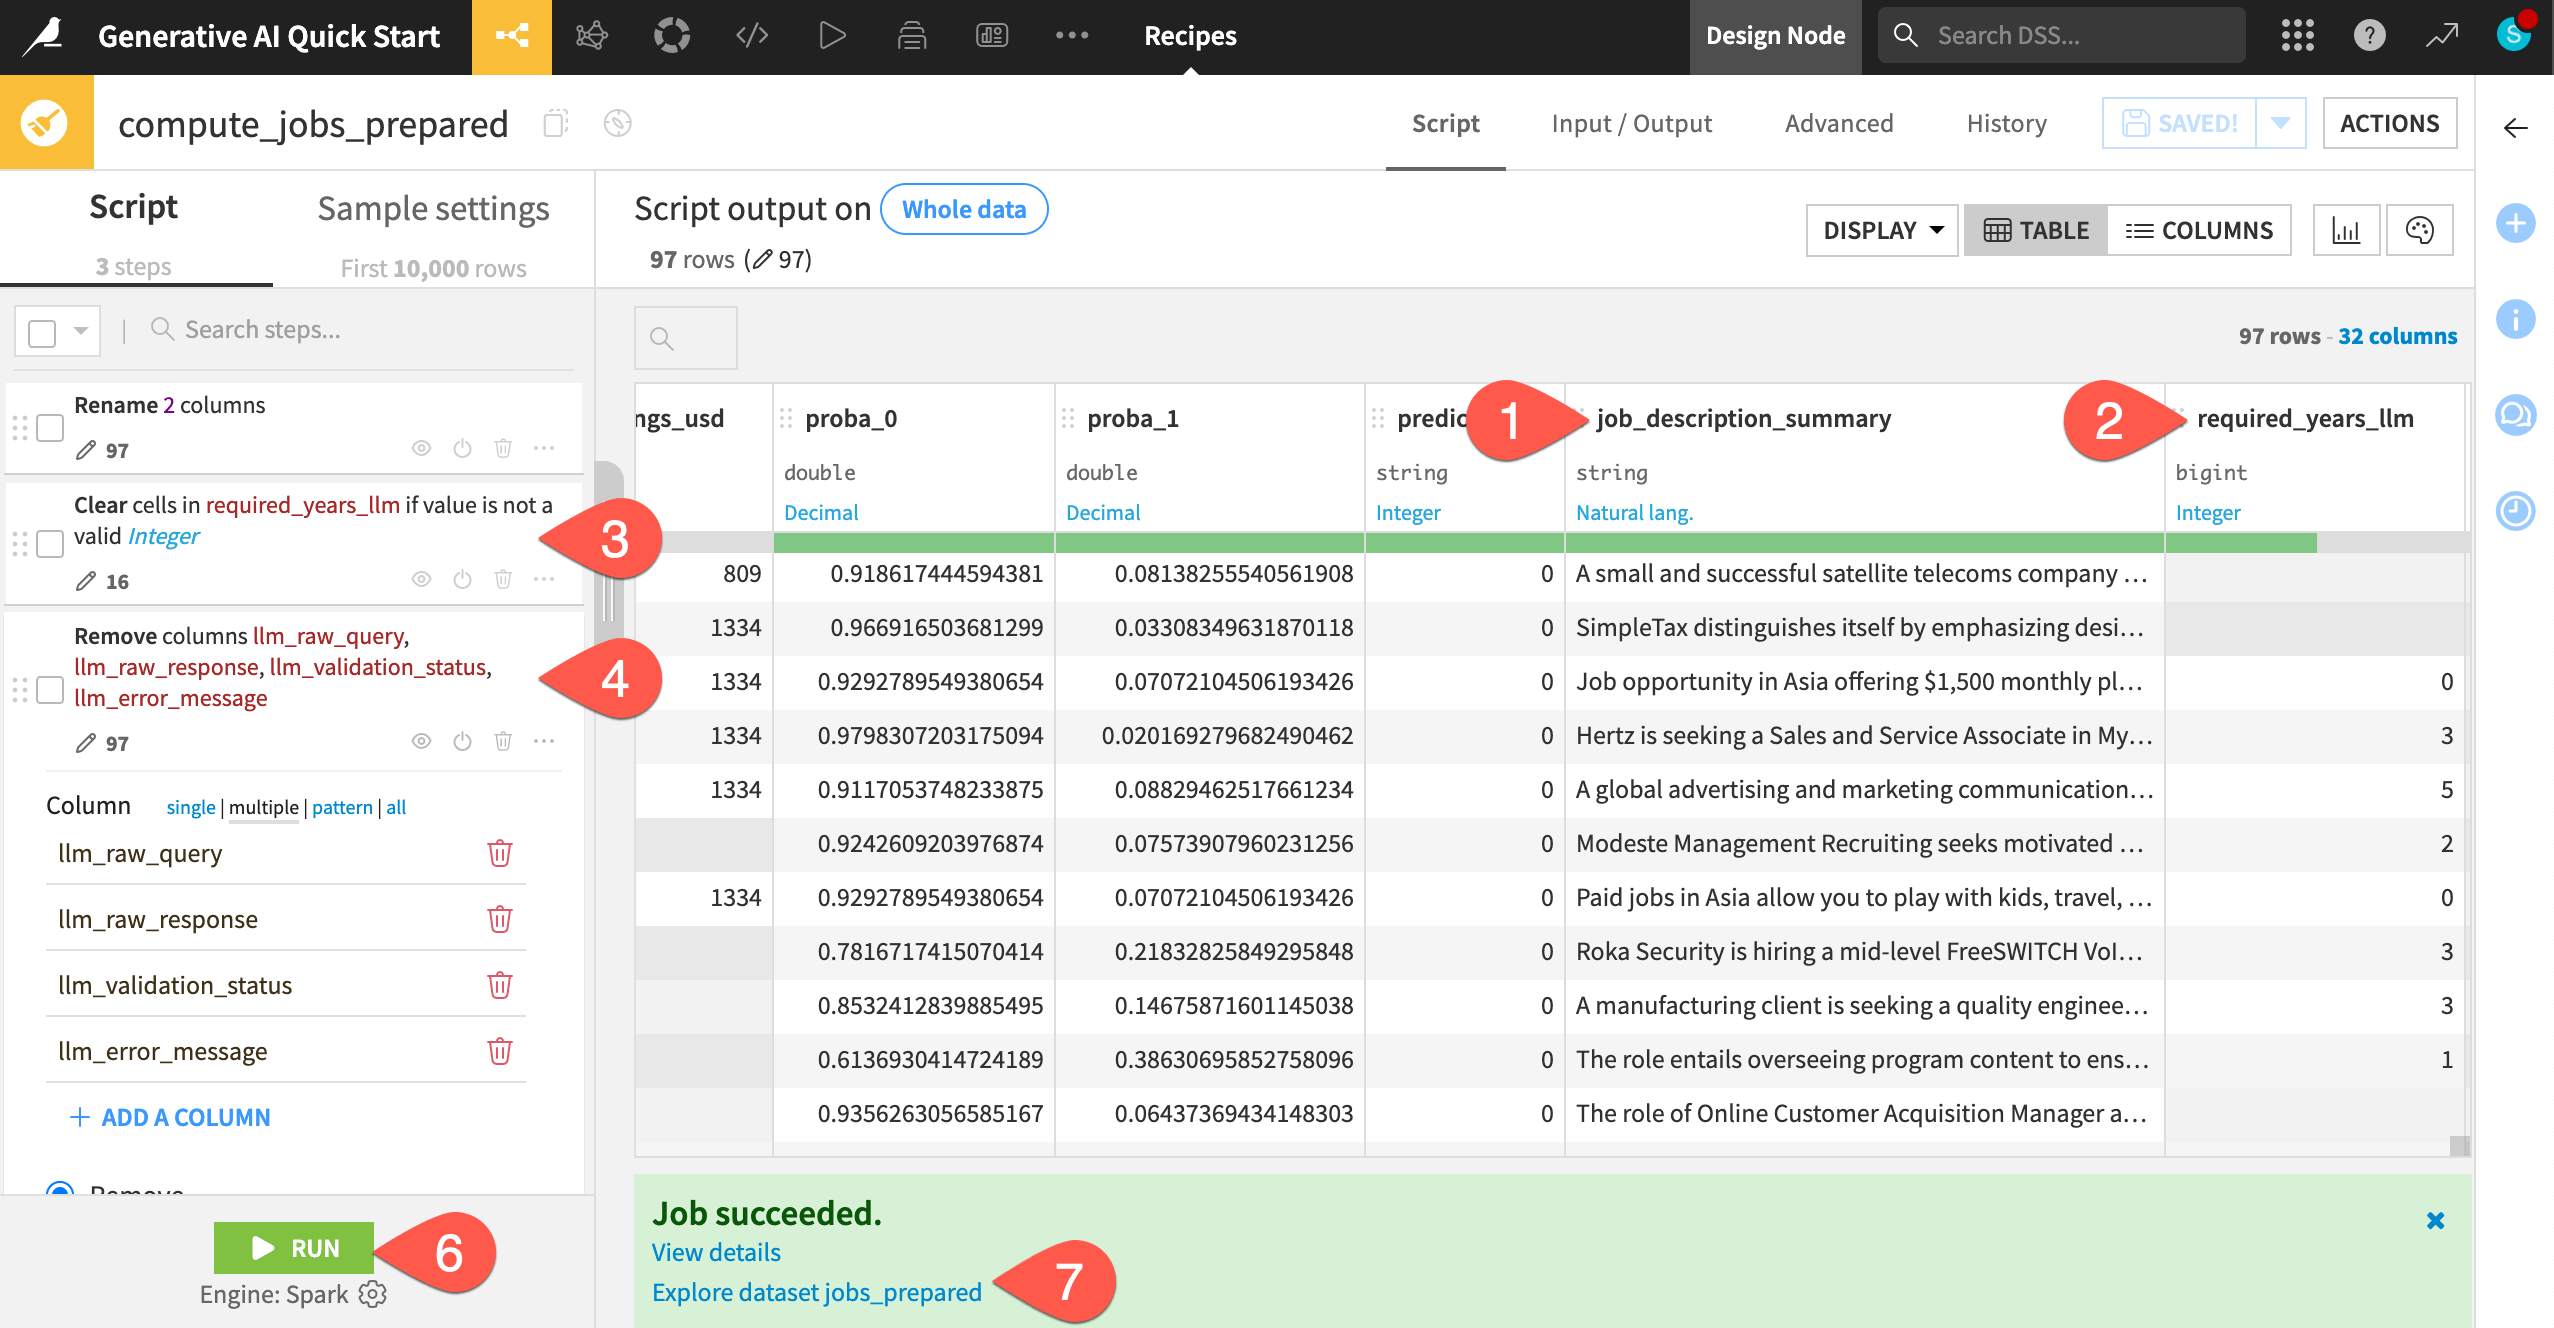
Add a few steps to the script, focusing on the columns added from the GenAI recipes.
Open the header of the summary column, and select Rename. Provide
job_description_summaryas the new name, and click OK.Do the same for the llm_output column, renaming it
required_years_llm.Open the same column header again, and select Clear invalid cells for meaning integer.
Open the header of the llm_error_message column, and select Delete.
Do the same for any other columns beginning with
llm_.Click Run (or type
@+r+u+n) to execute the recipe.Open the output jobs_prepared dataset to see your recipe’s instructions applied to the whole input dataset.
See also
You can learn much more about data preparation in Dataiku in other resources such as the Data Preparation Quick Start, where you’ll build the Data Preparation Flow zone found in this project.
Augment LLMs with your own knowledge#
Thus far, you can consider the LLM you’ve been querying as a foundational model. Although these kinds of models may “know” many things, your organization often has valuable knowledge that these models don’t possess.
Many new kinds of use cases become possible if you can improve upon a foundational LLM with a bank of internal knowledge. This technique is retrieval augmented generation, or RAG.
Important
As mentioned at the start, completing this section requires a text completion model that supports image input and an embedding LLM. If you haven’t already done so, see the initial RAG setup in the reference documentation to meet the prerequisites for this section. Otherwise, skip ahead to the final section.
Embed your documents#
One limitation of the data at hand is that it doesn’t provide insight into industry trends, such as which jobs have the greatest growth potential. While any foundational model could return generic answers, you might want the model to draw on specific sources. Imagine some knowledge internal to your organization, or, for the purpose of your job search, sources that you trust.
This internal knowledge may come in a variety of unstructured formats (PDFs, images, presentations, flat files, etc). In this case, the GenAI & Agents Flow zone includes a bls_sources folder with three documents from the U.S. Bureau of Labor Statistics (BLS):
Document |
Format |
|---|---|
A press release of employment projections |
|
A chart of projected employment growth by industry |
Image |
An article on the impact of AI on employment projections |
Markdown |
The first step is to take such a corpus of documents and “translate” them into some kind of numeric representation that the LLM will be able to understand. These are called embeddings.
Navigate back to the Flow (
g+f).In the GenAI & Agents Flow zone, double-click on the bls_sources folder to browse its contents.
Open the Actions (
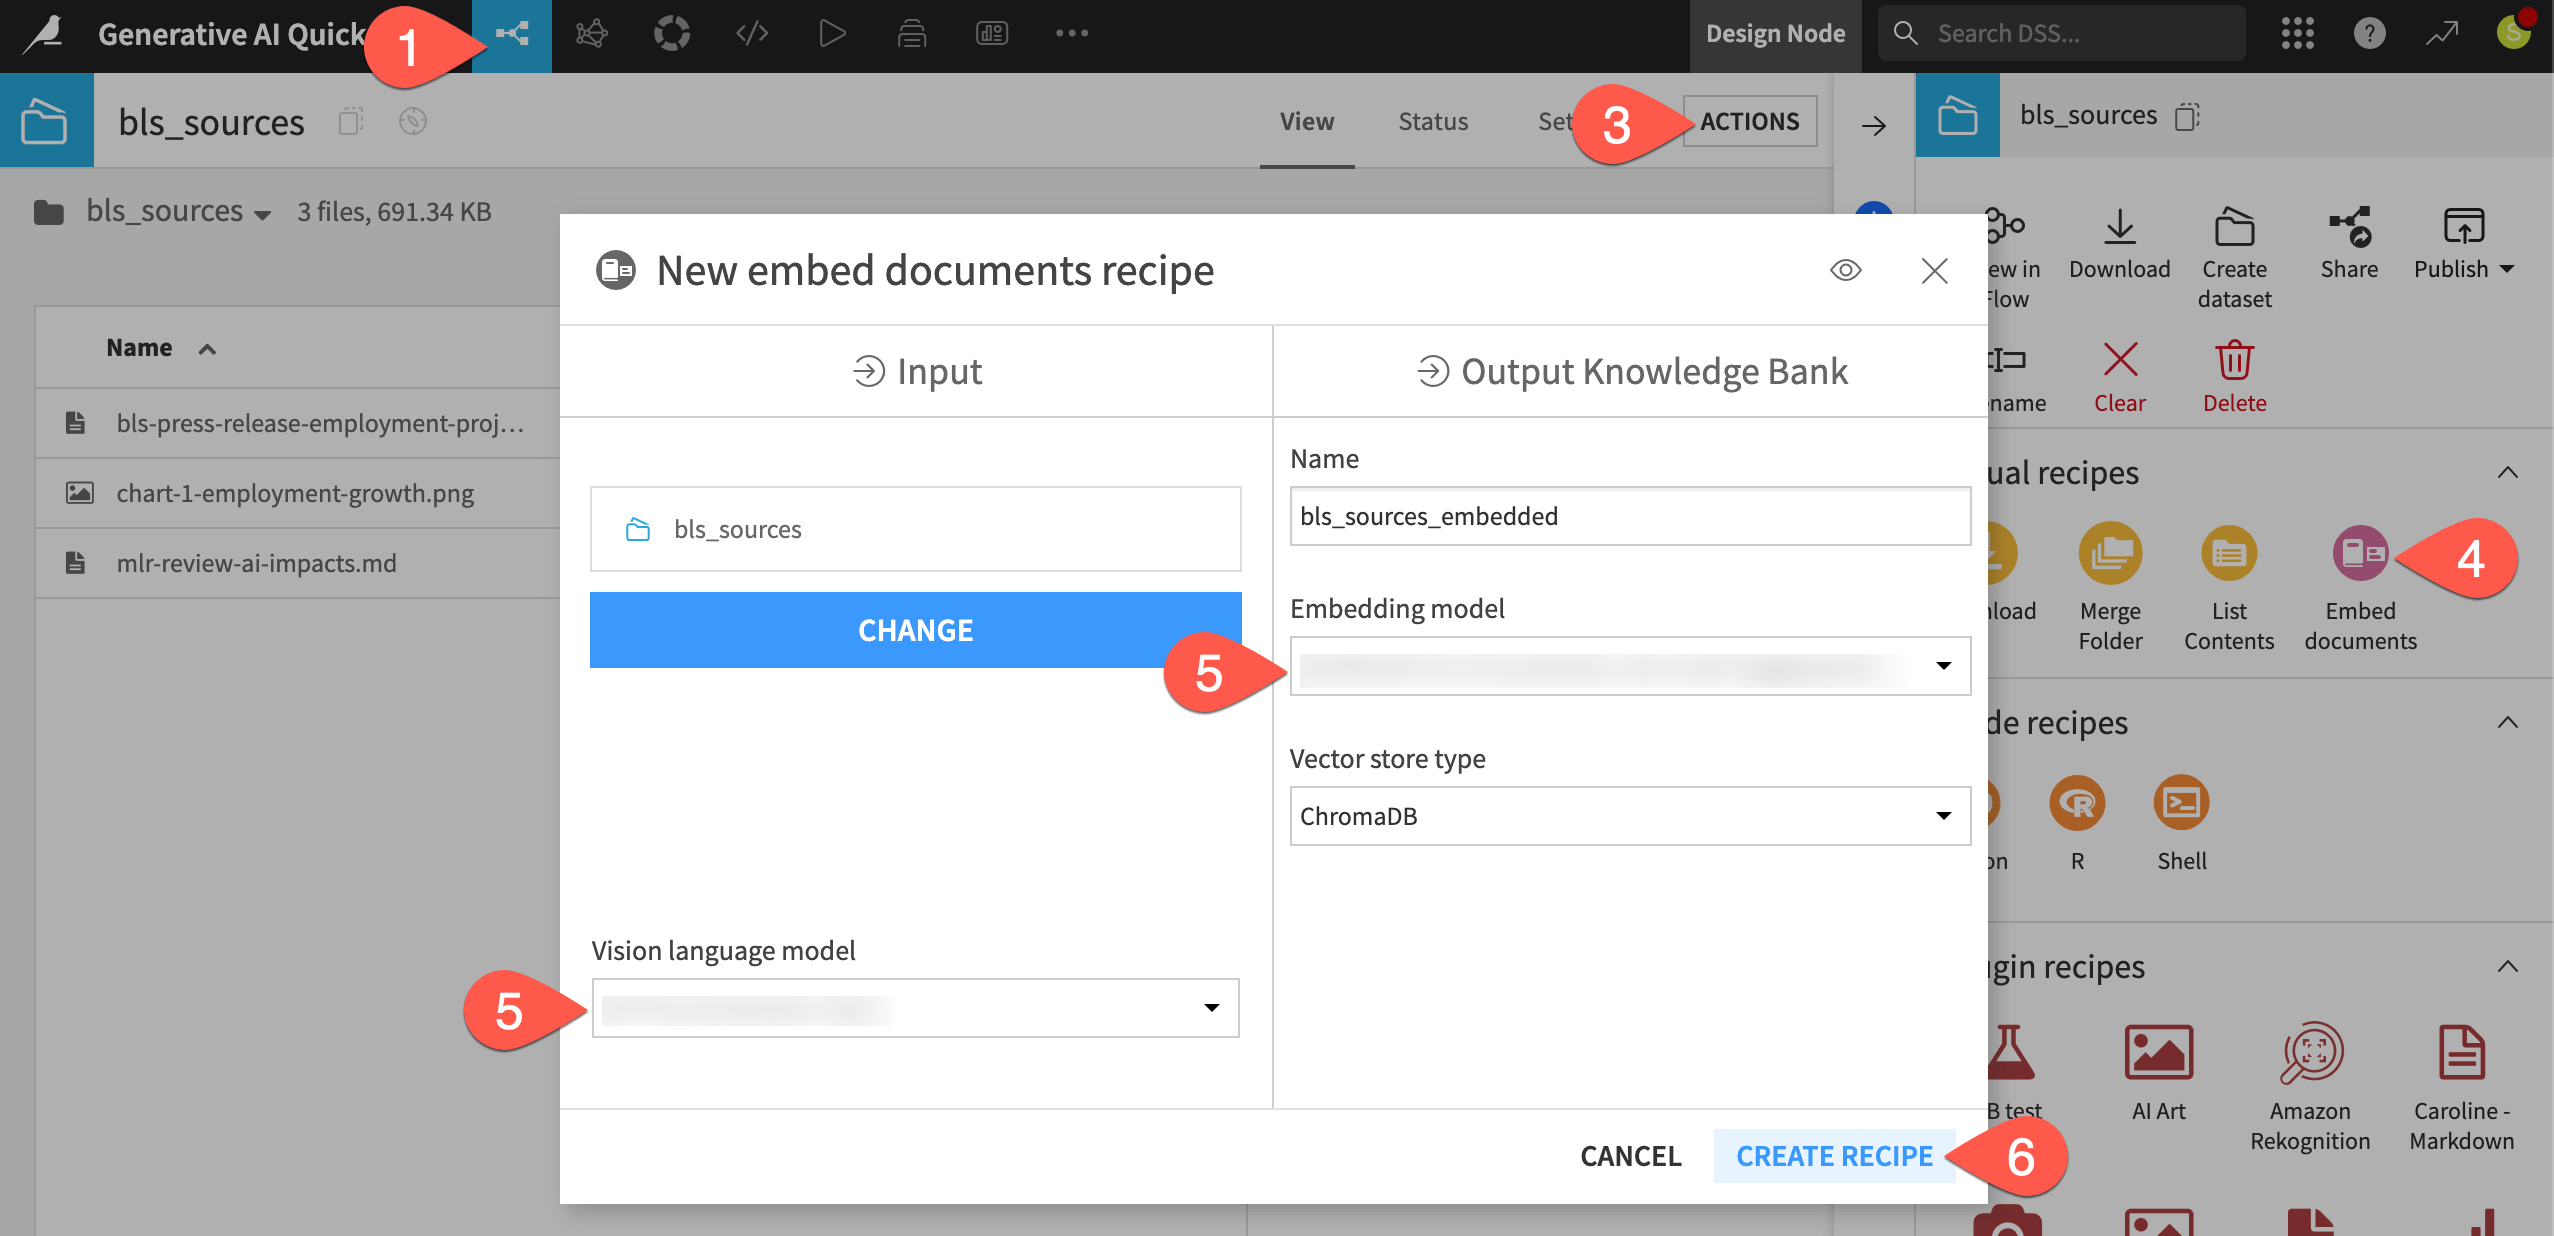
) tab of the right panel.Select the Embed documents recipe.
If needed, adjust the selection for the Embedding model you plan to use.
Click Create Recipe.
Tip
For convenience, the documents in need of embedding are already in the folder. However, Dataiku offers many visual or programmatic ways to routinely push files into Managed folders.
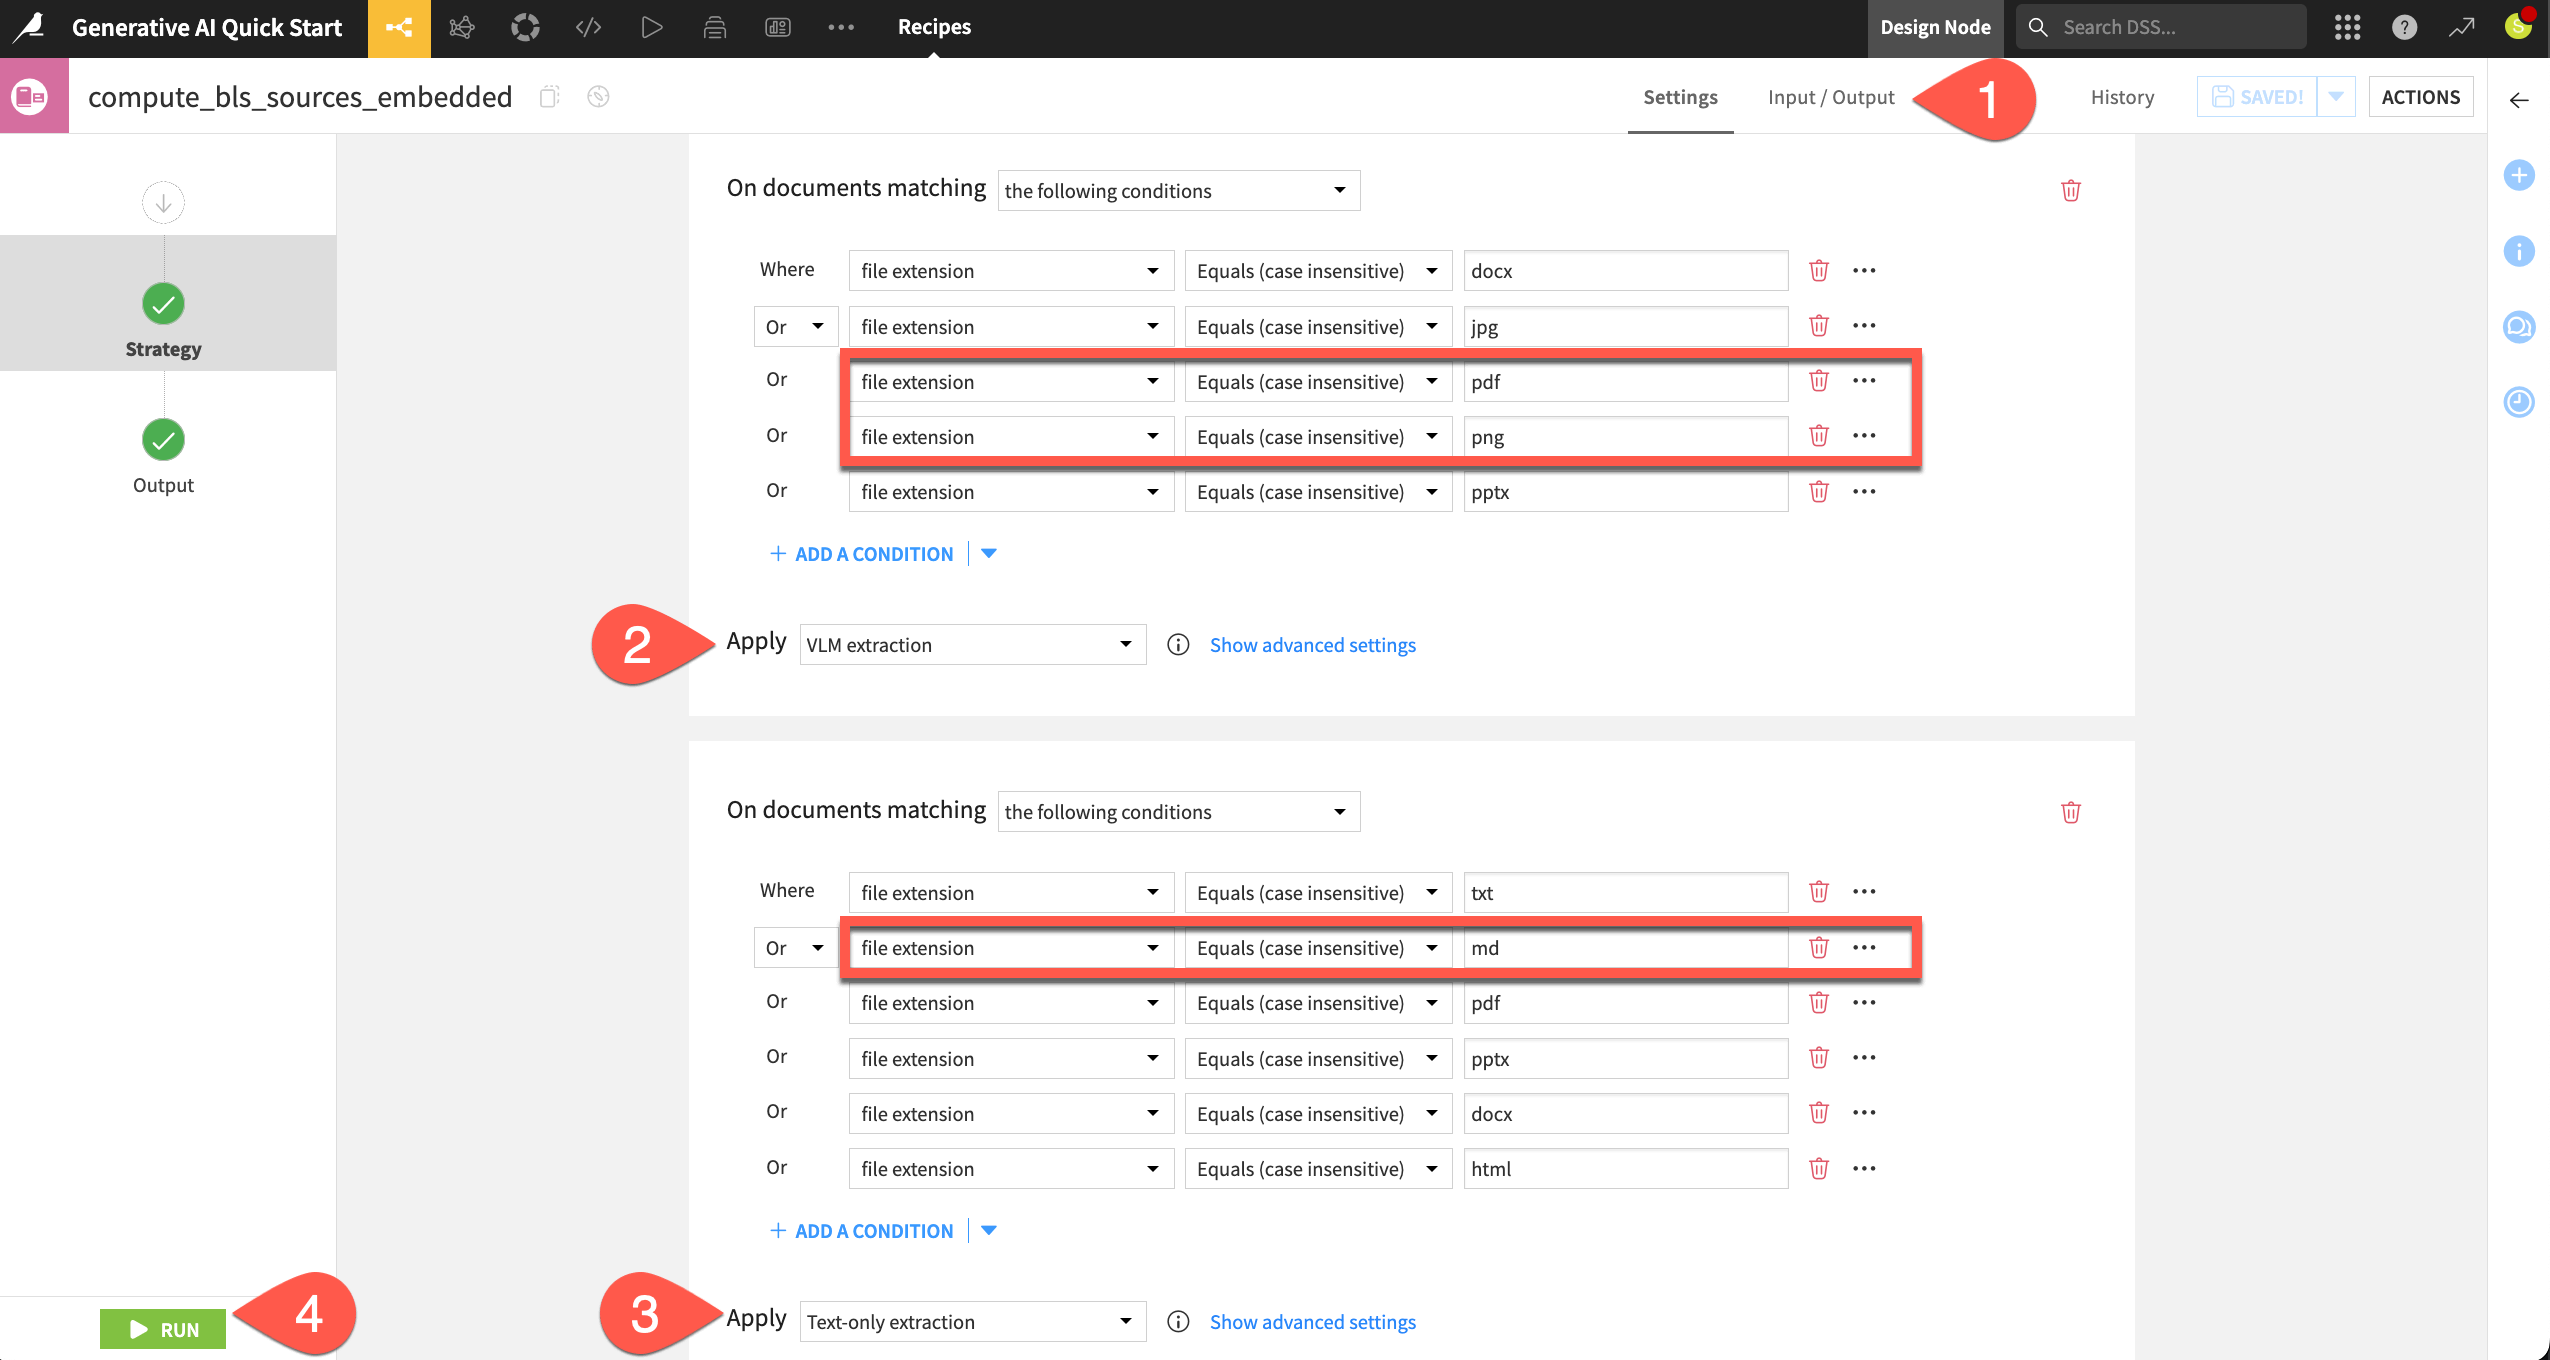
Configure extraction methods#
The embedding step applies an extraction method best suited to the file type.
If in the recipe’s Output step, you’re missing a folder to store generated images, go to the recipe’s Input / Output tab, click Set for Images Folder, and name the output folder
bls_sources_embedded_images. Then, return to the Settings tab.The Markdown file will undergo a basic text extraction process.
The PDF and image will undergo visual extraction, and so, if needed, next to VLM, choose a model supporting image input.
Click Run.
When the recipe finishes, open the output knowledge bank bls_sources_embedded.
Tip
If you’re unable to meet the requirements for an embedding model that supports image input, see Tutorial | Retrieval Augmented Generation (RAG) with the Embed dataset recipe.
Create an augmented LLM#
Once you have a knowledge bank, your next step will often be to create an augmented LLM based on it.
From the bls_sources_embedded knowledge bank, click + Create Augmented LLM.
For the LLM, select a model supporting image input from your LLM connection.
Click OK.
Return to the Flow (
g+f) to observe the augmented LLM’s representation as a pink diamond.
Tip
Review the dependencies in this part of the Flow:
The augmented LLM is an item created from the knowledge bank.
The knowledge bank is an output of the Embed documents recipe.
The Embed documents recipe takes the folder of source documents as its input.
Configure and test an augmented LLM#
Compared to a foundational LLM directly from an LLM connection, you can configure an augmented LLM in many ways. For example, you can instruct the model to include sources along with its responses.
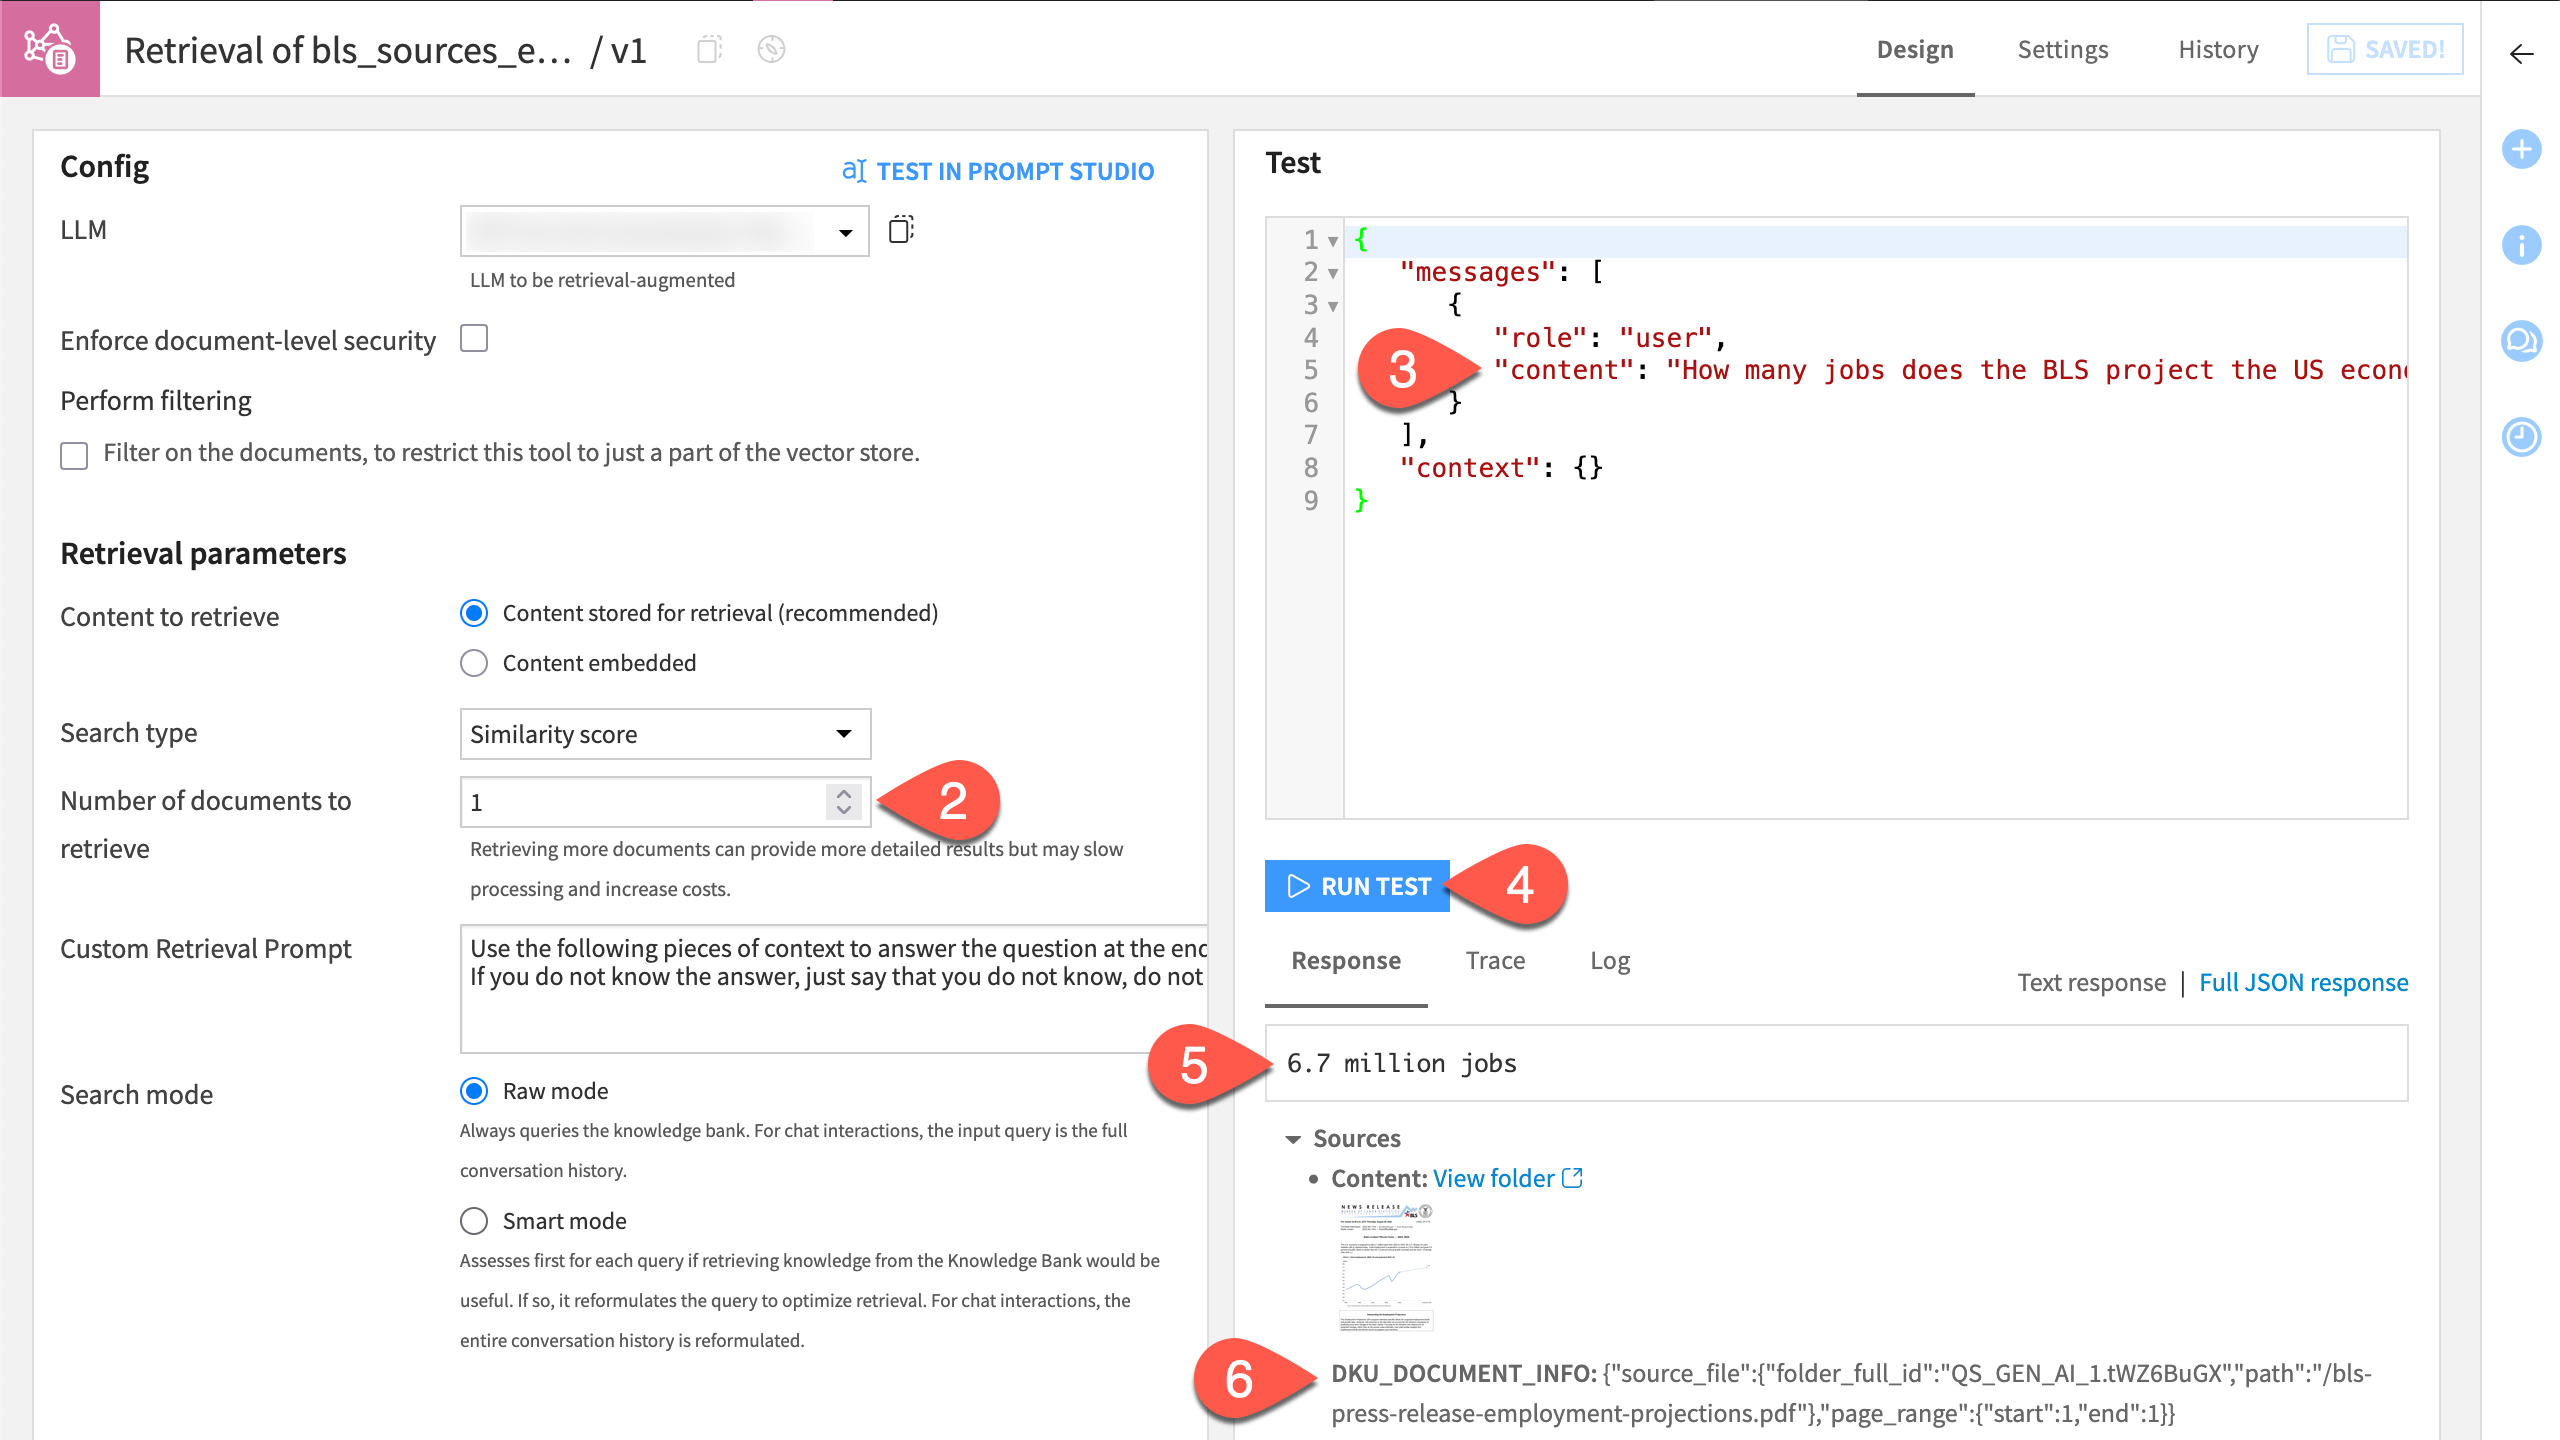
From the Flow, double-click to open the Retrieval of bls_sources_embedded augmented LLM.
In the Query Strategy section of the the augmented LLM’s Design tab, set the Search mode to Smart mode (as this is a chat example).
In the Retrieval section, set the number of documents to retrieve to
1.In the Chat window, submit the following prompt designed to test if the augmented LLM correctly draws upon the embedded source documents:
How many jobs does the BLS project the US economy to add from 2023 to 2033? Return only the number of jobs.
Hopefully, the augmented LLM returns an answer of 6.7 million.
It should also return the source where it found this answer (page 1 of the press release).
Enrich a dataset with responses from an augmented LLM#
Now that you’ve verified the augmented LLM is able to draw on the embedded knowledge, you can follow the same workflow as for the previous foundation model:
Engineer prompts in a Prompt Studio.
Export the best prompt to a Prompt recipe.
Try that next.
From the Design tab of the augmented LLM, click Test in Prompt Studio.
Name it
Enrich jobs with industry trends.Click Create.
Instead of the default prompt without inputs, click + Add Prompt > Managed mode (Blank template) > Create.
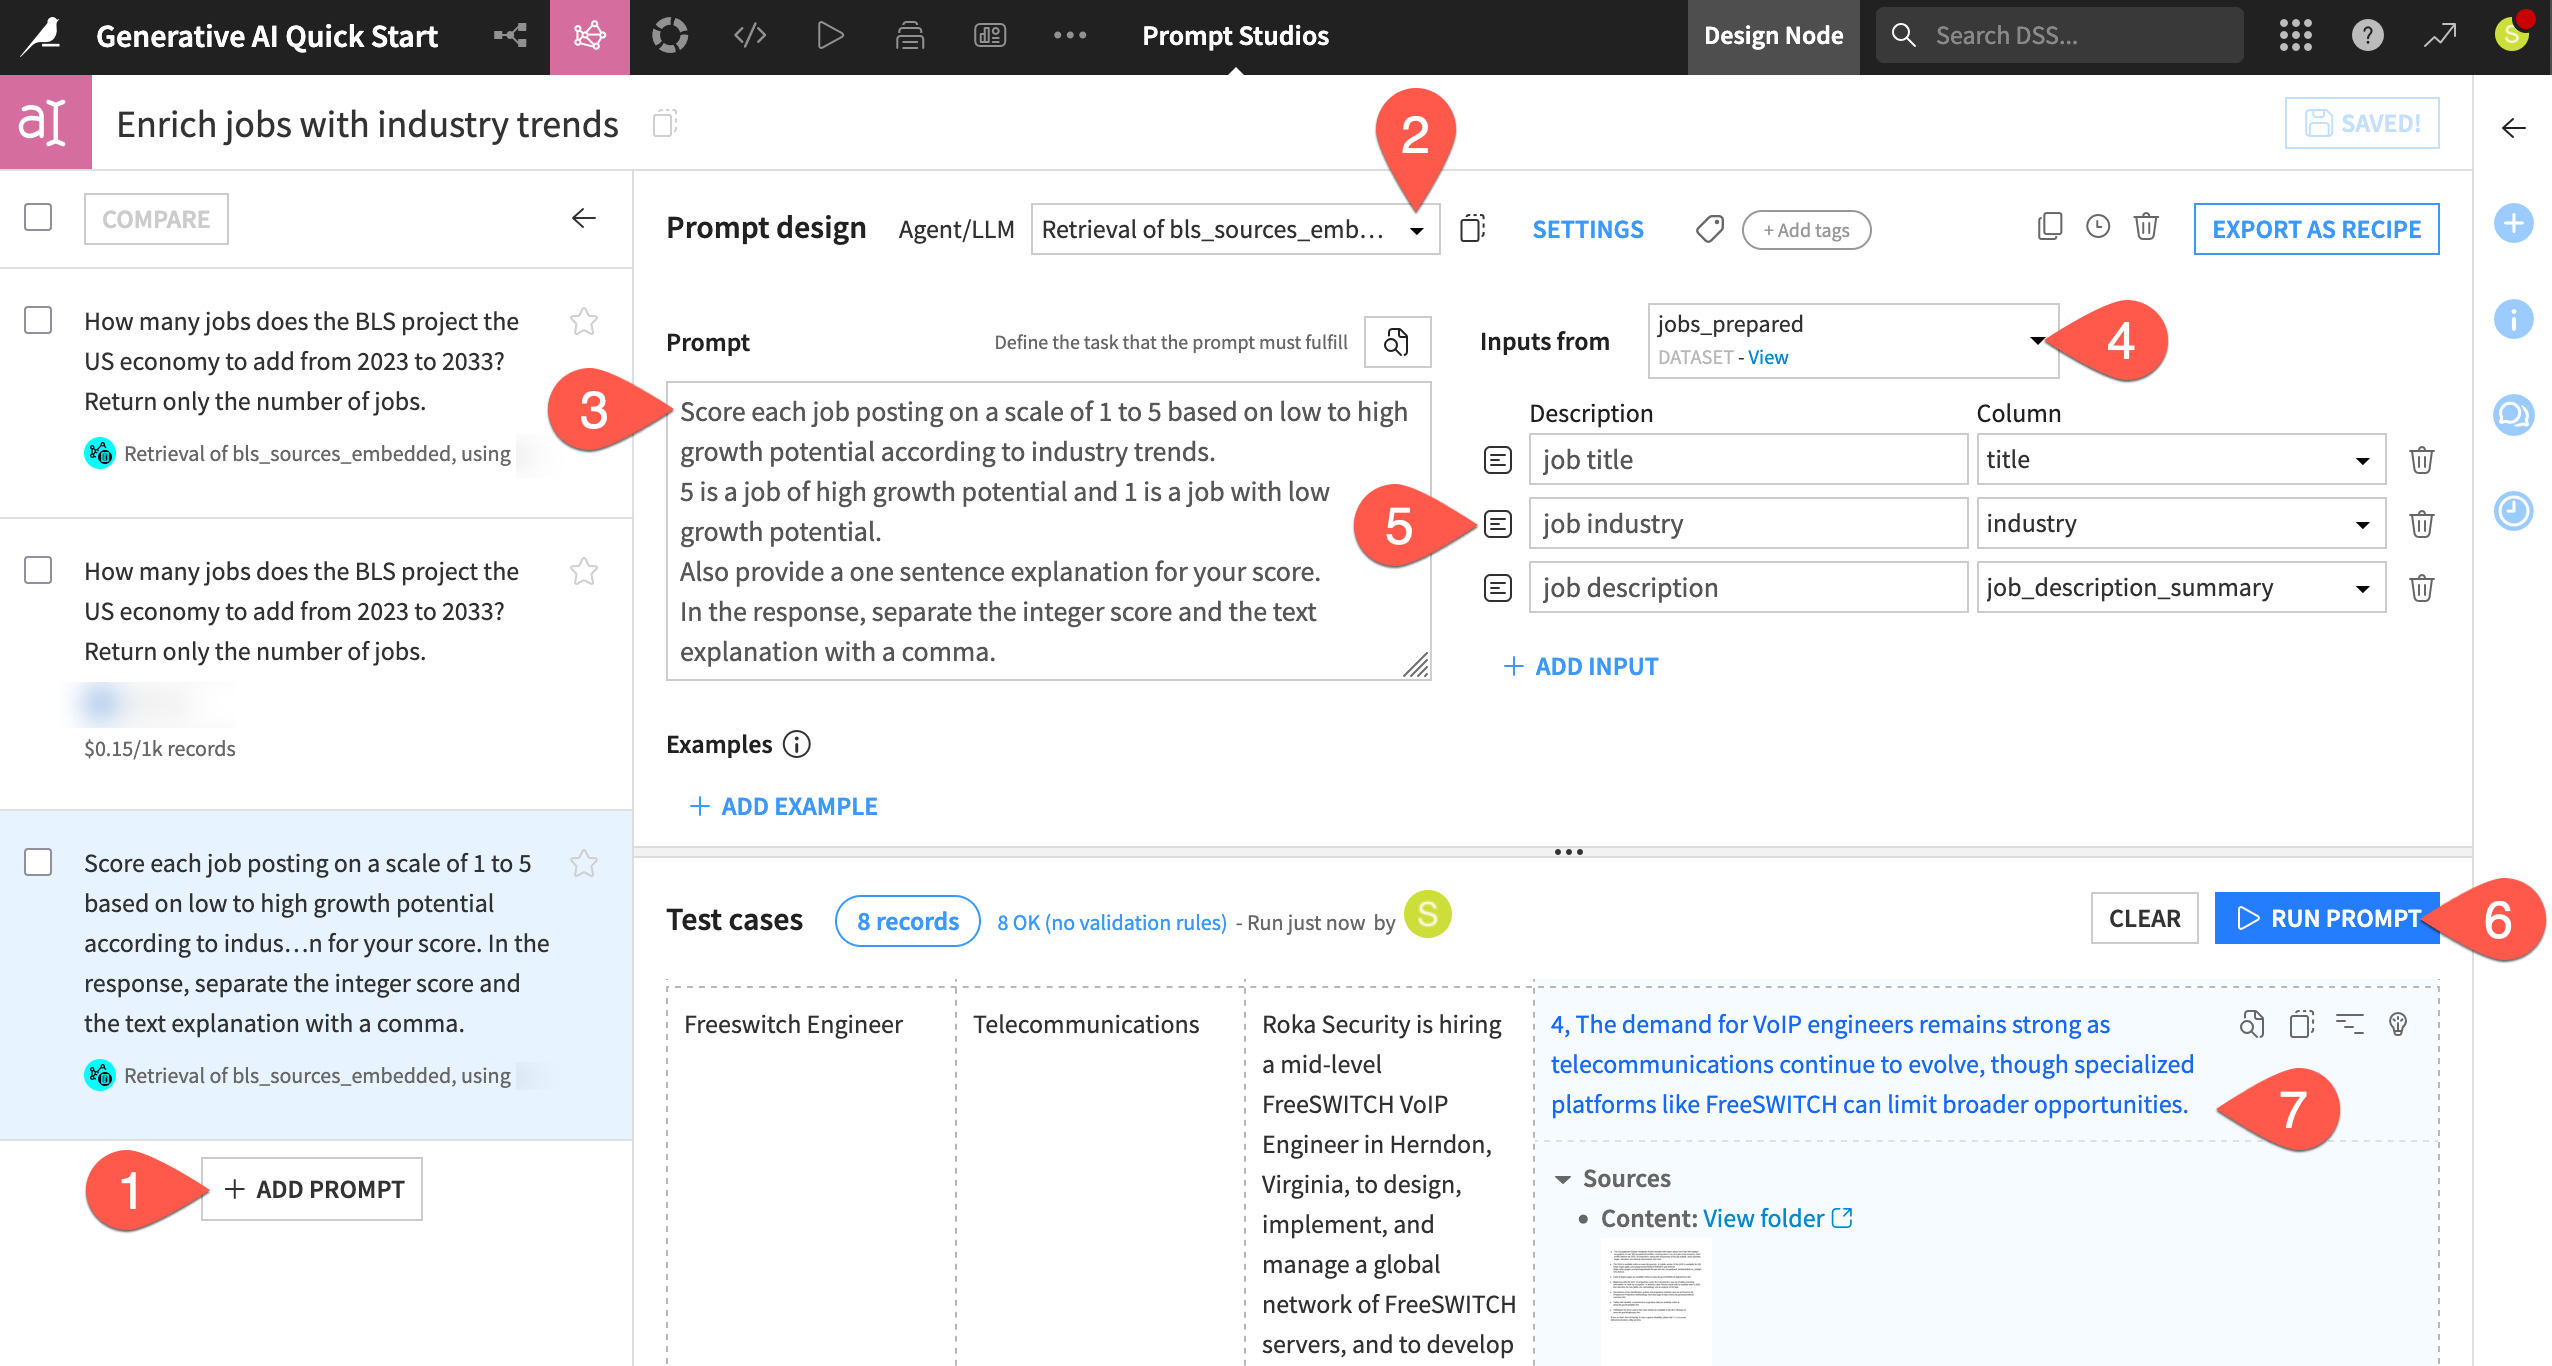
Copy-paste the text below into the Prompt field:
Score each job posting on a scale of 1 to 5 based on low to high growth potential according to industry trends.
5 is a job of high growth potential and 1 is a job with low growth potential.
Also provide a one sentence explanation for your score.
In the response, separate the integer score and the text explanation with a comma.
Next to Inputs from, select jobs_prepared as the input dataset.
Send the following three columns as inputs to the LLM:
Description
Column
job title
title
job industry
industry
job description
job_description_summary
Click Run Prompt to test it.
Review the test case results, noting not only the LLM’s response, but also the sources from which the LLM drew upon.
In this case, you can skip any further prompt engineering and export it to the Flow.
In the Enrich jobs with industry trends Prompt Studio, be sure to have selected the latest prompt.
Click Export as Recipe.
In the following dialog, select Create a new recipe.
Click Create.
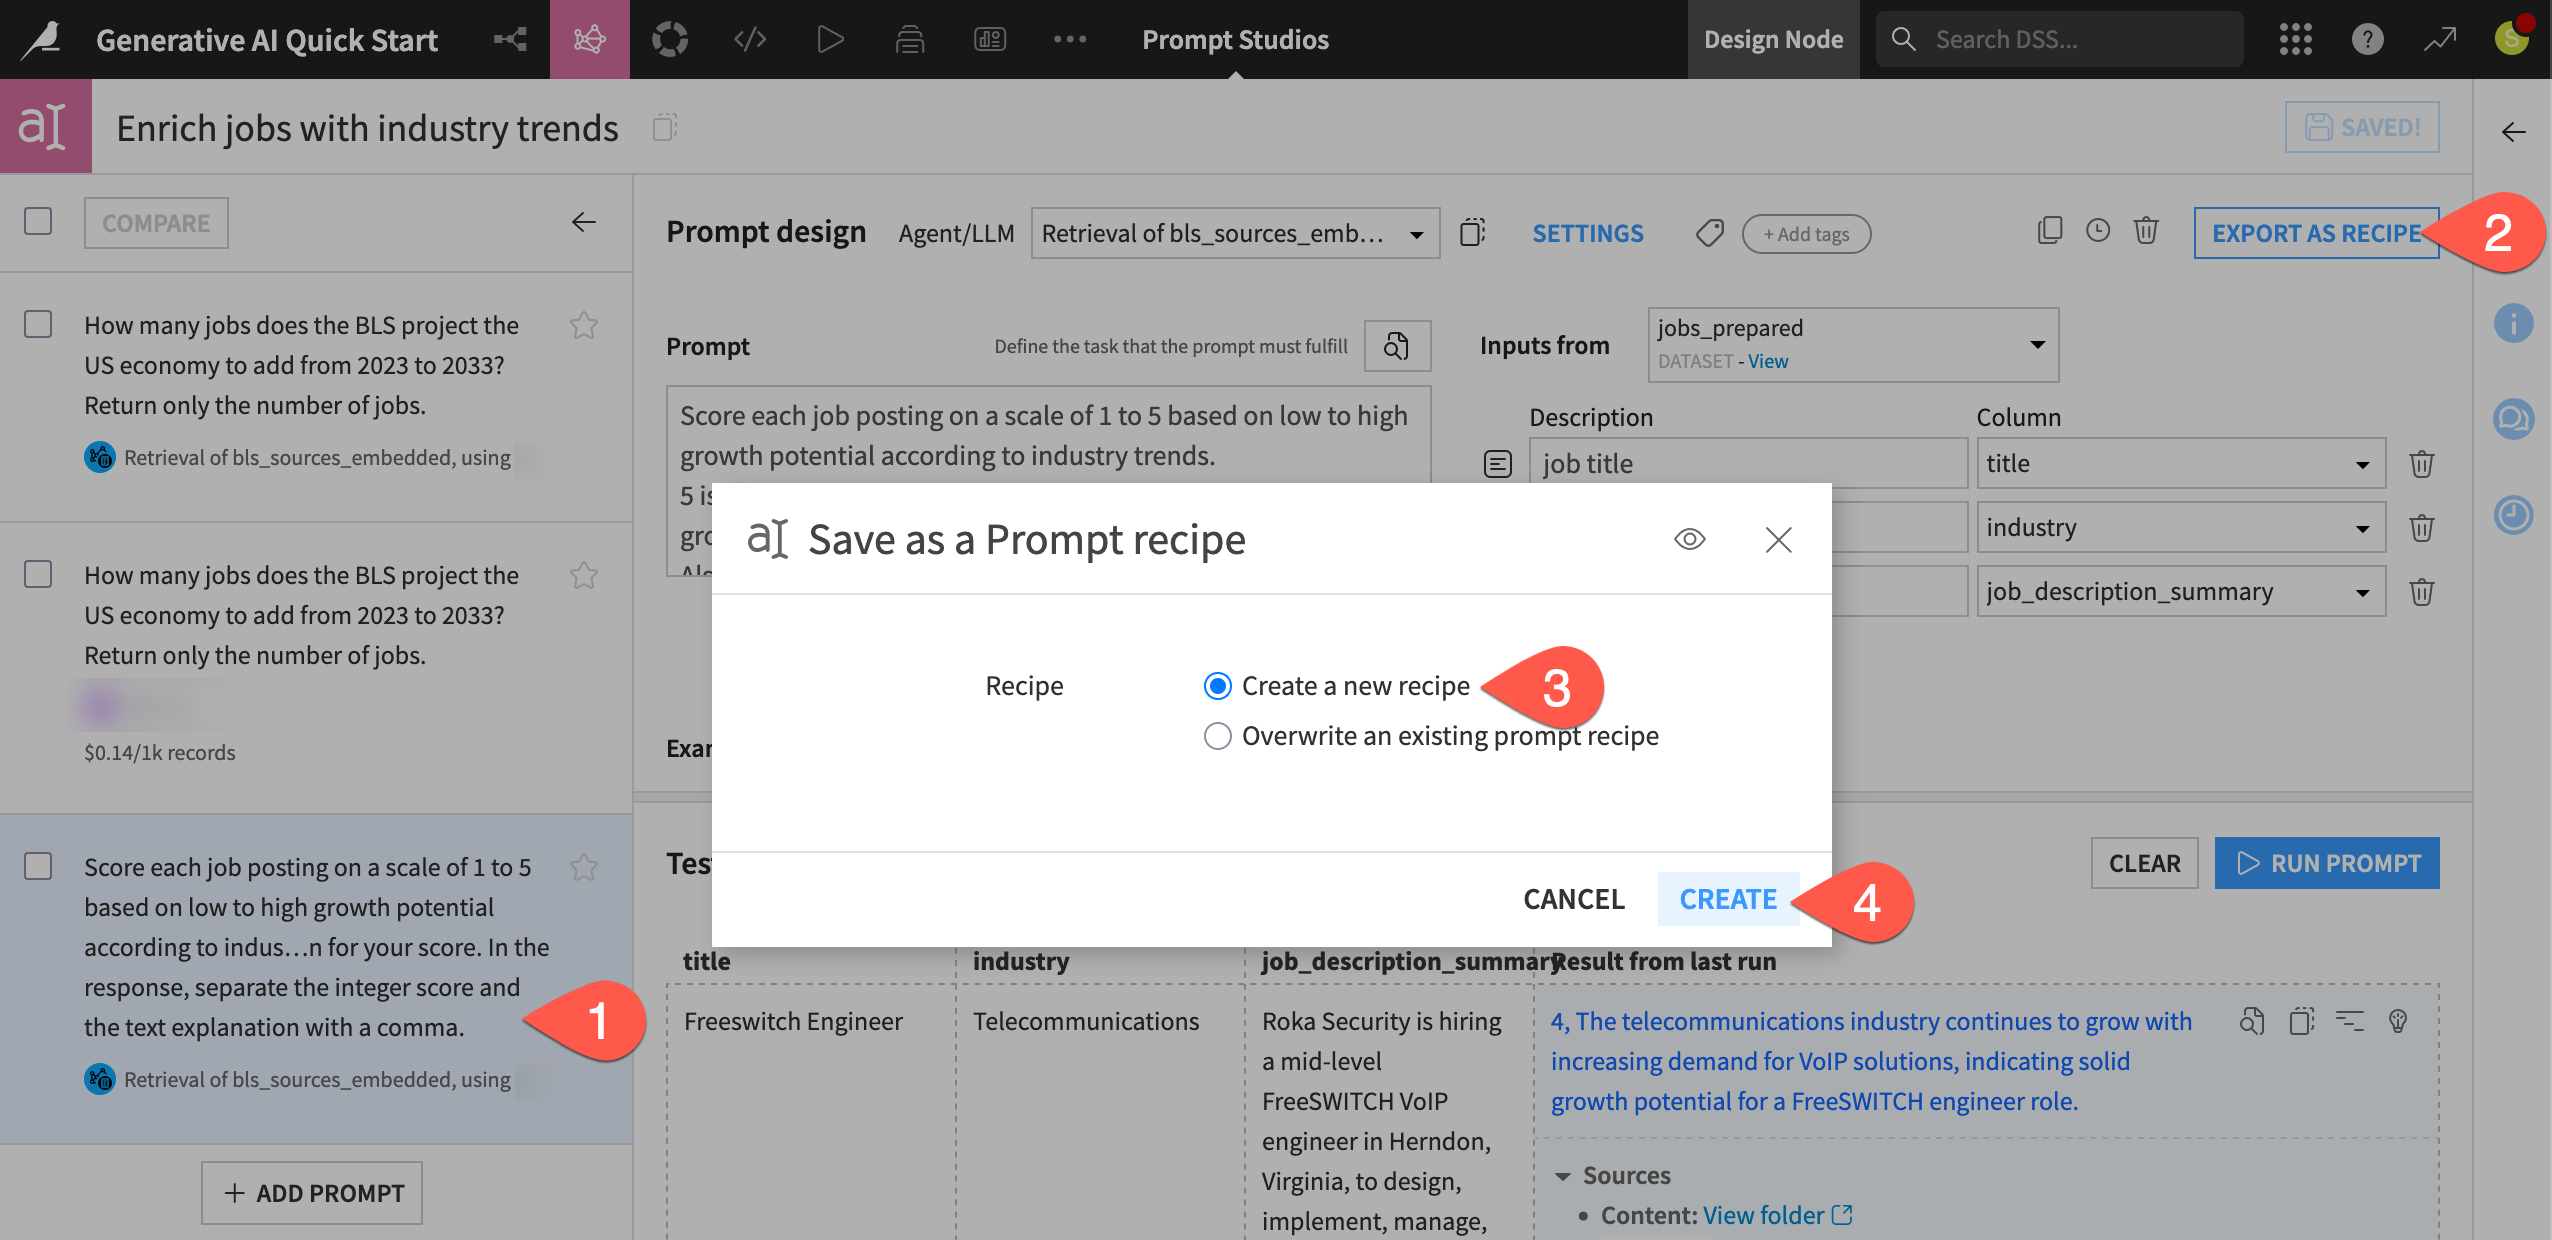
Name the output dataset
jobs_growth_potential.Click Create Recipe.
Click Run to execute the Prompt recipe on the input dataset.
When finished, explore the output jobs_growth_potential dataset, and examine the results in the llm_output column.
Tip
Feel free to use another Prepare recipe on the output! For example, use the Split column processor on the llm_output column to create separate growth_score and growth_explanation columns. Similarly, use the Unnest object processor on the llm_raw_response column to dive into the source data.
Chat with LLMs#
Thus far, you’ve used LLMs to enrich datasets record by record in ways impossible with traditional data preparation tools. However, your most frequent AI interaction these days is most likely through chatbots. As you might expect, it’s also possible in Dataiku to add a chat interface on top of what you’ve built so far!
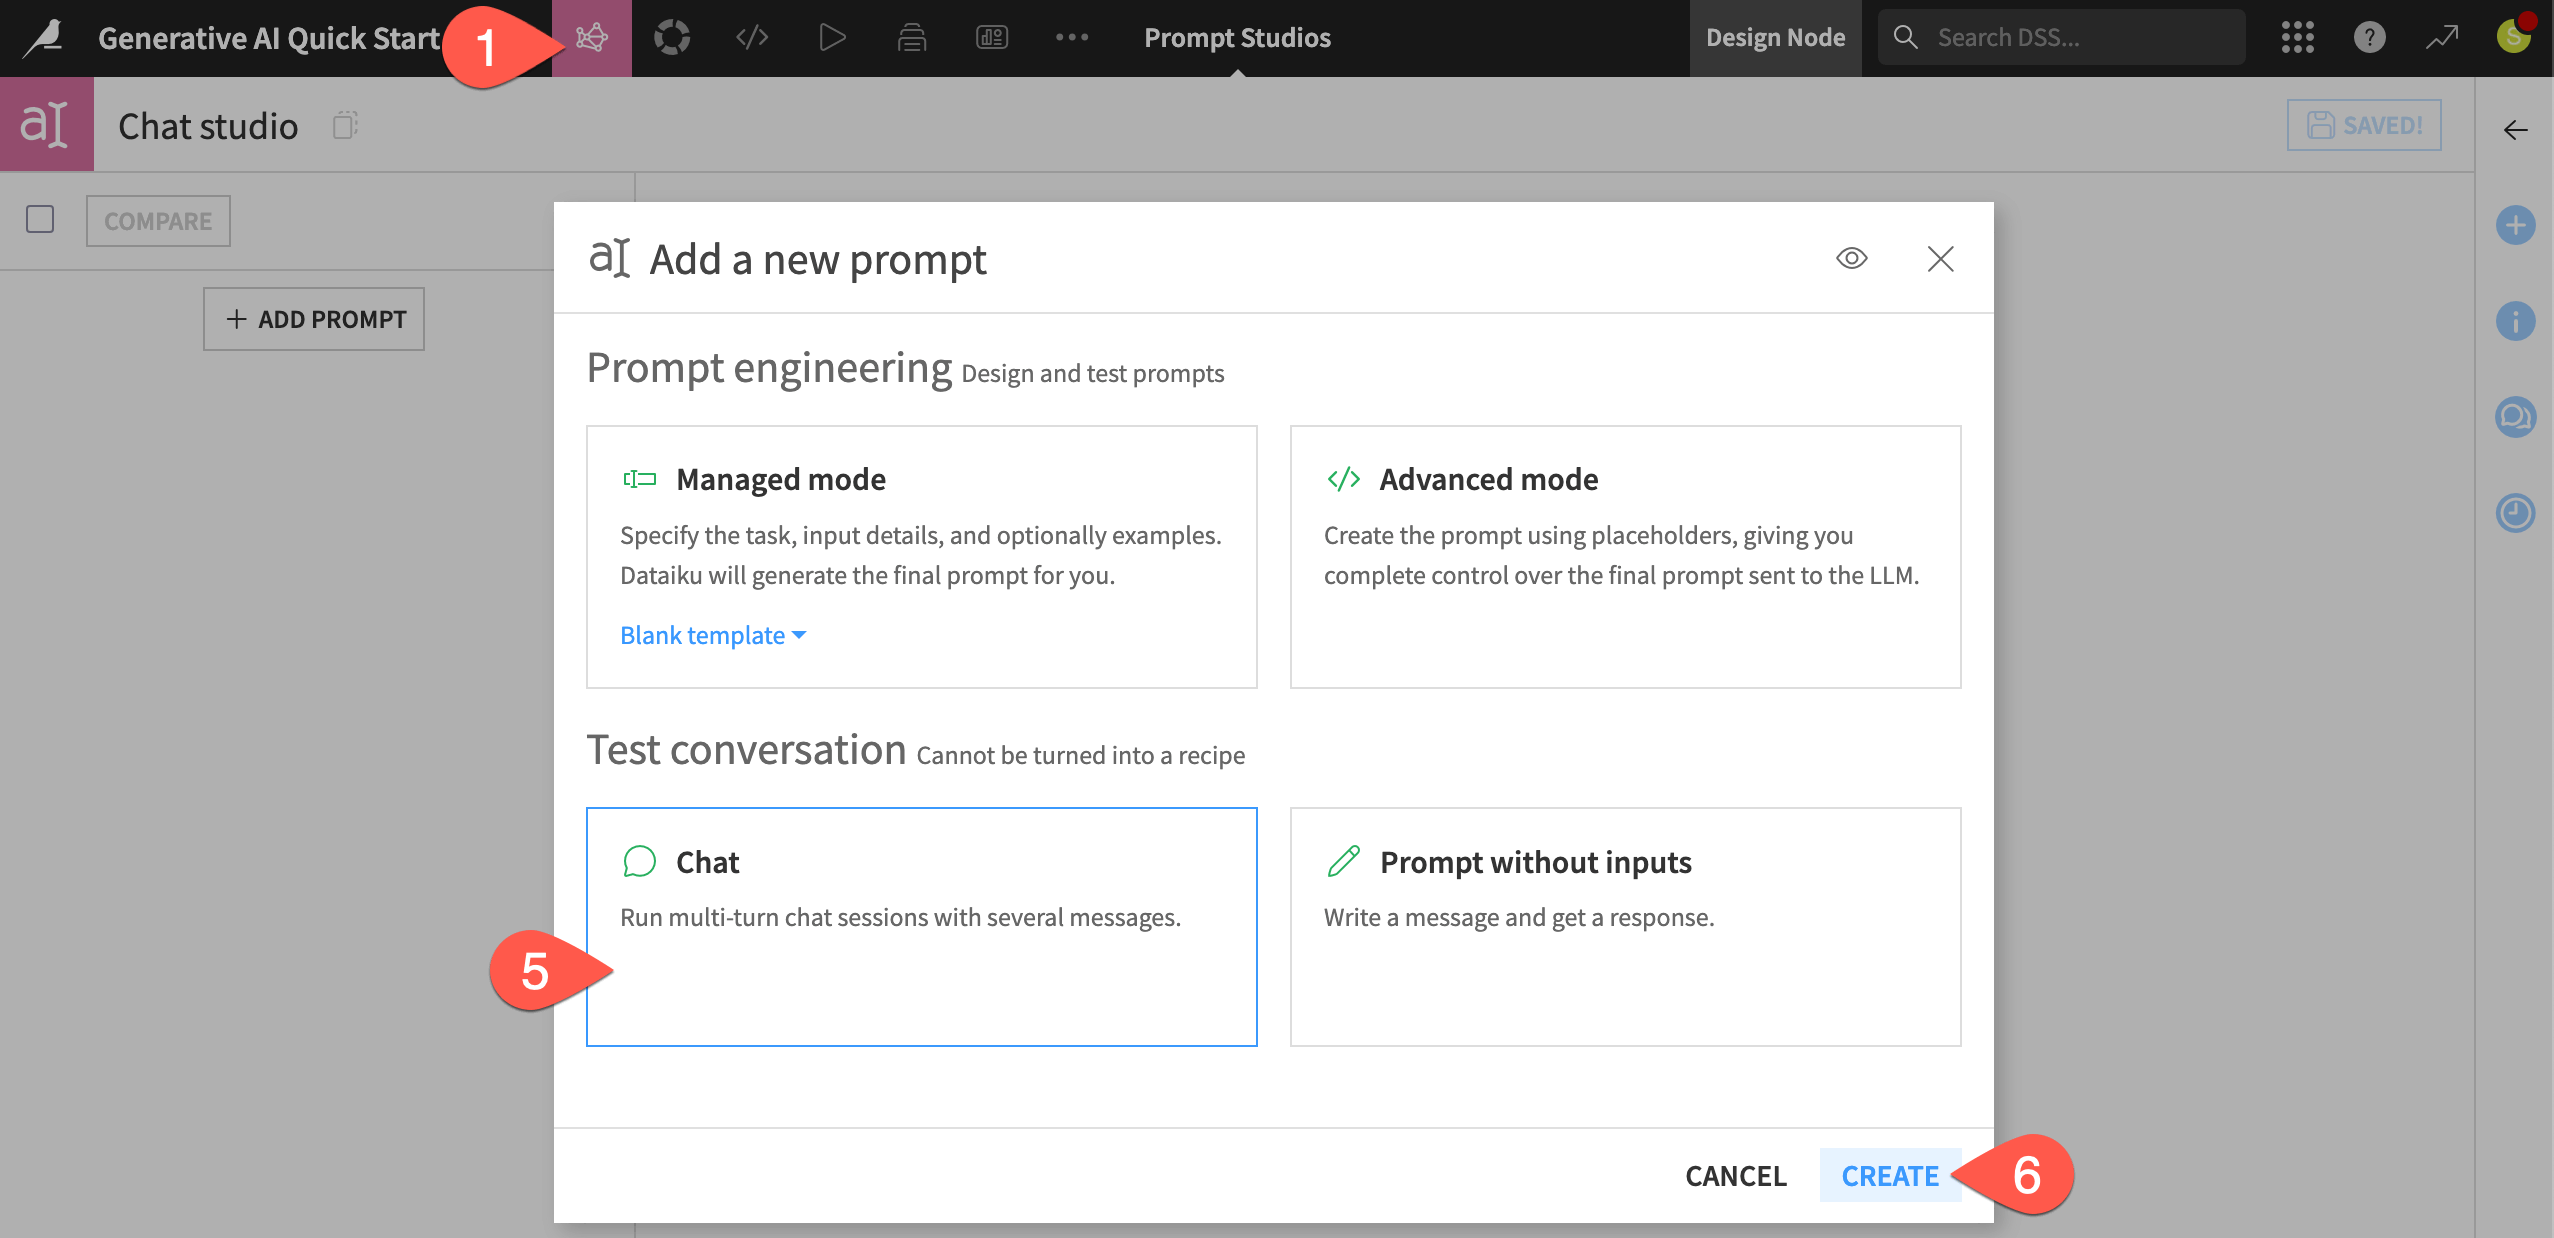
Create a Prompt Studio in chat mode#
The first step toward building a chatbot in Dataiku is often the chat mode of a Prompt Studio. This is an excellent testing ground before deploying a real chatbot.
From the GenAI (
) menu of the top navigation bar, select Prompt Studios.Click + New Prompt Studio.
Name it
Chat studio.Click Create to initiate the Prompt Studio.
Instead of managed mode, this time select Chat.
Click Create to test a conversation.
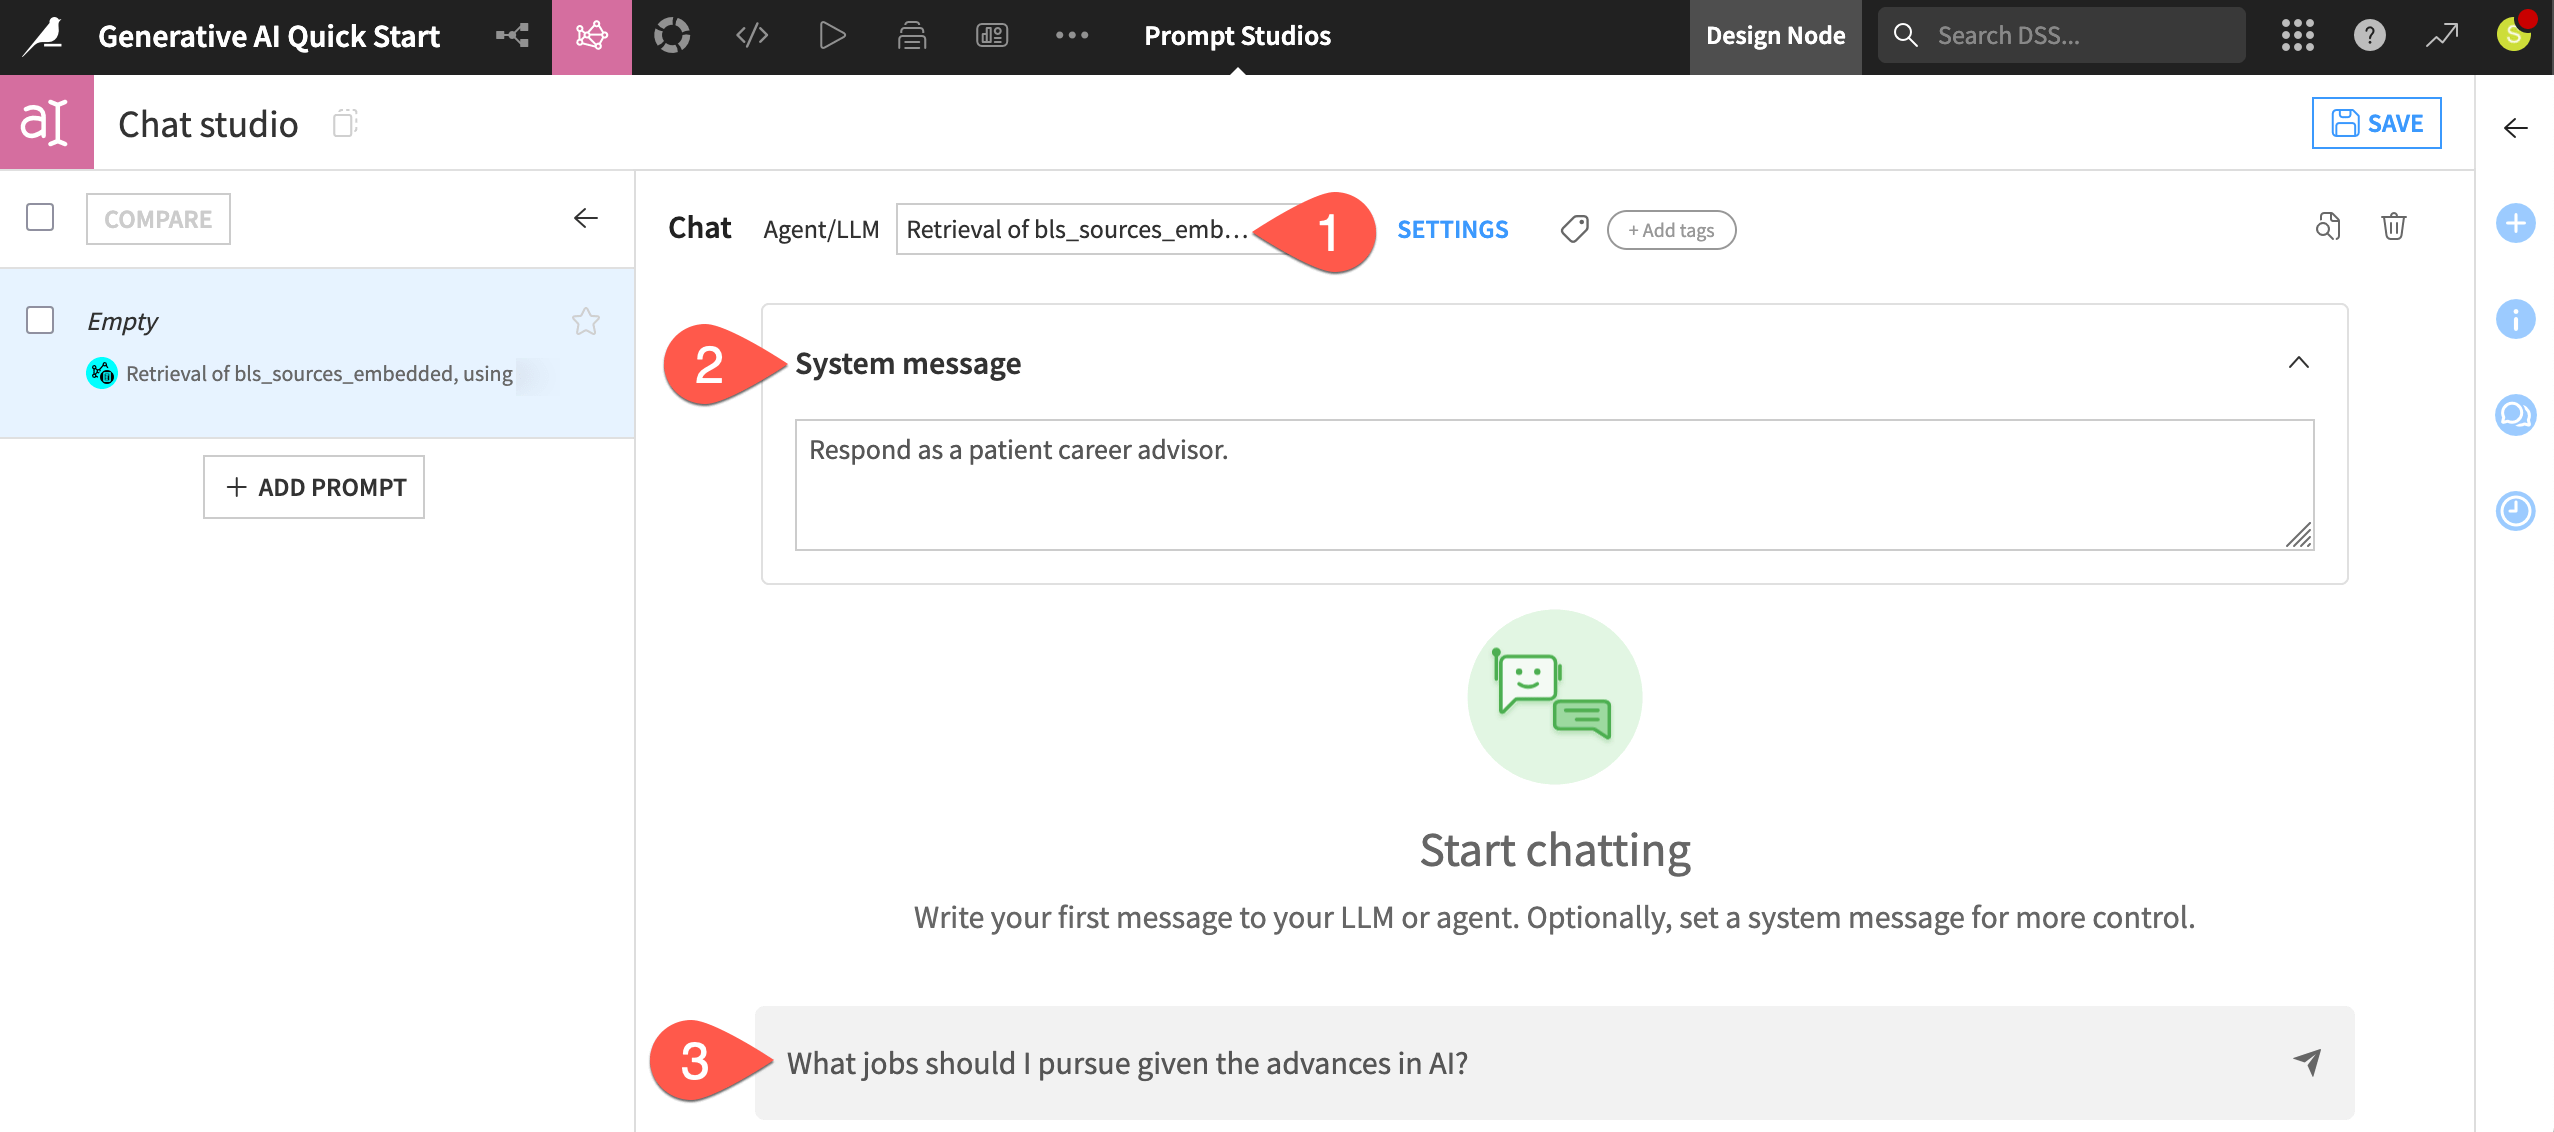
Chat in a Prompt Studio#
Instead of iterating over a dataset record by record, you can chat directly with LLMs, including augmented LLMs.
Select either your original LLM or, if you have one, the augmented LLM. (Its name begins with
Retrieval).Expand the System message window, and copy-paste the following system message to guide the model’s responses:
Respond as a patient career advisor.
Start chatting with the model, noting the availability of sources for each response if using an augmented LLM. Below is a suggestion to get started:
What jobs should I pursue given the advances in AI?
Deploy a chatbot#
In contrast to the previous examples, the Prompt Studio, as shown here, allows for repeated LLM queries without iterating over a dataset.
The chat mode of a Prompt Studio is great for testing, but it isn’t a full-fledged LLM application. When you are ready to deploy a chatbot, Dataiku has options detailed in the Chat UI reference documentation. These options offer answers for issues like security, tracing, user preferences, and history.
See also
See Tutorial | Build a RAG system and turn it into a conversational agent to build your first chatbot with an simple visual agent!
Next steps#
Congratulations! You’ve taken your first steps toward working with GenAI tools inside Dataiku.
To dive deeper into the topics covered here, your next step may be to begin the Generative AI Practitioner learning path. There you’ll learn more about text processing with LLMs and the RAG technique.
There are still many other Generative AI topics not covered in this quick start that you can explore further in the reference documentation:
If prompt engineering and RAG both fail to meet your needs, fine-tuning is a resource-intensive option for specialized cases.
If you need AI to do more than text generation, your next step may be to start building agents. For example, if you want to find the best job posting in the dataset for you, an agent may be able to help!
See also
You can also find more resources on Generative AI in the following spaces: