Tutorial | Jenkins pipeline for API services in Dataiku#
In this article, we will present a step-by-step guide on how to deploy a Dataiku API service usable for real-time scoring. This is part of a series of articles regarding CI/CD with Dataiku with other examples.
For an overview of the CI/CD topic, the use case description, the architecture and other examples, please refer to the introductory article.
To follow this article, you need to be comfortable both with Jenkins and Dataiku, especially its real-time prediction features. Knowledge of the content in the API Deployment course is a must.
You also need to have some knowledge of Python as the custom steps will be coded in Python using mainly Dataiku’s own Python client (called ‘dataikuapi’).
Note
You can find all the files used in this project attached to this article as by downloading the ZIP file. The last section of this article explains how to use it to kickstart your own project.
Introduction#
For our environment, based on what’s described in the main article, you will need the following setup:
One Jenkins server (we will be using local executors) with the following Jenkins plugins: GitHub Authentication, Pyenv Pipeline, xUnit.
One DSS Design node where Data scientists will build their API endpoints. This node will also be used as our API Deployer.
For serving the API endpoints, we need a specific type of node called an API node. In fact, we will use two of them: one for testing and one for production.
Our final architecture will be as follows:
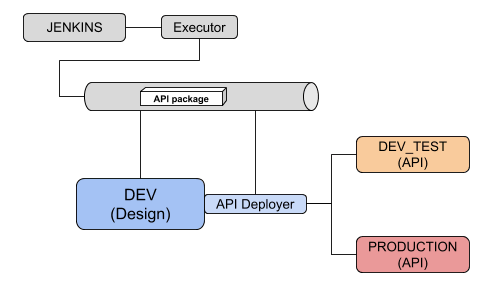
We’re not using an Artifactory server, but it could be added to store API packages.
Prerequisites#
There are some steps to perform in advance to prepare this environment.
Have a Design node and a Jenkins server set up.
Install the API nodes. You can follow the documentation on how to install a static API node.
Setup the API nodes in the API Deployer as documented here.
Create a project in the Design node. If you don’t have an existing project with at least one model (or even an API service already), we suggest you use the sample project on predicting churn. You can import it directly in Dataiku by clicking on + New Project > Learning / Sample projects > Predicting churn.
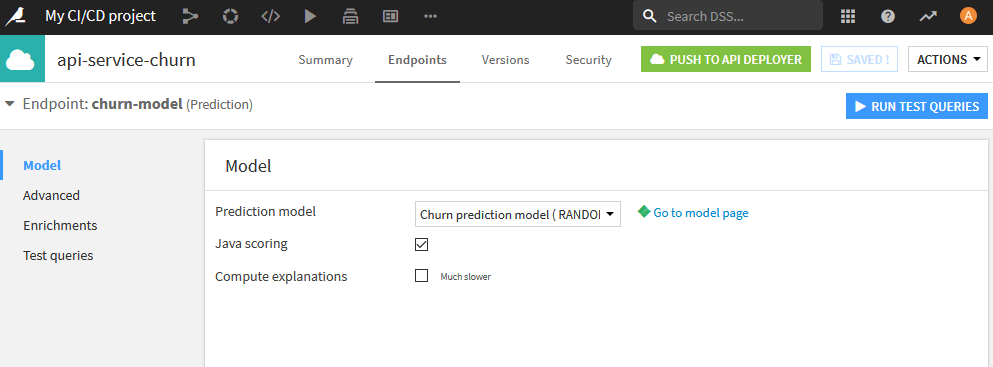
Lastly, you need to have an API service. With the above project loaded, you can create a simple API service with a single API endpoint using the model deployed in the Flow. See Create the API service in the reference documentation for more details.
A quick overview of the API service lifecycle#
As mentioned in the introduction, understanding the notion of an API Service in Dataiku (and how they’re used) is important.
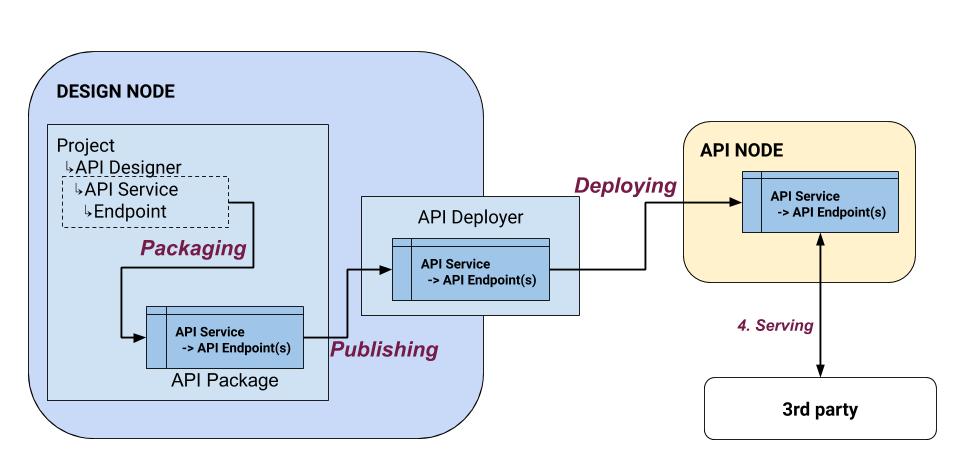
Let’s summarize the main steps of API publishing so that we’re sure to share common ground for the rest of this article.
The first step is to go in the API Designer module of your project and create an API Service.
Once this API Service is created, you can create one or more API endpoints in it. There are various types of endpoints.
In the simple case, you have a Prediction model endpoint, which is based on a visual ML model deployed in your Flow. Once defined, you need to prepare your API service for deployment by creating a version that will take a snapshot of your API Service and all its endpoints.
Once the version is created, you need to publish it to the API Deployer. To do that, DSS will package your API Service and all its endpoints in a ZIP file, and push this file to the API Deployer.
In the API Deployer, you can now see the API package, and it’s available for deployment on an Infrastructure where it will be available to 3rd parties.
Pipeline overview#
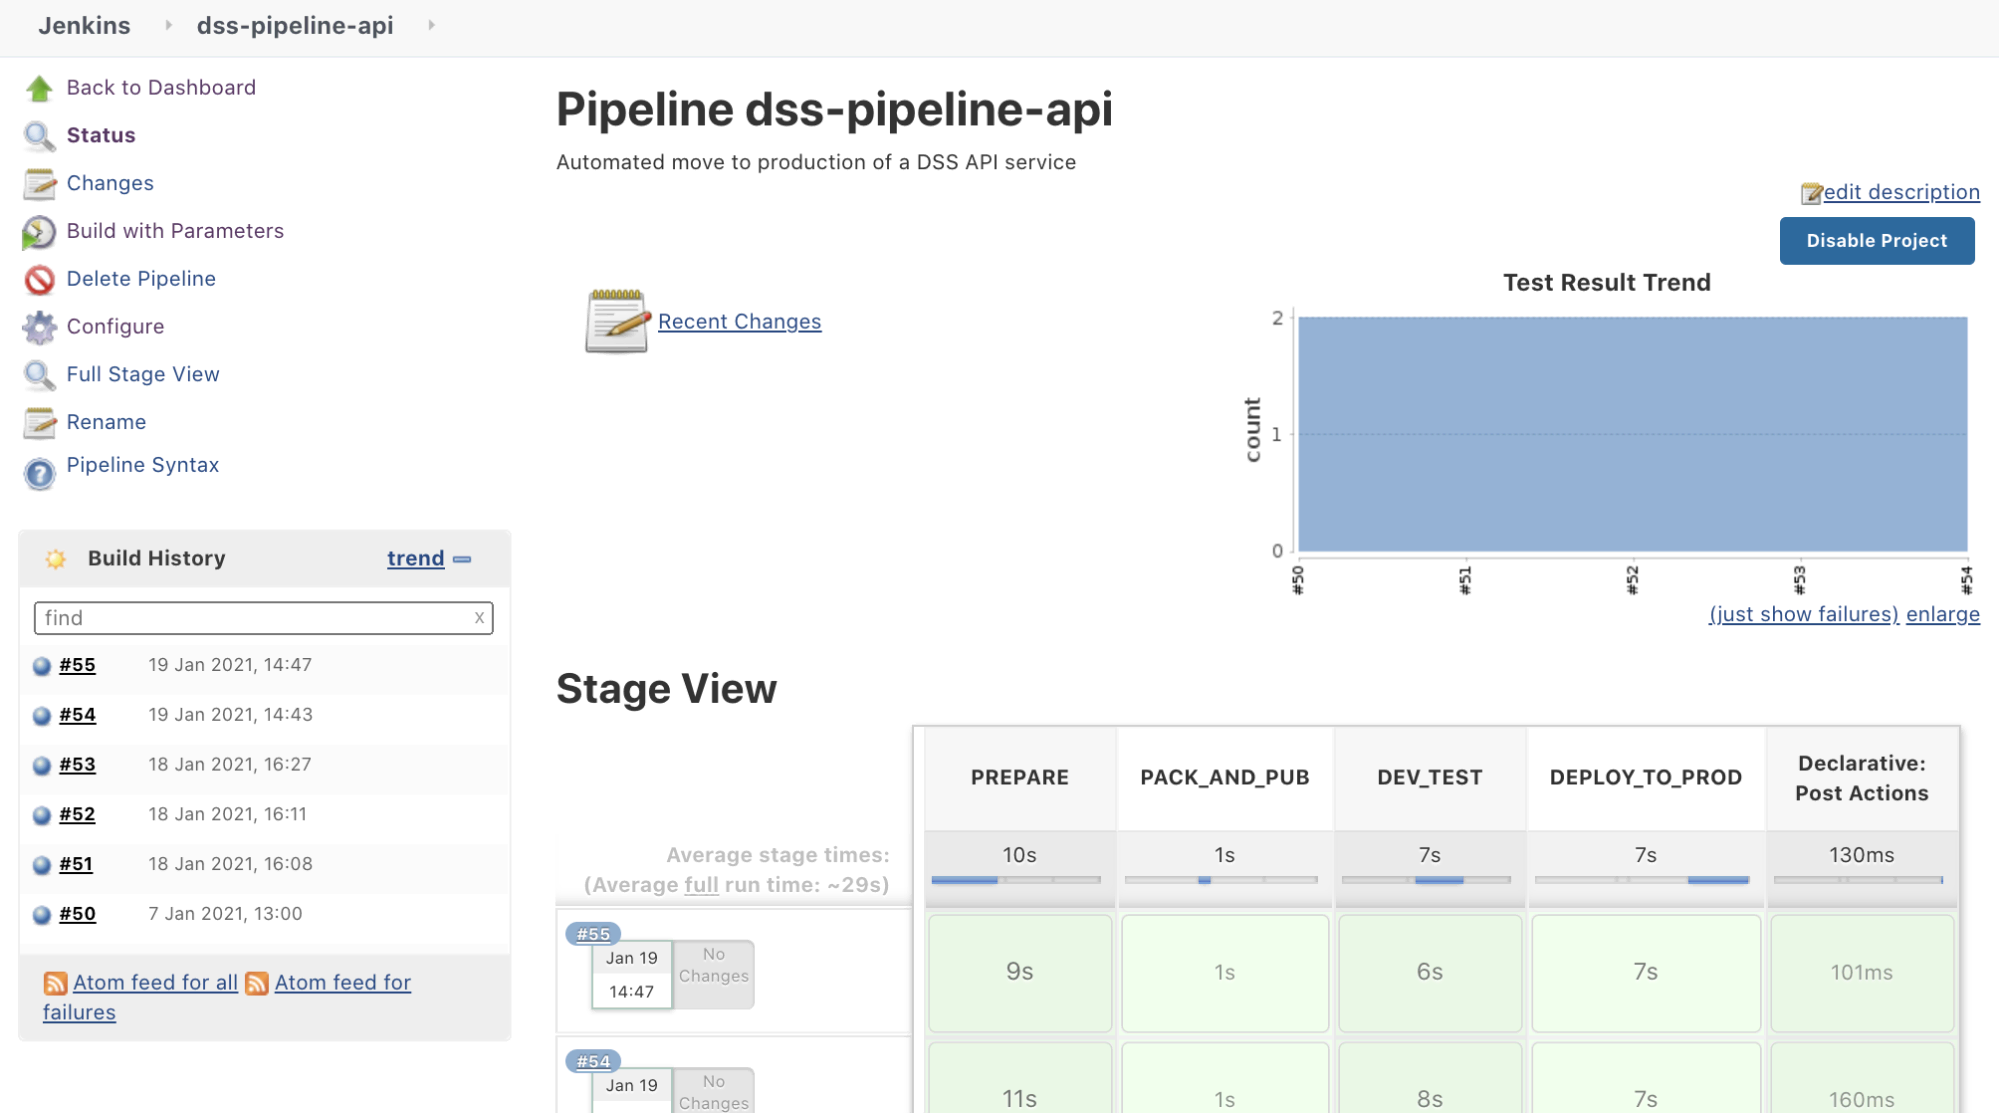
Now that we have everything in place, let’s set up our Jenkins pipeline. It will have four stages as explained in the main article:
Prepare - A technical stage where all the technical plumbing is done for the pipeline to execute well.
Package & Publish - Create an API package from your service and publish it to API Deployer.
Test in DEV - Deploy the package into the DEV API infrastructure and test it.
Deploy to PROD - Deploy the package into the API PROD infrastructure and validate it (inc. rollback).
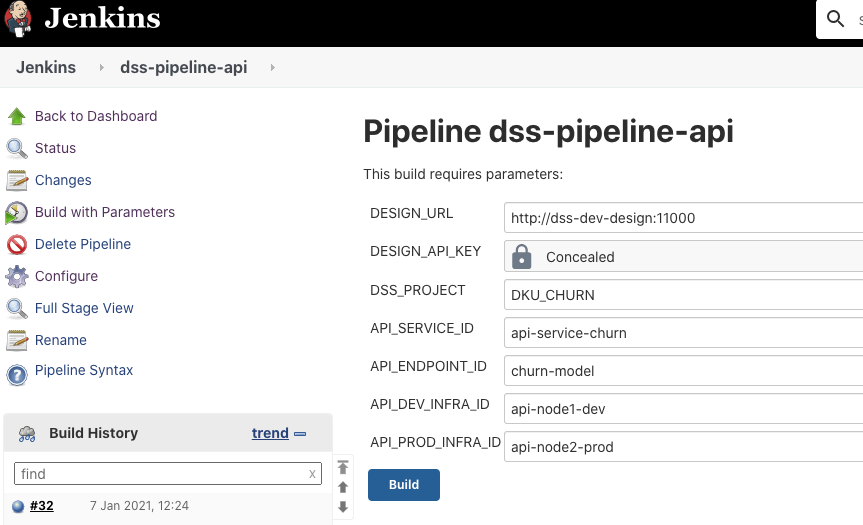
We will use Jenkins variables to configure our pipeline. Here are the variables we need.
The first ones are about defining what we want to deploy:
Variable |
Value |
Description |
|---|---|---|
DESIGN_URL |
String |
URL of our Design node (for example, |
DESIGN_API_KEY |
Password |
API key to access this node. |
API_SERVICE_ID |
String |
ID of the API service we will deploy, as defined in the API Designer section of a project (for example, |
API_ENDPOINT_ID |
String |
With an API service, you can have many endpoints. Here, we specify which endpoint we will test (for example, 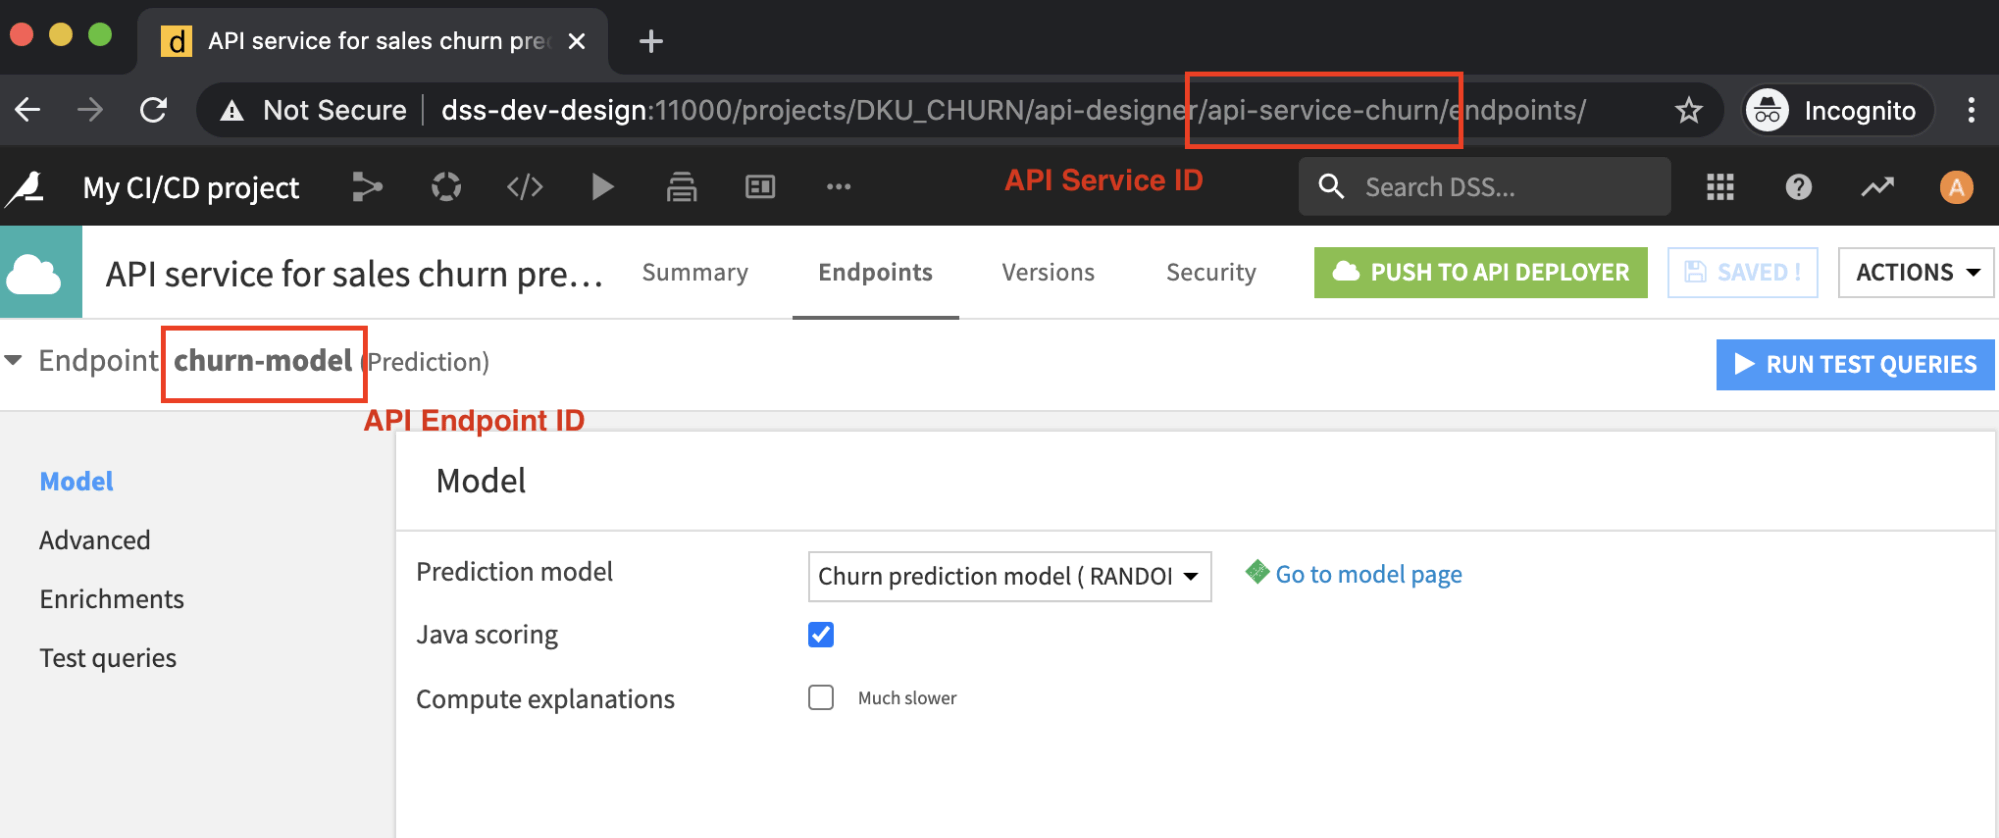
|
API_DEV_INFRA_ID |
String |
ID of the development API node as defined in API Deployer (for example, |
API_PROD_INFRA_ID |
String |
ID of the production API node as defined in API Deployer (for example, 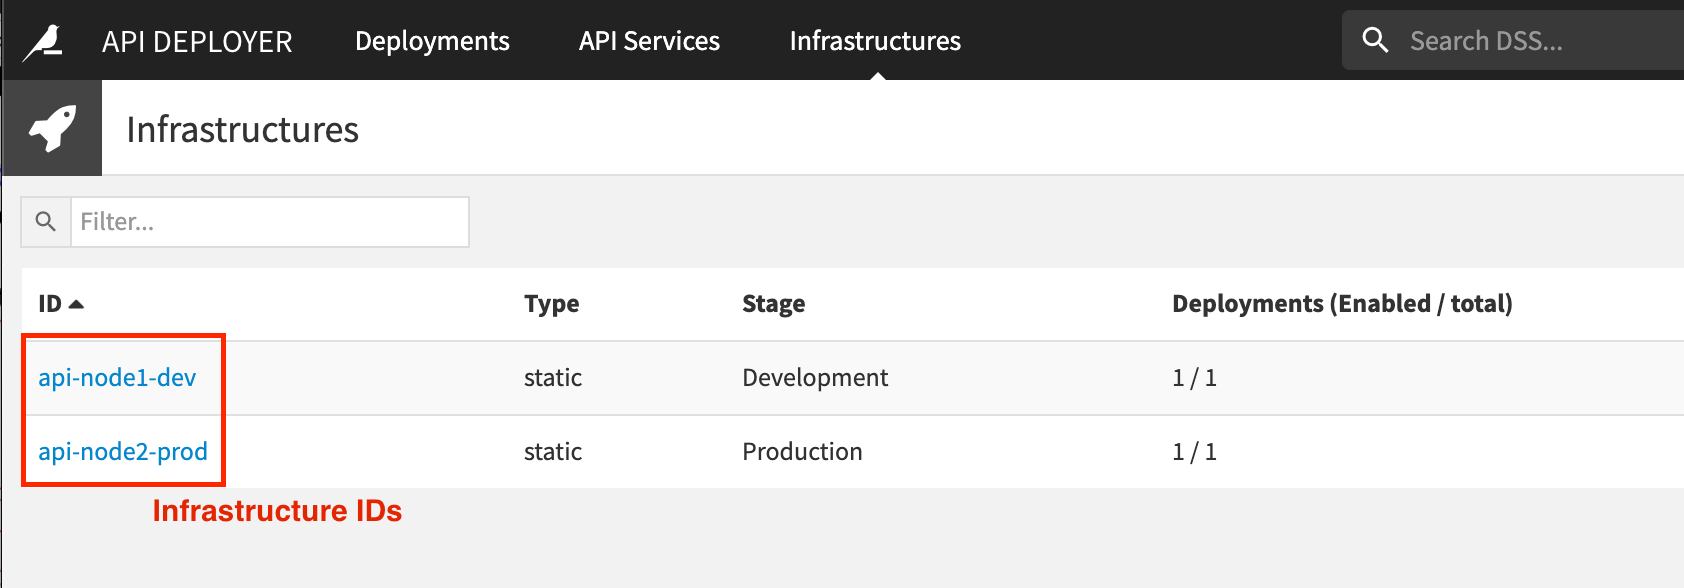
|
Deep-dive#
In this section, we will look in detail into each of the Jenkins pipeline stages.
Prepare#
This step is used to ensure the pipeline has all it needs to run. This needs to be adapted to your Jenkins environment and practices.
The main points are to retrieve the script files from a code repository and build the Python environment to run our tests. (This is where we leverage the Pyenv Pipeline Jenkins plugin).
As a pre-pipeline stage, we also define a Jenkins environment variable named api_package_id that we can use across the pipeline and that’s unique.
Package & publish#
This stage starts by creating a new API package, which is a snapshot of the current API service definition. This is done by retrieving the API service in our project and then calling the DSSAPIService.create_package() function.

Once this package is created, we will transfer it to API Deployer using a stream handle instead of a download–in order to avoid downloading a potentially large file. (However you can do the download approach, if you want to archive this file in an external repository). This part is done using the DSSAPIService.download_package_stream() function.
Next, we move to API Deployer and we check whether this API service is already known by the API Deployer. If not, we create it using the DSSAPIDeployer.create_service() function. Otherwise, we retrieve a handle on the existing instance.
Lastly, we publish our new package under this API Service using the stream handle we have. This is done with the DSSAPIDeployerService.import_version() function.
This step is now done and our newly created API package is in the API Deployer library, ready to be deployed.

Dev environment#
Deploying#
In this part, we will deploy the API package into the development API node (run_deploy_dev.py) and run tests on it (using the pytest Python framework and the files conftest.py & test_dev.py).
The first part is to retrieve the API service object using the API Deployer and the Jenkins parameter api_service_id.
Then, we check whether a deployment of this service already exists on our target infrastructure (identified by the Jenkins parameter infra_dev_id). If there is none, we create it using the DSSAPIDeployer.create_deployment() function otherwise, we retrieve a handle on the existing deployment to update it.
Next, we retrieve the deployment settings using DSSAPIDeployerDeployment.get_settings() on our deployment. The update is done by using the DSSAPIDeployerDeploymentSettings.set_single_version() function, and then saving the new deployment setting. (Don’t forget this last part!)
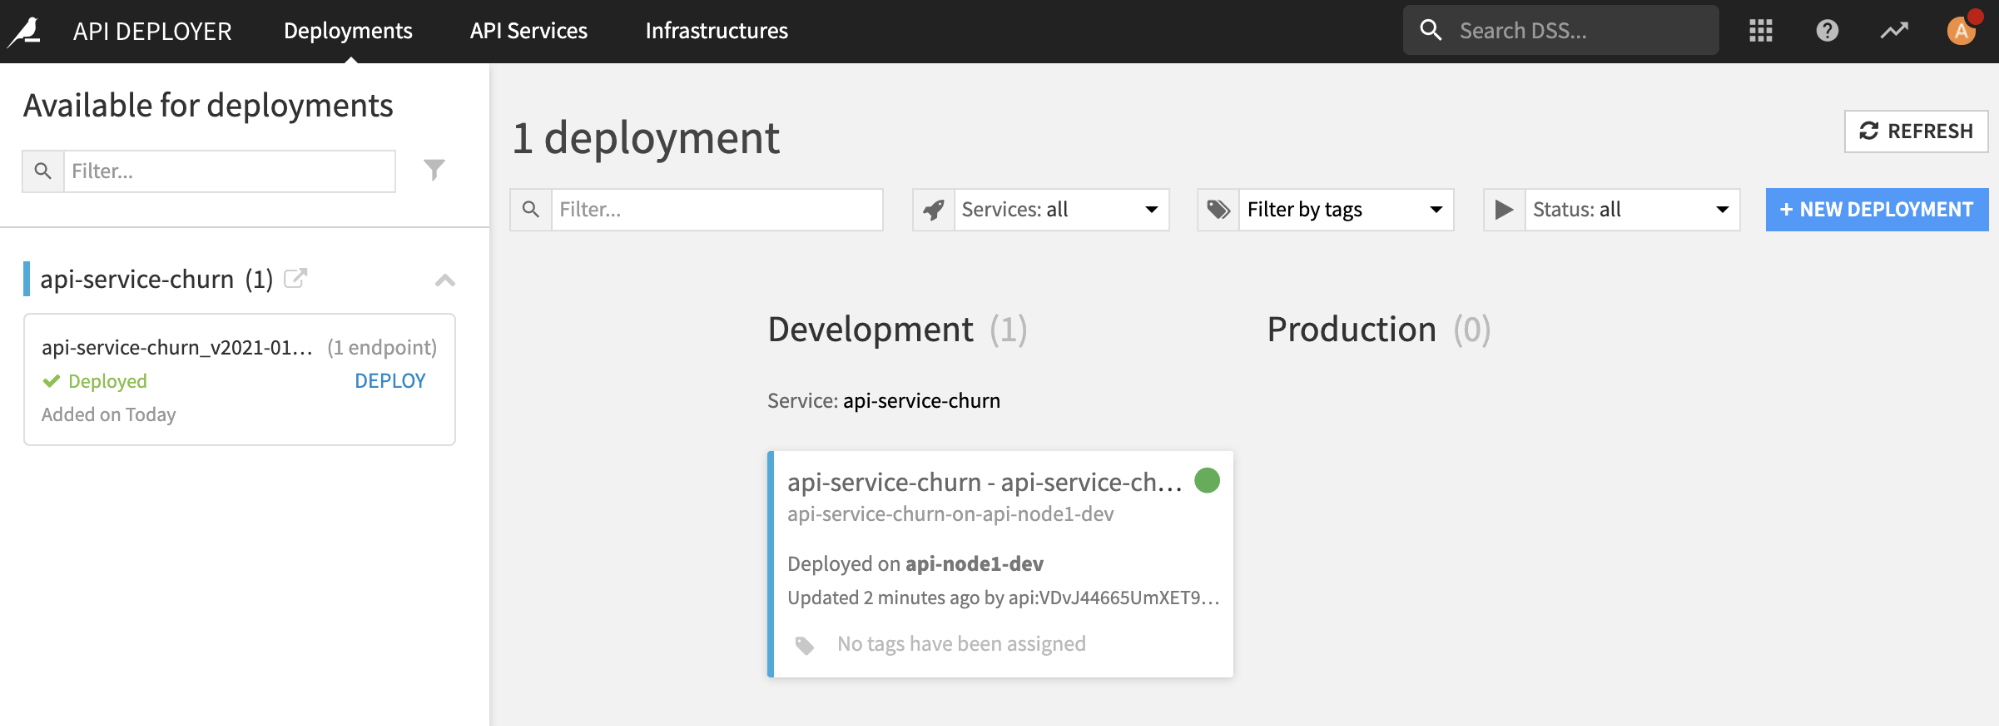
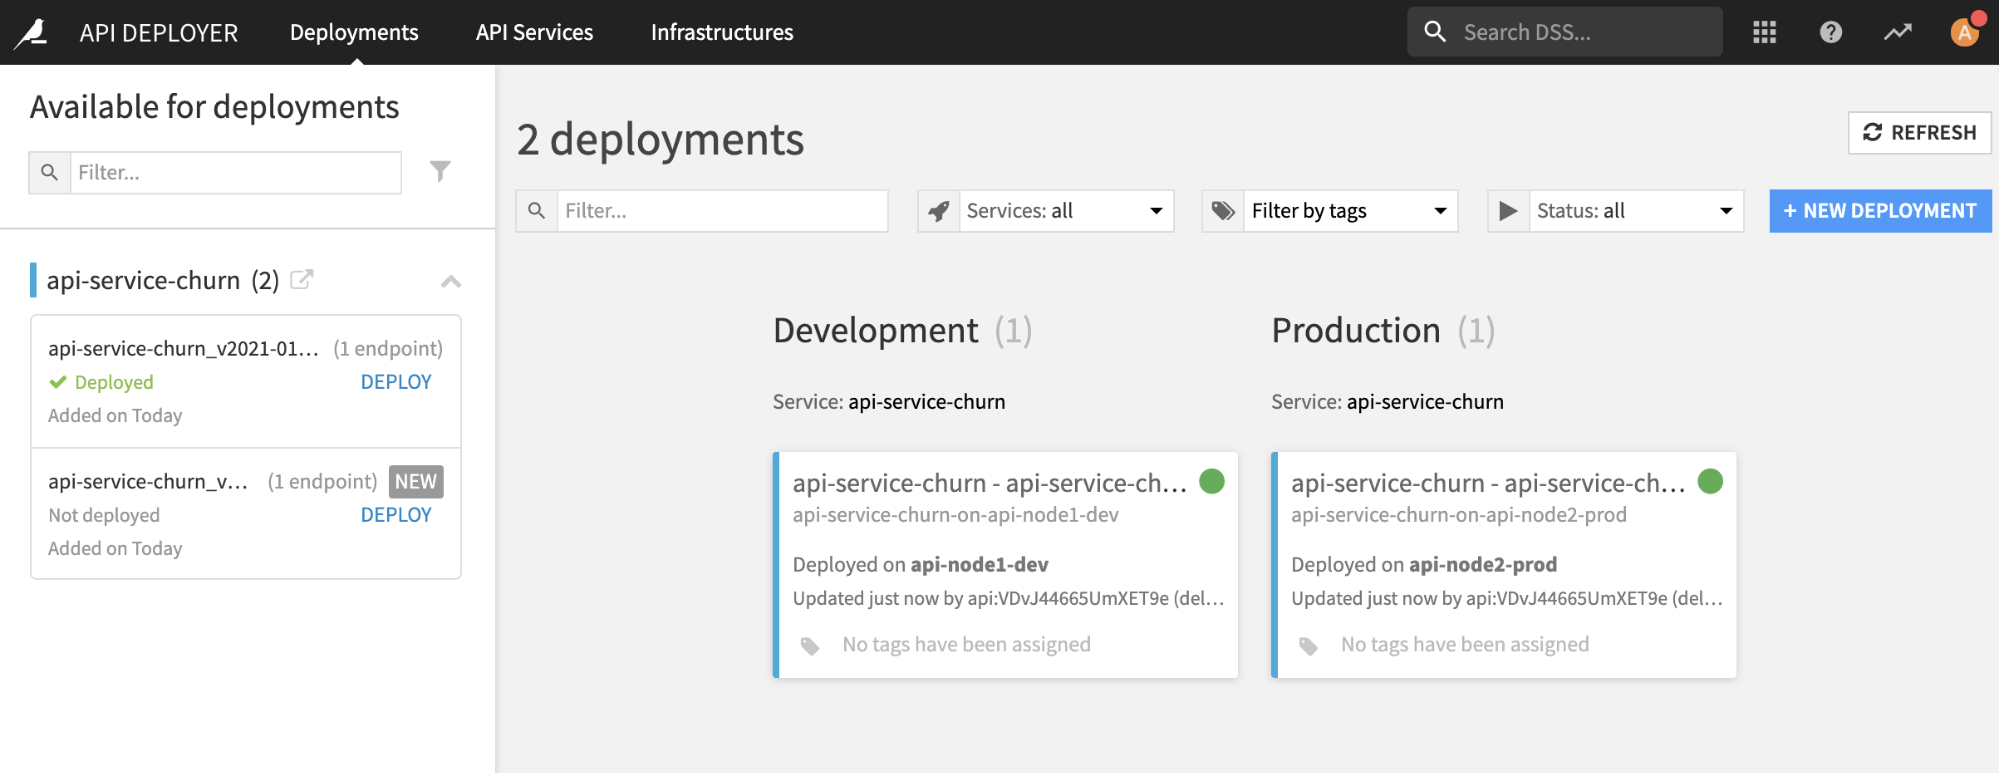
You need to note at this stage that the API Deployer is now aware of the new package, but the API node is still running the previous one. The next step is to ask the API Deployer to perform the update. This out-of sync state can be seen on the API Deployer dashboard with the deployment having a warning indicating ‘incomplete’ status.
Asking for the update is done by calling DSSAPIDeployerDeployment.start_update(). This operation is asynchronous so we need to wait for the API Deployer. The simplest approach is to use the DSSFuture.wait_for_result() function.
Lastly, we check the deployment status, and report that to Jenkins in case of any issues.
We now have a fully updated and active deployment that we need to test!
Testing#
The testing part will be based on the pytest Python framework. There are other frameworks to do testing of course, and you can choose the one you prefer.
The conftest.py file is used to pass the command line parameters to our tests, which are located in test_dev.py.
Testing is rather straightforward here. We’re just calling the API with various payloads and verify that the prediction returned is correct. This part is the one you will need to work on the most, to adapt it to your specific API endpoints and test as many cases as possible.
Although it’s hard to list all possible test cases, here is some food for thought: test the data structure expected for one or more features, test the endpoint’s enrichment, and test the prediction latency.
The only specific part is in the function build_apinode_client():
def build_apinode_client(params):
    client_design = dataikuapi.DSSClient(params["host"], params["api"])
    api_deployer = client_design.get_apideployer()
    api_url = api_deployer.get_infra(params["api_dev_infra_id"]).get_settings().get_raw()['apiNodes'][0]['url']
    return dataikuapi.APINodeClient(api_url, params["api_service_id"])
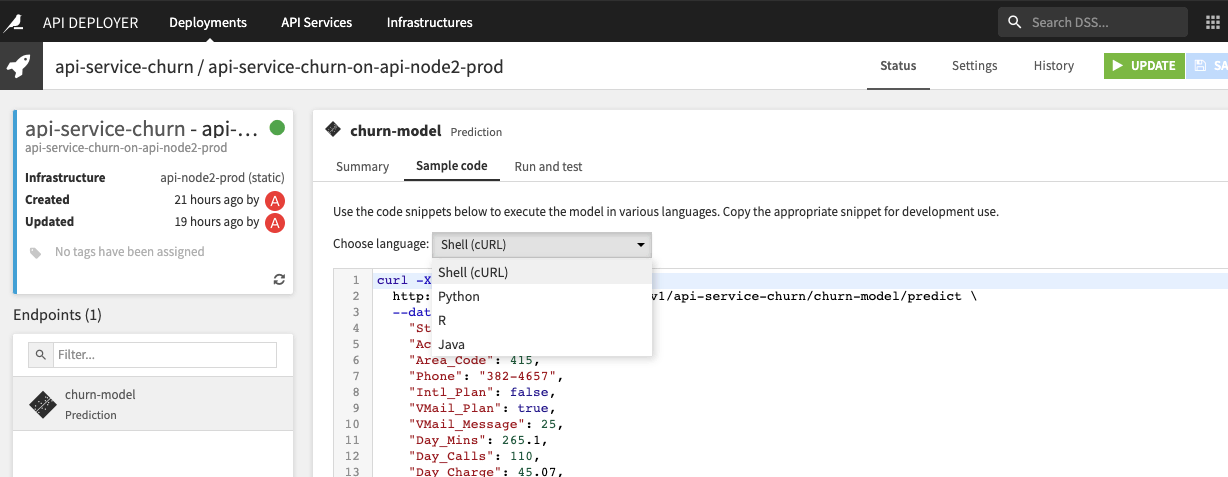
You have two ways to test the API endpoints: calling the URL directly with any HTTP request library or using Dataiku’s specific Python client called APINodeClient. We will use Dataiku’s Python library, but if you want sample code, you can look in any deployment Status > Sample code as a start.
To build the APINodeClient, we need the URL of the API node. This requires us to dig into the infrastructure object and extract the URL from its raw dict settings:
api_url = api_deployer.get_infra(params["api_dev_infra_id"]).get_settings().get_raw()['apiNodes'][0]['url']
This works only if you have a single API node on this infrastructure.
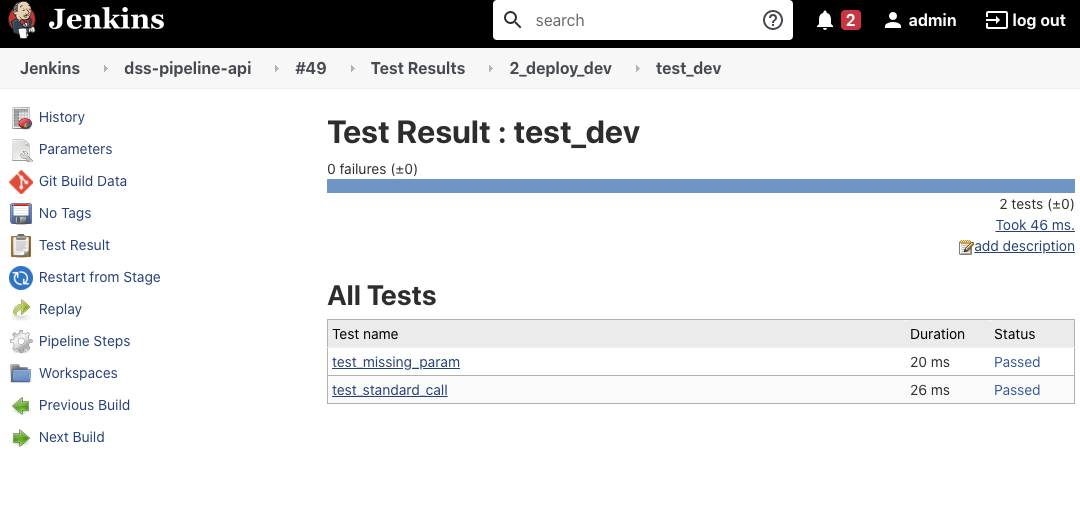
The sample code is running two basic prediction tests: one working case and one error case. Once these tests are executed correctly, we consider the API package to be valid and move to the next step: the production deployment.
Deploy to prod#
This stage is similar to the deployment done above. We will just pass another infrastructure ID. Programmatically speaking, this code could be moved to a common package as a function to simplify maintenance.
The main difference is at the end where we check the status of the new deployment and perform a rollback in case of any issues.
In terms of code, a rollback is performed by keeping track of and redeploying the previous API package. We do the first bit before the update:
running_version = dep_to_update.get_settings().get_raw()['generationsMapping']['generation']
Then, if rollback is needed, we use this ID to redeploy the previous package.
In this case, we experiment with a feature detail by returning two different error codes:
1if we’re unable to make a proper rollback - Need immediate action.2if we’re able to make a rollback - No need for immediate action.
This allows us to put a different status on the Jenkins pipeline: ERROR in the first case, UNSTABLE in the second using Jenkins try/catch control.
The full pipeline in action#
Now that our full pipeline is set up and understood, we can execute it. It should look like this:
We should see the test details if need be.
Within Dataiku, you will see the following API Deployer dashboard:
Sample usage#
To put this sample into action, here is a to-do list of what you should do to execute it:
Have your Jenkins and three DSS nodes installed and running.
Make sure to have Python 3 installed on your Jenkins executor.
Get all the Python scripts for the project ready in your own source code repository.
Create a new pipeline project in your Jenkins.
Add the variables as project parameters and assign them a default value according to your setup.
Copy/paste the pipeline.groovy as Pipeline script.
In the pipeline, setup your source code repository in the PREPARE stage.
Hit Build with parameters and you are ready to go!
Related assets:

