
Tutorial | Surface external models within Dataiku#
Get started#
Often, an organization employs a variety of tools and architectures in its technological schema. For instance, organizations commonly work with different tools for model training and deployment.
An organization that trains and deploys models outside of Dataiku can benefit from Dataiku’s flexible MLOps offering by “hopping on or off” at a number of different integration points.
This tutorial shows how to take a model deployed on a cloud ML platform and surface it within Dataiku as an external model.
Objectives#
In this tutorial, you will:
Surface within Dataiku a model externally deployed on a cloud ML platform.
Use that external model for explainability reports, comparisons with other types of models in Dataiku, and scoring data.
Prerequisites#
Completing the setup for this tutorial requires the assistance of your instance administrator and knowledge of the security and configuration of your cloud ML platform.
Before beginning this tutorial, you’ll need:
Dataiku 12.2 or later depending on your choice of external model.
A Full Designer user profile on the Dataiku for AI/ML or Enterprise AI packages.
An active deployed endpoint in either Amazon SageMaker, Azure Machine Learning, or Google Vertex AI. We’ll point to external resources for creating a sample endpoint in each case. Unrelated to Dataiku, you may need certain knowledge or rights to complete these tutorials.
An instance administrator to have created the external models code environment in the Administration > Settings > Misc section, as noted in the reference documentation on External Models.
Permissions granted to Dataiku to access your external endpoint. This may not be granted to your current instance as it relates to specific scope rights. We will specify the minimum required permissions to the extent possible.
An instance administrator to have created a dedicated connection to your cloud ML platform.
Create the project#
From the Dataiku Design homepage, click + New Project.
Select Learning projects.
Search for and select External Models.
If needed, change the folder into which the project will be installed, and click Create.
From the project homepage, click Go to Flow (or type
g+f).
Note
You can also download the starter project from this website and import it as a ZIP file.
Deploy a working external endpoint#
Before you can surface an external model in Dataiku, you need an endpoint running in your cloud ML platform. In each case, the tutorial includes instructions for creating an example endpoint following the cloud ML platform’s documentation.
Create an Amazon SageMaker endpoint by following their tutorial on customer churn prediction with XGBoost.
When finished, you should be able to get predictions, such as:
dummy = "5,0,12.524227291335833,2,5.639471129269478,5,4.937219265876419,150,5.881787271425925,5,3,0,0,0,0,0,0,0,0,0,0,0,0,0,0,0,0,0,0,0,0,0,0,0,1,0,0,0,0,0,0,0,0,0,0,0,0,0,0,0,0,0,0,0,0,0,0,0,0,0,0,0,0,0,0,0,0,0,0,0,0,0,0,0,0,0,0,1,0,0,0,0,0,0,0,0,0,0,0,0,0,0,0,0,0,0,1,1,0"
dummy_ar = np.fromstring(dummy, sep=',')
predictions = predict(dummy_ar)
print(predictions)
It should print something like:
['0.9981379508972168']
Create an Azure Machine Learning endpoint by following their tutorial on deploying a model to predict credit card defaults as an online endpoint.
When finished, this code block from the tutorial should return '[1,0]'.
# test the blue deployment with the sample data
ml_client.online_endpoints.invoke(
    endpoint_name=online_endpoint_name,
    deployment_name="blue",
    request_file="./deploy/sample-request.json",
)
Create a Google Vertex AI endpoint by following their tutorial on AutoML tabular training and prediction.
When finished, you should be able to get predictions, such as:
prediction = endpoint.predict(
    [
        {
            "Type": "Cat",
            "Age": "3",
            "Breed1": "Tabby",
            "Gender": "Male",
            "Color1": "Black",
            "Color2": "White",
            "MaturitySize": "Small",
            "FurLength": "Short",
            "Vaccinated": "No",
            "Sterilized": "No",
            "Health": "Healthy",
            "Fee": "100",
            "PhotoAmt": "2",
        }
    ]
)

print(prediction)
It should print something like:
Prediction(predictions=[
    {'classes': ['Yes', 'No'],
    'scores': [0.6285621523857117, 0.3714377582073212]
    }],
    ...
)
Create a connection in Dataiku to access the external endpoint#
After confirming that you have an endpoint running in your cloud ML platform, the next step is to create a connection in Dataiku with sufficient credentials to access the endpoint.
Important
Creating the connection requires administrative access. However, once the connection exists, other users only require the security setting Details readable by to access it.
From the waffle (
 ) of the Design node, click Administration.
Navigate to the Connections tab.
Click + New Connection.
Choose your cloud ML platform from the Managed Model Deployment Infrastructures section.
Provide any name, such as
sagemaker-ext.Enter a working way to get a role with the right to query the SageMaker endpoint on the correct account and region. (This screenshot is using STS with AssumeRole logic).
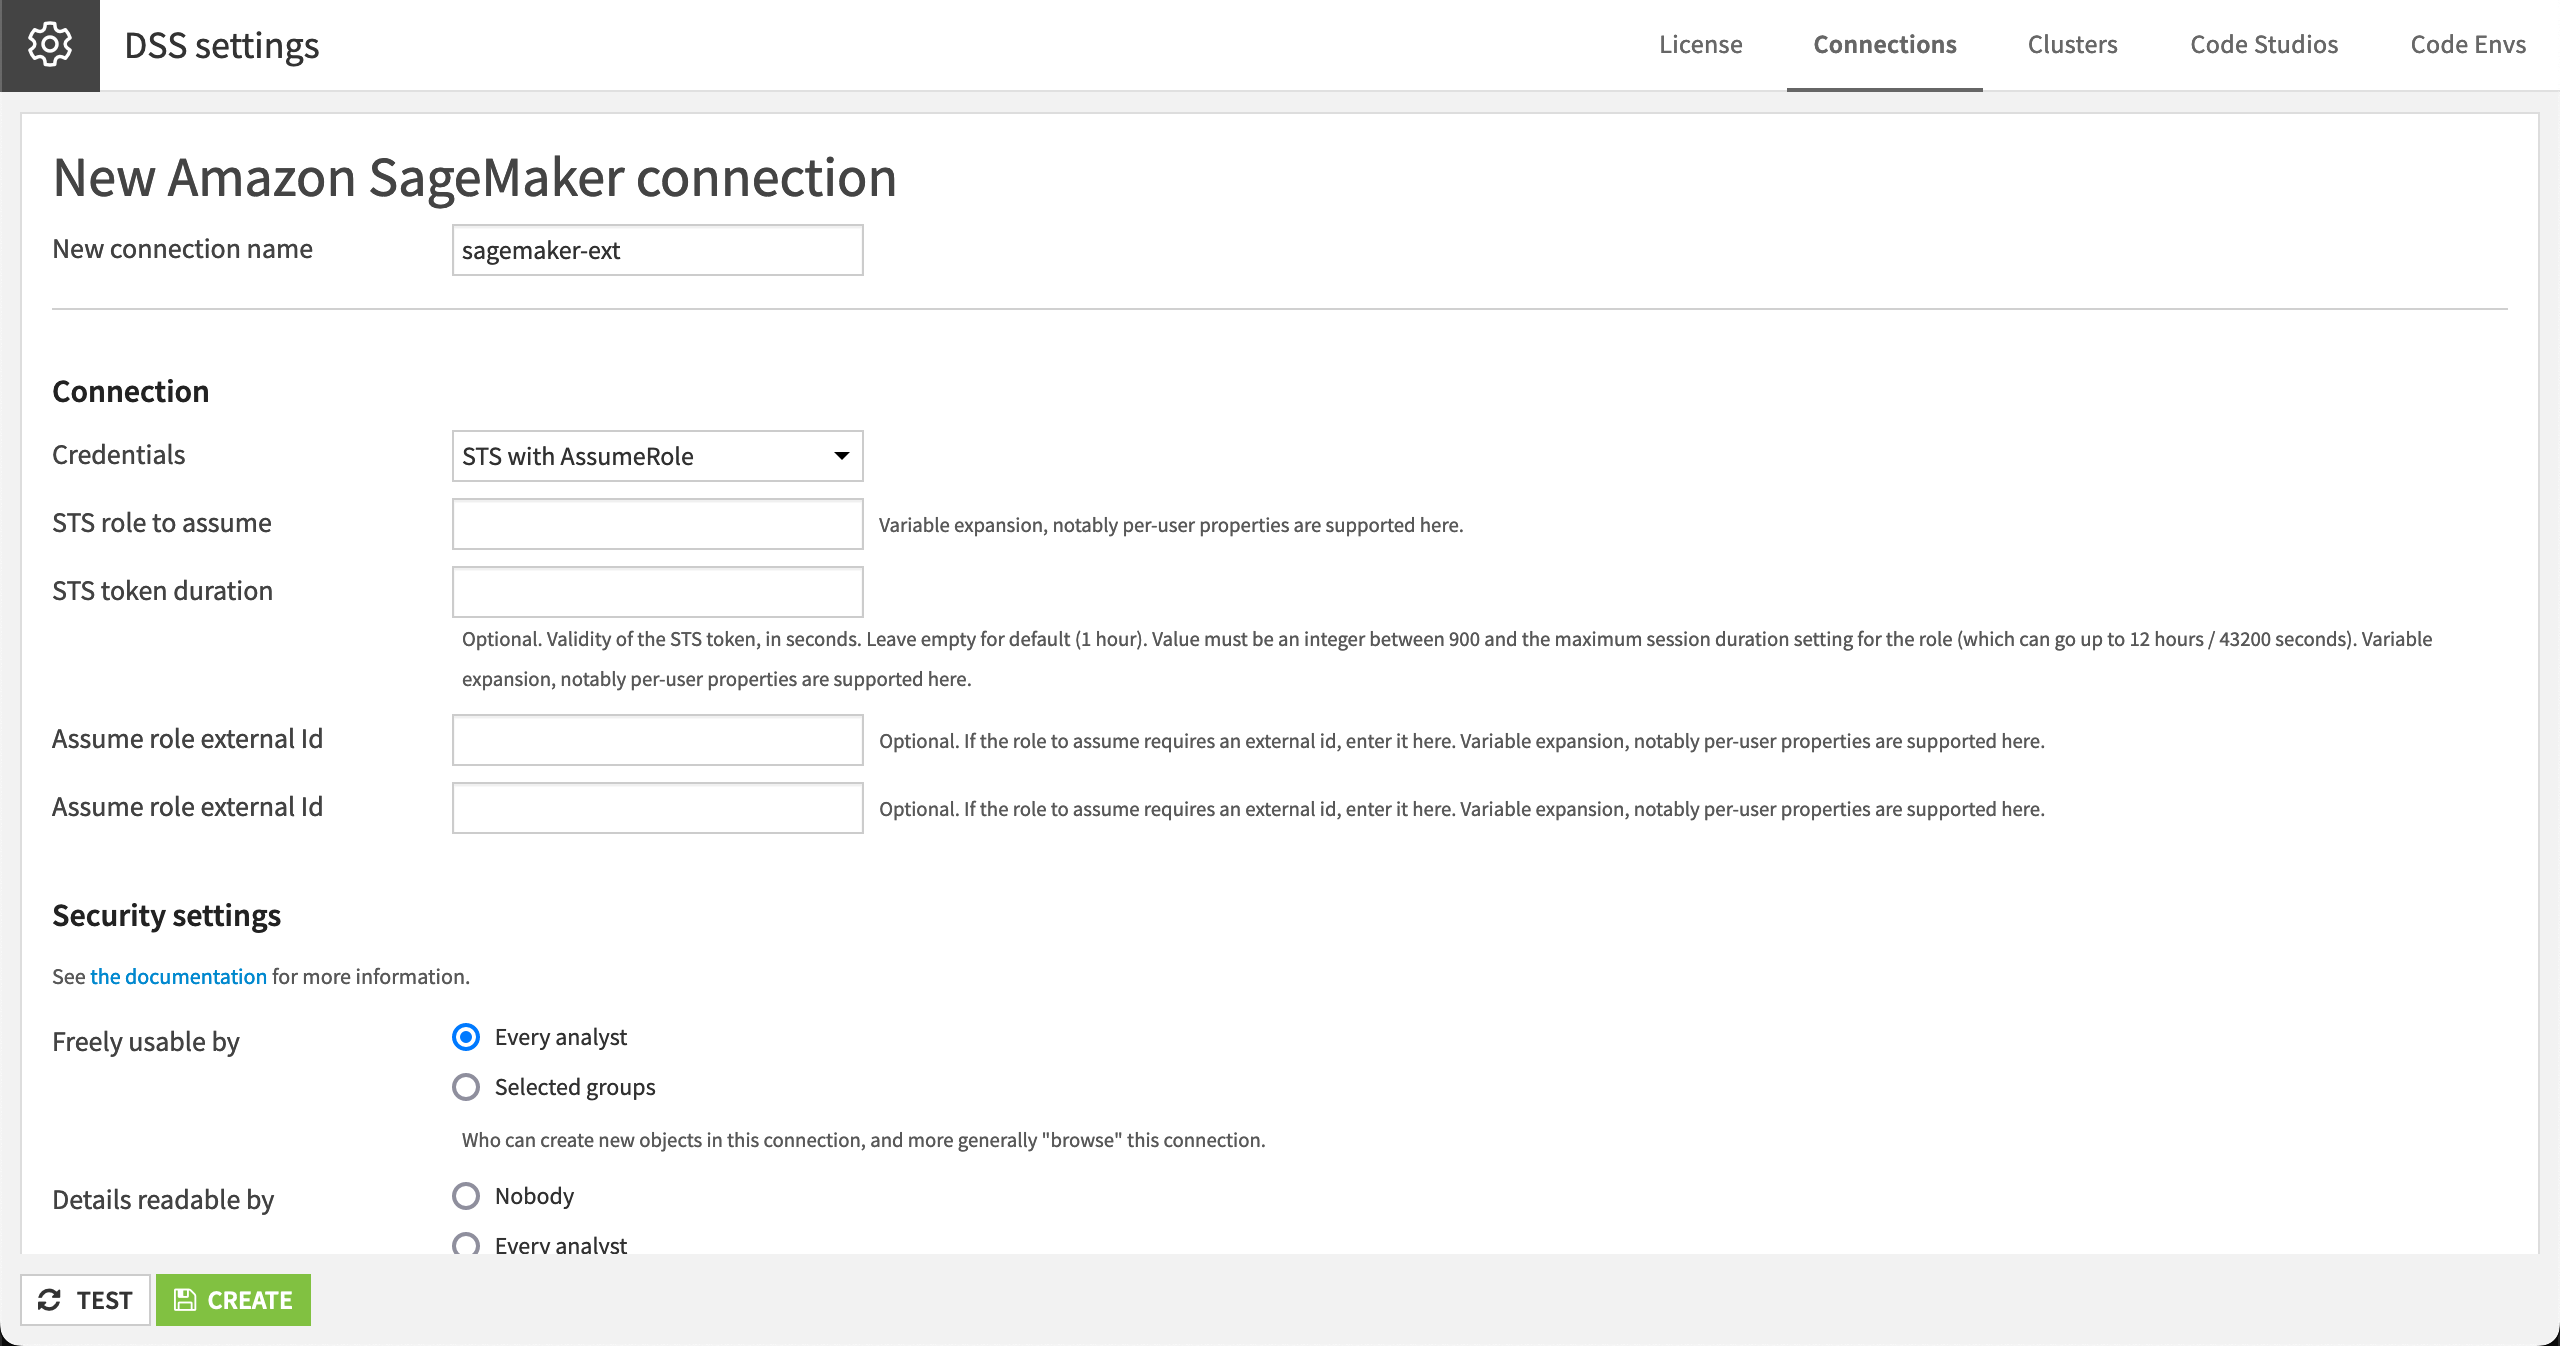
Dataiku external models require the following rights:
sagemaker:DescribeEndpointsagemaker:DescribeEndpointConfigsagemaker:InvokeEndpointsagemaker:ListEndpointConfigssagemaker:ListEndpoints
Note
See the Amazon SageMaker documentation on API permissions for details.
From the waffle (
) of the Design node, click Administration.Navigate to the Connections tab.
Click + New Connection.
Choose your cloud ML platform from the Managed Model Deployment Infrastructures section.
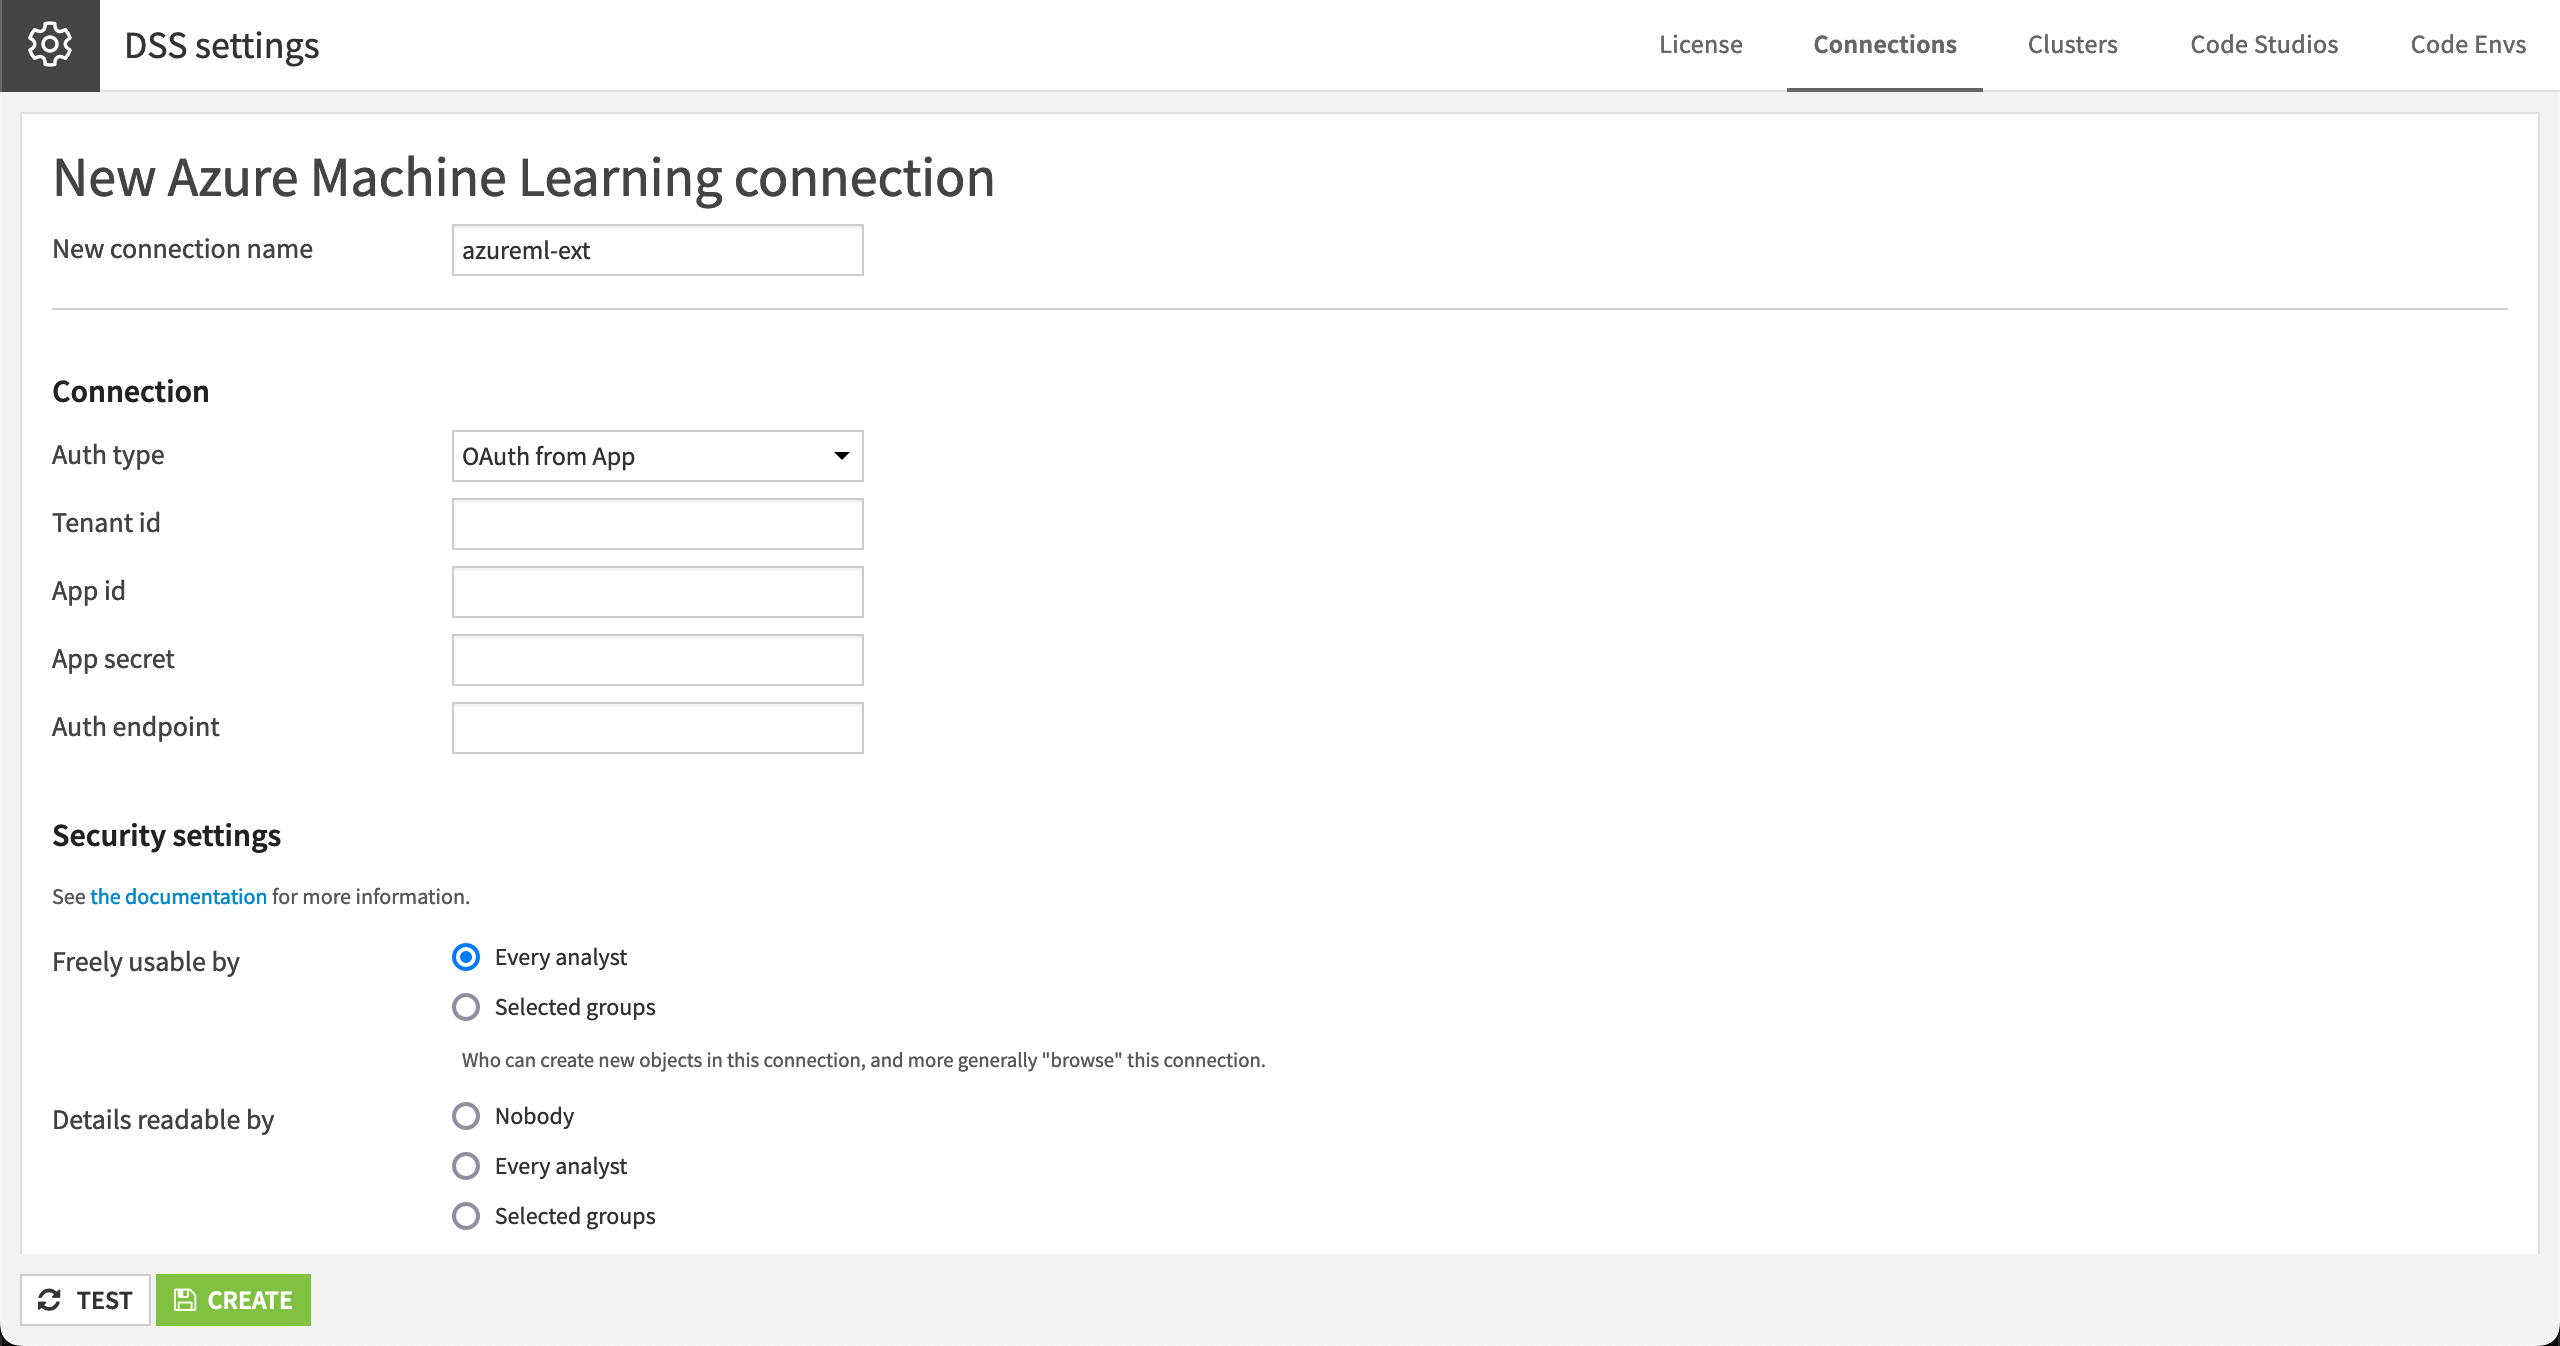
Provide any name, such as
azureml-ext.Enter a working way to get a role with the right to query the Azure Machine Learning endpoints you want to use. (This screenshot is using the OAuth from App method).
From the waffle (
) menu of the Design node, click Administration.Navigate to the Connections tab.
Click + New Connection.
Choose your cloud ML platform from the Managed Model Deployment Infrastructures section.
Provide any name, such as
vertex-ext.Enter the credentials to use. Ensure that this account is allowed to query Vertex endpoints, which is given by the role Vertex AI User.
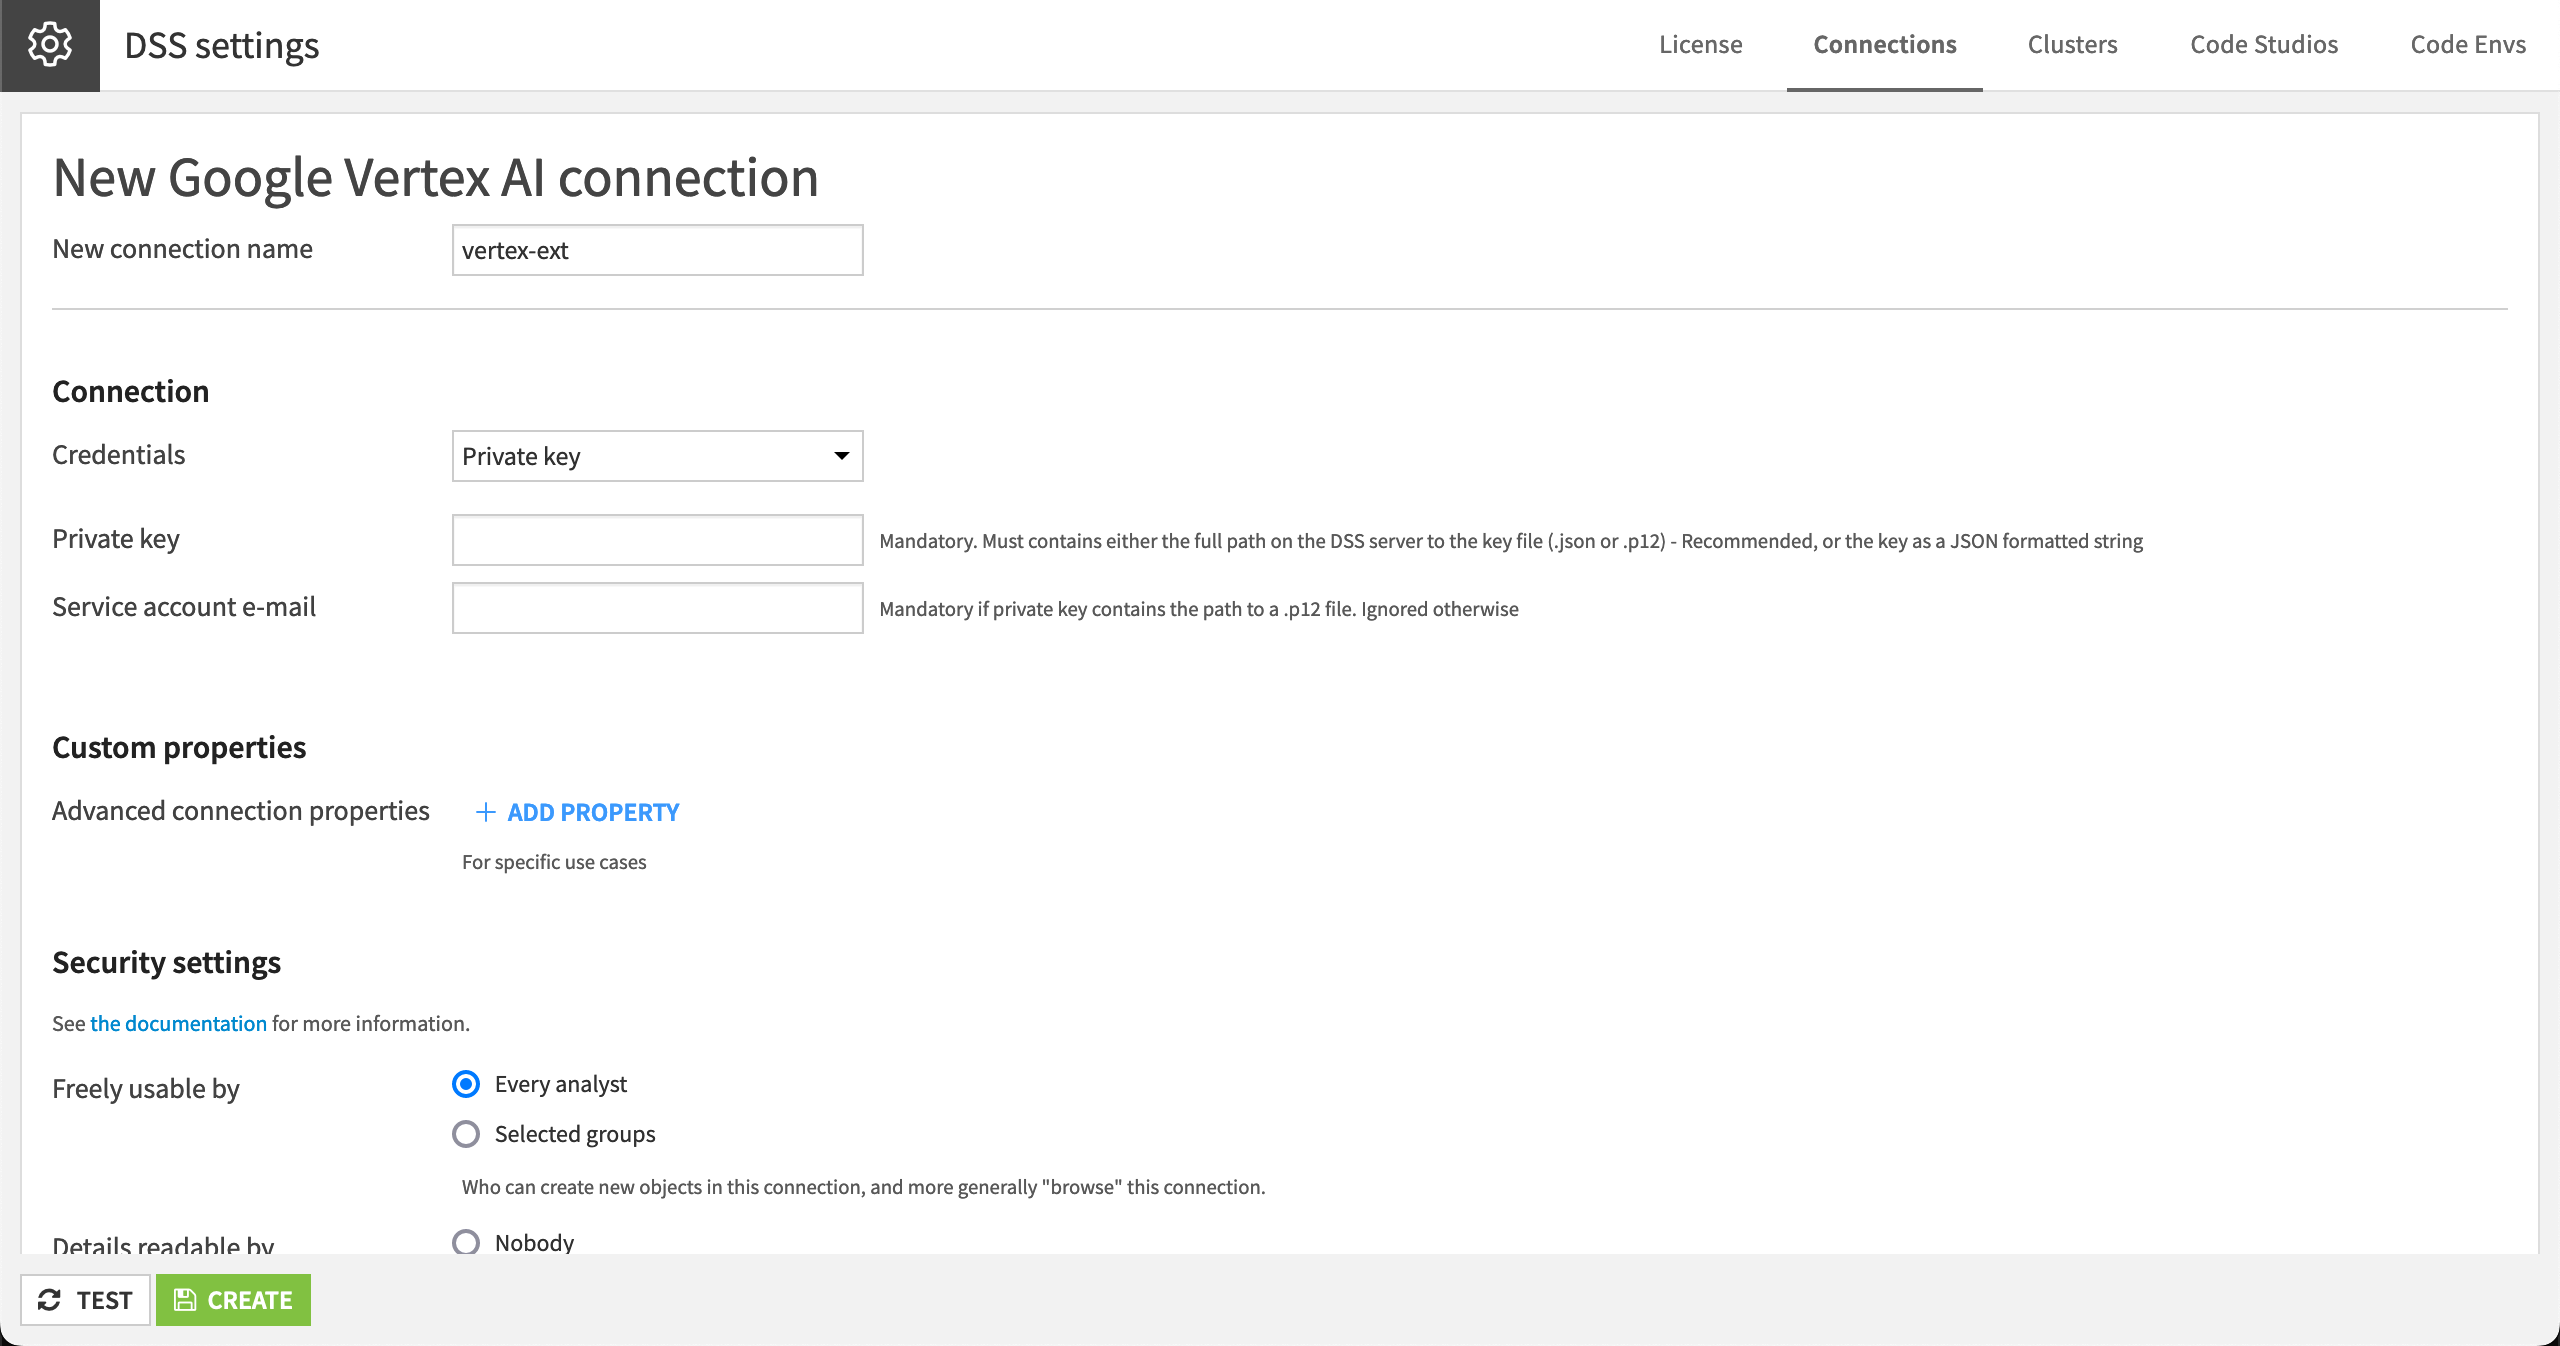
If you want more granular access, Dataiku requires the following rights:
aiplatform.endpoints.getaiplatform.endpoints.listaiplatform.endpoints.predict
Note
See the Vertex AI documentation on access control with IAM for details.
Add an evaluation dataset in Dataiku#
Once you have a connection in Dataiku to the external endpoint, you can create an external saved model.
However, before creating the actual model, a good practice is to have a dataset for Dataiku to evaluate the model performance. Each case here uses the model’s training data found in the starter project.
If you prefer not to evaluate the model, you can make that selection when creating a version of the external saved model. However, you’ll still need to provide a dataset so that Dataiku can save the feature names and types.
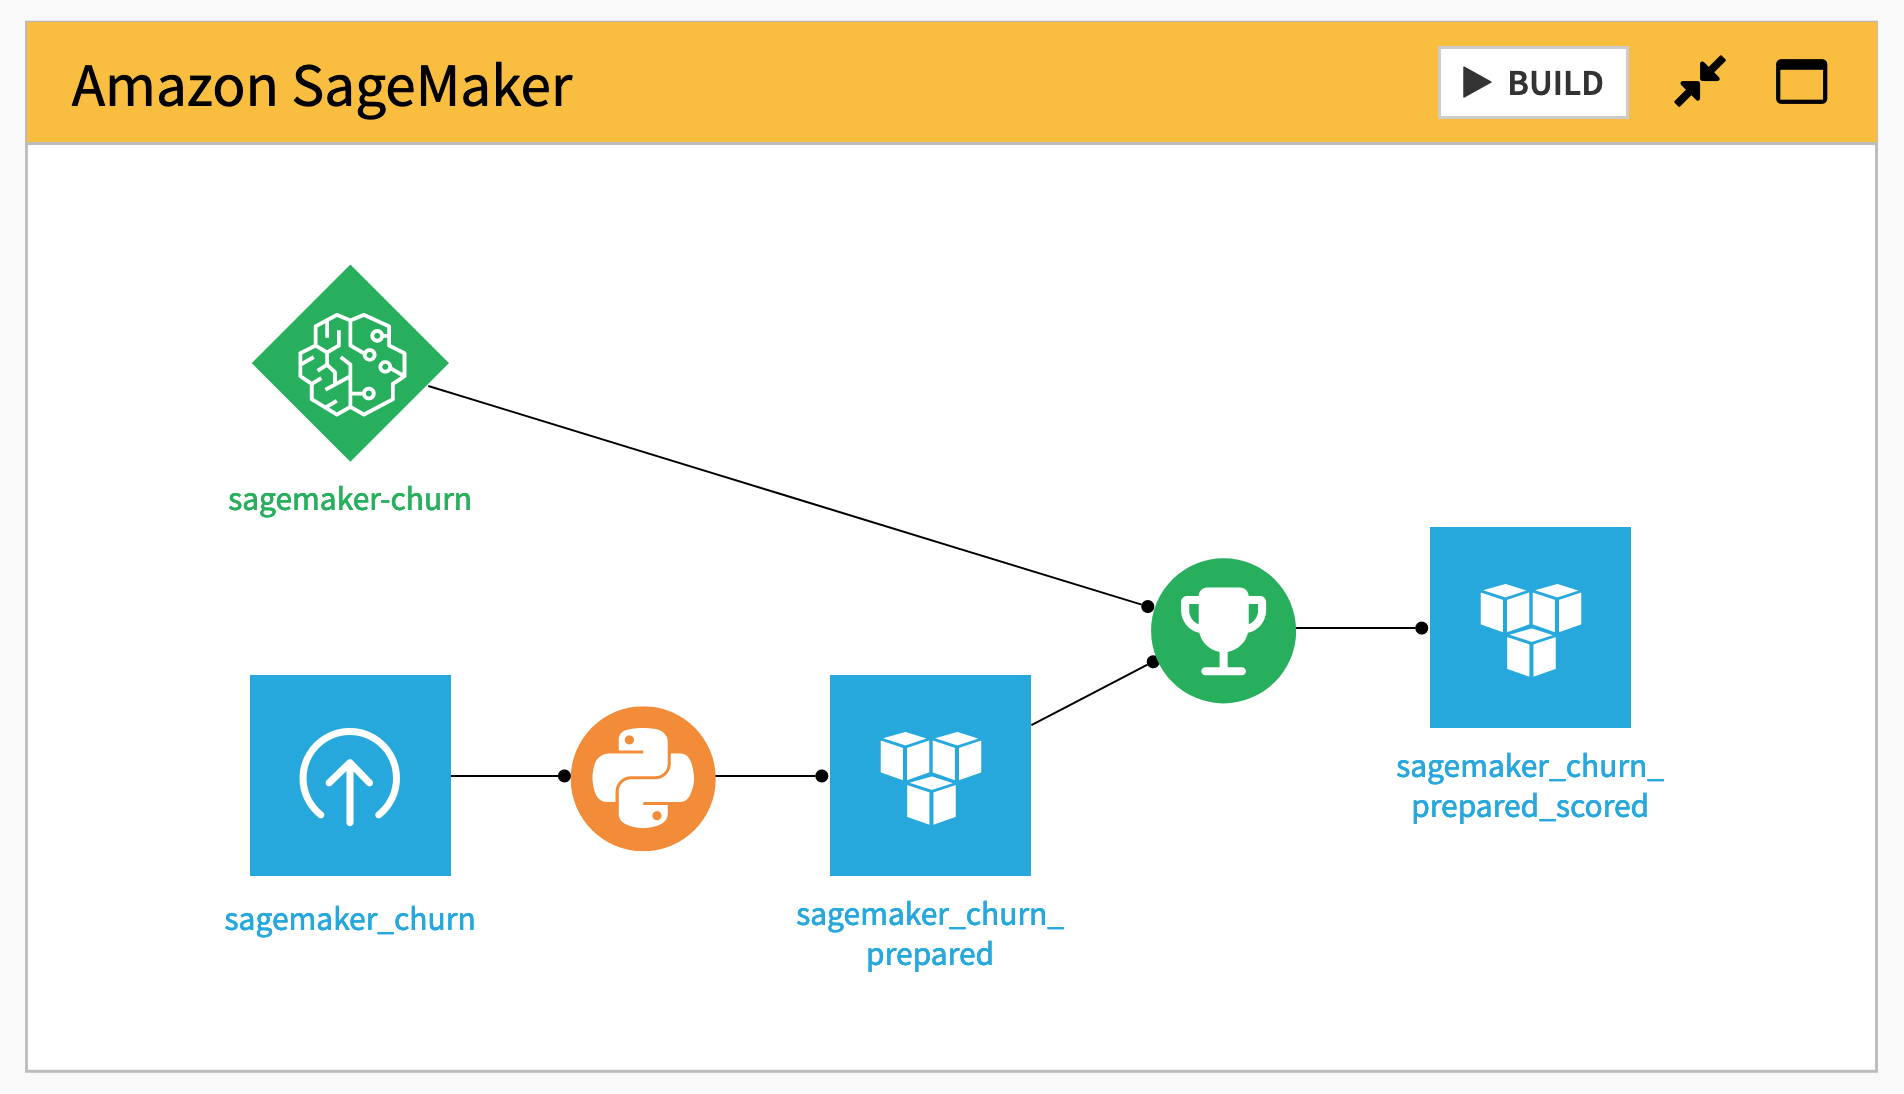
In the Amazon SageMaker Flow zone, find the sagemaker_churn_prepared dataset.
Note
We initially uploaded the dataset from the churn tutorial as sagemaker_churn. However, as SageMaker models require a specific format, we needed to transform this dataset into sagemaker_churn_prepared with a Python recipe using the exact same code as in the tutorial notebook.
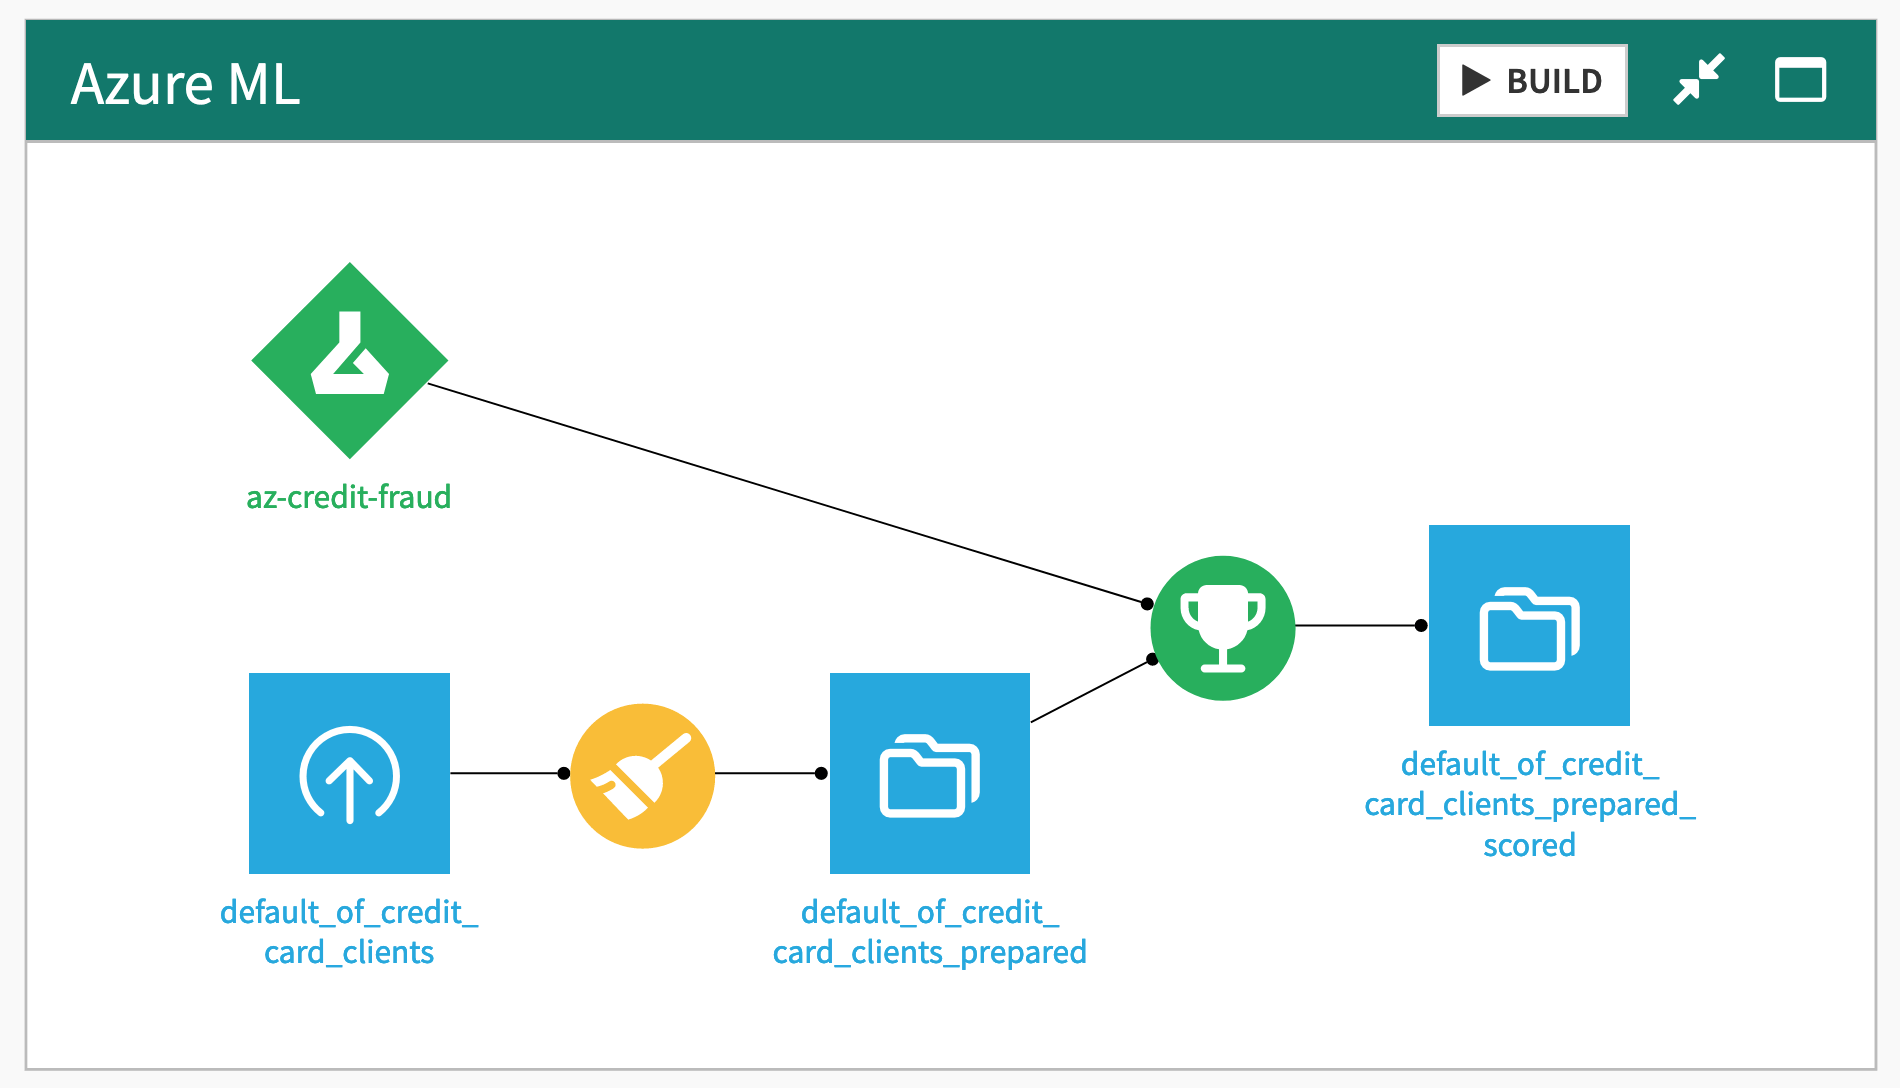
In the Azure ML Flow zone, find the default_of_credit_card_clients_prepared dataset.
Note
We uploaded the dataset from this Azure ML example data, removed the first line of X1, X2,..., and dropped the ID column in a Prepare recipe.
In the Vertex AI Flow zone, find the petfinder_tabular_classification dataset.
Note
We uploaded it from this Google Cloud sample data.
Create an external saved model in Dataiku#
Now that you have an evaluation dataset, let’s proceed with the creation of the external saved model itself.
From the Flow (
 ) menu in the top navigation bar, select Models & Agents.
Click + New Saved Model > New External Model.
Choose your cloud ML platform.
Fill in the basic model information:
Give a meaningful name to your model like
sagemaker-churn.The prediction type is a Two-class classification.
For the Authentication field, select the connection used in the previous step; sagemaker-ext in our case.
Select the Region where your endpoint is deployed; eu-west-1 in our case.
Click Create.
Give a meaningful name to your model like
az-credit-fraud.The prediction type is a Two-class classification.
For the Authentication field, select the connection used in the previous step; azureml-ext in our case.
The other fields (Subscription ID, Resource group, and Workspace) are specific to your setup.
Click Create.
Give a meaningful name to your model like
vertex-petfinder.The prediction type is a Two-class classification.
For the Authentication field, select the connection used in the previous step; vertex-ext in our case.
Select the Region where your endpoint is deployed; europe-west-1 in our case.
Project name is specific to your setup.
Click Create.
Add a model version#
You now have an external model, but you need to create a model version that will contain all the details to query the endpoint.
Open the saved model, and click on + Add Model Version.
In the first section, click on Get Endpoints List to fetch a list of accessible endpoints.
Select your endpoint from the list. Alternatively, you can enter its ID directly.
Enter a version ID, such as
v1.
Complete a few details specific to the case at hand:
Enter the classes:
0and1in our case.Leaving the default option to evaluate the model selected, enter the evaluation dataset, sagemaker_churn_prepared to have performance metrics on the model directly in Dataiku.
Select Churn?_True. as the target column.
Enter the classes:
0and1in our case.Leaving the default option to evaluate the model selected, enter the evaluation dataset, default_of_credit_card_clients_prepared to have performance metrics on the model directly in Dataiku.
Select default payment next month as the target column.
Enter the classes:
YesandNoin our case.Leaving the default option to evaluate the model selected, enter the evaluation dataset, petfinder_tabular_classification to have performance metrics on the model directly in Dataiku.
Select Adopted as the target column.
Take a few more steps to finish creating the model version:
As the computation of explainability data isn’t long in this sample, uncheck the Skip expensive reports box.
Leave the default option of allowing Dataiku to guess the input/output format using the evaluation dataset.
Click Create to let Dataiku create and evaluate this model. The creation is fast, but the evaluation can take some time.
Important
Unchecking the default option to Skip expensive reports allows Dataiku to perform the requests required to compute the explainability sections. Although this adds value to the model, it triggers thousands of requests.
This is acceptable for a tutorial, but for production endpoints, the additional stress on the endpoint may be a factor to consider. If need be, these reports can also be computed afterward individually.
Manage external endpoint changes#
Before demonstrating how you can use an external model surfaced in Dataiku, it’s important to recognize that Dataiku doesn’t control the endpoint behind this object.
Accordingly, these endpoints can change without notice. This could be a technical change, such as the addition of memory to the underlying infrastructure, or a change in the exposed model, such as a new deployed version.
Open your saved model from the Flow.
Open the report for your model version (such as v1).
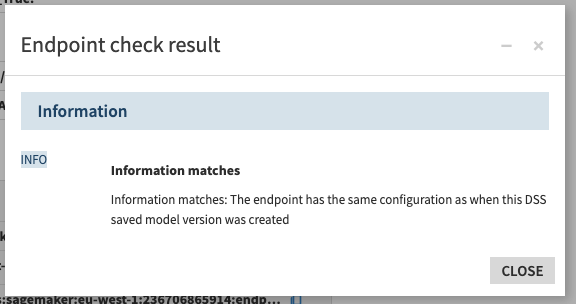
In the Summary panel, find details about the external endpoint and the Check Endpoint button.
The Check Endpoint button controls whether the data fetched and stored at the creation time is still accurate. If there are differences, Dataiku will offer you the ability to create a new saved model version as the potential data on performances and explainability is incorrect.
Use an external model in Dataiku#
Once you have a version of an external saved model in Dataiku, you can use it much like other visual models in Dataiku. In particular, three benefits are worth highlighting:
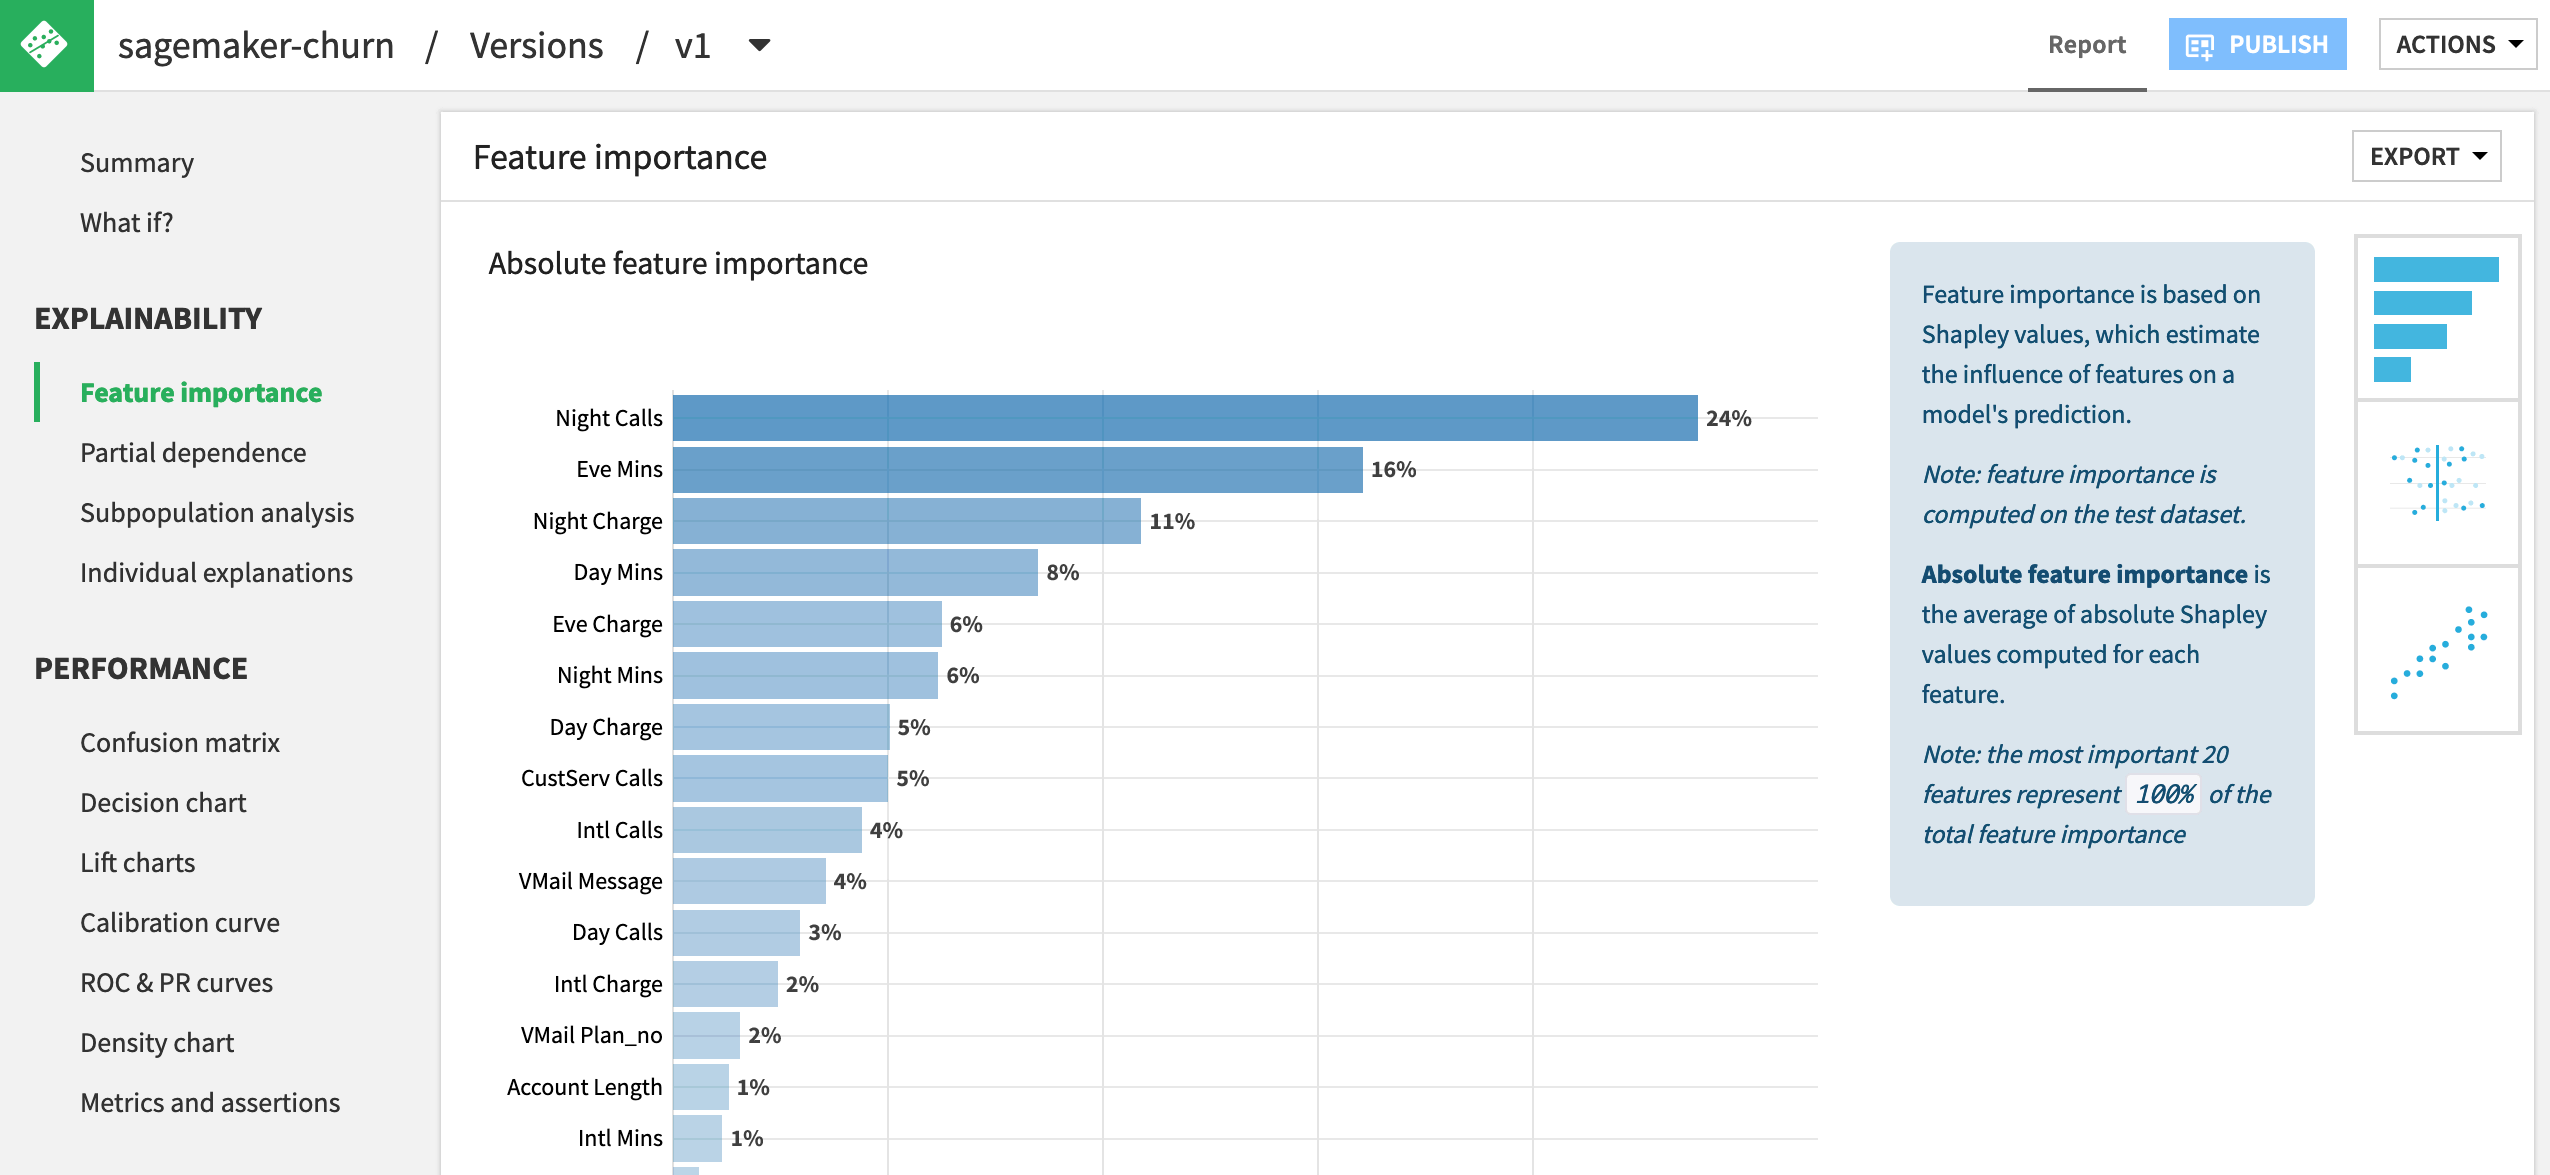
Model explainability#
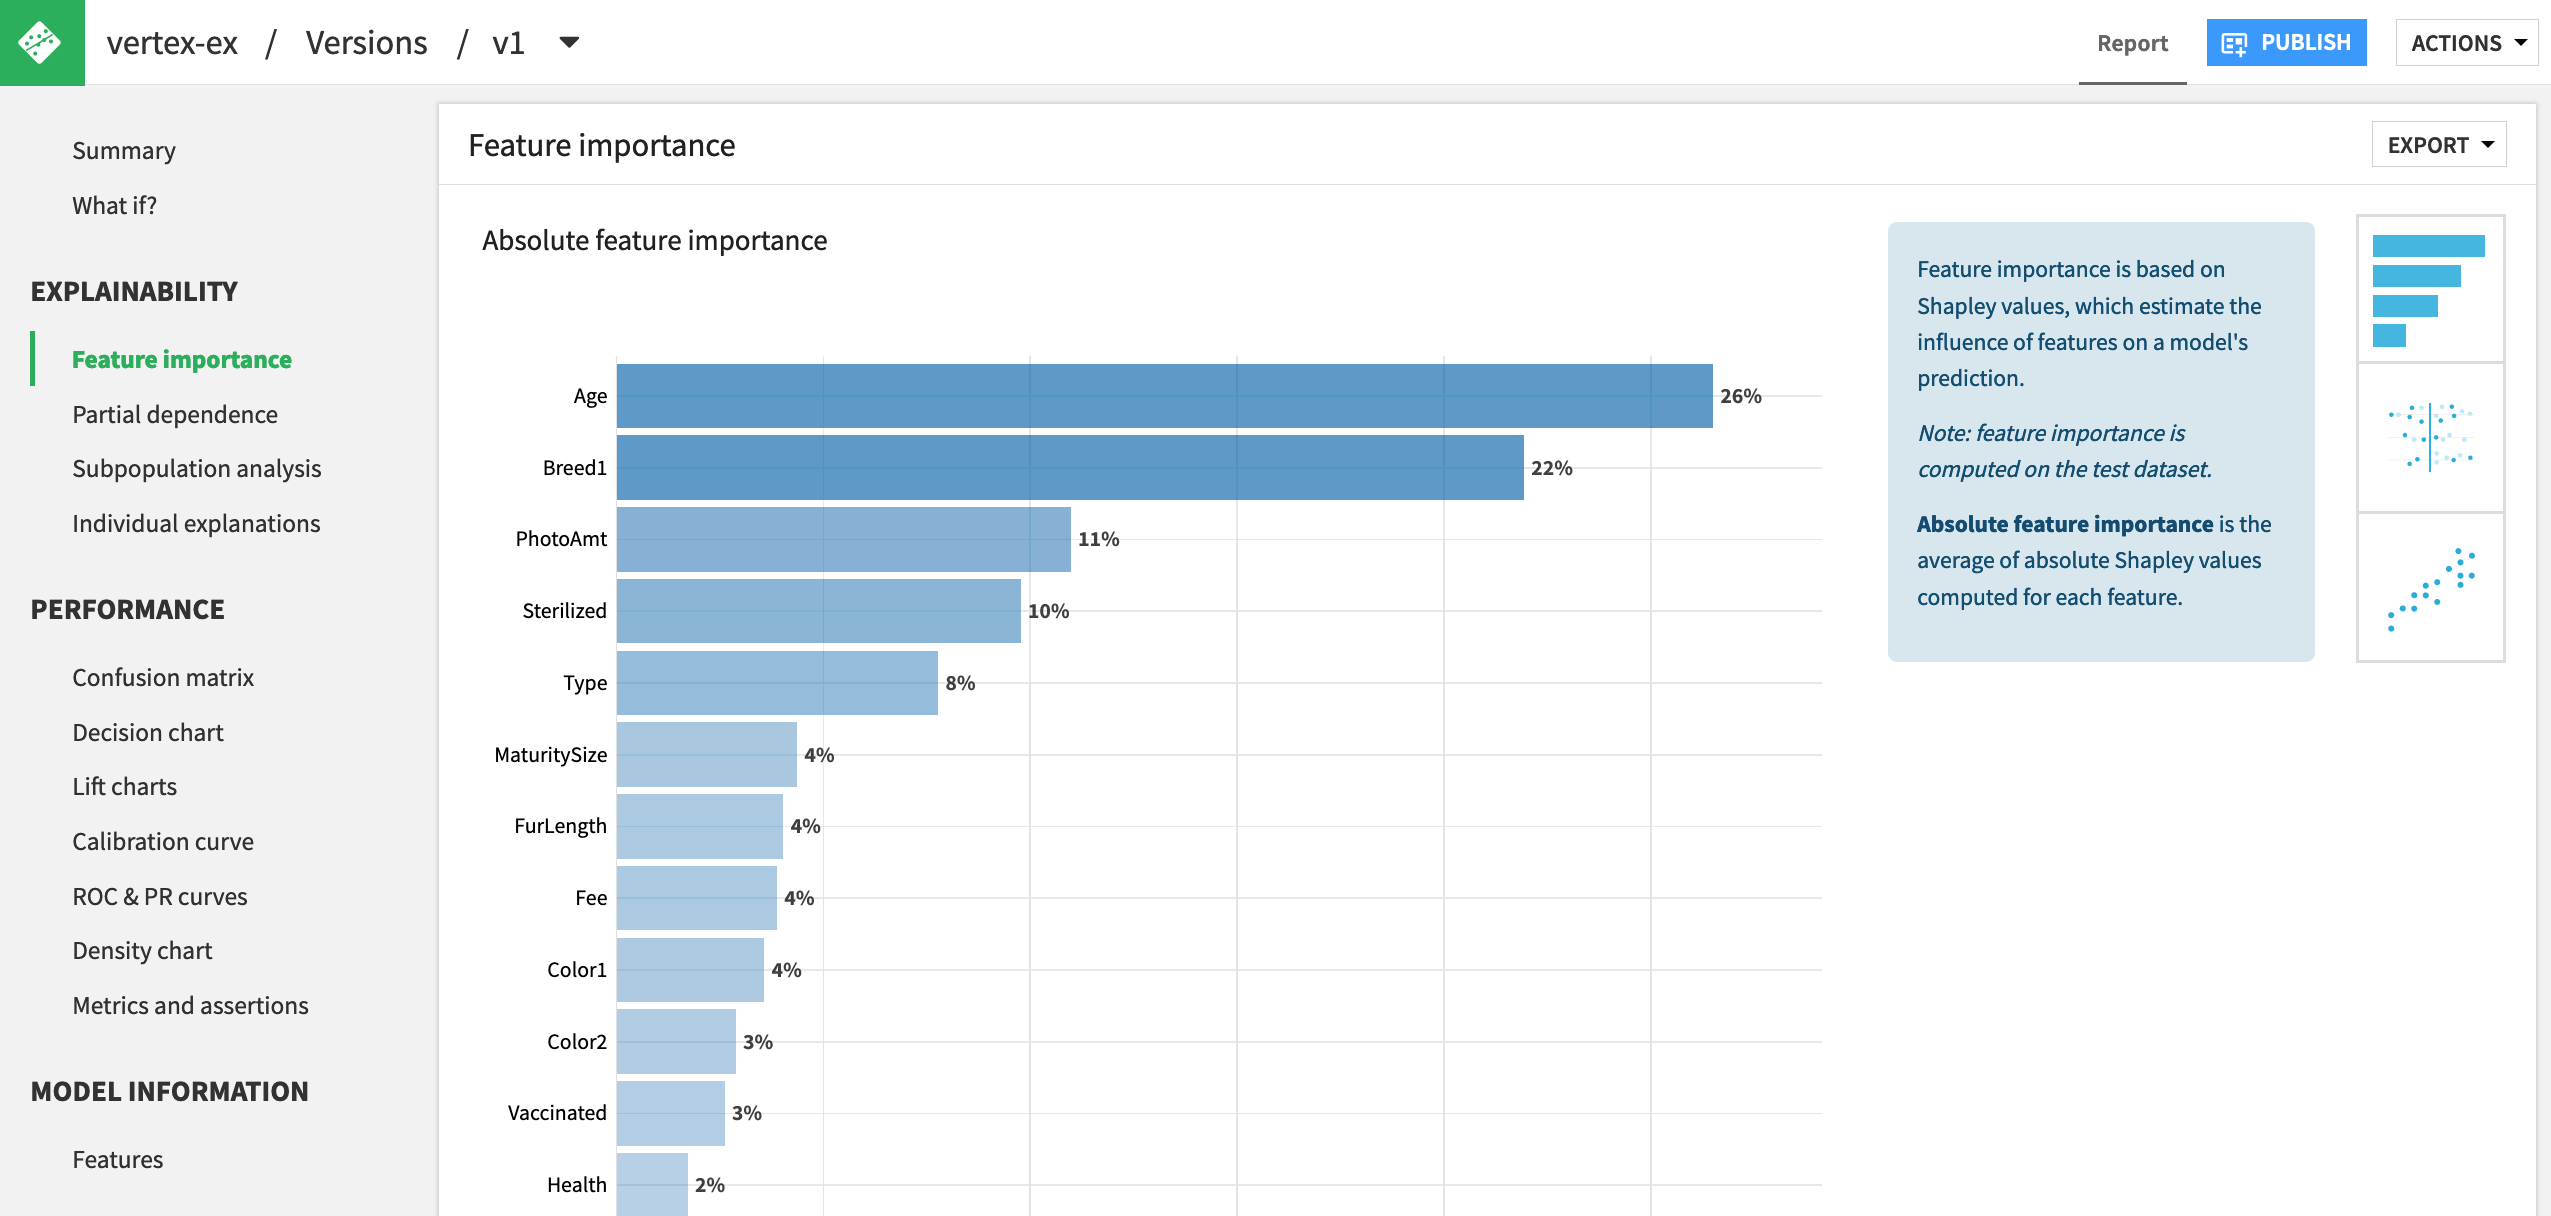
To avoid black box models, Dataiku offers many built-in visualizations to understand the nature of a model. The same interface for investigating a model built in Dataiku can be used for investigating models deployed on a cloud ML platform.
From the report of your model version, browse the Explainability and Performance sections on the left that were computed during the evaluation process. The available options will differ depending on the type of model at hand.
If you left the Skip expensive report option checked when creating the model version, feel free to request their computation manually.
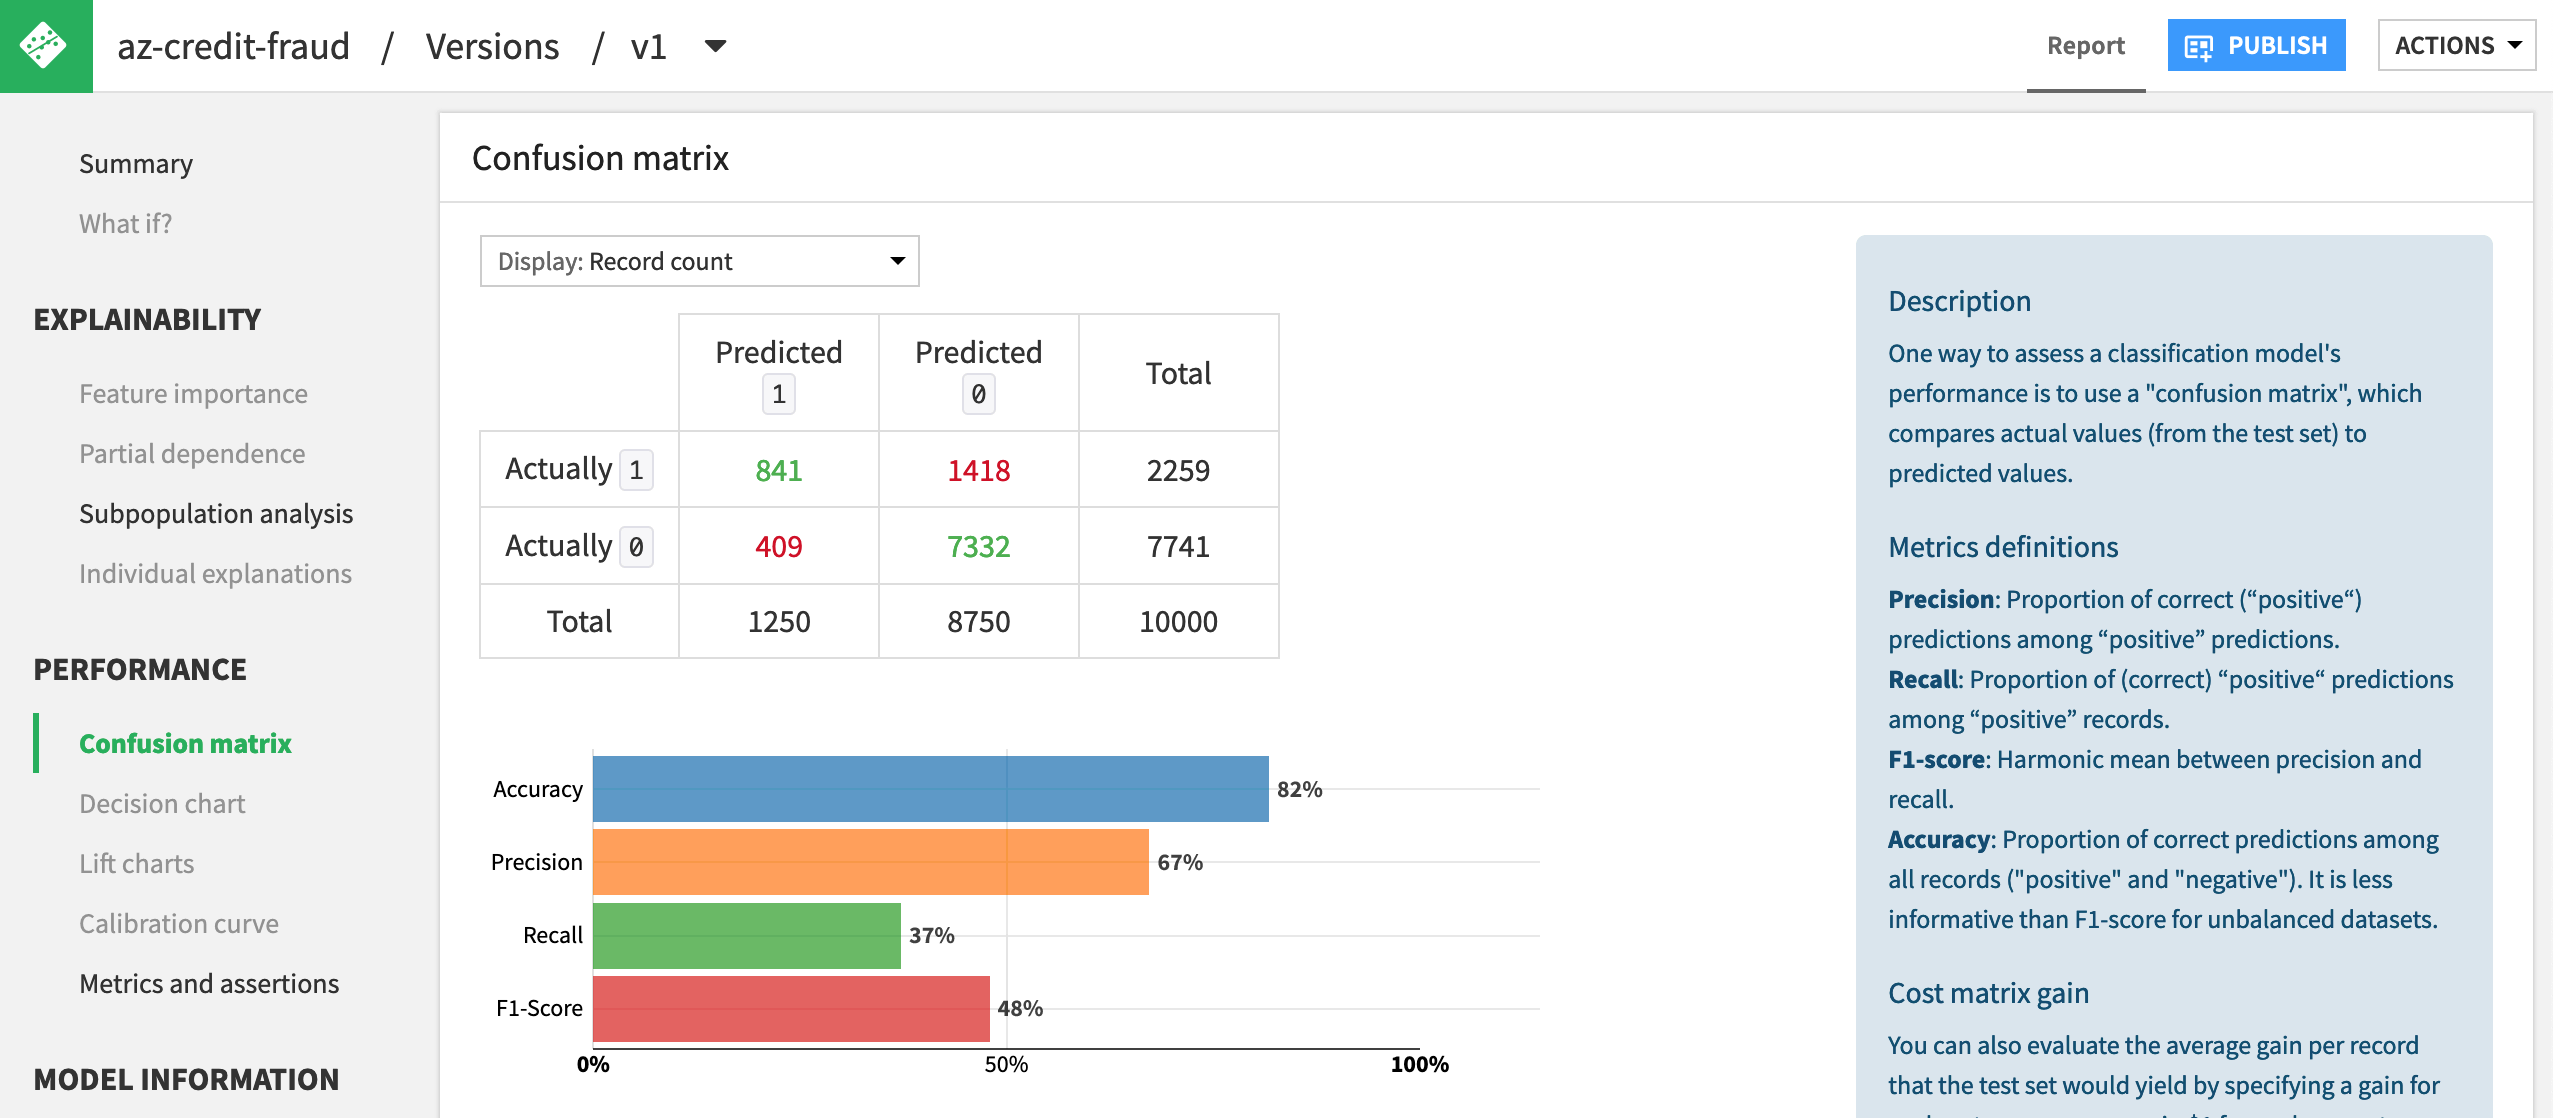
Note
The endpoint in the Azure ML tutorial model happens to be non-probabilistic (it only outputs 0 or 1), and so many of the reports can’t be computed.
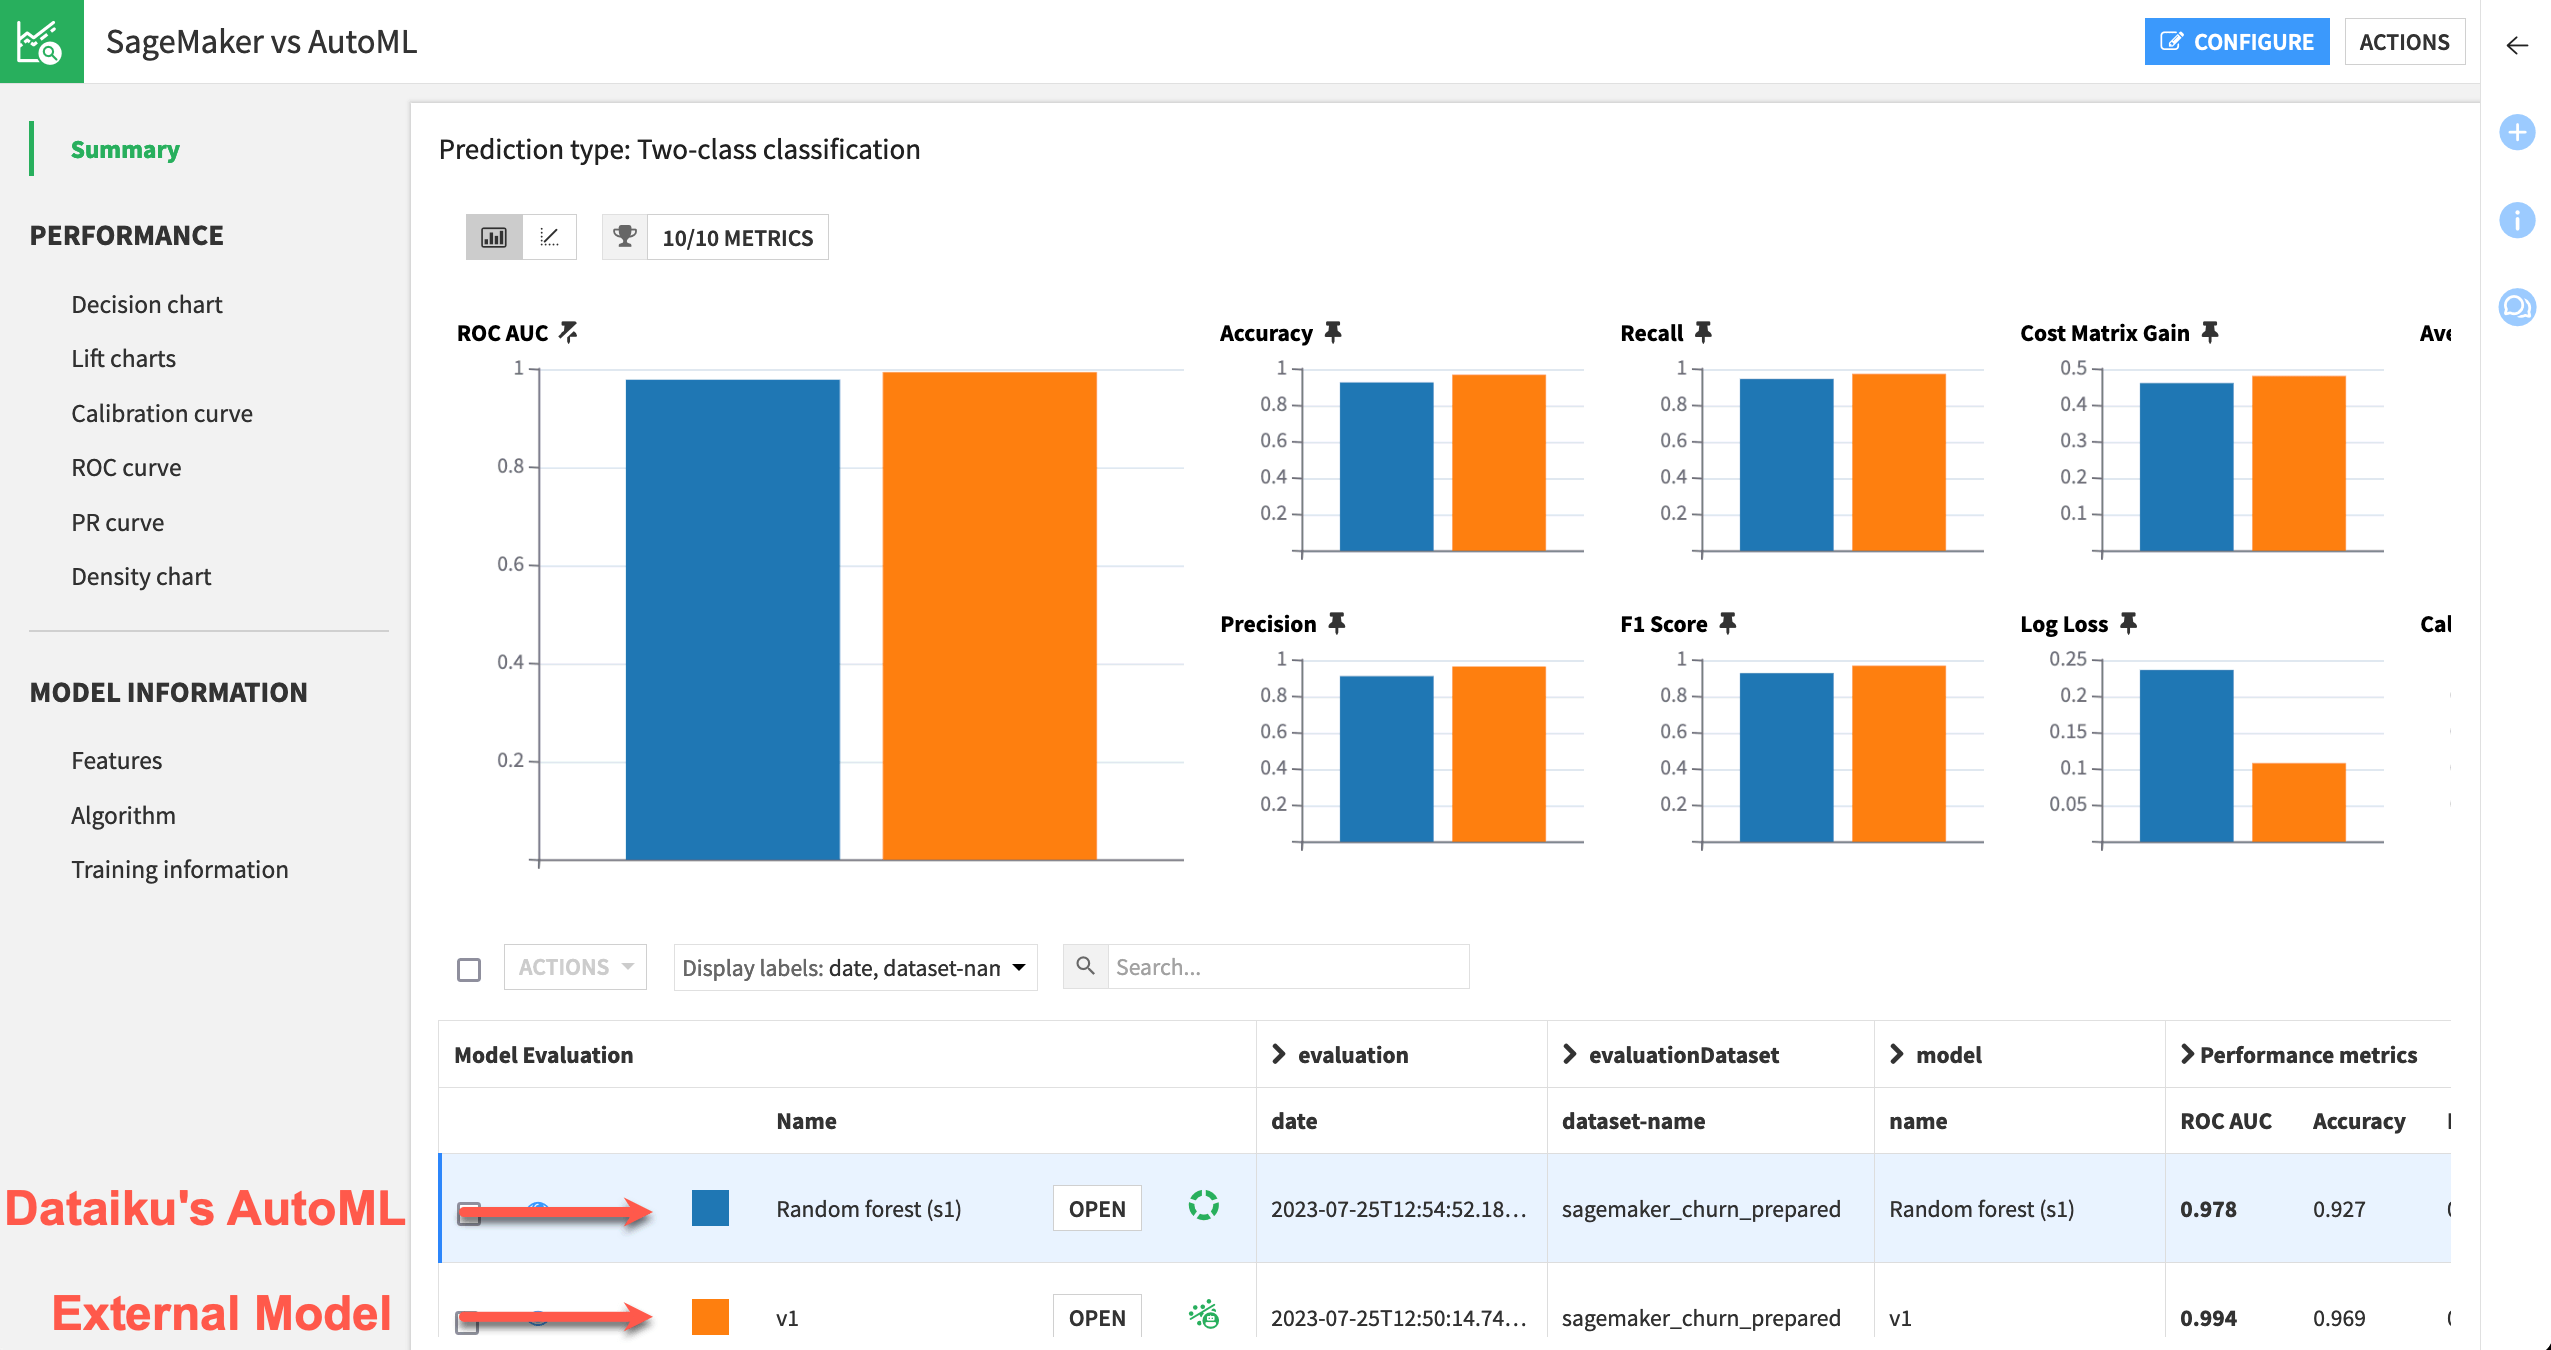
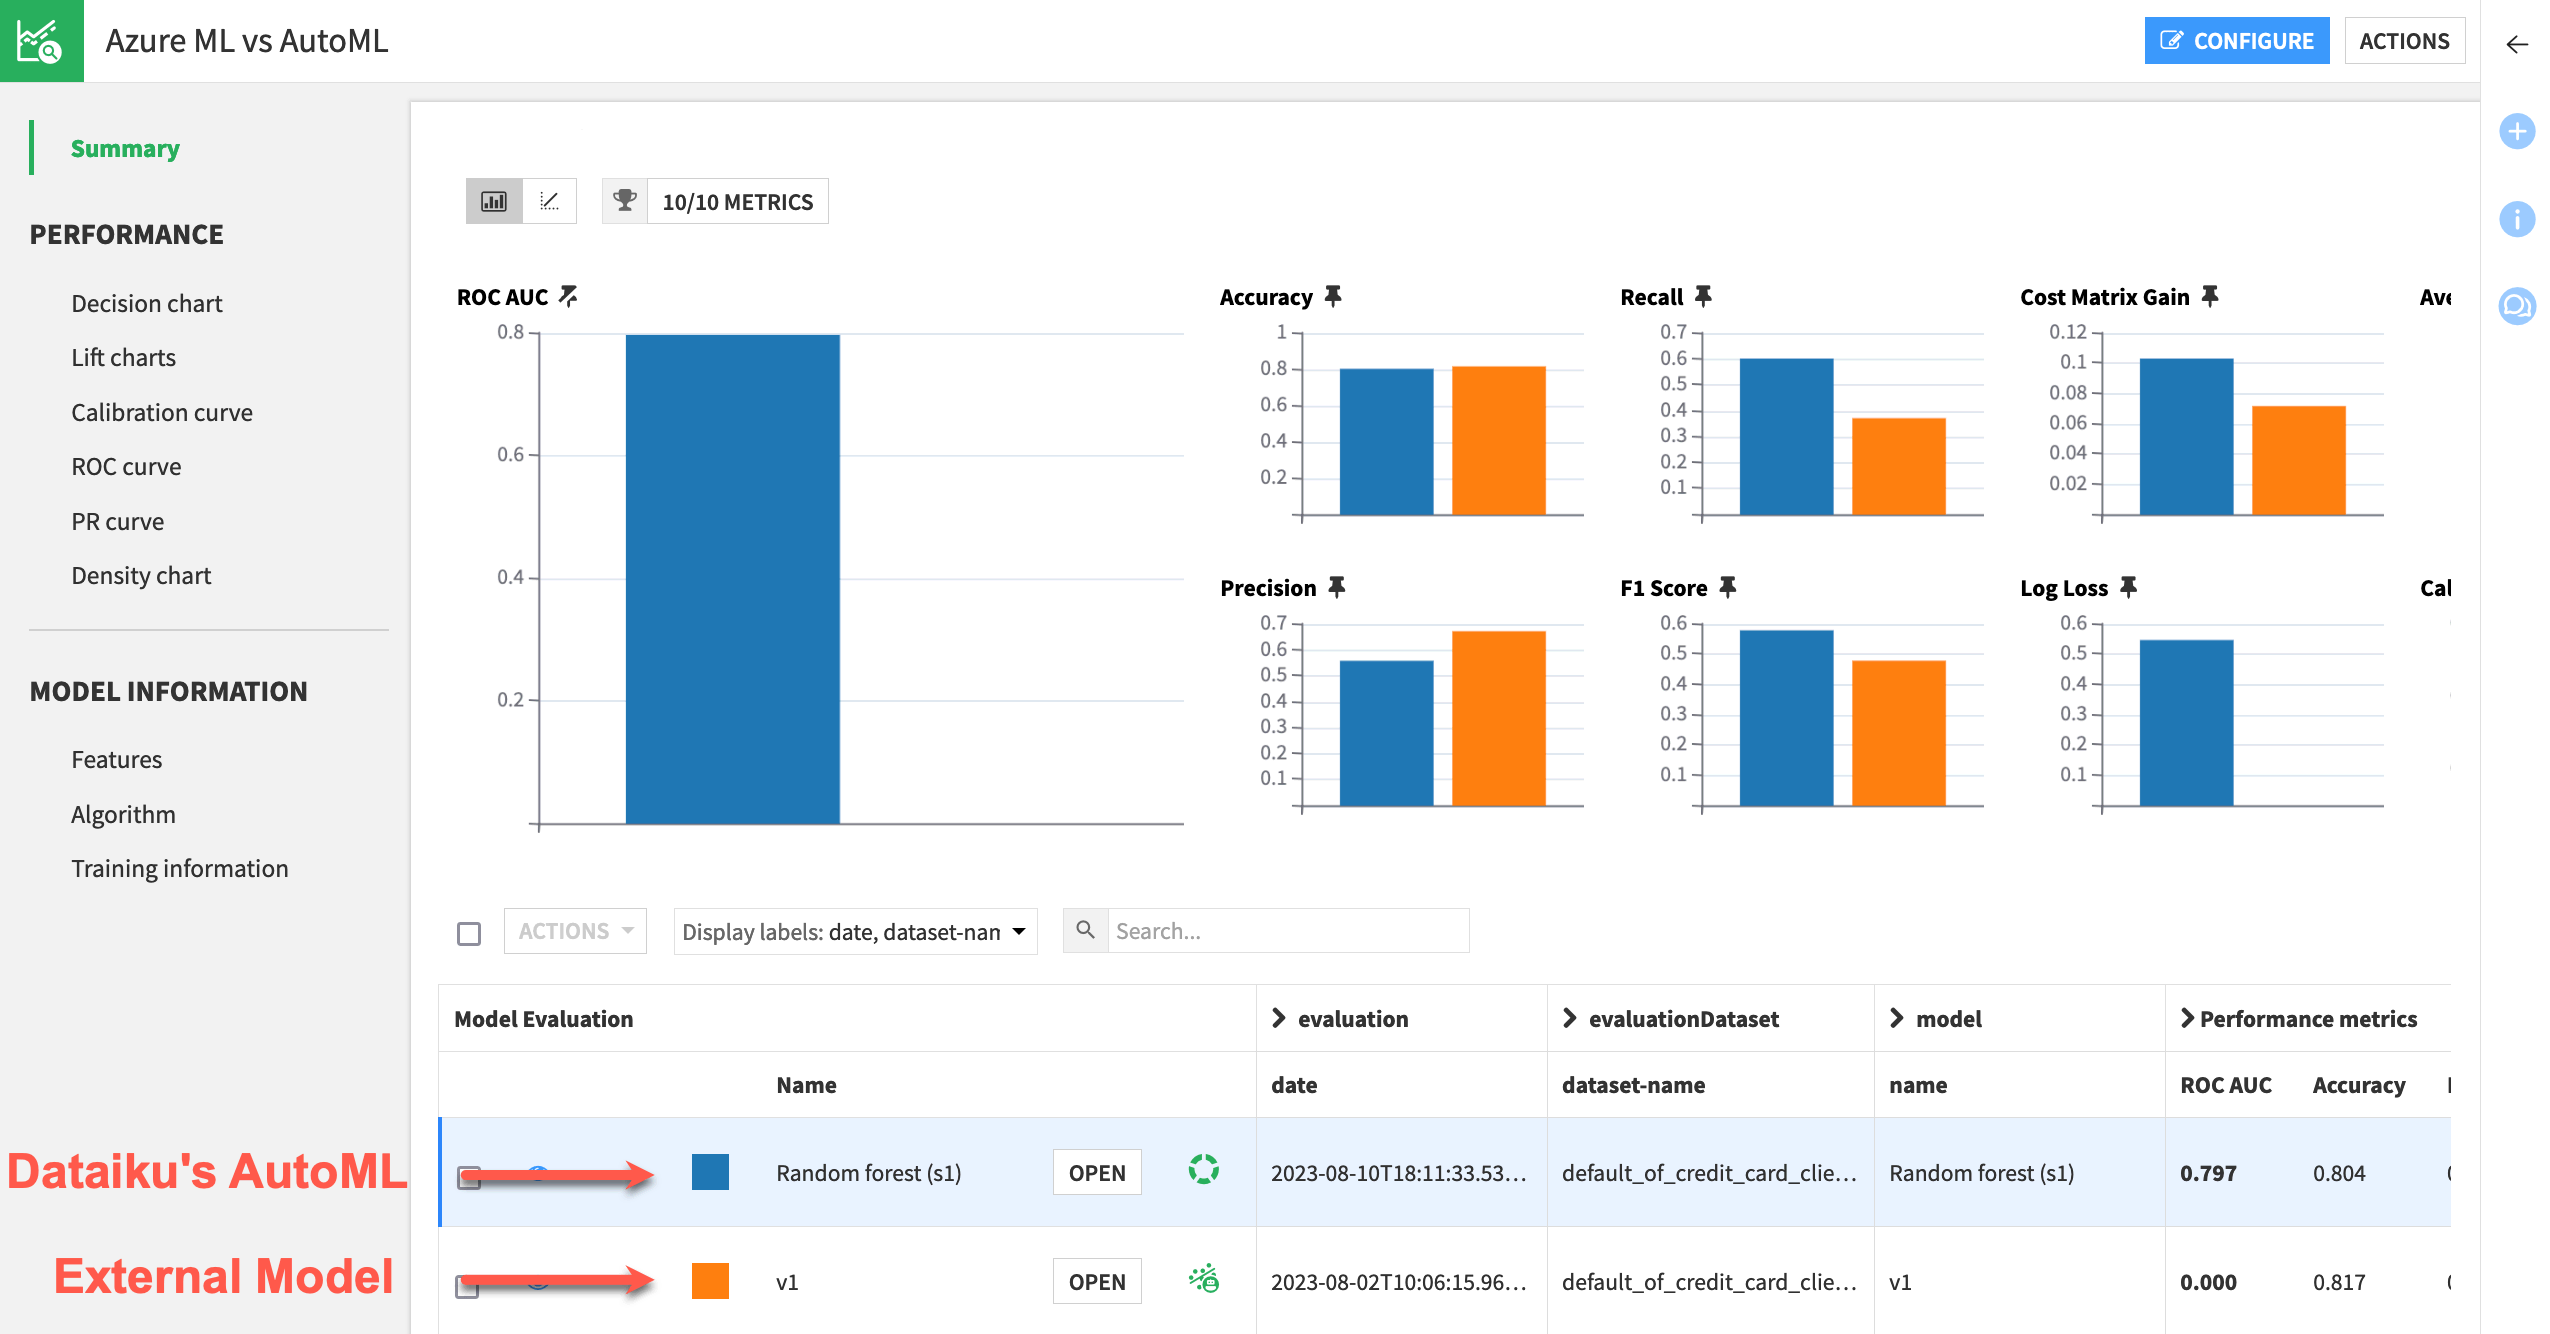
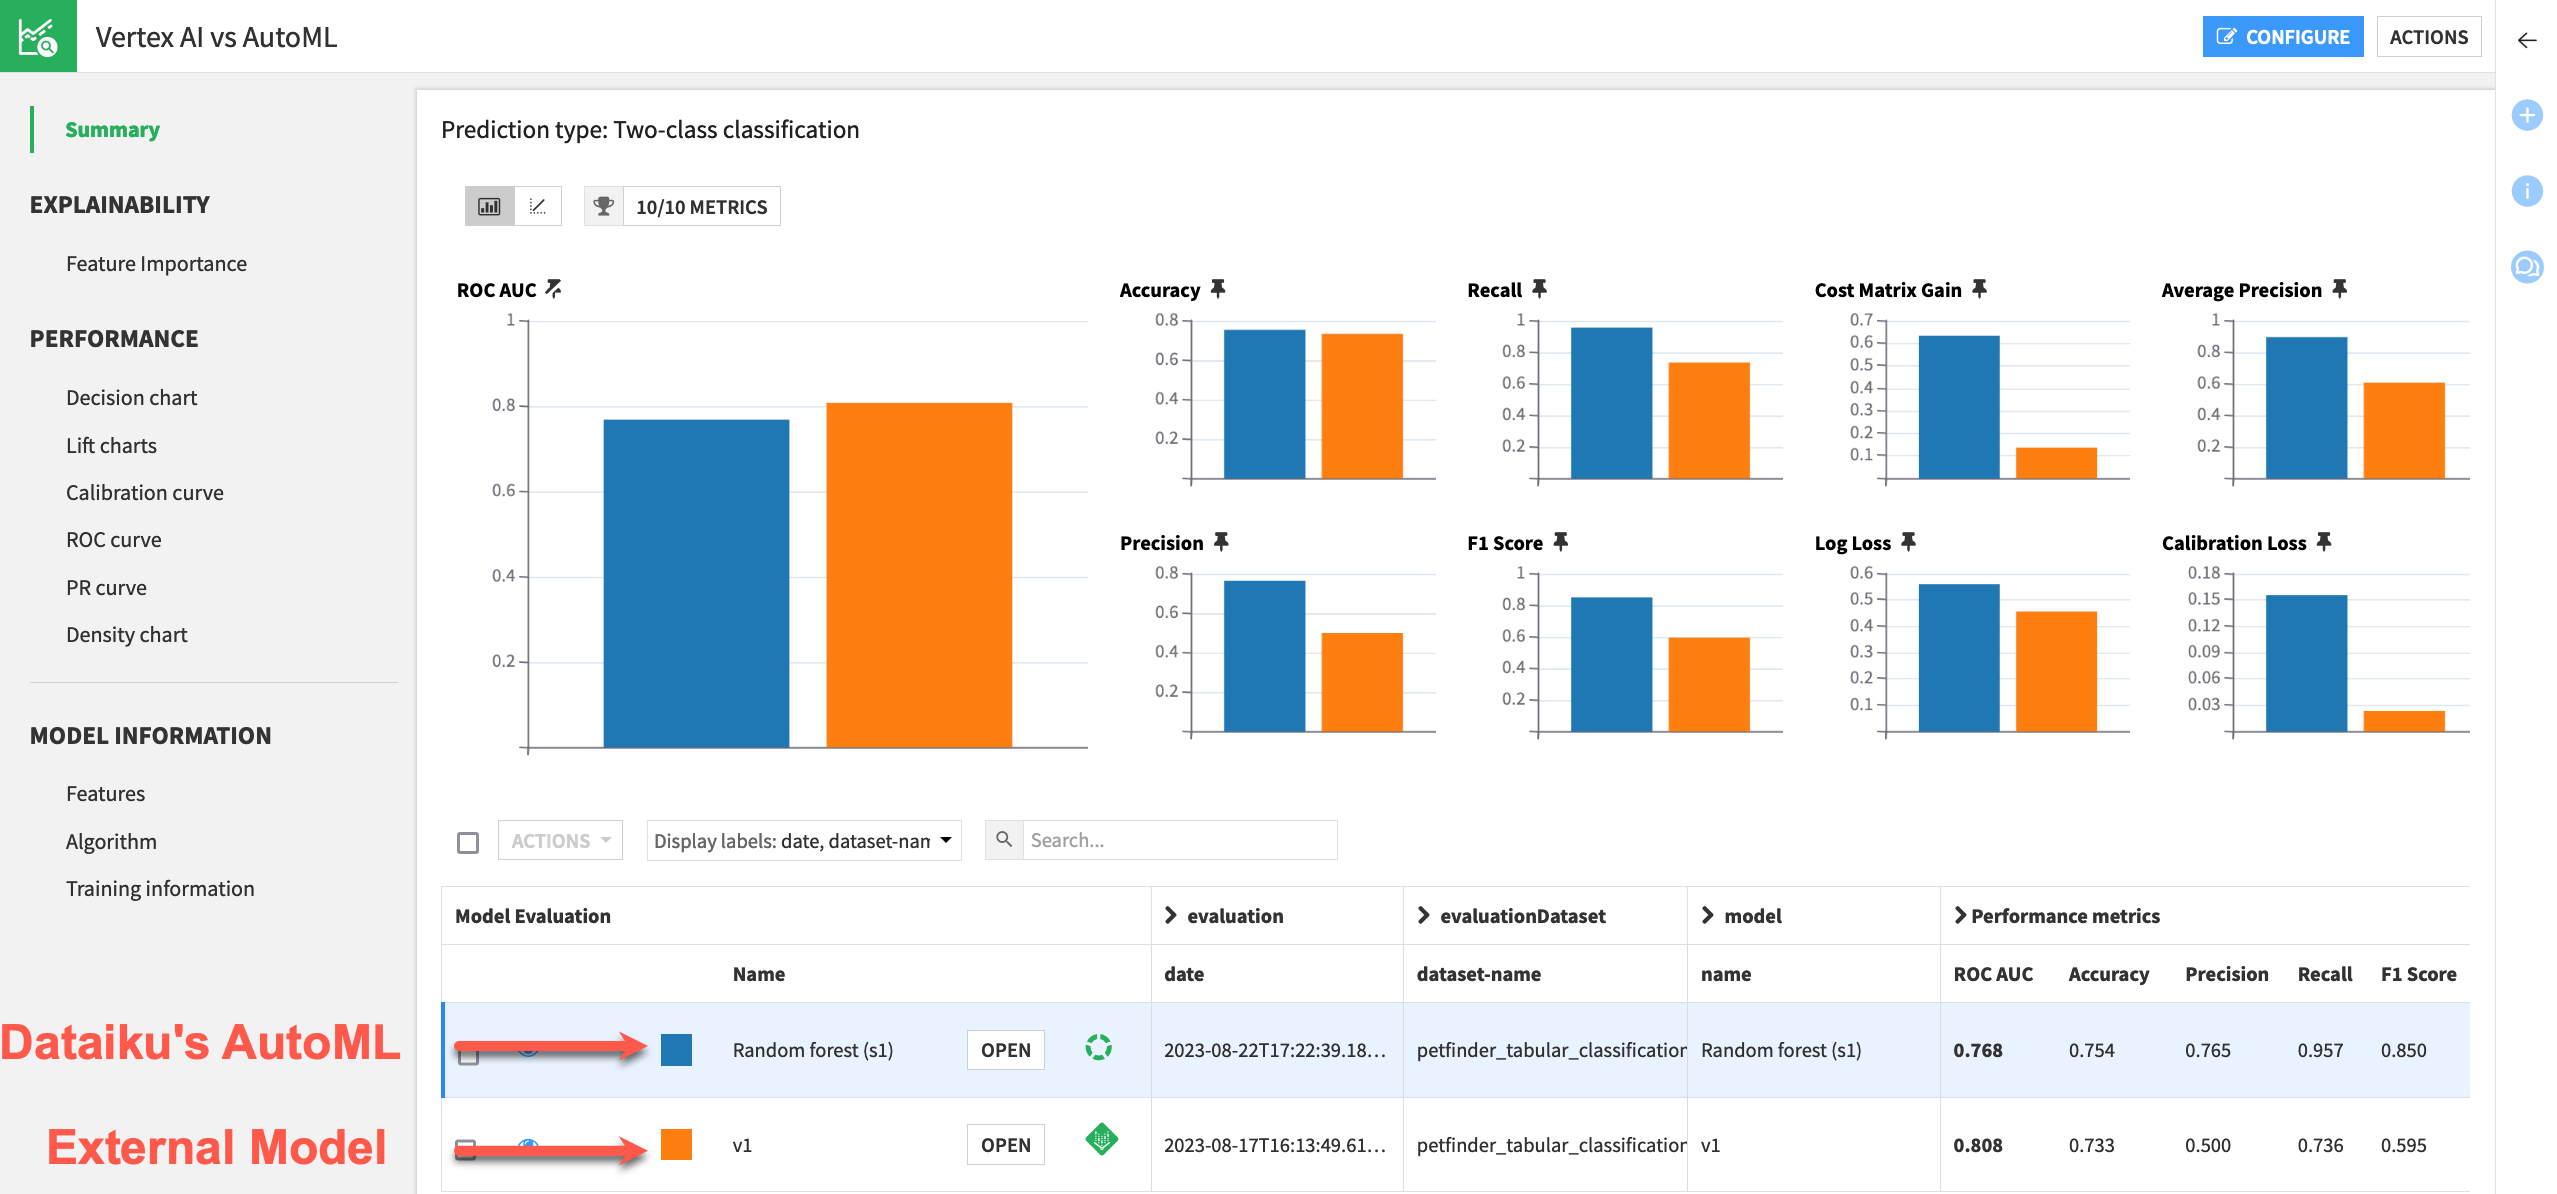
Model comparison#
To determine a champion model from any number of challengers, you may be familiar with creating a model comparison in Dataiku. This feature enables you to compare metrics side by side for any combination of models built in Dataiku, MLflow models imported into Dataiku, and models deployed externally.
The starter project already includes a model comparison containing a basic AutoML model built in Dataiku. You only need to add the external model to the existing model comparison object.
From the ML (
 ) menu in the top navigation bar, select Model Comparisons.
Open the model comparison for your cloud ML platform.
Click Configure.
Click + Add Items.
Click Select Saved Model Versions from the Flow.
Select the model version of your external endpoint.
Click Add.
Click Apply.
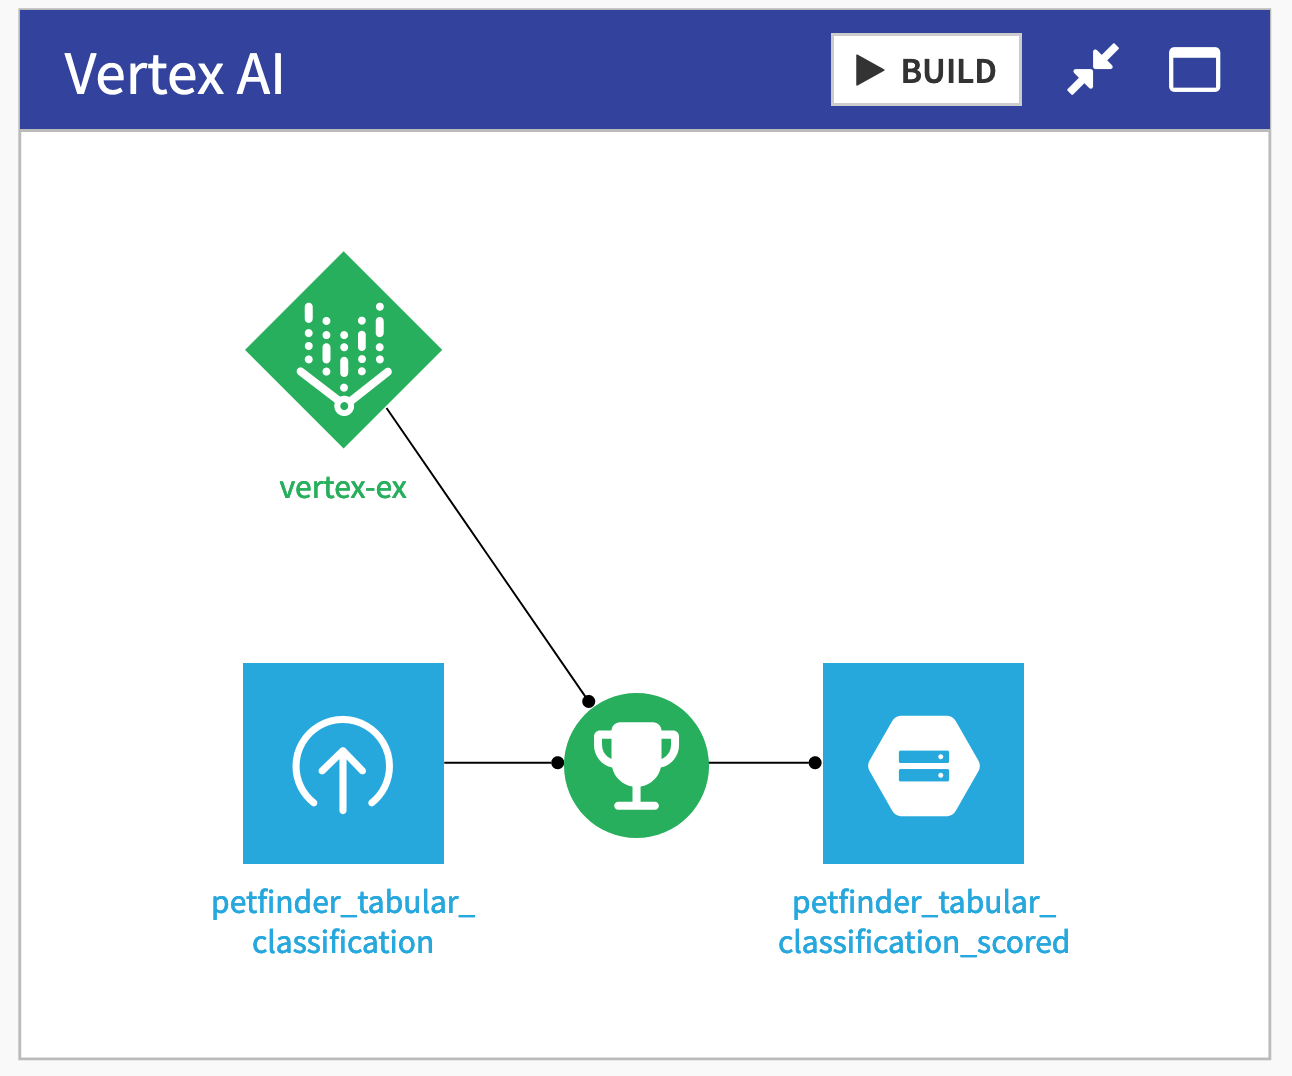
Model scoring#
If the external model is the champion, you can use it in a Score recipe in a Dataiku Flow as you would for a visual model. You can do this either manually for ad hoc scoring or through a scenario for a real high-volume scoring batch.
From the Flow zone dedicated to your cloud ML platform, select the external model and its evaluation dataset.
In the Actions tab, select the Score recipe.
Click Create Recipe.
In the Settings tab of the Score recipe, notice the engine selection of External Model at the bottom left. Recall that although you have surfaced the model in Dataiku, it’s only deployed externally.
Click Run to score the data using the external endpoint’s engine.

Additional considerations#
Endpoint scalability amidst increased democratization#
A key advantage of surfacing an external endpoint within Dataiku is the expanded audience of users who will be able to interact with the model. However, as with any democratization benefit, you’ll need to consider the corresponding impact on performance and volume on the endpoint.
The operations shown here generate queries to the external endpoint. This is especially true with explainability requests, which can reach into the thousands. To serve this new usage, you’ll need to plan for your endpoint to scale accordingly.
End user discovery and import of external models#
Although using external models in Dataiku is straightforward, actually surfacing them requires some knowledge of the underlying model and, potentially, administration rights to Dataiku and the ML cloud platform.
To simplify this process for end users, administrators might consider creating a dedicated Dataiku project that serves as a home for all external models and their corresponding sample datasets.
By making these models shareable and granting permissions to this project, a wider audience of Dataiku users can search for and add the desired external model into their own projects.
Deployment to a production environment#
This tutorial only demonstrated the usage of an external model in a Design sandbox. However, you can also surface external models in a scheduled, operationalized project. Deploying such a project to an Automation node is no different, provided the required connection also exists on the Automation node.
Next steps#
Congratulations! You have taken an endpoint deployed on your cloud ML platform and surfaced it as an external model within Dataiku. Now you, as well as a wider audience, can use it for key functions like model explainability, comparisons, and scoring.
See also
You can learn more in the reference documentation on External Models.
You can also learn more about other MLOps integrations points, such as: