
Tutorial | Deployment automation#
Get started#
The tutorials on batch and real-time API deployment presented two frameworks for putting work into production. For many use cases, this may be entirely sufficient. However, as your MLOps setup becomes more sophisticated, you may begin to explore how automation can do more.
For example, you may start with scenarios that monitor data drift or model performance. Once this is working, you may explore retraining models based on the metrics, checks, and data quality rules computed inside such scenarios.
With the right level of controls in place, it’s possible to automatically create and deploy new project bundles and/or API services based on these scenario results.
Objectives#
In this tutorial, you will:
Create a scenario that updates a project and/or API deployment automatically.
Prerequisites#
Completing this tutorial requires an active project and/or API deployment. The tutorial presents steps for both deployment frameworks side-by-side so the choice is yours.
The prerequisites in the project and/or API deployment tutorials detail what’s required.
Create the project#
From the Dataiku Design homepage, click + New Project.
Select Learning projects.
Search for and select Deployment Automation.
If needed, change the folder into which the project will be installed, and click Create.
From the project homepage, click Go to Flow (or type
g+f).
Note
You can also download the starter project from this website and import it as a ZIP file.
You’ll next want to build the Flow.
Click Flow Actions at the bottom right of the Flow.
Click Build all.
Keep the default settings and click Build.
Use case summary#
You’ll work with a simple credit card fraud use case. Using data about transactions, merchants, and cardholders, the Flow includes a model that predicts which transactions to authorize and which are potentially fraudulent.
A score of 1 for the target variable, authorized_flag, represents an authorized transaction.
A score of 0, on the other hand, is a transaction that failed authorization.
Putting this model into production can enable two different styles of use cases commonly found in machine learning workflows:
Scoring framework |
Example use case |
Production environment |
|---|---|---|
Batch |
A bank employee creates a monthly fraud report. |
Automation node |
Real-time |
A bank’s internal systems authorize each transaction as it happens. |
API node |
Tip
This use case is just an example to practice deploying and monitoring MLOps projects in production. Rather than thinking about the data here, consider how you’d apply the same techniques and Dataiku features to solve problems that matter to you!
Deploy on your own#
To continue this tutorial, you’ll need an active project and/or API deployment.
Using the project created above, create an active project and/or API deployment, applying the steps presented in the batch or real-time API deployment tutorials.
Start with a retrain model scenario#
The starting point is a scenario that retrains the model if the data drift metric fails. In more general terms, this scenario retrains the model when a chosen metric in the model evaluation store exceeds the specified threshold.
From the top navigation bar, go to Jobs (
 ) > Scenarios.
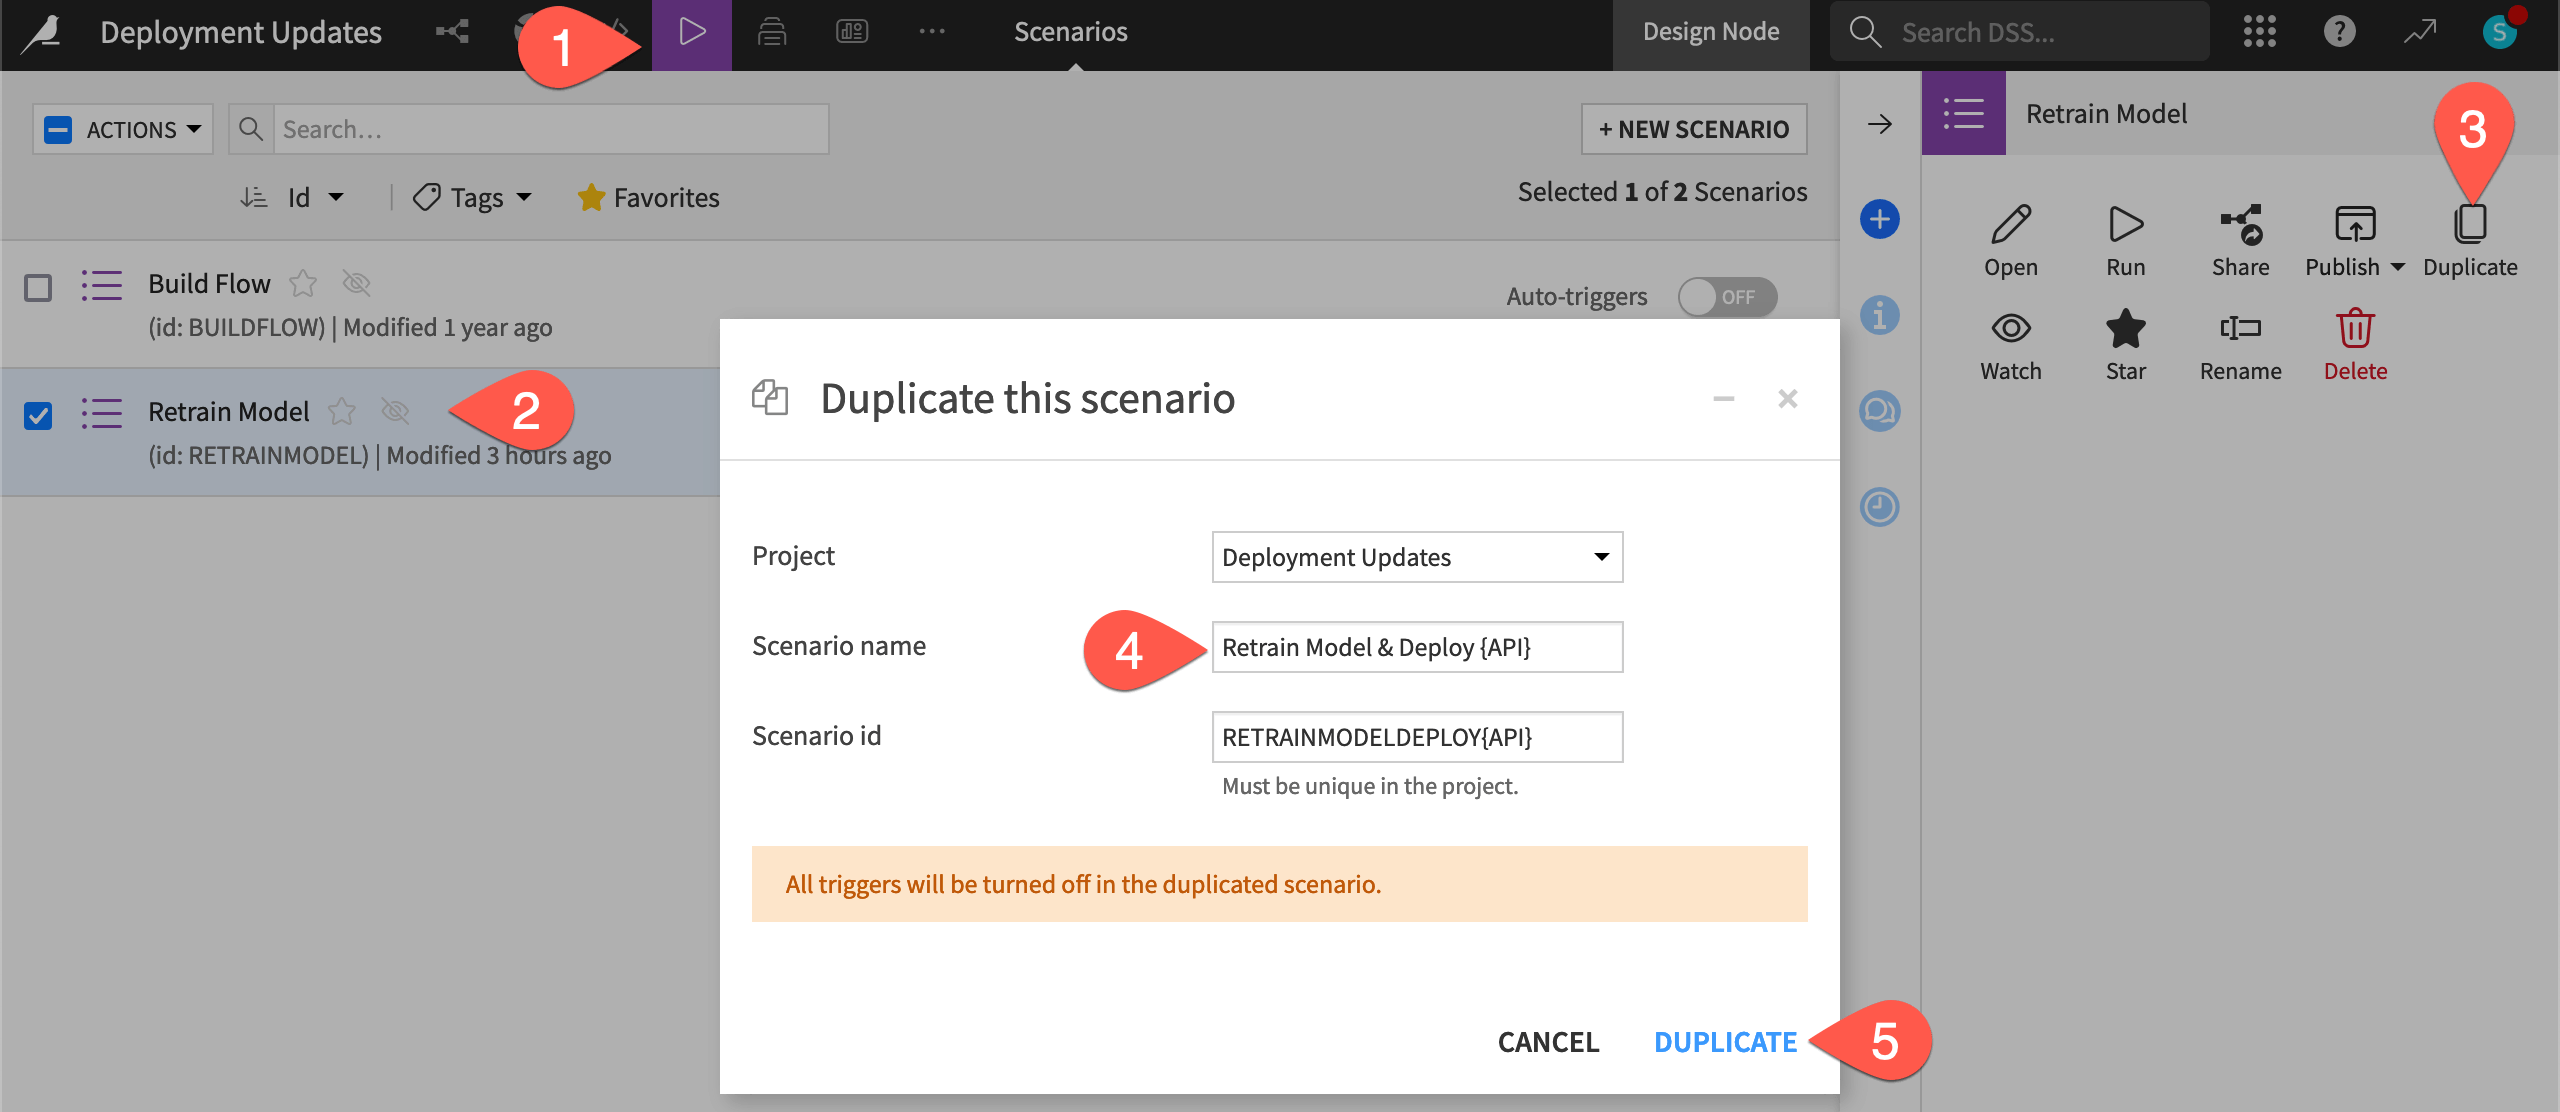
Check the box to the left of the Retrain Model scenario to open the Actions tab.
Click Duplicate.
Name it
Retrain Model & DeployorRetrain Model & Deploy API, depending on your implementation of either batch or real-time scoring.Click Duplicate.
See also
To learn more about the starting Retrain Model scenario, see Tutorial | Model monitoring with a model evaluation store.
Add a Create bundle or API service version step#
In the current scenario, the step that retrains the model runs only if a previous step (the MES check) fails. However, the step has checked the option to reset the failure state, and so this scenario can continue with other steps.
Let’s proceed with creating a new project bundle or API service version in cases where the model is retrained.
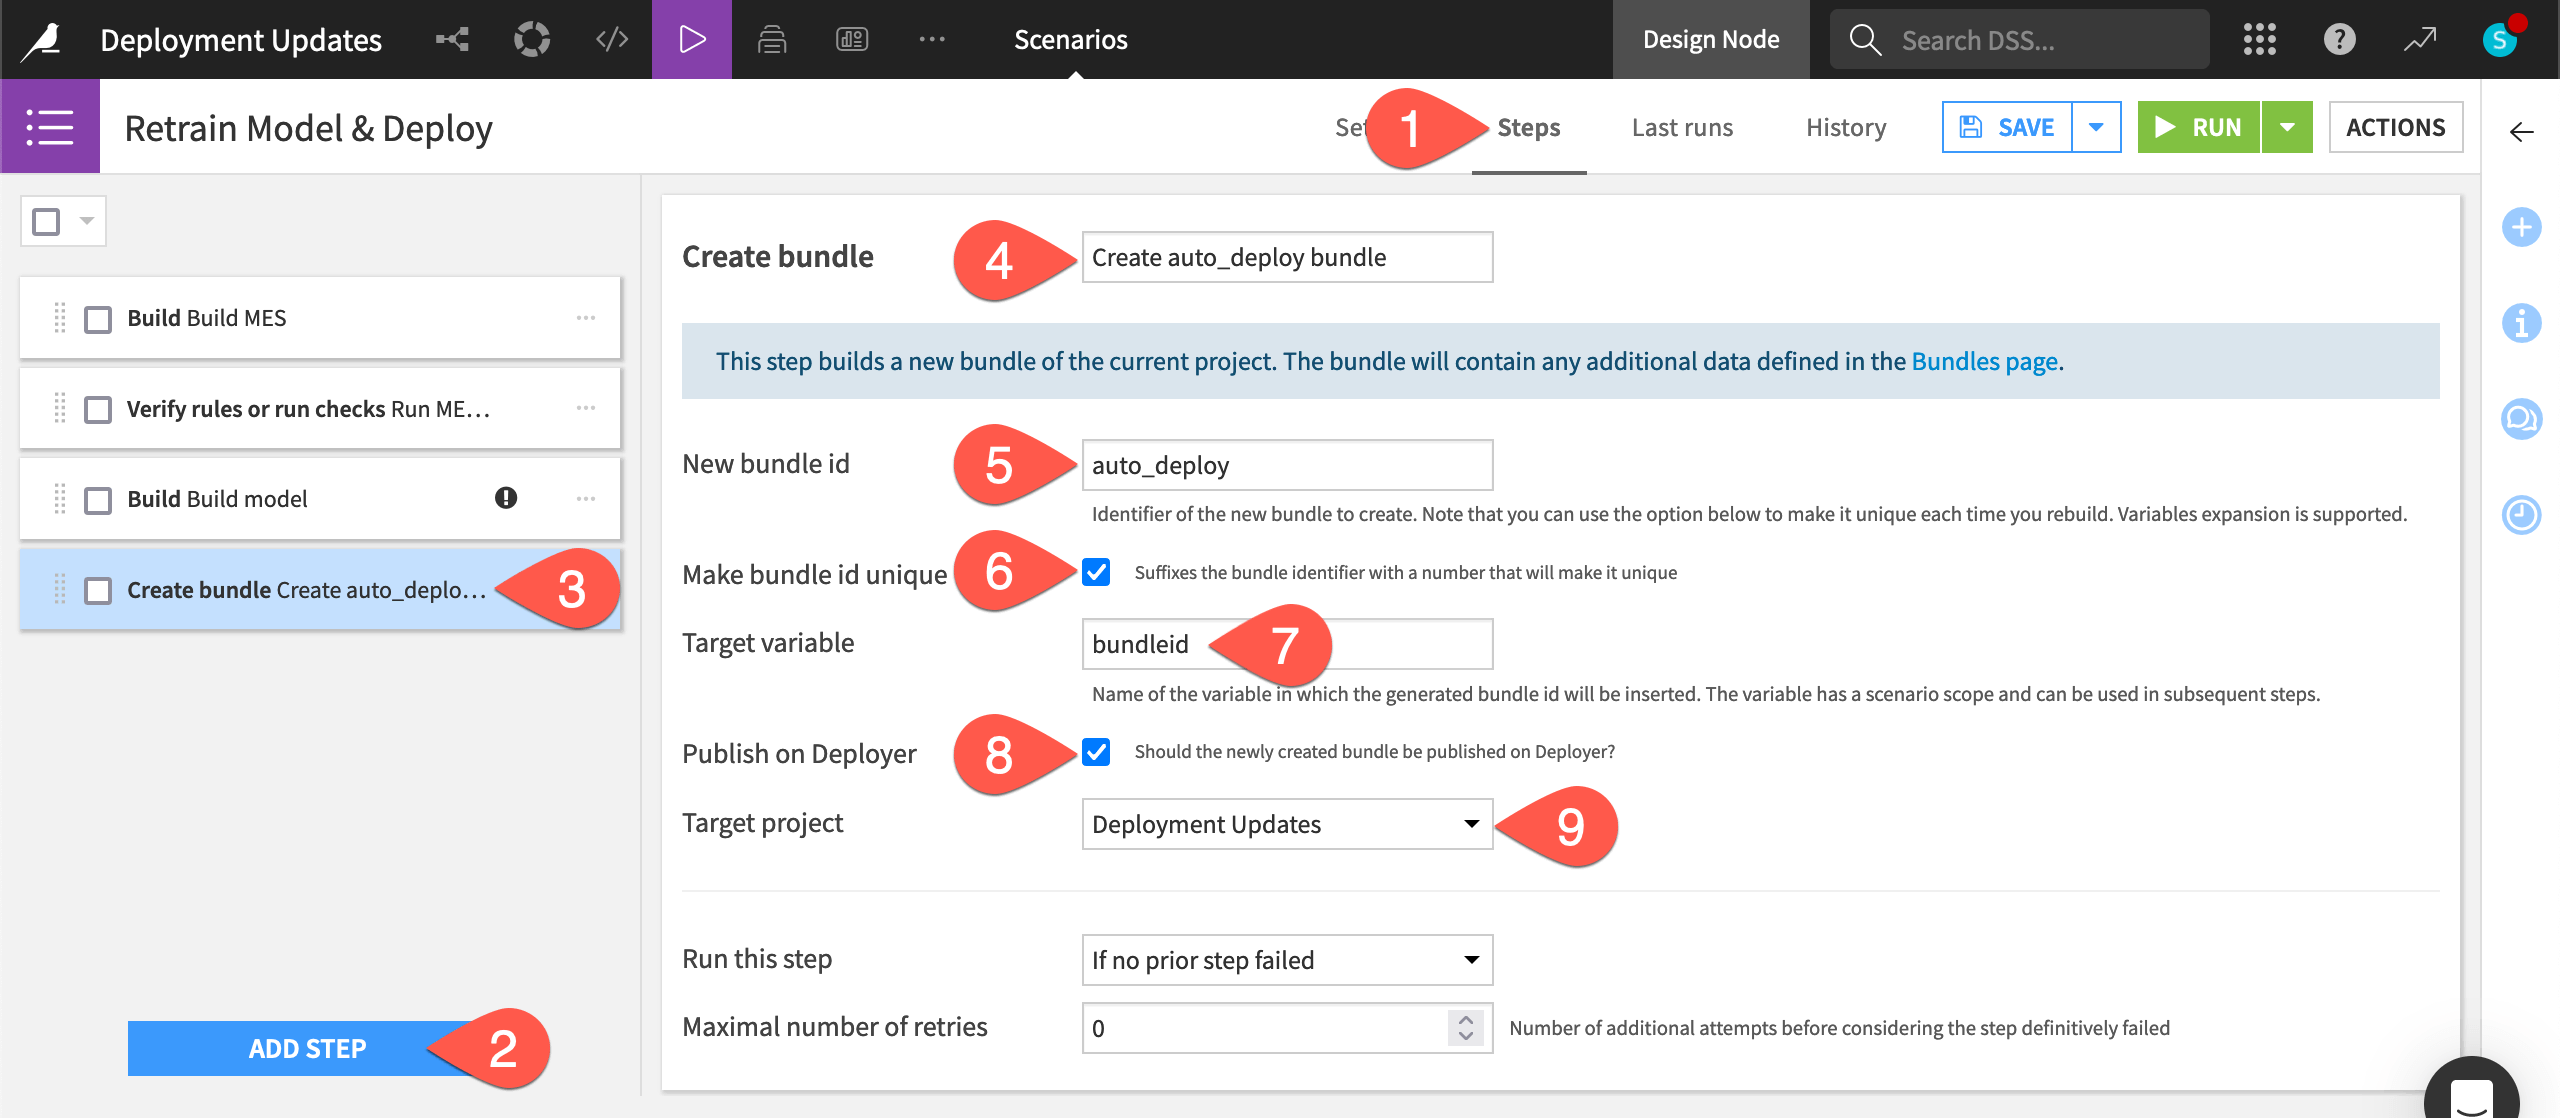
In the Retrain Model & Deploy scenario, navigate to the Steps tab.
Click Add Step.
Select Create bundle from the Deployer section.
Name the step
Create auto_deploy bundle.Provide the bundle id
auto_deploy.Check the box to Make bundle id unique. Instead of manually creating v1, v2, etc, our bundle ids will be “auto_deploy”, “auto_deploy1”, etc.
Provide the target variable
bundleid.Check the box to Publish on Deployer.
Choose the present project from the existing deployments as the Target project (selected by default).
Note
The help note at the top of this step indicates that the new bundle will include any additional data defined in the Bundles page. If you navigate to the Bundles page, click Configure Content to see what data will be included in the automatically-created bundles.
In the Retrain Model & Deploy API scenario, navigate to the Steps tab.
Click Add Step.
Select Create API service version from the Deployer section.
Name the step
Create auto_deploy_api service.Select fraud_detection as the API service.
Name the New version id as
auto_deploy_api.Check the box to Make version id. unique. This will suffix the version id with a unique identifier every time a new version is created.
Name the Target variable
versionid.Check the box to Publish on Deployer.
The Target service field will automatically make a selection. Make sure the correct API service is chosen.

Add an Update project or API deployment step#
As you’ve seen in the process for project and API deployment, once you have a bundle and/or API service, you need to deploy it. There are scenario steps for this too!
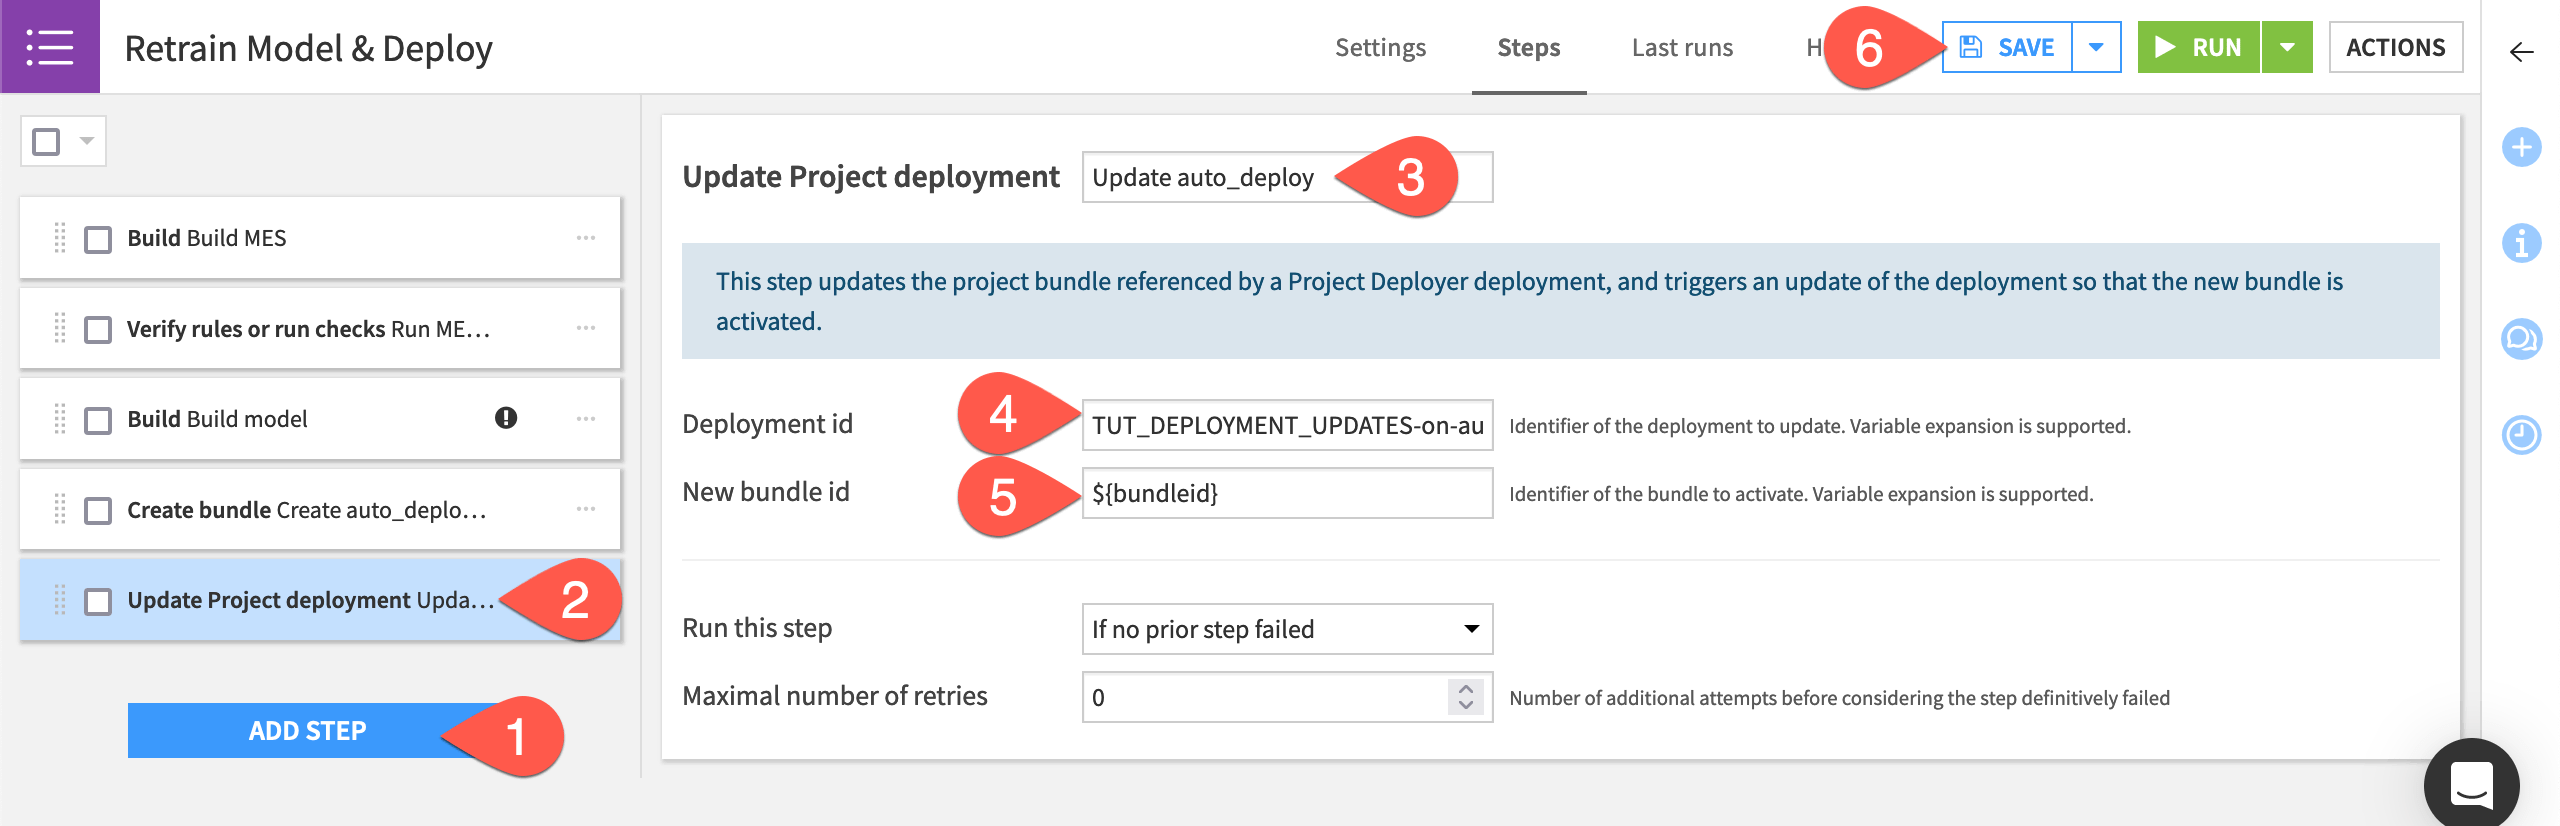
In the Retrain Model & Deploy scenario, click Add Step.
Select Update project deployment from the Deployer section.
Name the step
Update auto_deploy.Provide the Deployment id, which takes the form of
<PROJECTKEY>-on-<infrastructure>. Click on the field or start typing to see available options.Set the New bundle id to
${bundleid}. Be sure to use the variable syntax here since this references the target variable in the previous step.Click Save.
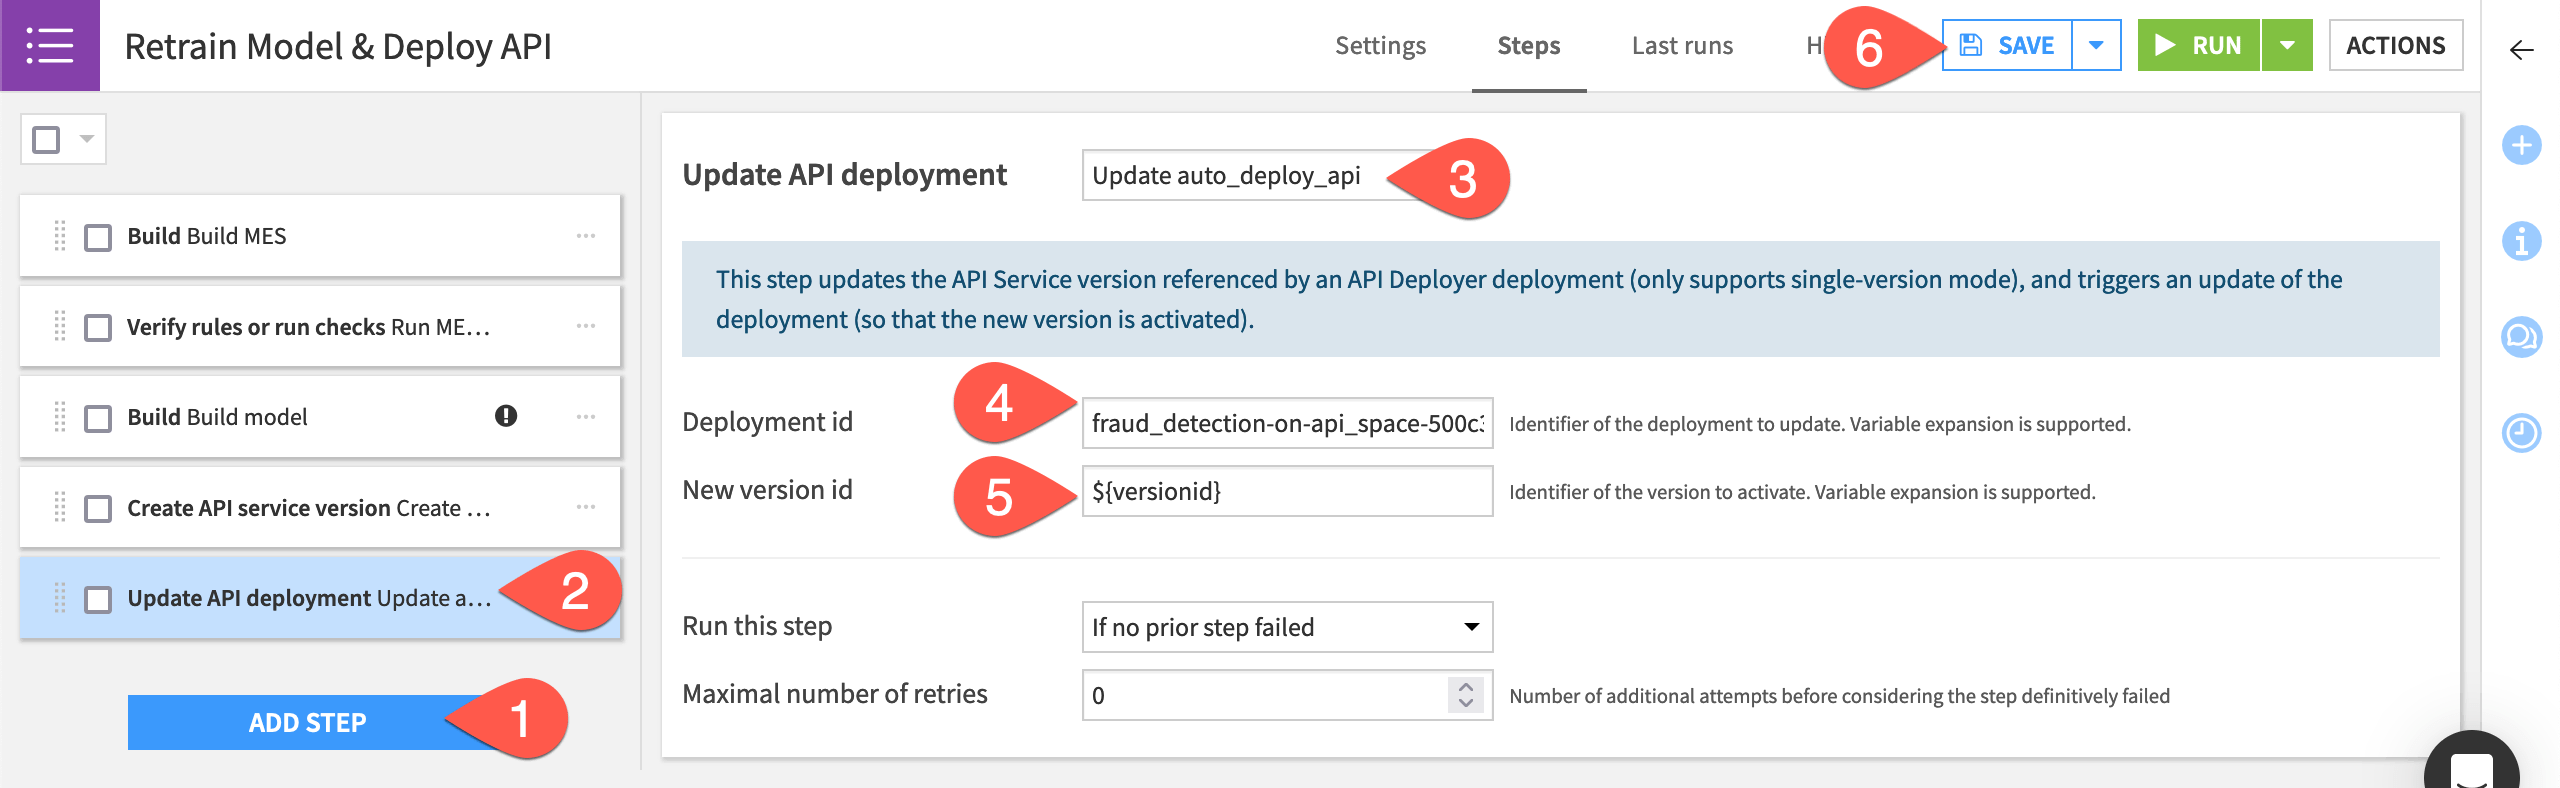
In the Retrain Model & Deploy API scenario, click Add Step.
Select Update API deployment from the Deployer section.
Name the step
Update auto_deploy_api.Provide the Deployment id, which takes the form of
<PROJECTKEY>-on-<infrastructure>. Click on the field or start typing to see available options.Set the New version id field to
${versionid}. Be sure to use the variable syntax here since this references the target variable in the previous step.Click Save.
Run the scenario & observe the outcome#
Rather than wait for a trigger, manually initiate the scenario run.
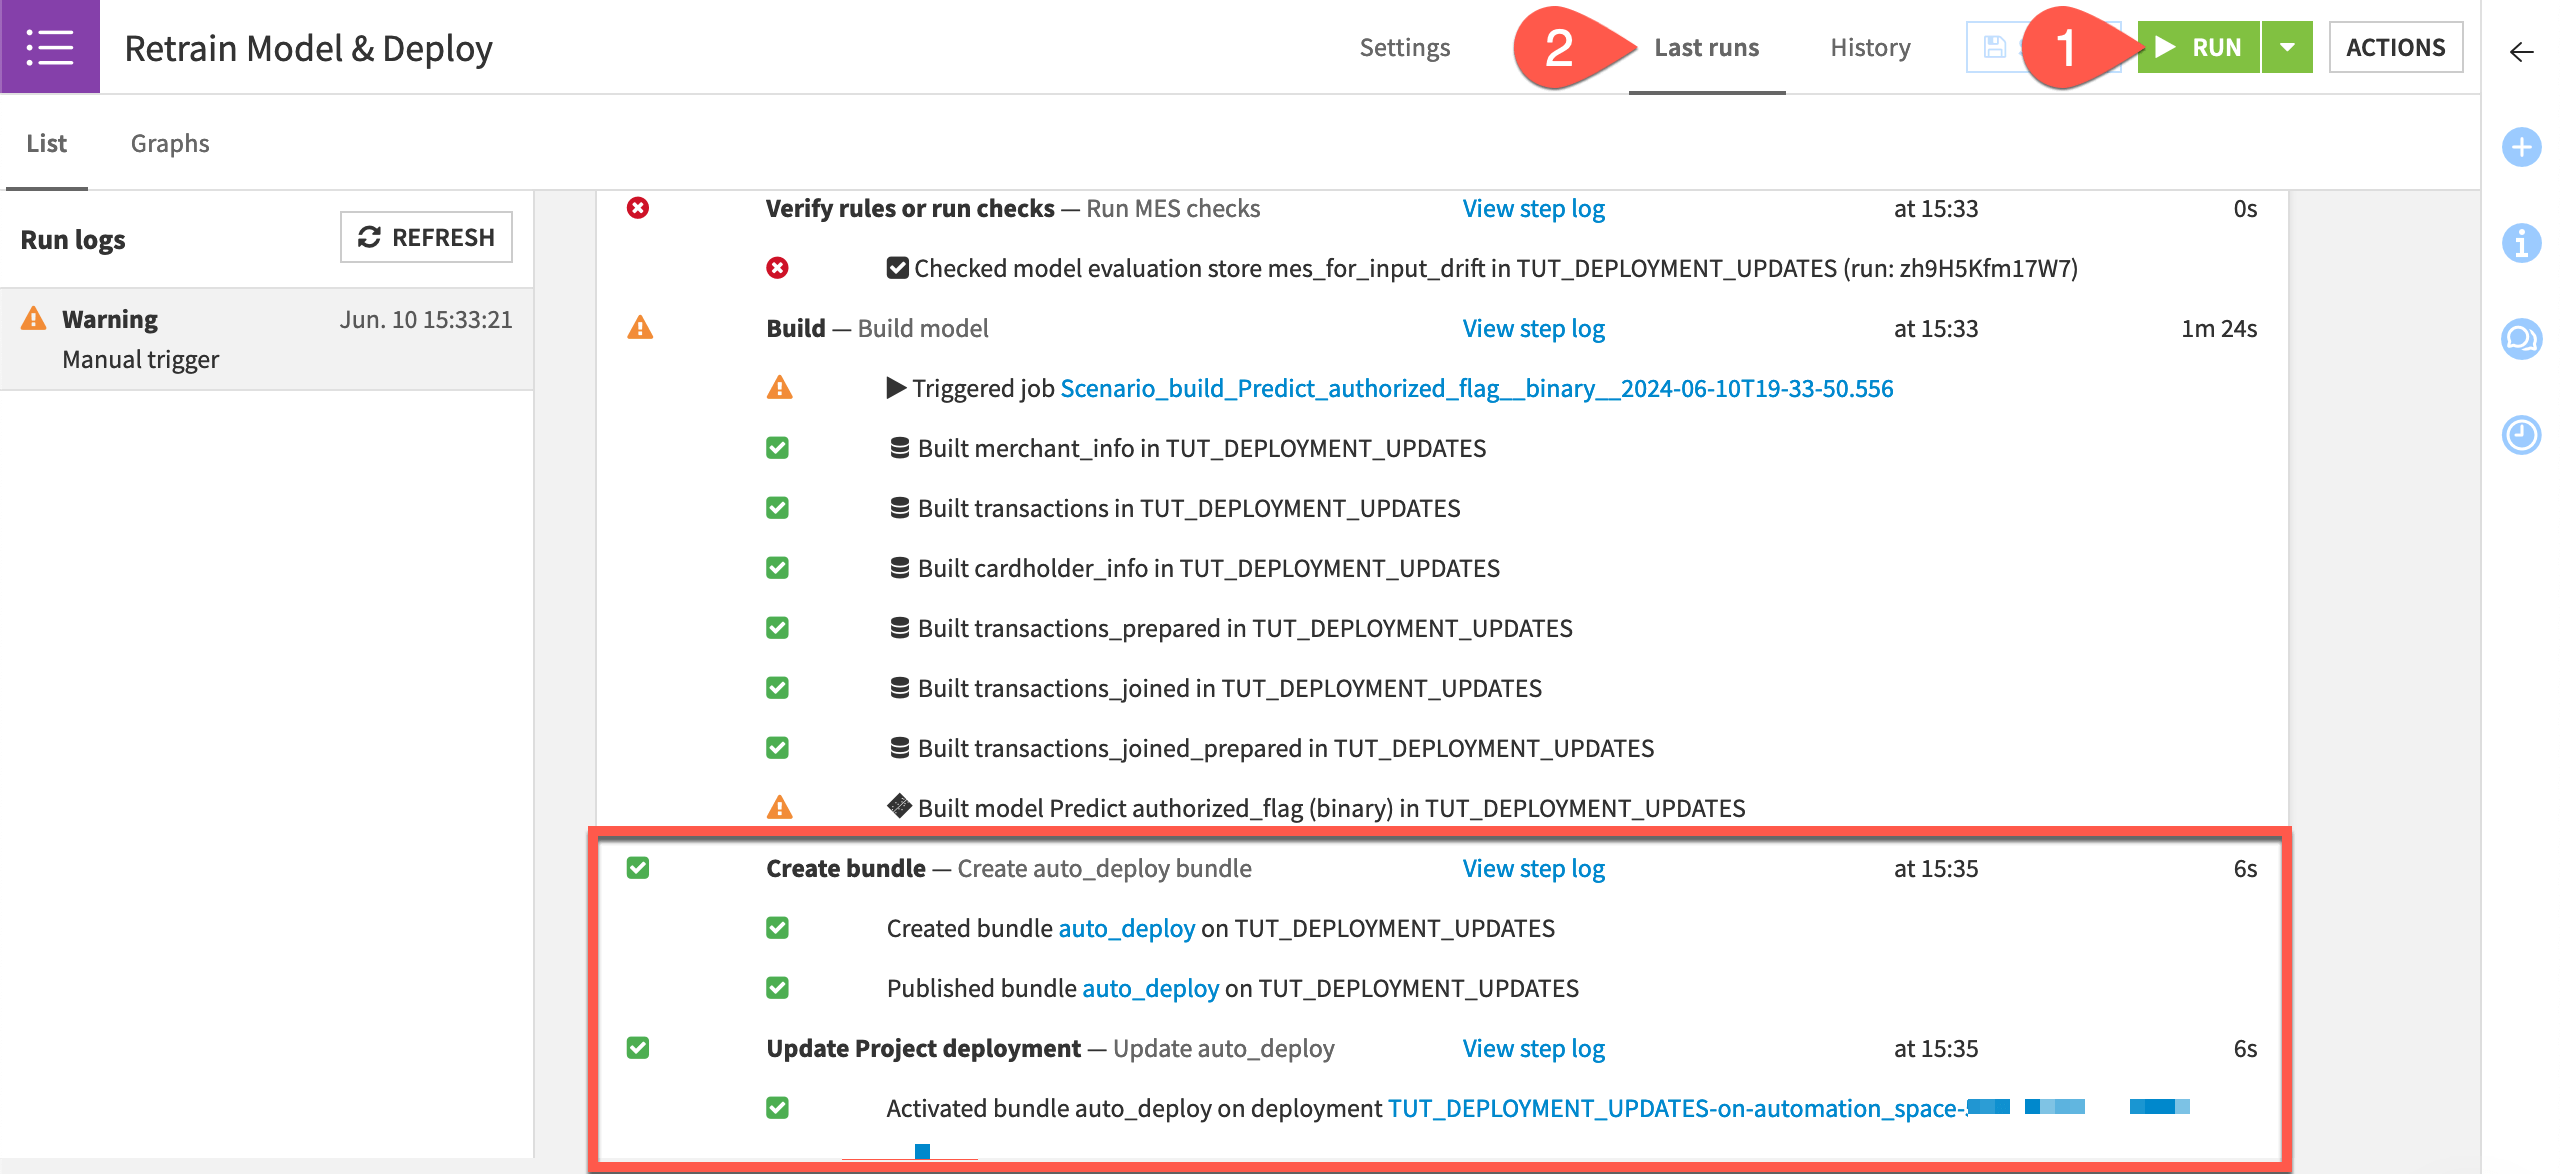
Click Run to manually trigger the Retrain Model & Deploy scenario on the Design node project.
Switch to the Last Runs tab to observe its progress, including the two new steps.
Click Run to manually trigger the Retrain Model & Deploy API scenario on the Design node project.
Switch to the Last Runs tab to observe its progress, including the two new steps.
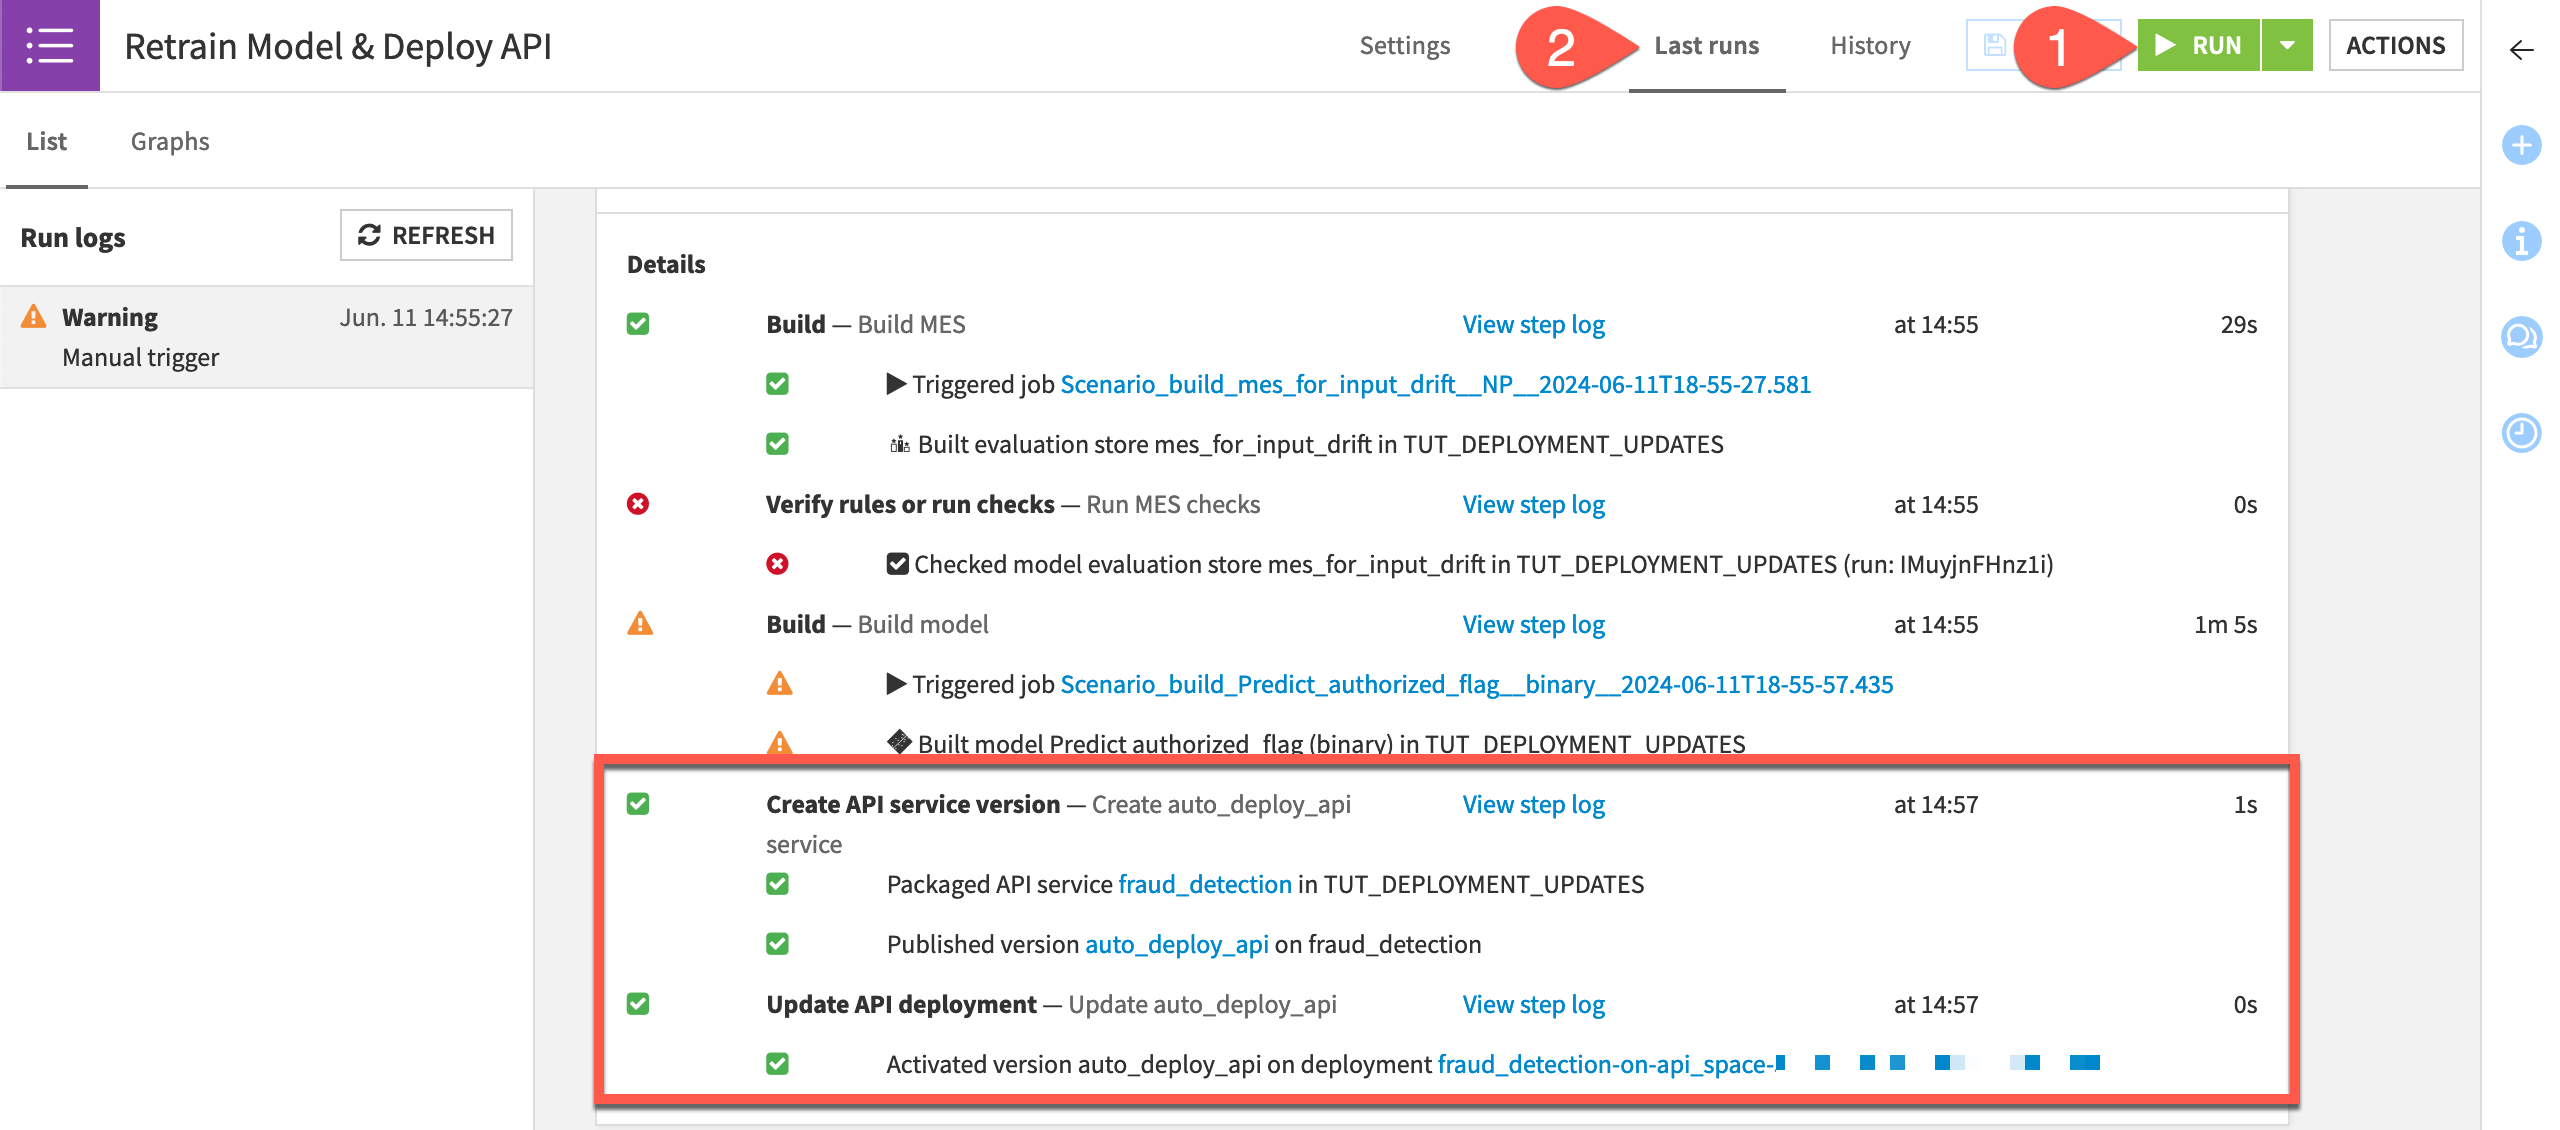
With no new data in this situation, the check on data drift in the model evaluation store will fail. You can anticipate the outcome.
Return to the Deployments page of the Project Deployer to confirm that auto_deploy is the new active bundle.
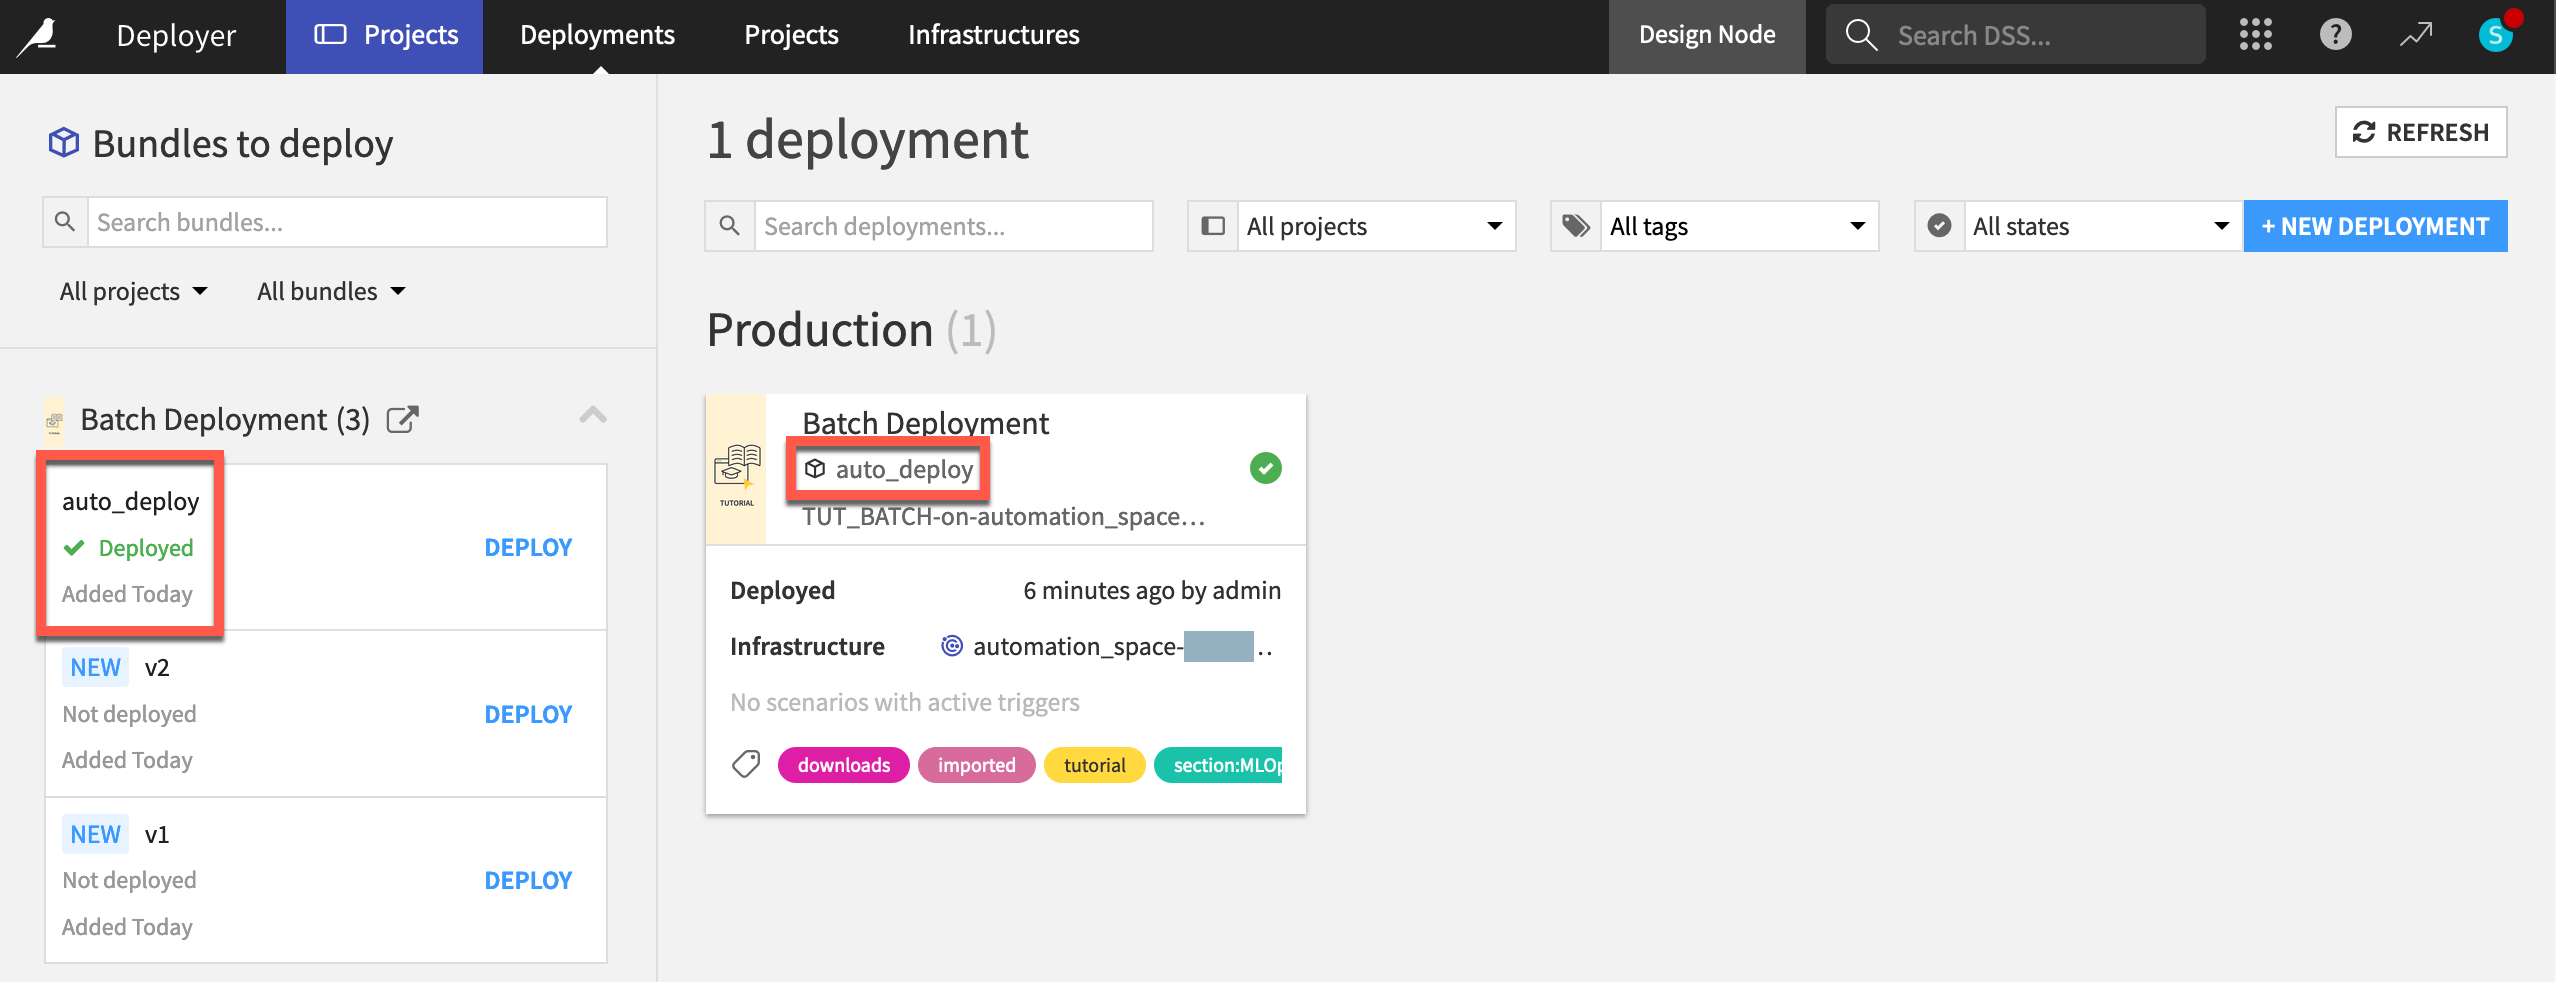
Confirm that the project on both the Design and Automation nodes has a new active version of the saved model found in the Flow.
Tip
Run the scenario again to see how the bundle ID increments to auto_deploy1, and so on.
Return to the Deployments page of the API Deployer to confirm that auto_deploy_api is the new active version.
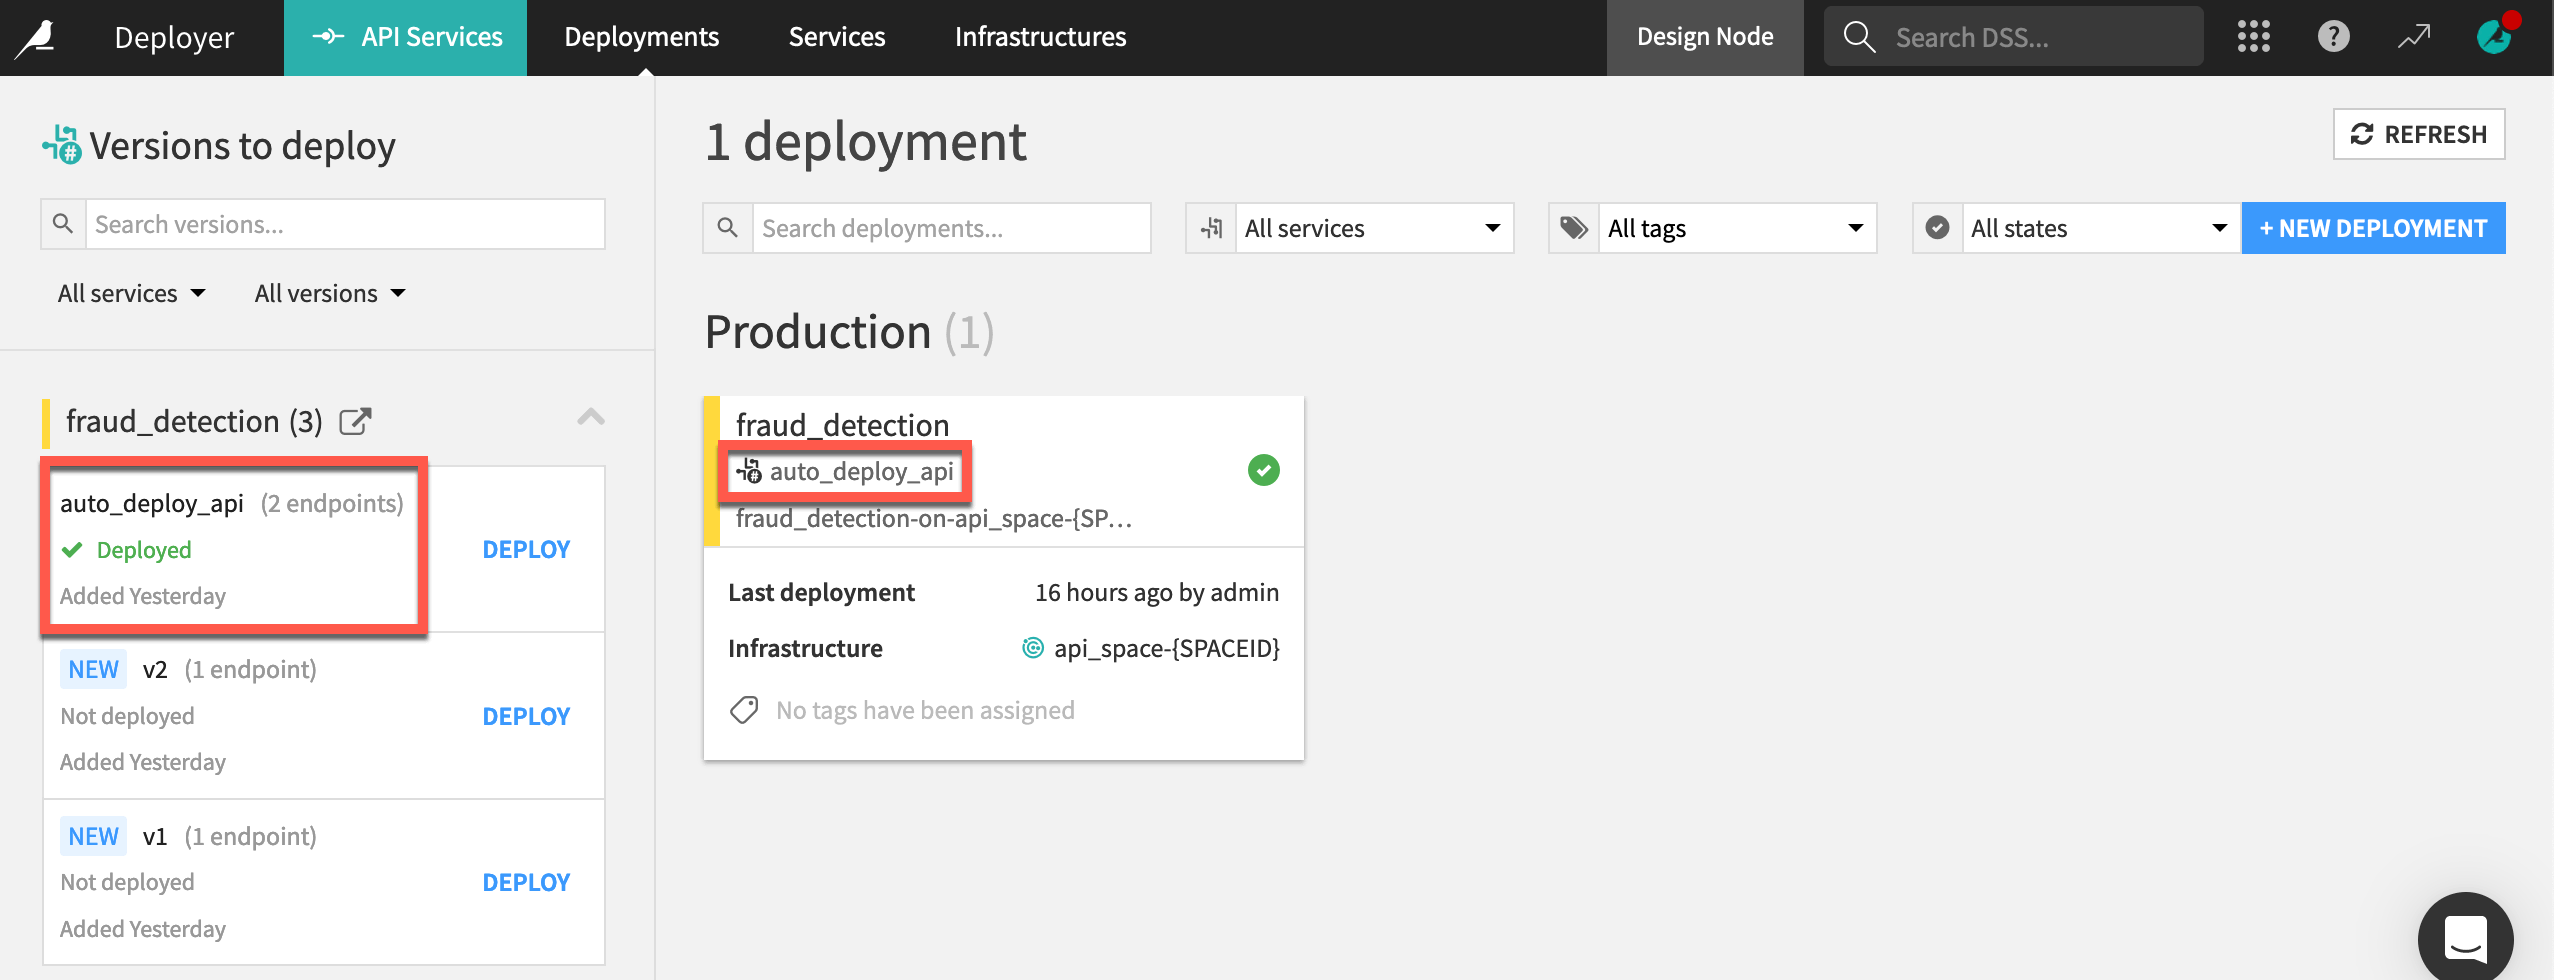
Confirm that the endpoint in the API service on both the Design node and API Deployer has a new version of the saved model found in the Flow.
Tip
Run the scenario again to see how the service ID increments to auto_deploy_api1, and so on.
Plan for a more robust setup#
To be sure, this scenario isn’t ready for a live MLOps setup. It’s intended only to demonstrate how you can use Dataiku to achieve your MLOps goals.
In fact, this level of automation may only become necessary when deploying large numbers of models in many projects. To do this successfully, though, you need to have mastered the fundamentals. You need robust metrics, checks, and data quality rules to know with certainty that the model you are redeploying is truly better than the existing one.
With that caveat, let’s discuss a few ways you could make this setup more robust to handle the challenges of live production.
Add more metrics, checks, and data quality rules#
This scenario triggered the model rebuild based on the failure of one check based on a model evaluation store metric.
Depending on the Flow, it’s likely that you also want to create metrics and data quality rules on other upstream objects, such as datasets or managed folders. If upstream rules fail, you can circumvent the model retraining cycle.
You might also want to implement metrics and checks on the saved model itself to determine whether it’s better than a previous version.
Keep a human in the loop#
Even after adding a sufficient level of metrics, checks, and data quality rules, you might never want to automatically deploy a bundle. Your scenario might stop at creating the new bundle, alerting a team member with a reporter, but leaving the job of updating the deployment to a human.
Add more stages of deployment infrastructure#
This example had only one lifecycle stage of deployment infrastructure. However, some organizations might have multiple stages, such as “Dev,” “Test,” and “Prod.”
In this case, a scenario might automatically update a deployment in the “Dev” stage but still require a human to push the deployment to the “Test” or “Prod” stages.
Next steps#
Congratulations! In this tutorial, you created a scenario that can automatically update a project or API deployment based on the result of a metric in a model evaluation store.
While this level of automation may not always be desirable (or advisable), it hints at what’s possible using only basic building blocks.
See also
For more information, please refer to the reference documentation on MLOps and in particular the article on Automating model evaluations and drift analysis.