
Tutorial | Multimodal machine learning#
Multimodal machine learning is a type of learning that integrates multiple types of modality such as tabular data, images, text, or audio.
Data modalities like text and images are typically not supported by classical ML models. In order to use them in the learning process, you need to create numerical representations of those data. That’s where the technique called embedding comes into play.
With embedding, unstructured modalities are transformed into semantically rich vectors, so classic machine learning models can process them. For this, you’ll utilize text and image embedding models, two important components of Generative AI.
Get started#
Objectives#
In this tutorial, you will:
Process your data to be able to use multimodal machine learning.
Design your pipeline to prepare your features and train your models.
Test and evaluate your multimodal models.
Prerequisites#
Dataiku version 13.0 or above.
Basic knowledge of Dataiku (Core Designer level or equivalent).
A supported LLM connection with text and image embedding models.
Create the project#
From the Dataiku Design homepage, click + New Project.
Select Learning projects.
Search for and select Multimodal ML.
If needed, change the folder into which the project will be installed, and click Create.
From the project homepage, click Go to Flow (or type
g+f).
Note
You can also download the starter project from this website and import it as a ZIP file.
Use case summary#
The project includes a folder containing movie posters from the IMDB dataset arranged in genre subfolders. Another dataset contains the films’ IDs, descriptions, and genres. So the project includes two modalities: text and images. The aim will be to bring these two modalities together and predict the genre of a film using its image and description.
Data preparation#
Unlike text, which can be found directly in a clean dataset format, images are unique files that need to be processed before an embedding or modeling process. Here’s how to do it efficiently in Dataiku.
Extract the list of images#
You’ll need the exact path of the images and their names to continue the tutorial. To do so:
Click the genre_posters folder that contains the images.
In the Actions tab (
 ), select the List Contents recipe.
Check the name of your output and click on Create Recipe.
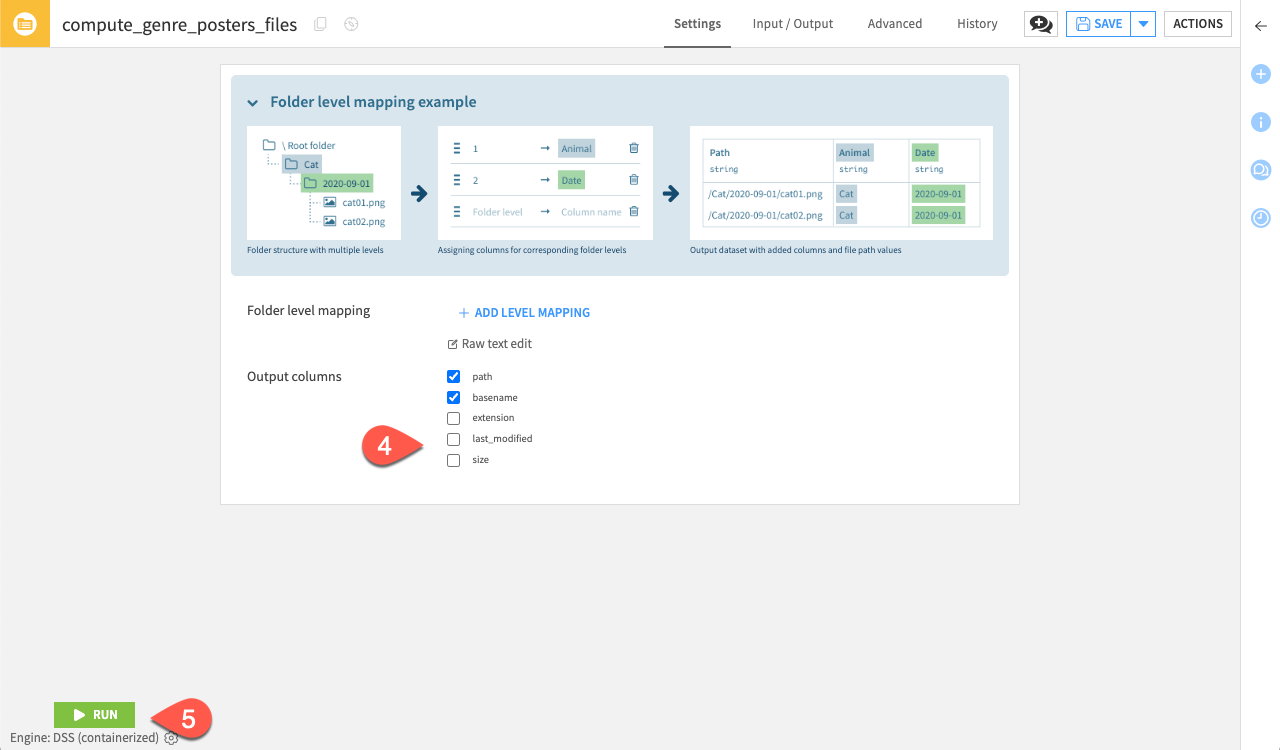
Uncheck the extension, last_modified, and size parameter as you don’t need them for this case.
Click Run.
Tip
You can add level mapping if the images are divided into folders that contain the class labels in their name. It is useful when the label is not defined in the structured data.
Join the modalities#
In Dataiku, the images are represented by their paths. You need to join the structured dataset with the new dataset listing the paths.
Hopefully, you can join the two dataset with the basename and the movie_id from the movies_genre_description and the genre_posters_files datasets, respectively.
Back in the Flow, click on the genre_posters_files folder.
In the Actions tab (
), select the Join recipe.Select the movies_genre_description dataset as the one to be joined.
Click Create Recipe.
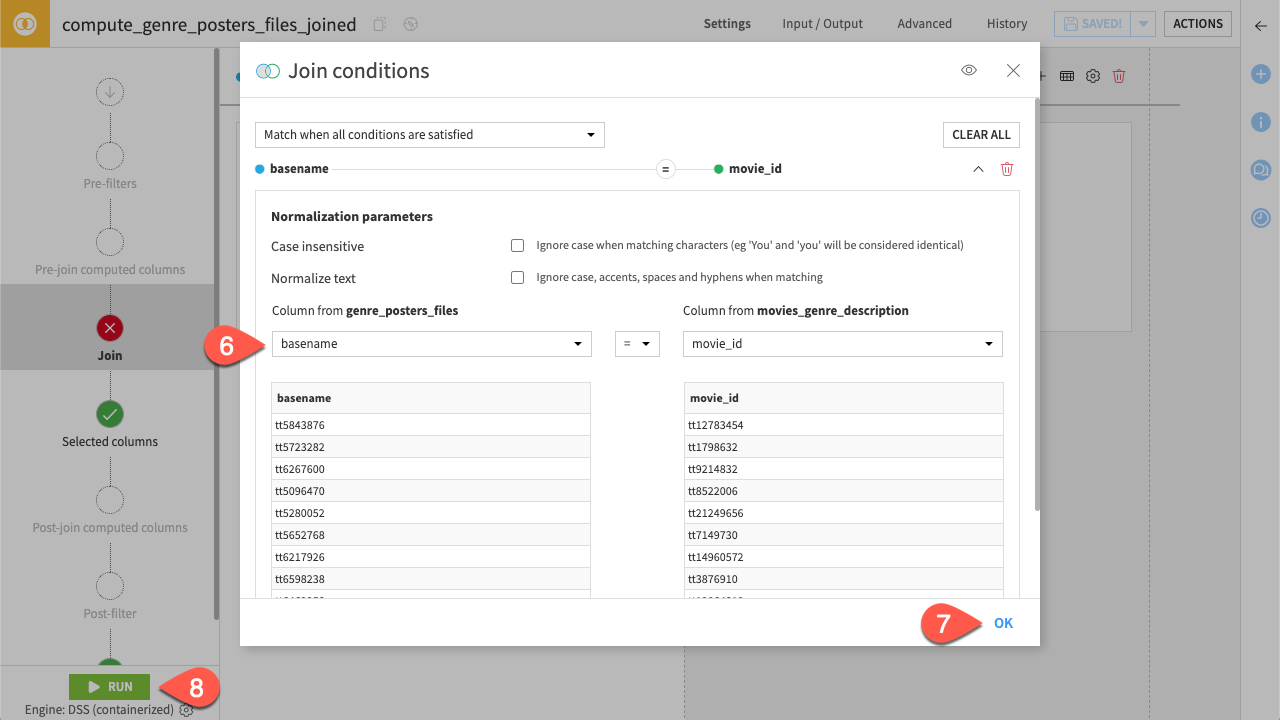
Change Left join to Inner join to ensure each image has a description linked to it.
Click Add a condition, change
pathtobasename.Click OK to validate.
Click Run.
Split the datasets#
You’re now ready to split the datasets into the different train, test, and evaluation sets. To do so:
Click the genre_posters_files_joined dataset.
In the Actions tab (
), click the Split recipe.Click +Add, enter
genre_trainin the Name input, and click Create Dataset.Repeat this operation for the
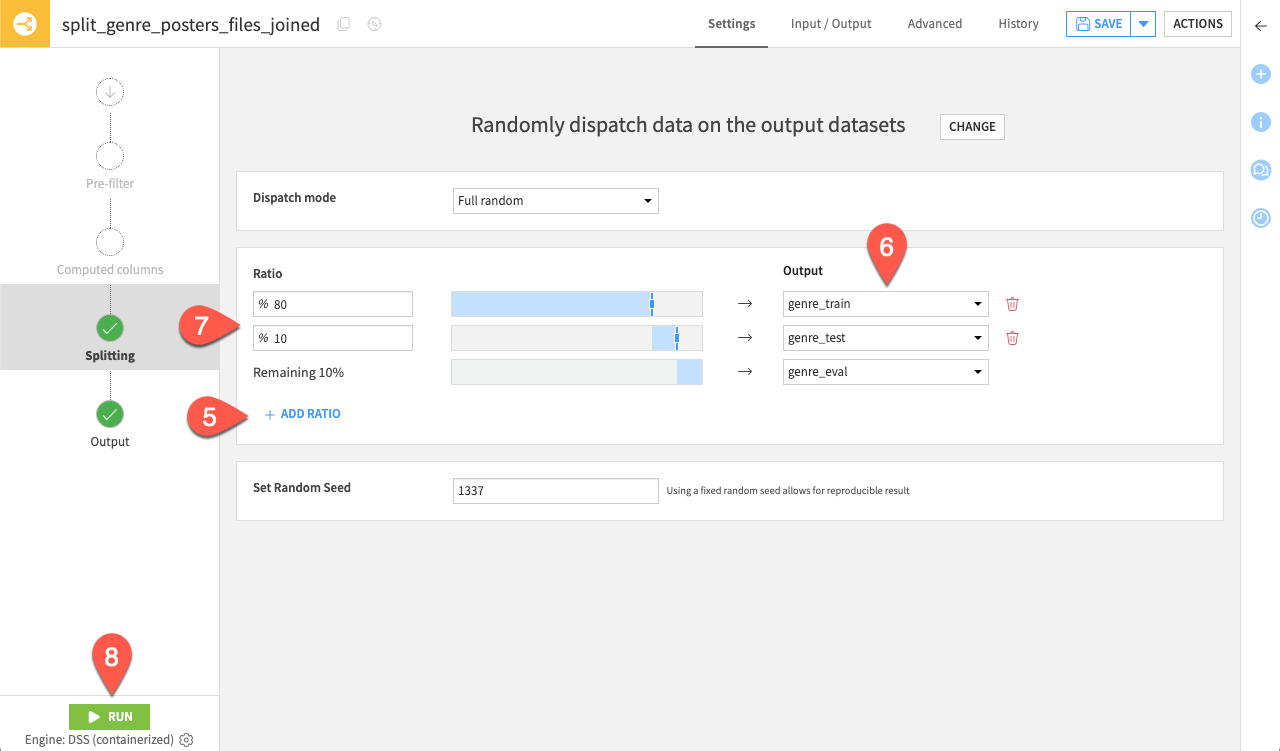
genre_testandgenre_evaldatasets, and click Create Recipe.Click Randomly dispatch data, then + Add Ratio.
Select genre_train, genre_test, and genre_eval as the Outputs.
Set the ratio at 80 and 10 for the genre_train and genre_test datasets, respectively. This should leave the final 10% for the genre_eval dataset.
Click Run.
Now, you should be ready to start designing your machine learning pipeline.
Design modeling#
To start the design of your features and models you need to create an AutoML analysis:
Click genre_train.
In the Actions tab (
), click Lab ( ).
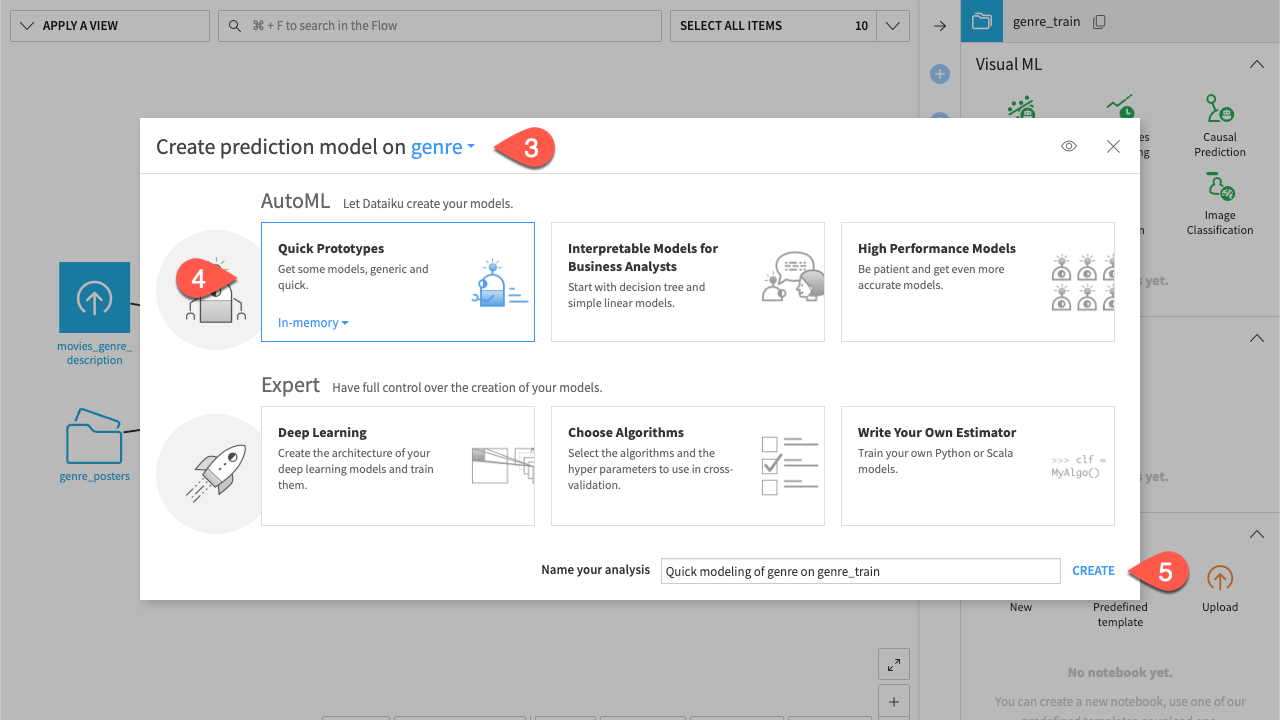
).Click AutoML Prediction, and select
genreas the feature to predict.Select Quick Prototypes.
Keep the name by default and click Create.
Now your analysis is created, you can configure the settings for your models, features, and embeddings you would like to use.
Settings configuration#
Before you configure the settings of the embeddings for text and images, you can set the training parameters.
Navigate to Design > Train/Test Set.
For the Policy, select Explicit extracts from two datasets.
As the Test set, select genre_test.
Click Save.
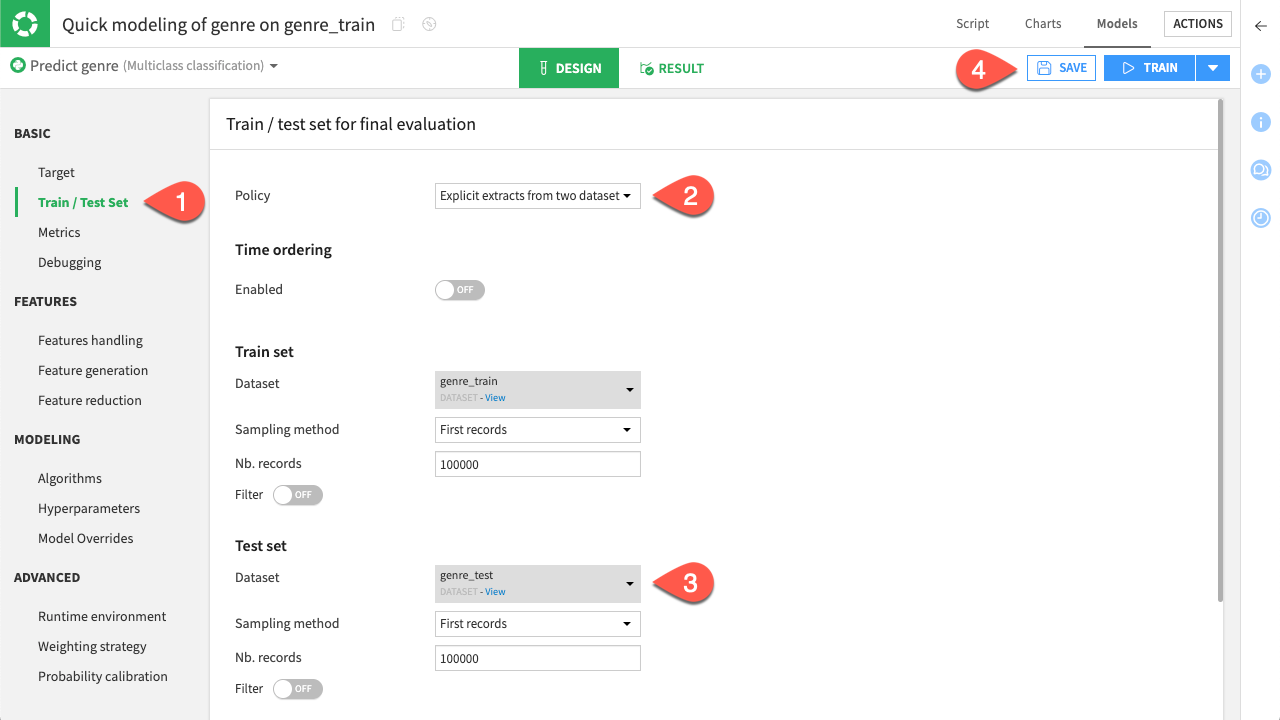
Image embedding#
Now that you have configured the datasets. You can take care of your features. First, have a look at the images.
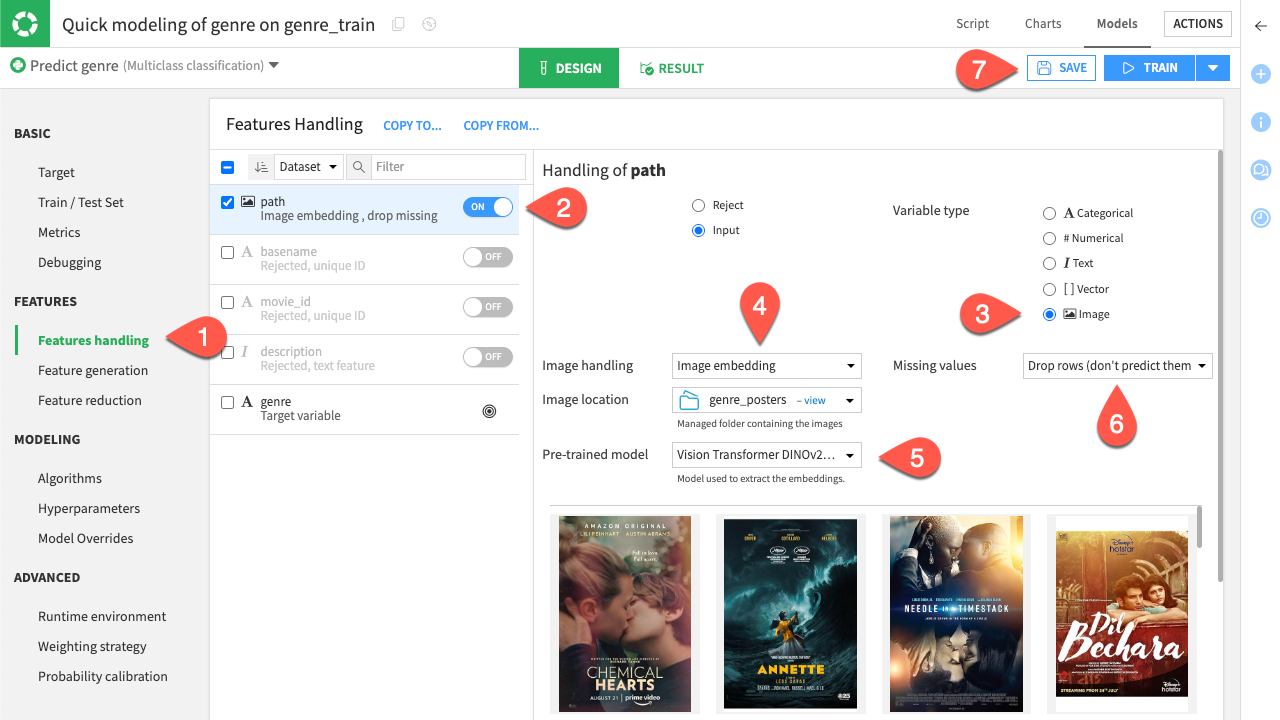
Navigate to Feature handling, under Features.
Toggle on path.
Set the Variable type to Image.
Select the Genre_posters folder where the images are stored as the Image location.
Note
You should be able to see the images loaded if the location is correct.
For the Pre-trained model, select an image or multimodal embedding model.
Note
You can only select embedding models that support images as input, namely image or multimodal embedding models.
Chose the way you want to deal with missing values.
Click Save.
Text embedding#
The images are now ready to be processed as input for the pipeline. Let’s have a look at the text description.
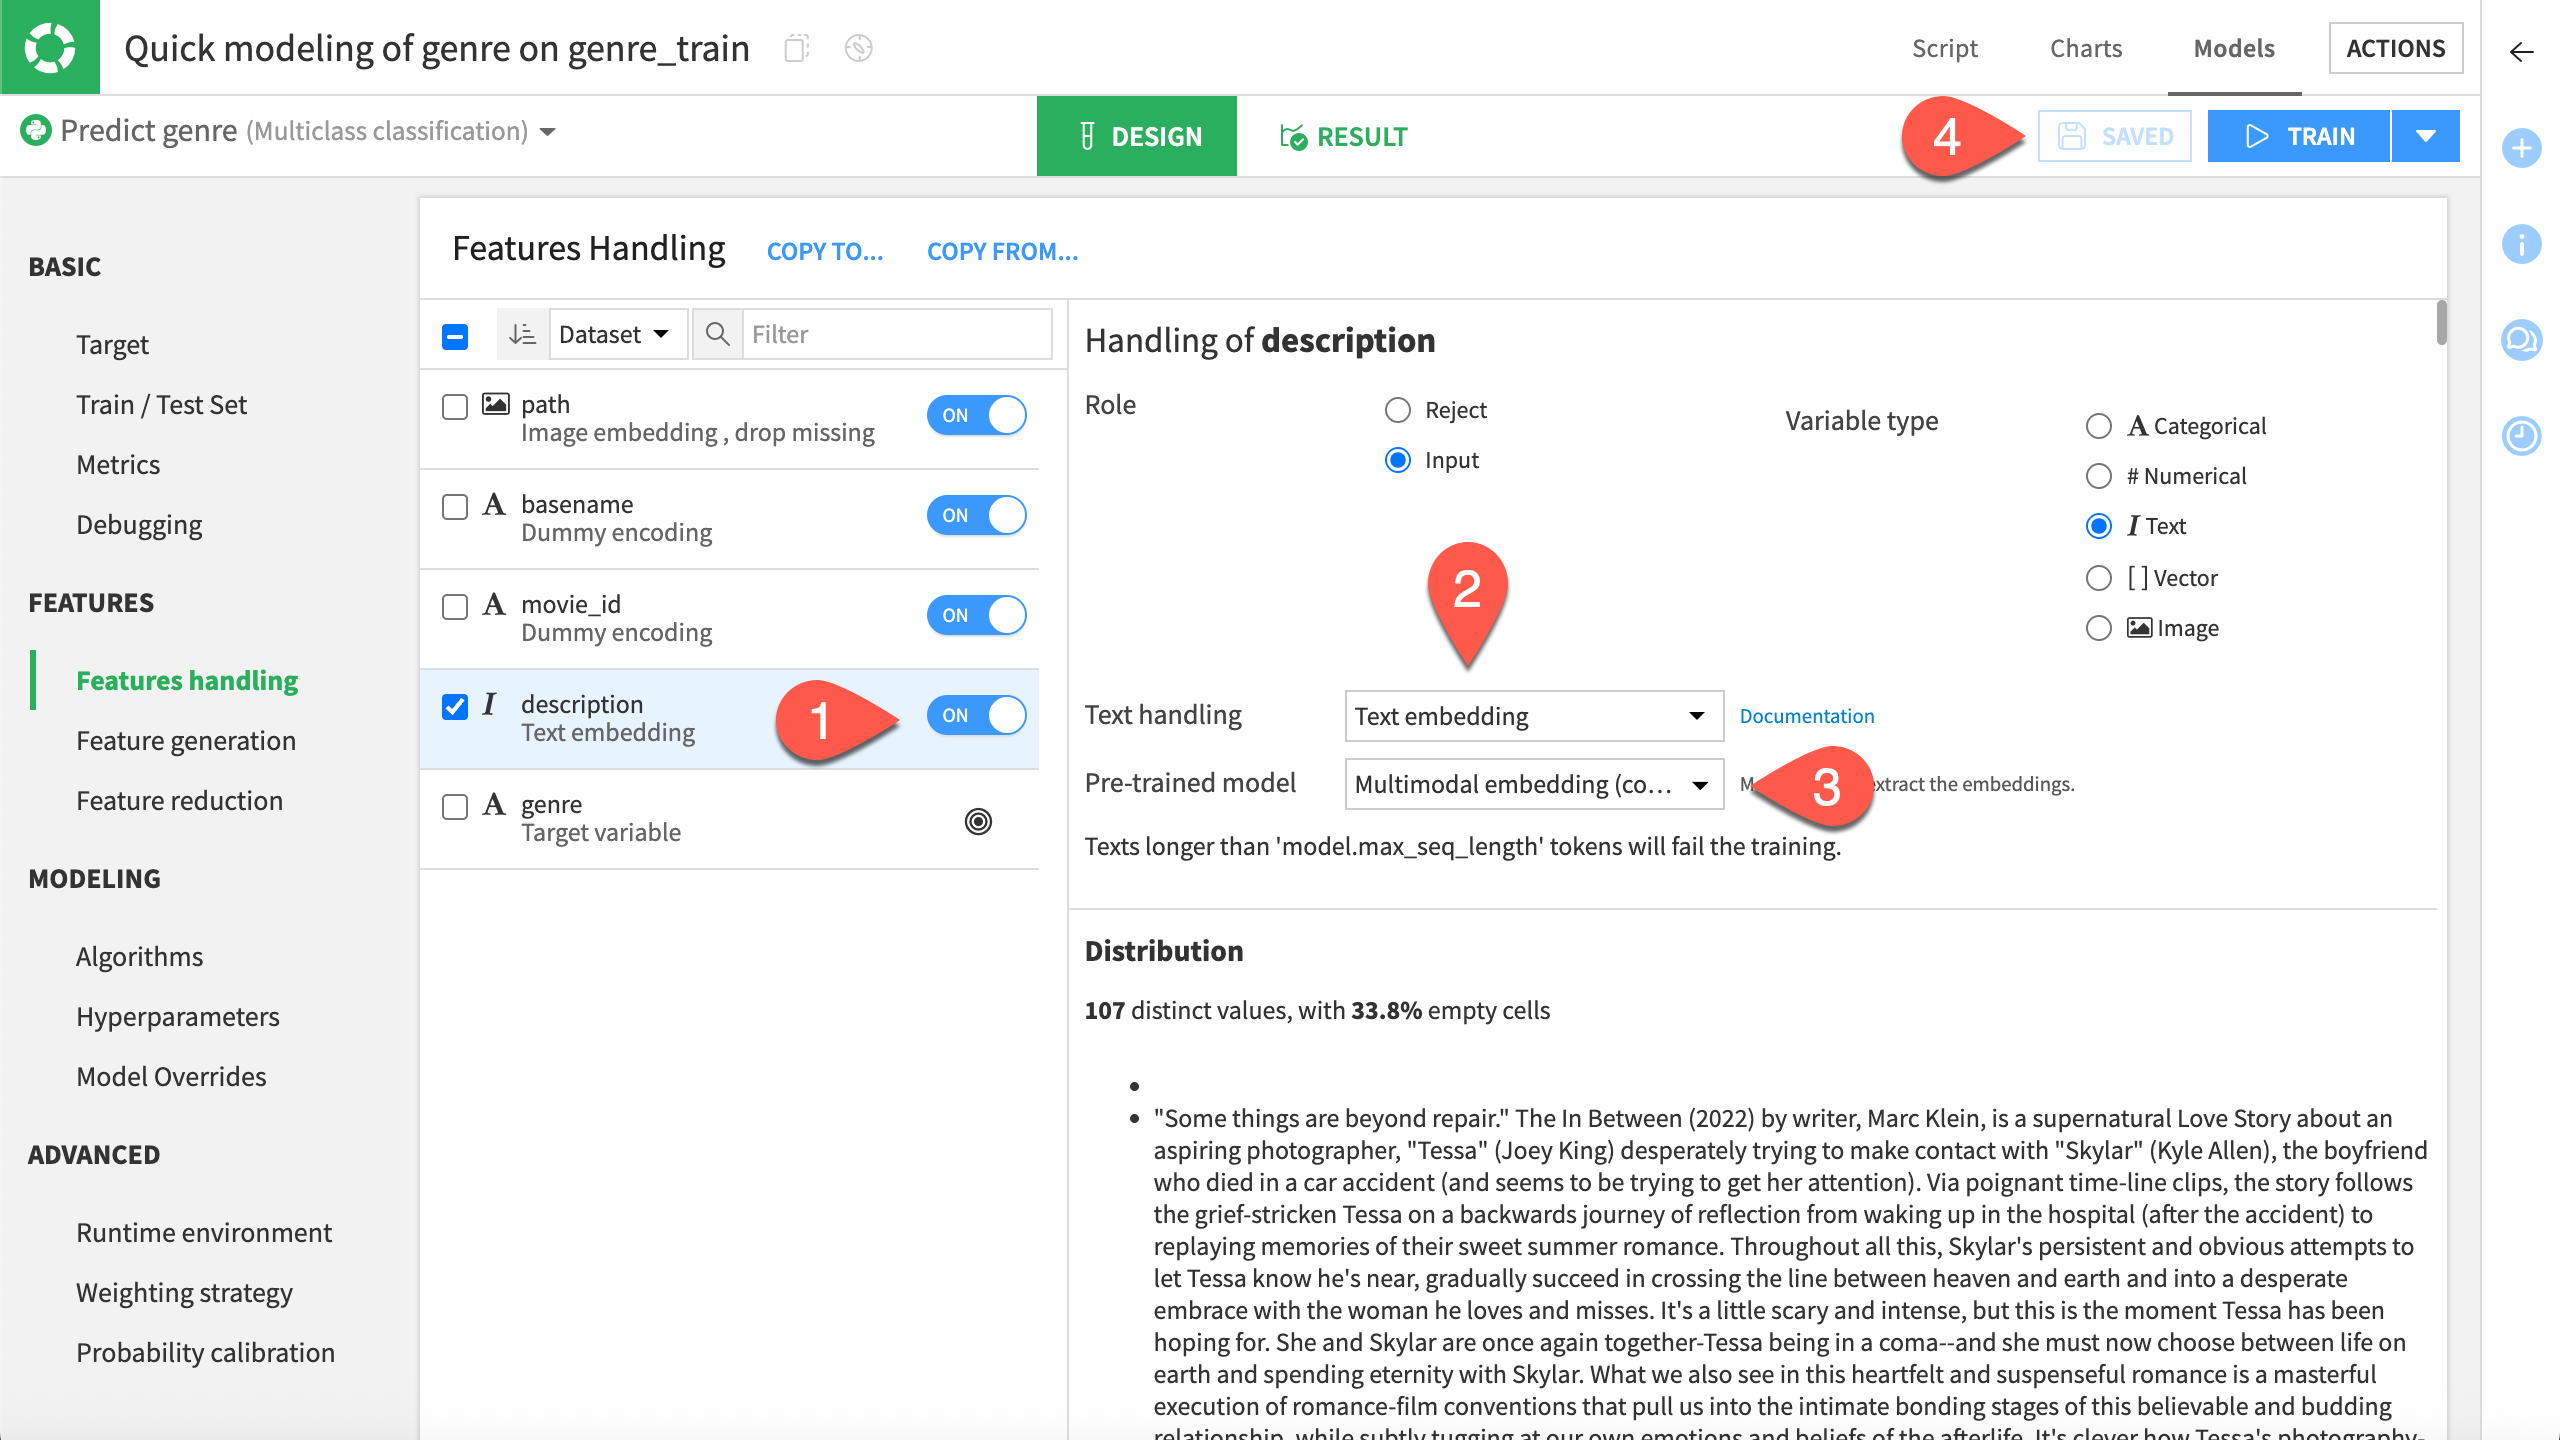
Toggle on the description feature.
Note
Because of its format, Dataiku already recognizes the text.
In Text Handling, select Text embedding.
For the Pre-trained model, select a text or multimodal embedding model.
Note
You’ll want to ensure that your model can support a considerable amount of tokens per row, depending on the length of the descriptions. Otherwise, the training stops.
Click Save.
Model selection#
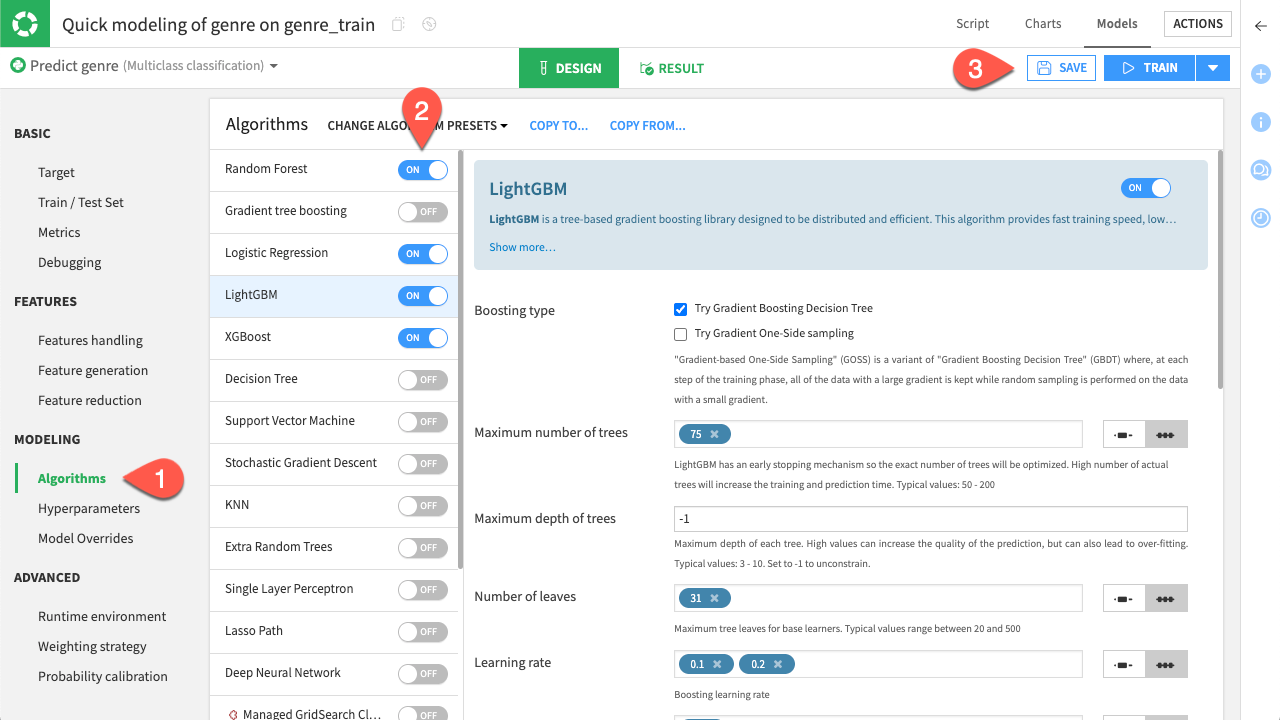
Navigate to the Algorithms tab, under Modeling.
Select the models you wish to test.
Click Save.
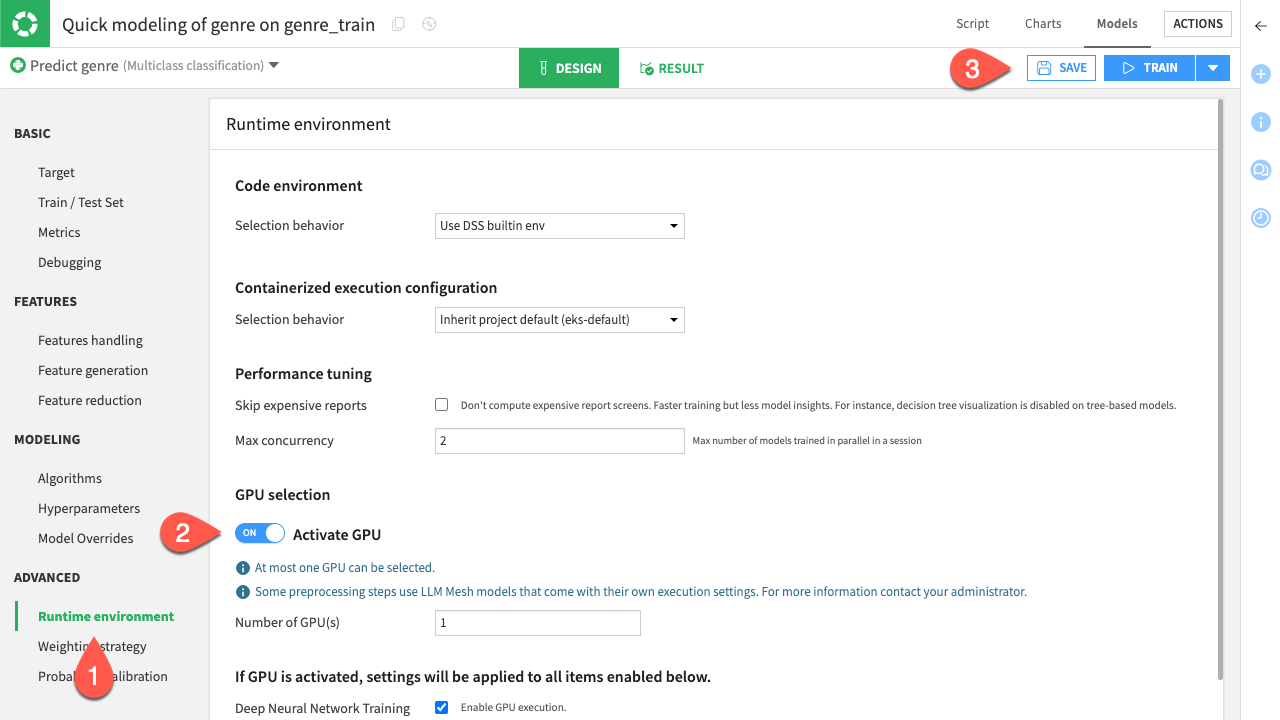
Optional: GPU computation#
This step is optional but highly recommended to speed up the training phase, especially if you’ve used HuggingFace models for the embeddings. If you have access to GPU computation:
Navigate to Runtime environment.
Toggle on Activate GPU, under GPU Selection.
Click Save.
Model training and evaluation#
Now that you have your modeling settings ready you can train all the models you had chosen previously.
Important
For the tutorial purpose, this dataset is small enough to be trained with a CPU computation only. Keep in mind that with real world problems you will prefer having a GPU-based computation to significantly reduce the training time.
Click Train
Name your training session and click Train to start.
After training has finished, select the best-performing model and click it.
Click Deploy.
Click Create.
Now that the model has been deployed, you can evaluate its robustness on other data with the evaluation dataset.
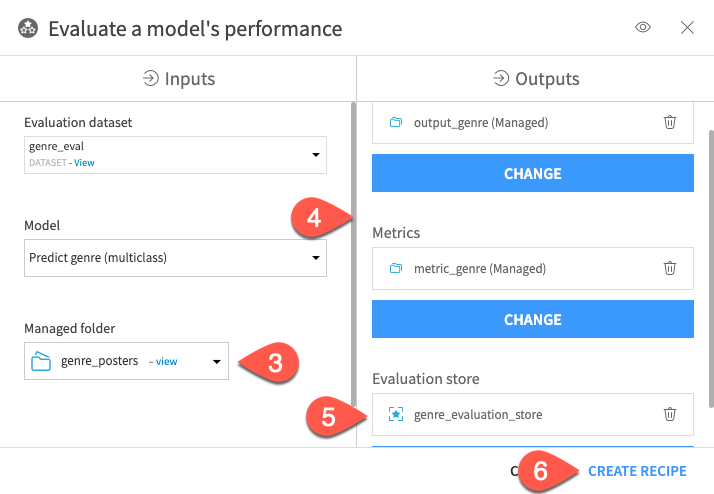
From the Flow, click Predict genre (multiclass).
In the Actions (
) tab, click Evaluate.Select genre_posters as the managed folder that stores the images.
Create the output_genre and metric_genre datasets for the output and metric record.
Create the genre_evaluation_store.
Click Create Recipe.
Click Run.
You’ll find the two datasets and the evaluation store in the Flow. You can click on it to explore how your model has performed on this task.
Next steps#
You have built a model involving multiple modalities, preparing data and designing your pipeline. You can now try this with your own projects with more fine-tuning or other modalities to build the best predictions out of your data!