
Concept | Flow#
Watch the video or read the summary below.
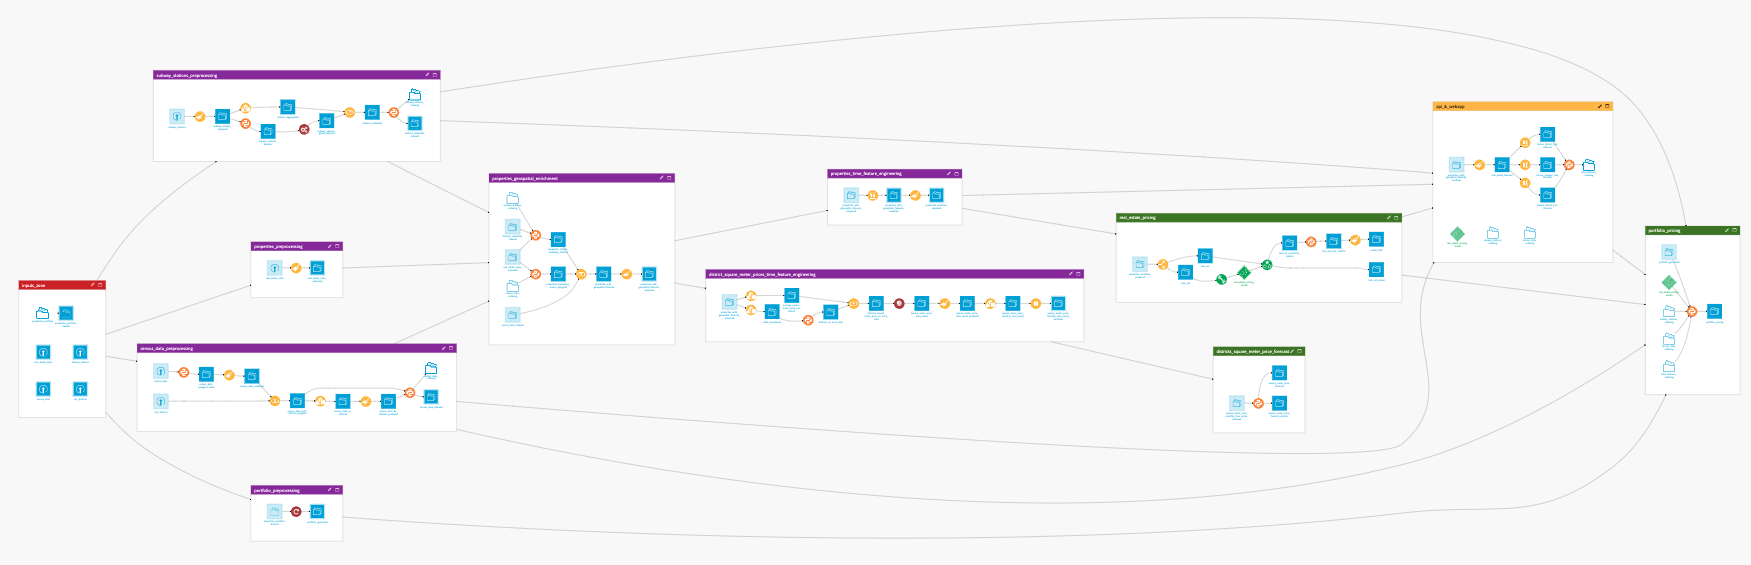
In Dataiku, the Flow is the visual representation of how data, recipes, models, and agents are connected within a project.
It shows how data moves through an analytical pipeline by making dependencies between components explicit.
In this representation:
Nodes represent Dataiku objects such as datasets, recipes, models, knowledge banks, etc.
Edges represent the connections between these objects, hence the dependencies among the different items.
From the initial data to the final output, the Flow allows you to trace how each element contributes to the pipeline. It provides a visual narrative of your data’s journey, helping you understand and communicate how your analytical pipeline transforms raw data into actionable insights.
Why the Flow matters#
In data projects, transformations are often distributed across multiple datasets, recipes, and models. Without a unifying view, it becomes difficult to understand how these elements relate to each other or how changes propagate through the pipeline.
The Flow serves several critical purposes:
Purpose |
Description |
|---|---|
Dependency tracking |
Visualizes which datasets, recipes, and models depend on each other, ensuring you understand the impact of changes throughout your pipeline. |
Data lineage |
Allows you to trace the origin and evolution of any output, making it easier to debug and validate your transformations. |
Collaboration |
Provides a visual canvas so that teams can share a common understanding of how data is processed. |
Governance |
Helps identify data lineage and maintain project organization as complexity grows. |
Navigation |
Acts as a central hub to access and manage all pipeline components. |
By making relationships visible, the Flow turns a collection of transformations into a coherent, navigable system.
Managing Flow complexity#
As projects grow, the Flow can become large and difficult to read. This is a natural consequence of representing many interconnected transformations in a single view.
To remain usable, the Flow relies on several mechanisms that help structure and reduce visual complexity:
Segmentation into Flow zones: grouping related parts of the pipeline into logical sections.
Annotation with tags: adding metadata to distinguish objects by purpose, ownership, or status.
Filtering views: focusing on a subset of the Flow based on specific criteria.
These mechanisms allow you to move between a global view of the pipeline and more focused perspectives, depending on your needs.
In Dataiku, these principles are implemented through features such as Flow zones, tags, and filtered views.
For more information, see the following how-to articles, which provide practical strategies to enhance the readability and navigability of your Flow as it grows in complexity.
How-to | Filter the Flow to create custom views of the Flow and only show relevant items on the screen.
How-to | Use Flow zones to logically group related objects within your Flow.
How-to | Tag the Flow items to add tags to the different items of the Flow and use these tags to select which parts of the Flow to view.
Building the Flow#
Because the Flow maintains a complete map of dependencies and is aware of all relationships between objects, Dataiku can intelligently process updates across your analytical pipeline.
When you make a change to a specific dataset or recipe, you don’t necessarily need to manually update every subsequent step. Thanks to the Build or Build all menu, you can choose to dynamically rebuild dependent items upstream or downstream. Dataiku will leverage the Flow’s dependency graph to ensure that your final outputs reflect the latest changes in your logic or data.
For a deeper understanding of how Dataiku handles these updates, see the Concept | Build modes article.
Next steps#
In this lesson, you learned about the Flow in Dataiku. Continue getting to know the basics of Dataiku by learning about recipe engines.
See also
For more information, see also:
The Flow article in the reference documentation.
The Flow creation and management article in the Developer Guide.