
Tutorial | Custom step-based scenarios#
Get started#
Scenarios are the main tool in Dataiku for automating actions, such as rebuilding datasets or retraining models.
By leveraging Python, you can extend the functionality of a scenario—from custom triggers to complex steps—tailoring automation to your specific use case.
Objectives#
In this tutorial, you will:
Add custom steps with Python code inside a step-based scenario.
Write custom scenario triggers with Python code.
Create custom scenario variables.
See also
This tutorial covers adding Python within a step-based scenario. For a scenario written entirely in Python code, please see Tutorial | Custom script scenarios.
Prerequisites#
To reproduce the steps in this tutorial, you’ll need:
Dataiku 12.0 or later.
An Advanced Analytics Designer or Full Designer user profile.
Basic knowledge of Dataiku (Core Designer level or equivalent).
Basic knowledge of Python.
Knowledge of scenarios.
Create the project#
From the Dataiku Design homepage, click + New Project.
Select Learning projects.
Search for and select Custom Step-based Scenarios.
If needed, change the folder into which the project will be installed, and click Create.
From the project homepage, click Go to Flow (or type
g+f).
Note
You can also download the starter project from this website and import it as a ZIP file.
Add a custom Python step#
Consider the final datasets at the end of the pipeline, such as tx_windows. This dataset—and others like it in the Flow—can serve as a key input to dashboards, webapps, or Dataiku apps. These outputs are often shared with other Dataiku projects or exported to external tools.
Automating the reconstruction of these key datasets as fresh data arrives is a critical production requirement. The project already includes a scenario to automate the refresh of tx_windows.
From the Jobs (
 ) menu in the top navigation bar, click Scenarios.
Open the Data Refresh scenario.
The scenario currently uses a visual step named Dataset build to refresh tx_windows once the upstream tx folder passes its quality check. While this setup is functional, you’ll replace it with a Python step to introduce more granular control during the build process.
Tip
This example rebuilds a dataset, but the logic works the same for other Dataiku objects such as retraining a model or refreshing a model evaluation store.
Build a dataset with code#
Convert the visual step into a Python code step. This transition provides access to the Python Scenario API, enabling programmatic scenario management and a broader range of automation possibilities.
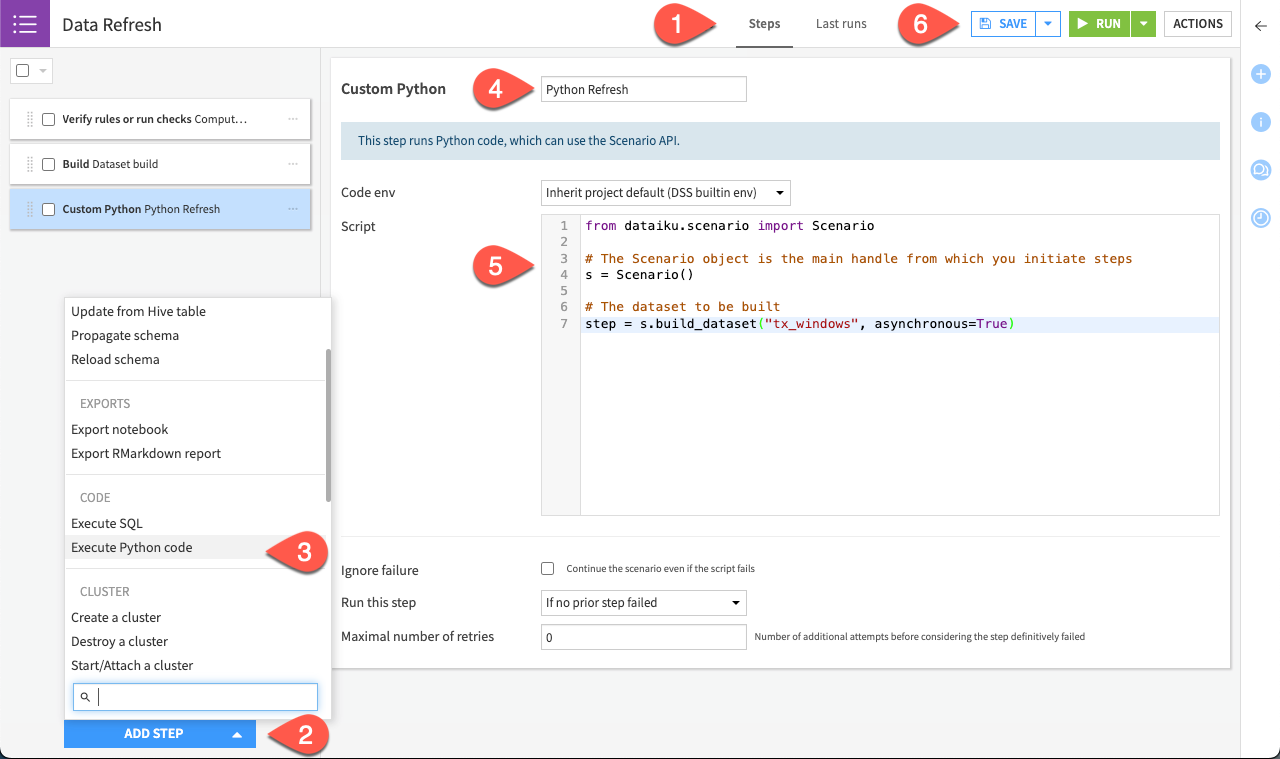
Navigate to the Steps tab of the Data Refresh scenario.
Click Add Step at the bottom left.
In the Code section, select Execute Python code.
Rename the step
Python Refresh.Copy-paste the code below.
from dataiku.scenario import Scenario

# The Scenario object is the main handle from which you initiate steps
s = Scenario()

# The dataset to be built
step = s.build_dataset("tx_windows", asynchronous=True)
Click Save (or
Cmd/Ctrl+S).
This Python code step now duplicates the original scenario logic. The next phase involves extending this implementation with custom code to increase flexibility.
Add custom functionality#
Scenario executions can occasionally stall or exceed their expected runtime due to upstream errors or infrastructure bottlenecks. To avoid this issue, you can set a timeout directly within the code step. To do so:
Replace the previous code with this complete one:
import dataiku
import time
from dataiku.scenario import Scenario
from dataiku.scenario import BuildFlowItemsStepDefHelper
from dataikuapi.dss.future import DSSFuture

# Setting the wanted timeout in second.
TIMEOUT_SECONDS = 3600

# Handling our scenario.
s = Scenario()

step = s.build_dataset("tx_windows", asynchronous=True)

start = time.time()
while not step.is_done():
    end = time.time()
    print("Duration: {}s".format(end-start))
    if end - start > TIMEOUT_SECONDS:
        f = DSSFuture(dataiku.api_client(), step.future_id)
        f.abort()
        raise Exception("Scenario was aborted because it took too much time.")
Click Save.
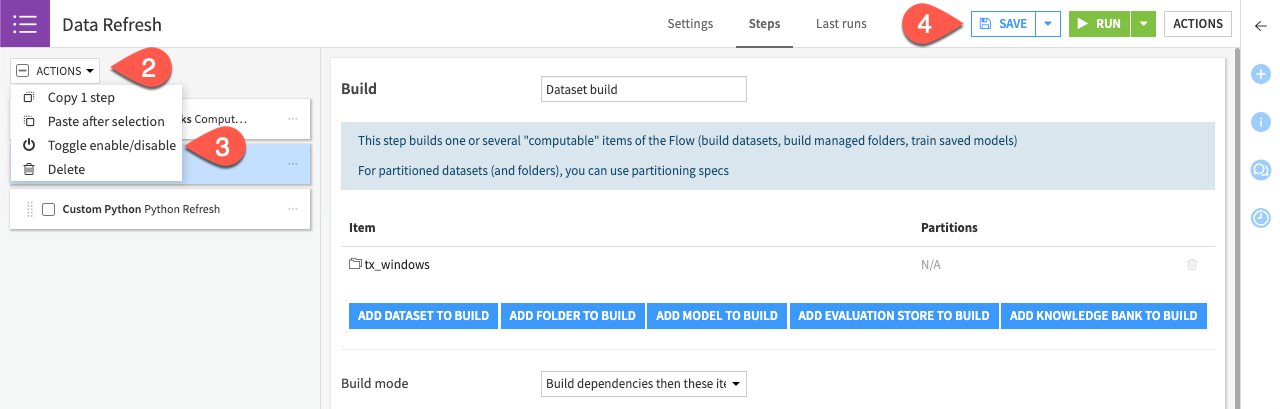
Your step is now complete. Disable the previous visual step, and run the scenario including the Python step:
Select the native Dataset build step, and disable it (
 ).
).Click Run to launch the new scenario.
Navigate to the Last runs tab to observe its behavior.
A successful run confirms that the Python Refresh step correctly initiates the dataset build, achieving the same result as the original visual step.
Optional: Trigger a scenario with custom Python code#
Important
Only certain user profiles, such as Advanced Analytics Designers and Full Designers, have access to custom triggers. If you don’t have this feature, skip ahead to Add scenario variables.
Adding various triggers to a scenario illustrates the value of automating precisely when actions occur. While standard triggers handle common events, custom triggers leverage Python scripts to initiate runs based on complex logic that visual triggers may not support.
Here, trigger the scenario based on the result of a check on the tx folder.
Navigate to the Settings tab of the Data Refresh scenario.
Click Add Trigger.
Choose Custom trigger.
Name it
TX folder empty check.Copy-paste the following code block.
import dataiku
from dataiku.scenario import Trigger

# Call the Managed Folder "tx" where the check is computed.
folder = dataiku.Folder("tx")

# Get the last outcome of the check called "Empty folder".
checks_message = folder.get_last_check_values().get_check_by_name('Empty folder')['lastValues'][0]['outcome']

# Call the trigger.
t = Trigger()

# Set up the condition.
if checks_message == 'OK':
    t.fire()
Click Save.
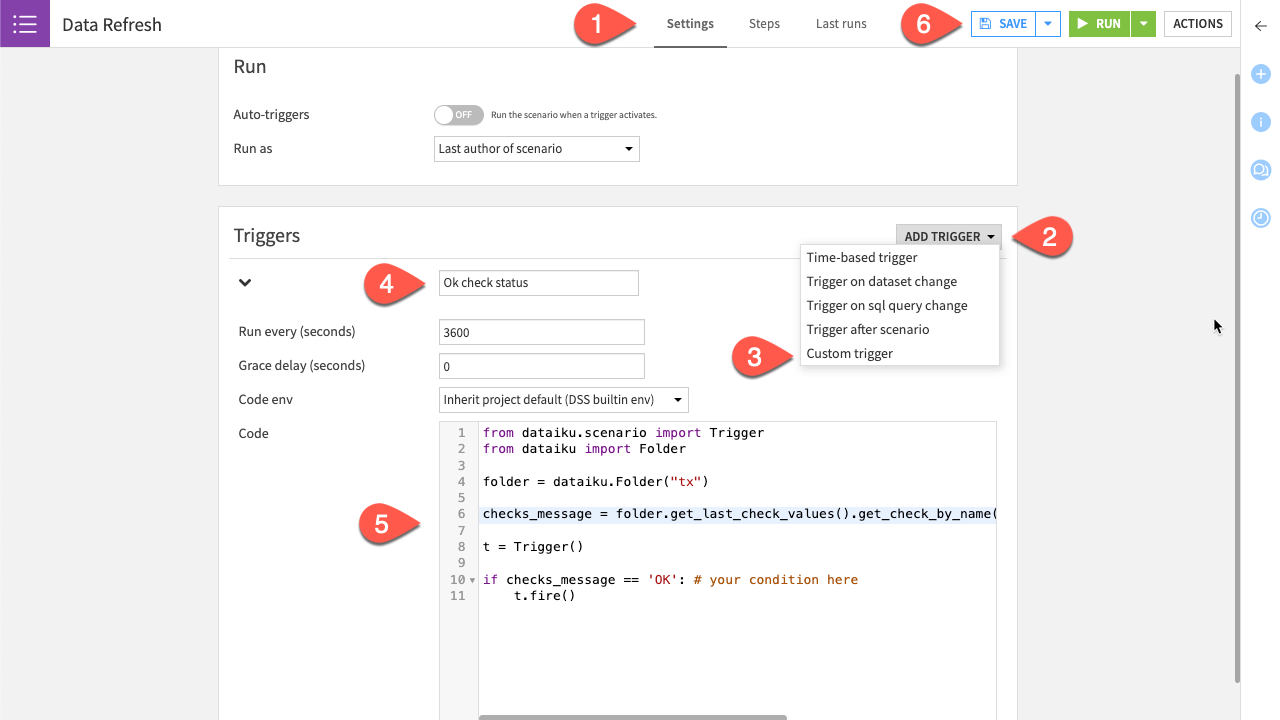
Once the custom Python script is saved, the trigger is ready to monitor the tx folder. The Run every (seconds) field determines the polling frequency—the interval at which Dataiku executes the script to evaluate the trigger condition. While the default is 3600 (one hour), this value can be adjusted to balance automation responsiveness with server resource consumption.
To activate the trigger:
In the Run every (seconds) field, enter
60. This allows the trigger to fire within a reasonable timeframe for testing while remaining resource-efficient.In the Run panel of the scenario, toggle Auto-triggers to On.
Click Save.
The scenario is now in a listening state. It will trigger automatically once the script logic is satisfied during the next scheduled check.
Important
While 60 seconds is appropriate for testing, high-frequency triggers can lead to significant resource consumption in production. Always reset this value to a higher interval or disable auto-triggers once testing is complete.
Tip
Because triggers evaluate in the background, their errors don’t appear in the standard scenario logs. If a trigger fails to fire, check the trigger artifacts in the scenario settings to look for Python syntax errors.
For deeper troubleshooting, administrators can also view the backend logs through waffle (![]() ) > Administration > Maintenance > Log files > backend.log.
) > Administration > Maintenance > Log files > backend.log.
Once the trigger fires, the execution will appear in the Last runs history. You can verify the source by looking for the TX folder empty check label, which distinguishes automated runs from manual ones.
Add scenario variables#
Scenario variables allow you to store and pass information between steps, providing shared context throughout the execution.
For example, you can set a variable that retrieves the trigger. The trigger passes data across the scenario that you can retrieve and use as a variable. In this example, you’ll dynamically adjust the timeout duration based on whether the scenario was triggered manually or automatically.
Although you can define a variable in the UI with a Define Variable step, use Python code because of its flexibility.
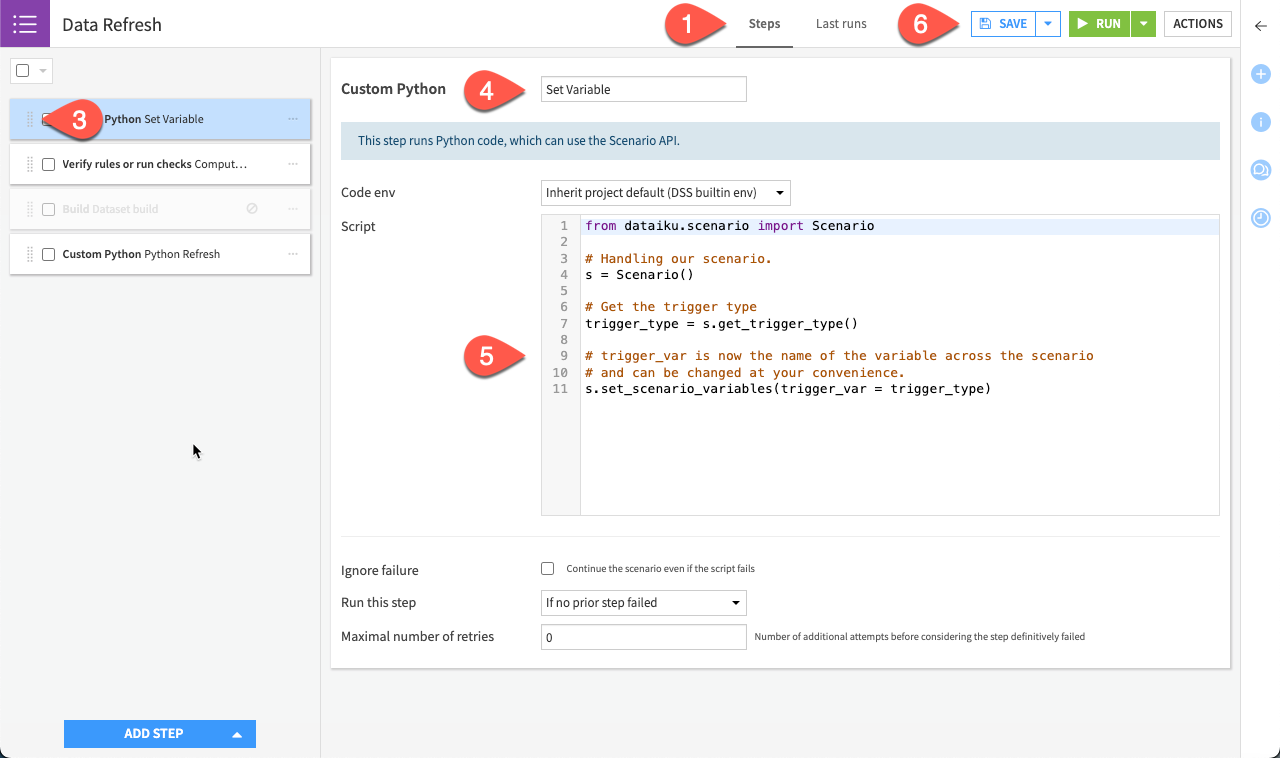
Navigate to the Steps tab.
Click Add Step > Execute Python code.
Drag the step card into the first position in the left panel (with the grip handle on the left of the card).
Rename the step
Set Variable.Copy-paste the code below:
from dataiku.scenario import Scenario

# Handling our scenario.
s = Scenario()

# Get the trigger type
trigger_type = s.get_trigger_type()

# trigger_var is now the name of the variable across the scenario
# and can be changed at your convenience.
s.set_scenario_variables(trigger_var = trigger_type)
Click Save.
This scenario variable is now accessible to every subsequent step, whether through code or the UI. The next task is to integrate this variable into the Python Refresh step to refine the script’s behavior.
To do so:
Navigate back to the Python Refresh step.
Copy-paste the updated code below:
import dataiku
import time
from dataiku.scenario import Scenario
from dataiku.scenario import BuildFlowItemsStepDefHelper
from dataikuapi.dss.future import DSSFuture

# Handling our scenario.
s = Scenario()
# Call the previously set variable
TRIGGER_VAR = s.get_all_variables()['trigger_var']
# If the scenario was triggered manually
if TRIGGER_VAR == "manual":
    TIMEOUT_SECONDS = 120
else:
    TIMEOUT_SECONDS = 3600
step = s.build_dataset("tx_windows", asynchronous=True)
start = time.time()
while not step.is_done():
    end = time.time()
    print("Duration: {}s".format(end-start))
    if end - start > TIMEOUT_SECONDS:
        f = DSSFuture(dataiku.api_client(), step.future_id)
        f.abort()
        raise Exception("Scenario was aborted because it took too much time.")
Click Save.
This logic ensures that manual test runs fail fast if they stall, while allowing automated production runs the full hour to complete. For example, you don’t want to wait too much time if an error loops the scenario.
You can now test this scenario:
Click Run.
Navigate to the Last runs tab of the scenario to see what happens.
Tip
To troubleshoot or monitor script execution, insert print() statements into the code. These outputs are captured in the scenario logs, accessible through the Last runs tab.
Visualize your results#
To monitor the performance of custom logic, use a reporter to log scenario metadata—such as the trigger source and execution status—directly to a dataset.
Navigate to the Settings tab, click Add Reporter.
Select Send to dataset.
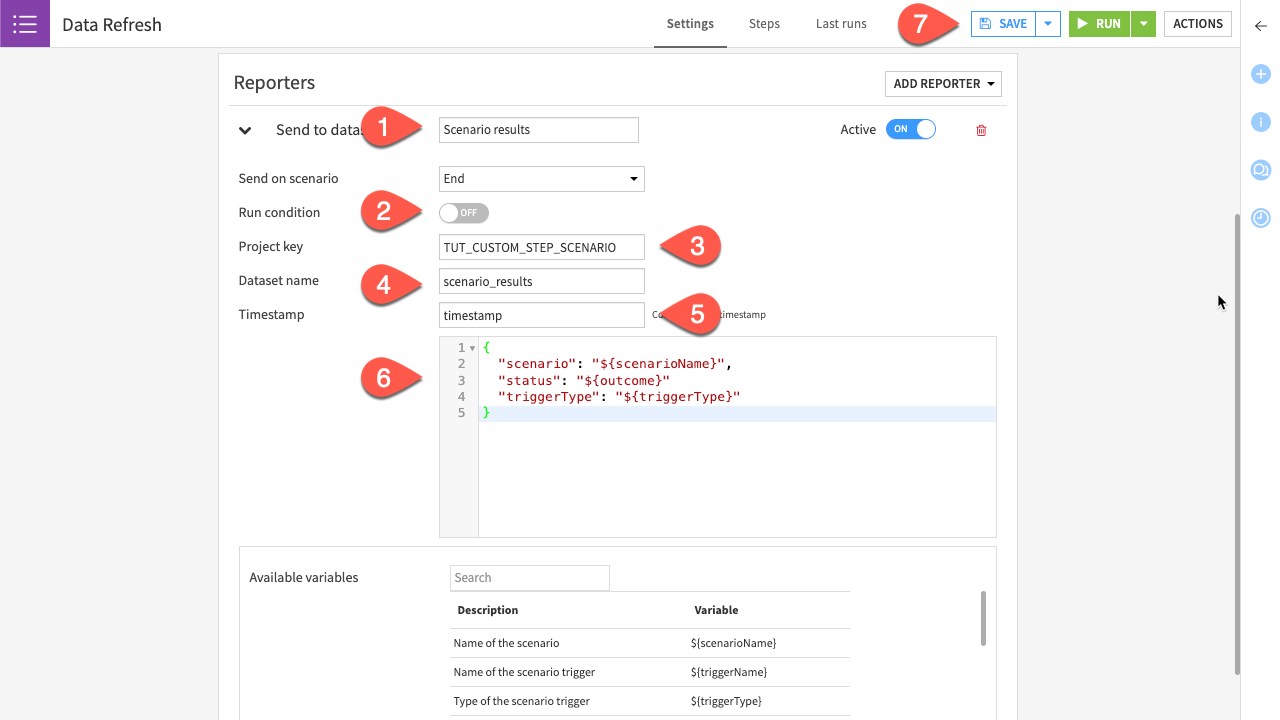
Configure a reporter#
Define the data payload the reporter will send to the dataset.
Name the reporter
Store scenario results.Turn Off the run condition to report all results, regardless of the scenario’s success or failure.
Provide the project key found in your URL.
Provide the dataset name
scenario_results.Provide
timestampas the name of the Timestamp column.Copy-paste the JSON below for the other two columns found in the schema.
{
  "scenario": "${scenarioName}",
  "status": "${outcome}",
  "triggerType": "${triggerType}"
}
Click Save to activate the reporter.
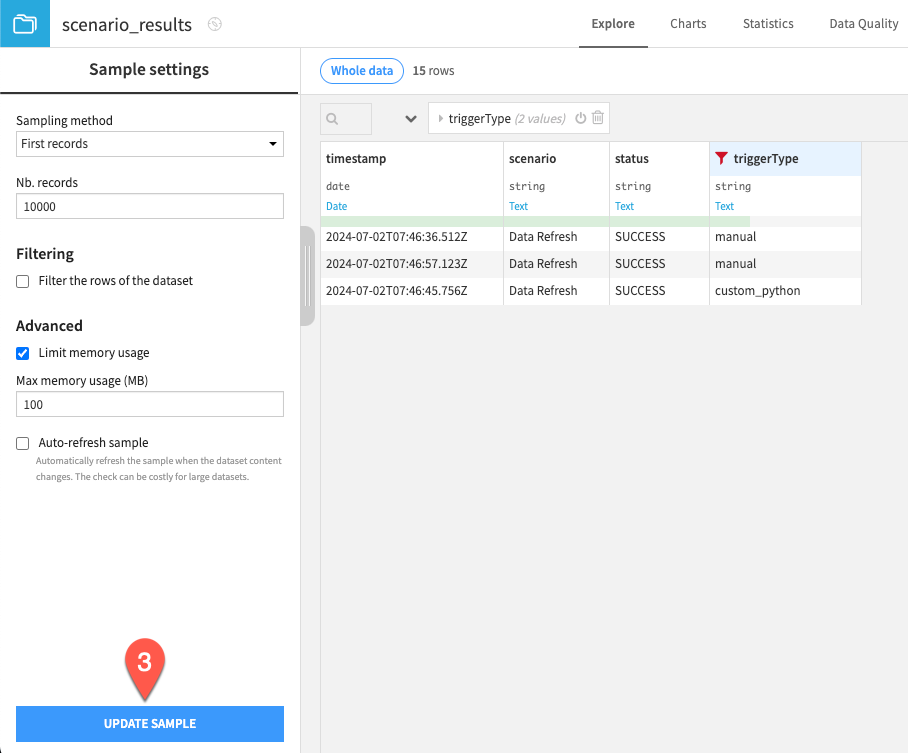
Check the results#
Once you’ve run the scenario a few times, you can check the results:
Navigate to the Flow.
In the Results Flow zone, open the scenario_results dataset.
Click on Update Sample to force the refresh and have the latest results from your test runs.
See also
To learn more about this feature, see Tutorial | Scenario reporters.
Next steps#
Congratulations! You’ve successfully extended a standard scenario with Python to create a more resilient and flexible automation workflow.
Important
To avoid unnecessary resource consumption or cloud billing, navigate back to the Settings tab of your scenario and ensure Auto-triggers is toggled Off before exiting the project.
Next, create a scenario entirely with Python in Tutorial | Custom script scenarios.
See also
You can learn more in the reference documentation on scenarios.