Tutorial | Time series analysis#
Get started#
Let’s perform some statistical analyses on time series data. We’ll be using a time series containing weekly price information for three airline stocks: United Airlines (UAL), American Airlines (AAL), and Delta Airlines (DAL).
Objectives#
In this tutorial, you will:
Learn about a multivariate time series dataset.
Perform built-in statistical tests on the data for trends, autocorrelation, and stationarity.
Interpret the output of these tests.
Prerequisites#
Dataiku 12.0 or later.
An Advanced Analytics Designer or Full Designer user profile.
Previous exposure to Interactive Statistics in Dataiku is helpful, but not required.
Create the project#
From the Dataiku Design homepage, click + New Project.
Select Learning projects.
Search for and select Time Series Analysis.
If needed, change the folder into which the project will be installed, and click Create.
From the project homepage, click Go to Flow (or type
g+f).
From the Dataiku Design homepage, click + New Project.
Select DSS tutorials.
Filter by ML Practitioner.
Select Time Series Analysis.
From the project homepage, click Go to Flow (or type
g+f).
Note
You can also download the starter project from this website and import it as a ZIP file.
Explore the Flow#
If you want to build models from data, it’s always important to explore that data beforehand by plotting charts and performing statistical analyses. Time series data is no exception.
By exploring your time series data, you’ll better understand underlying trends, patterns, and correlations. These insights will guide your feature engineering and inform which kinds of algorithms would be best suited for modeling the data.
Review the starting Flow#
In this project, the airline_stocks dataset is transformed into a prepared train dataset.
The train dataset is a time series dataset that includes three important columns:
Column |
Description |
|---|---|
Ticker |
Stores the stock symbol identifying three independent time series for the three airlines: American (AAL), Delta (DAL), and United (UAL). |
Date |
Stores weekly timestamps from 2008 to January 2022. |
Adj_close |
Stores the stock’s daily closing price. |

See also
To learn more about time series data preparation, visit Concept | Time series preparation.
Review the existing charts#
Creating a visual representation of time series data can be a valuable first step in identifying patterns, including trends and seasonalities. An initial chart has been provided for you.
Navigate to the Charts tab of the train dataset.
Interactively explore the existing line plots.
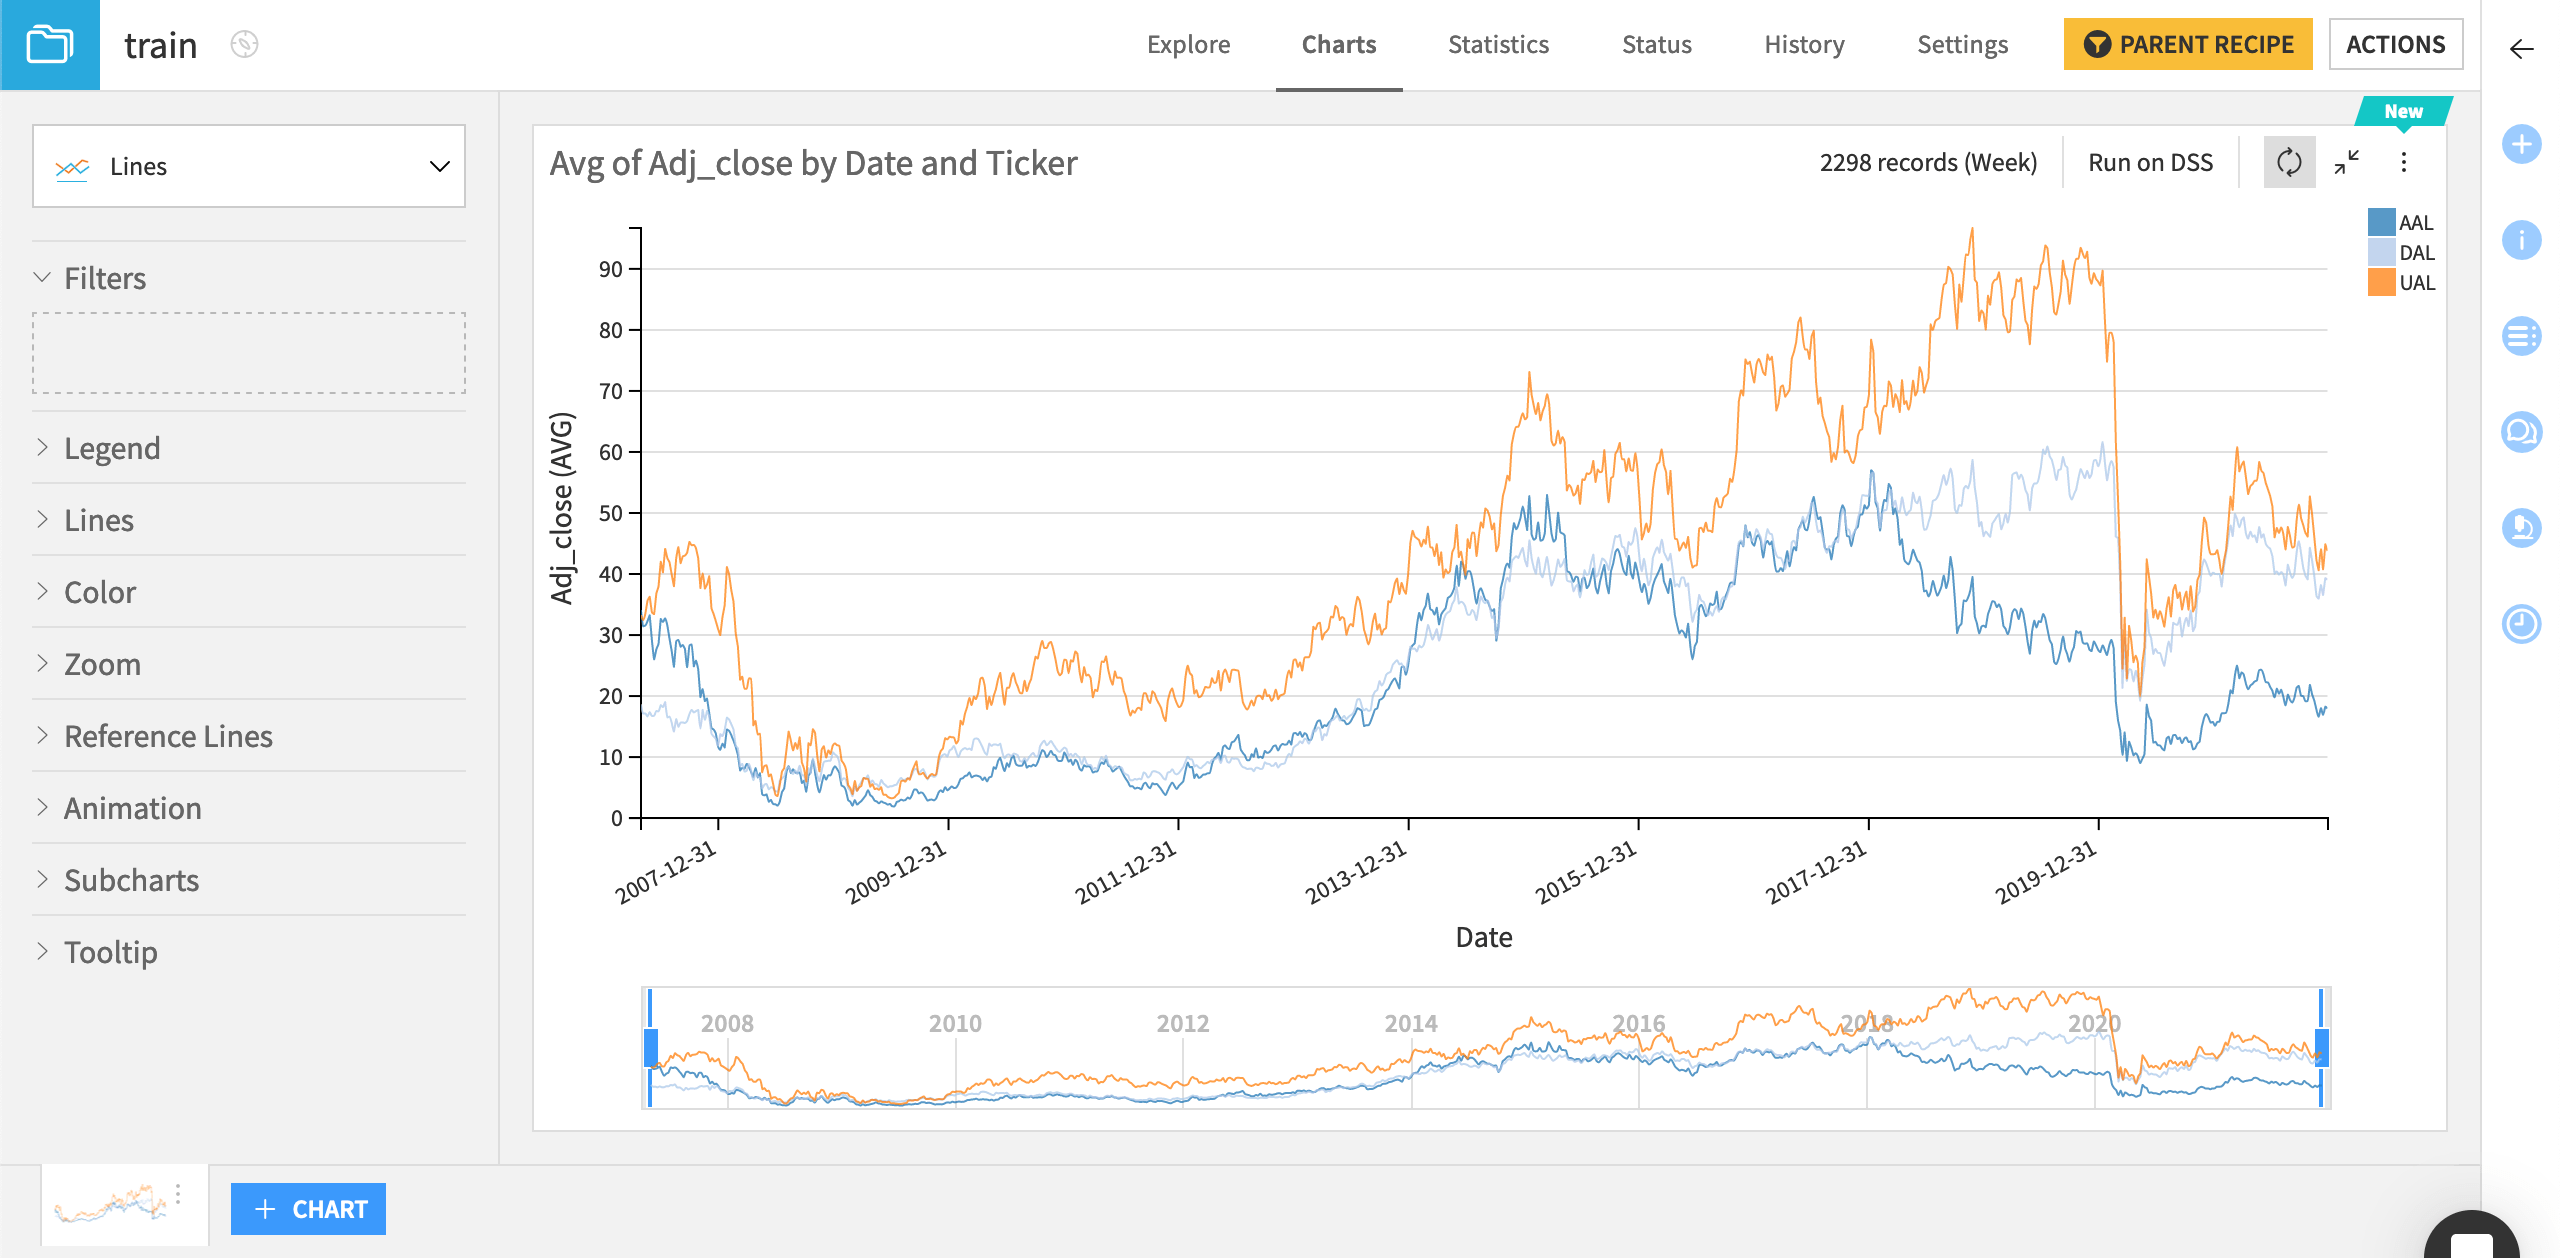
We can observe that:
Airline stock prices fall in early 2020, likely due to the COVID-19 pandemic.
There appears to be a general upward trend from 2009 to 2020 for the UAL and DAL time series.
AAL stock prices started to decrease in 2017.
See also
See Tutorial | Time series preparation for an exercise on visualizing time series data. Visit Charts for more general information.
Test for trends in time series data#
The previous chart showed that the time series seem to have a general upward trend. You can use the Mann-Kendall trend test to confirm this trend.
Choose a statistics card#
Let’s choose a card in a statistics worksheet.
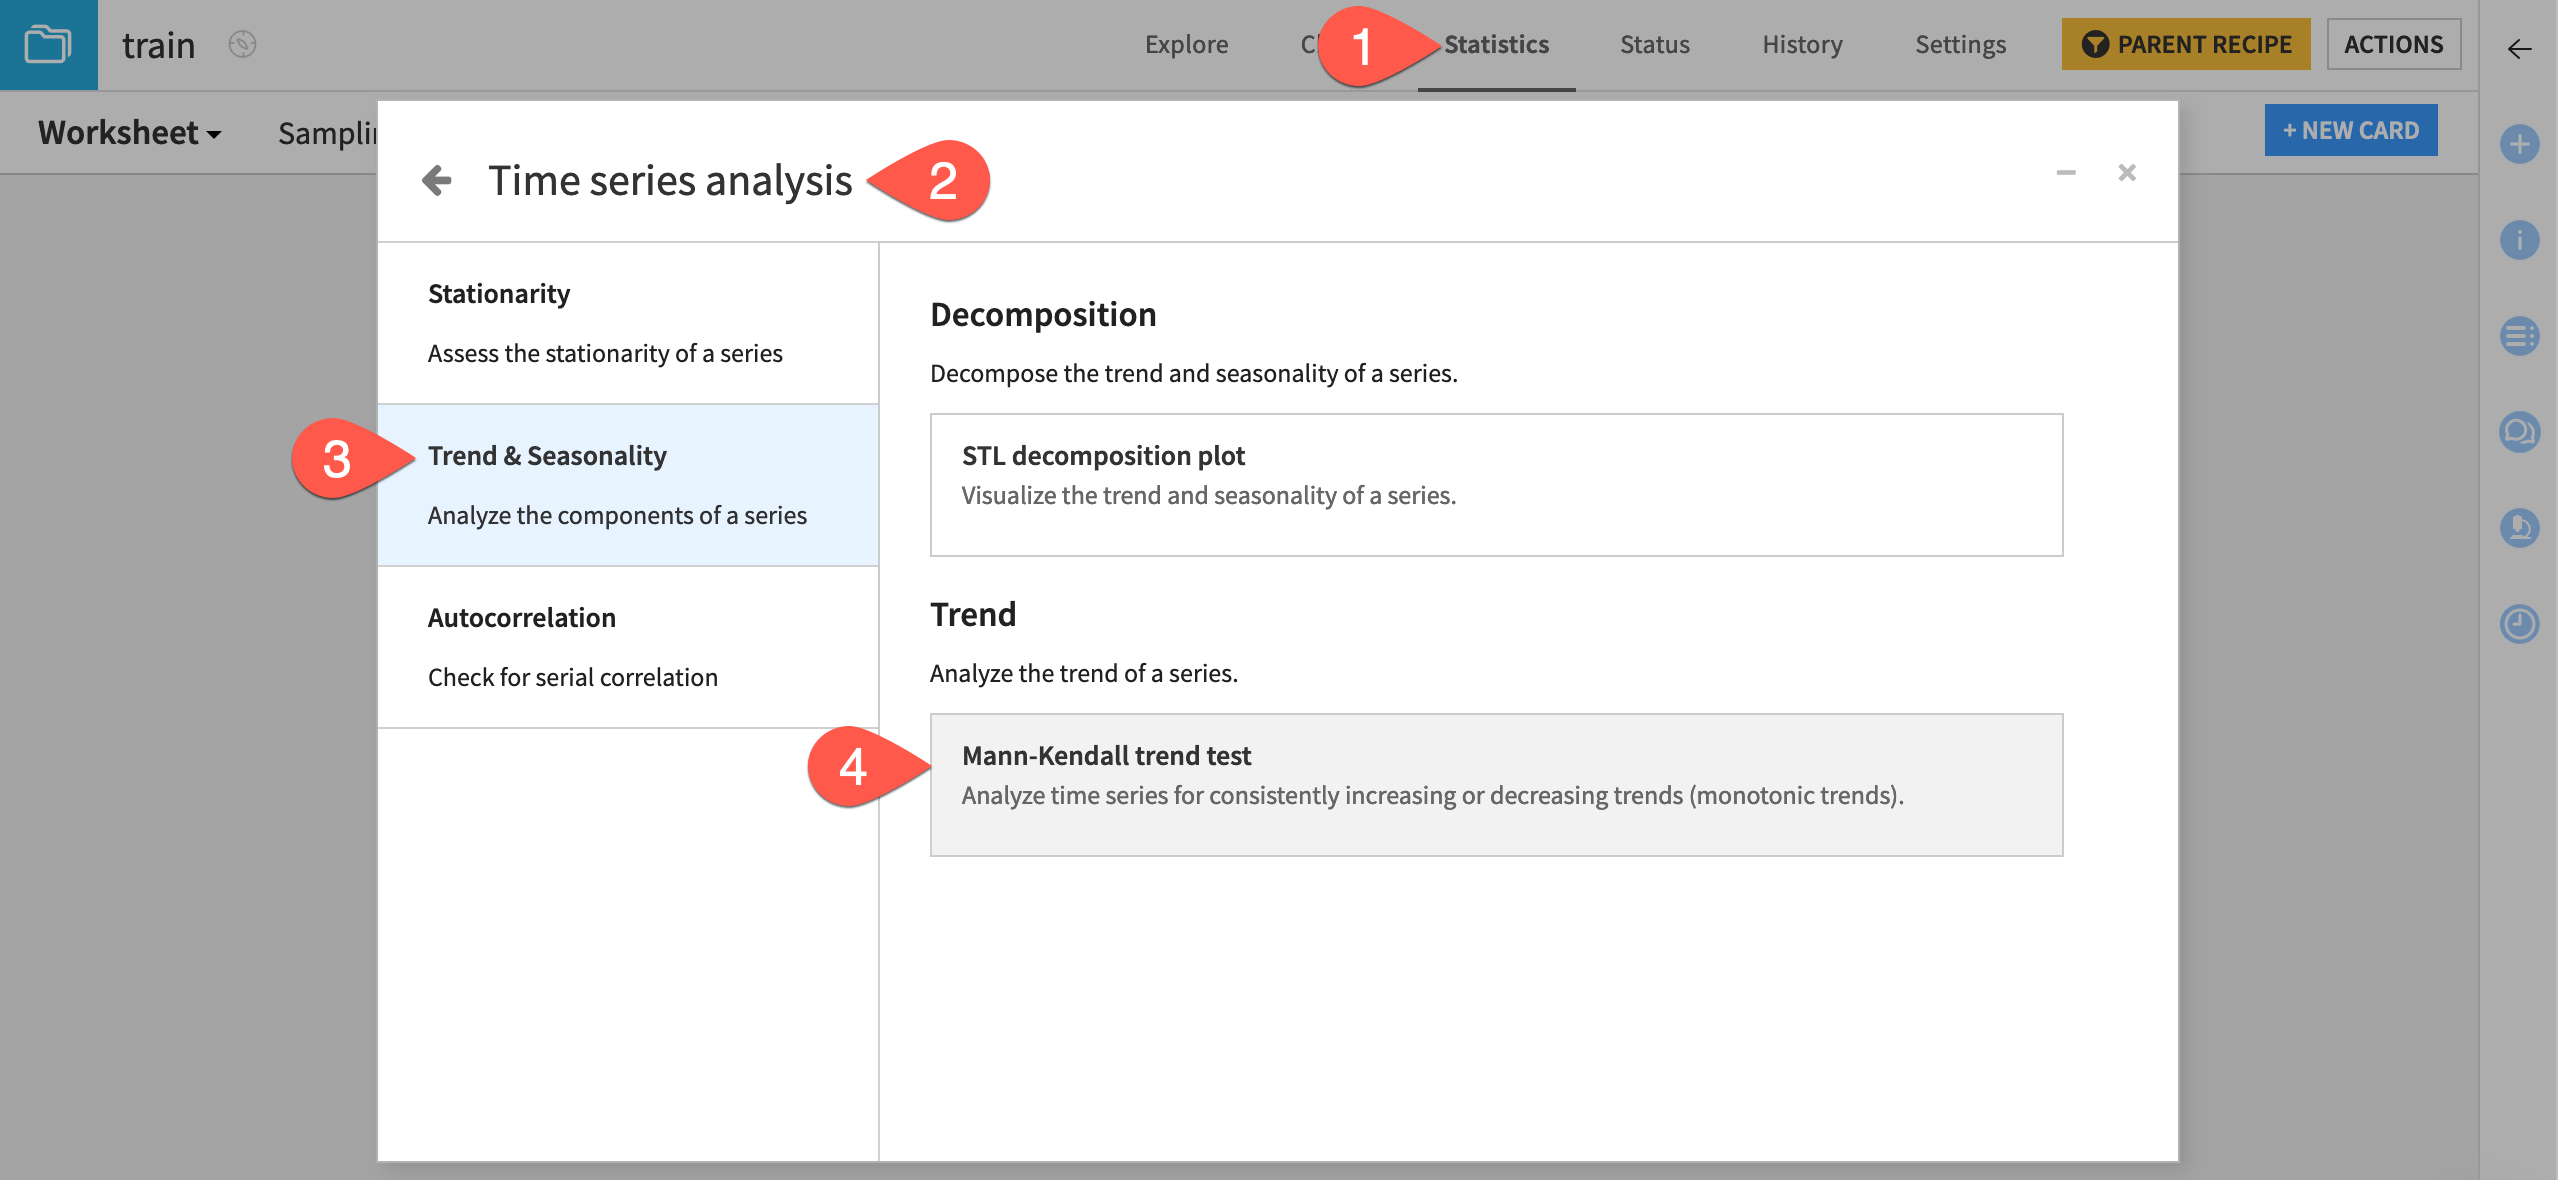
From the train dataset, navigate to the Statistics tab, and click + Create Your First Worksheet.
Select Time series analysis as the card type.
Select the Trend & Seasonality panel on the left of the dialog.
Choose the Mann-Kendall trend test.
Configure a Mann-Kendall trend test#
Now we’ll supply the correct variables to the card.
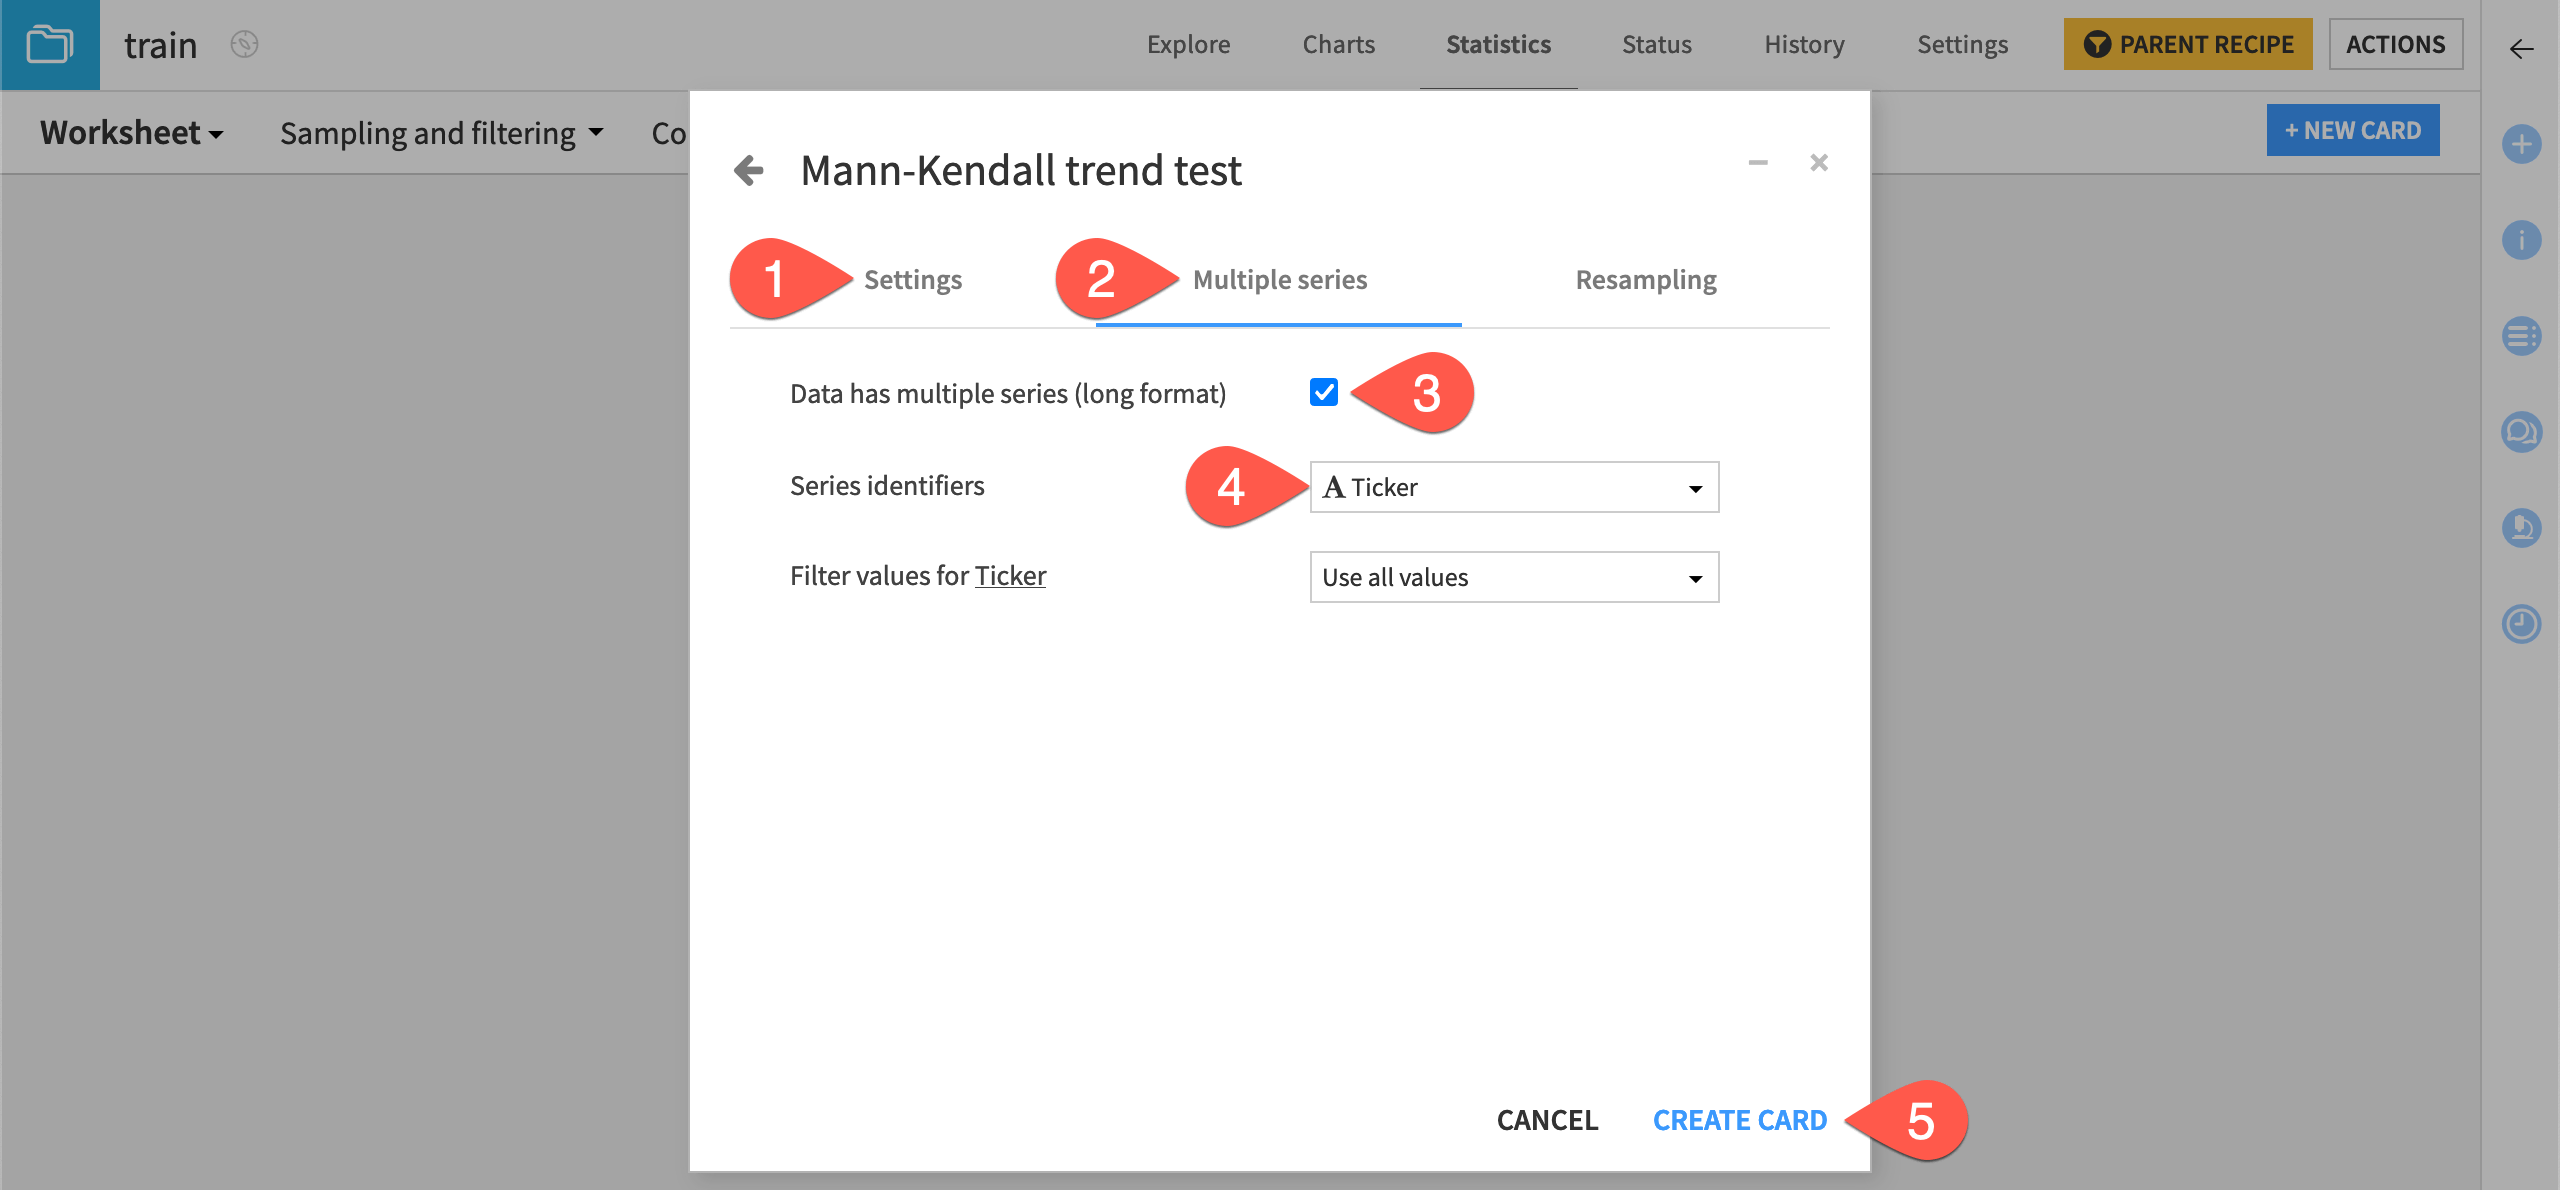
On the Settings tab of the card, select Adj_close as the series variable and Date as the time variable.
Switch to the Multiple series tab.
Check the box indicating the data has multiple series (one for each airline in our case).
Select Ticker as the series identifier.
Click Create Card.
Interpret the output#
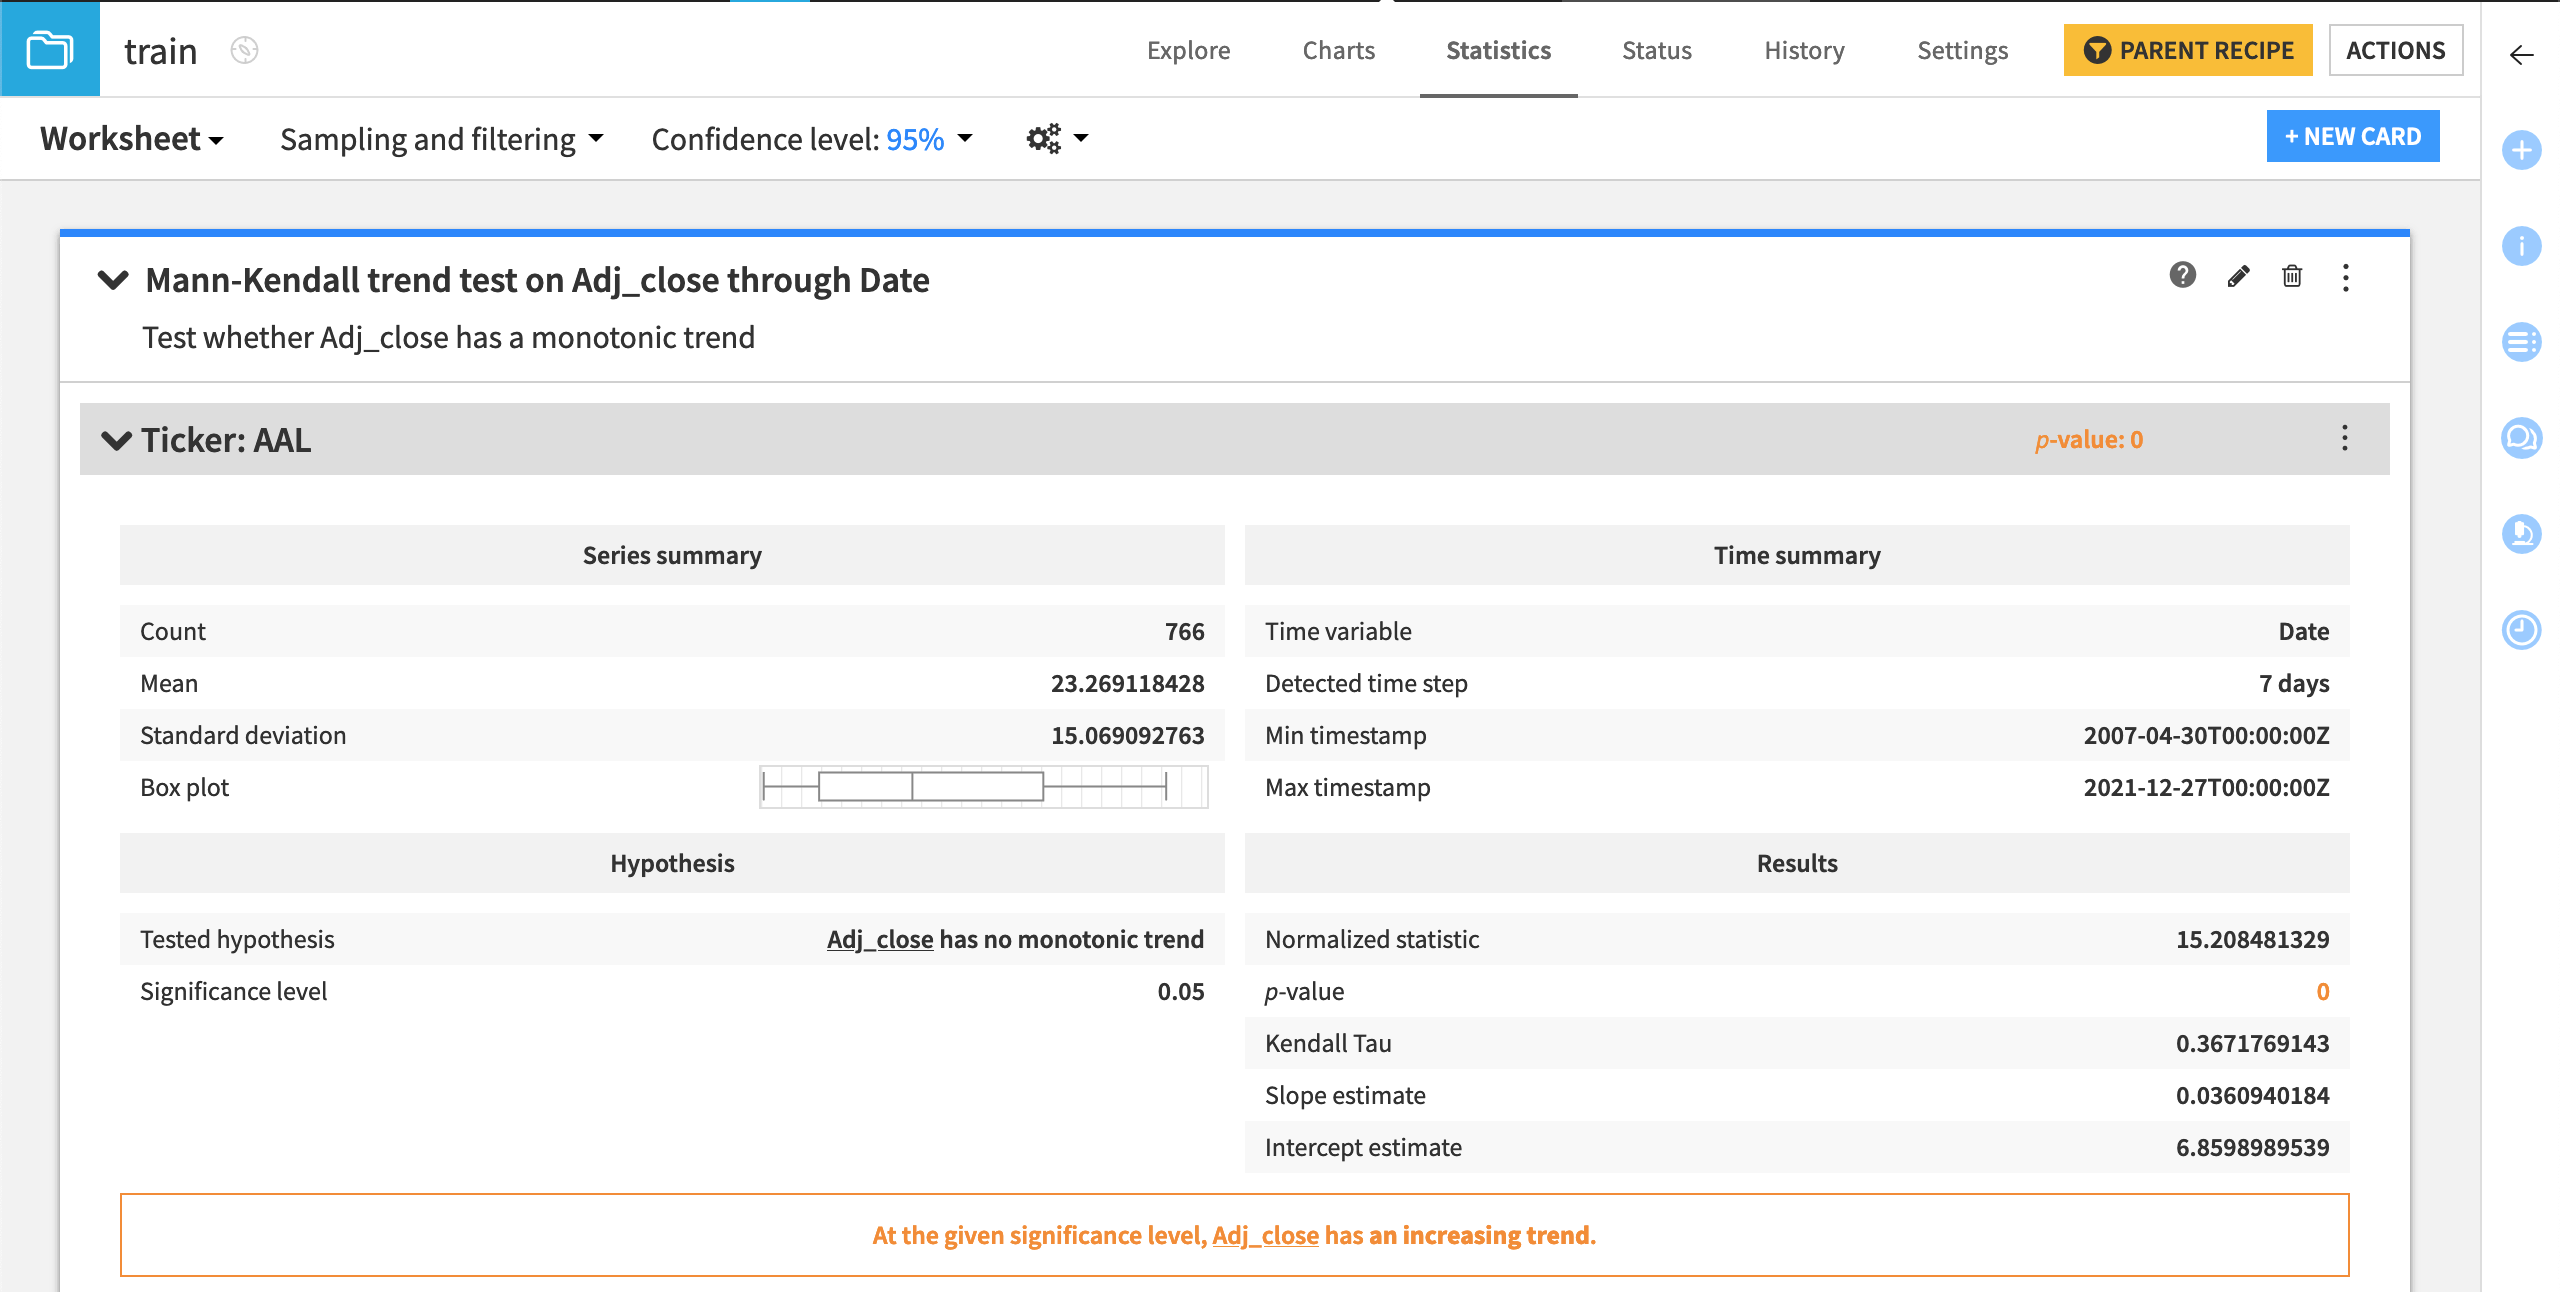
In this case, this test confirms that each time series has an upward or increasing trend, given a significance level of 0.05.
Test for autocorrelation in time series data#
Tests for autocorrelation assess whether a time series is correlated to lagged versions of itself. You can create a plot to assess the autocorrelation over a year (52 weeks) for the adjusted closing price.
Create an autocorrelation function plot#
Let’s add this kind of card to the statistics worksheet.
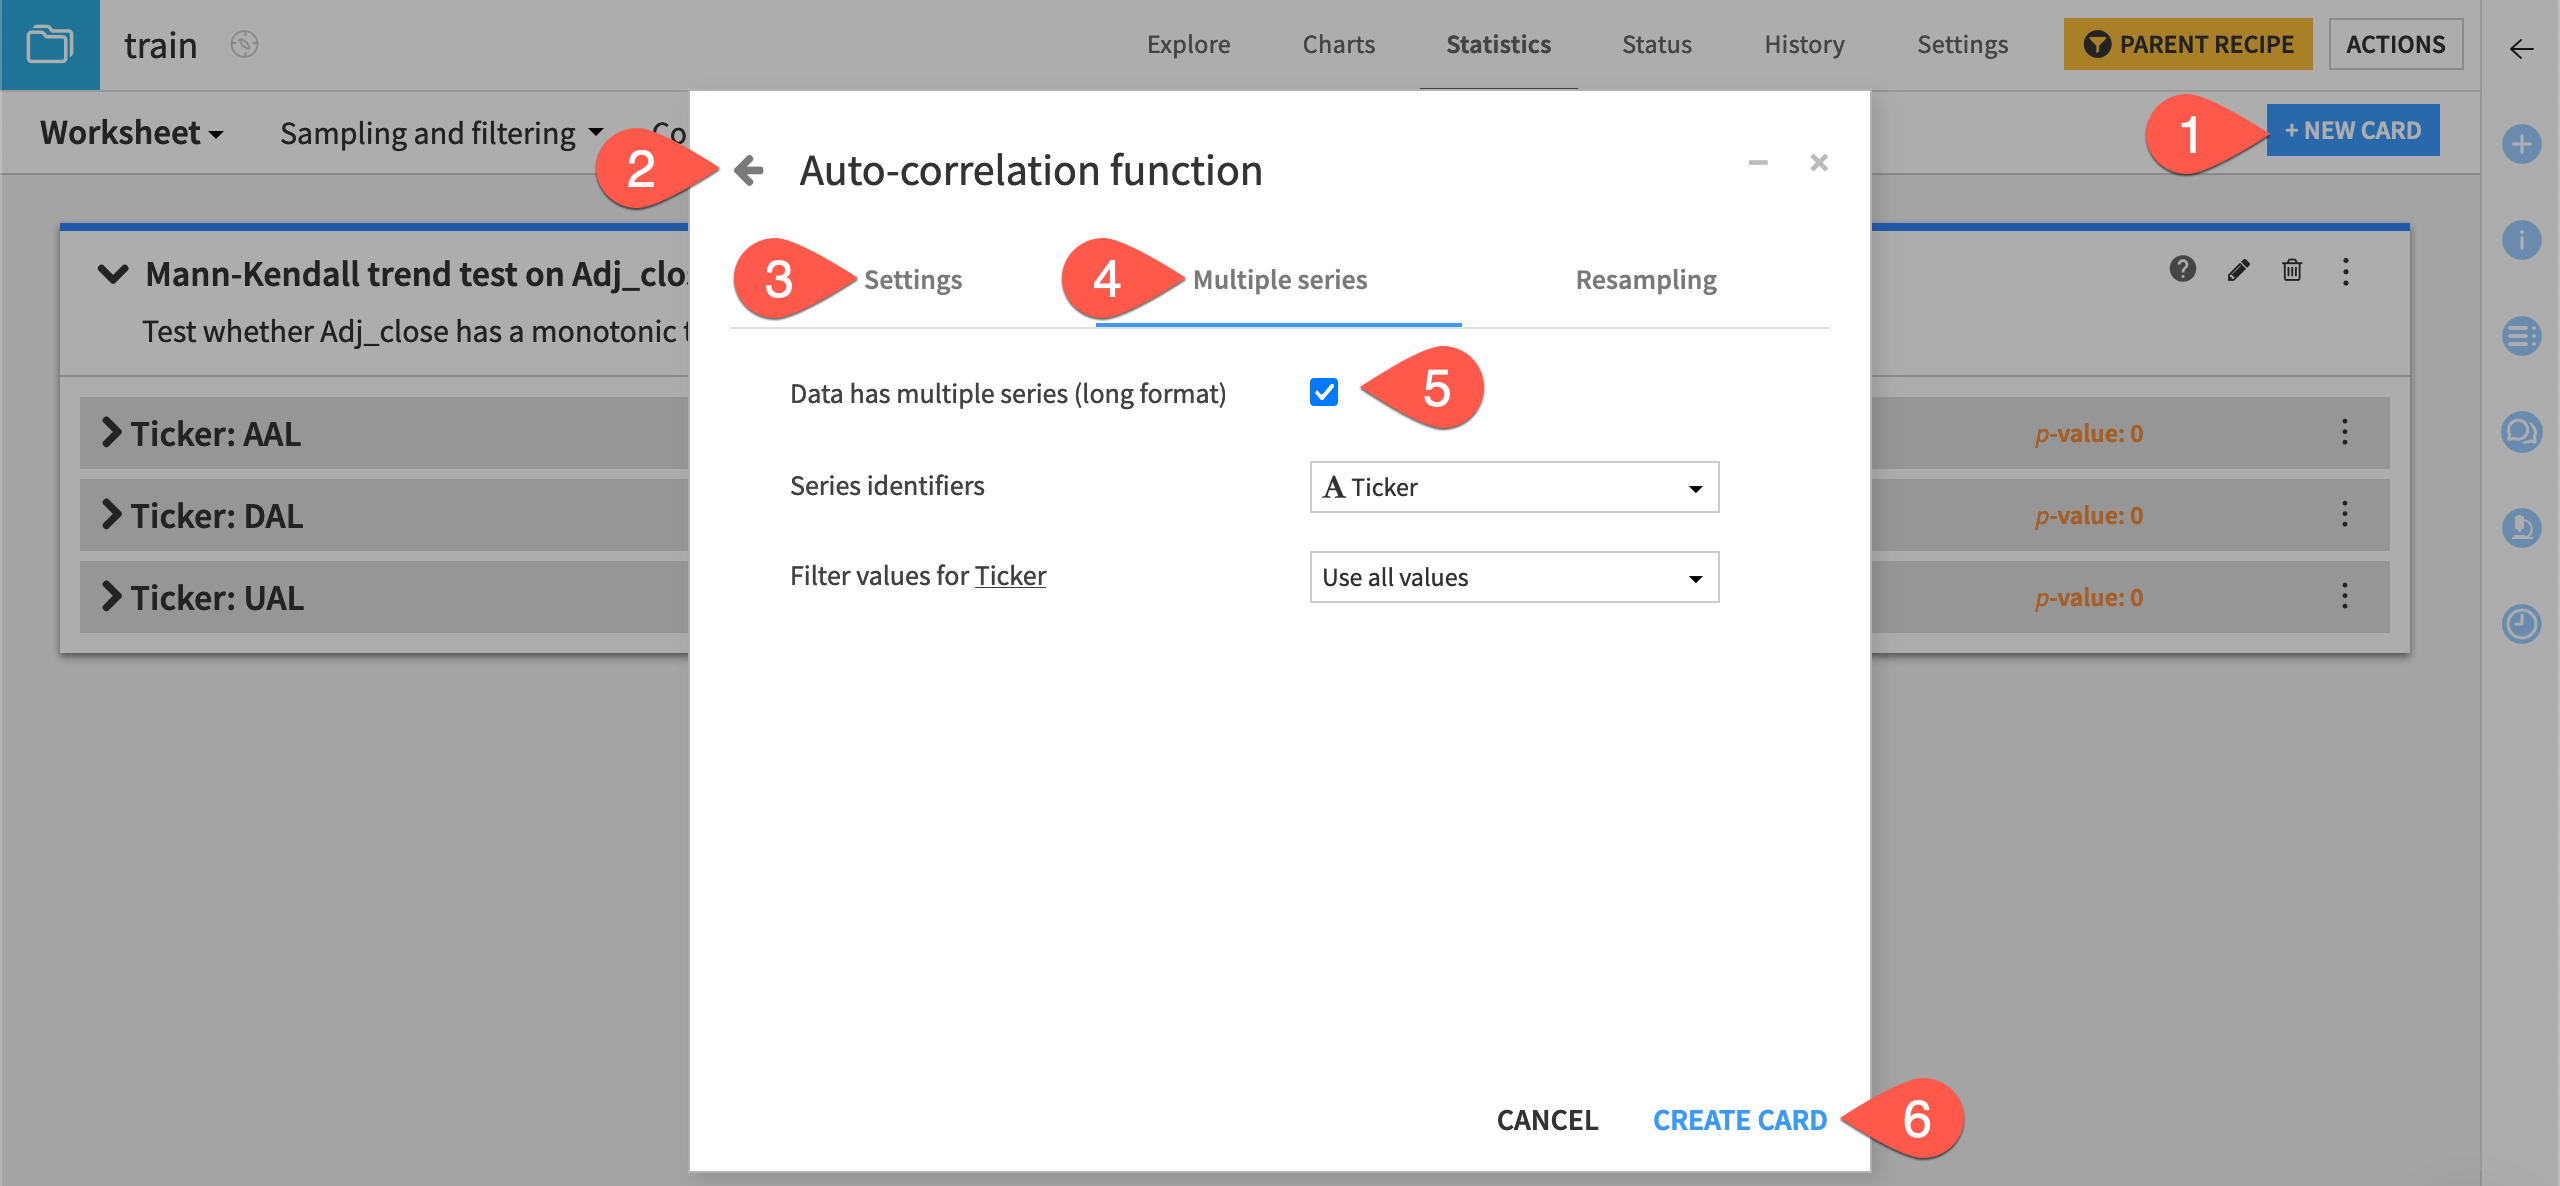
From the existing statistics worksheet, click + New Card.
Select Time series analysis > Autocorrelation > Autocorrelation function plot.
On the Settings tab, provide Adj_close as the series variable as before. Uncheck the box to automatically compute the lags, and specify
52as the number of lags.Switch to the Multiple series tab.
Check the box for multiple series. Ticker should already be set as the series identifier.
Click Create Card.
Interpret the output#
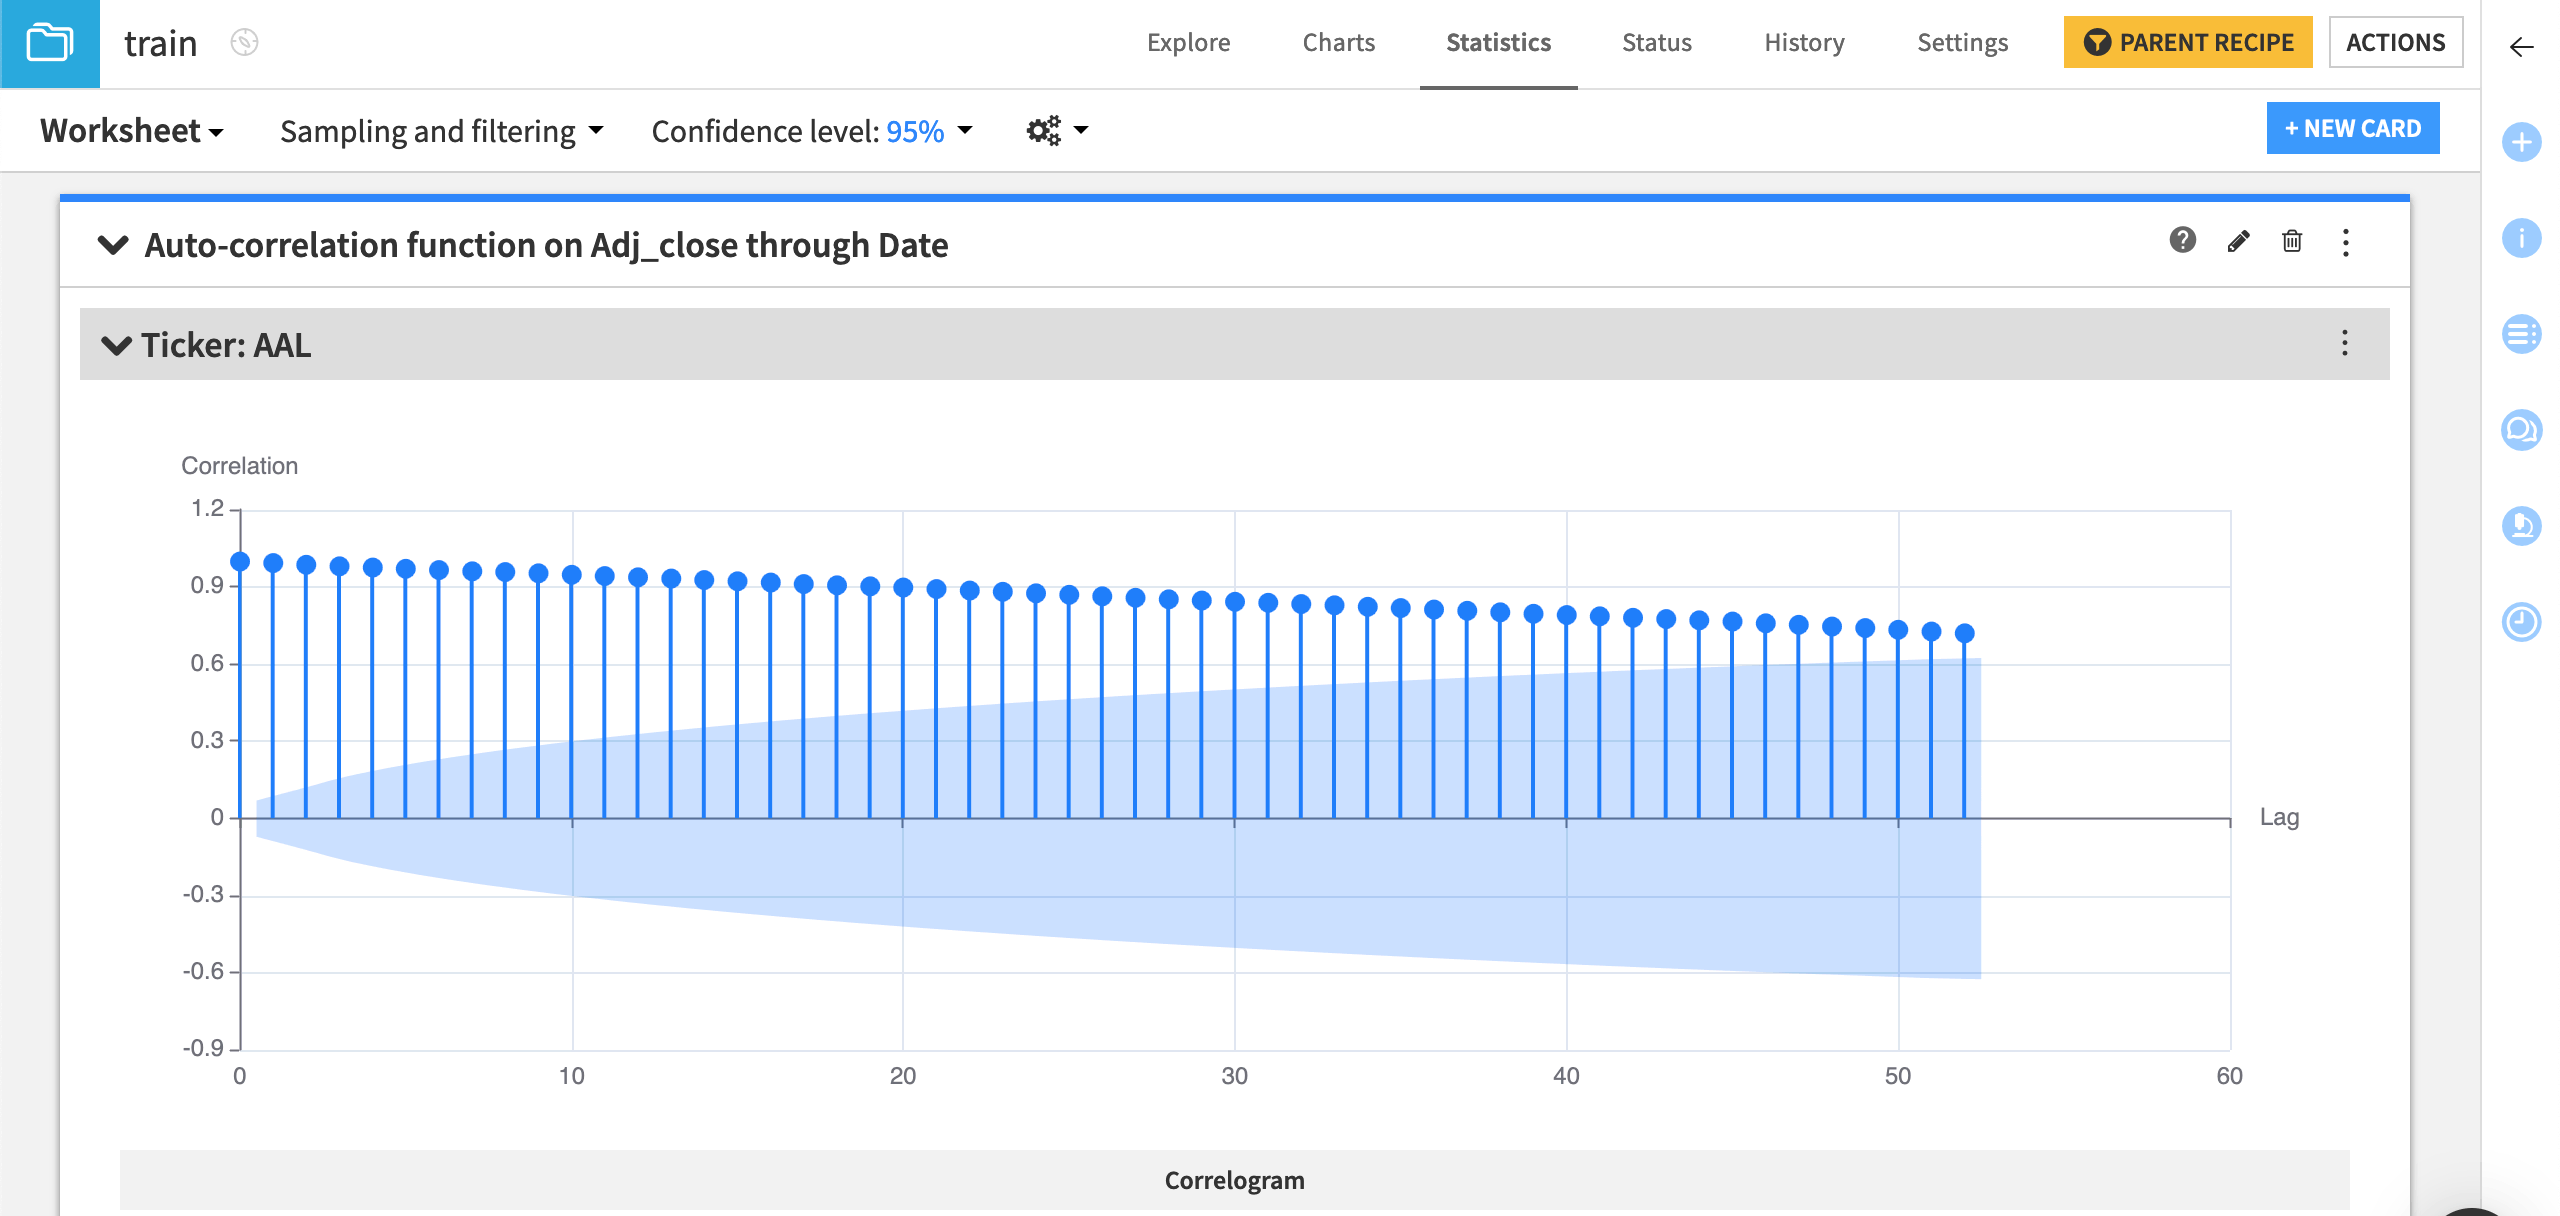
The spikes at each lag indicate autocorrelation. The autocorrelation appears to decrease as the time lags increase. Intuitively, you can expect that the stock price for a given day will be correlated with the prices from the previous days or weeks, and this correlation will reduce as time progresses.
See also
You can also conduct the Durbin-Watson statistical test to confirm the presence of a positive serial correlation in the time series.
Test for stationarity in time series data#
The Kwiatkowski-Phillips-Schmidt-Shin (KPSS) test aims to reject the hypothesis that the series is stationary. If the hypothesis is rejected, you can conclude the series isn’t stationary. Otherwise, the test is inconclusive. Non-stationary data is extremely difficult to estimate accurately.
Create a KPSS test#
Let’s add one last card to the worksheet.
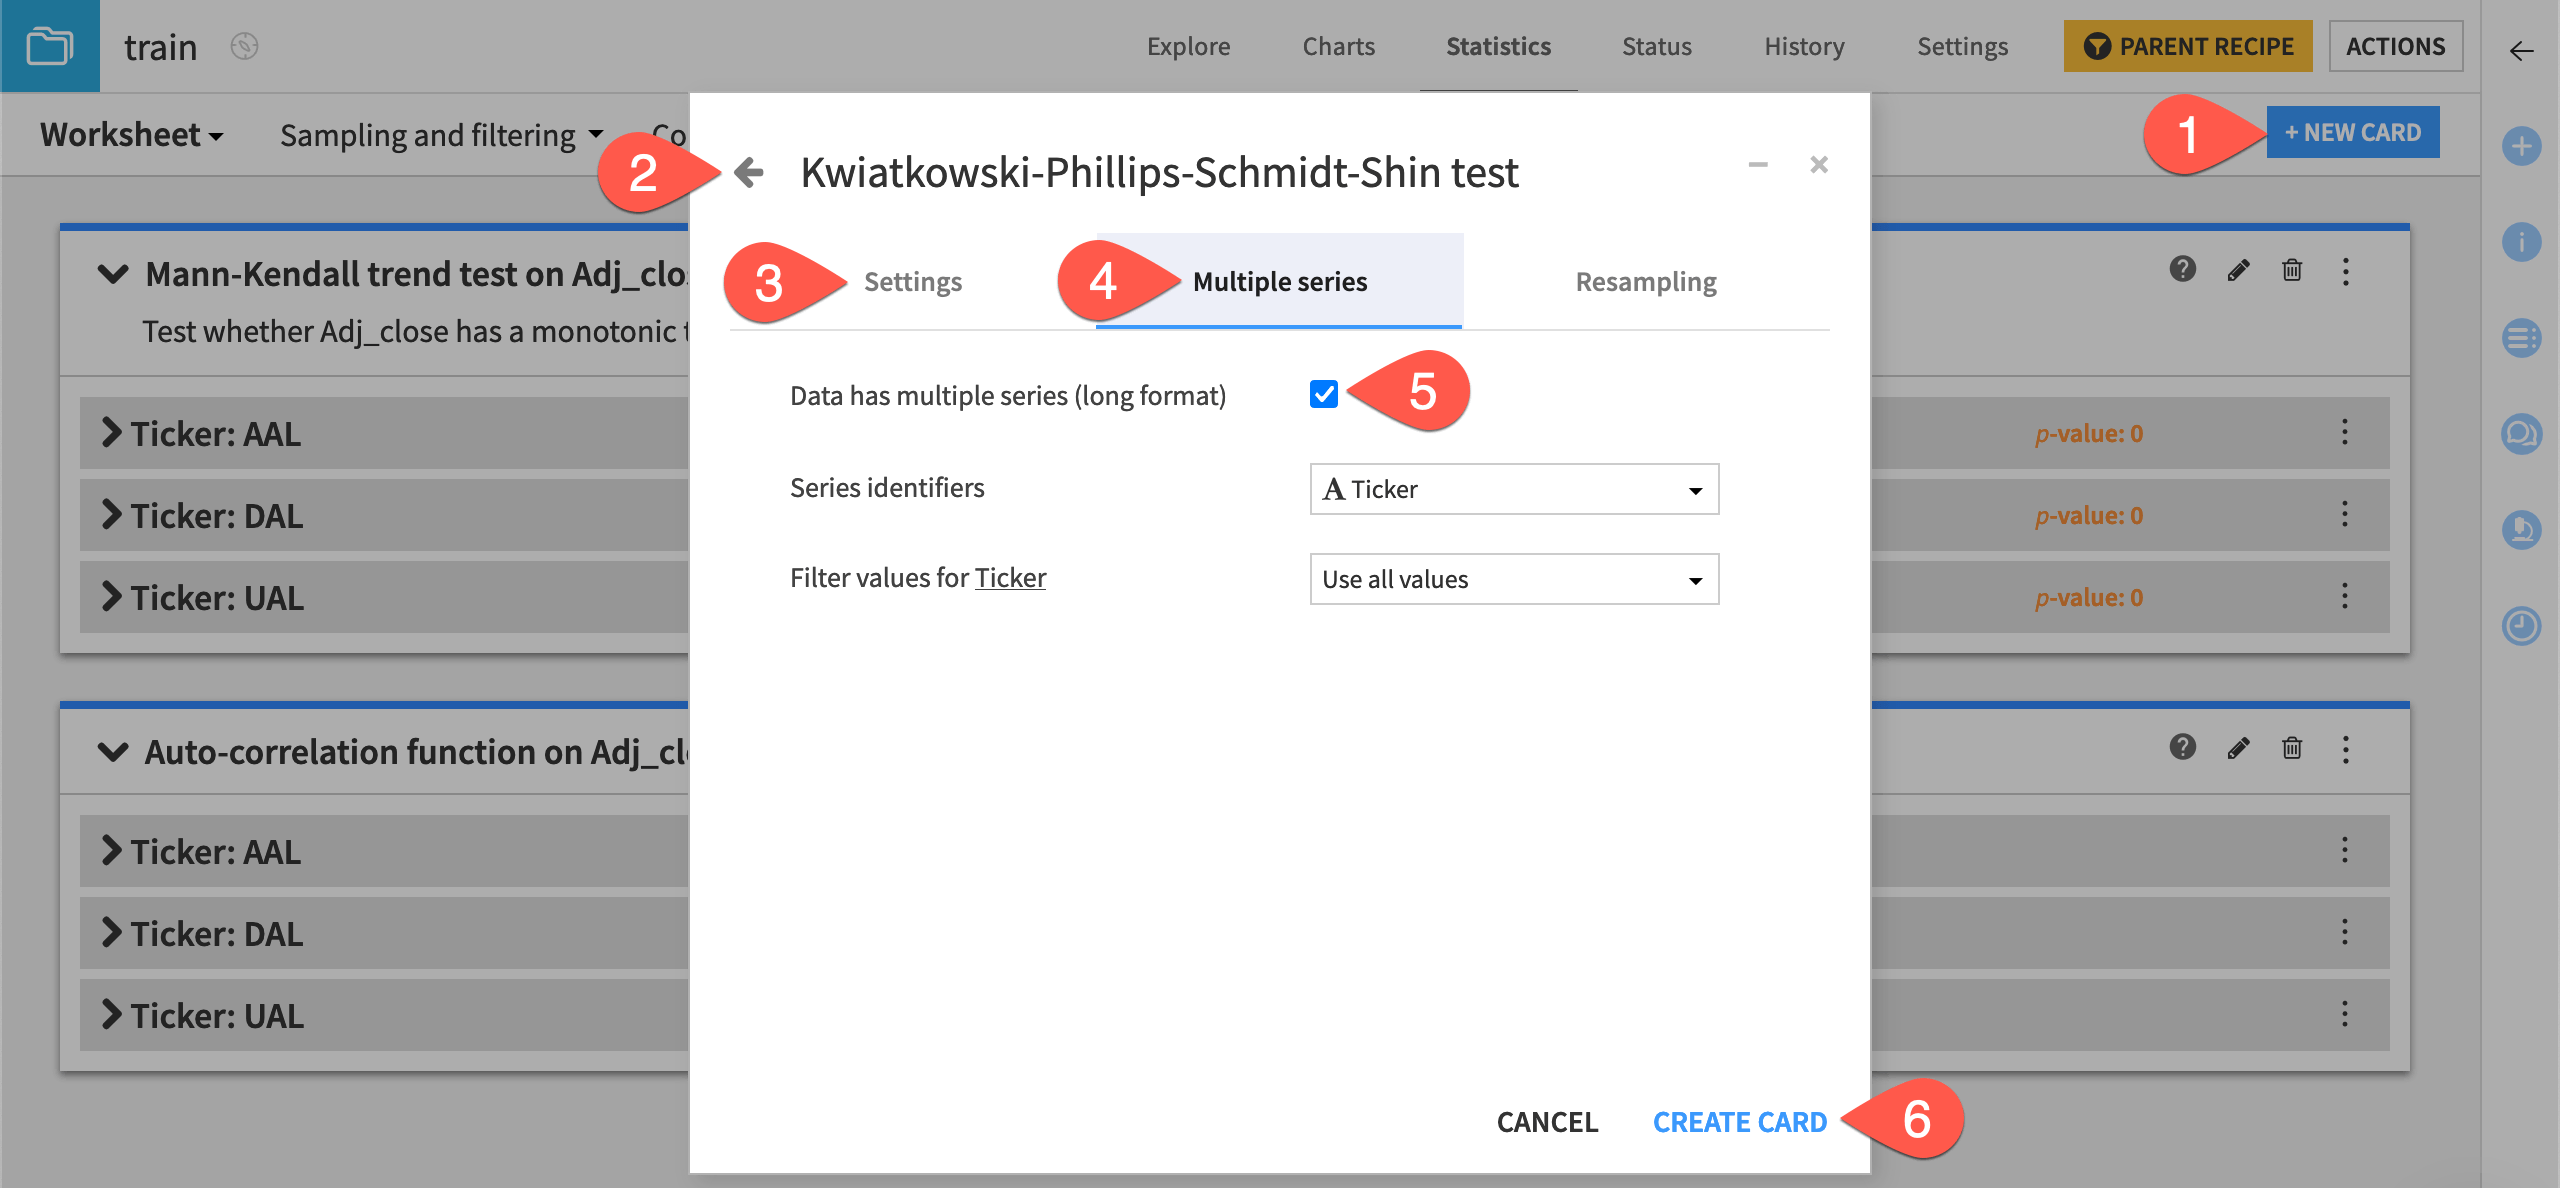
From the existing statistics worksheet, click + New Card.
Select Time series analysis > Stationarity > Kwiatkowski-Phillips-Schmidt-Shin test.
On the Settings tab, provide Adj_close as the series variable as before.
Switch to the Multiple series tab.
Check the box for multiple series. Ticker should already be set as the series identifier.
Click Create Card.
Interpret the output#
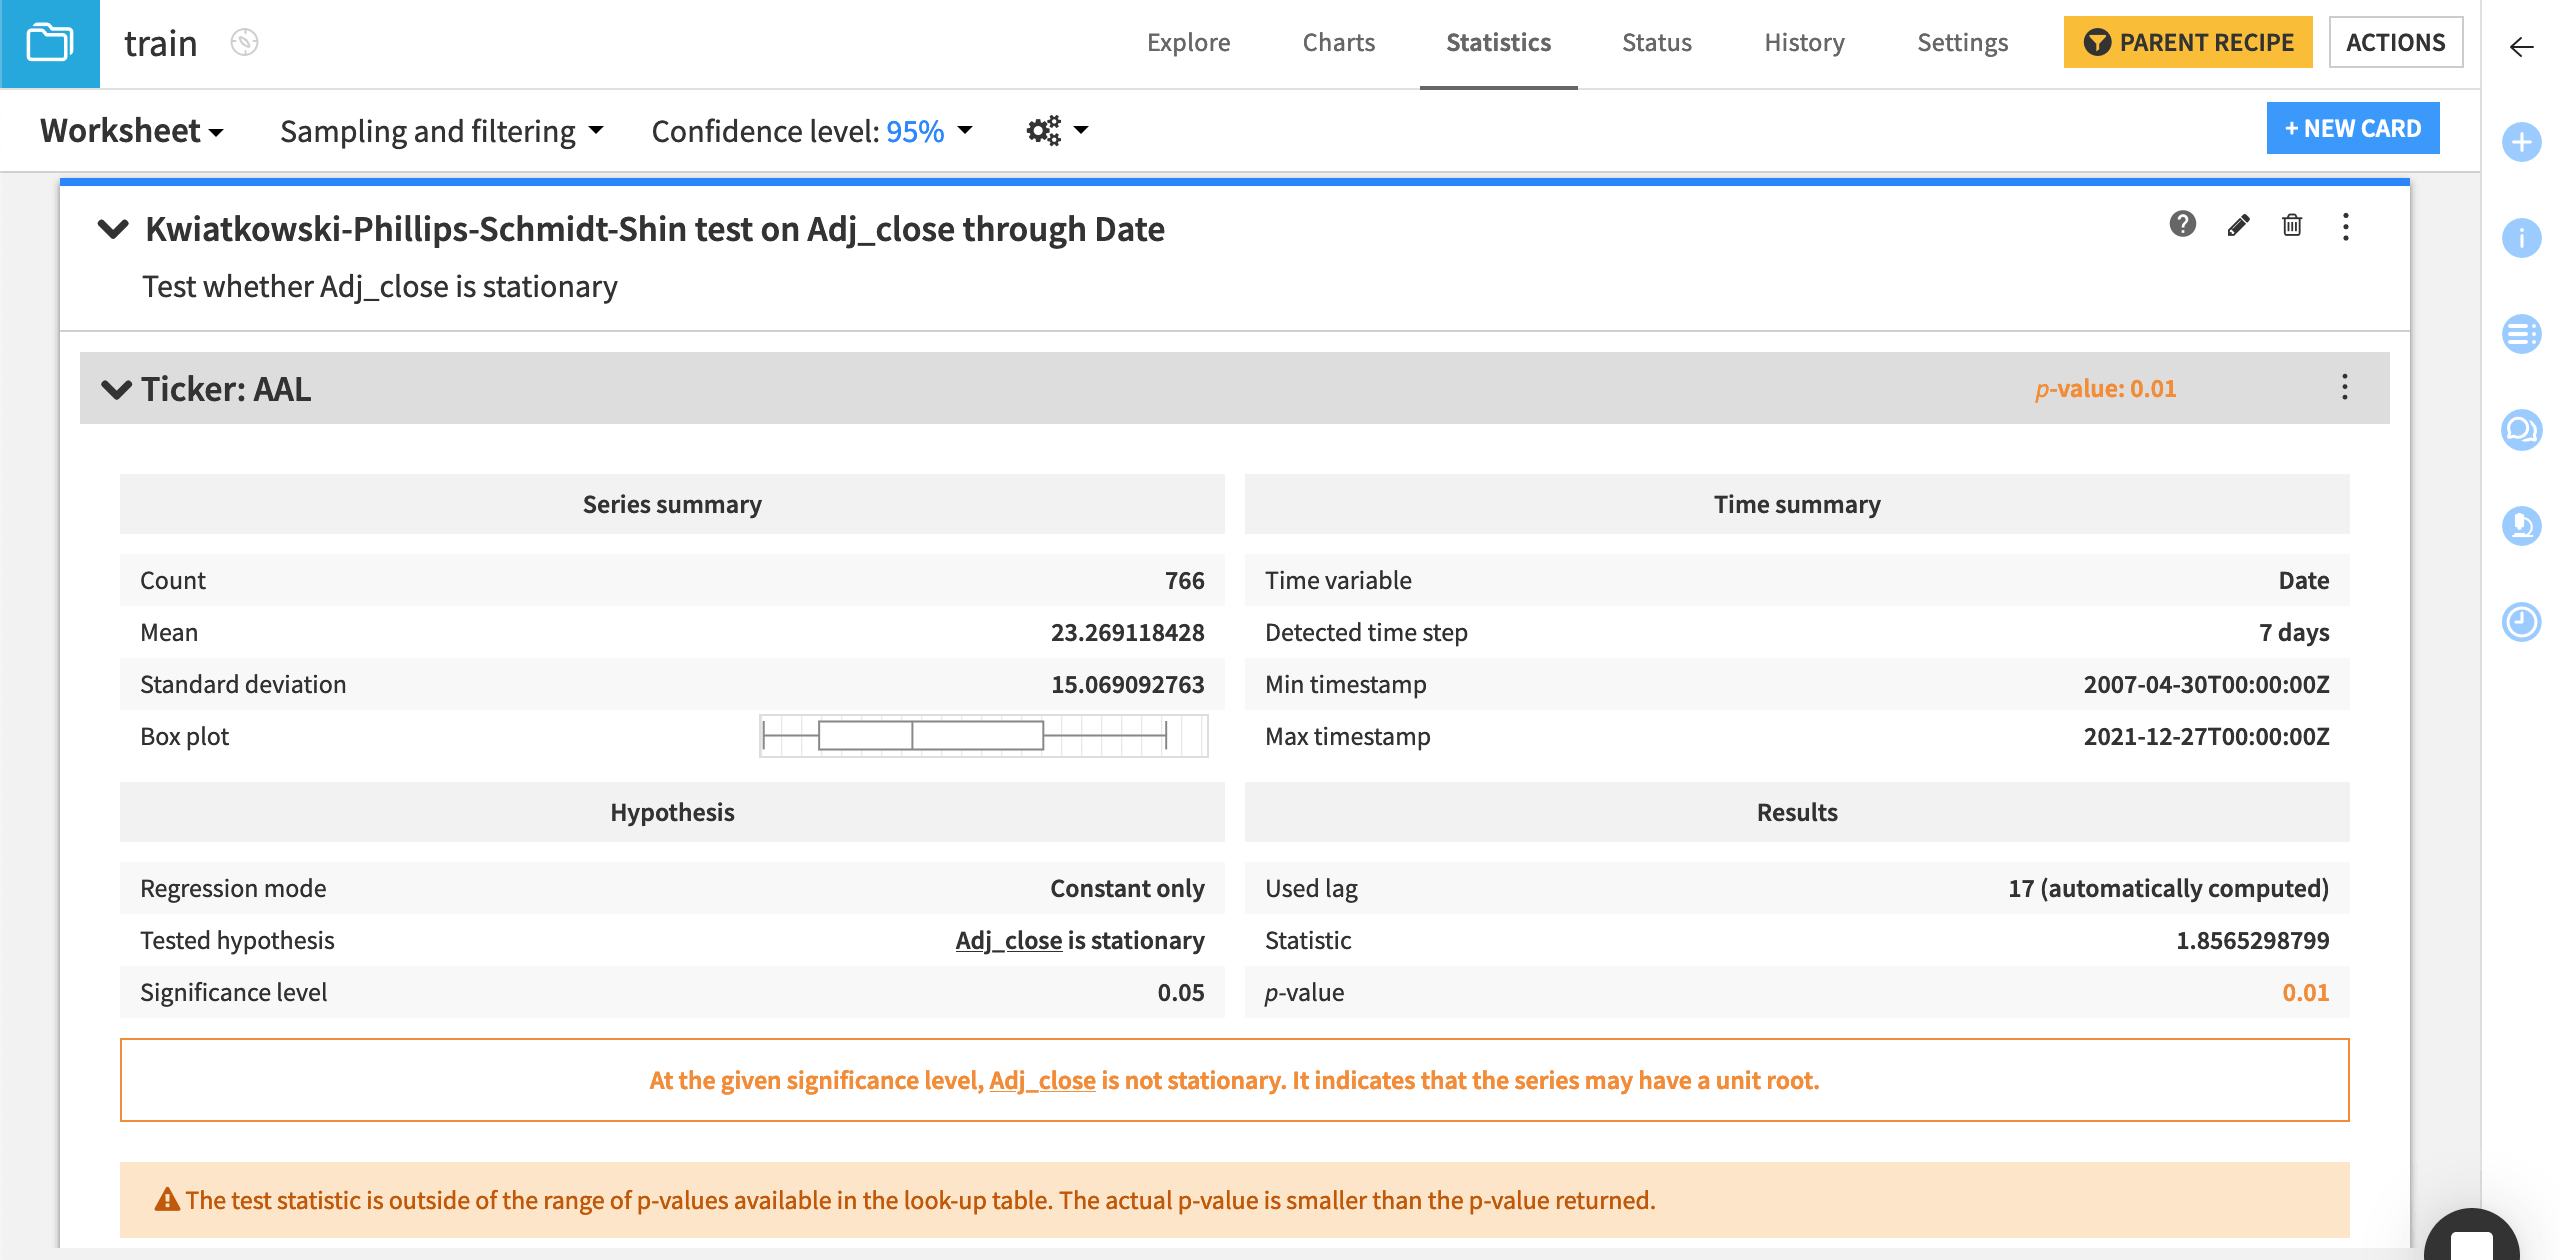
At the default 95% confidence level, the results indicate that each series isn’t stationary. This could be due to an external event, such as market fluctuations.
See also
See the reference documentation for other stationarity and unit root tests, such as the Augmented Dickey-Fuller test or the Zivot-Andrews test.
Next steps#
Congratulations on taking your first steps with performing statistical analyses on time series data! Now that you’ve tested statistical assumptions on this data, your next step may be to build forecasting models.
See how to do that in Tutorial | Time series forecasting (visual ML)!
See also
You can find more information about Time Series Analysis in the reference documentation.

