Tutorial | Build a conversational interface with Dataiku Answers#
Get started#
Dataiku includes two fully featured chatbot user interfaces: Answers and Agent Hub.
In this tutorial, you’ll use Dataiku Answers to build a no-code chat interface that generates answers from a knowledge bank created from an Embed documents or Embed dataset recipe.
Objectives#
In this tutorial, you will:
Create an Answers web application from a knowledge bank.
Configure the application to provide relevant answers from a sample of the Dataiku documentation sources.
Upload an additional document into the application for an on-the-fly analysis.
Prerequisites#
This tutorial assumes your Flow includes a knowledge bank of a sample of Dataiku documentation sources. Accordingly, you’ll first need to create this knowledge bank by following:
Preferably, Tutorial | Build a multimodal knowledge bank for a RAG project so you’ll be able to upload a document on-the-fly.
Alternatively, Tutorial | Retrieval Augmented Generation (RAG) with the Embed dataset recipe.
In addition to those prerequisites, you’ll also need to meet any requirements noted in the reference documentation on Answers, including an SQL connection.
Tip
You don’t need previous experience with large language models (LLMs), though it would be useful to read the article Concept | Embed recipes and Retrieval Augmented Generation (RAG) before completing this tutorial.
Create the conversational interface#
The first step to building a Dataiku Answers chat application is to initiate it from a knowledge bank found in the Flow.
In the top navigation bar, go to the Code (
) > Webapp menu.
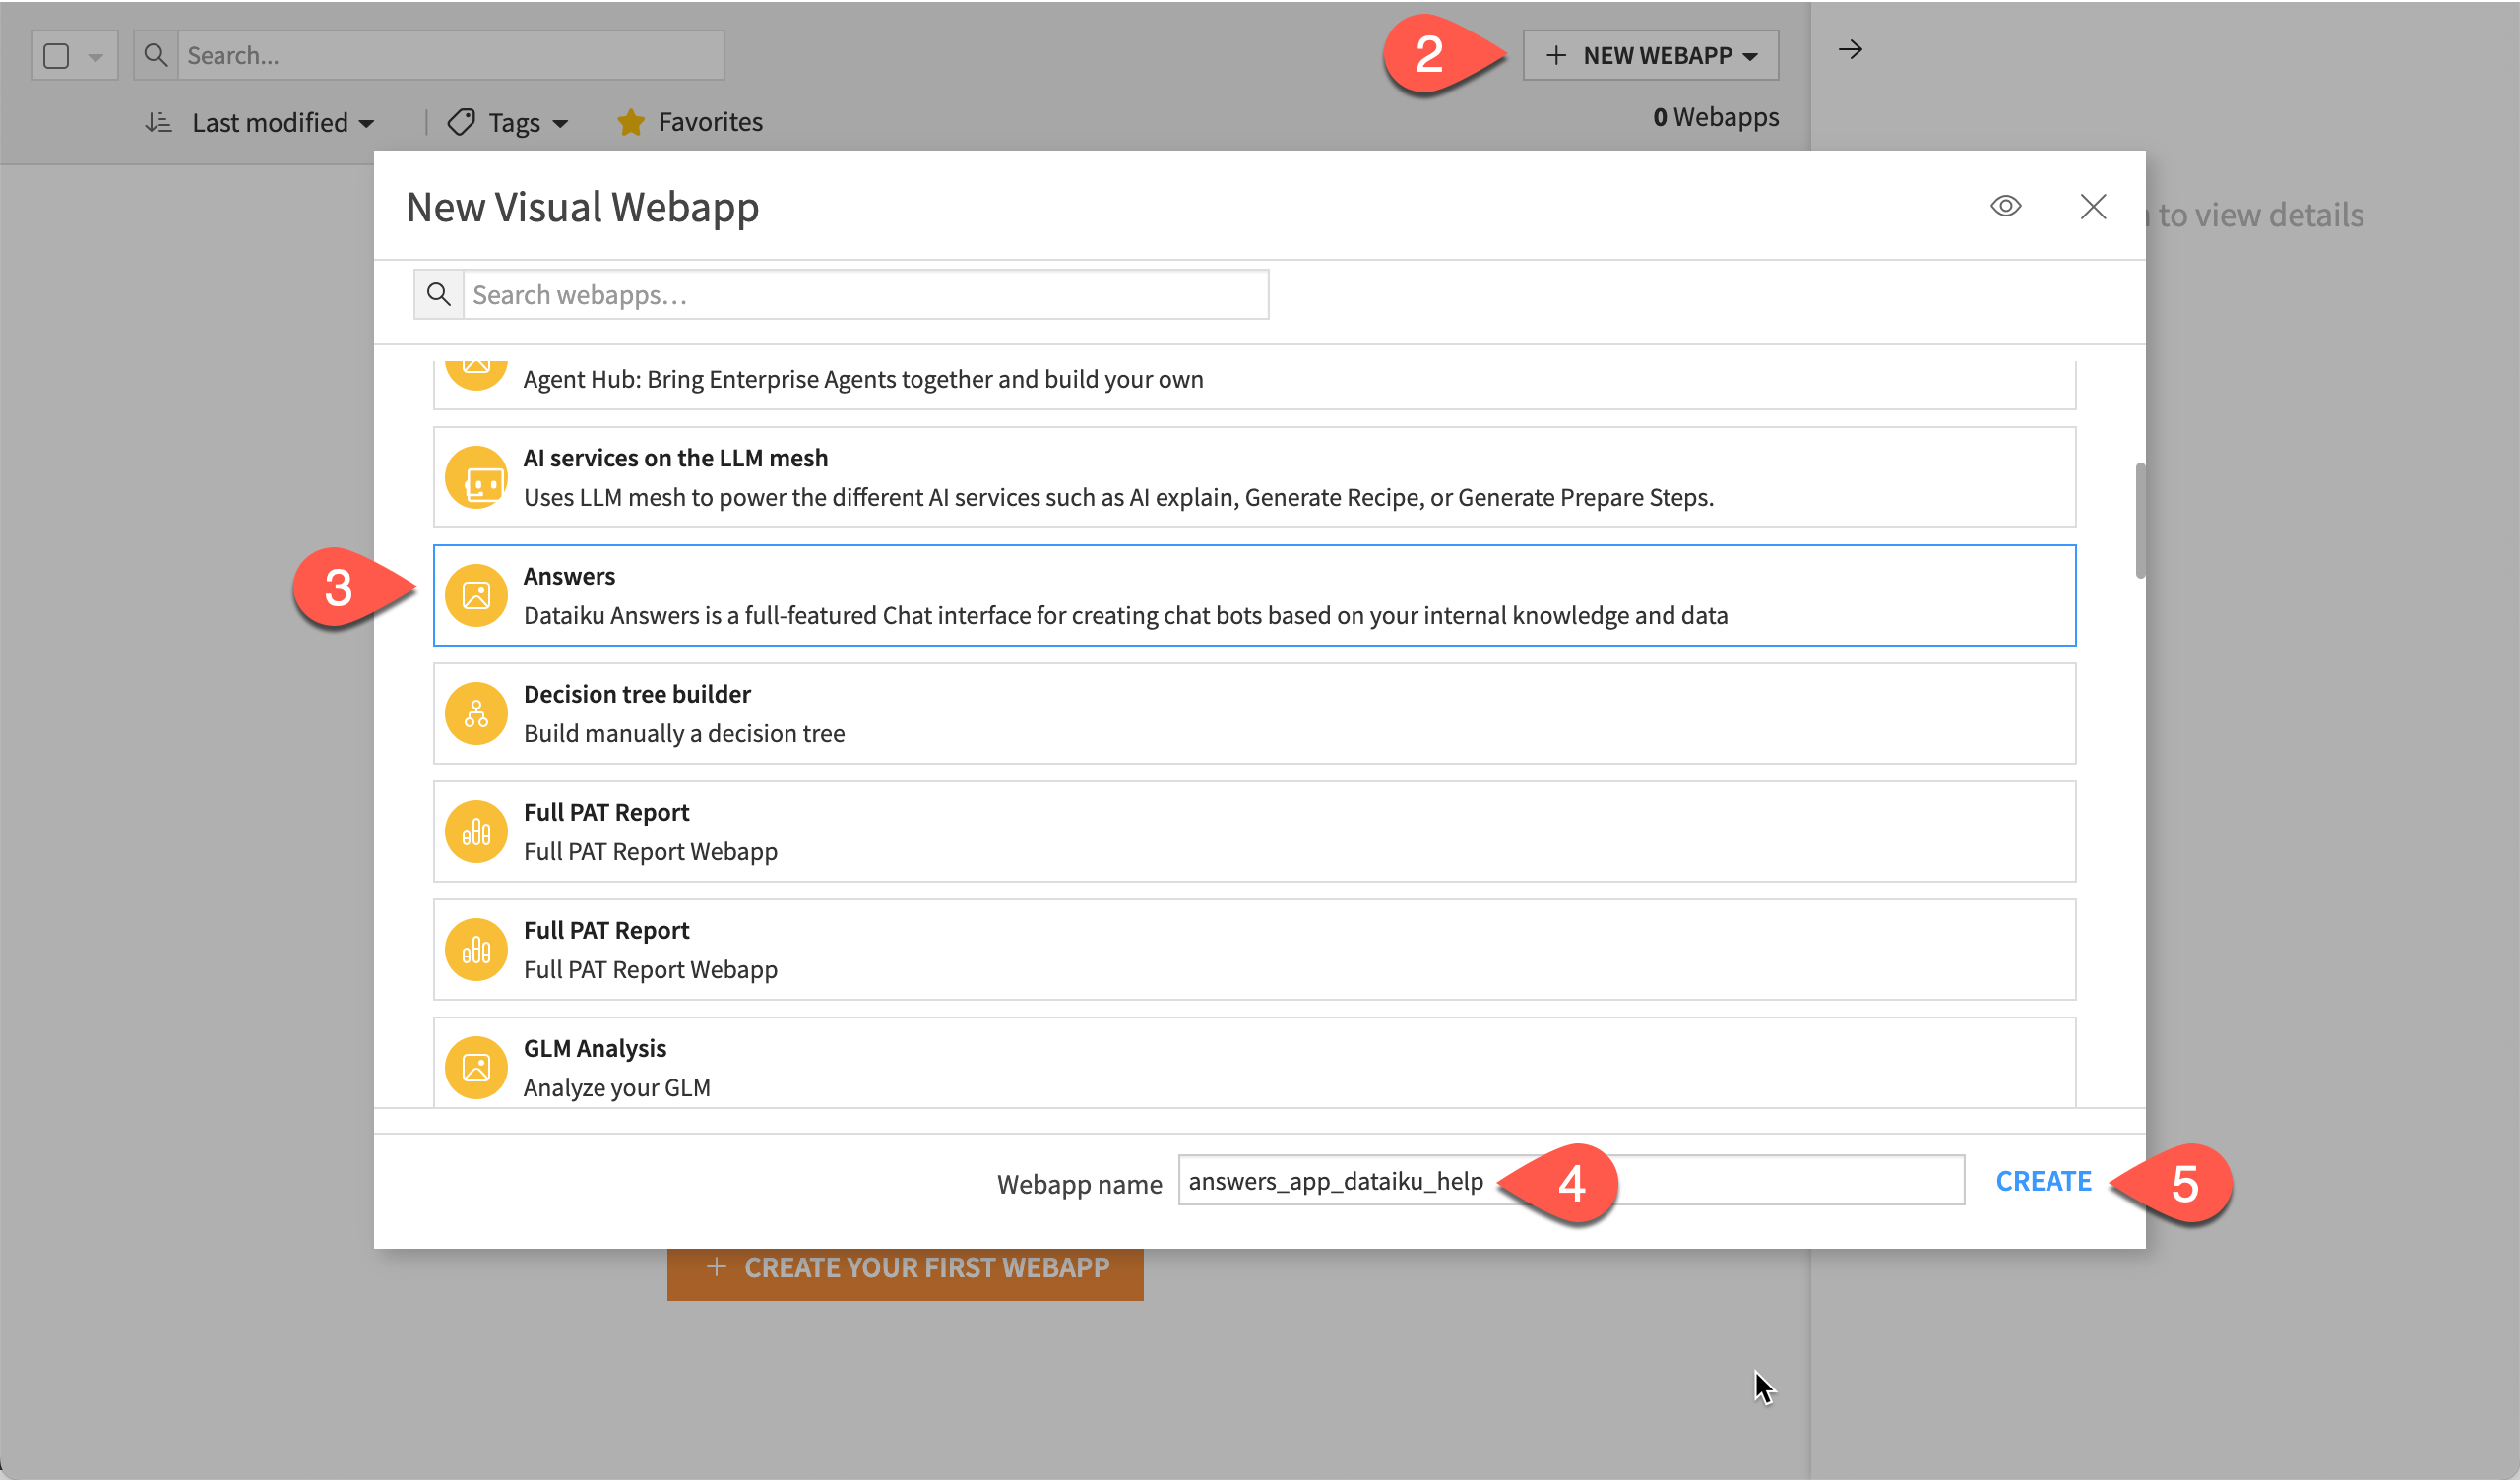
Click + New Webapp > Visual Webapp.
In the New Visual Webapp window, select Answers.
Name the webapp
answers_app_dataiku_help.Click Create.
Configure the conversational interface#
You can configure a Dataiku Answers webapp in many ways.
See also
This tutorial examines only a few of the most relevant settings. See Answers in the reference documentation for complete details.
Set the mandatory options#
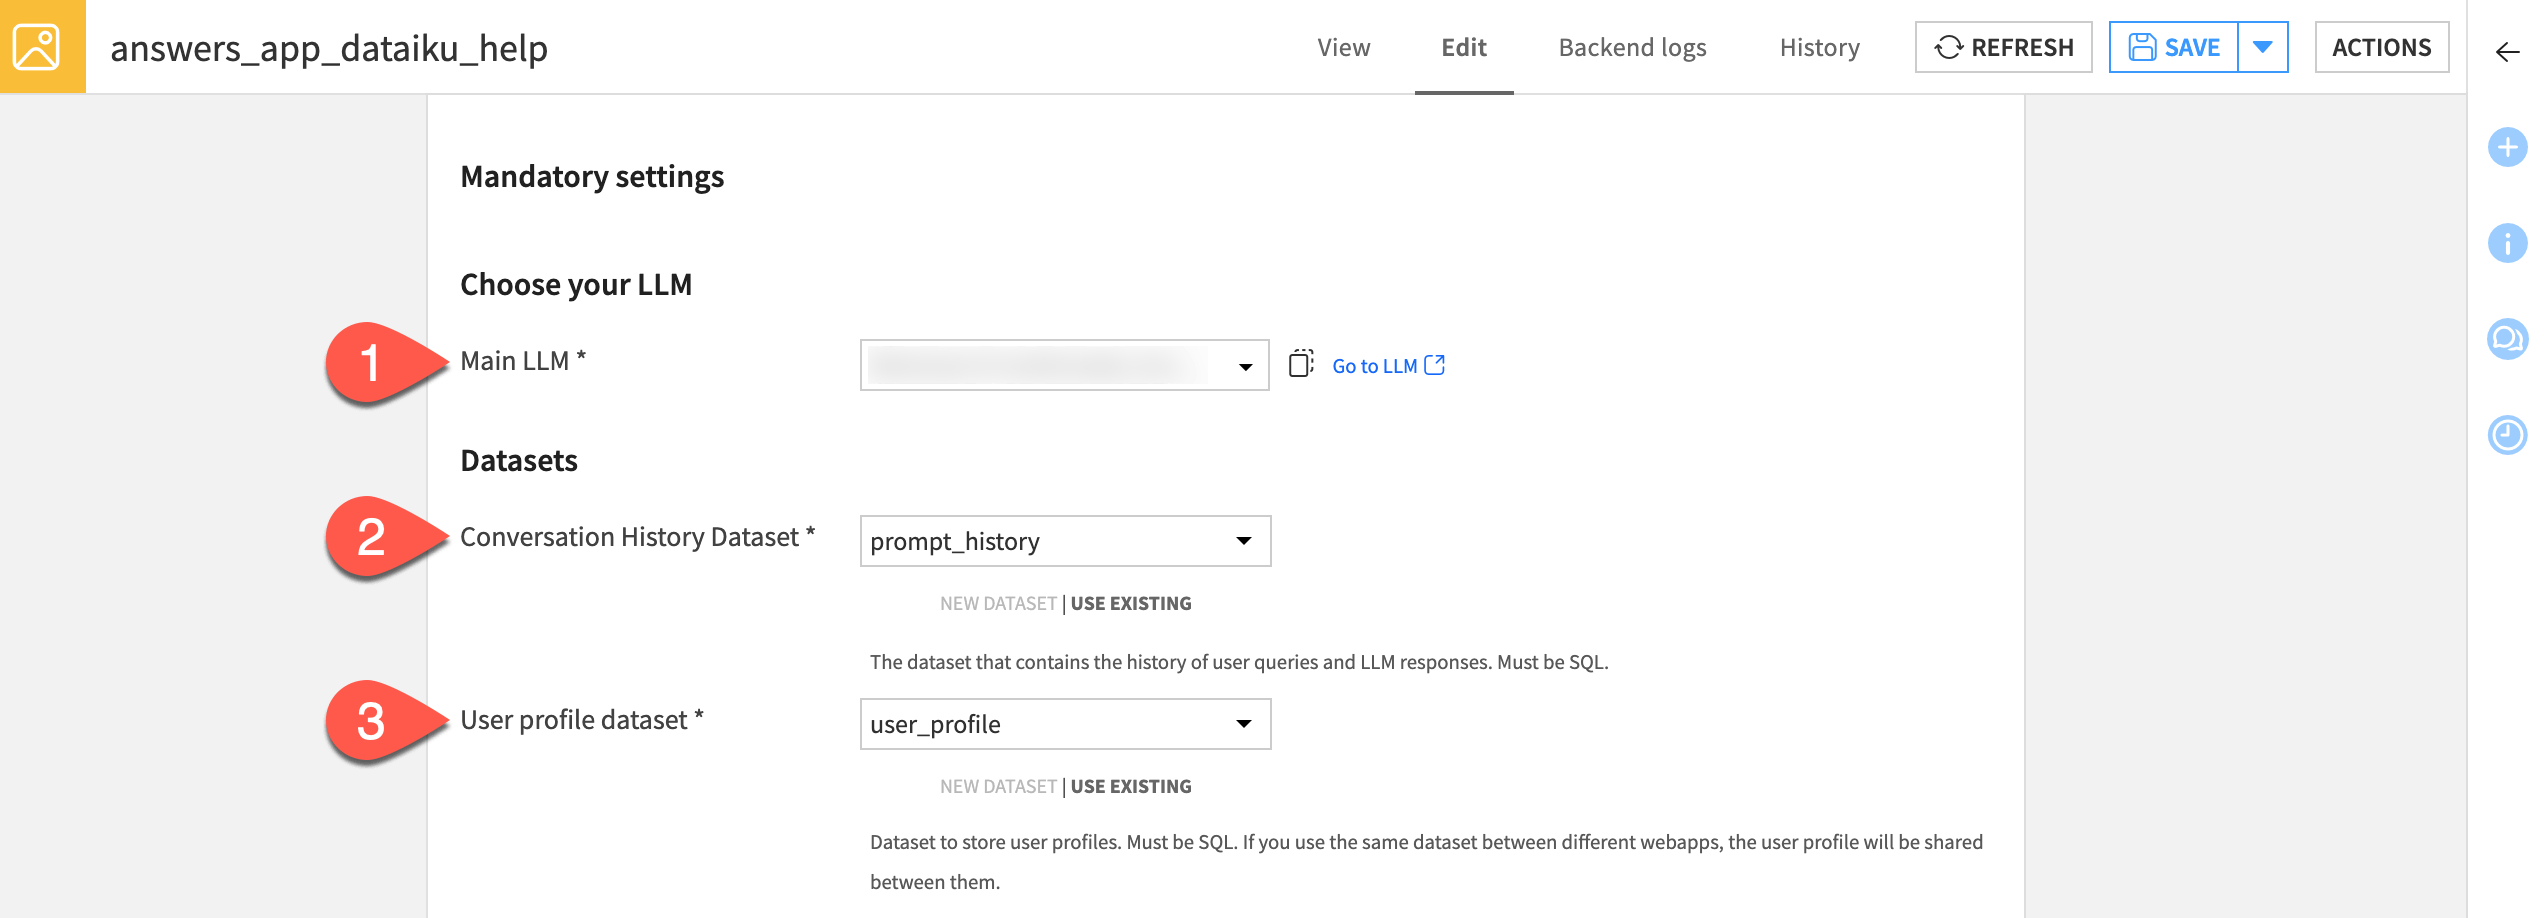
Even though you’ll configure this application to generate responses using the knowledge bank, you’ll need to select an LLM. You’ll also need to provide details for two SQL datasets:
A conversation history dataset for logging queries, responses and associated metadata and conversation feedback.
A user profile dataset for storing all user feedback.
In the Main LLM field, select an available LLM.
For the Conversation History Dataset field:
Click New Dataset.
Name it
prompt_history.Store it in an SQL connection.
Click Create Dataset.
For the Conversation User Profile Dataset field:
Click New Dataset.
Name it
user_profile.Store it in an SQL connection.
Click Create Dataset.
Set the knowledge retrieval parameters#
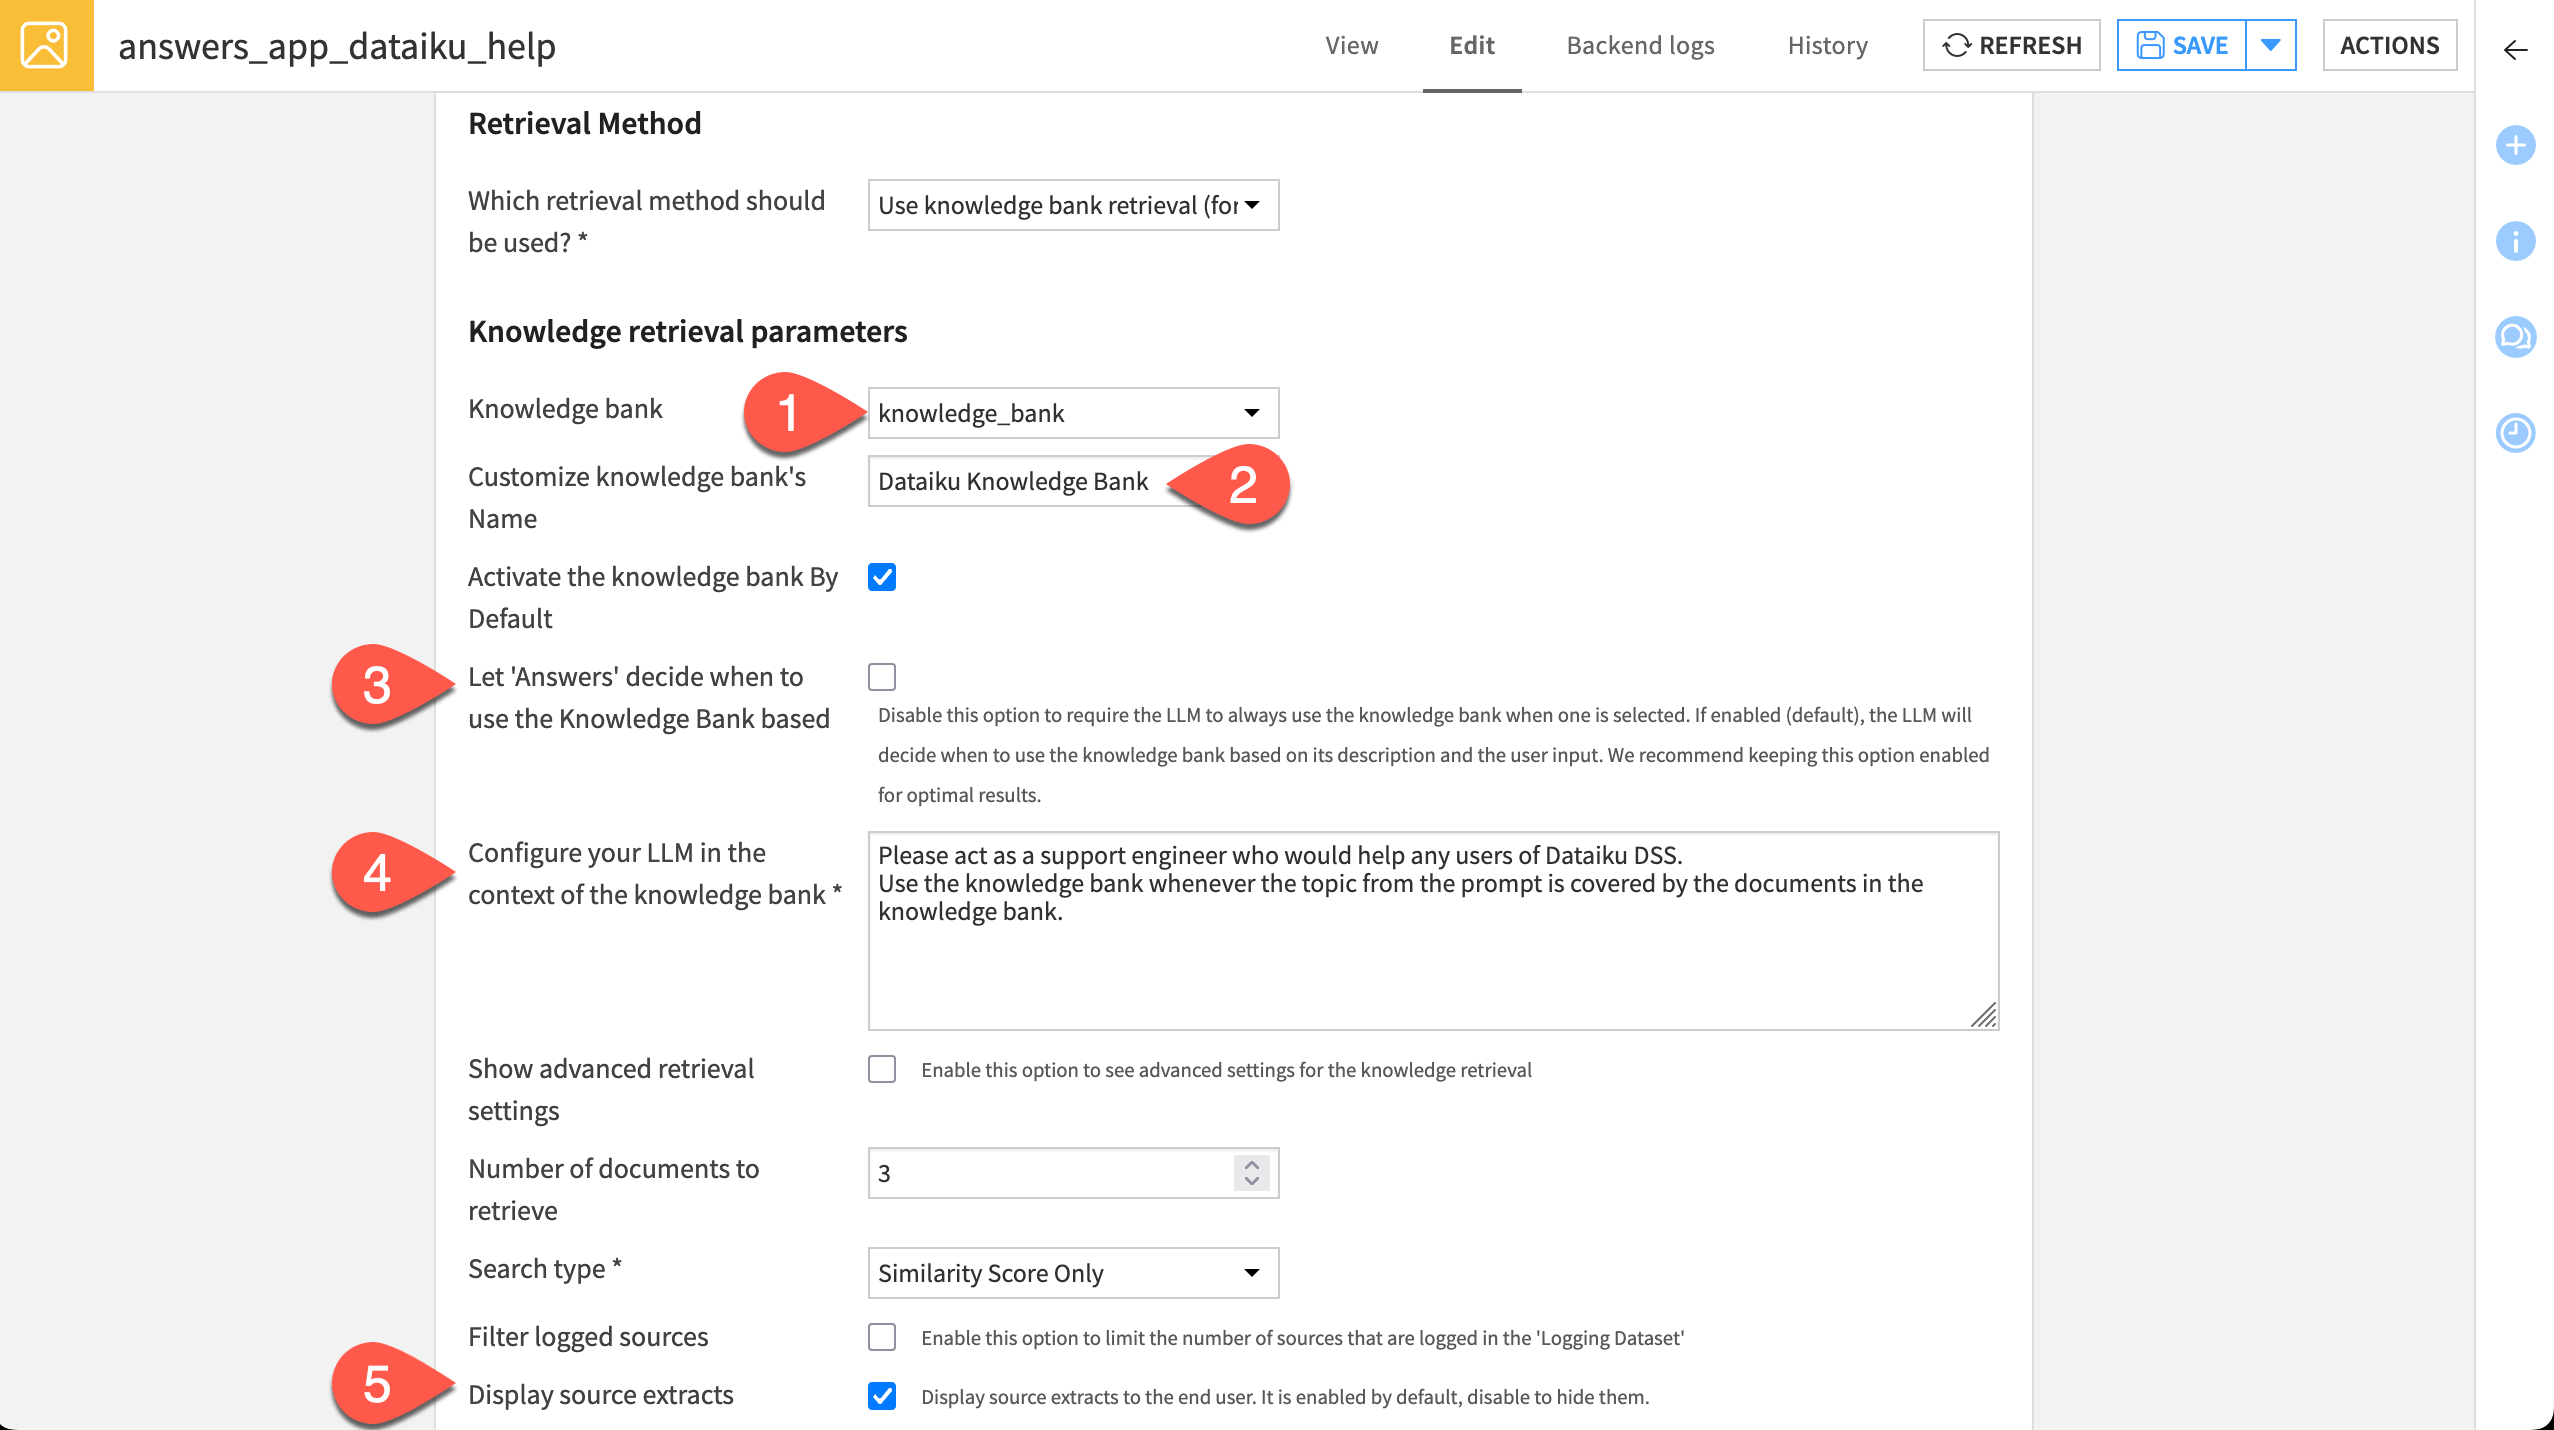
The Knowledge retrieval parameters allows you to configure which knowledge bank to use and customize its use.
In the left panel, click Retrieval Method.
In the Knowledge bank field, ensure that knowledge_bank is selected.
In the Customize knowledge bank’s name field, enter
Dataiku Knowledge Bank. Dataiku will display this name on the user interface.Uncheck the Let ‘Answers’ decide when to use the Knowledge Bank based option to require the LLM to use the knowledge bank to answer any questions.
In Provide any instructions to your LLM when knowledge bank is used, enter the following text:
Please act as a support engineer who would help any users of Dataiku DSS.
Use the knowledge bank whenever the topic from the prompt is covered by the documents in the knowledge bank.
Ensure that the Display source extracts is enabled to provide the users with the sources used to generate the answers.
In Select the metadata to include in the context of the LLM, select source_pages.
Allow users to upload documents#
If supported by the underlying LLM, you can let users upload documents. To do so:
In the left panel, click Document Upload.
Under Documents, select dataiku_doc.
Configure the user feedback options#
The Answers webapp offers several ways to collect user feedback.
Set up the conversation feedback#
You can gather user feedback by offering positive and negative feedback: thumbs up or down. Dataiku also lets you define custom choices.
Note
The webapp stores the feedback data in the dataset you created in the Conversation history dataset section of the LLM and Datasets panel.
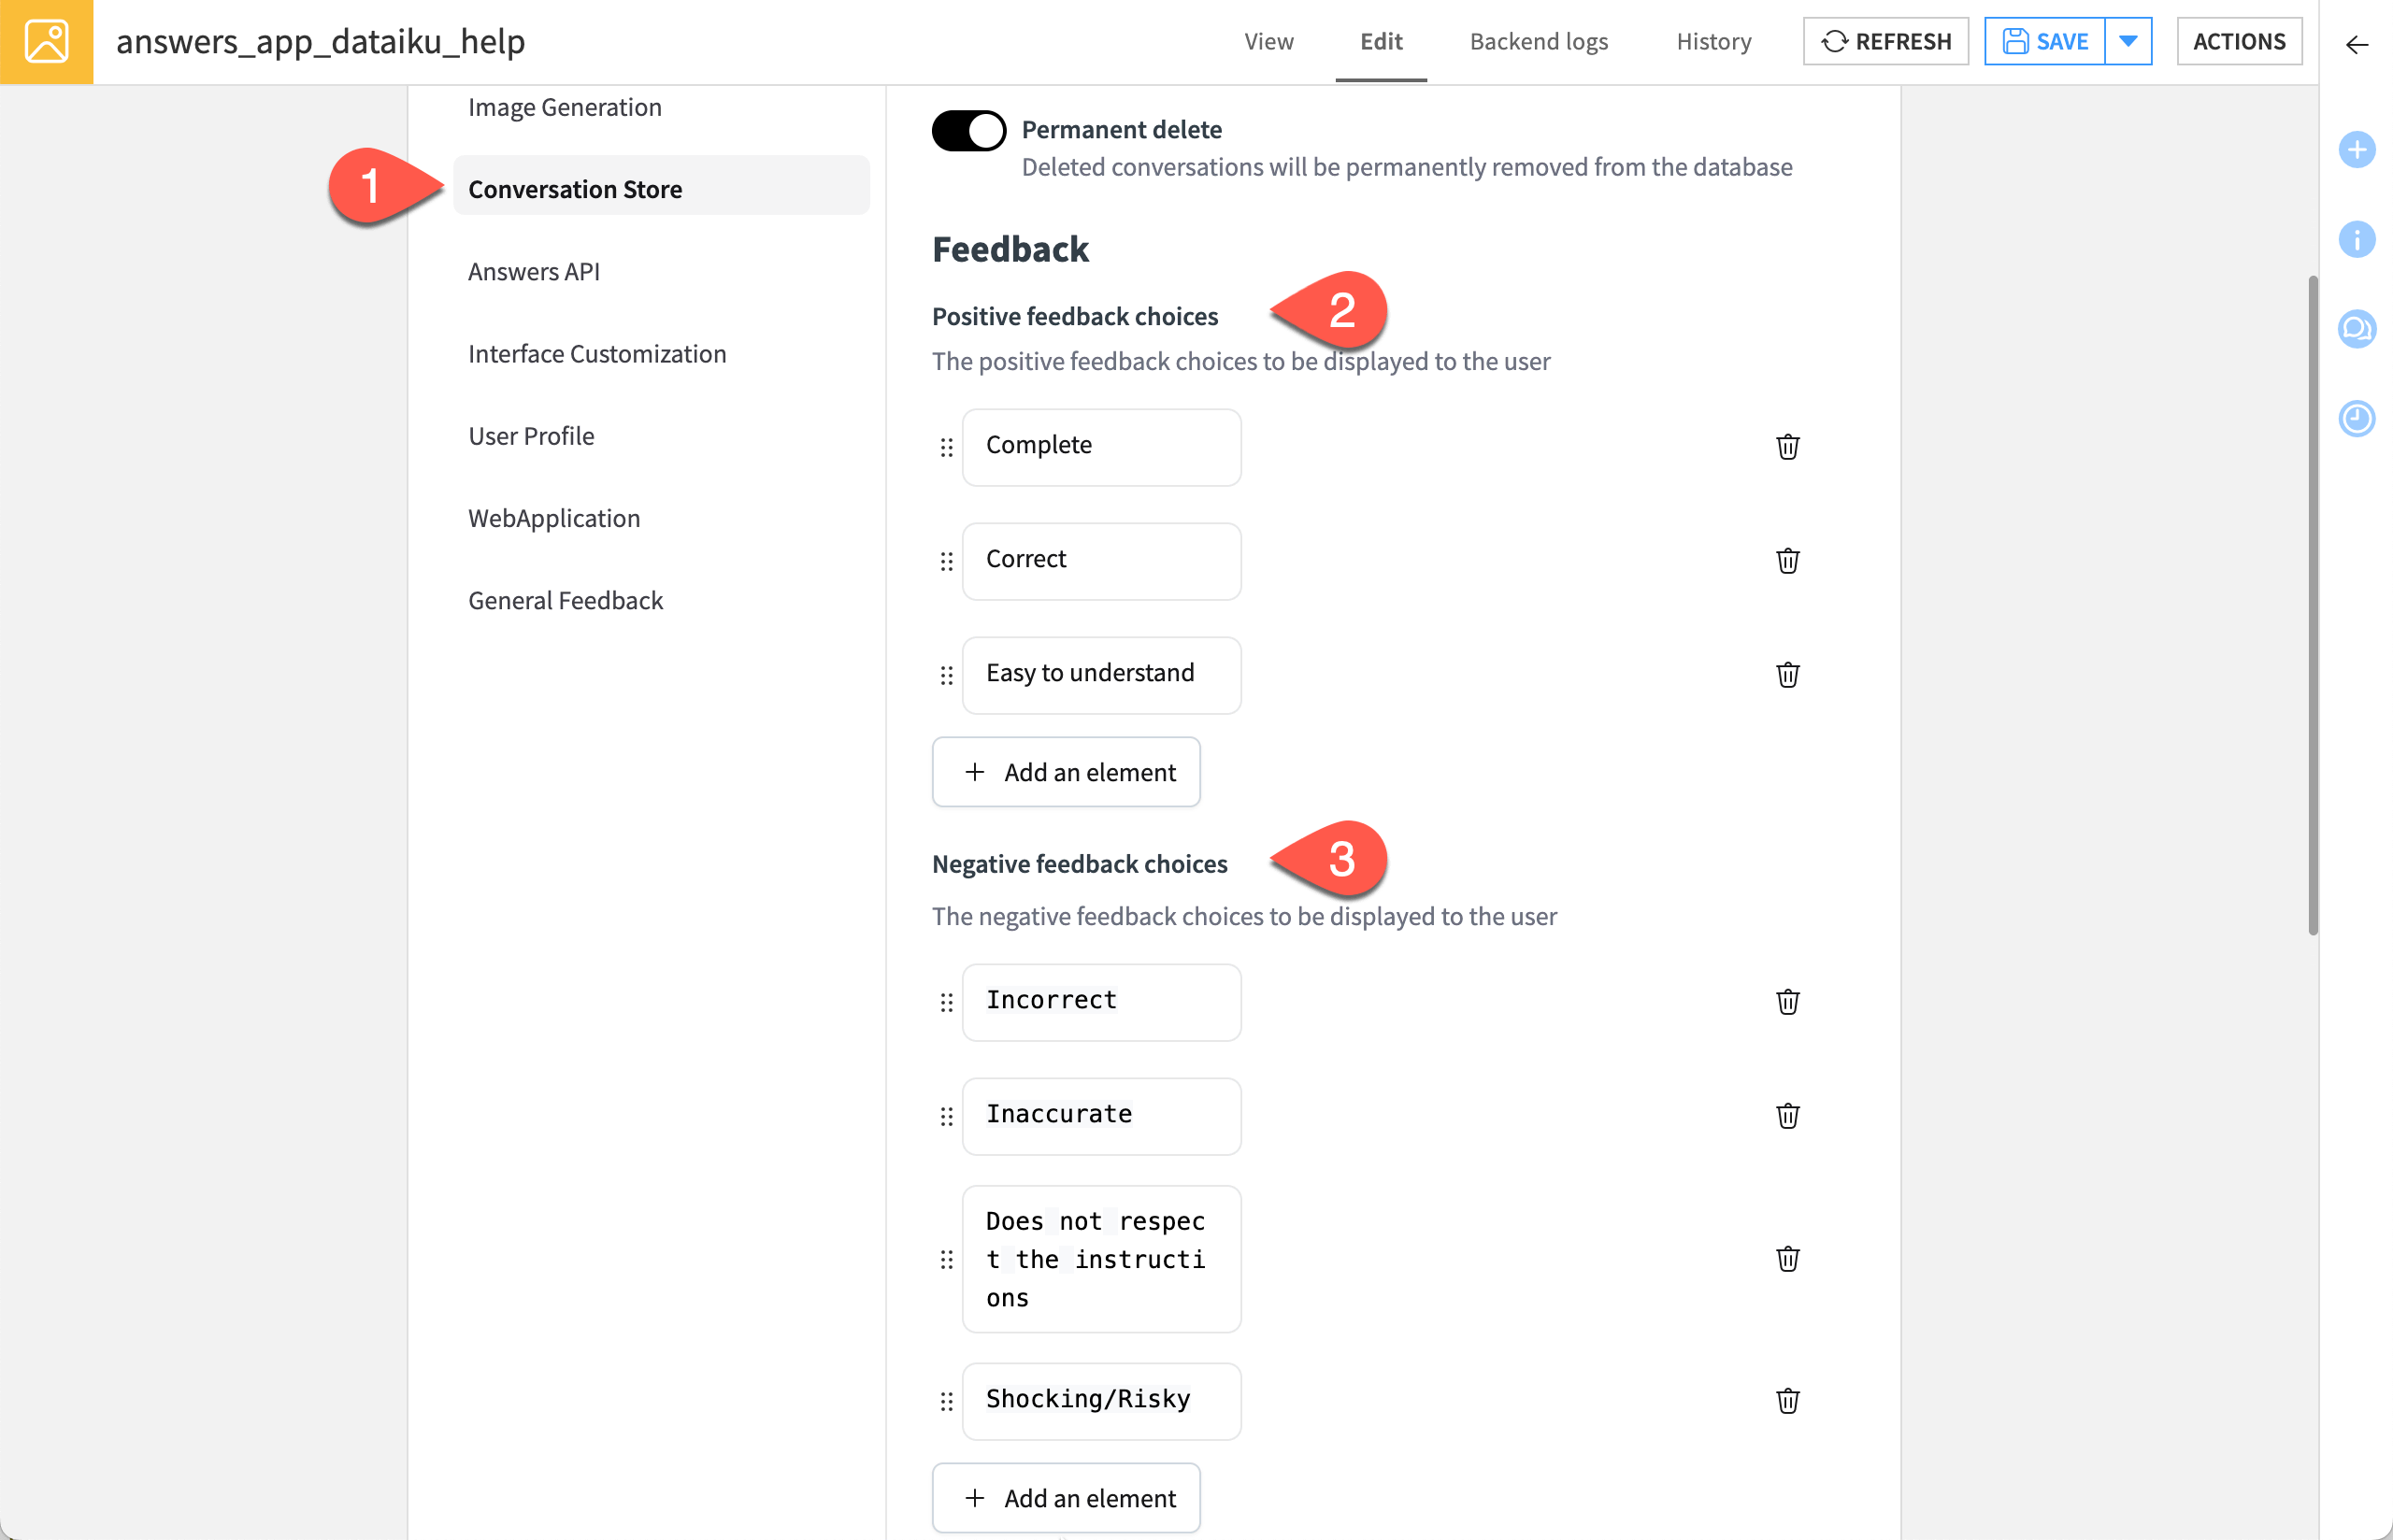
In the left panel, click Conversation Store.
Under Positive feedback choices, click + Add an Element three times:
CompleteCorrectEasy to understand
Under Negative feedback choices, click + Add an Element four times:
IncorrectInaccurateDoes not respect the instructionsShocking/Risky
Set up the general feedback#
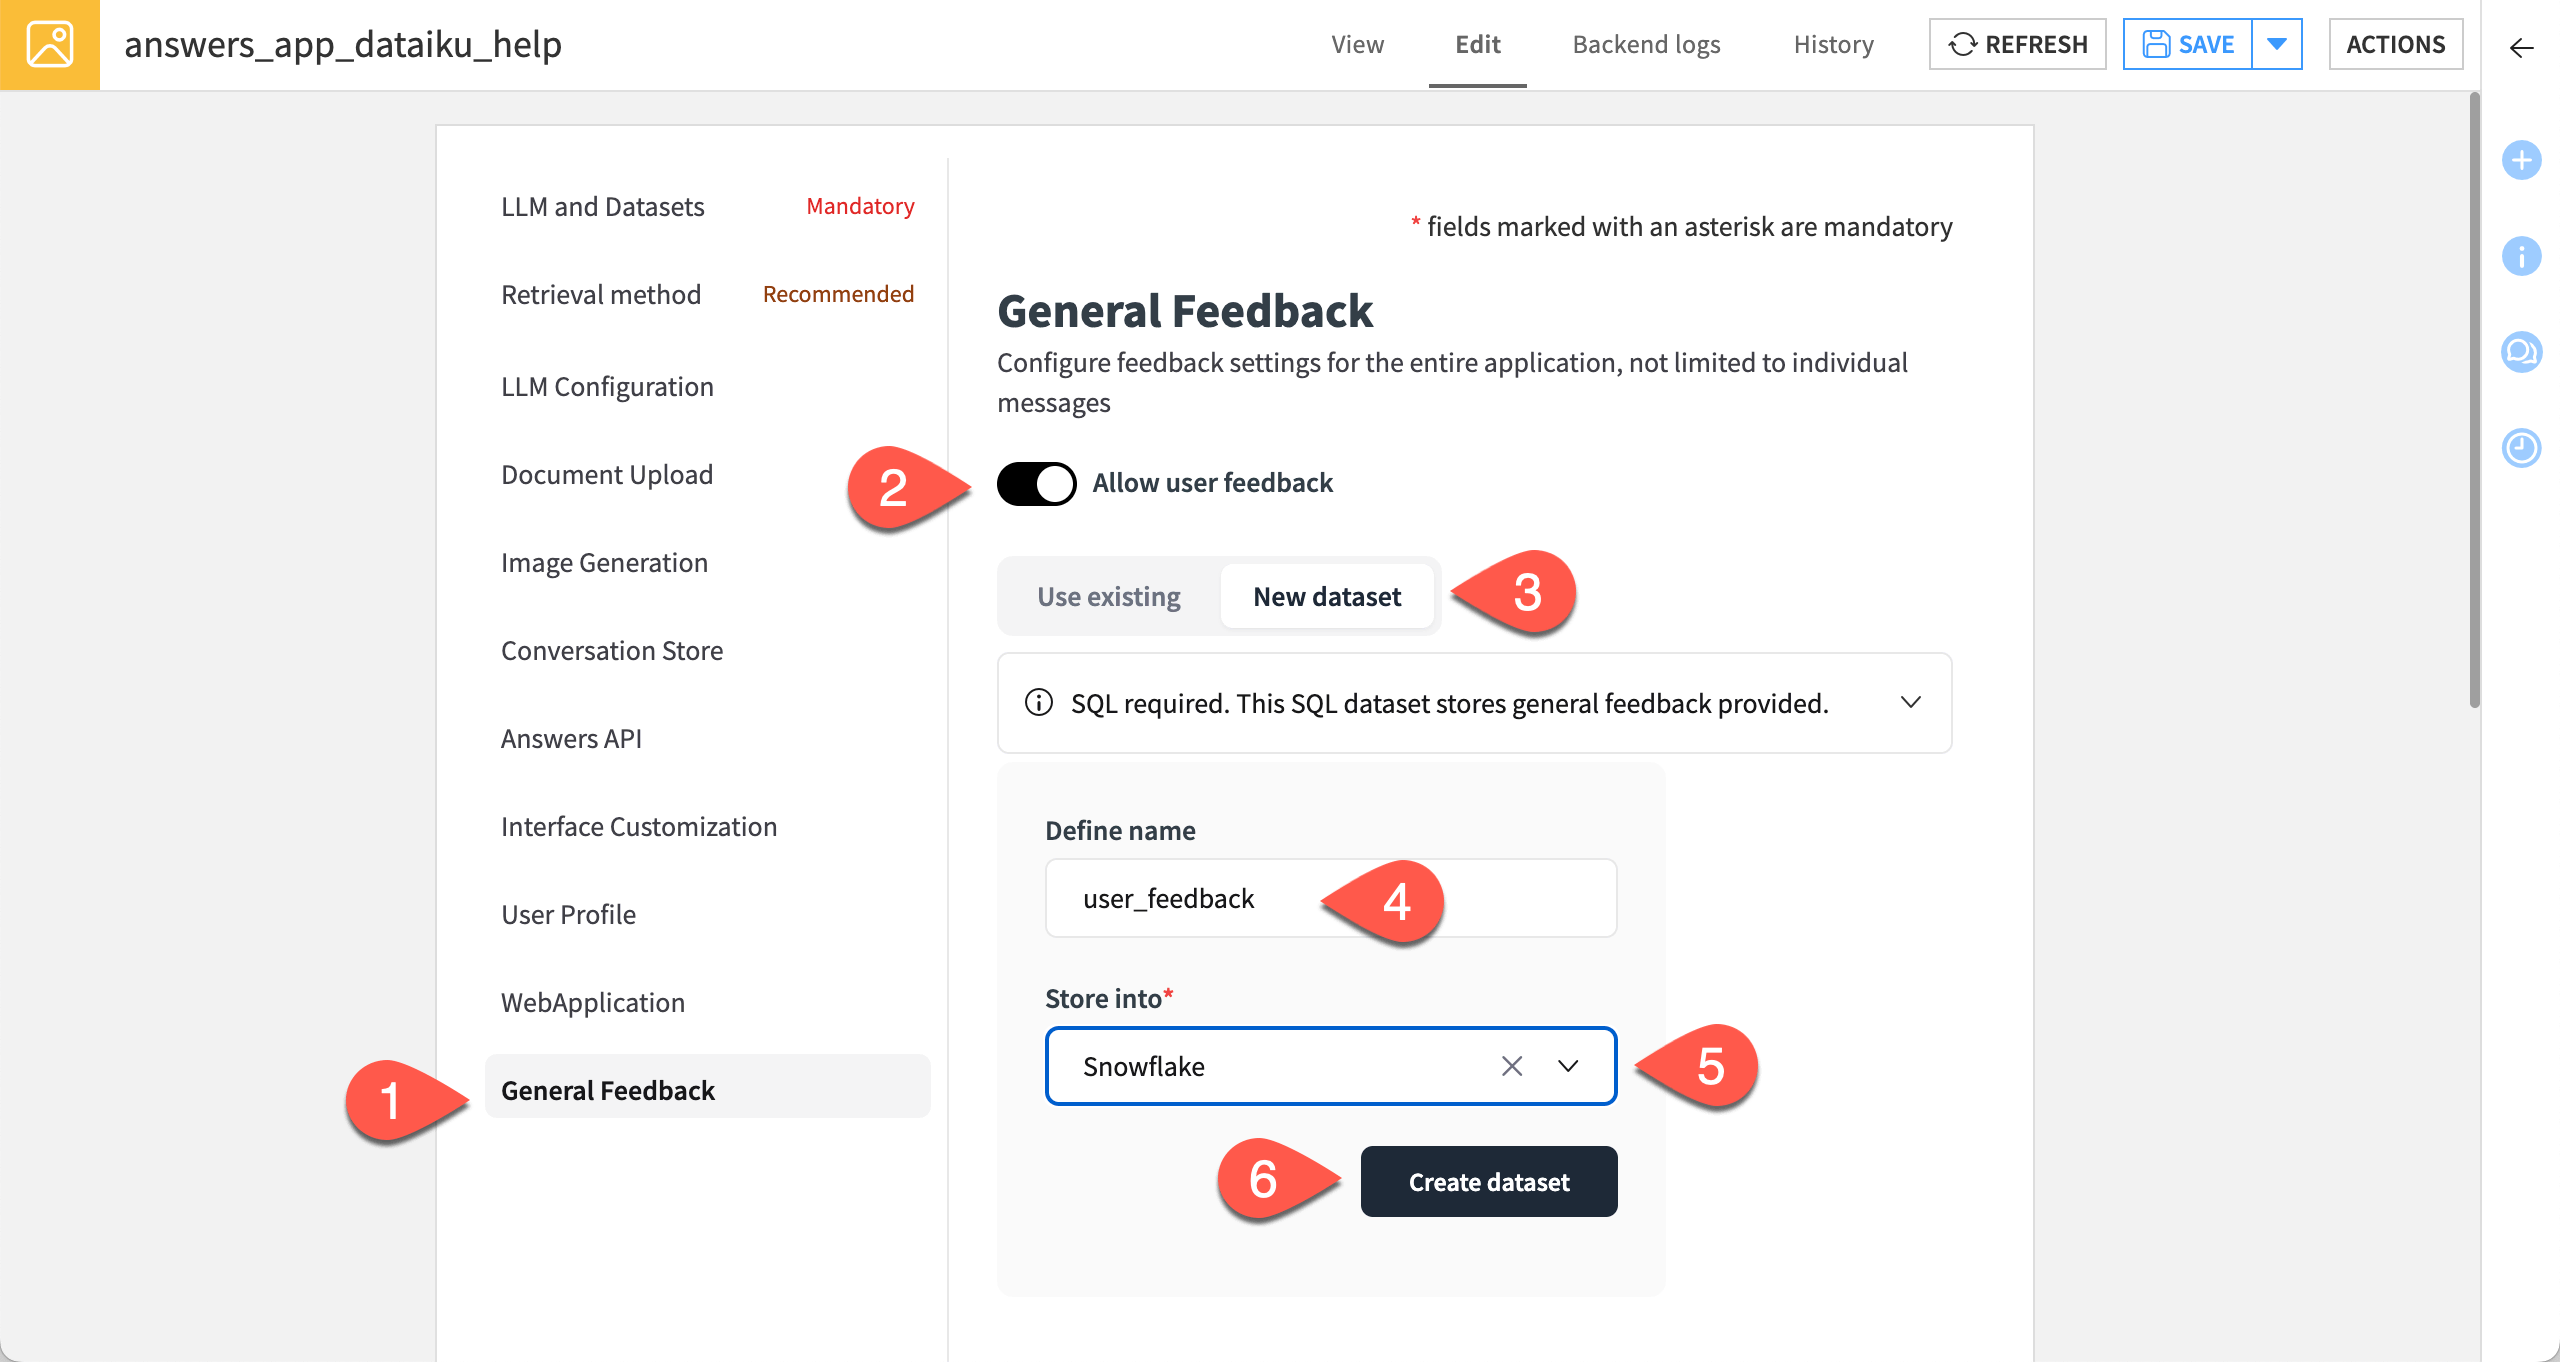
General feedback lets users to provide free-text comments on the overall experience. To enable it:
In the left panel, go to General feedback.
Enable Allow user feedback, then configure a dataset to store it.
Click New dataset.
Name it
user_feedback.Store it using an SQL connection.
Click Create dataset.
Customize the conversational interface#
The Interface Customization panel lets you to configure the conversational interface: title, subtitle, placeholder text in the prompt field, etc.
Customize it a bit.
In the left panel, click Interface Customization.
In the Displayed title field, enter
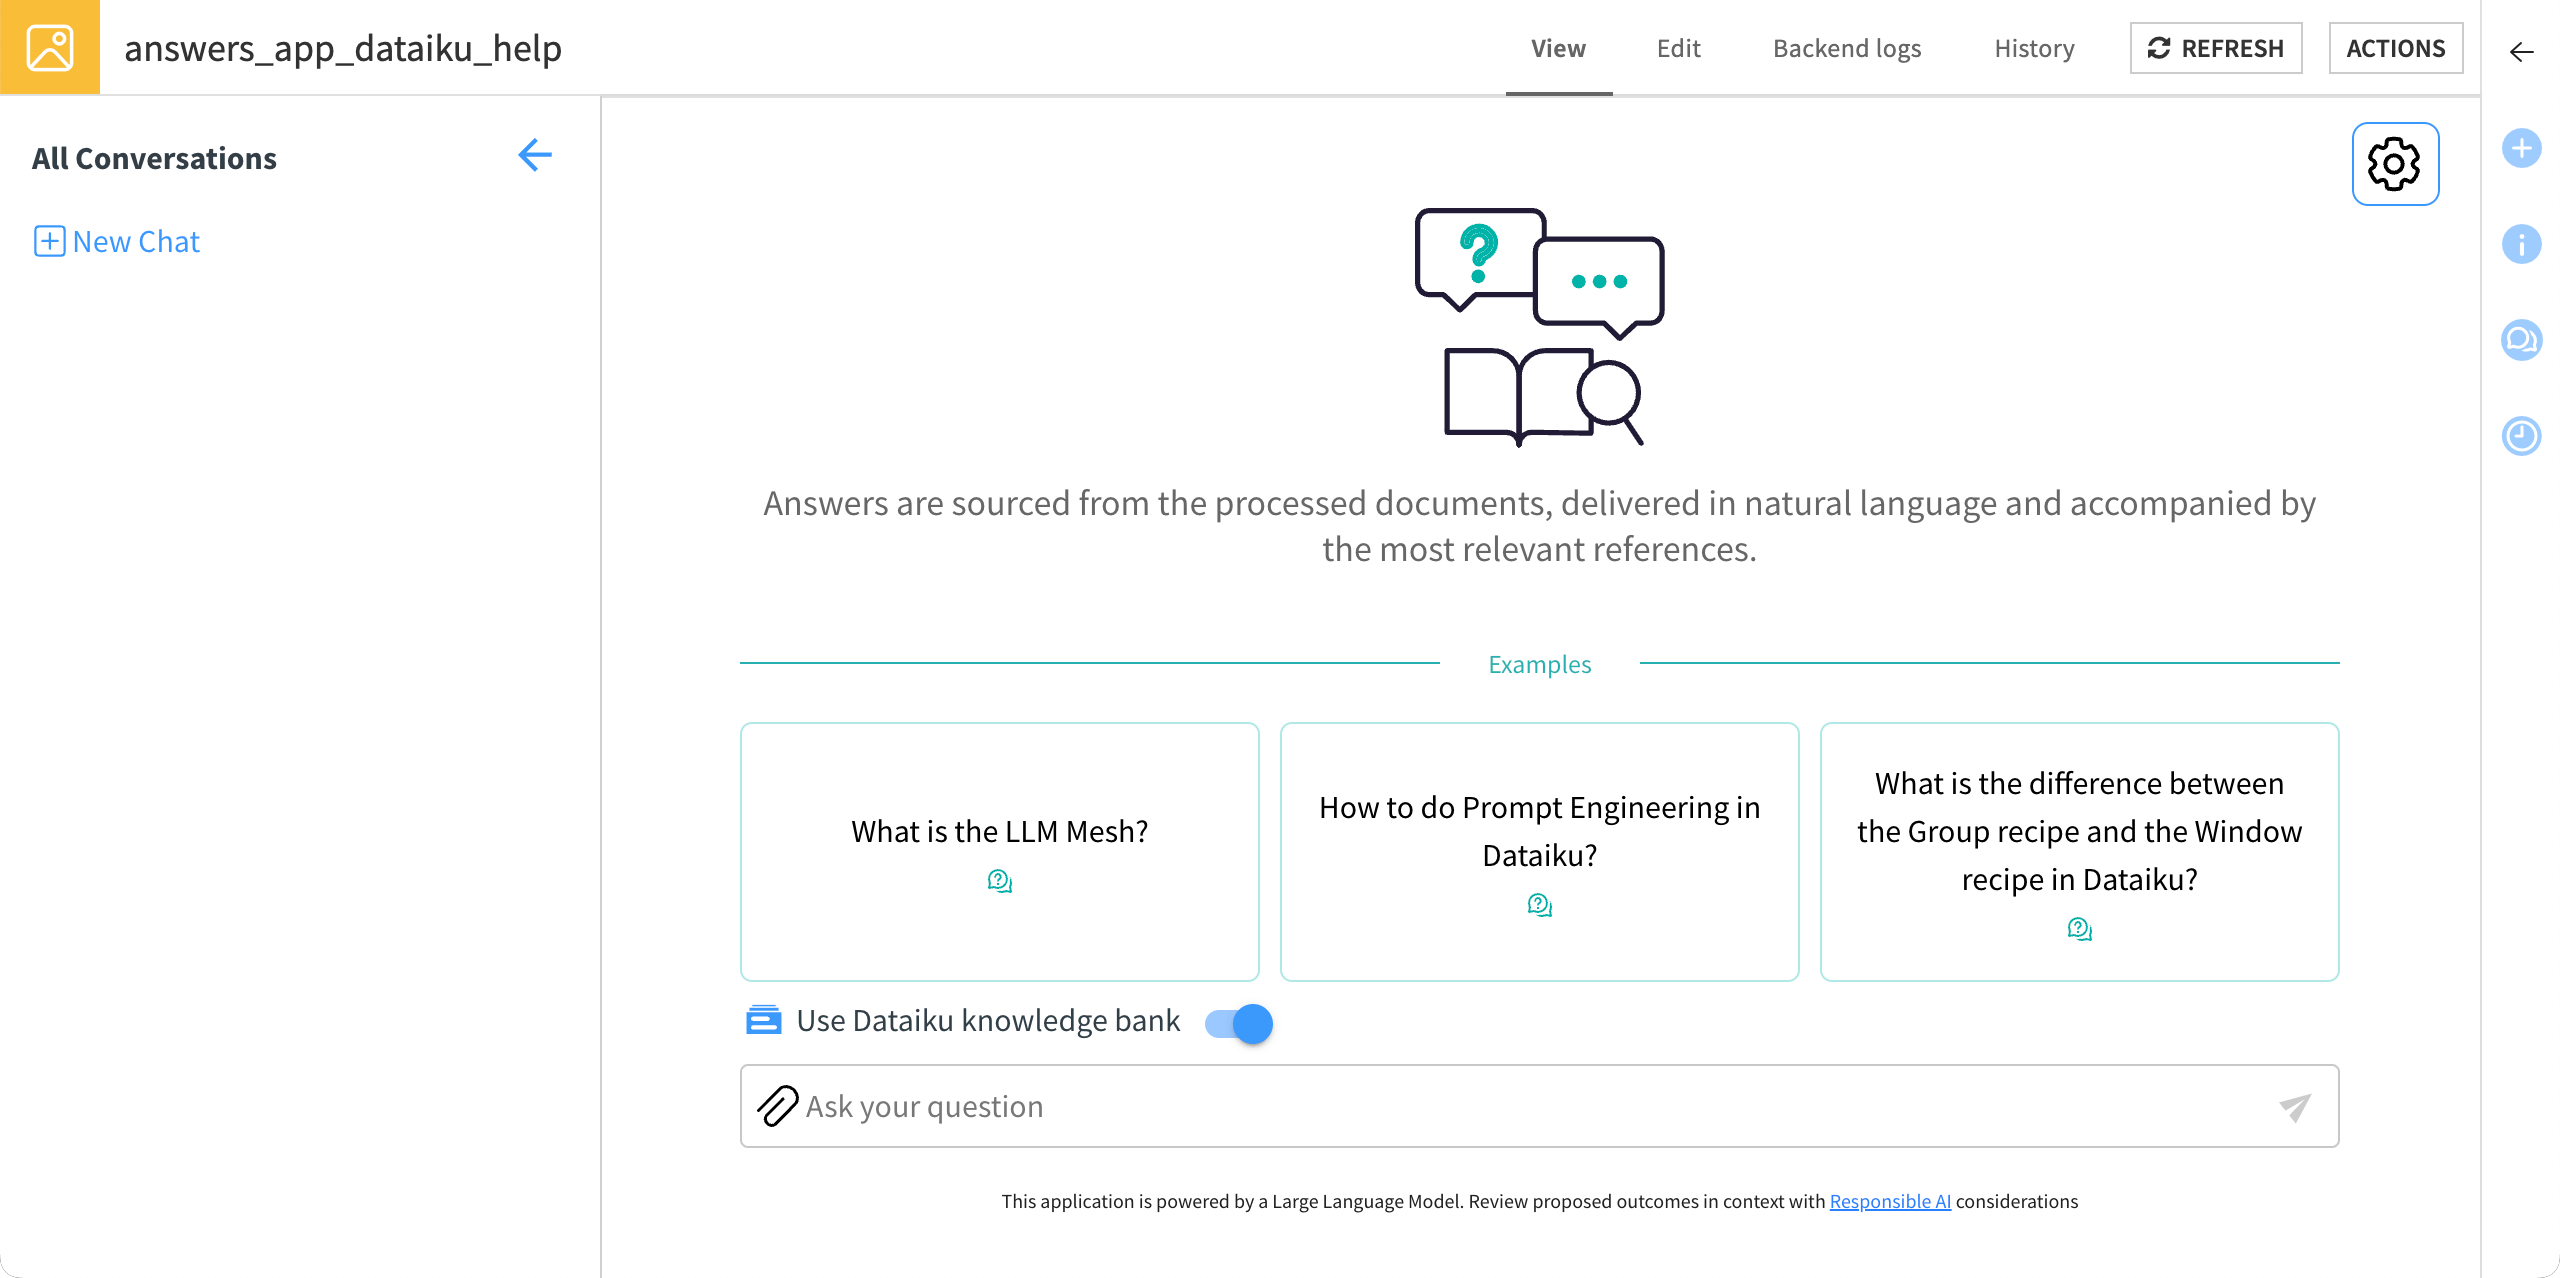
Ask the Dataiku Documentation.Under Example questions, replace the default examples with the following strings:
What's the LLM mesh?How to do Prompt Engineering in Dataiku?What's the difference between the Group recipe and the Window recipe in Dataiku?
Set up the backend#
You’re nearly finished!
Beneath the settings tile of any panel, in the Backend section, enable the Auto-start backend option.
You should be able to inherit the project’s default container, but if you run into a problem below, set the Container option to None - use backend to execute.
Click Save and View Webapp at the bottom of the Edit tab.
Once you’ve defined all these settings, you should see the following interface:
Use the conversational interface#
Once your webapp is up and running, you can allow users to start engaging with it. You can do this knowing that datasets like prompt_history, user_profile, and user_feedback are collecting the information necessary to evaluate the app’s performance.
Ask a question#
Ask a question to check how the interface works.
Click on the first example provided: What’s the LLM Mesh? It enters the question in the input field.
Click the Send button.
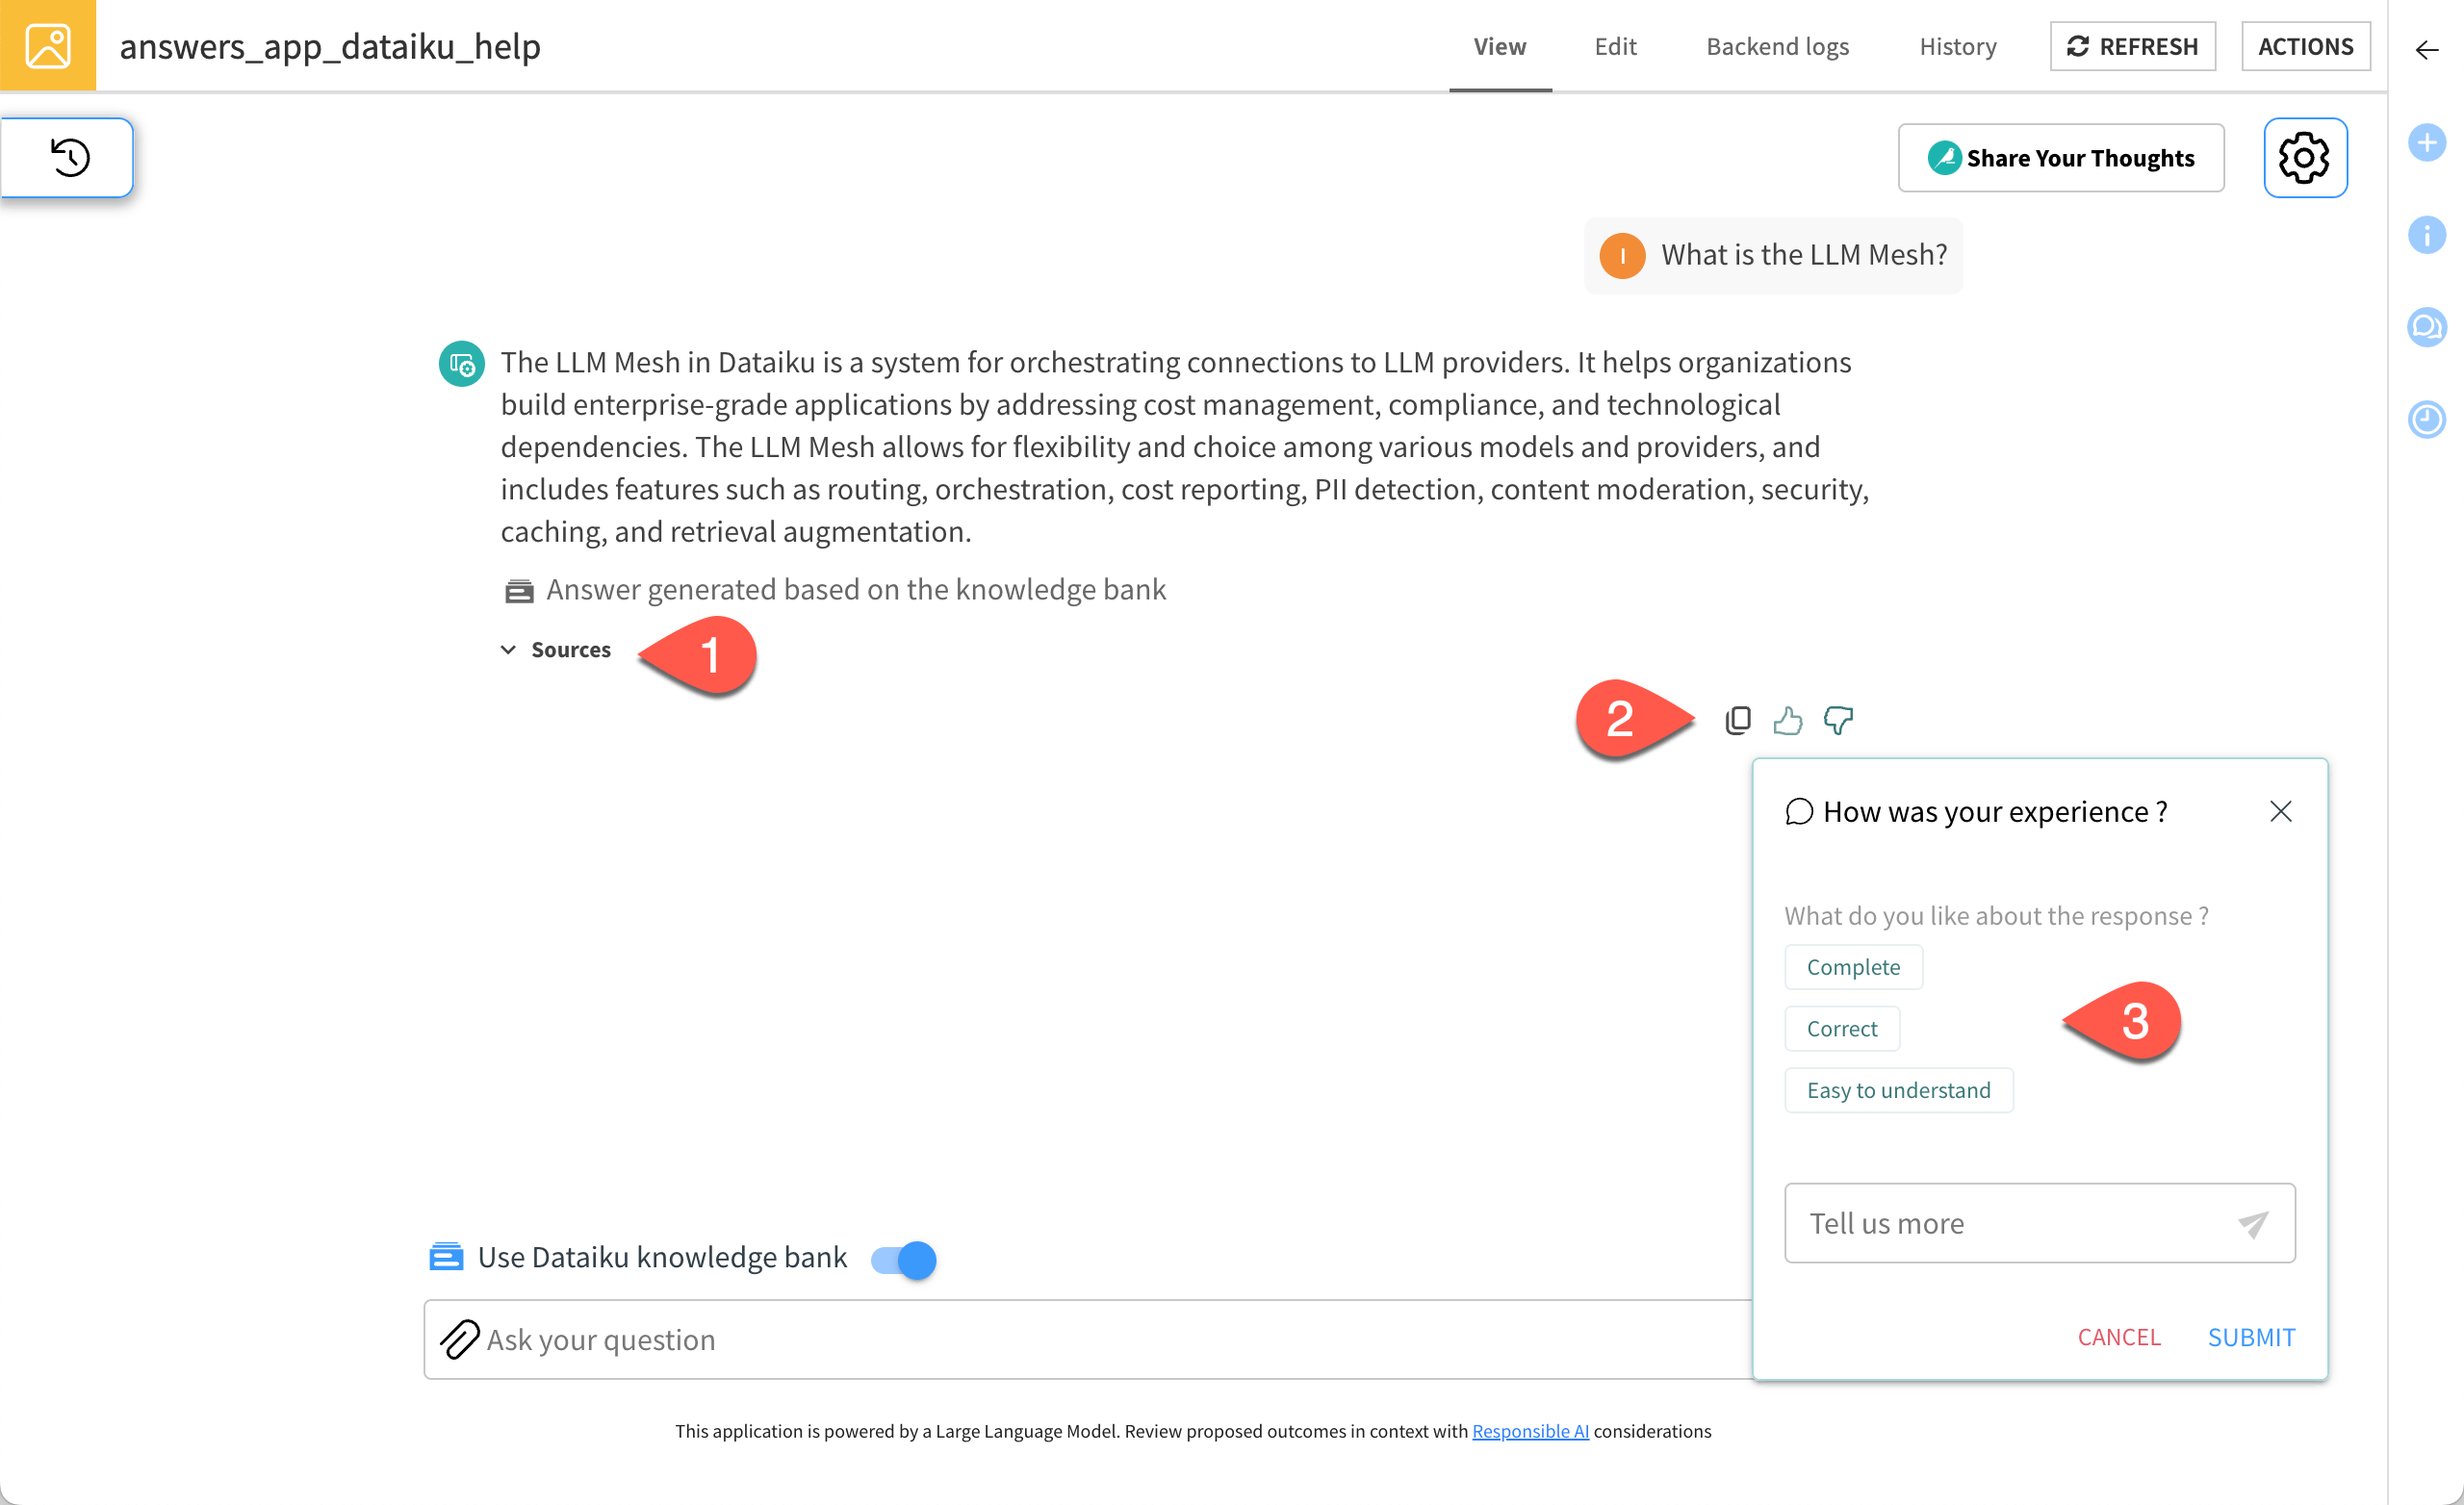
The LLM returns the response and allows you to:
View the sources used to answer the question.
Copy the response.
Give your feedback, using the strings set up previously or entering your own comment.
Upload a document to the conversational interface#
If your LLM supports it, upload a PDF to ask a question on some new content.
Download the PDF of a Knowledge Base article and store it on your computer.
In the conversational interface, click the Upload a file or image (
) icon in the input field and select the new PDF.
Enter the following prompt:
How to create a multimodal knowledge bank?
Click Send.
Tip
If you open the dataiku_doc folder in the Flow, you’ll find the new PDF stored inside it. Recall in Allow users to upload documents, you set dataiku_doc as the destination for uploaded documents.
Next steps#
Congratulations on building your first Dataiku Answers chat application! Feel free to continue refining it and exploring other possible settings to meet your use cases.
See also
For more information on the Answers application, see Dataiku Answers in the reference documentation.

