Tutorial | Visual logic processors for data preparation#
Get started#
A common data preparation task is defining complex rules based on several conditions or input columns. Think of cases where you needed to recode categorical values or define logic in the style of if-then statements.
Dataiku offers many tools to solve these kinds of problems. This article focuses on four tools in particular, each with its strengths and weaknesses.
Objectives#
In this tutorial, you will:
Practice defining rules and complex visual filters using four different methods:
Filtering conditions in visual recipes and other screens throughout Dataiku.
Prerequisites#
Dataiku 12.0 or later.
A basic level of knowledge about Dataiku is helpful. If you’ve never used Dataiku before, try the Core Designer learning path or a Quick Start tutorial!
Create the project#
From the Dataiku Design homepage, click + New Project.
Select Learning projects.
Search for and select Visual Logic.
If needed, change the folder into which the project will be installed, and click Create.
From the project homepage, click Go to Flow (or type
g+f).
Note
You can also download the starter project from this website and import it as a ZIP file.
Use case summary#
This project includes data from a simplified credit card fraud use case. Using data about transactions, merchants, and cardholders, you could build a model that predicts which transactions to authorize and which are potentially fraudulent.
A score of 1 for the target variable, authorized_flag, represents an authorized transaction. A score of 0, on the other hand, is a transaction that failed authorization.
Switch formula function#
You may be familiar with the SWITCH() function in Microsoft Excel. You can find the same functionality in Dataiku’s Formula language.
Let’s use the switch function in Dataiku’s Formula language to remap values in a single categorical column.
Open the Prepare recipe that computes transactions_joined_prepared.
Click + Add a New Step on the left.
Search for and add a new Formula step to the script.
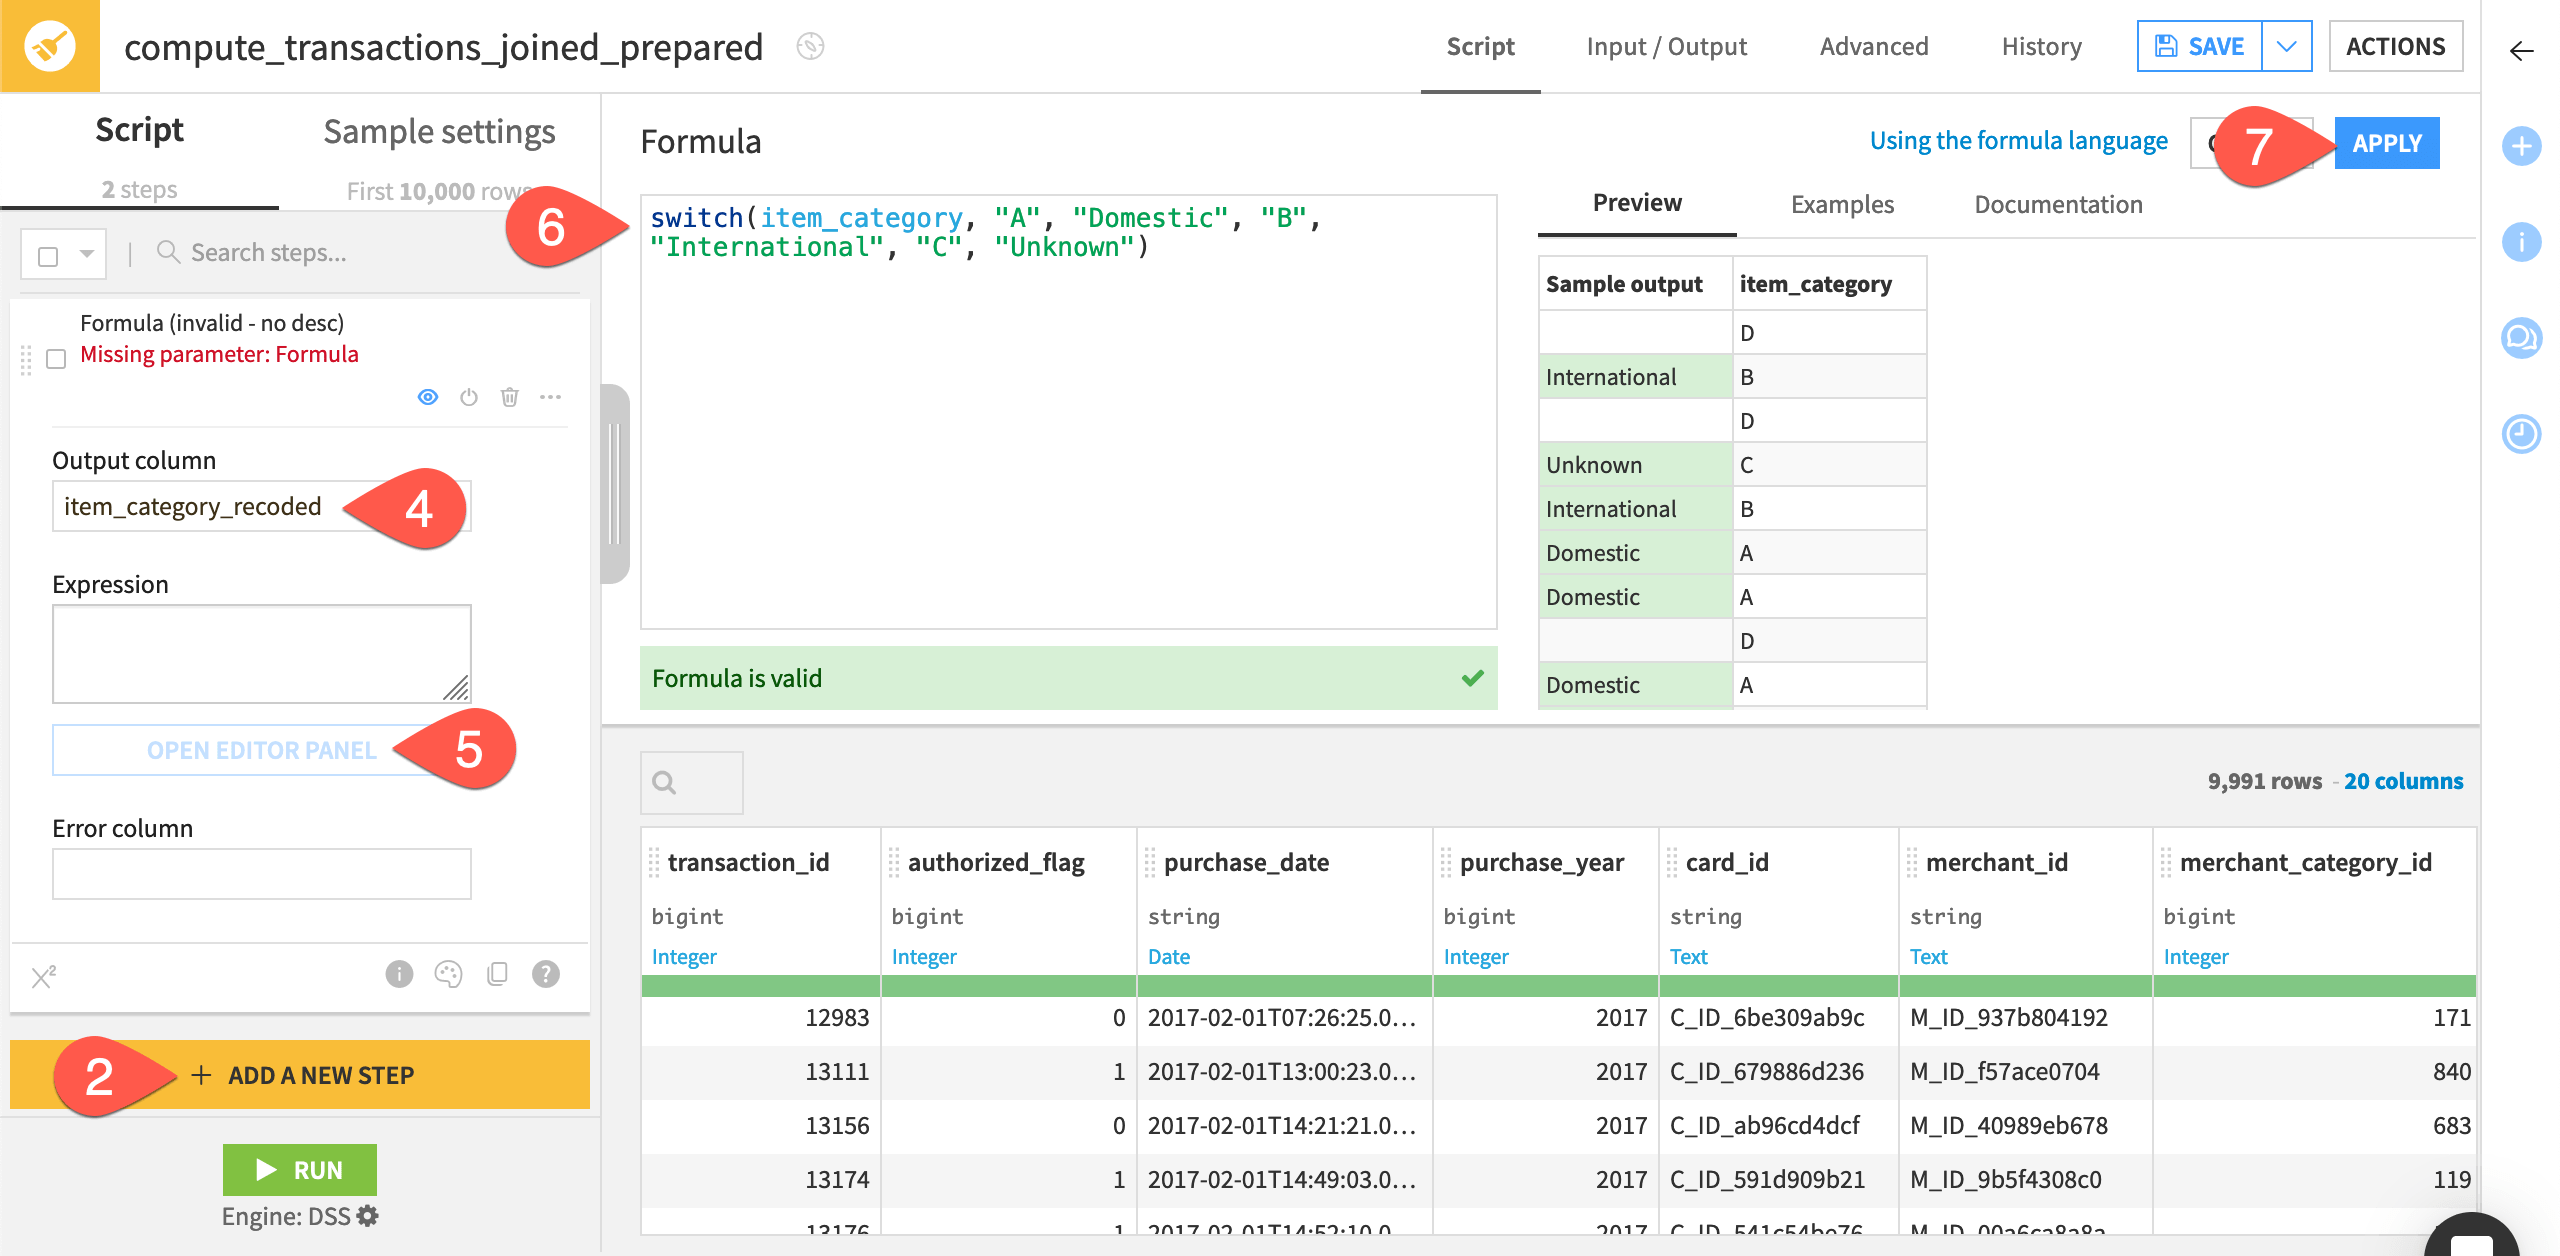
Name the output column
item_category_recoded.Click Open Editor Panel.
Paste the following expression below to recode the first three values.
switch(item_category, "A", "Domestic", "B", "International", "C", "Unknown")
Observe the sample output, and then click Apply.
Important
Note that any values not specified, such as category D in this case, remain empty in the output column.
Switch case processor#
In some cases, the switch function will be the perfect tool — particularly when creating a formula to be copied and pasted from a spreadsheet outside of Dataiku.
On the other hand, it may be difficult to read and maintain this kind of remapping for a column like merchant_subsector_description, which has 38 distinct values.
The Switch case processor step provides a more robust definition of rules for remapping a single variable.
In the same Prepare recipe, click + Add a New Step.
Search for and add a Switch case step to the script.
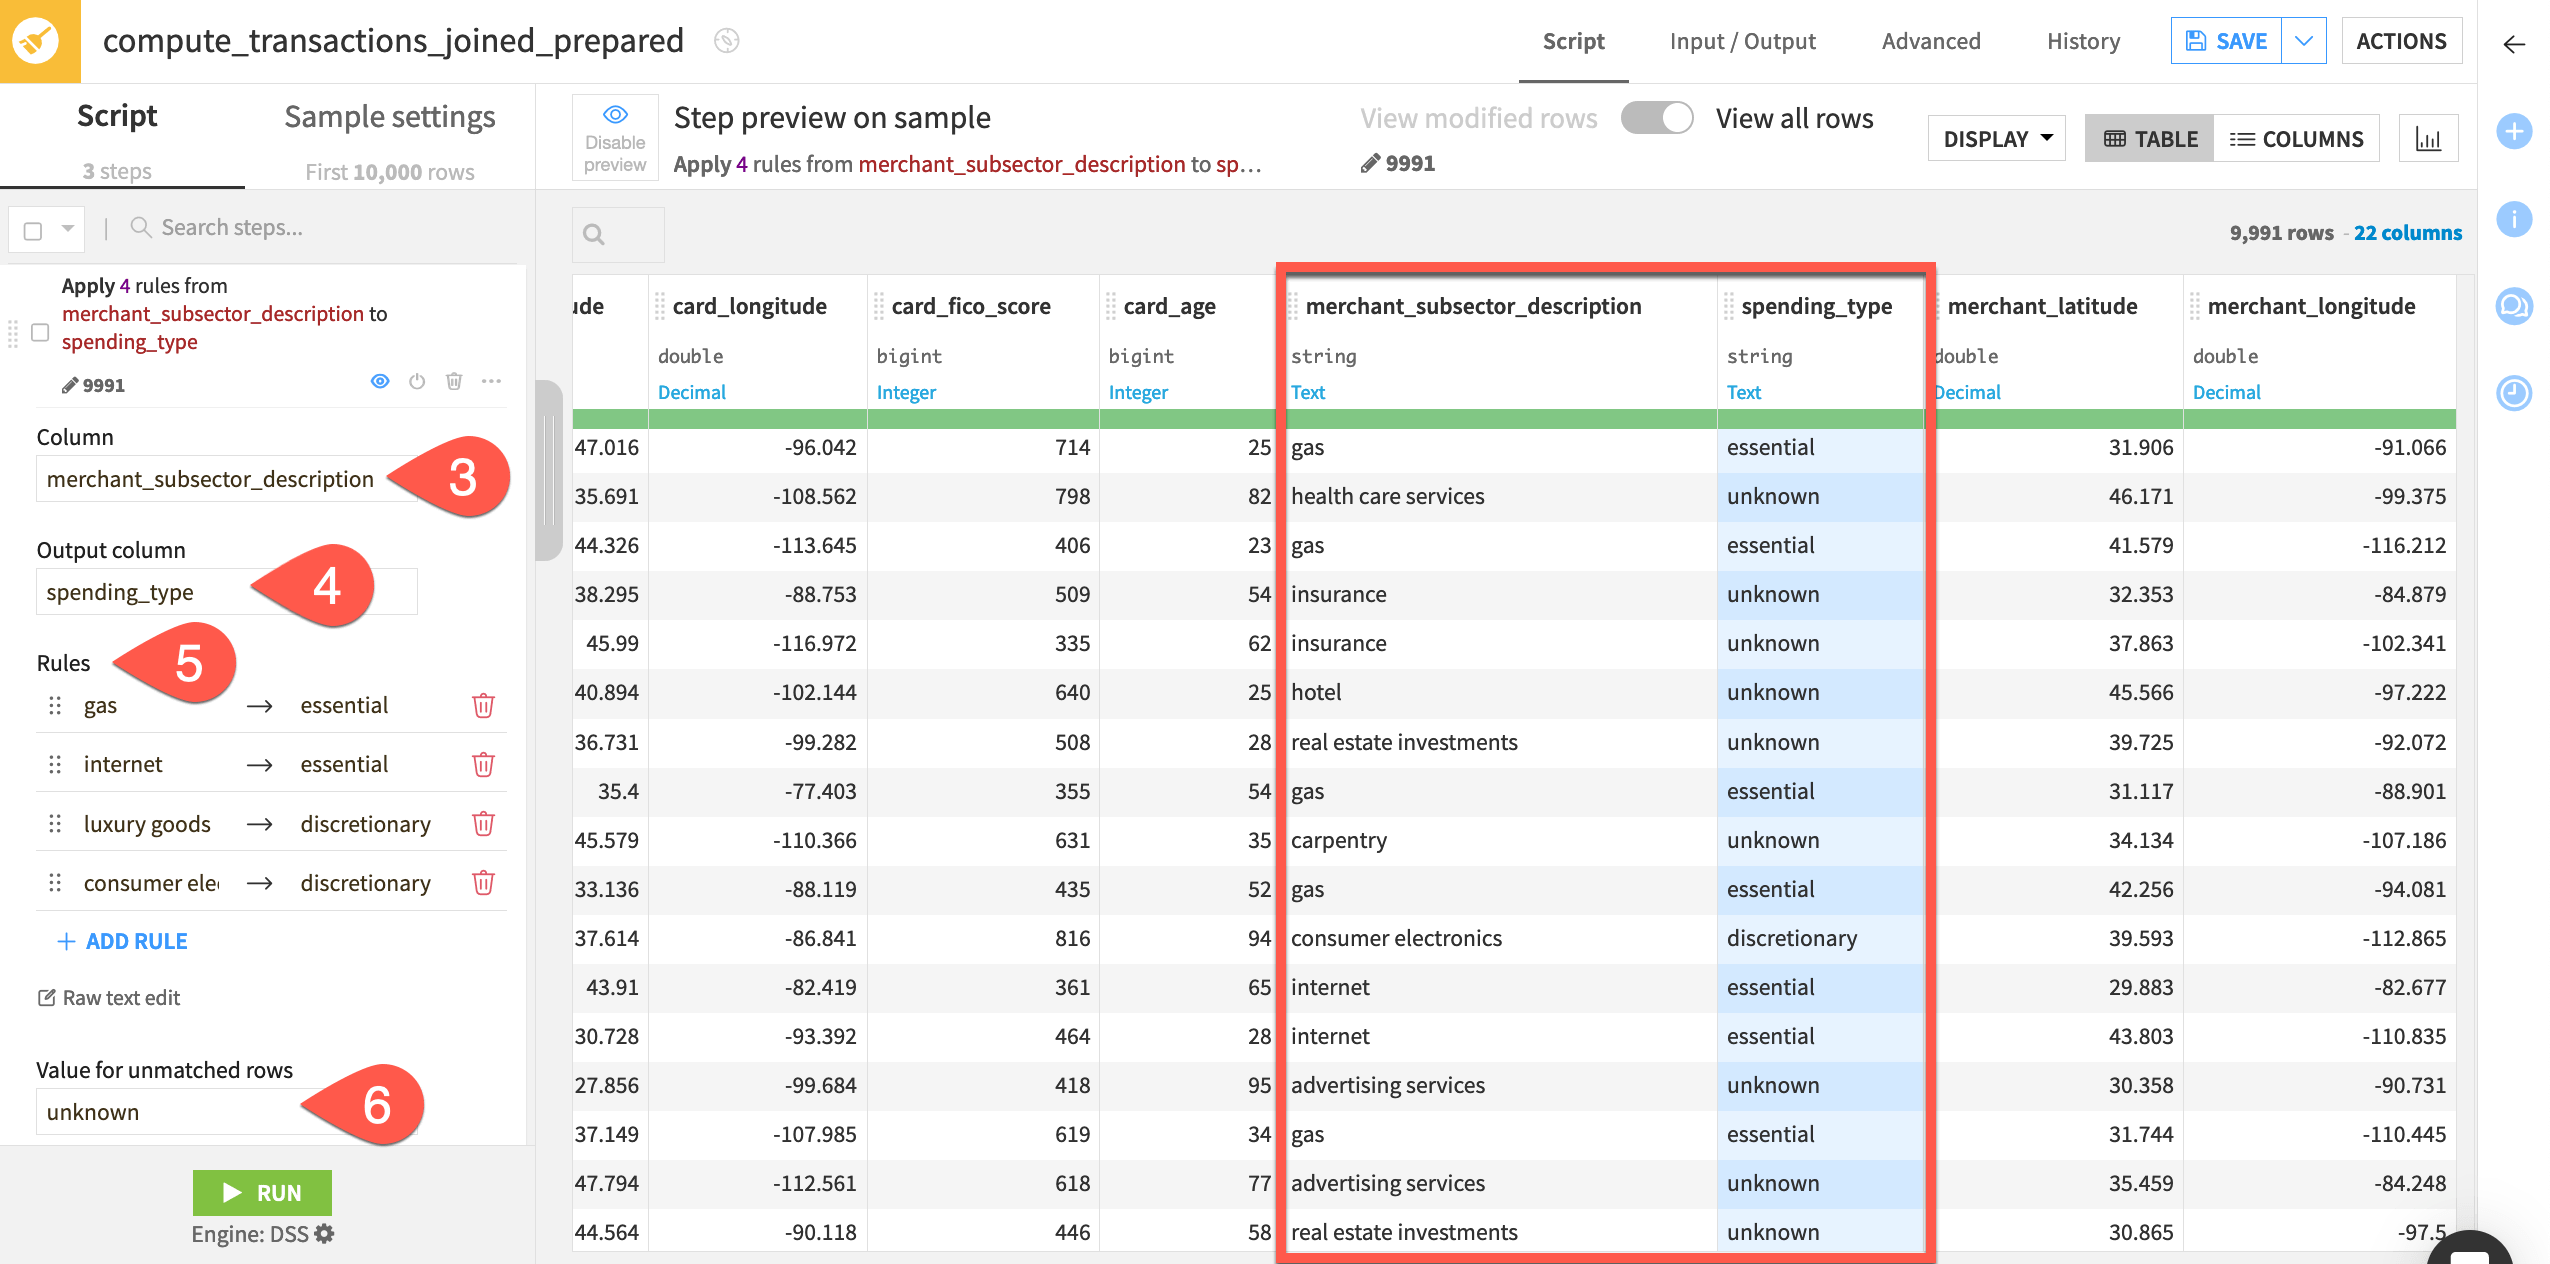
Select merchant_subsector_description as the column.
Name the output column
spending_type.Click + Add Rule repeatedly to create each of the following sets of key-value pairs:
gas->essentialinternet->essentialluxury goods->discretionaryconsumer electronics->discretionary
Add
unknownas the value for unmatched rows, and observe the step preview.
Important
This example uses the default case-sensitive Exact mode, but the processor also has the mode Lowercase (match GAS, Gas, and gas for example) and the accent-insensitive Normalize mode.
If you already have your mappings in two columns of a spreadsheet, click the Raw text edit option, and directly copy-paste them into the Rules field. Then click List edit to see the formatted rules.
Compared to the Formula step above, this Solution makes it much easier to review the table of rules.
Note
This processor has similar functionality to the Find and Replace processor. However, it has a few differences, such as the ability to set a value for unmatched rows.
Create if, then, else statements#
For more complicated logic, you can try the Create if, then, else statements processor. This processor allows you to implement if, else if, and else statements in a visual manner.
Let’s use this processor to create rules that define categories of risk.
In the same Prepare recipe, click + Add a New Step.
Search for and add a Create if, then, else statements step to the script.
Start with an if statement#
Let’s start by defining parameters based on the minimum and maximum possible values for FICO scores, a common measure of creditworthiness in the United States.
For the first condition, if the column card_fico_score is
<the value300, then set a new column (typerisk) equal to the valueinvalid.
Click Preview. All rows in the preview of the risk column should be empty since none satisfy this condition.
This is only the minimum bound. Let’s also add the maximum bound for an valid FICO score.
In the if block, click + Add a Condition.
If card_fico_score is
>the value850, then the risk column should equalinvalid.
When multiple conditions in an if or else if statement are present, we need to be mindful of the conjunction connecting them.
Set the conjunction connecting these conditions to OR so that if either one of the two conditions is satisfied, then the row will be marked as
invalidin the risk column.
Click Preview again. All rows remain empty.
Add an else if block#
Once you have the first if-then statement verifying valid FICO scores, define more rules to help categorize the level of a transaction’s risk.
In the editor panel, click + Add Else If Group.
Provide the condition days_active (the number of days a credit card is active) is
<the value30.If this condition is satisfied, then set the new column
riskequal to the valuehigh.
Click Preview, and observe that some rows in the risk column now have the value
high.
Add an else statement#
Let’s use a final else statement to define a rule for any value that doesn’t satisfy any of the conditions above it.
At the bottom of the editor panel, click + Add Else.
If none of the above conditions are met, set the new column
riskequal to the valuelow.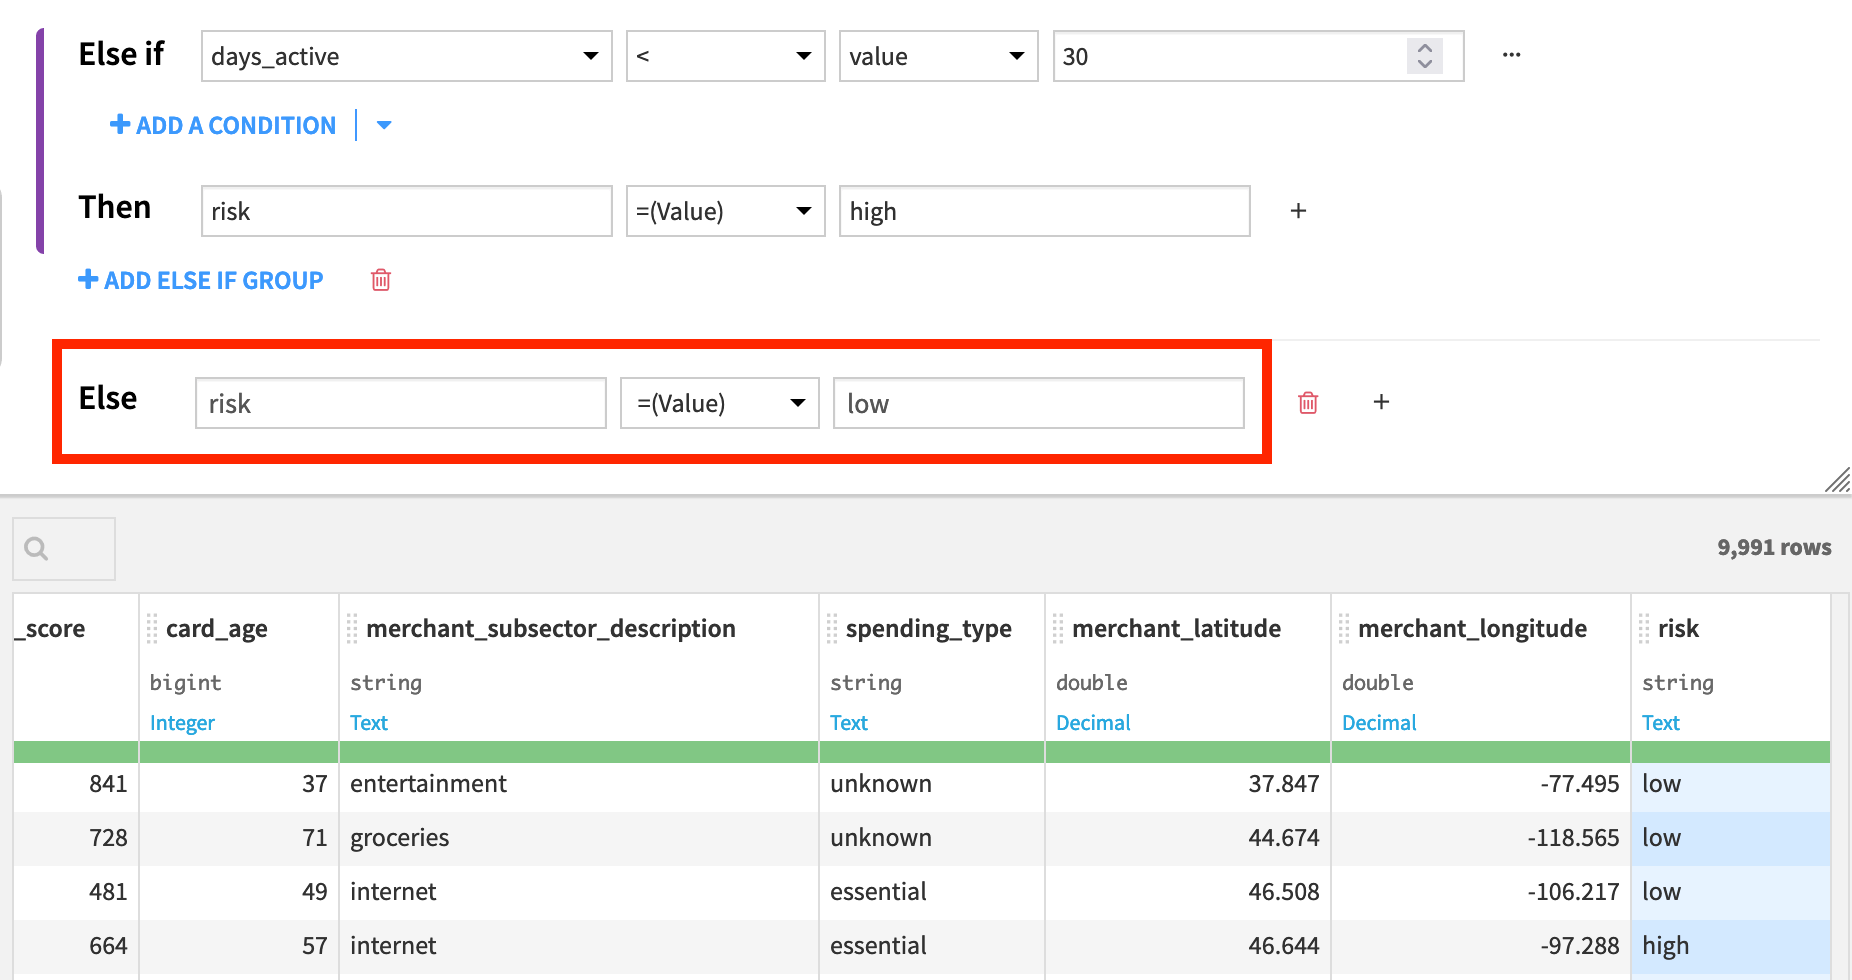
Click Preview to see all the previously empty rows now filled with this new value.
Add more else if blocks#
It’s possible to imagine needing many more possible outputs than just invalid, high, and low. You can define them with additional else if blocks.
Tip
Click and drag from the bottom right corner of the editor panel to reduce the size of the dataset output preview.
Beneath the first else if block (above the else block), click + Add Else If Group.
Provide the condition days_active is
<the value60.If this condition is satisfied, then set the new column
riskequal to the valuemedium.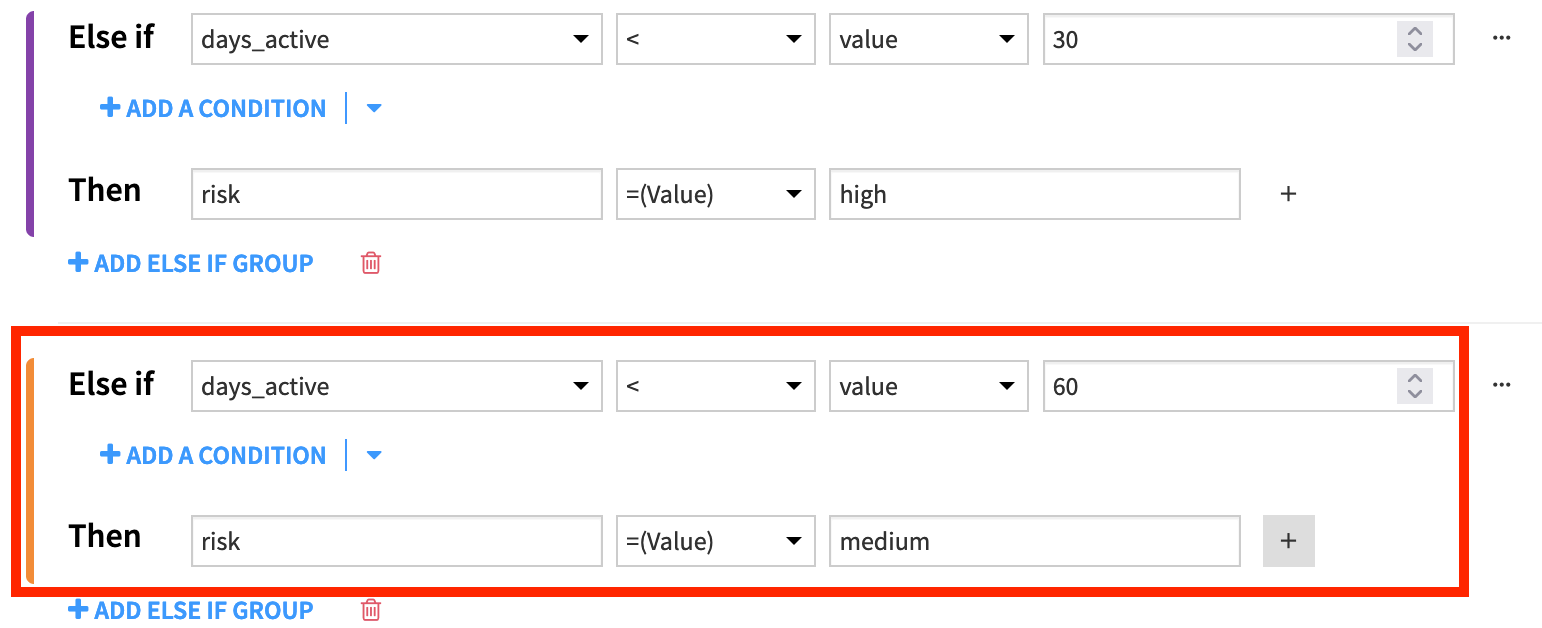
Click Preview to see that some values in the risk column now are labeled as
medium.
Important
The order of if and else if blocks matters! Consider the case where the order of the two else if blocks in this example were reversed. A transaction on a card active for 15 days would satisfy the first else if block and be labeled as a medium risk transaction — even though it also satisfies the more stringent (but subsequent) condition for high risk transactions.
Turn conditions into groups for nested logic#
You could summarize the current structure of the rules in place by:
if (A or B) then "invalid"
else if C then "high"
else if D then "medium"
else "low"
You often need much more complex, nested logic. For example, the actual rules for a medium risk value might be if D and (E or F).
For this kind of logic, you can organize conditions into groups of conditions. Let’s try this now.
In the editor panel, return to the second else if block that defines the medium risk values.
Click the dropdown arrow next to + Add a Condition to Add a group.
In addition to the first condition, force medium risk values to also satisfy at least one of the following two conditions:
signature_provided
==the value0.OR
purchase_amount
>the value200.
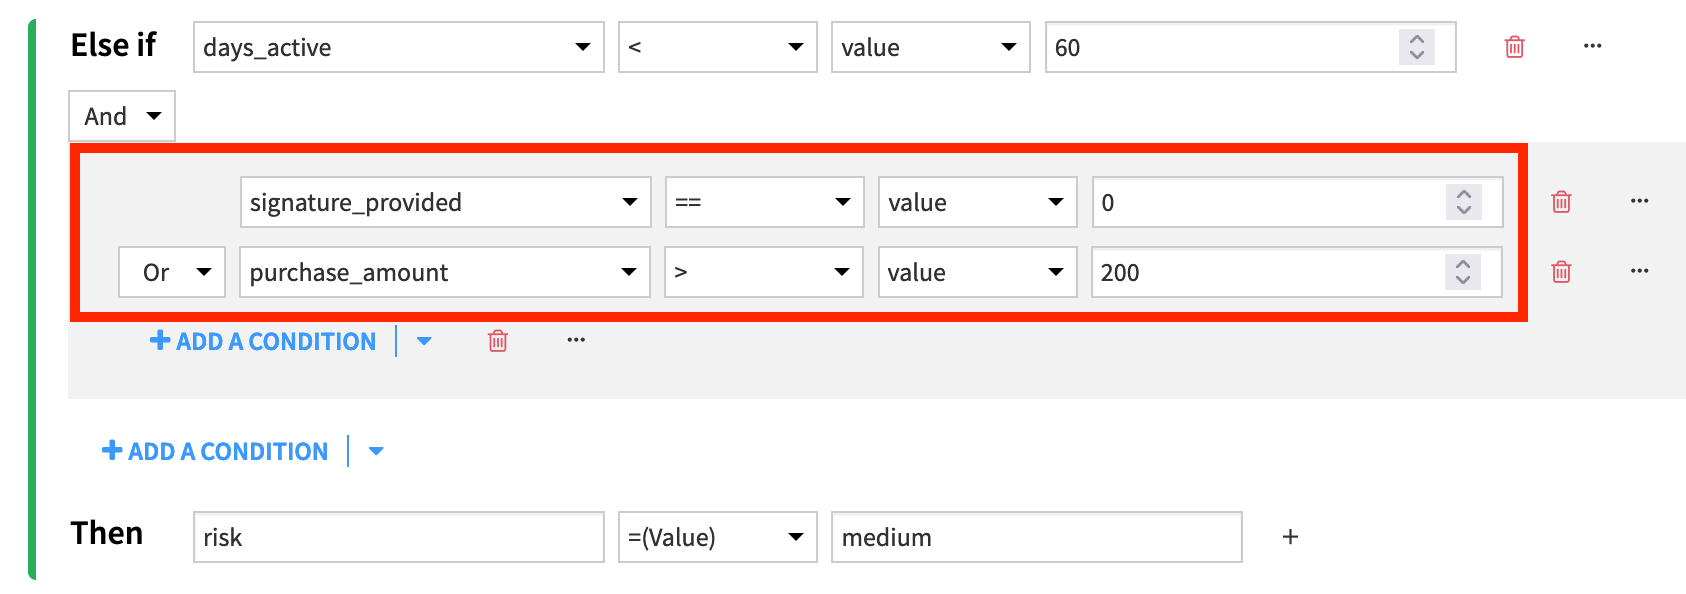
Click Preview to observe the new input, and then Apply to save the logic in this step.
Finally, Save the recipe.
Tip
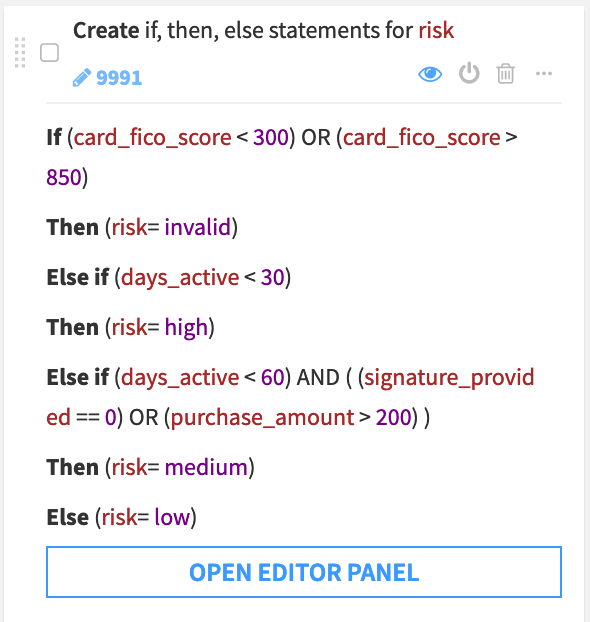
Although you can define a complex set of rules with this processor, Dataiku provides a readable summary of this step in the script on the left.
Going further#
This simple example only shows the beginning of what’s possible with this powerful processor. Two additional features are noteworthy:
More operators#
This processor offers many types of operators when creating conditions that vary depending on the storage type of the column.
This example used only numeric operators (greater than, less than, etc.), but strings and dates, for example, have many others, such as Contains or Is before date.
Comparing columns#
All conditions in this example are compared against a numeric value, but you can also evaluate conditions with respect to a column. You can also use a column (or a formula) for the output of a then statement.
This is particularly useful when you have windowed or lagged features. For example, if we had the customer’s average purchase amount, we could compare the purchase_amount of the transaction to the column purchase_amount_avg instead of a fixed value.

Use filtering conditions everywhere#
Instead of checking for invalid FICO scores in the Prepare recipe, you might want to perform this kind of check earlier in the data pipeline. For example, you might use a check in the Pre-filter step of the Join recipe.
You can use the same style of conditions available in the Create if, then, else statement processor in many of Dataiku’s filtering screens. These include the Pre-filter and Post-filter steps of most visual recipes.
Navigate to the Pre-filters step of the Join recipe.
Toggle On the Filter for the cardholder_info dataset.
Before performing the Join operation, keep only rows from this dataset that satisfy all the following conditions:
age
<= 100(an arbitrary upper bound).
Click the dropdown menu next to + Add a Condition, and click Add a group. In addition to the upper bound on age, set lower and upper bounds on FICO score:
fico_score
>=to300AND
fico_score
<=to850
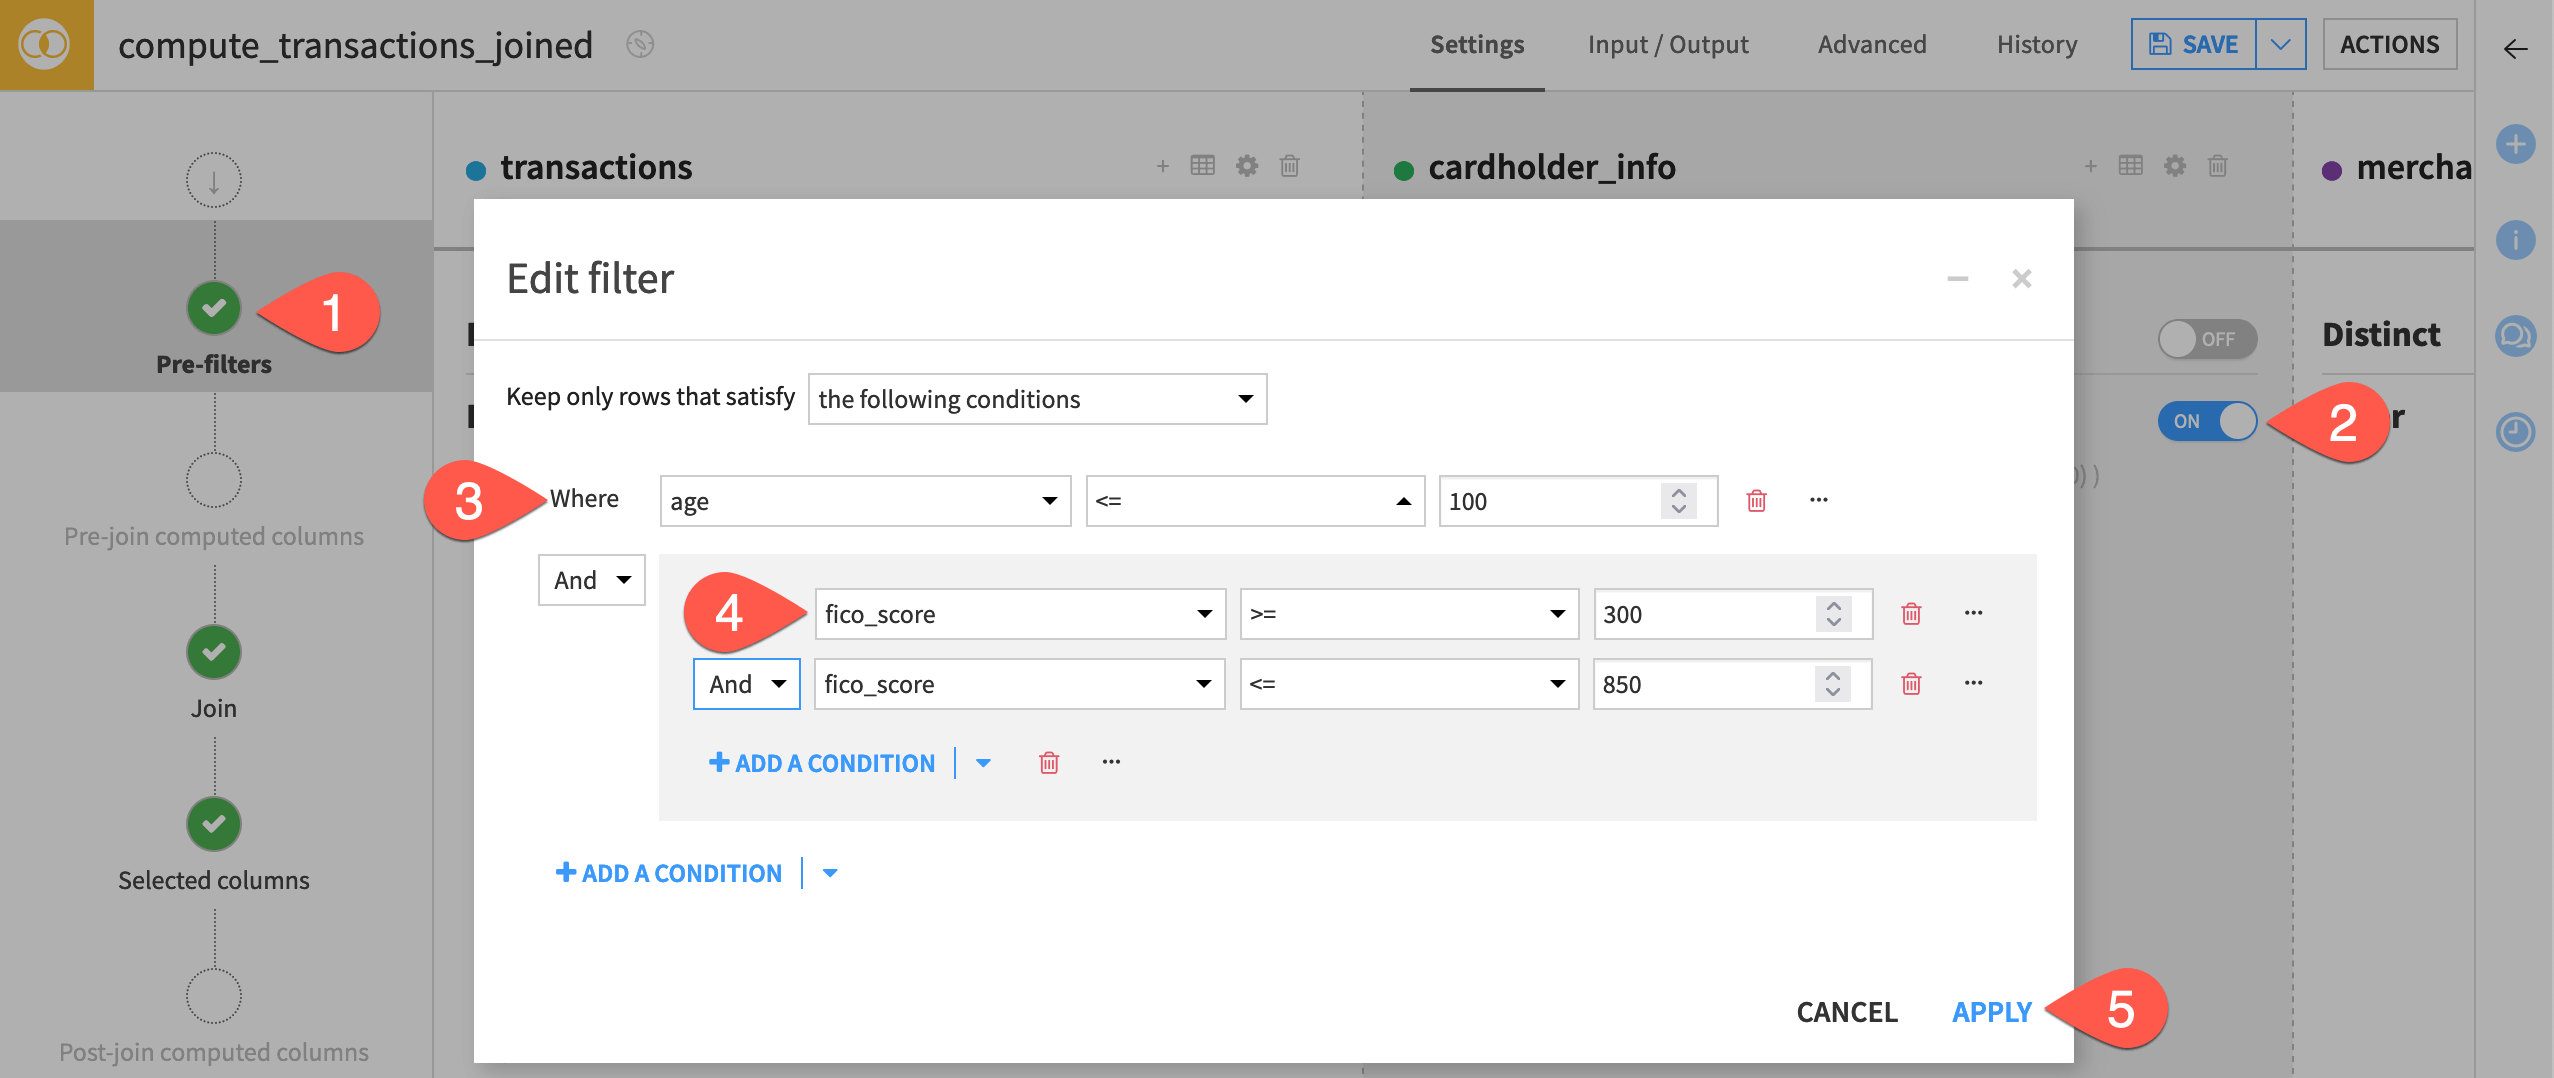
Click Apply, and review the summary of the filter.
Click Run at the bottom right of the recipe, and Run again to build the Flow downstream.
Next steps#
Congratulations! Your data preparation toolkit for defining rules and complex logic without code in Dataiku has now expanded.
You can learn more in the reference documentation on Data preparation and in the Knowledge Base.

