
Tutorial | Deploy an API service to a production environment#
Get started#
The batch framework demonstrated in Tutorial | Deploy a project bundle to a production environment works well for many use cases, such as creating periodic reports. For many other use cases though, you need to score individual records in real-time!
Objectives#
In this tutorial, you will:
Create an API endpoint from a saved model in the Flow of a Design node project.
Package that API endpoint inside an API service.
Publish that API service to the API Deployer.
Deploy that API service to a production infrastructure (an API node).
Add a query enrichment to a prediction endpoint in an API service.
Add a dataset lookup endpoint to an API service.
Redeploy new versions of API services.
Deploy multiple generations of a prediction endpoint to use for A/B testing.
Prerequisites#
Dataiku 12.0 or later.
A Full Designer user profile on the Dataiku for AI/ML or Enterprise AI packages.
An API node connected to the Design node:
Dataiku Cloud users can follow instructions for deploying API services on Kubernetes.
Administrators of self-managed Dataiku instances should see API Node & API Deployer: Real-time APIs in the reference documentation.
The Reverse Geocoding plugin (version 2.1 or above) installed on your Dataiku instance. (Dataiku Cloud instances include this plugin by default).
Broad knowledge of Dataiku (ML Practitioner + Advanced Designer level or equivalent).
Create the project#
From the Dataiku Design homepage, click + New Project.
Select Learning projects.
Search for and select Real-time APIs.
If needed, change the folder into which the project will be installed, and click Create.
From the project homepage, click Go to Flow (or type
g+f).
Note
You can also download the starter project from this website and import it as a ZIP file.
You’ll next want to build the Flow.
Click Flow Actions at the bottom right of the Flow.
Click Build all.
Keep the default settings and click Build.
Use case summary#
You’ll work with a simple credit card fraud use case. Using data about transactions, merchants, and cardholders, the Flow includes a model that predicts which transactions to authorize and which are potentially fraudulent.
A score of 1 for the target variable, authorized_flag, represents an authorized transaction.
A score of 0, on the other hand, is a transaction that failed authorization.
Putting this model into production can enable two different styles of use cases commonly found in machine learning workflows:
Scoring framework |
Example use case |
Production environment |
|---|---|---|
Batch |
A bank employee creates a monthly fraud report. |
Automation node |
Real-time |
A bank’s internal systems authorize each transaction as it happens. |
API node |
Tip
This use case is just an example to practice deploying and monitoring MLOps projects in production. Rather than thinking about the data here, consider how you’d apply the same techniques and Dataiku features to solve problems that matter to you!
Create an API endpoint and test queries#
Let’s start by creating an API service with one of the most common types of endpoint: a prediction endpoint.
Create an API service with a prediction endpoint#
To get started, you need a prediction model deployed to the Flow inside a project in the development environment.
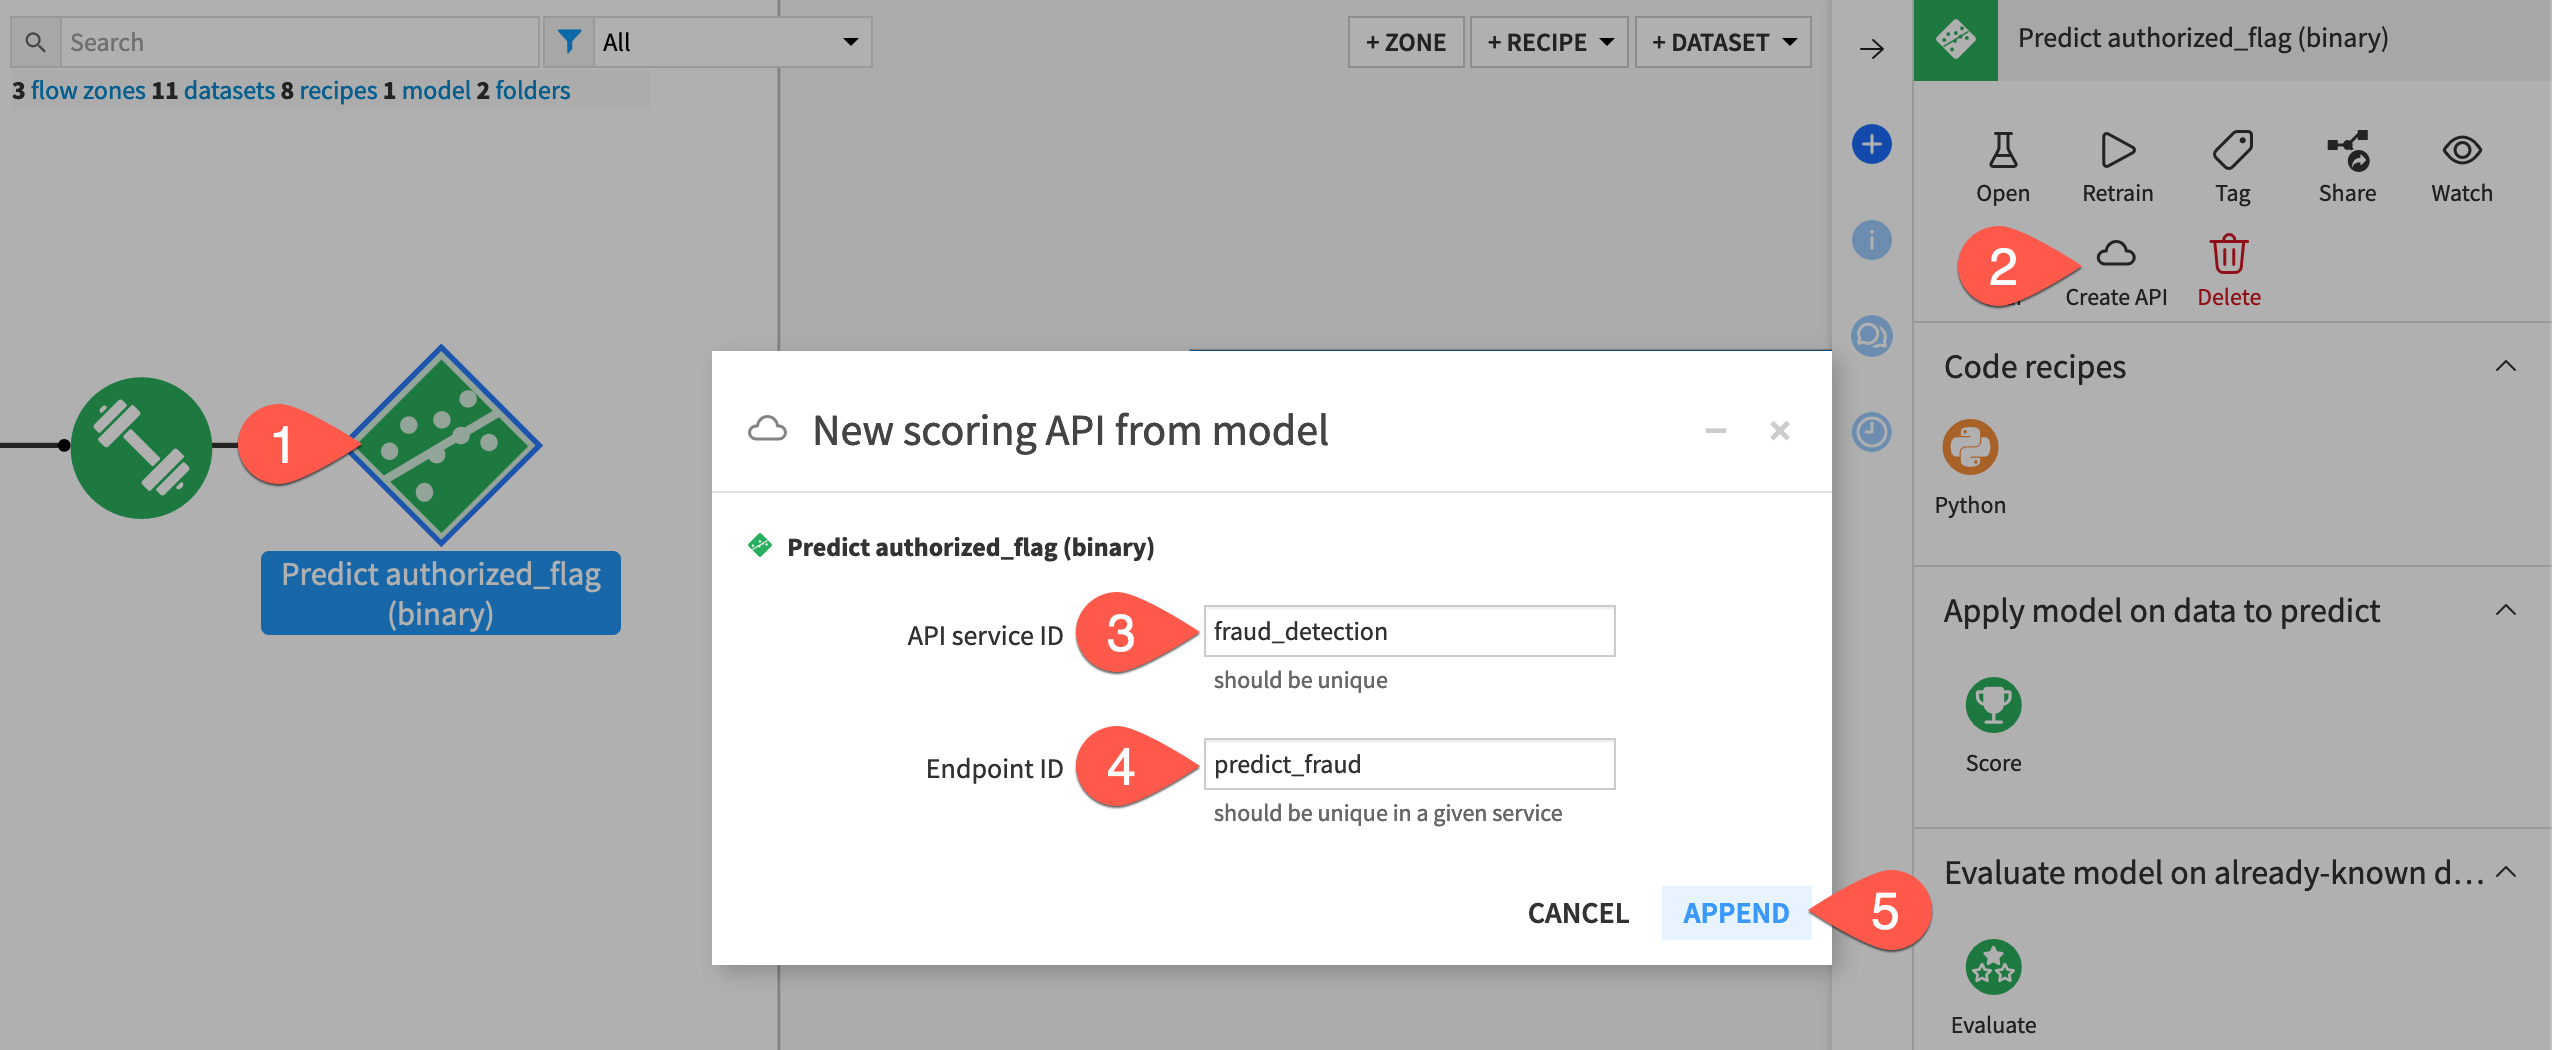
From the project Flow, select the prediction model Predict authorized_flag (binary).
In the Actions (
 ) tab of the right panel, click Create API.
In the New scoring API from model dialog, name the API service ID
fraud_detection.Important
The API service ID must be unique. If an API service with the same name already exists in your project, consider adding a unique identifier (such as your name) to the API service ID.
Name the Endpoint ID
predict_fraud. This ID should be unique within the API service.Click Append to open the API Designer.
Test the prediction endpoint#
The fraud_detection API service now includes the model as an endpoint named predict_fraud.
Next, you’ll run some test queries on records found in the test_scored dataset. These queries will confirm that the endpoint generates a proper prediction for whether a credit card transaction was fraudulent or not.
If not already there, in the top navigation bar, navigate to More Options (
 ) > API Designer. Click fraud_detection to open the API service.
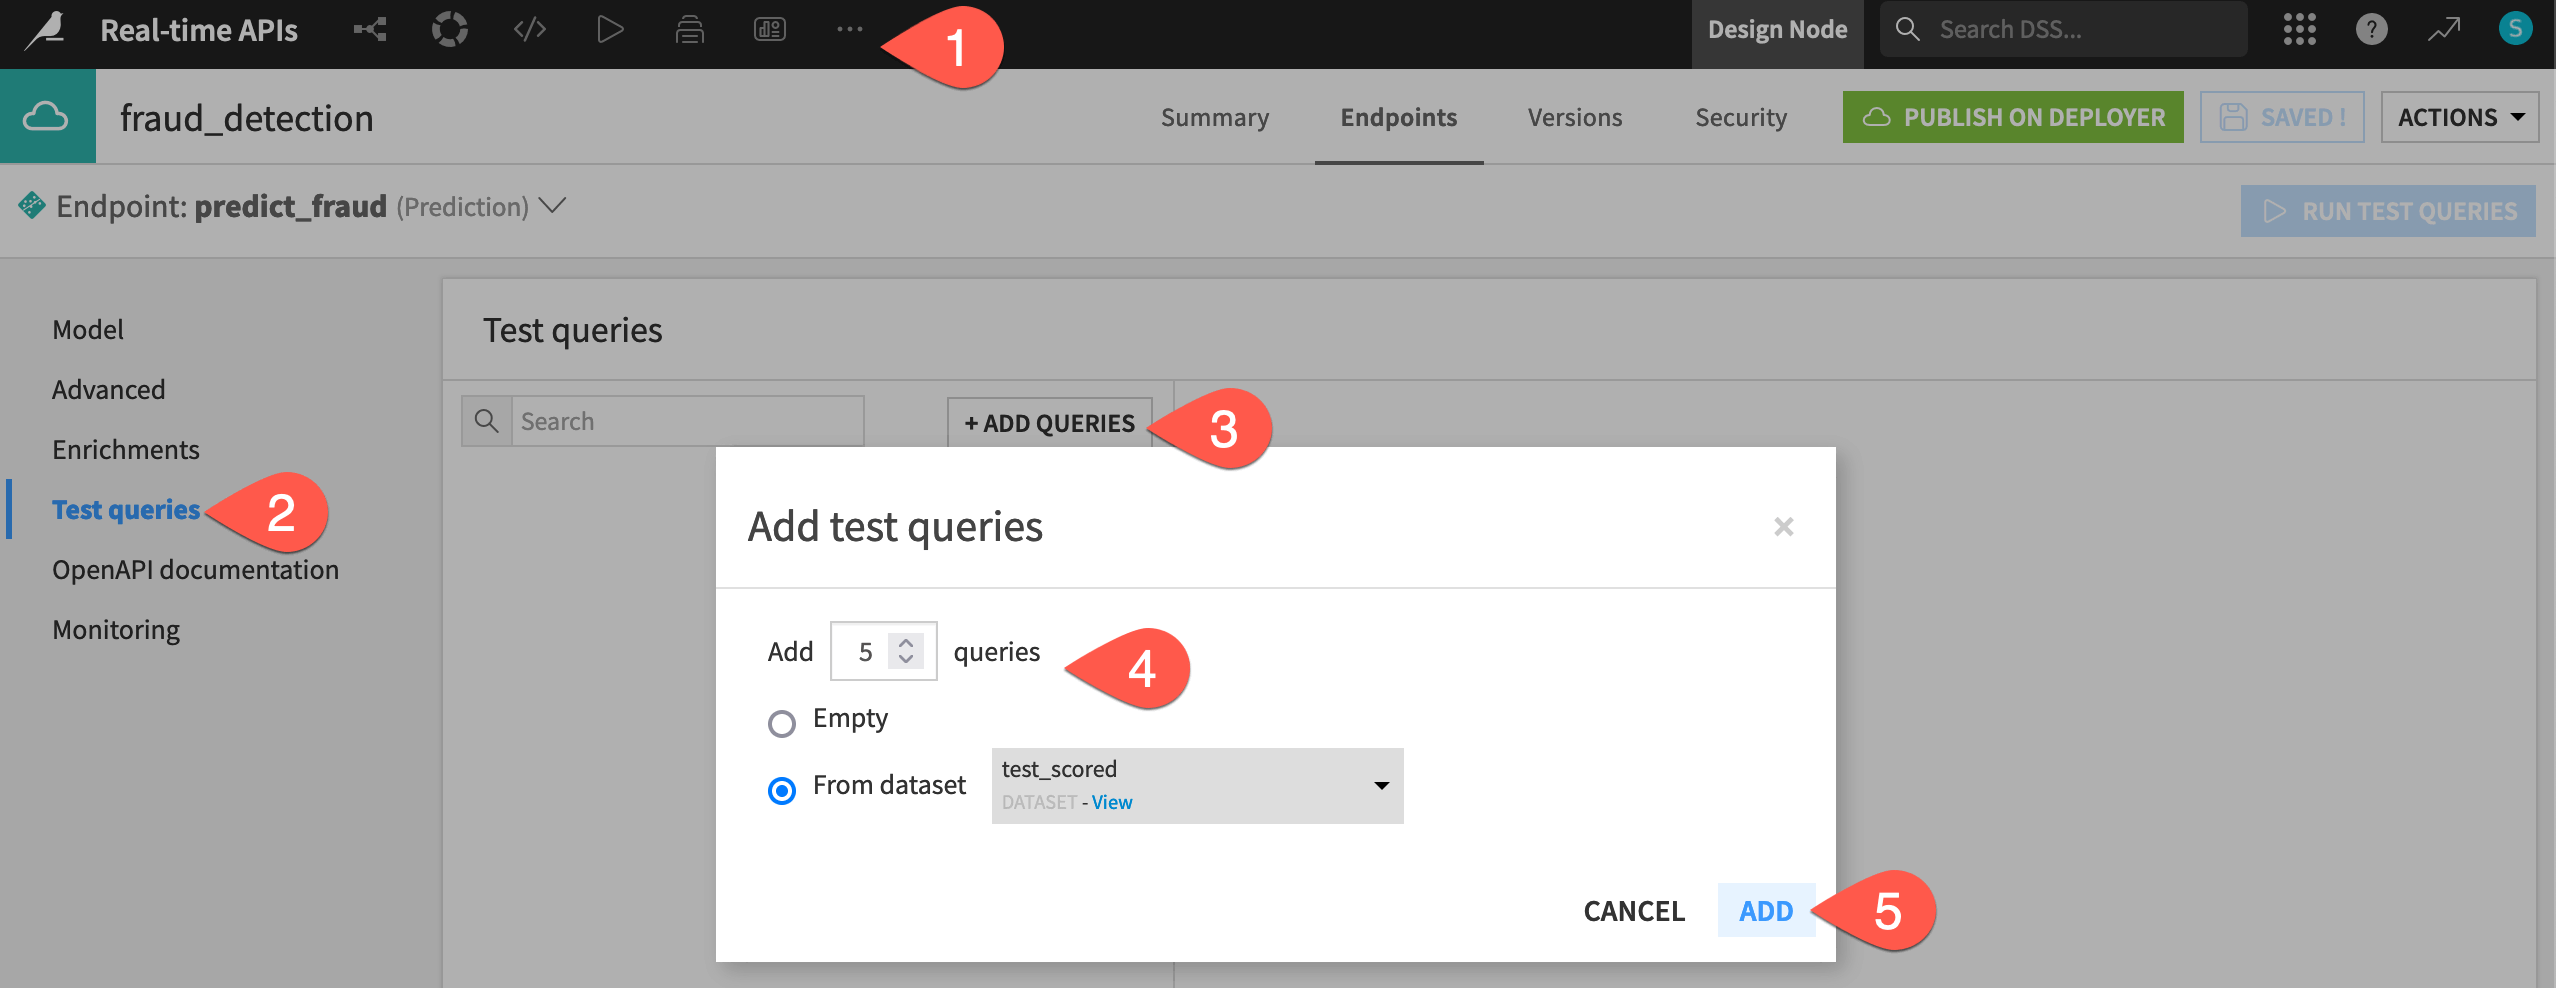
In the API service, go to the Test queries panel.
Click + Add Queries.
Choose to create
5test queries from the test_scored dataset.Click Add.
Now run them!
Click Run Test Queries.
Click the Details of the first query to see more details, such as the probabilities of the two outcomes according to the model.
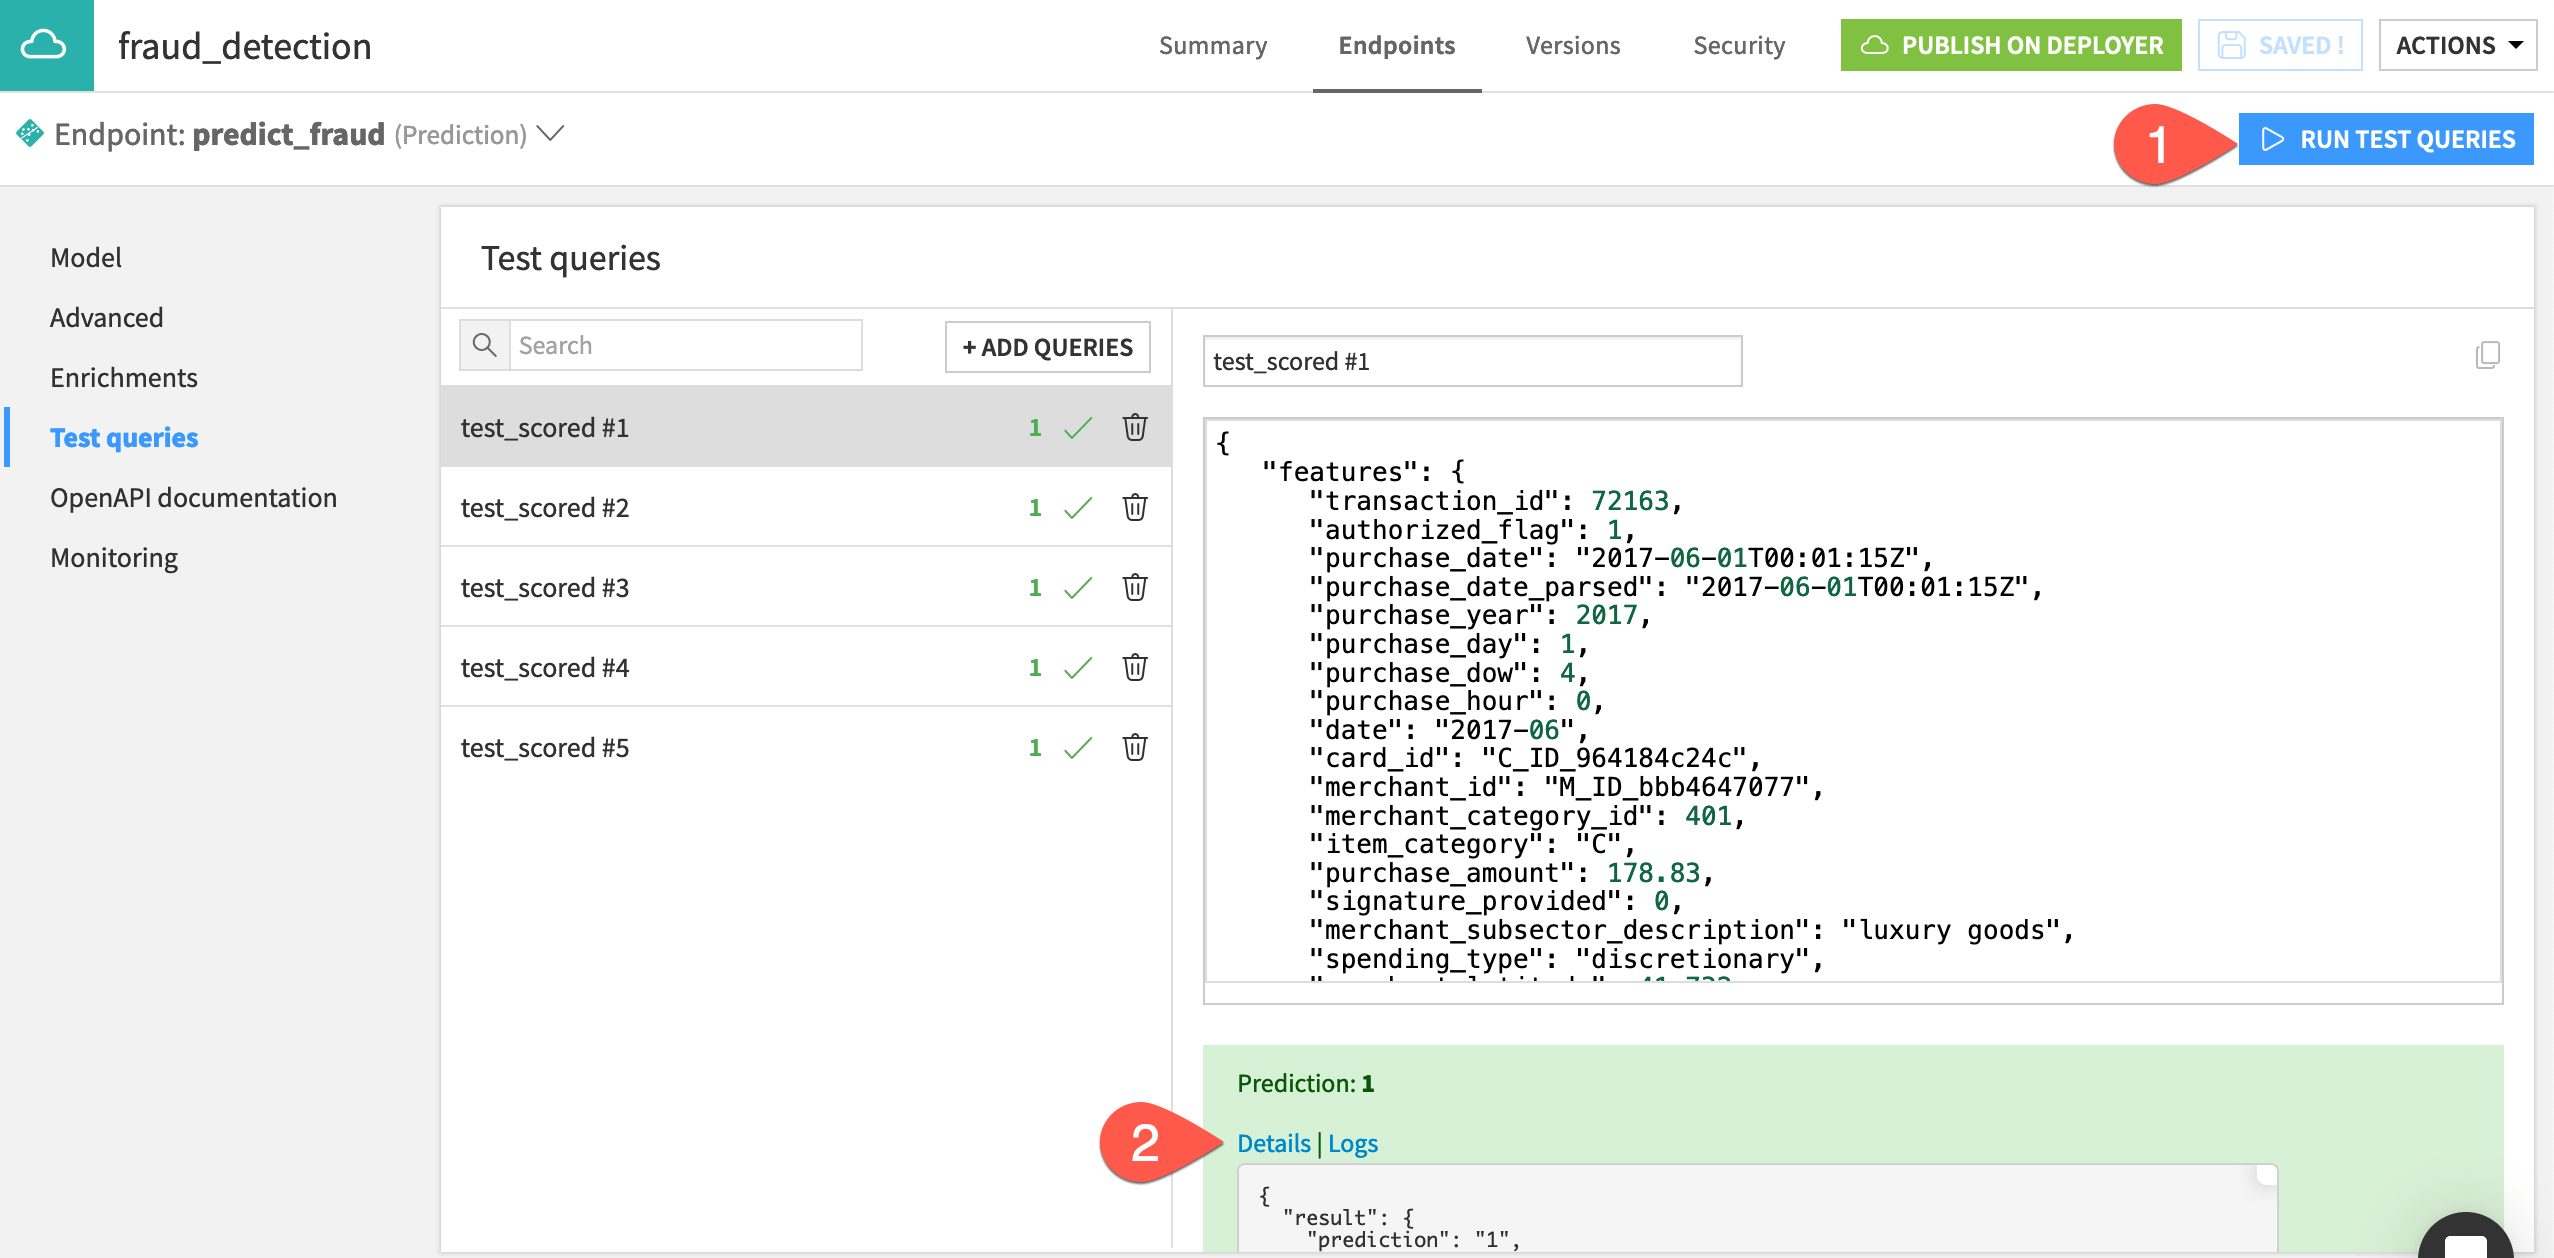
Tip
The Logs tab (next to Details) provides information that can be useful for debugging and troubleshooting.
Deploy a real-time API service#
You’ve successfully designed and tested an API service including a prediction endpoint. The next step is to actually deploy this API service from the Design node into a production environment!
Publish the API service on the API Deployer#
Recall that the Flow has a prediction model to classify credit card transactions as fraudulent or not. You’ve packaged this model as a prediction endpoint in an API service, but this service only exists on the Design node (the development environment).
Important
The remaining steps require an active connection between the Design node and the API Deployer. Dataiku Cloud users can follow instructions for deploying API services on Kubernetes. Administrators of self-managed Dataiku instances should follow API Node & API Deployer: Real-time APIs in the reference documentation.
The next step is to publish the API service from the Design node to the API Deployer.
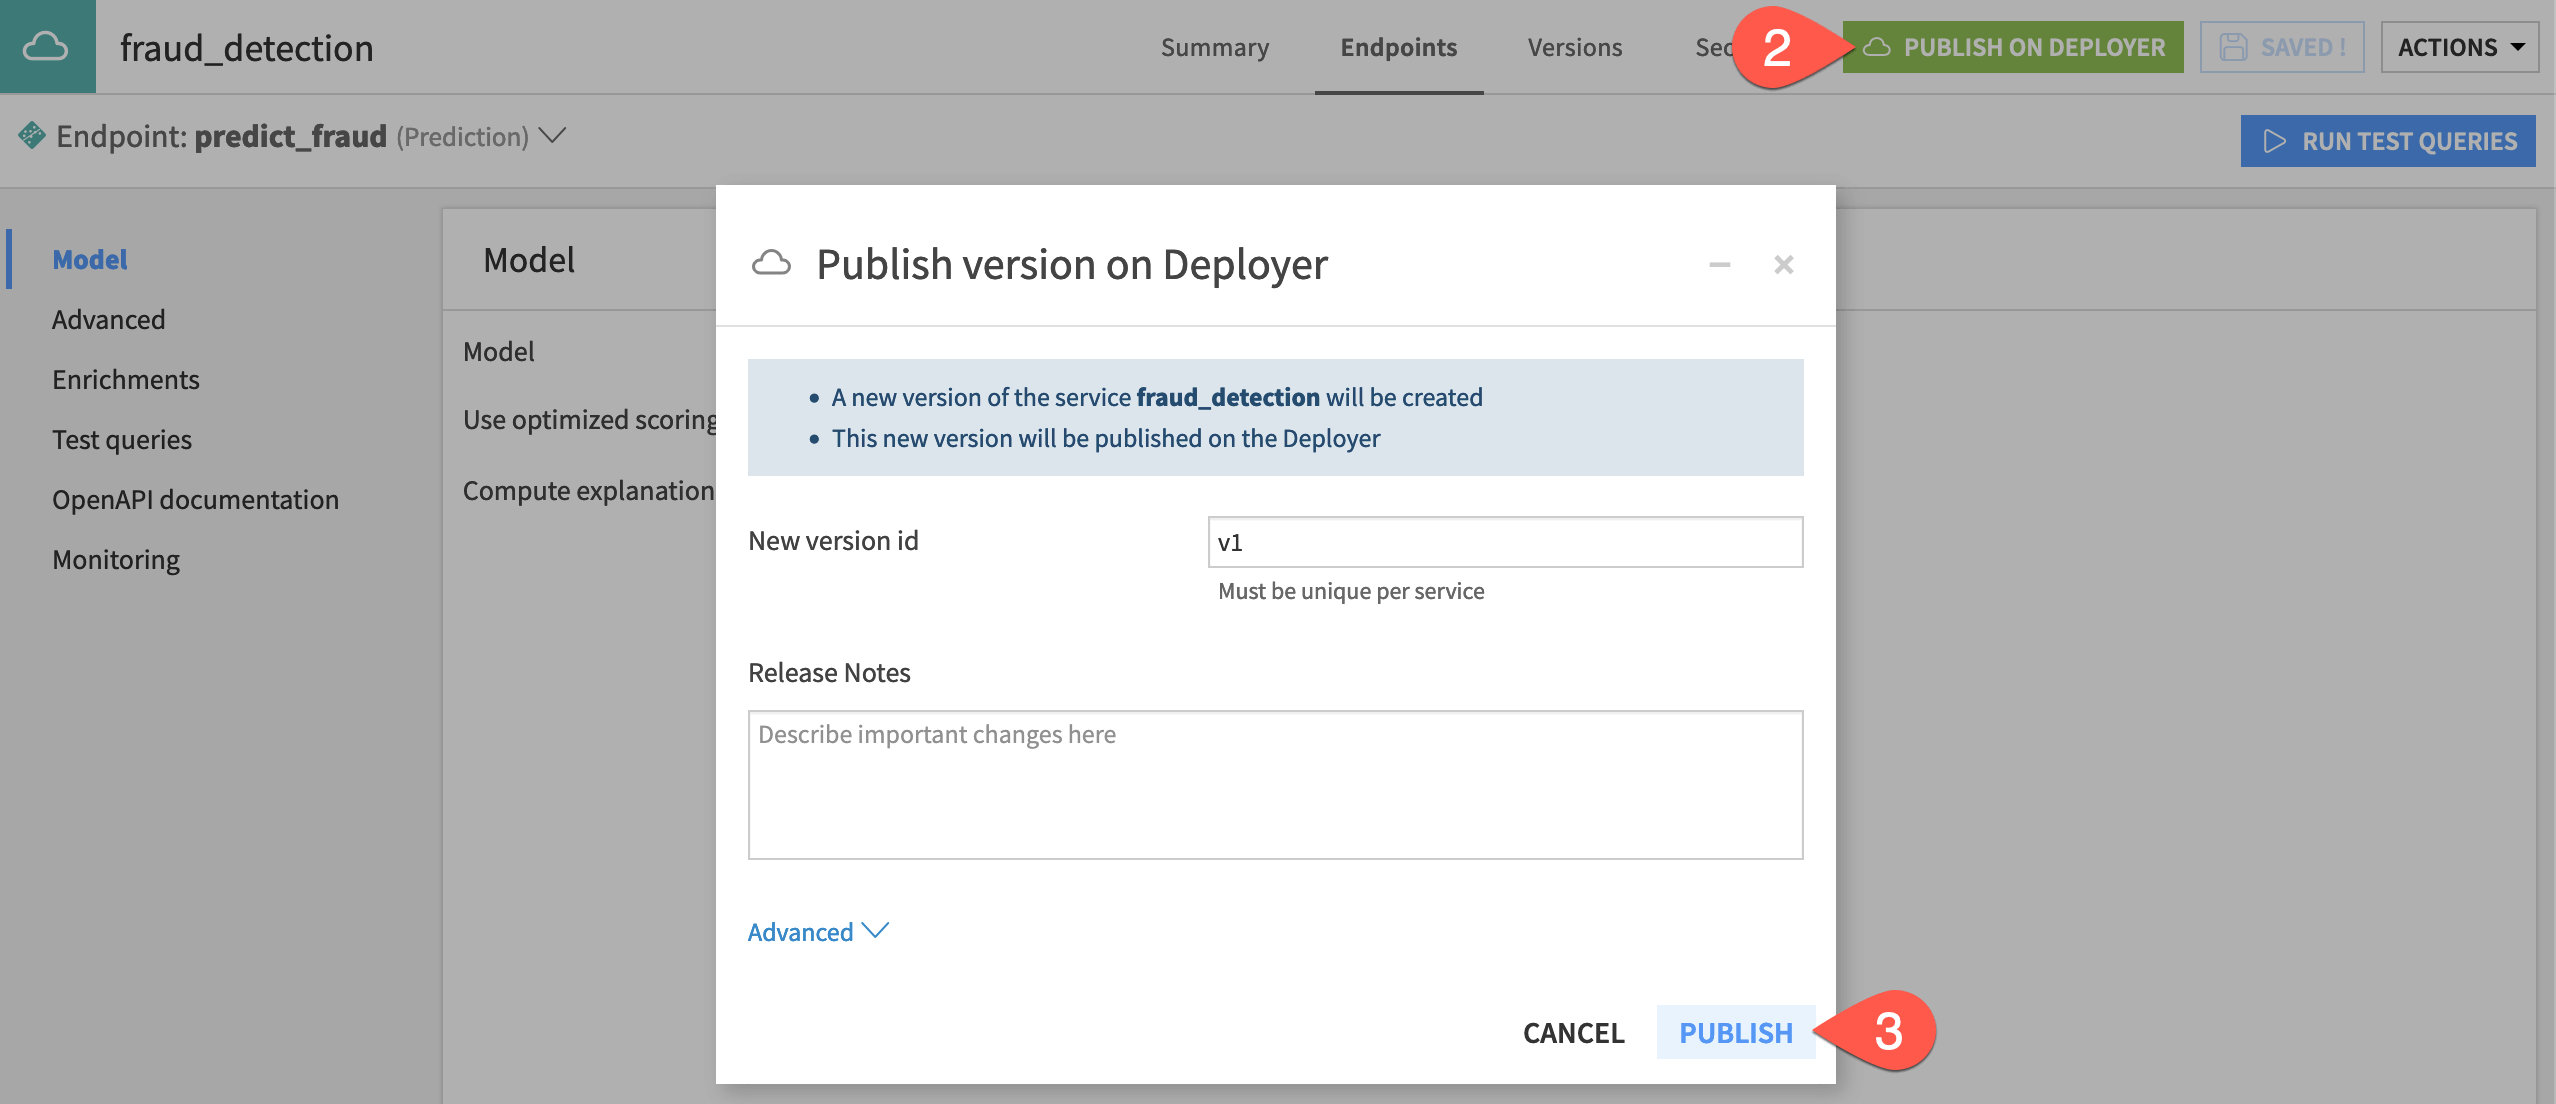
If not already open, in the top navigation bar of the Design node, navigate to More Options (
) > API Designer. Select the fraud_detection API service.Click Publish on Deployer.
Click Publish, keeping the default version ID name.
Deploy the API service to the deployment infrastructure#
You now have the API service including the prediction endpoint on the API Deployer. However, to query the endpoint, you still need to deploy the API service to an infrastructure.
First get to the Deployer. From the waffle (
 ) menu in the top navigation bar of the Design node, select Local (or Remote) Deployer.
On the Deployer homepage, select Deploying API Services.
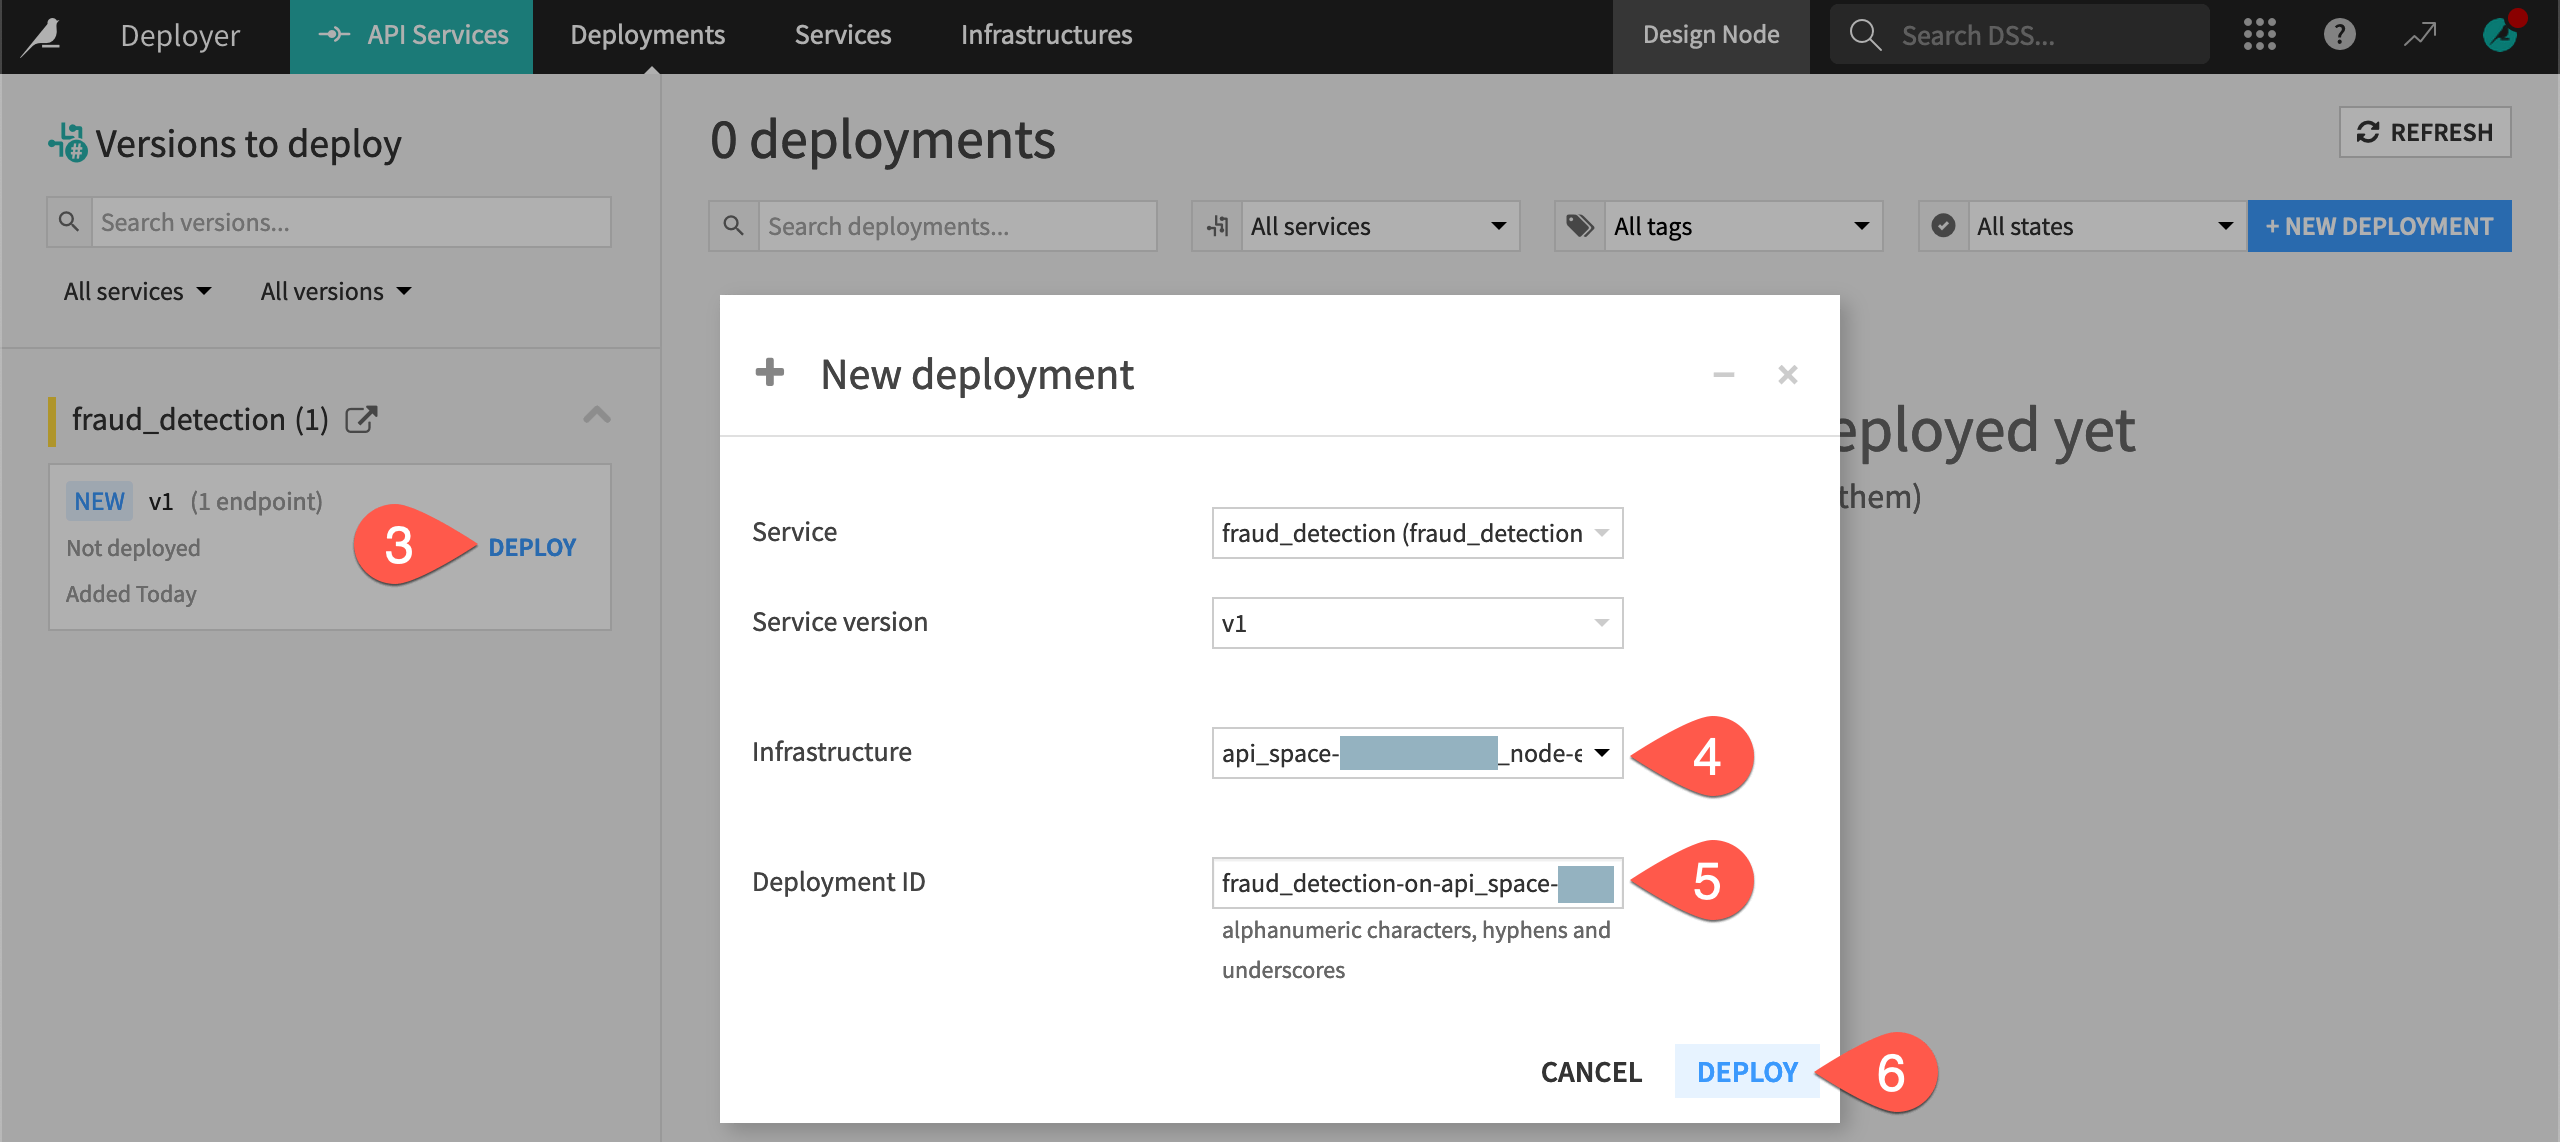
On the Deployments tab of the API Deployer, find the fraud_detection API service on the left, and click Deploy.
If not already selected in the dialog, choose an infrastructure for the new deployment. If you have multiple options, choose one at the earliest lifecycle stage, which might be named Development, for example.
Note the default Deployment ID (which takes the form
<api-service-name>-on-<infrastructure-name>).Click Deploy.
On the Status tab of the new deployment, click Deploy once again.
Important
Depending on the Govern deployment policy of your chosen infrastructure, it’s possible you receive a warning or an error for a missing approval in the Govern node. If you see a warning, you can ignore it. If you encounter an error, you’ll need to choose another infrastructure or obtain an approval for the saved model version. See resources on Implement AI Governance to learn more.
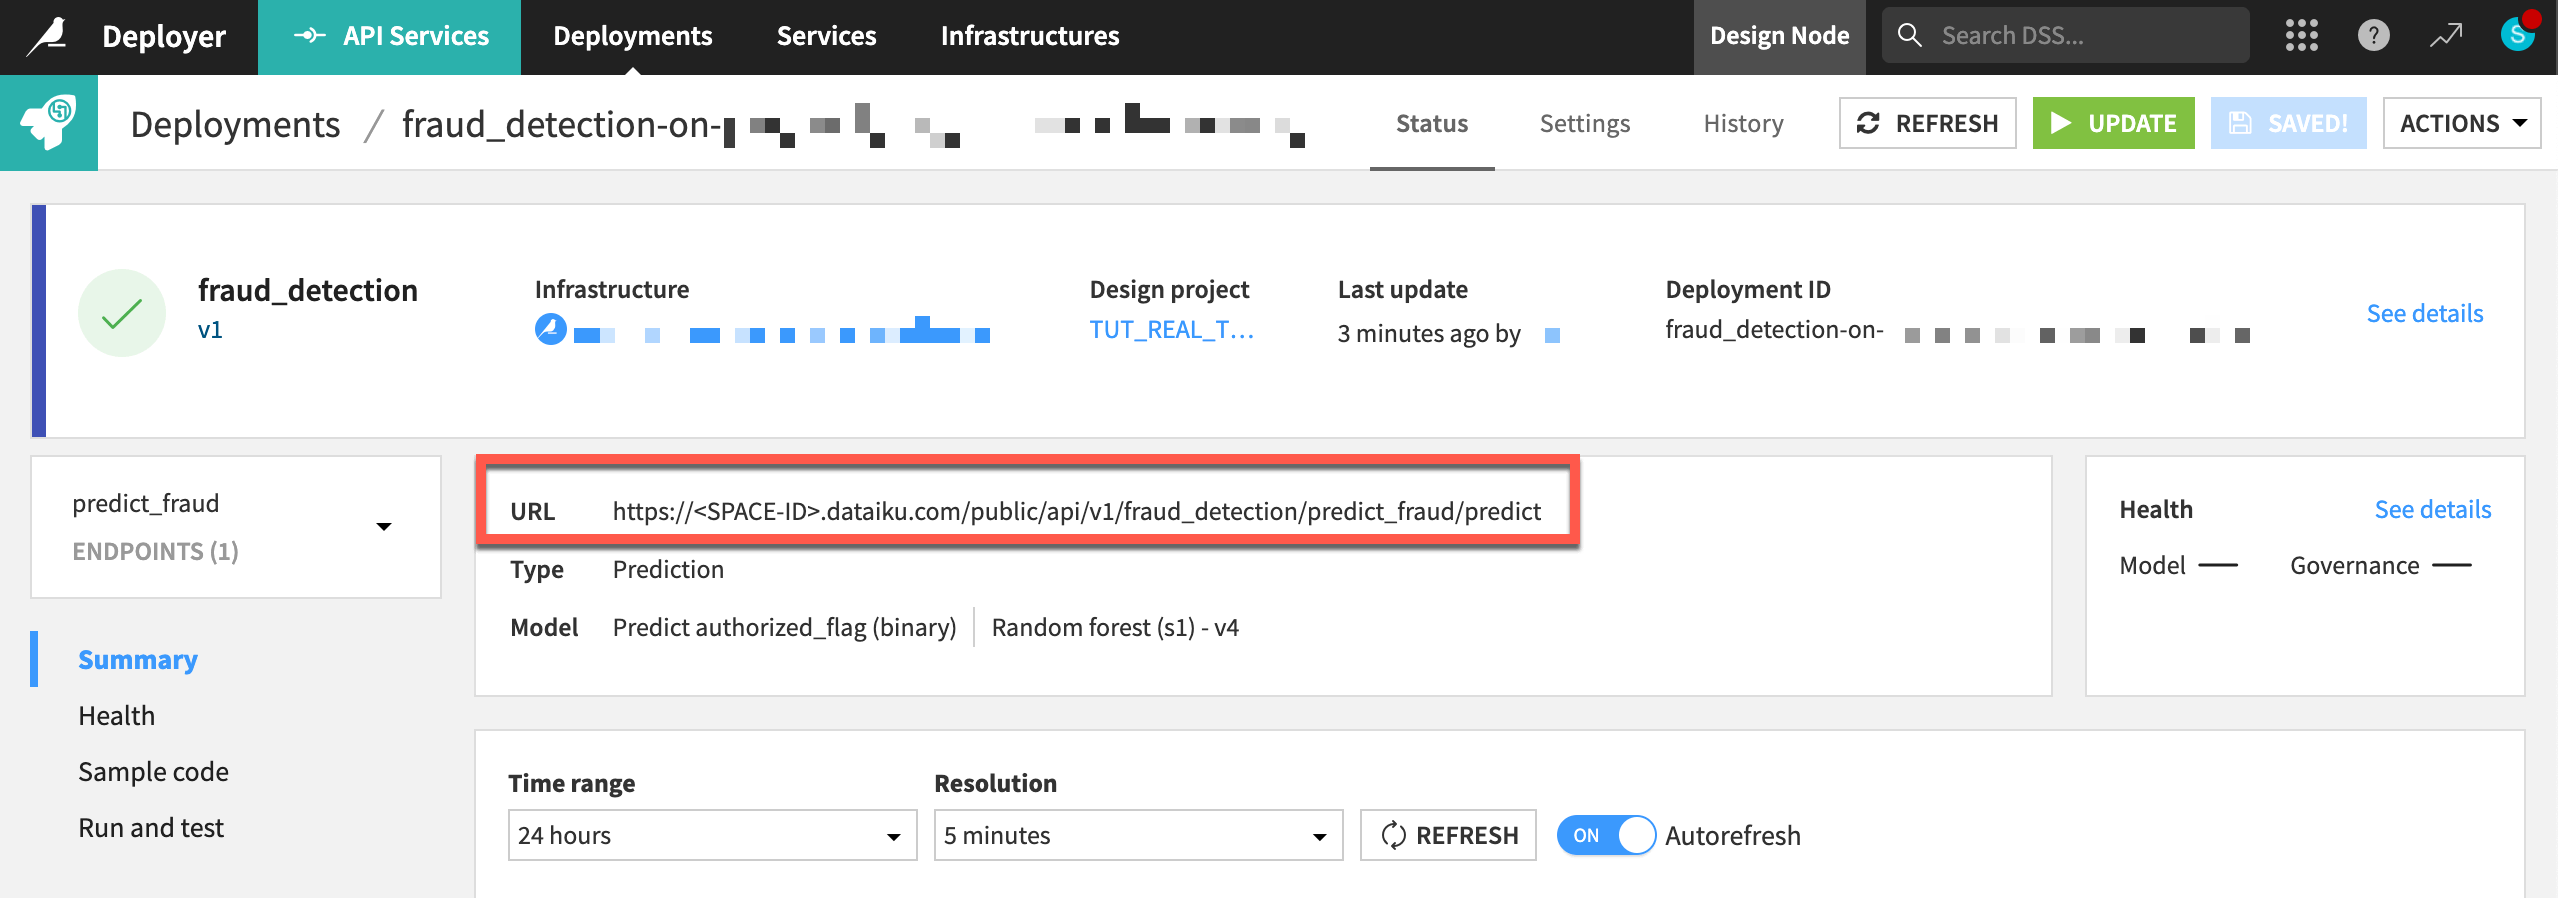
You now have an API service including a prediction endpoint available to serve real-time API calls. Note the dedicated URL of this API endpoint.
Query the API endpoint#
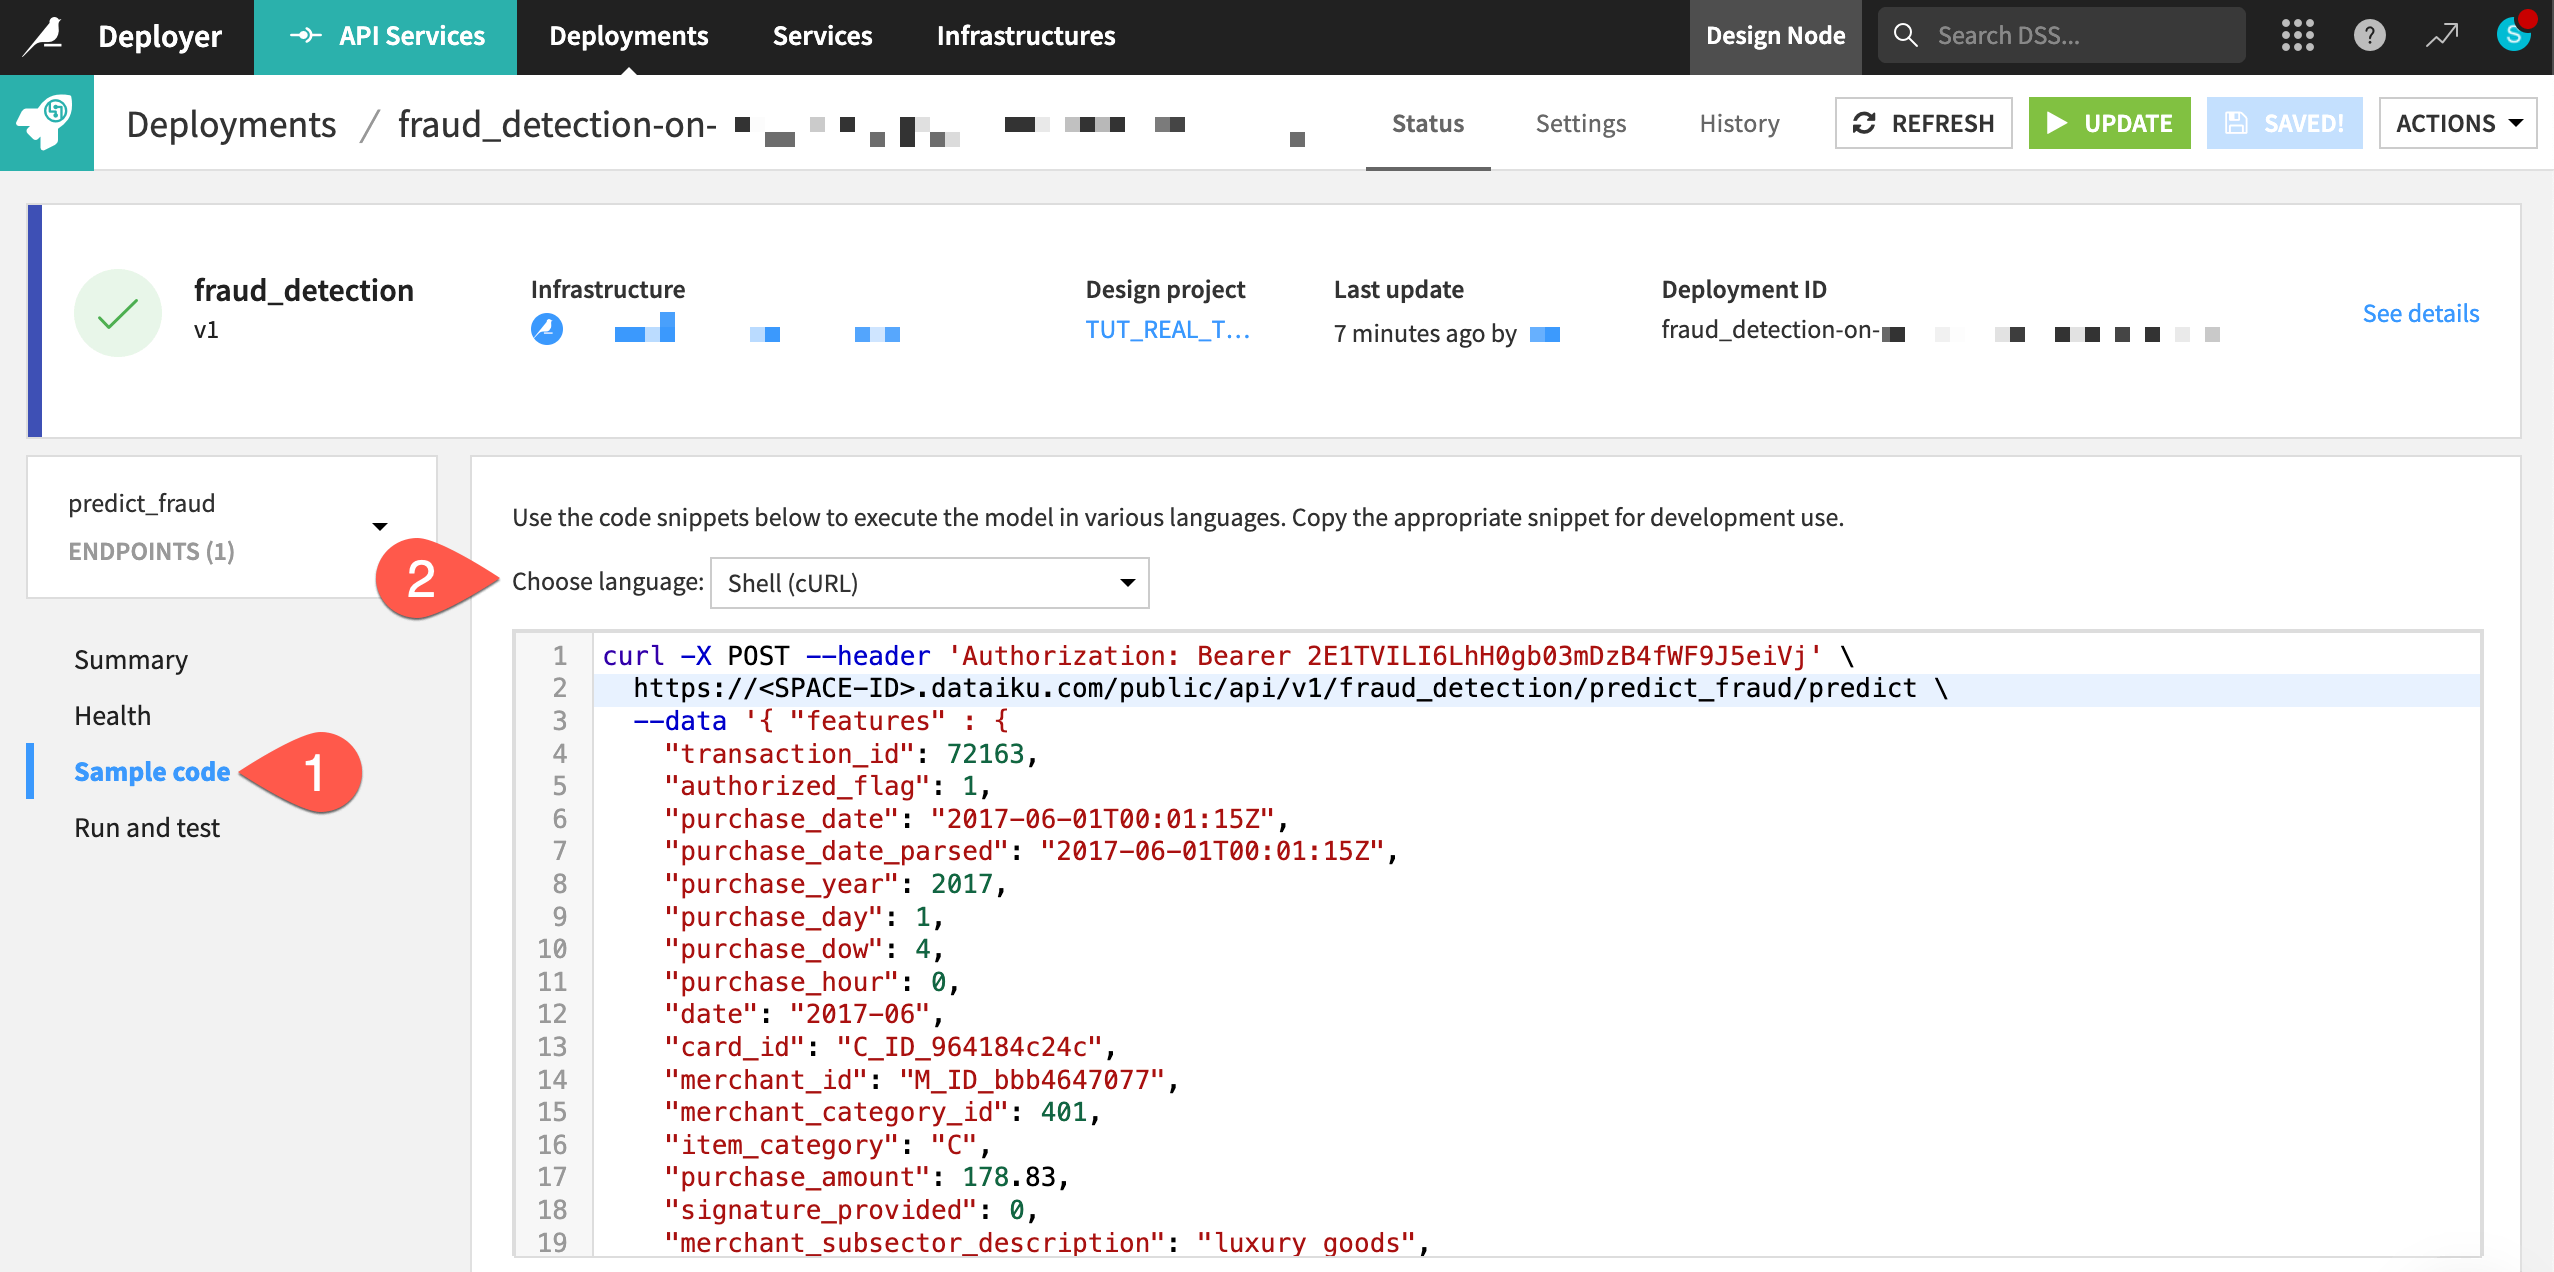
You can now submit real queries to this service by calling the endpoint URL. The Sample code panel provides snippets for calling the API in Shell (cURL), Python, R, or Java.
Within the Status tab of the prediction endpoint, navigate to the Sample code panel.
Copy-paste the Shell code into a terminal window.
Execute the live query, and see the prediction for this record returned in real-time.
You can also run the test queries previously defined in the API Designer of your project.
Still within the Status tab of the prediction endpoint, navigate to the Run and test panel.
Click Run All.
Now you have run on an API node the same queries initially tested in the project’s API Designer on the Design node!
Optional: Copy the deployment to another infrastructure#
Important
This section requires having a second deployment infrastructure. If you don’t have this available, you can skip to the next section.
When choosing an infrastructure in the previous step, you may have seen pre-configured lifecycle stages. An instance admin can modify these stages as desired, so your options may be different depending on the complexity of your organization’s deployment strategy.
Imagine your organization uses another stage of deployment infrastructure, and all tests on the first deployment infrastructure were successful. You’re now ready to copy the existing deployment to a new pool of API nodes.
Still within the Status tab of the API service, click Actions > Copy this deployment at the top right.
Select a new infrastructure, and keep the other default values.
Click Copy.
You’re now ready to deploy the service.
Click Deploy again on the page that opens up for the deployment.
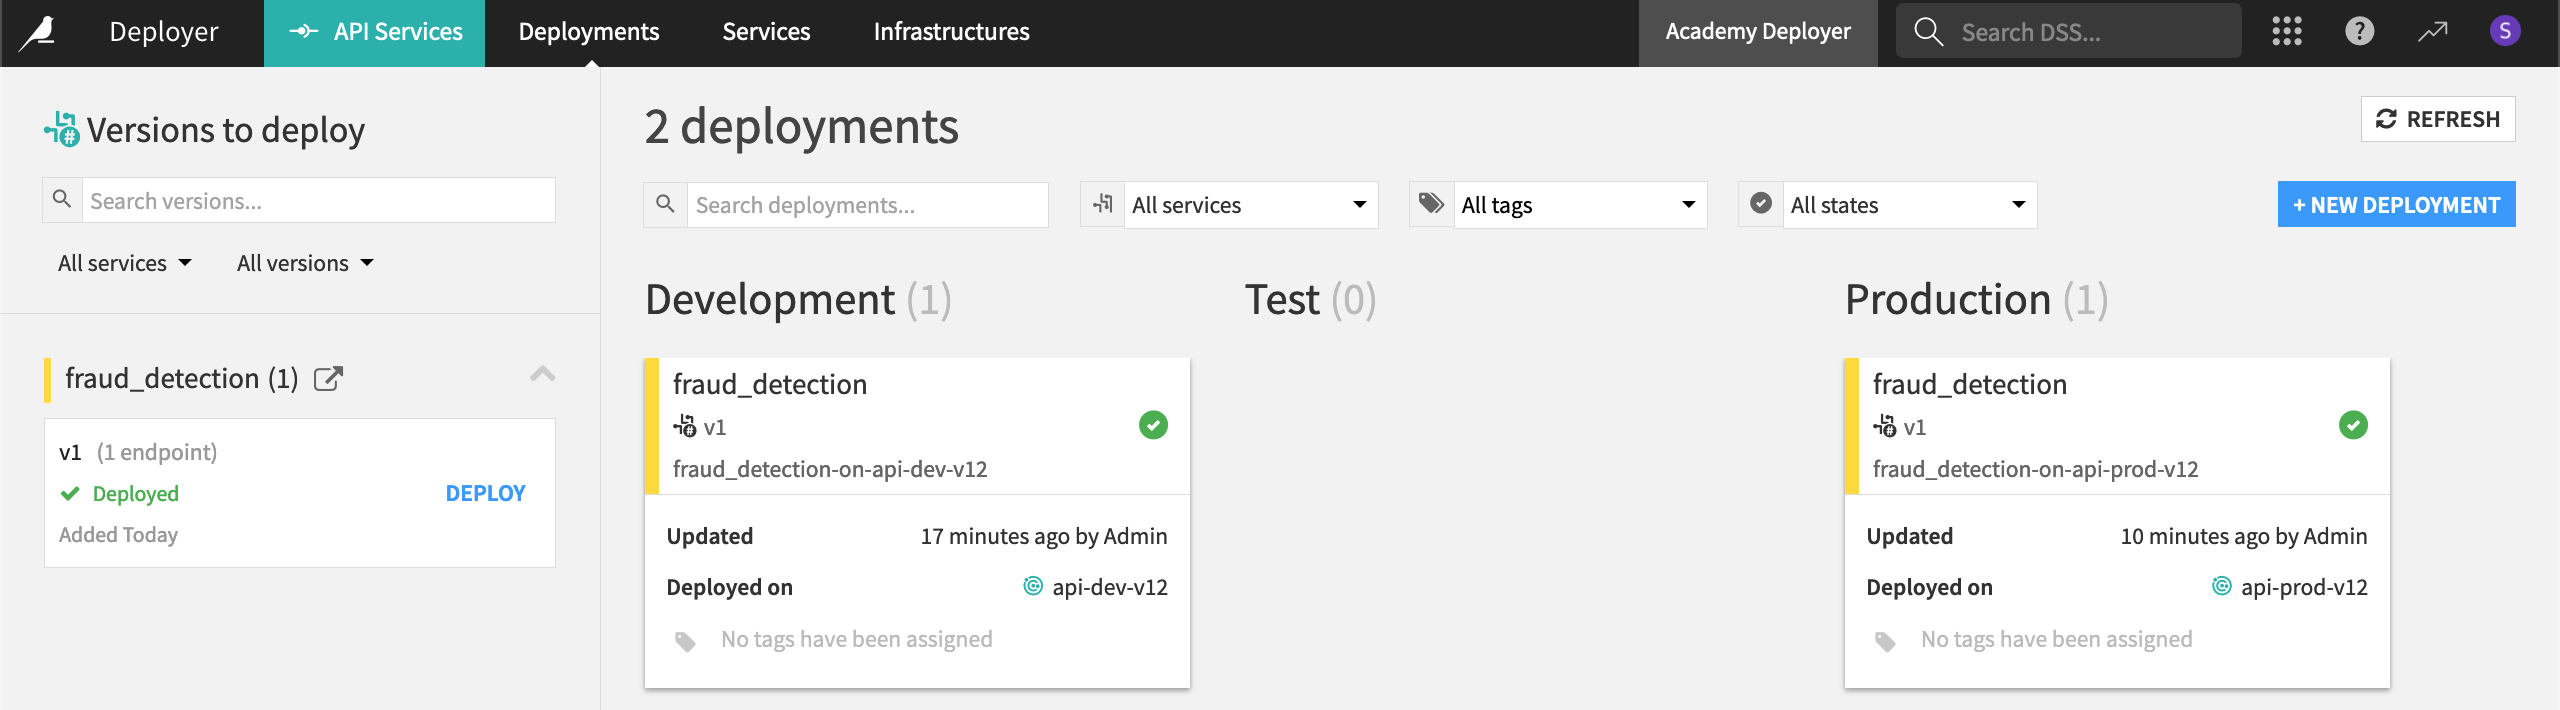
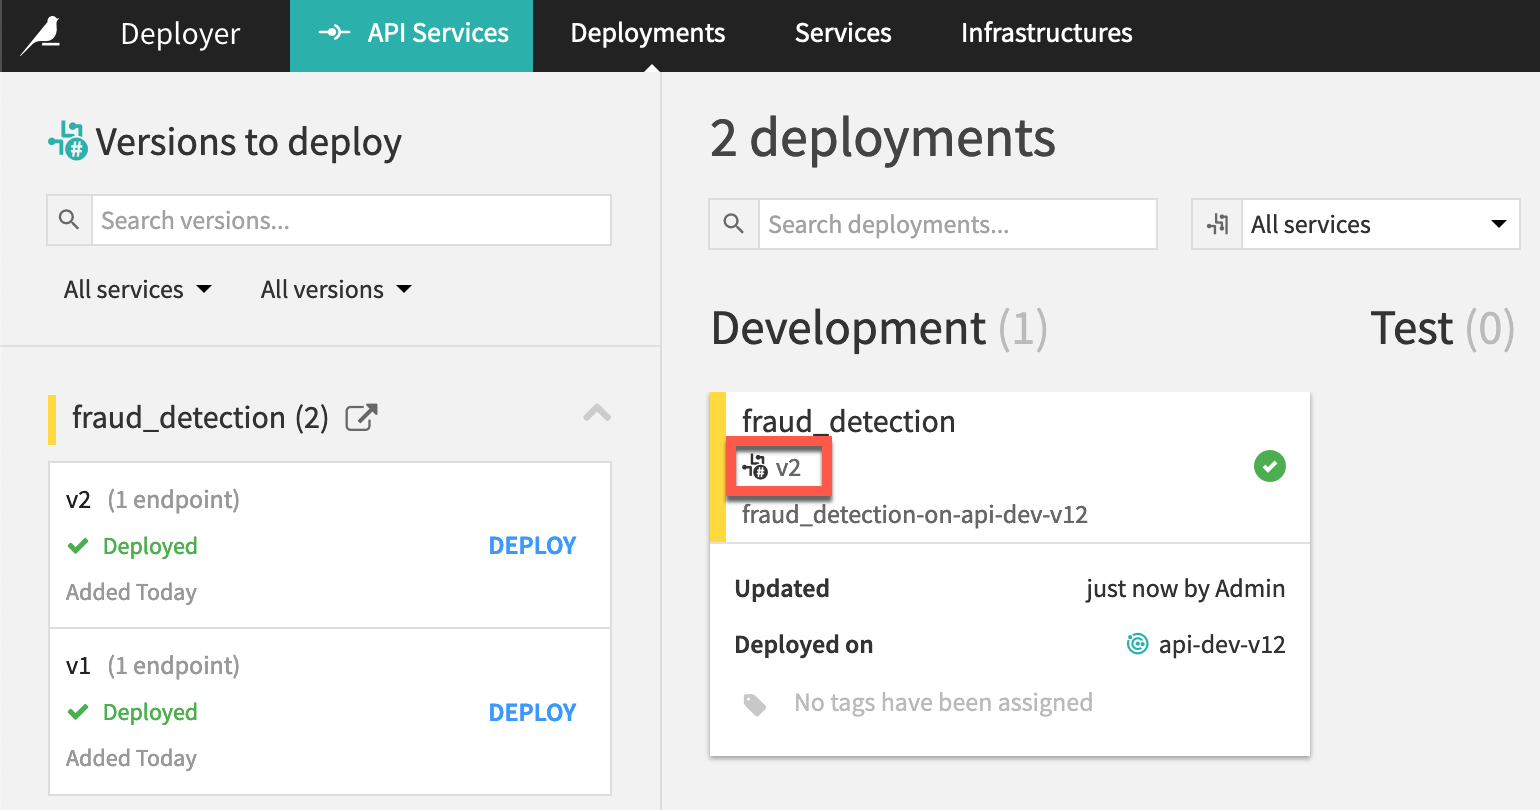
Once you’ve updated the deployment, click Deployments in the top navigation bar. Confirm that you deployed the fraud_detection API service to two different infrastructures at two different lifecycle stages.
Add an enrichment to a prediction endpoint#
You’ve successfully published an API service from the Design node to the API Deployer and then to a deployment infrastructure (an API node). This allowed you to receive a response from a query to a live prediction endpoint.
Often though, you may be missing information required for a model to score an incoming request. In such a situation, you’ll need to add an API query enrichment to the prediction endpoint within the existing API service on the Design node. Then, you’ll re-deploy a new version of the API service.
Add a query enrichment#
The project creators trained the prediction model in the Flow on six features from the training dataset. You can confirm this by opening the active version of the model, and navigating to the Features panel in the Model Information section.
Ideally, an incoming transaction to the API endpoint would have values for all six features. However, suppose at the time a transaction occurs, a merchant point of sale system sends values for only a subset of these features:
signature_provided
merchant_subsector_description
purchase_amount
merchant_state
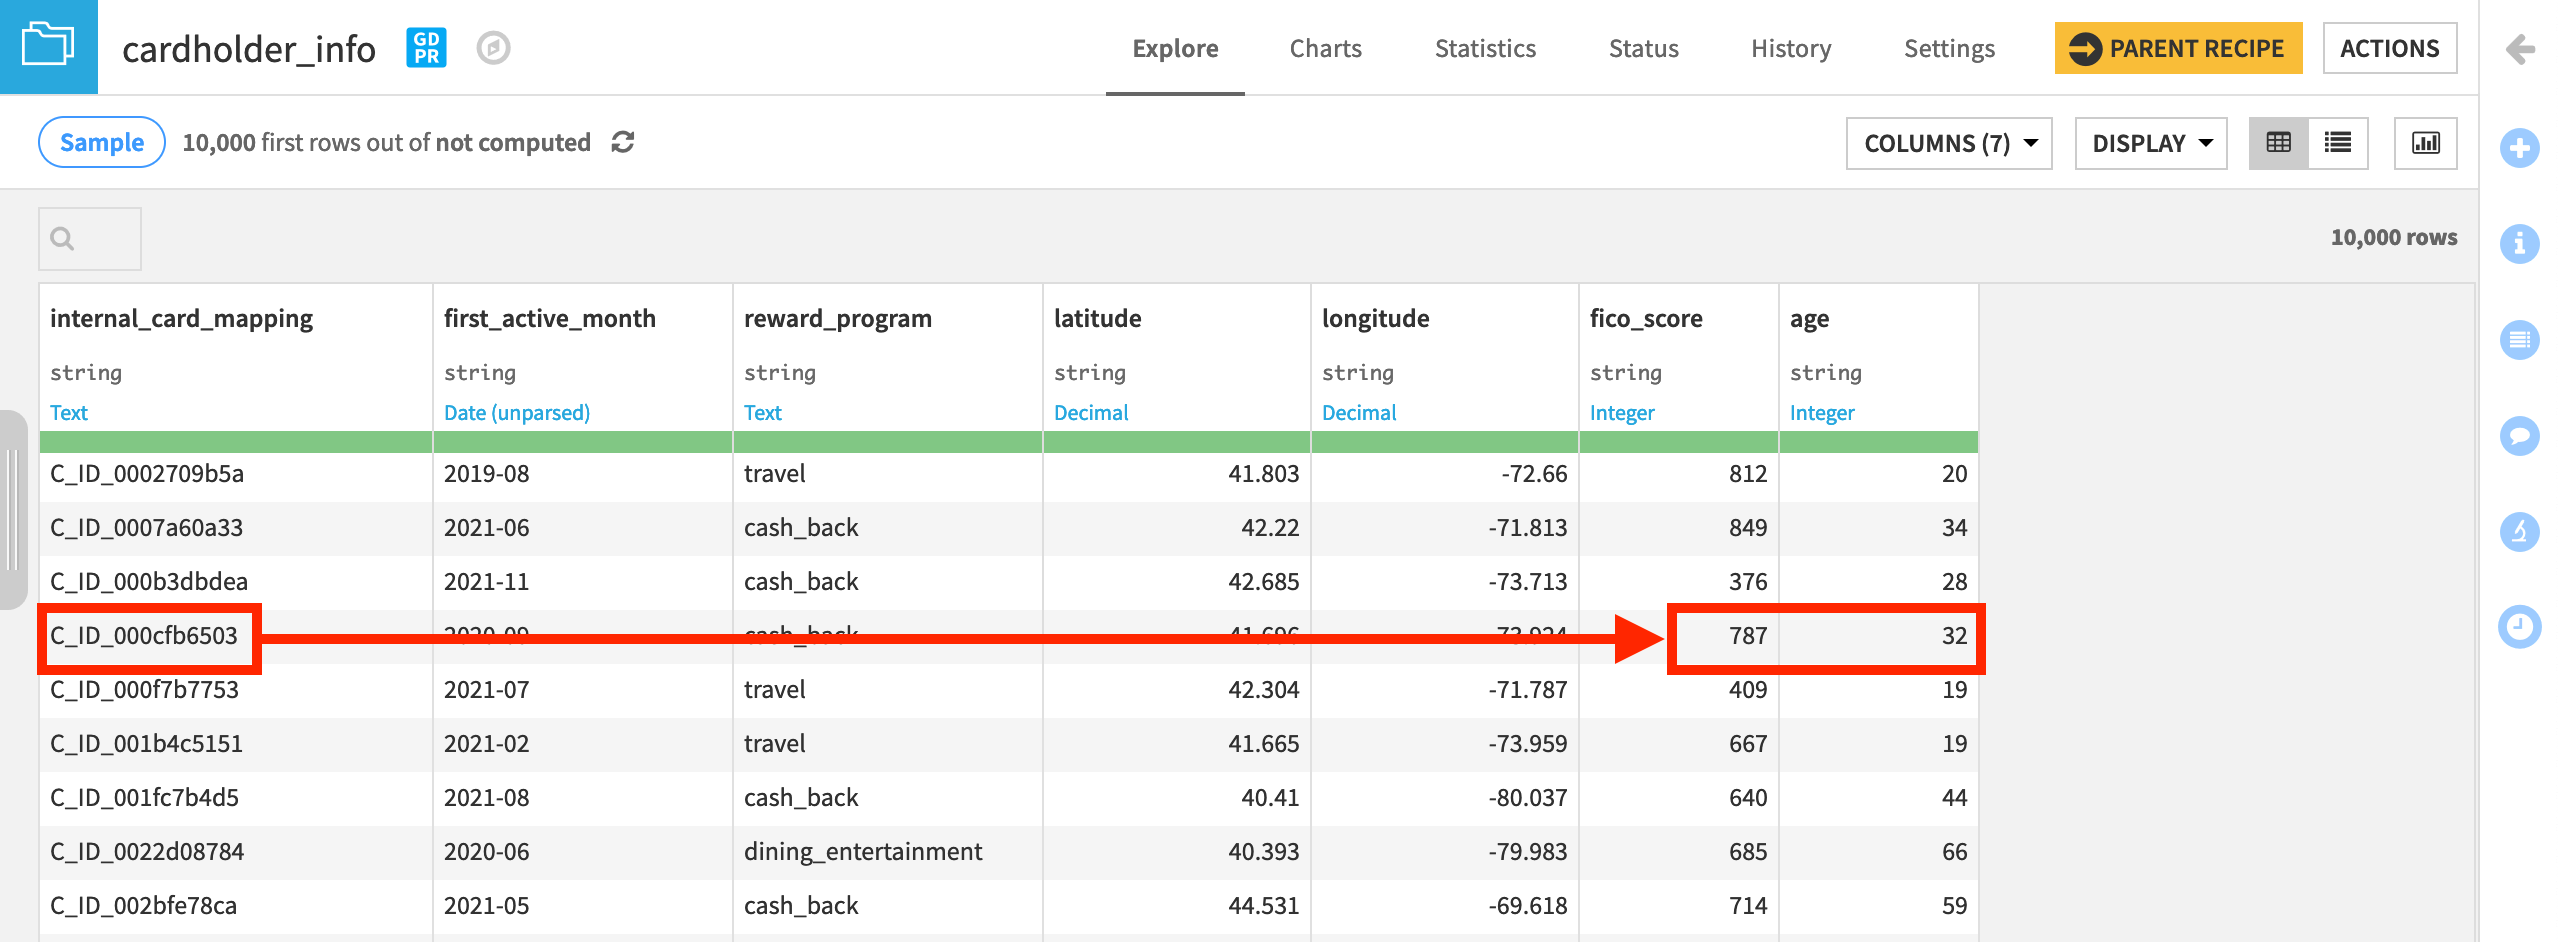
You first need to retrieve the missing values for the features card_fico_score and card_age from the internal database, and then use these values to enrich the API queries.
Using the cardholder_info dataset, you’ll use the card_id value of each real-time transaction to look up the corresponding values for fico_score and age. You’ll then pass the complete feature set to the prediction model for scoring.
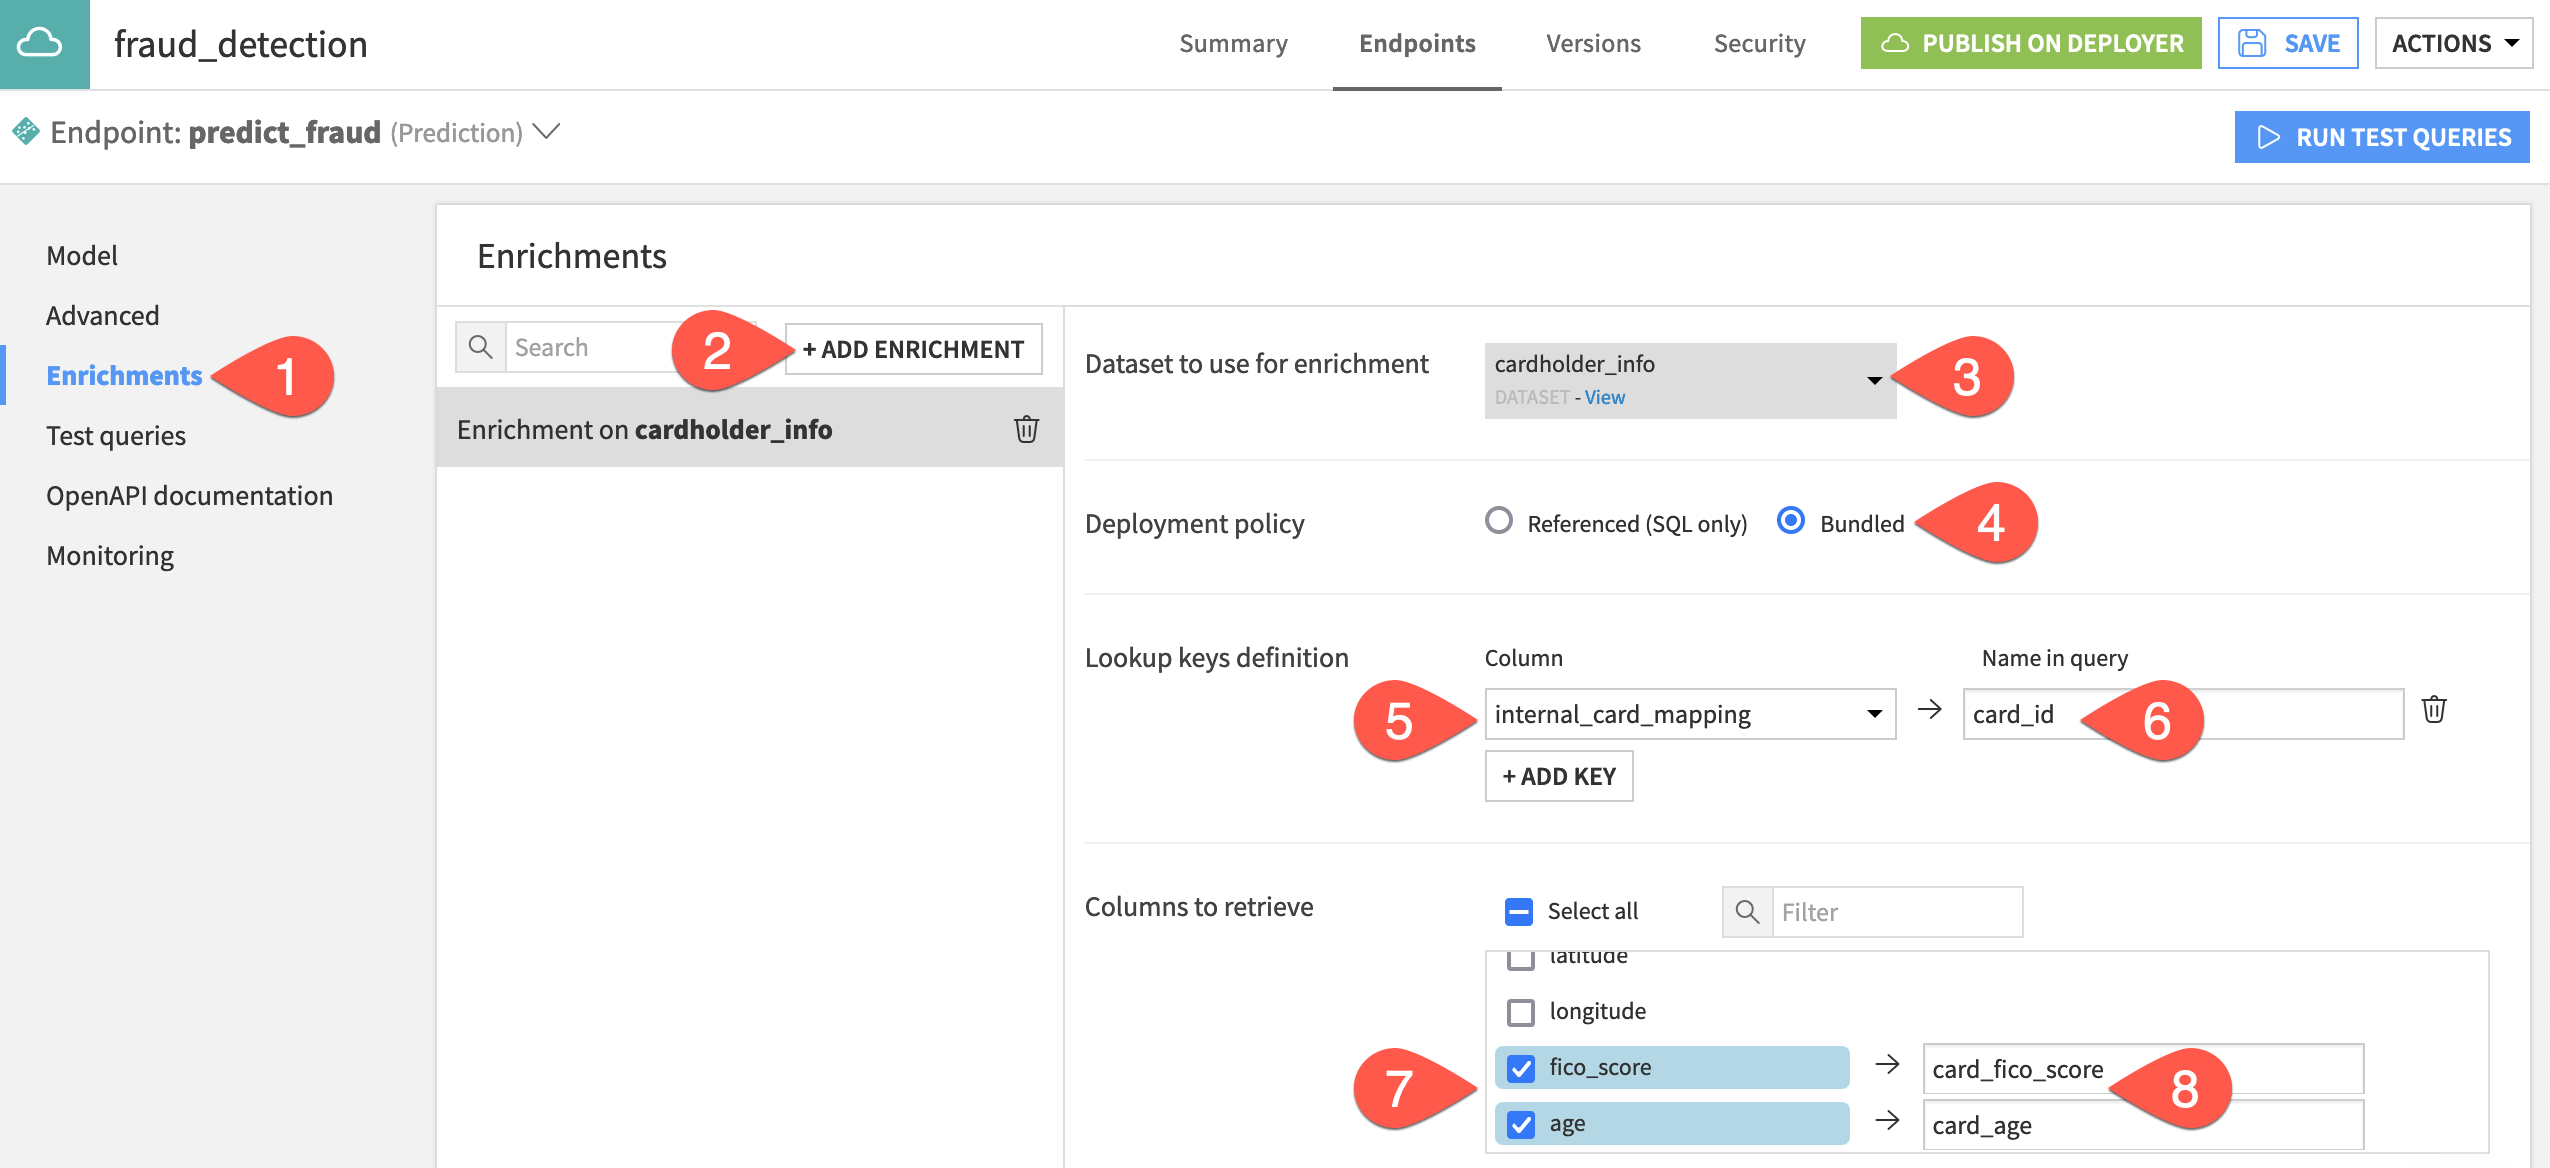
From the API Designer page in the Design node project, open the fraud_detection API service, and navigate to the Enrichments panel.
Click + Add Enrichment.
Select cardholder_info as the dataset to use for enrichment.
Leave the default Bundled deployment policy.
See also
If you want to use a referenced deployment policy, you’ll need an SQL connection. Follow resources on remapping connections.
Next to Lookup keys definition, click + Add Key, and select the internal_card_mapping column.
Provide
card_idas the name in the query for the lookup key.In Columns to retrieve, specify the two missing features to retrieve from the dataset: fico_score and age.
Remap these columns to the names
card_fico_scoreandcard_age.
Change one more setting before testing the enrichment.
Navigate to the Advanced panel of the API endpoint.
Check the box Return post-enrichment to deliver a more verbose response to each API query.
Test the query enrichment#
To test the enrichment, you’ll use a query that includes only four of the six features used to train the prediction model.
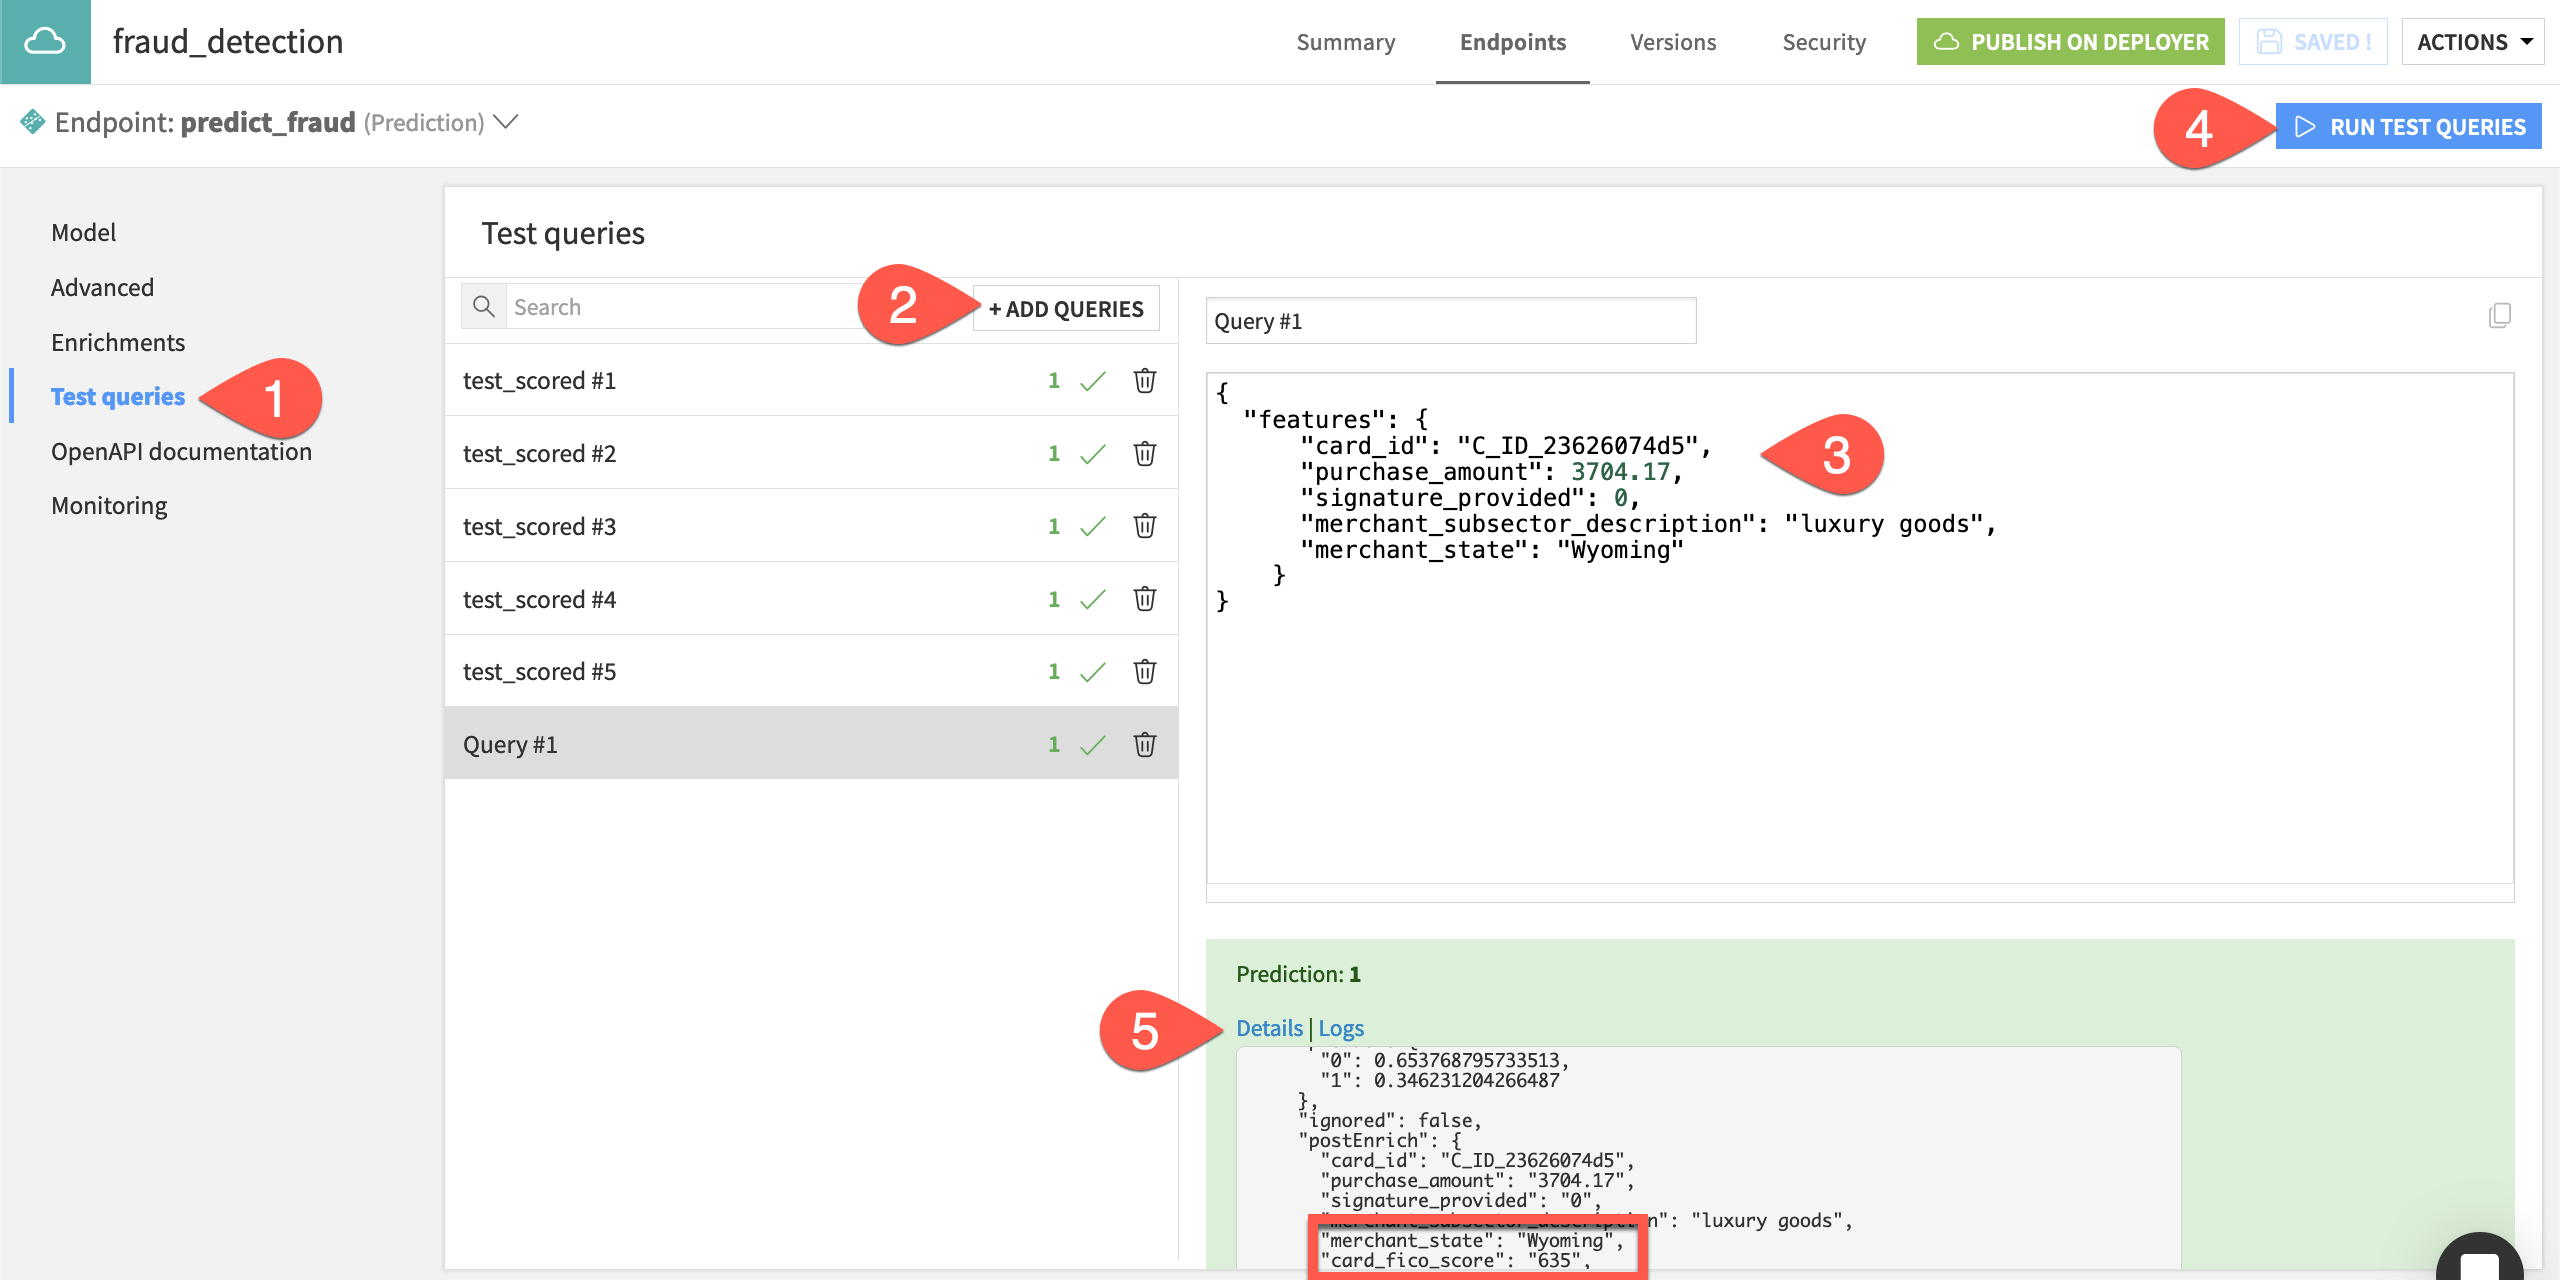
Navigate to the Test queries panel of the API endpoint.
Click + Add Queries, and then Add
1new empty query.For the new empty query, paste the following JSON object in the query window.
{
  "features": {
      "card_id": "C_ID_23626074d5",
      "purchase_amount": 3704.17,
      "signature_provided": 0,
      "merchant_subsector_description": "luxury goods",
      "merchant_state": "Wyoming"
    }
}
Click Run Test Queries.
Click Details in the API response for the new test query, and observe the values for card_fico_score and card_age despite them not being present in the query.
To summarize, the enrichment uses the card_id to retrieve the missing features (card_fico_score and card_age) so that the model has all features needed to generate a prediction.
Tip
You can also test the enrichment by modifying the JSON object for any of the previous test queries. To do this, delete all features except for the four used in the JSON object above. When you run the test queries, you’ll notice that the endpoint returns the same prediction as before for the modified test query — even without the missing features.
Redeploy the API service#
Now that you’ve added an enrichment to the prediction endpoint on the Design node, you need to redeploy a new version of the API service in the production environment.
From the fraud_detection API service in the Design node project, click Publish on Deployer.
Accept the default version ID, and click Publish.
Open the API service on the API Deployer, and click Deploy next to the new version.
In the Deploy version dialog, click OK to update the version used in the service.
Click OK again to confirm which deployment you want to edit.
Now on the Settings tab of the deployment, click the Update button.
If deploying to a static infrastructure, select the default Light Update.
Otherwise, navigate to the Status tab of the deployment to confirm the latest version is active.
Tip
You can track changes to a deployment in the Last Updates tab. At this point, you’ll see one update for the initial deployment and another update for the redeployment.
Add a dataset lookup endpoint to an API service#
Congratulations! You added an enrichment to a prediction endpoint, and redeployed the API service to the production infrastructure.
A prediction endpoint though is just one of many kinds of supported endpoints that can be packaged within an API service. Now let’s see another kind of endpoint: a dataset lookup. In fact, this endpoint is essentially the enrichment step of a prediction query — but without passing the query to a prediction model.
Add a dataset lookup endpoint#
Suppose you want to send a query including a specific merchant_id to an endpoint in an API service and receive all information relating to this specific merchant from the database.
You can add an endpoint to the API service for this exact purpose. The new endpoint will perform a dataset lookup in the merchant_info dataset, returning the other values in the dataset for a unique merchant_id.
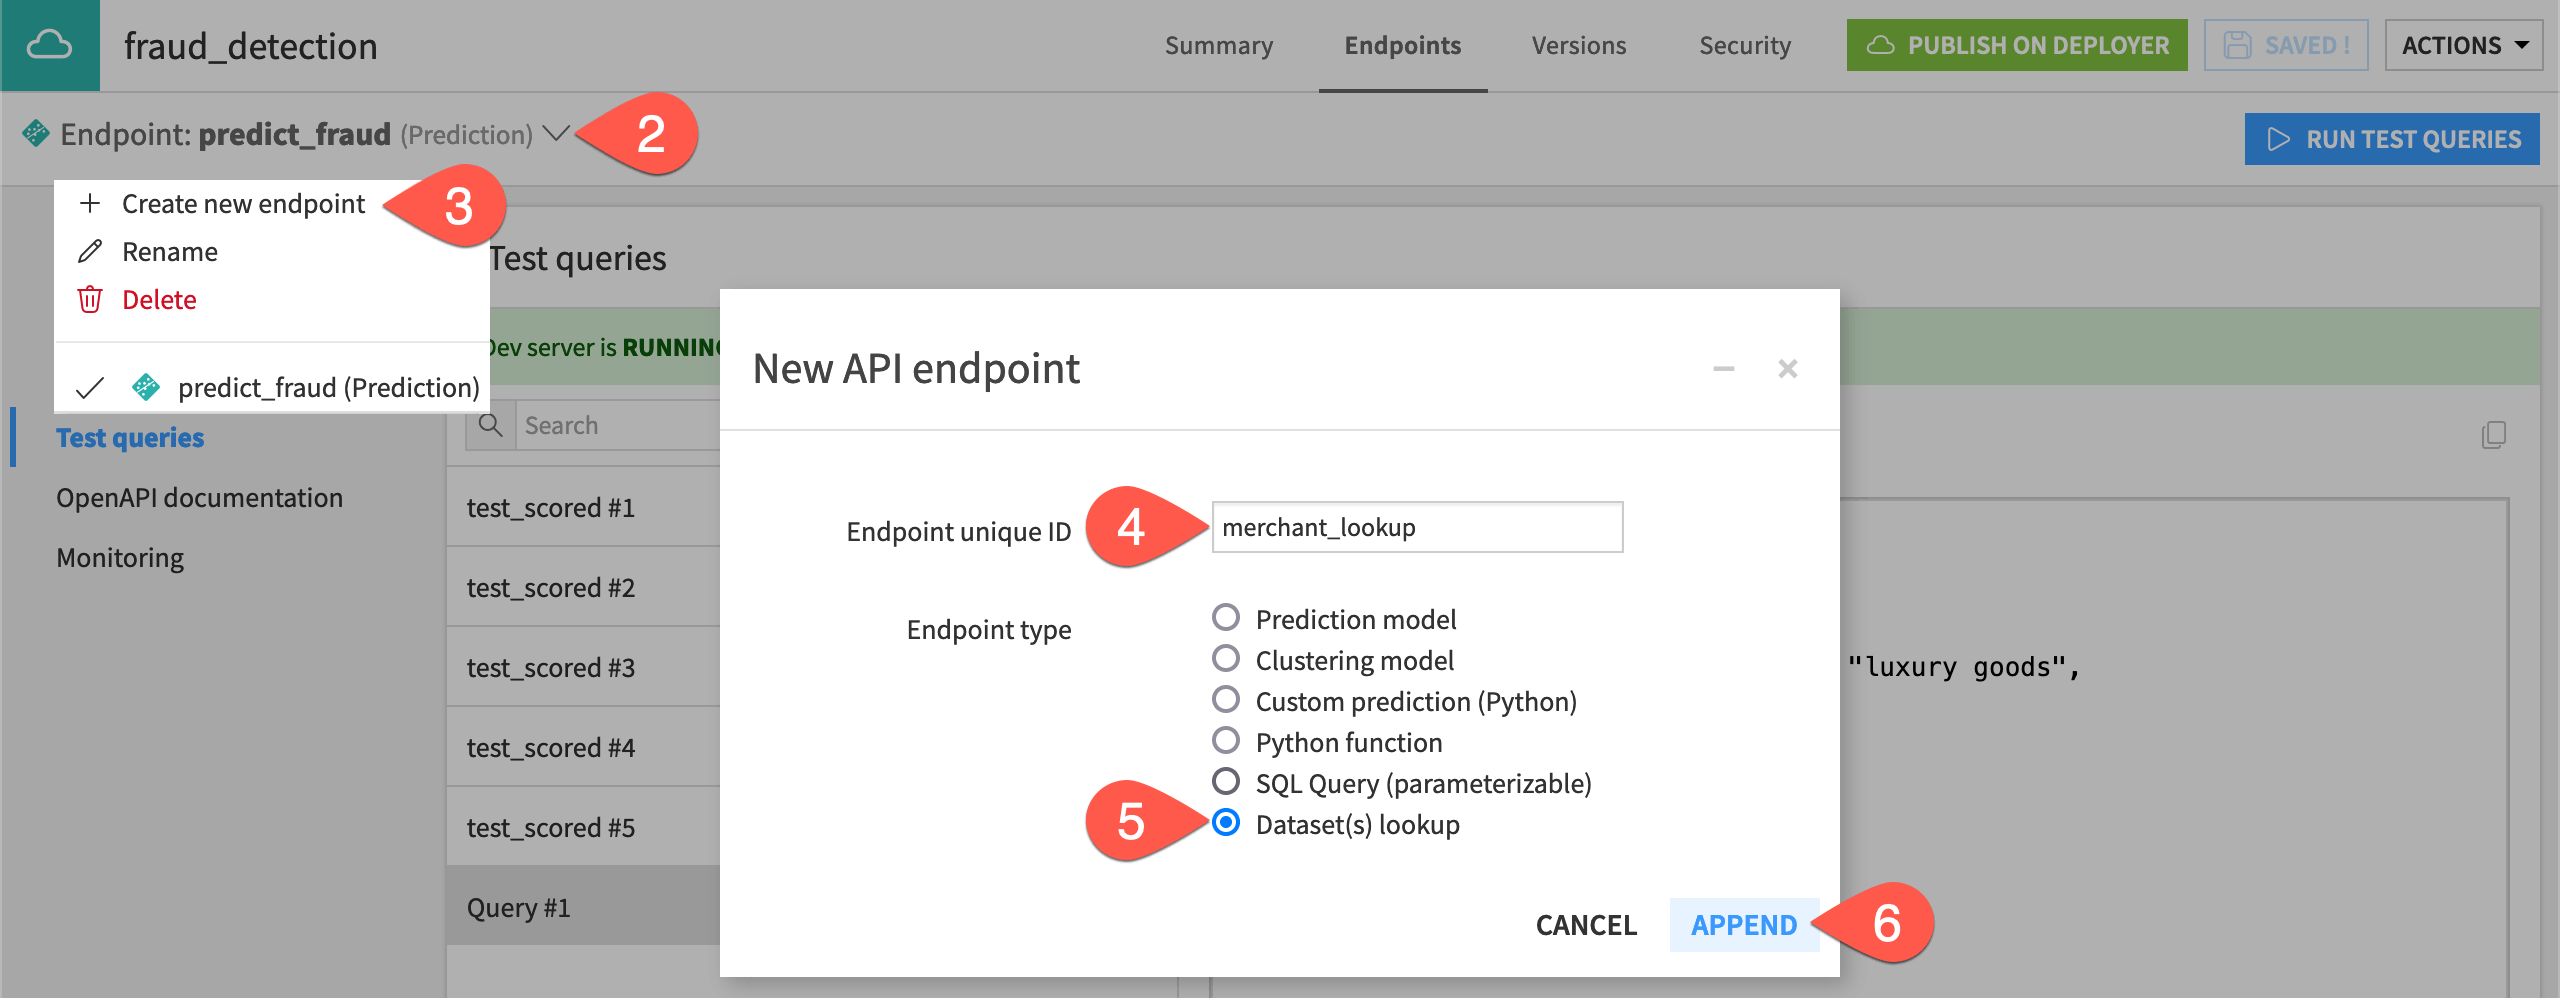
In the Design node project, navigate to the Endpoints tab of the fraud_detection API service.
Near the top left, click on the existing endpoint to open the dropdown menu.
Click Create new endpoint.
Name the endpoint
merchant_lookup.For the Endpoint type, select Dataset(s) lookup.
Click Append.
Now you can define the enrichment.
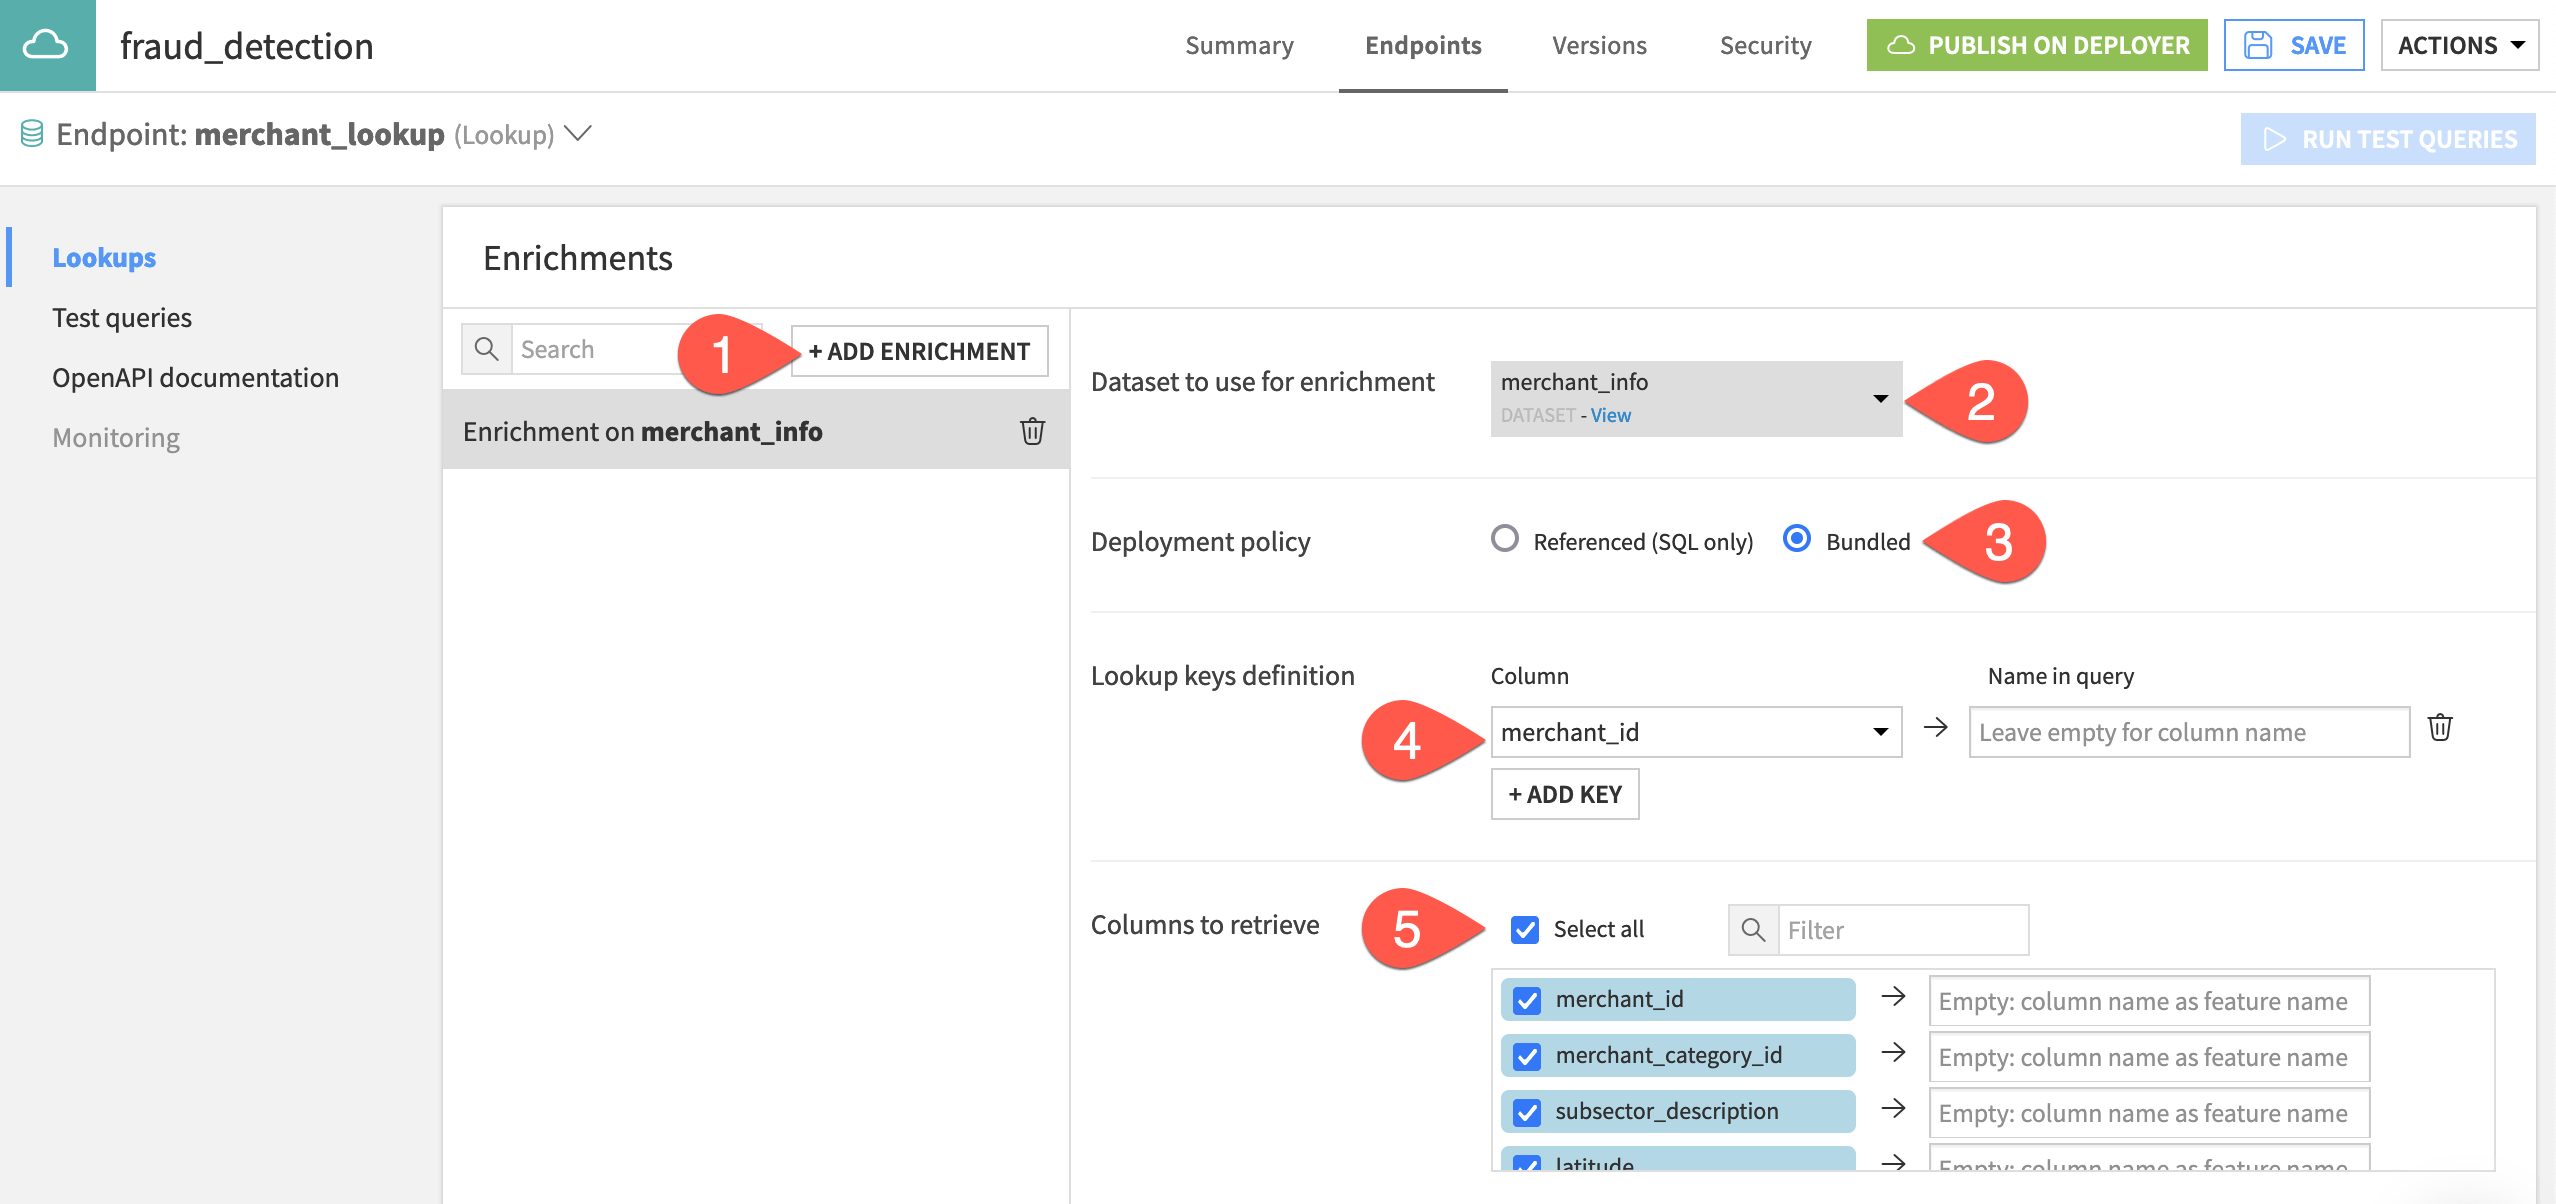
In the Lookups panel, click + Add Enrichment.
Select merchant_info as the dataset to use for enrichment.
Leave the default Bundled deployment policy.
Next to Lookup keys definition, click + Add Key, and select the merchant_id column. The Name in query for this feature will be the same, and so you don’t need to remap the name.
For Columns to retrieve, click the check box next to Select all to retrieve all columns.
Test the dataset lookup endpoint#
The dataset lookup endpoint is now included in the fraud_detection API service and ready for use. But first, test the endpoint to confirm that it works.
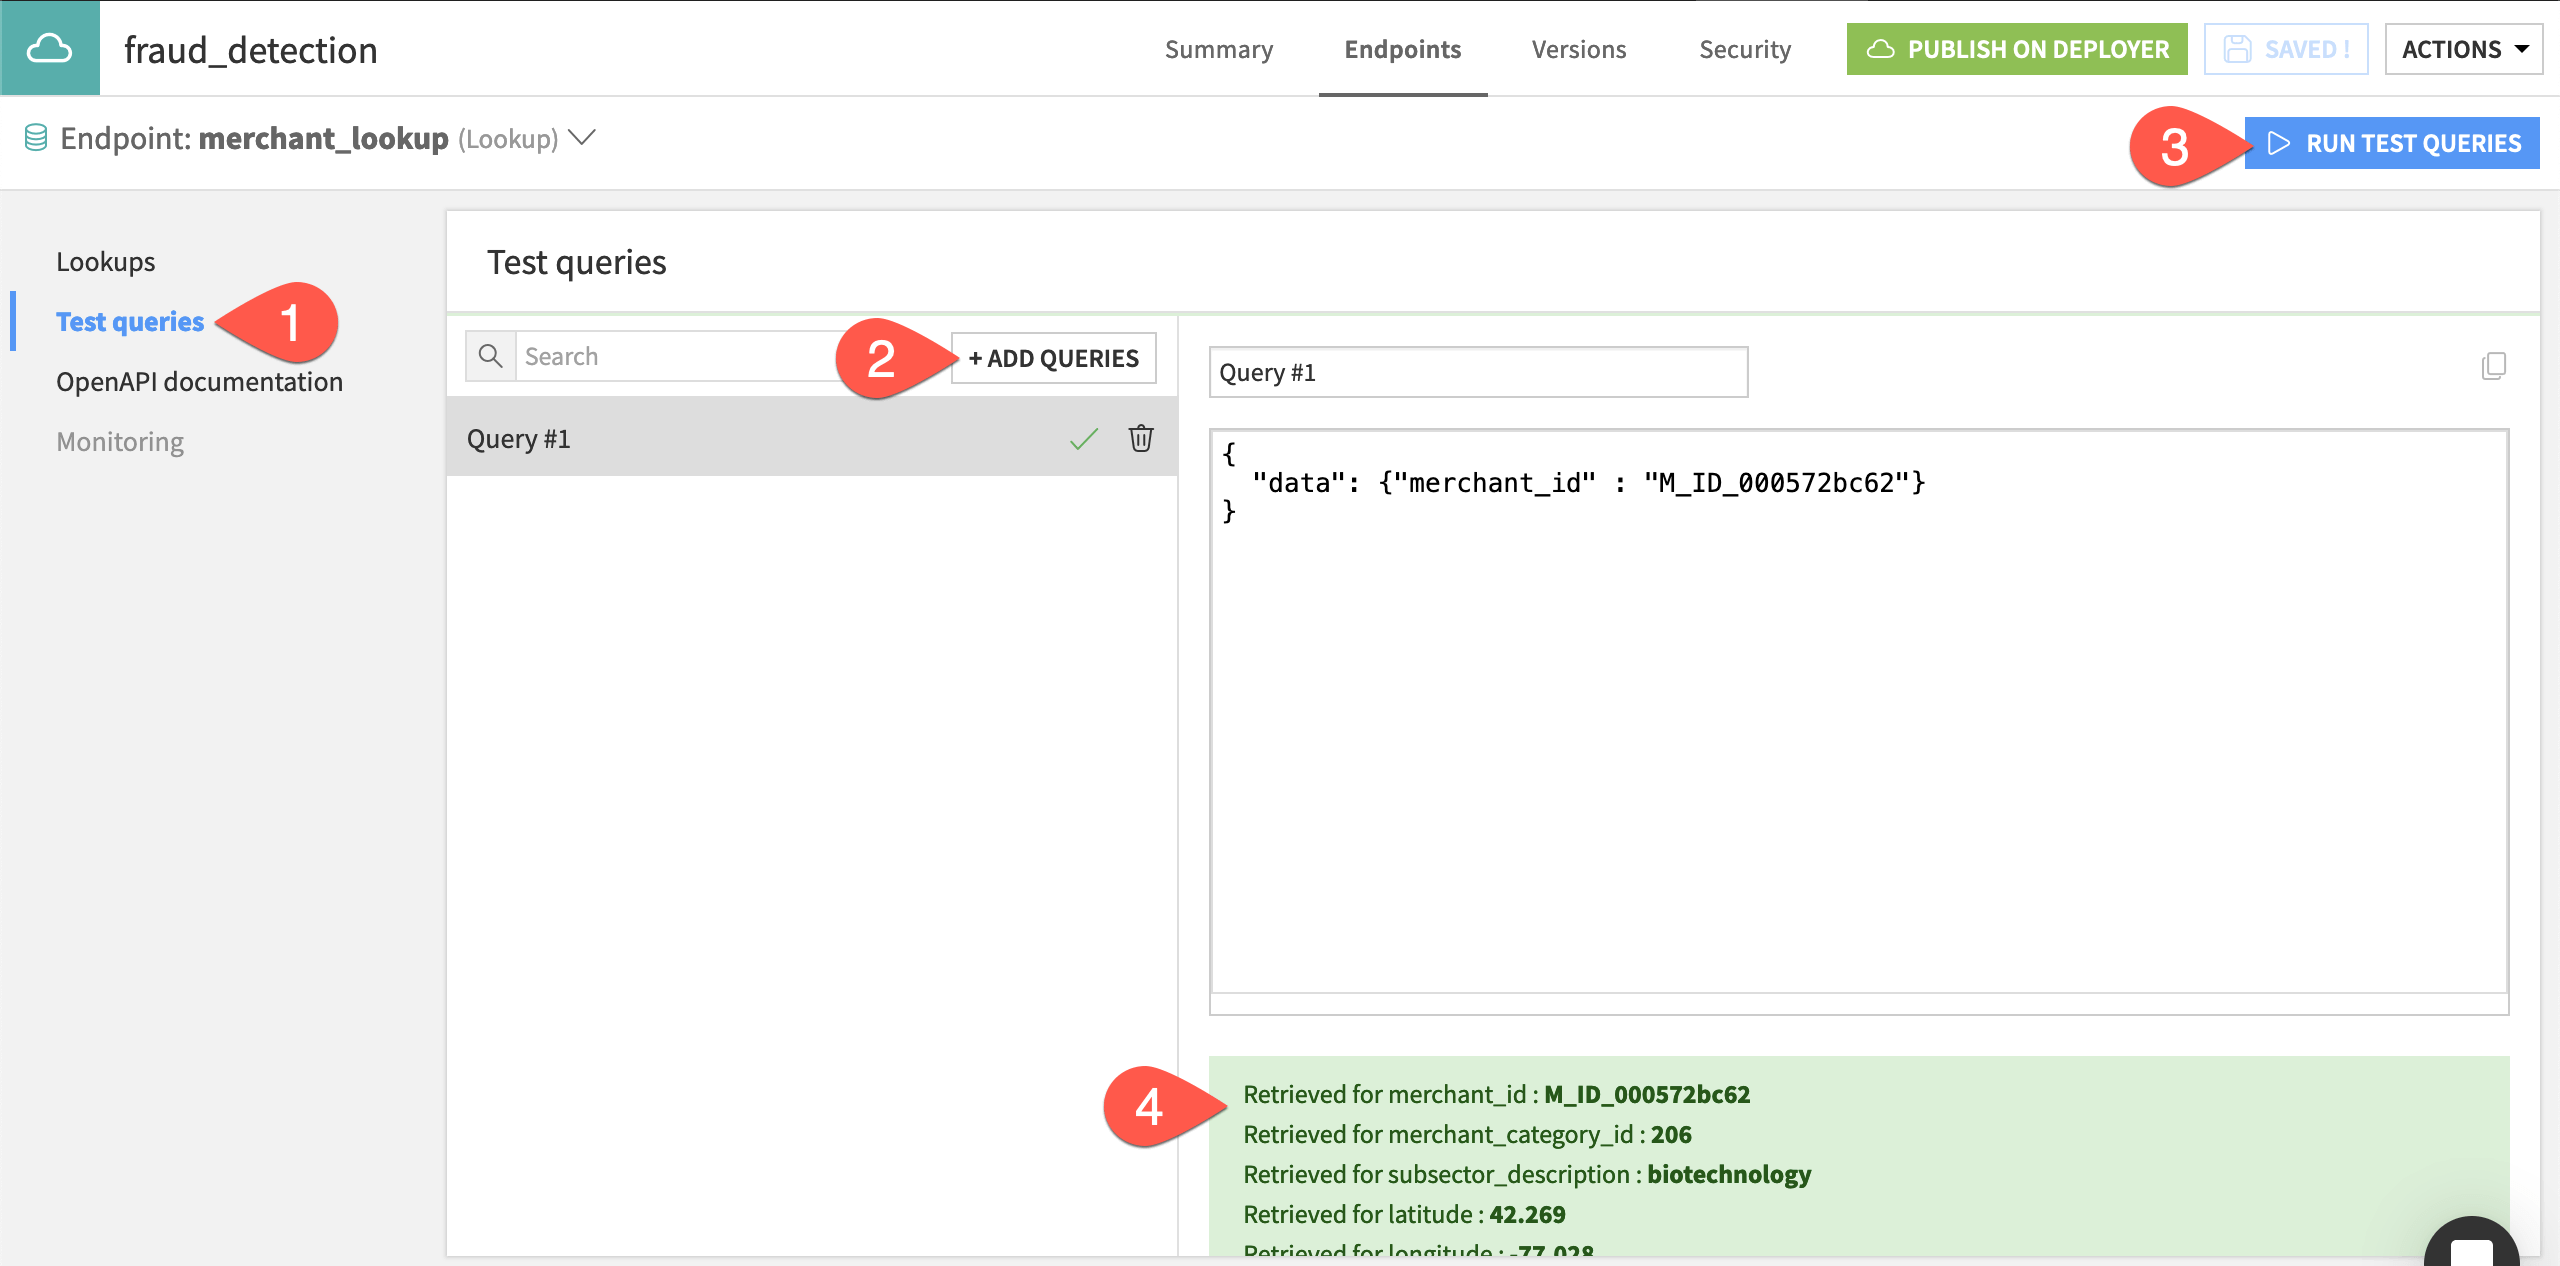
Navigate to the Test queries panel of the merchant_lookup endpoint.
Click + Add Queries, and copy-paste the following JSON object:
{
  "data": {"merchant_id" : "M_ID_000572bc62"}
}
Click Run Test Queries.
Observe the retrieved values for all columns in the merchant_info dataset:
Redeploy the API service#
Just like after adding the query enrichment, you need to deploy a new version of the API service including the dataset lookup endpoint.
Follow the same steps as the previous section for redeploying an API service — this time accepting the next increment of the version ID.
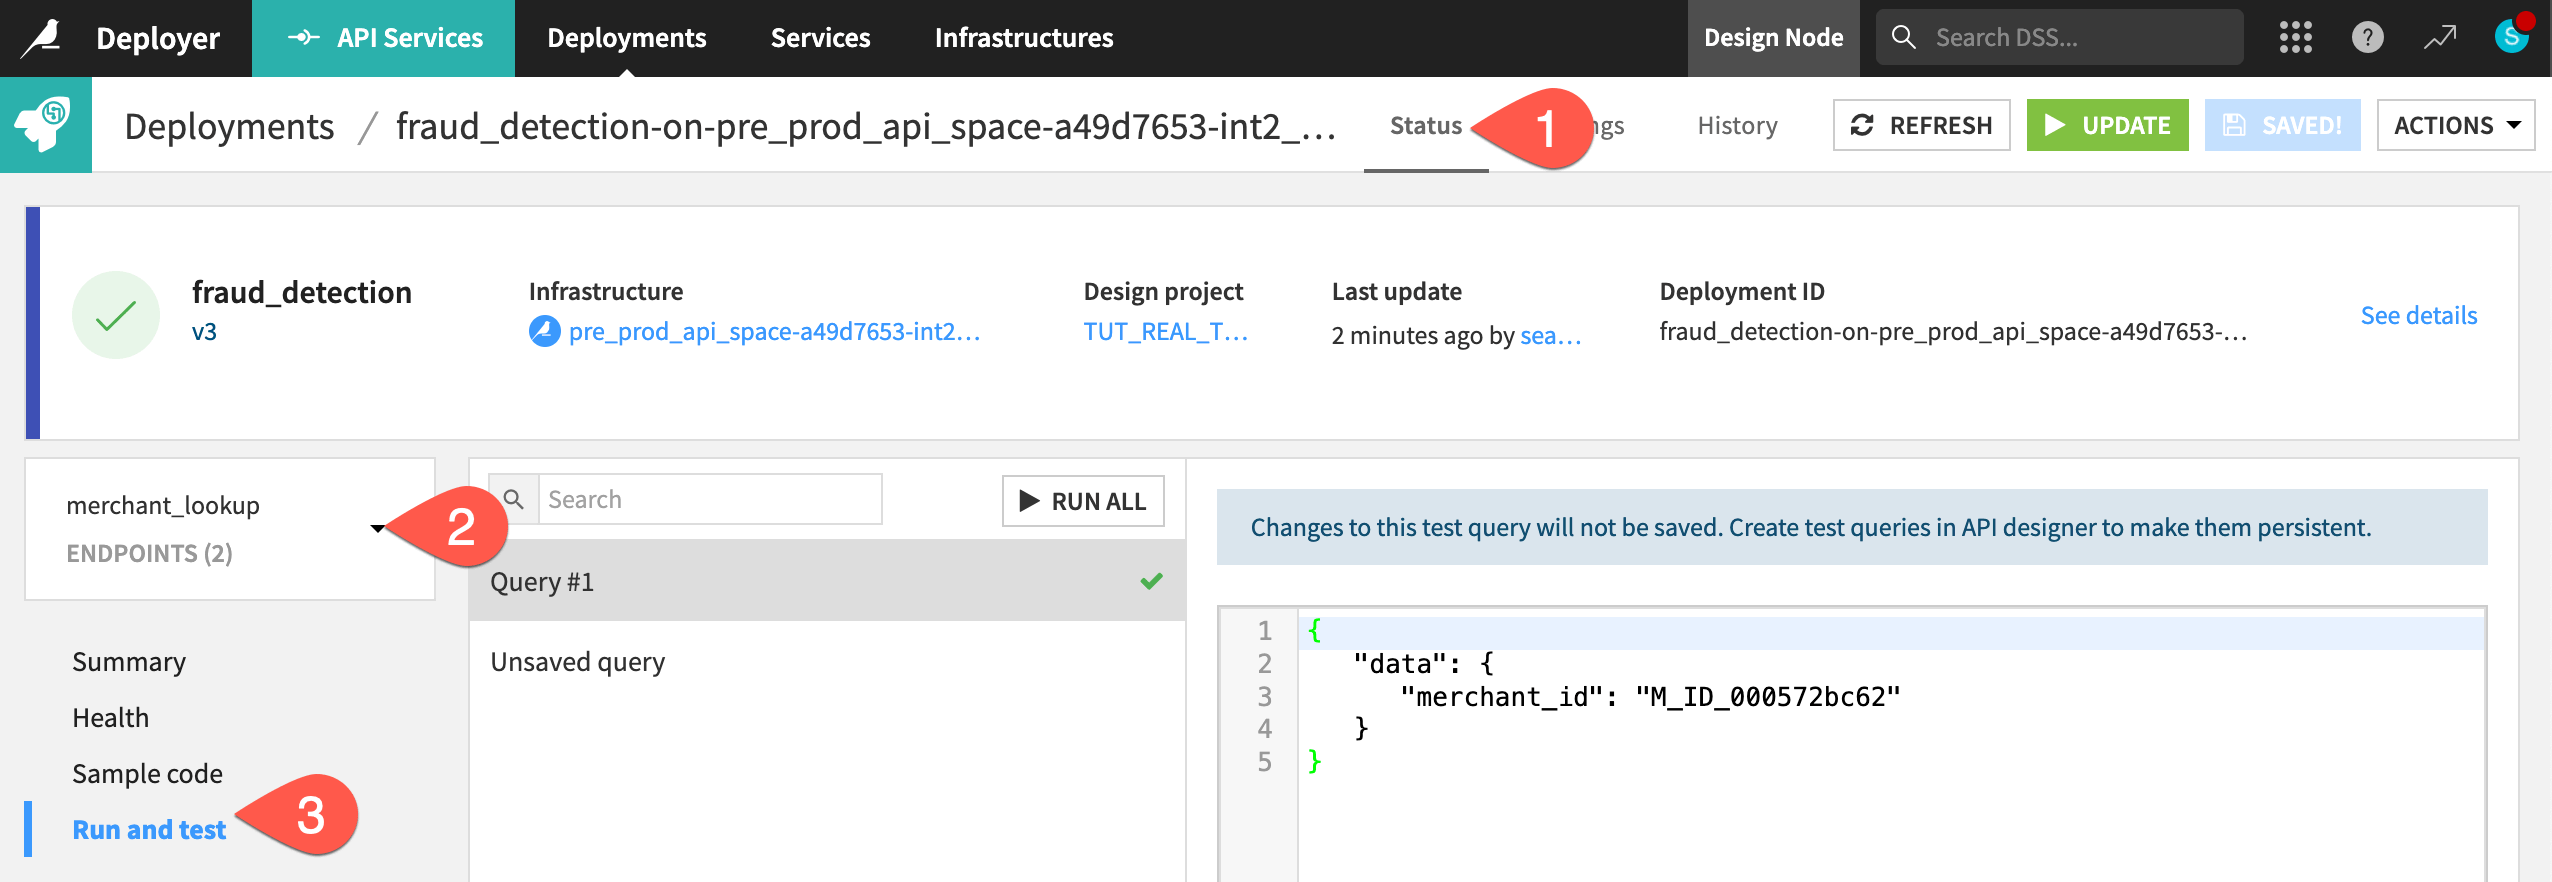
Navigate to the Status tab of the active deployment.
Select the merchant_lookup endpoint.
Run the test query using the Sample code or Run and test tabs.
Manage multiple versions of an API service#
Now that you are comfortable deploying and updating API services, let’s explore how to manage multiple versions of an API endpoint for A/B testing.
Deploy multiple versions of the endpoint for A/B testing#
When you’ve deployed multiple versions of your prediction endpoint, you may decide to run multiple generations of the endpoint at once. This allows the multiple versions of your prediction model to score requests to the API service.
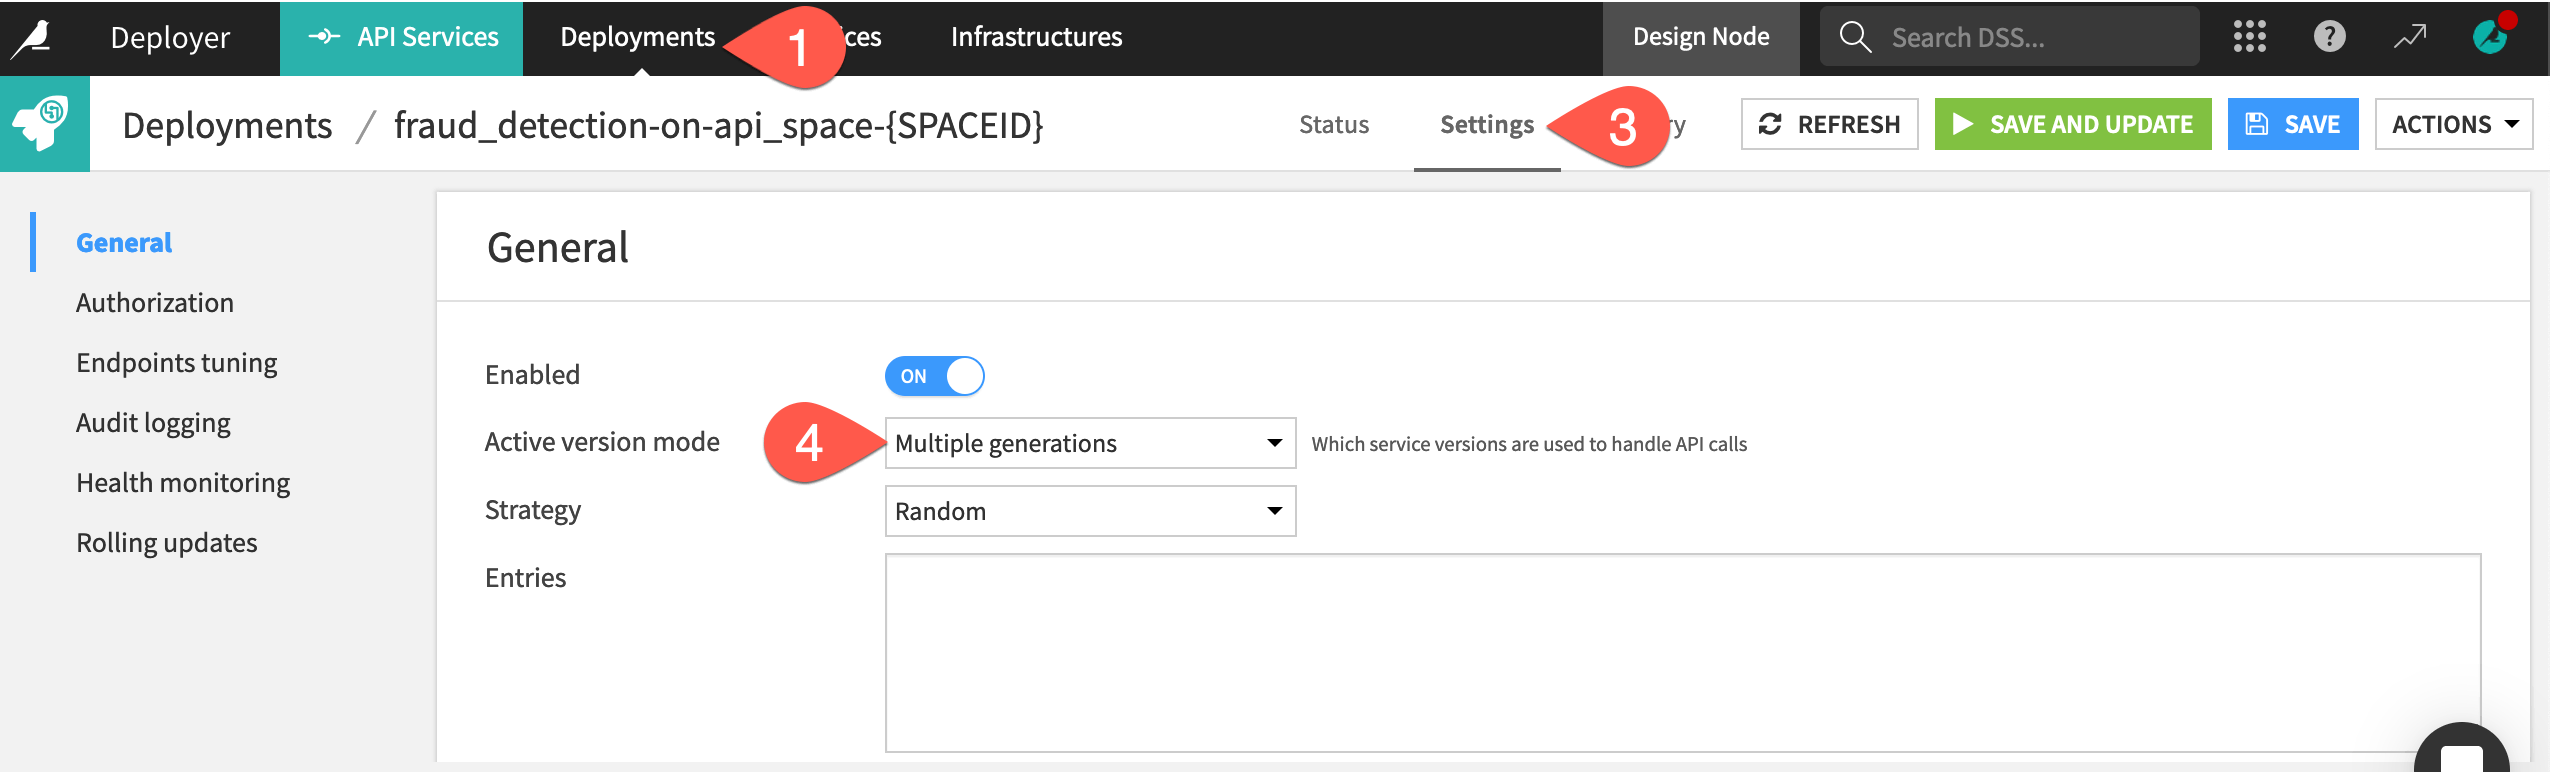
Navigate to the Settings tab of the active fraud_detection deployment.
Within the General panel, change the Active version mode to Multiple generations.
Direct 70% of calls to the v2 version and the remaining 30% to the new v3 version by copy-pasting the JSON array below into the Entries field.
[
   {
      "generation": "v2",
      "proba": 0.7
   },
   {
      "generation": "v3",
      "proba": 0.3
   }
]
Caution
Adjust the generation values to your version names if different from
v2andv3.The probabilities indicate the likelihood that calls to the API node will be served to each of the generations. Therefore, the sum of the probabilities of all generations must equal one.
Click Save and Update for the new settings to take hold.
If deploying on a static infrastructure, select the default Light Update option.
Important
You must set up multiple generations manually. You can’t do it through the automated deployment of API services.
Test multiple generations of the endpoint#
Next, confirm that queries will be sent to different generations of the API endpoint.
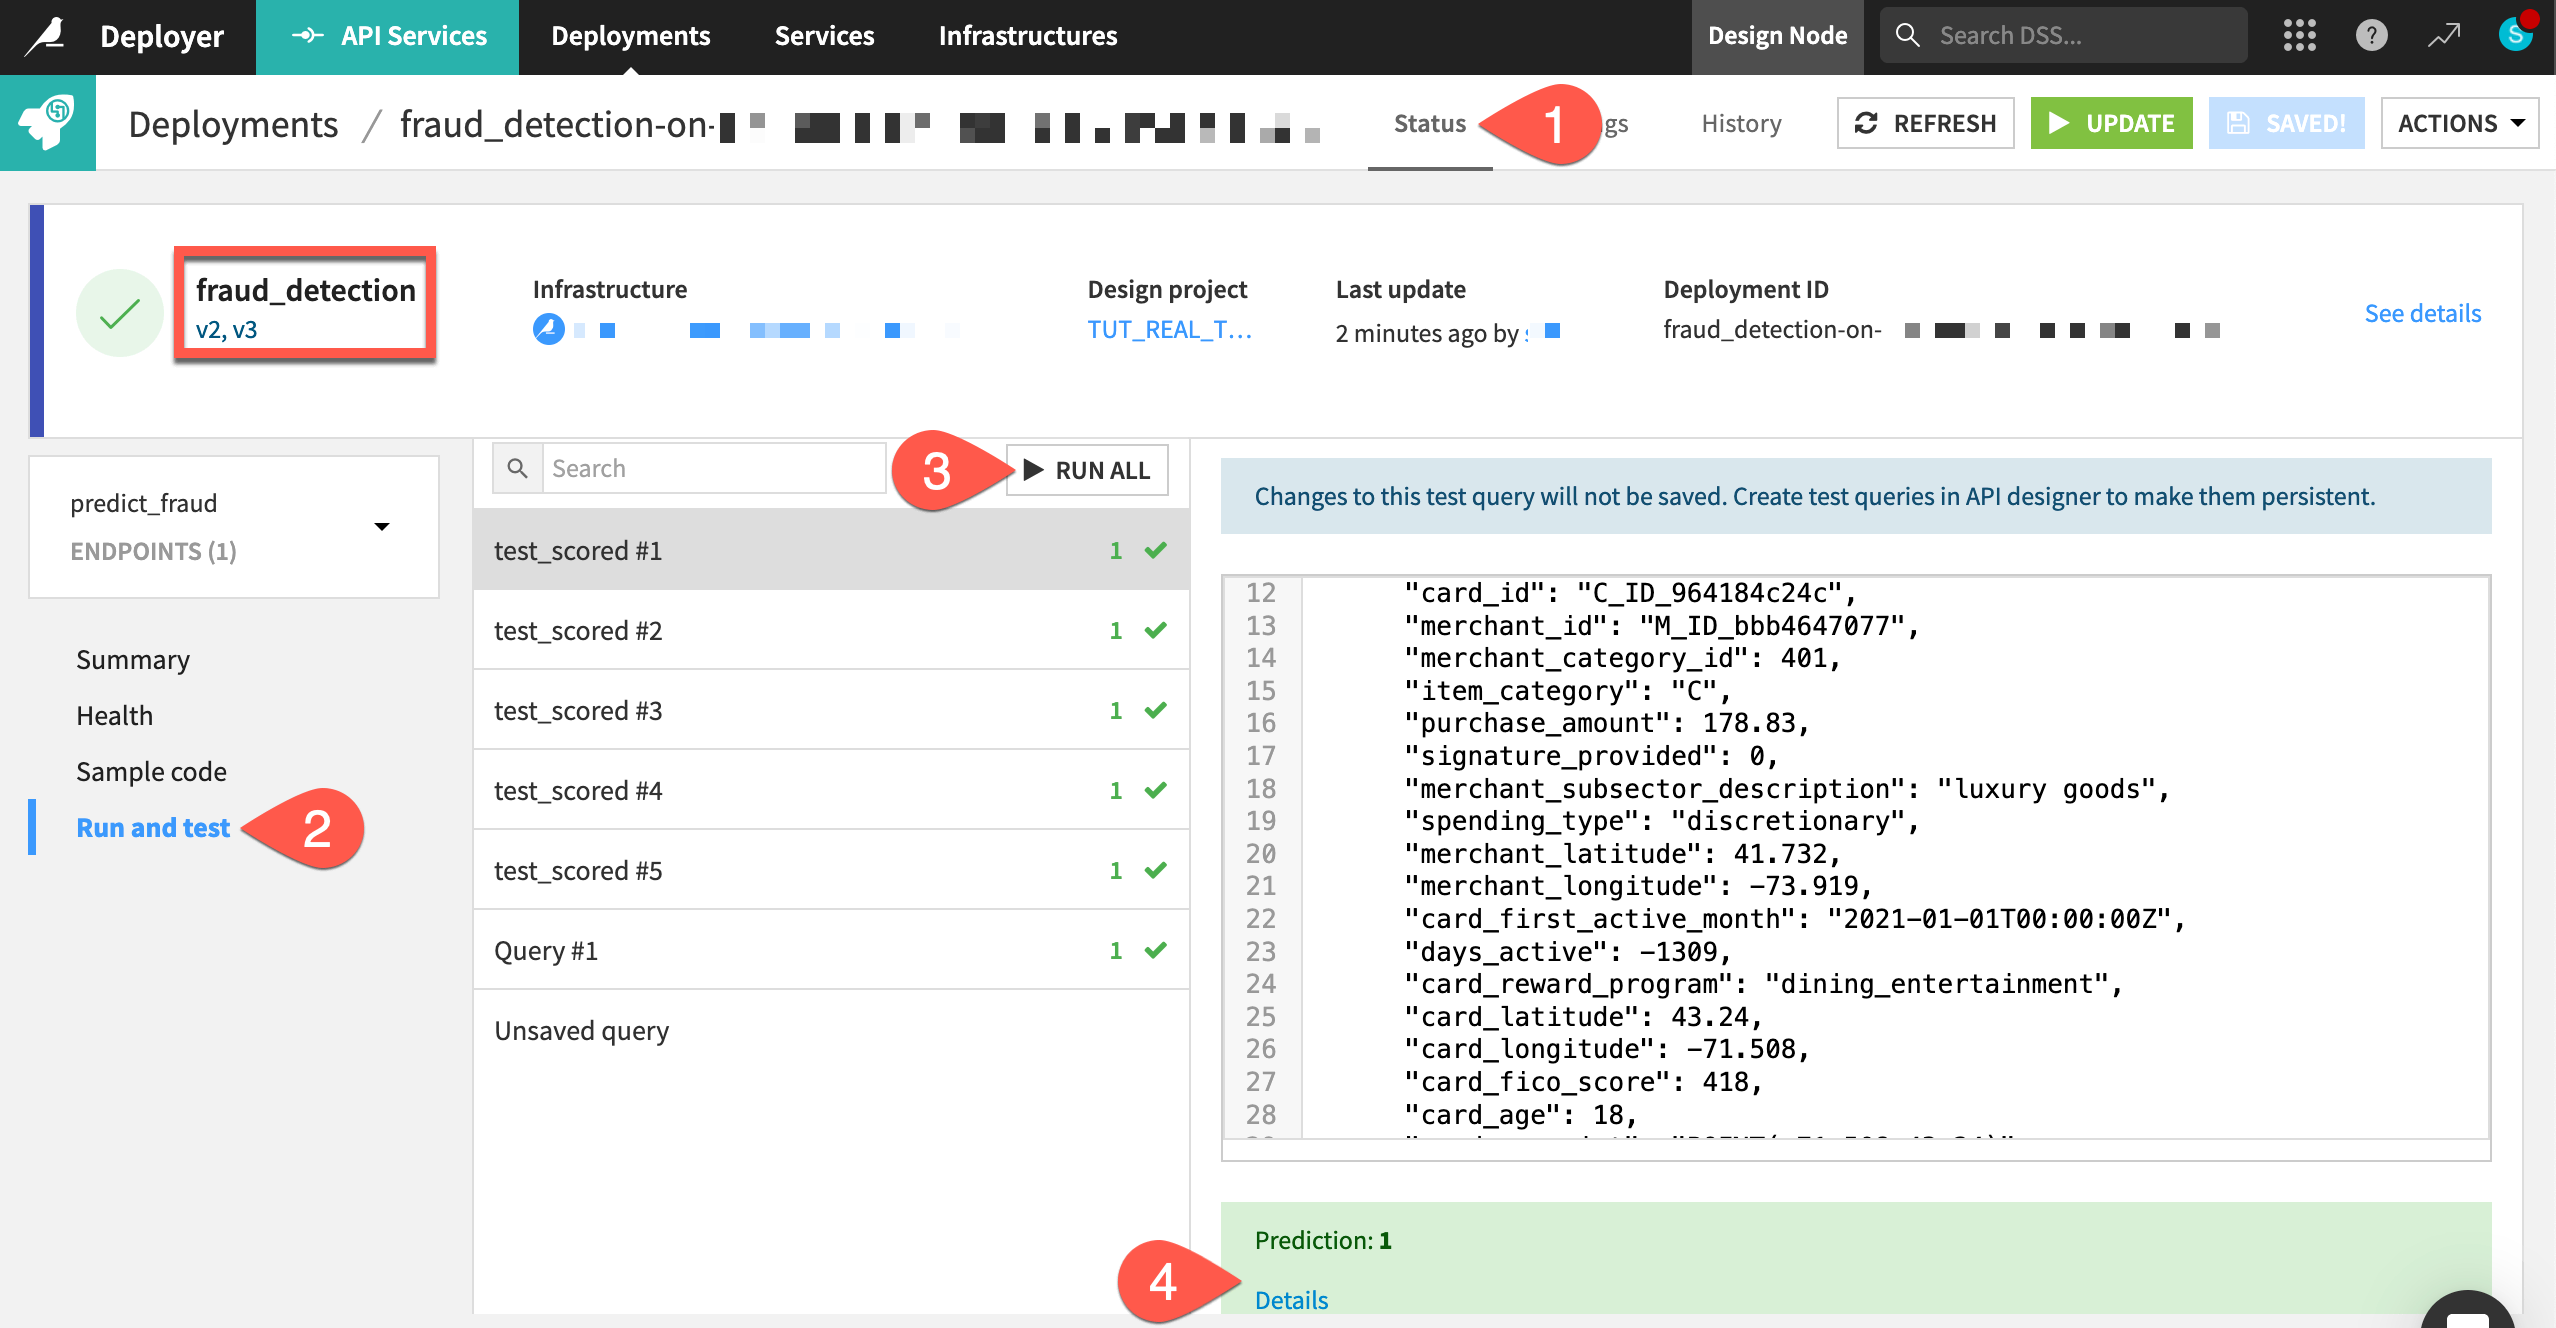
Navigate to the Status tab of the deployment.
Go to the Run and test panel of the predict_fraud endpoint.
Click Run All to run the test queries.
Click the Details of each response to see which version of the endpoint generated the response.
See also
The reference documentation provides more information on Managing versions of your endpoint.
Rollback versions#
The Project Deployer enables you to switch or rollback a deployment to previous project bundles. The API Deployer allows the same for API services. However, the ability to activate multiple generations of an API lets you take this a step further.
Here for example, the current version of the API service is actually deploying v2 and v3 with a certain probability. Still, you can always revert to an earlier version, just like on the Project Deployer.
From the API Deployer, select Services from the top navigation bar.
Select the fraud_detection service ID.
Next to the v1 version, click Deploy.
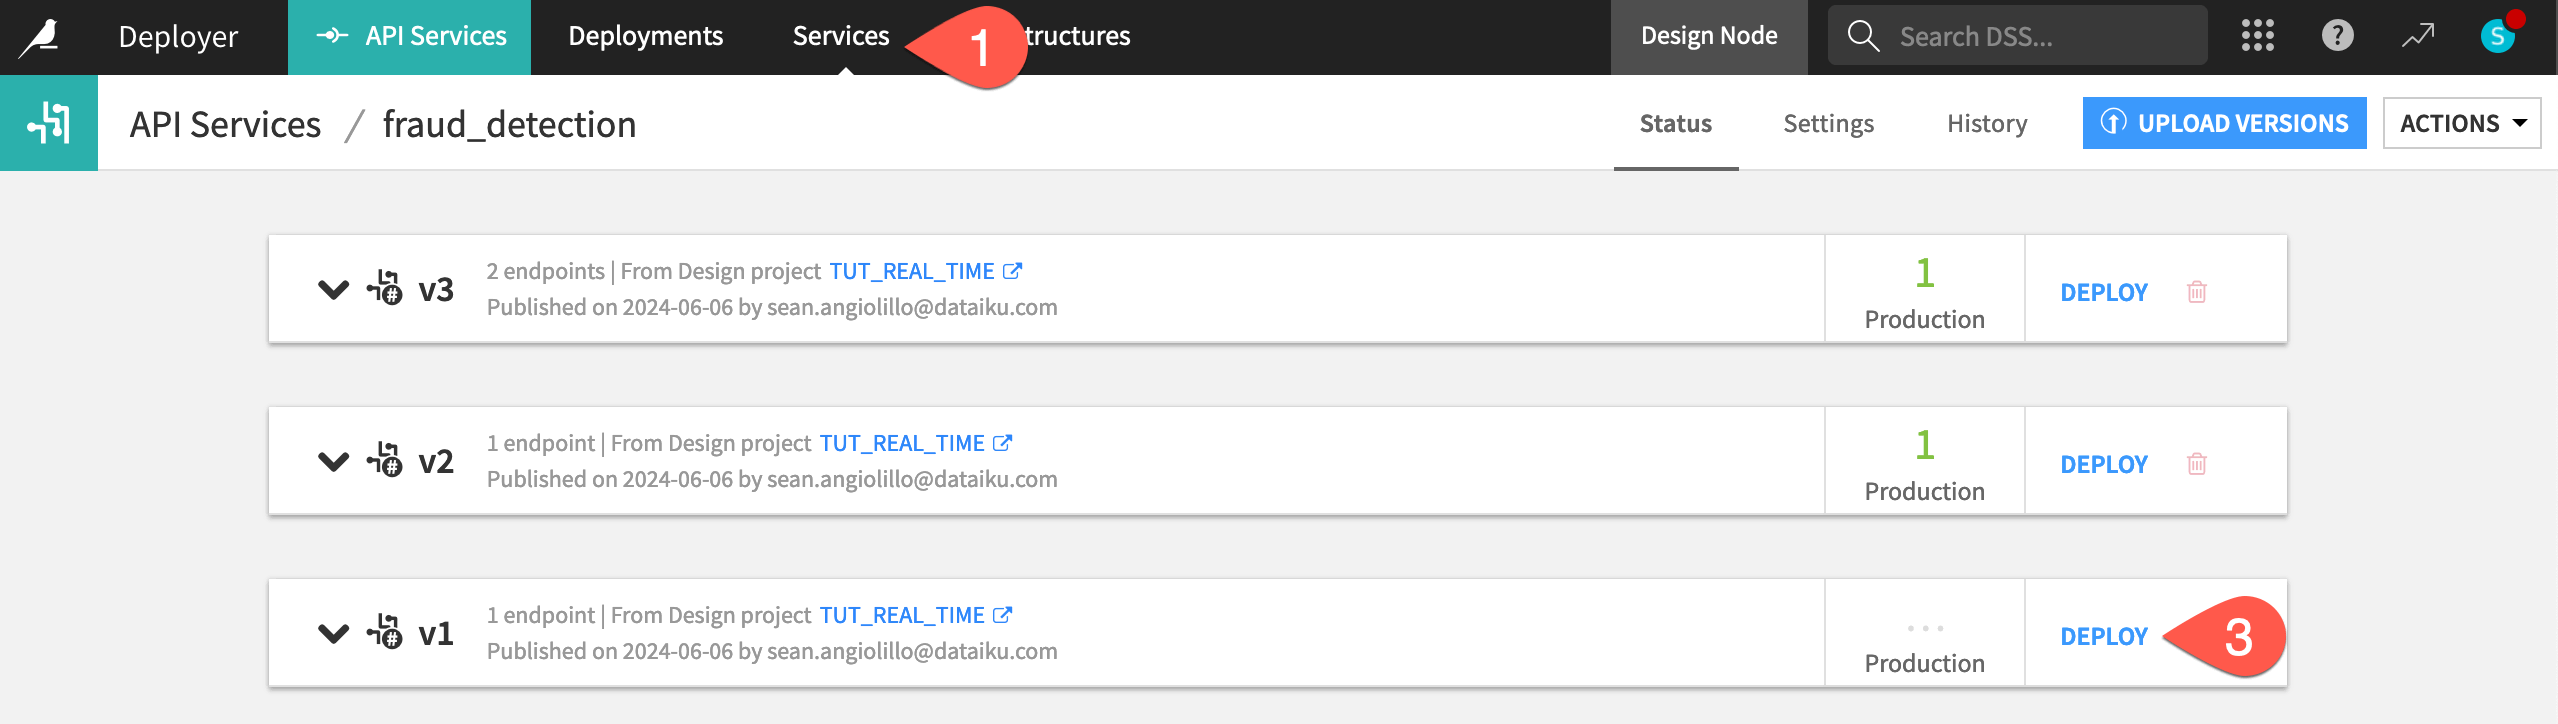
Click OK to confirm the update.
Click OK again.
In the Settings tab of the deployment, click Update.
If deploying to a static infrastructure, select the default Light update.
Confirm the update in the deployment’s Status tab.
Monitor an API service#
Whether you have single or multiple generations of an API service, you’ll need to be able to monitor all API services in production. Monitoring an API service has many facets to it, including model evaluations, model comparisons, and drift analysis. We’ll address this topic in the Production Monitoring course.
For now, you can take a quick peak at the currently deployed API service in the Unified Monitoring page.
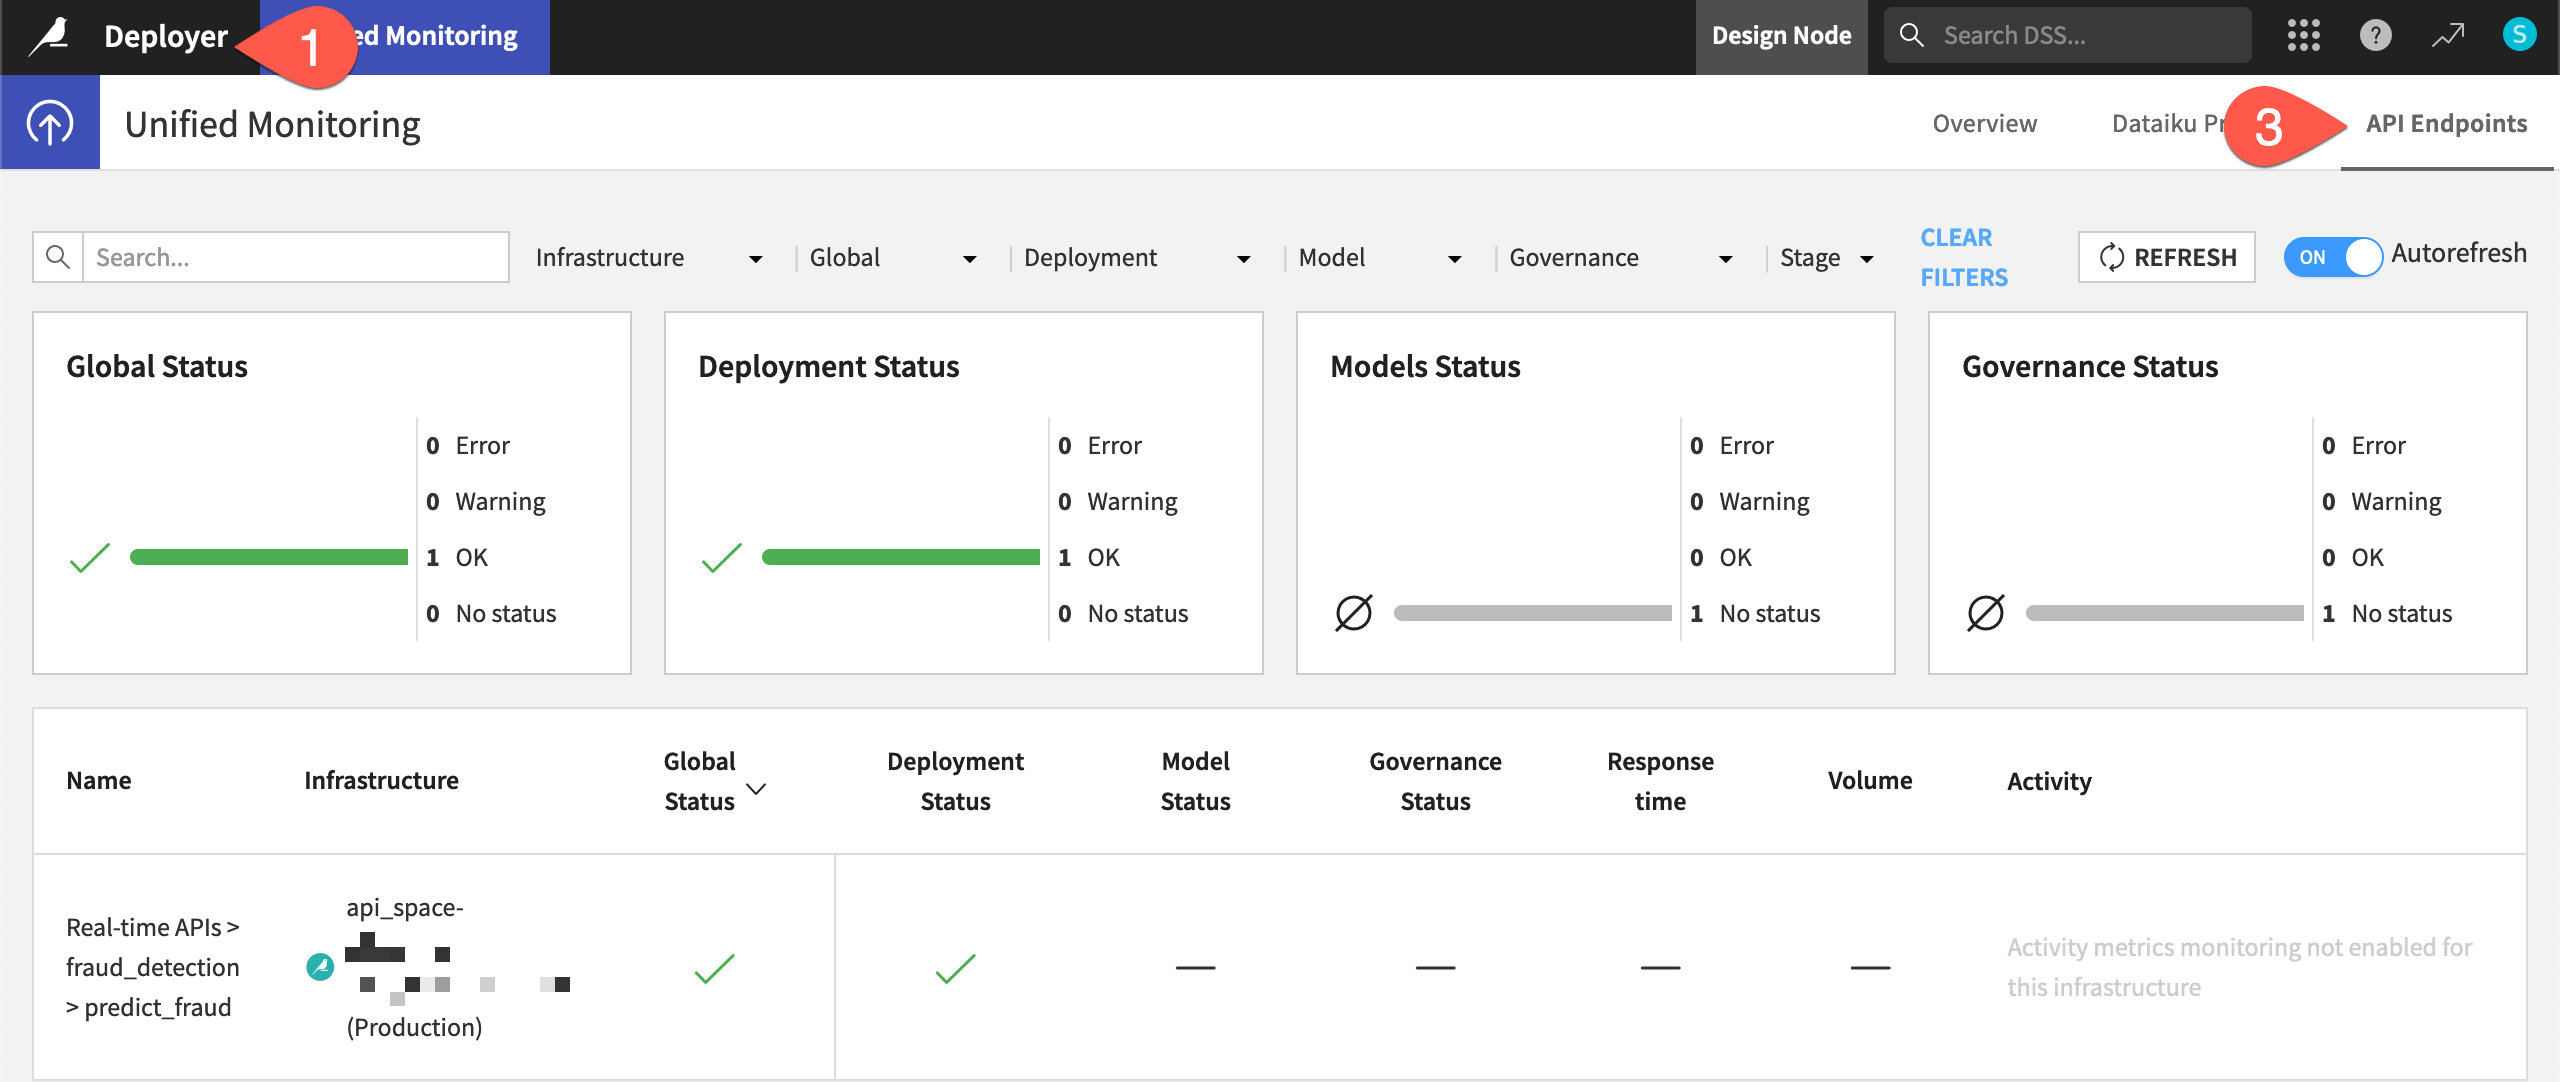
From the API Deployer, click Deployer to go to the Deployer home.
Select Monitoring.
Navigate to the API Endpoints tab.
Find your deployment, using the search box if needed.
If you can’t find it, the infrastructure to which you’ve deployed might not be monitored. Go to the Settings tab of the Unified Monitoring page, and confirm that the infrastructure hosting your deployment is in fact monitored.
Important
Depending on how fast you’ve made it through these steps, you may not yet see a monitored API endpoint. The default synchronization interval is five minutes. Learn more in the reference documentation on Unified Monitoring.
Tip
Why is the model status empty? As explained in the reference documentation on Understanding Model Status, you deployed this model without any checks in the model evaluation store.
Next steps#
Congratulations! Let’s recap all that you’ve accomplished:
You created an API endpoint from a prediction model in the Flow.
You packaged this API endpoint in an API service.
You published the API service on the API Deployer.
You deployed the API service to an API node, where it could answer live requests.
You added a query enrichment to the API endpoint and redeployed the API service.
You added a second endpoint (a dataset lookup) to an API service.
You deployed multiple versions of an API service simultaneously.
Although you’ve deployed an API service into production, it’s not yet monitored. To do so, begin exploring resources in the Production Monitoring course.
See also
See the reference documentation on API Node & API Deployer: Real-time APIs to learn more.