Tutorial | Export preprocessed data (for time series models)#
Get started#
To train a machine learning model, Dataiku modifies the input data you provide and uses the modified data, known as preprocessed data. You may want to export the preprocessed data and inspect it, such as when you want to investigate issues or perform quality checks.
In this article, we’ll show you how to export the preprocessed dataset for your time series model using Python code in a Jupyter notebook.
Preprocessing for time series models is different from classical models. For time series, preprocessing consists of two steps:
Resampling the time series to match the desired sampling frequency and start/end points.
Feature handling - preprocessing any external features.
For classical models we only have step 2, so the API is different between classical models and time series, as is the shape of the preprocessed data.
If you have a classical model, rather than a time series model, see Tutorial | Exporting a model’s preprocessed data with a Jupyter notebook.
Note
Dataiku comes with a complete set of Python APIs.
Objectives#
In this tutorial, you will learn how to use a Jupyter notebook to:
Preprocess an input DataFrame.
Compare the preprocessed data with the input data.
Export the preprocessed data to a new dataset.
Prerequisites#
To complete this tutorial, you must have:
Dataiku 12.0 or later.
An Advanced Analytics Designer or Full Designer user profile.
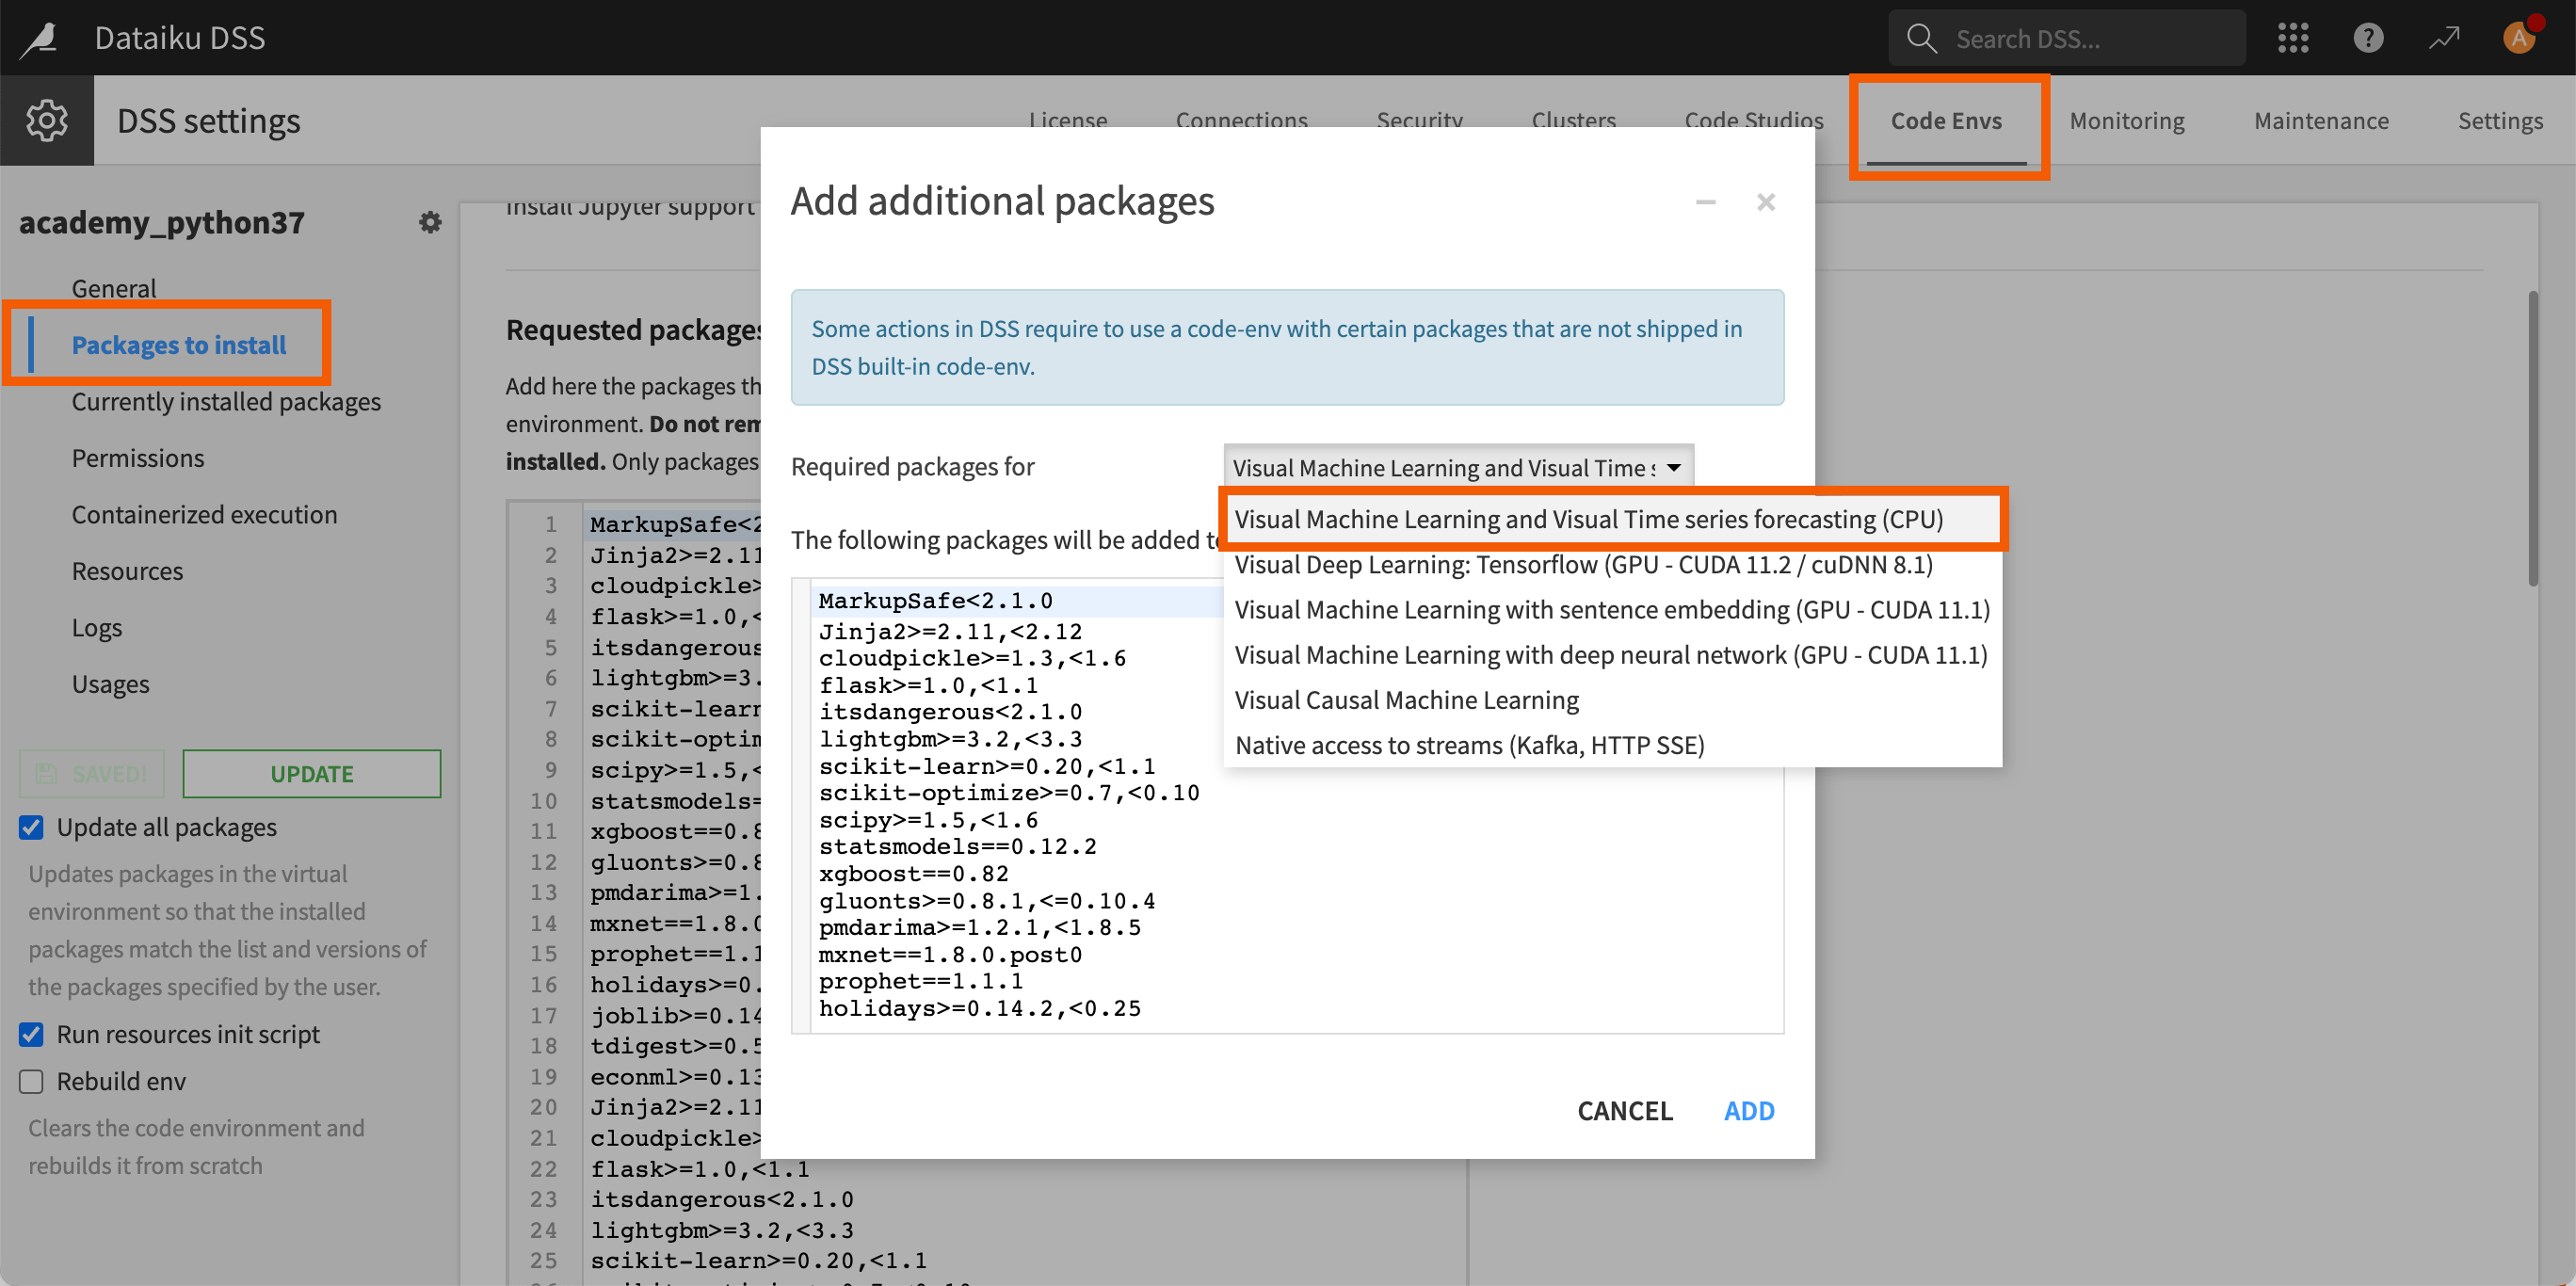
A compatible code environment with the required packages for time series forecasting models. This environment must be created beforehand by an administrator and include the Visual Machine Learning and Visual Time series forecasting package. See the requirements for the code environment in the reference documentation.
Create the project#
From the Dataiku Design homepage, click + New Project.
Select Learning projects.
Search for and select Time Series - Export Preprocessed Data.
If needed, change the folder into which the project will be installed, and click Create.
From the project homepage, click Go to Flow (or type
g+f).
Note
You can also download the starter project from this website and import it as a ZIP file.
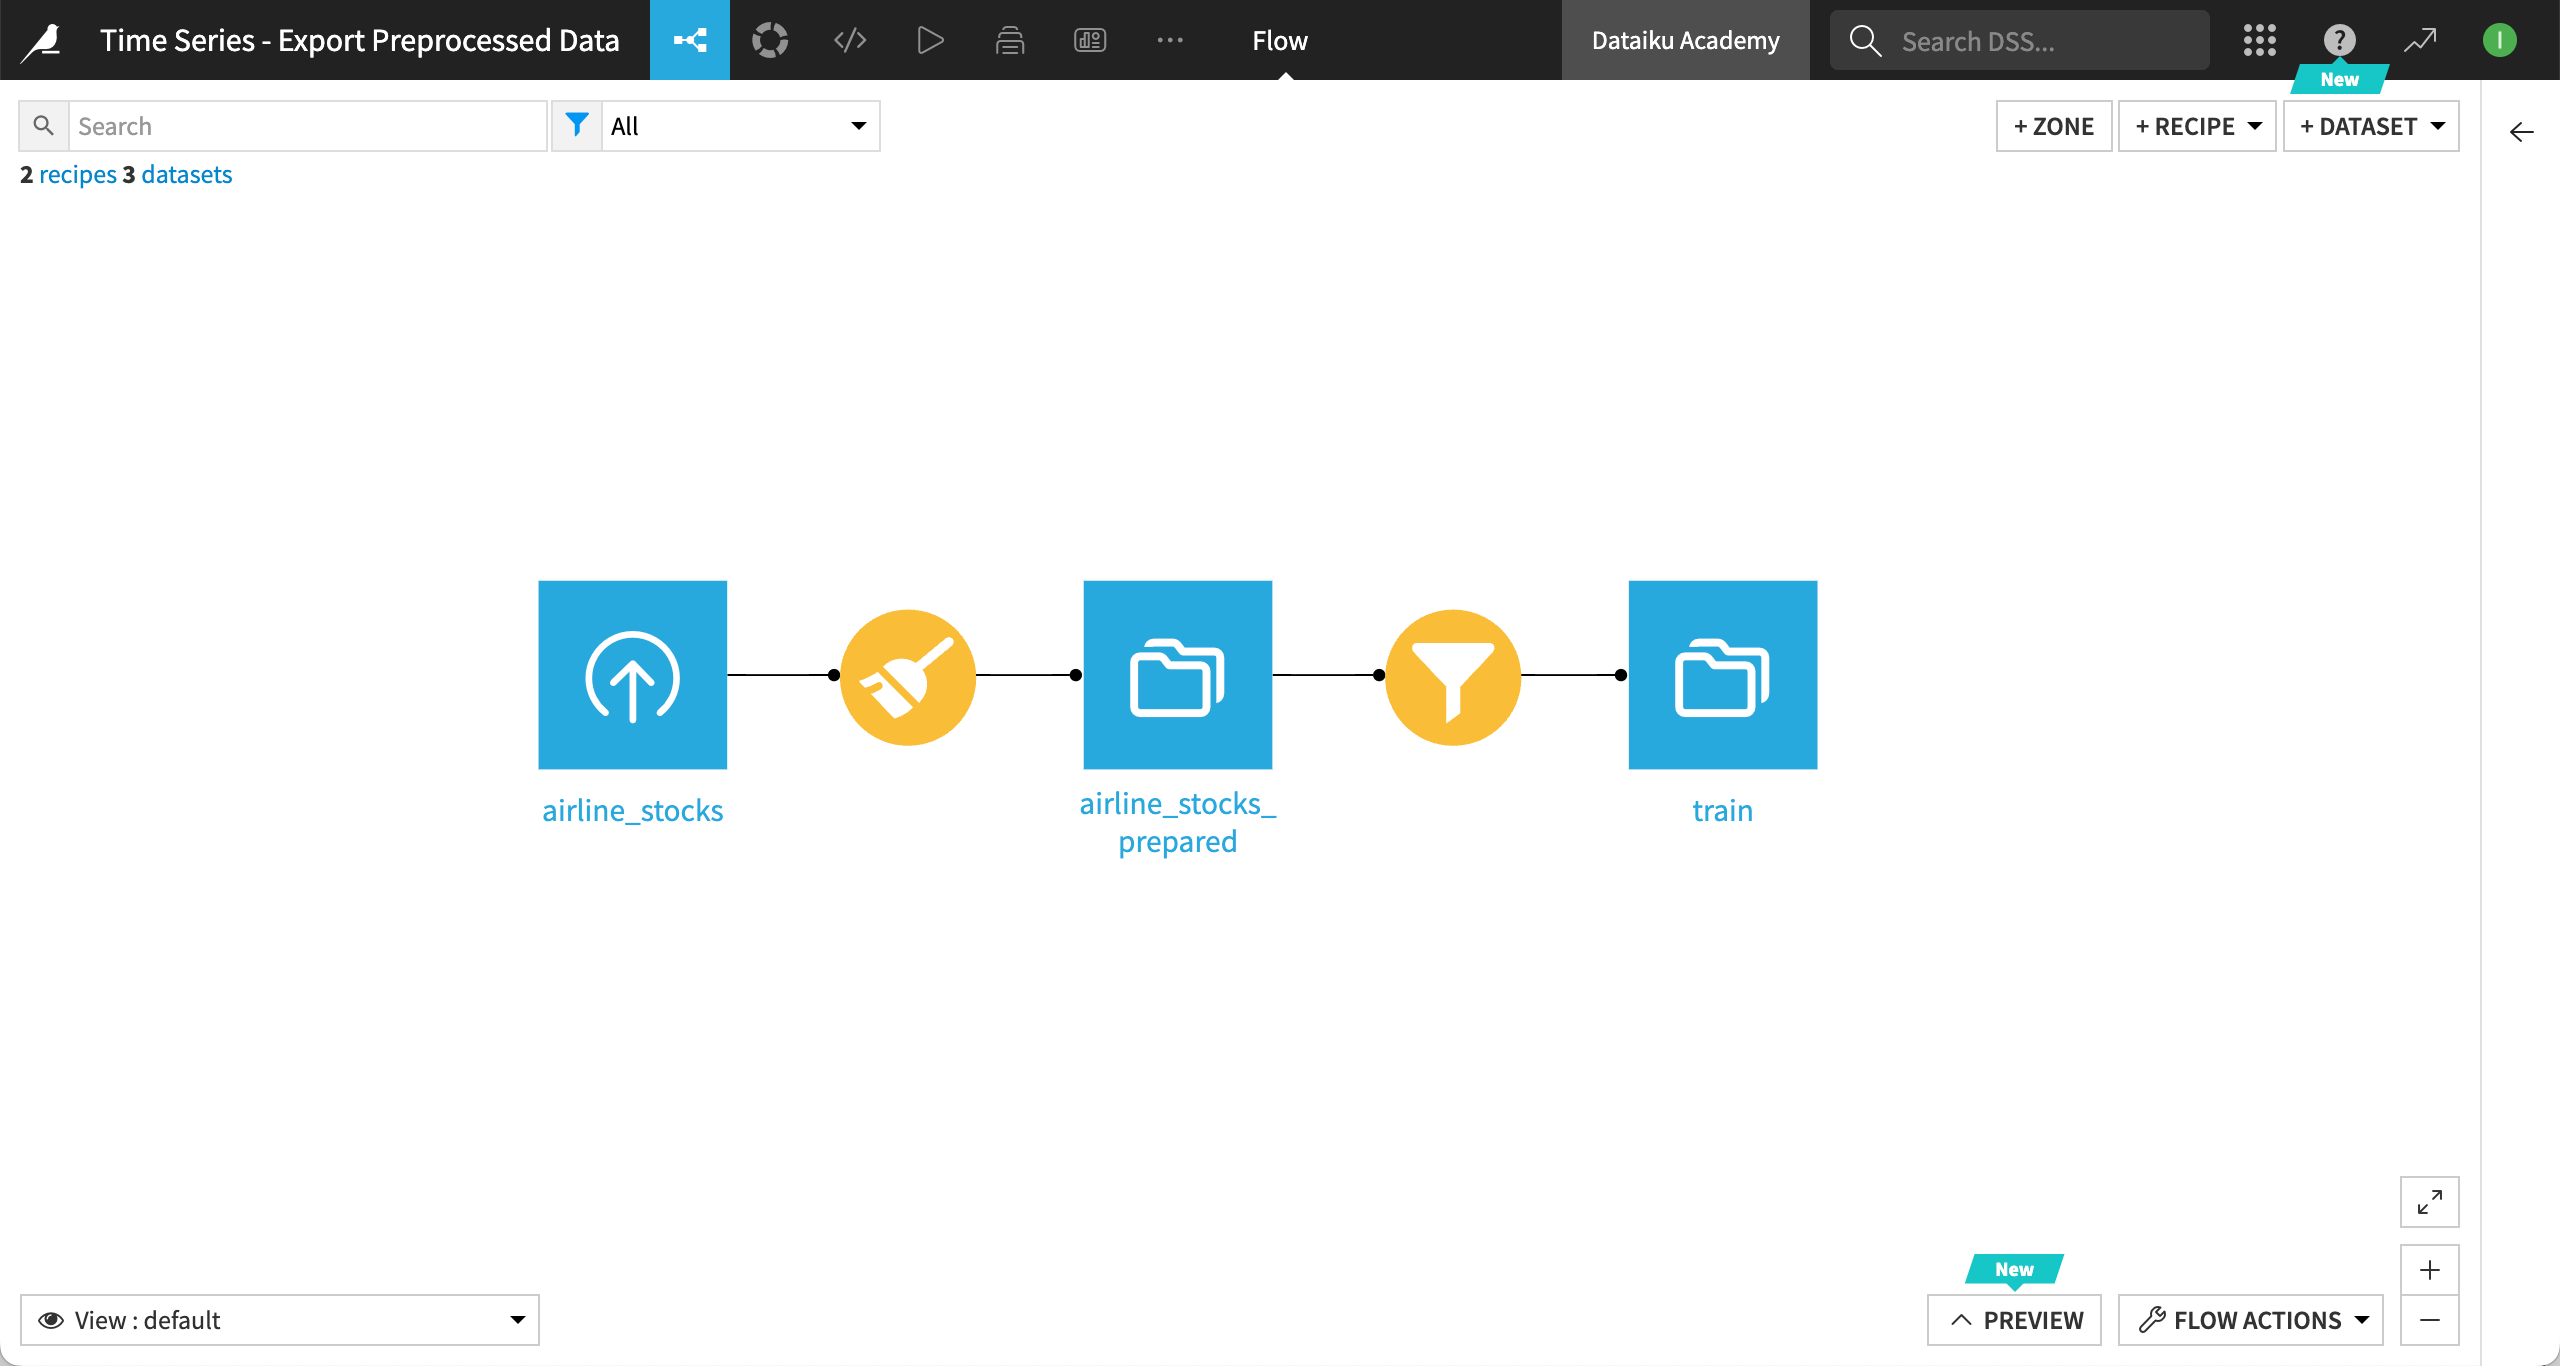
Note
You can also follow along using your own project, containing a time series forecasting model deployed to the Flow.
Train and deploy the time series model#
Before creating a notebook to export the preprocessed data, we must train and deploy a time series model in our project.
From the ML (
) menu of the top navigation bar, go to the Visual ML (Analysis) page, and open the Quick time series modeling of Adj_close on train analysis.
In the Design tab, go to the Runtime environment panel.
Under Code environment:
Set the Selection behavior option to Select an environment.
In the Environment dropdown, select the code environment that includes the Visual machine learning and visual time series forecasting package.
Click Save then Train at the top right of the screen.
In the Training models dialog, keep the default settings and click Train.
From the Results tab, select the model with the best score (here, Simple Feed Forward) and then click Deploy.
In the Deploy prediction model dialog, keep train as the Train dataset, leave the default name, and click Create.
You will be automatically redirected to the Flow where the Predict Adj_close model has been added.
Create a code notebook#
From your project, create a new Python notebook. To do so:
From the Code (
) menu of the top navigation bar, select Notebooks (or type
g+n).Click New Notebook > Write your own.
In the New Notebook dialog, select Python.
In the Code env option, select the same code environment as the one used by your deployed Time Series Forecasting model. This is essential, or you’ll get an error while running the notebook.
Name the notebook (for example
Export preprocessed dataset).Click Create. The notebook opens with some starter code.
Note
To learn more about working with code notebooks in Dataiku, you can try the Tutorial | Code notebooks and recipes.
Load the input DataFrame#
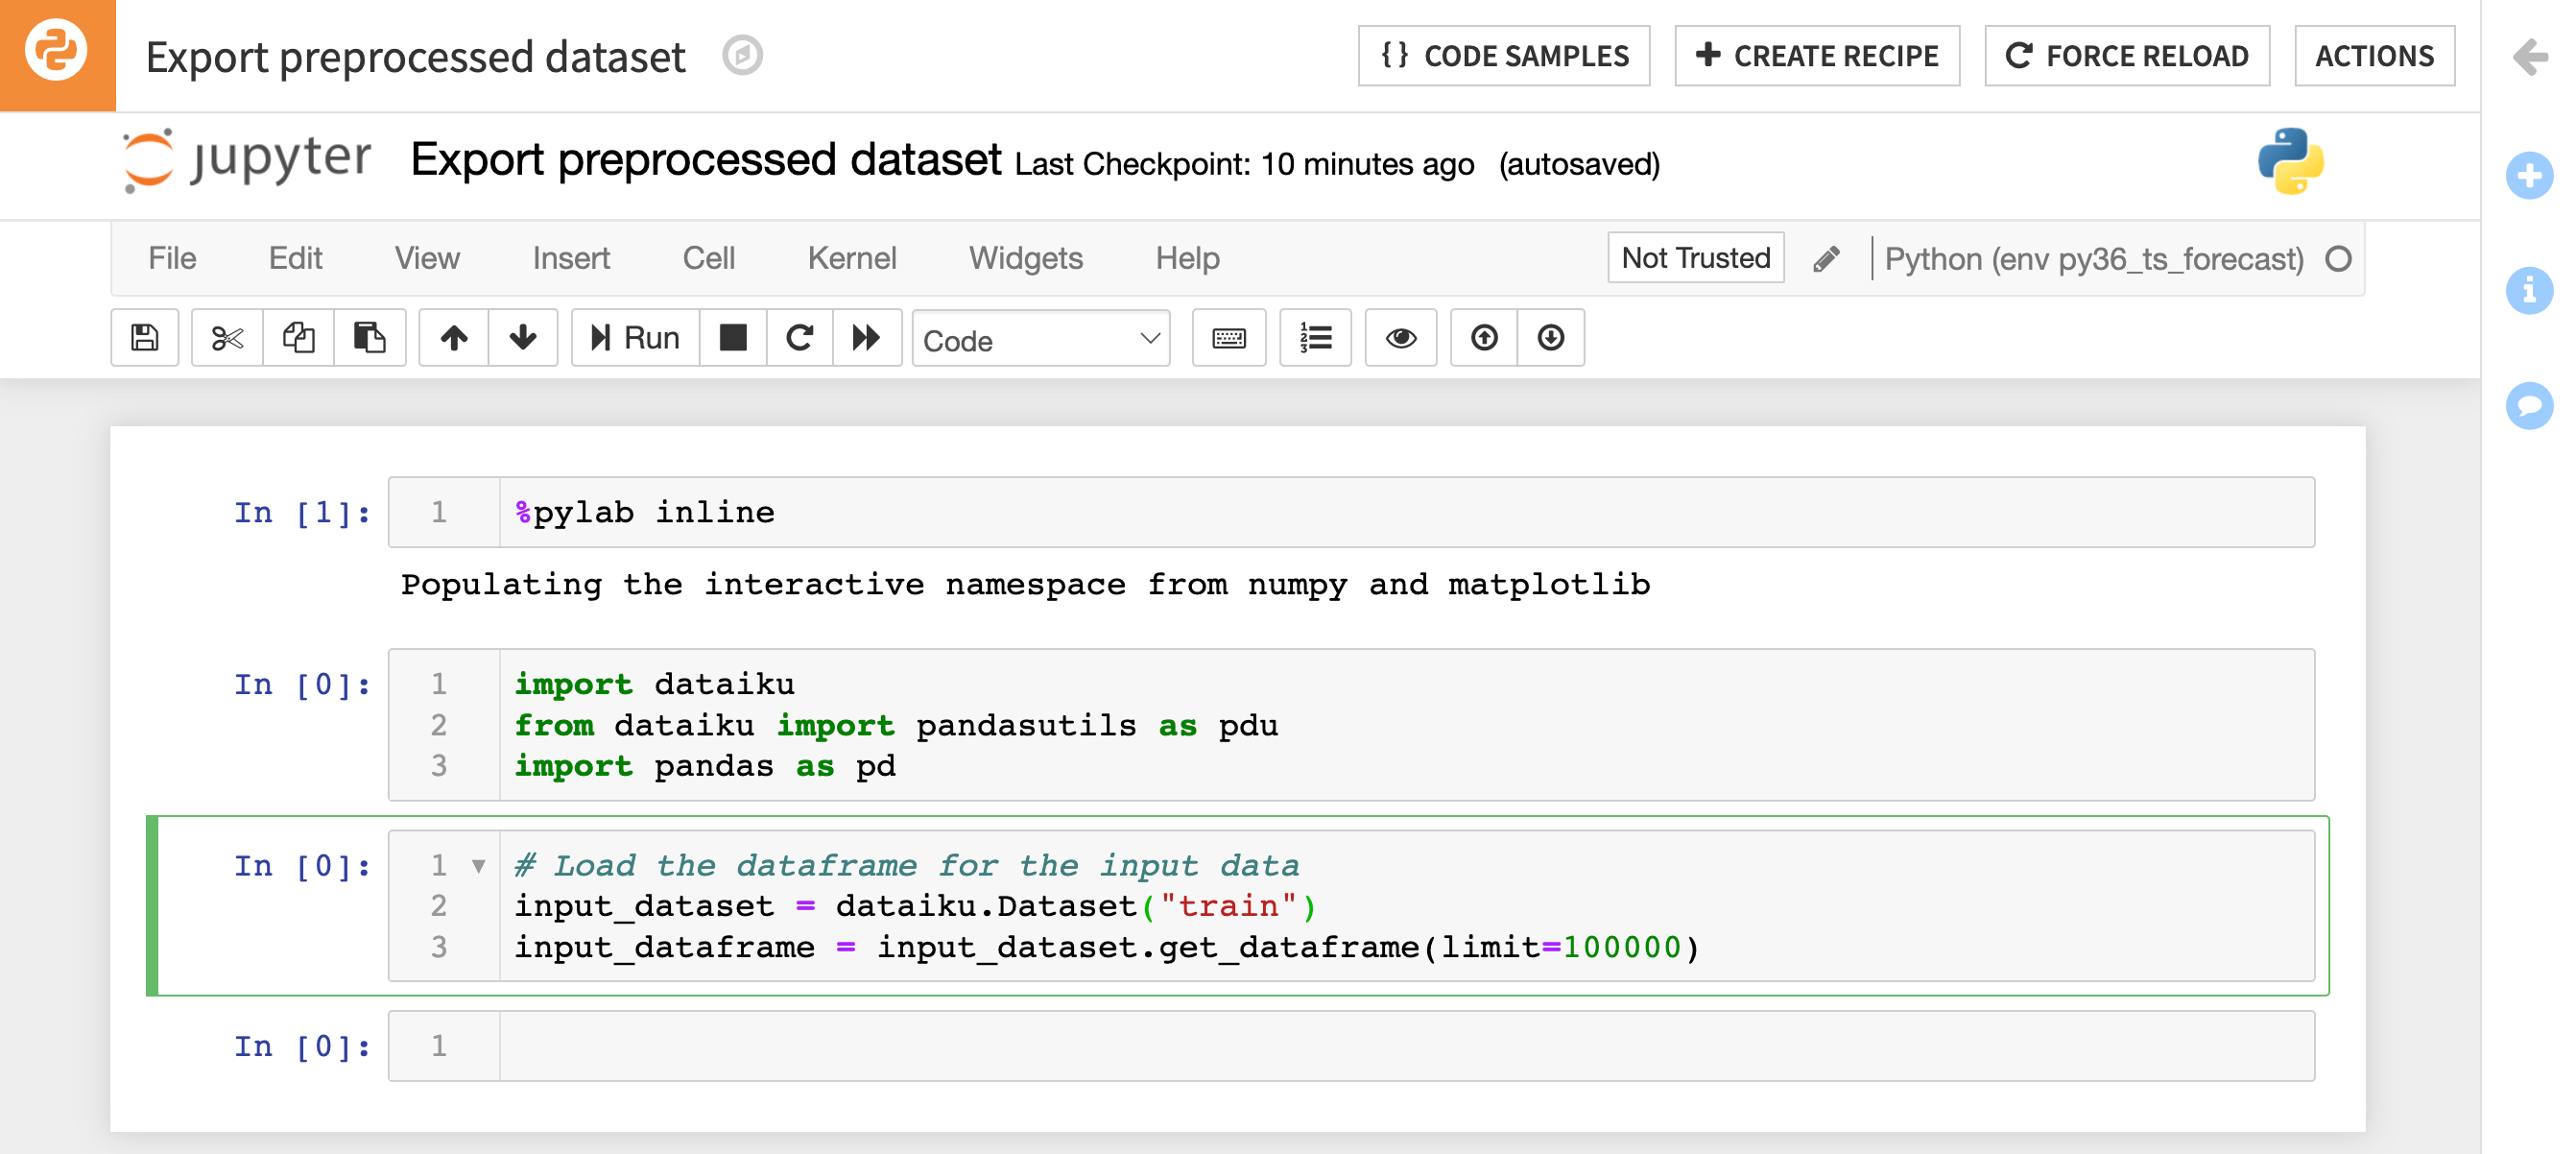
We’ll start by using the Dataiku API to get the input dataset for our model, as a pandas DataFrame.
In the starter code provided upon creating the notebook, replace the content of the third cell with the code sample below and replace
saved_model_input_dataset_namewith the name of your model’s input dataset.
# Load the DataFrame for the input data
input_dataset = dataiku.Dataset("saved_model_input_dataset_name")
input_dataframe = input_dataset.get_dataframe(limit=100000)
Load the predictor API for your saved model#
Next, we’ll use the predictor API to preprocess the input DataFrame. The predictor is a Dataiku object that allows you to apply the same pipeline as the visual model (preprocessing + scoring). For more information, see the API reference.
Add the following code.
# Get the model and predictor
model = dataiku.Model("saved_model_id")
predictor = model.get_predictor()
Replace
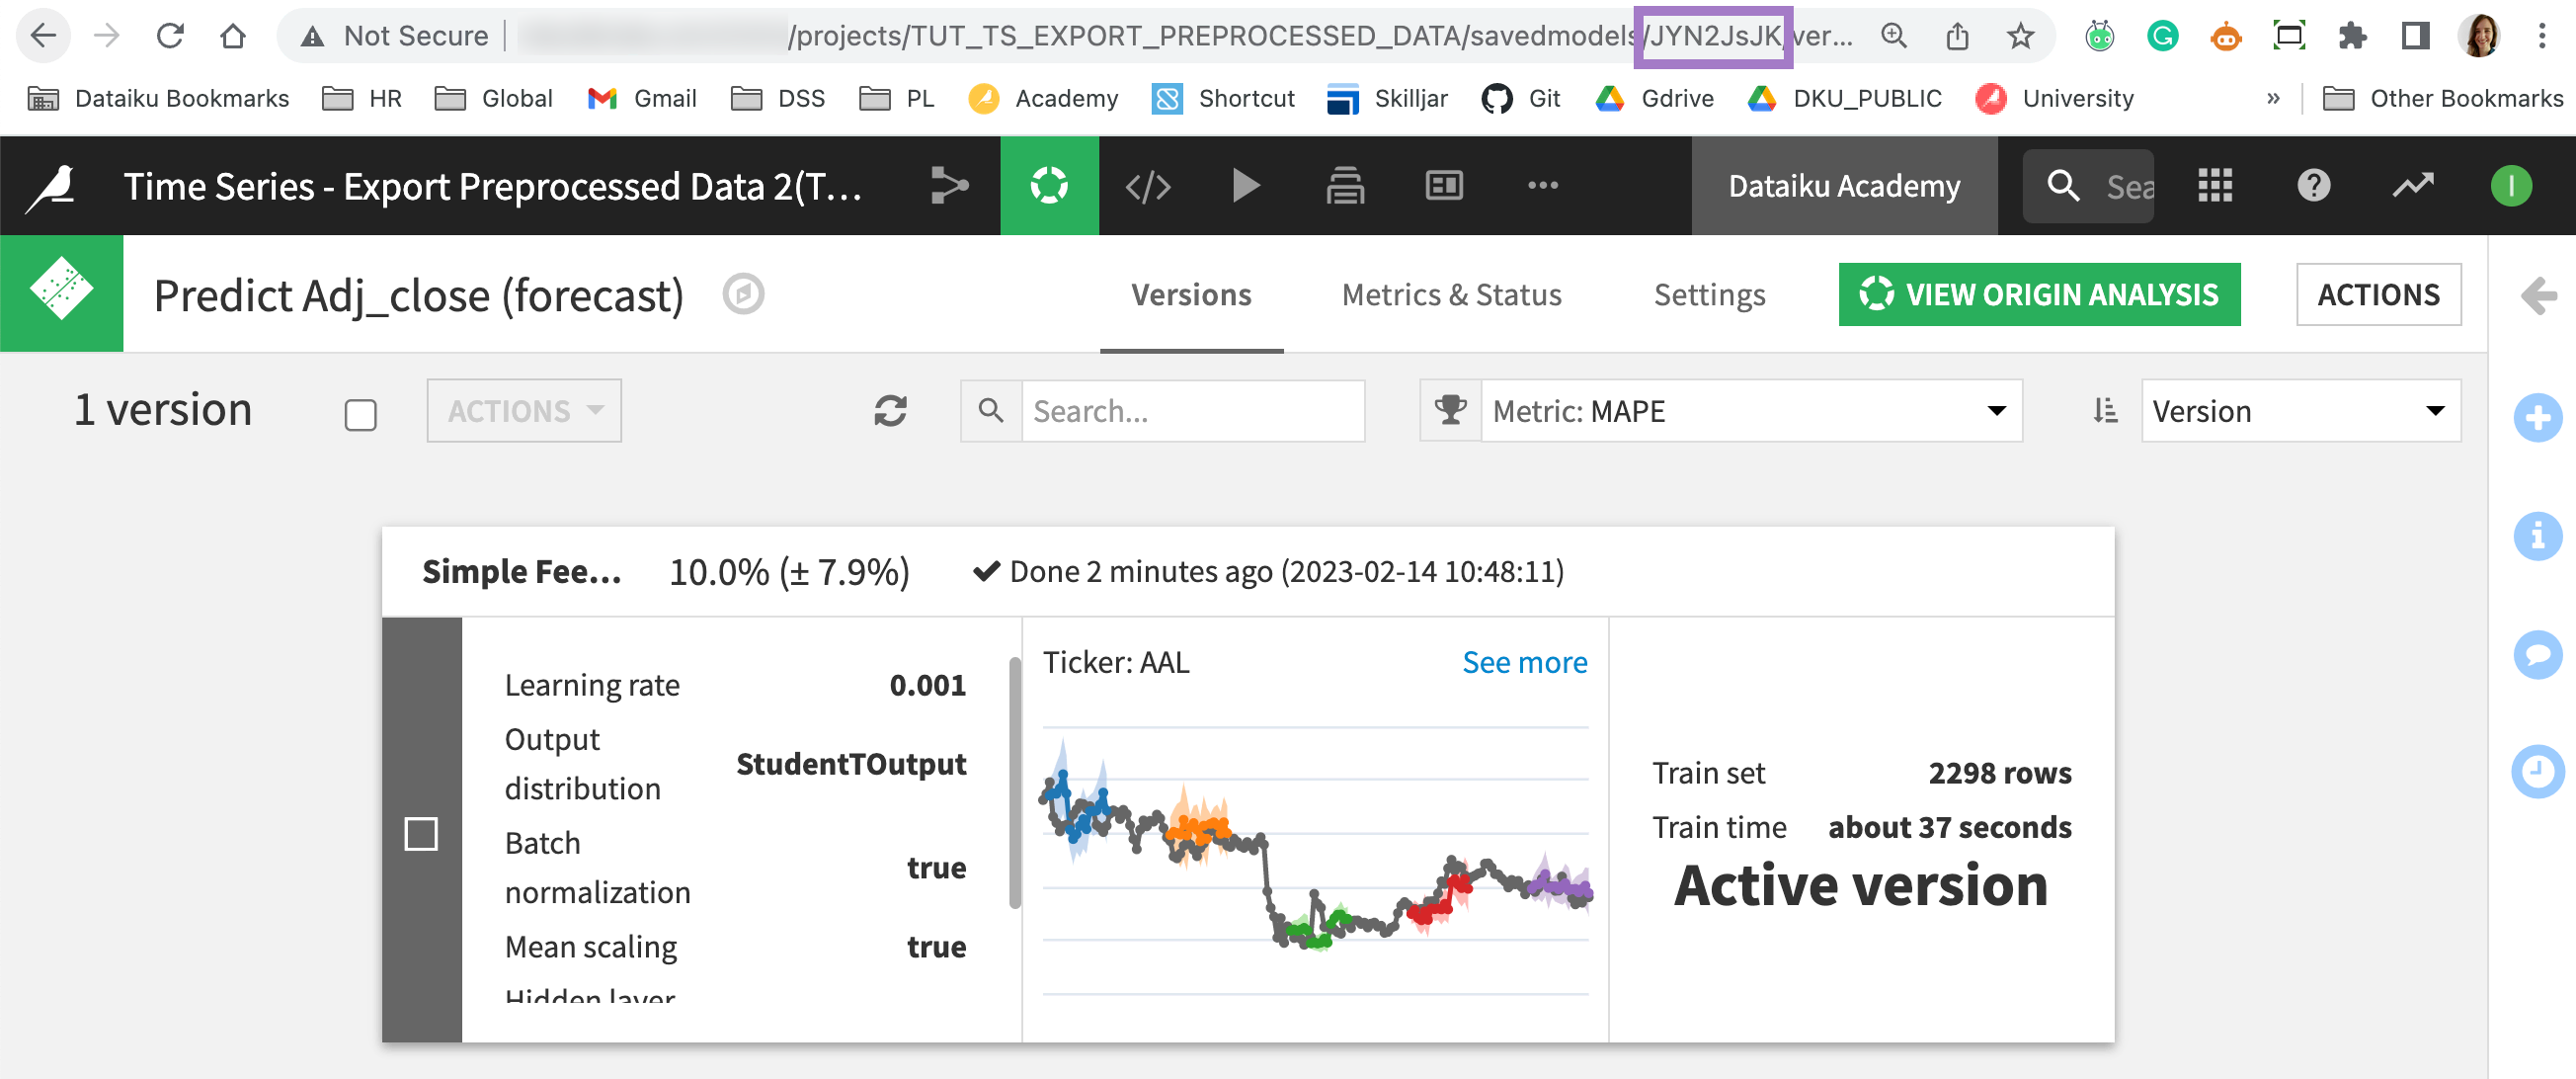
saved_model_idwith the ID of your saved model.Note
To get the ID of a saved model, double click on the saved model in the Flow. The ID is visible in the URL of the saved model, as shown below:
Preprocess the input DataFrame#
The model’s predictor has a preprocess method that performs the preprocessing steps and returns the preprocessed version of the data.
# Use the predictor to preprocess the data
past_preprocessed_df, future_preprocessed_df, past_resampled_df, future_resampled_df = predictor.preprocess(input_dataframe)
Examine the DataFrames#
The predictor.preprocess method for time series models has a different return type from the predictor.preprocess method of classical models.
For time series, preprocessing consists of both resampling and preprocessing external features if any.
Resampling involves interpolating missing time steps to match the desired sampling frequency, and/or extrapolating to align the start and end points of multiple time series.
External features are features that aren’t the time variable, a time series identifier, or the target variable.
For this reason, the predictor.preprocess method for time series returns four DataFrames:
The following DataFrame <df> |
contains the time steps: |
|---|---|
|
before the forecast horizon, after both resampling and external features handling. |
|
within the forecast horizon, after both resampling and external features handling. |
|
before the forecast horizon, after resampling only. |
|
within the forecast horizon, after resampling only. |
To see them, add the following code in a new cell of your notebook.
print(past_preprocessed_df)
print(future_preprocessed_df)
print(past_resampled_df)
print(future_resampled_df)
Note
If your model contains no external features with future values (that is, with time steps within the forecast horizon), then the values of future_preprocessed_df and future_resampled_df will be None.
If you are using external features, then you can create a combined DataFrame by concatenating together the past and future DataFrames. Otherwise, you can use the past_preprocessed_df as your preprocessed DataFrame.
import pandas as pd
if future_preprocessed_df is not None:
    preprocessed_dataframe = pd.concat([past_preprocessed_df, future_preprocessed_df])
else:
    preprocessed_dataframe = past_preprocessed_df
Comparing the preprocessed data and input data#
The original input_dataframe is a pandas DataFrame containing the data from your input dataset. We can print it out to see this and compare it with the preprocessed and resampled DataFrames:
print(input_dataframe)
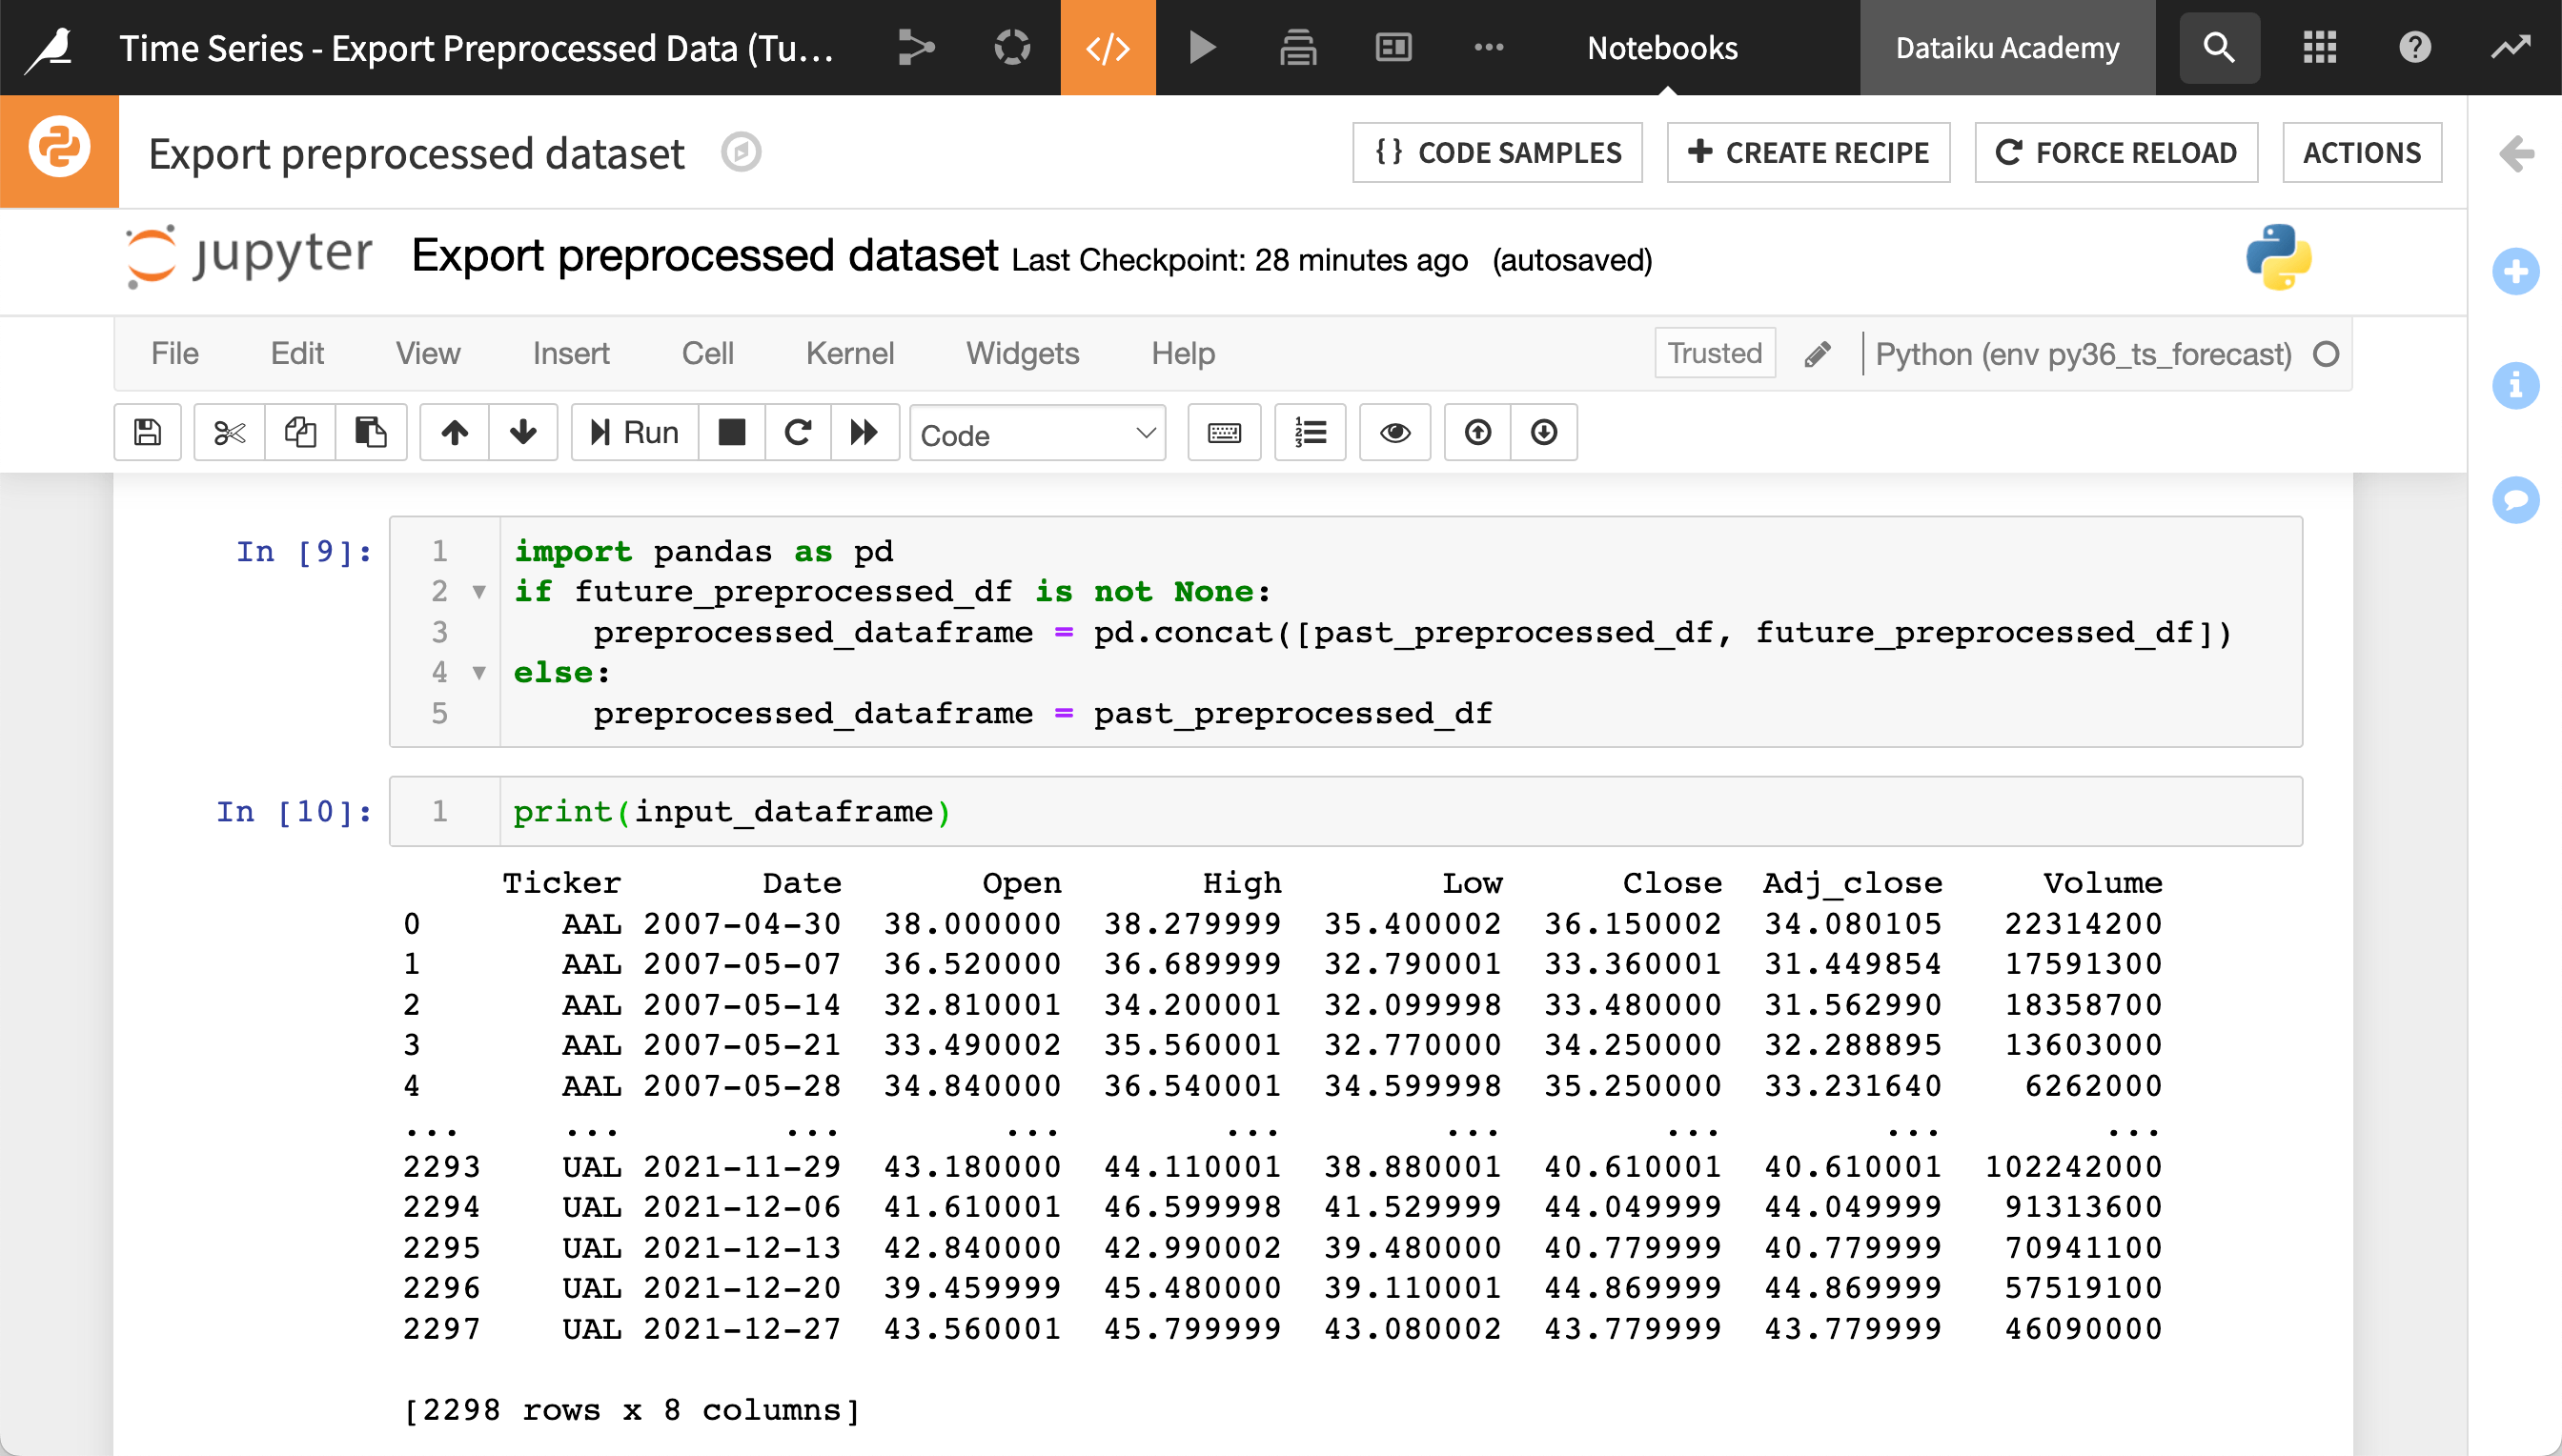
The number of features (and so the number of columns in preprocessed_data) might be different from the number of columns in the input_dataframe. The names of some features might be different from the column names in the input dataset. This is because the feature handling settings of your model training can add or remove columns from the dataset.
For more information about feature handling, see Concept | Features handling.
In addition, the number of rows in the preprocessed data can be different from the number of rows in the input dataset. This is due to the time series resampling. If your requested time step is smaller than input dataset time step and/or some time steps are missing in the input, then resampling will add rows using your chosen interpolation method. On the other hand, if your requested time step is larger than the input dataset time step, then resampling may remove rows while interpolating if necessary to match the requested sample rate.
For more information about time series resampling, see Concept | Time series resampling.
If you just want to look at the preprocessed data or perform simple calculations on it, then these steps may be sufficient. However, if your goal is to perform complex analyses on the preprocessed data, you should export the preprocessed data to a new dataset in Dataiku. We’ll do this in the next section.
Export the preprocessed data to a new dataset#
The previous steps allowed us to access the preprocessed data as a pandas DataFrame in a Python notebook. This can be useful for many applications, but in order to use the full power of Dataiku to analyze the preprocessed data, we can export it to a new dataset in the Flow.
Create a new, empty dataset#
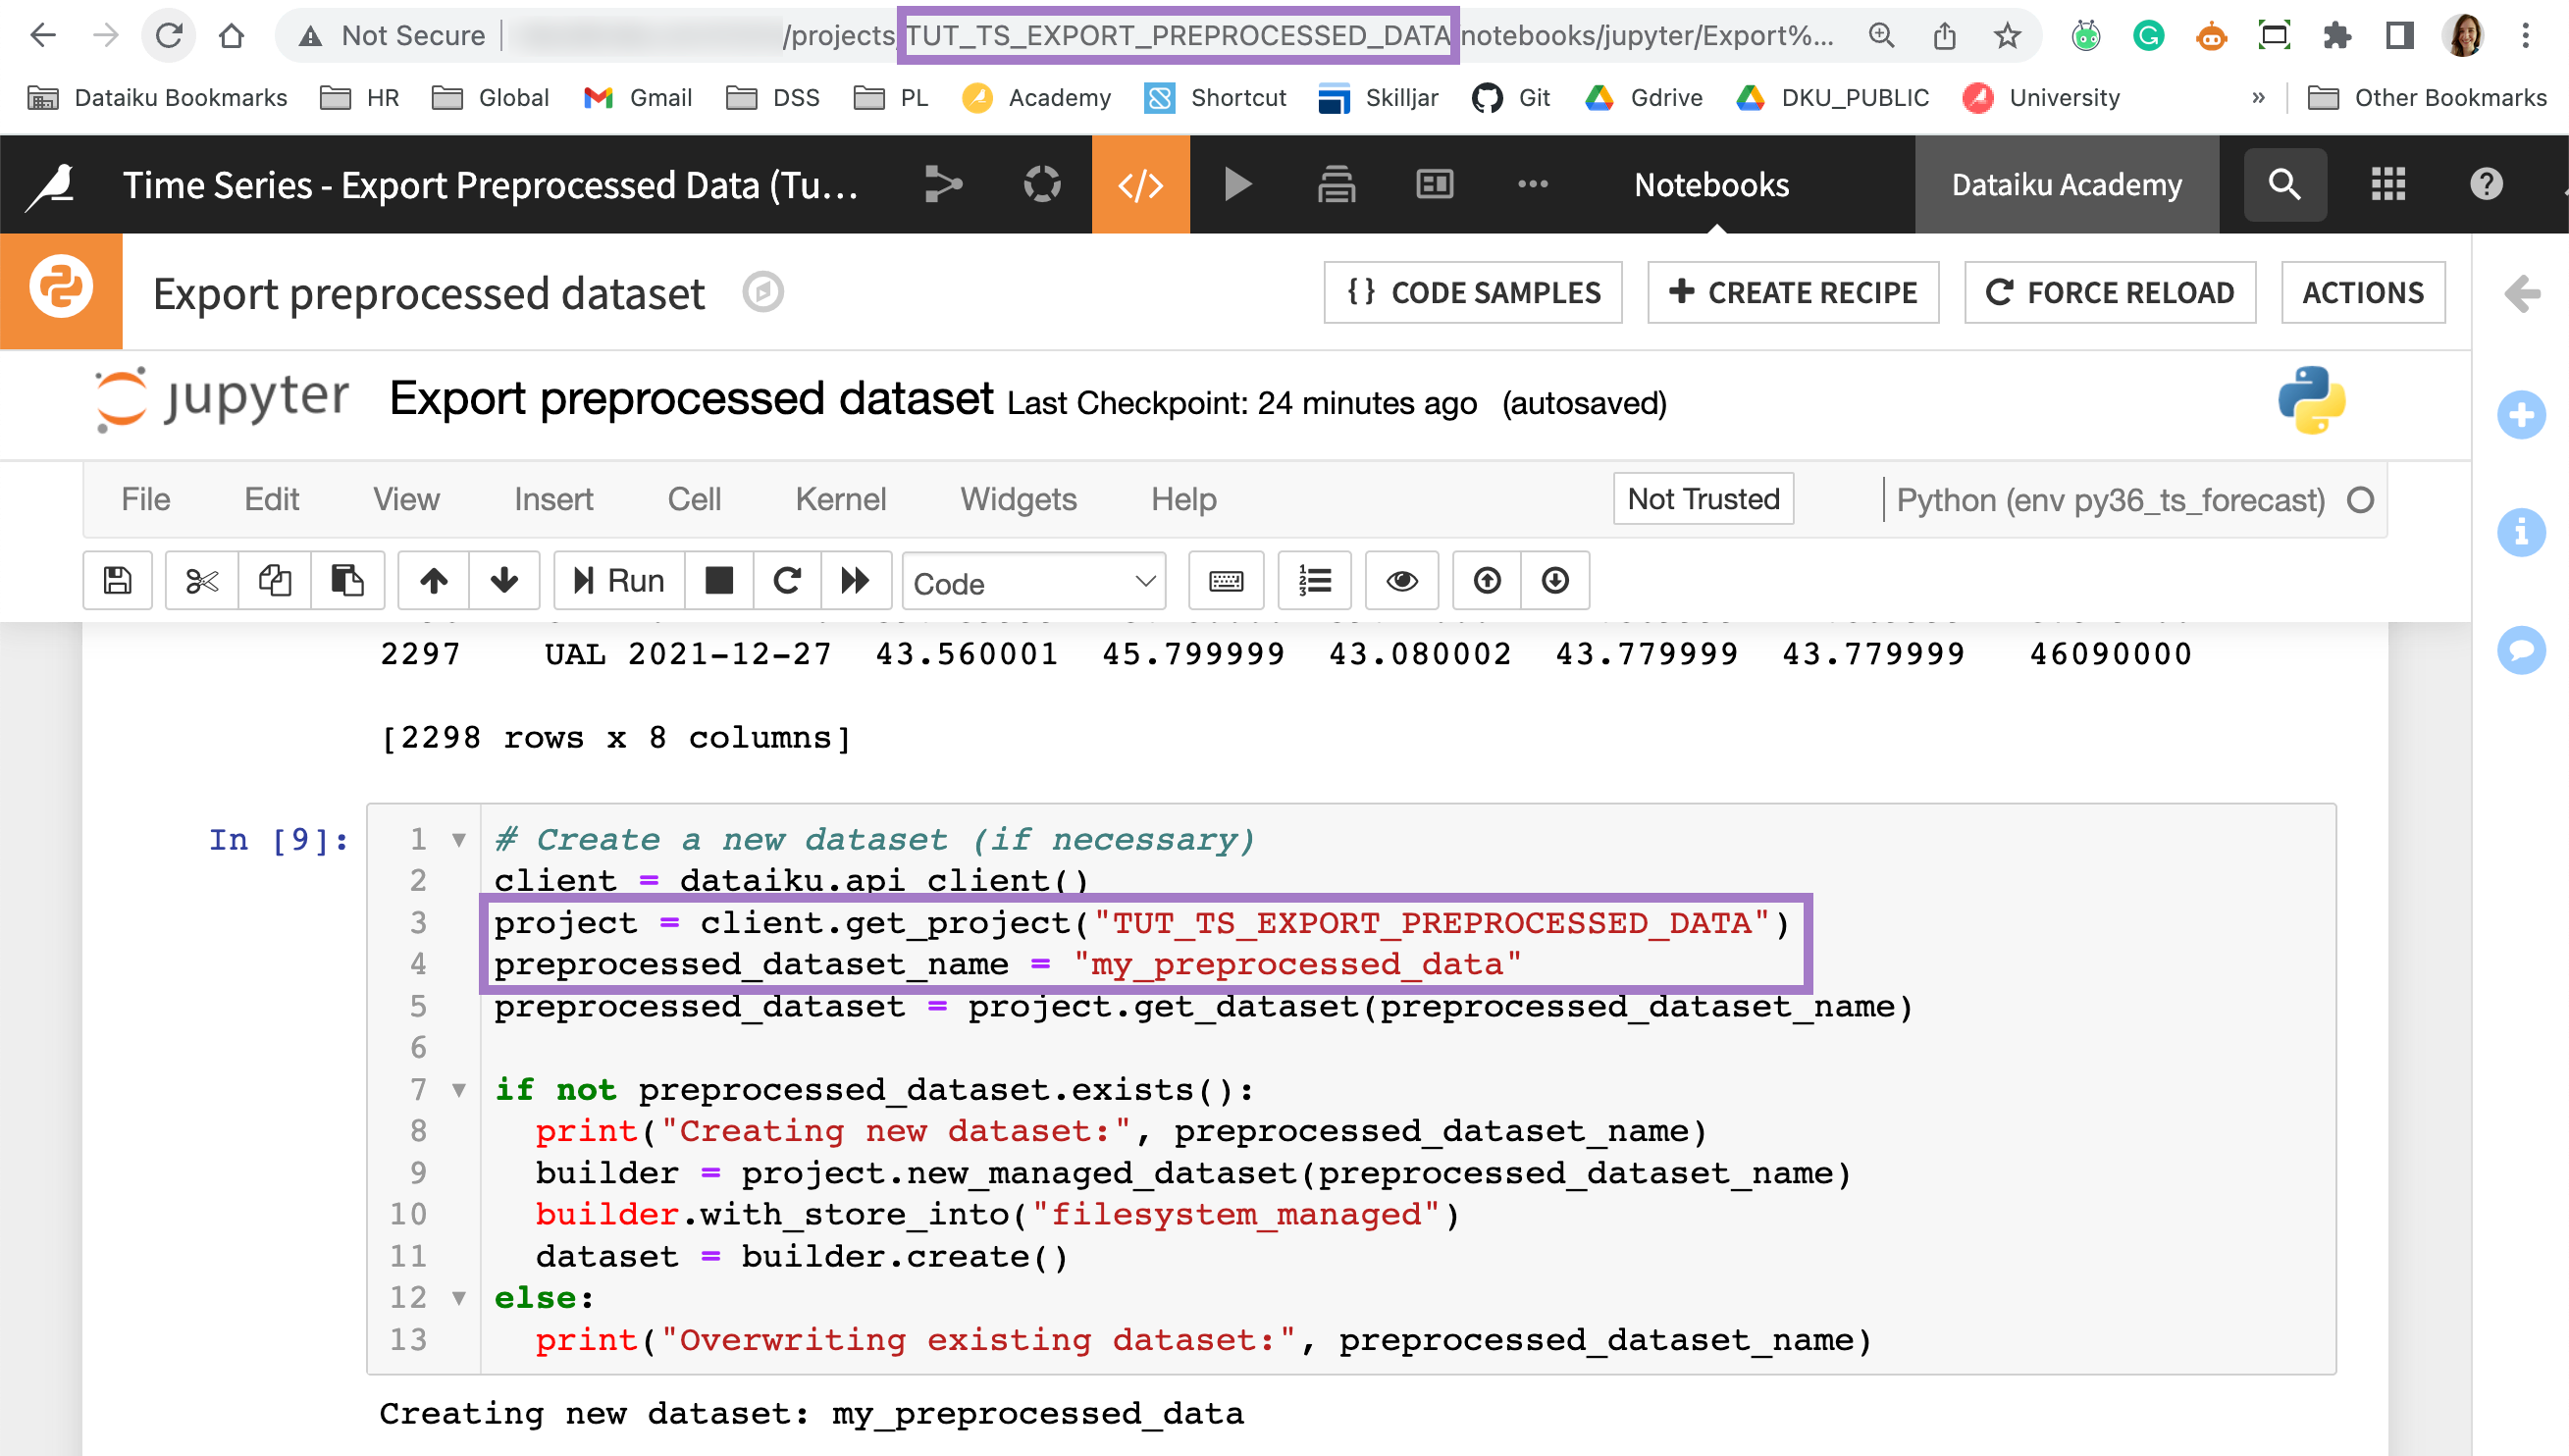
First, we’ll create a new dataset. The following code snippet uses the Dataiku API to create a new dataset if it doesn’t already exist. That way, we can re-run our code and overwrite the dataset with updated data.
Enter the following code in a new cell of your notebook.
# Create a new dataset (if necessary)
client = dataiku.api_client()
project = client.get_project("project_name")
preprocessed_dataset_name = "my_preprocessed_data"
preprocessed_dataset = project.get_dataset(preprocessed_dataset_name)

if not preprocessed_dataset.exists():
  print("Creating new dataset:", preprocessed_dataset_name)
  builder = project.new_managed_dataset(preprocessed_dataset_name)
  builder.with_store_into("filesystem_managed")
  dataset = builder.create()
else:
  print("Overwriting existing dataset:", preprocessed_dataset_name)
Replace
project_namewith the name of your project, as found in the URL (see the screenshot below).Replace
my_preprocessed_datawith any name you choose for your new dataset.
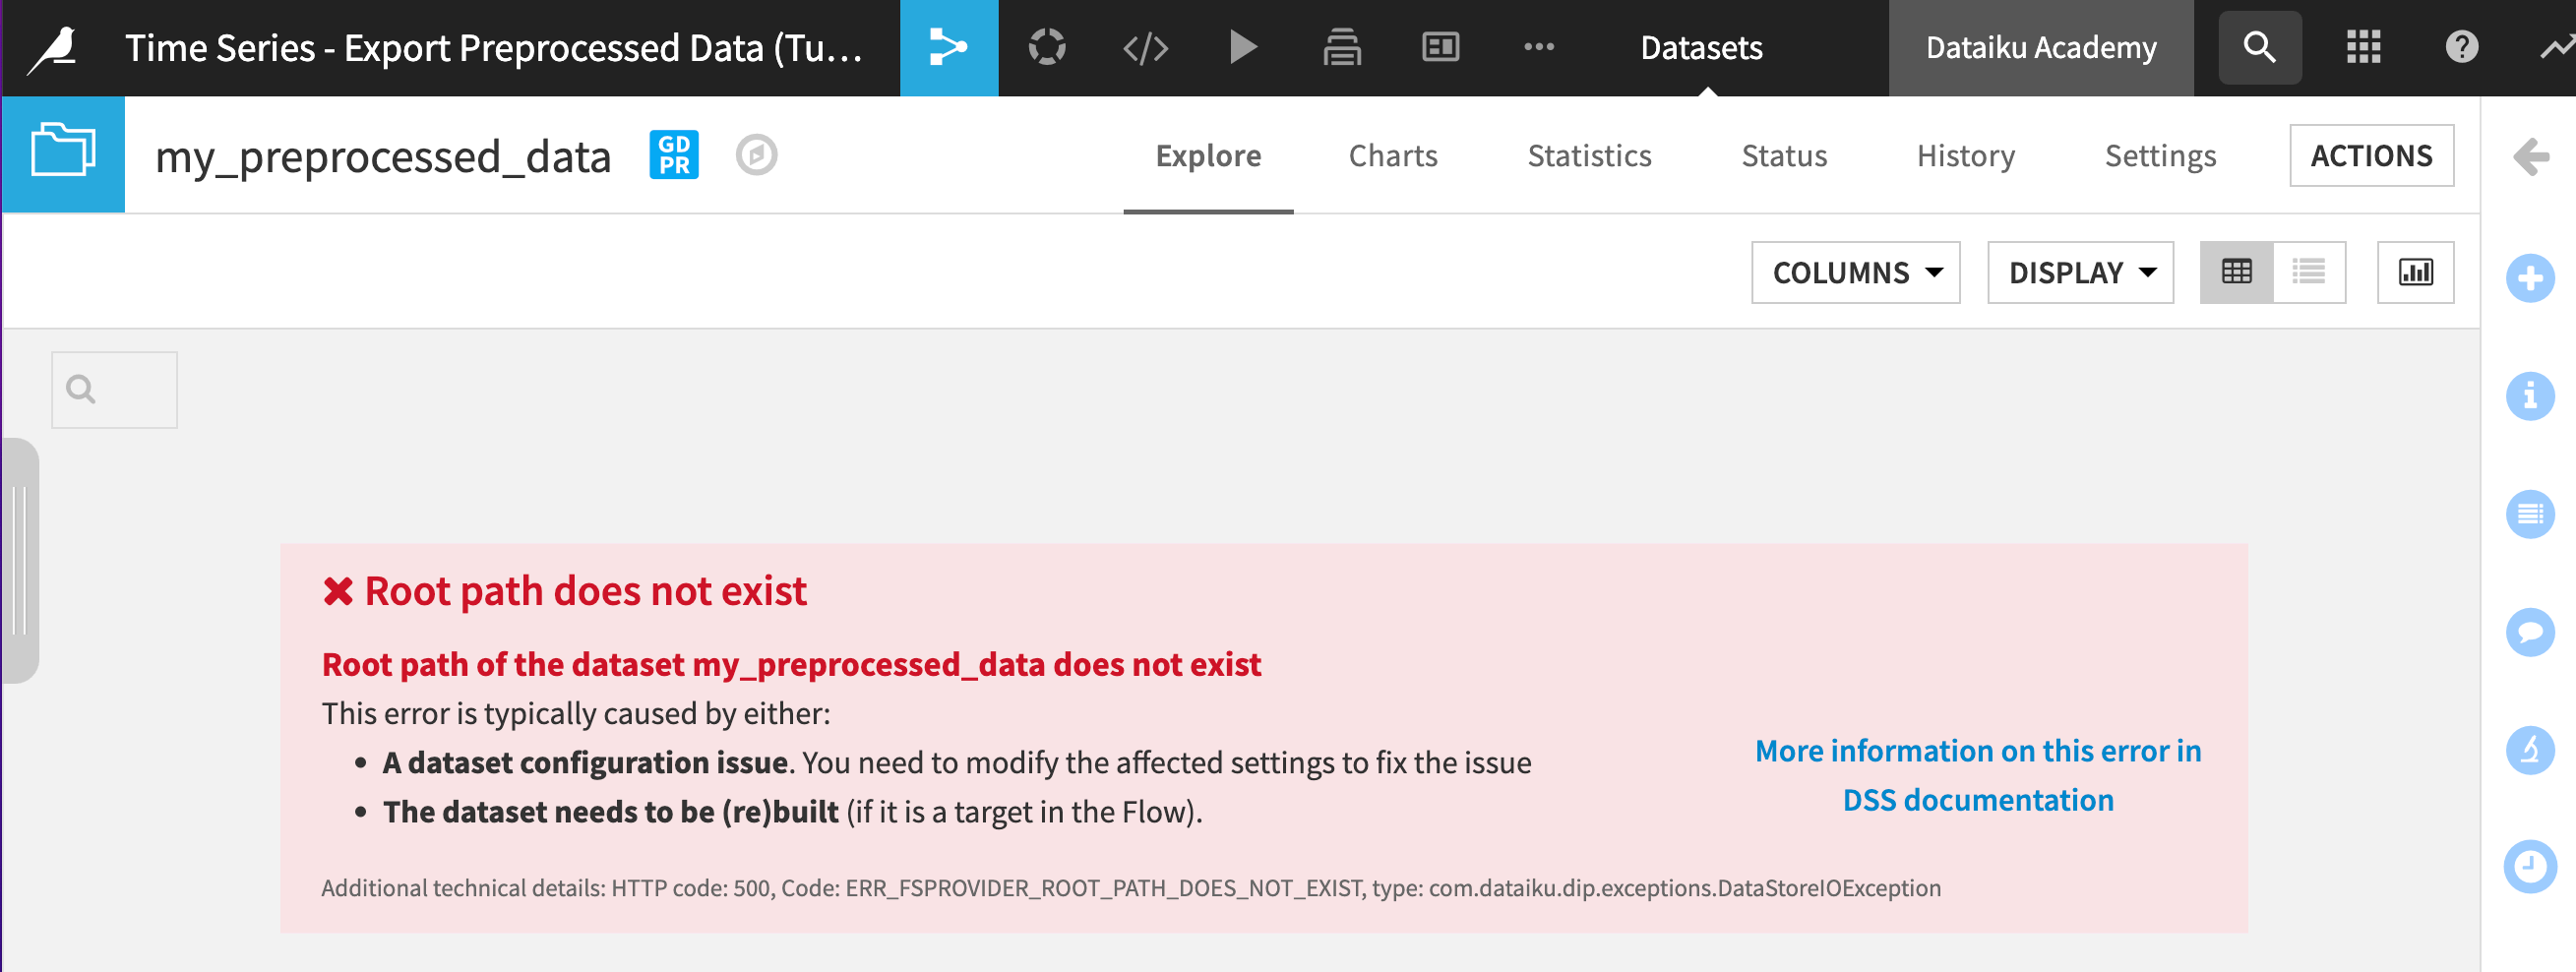
At this stage, the new dataset has been created and added to your Flow but is empty. If you try to open it, you’ll get the following screen:
Fill the empty dataset with the preprocessed data#
Now that our empty dataset has been created, we can fill it with the preprocessed data.
# Write the preprocessed data to the dataset
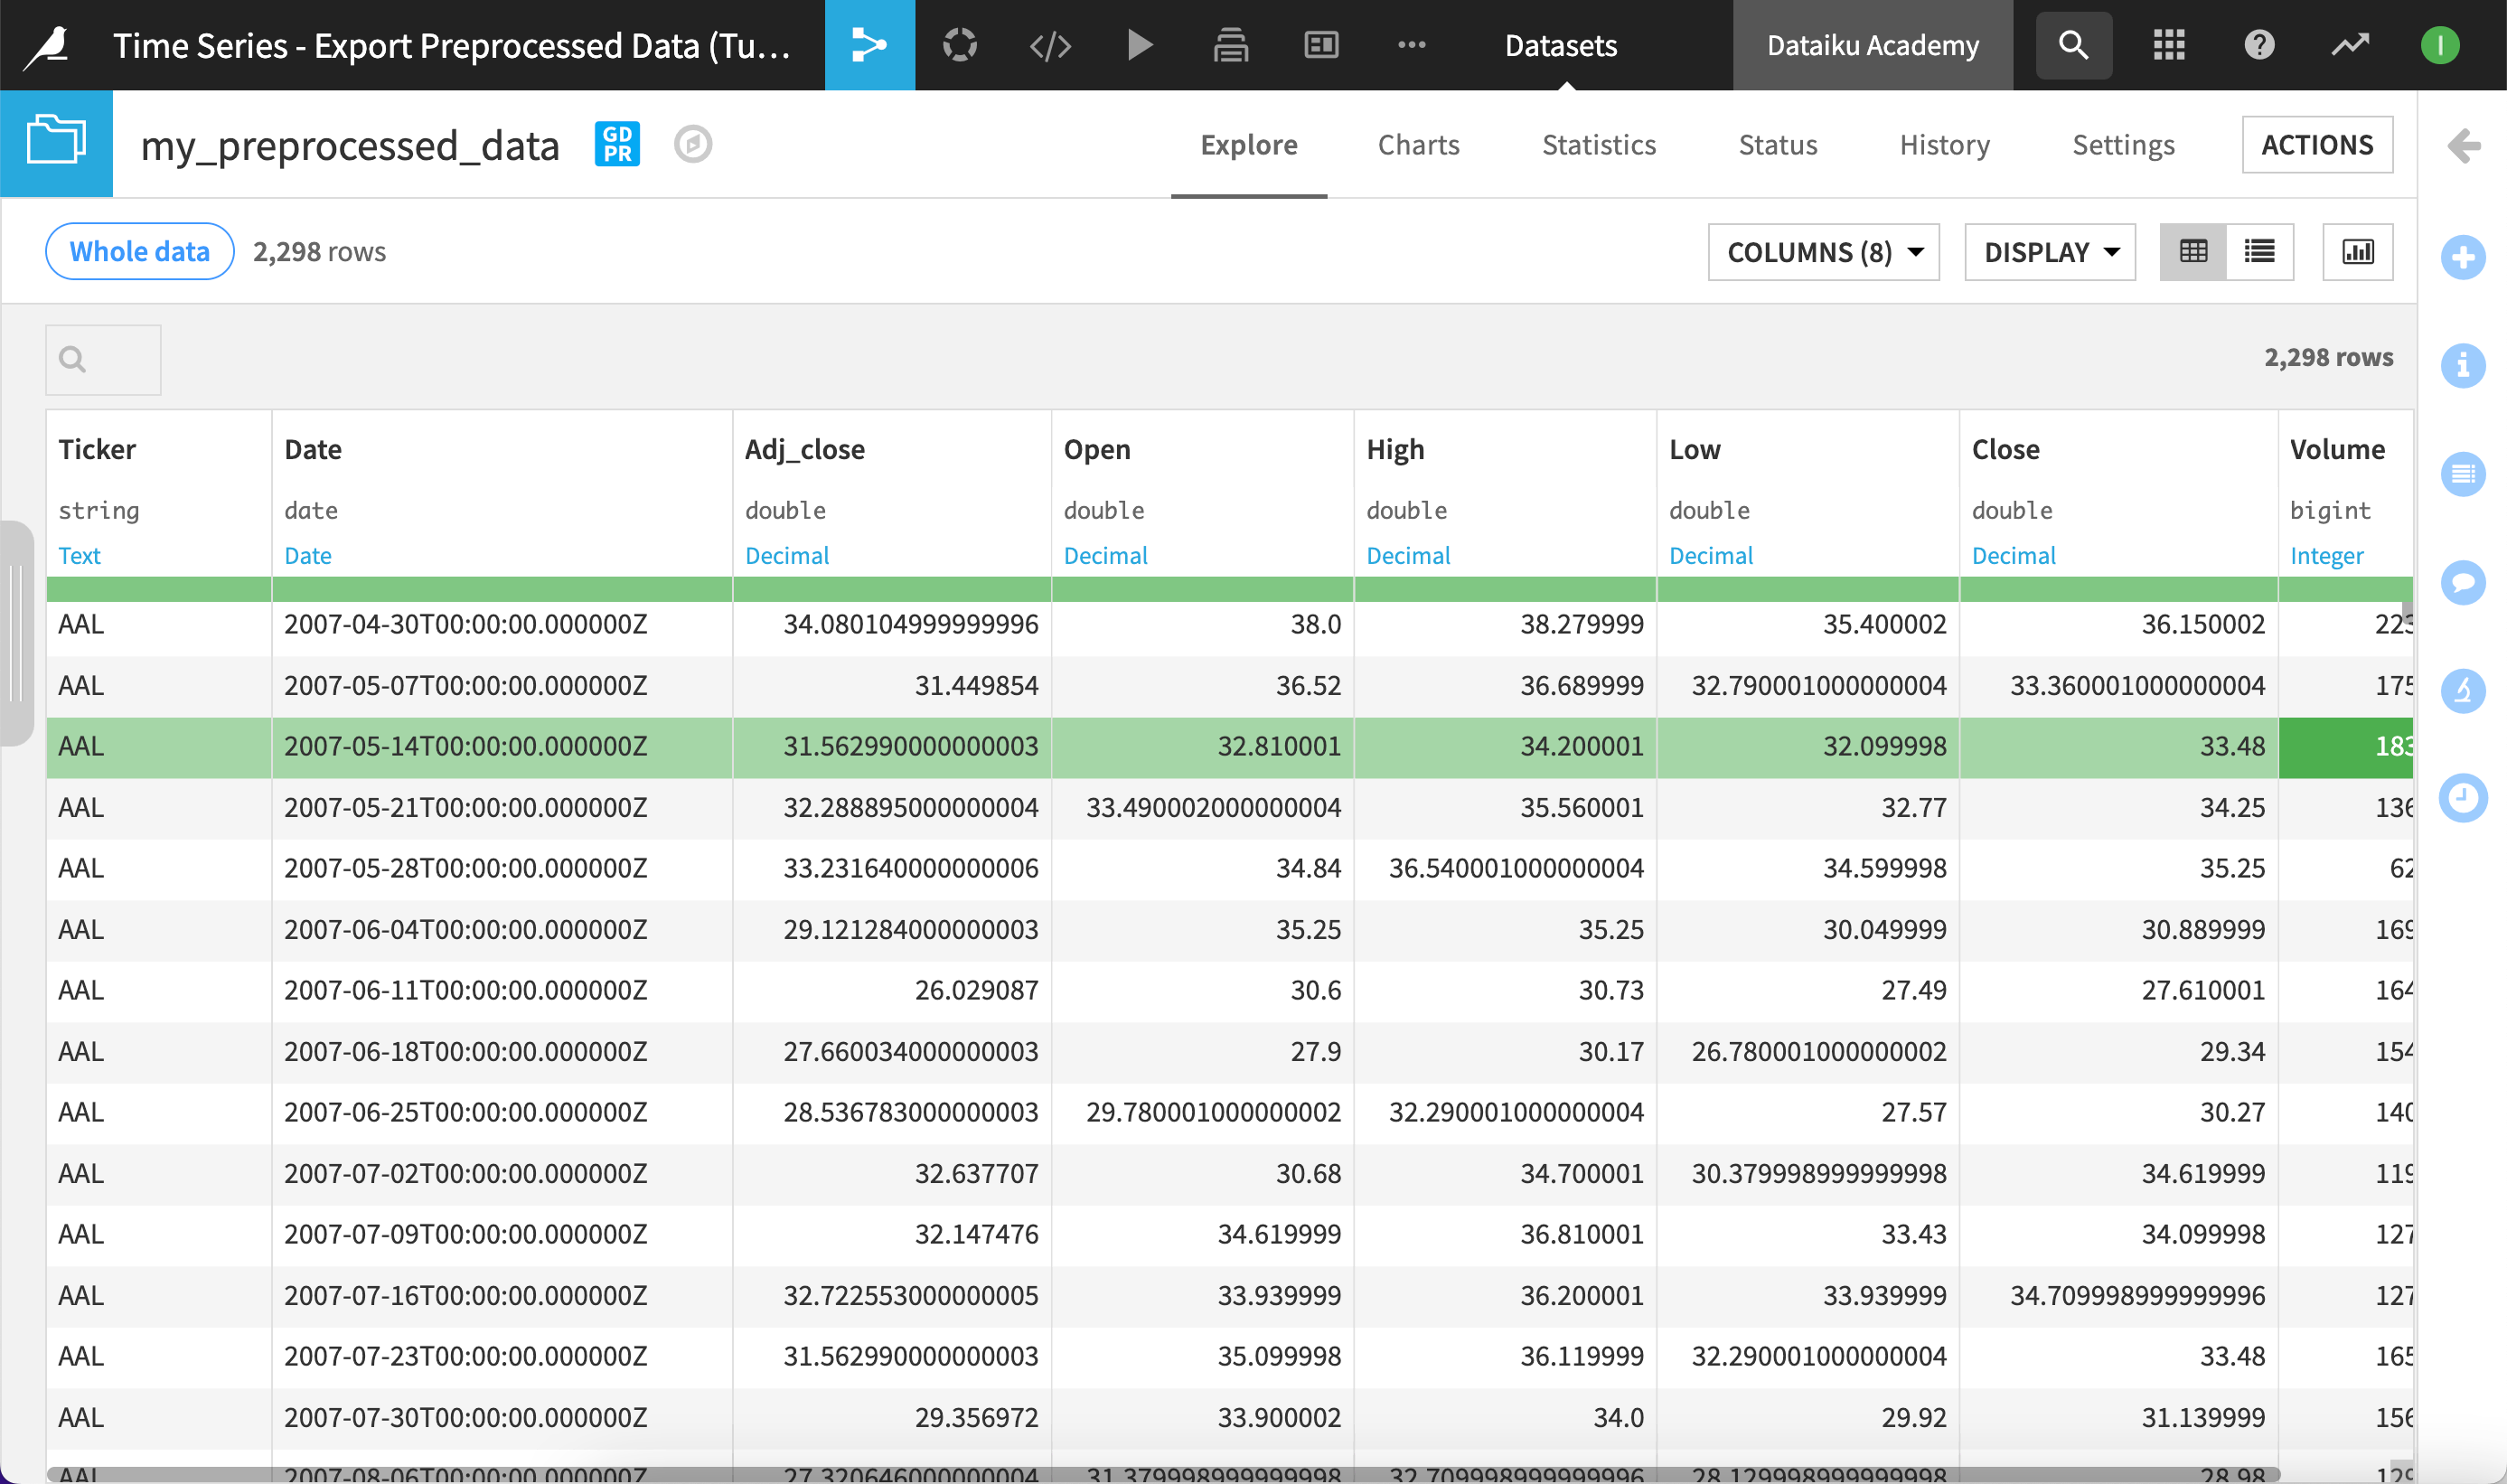
preprocessed_dataset.get_as_core_dataset().write_with_schema(preprocessed_dataframe)
This has created a new dataset in the Flow, containing the preprocessed data for our model.
Warning
This new dataset isn’t linked to your model. If you modify your original dataset or retrain your model, you’ll need to re-run the code in your notebook to update the preprocessed dataset.
Get the complete code sample#
If you don’t want to go through all the steps of this tutorial, copy the full code sample below and paste it in a new Python notebook.
%pylab inline

import dataiku
from dataiku import pandasutils as pdu
import pandas as pd

# Load the DataFrame for the input data
input_dataset = dataiku.Dataset("saved_model_input_dataset_name") # Replace saved_model_input_dataset_name with the name of your model's input dataset
input_dataframe = input_dataset.get_dataframe(limit=100000)

# Get the model and predictor
model = dataiku.Model("saved_model_id") # Replace saved_model_id with the ID of your saved model
predictor = model.get_predictor()

# Use the predictor to preprocess the data
past_preprocessed_df, future_preprocessed_df, past_resampled_df, future_resampled_df = predictor.preprocess(input_dataframe)

# Print the four datasets returned by the predictor.preprocess method for time series
print(past_preprocessed_df)
print(future_preprocessed_df)
print(past_resampled_df)
print(future_resampled_df)

import pandas as pd
if future_preprocessed_df is not None:
    preprocessed_dataframe = pd.concat([past_preprocessed_df, future_preprocessed_df])
else:
    preprocessed_dataframe = past_preprocessed_df

print(input_dataframe)

# Create a new dataset (if necessary)
client = dataiku.api_client()
project = client.get_project("project_name") # Replace project_name with the name of your project
preprocessed_dataset_name = "my_preprocessed_data" # Replace my_preprocessed_data with any name you choose for your new dataset
preprocessed_dataset = project.get_dataset(preprocessed_dataset_name)

if not preprocessed_dataset.exists():
  print("Creating new dataset:", preprocessed_dataset_name)
  builder = project.new_managed_dataset(preprocessed_dataset_name)
  builder.with_store_into("filesystem_managed")
  dataset = builder.create()
else:
  print("Overwriting existing dataset:", preprocessed_dataset_name)

# Write the preprocessed data to the dataset
preprocessed_dataset.get_as_core_dataset().write_with_schema(preprocessed_dataframe)
Next steps#
You can now use all the features of Dataiku to analyze this dataset. For example, you can:
Explore this dataset using the Dataiku UI, to analyze columns, compute dataset statistics, and create charts.
Use this dataset as part of a dashboard.
Use this dataset as the input to a recipe.
To automate updating the preprocessed dataset you can create a scenario and add a step to execute Python code. You could also create a code recipe from your code notebook.
To learn about:
Python recipes, see Tutorial | Code notebooks and recipes.
scenarios, see Concept | Automation scenarios.

