
Tutorial | Recipe engines#
Get started#
When a Flow meets certain conditions, Dataiku can offload computation to more powerful recipe engines (such as Spark or SQL) that can result in faster builds of data pipelines.
Knowing the basic outlines of how Dataiku selects the most optimal recipe engine can help guide an optimization strategy as you move from an experimental to a production workflow.
Objectives#
In this tutorial, you will:
Learn how recipe engines fit into a Flow optimization strategy.
Understand how Dataiku selects the most optimal recipe engine.
Prerequisites#
To reproduce the steps in this tutorial, you’ll need:
Dataiku 13.4 or later.
Basic knowledge of Dataiku (Core Designer level or equivalent).
Create the project#
From the Dataiku Design homepage, click + New Project.
Select Learning projects.
Search for and select Recipe Engines.
If needed, change the folder into which the project will be installed, and click Create.
From the project homepage, click Go to Flow (or type
g+f).
Note
You can also download the starter project from this website and import it as a ZIP file.
Use case summary#
The project has three data sources:
Dataset |
Description |
|---|---|
tx |
Each row is a unique credit card transaction with information such as the card that was used and the merchant where the transaction was made. It also indicates whether the transaction has either been:
|
merchants |
Each row is a unique merchant with information such as the merchant’s location and category. |
cards |
Each row is a unique credit card ID with information such as the card’s activation month or the cardholder’s FICO score (a common measure of creditworthiness in the US). |
Additional prerequisites#
This tutorial demonstrates the principles behind recipe engine selection on a Dataiku instance with both Spark and/or in-database (SQL) engines enabled.
Fully reproducing the steps shown here require one or both of these engines configured, along with compatible storage connections.
Using the Spark engine requires a connection like Amazon S3, Azure Blob Storage, Google Cloud Storage, or HDFS.
Using the in-database engine requires a SQL database.
Tip
If these aren’t available to you, you can still grasp the important principles from reading along.
Engine selection principles#
Dataiku executes all recipes with an engine. Depending on the infrastructure available to your instance, this means that alongside the DSS engine, other engines — such as Spark or in-database (SQL) — may be available in certain cases.
In most situations though, from the perspective of a user, the choice of recipe engine isn’t a daily concern. Detailed knowledge of Spark or in-database computation isn’t required. This all happens “under the hood.” Your instance administrator will have already selected the default storage location as you build your Flow. Based on these preferences, Dataiku (not you) makes the optimal recipe engine selections.
However, as you work with larger datasets (and begin to automate the execution of a Flow with scenarios), you may encounter computational bottlenecks. In this case, reviewing the recipe engines used in the Flow can be one part of a successful optimization strategy.
Rather than trying to manually change recipe engines, knowing a few basic principles will help ensure Dataiku selects the best possible engine. From a user’s perspective, two key considerations impact Dataiku’s selection of recipe engine.
What’s the storage connection of the input and output datasets?
What data transformation does the recipe perform?
Let’s examine how these questions impact Dataiku’s selection of a recipe engine.
Change storage connections#
First review the storage connection of all downstream datasets in the Flow. In this case, “downstream” means all data other than the raw data originating with this project.
From the Flow (
 ) menu in the top navigation bar, navigate to the Datasets page (
g+d).Select all datasets by checking the box in the top left corner.
Deselect the cards, tx, and merchants datasets.
Note
For uploaded files or files in folder datasets, you would need to use a Sync recipe to change their connection, but that won’t be required here.
In the Actions (
 ) tab of the right panel, click Change connection.
Choose the Spark or SQL-compatible connection that you will use for this tutorial.
Click Save.

Note
If choosing a Spark-compatible connection, you’ll also need to select a compatible file format, such as parquet.
Find the engine of a visual recipe#
Take the Join recipe as a first example. Review which engine Dataiku has selected for this recipe.
Return to the Flow, and double click to open the Join (
 ) recipe in the Data ingestion Flow zone.
Click the gear (
 ) icon underneath the Run button.
Click Show to view all engines, including those not selectable.
Click Close without making any changes.
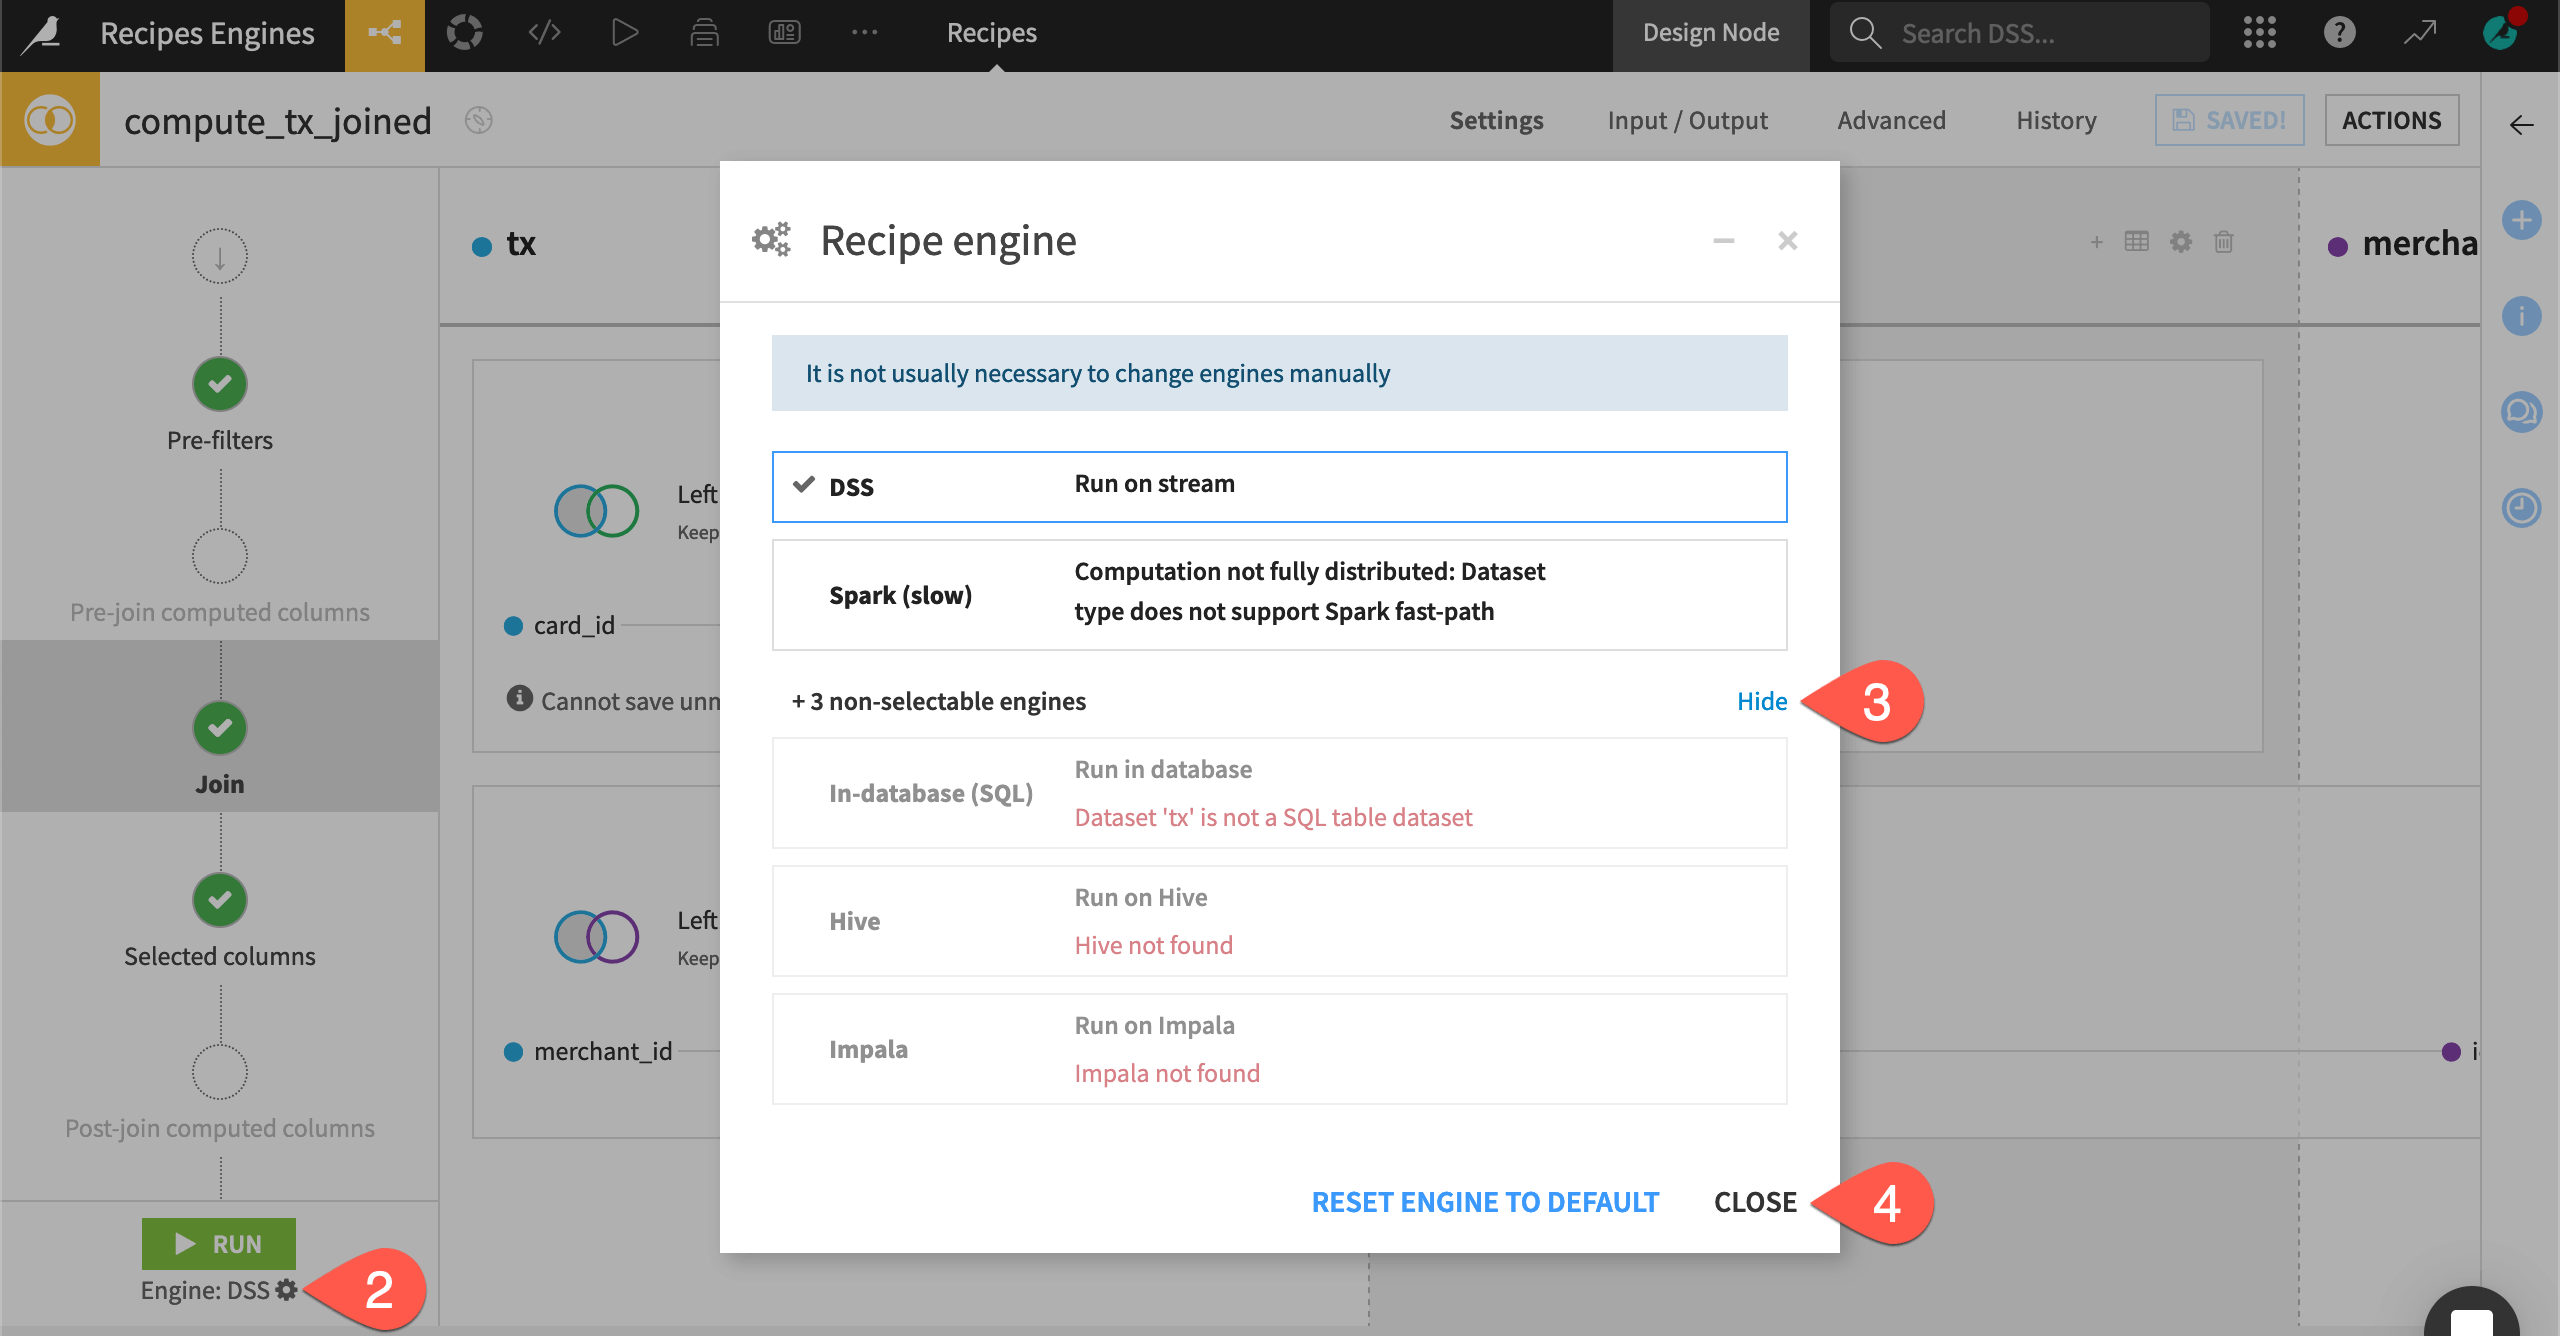
Dataiku selected the DSS engine. Do you know why yet? Before answering, let’s take a wider look at the other connections and engines used in the Flow.
Explore Flow views#
When thinking about optimization, two Flow views can be particularly helpful: connections and recipe engines.
From the Flow, open the View menu.
Select the Connections view.
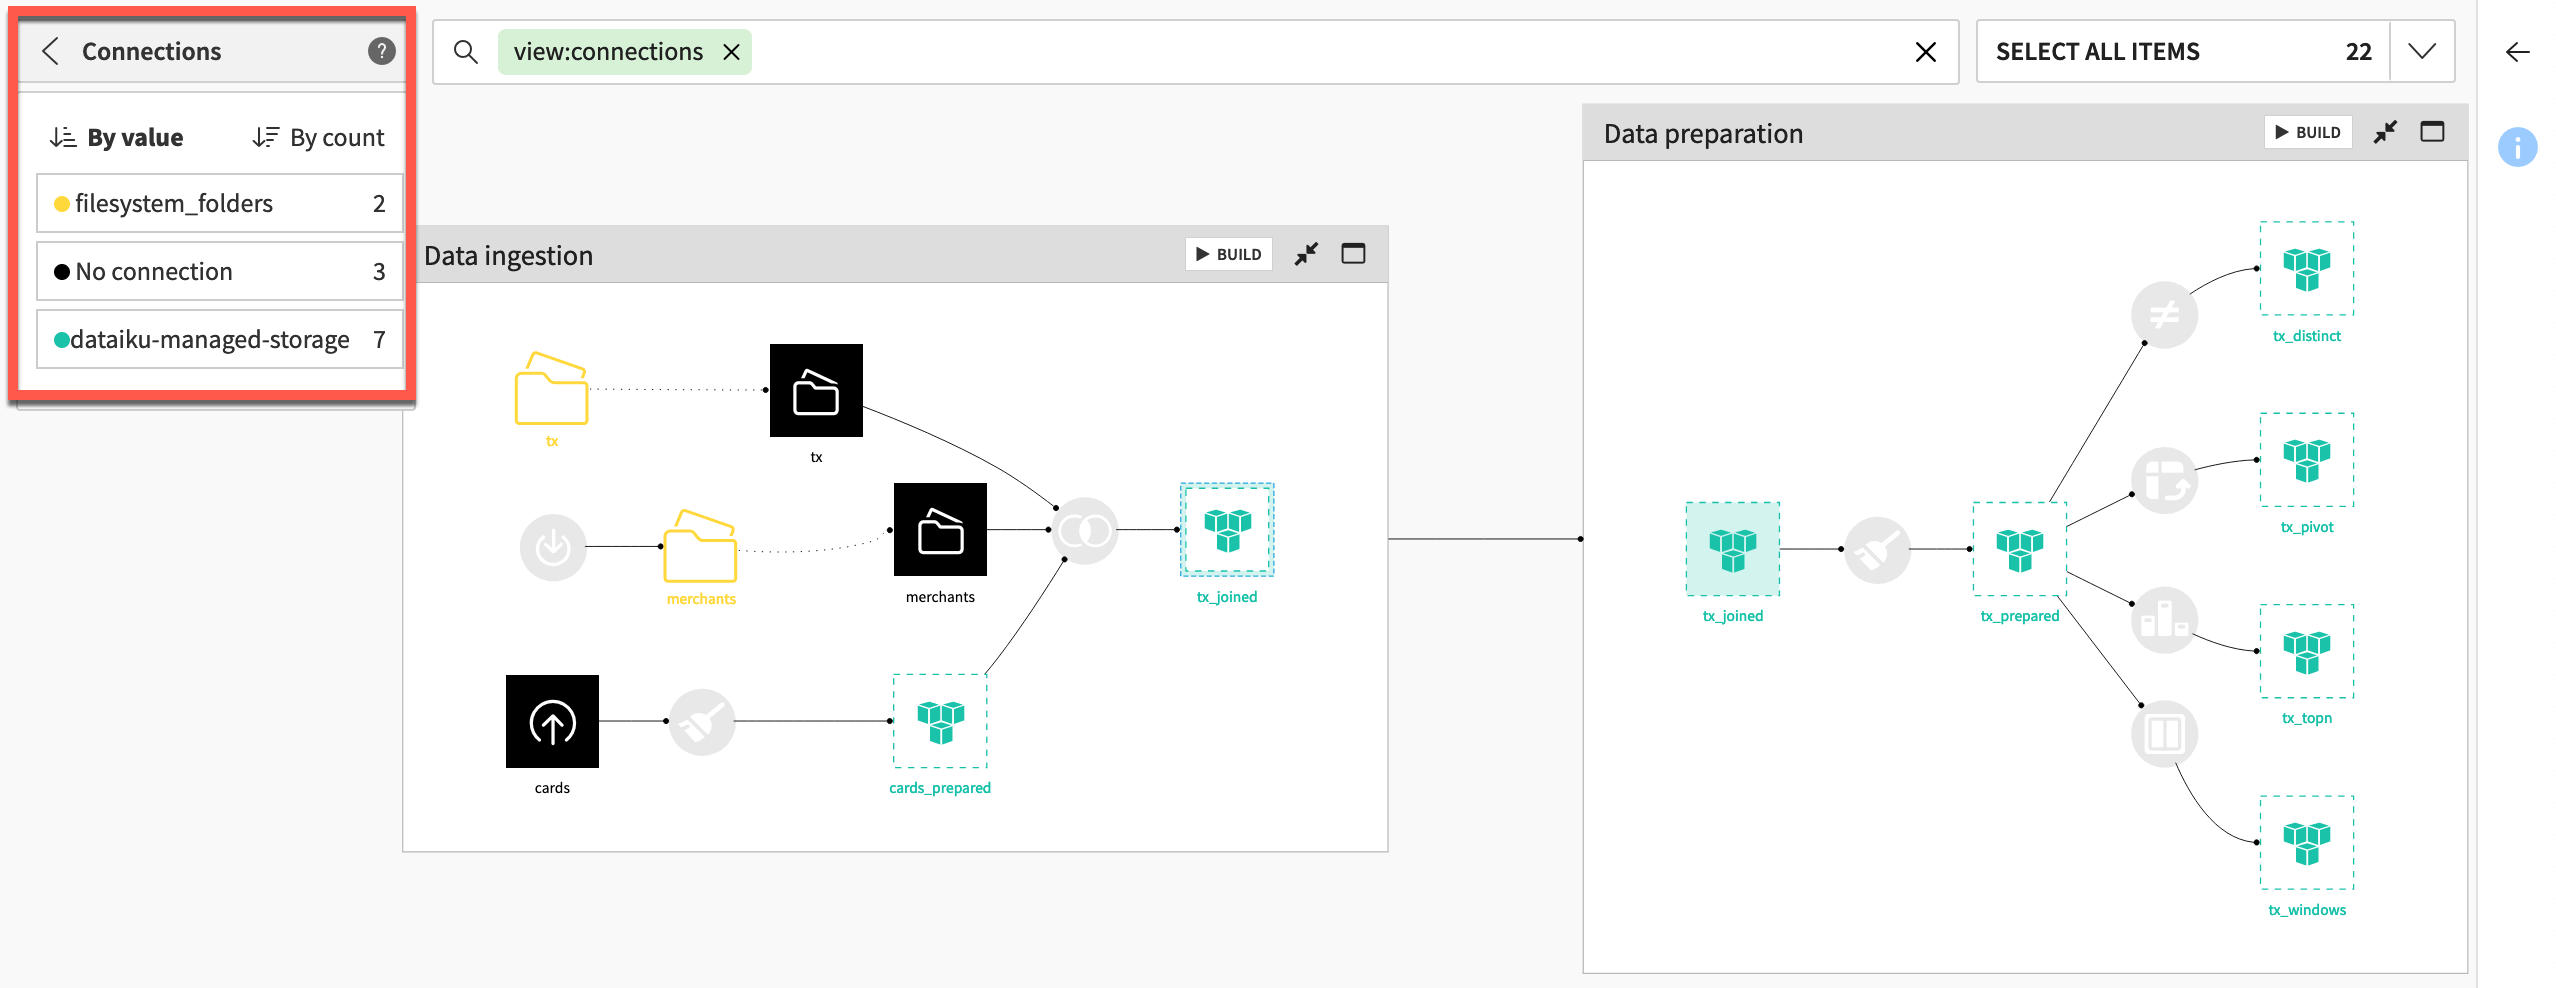
Note
Note how the same Spark-compatible connection (in this case an S3 bucket named dataiku-managed-storage) is used throughout the Data preparation Flow zone.
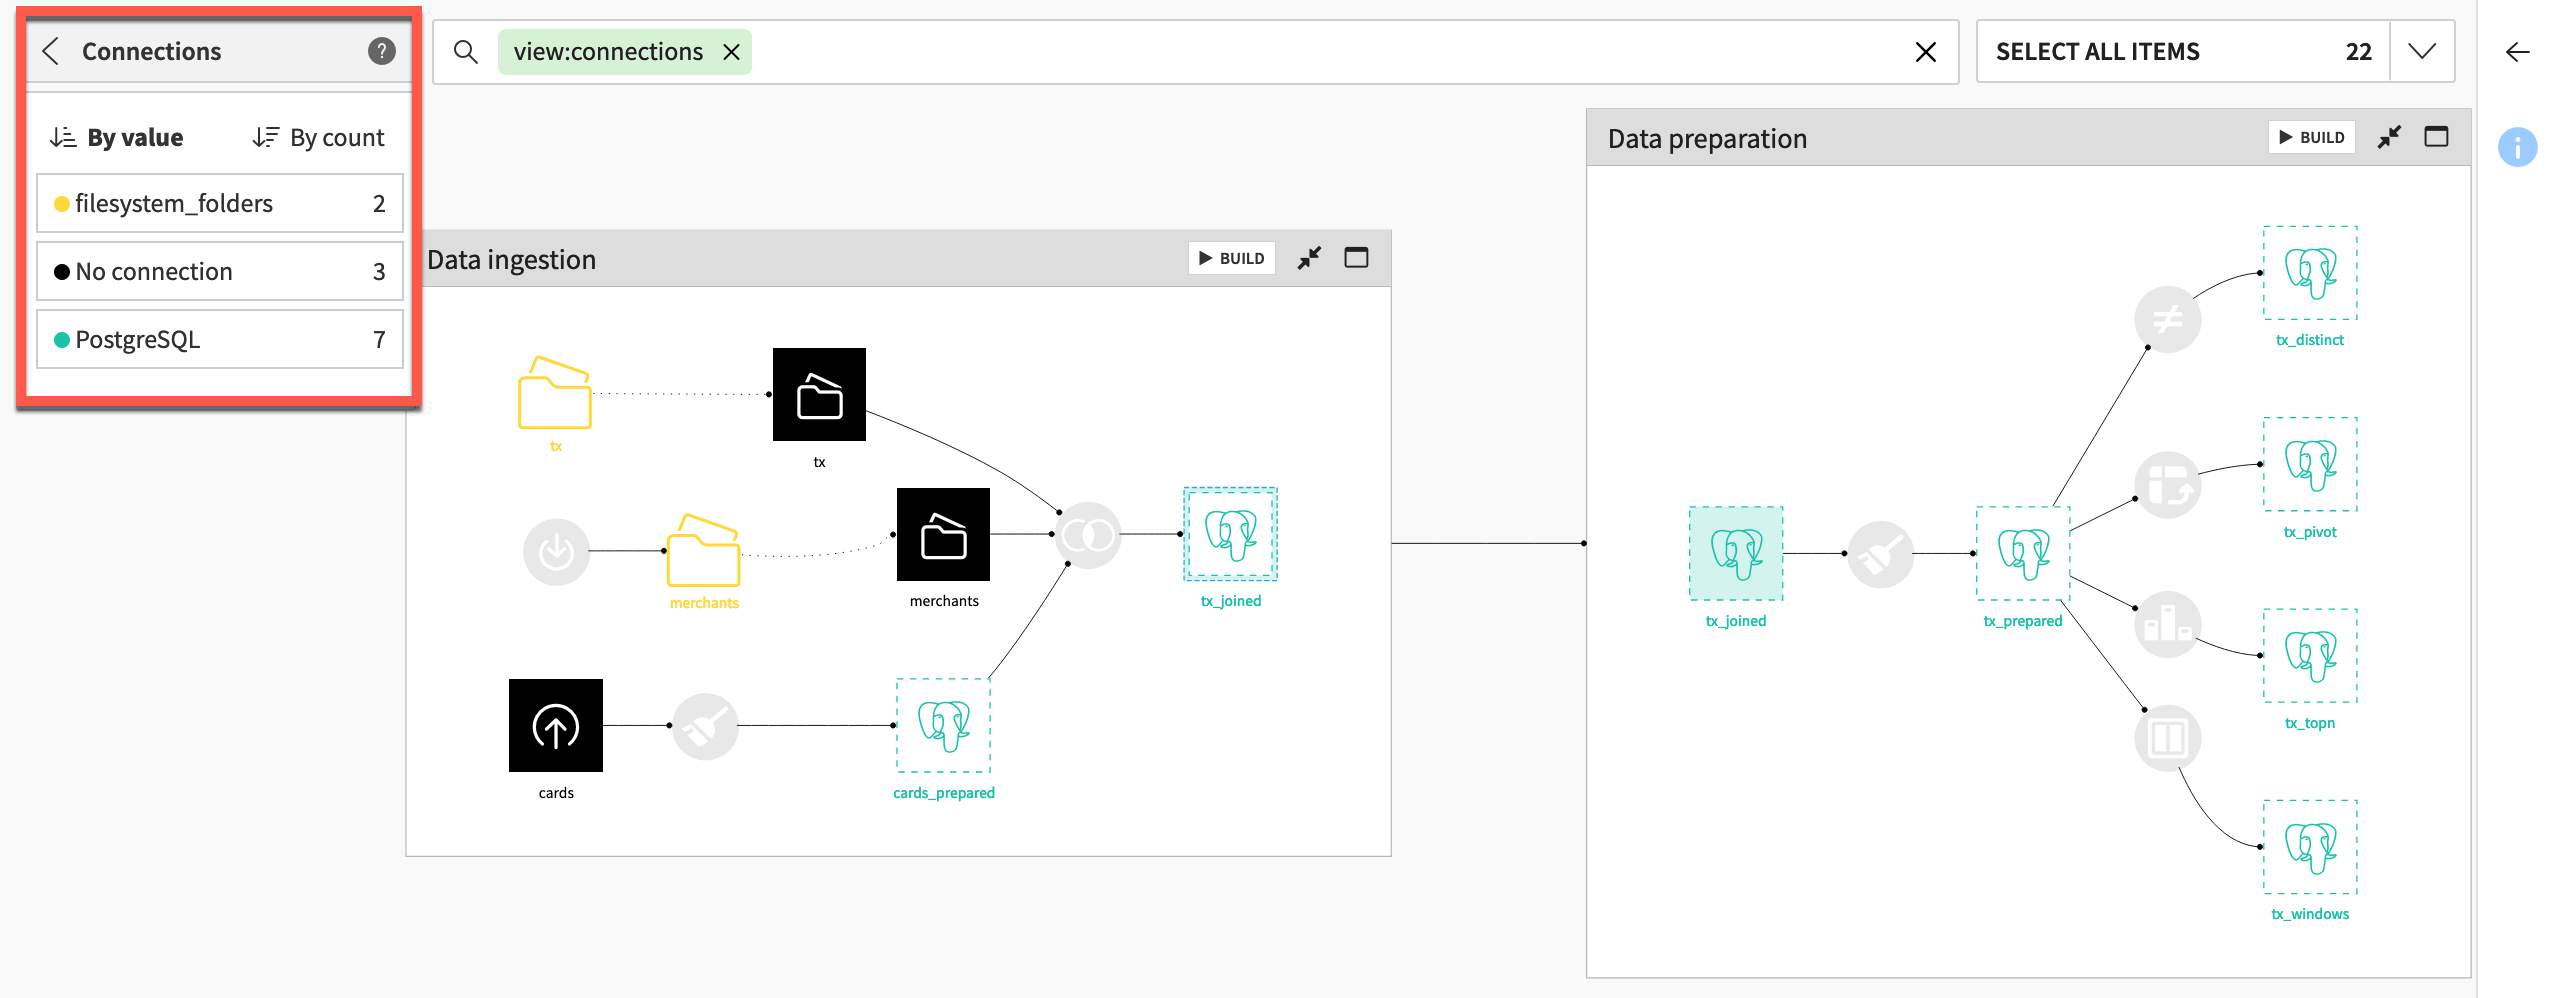
Note
Note how the same SQL connection (in this case a PostgreSQL database named PostgreSQL) is used throughout the Data preparation Flow zone.
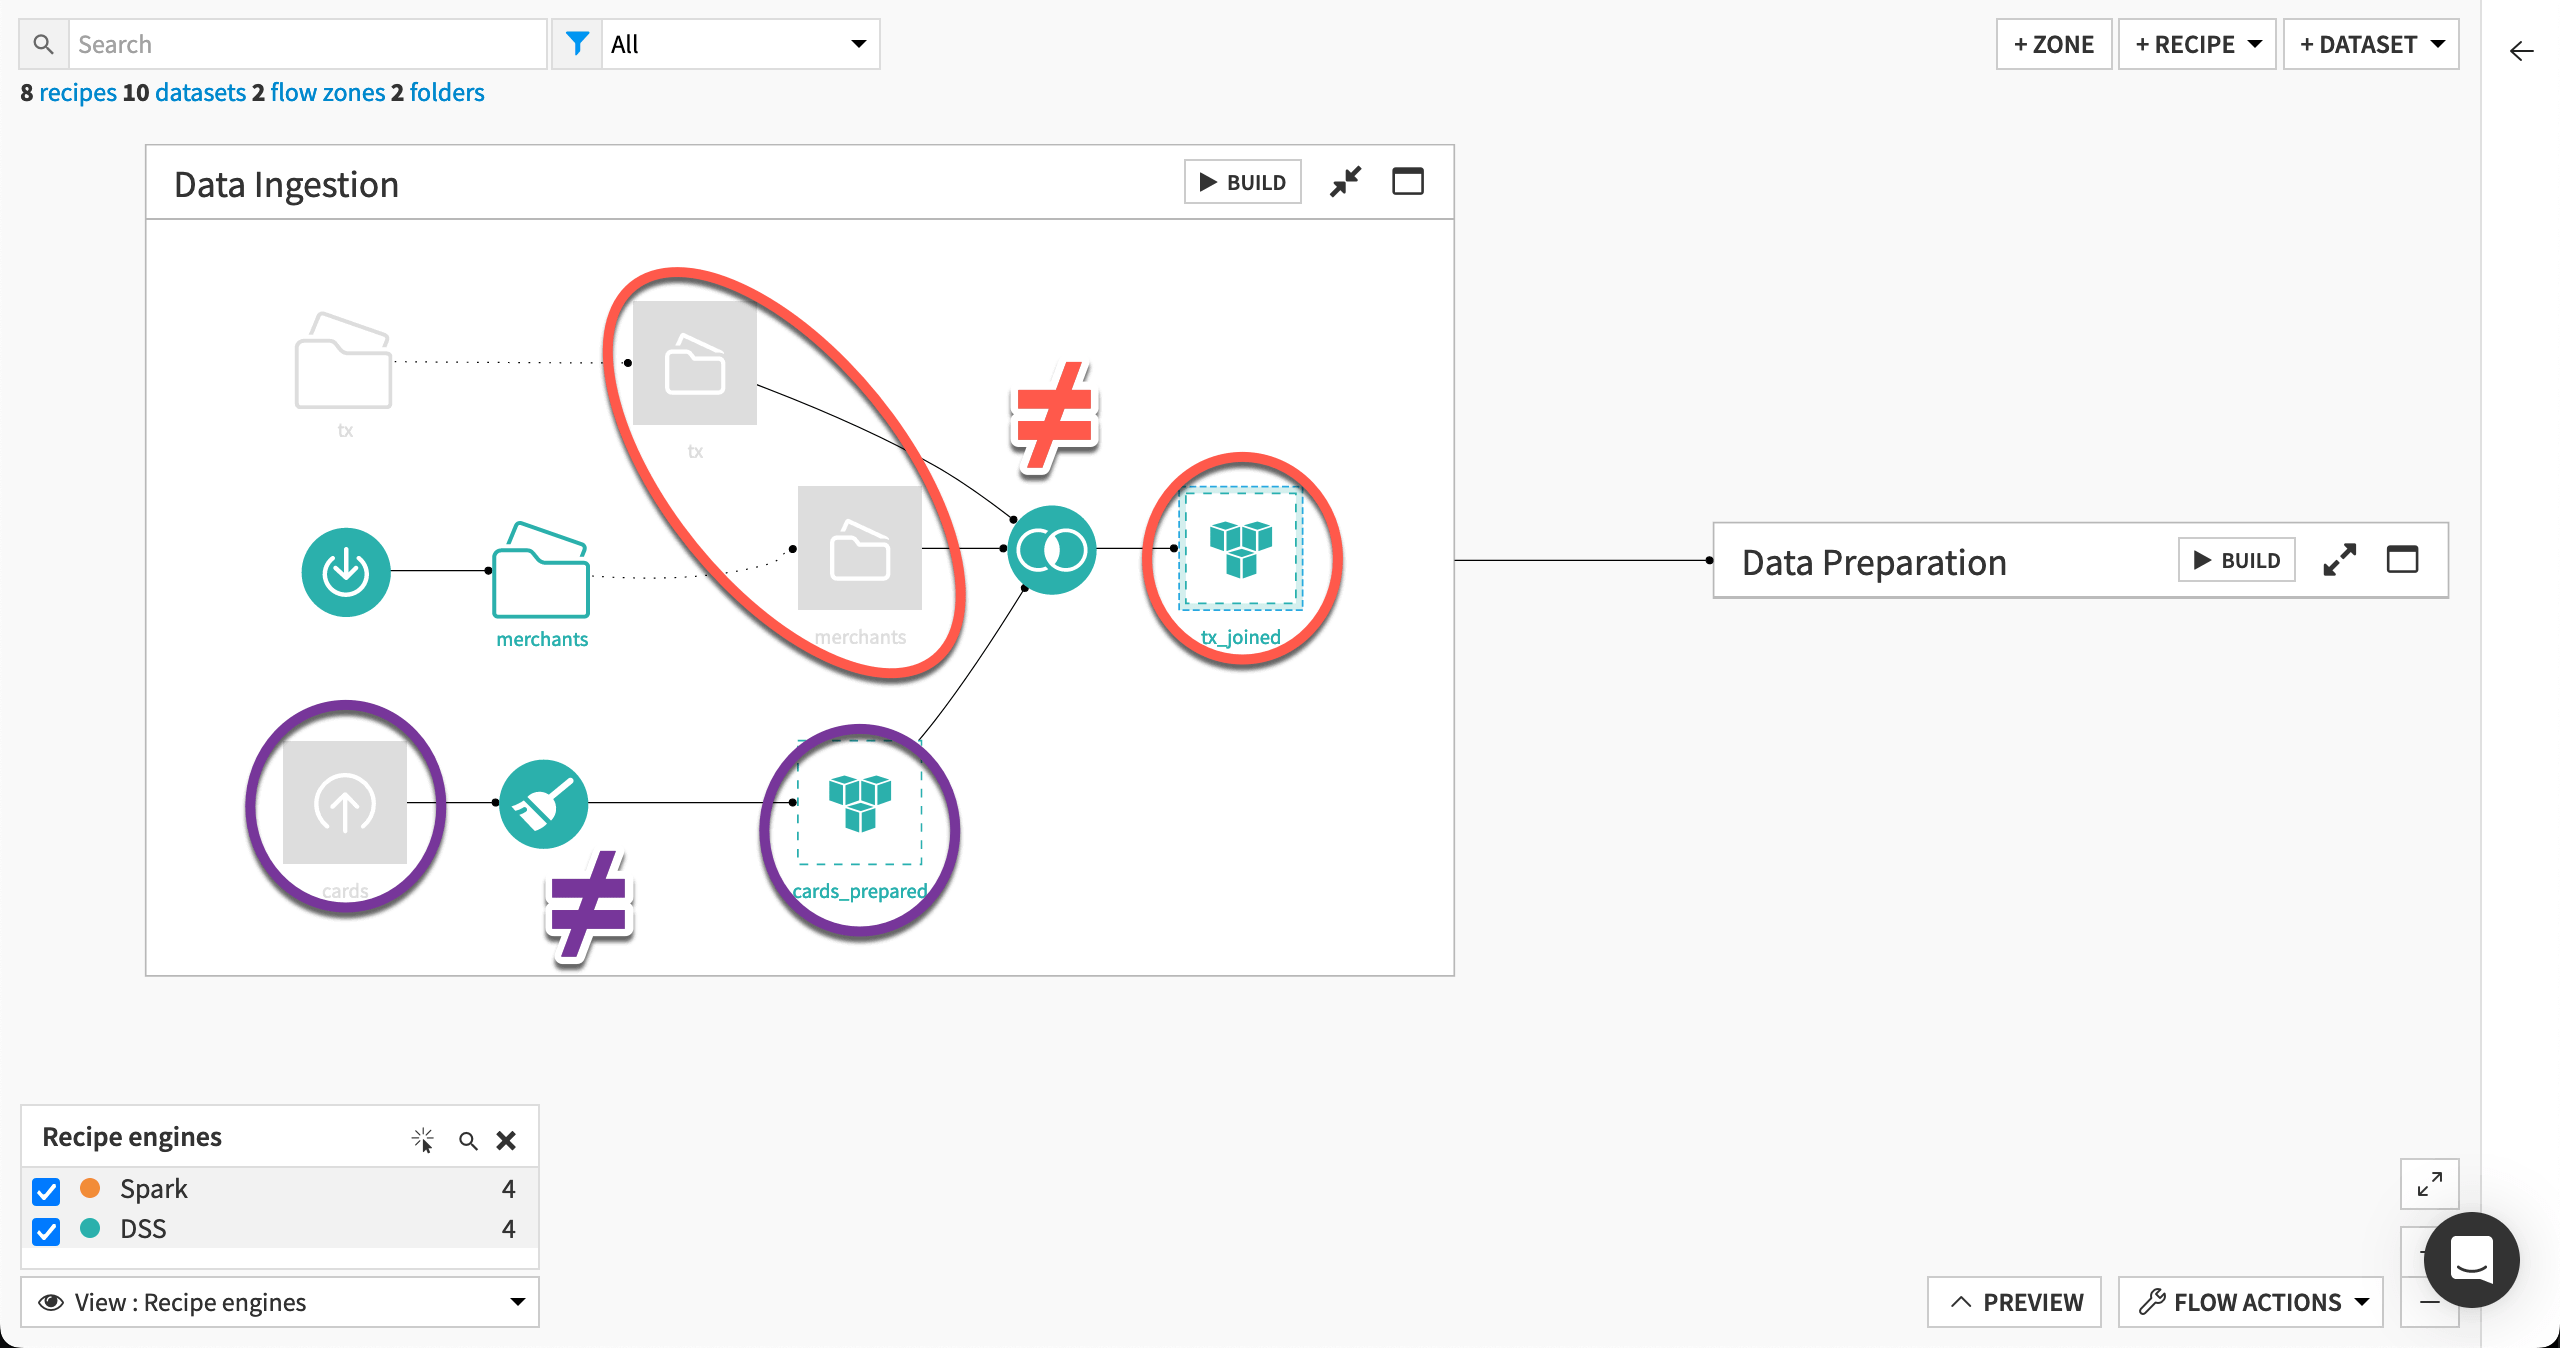
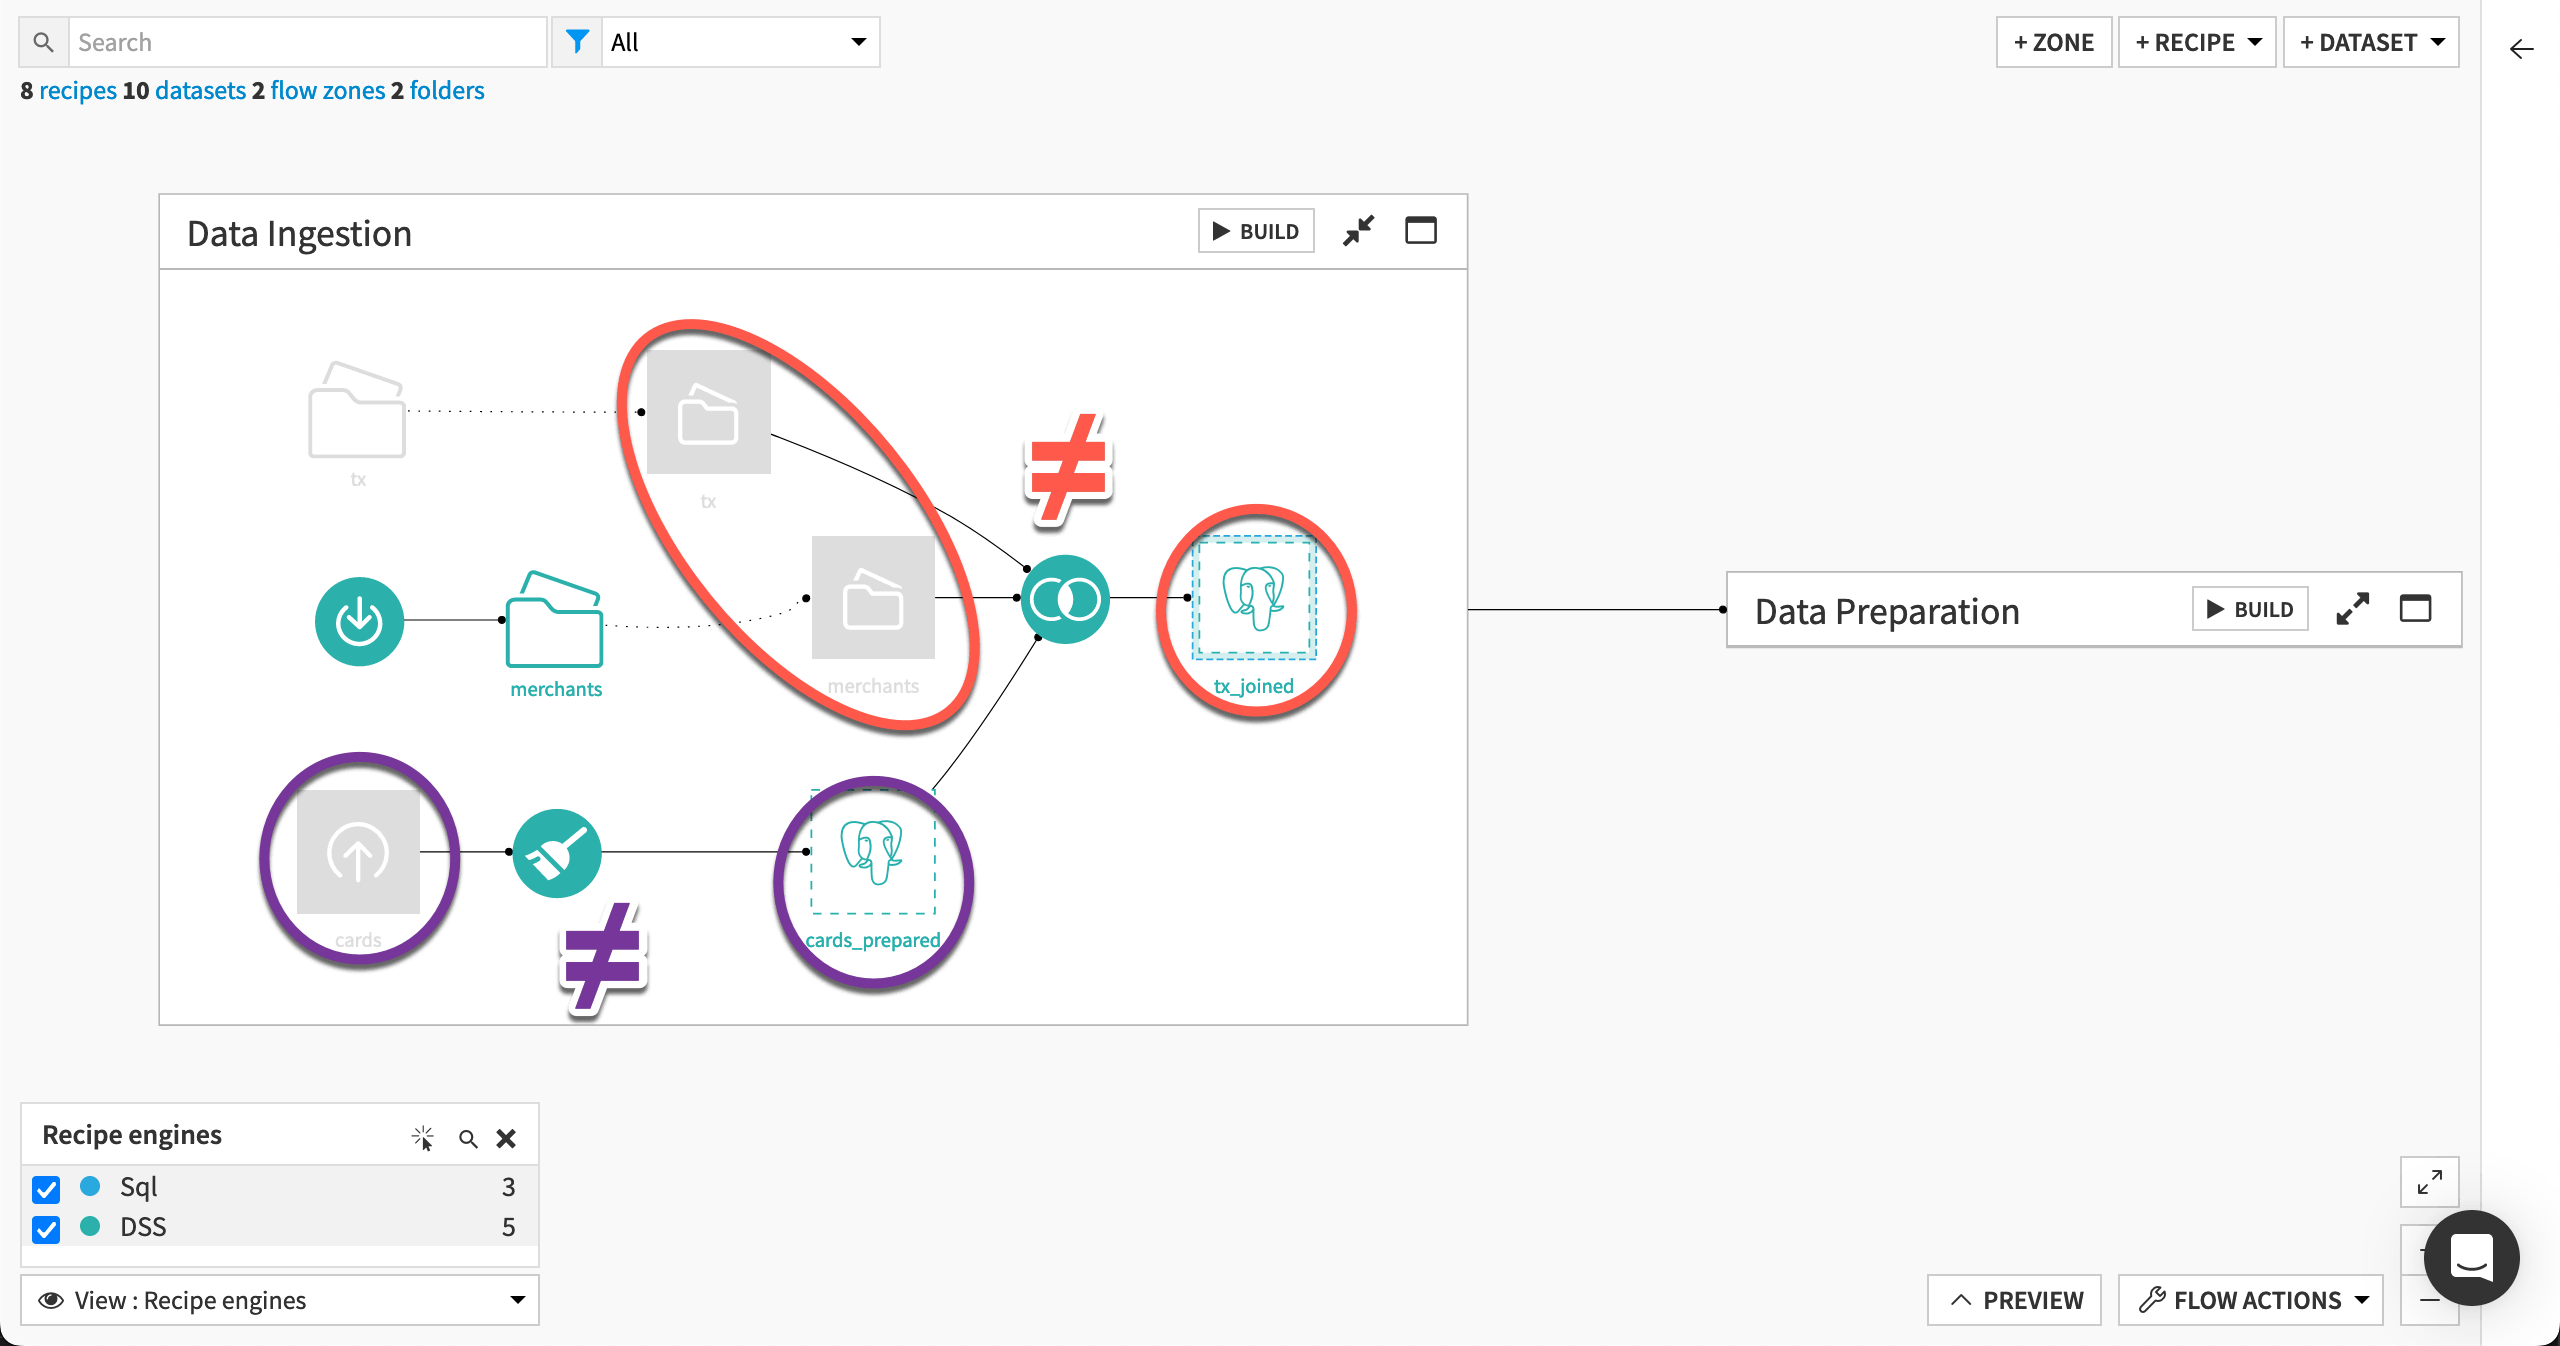
You can also use the recipe engines Flow view to see the engine of all recipes in the Flow.
From the Flow, open the View menu.
Select the Recipe Engines view.
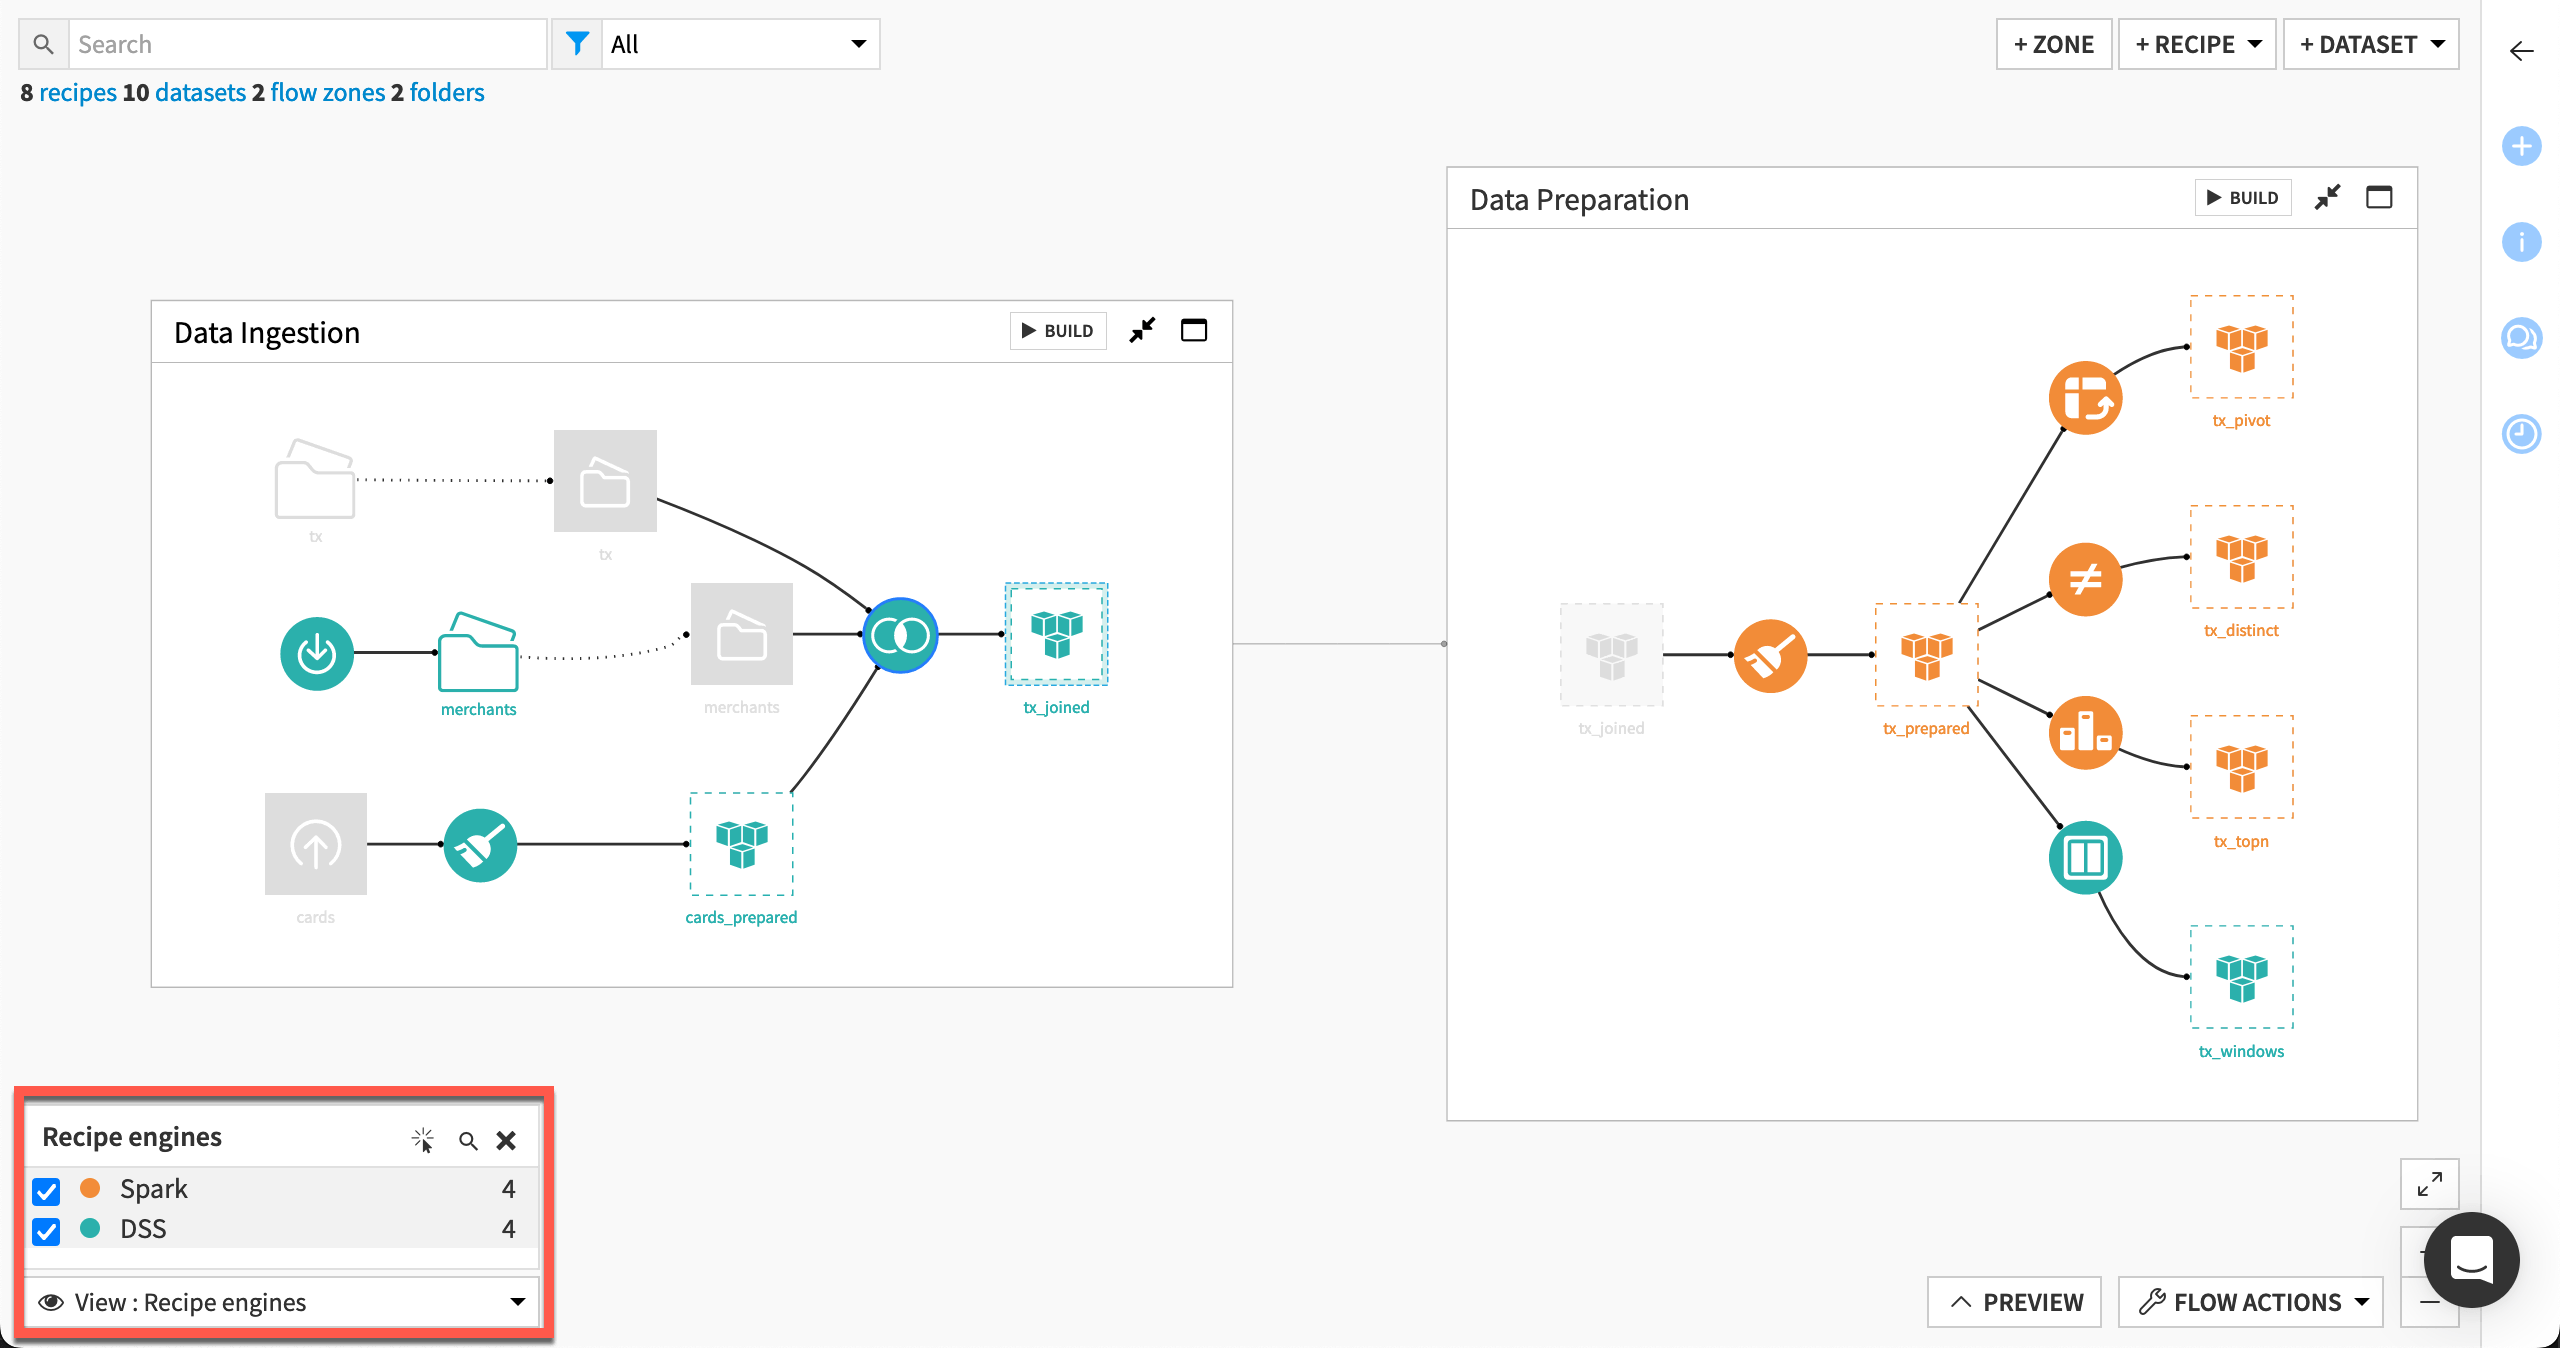

Let’s look closer at some of these selections.
Compare input and output connections#
For a recipe to use the Spark or SQL engine, its input and output datasets must share the same Spark or SQL-compatible connection. Let’s start in the Data ingestion Flow zone.
The Join recipe includes “file in folder” input datasets and a different type of output. Accordingly, it falls back to using the DSS engine.
Similarly, the Prepare recipe has an uploaded files input dataset and a different type of output. It also must use the DSS engine.
Tip
To optimize the Join recipe, use a Sync recipe to transfer the tx and merchants datasets to the same connection as the output. Feel free to try this on your own!
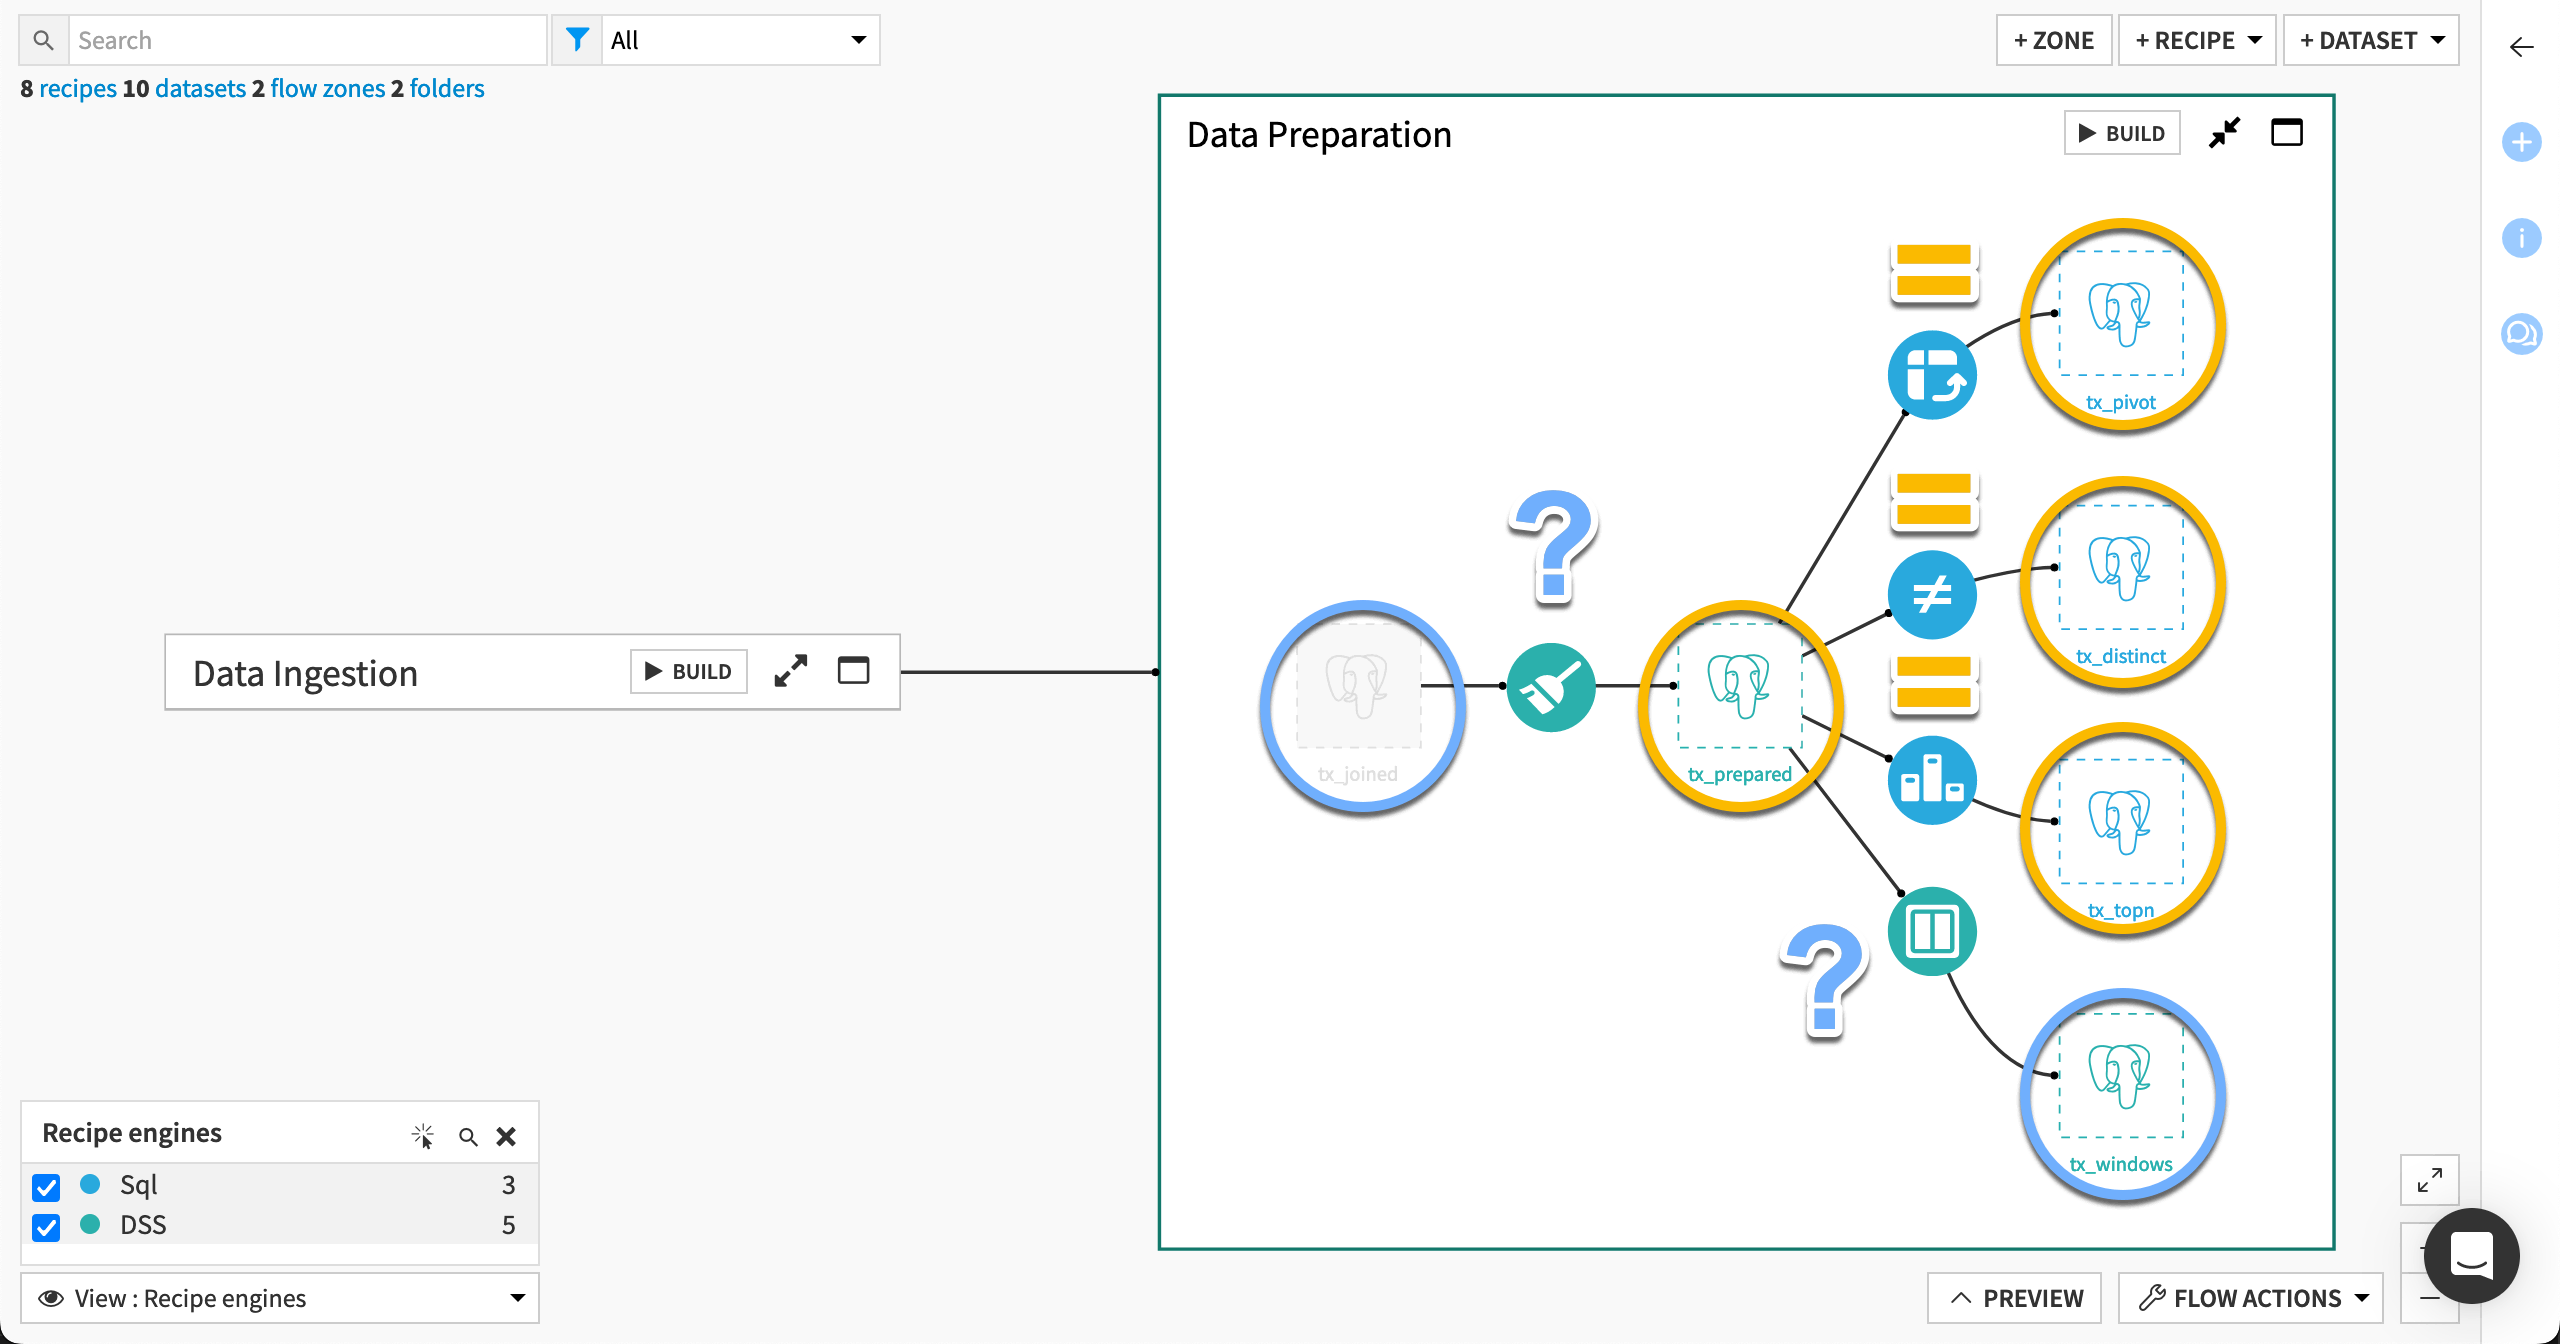
Conversely, all recipe inputs and outputs in the Data preparation Flow zone share the same connection. Those recipes (besides exceptions discussed below) can use the Spark or SQL engine depending on your chosen storage location.
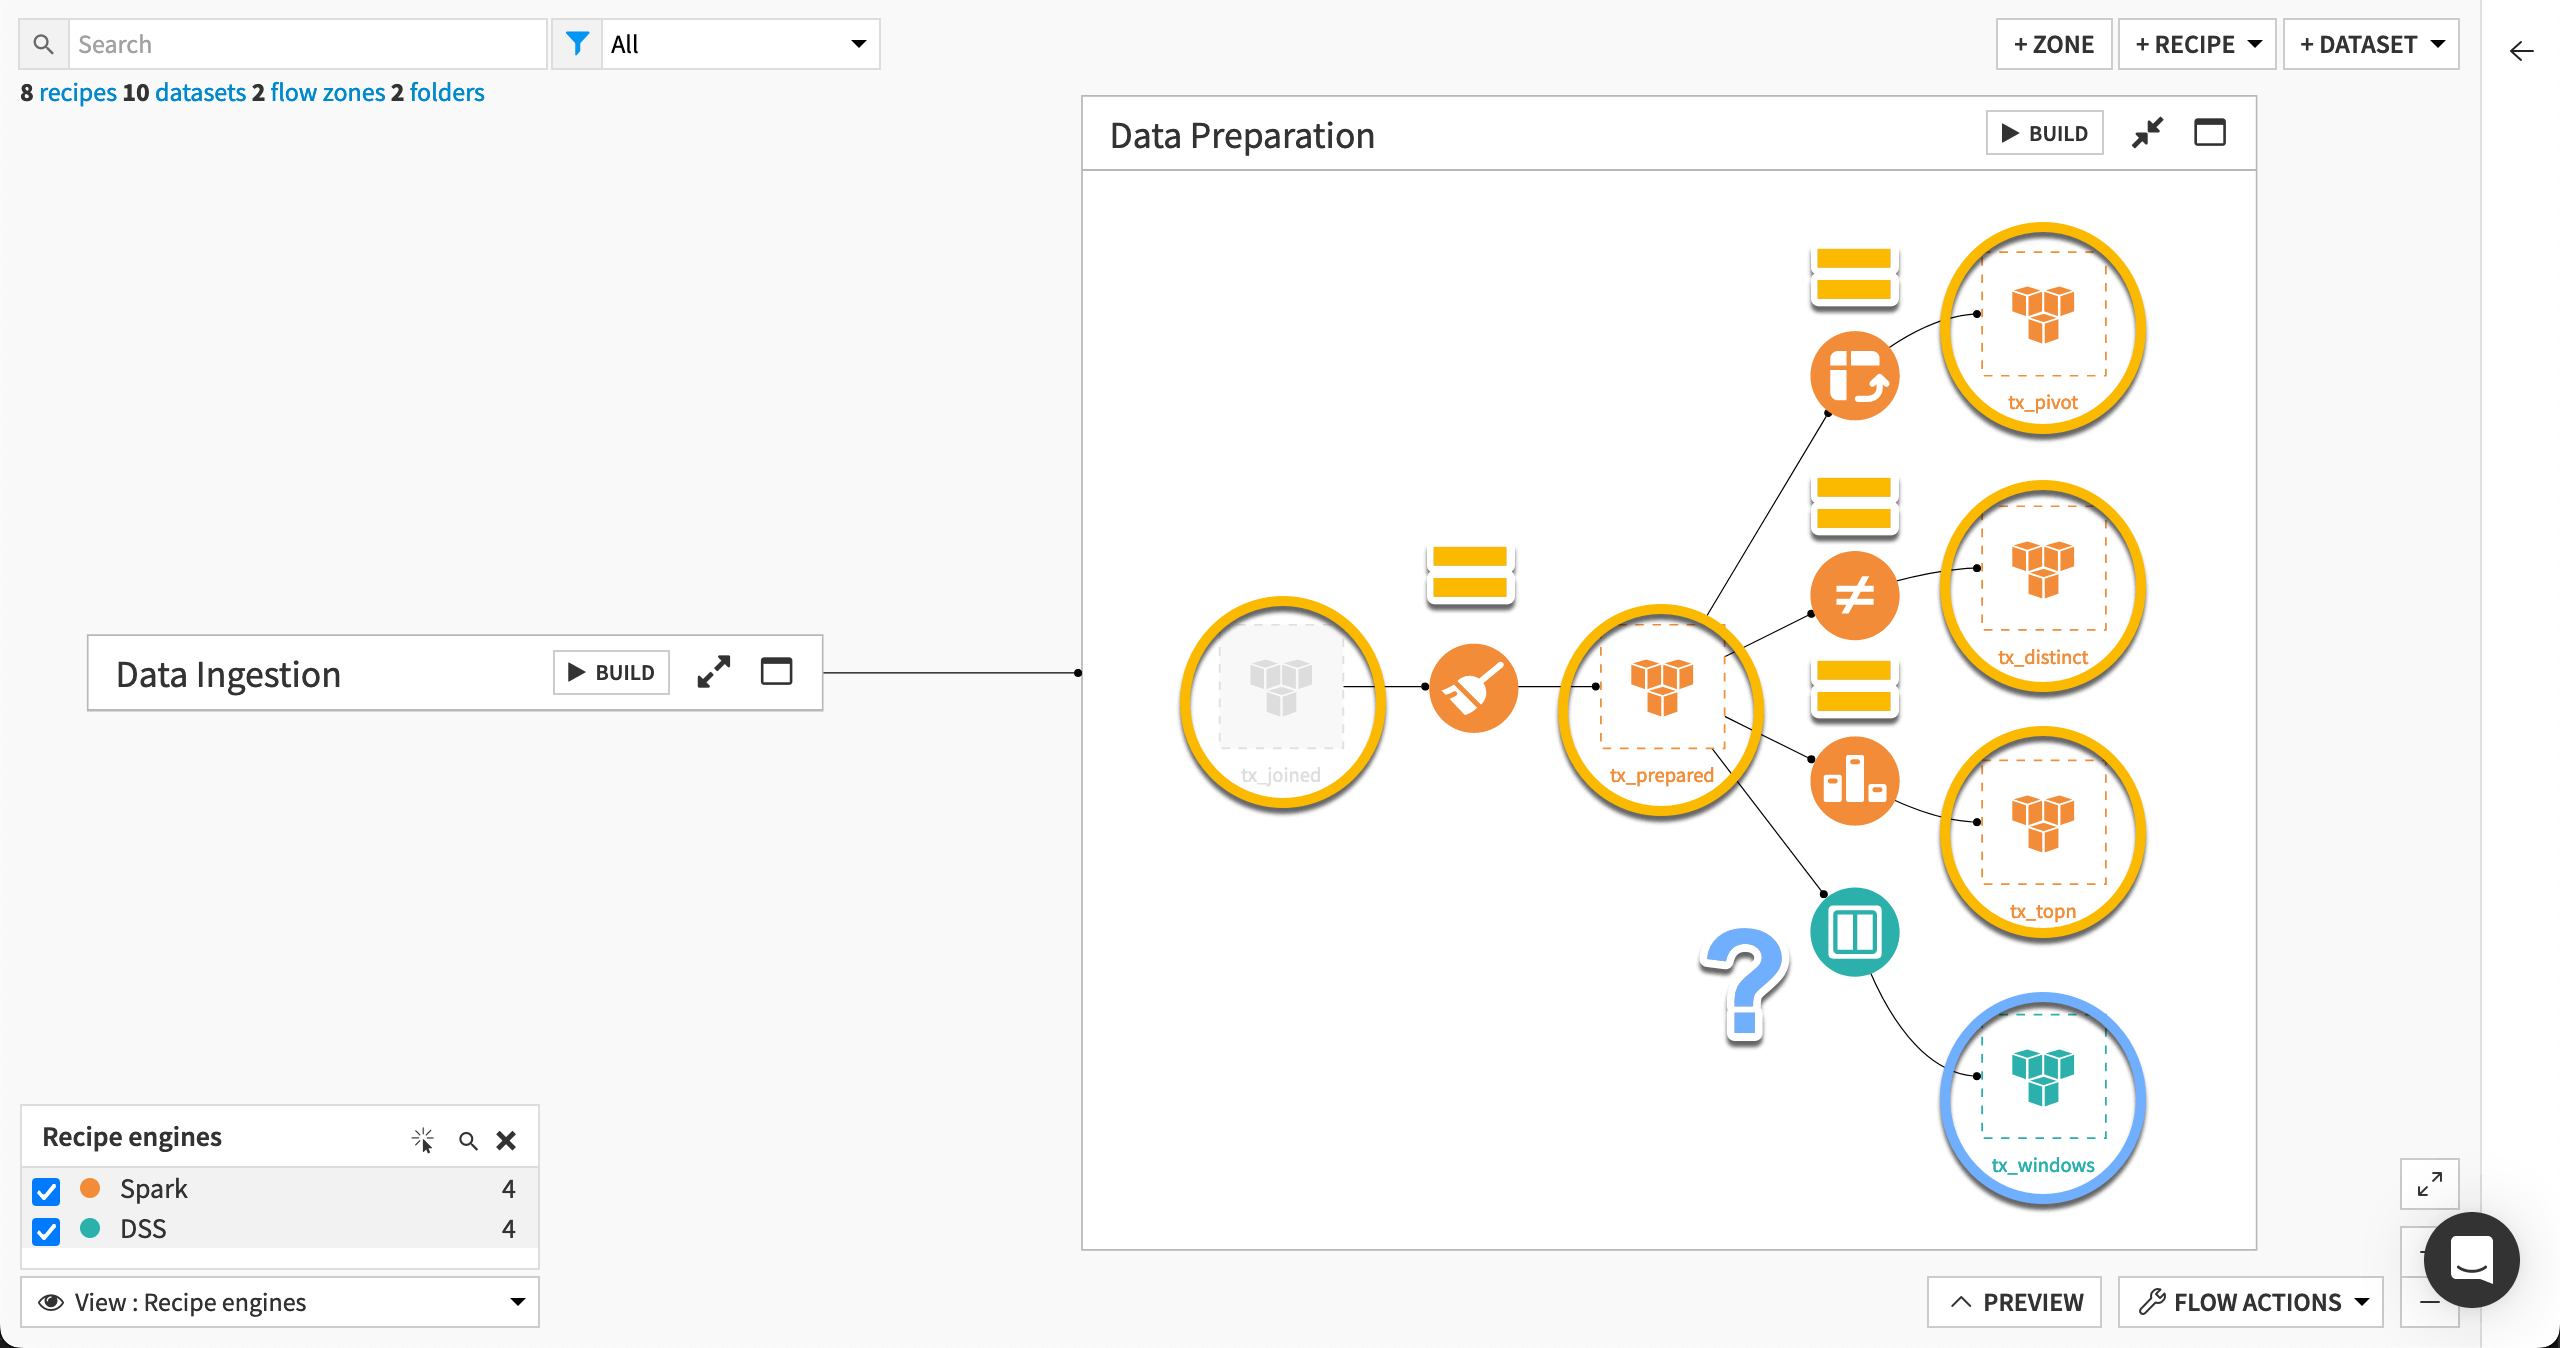
Compare data transformations#
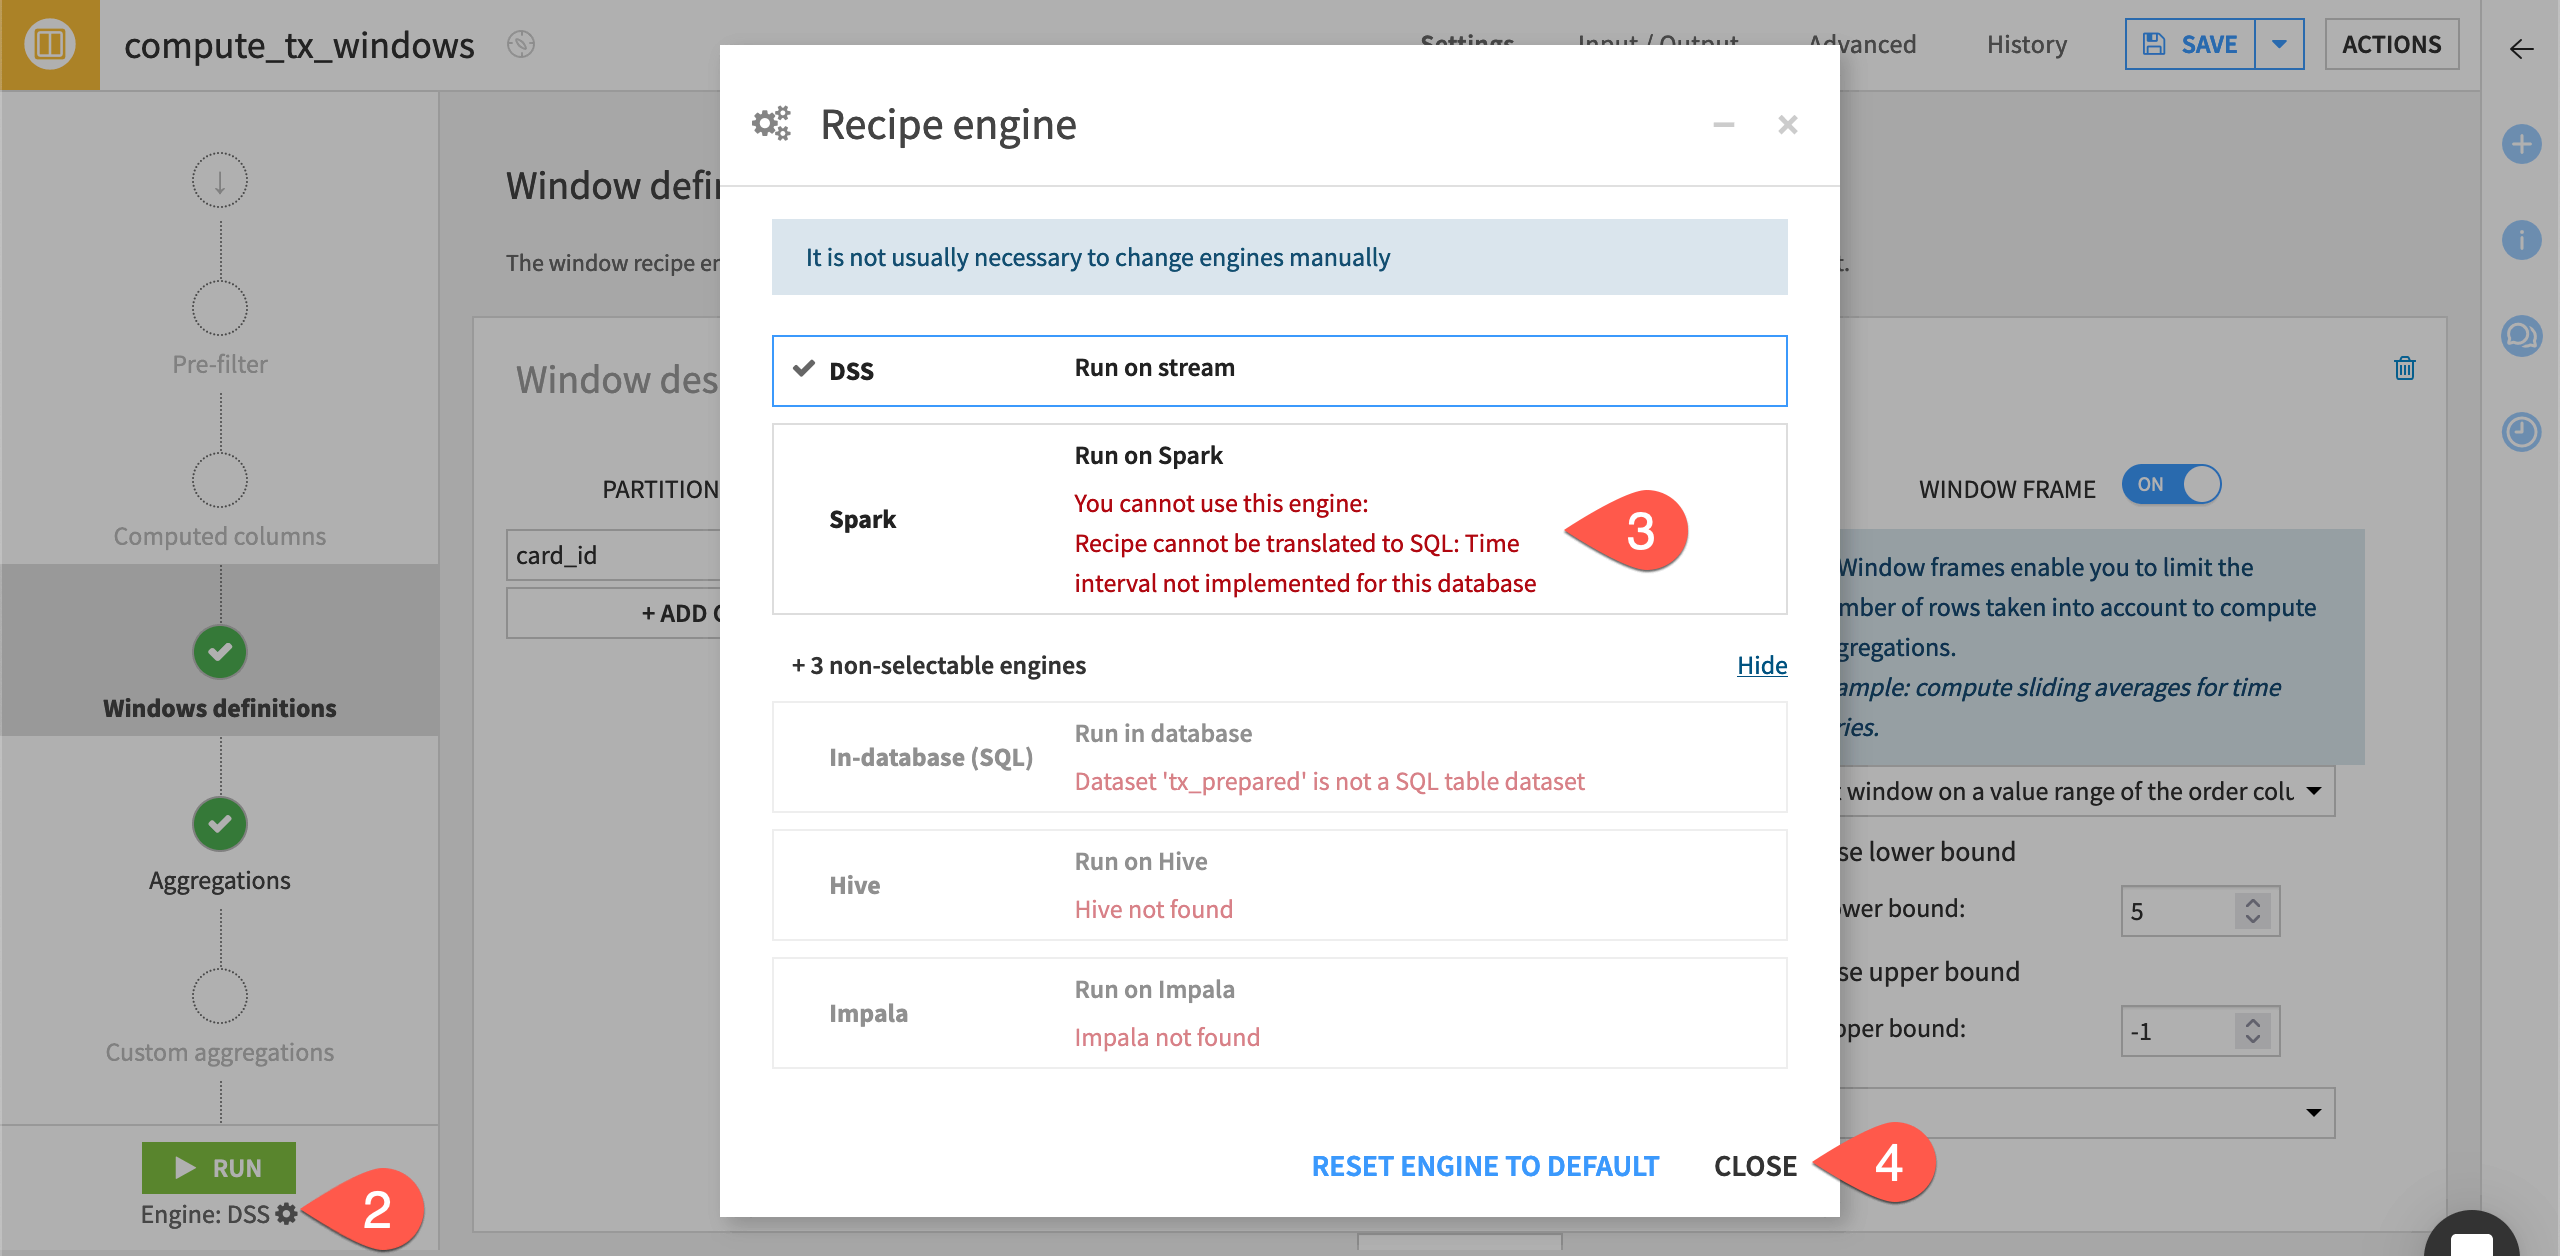
The Window recipe in this Flow uses the DSS engine even though its input and output and datasets share the same connection. Take a closer look.
Click to open the Window (
 ) recipe.
Click the gear (
) icon to open the recipe engine dialog.Note why the lack of a time interval implementation means this recipe must use the DSS engine.
Close the dialog without making any changes.
Note
Dataiku 14.5+ users might also notice two Spark options. If the data is small enough not to be worth Spark’s overhead, Dataiku can dynamically fall back to the DSS engine. While you could check the logs to know if Dataiku actually used the Spark engine, no user intervention is required!
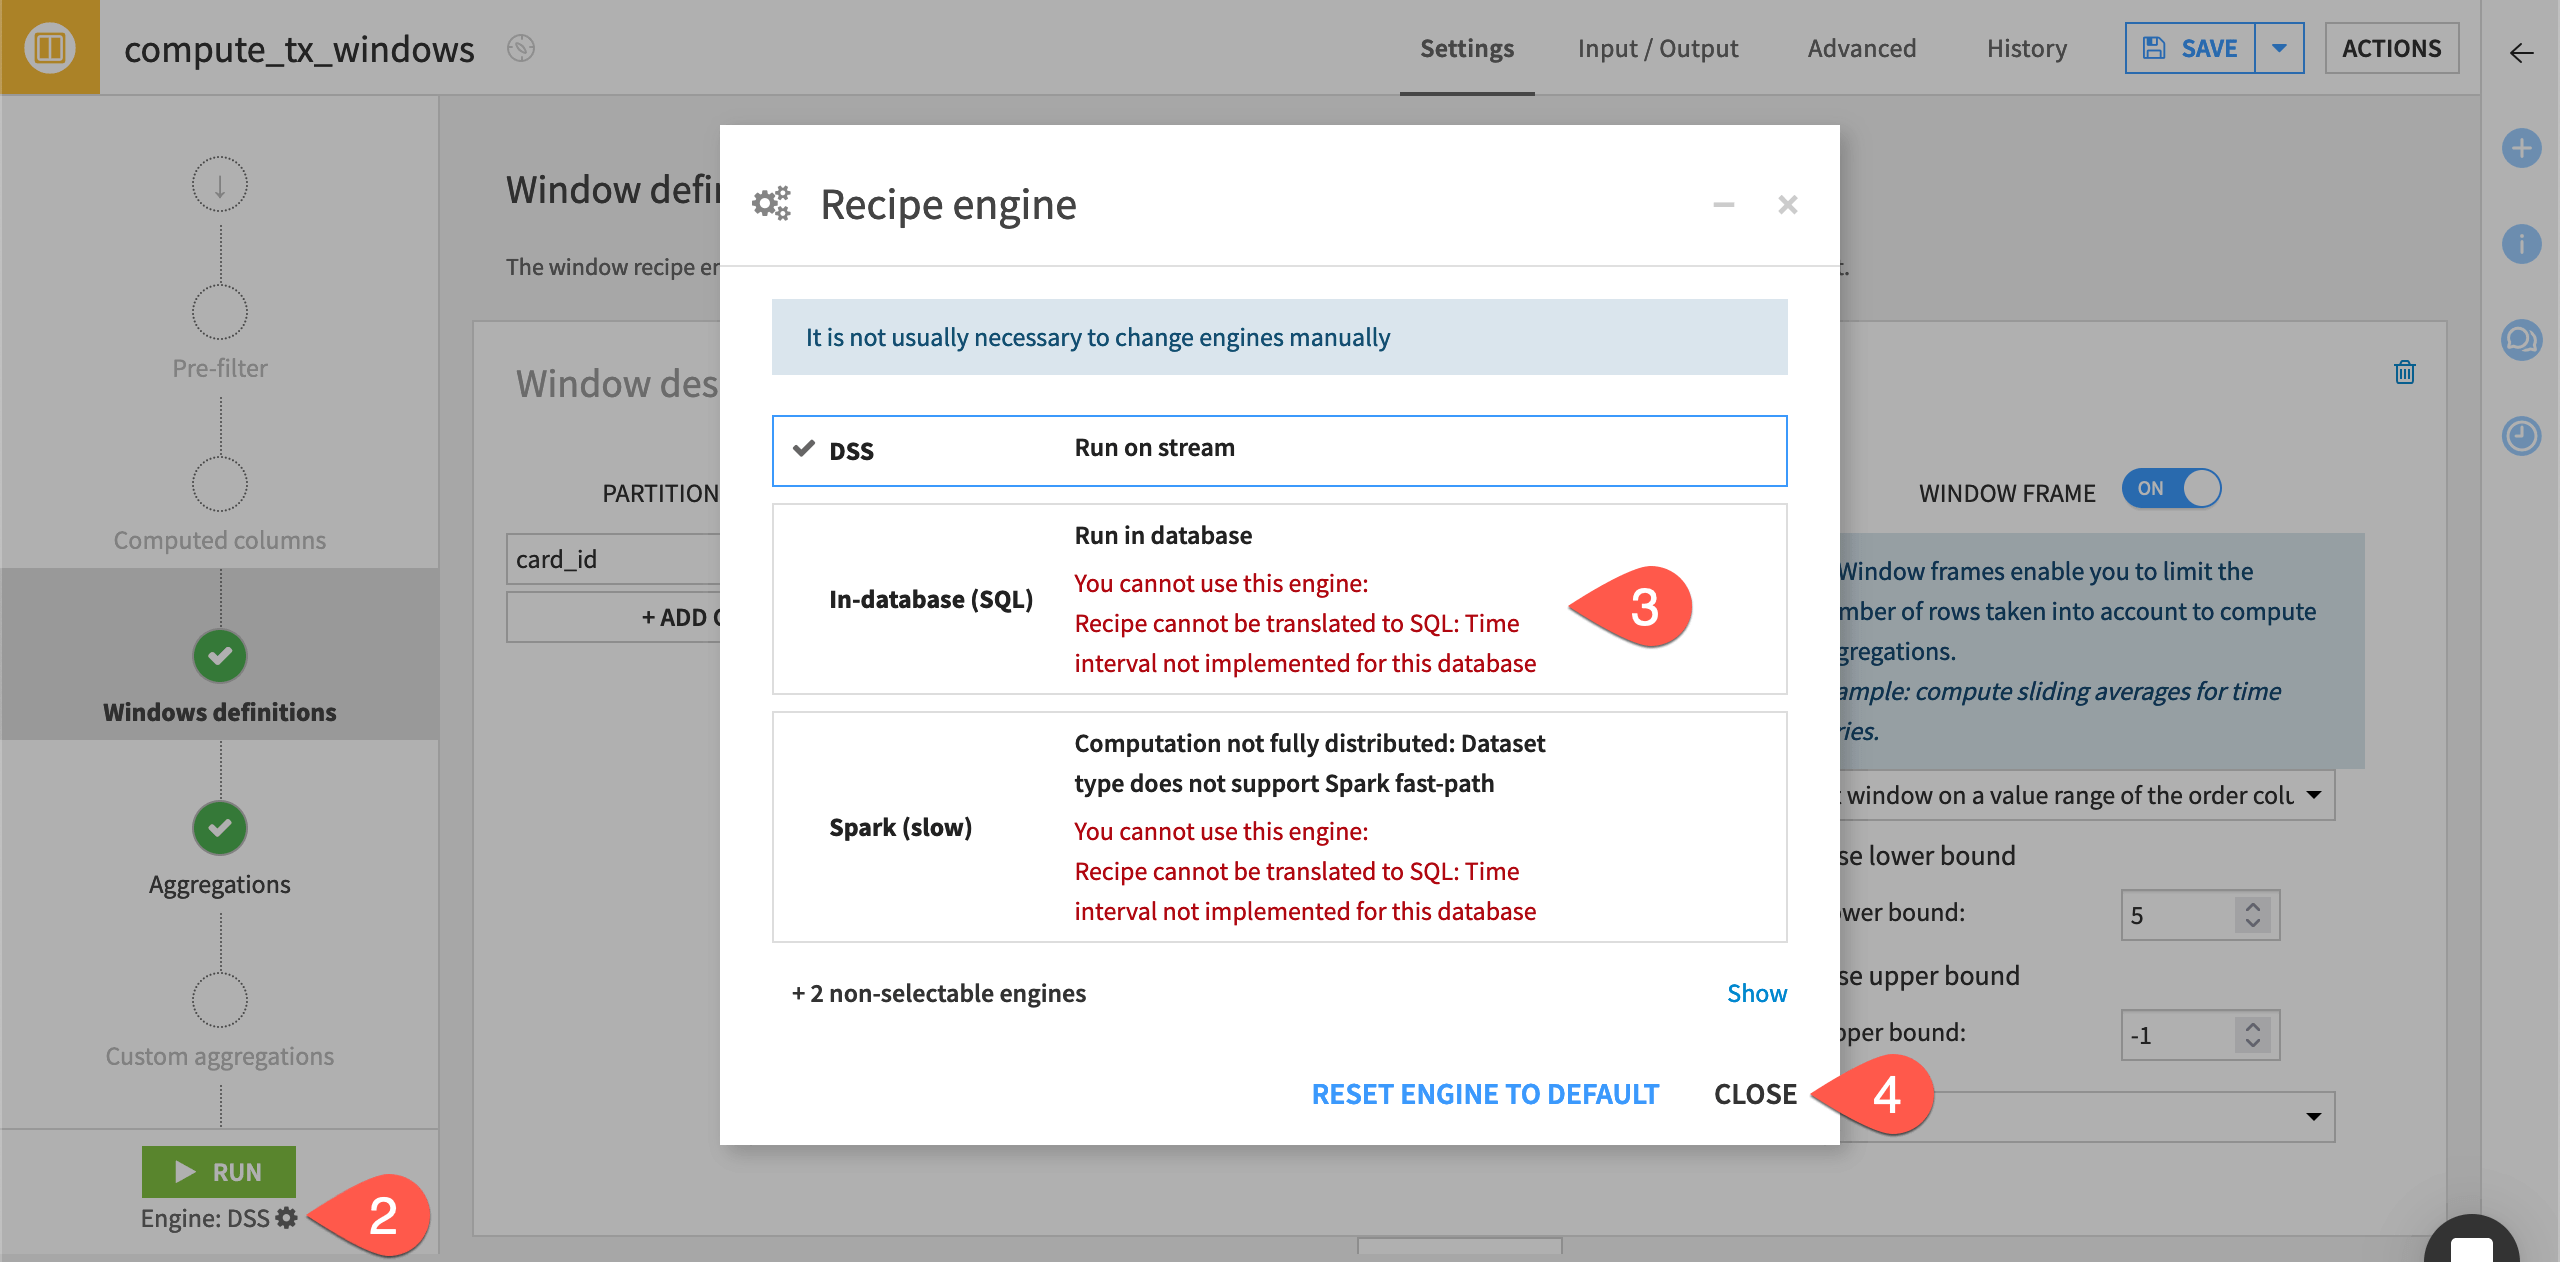
Although the Window recipe, like other visual recipes, is typically compatible with the Spark or SQL engines, a particular aspect to the data transformation in this recipe isn’t supported. In other words, it’s an edge case!
Tip
Switch the window frame setting to Limit the number of preceding/following rows, and observe the change in engine selection. If you needed to limit the window based on a value range without the DSS engine, you would need to find another way to express this transformation.
Compare supported processors#
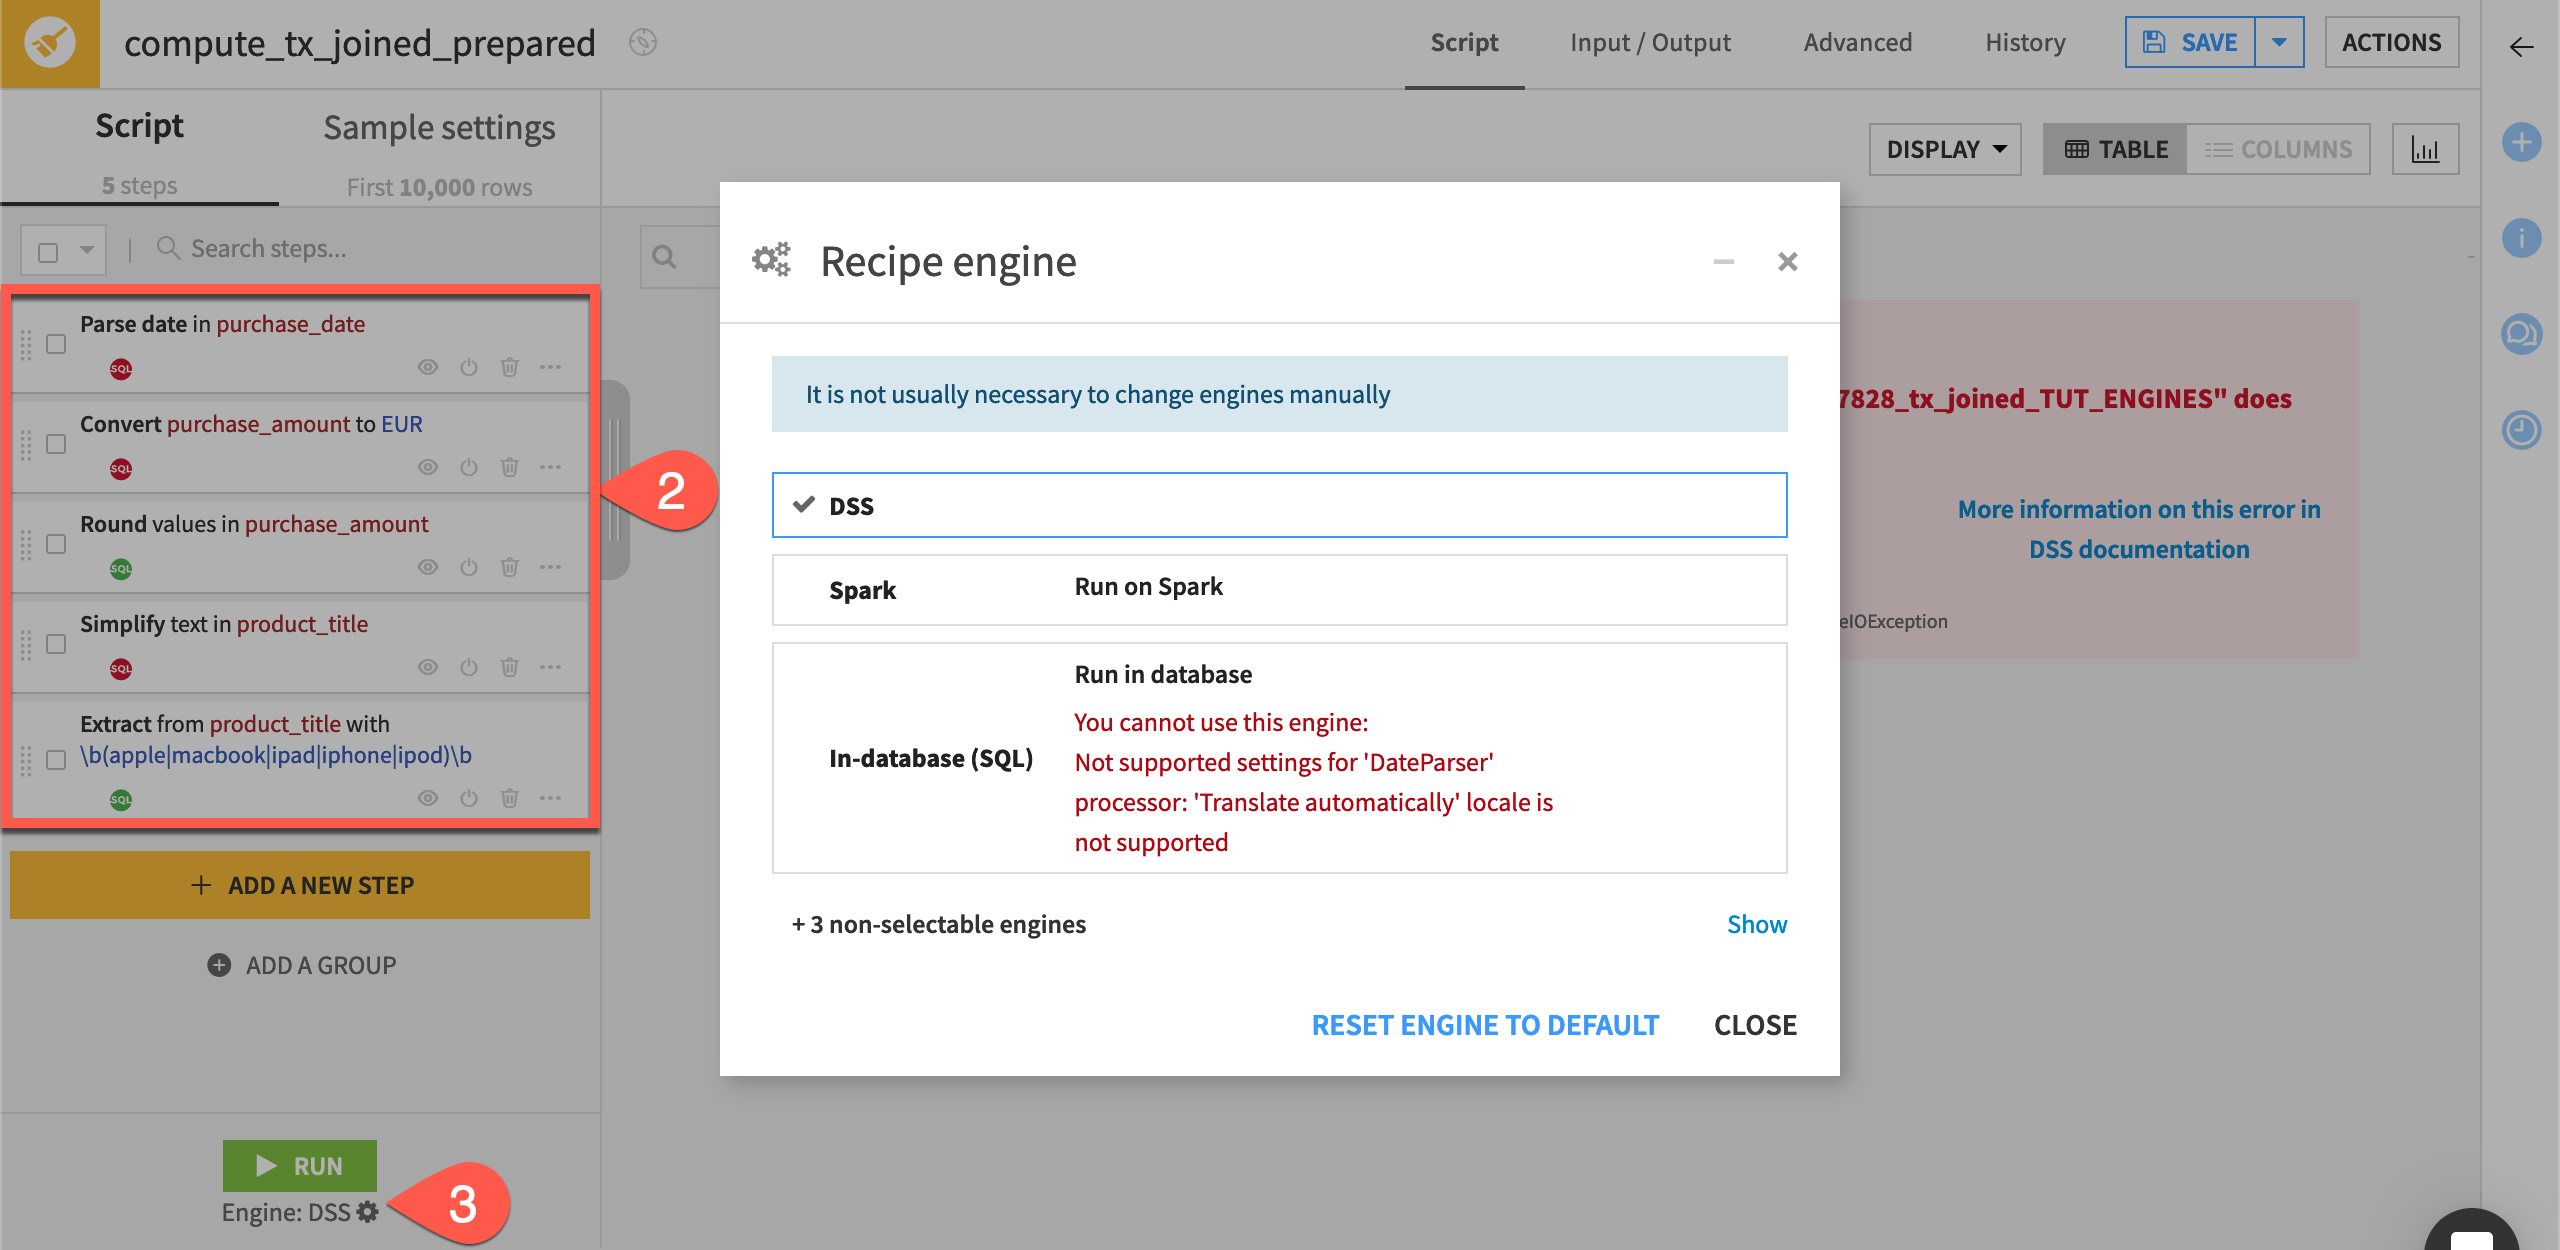
All processors in the Prepare recipe are compatible with the Spark engine. However, the ability of a Prepare recipe to use the in-database SQL engine depends on the specific processors in the script. See the list of supported processors in the reference documentation.
If you are using an SQL database, take a moment to see which processors are SQL compatible in the Flow’s second Prepare recipe.
Click to open the Prepare (
 ) recipe in the Data preparation zone.
To see which steps are SQL-compatible, observe how the script contains certain steps with green SQL icons (such as Round values) and other steps with red SQL icons (such as Convert currencies).
Click on the gear (
) icon underneath the Run button for further details about unsupported processors that prevent the selection of the SQL engine.
Tip
Aside from expressing the incompatible transformations in other ways, one optimization strategy may be to divide the steps into back-to-back Prepare recipes — one that’s SQL-compatible and one that’s not.
Next steps#
In this tutorial, you learned how Dataiku selects the most optimal recipe engine, and how that can guide optimization strategies.
The next step to further optimizing the Flow may be to enable Spark or SQL pipelines depending on your organization’s infrastructure.
For now though, move ahead to the Data Quality & Automation course to learn about metrics, data quality rules, and scenarios.
See also
See the reference documentation to learn more about Execution engines.