
Tutorial | Custom governance items#
Get started#
Tutorial | Custom governance templates presented how Govern node administrators holding advanced licenses can modify standard Govern items using a combination of fields, components, views, and sign-offs.
The Blueprint Designer, however, isn’t limited to creating custom versions of existing blueprints. Administrators with advanced licenses can also create entirely new blueprints to support the governance mission of their organizations.
Objectives#
In this tutorial, you will:
Create a blueprint for an entirely new type of Govern item.
Explore how reference fields can extend the inherent Govern item hierarchy.
Design view components with a table layout.
Use filters to display view components based on conditional logic.
Prerequisites#
To reproduce the steps outlined in this tutorial, you will need:
Dataiku 14.0 or later.
A Dataiku Govern node connected to a Design node.
An Advanced Dataiku Govern license.
Be a Govern admin to access the Blueprint Designer.
Knowledge obtained from the Tutorial | Custom governance templates.
Use case summary#
As a Govern node administrator, you’ll be aware of the Dataiku item hierarchy. However, your governance needs may require you to expand beyond this set of items. For example, the need to govern according to a specific regulatory framework may require modeling new classes of items that have their own relationships.
With this in mind, the motivating case for this tutorial is to extend the standard item hierarchy found in the Govern node. According to the standard template, a Business initiative is the top of the hierarchy among Govern items.
Imagine, however, that you want to extend this hierarchy to include an extra layer of organization on top of Business initiatives. Much like Business initiatives are a parent item to Govern projects, this tutorial demonstrates creating a new parent item for a Business initiative called a Stream.
Master reference fields#
Tutorial | Custom governance templates demonstrated creating a champion reference field, a mandatory user assigned to a Govern project. However, to build upon the Govern node’s information hierarchy, you’ll need a deeper understanding of how reference fields work.
Create a blueprint and its first version#
To create a new Stream item, the first step is to create a new blueprint, and then its first blueprint version.
Open the Govern node. You can navigate there from the Overview panel of the Cloud Launchpad or, from a Design node, go to the waffle (
 ) menu > Dataiku Govern.
From the waffle (
) menu of the top navigation bar, select Blueprint Designer.Click + Create Blueprint, and name it
Stream.If desired, adjust the icon and color, and then click Save.
Within the new blueprint, click Create New Version.
Name it
stream_v1.Click Create.

Populate the blueprint version#
When you fork an existing blueprint version, you inherit all its existing fields, views, and workflow steps. With an entirely new blueprint, you need to create all elements yourself.
As the goal is to create a parent item to related Business initiatives, you have to devise some kind of link between a Stream and a Business initiative. To connect any two types of items, you need a reference field.
Start by adding, in the Stream blueprint version, a reference field to a Business initiative.
From the stream_v1 blueprint version, go to the Fields panel.
Click the plus (
 ) icon to create a new field.
Select Reference, and name the new field
Stored Business initiatives. Then click Create.Provide the description
List of associated Business initiatives.Leave the default reference type of Store, and select Business initiative as the allowed blueprint, noticing that all possible blueprints are available for selection.

Once you have the first reference field, you need to add it to a view.
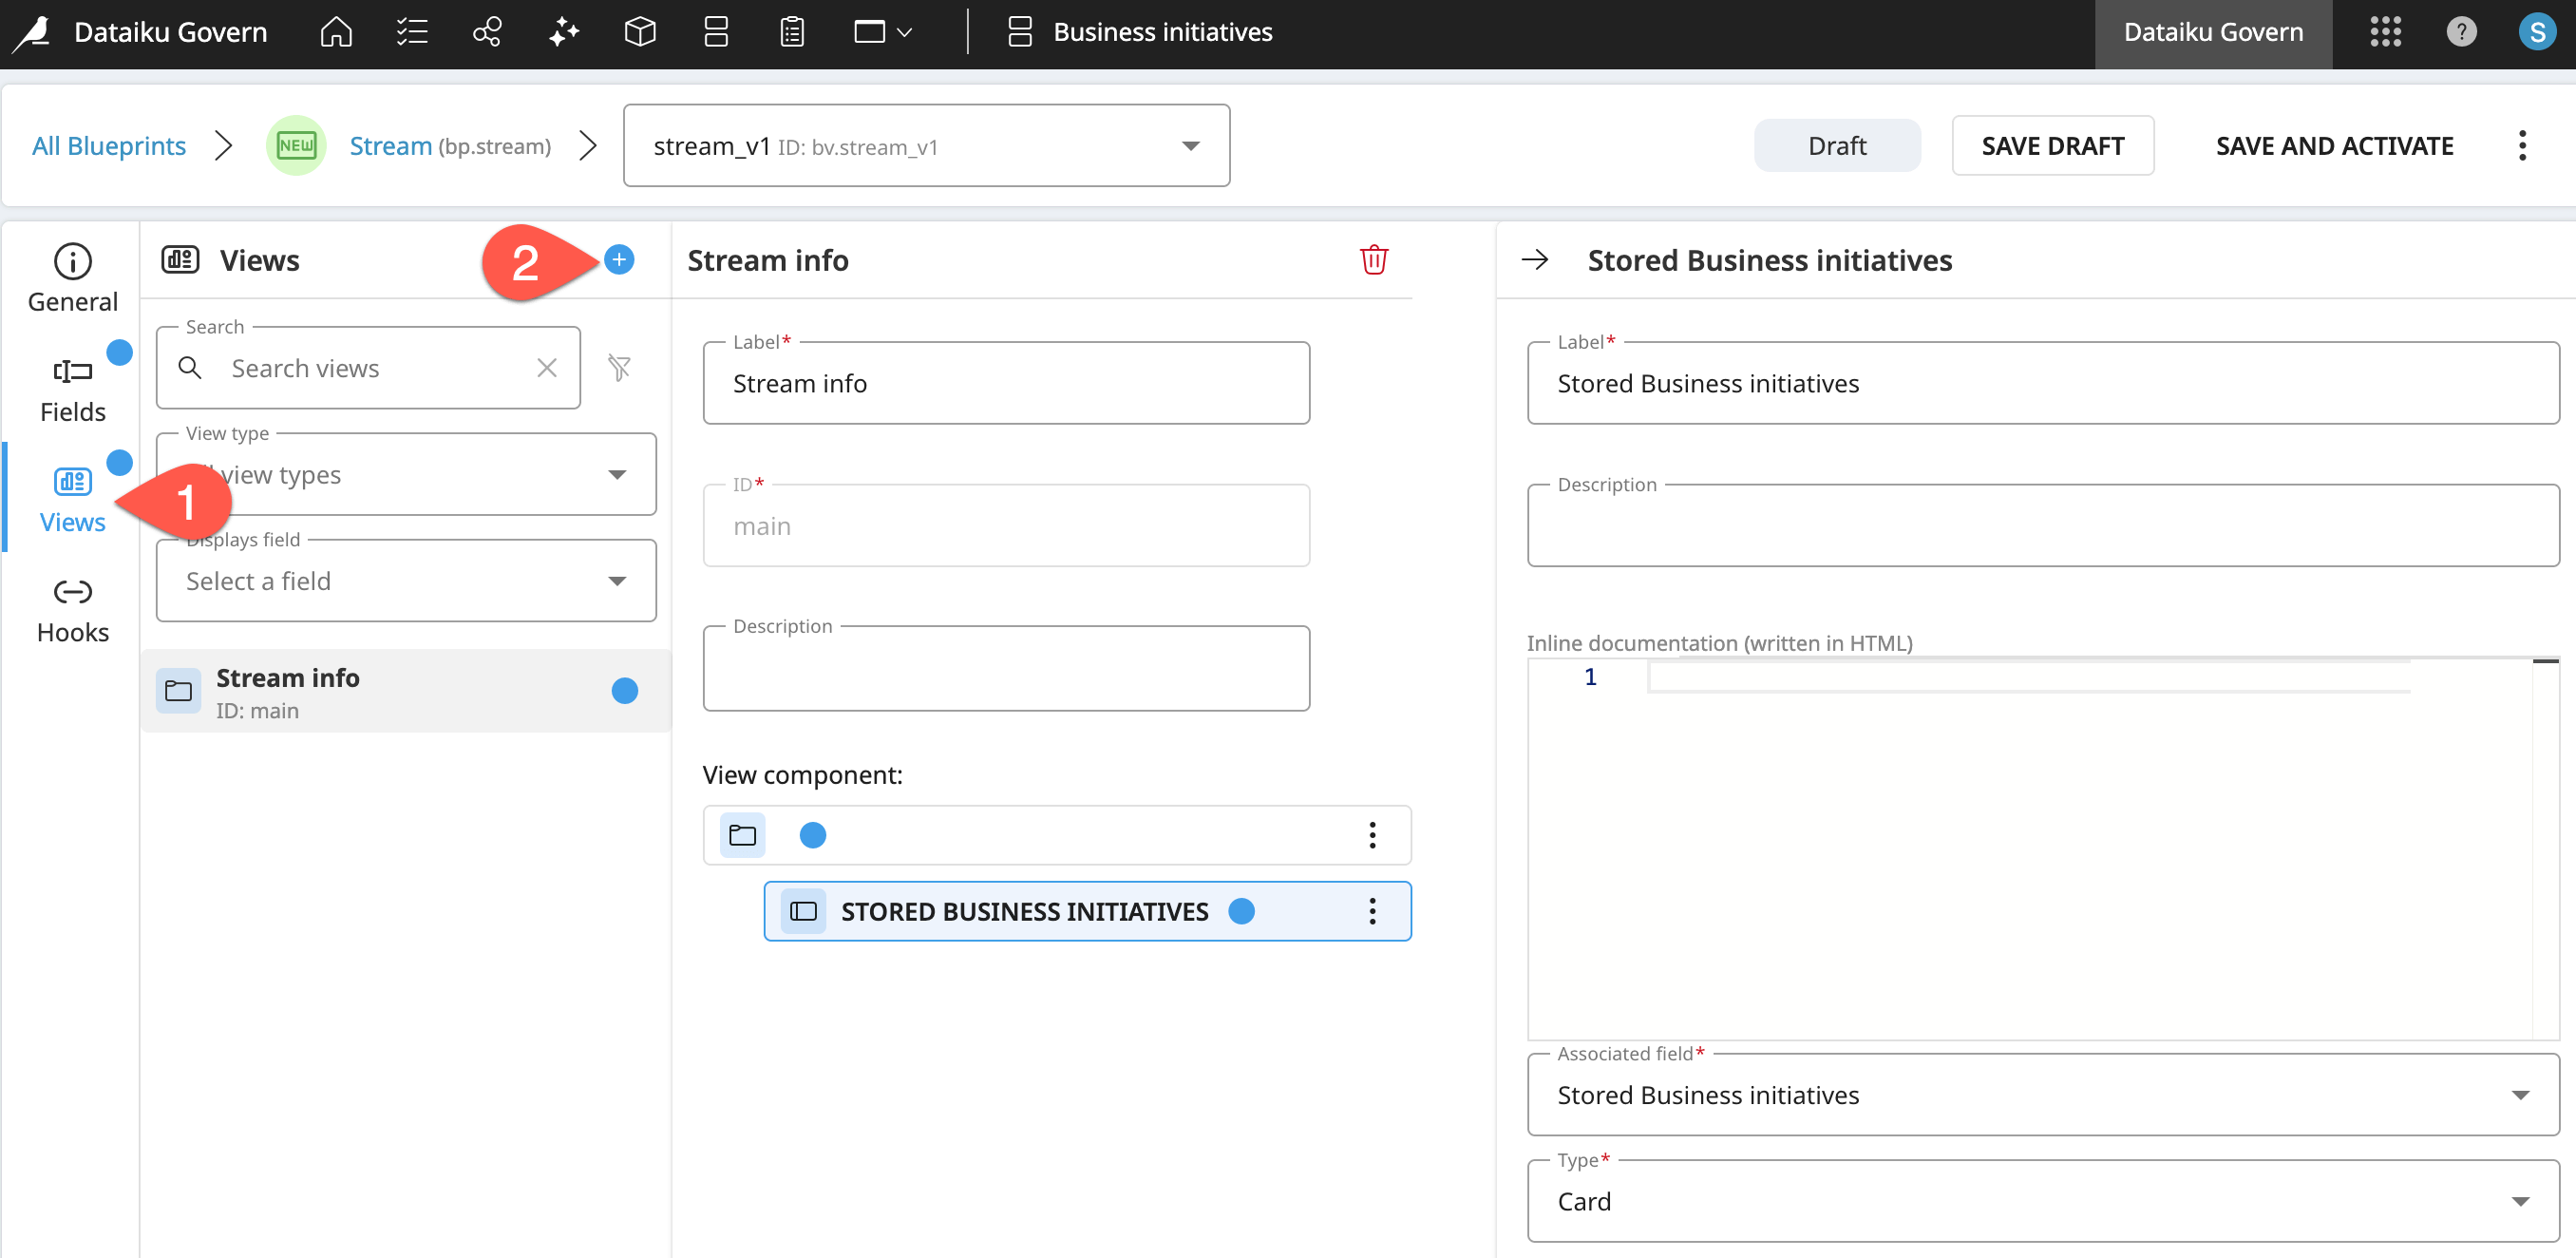
Within the stream_v1 blueprint version, go to the Views panel.
Click the plus (
) icon to create a new view.Name it
Stream info, and rename the view ID asmain. Then click Create.Within the new view, click Add View Component.
For the type, select Container, and click Create.
Within the container, click Add View Component.
Add the Stored Business initiatives field using the plus (
) icon. Then click Create.
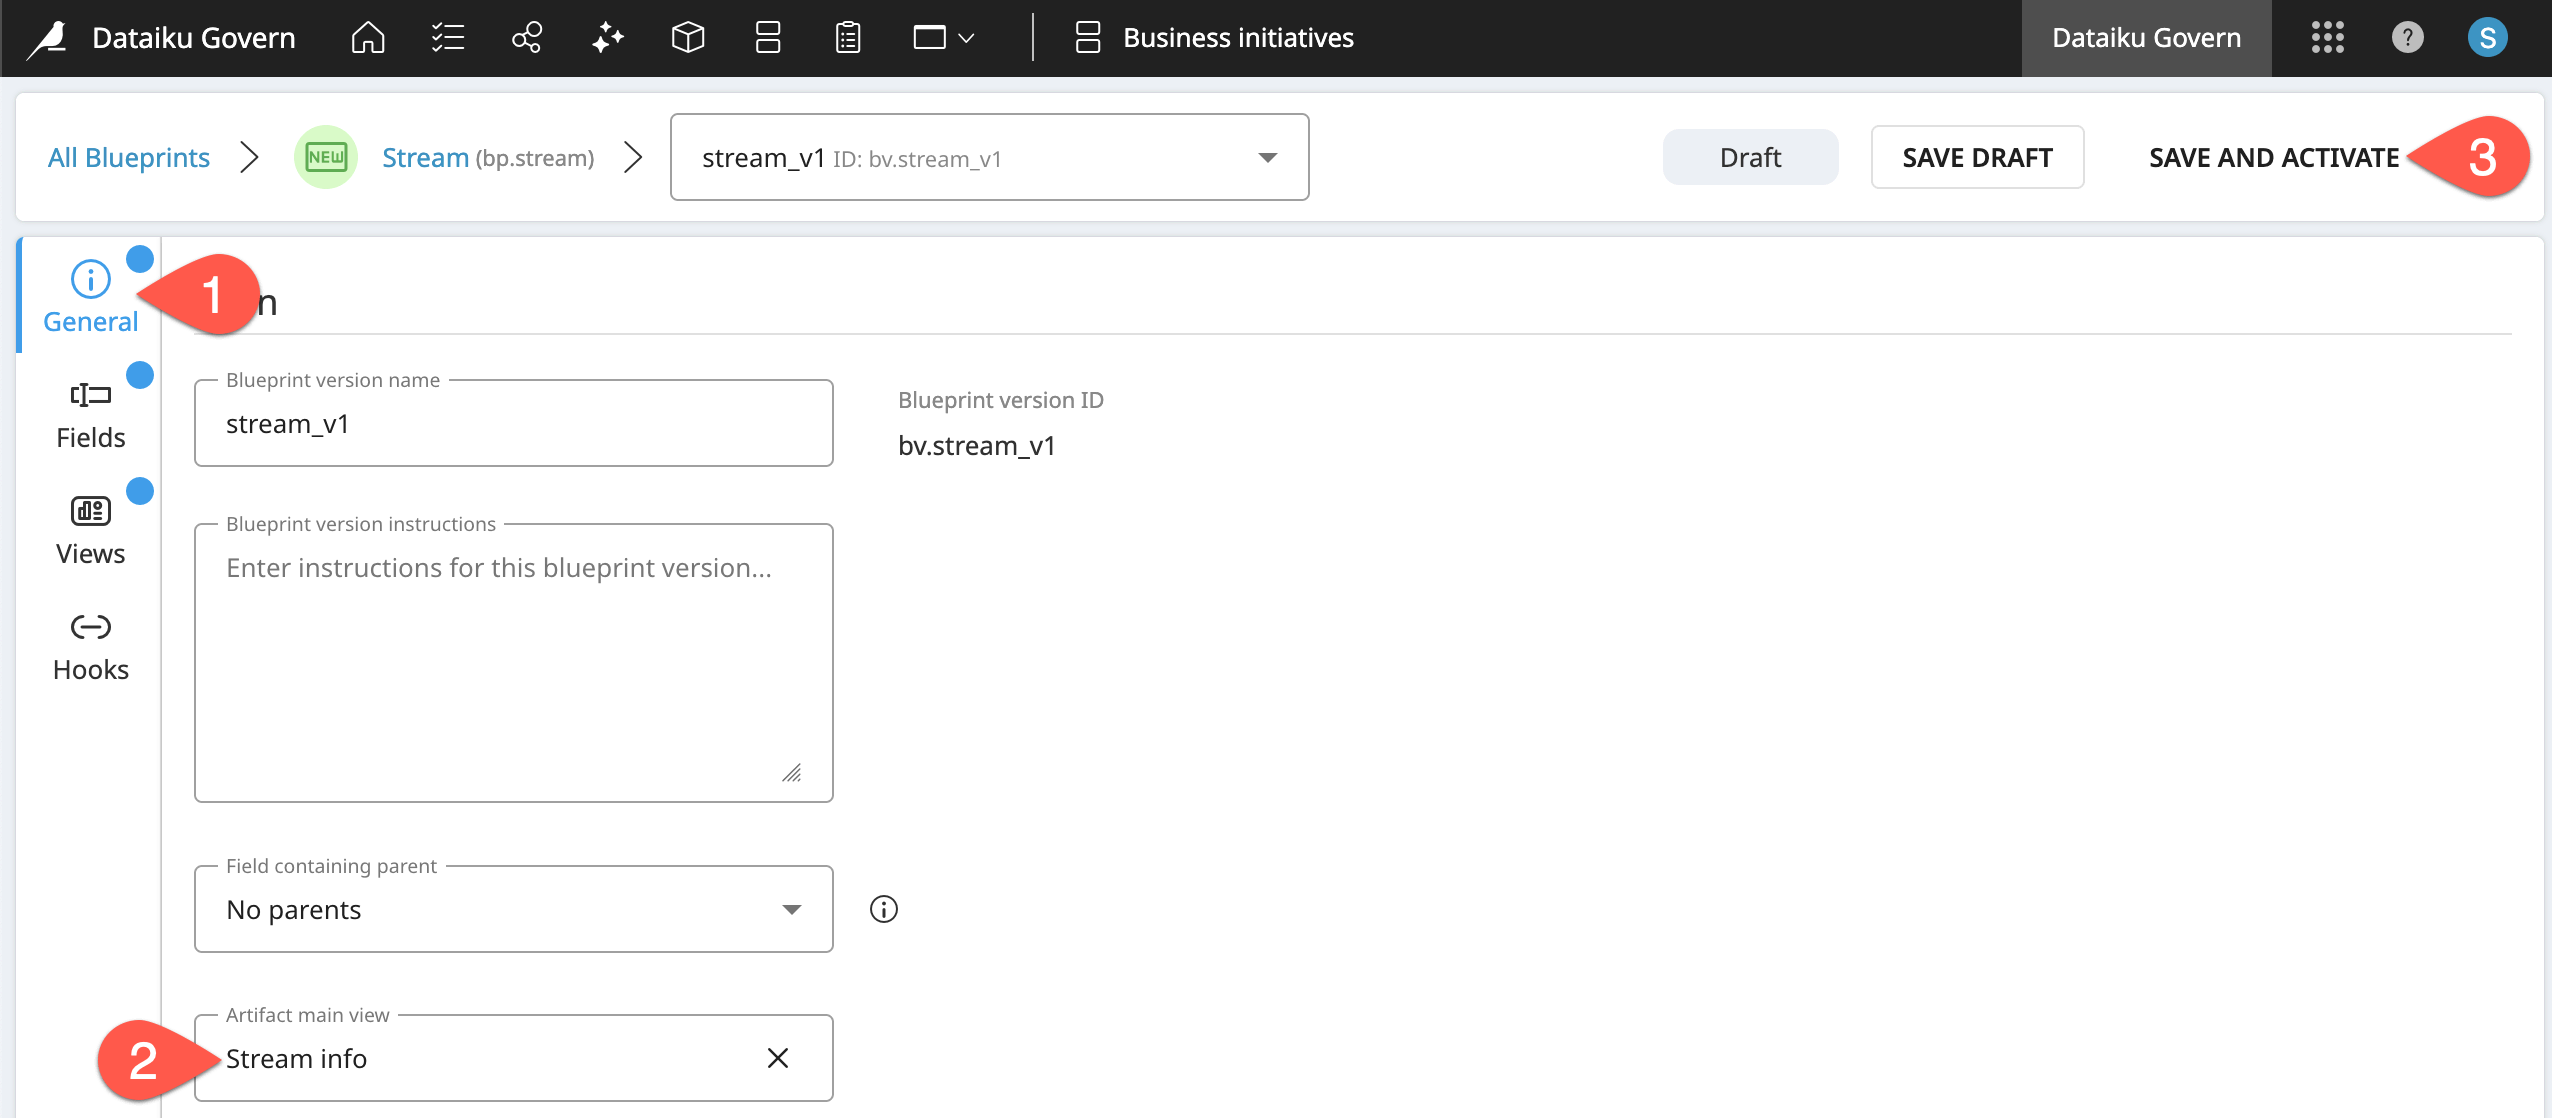
Lastly, assign the view in the item’s definition so it’s visible.
Within the stream_v1 blueprint version, go to the General panel.
For the artifact’s main view, select Stream info.
Having done all three actions, click Save and Activate, and Activate again to confirm.
Important
To recap, you now have a version of an entirely new type of Govern item, a Stream. This item is a “pure” Govern item, in that it doesn’t have a Dataiku source object.
Design a custom template for the child item#
The Business initiative item is still unaware of its new parent Stream. You’ll need to edit the template of a Business initiative to include the new reference parent field. As you can’t edit the standard template item, you’ll need your own custom version of a Business initiative.
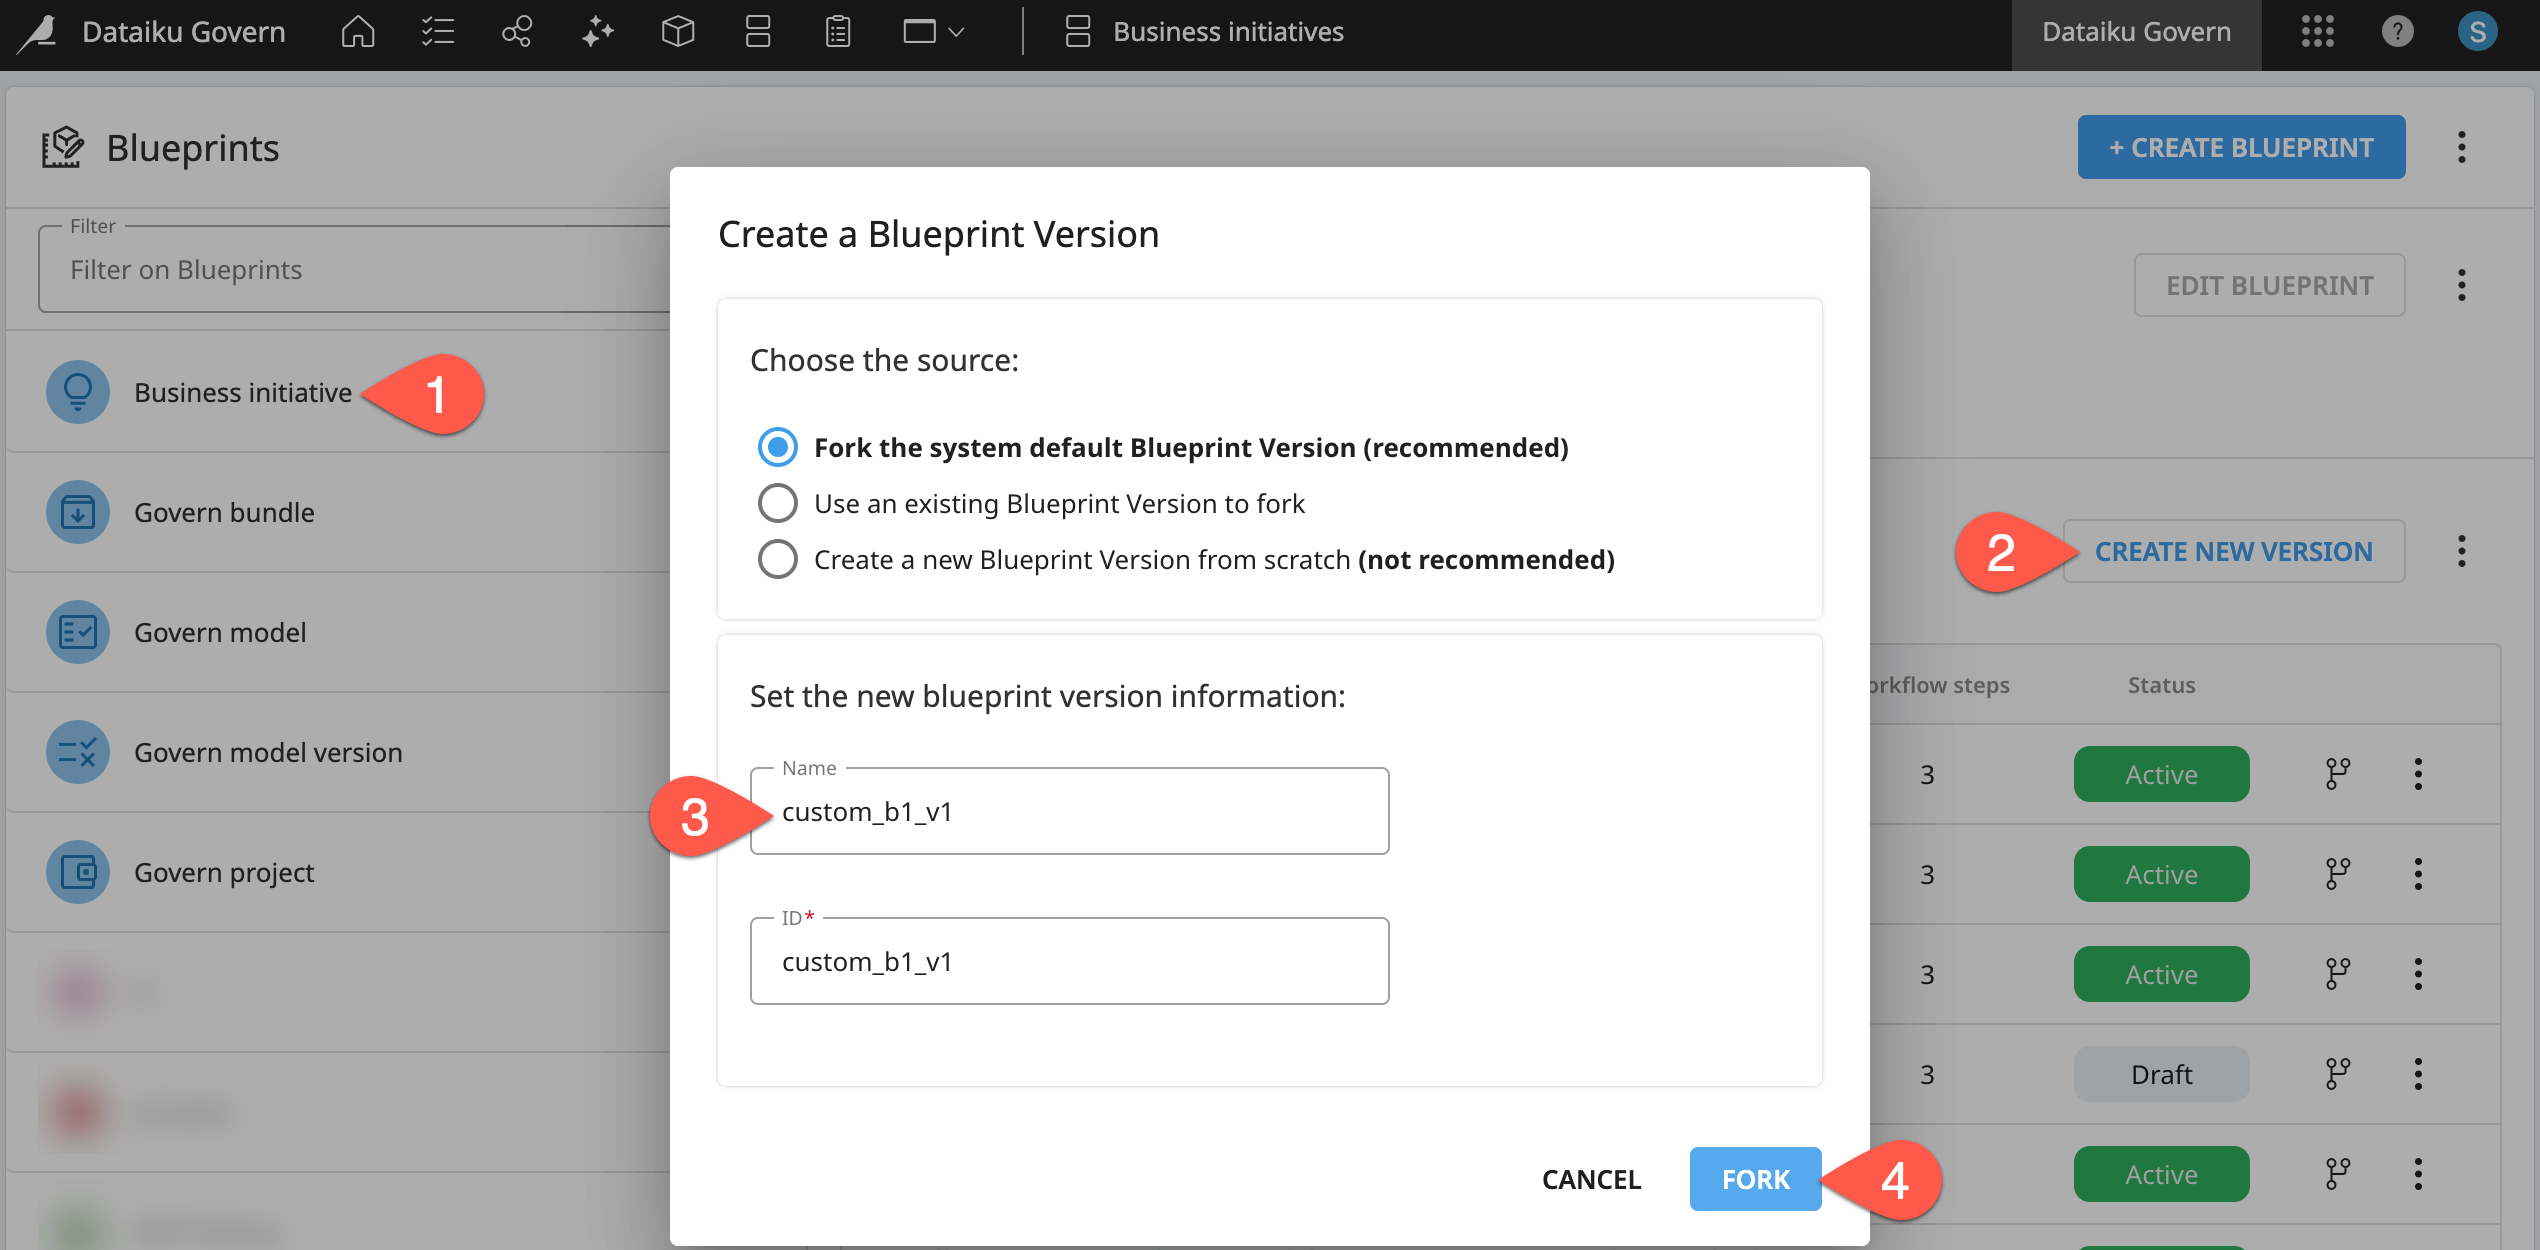
From the Blueprint Designer home, select Business initiative.
Within the Versions tab, click Create New Version.
Name it
custom_bi_v1.Click Fork.
The standard Business initiative has two reference fields: governed projects and sponsors. The first is a computed reference, whereas the second is a stored reference. Create a new reference field, for now, using the default type.
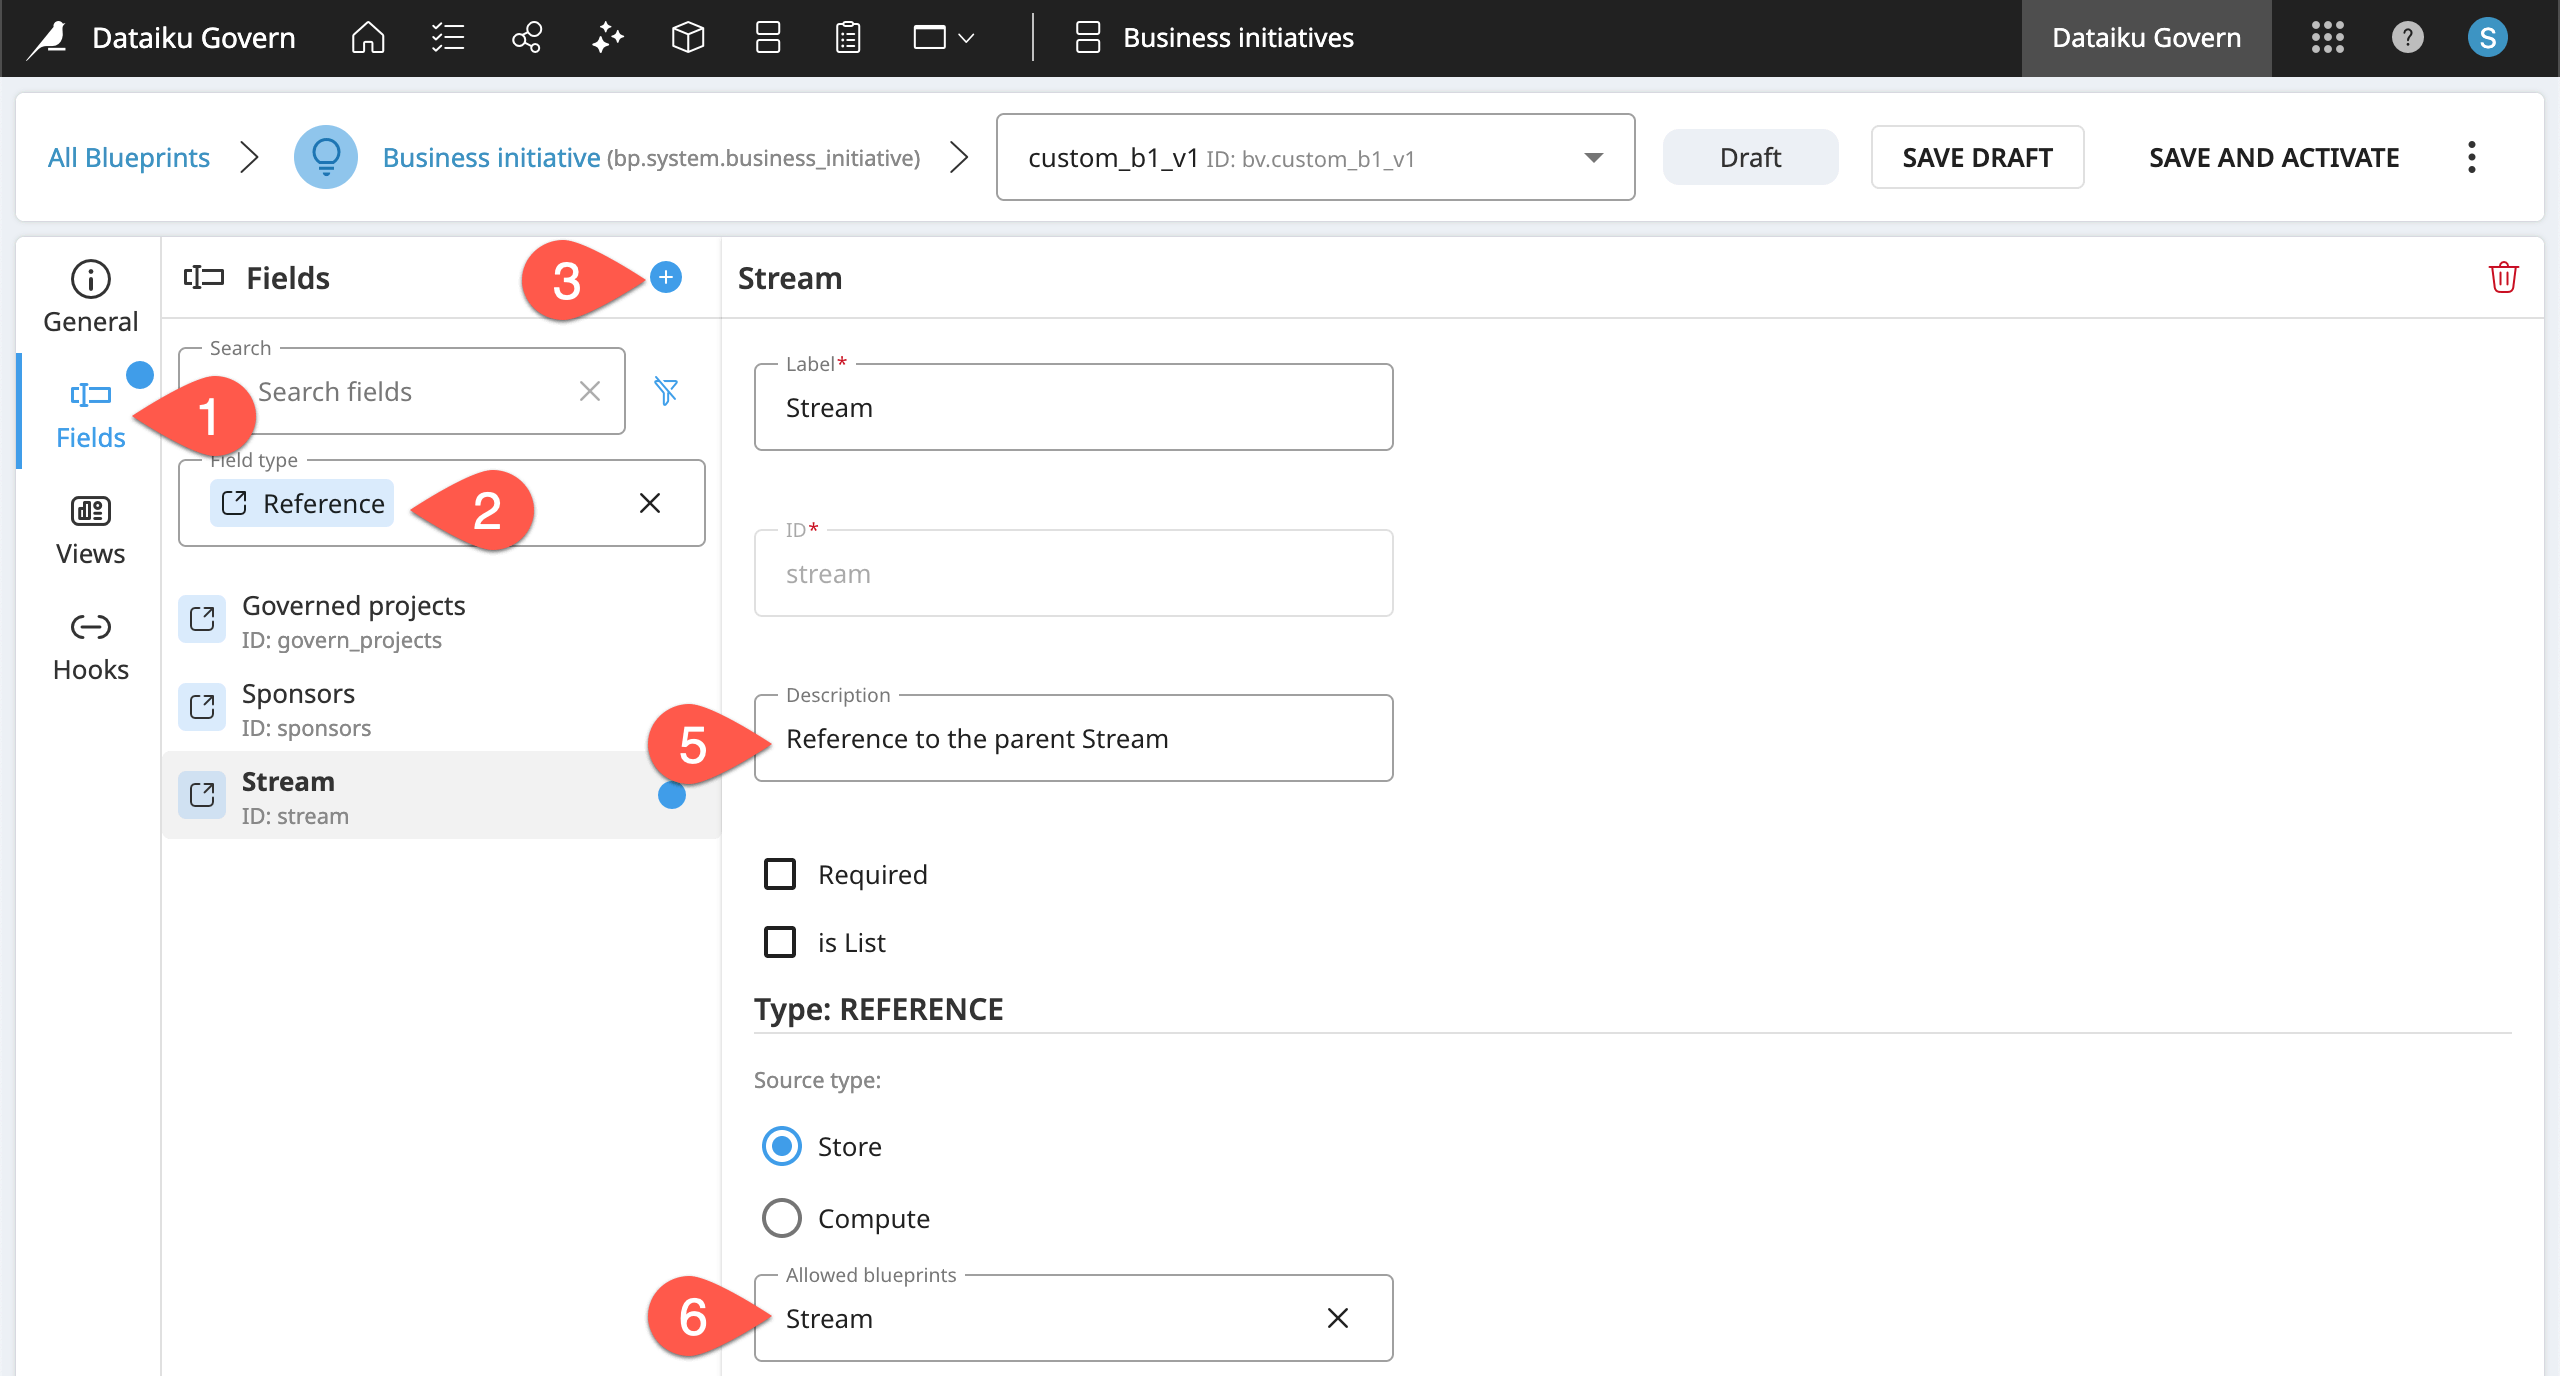
Within the custom_bi_v1 blueprint version, go to the Fields panel.
Filter for Reference field types to explore the existing stored and computed reference fields.
Click the plus (
) icon to create a new field.Select Reference, name it
Stream, and click Create.Give the description
Reference to the parent Stream.Leaving the default store option, select Stream as the only allowed blueprint.
Once you have the field, assign it to an existing view so that it’s visible.
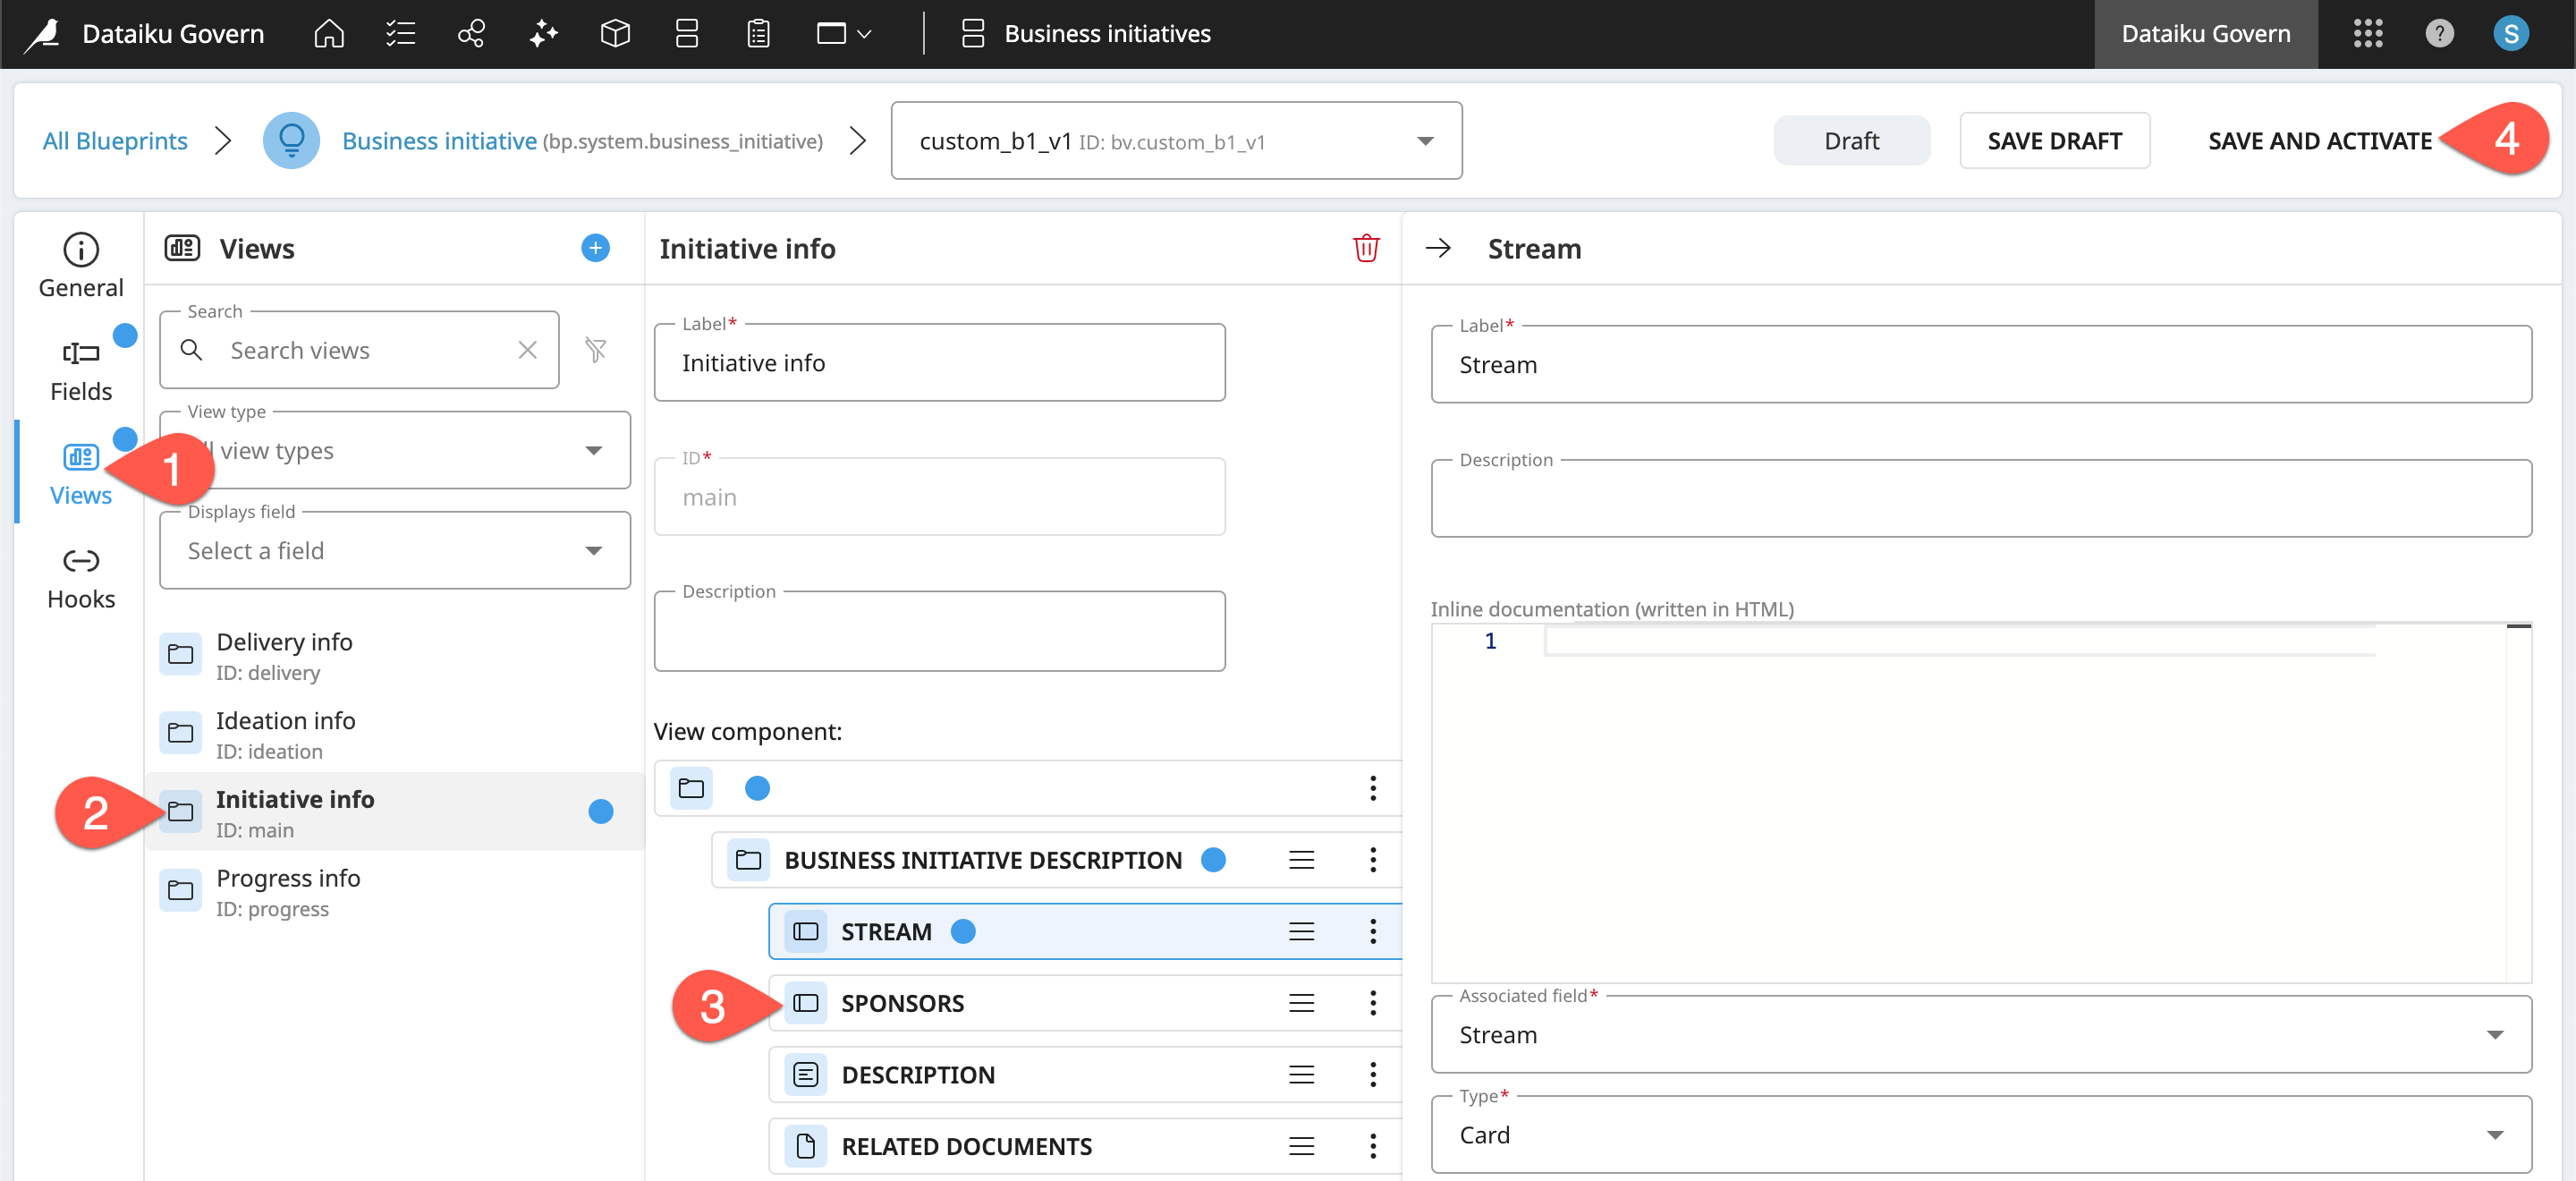
Within the custom_bi_v1 blueprint version, go to the Views panel.
Select Initiative info.
Select Sponsors > Vertical dots (
 ) > Insert view component > Before selection > Stream > Create.
Click Save and Activate and Activate again to confirm.
Use the new child template#
Now that you have a template for a Business initiative that includes the parent Stream reference field, the next step is to apply the template to a Business initiative.
From the top navigation bar, go to the Business initiatives (
 ) page.
Click Create.
Select your custom_bi_v1 blueprint version.
Name it
<YOUR INITIALS> First BI.Click Create.
Finally, you’ve come to the interesting part! Assign a new Stream to the Business initiative.
Within the Overview tab of the Business initiative, click Edit in the item header.
For the Stream field, click Select.
Since no Streams exist yet, click Create to start your first one.
Name it
<YOUR INITIALS> First Stream, and click Create to confirm.In the Business initiative’s item header, click Save.
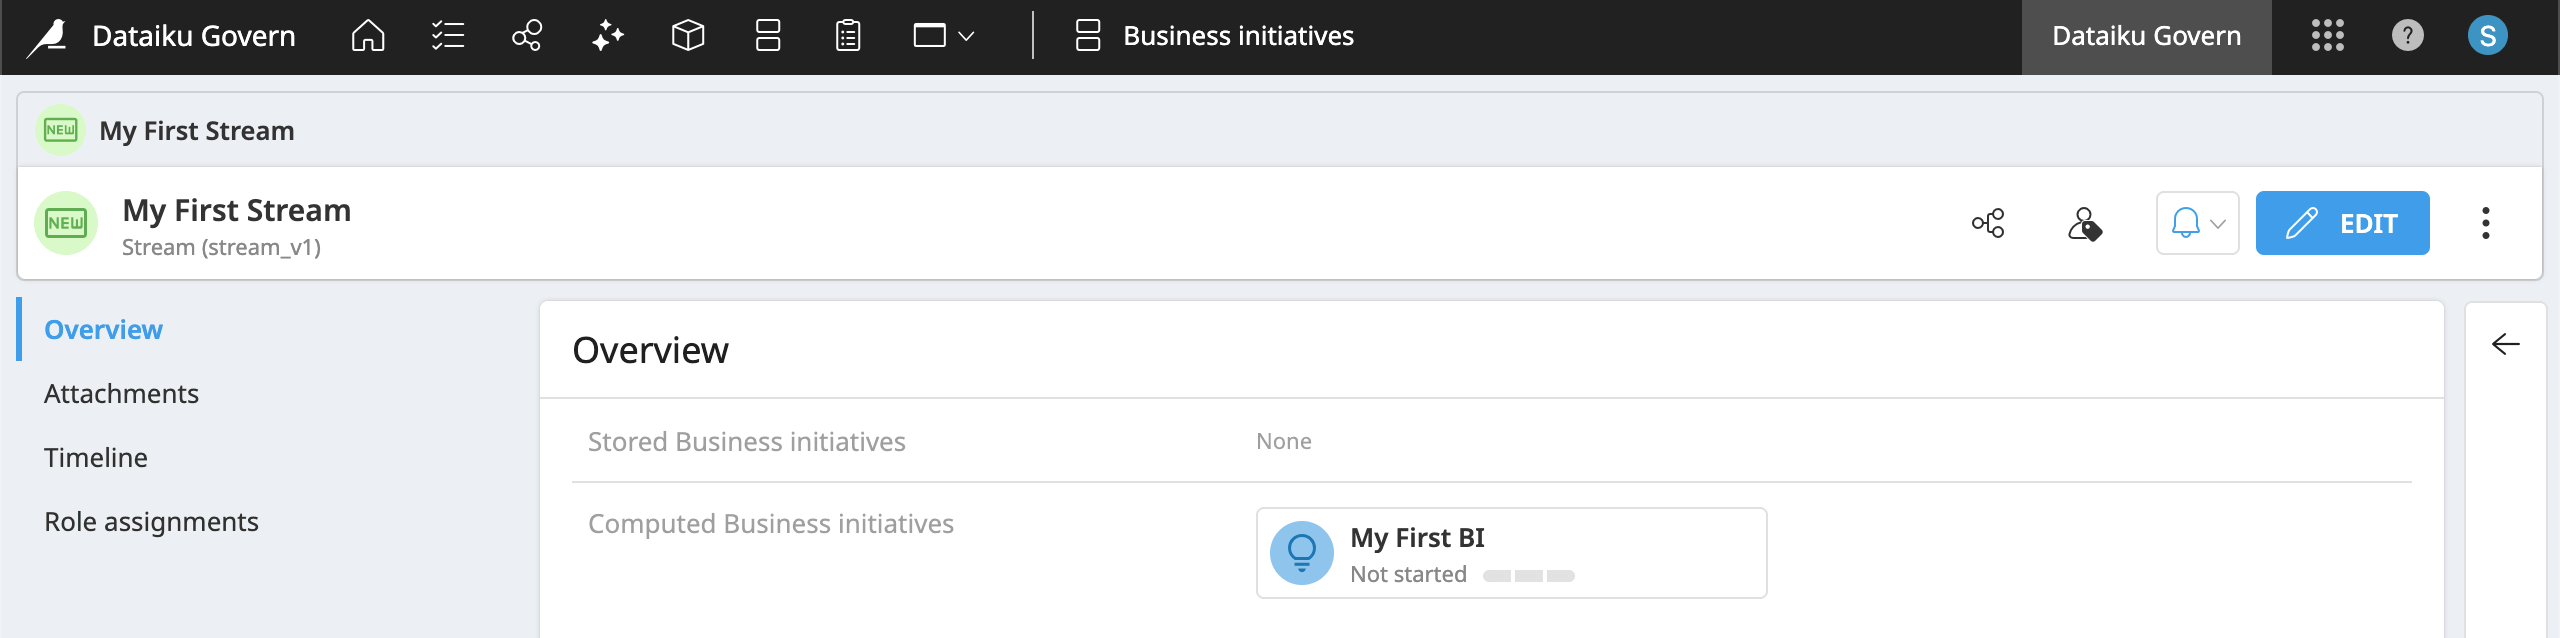
After saving, click on your First Stream to open the new Govern item.
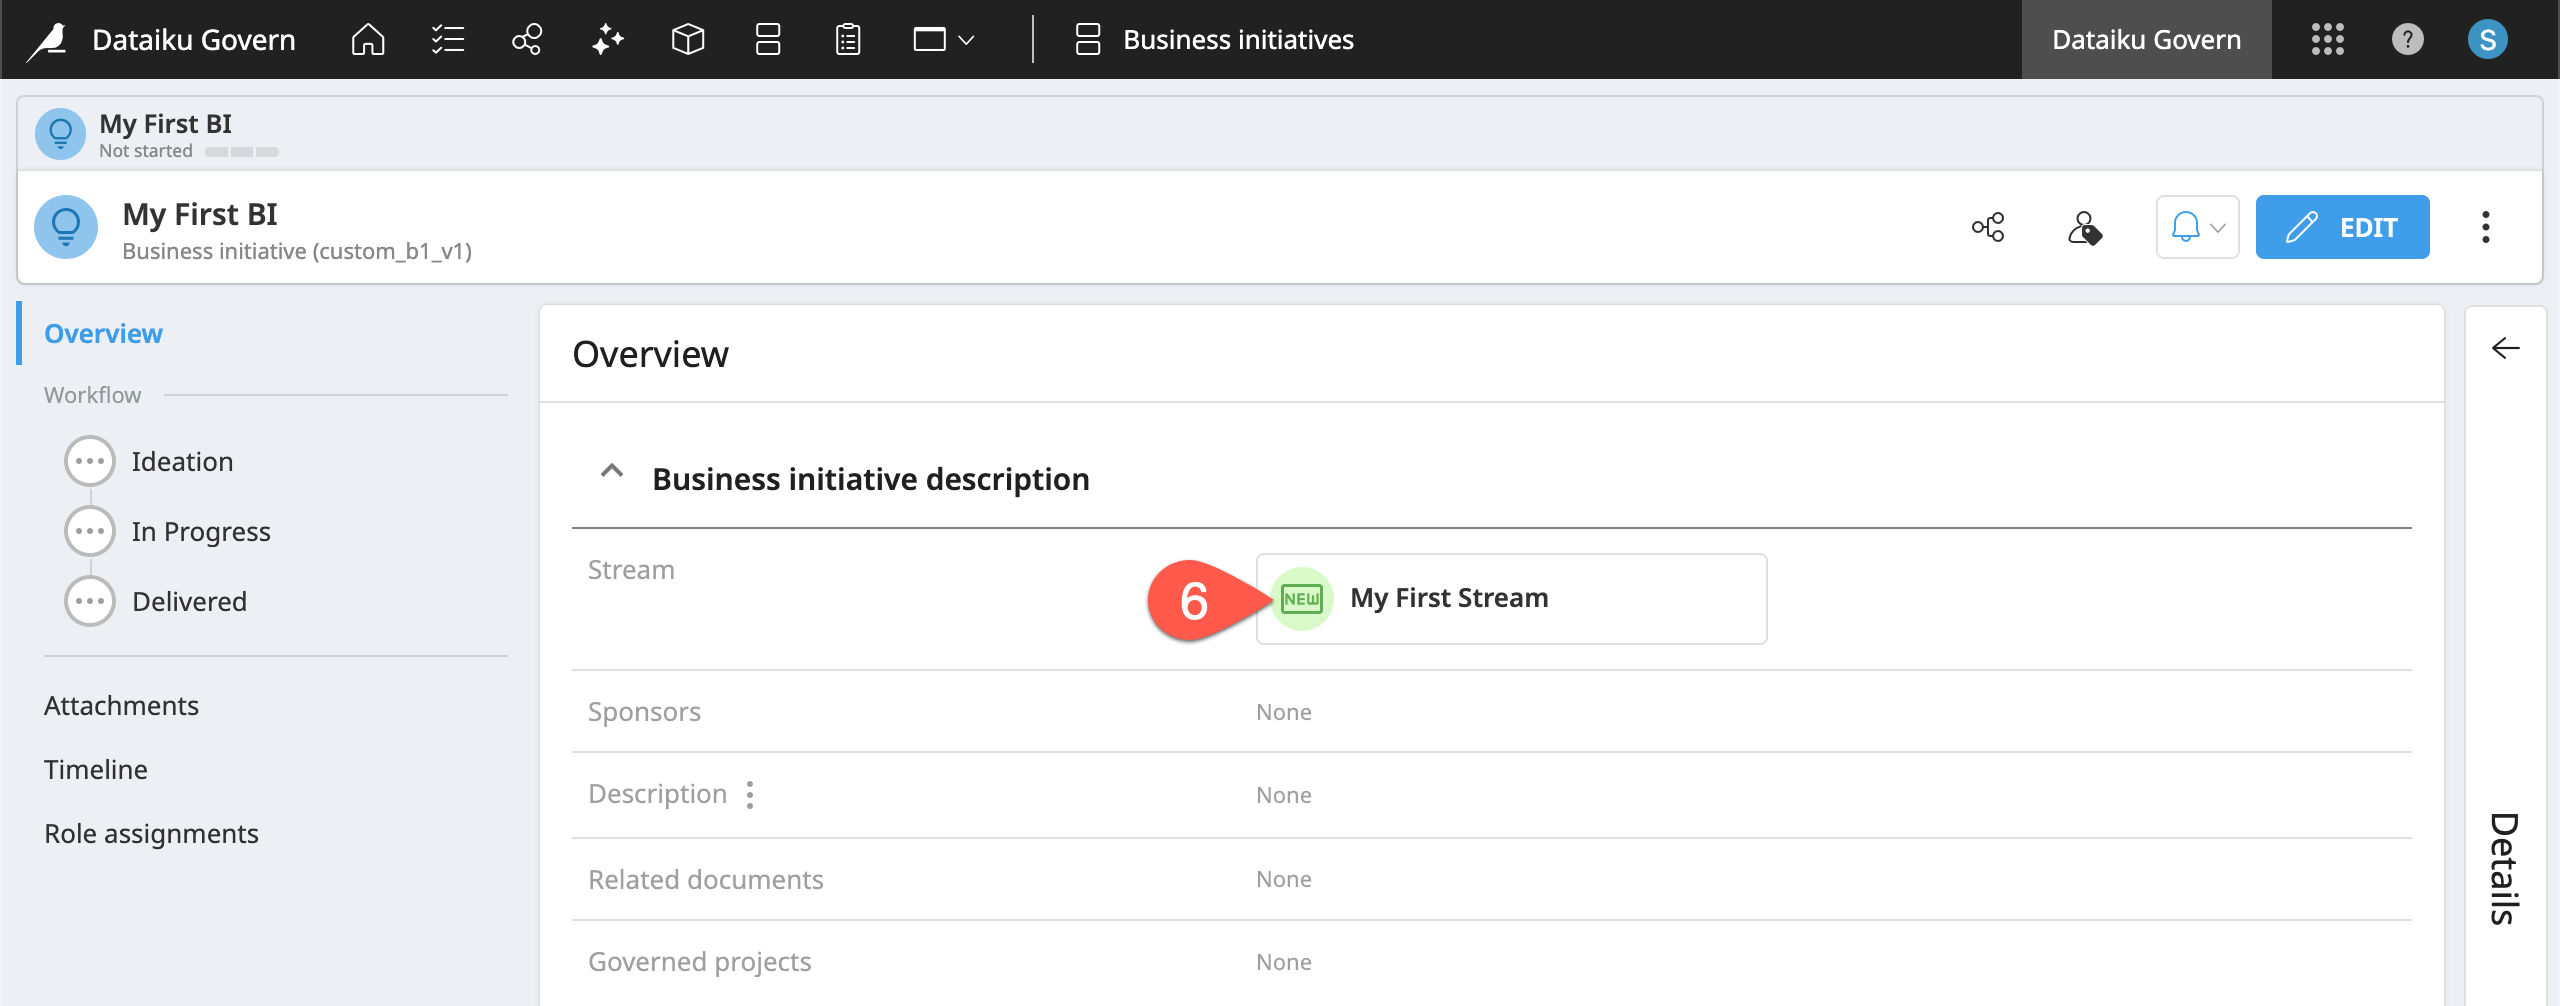
Important
The child Business initiative contains an associated Stream. However, the parent Stream shows “None” for Stored Business initiatives. What went wrong?
Understand stored vs. computed reference fields#
The problem is the misuse of stored vs. computed reference fields. Start with a basic definition:
A stored reference field is a one that points to items in other allowed blueprints.
A computed reference field, on the other hand, is a list of all items of a certain blueprint version that reference the item in a particular field.
A few examples will start to make this distinction clearer. Consider the relationship between deployments and infrastructures.
Every deployment must have one (and only one) infrastructure.
An infrastructure, on the other hand, can host many deployments.
In other words, there is a one-to-many relationship between infrastructures and deployments. This one-to-many relationship dictates the choice of stored and computed reference fields:
When a user is creating a deployment, the associated infrastructure is unknowable before the user chooses one. At any moment, a deployment can have at most one associated infrastructure. Accordingly, a deployment blueprint only needs to store the reference to the chosen infrastructure.
Now consider the situation from the perspective of an infrastructure. At any moment, an infrastructure must have the correct list of all its associated deployments. An infrastructure can receive a new deployment at any time. Therefore, with any page refresh, an infrastructure blueprint must compute the reference to all its associated deployments.
Tip
You can examine the infrastructure and deployment blueprints for yourself by displaying locked blueprints from the vertical dots (![]() ) menu of the Blueprint Designer.
) menu of the Blueprint Designer.
A specific kind of one-to-many relationship that often appears in the hierarchy of Govern items is the parent-child relationship. For example, one Business initiative can be a parent to many child Govern projects. But you can associate a Govern project to only one parent Business initiative. Based on this relationship:
A Govern project blueprint includes a stored reference to its one (optional) parent Business initiative. When a user assigns a Business initiative as the parent of a Govern project, the Govern node stores that result!
A Business initiative blueprint includes a computed reference to (possibly many) child Govern projects. To know which Govern projects belong to a Business initiative at any time, a computation must happen behind the scenes!
By contrast, consider a many-to-many relationship. Both Govern projects and Business initiatives have a many-to-many relationship with sponsors. The blueprint for a standard Govern project or a Business initiative includes a stored reference to the sponsors field, with two allowed blueprints: users and groups.
A user or a group can sponsor multiple Govern projects or Business initiatives.
At the same time, a Govern project or a Business initiative can have multiple users or groups as sponsors.
Create a computed reference field#
Now apply this knowledge to the desired relationship between Streams and Business initiatives.
A Business initiative can have at most one parent Stream. The Govern node only needs to store this selection.
A Stream can have many child Business initiatives. To ensure the correct list, the Govern node needs to compute the reference.
Accordingly, you can fix this situation by creating, in the parent item (the Stream), a computed reference to the child item (the Business initiative).
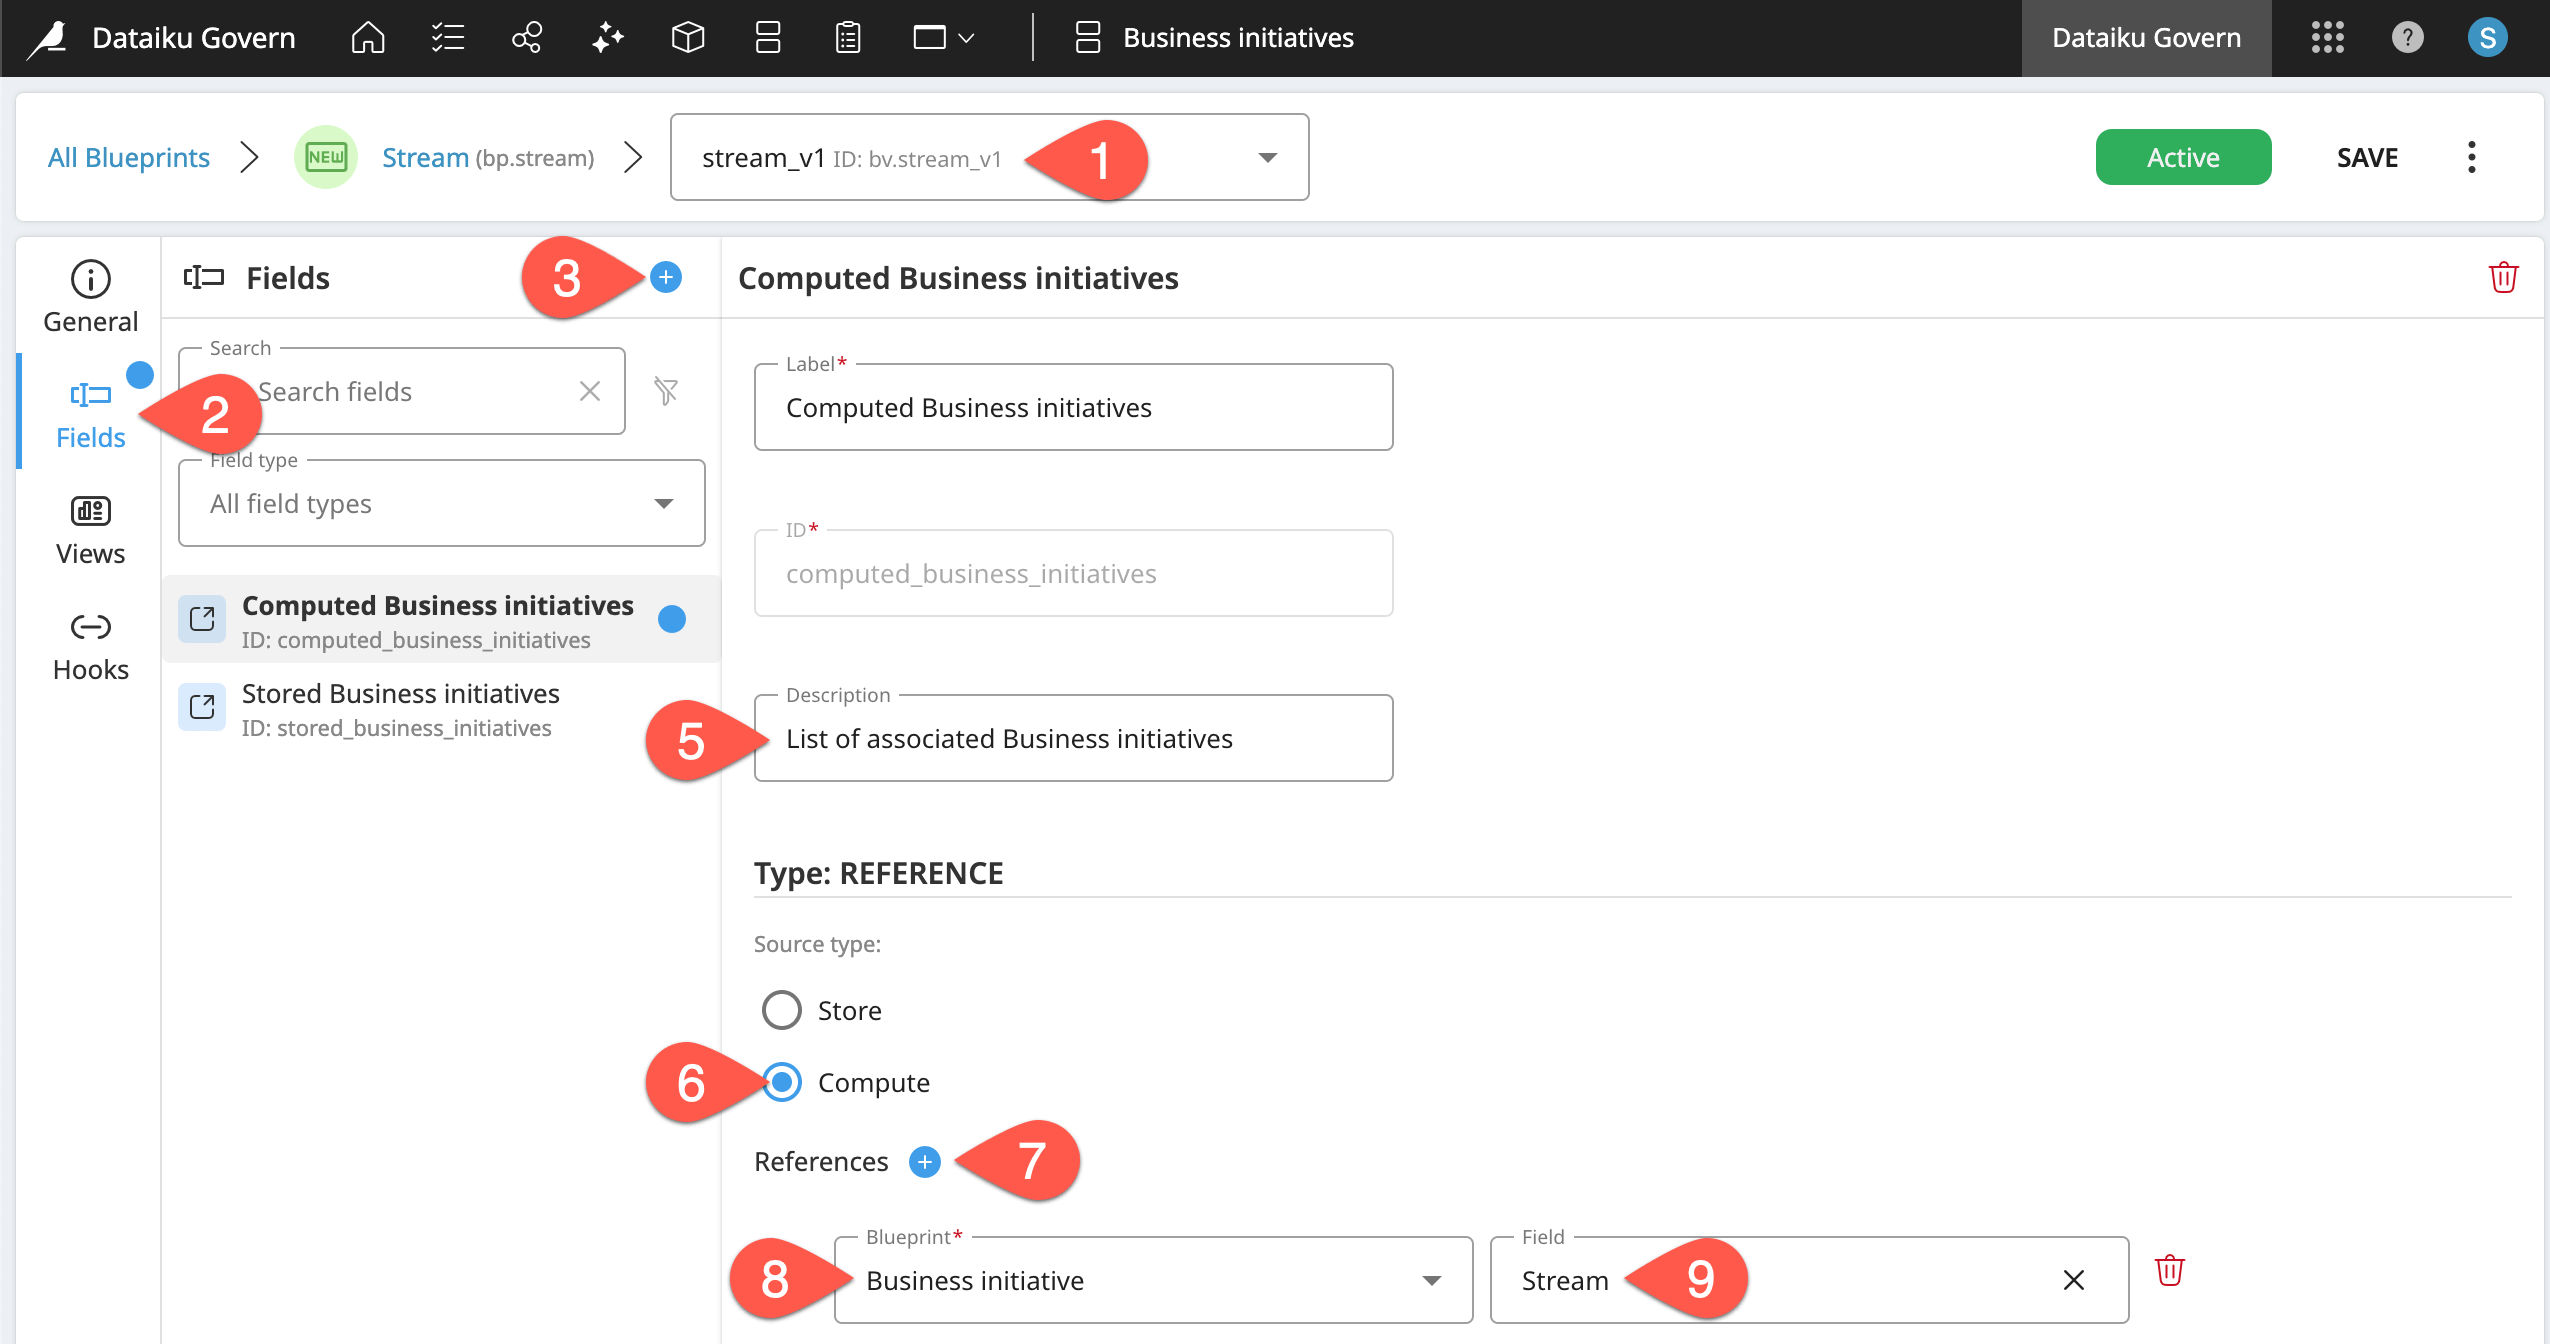
In the Blueprint Designer, select Stream, and then select the stream_v1 version.
Navigate to the Fields panel.
Click the plus (
) icon to create a new field.Select Reference, name it
Computed Business initiatives, and click Create.Give the description
List of associated Business initiatives.This time, for the source type, select Compute.
For references, click the plus (
) icon.Open the blueprint dropdown, and select a Business initiative.
For the field, select Stream.
Tip
To summarize this field: From the point of view of some item, the Computed Business initiatives field returns a list of all items of 1) a Business initiative blueprint that 2) reference that item in their field Stream.
As before, you need to include this new field inside a view.
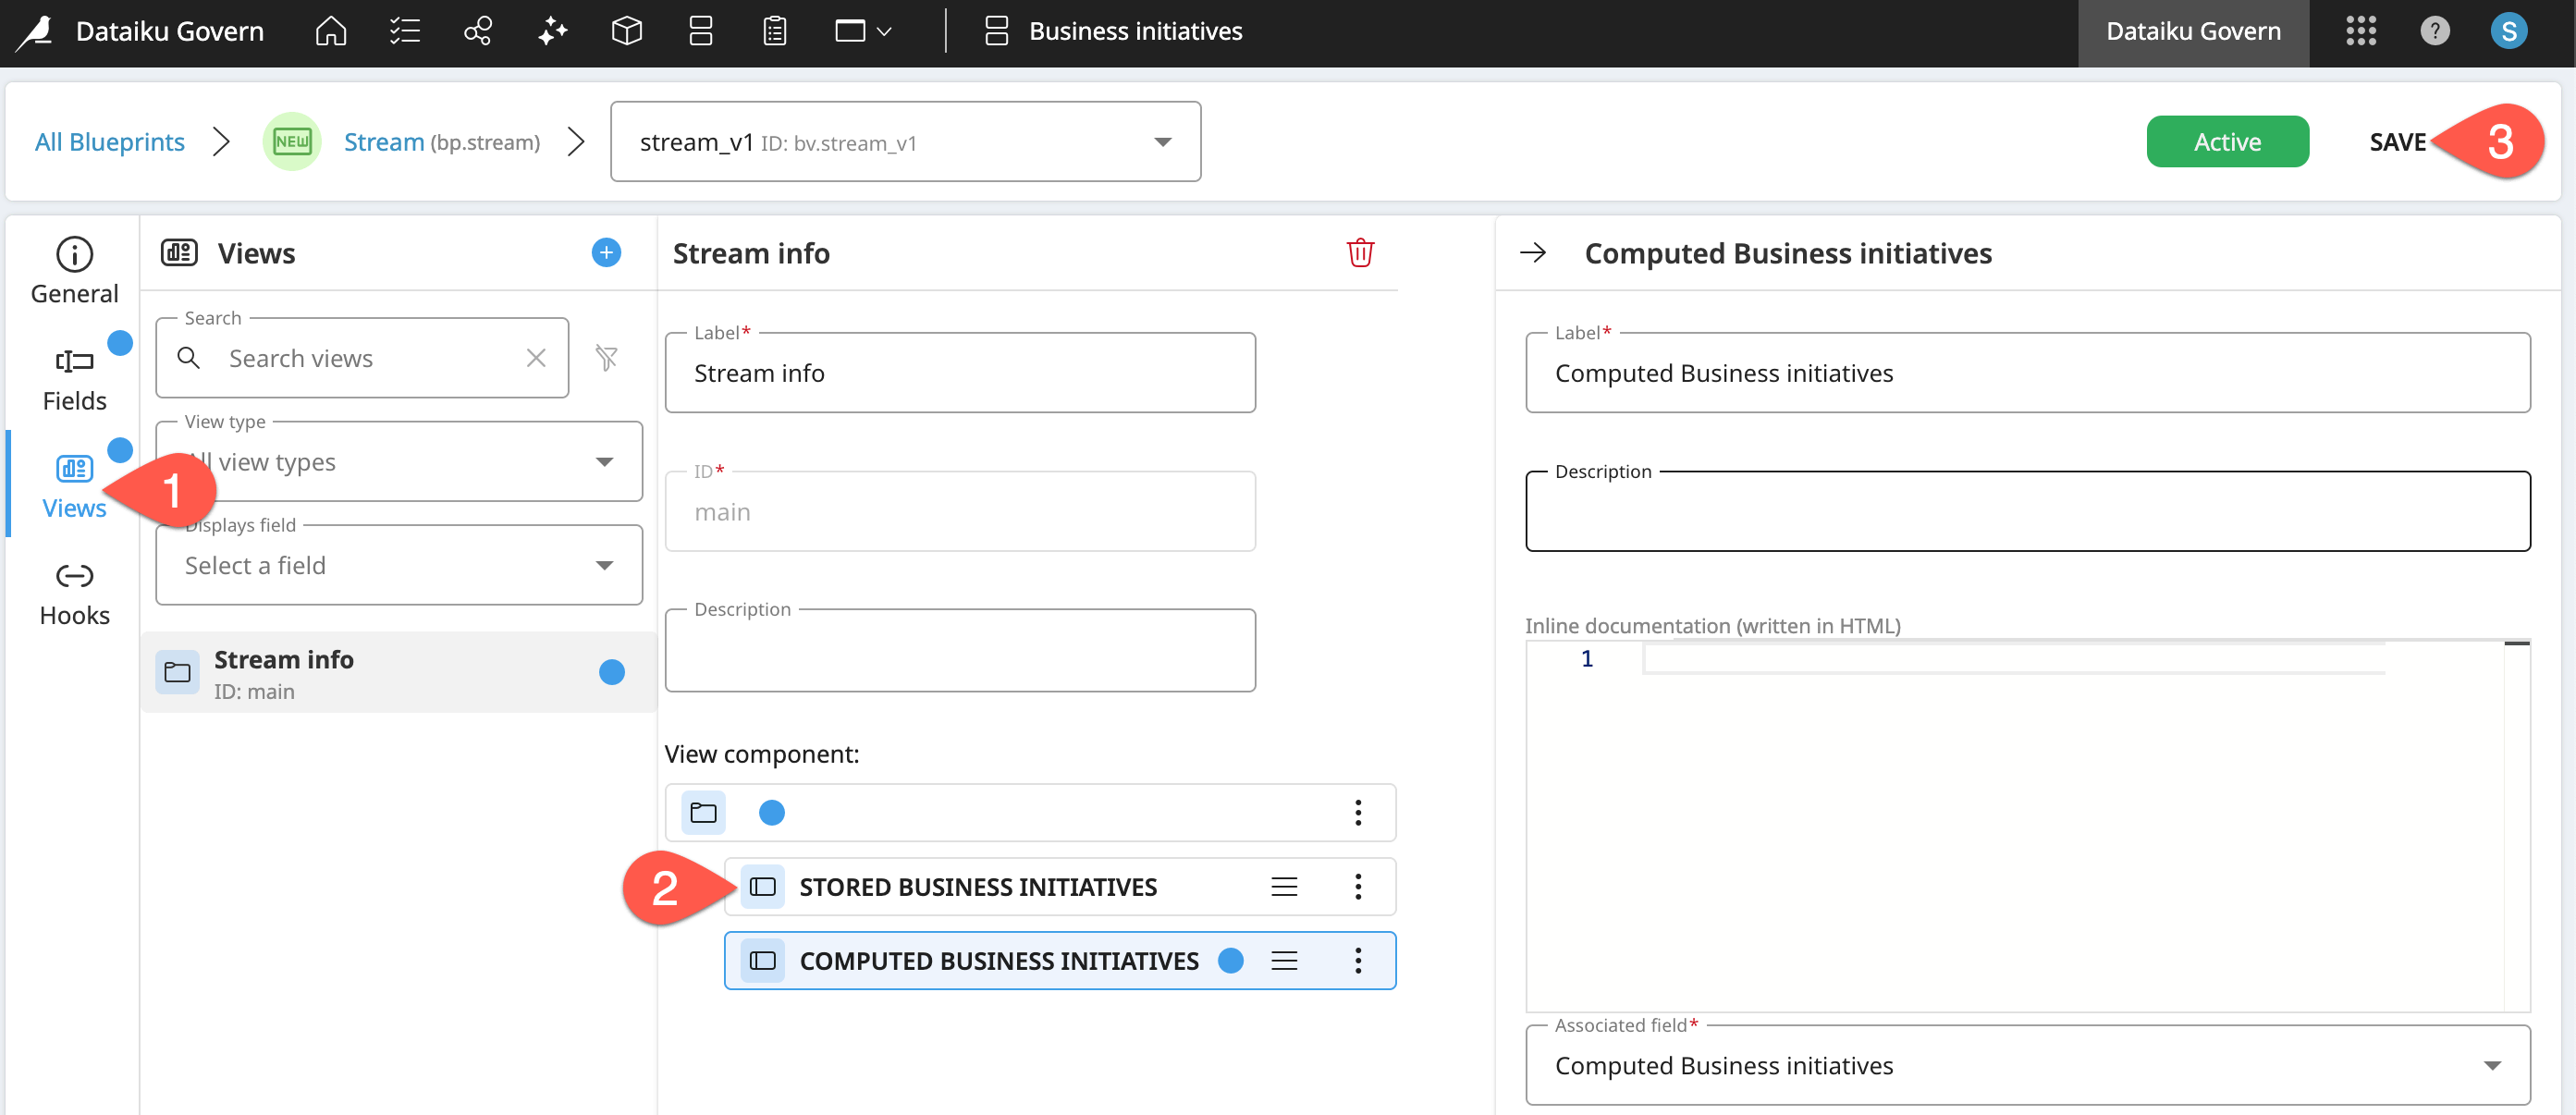
Within the stream_v1 blueprint version, go to the Views panel.
Select Stored Business initiatives > Vertical dots (
) > Insert view component > After selection > Computed Business initiatives > Create.Click Save and Save again to confirm.
Test the new template#
See if using a computed reference in the parent item created the kind of double-sided link you were after!
From the top navigation bar, go to the Business initiatives (
) page.Select your First BI.
Open your First Stream again.
Recognize that the Computed Business initiative field in the Stream is automatically populated with your New BI.
Tip
Why does this one work? The Computed Business initiatives field computes the latest list of all Business initiatives that have your First Stream in the Stream field.
Further confirm the parent-child link works by assigning a second Business initiative to the same Stream.
From the top navigation bar, go to the Business initiatives (
) page.Click Create, and select your custom_bi_v1.
Name the new Business initiative
<YOUR INITIALS> Second BI, and click Create.From the Overview tab of your Second BI, click Edit in the item header.
For the Stream field, click Select.
In the dialog that populates all existing Streams, choose your First Stream, and click Select.
In the Business initiative’s item header, click Save.
Open your First Stream to see both associated Business initiatives.
Tip
To confirm your understanding, create a second Stream, and try to add one Business initiative to two different Streams. Think through why it isn’t possible and the necessary field changes to make it happen.
Restrict item creation and selection in a view component#
Most parent-child relationships enable the creation of items from either the parent or the child item. For example:
From a Govern project, a user can associate an existing Business initiative as the parent or create a new Business initiative if the necessary one doesn’t exist.
Alternatively, from a Business initiative, a user can associate child Govern projects or create new ones if they don’t exist.
View components for associated reference fields include a setting called Choose how the user can select items. This setting controls the ability to create and/or select items.
Within the stream_v1 blueprint version, go to the Stream info view.
From the previous exercise, delete the incorrectly configured Stored Business initiatives field from the Stream info view.
Select the Computed Business initiatives component, and find the Choose how the user can select items setting.
Alternatively, in the Initiative info view of the custom_bi_v1 version, find this setting in the Stream component.
In both cases, the default option enables both the selection of existing items and the creation of new items. In other words:
From any Business initiative using this template, you can either select an existing Stream or create a new one.
Alternatively, from a Stream, you can not only associate existing Business initiatives, but also create new ones.
Perhaps you want to prevent the creation of a Stream from a Business initiative.
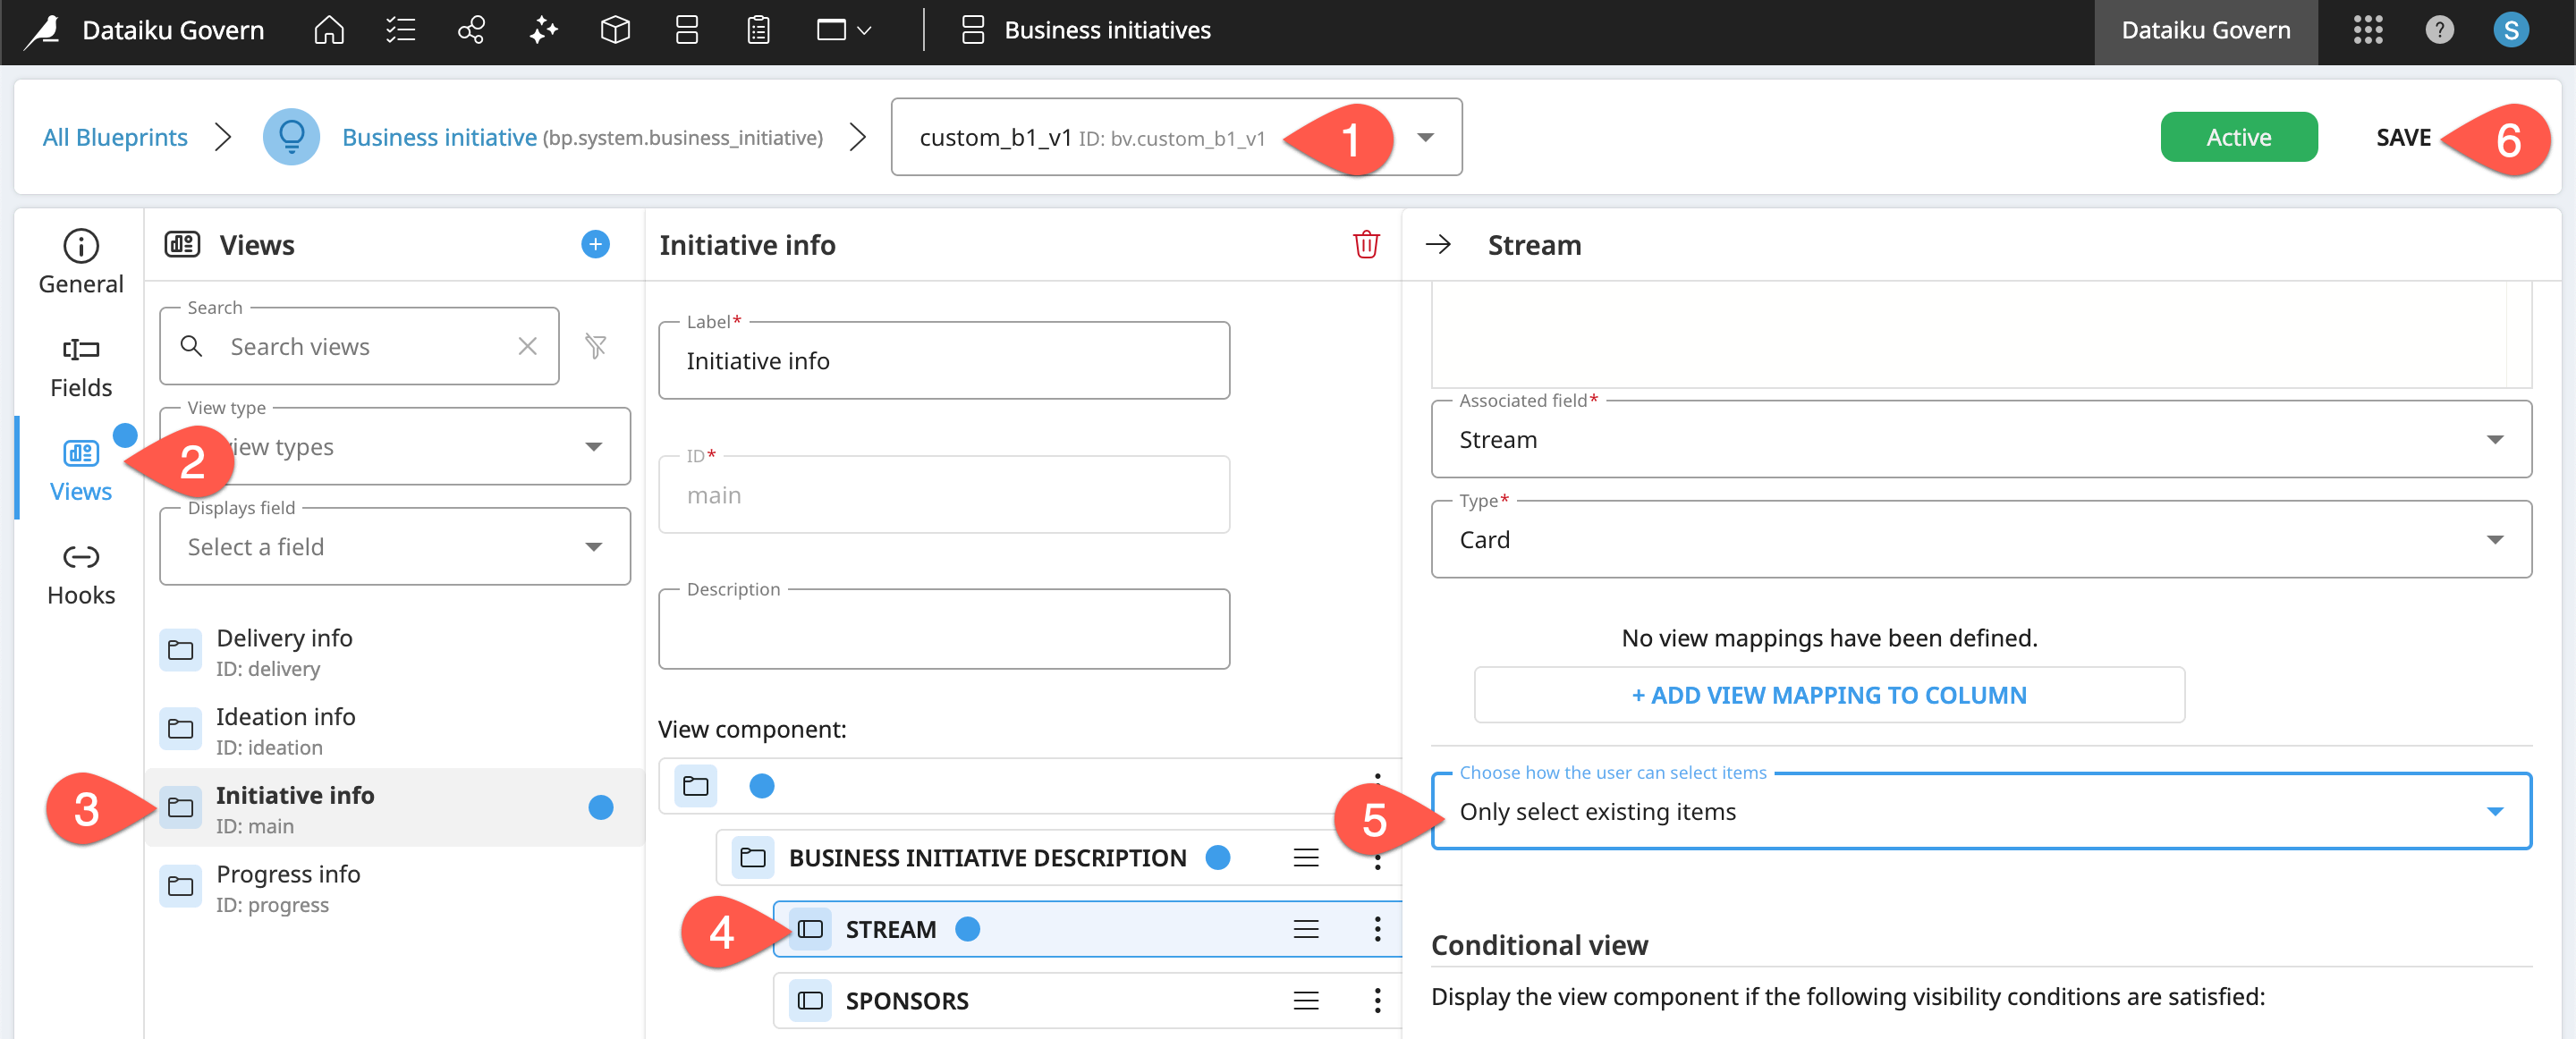
Open the custom_bi_v1 blueprint version.
Go to the Views panel.
Select the Initiative info view.
Select the Stream component.
For the setting “Choose how the user can select items,” pick Only select existing items.
Click Save and Save again to confirm.
Next, confirm that this blocker works.
Return to either of the Business initiatives governed according to your custom_bi_v1 template.
Within the Overview panel, click Edit in the item header.
Remove the associated First Stream by clicking the bin (
 ) icon.
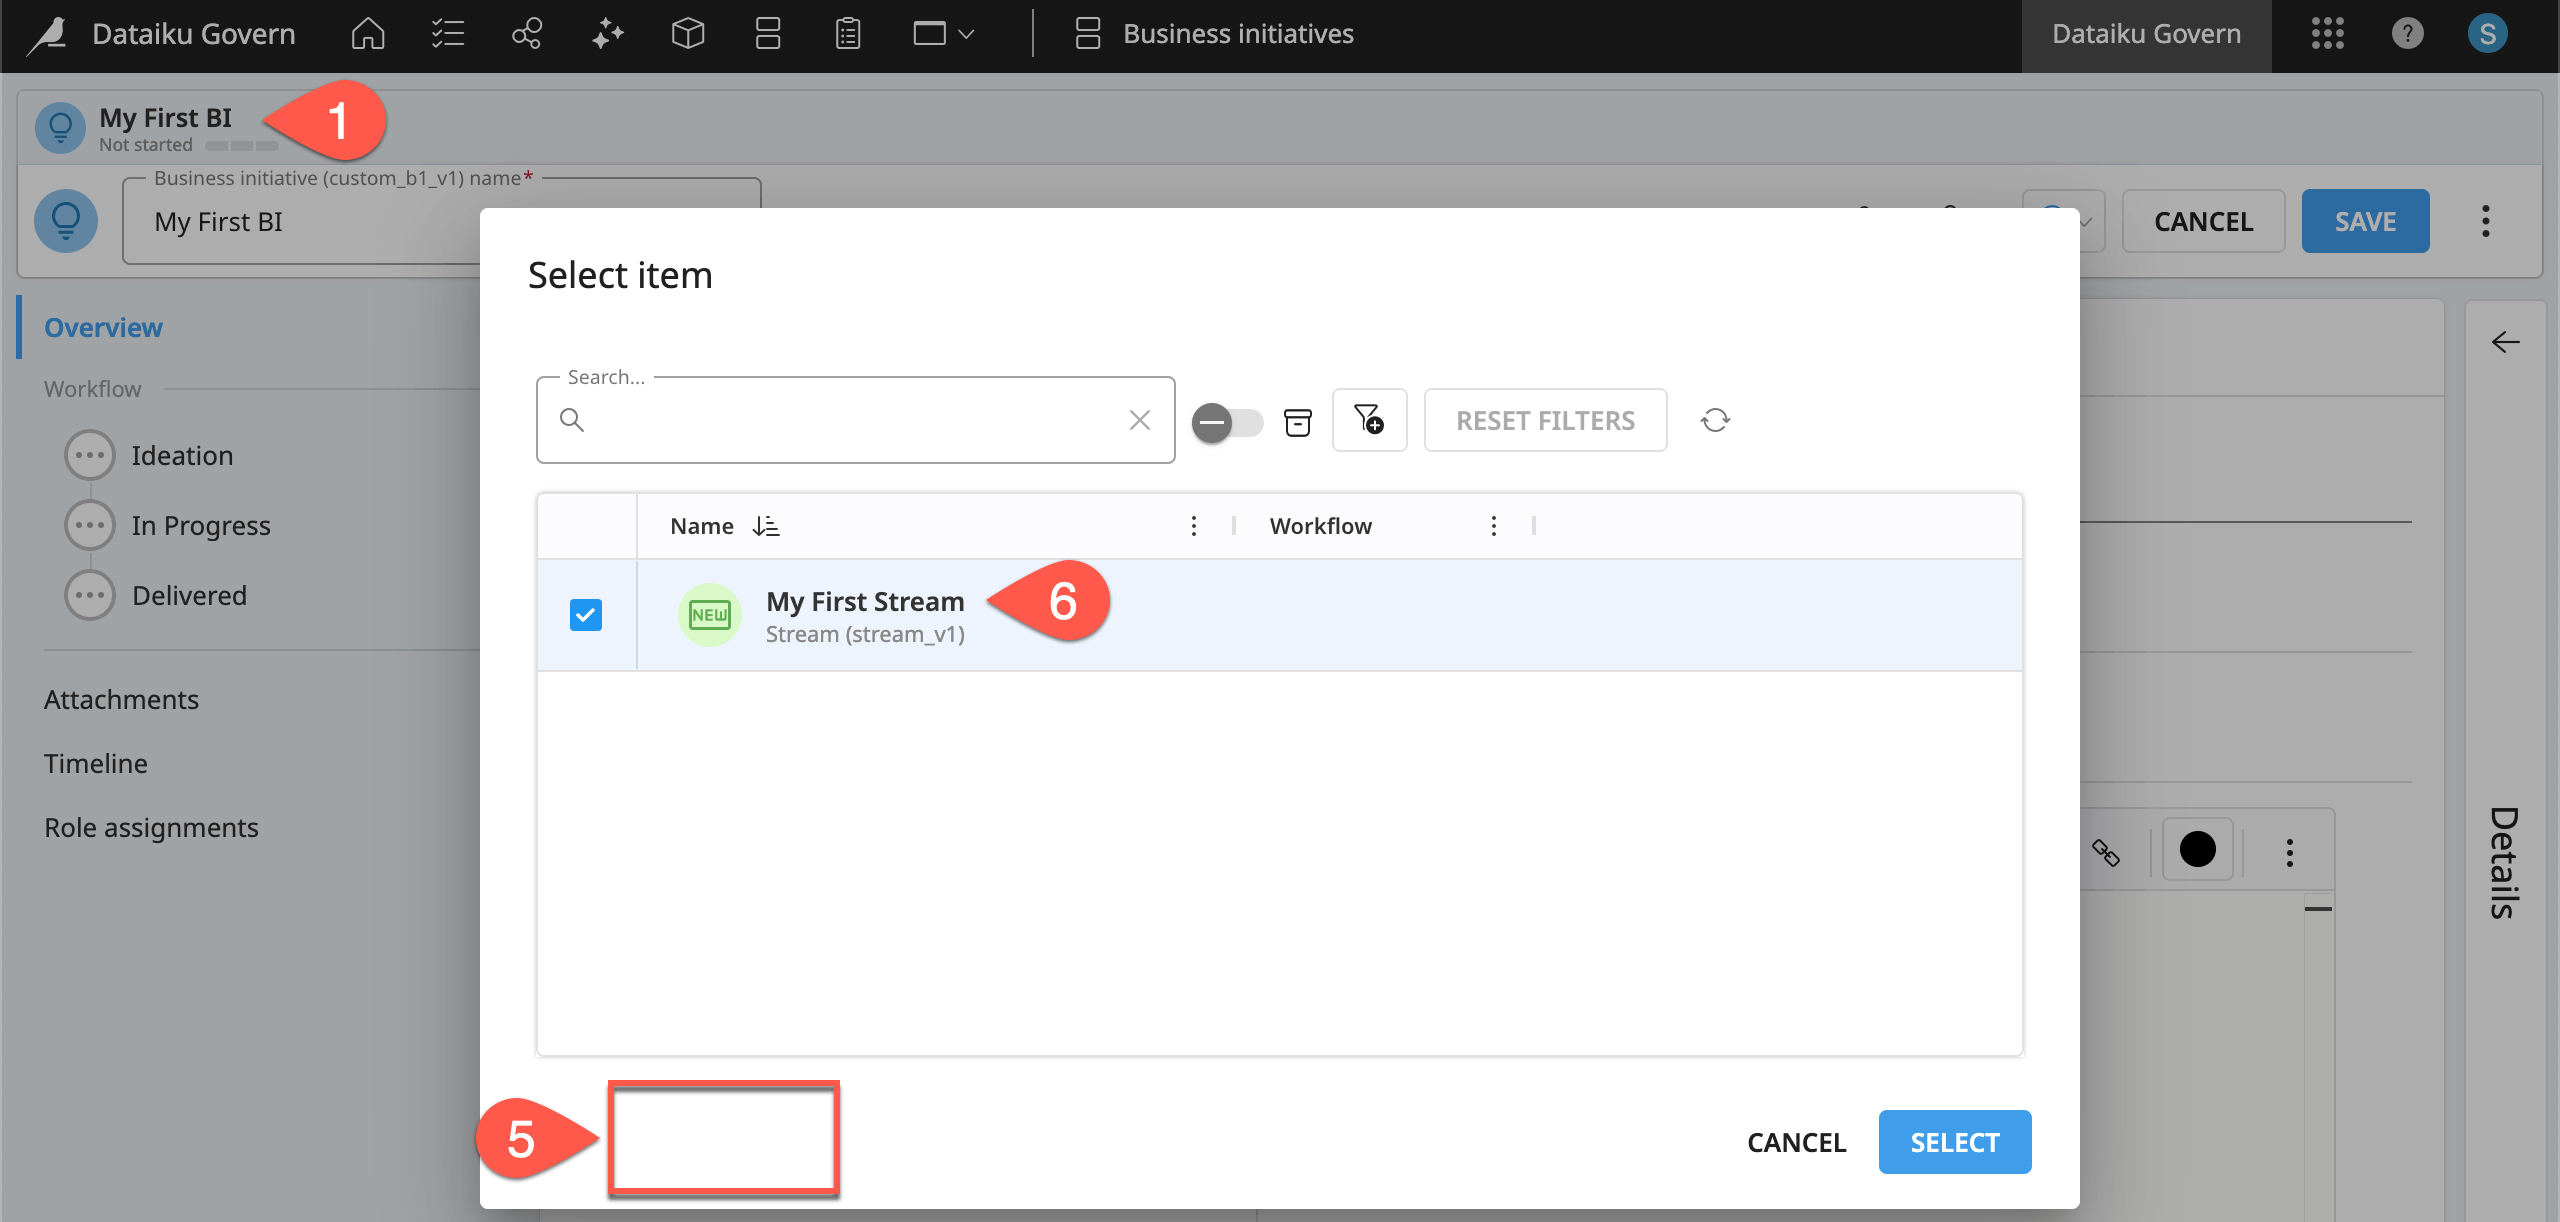
Note how the button now reads Select Existing.
Click it, and confirm the absence of the Create button in the dialog.
Reselect the First Stream, click Select, and then Save it again.
Tip
Restricting the creation of a parent Stream has introduced a problem! How does a user create a Stream if not from an existing Business initiative? The creation of custom items, as well as a centralized place to view them, often calls for a custom page. You’ll see how to do this in Tutorial | Custom governance pages.
Structure view components as tables#
Thus far, all view components you’ve created have been of the card variety. The Blueprint Designer, however, also enables you to structure view components in a table format, giving you greater control over the design and content of a custom Govern item.
Set a view component as a table#
In any Stream item, you may want to present information about the child Business initiatives in a table format. The first step is designing the view component.
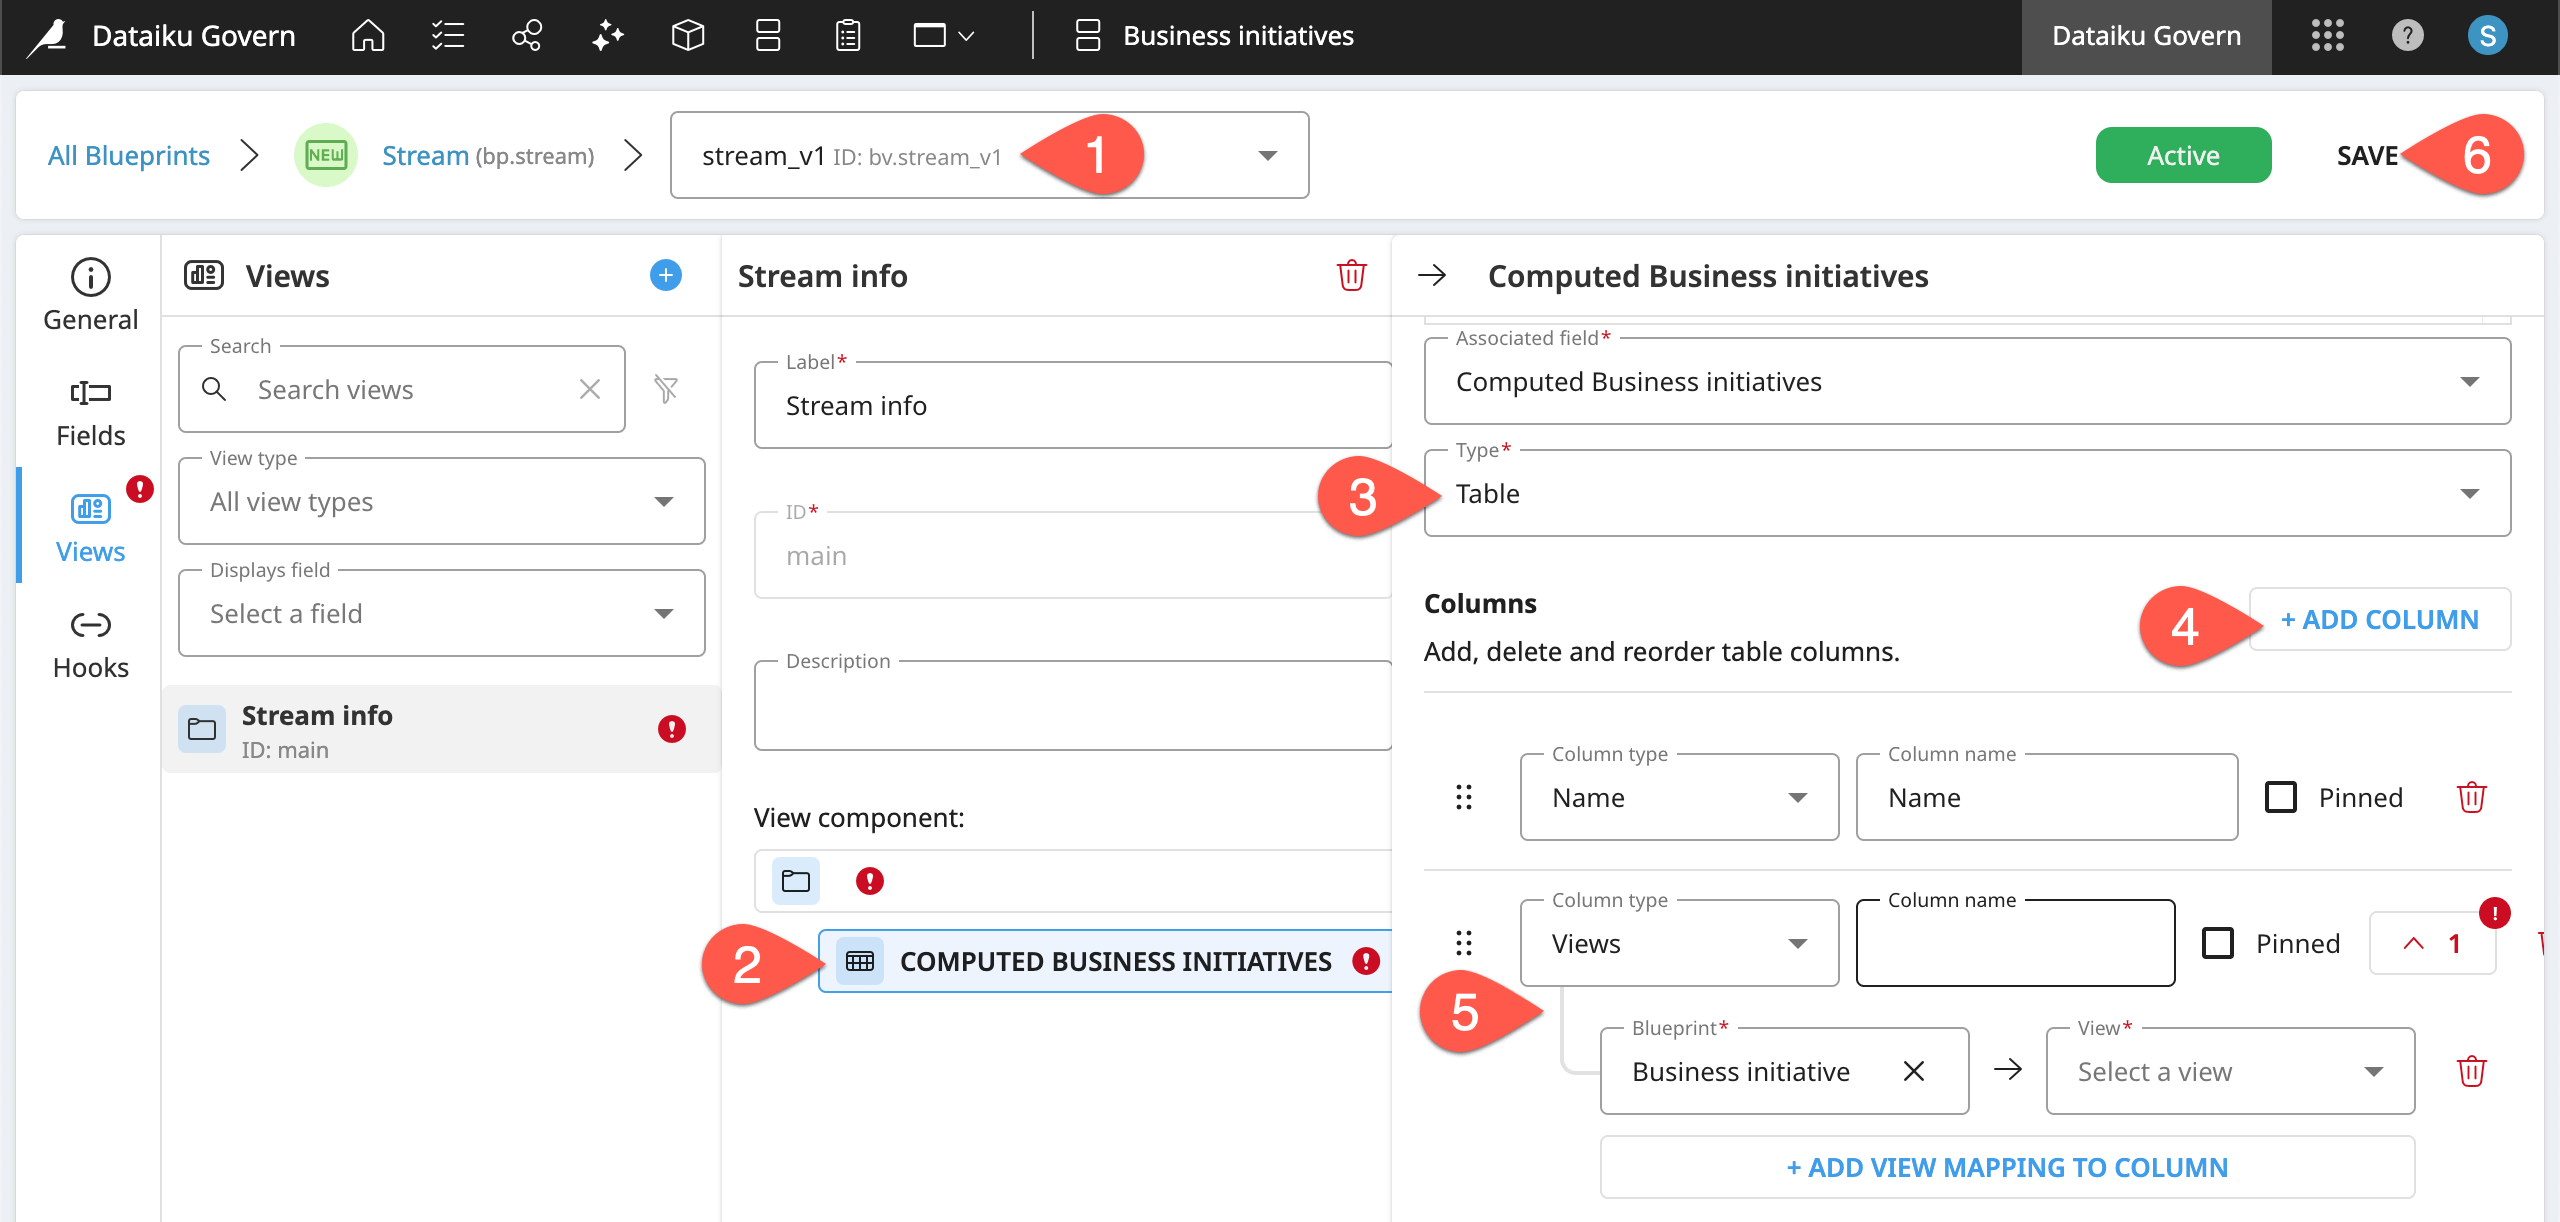
Open the stream_v1 blueprint version.
Go to Views > Stream info > Computed Business initiatives.
In this view component, change the Type from a Card to a Table.
Click + Add Column to automatically insert a Name column.
Click + Add Column again for a second column. Browse the existing views for a Business initiative to learn that none display well in a table format.
Leaving the view empty, click Save twice to confirm.
In a separate tab, return to your First Stream to see the initial table layout. You need to access it through an associated Business initiative.
Create a view for a table layout#
Not every view, such as those with heavy text fields, is well suited to a table layout. You may need to create new views with a table layout in mind. For example, the ratings of a Business initiative (all categorical fields) are something you may want to display in a Stream table.
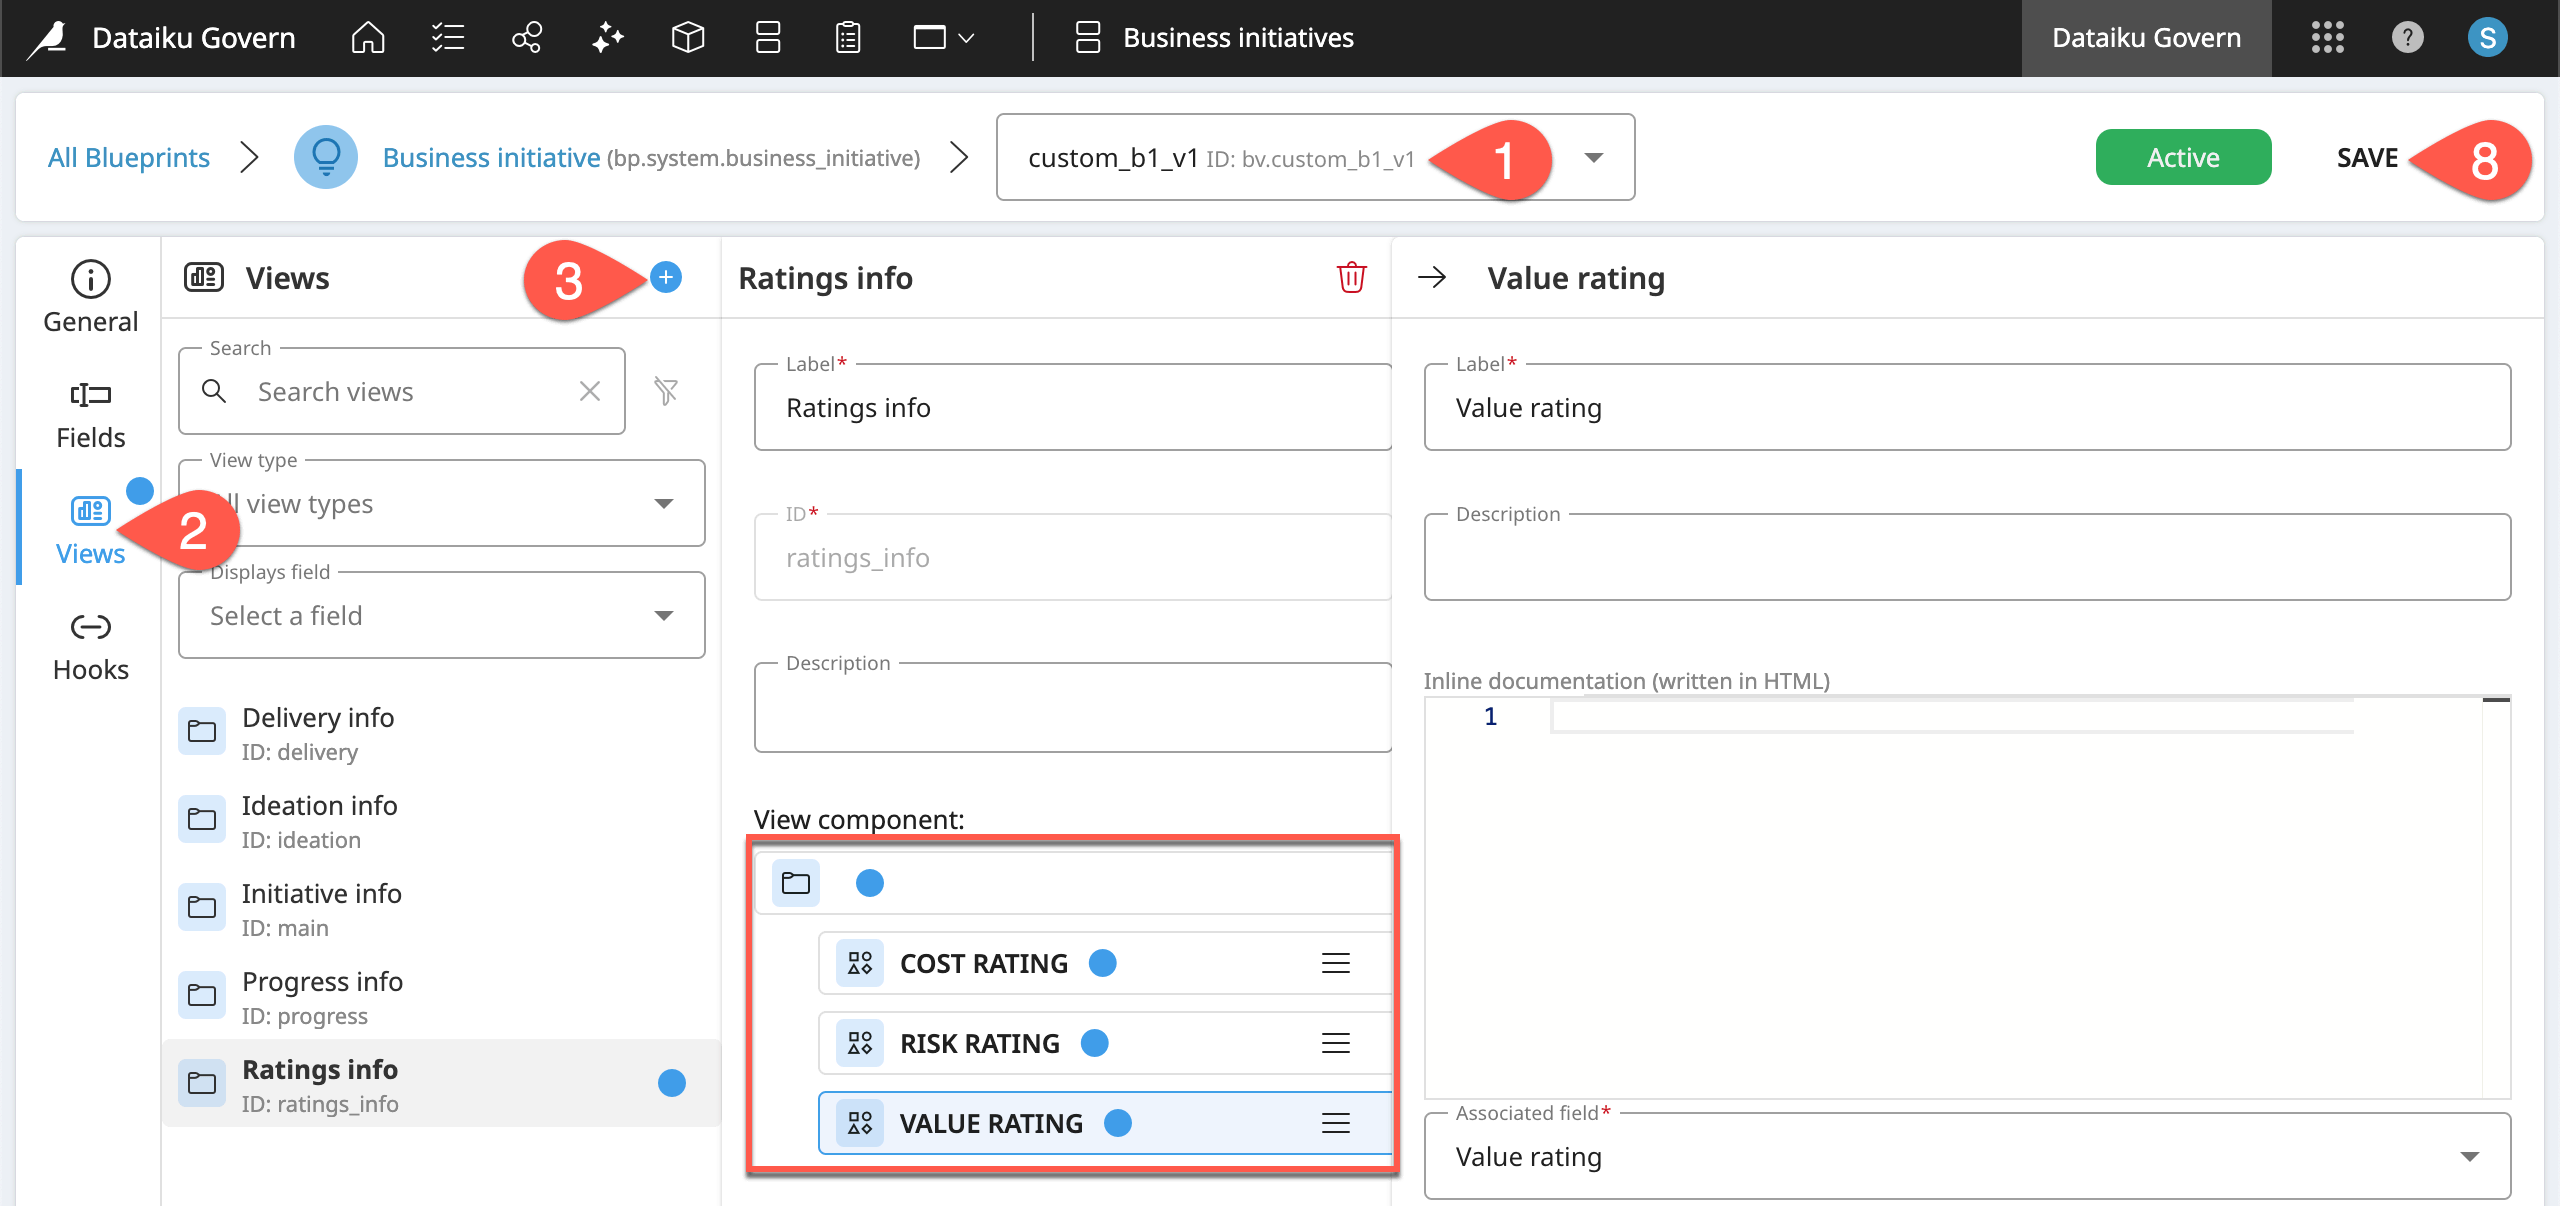
Open the custom_bi_v1 blueprint version.
Go to the Views panel.
Click the plus (
) icon to create a new view.Name it
Ratings info, and click Create.Click Add View Component.
Select Container as the type, and click Create.
Click Add View Component again, and add the three rating fields: Cost rating, Risk rating, and Value rating. Then click Create.
In the blueprint version, click Save and Save again to confirm.
Now that Business initiatives governed with this template include this view, you can use it in the Stream blueprint version.
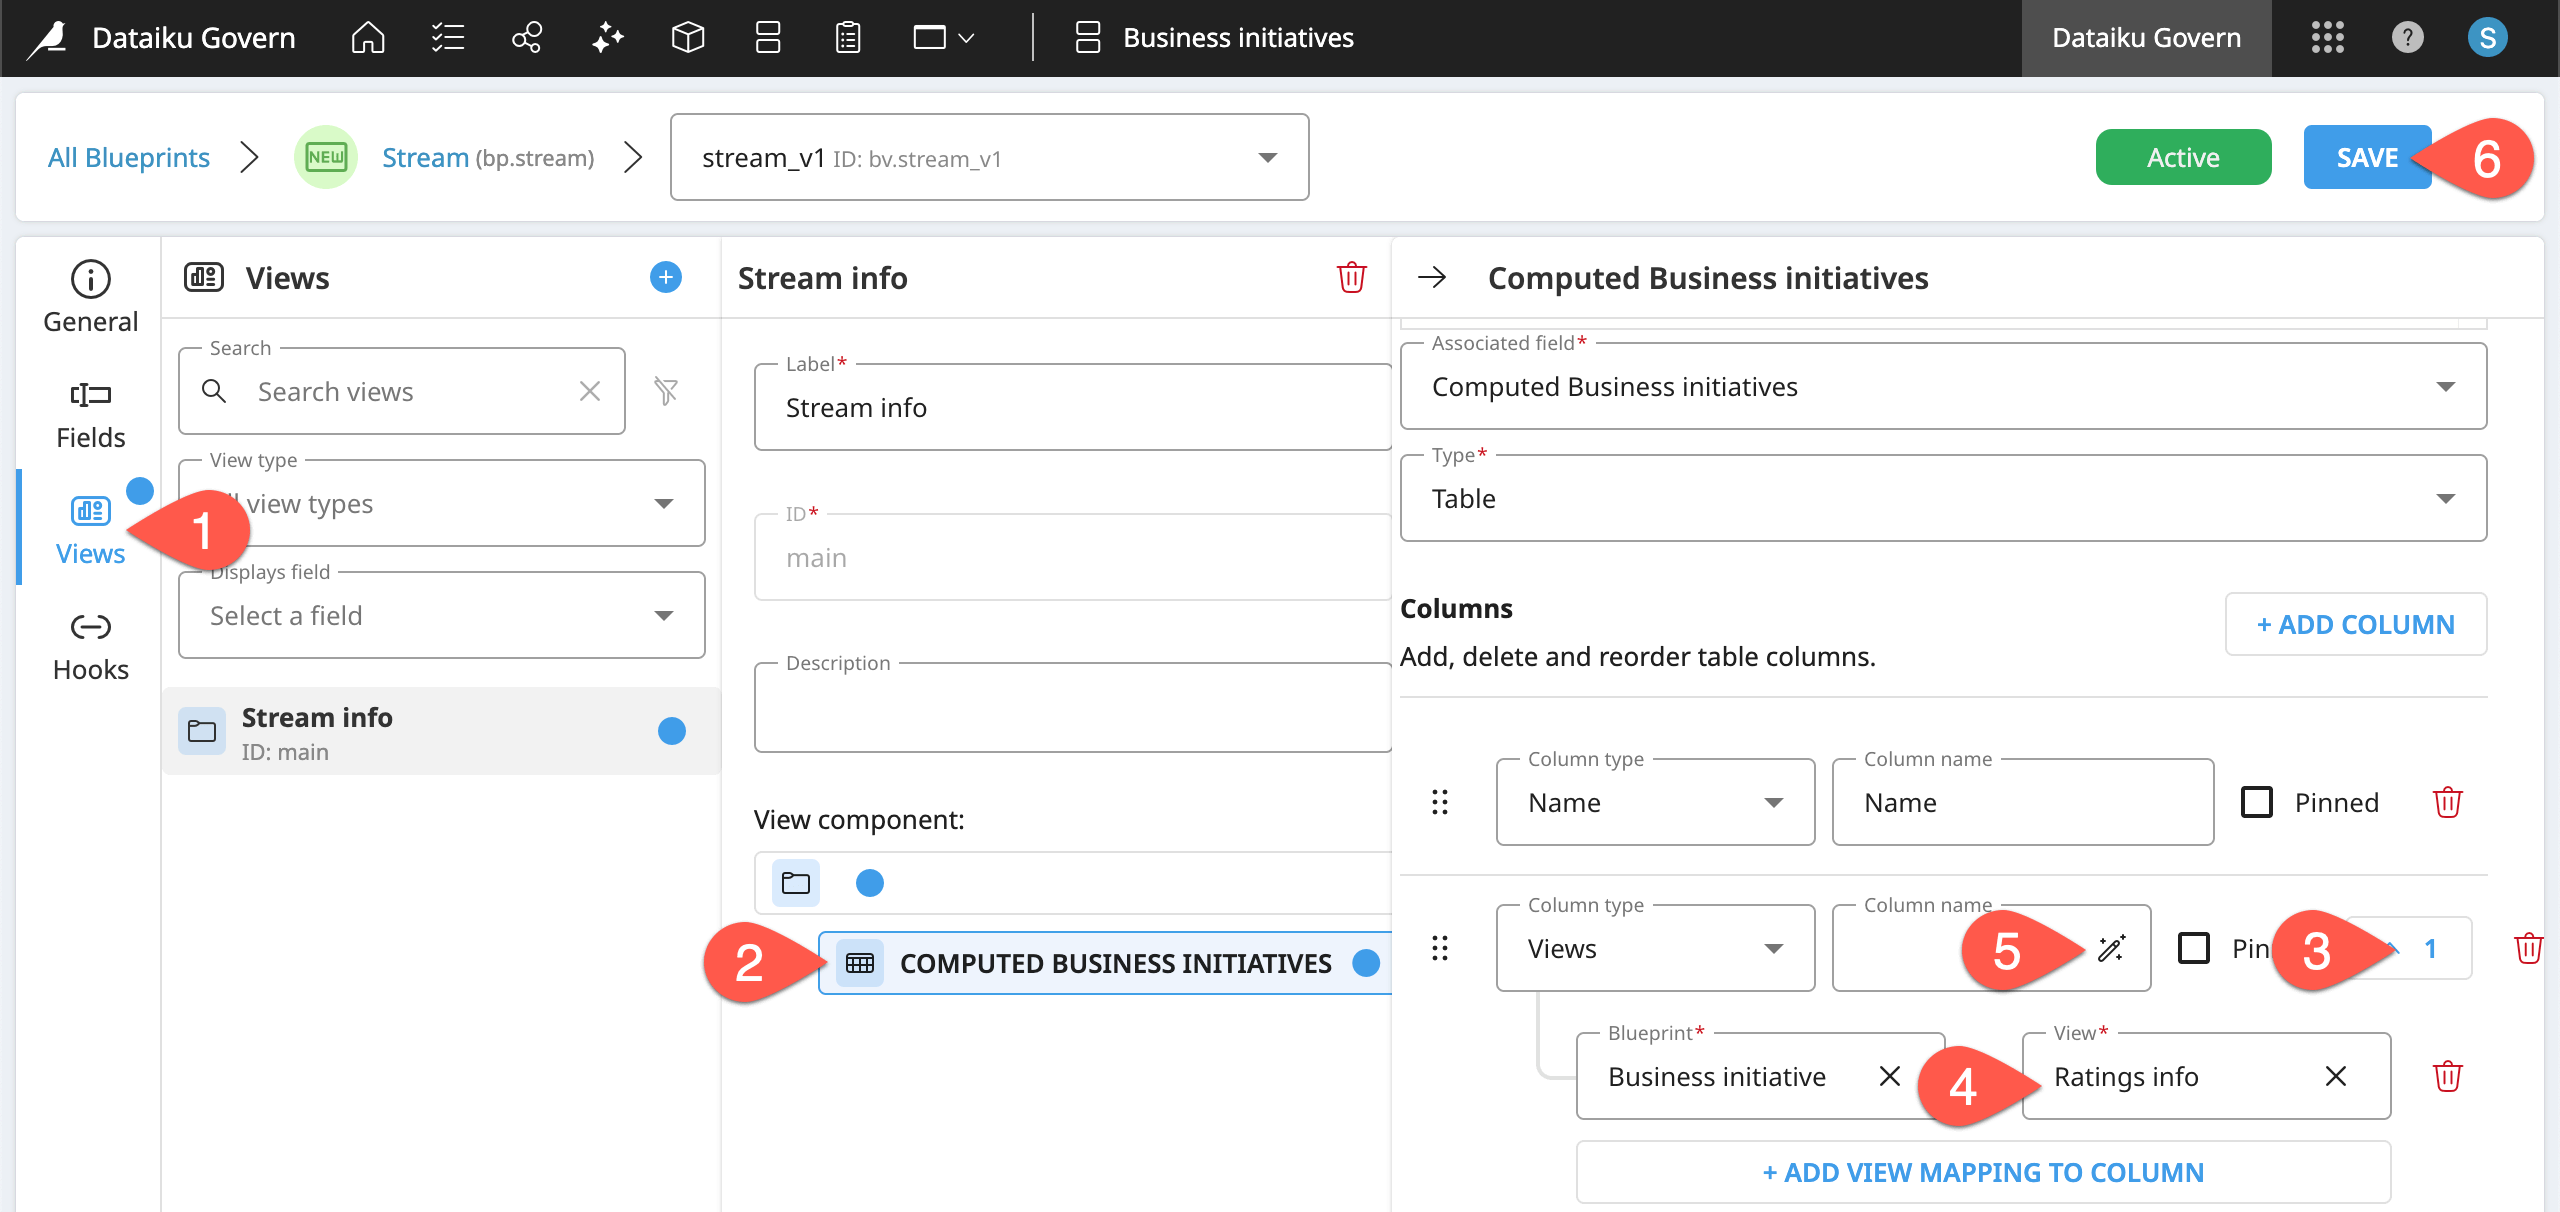
Return to the Views panel of the stream_v1 blueprint version.
In the Stream info view, select the Computed Business initiatives component.
Expand the column configuration that’s missing an assigned view.
Select Ratings info as the associated view from the Business initiative.
Click the wand (
 ) to auto-fill the column name.
Click Save and Save again to confirm.
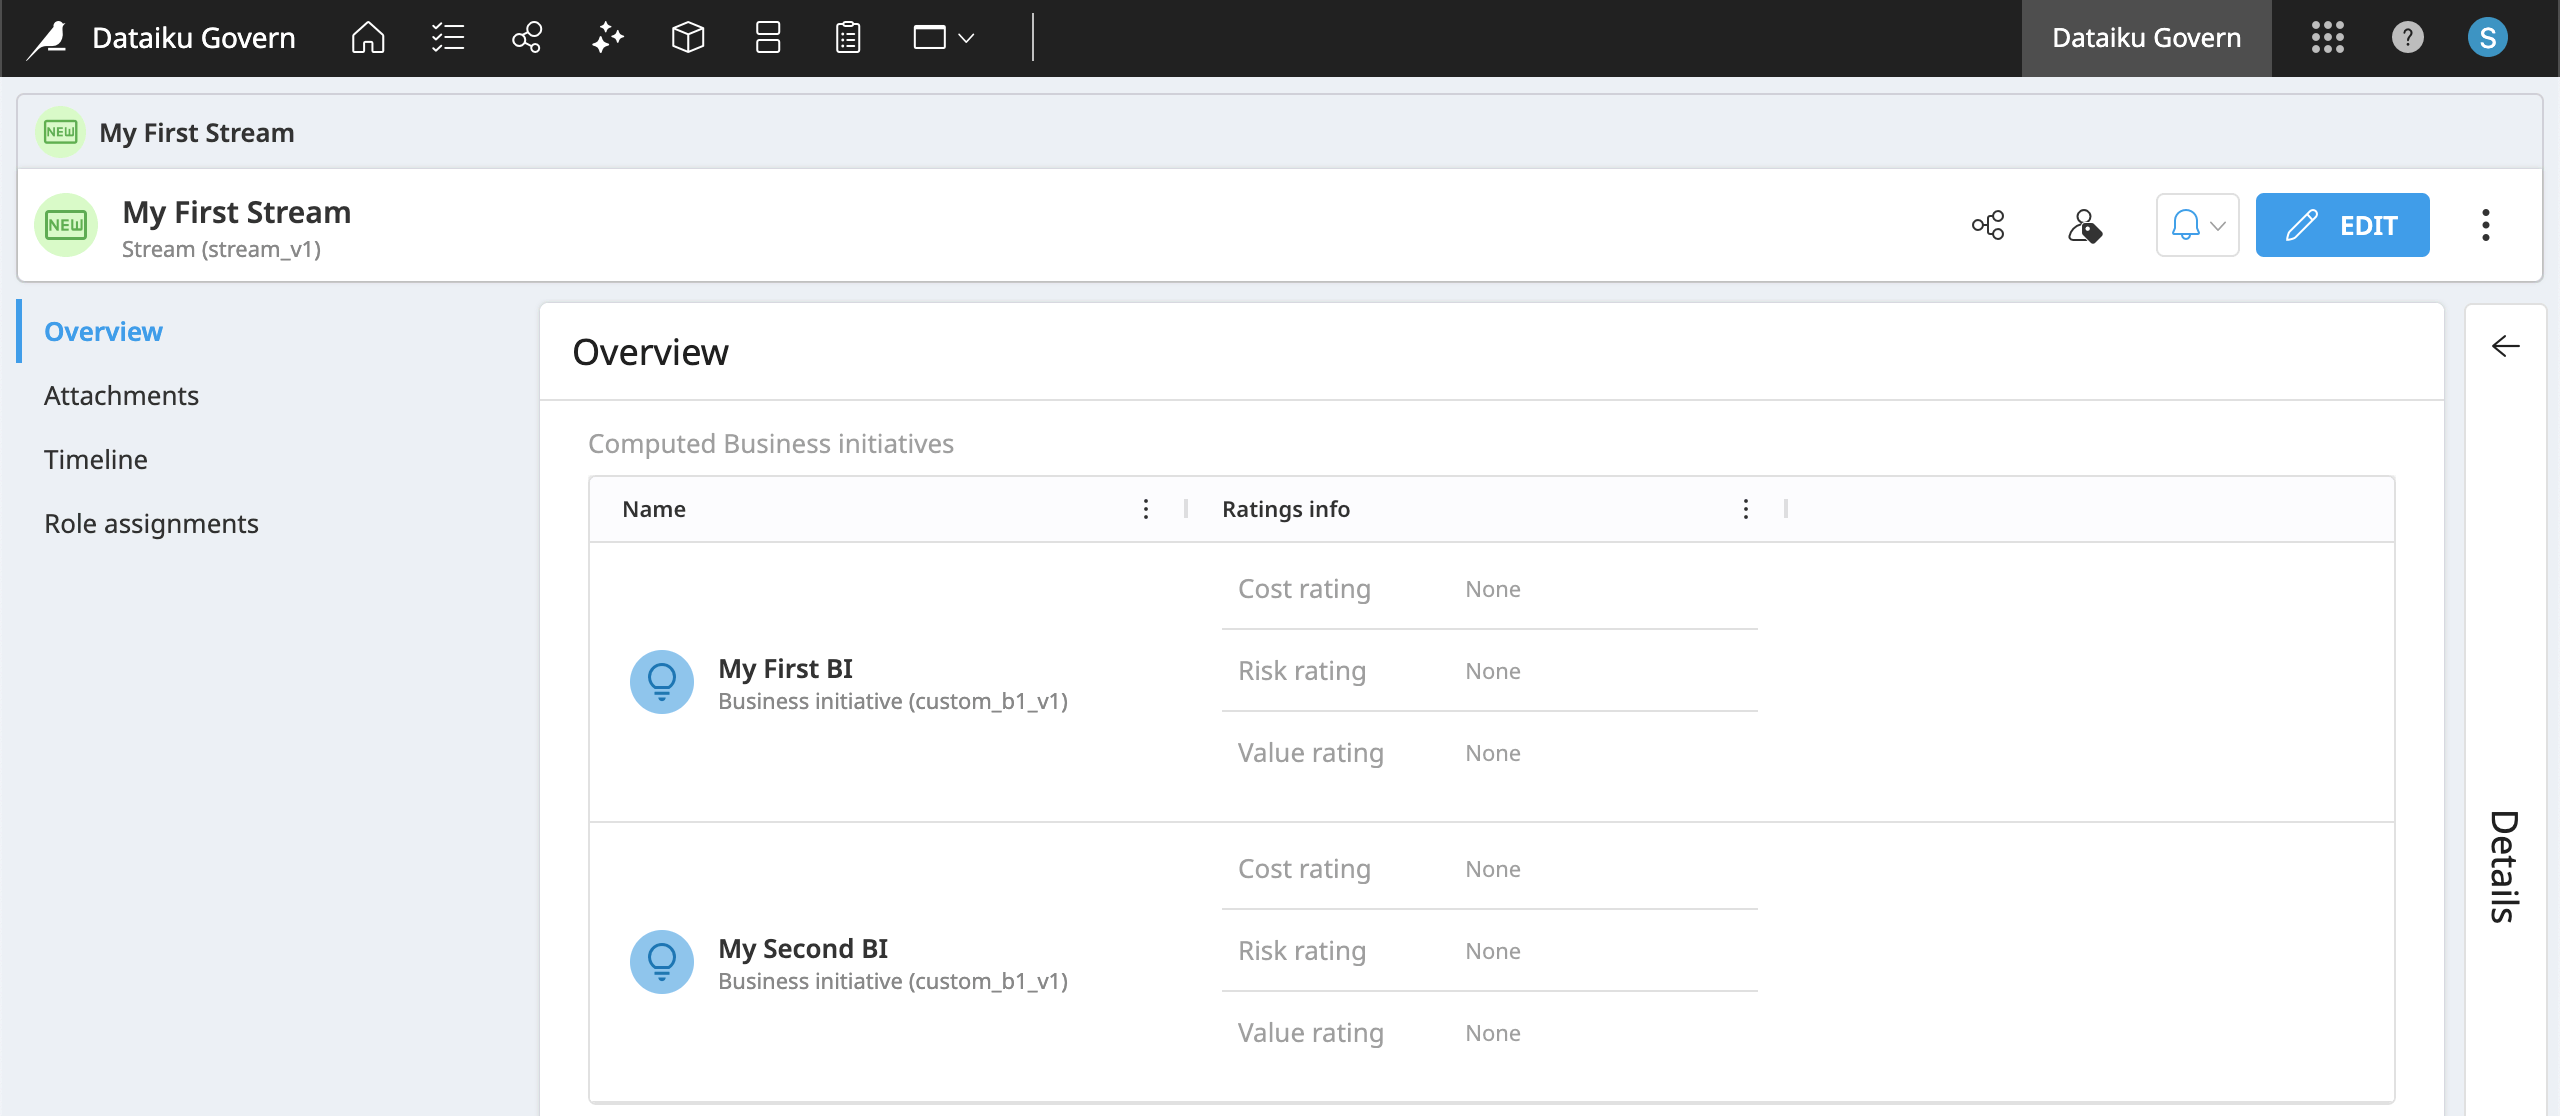
Refresh your First Stream to see the updated table.
Design conditional view components#
Thus far, any view component included in a standard Govern item is always present. However, similar to when building any form, conditional logic is often helpful. Being able to control the presence of certain components inside a Govern item based on some condition can make your governance efforts more dynamic and focused. This makes it more efficient for end users to complete their actual governance duties.
The use cases for conditional view components are wide-ranging. For example, you might have different governance requirements depending on the risk level at hand.
Create more fields#
Before creating a conditional view component, it will help to have a few more Stream fields.
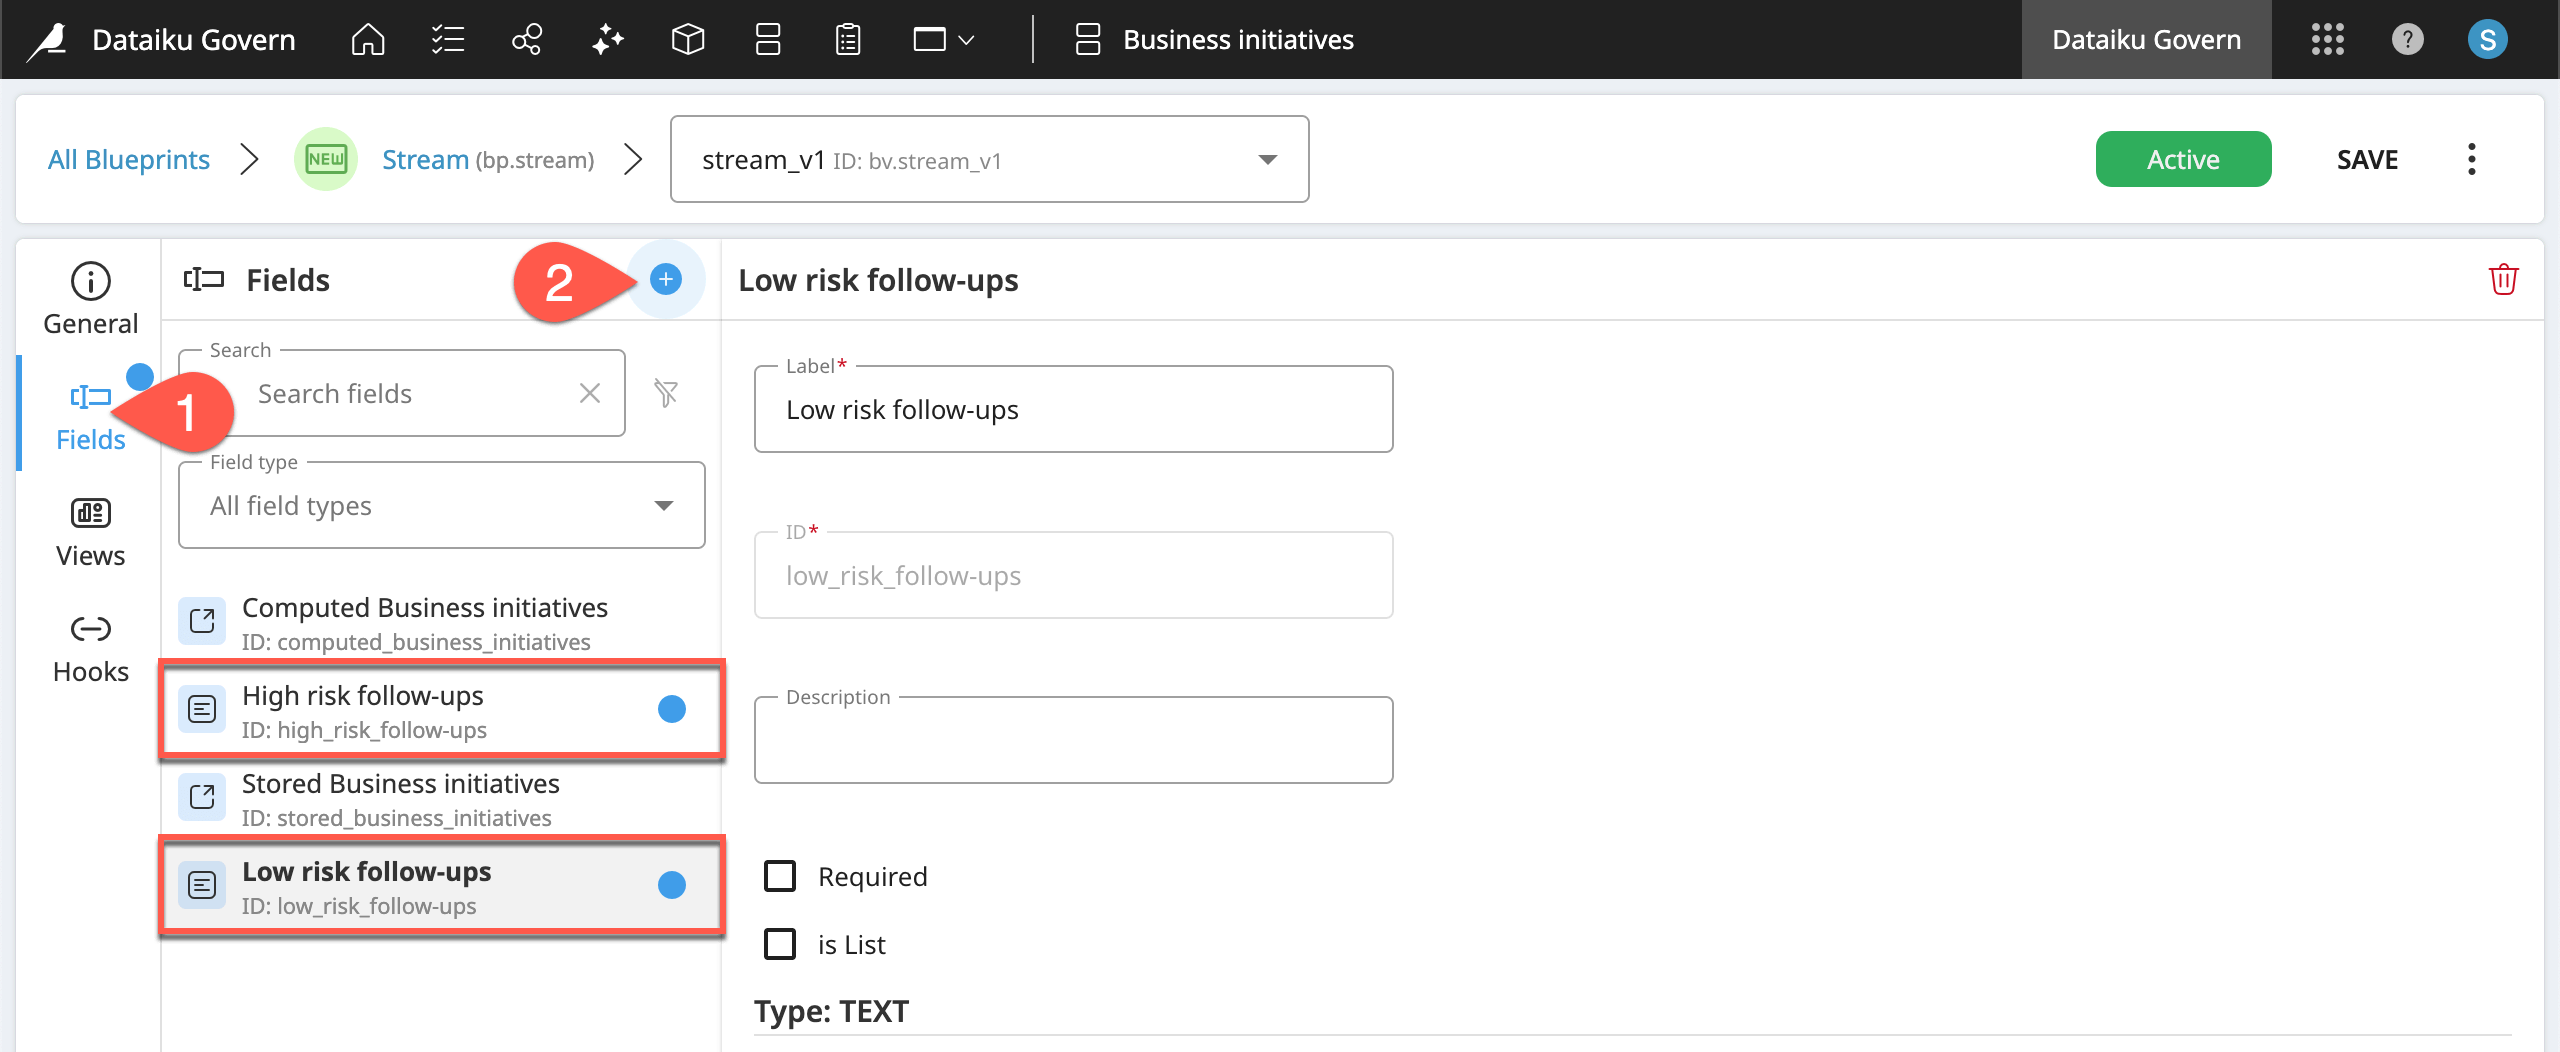
In the stream_v1 blueprint version, navigate to the Fields panel.
Click the plus (
) icon to create a new field.Select Text, name it
High risk follow-ups, and click Create.Click the plus (
) icon again to create another field.Select Text, name it
Low risk follow-ups, and click Create.
Add more view components#
Now that these fields exist, add them as additional view components inside a Stream.
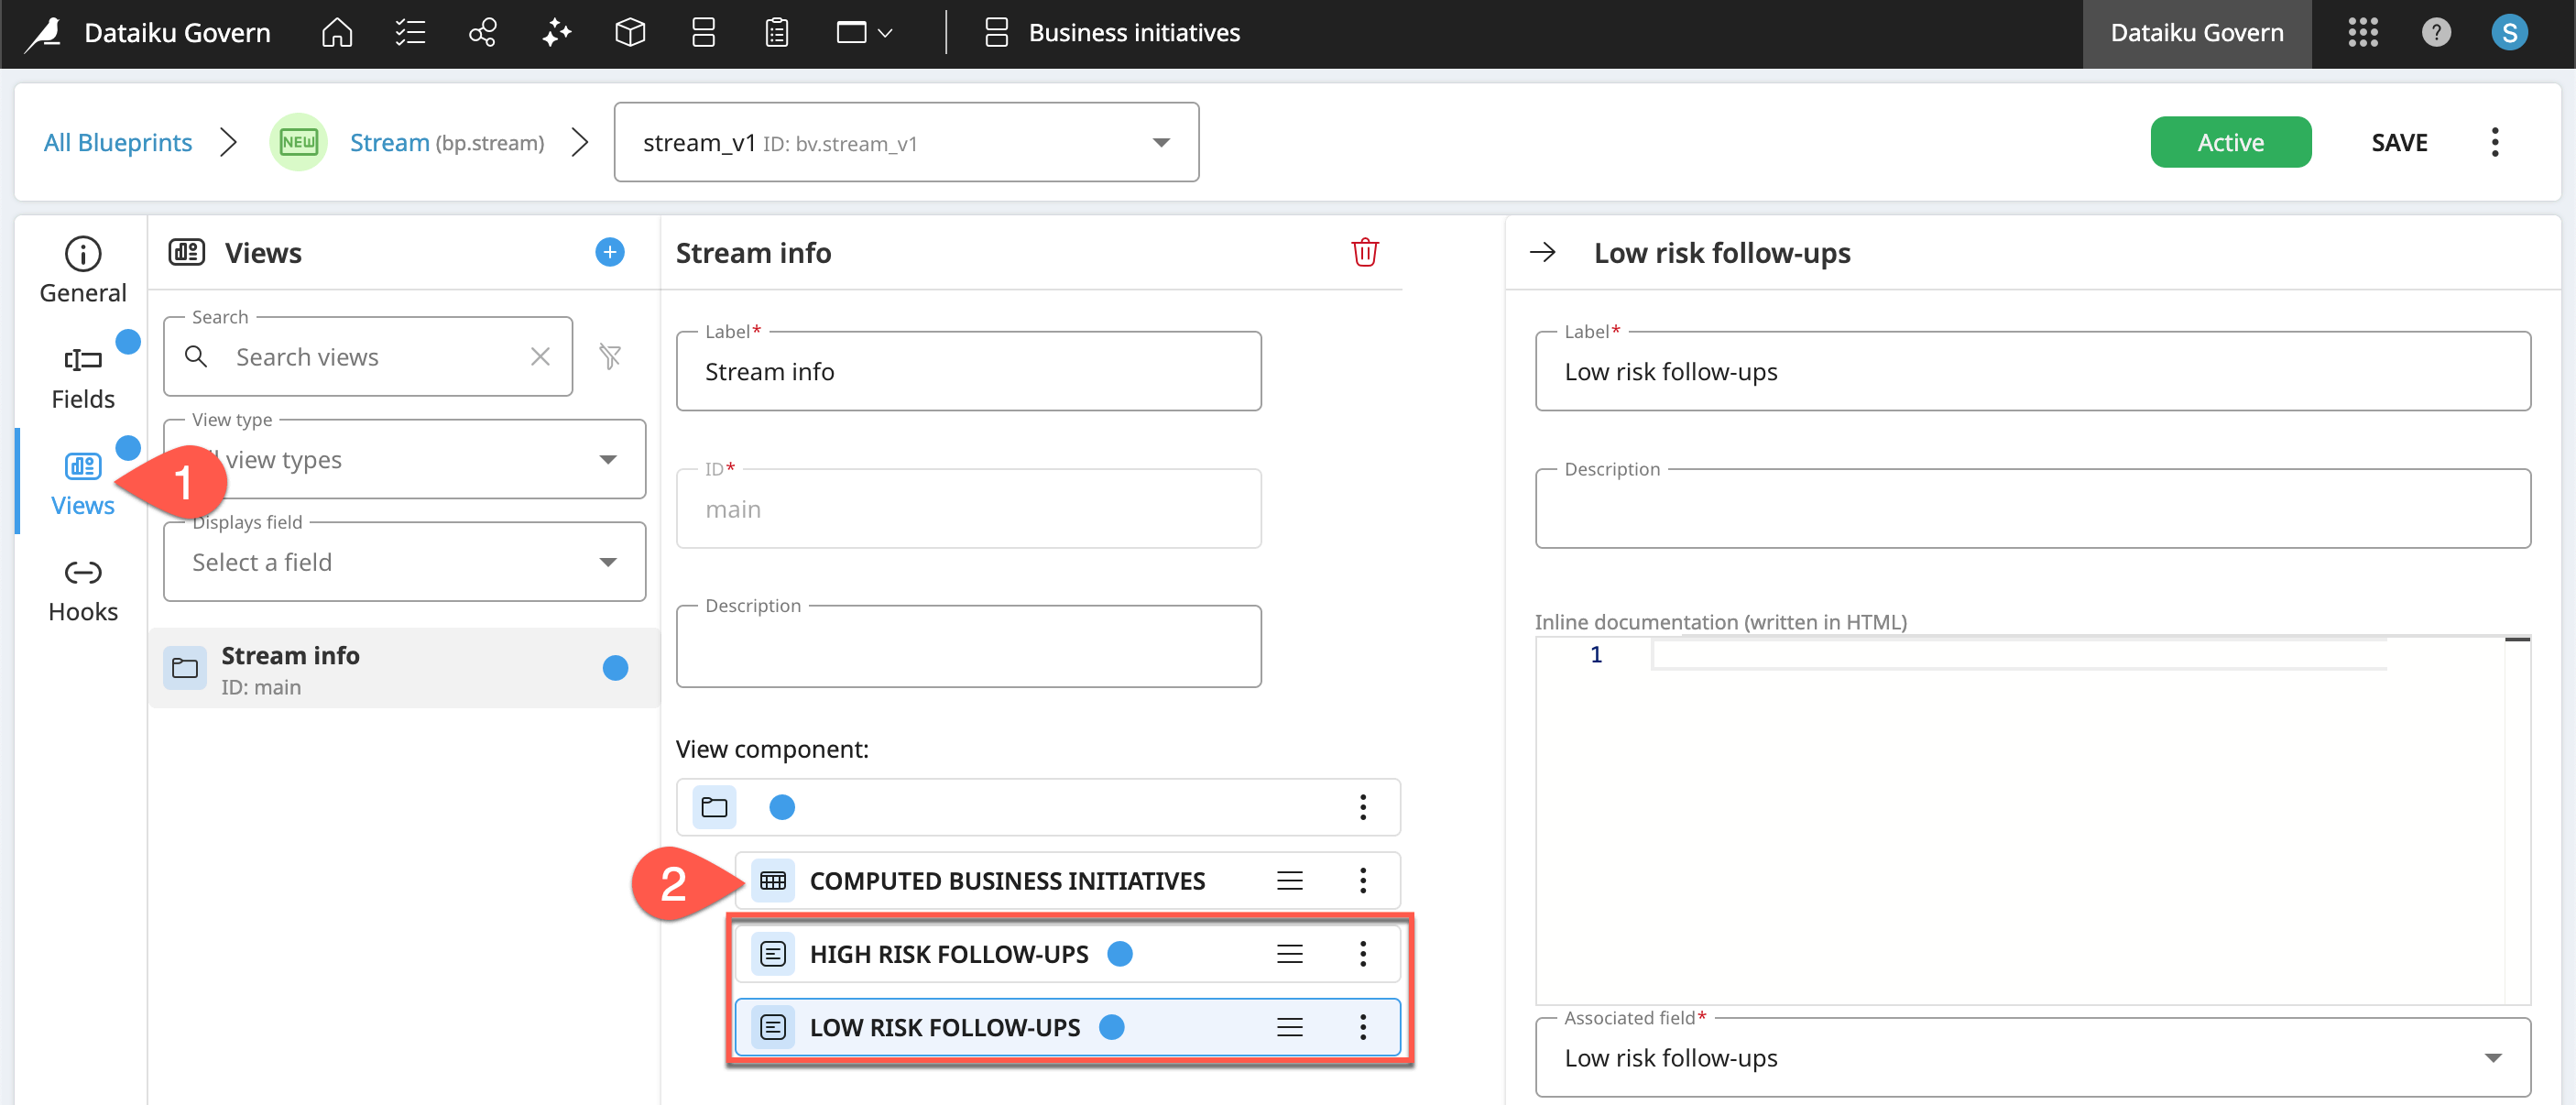
In the stream_v1 blueprint version, navigate to the Views panel.
Within the Stream info view, select Computed Business initiatives > Vertical dots (
) > Insert view component > After selection.Add both follow-up fields using the plus (
) icon, and click Create.
Add conditional logic#
Now that you have these view components, you can define conditional logic for when they should be visible based on any item, workflow step, or sign-off. To define these conditions, you’ll use the same set of filters at the top of Govern node pages.
End users don’t necessarily need to make a selection to determine what appears in the view that they ultimately see. For example, imagine you only want these last two components of a Stream to be visible according to the risk level of any associated Business initiative. In this case, a property in one item, a Business initiative, impacts the view of a separate item, a Stream.
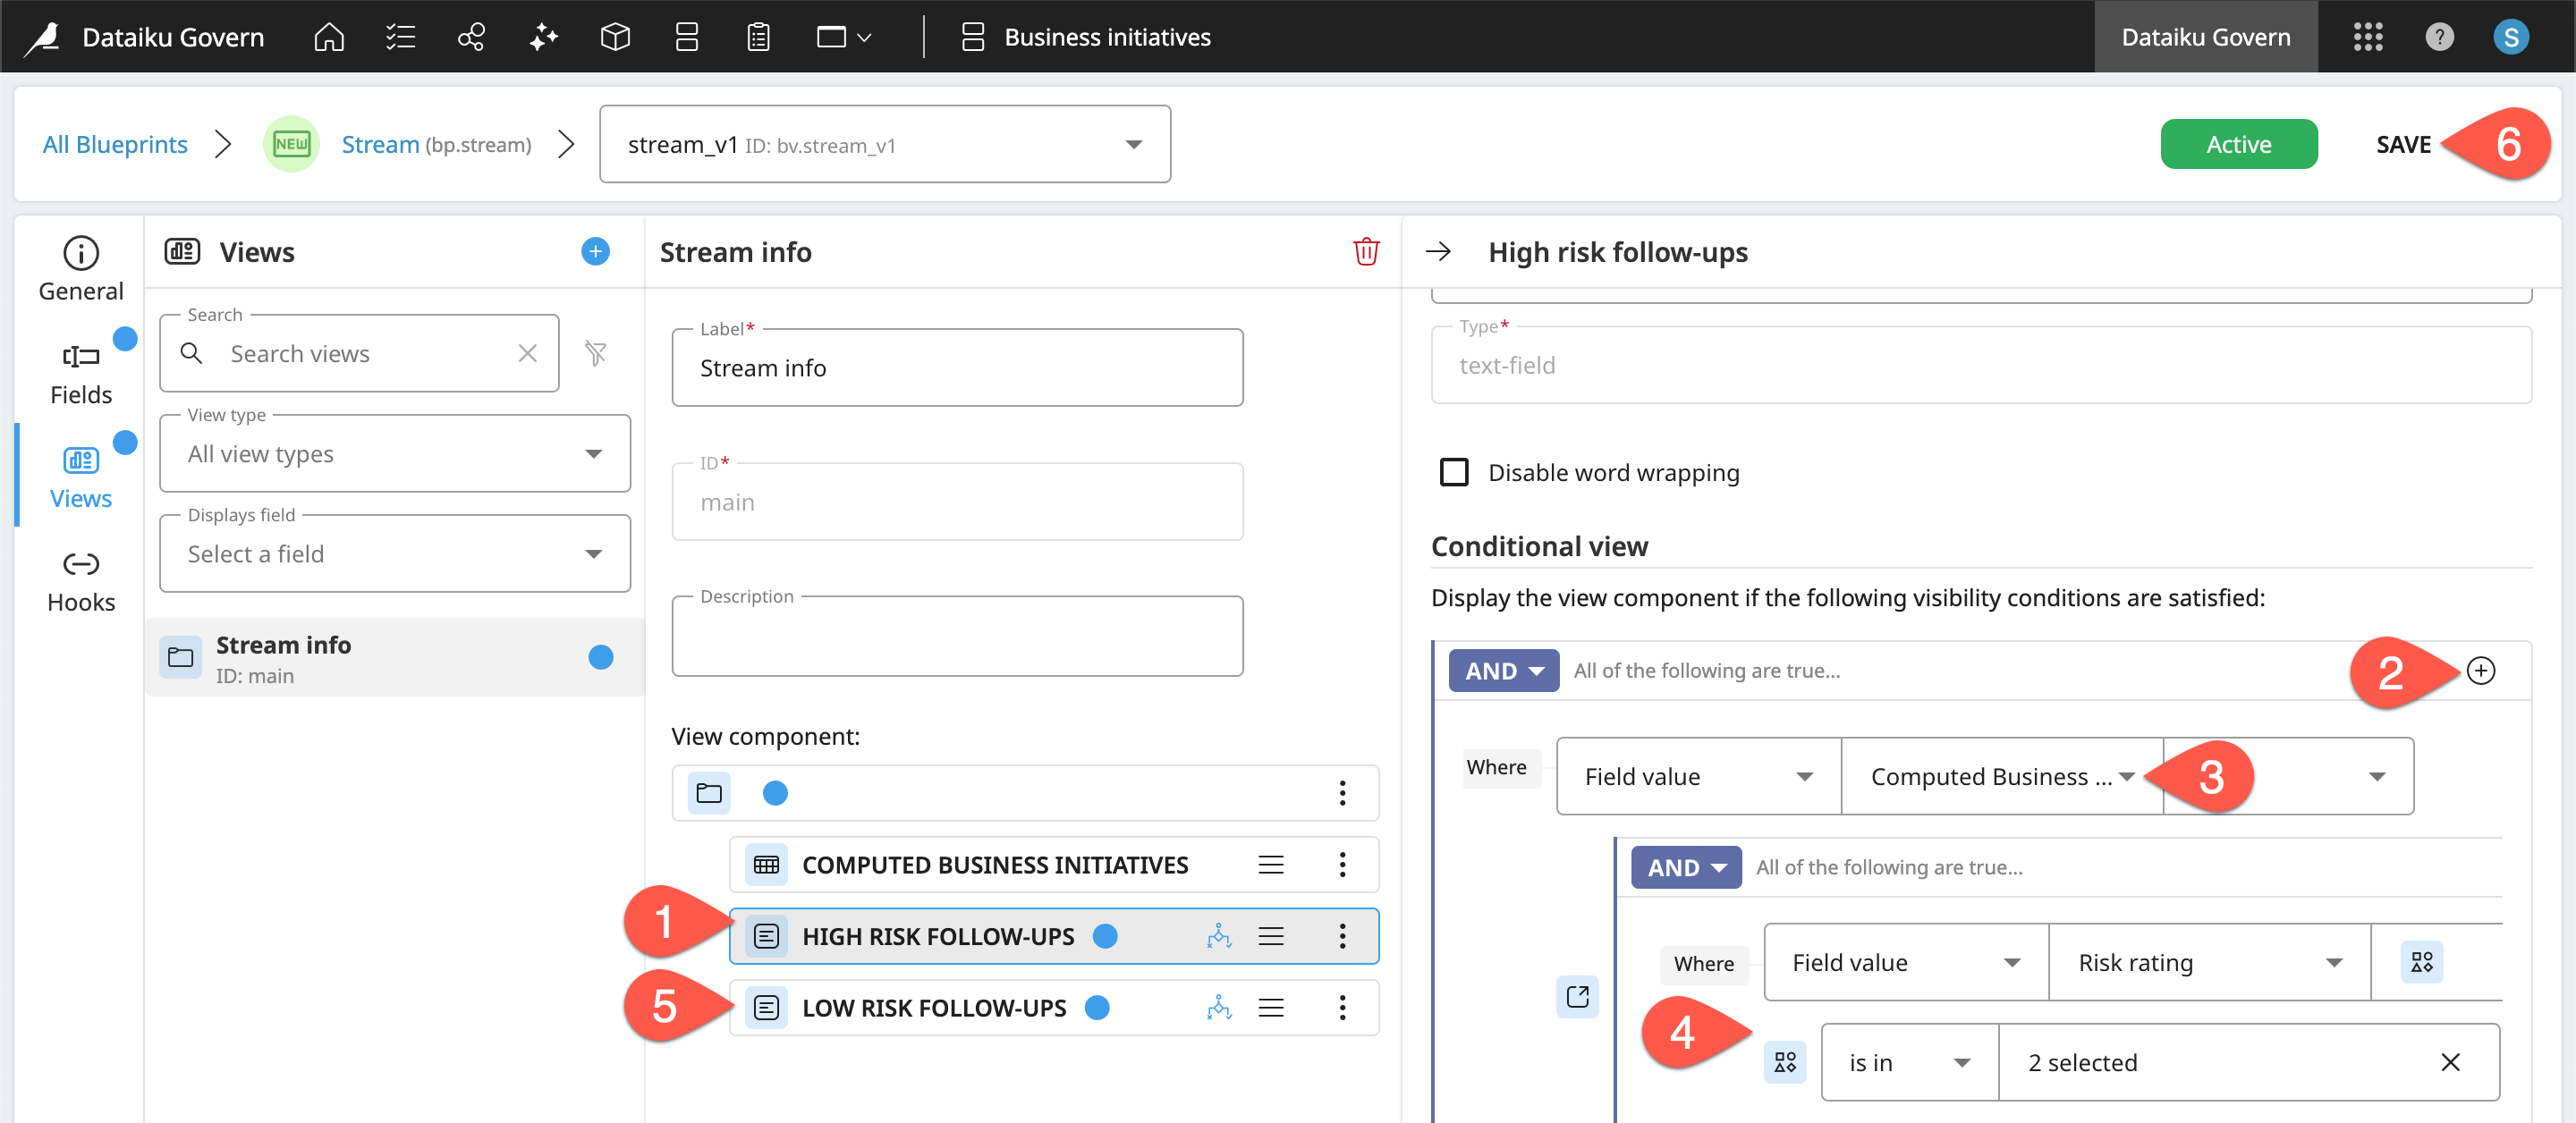
In the stream_v1 blueprint version, select the High risk follow-ups component.
In the Conditional view setting, click the plus (
 ) icon > Condition to add a filter.
Define the filter on the field value of Computed Business initiatives.
Within this reference, filter for where the Field value of Risk rating is in High or Medium high.
Apply the same logic to the Low risk follow-ups component, but filter for Low and Medium low risk.
Click Save and Save again to confirm.
Tip
Note the addition of the logic branching (![]() ) icon to signal that a view component has a condition attached to it.
) icon to signal that a view component has a condition attached to it.
Test conditional view components#
The last step is to make sure the conditional logic works!
Refresh the page of your First Stream to confirm the new components don’t appear (assuming no risk ratings exist).
Return to a Business initiative, such as your First BI, that belongs to the parent Stream.
Edit and save the Risk rating in that Business initiative to be High.
Confirm the presence of the corresponding follow-up component in the Stream.
Do the same for a Business initiative of Low risk.
Tip
One key to designing conditional view components is using the filters themselves. You’ll get more training on using these filters in Tutorial | Custom governance pages.
Next steps#
Congratulations! Instead of just modifying existing blueprint versions, you’ve seen how to create entirely new Govern items. Moreover, you saw how reference fields can tie those custom items into the information hierarchy of existing Govern items.
You’ve also picked up a few new tips for any kind of view components: restricting item selection, table views, and conditional logic.
See also
At this point you can only access Streams through an existing Business initiative. Why not create a page to centralize all Streams? For that, you’ll need the Custom Page Designer. Get started with Tutorial | Custom governance pages.
Before you finish, take a moment to delete work that you no longer need as a courtesy to those sharing your Govern node.
From the Business initiatives (
) page, open any item you created. From the vertical dots () menu, click Delete Business Initiative.From the Blueprint Designer, select your Stream blueprint. Next to the stream_v1 version, select the vertical dots (
) menu, click Delete. Use the dialog to continue to your First Stream. There, use the vertical dots () menu to delete the Stream.Once you’ve deleted all Streams, you can delete the steam_v1 blueprint version from the vertical dots (
) menu.Once you’ve deleted all blueprint versions, you can delete the Stream blueprint itself using its own vertical dots (
) menu.
See also
To explore all of the Blueprint Designer’s capabilities, consult the reference documentation on Build Custom Governance templates.