
Tutorial | Custom governance pages#
Get started#
Tutorial | Governance basics included a tour of the standard pages of the Govern node, such as Governable items, item registries, Business initiatives, and Governed projects. However, administrators with advanced licenses can also design custom pages to meet their own specific governance requirements.
Objectives#
In this tutorial, you will:
Create a custom page in the Govern node using the Custom Page Designer.
Design filters to refine which items to include on a custom page.
Enhance item tables with new columns.
Explore different layout options for custom pages.
Prerequisites#
To reproduce the steps outlined in this tutorial, you will need:
Dataiku 14.0 or later.
A Dataiku Govern node connected to a Design node.
An Advanced Dataiku Govern license.
Be a Govern admin to access the Blueprint Designer.
Knowledge of the Blueprint Designer.
Use case summary#
The standard pages of the Govern node support a wide variety of the most common governance use cases. Using just the standard pages, it’s possible to implement an end-to-end governance lifecycle as shown in Tutorial | Governance lifecycle.
However, many organizations find a need for greater customization as their governance journey matures. For this reason, using the Blueprint Designer, they begin creating their own custom governance templates, and even their own items. The natural next step is to design custom pages to support these custom templates and custom items.
Like with other governance tutorials, the exact details of the project are unimportant. To have common ground with the examples shown in this tutorial, you can reuse the Governance Basics project. Create it with the instructions below.
Create the project#
From the Dataiku Design homepage, click + New Project.
Select Learning projects.
Search for and select Governance Basics.
If needed, change the folder into which the project will be installed, and click Create.
From the project homepage, click Go to Flow (or type
g+f).
Note
You can also download the starter project from this website and import it as a zip file.
Align with the examples#
Before starting, take a few steps to ensure that your instance has at least one project with the following characteristics. This will help you confirm later results as you design custom pages.
First, make sure your Dataiku project includes a bundle.
On the Design node, open your version of the Governance Basics project.
From the More Options (
 ) menu of the top navigation bar, select Bundles.
Click + New Bundle.
Name it
v1.Click Create.
Next, make sure you have a sample Business initiative.
In the Govern node, open the Business initiatives (
 ) page.
Click Create.
Name it
Test Business initiative.Click Create.
Next, govern the project according to the following settings.
In the Govern node, open the Governable items (
 ) page.
Find your Governance Basics project, and click the gavel (
 ) to govern it.
For the project template, apply the Dataiku Standard template.
Add it to the Test Business initiative.
Govern all child items using the Dataiku Standard template.
Click Govern.
Then, set the following properties in the Govern project.
Open your version of the Governance Basics Govern project.
With the Overview selected, click Edit.
Add yourself as one of the Sponsors of the project.
For Sensitive data, select Yes.
In the Sign-off reviewers and approvers section, add yourself in the category of Business reviewers.
In the Qualification snapshot section, set the Risk rating to High.
Click Save.
Finally, make sure your Govern node has at least one item waiting for feedback.
In the Source Objects panel of the Govern project, find the active saved model version, and click Open in the right panel.
Move the project’s active saved model version into the Review workflow step.
Click Request Feedback, and notify yourself so that the model version’s Review step is Waiting for feedback.
Create your first custom page#
To begin using the Custom Page Designer, you’ll first create a default custom page, and then dissect how to modify it as needed.
Create a new page#
First, navigate to the Custom Page Designer, and create your first page.
Open the Govern node. You can navigate there from the Overview panel of the Cloud Launchpad or, from a Design node, go to the waffle (
 ) menu > Dataiku Govern.
From the waffle (
) menu of the Govern node’s top navigation bar, select Custom Page Designer.In the left panel, recognize the presence of the standard pages, such as Governable items. Select one such page to see how you can’t edit its content.
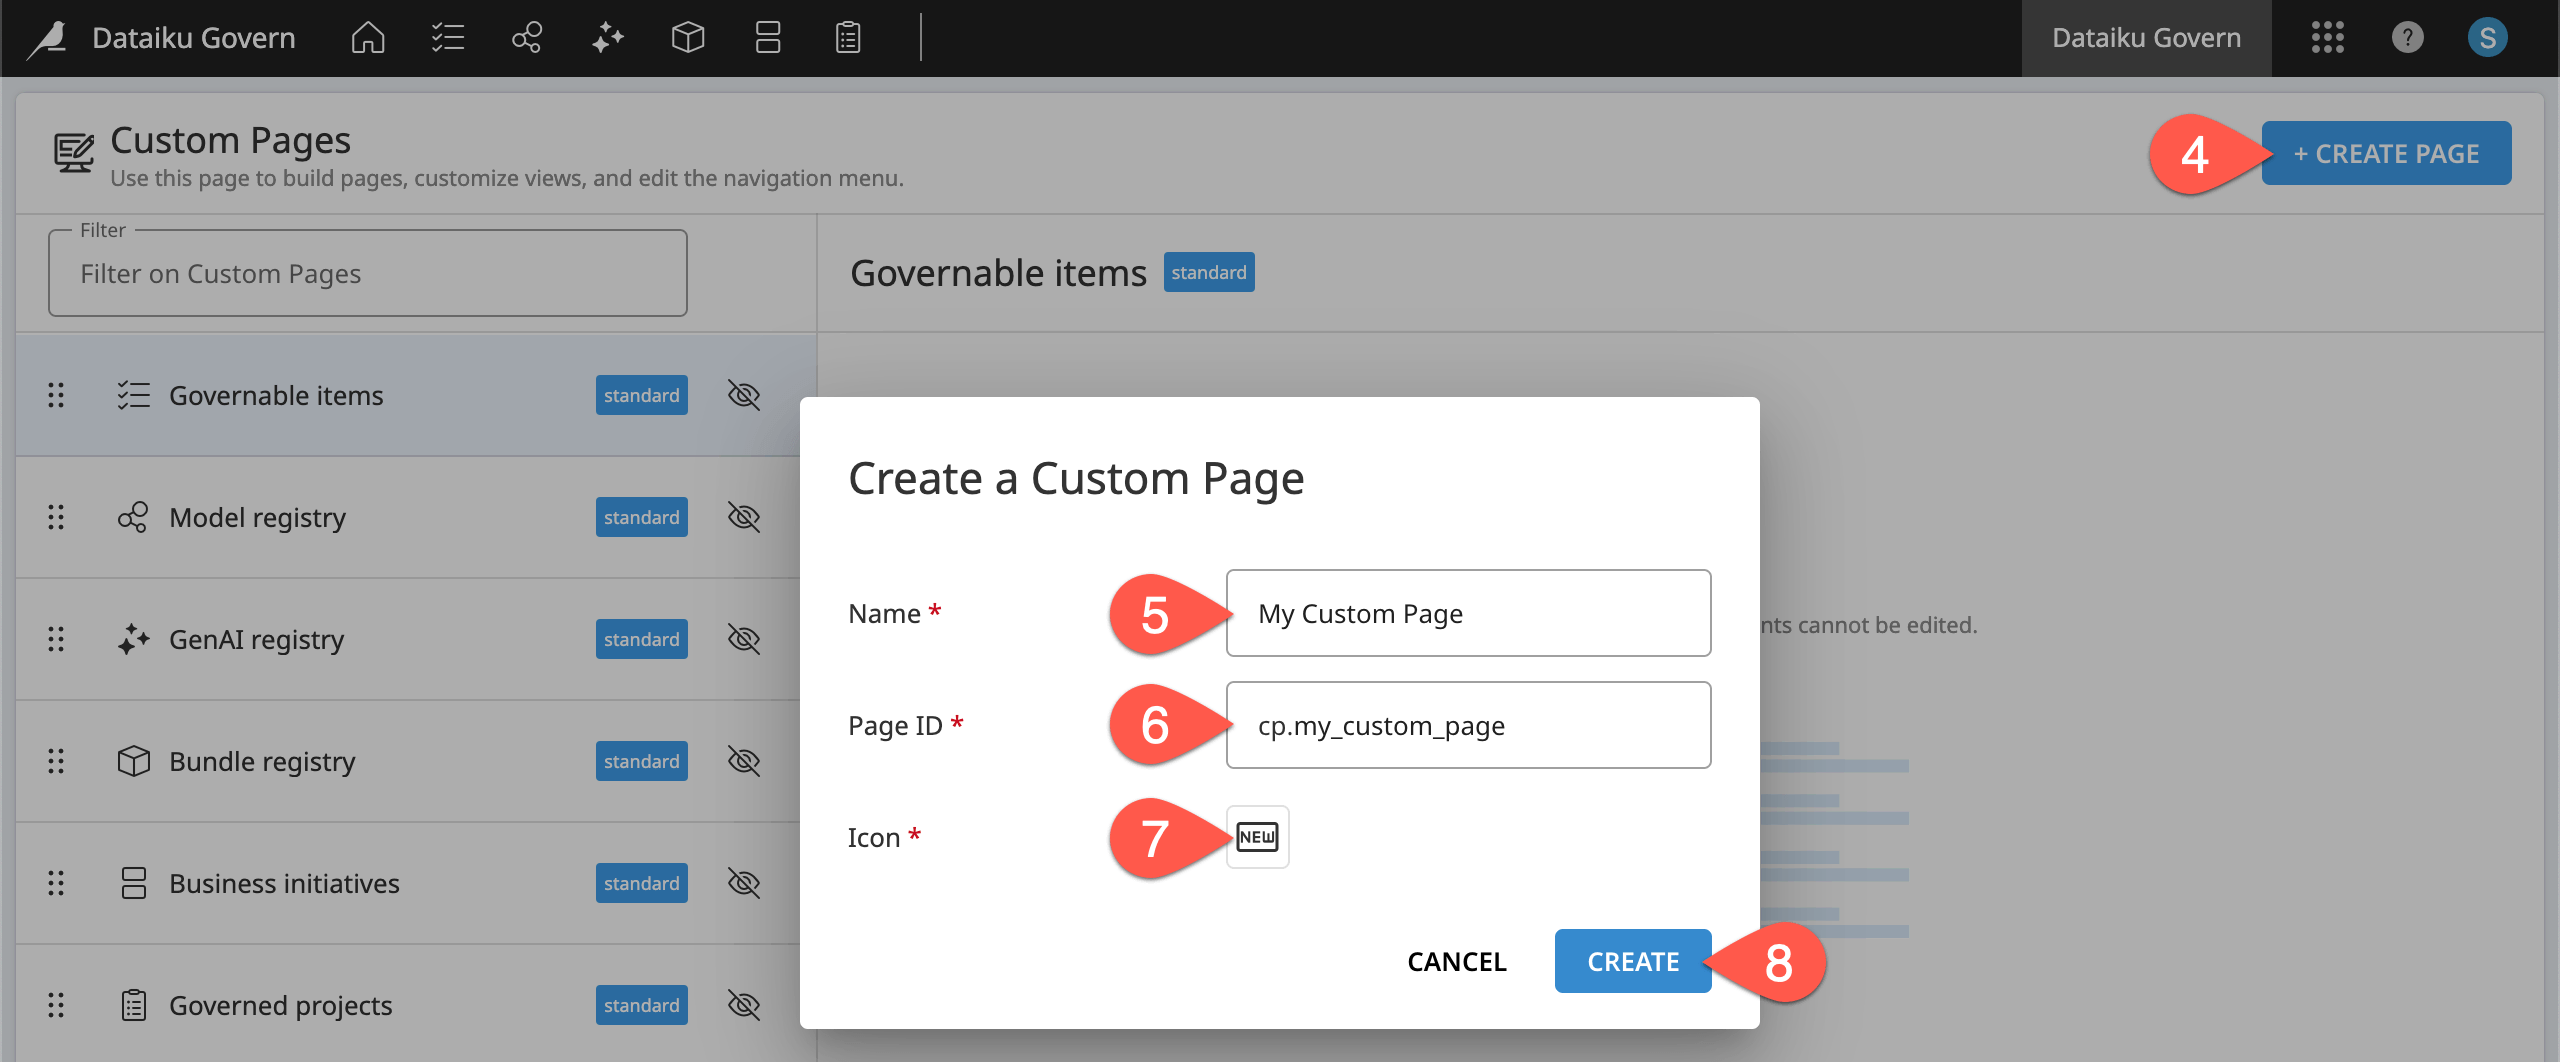
Click + Create Page to add your own page.
In the dialog, name it
<YOUR INITIALS> Custom Page.Make note of the auto-assigned Page ID.
Choose any icon to represent your page as it would appear in the top navigation bar of the Govern node when activated.
Click Create.
Tip
Recall bp and bv as the ID prefixes for blueprints and blueprint versions. The ID prefix for custom pages is cp.
Inspect the default custom page#
Your page isn’t yet visible to any users besides admins. Before modifying your custom page, preview the default custom page. Then, you’ll work backwards to understand how to shape the page content and design.
In a new Govern node tab separate from the Custom Page Designer, preview your hidden custom page:
In the top navigation bar, go to See more pages (
 ), and select your Custom Page.
Alternatively, go directly to
{your-instance-url}/pages/cp.{your-page-id}.
Take a moment to browse the content and layout of the default custom page. Observe what types of items appear in the table, the columns, the right panel, and what items you can create.
Walk through the tabs of the table below, matching the setting in the Custom Page Designer with its corresponding output in your custom page.
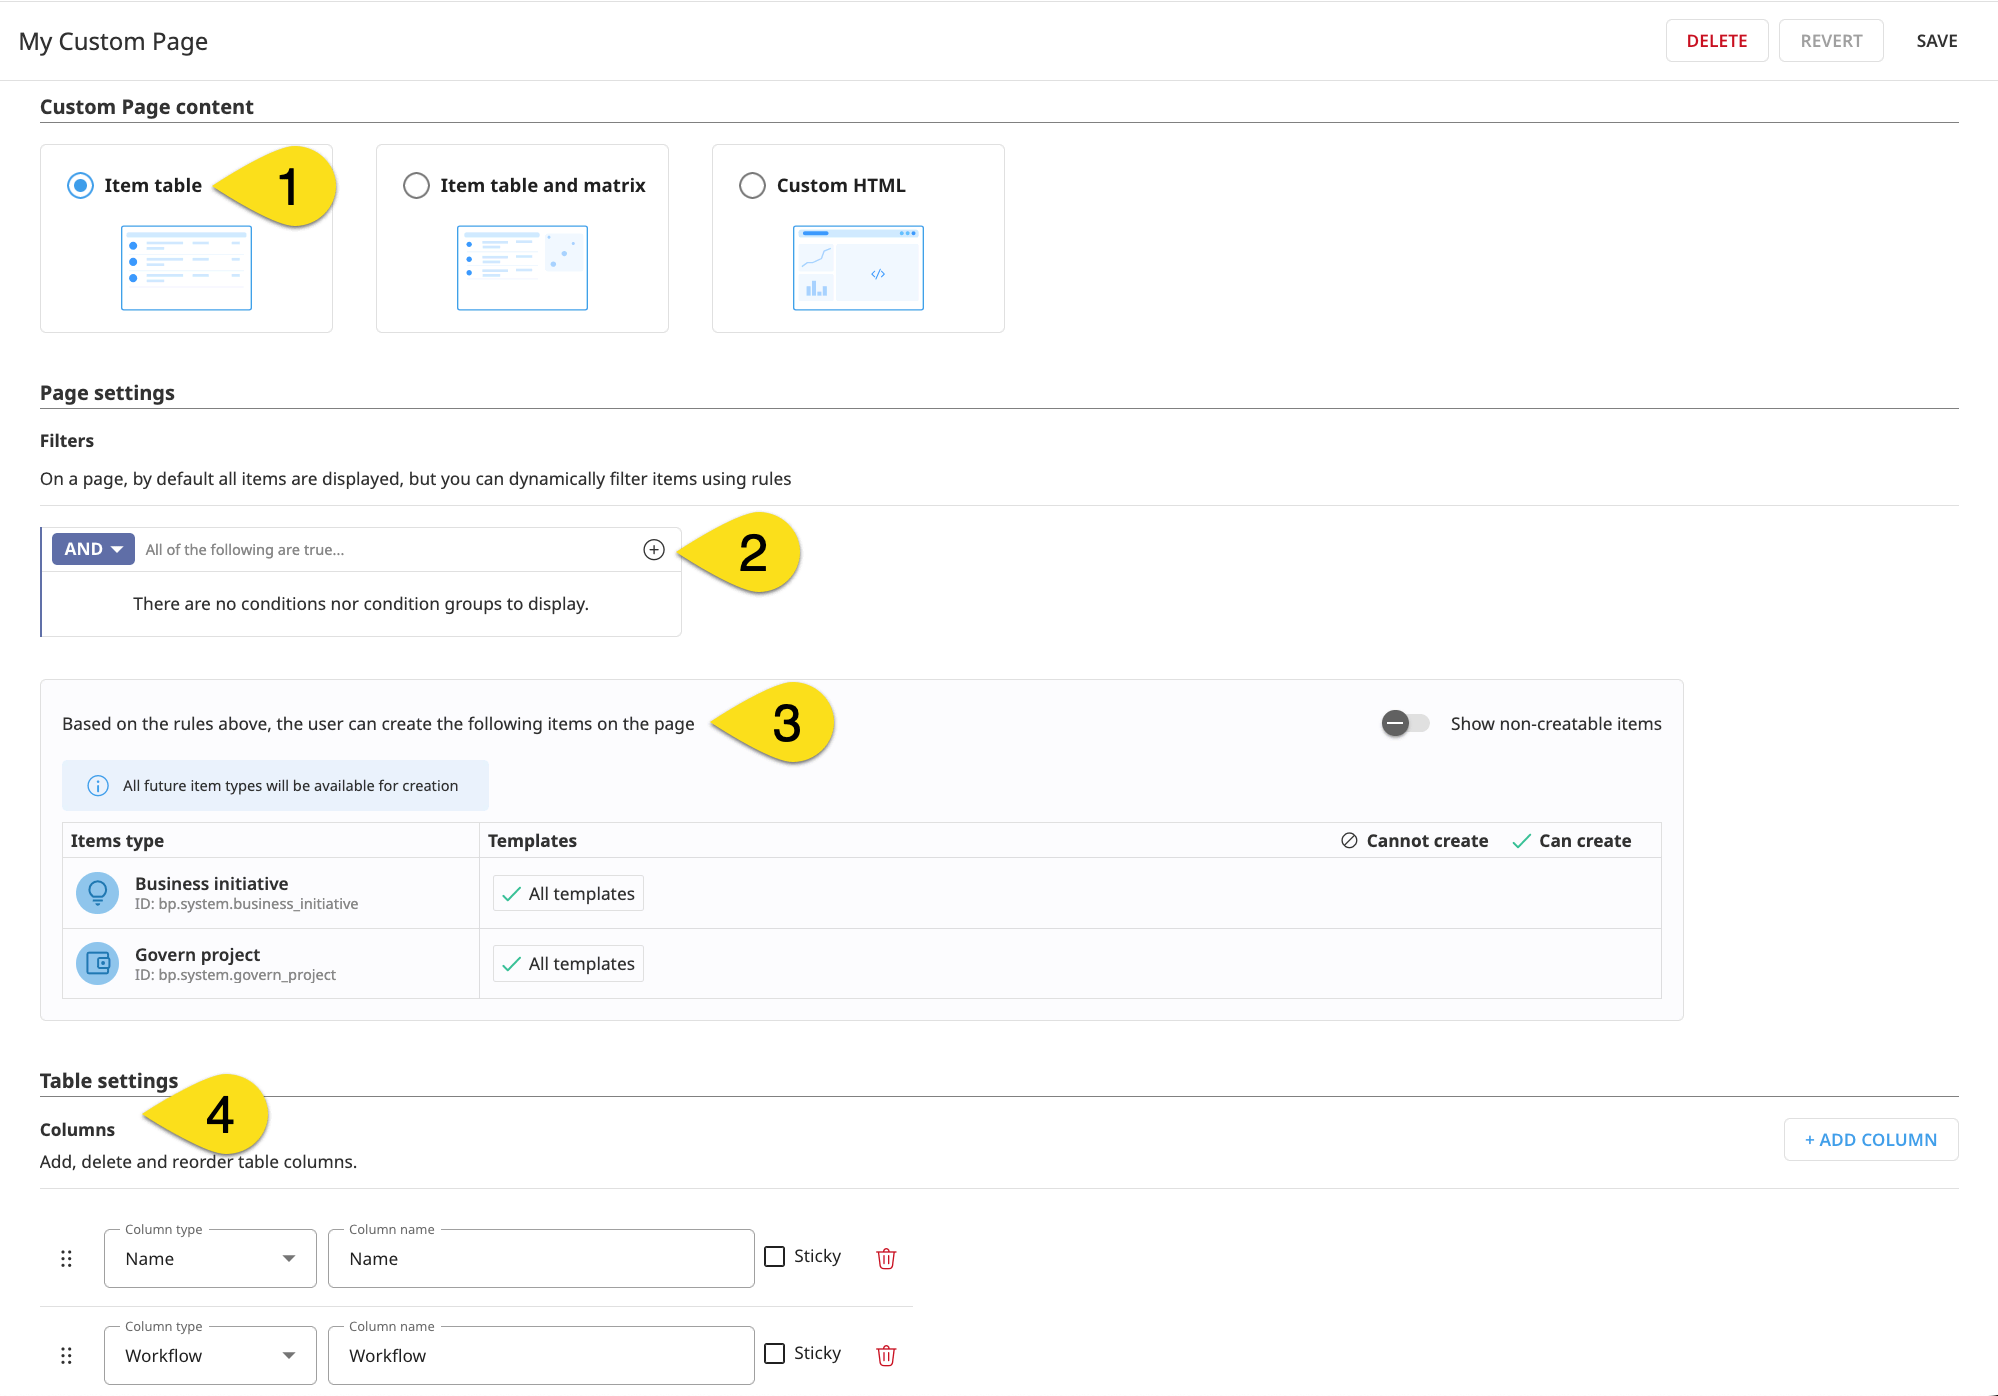
Custom Page Designer |
Choose between an item table (like registry pages), item table and matrix (like the Governed projects page), or custom HTML. |
Your Custom Page |
Your page is one item table. Click on a row to see more item details in the right panel. |
Custom Page Designer |
Create conditions to filter for specific types of items to include in the table. |
Your Custom Page |
With no filters, your item table includes all possible items. You’ll probably find datasets, projects, models, bundles, deployments, users, and more. |
Custom Page Designer |
Add new items to the table by clicking Create and selecting a blueprint version (as you would when creating a new Govern project from the Governed projects page). |
Your Custom Page |
With no filters, your page can create any type of Govern item (Business initiative or Govern project) or custom blueprint found on your instance. |
Custom Page Designer |
Define the structure of the item table. |
Your Custom Page |
Your page has two columns: name and workflow. |
Design filters for a custom page#
Depending on the number and size of projects on your instance, it’s possible that your custom page took a long time to load. That’s because you haven’t filtered for any items!
In Tutorial | Governance basics, you saw how to use the page filters to narrow the list of returned items. These same filters are key to designing governance pages. Instead of having to enable them each time, a custom page can apply a permanent baseline filter.
Filter by a field value#
As introduced in Tutorial | Custom governance templates, a specific blueprint version defines the structure of items appearing in the Govern node. Fields are the granular pieces of information available to define views belonging to a blueprint version. These same field values are one of the most powerful ways to filter governance pages.
Start with a simple example.
In the Custom Page Designer, go to the Filters of your page.
Under Page Settings, click the plus (
 ) icon > Condition to add your first filter condition.
Filter for the Field value of Sensitive data.
Select the category of Yes.
Click Save.
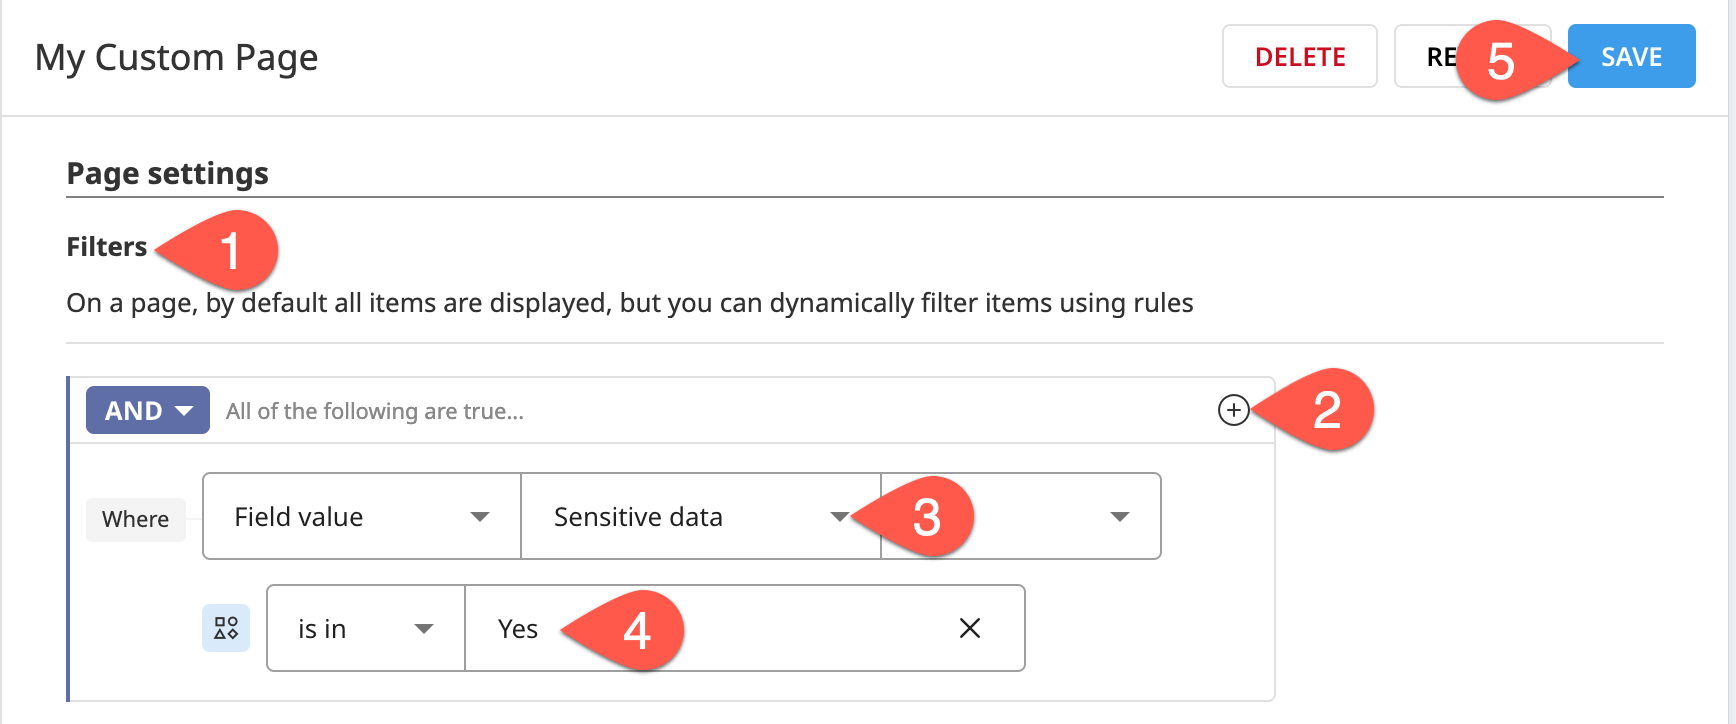
Refresh your Custom Page. Confirm the presence of your Governance Basics project in your custom page’s item table.
Use the field value popover#
In the filter condition, the field value dropdown includes all fields found on your instance. Recall that fields themselves aren’t specific to one particular item type. For example, according to the standard template, the field ID sponsors belongs to both Govern projects and Business initiatives.
When filtering an item table by a specific field value (sensitive_data), the item table returns only items having this specific field. Accordingly, when filtering by a field value, you need to be aware of which item types have this field.
How can you be sure which items have a particular field? While hovering over an option when selecting a field value filter, a popover window indicates the item types and templates containing the field.
In the Custom Page Designer, return to the Filters of your page.
Click on Sensitive data to open the field value dropdown.
In the dropdown menu, hover over Sensitive data to examine the popover, indicating the applicable item types and templates.
Hover over Sponsors to see an example of a field used across multiple item types, and then select it.
Add yourself as the sponsor reference.
Click Save.
Refresh your Custom Page. Confirm the presence of not only your Governance Basics Govern project, but also the Business initiative where it resides.
Find the correct field value#
Understanding how to select the correct field value is important. For example, the following two cases can and do occur:
The same field ID may have different labels.
The same label may have different field IDs.
Explore this fact with the following examples:
In the Custom Page Designer, return to the Filters of your page.
Click Sponsors to open the field value dropdown.
Search for
dataiku_itemto confirm how the same ID belongs to multiple item types, each with a different label.Search for
risk_ratingto confirm the presence ofqualification_risk_rating(belonging to a Govern project) andrisk_rating(belonging to a Business initiative), both of which share the label Risk rating.
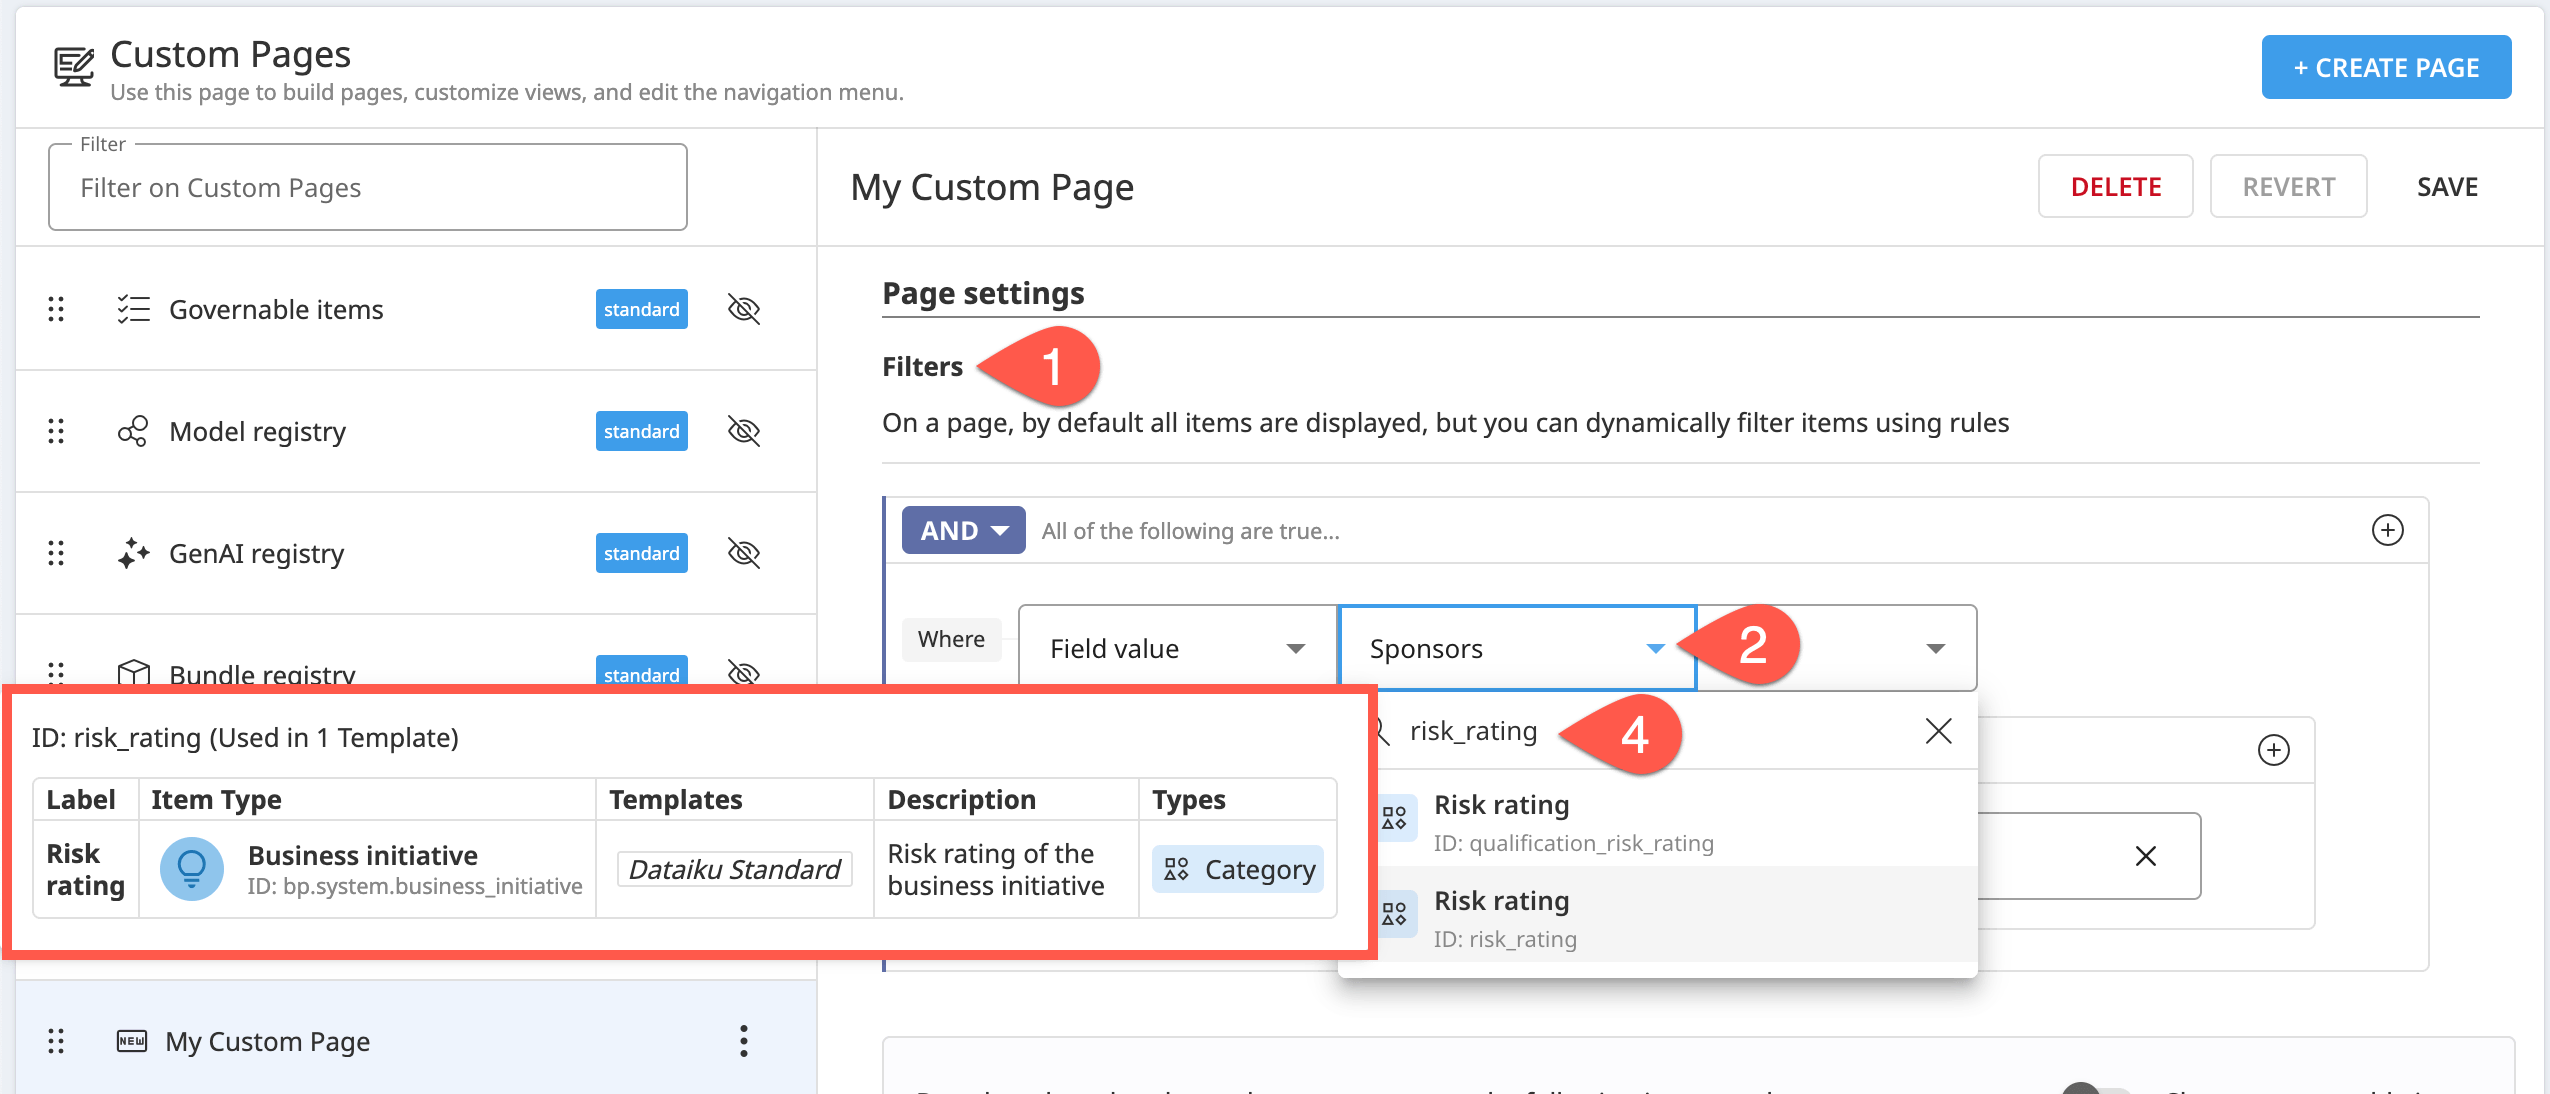
Tip
The field value dropdown searches by ID, not by label. Searching for the string Risk rating, for example, returns 0 results.
Filter by item type#
Filtering by field values impacts the types of items returned on a page. For example:
The field
sensitive_dataapplies only to Govern projects. Therefore, pages with this filter can include only Govern projects.The field
sponsorsapplies to Govern projects and Business initiative. Therefore, pages with this filter can include both item types.
You can also filter explicitly by item type. For example, you might create a registry of deployment infrastructures.
In the Custom Page Designer, return to the Filters of your page.
Click the bin (
 ) icon to delete any existing filters.
Click the plus (
) icon > Condition to add a new filter condition.Change the filter property to Item Type.
Browse all available item types, and then select both API Deployer Infrastructure and Project Deployer Infrastructure.
Click Save.
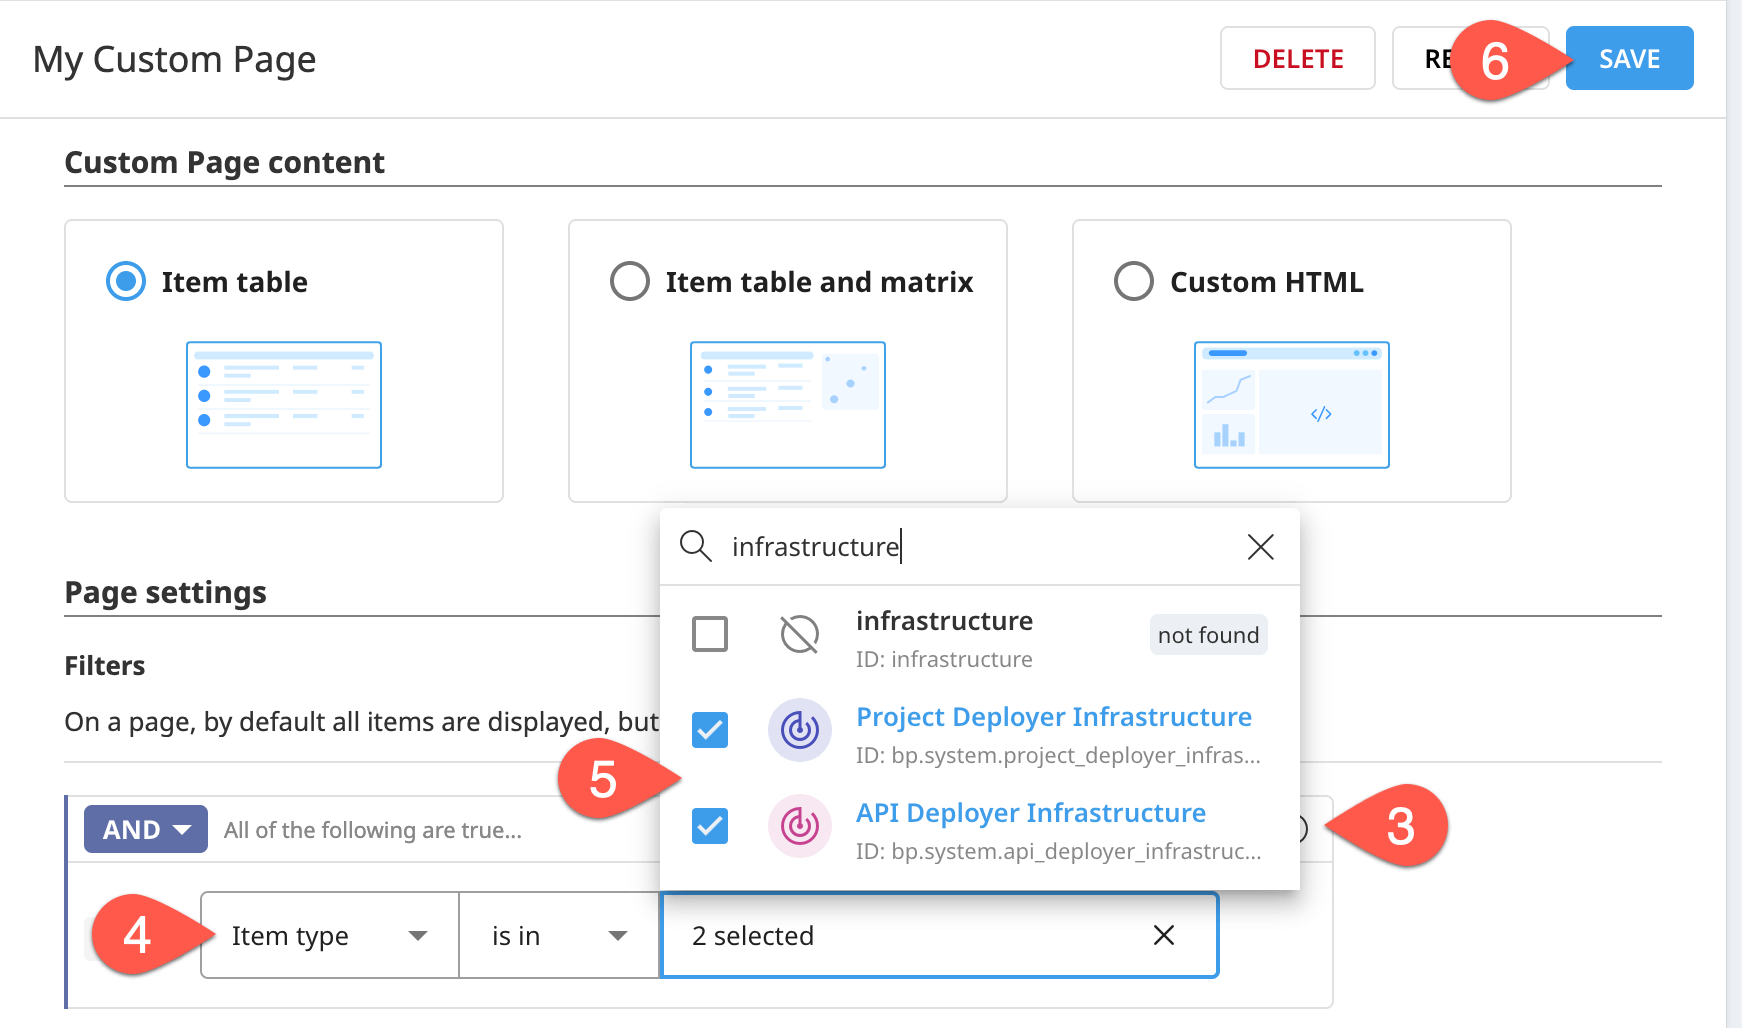
Confirm the outcome by refreshing your Custom Page. Click on an infrastructure to see its deployments and Govern check policy in the right panel.
Tip
Note the removal of the Create button from your custom page (as you can’t create deployment infrastructures from the Govern node).
Filter for stages of the governance lifecycle#
You may also want to create pages that correspond to specific stages of the governance lifecycle. For example, you want to view all projects currently in progress, bundles under review, or model versions in production.
In addition to filtering by workflow steps, you can also surface items based on the sign-off state. As you should already have at least one item waiting for feedback, create a page to filter for this condition.
In the Custom Page Designer, return to the Filters of your custom page.
Click the bin (
) icon to delete the filter for deployment infrastructures.Click the plus (
) icon > Condition to add a new filter condition.Filter for where the Sign-off (any sign-off) is waiting for feedback.
Click Save.
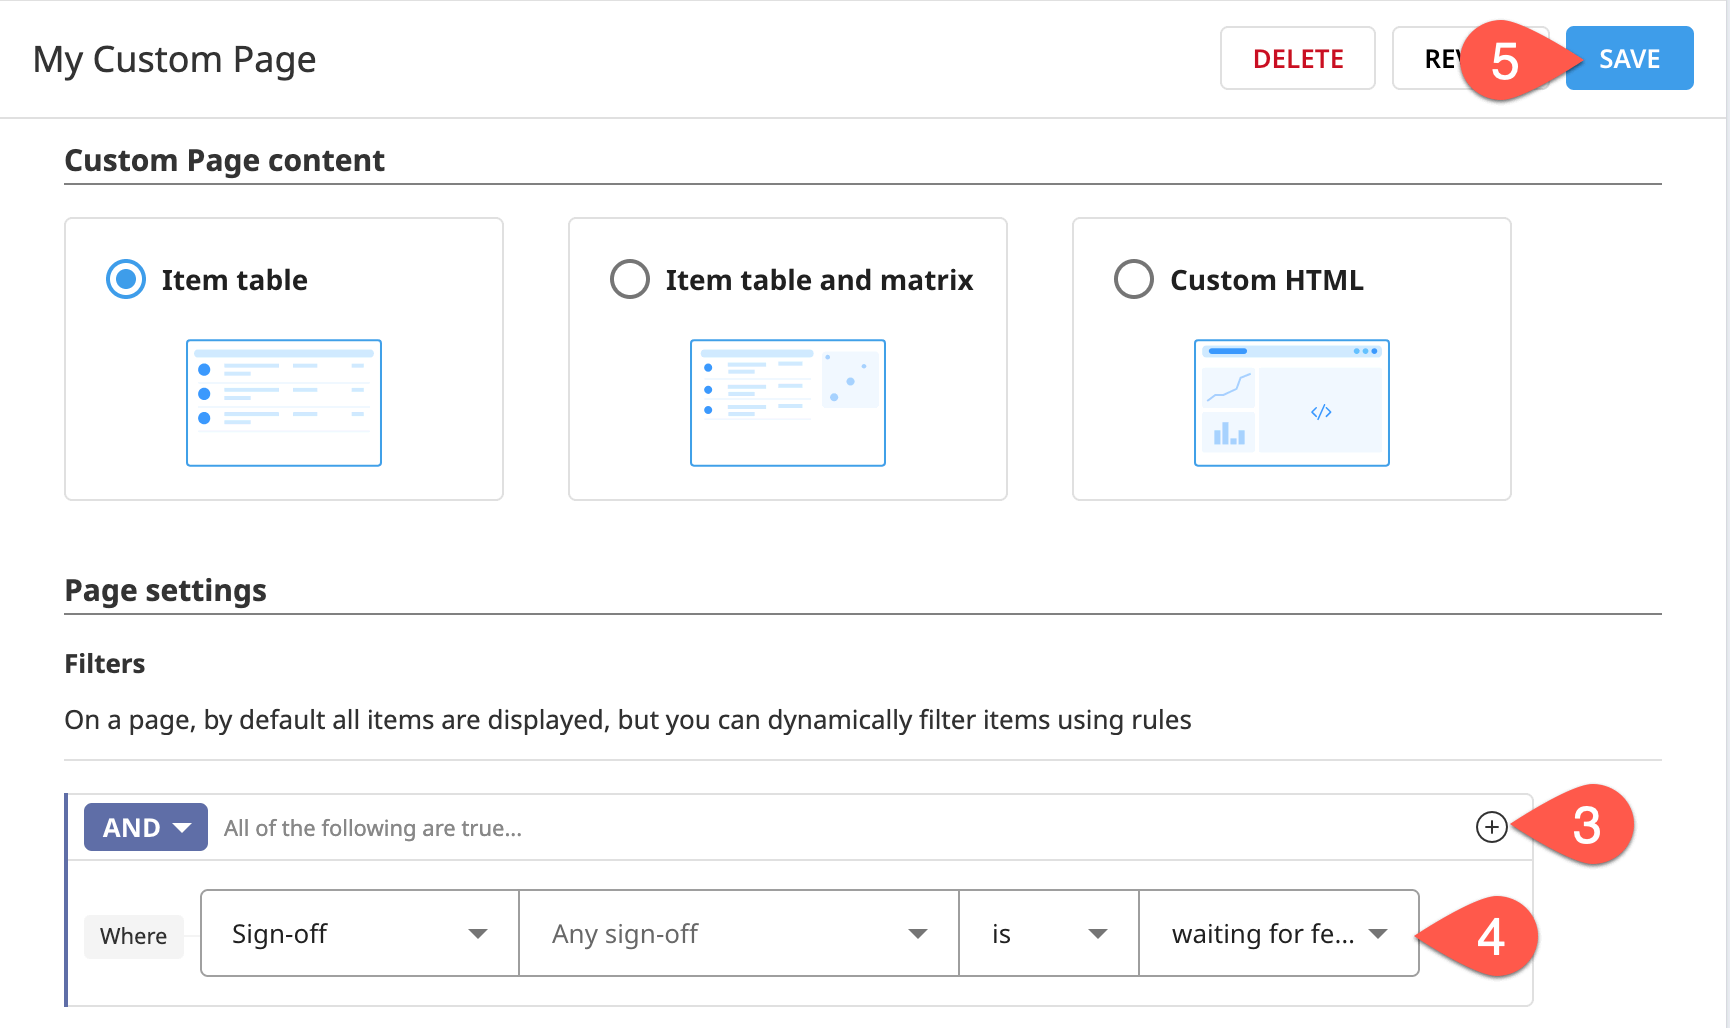
Refresh your Custom Page, and confirm the inclusion of the Logistic Regression (s3) - v1 saved model version that’s waiting for feedback.
Tip
Be mindful that, without an item type filter, your table includes all items waiting for feedback. If, for example, you had a Govern bundle waiting for feedback, it too would appear on this page.
Troubleshoot page filters#
You may soon find yourself wanting to combine filters in creative ways. You can definitely do this, but you need to be mindful of:
Which fields belong to which items.
The relationships or hierarchy between items.
Imagine, for example, that you want a custom page showing only Govern bundles of which you’re a sponsor. The first problem is to recognize that, according to the standard template, a Govern bundle doesn’t have a sponsor field. As you can confirm in the Blueprint Designer:
Sponsor is a field belonging to a Govern project.
A Govern bundle is a child item of a Govern project.
Accordingly, the correct query would be to filter for Govern bundles, belonging to Govern projects, of which you are a sponsor. Try a naive version of this query first.
In the Custom Page Designer, return to the Filters of your custom page.
Click the bin (
) icon to delete the filter for sign-offs awaiting feedback.Click the plus (
) icon > Condition to add a new filter condition.Filter for where Item type is in Govern bundle.
Click the plus (
) icon > Condition to add a second condition.Filter for the Field value of Sponsors.
Within the sponsor reference field, filter for Item is in
{your user}.Click Save.
Refresh your Custom Page, and observe the results.
You should have zero results in your page! Do you see the mistake? No item is a Govern bundle AND has a sponsor field. What you need is the right connecting reference.
The field ID
sponsorbelongs to a Govern project.A Govern project is a parent item of a Govern bundle.
Now you can design the filter of your custom page using a reference field to establish a bridge between the parent project and the child bundle.
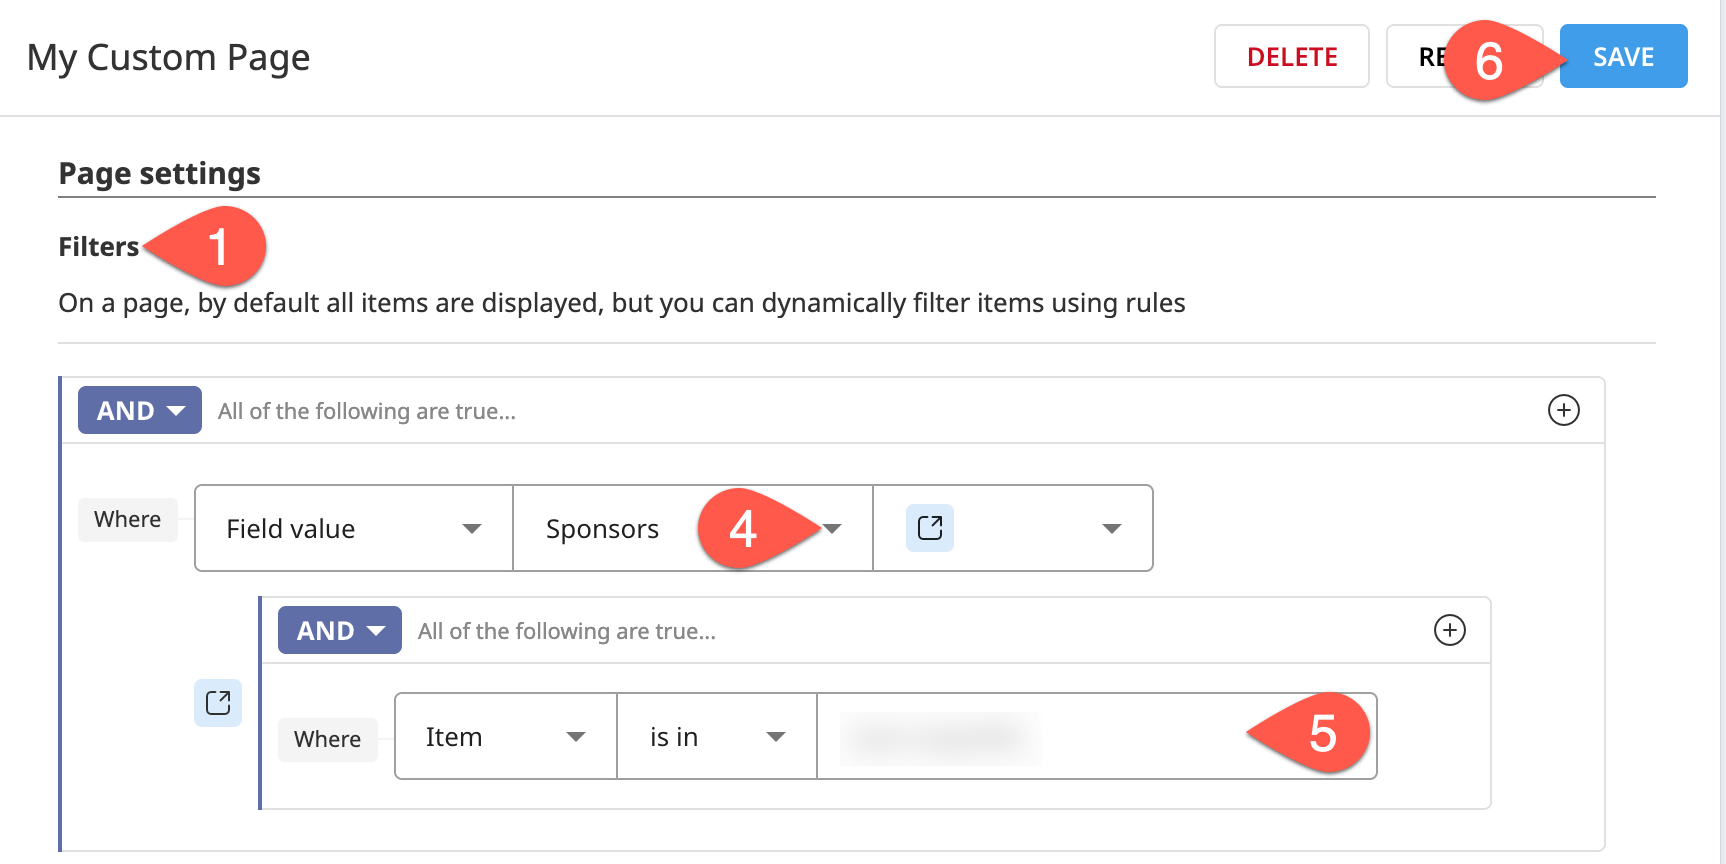
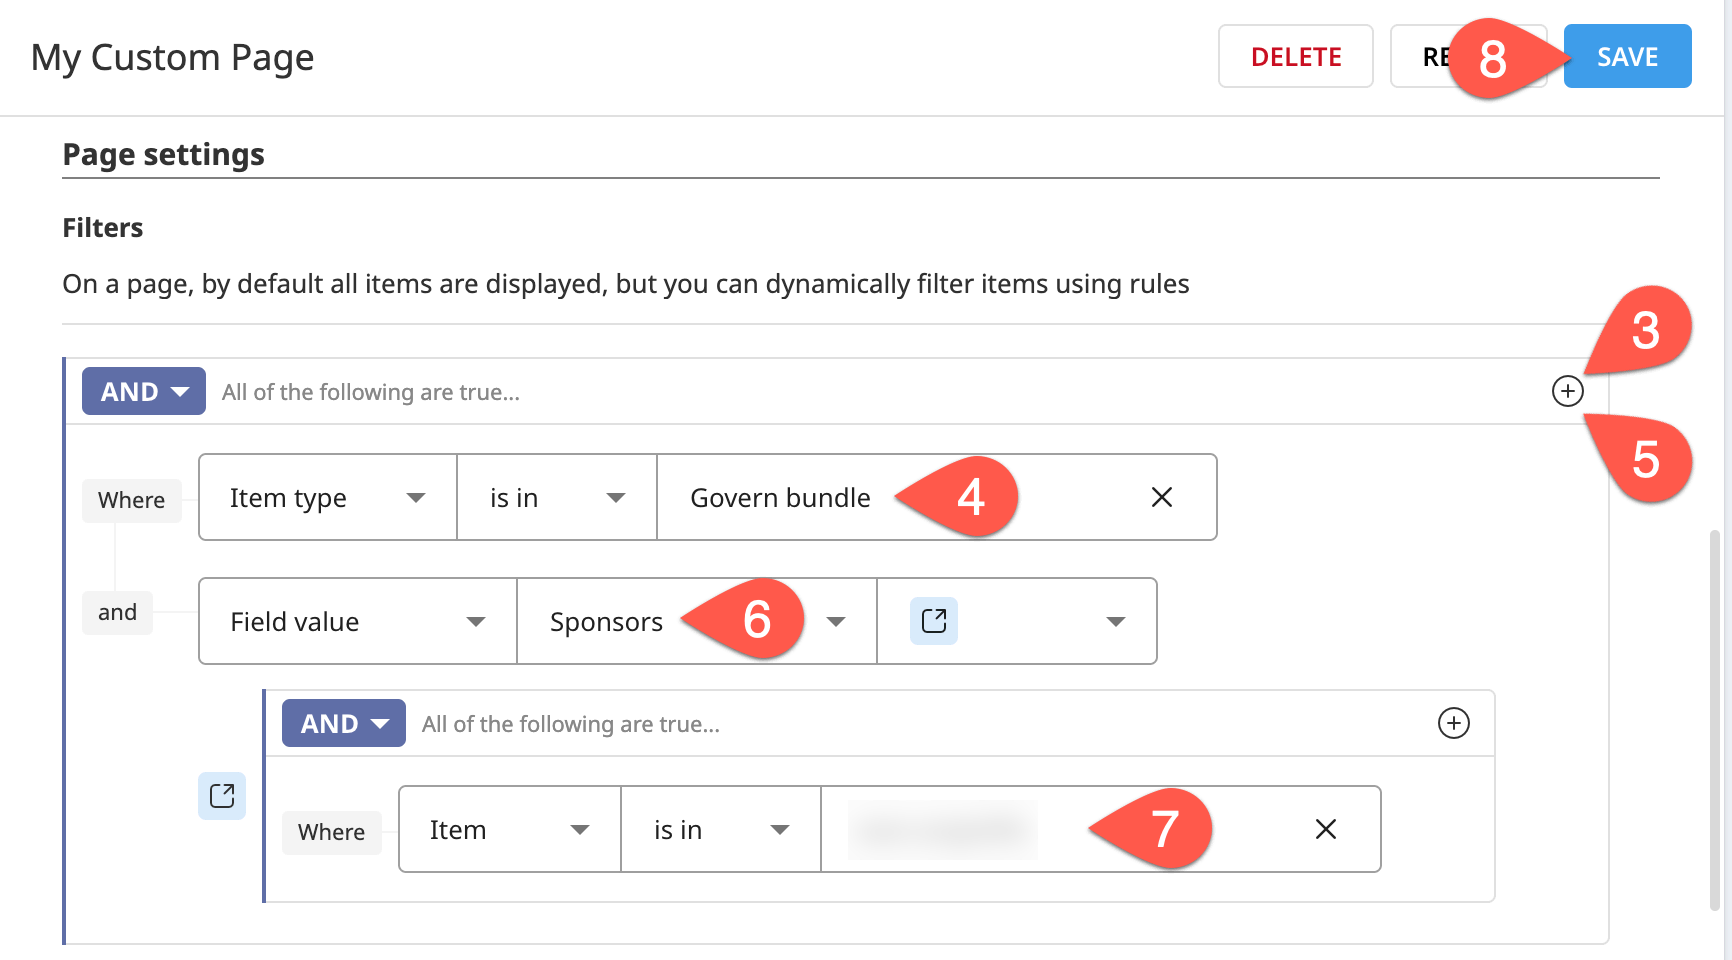
In the Custom Page Designer, return to the Filters of your custom page.
Click the bin (
) icons to delete the filters for the Sponsors field value.Click the plus (
) icon > Condition to add a new filter condition.Set the page’s second filter condition to the Field value ID of
governed_project, which, as confirmed by the popover, is the reference field to the parent Govern project.Within the Governed project reference, filter for the Field value ID of
sponsors(another reference field).Within the sponsor reference, filter for where Item is in
{your user}.Click Save.
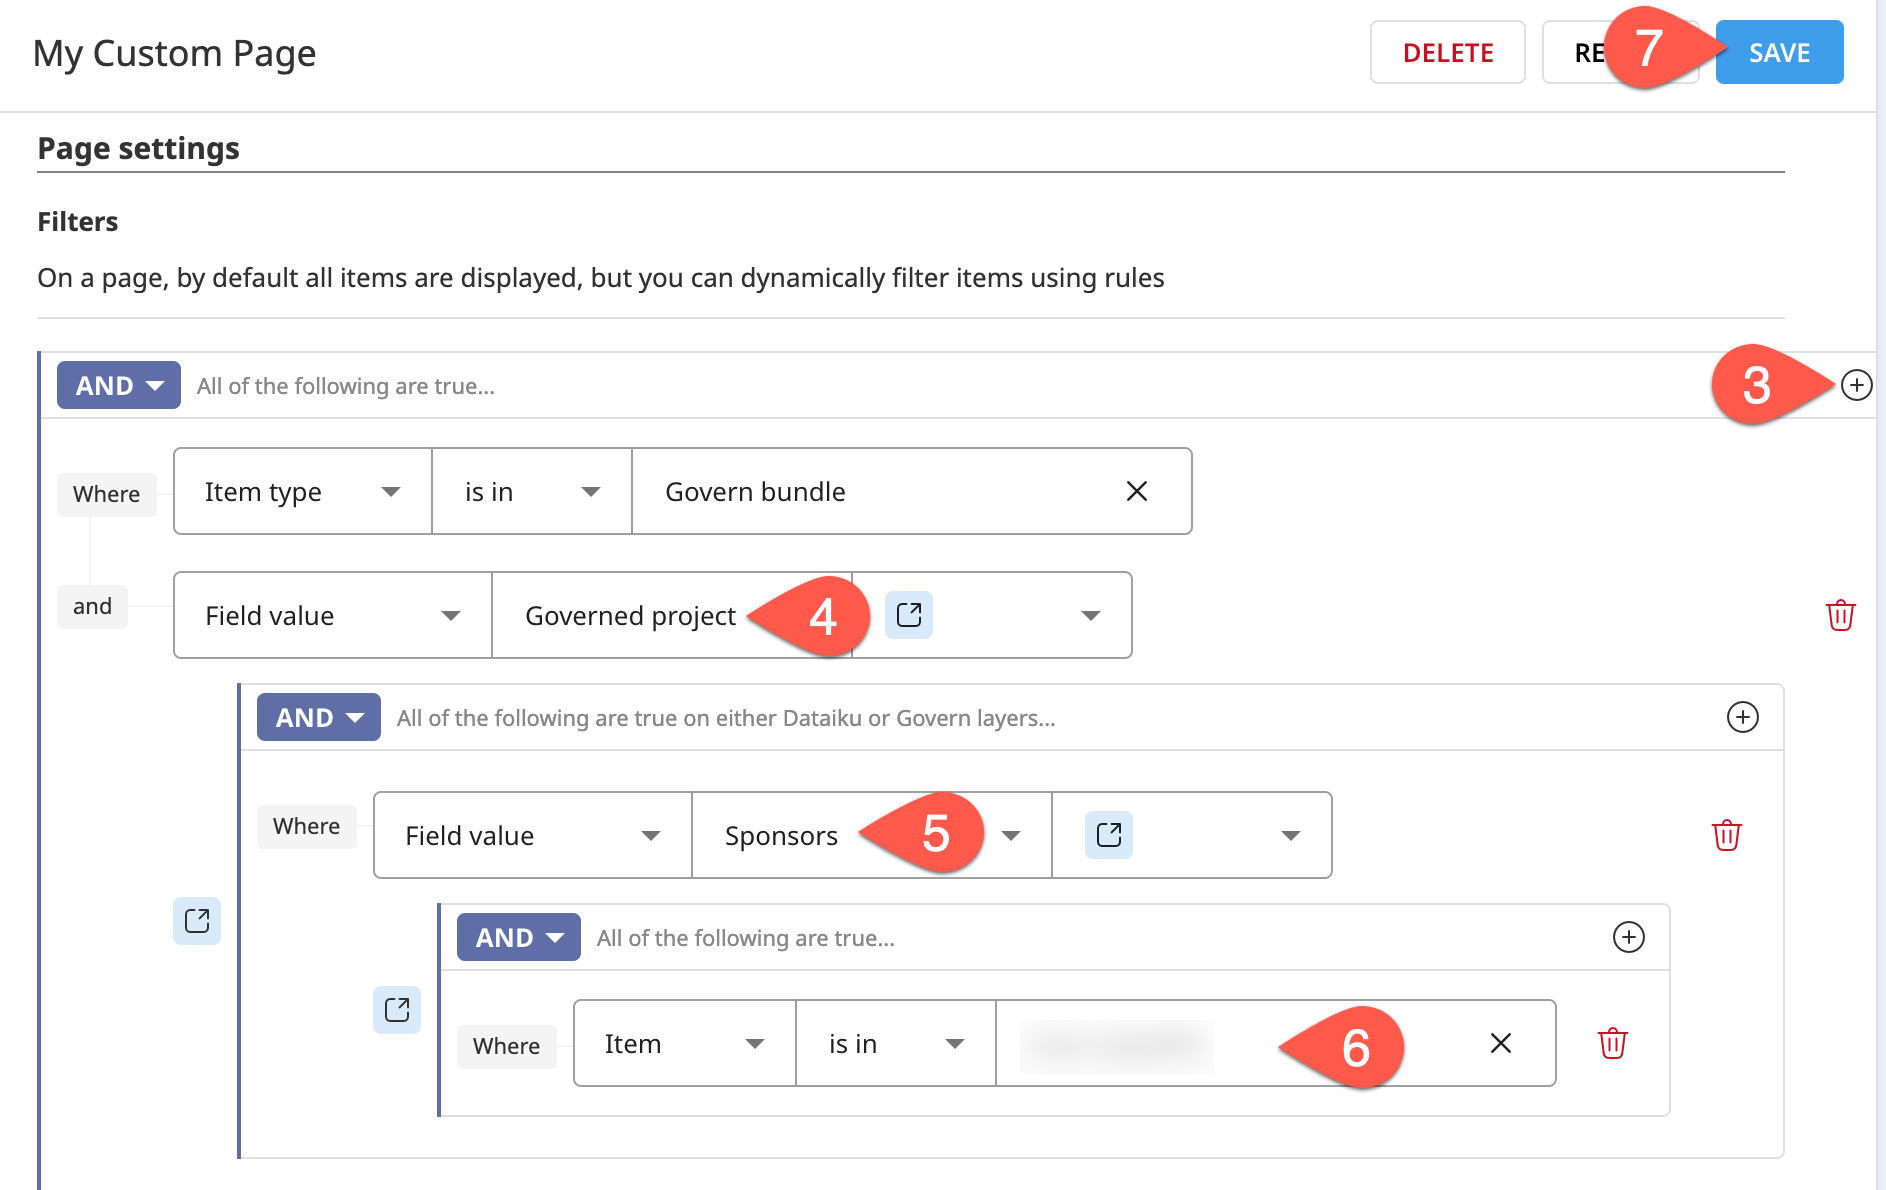
Refresh your Custom Page, and observe the results. It should include at least one item: the Govern bundle, which is the child item of a Govern project, of which you are a sponsor.
Tip
This tutorial only demonstrated a few kinds of filters. On your own, explore other filters, such as those based on template or item contents!
Add columns to an item table#
Instead of refining filters, you might want to make your custom page more informative. You can do that by editing the columns included in the item table.
Use views as table columns#
To create new columns in the item table, you need to draw on the blueprint version’s views.
If you select a bundle in the existing table of your custom page, you’ll find the right Details panel surfaces associated metadata similar to standard Govern pages. At the moment though, you only have columns for name and workflow.
Try displaying the bundle’s parent project in the table as a column.
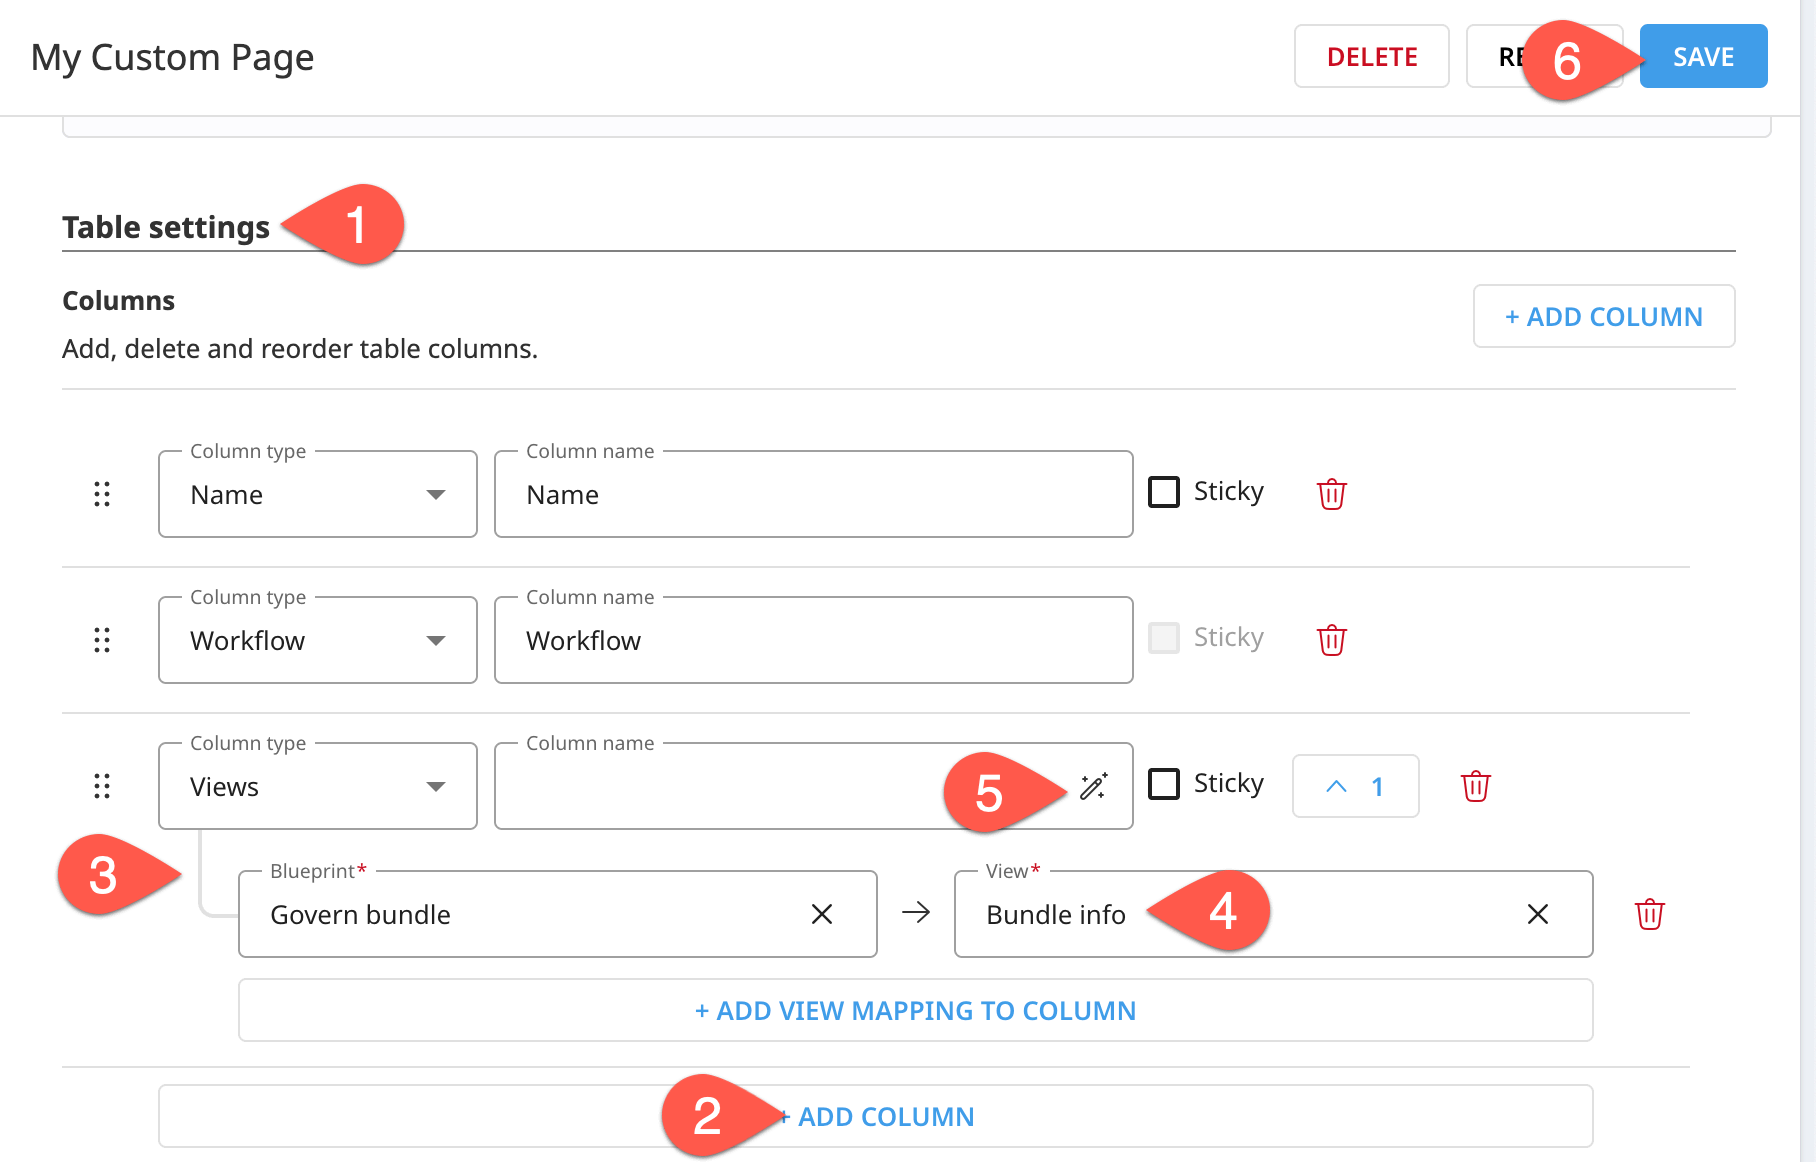
In the Custom Page Designer, navigate to the Table settings section of your custom page.
Click + Add Column.
By default, a column of the type Views belonging to the blueprint Govern bundle is added.
Browse the available views, and then select Bundle info.
Click the wand (
 ) icon to auto-fill the column name.
Click Save.
Refresh your Custom Page, and observe the results.
As you may have realized, none of the bundle’s existing views exactly meet this need. The Bundle info view of a Govern bundle, according to the standard template, includes not only the project name, but also a description field.
Tip
How could you improve this situation?
Since none of the existing views for this blueprint version meets the exact need, you’ll need to create a new view.
To create a new view, you’ll need to first create a custom blueprint version, as you can’t add a view to a standard Govern item.
Once you have a custom blueprint version of a Govern bundle, you can create a new view for it including only the Governed project field (ID
govern_project).Once you have the correct view, return to your custom page and assign the new view to the table’s third column.
To test it, switch the governance template of the existing Govern bundle (or a new one) to the new template.
Add an edit row button#
The last type of column you can add is an edit row button. A new use case will help demonstrate this feature.
First, build filters for high-risk Govern projects.
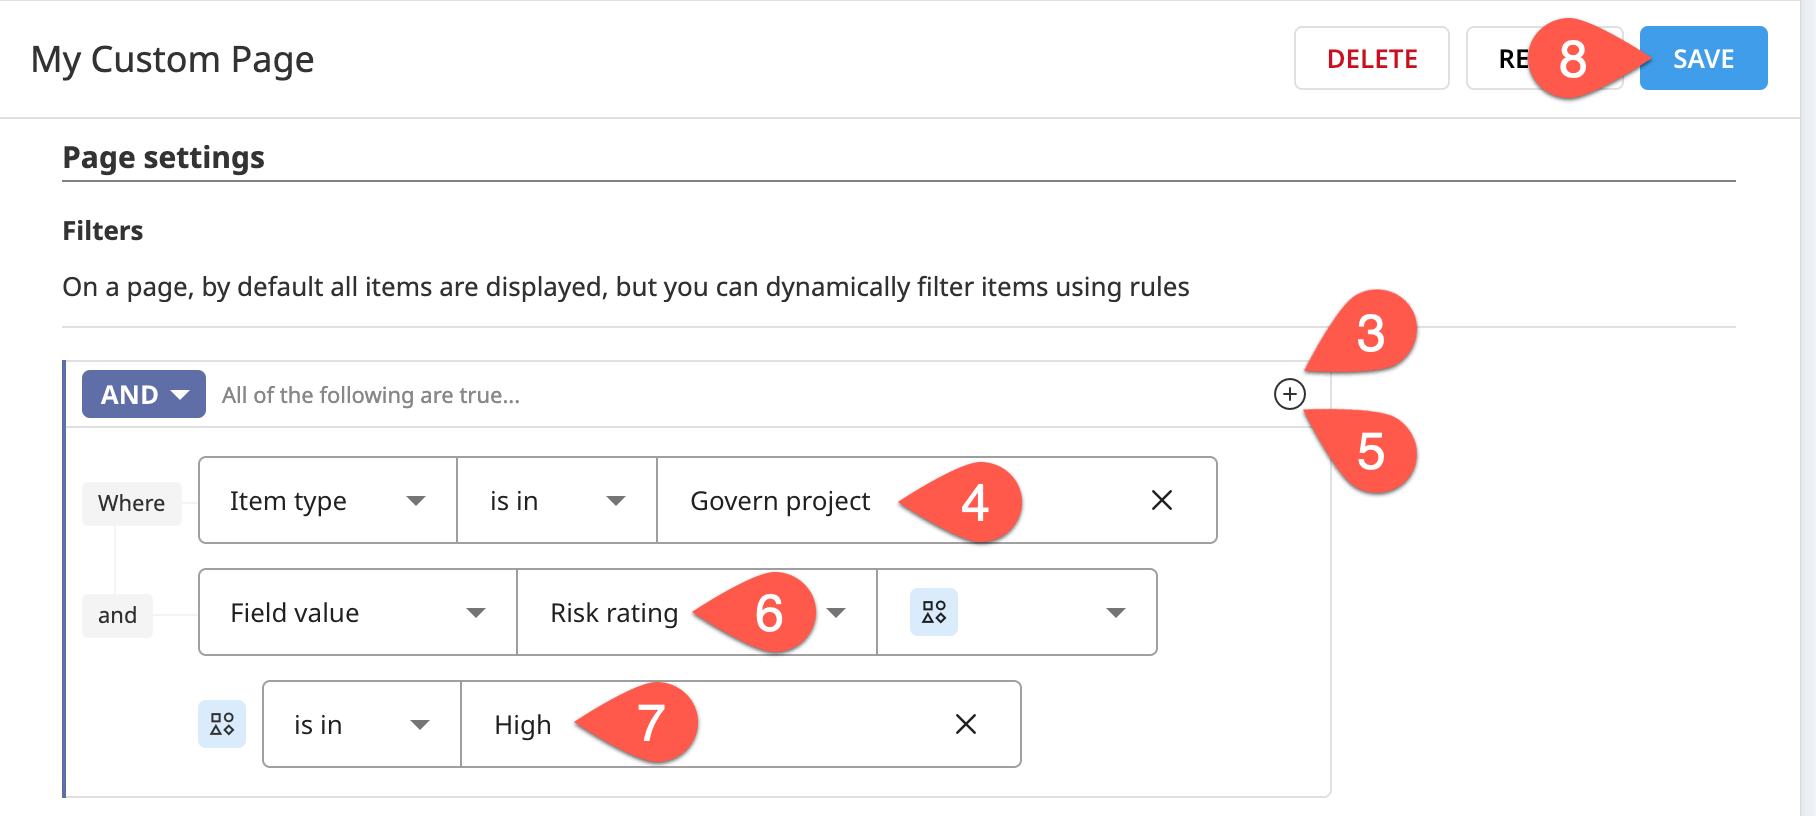
In the Custom Page Designer, return to the Filters of your custom page.
Click the bin (
) icon as needed to delete all existing filters.Click the plus (
) icon > Condition to add the first condition.Filter for where Item type is in Govern project.
Click the plus (
) icon > Condition to add a second condition.Filter for the Field value ID of
qualification_risk_rating(label “Risk rating”).Keep items in the category High for this field.
Click Save.
Refresh your Custom Page, and observe the results. You should see at least your Governance Basics project listed in the item table.
With the correct filters in place, now you can work on the columns.
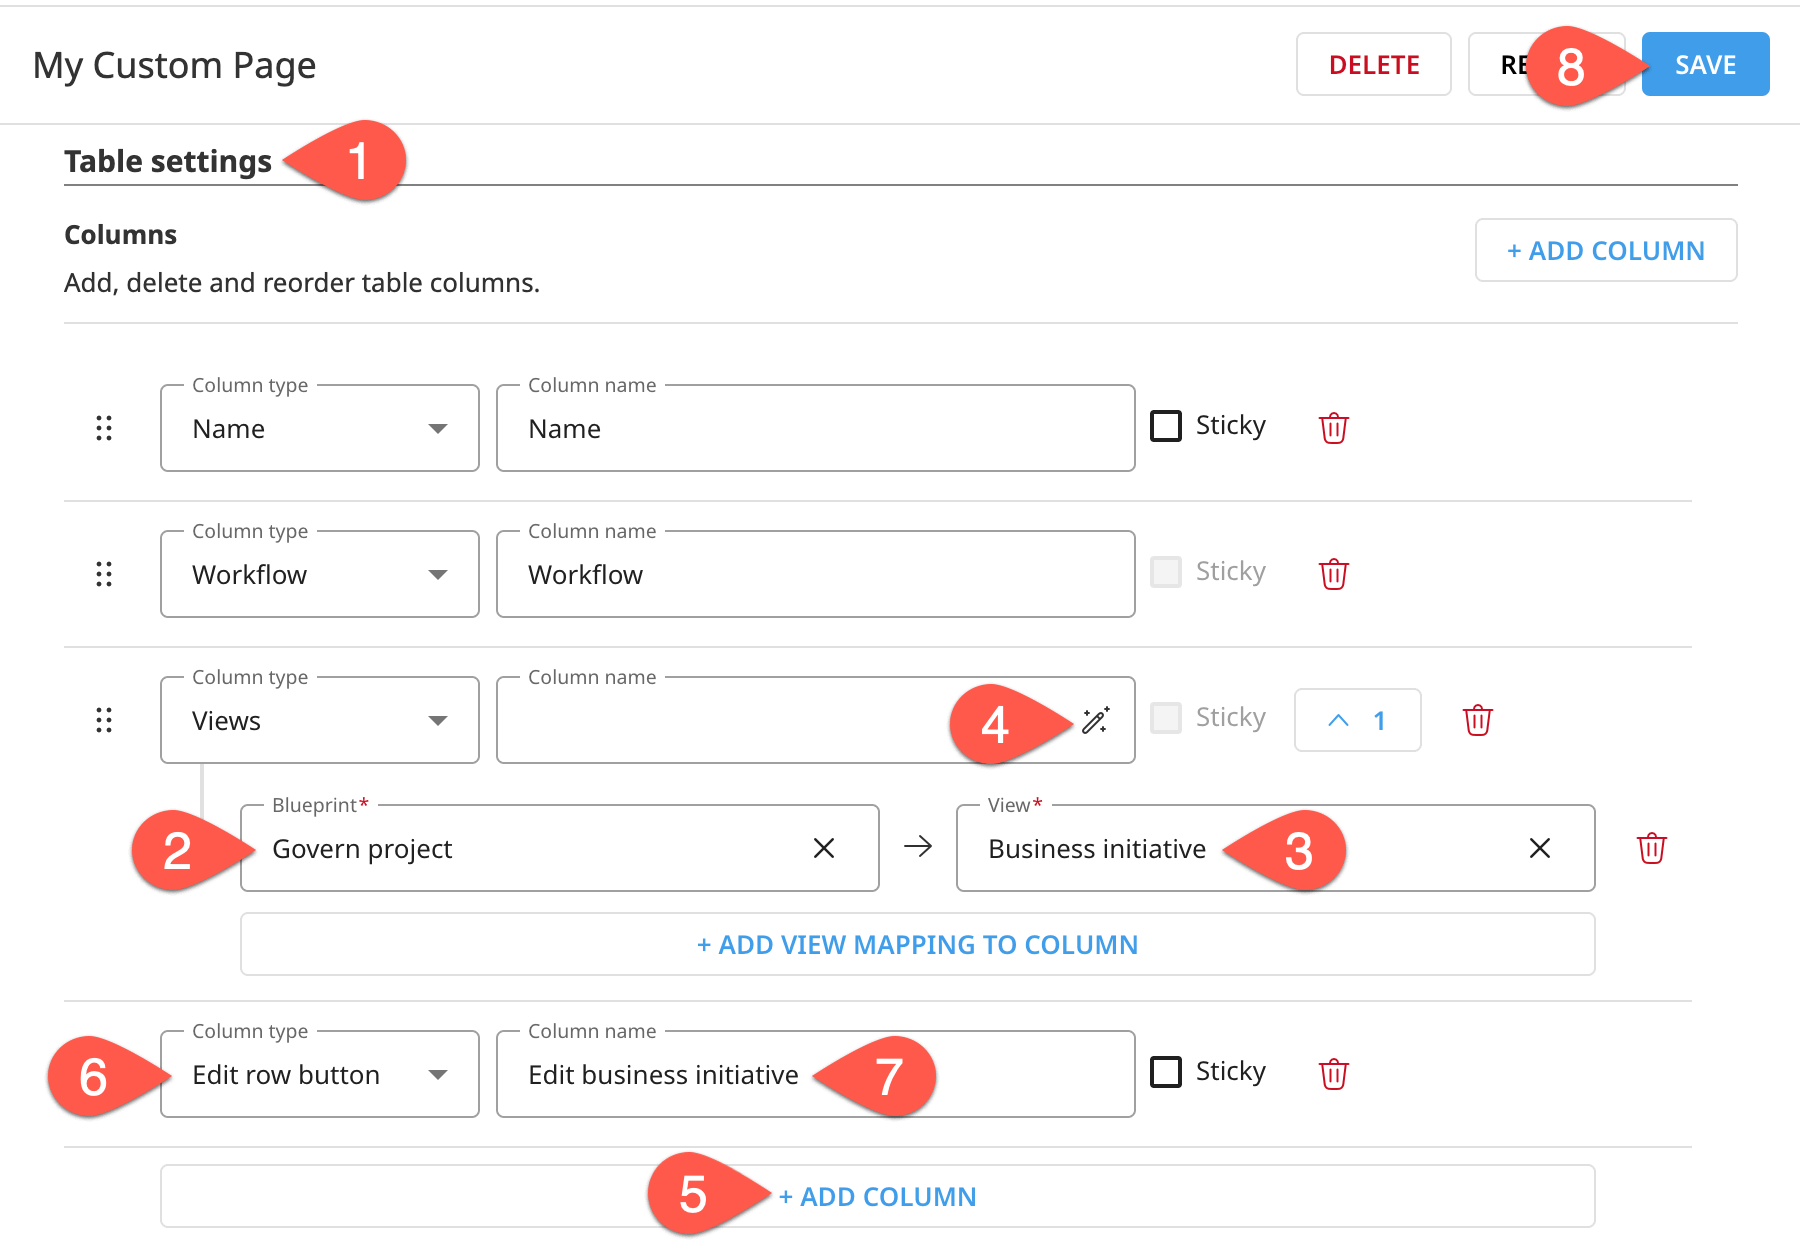
In the Custom Page Designer, return to the Table settings in your custom page.
In the third Views column, switch the Blueprint to a Govern project.
Change the view to Business initiative.
Change the third column name to
Business initiative.Click + Add Column.
Change the column type to Edit row button.
Name the new column
Edit Business initiative.Click Save.
Refresh your Custom Page, and observe the results.
Now you should be able to directly edit the associated Business initiative of any high risk Govern project!
Change the layout of a custom page#
At this point, you’ve seen the first layout option for a custom page: the standalone item table. However, there are two other layout options depending on your needs:
Item table and matrix
Custom HTML
Item table and matrix#
The standard Governed projects page is an example of an item table and matrix page layout. Between the item table on the left and the Details panel on the right is a matrix section.
The matrix is useful for visualizing items along numeric or categorical dimensions. More specifically, this layout plots items present in the item table (as configured by the filters) on a scatterplot-like grid. Users can define the axes according to any number or category fields that are available to those items.
Your present custom page includes only Govern projects. Accordingly, the available matrix axes for this page include any number or category field belonging to a Govern project.
Next, configure a matrix for your custom page.
In the Custom Page Designer, go to the Custom Page content section of your Custom Page.
Switch the layout to Item table and matrix.
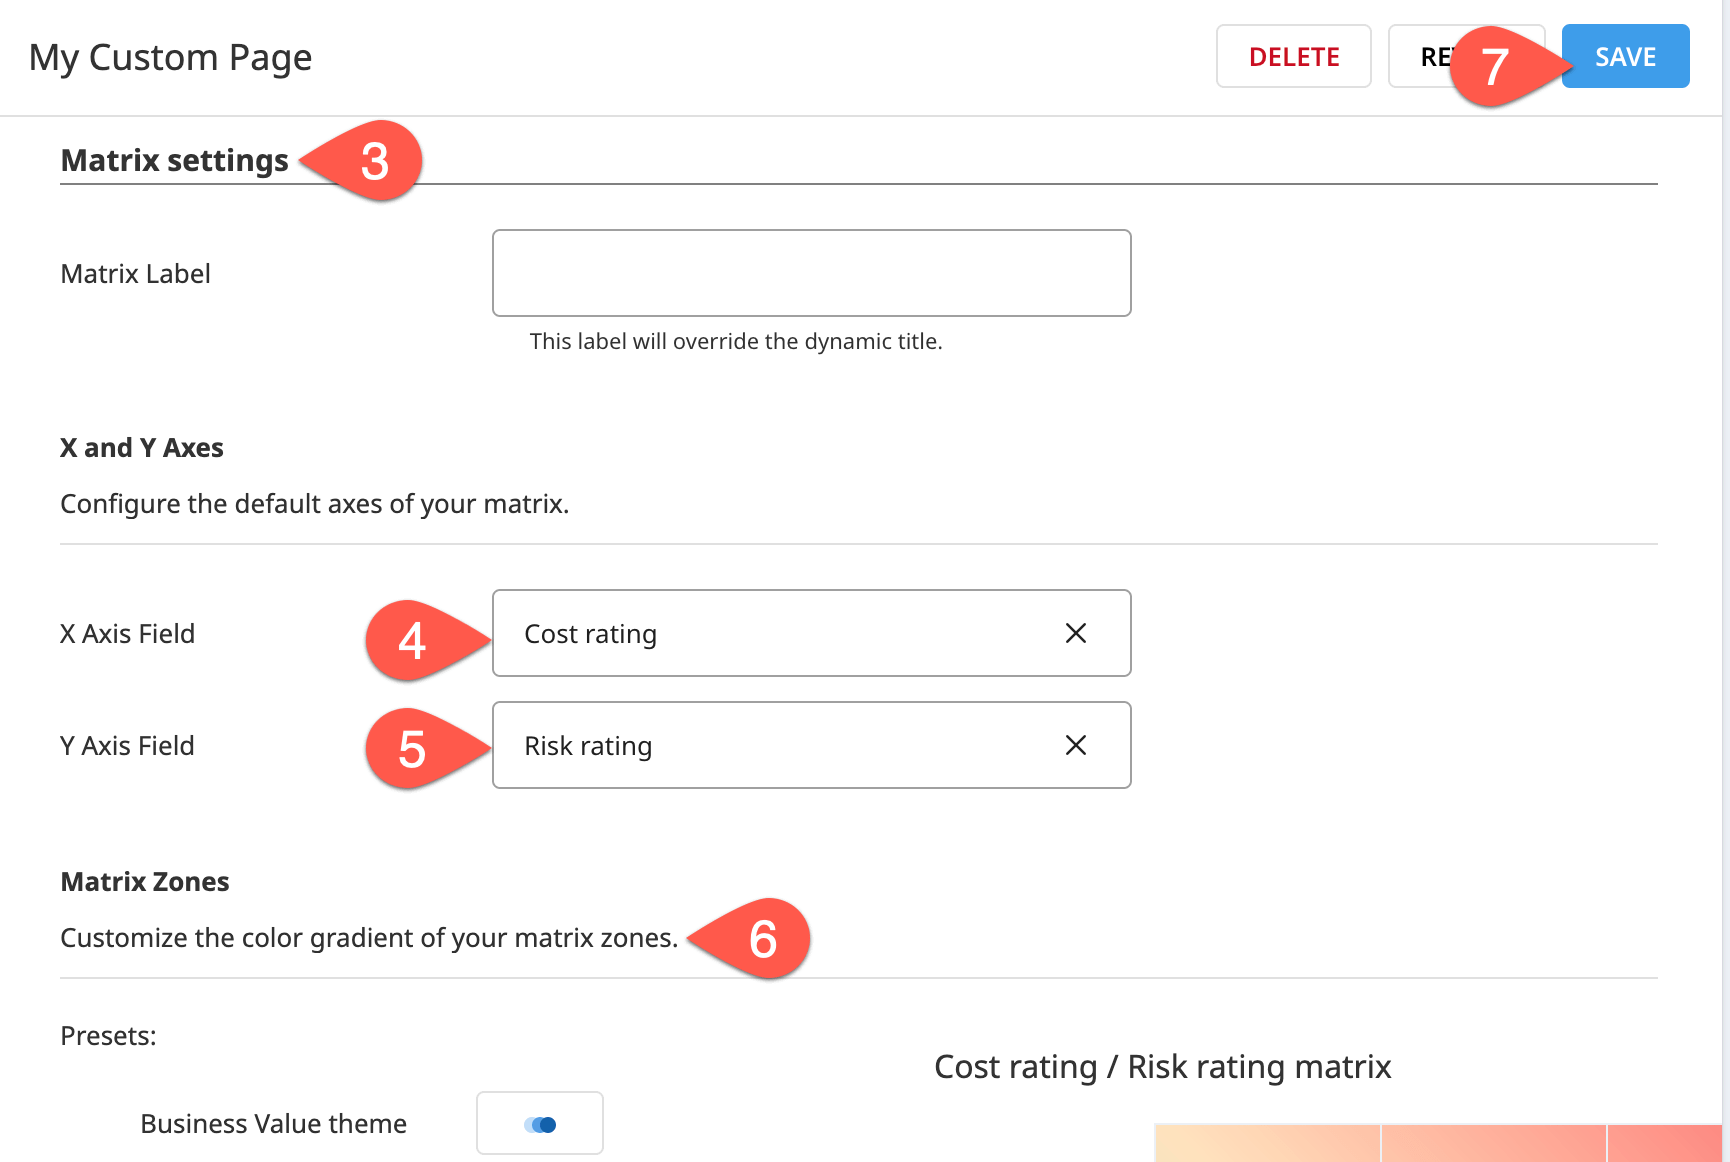
Scrolling down to Matrix settings, observe the empty default and the available fields for the X and Y axes.
For the X axis, select Cost rating.
For the Y axis, select Risk rating.
Feel free to adjust the matrix’s color gradient.
Click Save.
Refresh your Custom Page, and explore the matrix, adjusting the selected axes.
Tip
Adjust the page’s filters to include other item types, and observe the changes in the available axis fields.
Custom HTML#
For even more customization than what the item table and/or matrix pages can provide, you can also build pages entirely with HTML. For example, you might iframe a Dataiku dashboard as a custom governance page.
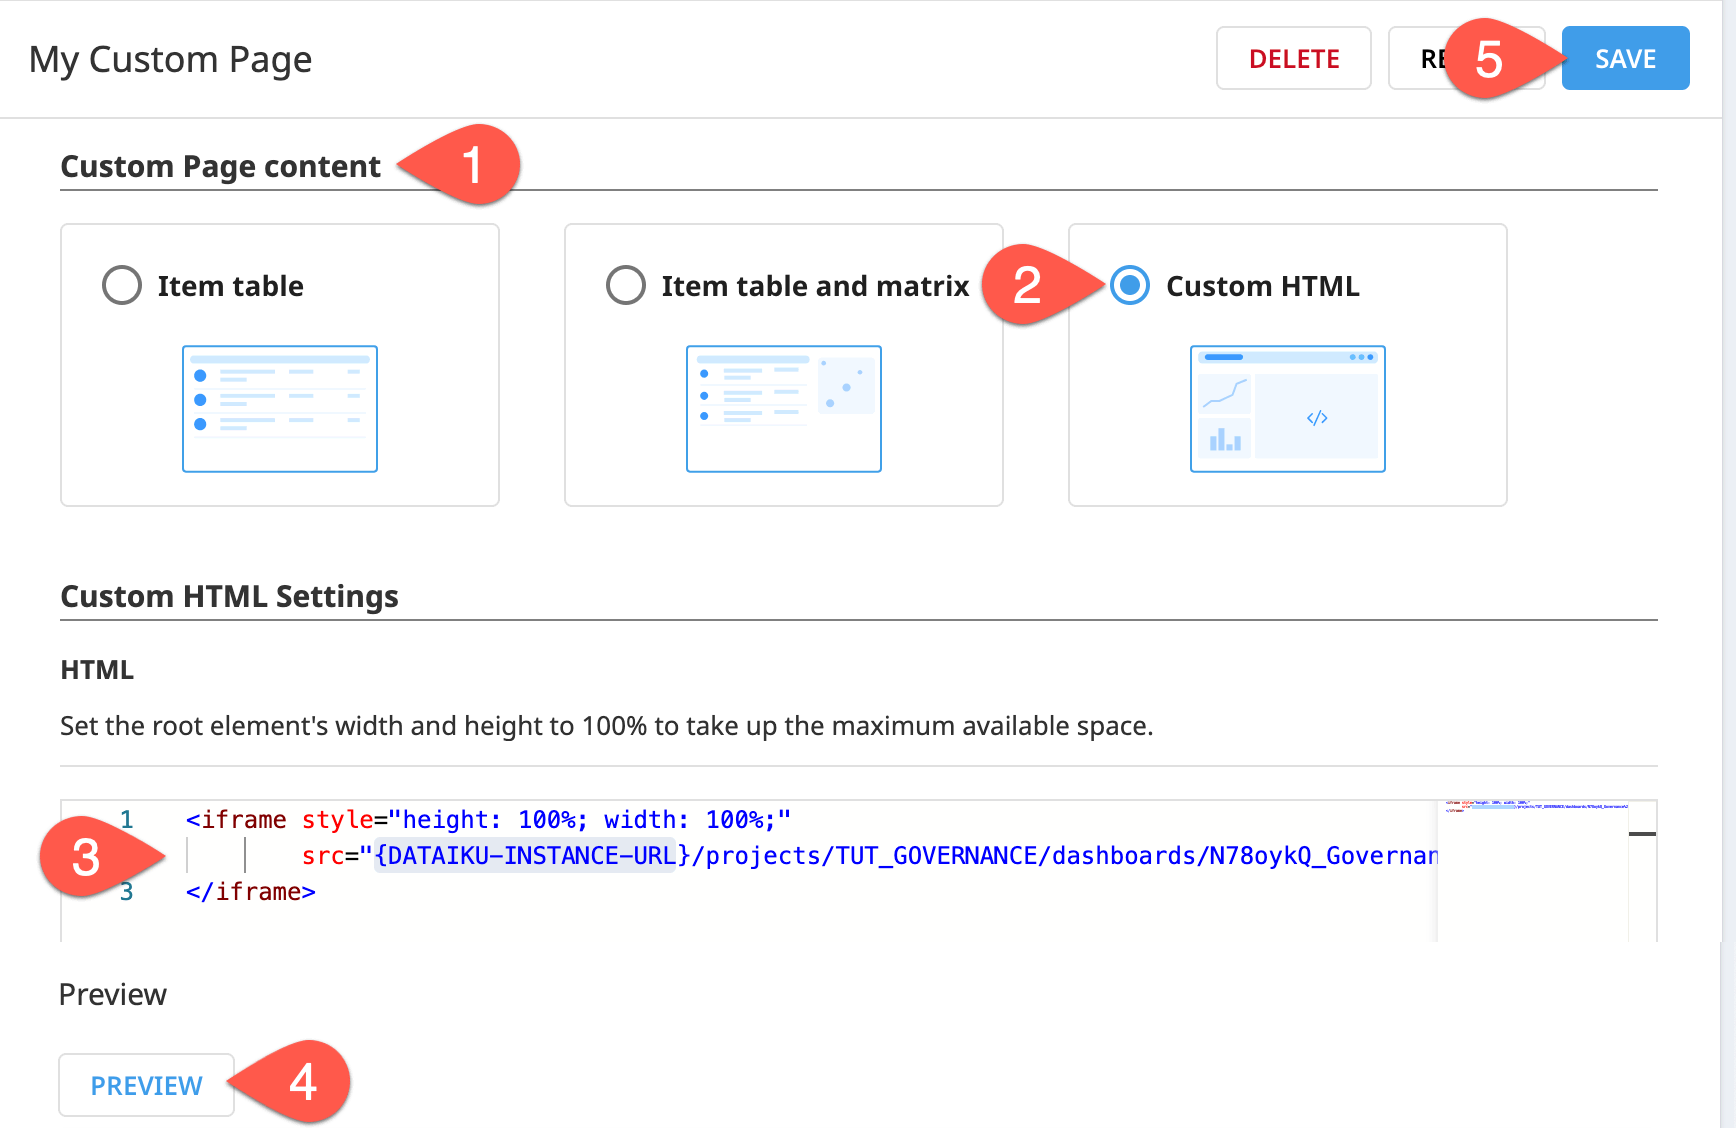
Within your Custom Page settings, go to Custom Page Content.
Select Custom HTML.
In the empty HTML field, copy-paste the snippet below.
Important
The
srcattribute specifies the URL of the content to embed. You must update the URL to match your specific Dataiku instance URL and project key.<iframe style="height: 100%; width: 100%;" src="{DATAIKU-INSTANCE-URL}/projects/TUT_GOVERNANCE/dashboards/N78oykQ_Governance%20Basics'%20default%20dashboard/view/VrAoYDO?fullScreen=true"> </iframe>
Click Preview to test it.
Click Save if the test correctly fetches the dashboard.
Refresh the built version of your Custom Page to see it in a separate browser tab.
Tip
This particular dashboard just has insights from the sample Dataiku project. However, you can also build dashboards that provide insights into your overall governance activities.
Next steps#
Congratulations! You’ve taken your first steps using the Custom Page Designer to create your own pages in the Govern node.
If you wanted to actually use any of the pages built in this tutorial, you’d just need to make it visible to non-admin users.
In the Custom Page Designer, go to the first section of settings in your Custom Page.
Toggle on the Visible option.
Before you finish, take a moment to delete work that you no longer need as a courtesy to those sharing your Govern node.
From the Custom Page Designer, open your Custom Page, and click Delete.
From the Governed projects (
 ) page, open your version of the Governance Basics project. From the vertical dots (
 ) menu in the item header, click Delete Govern Project, and confirm.
From the Business initiatives (
) page, open the Test Business initiative. From the vertical dots () menu in the item header, click Delete Business initiative, and confirm.From the Design node, delete your version of the Governance Basics project.
See also
Consult the reference documentation on Build Custom Pages to learn more.