Tutorial | Dataiku for R users#
Get started#
Dataiku’s visual interface enables collaboration with a wide pool of colleagues who may not be coders (or R coders for that matter). At the same time, code integrations for languages like Python and R retain the flexibility needed when you desire greater customization or freedom.
Objectives#
In this tutorial, you will:
Build an ML pipeline from R notebooks, recipes, and project variables.
Apply a custom R code environment to use CRAN packages not found in the built-in environment.
Use the Dataiku R API to edit Dataiku recipes and create ggplot2 insights from within RStudio.
Import R code from a Git repository into a Dataiku project library.
Work with managed folders to handle file types such as
*.RData.
Prerequisites#
Dataiku 12.0 or later.
An Advanced Analytics Designer or Full Designer user profile.
The R integration installed.
An R code environment with the packages tidyr, ggplot2, gbm, and caret (or the permission to create a new code environment).
Optional: RStudio Desktop integration.
Basic knowledge of Dataiku (Core Designer level or equivalent) is encouraged.
Create the project#
From the Dataiku Design homepage, click + New Project.
Select Learning projects.
Search for and select Dataiku for R Users.
If needed, change the folder into which the project will be installed, and click Create.
From the project homepage, click Go to Flow (or type
g+f).
From the Dataiku Design homepage, click + New Project.
Select DSS tutorials.
Filter by Developer.
Select Dataiku for R Users.
From the project homepage, click Go to Flow (or type
g+f).
Note
You can also download the starter project from this website and import it as a zip file.
You’ll next want to build the Flow.
Click Flow Actions at the bottom right of the Flow.
Click Build all.
Keep the default settings and click Build.
Observe the visual Flow#
Let’s start with a project built entirely with visual tools:
The data pipeline consists of visual recipes.
The native chart builder has been used for exploratory visualizations.
The machine learning model (shown in green) has been built with the visual ML interface.
Although using visual tools can amplify collaboration and understanding with non-R users, recreating this Flow in R opens opportunities for greater customization at every stage.
When you have completed the tutorial, you will have built the bottom half of the Flow pictured below:
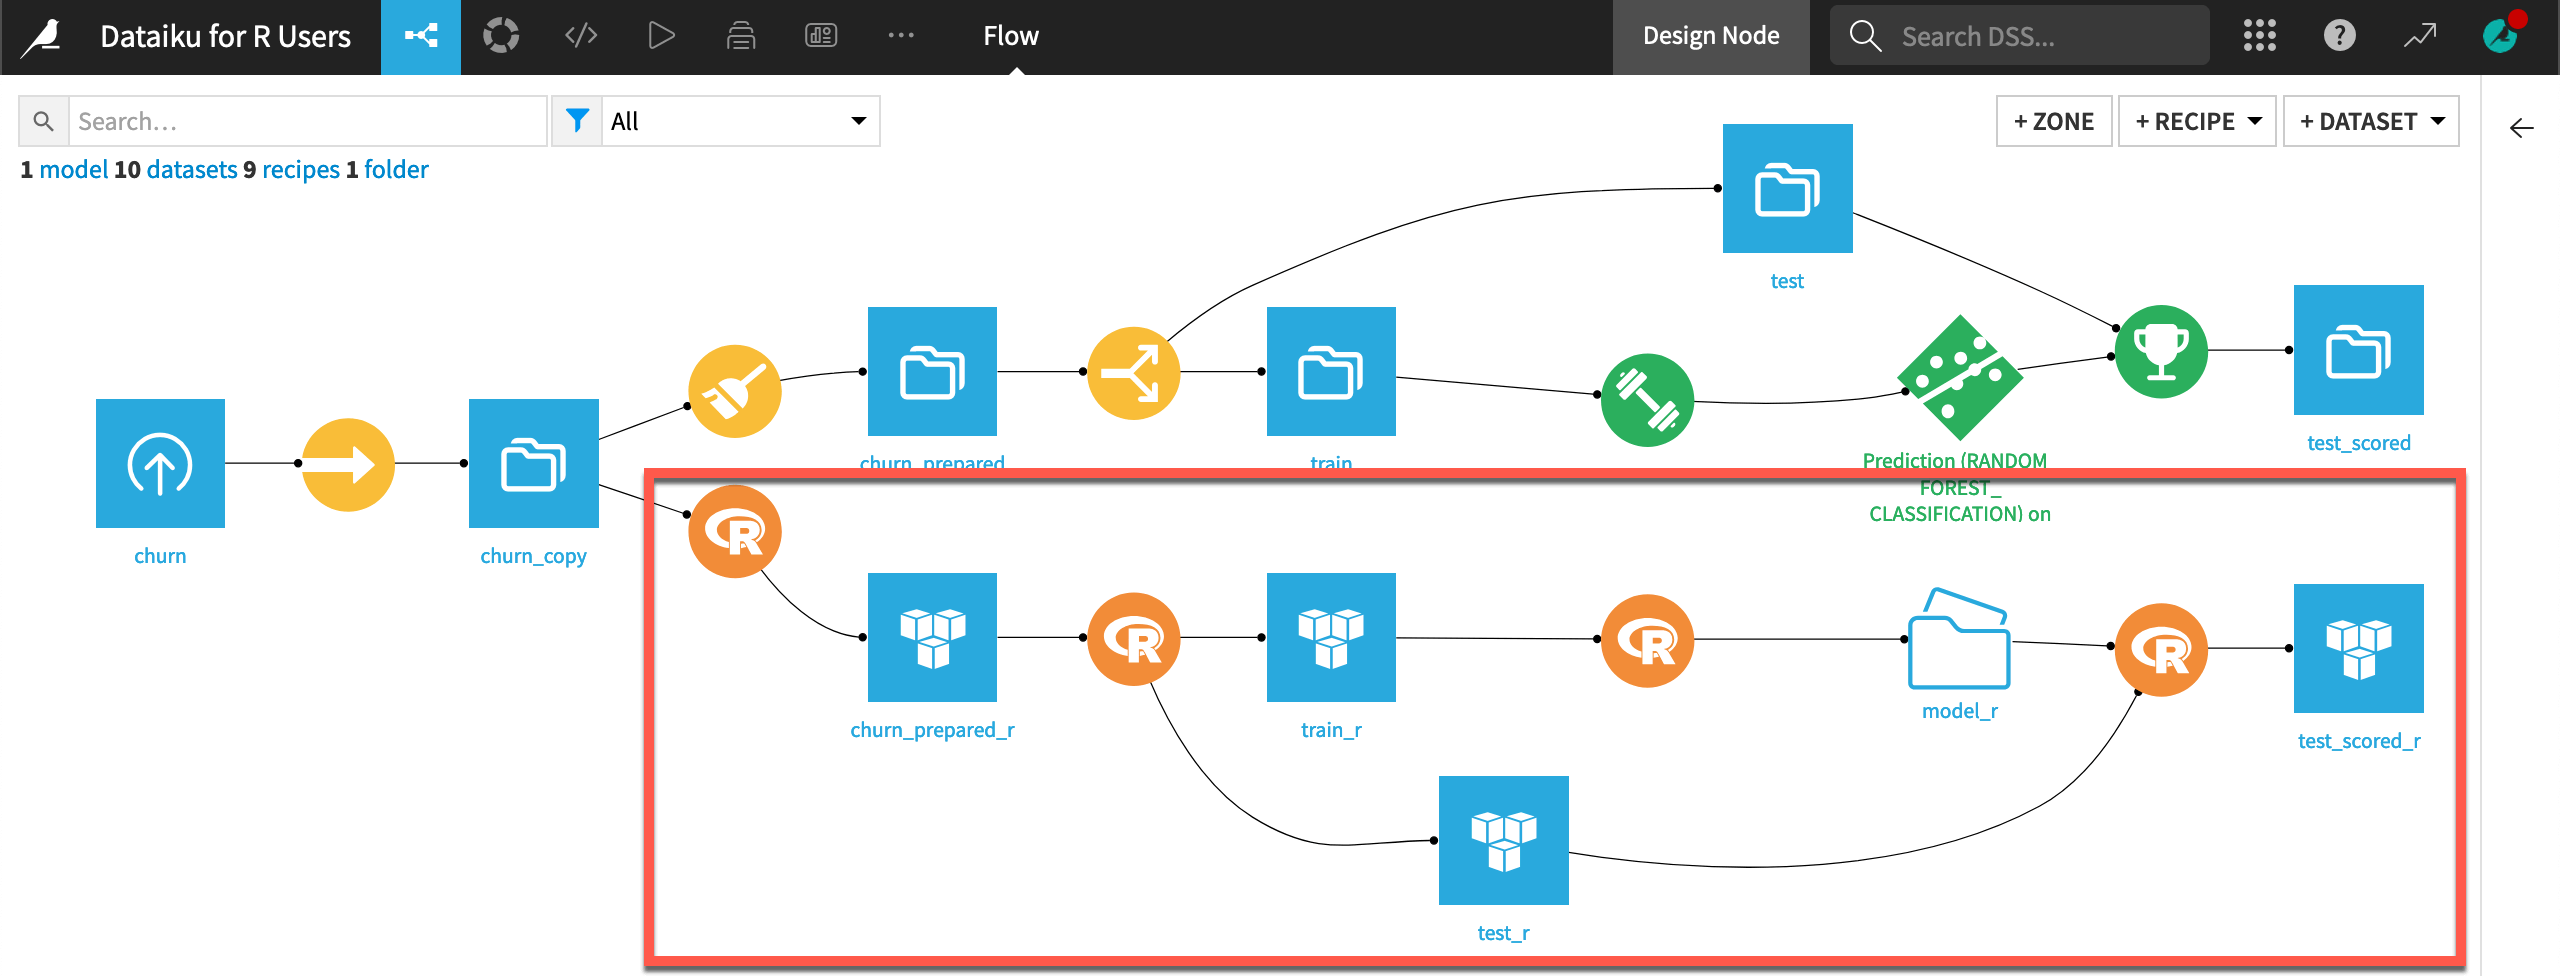
Even if primarily an R user, it will be helpful for you to familiarize yourself with the available set of visual recipes and what they can achieve.
The table below is far from 1-1 matching. However, it suggests a Dataiku recipe that performs a similar operation for the most common data preparation functions in base R or the tidyverse.
R package |
R function |
Similar Dataiku recipe/processor |
|---|---|---|
dplyr |
|
|
dplyr |
|
|
dplyr |
|
|
dplyr |
|
|
dplyr |
|
|
dplyr |
|
|
dplyr |
|
|
dplyr |
|
|
tidyr |
|
|
tidyr |
|
|
base, dplyr |
|
|
base, dplyr |
|
|
base, dplyr |
|
|
stringr |
NA |
Transform string processor et al. |
lubridate |
NA |
|
fuzzyjoin |
NA |
Note
As shown in the table, processors found in the Prepare recipe handle many data preparation functions. Moreover, many recipes and processors — although having a visual interface on top — are SQL-compatible.
Code in an R notebook#
Let’s start writing R code!
Create an R notebook from a dataset#
The fastest way to start writing R code is in a Jupyter notebook.
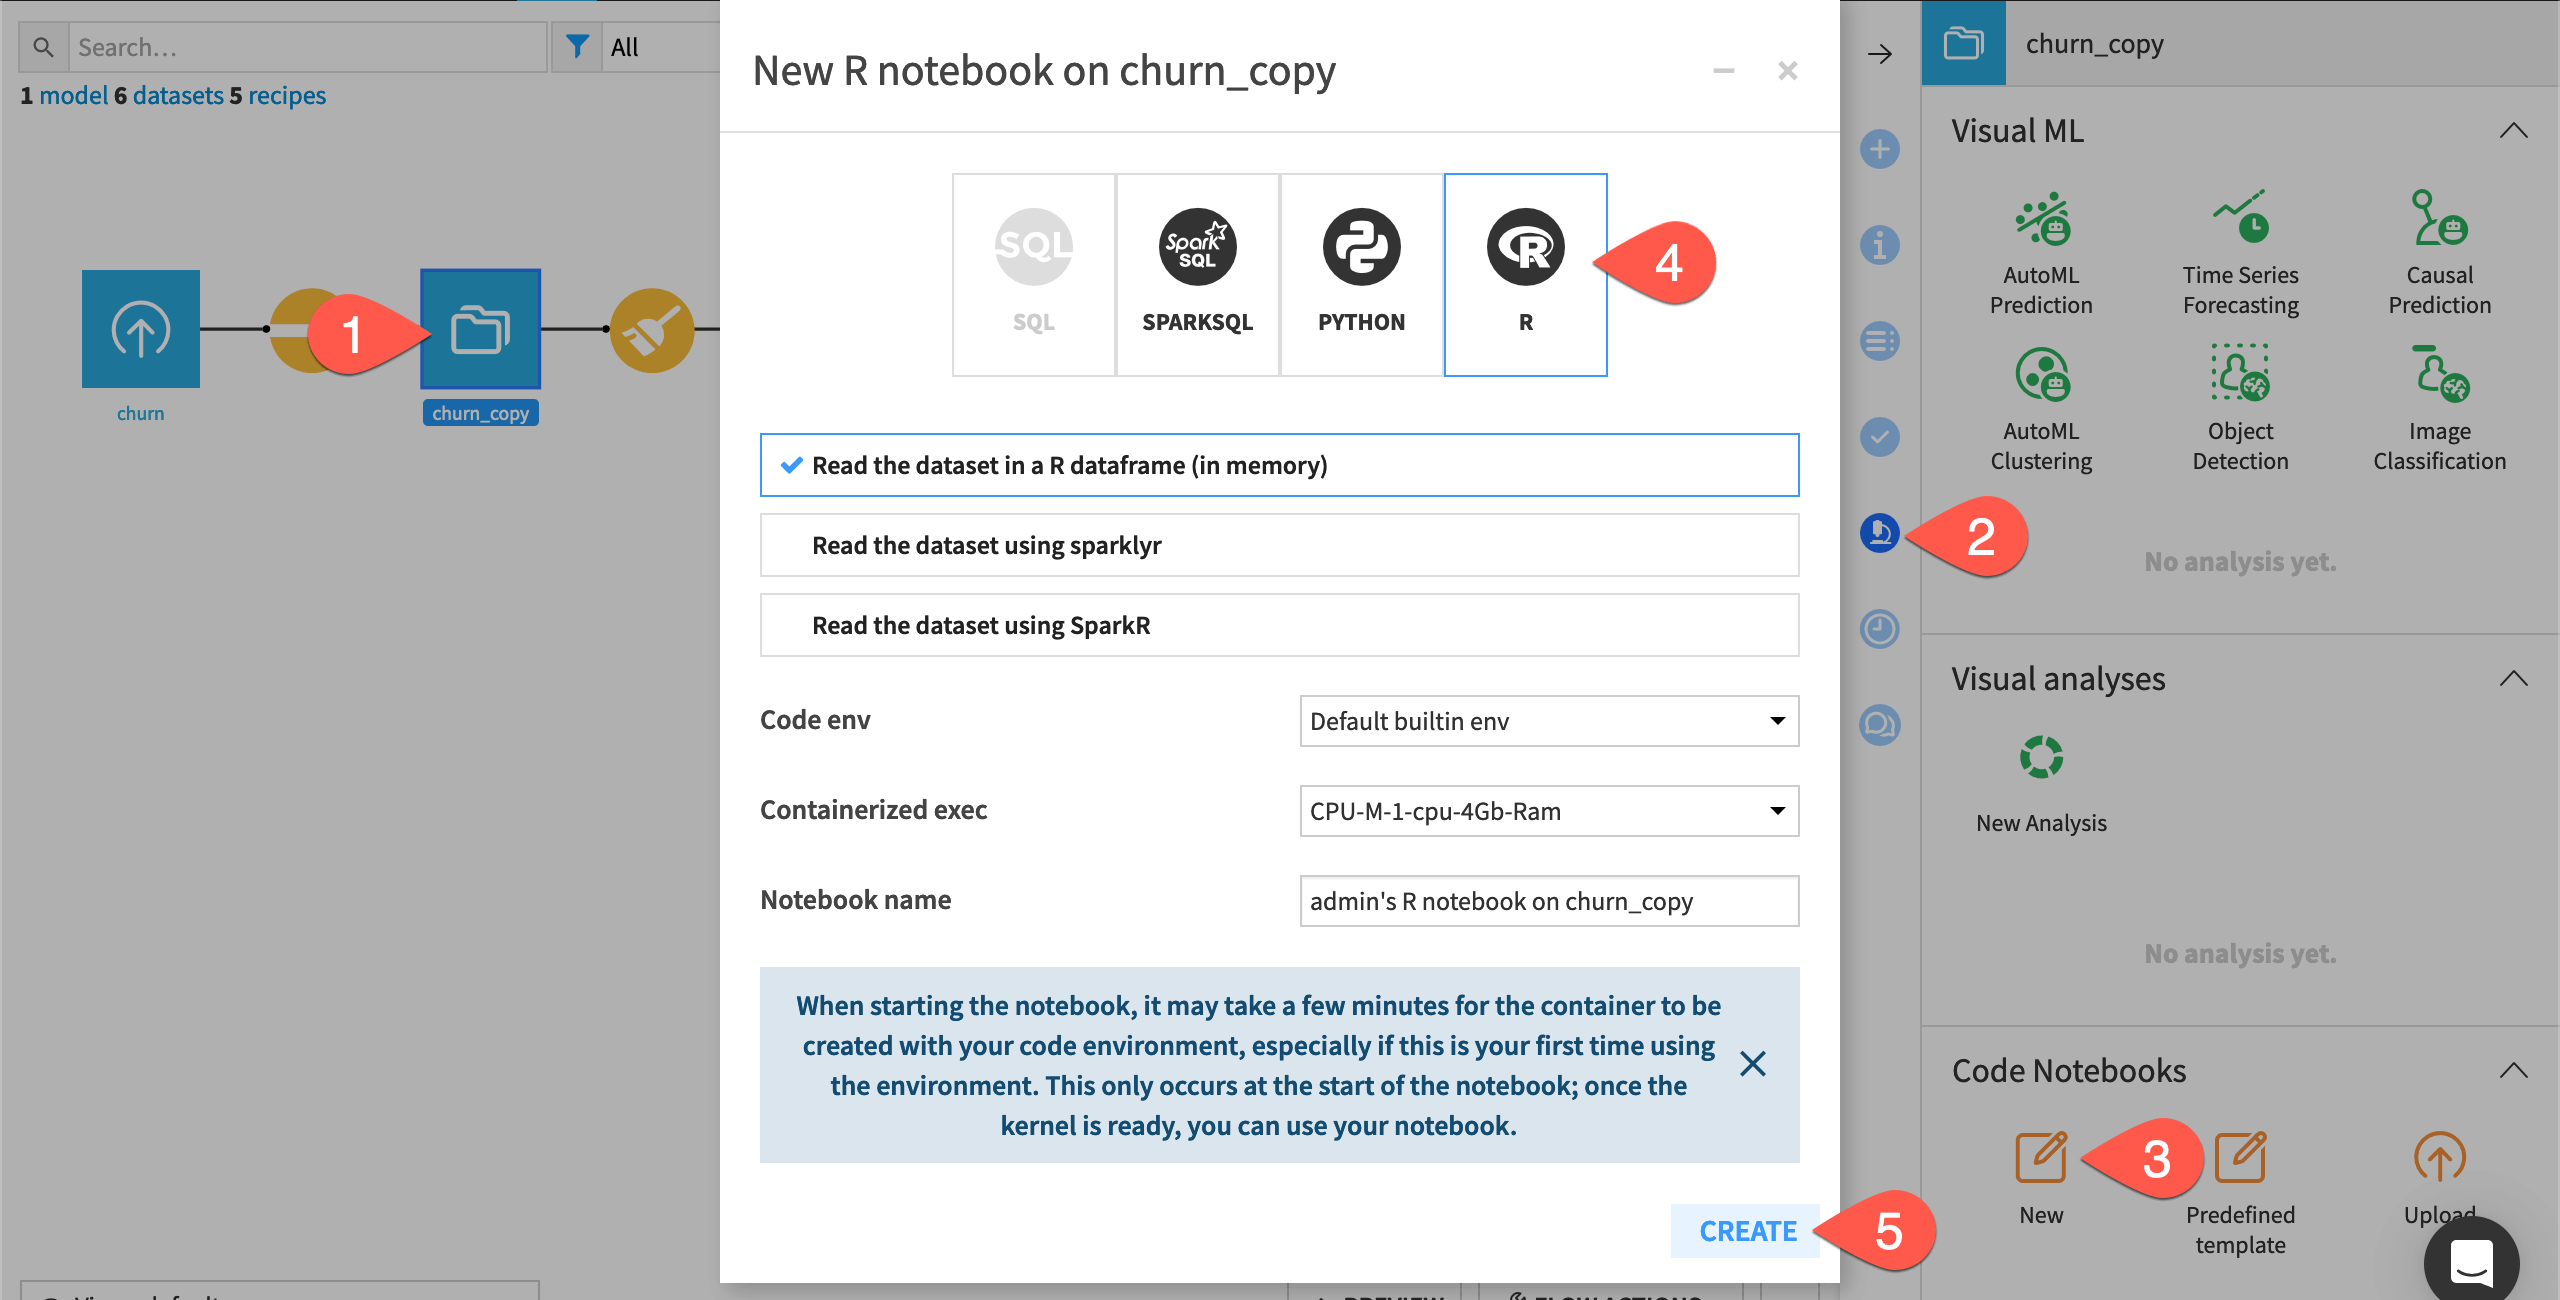
From the Flow, select the churn_copy dataset.
In the right side panel, navigate to the Lab (
) tab.
Under Code Notebooks, select New.
In the dialog, select R.
Click Create.
Inspect the starter code#
It’s worth taking a moment to understand the starter code in the default notebook.
The cell
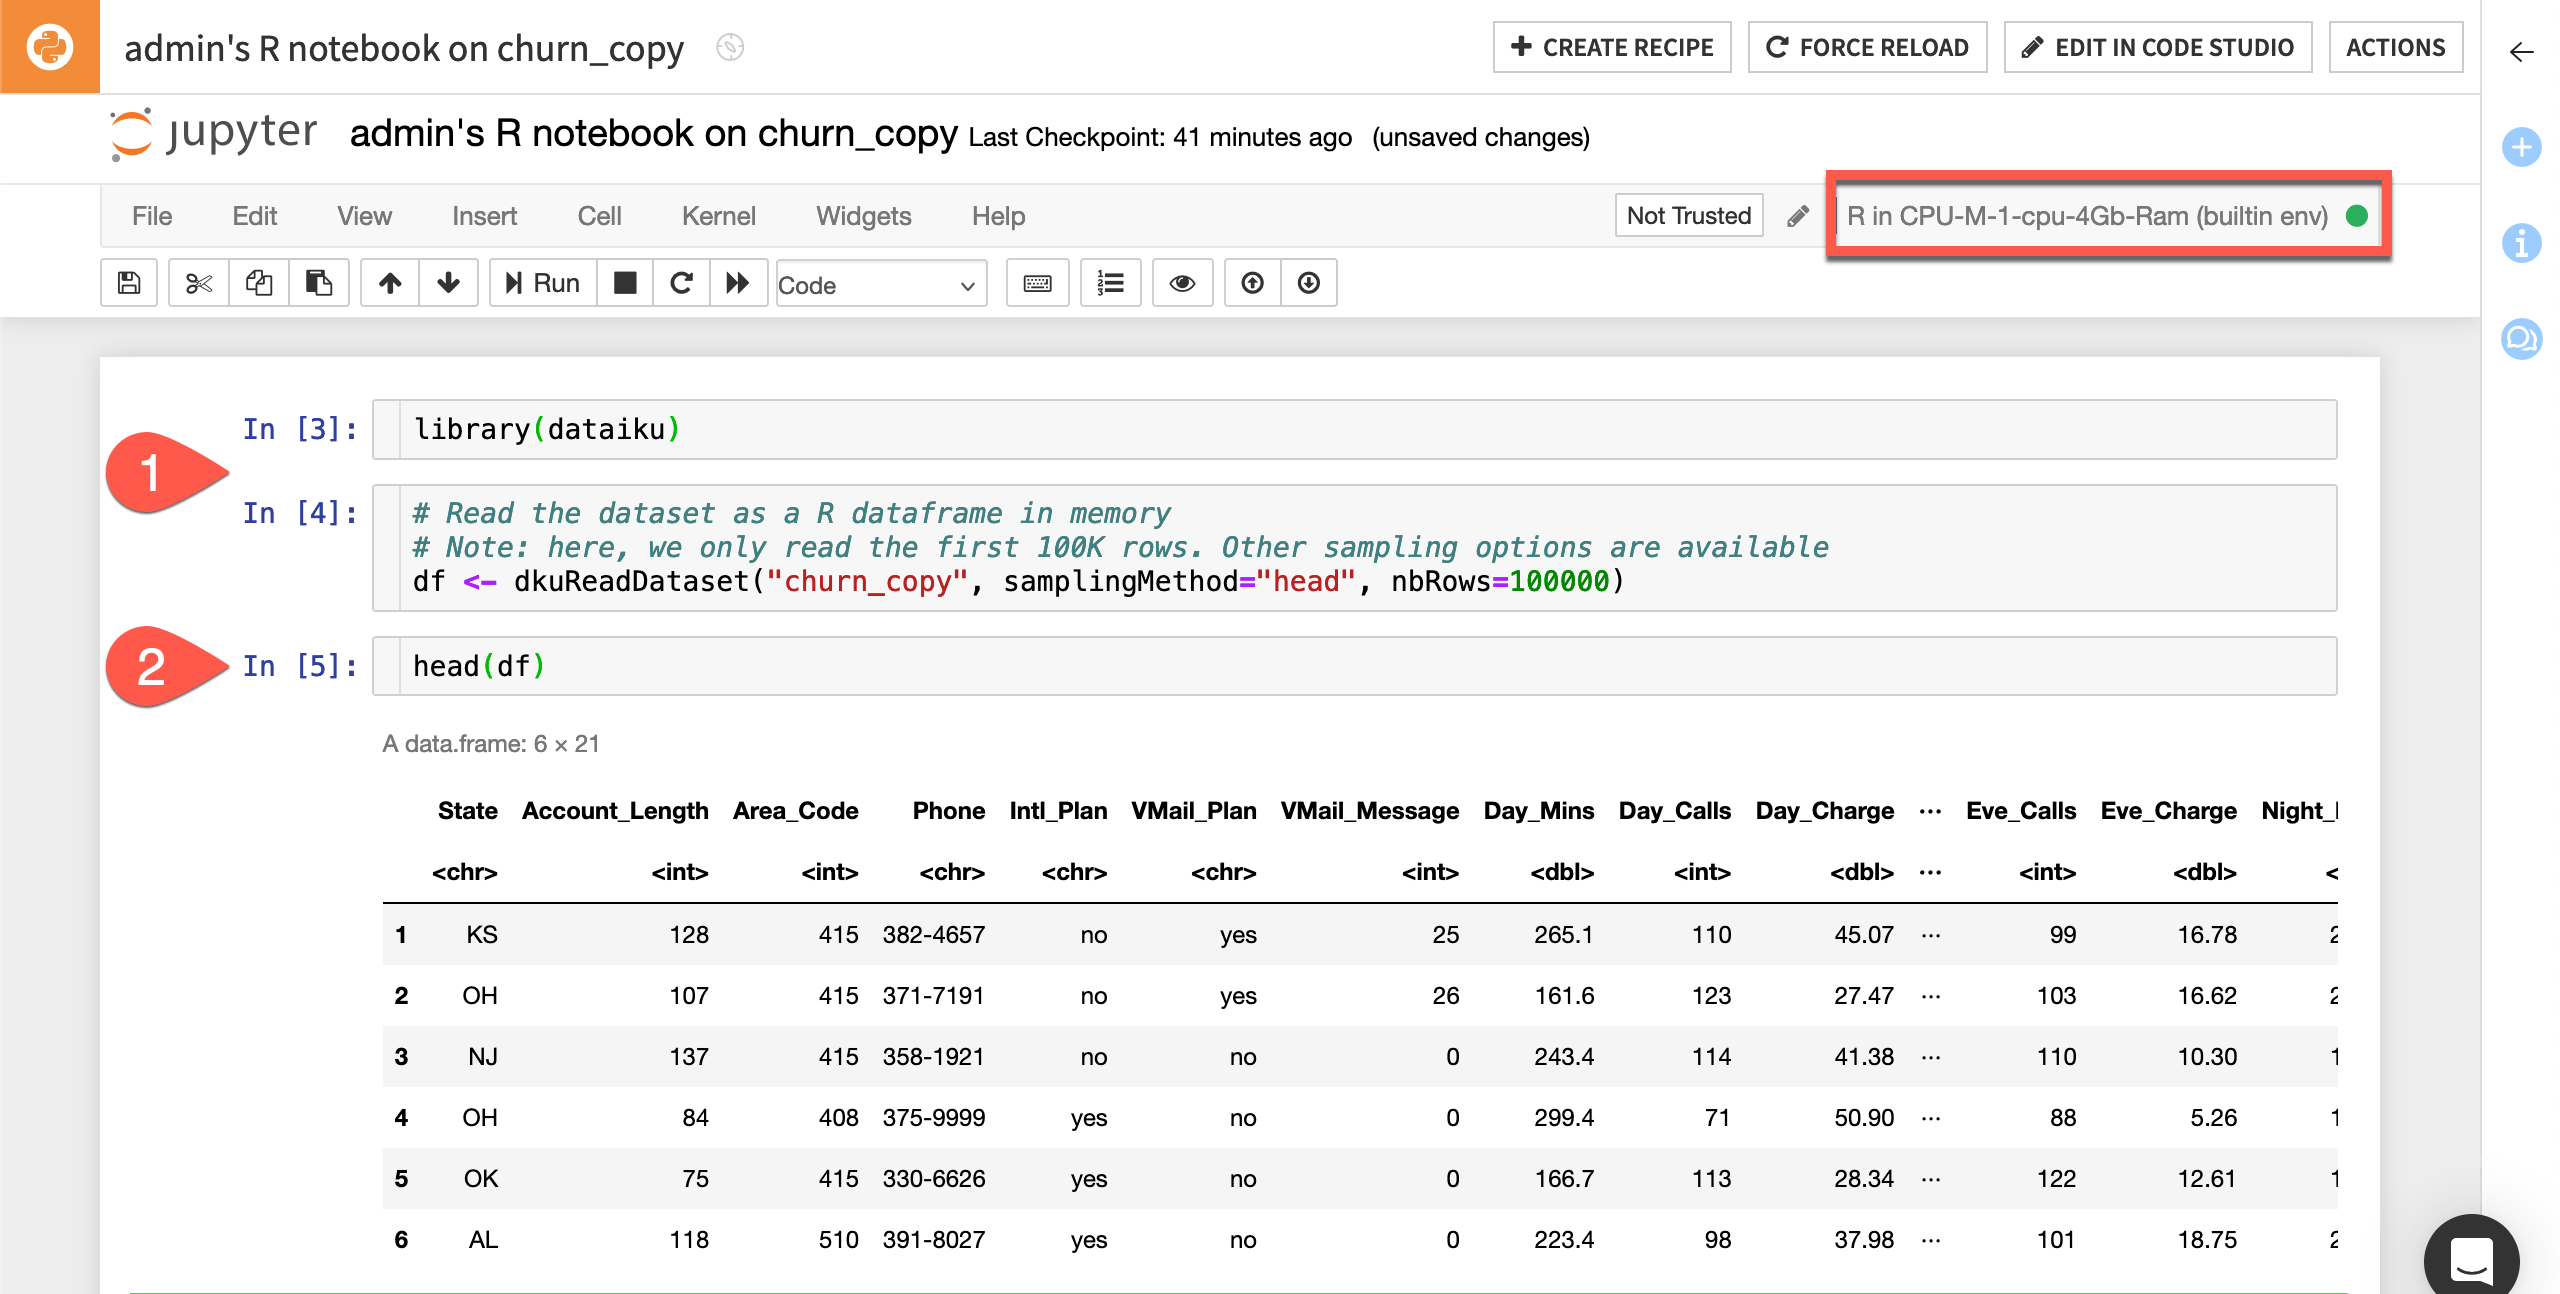
library(dataiku)loads the dataiku R package, which includes functions for interacting with Dataiku objects, such as datasets and folders.The second cell creates an in-memory R DataFrame named df from the Dataiku dataset from which you created this notebook.
Important
The churn_copy dataset, in this case, is a managed filesystem dataset, resulting from the original uploaded CSV file. However, the syntax in the R notebook would be exactly the same if the Sync recipe were instead moving the CSV file to an SQL database, an HDFS cluster, or cloud storage.
Run the first two cells in the notebook.
Add a new cell with code like
head(df)to start exploring the DataFrame as you normally would.
Note
dkuReadDataset() isn’t the only way to read a dataset with R. dkuSQLQueryToData() makes it possible to execute SQL queries from R. This can be helpful when you want to pull in a specific query of records into Dataiku, rather than any of the standard sampling options.
Use dplyr in a notebook#
Notice that the kernel of this notebook in the upper right corner says that it uses the built-in R environment.
Let’s find out what’s included in this environment.
Add a new cell to the notebook.
Run the command
library()$results[,1]to see a list of installed packages in the current environment.
You’ll find many familiar packages, including those found in the tidyverse, are base packages. Let’s use dplyr in this notebook for example.
Add
library(dplyr)in a cell at the top of the notebook.Delete any exploratory code.
After the assignment of df, add the following code to create a new DataFrame df_prepared_r.
df %>%
    rename(Churn = Churn.) %>%
    mutate(Churn = if_else(Churn == "True.", "True", "False"),
        Area_Code = as.character(Area_Code)) %>%
    select(-Phone) ->
    df_prepared_r
Set a new code environment#
You’ll often want to use R packages not found in the built-in environment. In these cases, you (or an admin) will need to create a code environment.
This tutorial requires the following R packages:
tidyr
ggplot2
gbm
caret
If you don’t already have such a code environment, see How-to | Create a code environment.
Select this code environment at the project level following How-to | Set a code environment.
Iterate between an R notebook and a recipe#
The df_prepared_r DataFrame only exists in the Lab, an experimental space for prototyping. This work doesn’t exist yet in the Flow, where production outputs are actually built. For the latter, you’ll need a code recipe.
Create an R recipe from a notebook#
You can convert the existing code notebook into a code recipe. To do so, you’ll need to define an output to the recipe.
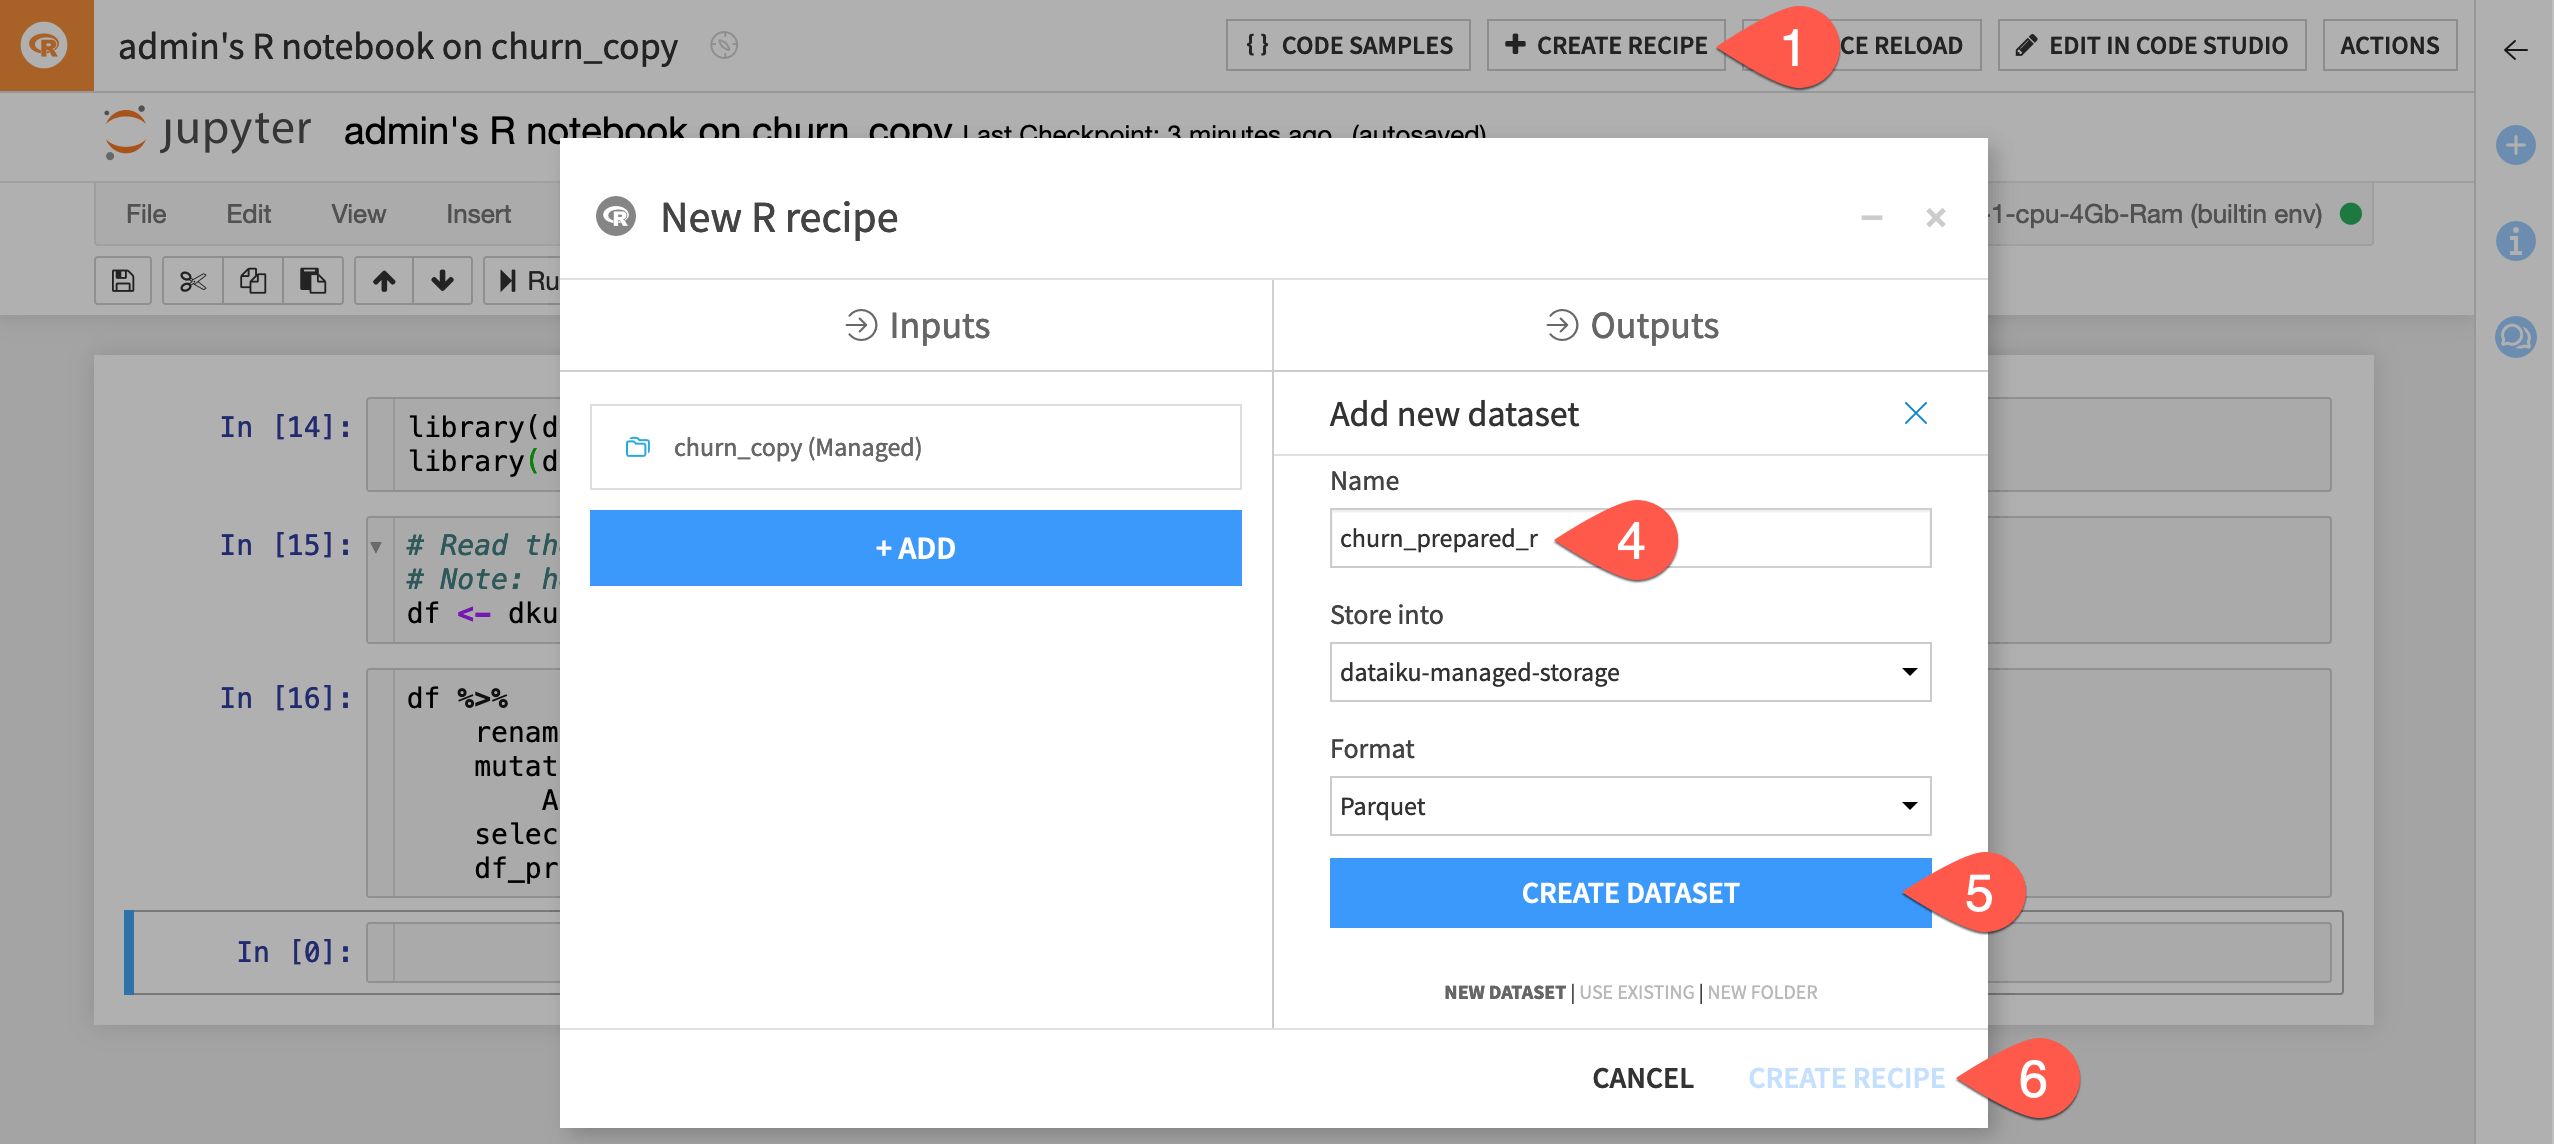
From the notebook, click + Create Recipe.
Click OK to accept the standard R recipe type.
Under Outputs, click + Add.
Name the output dataset
churn_prepared_r.Click Create Dataset.
Click Create Recipe.
Run an R recipe#
The recipe contains the same code found in the notebook, but with an additional line to write the output. You’ll need to change this line to write the new DataFrame you’ve created.
Change the last line to
dkuWriteDataset(df_prepared_r,"churn_prepared_r").Click Run (or type
@+r+u+n) to execute the recipe, and then explore the output dataset in the Flow.
Use the R API outside Dataiku#
You’ve seen how the Dataiku R API works in notebooks and recipes within Dataiku. However, you can also follow the reference documentation for Using the R API outside of DSS, such as in an IDE like RStudio.
Important
The reference documentation on Using the R API outside of DSS provides instructions for downloading the dataiku package and setting up the connection with Dataiku. If you’d rather not set this up at this time, feel free to create a new R notebook within Dataiku for this section.
After configuring a connection, you can use the Dataiku R API to read datasets found in Dataiku projects and code freely. For example, you can even share visualizations back to the Dataiku instance.
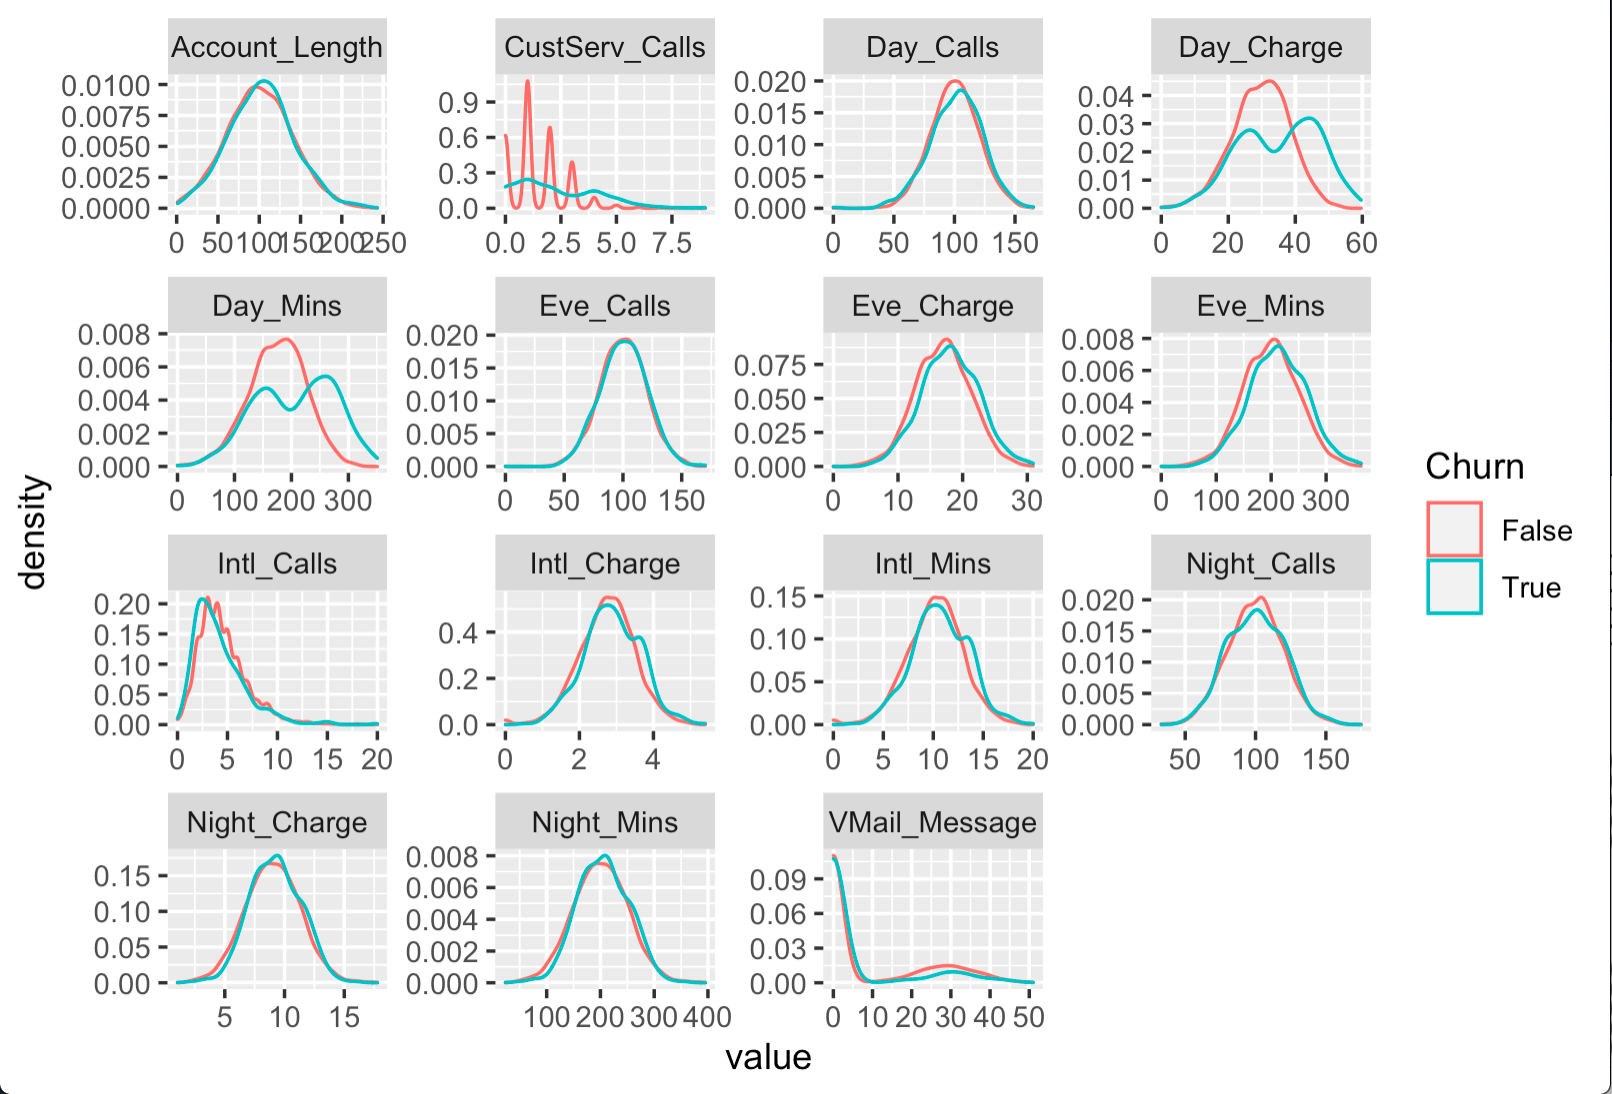
In a new R script of your IDE (or a new R notebook if staying within Dataiku), copy/paste and run the code below to save a ggplot2 object as a static insight.
Note
If working outside Dataiku, you’ll need to supply an API key. One way to find this is by going to Profile & Settings > API keys. Also, be sure to check that your project key is the same as given below.
library(dataiku)
library(dplyr)
library(tidyr)
library(ggplot2)

# These lines are unnecessary if running within Dataiku
dkuSetRemoteDSS("http(s)://DSS_HOST:DSS_PORT/", "Your API Key")
dkuSetCurrentProjectKey("DKU_TUT_R_USERS") # Replace with your project key if different

# Read the dataset as an in-memory R DataFrame
df <- dkuReadDataset("churn_prepared_r", samplingMethod="head", nbRows=100000)

# Create the plot
df %>%
  select(-c(State, Area_Code, Intl_Plan, VMail_Plan)) %>%
  gather("metric", "value", -Churn) %>%
  ggplot(aes(x = value, color = Churn)) +
  facet_wrap(~ metric, scales = "free") +
  geom_density()

# Save plot as a static insight
dkuSaveGgplotInsight("density-plots-by-churn")
After running the code above, return to Dataiku, and navigate to the Insights page (
g+i) to confirm the insight has been added.If you wish, you can publish it to a dashboard like any other insight, such as native charts or model reports.
Tip
In addition to ggplot2, the Dataiku R API has similar convenience functions for creating static insights with dygraphs, ggvis, and googleVis. You can gain more practice creating static insights with ggplot2 in Tutorial | Static insights.
Note
The code above visualizes the distribution for all numeric variables in the dataset among churning and returning customers. While the distribution for many variables is similar, a few variables like CustServ_Calls, Day_Charge, and Day_Mins follow different patterns.
Edit recipes from RStudio#
Returning to the Flow, you can see that the Split recipe divides the prepared data into a training set (70%) and a test set (30%).
Let’s achieve the same outcome with another R recipe, but demonstrate using the RStudio Desktop integration for editing and saving existing recipes.
Note
In addition to the RStudio integration used here, some users may also prefer to write R code in the RStudio Server IDE through a Code Studio template.
Create an R recipe from the Flow#
In addition to converting R notebooks to R recipes, you can also directly create a new R recipe.
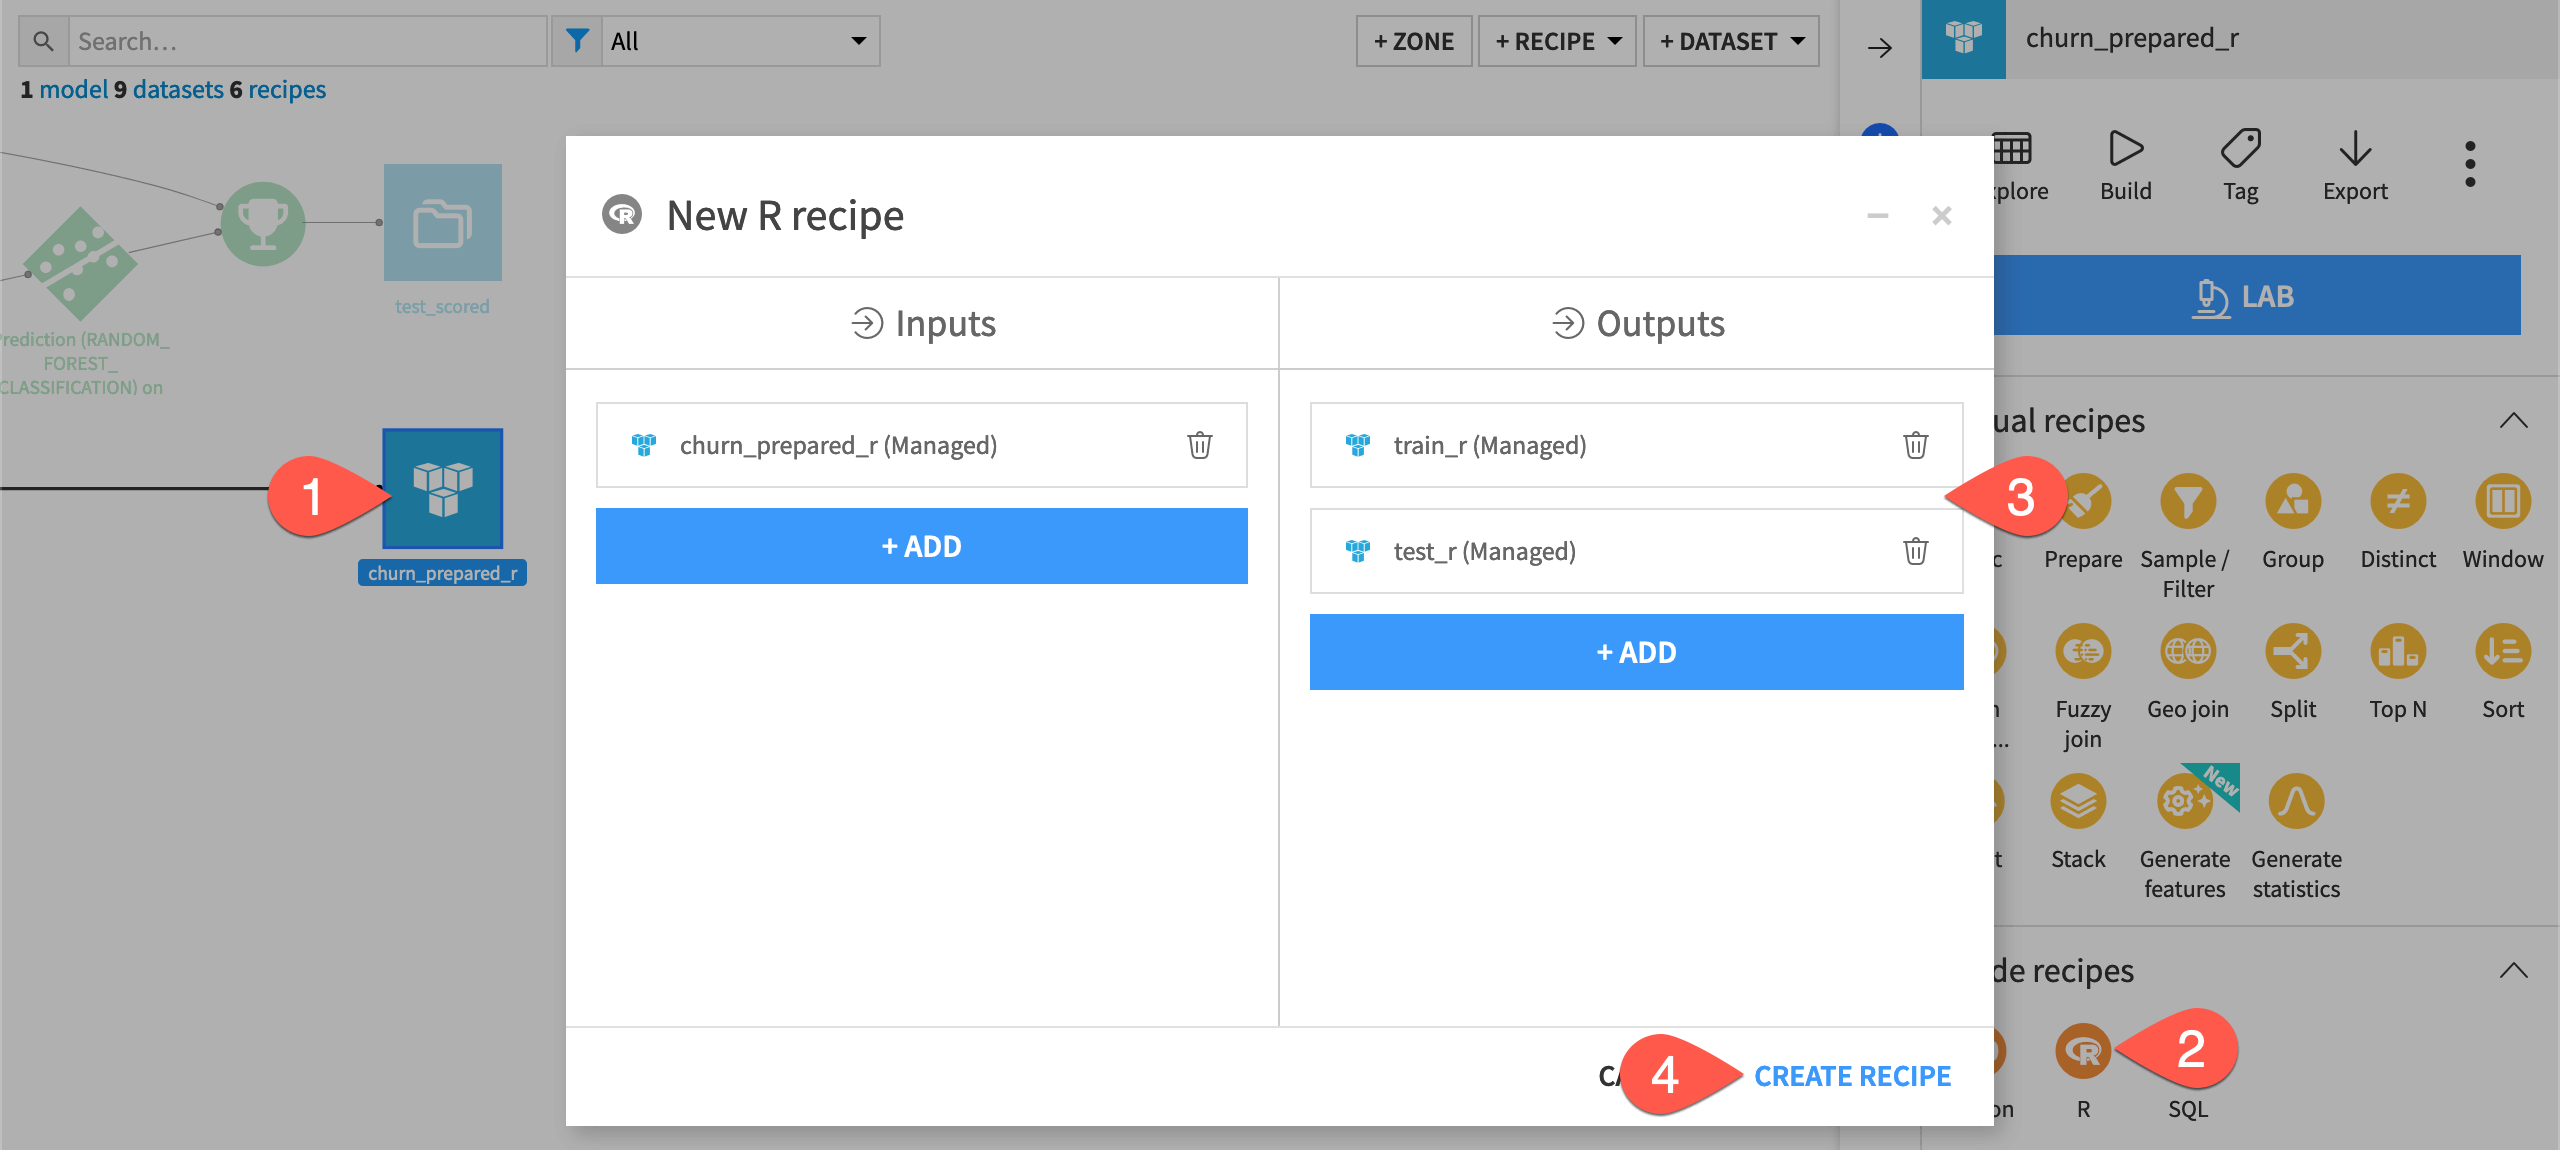
Select the churn_prepared_r dataset.
In the Actions panel, select a new R recipe.
Under Outputs, create two output datasets,
train_randtest_r.Click Create Recipe.
In the recipe editor, click Save.
Download an R recipe to RStudio#
Now that you have created the recipe, let’s edit it in RStudio, and save the new version back to the Dataiku instance.
Important
If you followed the setup in the section above, there are no additional configuration steps needed. Alternatively, you can also skip this step, and directly edit the R recipe within Dataiku.
Within RStudio, create a new R script.
From the Addins menu, select Dataiku: download R recipe code.
Choose the project key, DKU_TUT_R_USERS.
Choose the recipe ID, compute_train_r.
Click Download.
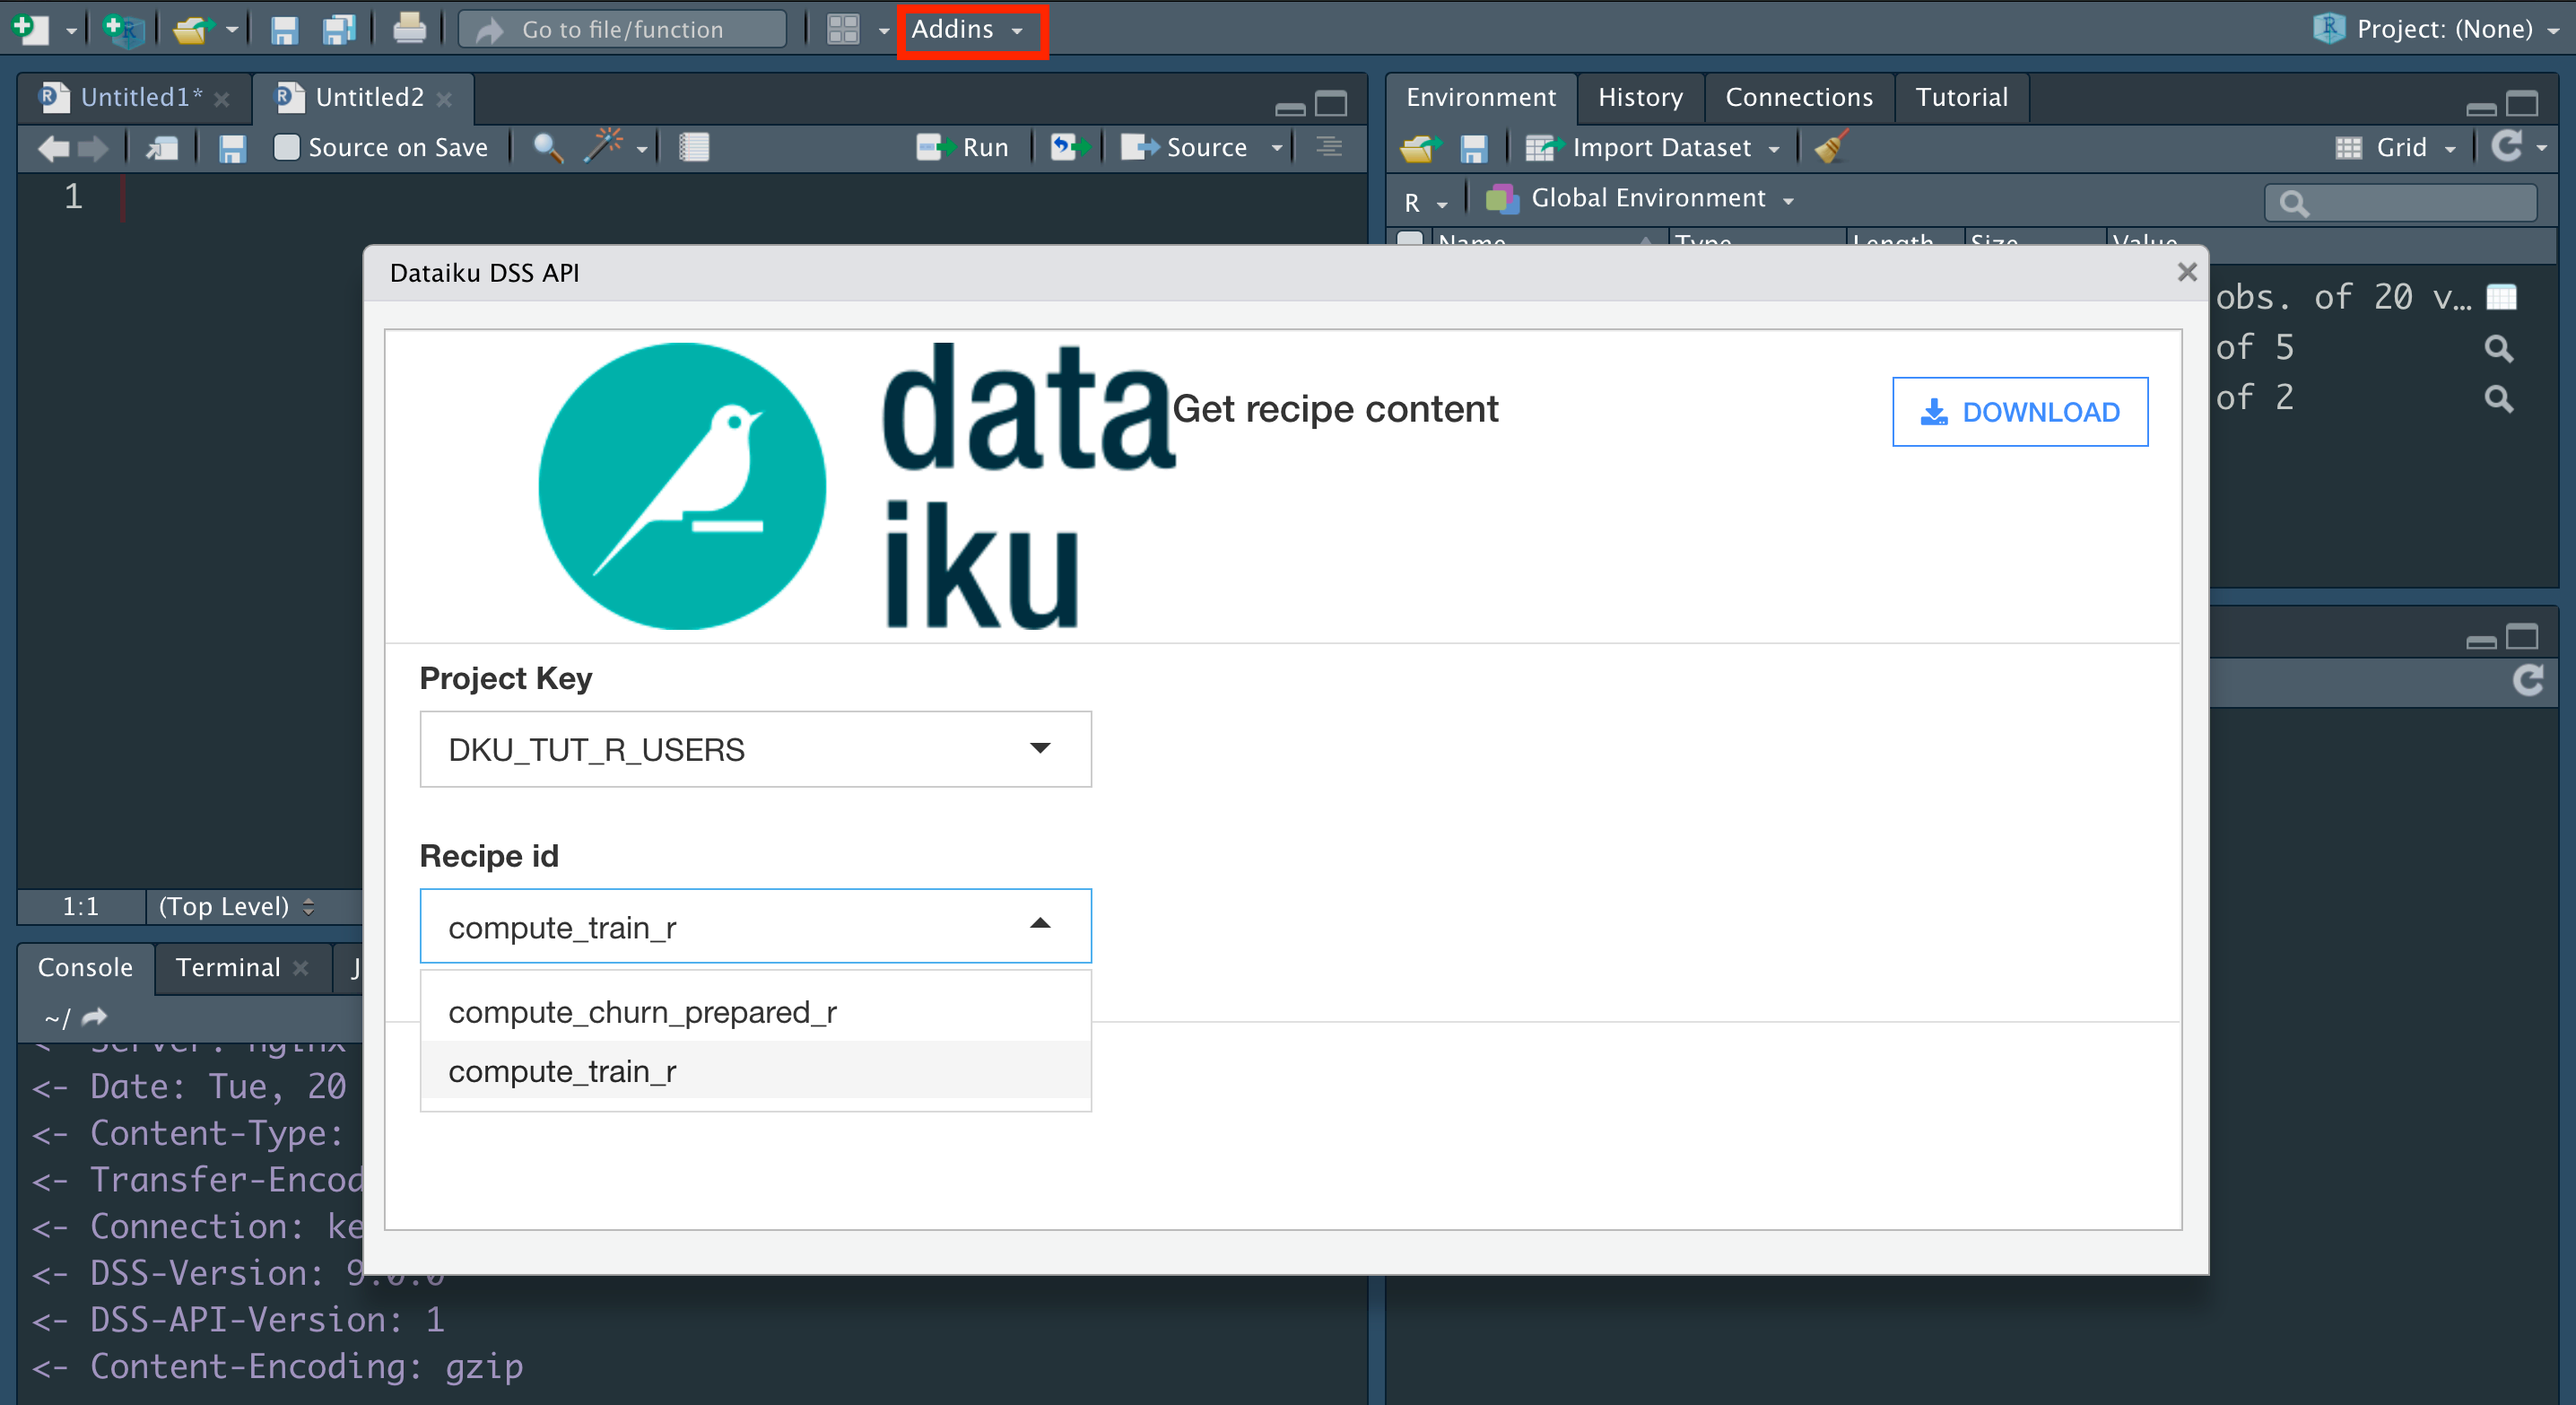
The previously empty R script should now be filled with the same R code found on the Dataiku instance. Let’s edit it to mimic the action of the visual Split recipe.
Replace the existing R script with the new code below.
library(dataiku)
library(dplyr)

# Recipe inputs
churn_prepared_r <- dkuReadDataset("churn_prepared_r", samplingMethod="head", nbRows=100000)

# Data preparation
churn_prepared_r %>%
    rowwise() %>%
    mutate(splitter = runif(1)) %>%
    ungroup() ->
    df_to_split

# Compute recipe outputs
train_r <- subset(df_to_split, df_to_split$splitter <= 0.7)
test_r <- subset(df_to_split, df_to_split$splitter > 0.7)

# Recipe outputs
dkuWriteDataset(train_r,"train_r")
dkuWriteDataset(test_r,"test_r")
Save an R recipe back to Dataiku#
Now, let’s save it back to the Dataiku instance.
From the Addins menu of RStudio, select Dataiku: save R recipe code.
After ensuring you have selected the correct project key and recipe ID, click Send to DSS.
Return to the Dataiku instance, and confirm that the new recipe has been updated after refreshing the page.
From the recipe editor, click Run to build both output datasets.
Note
One limitation to using the Dataiku R API outside Dataiku is the ability to write datasets. You can’t write from RStudio to a Dataiku dataset as explained in this How-to | Edit Dataiku recipes in RStudio.
Code with project variables#
You now have train and test sets ready for modeling. However, let’s first demonstrate how project variables can be useful in a data pipeline such as this.
In the modeling stage ahead, it will be convenient to have the target variable, numeric variables, and character variables stored as separate vectors. It could be helpful to save these vectors as project variables instead of copying and pasting them for the forthcoming training and scoring recipes.
From the top navigation bar, go to the Code (
) menu, and open the Notebooks page (
g+n).Open the code notebook for the churn_copy dataset.
Add the code snippet below to the end of the recipe in new cells. Walk through it line by line to understand how this section gets and sets project variables using the functions
dkuGetProjectVariables()anddkuSetProjectVariables()from the R API.# Empty any existing project variables var <- dkuGetProjectVariables() var$standard <- list(standard=NULL) dkuSetProjectVariables(var) # Define target, categoric, and numeric variables target_var <- "Churn" categoric_vars <- names(df_prepared_r)[sapply(df_prepared_r, is.character)] categoric_vars <- categoric_vars[!categoric_vars %in% c("Churn")] numeric_vars <- names(df_prepared_r)[sapply(df_prepared_r, is.numeric)] # Get and set project variables var <- dkuGetProjectVariables() var$standard$target_var <- target_var var$standard$categoric_vars <- categoric_vars var$standard$numeric_vars <- numeric_vars dkuSetProjectVariables(var)
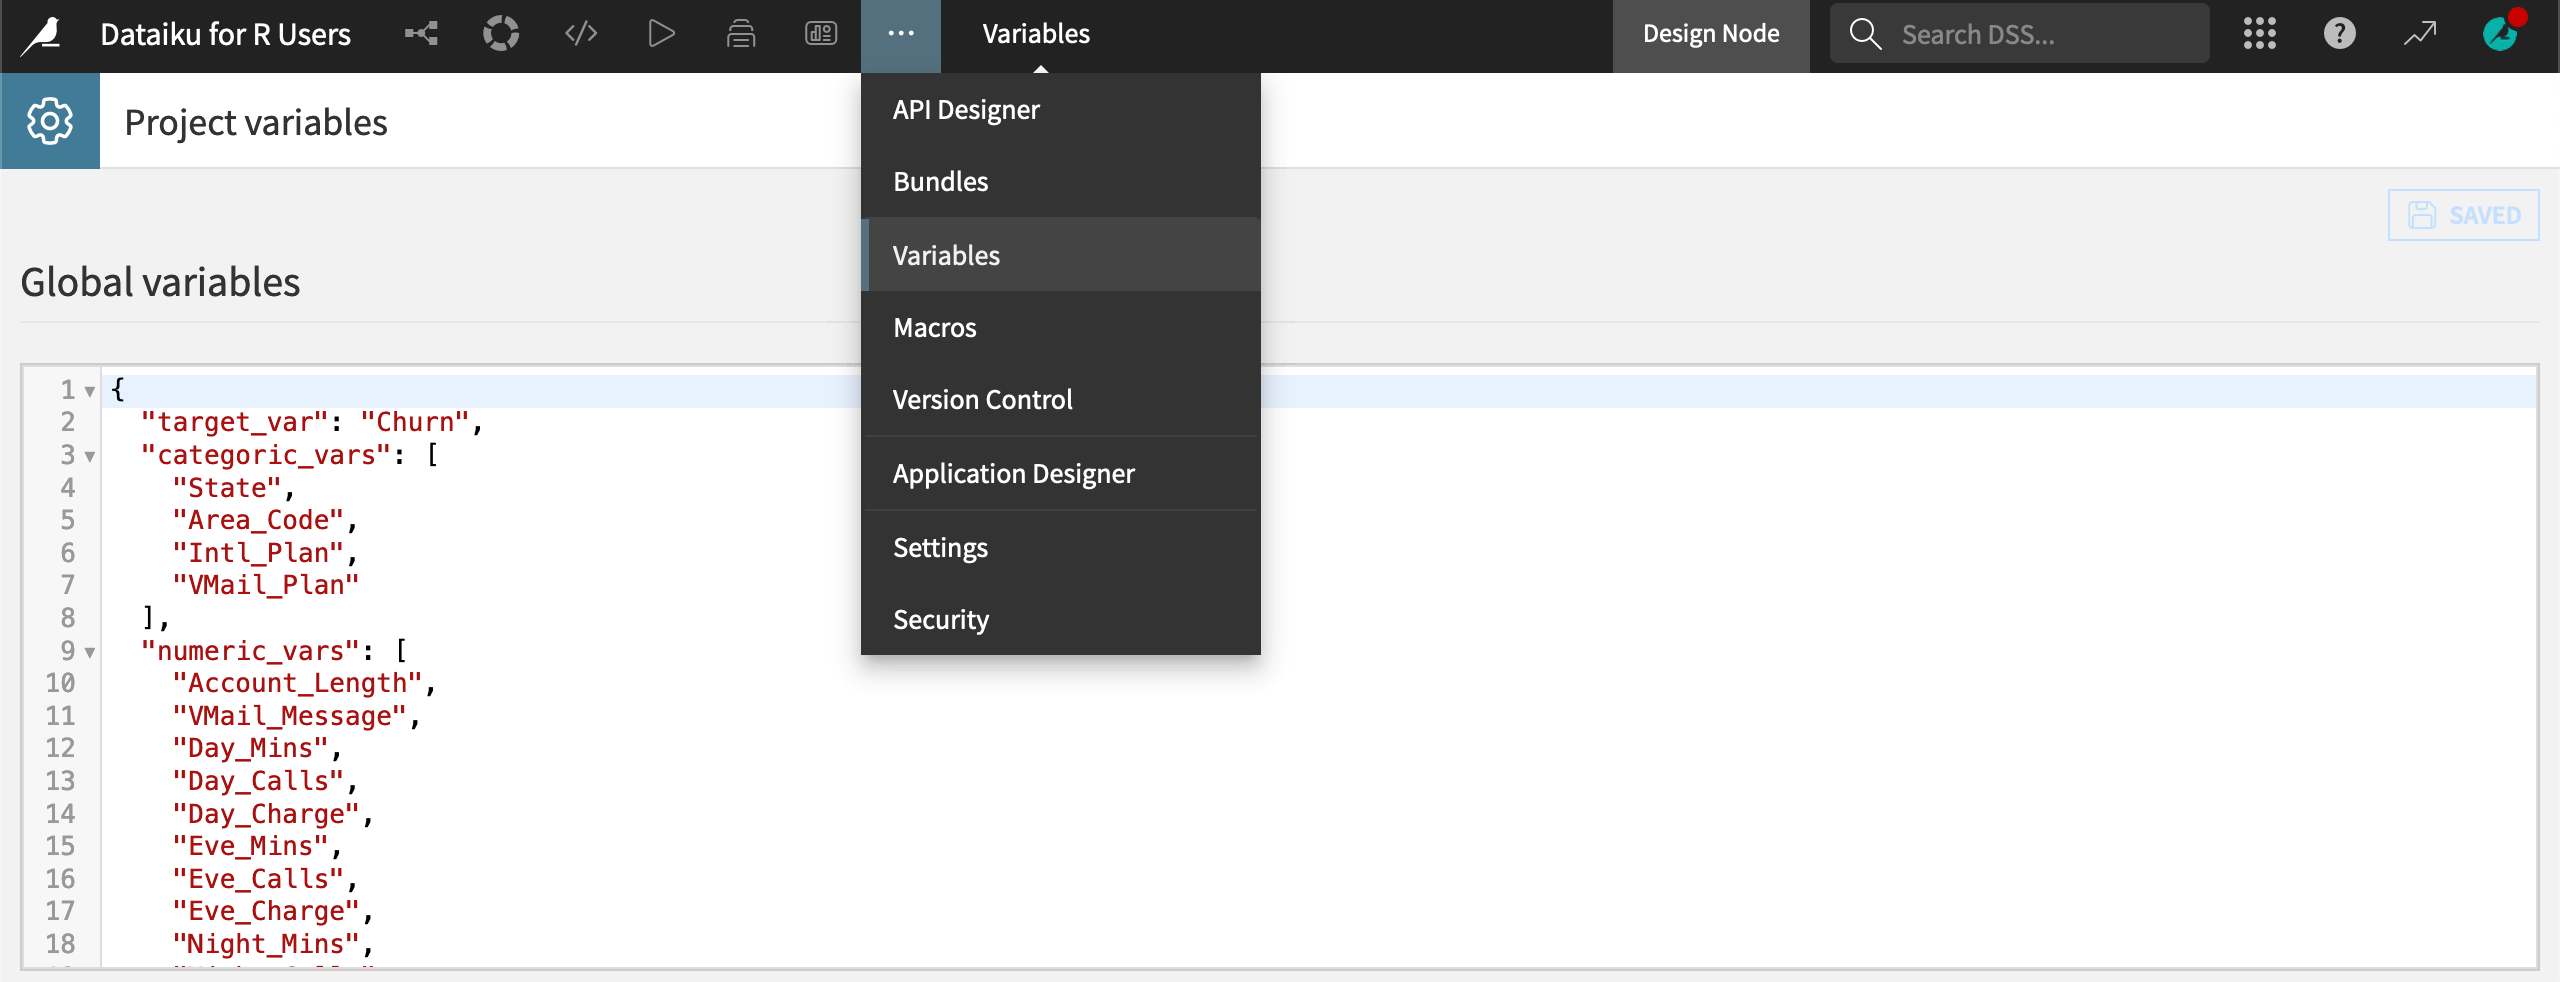
After running this code, navigate to the More Options (
) > Variables page from the top navigation bar.
You should see three global variables — meaning these variables are accessible anywhere in the project.
Tip
Try opening a new R notebook, and running vars <- dkuGetProjectVariables() to confirm how these variables are now accessible anywhere in the project as an R list.
Execute a machine learning workflow#
Review the ML workflow#
Now that you’ve prepared and split the dataset, you’re ready to begin modeling.
The green icons in the Flow represent the machine learning portion of the Flow. To summarize the visual ML workflow:
Train a model in the Lab.
Deploy the best version to the Flow as a saved model.
Send test data and the saved model to the Score recipe to produce output predictions.
You can achieve the same workflow with R recipes:
Write an R recipe that trains a model.
Output the model to a managed folder.
Write another R recipe to score the test data using the model in the folder.
To do this, you’ll need to be able to interact with managed folders through the R API.
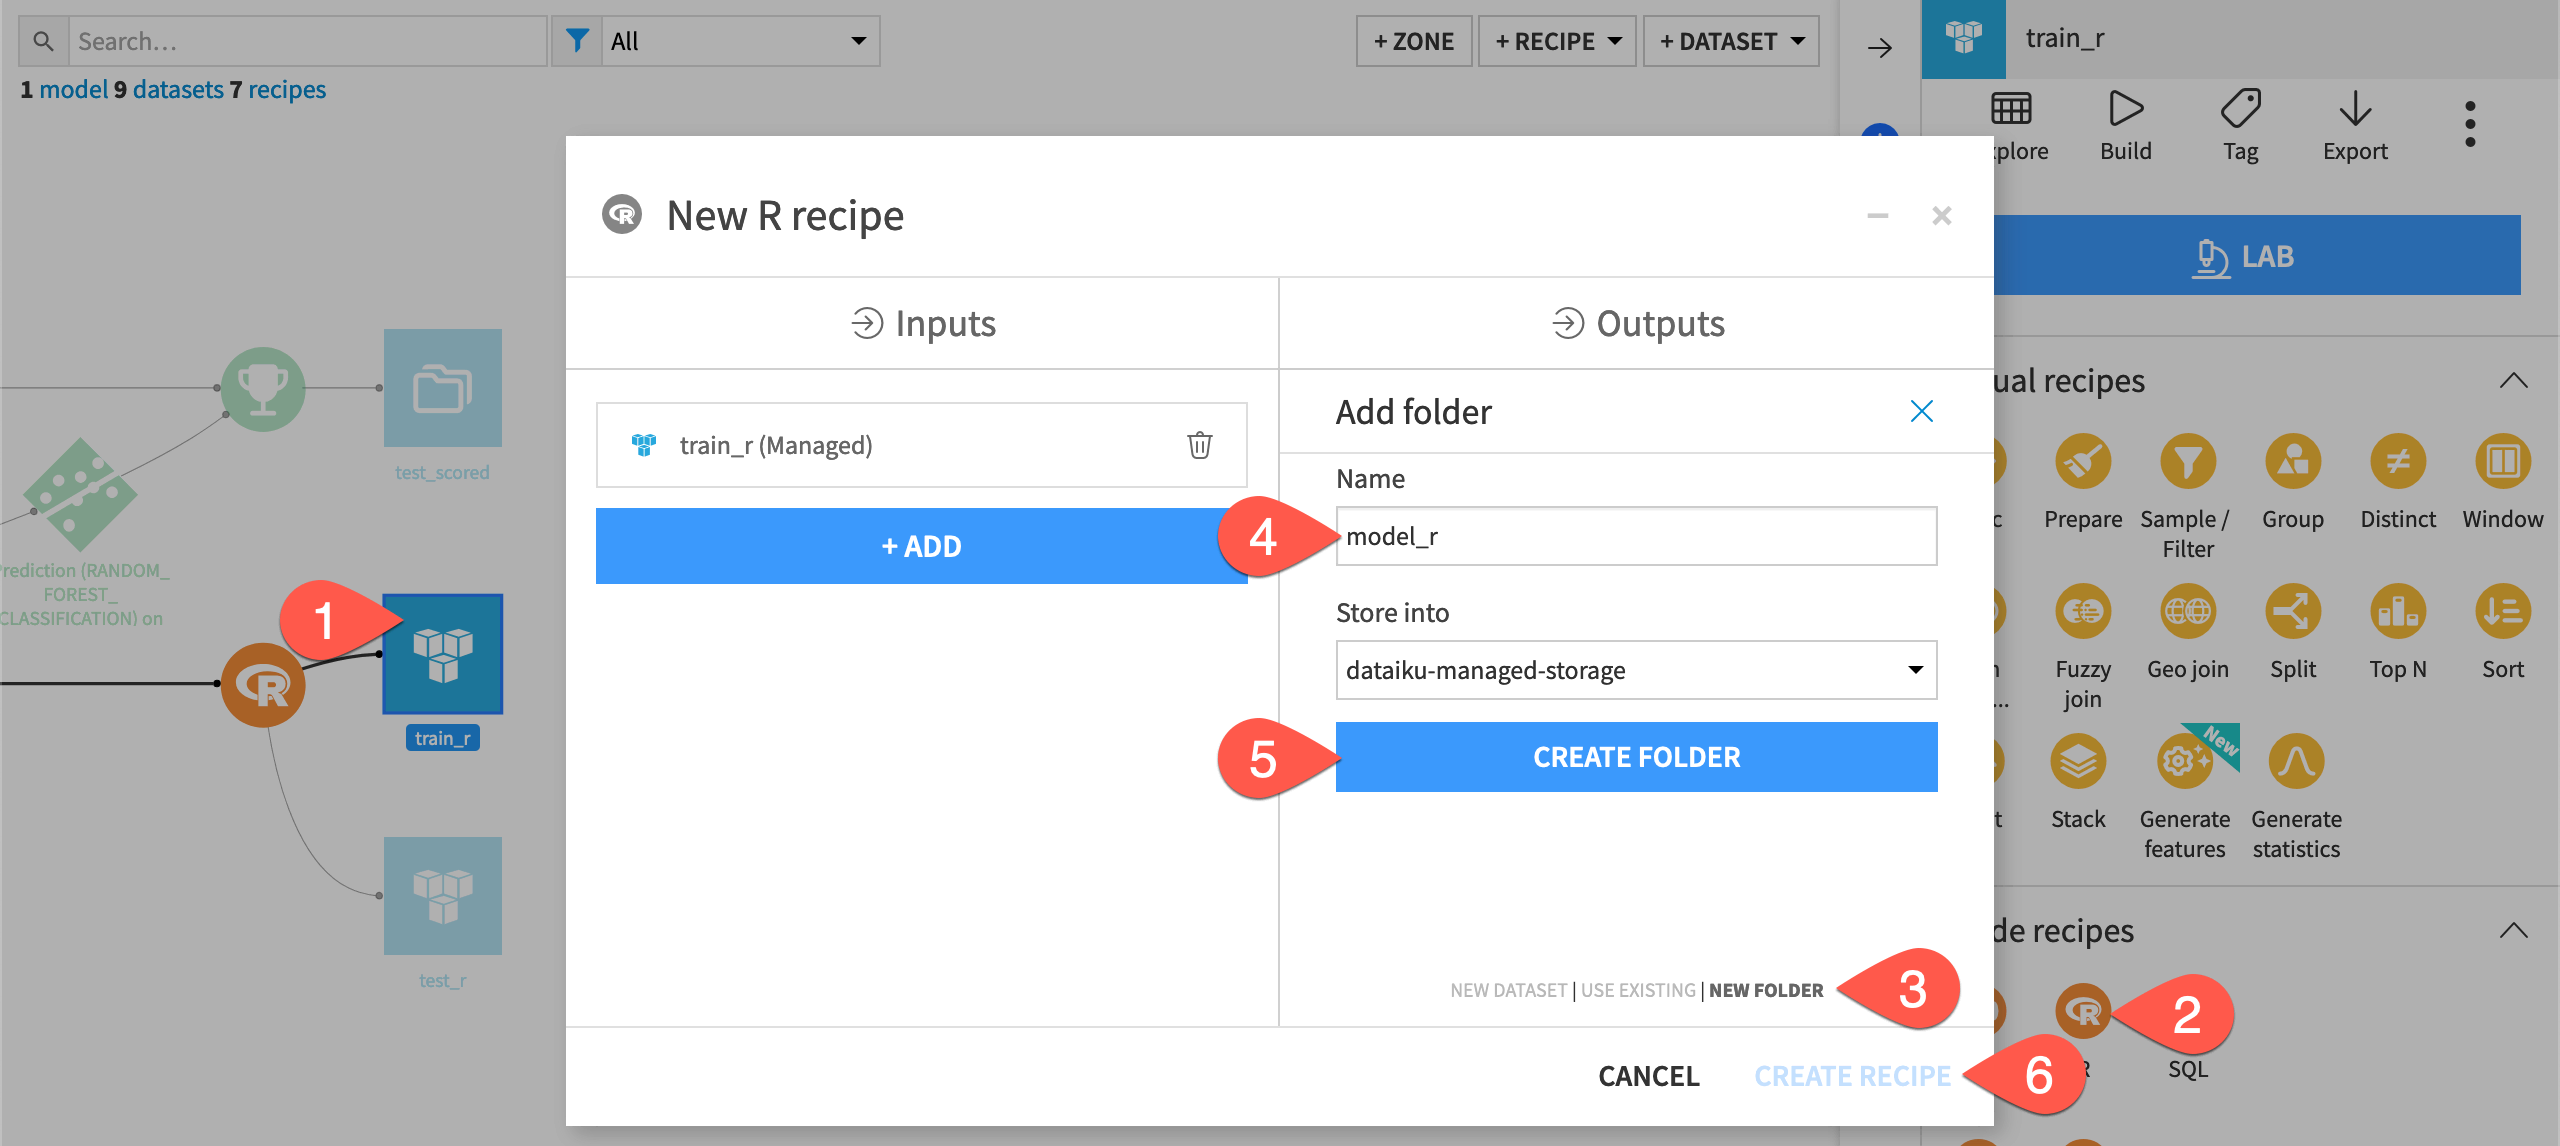
Create an R recipe with a managed folder output#
Given that the necessary packages exist in the project code environment, you’re ready to create an R recipe that trains a model. Unlike previous recipes however, the output of this recipe will be a managed folder instead of a dataset.
You can store any kind of file (supported or unsupported) in a managed folder, and use the Dataiku R API to interact with the files stored inside.
From the Flow, select the train_r dataset.
In the Actions panel, select an R recipe.
Under Outputs, click + Add and switch to New Folder.
Name the output folder
model_r.Click Create Folder.
Click Create Recipe.
Import code from a Git repository#
You now have the correct code environment, input, and output to build the model. Let’s start coding!
Imagine, however, that you want to reuse some code already developed outside of Dataiku. Perhaps you want to reuse the same parameters or hyperparameter settings found in models elsewhere.
Let’s import code from a Git repository so that you can use it in the current recipe.
Important
If you’re unable to import the code from the Git repository, feel free to just copy-paste it into the recipe instead.
From the Code (
) menu of the top navigation bar, select Libraries (
g+l).Click Git > Import from Git.
In the dialog window, supply the HTTPS link for this academy-samples GitHub repository (found by clicking on the Code button and then the clipboard).
Check out the default main branch.
Add
/r-users/as the path in the repository.Add
/R/as the target path of the project library.Uncheck Add to Python path.
Click Save and Retrieve.
Click OK to confirm the creation of the Git reference has succeeded.
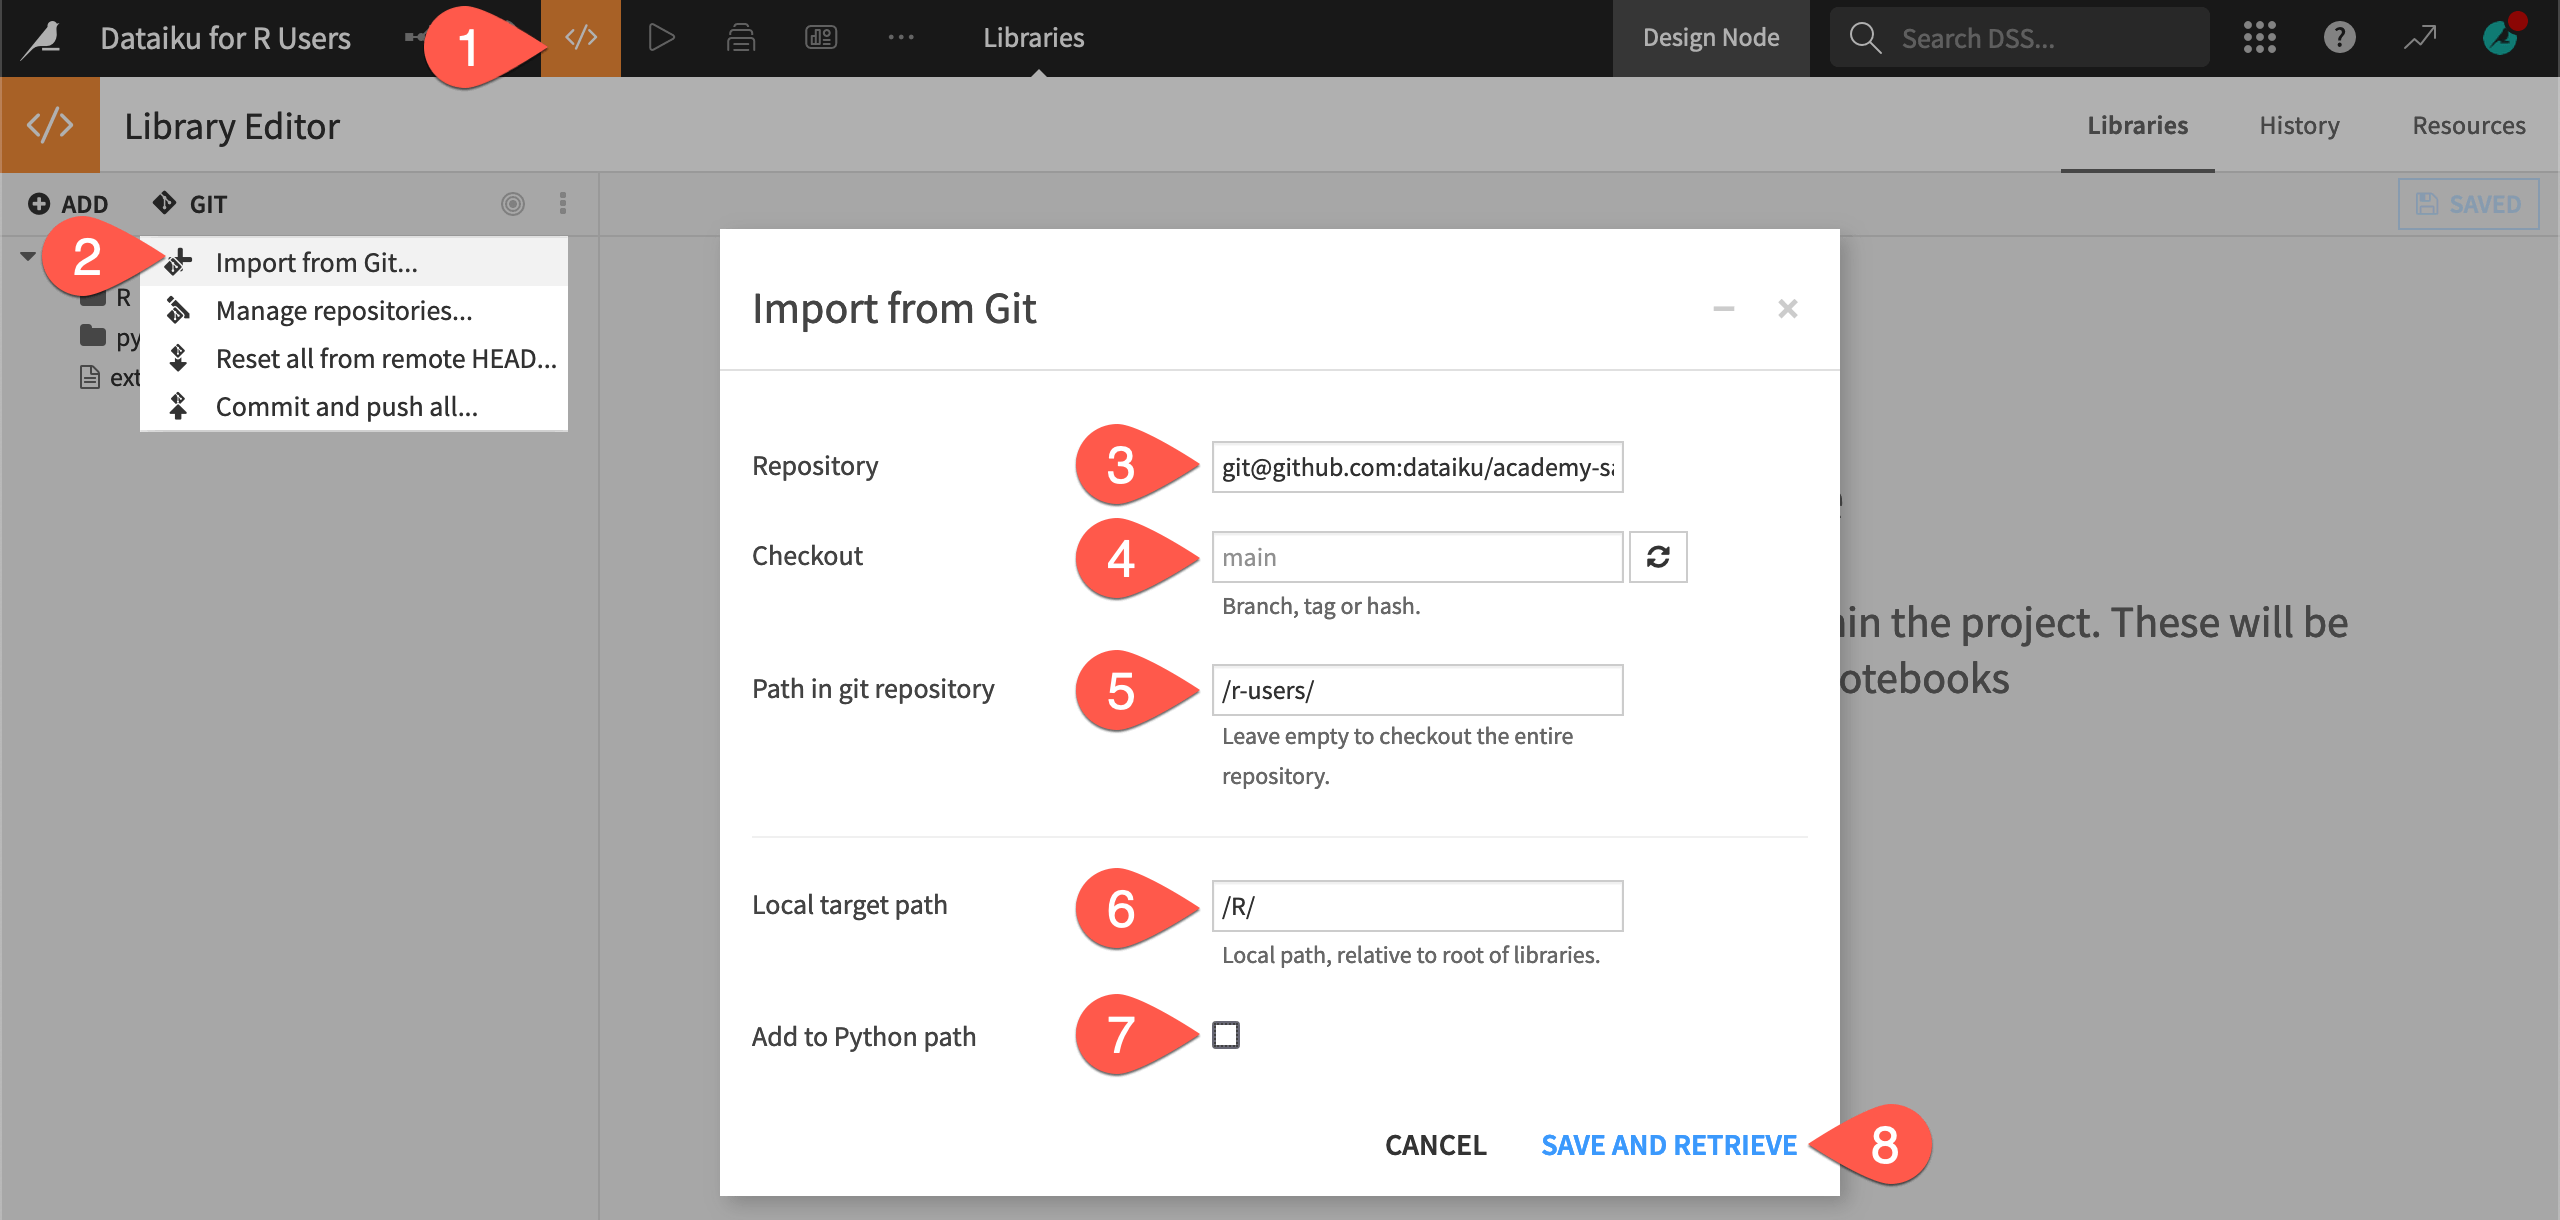
Let’s recap what this achieved:
The same file train_settings.R found in the GitHub repository is now also in the project library. You can use it in this project (or in other Dataiku projects as well by editing the importLibrariesFromProjects name of the
external-libraries.jsonfile).Open the file
external-libraries.jsonto view the Git reference.
Note
The reference documentation provides more details on reusing R code.
Train a model with an R recipe#
Once you have created the Git reference, you can import the contents of a file found in the project library with the function dkuSourceLibR().
Return to the R recipe that outputs the model_r folder.
Replace the existing recipe with the code snippet below, taking note of the following:
You can use the gbm and caret packages because of the project-level code environment.
dkuSourceLibR()imports the objectsfit.controlandgbm.gridfound in thetrain_settings.Rfile.dkuGetProjectVariables()calls the name of the project variables set earlier.
library(dataiku)
library(gbm)
library(caret)

# Import from project library
dkuSourceLibR("train_settings.R")

# Recipe inputs
df <- dkuReadDataset("train_r")

# Call project variables
vars <- dkuGetProjectVariables()
target.variable <- vars$standard$target_var
features.cat <- unlist(vars$standard$categoric_vars)
features.num <- unlist(vars$standard$numeric_vars)

# Preprocessing
df[features.cat]    <- lapply(df[features.cat], as.factor)
df[features.num]    <- lapply(df[features.num], as.double)
df[target.variable] <- lapply(df[target.variable], as.factor)
train.ml <- df[c(features.cat, features.num, target.variable)]

# Training (fit.control and gbm.grid found in train_settings.R)
gbm.fit <- train(
    Churn ~ .,
    data = train.ml,
    method = "gbm",
    trControl = fit.control,
    tuneGrid = gbm.grid,
    metric = "ROC",
    verbose = FALSE
)

# Recipe outputs
model_r <- dkuManagedFolderPath("model_r")
setwd(model_r)
system("rm -rf *")
path <- paste(model_r, 'model.RData', sep="/")
save(gbm.fit, file = path)
Write an R recipe output to a folder#
There’s one problem before you can run this recipe.
This code uses the default dkuManagedFolderPath() to retrieve the file path used to write the model to the folder output. However, this function works only for local folders.
If the data was hosted somewhere other than the local filesystem, or the code wasn’t running on the Dataiku machine, this code would fail.
Let’s modify this recipe to work for a local or non-local folder using dkuManagedFolderUploadPath() instead of dkuManagedFolderPath().
Replace the recipe outputs section with the code below.
# Recipe outputs (local or non-local folder)
save(gbm.fit, file= "model.RData")
connection <- file("model.RData", "rb")
dkuManagedFolderUploadPath("model_r", "model.RData", connection)
close(connection)
Click Run to train the model and save it in the folder.
When it’s finished, open the folder, and confirm it holds the
model.RDatafile.
Score test data with an R recipe#
There’s one last step to complete this Flow!
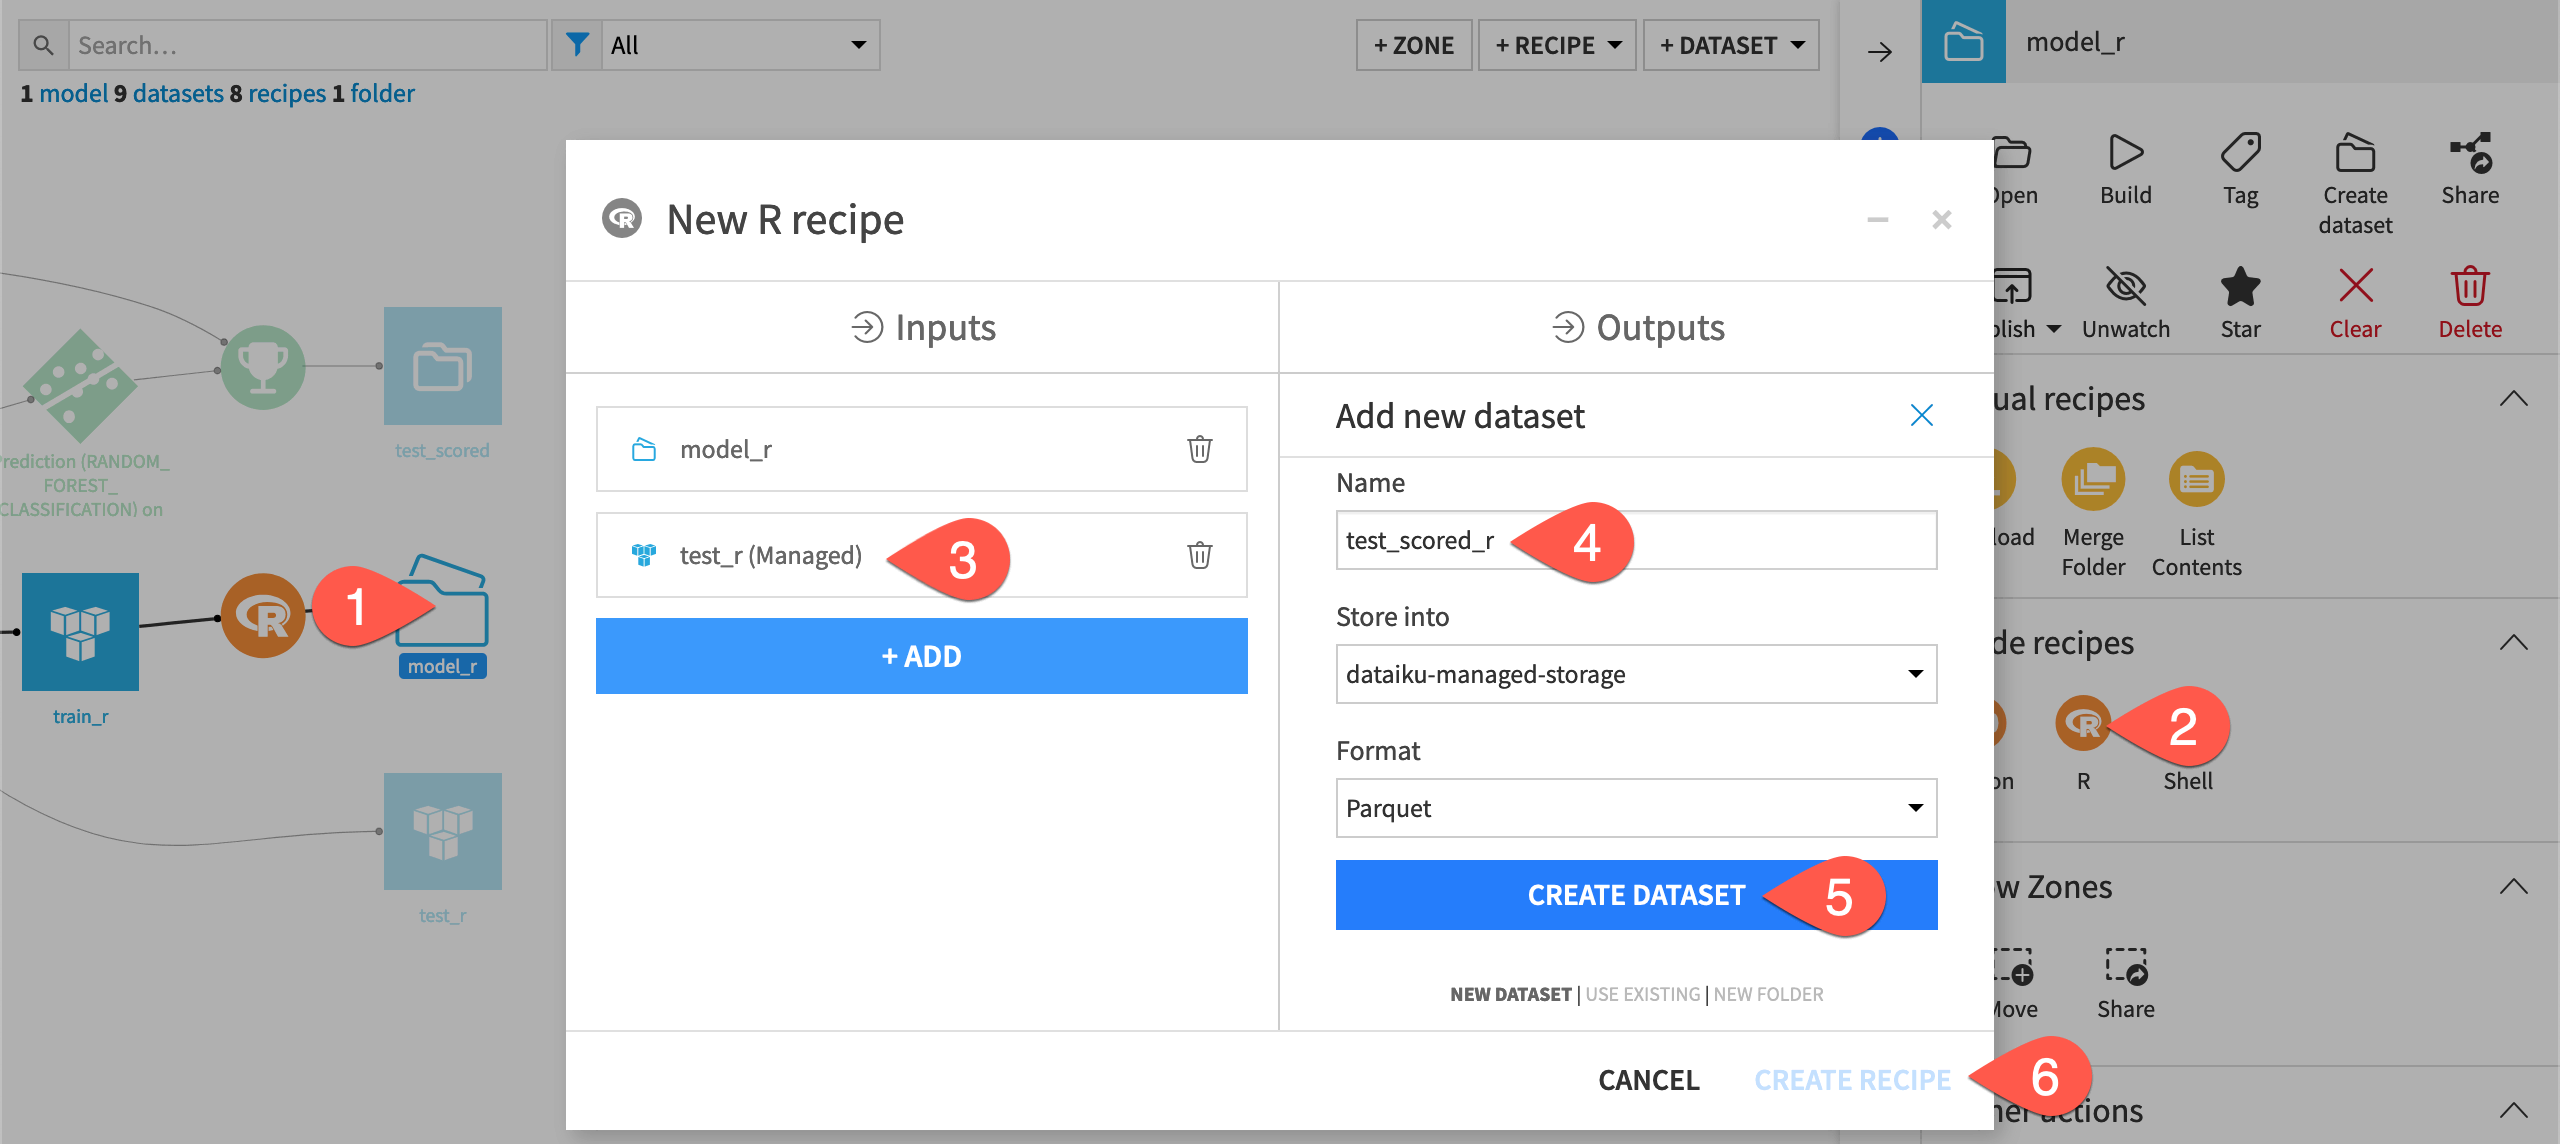
Now that there is a trained model in a managed folder, you can use it to score the testing data with another R recipe.
From the Flow, select the model_r folder.
In the Actions panel, select an R recipe.
Under Inputs, click + Add, and select the test_r dataset.
Under Outputs, click +Add. Name the new output dataset
test_scored_r.Click Create Dataset.
Click Create Recipe.
Once you have the correct inputs and output, you just need to supply the code.
Replace the default code with the snippet below.
library(dataiku)
library(gbm)
library(caret)

# Load R model (local or non-local folder)
data <- dkuManagedFolderDownloadPath("model_r", "model.RData")
load(rawConnection(data))

# Load R model (local folder only)
# model_r <- dkuManagedFolderPath("model_r")
# path <- paste(model_r, 'model.RData', sep="/")
# load(path)

# Confirm model loaded
print(gbm.fit)

# Recipe inputs
df <- dkuReadDataset("test_r")

# Call project variables
vars <- dkuGetProjectVariables()
target.variable <- vars$standard$target_var
features.cat <- unlist(vars$standard$categoric_vars)
features.num <- unlist(vars$standard$numeric_vars)

# Preprocessing
df[features.cat]    <- lapply(df[features.cat], as.factor)
df[features.num]    <- lapply(df[features.num], as.double)
df[target.variable] <- lapply(df[target.variable], as.factor)
test.ml <- df[c(features.cat, features.num, target.variable)]

# Prediction
o <- cbind(df, predict(gbm.fit, test.ml,
                    type = "prob",
                    na.action = na.pass))

# Recipe outputs
dkuWriteDataset(o, "test_scored_r")
Click Run to execute the recipe.
Note
In addition to standard R code, note how the code above uses the Dataiku R API:
dkuManagedFolderDownloadPath()interacts with the contents of a (local or non-local) managed folder. The strictly local alternative usingdkuManagedFolderPath()is also provided for demonstration in comments.dkuReadDataset()anddkuWriteDataset()handle reading and writing of dataset inputs and outputs.dkuGetProjectVariables()retrieves the values of project variables.
Next steps#
Congratulations! You’ve built an ML pipeline in Dataiku entirely with R. You’ve also demonstrated how this could occur within Dataiku or from an external IDE such as RStudio.
Next, you might take this project further by sharing results in an R Markdown report, for which you can follow Tutorial | R Markdown reports.
You might also want to develop a Shiny webapp, for which you can find follow Tutorial | R Shiny webapps.
See also
See the reference documentation for more information about DSS and R.

