
Tutorial | Custom governance templates#
Get started#
In Tutorial | Governance lifecycle, you saw how to use the standard template for governing items such as projects, bundles, and saved model versions. To customize the definition of Govern items, you’ll use the Blueprint Designer!
Objectives#
In this tutorial, you will:
Make your own copy of the standard template for a Govern item.
Customize this copy according to your own needs.
Apply your new template to a Govern item, in this case, a project.
Add a sign-off to your custom template.
Prerequisites#
To reproduce the steps outlined in this tutorial, you will need:
Dataiku 14.0 or later.
A Dataiku Govern node connected to a Design node.
An Advanced Dataiku Govern license.
Be a Govern admin to access the Blueprint Designer.
Create a blueprint version#
Every Govern item — such as a Govern project, Govern bundle, or Govern model version — has a blueprint behind it. The blueprint defines the structure of that item, including its workflow steps. However, many different versions of the blueprint defining that item may also exist.
In this section, you’ll create, activate, and apply your own blueprint version of a Govern item.
Tip
The Blueprint Designer also allows you to create entirely new types of Govern items. For now though, you’ll focus on customizing existing ones.
Browse existing blueprints#
All Govern items have a default blueprint version. You encountered your first blueprint version when selecting the Dataiku Standard template to govern items in Tutorial | Governance basics. Recall for example that, according to the standard template, a Govern project has five workflow steps, beginning with Exploration.
However, administrators with advanced licenses can also create their own versions of these templates — their own blueprint versions. For example, you may want your Govern project to have six workflow steps instead of the standard five.
Take a look at what blueprints already exist on your instance.
Open the Govern node. You can navigate there from the Overview panel of the Cloud Launchpad or, from a Design node, go to the waffle (
 ) menu > Dataiku Govern.
From the waffle (
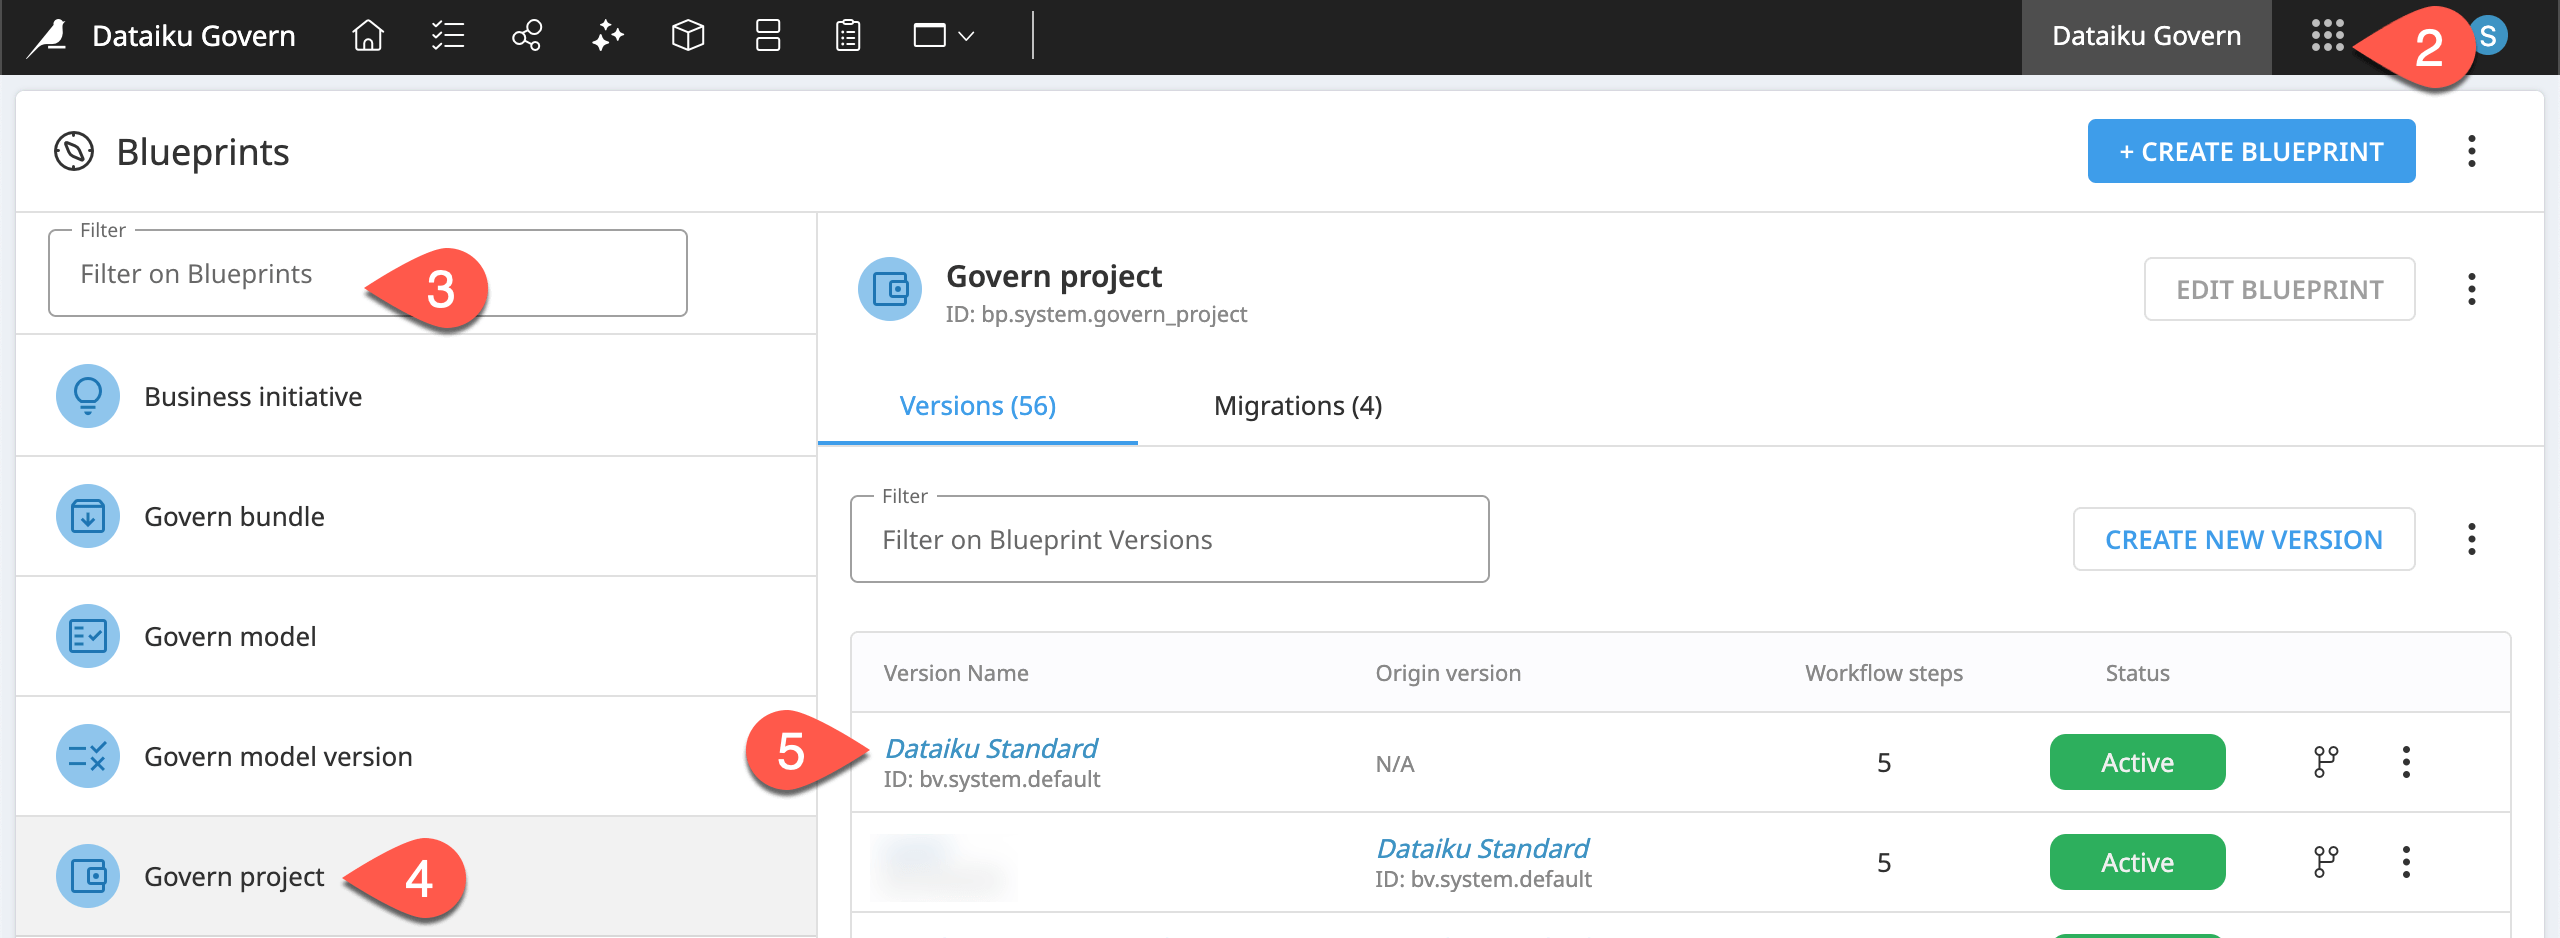
) menu of the top navigation bar, select Blueprint Designer.Browse the available item blueprints in the left panel.
Select the Govern project blueprint.
If more than one exists, browse available blueprint versions of a Govern project. Then select the Dataiku Standard template, which is the system default.
Tip
Start to recognize the ID syntax for blueprints (bp) and blueprint versions (bv).
The Govern project blueprint has an ID of
bp.system.govern_project.The standard blueprint version has an ID of
bv.system.default.
Contrast these IDs with the blueprint version you’ll create below!
Fork a blueprint version#
Creating a blueprint version of an item from scratch can be burdensome. Aside from what customizations you may make, your blueprint version still needs to respect certain parameters so that it continues to function as the actual item.
For this reason, most often you’ll fork a copy of an existing blueprint version. In other words, you’ll make your own copy of some blueprint version. The forked copy inherits all existing properties of the original item, while also providing a clean slate to implement your desired changes.
Use the back arrow of your browser or click Govern project in the page header to return to the page listing all Govern project blueprint versions.
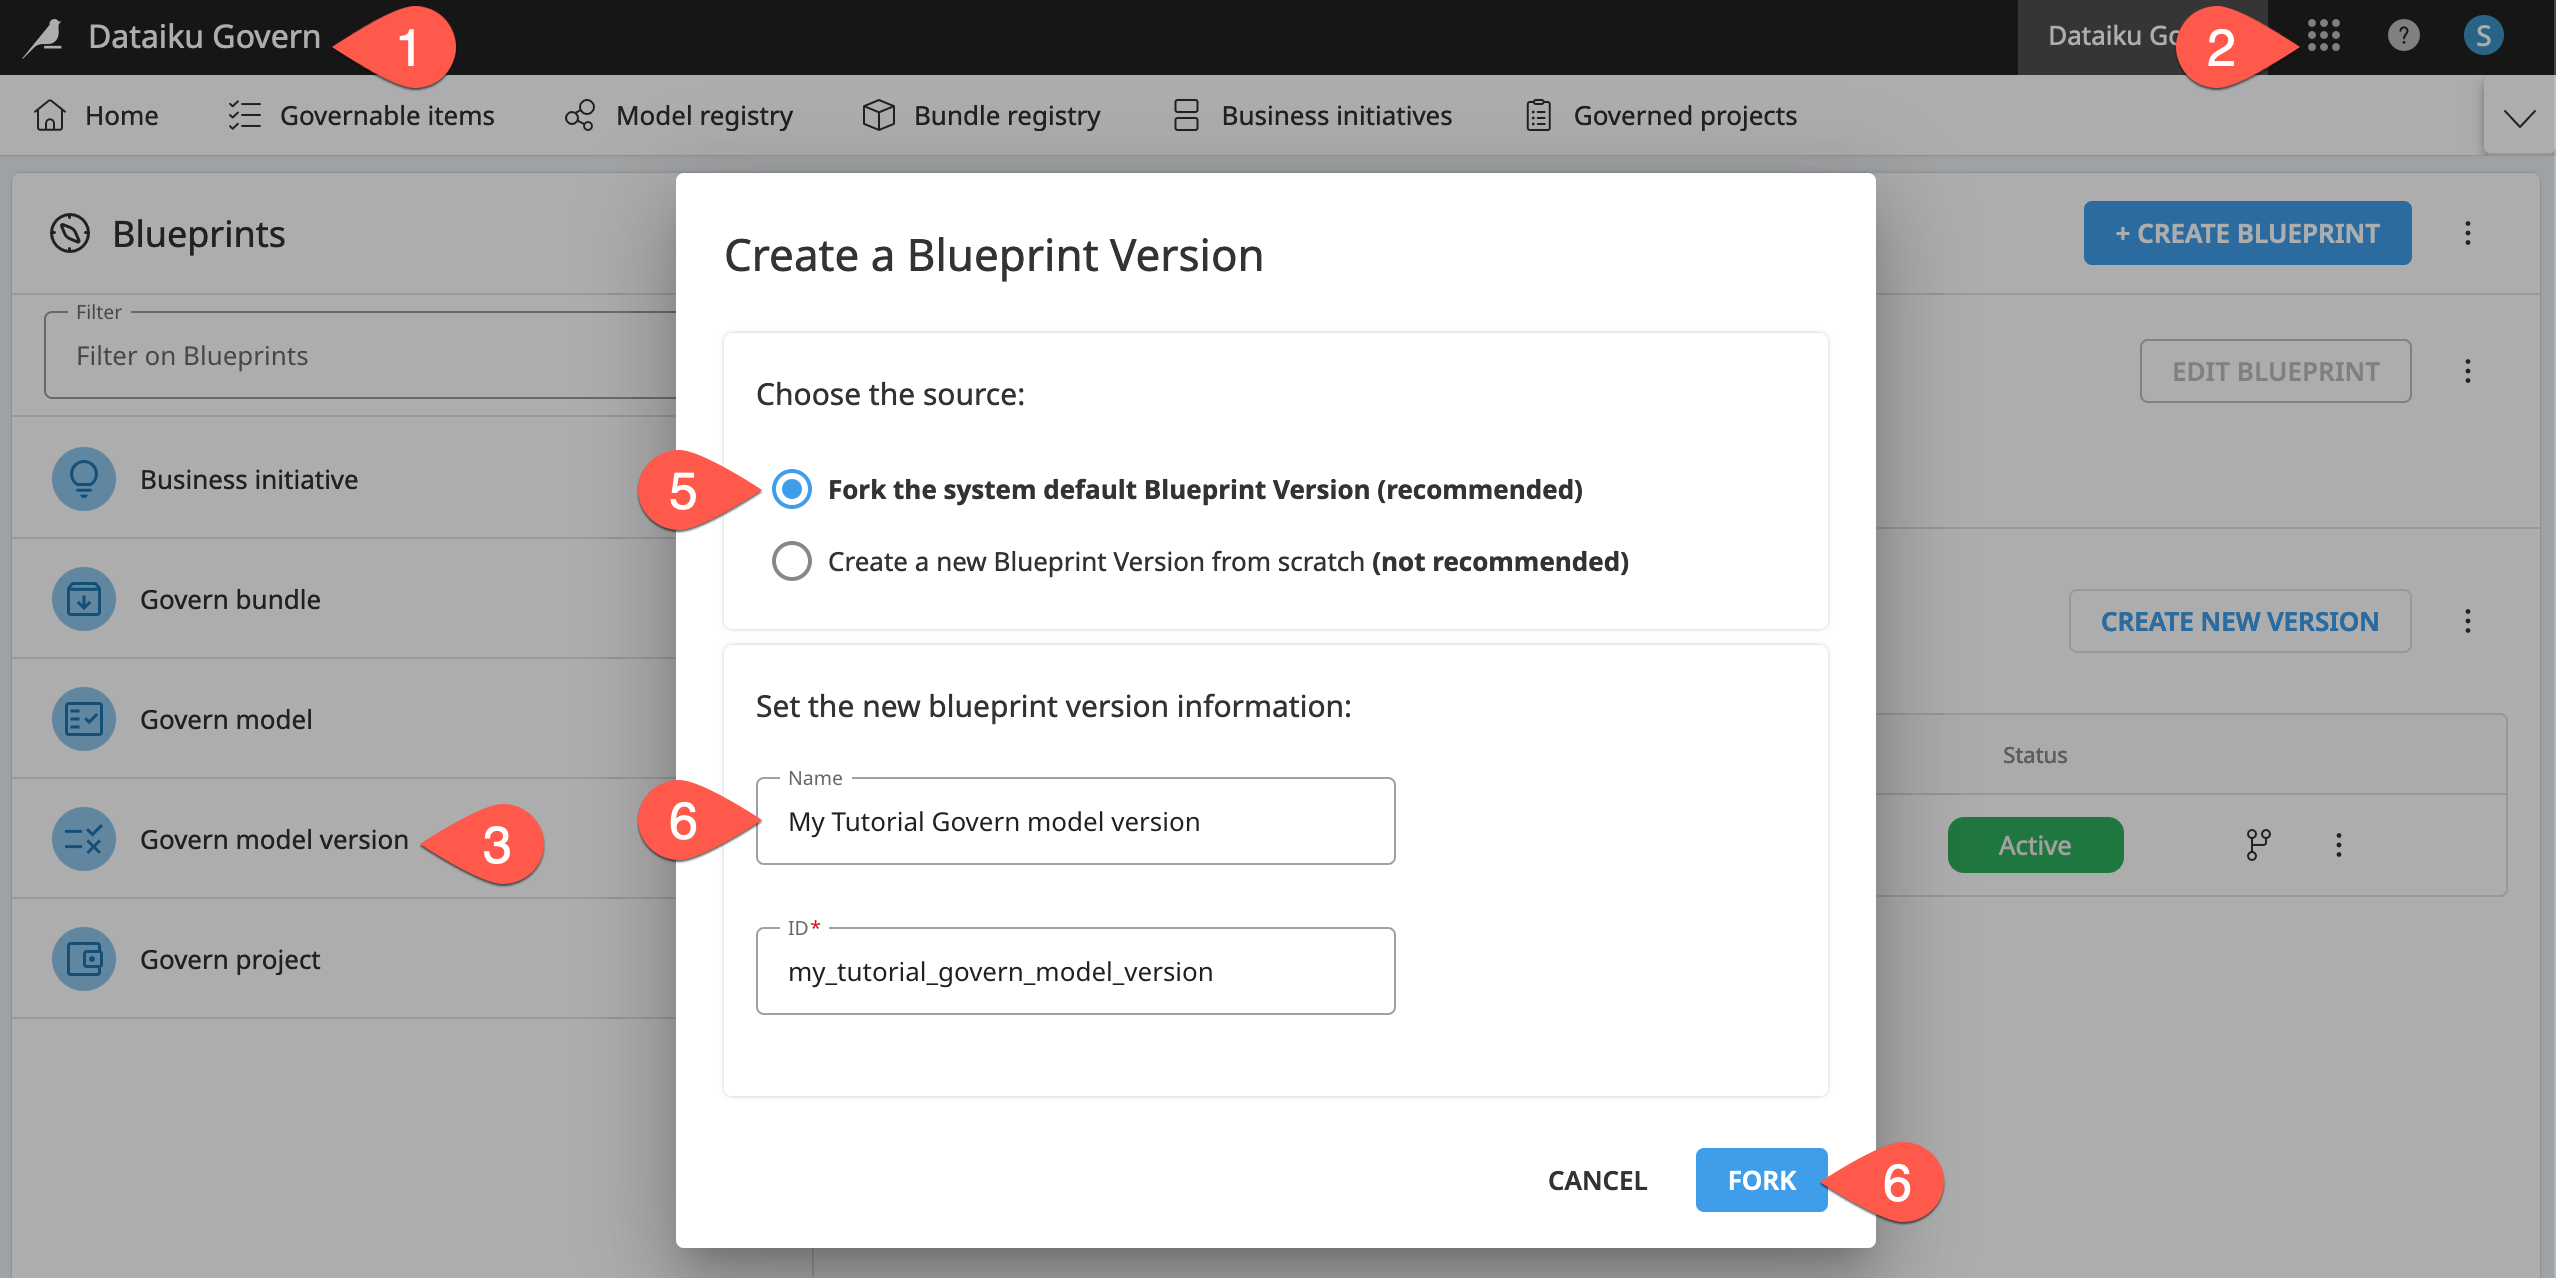
Click Create New Version.
Confirm you’ve selected Fork the system default Blueprint Version.
Name it
<YOUR INITIALS> Non-standard Govern Project.Click Fork.
Tip
You can fork a copy of any existing blueprint version. Most often though, you’ll want to fork the Dataiku Standard template, especially when beginning.
Inspect a blueprint version#
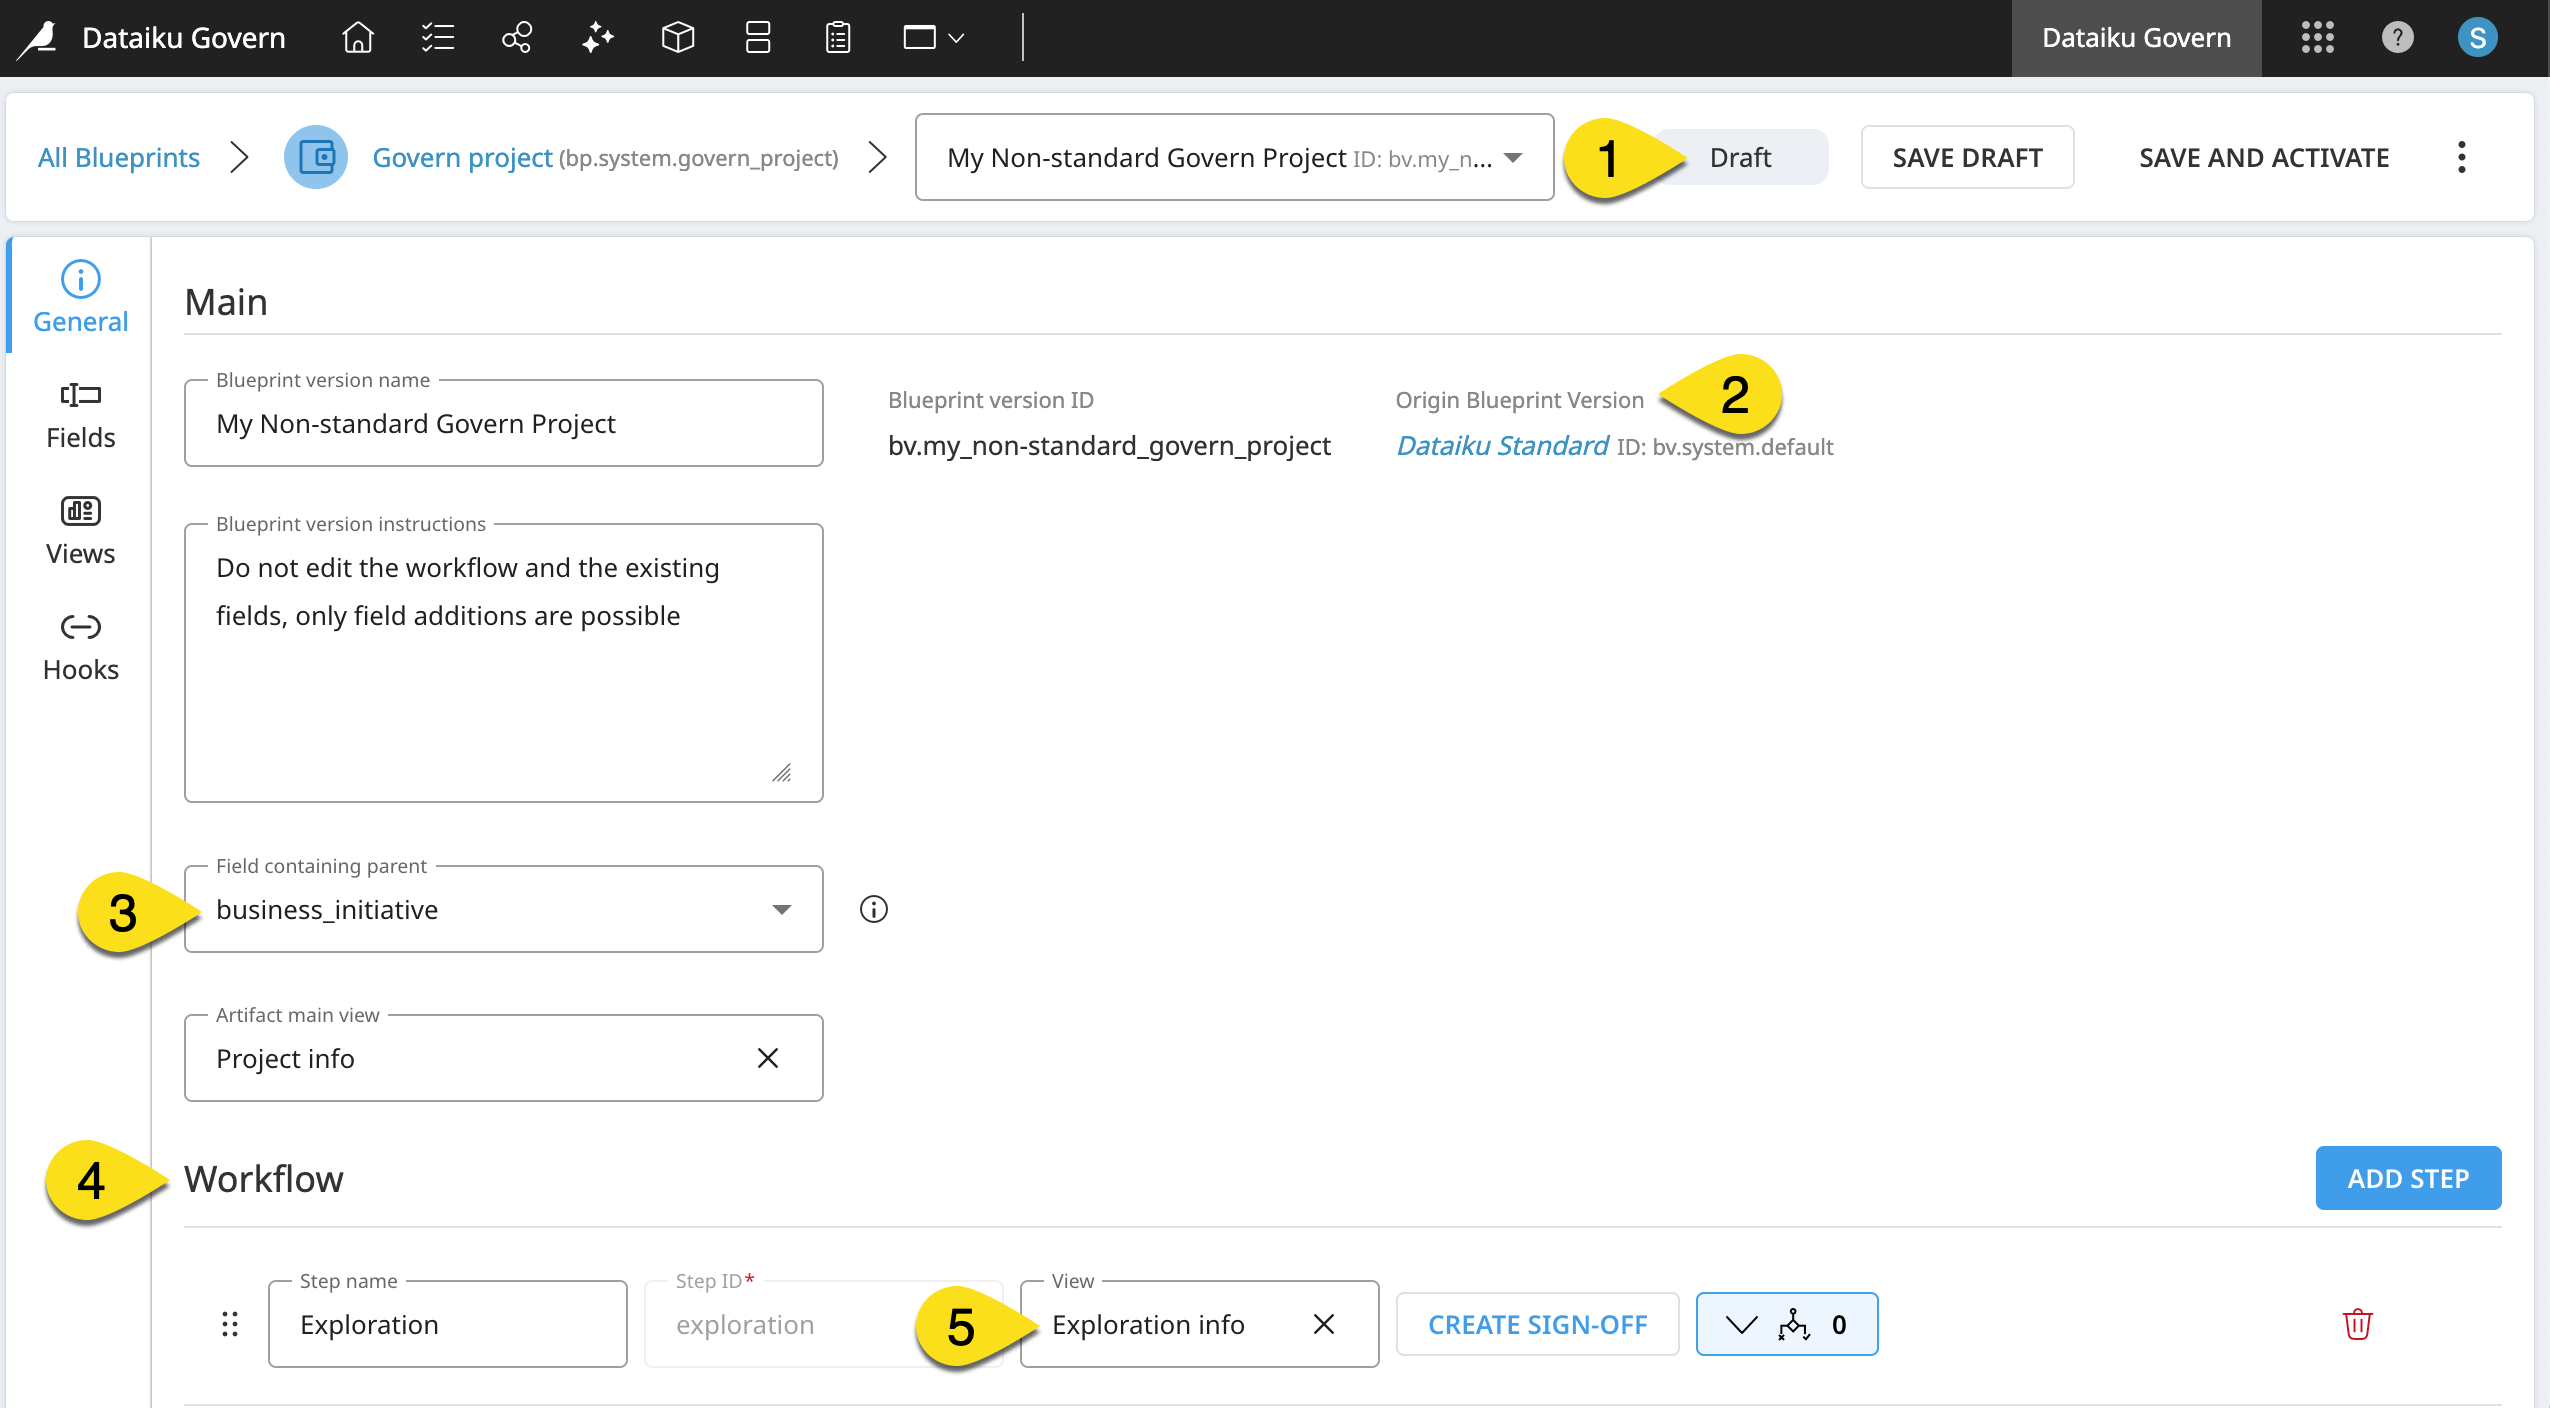
Take a look at your forked blueprint version of the standard Govern project. Confirm it has the following properties:
It’s still a Draft blueprint version, meaning no user on the instance can use it as a governance template yet.
Its origin is the Dataiku Standard template.
Its parent item is a Business initiative (since Govern projects can belong to Business initiatives).
It has the same five workflow steps as the standard template.
Each workflow step has an assigned view.
Edit and activate a blueprint version#
Start small by introducing two minor changes to your blueprint version.
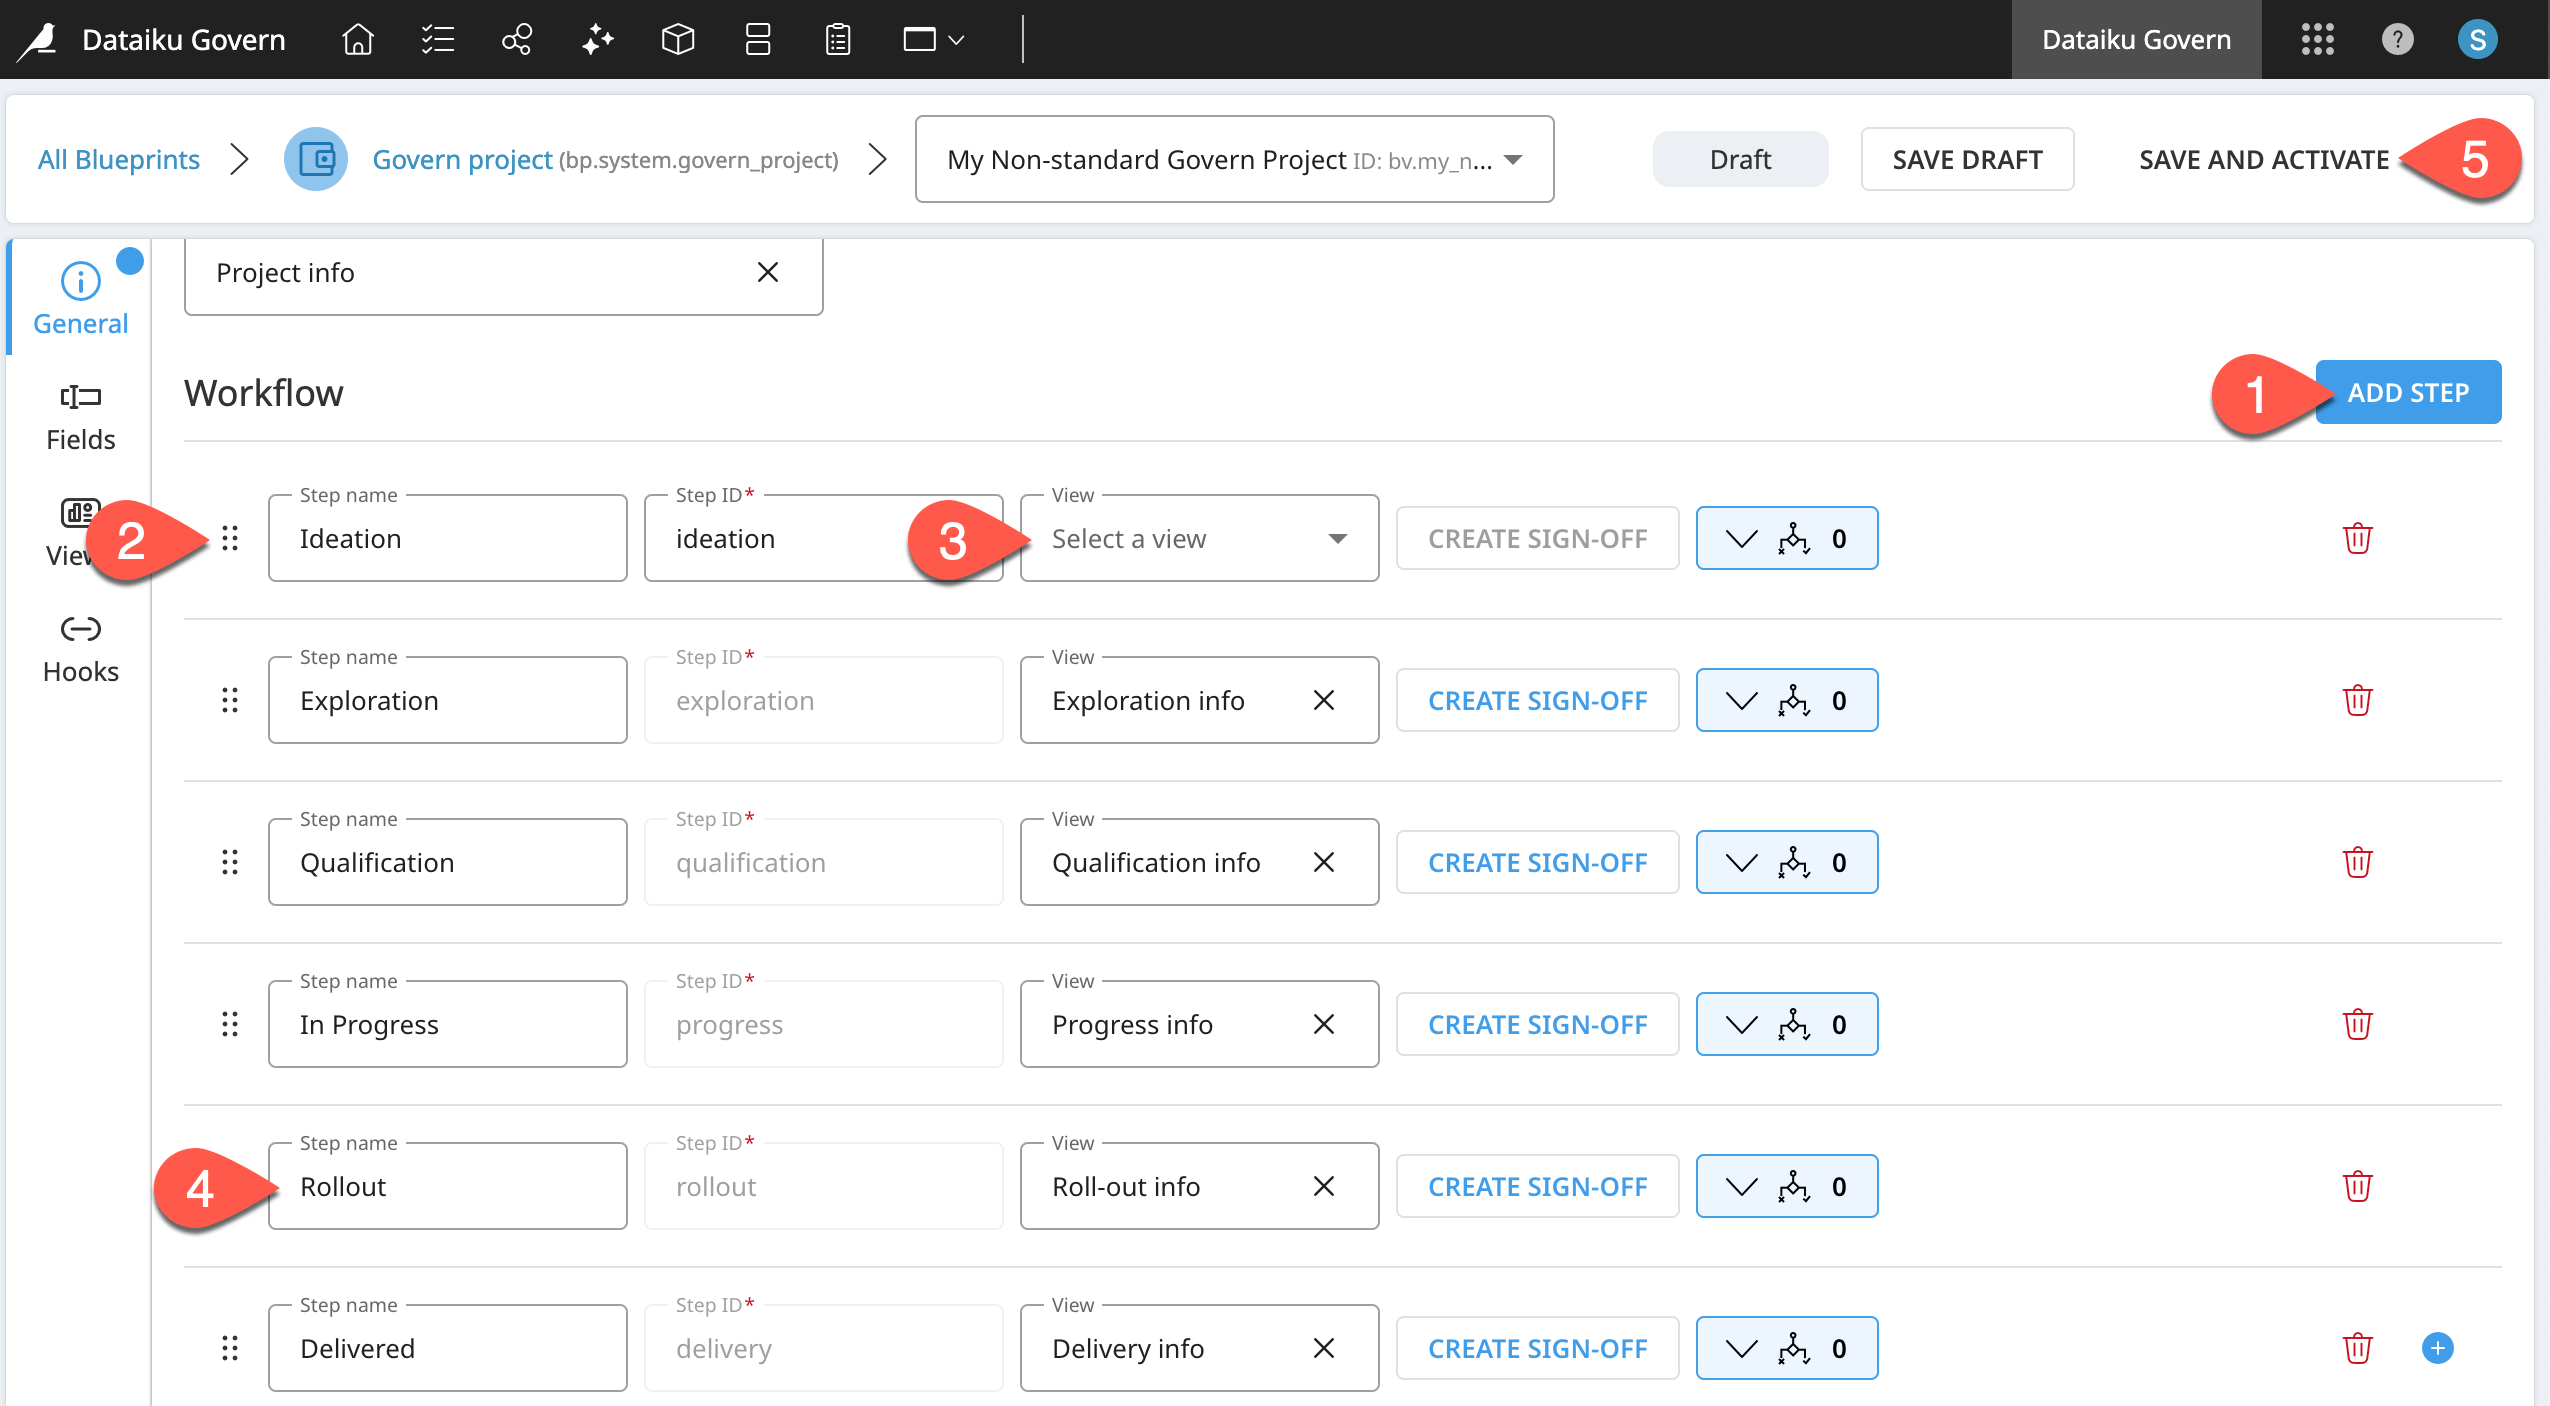
From the General panel of your blueprint version, click Add Step.
Name it
Ideation, and drag it to the first position using the handle.
Leave its View empty (for now).
Rename the Validation and Roll-out step as
Rollout.In the blueprint version header, click Save and Activate, and then Activate to confirm.
Govern an item with your own template#
Now that you’ve activated your own blueprint version, you can use it as a template for any Govern project. This could be either a project synced from a Dataiku node or one created directly within the Govern node.
Let’s demonstrate the latter.
Open a second Govern node tab so that your Blueprint Designer tab remains open.
In the second Govern node tab, navigate to the Governed projects (
 ) page.
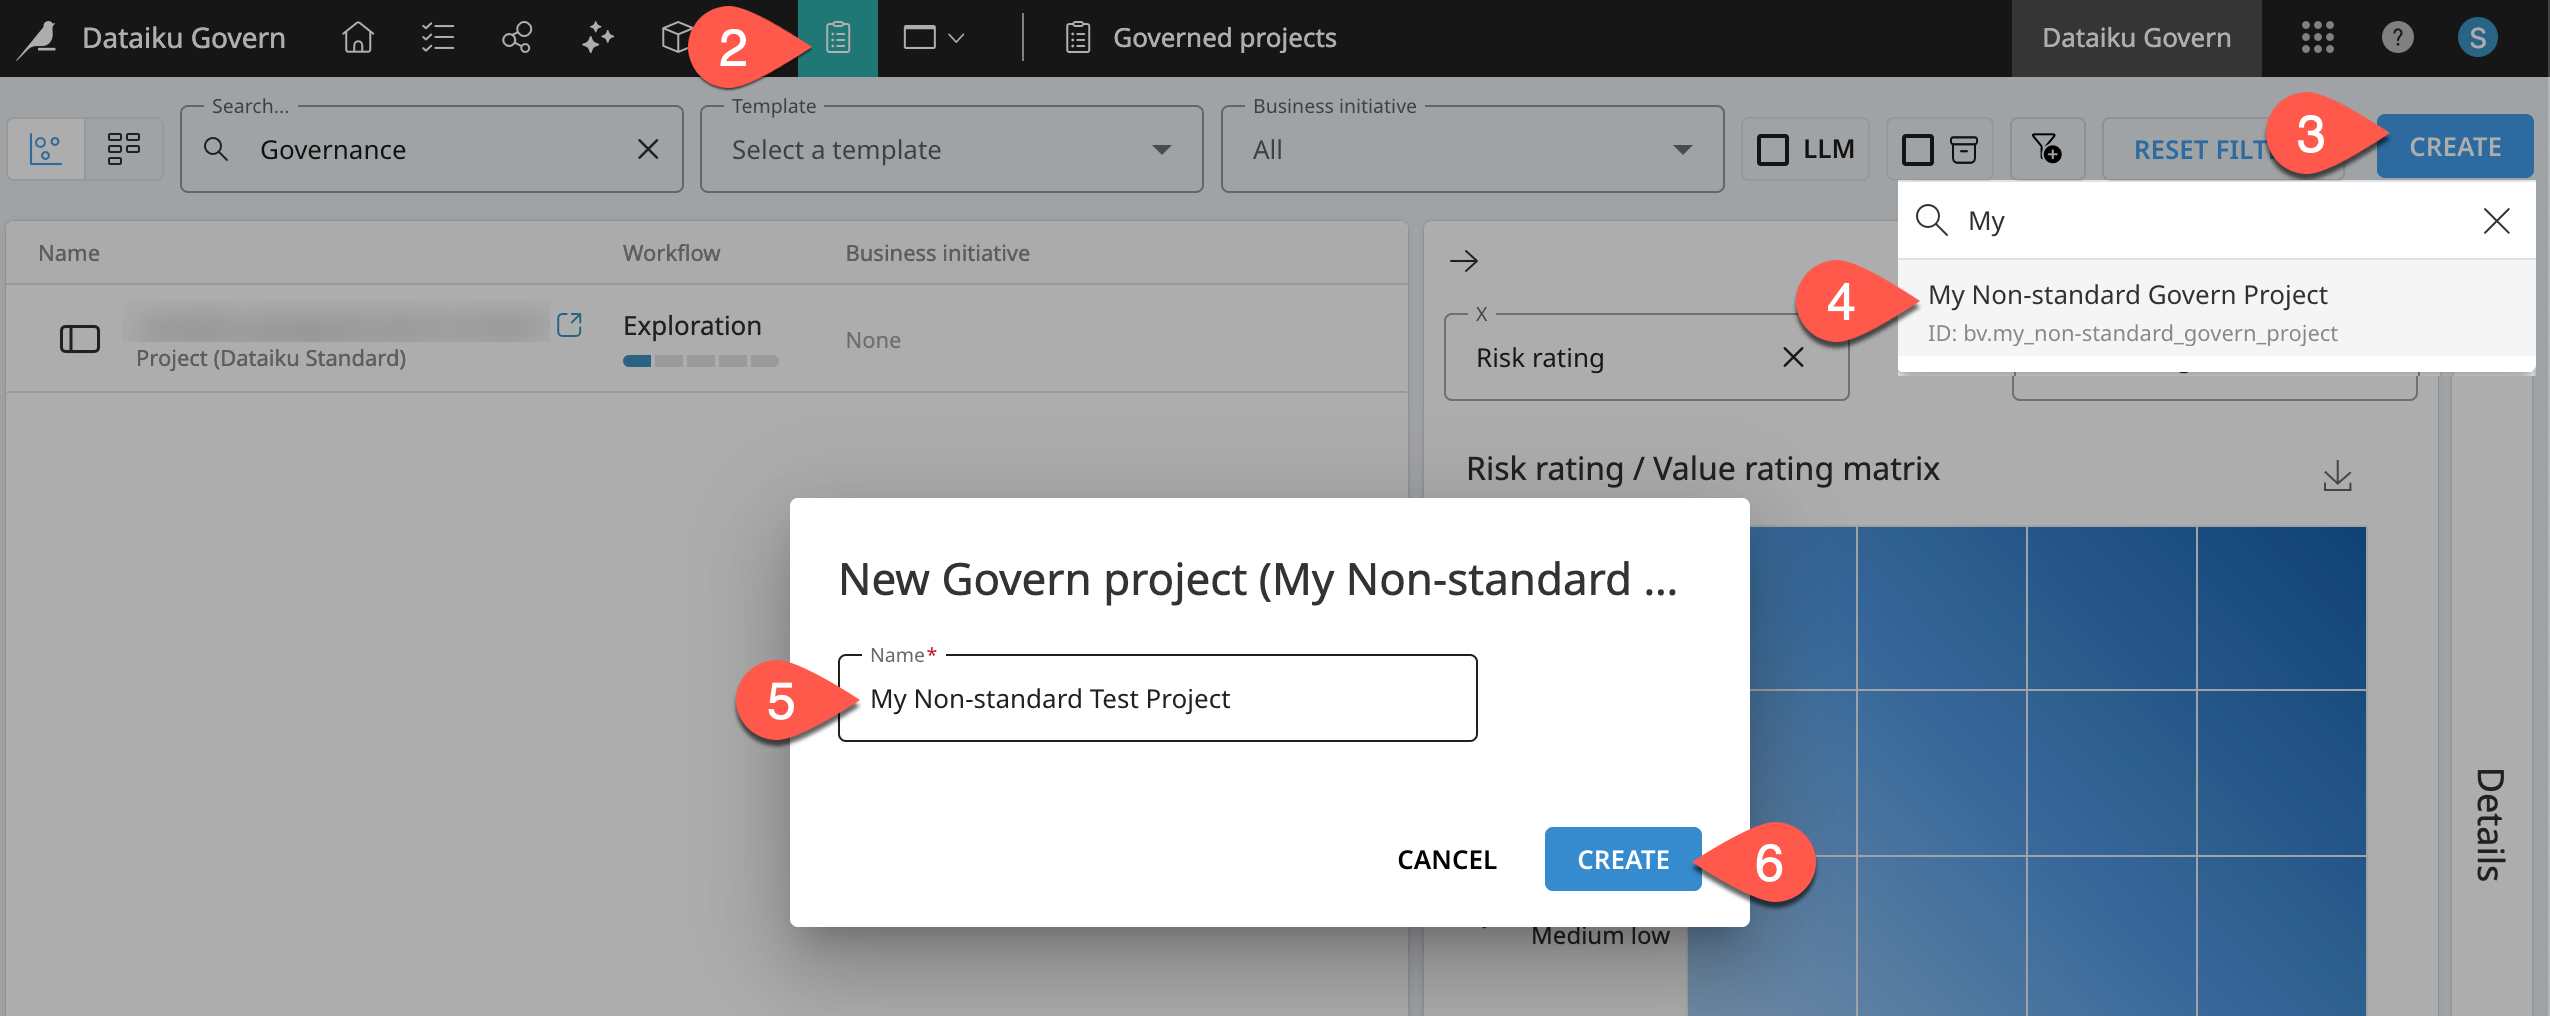
Click Create to start a new Govern project.
Select your Non-standard Govern project blueprint version.
Name it
<YOUR INITIALS> Non-standard Test Project.Click Create.
In your governed project, confirm the addition of the empty Ideation step and the renamed Rollout step.
Tip
Given that you forked the standard template at the start, everything else in this Govern project, besides your two changes, should be the same as a standard template Govern project.
Design a view in a blueprint version#
Now you have a Govern project defined by your own blueprint version! Next, you can start to iterate back and forth, making changes to your blueprint version, and confirming the presence of those changes in your Govern project.
To do so, you’ll need to understand the pieces that define the structure of Govern items: views, components, and fields.
Browse existing views#
You’ve already added a new step to the workflow of your blueprint version, but it’s currently empty. It doesn’t yet have an assigned view. Views define the structure of Govern items and workflow steps. For example, the “Qualification info” view defines the Qualification step in the workflow.
Within the General panel of your Govern project blueprint version, examine the assignment of views, such as the Project info view as the Artifact main view or the Qualification info view as the Qualification step.
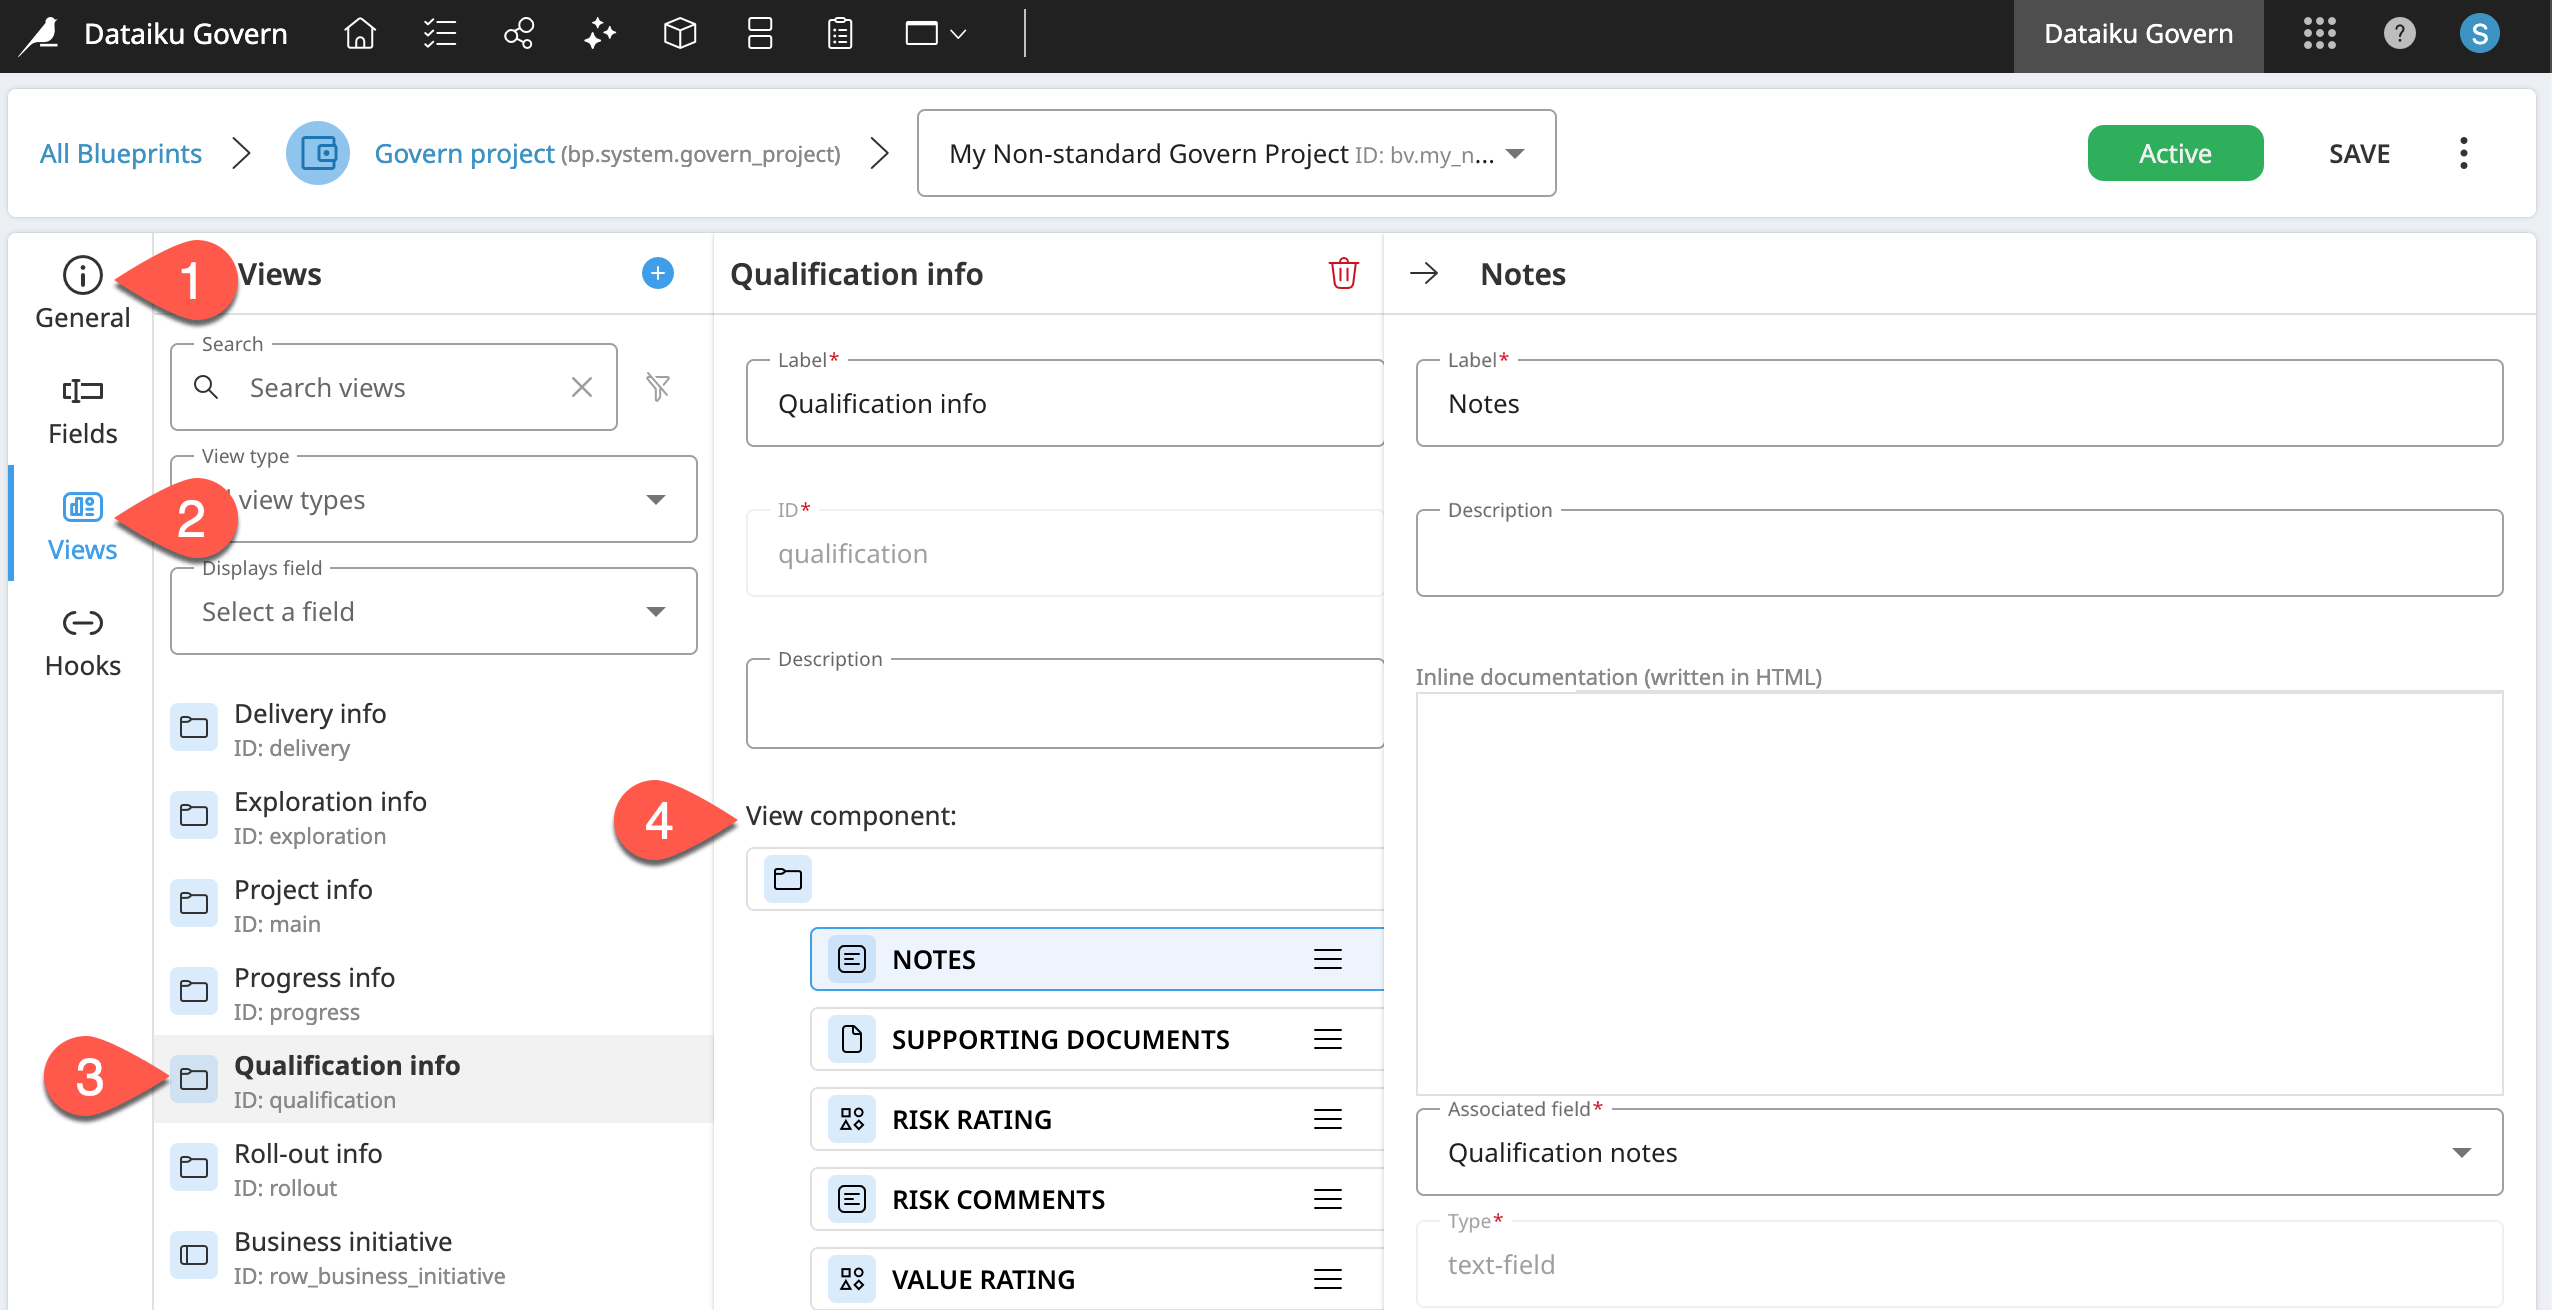
Navigate to the Views panel to see all existing views for this blueprint version.
Browse some available views, including Qualification info.
Note how the Qualification info view consists of several components, starting with a container component that holds fields such as Notes, Supporting Documents, etc.
Back in your Govern project, confirm for yourself how the Qualification workflow step consists of these same components.
Tip
Note that none of these steps, or more specifically their associated views, have a sign-off attached to it. You’ll add this later!
Create a view in a blueprint version#
Having explored some existing views, now create your own view for the Ideation stage.
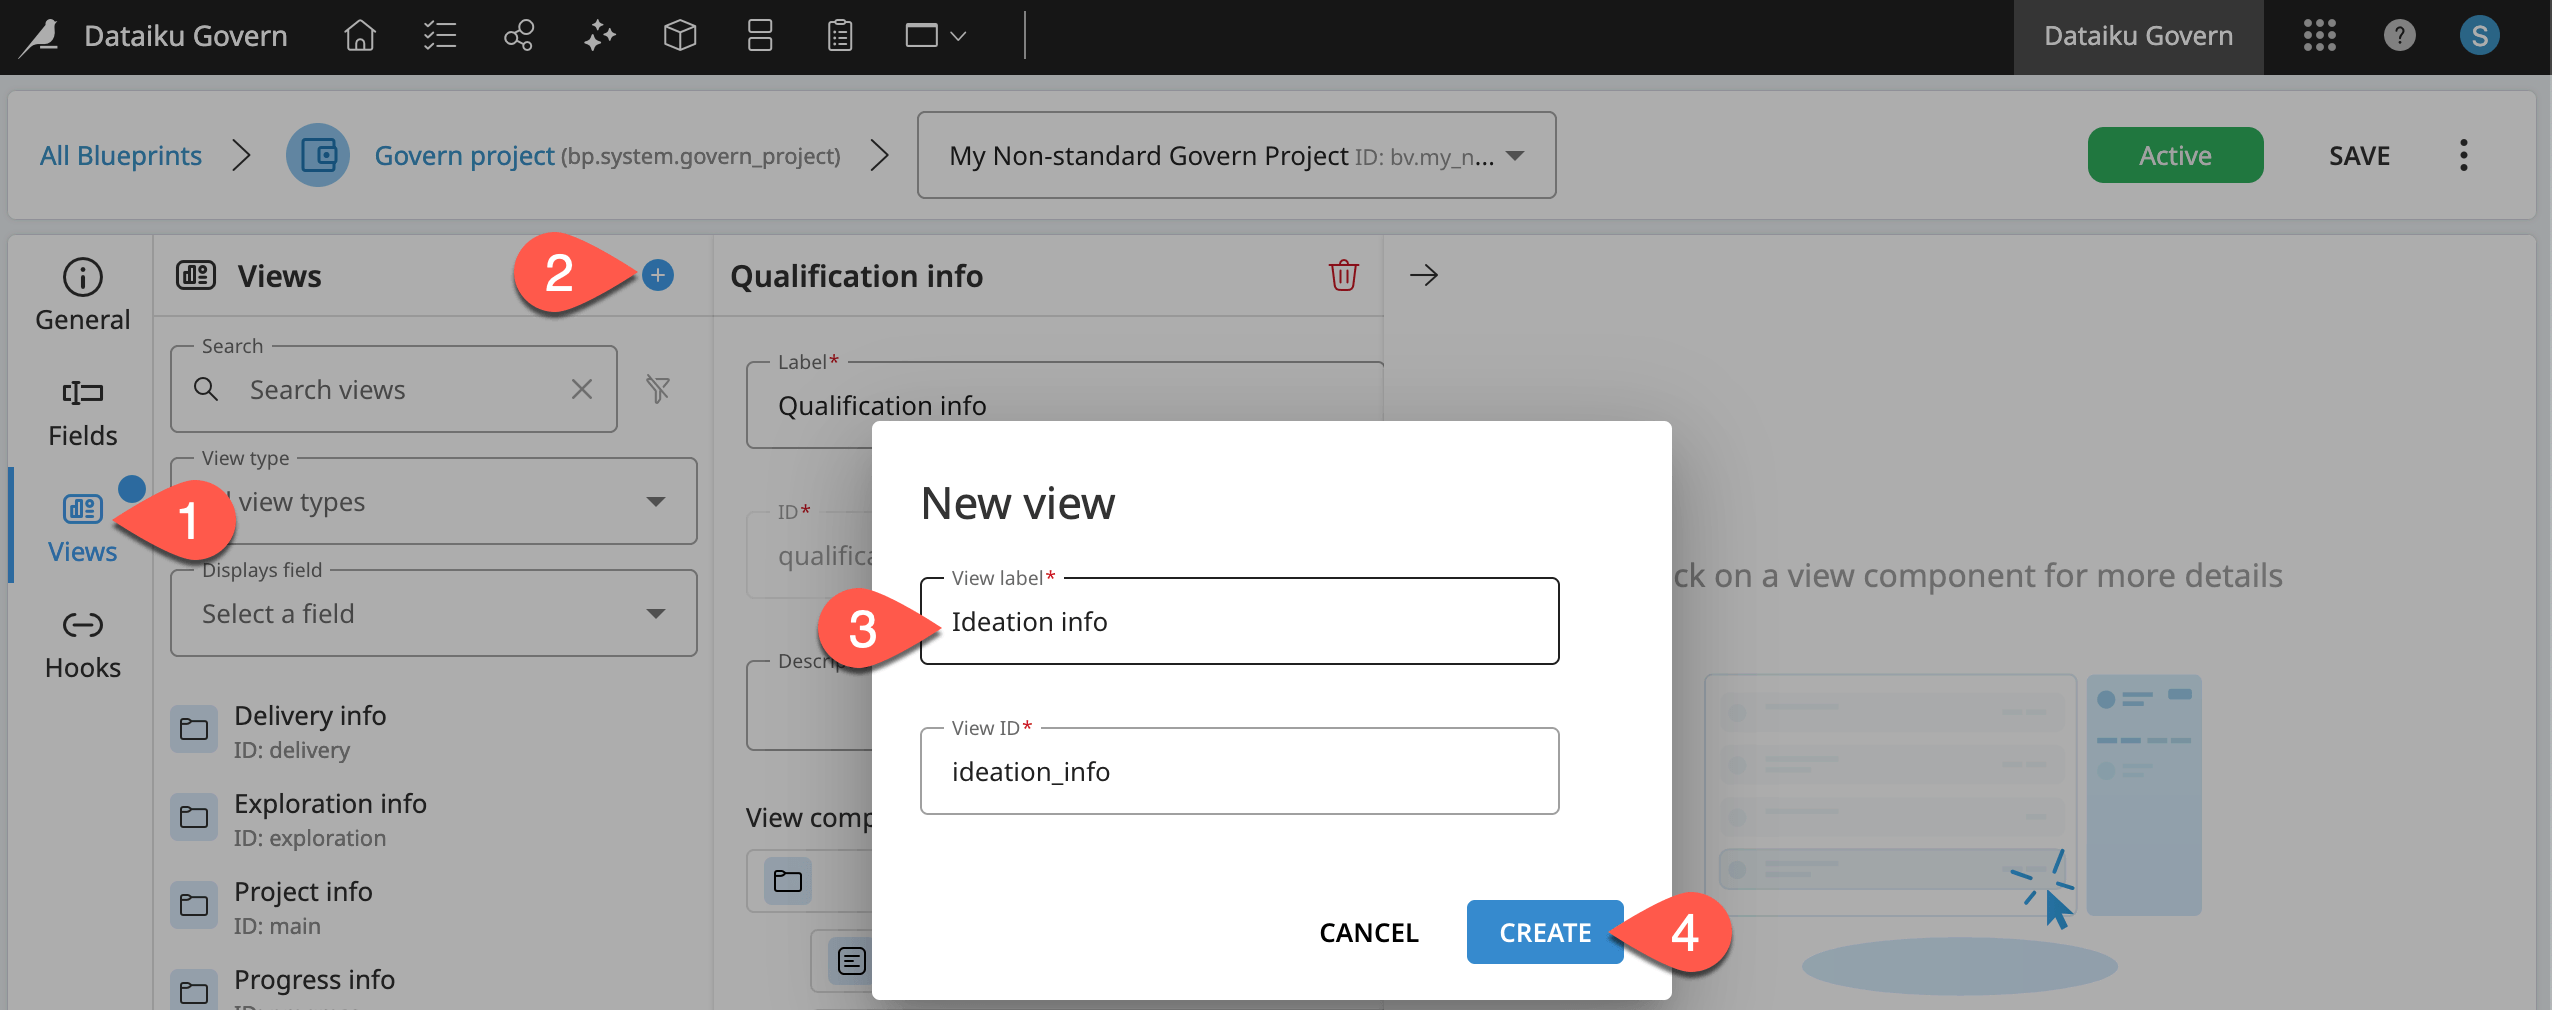
From your blueprint version, navigate to the Views panel if not already there.
In the Views column, click the plus (
 ) icon.
Name the new view
Ideation info.Click Create.
Add components to a view#
You now have a new view, but it’s empty. Next, add components to the view. Start by adding a container component so that you can add multiple fields to your view.
Within the Views panel of your blueprint version, in the Ideation info column, click + Add View Component.
Change the component Type to a Container, and click Create.
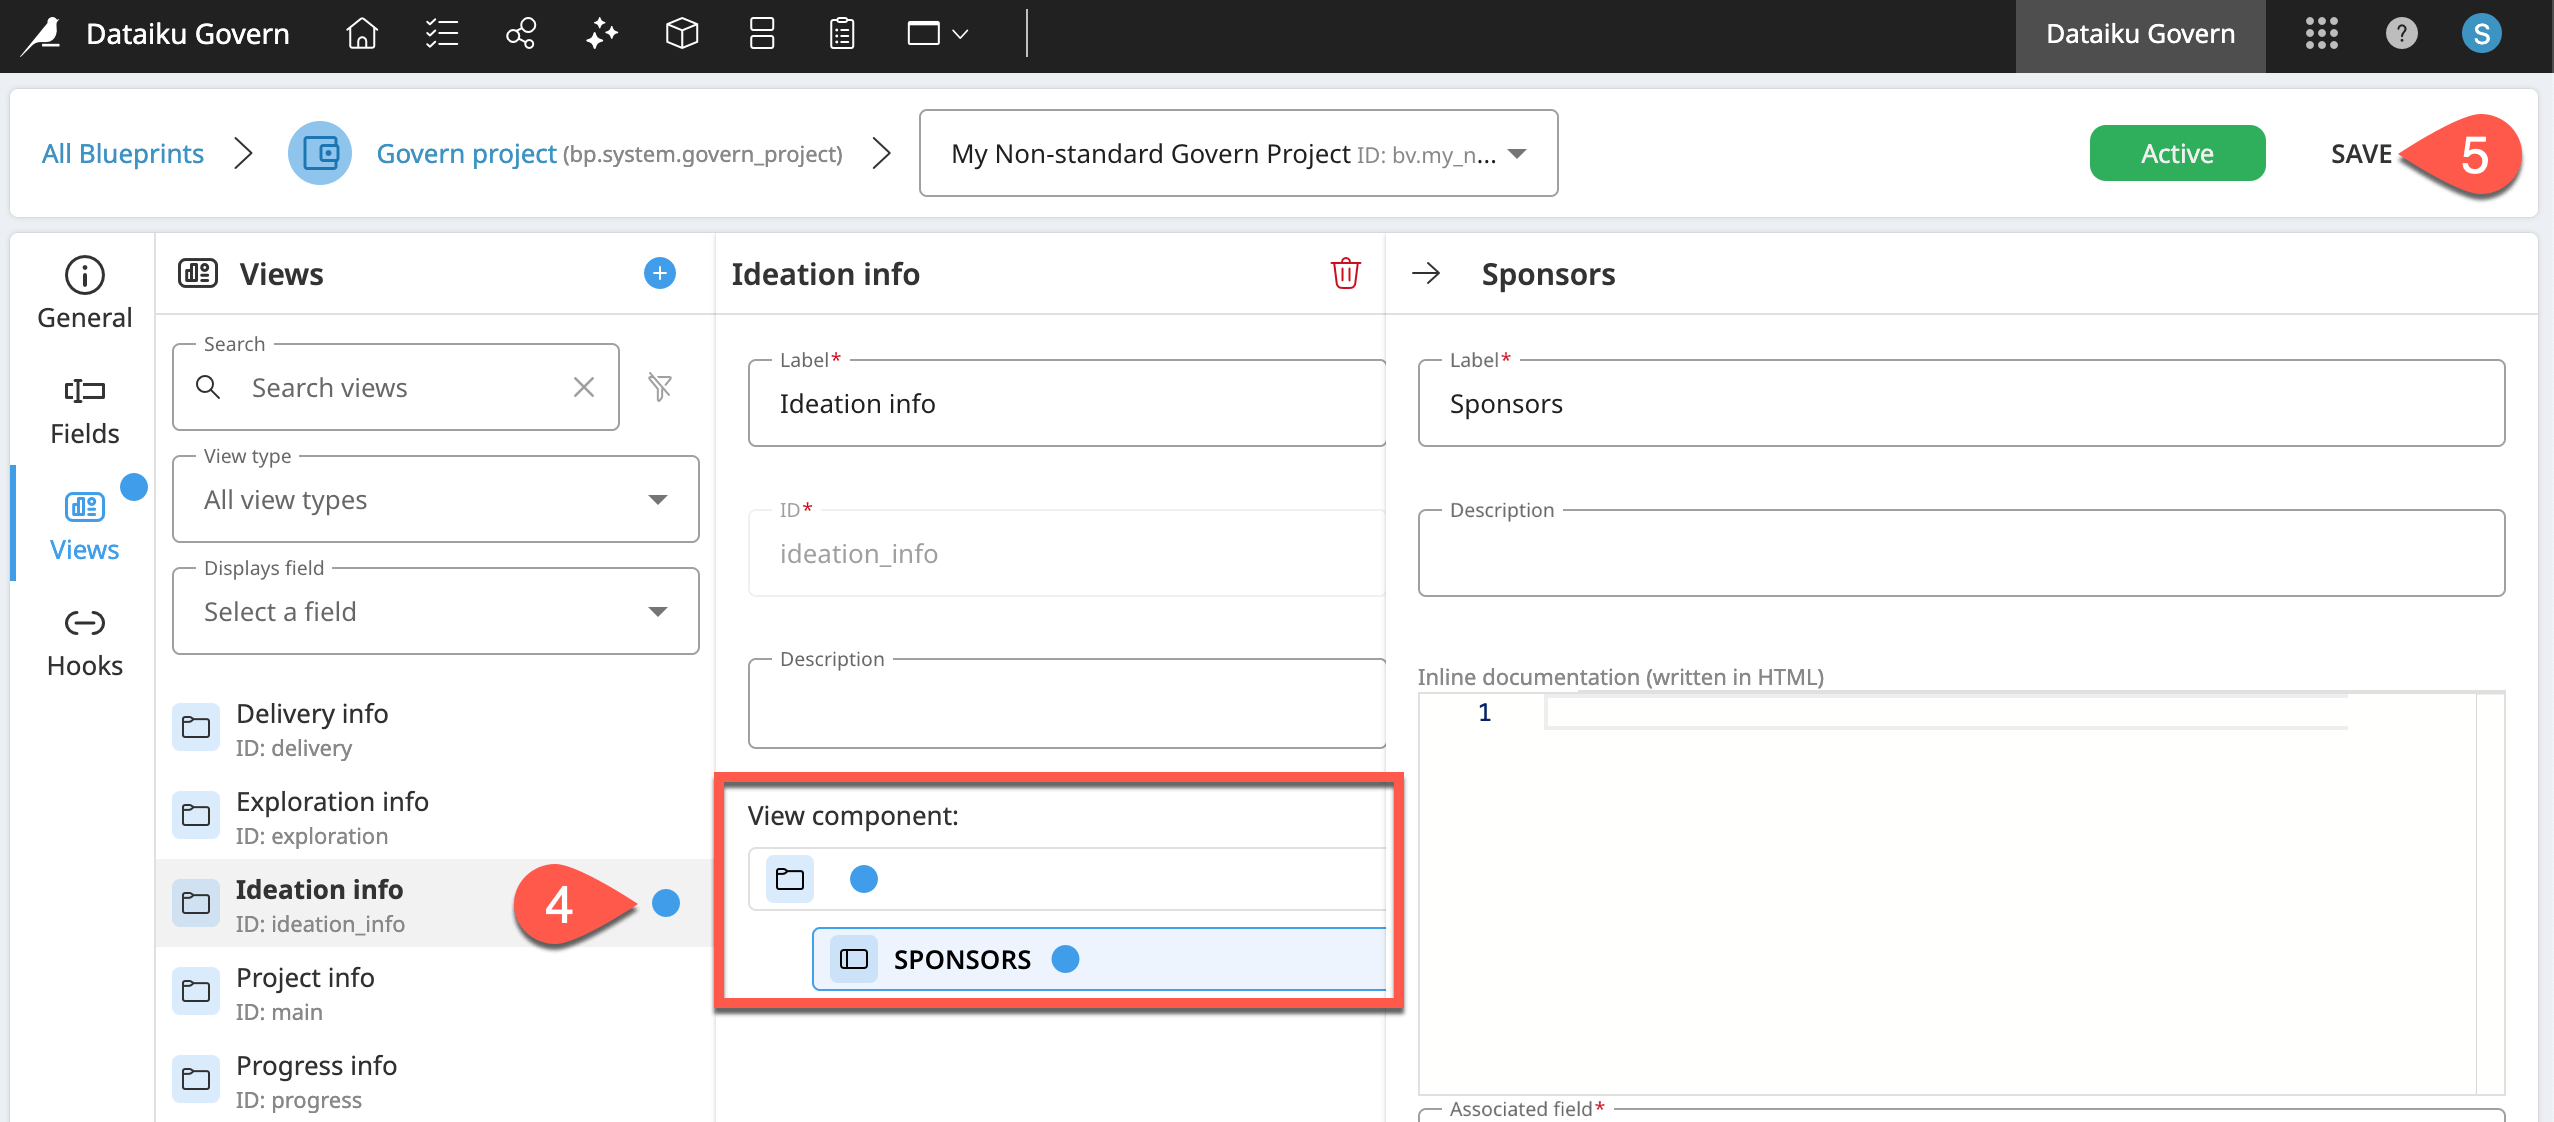
Below the container, click + Add View Component again. As an example for now, click the plus (
) next to Sponsors to add this field, and click Create.Recognize the presence of a blue circle, indicating unsaved changes to your blueprint version.
Click Save and Save again to confirm your changes.
Important
Take note of the message when saving your changes to an active blueprint version. One item is already using this blueprint version. Of course, these are minor changes that only impact a learning project. Keep in mind that making changes to a blueprint version already in use by multiple projects carries risk.
Assign a view to a workflow step#
Now that you’ve created this view, it’s available for assignment to any main view or step in the workflow.
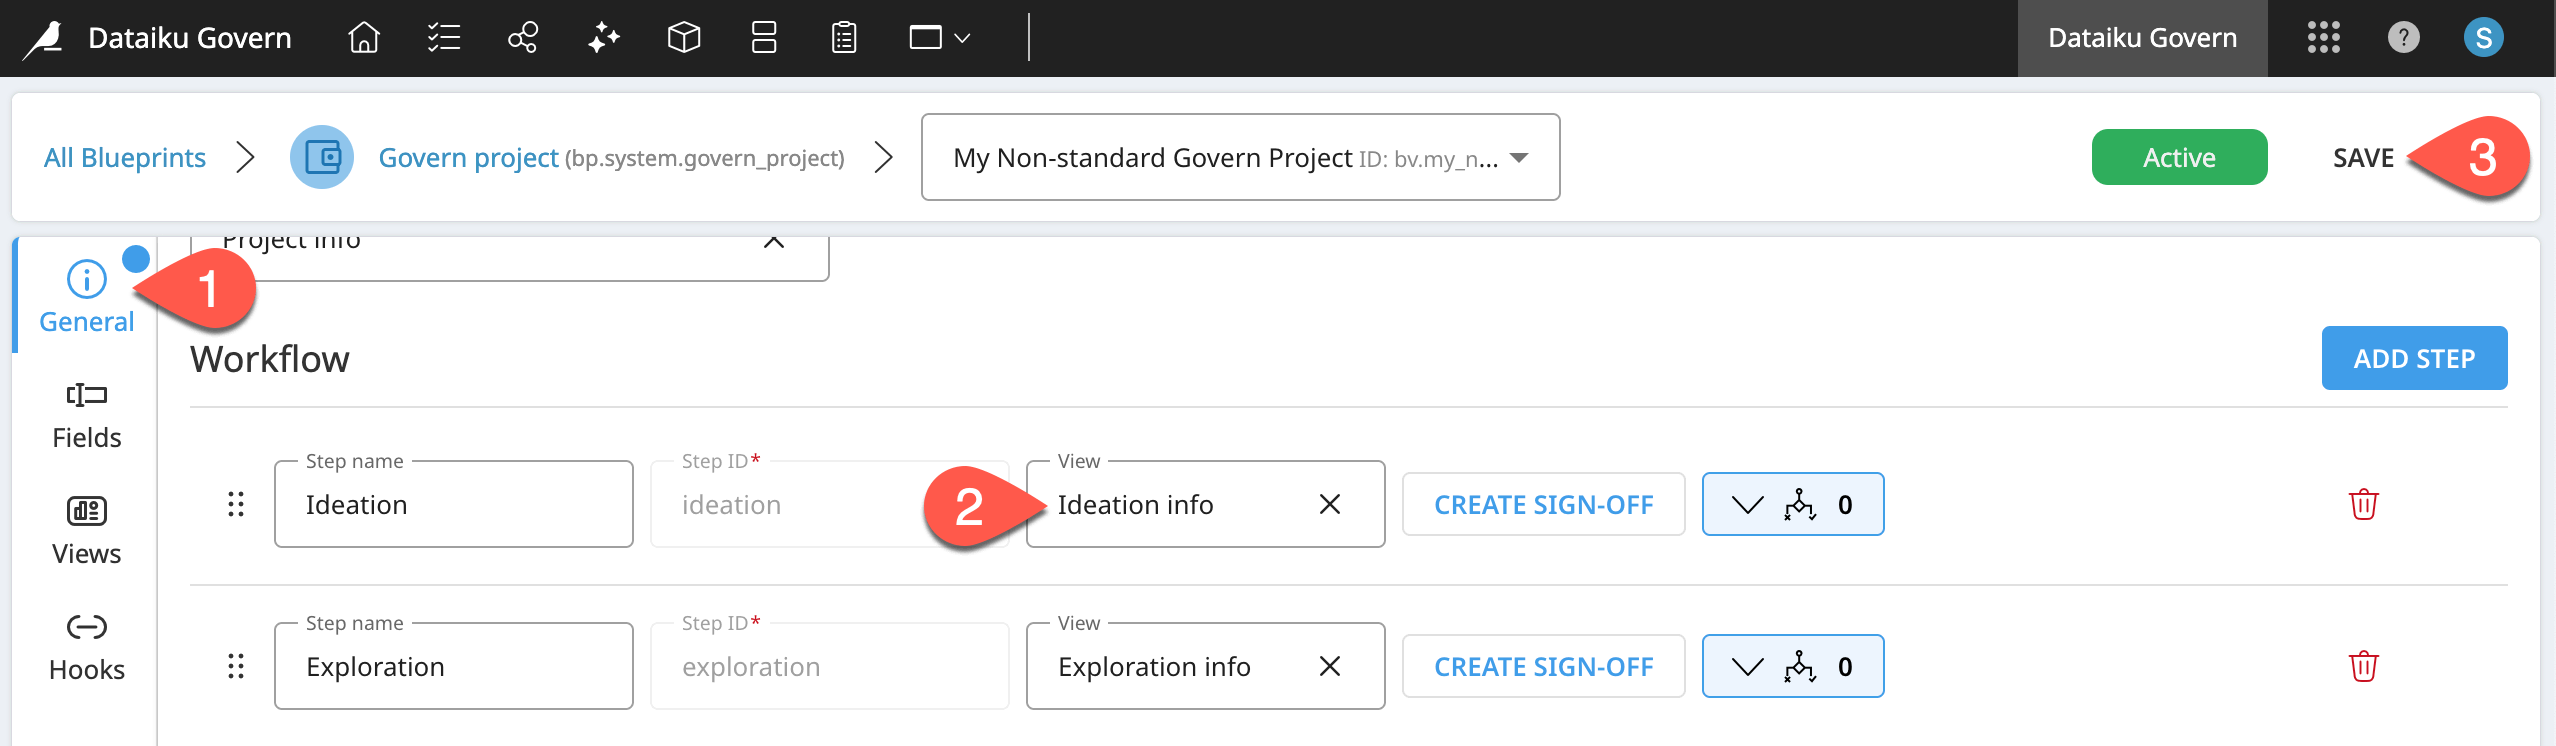
Return to the General panel of your blueprint version.
For the Ideation step, select the Ideation info view.
In the blueprint version header, click Save, and Save again to confirm.
In your other Govern node tab, refresh your Govern project to confirm the changes in the Ideation step. The previously empty step now includes a field to add sponsors (since that’s how you defined this view).
For practice, repeat this process, adding another field component, such as Start Date, to the Ideation info view.
Explore existing fields#
To recap your progress so far:
You created your own blueprint version of a Govern project, named <YOUR INITIALS> Non-standard Govern Project, forked from the Dataiku Standard template.
In that blueprint version, you created a new workflow step named Ideation.
You then created a new view named Ideation info, and assigned it as the definition of that step.
Next, you customized this view by selecting components like Sponsors from existing fields.
Sponsors was just one example of a field belonging to a Govern project. The Govern node provides various types of fields, including:
Text fields like Cost comments.
Category fields like Cost rating.
Uploaded file fields like Progress documents.
Date fields like Target end date.
Reference fields like Dataiku project.
Take a closer look at some existing fields.
Navigate to the Fields panel of your blueprint version.
Browse the available fields, such as those mentioned above, noting their properties.
As one example, review the Risk rating field, confirming its status as a non-required, category field.
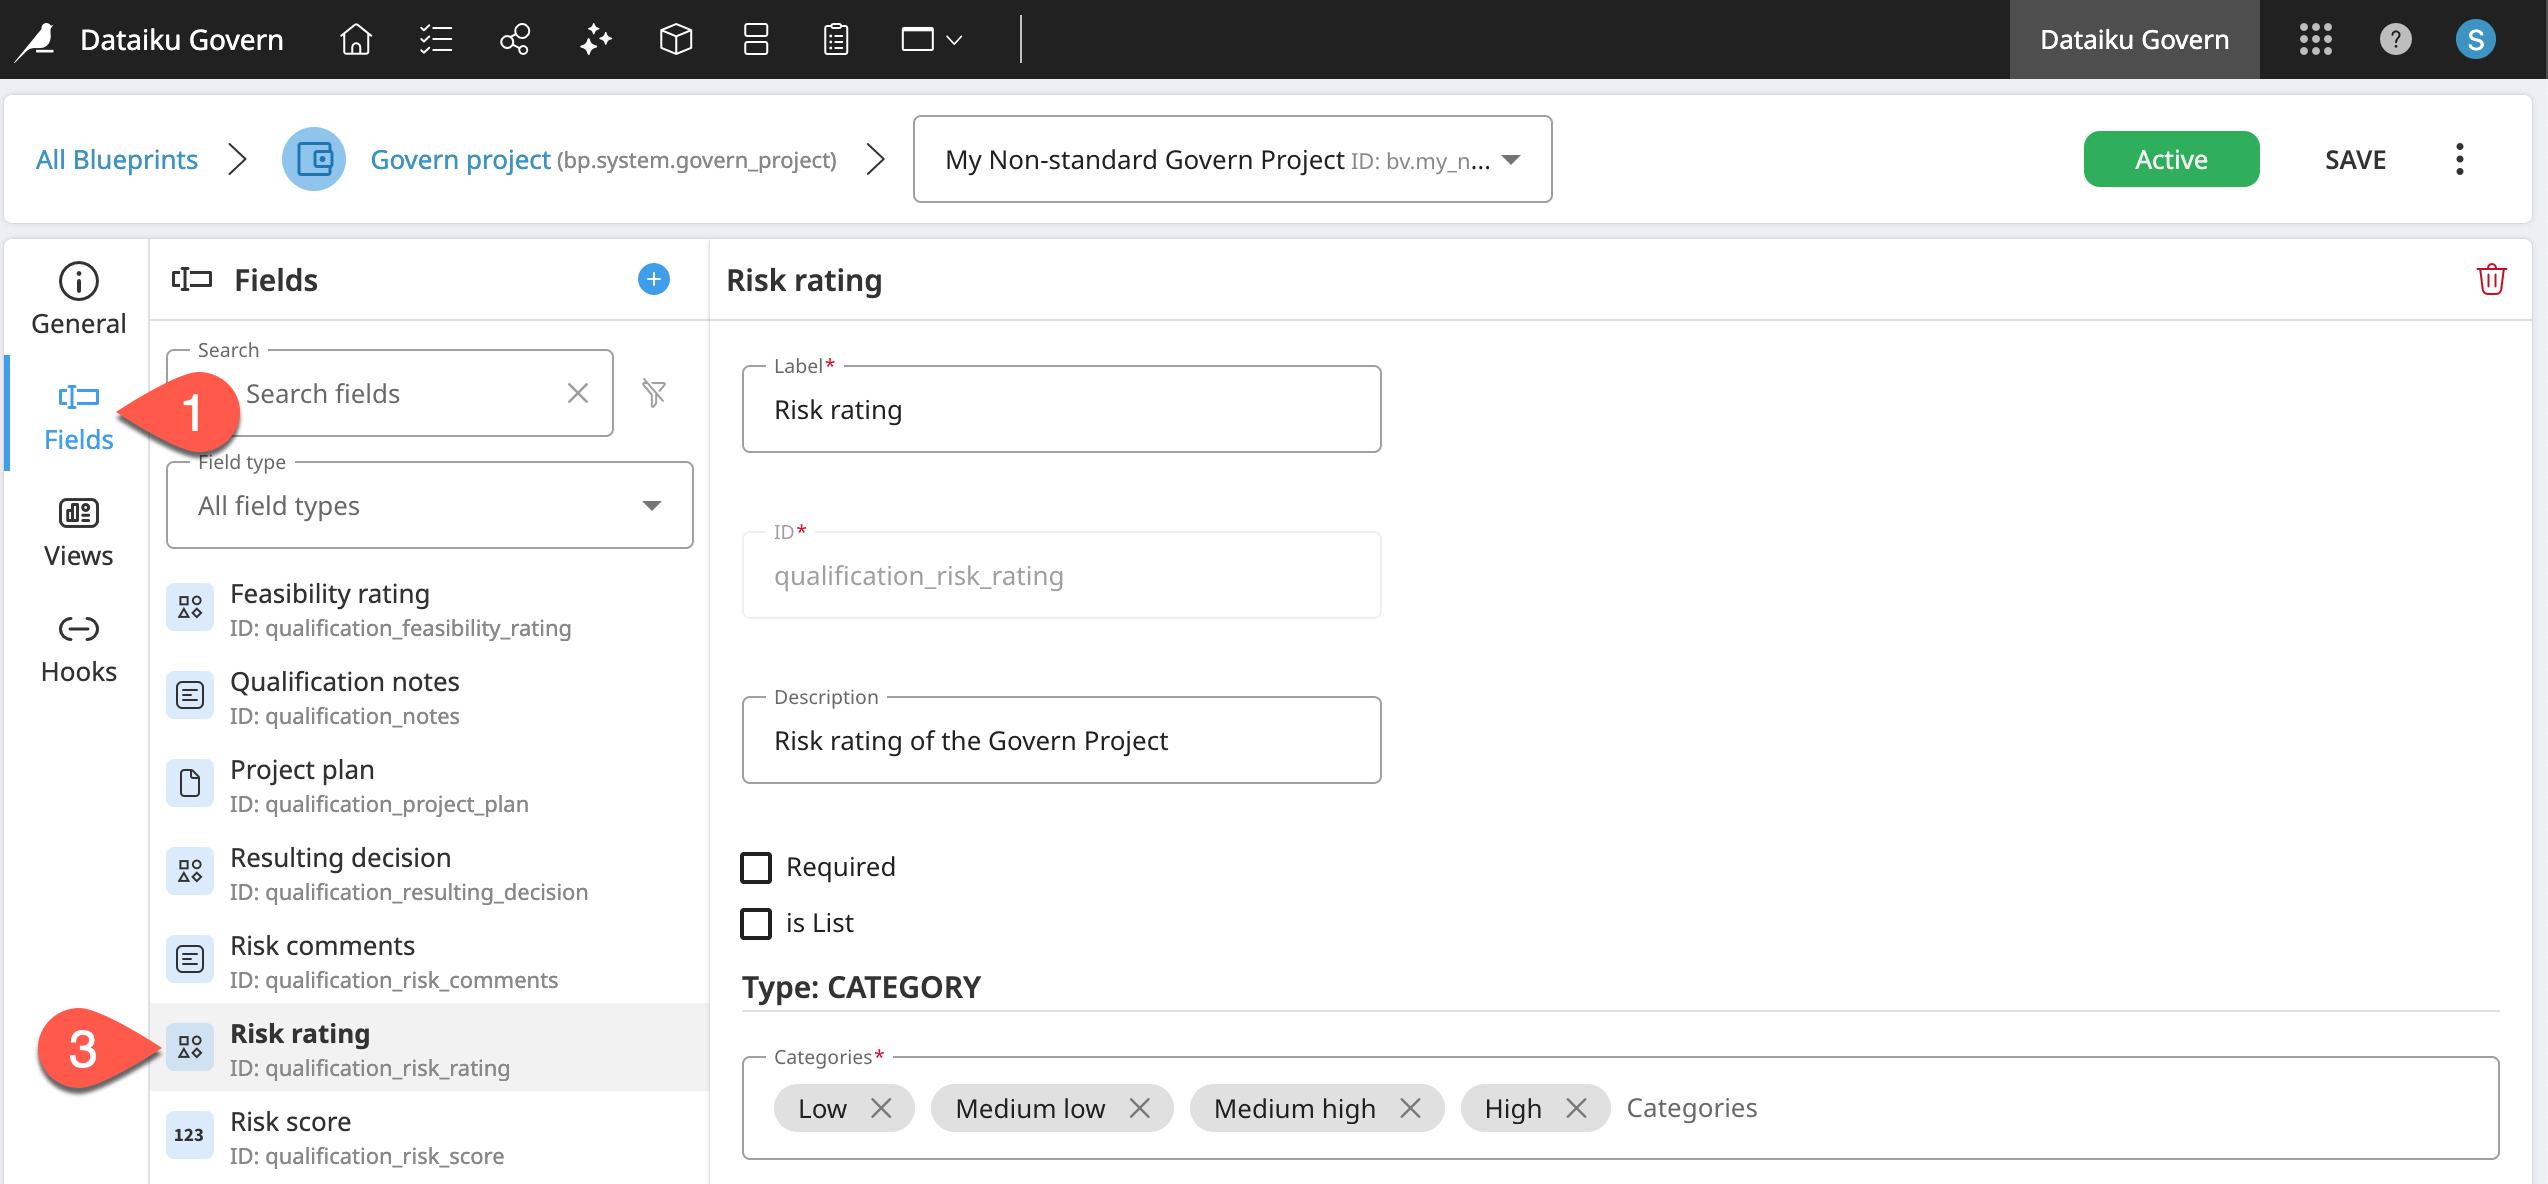
Confirm what appears here matches the structure of the Risk rating field in the Qualification step of your governed project.
Create a field for inclusion in a view#
None of the existing fields may exactly fit your needs. The next step is creating your own fields.
Consider that you want to define a field to represent the champion of a project. Although there is a sponsor field, perhaps you want every governed project to have exactly one champion. You can do that with a reference field. This type of field enables the user to select from a specific type of Dataiku or Govern item.
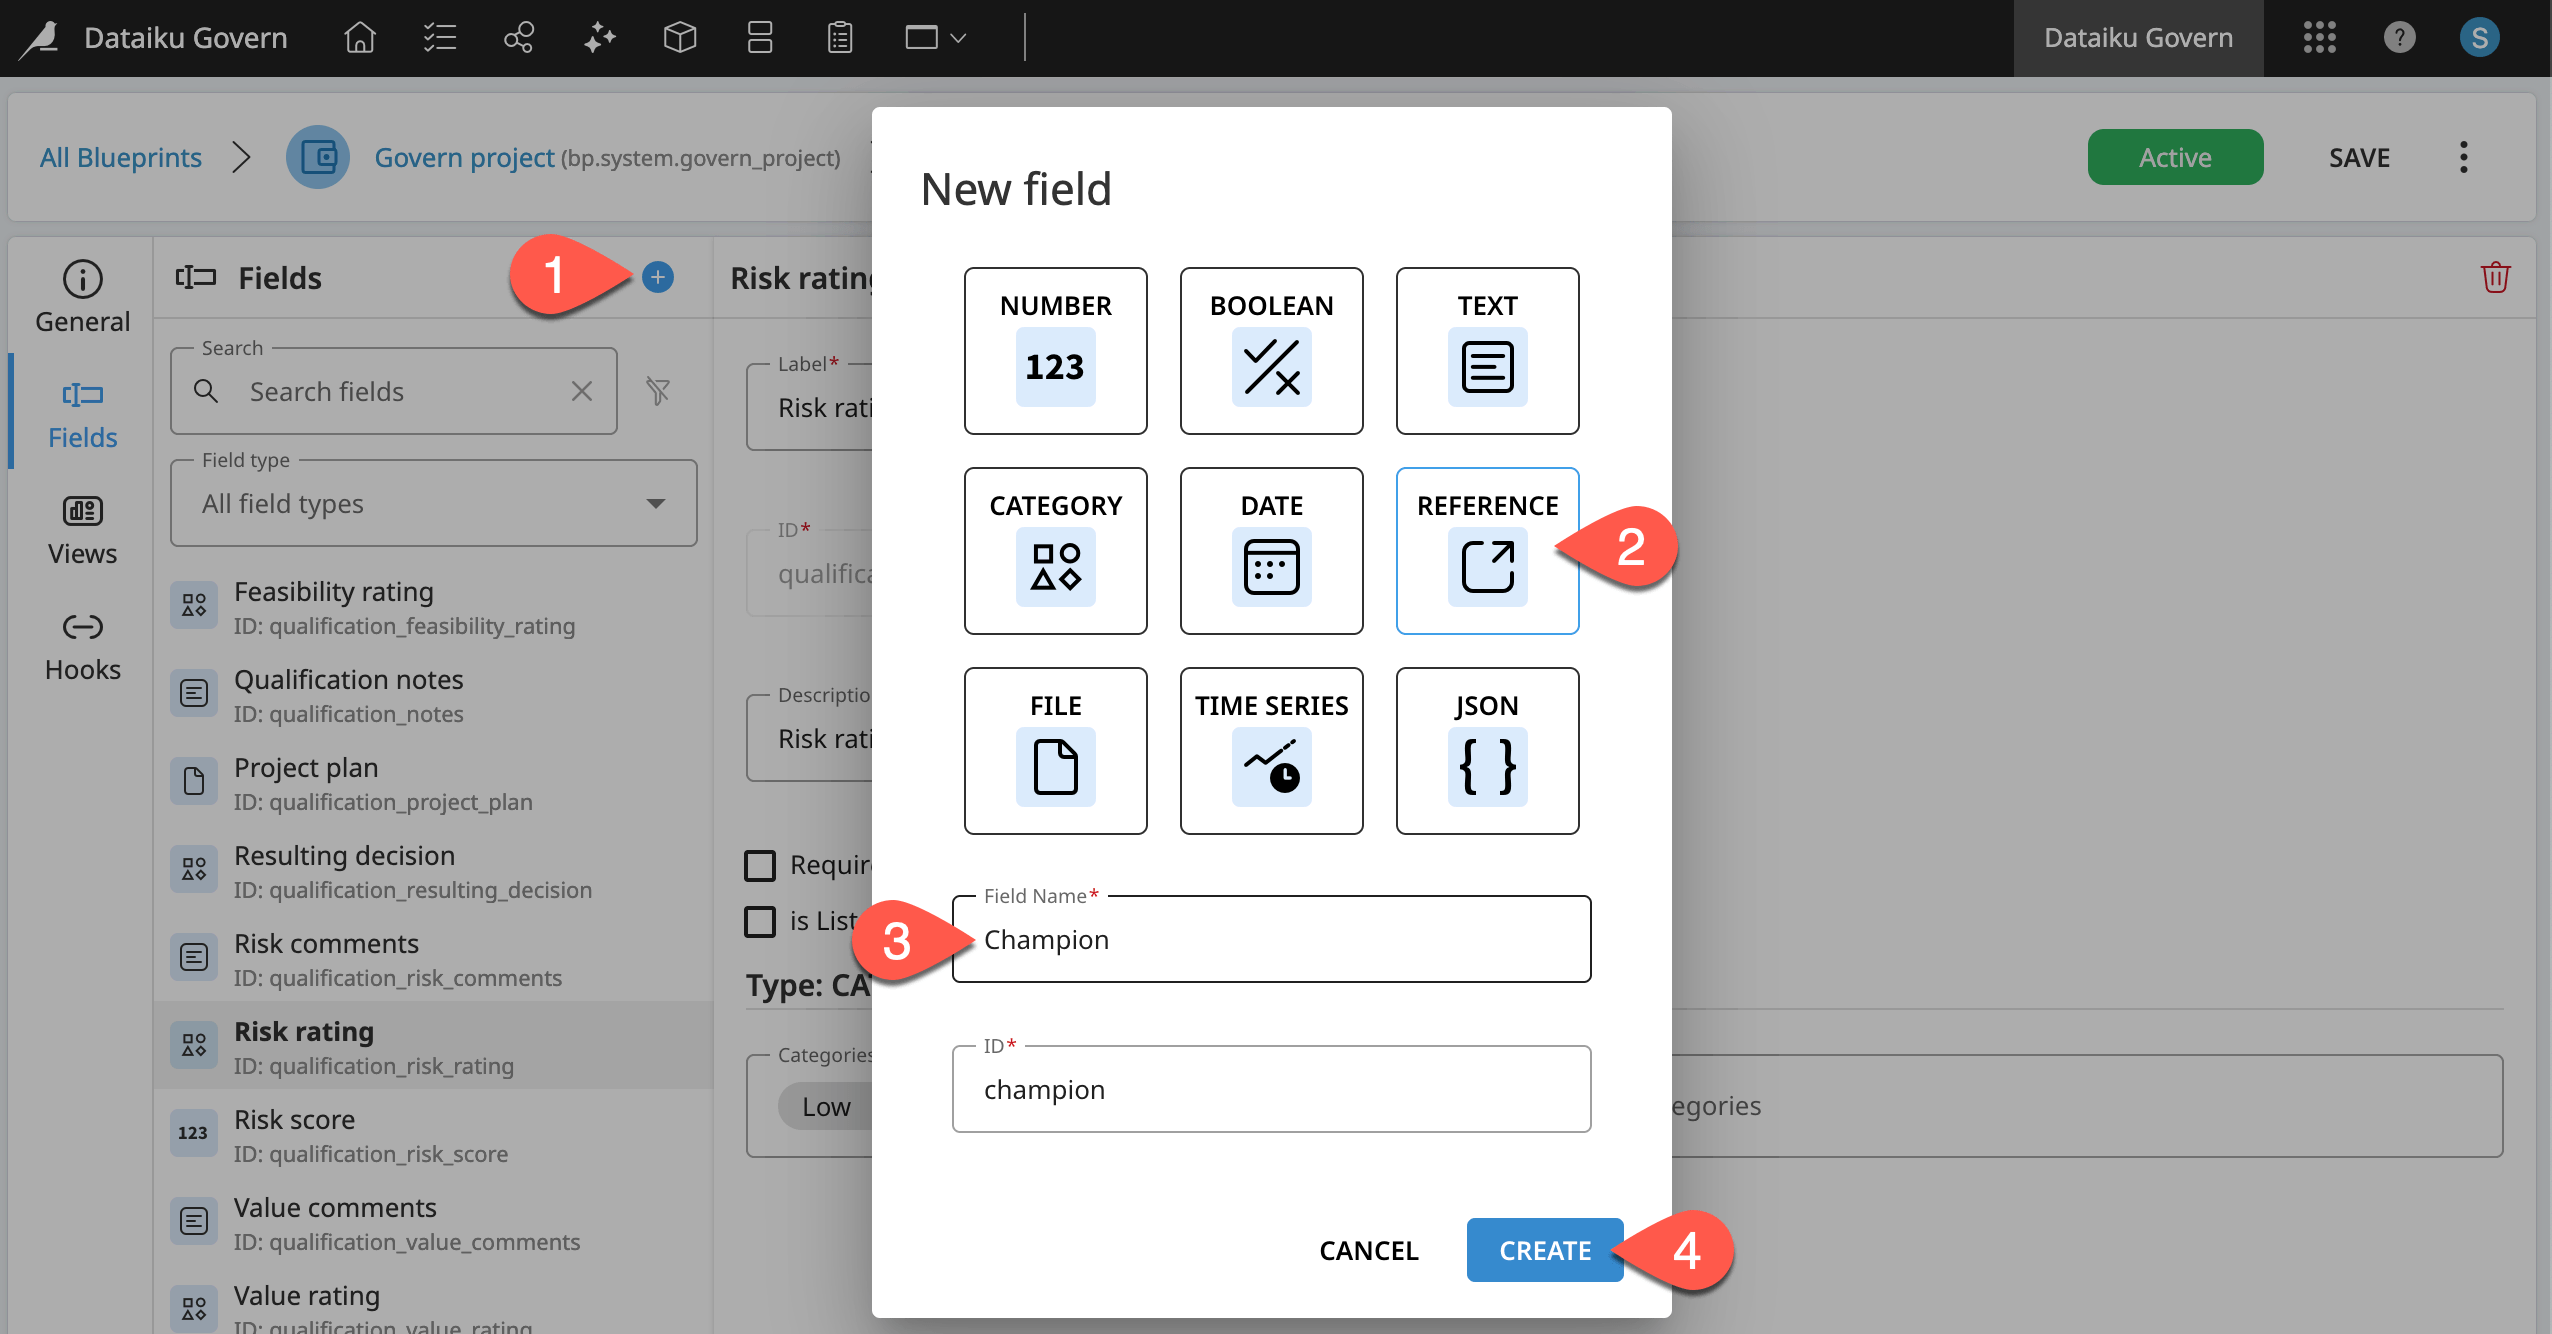
Within the Fields panel of your blueprint version, in the Fields column, click the plus (
) icon to create a new field.Define the new field as a Reference type.
For the field name, type
Champion.Click Create.
Now finish configuring the field for a champion of a governed project.
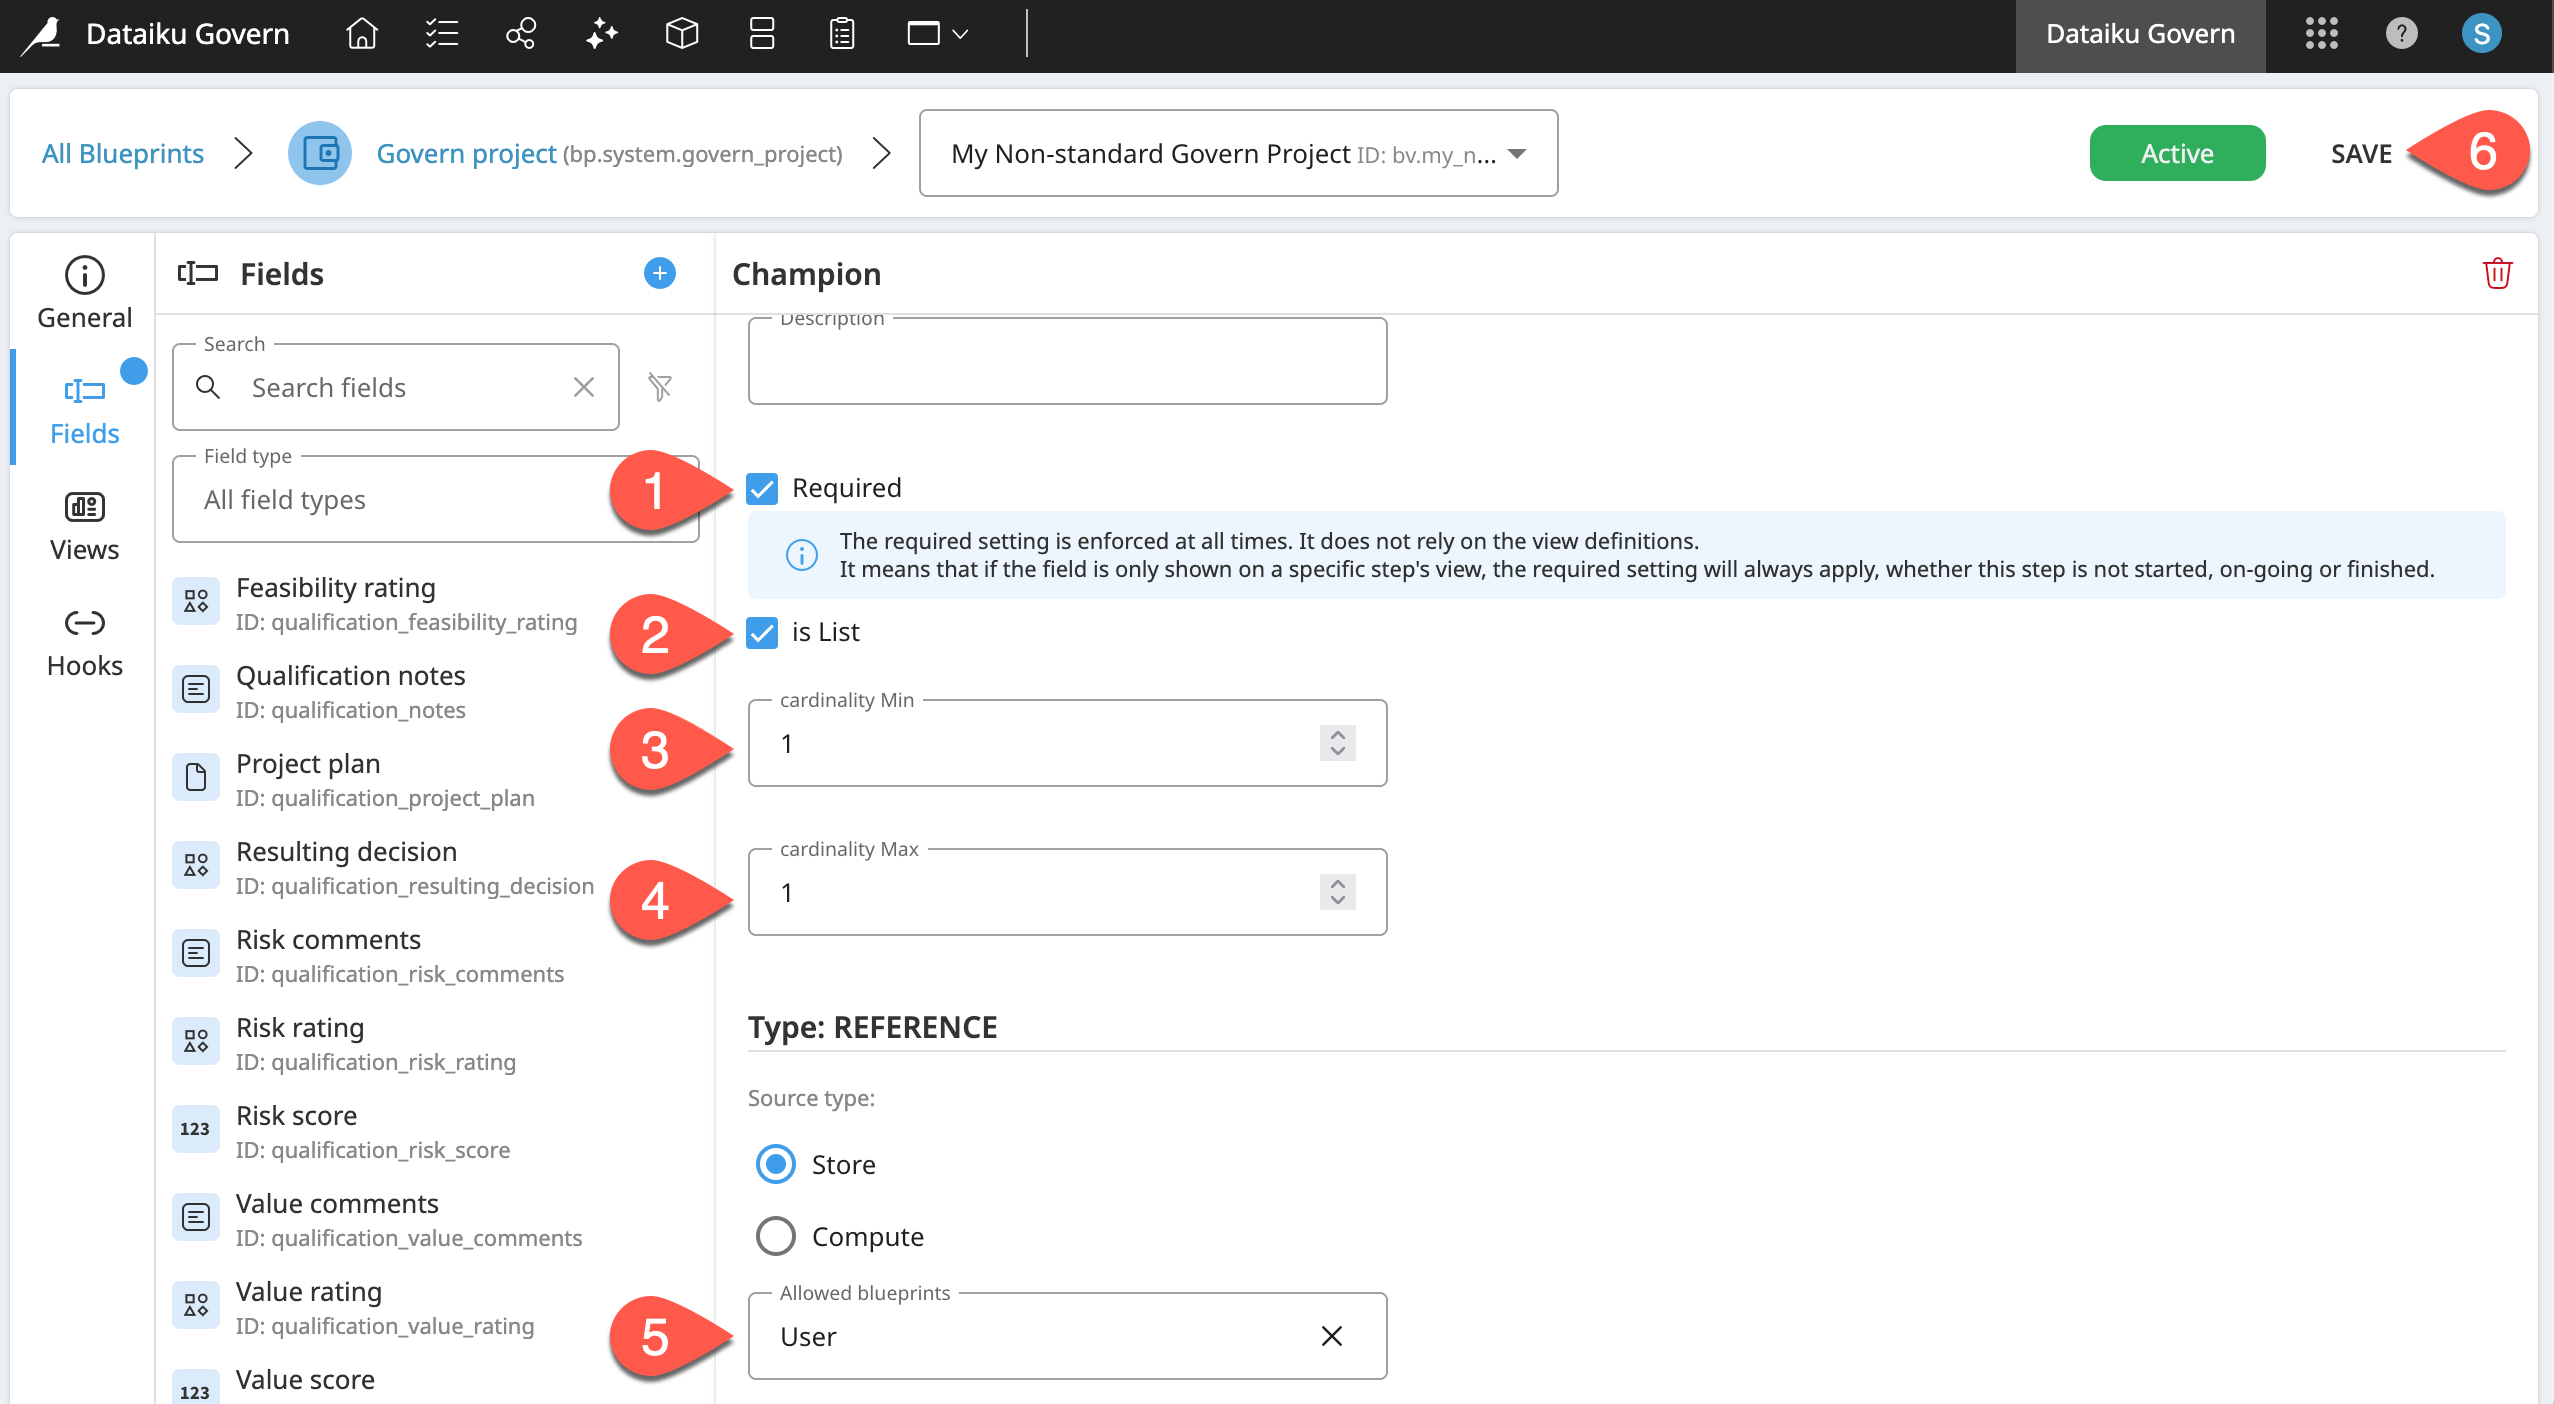
Check the box Required to make it mandatory for Govern projects using this template to complete this field.
Check the box is List to allow the selection of multiple values.
Set the cardinality Min field to
1.Set the cardinality Max field to
1.For the Allowed blueprints field, select User, as this is the asset from which those governing the project must select the champion.
Click Save, and Save again to confirm.
Now you can add this field to your view (which is already chosen as the view for the Ideation step).
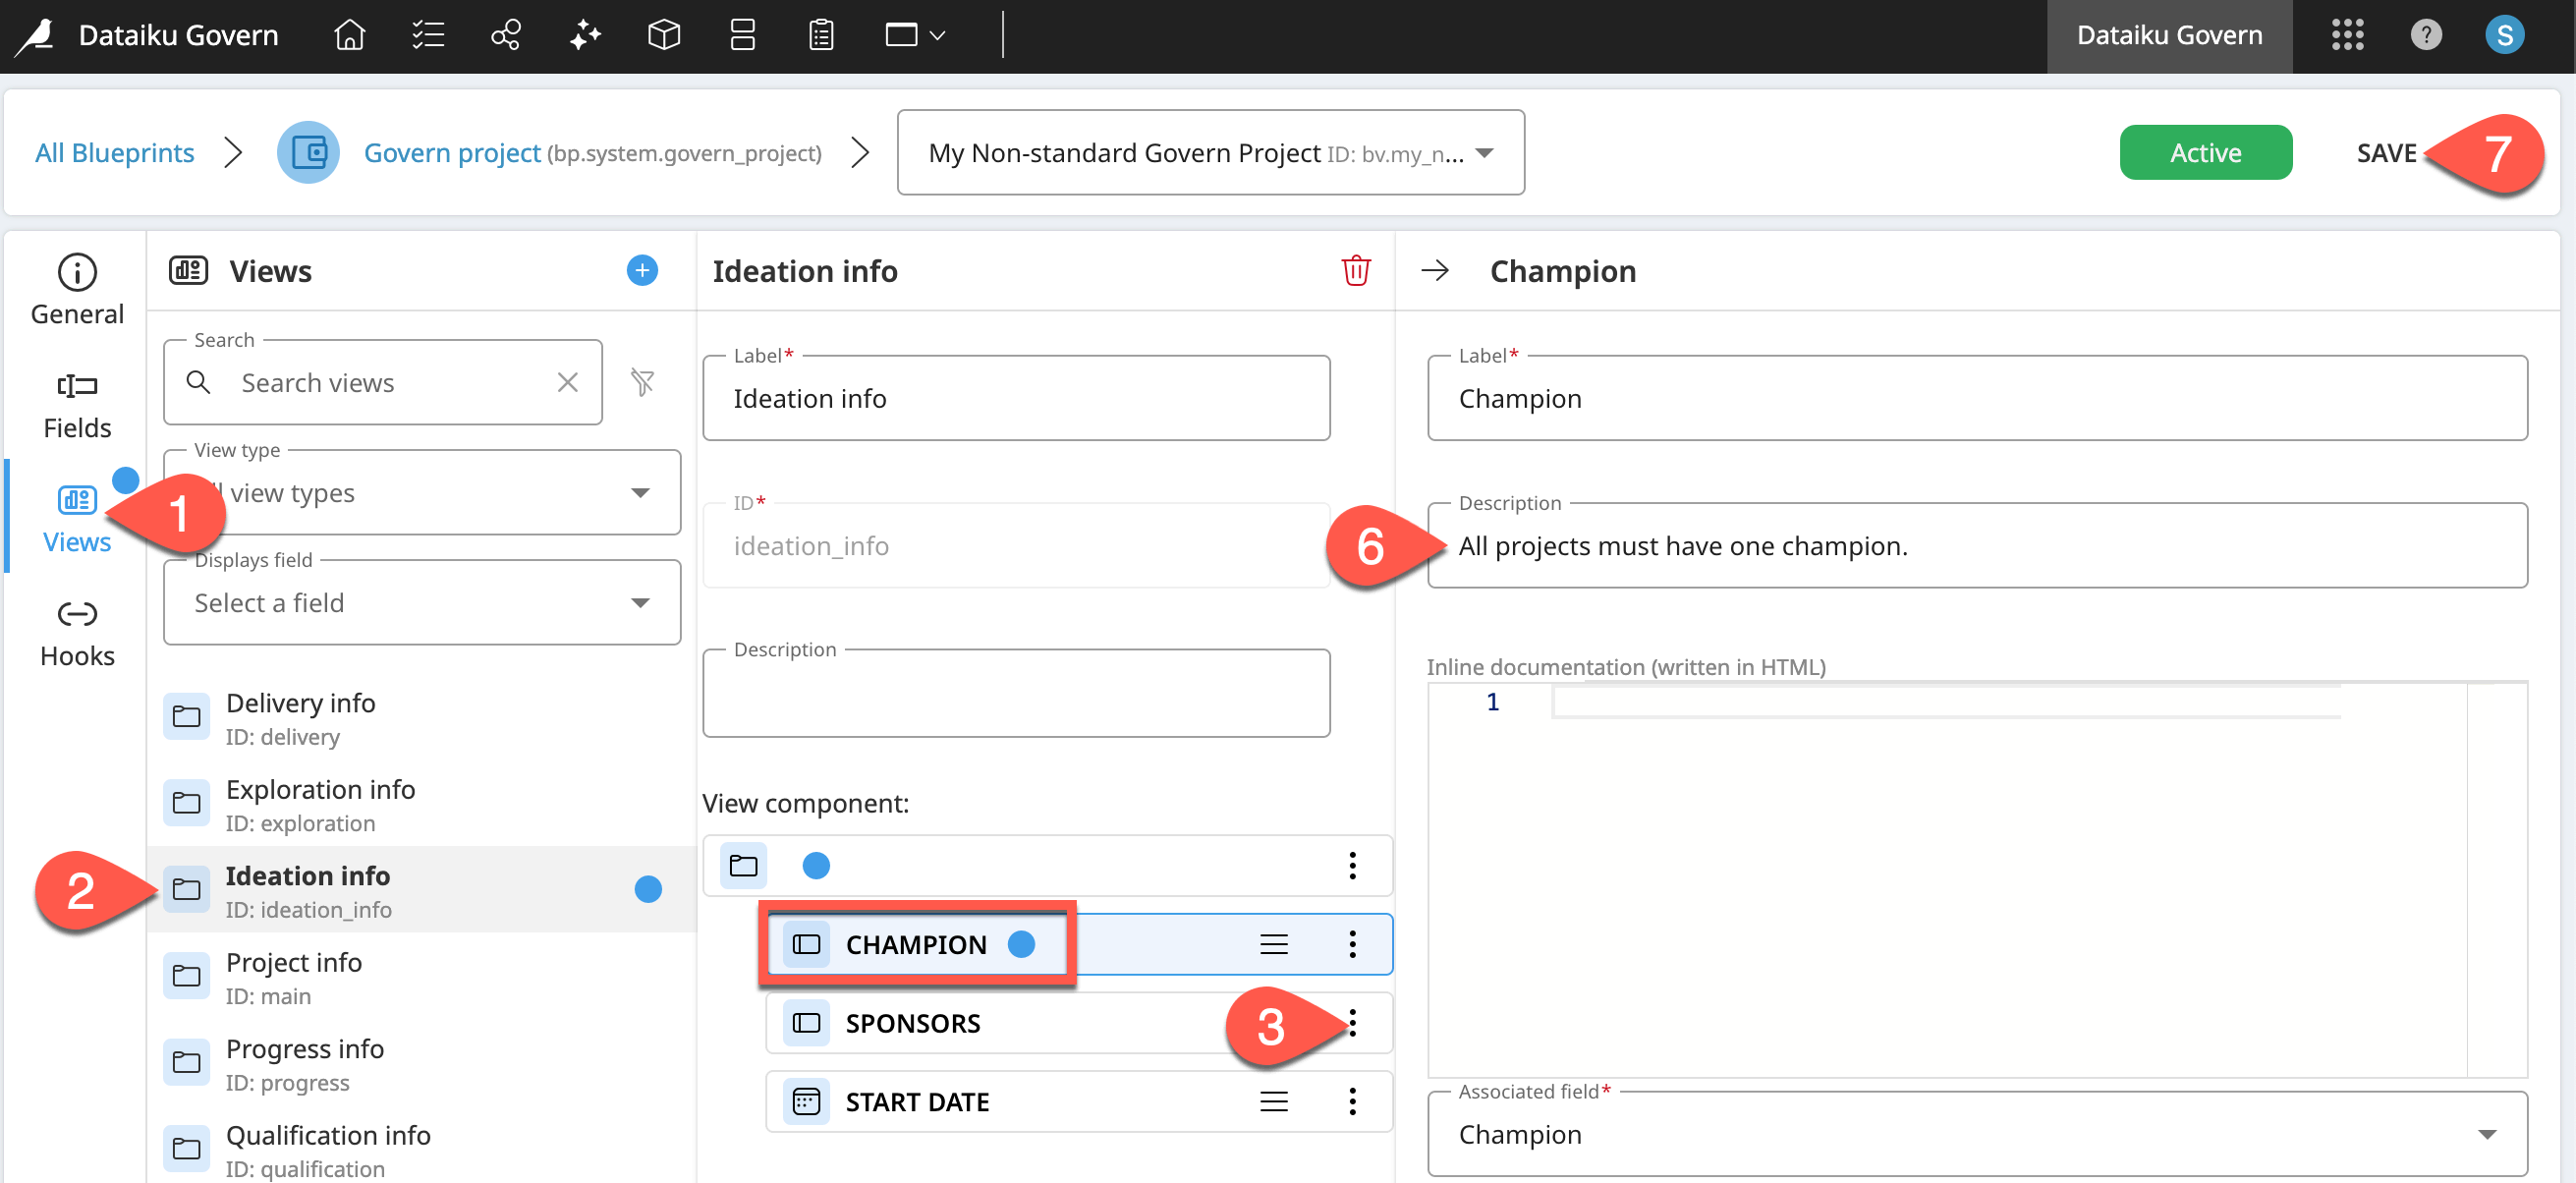
Navigate to the Views panel of your blueprint version.
From the Views column, select the Ideation info view.
Next to Sponsors, click the vertical dots (
 ) menu > Insert view component > Before selection.
In the new view component dialog, add the Champion field using the plus (
) icon.Click Create.
In the Champion column, copy-paste the following description:
All projects must have one champion.
Click Save, and Save again to confirm.
Now test it out!
Refresh your governed project.
Select the Ideation step.
In the item header, click Edit.
Click Set as Ongoing to start the Ideation step.
Experiment adding 0, 1, or multiple users in the Champion field.
Confirm how violating the cardinality rules for the champion field results in warnings (and invalid form errors) when attempting to save.
When ready, set yourself as the champion, and click Set as Finished to advance to the Exploration stage.
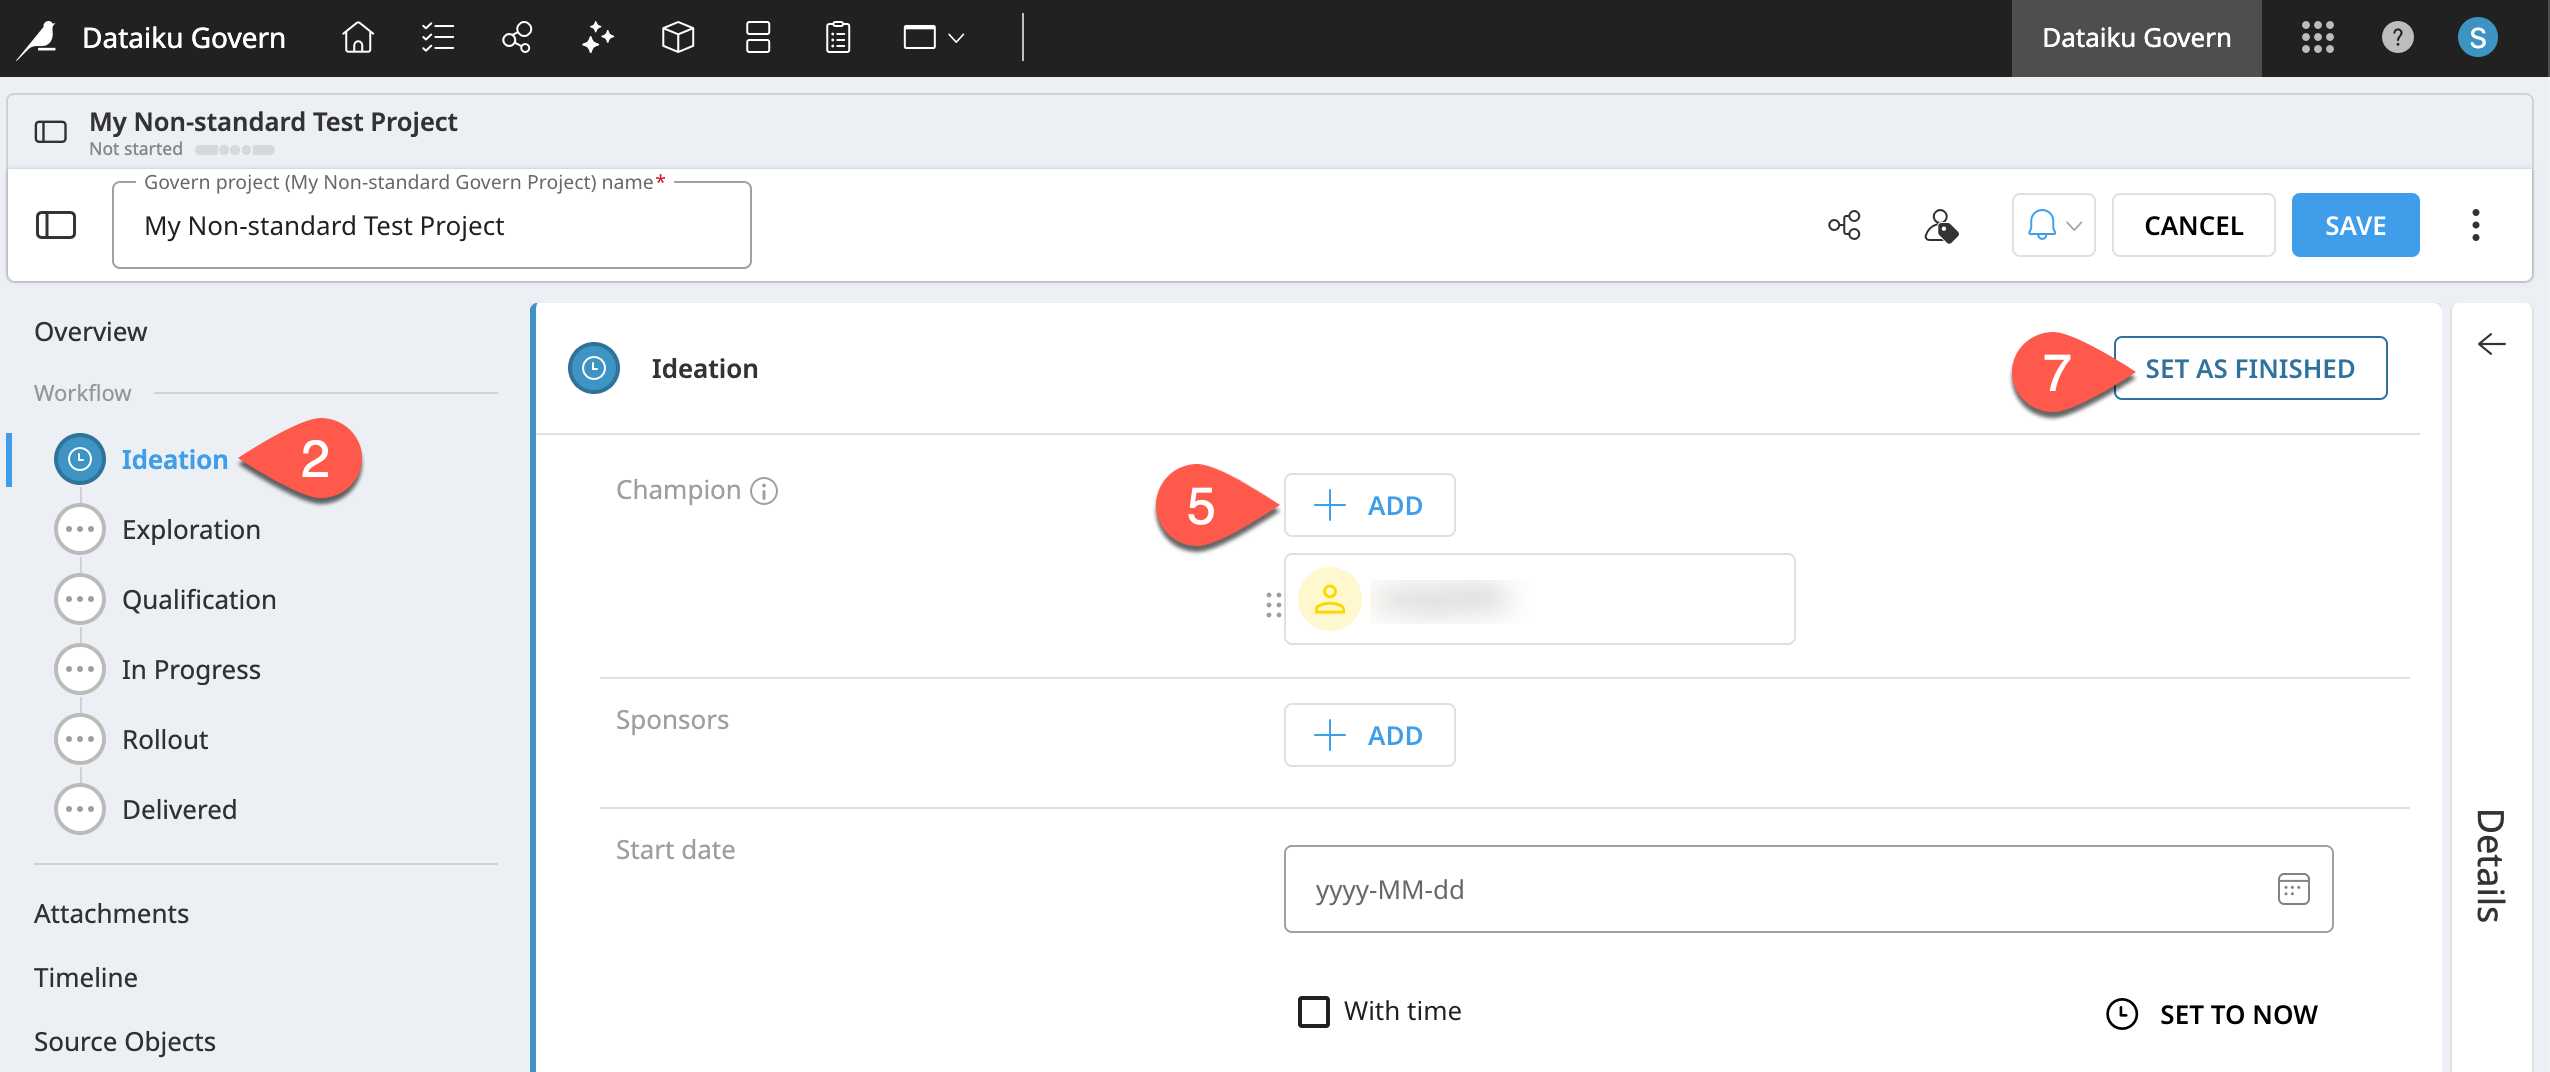
Click Save in the item header to confirm, leaving the Exploration stage in progress.
Design a sign-off for a workflow step#
As you saw in Tutorial | Governance lifecycle, Govern bundles and Govern model versions are two items that, according to the Dataiku Standard template, include a sign-off.
The Blueprint Designer enables you to add such sign-offs into the workflow of any item.
Add a sign-off to a workflow step#
Your organization may want to use the Govern node to pre-qualify new Dataiku projects. With that goal in mind, add a sign-off to the Qualification step of your Govern project’s blueprint version. For simplicity, set yourself as the approver.
Return to the General panel of your blueprint version of a Govern project.
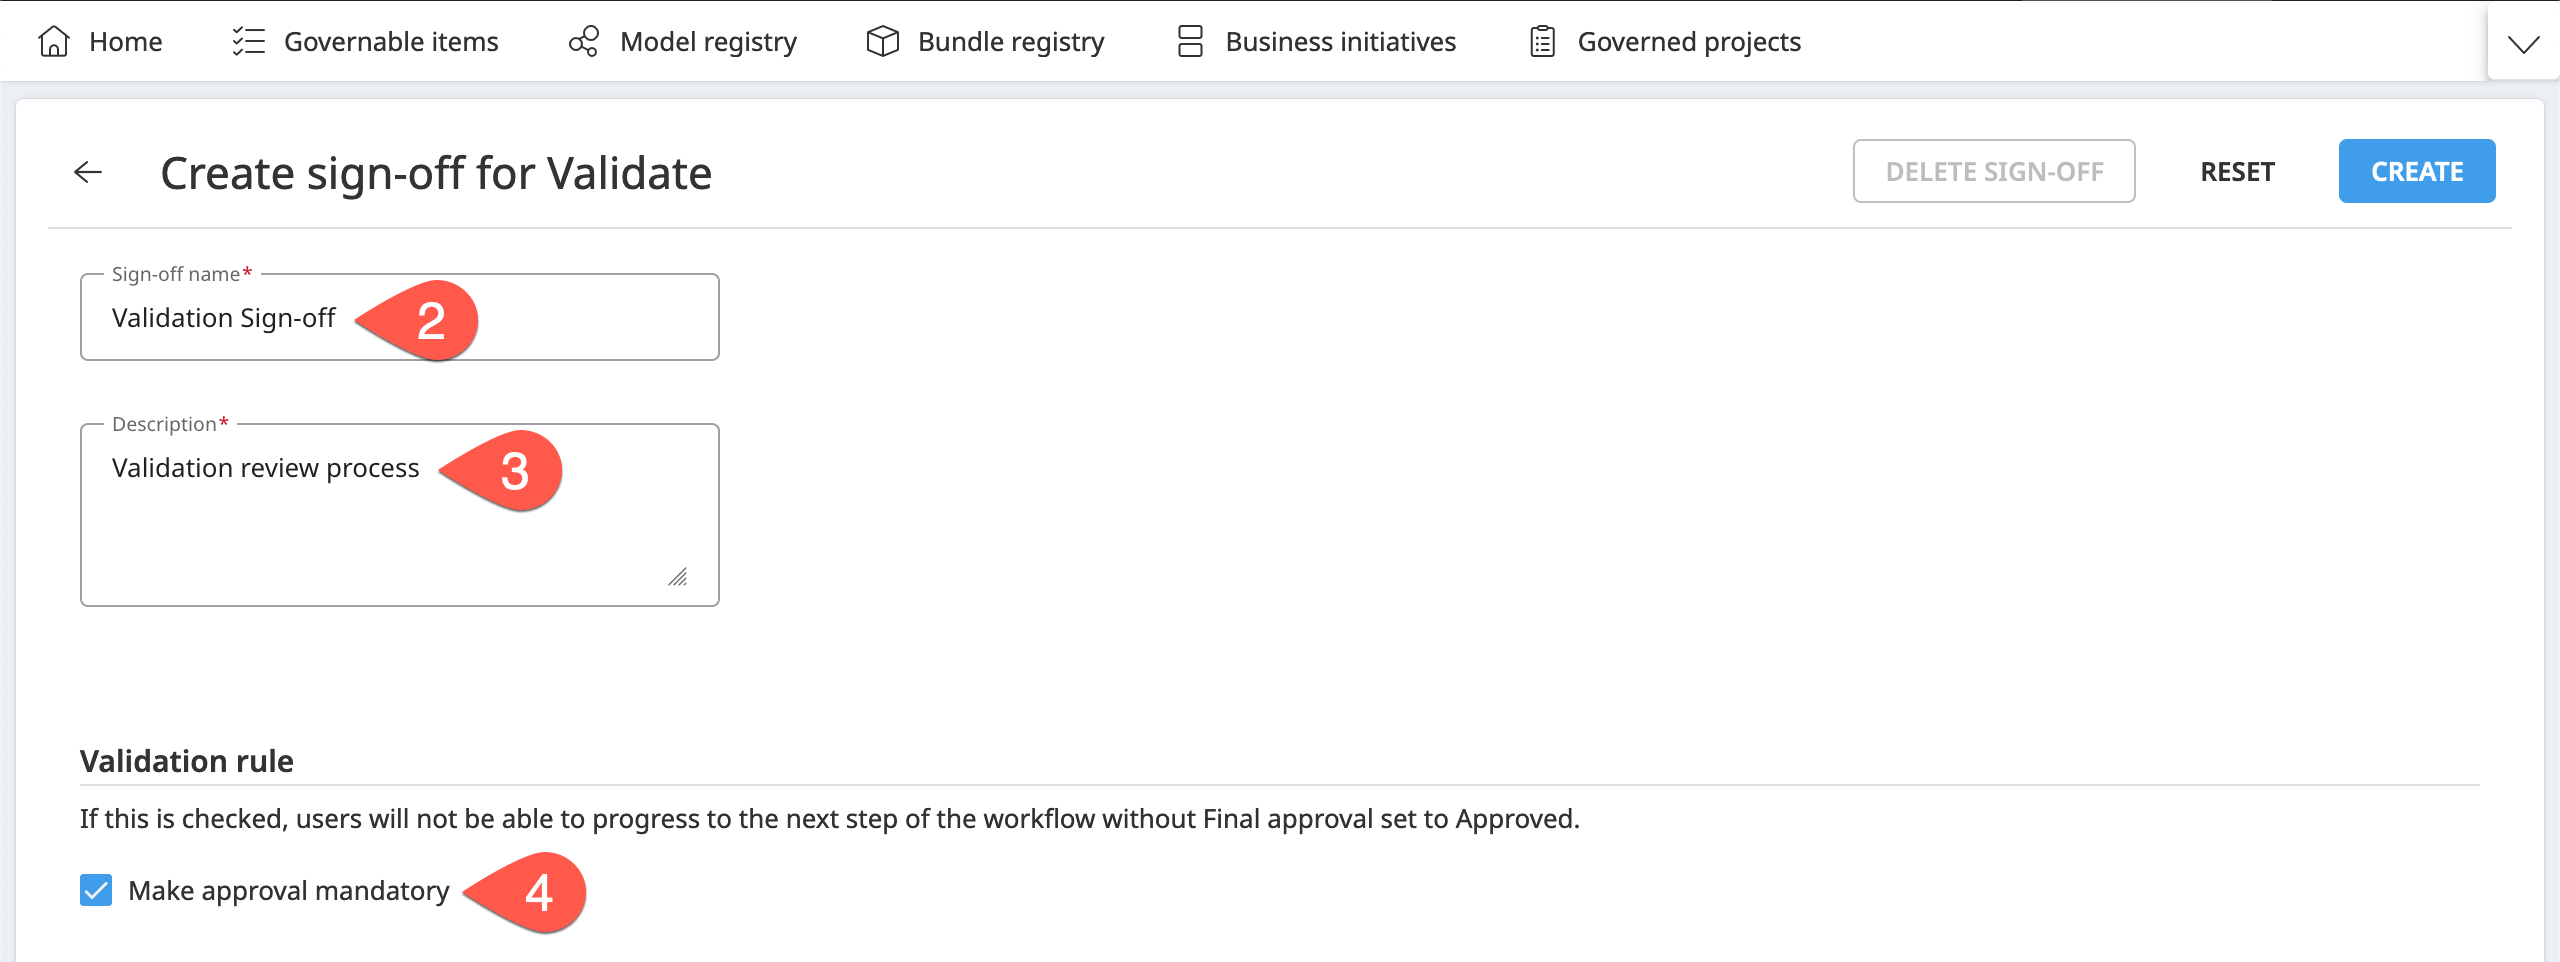
For the Qualification step, click Create Sign-off.
Name it
Qualification Sign-off.Copy-paste the following description:
Before you can create a Dataiku project, you must first receive an approval in the Qualification step.
Confirm that the box to Make approval mandatory is already selected.
Under Final approver, check the box for Users, and select yourself.
In the sign-off header, click Create.
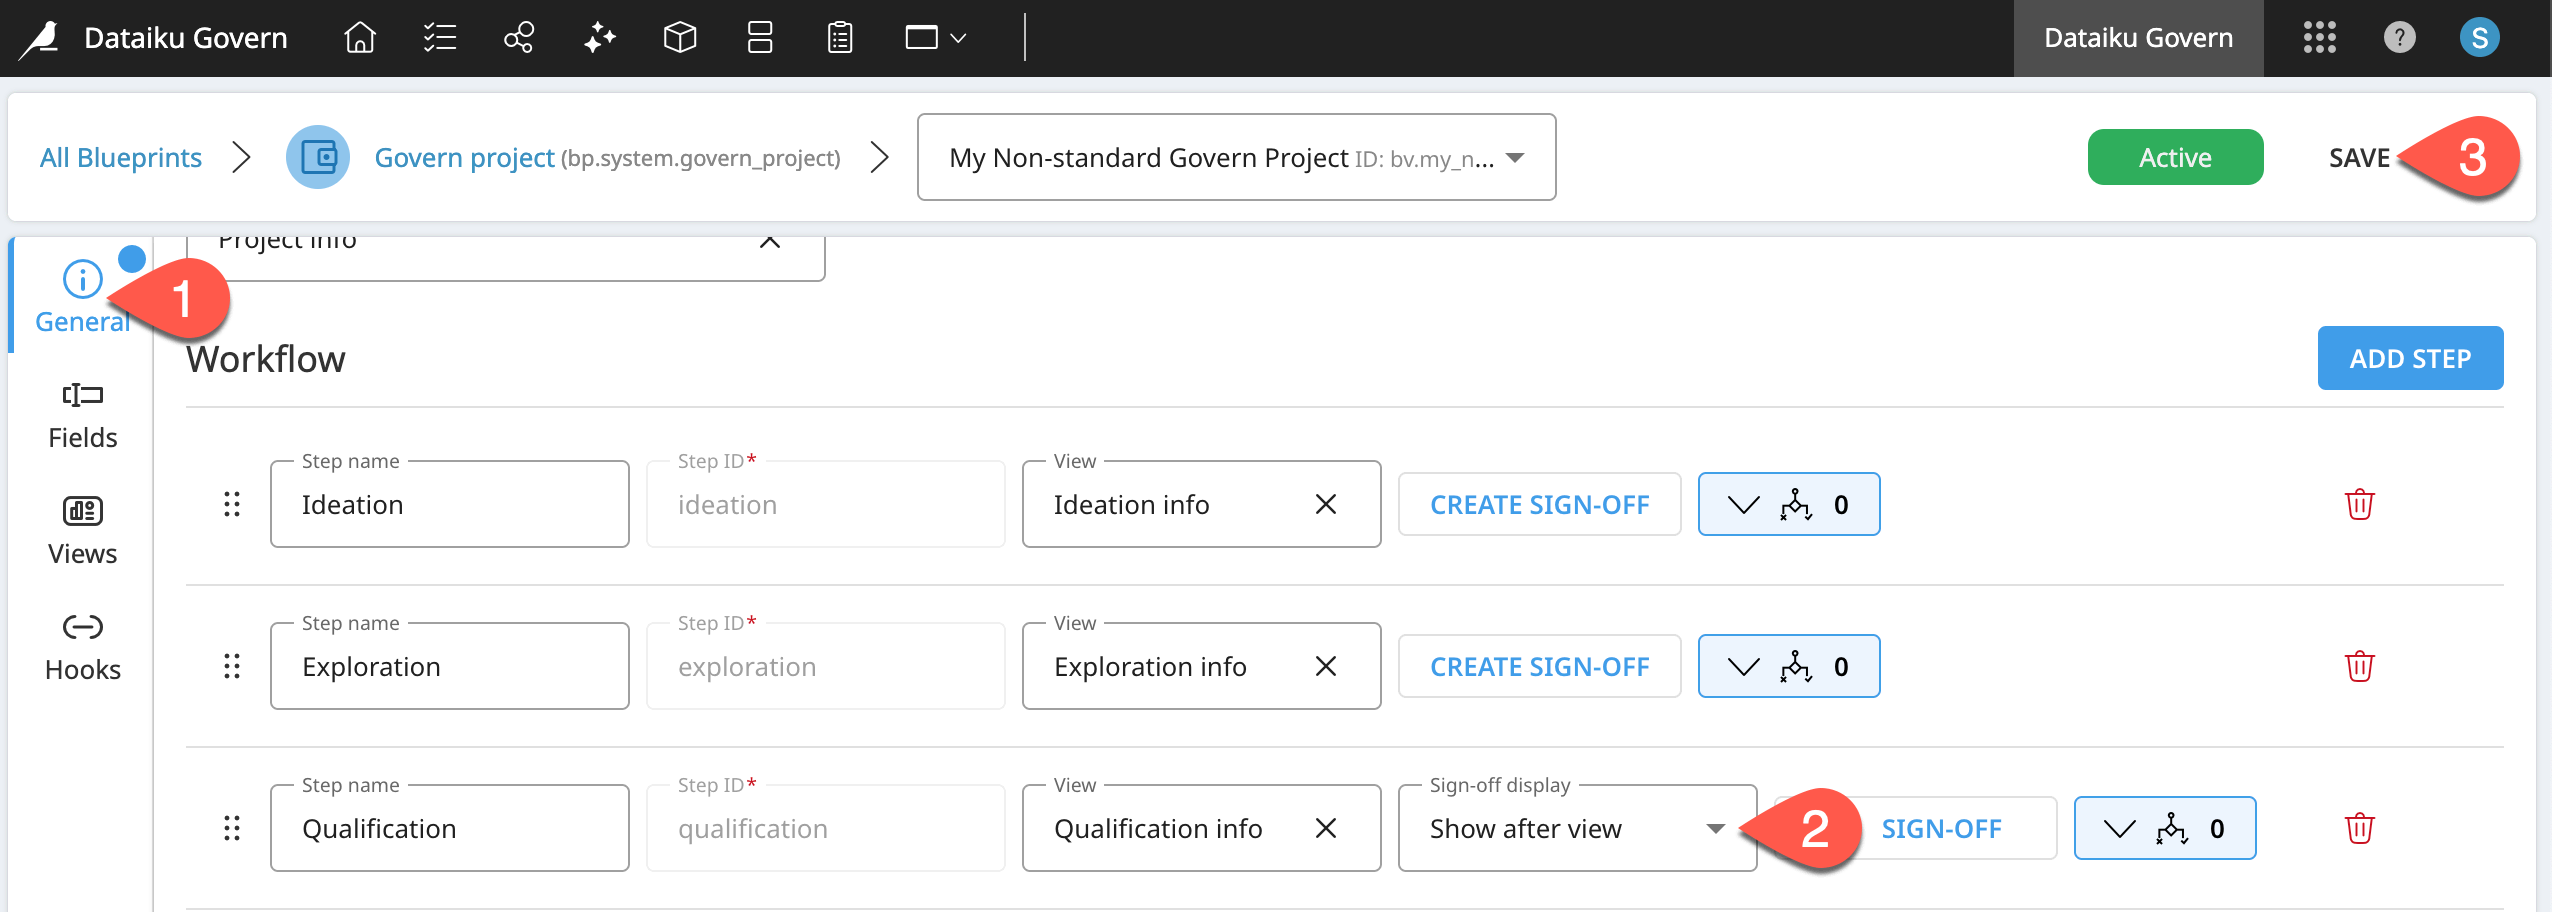
Place the sign-off after the step’s existing view so that the reviewer can examine the various ratings and comments attached to the step before submitting a review.
Click the back arrow to return to the General panel of your blueprint version.
Set the sign-off display of the Qualification step to Show after view.
In the header of your blueprint version, click Save, and Save again to confirm.
Walk through a custom sign-off#
Now that you’ve added the sign-off, you can update the step in the project, and then test it out like any other sign-off.
Refresh your Govern project.
In the item header of your Govern project, click Edit.
For the Exploration step, click Set as Finished to advance to the Qualification step.
Click Save to confirm the completion of the Exploration step.
In the Qualification step, click Update Step.
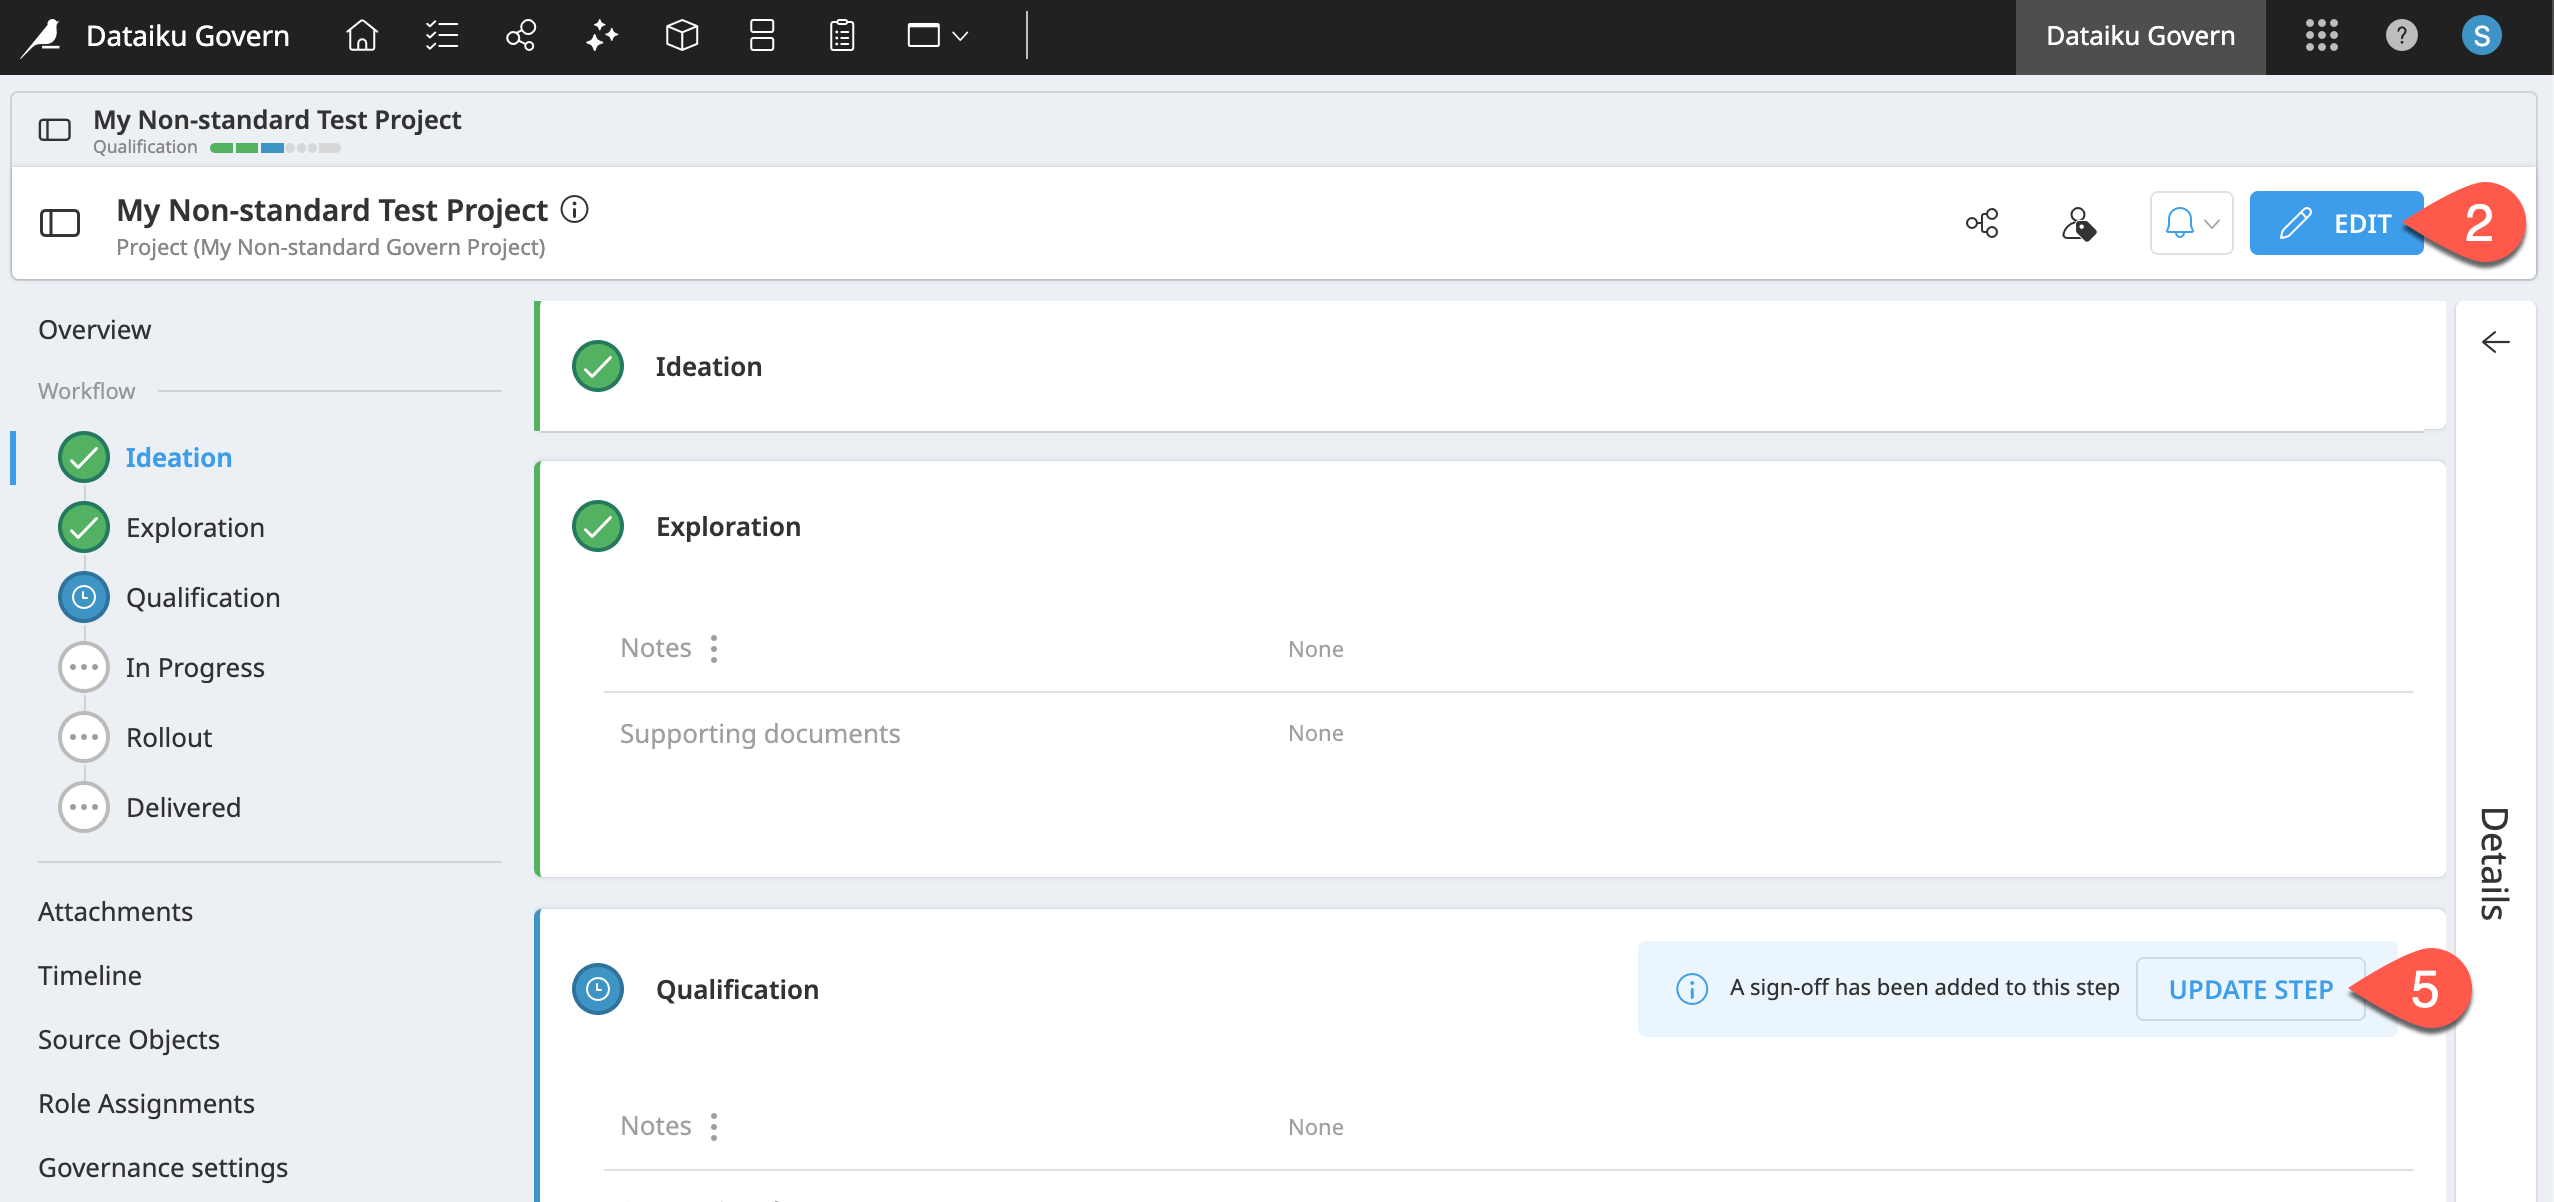
You should now be able to proceed through the sign-off process.
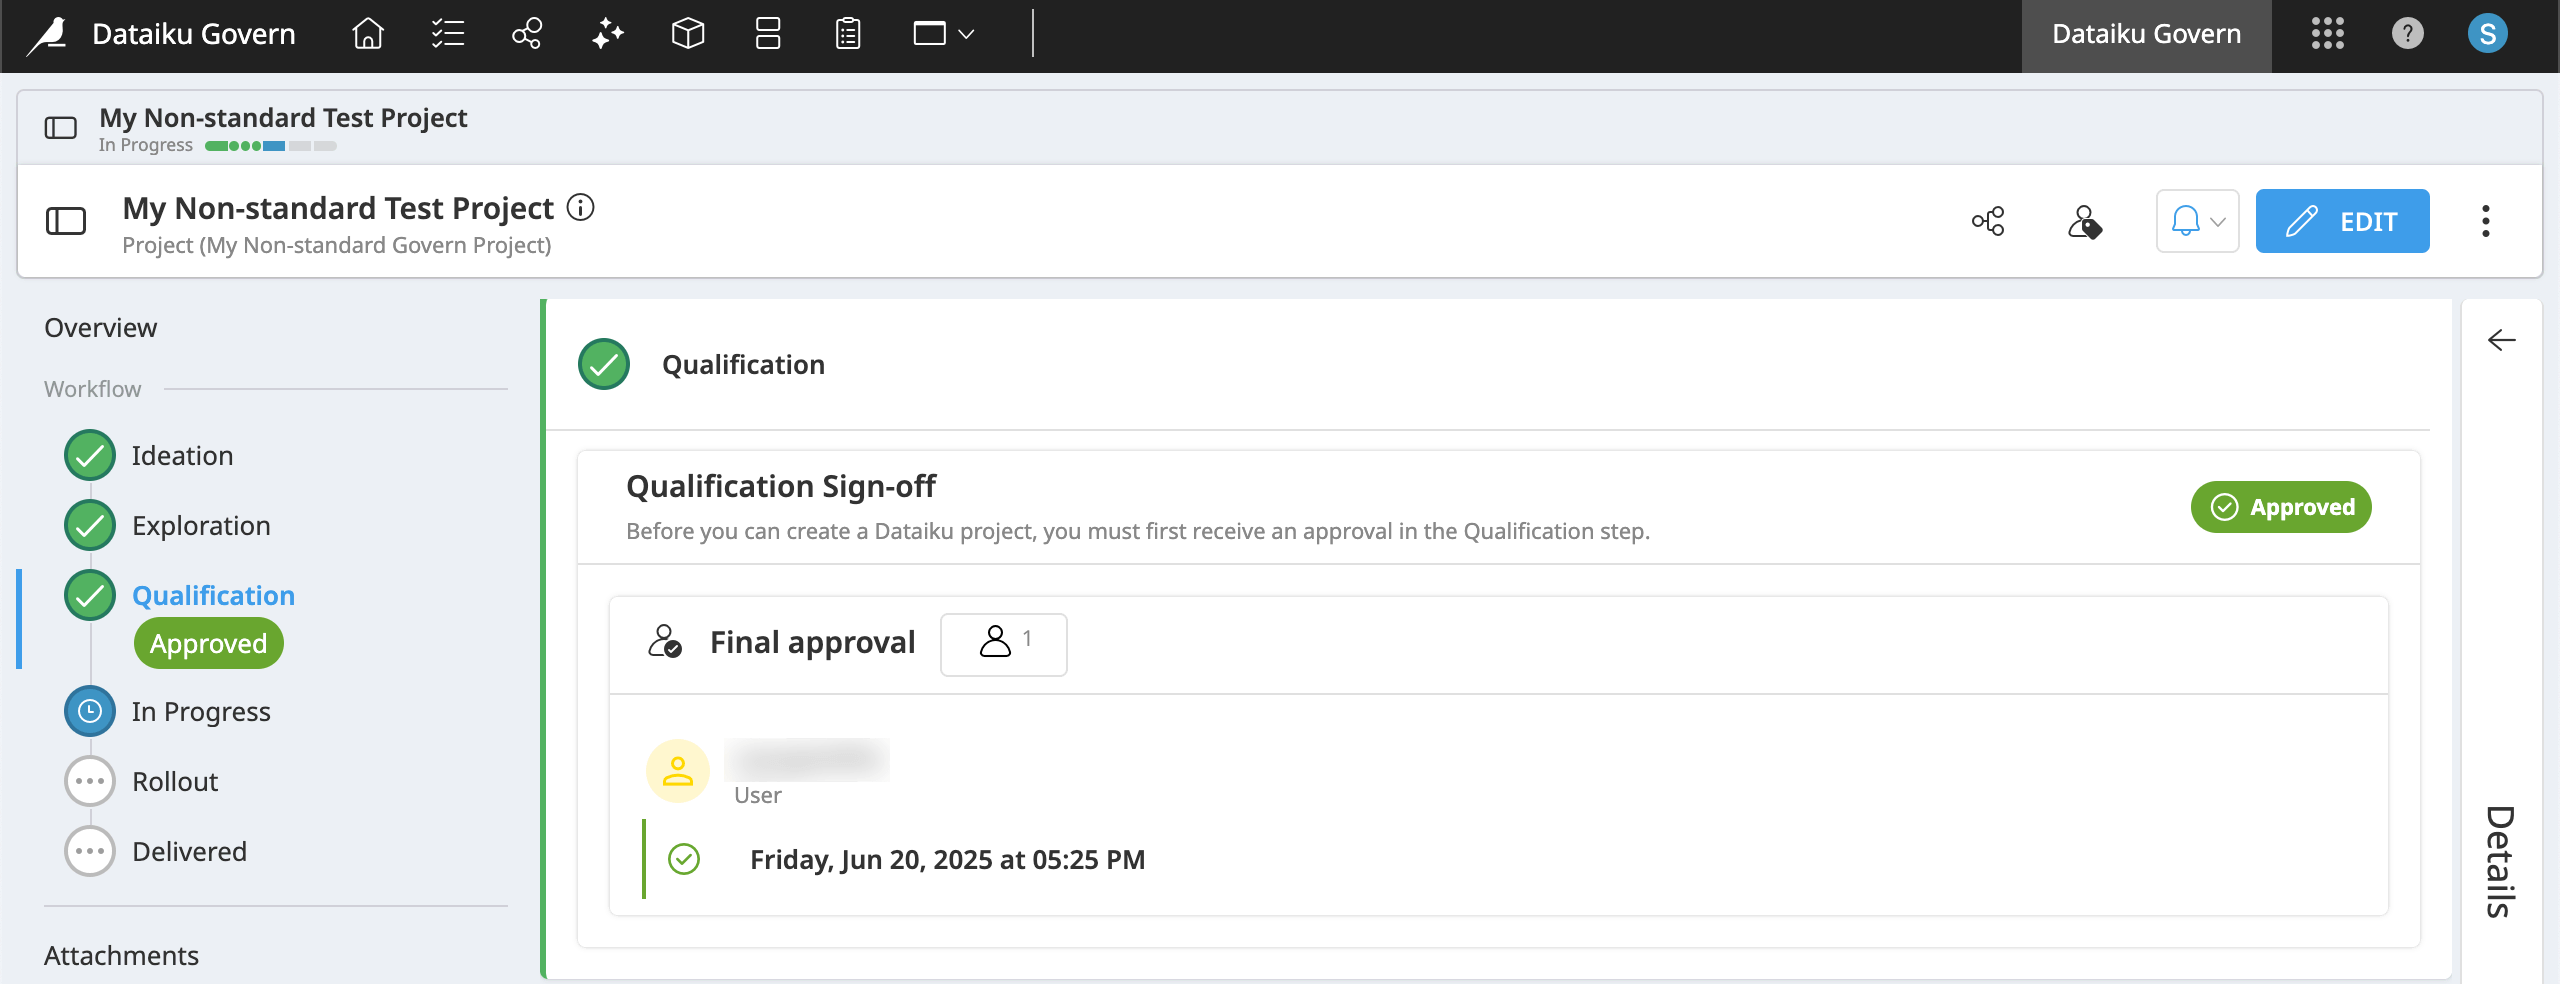
In the Qualification step, click Request Final Approval to start the sign-off process.
In the request approval dialog, click Request Final Approval to notify all users (you).
As the step is now waiting for approval, click Review.
In the review dialog, set the status to Approved.
Then click Submit Review.
In the item header of your governed project, click Edit.
Click Set as Finished on the Qualification step, advancing to the In Progress step.
Click Save to confirm your progress.
Tip
Your Govern project is now qualified, but it doesn’t yet have an associated Dataiku project. Return to Tutorial | Governance lifecycle if you’re unsure how to do that!
Next steps#
Congratulations! You’ve taken your first steps using the Blueprint Designer to customize the templates of Govern items. Depending on your objectives, your next step might be to use the Blueprint Designer to create entirely new kinds of items.
Before you finish, take a moment to delete work that you no longer need as a courtesy to those sharing your Govern node.
From the Governed projects (
) page, open the project using your blueprint version. From the vertical dots () menu, click Delete Govern Project, and confirm.From the Blueprint Designer, select your Non-standard Govern project blueprint version. From the vertical dots (
) menu, click Delete, and confirm.
See also
To explore all of the Blueprint Designer’s capabilities, consult the reference documentation on Build Custom Governance templates.