
Quick Start | Dataiku for MLOps#
Get started#
Are you interested in using Dataiku to deploy projects, models, and agents into production environments? Automate your data pipelines? You’re in the right place!
Create an account#
To follow along with the steps in this tutorial, you need access to a 12.6+ Dataiku instance. If you don’t already have access, you can get started in one of two ways:
Follow the link above to start a 14 day free trial. See How-to | Begin a free trial from Dataiku for help if needed.
The locally installed free edition isn’t fully compatible.
Open Dataiku#
The first step is getting to the homepage of your Dataiku Design node.
Go to the Launchpad.
Within the Overview panel, click Open Instance in the Design node tile once your instance has powered up.
Important
If using a self-managed version of Dataiku, open the Dataiku Design node directly in your browser.
Once you are on the Design node homepage, you can create the tutorial project.
Create the project#
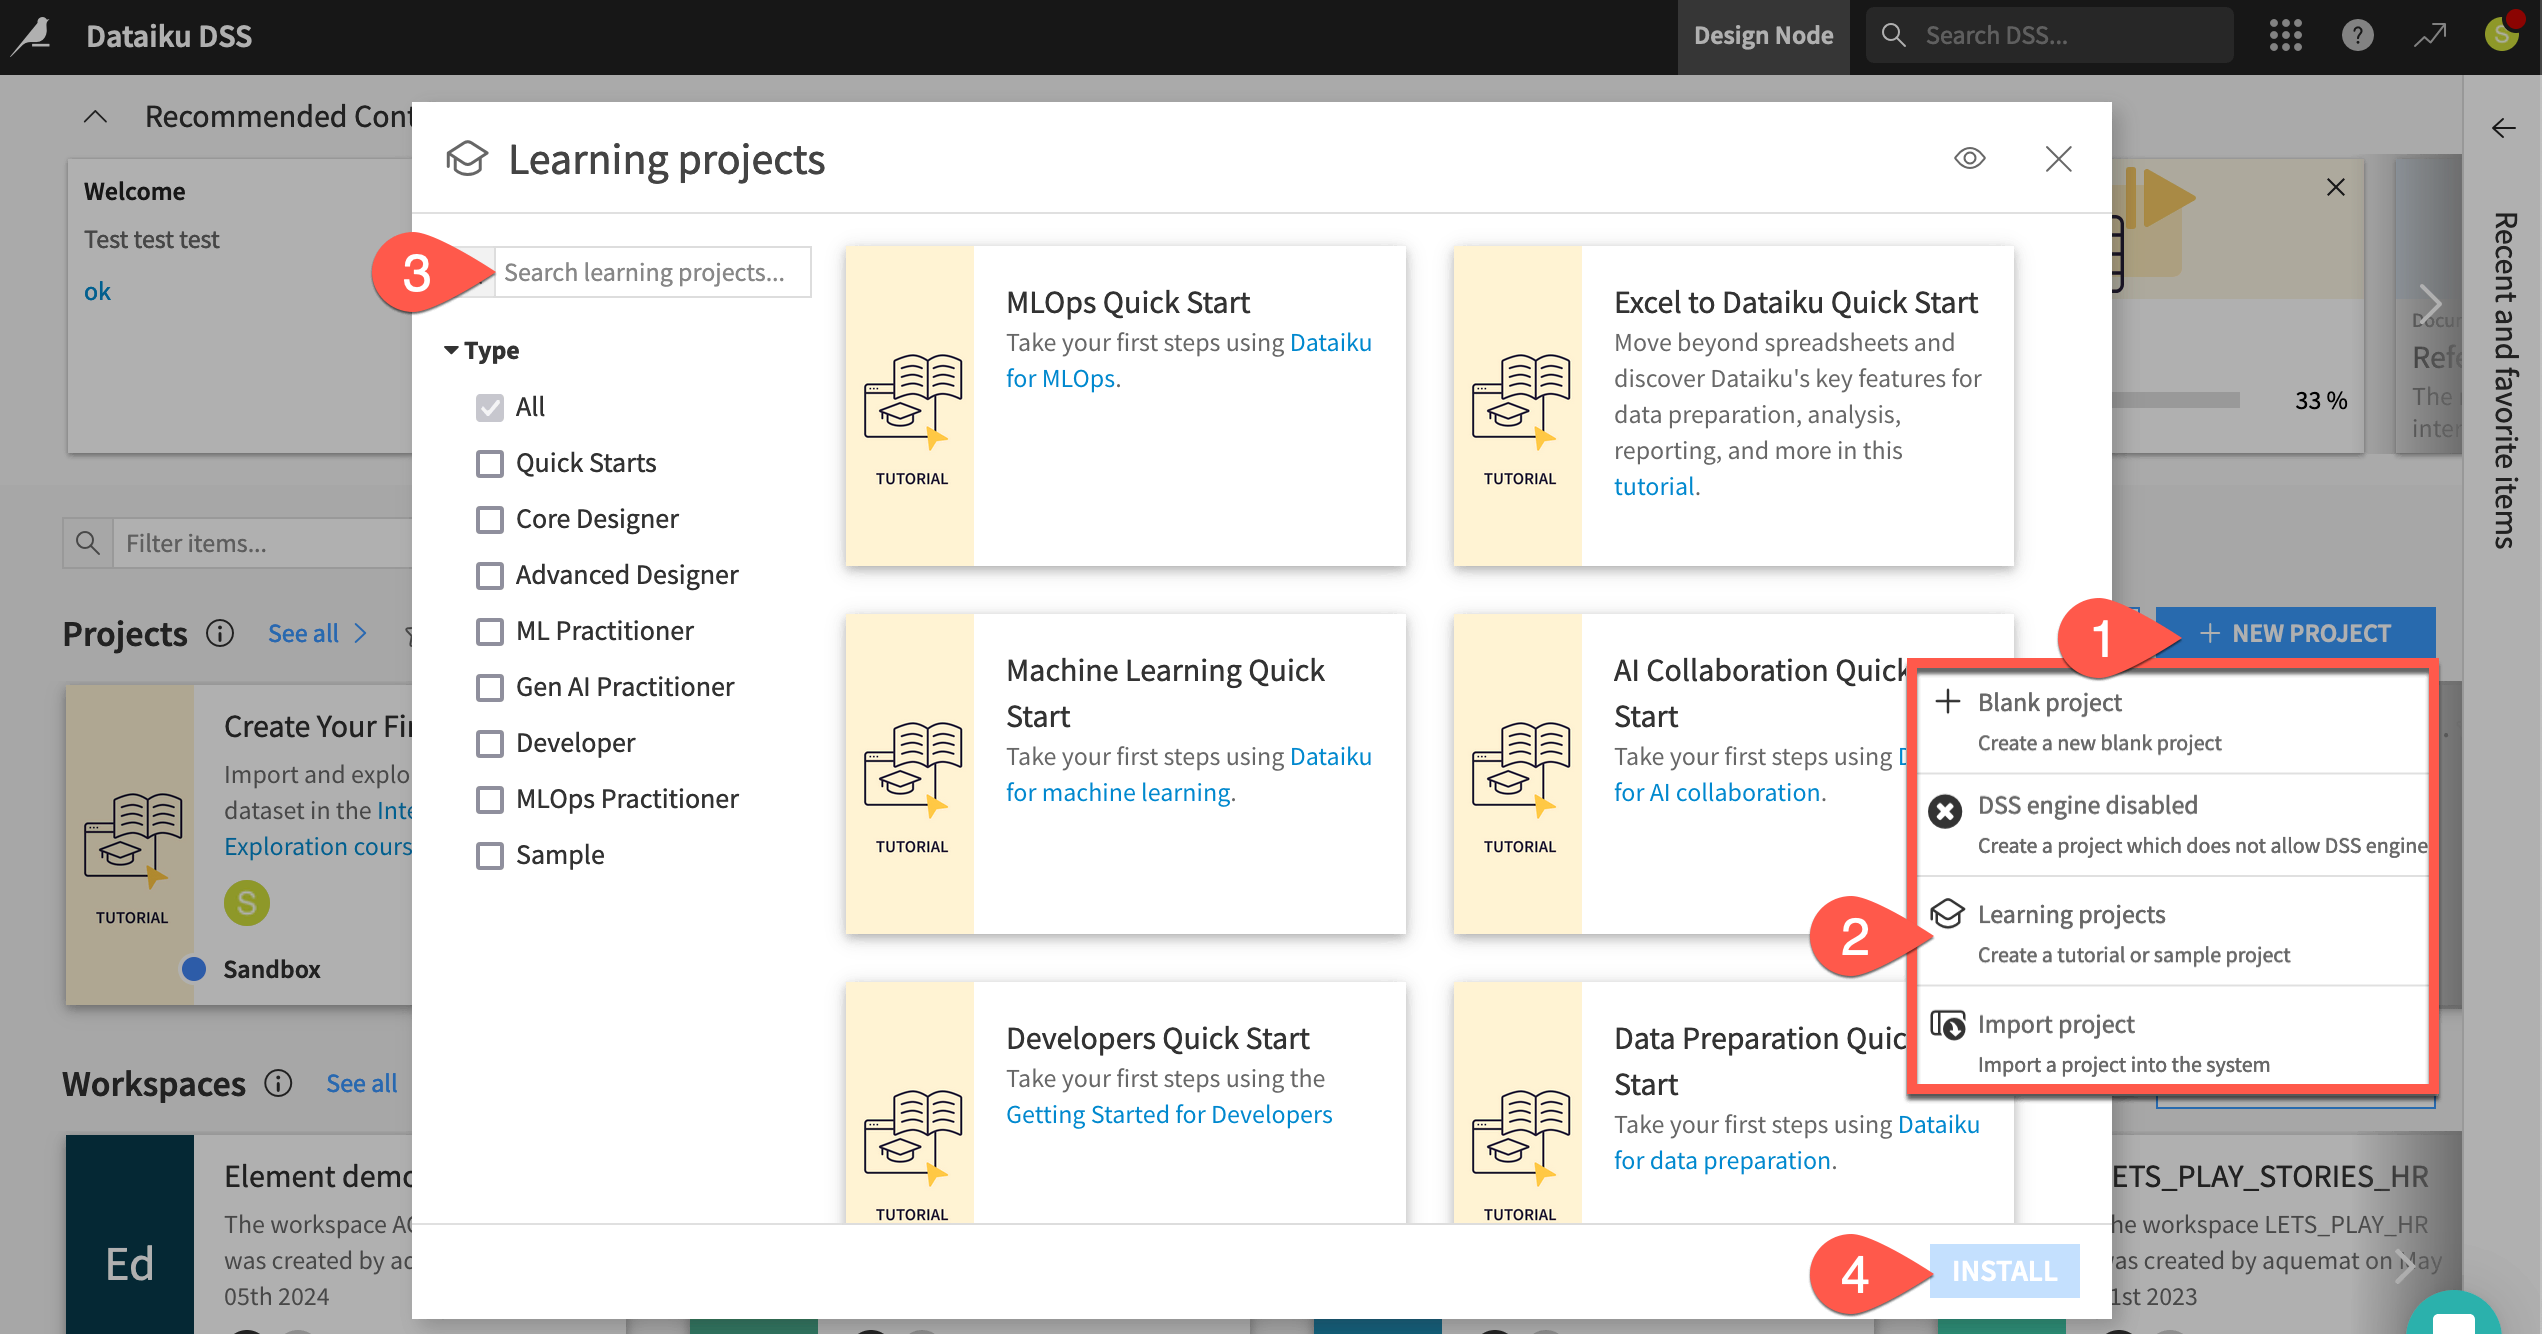
From the Dataiku Design homepage, click + New Project.
Select Learning projects.
Search for and select MLOps Quick Start.
If needed, change the folder into which the project will be installed, and click Create.
From the project homepage, click Go to Flow (or type
g+f).
Note
You can also download the starter project from this website and import it as a ZIP file.
Understand the project#
See a screencast covering this section’s steps.
Before rushing to deployment, take a moment to understand the goals for this quick start and the data at hand.
Objectives#
In this quick start, you’ll:
Create an API endpoint from a prediction model.
Deploy a version of the API endpoint to a production environment.
Automate the building of a data pipeline.
Tip
To check your work, you can review a completed version of this entire project from data preparation through MLOps on the Dataiku gallery.
Review the Flow#
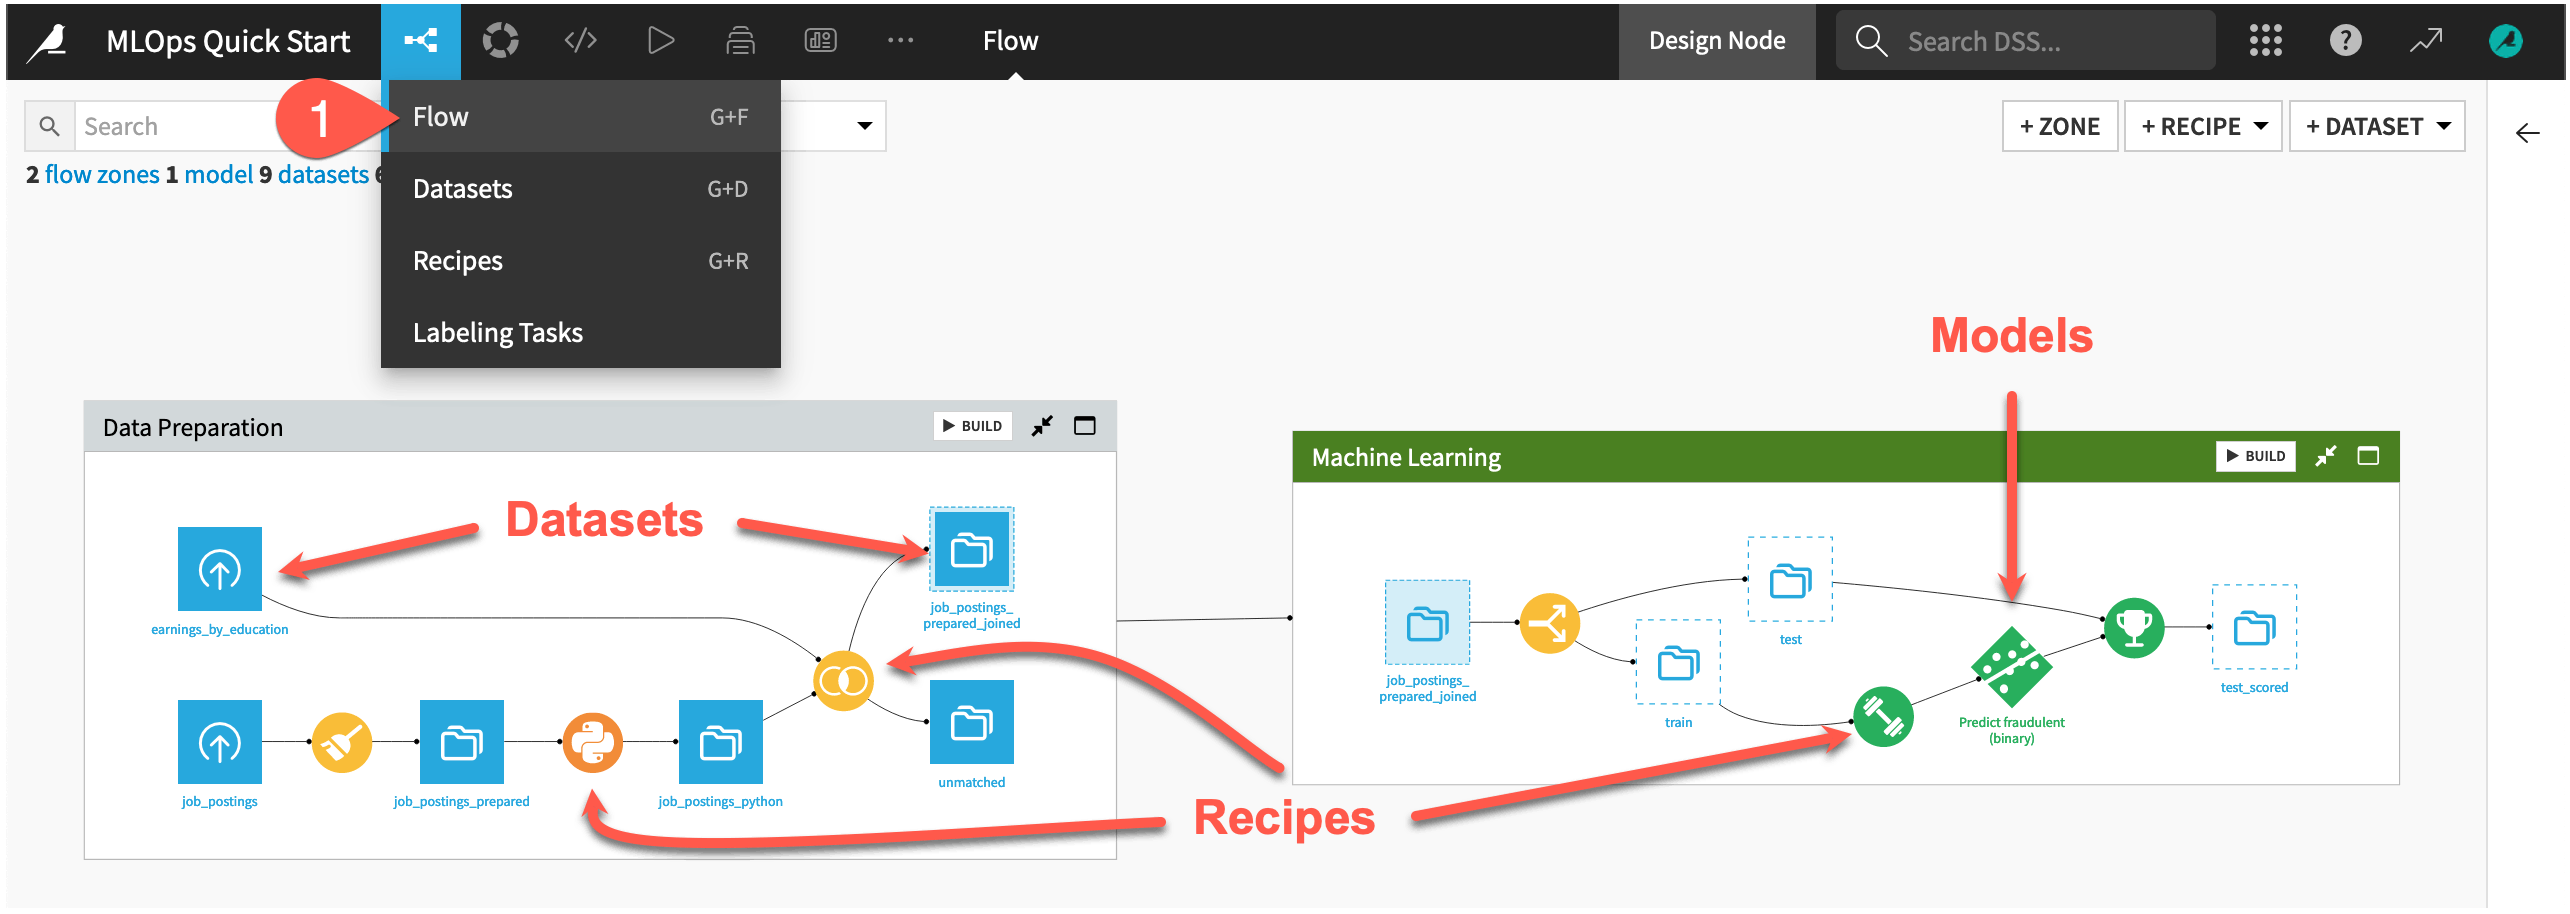
One of the first concepts a user needs to understand about Dataiku is the Flow. The Flow is the visual representation of how datasets, recipes (steps for data transformation), models, and agents work together to move data through an analytics pipeline.
Dataiku has its own visual grammar to organize AI and analytics projects in a collaborative way.
Shape |
Item |
Icon |
|---|---|---|

|
Dataset |
The icon on the square represents the dataset’s storage location, such as Amazon S3, Snowflake, PostgreSQL, etc. |

|
Recipe |
The icon on the circle represents the type of data transformation, such as a broom for a Prepare recipe or coiled snakes for a Python recipe. |

|
Model or Agent |
The icon on a diamond represents the type of modeling task (such as prediction, clustering, time series forecasting, etc.) or the type of agent (such as visual or code). |
Tip
In addition to shape, color has meaning too.
Datasets and folders are blue. Those shared from other projects are black.
Visual recipes are yellow.
Code elements are orange.
Machine learning elements are green.
Generative AI and agent elements are pink.
Plugins are often red.
This project begins in the Data Preparation Flow zone from a labeled dataset named job_postings composed of 95% real and 5% fake job postings. The pipeline builds a prediction model capable of classifying a job posting as real or fake. Your job will be to deploy the model found in the Machine Learning Flow zone as a real-time API endpoint.
Take a look now!
If not already there, from the (
 ) menu in the top navigation bar, select the Flow (or use the keyboard shortcut
 g+f).Starting from job_postings at the far left, review the objects in the Flow. Gain a high-level understanding of how the recipes first prepare, join, and split the data, then train a model, and finally use it score new data.
Tip
There are many other keyboard shortcuts! Type ? to pull up a menu or see the Accessibility page in the reference documentation.
Build the Flow#
Unlike the initial uploaded datasets, the downstream datasets appear as outlines. This is because you haven’t built them yet. However, this isn’t a problem because the Flow contains the recipes required to create these outputs at any time.
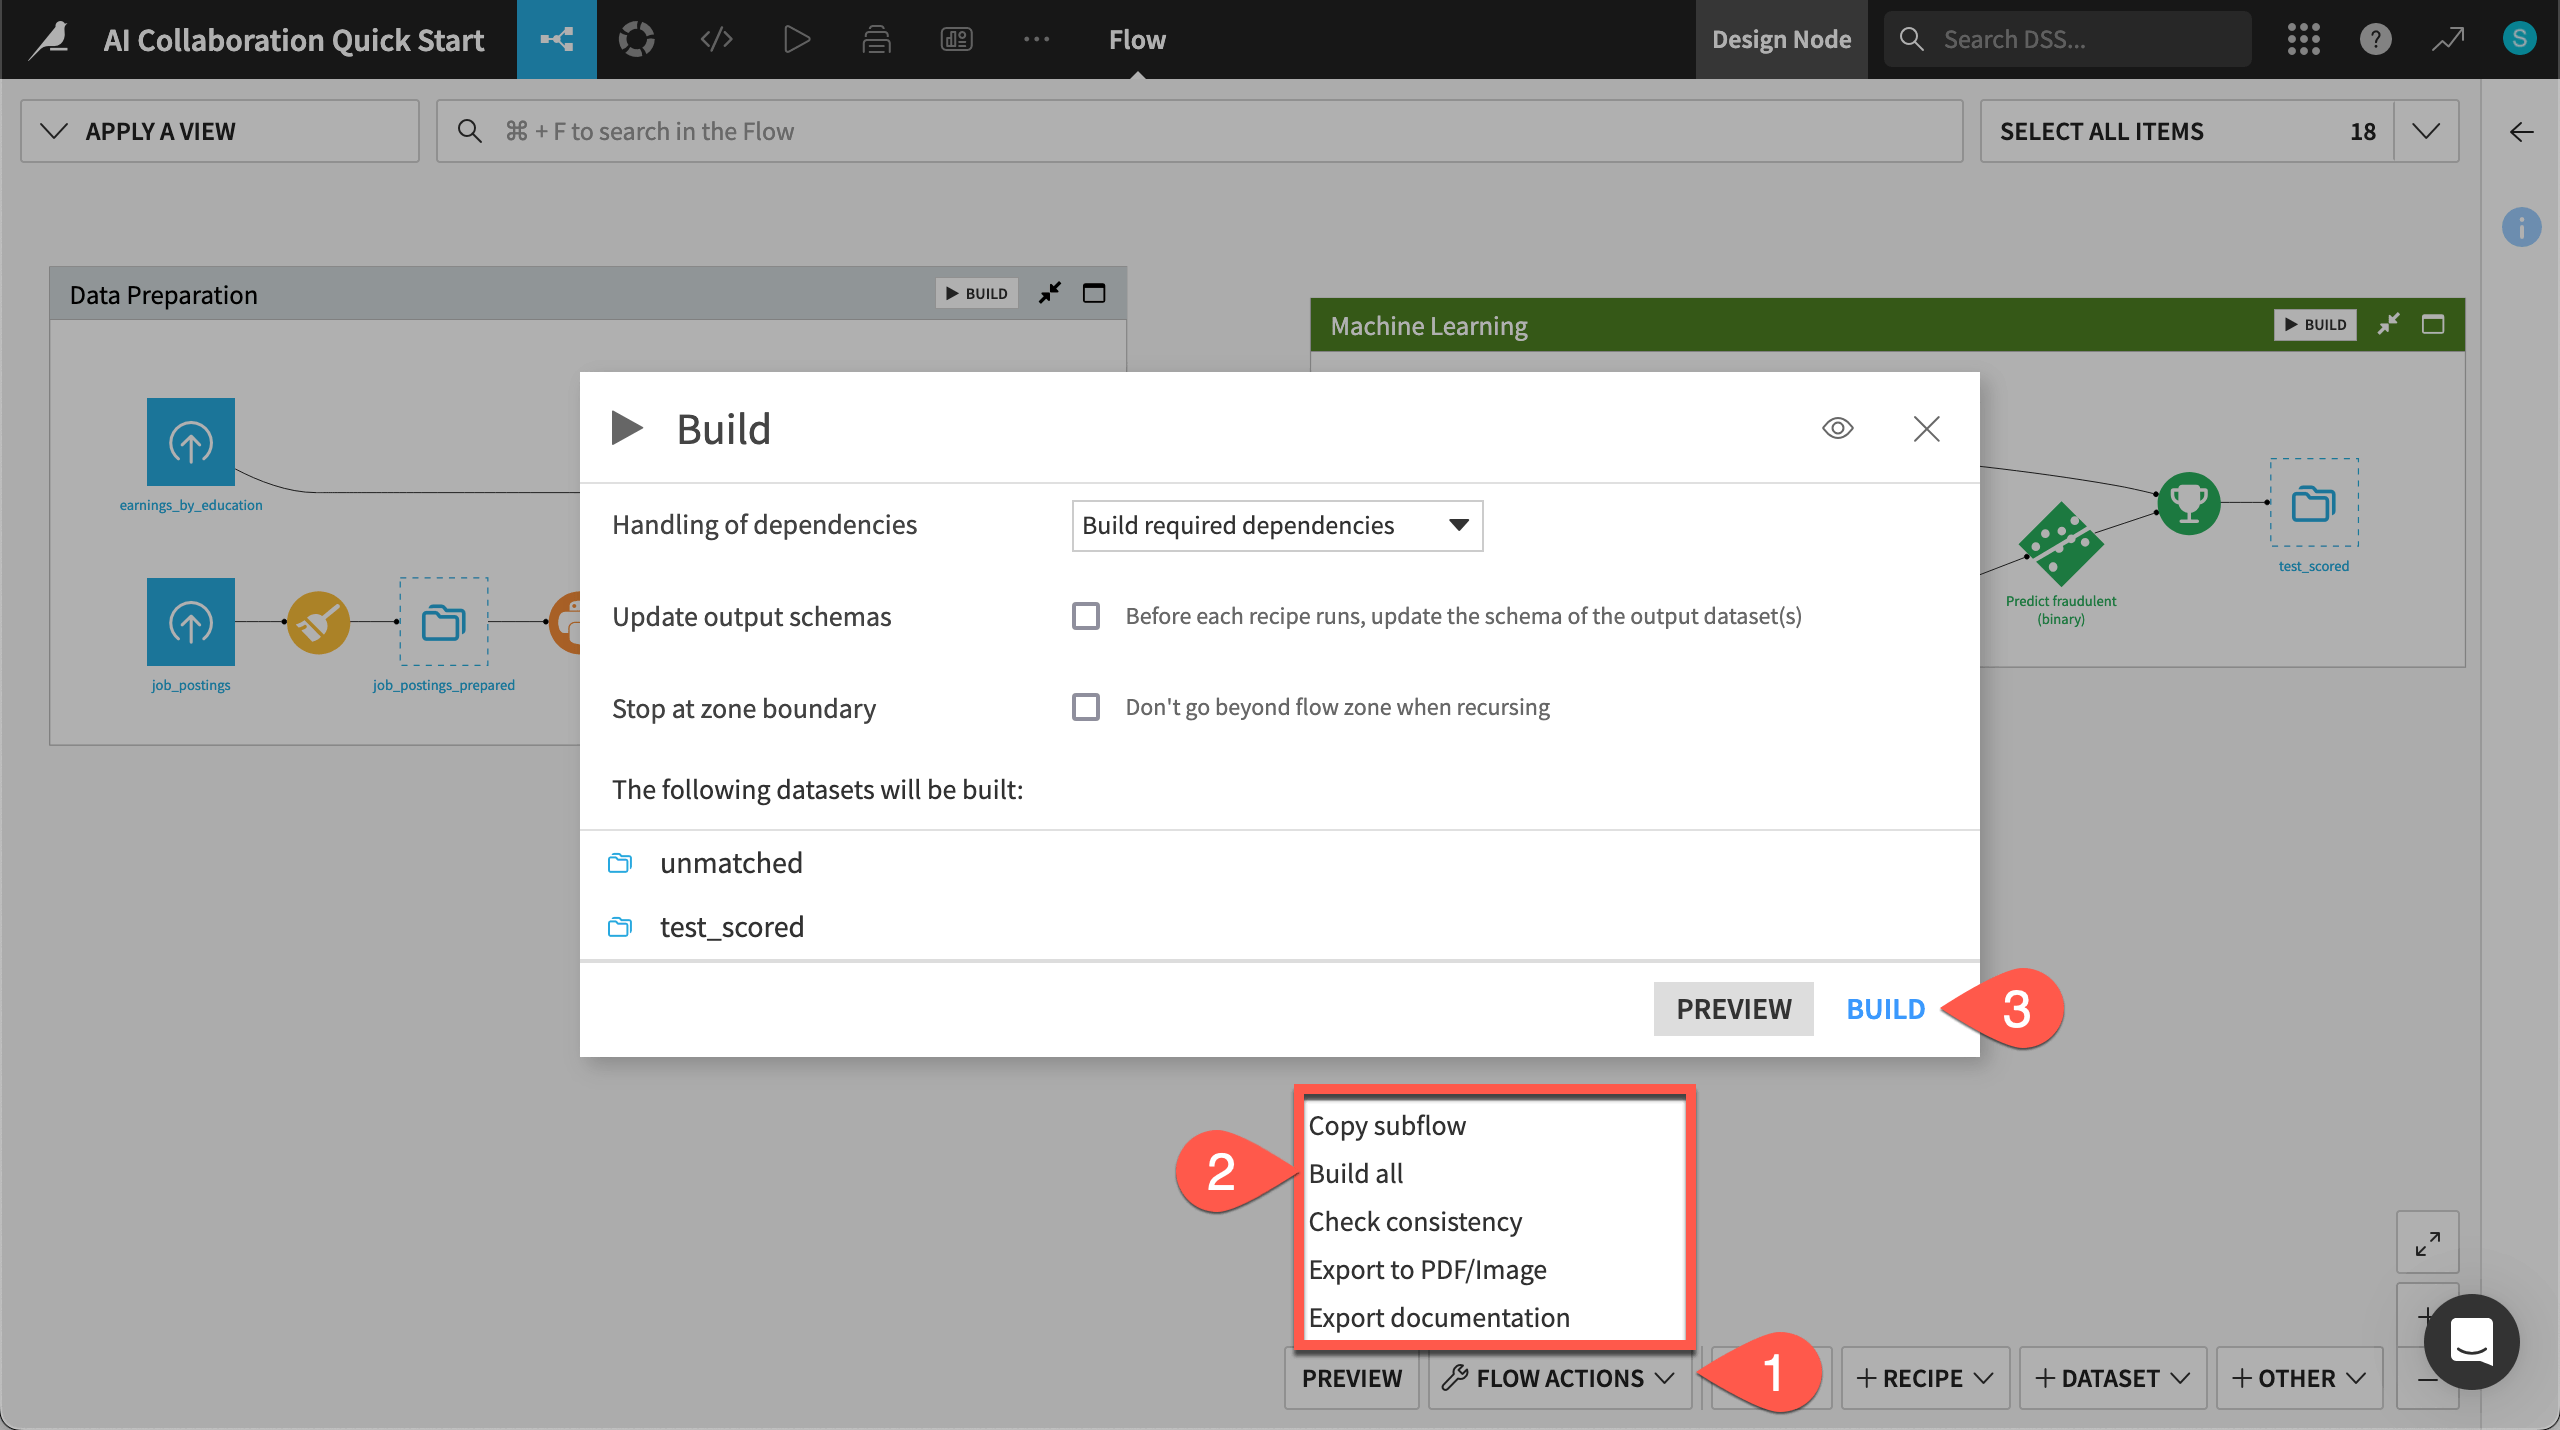
Open the Flow Actions menu.
Click Build all.
Leaving the default options, click Build to run the recipes necessary to create the items furthest downstream.
When the job completes, refresh the page to see the built Flow.
Inspect the saved model#
Take a closer look at the model found in the Flow.
In the Machine Learning Flow zone, double click to open the Predict fraudulent (binary) model (
 ).
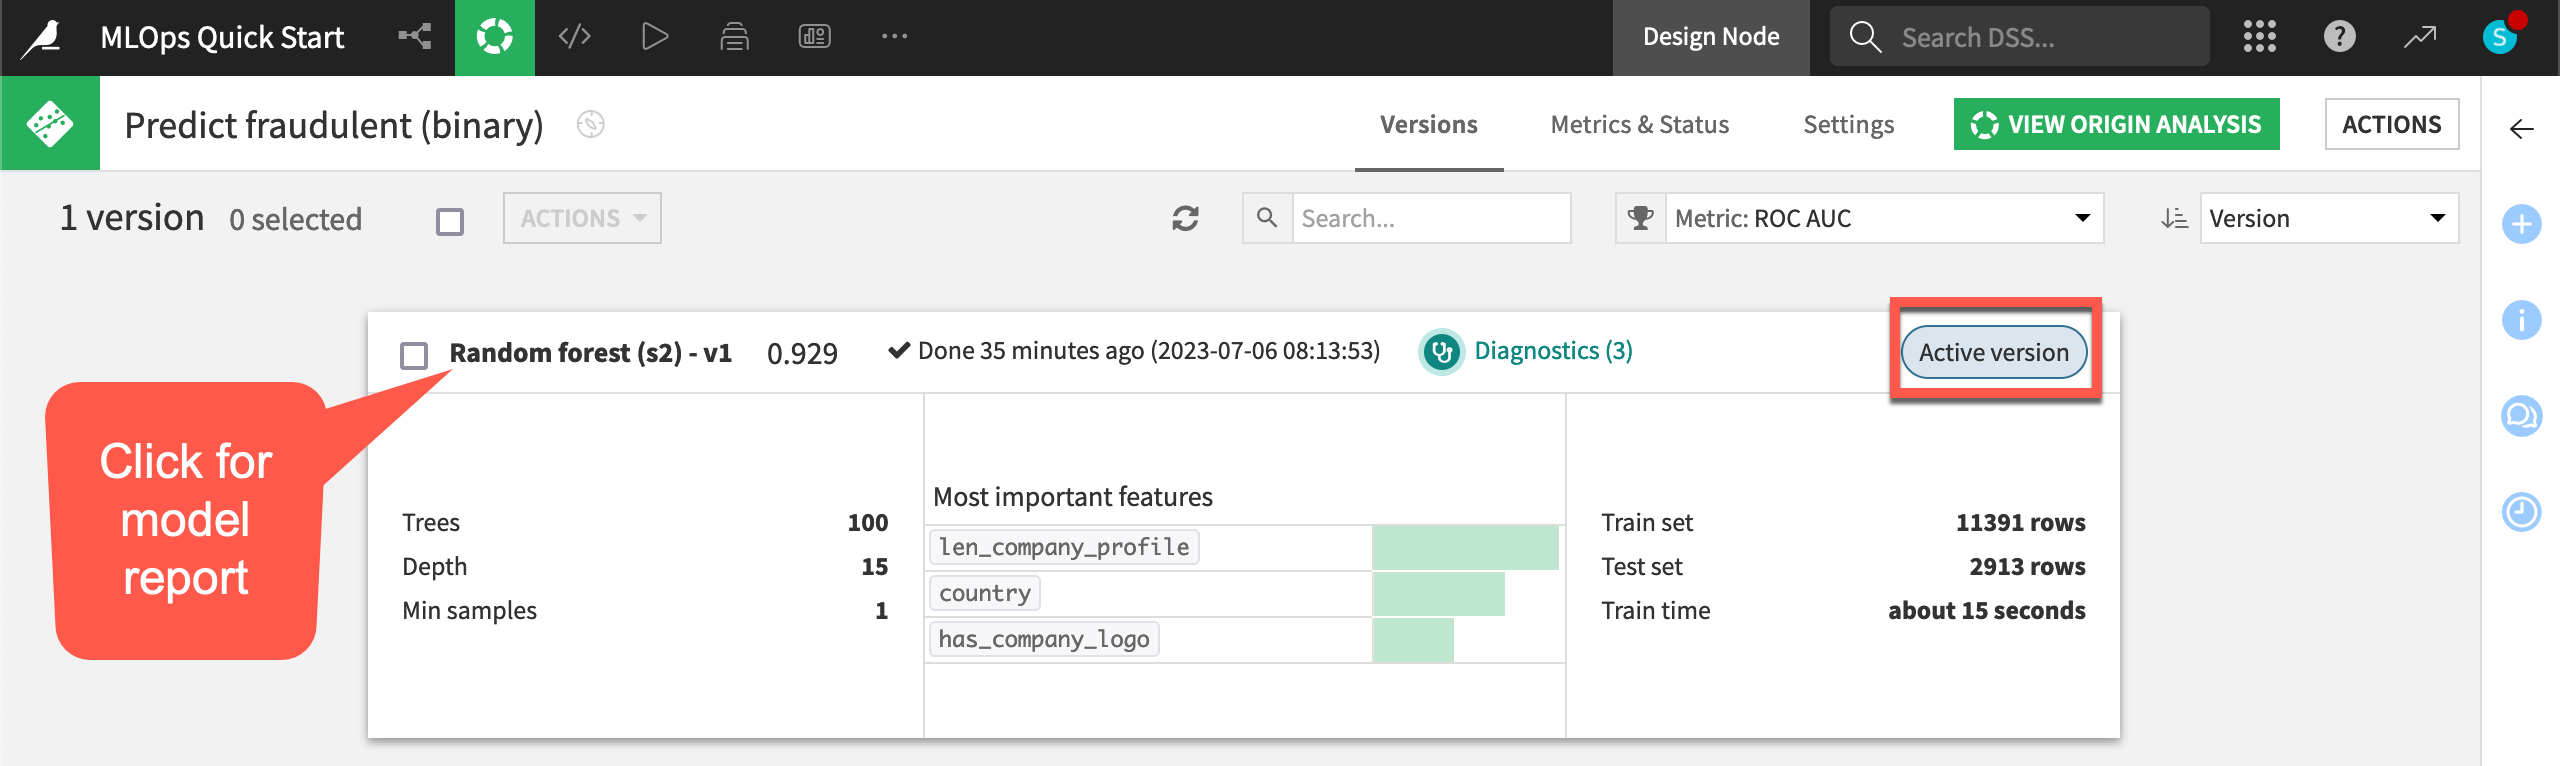
).Note that the model has only one version, and so this version is also the active version. As you retrain the model and deploy new versions, the model object tracks the history of its versions — making it possible to roll back between versions.
Click the model version name Random forest (s2) - v1 to see the full report, including visualizations of its explainability and performance.
Return to the Flow (
g+f) when finished inspecting the model.
Tip
In this case, the project’s builder used Dataiku’s visual AutoML to create the saved model in the Flow. However, it’s also possible to import models packaged with MLflow as saved models into Dataiku. See the reference documentation on MLflow Models to learn more.
See also
To learn more about creating this model, see the Machine Learning Quick Start.
Create an API endpoint#
See a screencast covering this section’s steps.
Dataiku’s architecture for MLOps supports both batch and real-time API scoring frameworks. In this case, let’s implement a real-time API strategy to individually score a new job posting as real or fake.
Create an API service including a prediction endpoint#
The first step is packaging the saved model in the Flow as a prediction endpoint within an API service.
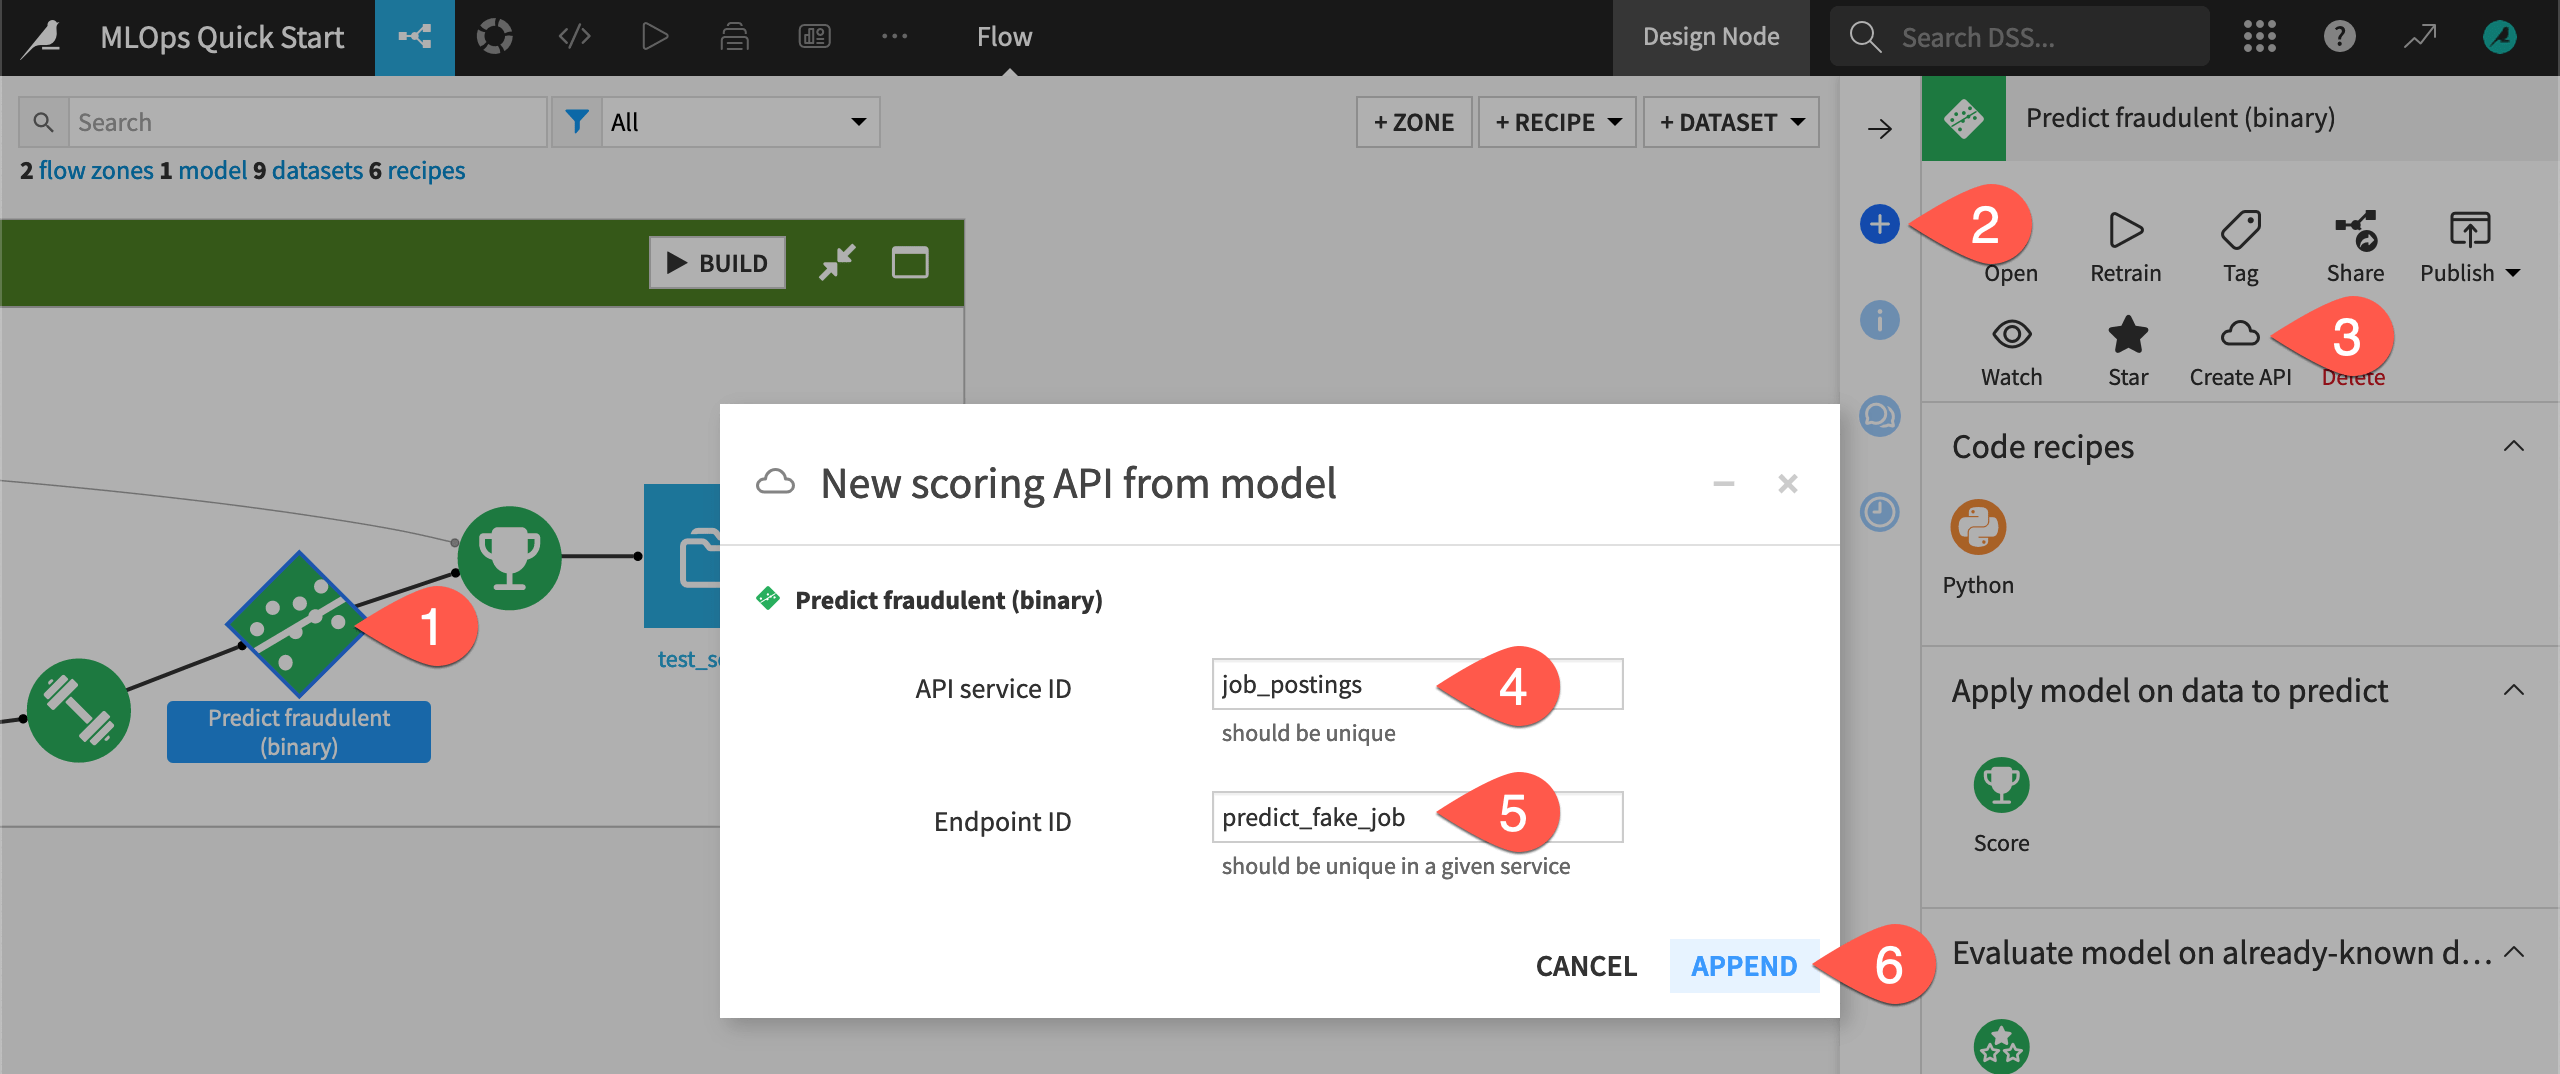
From the Flow, click on the saved model Predict fraudulent (binary) once to select it.
Open the Actions (
 ) tab in the right panel.
Select Create API.
Name the service ID
job_postings.Name the endpoint ID
predict_fake_job.Click Append.
Note
This path was a shortcut to the API Designer found in the top navigation bar’s More Options (![]() ) menu.
) menu.
Add test queries to an API endpoint#
Before deploying, add some test queries to the API endpoint to make sure that it’s working correctly.
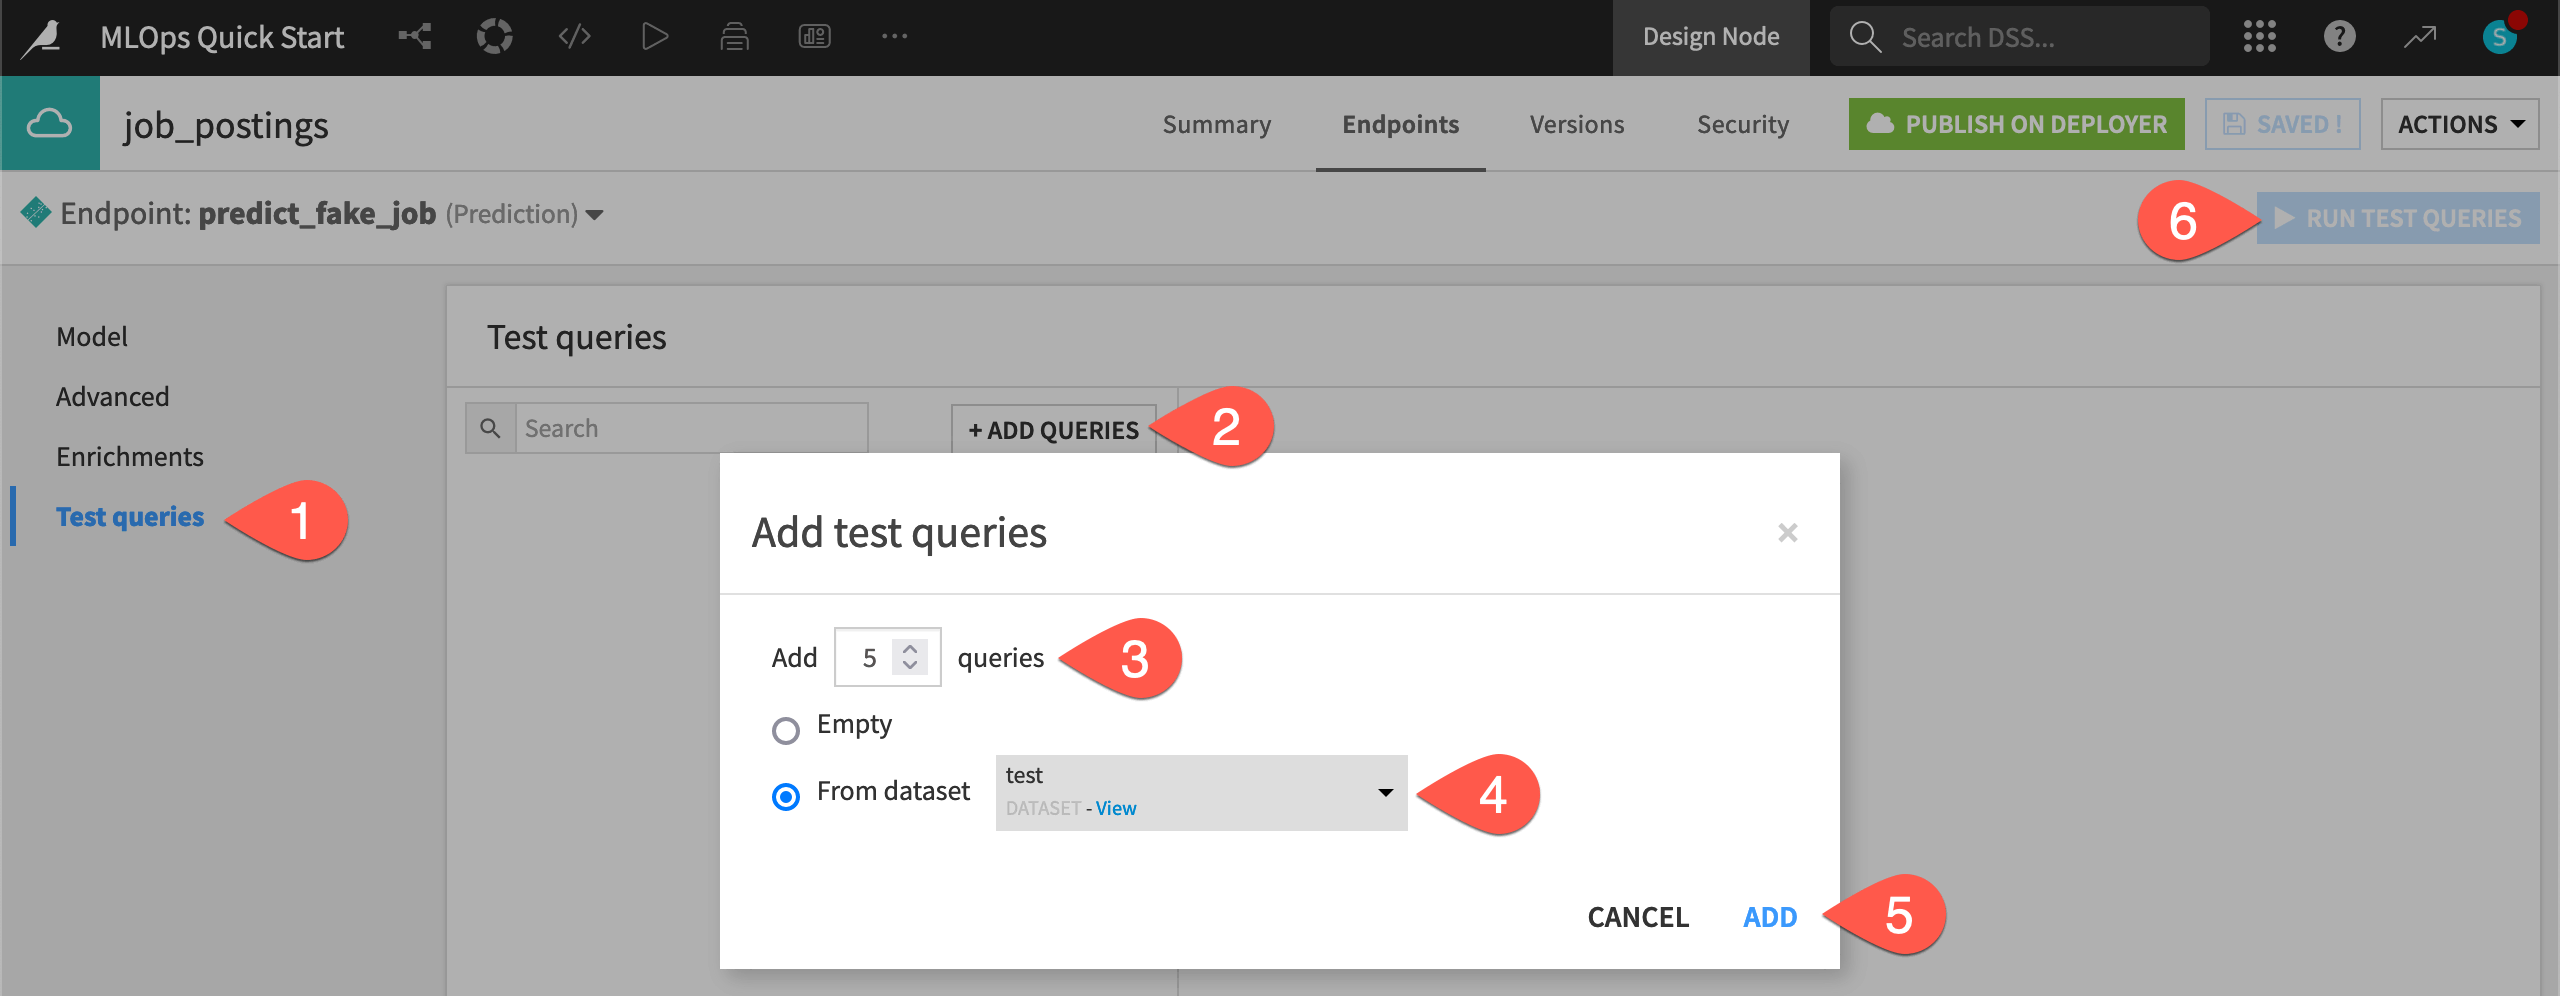
For the predict_fake_job endpoint, navigate to the Test queries panel.
Click + Add Queries.
Add
5queries.Choose to add them from the test dataset.
Click Add.
Click Run Test Queries.
Examine some test queries, including the features sent to the endpoint, the prediction returned, and additional details.
Deploy an API endpoint#
See a screencast covering this section’s steps.

Although you have created a version of an API service including the endpoint, it exists only on the Design node, which is a development environment. A production use case requires separate environments for development and production. For example:
A batch deployment use case would require enabling an Automation node.
A real-time API deployment use case (as shown here) could use an API node if staying within Dataiku’s ecosystem. Additionally, depending on your MLOps strategy, you also have external deployment options such as Amazon SageMaker, Azure ML, Google Vertex AI, Snowflake, or Databricks.
At a high-level, you can think of the entire process in three steps:
Create the API service in a Design node project (already done).
Publish the API service in the Design node project to the API Deployer.
Deploy the API service from the API Deployer to a production environment (typically an API node).
See also
Many organizations incorporate an additional governance framework throughout this process. They use a Govern node to manage the deployment of projects, models, and agents with a sign-off process. Learn more in the AI Governance Specialist learning path.
Configure an API node#
Before deploying, you first need to configure a production environment. In this example, you’ll use an API node.
Dataiku Cloud users, which includes those on free trials, need to follow instructions for deploying API services on Kubernetes from their Launchpad.
Users on self-managed instances need their instance administrators to follow API Node & API Deployer: Real-time APIs in the reference documentation.
From the Design node to the Deployer#
Once you have the necessary infrastructure in place, it’s a few more clicks to actually deploy the endpoint.
From the job_postings API service on the Design node, click Publish on Deployer.
Click Publish, accepting the default version ID.

From the Deployer to an API node#
You now have published the API service from the Design node to the API Deployer. Navigate there next.
Immediately after publishing, you can click the popup notification to Open API Deployer.
If you miss it, open the waffle (
 ) menu in the top right.
Choose Local/Remote Deployer (depending on your instance configuration).
Then select Deploying API Services.
Now that you have published the API service to the API Deployer, there is one more step to deploy the service to an API node.
On the API Deployer, find your API service job_postings.
Click Deploy.
If not already chosen for you, select an available infrastructure.
Click Deploy again.
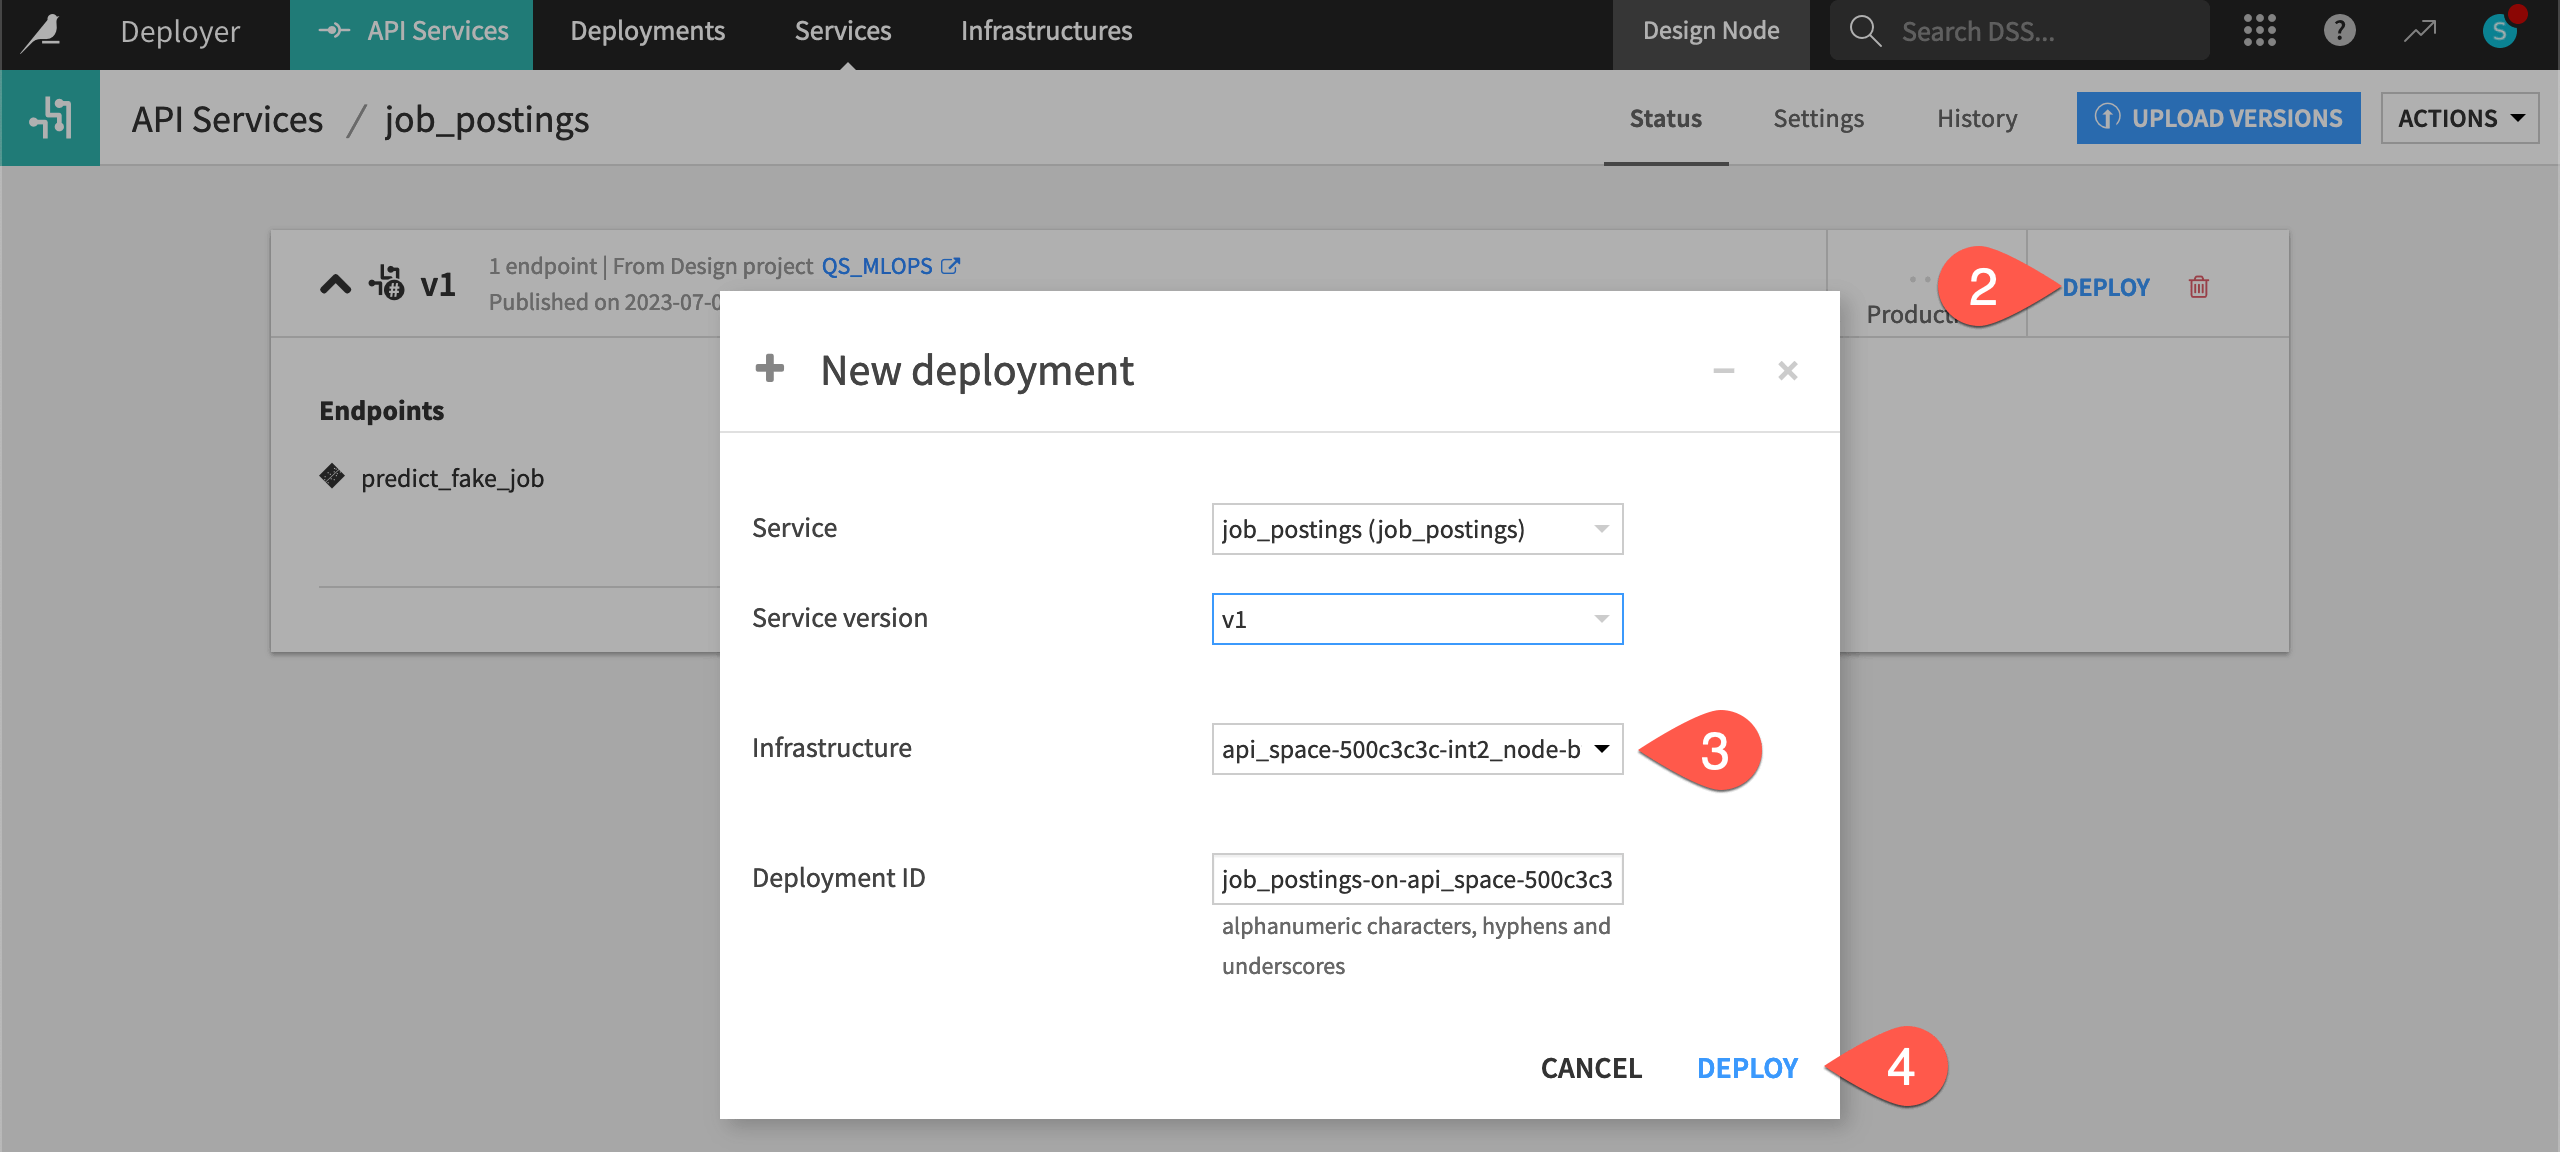
Important
It’s possible you’ll see a warning or even an error at this point due to the Govern policy associated with your chosen infrastructure. If you see a warning, you can ignore it. If you encounter an error, you’ll need to choose another infrastructure or obtain an approval in a Govern node sign-off.
Click Deploy once more to confirm.
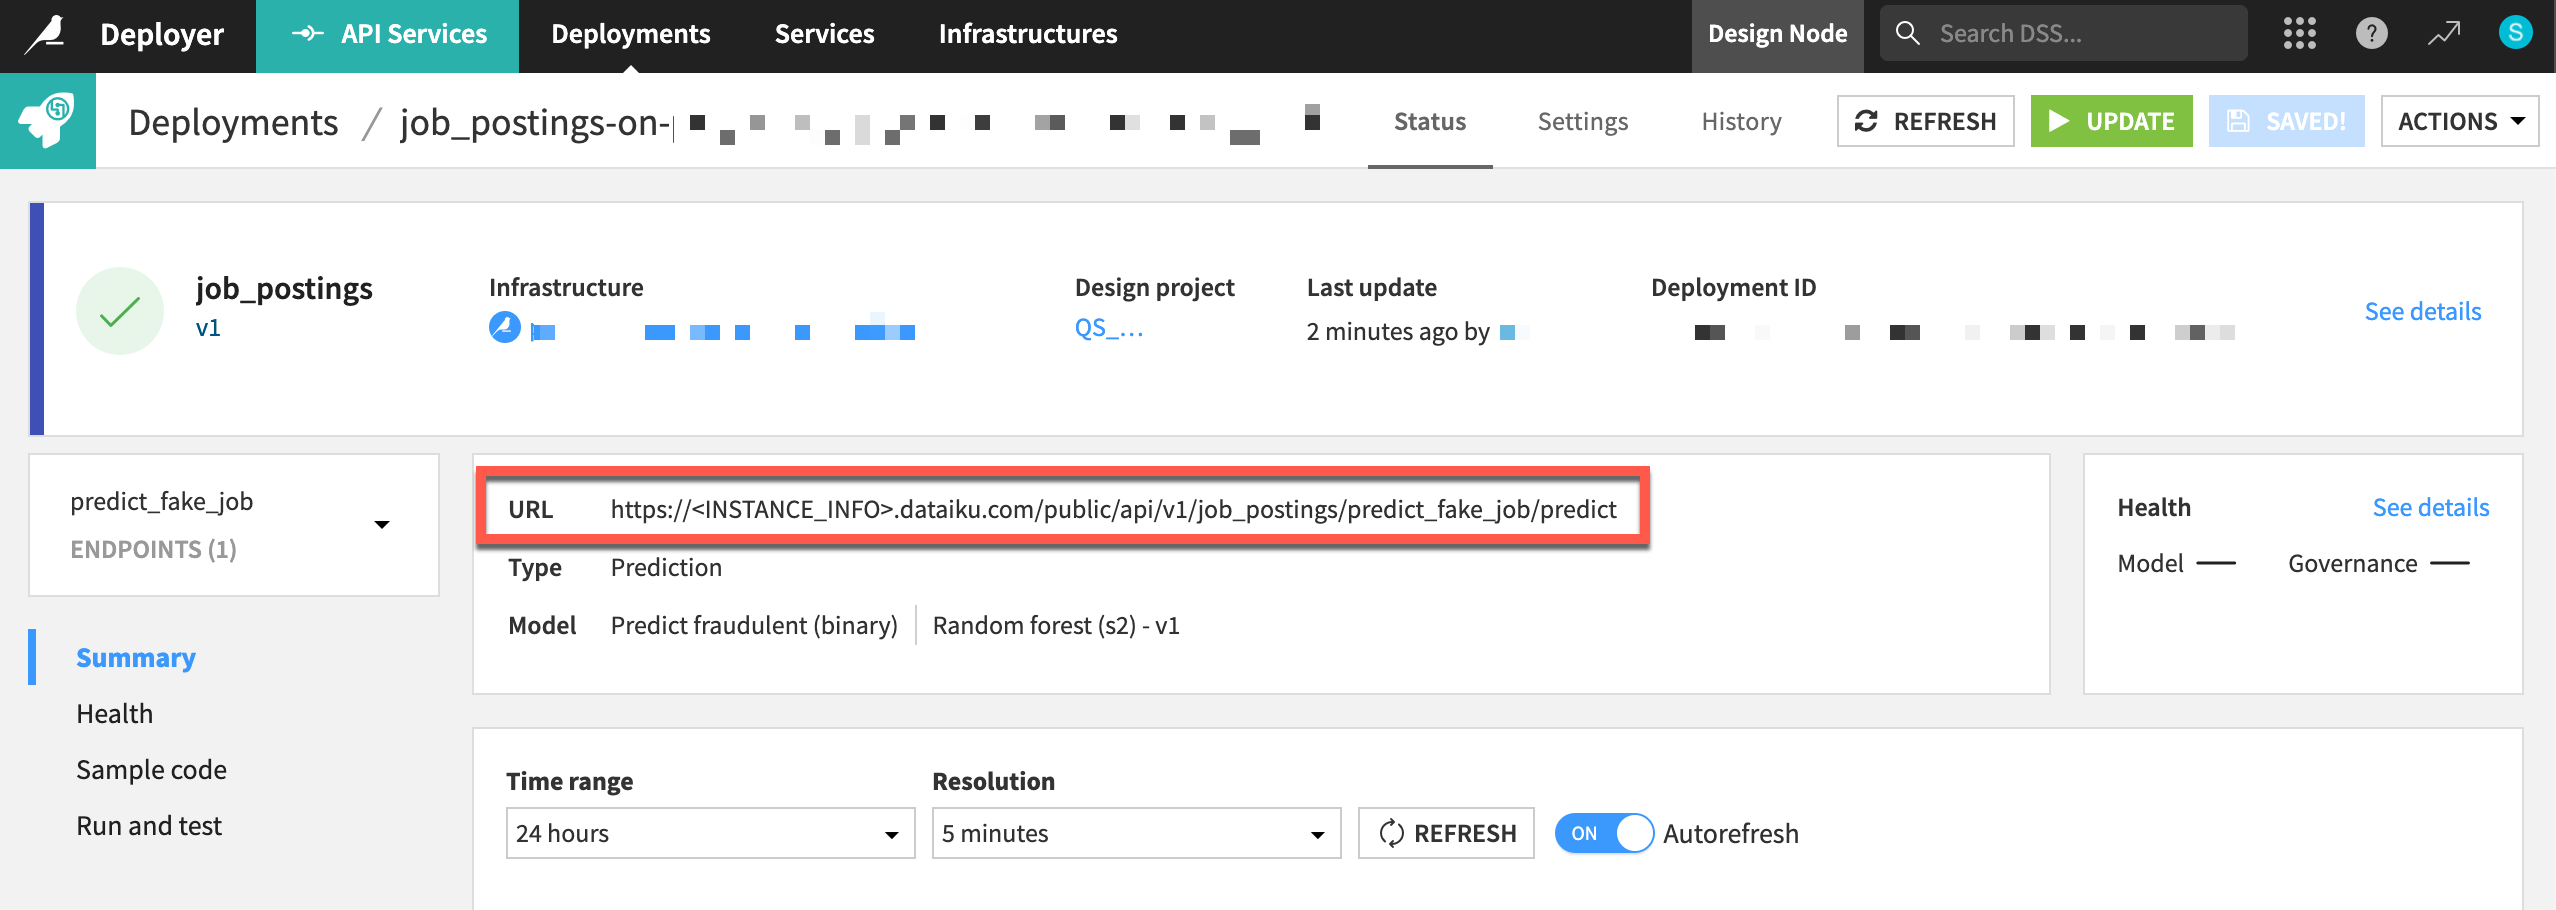
You should now have an API endpoint running in a production environment!
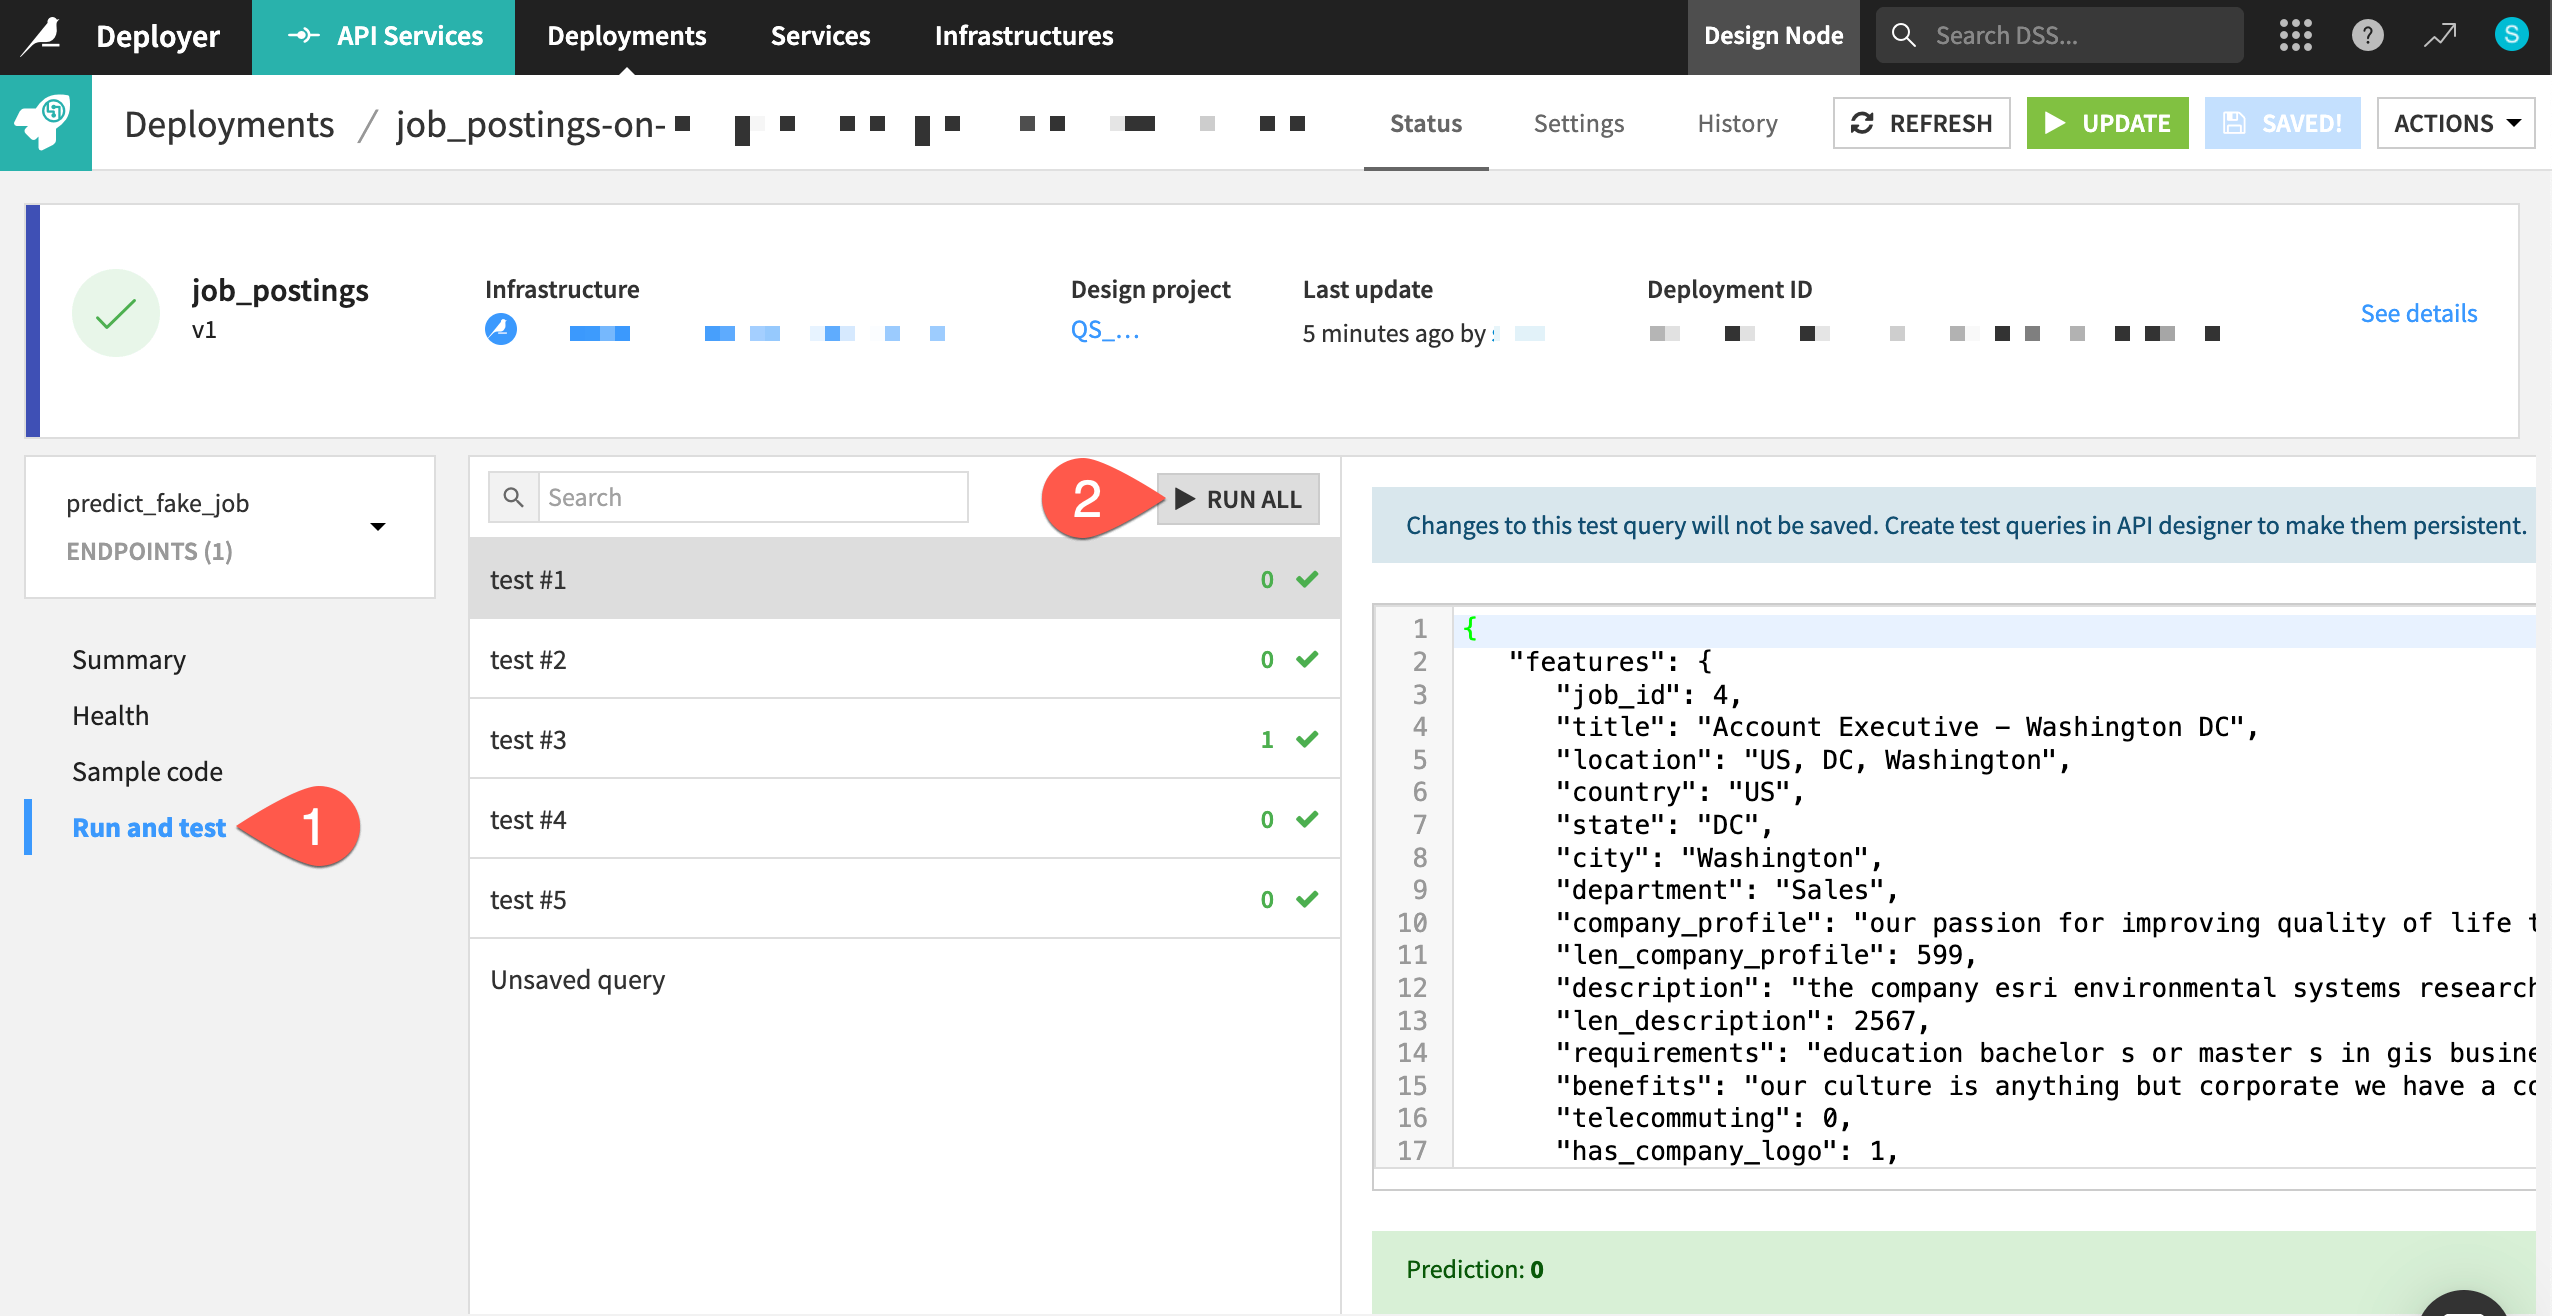
Send test queries to the API node#
Once again, test the endpoint with a few more queries—this time sending them to an API node.
From the predict_fake_job endpoint on the API Deployer, navigate to the Run and test panel.
Click Run All.
See also
Once you’ve deployed an API service, the next step would be to monitor it using a model evaluation store. You’ll learn more in the MLOps Practitioner learning path!
Automate the Flow#
Once you’ve mastered the basics, you can begin automating your MLOps processes with Dataiku’s system of scenarios. A scenario in Dataiku is a set of actions to run, along with conditions for when they should execute and who should receive a notification of the results.
Start small by designing a scenario that rebuilds the furthest downstream dataset only if an upstream dataset satisfies certain conditions. You’ll later see how to use the same tools for retraining models or deploying new versions of API services.
See also
These automation tools can be implemented visually, with code, or a mixture of both. To get started using code in your MLOps workflows, see MLOps lifecycle in the Developer Guide.
View the existing scenario#
This project already has a basic one step scenario for rebuilding the data pipeline.
Navigate back to the Design node project.
From the Jobs (
 ) menu in the top navigation bar, open the Scenarios page.
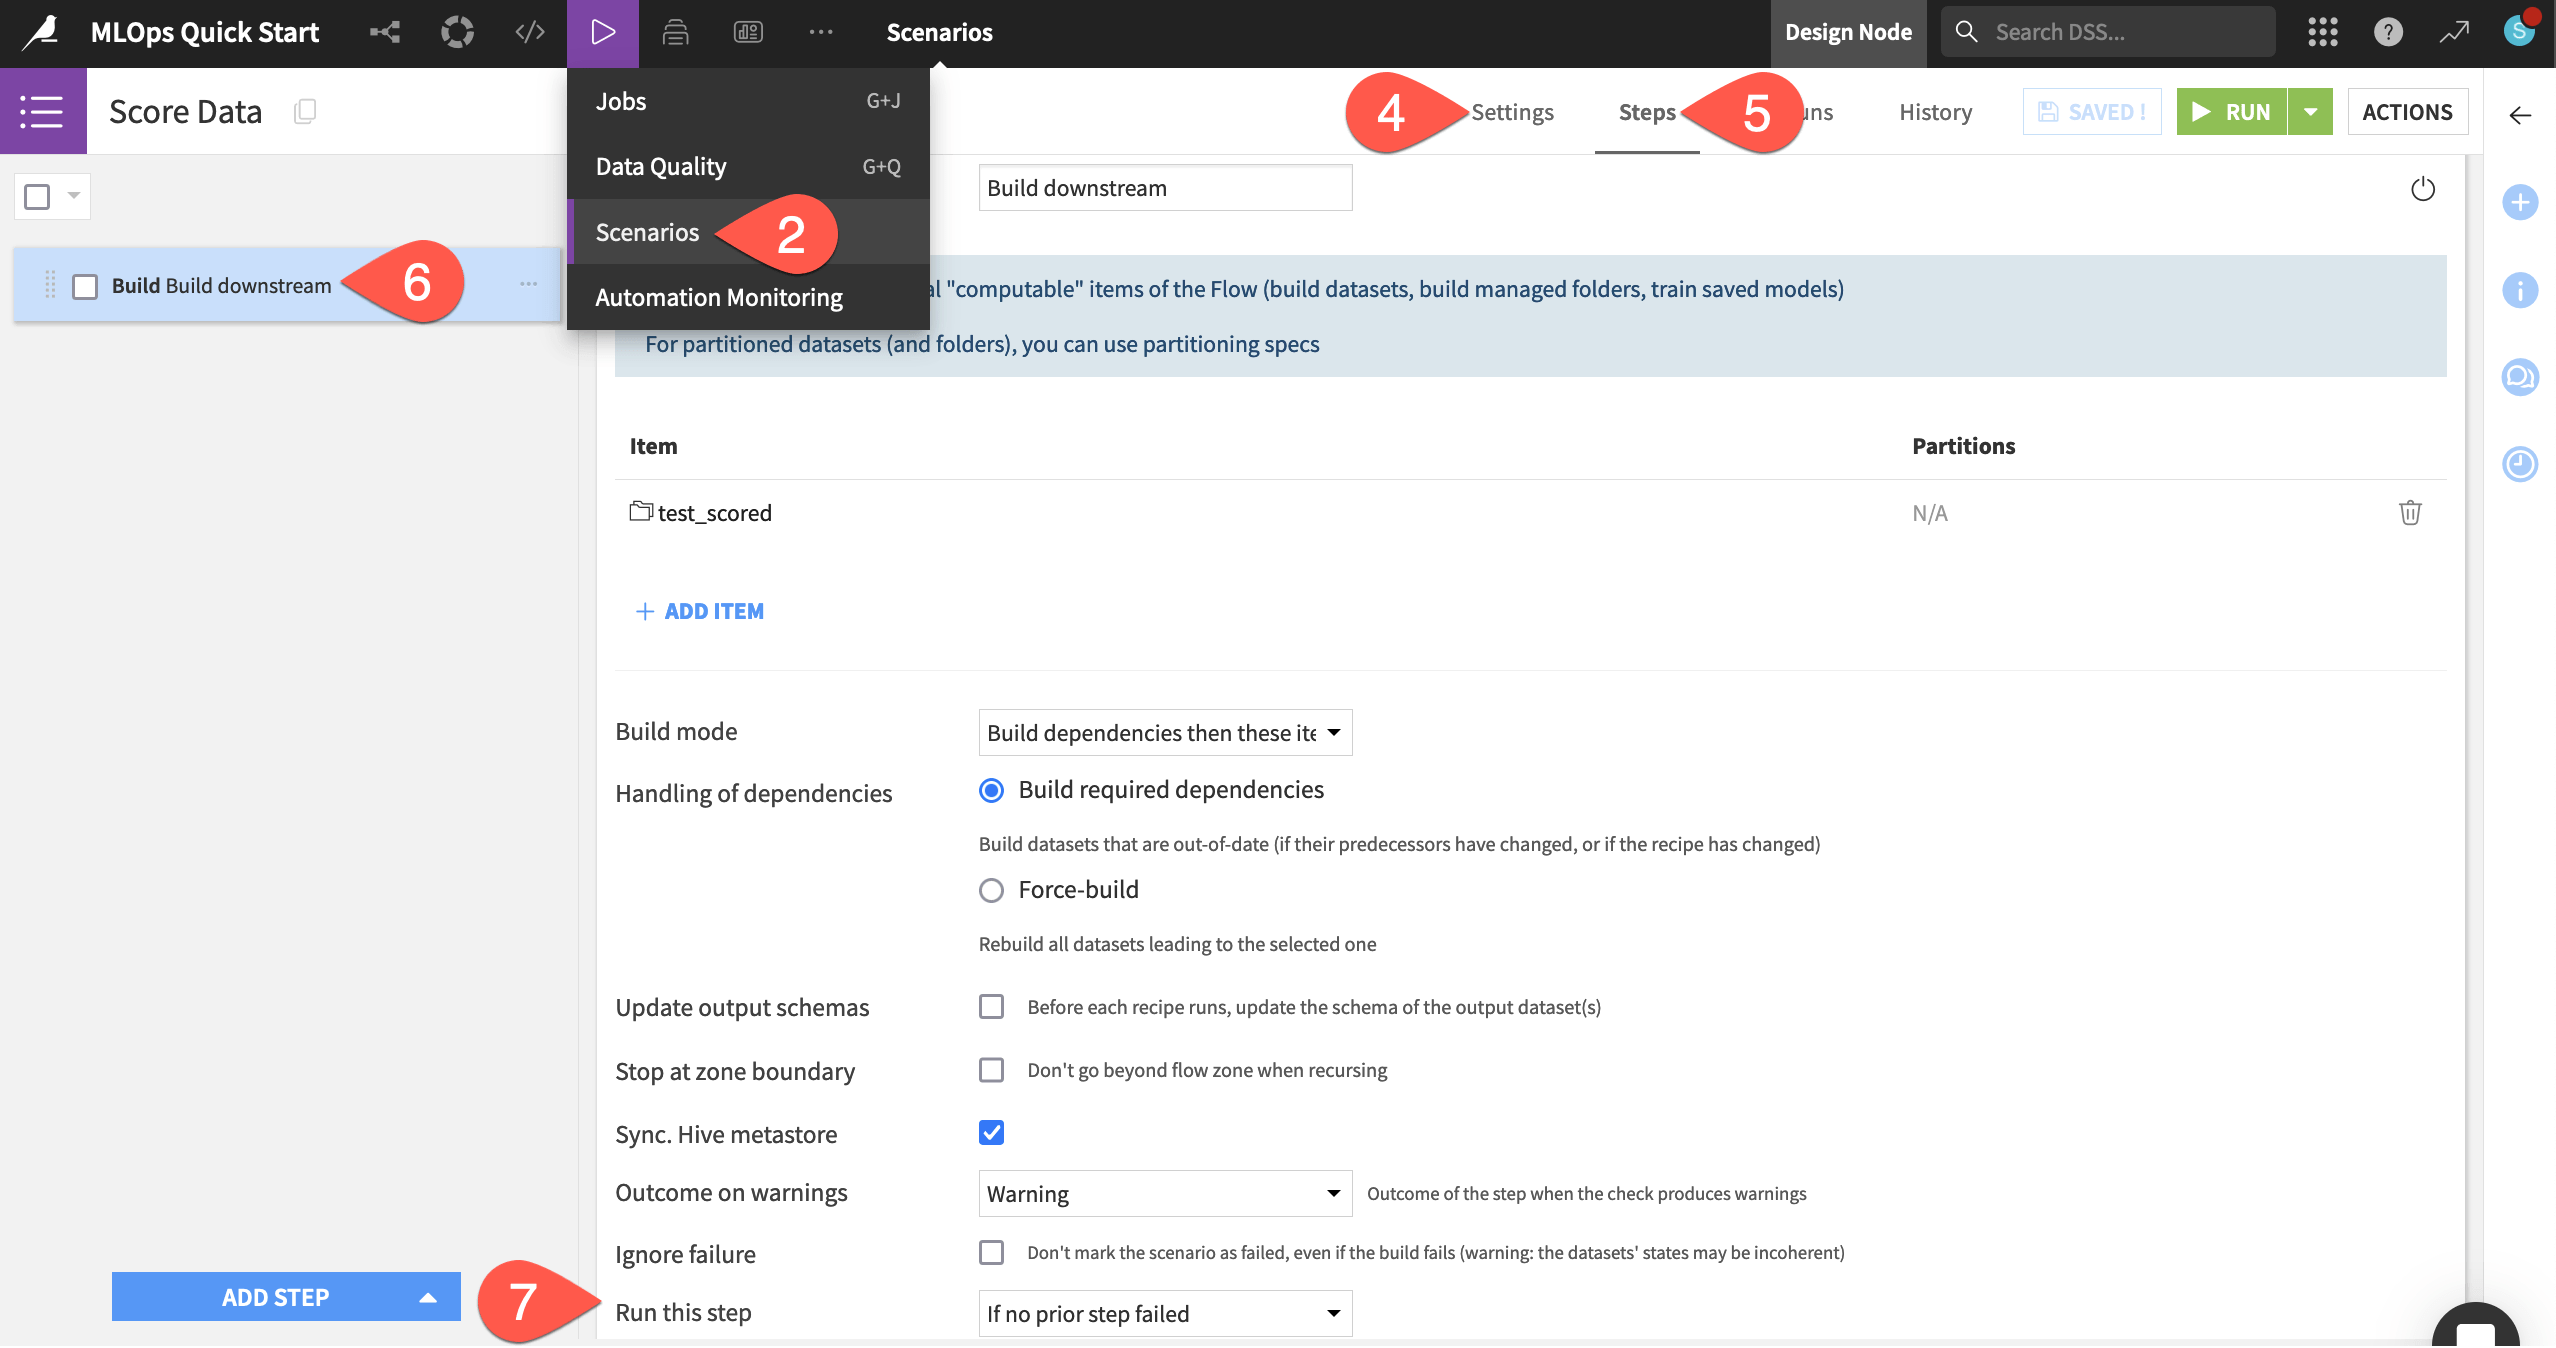
Click to open the Score Data scenario.
On the Settings tab, note that the scenario already has a weekly trigger, but doesn’t yet have a reporter.
Navigate to the Steps tab.
Click on the Build step to see that this scenario will build the test_scored dataset (and its upstream dependencies, if required) whenever the scenario is triggered.
Recognize that this step will only run if no previous step in the scenario has failed.
Tip
To optimize scenario runs, you’ll learn about build modes in the Data Pipelines course of the Advanced Designer learning path.
Select a data quality rule type#
As of now, on a weekly basis, this scenario will attempt to build the test_scored dataset if its upstream dependencies have changed.
Scenarios include many options for when they should execute (such as time periods, dataset changes, or code). Additionally, they also include tools for control of how they should execute. For example, you may want to interrupt (or proceed with) a scenario’s execution if a condition occurs (or fails to occur).
Let’s demonstrate this principle by adding a data quality rule to an upstream dataset of interest.
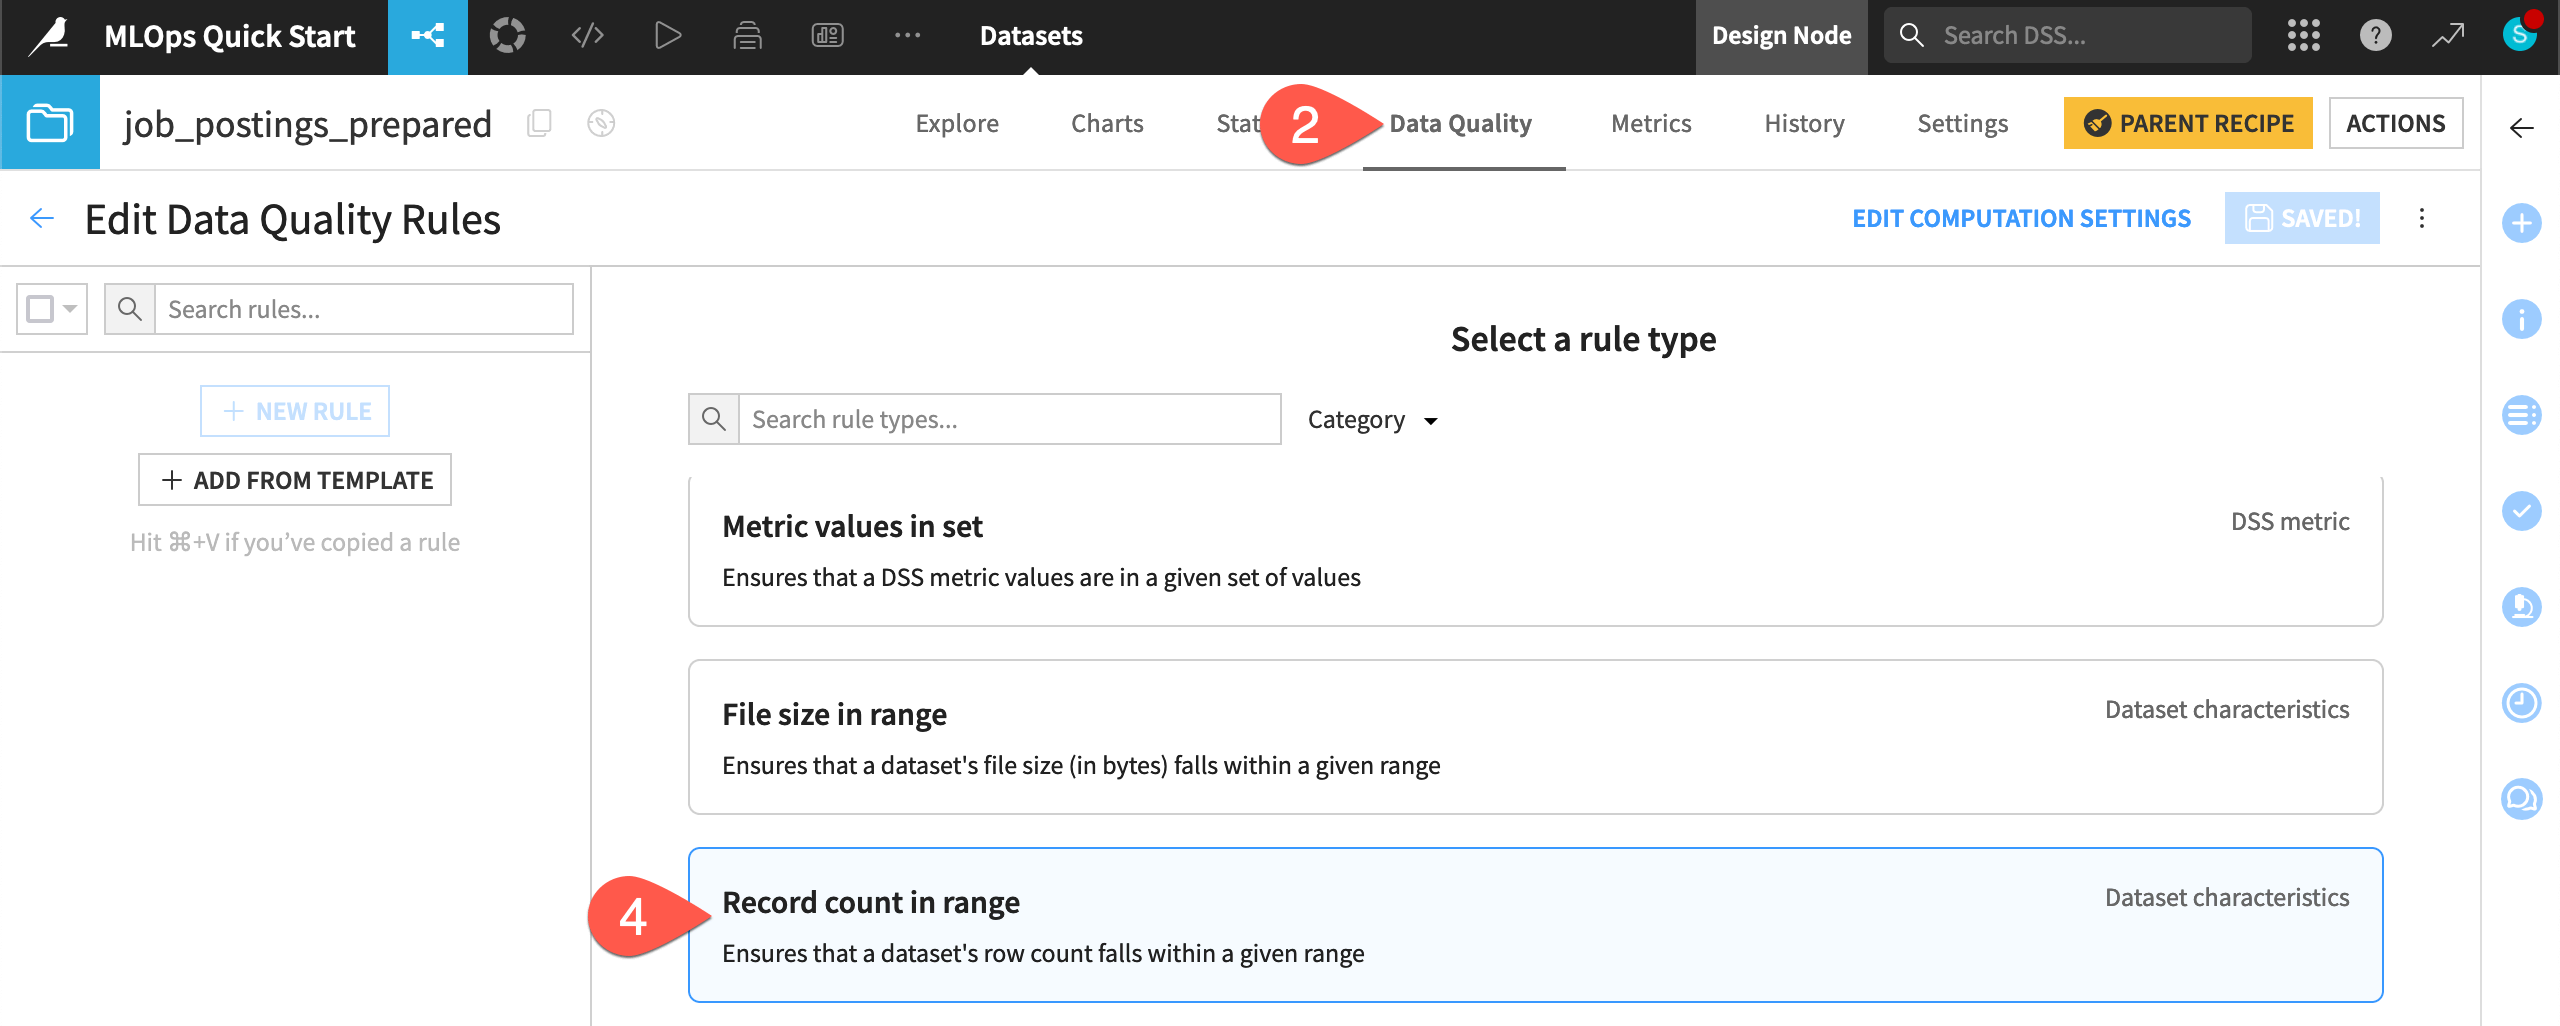
In the Data Preparation Flow zone, open the job_postings_prepared dataset.
Navigate to the Data Quality tab.
Click Edit Rules.
Select the rule type Record count in range.
Configure a data quality rule#
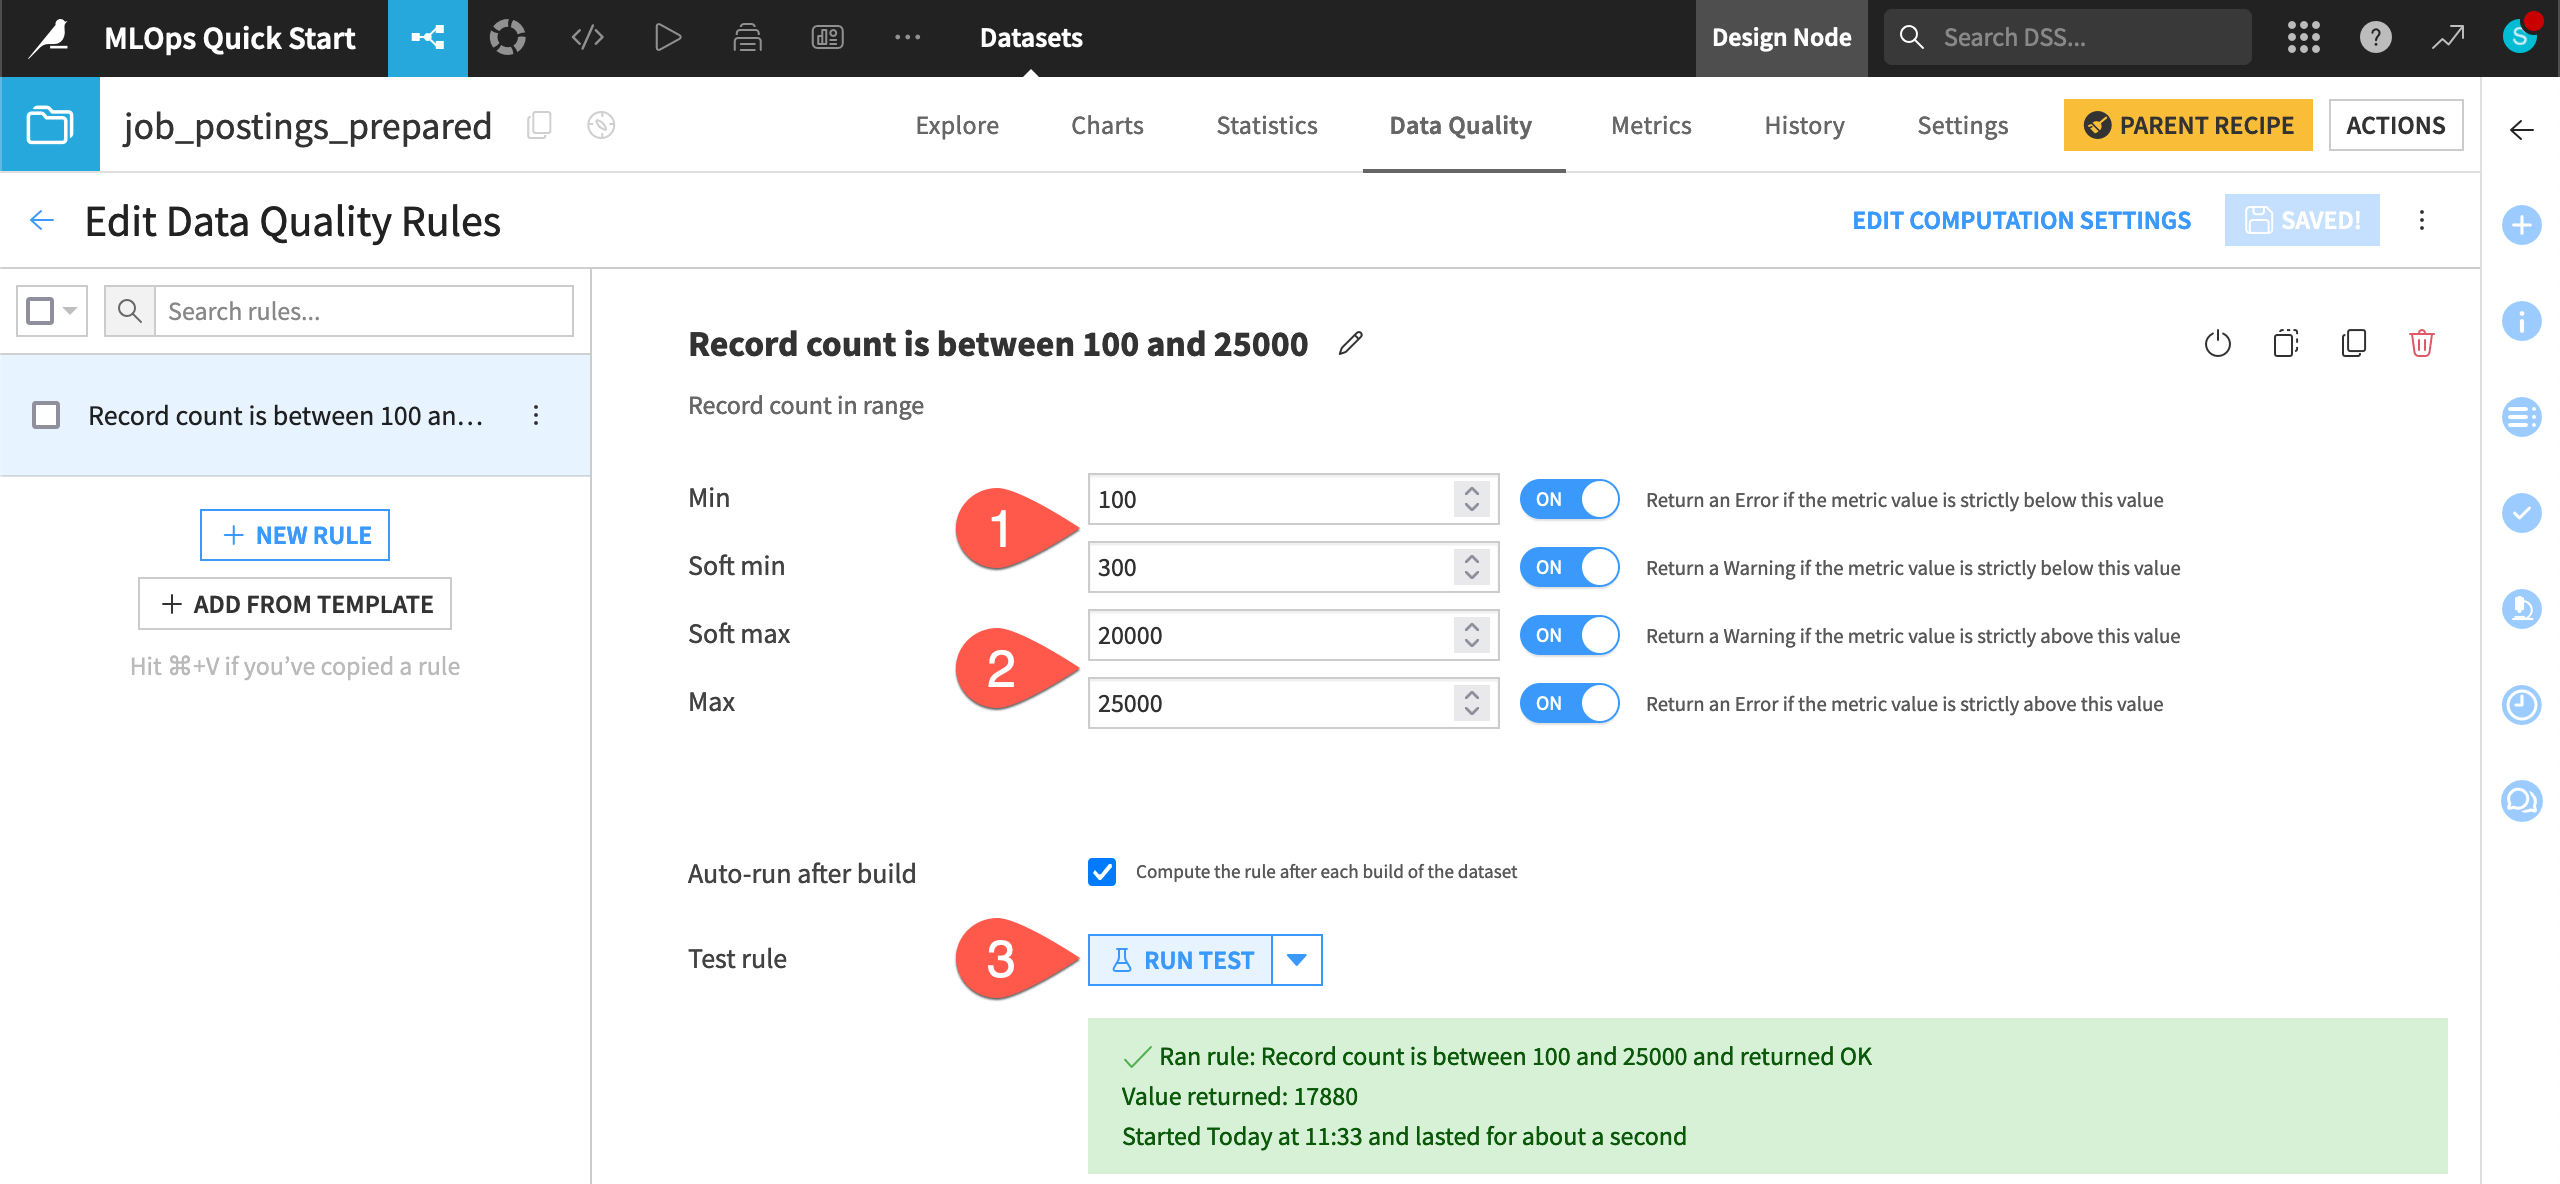
Define this rule assuming you have expectations on the number of records at the start of the pipeline.
Set the min as
100and the soft min as300.Set the soft max as 20k (
20000) and the max as 25k (25000). Make sure to turn ON all conditions.Click Run Test, and confirm that the record count is within the expected range.
Tip
Feel free to adjust these values to simulate warnings or errors on your own!
Verify a data quality rule in a scenario#
Imagine this rule were to fail: the number of upstream records is greater than or less than expected. You could avoid computing the downstream pipeline, while also sending a notification about the unexpected result.
Make the scenario verify this rule before building the pipeline.
From the Jobs (
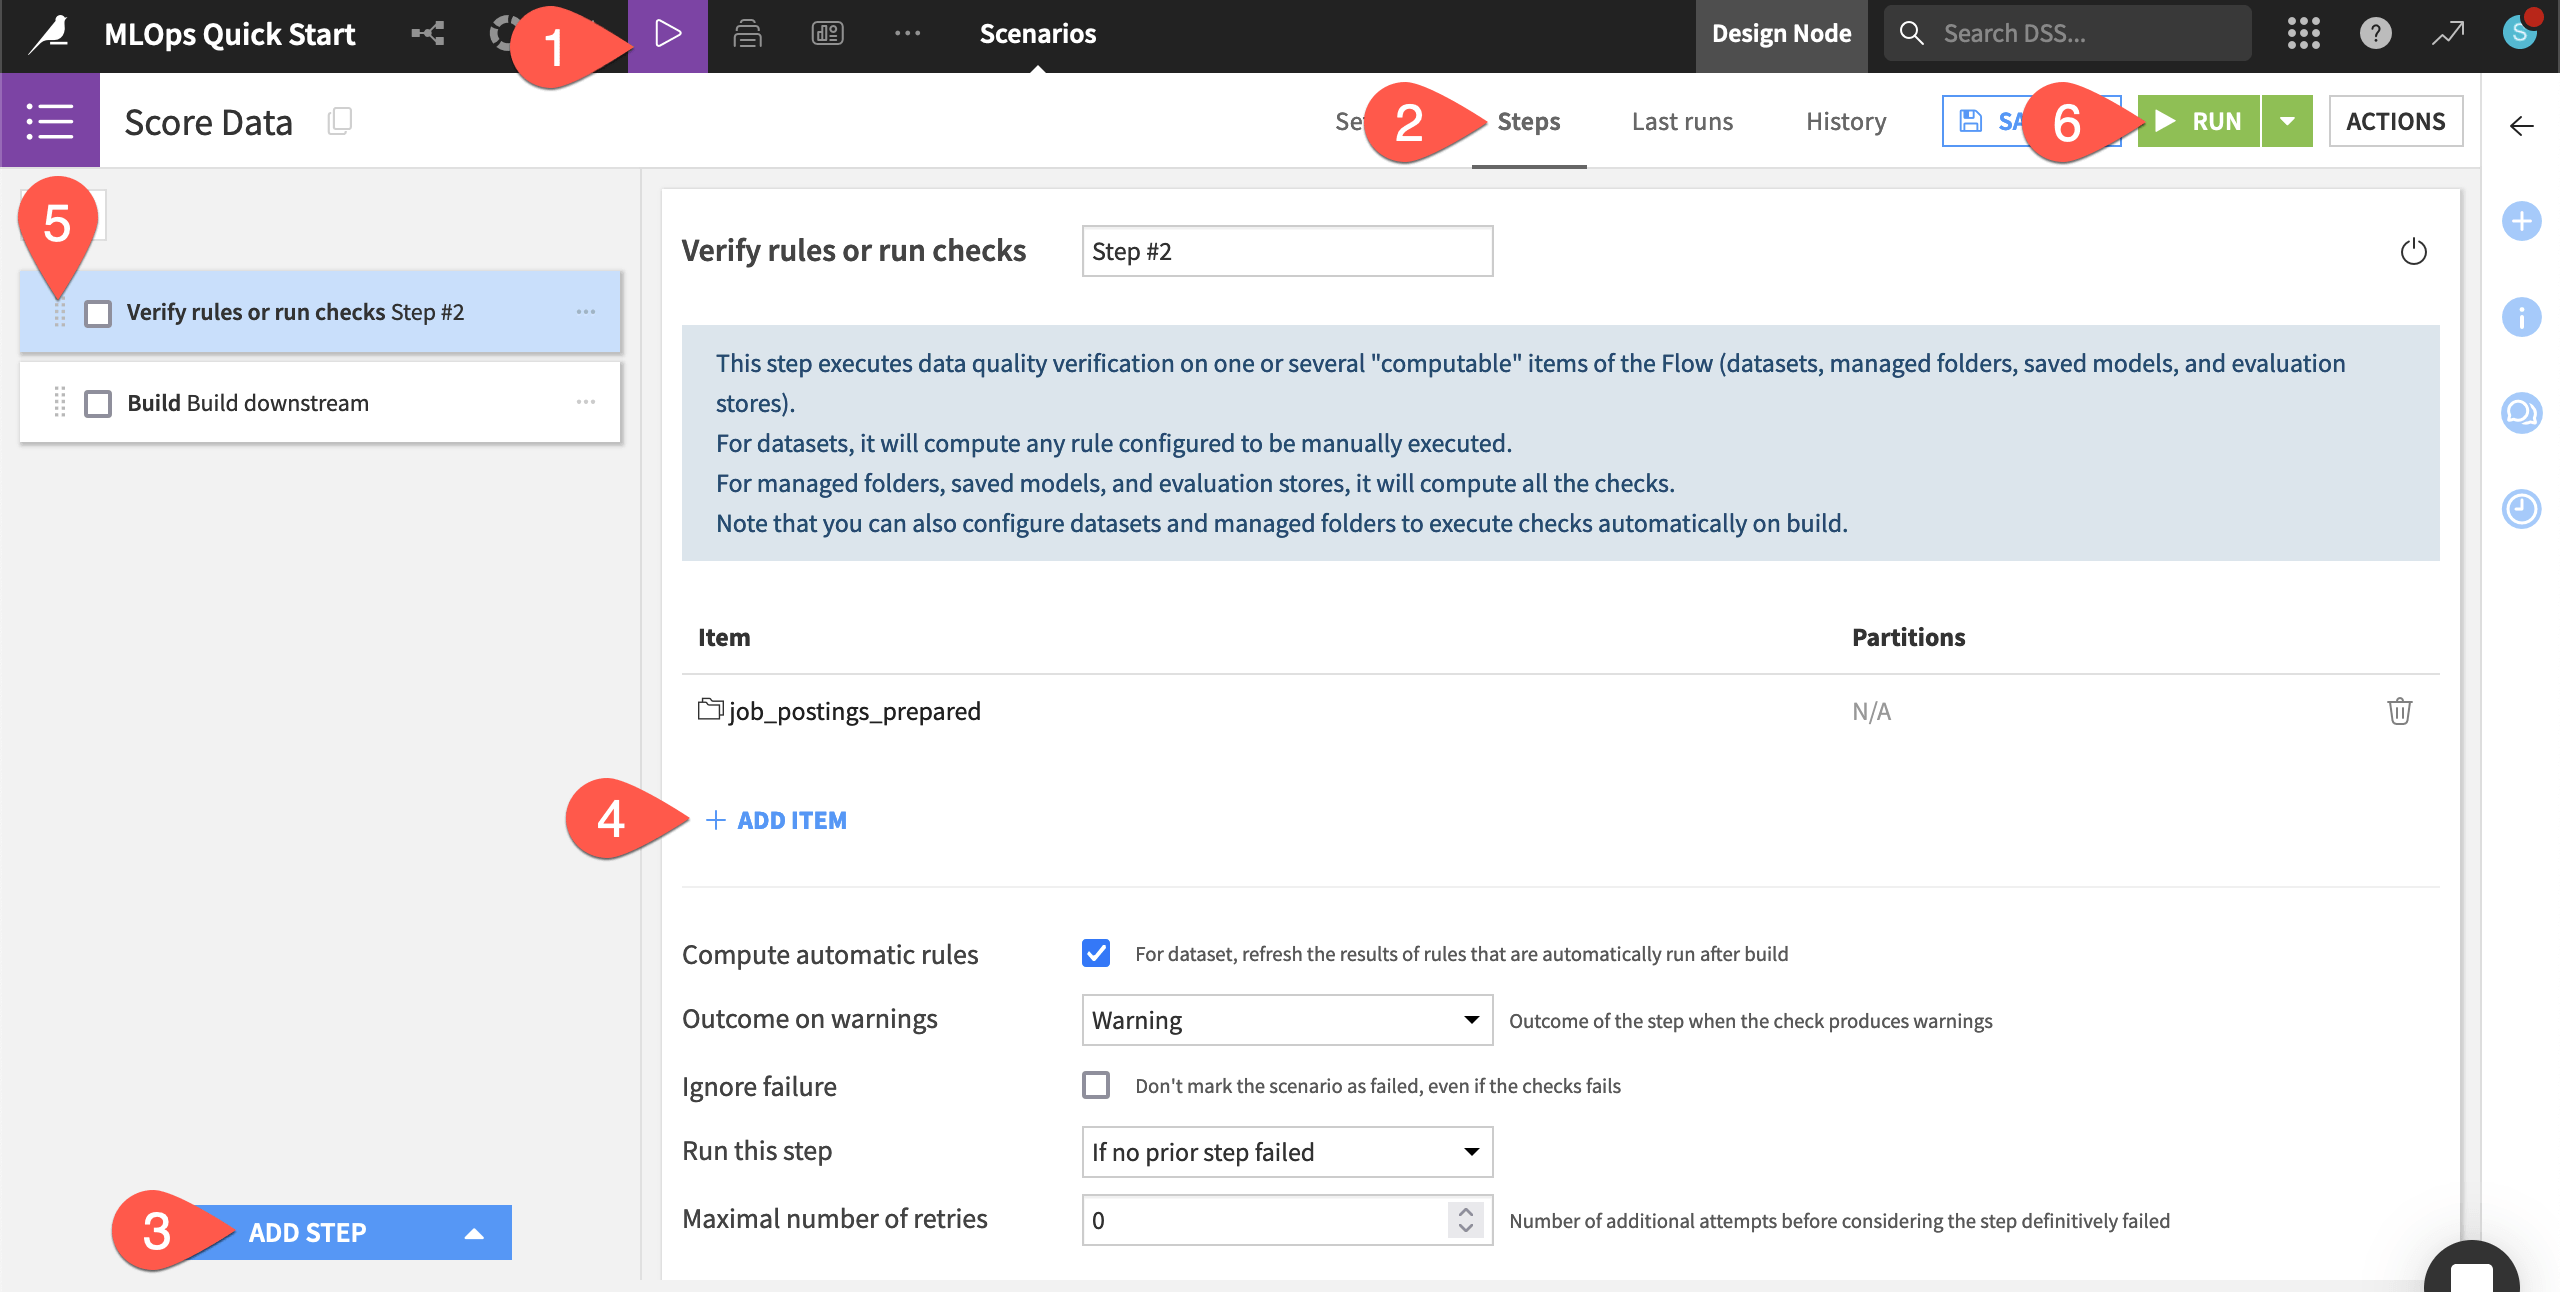
) menu in the top navigation bar, return to the Scenarios page, and open the Score Data scenario.Navigate to the Steps tab.
Click Add Step to view the available steps, and choose Verify rules or run checks.
Click + Add Item > Dataset > job_postings_prepared > Add.
Using the handle (
 ) on the left side of the step, drag the verification step to the first position.
Click Run to manually trigger the scenario’s execution.
Inspect the scenario run#
Take a closer look at what should be a successful scenario run.
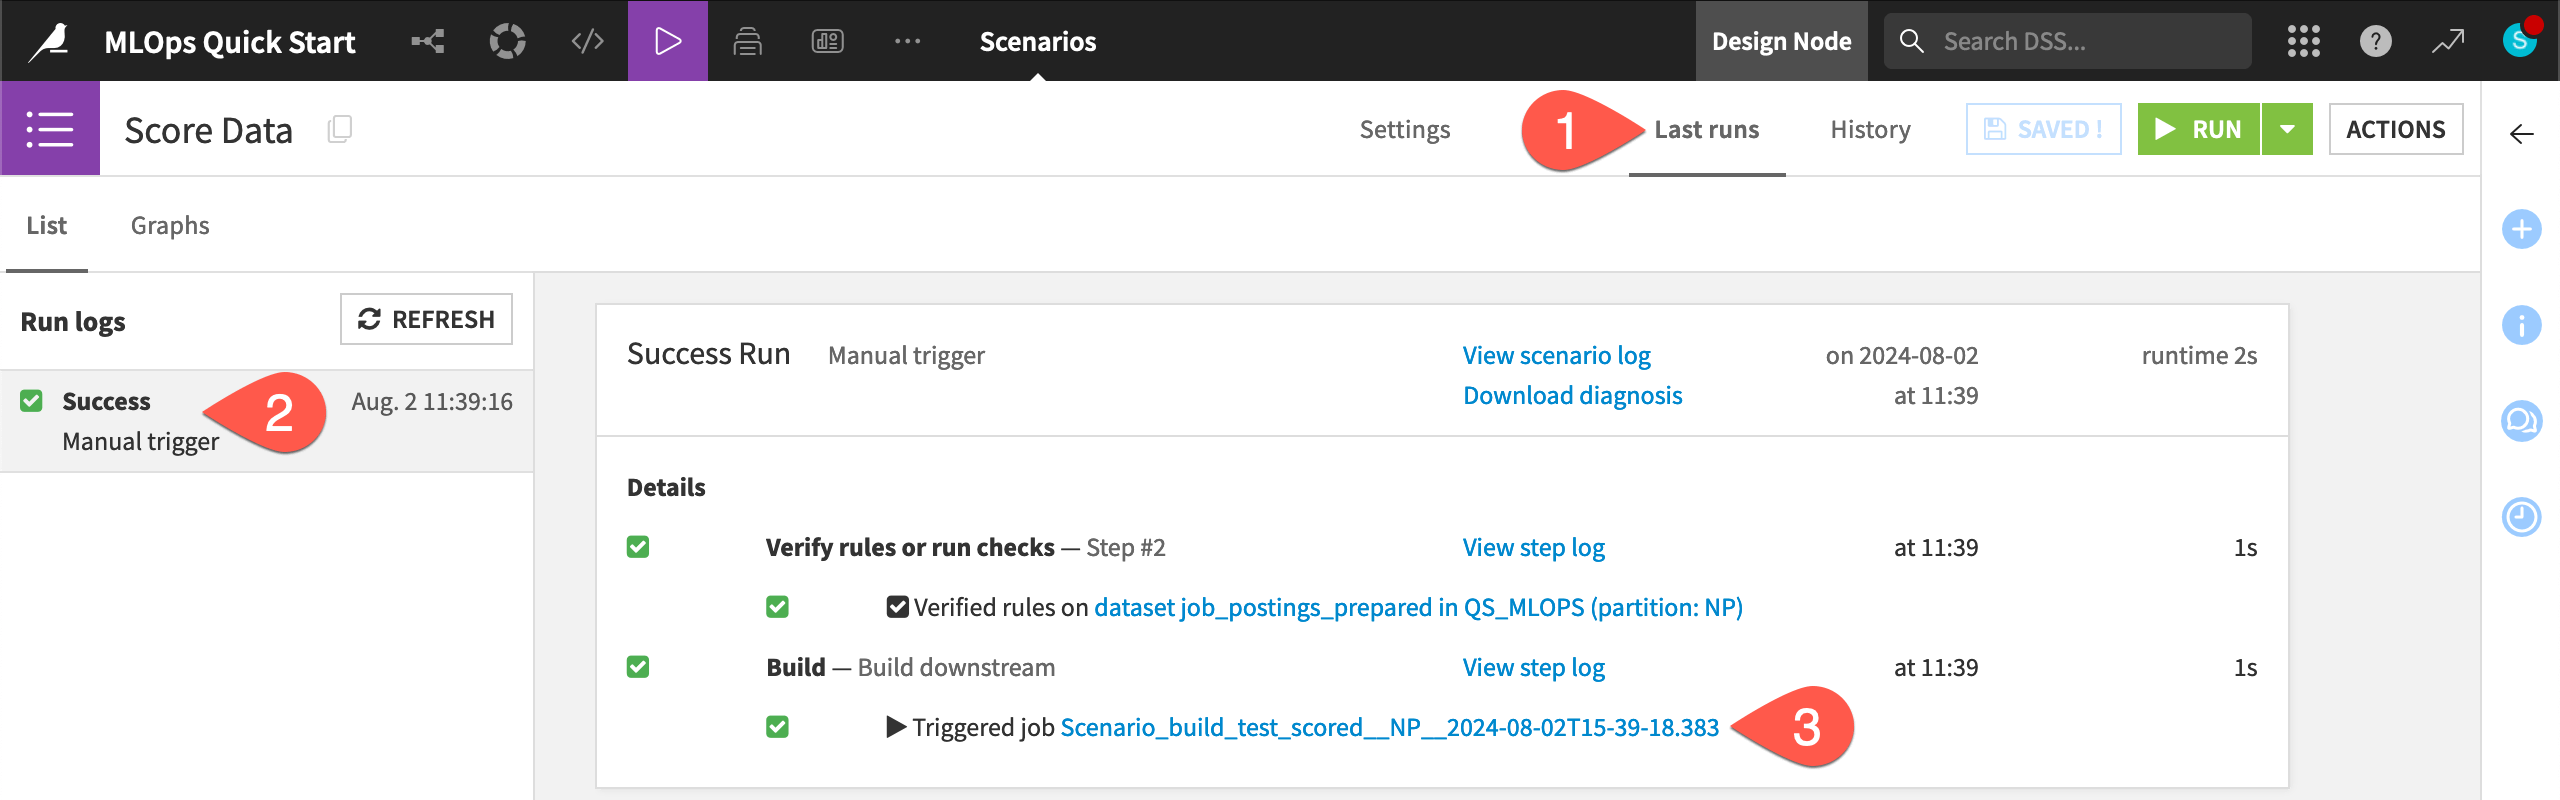
Navigate to the Last runs tab of the scenario.
Click on the most recent run to view its details.
The scenario’s build step triggered a job. Click on the job for the build step, and see that There was nothing to do for this job.
All that for nothing? What happened?
The data in the Flow hasn’t changed. The scenario was first able to successfully verify the Record count in range rule. This is the same result as when you directly tested the rule on the dataset. With this verification step done, the scenario could proceed to the build step.
The build step on the downstream test_scored dataset was set to build required dependencies. As this dataset wasn’t out of date, Dataiku didn’t waste resources rebuilding it.
See also
To see this job do some actual work, try the AI Collaboration Quick Start, where you’ll execute the same scenario via a reusable Dataiku app!
Next steps#
Congratulations! You’ve taken your first steps toward MLOps with Dataiku.
If you’ve already explored the Core Designer, ML Practitioner, and Advanced Designer learning paths, you’ll want to begin the MLOps Practitioner learning path. Then, challenge yourself to earn the MLOps Practitioner certification.
Another option is to shift your attention to AI collaboration. In the Quick Start | Dataiku for AI collaboration, you can learn about how users with different profiles and responsibilities can securely work together to build advanced projects.
See also
You can also find more resources on MLOps in the following spaces: